

Walkthrough Menu
General Tips
 • Hidden Object Scenes and mini-games are often randomized -
your solution may vary. • Hidden Object Scenes will be
referred to as HOS in this walkthrough. • The hint button only
appears in Hidden Object Scenes. • Hints are unlimited, but
you must wait for the hint meter to refill. • The 'Skip'
button only appears in mini-games. • Your inventory is in the
bottom panel - select an item to select it for use. • The
inventory panel auto-hides, move your mouse down to reveal the
panel. • Read your journal for details on your adventure.
• Hidden Object Scenes and mini-games are often randomized -
your solution may vary. • Hidden Object Scenes will be
referred to as HOS in this walkthrough. • The hint button only
appears in Hidden Object Scenes. • Hints are unlimited, but
you must wait for the hint meter to refill. • The 'Skip'
button only appears in mini-games. • Your inventory is in the
bottom panel - select an item to select it for use. • The
inventory panel auto-hides, move your mouse down to reveal the
panel. • Read your journal for details on your adventure.
Chapter 1
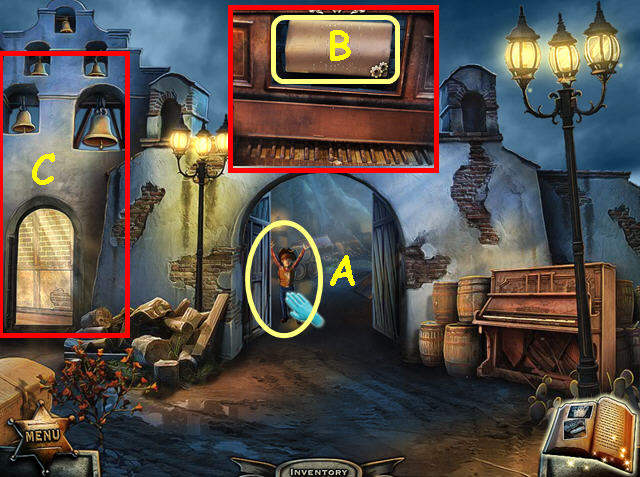
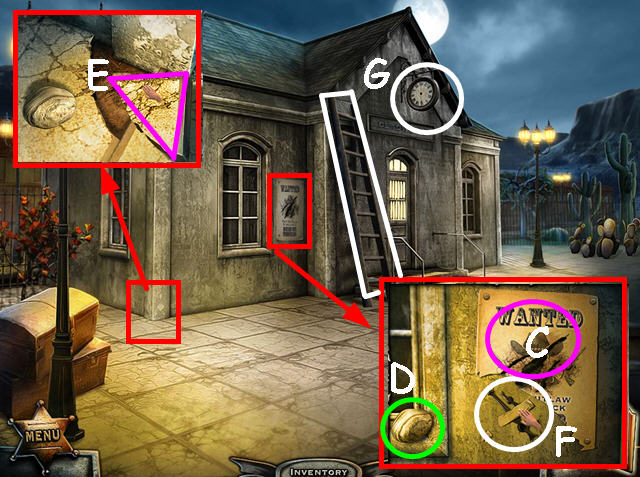
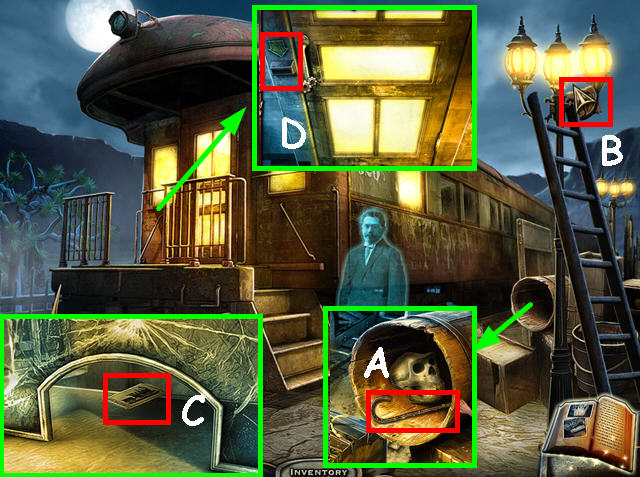
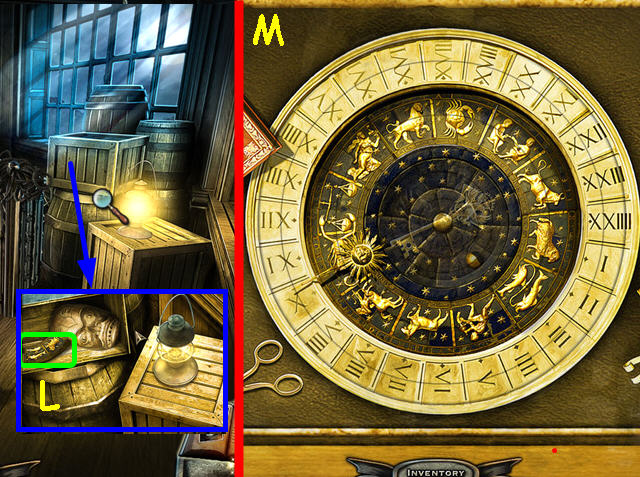
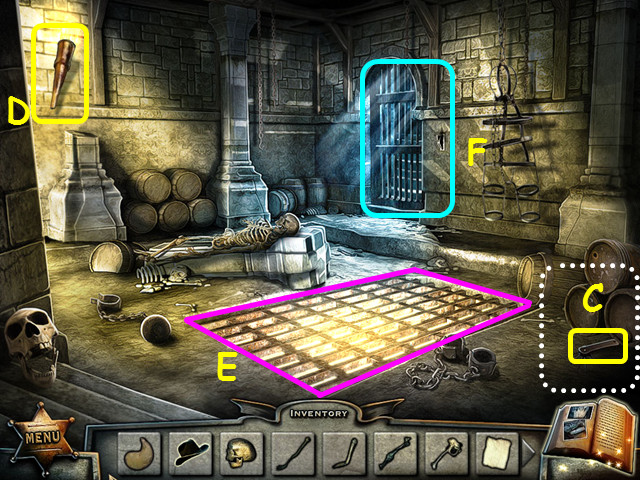
 • Take the OIL CAN (A). • Look at the mailbox and use the OIL
CAN on the mailbox door (B). • Take the POCKET WATCH and read
the note from the Sheriff (C). • Shoo away the buzzard and
take the NAIL PULLER (D). • Look at Billy's drawing and use
your senses (click when you see the blue hand) on the number
30 in the upper left corner (E). • Enter the saloon.
• Take the OIL CAN (A). • Look at the mailbox and use the OIL
CAN on the mailbox door (B). • Take the POCKET WATCH and read
the note from the Sheriff (C). • Shoo away the buzzard and
take the NAIL PULLER (D). • Look at Billy's drawing and use
your senses (click when you see the blue hand) on the number
30 in the upper left corner (E). • Enter the saloon.
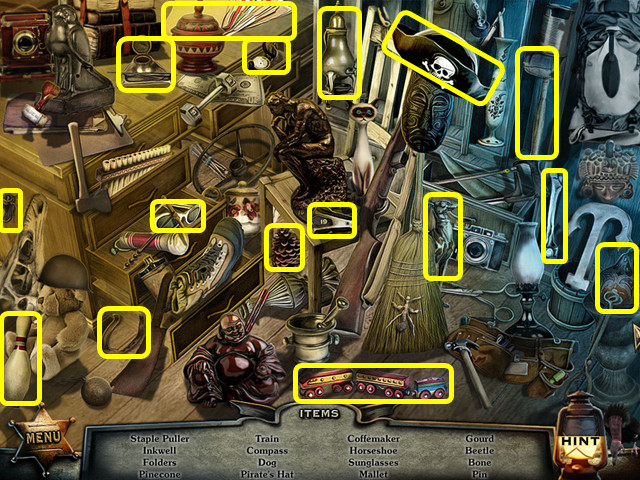
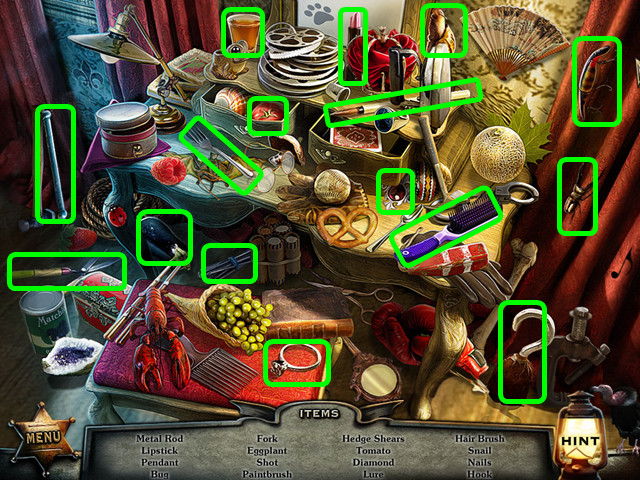
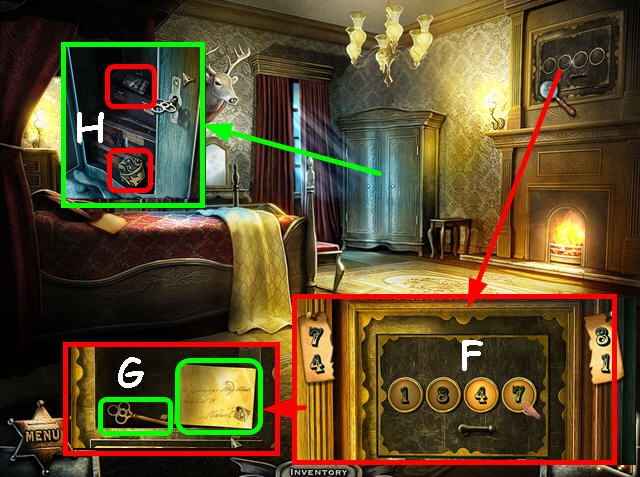
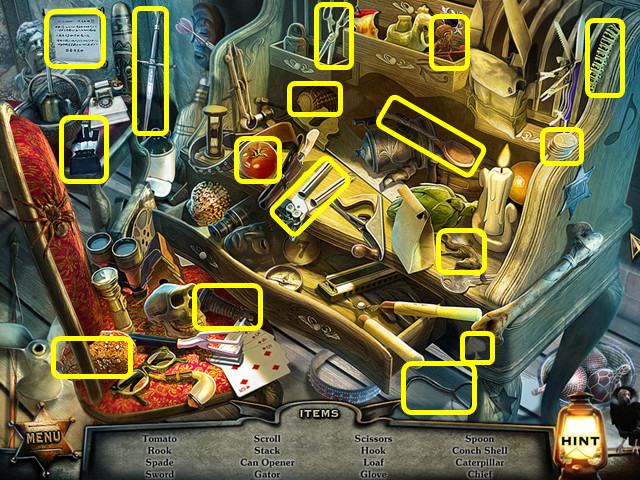
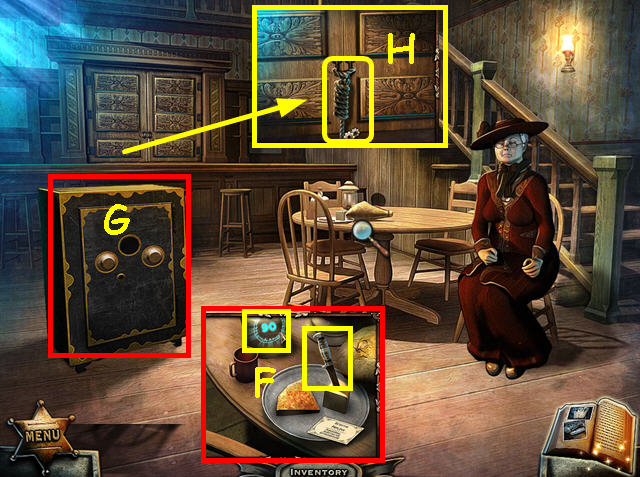 • Talk to Granny. • Look at the table; use your senses on the
number 90 and take the KNIFE (F). • Move the pile of stools
aside to find the safe (G). • Look at the cabinet behind the
bar counter and use the KNIFE to cut the rope (H). • Select
the cabinet for a HOS.
• Talk to Granny. • Look at the table; use your senses on the
number 90 and take the KNIFE (F). • Move the pile of stools
aside to find the safe (G). • Look at the cabinet behind the
bar counter and use the KNIFE to cut the rope (H). • Select
the cabinet for a HOS.
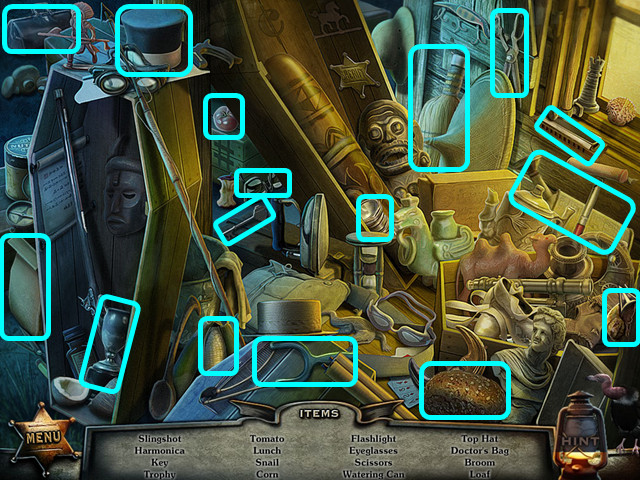
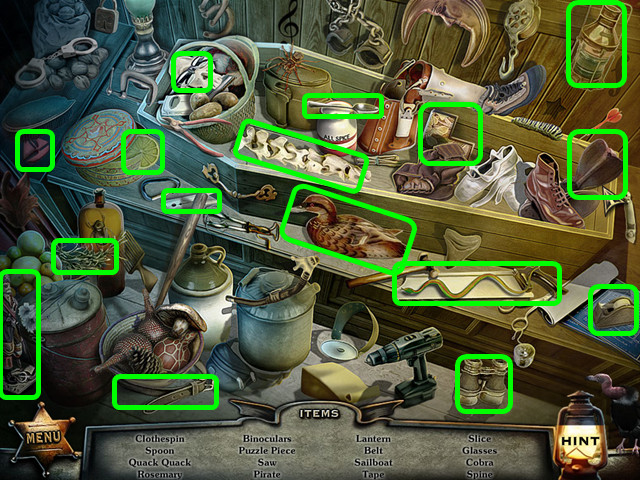
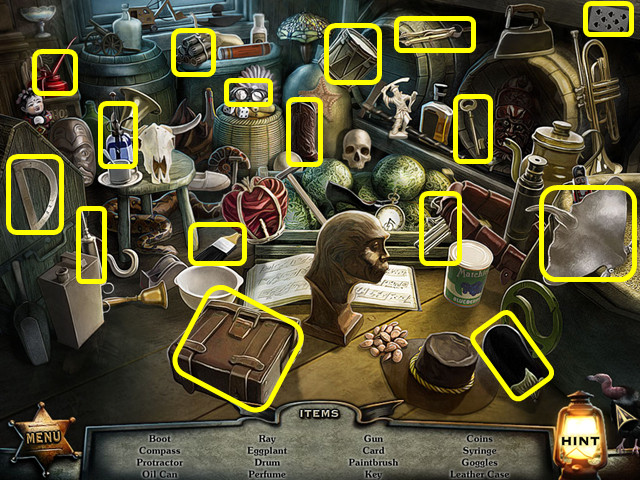
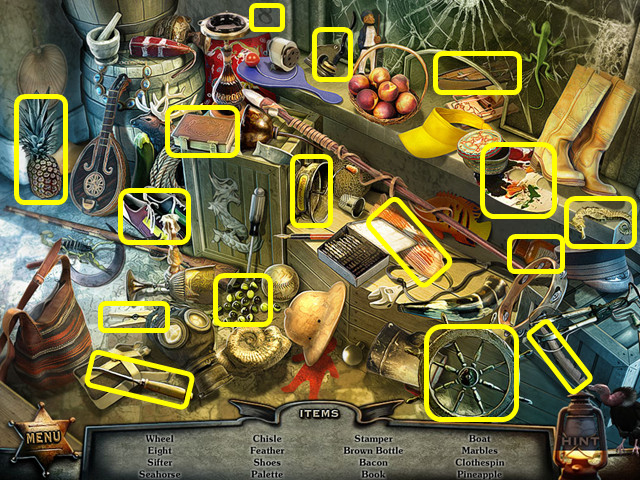
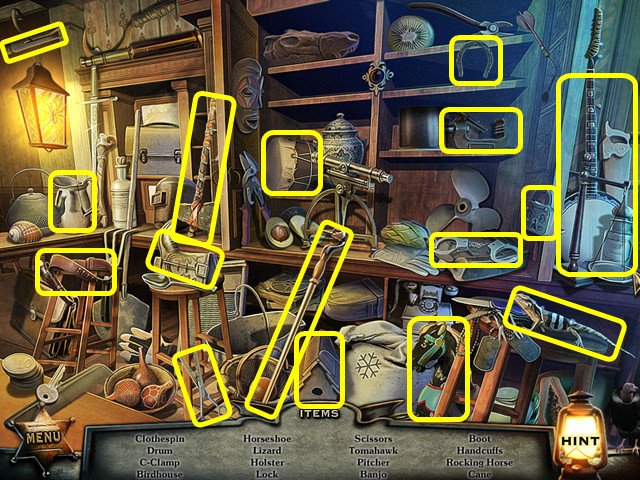 • Locate all the items on the list. • You will earn the CANE.
• Give the CANE to Granny and walk upstairs.
• Locate all the items on the list. • You will earn the CANE.
• Give the CANE to Granny and walk upstairs.
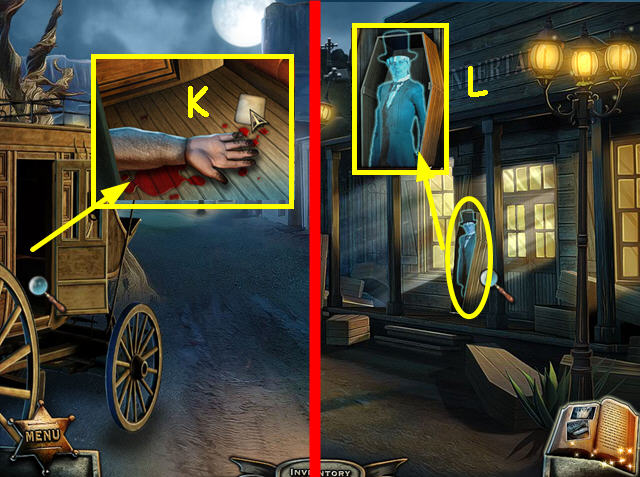
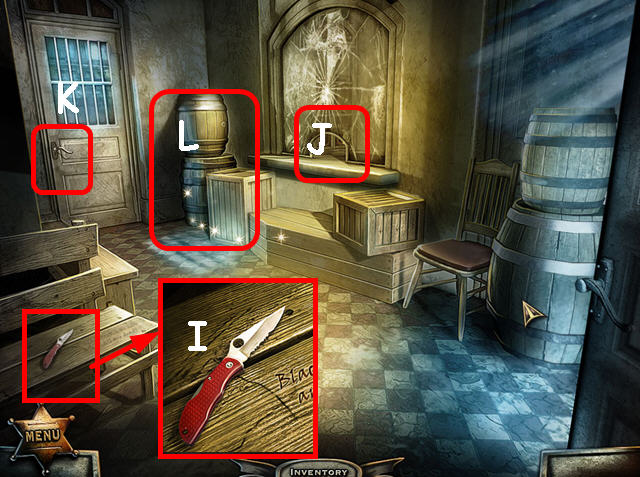
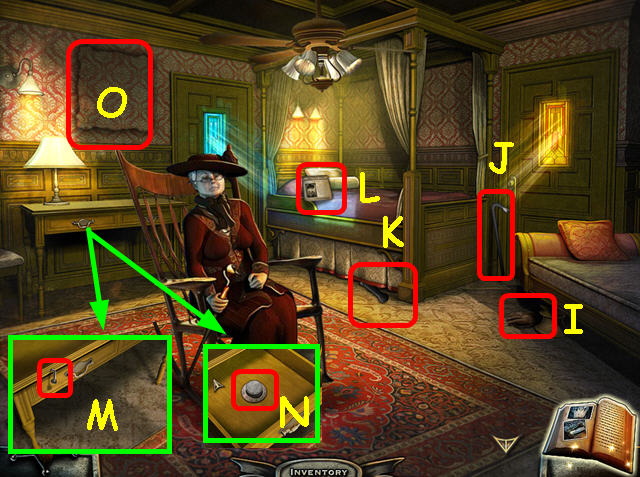 • Zoom into and take the GLOVE by the divan (I), the CROWBAR
by the door (J), and the SAFE HANDLE from under the bed (K). •
Read the news article on the bed (L). • Look at the drawer and
use the NAIL PULLER to remove the nail (M). • Open the drawer
and take the SAFE DIAL (N). • Look at the spot on the wall (O)
that is missing a painting and use your senses. Hmm, no
number. • Walk downstairs and look at the safe.
• Zoom into and take the GLOVE by the divan (I), the CROWBAR
by the door (J), and the SAFE HANDLE from under the bed (K). •
Read the news article on the bed (L). • Look at the drawer and
use the NAIL PULLER to remove the nail (M). • Open the drawer
and take the SAFE DIAL (N). • Look at the spot on the wall (O)
that is missing a painting and use your senses. Hmm, no
number. • Walk downstairs and look at the safe.
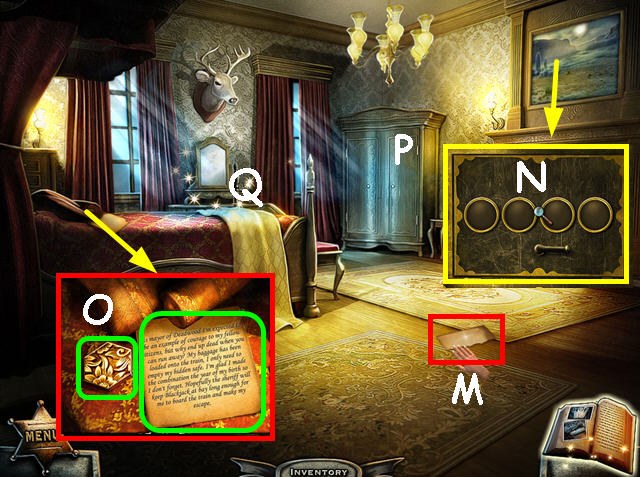
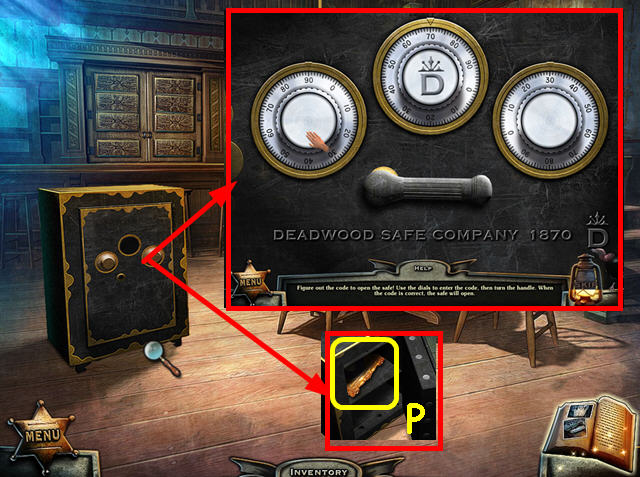 • Place the SAFE DIAL in the center hole, then place the SAFE
HANDLE in the small hole. • Turn the right dial to 30 – the
number we saw on Billy's drawing. • Turn the left dial to 90 –
the number on the whiskey bottle. • Turn the center dial to 70
– so the logo is positioned like the one in the lower right
corner. • Turn the handle. • Open the safe and take the
PORTRAIT (P). • Return upstairs.
• Place the SAFE DIAL in the center hole, then place the SAFE
HANDLE in the small hole. • Turn the right dial to 30 – the
number we saw on Billy's drawing. • Turn the left dial to 90 –
the number on the whiskey bottle. • Turn the center dial to 70
– so the logo is positioned like the one in the lower right
corner. • Turn the handle. • Open the safe and take the
PORTRAIT (P). • Return upstairs.
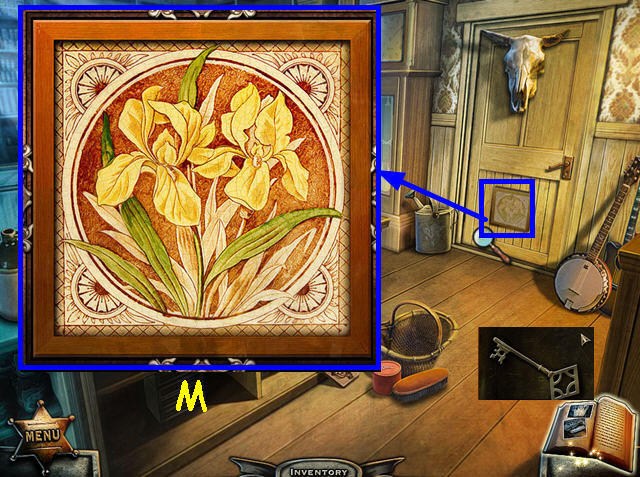
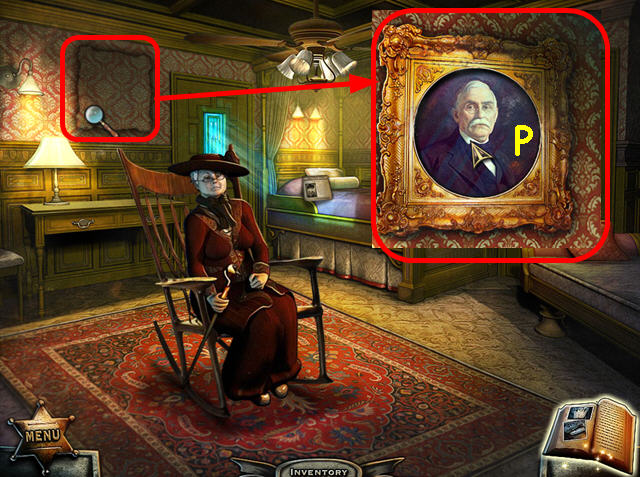 • Look at the wall and place the PORTRAIT in the outline (P).
• Take the GATE KEY from Granny's husband, Abner. • Return
downstairs and select the cabinet for a HOS.
• Look at the wall and place the PORTRAIT in the outline (P).
• Take the GATE KEY from Granny's husband, Abner. • Return
downstairs and select the cabinet for a HOS.
 • Locate all the items on the list. • You will earn the PUZZLE
PIECE.
• Locate all the items on the list. • You will earn the PUZZLE
PIECE.
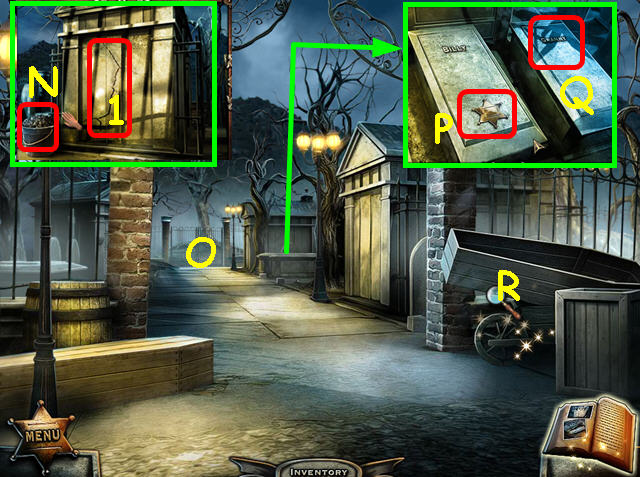
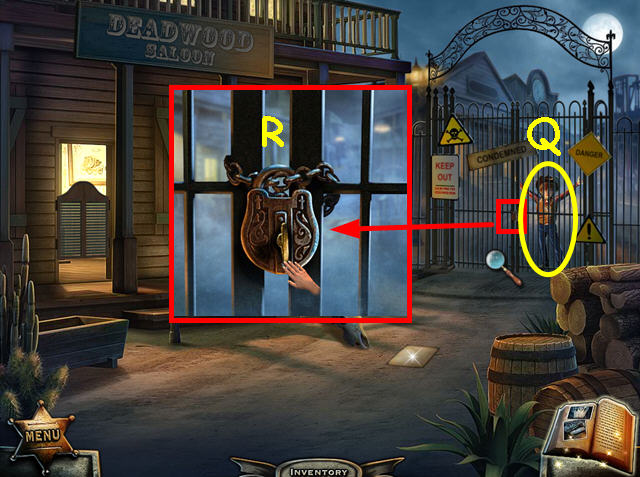 • Exit the saloon and look at Billy by the gate (Q). • Look at
the gate and use the GATE KEY on the lock (R). • Turn the key,
then walk forward.
• Exit the saloon and look at Billy by the gate (Q). • Look at
the gate and use the GATE KEY on the lock (R). • Turn the key,
then walk forward.
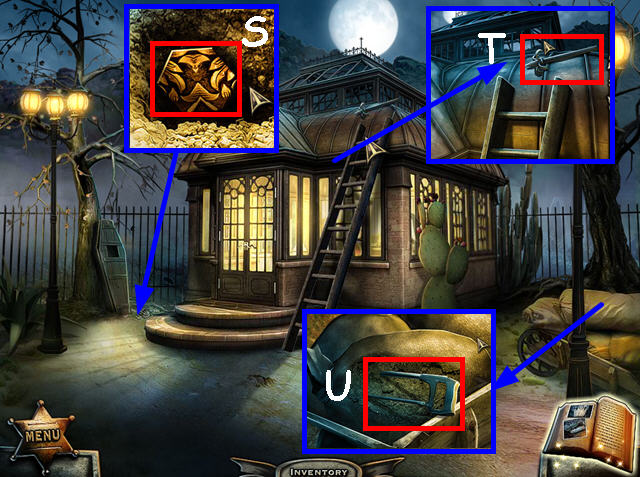
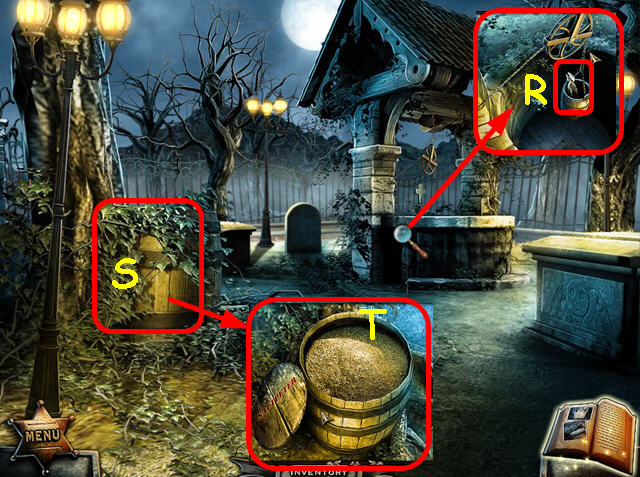
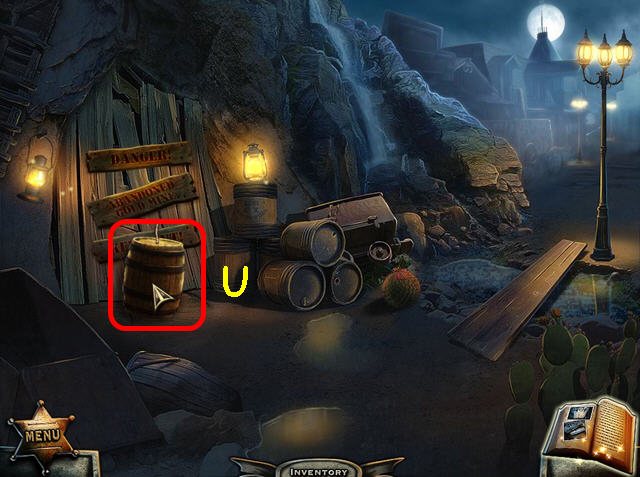
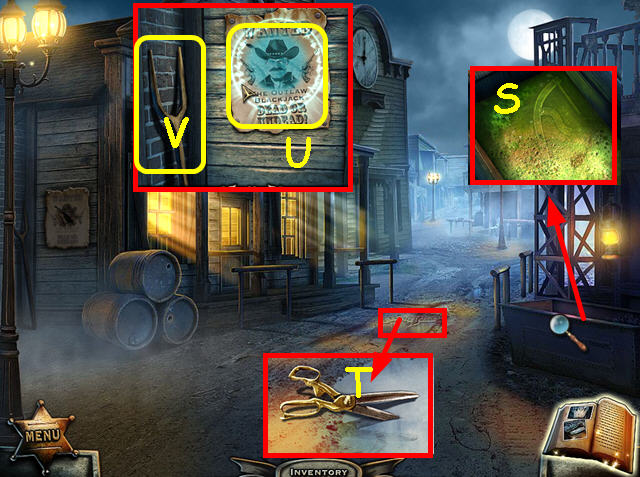 • Look in the trough and use the GLOVE to get the PUMP HANDLE
(S). • Look in the puddle and take the SCISSORS (T). • Look at
the poster; use your senses on the picture (U), then take the
PITCHFORK (V). • Walk forward and watch the cut-scene.
• Look in the trough and use the GLOVE to get the PUMP HANDLE
(S). • Look in the puddle and take the SCISSORS (T). • Look at
the poster; use your senses on the picture (U), then take the
PITCHFORK (V). • Walk forward and watch the cut-scene.
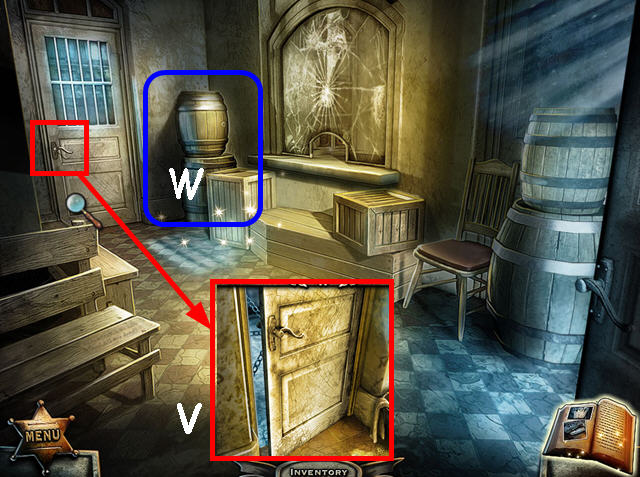
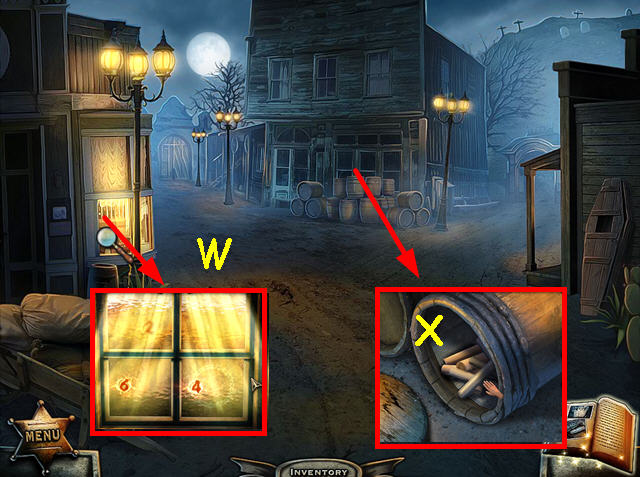 • Look at the window; use your senses and see the numbers
2-5-6-4 (W). • Look at the barrels; use the CROWBAR to open
the lid and take the SPOKES (X). • Walk to the right.
• Look at the window; use your senses and see the numbers
2-5-6-4 (W). • Look at the barrels; use the CROWBAR to open
the lid and take the SPOKES (X). • Walk to the right.
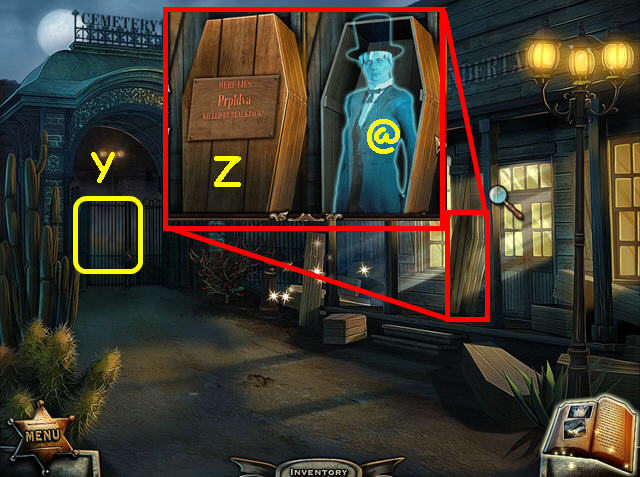 • Note the locked gate to the cemetery (Y). • Look at the
coffin (with your name on it) and use the CROWBAR to open the
lid (Z). • Talk to the Undertaker to learn he wants a death
certificate with fingerprints from the previous detective (@).
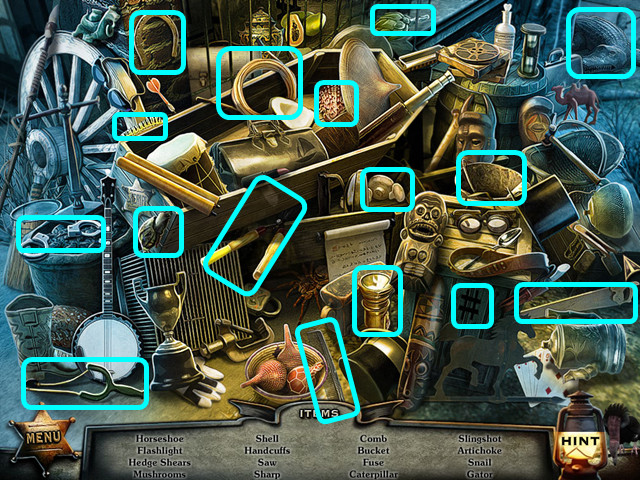
• Select the pile of coffins for a HOS.
• Note the locked gate to the cemetery (Y). • Look at the
coffin (with your name on it) and use the CROWBAR to open the
lid (Z). • Talk to the Undertaker to learn he wants a death
certificate with fingerprints from the previous detective (@).
• Select the pile of coffins for a HOS.
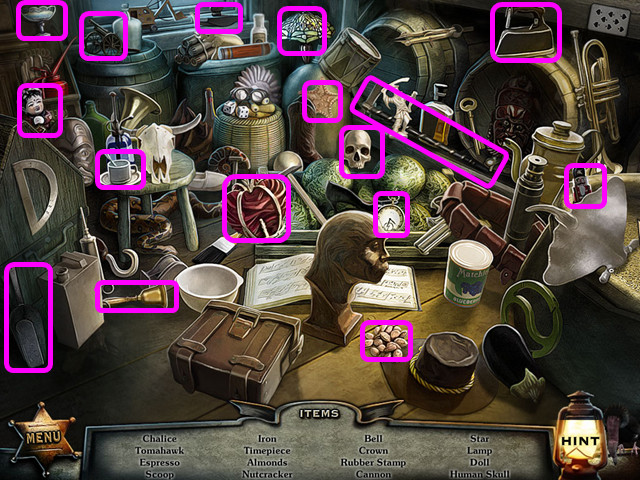
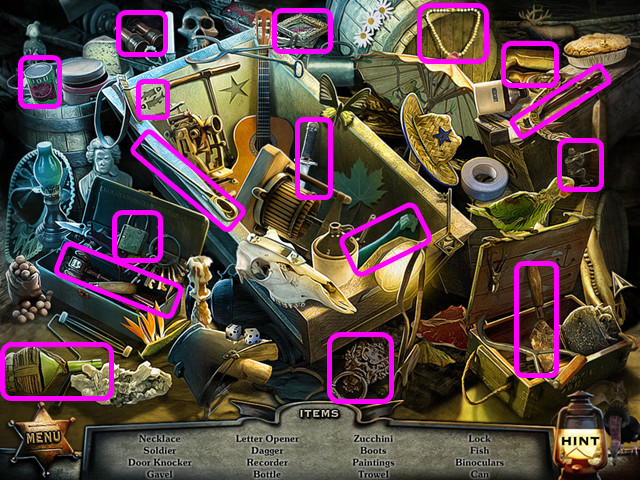
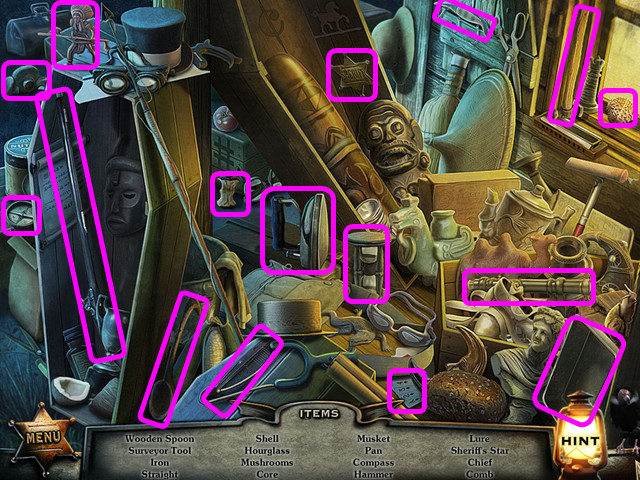 • Locate all the items on the list. • You will earn the
BLACKSMITH'S HAMMER. • Walk down, then go forward on the left
street.
• Locate all the items on the list. • You will earn the
BLACKSMITH'S HAMMER. • Walk down, then go forward on the left
street.
 • Use your senses on Billy at the gate, but he is taken away
and the gate sealed (A). • Look at the piano and use the
SCISSORS to take the PLAYER PIANO ROLL (B). • Enter the door
on the left for a mini-game (C).
• Use your senses on Billy at the gate, but he is taken away
and the gate sealed (A). • Look at the piano and use the
SCISSORS to take the PLAYER PIANO ROLL (B). • Enter the door
on the left for a mini-game (C).
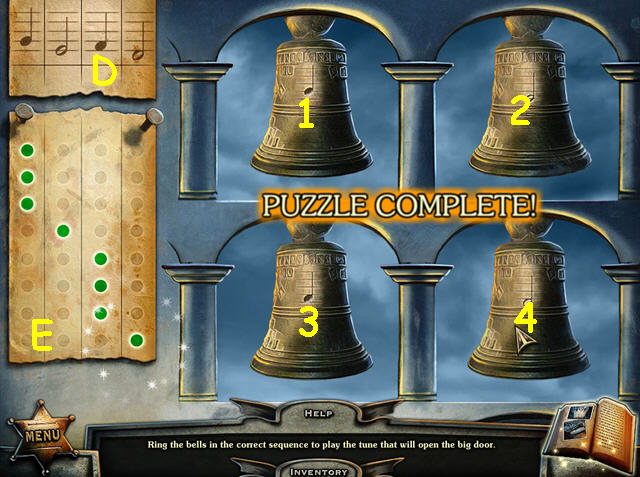 • Place the PLAYER PIANO ROLL on the left to activate the
mini-game. • The paper in the upper left indicates which bell
goes with each column (D). • Find the bell with the matching
note. • Play the bells correctly to see the green dots on the
left. • Should you make a mistake, the paper will clear and
you must start over. • Play the bells in this order:
1-1-1-2-3-3-3-4 (E). • Note - the melody is from Beethoven’s
Fifth. • Walk forward through the gate.
• Place the PLAYER PIANO ROLL on the left to activate the
mini-game. • The paper in the upper left indicates which bell
goes with each column (D). • Find the bell with the matching
note. • Play the bells correctly to see the green dots on the
left. • Should you make a mistake, the paper will clear and
you must start over. • Play the bells in this order:
1-1-1-2-3-3-3-4 (E). • Note - the melody is from Beethoven’s
Fifth. • Walk forward through the gate.
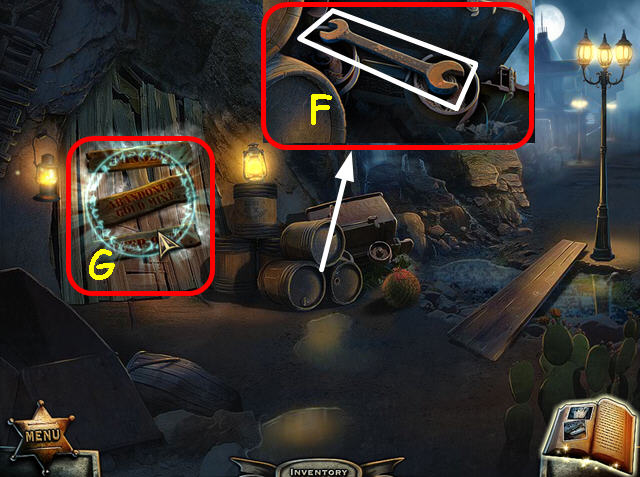 • Use your senses on the mine gate to learn you need
explosives (F). • Look at the junk pile and take the WRENCH
(G). • Walk forward across the stream.
• Use your senses on the mine gate to learn you need
explosives (F). • Look at the junk pile and take the WRENCH
(G). • Walk forward across the stream.
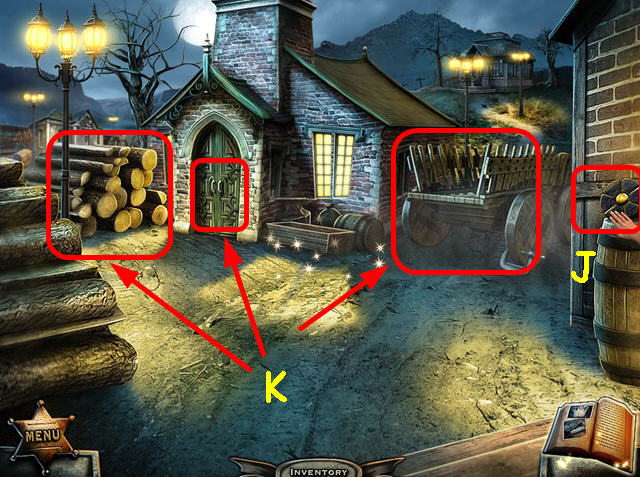
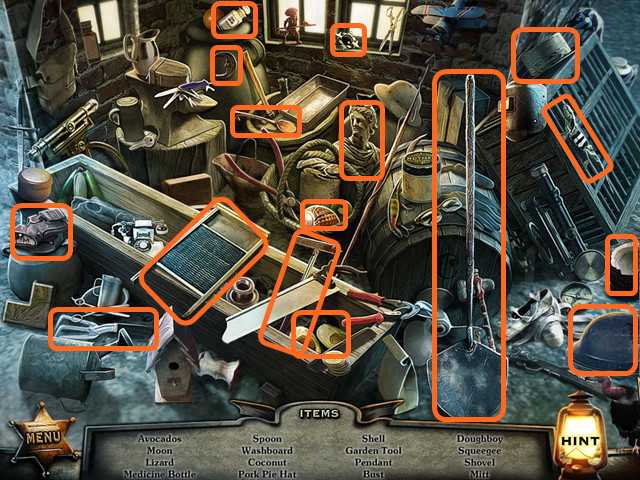
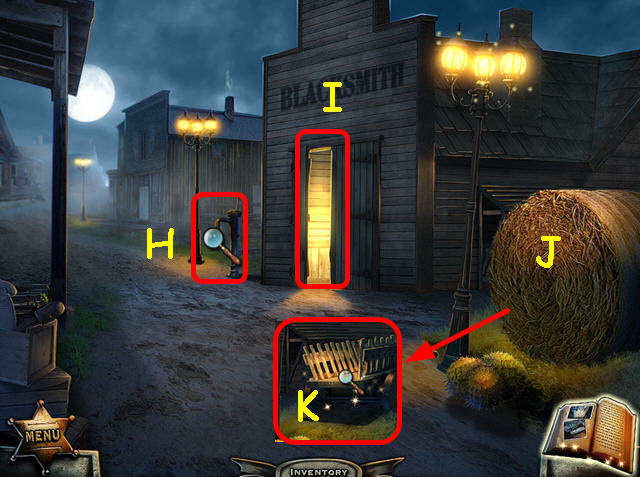 • Note the pump (H) and the entrance to the Blacksmith's (I).
• Use the PITCHFORK to move the hay bale (J). • Select the
wagon for a HOS (K).
• Note the pump (H) and the entrance to the Blacksmith's (I).
• Use the PITCHFORK to move the hay bale (J). • Select the
wagon for a HOS (K).
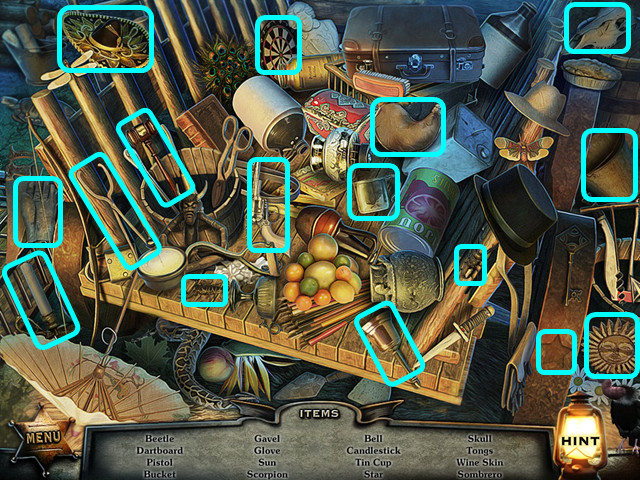 • Locate all the items on the list. • You will earn the EMPTY
WINE SKIN. • Enter the Blacksmith's.
• Locate all the items on the list. • You will earn the EMPTY
WINE SKIN. • Enter the Blacksmith's.
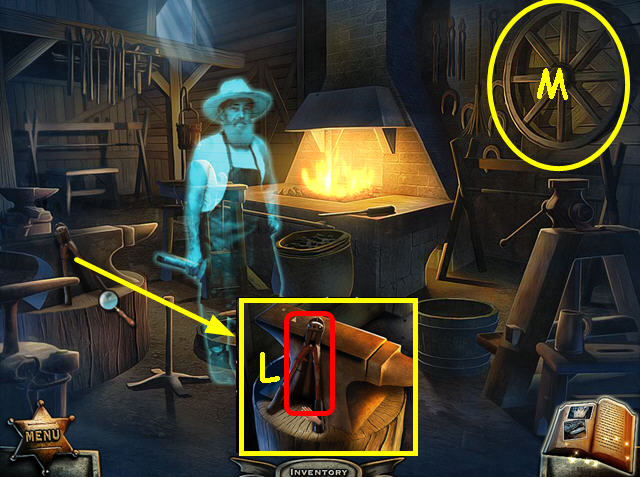 • After talking to the Blacksmith, look at the anvil and take
the BOLT CUTTER (L). • Look at the wagon wheel on the wall for
a mini-game (M).
• After talking to the Blacksmith, look at the anvil and take
the BOLT CUTTER (L). • Look at the wagon wheel on the wall for
a mini-game (M).
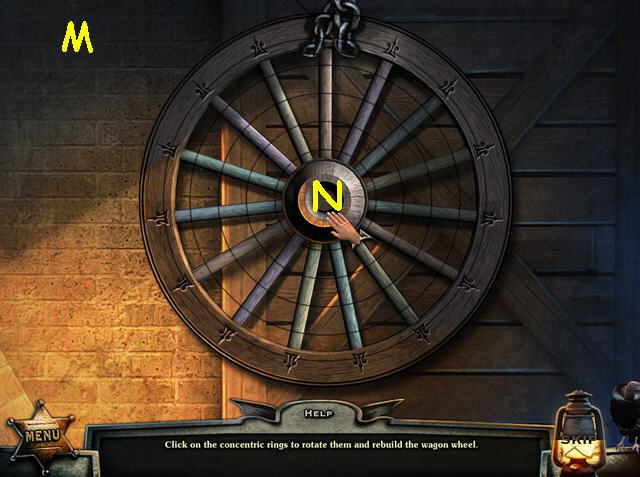 • Place the SPOKES on the wagon wheel to activate the
mini-game. • Rotate the rings to make the wheel whole as in
the screenshot (M). • There are 7 pieces to rotate – don't
forget to turn the very center of the wheel (N). • Take the
WAGON WHEEL. • Exit the Blacksmith's and head left.
• Place the SPOKES on the wagon wheel to activate the
mini-game. • Rotate the rings to make the wheel whole as in
the screenshot (M). • There are 7 pieces to rotate – don't
forget to turn the very center of the wheel (N). • Take the
WAGON WHEEL. • Exit the Blacksmith's and head left.
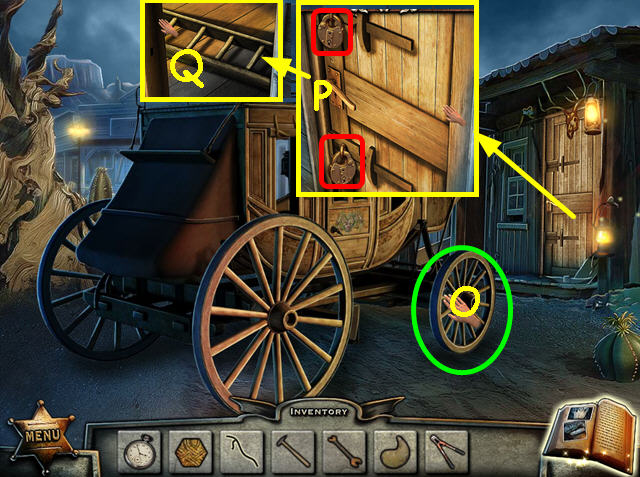 • Place the WAGON WHEEL on the coach, then push it aside (O).
• Look at the locked door on the right; use the BOLT CUTTER on
the 2 locks (P). • Open the door and take the LADDER (Q). •
Look at the coach door for a mini-game.
• Place the WAGON WHEEL on the coach, then push it aside (O).
• Look at the locked door on the right; use the BOLT CUTTER on
the 2 locks (P). • Open the door and take the LADDER (Q). •
Look at the coach door for a mini-game.
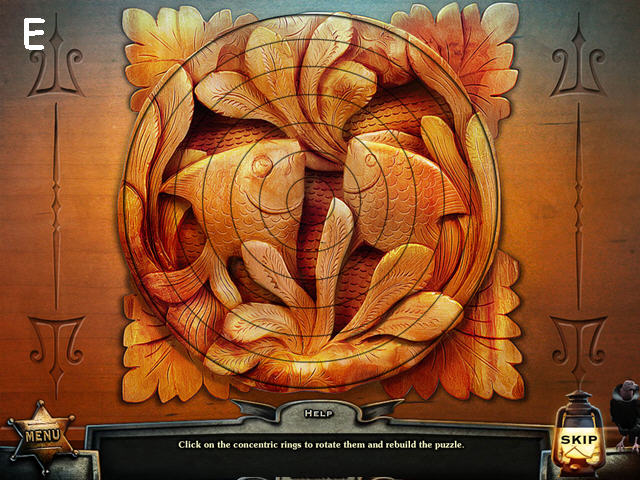
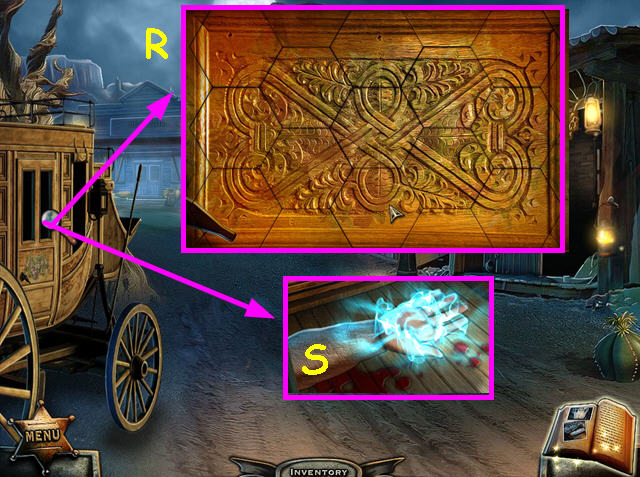 • Place the PUZZLE PIECE on the board to trigger the
mini-game. • Rotate the pieces to repair the carving (R). •
Look inside the coach to see the hand of the previous
detective (S). • Exit the coach and walk forward.
• Place the PUZZLE PIECE on the board to trigger the
mini-game. • Rotate the pieces to repair the carving (R). •
Look inside the coach to see the hand of the previous
detective (S). • Exit the coach and walk forward.
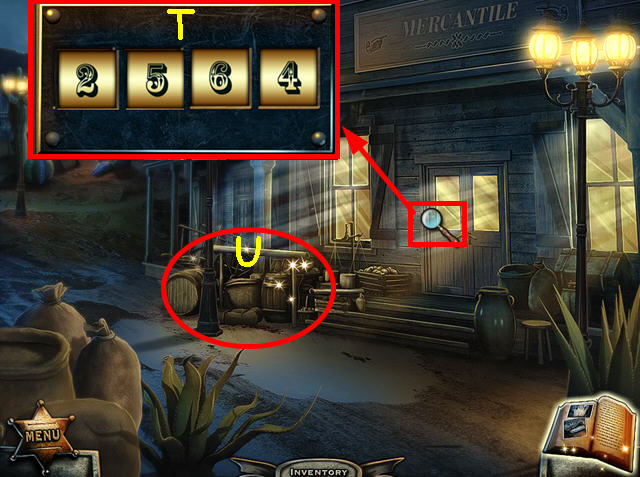 • Look at the door to the Mercantile and enter the numbers
from the window: 2-5-6-4 (T). • Select the hitching post area
for a HOS (U).
• Look at the door to the Mercantile and enter the numbers
from the window: 2-5-6-4 (T). • Select the hitching post area
for a HOS (U).
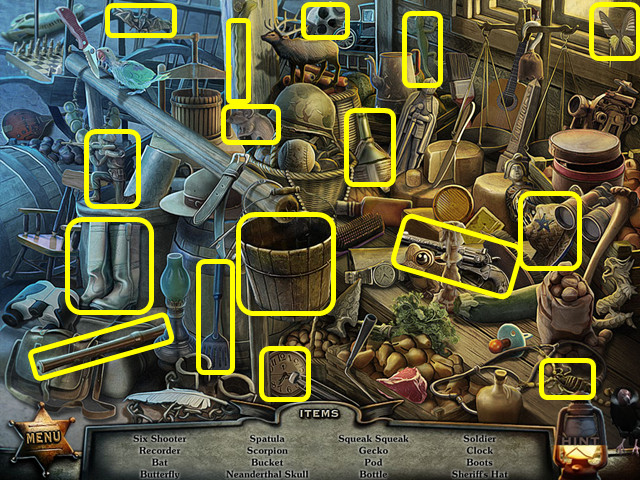 • Locate all the items on the list. • You will earn the EMPTY
BUCKET. • Walk forward to the gallows.
• Locate all the items on the list. • You will earn the EMPTY
BUCKET. • Walk forward to the gallows.
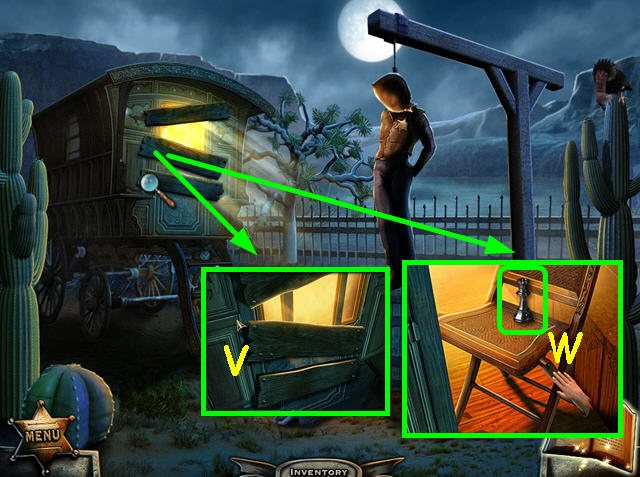 • Look at the wagon door and use the BLACKSMITH'S HAMMER to
remove the 3 boards (V). • Open the door and move items until
you find the 1/2 MISSING CHESS PIECE (W). • Walk down, then
enter the Mercantile.
• Look at the wagon door and use the BLACKSMITH'S HAMMER to
remove the 3 boards (V). • Open the door and move items until
you find the 1/2 MISSING CHESS PIECE (W). • Walk down, then
enter the Mercantile.
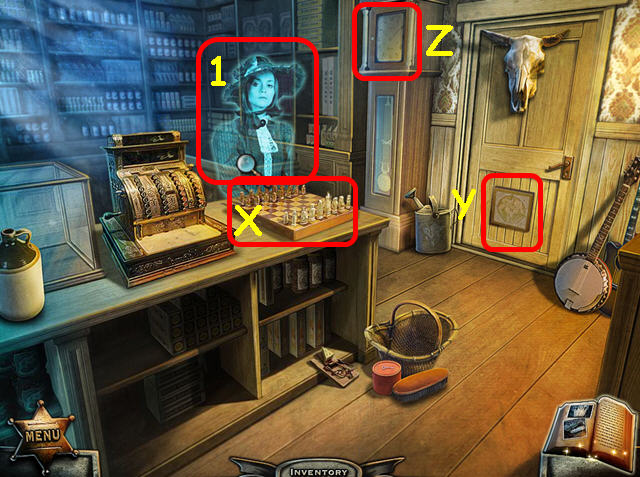 • Talk to the proprietress to learn she is missing 2 chess
pieces (1). • Note the chessboard (X). • Note the mini-game on
the door that is missing some pieces (Y). • Select the
grandfather clock for a mini-game (Z).
• Talk to the proprietress to learn she is missing 2 chess
pieces (1). • Note the chessboard (X). • Note the mini-game on
the door that is missing some pieces (Y). • Select the
grandfather clock for a mini-game (Z).
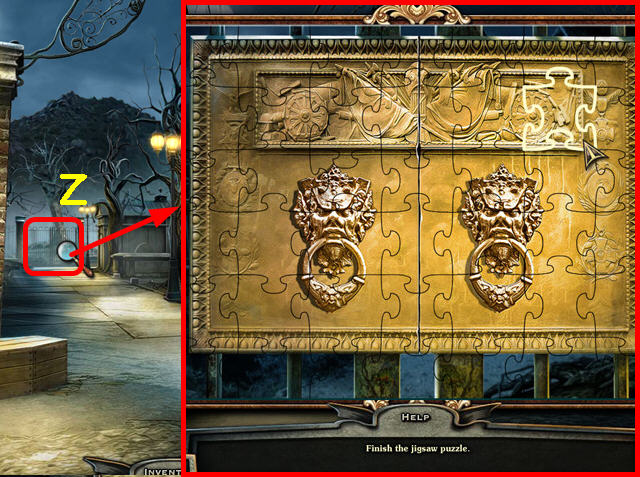
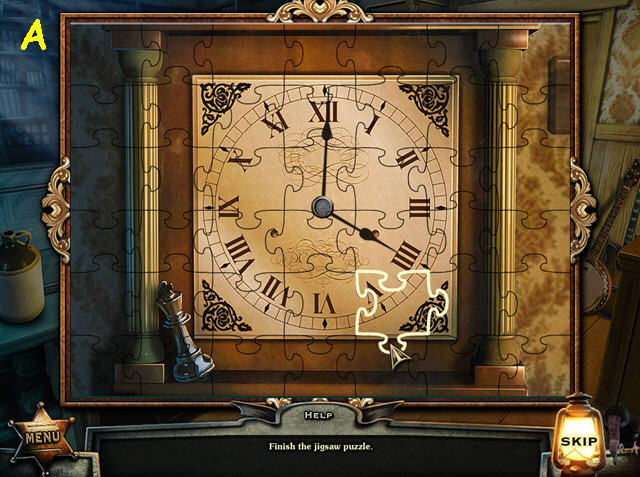 • Restore the face of the clock by dragging jigsaw pieces into
position. • Pieces will lock in place when correct (A). • You
will earn the 2/2 MISSING CHESS PIECE. • Look at the
chessboard.
• Restore the face of the clock by dragging jigsaw pieces into
position. • Pieces will lock in place when correct (A). • You
will earn the 2/2 MISSING CHESS PIECE. • Look at the
chessboard.
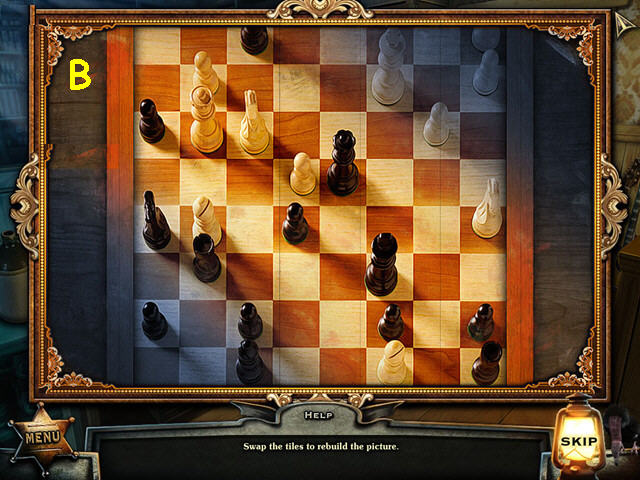 • Place the 2 MISSING CHESS PIECES on the board to trigger the
mini-game. • Restore the picture of the chessboard; select 2
tiles to swap positions (B). • You will earn the SHEARS. •
Exit the Mercantile and return to the gallows.
• Place the 2 MISSING CHESS PIECES on the board to trigger the
mini-game. • Restore the picture of the chessboard; select 2
tiles to swap positions (B). • You will earn the SHEARS. •
Exit the Mercantile and return to the gallows.
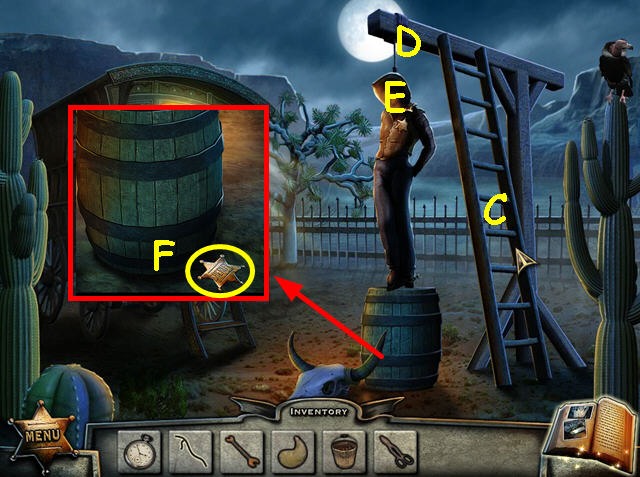 • Place the LADDER against the gallows (C). • Use the SHEARS
to cut down the Sheriff (D). • Remove the bag from the
Sheriff's head (E). • Talk to the Sheriff until he is gone,
then take the SHERIFF'S STAR (F). • Return to the front of the
Mercantile and select the hitching post area for a HOS.
• Place the LADDER against the gallows (C). • Use the SHEARS
to cut down the Sheriff (D). • Remove the bag from the
Sheriff's head (E). • Talk to the Sheriff until he is gone,
then take the SHERIFF'S STAR (F). • Return to the front of the
Mercantile and select the hitching post area for a HOS.
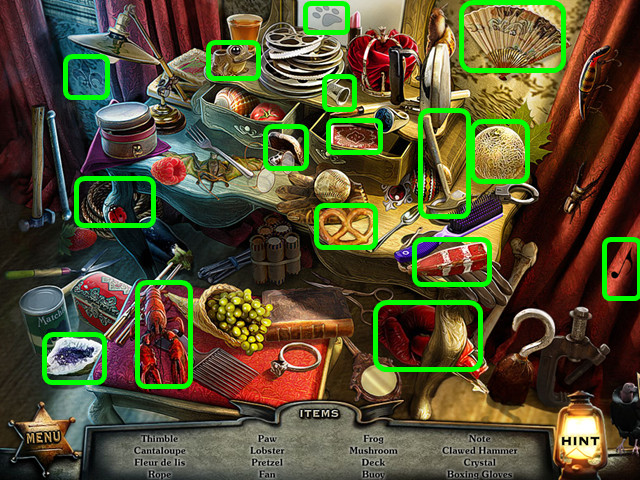
 • Locate all the items on the list. • You will earn the 1/2
DICE PUZZLE PIECE. • Walk down twice to the front of the
Blacksmith's.
• Locate all the items on the list. • You will earn the 1/2
DICE PUZZLE PIECE. • Walk down twice to the front of the
Blacksmith's.
 • Look at the water pump and place the PUMP HANDLE on the
device (G). • Place the EMPTY WATER BUCKET on the pump. • Pump
the handle then take the BUCKET OF WATER (H). • Select the
wagon for a HOS.
• Look at the water pump and place the PUMP HANDLE on the
device (G). • Place the EMPTY WATER BUCKET on the pump. • Pump
the handle then take the BUCKET OF WATER (H). • Select the
wagon for a HOS.
 • Locate all the items on the list. • You will earn the
UNSIGNED CERTIFICATE. • Enter the Blacksmith's.
• Locate all the items on the list. • You will earn the
UNSIGNED CERTIFICATE. • Enter the Blacksmith's.
 • Look at the hearth and use the BUCKET OF WATER on the hot
coals (I). • Take the CHARCOAL (J). • Exit the Blacksmith's
and walk forward to the coach area.
• Look at the hearth and use the BUCKET OF WATER on the hot
coals (I). • Take the CHARCOAL (J). • Exit the Blacksmith's
and walk forward to the coach area.
 • Enter the coach and use the CHARCOAL on the hand. • Next,
use the UNSIGNED CERTIFICATE on the hand to get the DEATH
CERTIFICATE (K). • Walk down 4 times, then go to the right. •
Look at the Undertaker's Ghost and give him the DEATH
CERTIFICATE (L). • Enter the building.
• Enter the coach and use the CHARCOAL on the hand. • Next,
use the UNSIGNED CERTIFICATE on the hand to get the DEATH
CERTIFICATE (K). • Walk down 4 times, then go to the right. •
Look at the Undertaker's Ghost and give him the DEATH
CERTIFICATE (L). • Enter the building.
Chapter 2
 • After speaking with the Undertaker, look in the left corner
and take the TONGS (A). • Note the stove on the right (B) •
Look at the bookcase; take the 2/2 DICE PUZZLE PIECE and read
the scroll for the dice diagram (C). • Look at the coffin and
place the 2 DICE PUZZLE PIECES in the lid. • Per the diagram,
change the dice to 6 -1 - 4 (D). • Select the coffin for a
HOS.
• After speaking with the Undertaker, look in the left corner
and take the TONGS (A). • Note the stove on the right (B) •
Look at the bookcase; take the 2/2 DICE PUZZLE PIECE and read
the scroll for the dice diagram (C). • Look at the coffin and
place the 2 DICE PUZZLE PIECES in the lid. • Per the diagram,
change the dice to 6 -1 - 4 (D). • Select the coffin for a
HOS.
 • Locate all the items on the list. • You will earn the
HANDLE. • Exit the building and select the pile of coffins for
a HOS.
• Locate all the items on the list. • You will earn the
HANDLE. • Exit the building and select the pile of coffins for
a HOS.
 • Locate all the items on the list. • You will earn the
SHERIFF'S KEY. • Walk down twice. • Look at the door and use
the SHERIFF'S KEY on the lock. • Turn the key, then turn the
knob and go inside.
• Locate all the items on the list. • You will earn the
SHERIFF'S KEY. • Walk down twice. • Look at the door and use
the SHERIFF'S KEY on the lock. • Turn the key, then turn the
knob and go inside.
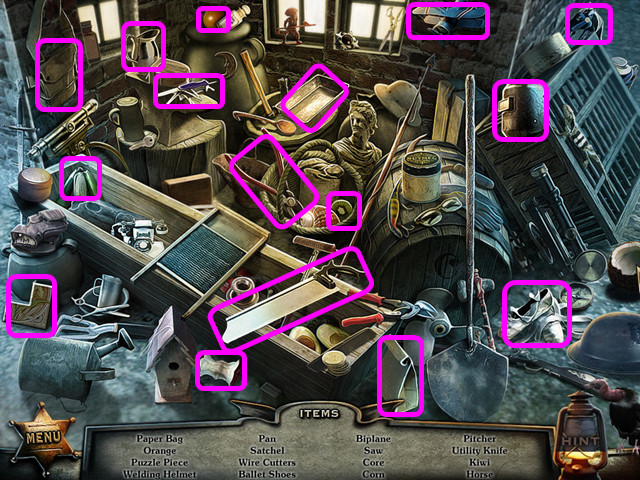
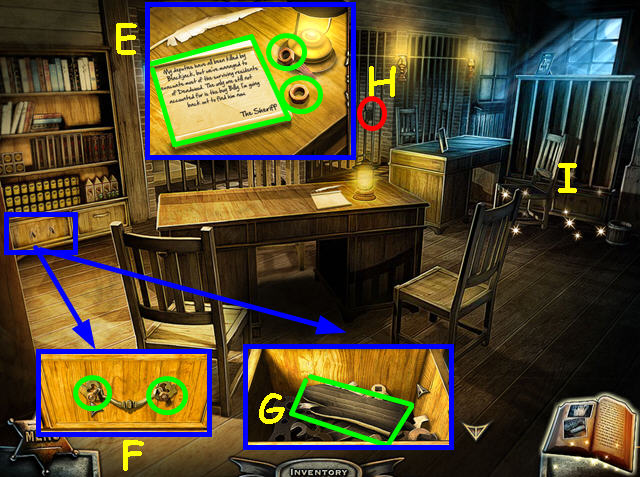 • Look at the desk, read the letter and take the 1/2 and 2/2
NUTS (E). • Look at the drawer under the bookcase and place
the HANDLE on the front (F). • Place the 2 NUTS on the bolts,
then use the WRENCH to secure them. • Open the drawer and take
the OVEN MITT (G). • Note the locked cell (H). • Look at the
cabinet on the right for a HOS (I).
• Look at the desk, read the letter and take the 1/2 and 2/2
NUTS (E). • Look at the drawer under the bookcase and place
the HANDLE on the front (F). • Place the 2 NUTS on the bolts,
then use the WRENCH to secure them. • Open the drawer and take
the OVEN MITT (G). • Note the locked cell (H). • Look at the
cabinet on the right for a HOS (I).
 • Locate all the items on the list. • You will earn the
MALLET. • Walk forward to the back exit.
• Locate all the items on the list. • You will earn the
MALLET. • Walk forward to the back exit.
 • Take the 1/3 PUZZLE DISC (J). • Note the woodpile, locked
door and the wagon (K). • Select the trough for a HOS.
• Take the 1/3 PUZZLE DISC (J). • Note the woodpile, locked
door and the wagon (K). • Select the trough for a HOS.
 • Locate all the items on the list. • You will earn the 3/3
PUZZLE PIECE. • Return to the Undertaker's.
• Locate all the items on the list. • You will earn the 3/3
PUZZLE PIECE. • Return to the Undertaker's.
 • Look at the stove and use the OVEN MITT to open the front. •
Use the TONGS to take the 1/3 PUZZLE PIECE (L). • Select the
coffin for a HOS.
• Look at the stove and use the OVEN MITT to open the front. •
Use the TONGS to take the 1/3 PUZZLE PIECE (L). • Select the
coffin for a HOS.
 • Locate all the items on the list. • You will earn the 2/3
PUZZLE PIECE. • Return to the Mercantile.
• Locate all the items on the list. • You will earn the 2/3
PUZZLE PIECE. • Return to the Mercantile.
 • Zoom into the bottom of the door for a mini-game. • Place
the 3 PUZZLE PIECES into the grid to trigger the mini-game. •
Drag the columns and rows to recreate the picture (M). • Take
the STOREROOM KEY then use it to unlock the door and go
inside.
• Zoom into the bottom of the door for a mini-game. • Place
the 3 PUZZLE PIECES into the grid to trigger the mini-game. •
Drag the columns and rows to recreate the picture (M). • Take
the STOREROOM KEY then use it to unlock the door and go
inside.
 • Take the LADDER (N). • Note the scales on the left (O). •
Look at the barrels and read the scroll for the gunpowder
recipe. Note the barrel is missing a tap (P). • Select the
area near the window for a HOS (Q).
• Take the LADDER (N). • Note the scales on the left (O). •
Look at the barrels and read the scroll for the gunpowder
recipe. Note the barrel is missing a tap (P). • Select the
area near the window for a HOS (Q).
 • Locate all the items on the list. • You will earn the SCOOP.
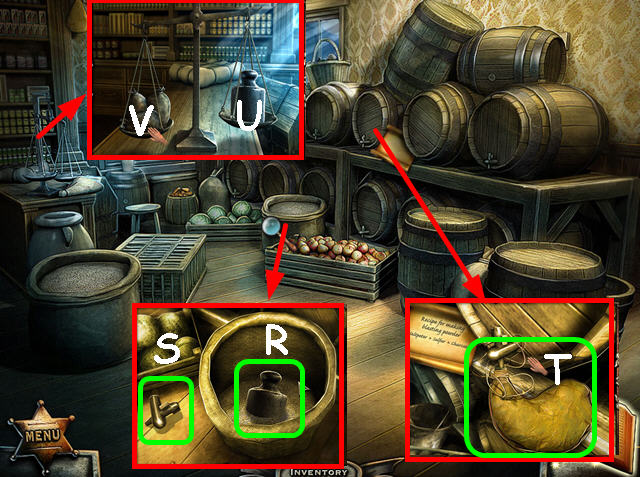 • Look at the grain; use the SCOOP 3 times to find the WEIGHT
(R). • Take the TAP (S). • Look at the barrel and place the
TAP on it then use the MALLET to make it secure. • Place the
EMPTY WINESKIN on the tap, then open the tap to get the
WHISKEY (T). • Look at the scales and place the WEIGHT on the
right (U). • Remove the bags to get the BAG OF SULFUR (V). •
Select the area by the window for a HOS.
• Look at the grain; use the SCOOP 3 times to find the WEIGHT
(R). • Take the TAP (S). • Look at the barrel and place the
TAP on it then use the MALLET to make it secure. • Place the
EMPTY WINESKIN on the tap, then open the tap to get the
WHISKEY (T). • Look at the scales and place the WEIGHT on the
right (U). • Remove the bags to get the BAG OF SULFUR (V). •
Select the area by the window for a HOS.
 • Locate all the items on the list. • You will earn the
PLAYING CARD. • Exit the Mercantile and walk down 5 times to
the crossroads. • Look at the window on the left and use the
PLAYING CARD to open the window. • Climb in the window to the
dining room.
• Locate all the items on the list. • You will earn the
PLAYING CARD. • Exit the Mercantile and walk down 5 times to
the crossroads. • Look at the window on the left and use the
PLAYING CARD to open the window. • Climb in the window to the
dining room.
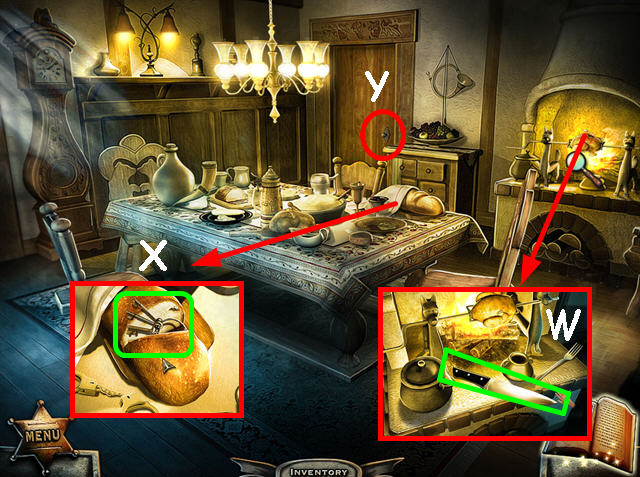 • Look at the fireplace and take the KNIFE (W). • Look at the
table and use your ability on the loaf of bread. • Use the
KNIFE to cut open the bread and take the JAIL CELL KEYS (X). •
Note the door with the missing handle (Y). • Return to the
Sheriff's.
• Look at the fireplace and take the KNIFE (W). • Look at the
table and use your ability on the loaf of bread. • Use the
KNIFE to cut open the bread and take the JAIL CELL KEYS (X). •
Note the door with the missing handle (Y). • Return to the
Sheriff's.
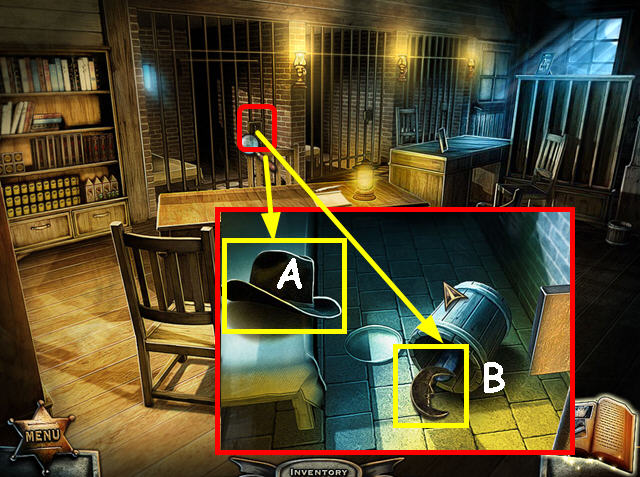 • Look at the cell door and use the JAIL CELL KEYS on the
lock; turn the key and open the door. • Take the BLACKJACK'S
HAT (A). • Tip over the bucket of water and take the MOON (B).
• Select the cabinet for a HOS.
• Look at the cell door and use the JAIL CELL KEYS on the
lock; turn the key and open the door. • Take the BLACKJACK'S
HAT (A). • Tip over the bucket of water and take the MOON (B).
• Select the cabinet for a HOS.
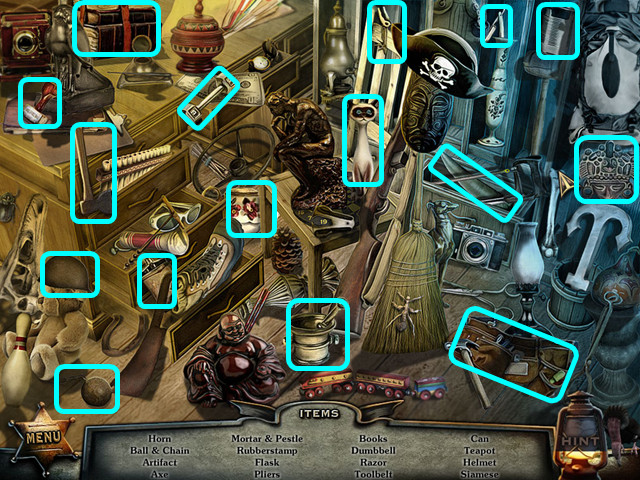 • Locate all the items on the list. • You will earn the AXE. •
Exit using the back door. • Use the AXE on the wood pile, then
walk to the left.
• Locate all the items on the list. • You will earn the AXE. •
Exit using the back door. • Use the AXE on the wood pile, then
walk to the left.
 • Look at the poster and use your ability; you note something
may be hidden behind the poster (C). • Take the ROCK by the
poster (D). • Look at the cracked tile on the ground by the
left corner of the building and use the ROCK to break off a
SHARP TILE PIECE (E). • Look at the poster again and use the
SHARP TILE PIECE of tile to remove it. • Take the CLOCK HANDS
(F). • Use the LADDER on the clock; look at the clock and
place the CLOCK HANDS on the face (G). • Use the POCKET WATCH
on the clock for a mini-game.
• Look at the poster and use your ability; you note something
may be hidden behind the poster (C). • Take the ROCK by the
poster (D). • Look at the cracked tile on the ground by the
left corner of the building and use the ROCK to break off a
SHARP TILE PIECE (E). • Look at the poster again and use the
SHARP TILE PIECE of tile to remove it. • Take the CLOCK HANDS
(F). • Use the LADDER on the clock; look at the clock and
place the CLOCK HANDS on the face (G). • Use the POCKET WATCH
on the clock for a mini-game.
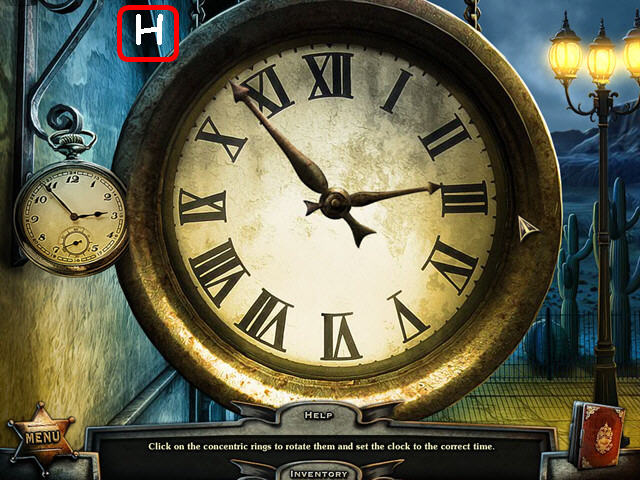 • Rotate the rings to repair the clock face. • Tip - start
with the numbers and work your way in. • As you rotate the
inner rings, they will catch up to the moving hands. • Once
the clock numbers and clock hands look correct, but the hands
are still moving, rotate the outer ring that is just outside
the numbers (H). • Enter the train station.
• Rotate the rings to repair the clock face. • Tip - start
with the numbers and work your way in. • As you rotate the
inner rings, they will catch up to the moving hands. • Once
the clock numbers and clock hands look correct, but the hands
are still moving, rotate the outer ring that is just outside
the numbers (H). • Enter the train station.
 • Look at the bench and take the POCKETKNIFE (I). • Note the
ticket window (J). • Note the chained door (K). • Look at the
barrels for a HOS (L).
• Look at the bench and take the POCKETKNIFE (I). • Note the
ticket window (J). • Note the chained door (K). • Look at the
barrels for a HOS (L).
 • Locate all the items on the list. • You will earn the
DOORKNOB. • Exit the train station and walk down 3 times until
you reach the Sheriff's. Walk forward and enter the window on
the left to return to the dining room. • Look at the door and
place the DOORKNOB in the hole. • Turn the knob and enter the
bedroom.
• Locate all the items on the list. • You will earn the
DOORKNOB. • Exit the train station and walk down 3 times until
you reach the Sheriff's. Walk forward and enter the window on
the left to return to the dining room. • Look at the door and
place the DOORKNOB in the hole. • Turn the knob and enter the
bedroom.
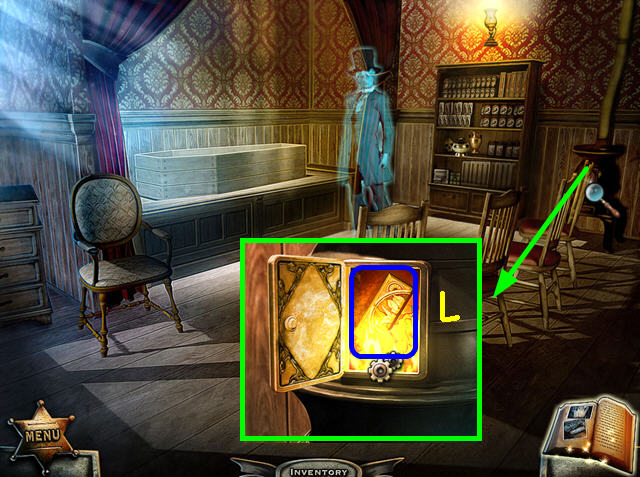
 • Take the 1/2 TORN PAPER (M). • Look at the painting over the
fireplace; use your senses then use the POCKETKNIFE to cut it
open (N). • Note the safe. • Look at the bed near the pillows;
read the note from the Mayor and take the 1/3 HEX PUZZLE PIECE
(O). • Note the locked cabinet (P). • Select the end of the
bed for a HOS (Q).
• Take the 1/2 TORN PAPER (M). • Look at the painting over the
fireplace; use your senses then use the POCKETKNIFE to cut it
open (N). • Note the safe. • Look at the bed near the pillows;
read the note from the Mayor and take the 1/3 HEX PUZZLE PIECE
(O). • Note the locked cabinet (P). • Select the end of the
bed for a HOS (Q).
 • Locate all the items on the list. • You will earn the
C-CLAMP HANDLE. • Return to the Sheriff's and go out the back
door.
• Locate all the items on the list. • You will earn the
C-CLAMP HANDLE. • Return to the Sheriff's and go out the back
door.
 • Look at the wagon wheel and use the C-CLAMP HANDLE on the
c-clamp (R). • Select the trough for a HOS.
• Look at the wagon wheel and use the C-CLAMP HANDLE on the
c-clamp (R). • Select the trough for a HOS.
 • Locate all the items on the list. • You will earn the
SHOVEL. • Walk to the right then return to the train station
(go through the Sheriff’s back door and go left); grab the
LADDER. • Walk down, then to the right.
• Locate all the items on the list. • You will earn the
SHOVEL. • Walk to the right then return to the train station
(go through the Sheriff’s back door and go left); grab the
LADDER. • Walk down, then to the right.
 • Look at the ground near the coffin and use the SHOVEL to dig
up the 2/3 HEX PUZZLE PIECE (S). • Use the LADDER on the roof;
look at the roof and take the SHARP METAL ROD (T). • Look at
the wagon on the right and use the SHARP METAL ROD to cut open
the sack and take the HACKSAW (U). • Return to and enter the
train station.
• Look at the ground near the coffin and use the SHOVEL to dig
up the 2/3 HEX PUZZLE PIECE (S). • Use the LADDER on the roof;
look at the roof and take the SHARP METAL ROD (T). • Look at
the wagon on the right and use the SHARP METAL ROD to cut open
the sack and take the HACKSAW (U). • Return to and enter the
train station.
 • Use the HACKSAW on the chained door (V). • Select the
barrels for a HOS (W).
• Use the HACKSAW on the chained door (V). • Select the
barrels for a HOS (W).
 • Locate all the items on the list. • You will earn the
CHISEL. • Walk out the back door then return to the building
where you left the ladder. • Take the LADDER the return to the
train.
• Locate all the items on the list. • You will earn the
CHISEL. • Walk out the back door then return to the building
where you left the ladder. • Take the LADDER the return to the
train.
 • Look at the barrel and use the chisel to remove the lid;
take the CANE (A). • Use the LADDER on the lamppost; and take
the PUZZLE PIECE (B). • Note the door to the train requires a
ticket. • Walk down and look at the ticket window; use the
CANE to get the TICKET (C). • Walk back to the train, look at
the door and use the TICKET on the slot (D). • Open the door
and look inside for a mini-game.
• Look at the barrel and use the chisel to remove the lid;
take the CANE (A). • Use the LADDER on the lamppost; and take
the PUZZLE PIECE (B). • Note the door to the train requires a
ticket. • Walk down and look at the ticket window; use the
CANE to get the TICKET (C). • Walk back to the train, look at
the door and use the TICKET on the slot (D). • Open the door
and look inside for a mini-game.
 • Place the PUZZLE PIECE in the frame to activate the
mini-game. • Rotate the rings to restore the carving (E). •
Take the 2/2 TORN PAPER. • Return to the bedroom (Go to the
center of town; enter the left window and go through the back
door).
• Place the PUZZLE PIECE in the frame to activate the
mini-game. • Rotate the rings to restore the carving (E). •
Take the 2/2 TORN PAPER. • Return to the bedroom (Go to the
center of town; enter the left window and go through the back
door).
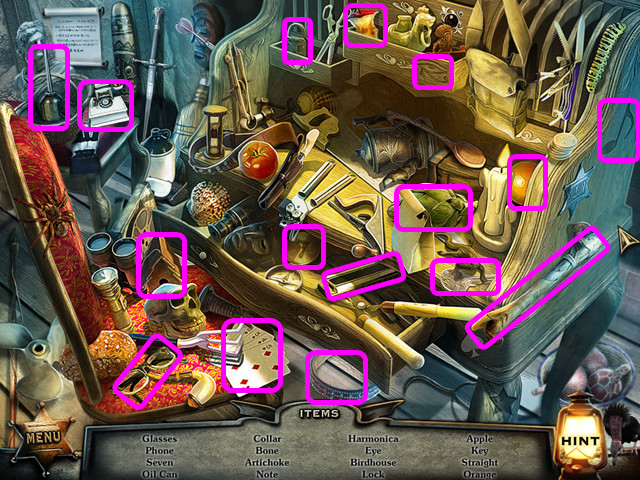
 • Select the end of the bed for a HOS. • Locate all the items
on the list. • You will earn the CLAW HAMMER.
• Select the end of the bed for a HOS. • Locate all the items
on the list. • You will earn the CLAW HAMMER.
 • Look at the safe and place the 2 TORN PAPERS on the nails. •
Set the dials to: 1-8-4-7 (F). • Read the letter and take the
CABINET KEY (G). • Look at the locked cabinet and use the
CABINET KEY on the lock. • Turn the key and open the door;
take the MATCHES and the 3/3 HEX PUZZLE PIECE (H). • Return to
the Sheriff's and exit through the back door. • Walk to the
right and look at the door for a mini-game.
• Look at the safe and place the 2 TORN PAPERS on the nails. •
Set the dials to: 1-8-4-7 (F). • Read the letter and take the
CABINET KEY (G). • Look at the locked cabinet and use the
CABINET KEY on the lock. • Turn the key and open the door;
take the MATCHES and the 3/3 HEX PUZZLE PIECE (H). • Return to
the Sheriff's and exit through the back door. • Walk to the
right and look at the door for a mini-game.
 • Place the 3 HEX PUZZLE PIECES into the holes to trigger the
mini-game. • Rotate the pieces to restore the carving (I). •
Enter the building.
• Place the 3 HEX PUZZLE PIECES into the holes to trigger the
mini-game. • Rotate the pieces to restore the carving (I). •
Enter the building.
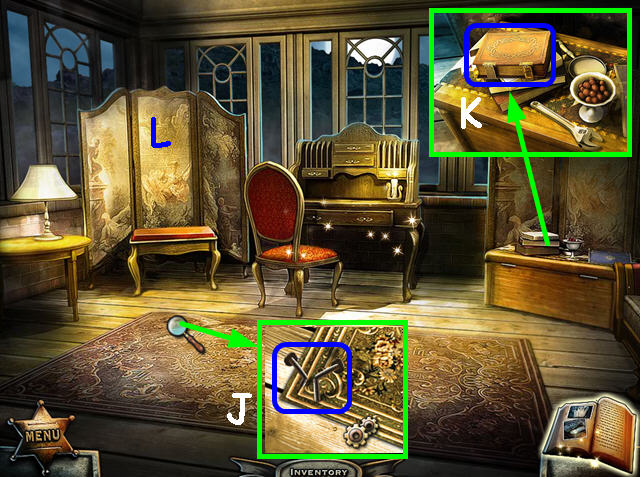 • Look at the corner of the rug and use the CLAW HAMMER to
remove the nails (J). • Pull back the rug to find a trap door
that is screwed shut. • Look at the chest and take the 1/3
LIBRARY BOOK (K). • Note the divider screen (L). • Select the
desk for a HOS.
• Look at the corner of the rug and use the CLAW HAMMER to
remove the nails (J). • Pull back the rug to find a trap door
that is screwed shut. • Look at the chest and take the 1/3
LIBRARY BOOK (K). • Note the divider screen (L). • Select the
desk for a HOS.
 • Locate all the items on the list. • You will earn the OIL
CAN. • Select the divider screen for a mini-game.
• Locate all the items on the list. • You will earn the OIL
CAN. • Select the divider screen for a mini-game.
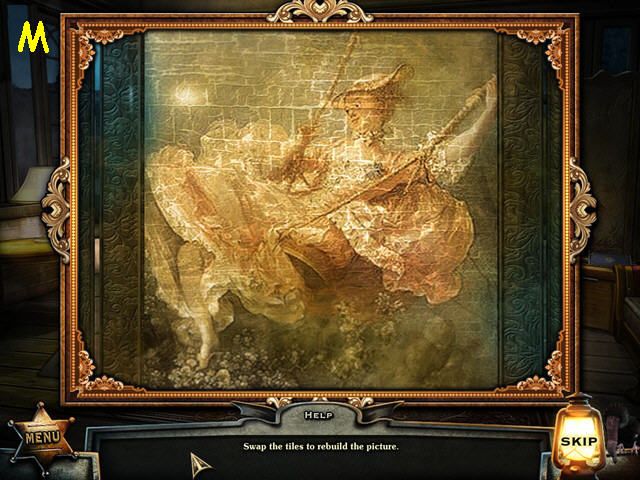 • Restore the picture by swapping the tiles. • Select 2 tiles
to swap locations (M). • You will earn the SUN. • Exit the
building and walk down.
• Restore the picture by swapping the tiles. • Select 2 tiles
to swap locations (M). • You will earn the SUN. • Exit the
building and walk down.
Chapter 3
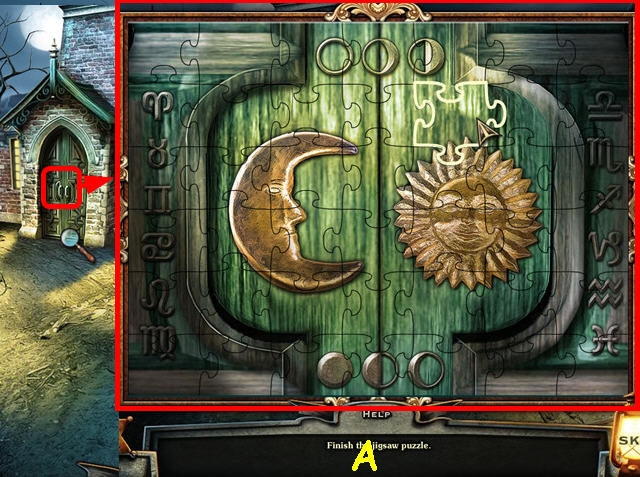 • Look at the door and place the SUN and MOON into the
matching niches for a mini-game. • Restore the face of the
clock by dragging jigsaw pieces into position. • Pieces will
lock in place when correct (A). • Enter the Library.
• Look at the door and place the SUN and MOON into the
matching niches for a mini-game. • Restore the face of the
clock by dragging jigsaw pieces into position. • Pieces will
lock in place when correct (A). • Enter the Library.
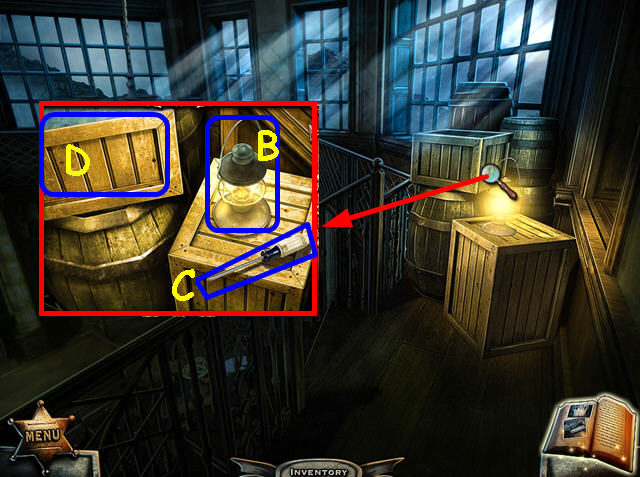 • Use the MATCHES to light the lamp (B). • Look at the lamp
and use the MATCHES to light it, then take the SCREWDRIVER
(C). • Note the crate (D). • It is too dark to do anything
else. • Exit the building, walk to the right and enter the
building.
• Use the MATCHES to light the lamp (B). • Look at the lamp
and use the MATCHES to light it, then take the SCREWDRIVER
(C). • Note the crate (D). • It is too dark to do anything
else. • Exit the building, walk to the right and enter the
building.
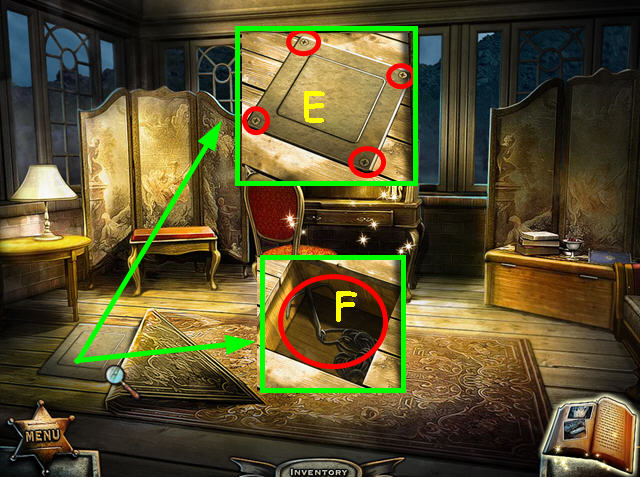 • Look at the trapdoor under the rug and use the SCREWDRIVER
to remove the 4 screws (E). • Remove the door and take the
HOOK (F). • Look at the desk for a HOS.
• Look at the trapdoor under the rug and use the SCREWDRIVER
to remove the 4 screws (E). • Remove the door and take the
HOOK (F). • Look at the desk for a HOS.
 • Locate all the items on the list. • You will earn the MIXING
SPOON. • Return to the library (Go through the back of the
Sheriff’s office).
• Locate all the items on the list. • You will earn the MIXING
SPOON. • Return to the library (Go through the back of the
Sheriff’s office).
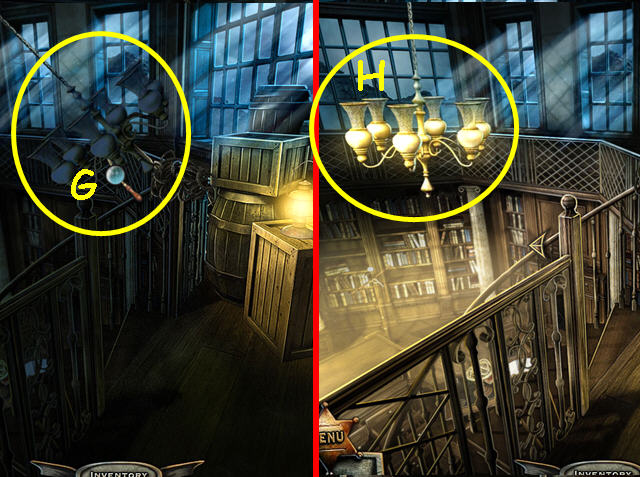 • Use the HOOK on the chandelier (G). • Use the MATCHES on the
chandelier (H). • Walk down the stairs.
• Use the HOOK on the chandelier (G). • Use the MATCHES on the
chandelier (H). • Walk down the stairs.
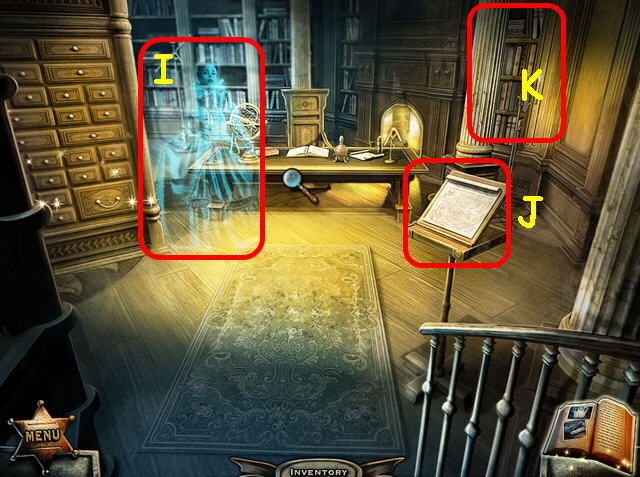 • After speaking with the librarian (I), read the note on the
stand (J). • Note the bookshelf mini-game on the right (K). •
Note the mini-game on the desk. • Select the drawers on the
left for a HOS.
• After speaking with the librarian (I), read the note on the
stand (J). • Note the bookshelf mini-game on the right (K). •
Note the mini-game on the desk. • Select the drawers on the
left for a HOS.
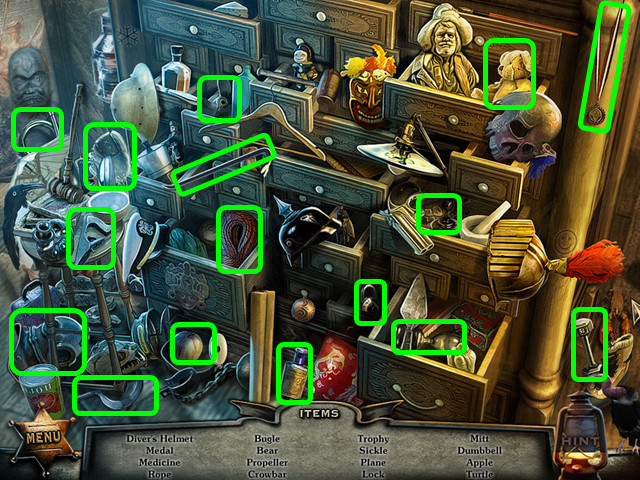 • Locate all the items on the list. • You will earn the
CROWBAR.
• Locate all the items on the list. • You will earn the
CROWBAR.
 • Return up the stairs and look at the crate. • Use the
CROWBAR to open the crate; take the 3/3 PUZZLE DISC (L). •
Walk down the stairs and look at the desk for a mini-game. •
Take the 2/3 PUZZLE DISC, then place the 3 PUZZLE DISCS onto
the mini-game. • Rotate the rings to restore the picture.
Don't forget the center circle (M). • Take the GRAVEYARD KEY.
• Exit the library and walk down twice to the front of the
Sheriff's. • Walk forward, then to the right. • Look at the
graveyard gate and use the GRAVEYARD KEY to open the lock. •
Walk forward.
• Return up the stairs and look at the crate. • Use the
CROWBAR to open the crate; take the 3/3 PUZZLE DISC (L). •
Walk down the stairs and look at the desk for a mini-game. •
Take the 2/3 PUZZLE DISC, then place the 3 PUZZLE DISCS onto
the mini-game. • Rotate the rings to restore the picture.
Don't forget the center circle (M). • Take the GRAVEYARD KEY.
• Exit the library and walk down twice to the front of the
Sheriff's. • Walk forward, then to the right. • Look at the
graveyard gate and use the GRAVEYARD KEY to open the lock. •
Walk forward.
 • Look at the tomb and take the BUCKET OF CHARCOAL (N). • Note
the crack in the front of the tomb (1). • Note the gate with
the missing handle (O). • Place the SHERIFF'S STAR on Billy's
grave (P). • Look at the graves and use your senses on
Granny's grave (Q). • Select the coffin for a HOS (R).
• Look at the tomb and take the BUCKET OF CHARCOAL (N). • Note
the crack in the front of the tomb (1). • Note the gate with
the missing handle (O). • Place the SHERIFF'S STAR on Billy's
grave (P). • Look at the graves and use your senses on
Granny's grave (Q). • Select the coffin for a HOS (R).
 • Locate all the items on the list. • You will earn the FUSE.
• Walk to the left.
• Locate all the items on the list. • You will earn the FUSE.
• Walk to the left.
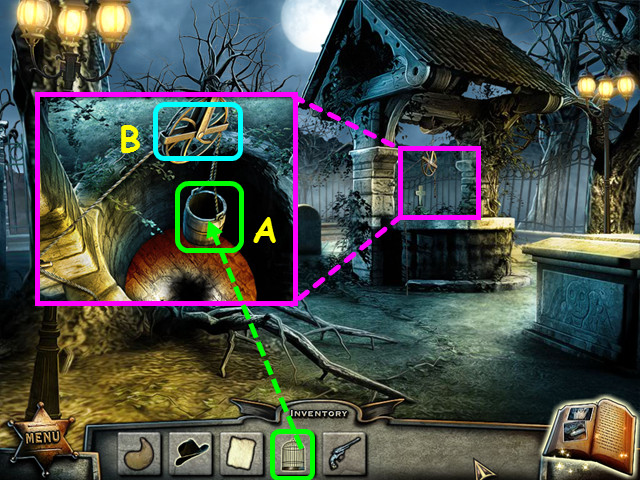
 • Look at the well and use the OIL CAN on the pulley. • Pull
up the bucket and take the GARDEN SHEARS (R). • Use the GARDEN
SHEARS to remove the vines from the barrel (S). • Look at the
barrel and remove the lid. • Pour the BAG OF SULFUR and the
BUCKET OF CHARCOAL into the barrel (T). • Use the MIXING SPOON
on the mixture then replace the lid. • Place the FUSE on the
lid, then take the BLASTING POWDER. • Walk down 3 times to the
crossroads, then walk up the left and go forward to the mine
entrance.
• Look at the well and use the OIL CAN on the pulley. • Pull
up the bucket and take the GARDEN SHEARS (R). • Use the GARDEN
SHEARS to remove the vines from the barrel (S). • Look at the
barrel and remove the lid. • Pour the BAG OF SULFUR and the
BUCKET OF CHARCOAL into the barrel (T). • Use the MIXING SPOON
on the mixture then replace the lid. • Place the FUSE on the
lid, then take the BLASTING POWDER. • Walk down 3 times to the
crossroads, then walk up the left and go forward to the mine
entrance.
 • Place the BLASTING POWDER in front of the mine entrance,
then use the MATCHES to light the fuse (U). • Enter the mine.
• Place the BLASTING POWDER in front of the mine entrance,
then use the MATCHES to light the fuse (U). • Enter the mine.
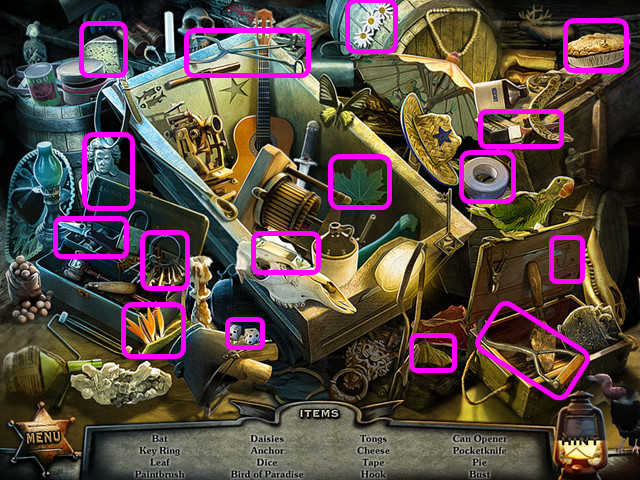
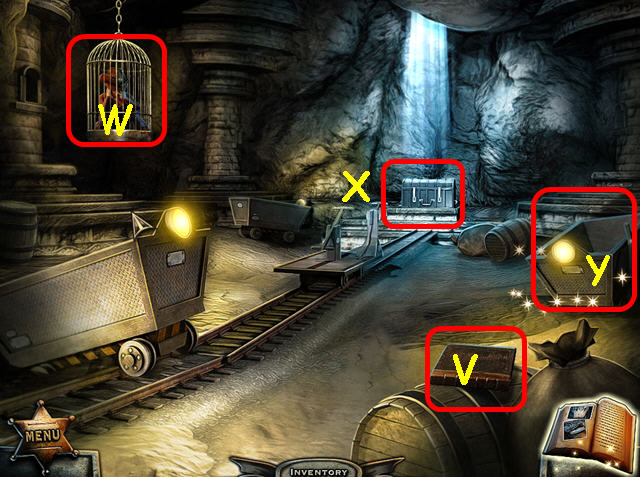 • Take the 2/3 LIBRARY BOOK (V). • Talk to Billy in the cage
(W). • Note the chest (X). • Select the mine cart for a HOS
(Y).
• Take the 2/3 LIBRARY BOOK (V). • Talk to Billy in the cage
(W). • Note the chest (X). • Select the mine cart for a HOS
(Y).
 • Locate all the items on the list. • You will earn the GATE
HANDLE. • Return to the cemetery and use the GATE HANDLE on
the gate for a mini-game.
• Locate all the items on the list. • You will earn the GATE
HANDLE. • Return to the cemetery and use the GATE HANDLE on
the gate for a mini-game.
 • Restore the picture by dragging jigsaw pieces into position.
• Pieces will lock in place when correct (Z). • Walk forward
through the gate.
• Restore the picture by dragging jigsaw pieces into position.
• Pieces will lock in place when correct (Z). • Walk forward
through the gate.
 • Move the coffin lid and take the 3/3 LIBRARY BOOK (1). •
Shoo away the vultures and look in the grave. Take the SPIKE
(2). • Walk down, then go to the left to the well area. Tale
the 5/6 BONE from the vulture (3). • Walk down twice to the
front of the Undertaker's and take the 1/6 BONE from the
vulture (4). • Walk down, to the left, then go forward to the
mine entrance.
• Move the coffin lid and take the 3/3 LIBRARY BOOK (1). •
Shoo away the vultures and look in the grave. Take the SPIKE
(2). • Walk down, then go to the left to the well area. Tale
the 5/6 BONE from the vulture (3). • Walk down twice to the
front of the Undertaker's and take the 1/6 BONE from the
vulture (4). • Walk down, to the left, then go forward to the
mine entrance.
 • Take the 2/6 BONE from the vulture (5). • Walk forward 4
times to the gallows and take the 3/6 BONE from the vulture
(6). • Walk down 7 times to the Sheriff's; enter then go out
the back door. Take the 4/6 BONE from the vulture (7). • Enter
the Library and go down the stairs (8). • Select the drawers
on the left for a HOS.
• Take the 2/6 BONE from the vulture (5). • Walk forward 4
times to the gallows and take the 3/6 BONE from the vulture
(6). • Walk down 7 times to the Sheriff's; enter then go out
the back door. Take the 4/6 BONE from the vulture (7). • Enter
the Library and go down the stairs (8). • Select the drawers
on the left for a HOS.
 • Locate all the items on the list. • You will earn the
SLEDGEHAMMER. • Look at the bookshelf on the right for a
mini-game.
• Locate all the items on the list. • You will earn the
SLEDGEHAMMER. • Look at the bookshelf on the right for a
mini-game.
 • Place the 3 LIBRARY BOOKS on the shelf to trigger the
mini-game. • You must select the books in the correct order.
If you make a wrong choice, you will hear glass breaking and
have to start over. • Press the books in numerical order. •
Take BLACKBEARD'S CURSE. • Return to the cemetery.
• Place the 3 LIBRARY BOOKS on the shelf to trigger the
mini-game. • You must select the books in the correct order.
If you make a wrong choice, you will hear glass breaking and
have to start over. • Press the books in numerical order. •
Take BLACKBEARD'S CURSE. • Return to the cemetery.
 • Look at the large tomb on the right and place the SPIKE into
the crack (A). • Use the SLEDGE HAMMER on the spike (B). •
Enter the tomb.
• Look at the large tomb on the right and place the SPIKE into
the crack (A). • Use the SLEDGE HAMMER on the spike (B). •
Enter the tomb.
 • Move the barrel on the right and take the LOCKPICK (C). •
Take the TORCH from the left wall (D). • Note the floor grate
(E). • Note the gate with the broken lever in back (F). •
Return to the mine.
• Move the barrel on the right and take the LOCKPICK (C). •
Take the TORCH from the left wall (D). • Note the floor grate
(E). • Note the gate with the broken lever in back (F). •
Return to the mine.
 • Look at the cage and use the LOCKPICK to free Billy (G). •
Billy will give you a MAGNET. • Select the mine cart for a HOS
(I).
• Look at the cage and use the LOCKPICK to free Billy (G). •
Billy will give you a MAGNET. • Select the mine cart for a HOS
(I).
 • Locate all the items on the list. • You will earn the TAPE.
• Return to the underground tomb.
• Locate all the items on the list. • You will earn the TAPE.
• Return to the underground tomb.
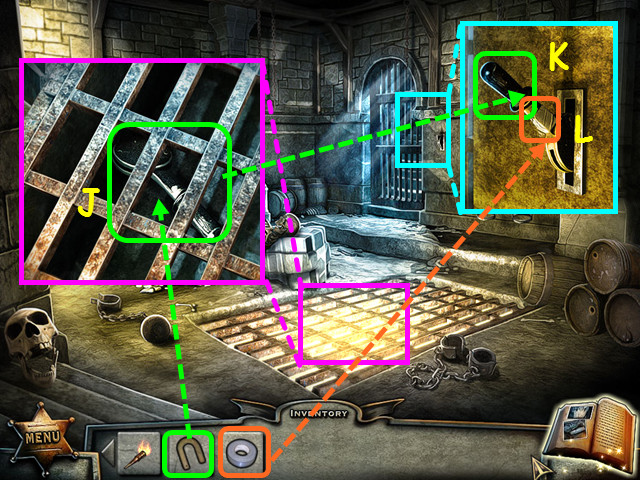 • Look at the floor grate and use the MAGNET to retrieve the
LEVER (J). • Look at the gate in the back and use the LEVER on
the broken lever (K). • Use the TAPE to secure the lever and
pull it open (L). • Walk forward.
• Look at the floor grate and use the MAGNET to retrieve the
LEVER (J). • Look at the gate in the back and use the LEVER on
the broken lever (K). • Use the TAPE to secure the lever and
pull it open (L). • Walk forward.
 • Use the TORCH to light the candles (M). • Take the 6/6 BONE
from the vulture (N). • Look at the altar and take the SHOVEL
(O). • Take a LIT CANDLE (P). • Walk down twice, then go
forward twice to Blackjack's coffin.
• Use the TORCH to light the candles (M). • Take the 6/6 BONE
from the vulture (N). • Look at the altar and take the SHOVEL
(O). • Take a LIT CANDLE (P). • Walk down twice, then go
forward twice to Blackjack's coffin.
 • Look inside the coffin and place the 6 BONES inside (Q). •
Take the TREASURE CHEST KEY that appears (R). • Place the
coffin lid on the coffin (S), then take the BOLTCUTTERS (T). •
Return to the mine and go inside.
• Look inside the coffin and place the 6 BONES inside (Q). •
Take the TREASURE CHEST KEY that appears (R). • Place the
coffin lid on the coffin (S), then take the BOLTCUTTERS (T). •
Return to the mine and go inside.
 • Look at the CAGE and use the BOLTCUTTERS to cut it down (U).
• Look at the chest and place the TREASURE CHEST KEY into the
top (V). • This will trigger a mini-game.
• Look at the CAGE and use the BOLTCUTTERS to cut it down (U).
• Look at the chest and place the TREASURE CHEST KEY into the
top (V). • This will trigger a mini-game.
 • Drag the columns and rows to restore the picture (W). • Take
the SIX-SHOOTER from inside the chest. • Return to the well
area.
• Drag the columns and rows to restore the picture (W). • Take
the SIX-SHOOTER from inside the chest. • Return to the well
area.
 • Look in the well and replace the bucket with the CAGE (A). •
Lower the cage down to trap Blackjack (B). • Exit the well
area and select the coffin for a HOS.
• Look in the well and replace the bucket with the CAGE (A). •
Lower the cage down to trap Blackjack (B). • Exit the well
area and select the coffin for a HOS.
 • Locate all the items in the list. • You will earn the
HAMMER. • Return to Blackjack's grave.
• Locate all the items in the list. • You will earn the
HAMMER. • Return to Blackjack's grave.
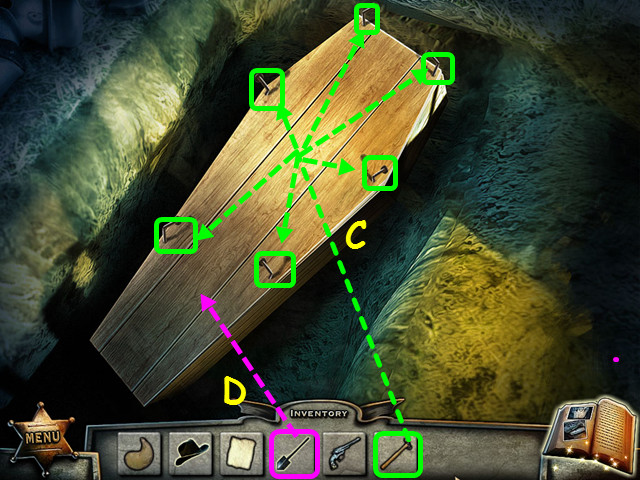 • Look at the coffin and use the HAMMER on the 6 nails (C). •
Use the SHOVEL on the coffin to finish burying the coffin (D).
• Return to the underground tomb and walk forward to the
altar.
• Look at the coffin and use the HAMMER on the 6 nails (C). •
Use the SHOVEL on the coffin to finish burying the coffin (D).
• Return to the underground tomb and walk forward to the
altar.
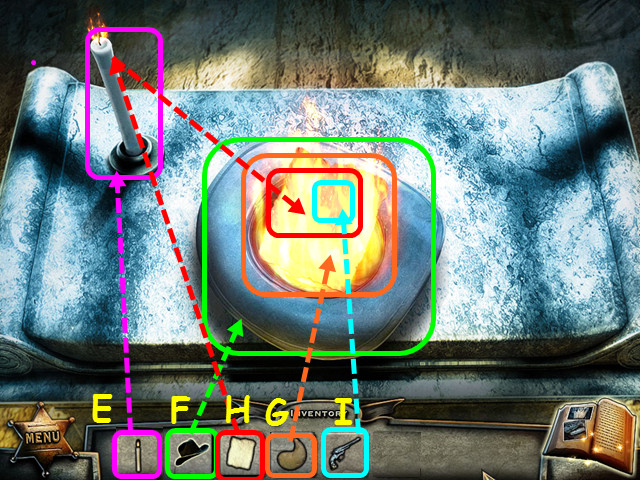 • Look at the altar and place the candle in the hole (E). •
Place BLACKJACK'S HAT (F) on the altar, then pour the WHISKEY
inside (G). • Use BLACKJACK'S CURSE on the candle, then on the
hat (H). • Place the SIX-SHOOTER inside the hat (I).
• Look at the altar and place the candle in the hole (E). •
Place BLACKJACK'S HAT (F) on the altar, then pour the WHISKEY
inside (G). • Use BLACKJACK'S CURSE on the candle, then on the
hat (H). • Place the SIX-SHOOTER inside the hat (I).
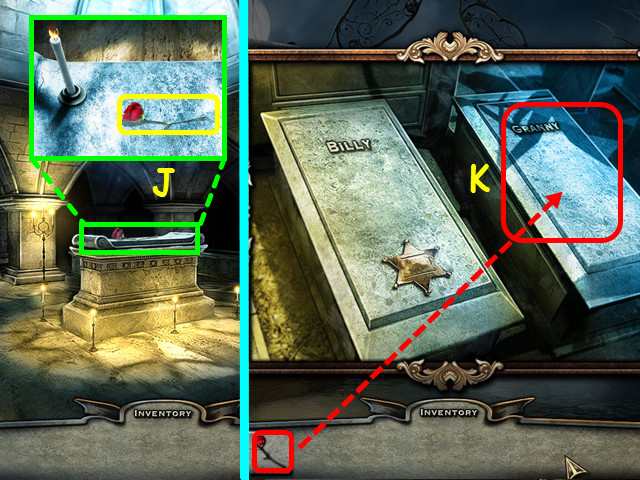 • After the cut-scene, take the ROSE from the altar (J). •
Walk to Billy and Granny's graves. • Place the ROSE on
Granny's grave (K). • Congratulations! You have completed
Ghost Encounters: Deadwood!
• After the cut-scene, take the ROSE from the altar (J). •
Walk to Billy and Granny's graves. • Place the ROSE on
Granny's grave (K). • Congratulations! You have completed
Ghost Encounters: Deadwood!
Created at: 2012-03-25