

Walkthrough Menu
- General Tips
- Chapter 1: Entering the School
- Chapter 2: The Abandoned Garden
- Chapter 3: Admin Building
- Chapter 4: The Cemetery
- Chapter 5: The Sanctuary
- Chapter 6: The Ancient Caves
- Chapter 7: School Library
- Chapter 8: Laboratory
- Chapter 9: The Island
General Tips
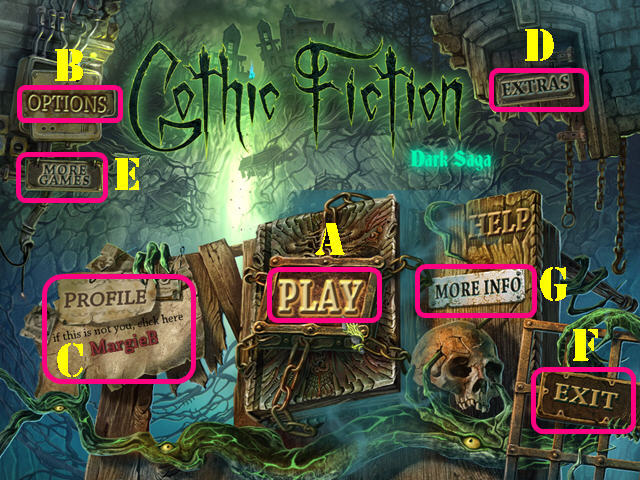
- This is the official guide for Gothic Fiction: Dark Saga Standard Edition.
- This is an Adventure Puzzle Game.
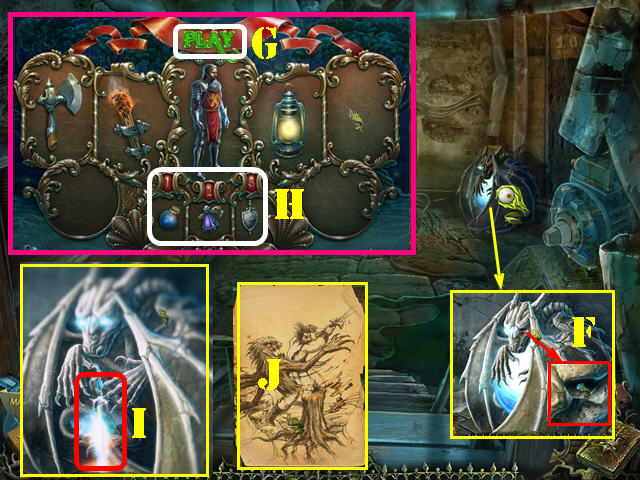
- Select 'Play' (A) to begin your adventure.
- The 'Options' (B) button allows you to adjust the screen, music, cursor, and sound.
- The 'if this is not you, click here' button (C) can be used to add or delete a player.
- The 'Extras' (D) button is only accessible during the Collector's Edition.
- Select 'More Games' (E) to view other titles by this developer. 'Exit' the game here (F). You can view the credits under 'More Info' (G).
- You can skip a puzzle once the 'SKIP' button fills.
- Click on the eye icon when it appears to take a closer look at a section, or to read information regarding the game.
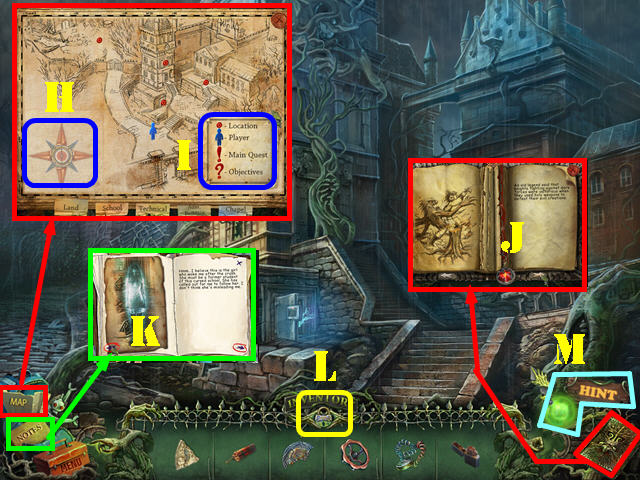
- Use the map to view locations, read objectives, and view quests. Press on the Blue Person Icon to view your current location. You can use the red arrows (H) on the compass to view different parts of the map.
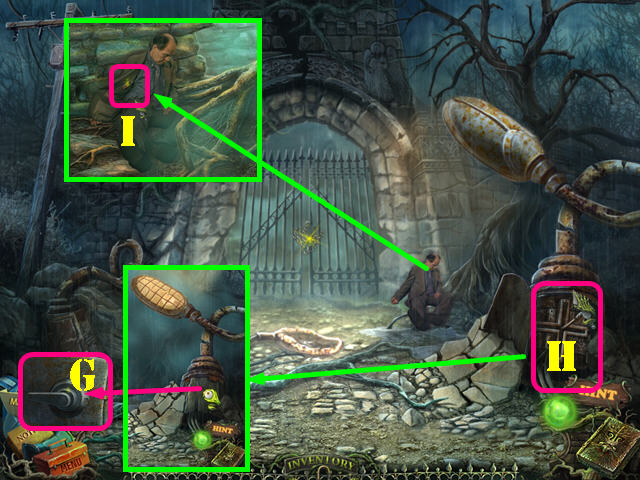
- Look at the legend to see what each icon represents (I).
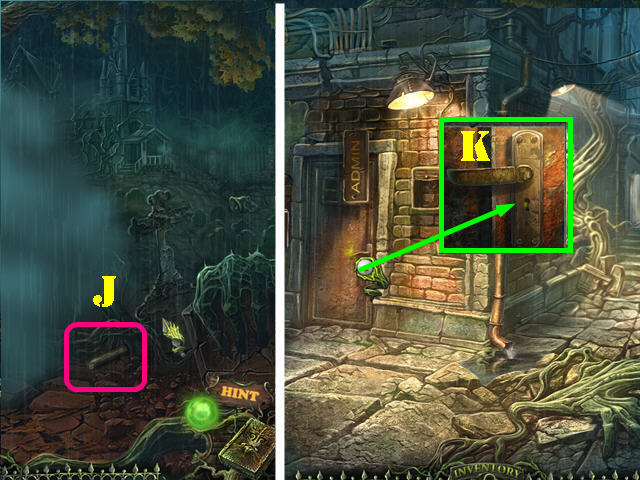
- You can read about the witch's story as it unfolds in the book (J). Pick up all the Book Pages found throughout the game to read the complete story.
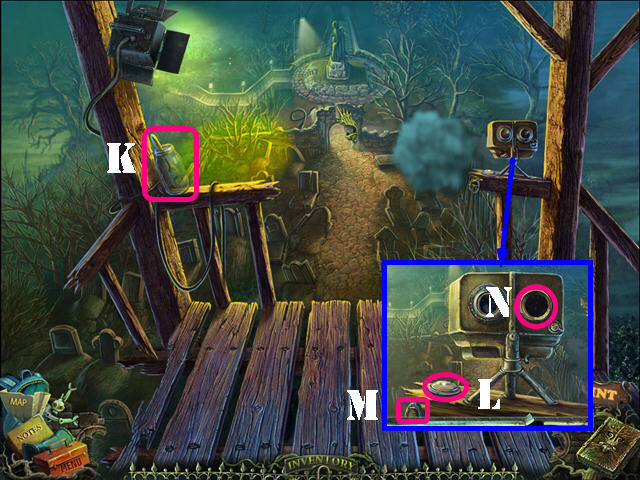
- Read the Notes to view the information you collect along the way (K).
- Use the portals to travel through locations quickly.
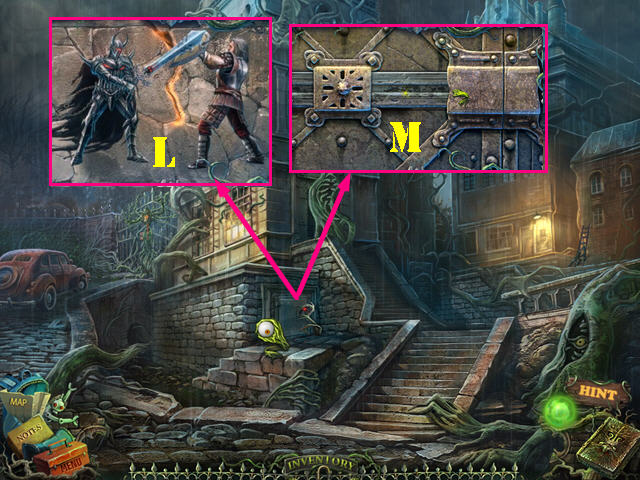
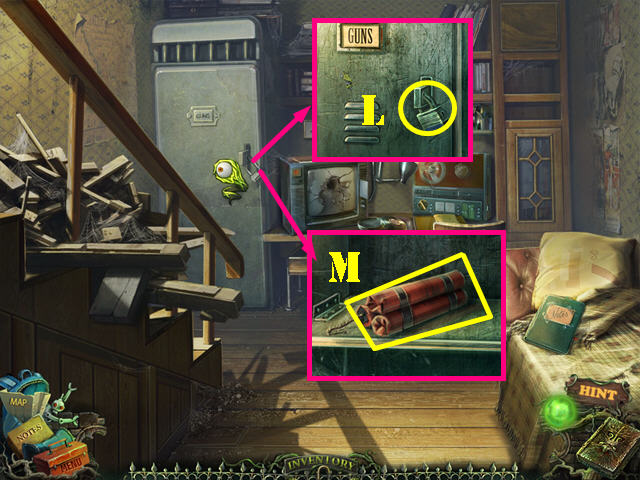
- Select the lock icon (L) to lock and unlock the inventory tray.
- Click on the Orb (M) in the lower right to obtain a Hint.
Chapter 1: Entering the School
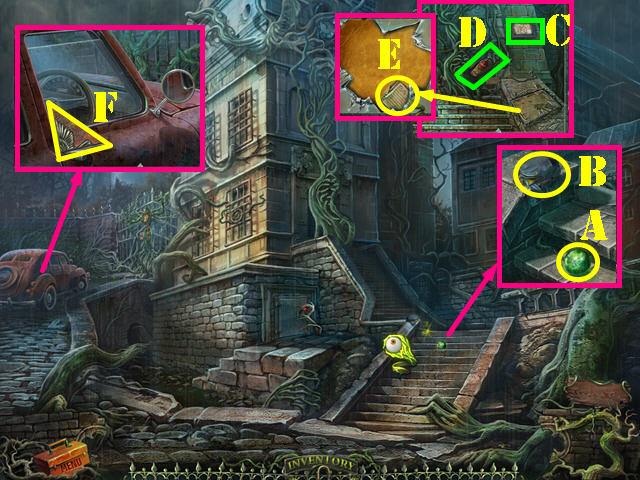
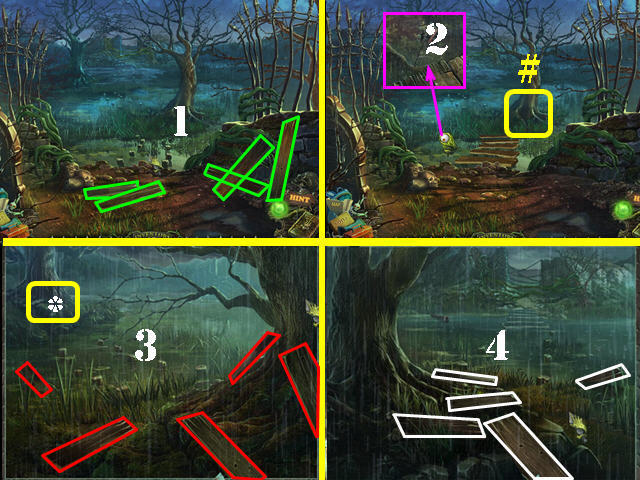
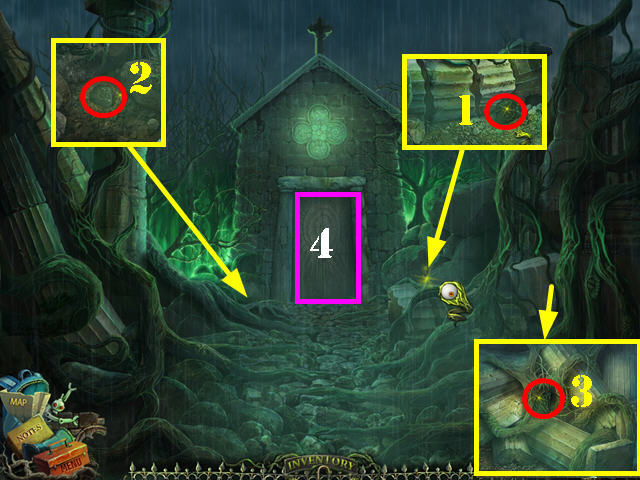
- Zoom into the steps; take the Orb (A) and the Backpack (B).
- Zoom into the other steps; take the Map (C).
- Take the EXTINGUISHER (D).
- Look at the broken glass and take the Note (E).
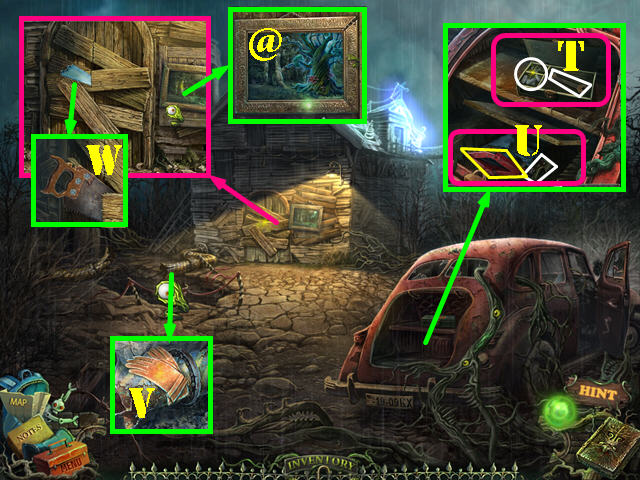
- Look at the car; take the PUZZLE PART (F).
- Go towards the admin building on the right.
- Talk to the man.
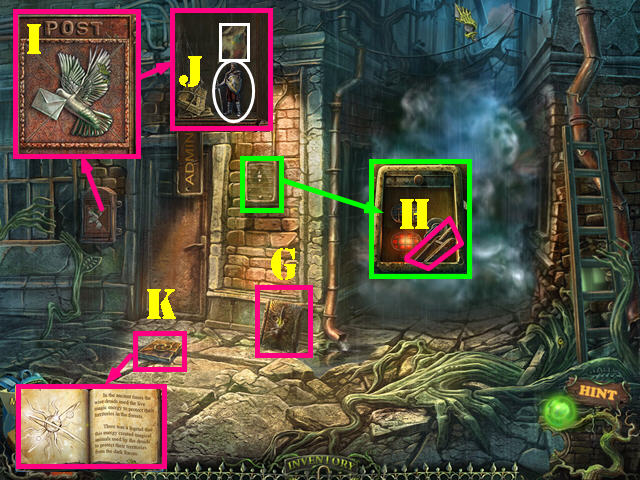
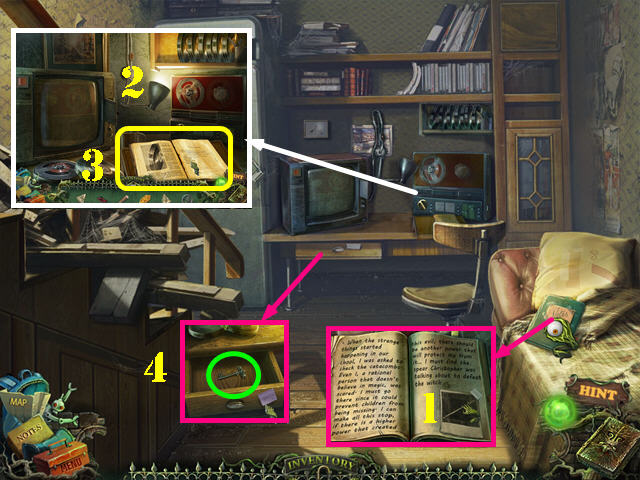
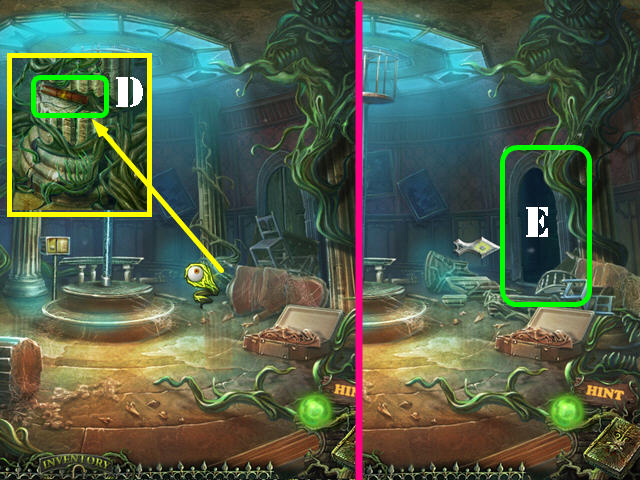
- Take the Book (G).
- Look at the power box; open it and take the SWITCH (H).
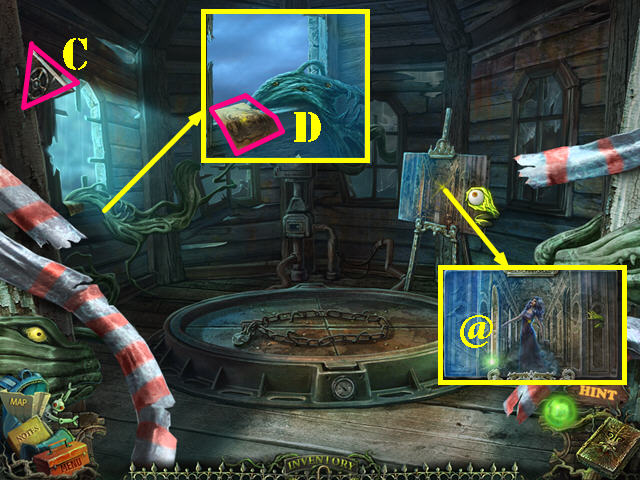
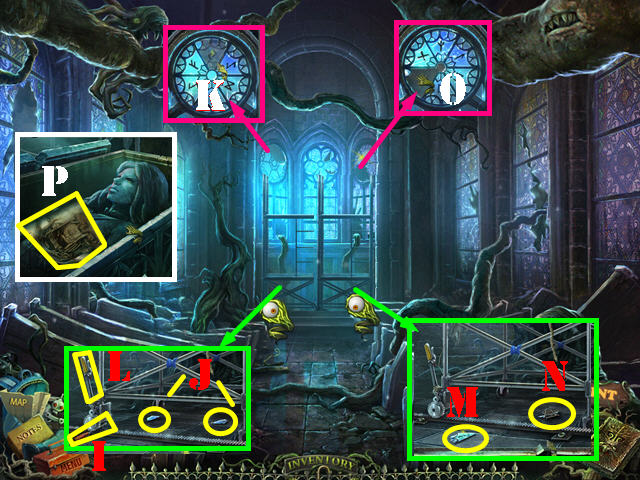
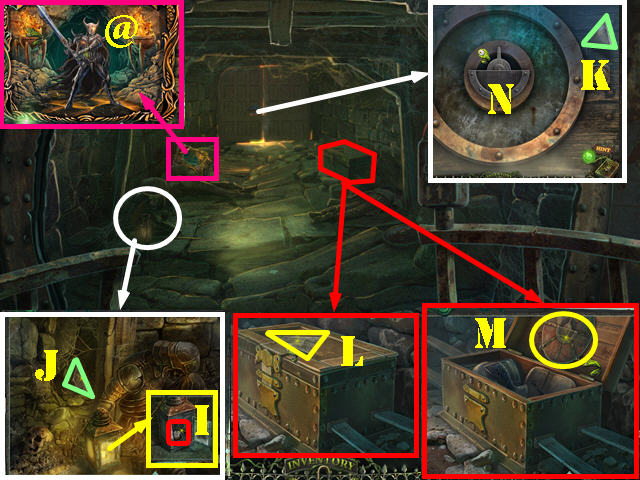
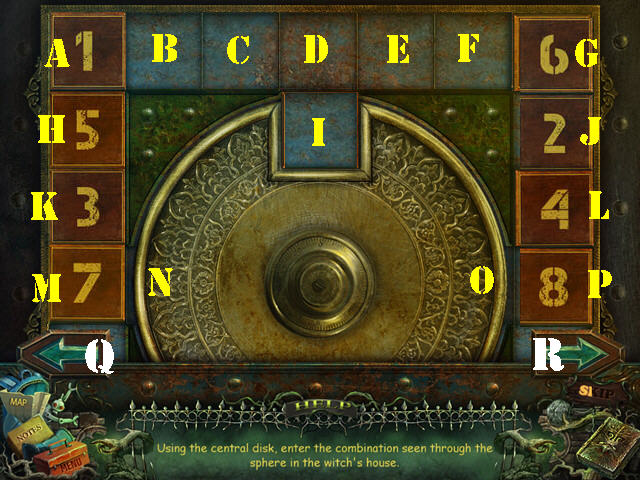
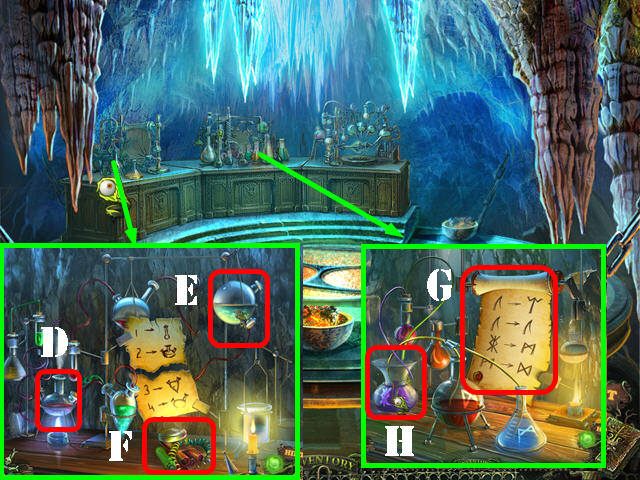
- Examine the mailbox; put the PUZZLE PART on it to activate a mini-puzzle. Swap the pieces to form this image (I).
- Take the KNIGHT and the PAPER 1/3 (J).
- Look at the notebook on the ground; flip the pages and take the Note (K).
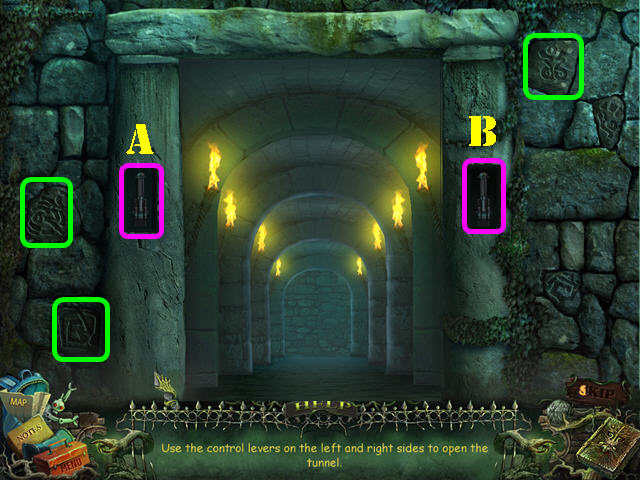
- Walk down.
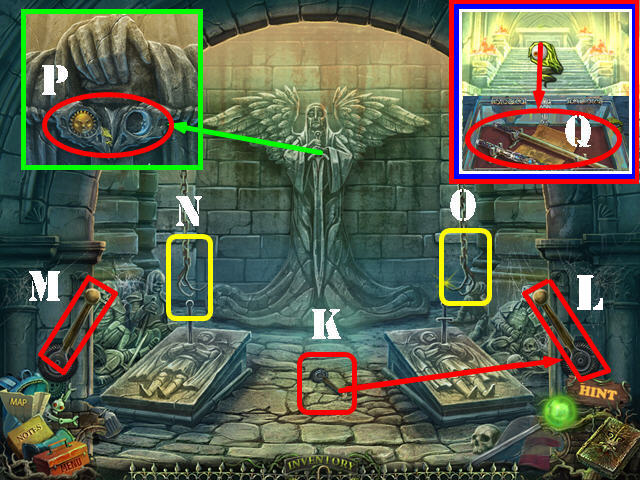
- Examine the basement door; put the KNIGHT on it (L).
- Open the latch and enter the basement (M).
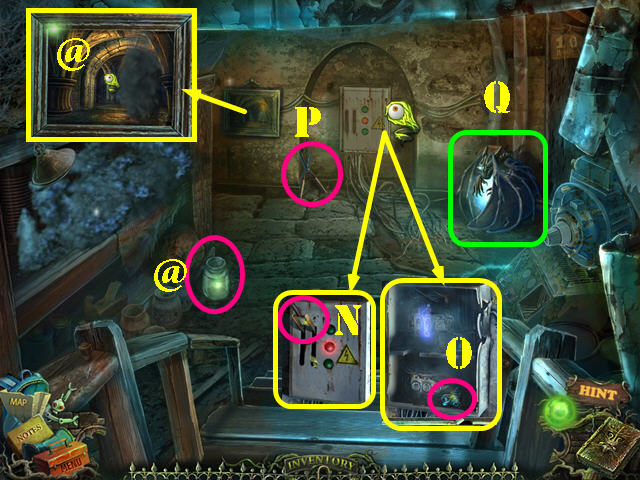
- Zoom into the power box; put the SWITCH on it and pull on the switch (N).
- Take the PUZZLE PART (O).
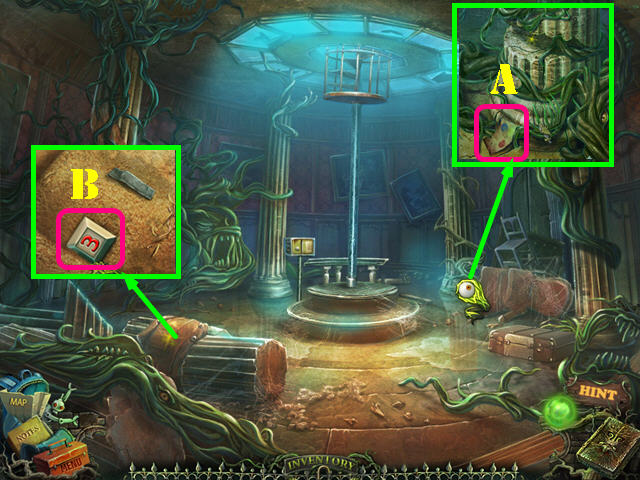
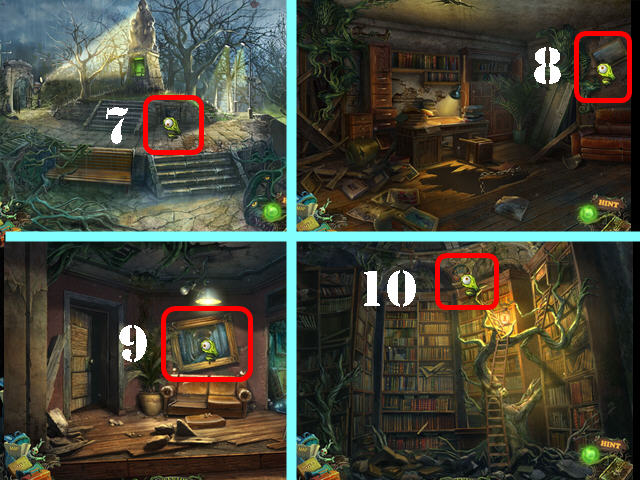
- Take the MYSTIC ENERGY 1/15 (@).
- Examine the painting; take the MYSTIC ENERGY 2/15 (@).
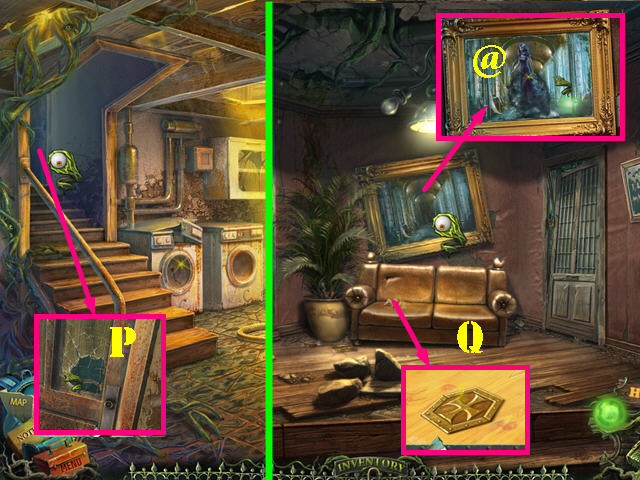
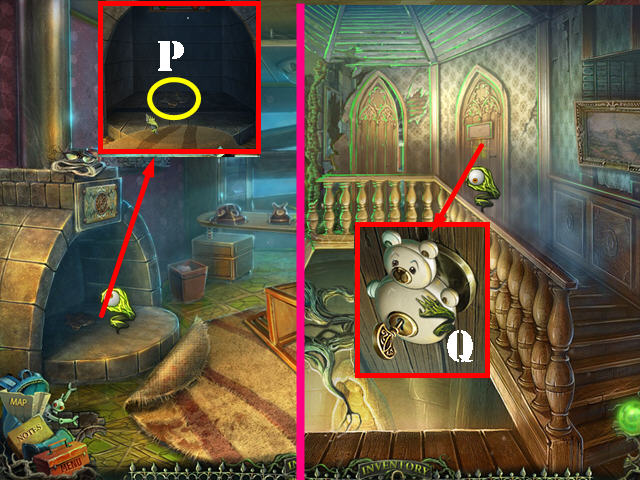
- Take the CLIPPERS (P).
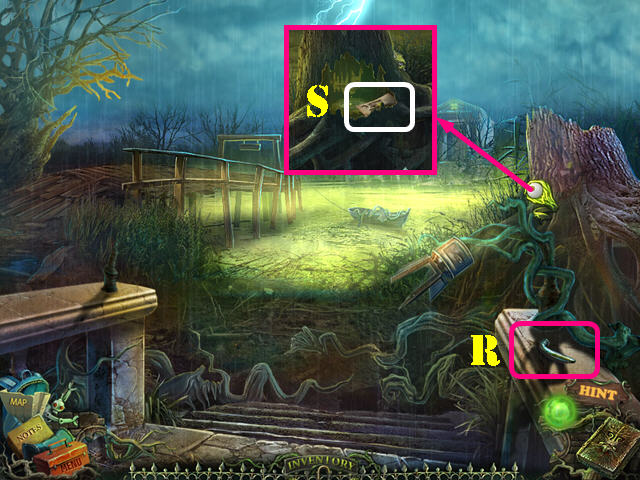
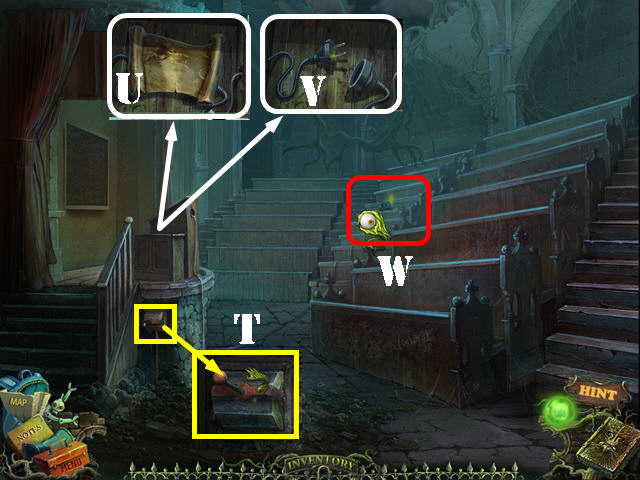
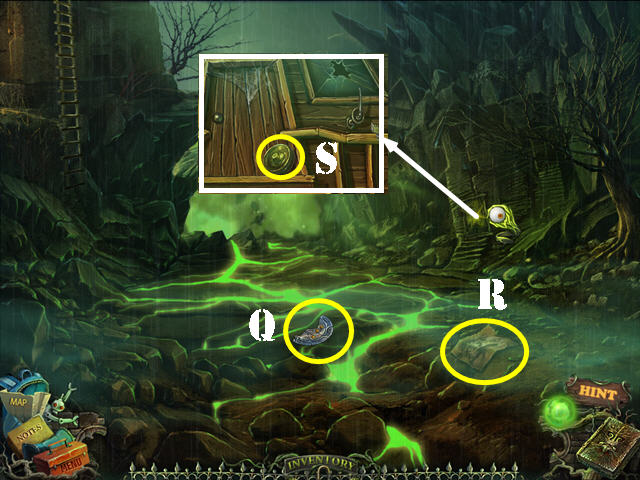
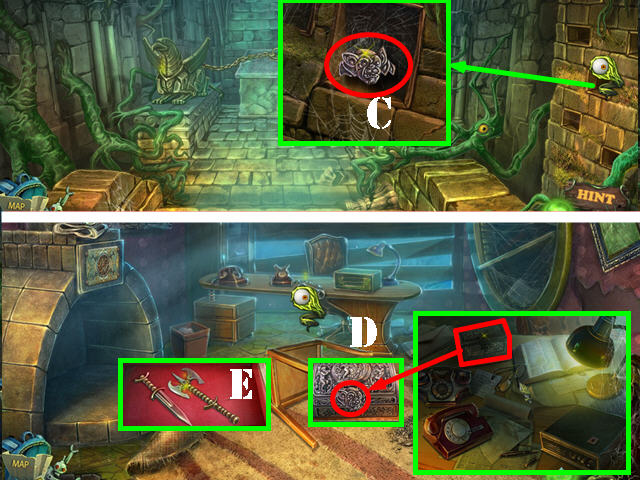
- Look at the gargoyle; it's missing an eye (Q).
- Return to the admin building entry.
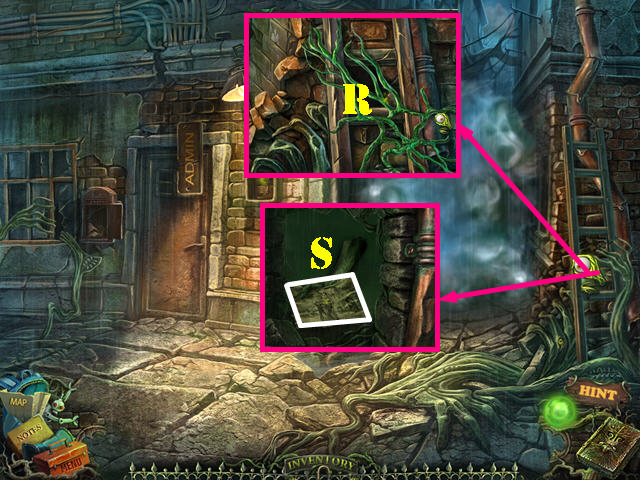
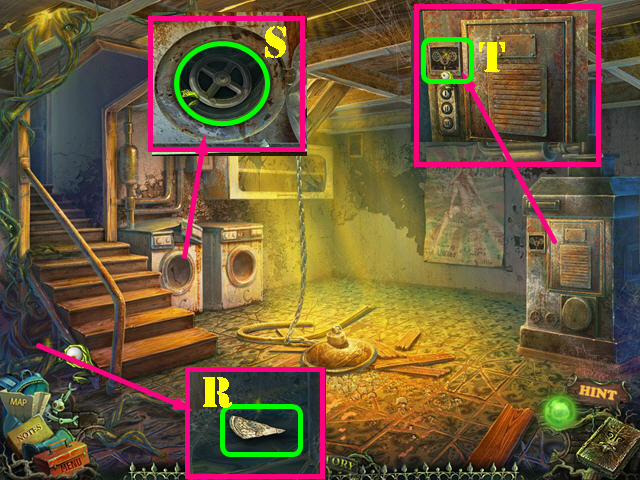
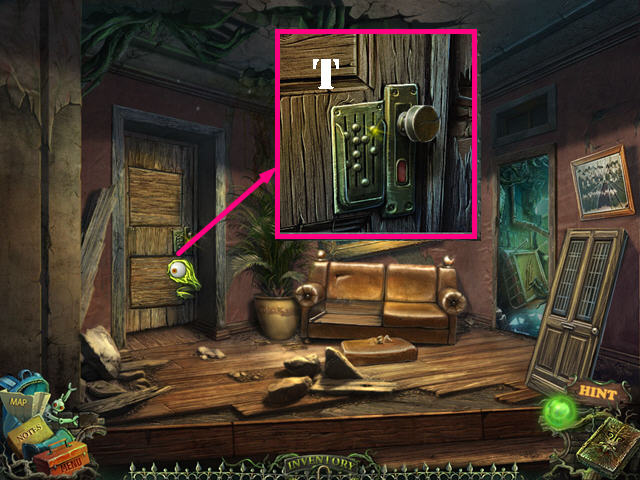
- Examine the ladder; cut the vines with the CLIPPERS and take the LADDER (R).
- Zoom into the hole in the brick wall and take the Book Page (S).
- Walk down.
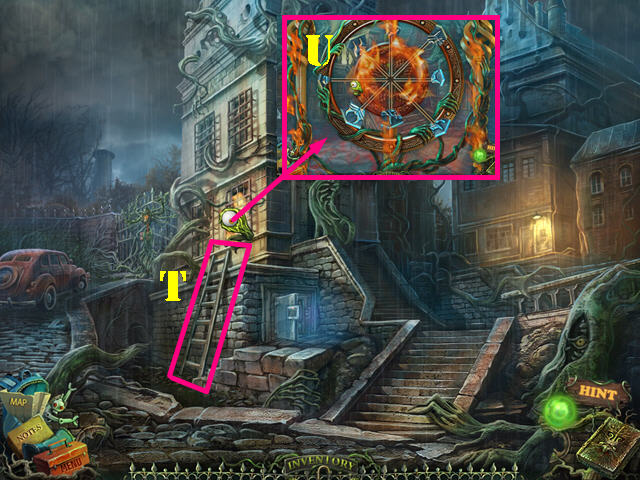
- Put the LADDER on the side of the building (T).
- Look in the window and use the EXTINGUISHER on the fire (U).
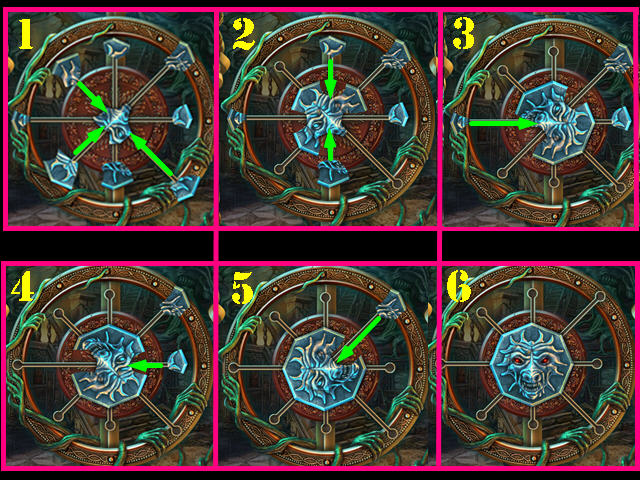
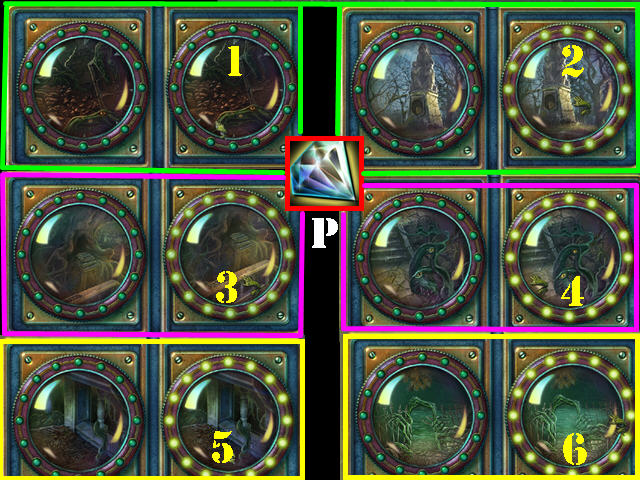
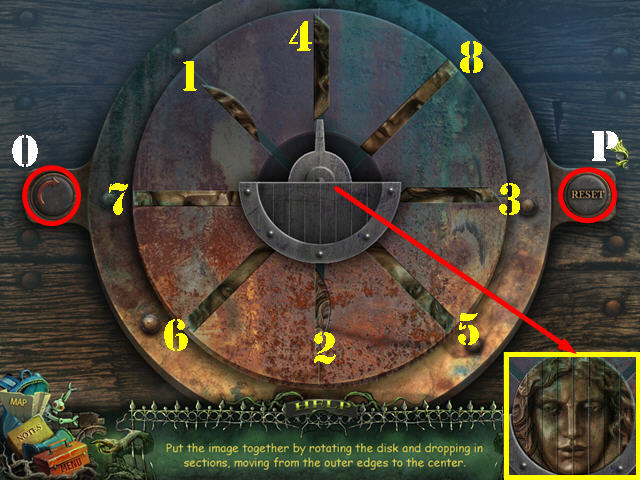
- Put the PUZZLE PART on the puzzle to activate it.
- Select the center piece to rotate it; push in the outer pieces into the right spots.
- Please look at the screenshot for the solution (1-6).
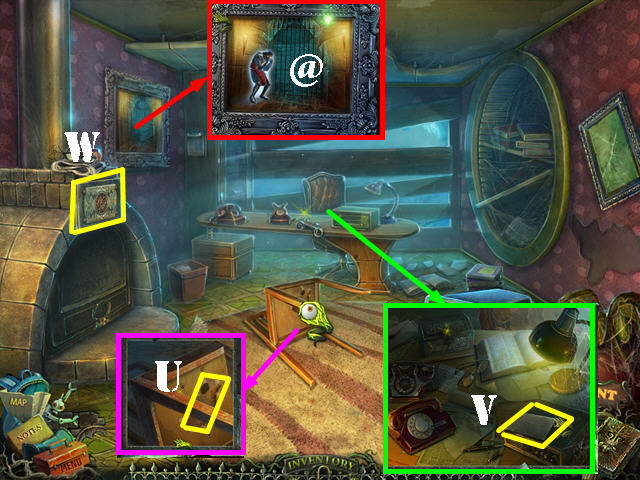
- Talk to the girl on the steps.
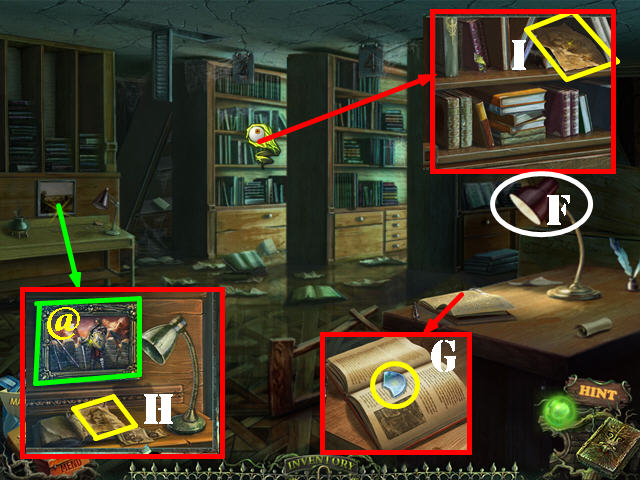
- Look at the left painting; take the MYSTIC ENERGY 3/15 (@).
- Look at the top right painting; take the MYSTIC ENERGY 4/15 (@).
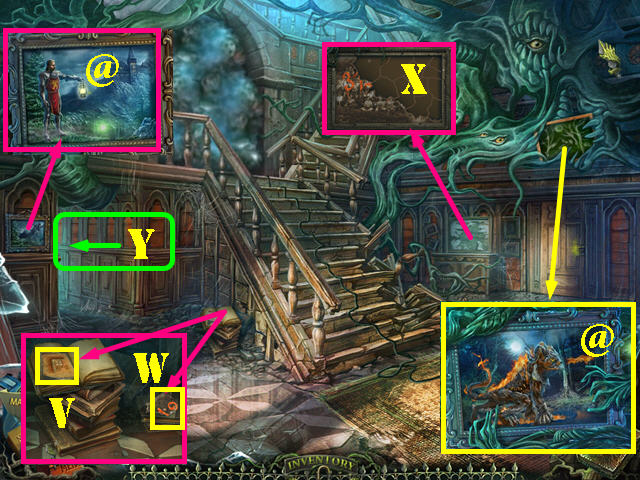
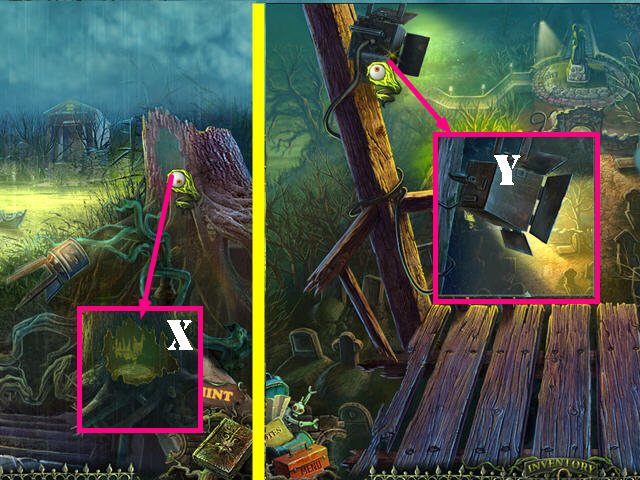
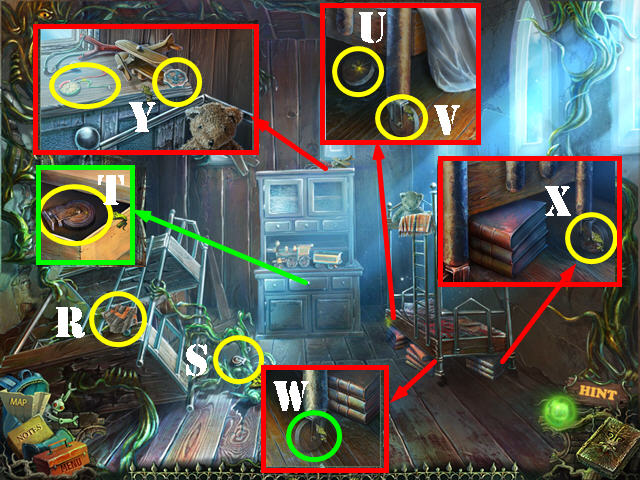
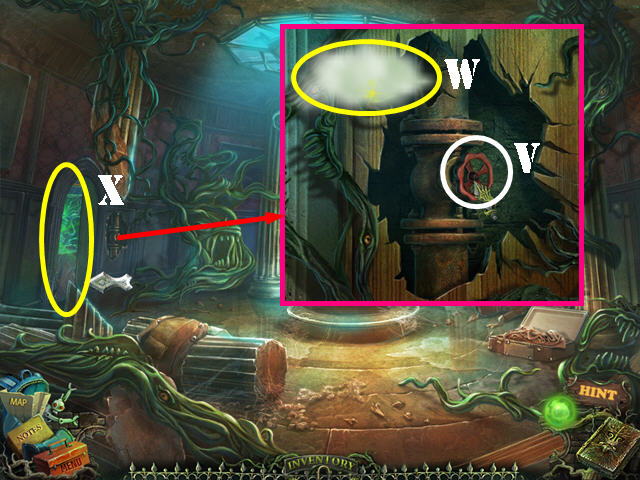
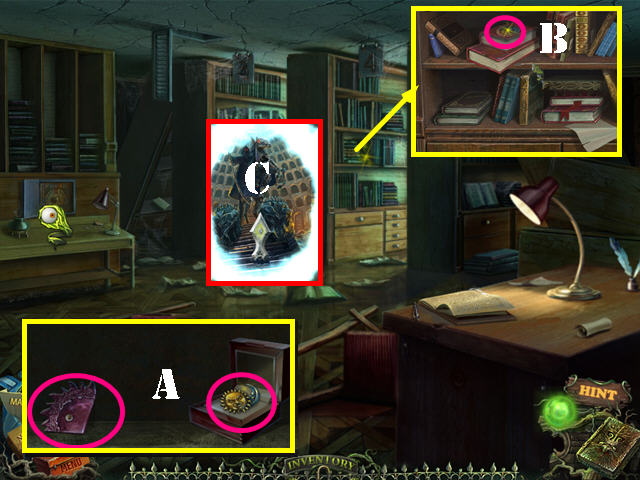
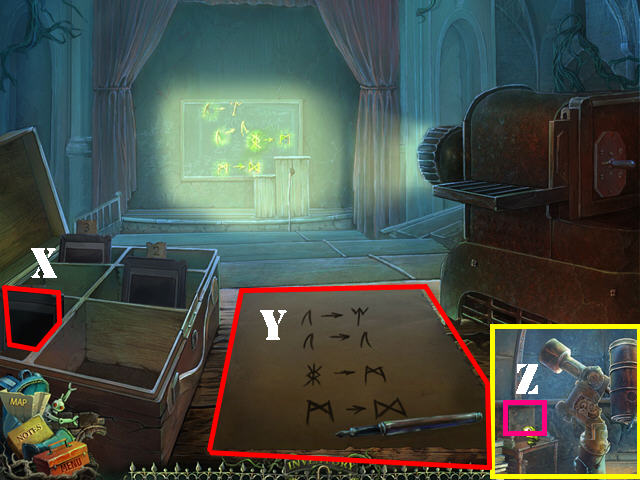
- Look at the stack of books; take the CODE (V) and the PIECE OF PHOTO 1/5 (W).
- Note the incomplete picture in the back; you need to find all the pieces (X).
- Go left (Y).
- Talk to the girl sitting down and then to her again in the cage.
- Examine the bottom of the column; take the PAPER 2/3 (A).
- Examine the column; open the flap and take the BUTTON (B).
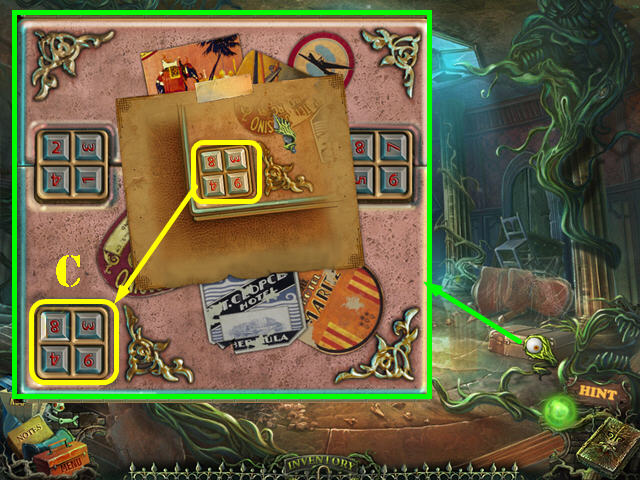
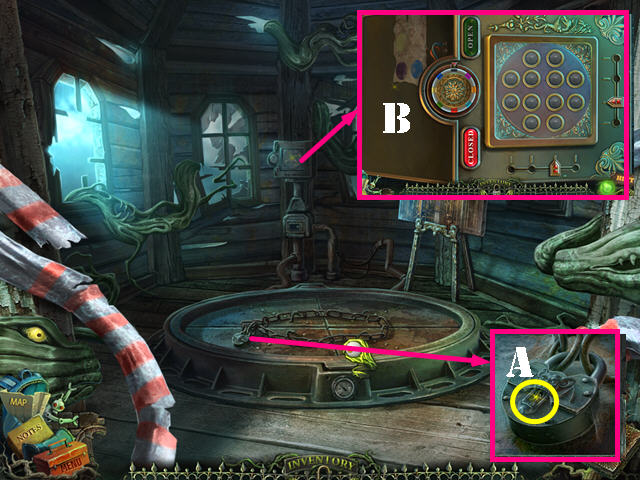
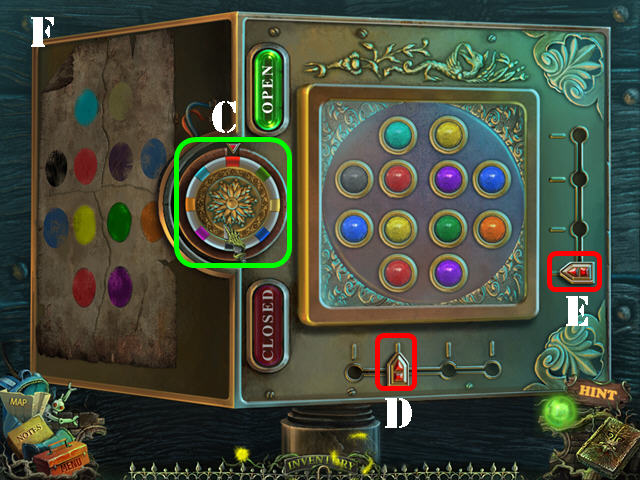
- Look at the suitcase; put the CODE on it and the BUTTON in the empty slot to activate a puzzle.
- Press the buttons in the lower right until they resemble the numbers on the code (C).

- Another puzzle will immediately follow.
- Move the numbers to the correct spots; once a number is in the right spot, it will depress on one of the buttons.
- Please look at the screenshot for the solution (D). Note: some numbers may have to move over the same spot more than once.
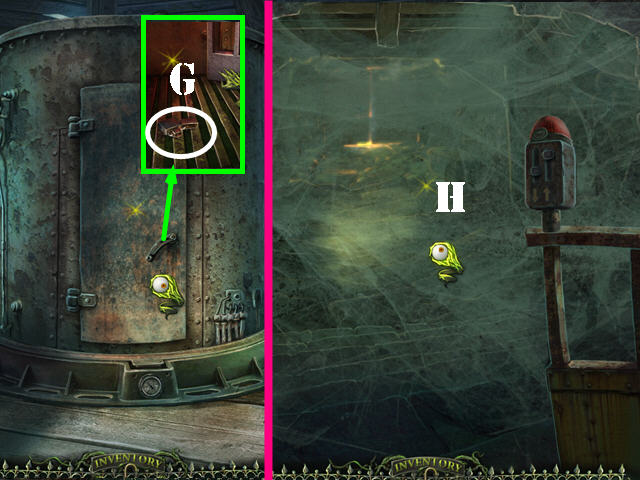
- Look in the suitcase again; take the Book Page and the GARGOYLE EYE (E).
Chapter 2: The Abandoned Garden
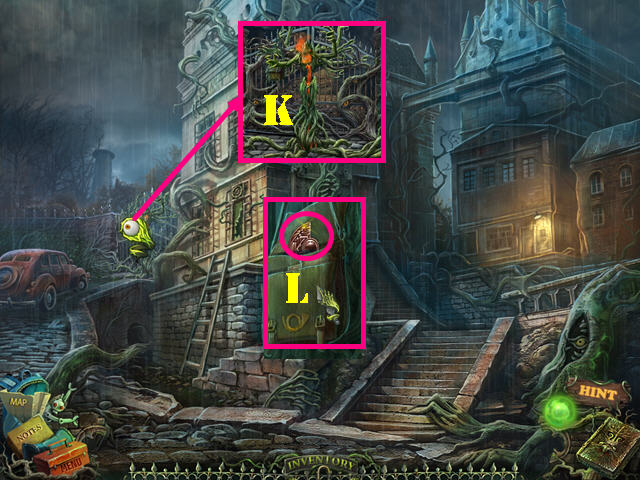
- Return to the basement.
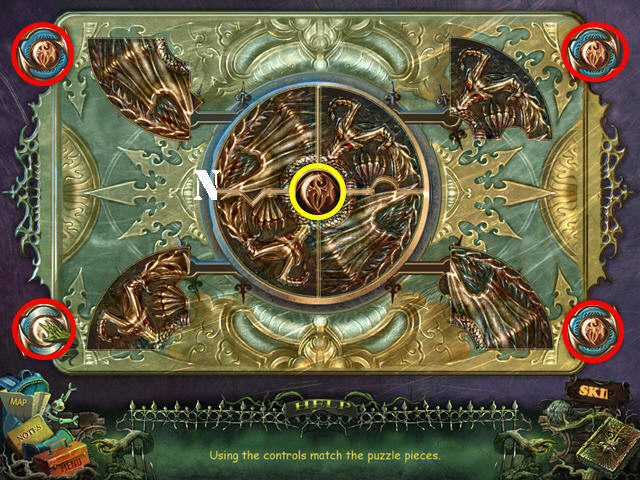
- Zoom into the gargoyle and then to its eye; put the GARGOYLE EYE in the socket to activate a puzzle (F).
- Help the knight defeat the witch's minions. Select any 3 items to add them to the bottom slots; then press Play (G) to view your selections.
- Place the Magic Fireflies, Mouse Potion, and the Shield and Sword into the slots (H) and then press Play.
- Take the SWORD OF STRENGTH (I) and the Book Page (J).
- Walk down.
- Zoom into the gate; you need something to defeat the monster. Zoom back into the gate; use the SWORD OF STRENGTH to defeat the monstrous plant (K).
- Zoom into the gate once more; open the bag and take the MEDALLION PIECE (L).
- Return to the basement.
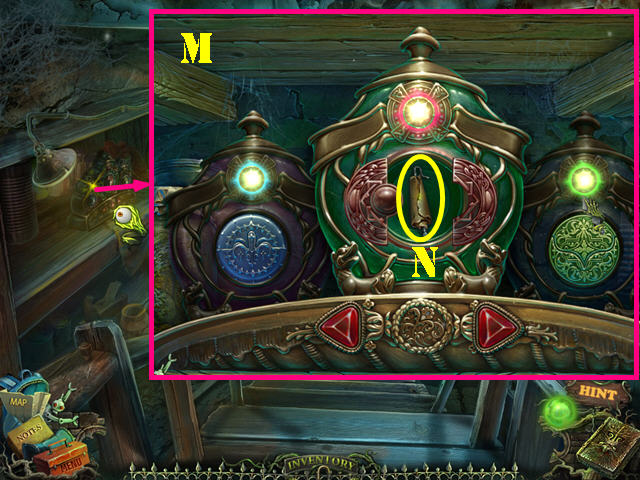
- Examine the shelf; put the MEDALLION PIECE in the slot to activate a puzzle.
- Drag the medallion pieces into the right spots. Once a piece is completed, press on the arrows to move another piece into the center.
- Please look at the screenshot for the solution (M).
- Take the note (N) and the HOOK below it.
- Walk down.
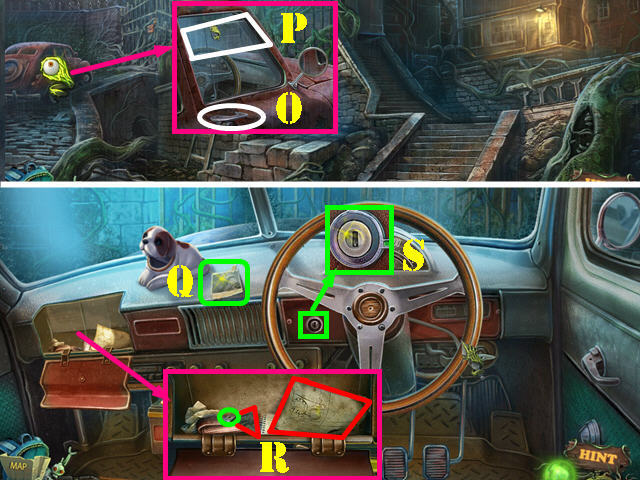
- Zoom into the car; try to press on the handle (O).
- Use the HOOK through the window to lift the latch, press on the handle (P) and enter the car.
- Take the note (Q).
- Open the glove compartment and look into it; take the first CAMEO PIECE, the Note, and the IGNITION KEY (R).
- Zoom into the ignition; insert the IGNITION KEY into it and turn the key (S).
- Exit the car on the right after it stops.
- Use the SWORD OF STRENGTH on the monstrous plant covering the car.
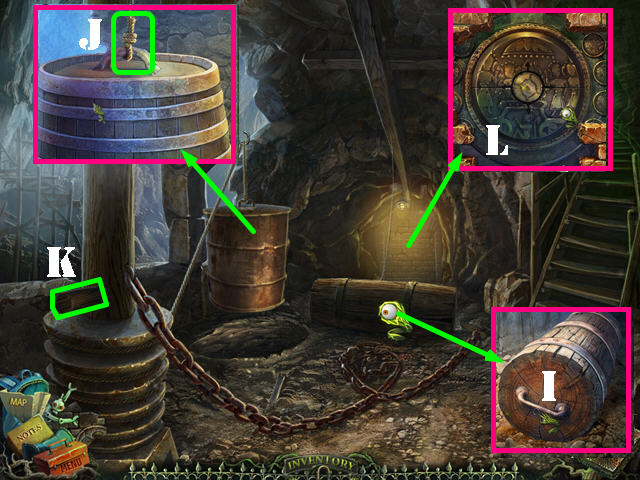
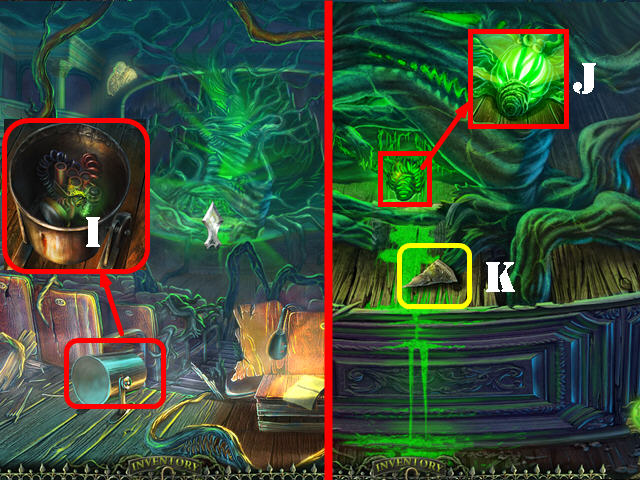
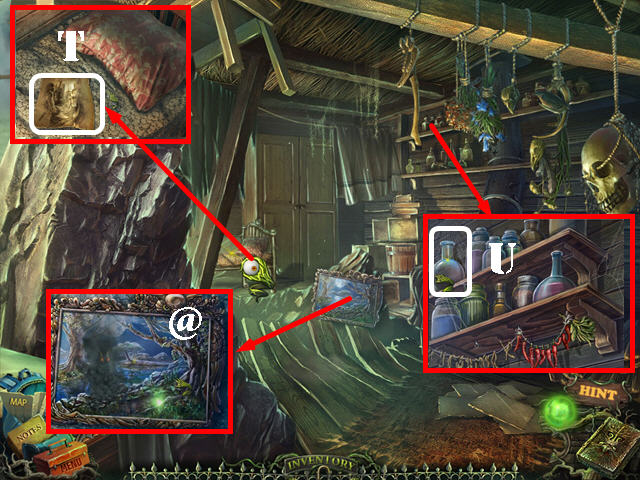
- Look in the trunk. Open the toolbox; take the WRENCH and the BOLTS (T).
- Lift the cover; take the JACK and the SAW HANDLE (U).
- Look in the hole; take the GLOVE (V).
- Look at the door; examine the painting and take the MYSTIC ENERGY 5/15 (@).
- Zoom into the saw blade. Put the SAW HANDLE on the blade; put the BOLTS on the handle and then use the WRENCH to fasten the bolts (W).
- Touch the saw and go through the door.
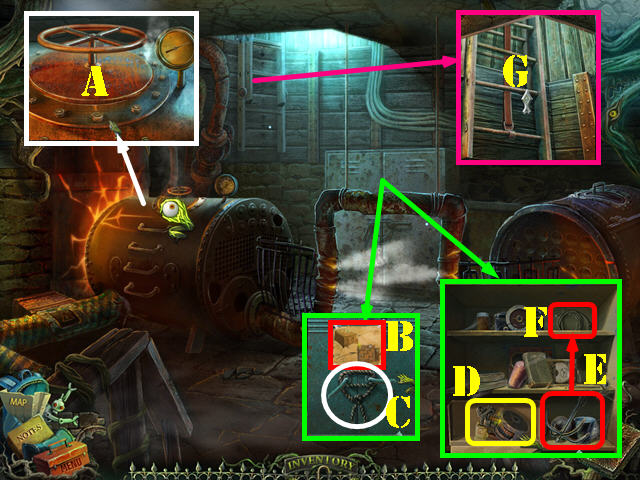
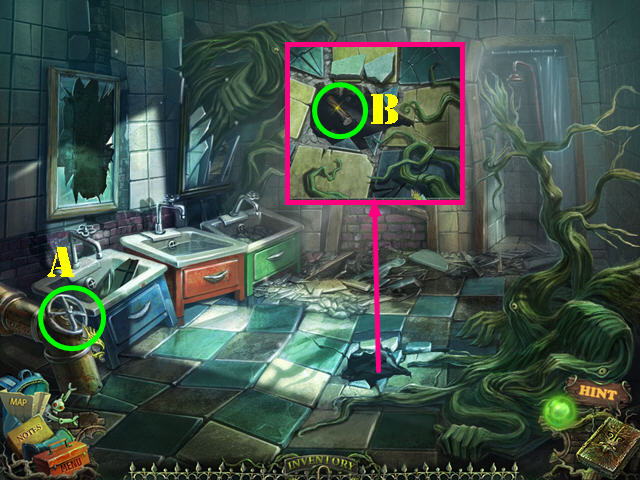
- Take a closer look at the boiler; use the GLOVE on the handle (A).
- Examine the locker and take the Note (B).
- Cut the rope with the CLIPPERS (C).
- Open the locker doors; open the box and take the NAIL GUN (D).
- Drag the hook (E) over to the rope (F) to get the GRAPPLING HOOK.
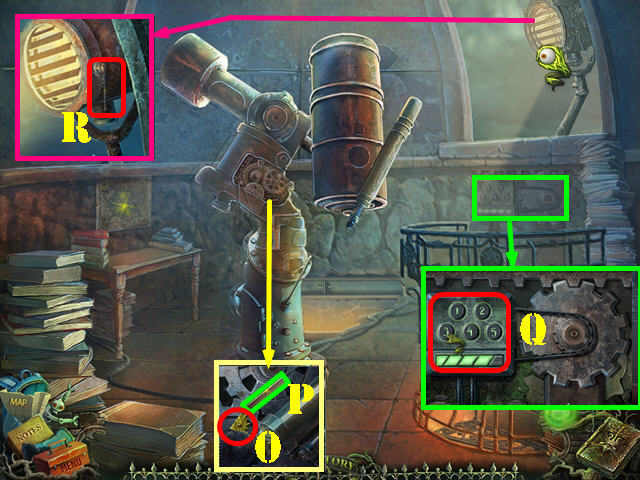
- Look at the ladder; put the GRAPPLING HOOK on it and go up the ladder (G).
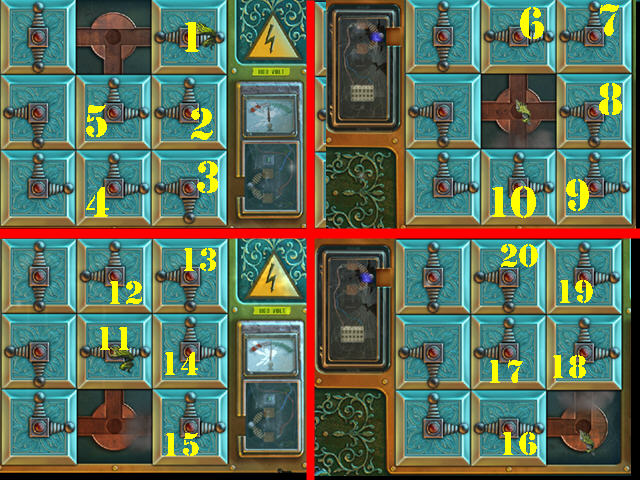
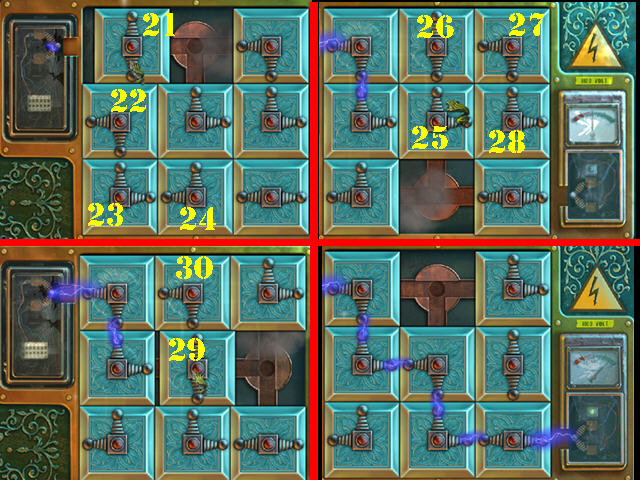
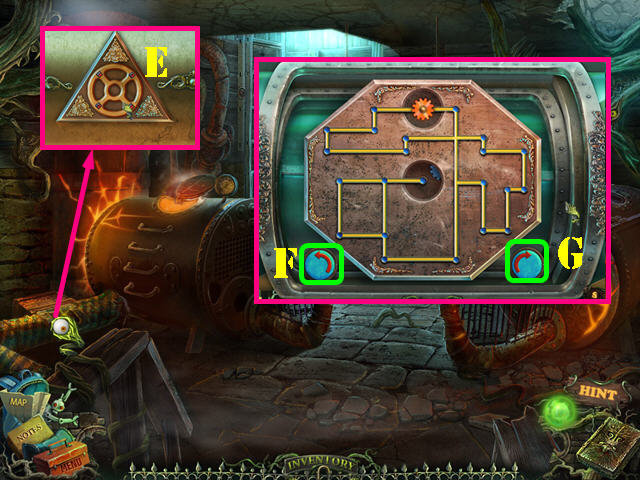
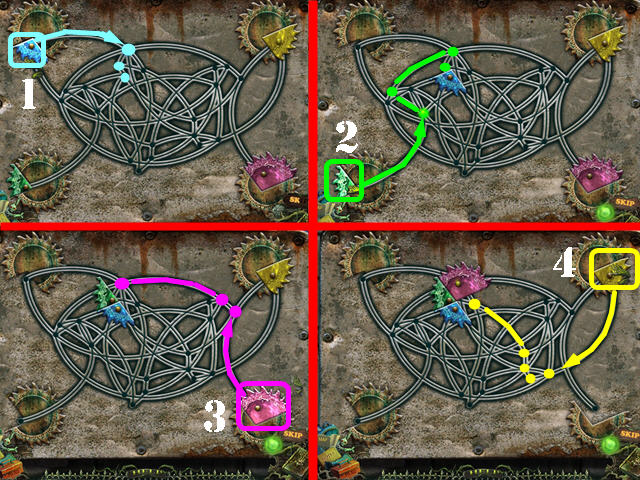
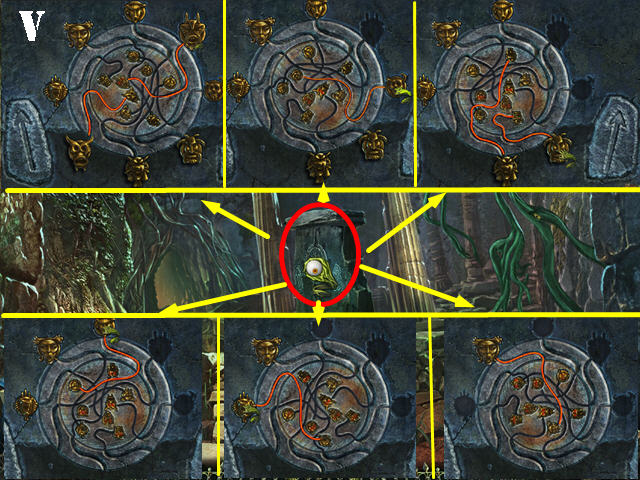
- Inspect the generator to activate a puzzle.
- Move the blocks to the correct positions so you can form a connection between the 2 connectors.
- Please look at the screenshot for the solution and press on the blocks in the order shown (1-29).

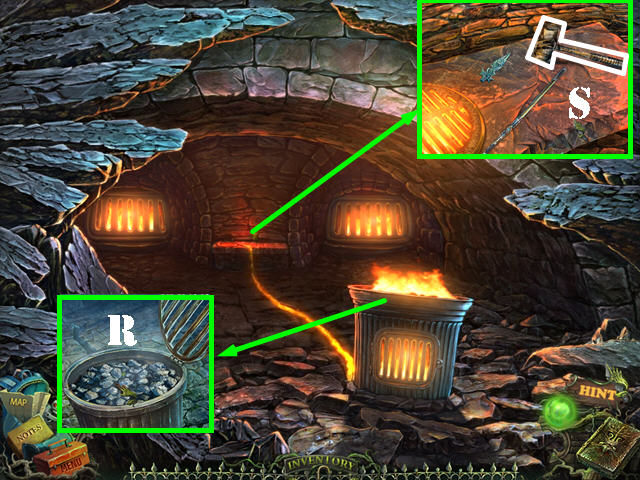
- Look at the ground; use the NAIL GUN on the vines (A).
- Go through the door (B) to reach the water tower.
- Tear both tape pieces blocking the scene.
- Take the TRIANGLE (C).
- Examine the painting; take the MYSTIC ENERGY 6/15 (@).
- Look at the window; take the Book Page (D).
- Return to the boiler room.
- Look at the pipe; insert the TRIANGLE in it to activate a puzzle (E).
- To solve the puzzle, press on the arrows in this order: F and G x 4.
- Walk down.

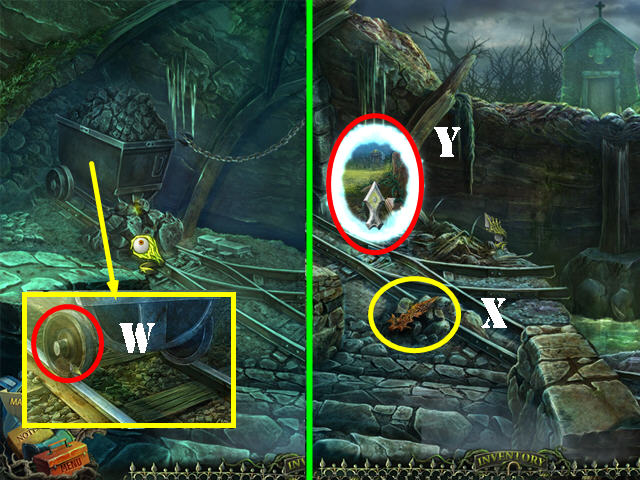
- Look at the hole in the ground; take the METAL BULB (H).
- Return to the generator room.
- Zoom into the device; put the METAL BULB on it and press on the handle (I).
- Look at the generator; and press the knob (J).
- Look at the power box and flip the switch (K).
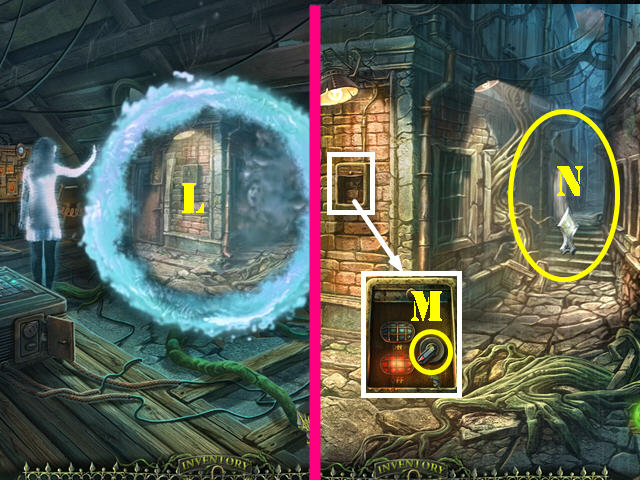
- Go through the portal (L).
- Zoom into the power box and flip the switch (M).
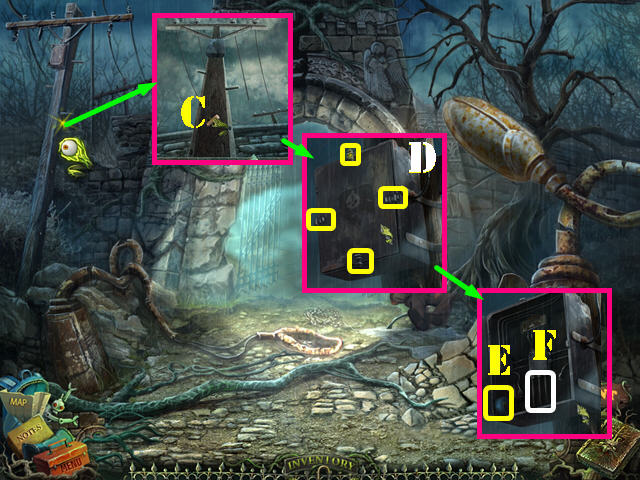
- Go right to reach the alleyway (N).
- Talk to the boy (O).
- Examine the painting; take the MYSTIC ENERGY 7/15 (@).
- Go right to reach the passage to the pond.
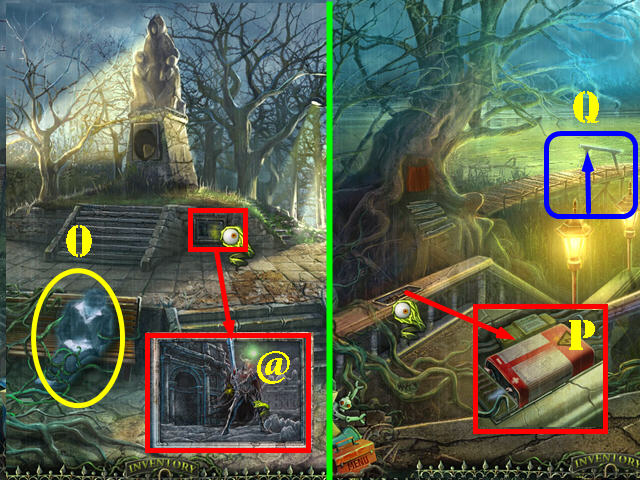
- Examine the railing; take the BATTERY (P).
- Take the bridge to go forward (Q).
- Take the HANDLE (R).
- Examine the base of the tree and touch it; take the Book Page (S).
- Walk down.
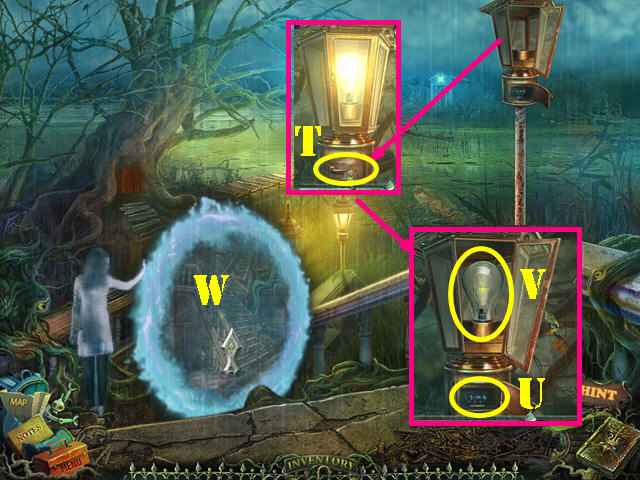
- Examine the light; put the HANDLE on the compartment (T).
- Press on the switch (U); open the cover and take the BULB (V).
- Go through the portal (W) to reach the school hall.
- Examine the broken lamp; take out the broken bulb and insert the BULB (X).
- Remove the old battery and replace it with the BATTERY (Y); flip the switch (Z).
- Go up the stairs.
Chapter 3: The Admin Building
- Examine the hole in the window; take the 1/3 STICK (A).
- Examine the painting; touch it and take the HANDLE (B).
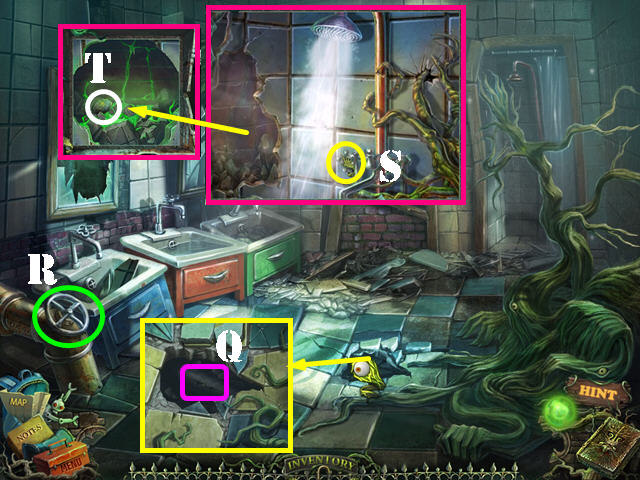
- Go through the center door to reach the washroom.
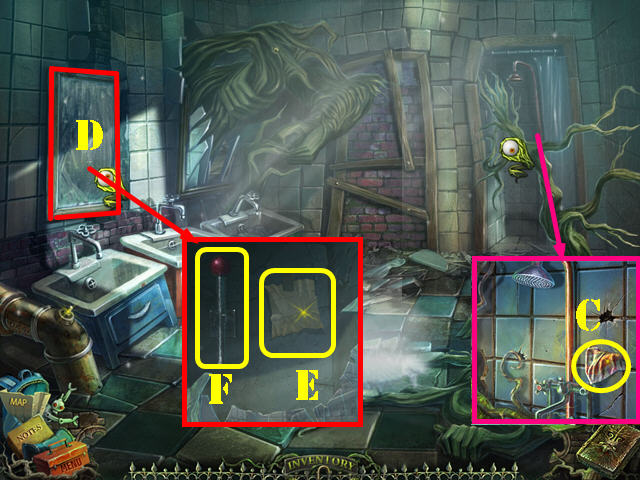
- Examine the shower; take the RAG (C).
- Look at the mirror and wipe it with the RAG (D).Take the Book Page (E) and the LEVER (F).
- Return to the alleyway and make a left towards the fog to reach the cemetery entrance.
- Zoom into the base of the lamppost; put the HANDLE in the slot and turn the handle (G).
- Put the LEVER on the base and turn the lever 5 times (H).
- Look at the man; open the jacket and take the ADMIN'S KEY (I).
- Open the gate and go through it.
- Take the STICK 2/3 (J).
- Walk down 3 times.
- Zoom into the door; put the ADMIN'S KEY in the lock and go through the door (K).
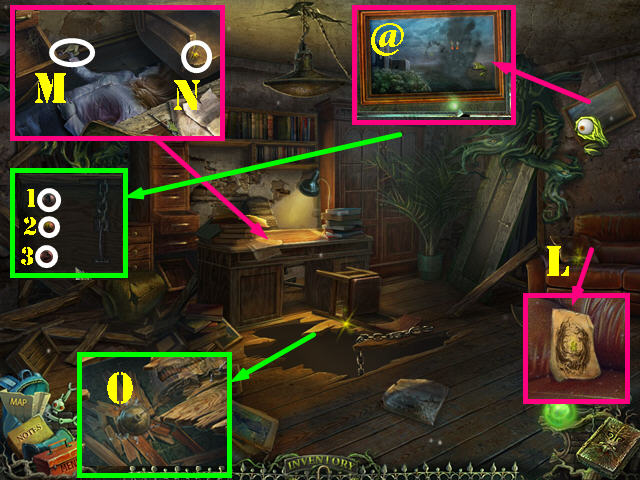
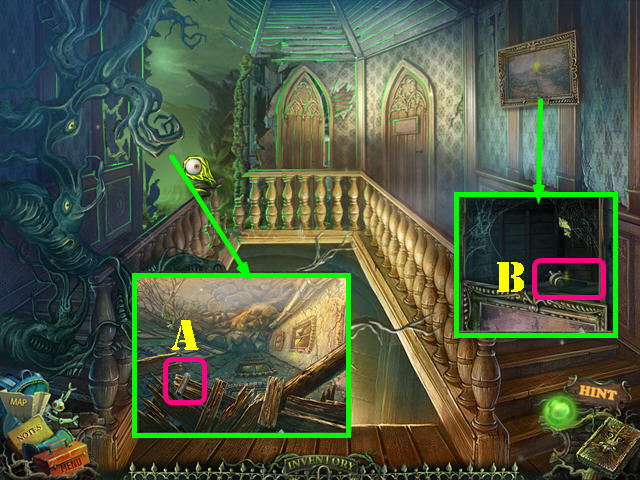
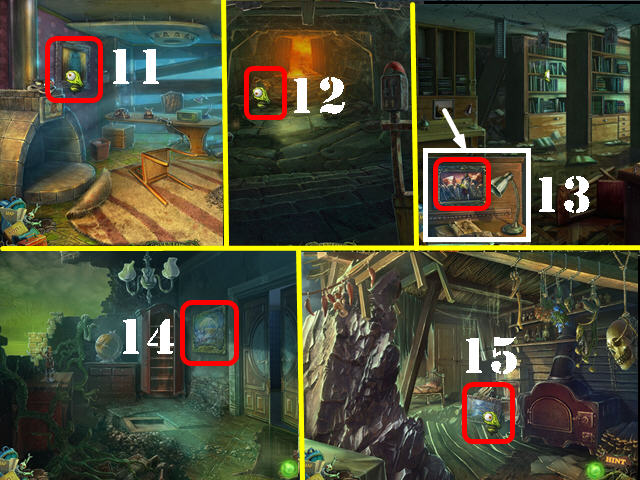
- Examine the painting; take the MYSTIC ENERGY 8/15 (@).
- Look at the couch; move the pillow and take the Book Page (L).
- Zoom into the desk; touch the lady's arm and take the Book Page (M).
- Take the BUTTON (N).
- Look at the cabinet; open the doors and push the books aside. Put the BUTTON in the slot. Press the buttons in this order: 2, 1, 3.
- Look at the hole in the ground; use the NAIL GUN on the chain (O).
- Go through the hole in the ground.
- Zoom into the left door; open it and go through it (P) to access the hallway.
- Examine the painting; take the MYSTIC ENERGY 9/15 (@).
- Zoom into the couch; remove the cushion and take the CROSS (Q).
- Walk down.
- Look under the stairs; take the second CAMEO PIECE (R).
- Look into the washing machine; open the door and take the TAP (S).
- Look at the machine and zoom into the device to activate a puzzle (T).
- Select adjacent pieces to swap them even the ones between sections (arrows). Keep swapping pieces until you recreate the image.
- Please look at the screenshot for the solution (U).
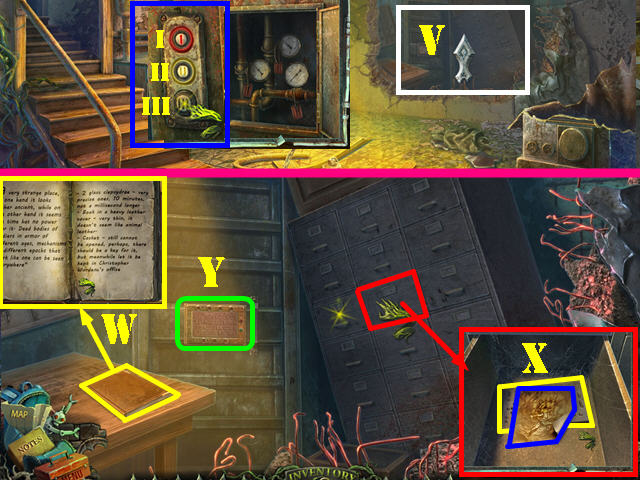
- Press on the buttons (I, II, and III).
- Go through the hole in the wall (V).
- Look at the book; open it, flip the pages and take the Note (W).
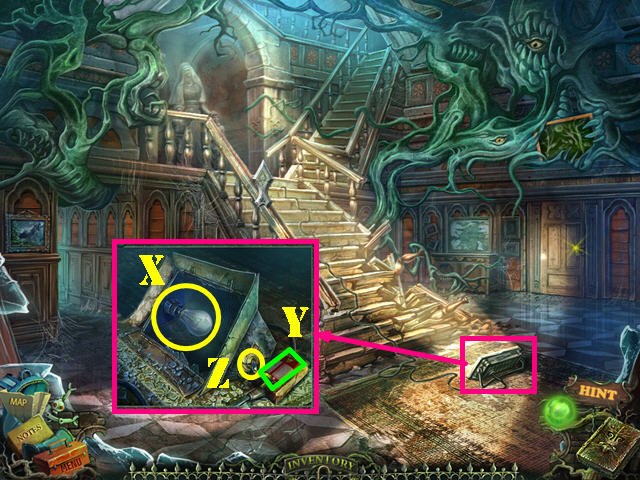
- Open the file cabinet drawer; take the Book Page and the CARD (X).
- Examine the lock; put the CARD on it to activate a puzzle (Y).

- Press the buttons to control the height of the conductors. Get the electrical impulse to run from the left diode to the right.
- To solve the puzzle, press on the buttons in this order: D, A, D, D, Y, Z, and T.
- Go through the door to reach the guard room.
- Look at the book; open it, and take the Note (1).
- Look at the desk; turn on the light (2).
- Open the book (3).
- Look at the drawer and take the KEY (4).
- To exit this building: walk down twice; go through the ceiling and walk down. Return to the washroom on the second floor of the school.
- Put the TAP in the pipe; spin the tap (A).
- Look at the hole on the ground; take the 3/3 STICK (B).
- Return to the cemetery entrance.
- Look at the electrical pole; put the 3 STICKS on it (C).
- Look at the box; remove the 4 latches and open the cover (D).
- Take the TAPE (E) and touch the wires (F).
- Go through the gate to reach the cemetery.
Chapter 4 : The Cemetery

- Look at the ground; take the RUNE (G).
- Look at the grave; use the JACK on the slab and take the Book Page (H).
- Go forward.
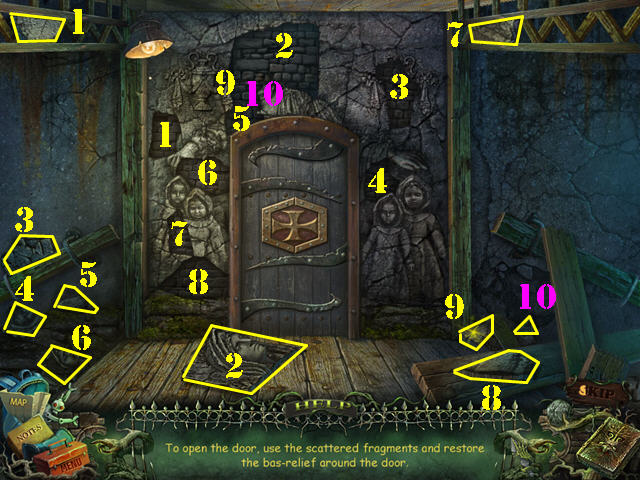
- Put the CROSS on the door to activate a puzzle.
- Click on a piece and hold down your mouse; then drag it into the desired spot.
- Please look at the screenshot and place the fragments in the matching spots (1-10).
- Enter the chapel.
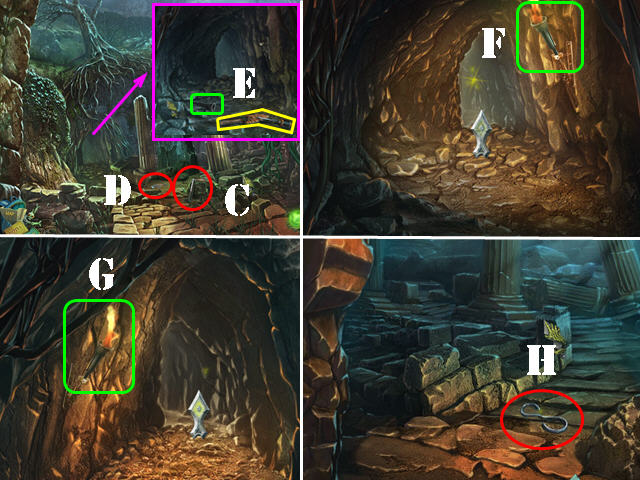
- Examine the bottom of the scaffolding; take the SCREWDRIVER (I) and the 2 PARTS OF GLASS (J).
- Look at the stained glass above the scaffolding and put the 2 PARTS OF GLASS in it (K).
- Zoom back into the scaffolding and touch the lever to move the scaffolding to the right (L).
- Zoom into the base of the scaffolding; take the PART OF GLASS (M). Also take the NAILS and the PART OF GLASS below it (N).
- Look at the stained glass above the scaffolding and put the 2 PARTS OF GLASS in it (O).
- Take a closer look at the casket; open it and take the Book Page (P).
- Return to the hallway in the admin building.
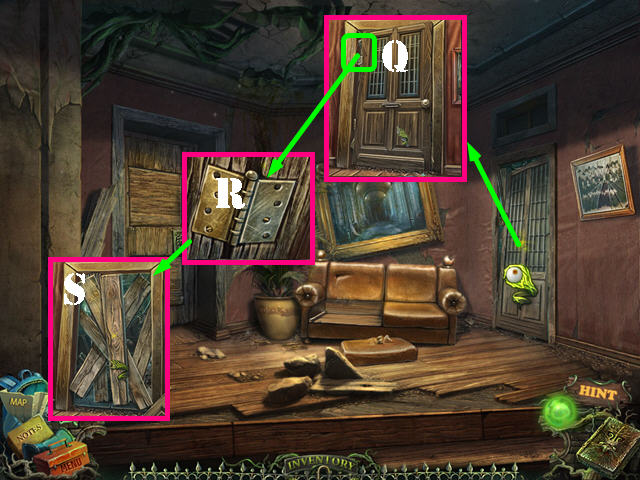
- Zoom into the right door and take a closer look at the hinges (Q); remove the screws with the SCREWDRIVER (R).
- Remove the boards by clicking on them 3 times (S). Go through the door to reach the medical room.
- Use the SWORD OF STRENGTH on the creature.
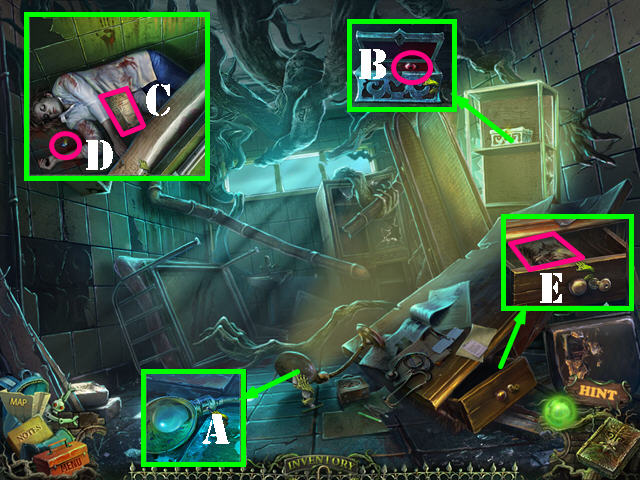
- Zoom into the lamp and click on the switch (A).
- Move the screen; press on the light again; zoom into and open the box and take the RED GEM (B).
- Look at the bed; take the Note (C). Move the arm and take the BLUE GEM (D).
- Look at the desk; open the drawer and take the Book Page (E).
- Go through the portal to return to the chapel.
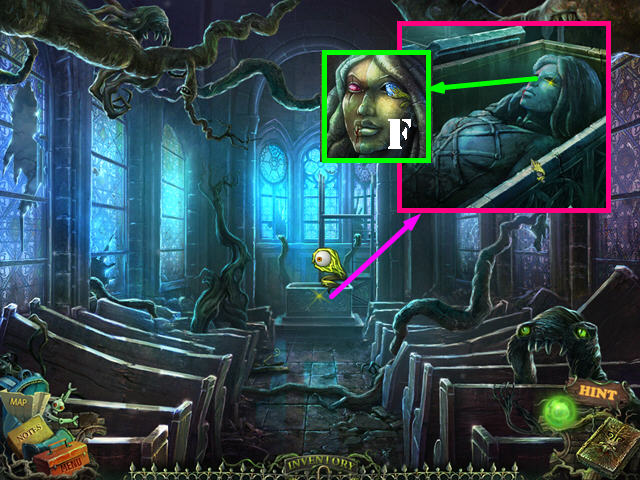
- Zoom into the coffin and then into the statue's face. Put the BLUE GEM and the RED GEM into the eye sockets (F).
- Go through the ground to reach under the altar.

- Take the HAMMER (G).
- Look at the broken steps; take the COMPASS (H).
- Select the 3 boards to put them in place (I); put the NAILS on the board and hammer them in with the HAMMER (J).
- Go up the steps to reach the belfry.
- Take the JAR and the OPTICAL DIAPHRAGM below it (K).
- Look at the camera; take the LENS (L) and the LENS RING (M).
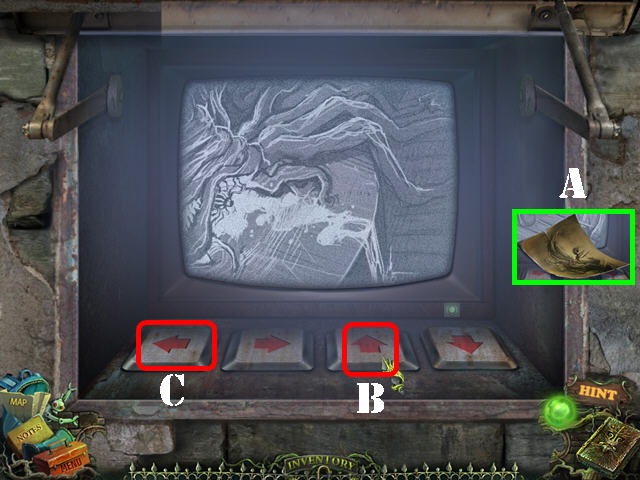
- Press on the camera (N); add the OPTICAL DIAPHRAGM followed by the LENS, and then the LENS RING to activate a puzzle.
- Drag the image on the right monocle until it matches the image on the left a total of 6 times.
- Please look at the screenshot for the solutions (1-6).
- Take the DIAMOND (P).
- Return to the washroom on the second floor of the school.
- Zoom into the hole in the ground; put the TAPE on the leaky pipe (Q).
- Turn the valve (R).
- Examine the shower; turn on the faucet (S).
- Look in the wall and take the RUNE (T).
- Exit the school, head left, and go into the boiler room.
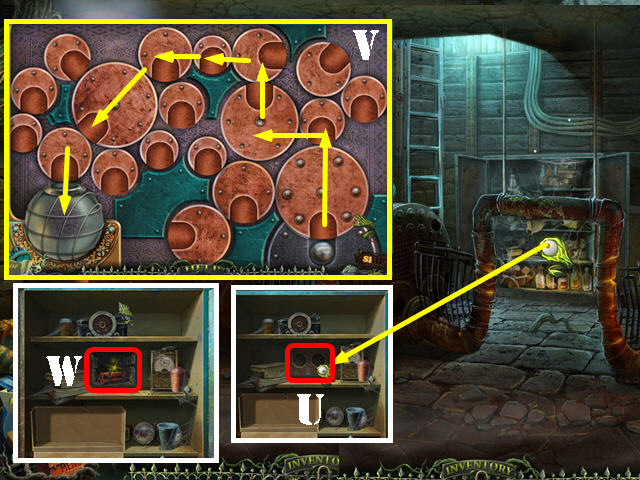
- Zoom into the shelf and then on the box; put the 2 RUNES in the slots to activate a puzzle (U).
- Your goal is to put the sphere into the flask on the left.
- Place the sphere in the slots of each rotating element, the sphere can only be moved in the between elements where not too much space is present.
- Please look at the screenshot and move the sphere in the order shown in the screenshot (V).
- Take the TNT (W).
- Return to the alleyway; turn right, and then forward to reach the pond beach.
- Examine the tree hollow; put the JAR in the oil to get the OIL (X).
- Return to the belfry in the chapel.
- Examine the light housing and put the OIL on it (Y).
- Turn the light.
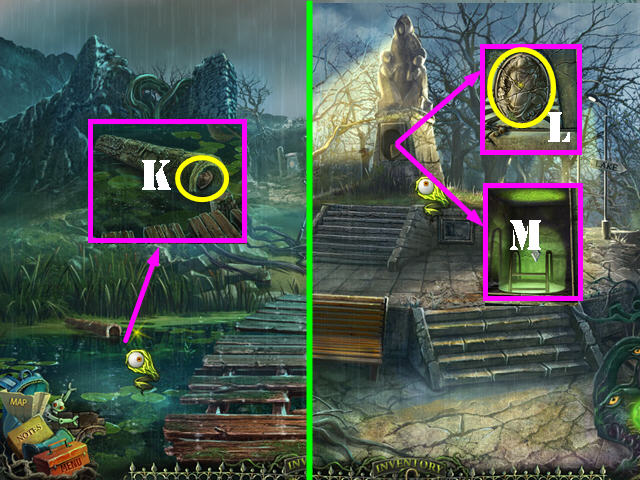
- Walk down 3 times and then go through the left gate to access the swamp entrance.
- Select the 5 boards marked in green to automatically add them to the path (1).
- Look in the water to see a ghost; take the LIGHTNING ROD (2).
- Look at the base of the tree (#); select the 5 boards marked in red to put them on the path (3).
- Look at the next tree (*); select the 5 boards marked in white to put them on the road (4).
- Go forward.
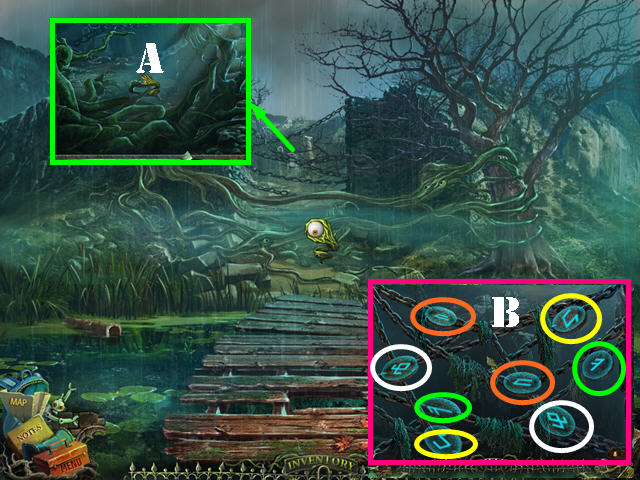
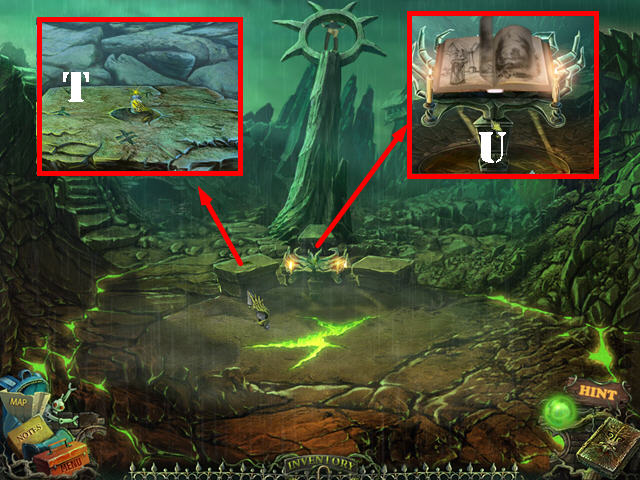
- Look at the plant roots; put the LIGHTNING ROD on the ground and then zoom into the chains to activate a puzzle (A).
- Memorize the location of the matching runes; then press on any rune and the markings will no longer be as visible.
- Select matching pairs of runes until all pairs have been selected. Please look at the screenshot for the color coded solution (B).
- You will automatically enter the sanctuary.
Chapter 5 : The Sanctuary
- Take the HANDLE (C).
- Take the PART OF DISK (D).
- Look in the cave; take the FLINT and TORCH (E).
- Put the TORCH in the holder and light it with the FLINT (F).
- Go forward.
- Light the next torch on the left with the FLINT (G).
- Go forward.
- Take the HOOK (H).
- Return to under the altar in the chapel.
- Look at the log; put the HOOK on it (I).
- Look at the barrel; cut the rope with the SWORD OF STRENGTH (J).
- Remove the peg (K).
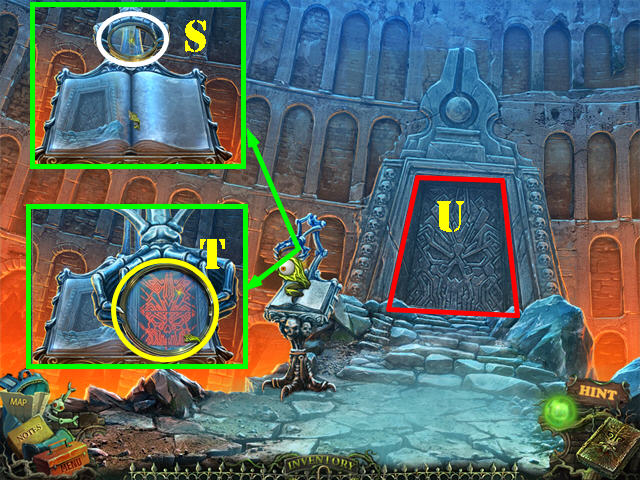
- Examine the back wall and zoom into the wall; put the COMPASS in the center to activate a puzzle (L).
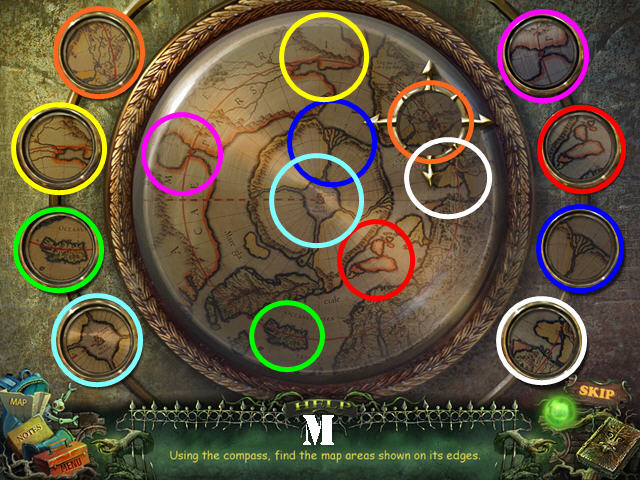
- Use the compass to find the areas shown inside the tokens; select the section inside the compass to eliminate it.
- Please look at the screenshot for the solution (M).
- Go forward to reach the secret library.
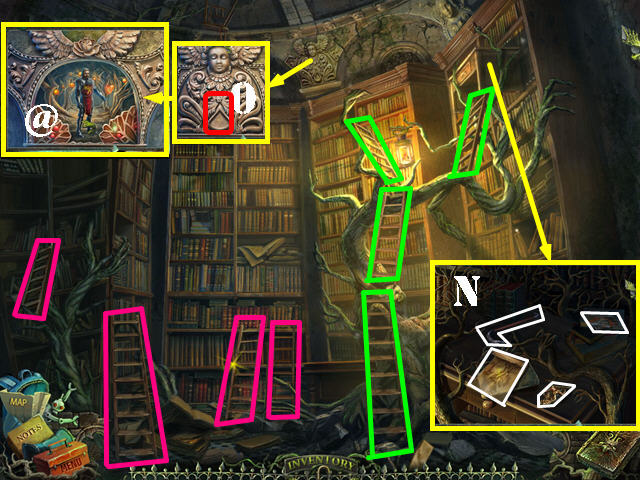
- Put the 4 ladders marled in magenta into the areas marked in green.
- Zoom into the niche on the right; take the PUZZLE PIECE, Book Page, CROWBAR, and PIECE OF PHOTO 2/5 (N).
- Inspect the bas-relief above the left ladder; put the DIAMOND in the niche (O).
- Take the MYSTIC ENERGY 10/15 (@) on the newly-found picture.
- Return to the pond beach.
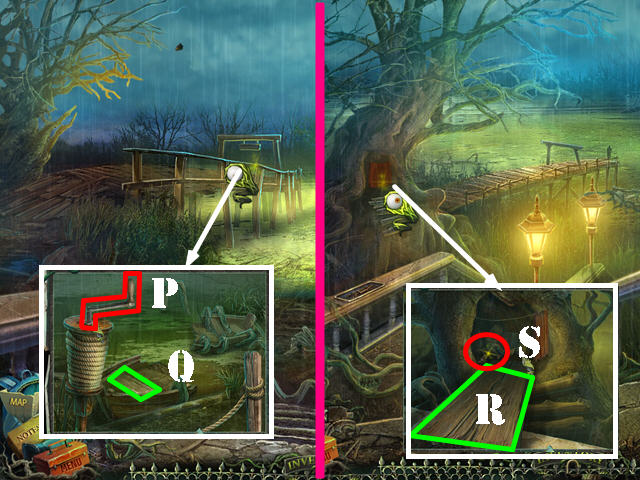
- Zoom into the pier; put the HANDLE on the winch (P).
- Twist the handle and take the BOARD (Q).
- Walk down to reach the passage to the pond.
- Look at tree; put the BOARD down (R).
- Move the curtain and take the KEY (S).
- Return to the hallway in the admin building.
- Zoom into the left door; use the CROWBAR on the lock and go through the door to access the office (T).
- Touch the chair and then look under it; take the PAPER 3/3 (U).
- Look at the painting; take the MYSTIC ENERGY 11/15 (@).
- Look at the desk and take the Note (V).
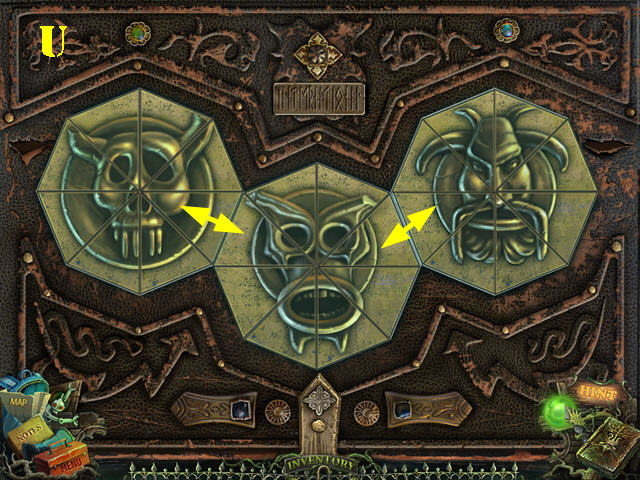
- Look at the mantle and put the PUZZLE PIECE on it to activate a puzzle (W).
- Position the outer pieces on the right side so they fit in the center once the center button is pushed.
- Press on the buttons marked in red to rotate the pieces adjacent to them; then press the center button (yellow) to enter your selection. Keep rotating the pieces until you have them in correctly.
- Position the pieces as shown in the screenshot and press on the yellow button to get the solution shown in the center (N).
- Look in the fireplace; take the PIECE OF PHOTO 3/5 (P).
- Return to the second floor in the school.
- Look at the right door; insert the KEY in the lock; turn the key and go through the door to access the boy's room (Q).
- Take the PIECE OF PHOTO 4/5 (R).
- Take the WHEEL (S).
- Look at the drawer; open it and take the WHEEL (T).
- Look under the bed; take the WHEEL (U) and put the WHEEL in place (V).
- Zoom into the 2 bed posts and put the WHEELS on them (W and X).
- Move the bed.
- Look above the dresser; take the VALVE and the CLOCK (Y).
- Return to the water tower outside the generator room.
- Examine the chains on the ground; open the lock and put the KEY in the lock (A).
- Zoom into the mechanism; put the 3 PAPERS on the left to activate a puzzle (B).
- Using the control elements, light the bulbs as shown in the hint.
- Move the red markers (D and E) to different areas; use the wheel in the center (C) to change the color of the balls where the 2 red markers intersect. Note: some of the colors are a bit faded on the clue, make sure you look carefully.
- Please look at the screenshot for the solution (F).
- Look at the elevator; open the door and take the LIGHTER (G).
- Go up the elevator to reach the ancient caves.
- Use the LIGHTER on the scene (H).
Chapter 6: The Ancient Caves
- Look at the painting and take the MYSTIC ENERGY 12/15 (@).
- Look at the skeleton; zoom into the lantern and open its door. Use the LIGHTER on the candle (I).
- Take the first PART OF TRIANGLE (J).
- Look at the back door; take the second PART OF TRIANGLE (K).
- Zoom into the chest; put the 2 PARTS OF TRIANGLE in the niche (L) to unlock the chest. Take the DISK (M).
- Look at the back door; put the DISK on the lock to activate a puzzle (N).
- Arrange the picture correctly.
- Use the button (O) to rotate the disk. Press on the top piece to add it to the center.
- Place the pieces on the edges first and work your way in. Use the reset button (P) to start over.
- Please look at the screenshot to see the order in which the pieces should be added (1-8).
- Go forward to reach the canyon.
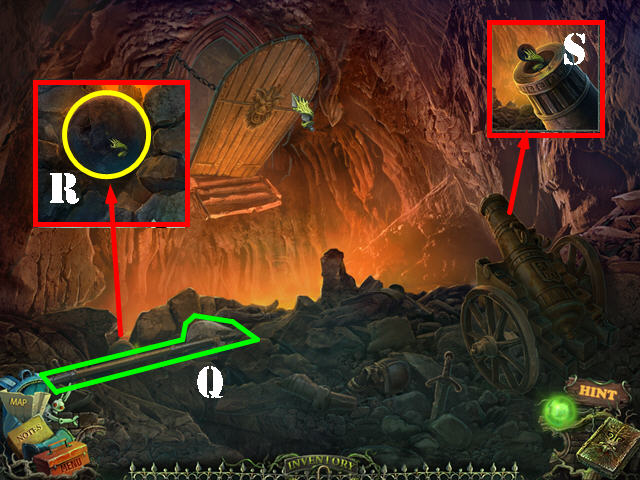
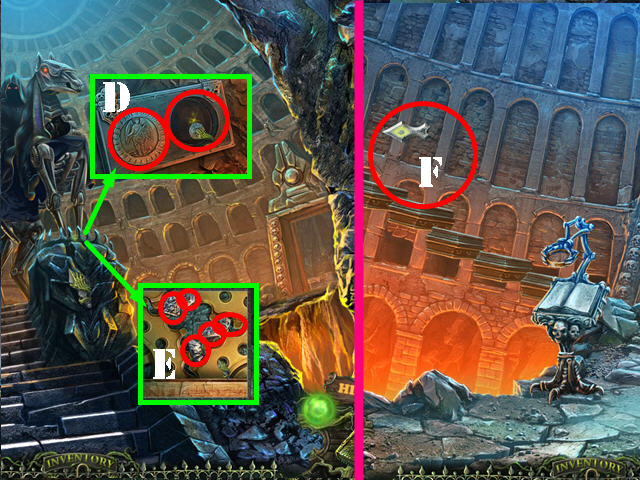
- Take the HALBERD (Q).
- Look in the lower left; remove the 3 stones and take the CANNONBALL (R).
- Look at the cannon; put the CANNONBALL on it and then use the LIGHTER on it (S).
- Go forward to reach the burial ground.
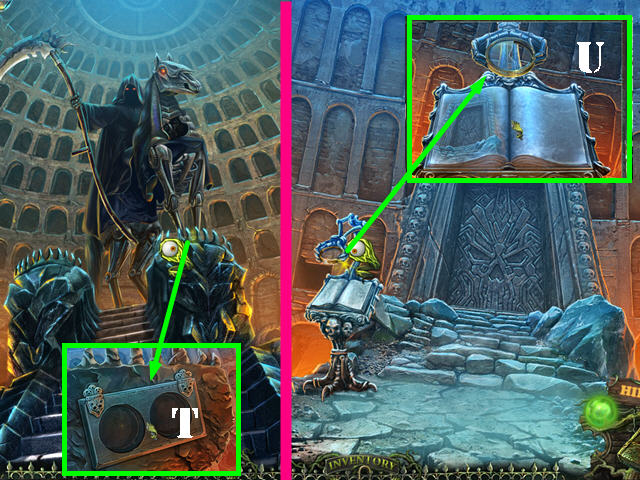
- Look at the altar; you need 2 medallions (T).
- Go right.
- Look at the book; you need a lens (U).
- Return to the left wing of the school.
- Look at the pipe; put the VALVE on it (V), spin the valve, and then use the LIGHTER on the gas coming out of the pipe (W).
- Go left to reach the theatre hall (X).

- Use the SWORD OF STRENGTH to the monster.
- Look in the bucket; take the first PART OF SUN (A).
- Examine the lamp; turn on the light (B), take the KEY and the Book Page below it (C).
- Walk down.
- Examine the bottom of the column; put the TNT on it (D).
- Light the TNT with the LIGHTER.
- Go right to reach the library (E).
Chapter 7: School Library
- Turn on the lamp (F).
- Zoom into the book and take the LENS (G).
- Look at the desk and then take a closer look at the painting; take the MYSTIC ENERGY 13/15 (@).
- Take the Book Page (H).
- Look at the bookcase and take the Book Page (I).
- Walk down.
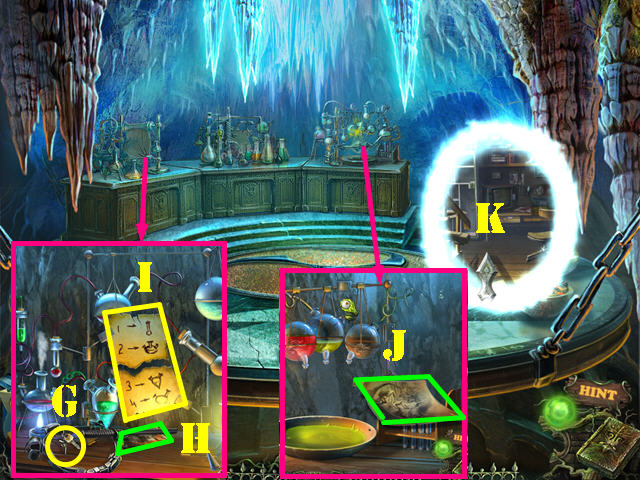
- Zoom into the box (J).
- Put the KEY on the lock to activate a puzzle (K).

- Turn the center wheel with the 2 arrows that surround the green lights. Press on the red button in the center to move the leads in and out of the bulbs.
- You have to complete five levels of this puzzle to complete it.
- This puzzle is random; the screenshot shows one possible solution (1-5).
- Take the second PART OF SUN (L) and then press on the lever (M) for the stairs to appear.
- Go up the stairs to reach the observatory (N).
- Look at the telescope; take the third PART OF SUN (O) and then press on the lever (P).
- Zoom into the number pad to activate a puzzle.
- Enter the correct code by using a trial and error method.
- To solve the puzzle, press the buttons in this order: 2, 1, 4, 5, and 3 (Q).
- Look at the light housing and pull on the chain (R).
- Return to the water tower by means of the boiler room; take the elevator to the ancient caves. Go forward twice and make a right to reach the burial ground.
- Zoom into the book; add the LENS to the piece (S) to activate a puzzle.
- Put the image back together by swapping the pieces.
- Please look at the screenshot for the solution (T).
- Go through the door to reach the witch's cell (U).
- Take the Book Page (V).
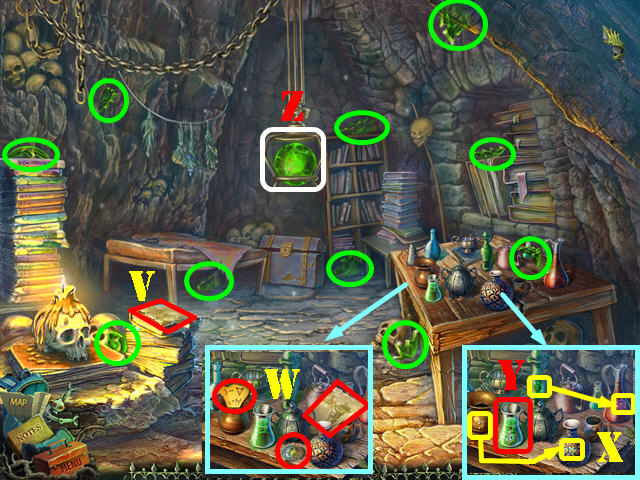
- Look at the table; take the DEMON'S SEAL, the Note, and the RECIPE (W).
- Select the matching symbols on the jars (X) and then take the POTION (Y).
- Select the 10 glass pieces marked in green to automatically add them to the crystal ball (Z).
- Look at the crystal ball after all the pieces have been added.
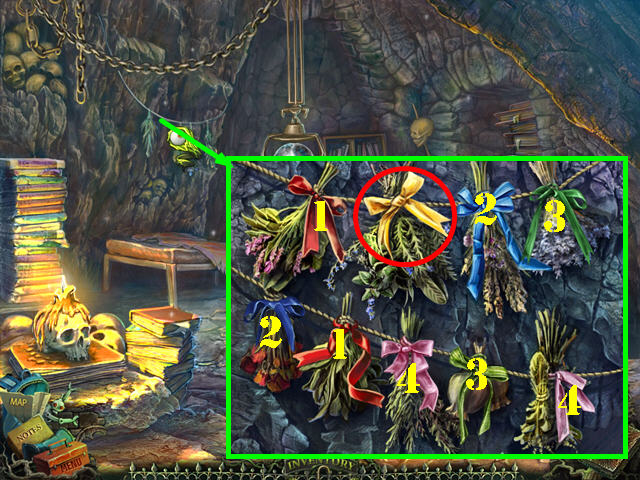
- Zoom into the plants to activate a puzzle.
- Untie the ribbons in pairs.
- Please look at the screenshot for the solution (1-4).
- Take the MAGIC HERB (red).
- Go through the portal to reach the school library.
- Zoom into the puzzle by the desk.
- Move the numbers to the matching numbers underneath the blocks. The numbers have to be rotated to the correct positions before they can be placed into the right spots.
- Using the screenshot markings as a key, please move the items in this order:
- Q, 4-M, Rx2, 8-O, 5-C, Q, 8-D, R, 7-O, Qx2, 8-P, 5-D, 6-C, 1-B, 2-A, 3-H, 4-K, 7-M, R, 5-I, R.
- 8-L, 5-P, Q, 6-I, R, 8-J, 5-L, 6-P, Q, 1-G, 2-F, 3-I, 4-E, 3-K, 4-I, 2-H, 4-A, 1-B, 8-C, 5-I, 8-J.
- 1-G, 4-F, 2-E, 5-H, 2-B, 4-C, 1-I, 4-F, 2-E, 1-A, R, 6-O, Q, 2-B, 4-C.
- 6-G, R, 8-O, Q, 6-P, 8-G, 4-F, 2-E, R, 6-O, Q, 8-P, 4-L, 2-J, and 6-G.
- Take the SEALS and the SUN (A).
- Look at the bookcase; take the ANGEL'S SEAL (B).
- Go through the portal to reach the burial ground (C).
- Zoom into the altar; put the ANGEL'S SEAL and the DEMON'S SEAL into the slots (D).
- Look at the gears and push on the 5 stones (E).
- Go right and then go up the left steps to reach the lab (F).
Chapter 8: Laboratory
- Look on the left table; take the KEY (G) and the PIECE OF PHOTO 5/5 (H).
- Put the RECIPE on the torn one; you need a plant (I).
- Look at the right table; take the Book Page (J).
- Go through the portal to reach the guard room (K).
- Zoom into the locker and use the KEY you found in the lab on the lock (L).
- Take the TNT (M).
- Return to the school hall.
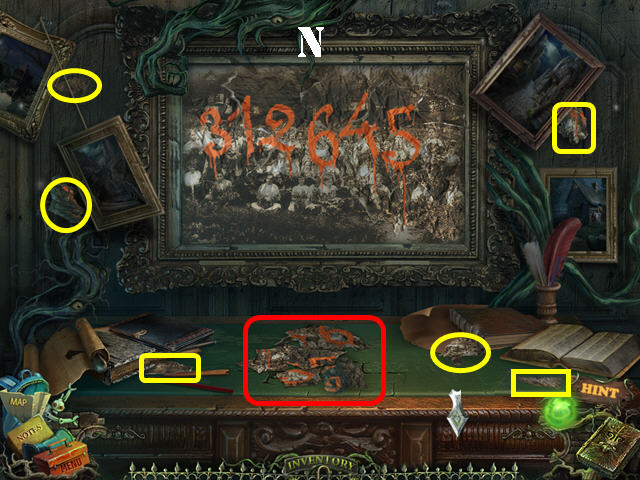
- Look at the painting on the right wall.
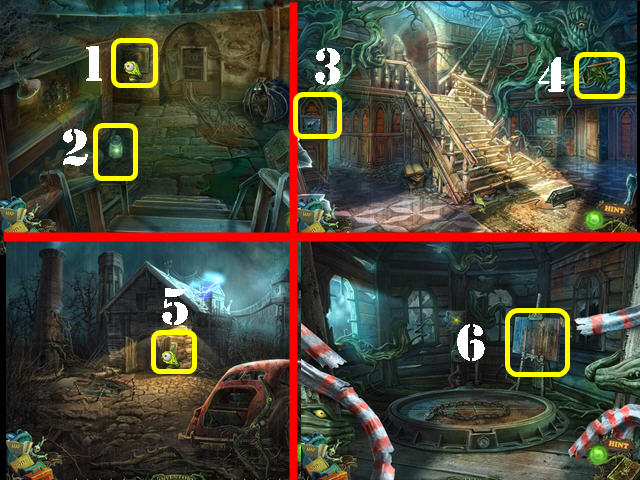
- Note: To solve this puzzle, make sure you collected the 5 photo pieces first. They are located here: School Hall, Secret niche in the library, in the fireplace in the office, the boy's room, left table in the lab.
- Move the papers in the red section out of the way and then put the puzzle piece in the picture.
- Move the items marked in yellow and take all the picture pieces below them and put them in place.
- Put the 5 PHOTO PIECES on the counter (red).
- Assemble the rest of the picture..
- Please look at the screenshot for the solution; note the numbers on the picture (N).
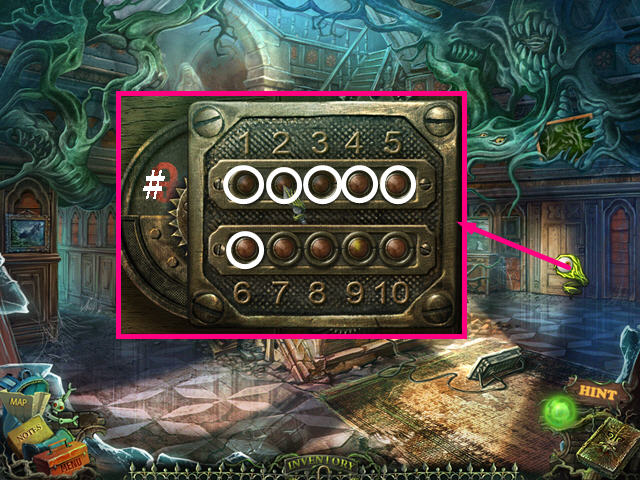
- Exit the painting and inspect the right door; enter the code 312645 (#).
- Go through the door to access the right wing.
- Look at the painting; take the MYSTIC ENERGY 14/15 (@).
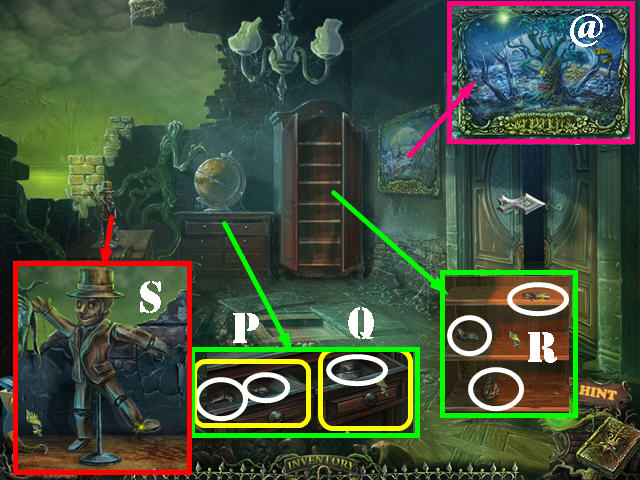
- Inspect the dresser; open the left drawer and take the RIGHT LEG plus the LEFT HAND (P).
- Open the right drawer; take the HAT (Q).
- Look at the armoire and open the doors; take the RIGHT HAND, LEFT LEG, and the HEAD (R).
- Zoom into the frame; put the RIGHT HAND, LEFT HAND, RIGHT LEG, LEFT LEG, and the HEAD on the frame. Then add the HAT to the head.
- Move the limbs in the position shown in the screenshot to unlock the door (S).
- Go through the right door to reach the auditorium.
- Use the SWORD OF STRENGTH on the monster.
- Look at and pull the lever (T) to raise the curtain.
- Look at the podium; take the Book Page (U) and then connect the plug (V).
- Inspect the projectors (W).
- Select a slide (X) and then take the RECIPE (Y).
- Return to the observatory.
- Look at the mechanism; put the 3 PARTS OF SUN and the SUN on it to activate a puzzle (Z).
- Select a sun part and dots will appear on the puzzle, choose one of those dots to travel to.
- Keep moving sun pieces until you have them all in one place.
- Please follow the steps on the screenshot (1-4).
- Take the Book Page (A).
- Another puzzle immediately follows the last one. Note: this puzzle will not activate unless the projector light is on.
- Direct the light beam over the tree roots.
- To solve the puzzle, press on the buttons in this order: Up (B), Left (C), Left (C), and Up (B).
- Return to the witch's cell (take the elevator in the water tower, go right, and forward).
- Return to the lab.
- Zoom into the left table; put the MAGIC HERB in the flask to get the POTION (D).
- Put the TNT, CLOCK on the table.
- Pour the POTION in the upper right flask (E) to get the POTION.
- Take the ANTI-PLANT BOMB (F).
- Zoom into the center table; put the RECIPE on it (G).
- Put the POTION on the flask to get the POTION (H).
- Return to the theatre hall in the first floor of the school.
- Zoom into the bucket; put the ANTI-PLANT BOMB in the bucket and then tip it over (I).
- Go forward.
- Zoom into the heart; use the SWORD OF STRENGTH on the HEART to add it to inventory (J).
- The ghost appears.
- Take the third CAMEO PIECE (K).
- Return to the swamp (go through the left gate in the cemetery and then go forward).
- Zoom into the left side of the water; use the HALBERD on the log and take the fourth CAMEO PIECE (K).
- Walk down 4 times to return to the alleyway.
- Zoom into the base of the statue; put the 4 CAMEO PIECES in the niche (L).
- Use the POTION in the niche and go down to the dungeon under the pond (M).
- Take the LADDER (N) and the SHOVEL (O).
- Return to the second floor of the school.
- Take a closer look at hole in the left wall; put the LADDER out the window (P).
- Go down the ladder to reach the flaming canyon.
- Use the SWORD OF STRENGTH on the monster.
- Take the PART OF DISK (Q).
- Grab the Book Page (R).
- Examine the door; take the WHEEL (S).
- Open the door and go through it to access the witch's hut.
- Look at the bed; take the Book Page (T).
- Look at the painting; take the 15/15 MYSTIC ENERGY (@).
- Look at the shelf; take the FLASK (U).
- Walk down and go through the portal to reach the sanctuary.
- Zoom into the altar; put the 2 PARTS OF DISKS in the niche to activate a puzzle.
- Rotate the disks using the arrows on both sides of the puzzle until the lines from the images on the outer circle are connected to the matching ones in the inner circle. Once the disk is correctly rotated, press on the outer head to light the path.
- Please look at the screenshot for the solution (V).
- Go through the portal and then go forward after the ghosts disappear to reach the burial village. Note this area for later.
- Return to the dungeon under the pond (return to the alleyway and go into the base of the statue).
- Zoom into the cart; remove the stones and add the WHEEL to the cart (W).
- Use the SWORD OF STRENGTH on the monster.
- Take the CORRUPTED SPEARHEAD (X).
- Go through the portal (Y) and then go forward to reach the island.
Chapter 9: The Island
- Examine the columns; move the debris aside and take the RUNE (1).
- Look at the ground; move the stone and use the SHOVEL in the dirt. Take the RUNE (2).
- Examine the broken columns; move the straw and take the RUNE (3).
- Take a closer look at the door (4).
- Put the 3 RUNES in the niches (green) to activate a puzzle.
- To solve the puzzle, press on the levers in this order: A, A, B, and A.
- Go forward to reach the crypt.
- Examine the wall; take the BROOCH (C).
- Return to the office in the admin building.
- Zoom into the table and then into the box; put the BROOCH in the indentation (D).
- Open the box; take the SWORD and the AXE (E).

- Return to the lab.
- Zoom into the right table; put the FLASK in the holder (F).
- Put the HEART on the flask.
- Put the CORRUPTED SPEARHEAD in the bowl and take the PURIFIED SPEARHEAD (G).
- Return to the crypt that is past the pond beach.
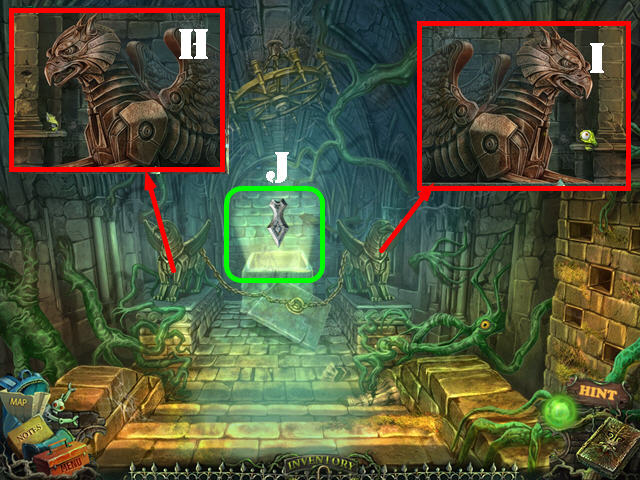
- Examine the left gryphon; give it the SWORD (H).
- Examine the right gryphon; give it the AXE (I).
- Go into the crypt to reach the dungeon (J).
- Take the LEVER (K). Put the LEVER in the slot (L).
- Pull on both chains (N and O).
- Look at the statue; put the SEALS in the niches (P).
- Pull on both levers (L and M).
- Zoom into the altar and remove the cover. Take the SPEAR PARTS and the Book Page (Q).
- Return to the second floor of the school; look through the hole in the wall; take the ladder out the window; go forward and then go forward on the left side of the scene.
- Look at the can and use the LIGHTER on the coals (R).
- Look at the table and put the PURIFIED SPEARHEAD and SPEAR PARTS on it.
- Touch the hammer (S) to get the SPEAR OF DAWN.
- Walk down.
- Zoom into the left altar; put the 15 MYSTIC ENERGIES down (T). You can find a list below of all the Mystic Energy locations in case you missed any.
- The school basement (1) and (2), the school hall (3) and (4), in the abandoned garden (5), in the water tower (6).
- In the alleyway (7), in the admin hall (8), admin hallway (9), and in the secret library in the chapel (10).
- In the admin office (11), in the ancient caves (12), in the school library (13), in the right wing of the school (14), and in the witch's hut (15).
- Examine the center altar (U). Please note that you will not be able to complete the game unless you've collected all the Book pages; their locations are listed throughout the guide.
- Watch the cut scene.
- Congratulations, you have completed Gothic Fiction: Dark Saga Standard Edition!
Created at: 2012-09-21