

Walkthrough Menu
- General Tips
- Chapter 1: The Fire Knight
- Chapter 2: On the Trail of Rosa Ramirez
- Chapter 3: Inside the Coliseum
- Chapter 4: Sergio's Good Fortune
- Chapter 5: Into the Mountains
- Chapter 6: A Mystery Solved
General Tips
- This is the official guide for Grim Façade: A Wealth of Betrayal.
- This guide will not mention each time you need to zoom into a scene; the screenshots will show each zoom scene.
- We will use the acronym HOP for Hidden-object puzzles. Interactive items will be color-coded and some will be numbered; please follow the numbers in order.
- HOPs may be random: our lists may vary from yours.
- Use the Map to travel to locations.
Chapter 1: The Fire Knight
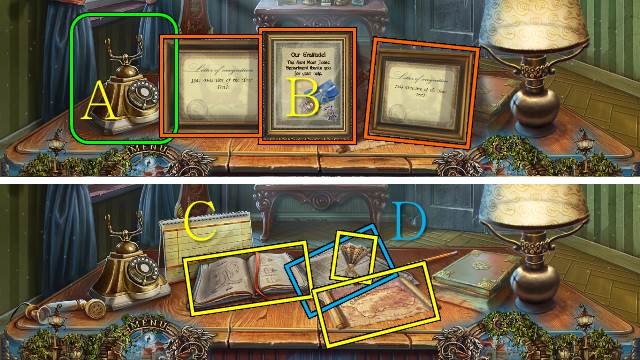
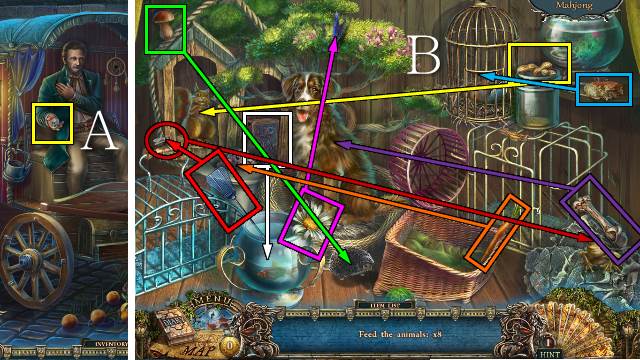
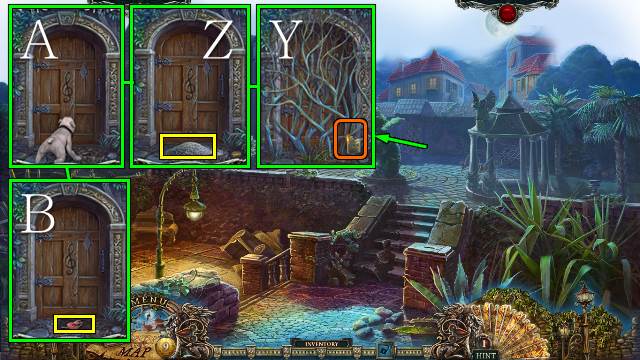
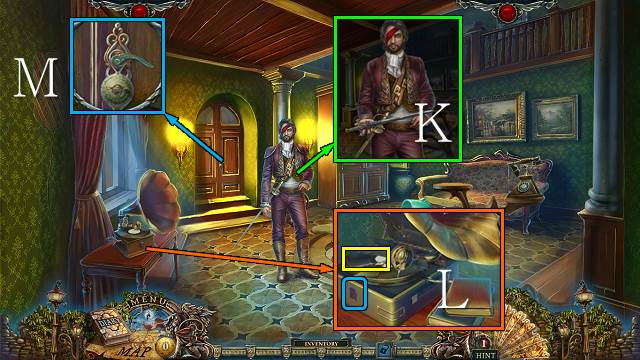
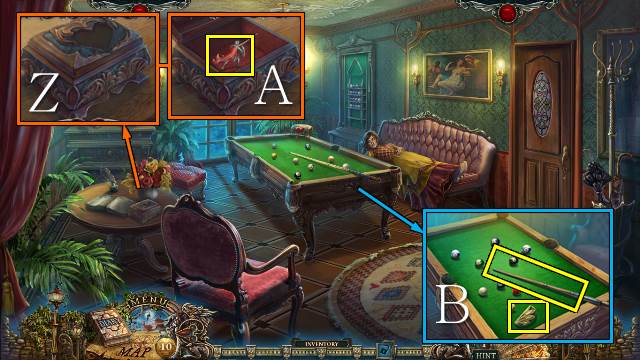
- Answer the phone (A).
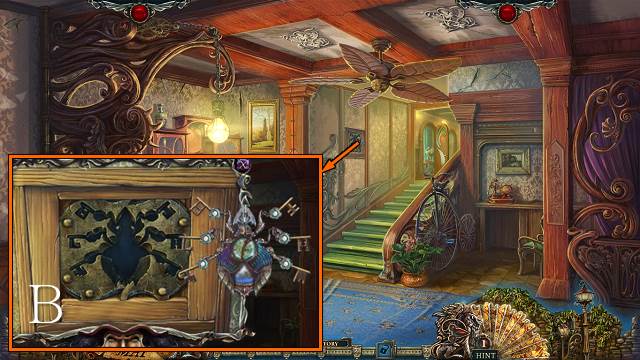
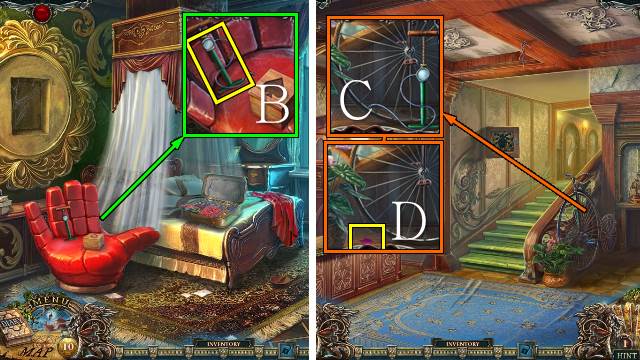
- Move the three picture frames (B).
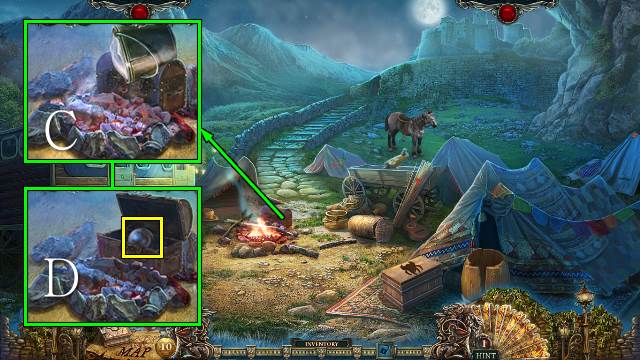
- Close the diary and take the diary, fan and map (C).
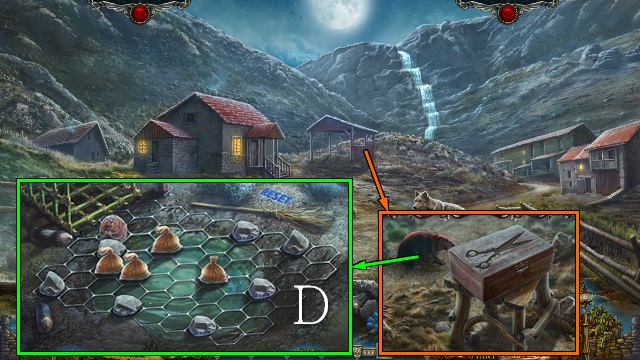
- Take the NEWSPAPER and read the article (D).
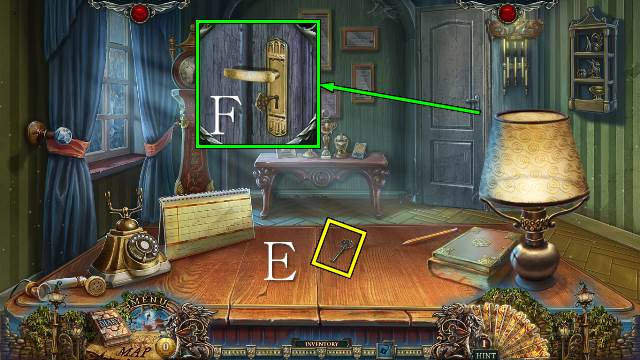
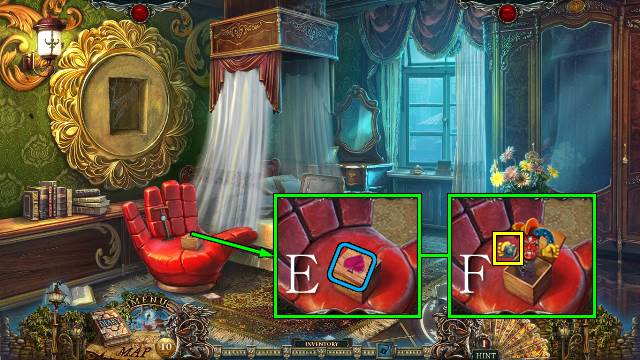
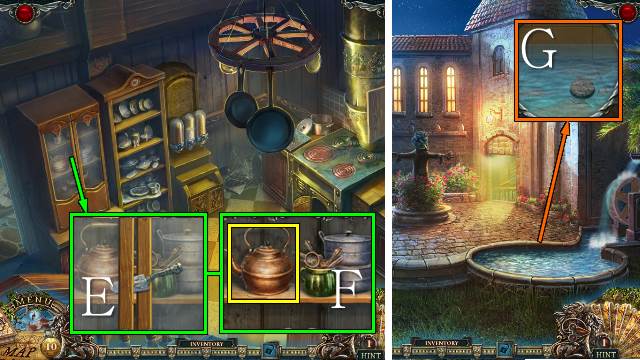
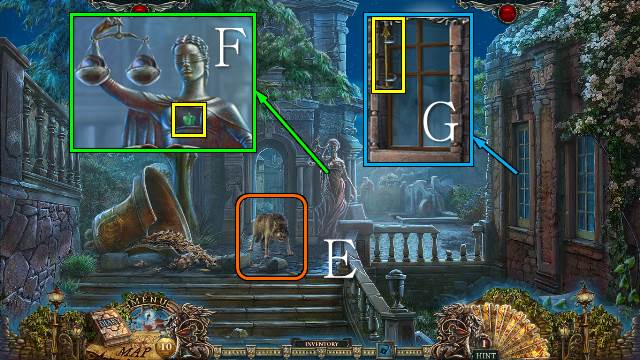
- Take the KEY (E).
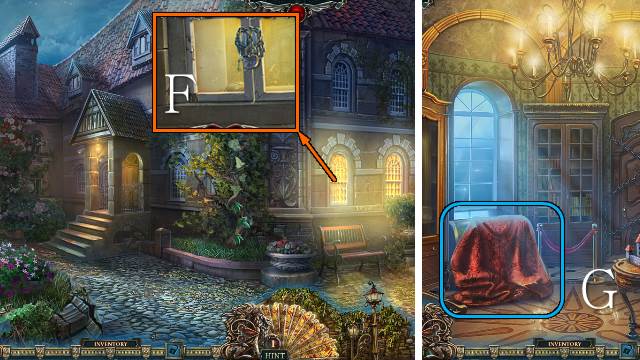
- Open the door with the KEY (F).
- Walk forward.
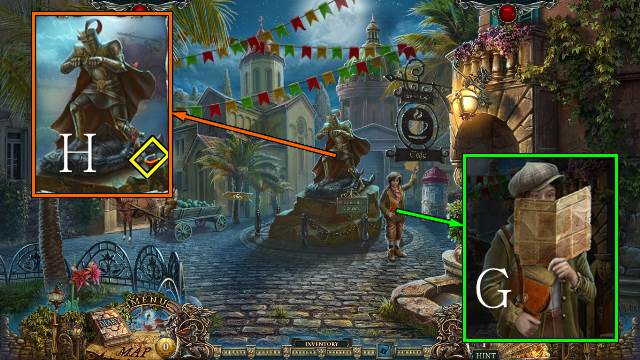
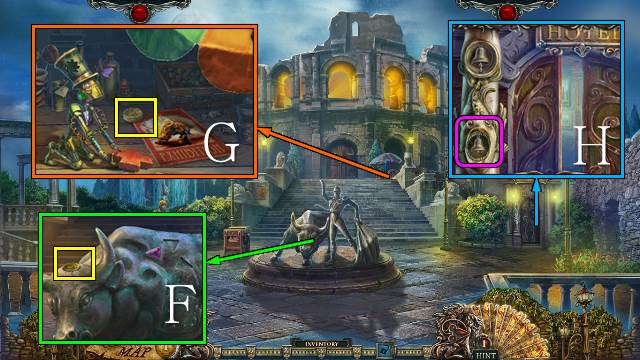
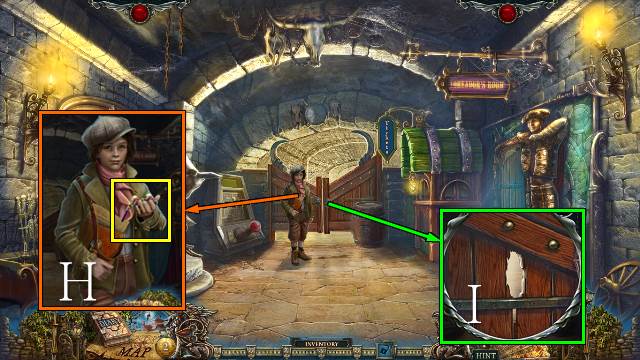
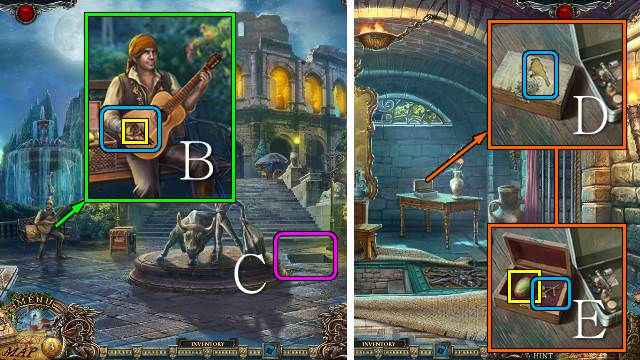
- Talk to the paper boy and give him the NEWSPAPER (G); you receive a SKETCH.
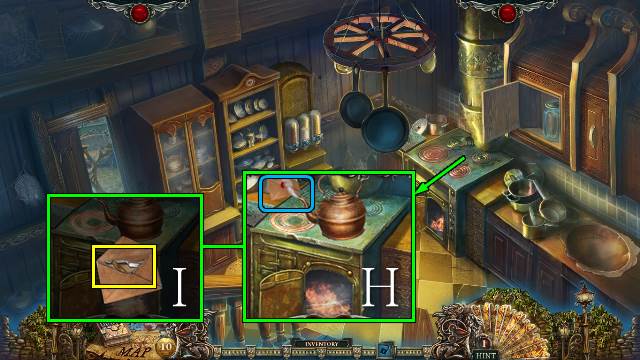
- Take the MAGNET (H).
- Go right.
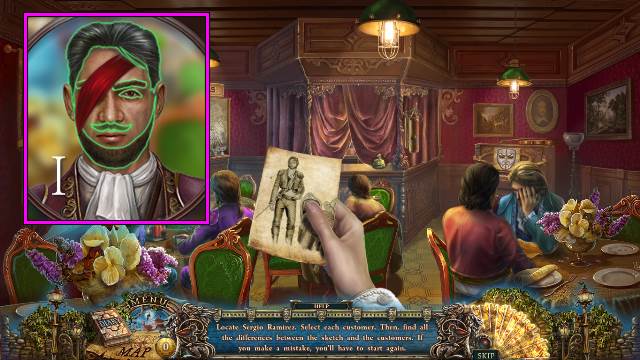
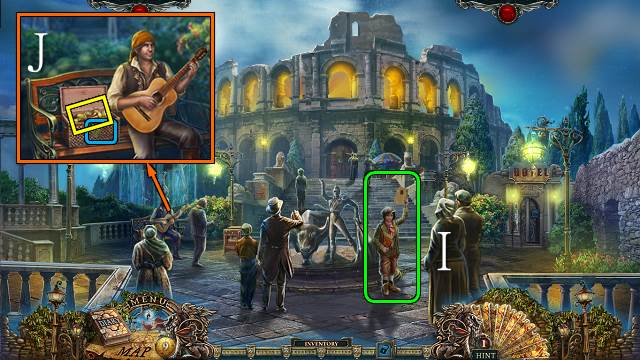
- Use the SKETCH on the scene, then select a customer for a mini-game.
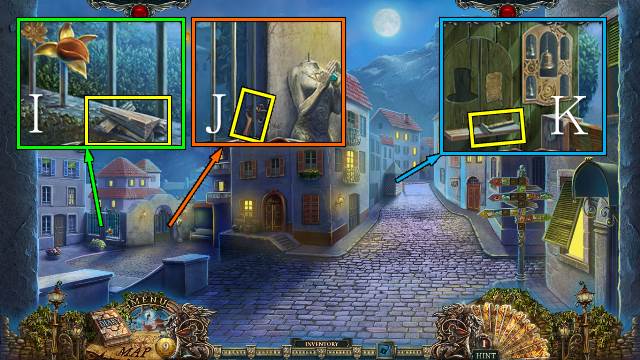
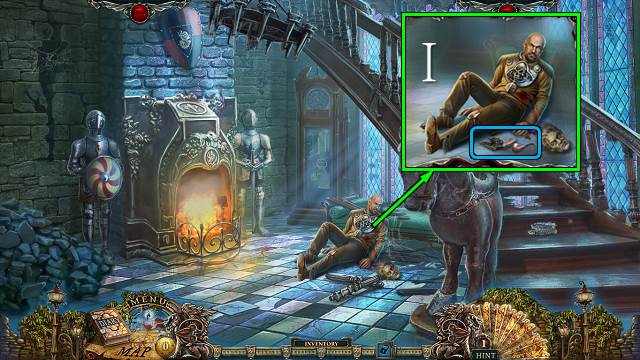
- Find the three or four differences between the customer and the sketch (I).
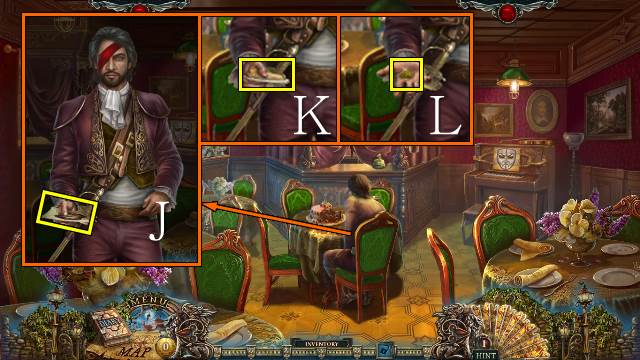
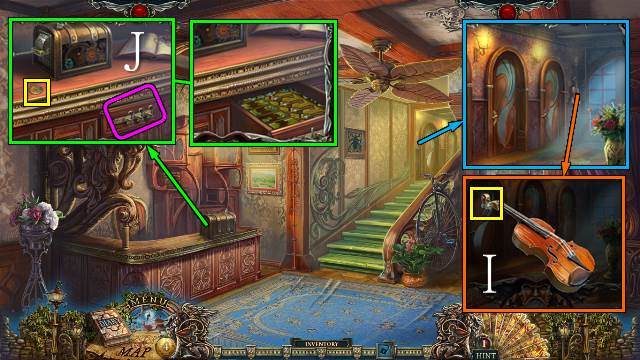
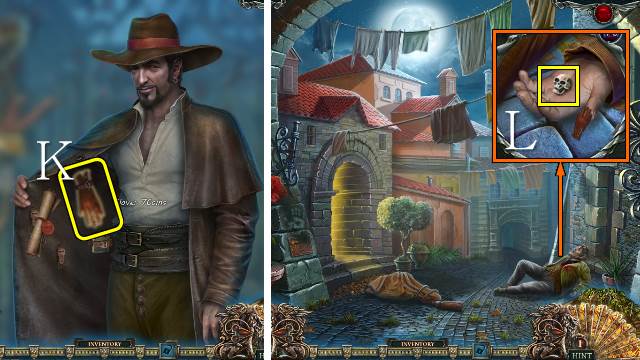
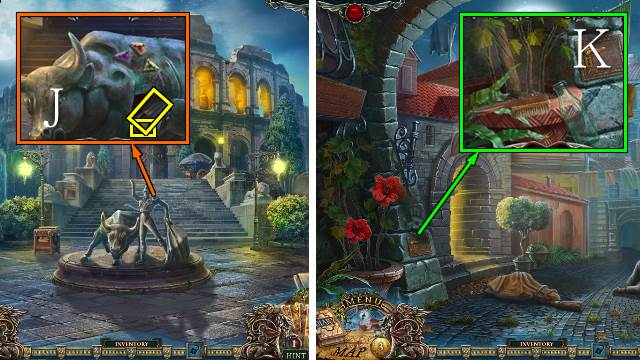
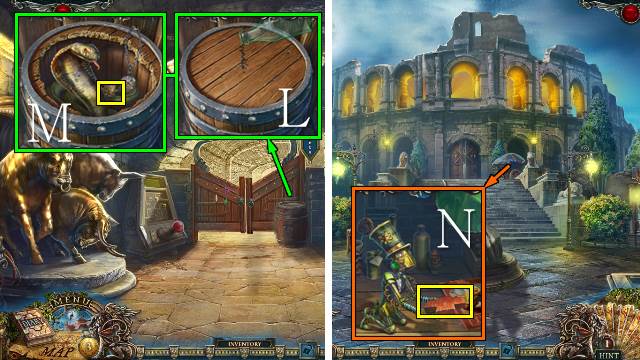
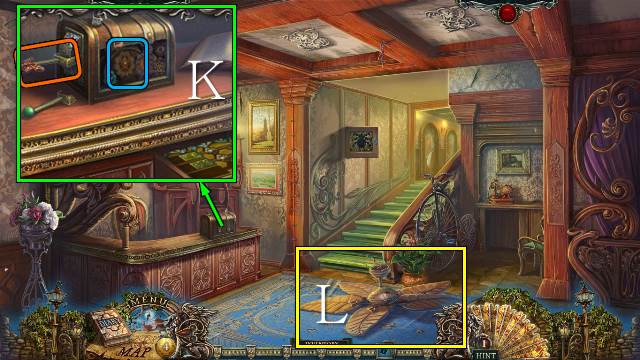
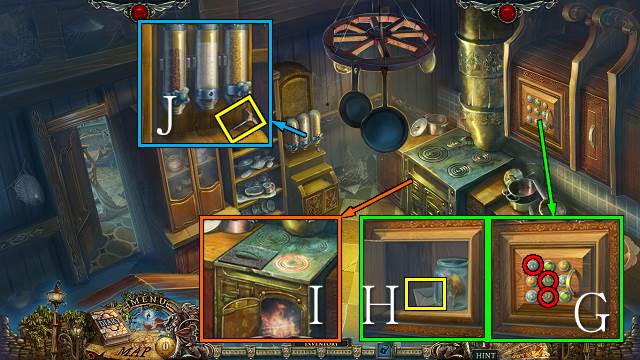
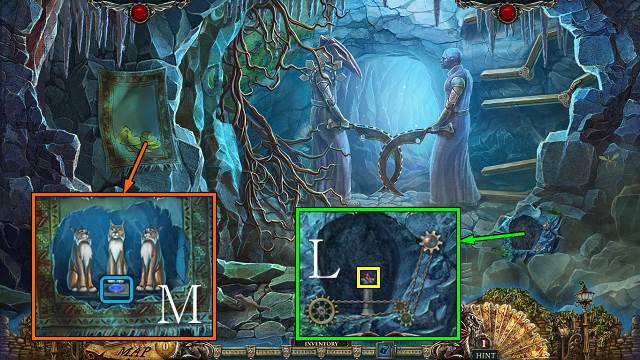
- Talk to Sergio; take ROSA'S PHOTO (J), ROSA'S NOTE (K) and two coins (L).
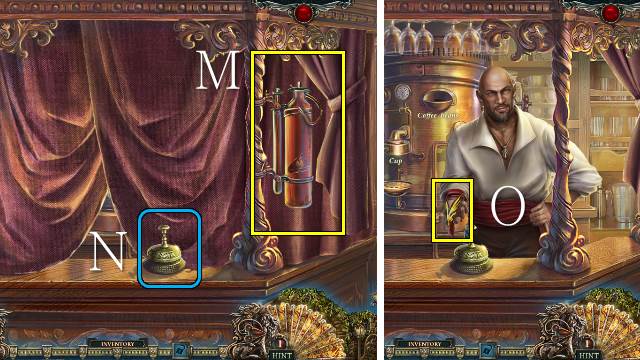
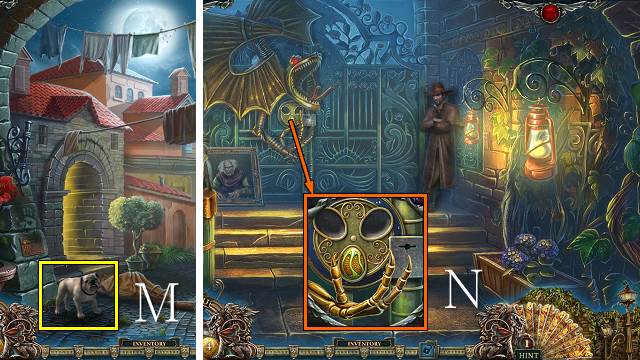
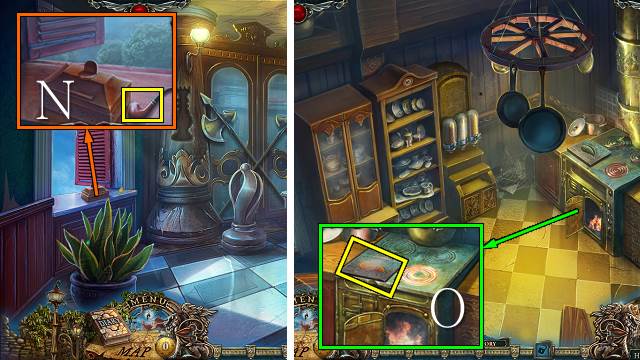
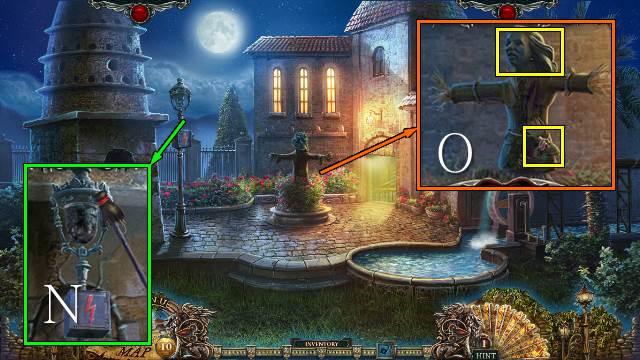
- Take the FIRE EXTINGUISHER (M) and ring the bell (N); talk to the barman and show him ROSA'S PHOTO.
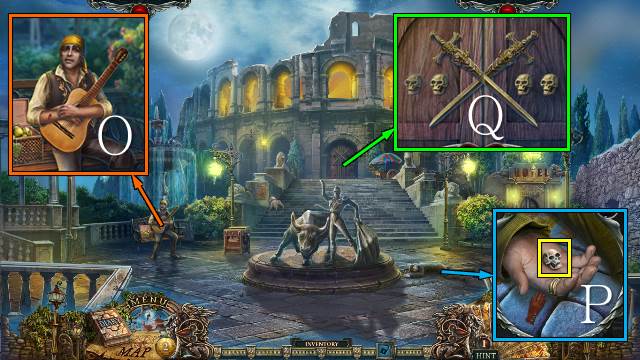
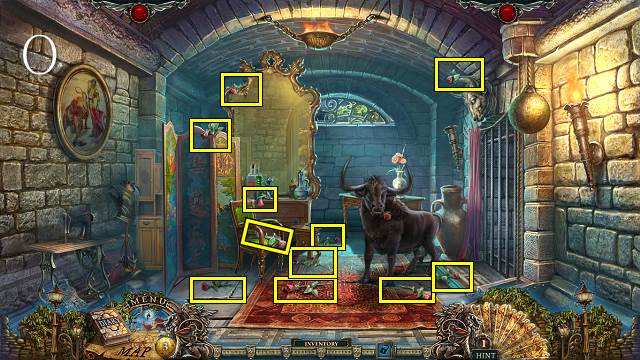
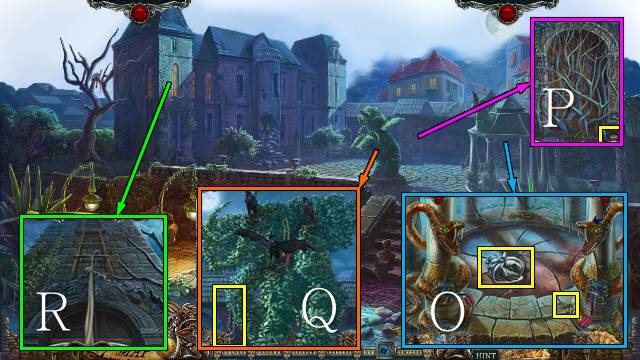
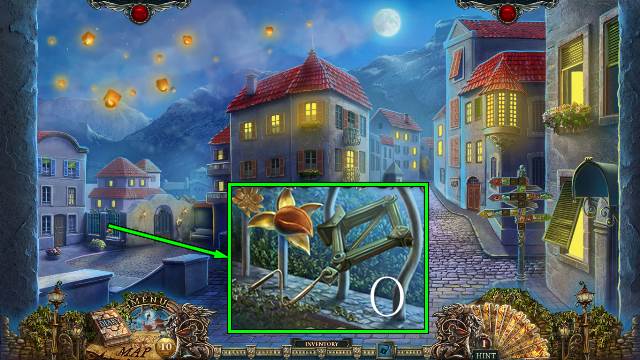
- Take the HELMET PIECE (O).
- Back out and walk down.
- Talk to the paper boy.
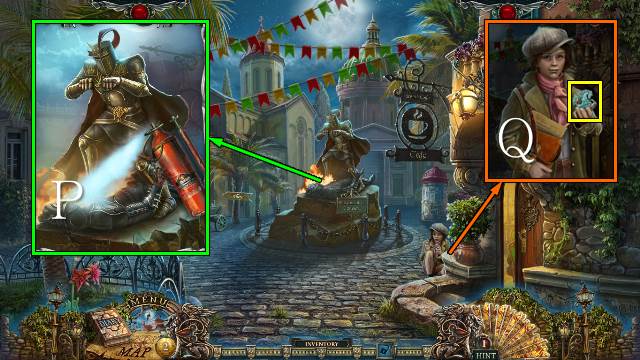
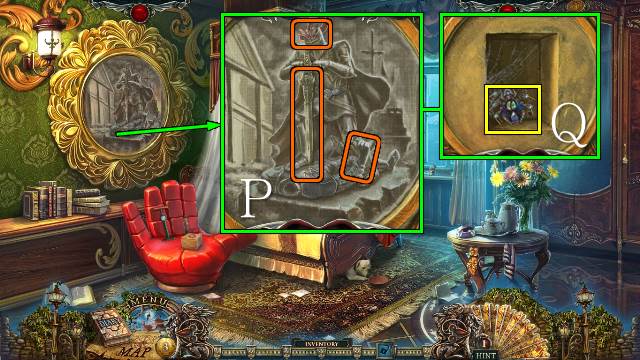
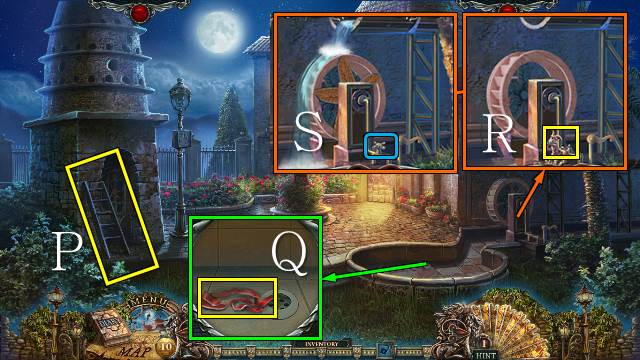
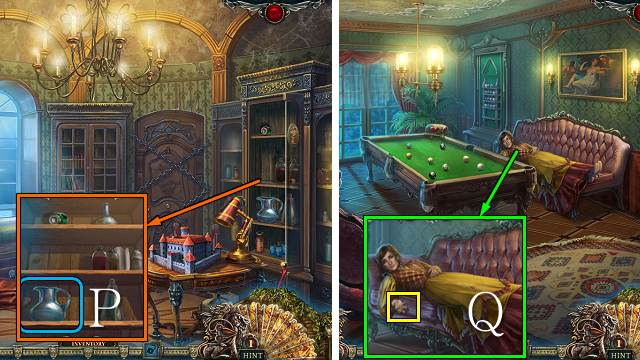
- Extinguish the fire with the FIRE EXTINGUISHER (P).
- Show the paper boy ROSA'S PHOTO; take HORSE 1/2 (Q).
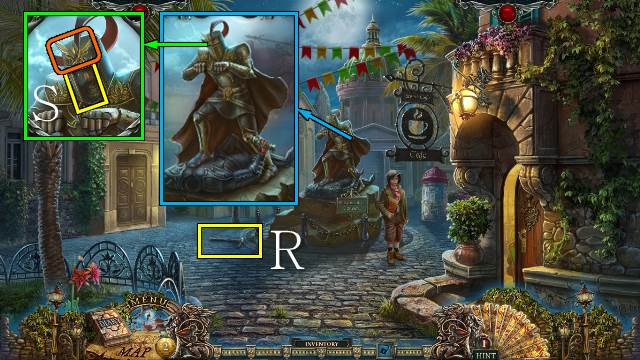
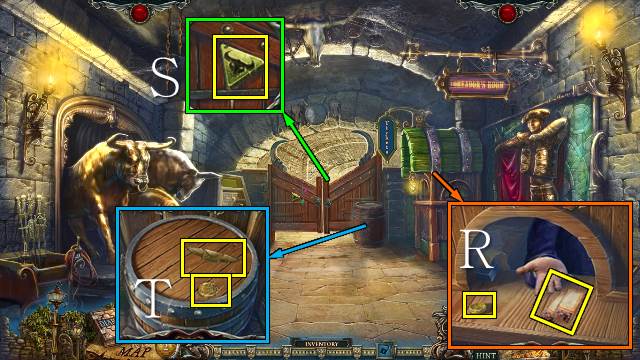
- Take the WALKING STICK (R).
- Put the HELMET PIECE on the helmet; take the LANTERN (S).
- Go left.
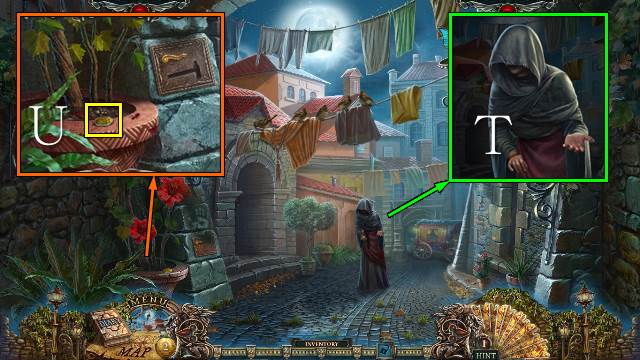
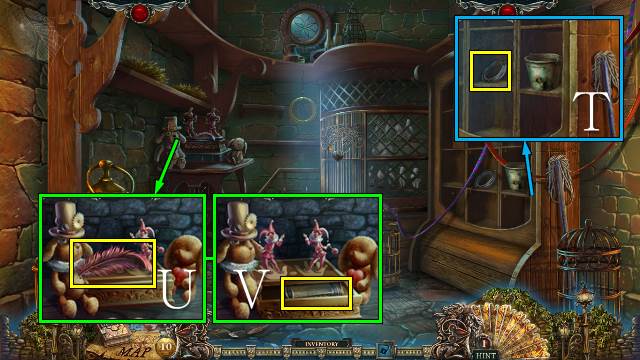
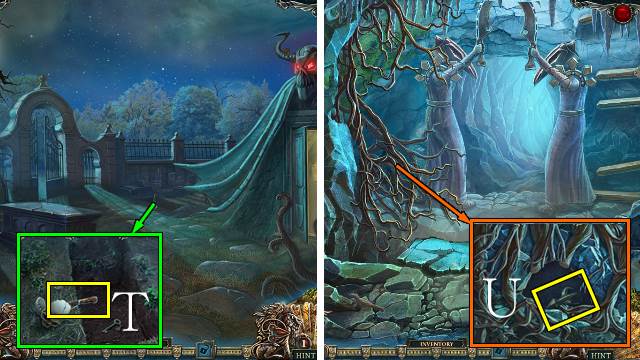
- Talk to the cloaked figure; give her the WALKING STICK (T).
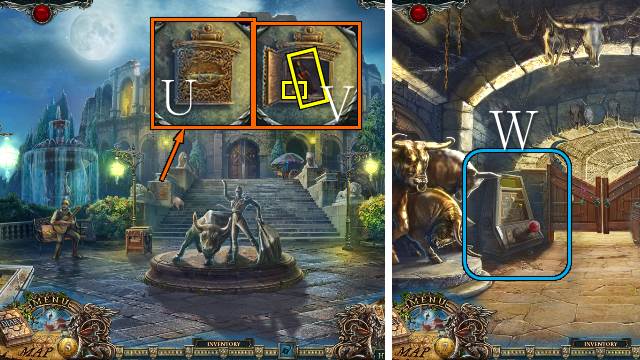
- Take the coin (U).
- Go left.

- Use the LANTERN.
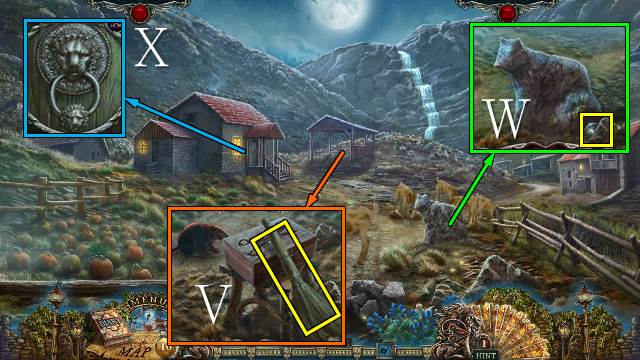
- Talk to the vendor; select the KNIFE (V), then select your coins (W) and give them to the vendor.
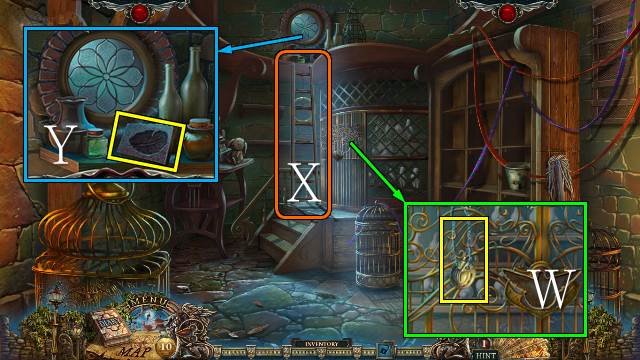
- Take the coin (X).
- Walk down.
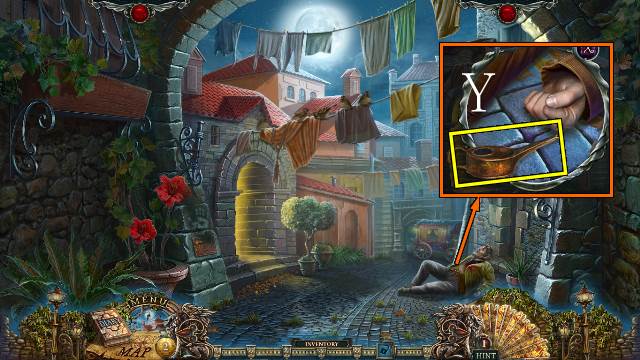
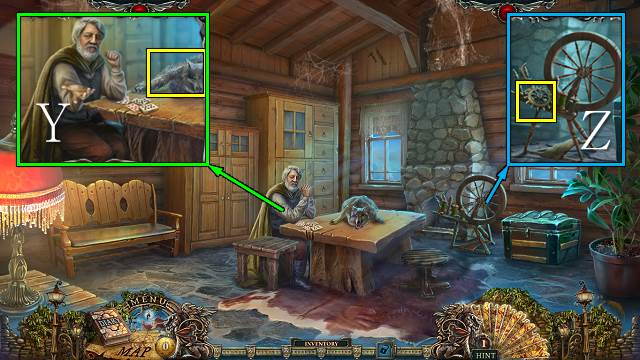
- Take the EMPTY OILCAN (Y).
- Walk forward.
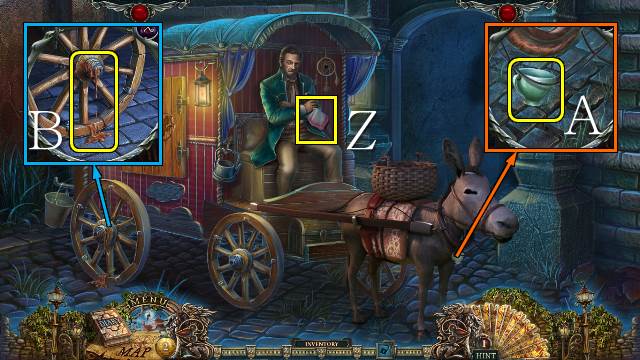
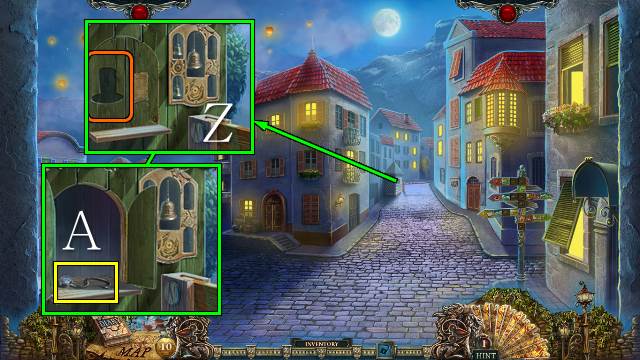
- Take Rosa's handkerchief (Z) and talk to the coachman.
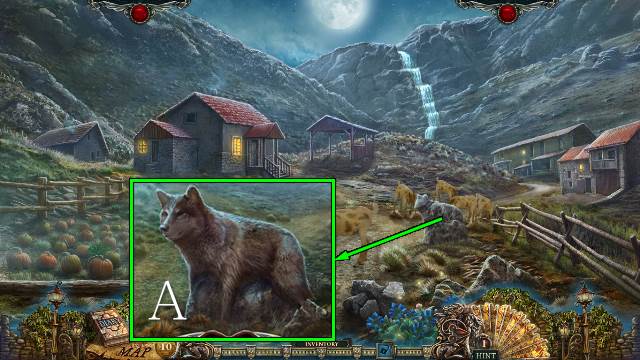
- Cut the strings with the KNIFE to receive the CUP (A).
- Use the EMPTY OILCAN on the wheel to receive a FULL OILCAN (B).
- Walk down twice.
- Talk to the paper boy.
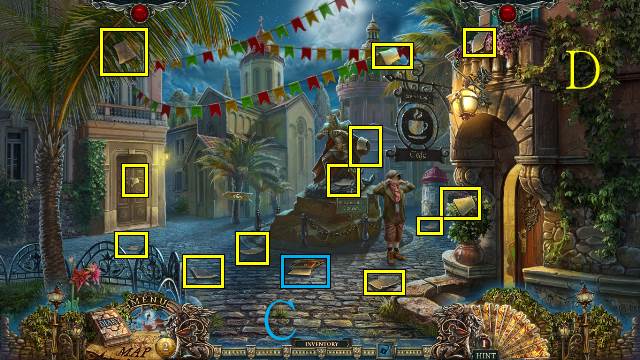
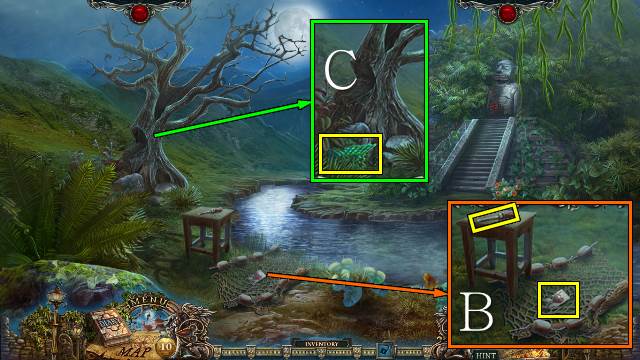
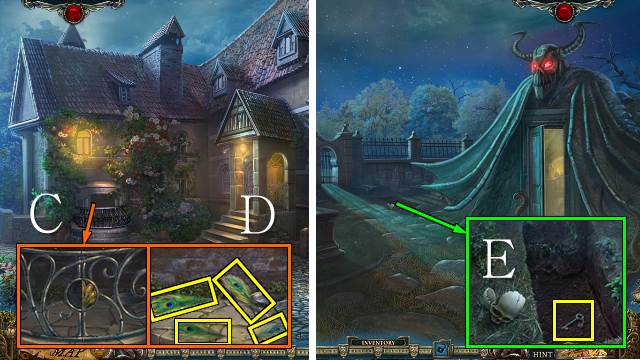
- Take the PAPER BAG (C) and find the 12 newspapers (D).
- Talk to the paper boy and give him the full PAPER BAG.

- Use the FULL OILCAN on the statue; take the HOSE (E).
- Go right.
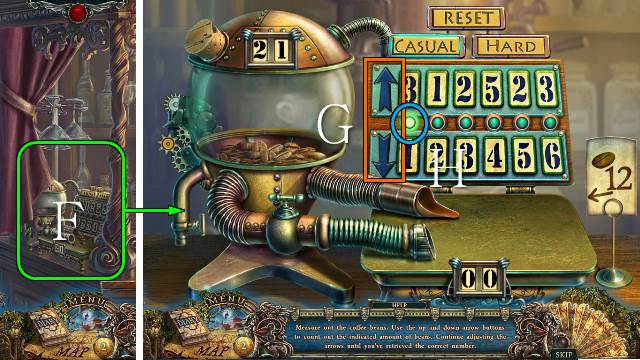
- Put the HOSE on the coffee dispenser (F) for a mini-game.
- Measure out the required number of beans; use the down arrow to add and the up arrow to remove beans (G).
- The number of beans added or removed is indicated by the light (H); bottom row for beans added, top row for beans removed.
- Casual solution: 4x down, up, down.
- Hard solution: 6x down, 6x up, 5x down, 5x up.
- You receive COFFEE BEANS.
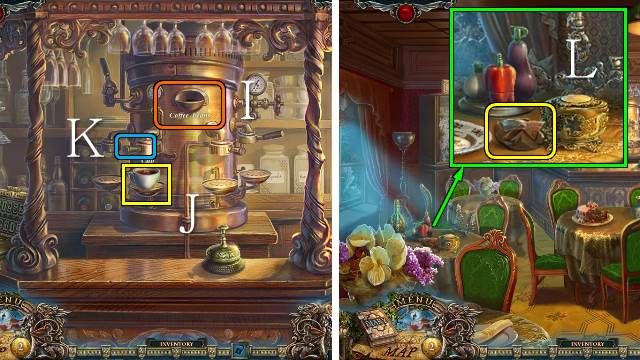
- Put the COFFEE BEANS in the machine (I) and place the CUP under the tap (J); pull the handle (K)and take the CUP OF COFFEE.
- Read the note (L).
- Go to the coachman at the Archway.
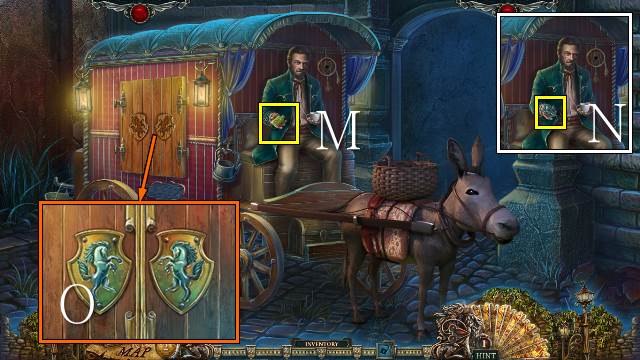
- Give the CUP OF COFFEE to the coachman and show him ROSA'S PHOTO; take the HOTEL TAG (M).
- Take HORSE 2/2 (N).
- Open the cabin with the HORSES (O).
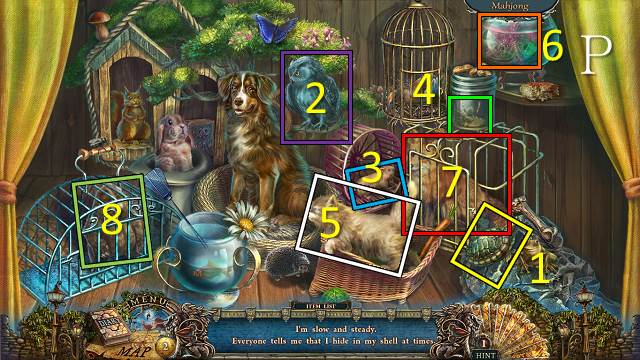
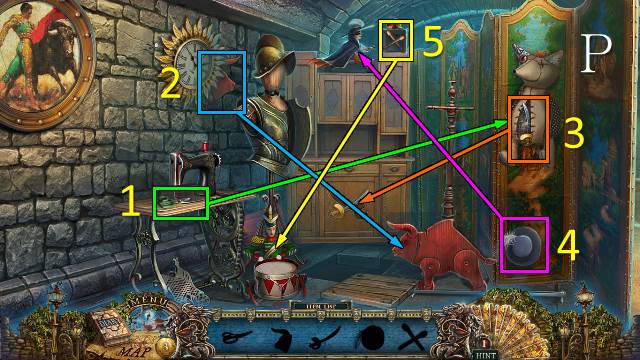
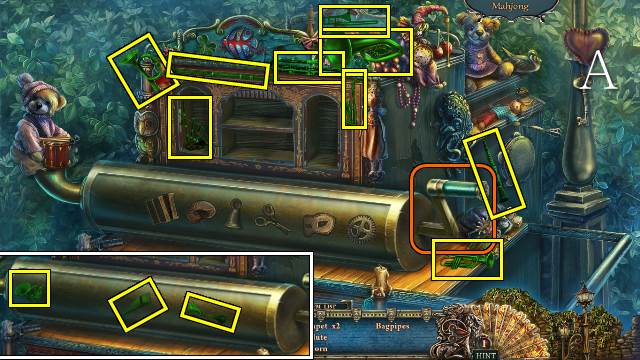
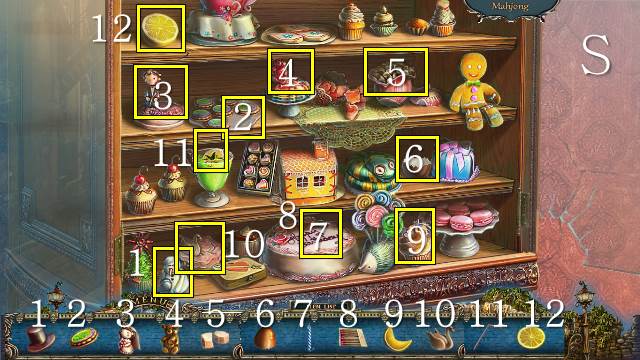
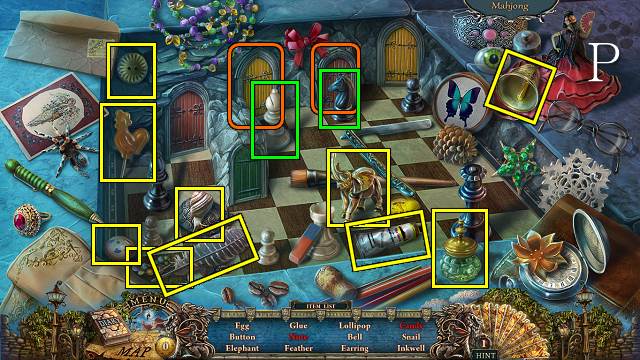
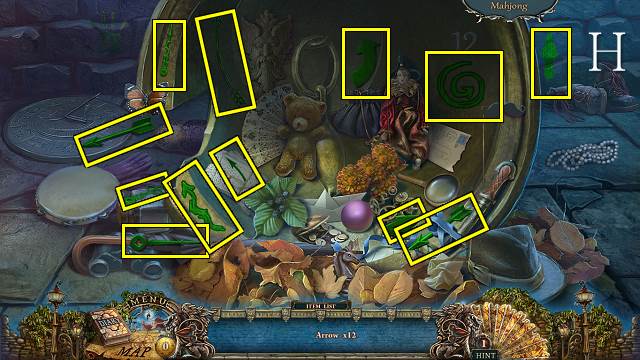
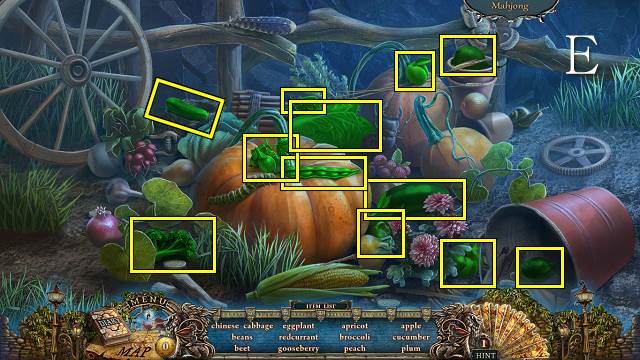
- Play the HOP (P); find the items described in the clues.
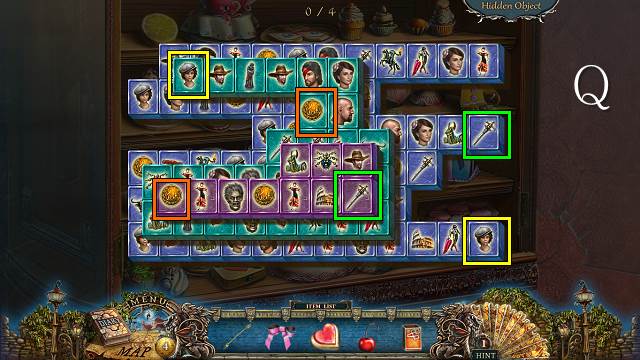
- Alternatively, you can play a Mahjong game (Q).
- Find pairs of matching tiles; tiles must be at the end of a row and may not be covered by other tiles.
- One item will be taken off the HOP list for every four pairs you find.
- You receive a CAT.
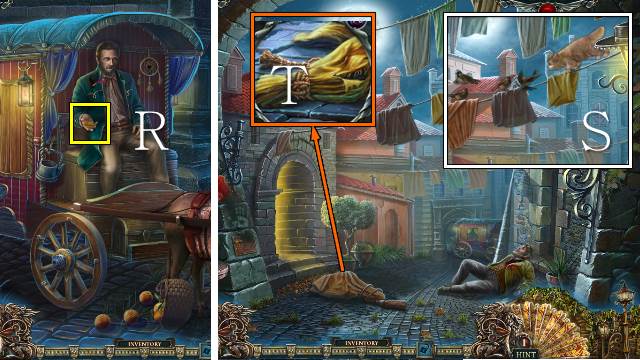
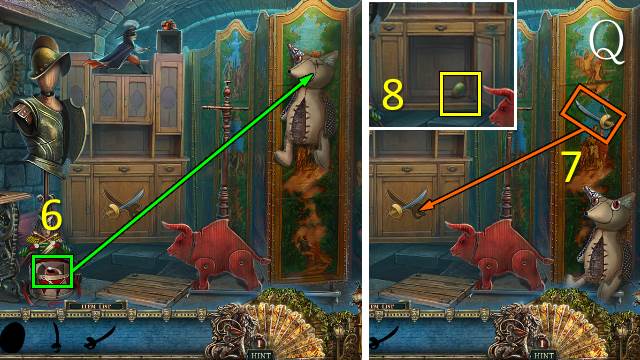
- Talk to the coachman; take the coin (R).
- Walk down.
- Release the CAT on the birds (S).
- Cut the RAG with the KNIFE (T).
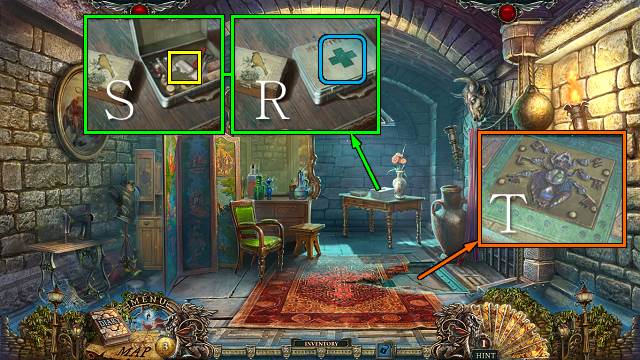
- Go to the Café.
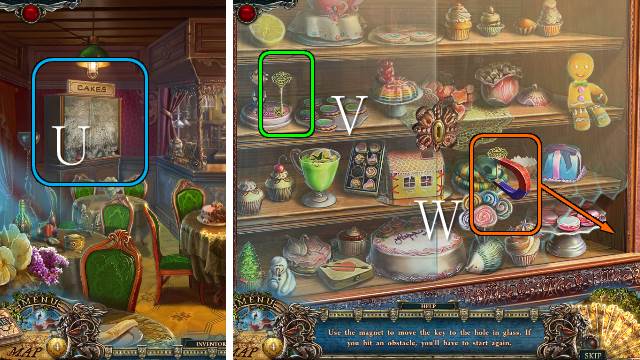
- Wipe the glass (U) with the RAG.
- Use the MAGNET on the key (V) and move it to the hole in the glass (W); you receive a KEY.
- Open the cabinet with the KEY.
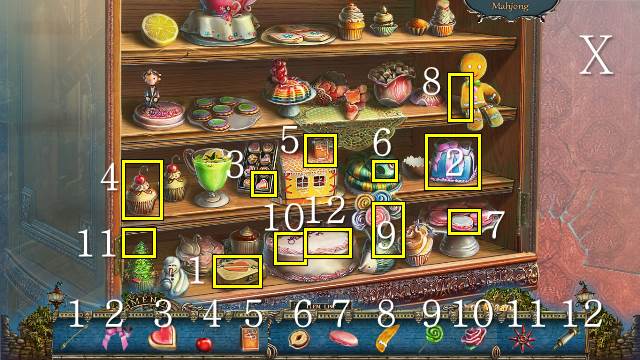
- Play the reverse HOP (X); place the items in the scene.
- You receive a CAKE.
- Go to the Vendor's Gate.
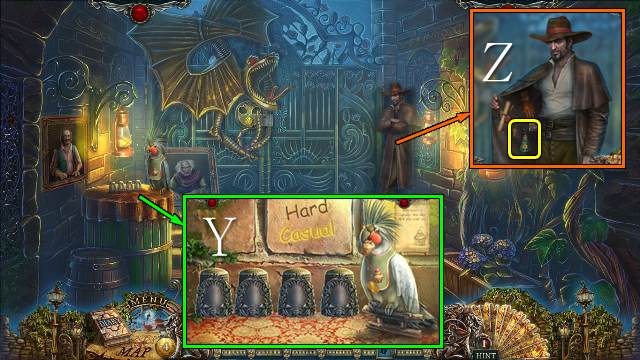
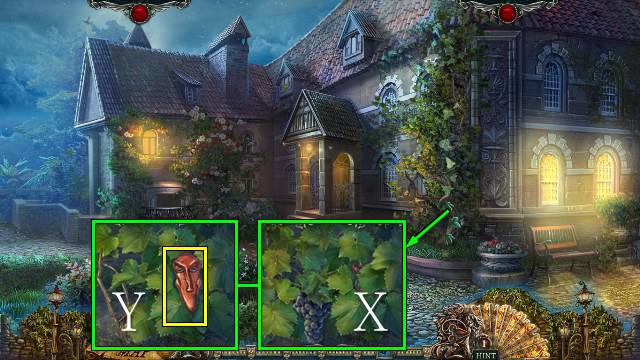
- Give the CAKE to the parrot for a mini-game (Y).
- Watch the thimbles closely to find the coin underneath; in Hard mode there are two coins.
- You receive a coin.
- Select the MEDICINE and give your coins to the vendor (Z).
- Go to the Archway.
- Give the MEDICINE to the coachman.
- Take IRON SKULL 1/4 (A).
- Play the HOP (B).
- Find the items to feed the animals.
- You receive a CARROT and a coin.
- Give the CARROT to the donkey (not shown).
- Walk forward.
Chapter 2: On the Trail of Rosa Ramirez
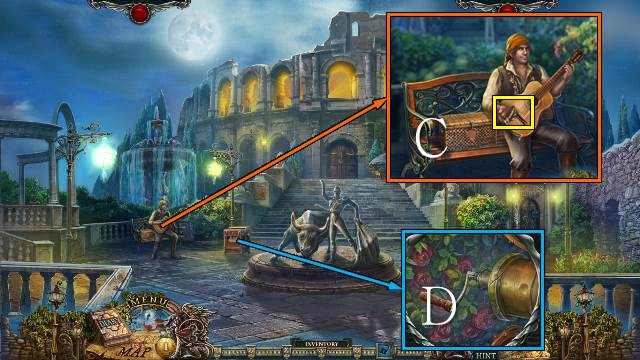
- Talk to the musician; show him ROSA'S PHOTO and take the ORGAN HANDLE (C).
- Put the ORGAN HANDLE on the organ (D).
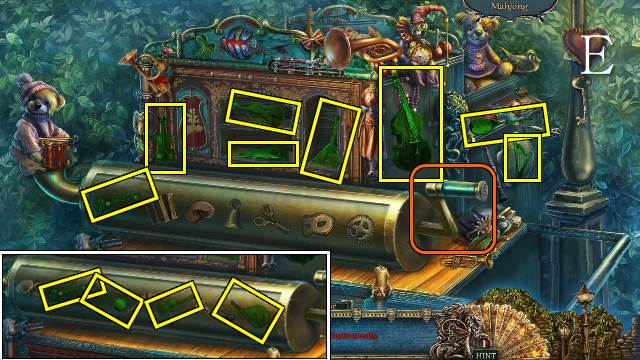
- Play the HOP (E).
- You receive a BELL.
- Take the coin (F).
- Take the coins and read the poster (G).
- Open the fish's mouth and put the BELL in it; ring the bells and walk forward (H).
- Take the TUNING PEG (I).
- Take the coin, put the TUNING PEG on the drawer and turn all handles (J).
- Put the HOTEL TAG in the drawer for a mini-game.
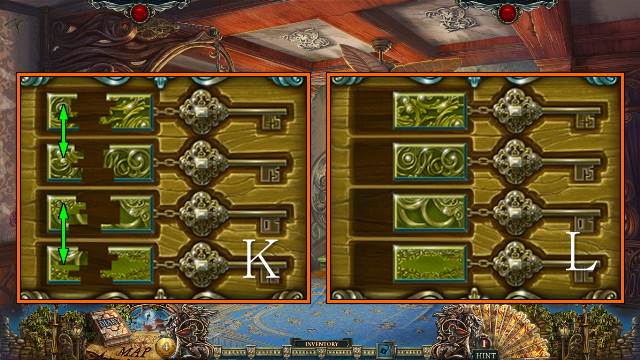
- Swap key tag parts until all pieces fit together (K).
- Take a KEY (L).
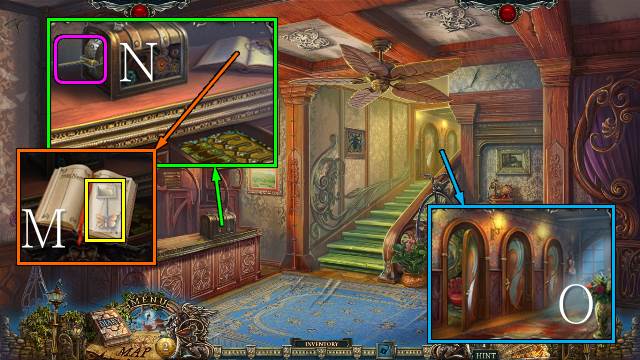
- Read the note and take the LEVER (M); break the lever on the device and put your LEVER on it (N).
- Open one of the doors with your KEY; go in (O).
- Move the loose items to the correct places to complete the statue (P); take the BEETLE (Q).

- Take the CASE LATCH, coin and IRON SKULL 2/4 (R).
- Read the poster and note, put the CASE LATCH on the suitcase and open both clasps (S); take the coin and SHOE and open the diary (T).
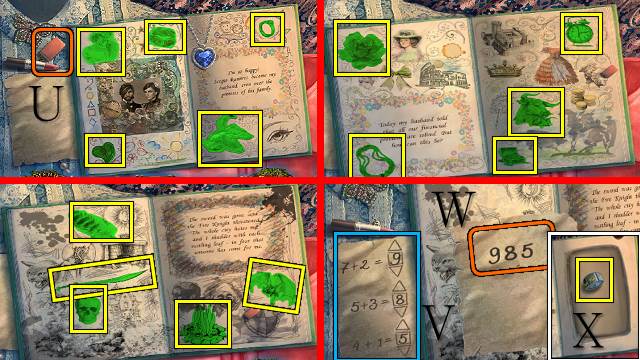
- Play the HOP; erase the listed items with the eraser (U).
- Enter the answers to the sums (V); you receive a code (W).
- Take the LOCK PART (X).
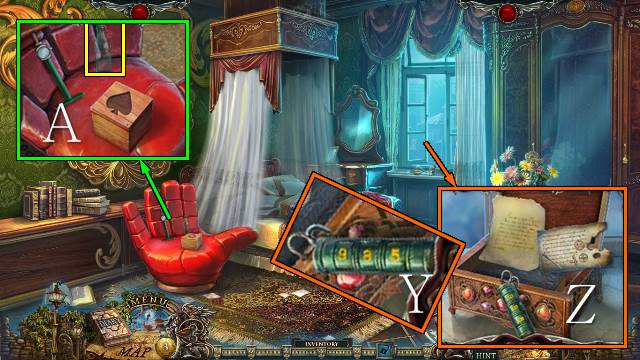
- Put the LOCK PART on the lock and enter 985 (Y); open the chest, move the note and put ROSA'S NOTE on it (Z).
- Take the EMPTY BOTTLE (A).
- Walk down.
- Put the BEETLE on the safe for a mini-game (B).
- Switch keys on the beetle to match the image.
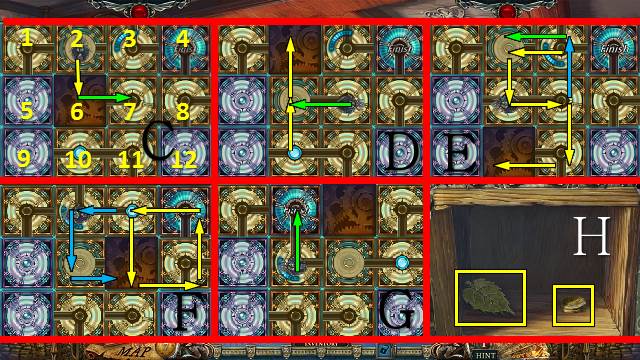
- Slide the tiles to connect pipes for the bug to move between; move the bug to the finish.
- The blue barrier moves when the bug is on the tile with the blue dot.
- Move tile 2, bug (C); 6, 10, bug (D); 11, 7, 6, 2, 3, 7, bug (E); 3, 4, 8, 7, 6, 2, 3 (F); bug (G).
- Take the IRON LEAF and coins (H).
- Walk down.
- Talk to the paper boy (I).
- Put the IRON LEAF on the basket; take the BONE (J).
- Walk down and left.
- Buy the GLOVE (K).
- Walk down.
- Open the victim's hand with the GLOVE; take IRON SKULL 3/4 (L).
- Go to the hotel room.
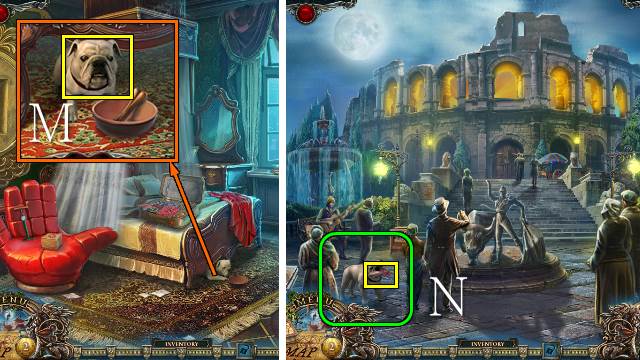
- Give the BONE to the dog; take the DOG (M).
- Walk down twice.
- Release the DOG; show him the SHOE.
- Take the note (N).
- Talk to the musician (O).
- Use the GLOVE to open the victim's hand and take IRON SKULL 4/4 (P).
- Put the IRON SKULLS on the door (Q).
- Walk forward.
Chapter 3: Inside the Coliseum
- Take the coins and ticket (R).
- Take BULL SIGN 1/2 (S).
- Take the coin and ENVELOPE EMBLEM (T).
- Walk down.
- Put the ENVELOPE EMBLEM on the mailbox (U); take the coins and STATUETTE (V).
- Walk forward.
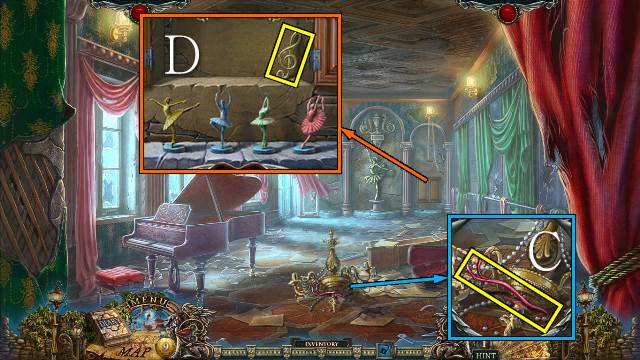
- Put the STATUETTE in the game for a mini-game (W).
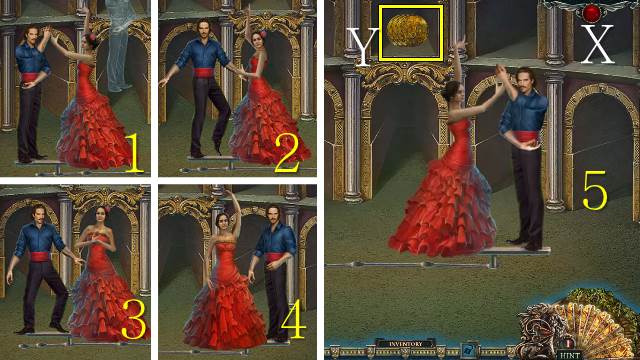
- Move the dancers' limbs to match the example (X).
- Take the coins (Y).
- Go to the Vendor's Gate.
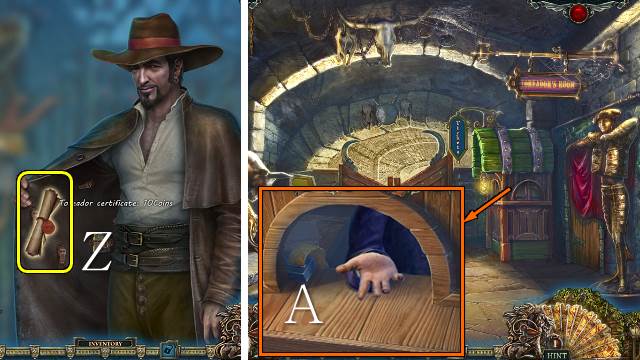
- Buy the TOREADOR CERTIFICATE (Z).
- Go to the Coliseum.
- Give the TOREADOR CERTIFICATE to the ticket seller (A).
- Go right.
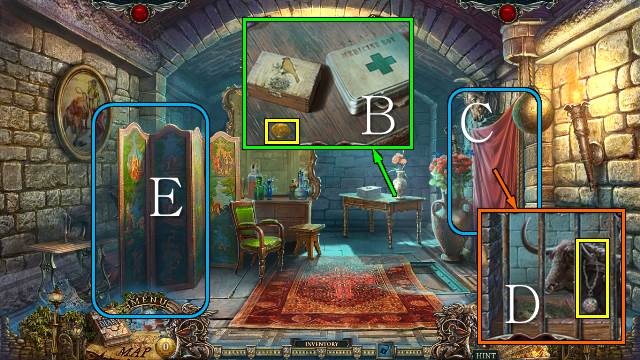
- Take the coin (B).
- Move the curtain (C).
- Take the POCKET WATCH (D).
- Move the room divider (E).
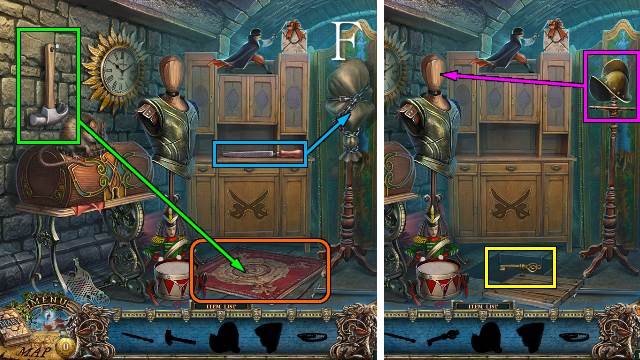
- Play the HOP (F).
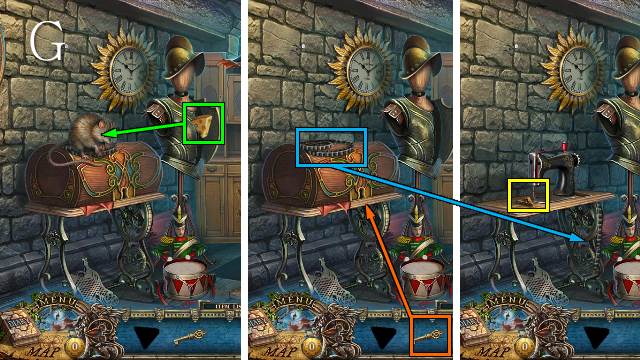
- Play the HOP (G).
- You receive BULL SIGN 2/2.
- Walk down.
- Talk to the paper boy; take the BINOCULARS (H).
- Look through the gate with the BINOCULARS (I).
- Walk down.
- Put the BULL SIGNS on the statue; take the coin and BRUSH (J).
- Walk down.
- Put the EMPTY BOTTLE by the termites and sweep them into the bottle with the BRUSH; you receive the TERMITES (K).
- Go to the Coliseum.
- Release the TERMITES on the barrel (L); hypnotise the snake with the POCKET WATCH and take the SUN (M).
- Walk down.
- Put the SUN on the puppet; take the CROSS (N).
- Go forward and right.
- Find the 12 roses for the BOUQUET (O).
- Give the BOUQUET to the bull.
- Play the HOP (P).
- Play the HOP (Q).
- You receive an EGG.
- Open the medicine box with the CROSS (R); take the BANDAGE (S).
- Cut the carpet with the KNIFE; put the BEETLE on the lock for a mini-game (T).
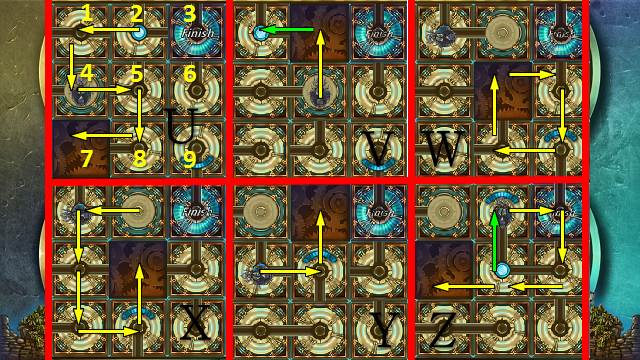
- Play as before.
- Move tile 8, 5, 4, 1, 2 (U); 5, bug (V); 8, 9, 6, 5 (W); 8, 7, 4, 1, 2 (X); 5, 4 (Y); bug, 5, 6, 3, 2, bug (Z).
- Go down the hatch.
- Play the HOP (A).
- You receive a PIANO KEY.
- Put the BANDAGE on the musician's arm; take the WOODEN BIRD (B).
- Go down the hole (C).
- Put the WOODEN BIRD on the box (D); take the EGG and put the BINOCULARS on the lens to get GLASSES (E).
- Go to the Hotel Room.
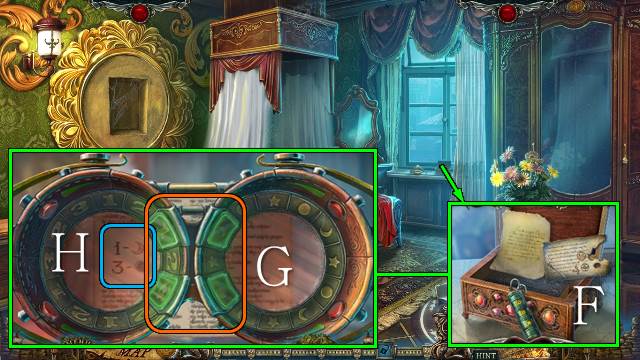
- Look at the notes with the GLASSES for a mini-game (F).
- Use the red buttons to turn the glasses until the numbers and symbols in the viewers (G) match those shown on the paper (H).
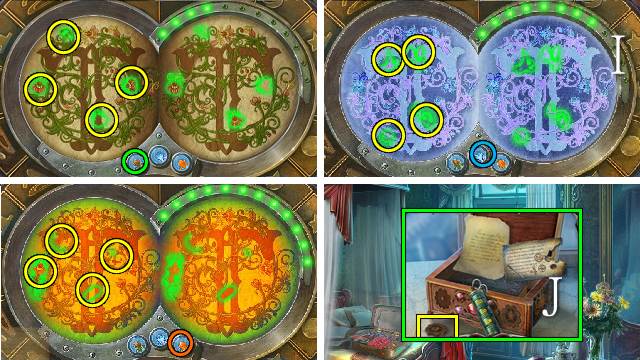
- Find the differences; there are three different filters (I).
- You receive a coin.
- Take the WHEEL (J).
- Walk down.
- Put the WHEEL on the box and pull the lever (K).
- Take the FAN (L).
- Walk down twice.
- Take the DOG (M).
- Go left.
- Put the EGGS on the door (N).
- Walk forward.
Chapter 4: Sergio's Good Fortune
- Take the CLIMBING HOOK and coins (O).
- Take the coins (P).
- Take the VIOLIN CASE KEY (Q).
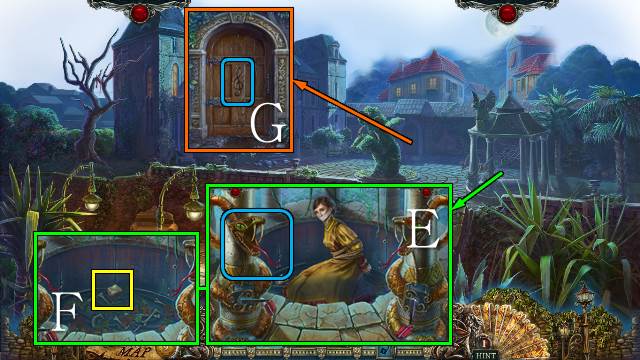
- Throw the CLIMBING HOOK on the ladder (R); go up.
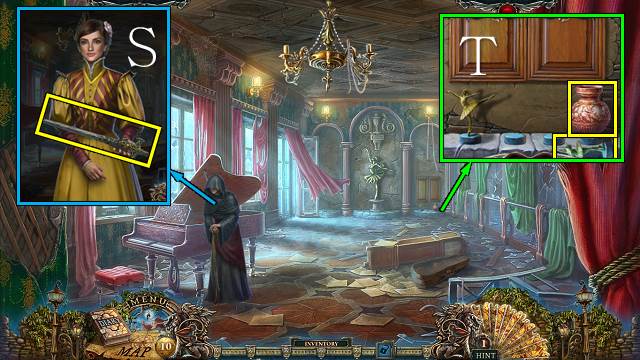
- Remove the cloak and talk to Rosa; take the SWORD and coins (S).
- Take the BALLERINA and EMPTY VESSEL (T).

- Open the case with the VIOLIN CASE KEY; take the BOW (U).
- Put the PIANO KEY on the piano; take the VALVE (V).
- Walk down twice.

- Buy the LIGHTER (W).
- Walk forward.
- Take the BALLERINA with the BOW (X).
- Burn the vines with the LIGHTER (Y) and put the ashes in the EMPTY VESSEL to receive a VESSEL WITH ASH (Z).
- Release the DOG on the door (A); take the BALLERINA (B).
- Walk forward.
- Take the SNAKE'S TONGUE (C).
- Put the three BALLERINAS on the pedestals; take the TREBLE CLEF (D).
- Walk down.
- Put the SNAKE'S TONGUE on the snake (E), cut the ropes with the KNIFE and take the WOODEN CHIP (F).
- Open the door with the TREBLE CLEF (G).
- Walk forward to Main Street.
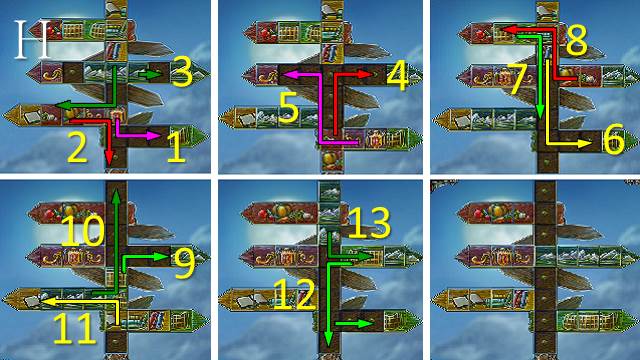
- Put the WOODEN CHIP on the signpost for a mini-game (H).
- Slide the wooden blocks to the arms of the signpost to restore the images.
- Blocks of the same color that are next to each other will slide together.
- Take the FIREWOOD (I).
- Take the SLINGSHOT (J).
- Take the DOOR KEY (K).
- Walk down.

- Shoot the three crows with the SLINGSHOT.
- Take the LIGHTNING EMBLEM (L).
- Walk down twice.
- Open the hatch with the DOOR KEY (M); take the JACK (N).
- Go to Main Street.
- Put the JACK between the bars (O); walk forward.
- Take the LADDER (P).
- Take the RED RIBBON (Q).
- Take the FOOL FIGURE (R), put the FAN and VALVE on the wheel and turn the valve (S).
- Go left.
- Take the WIRE (T).
- Take the FEATHER (U), put the FOOL FIGURE on the box and take the HAT ICON (V).
- Take the PHONOGRAPH NEEDLE (W).
- Put the LADDER under the window (X).
- Take the CASTING MOLD (Y).
- Walk down twice.
- Open the compartment with the HAT ICON (Z); take the PUMP TUBE (A).
- Go to the Hotel Room.
- Put the PUMP TUBE on the PUMP and pick it up (B).
- Walk down.
- Use the PUMP on the bike wheel (C); take the SPADE (D).
- Walk forward.
- Open the box with the SPADE (E); take the VALVE (F).
- Go to the Kitchen Courtyard and go right.
- Put the VESSEL WITH ASH on the safe and push the buttons (G); take the ENVELOPE (H).
- Put the FIREWOOD in the stove and the CASTING MOLD on the stove (I).
- Take the CORKSCREW (J).
- Go left.
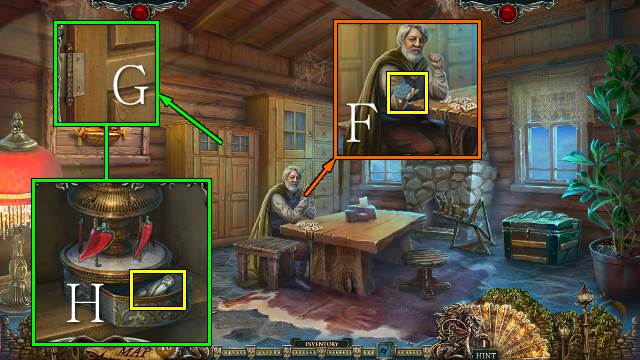
- Talk to Sergio; give him the SWORD and take the CABINET KEY (K).
- Put the PHONOGRAPH NEEDLE on the phonograph and take the WAX SHARD; open the book and read the note (L).
- Open the door with the CABINET KEY (M).
- Walk forward.
- Take the PIPE (N).
- Walk down twice.
- Melt the WAX SHARD on the stove; take the FLOWER PART (O).
- Walk down twice.

- Talk to the paper boy (P).
- Put the FLOWER PART on the flower; take the METAL BIRD (Q).
- Go to the Café.
- Take the CORK from the coffee dispenser with the CORKSCREW (R).
- Play the reverse HOP (S).
- You receive the LEMON HALF.
- Go to Sergio's Sitting Room.
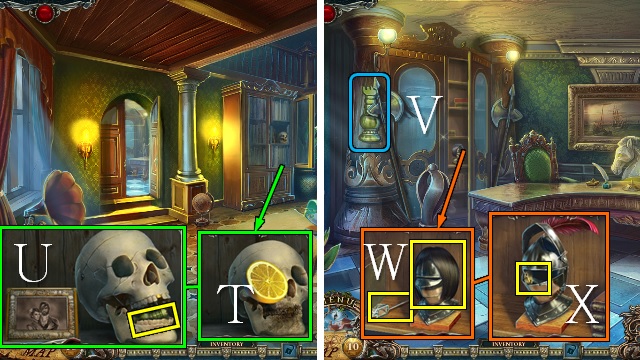
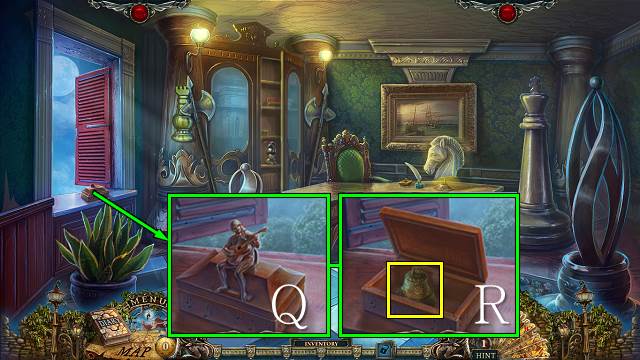
- Inspect the picture and clean the skull with the LEMON HALF (T); push the gold tooth and take the CHESS FIGURE (U).
- Walk forward.
- Put the CHESS FIGURE on the pillar (V).
- Open the door.
- Take the WIG and NET (W); put the FEATHER on the helmet and take the GLASS CUTTER (X).
- Walk down.
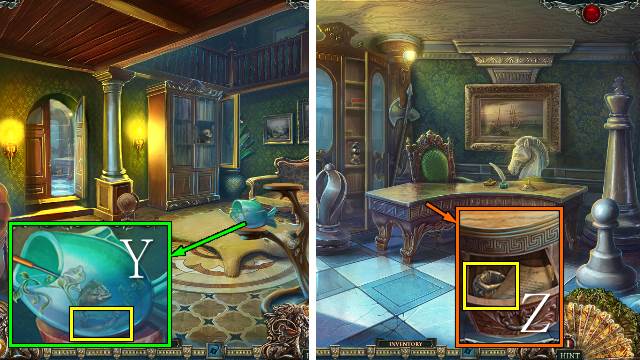
- Take the DESK HANDLE with the NET (Y).
- Walk forward.
- Put the DESK HANDLE on the desk and open the drawer; take the BAG and note (Z).
- Walk down twice.
- Put the VALVE on the dispenser and the BAG under it; turn the valve and take the RICE (A).
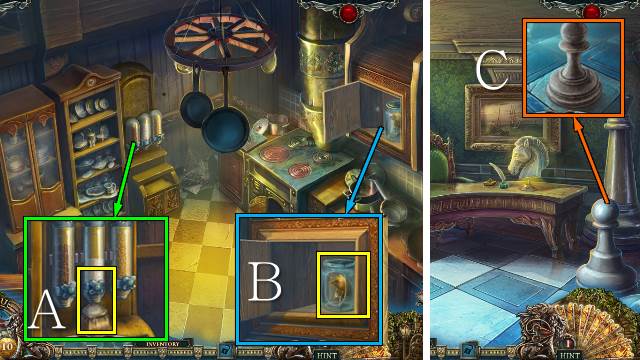
- Cut the jar with the GLASS CUTTER and take the CROWN (B).
- Go to Sergio's Office.
- Put the CROWN on the pawn (C).
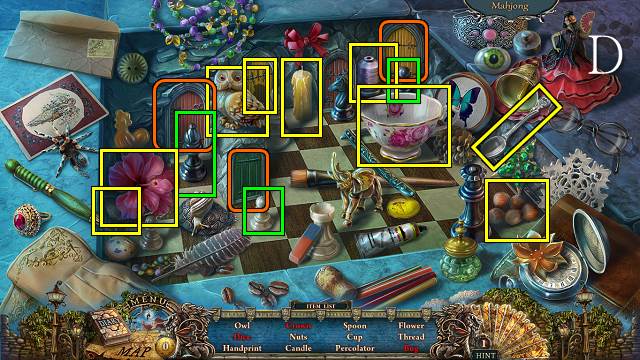
- Play the HOP (D).
- You receive a SERVER.
- Walk down twice.
- Open the latch with the SERVER (E); take the TEAPOT (F).
- Walk down.
- Plug the hole with the CORK and fill the TEAPOT in the basin; you receive a FILLED TEAPOT (G).
- Go right.
- Put the FILLED TEAPOT on the stove and put the ENVELOPE in the steam (H); take the RAZOR and note (I).
- Go to the Pigeon Coop.
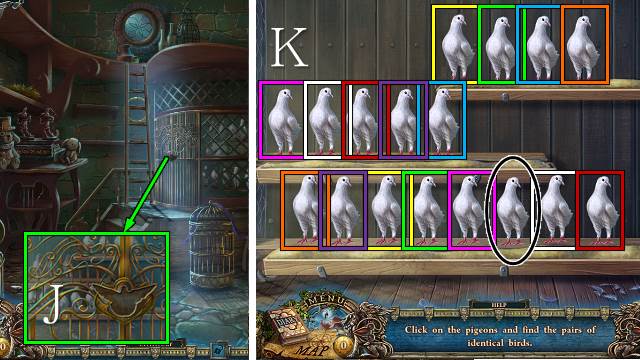
- Open the cage with the METAL BIRD (J).
- Put the RICE down for a mini-game (K).
- Find the pairs of birds with the same movements.
- Take the BLACK PIGEON.
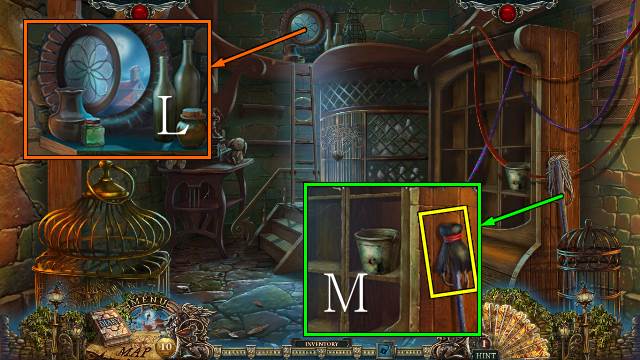
- Open the window and release the BLACK PIGEON (L).
- Put the WIG and RED RIBBON on the mop; take the MOP (M).
- Walk down.
- Open the power box with the LIGHTNING EMBLEM, put the WIRE in the light box and clean the lamp with the MOP (N).
- Move the hat and take the STATUE HEAD; open the pocket with the RAZOR and take the MUSICIAN FIGURINE (O).
- Go to Sergio's Office.
- Play the HOP (P).
- You receive BELL 1/2.
- Put the MUSICIAN FIGURINE on the box (Q); take BELL 2/2 (R).
- Go to Main Street.
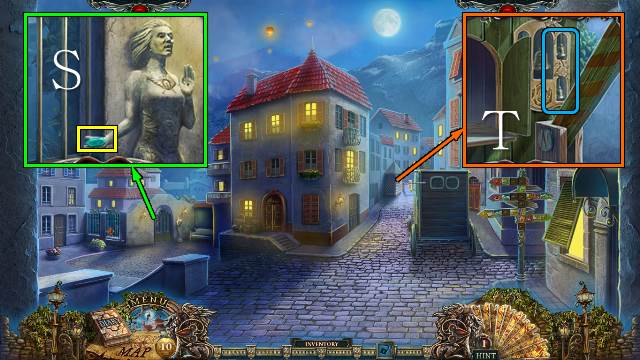
- Put the STATUE HEAD on the statue and take the CRYSTAL (S).
- Put the two BELLS in the mechanism (T).
- Walk forward.
Chapter 5: Into the Mountains
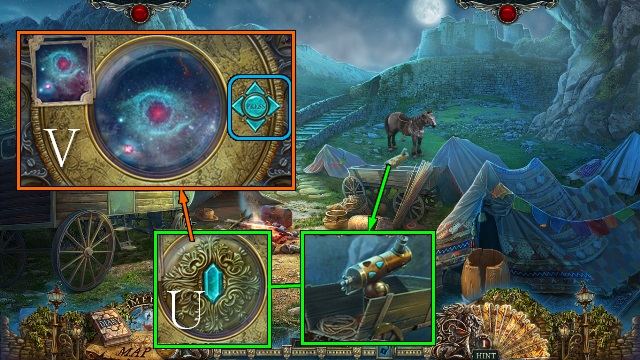
- Put the CRYSTAL on the telescope for a mini-game (U).
- Use the arrow keys to find the constellations in the pictures; push the round button each time you found one (V).
- Walk forward.
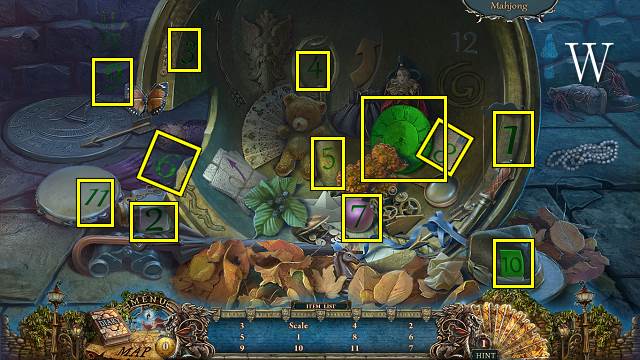
- Play the HOP (W).
- You receive the CLOCK DIAL.
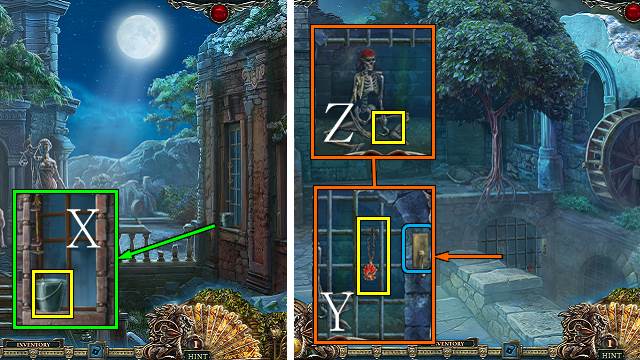
- Take the BUCKET (X).
- Walk right.
- Take the CHEST PIECE and flip the lever (Y); take the HOOK (Z).
- Walk down twice.
- Attach the HOOK to the rope to receive a ROPE WITH HOOK (A).
- Walk forward and then right.
- Throw the ROPE WITH HOOK over the wall.
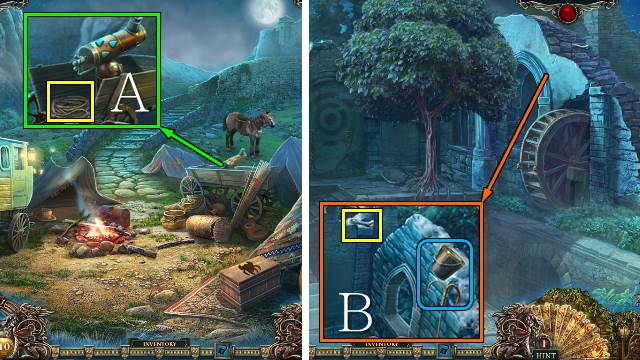
- Take the BONE and take some snow with the BUCKET to get a BUCKET WITH SNOW (B).
- Walk down twice.
- Extinguish the fire with the BUCKET WITH SNOW (C); open the chest with the CHEST PIECE and take the CRYSTAL BALL (D).
- Walk forward.
- Give the BONE to the wolf (E).
- Put the CRYSTAL BALL on the scales; take the VINEGAR (F).
- Pour the VINEGAR on the rust; take the SPEAR (G).
- Play the HOP (H).
- You receive the CLOCK HANDS.
- Walk forward.
- Talk to the man; put the PIPE next to the gun and use the GLASSES for a mini-game (I).
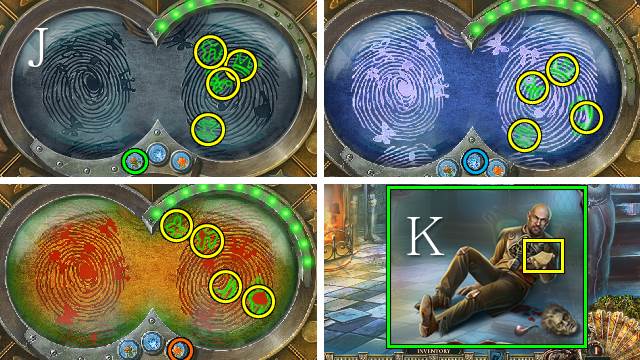
- Find the differences between the finger prints; there are three different views (J).
- You receive the EMPTY REVOLVER.
- Take the LETTER (K).
- Take the SHIELD (L); remove the rust with the VINEGAR and take the SCEPTER (M).
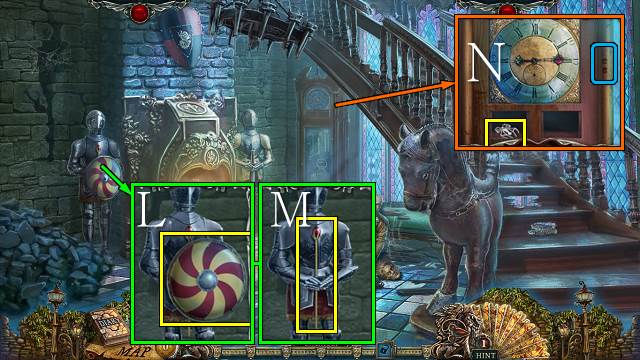
- Put the CLOCK DIAL and CLOCK HANDS on the clock, set it to 9:15 and take the CHEST KEY (N).
- Walk down twice.

- Open the chest with the CHEST KEY (O); take the MEDALLION and CLIPPERS (P).
- Walk forward and right.
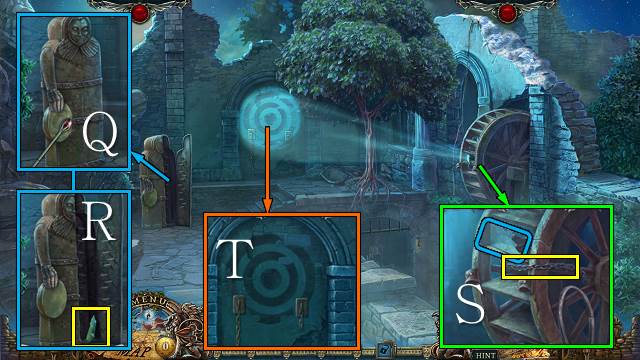
- Hit the drum with the SCEPTER (Q); take the MIRROR SHARD (R).
- Put the MIRROR SHARD on the water wheel; cut the CHAIN with the CLIPPERS (S).
- Throw the SPEAR at the bull's eye (T).
- Walk forward.
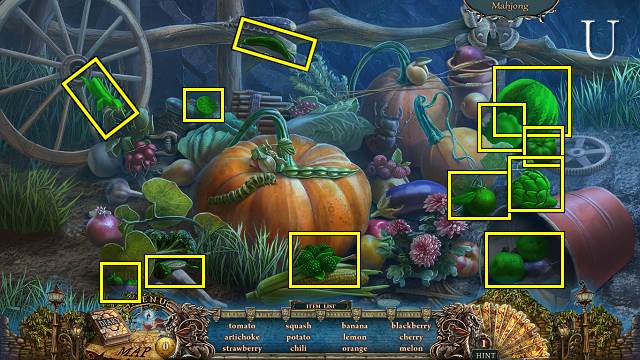
- Play the HOP (U).
- You receive the CHILI.
- Take the BROOM (V).
- Take the KNOCKER (W).
- Put the KNOCKER on the door and knock (X).
- Go left.
- Talk to the shepherd and give him the LETTER; take the WOLF PELT (Y).
- Take the COGWHEEL (Z).
- Walk down.
- Put the WOLF PELT on the wolf (A).
- Go right.
- Take the CARD and SCREWDRIVER (B).
- Take the CAGE (C).
- Walk down.
- Put the CAGE on the beaver and play the mini-game.
- Move the beaver to the cage; the beaver's movements are random (D).
- You receive the BEAVER.
- Play the HOP (E).
- You receive an APPLE.
- Go left.
- Give the CARD to the shepherd; take the MEDALLION (F).
- Remove the screws with the SCREWDRIVER (G); put the CHILI on the carousel and take the STONE STATUE (H).
- Walk down and right.
- Release the BEAVER on the tree (I).
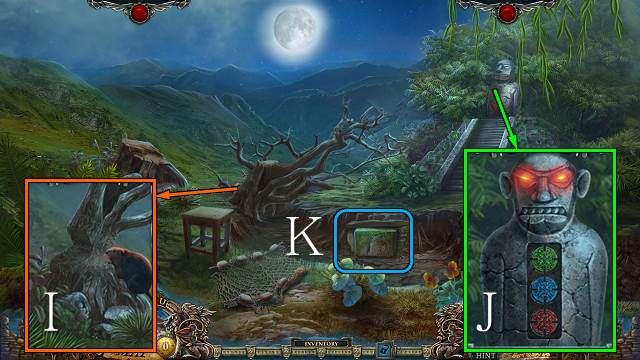
- Put the MEDALLIONS on the statue (J).
- Go down the hole (K).
Chapter 6: A Mystery Solved
- Remove the cobweb with the BROOM; place the COGWHEEL and CHAIN, turn the wheel and take the EYE (L).
- Remove the tapestry and put the STONE STATUE down; push the button (M).
- Play the mini-game.

- Level 1: Set the wooden levers so that each piece falls onto the correct part of the knight (N).
- Level 2: Select the piece of armor that requires the lever settings shown (O).
- Solution: helmet, shoe, epaulet, belt.
- Walk forward.
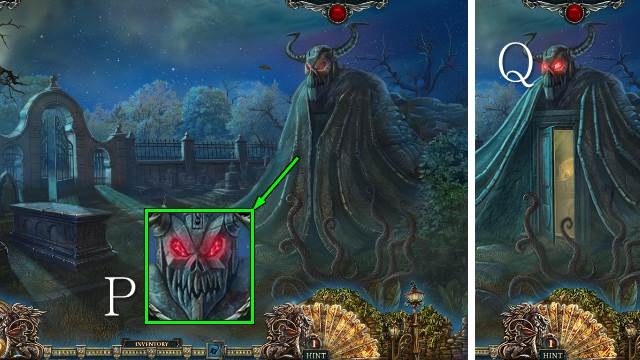
- Put the EYE in the gargoyle's face (P).
- Open the door and go right (Q).
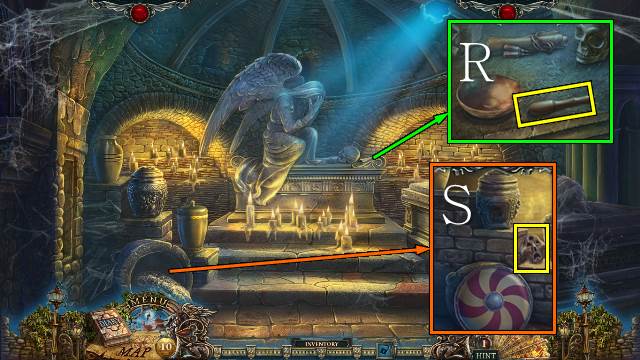
- Take the BATON (R).
- Put the APPLE in the urn and close it with the SHIELD; take the MASK (S).
- Walk down.
- Hit the machete with the BATON; take the MACHETE (T).
- Walk down.
- Remove the vines with the MACHETE; take the COFFIN PIECE (U).
- Walk forward and right.

- Put the COFFIN PIECE on the sarcophagus (V).
- Play the HOP (W).
- You receive a HEART.
- Walk down and forward.
- Remove the vines with the MACHETE (X); take the MASK (Y).
- Go forward.
- Put the HEART on the box (Z); take the KNIGHT (A).
- Take the CUE and the PEACOCK KEY (B).
- Walk down.
- Open the gate with the PEACOCK KEY (C); take the four FEATHERS (D).
- Walk down.
- Take the WINDOW KEY with the CUE (E).
- Go forward.
- Open the window with the WINDOW KEY (F); go in.
- Move the drape (G).
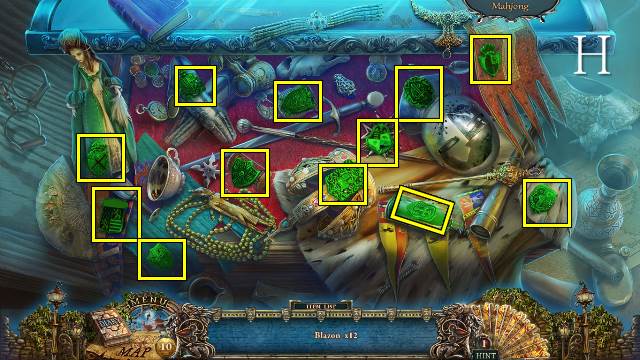
- Play the HOP (H).
- You receive a BLAZON.
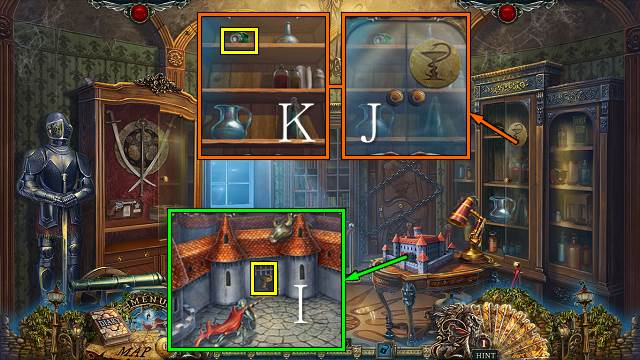
- Fight the dragon with the KNIGHT; open the gate and take the SNAKE EMBLEM (I).
- Open the cabinet with the SNAKE EMBLEM (J); take the AMMONIA (K).
- Walk down twice.
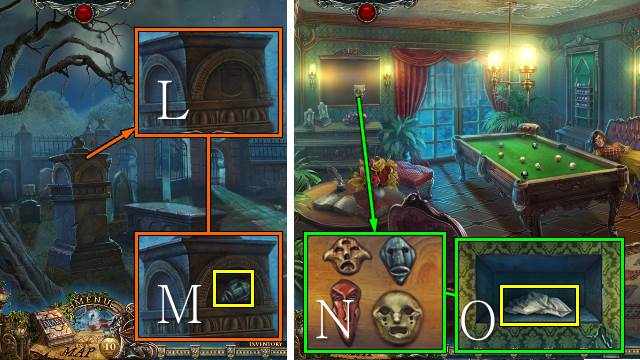
- Put the BLAZON on the pillar (L); take the MASK (M).
- Walk forward twice.
- Put the three MASKS on the wall (N); take the RAG (O).
- Walk down and right.
- Soak the RAG in the water and take the COMPRESS (P).
- Go down and forward.
- Put the COMPRESS on Rosa's head and revive her with the AMMONIA; talk to Rosa and take the CANNON (Q).
- Go down and right.

- Fan away the mosquitoes with the FEATHERS and open the box with the CANNON (R); put the EMPTY REVOLVER in the box and take the LOADED REVOLVER (T).
- Walk down and forward.
- Talk to Pedro and aim the LOADED REVOLVER at him (U).
Created at: 2014-05-23