

Walkthrough Menu
- General Tips
- Chapter 1: A Kidnapping
- Chapter 2: I'm Dead?
- Chapter 3: Dead Again
- Chapter 4: The Castle Gates
- Chapter 5: Third Time's the Charm
General Tips
- This is the official guide for Grim Façade: Hidden Sins.
- This guide will not mention each time you have to zoom into a location; the screenshots will show each zoom scene.
- Hidden-object puzzles are referred to as HOPs. This guide will not show HOP solutions. It will identify the location of the HOP and the inventory item acquired.
- This guide will show solutions for non-random puzzles. Please read the in-game instructions for each puzzle.
Chapter 1: A Kidnapping
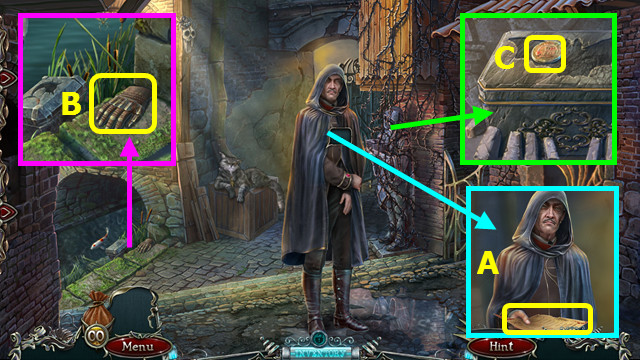
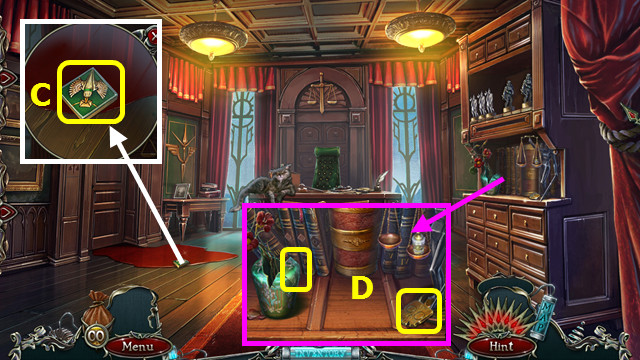
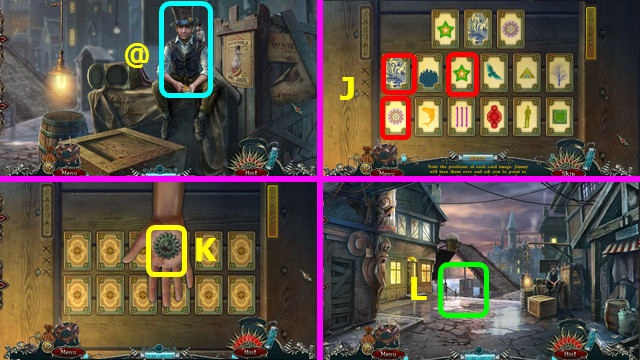
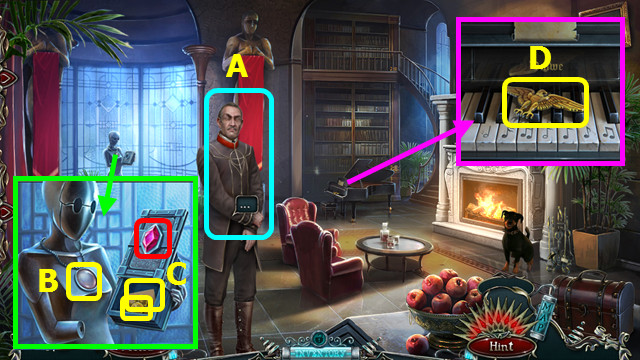
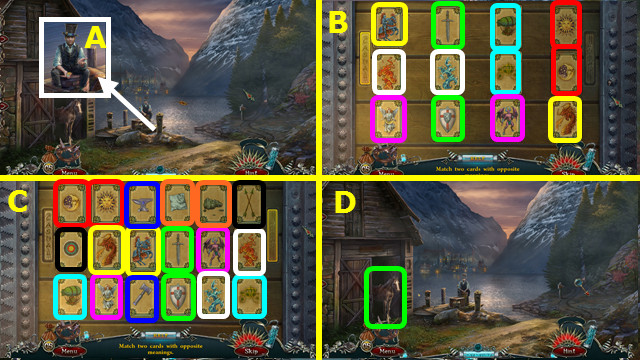
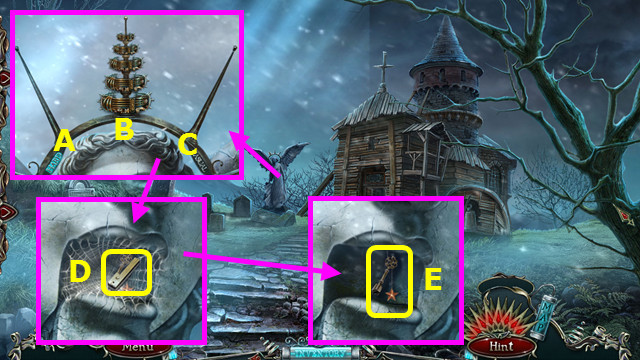
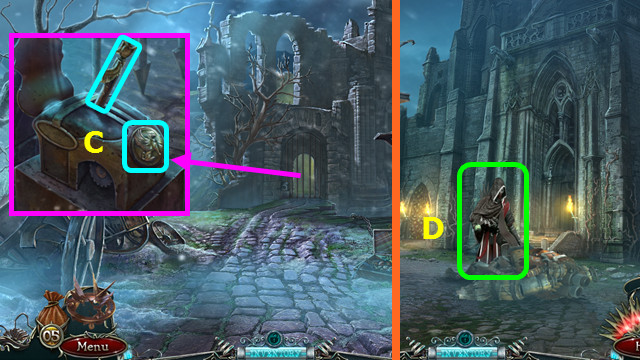
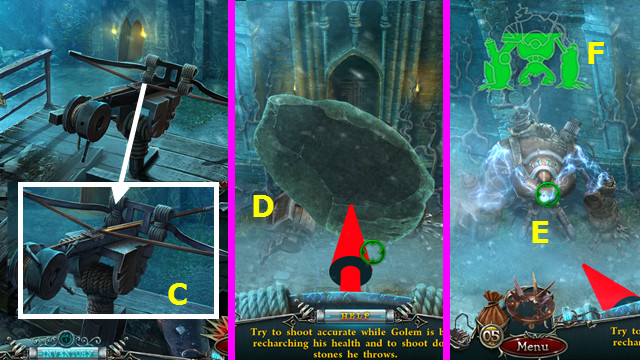
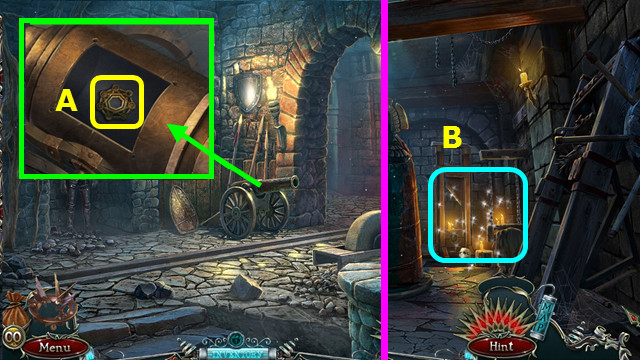
- Talk to Isaac thoroughly; take the BLACKLIST (A).
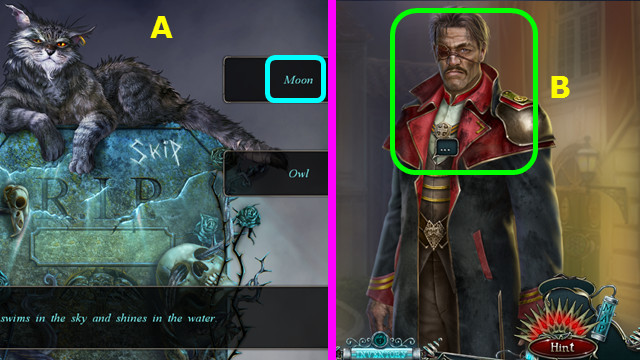
- Take the GAUNTLET (B).
- Use the GAUNTLET; take the OLD COIN (C).
- Walk forward.
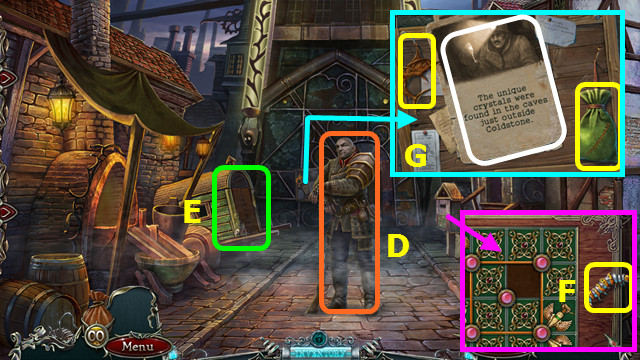
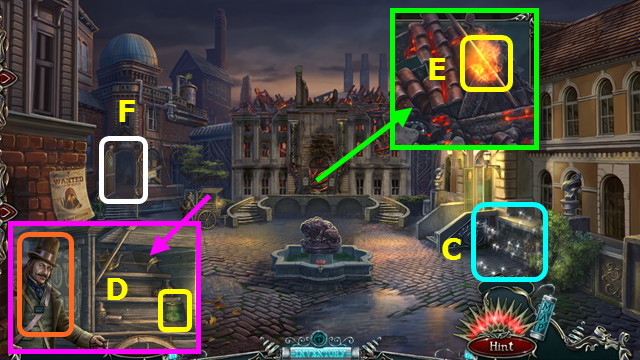
- Talk to the Guard (D).
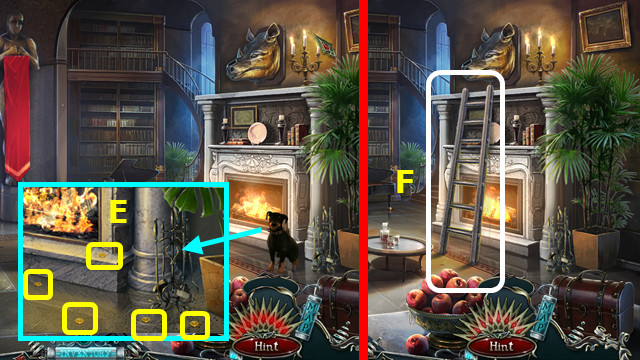
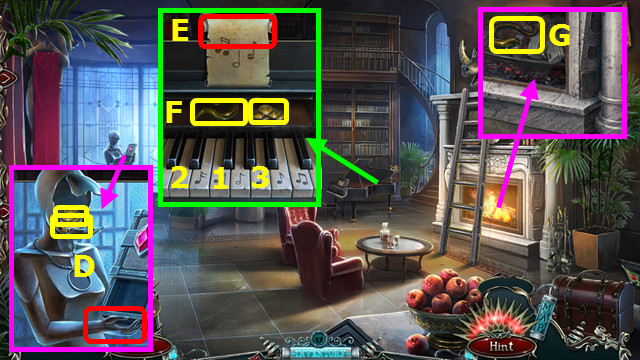
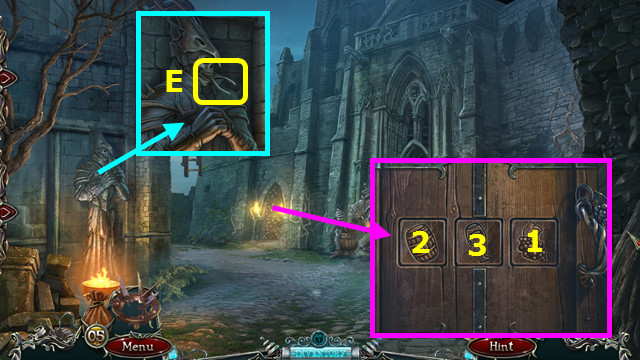
- Play the HOP; earn the BAT FIGURINE (E).
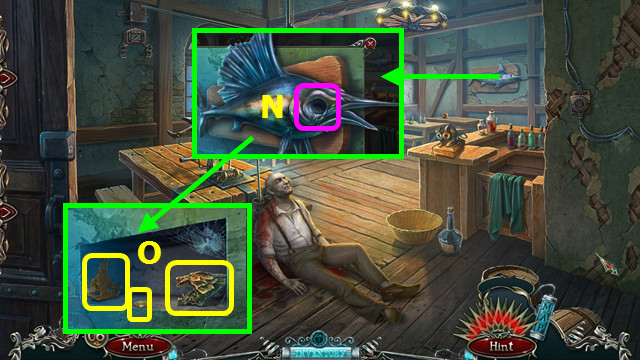
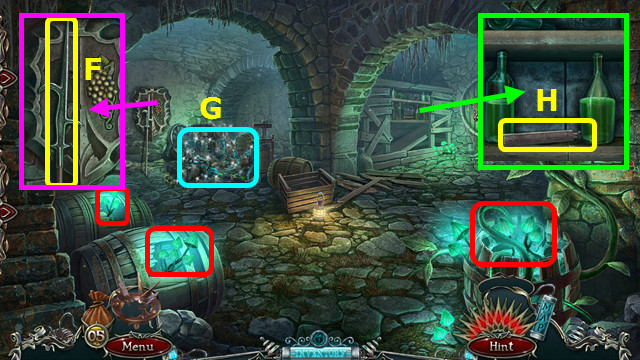
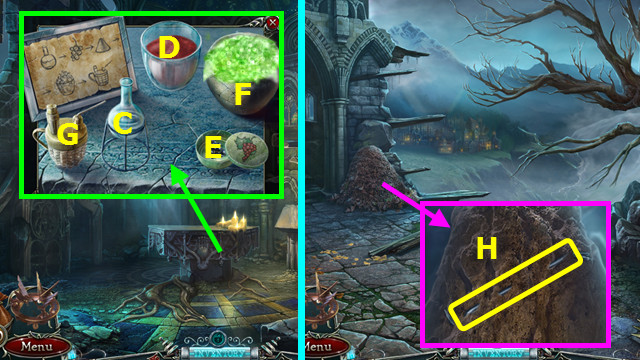
- Take the CATERPILLAR (F).
- Take the FISH FIGURINE and BAG; read the note (G).
- Walk down.
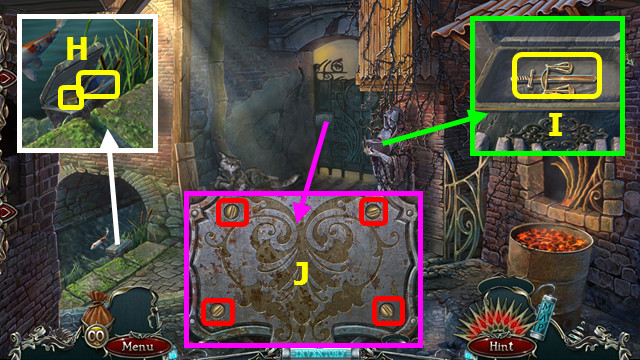
- Place the FISH FIGURINE; take the FISHING LINE and TONGS (H).
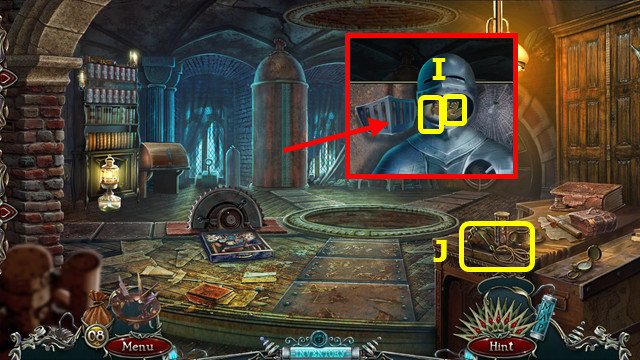
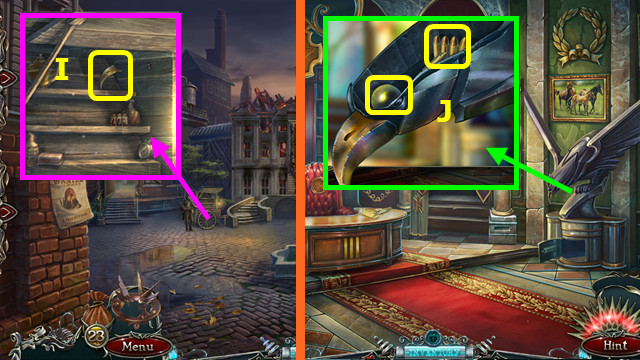
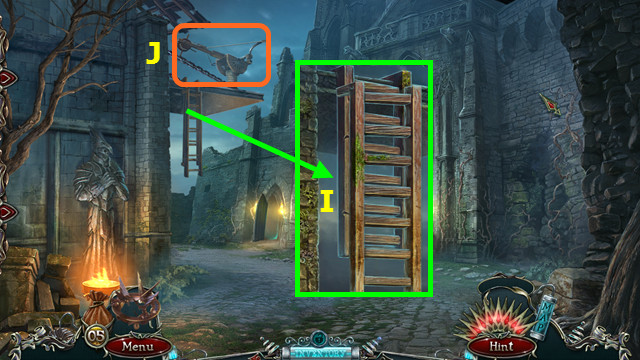
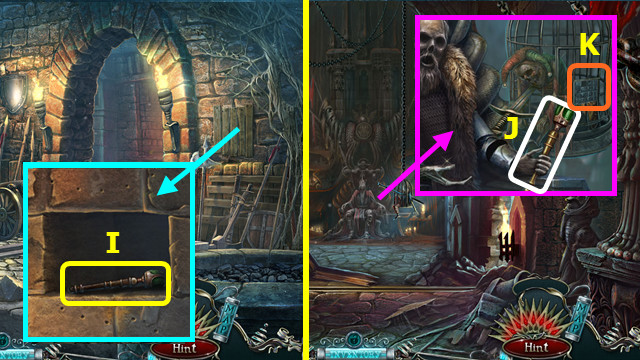
- Place the BAT FIGURINE; take the WOODEN SYMBOL (I).
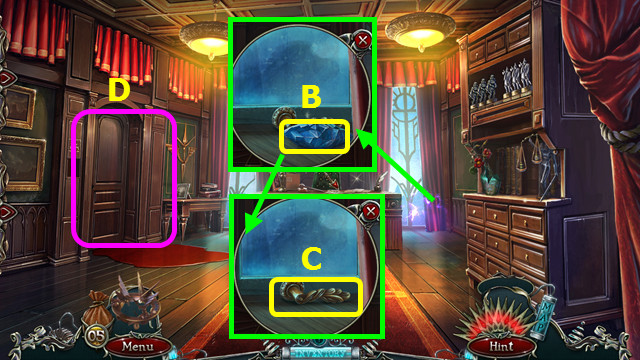
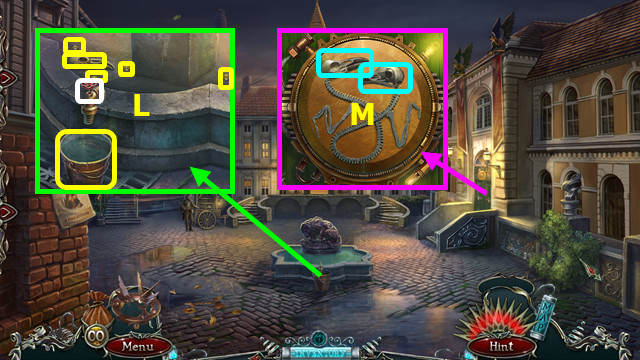
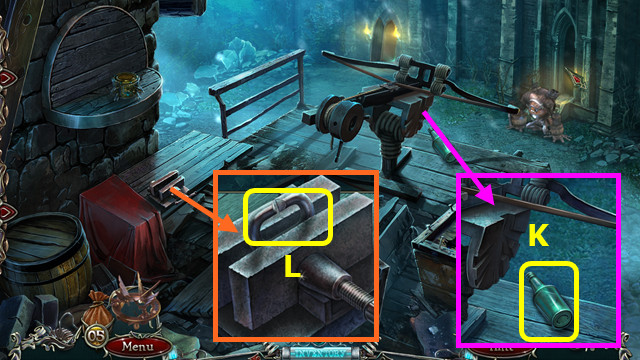
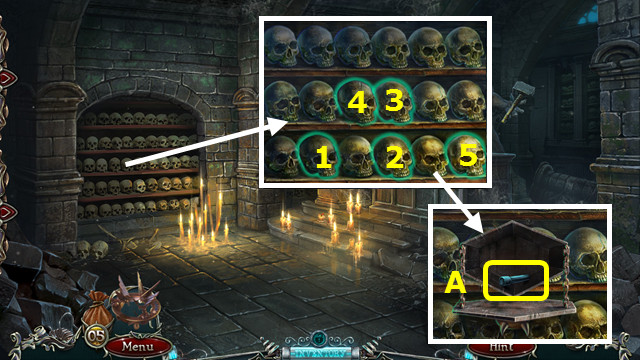
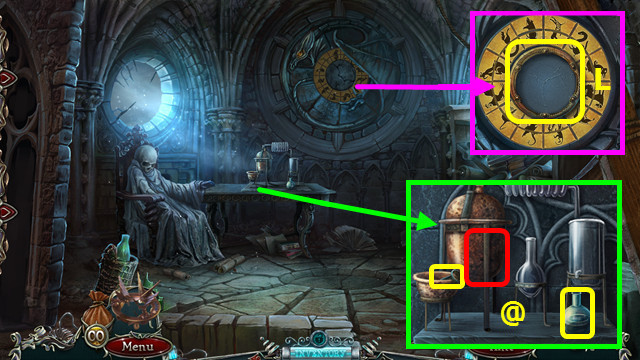
- Use the OLD COIN 4x (J).
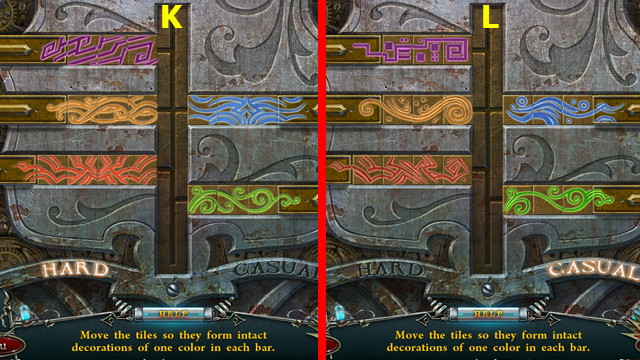
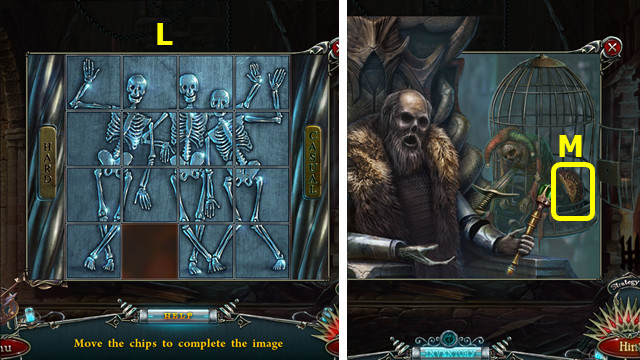
- Hard solution (K).
- Casual solution (L).
- Walk forward.
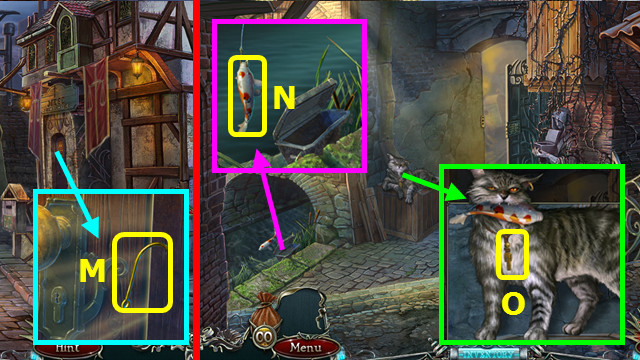
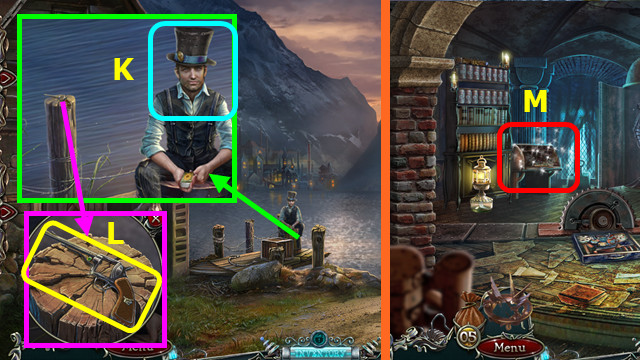
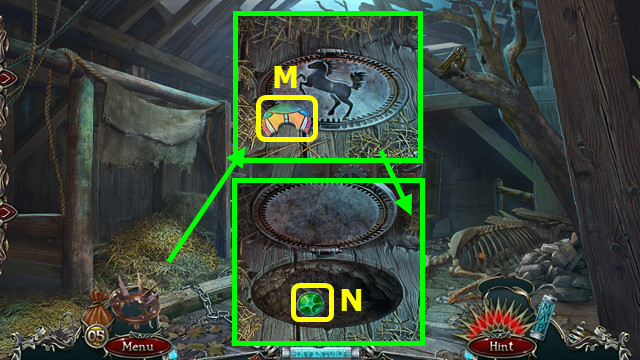
- Use the TONGS to take the HOOK (M).
- Combine the FISHING LINE, HOOK, and CATERPILLAR to make the FISHING LINE WITH BAIT (inventory).
- Walk down
- Use the FISHING LINE WITH BAIT; take the FISH (N).
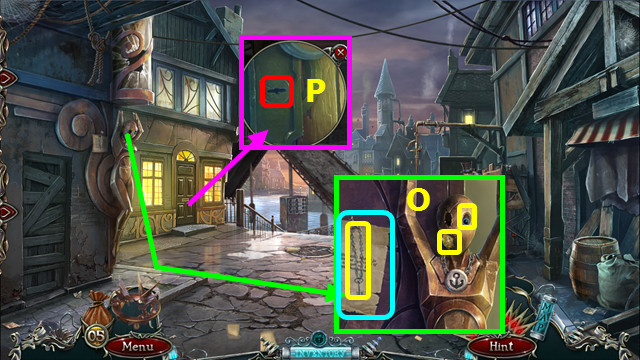
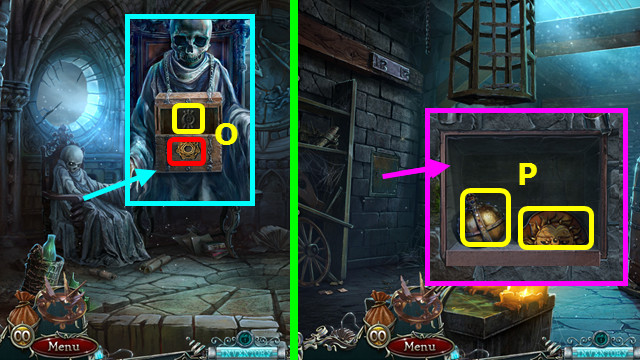
- Give the FISH; take the METAL FIGURINE (O).
- Walk forward.
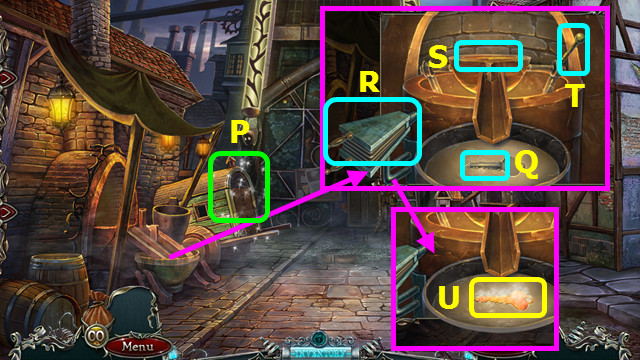
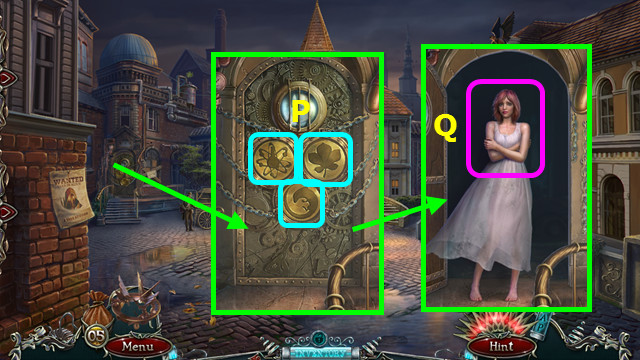
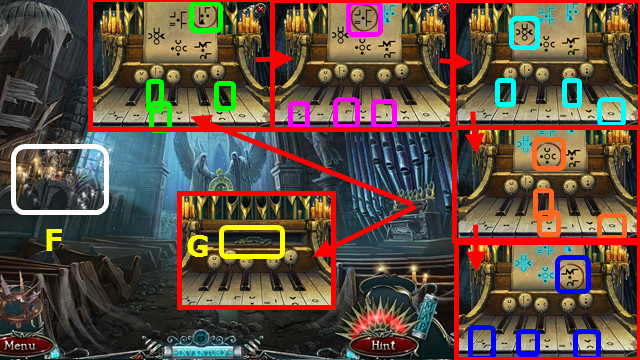
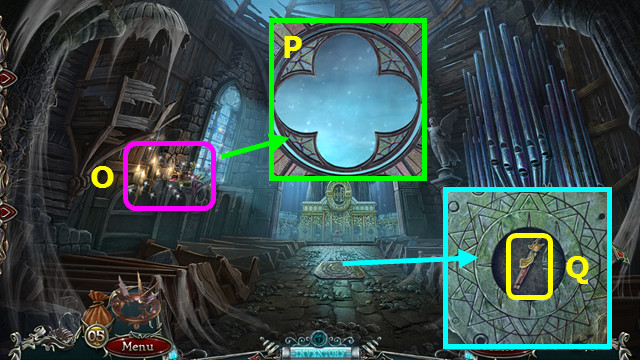
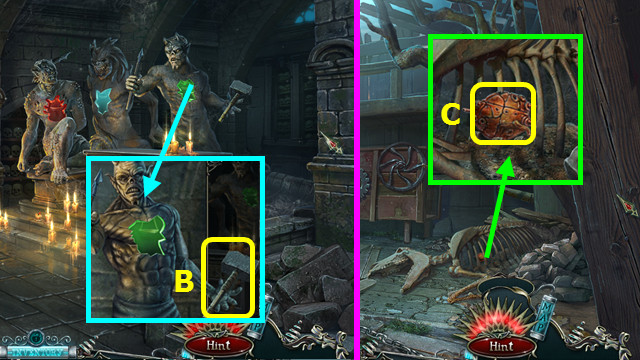
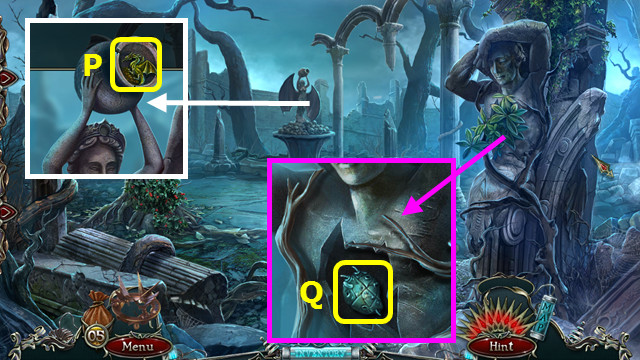
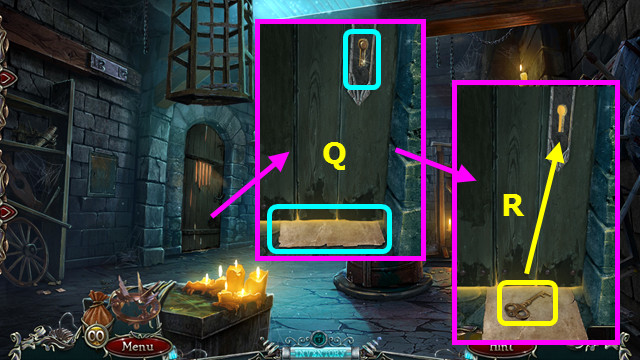
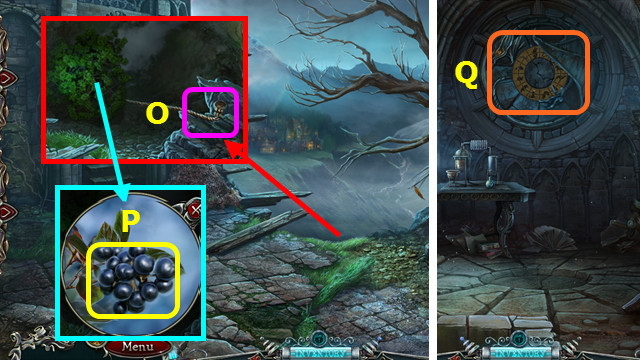
- Play the HOP; earn the KEY PIECE (P).
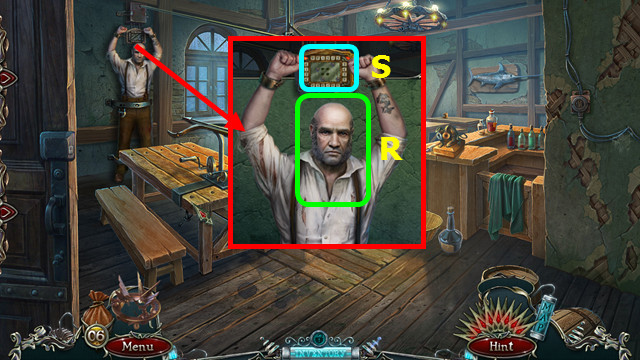
- Place the KEY PIECE (Q).
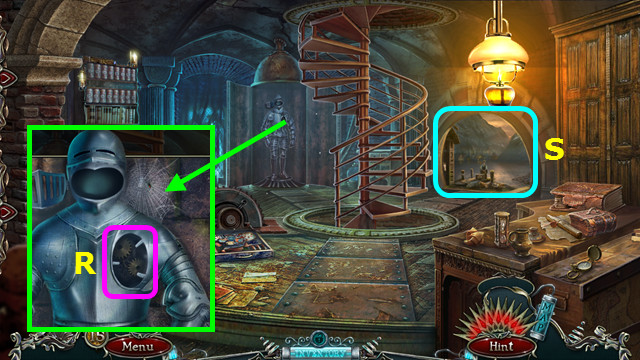
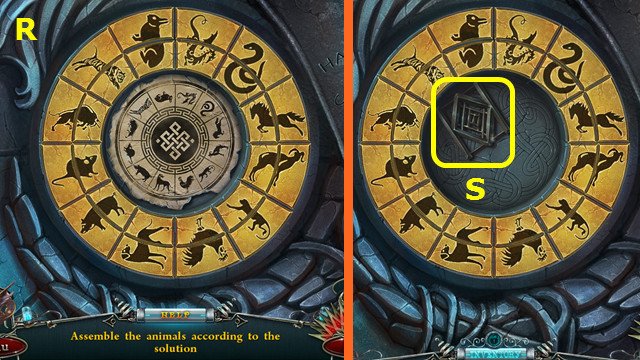
- Select (R); place the METAL FIGURINE (S) and move the lever (T).
- Use the TONGS to take the HOT KEY (U).
- Walk down.
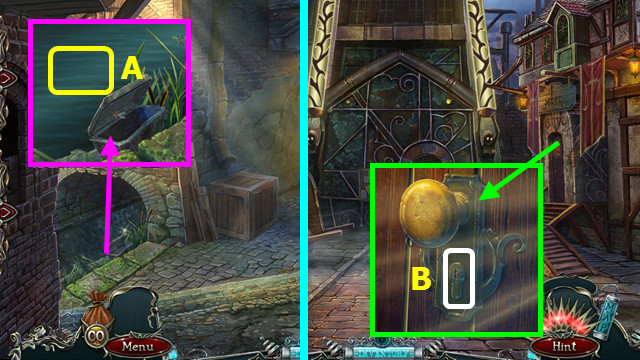
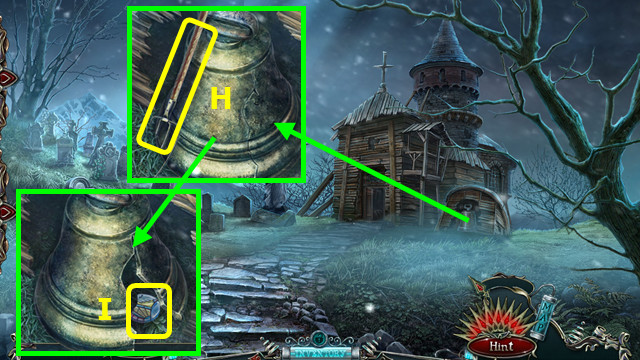
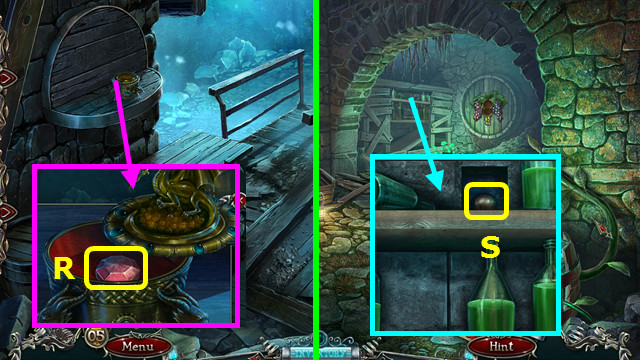
- Use the HOT KEY to make the KEY COPY (A).
- Walk forward.
- Use the KEY COPY (B).
- Walk right.
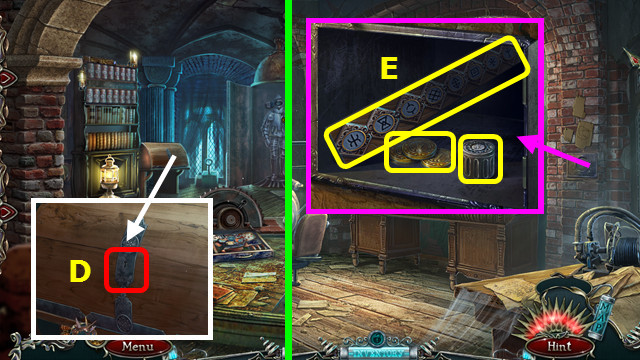
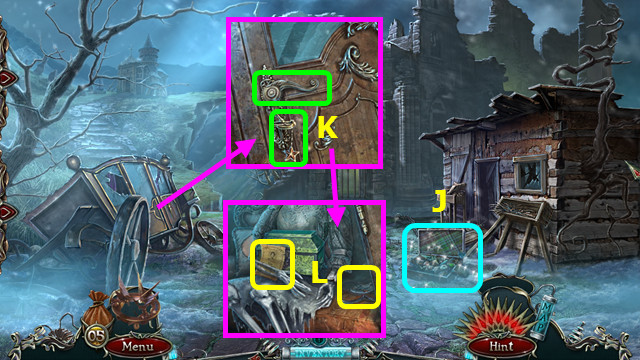
- Take the 1/2 POSTAL BOX TILE (C).
- Select and take the SHARP GLASS SHARD; take the IRON SKULL (D).
- Combine the BAG and SHARP GLASS SHARD; take 1 COIN and 2/2 POSTAL BOX TILE (inventory).
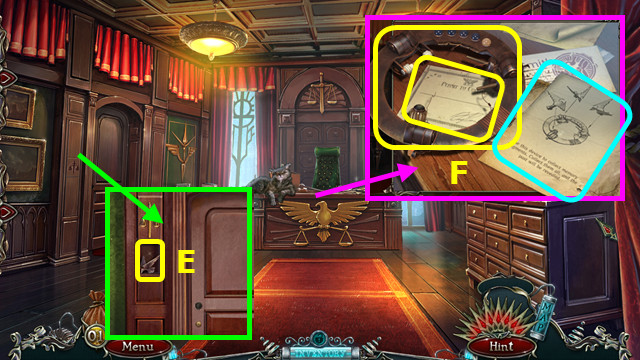
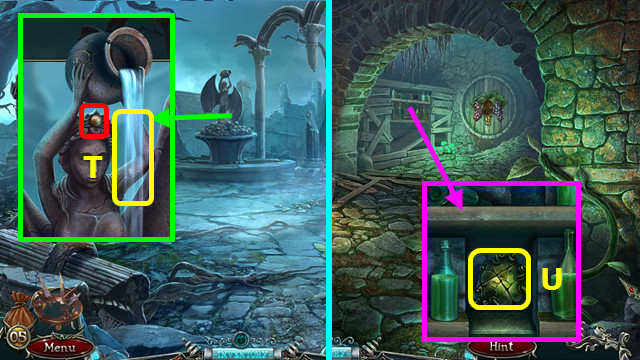
- Place the WOODEN SYMBOL; take the 1/3 IRON EAGLE (E).
- Take the DEVICE and BLANK PERMIT; read the notes (F).
- Walk down.
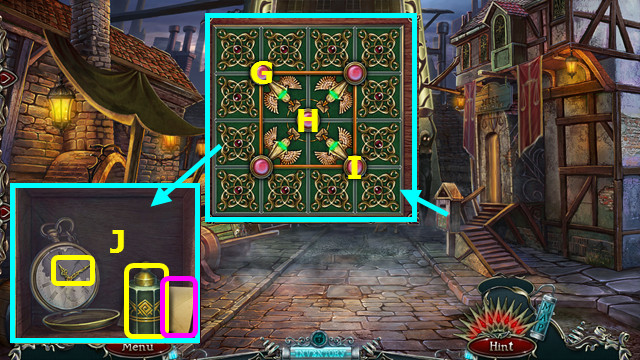
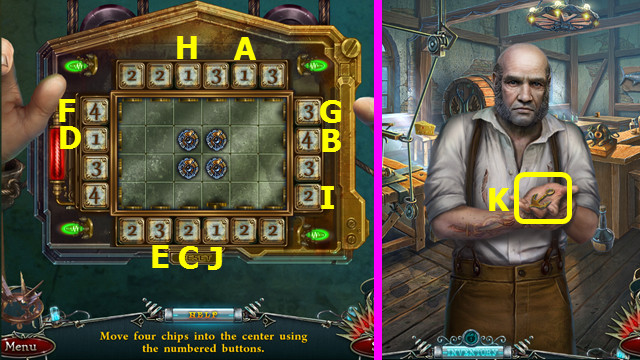
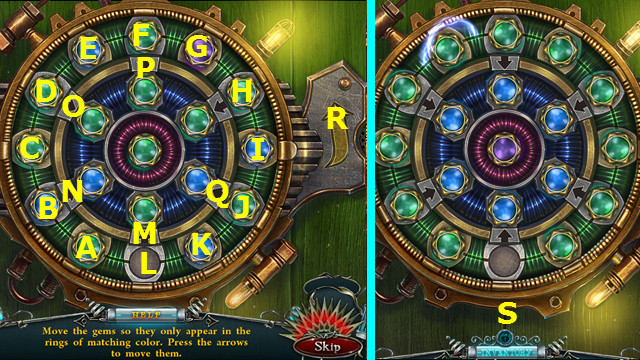
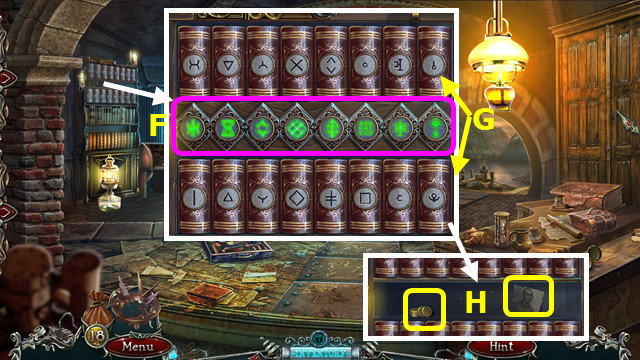
- Place the 2 POSTAL BOX TILES on the grid.
- Select Gx2-H-G-Ix2-Hx3-I.
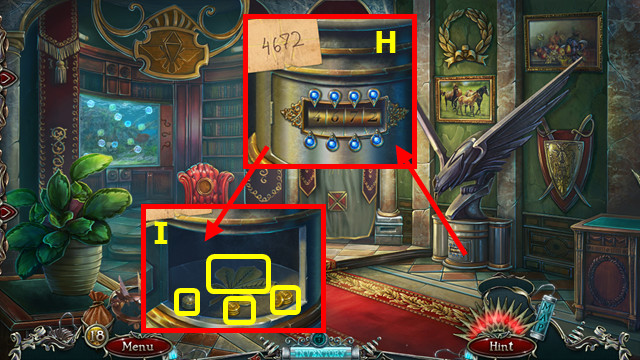
- Take the WEIGHT, open and read the note, and take the CLOCK HANDS (J).
- Walk down.
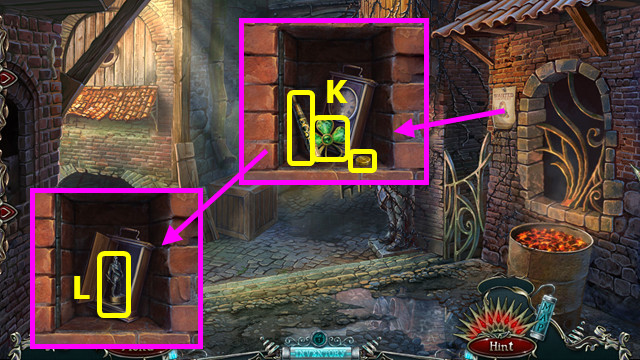
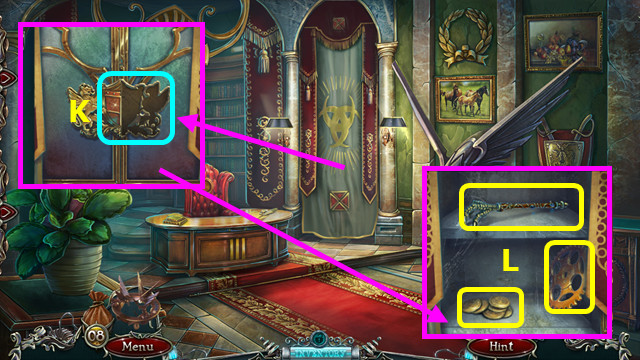
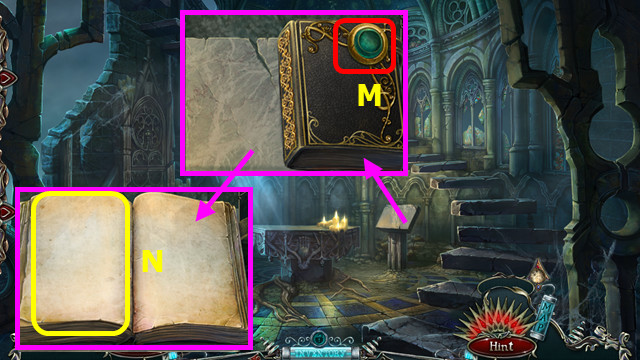
- Remove the wanted poster and place the IRON SKULL; take the BROKEN CLOVER BROOCH, PEN, and 2 COINS (K).
- Place the CLOCK HANDS; take the THIEF STATUETTE (L).
- Walk forward and right.
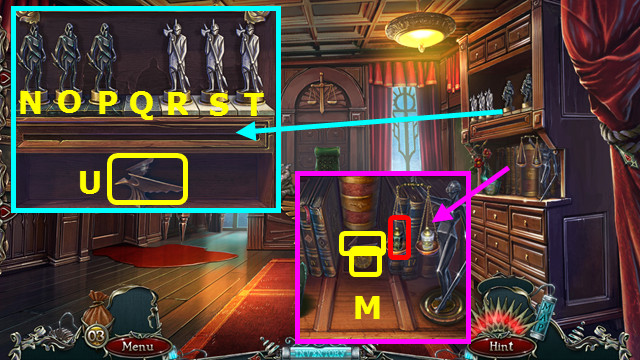
- Place the WEIGHT; take the 2 COINS and 2/3 IRON EAGLE (M).
- Place the THIEF STATUETTE; select P-R-S-Q-O-N-P-R-T-S-Q-O-P-R-Q.
- Take the 3/3 IRON EAGLE (U).
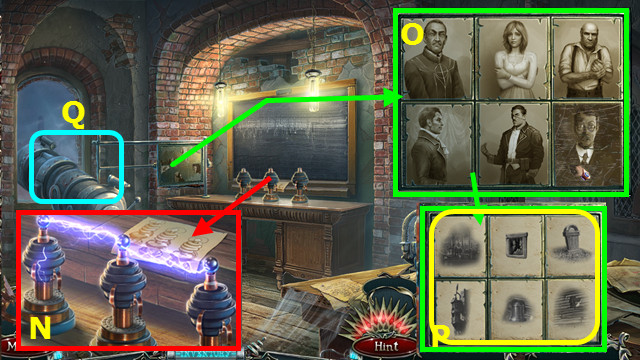
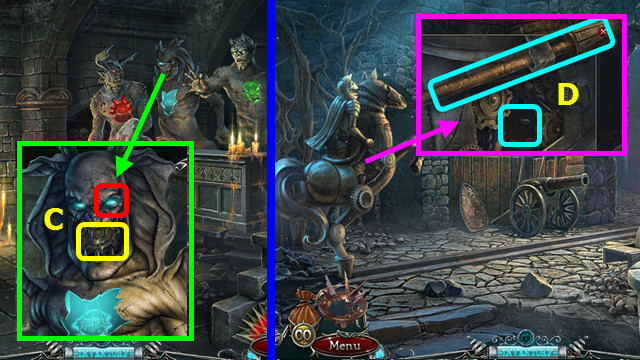
- Combine the DEVICE and 3 IRON EAGLES (inventory).

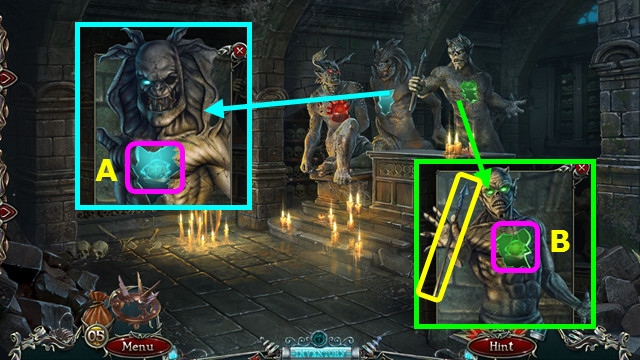
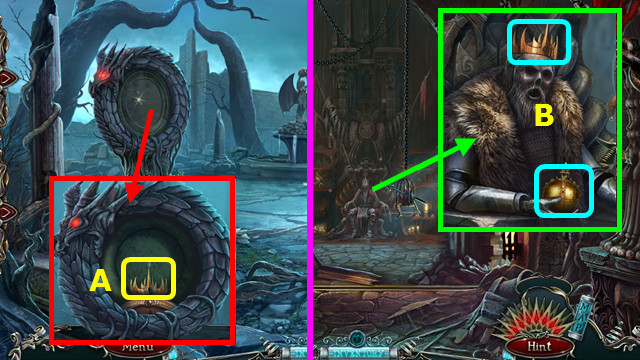
- Select the DEVICE (A).
- Select the device again and locate the 5 memory fragments (red).
- The fragments are moving so your locations may differ.
- Move the curtain; take the MEMORY CRYSTAL (B).
- Take the DOOR HANDLE (C).
- Select (D).
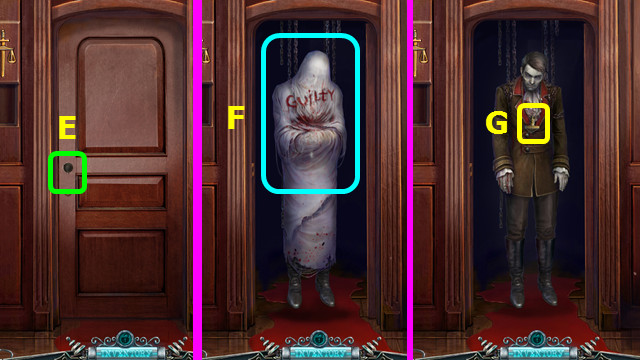
- Place and use the DOOR HANDLE (E).
- Remove the sheet (F).
- Take the JUDGE'S STAMP (G).
- Combine the BLANK PERMIT, PEN, and JUDGE'S STAMP to make the PERMIT (inventory).
- Walk down 2x.
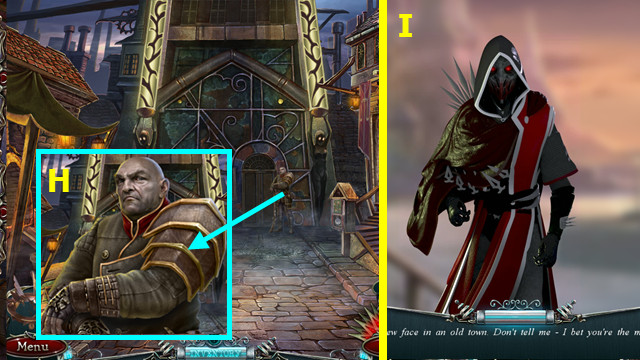
- Talk to the Guard (H).
- Walk forward 2x.
- Talk to the Avenger (I).
Chapter 2: I'm Dead?
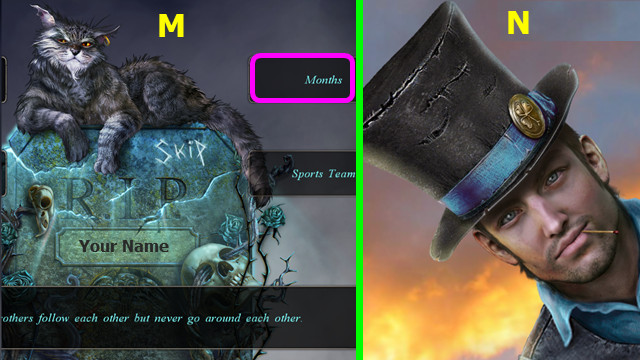
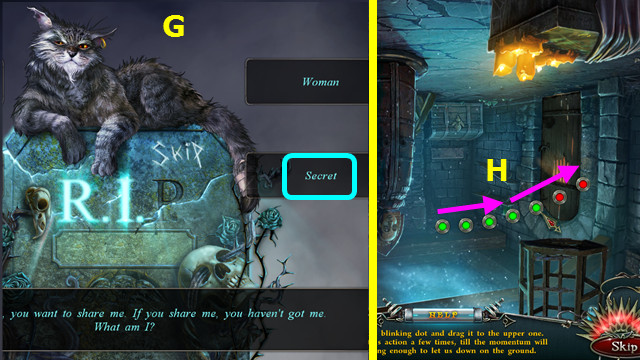
- Talk to the Cat; answer 3 randomly generated riddles (M).
- Talk to Jim (N).
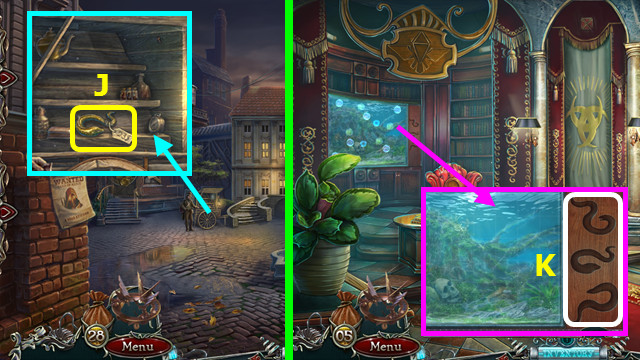
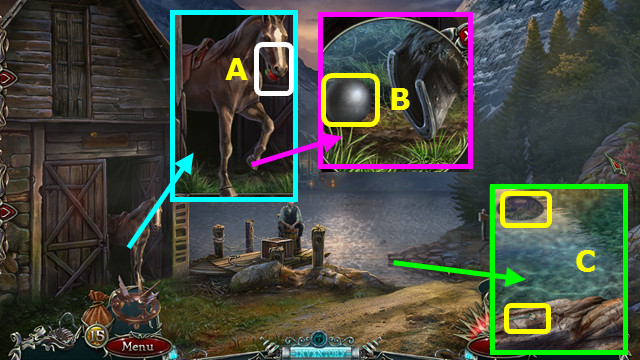
- Take the KEY, 1 COIN, and FISH EYE; read the note (O).
- Use the KEY; walk left (P).
- Talk to the man (R).
- Select (S).
- Select A-J.
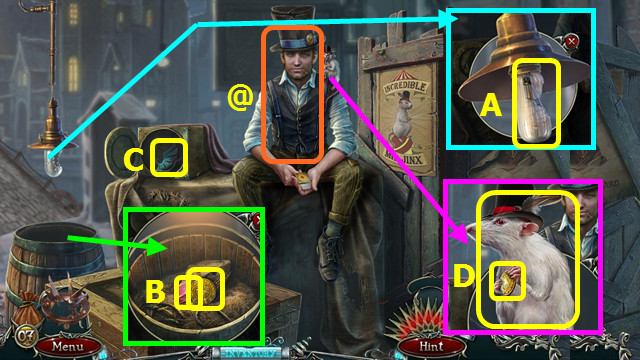
- Talk to the Man; take the ANCHOR FIGURINE (K).
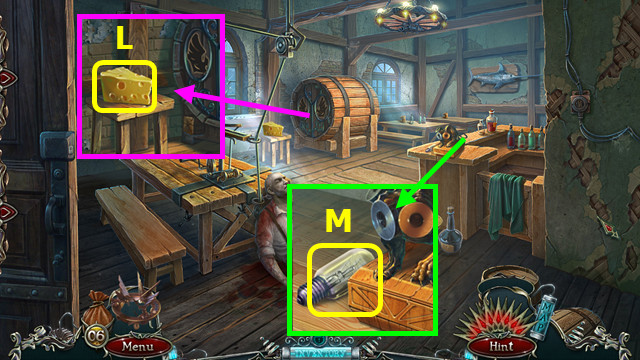
- Take the CHEESE (L).
- Take the LIGHT BULB (M).
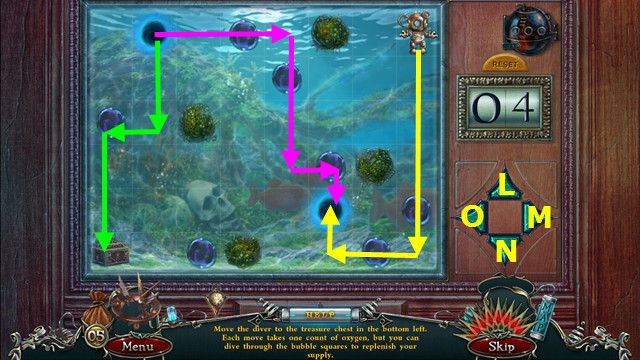
- Place the FISH EYE (N).
- Take the SAILBOAT FIGURINE, 1 COIN, and the 1st CERBERUS HEAD (O).
- Walk down and select Jim.
- Talk to Jim (@).
- Replace the LIGHT BULB (A).
- Take the 1 COIN and GEM (B).
- Place the SAILBOAT FIGURINE; take the IRON BIRD (C).
- Use the CHEESE to take MR. JINX and 1 COIN (D).
- Walk down.
- Read the note; take the BRONZE BIRD and 1 COIN (E).
- Use MR. JINX to take the 2nd CERBERUS HEAD (F).
- Place the ANCHOR FIGURINE; take the MEMORY CRYSTAL and 3rd CERBERUS HEAD (G).
- Walk left.
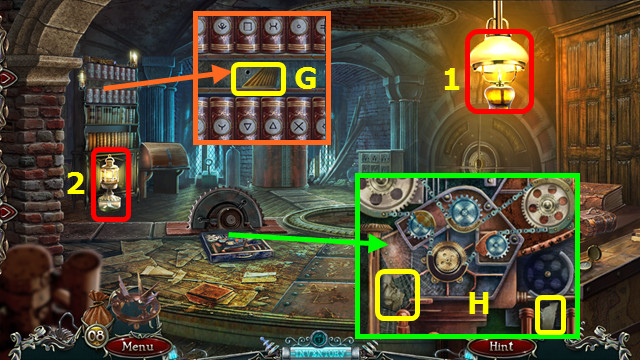
- Place the IRON BIRD and BRONZE BIRD; take the LIZARD KEY, 1st GEAR, and read the paper (H).
- Place the 3 CERBERUS HEADS; take the 2 COINS, CLOVER PART, and 2nd GEAR (I).
- Combine the BROKEN CLOVER BROOCH and CLOVER PART to make the CLOVER (inventory).
- Walk down and select Jim.
- Give Jim the CLOVER (@).
- Locate 3 sets of randomly generated cards (J).
- Take the 3rd GEAR (K).
- Select (L).
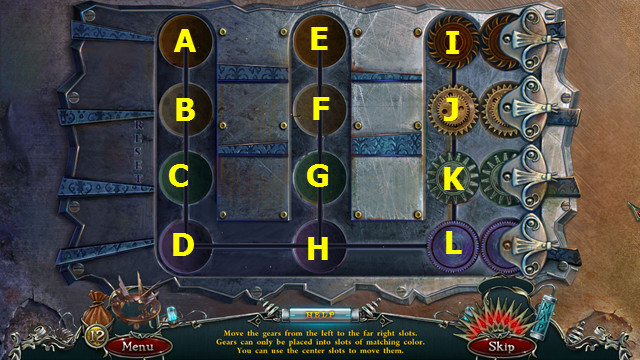
- Place the 3 GEARS.
- Select DL-CG-LD-GK-DL-BF-LD-KG-DL-GC-LD-FJ-DL-CG-LD-GK-DL-AE-LD-KG.
- DL-GC-LD-JF-DL-CG-LD-GK-DL-FB-LD-KG-DL-GC-LD-EI- DL-CG-LD-GK-DL-BF.
- LD-KG-DL-GC-LD-FJ-DL-CG-LD-GK-DL.
- Walk forward 2x.
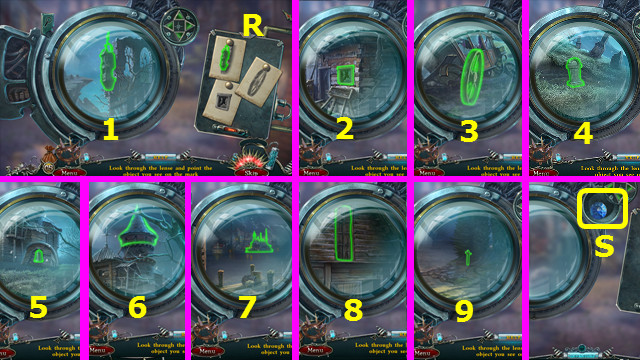
- Use the DEVICE (M) to find the 5 memory fragments.
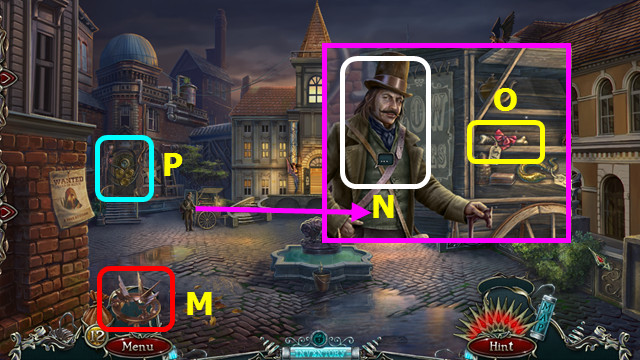
- Talk to Cheap Jack (N).
- Buy the BONE (O).
- Select (P).
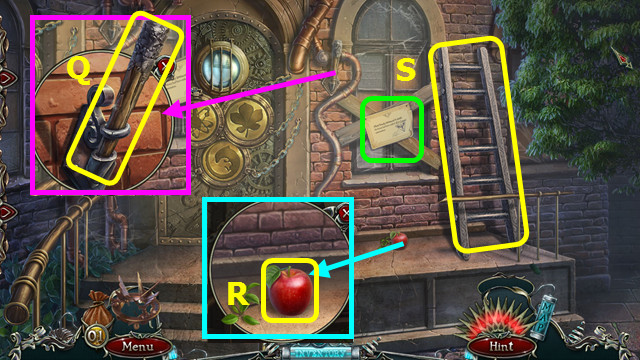
- Take the TORCH (Q) and APPLE (R).
- Read the notice and take the STEPLADDER (S).
- Walk down and forward.
- Talk to the Mayor (A).
- Take the LENS (B).
- Place the GEM; take the 4 COINS and PIECE OF PAPER (C).
- Open the PIECE OF PAPER; take the 1 COIN and SAFE COMBINATION (inventory).
- Take the BIRD (D).
- Use the BONE; take the 5 COINS (E).
- Place the STEPLADDER (F).
- Walk down.
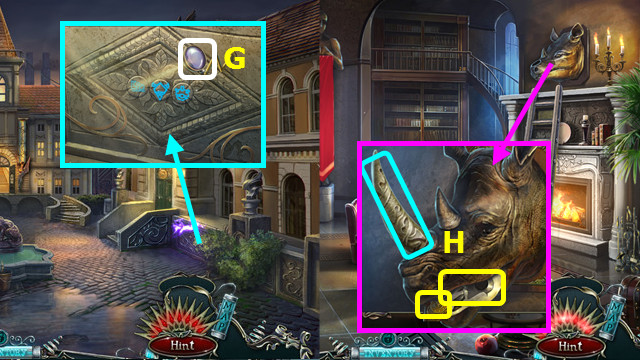
- Move the bushes; replace the LENS and select it 2x (G).
- Play the HOP; earn the RHINO HORN.
- Walk forward.
- Place the RHINO HORN; take the 1st BIRD SKULL and 5 COINS (H).
- Walk down.
- Purchase the WRENCH (I).
- Select (J).
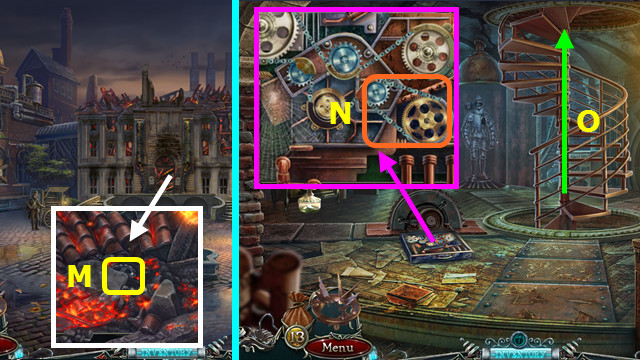
- Use the WRENCH; take the VALVE KNOB (K).
- Walk down.
- Place and turn the VALVE KNOB; take the FULL BUCKET, 2nd BIRD SKULL, and 4 COINS (L).
- Place the 2 BIRD SKULLS (M).
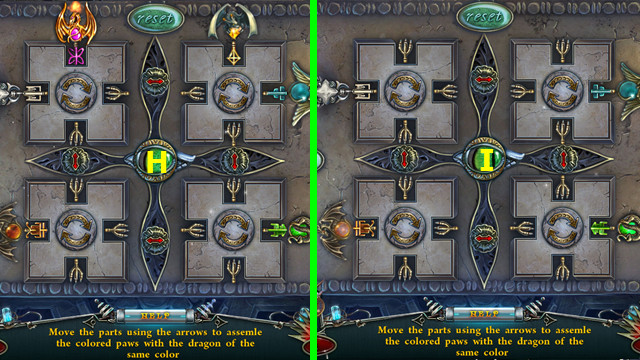
- Select A-B-C-D-E-F-G-Rx2-D-E-F-G-H-N-R-K-J-I-H-N-C-D-Q-I-H-G-F-E-D-C-B-A-L.
- K-J-O-E-F-M-R-K-L-P-G-H-I-J-K-L-P-E-D-C-B-A-L-K-J-I-H-G-F-M.
- Final solution (S).
- Walk right.
- Select the desk.
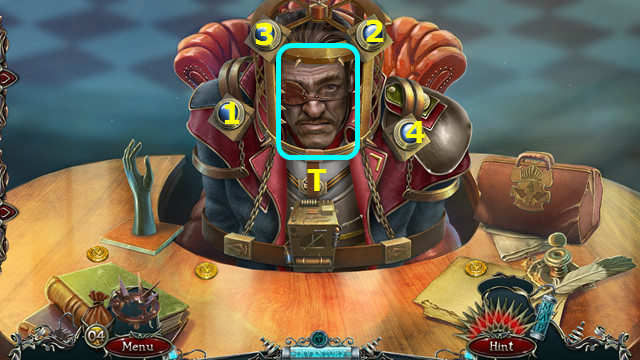
- Talk to John (T).
- Press 1-4.
- Talk to John.
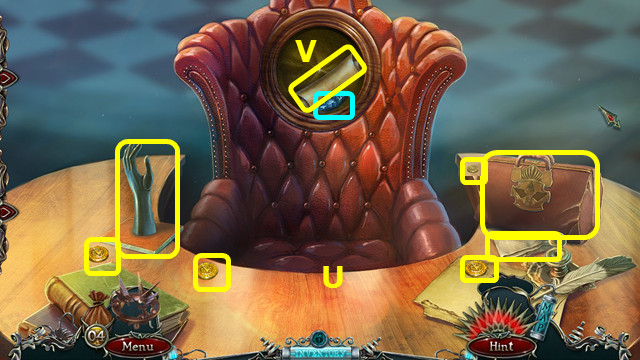
- Take the HAND, BAG, CLOTH, and 4 COINS (U).
- Place the BIRD; take the MEMORY CRYSTAL and the SHEET MUSIC (V).
- Walk down and forward.
- Place the HAND; take the 5 COINS and LOCK TUMBLER (D).
- Place the SHEET MUSIC (E).
- Select 1-3.
- Take the 1st EEL and 5 COINS (F).
- Use the FULL BUCKET; take the 2nd EEL (G).
- Walk down and right.
- Place the LOCK TUMBLER and SAFE COMBINATION; enter the code (H).
- Take the 10 COINS and the LEAF KEY (I).
- Walk down.
- Buy the 3rd EEL (J).
- Walk down and right.
- Place the 3 EELS (K).
- Select Nx5-Ox2-L-Mx3-Nx3-M-Nx3-O-Nx3.
- For the return, press Lx3-M-Lx2-M-N-O-L-Mx3-N-Mx3-L.
- You earn the CHEST.
- Open the CHEST and take the ATOM KEY (inventory).
- Walk down.
- Place the LEAF KEY, LIZARD KEY, and ATOM KEY; open the door (P).
- Talk to Lisbeth (Q).
Chapter 3: Dead Again
- Talk to the Cat; answer 3 random riddles (A).
- Talk to John (B).
- Play the HOP; earn the 12 COINS (C).
- Talk to Cheap Jack; purchase the FUEL (D).
- Combine the TORCH, CLOTH, and FUEL to make the TORCH WITH FUEL (inventory).
- Use the TORCH WITH FUEL to make the BURNING TORCH (E).
- Select (F).
- Use the BURNING TORCH (1-2).
- Take the 1st METAL WING (G).
- Take the 1/6 and 2/6 PHOTO PIECES (H).
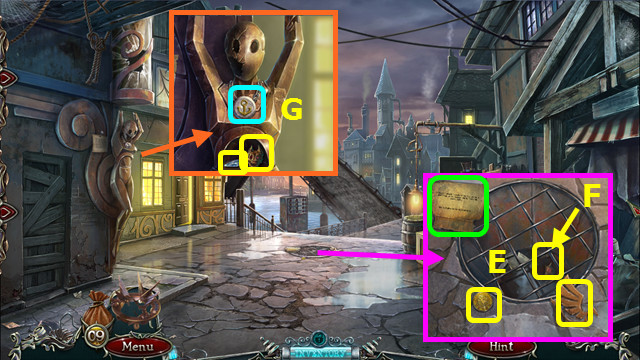
- Open the doors. Open the faceplate; take the 3/6 PHOTO PIECE and COAT OF ARMS (I).
- Take the HOOK (J).
- Walk down and right.
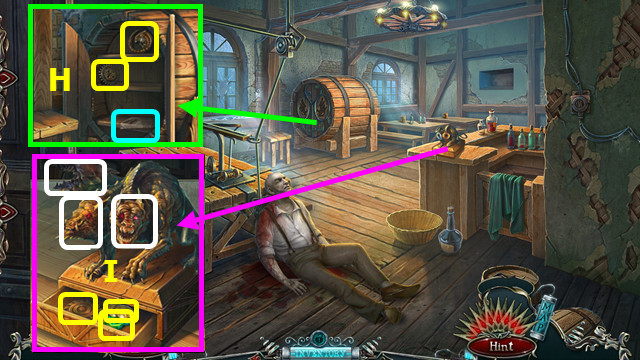
- Open the curtain; place the COAT OF ARMS (K).
- Take the METAL BIRD LEG, GEAR, and 5 COINS (L).
- Walk down.
- Use the METAL BIRD LEG; take the BIKE CHAIN (M).
- Walk left.
- Place the GEAR and BIKE CHAIN (N).
- Go up the stairs (O).
- Take the 2nd METAL WING, 4/6 and 5/6 PHOTO PIECES, and 2 COINS (P).
- Combine the BAG and 2 METAL WINGS; take the MECHANICAL HEART (inventory).
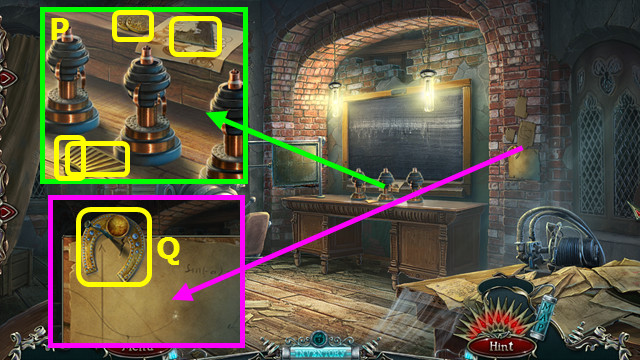
- Take the HORSESHOE and remove the paper (Q).
- Walk down.
- Place the MECHANICAL HEART (R).
- Walk right (S).
- Use the APPLE (A); take the 1/3 TESLA SPHERE (B).
- Take the DESK KEY; use the HOOK and take the LION'S HEAD (C).
- Walk down.
- Use the DESK KEY; play the HOP to earn the GOLDEN FEATHER (D).
- Go up the stairs.
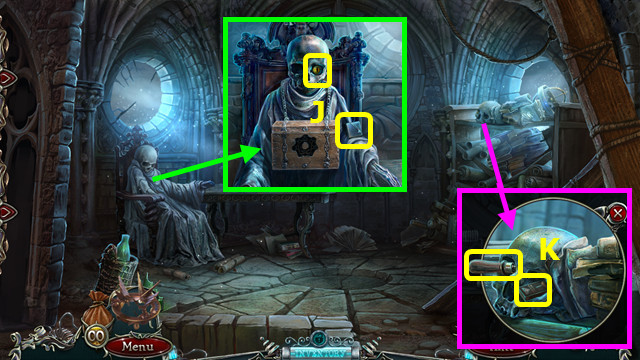
- Place the LION'S HEAD; take the 3 COINS, CYLINDER, and SOLUTION (E).
- Walk down.
- Place the SOLUTION (F).
- Solution (G).
- Take the 6/6 PHOTO PIECE and 5 COINS (H).
- Walk down.
- Buy the GOLDEN BEAK (I).
- Walk down and right.
- Place the GOLDEN BEAK and GOLDEN FEATHER; take the 2/3 TESLA SPHERE and BULLETS (J).
- Walk down, left, and right.
- Talk to Jim (K).
- Take the BROKEN REVOLVER (L).
- Combine the BROKEN REVOLVER, CYLINDER, and BULLETS to make the REVOLVER (inventory).
- Walk down 2x.
- Play the HOP; earn the 3/3 TESLA SPHERE (M).
- Go up the stairs.
- Place the 3 TESLA SPHERES (N).
- Place the 6 PHOTO PIECES; solution (O).
- Turn the 6 photos over; take the LANDMARKS (P).
- Select (Q).
- Place the LANDMARKS (R).
- Locate the 9 landmarks (1-9).
- Take the HORSESHOE STONE (S).
- Combine the HORSESHOE and HORSESHOE STONE to make the HORSESHOE (inventory).
- Walk down and right.
- Select and give Jim the HORSESHOE to trigger a mini-game. Cards appear in random order for each shuffle (A).
- Casual solution (color-coded) (B).
- Hard solution (color-coded) (C).
- Walk down.
- Select (D).
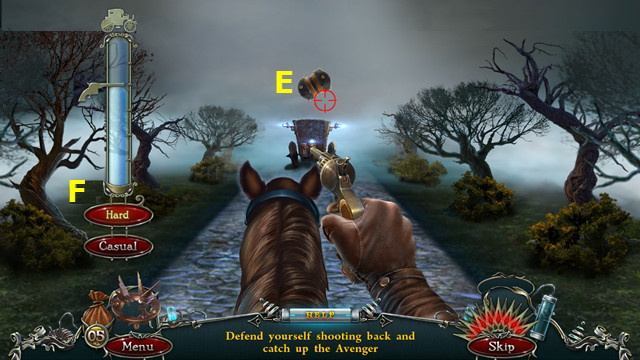
- Shoot the bombs (E).
- Fill the meter (F).
Chapter 4: The Castle Gates
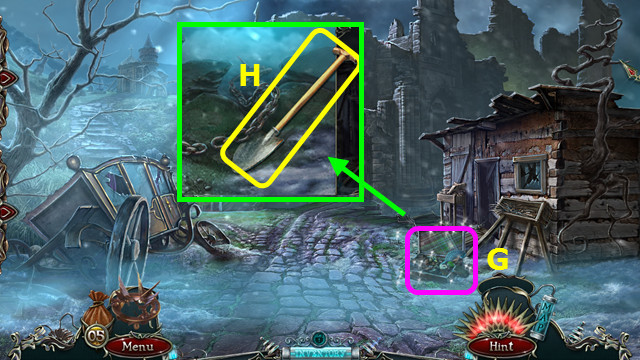
- Play the HOP; earn the 1st GLASS PIECE (G).
- Take the SHOVEL (H).
- Walk right.
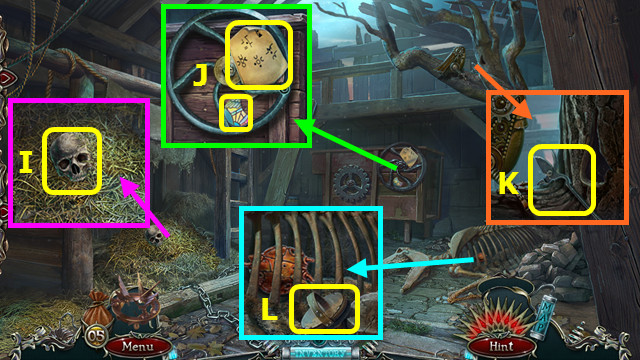
- Take the SKULL (I).
- Take the MUSIC SHEET and 2nd GLASS PIECE (J).
- Take the SHEARS (K).
- Take the BRUSH (L).
- Walk down and left.
- Casual solution; AC-AB-CB-AC-BA-BC-AC-AB-CB-CA-BA-CB-AC-AB-CB.
- Hard solution: AB-AC-BC-AB-CA-CB-AB-AC-BC-BA-CA-BC-AB-AC-BC-AB.
- CA-CB-AB-CA-BC-BA-CA-CB-AB-AC-BC-AB-CA-CB-AB.
- Take the ORGAN KEY (D).
- Use the BRUSH; take the STAR KEY (E).
- Walk forward.
- Play the HOP; earn the MUSICAL TRIANGLE (F).
- Place the MUSIC SHEET and ORGAN KEY; Select the chords (color-coded); Take the HORSE FIGURINE(G).
- Walk down.
- Take the PITCHFORK (H).
- Use the MUSICAL TRIANGLE; take the 3rd GLASS PIECE (I).
- Walk down.
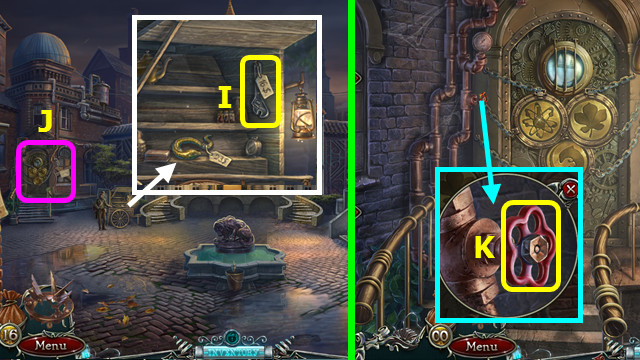
- Play the HOP; earn the HANDLE (J).
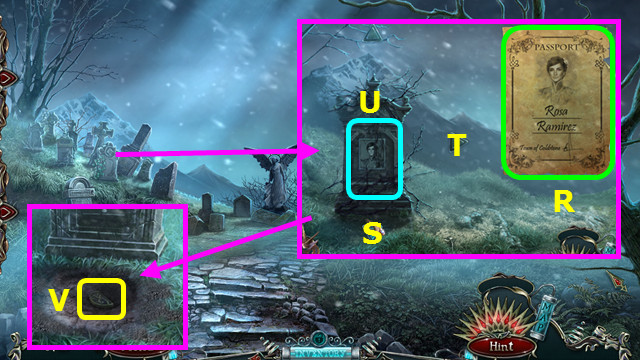
- Use the HANDLE and STAR KEY (K).
- Take the PASSPORT and BROKEN GLASS WINDOW (L).
- Walk right.
- Use the PITCHFORK; take the 4th GLASS PIECE (M).
- Combine the BROKEN GLASS WINDOW and 4 GLASS PIECES to make the GLASS WINDOW (inventory).
- Place the HORSE FIGURINE; take the 1/2 EMERALD (N).
- Walk down, left, and forward.
- Play the HOP; earn the 1st CASKET KEY (O).
- Place the GLASS WINDOW (P).
- Touch the center; take the 1st GOLD GRIFFIN (Q).
- Walk down.
- Place the PASSPORT (R).
- Select Sx2-Tx3.
- Remove the vines; select the tombstone (U).
- Use the SHOVEL; take the 2nd CASKET KEY (V).
- Walk down.
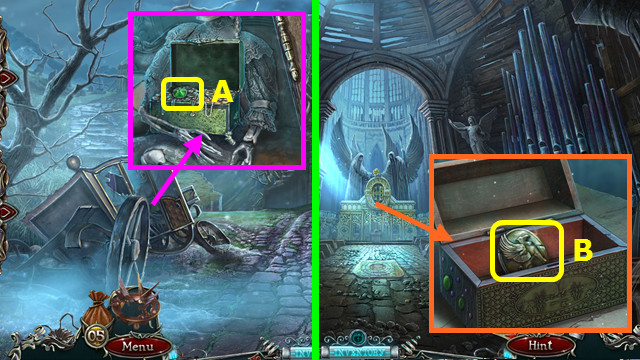
- Place the 2 CASKET KEYS; take the 2/2 EMERALD (A).
- Walk left and forward.
- Place the 2 EMERALDS; take the 2nd GOLD GRIFFIN (B).
- Walk down twice.
- Place the 2 GOLD GRIFFINS; pull the lever (C).
- Walk forward.
- Talk to the Avenger (D).
- Take the PLIERS (E).
- Use the SHEARS; select 1-3.
- Walk forward.
- Take the 3 MUSHROOMS (red).
- Take the HARPOON (F).
- Play the HOP; earn the CHAIN LINK (G).
- Take the FILE (H).
- Walk down.
- Use the HARPOON (I).
- Select the ballista (J).
- Take the EMPTY BOTTLE (K).
- Place the CHAIN LINK, use the FILE, and take the CUT CHAIN LINK (L).
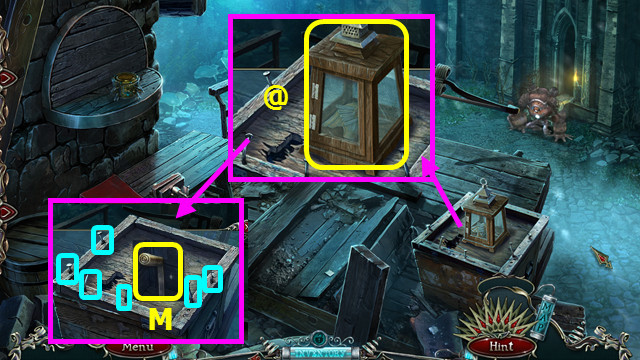
- Take the LANTERN (@).
- Use the PLIERS 6x; take the HANDLE (M).
- Open the LANTERN, take the WOODPECKER PART, and insert the 3 MUSHROOMS to make the GLOWING LANTERN (inventory).
- Walk down 2x.
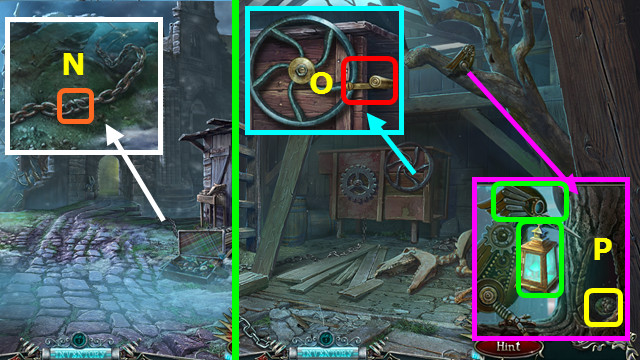
- Place the CUT CHAIN LINK (N).
- Walk right.
- Place and select the HANDLE (O).
- Place the WOODPECKER PART and GLOWING LANTERN; take the WINE TILE (P).
- Walk down.
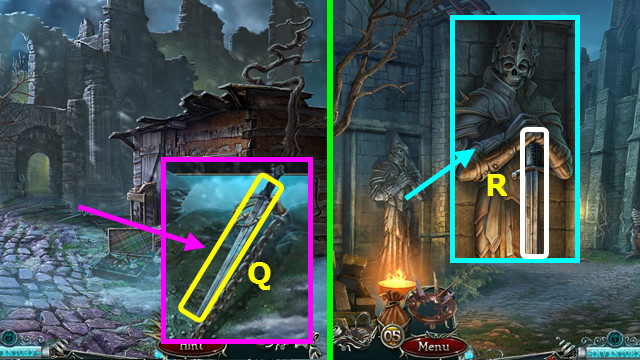
- Take the KNIGHT'S SWORD (Q).
- Walk forward.
- Place the KNIGHT'S SWORD (R).
- Walk left.
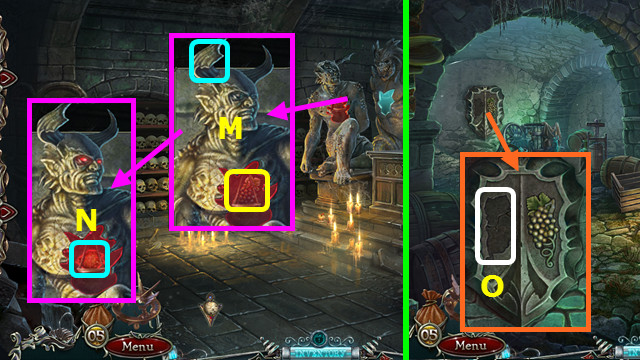
- Place the SKULL; select 1-5. This sequence is random; yours may differ.
- Take the 1/2 BALLISTA LEVER (A).
- Take the HAMMER (B).
- Walk down 2x; go right.
- Use the HAMMER; take the 1st HEART (C).
- Walk down; go forward 2x.
- Play the HOP; earn the 2/2 BALLISTA LEVER (D).
- Place the wine tile; select Gx2-F-E-J-G-Fx2-I-H-Gx2-Fx2-J-H-G-H-G-I-H-Gx2-H-I-Hx2.
- Final solution (K).
- Take the HORN (L).
- Walk down and go left.
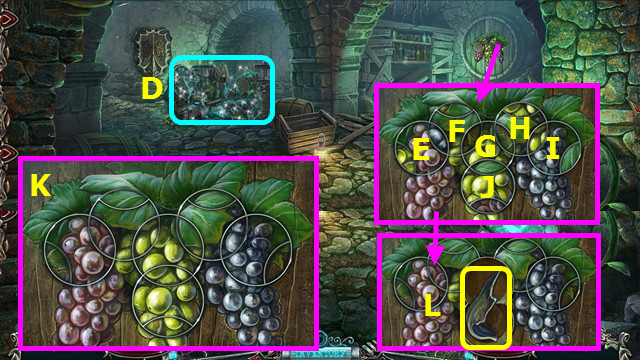
- Place the HORN; take the BLACK GRAPES (M).
- Place the 1st HEART (N).
- Walk down and forward.
- Place the BLACK GRAPES; walk forward (O).
- Take the DRAGON FIGURINE (P).
- Move the leaves, use the HAMMER, and take the 2nd HEART (Q).
- Walk down twice; select the ballista.
- Place the DRAGON FIGURINE; take the HEX KEY (R).
- Walk down and forward.
- Place the HEX KEY; take the PEARL (S).
- Walk forward.
- Place the PEARL; use the EMPTY BOTTLE to take the FULL BOTTLE (T).
- Walk down.
- Place the FULL BOTTLE; take the 3rd HEART (U).
- Walk down and left.
- Place the 2nd HEART (A).
- Place the 3rd HEART; take the BALLISTA ARROW (B).
- Walk down and select the ballista.
- Place the 2 BALLISTA LEVERS and BALLISTA ARROW (C).
- Shoot the rocks (D), and when he is recharging (E).
- Empty the meter (F).
- Walk down, right, and forward.
Chapter 5: Third Time's the Charm
- Talk to the cat; answer three random riddles (G).
- Trace the path of the dots from the blinking one to the other end; do this 6 times (H).
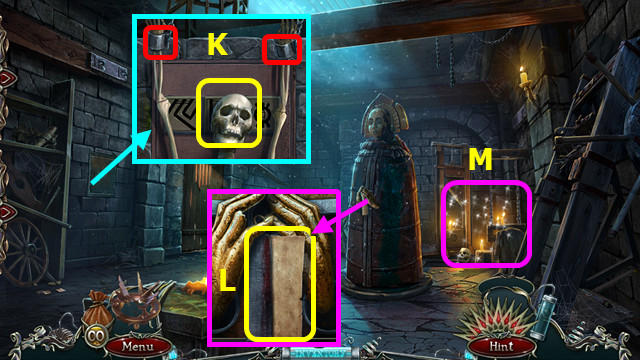
- Take the ROPE; remove the skeleton (K).
- Take the PAPER (L).
- Play the HOP; earn the LILY KEY (M).
- Place the LILY KEY; take the FINGER (N).
- Place the FINGER; take the CASKET KEY (O).
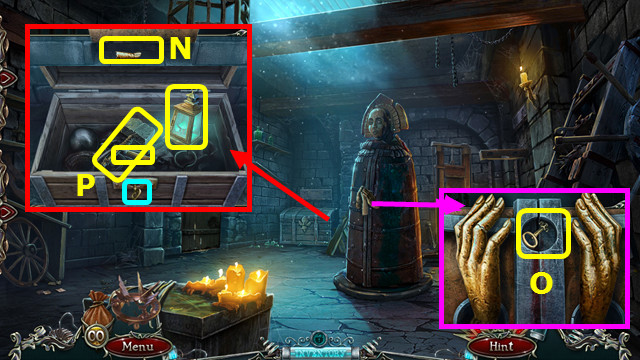
- Use the CASKET KEY; take the HAMMER, LANTERN, and AWL (P).
- Place the PAPER and use the AWL (Q).
- Pull the paper, take the KEY, and use it in the lock (R).
- Walk left.

- Take the EYE (A).
- Walk right.
- Take the LANCE and 1st RUNE (B).
- Walk down and left.
- Place the EYE; take the GEAR (C).
- Walk down, right, and left.
- Place the LANCE and GEAR (D).
- Walk right 2x.

- Take the 1st SKELETON CHIP (E).
- Use the LANTERN; take the GREEN EYE (F).
- Walk left.
- Select (G).
- Place the GREEN EYE in the center.
- Hard solution (H).
- Casual solution (I).
- The start positions are randomly generated.
- Go up the stairs.
- Take the 2nd SKELETON CHIP and BOOK KEY (J).
- Take the SCREWDRIVER and MATCHES (K).
- Take the SUN RING (L).
- Use the MATCHES; take the SPIRITS and SPIKE (@).
- Walk down.
- Place the BOOK KEY; open the book (M).
- Tear and take the SHEET WITH HINT (N).
- Walk down.
- Use the SPIKE, HAMMER, and ROPE (O).
- Take the BLACKBERRIES (P).
- Walk left and up.
- Select (Q).
- Place the SHEET WITH HINT in the center.
- The pieces are randomly jumbled; final solution is the same for hard and casual (R).
- Take the 2nd RUNE (S).
- Walk down 3x; go left.
- Use the SCREWDRIVER 4x and remove the cover; take the ALCHEMY SYMBOL (A).
- Walk down.
- Play the HOP; earn the RED POWDER (B).
- Walk left, right 2x, and left again.
- Place the SPIRITS (C) and RED POWDER (D); open the bowl and place the BLACKBERRIES (E).
- Place all 3 ingredients into the bowl (F).
- Use the atomizer (G) on the bowl to take the ANT POISON.
- Walk down.
- Use the ANT POISON; take the CROWBAR (H).
- Walk down and left.
- Use the CROWBAR 5x; take the SCEPTER (I).
- Walk right.
- Place the SCEPTER (J); select (K).
- Place the 2 SKELETON CHIPS.
- The start positions are randomly generated; final solution is the same for hard and casual (L).
- Take the 1st SUN PART (M).
- Walk right, left, and up.
- Place the ALCHEMY SYMBOL; take the 3rd RUNE (O).
- Walk down 3x, go left, and down.
- Place the 3 RUNES; take the 2nd SUN PART and the ORB (P).
- Combine the SUN RING and 2 SUN PARTS to make the SUN (inventory).
- Walk left, right, down, forward, and left.
- Place the SUN; take the CROWN (A).
- Walk down 2x and right.
- Place the ORB and CROWN (B).
- Walk forward.
- Select the Mayor; you earn the CROSSBOW (C).
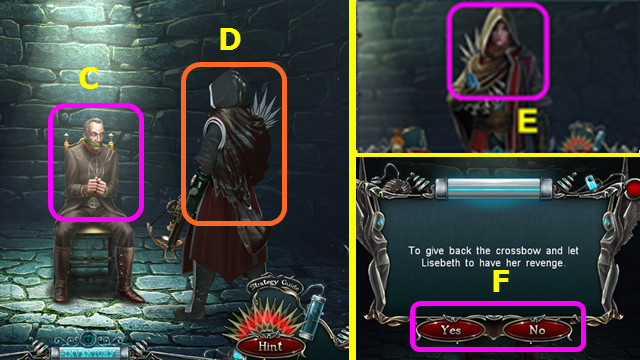
- Talk to the Avenger (D).
- Take the MEMORY CRYSTAL (E).
- Talk to the Avenger again; choose YES or NO (F).
- Congratulations! You have completed Grim Façade: Hidden Sins!
Created at: 2015-07-17