

Walkthrough Menu
- General Tips
- Chapter 1: The Police Station
- Chapter 2: Inside 37 Barton Street
- Chapter 3: The Prison Square
- Chapter 4: The Orphanage Office
- Chapter 5: Inside 16 Willow Street
General Tips
- This is the official guide for Grim Façade: Monster in Disguise.
- This guide will not mention each time you have to zoom into a location; the screenshots will show each zoom scene.
- Hidden-object puzzles are referred to as HOPs. This guide will not show HOP solutions. It will identify the location of the HOP and the inventory item acquired.
- This guide will show solutions for non-random puzzles. Please read the in-game instructions for each puzzle.
- In this game, you will sometimes have to select the new scene to trigger dialog, cut-scenes, or tasks prior to interacting with the scene.
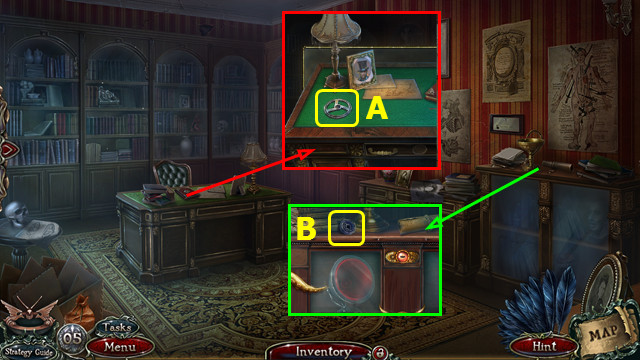
Chapter 1: The Police Station
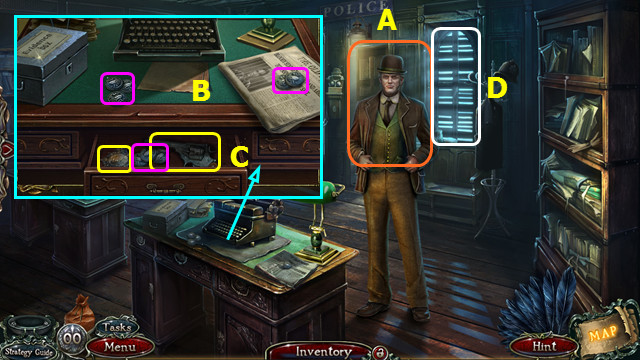
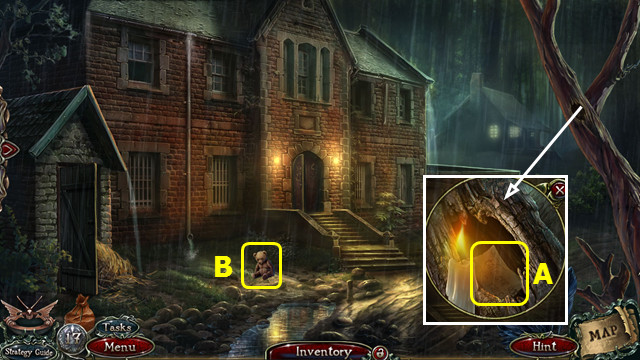
- Talk to the Detective (A).
- Take the 3 COINS and 2 COINS (B).
- Open the drawer; take the REVOLVER, 4 COINS, and BADGE (C).
- Open the shutters (D).
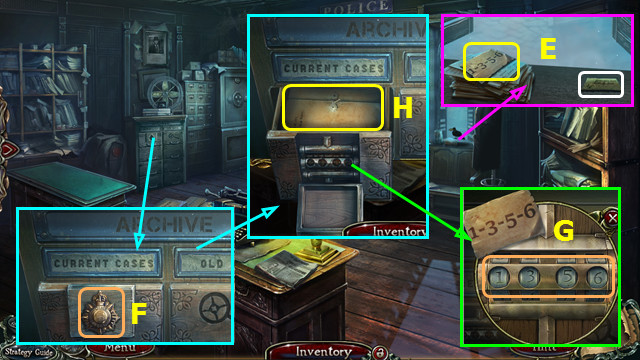
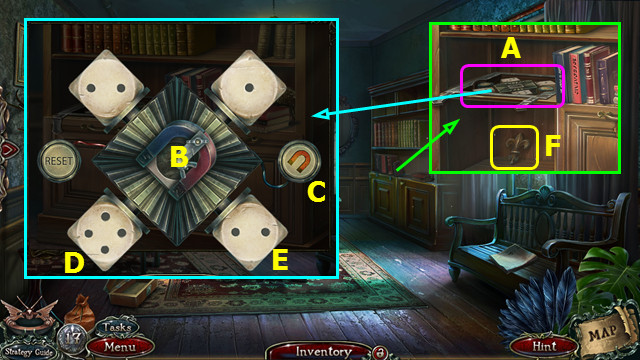
- Touch the raven; read the note and take the CODE (E).
- Place and take the BADGE (F).
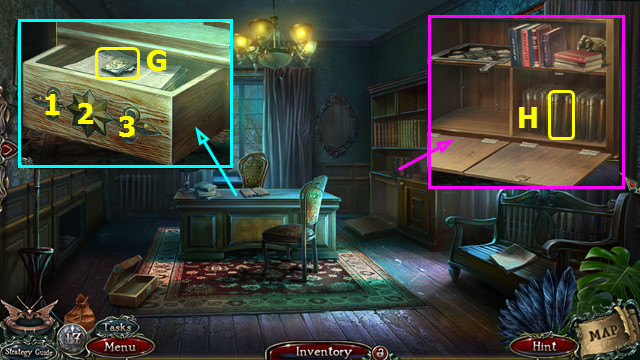
- Place the CODE; turn the dials to match (G).
- Take and open the folder; take the 1st SKULL PART and FOLDER (H).
- Talk to the Detective and accept the case.
- Walk forward.
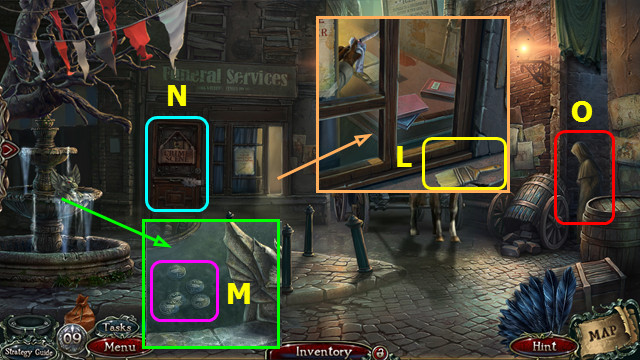
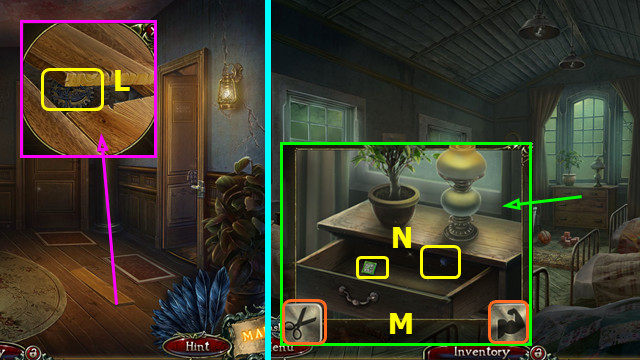
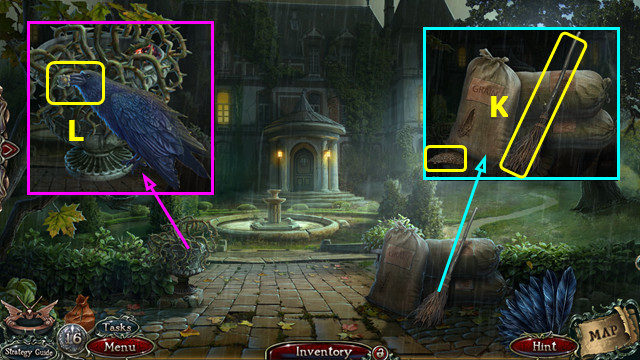
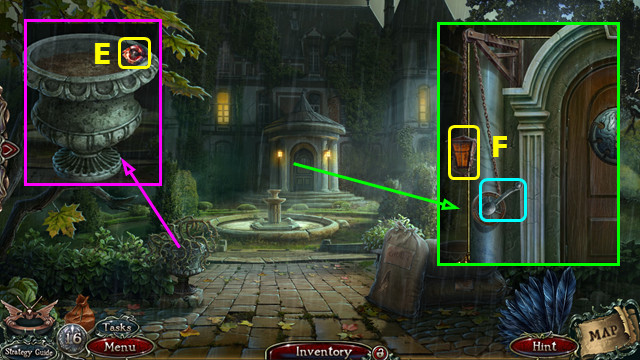
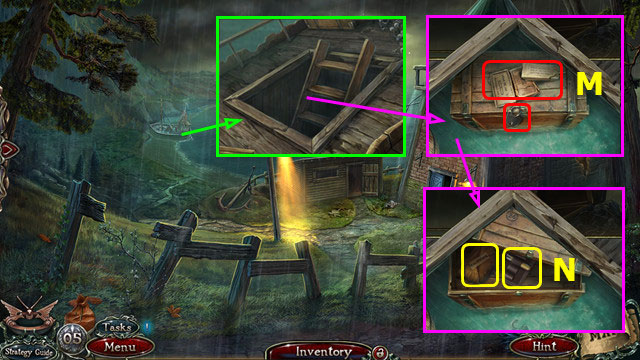
- Look in the window; take the BRUSH (L).
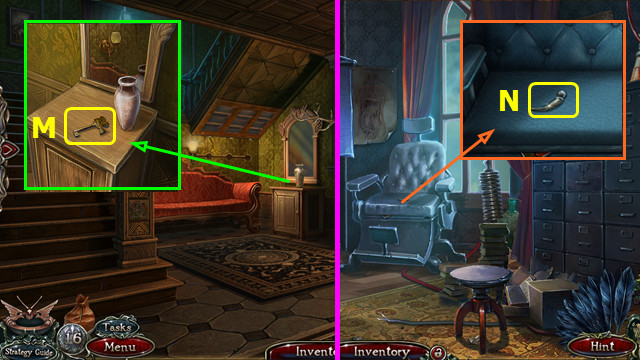
- Take the 5 COINS (M).
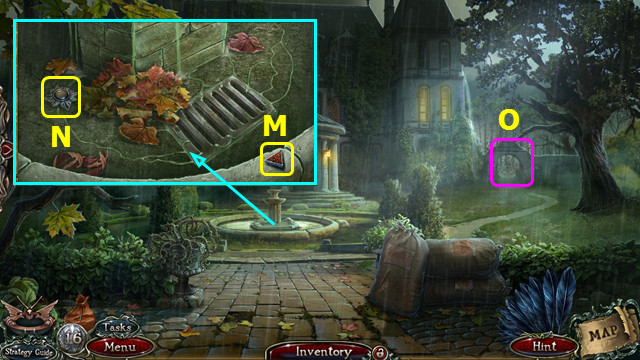
- Look at the door (N).
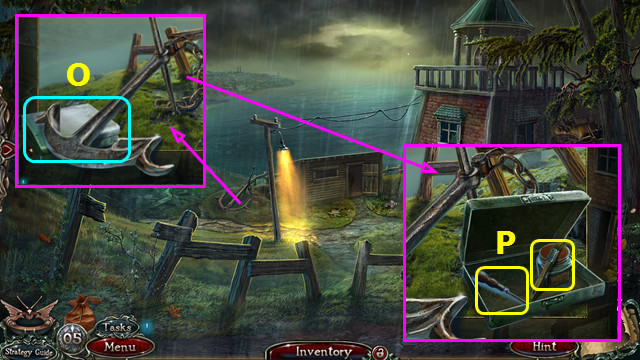
- Select (O).
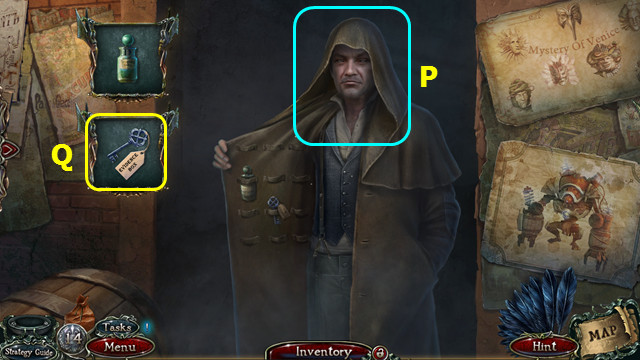
- Talk to the Merchant (P).
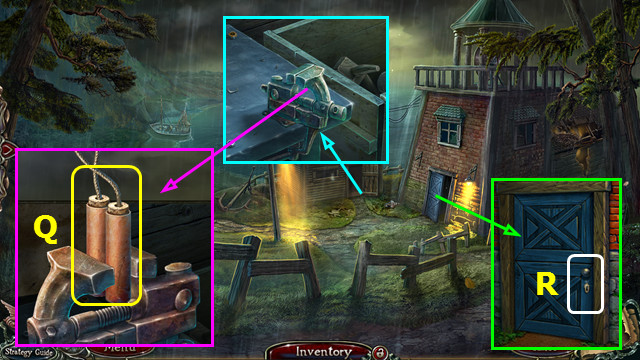
- Select, demand, and take the EVIDENCE BOX KEY (Q).
- Note: you may also choose to pay for the EVIDENCE BOX KEY.
- Exit the Merchant and walk down.
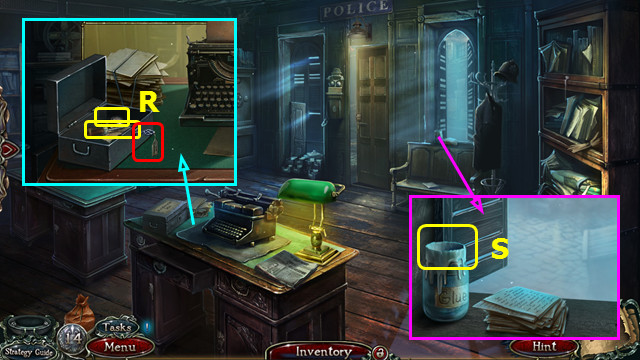
- Use the EVIDENCE BOX KEY and open the box; take the 2nd SKULL PART and AWL (R).
- Use the BRUSH to make the BRUSH WITH GLUE (S).
- Walk forward.
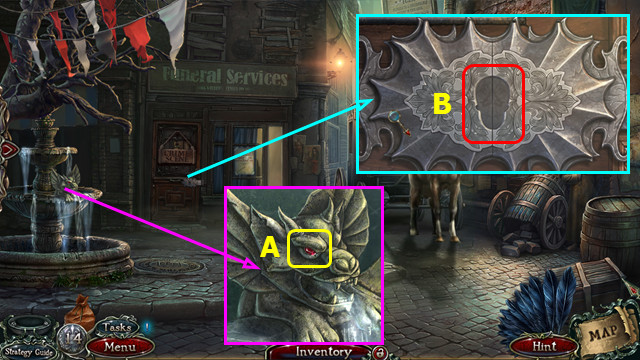
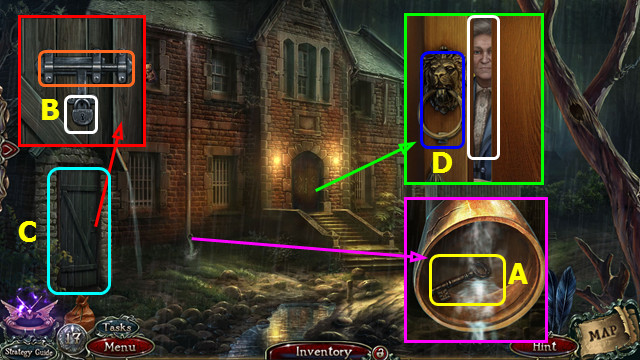
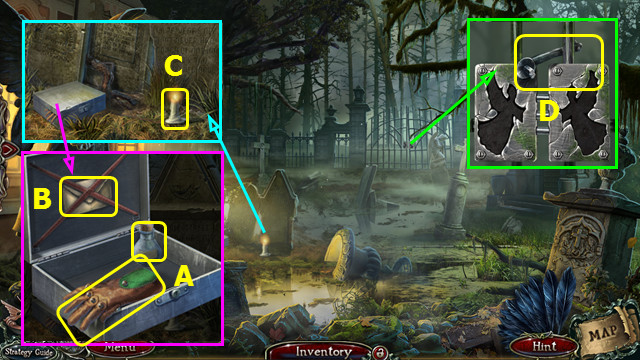
- Use the AWL to take the RUBY (A).
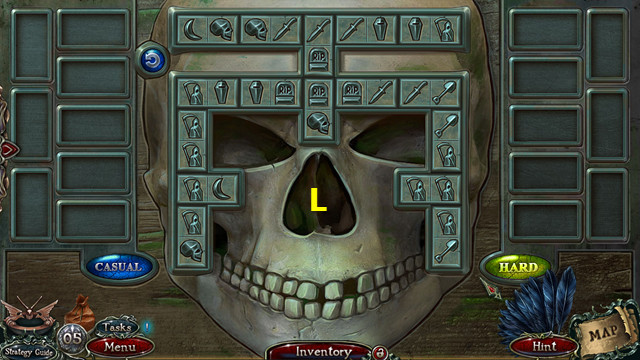
- Combine the 2 SKULL PARTS, BRUSH WITH GLUE, and RUBY to make the SKULL (inventory).
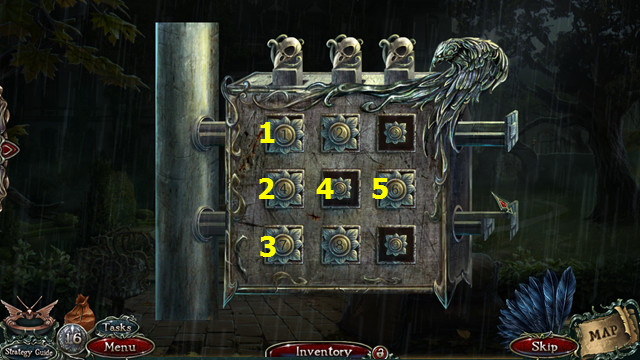
- Place the SKULL (B).
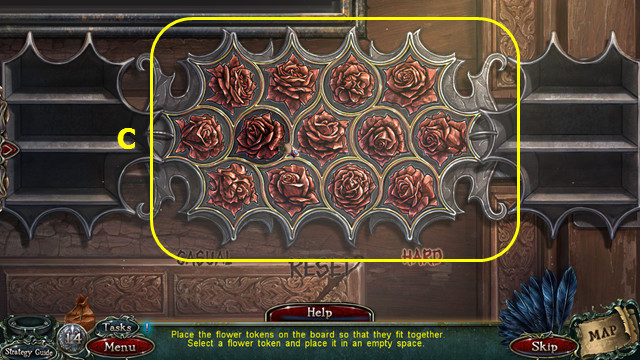
- Casual/ hard solution (C).
- Walk forward.
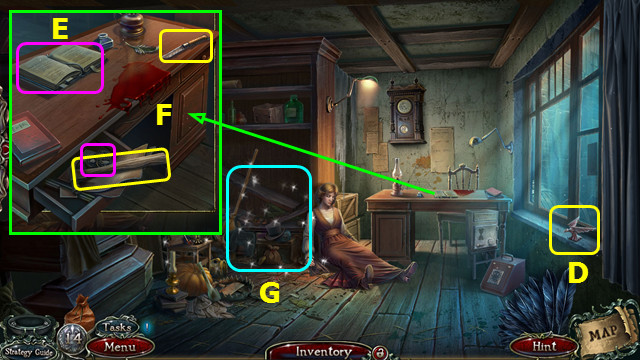
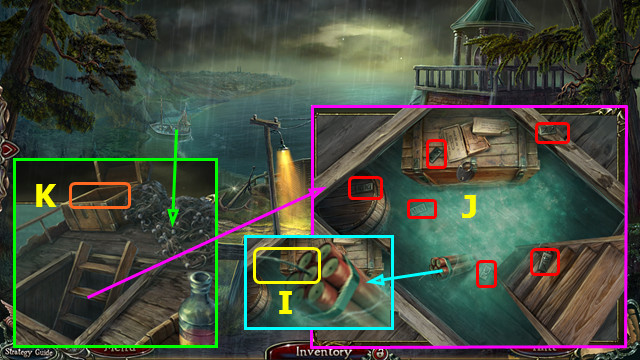
- Take the 1st METAL BIRD (D).
- Read the diary; take 3 COINS (E).
- Take the BLUNT KNIFE, HAMMER and 3 COINS (F).
- Play the HOP; earn the SCARAB (G).
- Place and select the SCARAB; take the 2nd METAL BIRD and 6 COINS (H).
- Walk down and select the Merchant; purchase the SMELLING SALTS.
- Exit the Merchant and go forward.
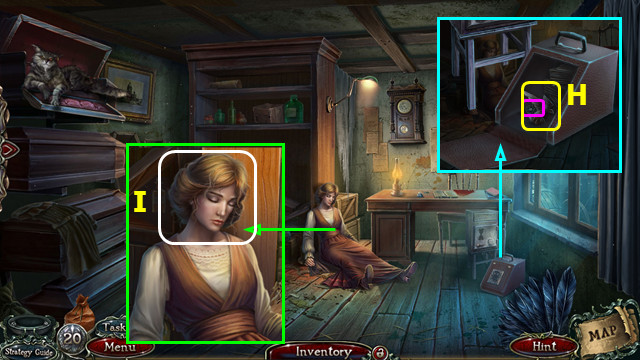
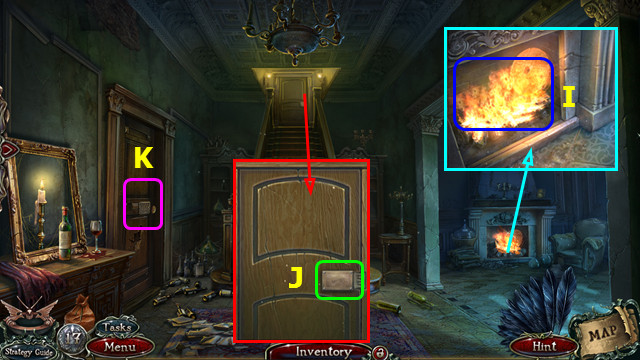
- Use the SMELLING SALTS (I).
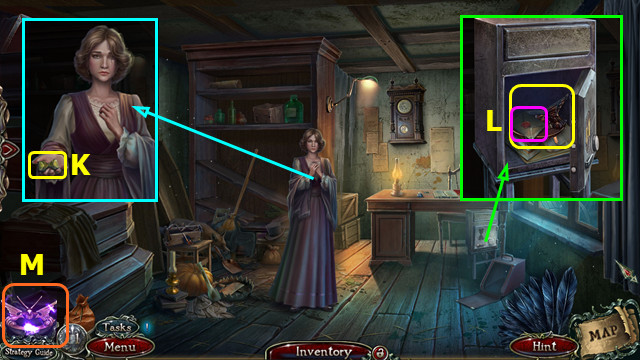
- Talk to Tom's Wife; show her the BADGE and take the HOURGLASS (K).
- Place and select the HOURGLASS; read the letter and take the DETECTOR (L).
- Combine the DETECTOR and 2 METAL BIRDS (inventory).
- The DETECTOR now sits on the menu bar; select it (M).
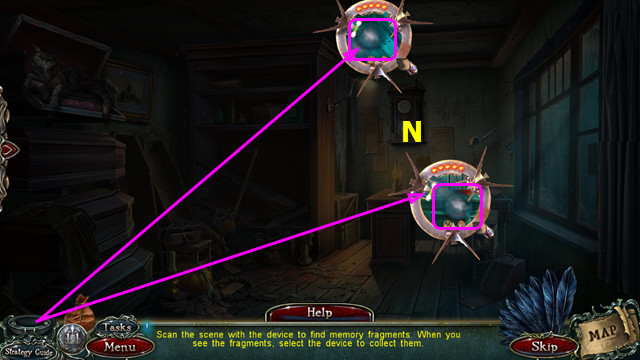
- Move the DETECTOR around; locate and select 5 memory fragments (N).
- The fragments move randomly.
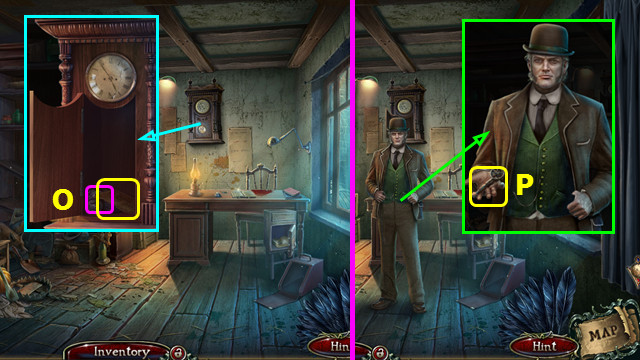
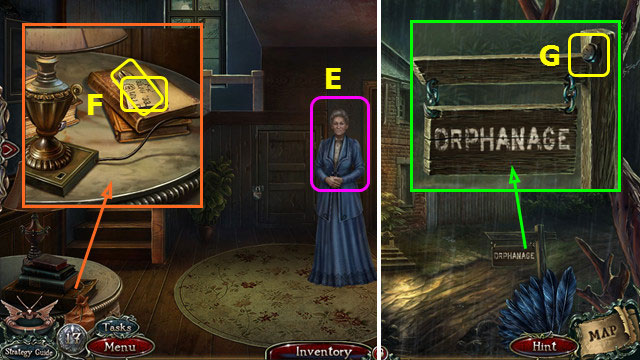
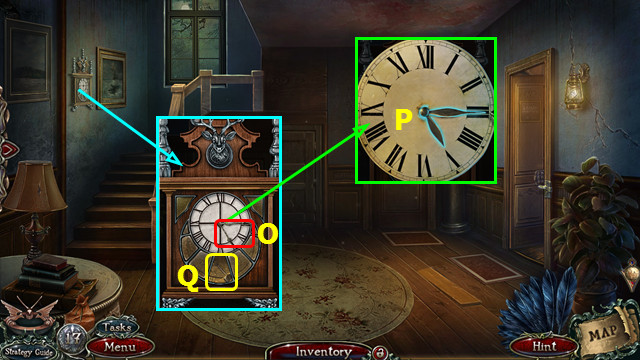
- Open the clock; take LEO'S PICTURE and 15 COINS (O).
- Talk to the Detective; give him LEO'S PICTURE and take the ARCHIVE KEY (P).
- Walk down 2x.
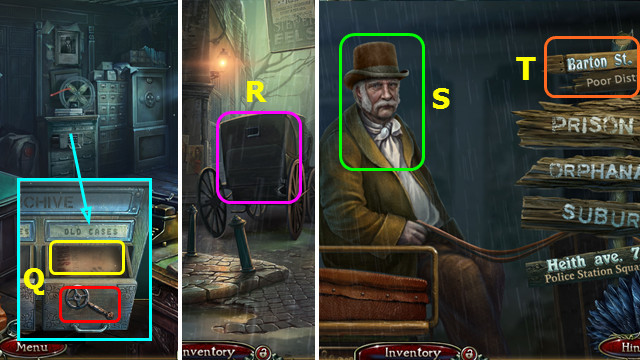
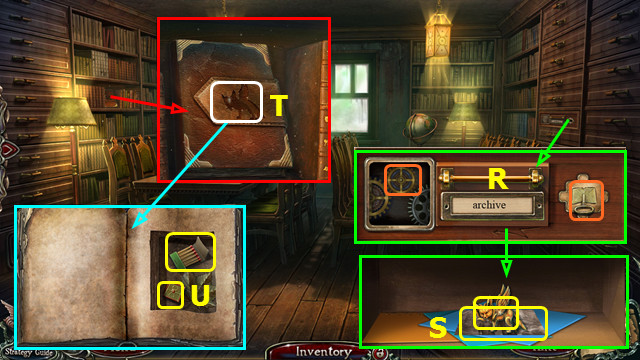
- Use the ARCHIVE KEY and open the drawer; take and read the files to find LEO'S ADDRESS and EVIDENCE for the folder (Q).
- Walk forward.
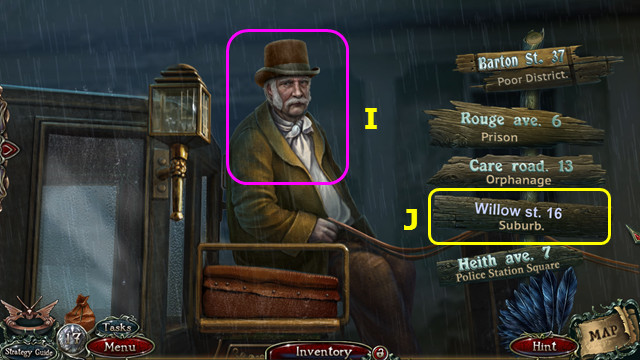
- Select the carriage (R).
- Give LEO'S ADDRESS (S); select the location (T) and pay the fare.
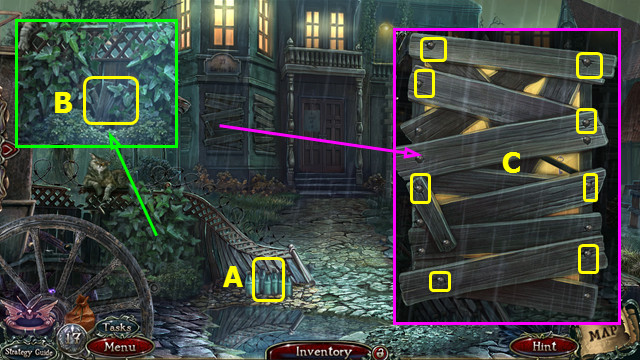
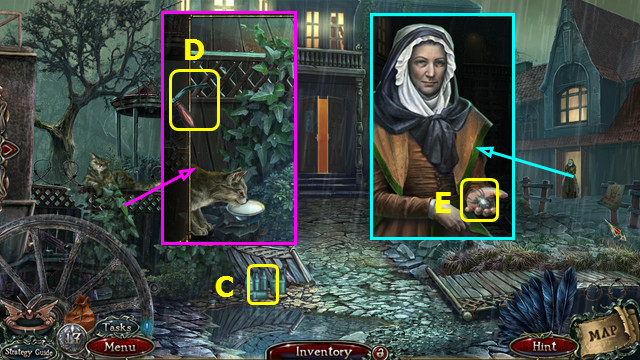
- Take the MILK (A).
- Move the vines 3x; take the PLANKS (B).
- Select the DETECTOR and locate the 5 memory fragments.
- Use the HAMMER 8x to earn the NAILS (C).
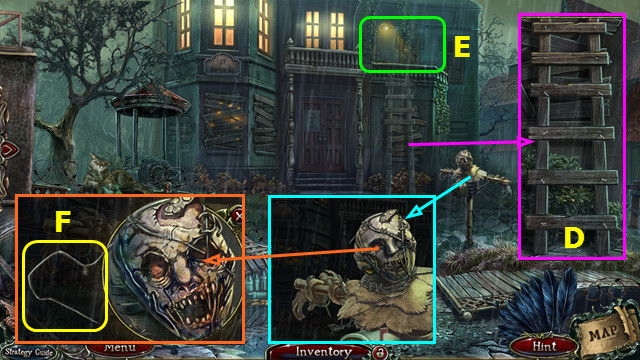
- Place the PLANKS and NAILS; use the HAMMER (D).
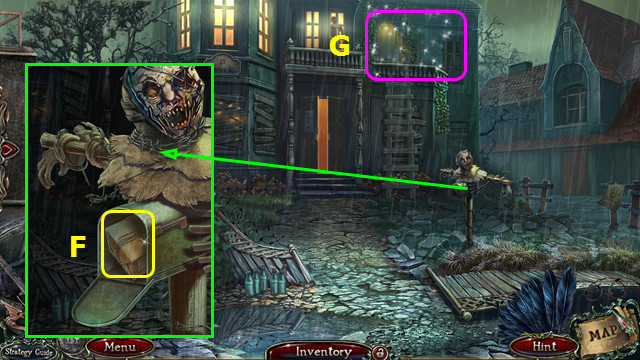
- Play the HOP; earn the CLIPPERS (E).
- Remove the mask; use the CLIPPERS to take the WIRE (F).
- Bend the WIRE 2x to make the HOOK (inventory).
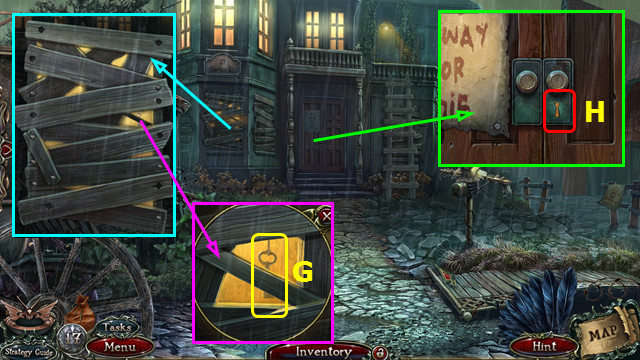
- Use the HOOK; take the HOUSE KEY (G).
- Look in the keyhole; use the HOUSE KEY (H).
- Walk forward.
Chapter 2: Inside 37 Barton Street
- Use the MILK (I).
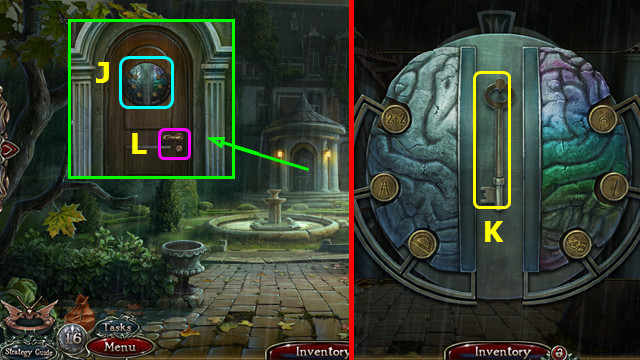
- Look at the lock (J).
- Select (K).
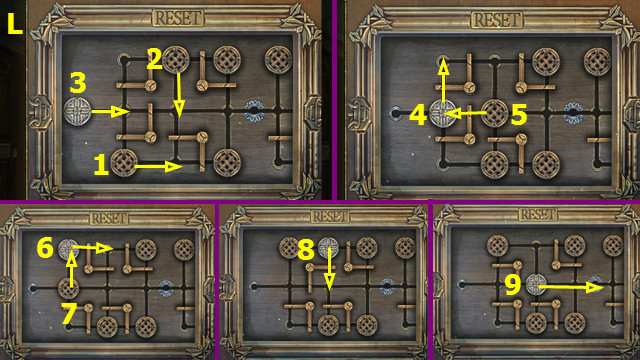
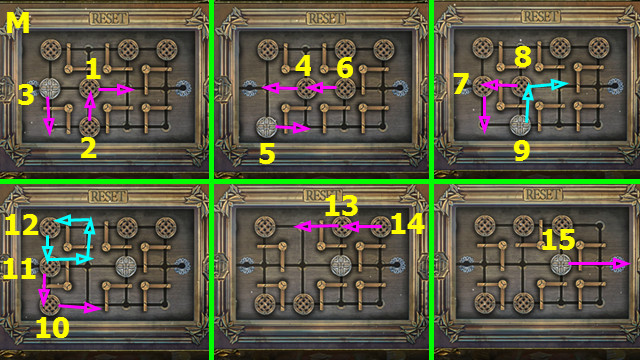
- Move the tokens in numerical order.
- Level one (L).
- Level two (M).
- Walk left.
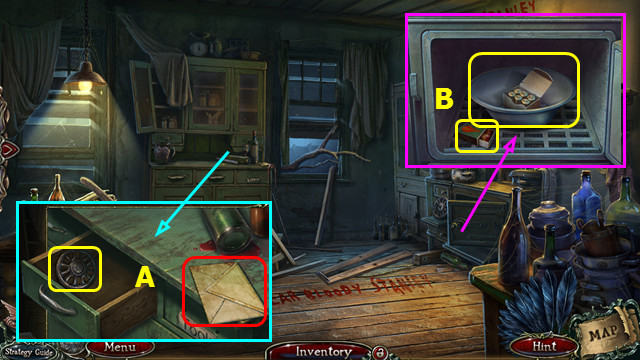
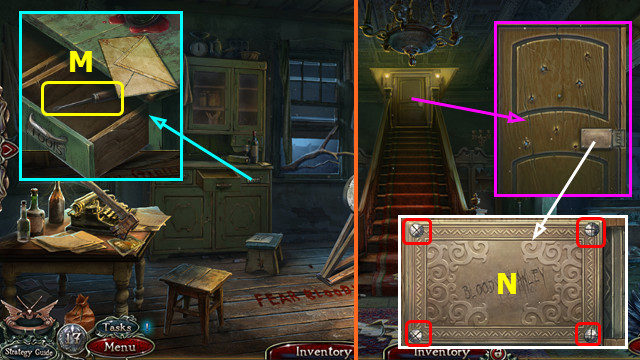
- Read the letter; open the drawer and take the WHEEL (A).
- Open the door; take the MATCHES and BOWL (B).
- Take the BULLETS from the BOWL (inventory).
- Open the REVOLVER and load the BULLETS (inventory).
- Walk down 2x.
- Take MILK (C).
- Combine the BOWL and MILK to make the BOWL OF MILK (inventory).
- Use the BOWL OF MILK; take the GRINDER HANDLE (D).
- Talk to the Woman; show her the BADGE and take the SPIDER KEY (E).
- Place and select the SPIDER KEY; take the PACKAGE (F).
- Play the HOP; earn the TONGS (G).
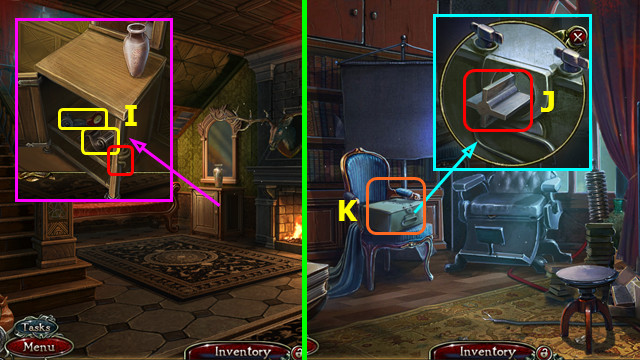
- Walk forward.

- Use the TONGS to take the GRINDSTONE (H).
- Walk left.
- Select (I).
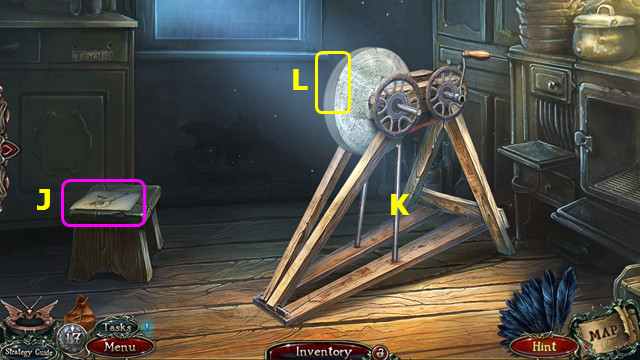
- Read the instructions (J).
- Restore the parts as shown; including the GRINDSTONE, WHEEL, and GRINDER HANDLE as they are needed (K).
- Select the handle and use the BLUNT KNIFE on the grindstone to make the SHARP KNIFE (L).
- Combine the PACKAGE and SHARP KNIFE; open the package and take the HANDLE (inventory).
- Place and select the HANDLE; take the SCREWDRIVER (M).
- Walk down.
- Use the SCREWDRIVER 4x (N).

- Slide the token and press the arrows in numerical order (1-12).
- Walk forward.
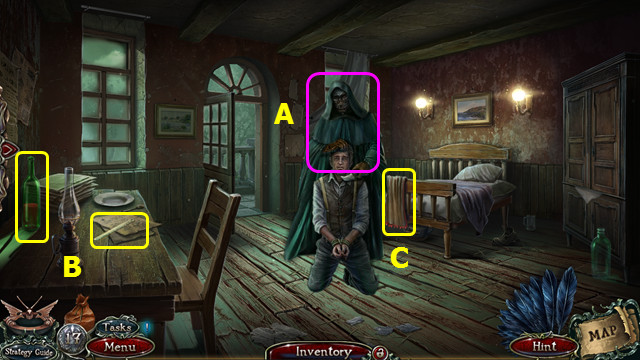
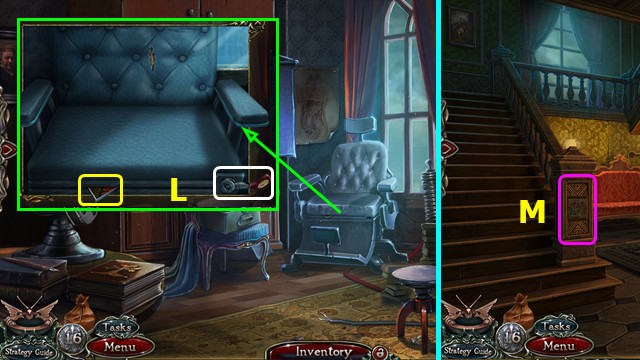
- Talk to the figure (A).
- Take the BOOZE and RULER (B).
- Take the 1st BLANKET (C).
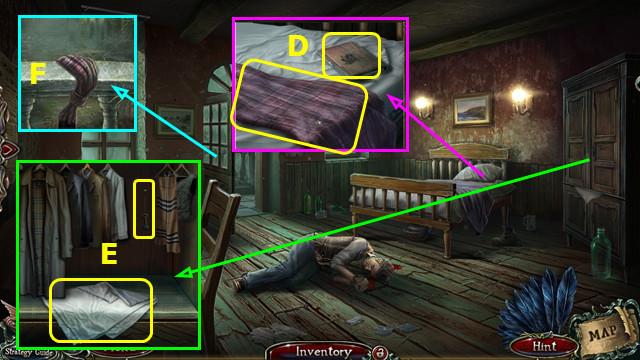
- Take the 2nd BLANKET; move the pillow, read the diary, and take the CODE (D).
- Use the RULER; take the 3rd BLANKET; move the coats and take the KEY (E).
- Combine the 3 BLANKETS to make the ROPE (inventory).
- Use the ROPE (F). Go forward.
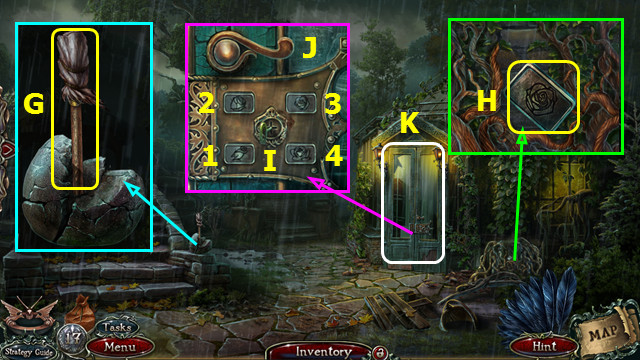
- Take the TORCH (G).
- Combine the TORCH, BOOZE, and MATCHES (inventory).
- Use the TORCH; take the ROSE (H).
- Place the KEY and ROSE; select 1-4, turn the key (I) and handle (J).
- Play the HOP; earn the PULLEY (K).
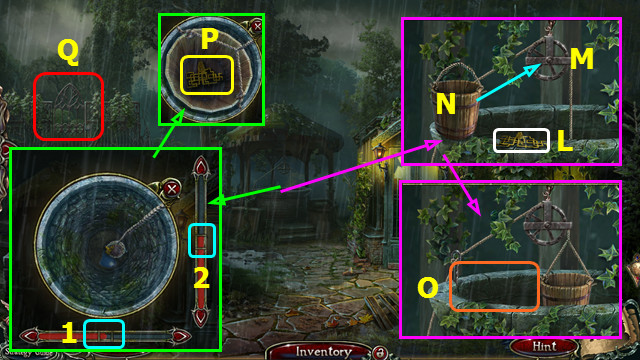
- Select (L).
- Place the PULLEY (M) and place the bucket (N) on it.
- Select the well (O).
- Click when the red bar is in the center (1-2).
- Take the GATE PART (P).
- Select (Q).
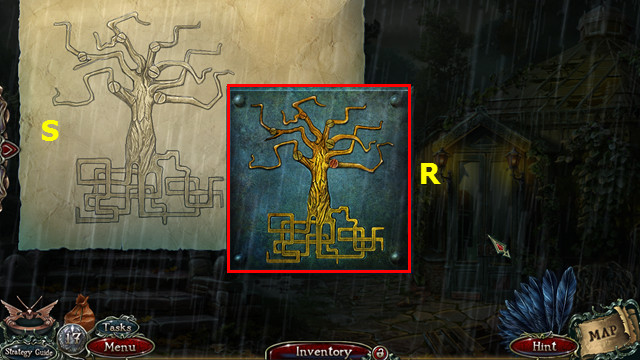
- Place the CODE and GATE PART.
- Restore the branches (R).
- Select the code paper to check your progress (S).
- Walk left.
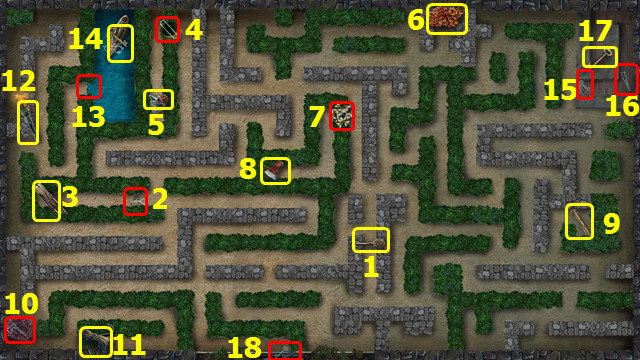
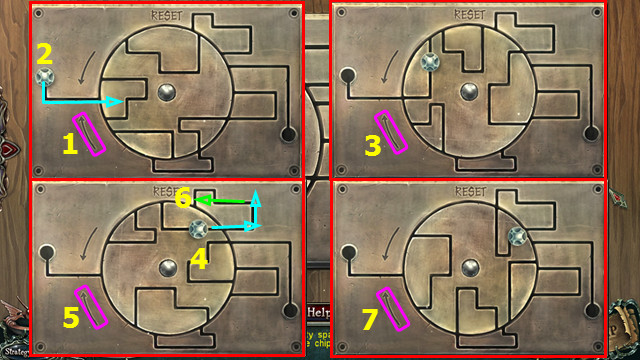
- Navigate the maze to the points in numerical order.
- Take the KEY (1); use the KEY (2).
- Take the PLANK (3); use the PLANK (4).
- Take the BEE SMOKER (5); take the LEAVES (6).
- The LEAVES will combine with the BEE SMOKER.
- Use the BEE SMOKER (7); take the AXE HEAD (8).
- Take the AXE HANDLE (9); the AXE HANDLE will combine with the AXE HEAD to make the AXE.
- Use the AXE (10); take the ROPE (11).
- Take the TORCH (12); use the ROPE (13).
- Take the KEY (14); use the KEY (15).
- Use the TORCH (16); take the KEY (17).
- Use the KEY (18).
- You earn the LIST.
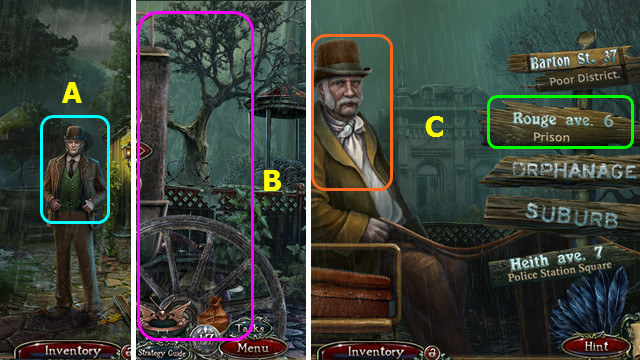
- Talk to the Detective; give the LIST and take the PERMIT (A).
- Walk down 3x.
- Select the carriage (B).
- Give the PERMIT; select the destination and pay the fare (C).
Chapter 3: The Prison Square
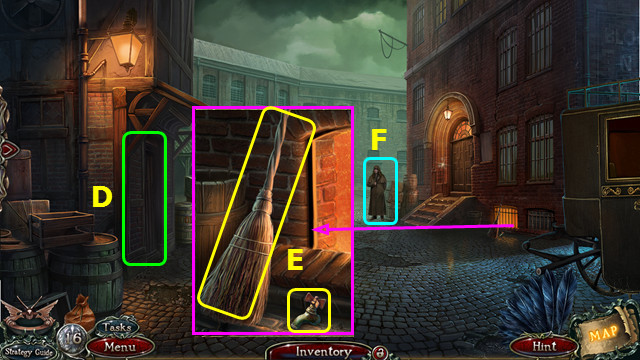
- Open the door and play the HOP; earn the EMPTY OILCAN (D).
- Take the FAUCET and BROOM (E).
- Talk to the Merchant; buy the LOCKPICK (F).
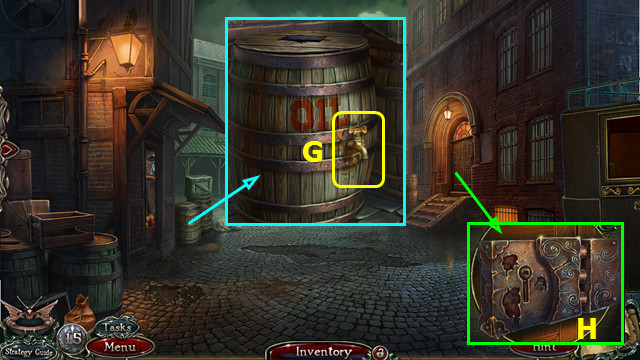
- Use the FAUCET and EMPTY OILCAN to make the OILCAN (G).
- Use the OILCAN and LOCKPICK (H).
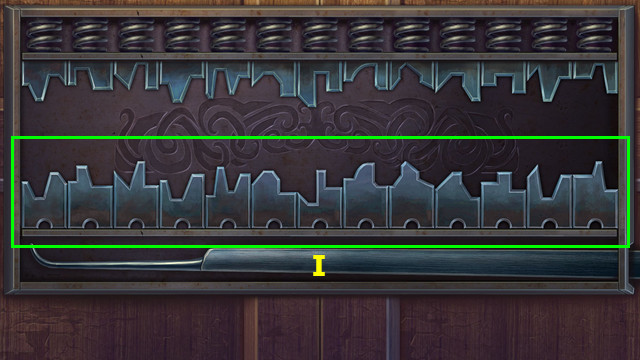
- Casual/Hard solution (I).
- Walk right.
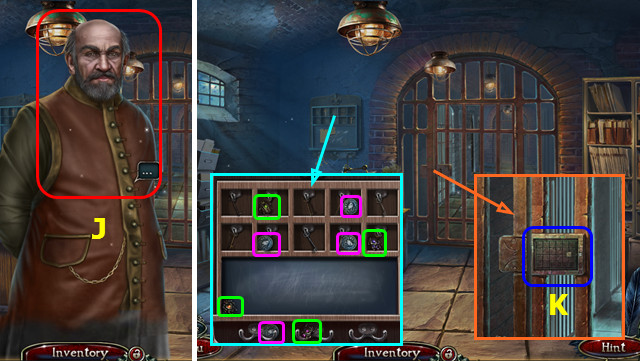
- Speak to the Jailer; show the BADGE and FOLDER (J).
- Take the 4 BUGS (green) and 4 COINS (pink).
- Select (K).
- Place the BUGS.
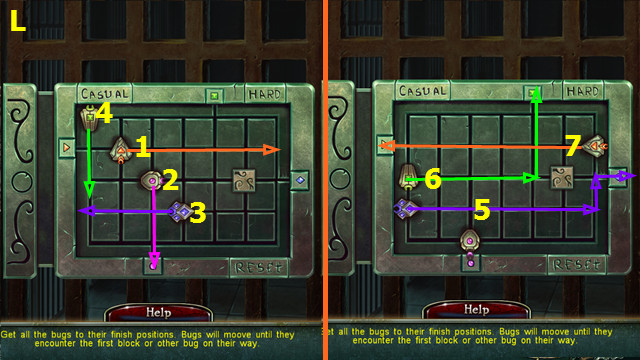
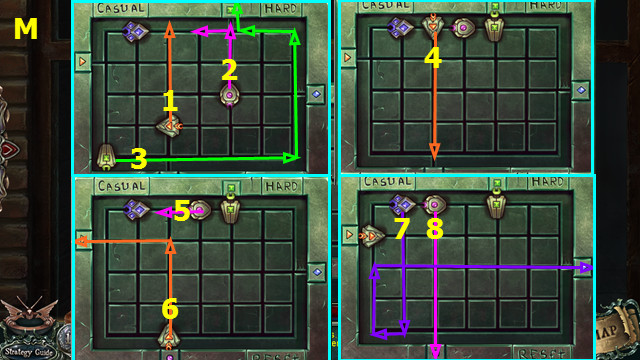
- Casual solution (L).
- Hard solution (M).
- Look in the cell.
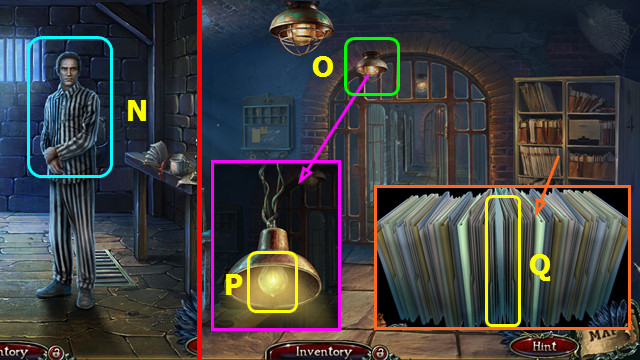
- Talk to the Prisoner (N).
- Use the BROOM (O); take the LIGHT BULB (P).
- Open the file; take the ADDRESS (Q).
- Walk down.
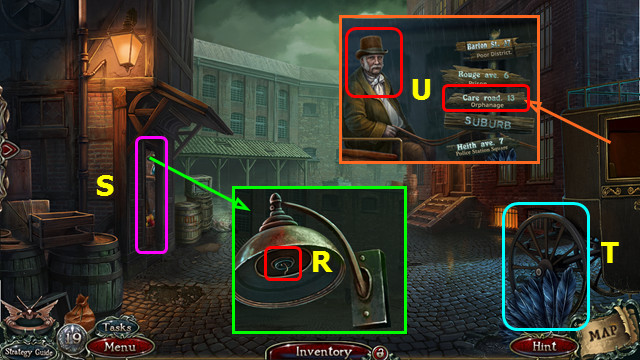
- Remove the broken bulb; place the LIGHT BULB (R).
- Play the HOP; earn the WHEEL (S).
- Place the WHEEL and select the carriage (T).
- Give the ADDRESS, select the destination, and pay the fare (U).
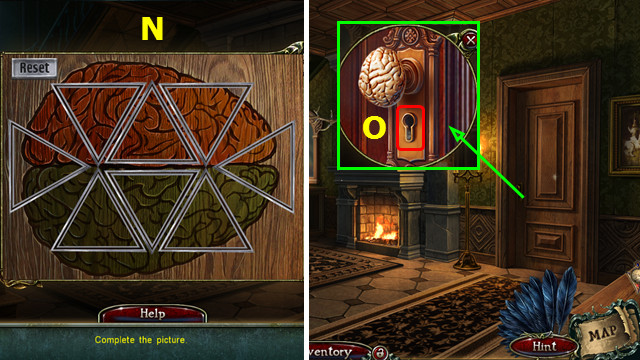
- Select the DETECTOR and locate the 5 memory fragments.
- Take the KEY (A).
- Use the KEY and open the latch (B).
- Play the HOP; earn the SOLVENT (C).
- Select the knocker, talk to the Woman, and show the BADGE (D).
- Walk forward.
- Talk to the Headmistress; take the KEY (E).
- Take the 1st CHILD'S DRAWING and NIPPERS (F).
- Walk down.
- Use the NIPPERS; take the LOCK BUTTON (G).
- Go forward.
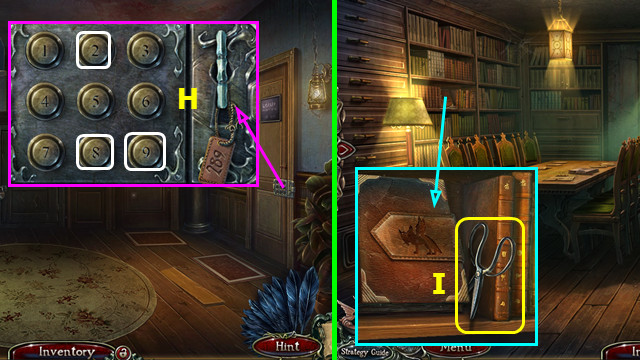
- Place the KEY and LOCK BUTTON; press 2-8-9 (H).
- Walk right.
- Take the SCISSORS (I).
- Take the 2nd CHILD'S DRAWING and CANDLE; use the solvent and take the CLOCK HAND (J).
- Take the POINTER (K).
- Walk down.
- Use the POINTER; take the WRAPPED GEAR (L).
- Use the SCISSORS on the WRAPPED GEAR to find the GEAR (inventory).
- Walk upstairs.
- Open the drawer. Select the scissors and use the SCISSORS to open the drawer further or select the strong arm and force the drawer open (M).
- Take the PETARD and 1/2 GAME BOX TILE (N).
- Note: if you use the strong-arm method, you cannot take the PETARD.
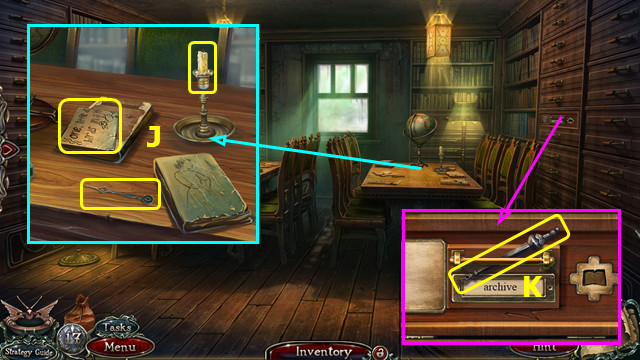
- Walk down.
- Place the CLOCK HAND (O); set the clock to 5:15 (P).
- Take the ARCHIVE KEY (Q).
- Walk right.
- Remove the cover and place the GEAR; place and select the ARCHIVE KEY (R).
- Take the DIARY KEY and PHOTO (S).
- Place the DIARY KEY (T); take the MATCHES and 2/2 GAME BOX TILE (U).
- Combine the CANDLE and MATCHES to make the BURNING CANDLE (inventory).
- Walk down 2x.
- Place the BURNING CANDLE; take the 3rd CHILD'S DRAWING (A).
- Take the TEDDY BEAR (B).
- Take the PIN from the TEDDY BEAR (inventory).
- Walk forward and upstairs.
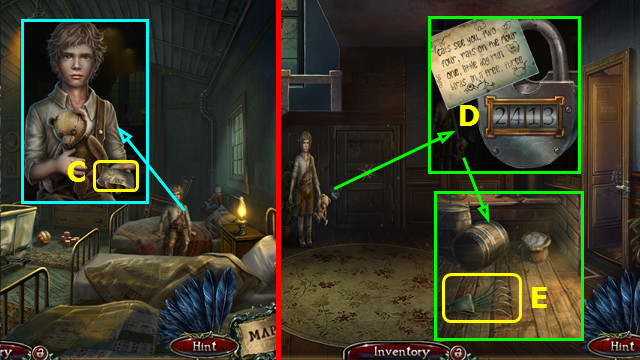
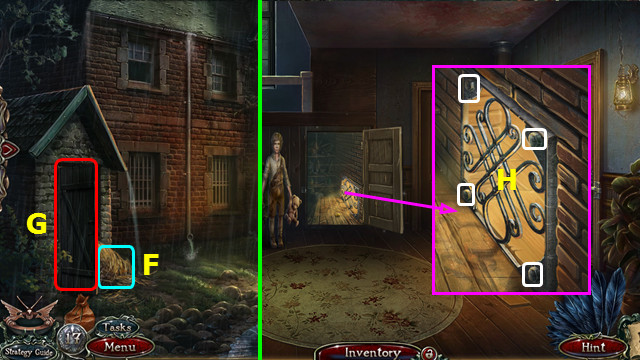
- Talk to the Boy; give him the TEDDY BEAR and PHOTO. Take the 4th CHILD'S DRAWING (C).
- Combine the 4 CHILD'S DRAWINGS to make the COUNTING RHYME (inventory).
- Walk down.
- Place the COUNTING RHYME; set the lock as shown (D).
- Take the RAKE (E).
- Walk down.
- Use the RAKE (F) and play the HOP (G); earn the WRENCH.
- Walk forward.
- Use the WRENCH 4x (H).
- Walk forward.
Chapter 4: The Orphanage Office
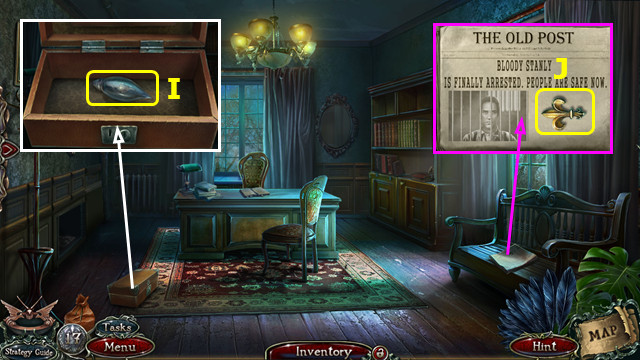
- Use the PIN and open the case; take the BULB (I).
- Take the 1st FLEUR-DE-LIS (J).
- Walk down and go upstairs.
- Place the BULB; take the MAGNET (K).
- Play the HOP; earn the GAME BOX (L).
- Combine the GAME BOX and 2 GAME BOX TILES (inventory).
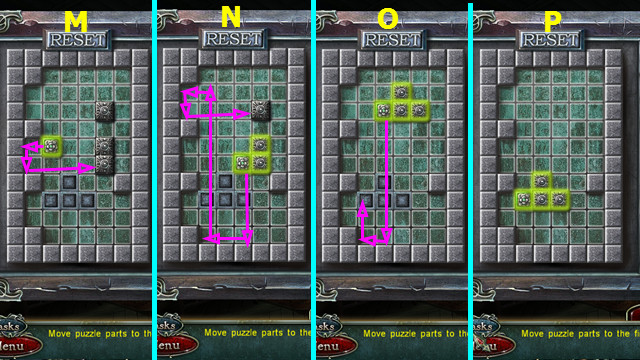
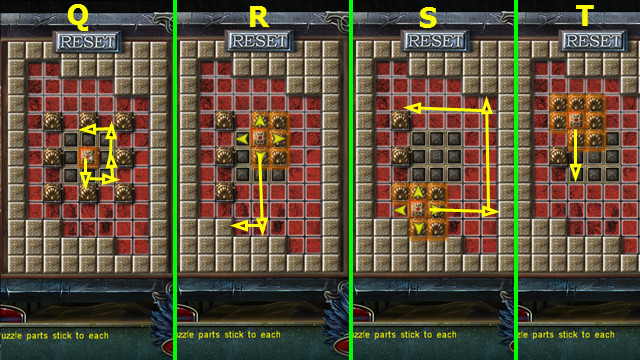
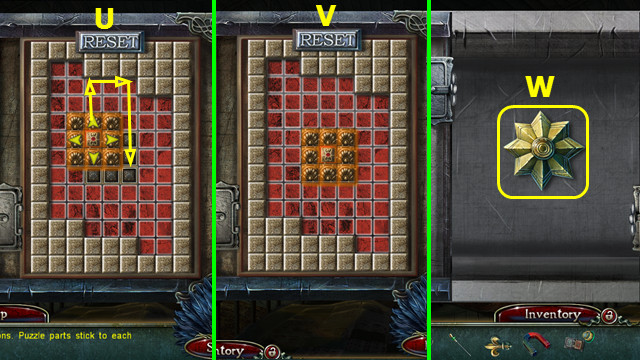
- Move the green tile: left-down-right (M), down-left-up-left-down-right (N), down-left-up (O), final position (P).
- Move the orange tile: down-right-up-up-left (Q), down-left (R), right-up-left (S), down (T), up-right-down (U), final position (V).
- Take the STAR (W).
- Walk down and forward.
- Move the books 4x; select the mini-game (A).
- Place the MAGNET (B).
- Select E-B-C-Dx2-C-E-B-C-Ex3.
- Take the 2nd FLEUR-DE-LIS (F).
- Place the STAR and 2 FLEUR-DE-LIS; press 1-3.
- Take the BOOKCASE KEY (G).
- Use the BOOKCASE KEY; take the STANLEY'S ADDRESS (H).
- Walk down 3x.
- Give the STANLEY'S ADDRESS (I).
- Select the destination and pay the fare (J).
- Take the BROOM; use the SCISSORS to take the NUTS (K).
- Note: if you used the SCISSORS to open the drawer, you cannot take the NUTS.
- Use the NUTS or PETARD; take the 1st BUTTON (L).
- Take the RAILING PART (M).
- Use the BROOM; take the 2nd BUTTON (N).
- Select (O).
- Place the 2 BUTTONS.
- Select 1-5.
- Walk right.
- Use the PIN and open the box; take the GLOVE and ACETONE (A).
- Open the letter and take the 1/5 FILM STRIP (B).
- Take the CANDLE (C).
- Take the HANDLE (D).
- Walk down.
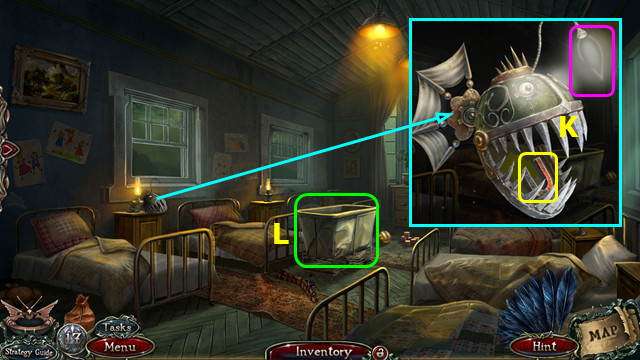
- Use the GLOVE; take the GEMSTONE (E).
- Place and select the HANDLE; take the LANTERN (F).
- Add the CANDLE to the LANTERN (inventory).
- Walk right.

- Remove the old lantern; place the LANTERN (G).
- Play the HOP; earn the 1/2 CHIP (H).
- Place the GEMSTONE; take the 2/2 CHIP (I).
- Walk down.
- Select (J).
- Place the 2 CHIPS.
- Arrange the chips as shown; take the DOOR KEY (K).
- Use the DOOR KEY and open the door (L).
- Go forward.
Chapter 5: Inside 16 Willow Street
- Take the PROJECTOR KEY (M).
- Go up the stairs.
- Take the HORN (N).
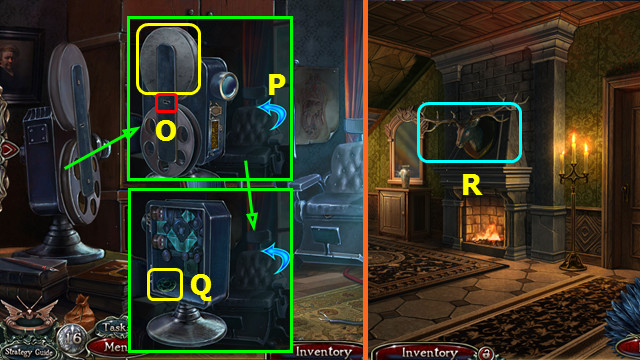
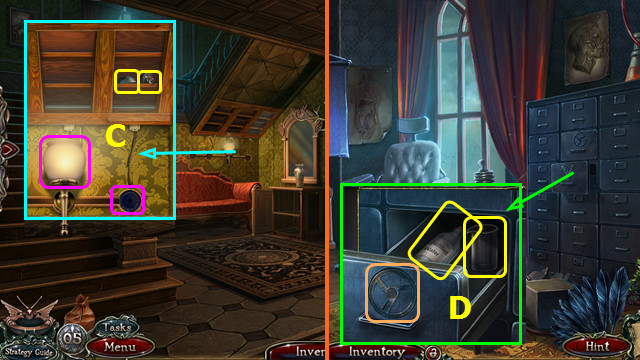
- Use the PROJECTOR KEY; take the FILM REEL (O).
- Turn the projector (P).
- Use the PROJECTOR KEY; take the 1st SCONCE PART (Q).
- Walk down.
- Select (R).
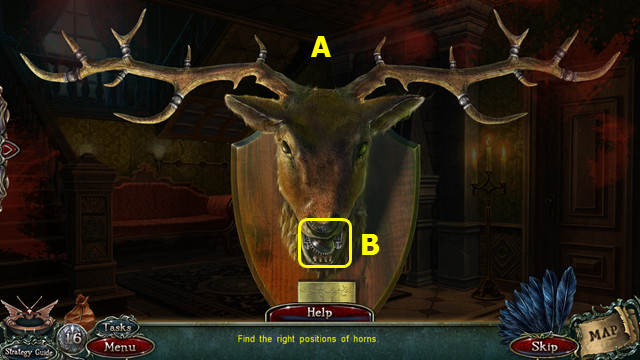
- Place the HORN.
- Restore the horn configuration (A).
- Take the CABINET KEY (B).
- Go upstairs.
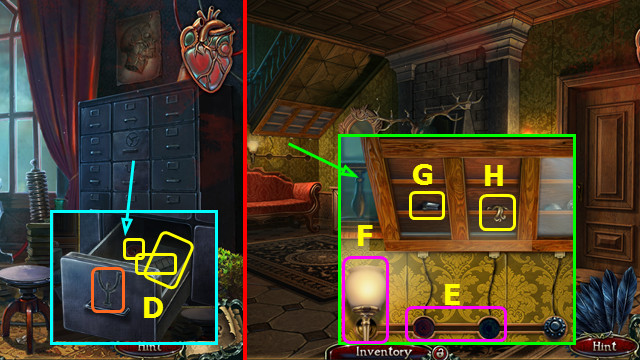
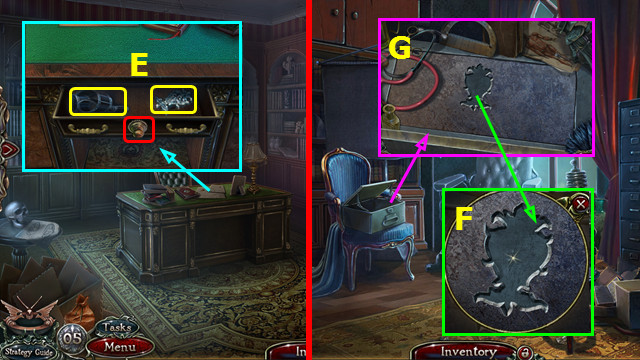
- Place and select the CABINET KEY; take the 2/5 FILM STRIP, INSTRUCTIONS, and 2nd SCONCE PART (D).
- Walk down.
- Place the 2 SCONCE PARTS (E); select the lamp (F).
- Take the BOX KEY (G); select the lamp again and take the MIRROR KEY (H).
- Place the MIRROR KEY; take the 3/5 FILM STRIP and CHAIR KEY (I).
- Go upstairs.
- Place and select the BOX KEY (J).
- Play the HOP; earn the BANDAGE (K).
- Exit the box; you automatically use the BANDAGE.
- Place and select the CHAIR KEY; take the 2/2 RAILING PART (L).
- Walk down.
- Select (M).
- Place the 2 RAILING PARTS.
- Solution (N).
- Take the DOOR KEY.
- Use the DOOR KEY (O).
- Walk right.
- Take the WHEEL (A).
- Take the SCONCE PART (B).
- Walk down.
- Place the SCONCE PART and select the lamp; take the 4/5 FILM STRIP and TABLE KEY (C).
- Go upstairs.
- Place and select the WHEEL; take the WATER and FLASK (D).
- Walk down and right.
- Place the TABLE KEY; take the 5/5 FILM STRIP and COMPARTMENT KEY (E).
- Walk down and go upstairs.
- Use the COMPARTMENT KEY (F).
- Play the HOP; earn the CABINET KEY (G).
- Walk down and right.
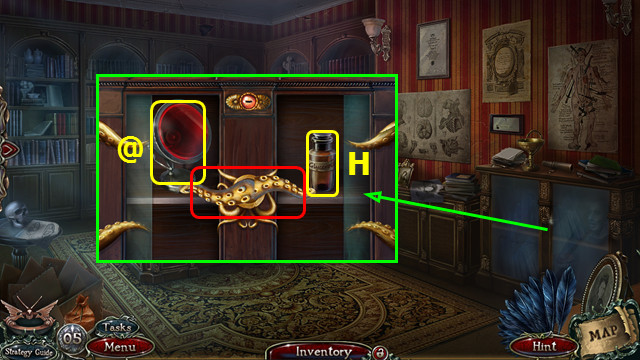
- Turn the CABINET KEY to the left; take the DARKROOM LIGHT (@).
- Turn the CABINET KEY to the right; take the GLYCEROL (H).

- Combine the INSTRUCTIONS, ACETONE, WATER, FLASK, and GLYCEROL (inventory).
- Use I-J-K on L.
- Place the 5 FILM STRIPS (M) and FILM REEL (N).
- Move the film strips to the film reel; place the full reel into the can (O).
- Use the flask (P) on (Q).
- Place and turn on the DARKROOM LIGHT (R).
- Take the MOVIE (S).
- Walk down and upstairs.
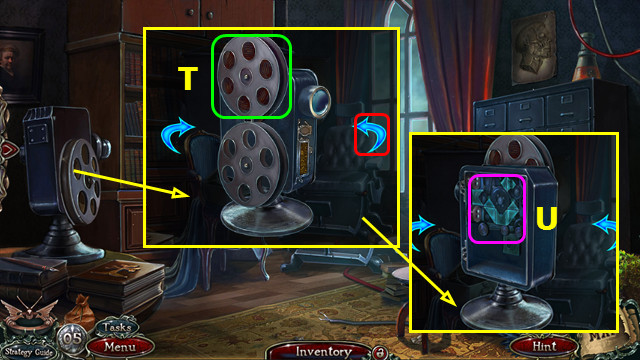
- Place the MOVIE (T).
- Select (U).
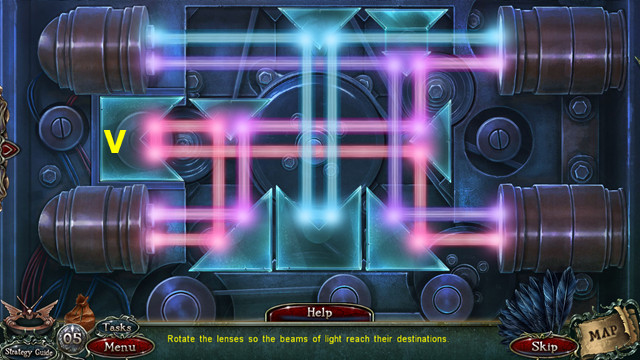
- Rotate the lenses as shown (V).
- You earn the HIDING SPOT.
- Walk down and right.
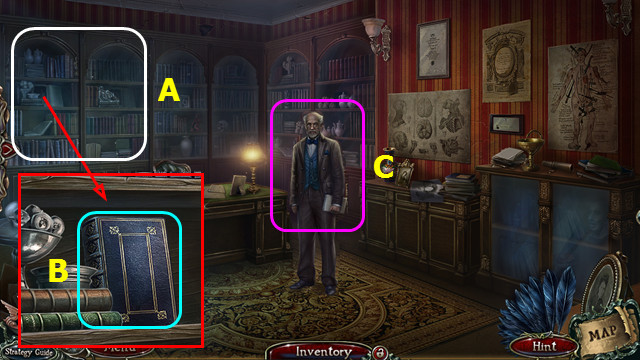
- Use the HIDING SPOT (A).
- Read the journal (B).
- Talk to Doc; take the 1/2 CEMETERY KEY (C).
- Walk down 2x; go right.
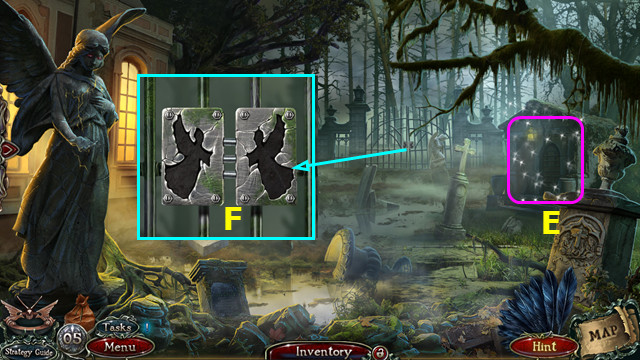
- Play the HOP; earn the 2/2 CEMETERY KEY (E).
- Place the 2 CEMETERY KEYS (F).
- Walk forward.
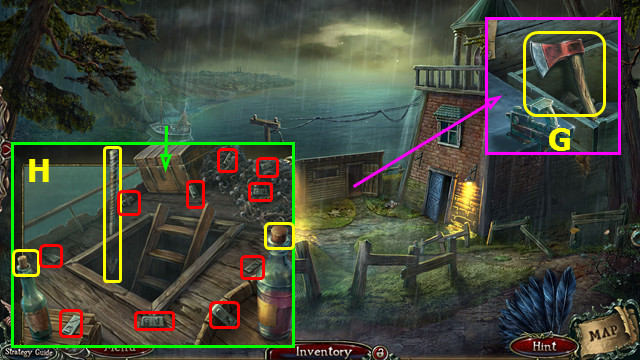
- Take the AXE (G).
- Take the HARPOON, 2 CORKS, and 1-10 of 16 DOMINO (H).
- Take the WICK (I) and 11-16 of 16 DOMINO (J).
- Open the chest and select (K).
- Place the 16 DOMINOES.
- Casual/hard solution (L).
- Take the CHARCOAL and CARDBOARD.
- Move the papers and use the AXE (M).
- Open the crate; take the SULPHUR and SALTPETER (N).
- Use the HARPOON (O).
- Open the box; take the AWL and RESIN (P).
- Place the CARDBOARD, SALTPETER, CHARCOAL, SULPHUR, and 2 CORKS; use the AWL 2x and WICK; take the DYNAMITE (Q).
- Look in the keyhole; place the RESIN and DYNAMITE (R).
- Walk right.
- Congratulations! You have completed Grim Facade: Monster in Disguise!
Created at: 2016-06-17