

Walkthrough Menu
- General Tips
- Chapter 1: The Redemption Society
- Chapter 2: Bartolomeo’s Mansion
- Chapter 3: Gaspar’s Residence
- Chapter 4: The Ship
- Chapter 5: The Theater
General Tips
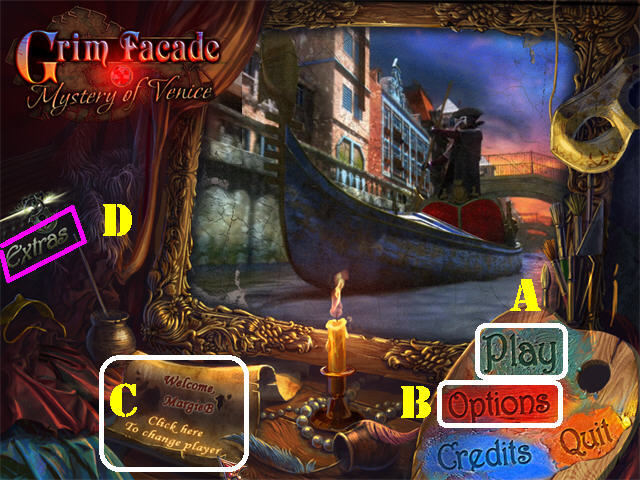
- Click on ‘Play’ (A) to access the main chapters in the game.
- The ‘Options’ (B) button allows you to adjust the screen, music, cursor, and sound.
- The ‘Click here to change player’ button (C) can be used to add or delete a new player.
- The ‘Extras’ (D) is only enabled in the Collector's Edition.
- Collect the GOLDEN DUCATS in the game in order to buy items in Giovanni’s shop.
- Click on the Binoculars Icon, when it appears, to take a closer look at a section, or to read information regarding the game.
- You can skip a puzzle once the ‘SKIP’ button fills. The ‘SKIP’ button only appears in puzzle sections; it is located in the lower right corner.
- Click on the FAN (H) in the lower right to obtain a Hint.
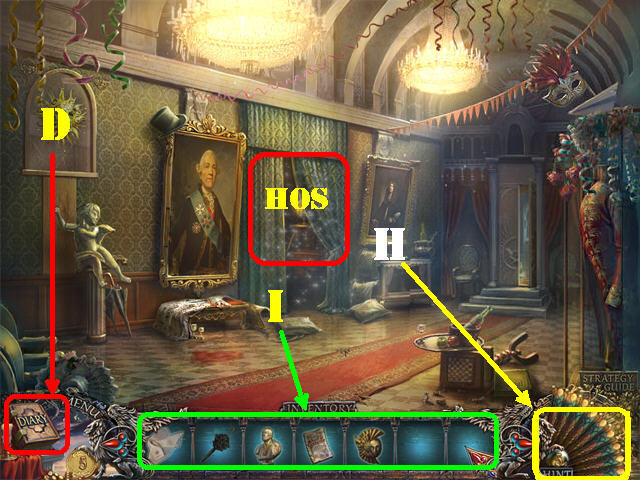
- A cluster of sparkles indicates a Hidden Object Scene which will grant an inventory item upon completion (HOS).
- Collect the FANS in Hidden Object Scenes to gain one additional hint per fan.
- You have unlimited Hints in the Hidden Object Scenes and in Quest Scenes, but you must wait for them to recharge between uses.
- Items written in orange in Hidden Object Scenes are hidden; you must open or click on something to make the hidden items appear.
- Pass your mouse over the bottom of the scene to access your Inventory Tray (I).
- To use an inventory item, select it and drag it to the desired location; click it into the spot in which you want it used.
- Use the arrows in your inventory tray to scroll through all the items you’ve collected.
- The Diary (D) is in the lower left; read it to find clues and read part of the story.
Chapter 1: The Redemption Society
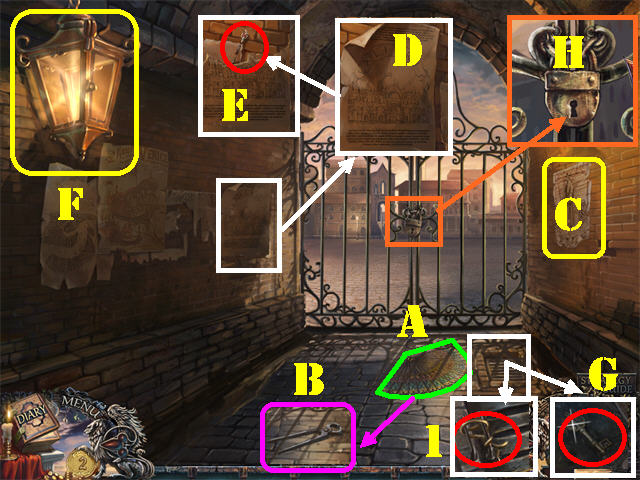
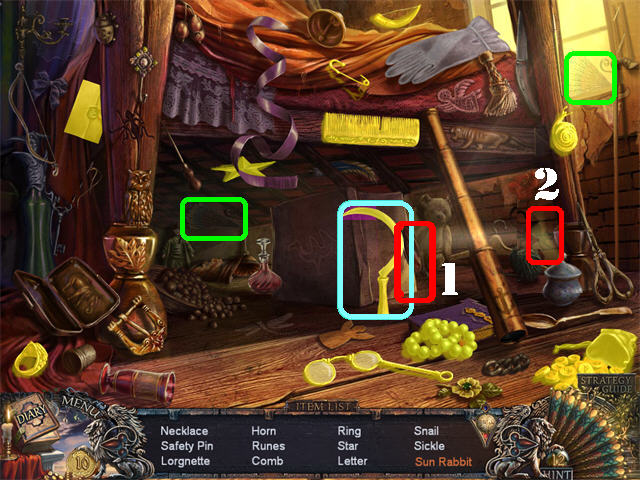
- Take the 2 GOLDEN DUCATS from the man’s hands.
- Grab the FAN (A) on the ground for an additional hint.
- Take the CLIPPERS (B) below the fan.
- Click on the DIARY PAGE (C) on the right wall.
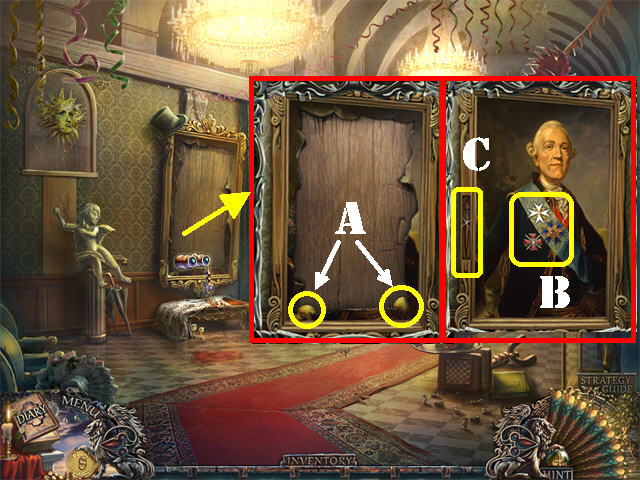
- Take a closer look at the poster on the left wall; take the POSTER SCRAP (D) and then grab the PIN (E) behind it.
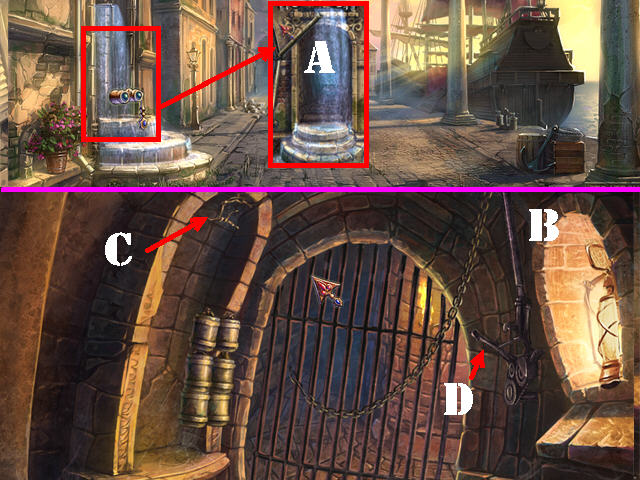
- Examine the lantern in the upper left; open it with the PIN and take the CANDLE (F).
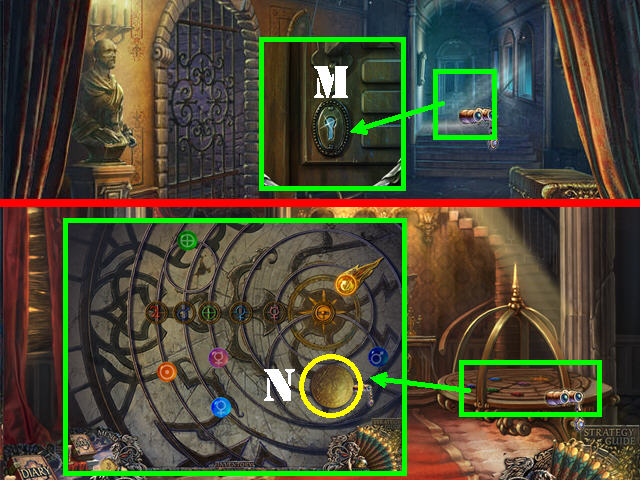
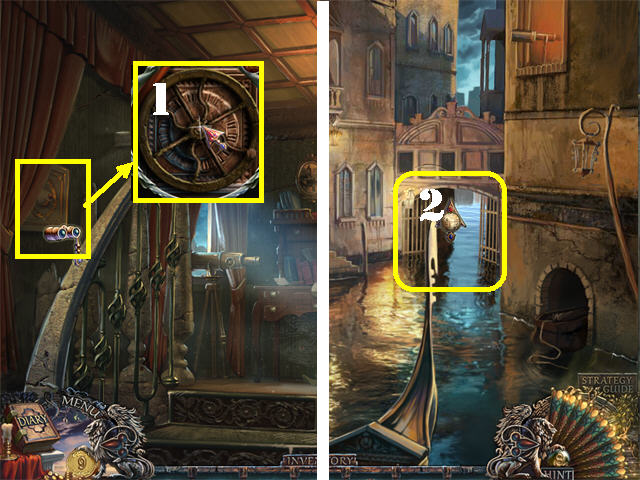
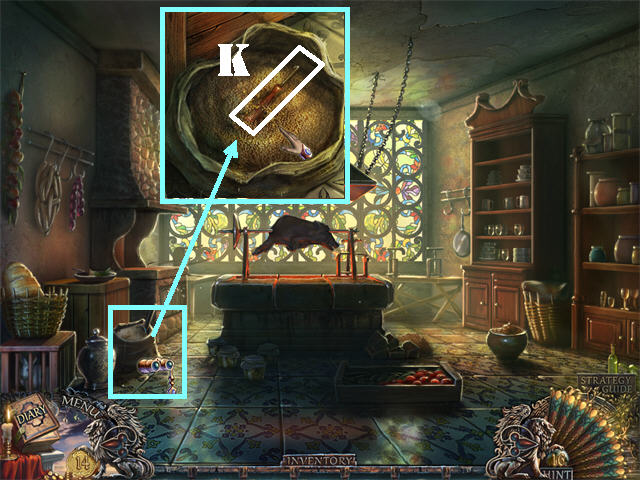
- Zoom into the grate in the ground; remove the wires with the CLIPPERS (1) and take the KEY (G).
- Examine the lock; place the KEY in the lock and turn once (H).
- Go through the gate.
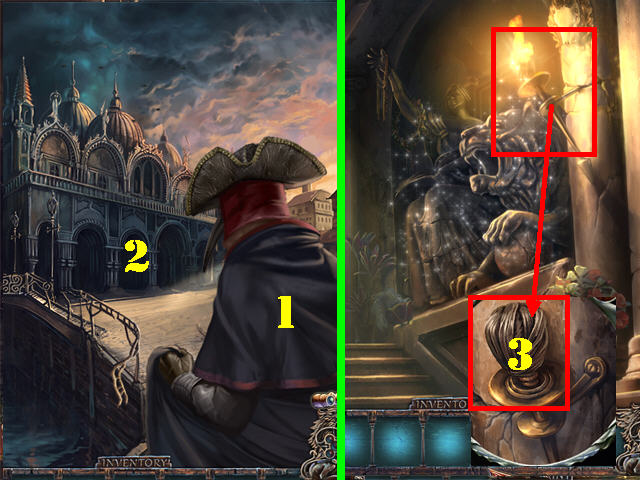
- Talk to the masked man (1).
- Go towards the center building (2).
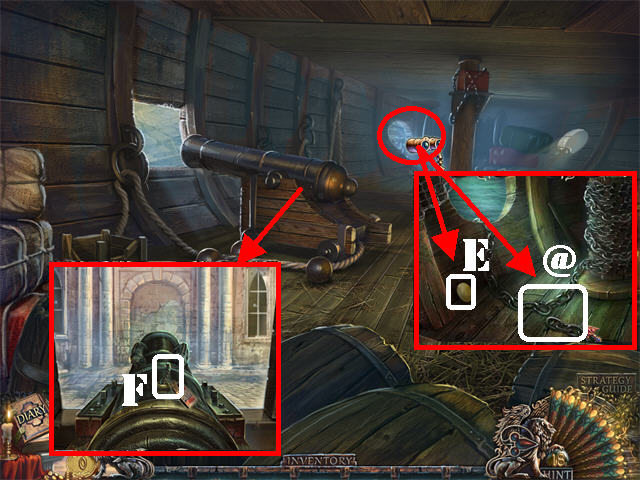
- Examine the torch on right; light it with the CANDLE to activate a Hidden Object Scene (3).
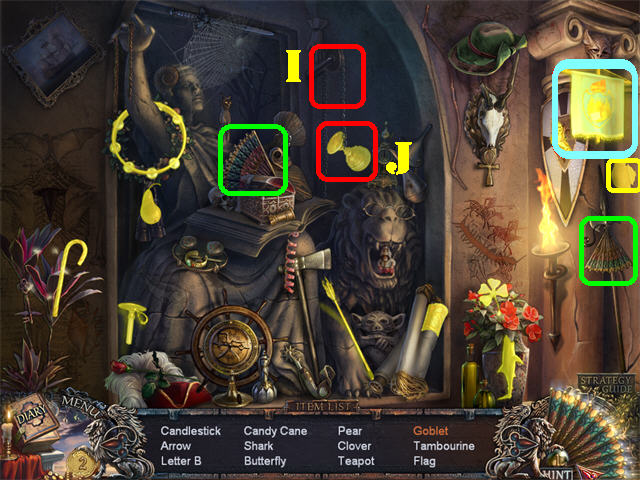
- Play the Hidden Object Scene.
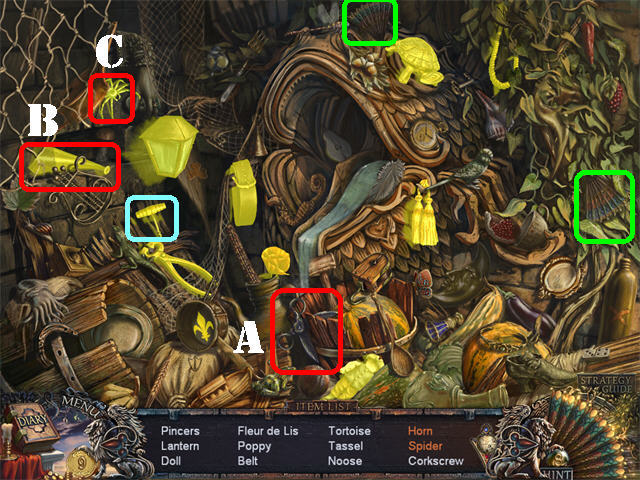
- Click on the chain (I) in the upper left; take the GOBLET (J).
- Grab the 2 FANS marked in green.
- The FLAG will be added to inventory.
- Click down and go towards the building on the right to see the masked man again.
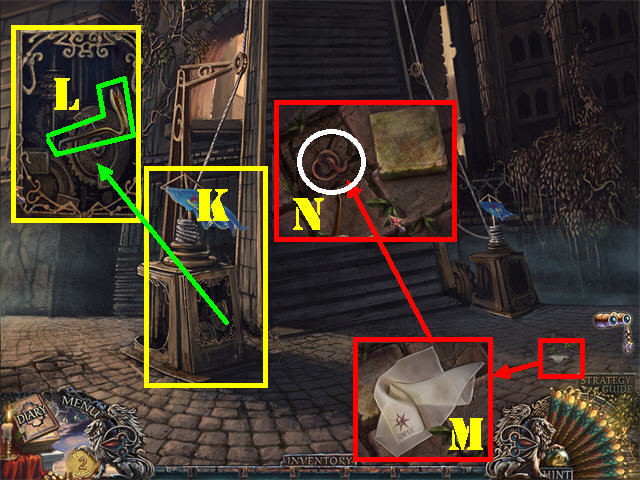
- Examine the bridge control on the left; place the FLAG on it (K).
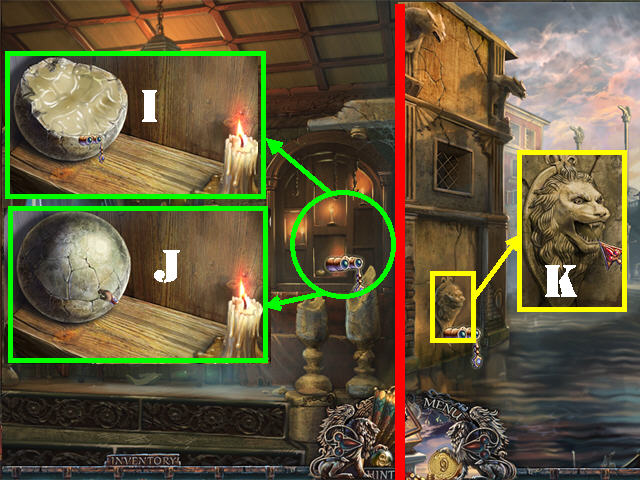
- Zoom into the base of the left bridge control; take the CROWBAR (L).
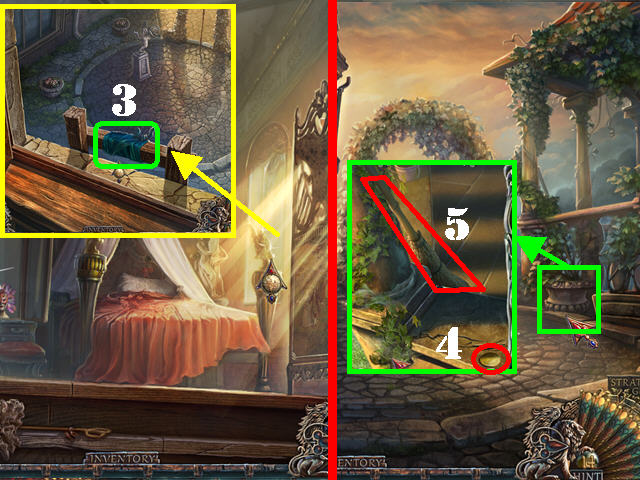
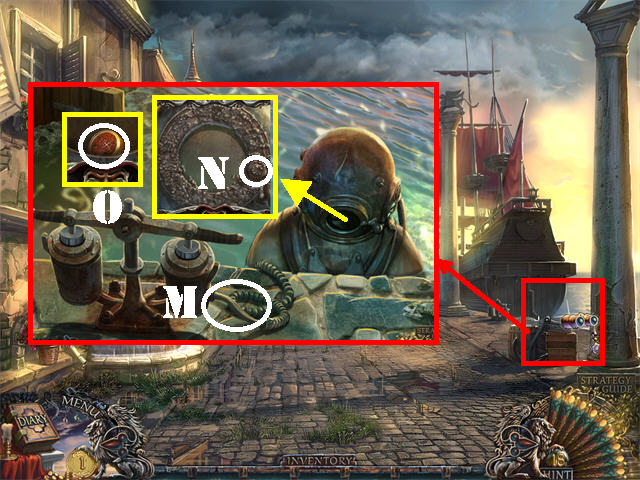
- Take a closer look at the HANDKERCHIEF on the ground and take it (M).
- Remove the loose stone on the ground with the CROWBAR; take the WORM (N).
- Cross the bridge.
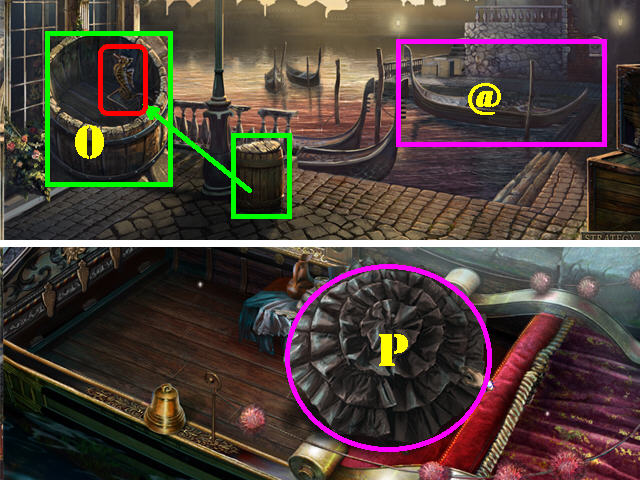
- Examine the barrel on left; open it with the CROWBAR and take the SEAHORSE (O).
- Head towards the gondola (@).
- Click on the UMBRELLA to close it; take the UMBRELLA (P) to activate a Hidden Object Scene; play it.

- Drag the KNIFE (Q) to the pillow and take the CRYSTAL (R).
- Open the purse on left and take the RING (S).
- The WHEEL will be added to inventory.
- Click down twice.
- Enter the building in the center.
- Play the Hidden Object Scene.
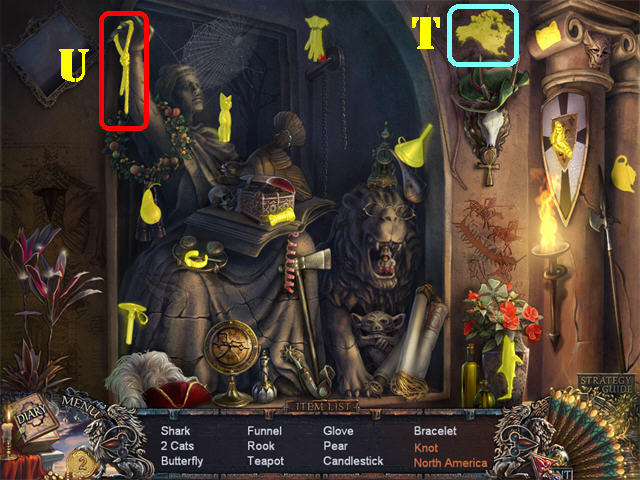
- Click on the hat in the upper right and take AMERICA (T).
- Click on the rope in the upper left and take the KNOT (U).
- AMERICA will be added to inventory.
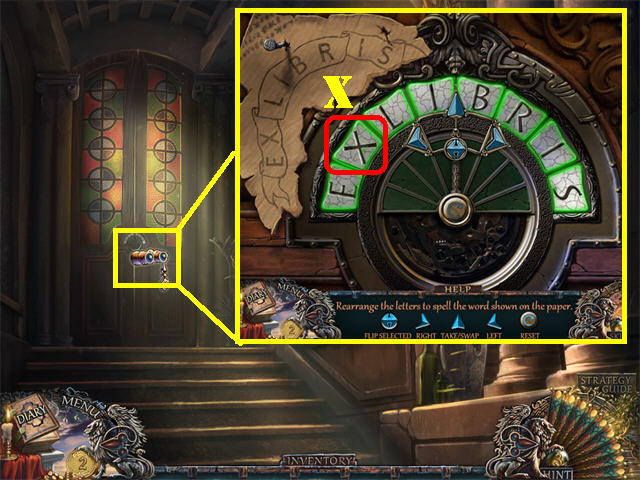
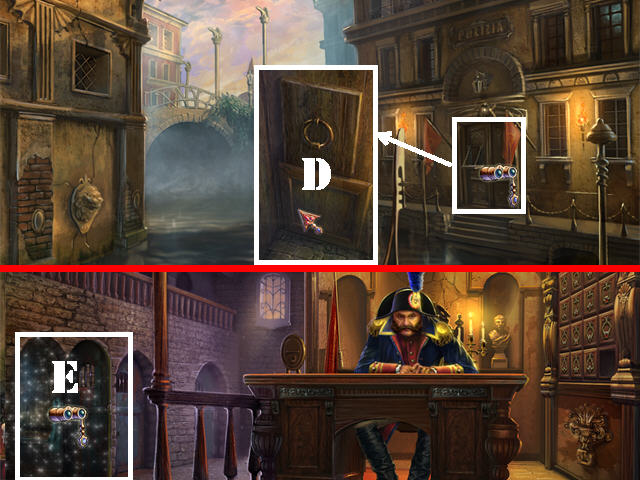
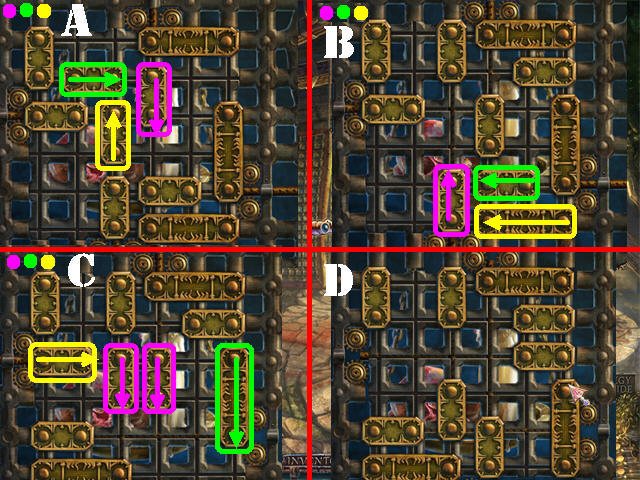
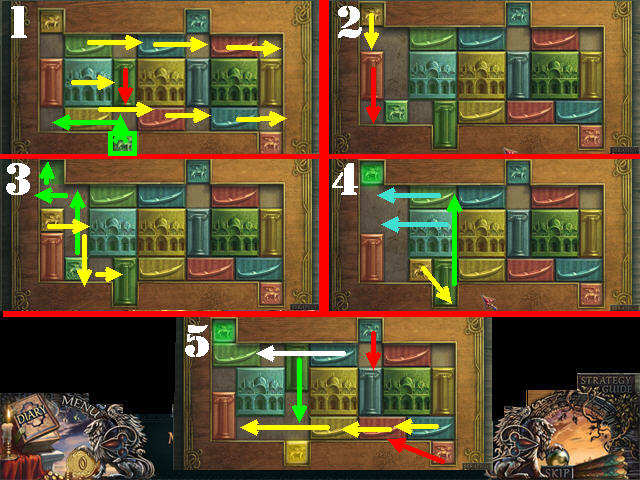
- Zoom into the door; place the POSTER SCRAP on it to activate a puzzle.
- You must spell the word ‘EXLIBRIS’ by grabbing the letters and placing them in the correct spots.
- You can only grab two letters at a time. Use the top arrow to grab the letters and use the arrows on the side to move from side to side.
- The double-sided arrows in the center can switch the positions of the two letters in your grip.
- Place two letters over 2 other letters on the board to replace them. You can either place the 2 letters in your grip in another spot with 2 letters or in the 2 empty slots.
- Try to position the letters that belong together next to each other so they can easily be moved to the correct spot.
- The solution to this puzzle is random since the beginning configuration is different each time you reset the puzzle.
- Take the ROMAN TEN (X) after the puzzle has been solved.
- Enter the library.
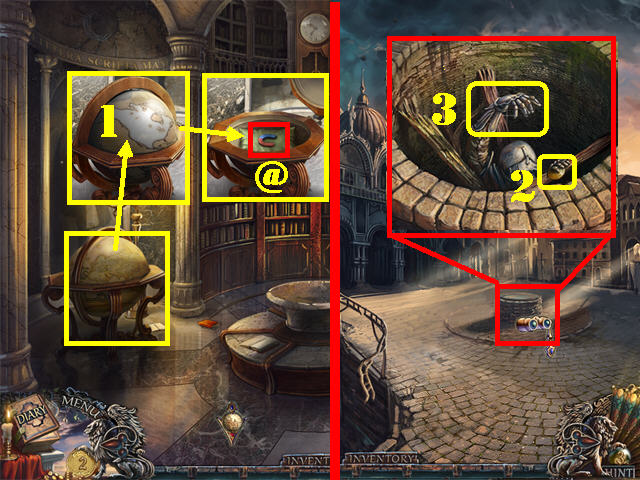
- Examine the globe; spin it and place AMERICA on it (1).
- Take the MAGNET (@) from inside the globe.
- Click down twice.
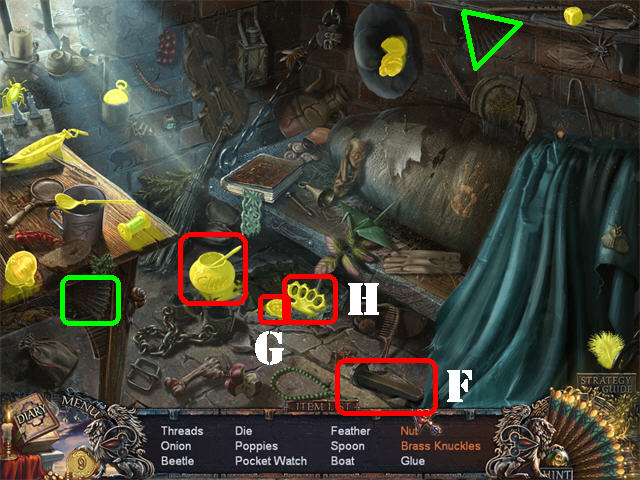
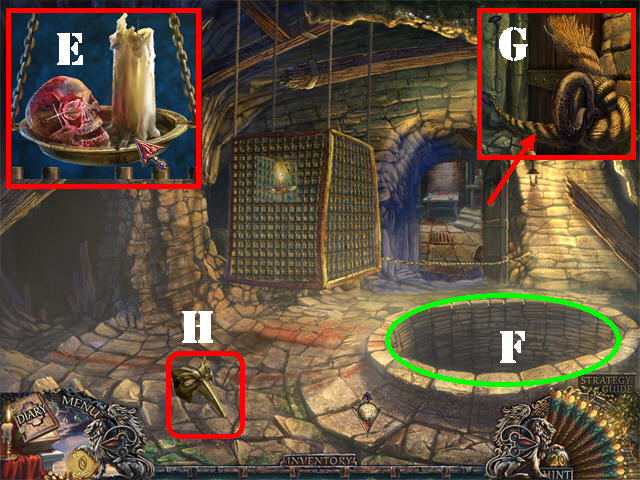
- Zoom into the well; click the CROWBAR onto the cover 4 times and take the GOLDEN DUCAT (2) and the GAUNTLET (3).
- Head towards the right.
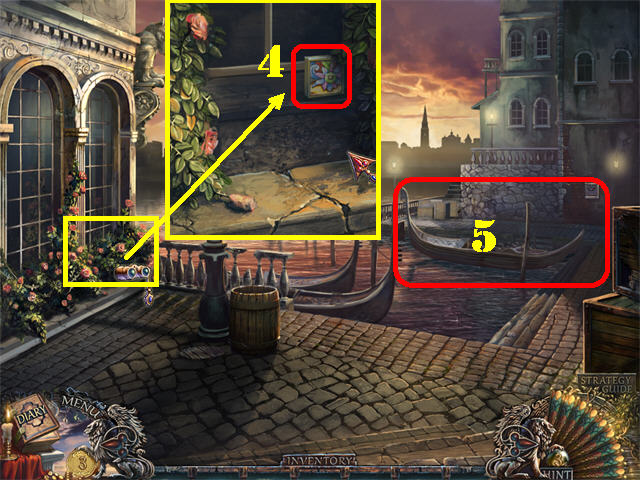
- Examine the plants below the window.
- Place the GAUNTLET on the thorns 3 times and take the PUZZLE PIECE (4).
- Go to the gondola (5).
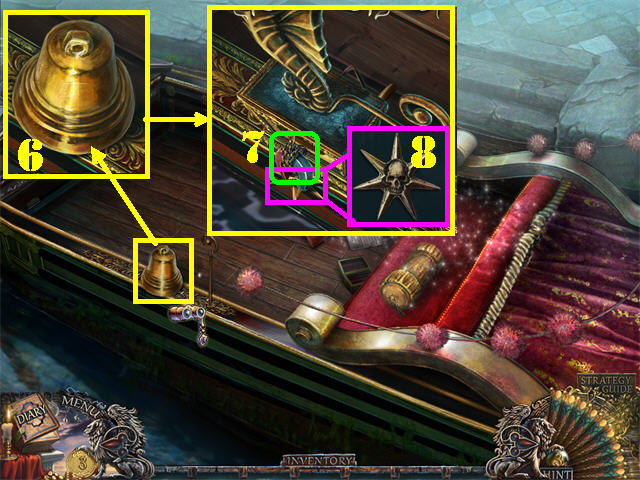
- Examine the BELL on left and then take it (6).
- Place the SEAHORSE on the side of the gondola.
- Put the MAGNET on the chain (7); pull the chain and take the AMULET (8).
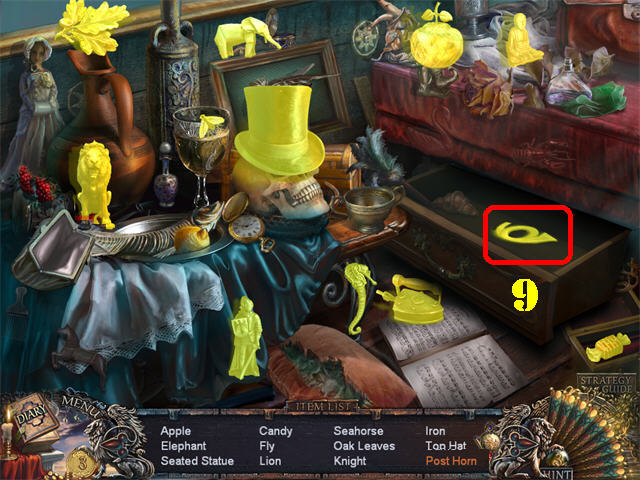
- Play the Hidden Object Scene in the gondola.
- Open the drawer and take the HORN (9).
- The POSTHORN will be added to inventory.
- Exit the gondola.
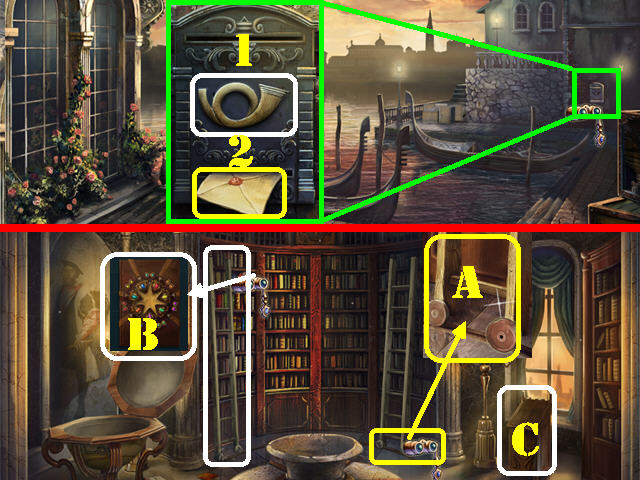
- Examine the mailbox on the right; place the POSTHORN on the outside of the mailbox (1) and take the LETTER (2).
- Return to the library.
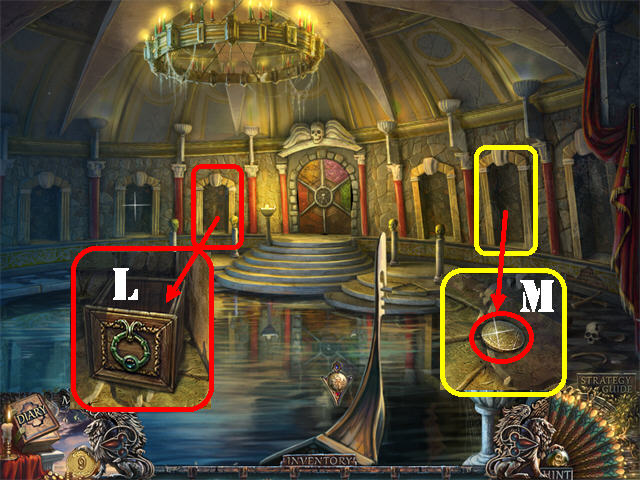
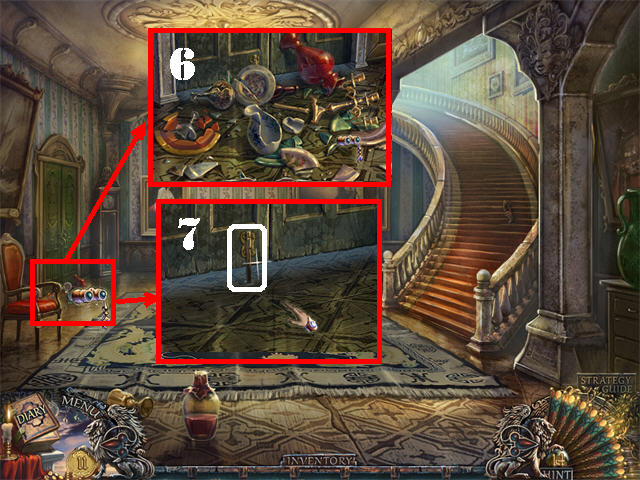
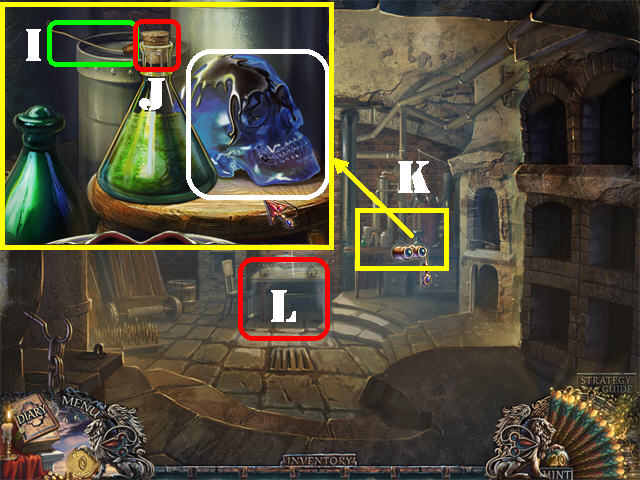
- Examine the bottom of the ladder; place the WHEEL on it (A).
- Click on the ladder to move it; zoom into the bookcase and take the BOOK (B).
- Place the BOOK on the pedestal by the window (C).
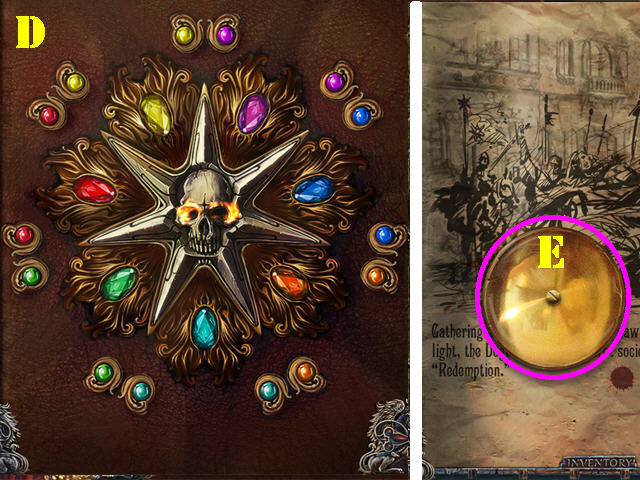
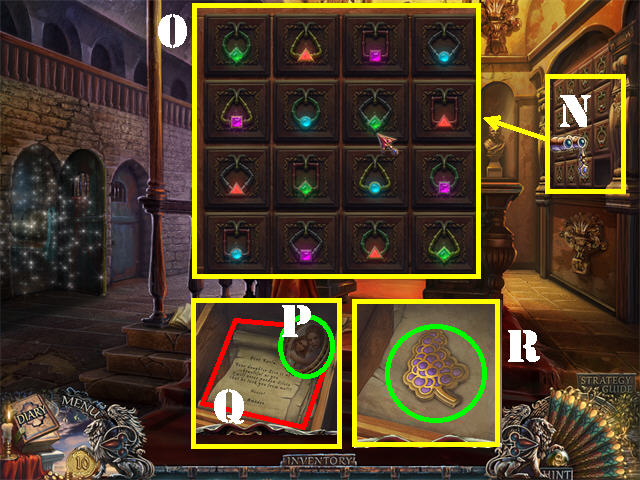
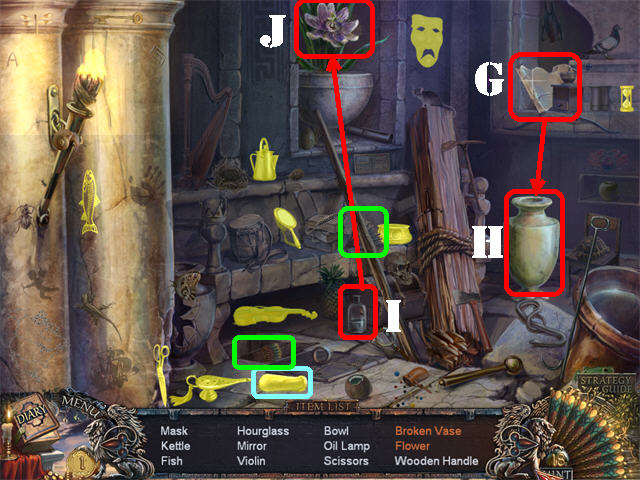
- Zoom into the pedestal and place the AMULET on the board to activate a puzzle.
- Move a large gem into the slot in which the large gem matches the color of the 2 small surrounding gems.
- Please look at the screenshot for the solution (D).
- Click on two pages and take the PENDULUM (E); you can continue reading the rest of the pages.
- Exit the book and click on the ladder to move it.
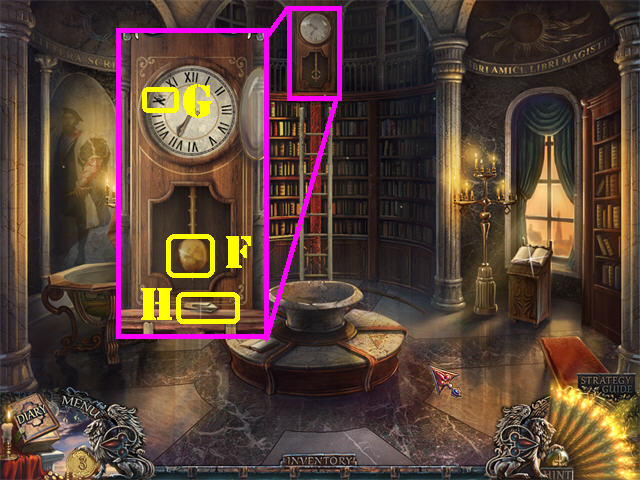
- Zoom into the clock and place the PENDULUM (F) at the bottom of the clock.
- Put the ROMAN X on the clock face (G).
- Take the TRIDENT TOOTH that falls at the bottom of the clock (H).
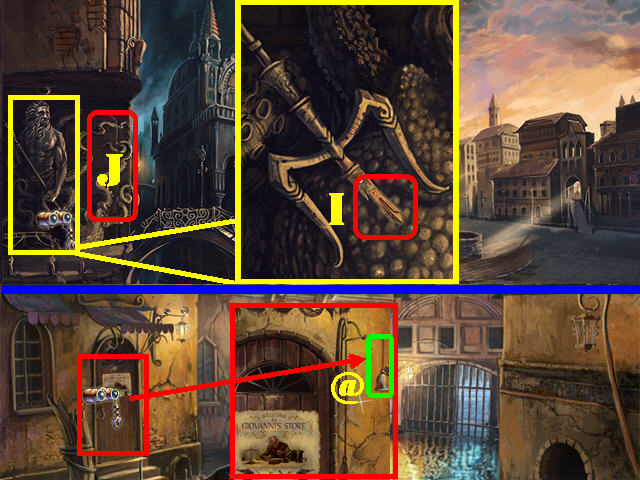
- Click down twice.
- Examine Poseidon’s statue on left; place the TRIDENT TOOTH on the broken trident (I).
- Go towards the left side of the scene (J).
- Examine the left door; place the BELL on the chain (@).
- Ring the bell once and go through the door to enter Giovanni’s store.
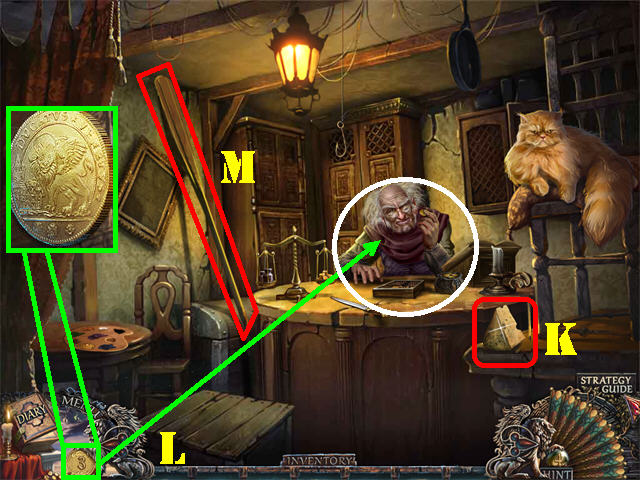
- Talk to Giovanni.
- In this store you can purchase various items needed for the game.
- Click on the CHEESE (K) and then click on the DUCAT (L) in the lower left; give it to Giovanni to automatically buy the cheese.
- Buy the PADDLE for 2 DUCATS in the same manner as you did the cheese (M).
- Click down twice and head right.
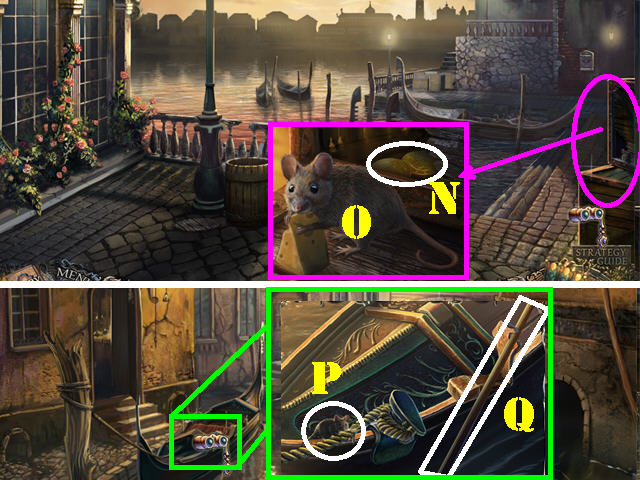
- Examine the crates in the lower right; place the CHEESE on the ground to make the mouse appear.
- Take the 2 DUCATS (N) and the 2 MOUSE (O).
- Click down and then head left.
- Zoom into the gondola; place the MOUSE over the rope so he can chew it off (P).
- Place the PADDLE you bought in the store on the oarlock; the gondola will then move aside (Q).
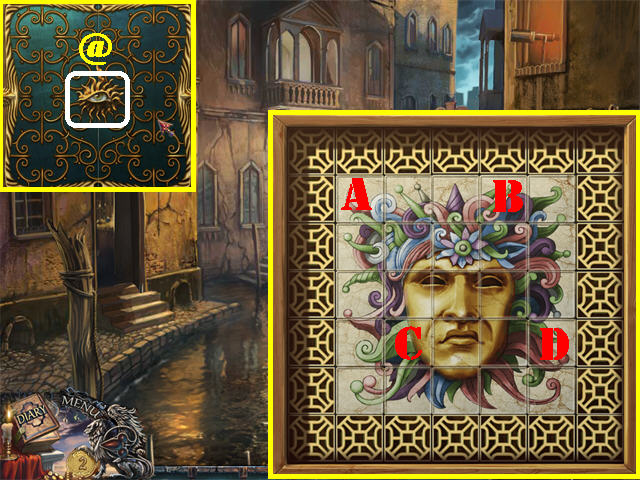
- Examine the door close to the gate; click on the EYE to open the panel (@).
- Place the PUZZLE PIECE in the empty slot to activate the puzzle.
- Click on the squares in a particular order to form the correct image.
- To solve the puzzle: click on A x 3, B x 3, C x and D x 3.
- Enter the mansion.
Chapter 2: Bartolomeo’s Mansion
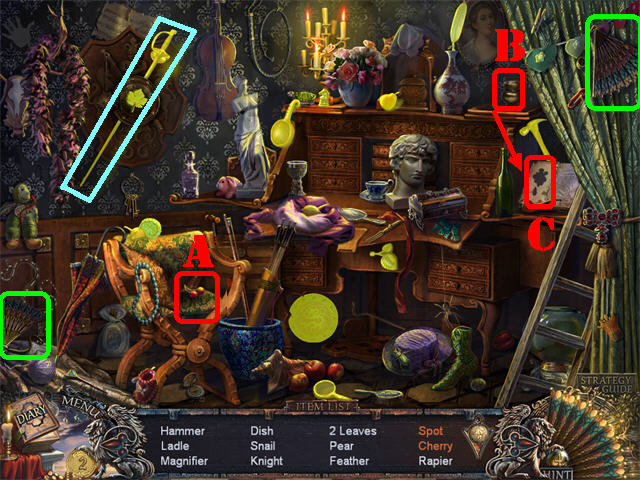
- Click on the curtains to activate a Hidden Object Scene; play it.
- Click on the pillow on the chair and take the CHERRY (A).
- Knock over the ink bottle in upper right (B); take the SPOT which lands on the book (C).
- Grab the 2 FANS marked in green.
- The RAPIER will be added to inventory.
- Open the glass case on right and zoom into it.
- Take the 3 MEDALS on the jacket (D). Exit the jacket.
- Examine the back door; place the RAPIER on the lock to pop it open (E).
- Go through the door and you will encounter the masked man; talk to him.
- Click on the entryway in which the masked man went through and the gate will close (F).
- Take JUPITER (G) and the 2 DUCATS (H) on the ground.
- Return to Giovanni’s store; buy the FISHING HOOK with 2 DUCATS (I).
- Exit the store; examine the fishing line above the gate.
- Place the FISHING HOOK on the line (J).
- Put the WORM on the hook. Exit the pop-up window.
- Return to the mansion and go through the back door.
- Examine the window on the far right; take the 1 DUCAT (K).
- Click on the fishing reel; zoom into the crab and take the KEY (L).
- Examine the back door; place the KEY in the lock and turn the key once (M).
- Go through the door.
- Examine the solar system on the right; take the 1 DUCAT (N).
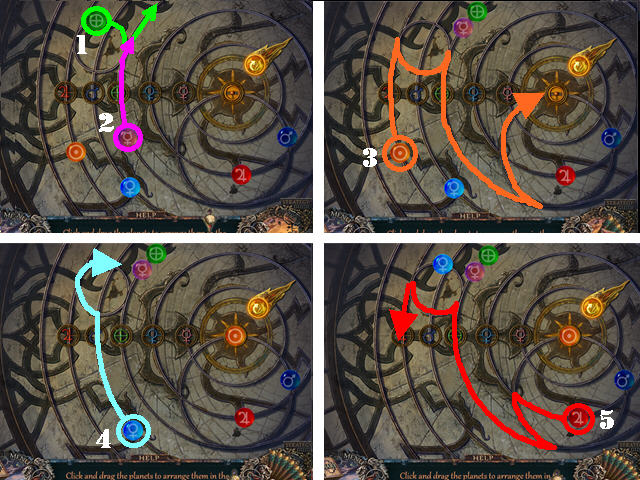
- Place JUPITER on the solar system to activate the puzzle.
- You must put the planets into the right spots.

- The planets can only move in between the grooves.
- Please follow the steps in the 2 screenshots to solve the puzzle. If you have trouble with step number 7, just move the planet that is in your way slightly down and then put back in its place.
- A mirror will appear by the solar system after the puzzle has been solved (O).
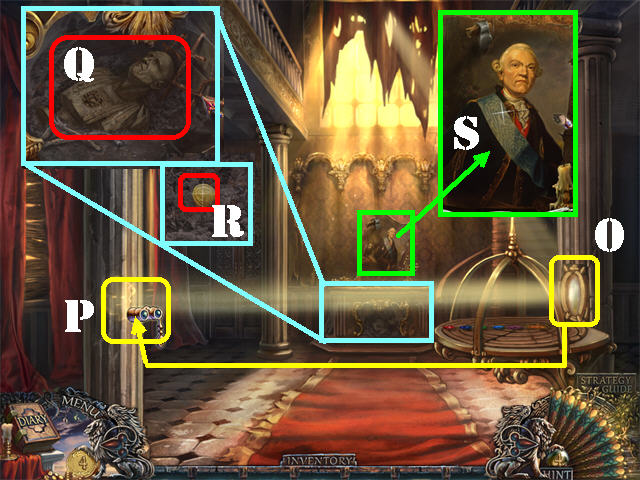
- Click on the spot on the column the light is shining on; you need something to break the column (P).
- Zoom into the fireplace; remove the debris and take the BUST (Q) plus the 1 DUCAT (R).
- Examine the portrait above the fireplace; take the PORTRAIT (S).
- Go up the steps.
- Examine the shelf on the right; take the 1 DUCAT (T) and the POLIZIA PASS (U).
- Zoom into the desk; place the LETTER on the desk.
- Open the letter with the LETTER OPENER already present on the desk (@).
- Read the LETTER (W) and take the 1 DUCAT (X).
- Examine the telescope on left; take the 1 DUCAT (Y).
- Exit the telescope and click down 3 times.
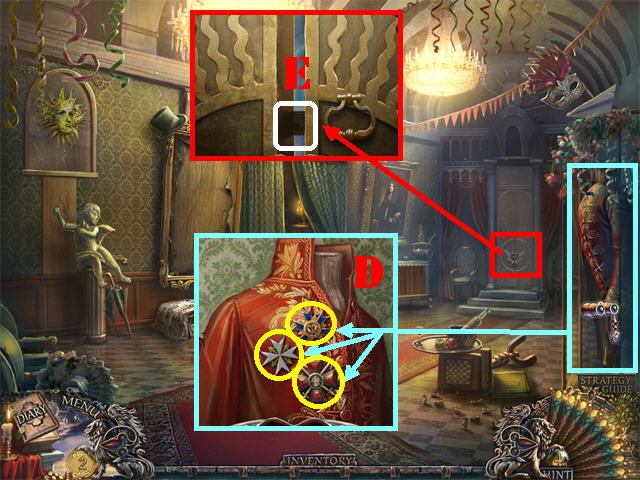
- Zoom into the empty frame; take the 2 DUCATS (A) in the bottom corners of the frame.
- Place the PORTRAIT in the frame.
- Place the 3 MEDALS on the portrait (B).
- Take the BRUSH that appears on the side of the frame (C).

- Return to Giovanni’s store.
- Buy the PALETTE for 5 DUCATS (D).
- Return to the mansion.
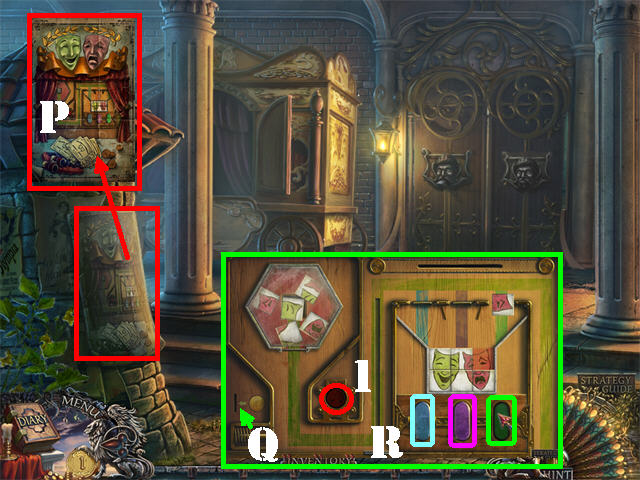
- Zoom into the small puppet theater below the portrait close to the back door (E).
- Note the positions of the characters on the curtain (F).
- Untie the knot and open the curtains (G).
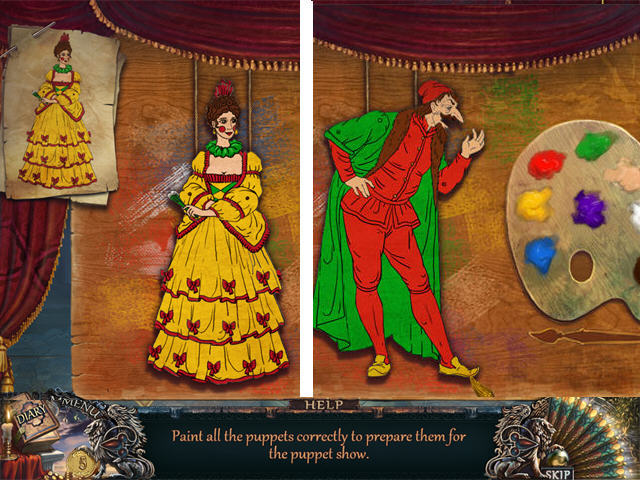
- Place the PALETTE and the BRUSH on the board to activate the puzzle.
- Using the brush and the colors on the palette to paint 3 different puppets according to the small image in the upper left.
- Please look at the screenshot for all 3 solutions (H).
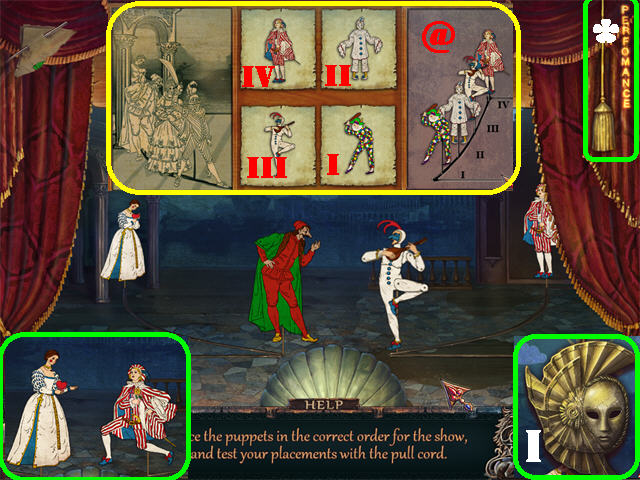
- Using the code found on the curtains, place the puppets in the correct order by dragging them from the center to the numbered spots on right.
- Position the puppets as shown in the screenshot (@).
- Pull on the tassel in the upper right to open the curtains (*).
- Pull on the tassel again to begin the performance.
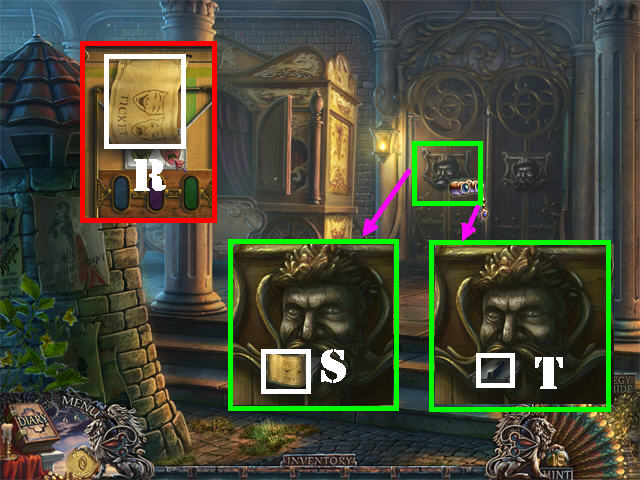
- Take the MASK INLAY (I).
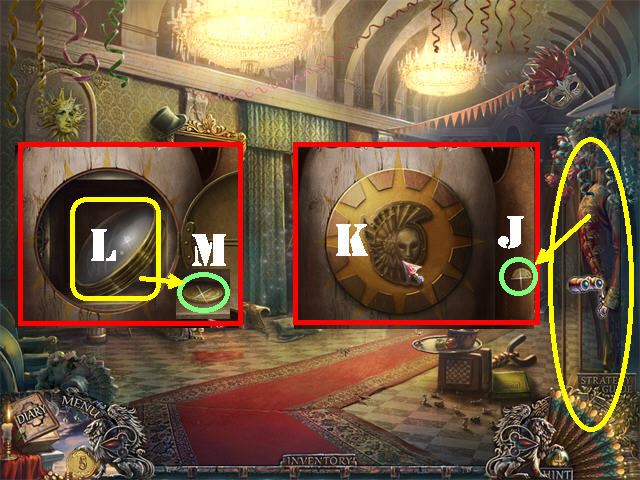
- Zoom into the glass case on the right.
- Zoom into the jacket; click on the buttons and take the 1 DUCAT (J).
- Place the MASK INLAY in the recess (K); take the LENS (L) and the 1 DUCAT (M).
- Play the Hidden Object Scene by the curtains.
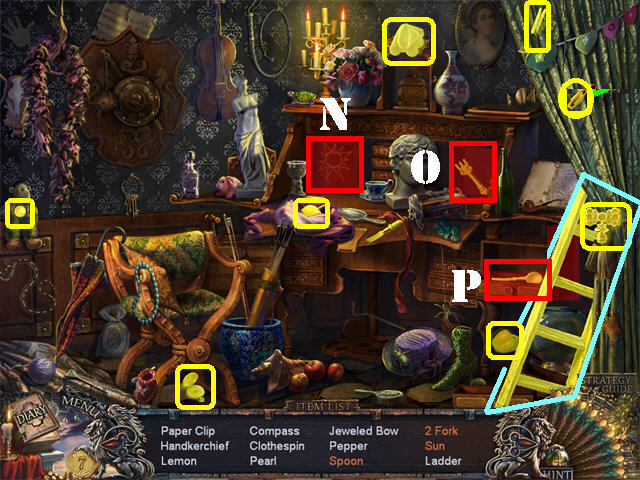
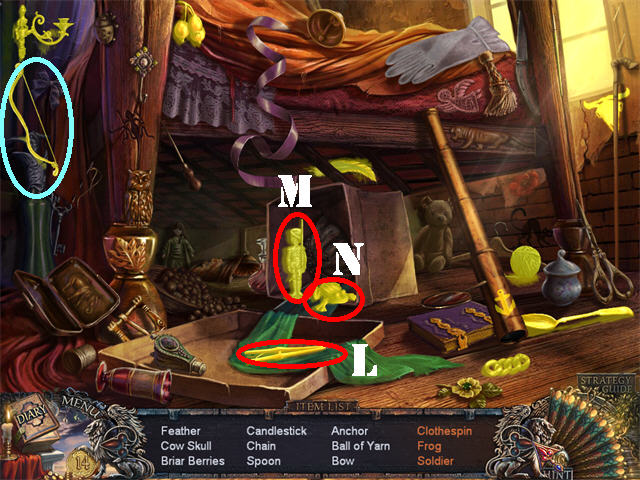
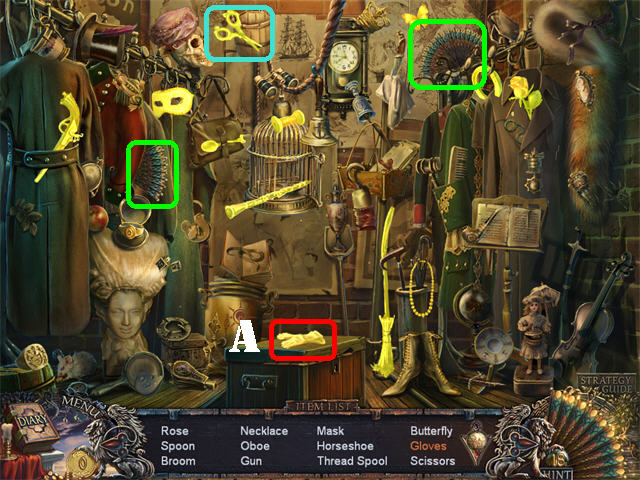
- Open the left cabinet; take the SUN (N).
- Open the right cabinet; take the FORK (O).
- Open the lower right drawer; take the SPOON (P).
- The LADDER will be added to inventory.
- Click down once to go back outside.
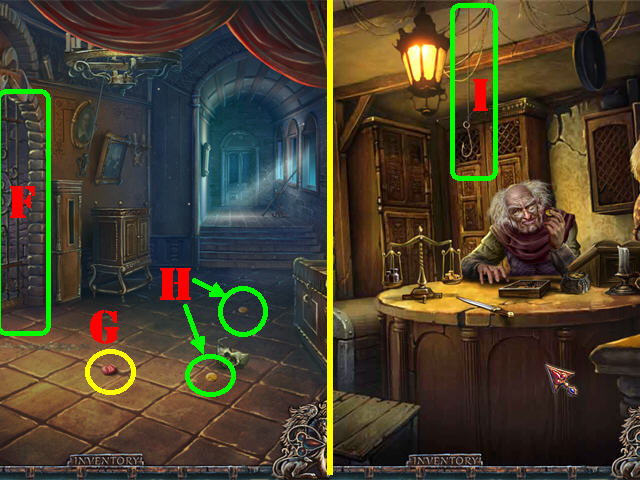
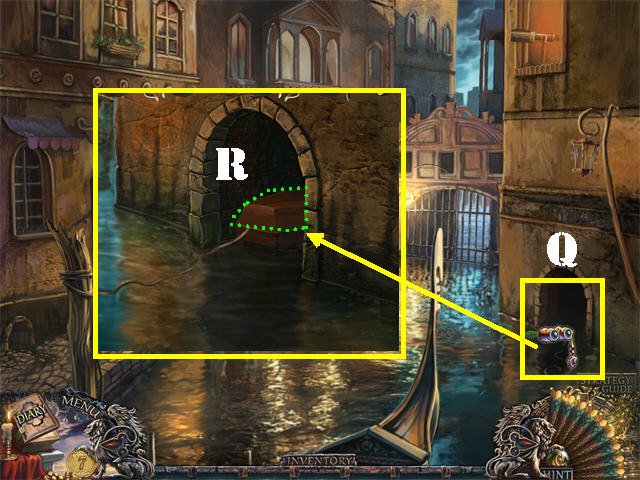
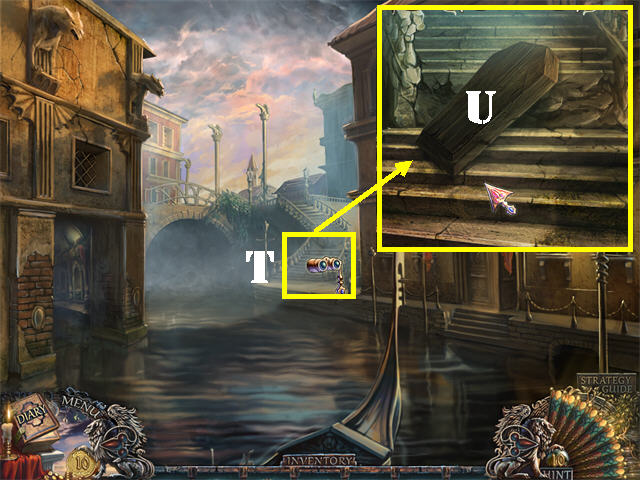
- Zoom into the tunnel entrance in the lower right (Q).
- Use the UMBRELLA to pull out the coffin.
- Take the COFFIN CAP (R).
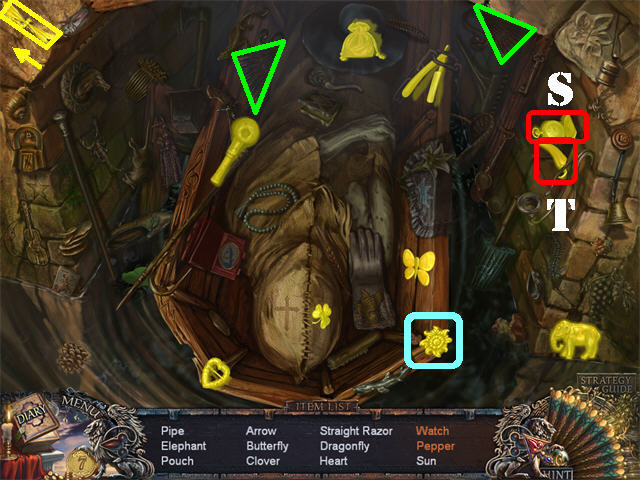
- Play the Hidden Object Scene in the tunnel.
- Remove the brick in the upper right and take the WATCH (S) and the PEPPER (T).
- Grab the 2 FANS marked in green.
- The SUN BUTTON will be added to inventory.
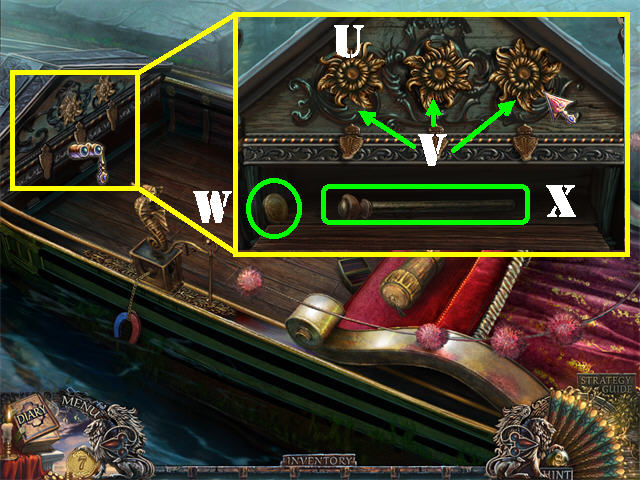
- Click down; head right and go into the gondola.
- Examine the front of the gondola; place the SUN BUTTON on the knob (U).
- Click on the 3 sun buttons to unlock the cabinet (V).
- Take the 1 DUCAT (W) and the LEVER (X).
- Return to the tunnel outside of Giovanni’s store.
- Play the Hidden Object Scene.
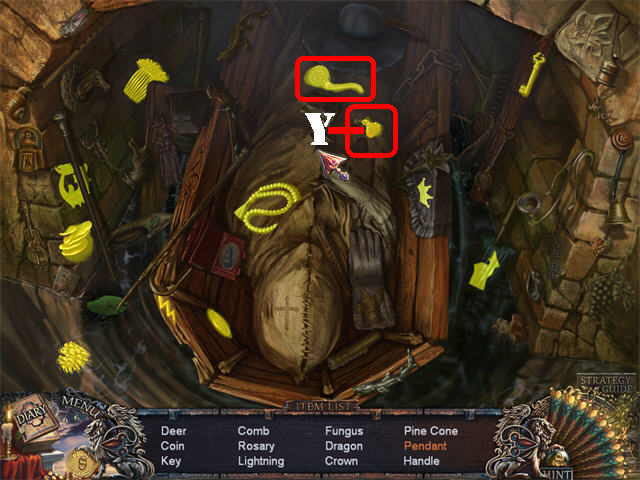
- Move the hand and take the PENDANT (Y).
- The HANDLE will be added to inventory.
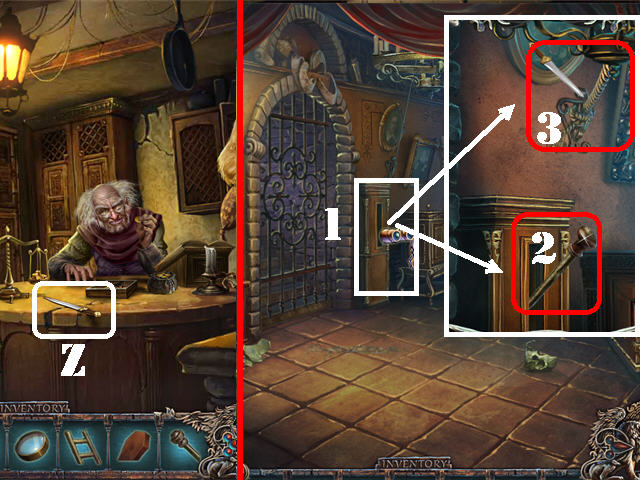
- Go into Giovanni’s store on left.
- Buy the KNIFE for 6 DUCATS (Z).
- Return to the mansion; go through the back door.
- Examine the mechanism next to the gate (1); place the LEVER in the slot (2).
- Cut the cable above the lever with the KNIFE you bought at the store; once the cable is cut the chandelier will fall hitting the lever and opening the gate (3).
- Go through the gate.
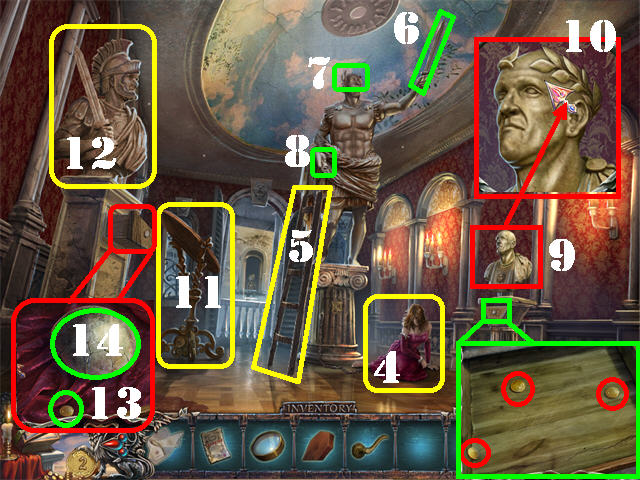
- Zoom into the little girl’s mother (4) and talk to her. Click down after you talk to her.
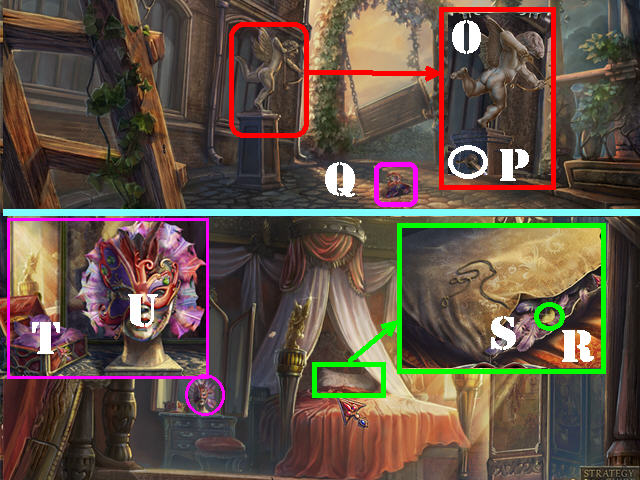
- Place the LADDER on the side of the large statue in the center (5).
- Take the SWORD (6) WREATH (7) and the SCROLL (8) from the statue.
- Place the BUST on the pedestal on right (9).
- Zoom into the bust and place the WREATH on its head (10).
- Zoom into the drawer below the right bust; take the 3 DUCATS circled in red.
- Click on the large mirror (11); a message appears stating that the code is now visible through the telescope.
- Give the SWORD to the bust on the left (12).
- Zoom into the left bust’s drawer; take the 1 DUCAT (13) and the STONE BALL PIECE (14).
- Click down.
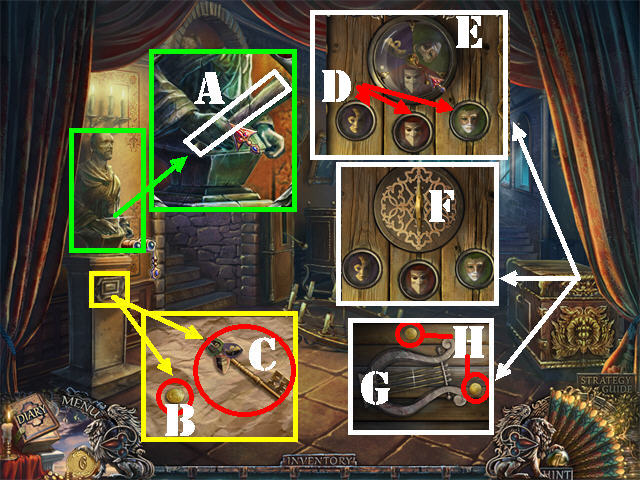
- Zoom into the bust on left; place the SCROLL in the hand (A).
- Zoom into the drawer below the bust; take the 1 DUCAT (B) and the CHEST KEY (C).
- Examine the chest on right; wipe each of the 3 windows twice with the HANDKERCHIEF (D).
- Click on the large dial twice so the symbols appear with the same background as the images below it (E).
- Place the CHEST KEY in the lock and turn it once (F).
- Take the LYRE (G) and the 2 DUCATS (H) from inside the chest.

- Click down.
- Zoom into the cherub on the left; place the LYRE in its hand and click on the strings 4 times to shatter the glass (I).
- Take the MASK OF VANITY (J) that falls on the ground.
- Go through the 2 back doors.
- Examine the window on the left; open it to let the light in (K).
- Place the HANDLE on the closet door; click on the handle to trigger a Hidden Object Scene; play it (L).
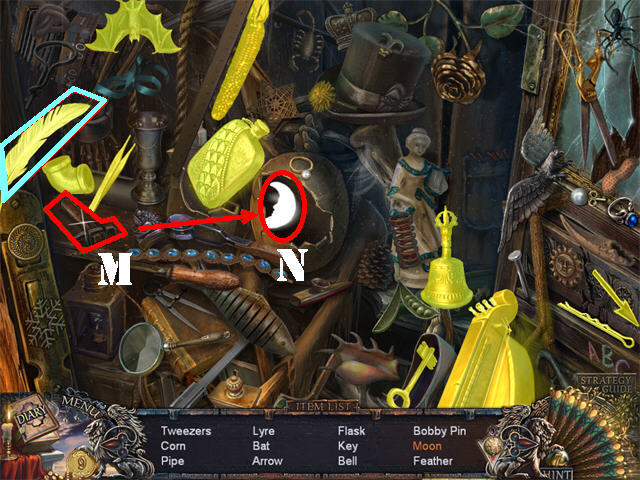
- Break the vase with the HAMMER (M) and take the MOON (N).
- The FEATHER will be added to inventory.
- Go up the stairway.
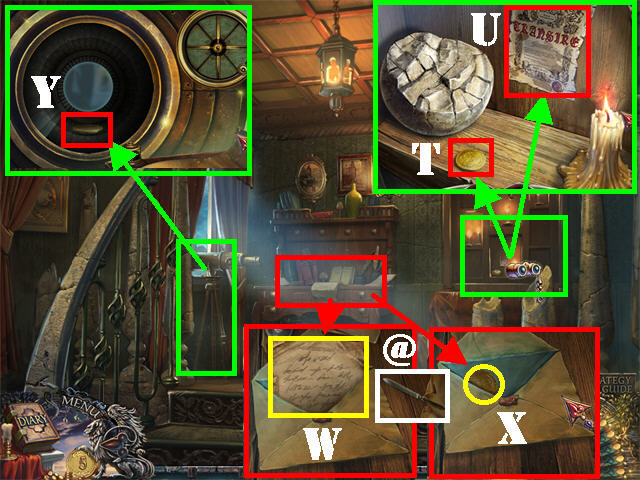
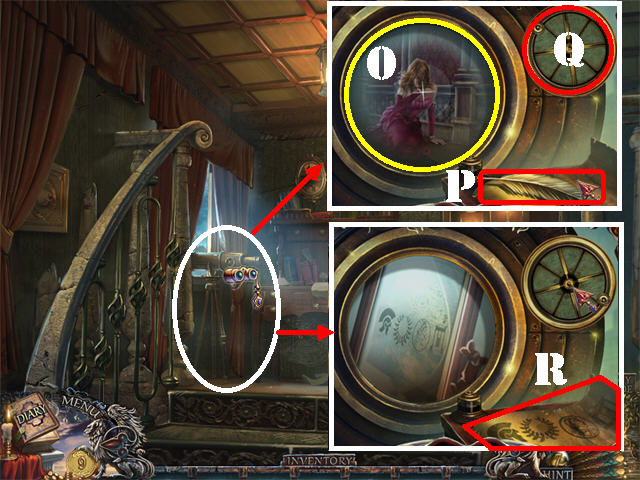
- Zoom into the telescope; place the LENS in the telescope (O).
- Place the FEATHER on the paper (P).
- Click on the wheel (Q) and you will see the female prisoner, Karla.
- Click on the wheel again for the symbols to appear in the lens. The feather will dip itself in the ink and will begin transferring the images onto the paper. Note: this step will only occur of you clicked on the large mirror in the prisoner’s room.
- Take the CODE (R).
- Click down.
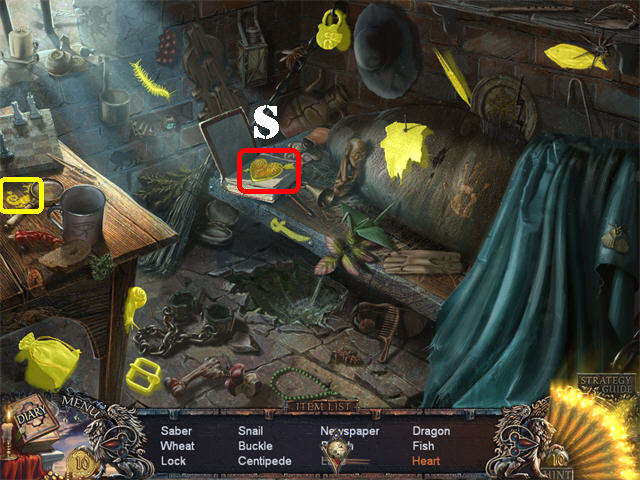
- Play the Hidden Object Scene.
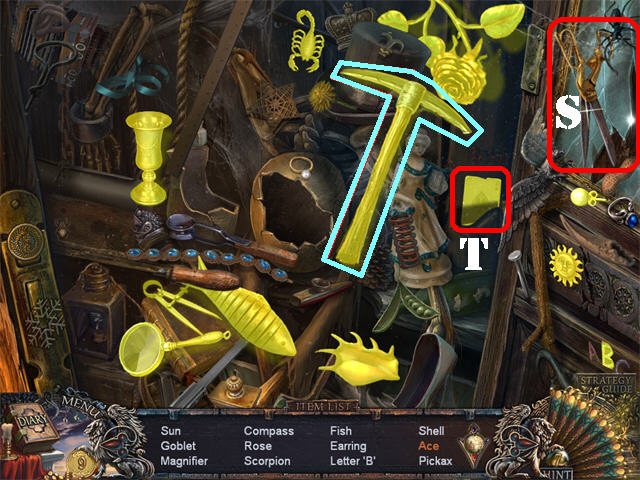
- Cut the pocket with the SCISSORS (S) and take the ACE (T).
- The PICKAX will be added to inventory.

- Zoom into the far left column; break it with the PICKAX 3 times.
- Take the MASK OF ENVY (U).
- Click down and go through the left entryway.
- Zoom into the prisoner (V).
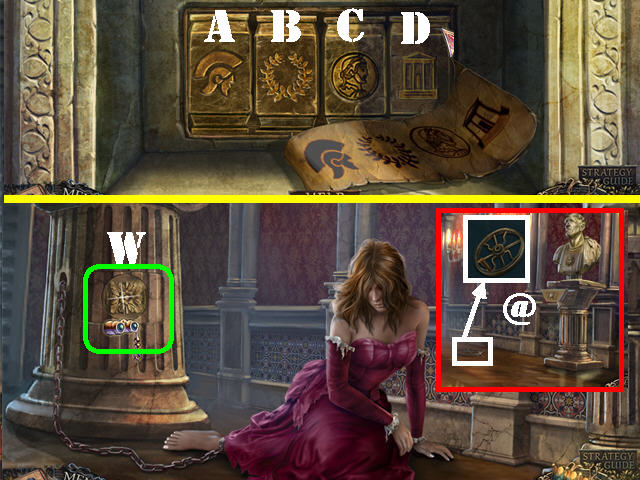
- Examine the left column; break it with the PICKAXE 3 times to reveal a puzzle (W).
- Place the CODE on the puzzle to activate it.
- Click on the tumblers in the correct order until the symbols on the code appear in the same order.
- The solution to this puzzle is always the same since the starting configuration is random but it can be solved in a similar way each time.
- Click on ‘B’ until the image of the wreath appears on the second tumbler.
- Click on ‘A’ until the first image on the code appears.
- Click on ‘D’ until the image of the building appears on the last tumbler.
- Click on ‘C’ until the third image on the code appears.
- In some instances just clicking on ‘B’ and ‘D’ will solve the puzzle if the pieces next to them fall into the right spots.
- Solving the puzzle frees the prisoner.
- Take the VALVE on the ground (@).
- Click down; head right and up the staircase.
- Zoom into the mechanism in the left side of the wall; put the VALVE on the mechanism on left (1).
- Turn the valve once; this action opens the gate in the canal.
- Click down 4 times and go through the back gate (2).
Chapter 3: Gaspar’s Residence
- The girl and the masked man are outside; click through the dialog.
- Play the Hidden Object Scene in the back.
- Cut the fence in the upper left with the SCISSORS (A); take the HORN (B) and the SPIDER (C).
- Grab the 2 FANS marked in green.
- The CORKSCREW will be added to inventory.
- Click on the police door on right; place the POLIZIA PASS in the slot (D).
- Enter the police station.
- Open the left door and play the Hidden Object Scene (E).
- Use the hammer on the ground (F); take the NUT (G) and the BRASS KNUCKLES (H).
- Grab the 2 FANS marked in green.
- The GLUE will be added to inventory.
- Return to the room in the second floor of the mansion.
- Zoom into the shelves on right; place the GLUE on the broken ball (I).
- Put the STONE BALL PIECE over the glue and take the BALL (J).
- Return to the area outside the police station.
- Zoom into the left door.
- Open the lion’s mouth and insert the BALL (K).
- Enter the secret place.
- Examine the alcove to the left of the door; take the FILE DRAWER (L).
- Examine the center alcove on the right side; take the 1 DUCAT (M).
- Return to the police station.
- Zoom into the files on right; place the FILE CASE in the empty slot to activate a puzzle (N).
- Click on two file boxes to swap their positions.
- Make sure you do not have any repeated symbols in the same row or column. Use the static pieces as clues to solve the puzzle.
- Please look at the screenshot for the solution (O).
- Click on the PORTRAIT (P) and the LETTER (Q) inside the file cabinet.
- Take the GRAPE KEY (R) below the letter.
- Play the Hidden Object Scene on left.
- Open the book; take the HEART (S).
- The HEART KEY will be added to inventory.
- Click down.
- Zoom into the steps (T).
- Place the COFFIN CAP over the steps and proceed forward (U).
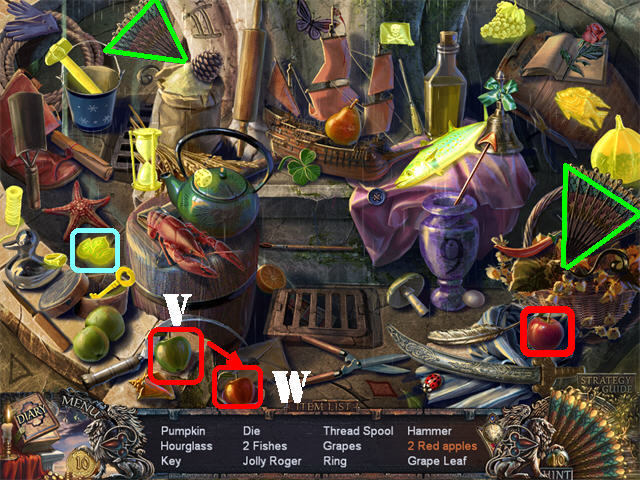
- Play the Hidden Object Scene by the statues.
- Click on the single green apple (V) and it will fall into the paint; take the RED APPLE (W).
- Grab the 2 FANS marked in green.
- The GRAPE KEY will be added to inventory.
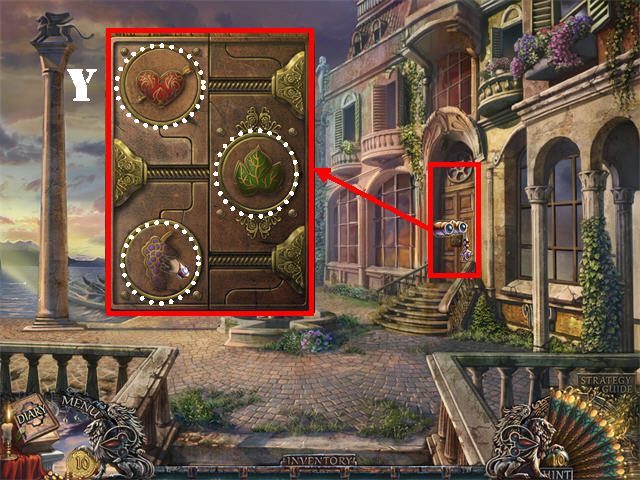
- Zoom into the door.
- Place the 2 GRAPE KEYS and the HEART KEY on the door (Y).
- Click on each of the 3 keys to unlock the door and go through the door.
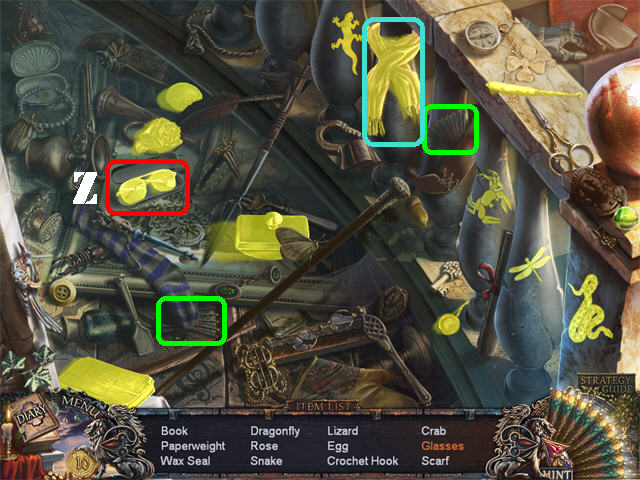
- Play the Hidden Object Scene by the stairs.
- Open the case; take the GLASSES (Z).
- Grab the 2 FANS marked in green.
- The SCARF will be added to inventory.
- Go up the steps.
- Play the bed Hidden Object Scene.
- Grab the 2 FANS marked in green.
- Click on the magnifying glass (1) and then click on the RABBIT (2).
- The SICKLE will be added to inventory.
- Examine the right window; open it and tie the scarf around the broken ladder (3).
- Go down the ladder.
- Examine the flower pot in the lower right; take the 1 DUCAT (4).
- Cut the ivy with the SICKLE 2 times and take the BROOM (5).
- Click down 3 times.
- Zoom into the debris by the door; clean it with the BROOM (6).
- Open the latch at the bottom of the door and go through the door to access the dining room (7).
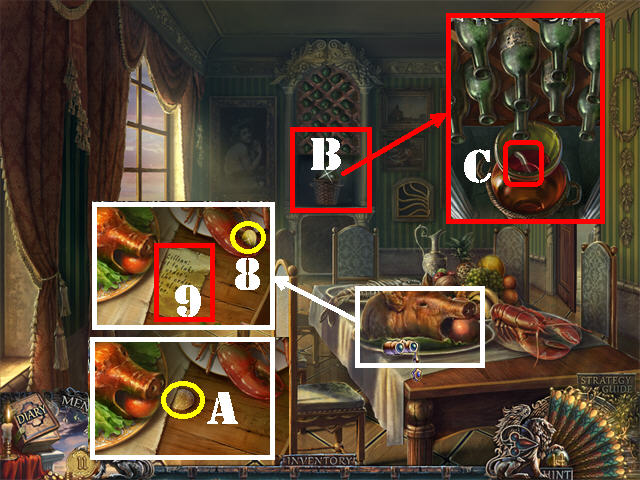
- Zoom into the pig head on the table; take the 1 DUCAT (8) and take the LETTER (9).
- Grab the 1 DUCAT (A) that was below the letter.
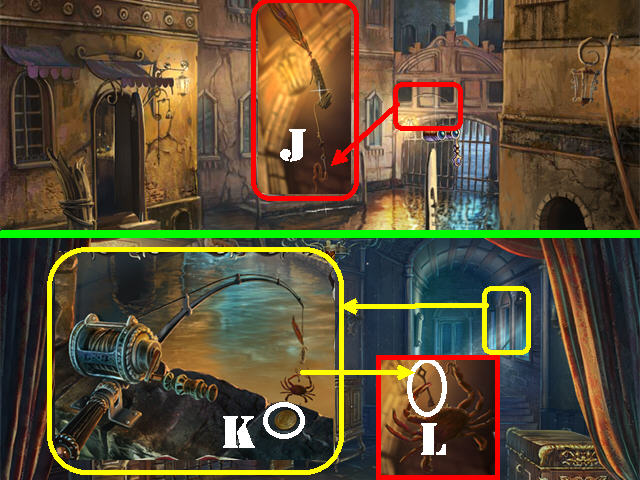
- Examine the wine bottles on the back wall; open them with the CORKSCREW (B).
- Take the PIPE that appears in the jug (C).
- Go into the right door to access the kitchen.
- Examine the boar; take the 1 DUCAT (D) and the ARROW (E).
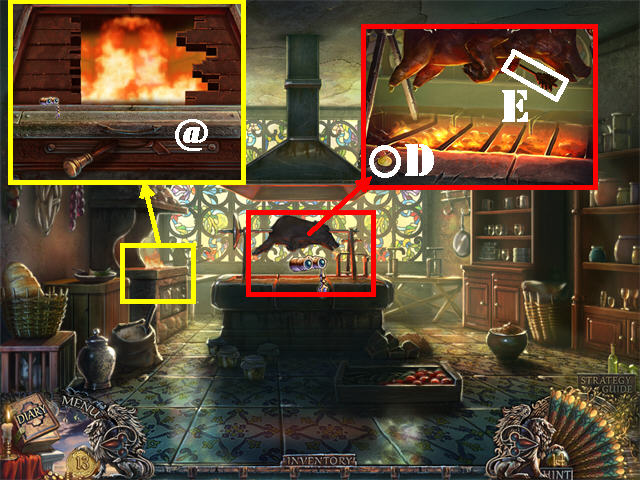
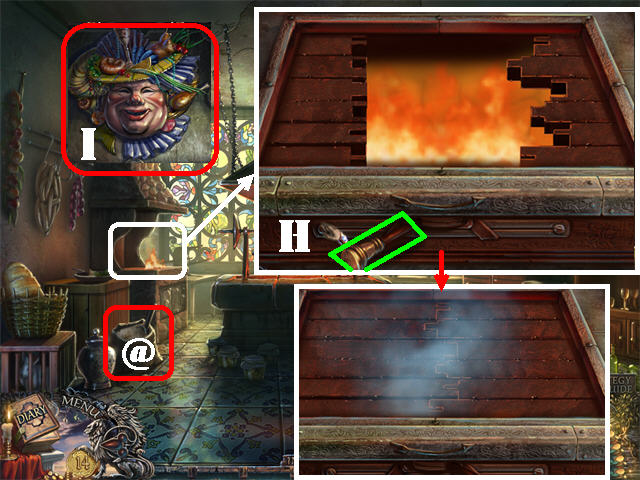
- Click on the grill below the boar.
- Examine the stove on the left; you need to find a mitten (@).
- Click down twice.
- Play the Hidden Object Scene.
- Drag the PICK (F) over to the right banister and take the CRYSTAL (G).
- The OVEN MITT will be added to inventory.
- Return to the kitchen.
- Examine the stove; place the OVEN MITT on it to activate a puzzle.
- Click on any 2 of the left slats to swap their positions.
- Line up the slats on the left so they lock in perfectly with the slats directly across from them on the right.
- Once you have positioned the slats correctly click on the lever at the bottom to check your work.
- Please look at the screenshot for the solution (H).
- Take the MASK OF GLUTTONY (I).
- Look at the flour sack in the lower left to trigger a Hidden Object Scene outside (@).
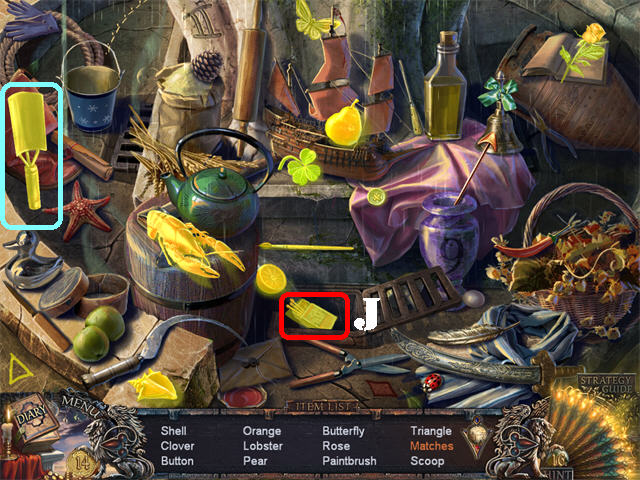
- Go outside.
- Play the statue Hidden Object Scene.
- Open the grate; take the MATCHES (J).
- The SCOOP will be added to inventory.
- Return to the kitchen; zoom into the sack on the ground.
- Place the SCOOP in the sack 3 times and take the CROCHET HOOK (K).
- Return to the bedroom upstairs.
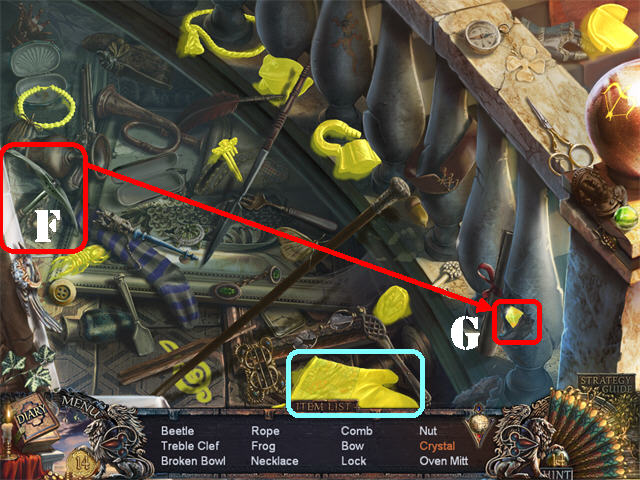
- Play the Hidden Object Scene.
- Open the box in the center; take the CLOTHESPIN (L), the SOLDIER (M), and the FROG (N).
- The BOW will be added to inventory.
- Go down the ladder by the window.
- Zoom into cupid; give Cupid the BOW and the ARROW (O).
- Click on the handle at the base of the statue so Cupid can shoot the arrow (P).
- Take the HALF OF A MASK that falls on the ground (Q).
- Return to the bedroom.
- Examine the pillow on the bed.
- Cut the pillow with the CROCHET HOOK; take the 1 DUCAT (R) and the FEATHERS (S).
- Zoom into the box next to the bed; open the box and place the FEATHERS inside the box (T).
- Place the HALF OF A MASK on the face to activate a puzzle (U).
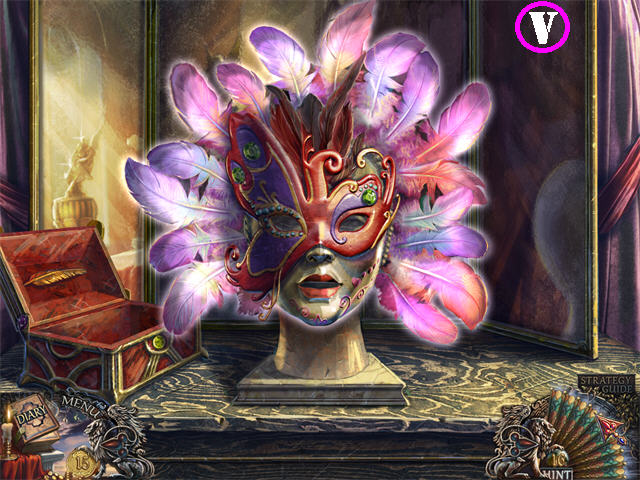
- Take one feather at a time from the box and place it on the mask.
- Right-click on a feather to rotate it.
- Feathers placed in the correct spot will lock in place.
- Please look at screenshot for solution (V).
- Take the MASK OF LUST.
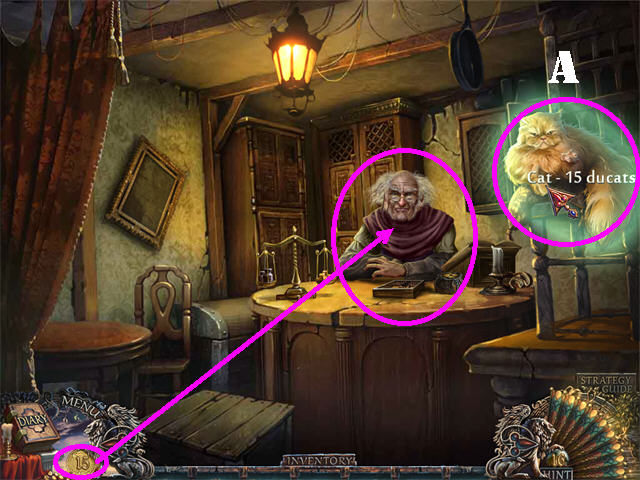
- Return to Giovanni’s store.
- Purchase the CAT for 15 DUCATS (A).
- Click down and go forward.
- Play the Hidden Object Scene.
- The EMPTY OILCAN will be added to inventory.
- Return to the kitchen.
- Zoom into the roasting boar; place the EMPTY OILCAN on the rack.
- Take the HOG OIL (X).
- Click down 3 times.
- Zoom into the bottom of the column; place the CAT that you bought at the store at the base of the column to chase away the mice (Y).
- Head left and then right towards the ship.
Chapter 4: The Ship
- Play the Hidden Object Scene on the ship.
- Cut the fabric on the right with the RAPIER (C); take the HEART (D).
- Grab the 2 FANS marked in green.
- The MATCHES will be added to inventory.
- Open the cargo hold and go down.
- Zoom into the porthole on the far left; take the 1 DUCAT (E).
- Click on the chains (@).
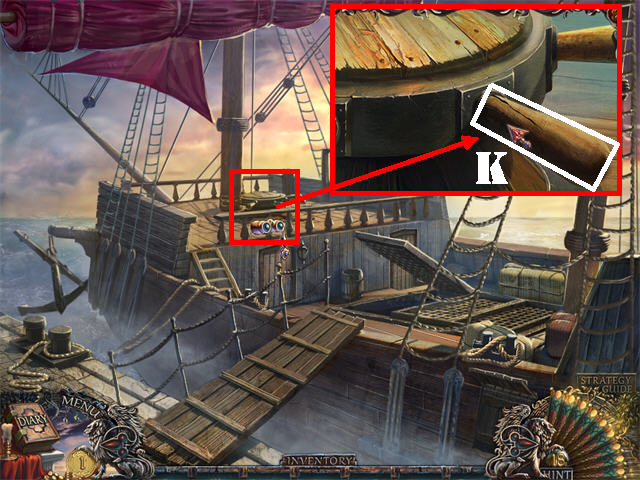
- Examine the cannon; light the fuse with the MATCHES (F). This action triggers a Hidden Object Scene outside.
- Click down twice; play the Hidden Object Scene on the left.
- Click on the stone slab in the upper right (G); take the BROKEN VASE down below (H).
- Drag the growing potion (I) to the dead flower in the upper right; take the FLOWER (J).
- Grab the 2 FANS marked in green.
- The HANDLE will be added to inventory.
- Board the ship.
- Examine the anchor wheel (J); place the HANDLE on it to activate a Hidden Object Scene; play it (K).
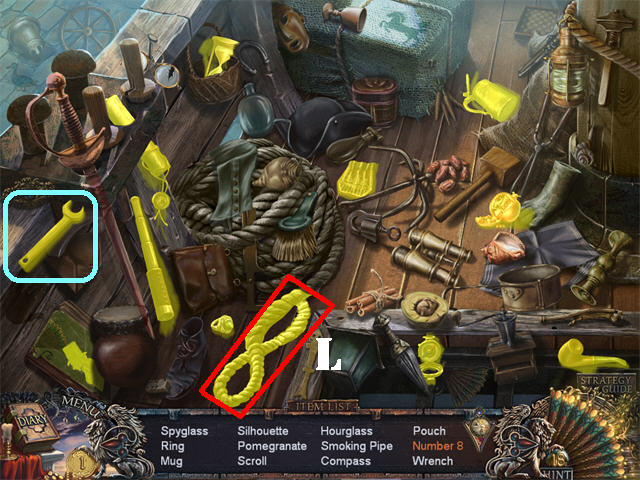
- Find the items on the list.
- Click on the rope; take the ‘8’ (L).
- The WRENCH will be added to inventory.
- Click down.
- Examine the lower right side of the scene; place the PIPE on the diver’s hose (M).
- Click on the pump for the diver to appear.
- Zoom into the diver’s helmet; place the HOG OIL on the rusty nut (N).
- Place the WRENCH on the nut and take the BUTTON inside the helmet (O).
- Click down and go forward.
- Grab the POSTER on the left (P).
- Zoom into the cart; place the BUTTON on the gaming machine (1).
- Put the DUCAT into the coin slot to activate a puzzle (Q).
- Click on the red button to release one of the puzzle pieces.
- As the puzzle piece travels o the right, click on one of the three colored buttons at the bottom to enter that piece into the correct slot (R).
- The red pieces belong on the right, the green pieces belong on the left, and the half and half pieces belong in the center.
- Click on the red button once a piece that belongs at the bottom of the puzzle is at the exit.
- Take the TICKET after the puzzle has been solved (R).
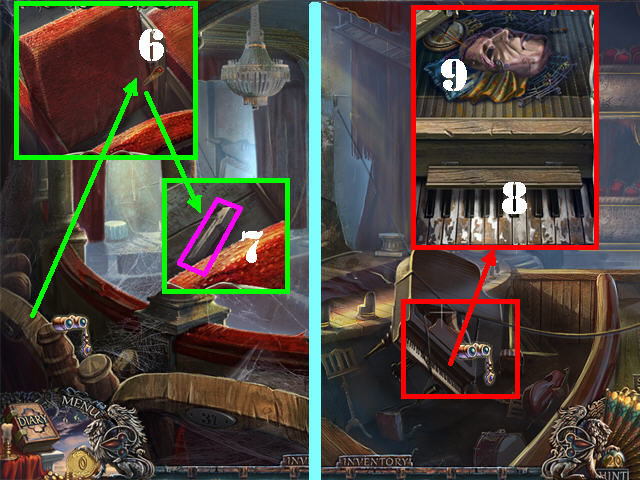
- Zoom into the door; place the TICKET (S) in the slot and take the PIANO KEY (T).
- Enter the theater.
Chapter 5: The Theater
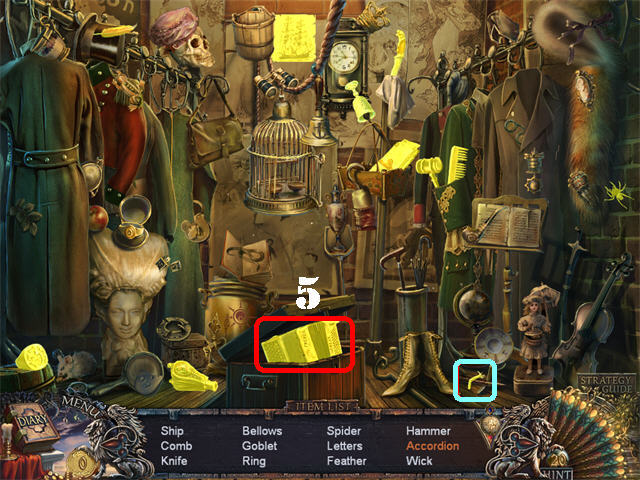
- Play the Hidden Object Scene below the staircase.
- Click on the gift box; take the GLOVES (A).
- Grab the 2 FANS marked in green.
- The SCISSORS will be added to inventory.
- Head upstairs.
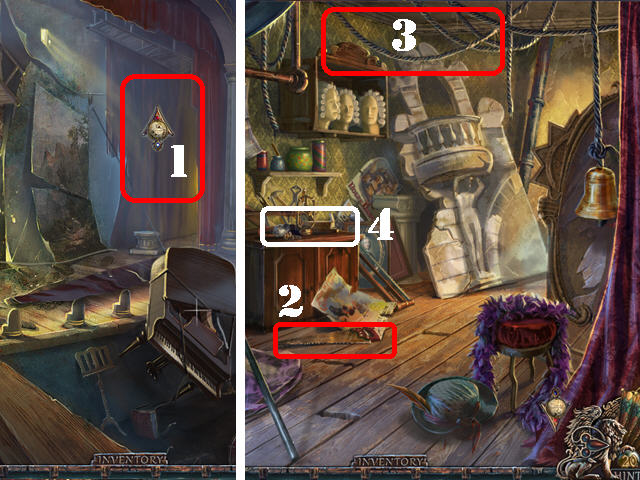
- Zoom into the handle on the right; take the MECHANICAL HANDLE (B).
- Cut the rope with the SCISSORS (C).
- Examine the chair in the lower left corner; take the HAMMER HANDLE (D).
- Click down.
- Zoom into the right door; place the HAMMER HANDLE on the hammer head (E).
- Pull on the hammer to remove the nail and open the door; go through it.
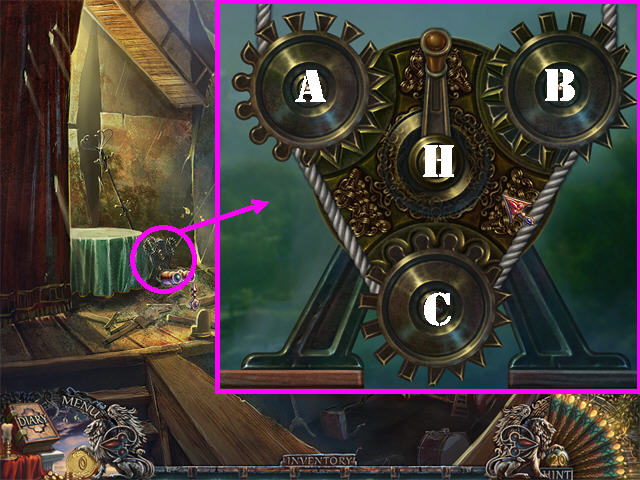
- Zoom into the mechanism in the lower left; place the MECHANICAL HANDLE on it to activate a puzzle.
- Click on the gears until they are in the correct slots.
- Click on the gears in this order: A, B, C x 2. Then click on the handle (H) once to solve the puzzle. This solution may be random; however, the screenshot shows the final image.
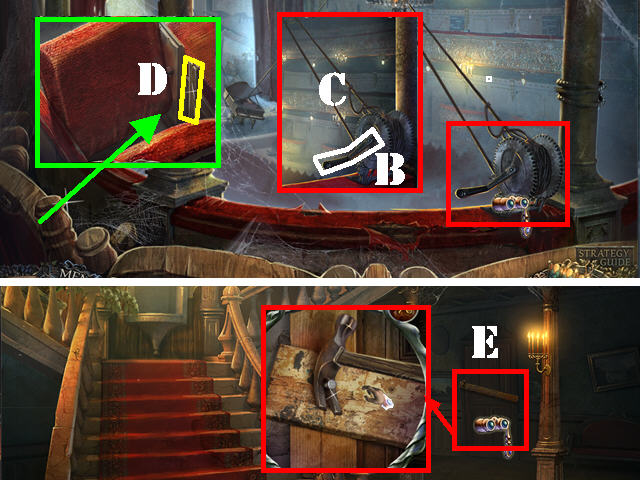
- Go backstage (1).
- Take the SAW (2) on the ground.
- Grab the ROPE (3) in the upper center.
- Take a closer look at the stand (4).
- Click down twice.
- Play the Hidden Object Scene.
- Open the chest; take the ACCORDION (5).
- The WICK will be added to inventory.
- Go upstairs.
- Zoom into the chair in the lower left corner; cut the chair with the SAW (6) and take PIANO KEY (7).
- Click down and go right.
- Examine the piano; place the 2 PIANO KEYS on the keyboard (8).
- Take the MASK OF LAZINESS (9).
- Go backstage.
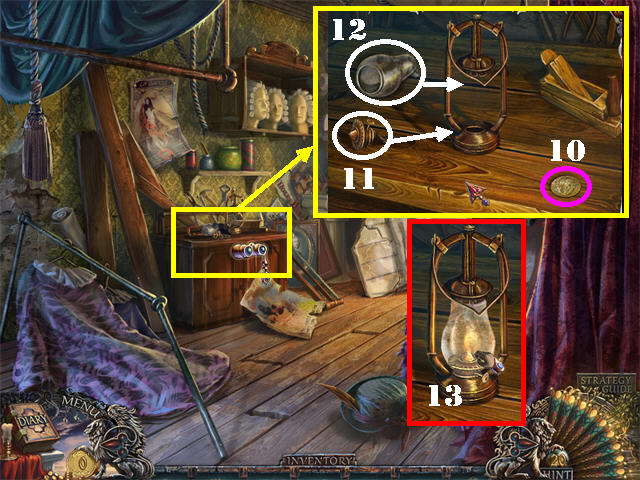
- Examine the stand on left; take the COIN OF GREED (10).
- Place the WICK on the gold piece.
- Drag the WICK to the lantern base (11).
- Drag the glass to the lantern base (12).
- Take the LANTERN (13).
- Go to the dock.
- Play the Hidden Object Scene.
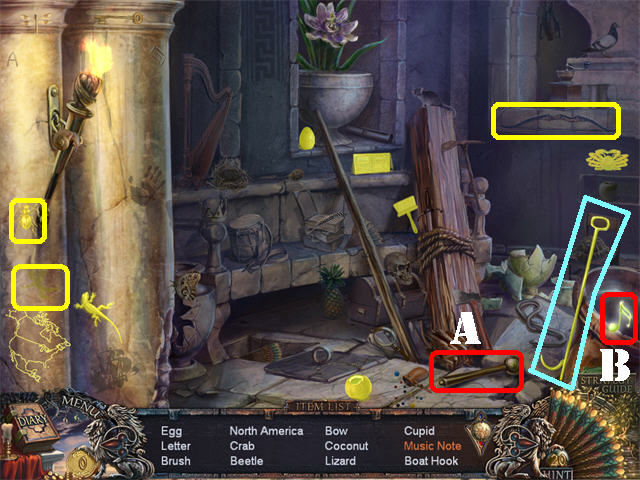
- Drag the DRUMSTICK (A) to the drum and take the MUSIC NOTE (B).
- The BOAT HOOK will be added to inventory.
- Go into the ship’s cargo hold.
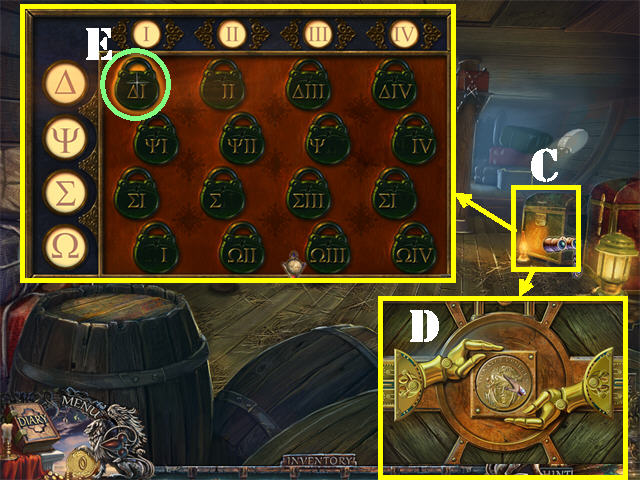
- Examine the chest on right (C); place the COIN OF GREED over the slot (D).
- Click on the coin to activate a puzzle.
- Place the locks in the correct spots. Click on any two locks to swap their positions.
- Note the symbols on the left and the Roman numerals above; use those items as clues as to where the locks need to be placed.
- Please look at the screenshot for the solution.
- Take the first LOCK in the upper left corner after the puzzle has been solved (E).

- Take a closer look at the porthole on the far left; place the LOCK on the chains (1).
- Click down.
- Turn the wheel on the ship in order to lower the anchor (2).
- Return to the cargo hold.
- Look at the small chest on the ground; take the MASK OF GREED (3).
- Click down twice.
- Zoom into the waterfall; place the BOAT HOOK on the pipe (A).
- Go through the door.
- Zoom into the right side of the wall; place the LANTERN on the right (B).
- Examine the weights on left; place the BOAT HOOK on the chain (C).
- Examine the right side of the wall and pull on the lever (D).
- Go through the door.
- Examine the cage to activate a puzzle.
- Slide the bars out of the way until you open all four locks.
- Please look at the screenshot for the solution. To solve the puzzle click on the colored bars in this order: Purple, Green, and Yellow.
- Take the RED SKULL after the puzzle has been solved (E).
- Remove the grating covering the well (F).
- Examine the top of the back door to see the masked man behind the door.
- Examine the bottom of the door; place the ROPE on the door (G). The masked man will trip on the rope as he comes out the door and then he will fall into the well.
- Grab the MASK OF ANGER on the floor (H).
- Go forward.
- Examine the desk in the back; take the BUCKET HANDLE (I).
- Remove the cork from the green beaker (J); take the BLUE SKULL (K).
- Examine the small table to activate a puzzle (L).
- Drag the lions in the small squares over to their matching spots on the board by sliding the large pieces out of the way.
- The positions of the large pieces do not matter.
- Please look at the steps in the 2 screenshots for the solution.
- Zoom into the table after the puzzle has been solved and take the GREEN SKULL (1).
- Return to the theater.
- Zoom into the bucket; place the BUCKET HANDLE on it and take the BUCKET WITH WATER (2).
- Click down 4 times and go into the left door.
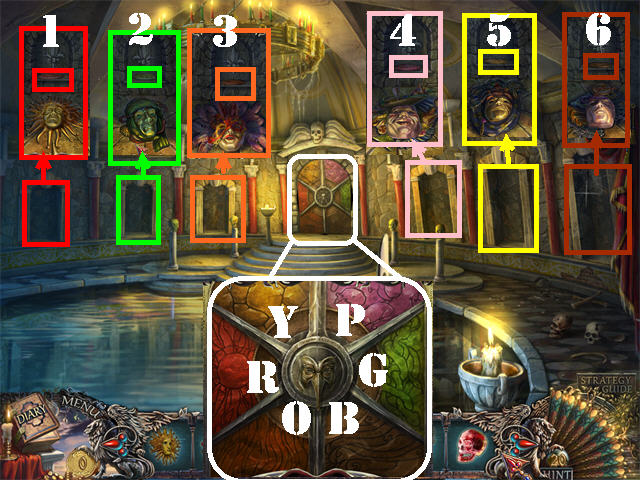
- In the left alcove put the MASK OF VANITY; take the RED KEY (1).
- Put the MASK OF ENVY in the center alcove on the left; take the GREEN KEY (2).
- In the alcove to the left of the door place the MASK OF LUST; take the ORANGE KEY (3).
- In the alcove to the right of the door place the MASK OF GLUTTONY; take the PINK KEY (4).
- Place the MASK OF GREED in the center alcove on the right; take the YELLOW KEY (5).
- Place the MASK OF LAZINESS in the right alcove; take the BROWN KEY (6).
- Examine the back door.
- Place the following keys on the door in their matching spots; PINK (P), GREEN (G), BROWN (B), ORANGE (O), RED (R), and YELLOW (Y).
- Place the MASK OF ANGER in the center of the door; go through the door.

- Put out the fire with the BUCKET WITH WATER (@).
- Click on the little girl to trigger a puzzle.
- Place the RED SKULL, GREEN SKULL, and the BLUE SKULL on the board to activate the puzzle.
- You must get each colored skull to their matching spot on right without hitting one of the blades.
- Click on a skull and then on the spot you want to move it to.
- Follow the steps on the screenshot to get all 3 skulls across. Please RESET the puzzle after each skull has reached the right side for the solution to work for you.
- Congratulations! You have completed Grim Façade; Mystery of Venice!
Created at: 2011-07-22