

Walkthrough Menu
- General Tips
- Chapter 1: Murders in Venice
- Chapter 2: The Red Cat Gang
- Chapter 3: Giuseppe
- Chapter 4: The Gondola
- Chapter 5: The Red Cat
General Tips
- This is the official guide for Grim Façade: The Red Cat.
- This guide will not mention when you have to zoom into a location; screenshots will show each zoom scene.
- The screenshots will show where to play Hidden-Object Puzzles (HOP).
- This guide will give step-by-step solutions for all puzzles that are not random. Read the instructions in the game for each puzzle.
Chapter 1: Murders in Venice
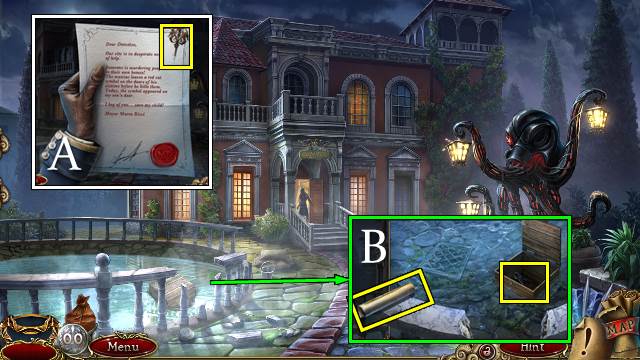
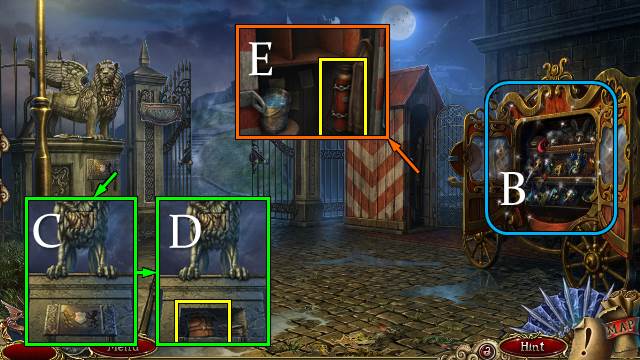
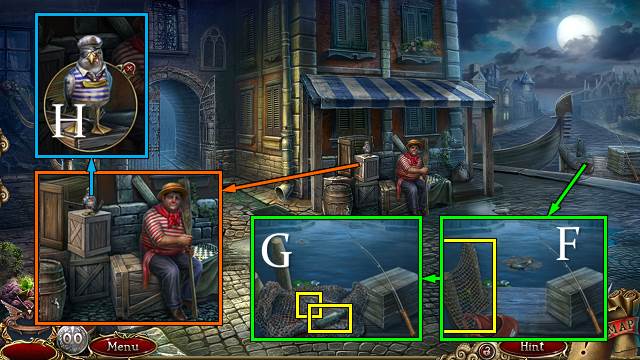
- Take the PIN (A); lower the paper.
- Try to walk forward.
- Open the chest. Take the INSULATED PLIERS and ELECTROMAGNETIC INSTRUCTIONS (B).
- Select the eye (C).
- Take the CRYPTIC KEY (D).
- Scroll down.
- Open the hatch. Use the INSULATED PLIERS; take the WIRES and BATTERY (E).
- Place the BATTERY and WIRES on the ELECTROMAGNETIC INSTRUCTIONS and put the wires and magnet in place. Take the ELECTROMAGNET.
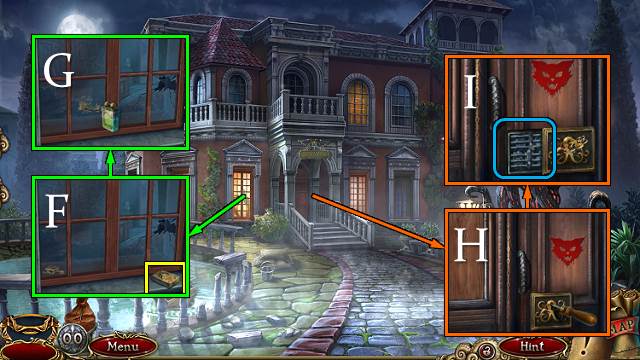
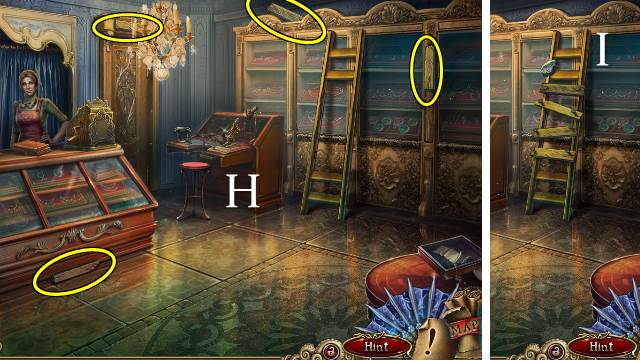
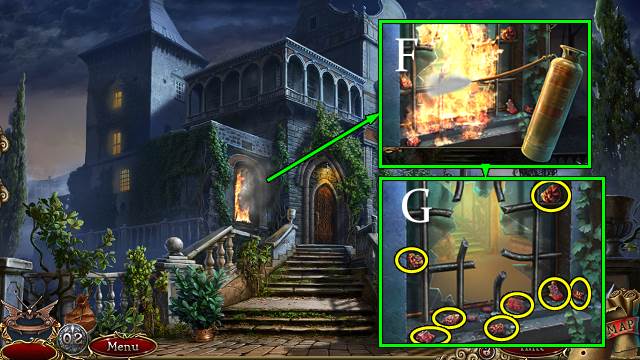
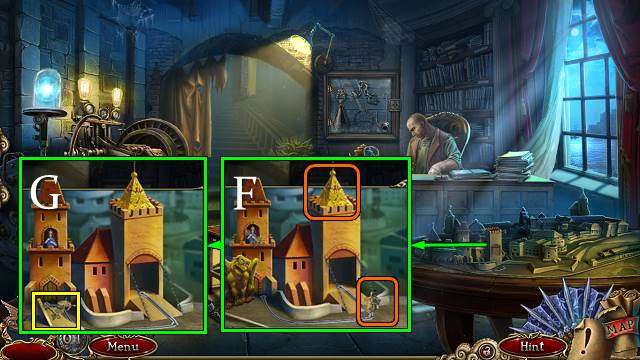
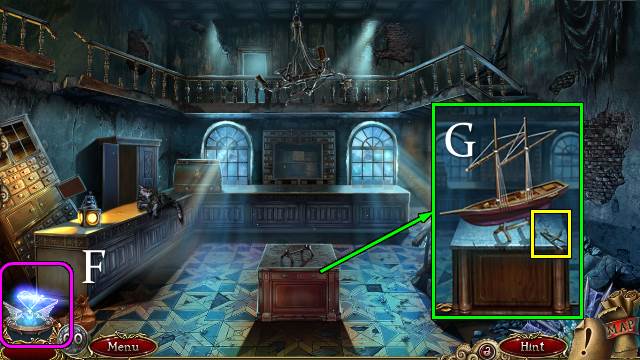
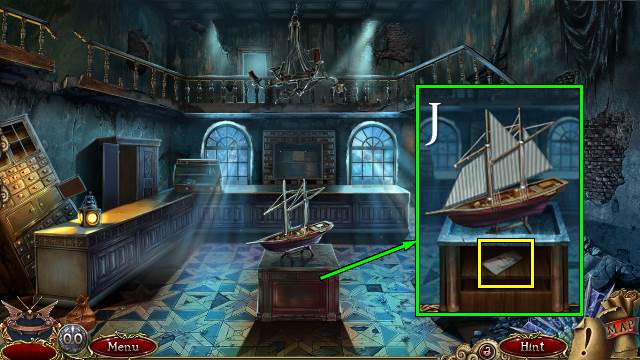
- Look through the window; pick up, open, light and take the LIGHTER (F). Use the ELECTROMAGNET and move the FRONT DOOR KEY to the hole (G).
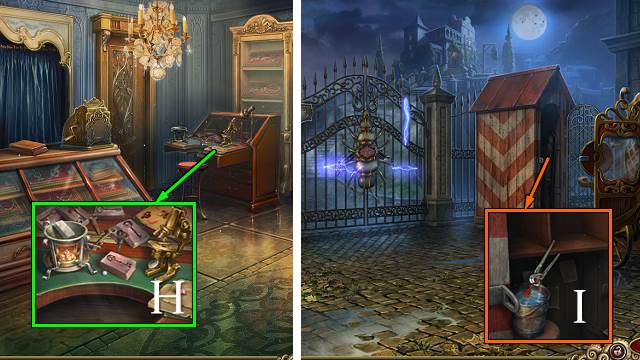
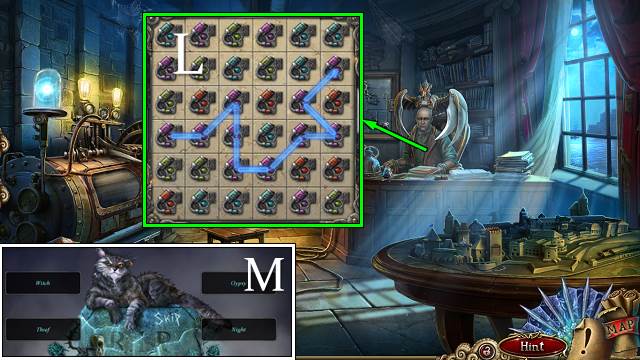
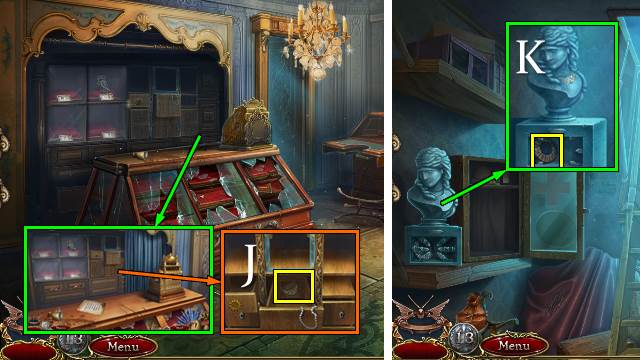
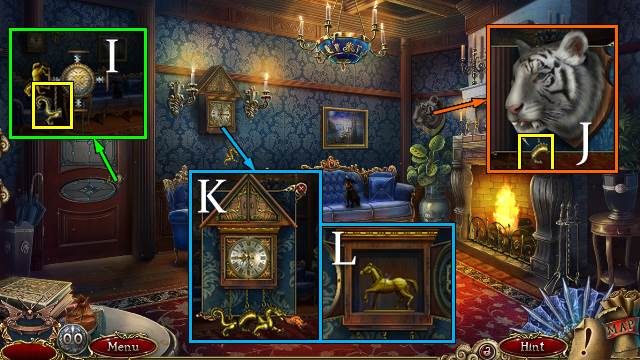
- Take the SCREWDRIVER (H). Place and turn the FRONT DOOR KEY. Play the mini-game (I).
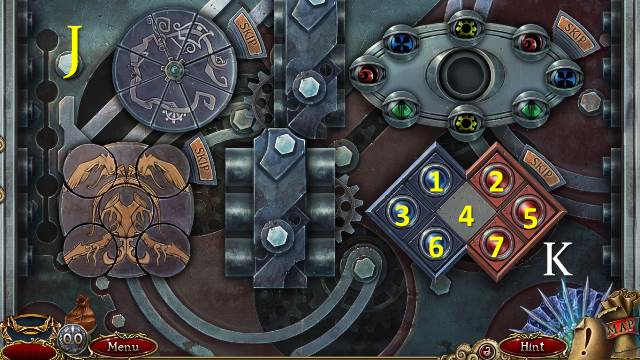
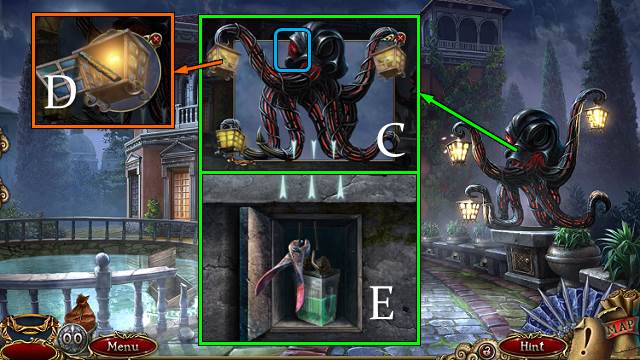
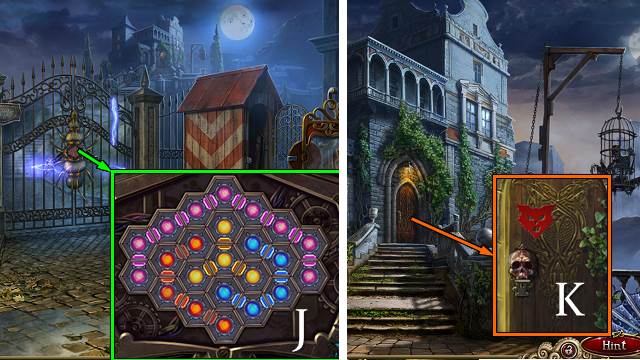
- Solution (J).
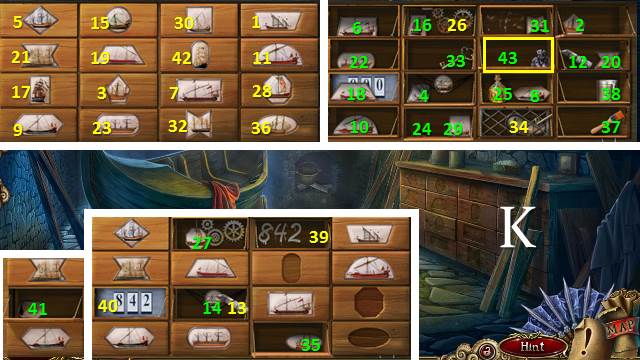
- Solution section K: 2-1-7-6-5-7-4-6-3-1-4-6-2-4.
- Go forward.
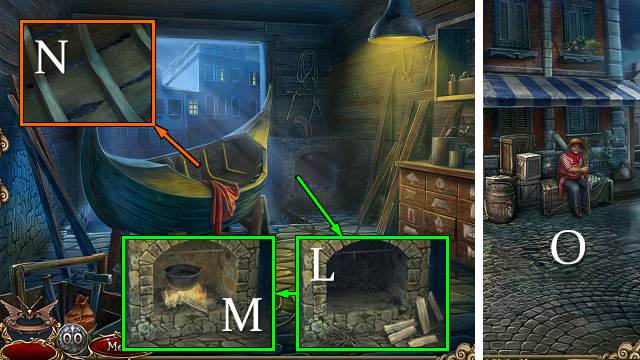
- Use the LIGHTER, then light it again.
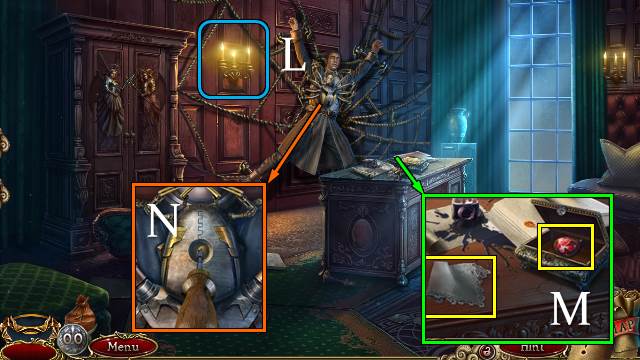
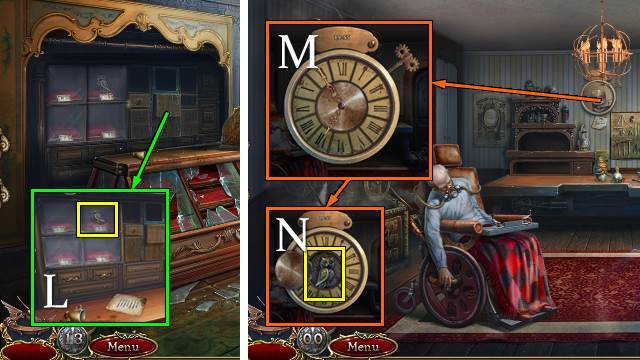
- Use the LIGHTER on the candles (L).
- Open the box; take the RUBY EYE and HANDKERCHIEF (M).
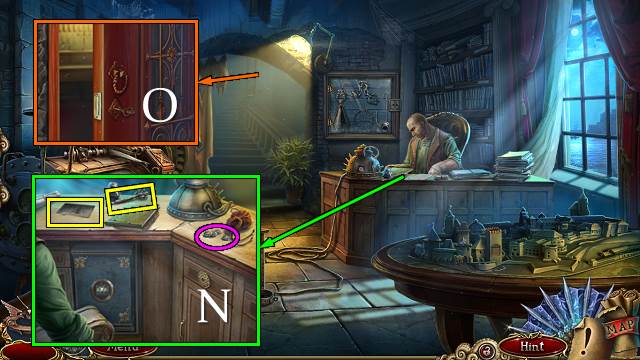
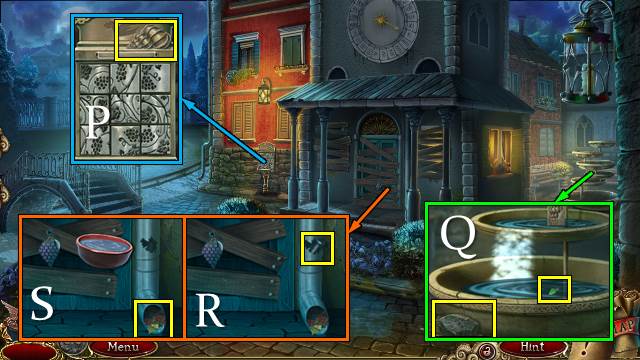
- Take the BOLT with the SCREWDRIVER (N).
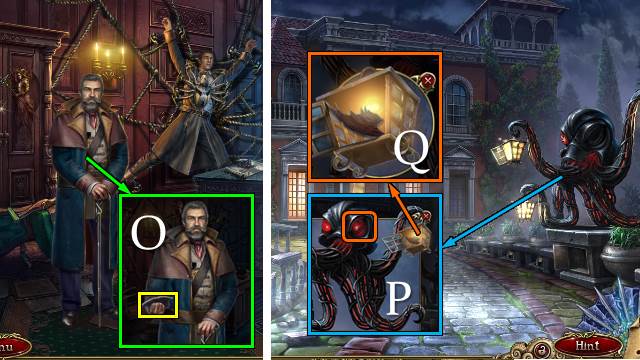
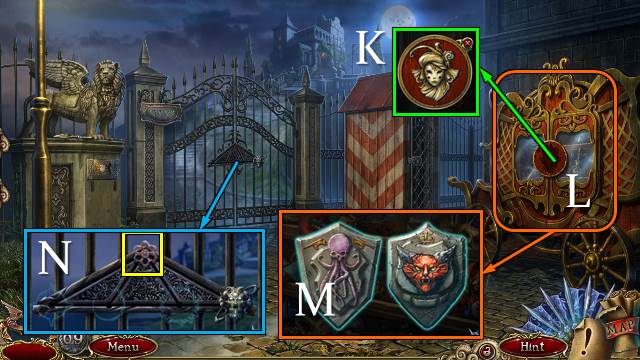
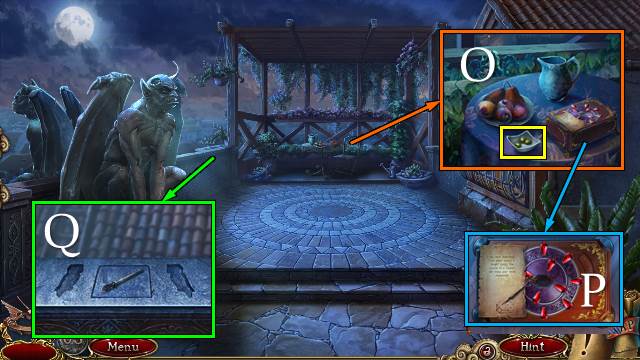
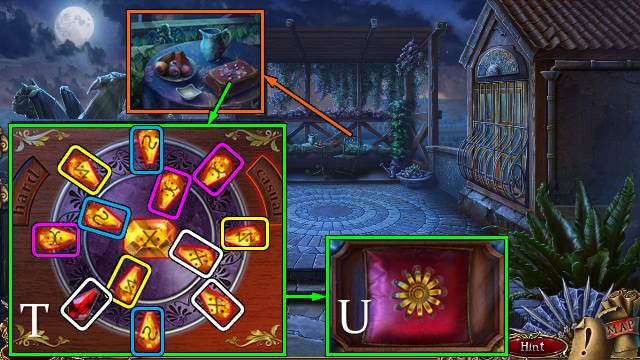
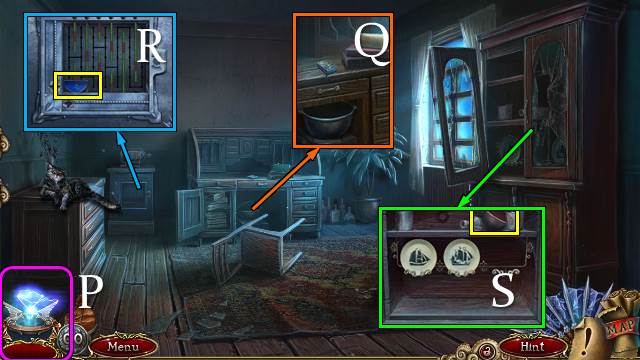
- Talk to the Mayor; take the ANGEL WING (O).
- Walk down.
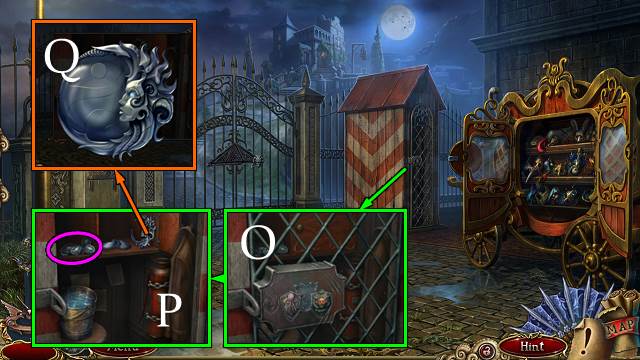
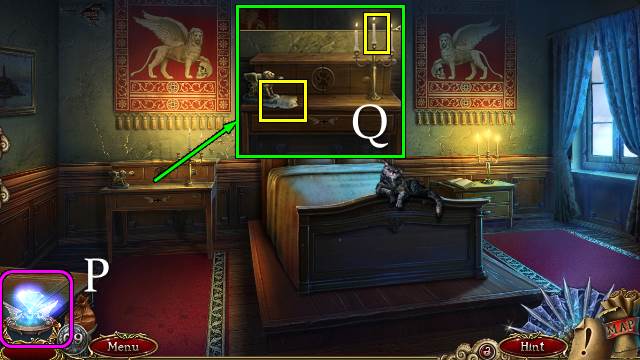
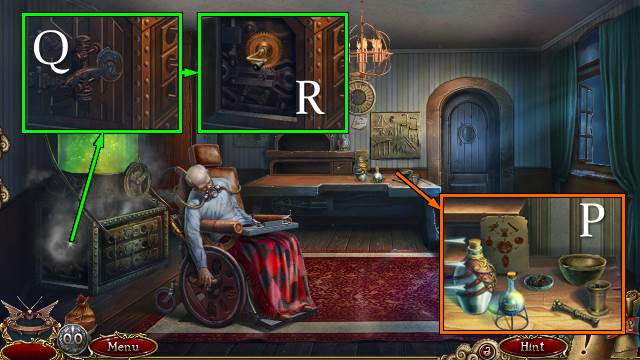
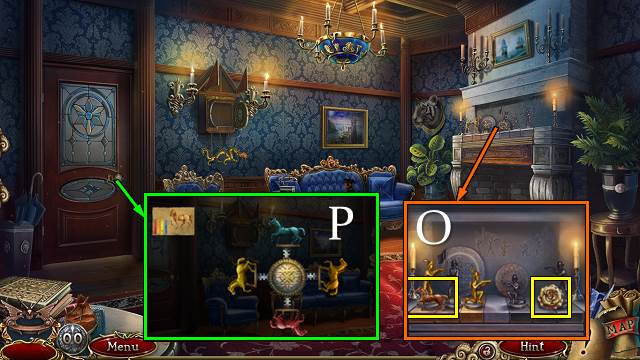
- Place and select the RUBY EYE (P).
- Take the DEVIL WING (Q).
- Go forward.
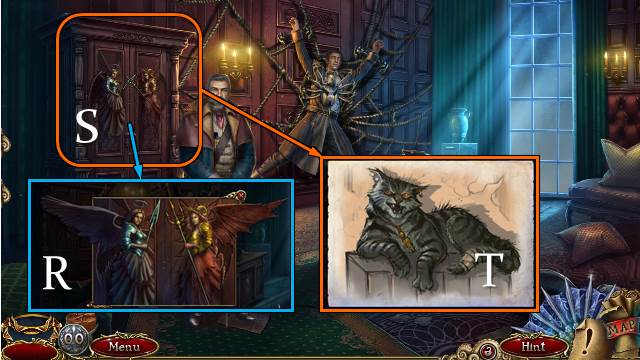
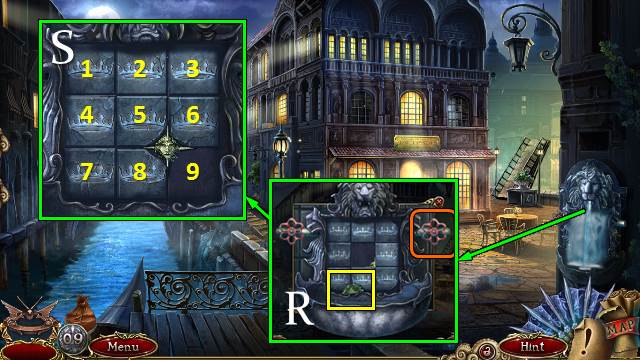
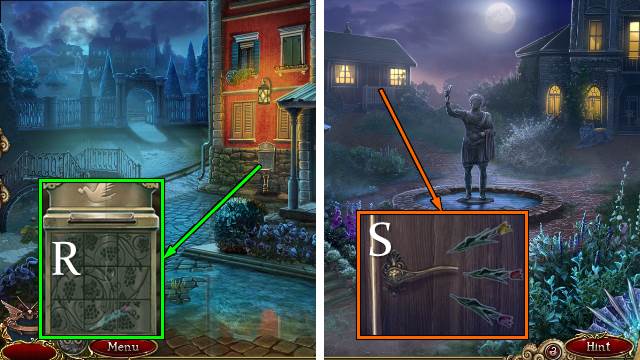
- Place the ANGEL WING and DEVIL WING (R).
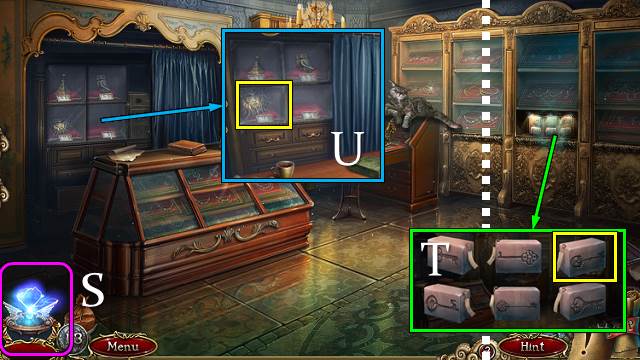
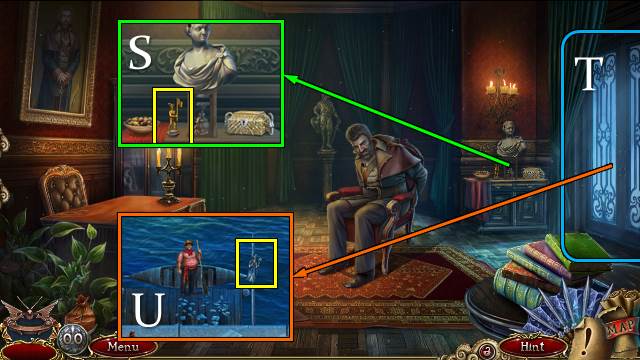
- Play the HOP (S).
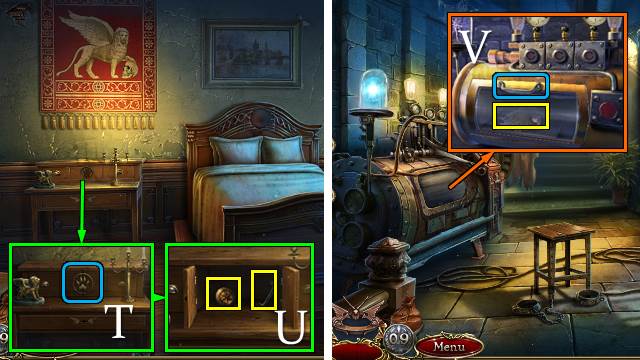
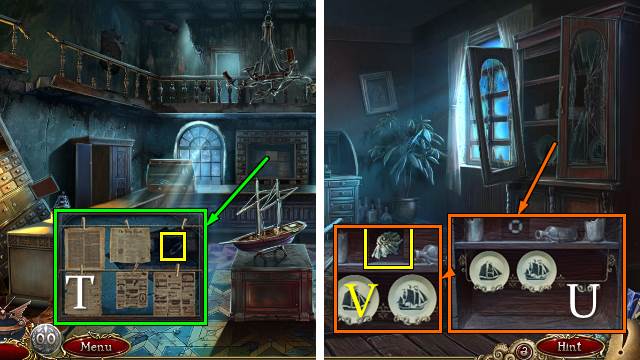
- HOP jigsaw solution (T).
- Receive a STAR SHAPE.

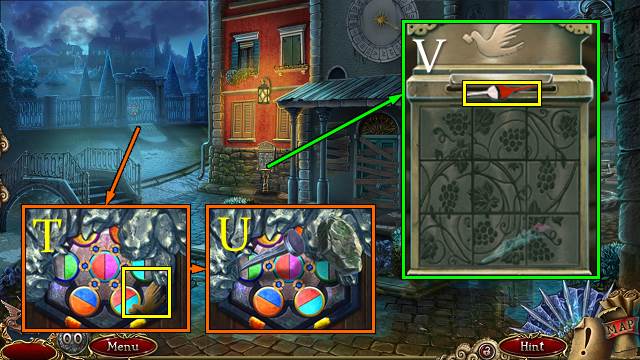
- Open the CRYPTIC KEY and take the instructions. Place the STAR SHAPE and BOLT and use the SCREWDRIVER. Take the CRYPTIC KEY.
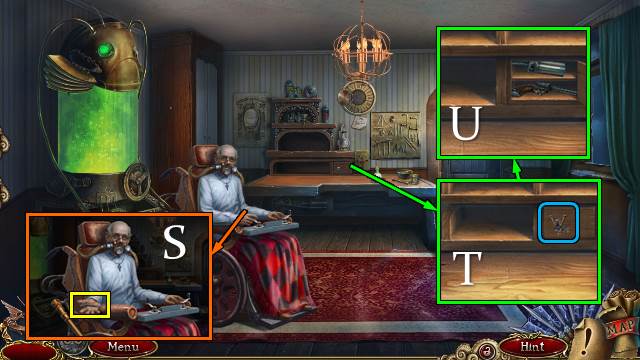
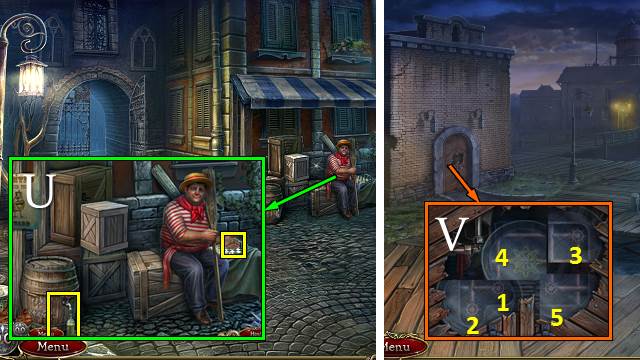
- Place the CRYPTIC KEY for a mini-game (U).
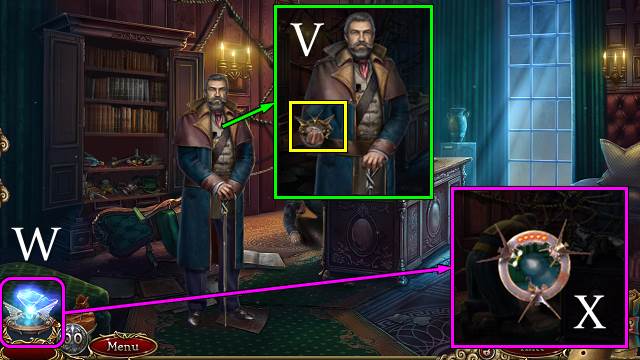
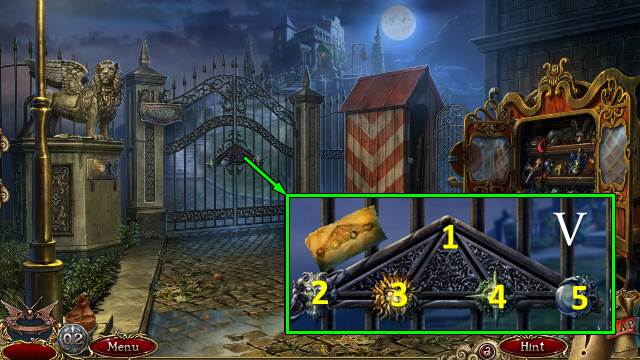
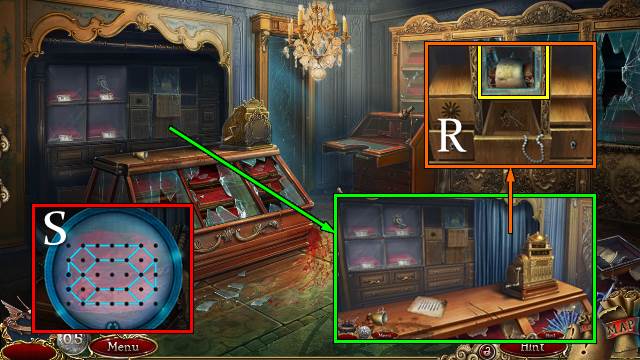
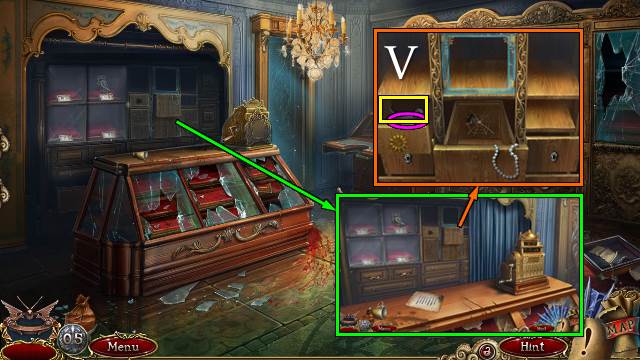
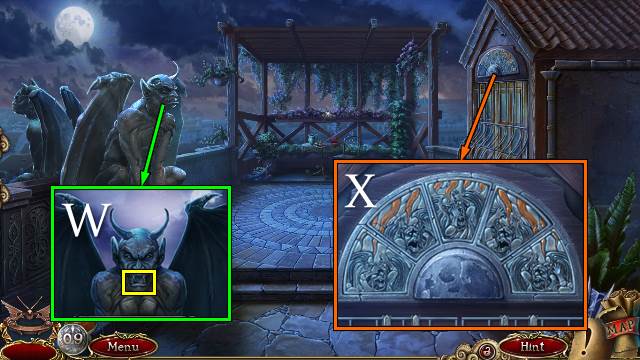
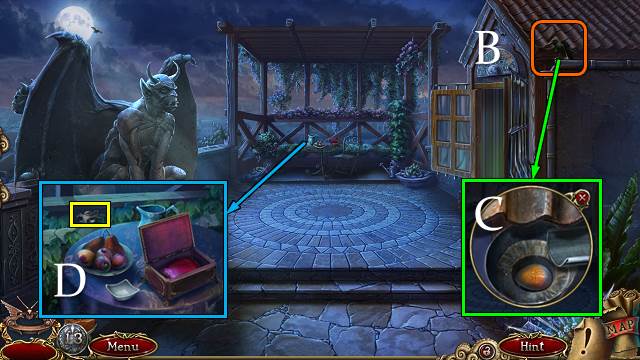
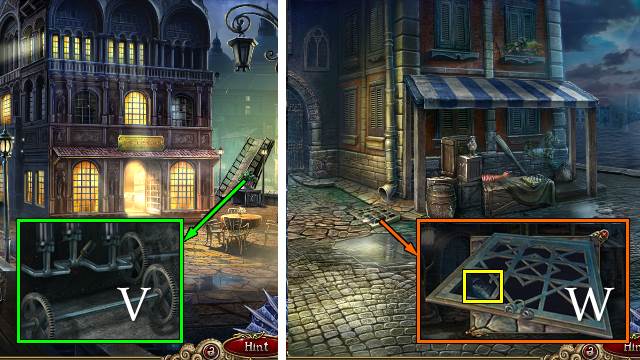
- Talk to the Mayor. Take the MEMORY FRAGMENT DETECTOR (V).
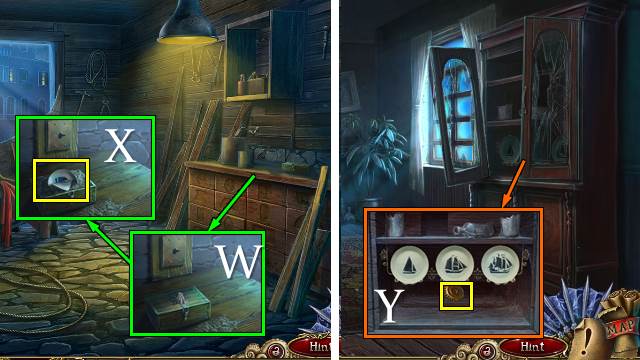
- Read the note on the MEMORY FRAGMENT detector. Take the detector.
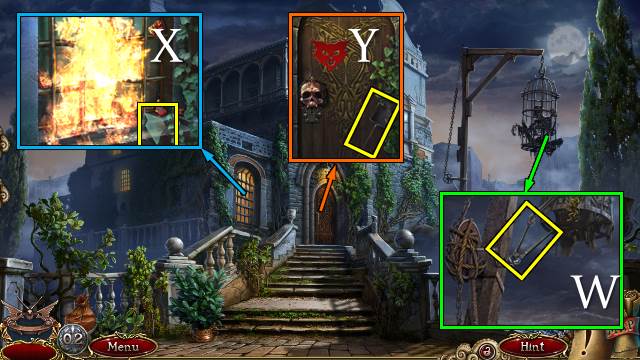
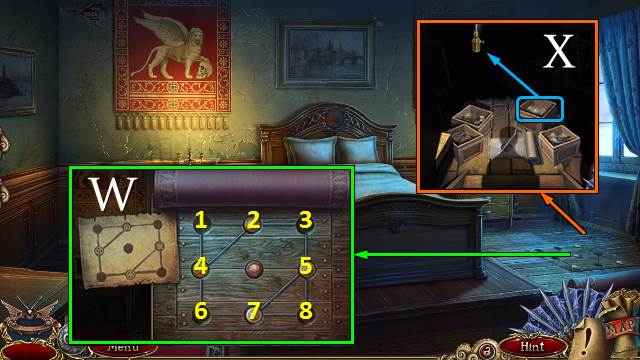
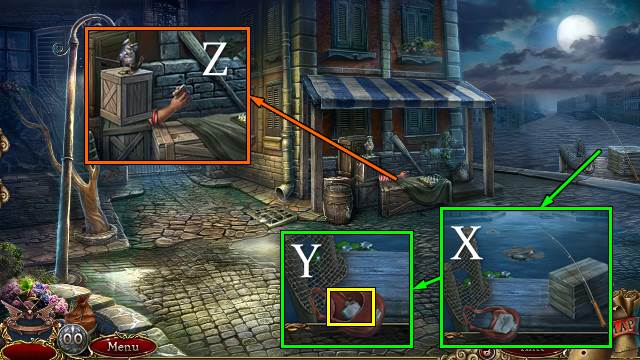
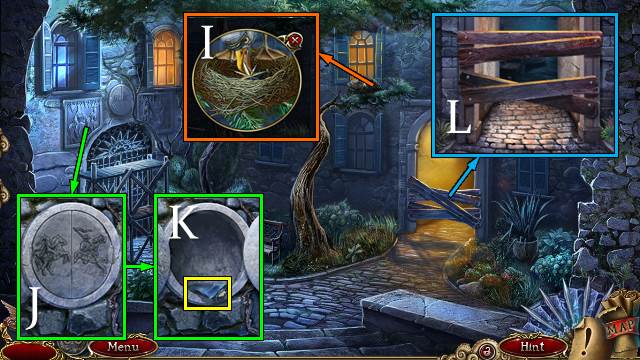
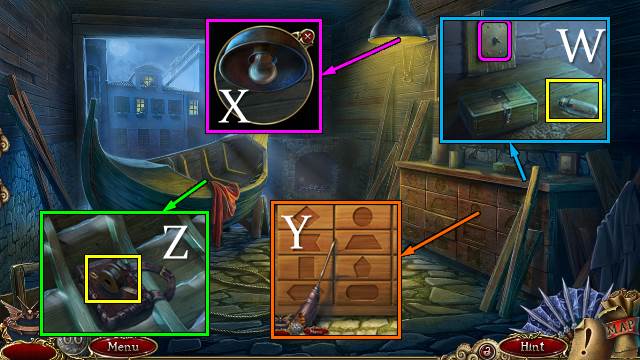
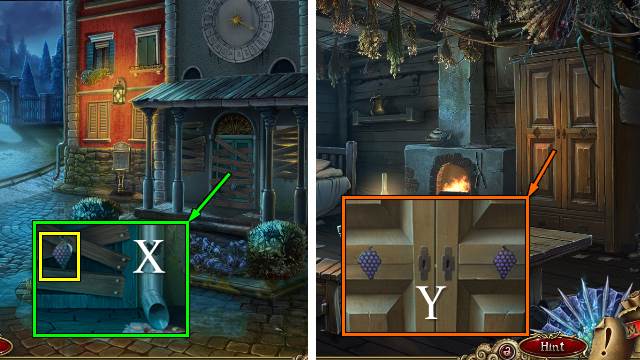
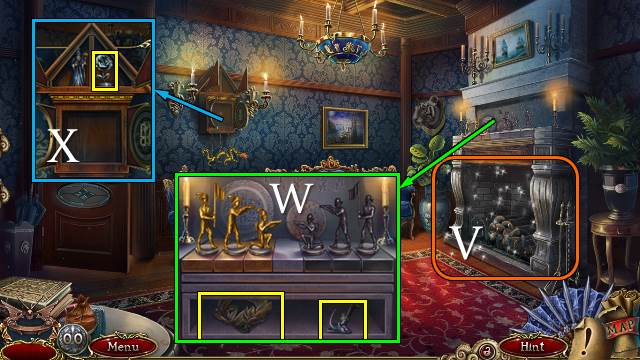
- Use the detector (W); find the 5 fragments (X).
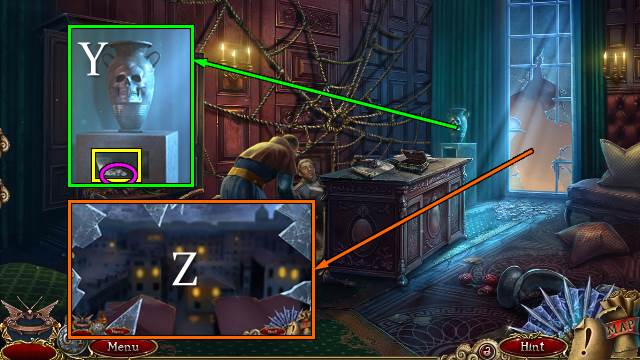
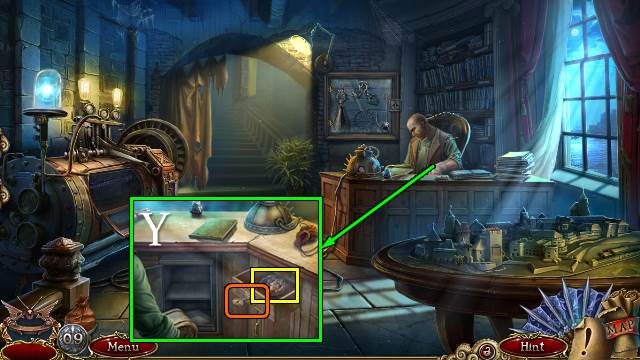
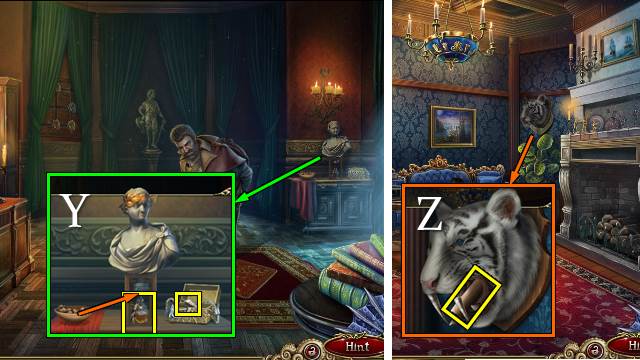
- Turn the vase; take 4 coins and the OWL CODE (Y).
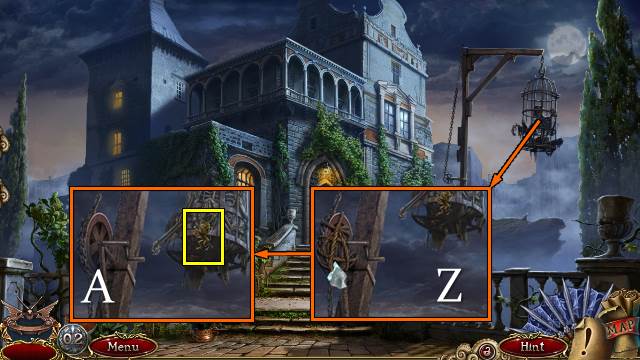
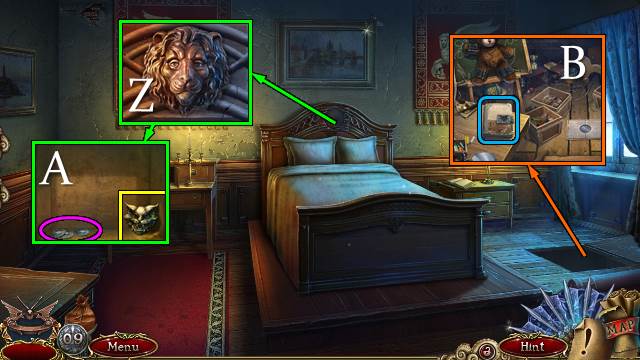
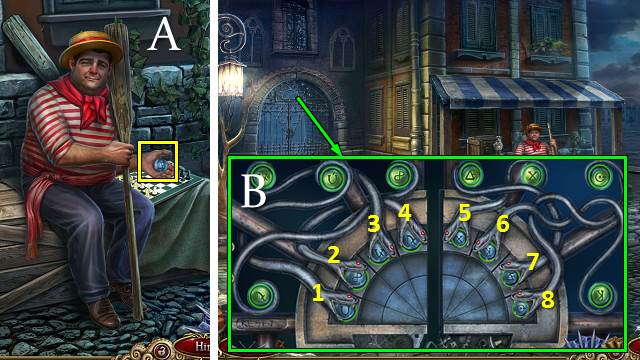
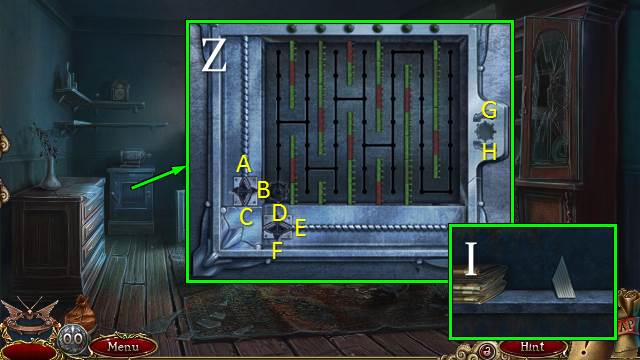
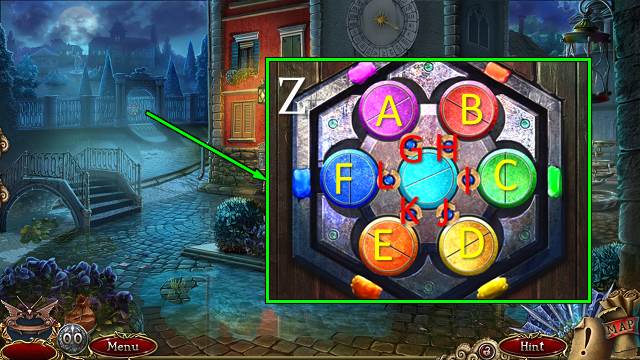
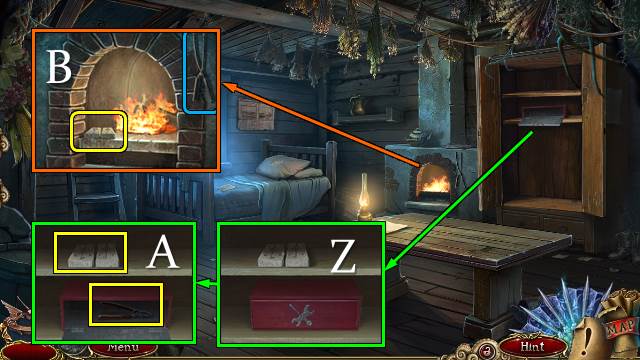
- Remove the 6 shards with the HANDKERCHIEF. Go forward for a mini-game (Z).

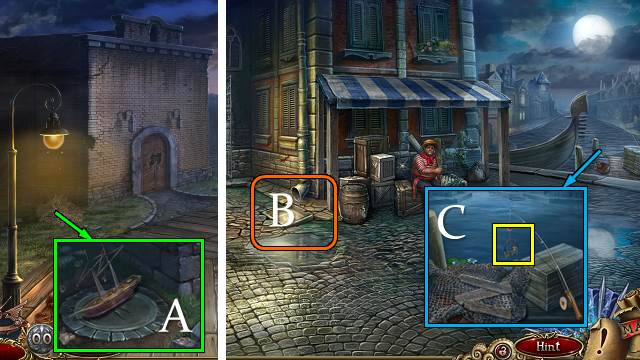
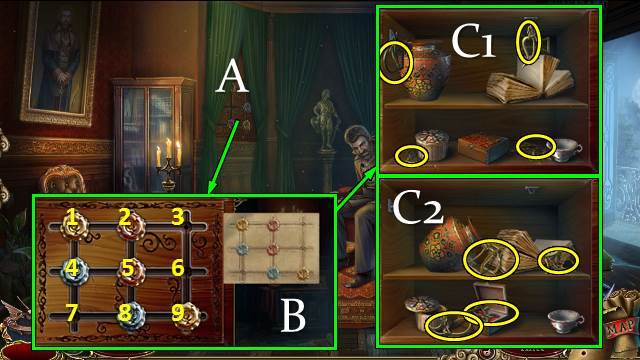
- Solution (A).
- Try to walk forward.
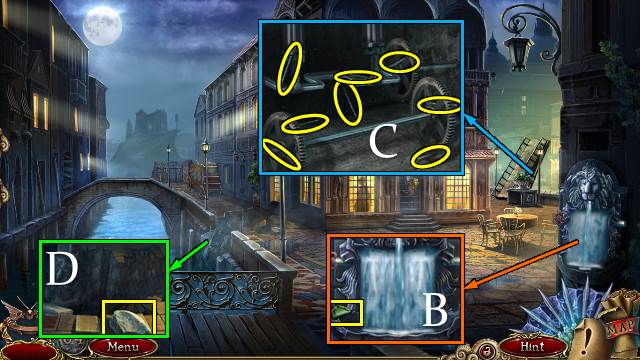
- Take the AMULET PART (B).
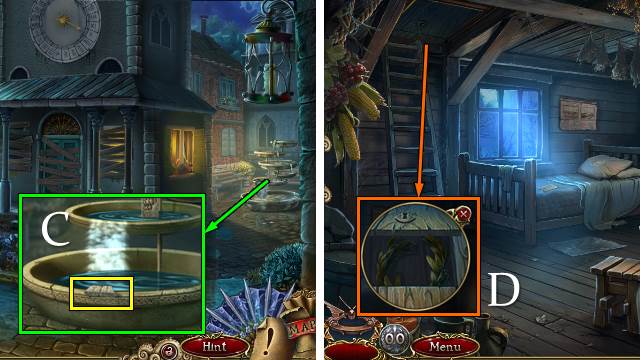
- Find the 8 NAILS (C).
- Take the STONE (D).
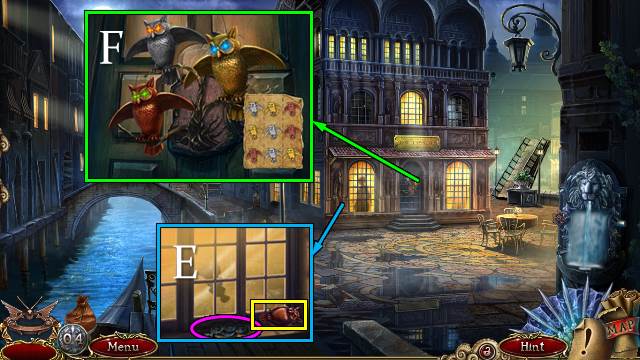
- Take the 5 coins and the OWL (E).
- Place the OWL and OWL CODE; enter the code left to right and top to bottom (F).
- Go forward.
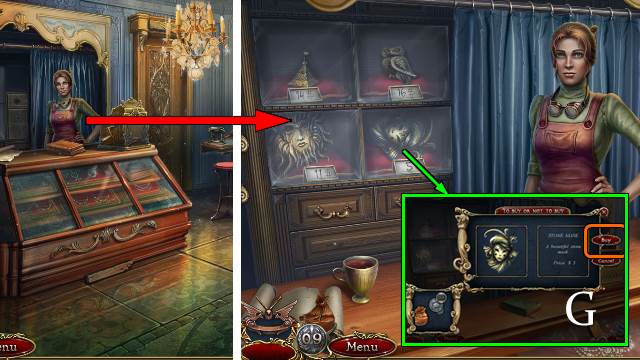
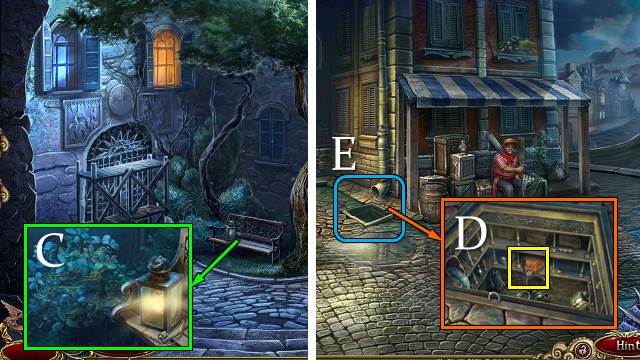
- Talk to the shopkeeper. Buy the STONE MASK (G).
- Select the ladder, then find the 4 rungs (H).
- Use the NAILS and STONE; take the LADDER (I).
- Walk down.

- Place the LADDER. Go forward (J).
- Try to walk forward.
- Place the STONE MASK (K).
- Play the HOP (L).
- HOP jigsaw solution (M).
- Receive the SHIELD KEYS.
- Take the VALVE HANDLE (N).
- Place the SHIELD KEYS (O); open the door. Take the 9 coins (P). Open the cabinet and take and restore the MOON AMULET (Q).
- Walk down.
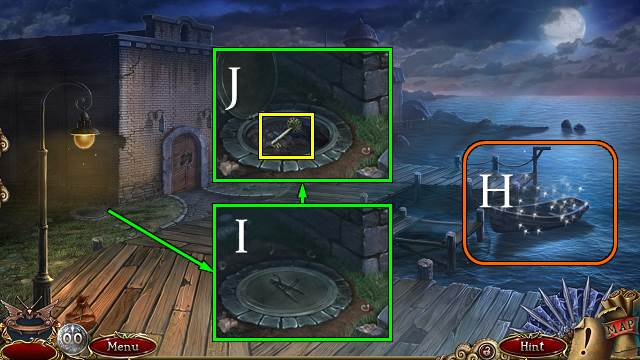
- Place and turn the VALVE HANDLE. Take the AMULET PART and play the mini-game ®.
- Solution (R): 2-3-6-5-8-7-4-5-2-3-6-5-8-9-6-5-8-9.
- Take the STAR EMBLEM.
- Enter the shop.
- Use the detector and find 5 fragments (S).
- Check the tags and take the WAX MOLD (T).
- Buy the SUN AMULET (U).
- Walk down and left.
- Combine the AMULET PARTS and STAR EMBLEM; restore and take the STAR AMULET.
- Use the PIN on the SUN AMULET; take the CELESTIAL CODE and SUN AMULET.
- Place the STAR AMULET; place the SUN AMULET, MOON AMULET and CELESTIAL CODE. Check the code and move 5-4-3-2-1-5-4-3-1 (V).
- Go forward.
Chapter 2: The Red Cat Gang
- Take the TONGS (V).
- Look through the window. Take the SHARP SHARD with the TONGS (W).
- Take the SCOOP (X).
- Wrap the HANDKERCHIEF around the SHARP SHARD.
- Take the ROPE with the SHARP SHARD (Z). Turn the crank and take the LION (A).
- Walk down.
- Play the HOP (B); receive a STEEL INGOT.
- Place the LION (C); take the BAG (D).
- Take the SAW from the BAG.
- Use the SAW; take the EXTINGUISHER (E).
- Go forward.
- Use the EXTINGUISHER (F); take the 8 HOT COALS with the SCOOP (G).
- Go to the Jewelry Shop.
- Place the WAX MOLD, STEEL INGOT and HOT COALS; use the TONGS. Receive the HOT KEY (H).
- Go down and left.
- Use the HOT KEY; receive the COPIED KEY (I).
- Play the mini-game (J).
- Go forward.
- Place and turn the COPIED KEY. Go forward (K).
- Play the mini-game (L).
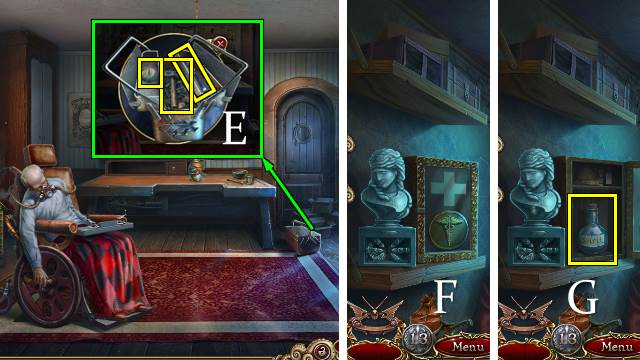
- Talk to the cat; answer the random questions (M).
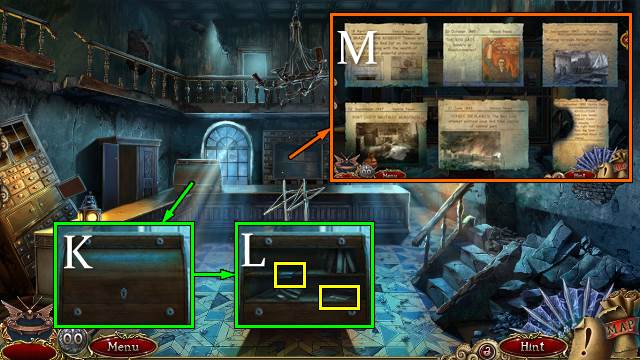
- Take the 4 coins and PEN. Move the books, read the note and take BERTRANDO'S ROOM KEY underneath it (N).
- Open the door with BERTRANDO'S ROOM KEY; go forward (O).
- Use the detector; find the 5 fragments (P).
- Move the lion and take the HIDDEN CODE. Take a CANDLE (Q).
- Walk down.
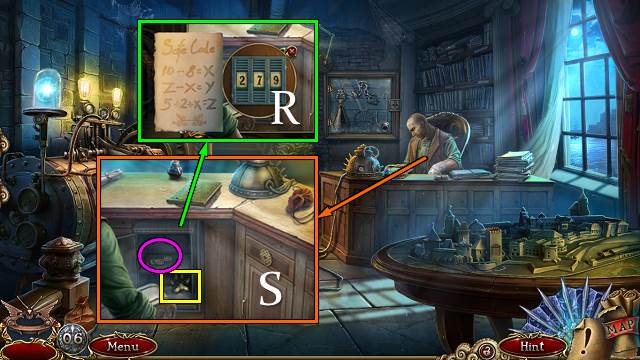
- Place the CANDLE on the HIDDEN CODE; move the candle over the paper and take the SAFE CODE.
- Place the SAFE CODE; enter 279 (R).
- Read the note; take the LION'S PAW and 3 coins (S).
- Go forward.
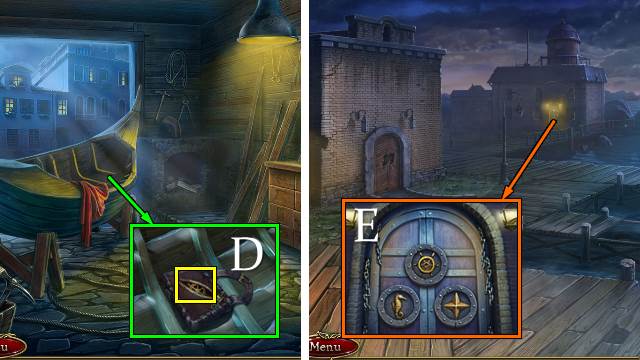
- Place the LION'S PAW (T); take the MICROWAVE HANDLE and TRAPDOOR KEY (U).
- Walk down.
- Place the MICROWAVE HANDLE; open the hatch, move the dust and take the TRAPDOOR SOLUTION (V).
- Go forward.
- Lift the rug and place the TRAPDOOR KEY and TRAPDOOR SOLUTION for a mini-game (W).
- Solution: (1-2)-(6-4-1)-(2-4-6-7)-(3-2)-(1-4)-(8-5).
- Select the eye.
- Move the mat, open the crates with the crowbar and put the lightbulb (inside random crate) in the lamp. Play the HOP; receive the CARVED KEY (X).
- Walk down.
- Open the drawer with the CARVED KEY; take the LION'S HEAD and TORTURE TOOLS KEY PART underneath it (Y).
- Go forward.
- Place the LION'S HEAD (Z); take the 3 coins and RED CAT HEAD (A).
- Place the RED CAT HEAD and play the HOP; receive BERTRANDO'S DIARY (B).
- Go to the Jewelry Shop.

- Try to walk forward.
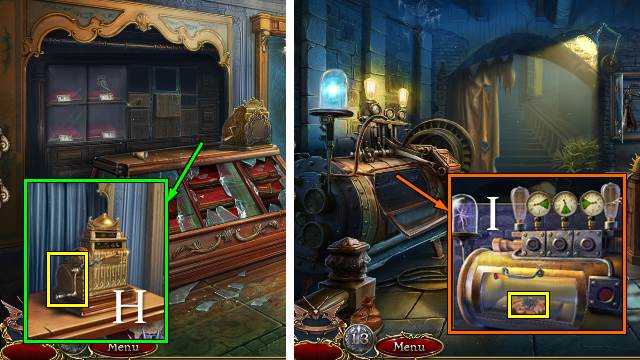
- Read the tag and take the PIN (C).
- Take the 3 coins; buy the ROOF CHARM. Open the curtain (D).
- Take the TWEEZERS (E).
- Go to Bertrando's Study.
- Place the ROOF CHARM, then the PIN (F). Move the knight, kick the door and take the WINGED KEY and CLOCKWORK KNIGHT (G).
- Go forward.
- Place and turn the WINGED KEY; take the 4 coins and TORTURE TOOLS KEY PART (H).
- Take the BUTTERFLY with the TWEEZERS (I).
- Walk down.
- Place the two TORTURE TOOLS KEY PARTS; move the lock, open the cabinet and take the HOOK (J).
- Go to the Jewelry Shop.
- Place the BUTTERFLY (K). Open the case and take the UNCUT RUBY (L).
- Go right.
- Attach the HOOK to the ROPE. Take the HOOK AND ROPE.
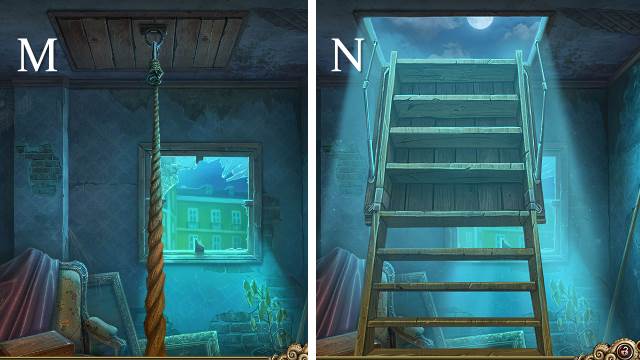
- Use the HOOK AND ROPE and pull (M).
- Pull down the ladder (N).
- Go forward.
Chapter 3: Giuseppe
- Take the OLIVES (O); place the PEN and take the GEMSTONE DRAWING (P).
- Take the GLASS CUTTER (Q).
- Walk down twice.
- Use the GLASS CUTTER; take the CUTTING MACHINE INSTRUCTIONS and CUTTING MACHINE (R).
- Place the CUTTING MACHINE INSTRUCTIONS on the CUTTING MACHINE; place the UNCUT RUBY, pull the handle, lower the ruby, then lower and look through the ocular. Place the GEMSTONE DRAWING and draw the gem (S). Take the CUT RUBY.
- Go right and forward.
- Place the CUT RUBY for a mini-game (T).
- Take the FLOWER (U).
- Walk down twice.
- Open the drawer with the FLOWER. Take the HORN and 4 coins (V).
- Go right and forward.
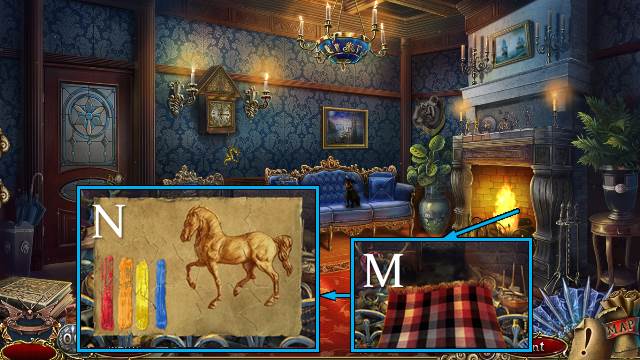
- Place the HORN; take the GARGOYLE PANEL (W).
- Place the GARGOYLE PANEL for a mini-game (X).
- Go right.

- Try to walk forward.
- Open the book, turn the pages and take the CADUCEUS (Y). Take the 4 coins (Z).
- Take the TONGS, CATFISH KEY and GARDEN SHEARS (A).
- Walk down.
- Chase off the crow (B).
- Take the AMBER PIECE with the TONGS (C).
- Use the GARDEN SHEARS; take the WRENCH INSERT (D).
- Go right.
- Open the toolbox with the WRENCH INSERT; take the HAMMER, CHISEL and GAUGE (E).
- Walk down twice.
- Place the CADUECUS (F), open the box and take the SPIRITS (G).
- Walk down.
- Use the CHISEL and HAMMER; receive the MACHINE HANDLE (H).
- Go to Bertrando's Study.
- Remove the broken gauge and place the GAUGE and AMBER PIECE. Push the buttons until all dials are green, close the hatch and push the red button. Open the hatch and take the SPIDER GEM (I).
- Go to the Jewelry Shop.
- Place the SPIDER GEM; take the NECKLACE (J).
- Go right.
- Place the NECKLACE; take the CLOCKFACE and 3 coins underneath it (K).
- Walk down.
- Buy the OWL (L).
- Go to Giuseppe's Room.
- Place the CLOCKFACE and set the clock to 7:55 by moving the big hand to 11, then moving it back and forth between 10 and 11 six times (M). Take the CLOCKWORK KEY, open the clock and take the OWL (N).
- Walk down.

- Place the two OWLS. Take the POWDER (O).
- Go right.
- Scroll right. Place the OLIVES, SPIRITS and POWDER. Pound the olives with the pestle. Add all ingredients to the bowl. Take the RUST SOLVENT with the flask (P).
- Wind up the CLOCKWORK KNIGHT with the CLOCKWORK KEY; take the RUSTED GEAR.
- Use the RUST SOLVENT on the RUSTED GEAR. Take the GEAR.
- Place and turn the CATFISH KEY (Q); remove the gear and place the GEAR and MACHINE HANDLE. Turn the handle (R).
- Talk to Guiseppe; take the DESK KEY (S).
- Open the compartment with the DESK KEY (T); take the PISTON and REVOLVER (U).
- Walk down four times.
Chapter 4: The Gondola
- Place the PISTON (V).
- Go right.
- Try to walk forward.
- Use the REVOLVER, open the grate and take the FISH SKELETON (W).
- Open the bag with the FISH SKELETON (X); take the FLASK (Y).
- Talk to the gondolier; offer the FLASK (Z).
- Talk to the gondolier; take the TILE (A).
- Place the TILE for a mini-game (B).
- Solution: (3,4)-(7,8)-(3,4)-(4,5)-(1,2)-(4,5)-(3,4)-(6,7)-(5,6)-(3,4)-(2,3)-(4,5)-(2,3).
- Go left.
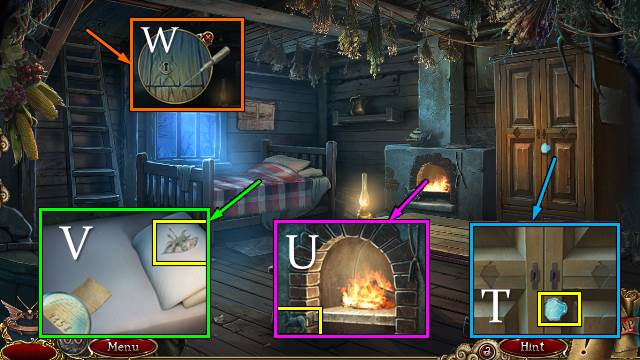
- Flick the switch and take the LANTERN and CLIPPING 1/3. Use the GARDEN SHEARS and take the THIN ROPE (C).
- Walk down.
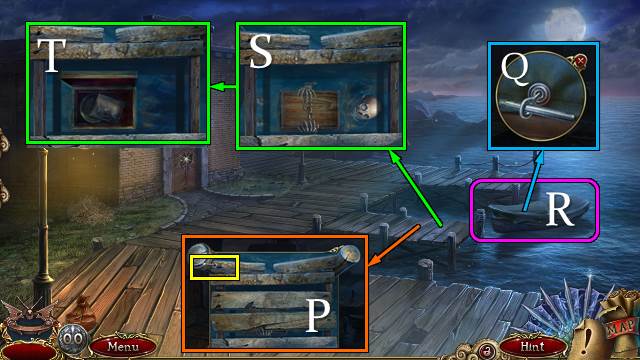
- Use the LANTERN and take the COFFIN LID (D).
- Play the HOP (E); receive the KNIGHT INLAY.
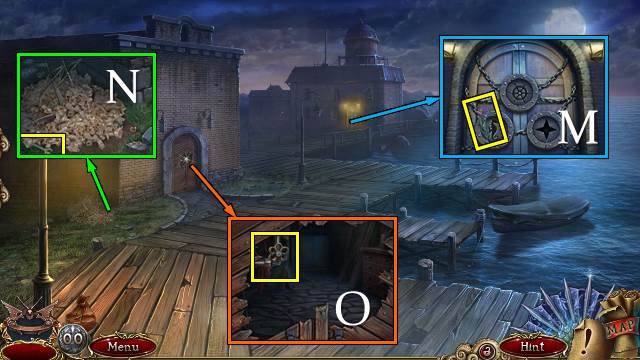
- Use the THIN ROPE and take the NET (F). Use the NET and take the BOTTLE and SHARK'S TOOTH (G).
- Offer the SHARK'S TOOTH; take TESLA THE GULL and the CROWBAR behind him (H).
- Go left.
- Release TESLA THE GULL; take the GOLDEN COMPASS (I).
- Place the KNIGHT INLAY (J); take the CHESS PIECE and RAG (K).
- Take the NAILS and PLANKS with the CROWBAR (L).
- Go right.
- Take FLOWER 1/3 (M).
- Take the WRENCH (N).
- Use the WRENCH and take the FAWCET HANDLE (O).
- Take the ROD (P).
- Remove the bolt with the ROD (Q).
- Play the HOP (R); receive a SAW.
- Use the CROWBAR, then the SAW (S). Open the box and take CLIPPING 2/3 and the DIRTY PLATTER (T).
- Walk down twice.
- Place the BOTTLE and FAWCET HANDLE. Fill the bottle and take the VINEGAR. Give the CHESS PIECE to the gondolier. Take the SEAHORSE (U).
- Go left and right.
- Combine the RAG and VINEGAR with the DIRTY PLATTER; put vinegar on the rag and clean the dish. Take the PLATTER.
- Place the PLATTER; turn the valves in order (V). Go forward.
- Take the LIGHTBULB (W).
- Place the LIGHTBULB (X).
- Flick the switch (W).
- Take the BROOM (Y).
- Take the REEL (Z).
- Walk down.
- Use the BROOM; take the SHIP (A).
- Walk down twice.
- Play the HOP (B); receive a BROOCH.
- Place the REEL. Reel in the line and take ADRIANNA'S GLASSES (C).
- Go left, right and left.
- Open the bag with the BROOCH; take the GOLDEN WHEEL (D).
- Walk down.
- Place the GOLDEN WHEEL, SEAHORSE and GOLDEN COMPASS. Open the door and go forward (E).
- Use the detector and find 5 fragments (F).
- Take the DIVIDER; place the SHIP (G).
- Walk down.
- Play the HOP (H); receive a BRUSH.
- Place the DIVIDER (I), open the lid and take the DESK KEY (J).
- Go forward.
- Open the desk with the DESK KEY (K); take SAILS 1/3 and CLIPPINGS 3/3 (L).
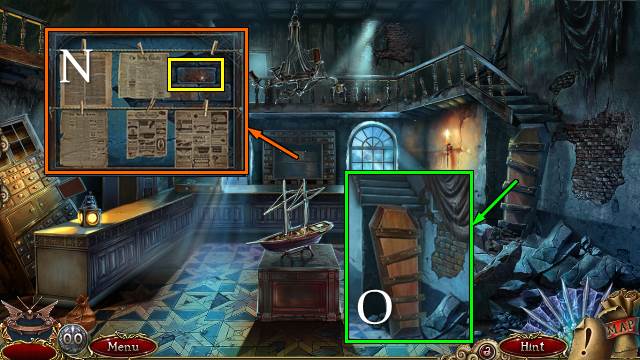
- Place the CLIPPINGS and put them in chronological order (M).
- Take the BRICK and remove the bricks (N).
- Put the PLANKS and NAILS on the COFFIN LID and use the BRICK; take the COFFIN LADDER.
- Place the COFFIN LADDER (O).
- Go forward.
- Use the detector and find 5 fragments (P).
- Take the LIGHTER and POT (Q).
- Take PUZZLE PART 1/4 (R).
- Open the door and take the BOWL (S).
- Walk down.
- Use the LIGHTER and take the LIFE PRESERVER (T).
- Go forward.
- Place the LIFE PRESERVER (U); take the SEASHELL (V).
- Go to the Gondola Workshop.
- Place the SEASHELL (W); open the box and take SAILS 2/3 and the PLATE (X).
- Go to the Chief's Office.
- Place the PLATE and order the ships from smallest to biggest. Take the COGWHEEL (Y).
- Place the COGWHEEL for a mini-game (Z).
- Solution: D3-A3-B-E-D2-H-D-H-F5-G-F-G-D-C2-B-E-D2-H-(D-H)x3-F2-A3-B-E-D2-H-F4-G-(F-G)x2.
- D2-C2-B-E-F2-G-D4-H-(D-H)x2-A4-B-E-F2-G-(F-G)x4-E-C6-B-D2-H-(D-H)x4.
- Select handle to open the safe; take SAILS 3/3.
- Walk down.
- Place the SAILS; take the SHIP PHOTO (J).
- Walk down and left.
- Place the SHIP PHOTO for a mini-game (K).
- You receive some RESIN.
- Place the sticks and logs in the fireplace and place the POT and RESIN (L). Use the LIGHTER and BRUSH to get a BRUSH WITH RESIN (M).
- Move the bag and use the BRUSH WITH RESIN (N).
- Move the gondola.
- Talk to the Gondolier (O).
Chapter 5: The Red Cat
- Try to walk forward.
- Take the SHELL (P).
- Take the STONE and place the SHELL. Take PUZZLE PART 2/4. Fill the BOWL and take the BOWL WITH WATER (Q).
- Take the CHISEL (R). Use the BOWL WITH WATER; take PUZZLE PART 3/4 (S).
- Take the DOVE (T); take the METAL with the CHISEL and STONE (U).
- Place the DOVE for a mini-game; take the BUOY INLAY (V).

- Match the lilies (W). Open the box with the BUOY INLAY (X); take PUZZLE PART 4/4 and GOLDEN LEAF 1/2 (Y).
- Place the PUZZLE PARTS for a mini-game (Z).
- Solution: B-A-H-I-G-D2-J-B3-H-E2-K-L-C-A-I-A2-D-G-D2-J.
- Go left.

- Take GRAPE CHARM 1/2 (M).
- Take GOLDEN LEAF 2/2 (N).
- Remove the cover; take the GAZEBO KEY (O).
- Take the HOOK. Use the GAZEBO KEY (P).
- Play the HOP (Q); receive FLOWER 2/3.
- Walk down.
- Take FLOWER 3/3 with the HOOK (R).
- Go left.
- Place the FLOWER and select red, purple, yellow. Open the door (S).
- Go forward.
- Take the GLASS SHARD (T).
- Take GREEN HORSE 1/3 (U).
- Remove a LENS from ADRIANNA'S GLASSES.
- Take the BLANKET. Use the GLASS SHARD and take the TOOLBOX KEY. Place the LENS and take the DOOR CODE (V).
- Take the SCREWDRIVER (W).
- Walk down twice.
- Take GRAPE CHARM 2/2 with the SCREWDRIVER (X).
- Go left and forward.
- Place the GRAPE CHARM and open the doors (Y).
- Place the TOOLBOX KEY (Z), open the box and take the CUTTERS and KEY MOLD (A).
- Place the KEY MOLD and METAL. Use the tongs and take the HOT MOLD (B).
- Walk down twice.
- Dip the HOT MOLD in the water and take the ATTIC KEY (C).
- Go left and forward.
- Use the ATTIC KEY and take the LAUREL WREATH (D).
- Walk down.
- Play the HOP (E); receive a BELL.
- Take the MOON from the LAUREL WREATH and place the GOLDEN LEAF on the wreath.
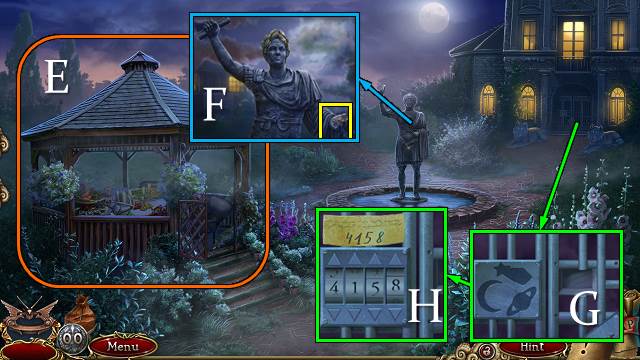
- Place the LAUREL WREATH and take the COMET (F).
- Turn over the BELL and take SATURN with the PLIERS.
- Place the COMET, MOON and SATURN (G). Place the DOOR CODE; enter 4158 (H).
- Go right.
- Take DRAGON FRAGMENT 1/2 (I).
- Take DRAGON FRAGMENT 2/2 (J).
- Place the DRAGON FRAGMENT and pull the parts down. Set the clock to 9:30 (K). Take the YELLOW HORSE 2/3 (L).
- Use the BLANKET and play the HOP (M).
- HOP jigsaw solution (N).
- Receive the HORSE LOCK SOLUTION.
- Take the RED HORSE 3/3 and GOLDEN ROSE 1/3 (O).
- Place the GREEN HORSE and HORSE LOCK SOLUTION. Move red, orange, yellow, green (P).
- Go left.
- Try to walk forward.
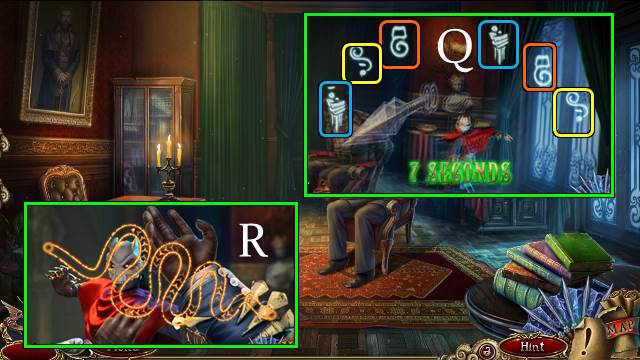
- Play the two mini-games (Q, R).
- Take the SOLDIER FIGURINE (S).
- Open the window (T).
- Talk to the Gondolier. Take the WIZARD CHARM (U).
- Walk down.
- Try to take the money and play the HOP (V); you receive BRONZE ROSE 2/3.
- Place the SOLDIER FIGURINE; rearrange the figurines. Take the SMALL WREATH and CASKET KEY (W).
- Place the WIZARD CHARM; take SILVER ROSE 3/3 (X).
- Go left.
- Place the SMALL WREATH. Move two olives, pull the wreath and take the OLIVE OIL. Open the casket with the CASKET KEY; take the FANG (Y).
- Walk down.
- Place the FANG; take the FLOWER DRAWING (Z).
- Go left.
- Open the drapes (A).
- Place the GOLDEN ROSE and FLOWER DRAWING for a mini-game (B).
- Solution: (4-7)-(5-4)-(2-3)-(8-5-2)-(7-8-5)-(6-9-8)-(3-6-9).
- Find the 8 pieces of GOLDEN CHAIN (C1/C2).
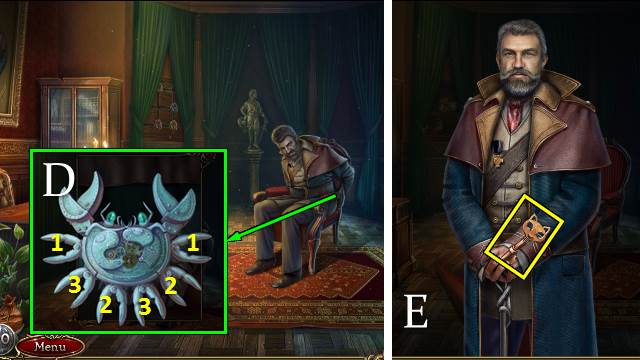
- Open the claws in order and use the OLIVE OIL. Take the MECHANICAL CRAB (D).
- Take the SECRET DOOR KEY (E).
- Connect the pieces of the GOLDEN CHAIN; attach the MECHANICAL CRAB. Take the CHAIN LADDER.
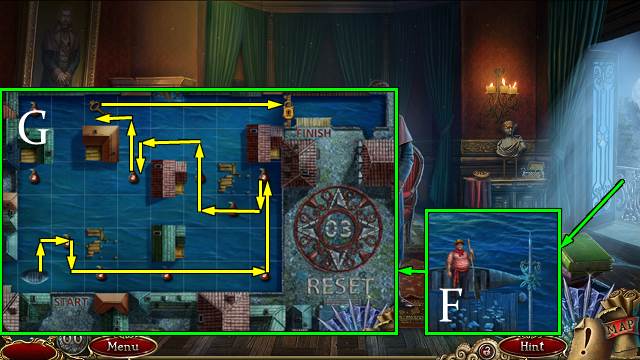
- Use the CHAIN LADDER (F) and zoom in for a mini-game (G).
- Go forward twice.
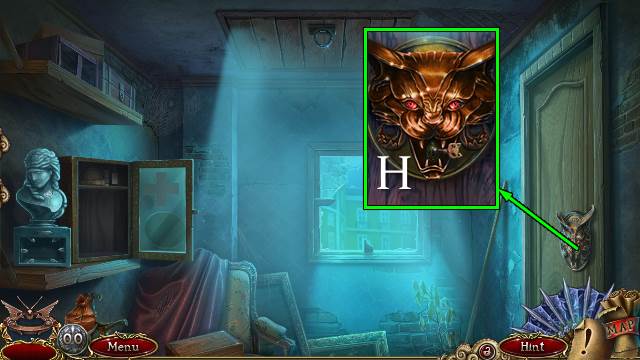
- Use the SECRET DOOR KEY and open the door (H).
- Go right.
- Congratulations, you've completed Grim Façade: The Red Cat.
Created at: 2016-11-20