

Walkthrough Menu
- General Tips
- Prologue: The Theater
- Chapter 1: The Garden
- Chapter 2: The Watertower
- Chapter 3: The Academy
- Chapter 4: The Villa
- Chapter 5: The Gate
- Chapter 6: The Necroplis
General Tips
- This is the official guide for Grim Legends 3: The Dark City.
- This guide will not tell you when you have to zoom into a location; the screenshots will show each zoom scene.
- Hidden-object puzzles are referred to as HOPs. This guide will not show screenshots of the HOPs, however, it will mention when an HOP is available and the inventory item you'll collect from it.
- Use the Map to fast travel to a location.
Prologue: The Theater
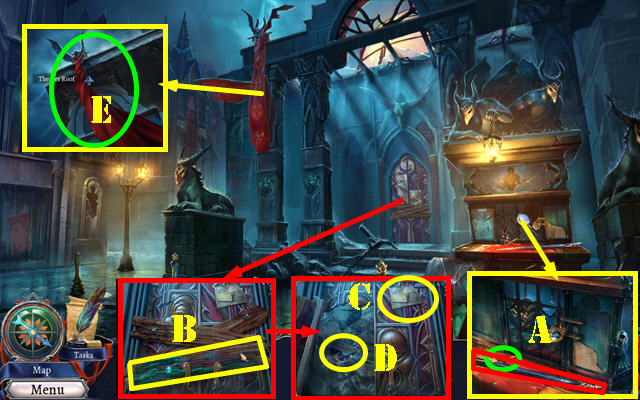
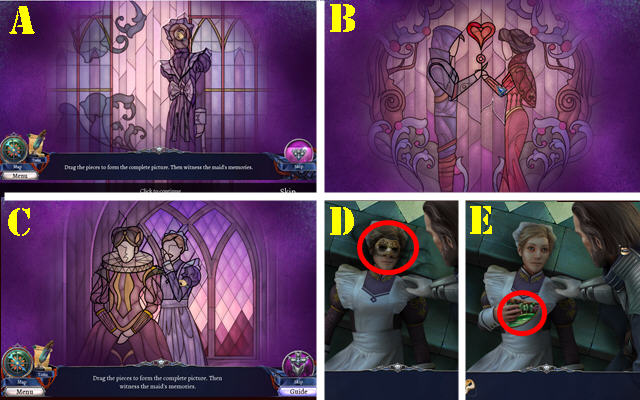
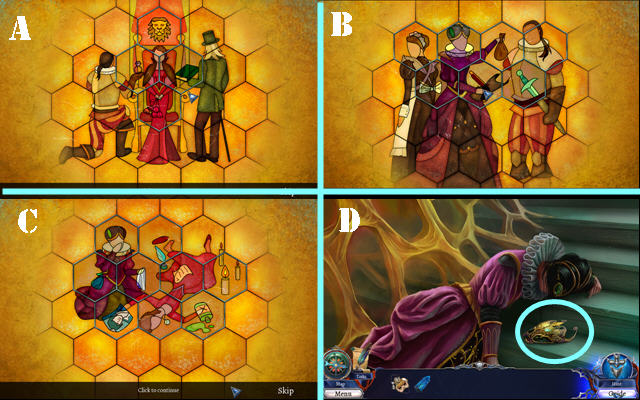
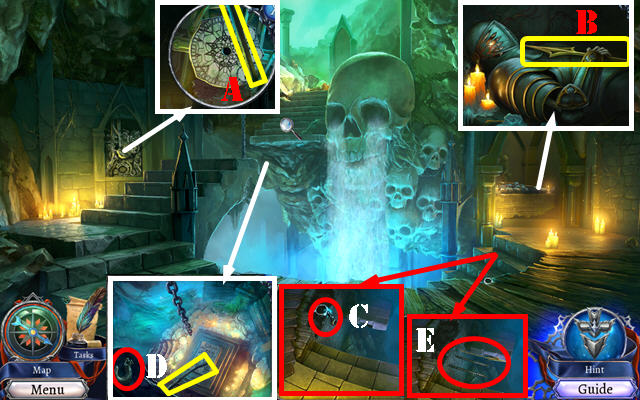
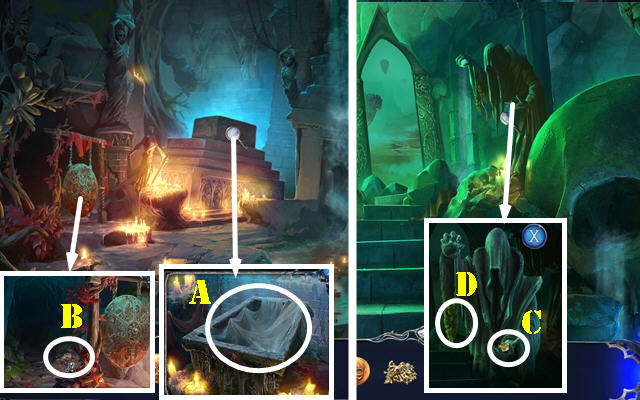
- Select the items twice; take the CANE HANDLE and TICKET PUNCH (A).
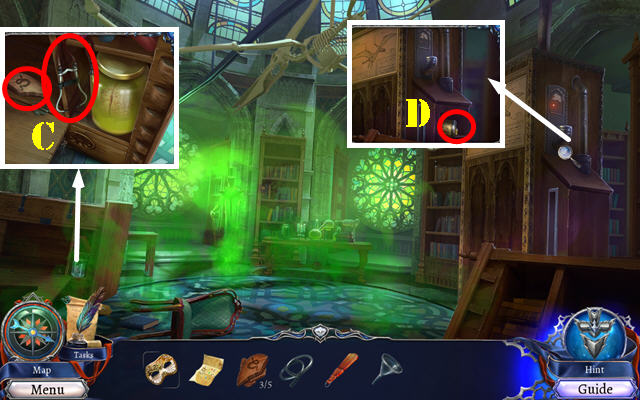
- Remove the board (B); use the TICKET PUNCH. Remove the boards and open the door. Look at the note (C). Select the rocks; take the CANE HEAD (D).
- Place the CANE HANDLE on the CANE HEAD; receive the CANE.
- Use the CANE (E); select the sheet and go up to the Theater Roof.
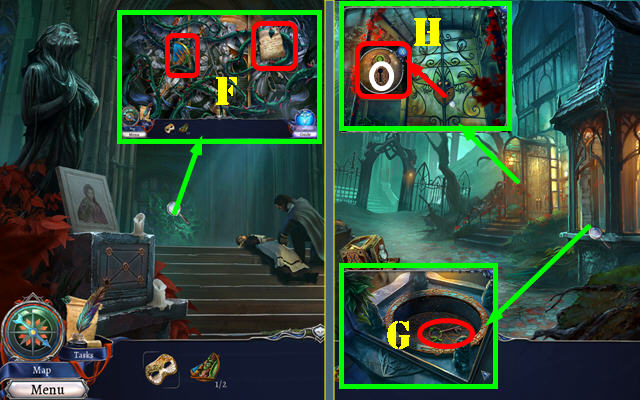
- Look at the scroll (F); take the LOCK PICK.
- Take the OWL TOKEN PART 1/2 (G) and OWL TOKEN PART 2/2 (H).
- Place the OWL TOKEN 2/2; take the LENS 1/2, LENS 2/2, BINOCULARS, LENS CASING and HANDLE (I).
- Place the LENS CASING, LENSES 2/2 and HANDLE on the BINOCULARS.
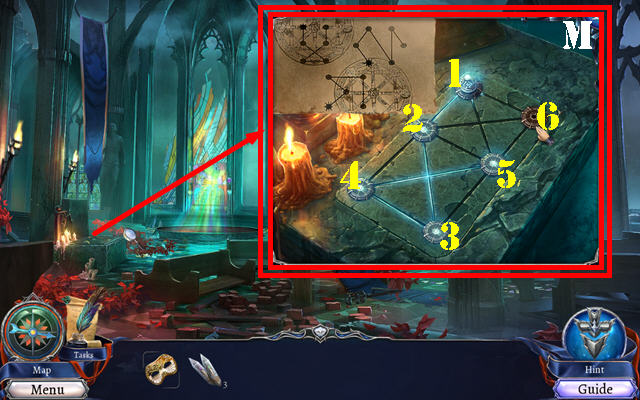
- Use the BINOCULARS on the scene (J).
- Select (1-5).
- You receive the TRAPDOOR CODE.
- Go back twice.
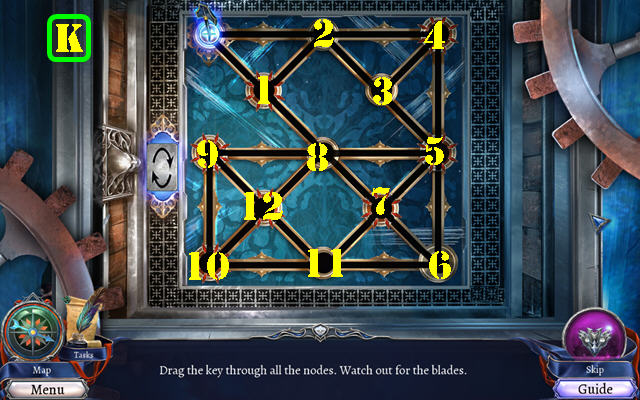
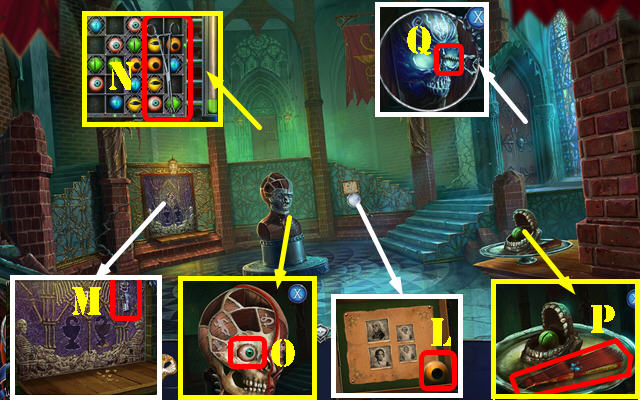
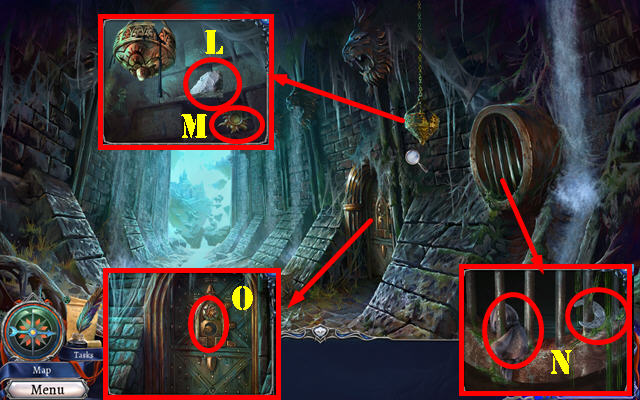
- Use the LOCK PICK; turn the pieces as shown (K); take the MECHANICAL MASK (L).
- Go to the Theater Roof.
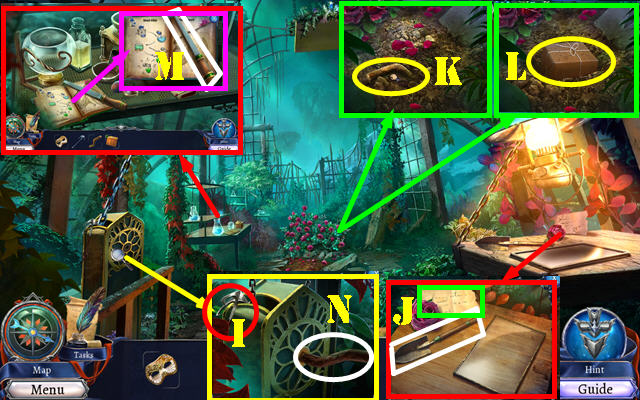
- Place the TRAPDOOR CODE and MECHANICAL MASK for a puzzle. Select the masks in each section as shown and press the mask (M). Open the cover and go Backstage.
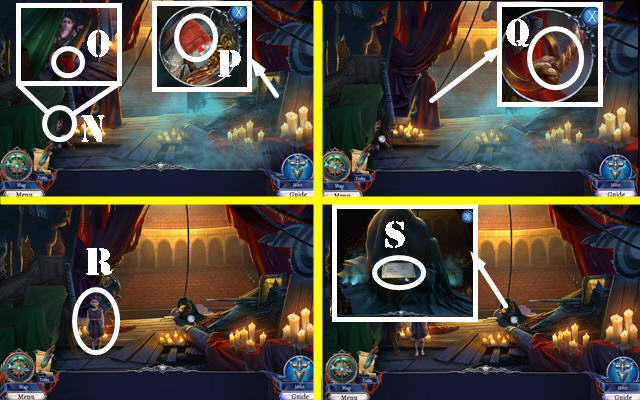
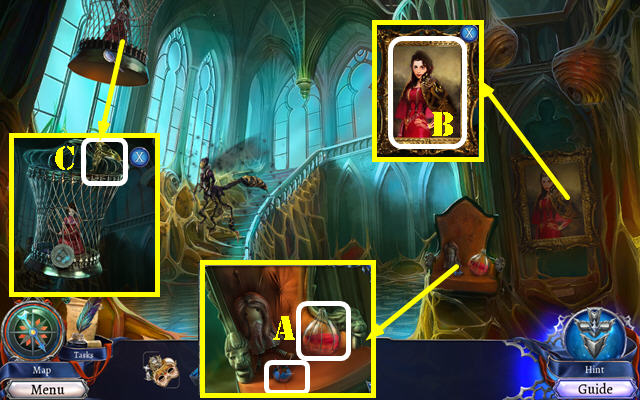
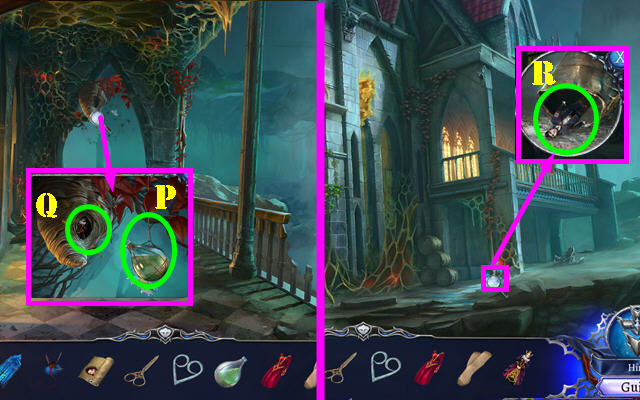
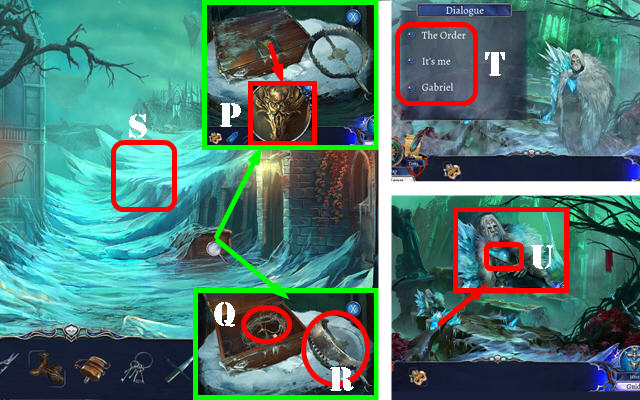
- Talk to the girl (N); take the THEATER RAG (O).
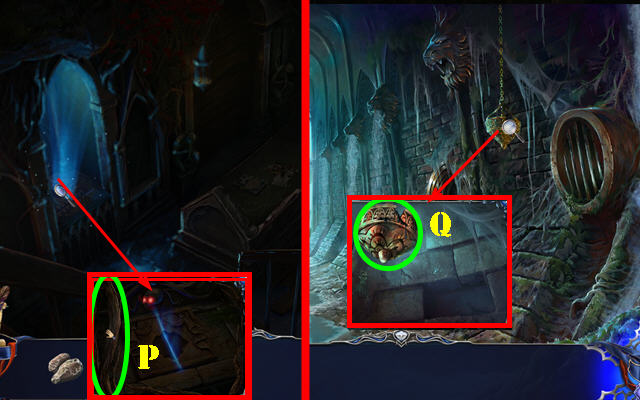
- Use the THEATER RAG to get the MIRROR SHARD (P).
- Remove the sheet; use the MIRROR SHARD (Q).
- Talk to the girl (R).
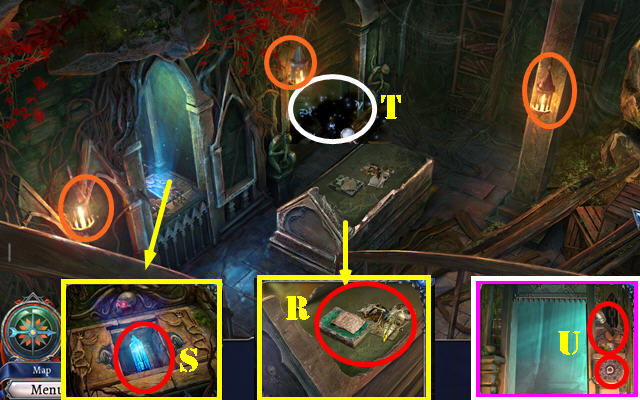
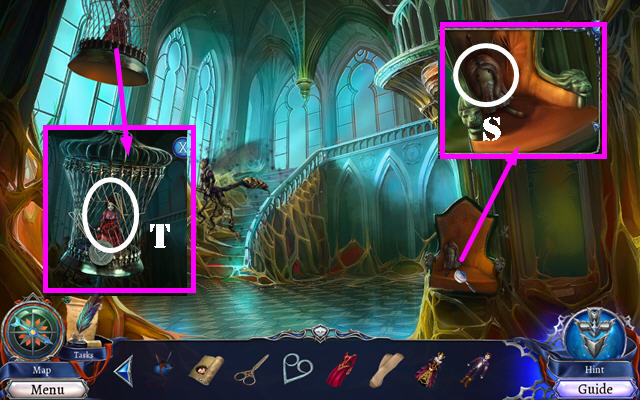
- Move two items; look at the note (S). Select the sheet.
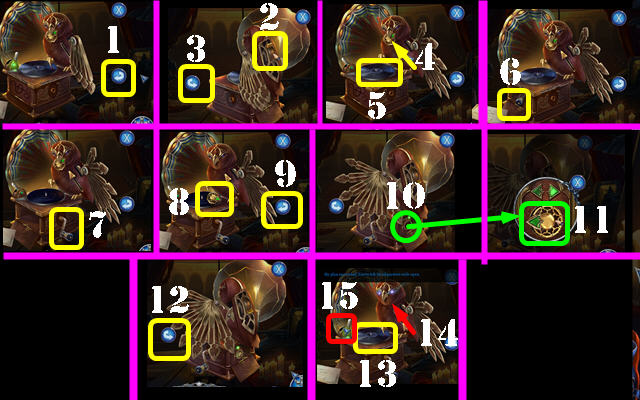
- Rotate (1). Select the switch (2). Rotate (3), select (4).
- Take the DISC and TREBLE KEY (5).
- Place the TREBLE KEY; take the CRANK (6).
- Place the CRANK (7); turn it and take the GRAMOPHONE DIAL (8). Rotate (9).
- Place the GRAMOPHONE DIAL (10); select 5x (11). Rotate (12).
- Place the DISC (13), select (14) and pull (15).
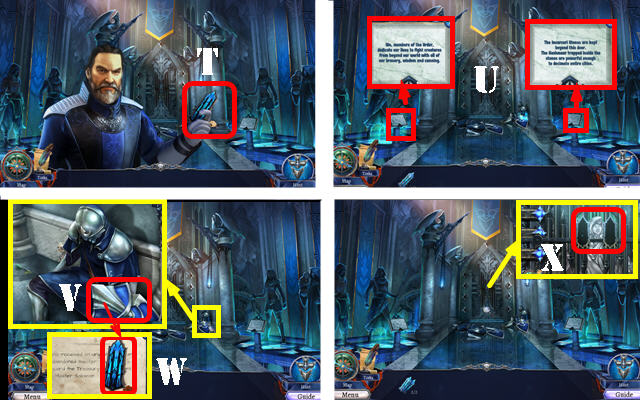
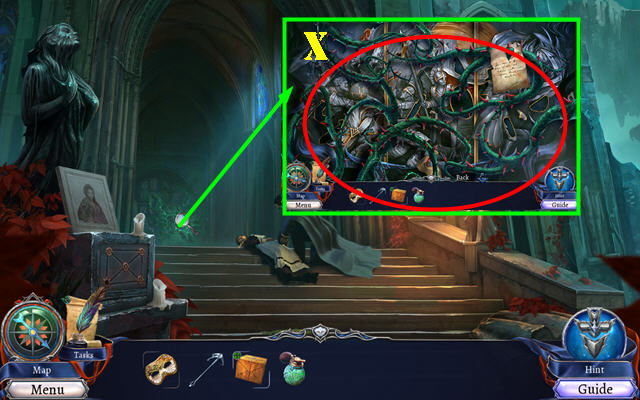
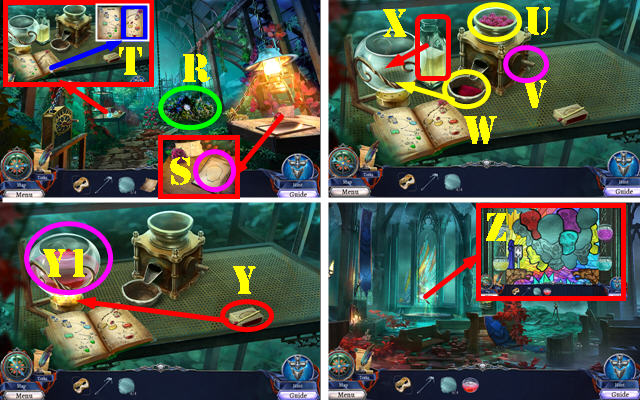
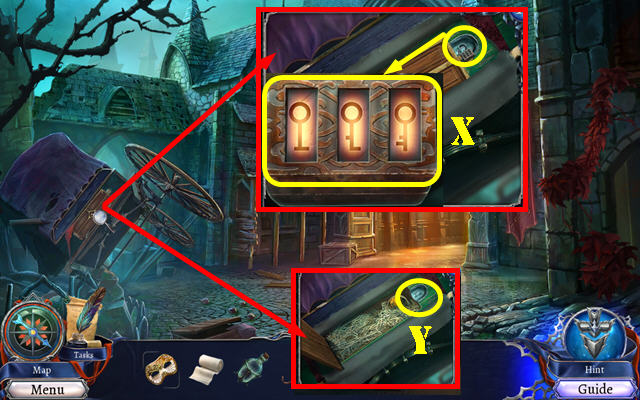
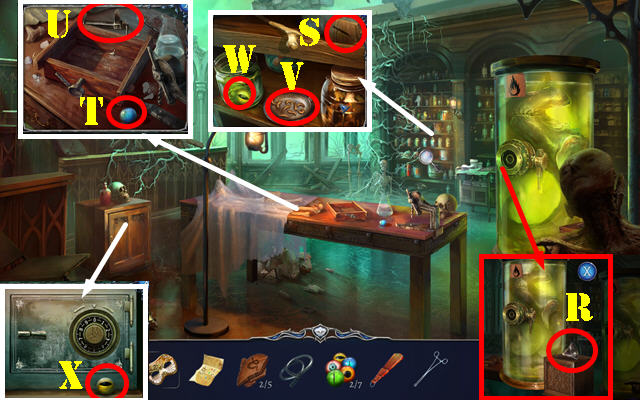
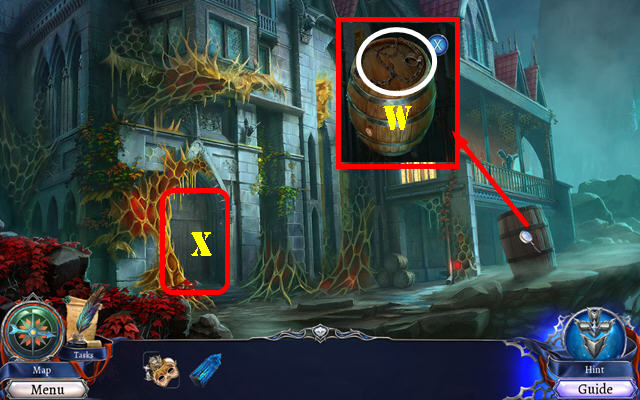
- Take the INCARCERI TOKEN 1/2 (T).
- Look at the two signs (U).
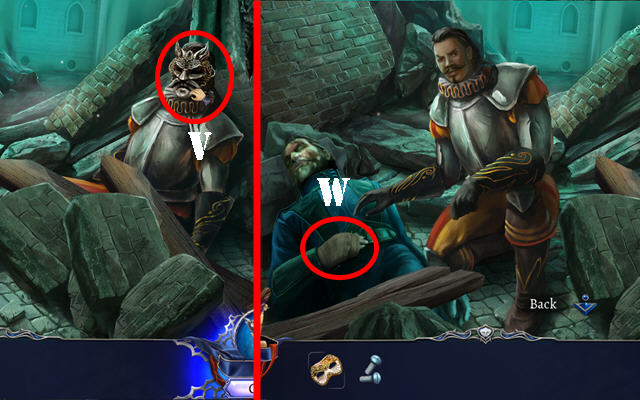
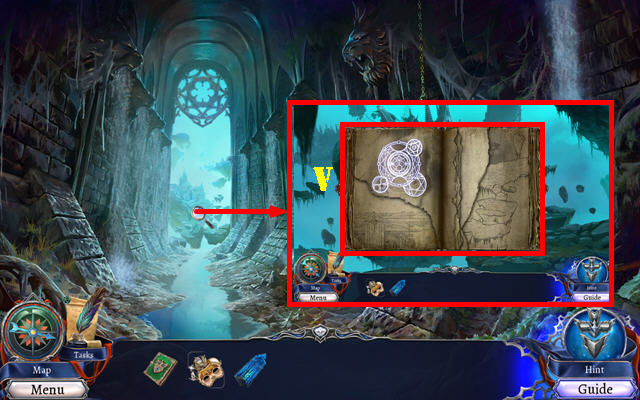
- Select 4x (V); take the INCARCERI TOKEN 2/2 (W).
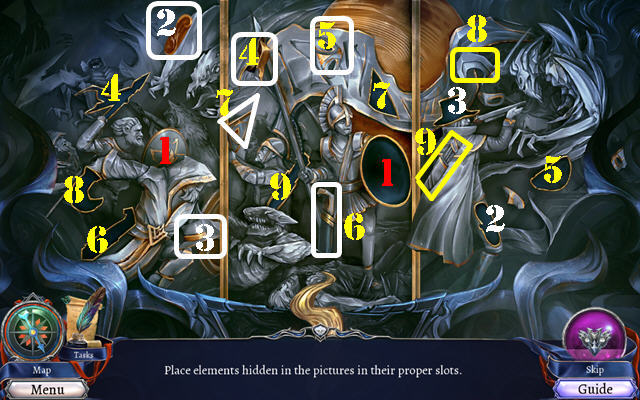
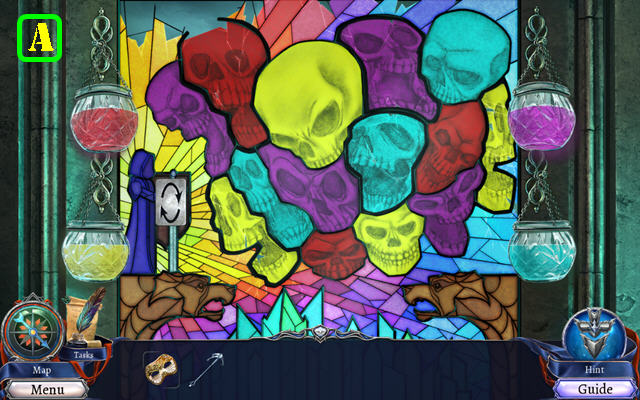
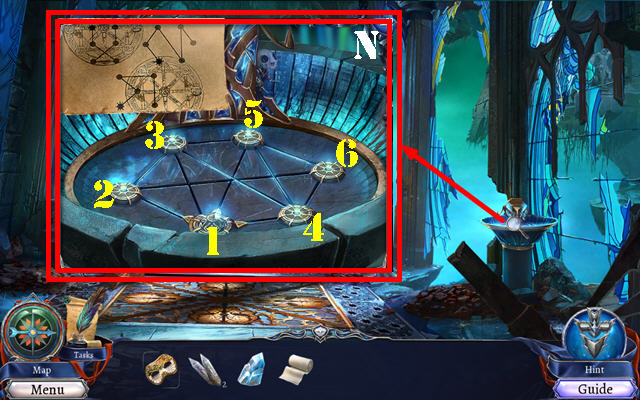
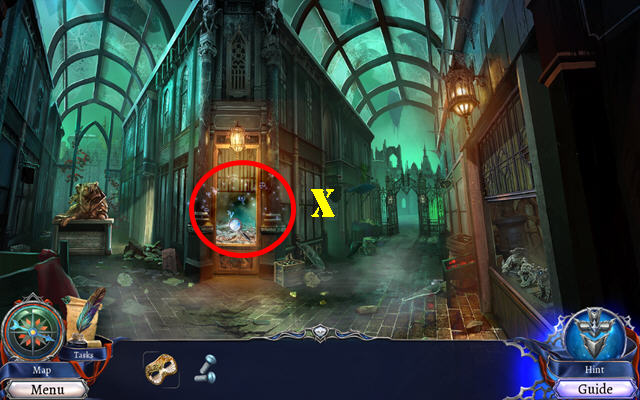
- Place the INCARCERI TOKENS 2/2 for a puzzle (X).
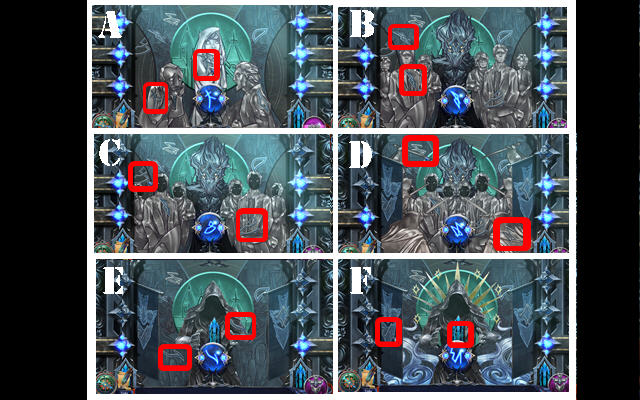
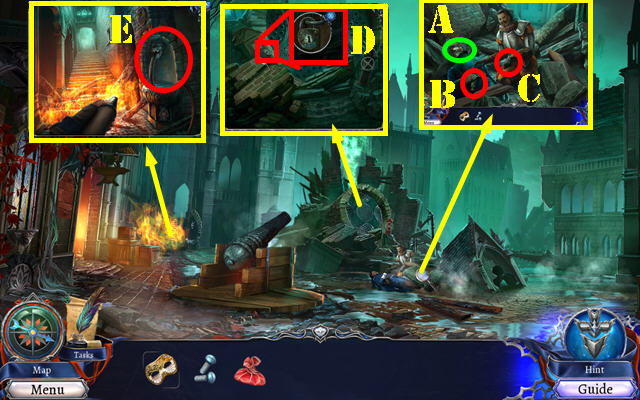
- Solution (A-F).
- Go forward.
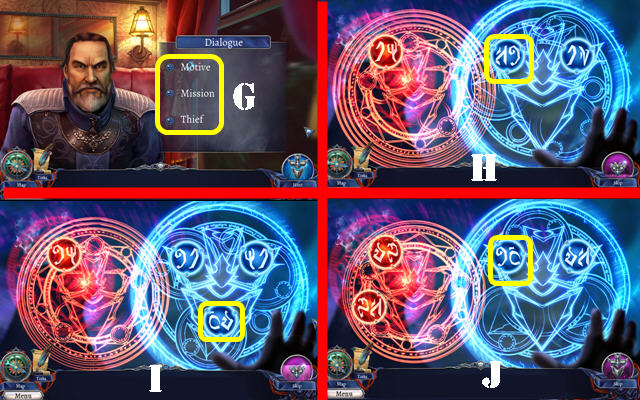
- Talk to the man. Select Motive, Mission and Thief (G) for a puzzle.
- The solutions are random (H-I-J).
Chapter 1: The Garden
- Take the BULL TOKEN LEFT and FIREWORK; look at the note (K).
- Talk to the men; take the SUITCASE TOKEN (L).
- Move the two bags and select both latches. Place the SUITCASE TOKEN (M).
- Play the HOP (N) to get the NAIL FILE.
- Use the NAIL FILE to get the BULLET (O). Look at the three notes (orange).

- Use the NAIL FILE (P); select the area. Open the suitcase and move the shirt; take the SUPREMACY DOCUMENT and PISTOL; look at the note (Q).
- Select the FIREWORK; receive the GUN POWDER.
- Select the PISTOL; use the BULLET and GUN POWDER; take the LOADED PISTOL.
- Give the SUPREMACY DOCUMENT (R).

- Use the LOADED PISTOL and shoot once it's on the target (S).
- Go to the Crane Top (T).
- Take the HEAVY STONE (U).
- Place the BULL TOKEN LEFT (V); press once.
- Take the COPPER WIRE and STEEL ARROW (W).
- Go back.
- Use the STEEL ARROW and HEAVY STONE; remove the hay; take the MAGNET (X).
- Use the COPPER WIRE on the MAGNET; receive the LONG-RANGE MAGNET.
- Return to the Crane Top.
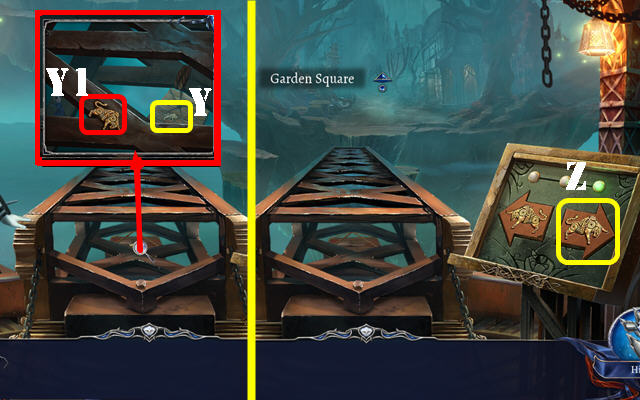
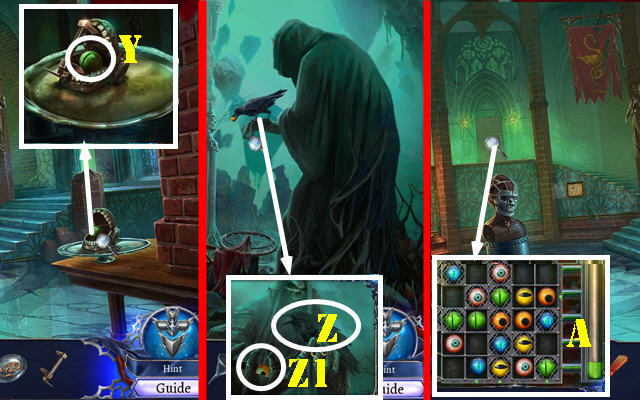
- Use the LONG-RANGE MAGNET (Y); take the BULL TOKEN RIGHT (Y1).
- Place the BULL TOKEN RIGHT and press it (Z).
- Go forward.

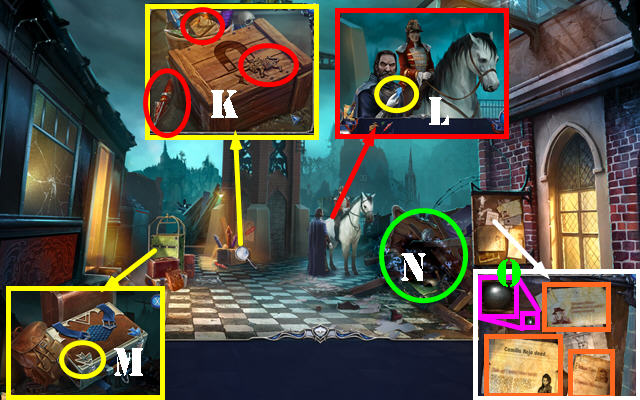
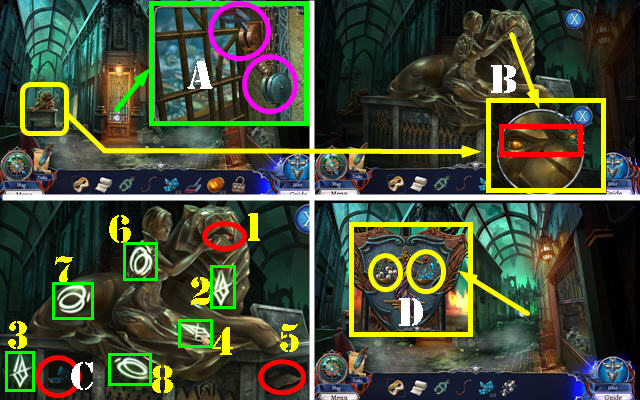
- Talk to the man (A).
- Take the TRIPOD and CAMERA ORNAMENT (B).
- Look at the note (C); take the HANDKERCHIEF (C1).
- Look at the photo (D) and rotate (E).
- Use the HANDKERCHIEF; receive the WET HANDKERCHIEF (F).
- Look at the note (G).
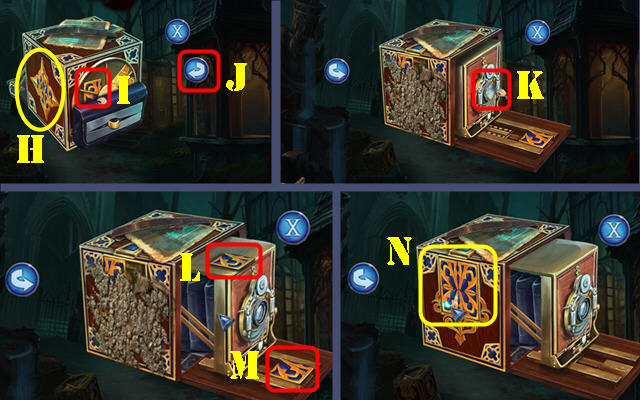
- Place the CAMERA ORNAMENT (H); select the panel and take the CAMERA TOKEN 1/3 (I). Rotate (J).
- Take the CAMERA LENS (K). Take the CAMERA TOKEN 2/3 (L) and CAMERA TOKEN 3/3 (M).
- Use the WET HANDKERCHIEF; place the CAMERA TOKENS 3/3. Arrange the tokens as shown (N).
- Take the FLASH LAMP, CAMERA PIN and PHOTOGRAPHIC PLATE (O). Rotate (P).
- Use the CAMERA PIN and select it twice; take the FLASH POWDER and CAMERA BUTTON (Q). Rotate (R).
- Place the CAMERA BUTTON; press it; take the PHOTO SHARPENER (S).
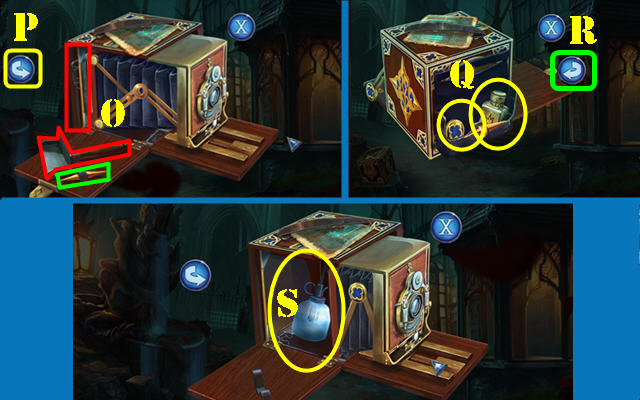
- Use the FLASH POWDER on the FLASH LAMP; receive the FLASH LAMP WITH POWDER.
- Use the PHOTO SHARPENER and CAMERA LENS on the PHOTOGRAPHIC PLATE; receive the PHOTO GLASS.
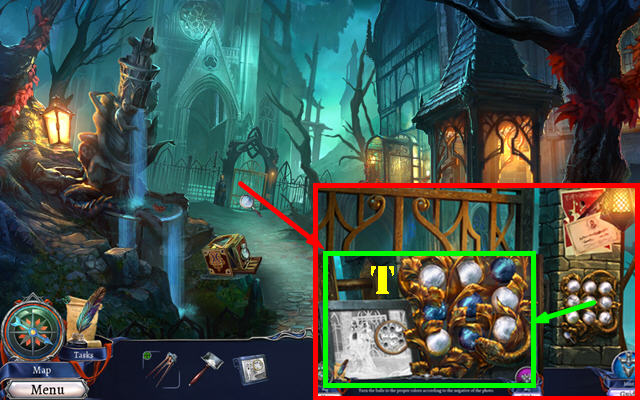
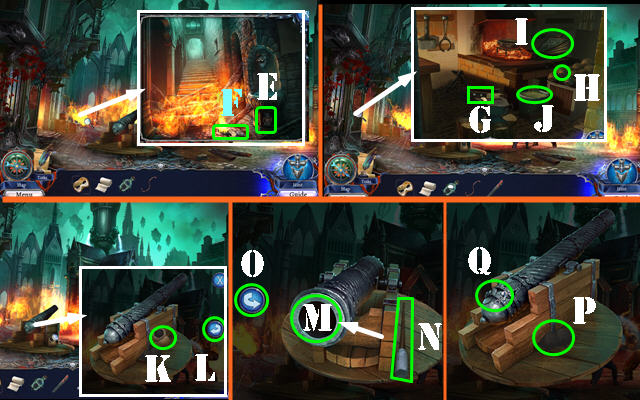
- Place the PHOTO GLASS for a puzzle. Solution (T).
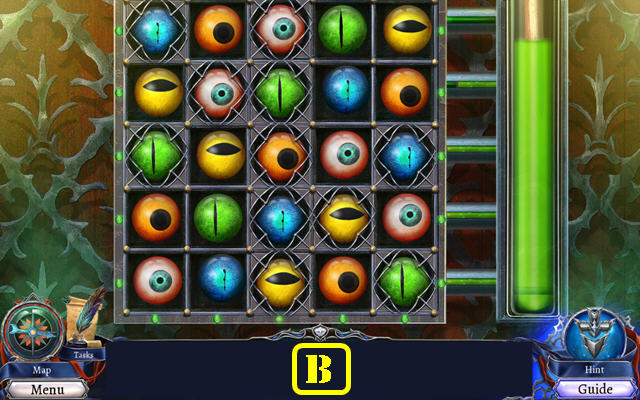
- Open the gate; go forward for a puzzle. The solutions are random. Complete four rounds to win.

- Take the CANDLE (U).
- Select the TRIPOD'S wingnut; receive the TRIPOD LEG.
- Use the CANDLE on the TRIPOD LEG; receive the CANDLE-ON-A-STICK.
- Use the CANDLE-ON-A-STICK to get the LIT CANDLE (V).
- Place the FLASH LAMP WITH POWDER on the scene and then use the LIT CANDLE on it (W).
- Select (X) for a puzzle.
- Solution one (A).
- Solution two (B).
- Solution three (C).
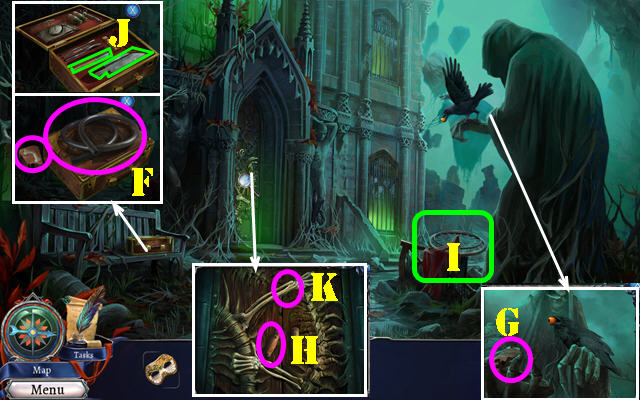
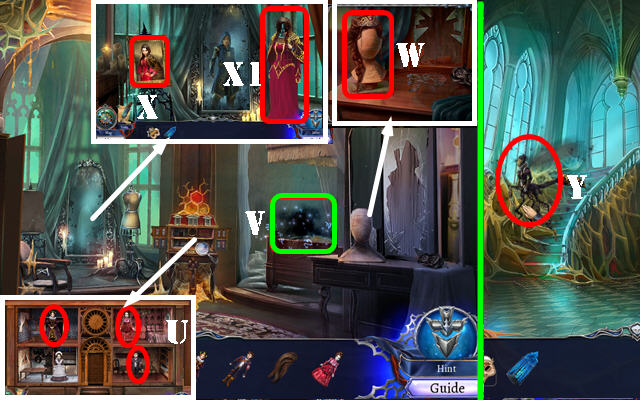
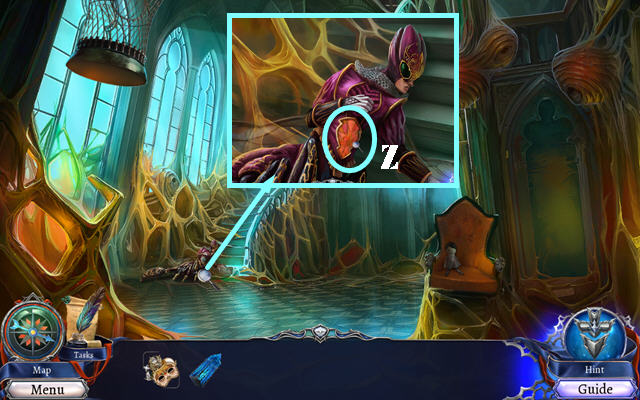
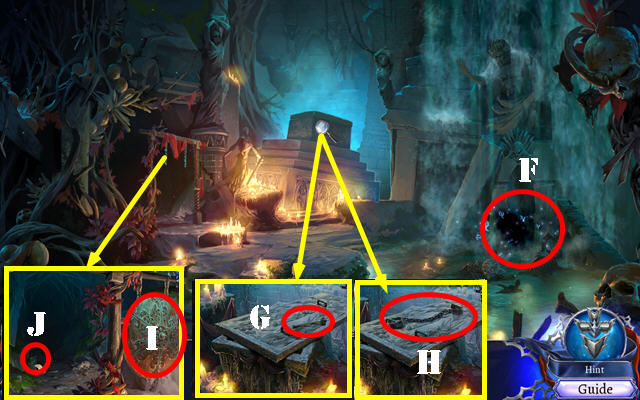
- Take the MAID MASK (D) and CITY MODEL 1/2 (E).
- Go back.
- Take the CITY MODEL 2/2 and look at the note (F).
- Go back.
- Place the CITY MODELS 2/2; take the GREENHOUSE KEY (G).
- Use the GREENHOUSE KEY (H); go through the door.
- Take the GRAPPLING HOOK (I).
- Take the TROWEL; look at the note (J).
- Take the CURVED BRANCH (K). Use the TROWEL; take the MYSTERY BOX (L).
- Look at the book; take the FILE (M).
- Use the FILE on the CURVED BRANCH.
- Place the CURVED BRANCH; select it (N).
- Play the HOP (O) to get the DEMONCAP MUSHROOMS.
- Use the matches (P). Pour the liquid (Q). Place the strainer (R).
- Place the DEMONCAP MUSHROOMS (S). Pull the handle (T).
- Pour the bowl (U). Use the ladle (V).
- Remove the strainer; place the cap (W) and take the WEED KILLER.
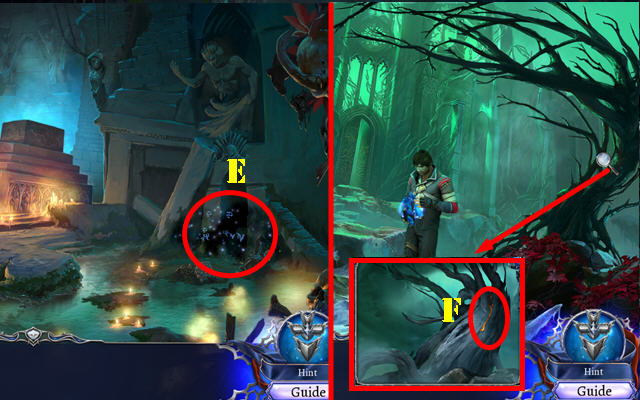
- Return to the Cathedral Yard.
- Use the WEED KILLER for a puzzle (X).
- Solution (1-9).
- Go forward.
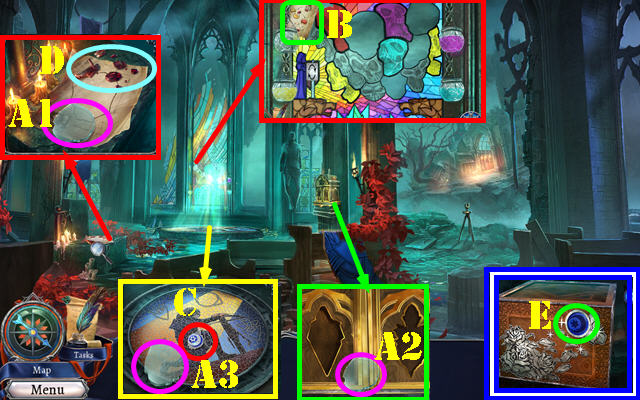
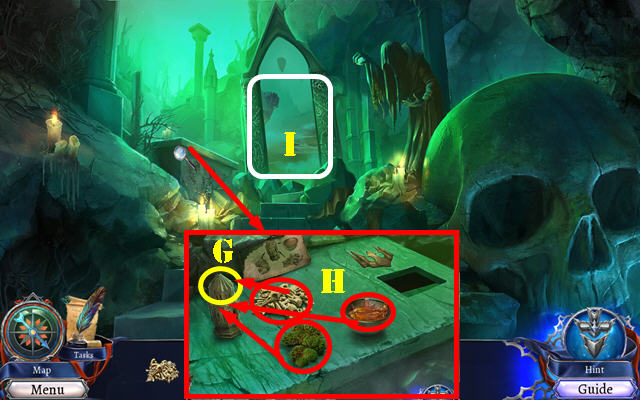
- Take the STAINED GLASS 1/4 (A1), STAINED GLASS 2/4 (A2) and STAINED GLASS 3/4 (A3).
- Take the PIGMENT RECIPE (B) and GABRIEL'S NECKLACE (C).
- Select the fragments (D); take the GLASS PANE SKETCH.
- Select the MYSTERY BOX twice; place GABRIEL'S NECKLACE on it (E).
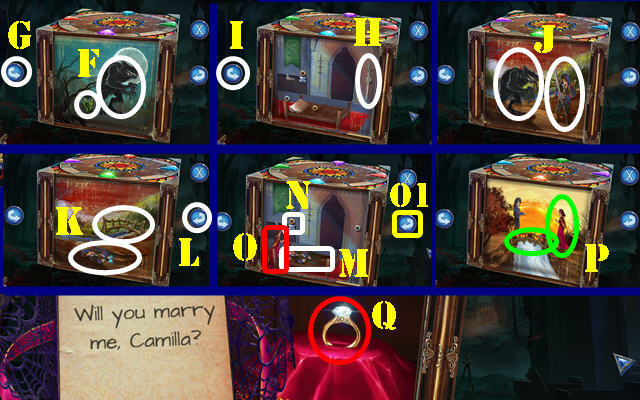
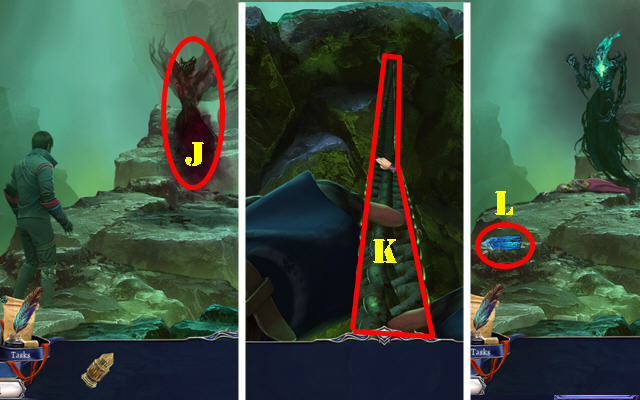
- Take the TINY WEREWOLF and TINY HERB (F). Rotate twice (G).
- Take the TINY SWORD (H). Rotate (I).
- Place the TINY WEREWOLF and TINY SWORD (J).Take the TINY BRIDGE and TINY GABRIEL FIGURE (K). Rotate (L).
- Place the TINY GABRIEL FIGURE (M) and TINY HERB (N). Take the TINY NURSE FIGURE (O). Rotate (O1).
- Place the TINY NURSE FIGURE and the TINY BRIDGE (P).
- Remove the ribbon; take the ENGAGEMENT RING (Q).
- Return to the Greenhouse.
- Play the HOP (R) to get the PIGMENT FRUITS.
- Place the GLASS PANE SKETCH; use the ENGAGEMENT RING; take the STAINED GLASS 4/4 (S).
- Place the PIGMENT RECIPE (T) and PIGMENT FRUITS (U).
- Pull the handle (V). Pour the bowl (W) and liquid (X). Use the match (Y). Take the PIGMENT (Y1).
- Return to the Cathedral Ruins.
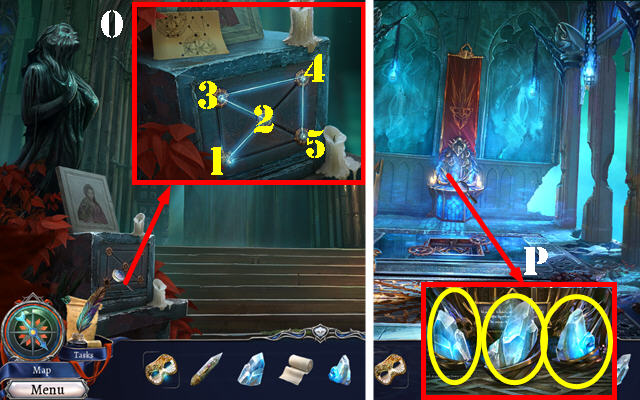
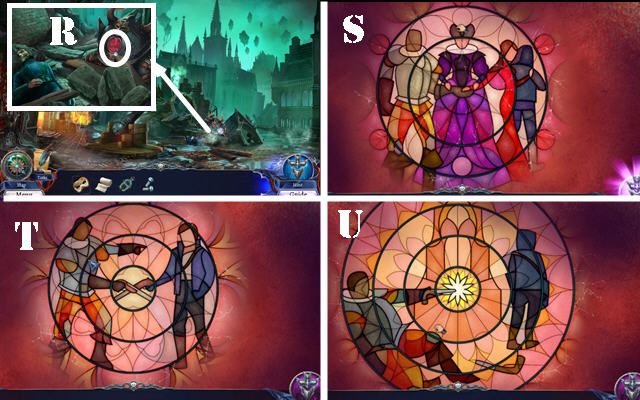
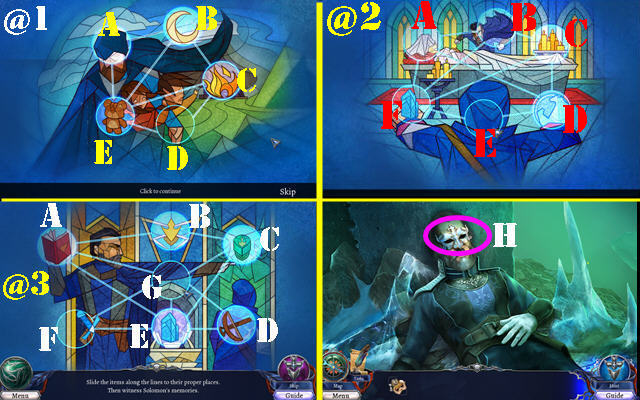
- Place the PIGMENT and STAINED GLASSES 4/4 for a puzzle (Z).
- Solution (A).

- Select (1-5).
- Go to the Inner Sanctuary (B).
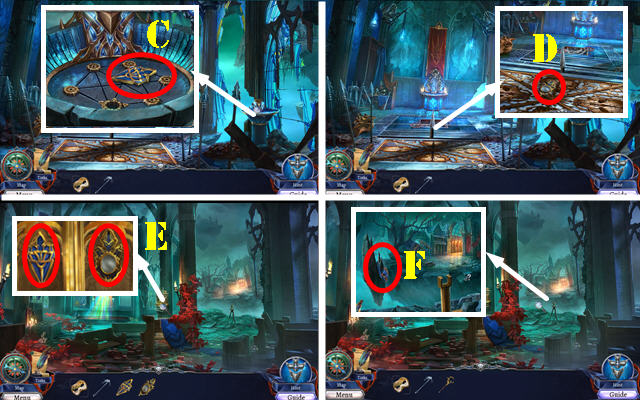
- Select the scene.
- Take the RELIQUARY TOKEN 1 (C) and RELIQUARY TOKEN 2 (D).
- Go back.
- Place the RELIQUARY TOKEN 1 and RELIQUARY TOKEN 2 (E); open the door and play the HOP to get the CROSIER.
- Use the CROSIER to get SOLOMON'S PACK (F).
- Open SOLOMON'S PACK; take the CRYPTEX.
- Return to the Inner Sanctuary.
- Select the scene. Use the CROSIER (G). Select the floor; take the BLADE SHARD (H).
- Use the BLADE SHARD (I) and select the floor. Select the 6 blades (1-6); receive the STRING.
- Use the BLADE SHARD on SOLOMON'S PACK; take the SANCTUARY KEY and PHOTO CODE.
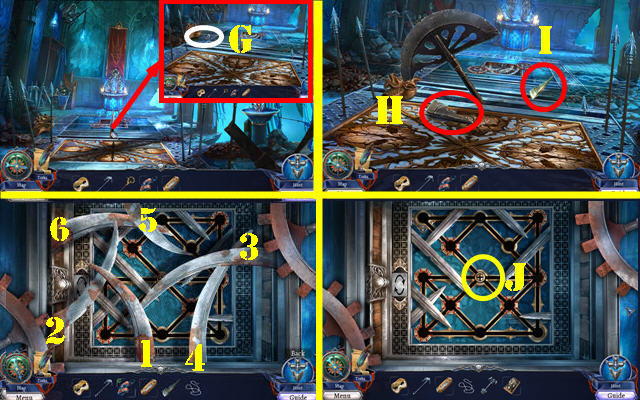
- Use the SANCTUARY KEY for a puzzle (J).
- Solution (K).
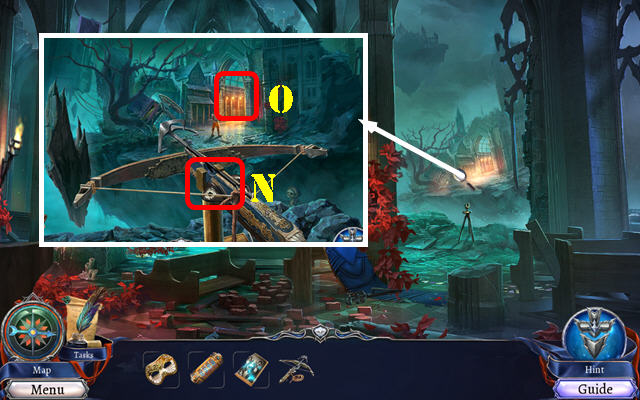
- Play the HOP (L) to get the HEAVY CROSSBOW.
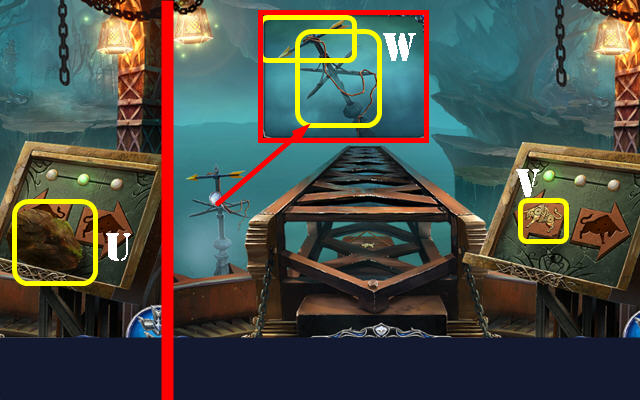
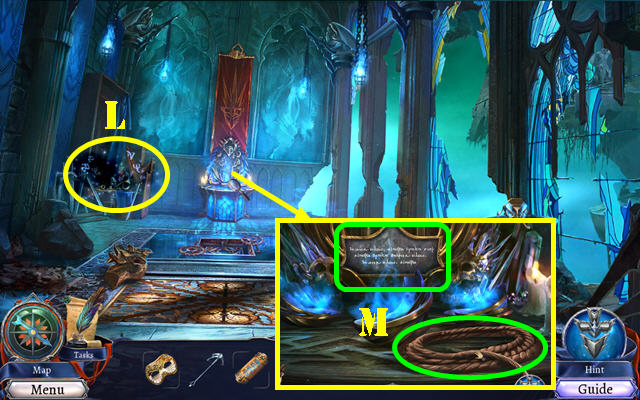
- Take the ROPE and look at the sign (M).
- Use the STRING, GRAPPLING HOOK and ROPE on the HEAVY CROSSBOW; select it.
- Go back.
- Place the HEAVY CROSSBOW and select it (N).
- Open the gate and go forward for a rune puzzle (O). The solutions are random; solve three rounds to complete the puzzle.
Chapter 2: The Watertower

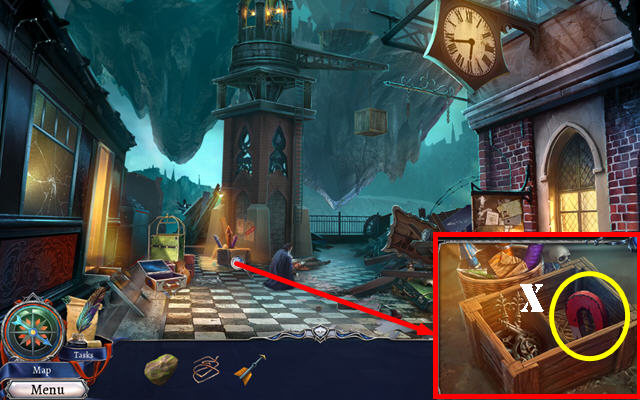
- Take the MALLET (A). Remove the boulder (B).
- Use the MALLET (C); take the CHISEL (C1). Push the cart (D).
- Take the SPEAR and SHIELD (E).
- Use the SPEAR (F) and select it (G).
- Place the SHIELD (H). Use the CHISEL and MALLET (I).
- Go to the Market Entrance (J).
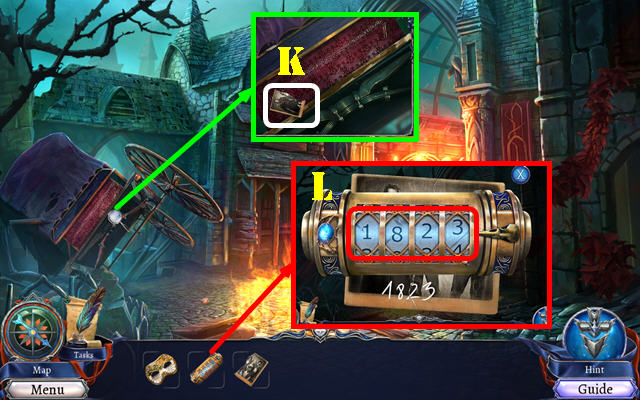
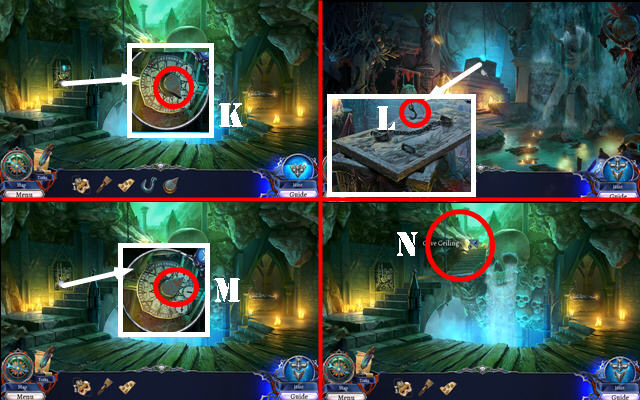
- Take the PHOTO CODE (K).
- Place the PHOTO CODE on the PHOTO CODE.
- Place the PHOTO CODE on the CRYPTEX; drag the numbers to 1823 (L). Open the scroll; take the MAGIC CHALKS 1, 2, and 3.
- Use one MAGIC CHALK; follow 1-6. Take the WISDOM CRYSTAL and BANDAGE (M).
- Go to the Inner Sanctuary.
- Use one MAGIC CHALK follow 1-6. Take the HEALING SALVE and BRAVERY CRYSTAL (N).
- Go back twice.
- Use the MAGIC CHALK; follow 1-5. Take the DAGGER and CUNNING CRYSTAL (O).
- Return to the Inner Sanctuary.
- Place the WISDOM CRYSTAL, BRAVERY CRYSTAL and CUNNING CRYSTAL (P).
- Return to the Market Entrance.

- Use the DAGGER to get the TWINE (Q).
- Play the puzzle (R). The solutions are random; play three rounds to beat the puzzle.
- Go to the Market Alley (S).
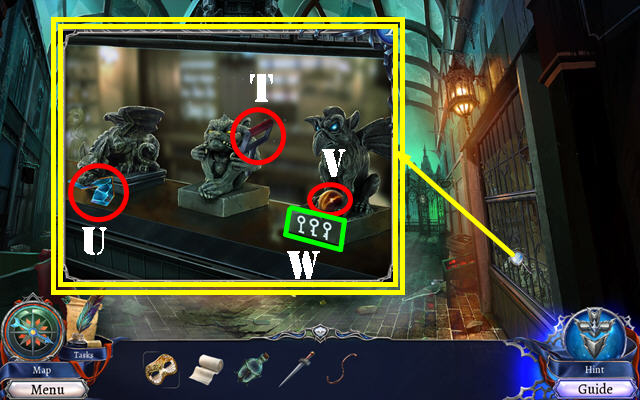
- Select the latch and open the cage; take the RESTAURANT HANDLE (T) and GATE TOKEN 1/2 (U).
- Use the DAGGER (V); take the TIGER EYE 1/2. Note the clue (W).
- Go back.
- Select the correct key symbols (X). Take the PADLOCK. Open the compartment; take the TIGER EYE 2/2 (Y).
- Go to the Market Alley.
- Place the RESTAURANT HANDLE and PADLOCK (A); select the handle. Play the HOP to get the PEARLS.
- Place the TIGER EYES 2/2 (B). Select 1-8; take the GATE TOKEN 2/2 (C).
- Place the PEARLS and GATE TOKENS 2/2 (D).
- Turn the valve (E); take the EMBER (F).
- Take the SCREWS (G) and CANNON BALL (H). Press the bellows (I). Dip the TWINE (J); receive the STICKY TWINE.
- Take the BLACK POWDER (K). Rotate (L).
- Insert the BLACK POWDER and CANNON BALL (M); use the rod (N). Rotate (O).
- Dip the STICKY TWINE (P) to get the FUSE. Place the FUSE and use the EMBER (Q).
- Play the puzzle (R).
- Solution (S-T-U).
- Take the CAPTAIN MASK (V).
- Use the HEALING SALVE and BANDAGE (W). Talk to both men.
- Return to the Market Alley.
- Play the HOP (X) to get the ICE.
- Go to the Main Square.
- Use the ICE (A). Look at the bottle to get the PRESCRIPTION (B); take the FIRE BRIGADE KEY (C).
- USE THE FIRE BRIGADE KEY PART (D); open the door and take the HOSE.
- Attach the HOSE (E).
- Go forward.
Chapter 3: The Academy
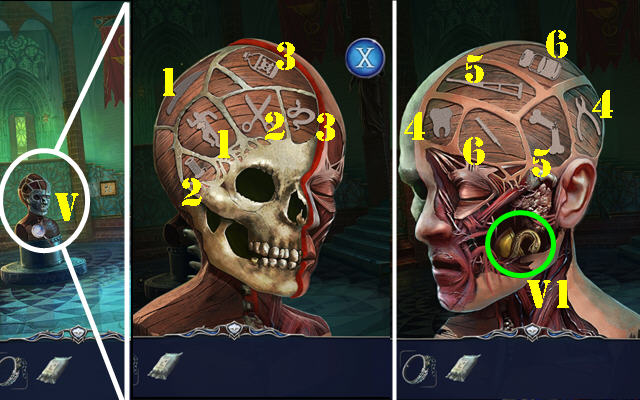
- Take the RUBBER TUBE and PHRENOLOGY PART 1/5 (F).
- Take the PHRENOLOGY PART 2/5 (G) and SAW HANDLE (H).
- Play the HOP (I) to get the ANATOMY TOKEN.
- Place the ANATOMY TOKEN; open the box; take the BONE SAW and SCALPEL (J).
- Place the SAW HANDLE and SCREWS on the BONE SAW; use the SCALPEL on the screws.
- Use the BONE SAW (K); go through the door.
- Open the glass door; take the GLASS EYE 1/7 (L).
- Take the SKELETON KEY (M), CLAMPS (N), GLASS EYE 2/7 (O) and FAN (P).
- Use the SKELETON KEY and select it (Q); enter the Operating Room.
- Take the FUNNEL (R), PHRENOLOGY PART 3/5 (S), GLASS EYE 3/7 (T) and VISE (U).
- Select the 3 jars; take the LARVAE JAR (V). Use the CLAMPS to get the GLASS EYE 4/7 (W).
- Open the cabinet; take the GLASS EYE 5/7 (X).
- Go back.
- Use the VISE; take the GLASS EYE 6/7 (Y).
- Go back.
- Give the LARVAE JAR (Z); take the GLASS EYE 7/7 (Z1).
- Return to the Academy Hall.
- Place the GLASS EYES 7/7 for a puzzle (A).
- Solution (B).
- Enter the Library.
- Use the FAN; take the STETHOSCOPE and PHRENOLOGY PART 4/5 (C).
- Take the CANISTER (D).
- Return to the Operating Room.

- Place the STETHOSCOPE for a puzzle. Turn 4 clockwise, 7 counterclockwise, 3 clockwise, 0 counterclockwise and 4 clockwise (E).
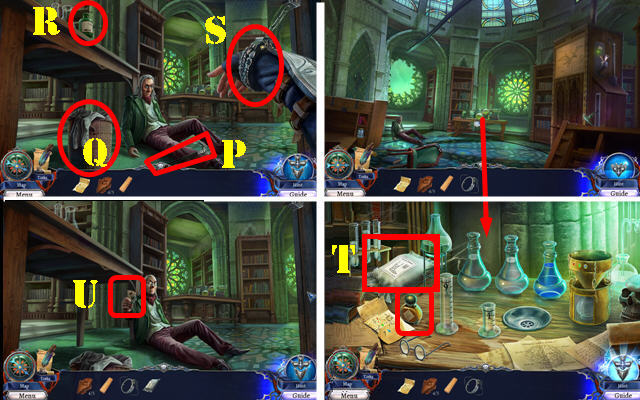
- Look at the postcard; take the PTERODACTYL LEVER and GOLD BAR.
- Place the RUBBER TUBE (F) and use the CANISTER; take the WHALE OIL (G).
- Return to the Library for an automatic puzzle. The solution is random.
- Place the FUNNEL and use the WHALE OIL (H). Place the PTERODACTYL LEVER and pull it (I).
- Select (J) for a puzzle.
- Solution (K-L-M).
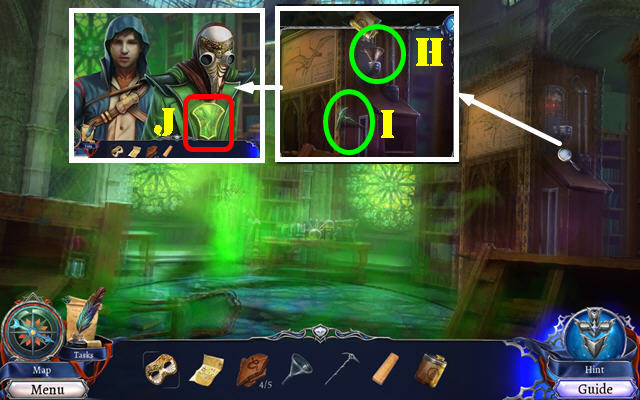
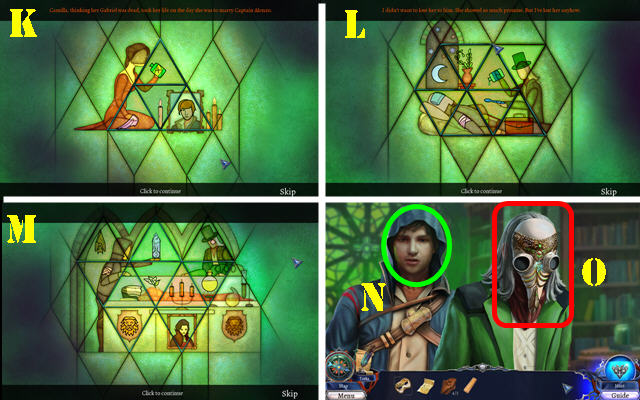
- Talk to Gabriel (N); select the mask (O).
- Select the cane (P) and the basket (Q). Select the bottle (R) and touch the basket to receive the ACID FLASK.
- Use the ACID FLASK (S); receive the HANDCUFFS.
- Go back.
- Take the GYPSUM and SMELLING SALTS (T).
- Use the SMELLING SALTS and give the PRESCRIPTION; take the PHRENOLOGY PART 5/5 (U).
- Go to the Academy Hall.
- Place the PHRENOLOGY PARTS 5/5 (V). Select matching pairs (1-6).
- Take the HIGEIA TOKEN (V1).
- Go back.
- Play the HOP (W) to get the MINT.
- Return to the Operating Room.
- Pour the beaker (W1).Place the GYPSUM and HIGEIA TOKEN; take the HIGEIA FORM (W2).
- Return to the Main Square.
- Place the GOLD BAR (X) and use the tongs (X1). Place the HIGEIA FORM (X2). Select and use the tongs (X-X2). Use the mallet (X3-X2); take the HIGEIA TOKEN.
- Return to the Academy Hall.
- Place the 2 HIGEIA TOKENS; take the INGREDIENTS (Y).
- Return to the Library.
- Place the MINT and the INGREDIENTS for a puzzle (Z).
- Solution: (A-F)-(F-E)-(A-F)-(F-E)-(A-F)-(F-E)-(F-D).
- (B-E)-(E-F)-(F-G)-(E-F)-(F-G)-(E-F)-(B-E)-(E-F)-(E-D).
- (C-F)-(F-E)-(C-F)-(F-E)-(C-F)-(F-E)-(E-G)-(F-E)-(C-F)-(F-E)-(E-D).
- Take the CURE.
- Take the SEWER TOKEN (H).
- Return to the Main Square.

- Give the CURE (I). Take the HANDCUFF KEY (J).
- Use the HANDCUFF KEY on the HANDCUFFS; receive the OPEN HANDCUFFS.
- Place the SEWER TOKEN and OPEN HANDCUFFS (K). Open the hatch and enter the Sewer.
Chapter 4: The Villa
- Take the FLINT (L). Remove the stone; take the SUN TOKEN (M).
- Take the MOON TOKEN and DIRTY CLOTH (N).
- Place the SUN TOKEN and MOON TOKEN (O); enter the Hideout.
- Take the BRANCH (P).
- Place the DIRTY CLOTH on the BRANCH; take the DRY TORCH.
- Go back.
- Use the DRY TORCH; receive the UNLIT TORCH (Q).
- Use the FLINT on the UNLIT TORCH; receive the LIT TORCH.
- Return to the Hideout.
- Use the LIT TORCH on the scene. Select the three lanterns (orange); receive the EXTINGUISHED TORCH.
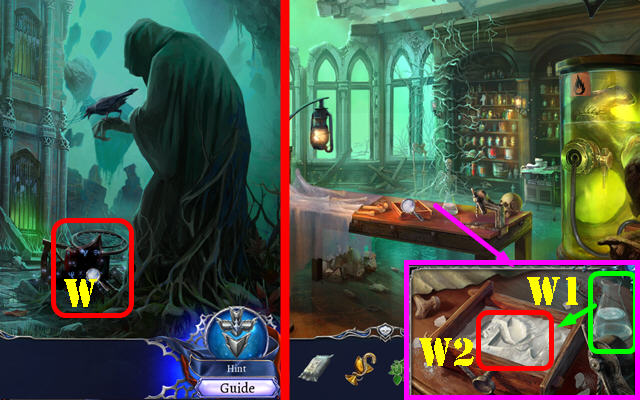
- Take the ANCIENT BOOK SPELL, MASKS and HIDEOUT TOKEN. Look at the note; take the HIDEOUT TOKEN (R).
- Place the 2 HIDEOUT TOKENS; take the INCARCERI STONE and ANCIENT BOOK TOKEN (S).
- Try to Go back.
- Play the HOP (T) to get the HAND WINCH.
- Try to Go back; place the HAND WINCH and EXTINGUISHED TORCH (U). Go forward.
- Place the ANCIENT BOOK TOKEN on the ANCIENT BOOK SPELL. Flip the pages twice.
- Place the ANCIENT BOOK SPELL (V).
- Go forward.
- Take the CHAIN (W).
- Enter the Mansion (X).
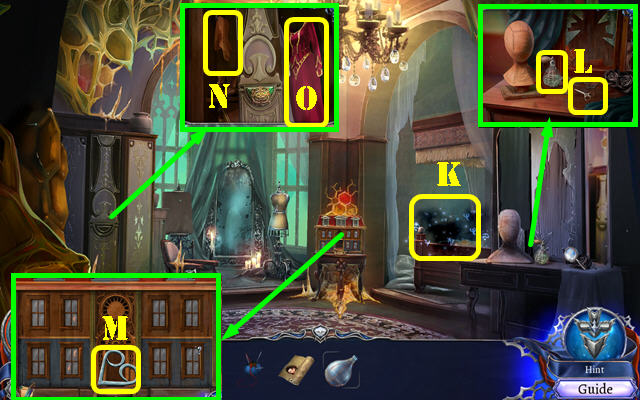
- Take the SEWING ACCESSORIES and WINE BOTTLE (A).
- Take the CAMILLA PAINTING (B) and CORKSCREW (C).
- Use the CORKSCREW on the WINE BOTTLE.
- Go back.

- Use the CORKSCREW (D). Place the barrel (E).
- Go to the Balcony (F).
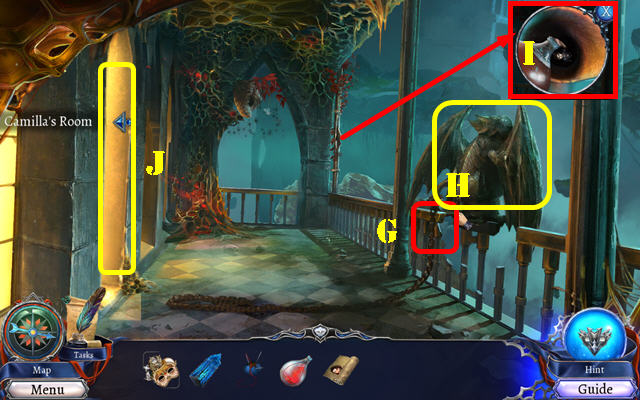
- Attach the CHAIN (G) and select it.
- Select the statue (H).
- Use the WINE BOTTLE; receive the EMPTY WINE BOTTLE (I).
- Enter Camilla's Room (J).
- Play the HOP (K) to get the WARDROBE TOKEN.
- Take the SCISSORS and PERFUME (L).
- Take the HEART TOKEN (M). Open both doors.
- Use the PERFUME on the EMPTY WINE BOTTLE; receive the HORNET TRAP.
- Place the WARDROBE TOKEN; take the STOCKING (N). Move the dress; take the RED DRESS (O).
- Go back.
- Use the HORNET TRAP (P); take the MOTHER FIGURINE (Q).
- Go back.
- Take the GABRIEL FIGURINE (R).
- Go to the Mansion.
- Use the SCISSORS to get the HAIR (S).
- Place the HEART TOKEN; open the cage and take the CAMILLA FIGURINE (T).
- Go to Camilla's Room.
- Place the MOTHER FIGURINE, GABRIEL FIGURINE and CAMILLA FIGURINE (U); take the TIARA.
- Play the HOP (V) to get the JACKET.
- Place the STOCKING and HAIR. Use the SEWING ACCESSORIES and place the TIARA. Take the WIG (W).
- Place the CAMILLA PAINTING (X). Place the RED DRESS, WIG and JACKET. Select the mannequin (X1).
- Return to the Mansion.
- Select the creature for a puzzle (Y). The solution is random; solve three rounds to win the puzzle.
- Select (Z) for a puzzle.
- Solutions (A-B-C).
- Take the Mask of Baroness Agatha Roja (D).
- Go back three times.
- Take the EMPTY CANTEEN (E).
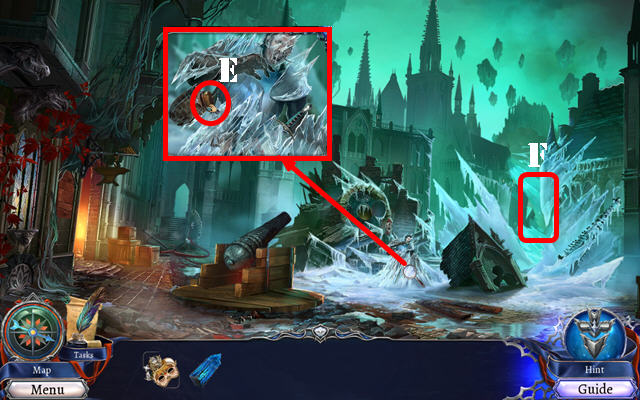
- Go to the Icy Promenade (F).
Chapter 5: The Gate
- Take the ICICLE (G) and METAL ORNAMENT (H).
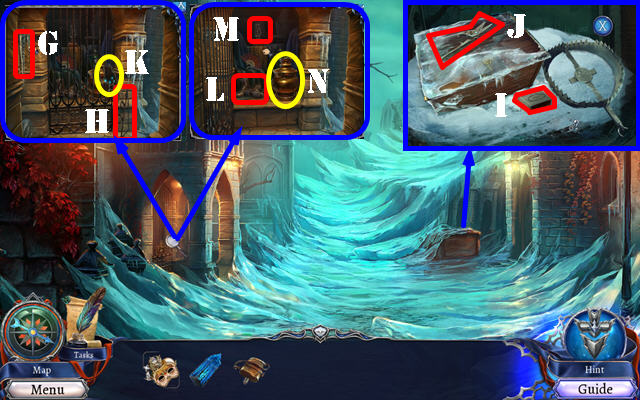
- Take the MATCHES (I).
- Use the METAL ORNAMENT; take the WIRE CUTTERS (J).
- Use the WIRE CUTTERS and open the gate (K). Take the ARMY BOOTS (L) and OIL LAMP (M).
- Select the OIL LAMP twice.
- Place the ICICLE (N); use the OIL LAMP and MATCHES. Use the EMPTY CANTEEN to get the BOILING WATER.
- Go back.
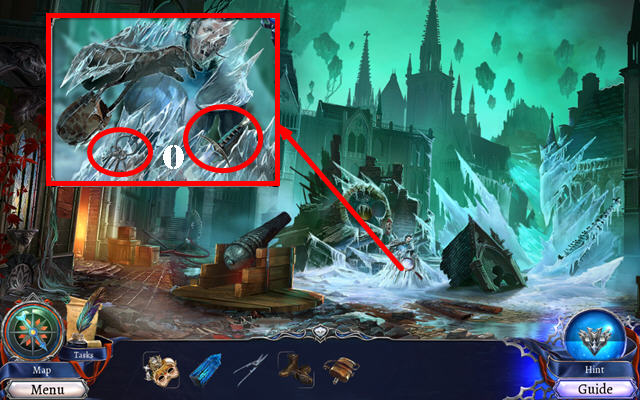
- Use the BOILING WATER; take the CITY GUARD KEY and SHORT SWORD (O).
- Go to the Icy Promenade.
- Use the BOILING WATER and CITY GUARD KEY (P); open the box. Use the WIRE CUTTERS; take the BARBED WIRE (Q). Use the SHORT SWORD; take the METAL JAWS (R).
- Use the METAL JAWS and BARBED WIRE on the ARMY BOOTS; receive the CRAMPONS.
- Use the CRAMPONS (S).
- Select The Order-It's me-Gabriel (T) for a puzzle. The solution is random; solve three rounds to solve the puzzle.
- Select (U) for a puzzle.
- Solution one: E-C-B-A-E-D-C-B-E-D (@1).
- Solution two: D-C-B-A-D-C-B-F-E-D-C-B-F-E (@2).
- Solution three: G-F-E-G-C-B-A-E-F-G-C-B-A-E-D-G-C-B-A-E-F-G (@3).
- Take the Mask (H).
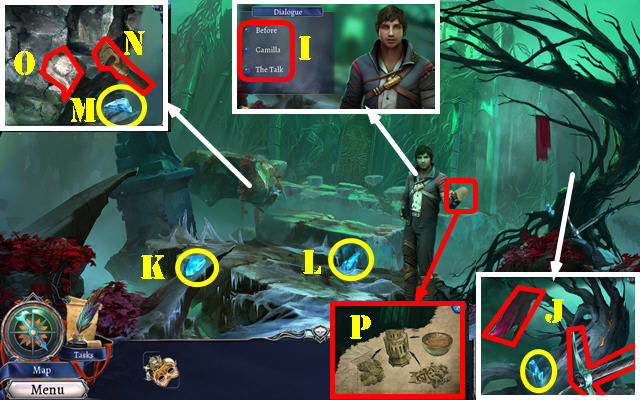
- Talk to Gabriel and select Before-Camilla-The Talk (I).
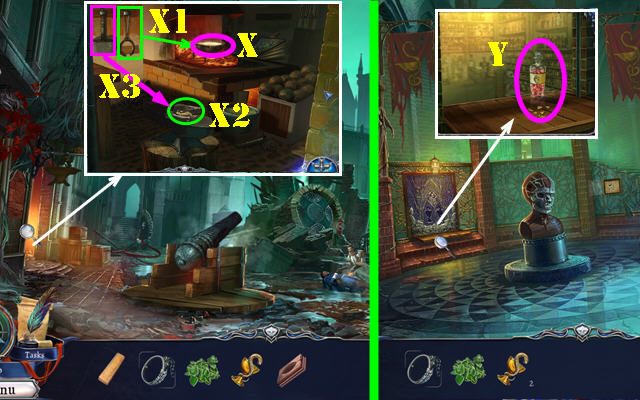
- Take the PICKAXE, BLACK CLOTH and INCARCERI SHARD 1/4 (J).
- Take the INCARCERI SHARD 2/4 (K) and INCARCERI SHARD 3/4 (L).
- Take the INCARCERI SHARD 4/4 (M) and SCRAPER (N). Use the PICKAXE; take the IRREGULAR CHALK STONE (O).
- Give the INCARCERI SHARDS 4/4; take the INCENSE RECIPE (P).
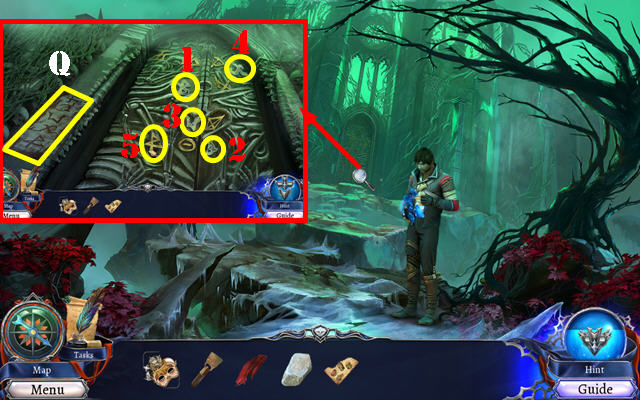
- Place the BLACK CLOTH and use the IRREGULAR CHALK STONE (Q).
- Select 1-5.
- Go forward.
Chapter 6: The Necropolis
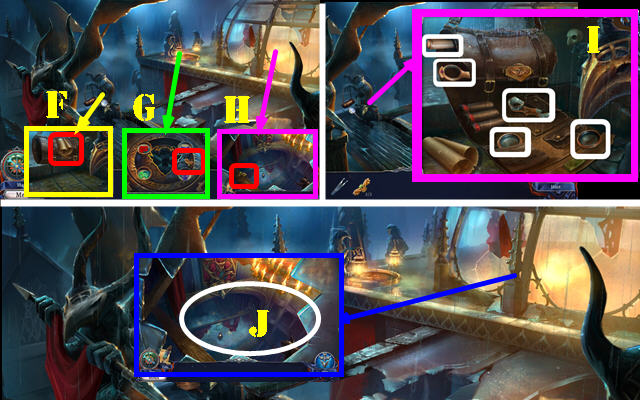
- Take the METAL ROD 1/3 (A), METAL ROD 2/3 (B) and SHACKLES (C).
- Take the METAL ROD 3/3 and BIG HOOK (D).
- Place the METAL RODS 3/3 (E) and go forward.
- Play the HOP (F) to get the BRONZE SHIELD.
- Take the DRUM STICK (G). Place the SHACKLES (H).
- Place the BRONZE SHIELD (I) and use the DRUM STICK on it. Take the CRANE PART (J).
- Go back.
- Place the CRANE PART and select it (K).
- Go to the Waterfall.
- Attach the BIG HOOK and select it (L).
- Go back.
- Select the crane part (M).
- Go to the Cave Ceiling (N).
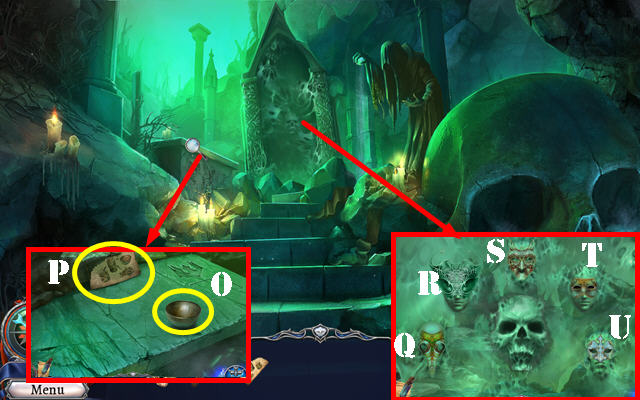
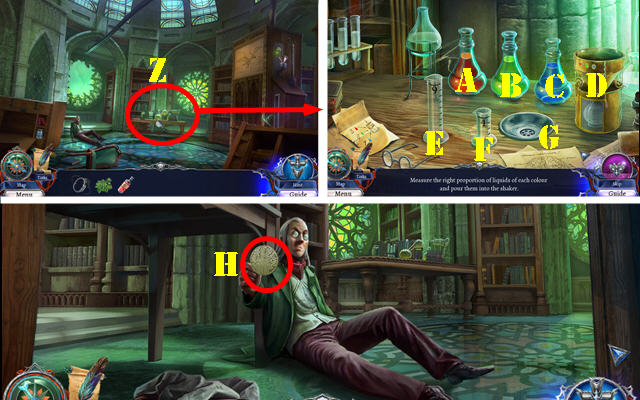
- Take the BOWL (O). Place the INCENSE RECIPE; look at it (P).
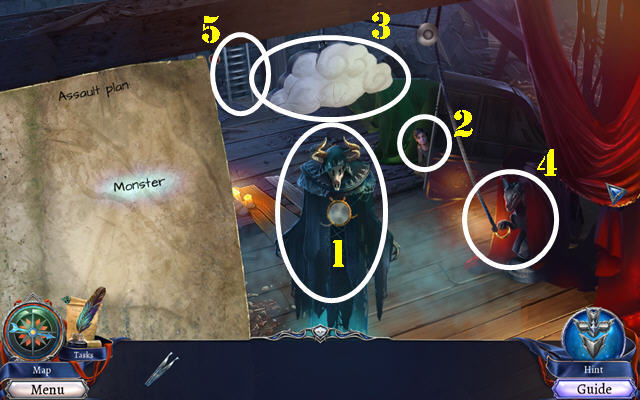
- Place the MASKS for a puzzle. Select the correct mask when you hear the phrases below.
- Select (Q): 'I've dealt with black magic.' Or I've broken the oath sacred to my profession.'
- Select (R): 'I've valued money more than happiness.' Or 'I've tried to force someone to be like me.'
- Select (S): 'I've forced someone to marry me.' Or 'I've let anger take control over me.'
- Select (T): 'I've betrayed the trust of a dear friend.' Or 'I've spied on someone, whom I should've trust.'
- Select (U): 'I've valued rules more than human life.' Or 'I've let someone most dear to me die.'

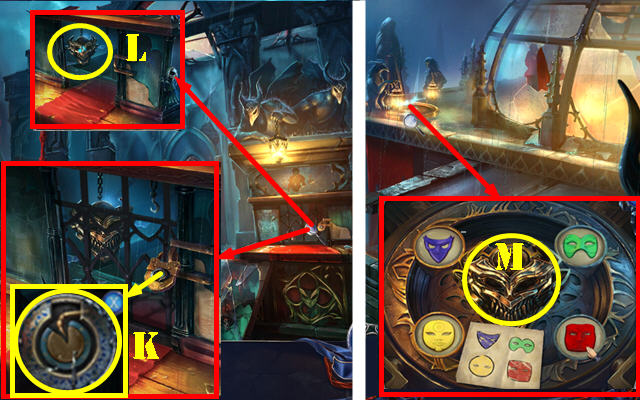
- Take the ALTAR TOKEN (V).
- Go back.
- Place the ALTAR TOKEN (W); take the OIL (X).
- Go back.
- Use the OIL and open the helmet; take the OBOL (Y).
- Go to the Waterfall.
- Take the LACE VEIL (A).
- Use the LACE VEIL; receive the ANIMAL BONES (B).
- Go to the Cave Ceiling.
- Place the OBOL (C). Use the SCRAPER; receive the SMELLY MOSS (D).
- Return to the Waterfall.
- Play the HOP (E) to get the CENSER.
- Return to the Necropolis Gate.
- Use the BOWL; receive the MYRRH (F).
- Return to the Cave Ceiling.
- Put down the SMELLY MOSS, ANIMAL BONES, CENSER and MYRRH. Remove the top (G); place the smelly moss, animal bones and myrrh (H).
- Take the EXORCISM INCENSE.
- Go to the Altar Balcony (I).
- Throw the EXORCISM INCENSE (J).
- Select the rope 3x; go forward (K).
- Select the Incarceri Stone (L).
- Congratulations, you've completed Grim Legends 3: The Dark City.
Created at: 2016-08-14