

Walkthrough Menu
- General Tips
- Prologue: The Wedding
- Chapter 1: Twisted Paths
- Chapter 2: The Curse of the House Haugwitz
- Chapter 3: Echoes from the Past
- Chapter 4: The Hidden
- Chapter 5: The Plan
- Chapter 6: The Fallen Angel
- Chapter 7: The Verge
General Tips
- This is the official guide for Grim Legends: The Forsaken Bride.
- This guide will not mention each time you have to zoom into a location; the screenshots will show each zoom scene.
- We will use the acronym HOP for Hidden-object puzzles. Interactive items will be color-coded and some will be numbered; please follow the numbers in sequence.
- You have the option of playing Dominoes instead of a HOP. The HOP lists may be random; our lists may vary from yours.
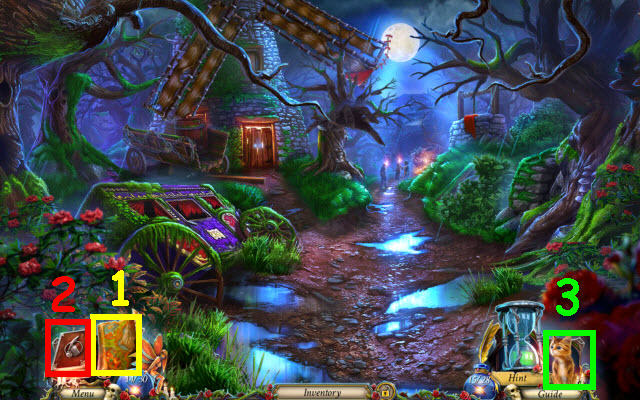
- Use the map (1) to check objective locations and fast travel to previously unlocked locations.
- Select the journal (2) for story updates.
- You will acquire Kitty (3) as your assistant. Kitty will jump up when she can be used in a scene.
Prologue: The Wedding
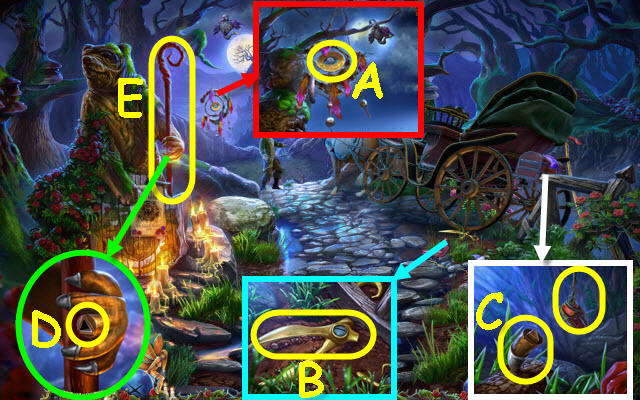
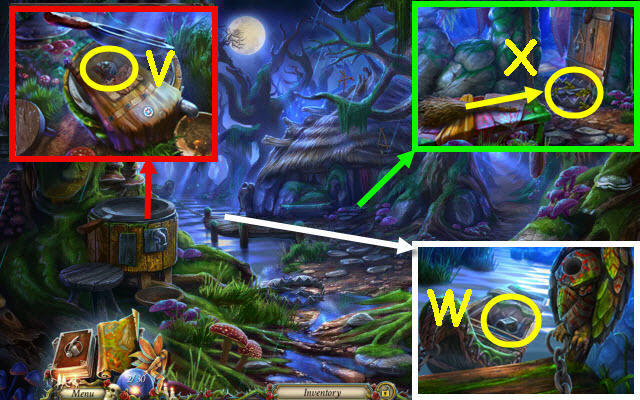
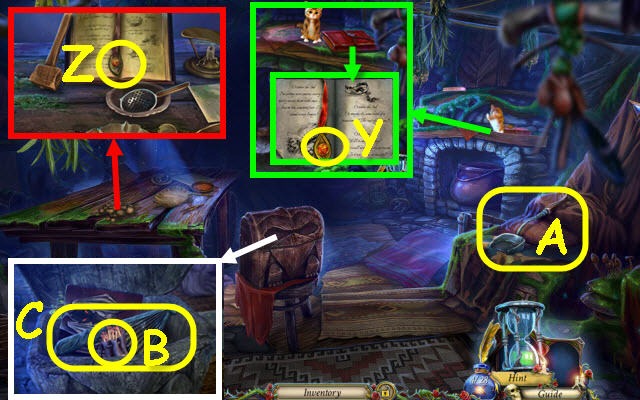
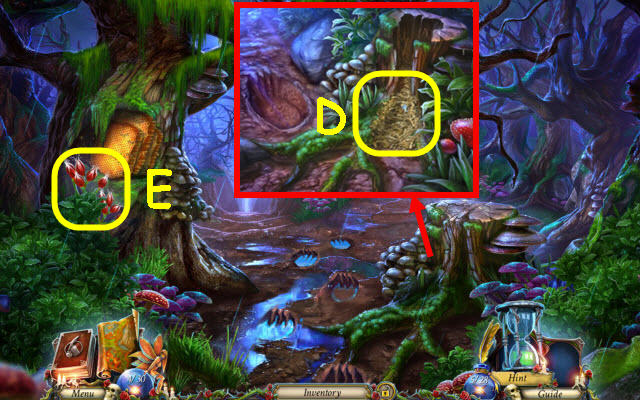
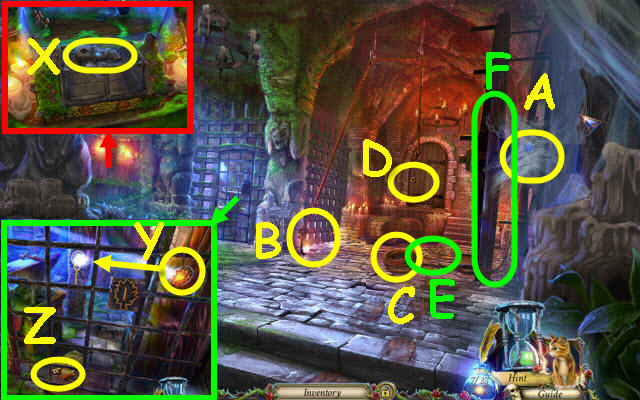
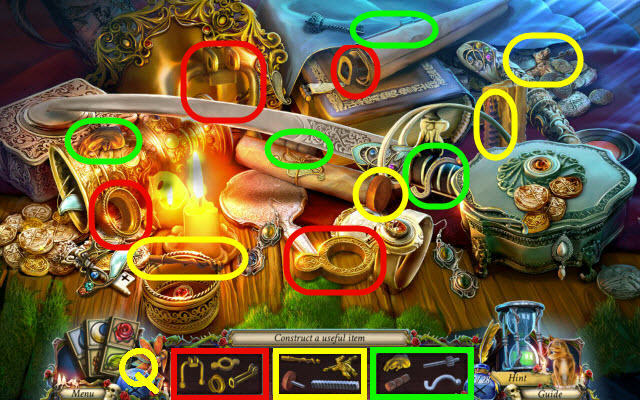
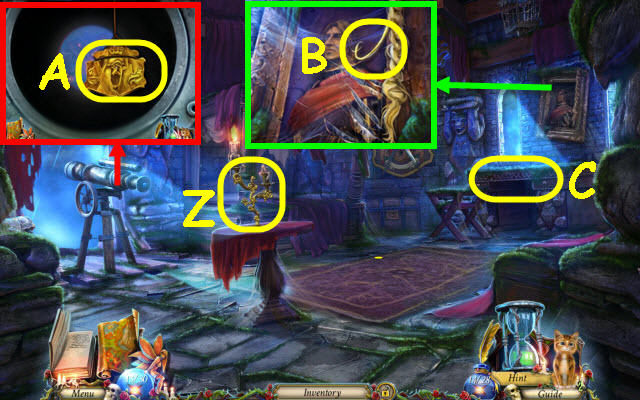
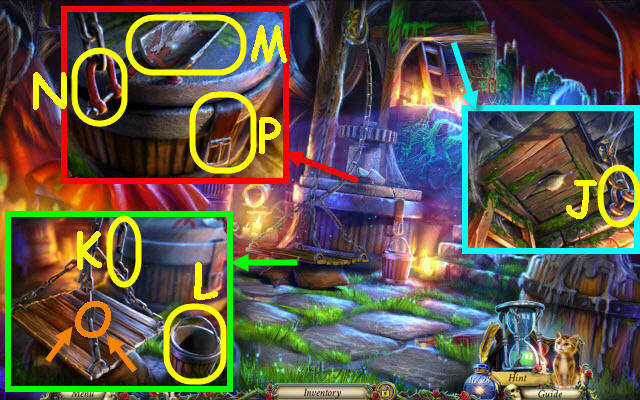
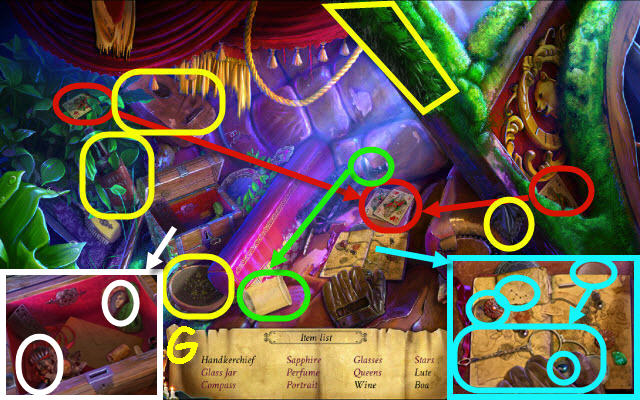
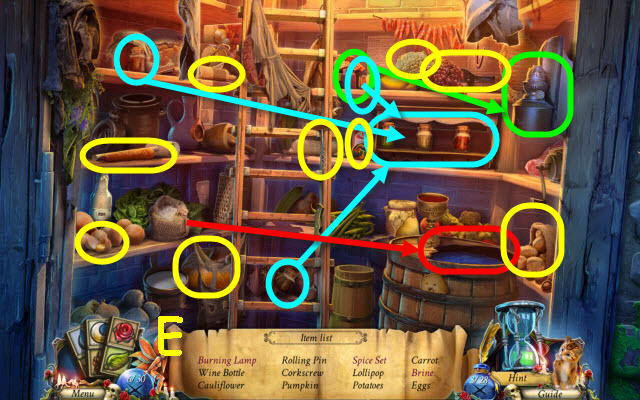
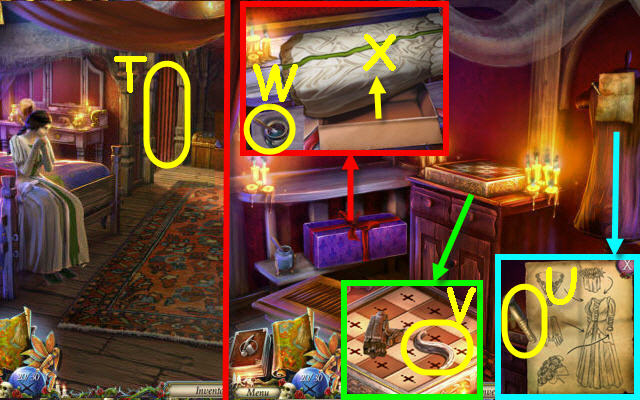
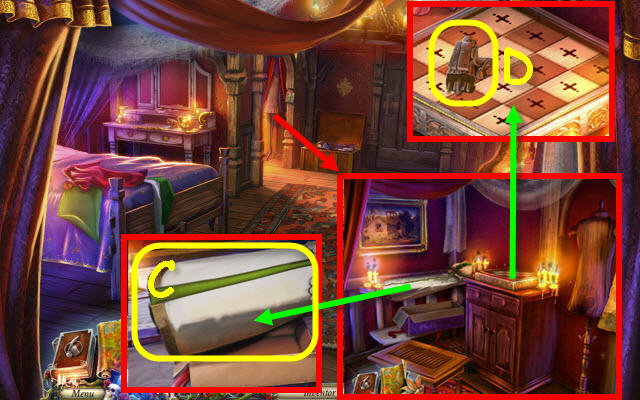
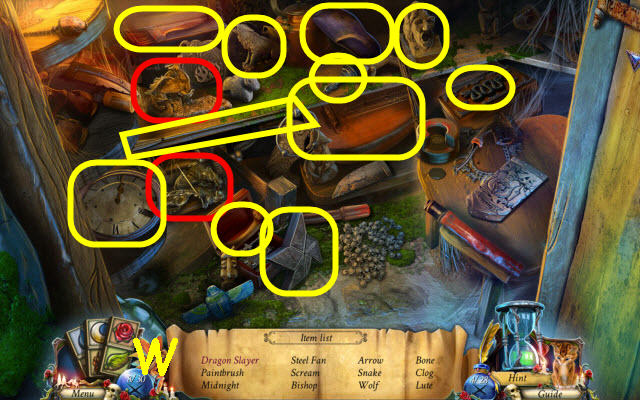
- Take the GOLD COIN (A).
- Use the GOLD COIN on the screw; take the IMPROVISED BLADE (B).
- Take the IRON CLAW (C).
- Use the IRON CLAW on the knuckle (D); take the CROZIER (D).
- Use the CROZIER and IMPROVISED BLADE on the rope (E).
- Take the WOOL SCARF (F).
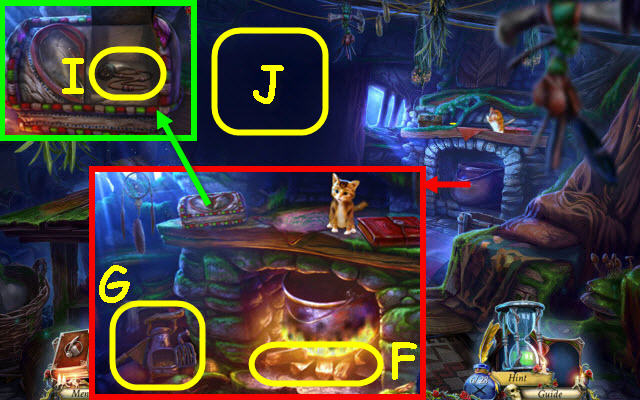
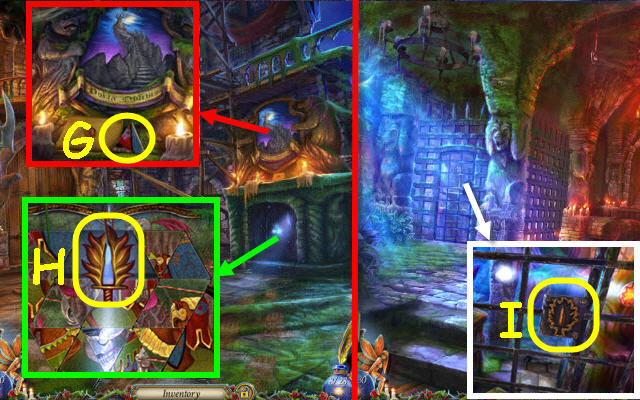
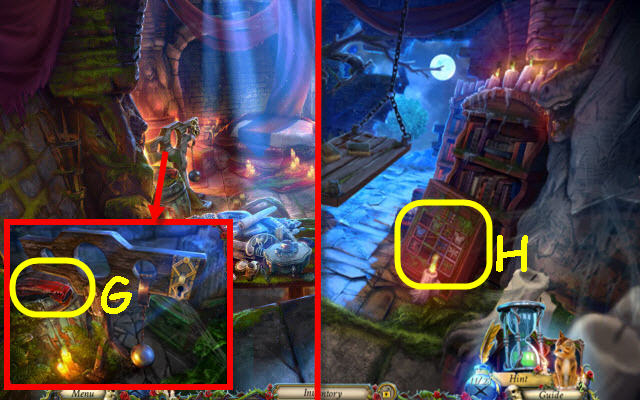
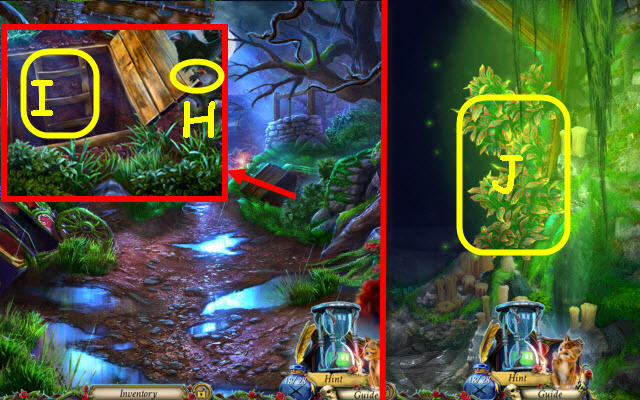
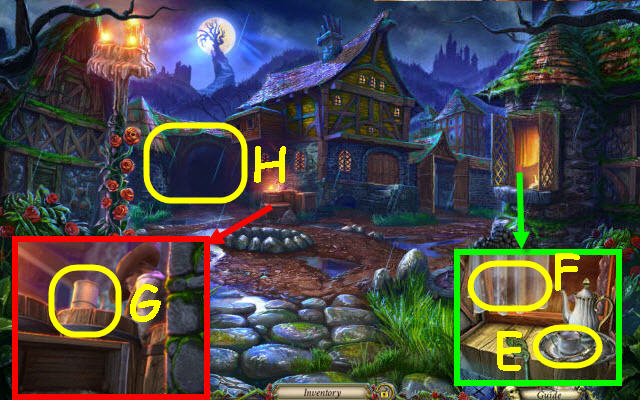
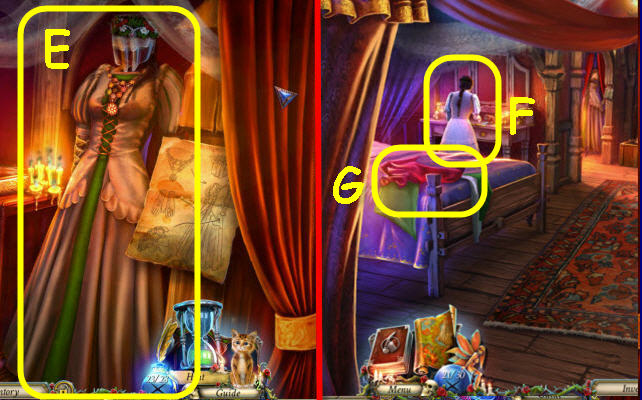
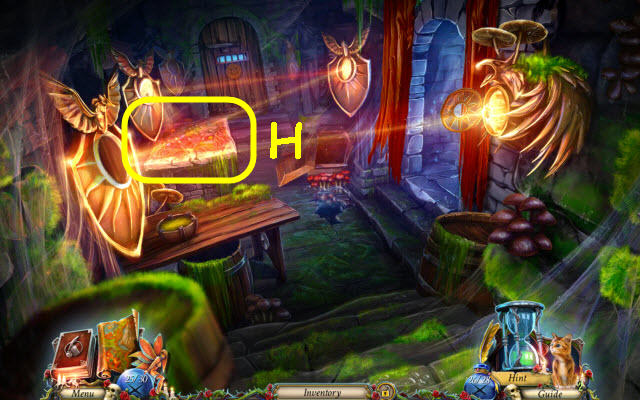
- Use the WOOL SCARF to get Kitty (G). He will be added to your toolbar (H) and can be used to obtain items out of your reach.
- Use Kitty on the rag doll (I).
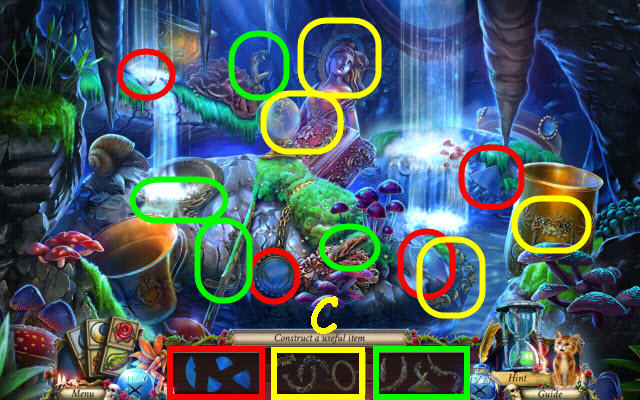
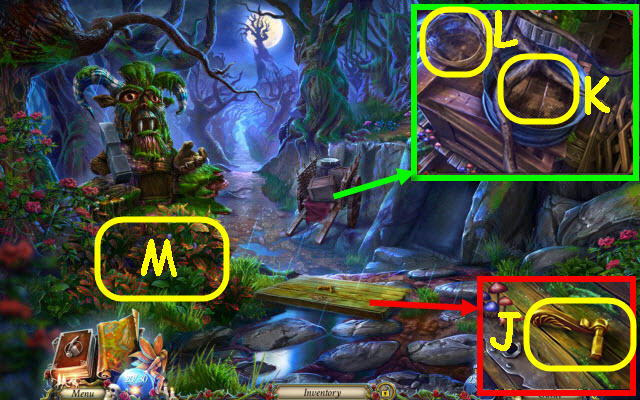
- Remove the material; take the WIRE (J).
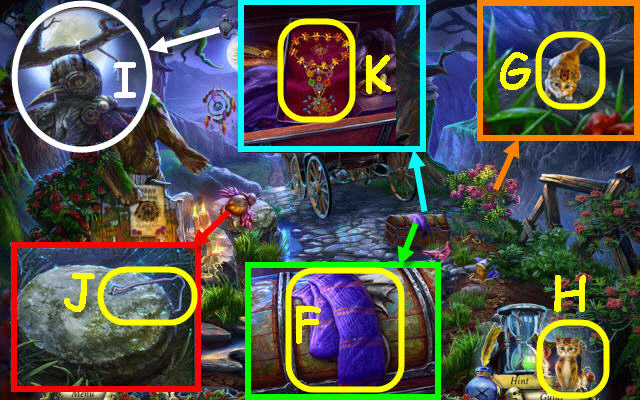
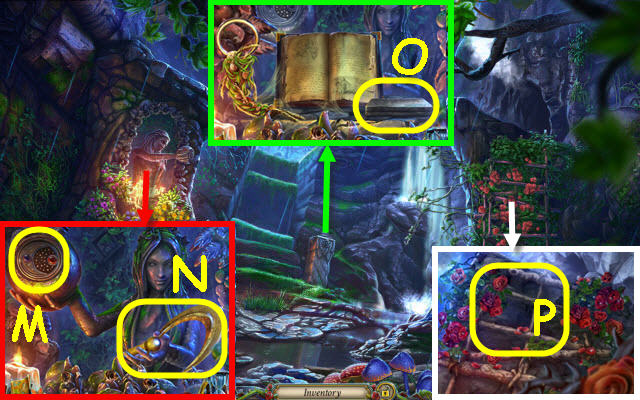
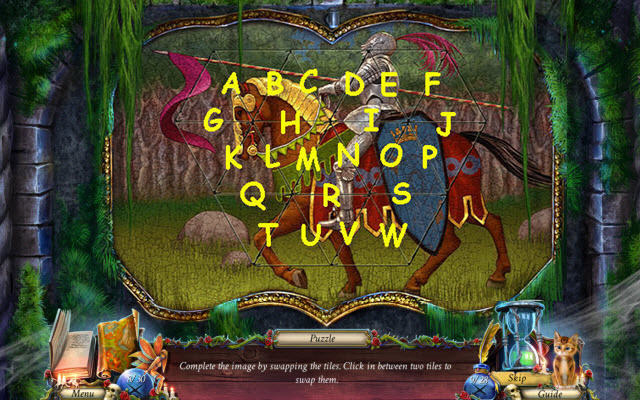
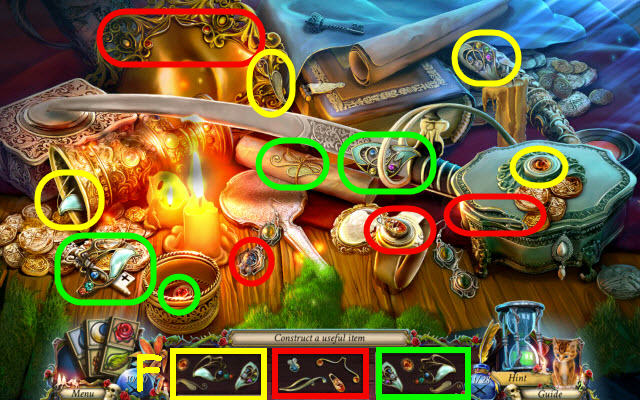
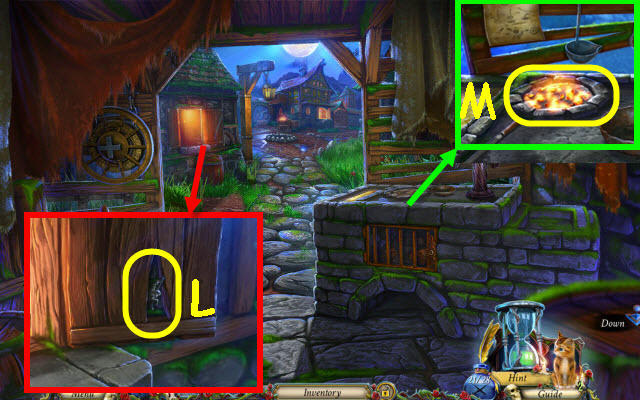
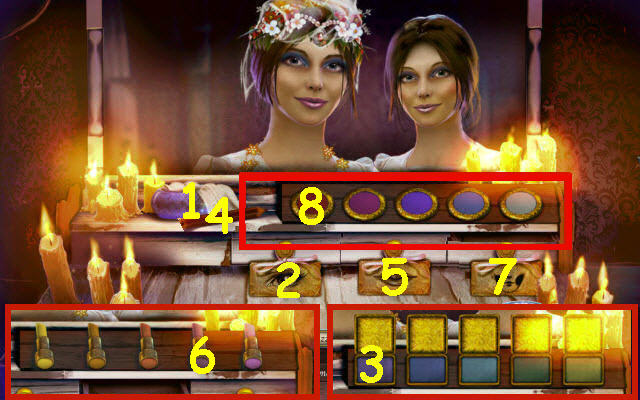
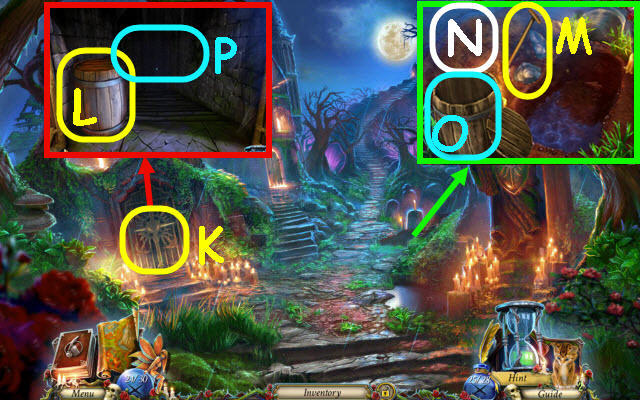
- Use the WIRE on the lock; open the trunk. Select the necklace and place the scattered gems inside to trigger a puzzle (K).
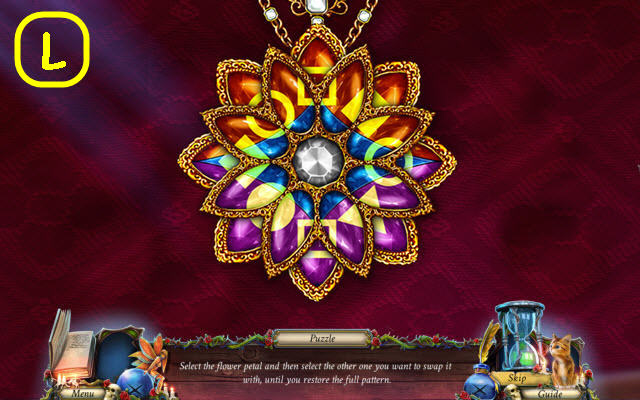
- Swap the petals to complete the image.
- See screenshot for solution (L).
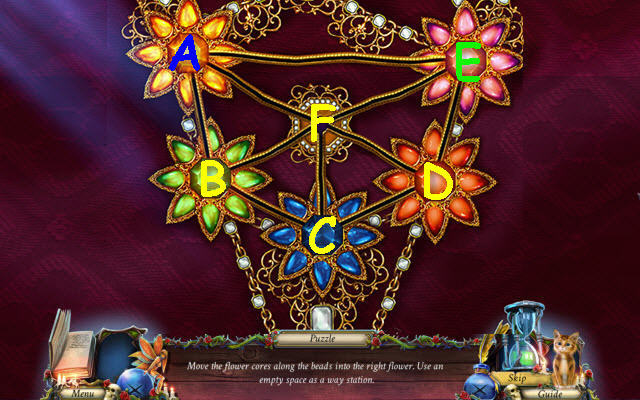
- Complete the flowers.
- To solve the puzzle, select the following: C, D, E, F, A, B, C, D and F.
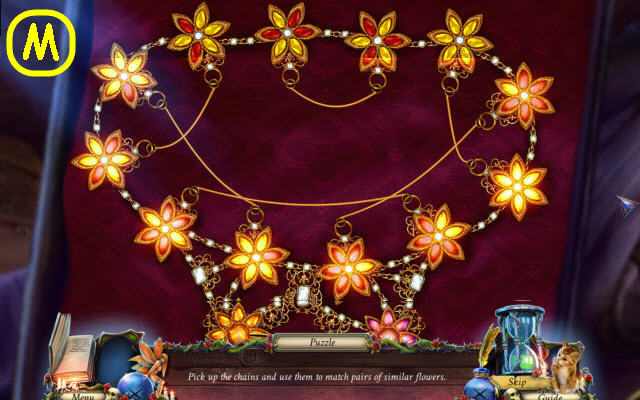
- Connect the matching petals.
- See screenshot for solution (M).
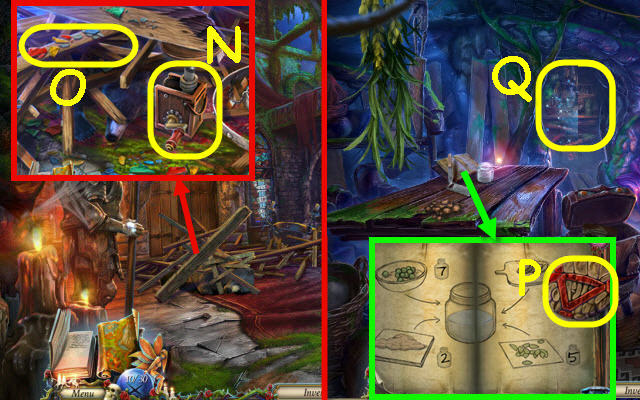
- Take the NECKLACE.
- Enter the carriage.
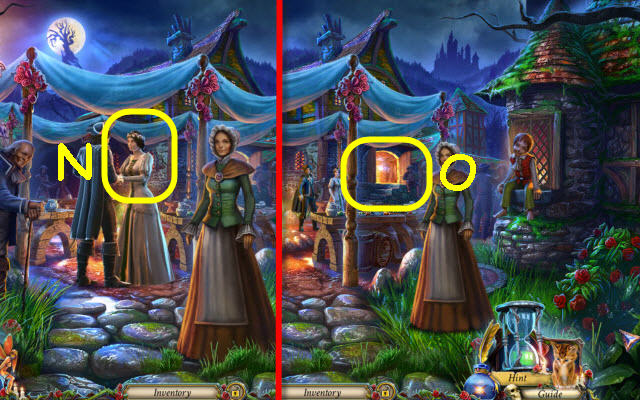
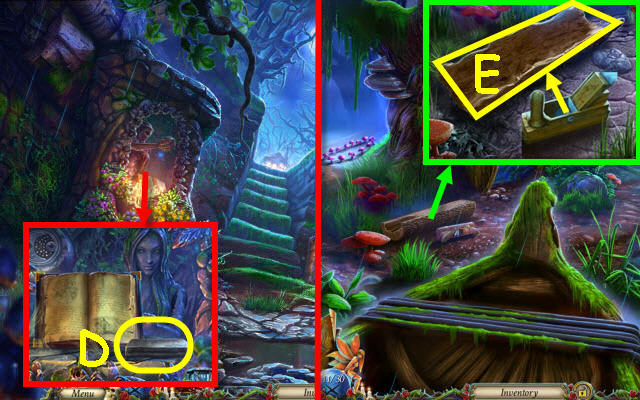
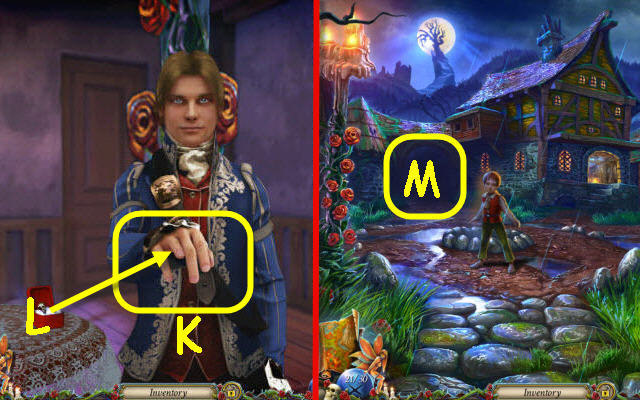
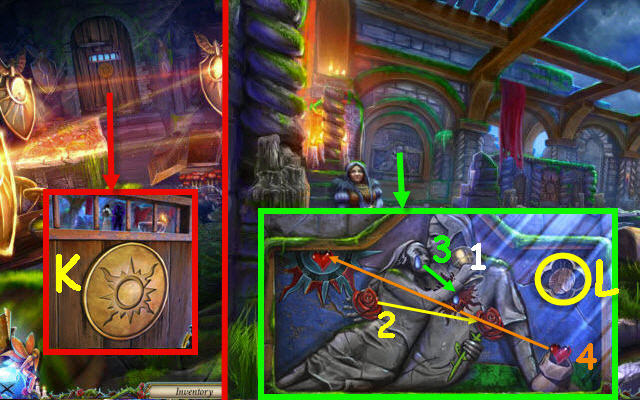
- Speak to Lilly; give her the NECKLACE (N).
- Select the Inn (O).
Chapter 1: Twisted Paths
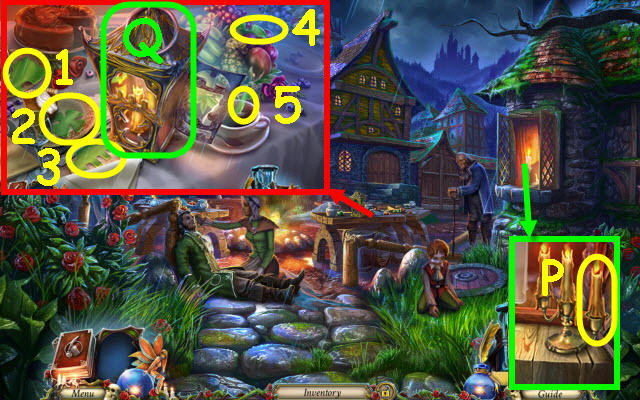
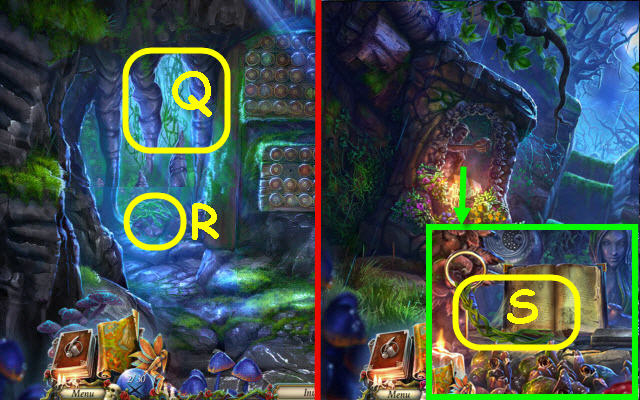
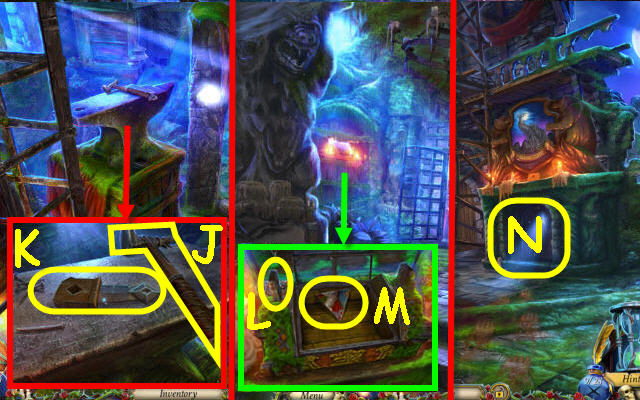
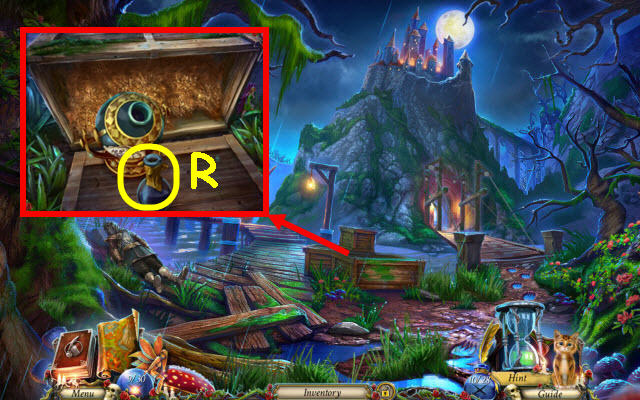
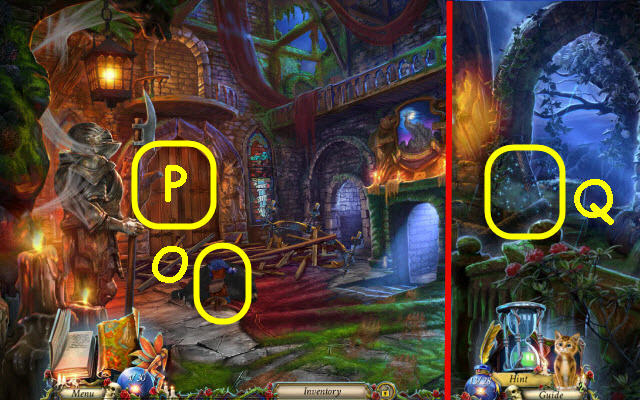
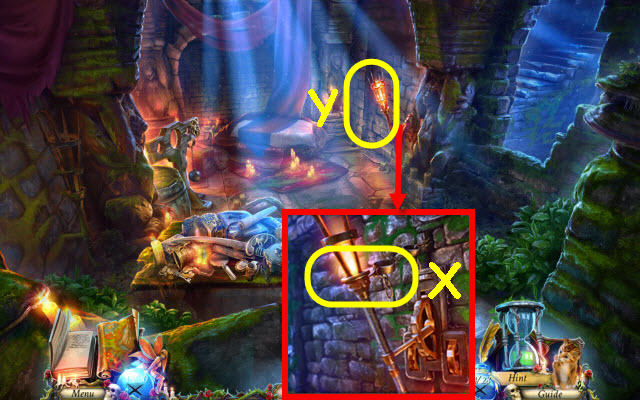
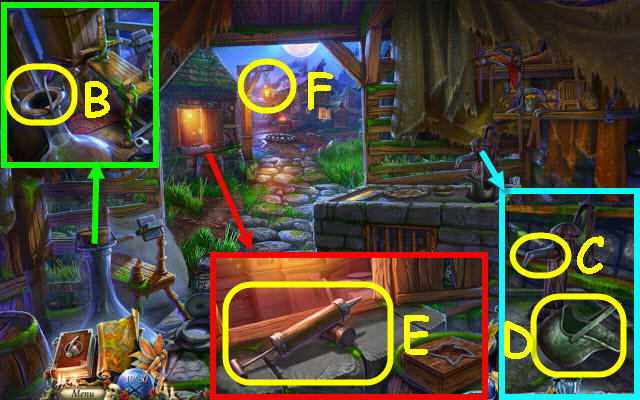
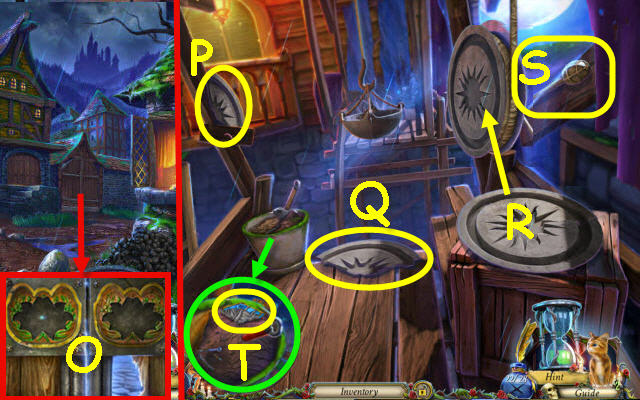
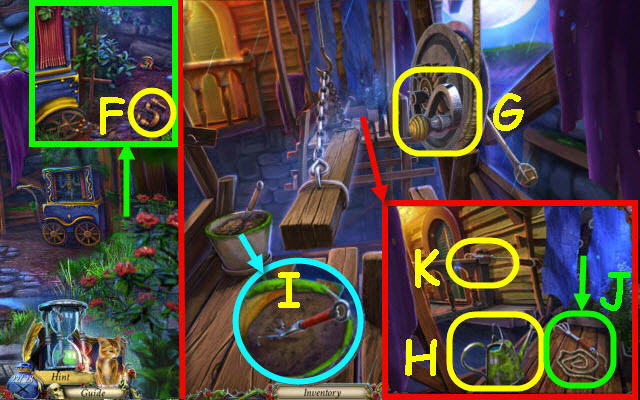
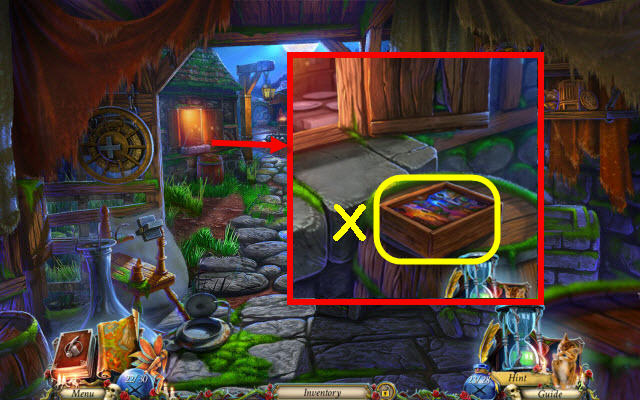
- Take the CANDLE (P).
- Place the CANDLE in the lantern; move the objects and place the glass pieces (1-5) in the matching shaped slots.
- Close the door; take the LANTERN (Q).
- Go forward through the arch.
- Use the LANTERN anywhere.
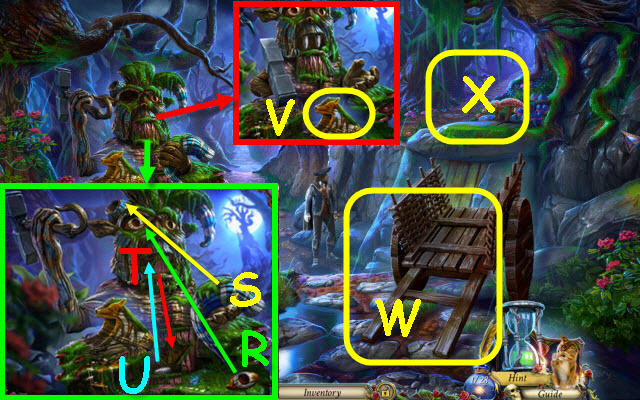
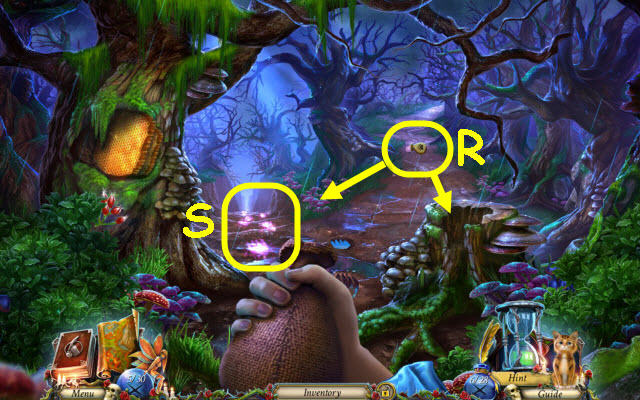
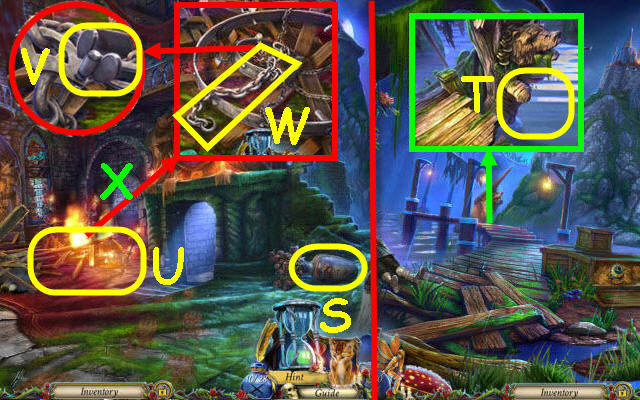
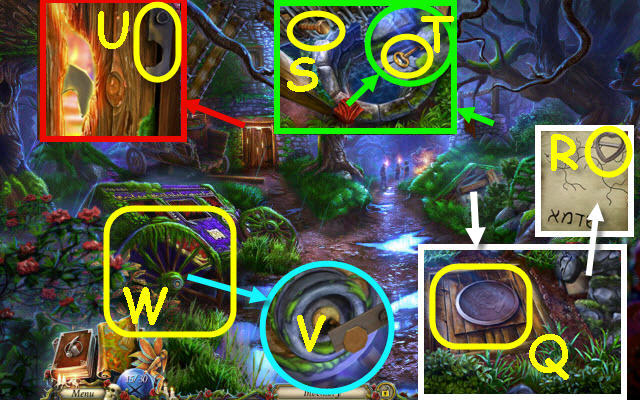
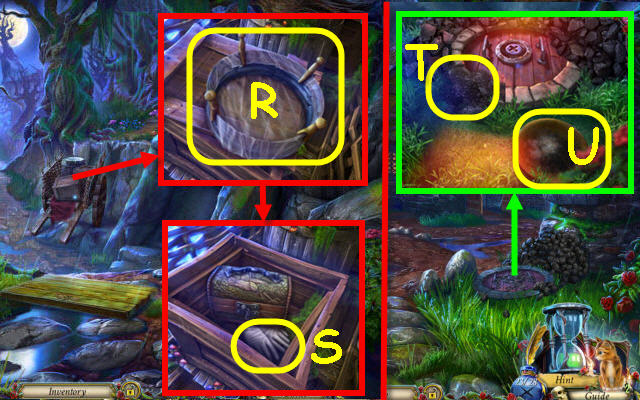
- Move the leaves; place the eye in the socket (R), the horn on the head (S), the cutout in the slot (T) and the tooth in the mouth (U).
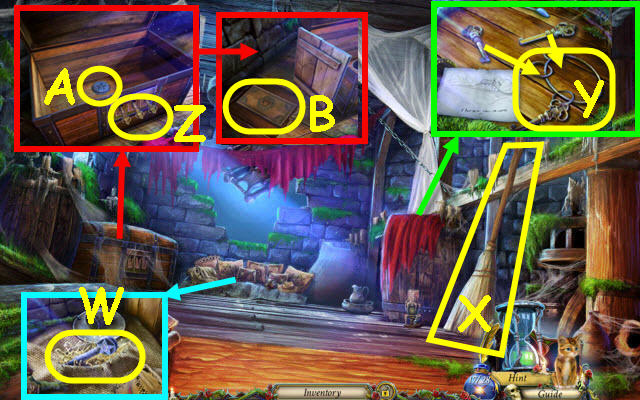
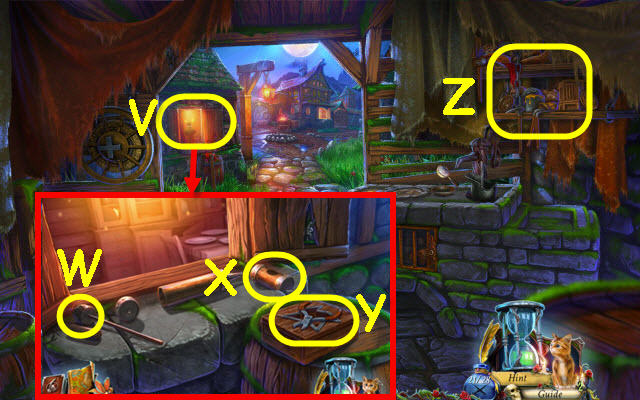
- Take the WEDGE-SHAPED FIGURINE (V).
- Select the cart twice; place the WEDGE-SHAPED FIGURINE under it (W).
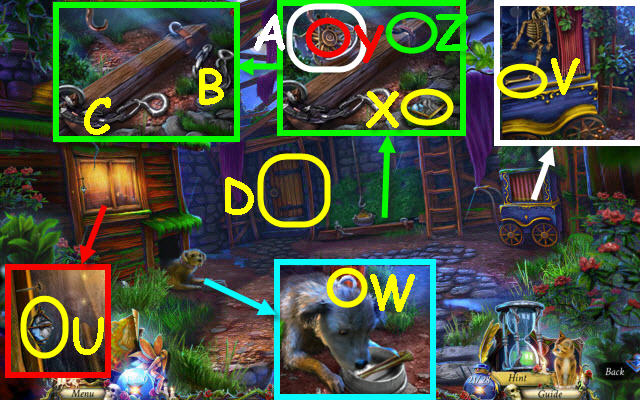
- Go up (X).
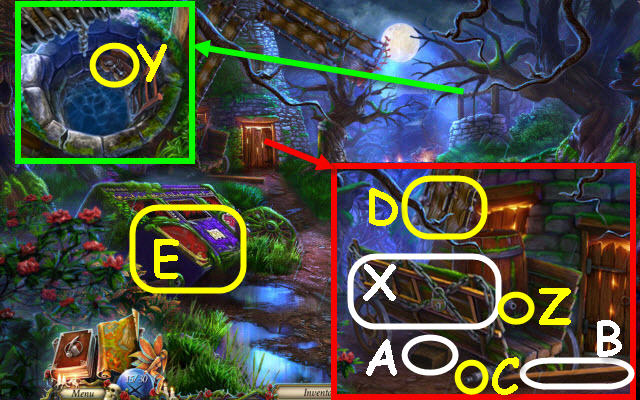
- Take the map (Y) which is added to your toolbar (Z).
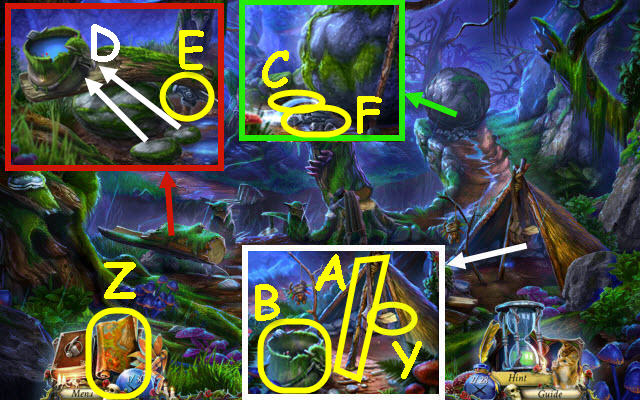
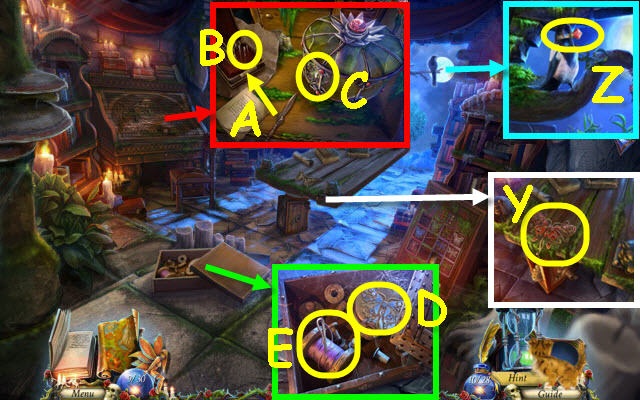
- Remove the bag and the knot; take the TIMBER (A) and EMPTY CAULDRON (B).
- Use the EMPTY CAULDRON on the water (C); receive a FULL CAULDRON.
- Place the FULL CAULDRON and two rocks on the log (D); take the HIKING PICK (E).
- Use the TIMBER on the boulder and HIKING PICK on the wedge; remove the stones (F).
- Cross the ravine.

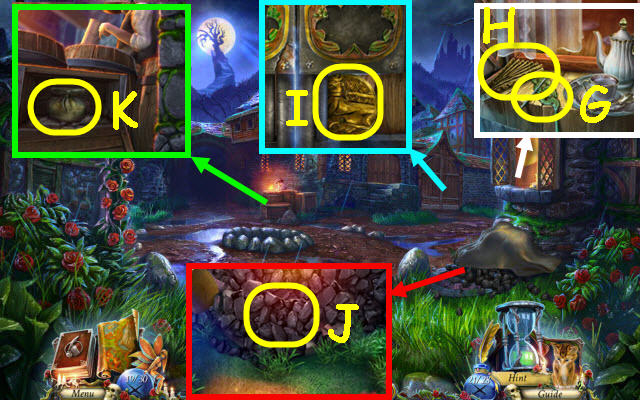
- Take the DIRTY RELIEF PIECE (G).
- Wash the DIRTY RELIEF PIECE in the water (H); receive a RELIEF PIECE.
- Remove the leaves; place the RELIEF PIECE on the pedestal (I).
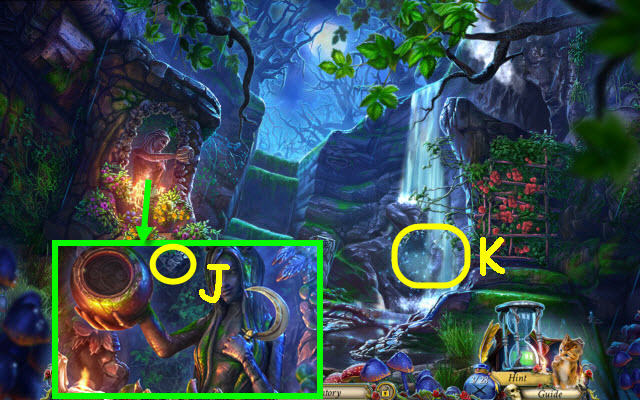
- Push the brick (J).
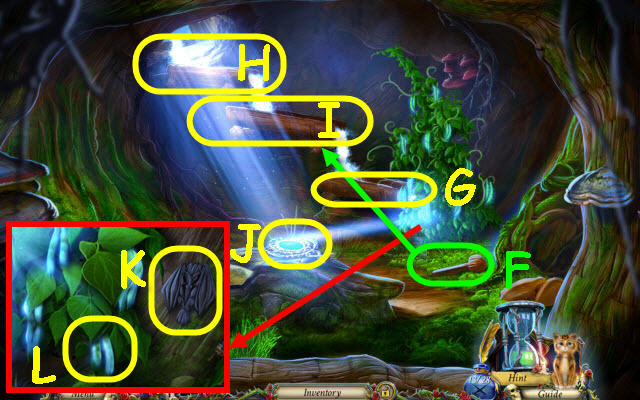
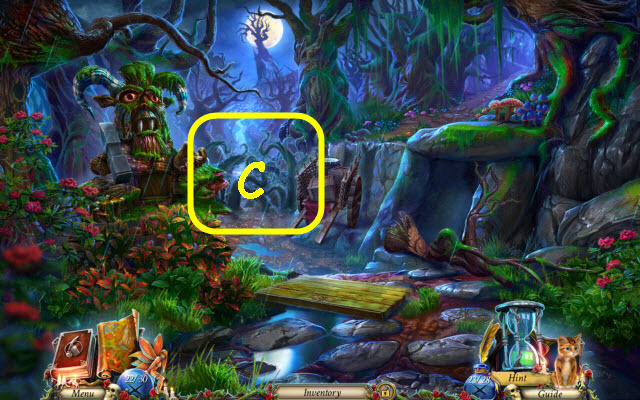
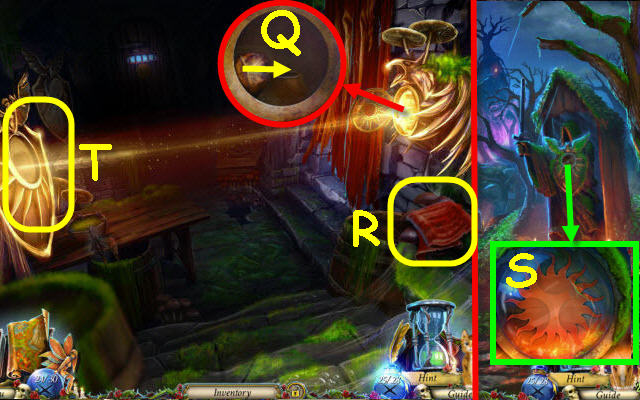
- Examine the waterfall to access a HOP (K).
- Play the HOP.
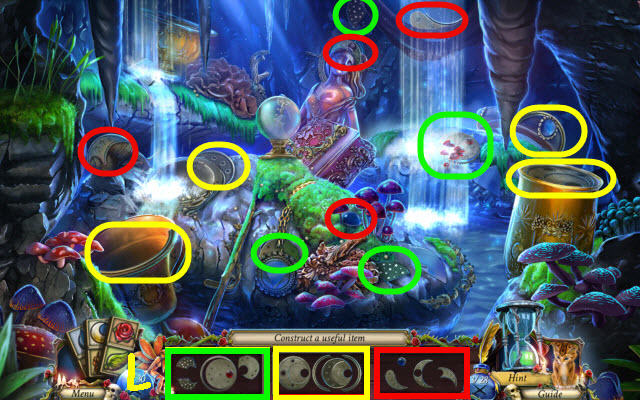
- You receive a CRESCENT MOON (L).
- Place the CRESCENT MOON in the sphere (M); take the BLUNT SICKLE (N).
- Use the BLUNT SICKLE on the stone (O); receive a SICKLE.
- Use the SICKLE 3x on the bush; enter the cave (P).
- Use the HIKING PICK on the stalactite; use the SICKLE 3x on the vines (Q).
- Take the CUT VINES (R).
- Back out.
- Remove the braid; place the CUT VINES on the ring. Select the vines; take the VINE ROPE (S).
- Return to the cave.
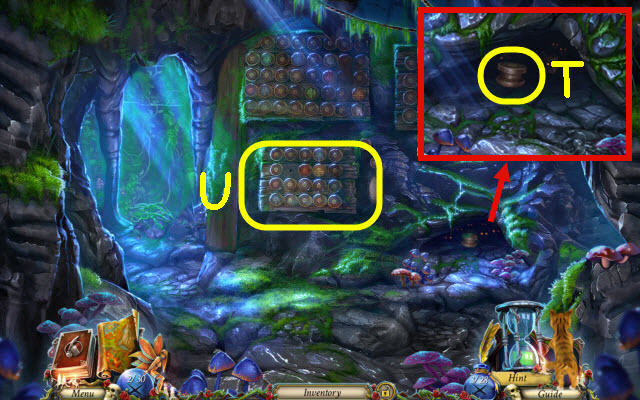
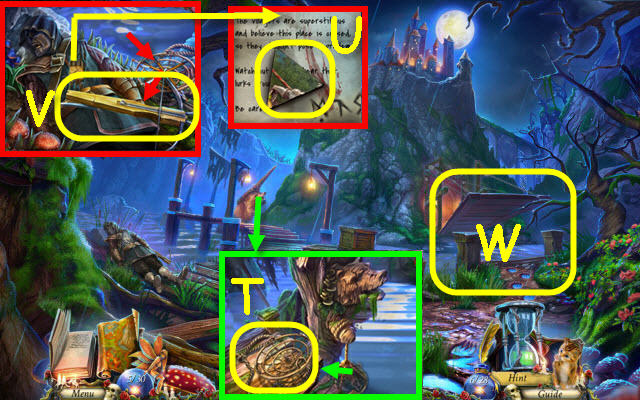
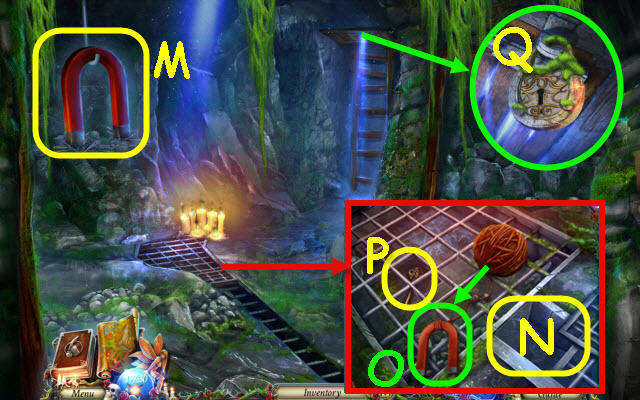
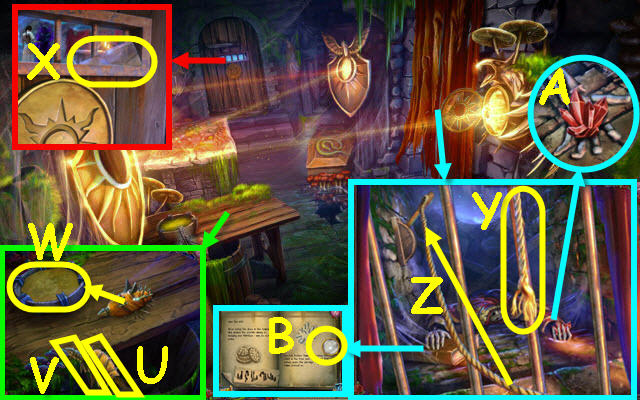
- Send Kitty in the hole; take the WHEEL (T).
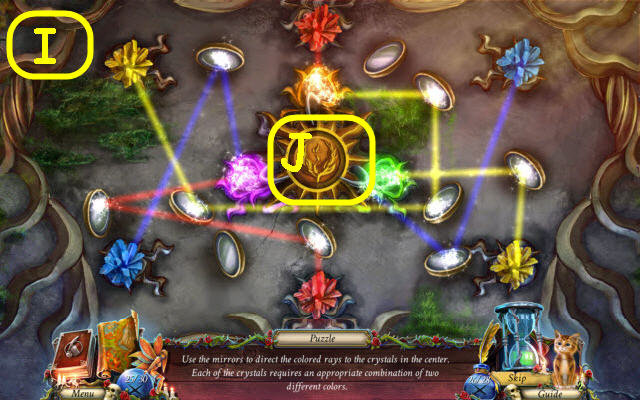
- Place the WHEEL and VINE ROPE on the mechanism to trigger a puzzle (U).
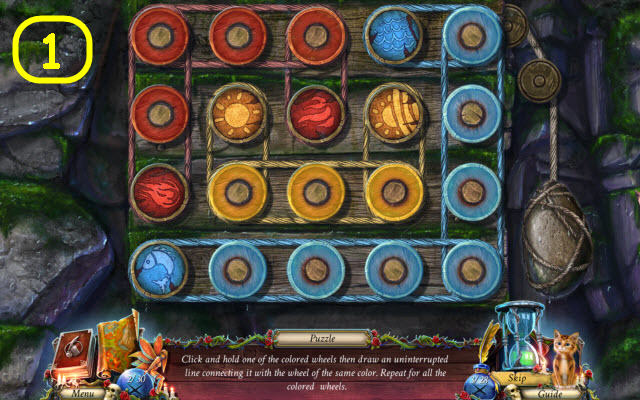
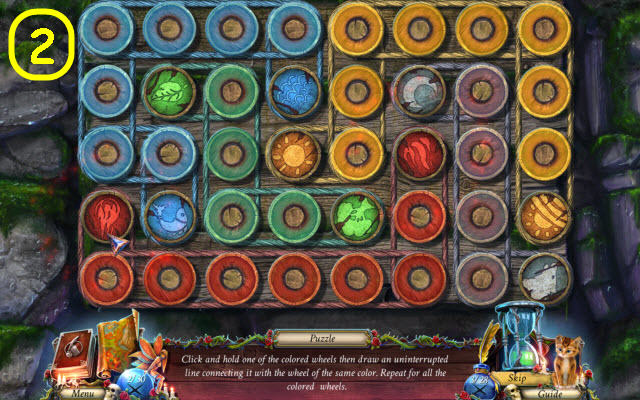
- Connect the matching colored wheels.
- See screenshot for solutions (1-3).
- Go up the stairs.
- Take the HALF HEART PIECE (V).
- Pull the chain; take the MUG (W).
- Use the broom on the trap (X); enter the Hut.
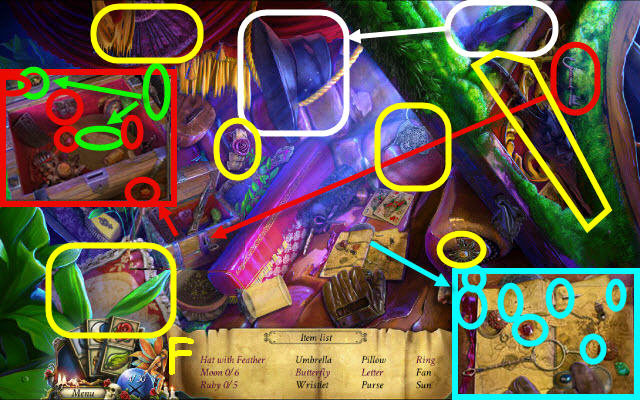
- Open the book and flip the pages; take the RAVEN EYE 1/2 (Y).
- Take the RAVEN EYES 2/2 (Z); turn the pages.
- Take the STEEL SHOVEL (A).
- Place the 2 RAVEN EYES on the chest; open the lid. Take the MATCHES (B) and BELLOWS (C).
- Back out; go up the path on the right.
- Use the HIKING PICK on the stump; take the TINDER (D).
- Take the BEAR POPPY (E).
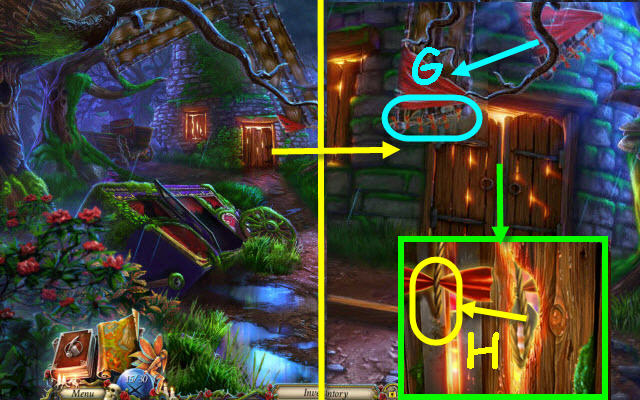
- Go to the Hut.
- Use the MATCHES and STEEL SHOVEL on the wood; receive STEEL SHOVEL WITH EMBERS (F).
- Replace the BELLOWS; place the TINDERS and STEEL SHOVEL WITH EMBERS in the FUMIGATOR (G). Take it.
- Place the HALF HEART PIECE on the box; take the CLAW (I).
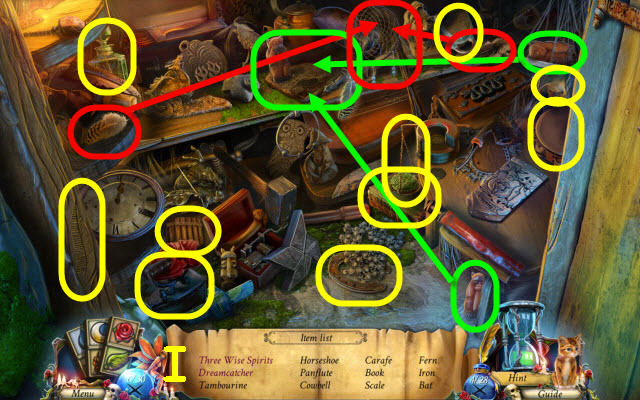
- Examine the alcove to access a HOP (J).

- Play the HOP.
- You receive a GRINDER (K).
- Go to the Twisted Paths.
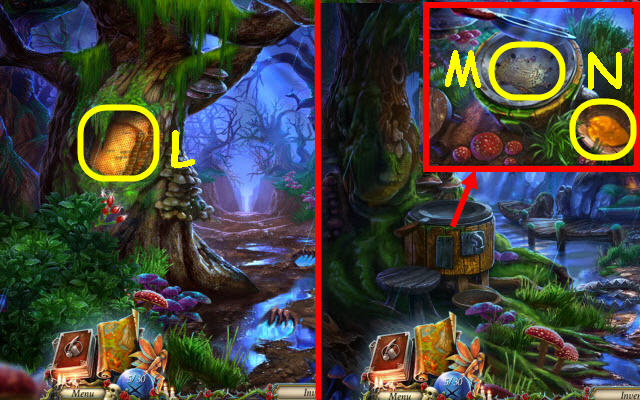
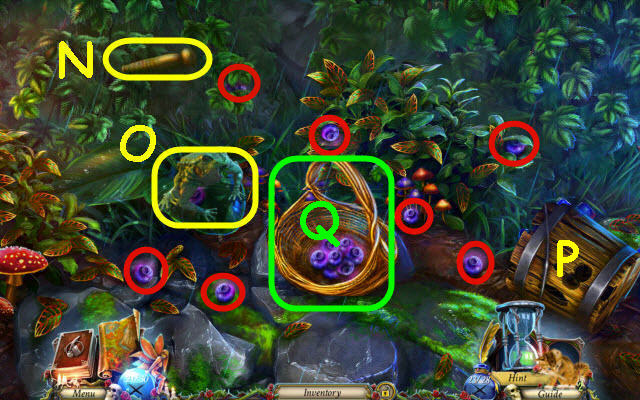
- Use the FUMIGATOR on the bees; take the HONEYCOMB (L).
- Back out.
- Remove the cloth and place the HONEYCOMB in the press; close it. Take the WAX (M) and BOWL OF HONEY (N).
- Enter the hut.
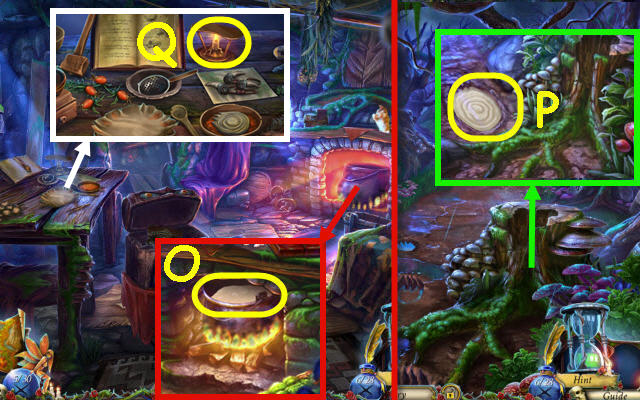
- Place the WAX and MUG in the pot; receive a MUG OF WAX (O).
- Go to the Twisted Paths.
- Use the MUG OF WAX in the track; take the WAX TRACK (P).
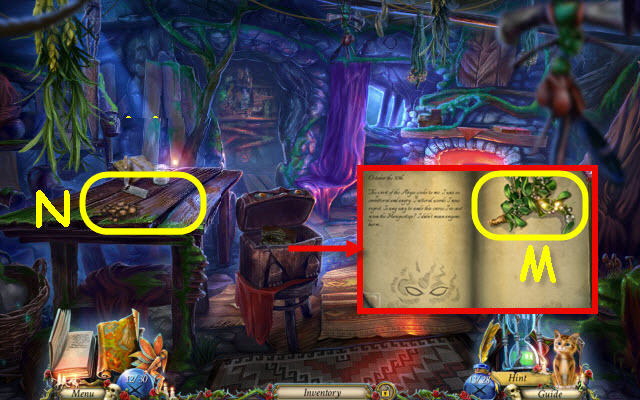
- Return to the Hut; zoom into the table.
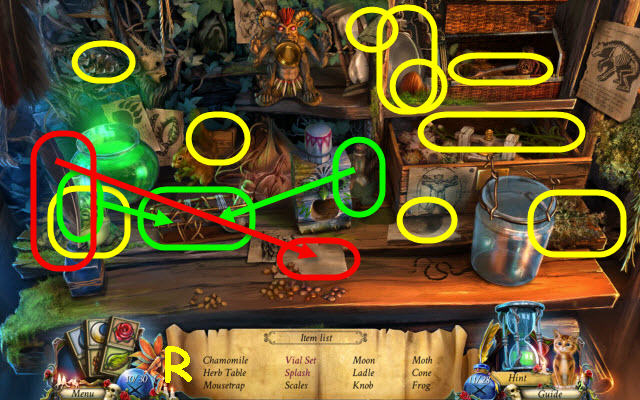
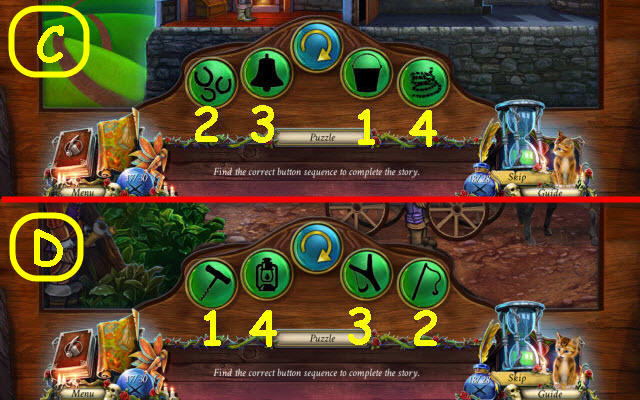
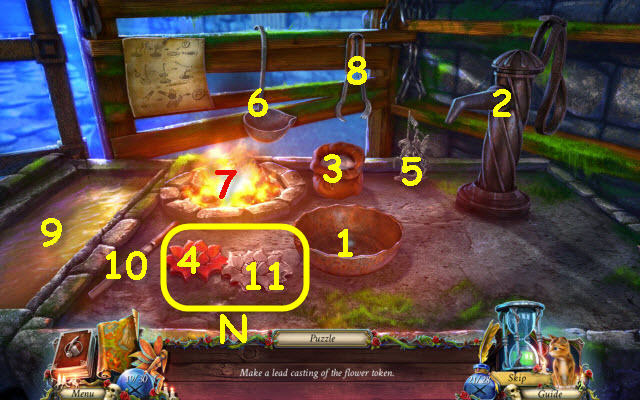
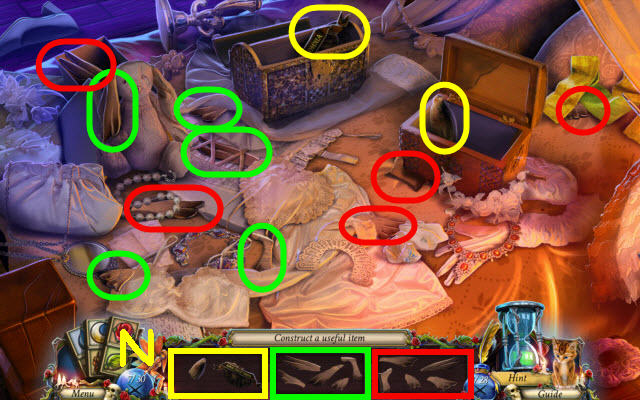
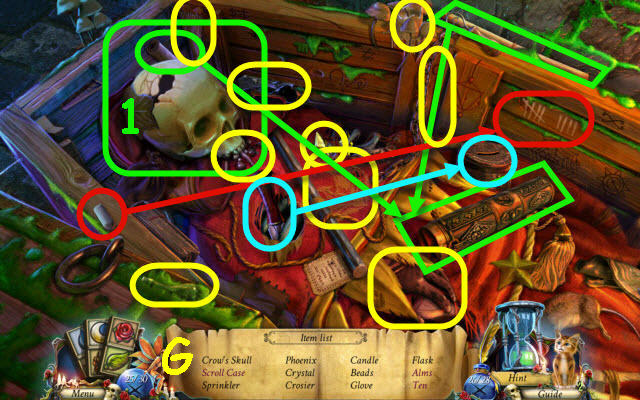
- Place the GRINDER, BEAR POPPY, CLAW, BOWL OF HONEY and WAX TRACK on the table. Use the MATCHES on the candle to trigger a puzzle (Q).

- Prepare the recipe.
- Select or move the following: 1-2, 3-2, 2-4, 4, 5, 6-5, 5, 7-8, 9-10, 12, 11-12-10x2, 11-5-10x3, 11-8-10x2, 10x2.
- Take the HUNTER'S DUST.
- Go to the Twisted Paths.
- Place the HUNTER'S DUST on the tracks and sprinkle them (R). Follow the pink prints after each sprinkling (S); left 2x, right 2x and left.
- Pull up the CREEL; remove the contents and take it (T).
- Open the coat and envelope; take the TRIANGULAR RELIEF PIECE (U).
- Use the CREEL in the water; place the arrows on the crossbow. Take the CROSSBOW (V).
- Use the CROSSBOW on the bridge to trigger a puzzle (W).
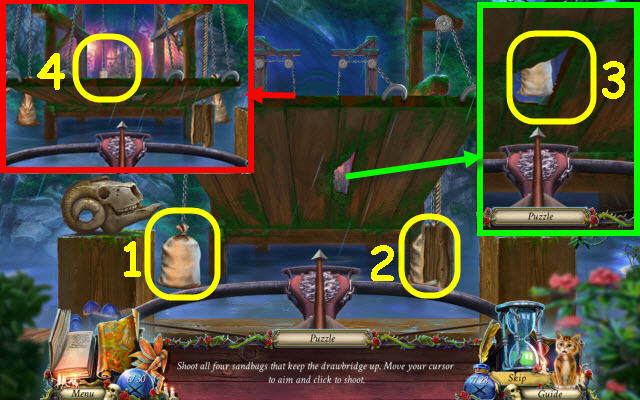
- Shoot the sandbags.
- Shoot in the order marked (1-4).
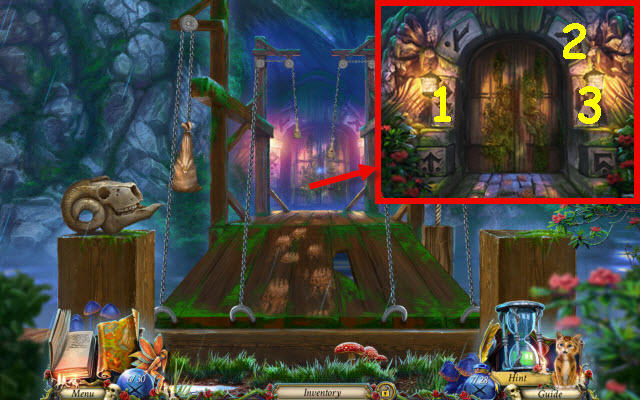
- Select the runes in the correct order (1-3).
- Go forward.
- Use the HIKING PICK on the wall; pull the chest and take the TWISTED PLATE (X).
- Select the pendant twice (Y).
- Pull the rug; take the WINDLASS KEY (Z).
- Remove the cobwebs and use WINDLASS KEY on the lock (A).
- Select the knot 4x (B); take the ROPE AND HOOK (C).
- Tie the ROPE AND HOOK on the handle (D).
- Select the rope and tie it (E); rotate the wheel (F).
- Go up the stairs.
- Read the letter; take the 2nd TRIANGULAR RELIEF PIECE (G).
- Take the FLAMING BLADE (H).
- Back out.
- Place the FLAMING BLADE on the lock (I).
- Place the TWISTED PLATE on the anvil; use the hammer (J) on it. Take the STRAIGHTENED PLATE (K).
- Use the STRAIGHTENED PLATE in the slot (L); take the 3rd TRIANGULAR RELIEF PIECE (M).
- Go up the stairs.
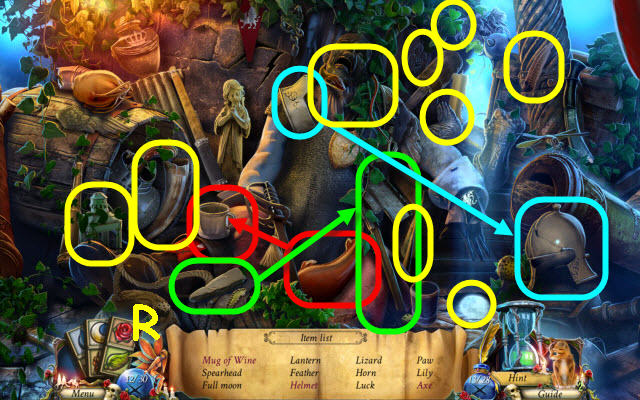
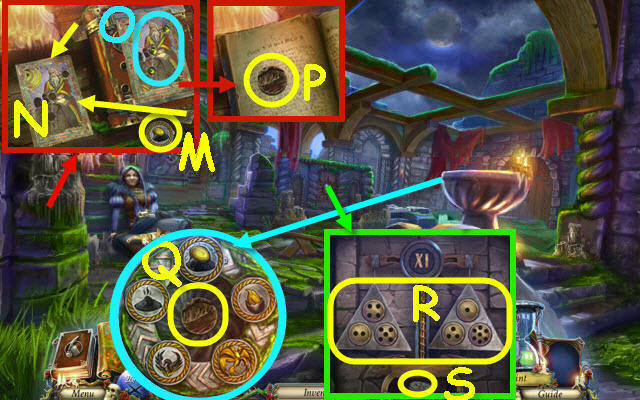
- Place the 3 TRIANGULAR RELIEF PIECES on the image to trigger a puzzle (N).
- Complete the image.
- Select the following: T, R, U, N, R, L, K, I, L, M, N, O, S, W, N, M, H, B, A, P, O, N, M, H and B.
- P, O, N, M, H, N, O, S, L, M, N, O, P, J, F, L, M, N, O, P, J, P, O, N, M, L, M, N and P.
- Enter the Secret Chamber.

- Examine Lilly (O).
- Examine the table to access a HOP (P).
- Play the HOP.
- You receive a CORKSCREW (Q).
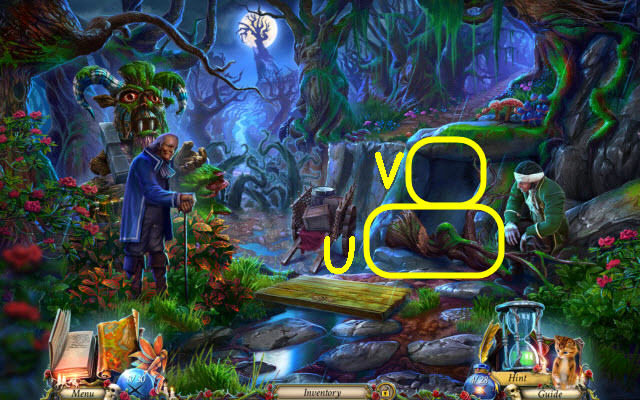
- Go to the Mountain Foot.
- Open the crate; select the vase 3x and use the CORKSCREW on it. Take the SMELLING SALTS (R).
- Go forward twice into the Main Hall.
Chapter 2: The Curse of House Haugwitz
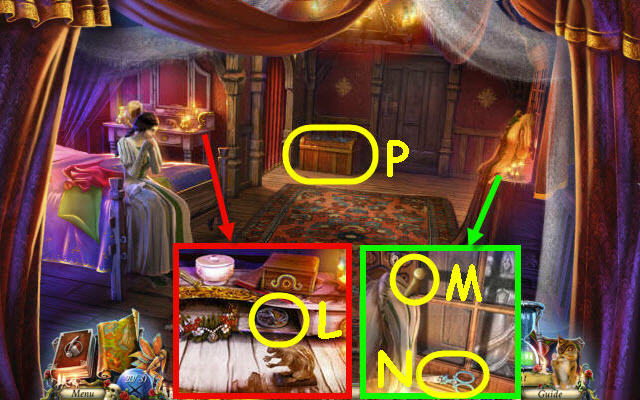
- Remove the flowers; take the EMPTY VASE (S).
- Go to the Mountain Foot.
- Use the EMPTY VASE in the water; receive a FULL VASE (T).
- Return to the Main Hall.
- Use the FULL VASE on the fire (U).
- Unscrew the bolt (V); take the CHANDELIER CHAIN (W).
- Enter the Library (X).
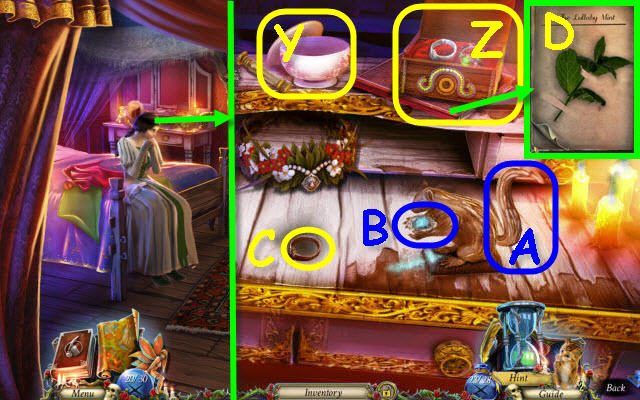
- Take the BUTTERFLY 1/4 (Y).
- Use the Kitty on the bird; receive a JEWELED ROD (Z).
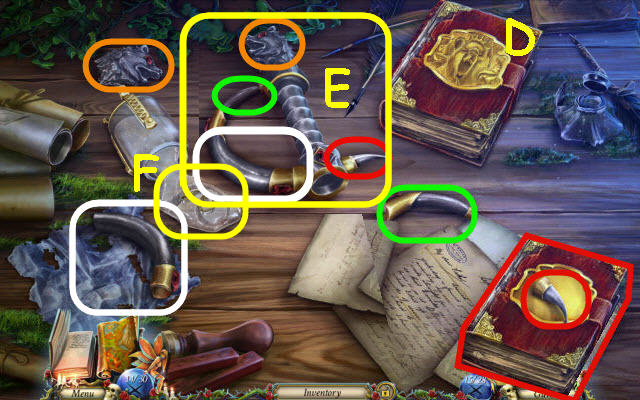
- Open the desk; read the letter and use the letter opener (A) on the package.
- Unwrap and open the box; take the NEEDLE (B).
- Place the JEWELED ROD on the container; take the BUTTERFLIES 2/4 (C).
- Take the BUTTERFLIES 3/4 (D).
- Place the NEEDLE on the spool; take the NEEDLE AND THREAD (E).
- Go to the Secret Chamber.
- Examine the table to access a HOP.
- Play the HOP.
- You receive BUTTERFLIES 4/4 (F).
- Use the NEEDLE AND THREAD on the glove; take the SEWED GLOVES (G).
- Go to the Study.
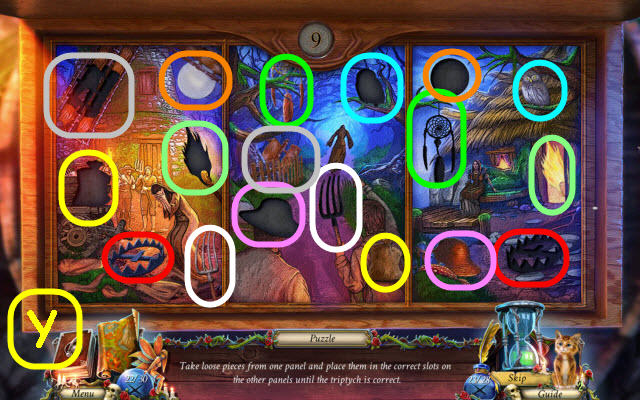
- Place the 4 BUTTERFLIES on the panel to trigger a puzzle (H).
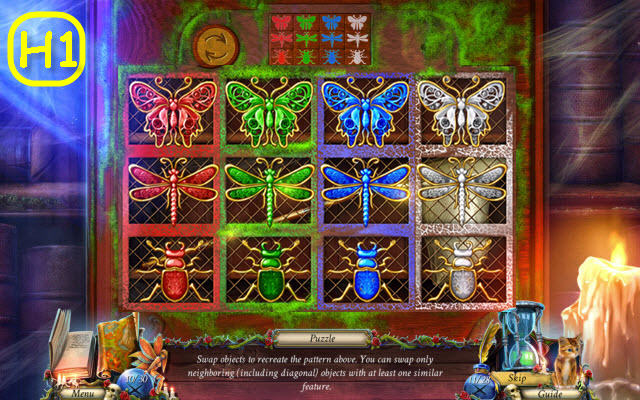
- Arrange the objects per the pattern.
- The starting layout is random.
- See screenshot for solution (H1).
- Take the BUTTERFLY NET.
- Use the BUTTERFLY NET to retrieve the JACK CRANK (I).
- Place the JACK CRANK on the winch; turn it (J).
- Attach the CHANDELIER CHAIN on the ring (K).
- Attach the rings (L); turn the crank and take the JACK (M).
- Back out.
- Place the JACK under the large beam; crank it (N).
- Use the SEWED GLOVES on the shards (O); select the boards twice.
- Receive a HALF HEART PIECE.
- Go to the Hut; the woman will take your HALF HEART PIECE.
- Read the recipe; turn the page and take the WOODEN DISK (P).
- Examine the alcove to access a HOP (Q).
- Play the HOP.
- You receive SCALES (R).
- Back out.
- Place the WOODEN DISK in the slot (S).
- Go forward on the boat.
- Take the HOE (T).
- Use the HOE on the plant; take the MANDRAKE ROOT (U) and VINES EMBLEM (V).
- Take the HOOKED NAIL (W); place the VINES EMBLEM in the recess (X).
- Enter the tree.
- Take the RUSTY PLANE BLADE (Y).
- Go to the Hut. Place the HOOKED NAIL on the rope (Z); take the FISHING ROD (A).
- Go to the Swamp. Use the FISHING ROD on the antlers; take the DEER HORN (B).
- Go to the Shrine. Examine the waterfall to access a HOP.
- Play the HOP.
- You receive a SMALL MIRROR (C).
- Use the RUSTY PLANE BLADE on the stone; receive a PLANE BLADE (D).
- Go to the Swamp.
- Place the PLANE BLADE on the plane; use the plane on the log and take the WOODEN GUTTER (E).
- Go forward.
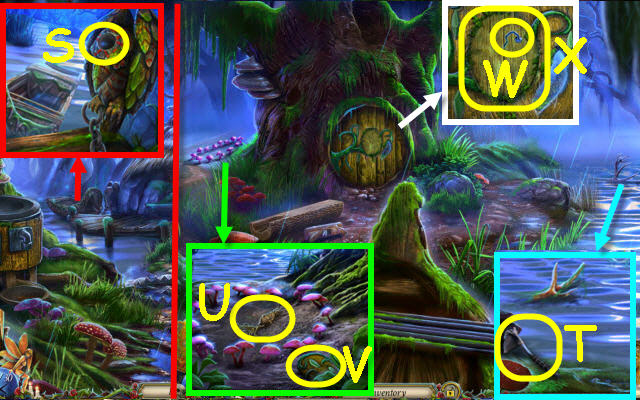
- Place the peg in the hole (F).
- Place the WOODEN GUTTER on the lower pegs (G), select the gutters (H-I) and place the SMALL MIRROR on the stone (J).
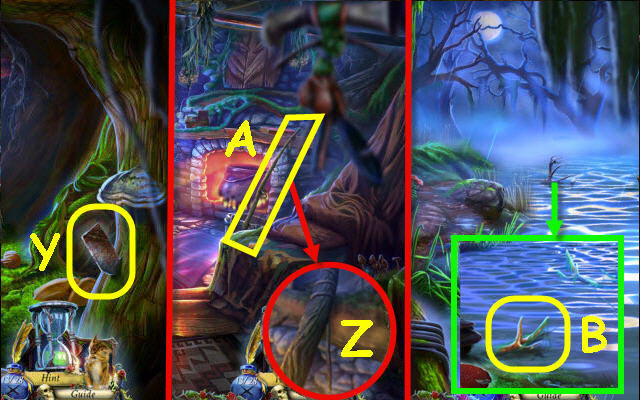
- Take the WOODEN CROW (K) and MOON BEAN POD (L).
- Go to the Hut.
- Place the WOODEN CROW on the book cover; read it and take the MISTLETOE (M) after the cutscene.
- Place the SCALES, MANDRAKE ROOT, DEER HORN, MOON BEAN POD and MISTLETOE on the table to trigger a puzzle (N).
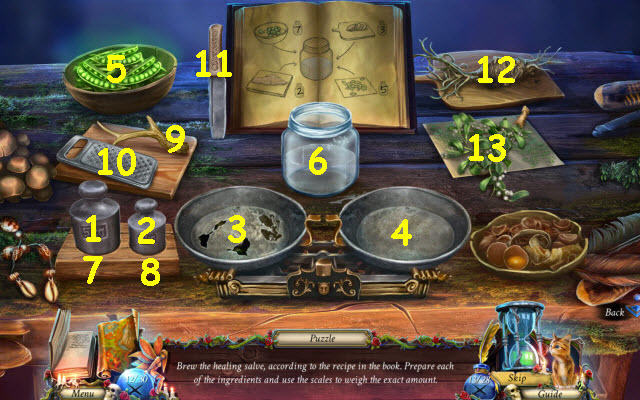
- Prepare the recipe.
- Select and move the following: 1-3, 2-3, 5-4, 4-6, 1-7, 9-10, 9-4, 4-6, 11-12, 2-4, 1-3, 12-4, 4-6, 2-8, 13-4 and 4-6.
- Take the HEALING SALVE.
- Go to the Main Hall.
- Give the HEALING SALVE to the woman (O).
- Open the door; go through (P).
- Examine the timbers to access a HOP (Q).
- Play the HOP.
- You receive an AXE (R).
- Take the FULL OILCAN (S).
- Take the EMPTY LITTLE BARREL (T).
- Use the AXE on the barrel 4x; take the SHACKLES (U).
- Use the EMPTY LITTLE BARREL to get the GUNPOWDER (V).
- Back out.
- Use the FULL OILCAN on the hand; open the hand and take the HALBERD (W).
- Go to the Secret Chamber.
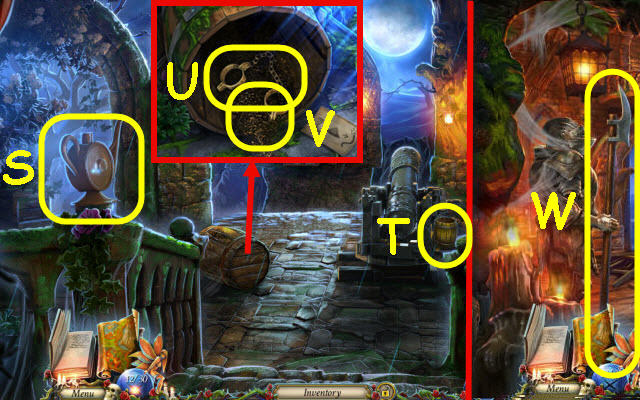
- Pull the torch; place the SHACKLES on it and pull again (X).
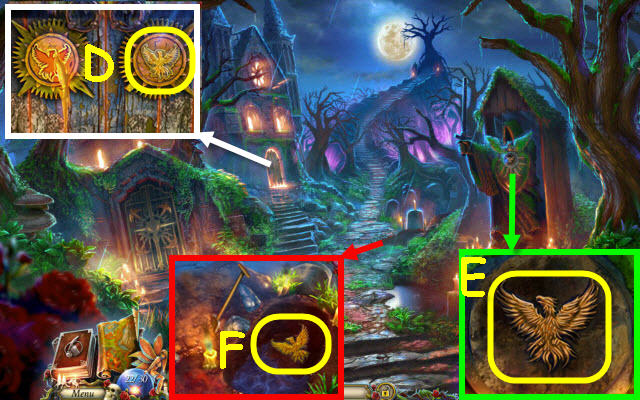
- Go to the Tower (Y).
- Take the CANDLESTICK (Z).
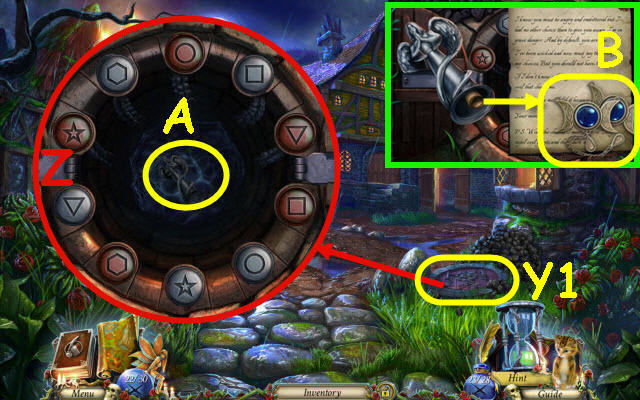
- Take the BEAR INSIGNIA (A); select the lens 3x.
- Take the STRING (B).
- Examine the table (C).
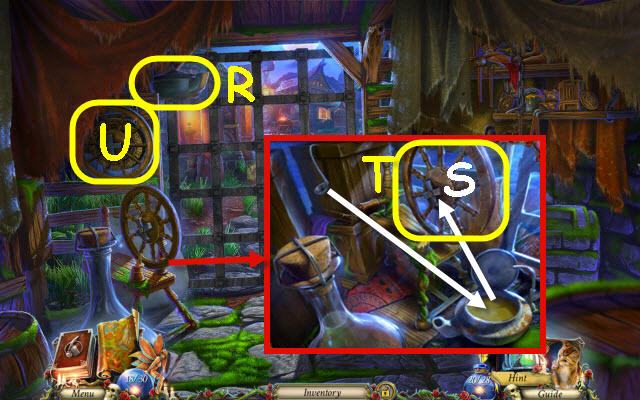
- Assemble the hilt per the color coding; knock over the bottle and unwrap the cloth to uncover them.
- Place the BEAR INSIGNIA on the journal (D). Read it, close it and move the pages to uncover the last piece in green.
- Take the SWORD HANDLE (E).
- Dunk the STRING in the liquid; take the STICKY STRING (F).
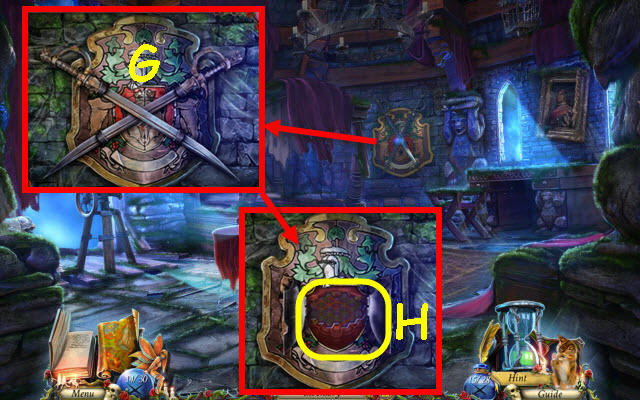
- Place the SWORD HANDLE on the sword; remove both swords (G).
- Open the center; select it to trigger a puzzle (H).
- Complete the diagram.
- See screenshot for solution (I).
- Read the papers and look at the pictures; take the COPPER KEY.
- Back out.
- Use the COPPER KEY in the lock; take the STEEL BALL (J).
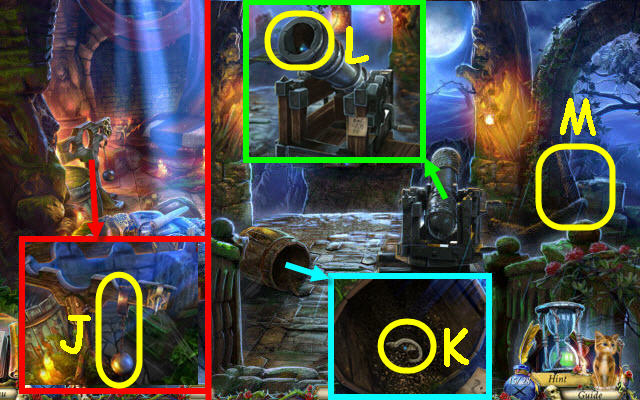
- Go to the Courtyard.
- Dip the STICKY STRING in the gunpowder; take the FUSE (K).
- Select the cannon; place the GUNPOWDER and STEEL BALL in the barrel (L).
- Examine the pillars to access a HOP (M).
- Play the HOP.
- You receive a RAMROD (N).
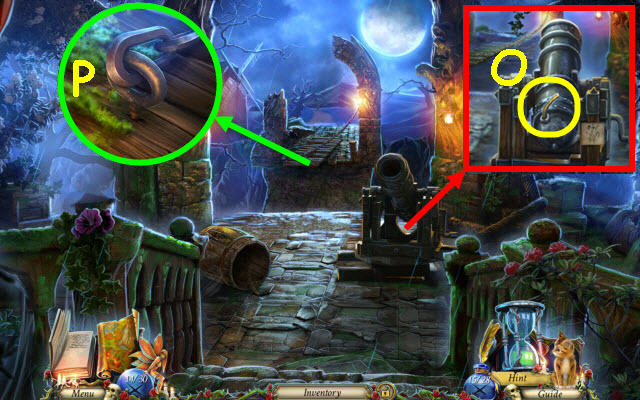
- Use the RAMROD in the cannon; select it. Place the FUSE on it and light it with the CANDLESTICK (O).
- Use the HALBERD on the chain (P).
- Go forward.
Chapter 3: Echoes from the Past
- Move the foliage; clear the coverings (Q).
- Move the rune and read the note. Turn over the note; take the BROOCH (R).
- Take the SCREW (S).
- Move the cloth and use the BROOCH on the key; take the SMALL KEY (T).
- Zoom into the door twice; take the FITTING SCRAP (U).
- Use the SCREW and FITTING SCRAP on the axle (V). Turn it a few times and remove it; take the COACH WHEEL (W).
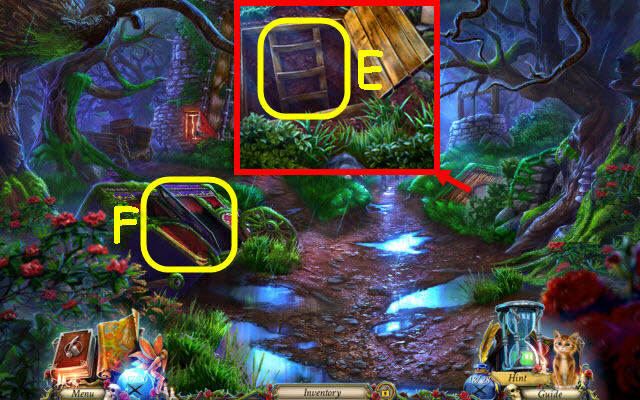
- Use the SMALL KEY on the padlock and turn it; take the LADDER (X).
- Place the LADDER in the well; take the TAP (Y).
- Place the TAP on the stem; select it twice (Z).
- Select the block (A) and beam (B); place the COACH WHEEL on the axle (C).
- Move the wagon; select the blade (D).
- Examine the coach to access a HOP (E).
- Play the HOP.
- You receive an UMBRELLA (F).
- Use the UMBRELLA on the blade; take the KITE TAIL (G).
- Tie the KITE TAIL on the latch; pull it (H).
- Enter the windmill.
- Take the SHACKLE (J).
- Release the chain (K); take the BUCKET (L).
- Take the HALF PIPE (M).
- Attach the SHACKLE; select it (N).
- Place the sandbags on the platform (O).
- Take the BELT (P).
- Back out.

- Attach the BUCKET; select the winch twice and take the BUCKET WITH WATER (Q).
- Enter the windmill.
- Place the HALF PIPE and BELT on the crack (R).
- Move the cloth and pour the BUCKET WITH WATER in the pipe; take the WINDMILL KEY (S).
- Remove the cover; place the pieces (T) and WINDMILL KEY on the lock. Turn the key; take the RAZOR (U) and read the note.
- Use the RAZOR on the sack; open the hatch (V).
- Go up.
- Move the hat and use the RAZOR on the stitches; take the STAR KEY (W).
- Take the BROOM (X).
- Move the cloth and items. Select the 2 keys; take the KEY RING (Y).
- Use the BROOM and KEY RING on the chest; turn the keys (Z). Open the lid.
- Move the clothes and use the STAR KEY on the screw; select twice (A).
- Remove the panel; place the BROOCH on the board to trigger a puzzle (B).
- Find the correct sequence.
- See screenshot for part 1 (C) and 2 (D) solutions.
- Read all three pages until you trigger a cutscene; take the SILVER STAG.
- Go to the Windmill.
- Place the SILVER STAG on the hatch; open it and go down (E).
- Select anywhere and back out.
- Examine the coach to access a HOP (F).
- Play the HOP.
- You receive a GLASS JAR (G).
- Read the note (H).
- Go down the tunnel (I).
- Use the GLASS JAR on the fireflies; receive a FIREFLY LANTERN (J).
- Use the FIREFLY LANTERN anywhere.

- Follow the runes (K).
- Go left, right, straight and right.
- Select the doorway twice; go forward (L).
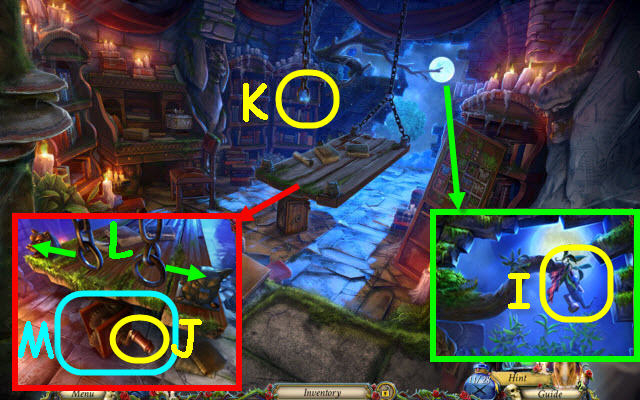
- Pull the MAGNET; take it (M).
- Open the grate; send Kitty in it (N).
- Attach the MAGNET to the yarn (O); use it on the key (P). Take the SILVER KEY.
- Use the SILVER KEY on the lock (Q); turn it.
- Go up.
Chapter 4: The Hidden
- Take down the pot (R).
- Open the pot; use the ladle on it and pour on the spindle (S).
- Take the WHEEL (T).
- Place the WHEEL on the mechanism; turn it (U).
- Zoom in and receive a METAL FLOWER (V).
- Remove the piston (W); take the EMPTY TANK (X).
- Remove the planks and cover; take the NAIL CLIPPERS (Y).
- Examine the shelves to access a HOP (Z).
- Play the HOP.
- You receive GLUED COINS (A).
- Use the NAIL CLIPPERS on the wires; remove the cork. Place the GLUED COINS in the bottle; receive COPPER COINS (B).
- Use the EMPTY TANK on the pump; receive a FULL TANK (C).
- Take the COAL CARRIER (D).
- Place the FULL TANK in the sprayer head and the COPPER COINS on the bar. Select the bar twice; take the WATER SPRAYER (E).
- Use the WATER SPRAYER on the lantern (F).
- Go forward.
- Take the CROCHET (G) and ELEGANT FAN (H).
- Take the GOLDEN RELIEF PIECE (I).
- Remove the cover; use the COAL CARRIER to get COAL (J). Move the remaining coal.
- Place the GOLDEN RELIEF PIECE on the crate; take the GYPSUM (K).
- Back out.
- Use the CROCHET on the figure; take the LEAD HUSSAR (L).
- Use the COAL and ELEGANT FAN on the embers (M).
- Place the GYPSUM, LEAD HUSSAR and METAL FLOWER on the table to trigger a puzzle.
- Make the casting.
- Select or use the following: 1-2, 3-1, 4-1, 5-6, 6-7-1, 8-1-9 and 10-11.
- Take the 2 METAL FLOWERS (N).
- Go to the Square.
- Place the 2 METAL FLOWERS in the recesses (O).
- Go through the gates; go up the ladder.
- Move the rag and wood; select the pieces (P-Q).
- Place the disk on the wheel (R); pull the lever (S).
- Take the ICY MEDALLION PIECES 1/3 (T).
- Go down the ladder.
- Take the ICY MEDALLION 2/3 (U).
- Open the curtain and select the skeleton; take the BONE (V).
- Give the BONE to the dog; take the COLLAR (W).
- Take the ICY MEDALLION 3/3 (X) and SUN NUT (Y).
- Remove the belt; place the COLLAR on the beam (Z).
- Remove the chain and container (A).
- Select the chain (B) twice; select the chain (C).
- Place the 3 ICY MEDALLIONS on the door and examine it to access a HOP (D).
- Play the HOP.
- You receive SWEETS (E).
- Place the SWEETS on the ground; take the CRANK (F).
- Go up the ladder.
- Place the SUN NUT and CRANK on the disk; select the crank (G).
- Take the WATERING POT (H).
- Use the WATERING POT on the dirt; take the RAKE (I).
- Select the rope 3x; attach the RAKE (J).
- Use the rake on the railing; select it (K).
- Go to the balcony; select the door twice and enter.
- Speak to Lilly.
- Take the CROW TOKEN (L).
- Take the CLIP 1/3 (M) and SILVER SCISSORS (N).
- Place the CROW TOKEN on the trunk to trigger a puzzle (P).
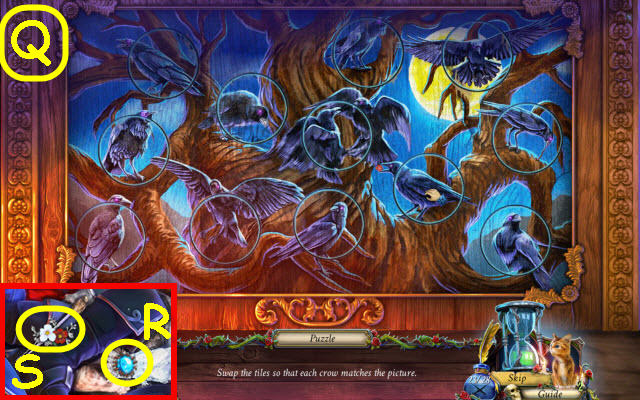
- Complete the image.
- See screenshot for solution (Q).
- Use the SILVER SCISSORS on the stitching; take the MOONSTONE (R) and HAIRPIN 1/2 (S).
- Open the curtain (T); zoom in.
- Take the CLIPS 2/3 (U); examine the diagram.
- Take the NUTCRACKER TAIL (V).
- Take the GLUE (W); open the box and remove the dress (X).
- Open the jar (Y) and the box (Z).
- Place the NUTCRACKER TAIL and MOONSTONE on the nutcracker; select the tail (A).
- Use the GLUE and the powder (B) on the ring (C).
- Take the PREPARED RINGS (Z).
- Open the book and turn the page; take the LULLABY MINT (D).
- Back out; go to the Square.
Chapter 5: The Plan
- Place the LULLABY MINT in the cup; select the pot and take the SLEEPING POTION (E).
- Use the SILVER SCISSORS on the curtain; receive TULLE (F).
- Place the SLEEPING POTION in the cup (G).
- Go forward (H).
- Examine the cave entrance to access a HOP.
- Play the HOP.
- You receive a COLD IRON (I).
- Take the COPPER HANDLE (J).
- Remove the branches and netting (K); take the EMPTY BASKET (L).
- Examine the plants (M).
- Take the CLIPS 3/3 (N).
- Use Kitty on the frog (O).
- Place the EMPTY BASKET on the rock; move plant leaves covering berries and flip the bucket (P).
- Pick the berries circled in red; take the BERRY BASKET (Q).
- Place the TULLE and 3 CLIPS on the frame; take the SIEVE (R).
- Open the crate and move the chest; take the WHITE GLOVES (S).
- Back out.
- Use the SIEVE on the ash (T); take the BLACK PIGMENT (U).
- Back out.

- Use the COPPER HANDLE on the door and open it; take the HAIRPINS 2/2 (V).
- Unearth the pieces and place them in the slots as you find them; take the KNIGHT FIGURINE BASE (W).
- Place the COLD IRON on the fire; receive a HOT IRON (X).
- Go to the bedroom.
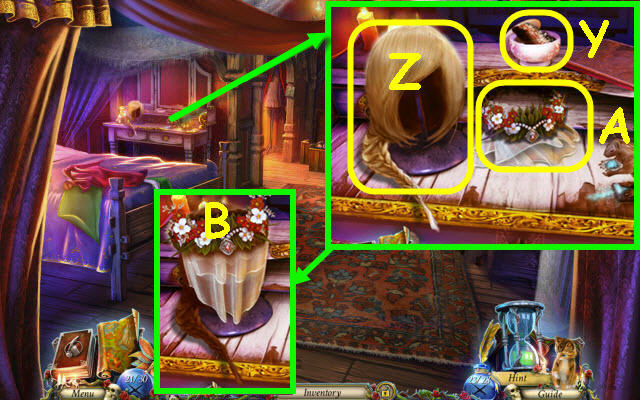
- Place the BLACK PIGMENT and BERRY BASKET in the container (Y). Select the container twice; use the comb on the wig (Z).
- Place the TULLE and 2 HAIRPINS on the garland (A).
- Place the garland on the wig. Take the GARLAND AND WIG (B).
- Use the HOT IRON on the dress; take the WEDDING DRESS (C).
- Select the knight; place the KNIGHT FIGURINE BASE on it (D). Select the knight to trigger a puzzle.

- Move the knight to all squares.
- See screenshot for solution (1-19).
- Take the NECKLACE.
- Place the WEDDING DRESS, NECKLACE, WHITE GLOVES and GARLAND AND WIG on the form (E).
- Speak to Lilly (F).
- Examine the bed to access a HOP (G).
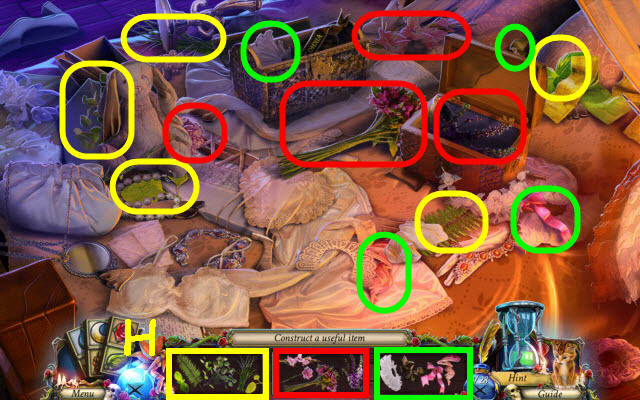
- Play the HOP.
- You receive a BOUQUET (H).
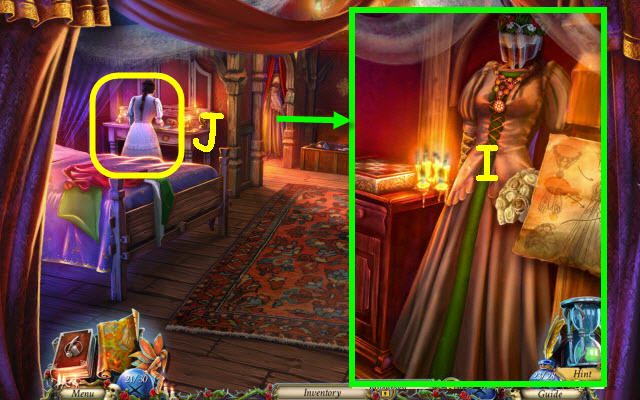
- Place the BOUQUET on the dress; select it (I).
- Select Lilly to trigger a puzzle (J).
- Match the makeup.
- Select the following: 1, 2, 3, 4x4, 5, 6, 7 and 8.
- Go forward.
- Give the PREPARED RINGS to Edward (K).
- Place the ring on the finger (L).
- Go forward.
Chapter 6: The Fallen Angel

- Take the ANGEL FIGURINE KEY (M).
- Go to the Bedroom.
- Examine the bed to access a HOP.
- Play the HOP.
- You receive a WOODEN PIGEON (N).

- Use the WOODEN PIGEON on the lock; knock over the angel (P).
- Open the panel; set the correct tokens (Q).
- Read the book; take the DIAMOND EARRING (R).
- Back out.
- Use the DIAMOND EARRING on the window; select it and open the drawer (T).
- Use or select the following: 1-2, 3-4, 1-4, 5-6, 7-6, 1-6.
- Take the HATCHET.
- Go to the Crossroads.
- Use the HATCHET on the tree 3x (U).
- Examine the cave entrance to access a HOP (V).
- Play the HOP.
- You receive a STEEL FAN (W).
- Go to the Alley.
- Place the STEEL FAN on the box (X).
- Examine the box to trigger a puzzle.
- Complete the image.
- Move the items blocking others; place the remaining items as color coded (Y).
- Read the letters; take the DRAIN KEY.
- Go forward.
- Use the DRAIN KEY on the drain; turn it (Y1).
- Find the matches and change the symbols.
- See screenshot for solution (Z).
- Select the angel (A).
- Use the ANGEL FIGURINE KEY on the bottom; read the note and take the MEDALLION (B). Go to the Crossroads.
- Use the MEDALLION on the vines (C).
- Go forward.
Chapter 7: The Verge
- Take the GOLDEN PHOENIX 1/4 (D).
- Take the GOLDEN PHOENIX 2/4 (E).
- Move the dirt; take the GOLDEN PHOENIX 3/4 (F).
- Go up the stairs.
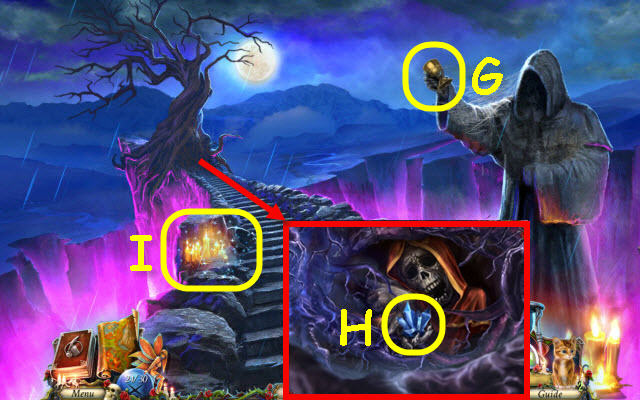
- Take the STONE CHALICE (G).
- Move the branches; take the GLOWING CRYSTAL 1/3 (H).
- Examine the candles to access a HOP (I).
- Play the HOP.
- You receive the GOLDEN PHOENIX 4/4 (J).
- Back out.
- Place the 4 GOLDEN PHOENIXES on the door (K).
- Take the EMPTY BARREL (L).
- Attempt to go forward; back out.
- Place the EMPTY BARREL by the grave; use the shovel (M) on the dirt pile (N) and dump in the barrel (O). Take the FULL BARREL.
- Roll the FULL BARREL down the stairs (P).
- Go forward.
- Open the door and select the cobwebs; place the crystal on the holder (Q).
- Take the RAG (R).
- Back out.
- Use the RAG on the shield; turn the sun rays and take the SHIELD (S).
- Enter the Crypt.
- Place the SHIELD on the frame; select it (T).
- Select the torch (U); unwrap it and place the spiked stick (V) on it. Select it and dunk it in the oil (W); receive a TORCH.
- Take the SHARD (X).
- Open the curtain; use the SHARD on the rope (Y).
- Hook the rope on the lever and pull it (Z); use Kitty on the rope.
- Open the hand; take the GLOWING CRYSTALS 2/3 (A).
- Read the book and turn the page; take the MONOCLE (B).

- Take the COPPER HAND (C).
- Use the TORCH on the sunbeam and the MONOCLE on the TORCH; take the BURNING TORCH (D).
- Use the BURNING TORCH on the snake; place the COPPER HAND on the dial (E).
- Turn the dial in the correct order (1-3).
- Examine the box to access a HOP (F).
- Play the HOP.
- You receive the GLOWING CRYSTAL 3/3 (G).
- Place the 3 GLOWING CRYSTALS on an empty slot on the table (H).
- You will trigger a puzzle.
- Set the correct colors.
- See screenshot for solution (I).
- Take the SUN SYMBOL (J).
- Place the SUN SYMBOL on the door (K).
- Go forward.
- Place the STONE CHALICE in the slot (1); follow the numbered moves (2-4).
- Take the WOODEN RELIEF PIECE 1/4 (L).
- Take the PHOENIX NESTLING (M).
- Assemble the drawing (N); place it on the book and select the 3 holes (O).
- Open the book; take the WOODEN RELIEF PIECE 2/4 (P).
- Place the PHOENIX NESTLING in the slot; arrange them in order and take the WOODEN RELIEF PIECE 3/4 (Q).
- Place the SUN SYMBOL in the recess; balance the scales (R) and take the WOODEN RELIEF PIECE 4/4 (S).
- Go to the Edge.
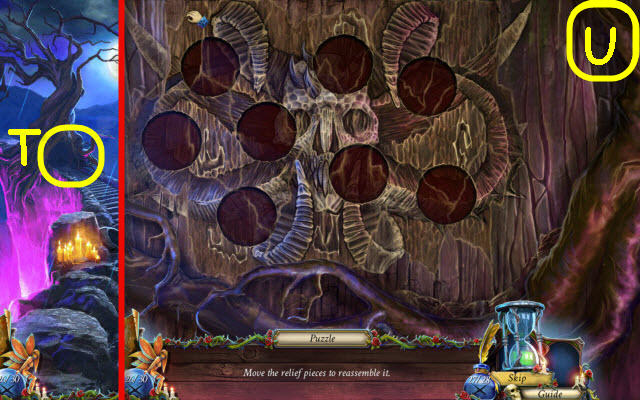
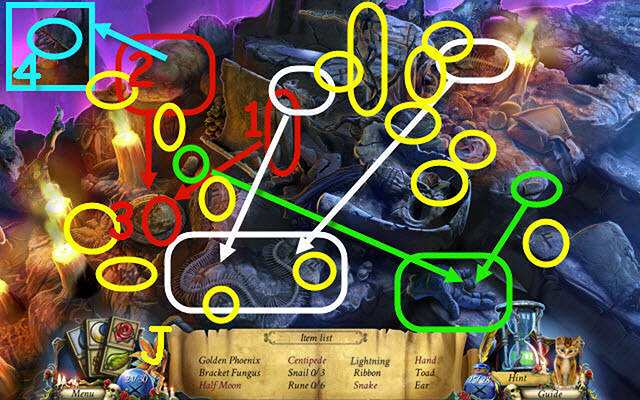
- Place the 4 WOODEN RELIEF PIECES on the trunk to trigger a puzzle (T).
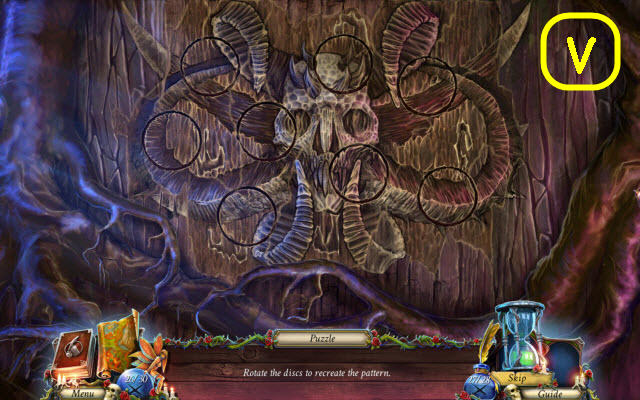
- Assemble the relief (U).
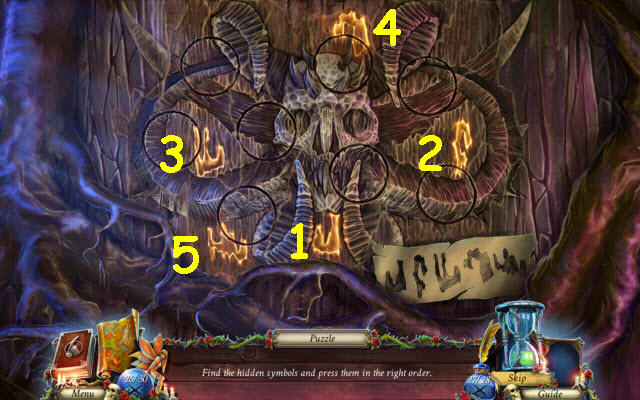
- Complete the image (V).
- Press the runes in order (1-5).
- Go forward.
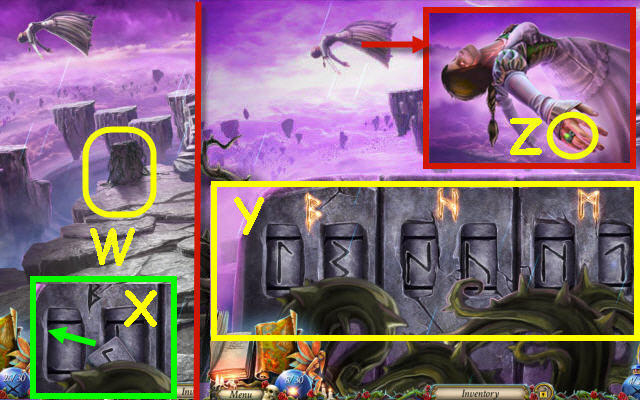
- Use the MEDALLION on the vine (W).
- Place the rune in the slot (X).
- Select the symbols that make up the rune above (Y).
- Take the ring (Z).
- Congratultions, you've completed Grim Legends: The Forsaken Bride
Created at: 2014-03-28