

Walkthrough Menu
- General Tips
- Chapter 1: The Front Porch
- Chapter 2: The Garden
- Chapter 3: The Mirrored Hall
- Chapter 4: The Headmaster's Office
- Chapter 5: The Mirrored Kitchen
- Chapter 6: The Bathroom
- Chapter 7: The Mirrored Cellar
General Tips
- This is the official guide for Grim Tales: Bloody Mary.
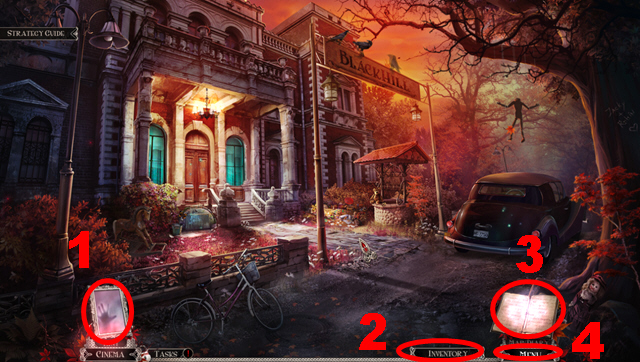
- Push the hint button (1) whenever you need help.
- Collected items will be stored in the inventory (2).
- Select the journal (3) to access the map and to review the gathered information.
- Access the menu (4) to leave the game and to adjust the sound and the display mode.
- There are three grades of difficulty you can choose from: casual, advanced, and hardcore.
- Hidden-object puzzles are referred to as HOPs in this guide. Items listed in yellow are hidden, or they require additional actions to locate. Interactive items are color-coded.
Chapter 1: The Front Porch
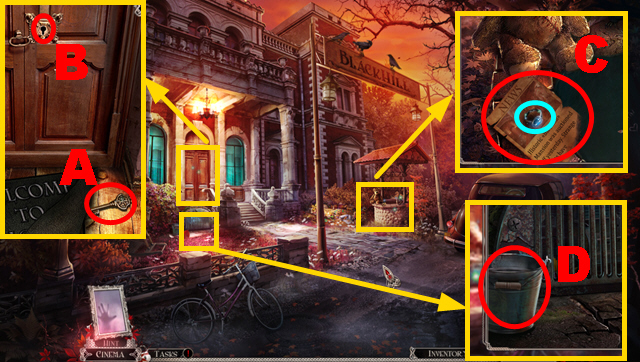
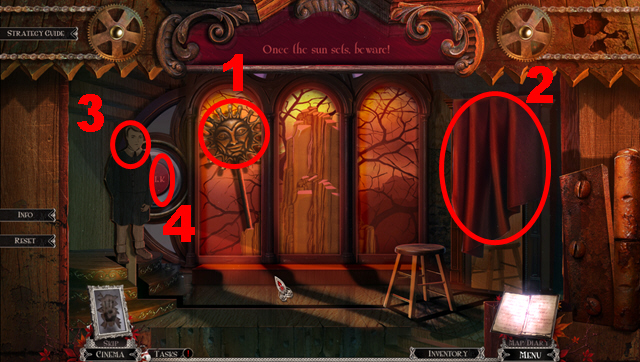
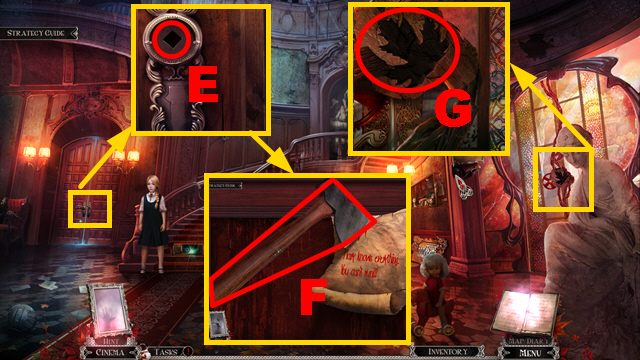
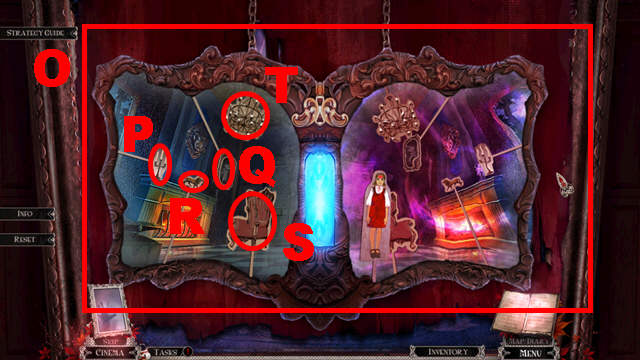
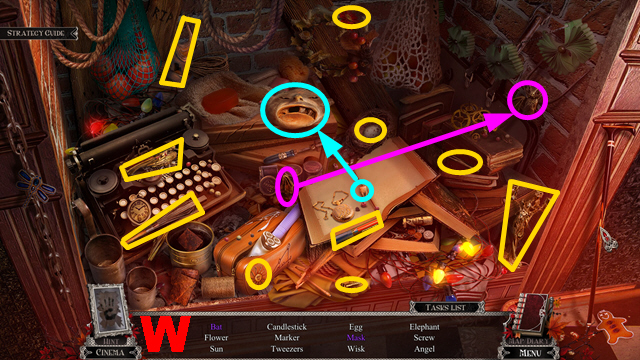
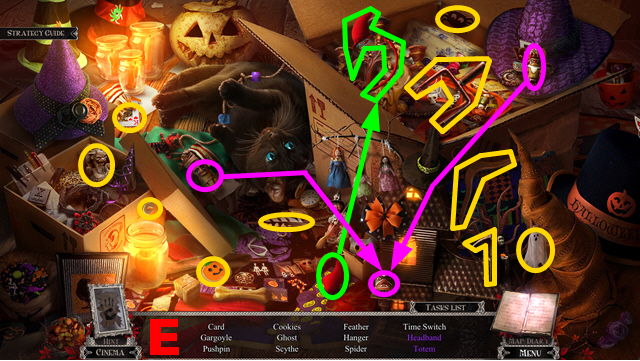
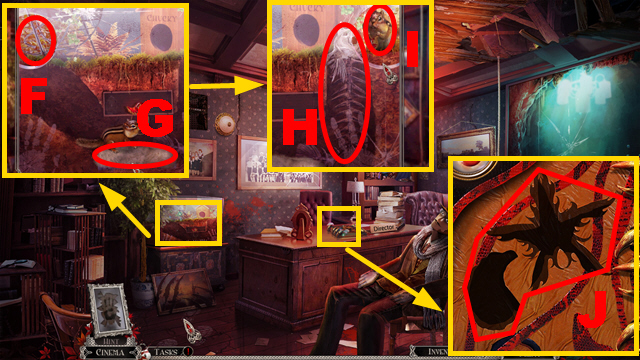
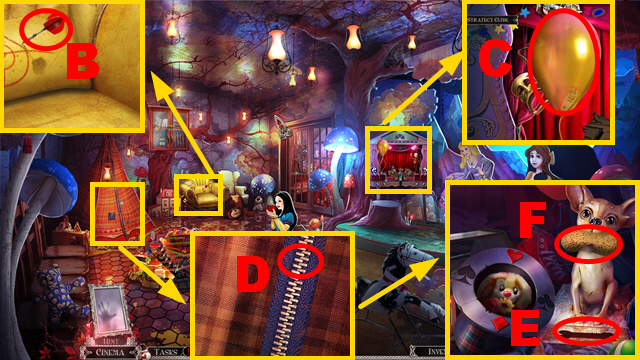
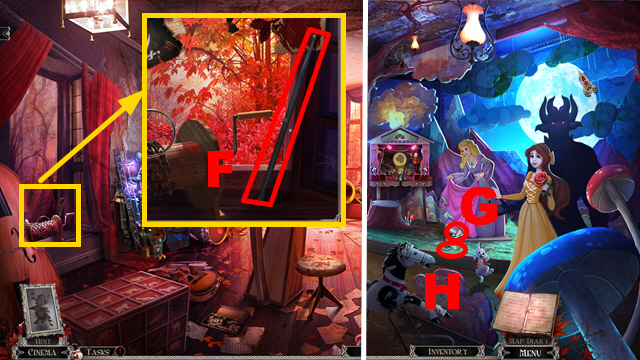
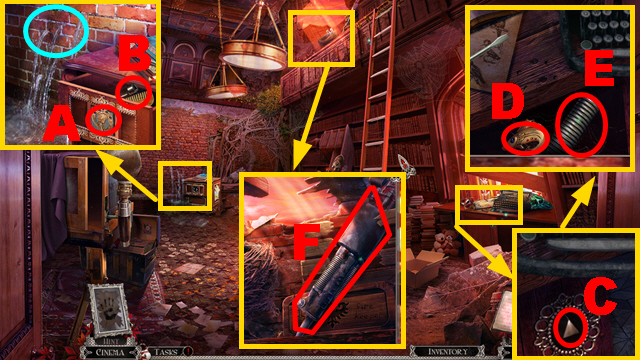
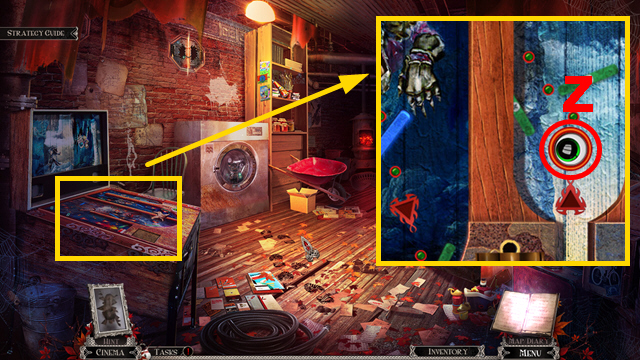
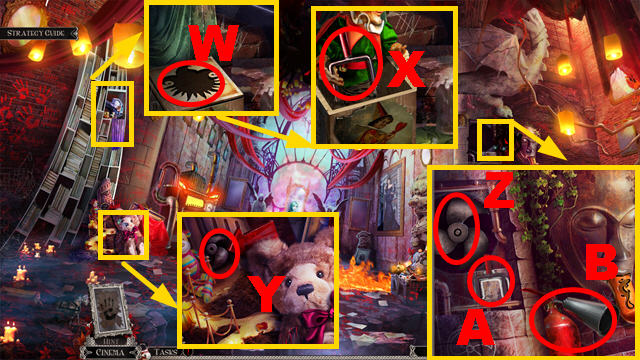
- Zoom into the door and remove the welcome mat; take the KEY (A) and insert the KEY into the lock (B).
- Zoom into the well and open the paper; take the 1/4 RING (light blue) and read the note (C).
- Zoom into the grate; take the BUCKET (D).
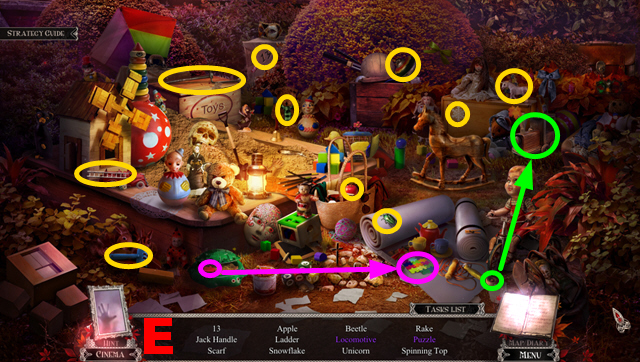
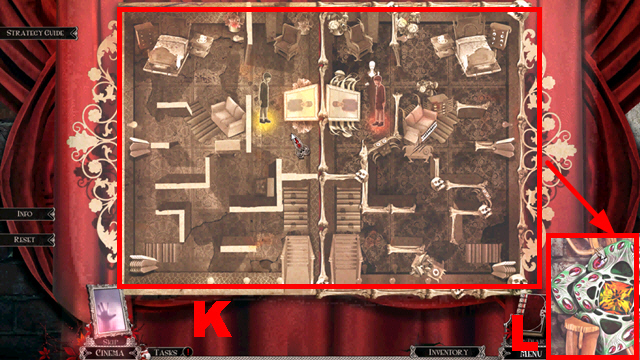
- Play the HOP.
- You will receive the JACK HANDLE (E).
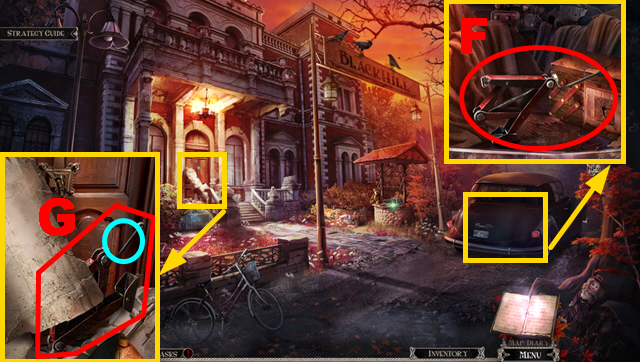
- Zoom into the car and open the trunk; connect the JACK HANDLE to the car jack and take the CAR JACK (F).
- Zoom into the door; put down the CAR JACK (G) and push the handle (light blue).
- Enter the Foyer.
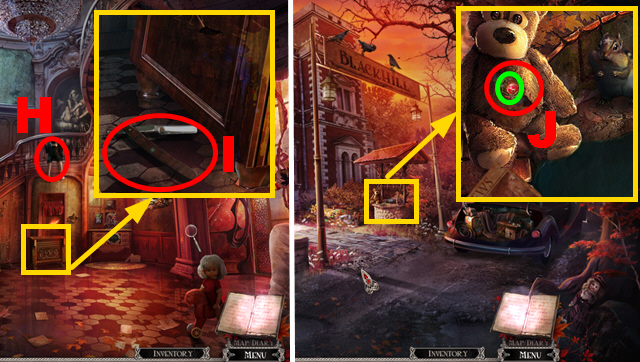
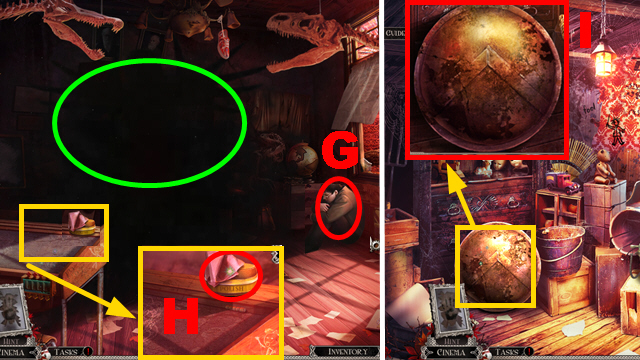
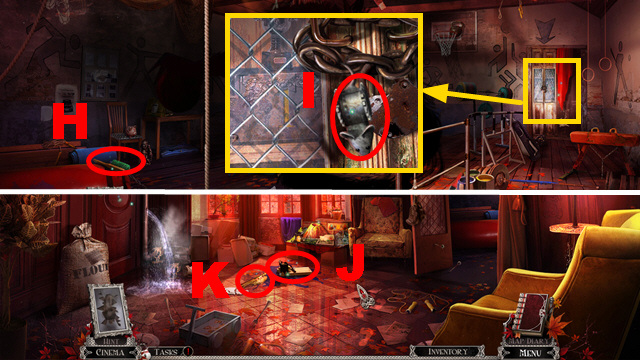
- Talk to the boy (H).
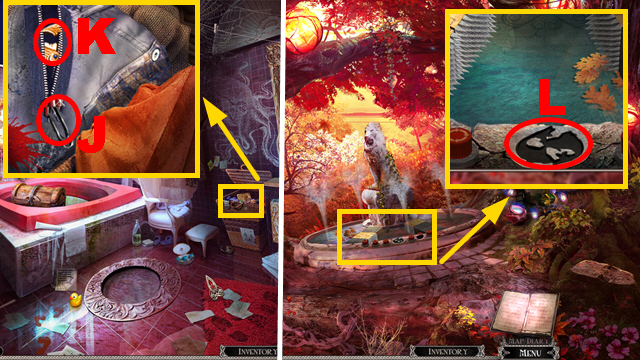
- Zoom into the floor; take the RAZOR (I).
- Walk down.
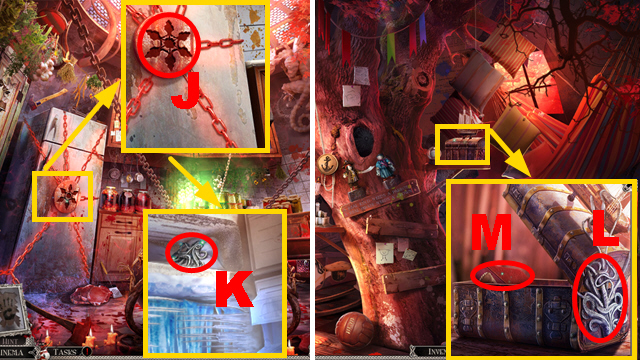
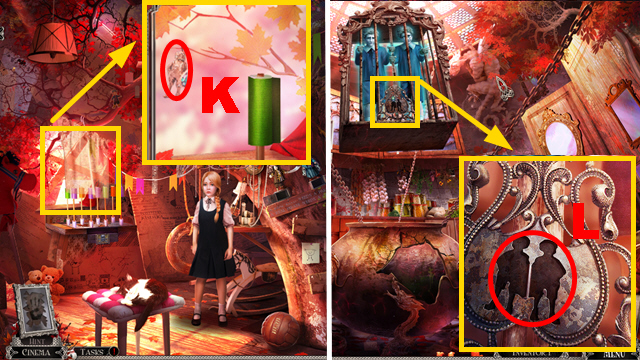
- Zoom into the well; cut open the teddy bear with the RAZOR (J) and take the OWL AMULET (green).
- Enter the Foyer.
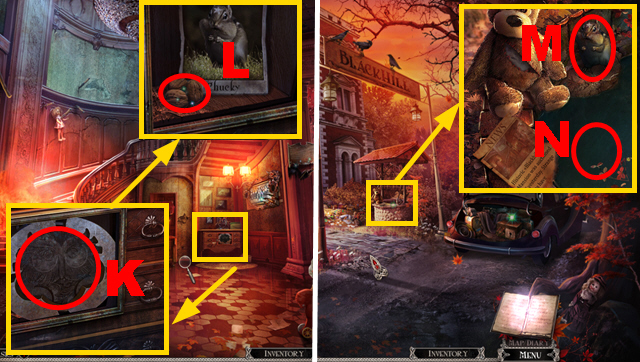
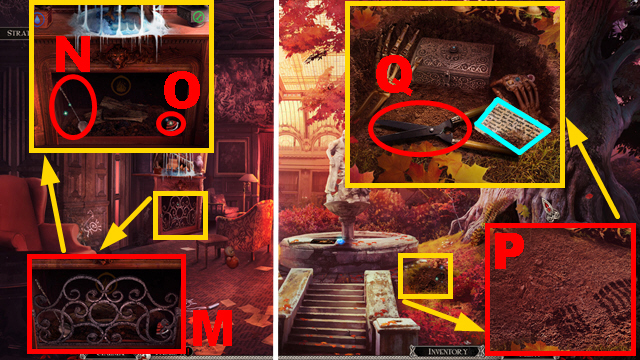
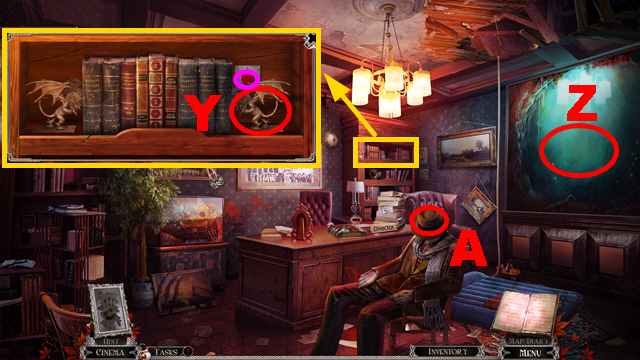
- Zoom into the dresser and insert the OWL AMULET into the niche (K); take the NUTS (L).
- Walk down.
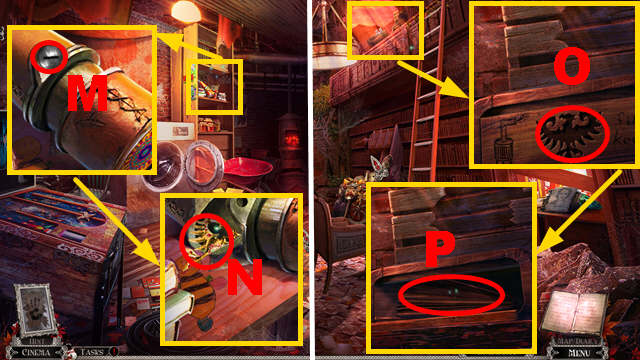
- Zoom into the well; give the NUTS to Chucky, take CHUCKY (M), and place the BUCKET into the water (N) to acquire the BUCKET OF WATER.
- Enter the Foyer.
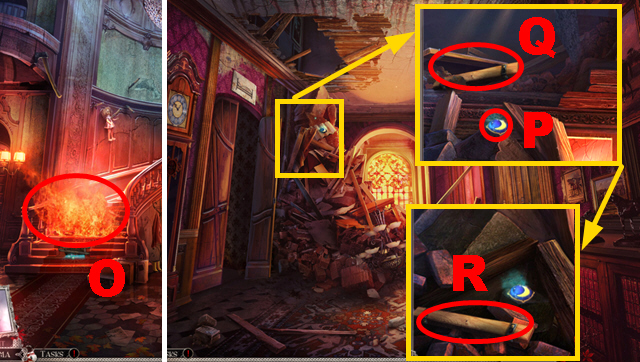
- Put out the fire with the BUCKET OF WATER (O).
- Go to the Second Floor.
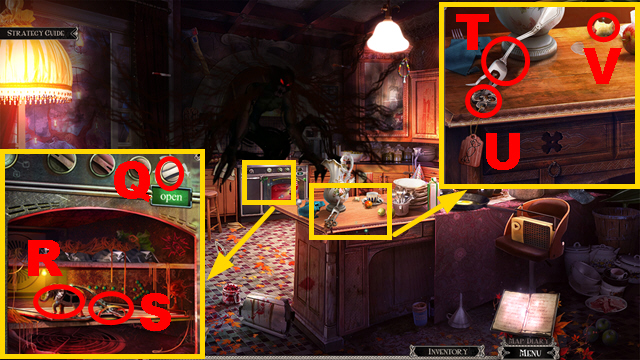
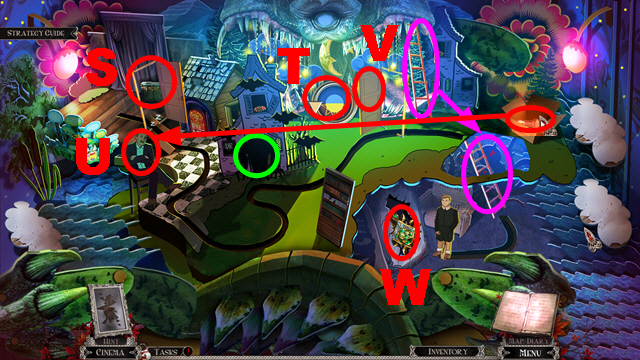
- Zoom into the debris and try to grab the amulet (P); send CHUCKY to the planks (Q) and take the SMALL PLANK (R).
- Walk down.
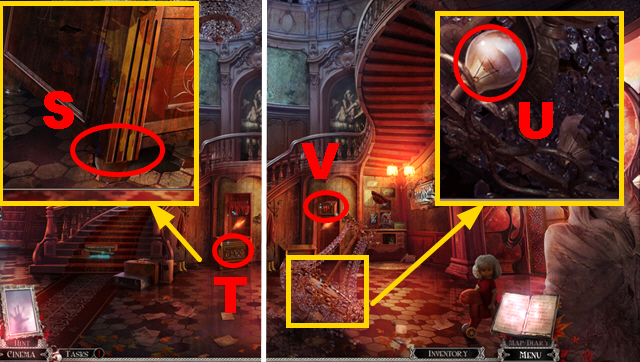
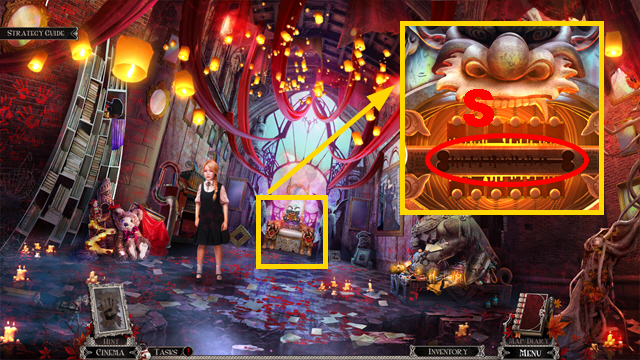
- Zoom into the dresser; put the SMALL PLANK below the dresser (S).
- Move aside the dresser (T).
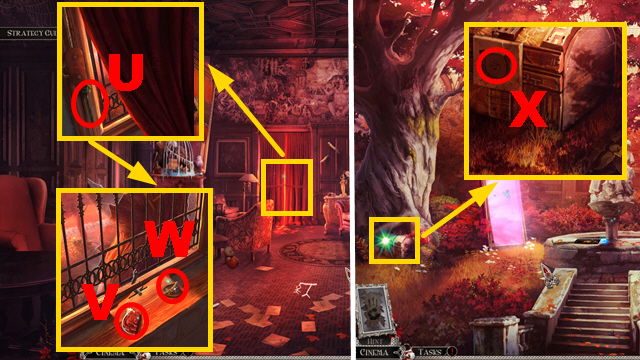
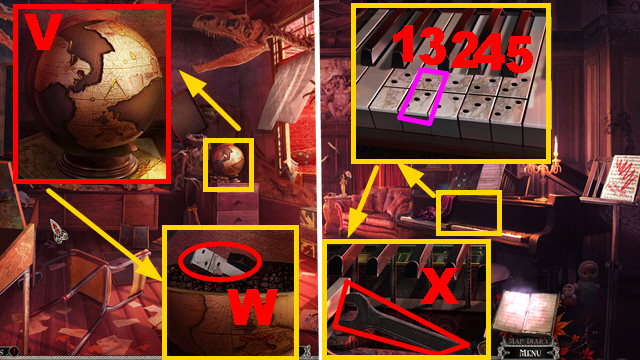
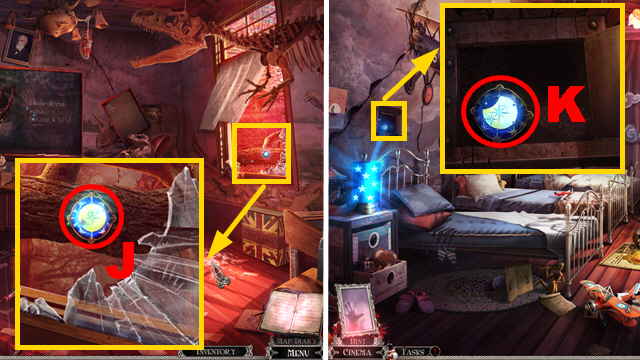
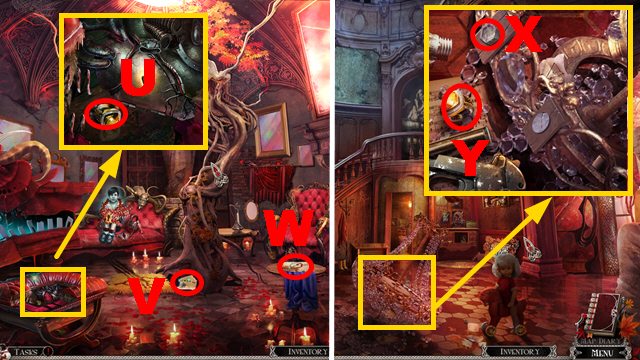
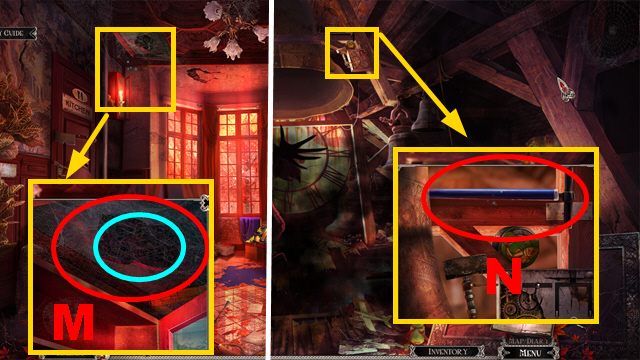
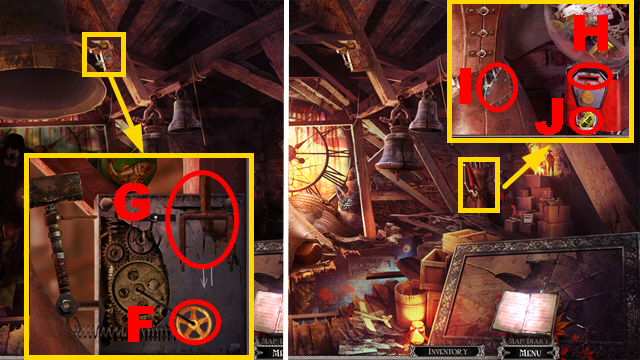
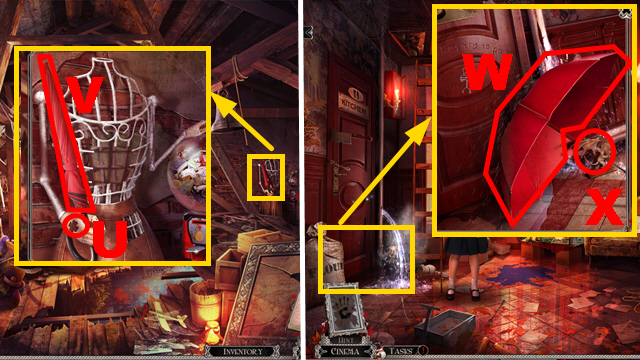
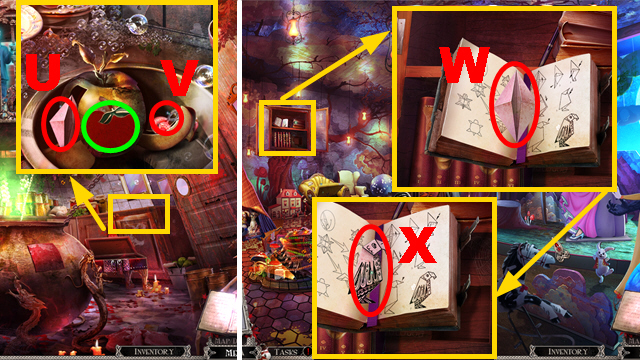
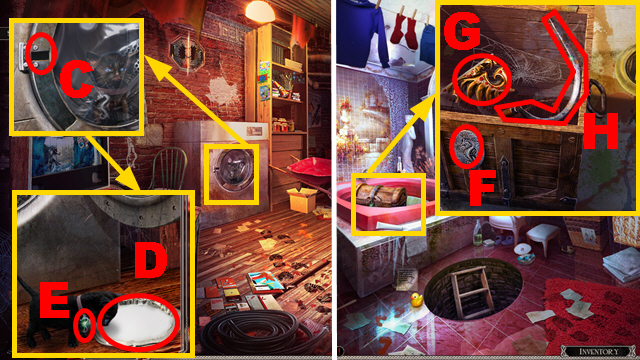
- Zoom into the chandelier; take the BULB (U).
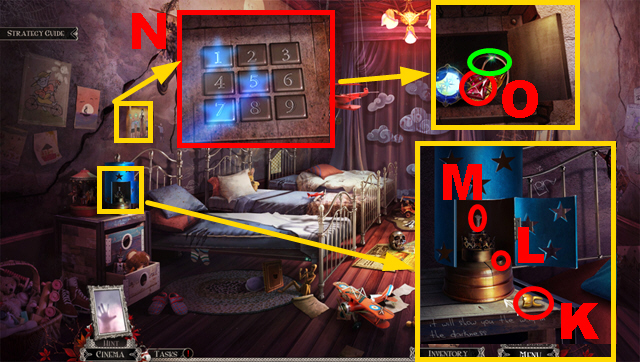
- Zoom into the door (V).
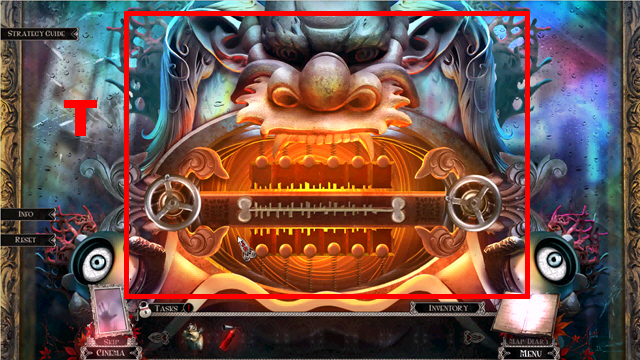
- Play the mini-game.
- Activate the elements in numerical order: 1-4 to solve this puzzle.
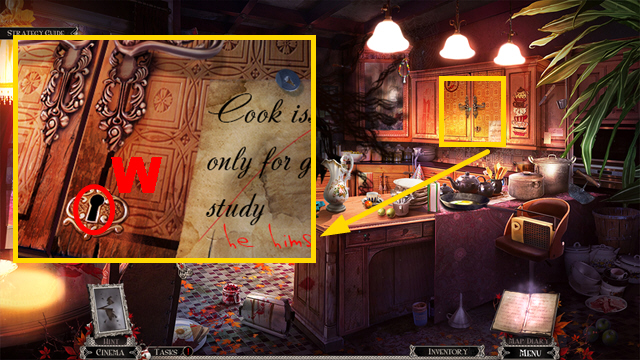
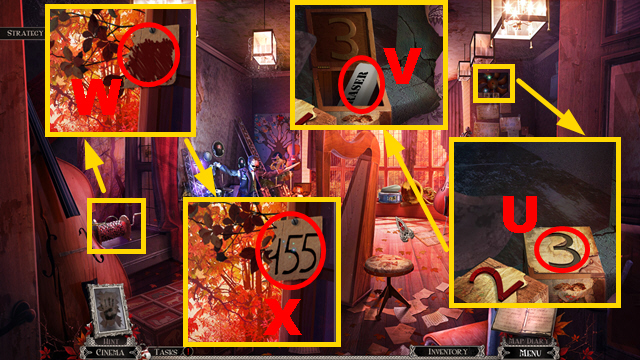
- Enter the Storeroom.
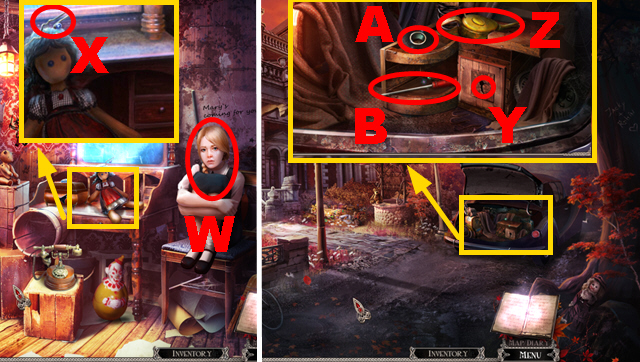
- Talk to Jackie (W); you will receive the BOY AMULET PART.
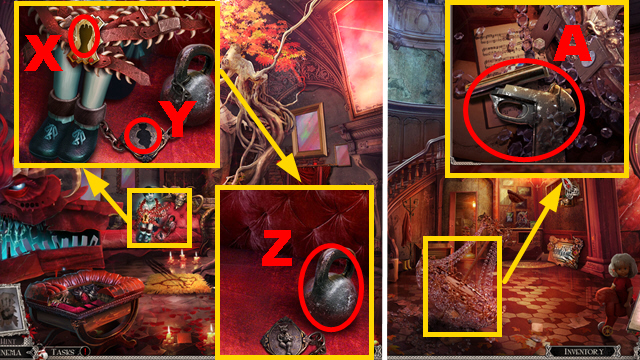
- Zoom into the doll; take the PIN (X).
- Walk down twice.
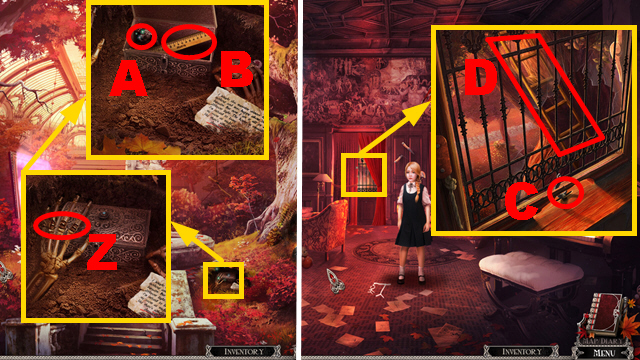
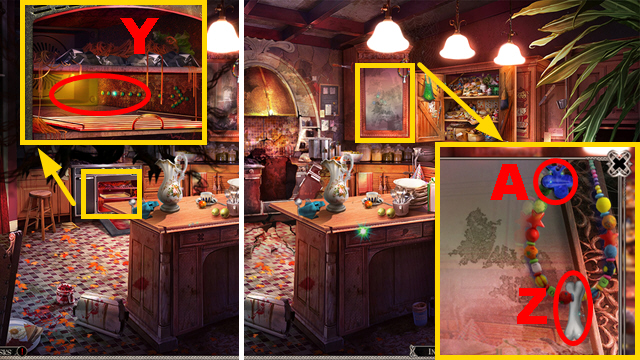
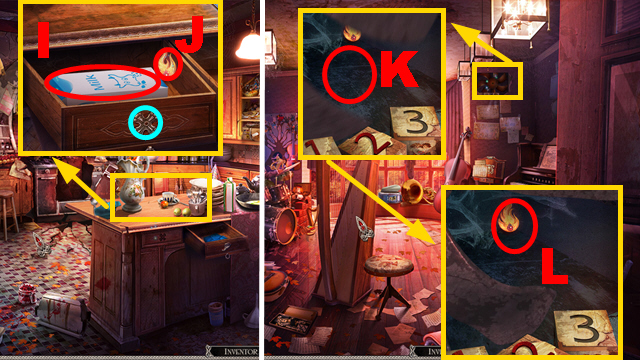
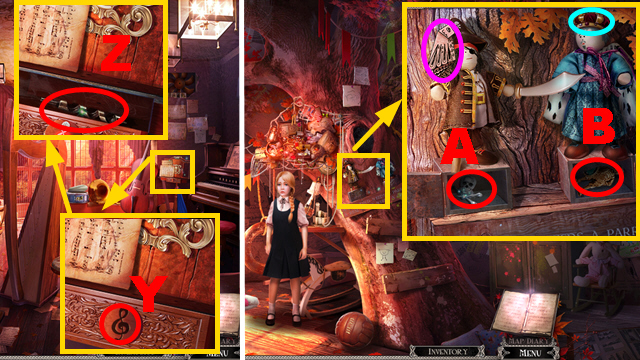
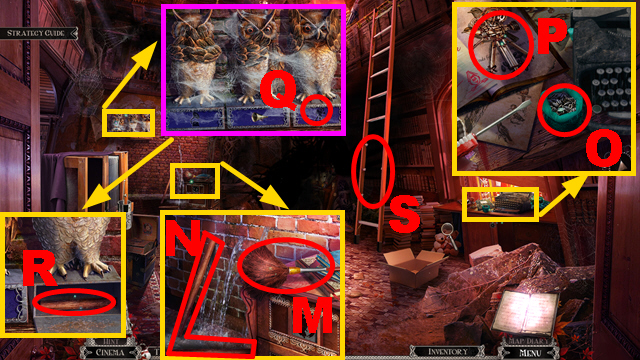
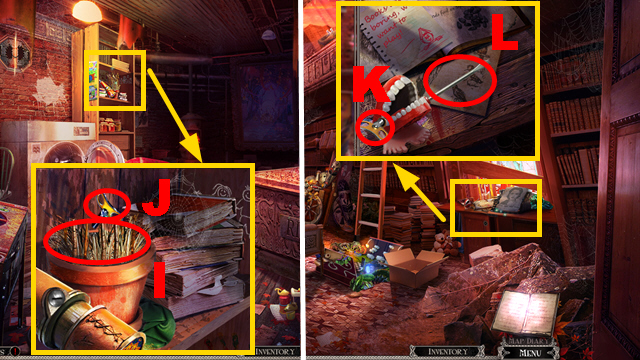
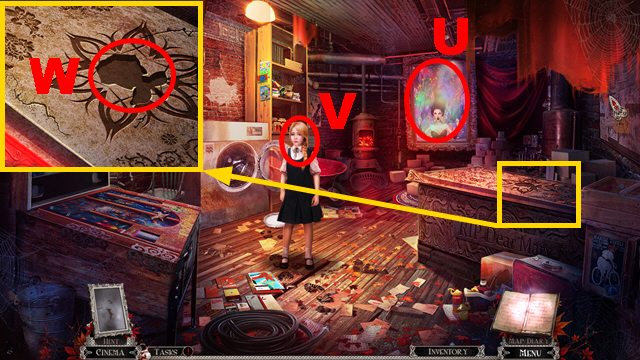
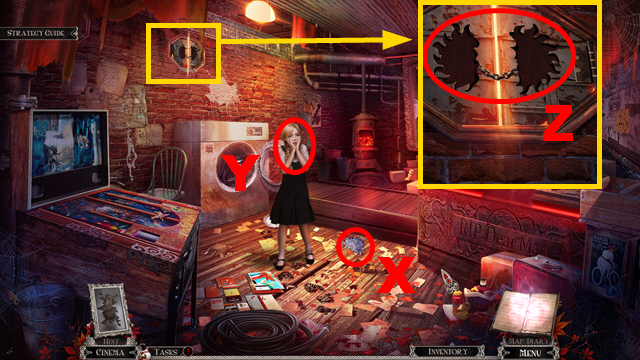
- Zoom into the trunk and insert the PIN into the toolbox (Y); take the OIL CAN (Z), the ELECTRICAL TAPE (A), and the SCREWDRIVER (B).
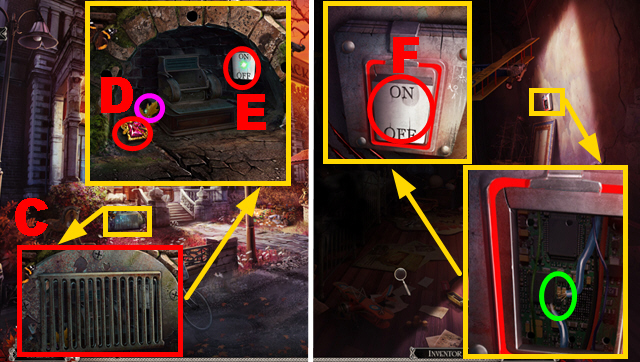
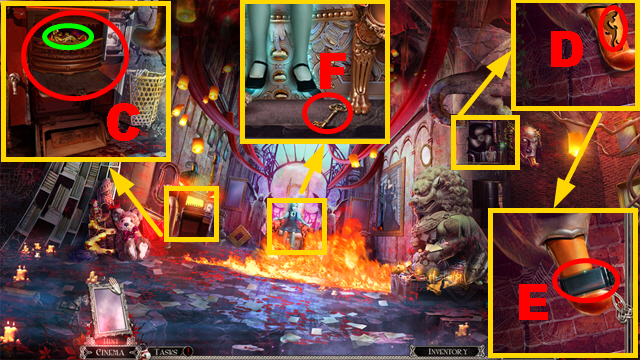
- Zoom into the grating and remove it with the SCREWDRIVER (C); take the 1/2 RUBY (D), the LEAF AMULET (purple), and the TOGGLE SWITCH (E).
- Go to the Boys' Dormitory.
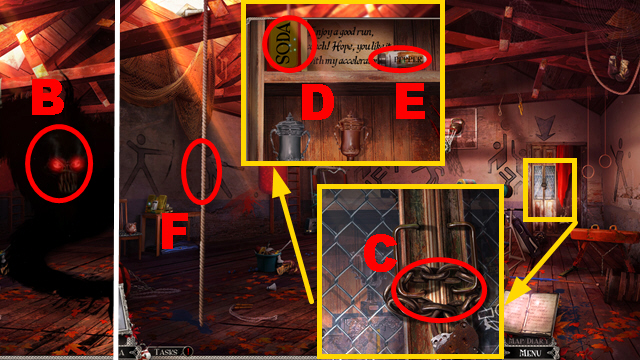
- Zoom into the light switch and fix the wire with the ELECTRICAL TAPE (green); insert the TOGGLE SWITCH into the niche (F) and push the switch.
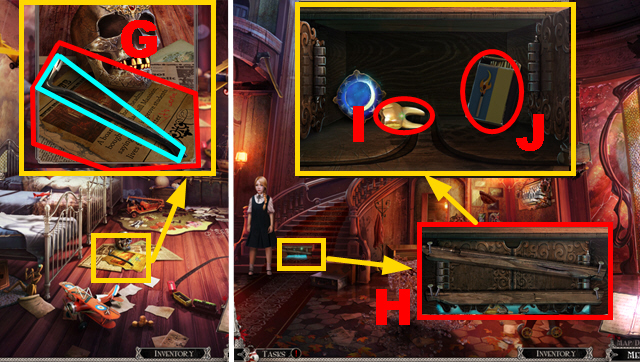
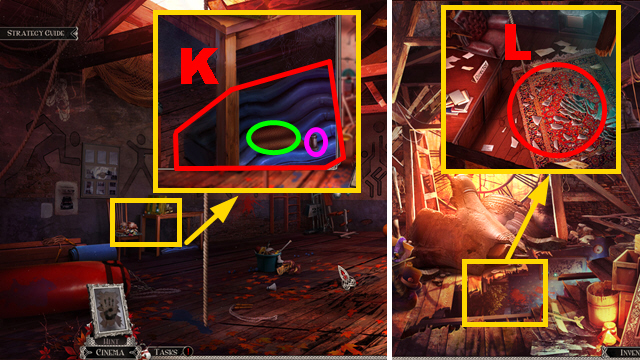
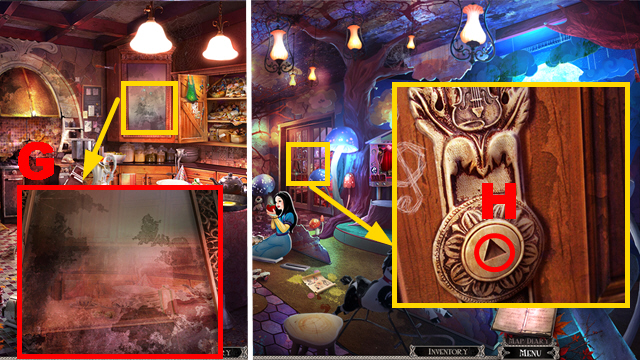
- Zoom into the floor; take the CROWBAR (light blue) and read the note (G).
- Walk down twice.
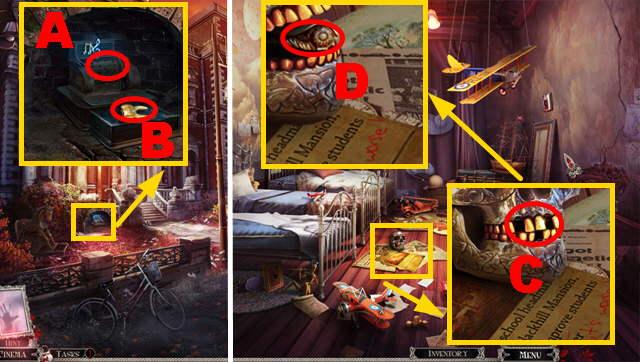
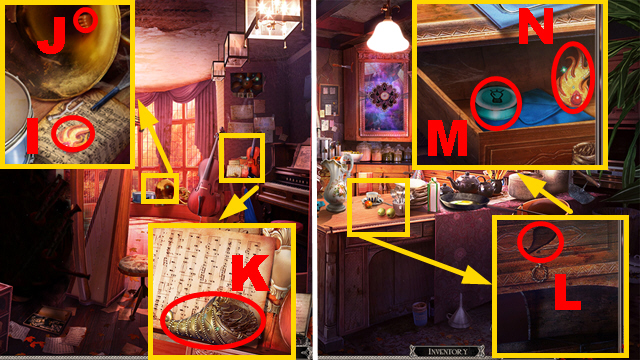
- Zoom into the stairs and remove the planks with the CROWBAR (H); take the 1/3 GOLD TOOTH (I) and the MATCHES (J).
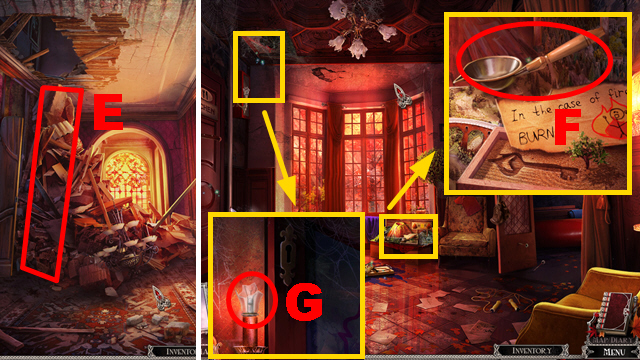
- Go to the Boys' Dormitory.
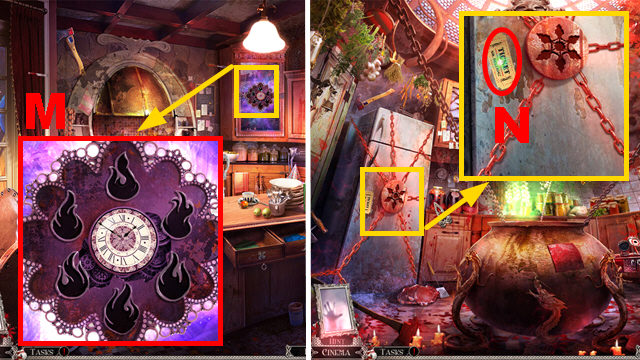
- Zoom into the dresser and take the 2/3 GOLD TOOTH (K); pour the OIL CAN into the lantern (L) and light the fuse with the MATCHES (M).
- Zoom into the poster, remove the poster, and push the numbers 1, 5, and 7 (N); take the 2/2 RUBY (O) and the MASK (green).
- Go to the Foyer.
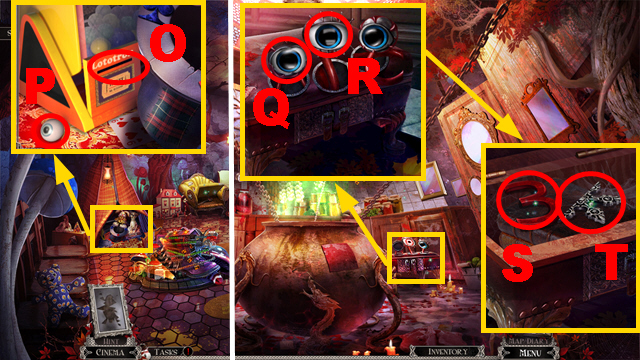
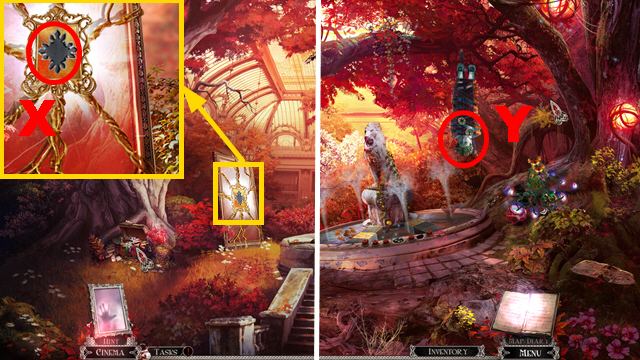
- Zoom into the frame; insert the 2 RUBIES into the niches (P).
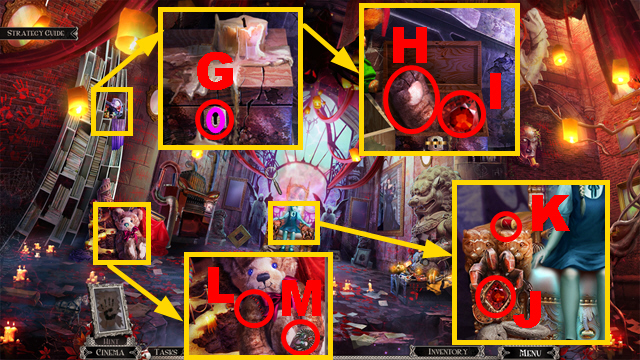
- Zoom into the frame (Q).
- Play the HOP.
- You will receive the INFINITY AMULET (R).
- Go to the Second Floor.

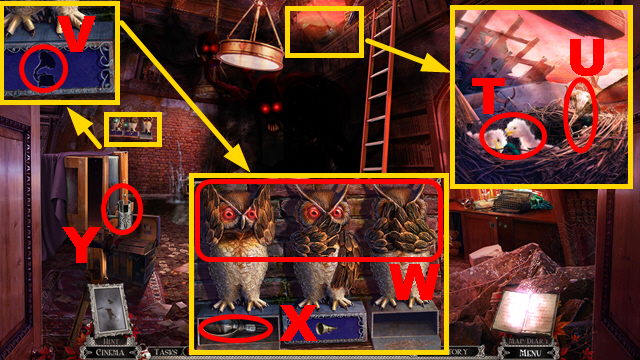
- Zoom into the clock and insert the INFINITY AMULET into the niche (S); take the CORKSCREW (T).
- Walk down.
- Zoom into the plate and open the bottle with the CORKSCREW (U); take the TOY FLUTE (V).
- Go to the Boys' Dormitory.

- Zoom into the wooden doll and connect the TOY FLUTE and the MASK to it (W); take the COUNTERWEIGHT (X).
- Walk down.
- Zoom into the clock; connect the COUNTERWEIGHT to the clock (Y) and take the BARREL (Z).
- Go to the Front Porch.
- Zoom into the grating and insert the BARREL into the instrument (A); take the 3/3 GOLD TOOTH (B).
- Go to the Boys' Dormitory.
- Zoom into the floor and insert the 3 GOLD TEETH into the skull's mouth (C); take the DOOR HANDLE (D).
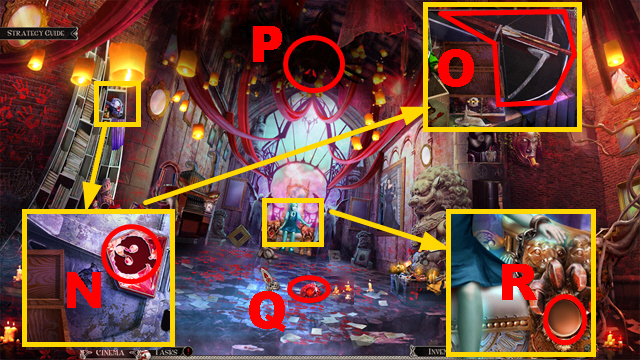
- Go to the Foyer.
- Zoom into the left door; connect the DOOR HANDLE to the door (E) and push the handle.
- Try to enter the Recital Hall.
- Take the AXE (F).
- Zoom into the right door; insert the LEAF AMULET into the niche (G).
- Enter the Garden.
Chapter 2: The Garden
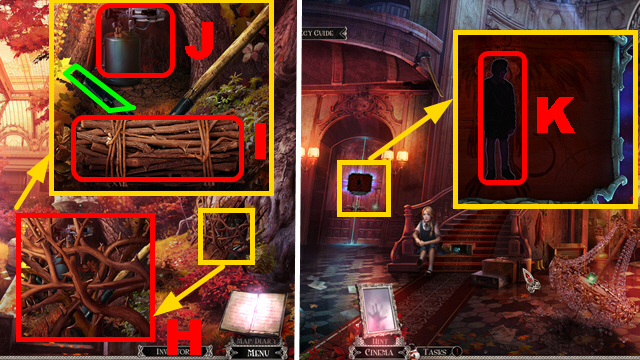
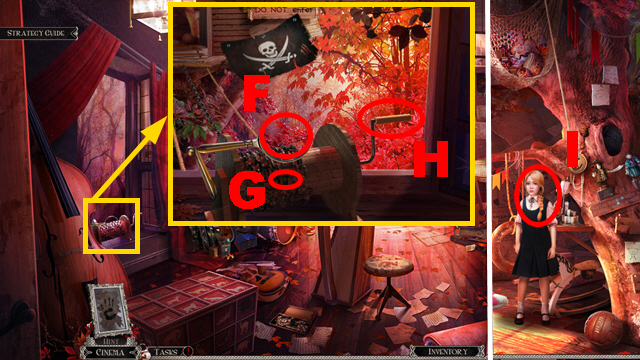
- Zoom into the roots, remove the roots with the AXE (H), and take the BOY AMULET PART (green) and the BLACKTHORN TINDER (I); light the blowtorch with the MATCHES (J) and take the BLOWTORCH.
- Walk down.
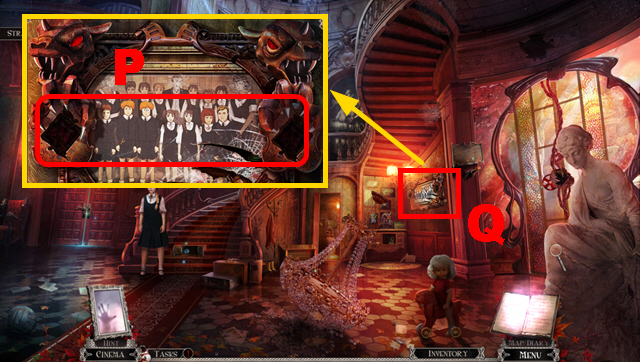
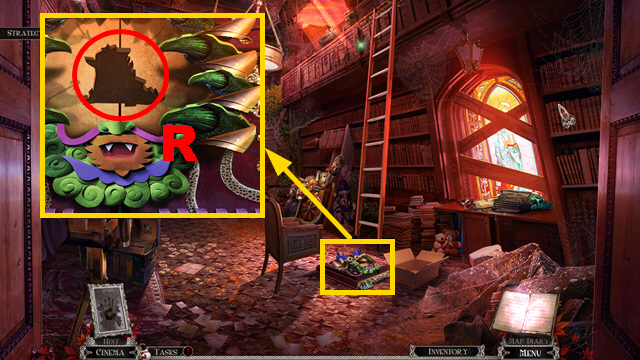
- Zoom into the left door; insert the 2 BOY AMULET PARTS into the niche (K).
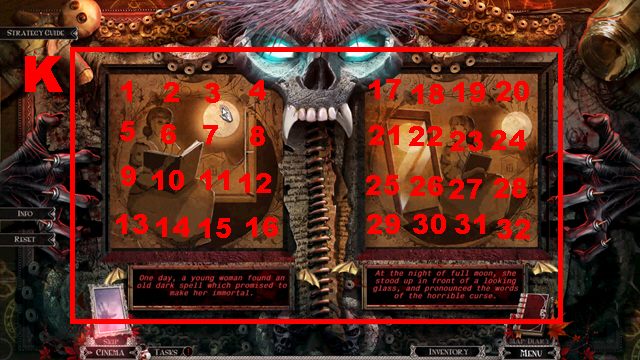
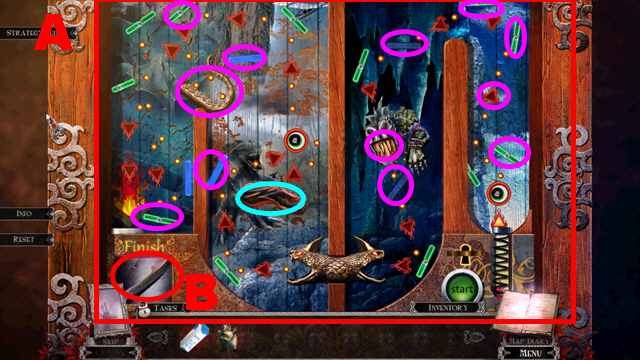
- Play the mini-game.
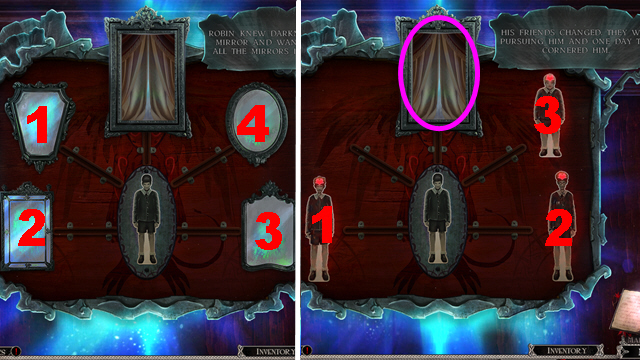
- Break the mirrors 1-4.
- Select the boys 5-7.
- Select the mirror (purple).
- Play the mini-game.
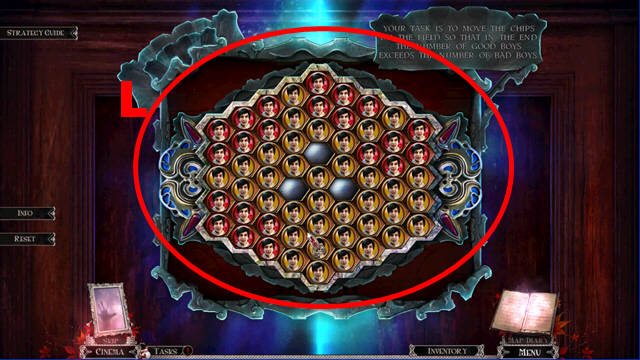
- To solve this puzzle (L), move the chips across the board so that the good boys outnumber the bad boys.
- Moving a chip to a neighboring field will create a new chip and turn adjacent chips to your color.
- Jumping across a chip removes a chip from its previous position, but turns all adjacent chips to your color.
- The opponent's moves are random.
- Enter the Recital Hall.
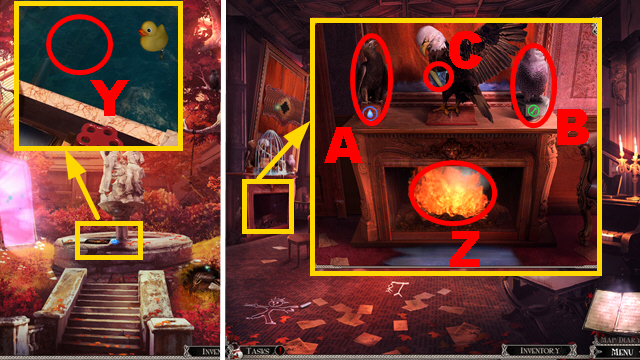
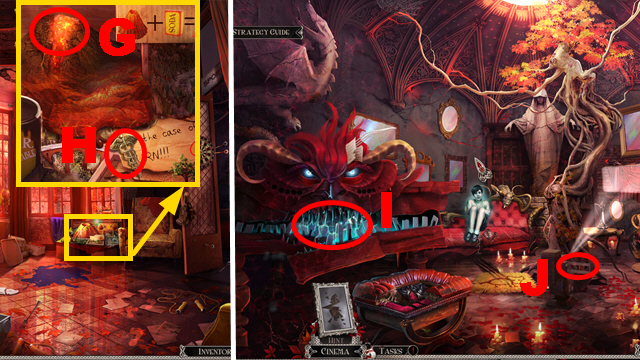
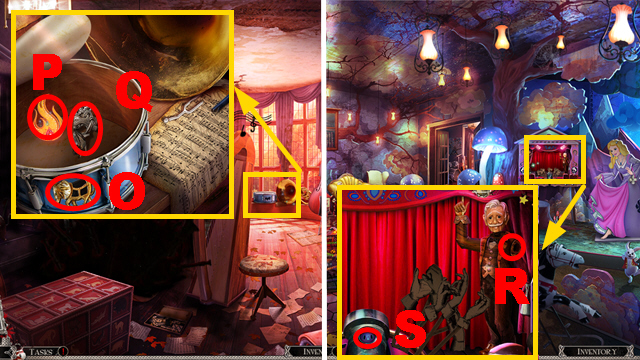
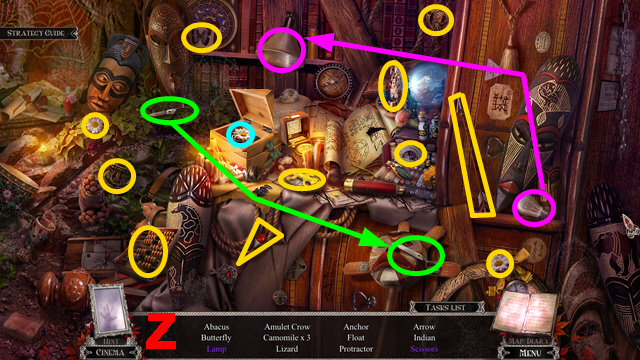
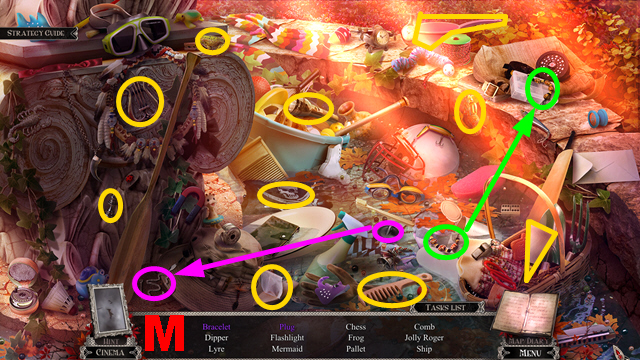
- Zoom into the fireplace and melt the grating with the BLOWTORCH (M); take the FIREPLACE SHOVEL (N) and the 1/2 FLOWER AMULET (O).
- Go to the Garden.
- Zoom into the soil and remove the soil with the FIREPLACE SHOVEL (P); take the PRUNING SHEARS (Q) and read the note (light blue).

- Zoom into the tree and send CHUCKY up to the branch (R); cut the rope with the PRUNING SHEARS (S) to acquire the TIRE and the ROPE.
- Zoom into the wheelbarrow; connect the TIRE to the wheelbarrow (T) and move it aside.
- Go to the Recital Hall.
- Zoom into the window, connect the ROPE to it, and pull the rope (U); take the 2/2 FLOWER AMULET (V) and the 2/4 RING (W).
- Go to the Garden.
- Zoom into the chest; insert the 2 FLOWER AMULETS into the niche (X).
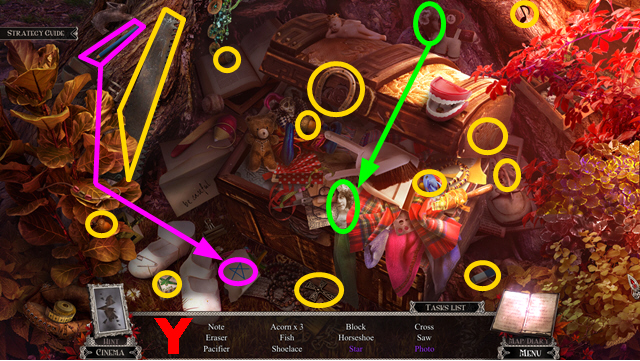
- Play the HOP.
- You will receive the SAW (Y).
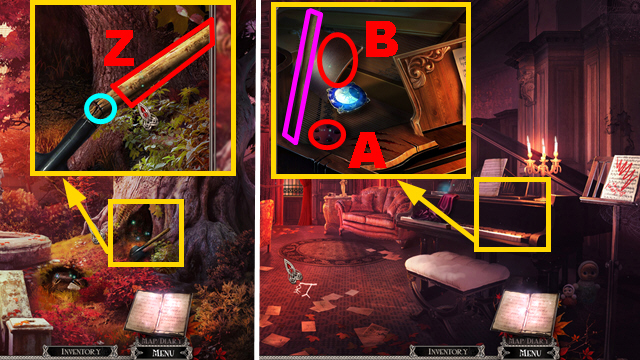
- Zoom into the tree; cut the shovel with the SAW (light blue) and take the WOODEN HANDLE (Z).
- Go to the Recital Hall.
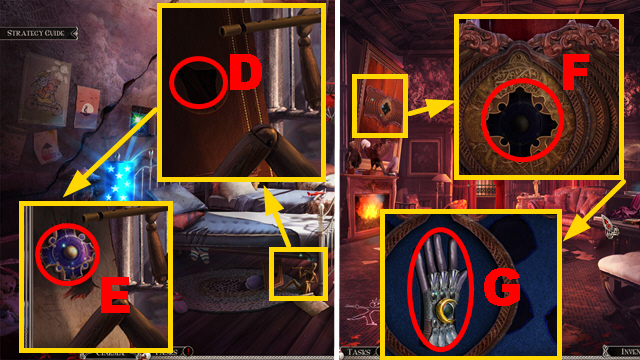
- Zoom into the piano and open the lid with the WOODEN HANDLE (purple); take the FOUNTAIN LEVER (A) and the ALUMINUM PLATE (B).
- Go to the Garden.

- Zoom into the fountain, put the ALUMINUM PLATE on the crack (C), and fix it with the BLOWTORCH; connect the FOUNTAIN LEVER to the pipe (D), turn the lever, and take the CLASSROOM KEY (E).
- Go to the Second Floor.
- Zoom into the door; insert the CLASSROOM KEY into the lock (F) and turn the key.
- Enter the Classroom.
- Talk to the boy (G).
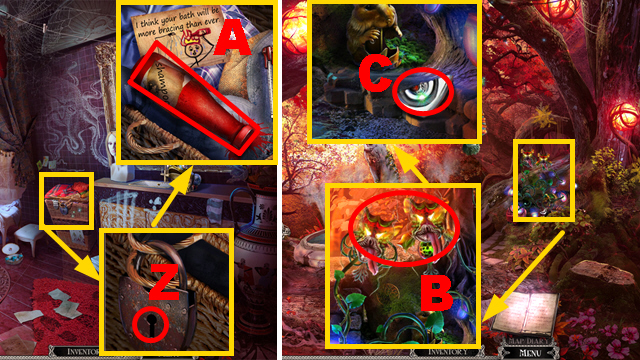
- Zoom into the table; take the POLISH (H).
- Go to the Storeroom.
- Zoom into the shield; clean the mirror shield with the POLISH (I) and take the MIRROR SHIELD.
- Go to the Classroom.
- Defeat the monster with the MIRROR SHIELD (green).
- Zoom into the rag; take the RAG (J).
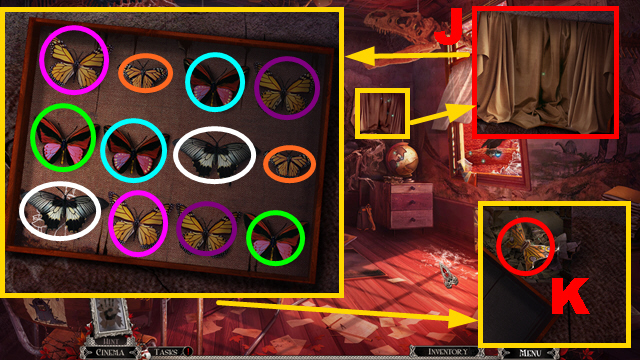
- Play the mini-game.
- Activate butterflies framed in the same color to complete this puzzle.
- Take the BUTTERFLY AMULET (K).
- Go to the Storeroom.
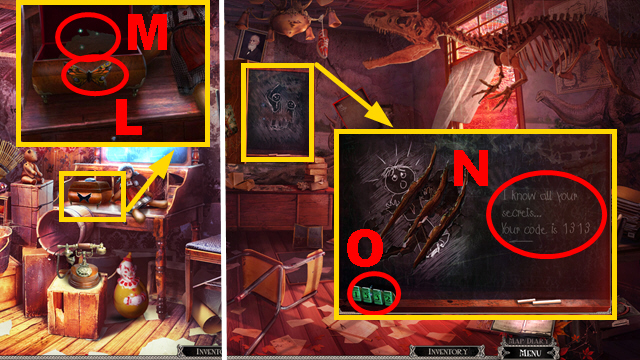
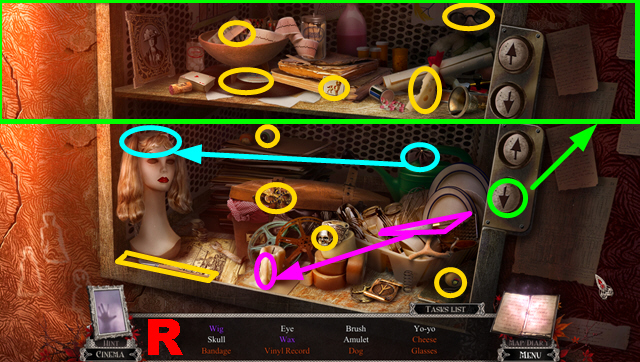
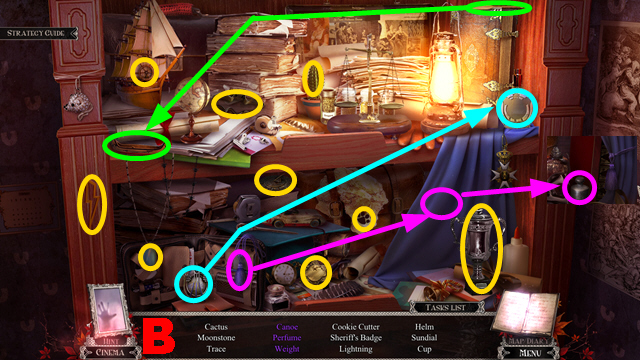
- Zoom into the box and insert the BUTTERFLY AMULET into the niche (L); take the 1/3 CONTINENT (M).
- Go to the Classroom.
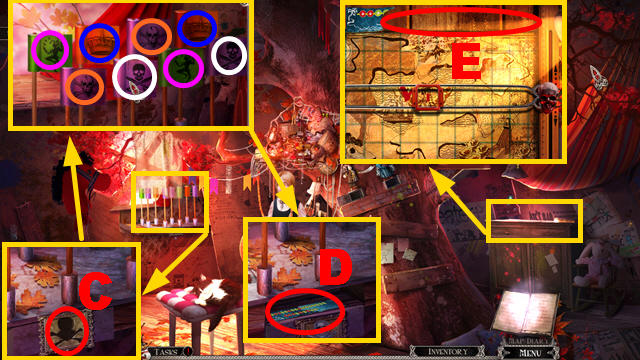
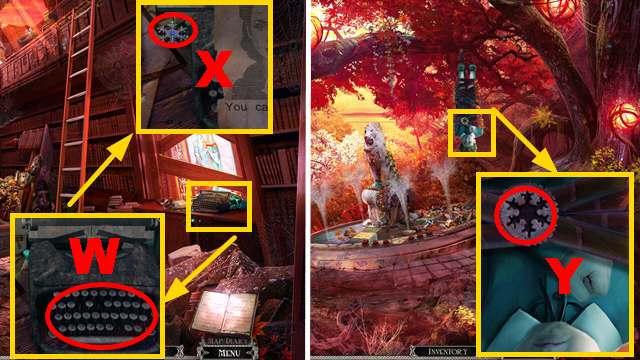
- Zoom into the blackboard; clean it with the RAG (N) and take the CODE WHEELS (O).
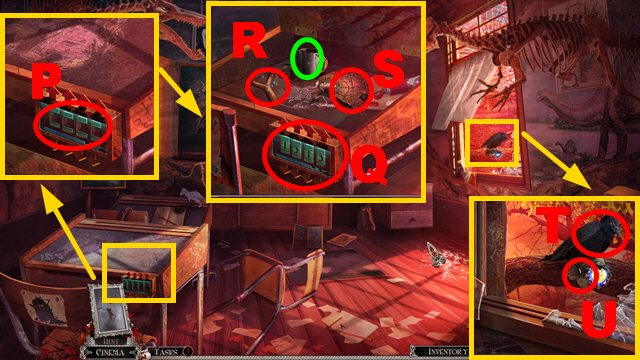
- Zoom into the table, connect the CODE WHEELS to it (P), and enter the code 1-3-1-3 (Q); take the SLINGSHOT (R), the MUG (green), and the 2/3 CONTINENT (S).
- Zoom into the window and shoot the SLINGSHOT at the raven (T); take the 3/3 CONTINENT (U).
- Zoom into the globe and insert the 3 CONTINENTS into it (V); take the PIANO KEY (W).
- Go to the Recital Hall.
- Zoom into the piano and insert the PIANO KEY into the gap (purple); push the piano keys in numerical order: 1-5, and take the WRENCH (X).
- Go to the Garden.
- Zoom into the fountain; place the MUG into the water (Y) to acquire the MUG WITH WATER.
- Go to the Recital Hall.
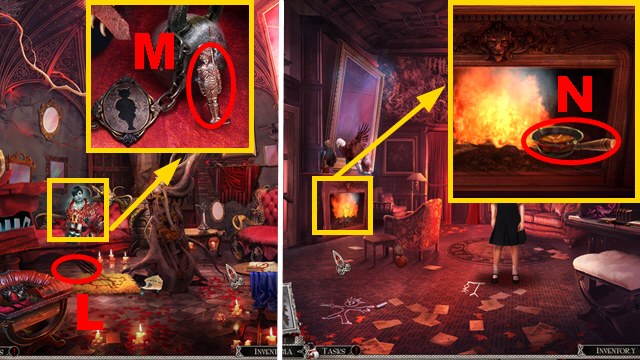
- Zoom into the fireplace, insert the BLACKTHORN TINDER into it (Z), and light the tinder with the BLOWTORCH; pour the MUG WITH WATER over the bird (A), turn the bird (B) with the WRENCH, and take the FEATHER MEDALLION (C).
- Go to the Boys' Dormitory.
- Zoom into the wooden doll and insert the FEATHER MEDALLION into the slot (D); take the MOON AMULET (E).
- Go to the Recital Hall.
- Zoom into the frame and insert the MOON AMULET into the niche (F); take the MOON GLOVE (G).
- Walk down.

- Zoom into the stairs; use the MOON GLOVE to acquire the 1/6 STAR AMULET (H).
- Enter the Garden.
- Zoom into the fountain; use the MOON GLOVE to acquire the 2/6 STAR AMULET (I).
- Go to the Classroom.
- Zoom into the window; use the MOON GLOVE to acquire the 3/6 STAR AMULET (J).
- Go to the Boys' Dormitory.
- Zoom into the wall; use the MOON GLOVE to acquire the 4/6 STAR AMULET (K).
- Walk down.

- Zoom into the debris; use the MOON GLOVE to acquire the 5/6 STAR AMULET (L).
- Go to the Recital Hall.
- Zoom into the piano; use the MOON GLOVE to acquire the 6/6 STAR AMULET (M).
- Zoom into the frame; insert the 6 STAR AMULETS into the slots (N).
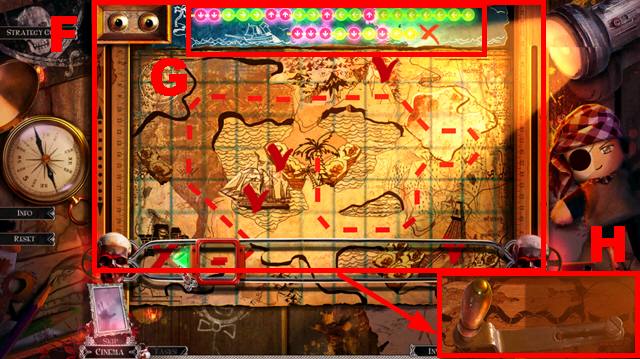
- Play the mini-game.
- To solve this puzzle (O), move the objects in the following order: Qx2, Sx4, Qx3, T, Q, T, Sx2, Q, Sx2, P, T, Q, S, and Rx6.
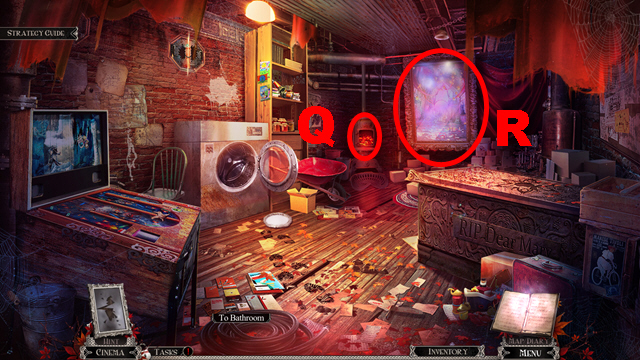
Chapter 3: The Mirrored Hall
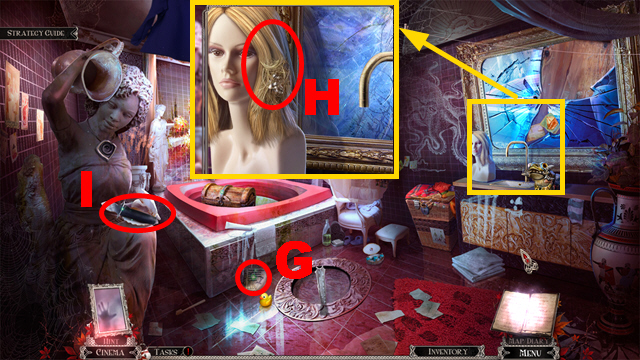
- Zoom into the armchair; take the 3/4 RING (U).
- Read the 2 notes (V) and (W).
- Go to the Foyer.
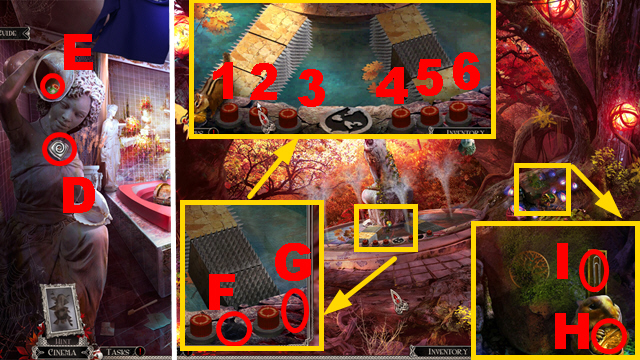
- Zoom into the chandelier and remove the bolt with the WRENCH (X); take the 4/4 RING (Y).
- Go to the Garden.
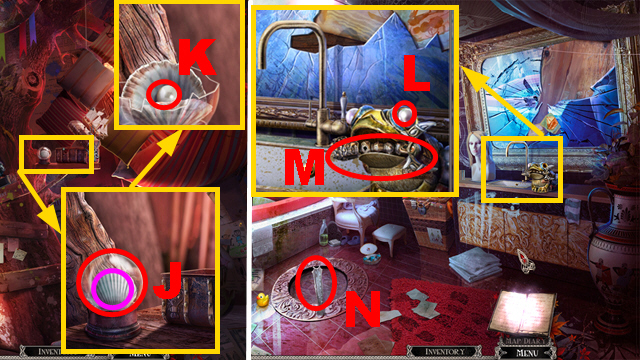
- Zoom into the ground and put the 4 RINGS on the hand (Z); take the IMP AMULET (A) and the RULER (B).
- Go to the Recital Hall.
- Zoom into the window and open it with the RULER (C); take the LADDER (D).
- Go to the Second Floor.
- Put the LADDER next to the debris (E).
- Go up the ladder to the Third Floor.
- Zoom into the table; take the POT (F).
- Zoom into the wall; remove the broken bulb (G) and put the BULB in its place.
- Enter the Gym.
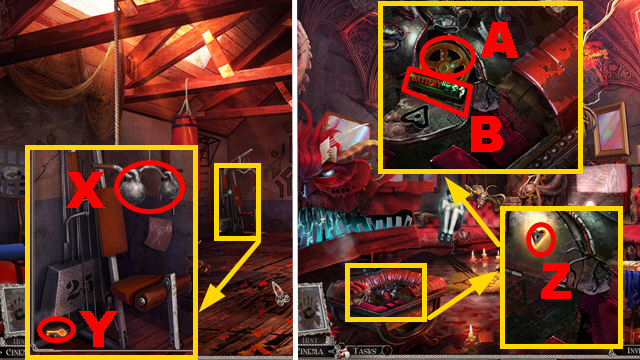
- Take the BRUSH (H).
- Zoom into the cabinet; take the TOY MOUSE (I).
- Walk down.
- Insert the TOY MOUSE into the mouse trap (J), take the MOUSE TRAP, and take the 1/2 ANGEL AMULET (K).
- Go to the Mirrored Hall.
- Put down the MOUSE TRAP (L).
- Zoom into the sofa; take the TIN SOLDIER (M).
- Go to the Recital Hall.
- Zoom into the fireplace, place the POT into the fireplace (N), and put the TIN SOLDIER into the pot; take the POT WITH TIN.
- Go to the Third Floor.
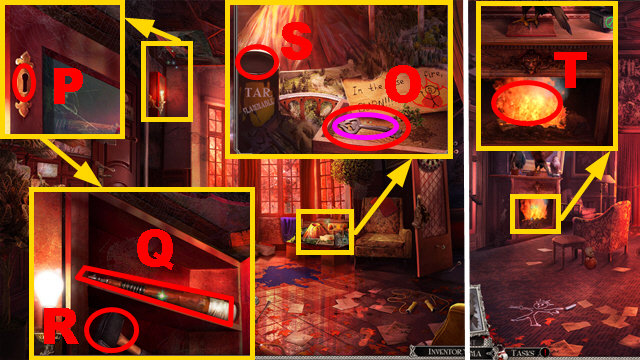
- Zoom into the table; pour the POT WITH TIN into the mold (O) and take the FIRE CABINET KEY (purple).
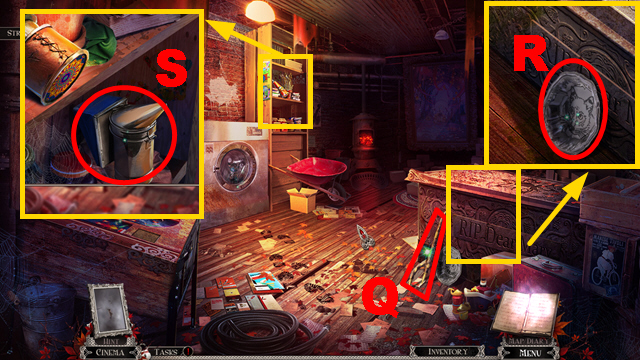
- Zoom into the wall, insert the FIRE CABINET KEY into the lock (P), and turn the key; take the DOWEL WITH CLOTH (Q) and the HAMMER (R).
- Zoom into the table; put the DOWEL WITH CLOTH into the can (S) to acquire the TORCH.
- Go to the Recital Hall.
- Zoom into the fireplace; put the TORCH into the fire (T) to acquire the BURNING TORCH.
- Go to the Mirrored Hall.
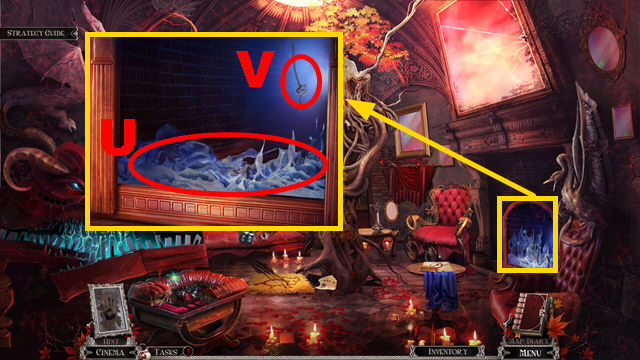
- Zoom into the fireplace and melt the ice with the BURNING TORCH (U); send CHUCKY towards the rope (V).
- Play the HOP.
- You will receive the 2/2 ANGEL AMULET (W).
- Zoom into the sofa, insert the 2 ANGEL AMULETS into the niche (X), and insert the IMP AMULET into the slot (Y); you will receive the CARTRIDGE.
- Zoom into the sofa; take the 1/2 WEIGHT (Z).
- Go to the Foyer.
- Zoom into the chandelier; insert the CARTRIDGE into the flare gun (A) and take the FLARE GUN.
- Go to the Gym.
- Shoot the FLARE GUN at the monster (B).
- Zoom into the cabinet and break the chain with the HAMMER (C); take the PACK OF SODA (D) and the PEPPER POT (E).
- Put CHUCKY on the rope (F) to acquire the SLIDES.
- Walk down.
- Zoom into the table; pour the PACK OF SODA into the volcano (G) and take the CADUCEUS AMULET (H).
- Go to the Mirrored Hall.
- Throw the PEPPER POT into the monster's mouth (I).
- Insert the SLIDES into the projector (J).
- Play the mini-game.
- To solve this puzzle (K), move the boy in the following directions: Down, right x5, up x3, left x4, up x3, right, down, right x2, down, right, and up x3.
- Left x3, down, left, up, left, up x2, right x2, up, left x2, up, right x2, up, right x2, and down.
- Take the ATTIC KEY (L).
- Go to the Third Floor.
- Zoom into the wall; remove the cobwebs with the BRUSH (M) and insert the ATTIC KEY into the niche (light blue).
- Go to the Attic.
- Zoom into the ceiling; take the PUMP (N).
- Go to the Gym.

- Zoom into the cabinet; inflate the ball with the PUMP and take the BASKETBALL (O).
- Throw the BASKETBALL into the basket (P) and take the 2/2 WEIGHT (Q).
- Zoom into the table, insert the CADUCEUS AMULET into the niche (R), and break the piggybank with the HAMMER (S); take the COIN (T), the COTTON WOOL (U), the STETHOSCOPE (V), and the SCALPEL (W).
- Zoom into the weight machine and connect the 2 WEIGHTS to it (X); take the HEART KEY (Y).
- Go to the Mirrored Hall.
- Zoom into the armchair, insert the HEART KEY into the lock (Z), and turn the key; take the GEAR (A) and the BATTERY (B).
- Go to the Attic.
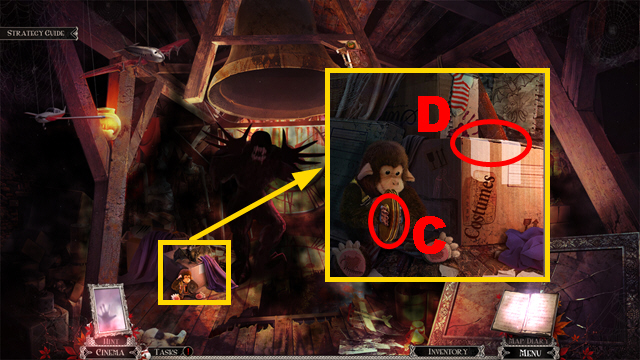
- Zoom into the crate; insert the BATTERY into the monkey (C) and open the crate with the SCALPEL (D).
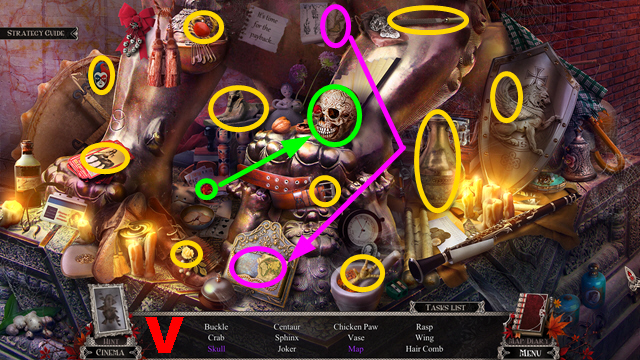
- Play the HOP.
- You will receive the SWITCH (E).
- Zoom into the mechanism and insert the GEAR into it (F); connect the SWITCH to it (G) and pull the switch.
- Zoom into the sweets machine and insert the COIN into the slot (H); take the LEATHER PATCH (I) and the GLUE (J).
- Go to the Gym.
- Zoom into the table, spread the glue over the hole, and put the LEATHER PATCH on the hole (green); inflate the mattress with the PUMP (purple) and take the MATTRESS (K).
- Go to the Attic.
- Zoom into the floor; throw down the MATTRESS (L).
- Climb down to the Headmaster's Office.
Chapter 4: The Headmaster's Office
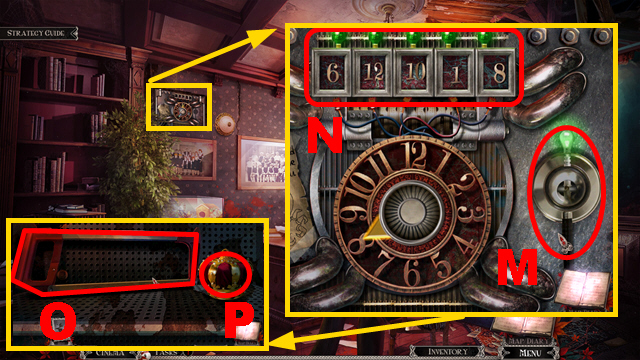
- Remove the painting and zoom into the safe; connect the STETHOSCOPE to it (M) and enter the correct code 6-12-10-1-8 (N).
- Take the METAL-CUTTING SAW (O) and the CROWN (P).
- Go to the Attic.

- Zoom into the dummy and cut the corset with the SCALPEL (Q); cut the rods with the METAL-CUTTING SAW (R) and take the SIEVE (light blue).
- Go to the Third Floor.
- Zoom into the door, cut the sack with the SCALPEL (S), place the SIEVE next to the sack (T), and push the sieve; take the FOUR-LEAF KEY (green).
- Go to the Attic.
- Zoom into the dummy and insert the FOUR-LEAF KEY into the slot (U); take the UMBRELLA (V).
- Go to the Third Floor.
- Zoom into the door and put down the UMBRELLA (W); take the BOOKEND (X).
- Go to the Headmaster's Office.
- Zoom into the shelf and put down the BOOKEND (Y); push the button (purple).
- Try to take a look at the tank (Z).
- Try to grab the hat (A).
- Play the HOP.
- You will receive the TROPHY (B).
- Go to the Gym.
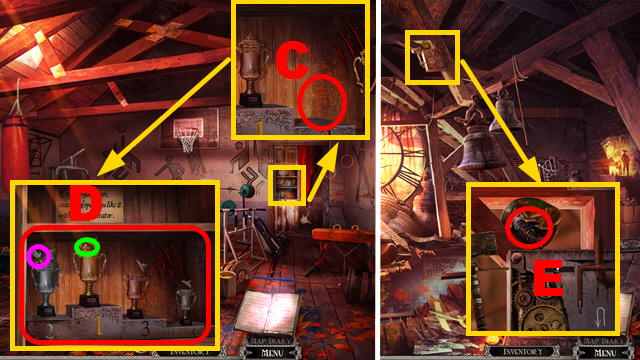
- Zoom into the cabinet, put down the TROPHY (C), and swap the trophies until they are aligned correctly (D); take the CAN OPENER (purple) and the MAGIC STAR (green).
- Go to the Attic.
- Zoom into the mechanism; open the can with the CAN OPENER and take the FISH BONES (E).
- Go to the Headmaster's Office.
- Zoom into the aquarium, send CHUCKY through the left hole (F) and put down the COTTON WOOL (G); place the FISH BONES next to the right hole (H).
- Take CHUCKY (I) to acquire the RUBY DROP.
- Zoom into the desk; insert the MAGIC STAR and the RUBY DROP into the slots (J).
- Play the mini-game.
- To solve the first part of the puzzle (K), swap the pieces in the following order: 21-23, 31-18, 21-27, 21-26, 14-8, 16-4, 16-13, 31-29, 1-16, 15-9, 9-13, 14-5.
- 16-5, 1-15, 25-21, 29-25, 13-16, 9-12, 5-8, 1-4, 2-3, 6-7, 10-11, 14-15, 13-15, 9-11, 5-7, and 1-3.
- To solve the second part of the puzzle (L), swap the pieces in the following order: 7-9, 14-6, 2-7, 4-11, 12-10, 16-2, 8-14, 15-1, 20-17, 15-16, 11-12, 7-8, 6-7, 10-11, 14-15, 13-14, 9-10, 5-6, 1-13, 9-13, 1-4, and 2-3.
- Take the KITCHEN KEY (light blue).
- Go to the Third Floor.
- Zoom into the door; insert the KITCHEN KEY into the lock (M) and turn the key.
- Enter the Kitchen.
- Zoom into the counter; take the OVEN SWITCH (N).
- Zoom into the cabinet; take the OVEN GLOVE (O) and read the note (P).
- Zoom into the oven, insert the OVEN SWITCH into the slot (Q), open the oven, and pull out the elephant with the OVEN GLOVE; take the ELEPHANT AMULET (R) and the PLIERS (S).
- Zoom into the counter and remove the fork with the PLIERS (T); take the CUPBOARD KEY (U) and try to grab the apple (V).
- Zoom into the cupboard.
- Insert the CUPBOARD KEY into the lock (W) and turn the key.
- Play the HOP.
- You will receive the GAS TANK (X).
- Zoom into the oven; insert the GAS TANK into the oven (Y).
- Zoom into the mirror; take the BONE (Z) and the CLUBS AMULET (A).
- Enter the Recreation Room.
- Zoom into the chair; take the DART (B).
- Zoom into the tiny stage; throw the DART at balloon (C) to acquire the SLIDER.
- Zoom into the tent and connect the SLIDER to it (D); insert the BONE into the niche (E) and take the SPONGE (F).
- Walk down.
- Zoom into the mirror; clean it with the SPONGE (G).
- Try to enter the mirror; you will receive the MUSIC CLASS DOOR HANDLE.
- Enter the Recreation Room.
- Zoom into the door; connect the MUSIC CLASS DOOR HANDLE to the slot (H) and push the handle.
- Enter the Music Classroom.
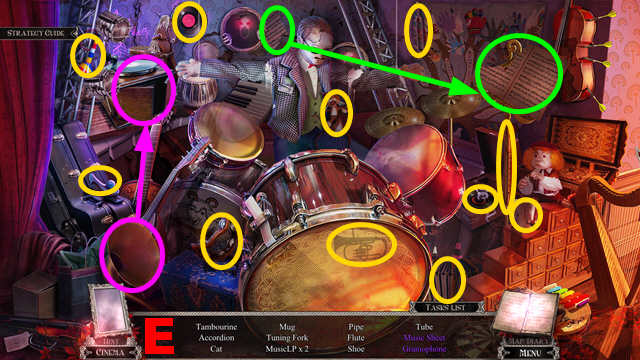
- Zoom into the drums; take the 1/6 FIRE AMULET (I) and send CHUCKY into the instrument to acquire the DOLL'S HAND (J).
- Zoom into the violin; take the CORNUCOPIA (K).
- Go to the Kitchen.
- Zoom into the counter and insert the CORNUCOPIA into the niche (L); take the LIGHT BUTTON (M) and the 2/6 FIRE AMULET (N).
- Go to the Music Classroom.
- Zoom into the drums and insert the ELEPHANT AMULET into the slot (O); take the 3/6 FIRE AMULET (P) and the 1/2 BEAST'S MASK (Q).
- Walk down.
- Zoom into the tiny stage; connect the DOLL'S HAND to the doll (R), insert the LIGHT BUTTON into the slot (S), and push the button.
- Play the mini-game.
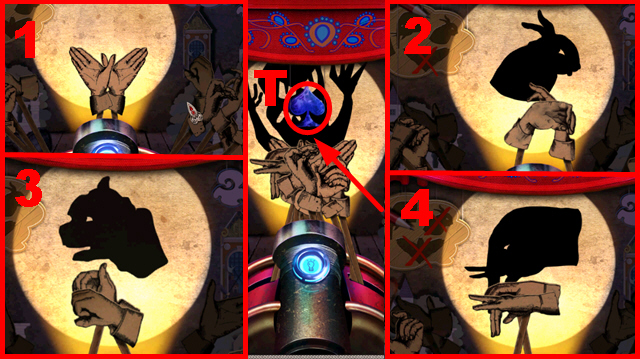
- To solve this puzzle, select the hands 1-4 to create the correct shadow figures.
- Take the SPADES AMULET (T).
- Zoom into the tent and insert the SPADES AMULET (U) and the CLUBS AMULET (V) into the niches; take the FLOWER (W).
- Give the FLOWER to beauty (X) and take the 2/2 BEAST'S MASK (Y).
- Zoom into the chair and insert the 2 BEAST'S MASKS into the slot (Z); take the 4/6 FIRE AMULET (A) and the BOW (B).
- Enter the Music Classroom.
- Zoom into the violin; place the BOW next to the violin (C) and take the VIOLIN.
- Play the VIOLIN to defeat the monster (D).
- Play the HOP.
- You will receive the SLIPPER (E).
- Zoom into the window; take the DRUM STICK (F).
- Walk down.
- Give the SLIPPER to the figurine (G) and take the X KEY (H).
- Walk down.
- Zoom into the counter and insert the X KEY into the slot (light blue); take the MILK CARTON (I) and the 5/6 FIRE AMULET (J).
- Enter the Music Classroom.
- Zoom into the vent and place the DRUM STICK into the propeller (K); send CHUCKY into the opening (L) to acquire the 6/6 FIRE AMULET.
- Walk down twice.
Chapter 5: The Mirrored Kitchen
- Zoom into the mirror; insert the 6 FIRE AMULETS into the slots (M).
- Enter the Mirrored Kitchen.
- Zoom into the fridge; take the LOTTERY TICKET (N).
- Go to the Recreation Room.
- Zoom into the tent; insert the LOTTERY TICKET into the slot (O) and take the EYE (P).
- Enter the Mirrored Kitchen.
- Zoom into the stool; insert the EYE into the hole (Q).
- Push the eye (Q) once and the eye (R) three times to reveal identical eyes; take the NUMBER 3 (S) and the 1/2 SNOWFLAKE (T).
- Go to the Music Classroom.
- Zoom into the vent and put the NUMBER 3 on the cube (U); take the ERASER (V).
- Zoom into the window and put the ERASER on the sheet of paper (W); take the CODE FRAGMENT (X).
- Walk down.
- Zoom into the cabinet and connect the CODE FRAGMENT to the paper piece (Y); turn the code disks Z-B in the following order to enter the correct code '2455': Ax3, Zx2, A, Bx2, Ax3, Bx2, A, Bx3, and Ax3.
- Take the TRAIN (C).
- Zoom into the railway tracks; put down the TRAIN (D).
- Play the mini-game.
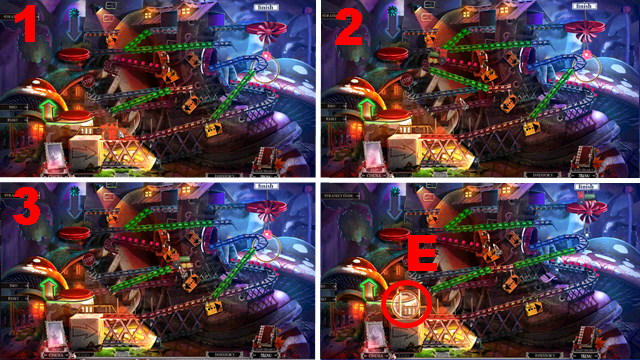
- To solve this puzzle, arrange the green railway tracks according to the steps 1-3.
- Take the LENS (E).
- Go to the Music Classroom.
- Zoom into the window and insert the LENS into the magnifying glass (F); cut the chain with the PLIERS (G) and turn the handle (H).
- Enter the Tree House.
- Talk to Jackie (I); you will receive the 2/2 SNOWFLAKE.
- Go to the Mirrored Kitchen.
- Zoom into the fridge and insert the 2 SNOWFLAKES into the niche (J); take the KRAKEN AMULET (K).
- Go to the Tree House.
- Zoom into the chest and insert the KRAKEN AMULET into the slot (L); take the BOOK (M).
- Go to the Recreation Room.
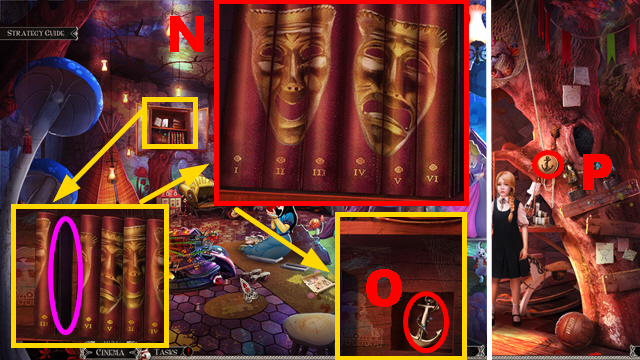
- Zoom into the shelf and place the BOOK into the gap (purple); swap the books until they are aligned correctly (N) and take the ANCHOR (O).
- Go to the Tree House.
- Insert the ANCHOR into the niche (P).
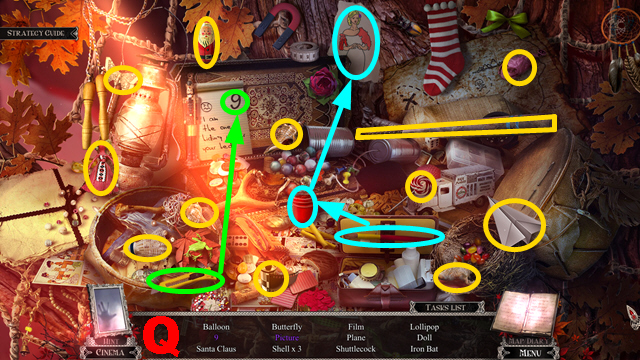
- Play the HOP.
- You will receive the STEEL BAT (Q).
- Go to the Mirrored Kitchen.
- Zoom into the fridge and defeat the monster with the STEEL BAT (R); take the GNOME (purple).
- Go to the Recreation Room.
- Put down the GNOME (S) and take the POISONED APPLE (T).
- Go to the Mirrored Kitchen.
- Zoom into the sink and insert the POISONED APPLE into the niche (green); take the SHEET OF PAPER (U) and the TREBLE CLEF (V).
- Go to the Recreation Room.
- Zoom into the cabinet and then zoom into the open book; put down the SHEET OF PAPER (W), fold the paper five times, and take the ORIGAMI PARROT (X).
- Enter the Music Classroom.
- Zoom into the music stand and insert the TREBLE CLEF into the slot (Y); take the DRILL BIT (Z).
- Go to the Tree House.
- Zoom into the figurines and connect the ORIGAMI PARROT to the pirate (purple) and the CROWN to the king (light blue); take the SKULL AND BONES (A) and the 1/2 TWINS' AMULET (B).
- Zoom into the flags; insert the SKULL AND BONES into the niche (C).
- Play the mini-game.
- Select pairs of flags framed in the same color to complete this puzzle.
- Take the MAP PIECE (D).
- Zoom into the table; put down the MAP PIECE (E).
- Play the mini-game.
- To solve this puzzle (F), guide the pointer into the correct directions (G).
- Take the DRILL HANDLE (H).
- Go to the Recreation Room.

- Zoom into the chair; connect the DRILL BIT and the DRILL HANDLE to the drill (I) and take the DRILL.
- Go to the Mirrored Kitchen.
- Cut open the cauldron with the DRILL (J) and take the CANE (green).
- Go to the Tree House.
- Zoom into the window; use the CANE to acquire the 2/2 TWINS' AMULET (K).
- Go to the Mirrored Kitchen.
- Zoom into the cage; insert the 2 TWINS' AMULETS into the slot (L).
- Talk to the twins.
- Go to the Recital Hall and then to the Library.
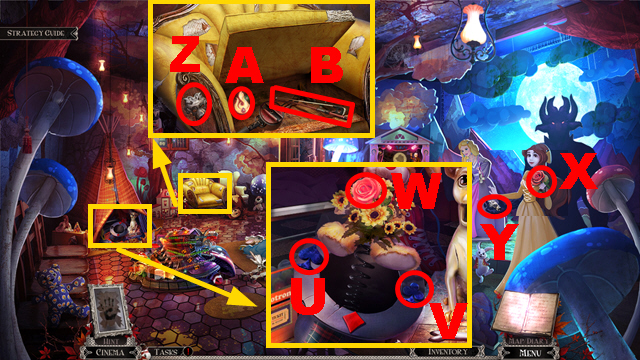
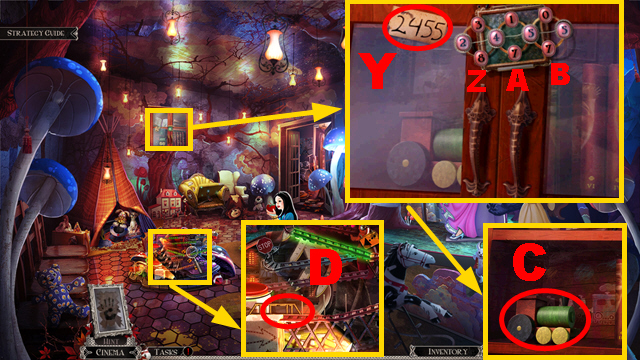
- Zoom into the table; take the DUSTER (M) and the 2 RUNGS (N).
- Zoom into the desk and open the book; take the SACK OF GRAIN (O) and the PROJECTOR AMULET (P).
- Zoom into the owl statues and clean them with the DUSTER (purple); insert the PROJECTOR AMULET into the niche (Q) and take the 3/3 RUNG (R).
- Insert the 3 RUNGS into the ladder (S).
- Zoom into the broken roof; give the SACK OF GRAIN to the birds (T) and take the GRAMOPHONE AMULET (U).
- Zoom into the owl statues and insert the GRAMOPHONE AMULET into the niche (V); set the owl statues into the correct poses (W) and take the FLASH (X).
- Connect the FLASH to the camera (Y) to defeat the monster.
- Play the HOP.
- You will receive the RAVEN AMULET (Z).
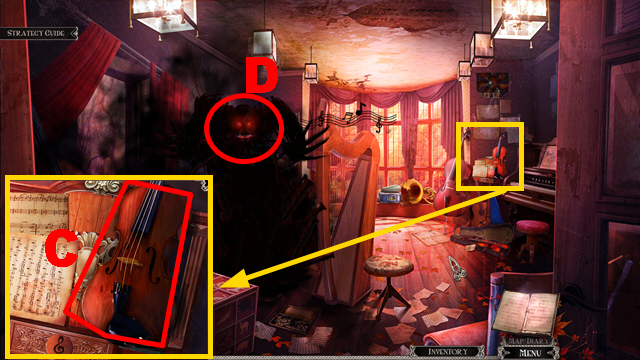
- Zoom into the table and insert the RAVEN AMULET into the niche (A); take the TRIANGLE KEY and the COMB (B).
- Zoom into the desk, insert the TRIANGLE KEY into the lock (C), and turn the key; take the 1/2 FISH AMULET (D) and the SPRING (E).
- Zoom into the broken roof; insert the SPRING into the jackhammer (F) and take the JACKHAMMER.
- Zoom into the table; break the wall with the JACKHAMMER (light blue).
- Enter the Bathroom.
Chapter 6: The Bathroom
- Read the note (G).
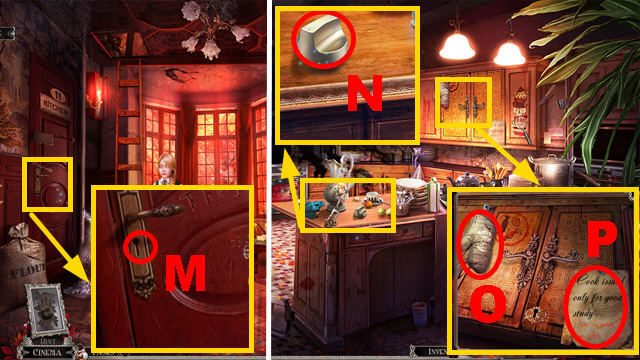
- Zoom into the sink; brush the wig with the COMB (H) to acquire the 1/2 WHIRLPOOL AMULET.
- Take the OYSTER KNIFE (I).
- Go to the Tree House.
- Zoom into the chest, break the crystal ball with the STEEL BAT (J), and open the shell with the OYSTER KNIFE (purple); take the PEARL (K).
- Go to the Bathroom.
- Zoom into the sink and insert the PEARL into the niche (L); take the DAGGER HANDLE (M).
- Connect the DAGGER HANDLE to the dagger blade (N) and take the DAGGER.
- Go to the Garden.

- Zoom into the mirror; cut the magic blanket with the DAGGER (O) and take the MAGNET (P).
- Go to the Bathroom.
- Zoom into the whirlpool; place the MAGNET next to the drainage (Q) to acquire the MONSTER AMULET.
- Walk down.
- Zoom into the book; insert the MONSTER AMULET into the slot (R).
- Play the mini-game.
- To solve this puzzle, open the door (S), move the boy, turn to night (T), move the boy, open the crate and take the flashlight (U) to chase away the monster (green), turn to day, and move the boy.
- Open the door (V), place the ladder correctly (purple), move the boy, turn to night, and take the NEPHRITE MEDALLION (W).
- Go to the Garden.
- Zoom into the mirror; insert the NEPHRITE MEDALLION into the slot (X).
- Enter the Mirrored Garden.
- Talk to the boy (Y) to acquire the BASKET KEY.
- Go to the Bathroom.
- Zoom into the basket, insert the BASKET KEY into the lock (Z), and turn the key; take the SPICY SAUCE (A).
- Go to the Mirrored Garden.
- Zoom into the plants and pour the SPICY SAUCE over them (B); take the 2/2 WHIRLPOOL AMULET (C).
- Go to the Bathroom.
- Insert the 2 WHIRLPOOL AMULETS into the niche (D) and take the SWITCH (E).
- Go to the Mirrored Garden.
- Zoom into the fountain, insert the SWITCH into the slot (F), and put down CHUCKY (G); turn the switches in the order 6, 5, 4, 1, and 2 to acquire the GOLDEN NUT.
- Zoom into the plants; insert the GOLDEN NUT into the figurine (H) and take the CLIP (I).
- Go to the Bathroom.
- Zoom into the basket, attach the CLIP to the slider (J), and pull down the clip; take the 2/2 FISH AMULET (K).
- Go to the Mirrored Garden.
- Zoom into the fountain; insert the 2 FISH AMULETS into the niche (L).
- Play the HOP.
- You will receive the SCRAPER (M).

- Zoom into the plants; remove the moss with the SCRAPER (N) and take the TREE AMULET (light blue).
- Zoom into the boy; insert the TREE AMULET into the niche (O) to acquire the FACE AMULET.
- Go to the Bathroom.
- Insert the FACE AMULET into the floor (P).
- Enter the Cellar.
- Take the FORKED BRANCH (Q).
- Zoom into the sarcophagus; take the SILVER BOWL (R).
- Zoom into the shelf; take the SMOKER (S).
- Go to the Mirrored Garden.

- Chase away the bees with the SMOKER (T).
- Insert the FORKED BRANCH into the tree's mouth (green) and take the PINBALL MACHINE KEY (purple).
- Go to the Cellar.
- Zoom into the pinball machine; insert the PINBALL MACHINE KEY into the lock (U), turn the key, and take the TYPEWRITER KEY (V).
- Go to the Library.
- Zoom into the desk and connect the TYPEWRITER KEY to the typewriter (W); take the SNOWFLAKE AMULET (X).
- Go to the Mirrored Garden.
- Zoom into the boy and insert the SNOWFLAKE AMULET into the slot (Y); you will receive the PINBALL.
- Go to the Cellar.
- Zoom into the pinball machine; insert the PINBALL into the machine (Z).
- Play the mini-game.
- To solve this puzzle (A), activate and set all the elements correctly (purple) so that the pinball reaches the hole.
- Push the hand (light blue) when the pinball falls into it.
- Take the WASHING MACHINE DOOR HANDLE (B).
- Zoom into the washing machine and connect the WASHING MACHINE DOOR HANDLE to it (C); put down the SILVER BOWL (D), pour the MILK CARTON into the bowl, and take the SEAHORSE AMULET (E).
- Walk down.
- Zoom into the whirlpool and insert the SEAHORSE AMULET into the niche (F); take the 1/2 PHOENIX AMULET (G) and the SICKLE (H).
- Go to the Cellar.
- Zoom into the shelf and cut the grass with the SICKLE (I); take the WIND-UP KEY (J).
- Go to the Library.
- Zoom into the desk; connect the WIND-UP KEY to the teeth (K), turn the key, and take the SCREWDRIVER (L).
- Go to the Cellar.
- Zoom into the shelf and remove the screw with the SCREWDRIVER (M); take the 2/2 PHOENIX AMULET (N).
- Go to the Library.
- Zoom into the roof and insert the 2 PHOENIX AMULETS into the slot (O); take the BELLOWS (P).
- Go to the Cellar.
- Light the oven with the BELLOWS (Q).
- Zoom into the mirror (R).
Chapter 7: The Mirrored Cellar
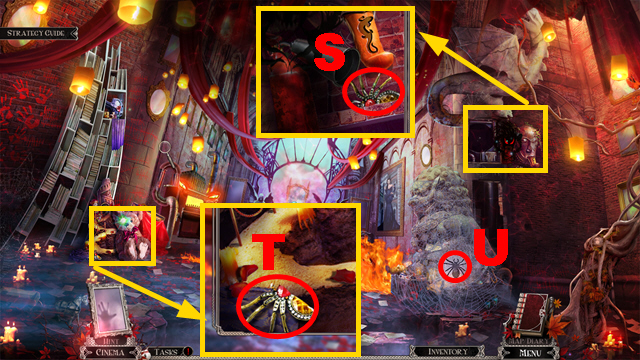
- Zoom into the mask; take the 1/2 SPIDER AMULET (S).
- Zoom into the teddy bear; take the 2/2 SPIDER AMULET (T).
- Insert the 2 SPIDER AMULETS into the slot (U).
- Play the HOP.
- You will receive the JOKER AMULET (V).
- Zoom into the shelf and insert the JOKER AMULET into the niche (W); take the LEVER (X).
- Zoom into the teddy bear; send CHUCKY into the castle (Y) to acquire the FAN BLADES.
- Zoom into the wall and insert the FAN BLADES (Z) and the LEVER (A) into the mechanism; turn the lever and take the FIRE EXTINGUISHER (B).
- Zoom into the oven monster; defeat the monster with the FIRE EXTINGUISHER (C) and take the SALAMANDER AMULET (green).
- Zoom into the wall and insert the SALAMANDER AMULET into the niche (D); take the LIGHTER (E).
- Zoom into the throne; take the GOLDEN KEY (F).
- Zoom into the shelf, melt the wax with the LIGHTER (G), insert the GOLDEN KEY into the lock (purple), and turn the key; take the TOY PAW (H) and the RHOMBUS RUBY (I).
- Zoom into the throne and insert the RHOMBUS RUBY into the niche (J); take the SPOOL (K).
- Zoom into the teddy bear and connect the TOY PAW to the teddy bear (L); sew the paw with the SPOOL and take the PHEASANT AMULET (M).
- Zoom into the shelf and insert the PHEASANT AMULET into the niche (N); take the CROSSBOW (O).
- Shoot the CROSSBOW at the monster (P).
- Take the ROUND RUBY (Q).
- Zoom into the throne and insert the ROUND RUBY into the slot (R); you will receive the SILVER BONE.
- Zoom into the throne; insert the SILVER BONE into the niche (S).
- Play the mini-game.
- To solve this puzzle (T), swap the parts at the top and the bottom of the silver bone until they fit the barbs of the silver bone.
- Break the mirror with the FIRE EXTINGUISHER (U).
- Talk to Jackie; you will receive the ROSE (V).
- Zoom into the sarcophagus; insert the ROSE into the niche (W).
- Take the SUNSET KEY (X).
- Talk to Jackie (Y); you will receive the SUNRISE KEY.
- Zoom into the wall; insert the SUNSET KEY and the SUNRISE KEY into the slots (Z).
- Congratulations, you have completed Grim Tales: Bloody Mary.
Created at: 2013-10-22