

Walkthrough Menu
- General Tips
- Chapter 1: Victor's House
- Chapter 2: The Basement
- Chapter 3: Abigail's House
- Chapter 4: The Tower
- Chapter 5: Tower Roof
General Tips
- This is the official guide for Grim Tales: Graywitch.
- This guide will not tell you when you have to zoom into a location; the screenshots will show each zoom scene.
- Hidden-object puzzles are referred to as HOPs. This guide will not show screenshots of the HOPs, however, it will mention when an HOP is available and the inventory item you'll collect from it.
- Use the Map to fast travel to a location.
Chapter 1: Victor's House
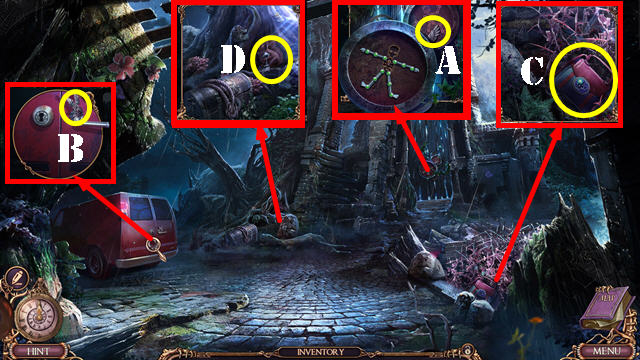
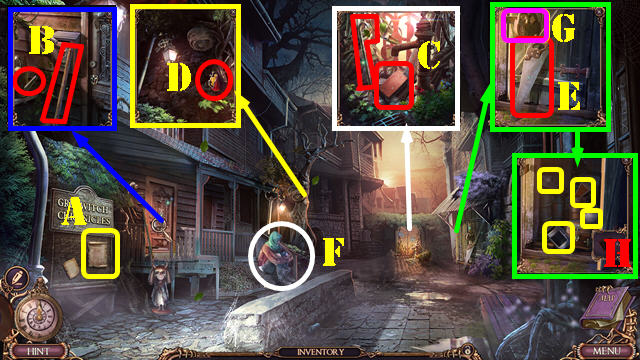
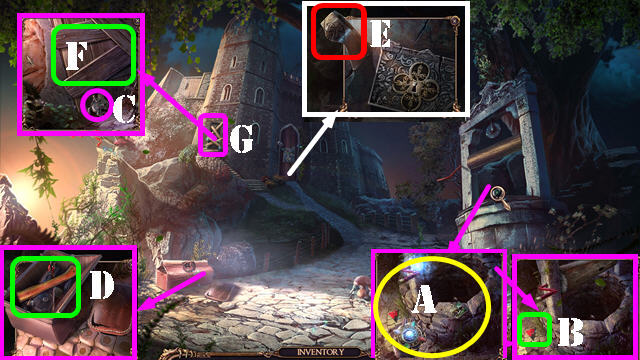
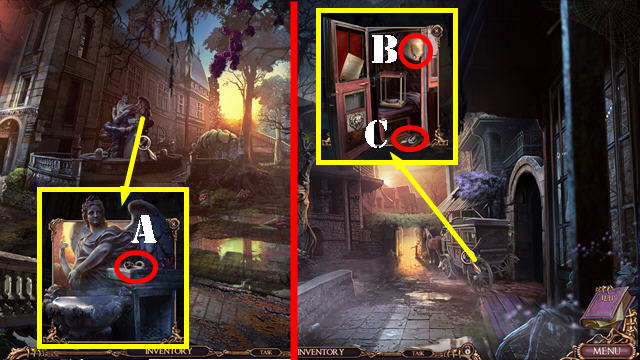
- Take the WINGED WOLF 1/2 (A), WINGED WOLF (B), and BAG (C).
- Place the WINGED WOLF on the BAG; take the NUTS, read the note and take the SKELETON PARTS 1/2.
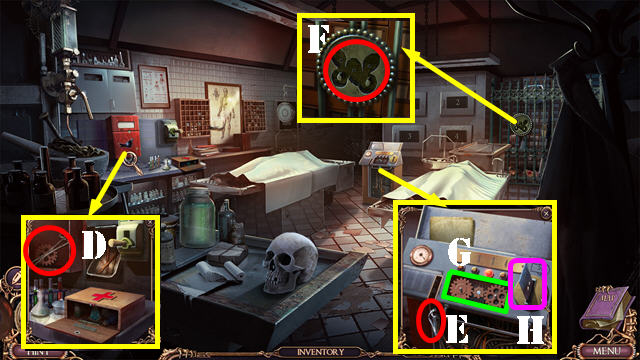
- Give the NUTS (D); take the VAN KEY.
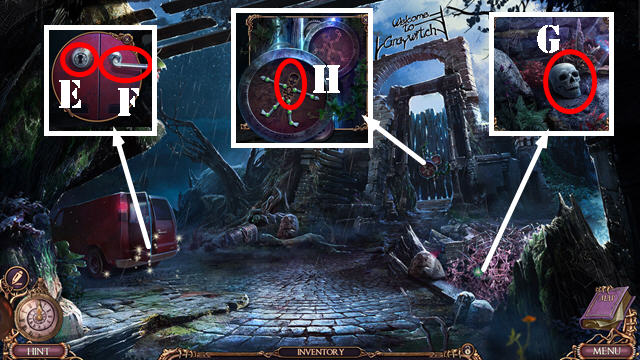
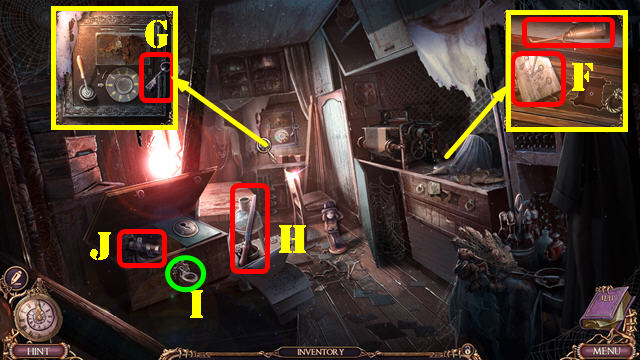
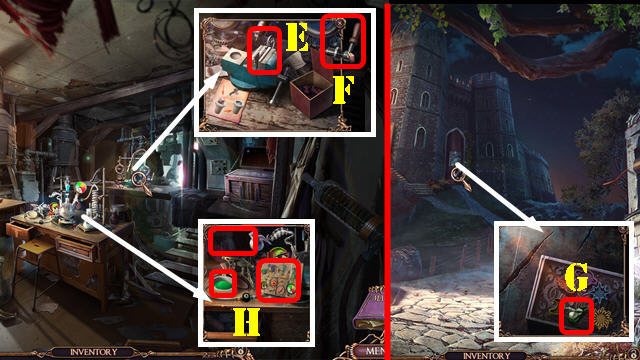
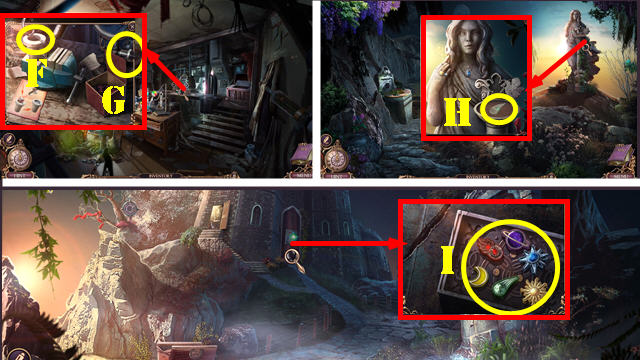
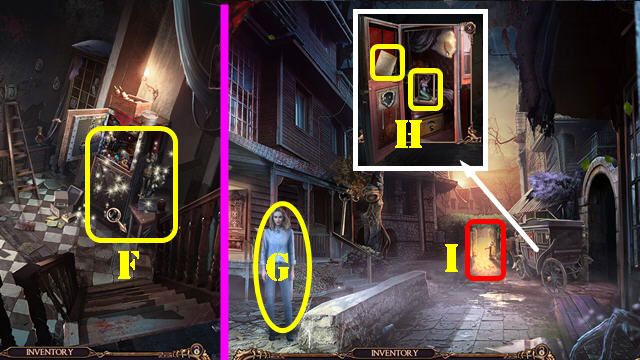
- Use the VAN KEY (E) and pull the handle (F); play the HOP to get the GAUNTLET.
- Use the GAUNTLET; take RICHARD'S SKULL (G).
- Automatically receive the SKELETON PARTS and RICHARD'S SKULL.
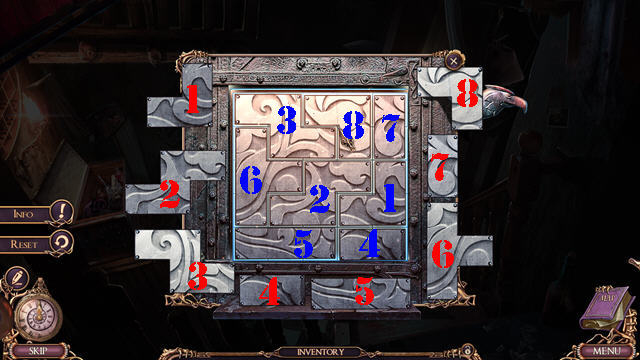
- Place the SKELETON PARTS for a puzzle (H).
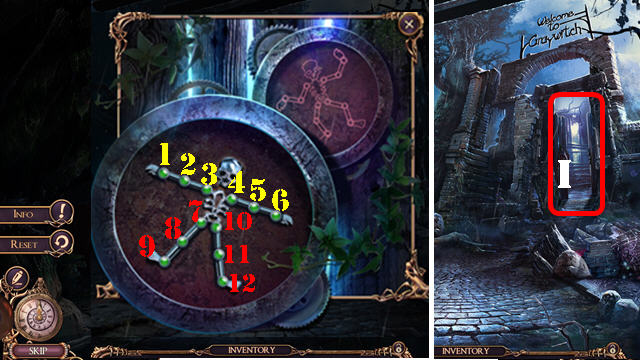
- Solution: 3x3-2-1-5-6x3-8-10-11.
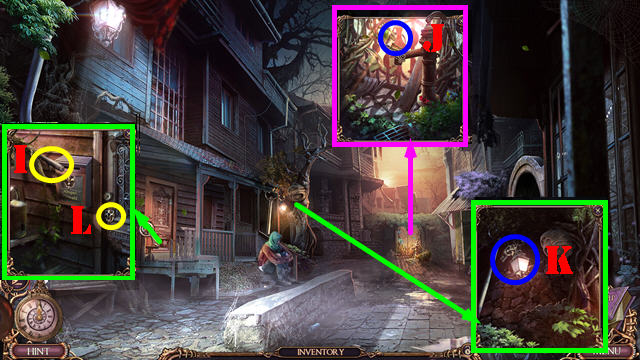
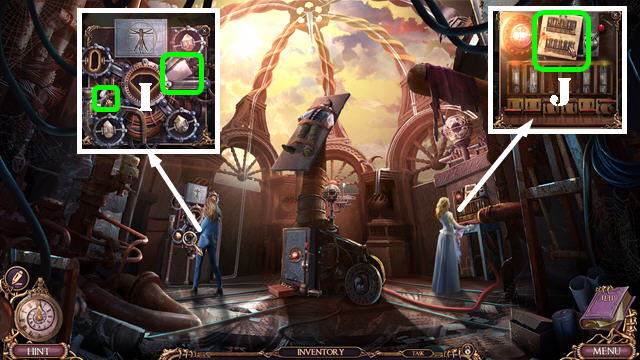
- Go to the Abandoned Street (I).
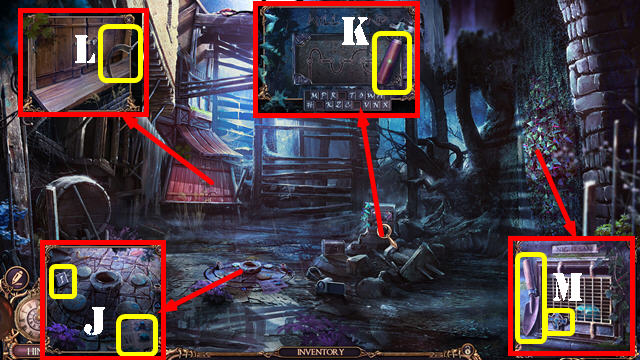
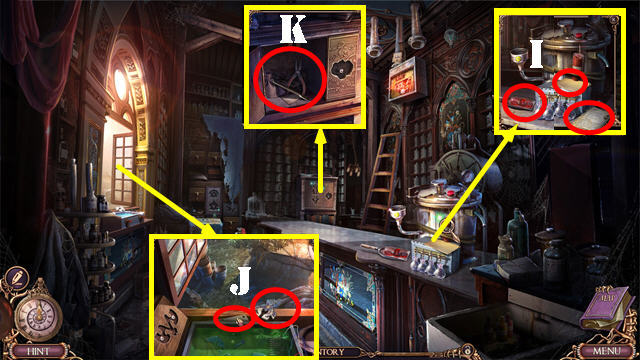
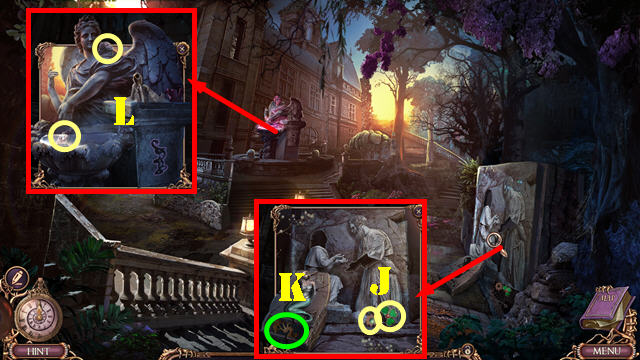
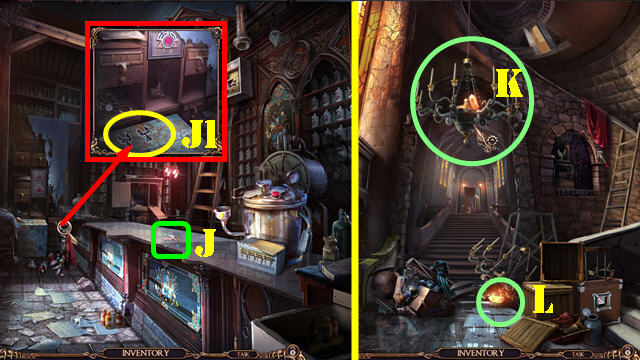
- Take the LETTERS 1/3 and look at the instructions (J).
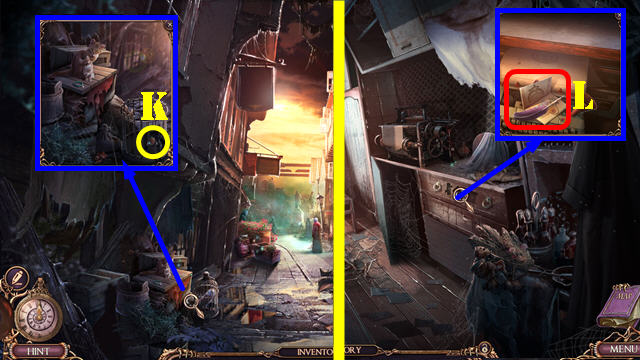
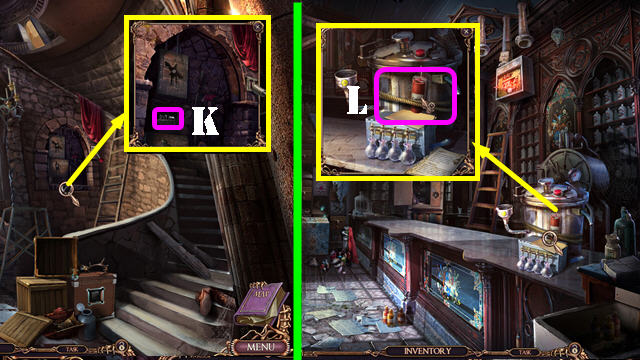
- Take the HANDLE (K).
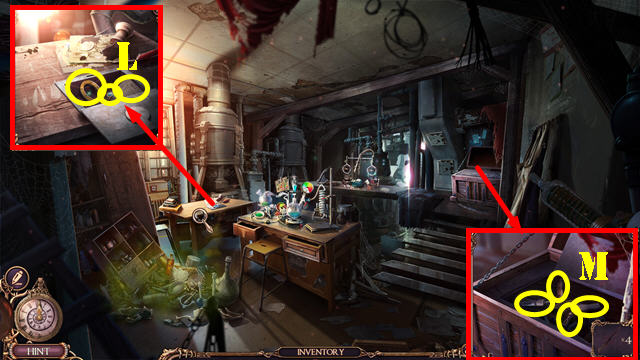
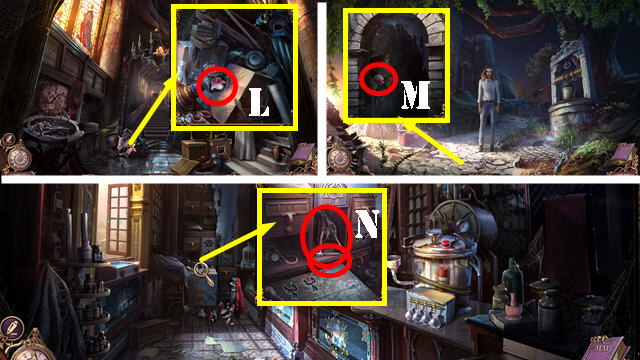
- Place the HANDLE; take the SICKLE (L).
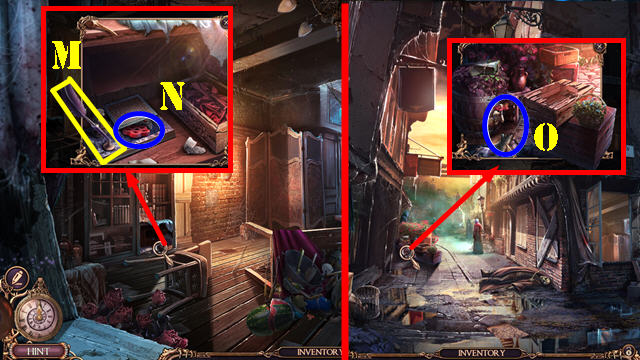
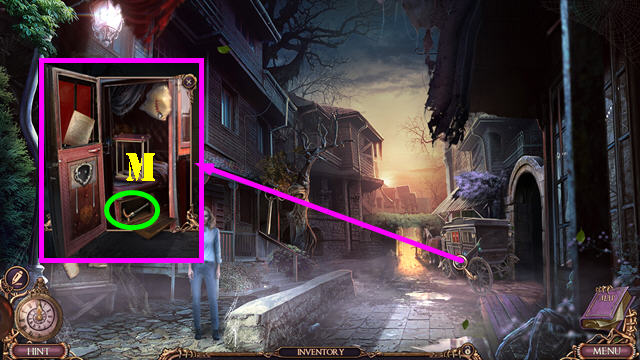
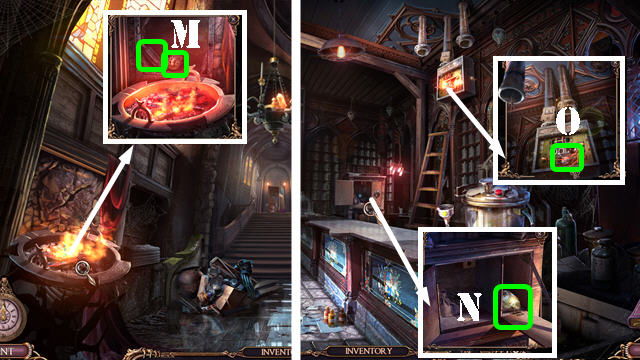
- Use the SICKLE; take the CROSS AMULET and SHOVEL (M).
- Walk down.
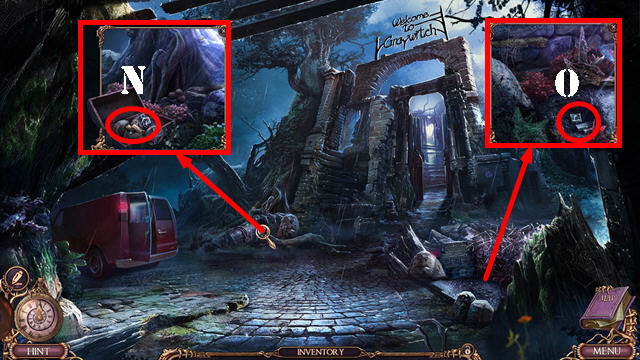
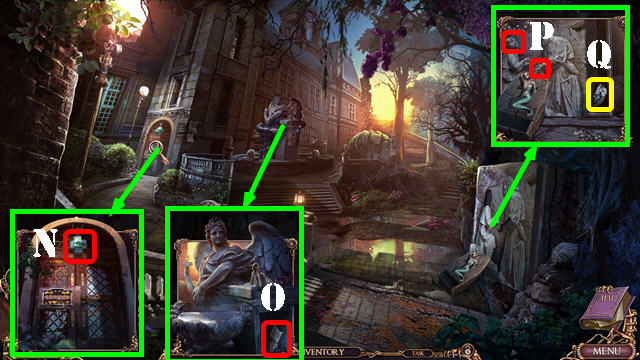
- Use the SICKLE and place the CROSS AMULET; take the HORSE AMULETS 1/3, LETTERS 2/3, and CANDLES (N).
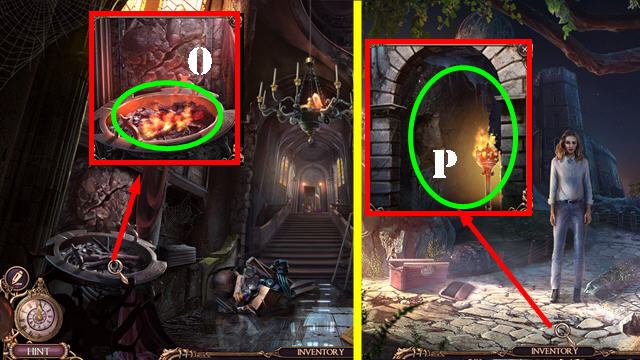
- Use the SHOVEL; take the LETTERS and CHALK (O).
- Go forward.
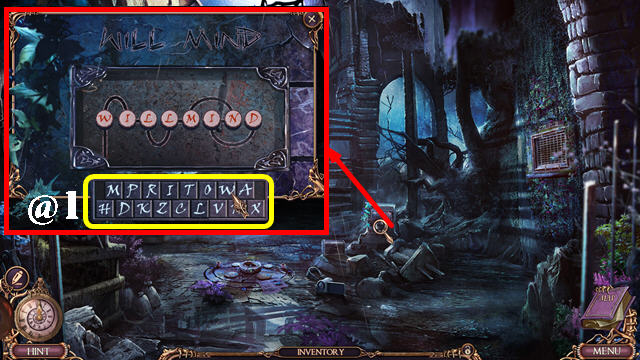
- Place the LETTERS for a puzzle. Select: D-I-N-M-L-L-I-W (@1).
- Take the HACKSAW.
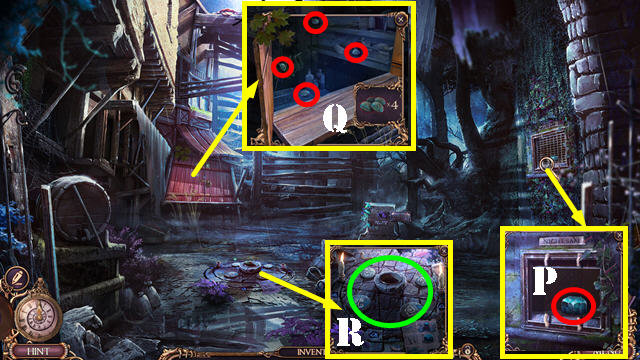
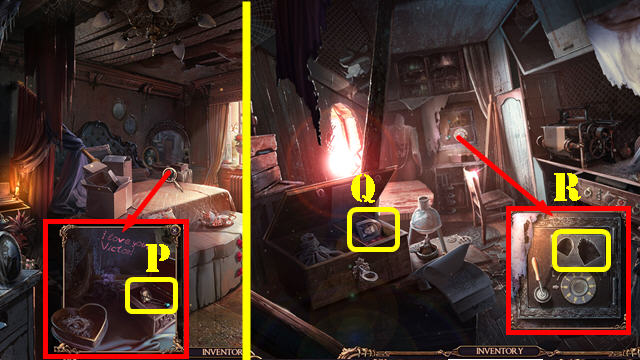
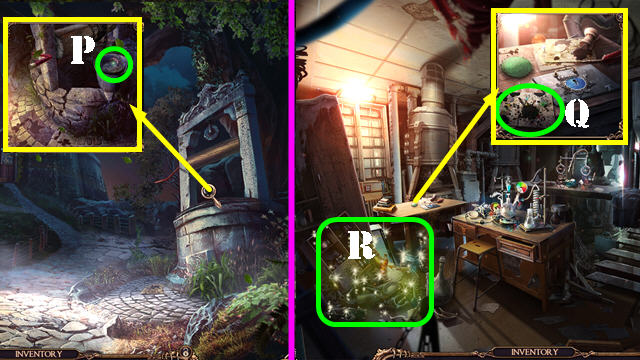
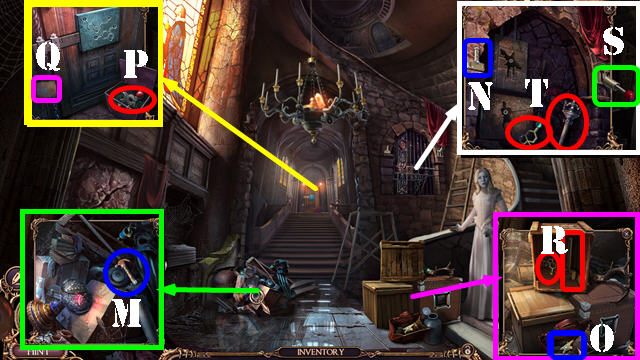
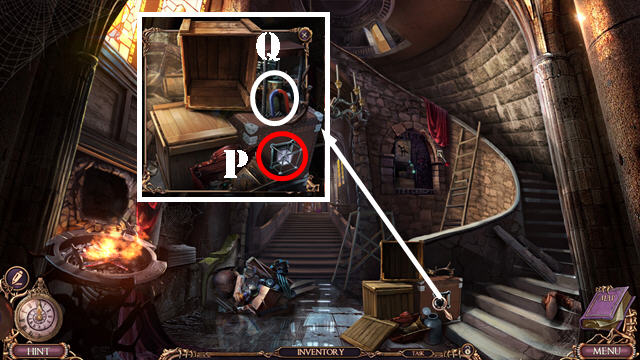
- Use the HACKSAW; take the SUMMONING STONE (P).
- Use the HACKSAW; select the items to receive the RUNESTONES (Q).
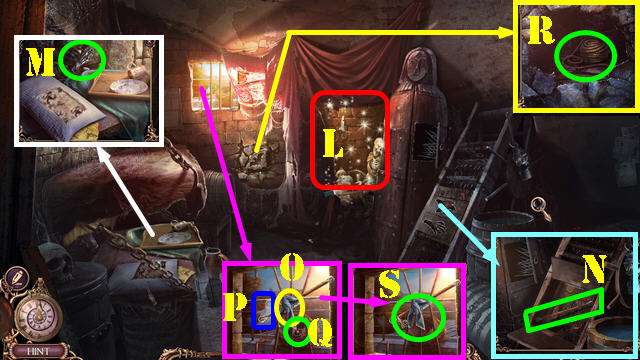
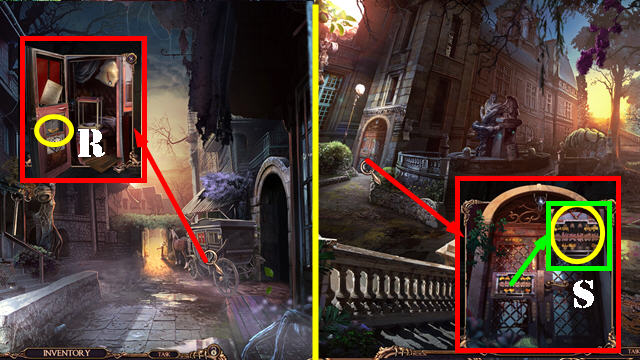
- Place the SUMMONING STONE, CANDLES, RUNESTONES, and CHALK (R). Receive the AURA MAGNIFIER, AURA VIAL 0/7, and RICHARD'S SKULL.
- Walk down.
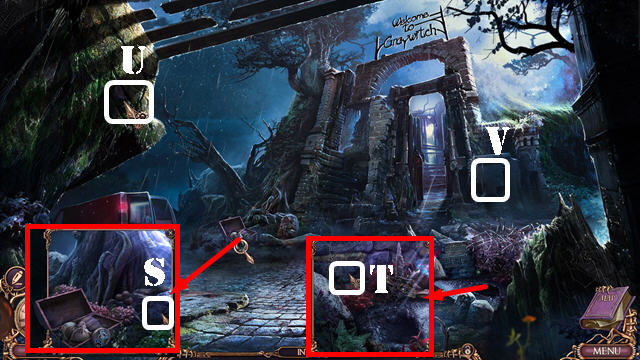
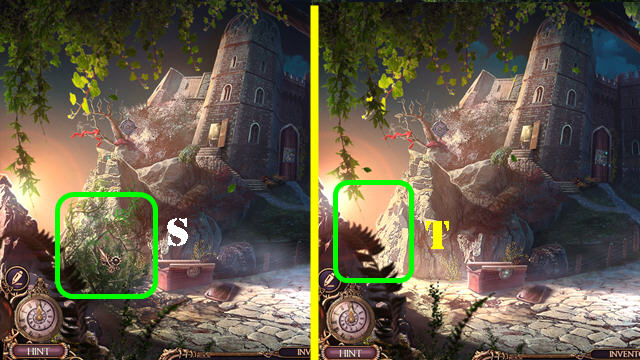
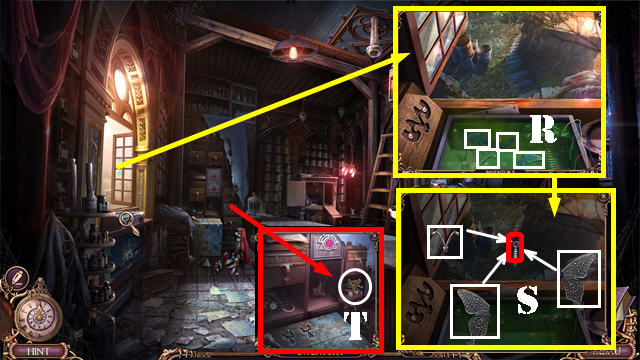
- Use the AURA MAGNIFIER (S); receive the AURA VIAL 1/7.
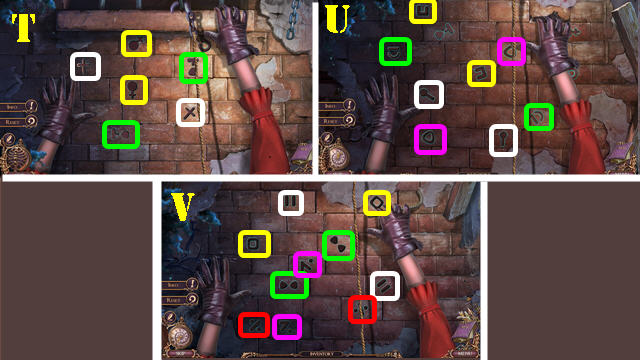
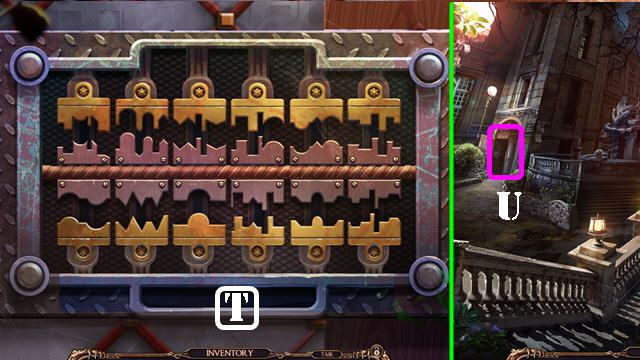
- Use the AURA MAGNIFIER (T); receive the AURA VIAL 2/7.
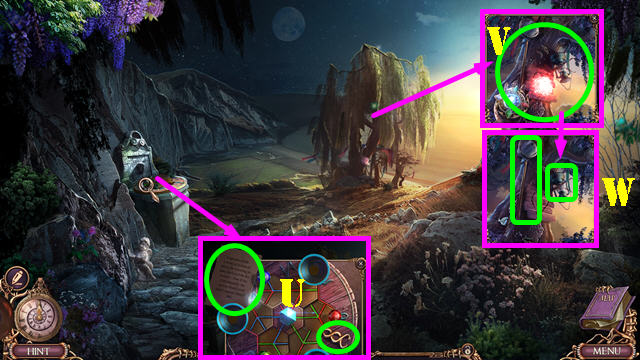
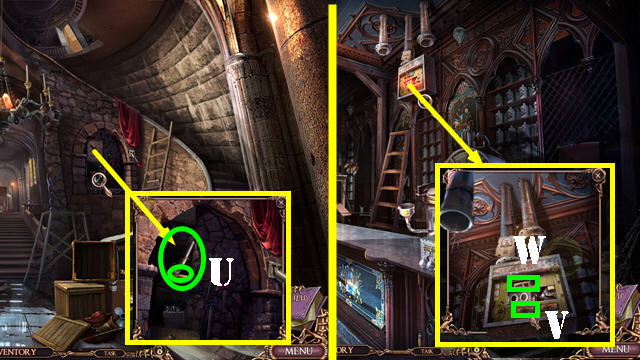
- Use the AURA MAGNIFIER (U); receive the AURA VIAL 3/7.
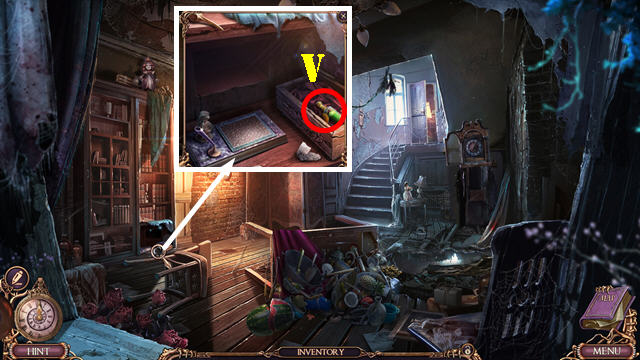
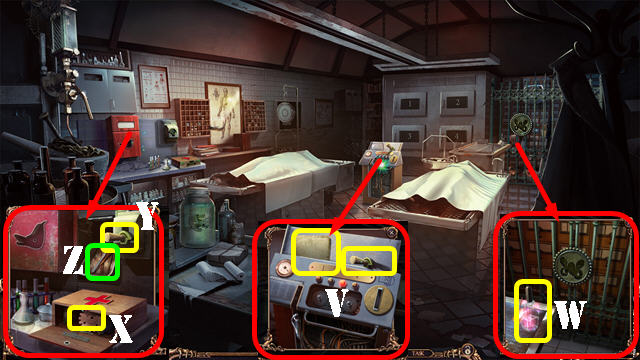
- Use the AURA MAGNIFIER (V); receive the AURA VIAL 4/7.
- Go forward.

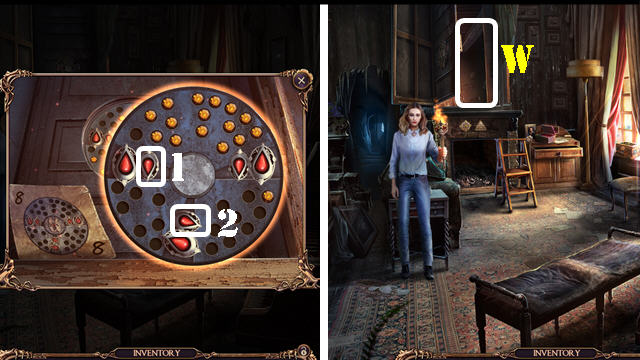
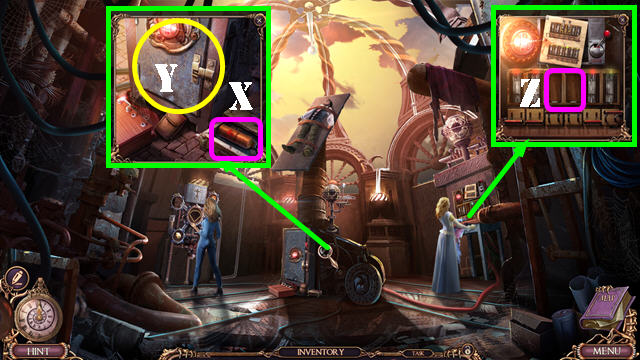
- Use the AURA MAGNIFIER (W); receive the AURA VIAL 5/7.
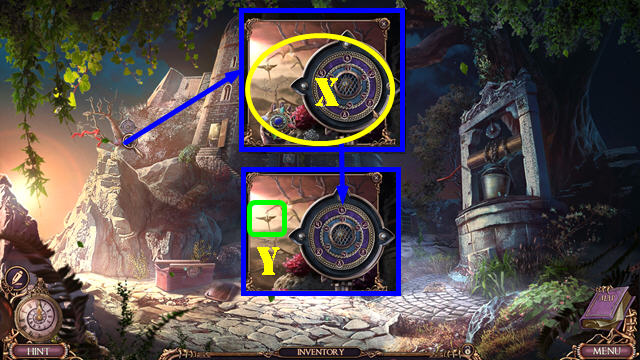
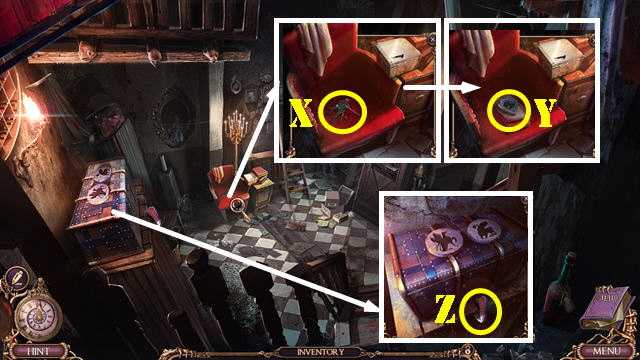
- Use the AURA MAGNIFIER (X); receive the AURA VIAL 6/7.
- Use the AURA MAGNIFIER (Y); receive the AURA VIAL.
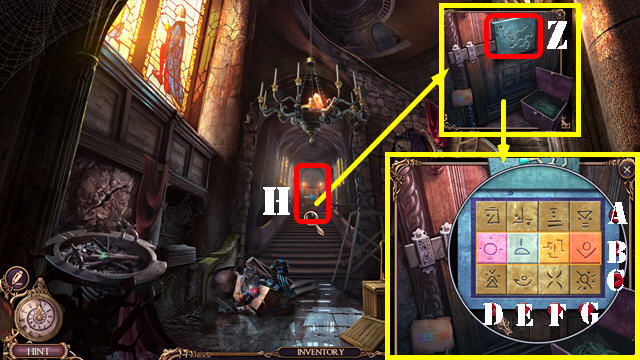
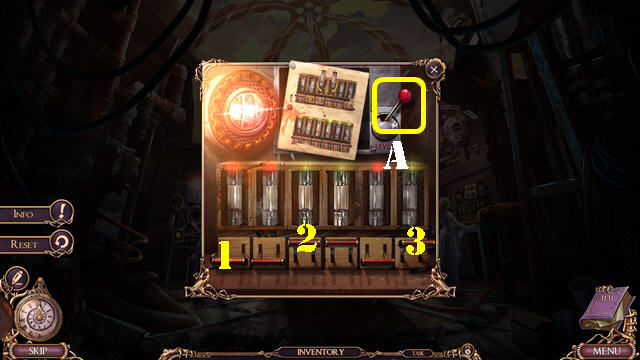
- Use the AURA VIAL (Z) for a puzzle.
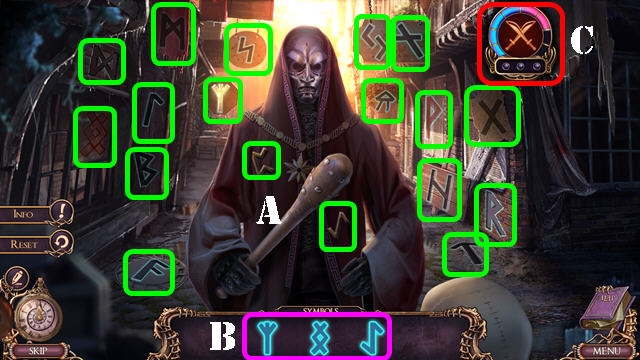
- Find and select the symbols (A) shown below (B) four times in a row before time (C) runs out.
- The solution is random.
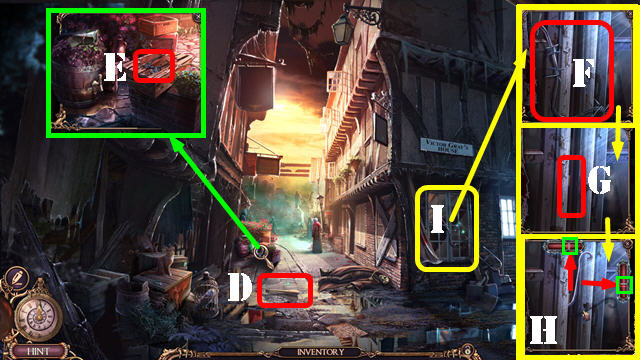
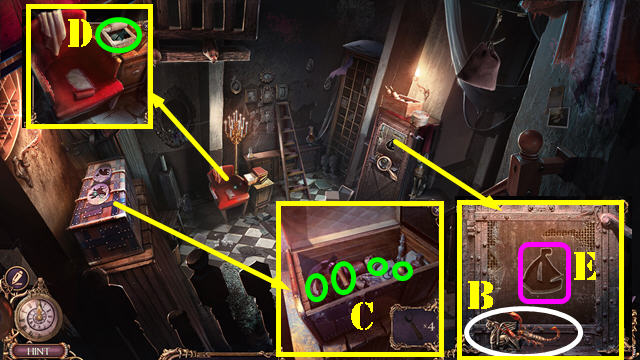
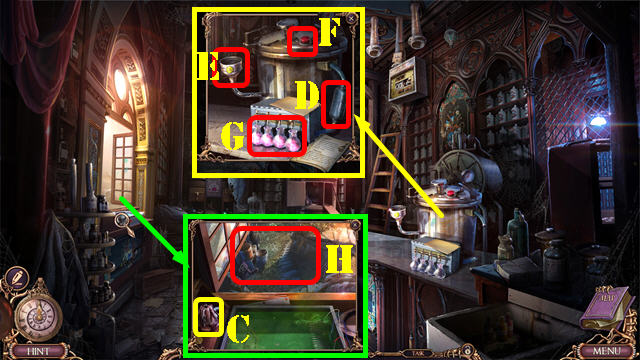
- Take the CLUB (D).
- Use the CLUB; take the WIRE CLIPPERS and SCREWS (E).
- Use the WIRE CLIPPERS (F); receive the WIRE.
- Cut the WIRE with the WIRE CLIPPERS; take the WIRE HOOK.
- Use the WIRE HOOK for a puzzle (G). Solution (H).
- Enter Victor's House (I).
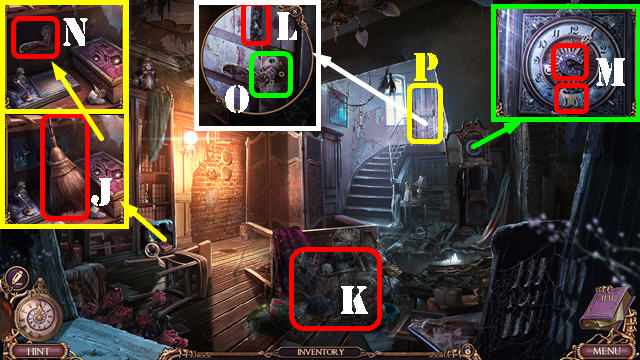
- Take the DUSTER (J).
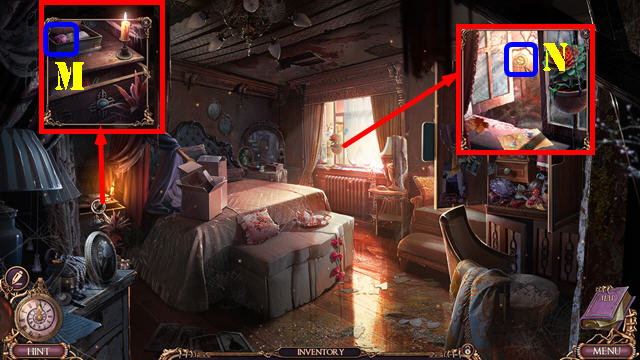
- Use the DUSTER (K); play the HOP to get the SCREWDRIVER.
- Use the SCREWDRIVER (L); receive the HORSE AMULETS 2/3.
- Take the HORSE AMULETS and CAT AMULETS 1/2 (M).
- Place the HORSE AMULETS; take the SPARE HANDLE (N).
- Place the SPARE HANDLE and SCREWS; use the SCREWDRIVER (O); enter the Victor's Bedroom (P).
- Automatically receive the WEDDING FIGURINES 1/2 and RICHARD'S SKULL.
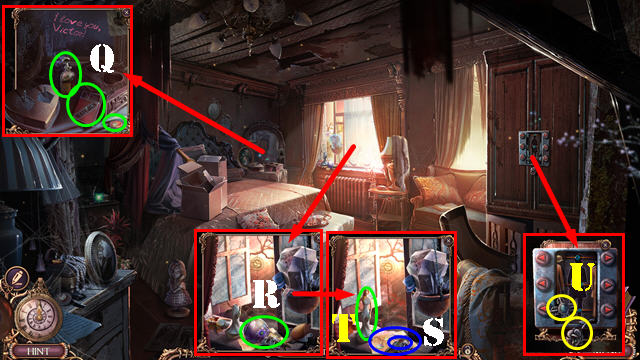
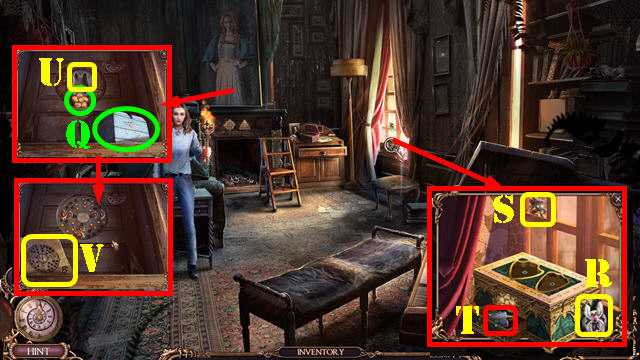
- Take the MATCHES, COINS 1/2, and GLUE (Q).
- Take the EMPTY PERFUME SPRAY (R). Look at the note and take the ROSE AMULETS 1/2 (S). Use the GLUE; take the WEDDING FIGURINES (T).
- Take the ROSE AMULETS and SILVER CROSS (U).
- Walk down.
- Place the ROSE AMULETS; take the PLANT POWDER (V).
- Return to Victor's Bedroom.
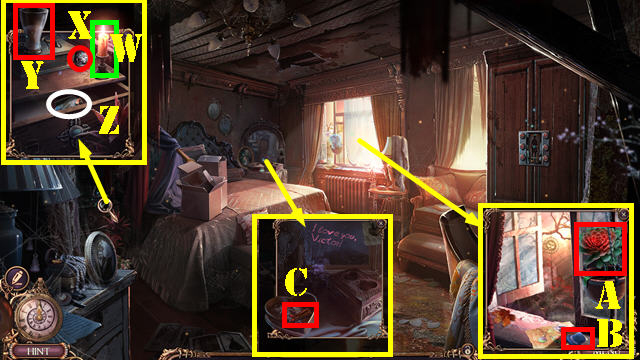
- Use the MATCHES (W); take the HEART AMULETS 1/2 (X) and WATER (Y).
- Place the SILVER CROSS; take the DOLL CLOTHES 1/3 (Z).
- Place the WATER and PLANT POWDER in the EMPTY PERFUME SPRAY; take the PLANT REVIVER.
- Use the PLANT REVIVER (A); take the DOLL CLOTHES 2/3 (B).
- Place the WEDDING FIGURINES; take the DOLL CLOTHES (C).
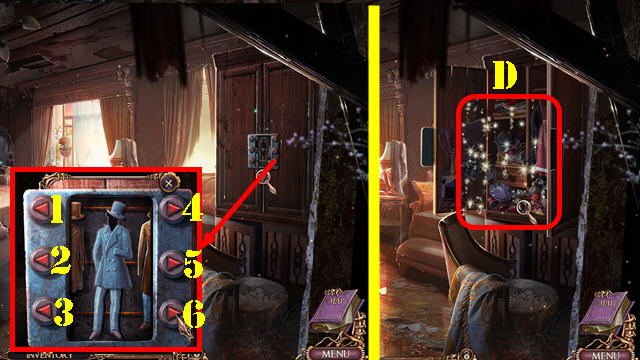
- Place the DOLL CLOTHES 3/3 for a puzzle. Solution: 4-4-5-5-6-6.
- Play the HOP (D) to get the clothes; they automatically get used.
- Walk down twice and go forward to Graywitch Square.
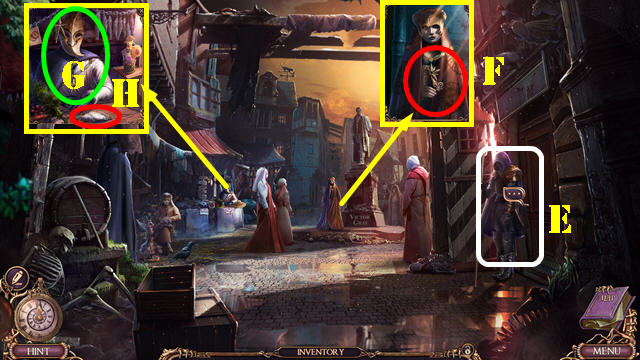
- Talk to the guard; receive the WANTED POSTER (E).
- Give the WANTED POSTER (F); receive the COINS.
- Give the COINS (G); take the FISH (H).
- Go to Victor's Bedroom.
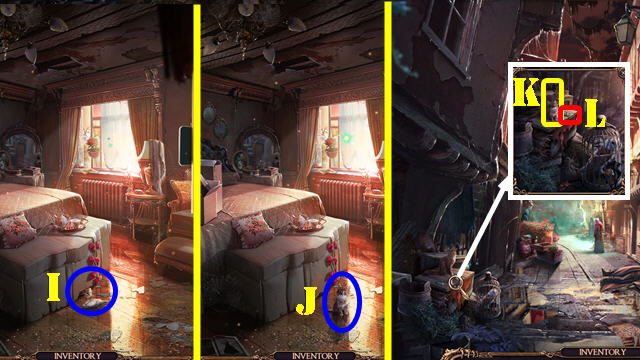
- Use the FISH (I); take the KITTEN (J).
- Walk down twice.
- Place the KITTEN (K); take the CAT AMULETS (L).
- Go to Victor's Bedroom.
- Place the CAT AMULETS; take the YARN BALL (M).
- Select the YARN BALL and place the WIRE HOOK on it; take the HOOK ON A STRING.
- Use the HOOK ON A STRING; receive the CELESTIAL AMULET (N).
- Go to Graywitch Square.
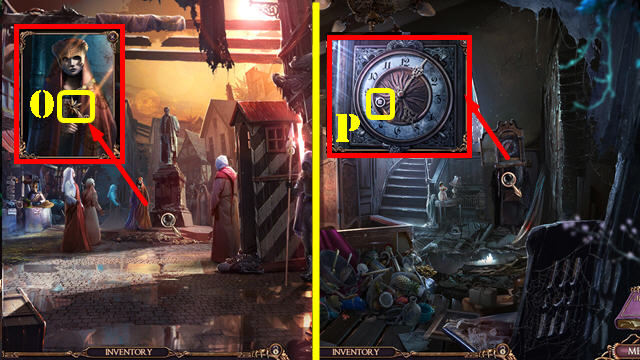
- Give the CELESTIAL AMULET; receive the LETTER and WINDING KEY (O).
- Return to Victor's House.
- Use the WINDING KEY for a puzzle (P).
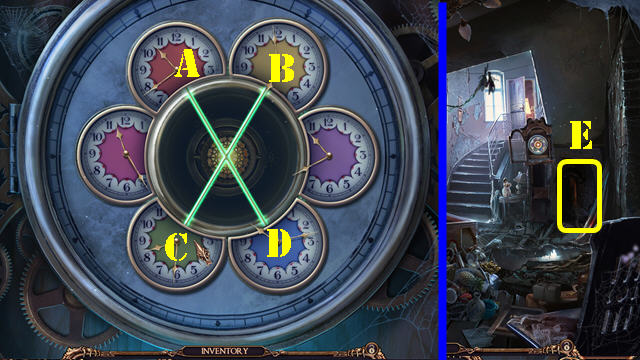
- Solution: D-A-D-Ax2-Dx2-A-D-A-C-B-A-D-B-C-B-C.
- Go to Victor's Basement (E).
Chapter 2: The Basement
- Automatically receive the SCROLL AMULETS 1/3 and RICHARD'S SKULL.
- Take the KEY DIAGRAM and EMPTY OILCAN (F).
- Take the BLANK KEY (G) and FILE (H).
- Place the BLANK KEY on the KEY DIAGRAM. Use the FILE on the raw material; take the KEY.
- Use the KEY (I); take the SCROLL AMULETS 2/3 (J).
- Walk down twice.
- Use the FILE; take the SCROLL AMULETS (K).
- Go to Victor's Basement.
- Place the SCROLL AMULETS; take the QUILL PEN and SHOPPING LIST (L).
- Go to Victor's House.
- Place the QUILL PEN (M); take the VALVE and HEART AMULETS (N).
- Walk down.
- Use the VALVE and EMPTY OILCAN; receive the OIL (O).
- Go to Victor's Bedroom.
- Place the HEART AMULETS; take the HAIRPIN and PORTRAIT TOKENS 1/2 (P).
- Go to Victor's Basement.
- Use the HAIRPIN; take the PORTRAIT TOKENS (Q).
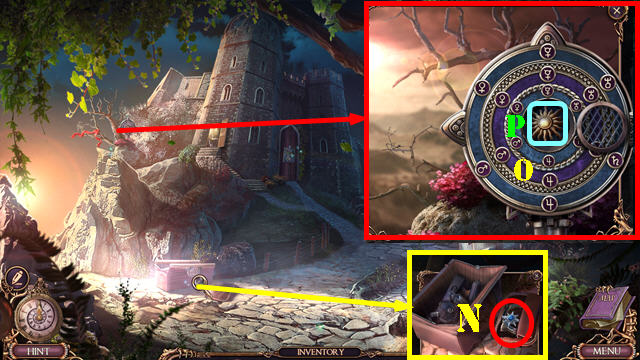
- Use the OIL; place the PORTRAIT TOKENS (R) for a puzzle.
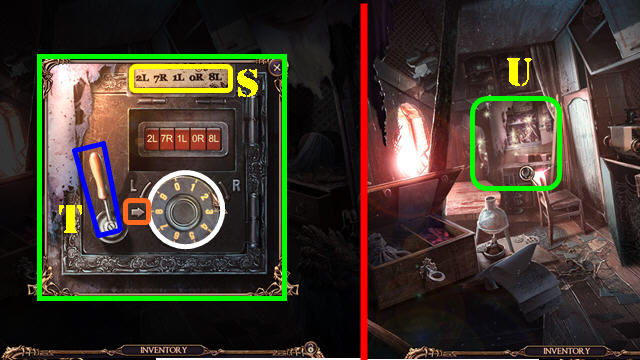
- Using the clue (S), stop each number (white) on the arrow (orange). Drag 2 counterclockwise, 7 clockwise, 1 counterclockwise, 0 clockwise, and 8 counterclockwise. Pull the handle (T).
- Play the HOP (U) to get the BAG OF COINS.
- Go to Graywitch Square.
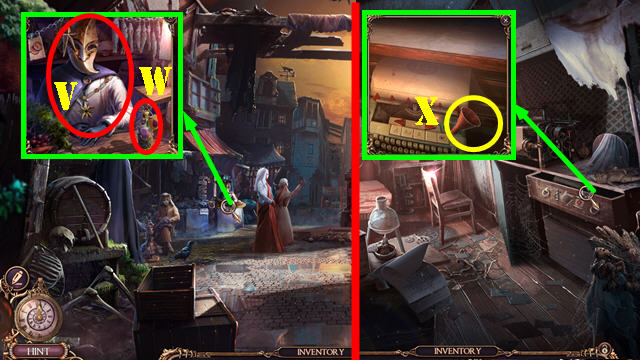
- Give the SHOPPING LIST and BAG OF COINS (V); take the INK (W).
- Go to Victor's Basement.
- Use the INK and LETTER for a puzzle (X).
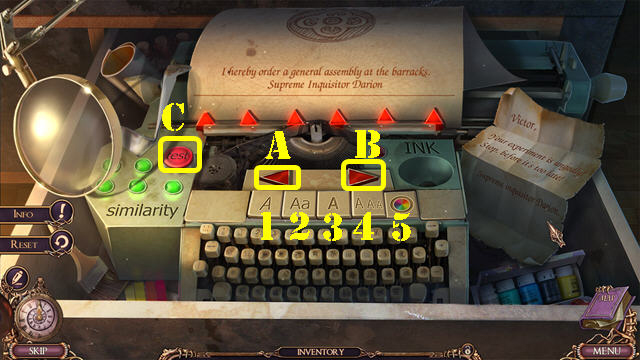
- Solution: 1-B-2-B-4-A-5-B-B-C.
- Take the FALSIFIED DOCUMENT.
- Go to Graywitch Square.
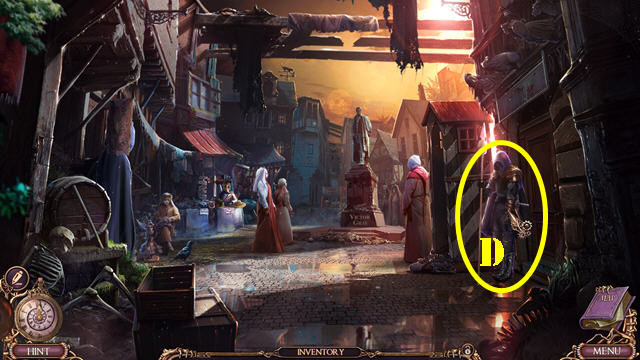
- Give the FALSIFIED DOCUMENT (D).

- Automatically receive the RAVEN AMULET and RICHARD'S SKULL.
- Take the SHARP SHARD (E).
- Take the CANDLE and BREAD (F). Use the SHARP SHARD (G); receive the CLOTH. Look at the note (G1).
- Use the OIL, pull the handle and take the PICK (H). Dip the CLOTH; receive the WET CLOTH (I).
- Read the note; take the FLINT AND STEEL 1/2 (J).
- Use the PICK; receive the FLINT AND STEEL (K).
- Use the FLINT AND STEEL on the CANDLE; take the LIT CANDLE.
- Use the LIT CANDLE (L); play the HOP to get the HOOK.
- Use the PICK (M); take the BONE HAND AMULET.
- Place the BONE HAND AMULET and RAVEN AMULET; take the STAFF (N).
- Use the WET CLOTH and STAFF (O). Use the BREAD (P); take the BAT AMULET (Q).
- Place the BAT AMULET; take the ROPE (R).
- Place the HOOK on the ROPE; take the GRAPPLING HOOK.
- Use the GRAPPLING HOOK (S) for a puzzle.
- Solution (T-U-V).
- Read the note (A).
- Take the PIPE and POLE (B).
- Take the BRICK and NAIL PULLER (C).
- Take the COIN PURSE (D) and SAW (E).
- Give the COIN PURSE (F); receive the LIGHTER.
- Use the NAIL PULLER (G); select the items (H) to receive the EMPTY SMOKER.
- Use the SAW (I); receive the WOOD CHUNKS.
- Open the EMPTY SMOKER; place the WOOD CHUNKS and use the LIGHTER. Close the smoker, insert the PIPE, and take the SMOKER.
- Use the POLE; receive the PIKE POLE (J).
- Use the SMOKER and the PIKE POLE; receive the HOUSE KEY and LANTERN (K).
- Use the HOUSE KEY (L); enter Abigail's House.
Chapter 3: Abigail's House
- Automatically receive the FEATHER AMULET and RICHARD'S SKULL.
- Take the SCROLL AMULET and LETTER OPENER (M).
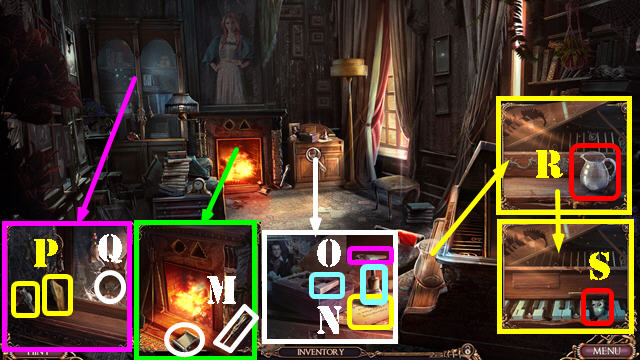
- Take the PIANO KEYS 1/2 and INK REMOVER (light blue). Read the note (N). Place the SCROLL AMULET and FEATHER AMULET; take the PIANO KEYS and BROKEN KEY 1/2 (O).
- Read the note; take the OWL AMULETS 1/3 (P). Use the BRICK; take the EYE AMULET (Q).
- Take the PITCHER (R). Use the LETTER OPENER; take the OWL AMULETS 2/3 (S).
- Walk down.
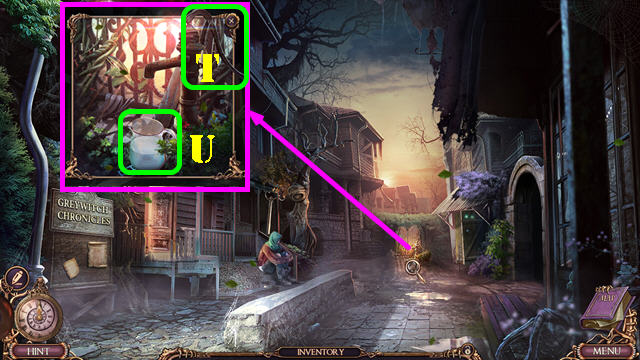
- Place the PITCHER and pump the handle (T); take the PITCHER OF WATER (U).
- Return to Abigail's House.
- Use the PITCHER OF WATER; take the OWL AMULETS (V).
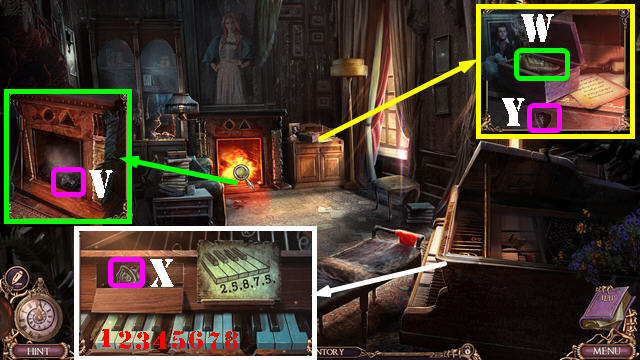
- Place the OWL AMULETS; take the PIANO SKETCH (W).
- Place the PIANO KEYS and PIANO SKETCH; select (2-5-8-7-5); take the SHIELD RING (X).
- Use the SHIELD RING (Y); play the HOP to get the ENVELOPE.
- Use the LETTER OPENER on the ENVELOPE; take the LOCKPICK.
- Walk down.
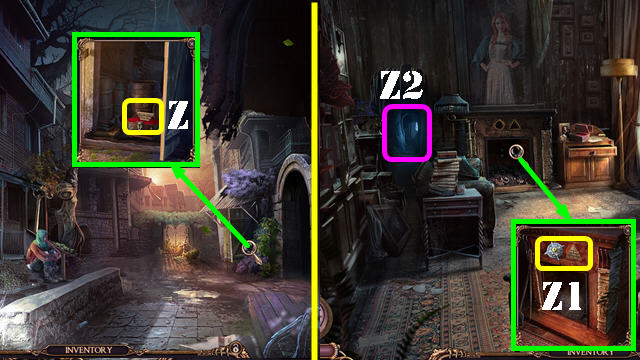
- Use the LOCKPICK; take the PYRAMID AMULET (Z).
- Go to Abigail's House.
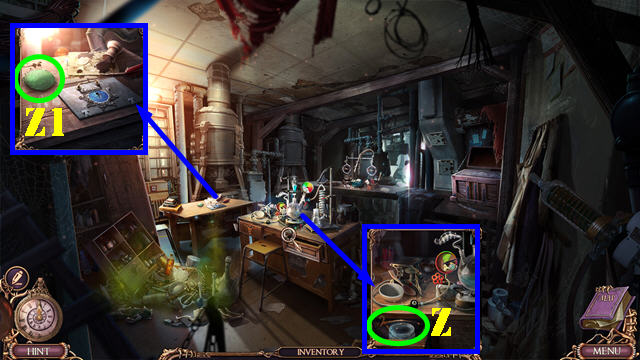
- Place the EYE AMULET and PYRAMID AMULET (Z1).
- Use the LANTERN (Z2) for a puzzle.
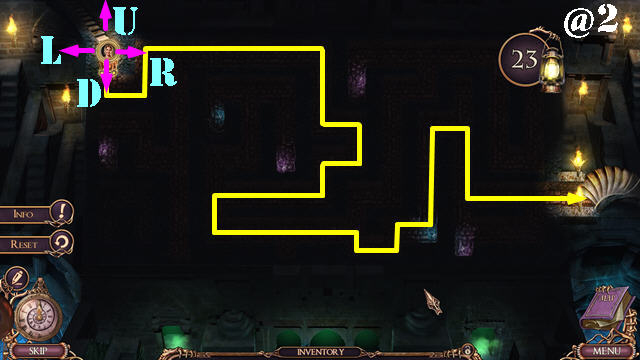
- Solution: D-R-U-Rx2-D-R-D-L-D-L-D-Rx2-D-R-U-R-U-R-D-Rx2 (@2).
- Automatically receive the TIME ECHO 0/4 and RICHARD'S SKULL.
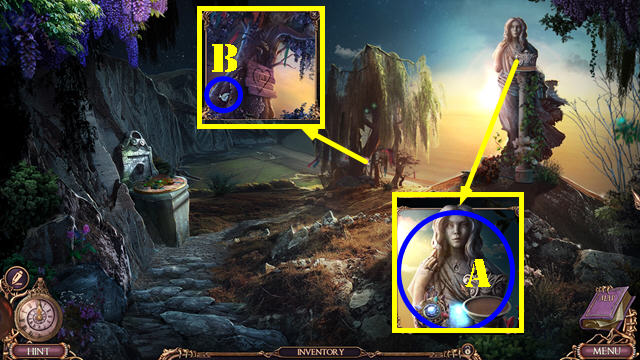
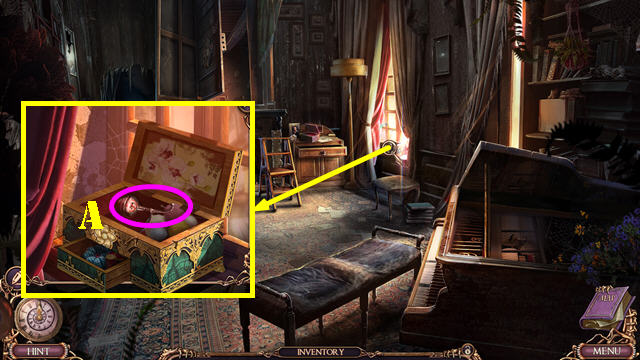
- Look in the well; automatically receive the TIME ECHO 1/4 (A). Take the MOSAIC PIECE (B).
- Take the RIDER CHARM (C).
- Place the RIDER CHARM; take the HANDLE and BOLT CUTTER (D).
- Place the HANDLE (E); receive the AXE.
- Use the AXE (F); enter the Workshop (G).
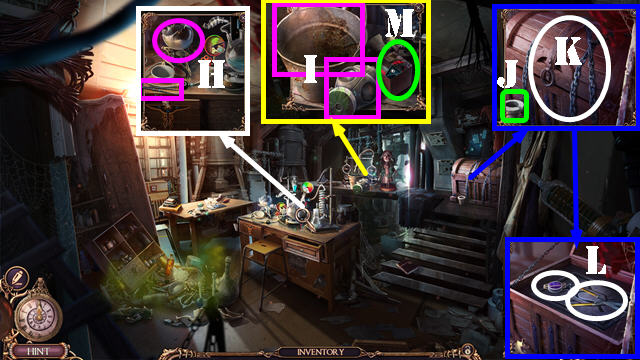
- Select the broken crystal and take the TWEEZERS (H).
- Take the GAS MASK and BUCKET (I).
- Take the CRUCIBLE (J).
- Use the BOLT CUTTER; receive the CHAIN (K). Take the HEDGE CLIPPERS and PLANET AMULET (L).
- Place the MOSAIC PIECE for a puzzle (M).
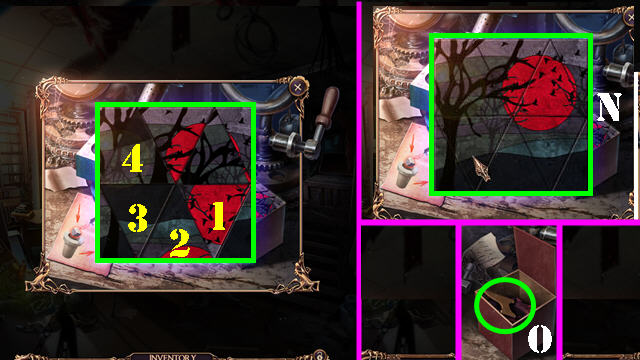
- Solution (1-4). Final Image (N).
- Take the BLACKSMITH AMULETS 1/2 (O).
- Walk down.
- Use the CHAIN and BUCKET; take the TALISMAN (P).
- Go to the Workshop.
- Use the INK REMOVER; take the RECIPE (Q).
- Use the GAS MASK (R); play the HOP to get the VESSEL.
- Walk down.
- Use the HEDGE CLIPPERS (S); go to the Shore (T).
- Look at the note; take the CADUCEUS AMULET 1/2 (U).
- Look at the tree to receive the TIME ECHO 2/4 (V). Take the NET and BROKEN LANTERN (W).
- Walk down.
- Look at the tree to receive the TIME ECHO 3/4 (X).
- Use the NET to receive the CADUCEUS AMULET (Y).
- Go to the Workshop.
- Use the CADUCEUS AMULET; take the GLASS JAR and TONGS (Z).
- Use the GLASS JAR (Z1); receive the GREEN POWDER.
- Go to the Shore.
- Look at the statue to get the TIME ECHO 4/4 (A).
- Use the TONGS to get the PIGEON AMULET (B).
- Walk down.

- Place the PIGEON AMULET; take the RINGS 1/2 (C).
- Use the TWEEZERS to get the BROKEN KEY (D).
- Go to the Workshop.
- Place the BROKEN KEY (E) and pull the handle (F); take the WHOLE KEY.
- Walk down.
- Use the WHOLE KEY; take the BROKEN AMULET (G).
- Go to the Workshop.
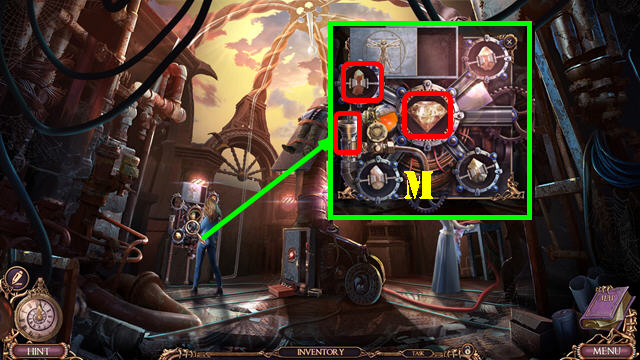
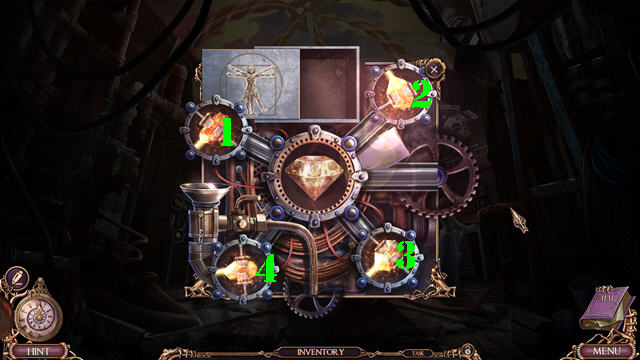
- Place the RECIPE, VESSEL, and GREEN POWDER for a puzzle (H).
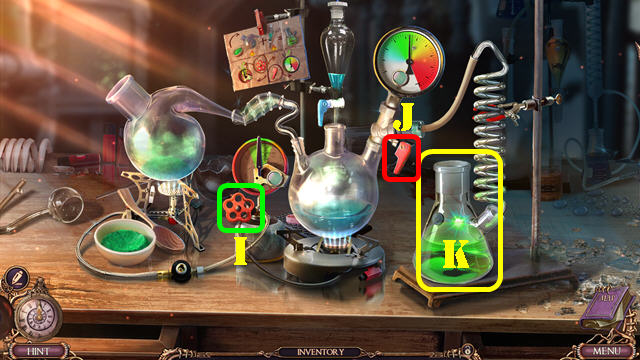
- Select I-Jx5. Take the ACID (K).
- Use the ACID; take the RINGS and BLACKSMITH AMULETS; read the note (L).
- Automatically receive the MAGIC PRISM and RICHARD'S SKULL.
- Use the BLACKSMITH AMULETS; select the four parts to receive the DAGGER (M).
- Walk down.
- Use the DAGGER; take the STAR AMULET and PLANETARY RING (N).
- Place the PLANETARY RING for a puzzle. Solution (Ox3-Px4). Take the SUN AMULET (light blue).
- Remove the glass from the BROKEN LANTERN; place the MAGIC PRISM and take the MAGIC LANTERN.
- Go to the Shore.
- Use the MAGIC LANTERN; take the TEAR PENDANT (Q).
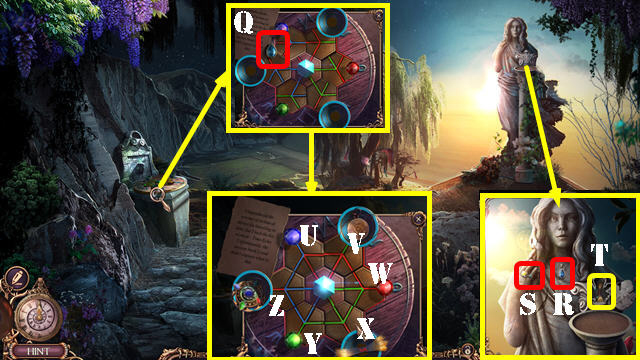
- Place the TEAR PENDANT (R) and RINGS (S); take the LOCK OF HAIR (T).
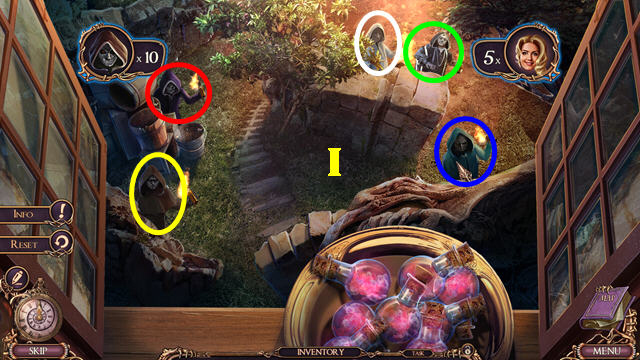
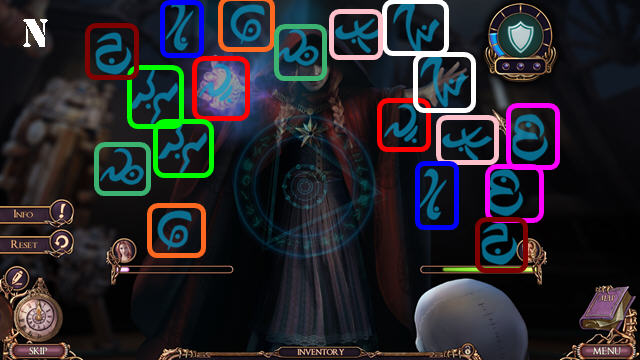
- Place the LOCK OF HAIR, TALISMAN, and TIME ECHO for a puzzle. Solution: Ux4-Vx5-Wx5-Xx5-Yx5-Zx5.
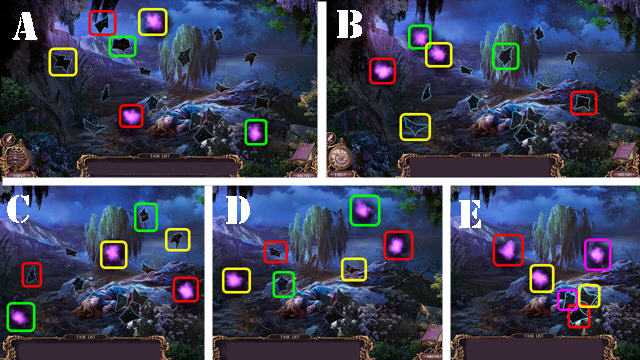
- Collect the magic anomalies (A-B-C-D-E). Take the CHEAP BRACELET.
- Automatically receive the HALFMOON AMULET and RICHARD'S SKULL.
- Go to the Workshop.
- Place the CRUCIBLE and CHEAP BRACELET (F). Pull the handle (G) and take the MELTED TIN.
- Go to the Shore.
- Place the BROKEN AMULET and MELTED TIN; take the COMET AMULET (H).
- Walk down.
- Place the HALFMOON AMULET, COMET AMULET, STAR AMULET, SUN AMULET, and PLANET AMULET for a puzzle (I).
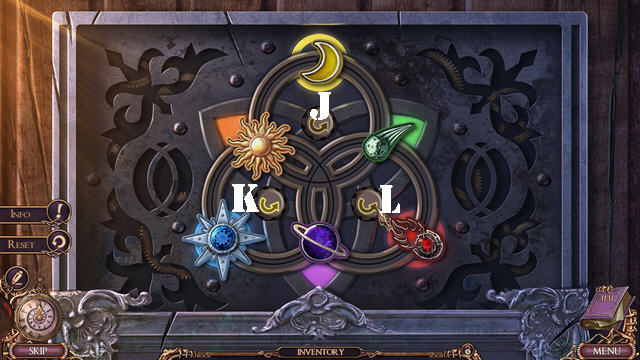
- Solution: Jx2-Kx2-Lx2.
Chapter 4: The Tower
- Automatically receive the CROWBAR and RICHARD'S SKULL.
- Take the METALWORKING AMULETS 1/3 (M), METALWORKING AMULETS 2/3 (N) and METALWORKING AMULETS (O).
- Place the METALWORKING AMULETS; take the OMEGA AMULETS 1/2 and SWITCH HANDLE (P). Look at the note (Q).
- Use the CROWBAR; take the MOLECULE AMULETS 1/2 and MALLET (R).
- Place the SWITCH HANDLE and pull it (S). Take the MOLECULE AMULETS and TORCH (T).
- Place the MOLECULE AMULETS for a puzzle (Z). Solution: Bx2-Fx2-Ax3-D.
- Go to the Lab (H).
- Look at the notes; take the HOT COALS (I).
- Take the OMEGA AMULETS; look at the note (J).
- Place the OMEGA AMULETS; take the PLIERS and CHISEL (K).
- Walk down.
- Use the CHISEL and MALLET; take the GEOMETRIC AMULETS 1/2 (L).
- Walk down.
- Use the CROWBAR; take the GEOMETRIC AMULETS (M).
- Go to the Lab.
- Place the GEOMETRIC AMULETS; take the BELLOWS and GLASS CUTTER (N).
- Walk down.
- Use the HOT COALS and BELLOWS; dip the TORCH to get the BURNING TORCH (O).
- Walk down.
- Use the BURNING TORCH (P).
- Use the CROWBAR; take the FLOWER AMULET and JEWELRY BOX (Q).
- Take the WINGED AMULET (R) and GRIFFIN AMULETS 1/2 (S). Place the FLOWER AMULET; take the RAZORBLADE and SMALL KEY (T).
- Use the SMALL KEY on the JEWELRY BOX; take the CODE NOTE.
- Place the WINGED AMULET (U) and CODE NOTE (V); select the puzzle.
- Solution: 1-2.
- Go to the Secret Room (W).
- Take the SOLDIER AMULET (X). Use the RAZORBLADE; take the SHIELDS 1/2 (Y).
- Use the PLIERS to get the SHIELDS (Z).
- Walk down.
- Place the SHIELDS; take the INSECTICIDE (A).
- Go to the Secret Room.
- Use the INSECTICIDE; take the GRIFFIN AMULETS (B).
- Place the GRIFFIN AMULETS; select the four pieces to get the CAN OPENER (C).
- Use the CAN OPENER; take the SAILBOAT AMULET (D).
- Place the SAILBOAT AMULET for a puzzle (E).
- Solution (1-8).
- Play the HOP (F) to get VICTOR'S PAPERS.
- Walk down twice.
- Give VICTOR'S PAPERS (G).
- Open the door; take the MERMAID FIGURINE and look at the note (H).
- Go to the Park (I).
- Automatically receive the CURSE ABSORBER and RICHARD'S SKULL.
- Take the CLOVER AMULET and GEARS 1/3 (J).Place the MERMAID FIGURINE; take the TREE AMULET (K).
- Use the CURSE ABSORBER; take the STONE HEAD and LION AMULET 1/2 (L).
- Walk down.
- Use the TREE AMULET; take the WALKING CANE (M).
- Go to the Park.
- Use the WALKING CANE to get the MEDICAL SIGN (N).
- Use the GLASS CUTTER on the MEDICAL SIGN; take the HYGIEIA AMULET.
- Place the HYGIEIA AMULET; take the STONE ARM (O).
- Place the STONE HEAD and STONE ARM (P); take the LION AMULET (Q).
- Walk down.
- Place the LION AMULET; take the KEY BUNCH (R).
- Go to the Park.
- Place the KEY BUNCH for a puzzle (S).
- Solution (T).
- Enter the Morgue (U).
- Take the LEVER and look at the note (V).
- Use the CURSE ABSORBER; take the DIRT REMOVER (W).
- Place the CLOVER AMULET; take the GEARS 2/3 (X). Place the LEVER (Y); take the SCALPEL (Z).
- Walk down.
- Use the DIRT REMOVER; take the COBRA AMULETS 1/3 (A).
- Walk down.
- Use the SCALPEL (B); take the COBRA AMULETS 2/3 and BIRD AMULET (C).
- Go to the Morgue.
- Place the BIRD AMULET; take the GEARS and FORCEPS (D).
- Use the FORCEPS to get the COBRA AMULETS (E).
- Place the COBRA AMULETS (F); play the HOP to get the PUNCH CARD.
- Place the GEARS (G) and PUNCH CARD (H).
Chapter 5: Tower Roof
- Automatically receive the RAINBOW AMULET.
- Look at the note; take the ANGEL AMULETS 1/2 (I).
- Look at the note (J).
- Walk down.
- Place the SOLDIER AMULET; take the BULLET (K).
- Go to the Lab.
- Use the SCALPEL to receive the CORDITE and STRING (L).
- Walk down.
- Use the CORDITE; take the BLUE CYLINDER and MASK AMULET (M).
- Go to the Lab.
- Place the MASK AMULET; take the CRYSTAL (N).
- Use the PLIERS; take the HYPERCUBE AMULET (O).
- Walk down.
- Place the HYPERCUBE AMULET (P); take the MAGNET and DISASSEMBLED LAMP (Q).
- Use the STRING on the MAGNET; take the MAGNET ON STRING.
- Go to the Lab.
- Place the MAGNET ON STRING for a puzzle. Remove the four pieces with the magnet (R). Assemble the butterfly (S).Take the BUTTERFLY AMULET.
- Place the BUTTERFLY AMULET; take the ICARUS FIGURINE and CHEMICAL REAGENT (T).
- Walk down.
- Place the ICARUS FIGURINE; take the DISASSEMBLED GUN and BATTERY (U).
- Go to the Lab.
- Place the BATTERY (V); take the CAPSULE (W).
- Go to the Tower Roof.
- Place the RAINBOW AMULET; take the FUEL (X).
- Use the FUEL on the DISASSEMBLED LAMP; take the BLOWTORCH.
- Use the BLOWTORCH (Y); play the HOP to get the FUSES.
- Place the FUSES for a puzzle (Z).
- Solution (1-2-3). Pull the lever (A).
- Automatically receive the VITRUVIAN AMULET.

- Place the VITRUVIAN AMULET; take the FLINT LOCK and AXES AMULET (B).
- Go to the Lab.
- Place the AXES AMULET; take the GUNPOWDER and WRENCH (C).
- Use the WRENCH on the CAPSULE; remove the CHEMICALS.
- Place the BLUE CYLINDER (D). Place the CHEMICALS and CHEMICAL REAGENT (E). Push the button (F). Take the SLEEPING GAS BOMBS (G).
- Use the SLEEPING GAS BOMBS for a puzzle (H).
- Throw bombs at all the bad guys (I). Solution is random.
- Take the ANGEL AMULETS (J).
- Place the ANGEL AMULETS (J1); play the HOP to get the CHEMICAL ESSENCE.
- Walk down.
- Place the FLINT LOCK on the DISASSEMBLED GUN. Slide the compartment; place the GUNPOWDER and BULLET. Take the LOADED GUN.
- Use the LOADED GUN (K); take the CRYSTAL (L).
- Go to the Tower Roof.
- Place the two CRYSTALS and CHEMICAL ESSENCE for a puzzle (M).
- Select 1-1-4.
- Select matching pairs before time runs out. Solution is random (N).
- Congratulations, you've completed Grim Tales: Graywitch.
Created at: 2017-03-03