

Walkthrough Menu
- General Tips
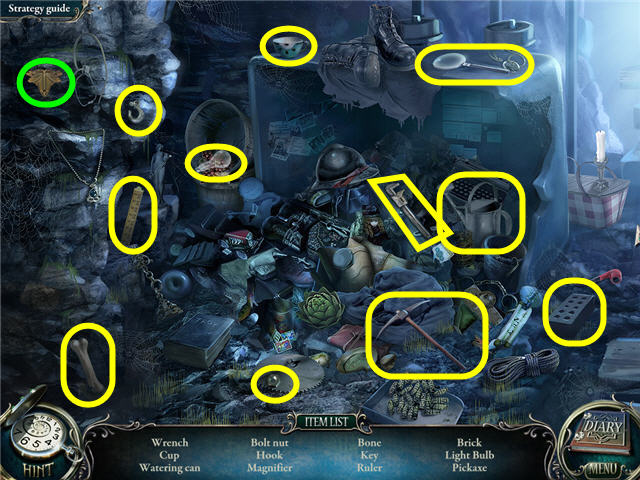
- Chapter 1- The Ring
- Chapter 2 - The Handkerchief
- Chapter 3 - The Rifle
- Chapter 4 – The Rose
- Chapter 5 – Father
- Chapter 6 - Luisa
General Tips
- Choose from three modes of play: Casual, Advanced or Hardcore.
- Casual Mode has sparkles in all areas of interest. Advanced Mode has no sparkles.
- Hardcore Mode has no hints, mini-game skips or sparkles.
- Click on Options (1) to adjust the Volume, Cursor and Screen size.
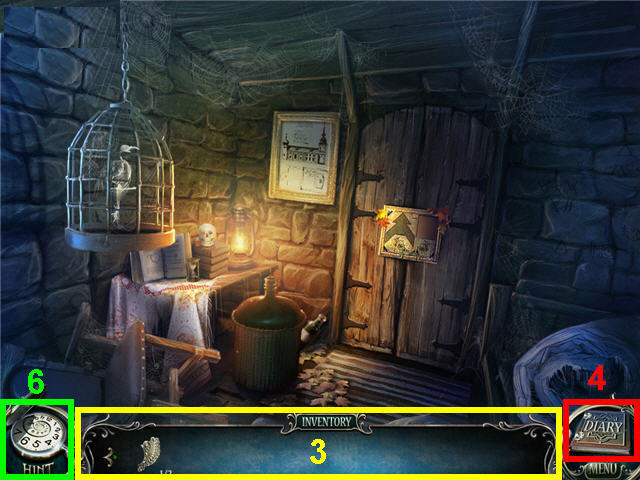
- Move your cursor to the bottom of the screen to access the Inventory Bar (3).
- Consult your Diary (4) often; it contains story points and puzzle hints.
- Click on the pocket watch (6) to get a hint in either the Hidden Object Scenes or regular gameplay.
- Click on the Info button above the pocket watch during a puzzle to get your puzzle objective.
- There is no penalty for random clicking.
- Items in Hidden Object Scenes may be random.
Chapter 1- The Ring
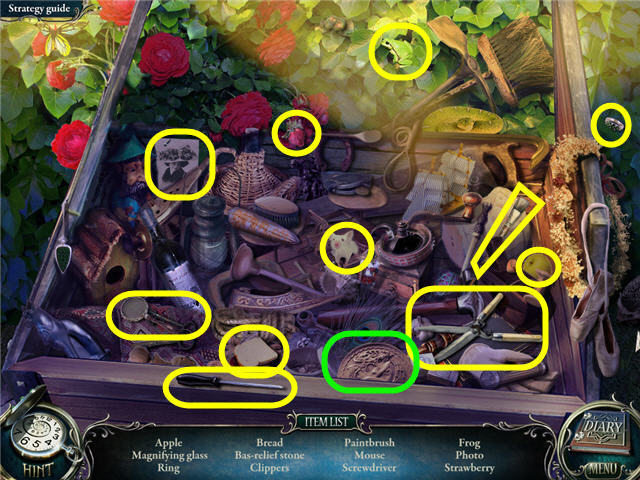
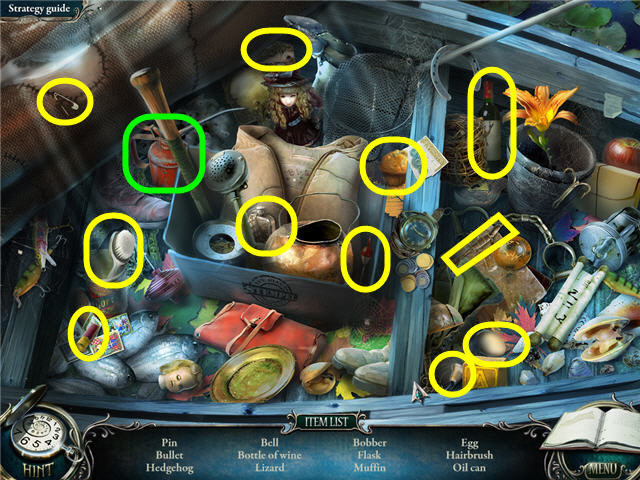
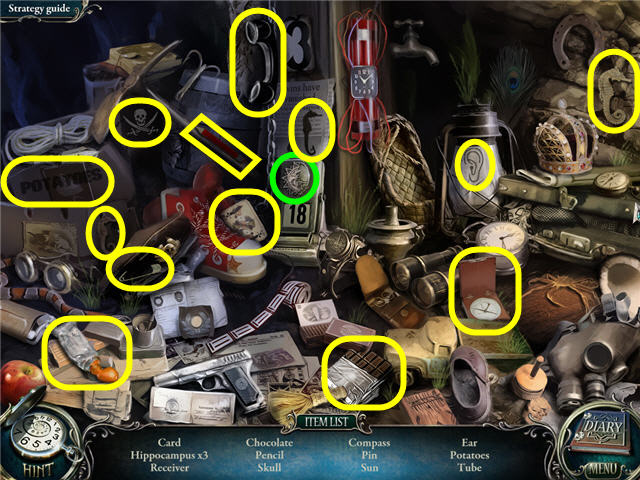
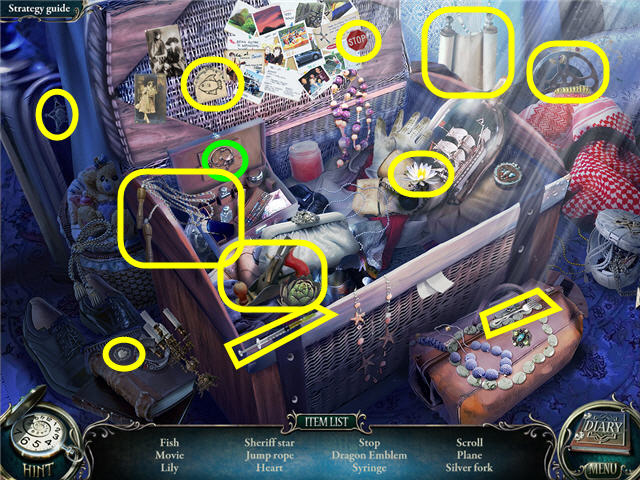
- Examine the crate to access a Hidden Object Scene.
- Find the items listed and get a BAS-RELIEF STONE.
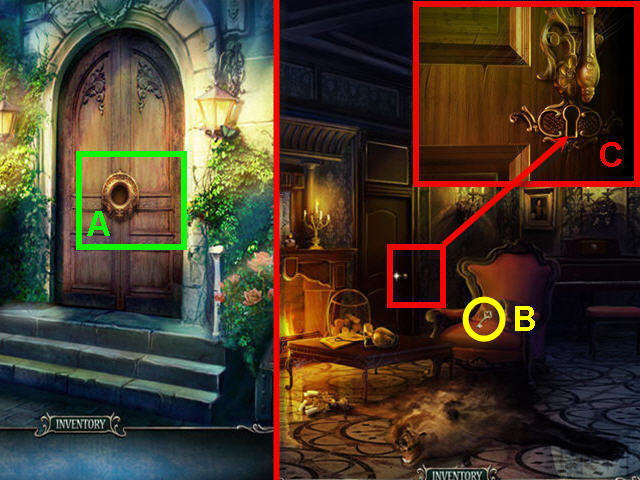
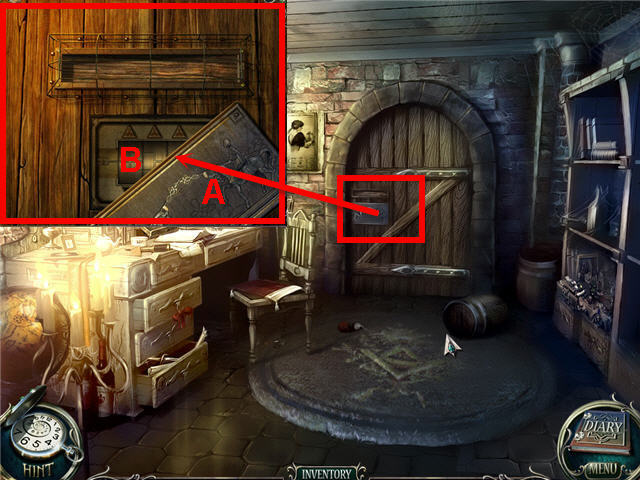
- Examine the door; place the BAS-RELIEF STONE on the lock (A).
- Enter the house.
- Examine the chair; take the DOOR KEY (B).
- Examine the door; use the DOOR KEY on the lock (C).
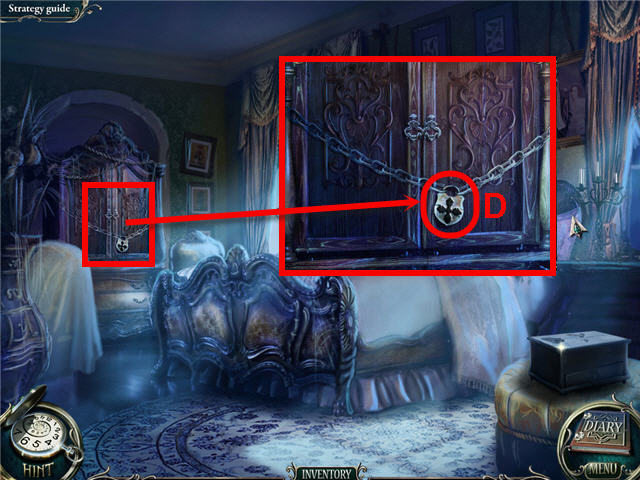
- Enter Luisa's room.
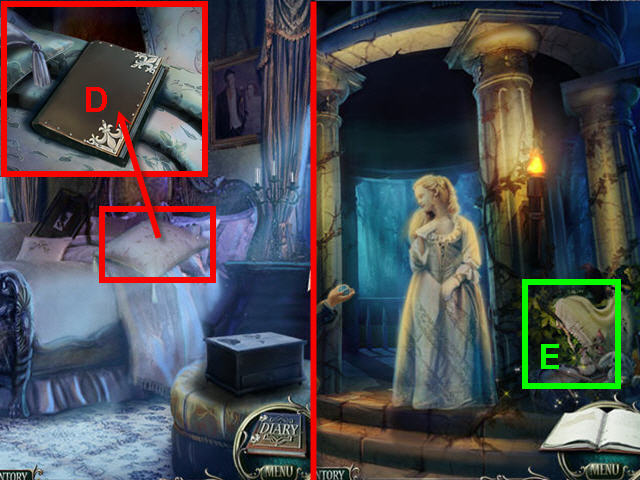
- Examine the pillow; move it and open the diary (D).
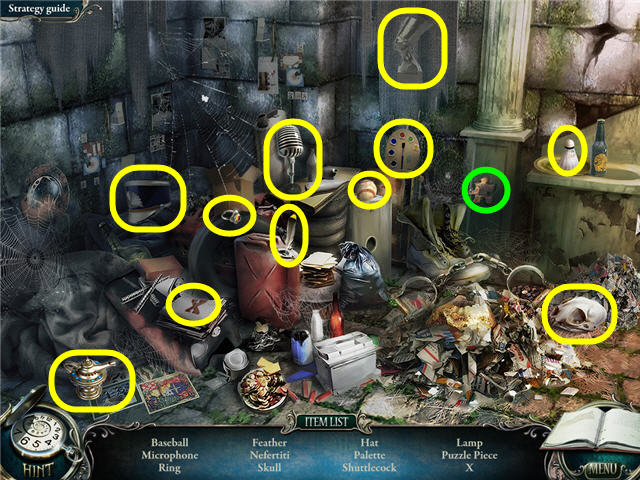
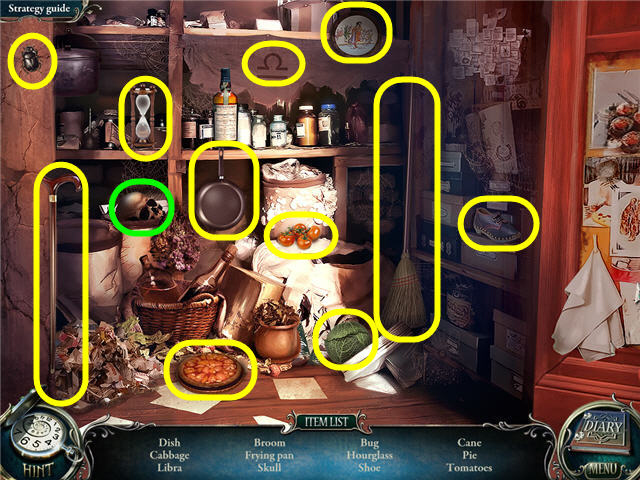
- Examine the bush (E) to access a Hidden Object Scene.
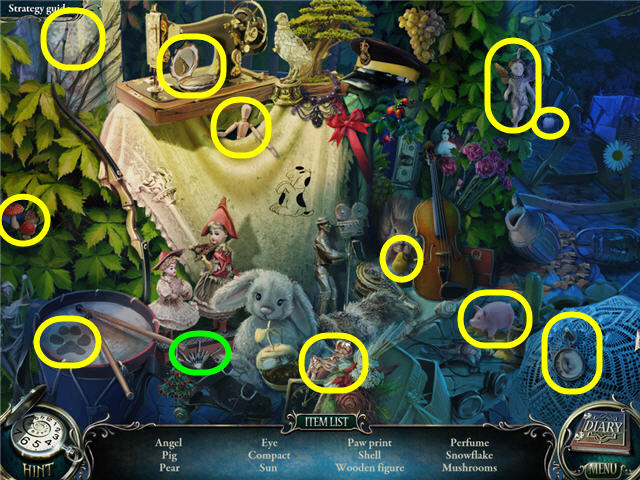
- Find the items listed and get a BAS-RELIEF PIECE 1 OF 2.
- Head to the church.
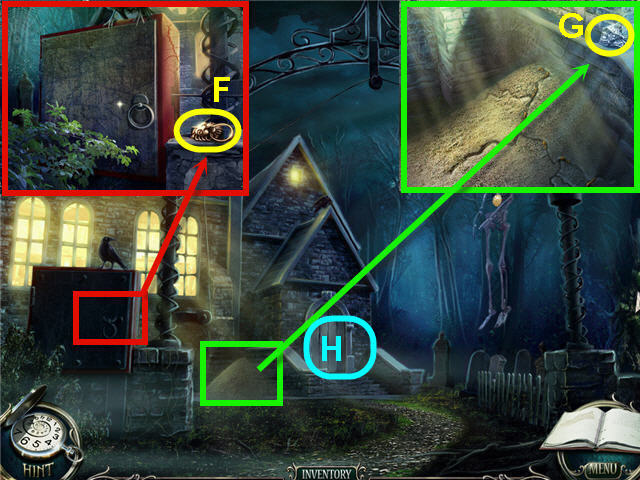
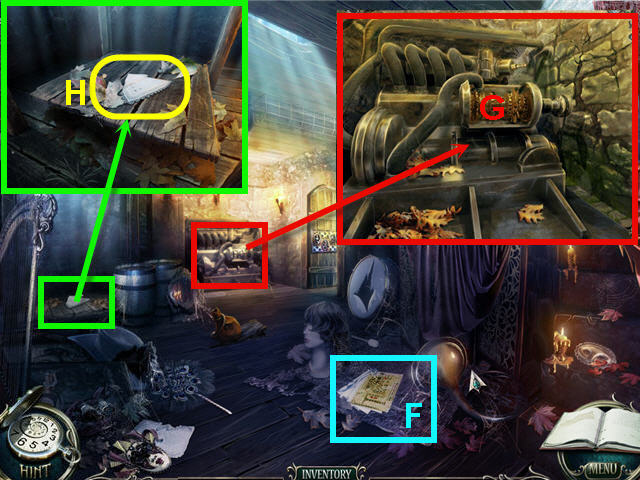
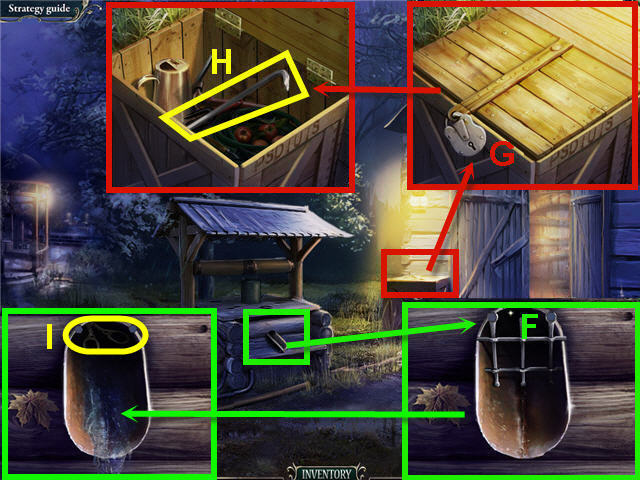
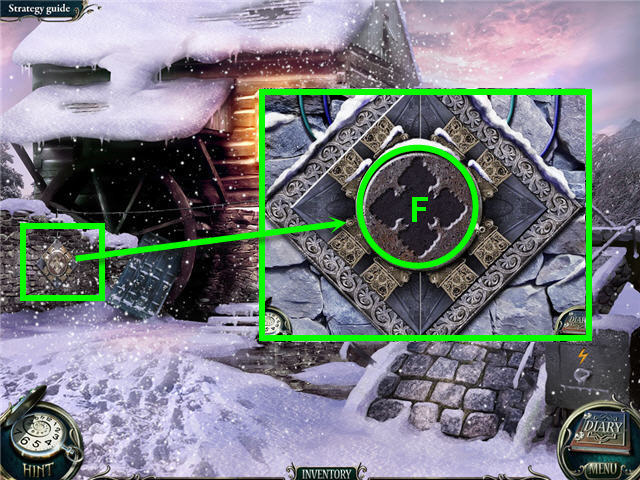
- Examine the gear box; take the LION (F).
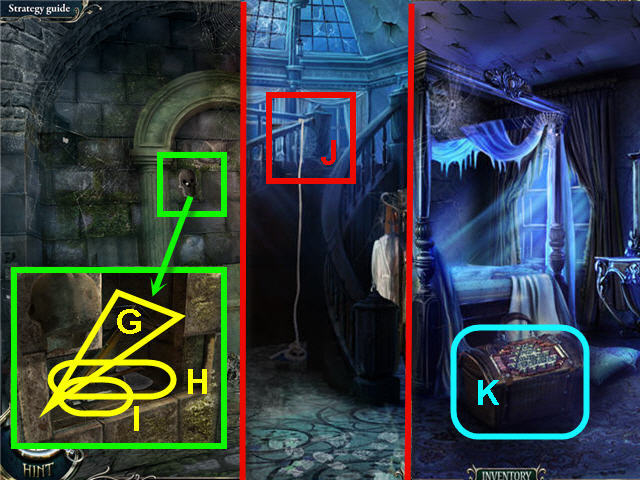
- Examine the termitary; take the MOSAIC PIECE (G).
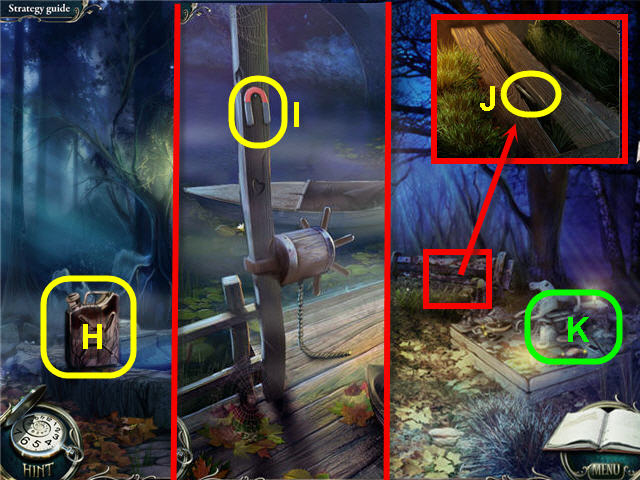
- Zoom into the closed door (H); place the LION on the door.
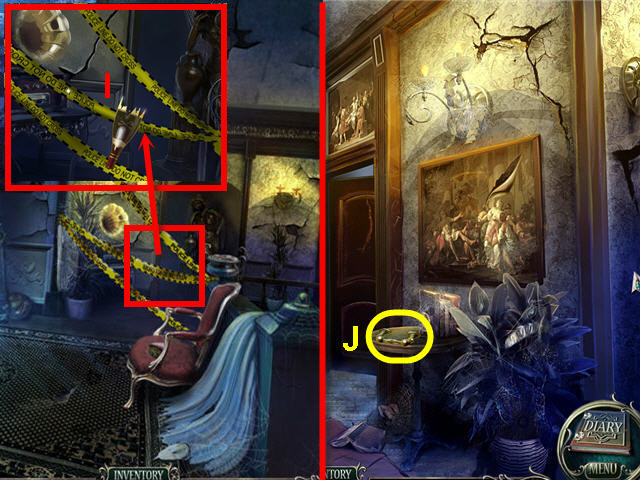
- Enter the church and head left.
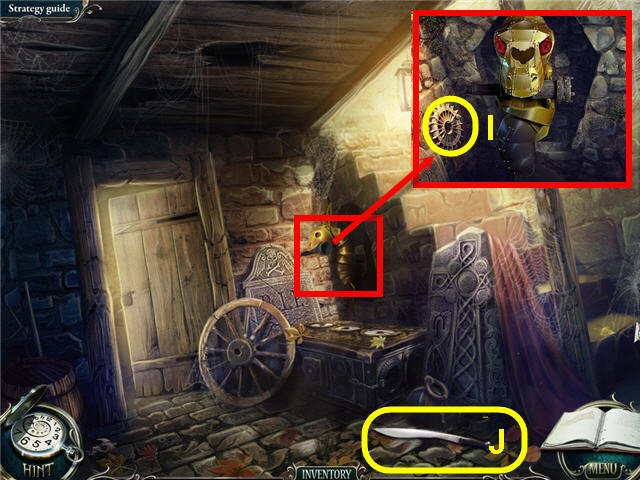
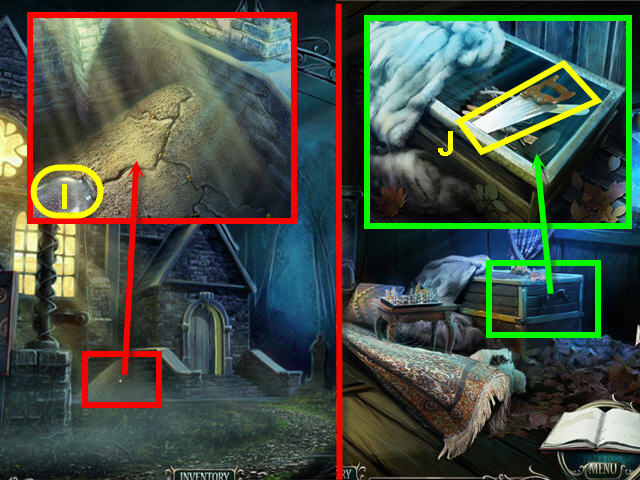
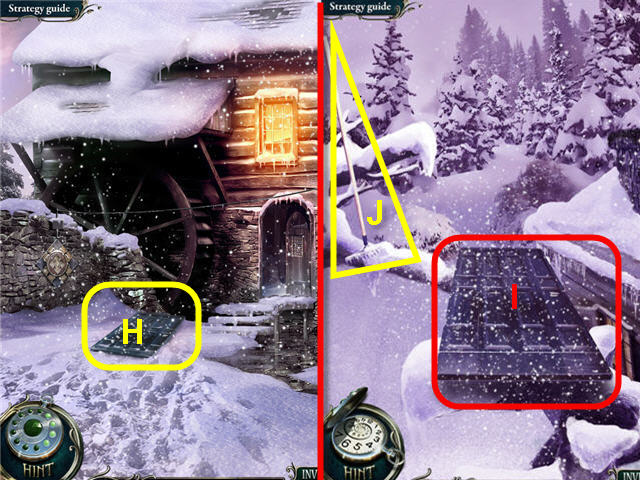
- Examine the torch; take the GEAR (I).
- Take the MACHETE (J).
- Head to the outside.
- Zoom into, open, and examine the block.
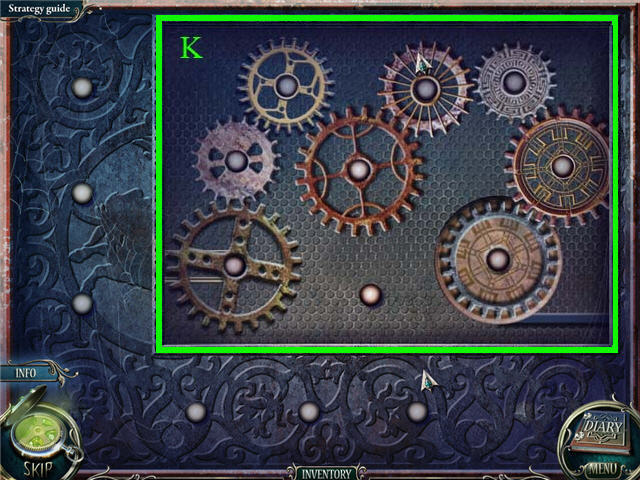
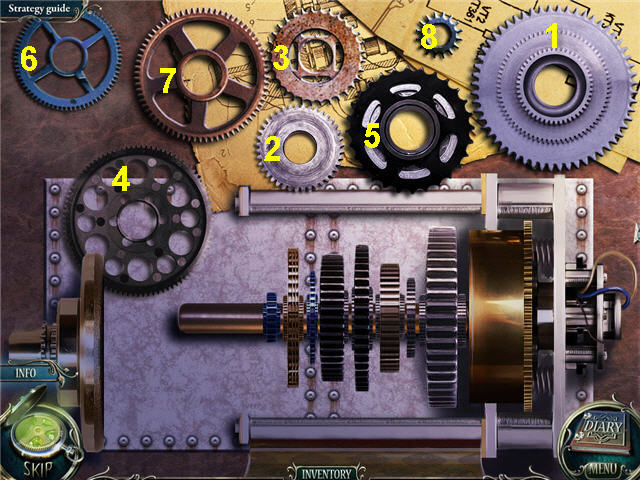
- Place the GEAR on the gear box to trigger a puzzle.
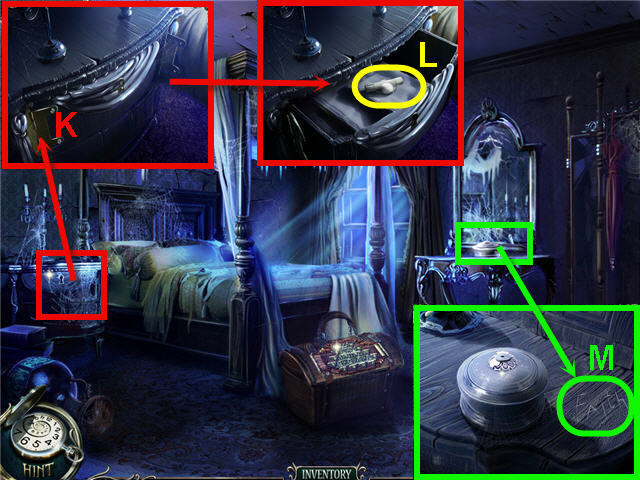
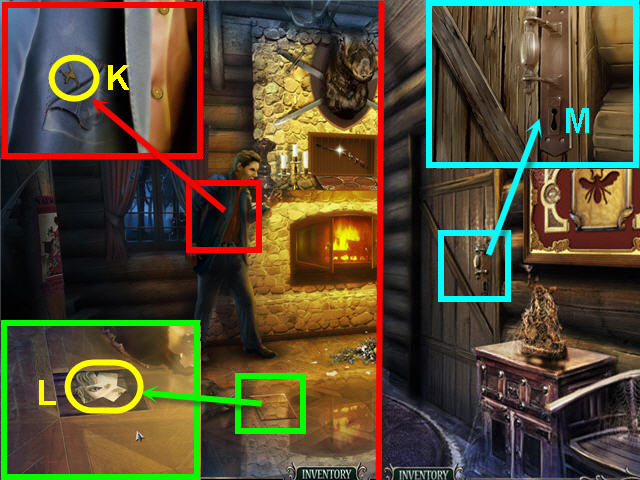
- Arrange the gears on the pegs from the right to the left so that they all turn as shown in the screenshot (K).
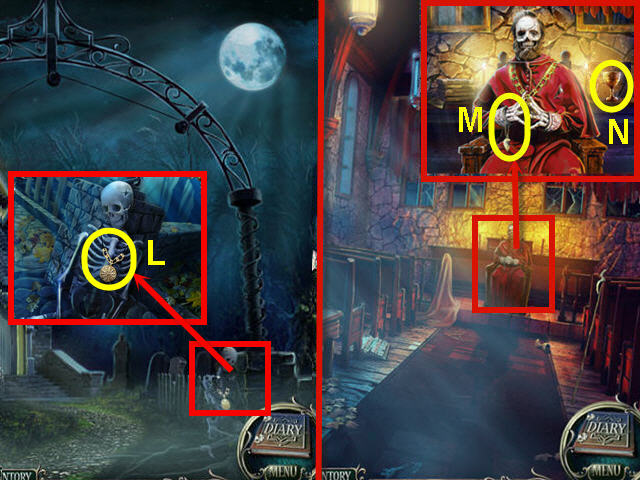
- Examine the skeleton; take the MEDALLION (L).
- Head into the church.
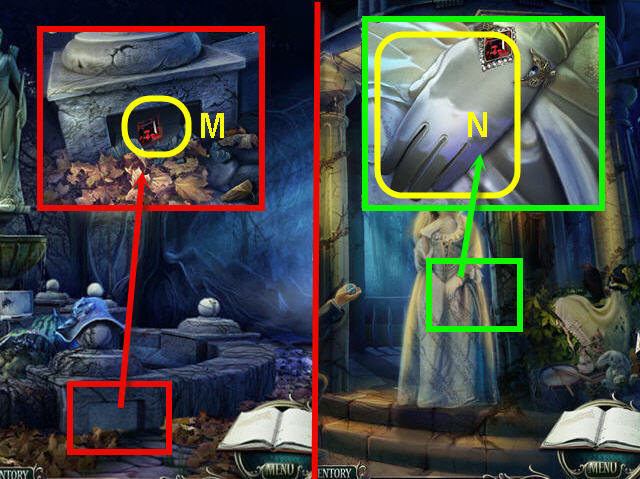
- Examine the holy man; give him the MEDALLION; take the HEART HALF (M) and MUG (N).
- Head to the cemetery.
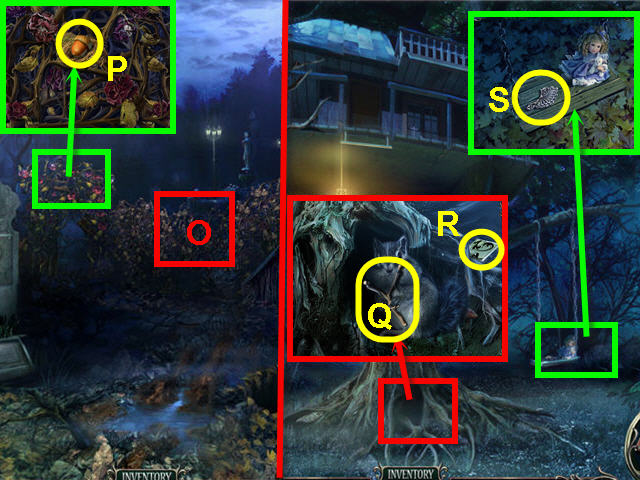
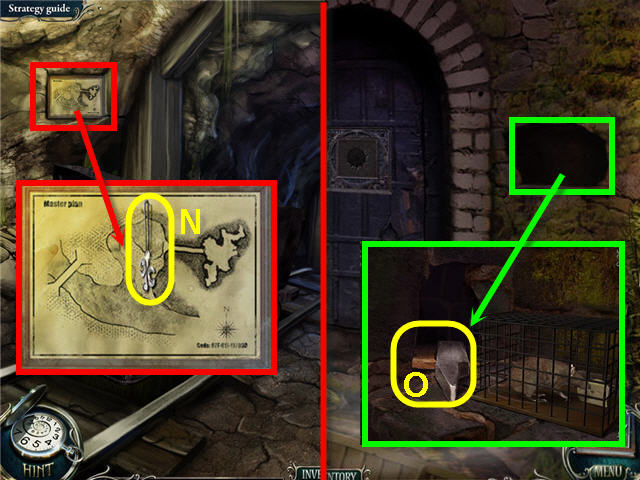
- Use the MACHETE on the right bush (O).
- Examine the bush; use the MACHETE three times and take the ACORN (P).
- Head forward twice to the tree.
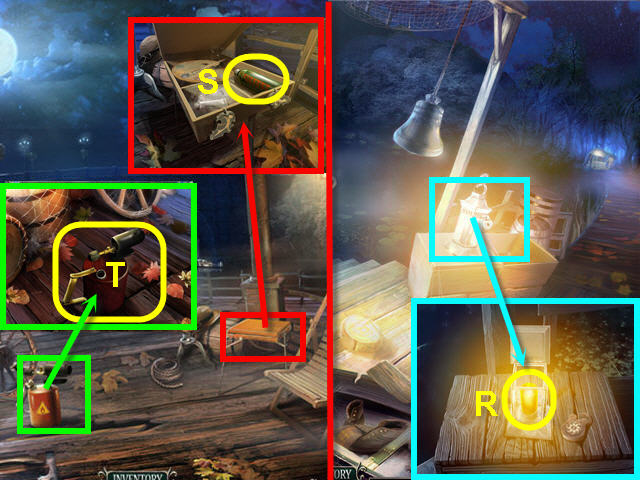
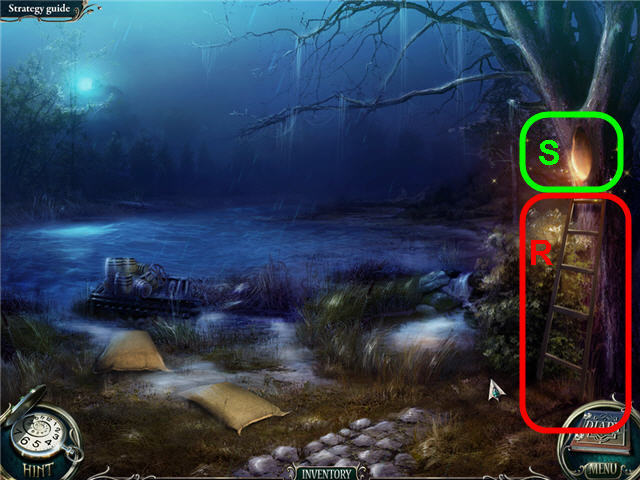
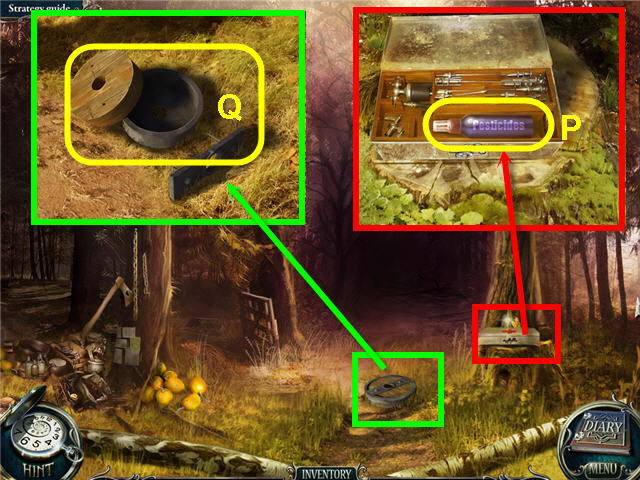
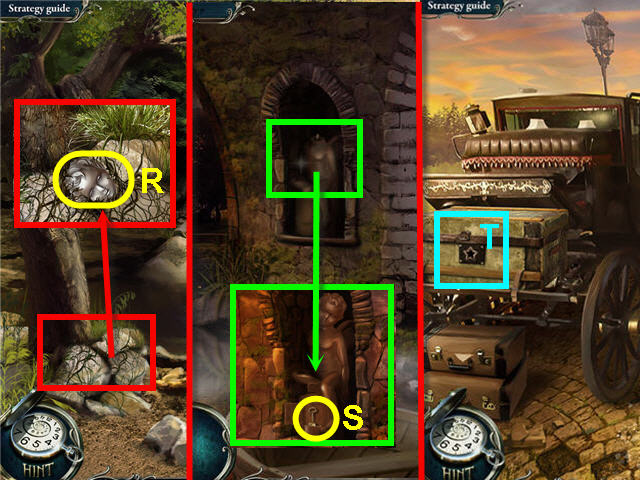
- Examine the roots of the tree; give the ACORN to the squirrel. Take the SLINGSHOT (Q) and PIECE OF PUZZLE (R).
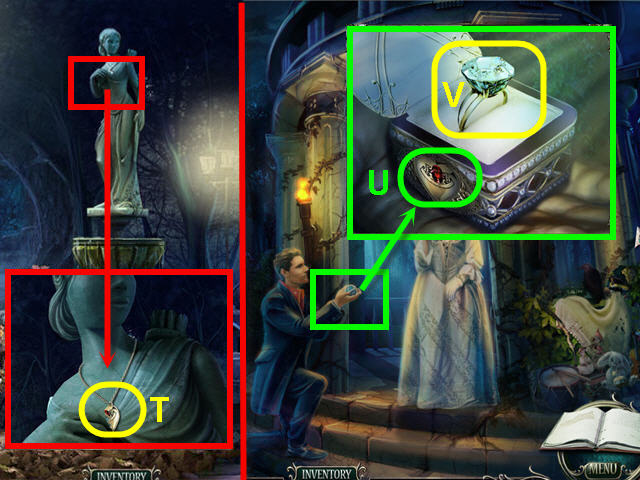
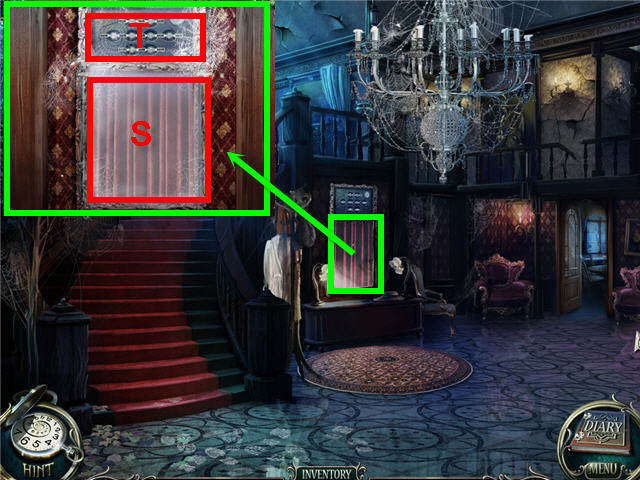
- Examine the swing and take the PIECE OF MEDALLION (S).
- Head into the church, head left and into the small room.
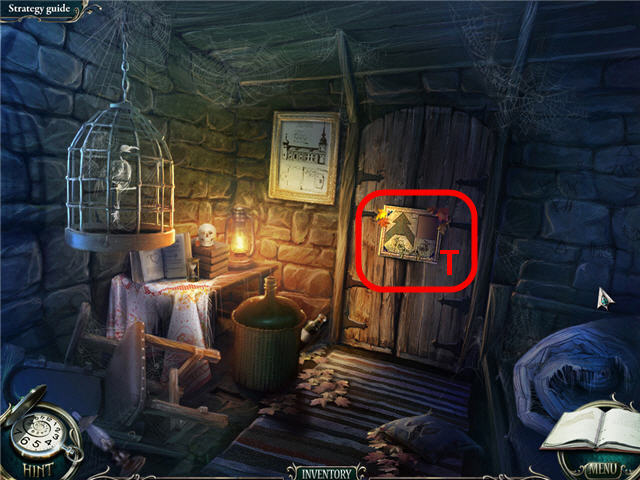
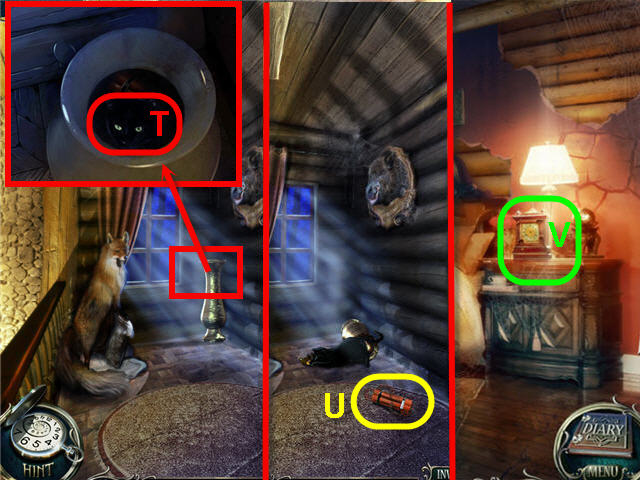
- Examine the cupboard (T).
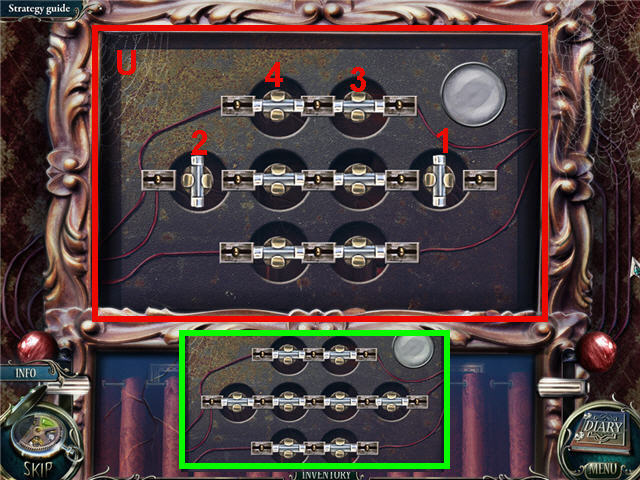
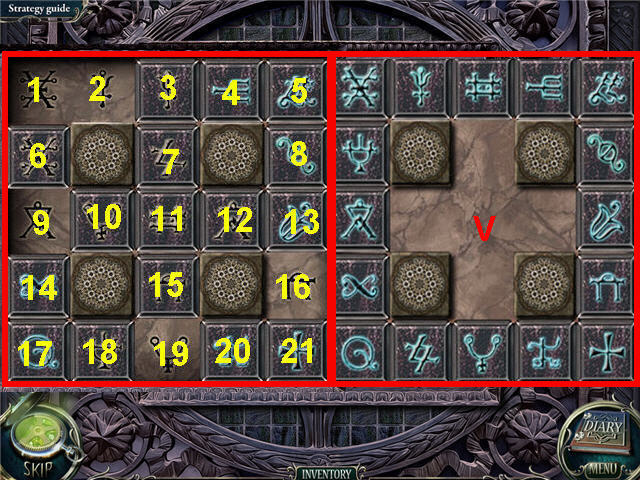
- Place the PIECE OF PUZZLE in the empty slot to trigger a puzzle.
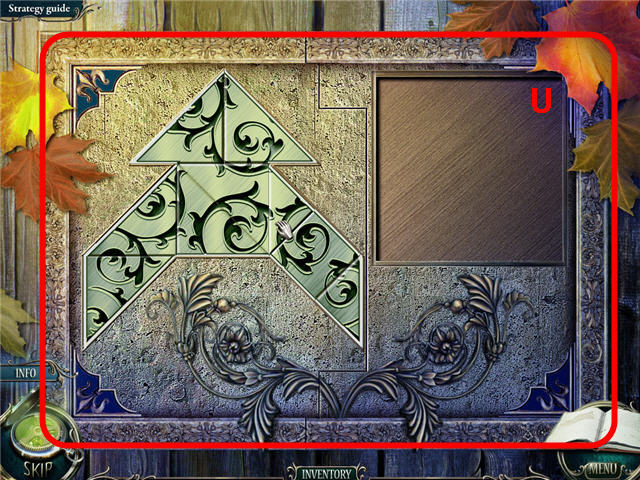
- Place the pieces of the puzzle on the grid to complete the pattern on the tiles.
- Right-click to rotate the tiles. See screenshot for solution (U).
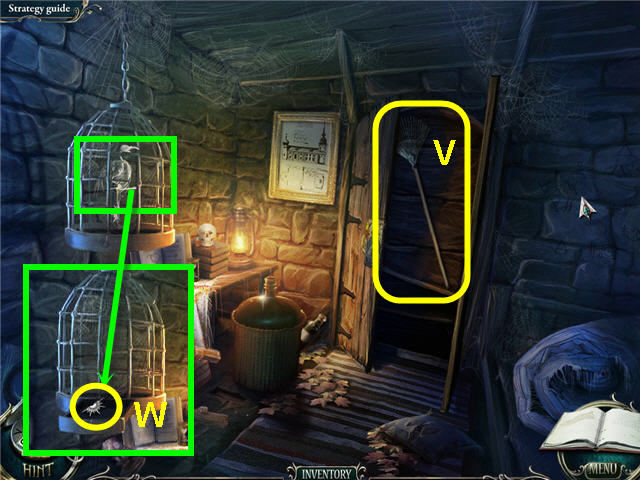
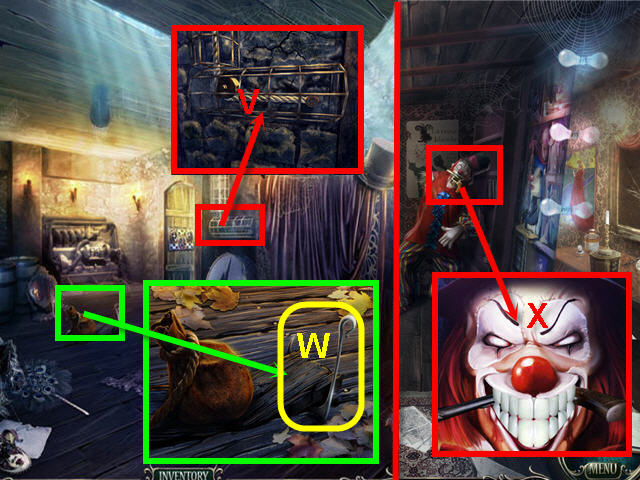
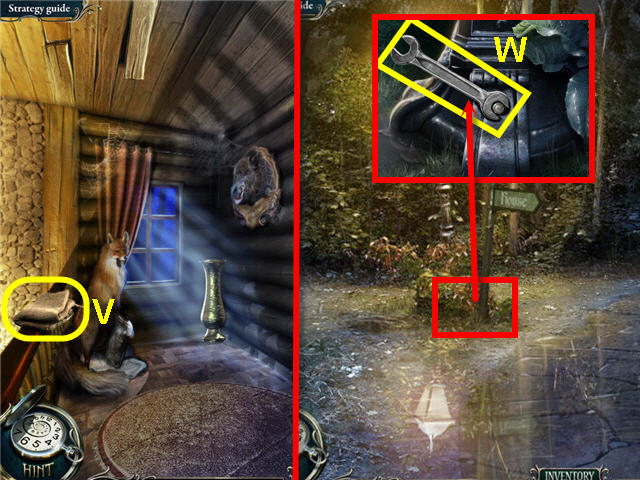
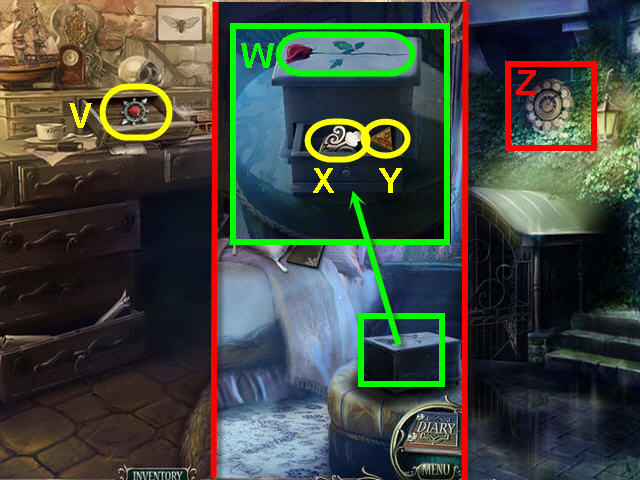
- Take the RAKE (V).
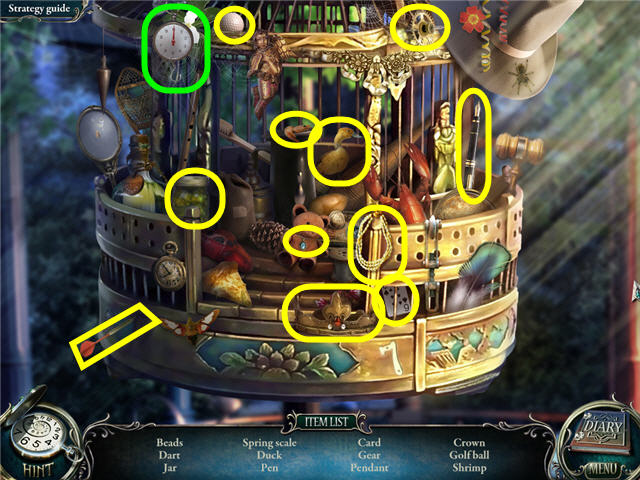
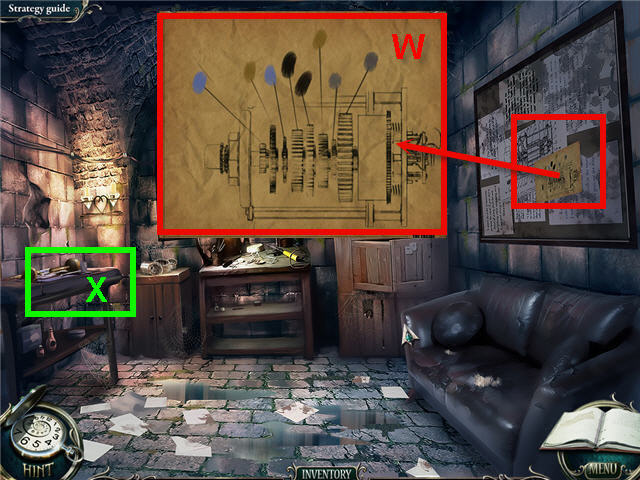
- Examine the birdcage; use the SLINGSHOT on the cage. Take the BAS-RELIEF PIECE 2 OF 2 (W).
- Head to the cemetery.
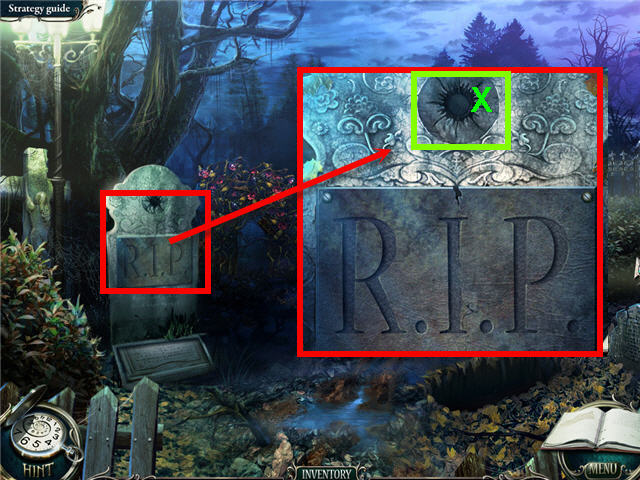
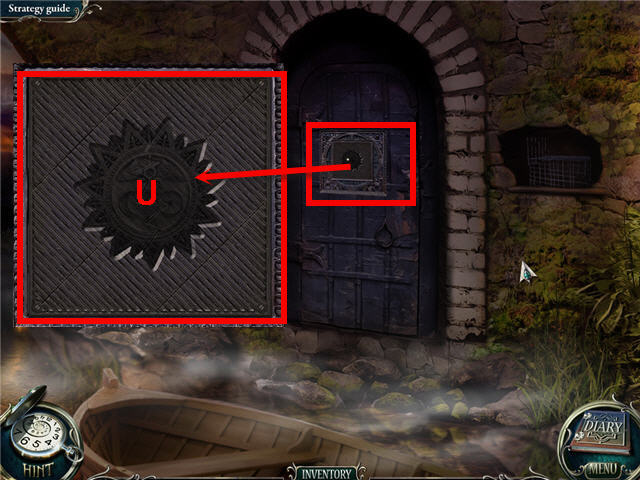
- Examine the headstone.
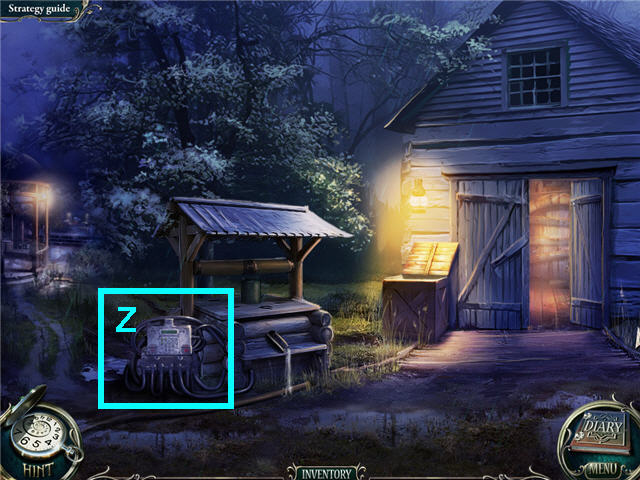
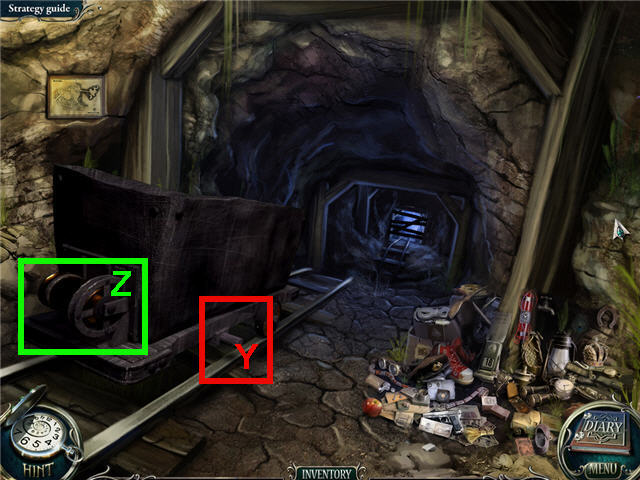
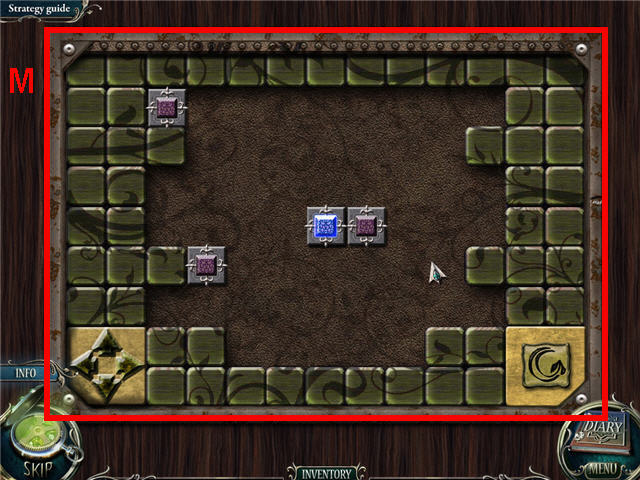
- Place the BAS-RELIEF PIECE on the slot (X) to trigger a puzzle.
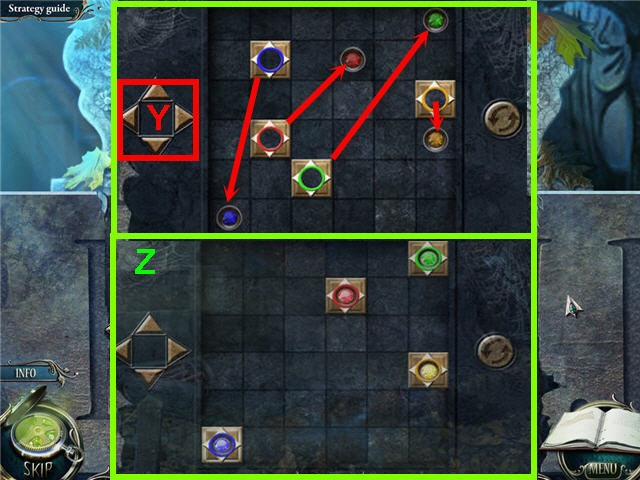
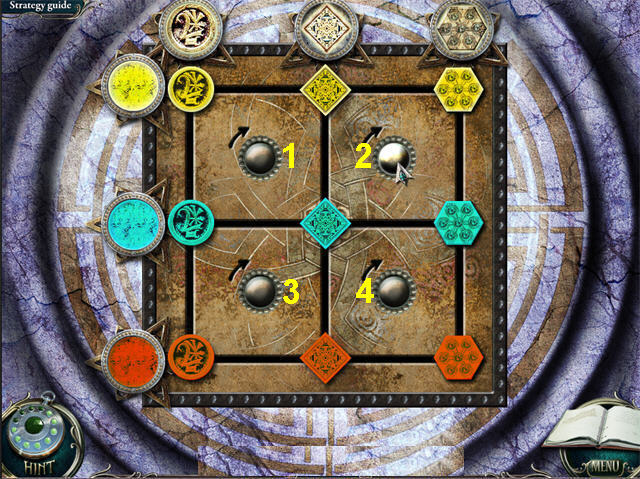
- Move the 4 colored squares to their matching colored centers.
- Click on the square you wish to move and then use the arrows on the left (Y) to move it.
- Solution: click on red - left, up, right, yellow – up, blue – left, green – left, up, blue – right, red – left, down, right, yellow – down, green – right, yellow – up, green – up, blue – down, left. See screenshot for solution (Z).
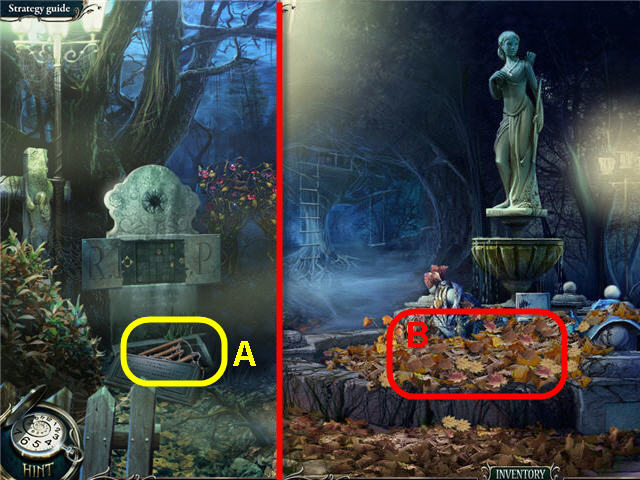
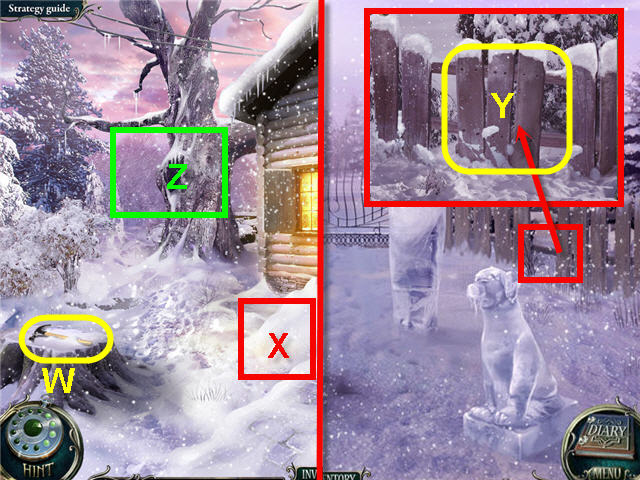
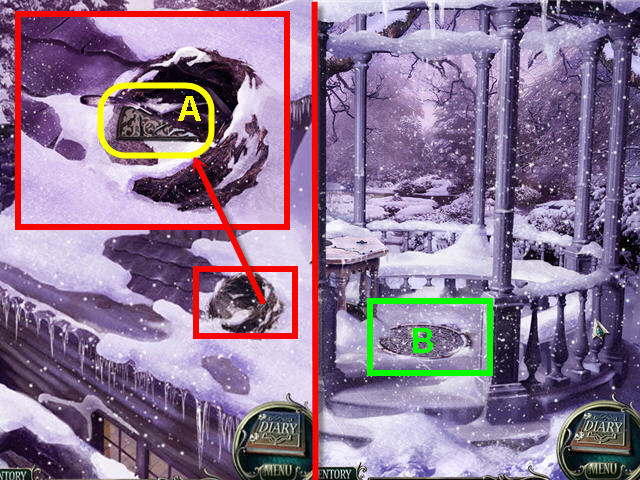
- Take the LADDER (A).
- Head to the fountain; use the RAKE on the leaves (B).
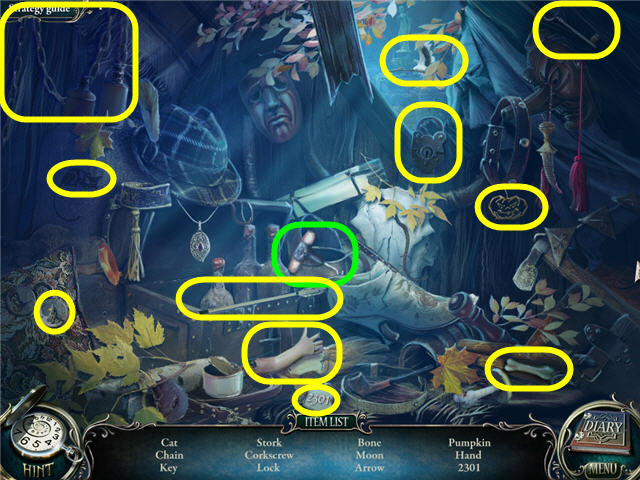
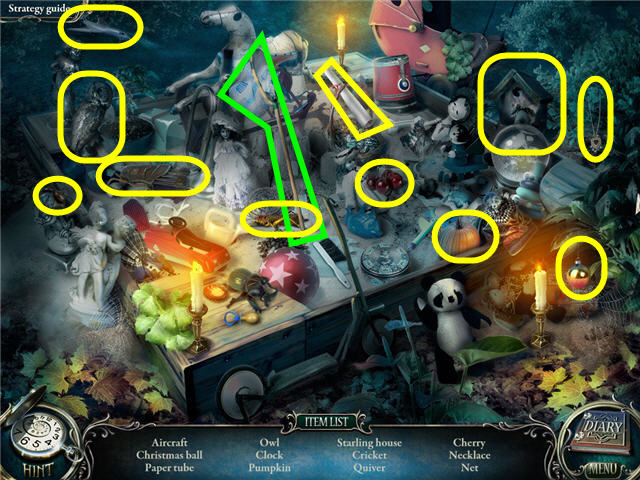
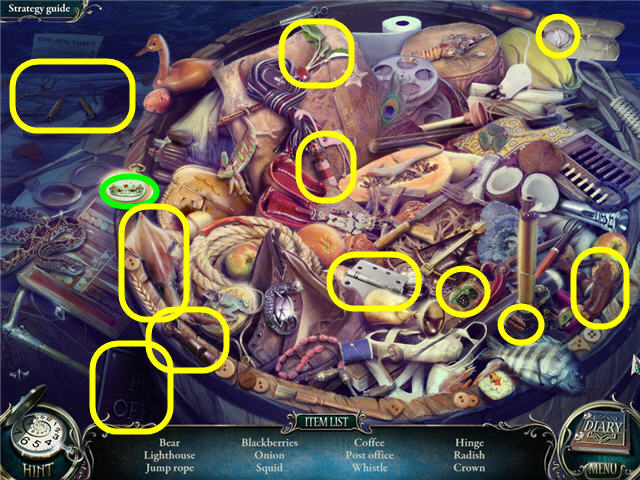
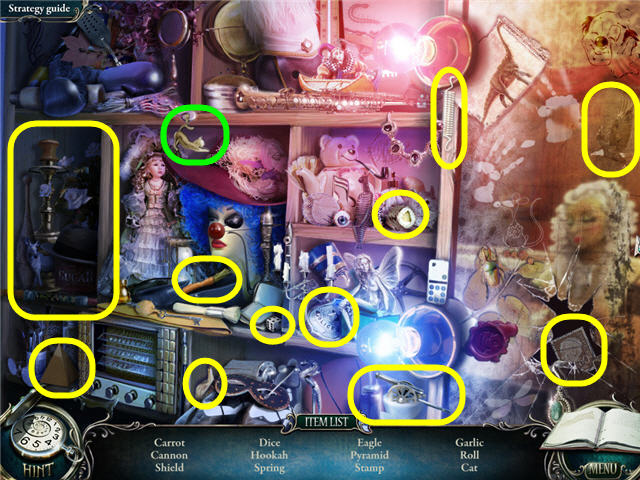
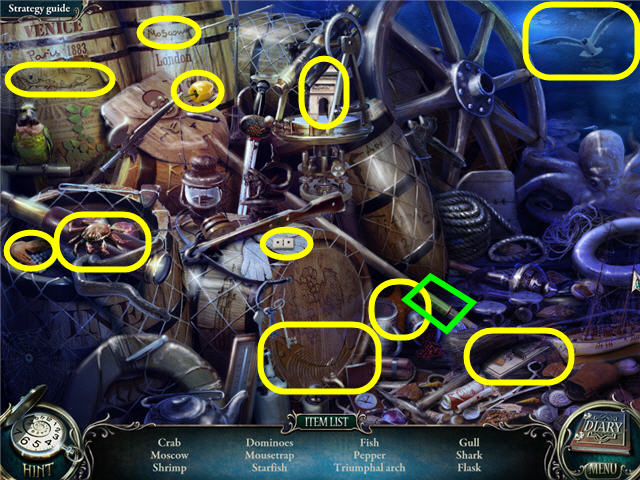
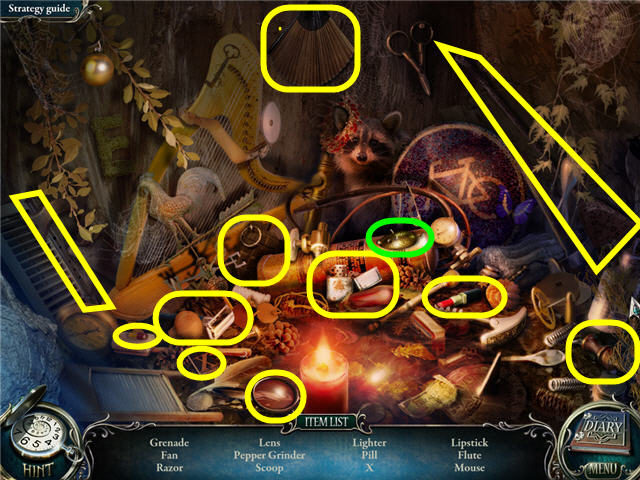
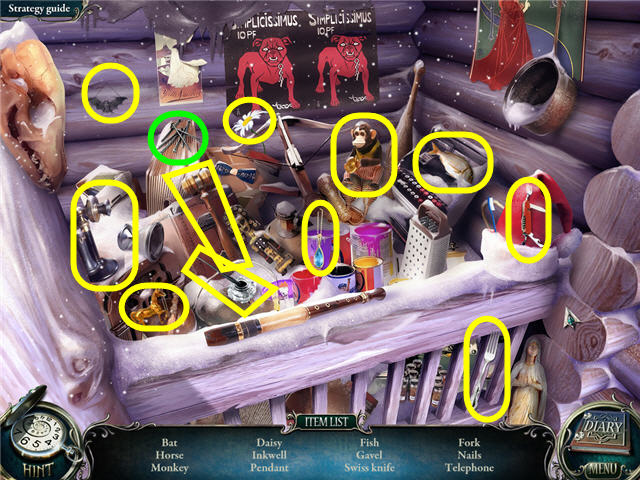
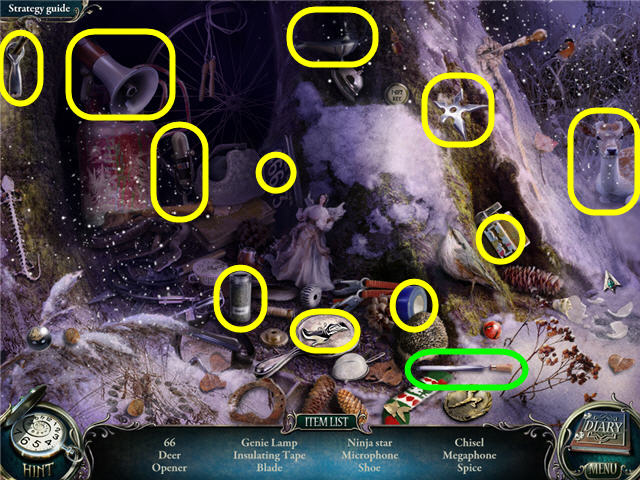
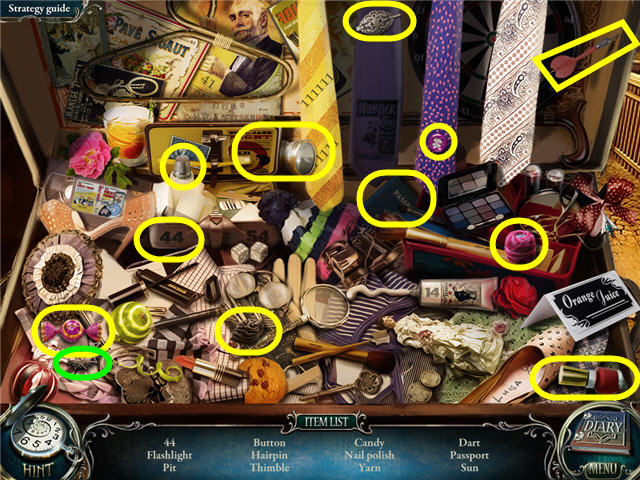
- Click on the fountain to access a Hidden Object Scene.
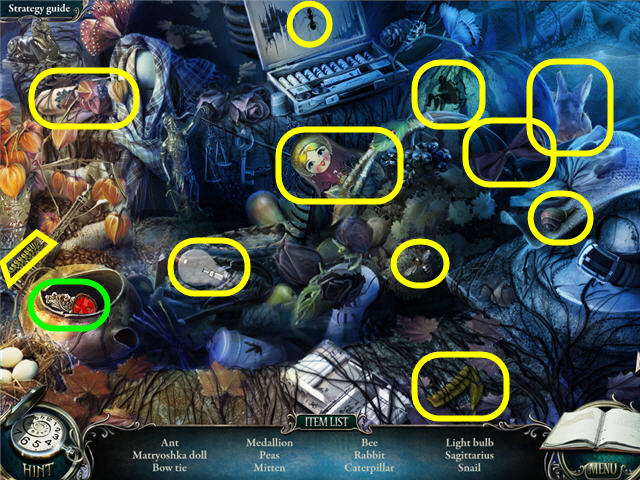
- Find the items listed and get the PIECE OF MEDALLION 2 OF 2.
- Head to the church basement.
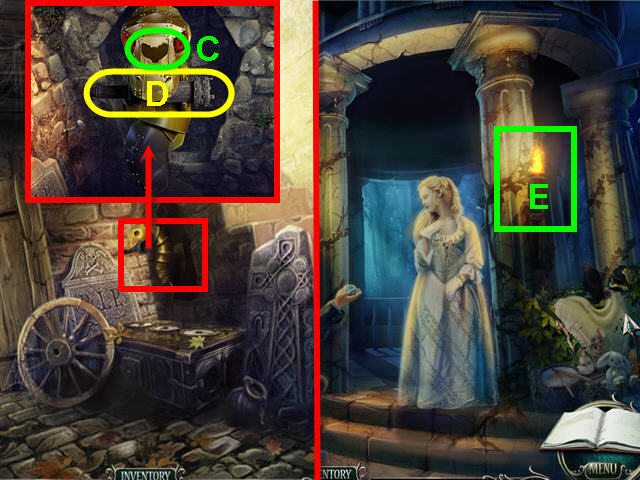
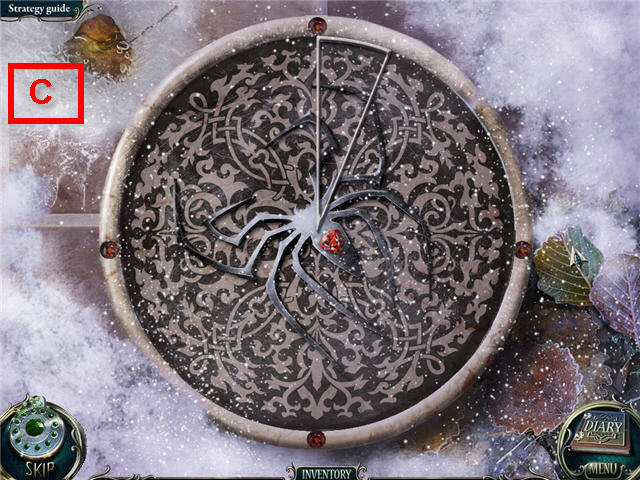
- Examine the dragon; place the PIECE OF MEDALLION in the slot (C) and take the TORCH (D).
- Head to the rotunda.
- Examine the torch (E); light the TORCH and get a BLAZING TORCH.
- Head to the tree.
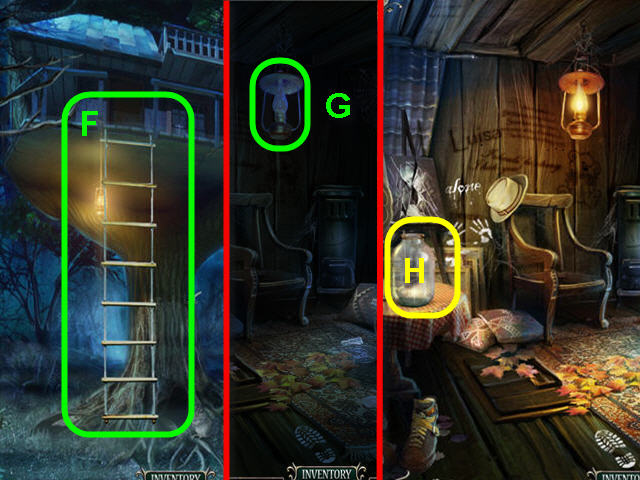
- Examine and place the LADDER on the tree house (F) and climb up.
- Examine the lamp (G) and light it with the BLAZING TORCH.
- Take the JAR (H).
- Back out to the front of the church.
- Examine the termitary; use the JAR on the termites and take the JAR WITH TERMITES (I).
- Head into the tree house.
- Examine and use the JAR OF TERMITES on the box; take the SAW (J).
- Enter the church.
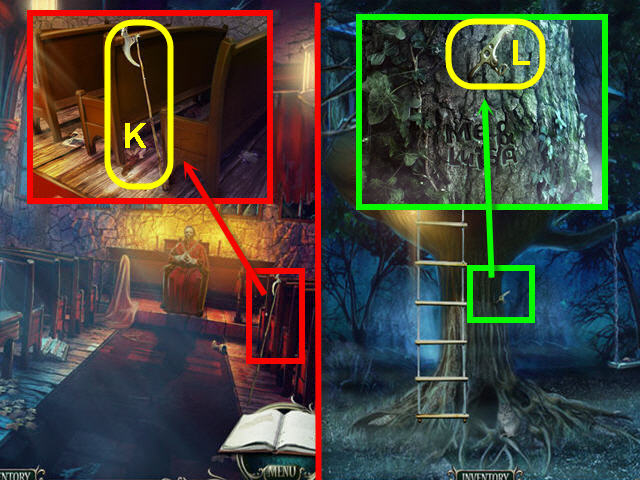
- Examine and use the SAW on the halberd (K) to get a STICK.
- Head to the tree.
- Examine and use the STICK on the head of the ice axe and take the ICE AXE (L).
- Back out to the fountain.
- Examine the tile and use the ICE AXE four times; take the RUBY (M).
- Head back to the rotunda.
- Examine Luisa's hand; place the RUBY on the bracelet and take the GLOVE (N).
- Head to the cemetery.
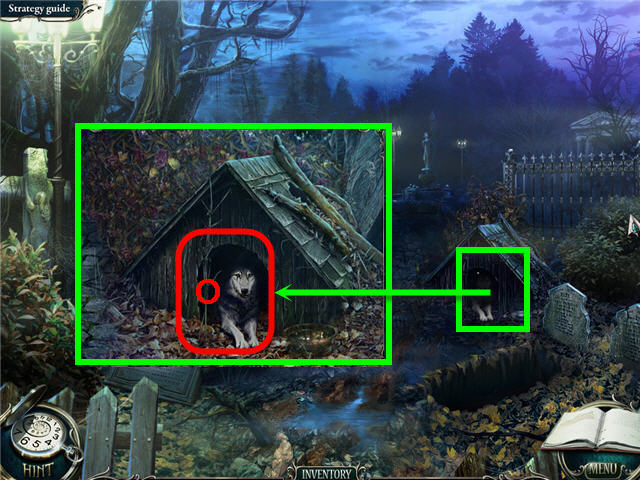
- Examine the dog house (O) and give the dog the GLOVE.
- Click on the dog house to access a Hidden Object Scene.
- Find the items listed and get a CORKSCREW.
- Enter the small room in the church basement.
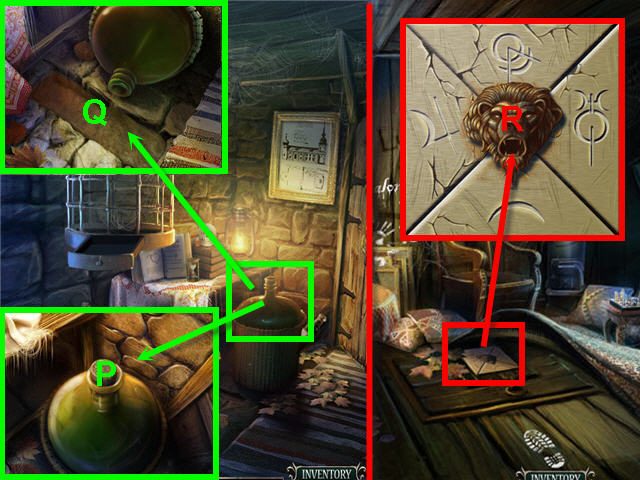
- Examine the bottle; use the CORKSCREW on the cork (P).
- Examine the falling bottle; use the MUG on the oil (Q) to get a MUG WITH OIL.
- Head into the tree house.
- Click on the carpet and examine the hiding place.
- Use the MUG WITH OIL on the rusty lion head (R); click the lion head to turn.
- Place the MOSAIC PIECE on the board to trigger a puzzle.
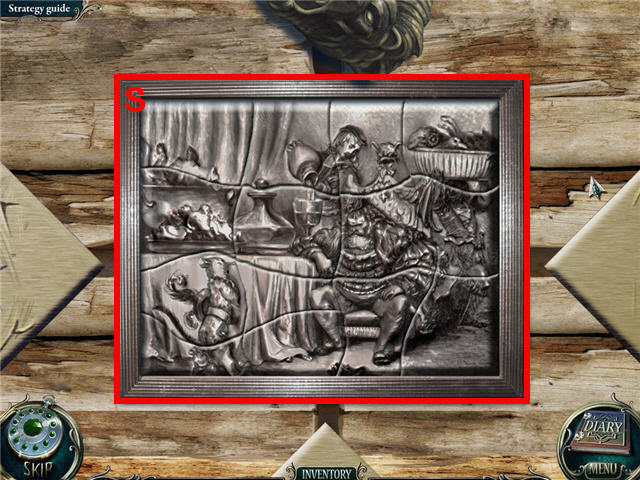
- Drag the pieces to the board to complete the picture.
- Right click to rotate the pieces. See screenshot for solution (S).
- Click on the hiding place to access a Hidden Object Scene.
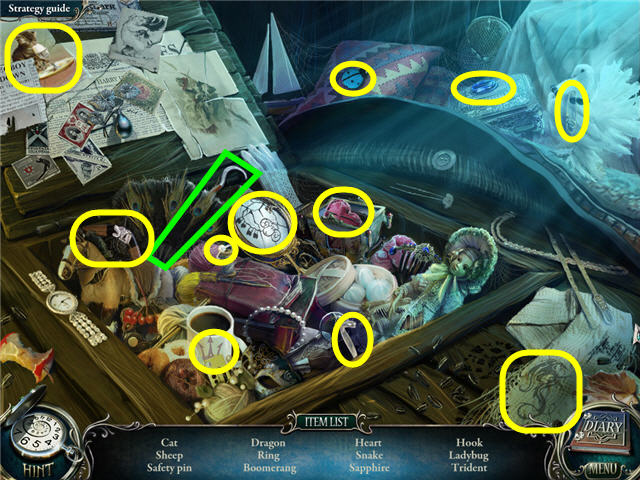
- Find the items listed and get a HOOK.
- Go to the fountain.
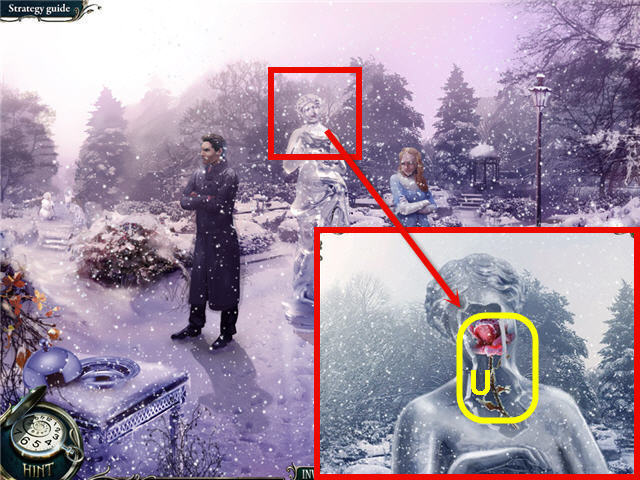
- Examine the statue neck; use the HOOK on the necklace to get the HEART HALF 2 OF 2 (T).
- Back out to the rotunda.
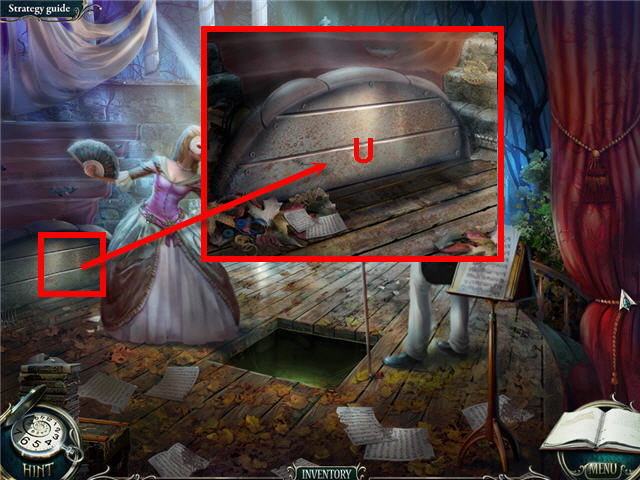
- Examine John Gray's hand; place the HEART HALF in the slot (U) and take the RING (V).
- Back out to the living room.
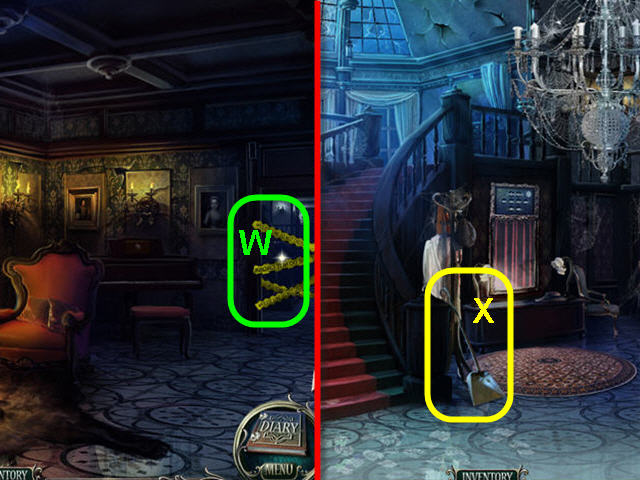
- Use the MACHETE on the police tape (W) and enter the hallway.
- Take the SCOOP (X).
- Head to the second floor.
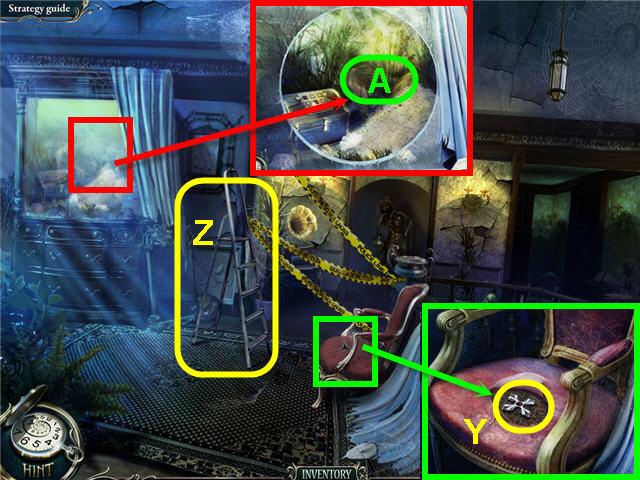
- Examine the chair; click on the seat and take the KEY (Y).
- Take the STEPLADDER (Z).
- Examine the aquarium; use the RING on the glass.
- Use the SCOOP on the sand (A) to get a SCOOP WITH SAND.
- Go to the first floor.
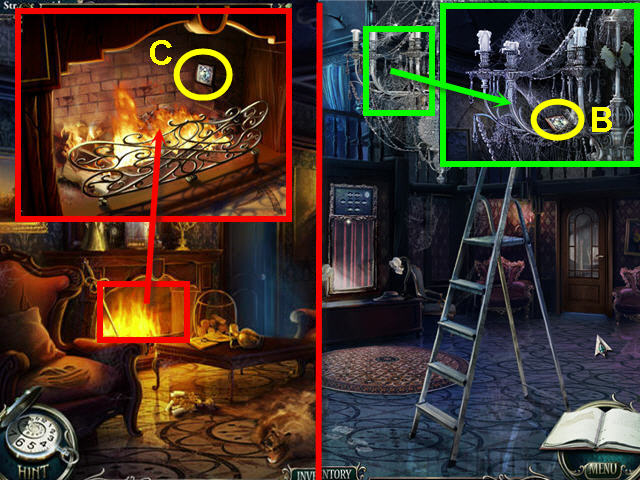
- Place the STEPLADDER under the chandelier.
- Examine the chandelier; take the BUTTON 1 OF 3 (B).
- Back out to the living room.
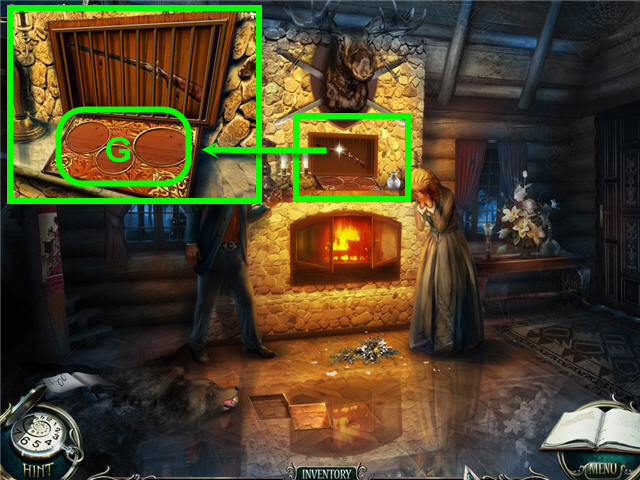
- Examine the fireplace; use the SCOOP WITH SAND on the fire.
- Take the BUTTON 2 OF 3 (C).
- Head to Luisa's room.
- Examine the cupboard; use the KEY on the lock (D).
- Click on the cupboard to access a Hidden Object Scene.
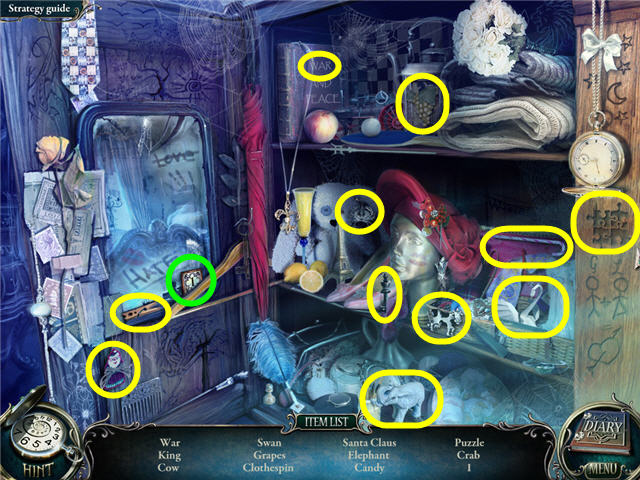
- Find the items listed and get a BUTTON 3 OF 3.
- Head to the second floor.
- Examine the aquarium and click on the trunk.
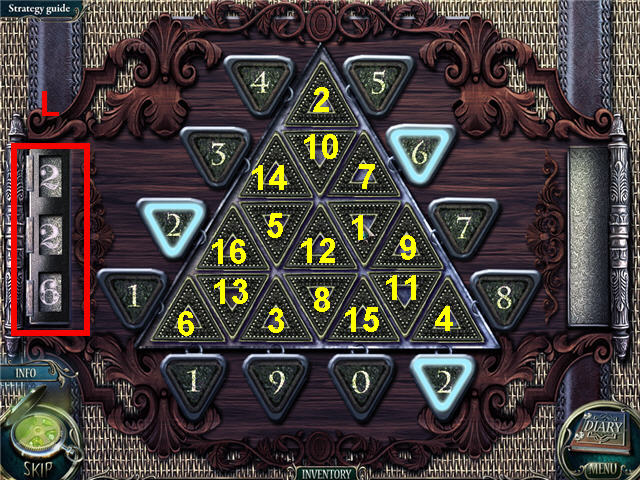
- Place the BUTTON on the trunk to trigger a puzzle.
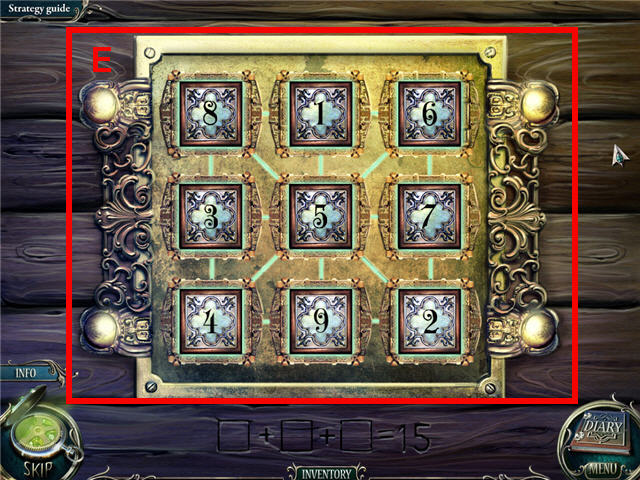
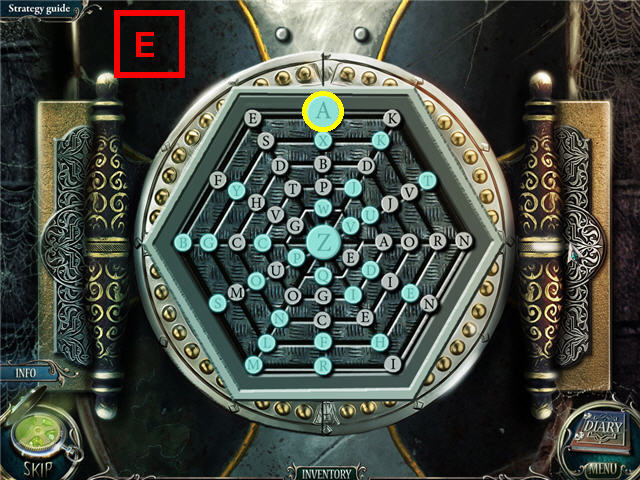
- Rearrange the buttons so that all rows, columns, and diagonals add up to 15.
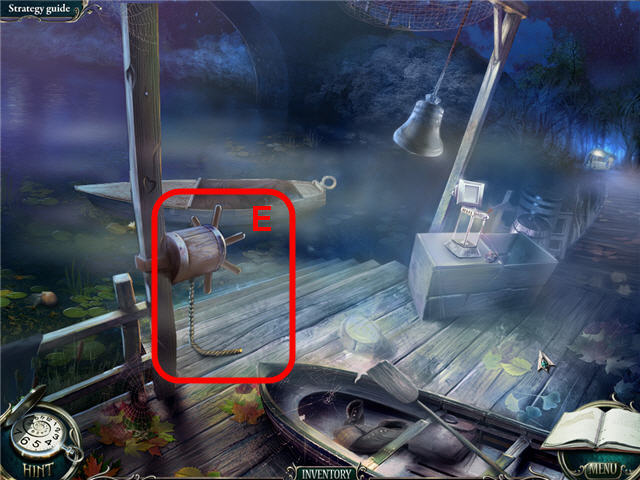
- Click on any two buttons to switch them. The lights in between the buttons will light when correct. See screenshot for solution (E).
Chapter 2 - The Handkerchief
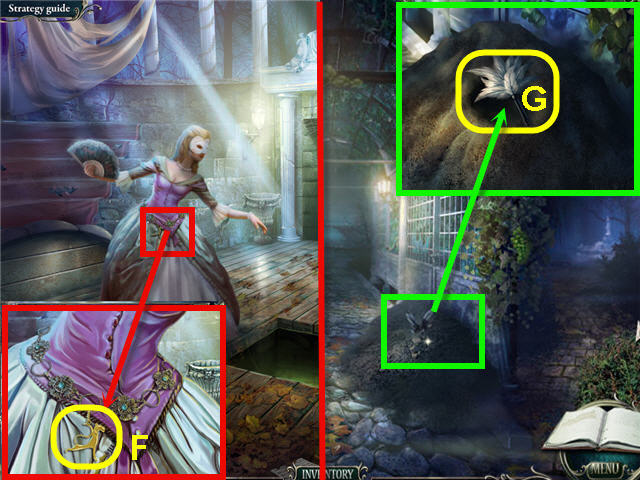
- Examine Luisa's dress; take the CAT (F).
- Head to the vineyard.
- Examine the heap; use the SCOOP; take the FEATHER DUSTER (G).
- Go to the fountain.
- Take the GAS CAN (H).
- Back out and head forward to the boat launch.
- Take the MAGNET (I).
- Head right to the children's playground.
- Examine the grass; use the MAGNET to get the FILE (J).
- Click on the sandbox (K) to access a Hidden Object Scene.
- Find the items listed and get a NET.
- Go to the vineyard.
- Examine the panel; use the FILE twice on the grate; take the FUNNEL (L).
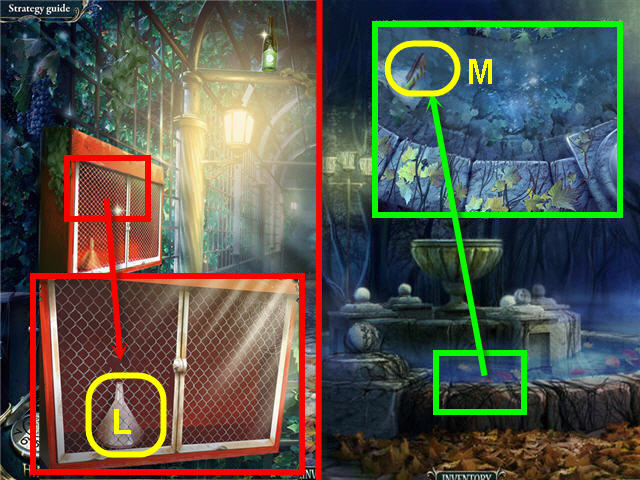
- Head to the fountain.
- Examine the water in the fountain; use the NET to catch the FISH (M).
- Go to the landing.
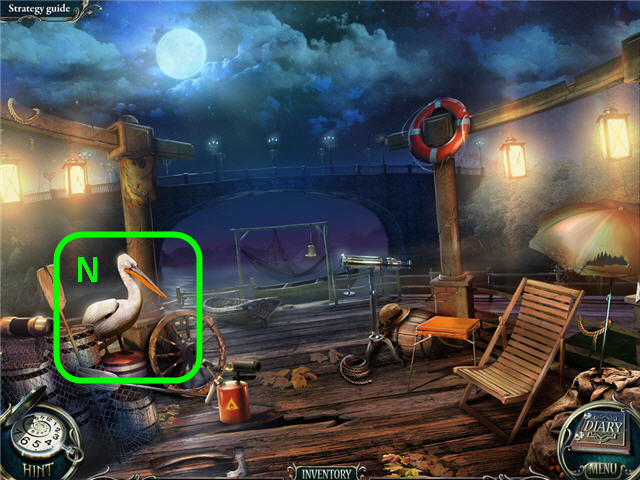
- Examine and give the FISH to the pelican (N).
- Click on the barrels to access a Hidden Object Scene.
- Find the items listed and get a BUTTON.
- Back out twice and enter the basement.
- Examine the closed door; place the BUTTON on the lock to trigger a puzzle.
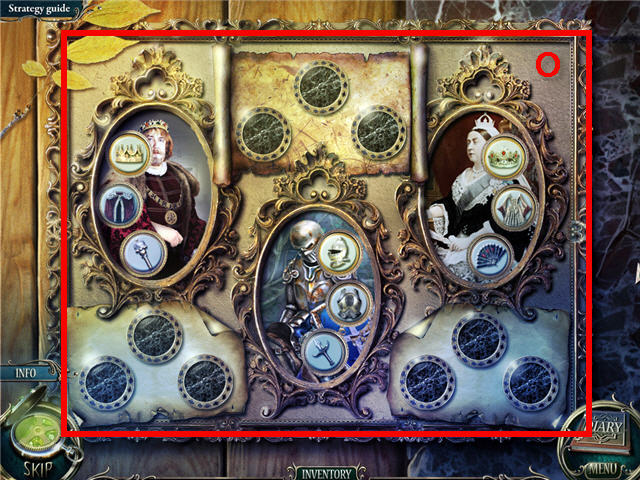
- Drag the buttons to their appropriate spots to dress the characters.
- See screenshot for solution (O).
- Enter the dressing room.
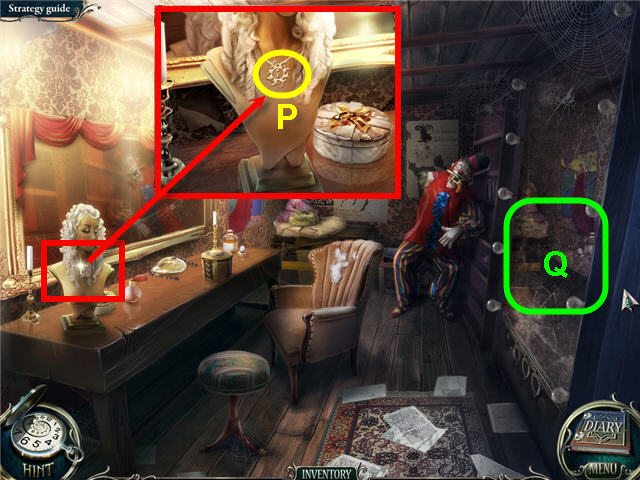
- Examine the bust; take the KEY (P).
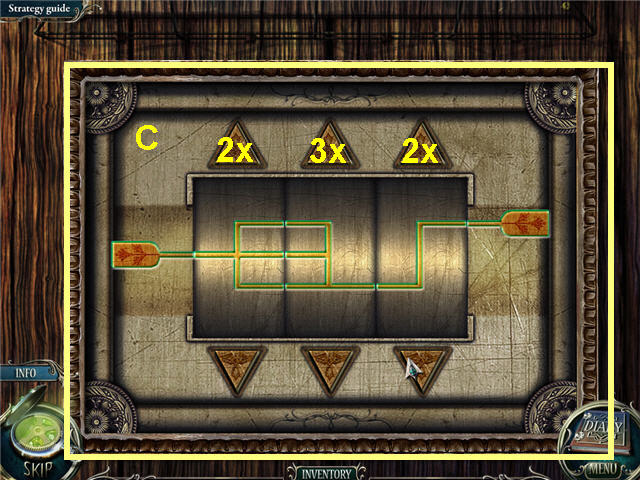
- Examine the mirror; use the FEATHER DUSTER on it (Q) to trigger a puzzle.
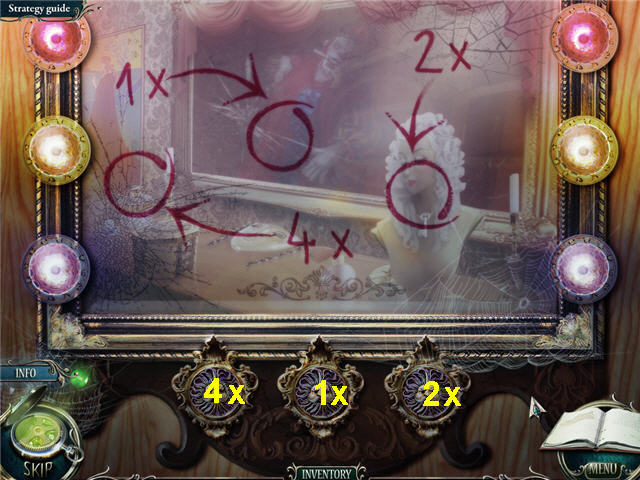
- Press the buttons the amount of times shown on the mirror.
- Solution: from left; 4 times, 1 time, 2 times.
- Click where the mirror was to access a Hidden Object Scene.
- Find the items listed and get a CAT.
- Go to the boat launch.
- Examine the lantern; use the KEY on the lock and take the CANDLE (R).
- Back out.
- Examine the painter's case; place the 2 CAT on the locks and take the SOLVENT (S).
- Examine and use the FUNNEL, GAS CAN and CANDLE on the blowtorch.
- Take the BLOWTORCH (T).
- Go to the amphitheatre.
- Examine the prompt box; use the BLOWTORCH on the panel (U).
- Click on the prompt box to access a Hidden Object Scene.
- Find the items listed and get a SCREWDRIVER.
- Head into the basement.
- Examine the right mechanism; use the BLOWTORCH on the rope (V).
- Examine the HOOK and take it (W).
- Head into the dressing room.
- Examine the clown; use the SOLVENT on the clown's face (X) to trigger a puzzle.
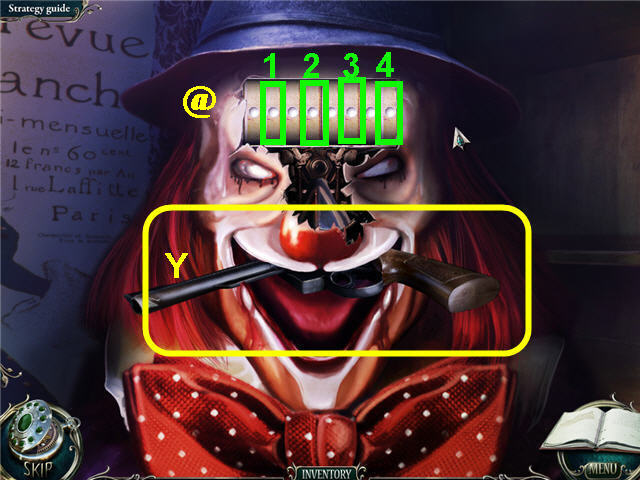
- Turn the reels so that a white circle appears on each.
- Clicking on one reel will turn the ones on either of side also.
- Click on the reels in the order shown in the screenshot (@).
- Take the GUN (Y).
- Go to the vineyard.
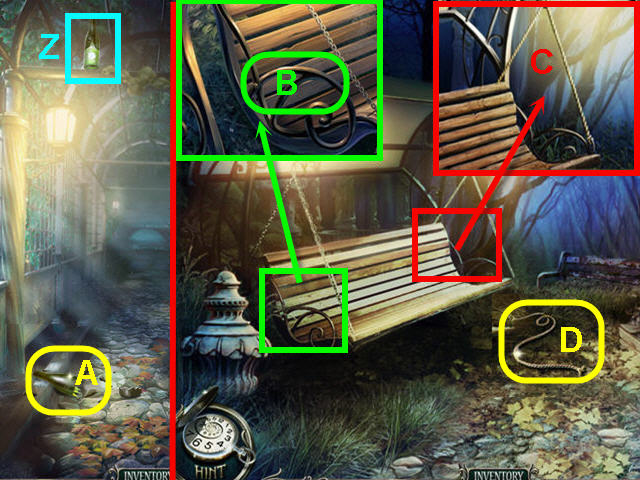
- Examine the bottle (Z) and shoot it with the GUN.
- Pick up the BROKEN BOTTLE (A).
- Head to the children's playground.
- Examine the left swing handle; use the SCREWDRIVER on the screw (B) and get a HANDLE.
- Examine the right swing handle; use the BROKEN BOTTLE on the rope (C).
- Take the ROPE (D).
- Back out.
- Place the ROPE on the winch (E).
- Place the HOOK on the rope; click on the rope.
- Click on the boat to access a Hidden Object Scene.
- Find the items listed and get an OIL CAN.
- Go to the basement of the amphitheatre.
- Examine the note (F).
- Examine and place the HANDLE and OIL CAN on the mechanism (G); pull the handle.
- Examine the elevator; take the HANDKERCHIEF (H).
- Examine the police tape; cut it with the BROKEN BOTTLE (I).
- Head to the corridor.
- Take the HANDLE (J).
- Enter mother's room.
- Examine the cupboard; use the SCREWDRIVER on the hinge (K).
- Take the FUSE 1 OF 2 (L).
- Examine the mirror; click on Faith (M) to get a diary update.
- Go to the living room.
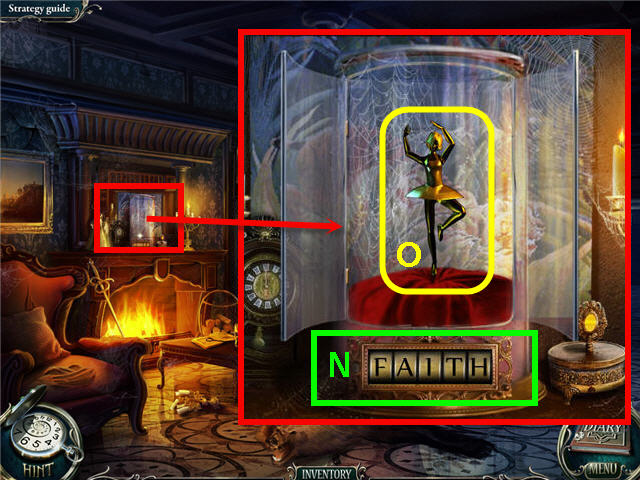
- Examine the mantle; use the code from mother's room to open the glass case.
- Solution: click the reels until they spell FAITH (N).
- Take the BALLET DANCER (O).
- Head to mother's room.
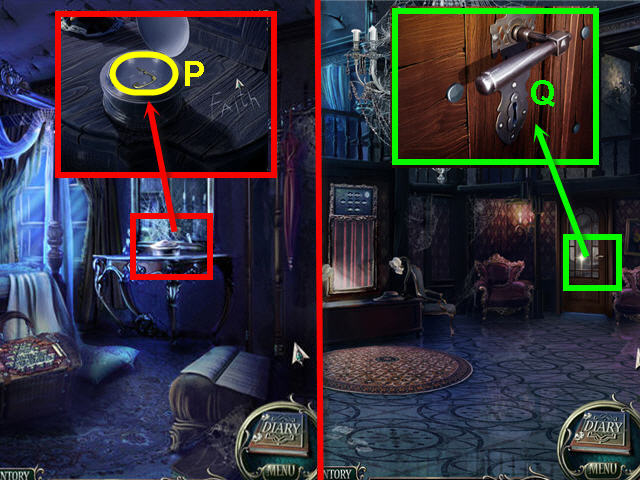
- Examine the mirror; place the BALLET DANCER on the music box.
- Take the LOCK PICK (P).
- Back out three times.
- Examine the closed door; use the LOCK PICK on the lock (Q).
- Enter the dining room.
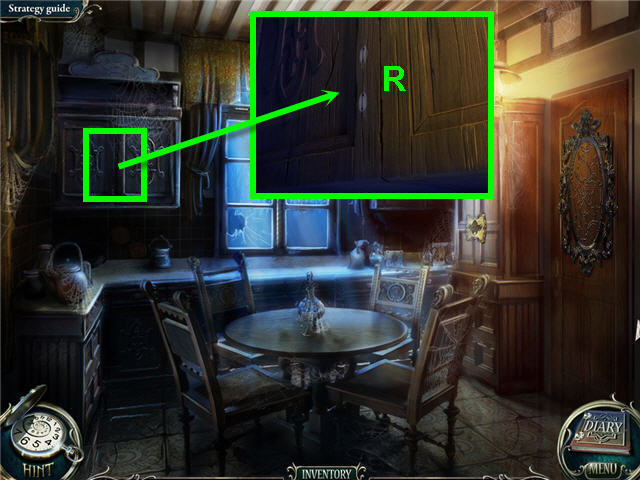
- Examine the cupboard; place the HANDLE on the door (R).
- Click on the cupboard to access a Hidden Object Scene.
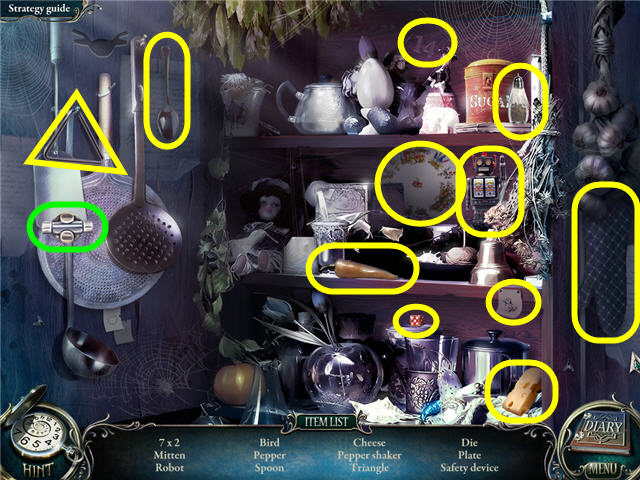
- Find the items listed and get a FUSE 2 OF 2.
- Back out.
- Examine the niche; use the HANDKERCHIEF on the dust (S).
- Examine the upper portion of the mechanism (T).
- Place the FUSE on the panel to trigger a puzzle.
- Turn all the fuses horizontally.
- Clicking on one fuse will turn other fuses.
- See screenshot for solution (U).
Chapter 3 – The Rifle
- Head to the second floor.
- Take the BAG (V).
- Exit the house.
- Examine the foundation of the sign; take the WRENCH (W).
- Go to the stable, then left to the pavilion.
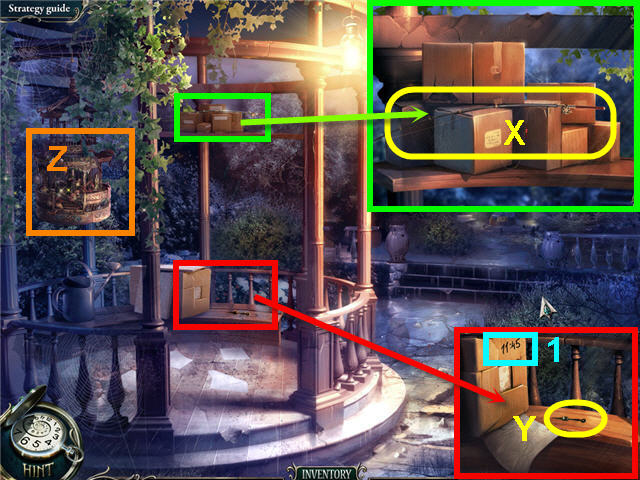
- Examine the shelf; take the ROD (X).
- Examine the bench; take the CLOCK HANDS 1 OF 2 (Y).
- Note the time on the box (1).
- Click on the cage (Z) to access a Hidden Object Scene.
- Find the items listed and get a SPRING SCALE.
- Enter the stable.
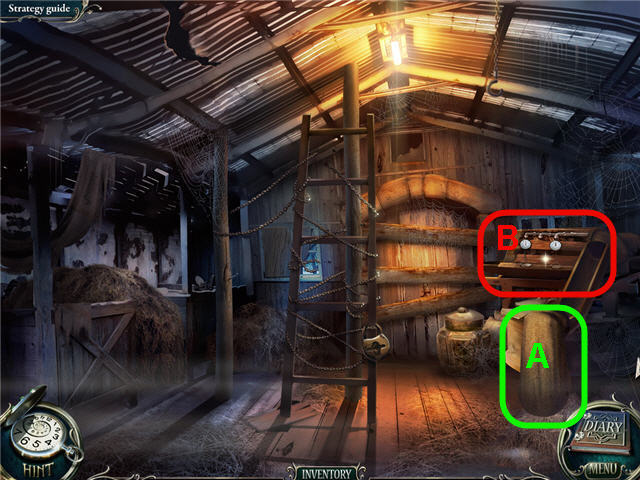
- Place the BAG on the grain chute (A).
- Examine the grain sorter (B).
- Place the SPRING SCALE in the center to trigger a puzzle.
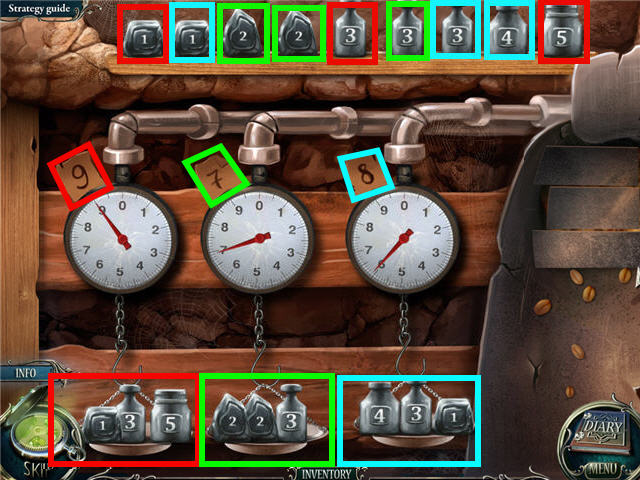
- Place the weights on the scales so that the number on the scale matches the number above.
- You can only place three weights on each scale.
- Solution: left scale – 3, 5, 1, middle scale – 3, 2, 2, right scale – 4, 3, 1.
- Take the FULL BAG (C).
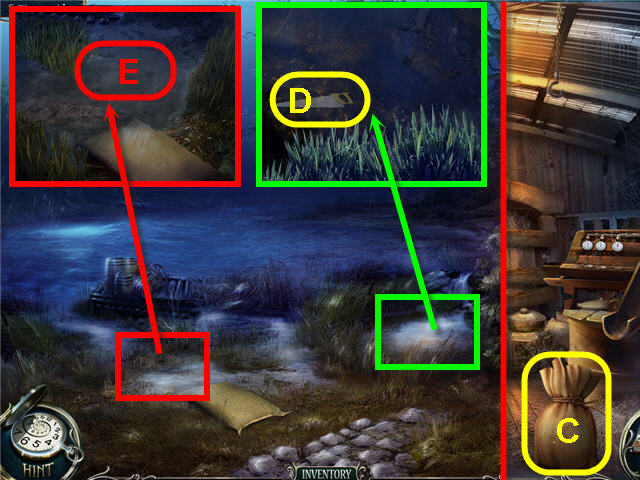
- Back out twice and head left to the lake.
- Examine the spring; use the ROD to get the SAW (D).
- Examine the quagmire; place the FULL BAG on the water (E).
- Click on the raft to access a Hidden Object Scene.
- Find the items listed and get a FLASK.
- Back out and go forward.
- Examine the motor.
- Place the FLASK on the motor (Z) to trigger a puzzle.
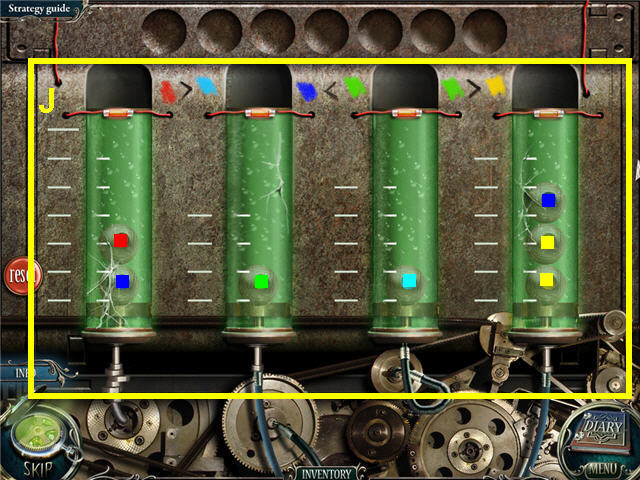
- Place the colored balls into the flasks so that all the plungers are at the bottom.
- Each ball is a different weight, note the coding of which are greater or less than others. See screenshot (J) for solution.
- Examine the crate; use the SAW on the lock (G).
- Take the CROWBAR (H).
- Examine the spout; use the WRENCH on the grating (F).
- Take the SCISSORS (I).
- Back out to the fireplace room.
- Examine the pocket and use the SCISSORS on it; take the KEY (K).
- Examine the floor; use the CROWBAR on the tile.
- Take the PIECES OF PUZZLE (L).
- Head to the second floor.
- Examine the door; use the KEY on the lock (M) and enter.
- Click under the bed to access a Hidden Object Scene.
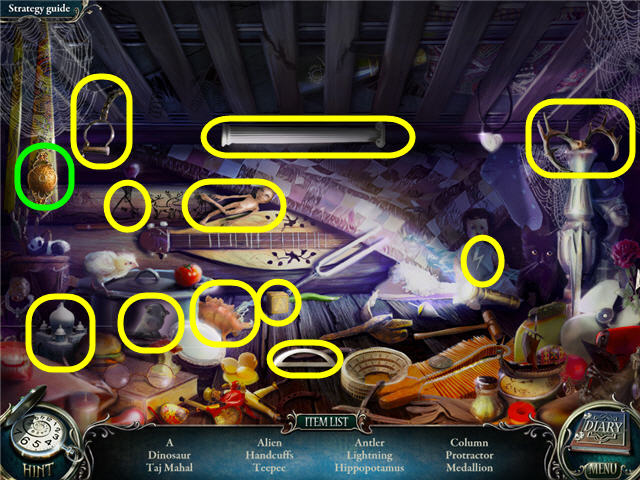
- Find the items listed and get a MEDALLION.
- Examine the picture on the left wall.
- Place the PIECES OF PUZZLE on the picture to activate a puzzle.
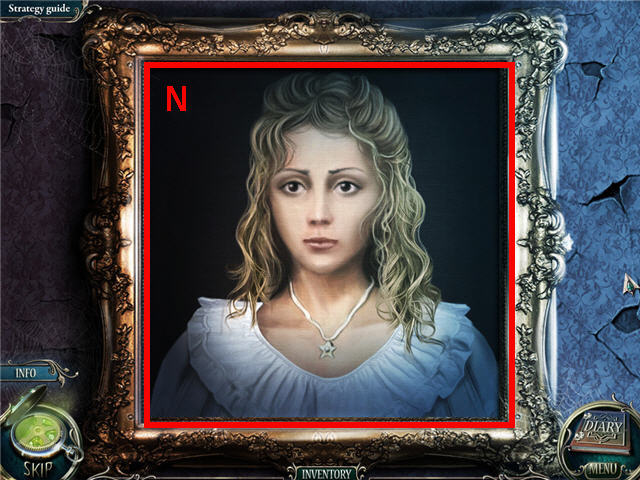
- Drag the columns and rows into place to complete the picture.
- Tip: Do all the rows first and then the columns. See screenshot (N) for solution.
- Take the BUTTON.
- Go into the stable.
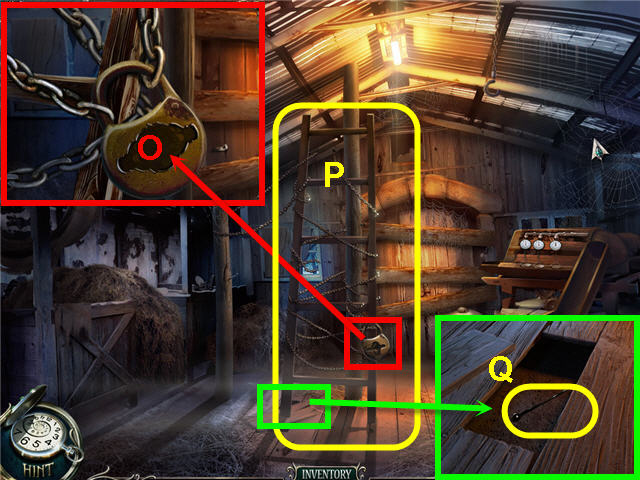
- Examine the lock and use the MEDALLION on it (O).
- Take the LADDER (P).
- Examine the notch and take the CLOCK HANDS 2 OF 2 (Q).
- Head to the lake.
- Place the LADDER against the tree (R).
- Click on the hollow (S) to access a Hidden Object Scene.
- Find the items listed and get a MOUSE.
- Head to the second floor in the house.
- Examine the vase; use the MOUSE on the cat (T).
- Take the DYNAMITE (U).
- Head into the bedroom.
- Examine the clock (V); place the CLOCK HANDS on the clock face.
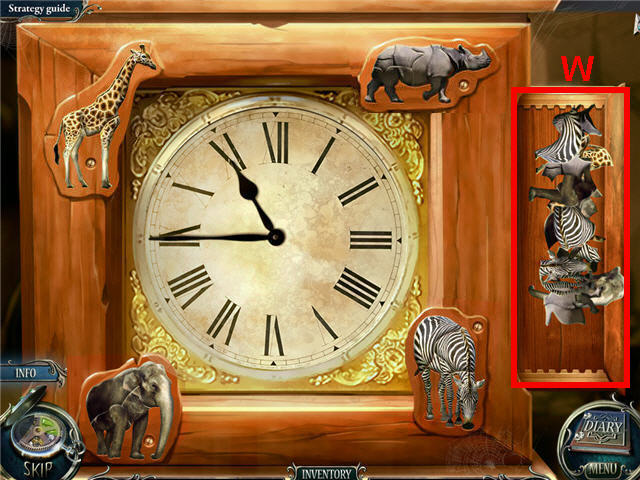
- Set the clock to the time found on the box at the pavilion (11:45).
- Reassemble the 4 animal puzzles as shown in the screenshot by dragging the puzzle pieces into place (W).
- Get a CLOCK.
- Exit the house and head to the square past the pavilion.
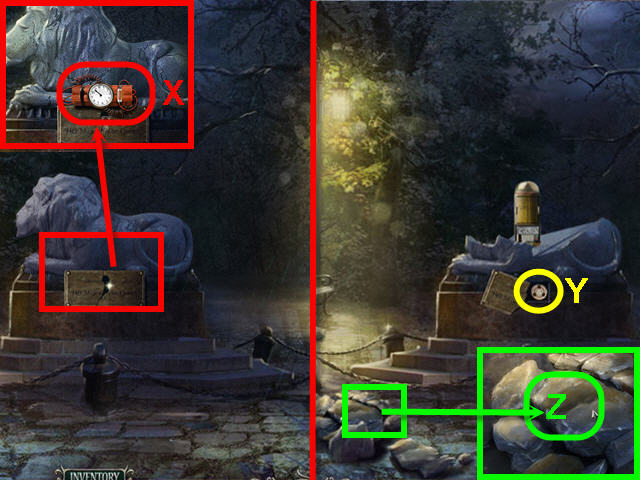
- Examine the lion; use the DYNAMITE and the CLOCK on the plaque (X).
- Examine the lion; take the BUTTON (Y).
- Examine the fragments; take the STONE (Z).
- Go to the sign.
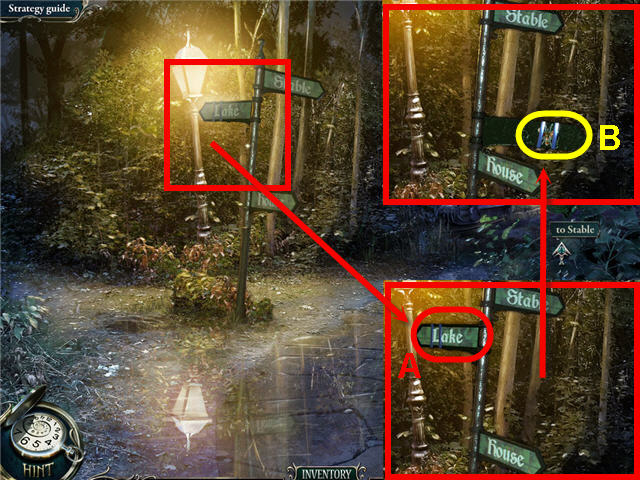
- Examine the sign; use the STONE on the lake sign (A); take the BEE (B).
- Head to the second floor of the house.
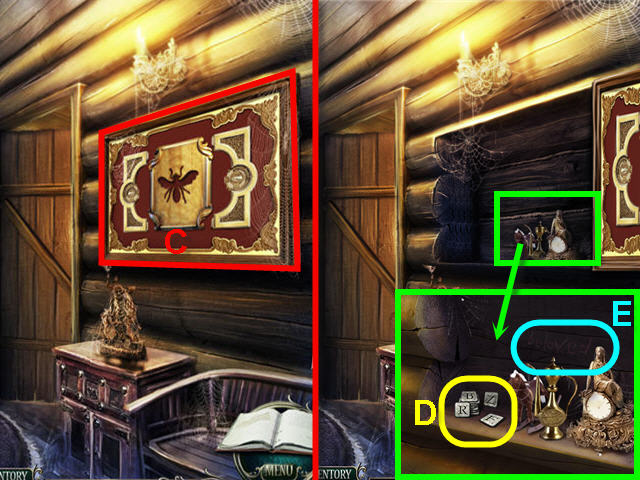
- Place the BEE on the picture (C).
- Examine the picture; take the LETTERS (D). Note the etching of “beloved” (E).
- Head to the lion square.
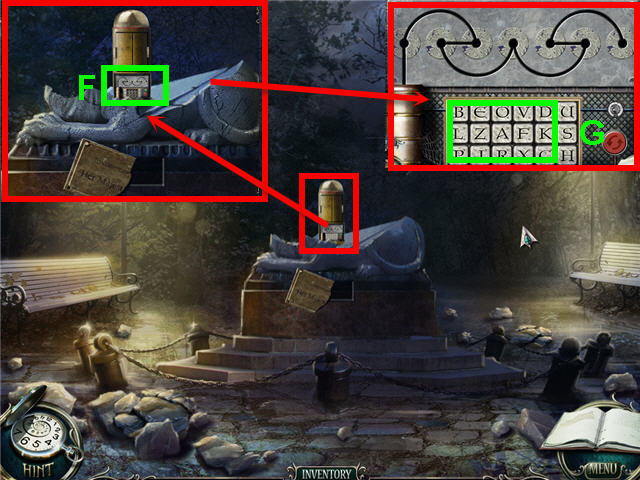
- Examine the broken lion.
- Examine the lock (F); place the LETTERS on the lower panel to trigger a puzzle.
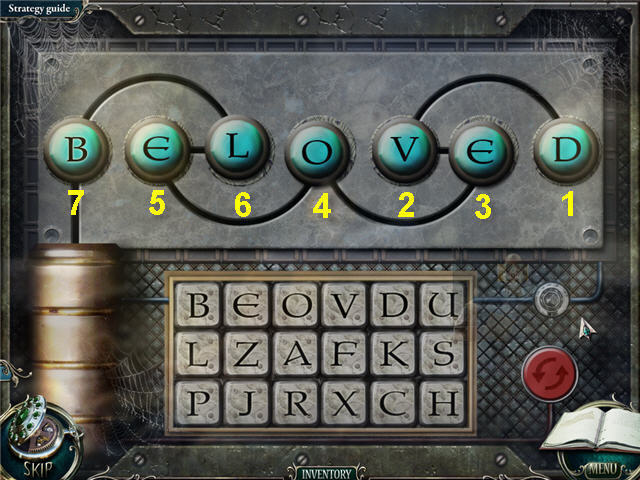
- Spell the word etched in the wall behind the bee picture.
- The letters will follow the path above; push the reset button in red to start over.
- Spell 'BELOVED' by clicking on the letters in this order: DVEOELB.
- Take the BUTTON.
- Go to the fireplace room.
- Examine the gun.
- Place the 3 BUTTON on the slots (G) to trigger a puzzle.
- Move the buttons around to complete the patterns.
- Click on any button that is connected to an empty space to move it to that space.
- Click on the buttons in the order shown in the screenshot.
- Take the GUN.
- Head upstairs to the corridor.
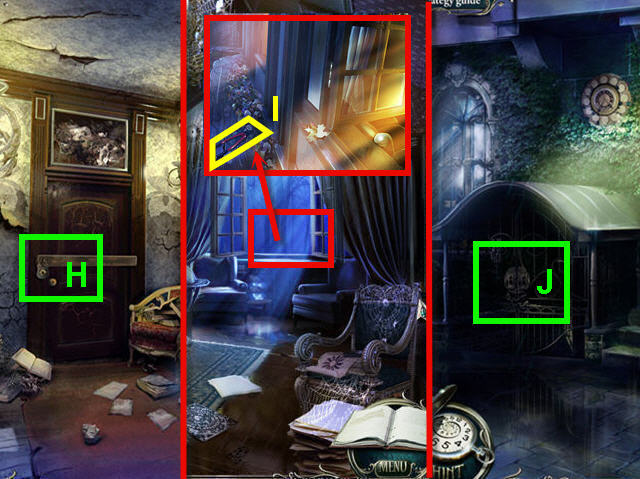
- Examine the door lock; shoot the lock (H) with the GUN.
- Enter father's room.
- Examine the window; take the BOLT CUTTERS (I).
- Back out to the entrance of the house.
- Examine the gates; use the BOLT CUTTERS on the lock (J).
- Enter the basement.
- Click on the shelf to access a Hidden Object Scene.
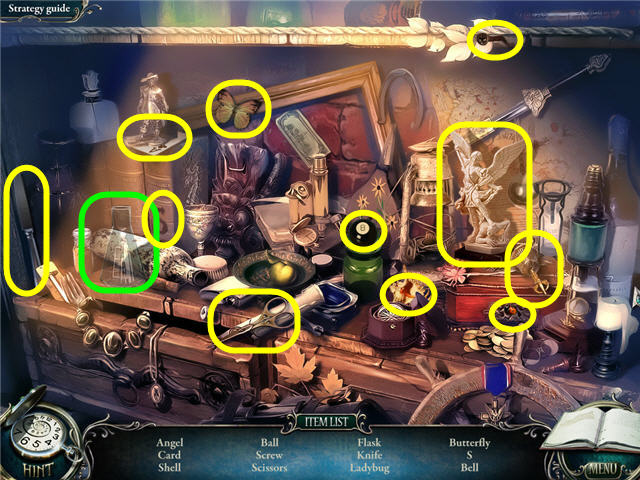
- Find the items listed and get a FLASK.
- Go to the father's room.
- Examine the table and click on the flasks to zoom into the lab area.
- Place the FLASK in the center to trigger a puzzle.
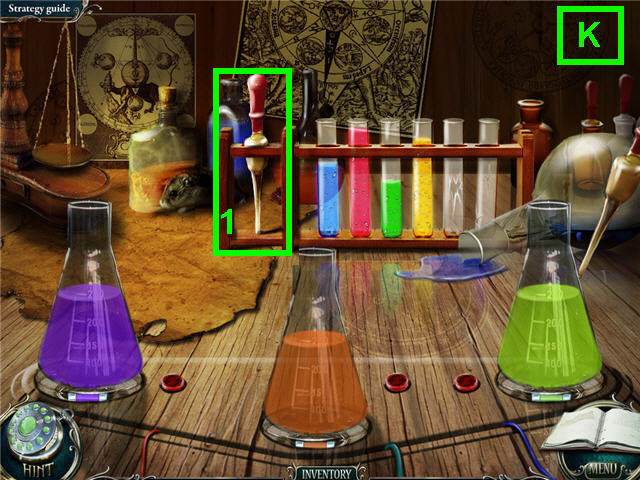
- Mix the colors in the flasks to match the labels on the bottom.
- Use the dropper (1) on the test tubes and then on the flasks.
- Solution: Left flask = blue (already there) +red, middle flask = red + yellow, right flask = green + yellow (K).
- Take the KEY.
- Head to the basement.

- Examine the table and zoom into the drawer.
- Use the KEY on the lock (L).
- Examine the drawer to access a Hidden Object Scene.
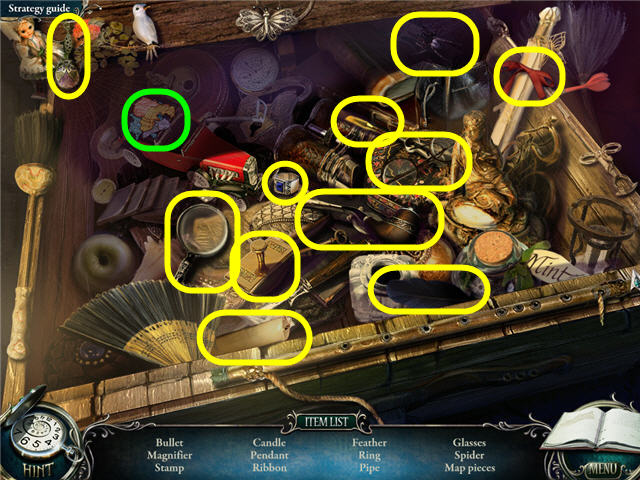
- Find the items listed and get the MAP PIECES.
- Back out of the desk close-up and click on the wall map above the desk.
- Place the MAP PIECES on the map to trigger a puzzle.
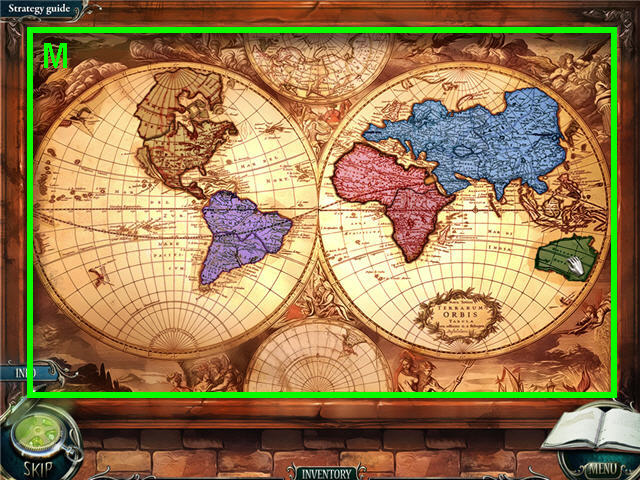
- Arrange the MAP PIECES on the map to complete it.
- Drag the pieces and right-click to rotate.
- See screenshot (M) for solution.
Chapter 4 – The Rose

- Examine the chair; take the WOODEN INLAY (N).
- Head to the gazebo.
- Take the SALT (O).
- Back out and head to the valley of ice figures.
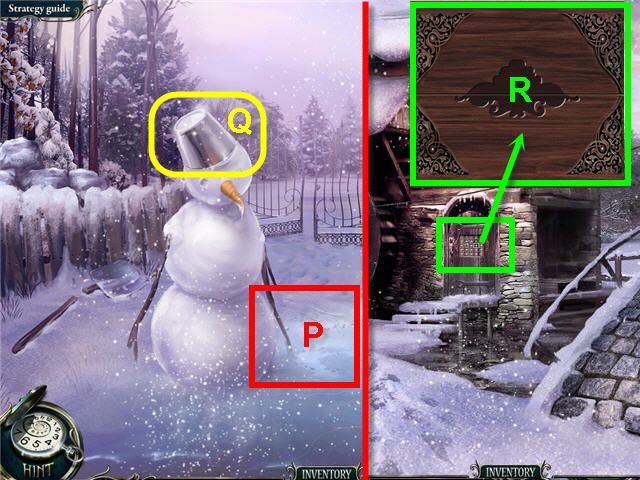
- Place the SALT on the skating rink (P).
- Take the BUCKET (Q).
- Head to the bridge.
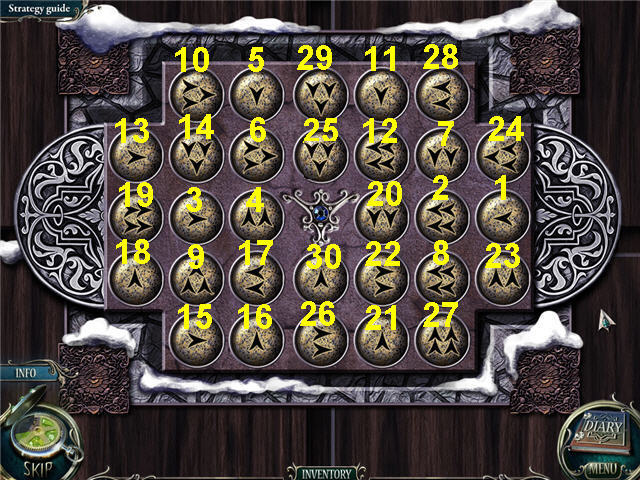
- Examine the mill door; place the WOODEN INLAY in the slot (R) to trigger a puzzle.
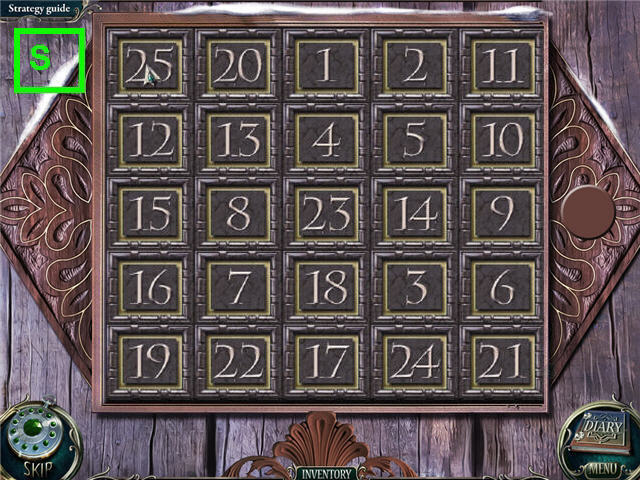
- Open the cells 1 through 25 in consecutive order.
- See screenshot (S) for the original layout solution. The placing of numbers is random after each attempt.
- Enter into the mill.
- Click on the shelves to access a Hidden Object Scene.
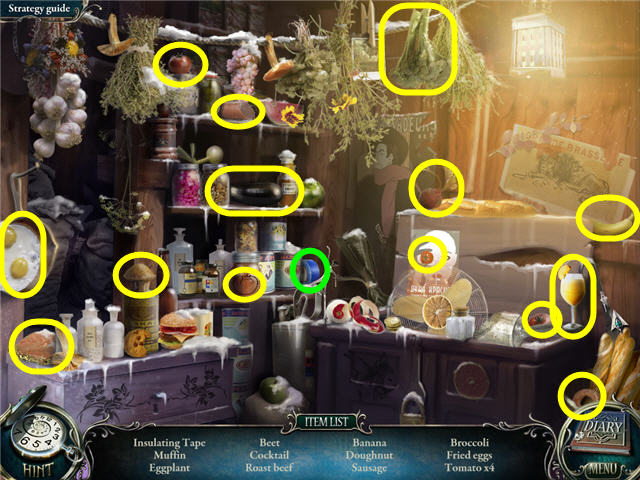
- Find the items listed and get the INSULATING TAPE.
- Head to the ice figures.
- Examine the spade; use the INSULATING TAPE on the handle.
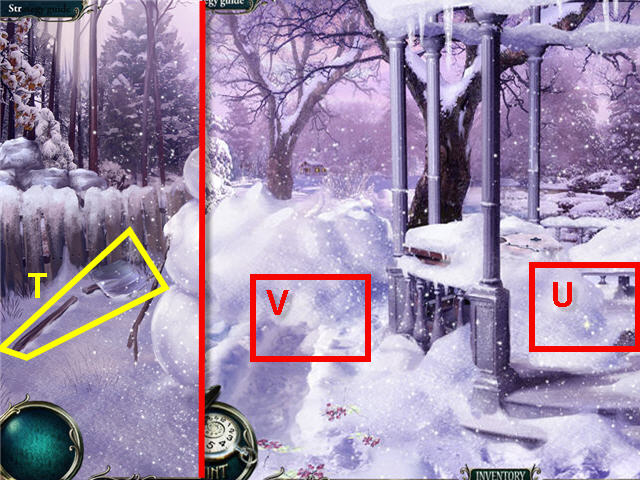
- Take the SPADE (T).
- Head to the gazebo.
- Use the SPADE on the snow in the gazebo (U) and on the path (V).
- Head to the hunting lodge.
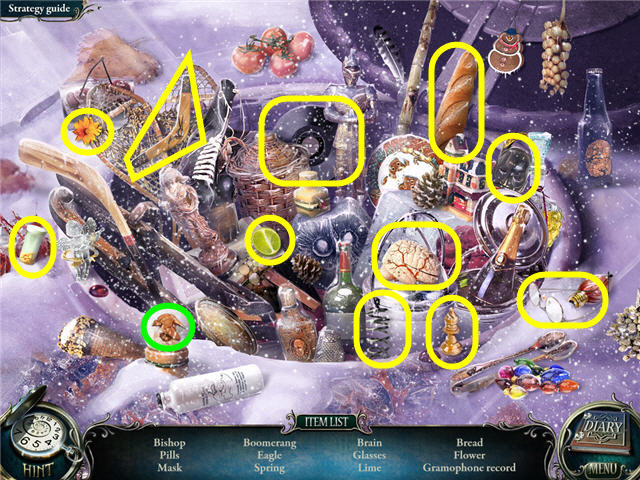
- Click on the veranda to access a Hidden Object Scene.
- Find the items listed.
- Get the NAILS.
- Take the HAMMER (W).
- Examine the snow; use the BUCKET on the pile (X) to get a BUCKET WITH SNOW.
- Head to the ice figures.
- Examine the fence; use the HAMMER to get the BOARDS (Y).
- Head to the hunting lodge.
- Examine the tree; place the BOARDS, NAILS and HAMMER on the trunk (Z).
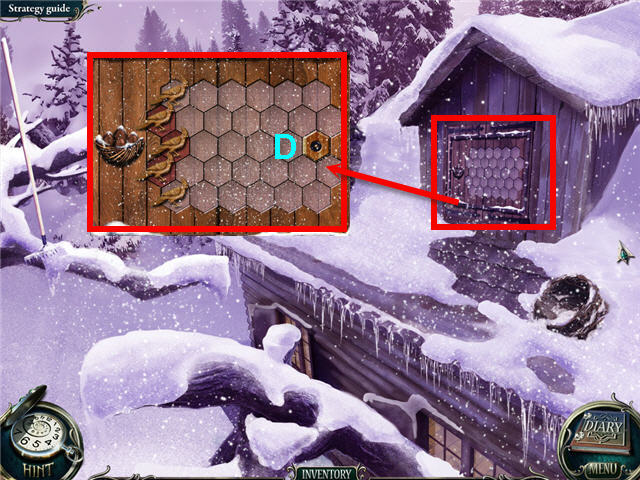
- Head up to the roof.
- Examine the nest; take the BAS-RELIEF PIECE (A).
- Go to the gazebo.
- Examine the hatch; place the BAS-RELIEF PIECE on the hatch (B) to trigger a puzzle.
- Arrange the pieces to complete the picture.
- Click on any two pieces to switch them. See screenshot for solution (C).
- Click on the hatch to access a Hidden Object Scene.
- Find the items listed and get an EAGLE.
- Head up to the hunting lodge roof.
- Examine the attic doors.
- Place the EAGLE on the slot (D) to trigger a puzzle.
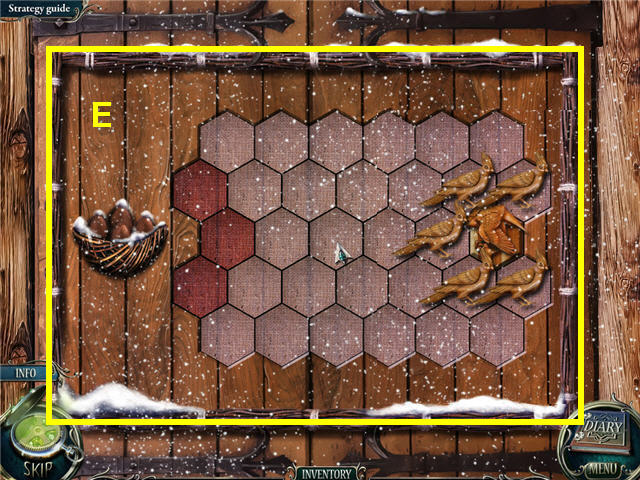
- Keep the eagle away from the nest by moving the birds to trap him in a corner.
- Be sure and keep all the birds in a line so that the eagle does not find a way through.
- The moves of the eagle are random. See screenshot for one solution (E).
- Click on the attic doors to access a Hidden Object Scene.
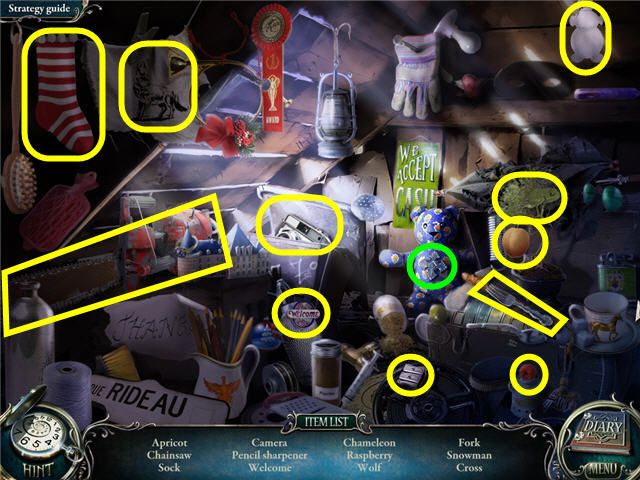
- Find the items listed and get a CROSS.
- Go to the bridge.
- Examine the wall.
- Place the CROSS in the center (F).
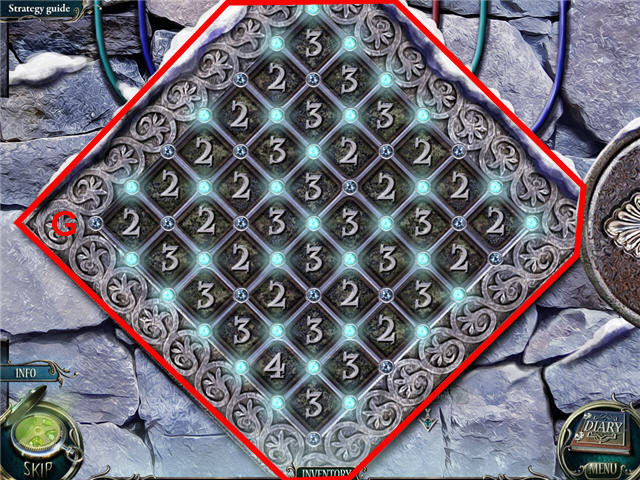
- Turn on the lights so that the number of lights lit around each square equals the number written in the square.
- See screenshot for solution (G).
- Take the DOOR (H).
- Head to the hunting lodge roof.
- Place the door on the branch (I); take the RAKE (J).
- Head over the bridge to the forest.
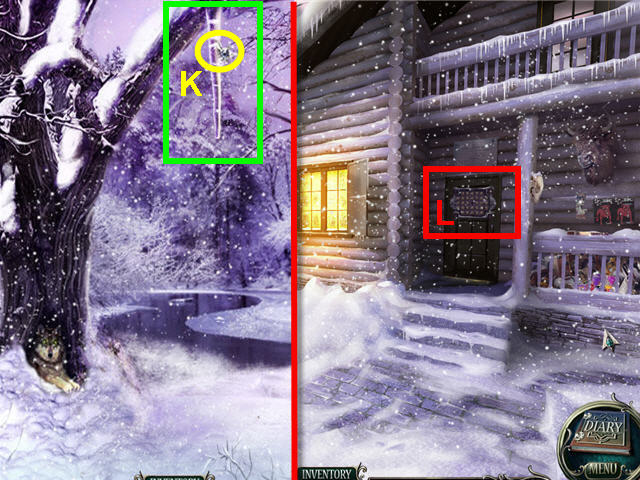
- Examine the icicle.
- Use the RAKE on the icicle; get a STAR JEWEL (K).
- Head to the hunting lodge.
- Examine the door (L).
- Place the STAR JEWEL on the lock to trigger a puzzle.
- Find the starting point to get to the medallion in the center by using each arrow.
- Jump to the next button by jumping the number and direction of arrows on the button you are on.
- See screenshot for solution.
- Enter the hunting lodge.
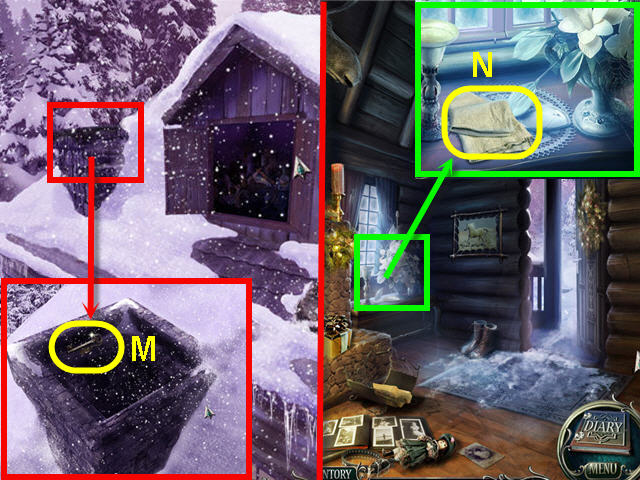
- Examine the window; take the CLOTH (N).
- Exit and head up on the roof.
- Examine the chimney; use the CLOTH on the chimney and take the MILL KEY (M).
- Enter the mill house.
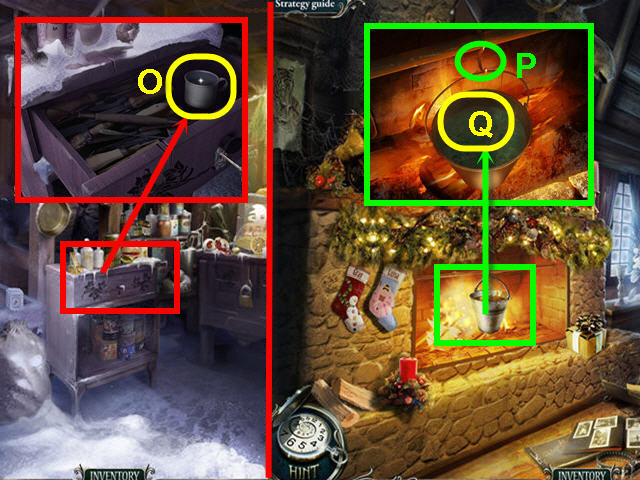
- Examine the cupboard; use the MILL KEY on the lock.
- Take the MUG (O).
- Head to the hunting lodge.
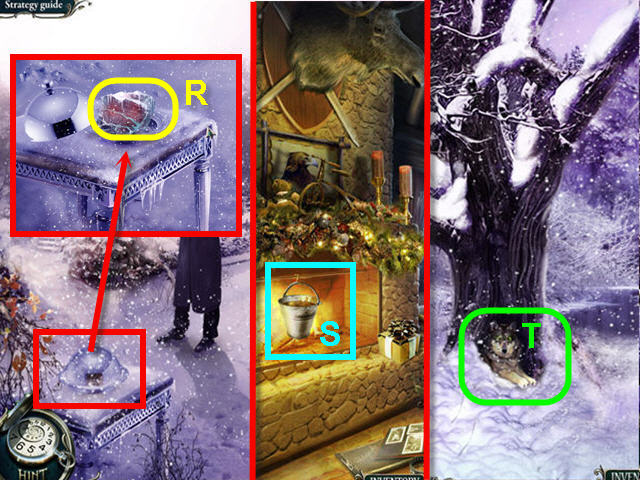
- Examine the fireplace; hang the BUCKET WITH SNOW on the hook (P).
- Use the MUG on the water bucket (Q) to get a MUG WITH HOT WATER.
- Head to the yard.
- Examine the plate; use the MUG WITH HOT WATER on the plate.
- Move the lid and take the FROZEN MEAT (R).
- Head to the hunting lodge.
- Examine the fireplace; place the FROZEN MEAT in the bucket (S); get THAWED MEAT.
- Head to the forest.
- Examine the wolf and give it the THAWED MEAT (T).
- Click on the den to access a Hidden Object Scene.
- Find the items listed and get a CHISEL.
- Head to the yard.
- Examine the head of the statue; use the CHISEL on the ice.
- Take the ROSE (U).
- Examine the table; open the drawer; take the RUBY MEDALLION (V).
- Head to Luisa's room.
- Examine the chest; place the ROSE on the top (W).
- Take the KEY (X) and TRIANGLE (Y).
- Exit the house.
- Examine the clock (Z); place the KEY in the slot to trigger a puzzle.
- Move the clock hands to matching items; repeat until all are grayed out.
- See screenshot for solution.
- Get the CLOCK HAND.
- Enter into the basement.
Chapter 5 – Father
- Examine the door.
- Place the ARROWS on the knights (A); click on the exposed lock (B).
- Place the TRIANGLE on the empty slot to trigger a puzzle.
- Use the clock hands to connect the lines from left to right.
- See screenshot for solution (C).
- Enter the basement corridor.
- Click on the statue to access a Hidden Object Scene.
- Find the items listed.
- Get a SLEDGEHAMMER.
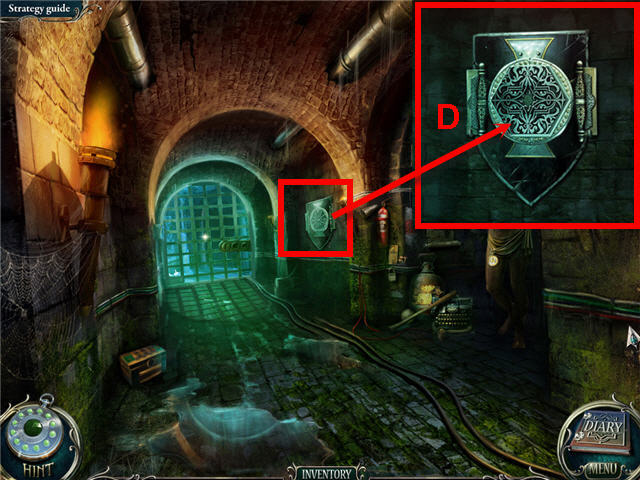
- Examine the wall; zoom onto the shield.
- Place the RUBY MEDALLION on the shield (D) to trigger a puzzle.
- Click on the buttons in alphabetical order from A-Z.
- You can only choose a button that is along the lighted connecting lines.
- See screenshot for solution (E).
- Use the SLEDGEHAMMER on the wall three times.
- Enter into the walled room.
- Click on the pile of debris to access a Hidden Object Scene.
- Find the items listed and get a PUZZLE.
- Click on Gray.
- Click on the frame in front of Gray's feet; place the puzzle on the frame to trigger a puzzle.
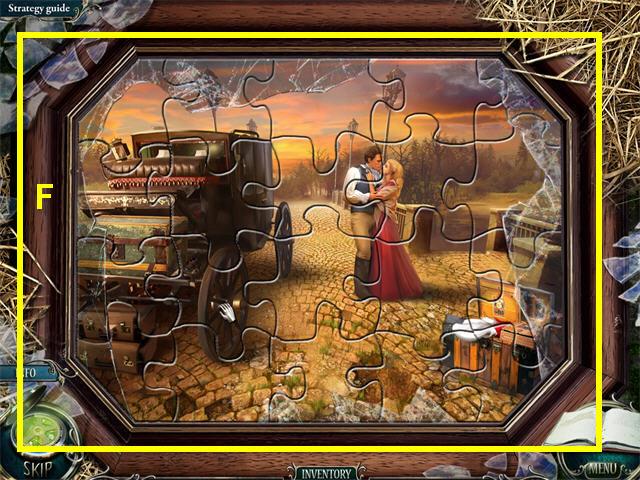
- Assemble the puzzle to complete the picture.
- Right-click on a piece to turn it. See screenshot (F) for solution.
- Head to the forest.
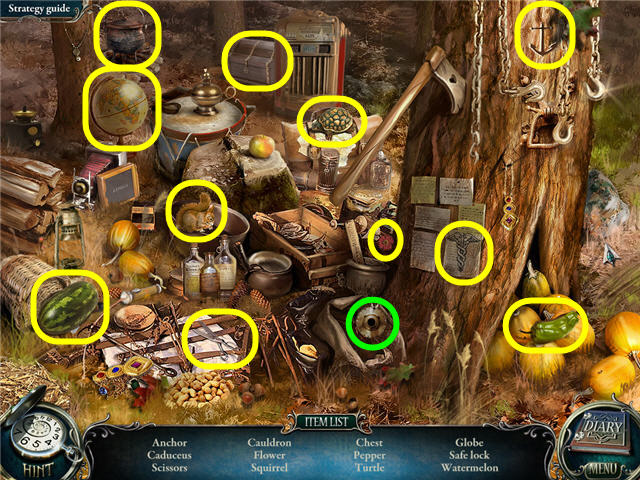
- Click on the tree to access a Hidden Object Scene.
- Find the items listed.
- Get a SAFE LOCK.
- Examine the medicine chest; take the RESIN (G).
- Go to the bridge.
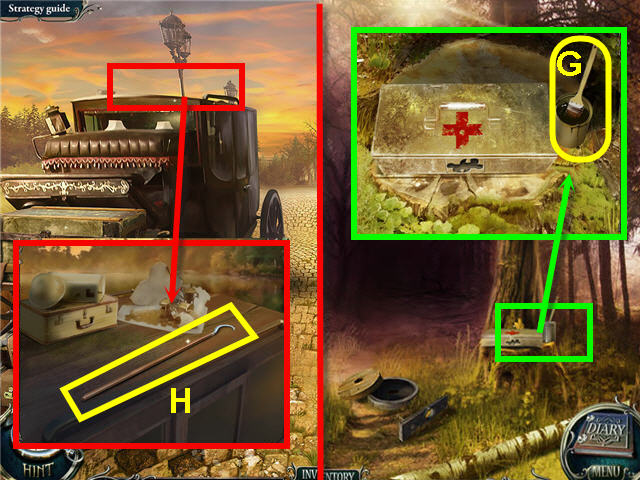
- Examine the carriage roof; take the HOOK (H).
- Head to the bank.
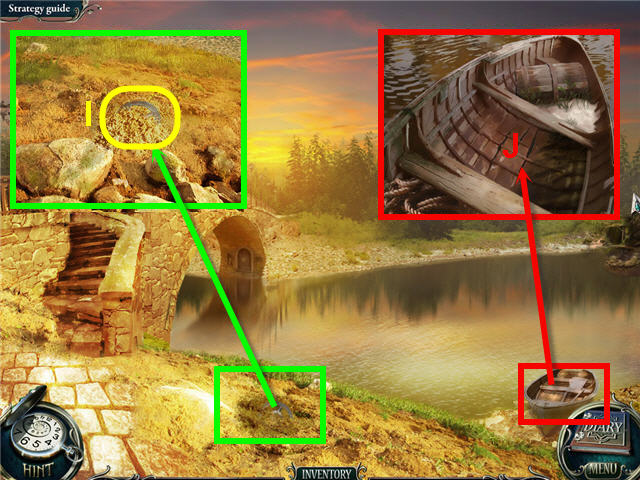
- Examine the sand; uncover and take the COGWHEEL (I).
- Examine the boat; use the RESIN on the boat (J).
- Head to the spring.
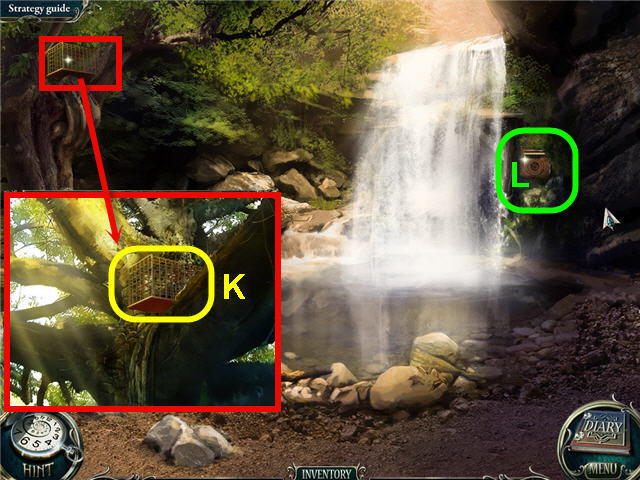
- Examine the branch; use the HOOK to get a CAGE (K).
- Examine the waterfall pump (L).
- Place the SAFE LOCK in the center to trigger a puzzle.
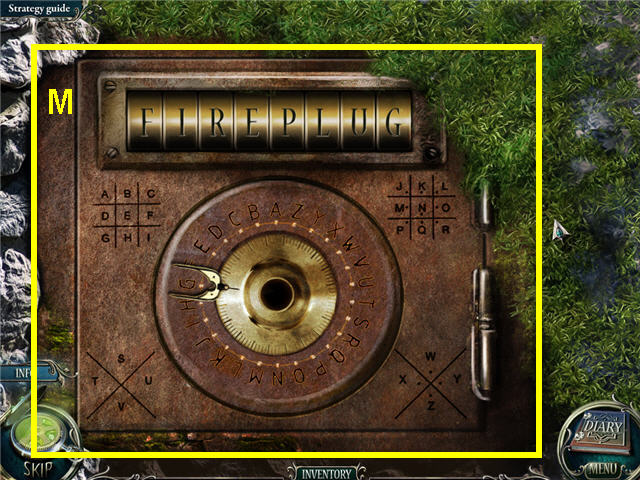
- Rotate the dial to the correct letter to complete the word.
- Use the letters and the grids on the 4 corners of the dial to decipher the code above.
- The solution is: 'FIREPLUG' (M).
- Turn the wheel.
- Head into the mine.
- Click on the discarded items to access a Hidden Object Scene.
- Find the items listed.
- Get a SUN 1 OF 2.
- Examine the wall; take the MEDICINE CHEST KEY (N).
- Go to the overpass.
- Examine the hole in the wall; use the CAGE on the mouse.
- Take the HAMMER (O).
- Head to the forest.
- Examine the medicine chest; use the MEDICINE CHEST KEY on the lock.
- Take the WEED KILLER (P).
- Examine the wheel; click on any piece to assemble.
- Use the HAMMER on the assembled wheel and take the WHEEL (Q).
- Head to the spring.
- Examine the stones; use the WEED KILLER on the grass and take the HEAD (R).
- Go to the overpass.
- Examine the statue; place the HEAD on top.
- Take the STAR KEY (S).
- Go to the bridge.
- Examine the box; use the STAR KEY on the lock (T).
- Click on the box to access a Hidden Object Scene.
- Find the items listed and get a SUN 2 OF 2.
- Head to the overpass.
- Examine the door.
- Use the SUN on the slot (U) to trigger a puzzle.
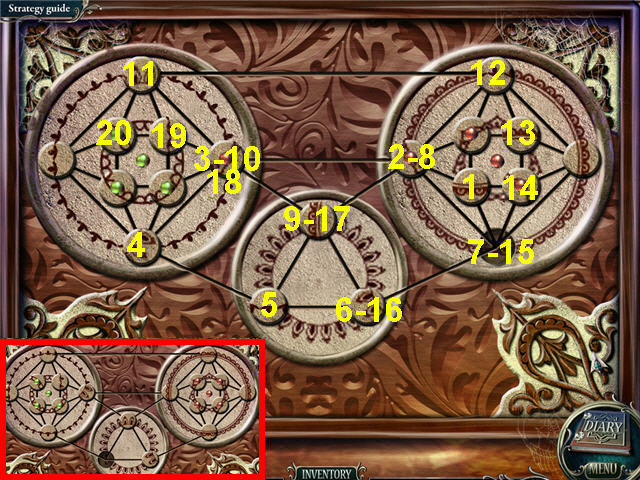
- Arrange the tiles so that they are on top of their matching symbol.
- For the solution move the squares marked on the screenshot in the following order: the first number is the square to move, the second number is the square to move it to: 6-1, 3-2, 10-6, 15-19, 11-15, 7-9, 15-3, 19-7, 12-10, 13-15, 7-16, 15-13, 18-7, 10-12, 9-18, 6-19, 7-6. 12-9 (V).
- Enter the secret room.
- Examine the instructions (W) to get a diary update.
- Examine the engine (X).
- Place the COG WHEEL on the engine to trigger a puzzle.
- Place the cogs on the spindle in the order given on the instruction from the wall. See screenshot for solution.
- Get an ENGINE.
- Head to the mine.
- Examine the wheel and place the WHEEL on the axle (Y).
- Examine the engine and place the ENGINE in the compartment (Z).
- Head to the grotto.
- Click on the crashed mine cart to access a Hidden Object Scene.
- Find the items listed and get a DRAGONFLY KEY.
- Head to the secret room by the overpass.
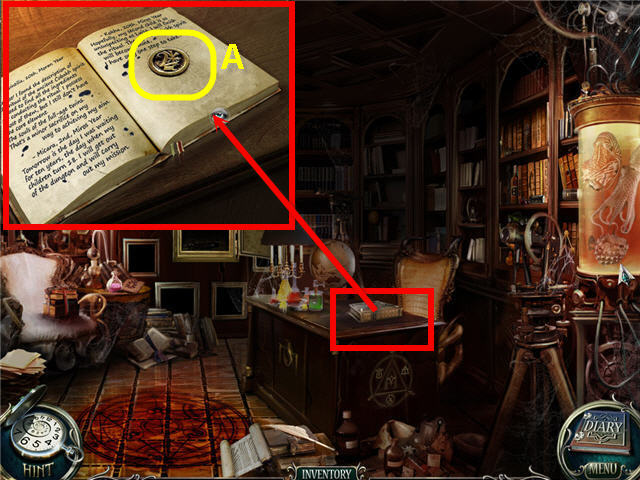
- Examine the books to trigger a puzzle.
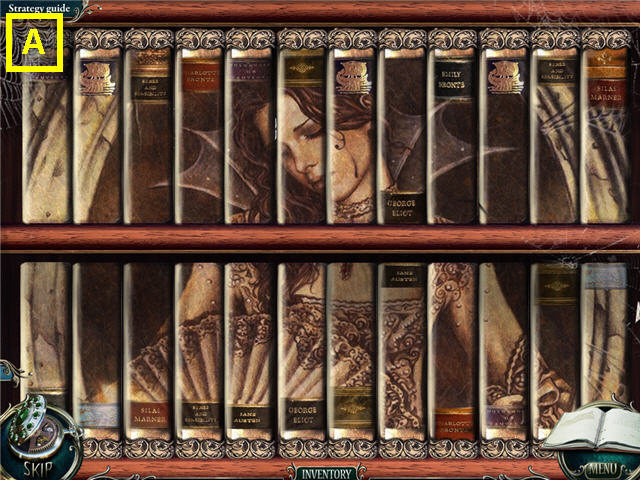
- Arrange the books on both shelves to complete the picture.
- See screenshot for solution (A).
- Place the DRAGONFLY KEY in the slot; take the CLEF and TRIANGULAR KEY.
- Head into the grotto via the mine.
Chapter 6 – Luisa
- Examine the fence; use the TRIANGULAR KEY on the lock (B).
- Go to the drawing room.
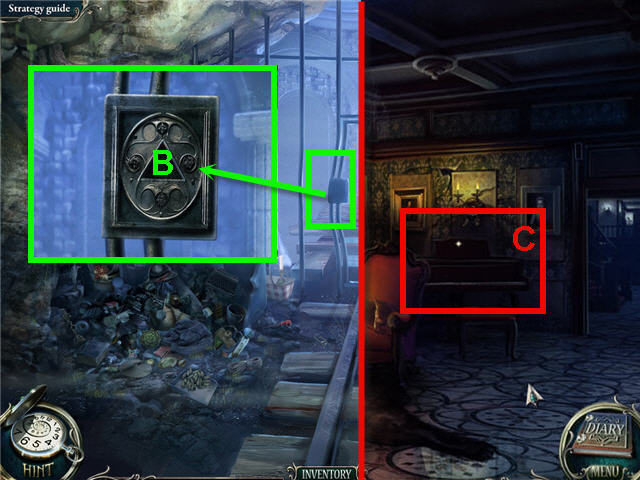
- Examine the piano (C); place the CLEF in the slot to trigger a puzzle.
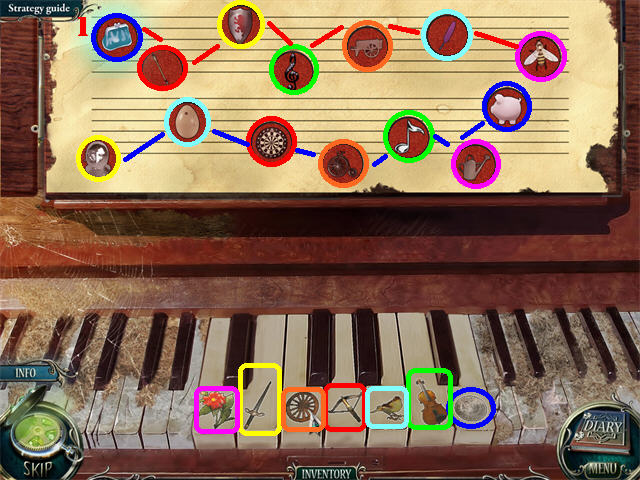
- Play the melody on the sheet music by pressing the related keys.
- See screenshot for solution.
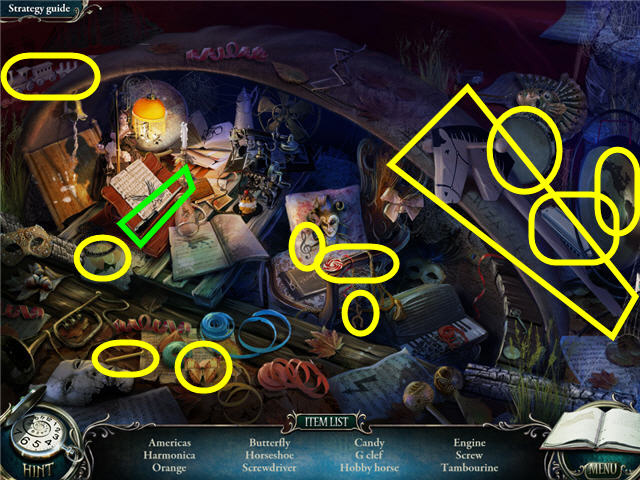
- Click on the piano to access a Hidden Object Scene.
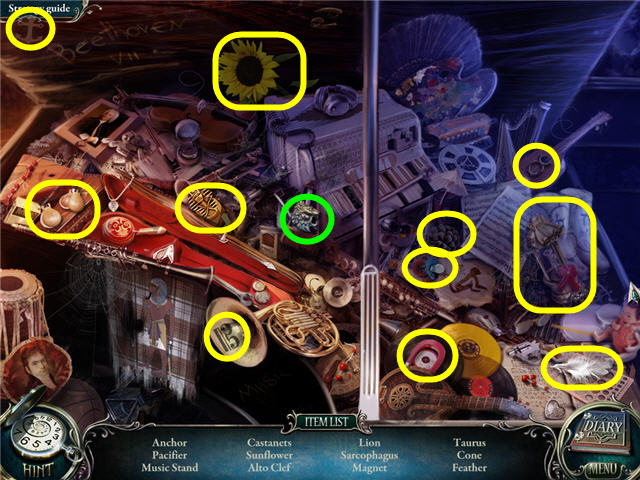
- Find the items listed and get a LION.
- Go to the basement corridor.
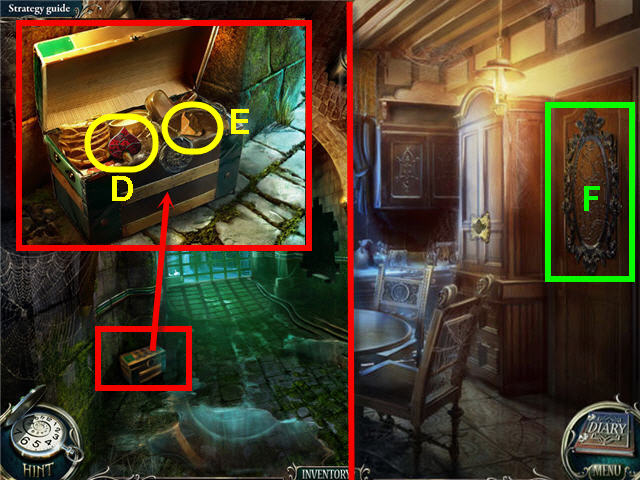
- Examine the box.
- Place the LION on the lock; take the STAINED GLASS PIECE (D) and the CROSS (E).
- Head to the dining room.
- Examine the door.
- Place the STAINED GLASS PIECE on the mosaic to trigger a puzzle.
- Assemble the pieces to complete the mosaic.
- Right click to turn the pieces. See screenshot (F) for solution.
- Click on the pantry to access a Hidden Object Scene.
- Find the items listed and get a SKULL.
- Head to the basement corridor and into the walled room.
- Examine the niche; place the SKULL in the slot.
- Take the CROSSBOW (G), AXE (H) and LOCK PIECE (I).
- Head to the hallway.
- Examine the banister; use the CROSSBOW on the banister (J).
- Head upstairs and into mother's room.
- Examine the box (K); place the LOCK PIECE on the left hinge to trigger a puzzle.
- The goal is to have each triangle pressed in.
- Note the number on the left (L), scroll your cursor over the triangles and note which 3 numbers light up on the sides. When the lit up numbers match the numbers on the dial, click on the triangle.
- See screenshot for solution.
- Click on the chest to access a Hidden Object Scene.
- Find the items listed and get a DRAGON.
- Go to father's room.
- Examine the cabinet; place the DRAGON on the slot to trigger a puzzle.
- Move the blue square to the center by using the arrows on the left and the pink squares.
- Solution legend- ULP=upper left pink, LRP=lower right pink square, M = Middle, B =blue square etc. L =left arrow, R=right arrow, U = up arrow, D = down arrow.
- One solution: LLP – R, U; ULP – R; B- L; UMP – D; B - R, U; URP – L, D; B – R, D; MRP – L; LRP – U, L; LLP – U; URP – L, D, R; LLP – L; ULP – D, R; URP – U, L; B - U, L, D, R.
- See screenshot for final solution (M).
- Enter the secret room.
- Take the KEY (N).
- Go to the kitchen.
- Examine the cupboard.
- Place the KEY in the lock; take the PIGEON (O).
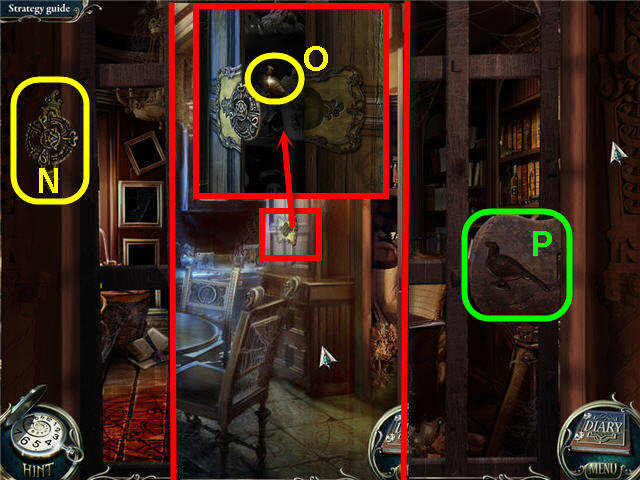
- Head back to the secret room in father's room.
- Place the PIGEON in the lock (P).
- Click on the bookcase to access a Hidden Object Scene.
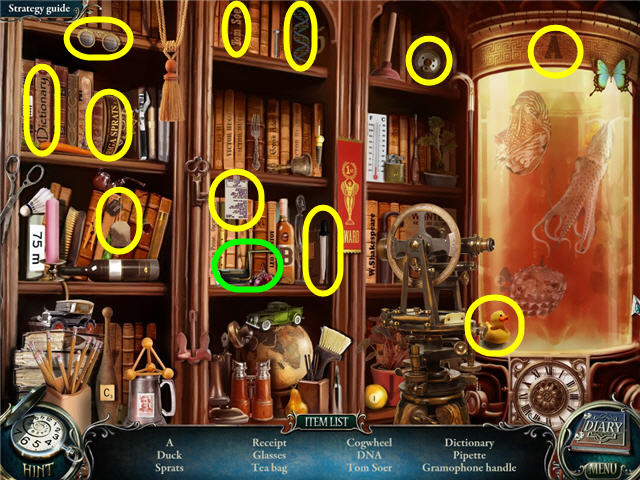
- Find the items listed.
- Get a GRAMOPHONE HANDLE.
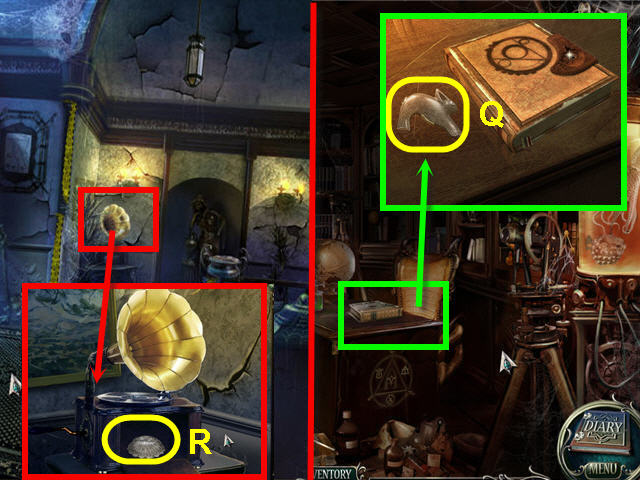
- Examine the book; take the RABBIT (Q).
- Find the items listed.
- Back out to the second floor hallway.
- Examine the gramophone.
- Place the gramophone handle on the gramophone; take the SEASHELL (R).
- Head to the basement corridor.
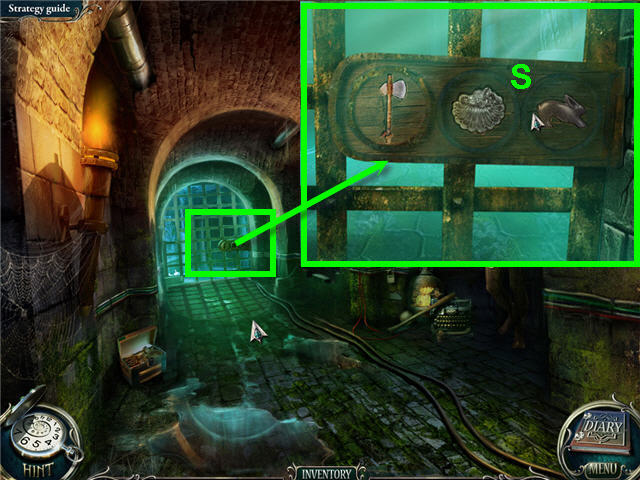
- Examine the fence; place the AXE, RABBIT and SEASHELL on the lock (S).
- Head to the stairs.
- Click on the junk pile to access a Hidden Object Scene.
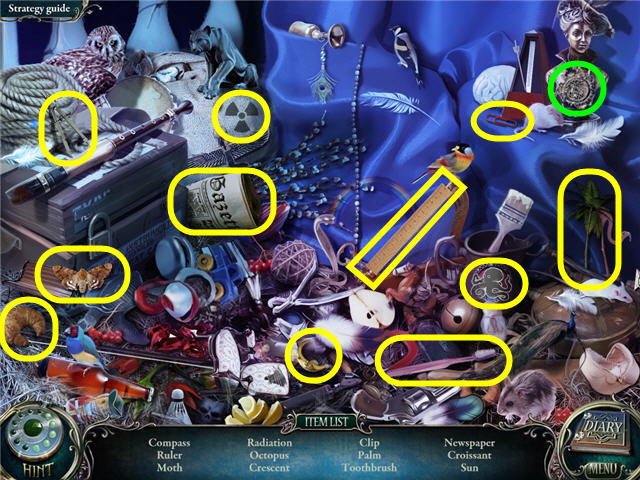
- Find the items listed.
- Get a BAS-RELIEF PIECE.
- Examine the box; use the CROSS on the slot.
- Take the SOPORIFIC (T).
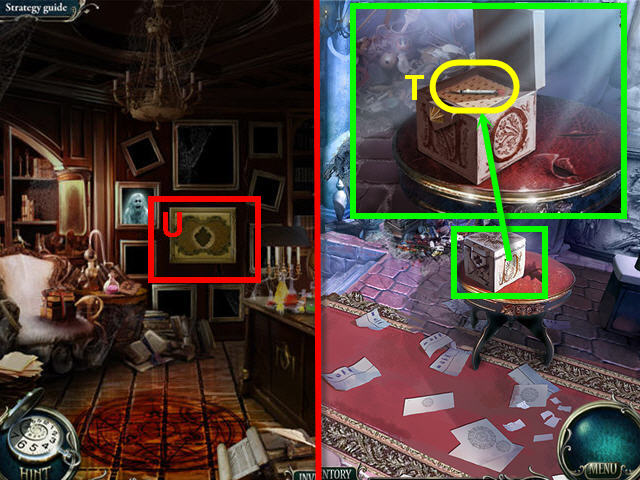
- Head into the secret room in the father's room.
- Examine the safe (U); place the BAS-RELIEF PIECE on the slot to trigger a puzzle.
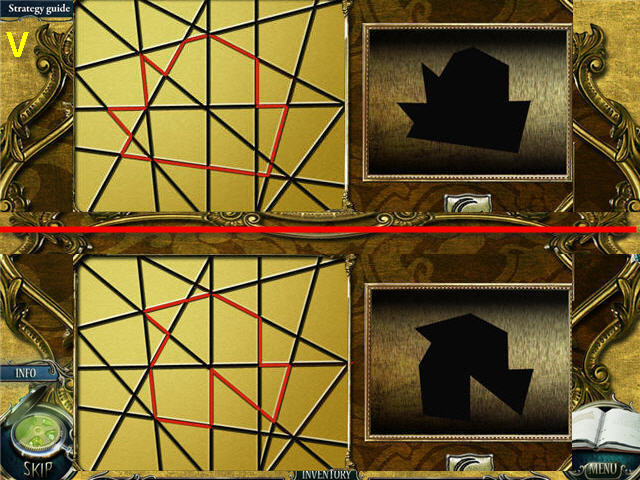
- Recreate the shapes on the right on the left grid by clicking on the lines to highlight them.
- See screenshot (V) for the first two solutions.
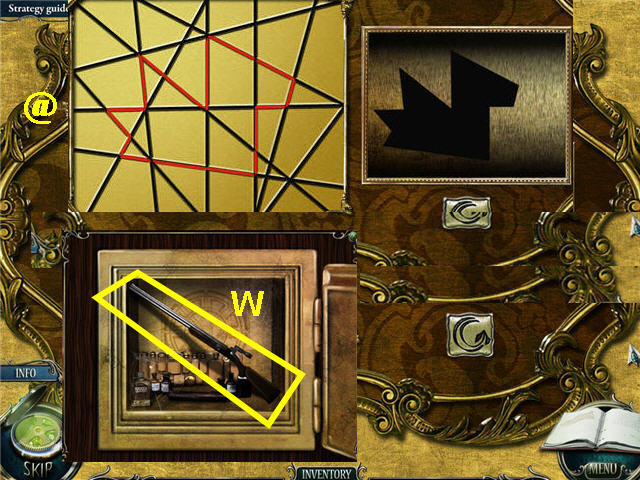
- See screenshot section (@) for the third solution.
- Examine the opened safe.
- Take the GUN (W) to get a GUN WITH SOPORIFIC.
- Head to the stairs at the end of the basement corridor.

- Examine the demon (X); shoot him with the GUN WITH SOPORIFIC.
- Head down to the demon.
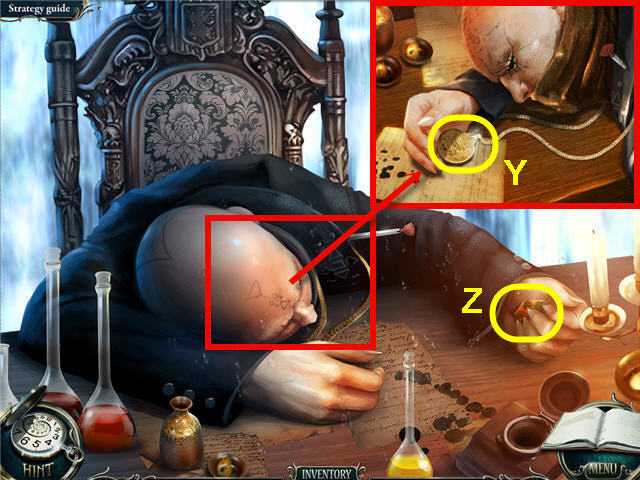
- Zoom into the demon (Y); take the MEDALLION.
- Open the demon's hand; take the ORANGE COIN (Z).
- Head up to the secret room in father's room.
- Examine the book; place the MEDALLION on the slot.
- Open the book; take the YELLOW COIN (A).
- Head down to the levitation platform.
- Click on the platform below Luisa.
- Place the ORANGE COIN and the YELLOW COIN on the mechanism to trigger a puzzle.
- Arrange the coins so that they match the vertical and horizontal shapes on the top and left.
- See screenshot for solution guide. The first number is the button you push and the second number is the amount of times you push it: 1x2, 3, 4, 3x2, 4x2, 2x2, 1x3, 2, 3, 1, 3, 2, 4, 3x3, 4, 3, 2x2, 4, 2, 4x2, 2, 4x3, and 2x3.
- Congratulations! You have successfully completed Grim Tales: The Bride Standard Edition.
Created at: 2011-09-02