Welcome to the
Grim Tales: The Generous Gift
Walkthrough A mysterious birthday gift uncovers a sinister
kidnapping plot! Whether you use this document as a reference
when things get difficult or as a road map to get you from
beginning to end, we're pretty sure you'll find what you're
looking for here. This document contains a complete Grim
Tales: The Generous Gift game walkthrough featuring annotated
screenshots from actual gameplay! We hope you find this
information useful as you play your way through the game. Use
the walkthrough menu below to quickly jump to whatever stage
of the game you need help with. This walkthrough was created
by
Margie B, and is protected under US
Copyright laws. Any unauthorized use, including re-publication
in whole or in part, without permission, is strictly
prohibited.
Walkthrough Menu
General Tips
-
This is the official guide for Grim Tales: The Generous
Gift.
-
This guide won't tell you when to zoom into a location;
the screenshots show each zoom scene.
-
Hidden-object puzzles are referred to as HOPs. Only the
locations of the HOPs will be shown.
- Use the Map to fast travel to a location.
Chapter 1: Holly's Loft
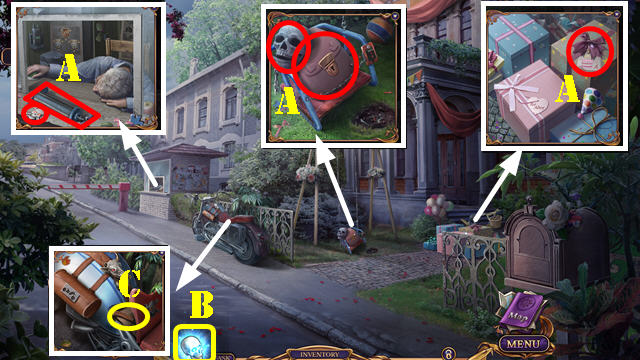
-
Take AIR PUMP, SKULL TRINKET, ALICE'S BACKPACK, RIBBON
WITH SAFETY PIN, and Richard Gray's Skull (A).
-
Select Richard Gray's Skull (B); receive BIRTHDAY CARD.
-
RIBBON WITH SAFETY PIN on ALICE'S BACKPACK. Look at card;
take MOTORCYCLE AMULET 1/2 and PENCIL.
-
Place SKULL TRINKET; look at note and take JACKKNIFE (C).
-
Use JACKKNIFE and select (D). Play HOP; receive TOY
SHOVEL.
- Use TOY SHOVEL; take MOTORCYCLE AMULET (E).
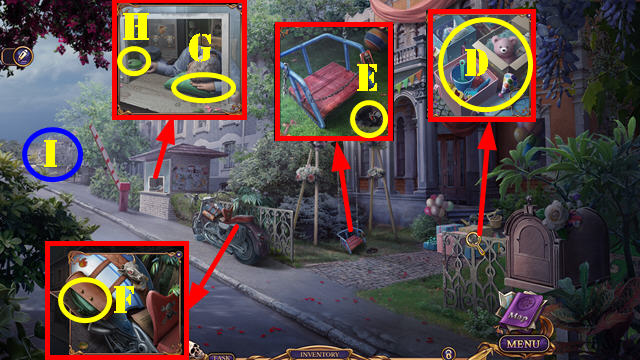
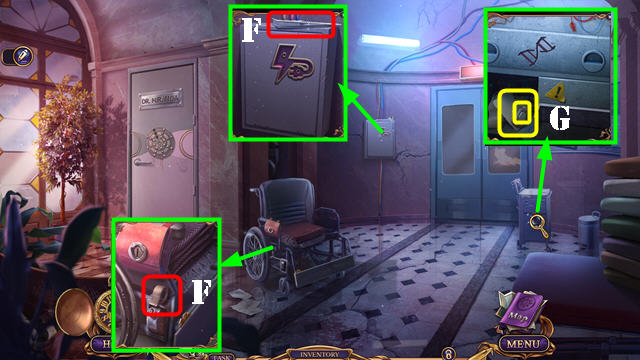
- Place MOTORCYCLE AMULET; take PILLOW (F).
- Use PILLOW (G); select button (H).
- Go (I).
-
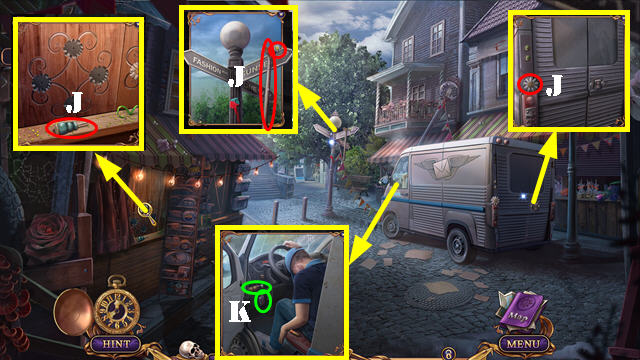
Take CHAMOMILE AMULET 1/4-2/4, CANE, and SCREWDRIVER (J).
-
Use CANE and open the door; take BROKEN DOOR REMOTE and
ACETONE (K).
- Walk down.
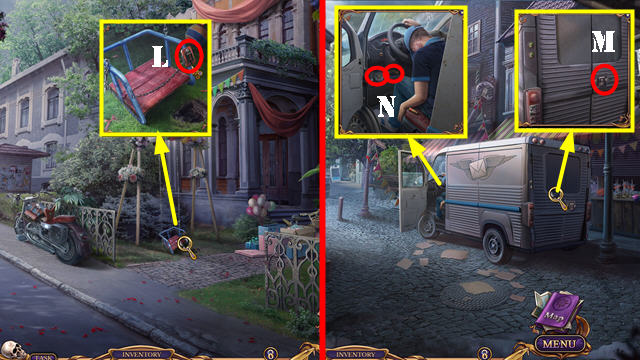
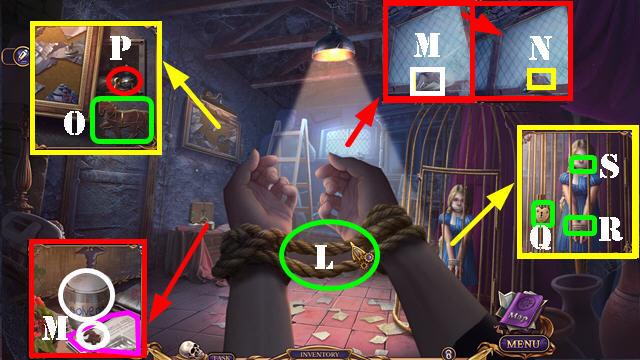
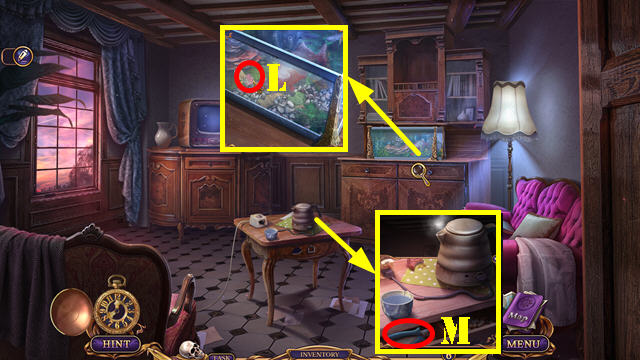
- Use SCREWDRIVER; take BLACK SWITCH (L).
- Go to Funfair.
- Use SCREWDRIVER; take WHITE SWITCH (M).
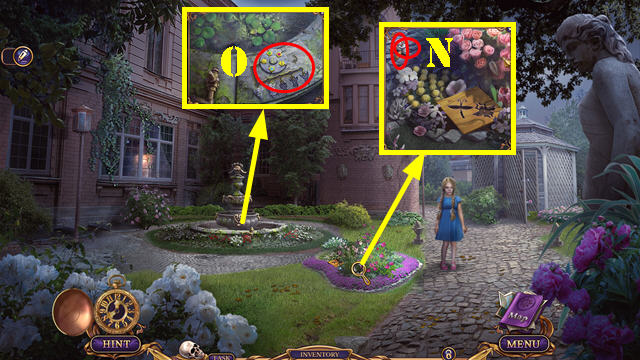
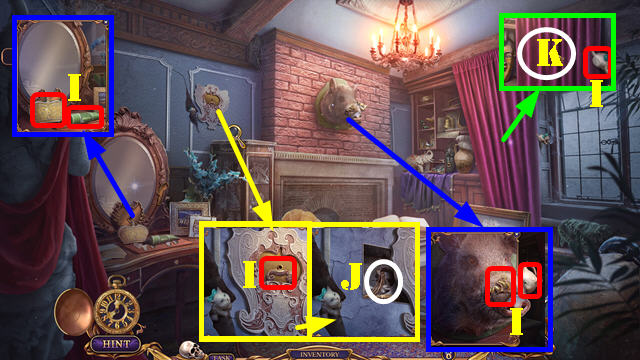
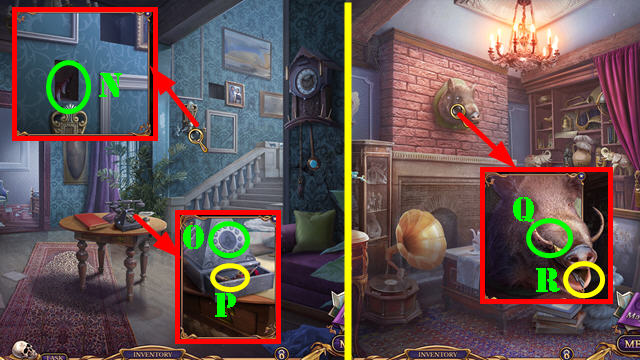
-
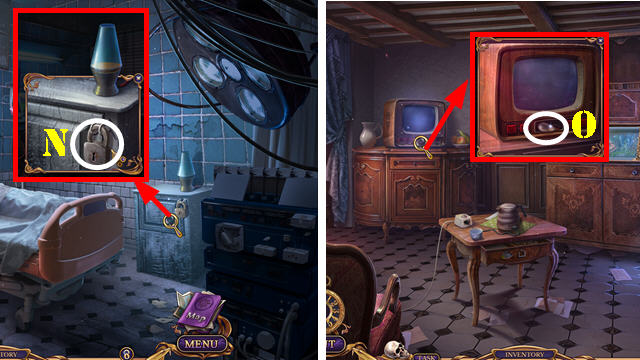
Place BLACK SWITCH and WHITE SWITCH; take BULL'S HORN and
CHAMOMILE AMULET 3/4 (N).
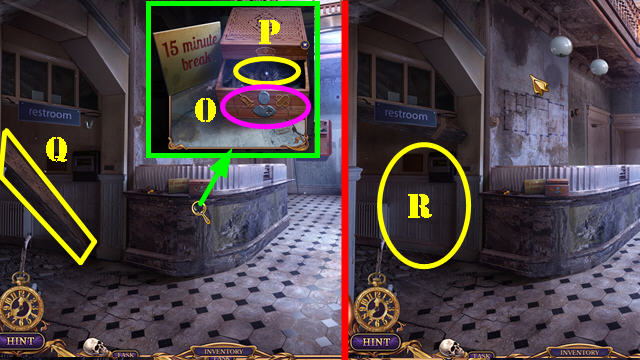
- Walk down.
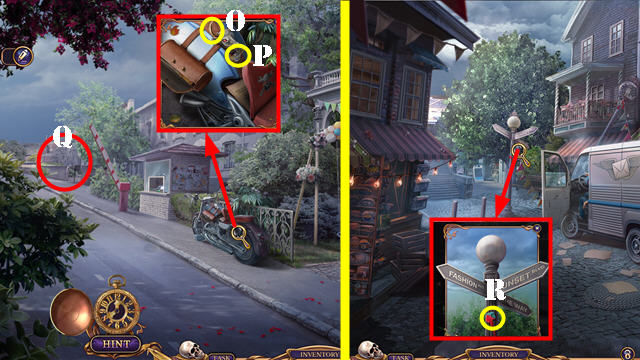
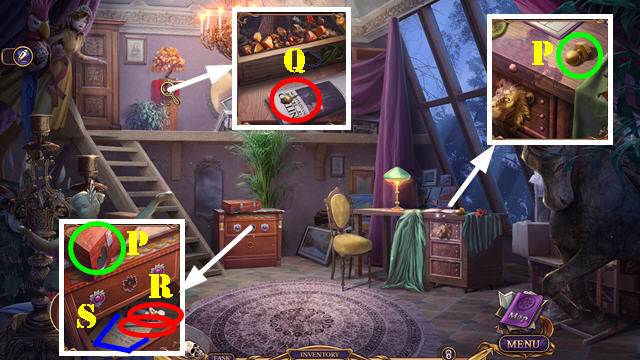
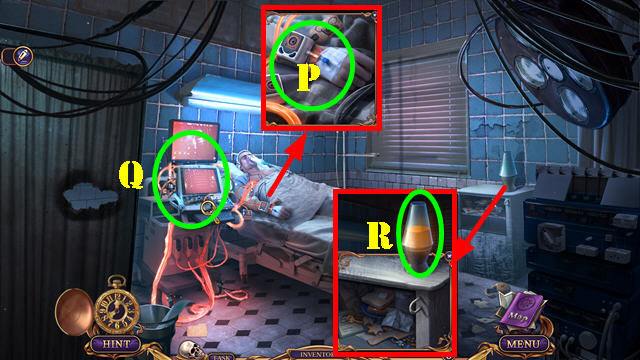
- Place BULL'S HORN (O); take GUARDIAN'S BADGE (P).
- Go (Q).
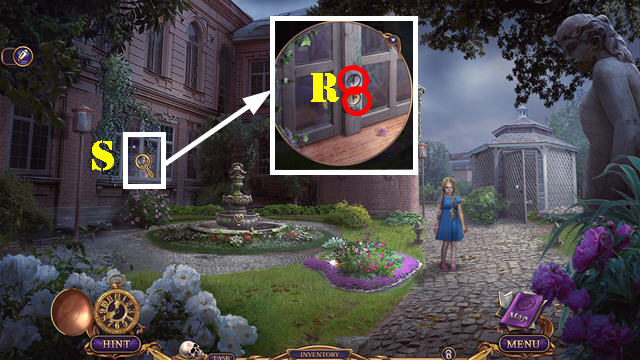
- Use ACETONE (R); receive BUTTON.
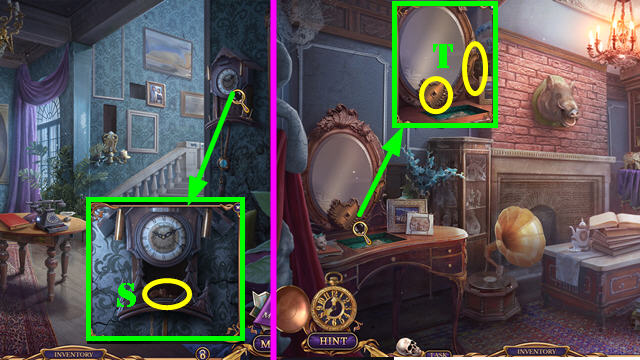
- Walk down.
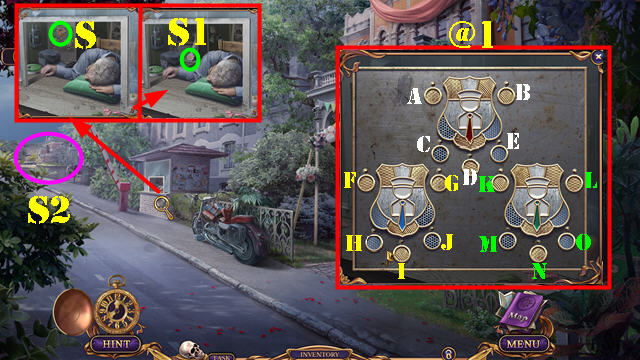
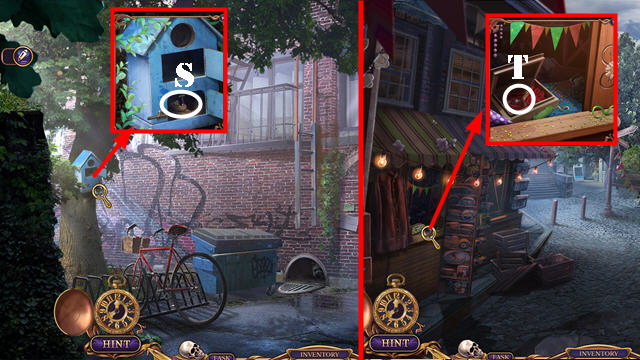
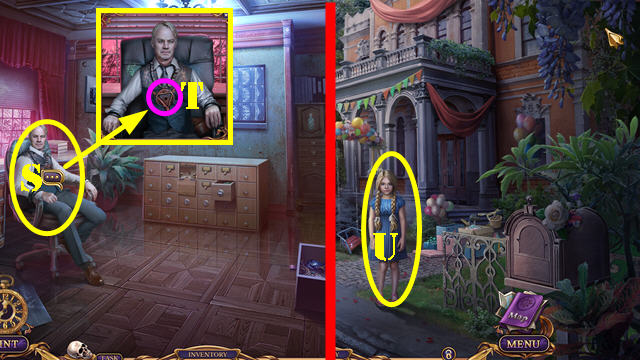
- Place GUARDIAN'S BADGE (S).
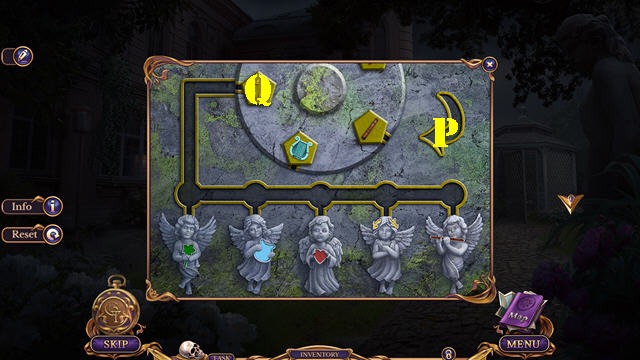
-
Solution (@1): (A-C)-(-B-J)-(I-O)-(G-L)-(D-K)-(D-H).
- Take CHAMOMILE AMULET 4/4 (S1).
- Go (S2).
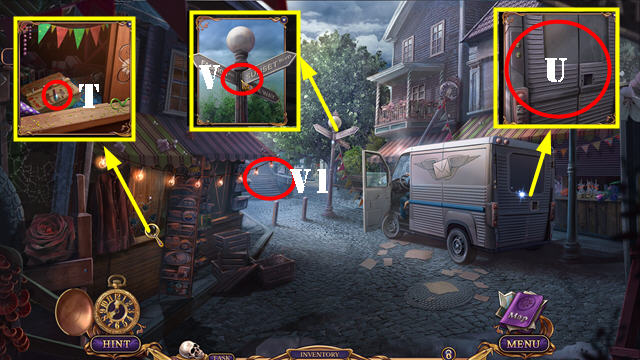
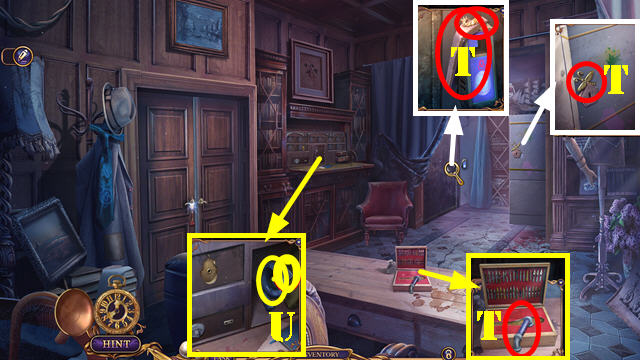
- Place CHAMOMILE AMULET 4/4; take BATTERY (T).
-
Select BROKEN DOOR REMOTE; place BATTERY and BUTTON; take
DOOR REMOTE.
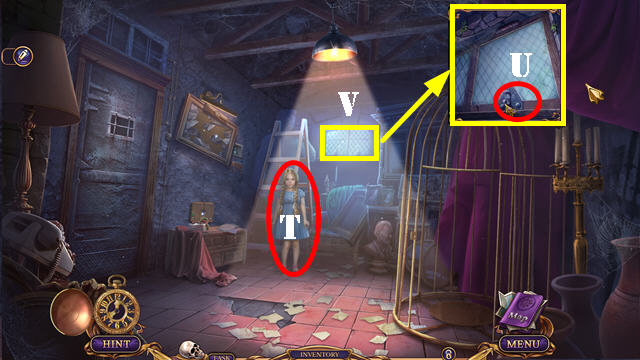
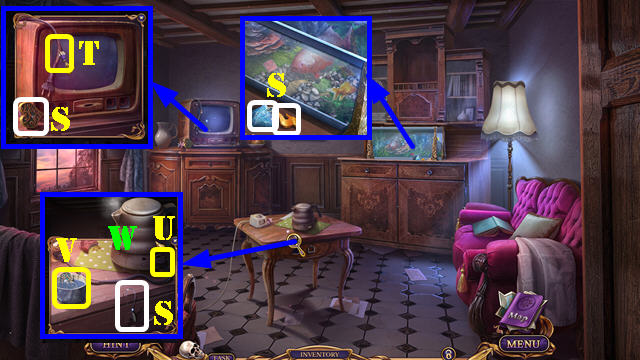
-
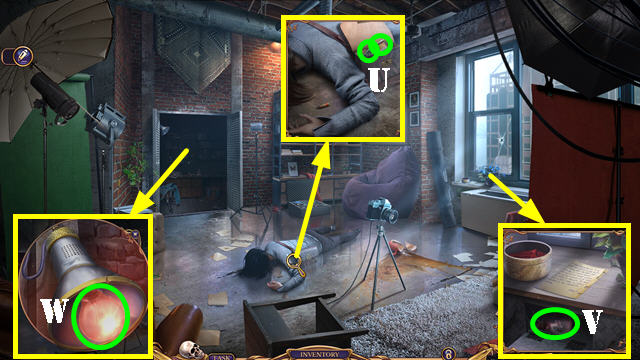
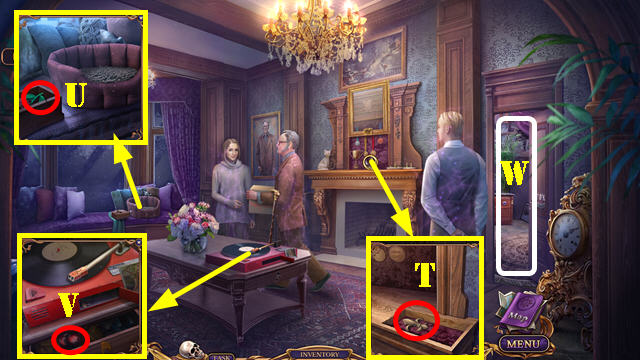
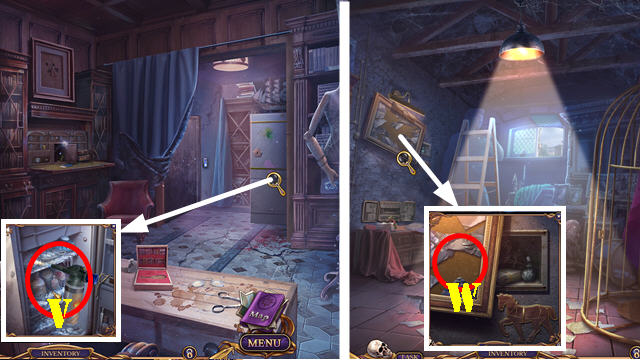
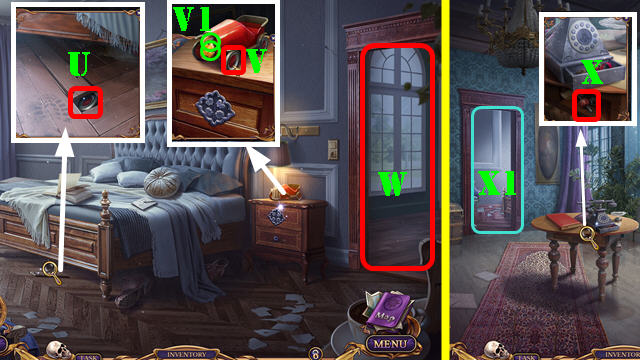
Use DOOR REMOTE (U). Play HOP; receive CUSTOMER'S ADDRESS.
- Place CUSTOMER'S ADDRESS (V).
- Go (V1).
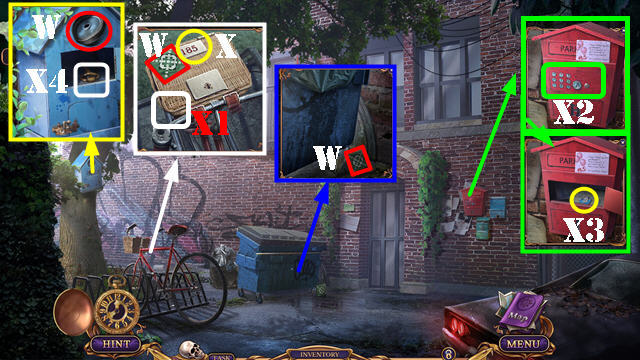
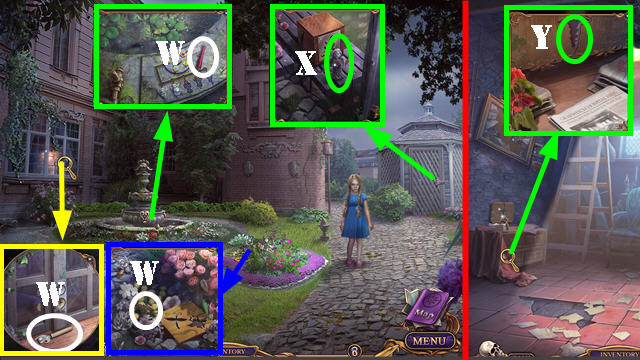
- Take DECORATIVE TILE 1/5-2/5 and WHEEL (W).
-
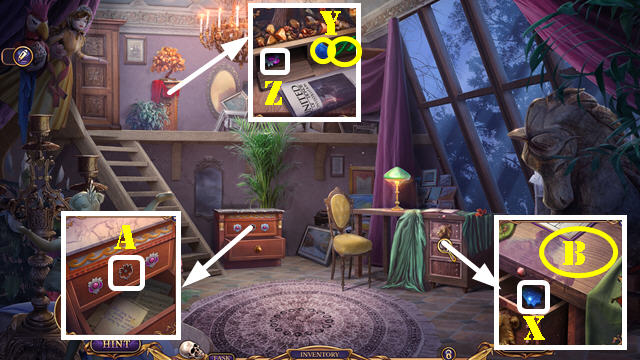
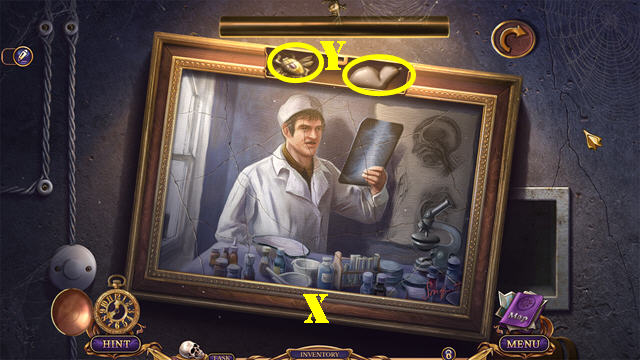
Place BIRTHDAY CARD (X) and use PENCIL (X1); receive
HOLLY'S CODE.
-
Place HOLLY'S CODE; select 185 and key button (X2). Look
at the check; take BIRD EMBLEM (X3).
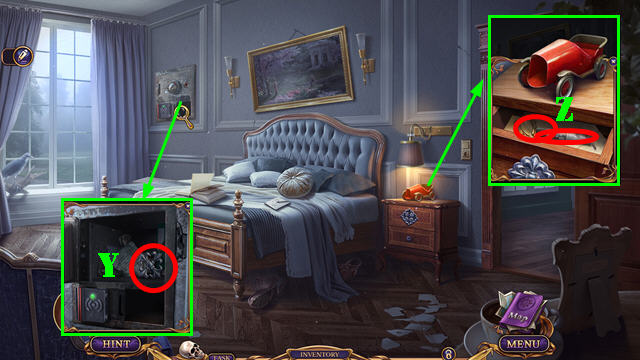
- Place BIRD EMBLEM; take BICYCLE KEY (X4).
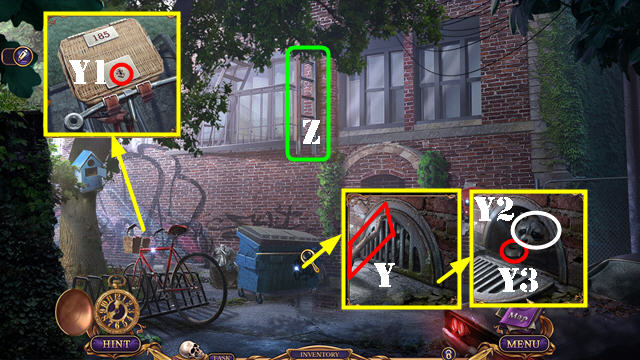
- Place WHEEL; take BRANCH (Y).
- Use BICYCLE KEY (Y1). Play HOP; receive NUTS.
- Give NUTS (Y2); take DUCT TAPE (Y3).
- BRANCH and DUCT TAPE on CANE; take LONG CANE.
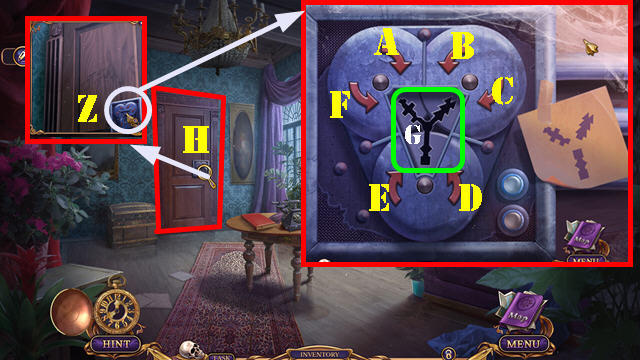
- Use LONG CANE (Z).
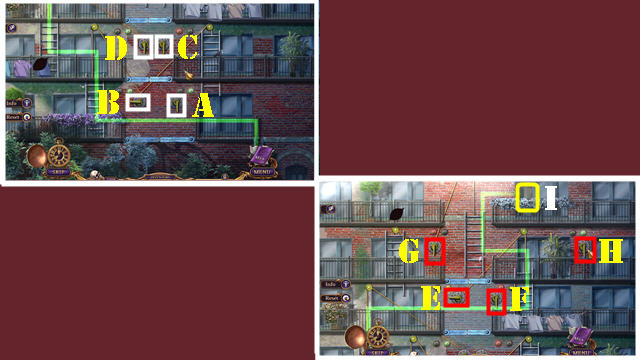
- Solution one (A-B-C-B-D).
- Solution two: (E-G-E-H).
- Go (I).
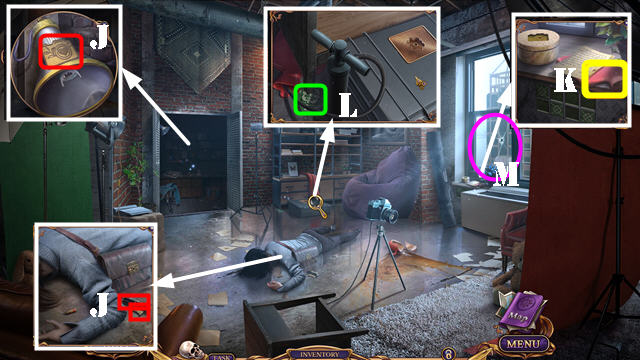
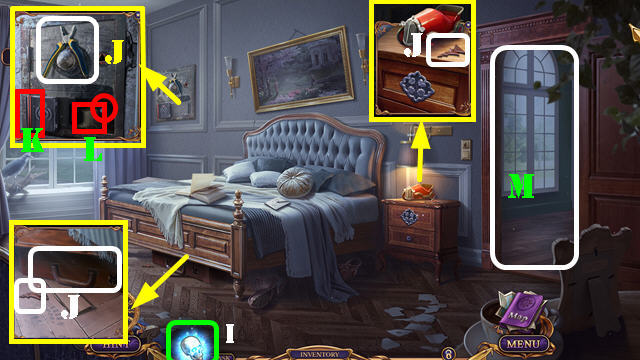
-
Take H MONOGRAM, LASER POINTER, and PHOTOGRAPHER'S EMBLEM
(J).
- Look at note; take HOT-WATER BOTTLE (K).
-
Place HOT-WATER BOTTLE and use AIR PUMP; take DECORATIVE
TILE 3/5 (L).
- Go (M).
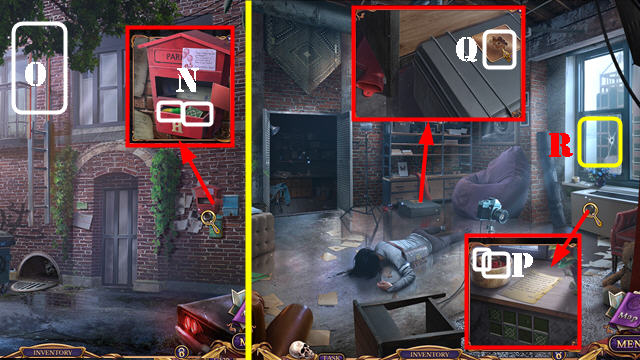
-
Place H MONOGRAM; take DECORATIVE TILE 4/5 and LEMON JUICE
(N).
- Go (O).
-
Place PHOTOGRAPHER'S EMBLEM; take HOLLY'S BRACELET and
WORKER FIGURINE (P).
-
Use HOLLY'S BRACELET (Q). Play HOP; receive LEATHER GLOVE.
- Go (R).
- Use LEMON JUICE; take BEAR FIGURINE (S).
- Walk down.
-
Place WORKER FIGURINE and BEAR FIGURINE; take GOLD KEY
(T).
- Go to Holly's Loft.
-
Use GOLD KEY; take MATCHES and DECORATIVE TILE 5/5 (U).
- Place DECORATIVE TILE 5/5; take RED BULB (V).
-
Use LEATHER GLOVE and place RED BULB (W). Play HOP;
receive photo.
-
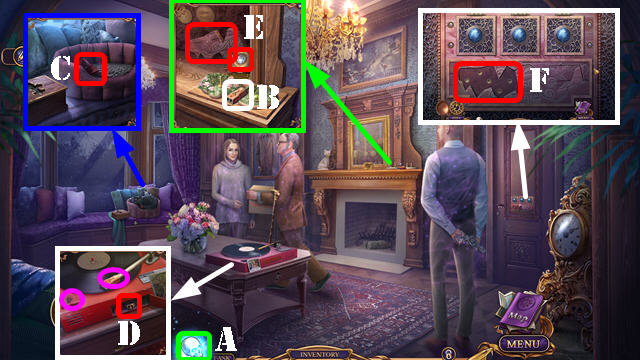
Select Richard Gray's Skull (A); receive PORCELAIN GIRL.
- Take PHONOGRAPH NEEDLE (B).
-
Use LASER POINTER on cat; take HANDKERCHIEF and PLAY
BUTTON (C).
-
Look at photo. Place PLAY BUTTON and PHONOGRAPH NEEDLE
(purple); select button and take OLIVER'S SIGNET RING (D).
-
Use OLIVER'S SIGNET RING; take OLIVER'S LOCKET and WOOD
INLAY (E).
- Place WOOD INLAY (F).
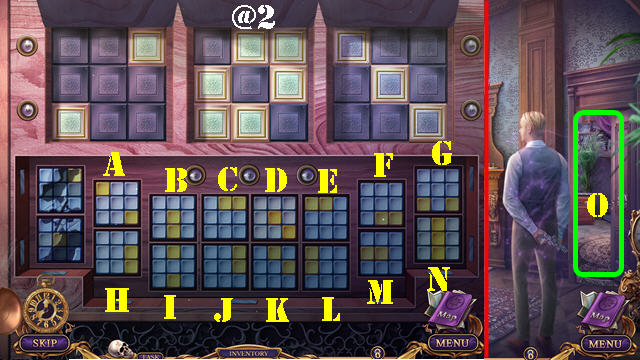
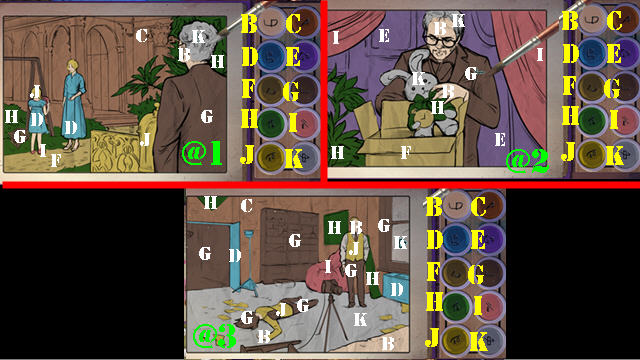
- Solution (@2): (C-I-F-G)-(I-J-G-D-M)-(A-I-N).
- Go (O).
- Take ARTIST'S SUITCASE and DRAWER KNOB (P).
- Look at newspaper; receive WINDING KNOB (Q).
-
Place DRAWER KNOB; take PORCELAIN BOY and PAINTBRUSH (R).
Look at note (S).
- Walk down.
-
Place PORCELAIN BOY and PORCELAIN GIRL; take FLEUR-DE-LIS
(T).
- Place FLEUR-DE-LIS; take STONE LEAVES (U).
-
WINDING KNOB on OLIVER'S LOCKET. Look at photo and take
MUSIC NOTE.
- Place MUSIC NOTE; take LION'S EYES (V).
- Go (W).
- Place LION'S EYES; take STONE FLOWER (X).
-
Place STONE FLOWER and STONE LEAVES (Y); take RED CRYSTAL
(Z).
-
Place RED CRYSTAL (A). Play HOP; receive ARTIST'S AMULET.
-
ARTIST'S AMULET on ARTIST'S SUITCASE; take SPONGE and
PAINTS.
- Place PAINTS and PAINTBRUSH (B).
-
Dip the paintbrush in a color and then on picture.
Solution (@1-@2-@3).
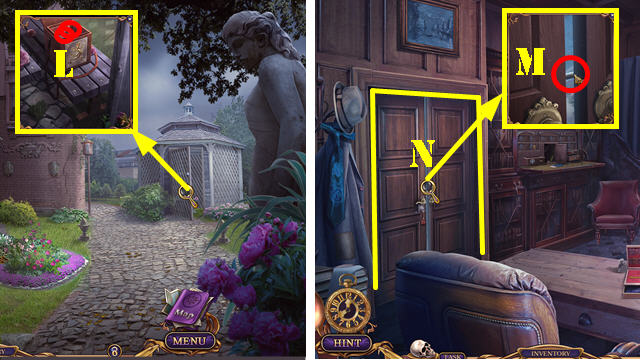
Chapter 2: Mansion
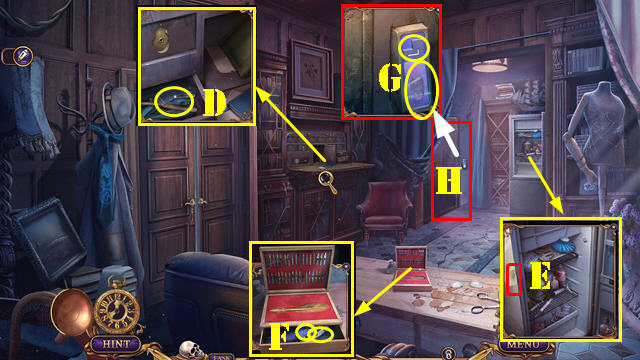
- Use JACKKNIFE (L).
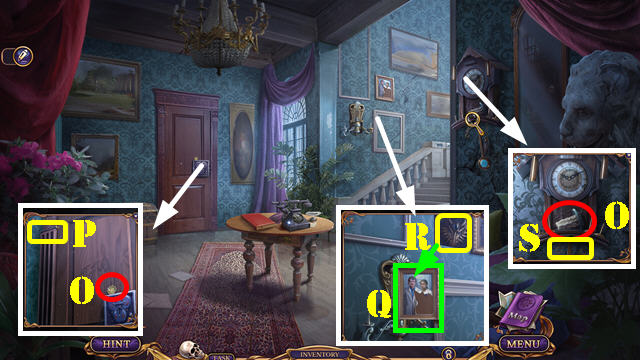
-
Take SOLVENT, NEWSPAPER CLIPPING, and HORSE AMULET (M).
- Look at newspaper (purple).
- Use HANDKERCHIEF; take HORSE AMULET (N).
-
Move frame and place two HORSE AMULETS (O); take CAGE KEY
(P).
- Use CAGE KEY (Q) and JACKKNIFE (R); remove gag (S).
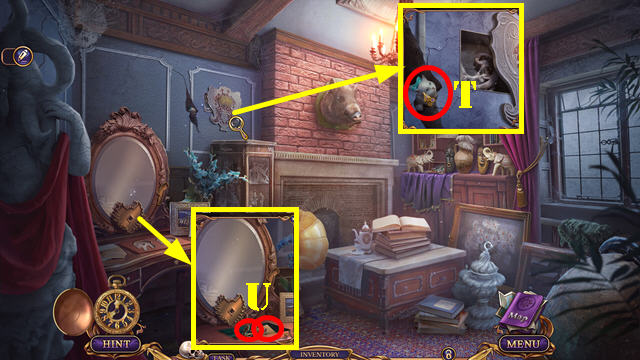
-
Give NEWSPAPER CLIPPING (T). Play HOP; receive HATCH RING.
- Place HATCH RING (U).
- Go (V).
- Receive UNCHARGED CELLPHONE.
-
Take CAN OPENER, CELLPHONE ANTENNA, and CADUCEUS (W).
-
CAN OPENER and SPONGE on SOLVENT; take SPONGE WITH
SOLVENT.
-
Use SPONGE WITH SOLVENT; take ANGEL FIGURINE 1/3 (X).
- Walk down.
- Place CADUCEUS (Y).
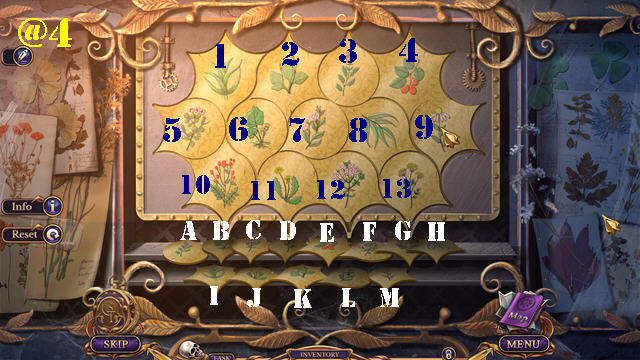
-
Solution (@4):
(A-3)-(B-6)-(C-12)-(D-13)-(E-4)-F-5)-(G-10).
- (H-8)-(I-1)-(J-11)-(K-2)-(L-7)-(M-9).
- Take INSECT SPRAY and ANGEL FIGURINE 2/3.
- Go to Backyard.
-
Use INSECT SPRAY; take ANGEL FIGURINE 3/3 and GOLDEN
PICKLOCK (N).
- Place ANGEL FIGURINE 3/3 (O).
- Solution: (Px2-Q-Px3-Q-Px3- Q-Px3-Q-Px3-Q).
- Take SILVER PICKLOCK.
- Use SILVER PICKLOCK and GOLDEN PICKLOCK (R).
- Go (S).
-
Take FRIDGE HANDLE, DRAWER HANDLE, LIZARD TOKEN PARTS 1/3,
and DRAGONFLY (T).
-
Place DRAWER HANDLE; take HOSE and CELLPHONE BATTERY (U).
-
Select UNCHARGED CELLPHONE 2x; place CELLPHONE BATTERY and
CELLPHONE ANTENNA.
- Receive BLOWTORCH.
- Go to Oliver's Study.
-
Place FRIDGE HANDLE; use BLOWTORCH and MATCHES (V). Play
HOP; receive PUZZLE PIECE.
- Walk down twice.
- Place PUZZLE PIECE (W).
- Solution (X).
- Take SCARAB and CAT PAW (Y).
- Go to Backyard.
-
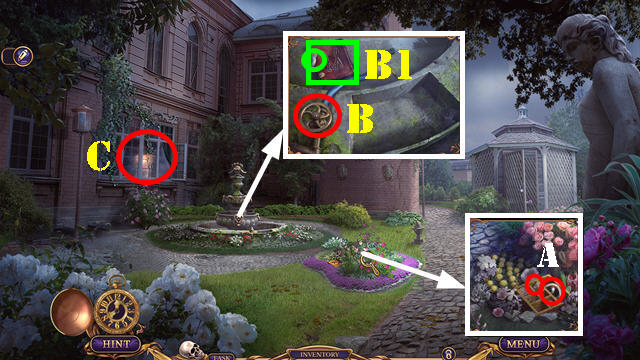
Place DRAGONFLY and SCARAB; take VALVE and QUILL (A).
-
Place HOSE and VALVE (B); select valve. Take KNOB and WET
DIARY (B1).
- Go (C).
- Place KNOB; take PIECE OF TAPE (D).
- Use PIECE OF TAPE; take OLIVER'S FINGERPRINT (E).
-
Place QUILL; take CORKSCREW and DISLODGED BUTTON (F).
-
Place DISLODGED BUTTON and OLIVER'S FINGERPRINT (G); press
button.
- Go (H).
-
Take BROKEN CAT FIGURINE, CROWN EMBLEM, LIZARD TOKEN PARTS
2/3-3/3, CAT HEAD, and GLUE (I).
- Place CROWN EMBLEM; take CURTAIN TIEBACK (J).
-
Use CURTAIN TIEBACK (K). Play HOP; receive VIOLIN BOW.
- Walk down twice.
-
Place LIZARD TOKEN PARTS 3/3; take TORN PHOTO and LIPSTICK
(L).
- Go to Oliver's Study.
- Use VIOLIN BOW (M).
- Enter (N).
- Take COIN and LARGE CANDLESTICK (O).
- Use VIOLIN BOW (P); receive WOODEN PINE CONE.
- Place TORN PHOTO (Q); take DRAGON CREST (R).
- Place WOODEN PINE CONE (S); receive THIN PLIERS.
- Go to Collection Room.
- Use THIN PLIERS (T); receive CAT FIGURINE.
-
GLUE, CAT HEAD, and CAT PAW on BROKEN CAT FIGURINE; take
CAT FIGURINE.
-
Place two CAT FIGURINES; take HINT and MECHANISM KEY (U).
- Go to Mansion Corridor.
- Place HINT (Z).
- Solution (Dx2-C-Ax2).
- Use MECHANISM KEY (G).
- Enter (H).
-
Select Richard Gray's Skull (I); receive ACCESS CARD.
-
Take CLOCK FIGURINES 1/4-2/4, MICHAEL'S BRIEFCASE, and
PLIERS (J).
-
Use ACCESS CARD (K); take SMALL CANDLESTICK and PHONE DIAL
(L).
- Go (M).
-
Place LARGE CANDLESTICK and SMALL CANDLESTICK; take CLOCK
FIGURINES 3/4 (N).
- Place PHONE DIAL (O); take BOAR TUSK (P).
- Go to Collection Room.
- Place BOAR TUSK (Q); take CLOCK FIGURINES 4/4 (R).
- Go to Mansion Corridor.
- Place CLOCK FIGURINES 4/4; take FRAME PART (S).
- Go to Collection Room.
-
Place FRAME PART and DRAGON CREST (T). Play HOP; receive
HAIR DRYER.
- Go to Michael's Room.
- Use PLIERS; take CAR WHEEL (U).
-
Place CAR WHEEL (V); take BRIEFCASE KNOB and PHONE EMBLEM
(V1).
- Go (W).
- Place PHONE EMBLEM; take SAFE LEVER (X).
- Go (X1).
-
BRIEFCASE KNOB on MICHAEL'S BRIEFCASE; look at ID card and
take STETHOSCOPE.
-
Place SAFE LEVER and STETHOSCOPE; look at note and take
BLACK LILY AMULET (Y).
-
Place BLACK LILY AMULET and select; take PETROLEUM JELLY
and M MONOGRAM (Z).
-
HAIR DRYER and M MONOGRAM on WET DIARY. Play HOP; receive
MICHAEL'S DIARY.
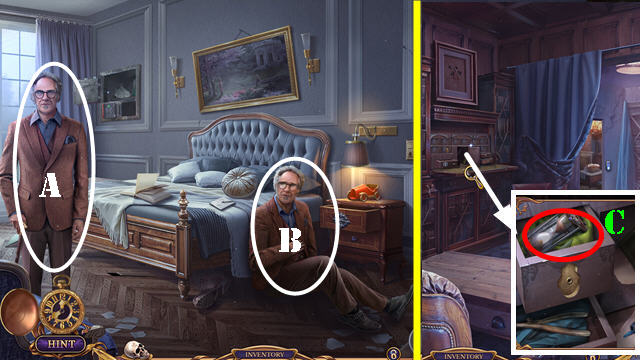
- Give MICHAEL'S DIARY (A).
- Talk (B); receive PAPER FRAGMENT.
- Go to Oliver's Study.
-
Open PAPER FRAGMENT and play HOP; receive MAGICAL LOCKET.
- Place MAGICAL LOCKET; take hourglass and Card (C).
Chapter 3: Hospital
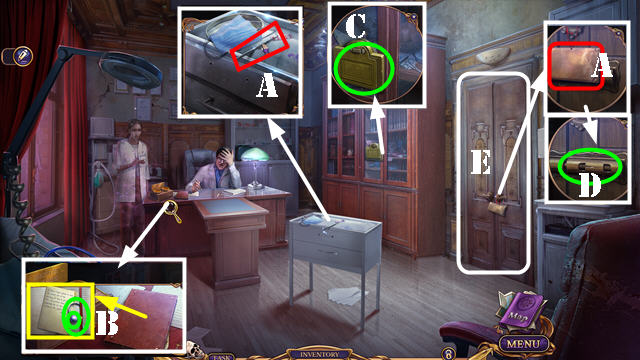
- Take SIGN PLATE and PICKLOCK (A).
-
Select notebook; take MAGNIFIER and COLORFUL GEMS 1/3 (B).
- Use COIN (C); receive SNAKE AMULET.
- Use PICKLOCK (D).
- Go (E).
- Take DUCT TAPE and TWEEZERS (F).
-
Use CORKSCREW and select; take DOCTOR FIGURINE and PAPER
FRAGMENT (G).
- Walk down.
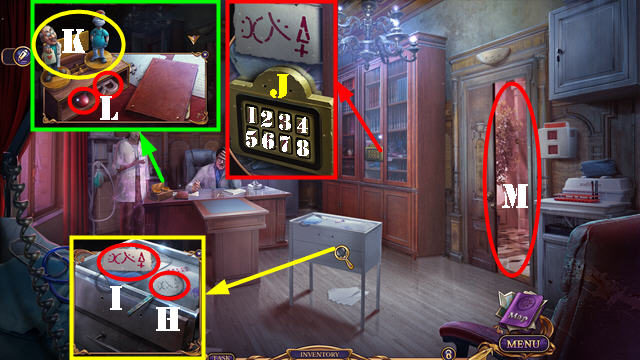
-
Use MAGNIFIER (H). Place PAPER FRAGMENT and use LIPSTICK;
take OLIVER'S CODE (I).
-
Place OLIVER'S CODE; select 5-4-7 (J). Play HOP; receive
OLIVER'S BRIEFCASE.
-
SNAKE AMULET on OLIVER'S BRIEFCASE; take DOCTOR FIGURINE.
-
Place two DOCTOR FIGURINES (K); take ARMCHAIR LEVER and
LETTER R (L).
- Go (M).
-
Place ARMCHAIR LEVER and use PETROLEUM JELLY (N); take
STAR OF LIFE (O).
-
STAR OF LIFE on OLIVER'S BRIEFCASE; take COLORFUL GEMS 2/3
and LETTER N.
- Place LETTER R and LETTER N; take FLAT HANDLE (P).
- Walk down.
- Place FLAT HANDLE; take ELECTRIC PANEL EMBLEM (Q).
- Go (R).
-
Place ELECTRIC PANEL EMBLEM; take COLORFUL GEMS 3/3 (S).
- Place COLORFUL GEMS 3/3 (T).
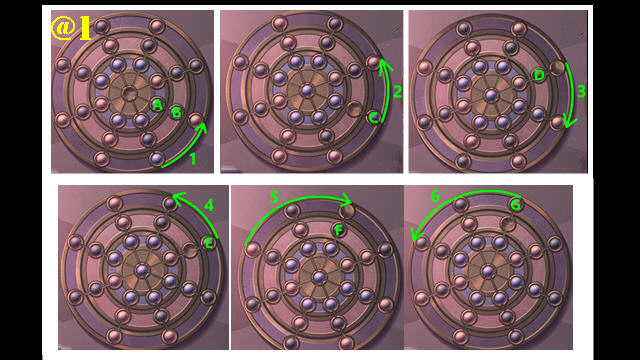
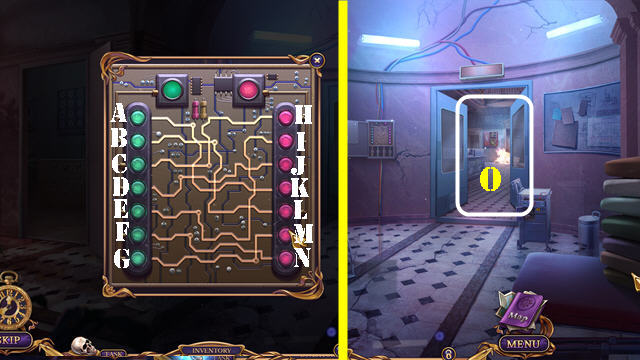
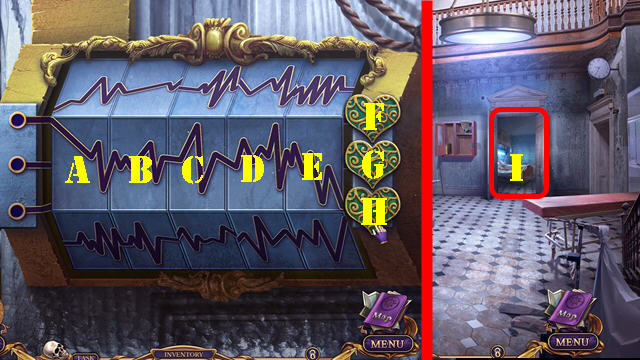
-
Solution part 1 (@1). Select (A-B). Rotate circle; follow
arrow 1.
- Select (C). Rotate outer circle; follow arrow 2.
- Select (D). Rotate outer circle; follow arrow 3.
- Select (E). Rotate outer circle; follow arrow 4.
- Select (F). Rotate outer circle; follow arrow 5.
- Select (G). Rotate outer circle; follow arrow 6.
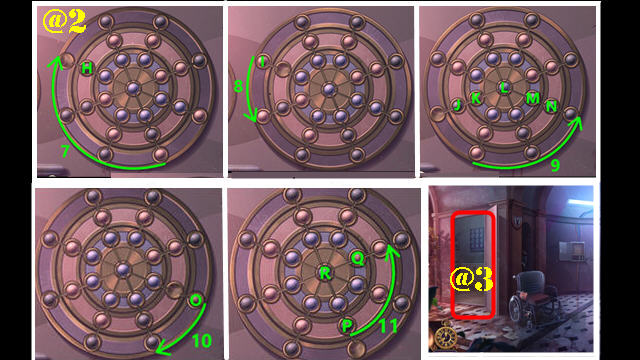
-
Solution part 2 (@2). elect (H). Rotate outer circle;
follow arrow 7.
- Select (I). Rotate outer circle; follow arrow 8.
-
Select (J-K-L-M-N). Rotate outer circle; follow arrow 9.
- Select (0). Rotate outer circle; follow arrow 10.
-
Select (P). Rotate circle next to outermost circle; follow
arrow 11. Select (Q-R).
- Go (@3).

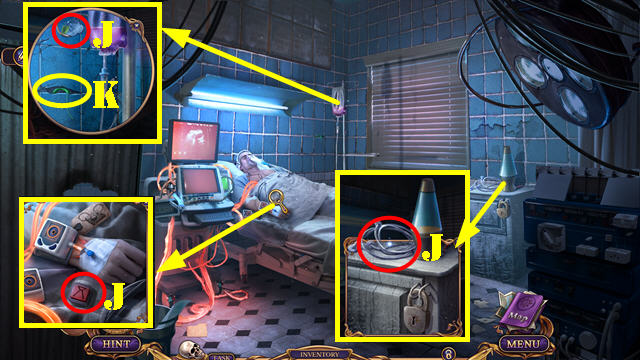
-
Take RESTRAINT STRAPS, FUSE, MECHANISM PARTS 1/4, BOWL,
and SCALPEL (U).
- Pull tab (U1).
- Use SIGN PLATE; take DNA EMBLEM (U2).
- Use SCALPEL; take MECHANISM PARTS 2/4 (U3).
- Walk down.
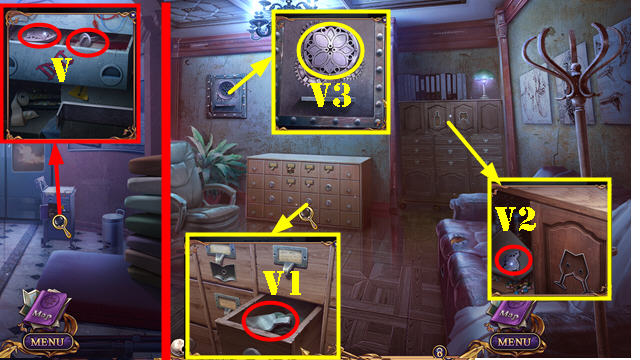
-
Place DNA EMBLEM; take MECHANISM PARTS 3/4 and INDEX FILE
KNOB (V).
- Go to Director's Office.
- Place INDEX FILE KNOB; take BOTTLE AMULET (V1).
-
Place BOTTLE AMULET and select; take MECHANISM PARTS 4/4
(V2).
-
Place MECHANISM PARTS 4/4 (V3). Play HOP; receive
UNFINISHED DEVICE.
- Use MAGICAL LOCKET (W).
-
Place RESTRAINT STRAPS; take FUSE and WHITE RABBIT (X).
- Walk down.
- Place two FUSES (Y).
- Solution (A-K)-(B-L)-(C-H)-(D-J)-(E-I)-(F-N)-(G-M).
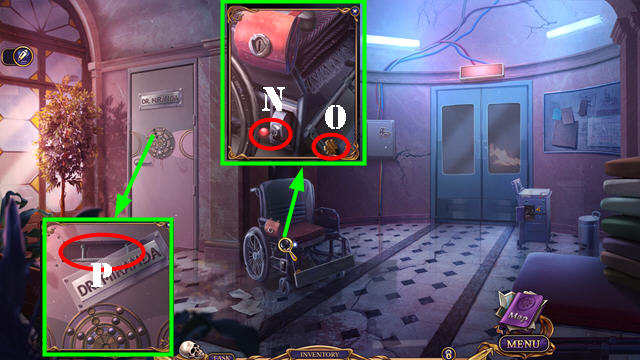
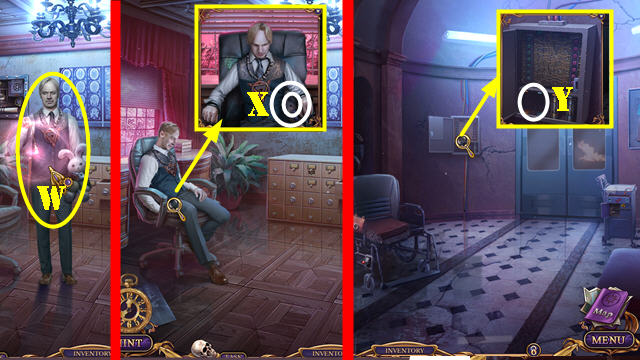
- Go (O).
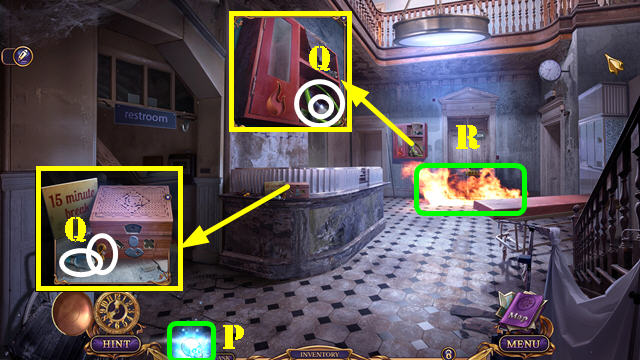
-
Select Richard Gray's Skull (P); receive BROKEN FIRE
EXTINGUISHER.
-
Take BLUE BULB, INFINITY AMULET, FIRE EXTINGUISHER HOSE,
and EMPTY VESSEL (Q).
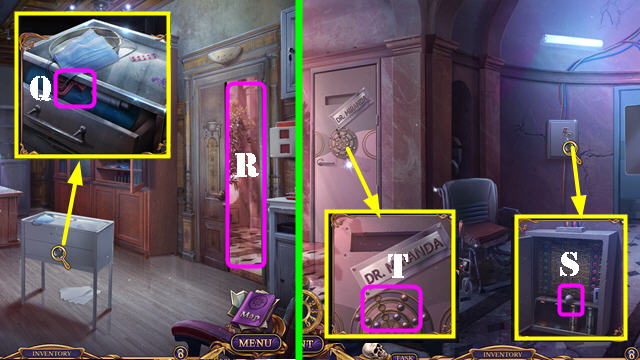
-
INFINITY AMULET on OLIVER'S BRIEFCASE; take FIRE
EXTINGUISHER LEVER.
-
FIRE EXTINGUISHER HOSE and FIRE EXTINGUISHER LEVER on
BROKEN FIRE EXTINGUISHER; take FIRE EXTINGUISHER.
- Use FIRE EXTINGUISHER (R).

- Take DOCTOR'S CAP EMBLEM (S).
-
Use SCALPEL (T); receive SOFA PULL TAB and INDEX FILE
TOKEN.
- Go to Director's Office.
- Place INDEX FILE TOKEN (U).
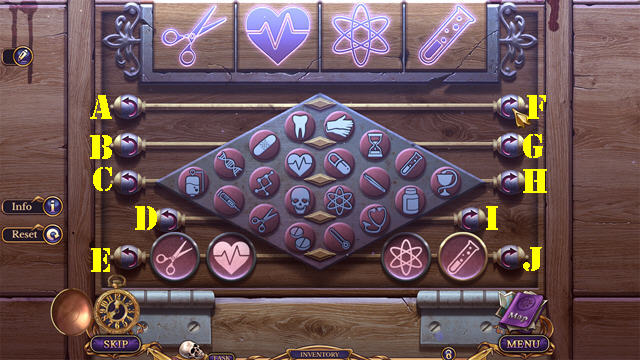
- Solution (C-J)-(B-H)-(D-H)-(D-F).
- Take WINEGLASSES AMULET.
-
Place WINEGLASSES AMULET and select; take SYRINGE EMBLEM
and NEEDLE AND THREAD (K).
-
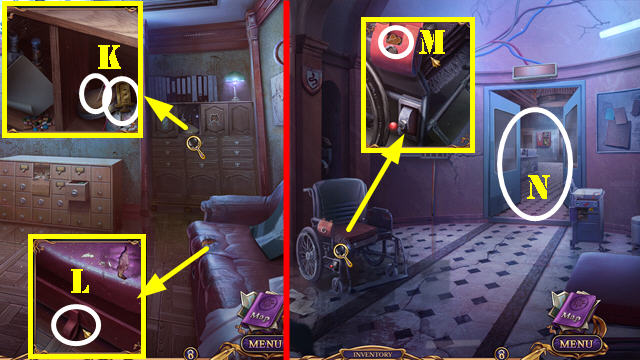
Place SOFA PULL TAB; use NEEDLE AND THREAD and select (L).
Play HOP; receive BAG KEY.
- Walk down.
- Use BAG KEY; take BANDAGE EMBLEM (M).
- Go (N).
-
Place SYRINGE EMBLEM, DOCTOR'S CAP EMBLEM, and BANDAGE
EMBLEM (O); take ROPE (P).
- Use ROPE (Q).
- Go (R).
-
Take FIRE CHARM, CHUNK OF ICE, HOOK, and HEART TOKENS 1/3
(S).
- Use DUCT TAPE; take POWER CORD (T).
-
Place POWER CORD (U). Place BOWL and CHUNK OF ICE (V).
Select teapot (W) and take HEART TOKENS 2/3 (V).
- Walk down.

-
Place FIRE CHARM; take HEART TOKENS 3/3 and TV BUTTONS 1/4
(X).
- Place HEART TOKENS 3/3 (Y).
- Solution: (B-Ex2-H)-(A-B-Cx2-D-Ex2-F).
- (A-B-Cx2-D-Ex2-G).
- Go (I).
-
Take TV BUTTONS 2/4, TEAPOT AMULET, and SUCTIONED TUBES
(J).
- Use TWEEZERS (K); receive FISHING LINE.
- Go to Resting Room.
- FISHING LINE on HOOK; take FISHING LINE WITH HOOK.
-
Use FISHING LINE WITH HOOK (L); receive TV BUTTONS 3/4.
- Place TEAPOT AMULET; take BOLT CUTTER (M).
- Go to Special Ward.
-
Use BOLT CUTTER and select (N). Play HOP; receive TV
BUTTONS 4/4.
- Go to Resting Room.
- Place TV BUTTONS 4/4; take RED BULB (O).
- Go to Special Ward.
-
SUCTIONED TUBES, EMPTY VESSEL, BLUE BULB, and RED BULB on
UNFINISHED DEVICE; take ABILITY COLLECTING DEVICE.
- Use ABILITY COLLECTING DEVICE (P).
- Play HOP (Q); receive VESSEL WITH ENERGY.
-
Select lamp and use VESSEL WITH ENERGY (R). Receive TIME
CRYSTAL.
- Go to Director's Office.
- Talk (S).
- Place TIME CRYSTAL (T).
- Give WHITE RABBIT (U).
-
Congratulations, you've completed Grim Tales: The Generous
Gift!