

Walkthrough Menu
General Tips
- This is the official guide for Grim Tales: The Hunger.
- This guide won't tell you when to zoom into a location; the screenshots show each zoom scene.
- Hidden-object puzzles are referred to as HOPs. Only the locations of the HOPs will be shown.
- Use the Map to fast travel to a location.
Chapter 1: The Police Station
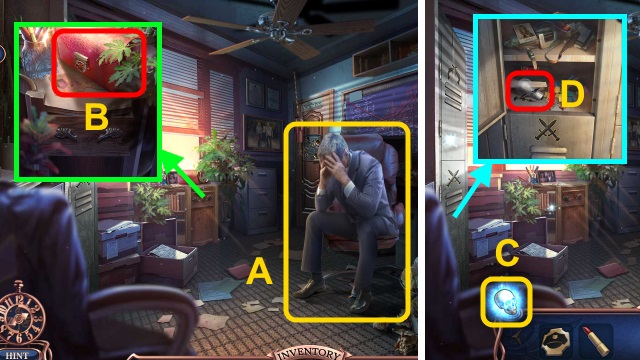
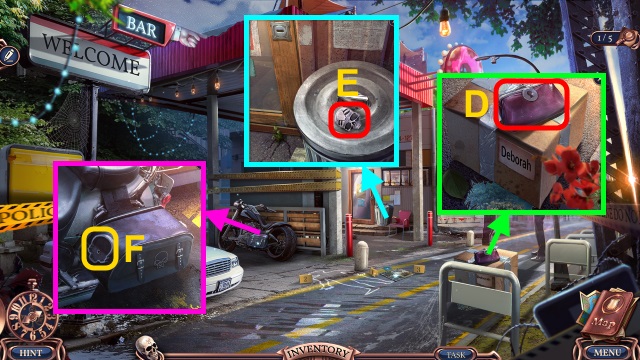
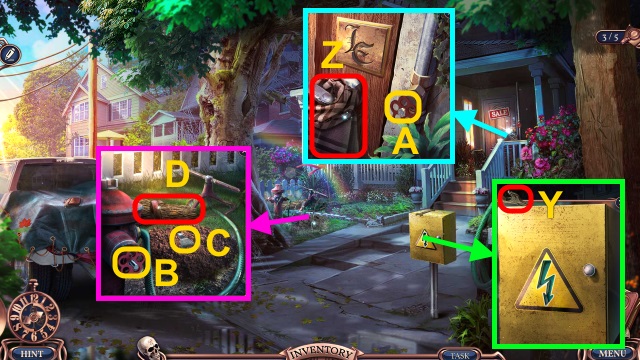
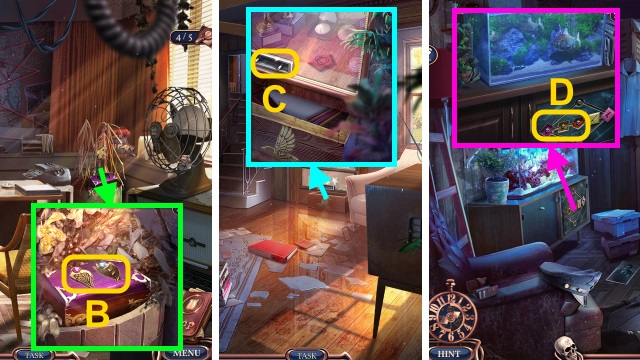
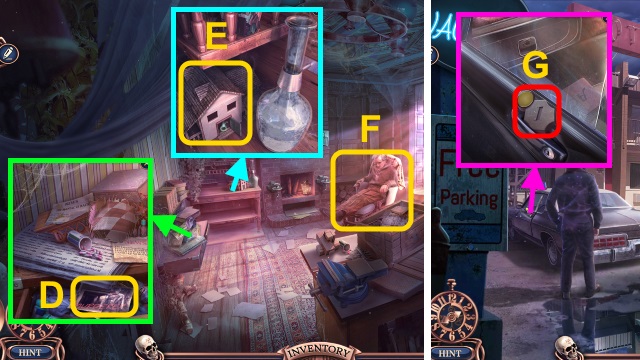
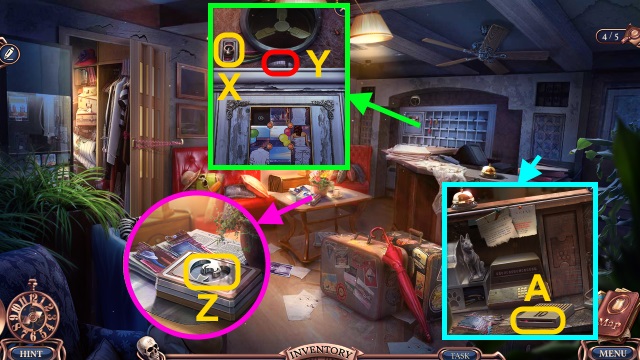
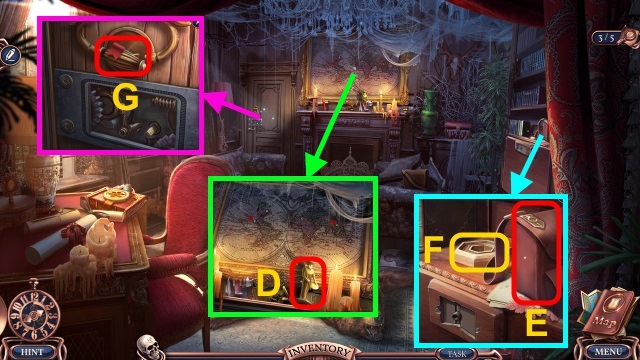
- Talk (A); receive HAT TOKEN.
- Take ANNA GRAY'S BAG (B).
- Open ANNA GRAY'S BAG; take Skull and LIPSTICK.
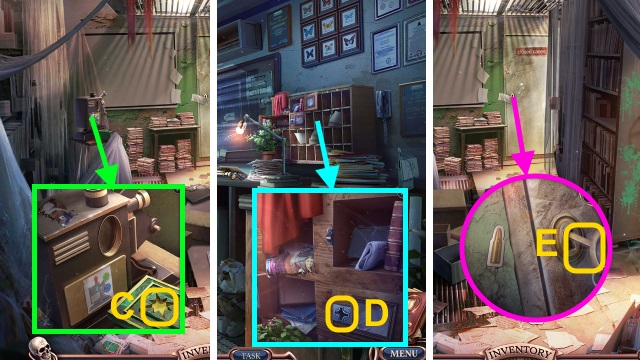
- Examine Skull (C); receive DOUBLE GUN EMBLEM.
- Place DOUBLE GUN EMBLEM; take CLOCK HANDS and LIGHT BULB (D).
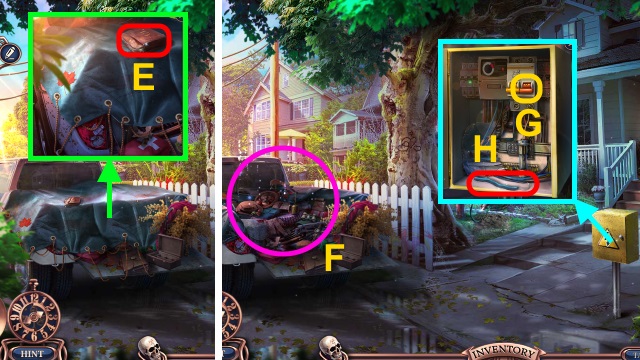
- Place LIGHTBULB. Play HOP; receive NAIL FILE (E).
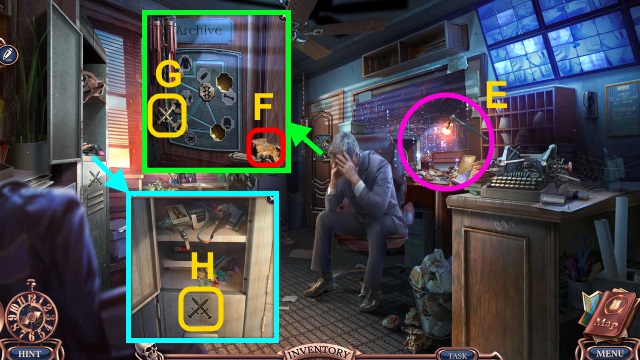
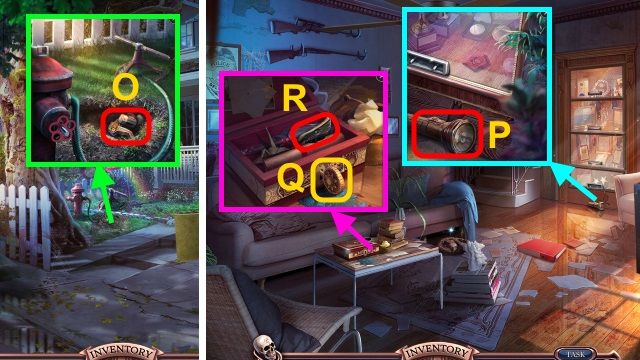
- Take GLOBE TILE (F). Use NAIL FILE (G); receive DAGGER EMBLEM.
- Place DAGGER EMBLEM (H). Play HOP; receive DRAWER HANDLE.
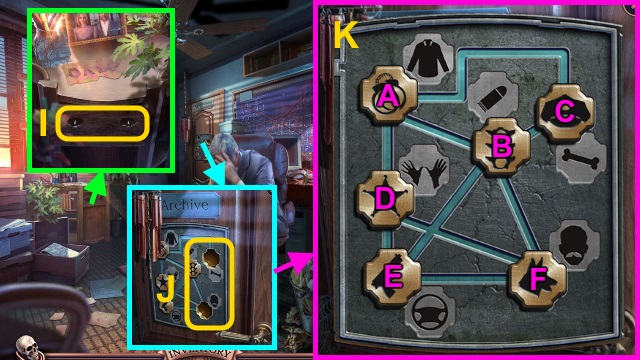
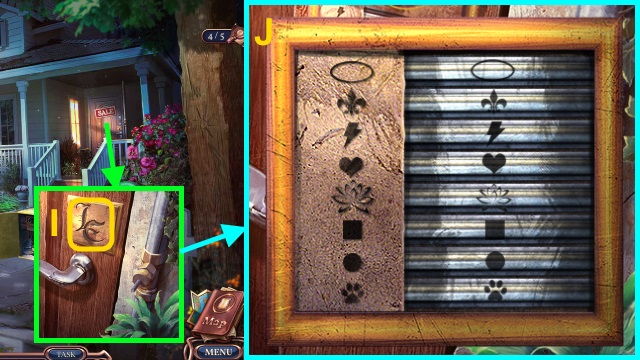
- Examine; place DRAWER HANDLE (I). Take DOG TOKEN.
- Place HAT TOKEN and DOG TOKEN (J).
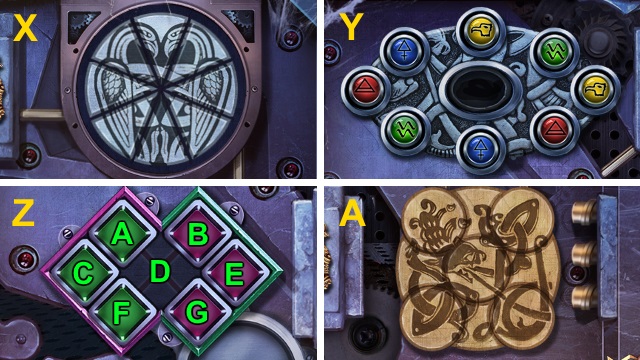
- Solution (K): (F-B)-(B-C)-(B-F)-(B-E)-(A-D).
- Walk forward.

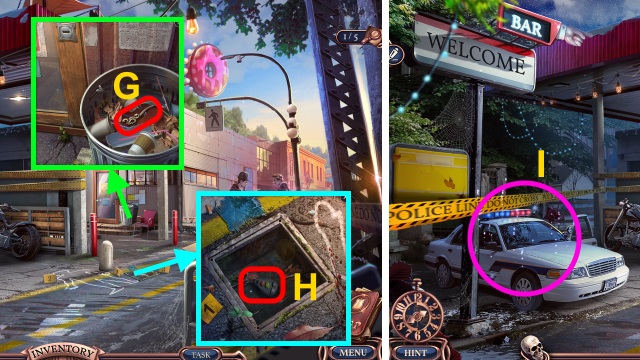
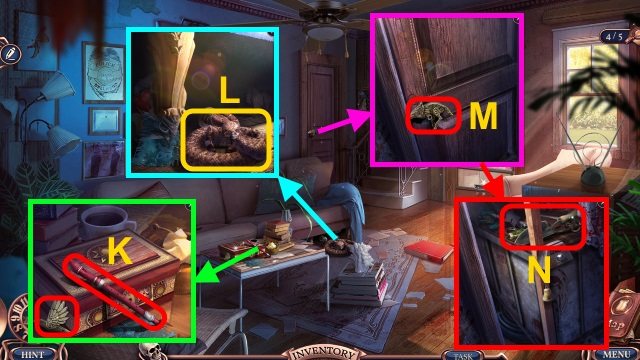
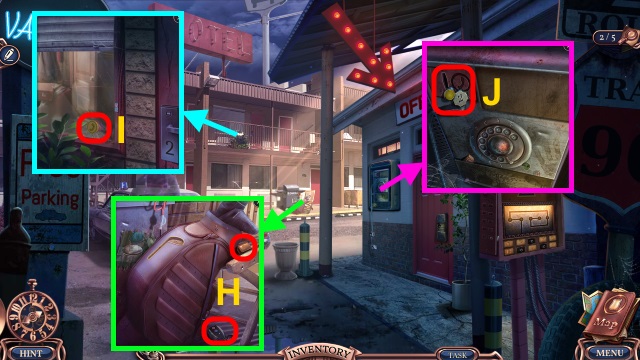
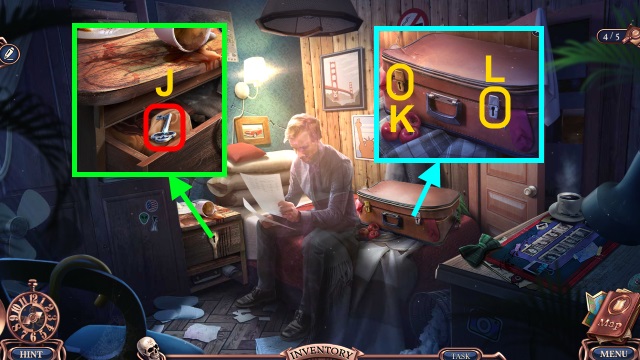
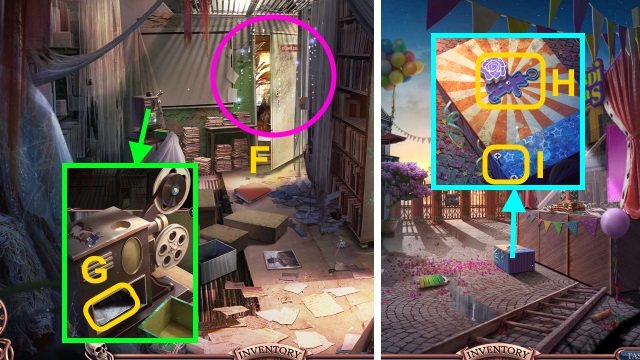
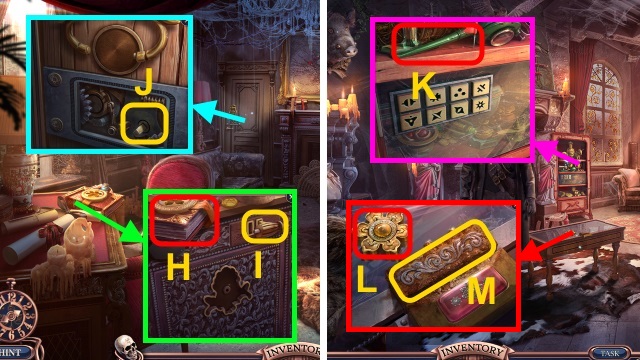
- Take DEVELOPER, OWL HEAD, and TOOL BOX (L).
- Take TYPEWRITER KEY (M). Place CLOCK HANDS and OWL HEAD; take GEAR.
- Walk down.
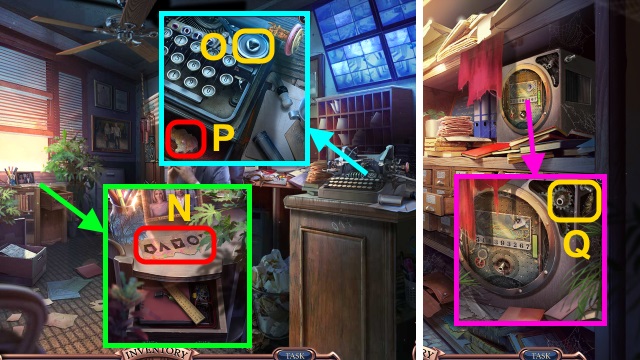
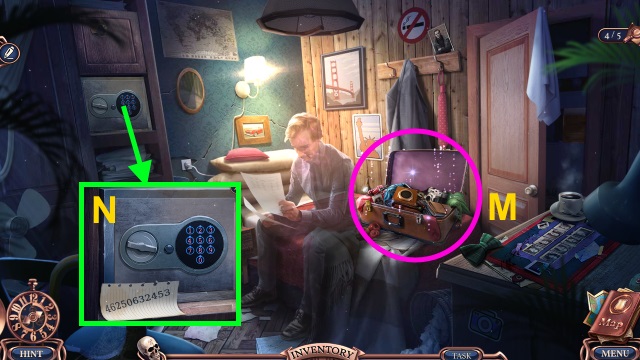
- Use DEVELOPER; take CODE (N).
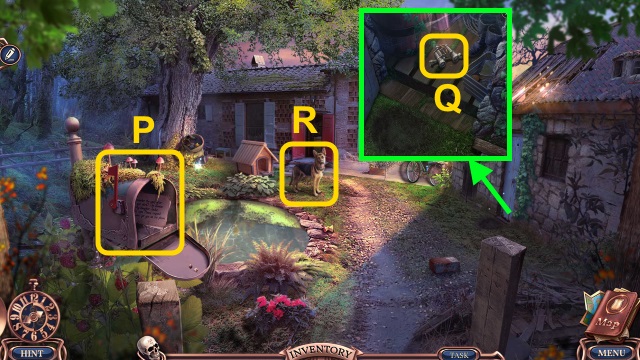
- Use TYPEWRITER KEY (O); enter 017. Take GLOBE TILE (P).
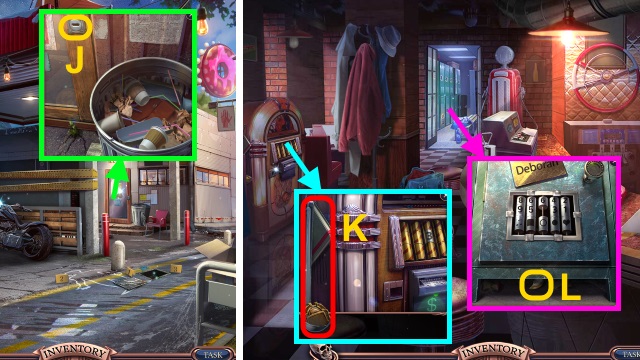
- Walk forward.
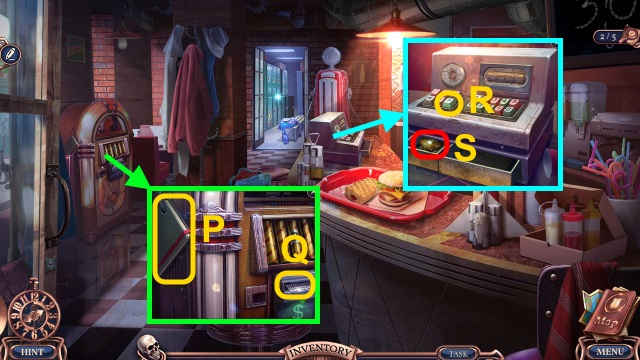
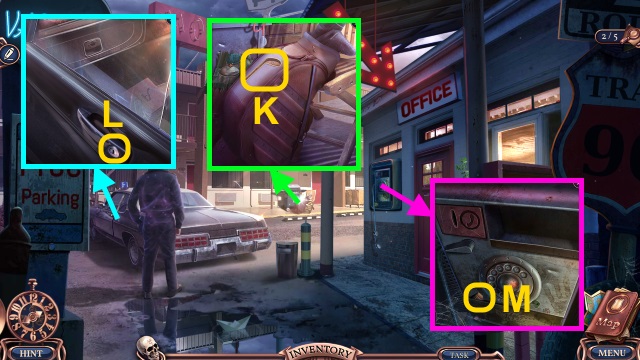
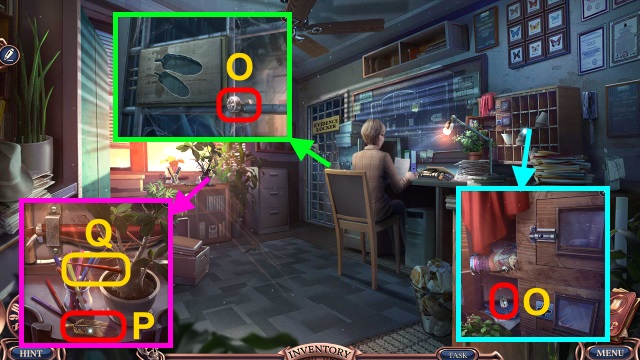
- Place GEAR. Flip switch; take WOLF FIGURINE (Q).

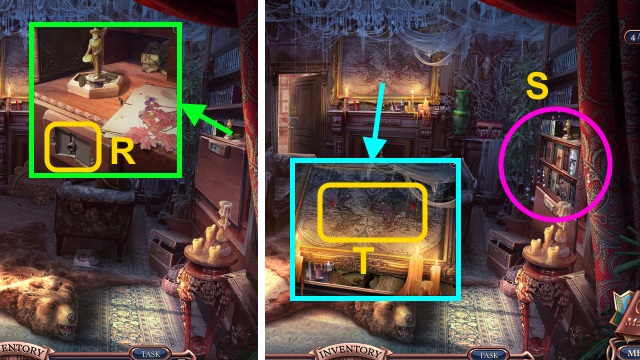
- Place WOLF FIGURINE; place figurines. Take GLOBE TILE (R).
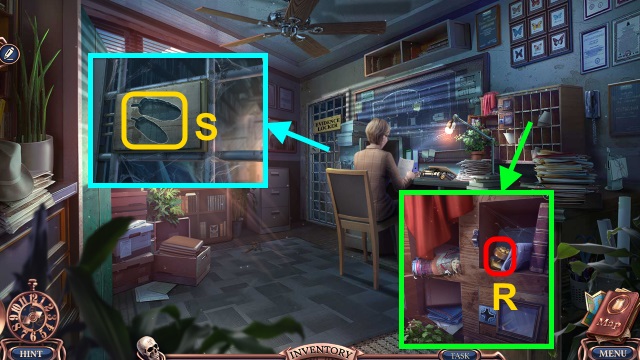
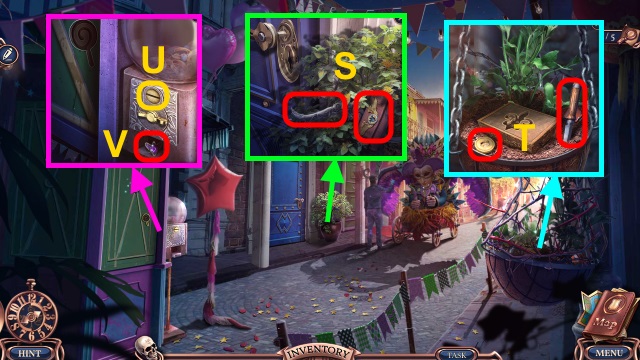
- Place 3 GLOBE TILES; take TOOLS EMBLEM (S).
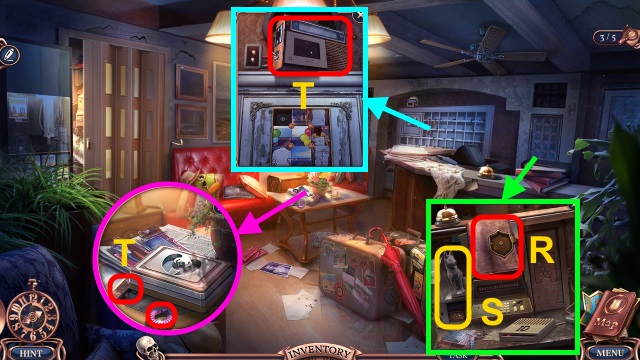
- TOOLS EMBLEM on TOOL BOX; take RUST REMOVER and SCISSORS.
- Walk down.
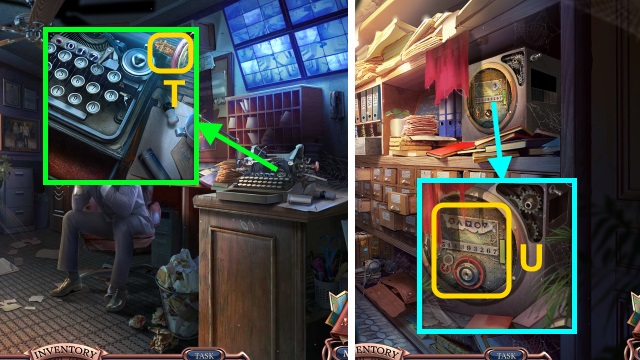
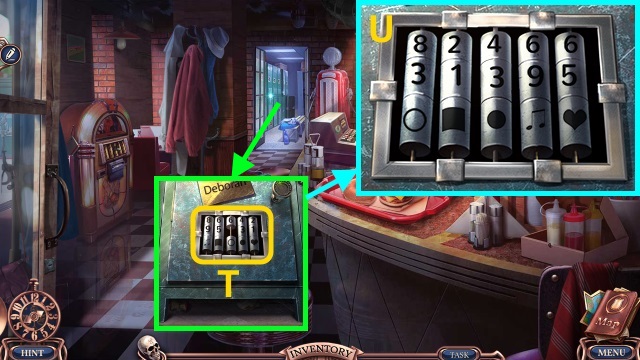
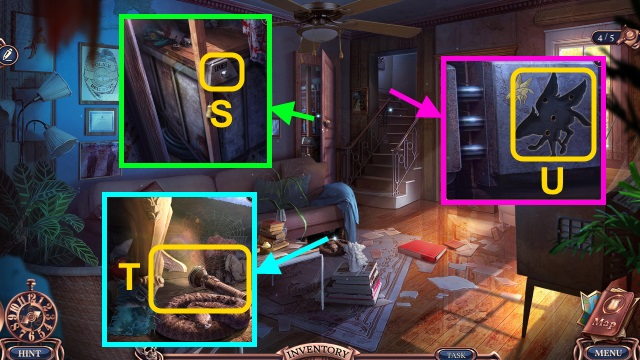
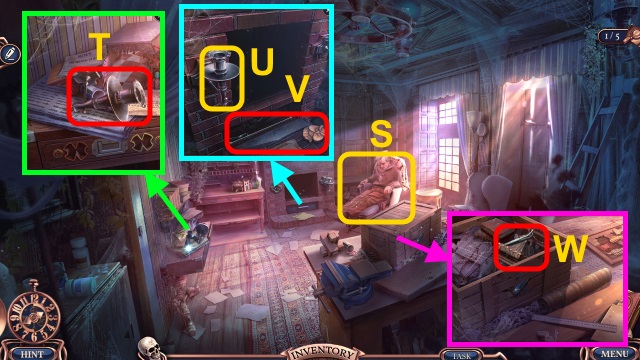
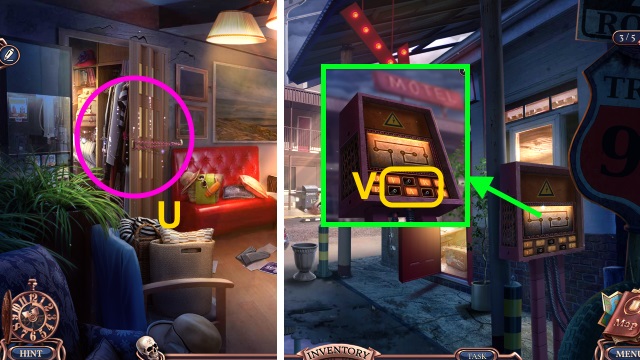
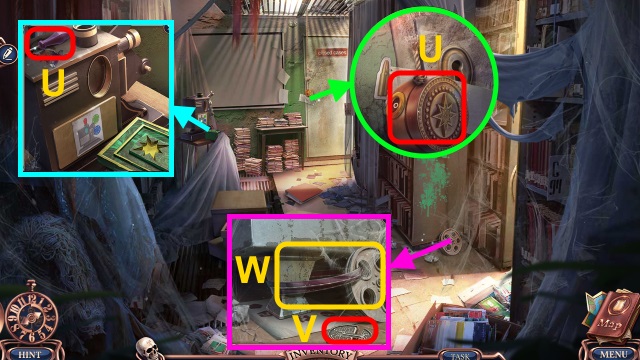
- Use RUST REMOVER; take KNOB (T).
- Walk forward.
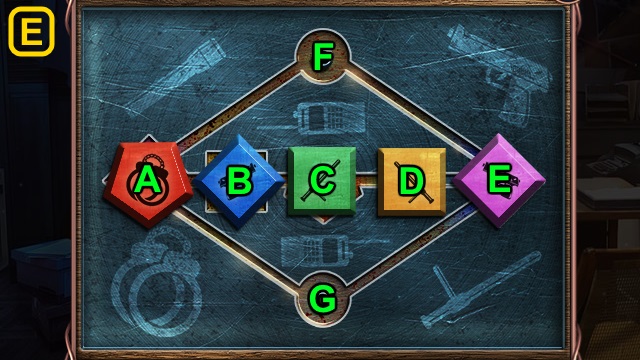
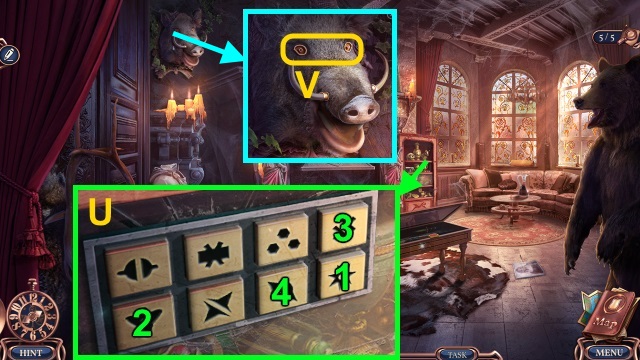
- Use KNOB and CODE (U).
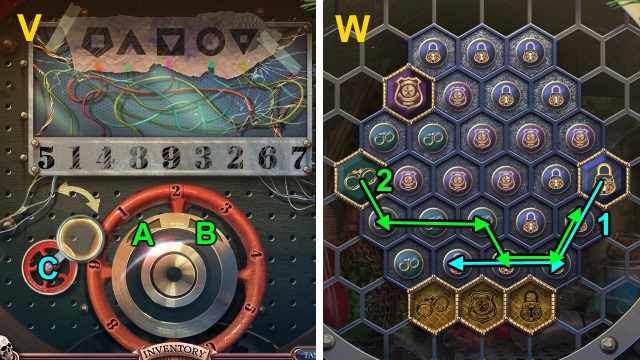
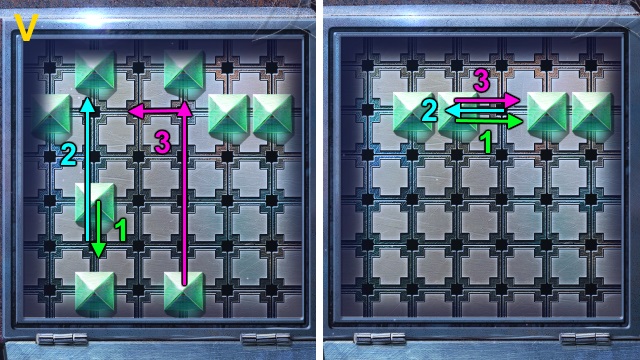
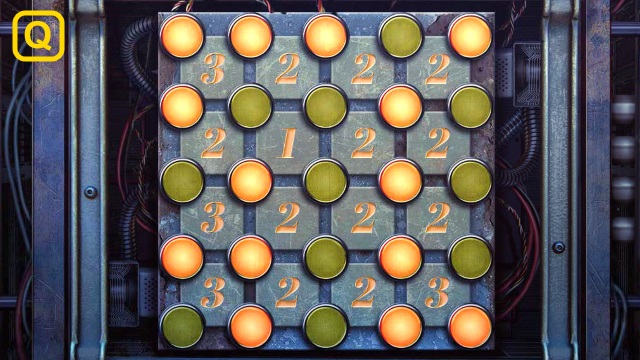
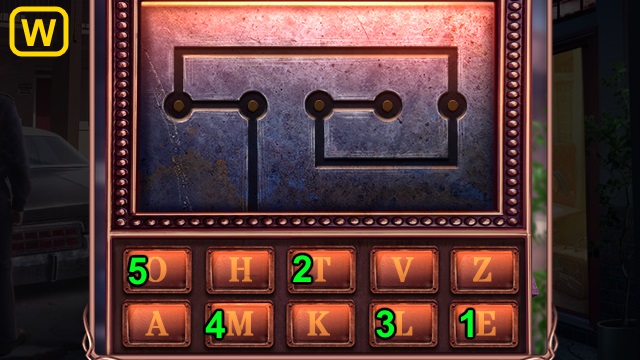
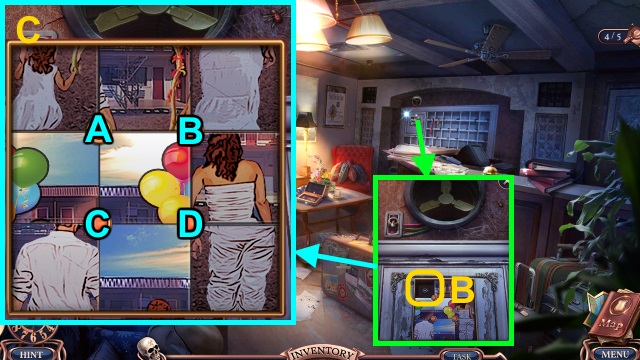
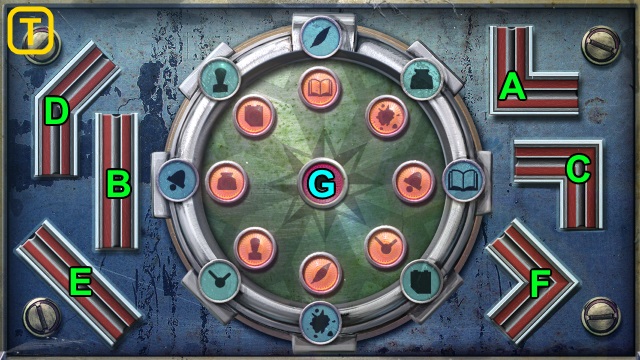
- Solution (V): (Ax2-C)-(B-C)-(Ax3-C)-(B-C)-(Bx4-C).
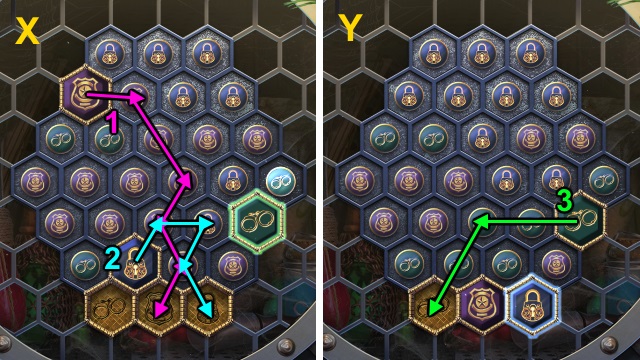
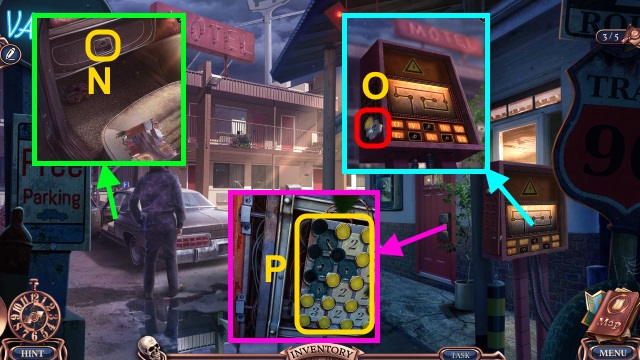
- Solution (W-Y).
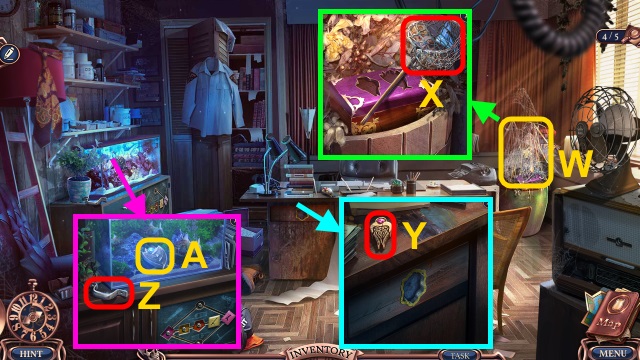
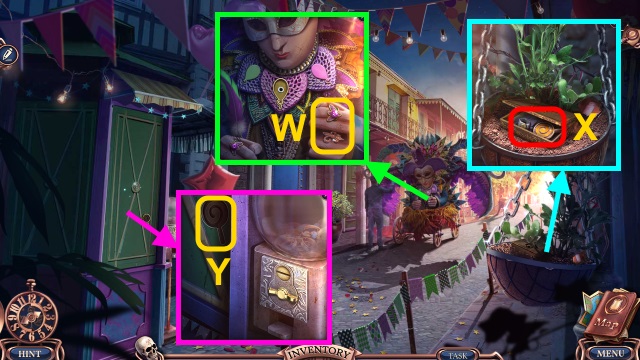
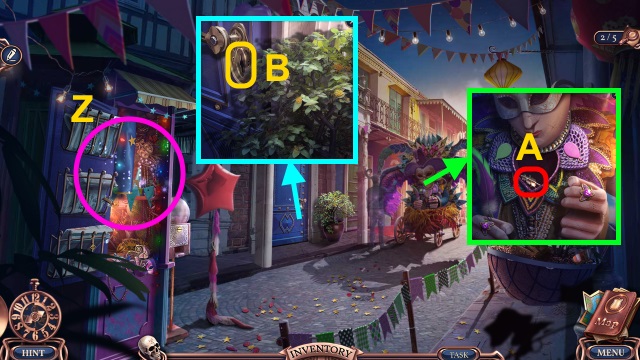
- Take STAR RING.
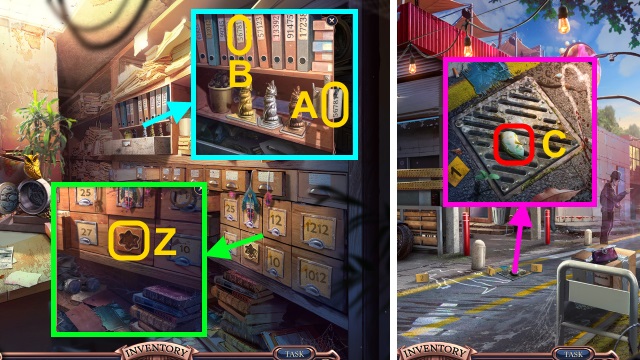
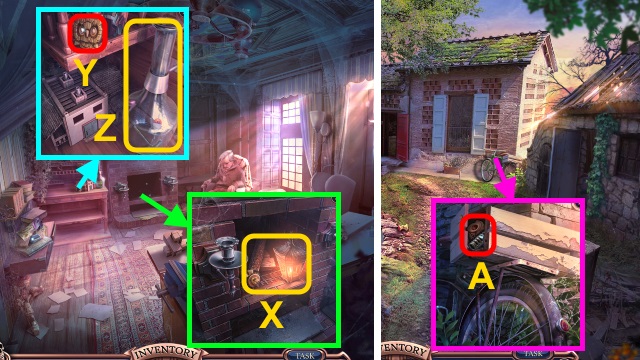
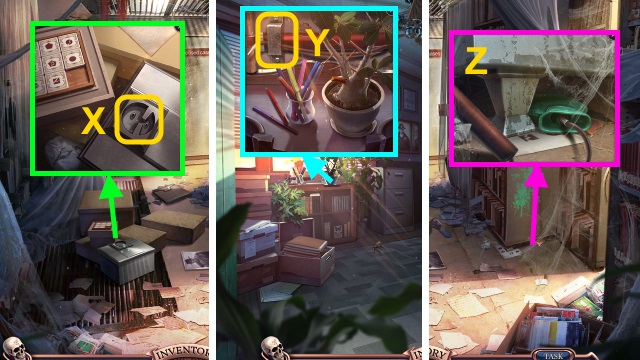
- Use STAR RING (Z). Examine note; take MANIAC'S CASE NUMBER.
- Use MANIAC'S CASE NUMBER (A); open binder (B). Take picture.
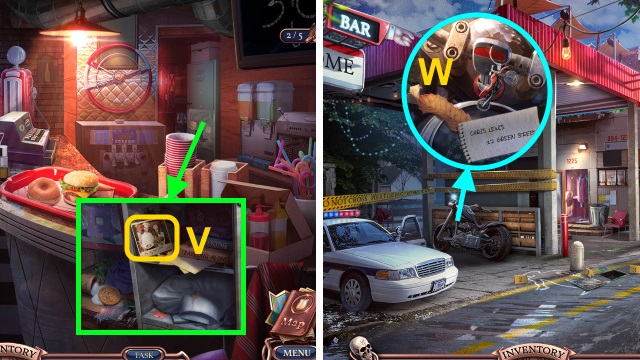
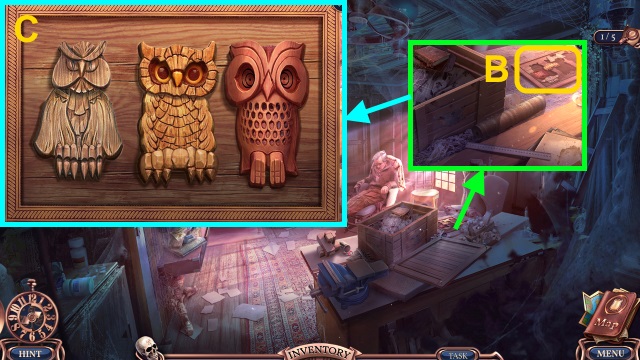
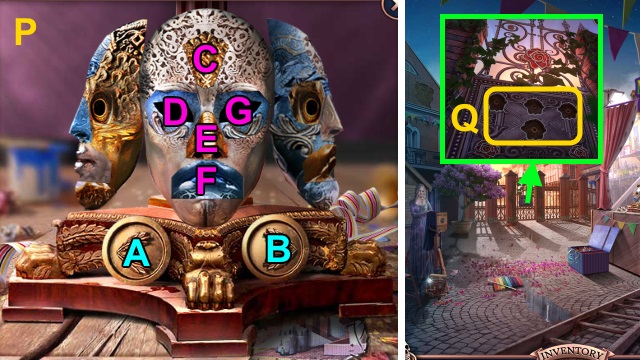
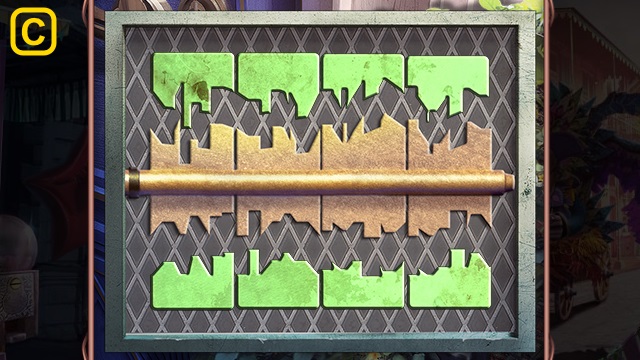
- Take DONUT EMBLEM (1/3) (C).
- Take VICTIM'S WALLET (D). Use SCISSORS; open. Move items; take BACKPACK.
- Take SKULL (E).
- Place SKULL (F); take LEATHER GLOVE and BELT.
- Open; use LEATHER GLOVE. Take HAIRPIN (G).
- HAIRPIN on VICTIM'S WALLET; take DONUT EMBLEM (2/3) and COIN.
- Use COIN; take CAR KEY FOB (H).
- Use CAR KEY FOB. Play HOP; receive GOLDEN SYMBOL (I).
- GOLDEN SYMBOL on BACKPACK; open. Take picture and DONUT KEY.
- Use DONUT KEY (J).
- Walk forward.
- Take CHEF EMBLEM (1/4) and LADLE (K).
- Use LADLE (L); receive DONUT EMBLEM.
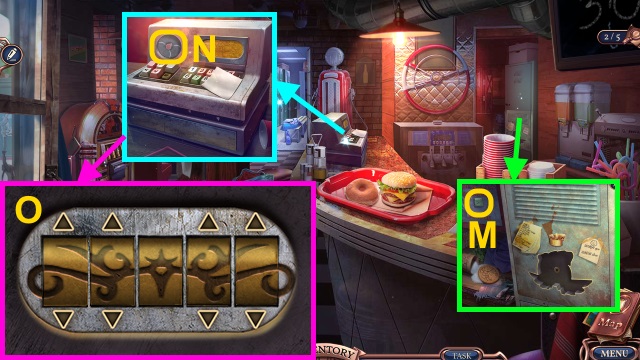
- Use LADLE (M); take ARROW KEY.
- Place DONUT EMBLEM (N).
- Solution (O).
- Take DOLLAR and NAPKIN.
- Examine (P); use NAPKIN and LIPSTICK. Take CODE.
- Use DOLLAR (Q); take CODE WHEEL.
- Place ARROW KEY (R); take CHEF EMBLEM (2/4) (S).
- Place CODE WHEEL and CODE (T).
- Solution (U).
- Take CHEF EMBLEM and DIARY.
- Read DIARY; take CHEF EMBLEM. Turn page; take card.
- Place CHEF EMBLEM; open. Examine picture (V); take MOTORCYCLE KEY.
- Use Skull; receive ADDRESS.
- Walk down.
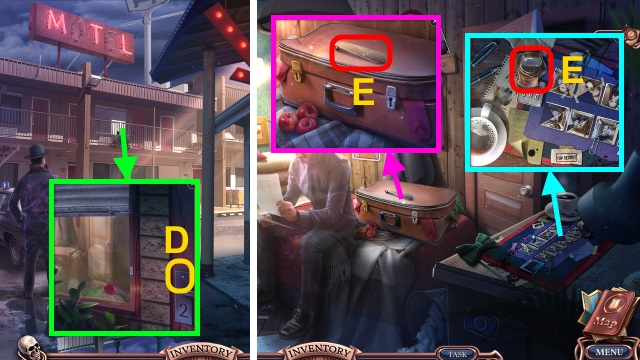
- Use MOTORCYCLE KEY and ADDRESS (W).
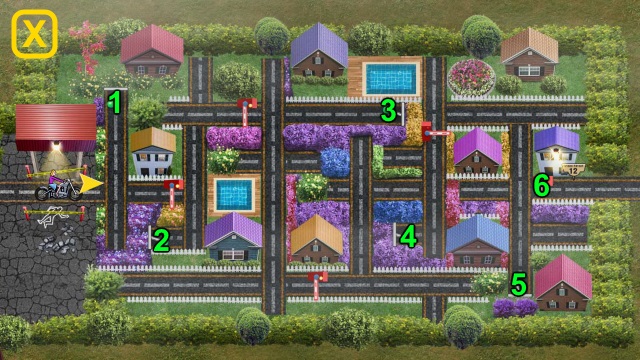
- Solution (X): go to locations in order (1-6).
- Take WRENCH (Y).
- Take CHRIS' SCARF (Z). Use WRENCH (A); receive HANDLE.
- Place HANDLE (B). Use CHRIS' SCARF (C); receive GLASS SHARD. Use BELT (D); take BROOM.
- Take CHRIS'S SATCHEL (E); use GLASS SHARD.
- Play HOP; receive ELECTRICITY EMBLEM (F).
- Place ELECTRICITY EMBLEM. Flip switch (G); take WIRE (H).
- WIRE on CHRIS'S SATCHEL; take badge. Take LIGHTER and CL MONOGRAM.
- Place CL MONOGRAM (I).
- Solution (J).
- Walk right.
- Take RECORDER and RAVEN EMBLEM (K).
- Use RECORDER (L); take DOOR KNOB.
- Take BODY PART (M); place DOOR KNOB.
- Take SPADE, PINCERS, and GLUE (N).
- Walk down.
- Use SPADE; take LEG PART and BATTERY (1/2) (O).
- Walk right.
- Take DEAD FLASHLIGHT (P); place RAVEN EMBLEM. Take LEVER and SUN KEY.
- Use SUN KEY (Q); take WING PART (R).
- Place LEVER (S). Play HOP; receive BATTERY.
- BATTERY on DEAD FLASHLIGHT; take FLASHLIGHT.
- Use FLASHLIGHT; take WING PART (T).
- Place LEG PART, BODY PART, and 2 WING PARTS (U).
- Solution (V).
- Walk forward.
- Use BROOM (W).
- Take SCOOP NET (X). Use PINCERS; receive GUN TILE.
- Take ANGEL WINGS (Y).
- Take HANDLE (Z). Use SCOOP NET (A); receive DEVIL WINGS.
- Place ANGEL WINGS and DEVIL WINGS (B); take BATON TILE.
- Walk down.
- Place HANDLE (C); take HANDCUFFS TILE.
- Walk forward.
- Place GUN TILE, BATON TILE, and HANDCUFFS TILE (D).
- Solution (F): (E-G)-(D-E-F)-(C-D-E)-(B-C-D)-(A-B-C).
- (F-A-B)-(G-A)-(E-F)-(D-E)-(C-D)-(B-C)-(A-B).
- (E-G)-(B-A)-(C-B)-(D-C)-(F-E-D)-(G-E).

- Play HOP; receive POLICE BADGE (F).
- Place POLICE BADGE (G); take cloth.
Chapter 2: Chris's House
- Select Show All (H); receive PHOTO OF CHRIS AND ALEXANDER and NAVIGATOR.
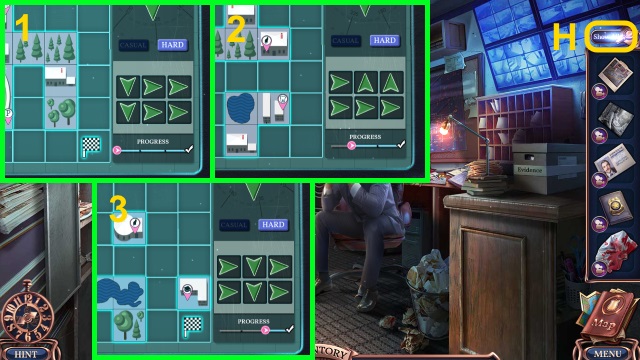
- Examine NAVIGATOR; press power button.
- Solution (1-3).
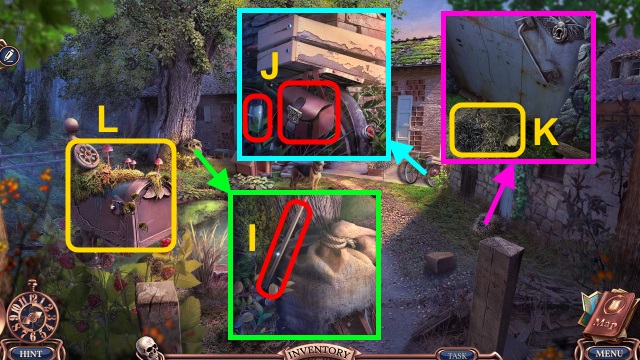
- Take BROKEN FISHING ROD (I).
- Take EMPTY BOTTLE and BICYCLE BAG (J). Use PINCER; receive BICYCLE SPOKE.
- Use LIGHTER (K); take PESTICIDE.
- Use PESTICIDE; take REEL (L).

- Use BICYCLE SPOKE (M). Play HOP; receive FISHING LINE.
- REEL and FISHING LINE on BROKEN FISHING ROD; take FISHING ROD.
- Use EMPTY BOTTLE (N); receive WATER BOTTLE. Use FISHING ROD.
- Solution (O): stop markers in the center of each meter 3x.
- Receive WHEEL EMBLEM.
- WHEEL EMBLEM on BICYCLE BAG; take MAILBOX FLAG.
- Place MAILBOX FLAG (P). Read letters; take BUTTERFLY KEY.
- Use BUTTERFLY KEY; examine binoculars. Take BONE (Q).
- Give BONE (R).
- Walk forward.
- Give PHOTO OF CHRIS AND ALEXANDER (S); receive CHRIS'S DIARY.
- Take CANDLESTICK (T).
- Place CANDLESTICK (U); take POKER and FIGURINE PART (1/3) (V).
- Use POKER; take TWEEZERS and UNLIT LANTERN (W).
- Open UNLIT LANTERN; use LIGHTER. Take LANTERN.
- Use LANTERN; take STAMP (X).
- Take FIGURINE PART (2/3) (Y). Use WATER BOTTLE (Z); receive HEXAGON.
- Walk down.
- Use HEXAGON. Take FIGURINE PART and SPRING (A).
- Walk forward.
- Place FIGURINE PART (B).
- Solution (C).
- Take STAMP.
- Place 2 STAMPS; take photo (D). Take MANSARD ROOF.
- Place MANSARD ROOF; take DIARY KEY (E).
- DIARY KEY on CHRIS'S DIARY. Play HOP; receive MOTEL PHOTO.
- Give MOTEL PHOTO (F).
- Take NUMBER (1/4) (G).
- Take LETTER L and SHUTTERS REMOTE CONTROL (H).
- Use SHUTTERS REMOTE CONTROL; take PHONE TOKEN (I).
- Take NUMBER (2/4) (J); use PHONE TOKEN. Take BROKEN EMBLEM.
- GLUE on BROKEN EMBLEM; take GOLF CLUB EMBLEM.
- Place GOLF CLUB EMBLEM (K). Play HOP; receive MULTI-TOOL.
- Use MULTI-TOOL (L); take ALEXANDER'S WALLET.
- Open ALEXANDER'S WALLET; take watch, GLOVE BOX BUTTON, and NUMBER (3/4).
- Use TWEEZERS (M); receive LETTER T.
- Examine (N); place GLOVE BOX BUTTON. Take PLIERS.
- Use PLIERS; take NUMBER (O).
- Place NUMBER (P).
- Solution (Q).
- Walk right.
- Use Skull; receive DOG STATUE.
- Take CHRIS'S NOTES (R). Place DOG STATUE (S); take LETTER M.
- Take RADIO, SCRUNCHIE, and PHOTO PIECE (1/2) (T).
- Use SCRUNCHIE. Play HOP; receive CASSETTE (U).
- Walk down.
- Place LETTER L, LETTER T, and LETTER M (V).
- Solution (W).
- Take FUSE.
- CASSETTE and FUSE on RADIO; turn radio on. Receive cassette and TOGGLE.
- Walk right.
- Place TOGGLE (X); take SCARAB (Y).
- Place SCARAB (Z); take PUNCH CARD.
- Place PUNCH CARD (A); open binder. Examine paper; take PUZZLE PIECE.
- Place PUZZLE PIECE (B).
- Solution (C): A-B-A-C-B-D-C-A-D.
- Take ROOM CARD.
- Walk down.
- Use ROOM CARD (D).
- Walk forward.
- Take KNOB and SHOEHORN (E).
- Use SHOEHORN (F); receive PHOTO PIECE.
- Place KNOB; take GOLDEN KEY (G).
- Place PHOTO PIECE (H).
- Solution (I).
- Take CHRIS'S LOCKET.
- CHRIS'S LOCKET on CHRIS'S NOTES. Read note; take PAPER CLIP.
- Use PAPER CLIP; take SILVER KEY (J).
- Use GOLDEN KEY (K) and SILVER KEY (L).
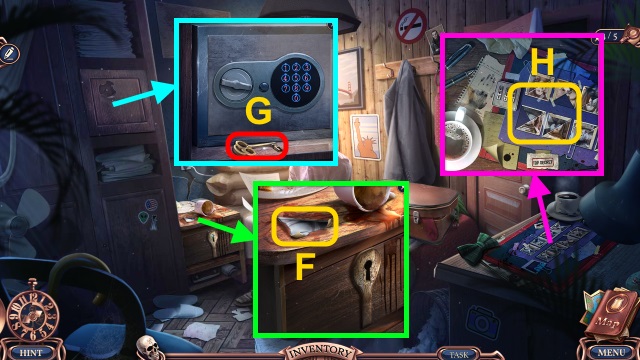
- Play HOP; receive SAFE COMBINATION (M).
- Use SAFE COMBINATION (N); enter code. Take folder.
Chapter 3: The Festival
- Examine scene. Select Show All; receive COIN PURSE.
- Take WHITE AND BLACK RINGS (1/2) and BLADE (O).
- Take FEATHER (P). Use BLADE (Q); receive SPIKE.
- Use SPIKE; take WHITE AND BLACK RINGS (R).
- WHITE AND BLACK RINGS on COIN PURSE. Examine photo; take FEATHER.
- Place 2 FEATHERS (S).
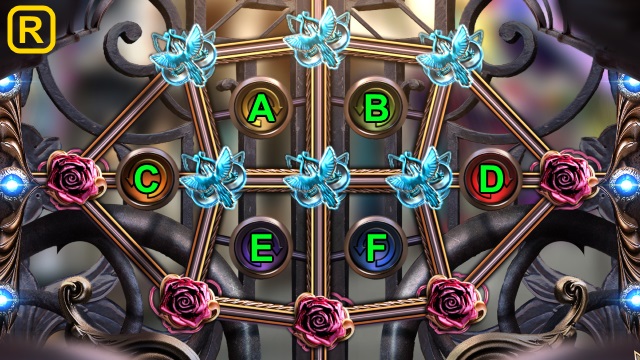
- Solution (T): (A-G)-(B-G)-(C-G)-(D-G)-(E-G)-(F-G).
- Walk forward.
- Take COMPASS and SCREWDRIVER (U).
- Take TREE EMBLEM (V). Use BLADE (W); take TAKE-UP REEL.
- Place TREE EMBLEM (X); take HOT WATER BOTTLE and PROJECTION LAMP.
- Walk down.
- Use SCREWDRIVER (Y); take PUMP.
- Walk forward.
- Use HOT WATER BOTTLE and PUMP; take HINT (Z).

- Place HINT (A).
- Solution (B): F-C-B-E-H-G-D-E-H-I-F-C.
- B-E-D-A-B-E-H-G-D-E-F-I-H.
- E-B-C-F-E-B-A-D-G-H-E-F-I.
- Take COMPASS BUTTON.
- COMPASS BUTTON on COMPASS; take WIND ROSE and MIRROR.
- Place WIND ROSE (C); take LOCK PART.
- Walk down.
- Place LOCK PART (D); take SECRET KEY.
- Walk forward.
- Remove tape; use SECRET KEY (E).
- Play HOP; receive FILM (F).
- Place MIRROR, FILM, TAKE-UP REEL, and PROJECTION LAMP; take picture (G).
- Use Skull; receive FESTIVAL TRINKET.
- Take ROSE (1/4); place FESTIVAL TRINKET (H). Play HOP; receive MASK PART. Use SCREWDRIVER (I); take BROKEN KEY.

- Use TWEEZER (J); receive GOLDEN PETAL.
- Take ROSE (2/4) and UMBRELLA (K). Place GOLDEN PETAL (L); take COSMETIC and MASK PART.
- Take BROKEN PRUNERS (M). Use UMBRELLA (N); receive BRONZE KEY.
- BRONZE KEY on COSMETIC; take card and ROSE (3/4).
- Place 2 MASK PARTS (O).
- Solution (P): (D-B-D)-(D-B-D)-(E-B-E)-(C-B-C).
- (E-B-E)-(C-B-C)-(F-A-F)-(A-F-A-F).
- Take ROSE.
- Place ROSE (Q).
- Solution (R): Ax2-E-B-Ax2-B-F-A-C-B-Dx3-Ex2.
- Go forward.
- Take PRUNERS PART and KEY HOLDER (S).
- PRUNERS PART and SPRING on BROKEN PRUNERS; take PRUNER.
- Use PRUNER; take FILE and GAME COIN (T).
- Use GAME COIN (U); take FESTIVAL RING (V).
- Place FESTIVAL RING; take FLEUR-DE-LIS (W).
- Place FLEUR-DE-LIS; take LOLLIPOP EMBLEM and VILLAIN'S SIGNET (X).
- Place LOLLIPOP EMBLEM (Y).
- Play HOP; receive BALLOON (Z).
- VILLAIN'S SIGNET on KEY HOLDER; take razor and KEY PART.
- Place BALLOON; take KEY PART (A).
- 2 KEY PARTS on BROKEN KEY; take MANSION KEY.
- Use MANSION KEY (B).
- Solution (C).
- Walk forward.
- Take GOLD DIGGER'S FIGURINE (D).
- Take BAG (E). Place GOLD DIGGER'S FIGURINE (F); take MONOGRAM M.
- MONOGRAM M on BAG; take FLAG (1/5).
- Take FLAG (2/5) (G). Use FILE; receive METAL KNOB.
- Take GRIMOIRE (H). Examine (I); place METAL KNOB. Take MECHANISM FRAGMENT.
- Place MECHANISM FRAGMENT (J).
- Walk forward.
- Take FLAG (2/5) and OILCAN (K).
- Take GOLDEN BROOCH (L). Use OILCAN (M); open. Take FLAG (4/5) and FANG (1/2).
- GOLDEN BROOCH on GRIMOIRE. Take paper and FANG.

- Place FANG (N); take GOLD RUSH EMBLEM (O).
- Walk down.
- Place GOLD RUSH EMBLEM (P). Play HOP; receive COMPASSES.
- Examine (Q); use COMPASSES. Take MONOGRAM V.
- MONOGRAM V on BAG; take RITUAL and BOOK SIGN.
- Place BOOK SIGN (R).
- Play HOP; receive FLAG (5/5) (S).
- Place FLAG (5/5) (T); take map and GOLDEN BRACELET.
- Walk forward.
- Place GOLDEN BRACELET; solution (U).
- Take DARK POTION and BOAR EYES.
- Place BOAR EYES (V).
- Solution (X-Y).
- Place pink tile on (Z). Solution: B-A-G-E-G-F-D-F-C-A-D-B-F-D.
- Solution (A).
- Take SPHERE OF ETERNAL LIFE.
- Examine RITUAL; use DARK POTION and SPHERE OF ETERNAL LIFE.
- Congratulations! You have completed Grim Tales: The Hunger.
Created at: 2018-08-17