

Walkthrough Menu
- General Tips
- Chapter 1: Museum
- Chapter 2: Abandoned Factory
- Chapter 3: Guardian's House
- Chapter 4: The Past
- Chapter 5: Supermarket
- Chapter 6: Outcasts
General Tips
- This is the official guide for Grim Tales: The Nomad.
- This guide won't tell you when to zoom into a location; the screenshots show each zoom scene.
- Hidden-object puzzles are referred to as HOPs. Only the locations of the HOPs will be shown.
- Use the Map to fast travel to a location.
Chapter 1: Museum
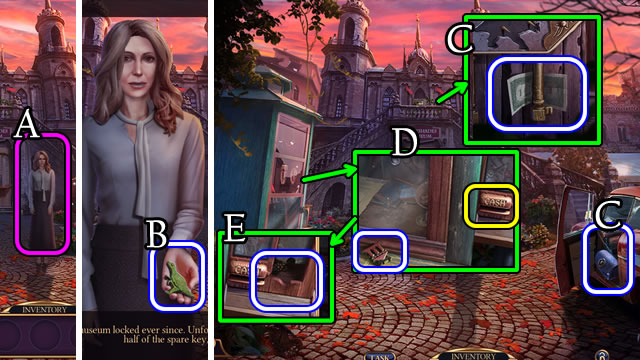
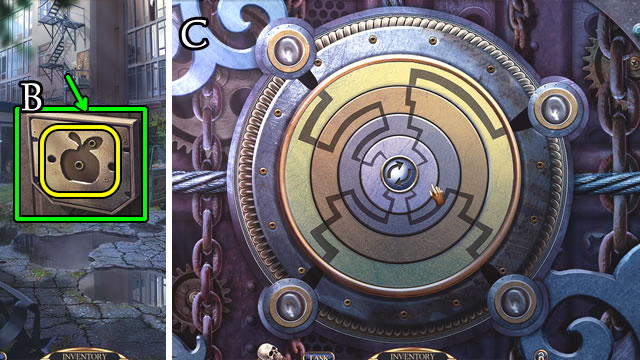
- Speak to character; (A) take 1/2 DINOSAUR TOKENS (B).
- Remove tape, take DOLLAR BILL; BAG (C).
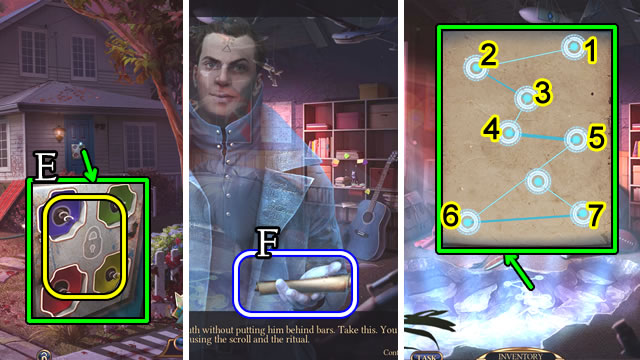
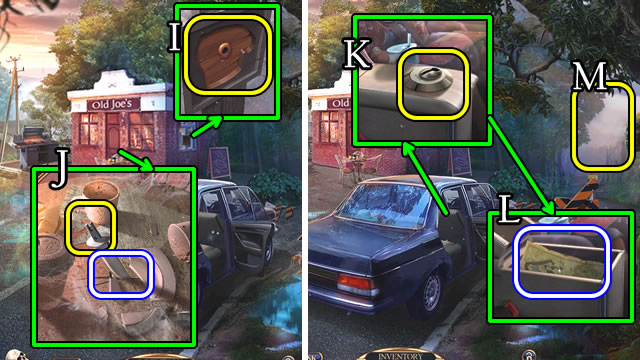
- Take MUSEUM MAGNET; use DOLLAR BILL (D); take SOUVENIR PIN (E).
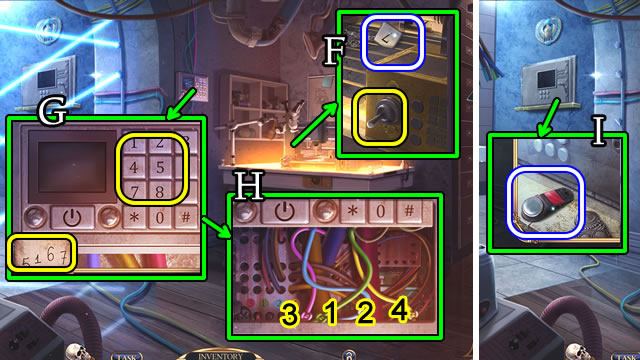
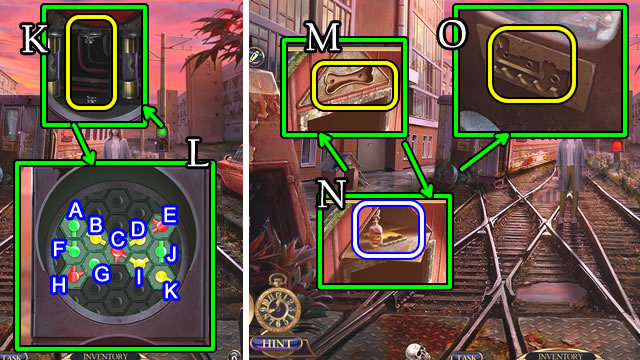
- SOUVENIR PIN on BAG. Take LIGHTER, 1/3 BATTERIES, PEN and Skull.
- Select Skull (F); speak to character.
- Use LIGHTER for MINI-HOP (G); receive ALARM SYSTEM FOB.
- Take 2/3 BATTERIES; use ALARM SYSTEM FOB (H); take 2/2 DINOSAUR TOKENS (I).
- Place 2/2 DINOSAUR TOKENS (J).
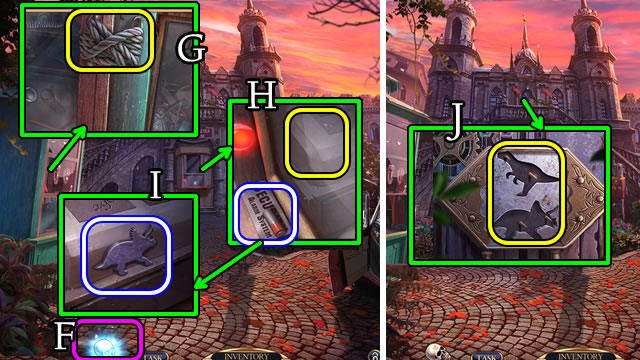
- Solution. (1-7)-(Ax3)-(8).
- Go forward.
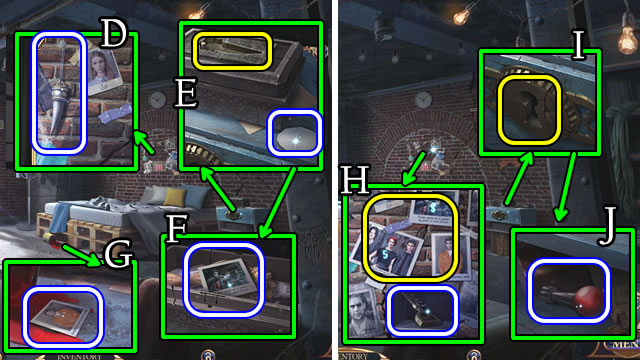
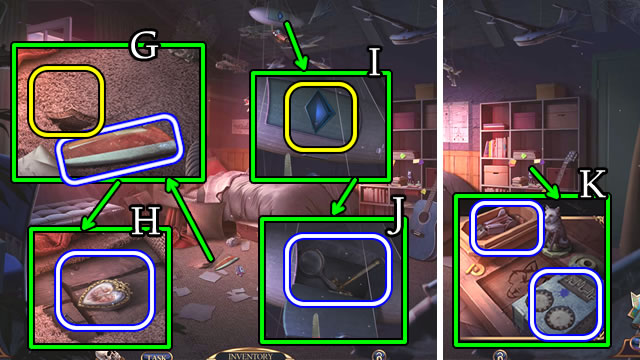
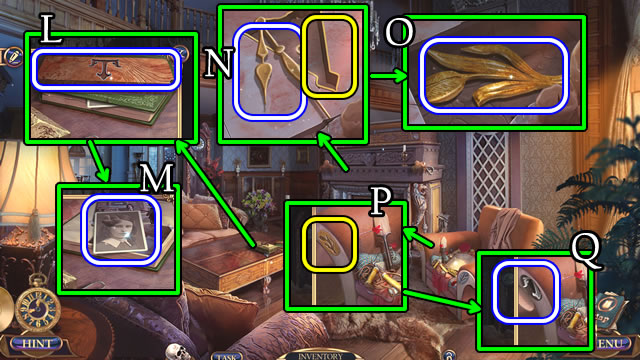
- Speak to character; take PASSWORD (K).
- Take REMOTE CONTROL WITHOUT BATTERIES, GUEST RECORD; ELECTRIC PANEL KEY (L).
- Go down.
- Take RUBBER GLOVE; use ELECTRIC PANEL KEY (M); take 3/3 BATTERIES (N).
- Go forward.
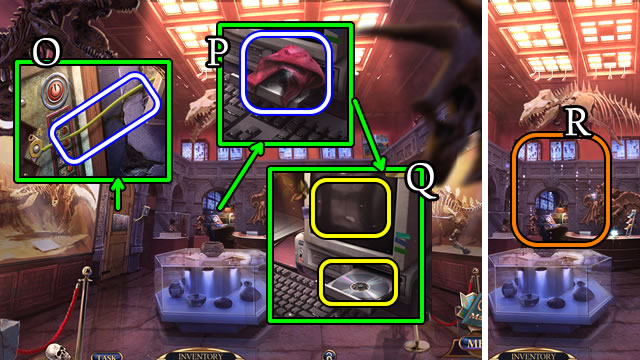
- Use RUBBER GLOVE for 1/3 WIRES (O).
- 3/3 BATTERIES in REMOTE CONTROL WITHOUT BATTERIES for REMOTE CONTROL.
- GUEST RECORD for CCTV RECORDING and 2/3 WIRES.
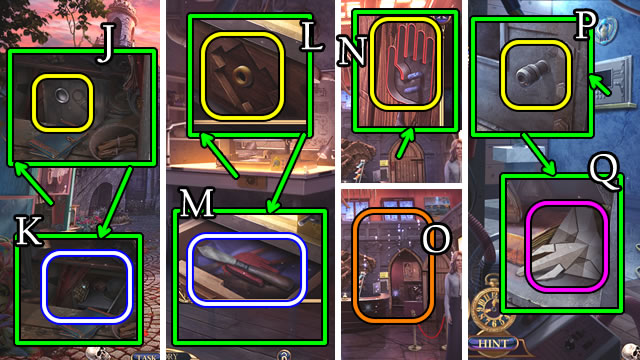
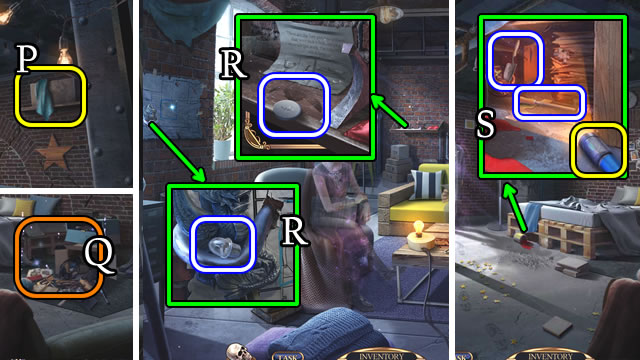
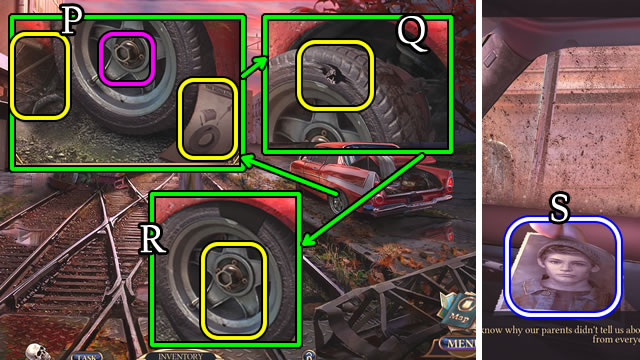
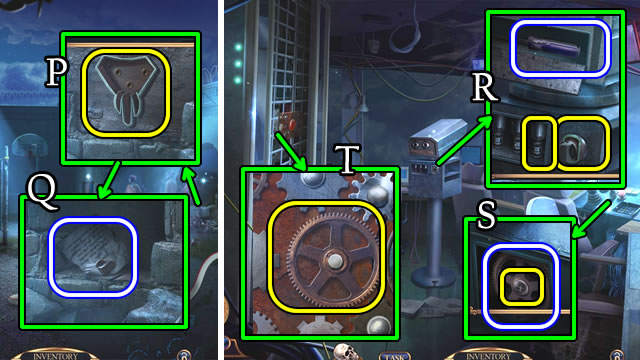
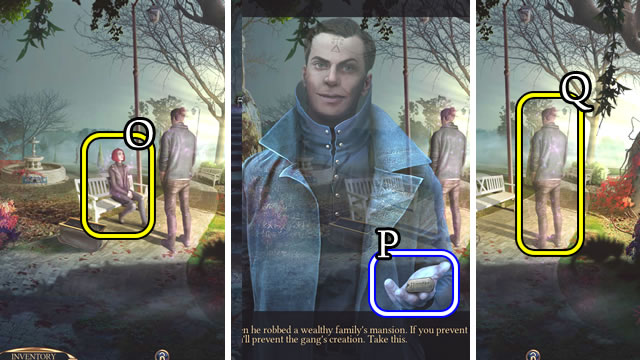
- Take LOUISA'S HANDKERCHIEF (P); place CCTV RECORDING; use REMOTE CONTROL; place PASSWORD (Q).
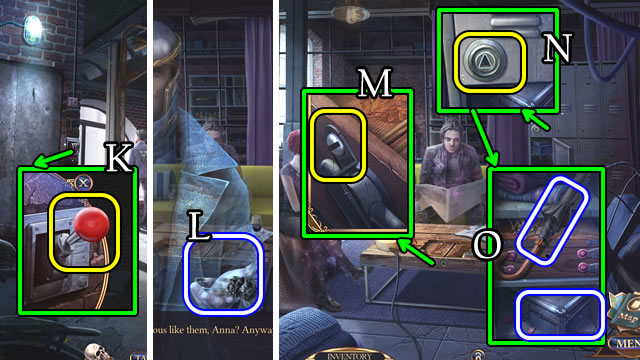
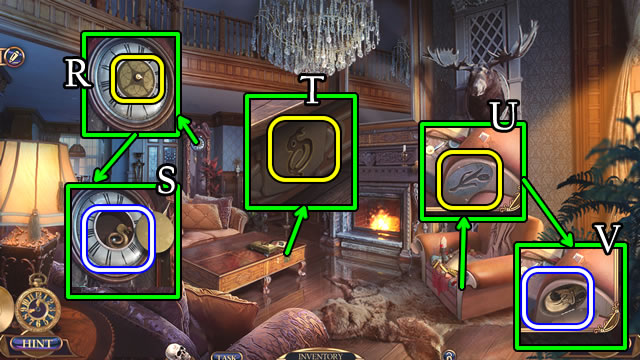
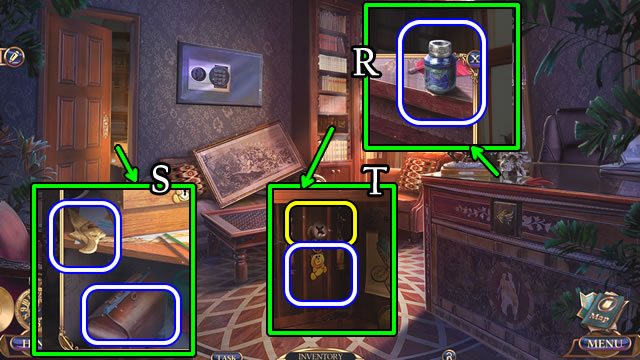
- Play HOP (R) for RULER.
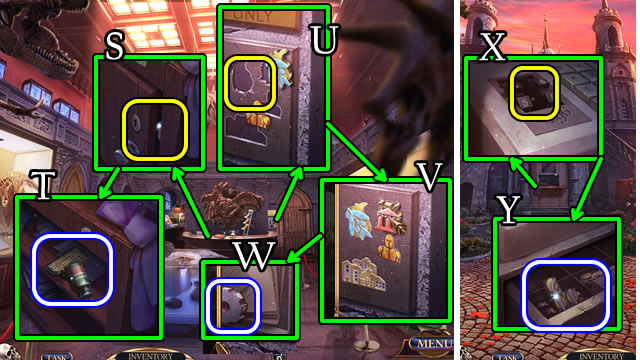
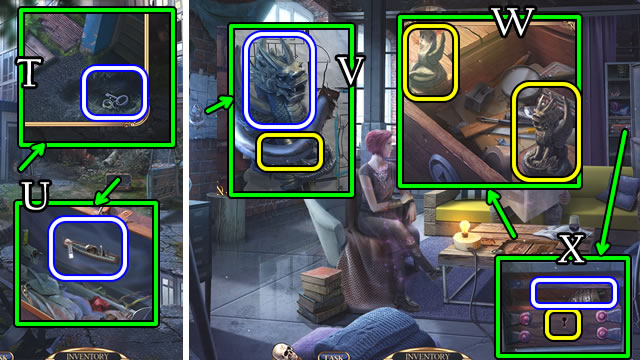
- Use RULER (S); open, take ACETONE and TOWN MAGNET (T).
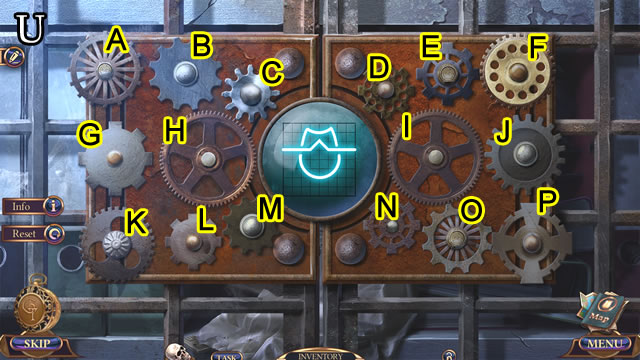
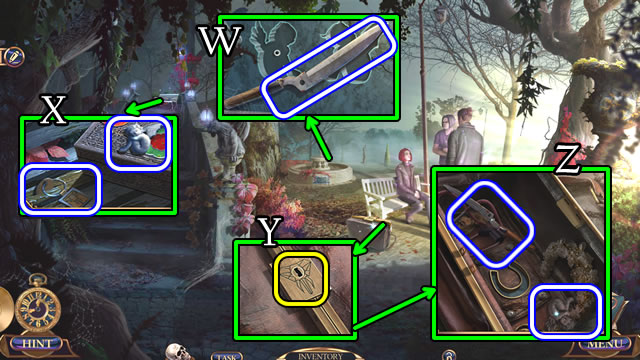
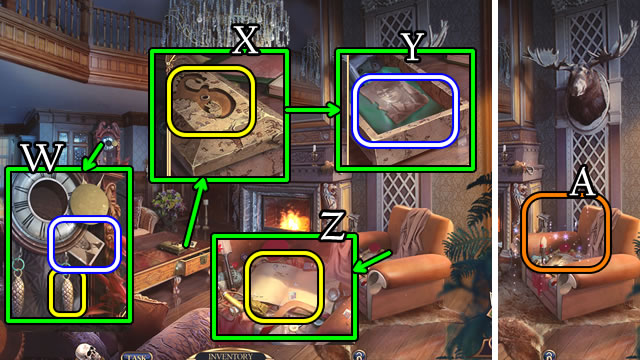
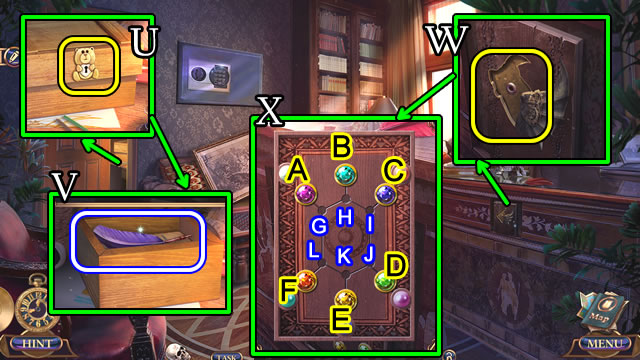
- Place MUSEUM and TOWN MAGNETS (U); solution (V); take NUMBER WHEEL (W).
- Go down.
- Place NUMBER WHEEL (X); enter 2-9-6; take CIRCUIT BOARD (Y).
- Go forward.
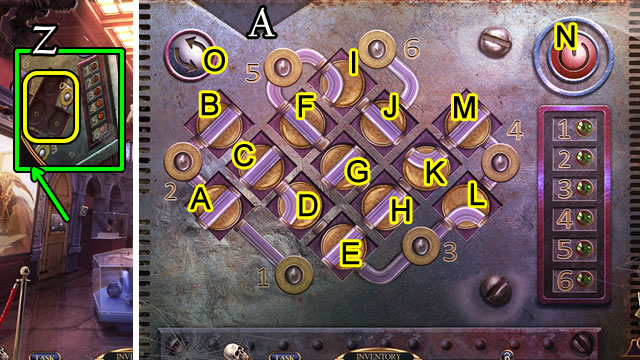
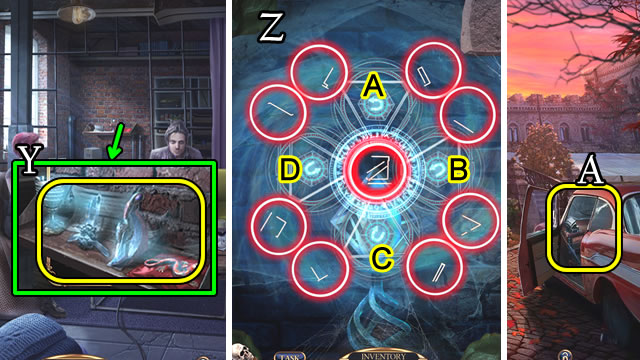
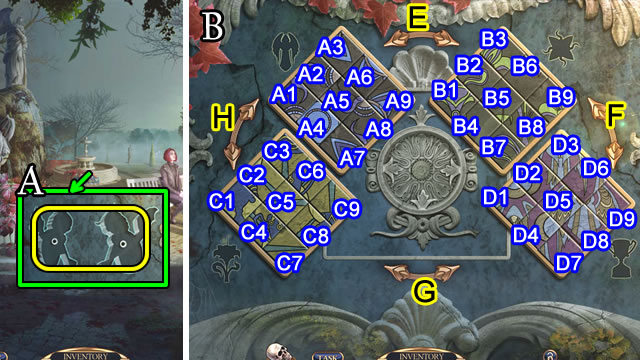
- Place CIRCUIT BOARD (Z).
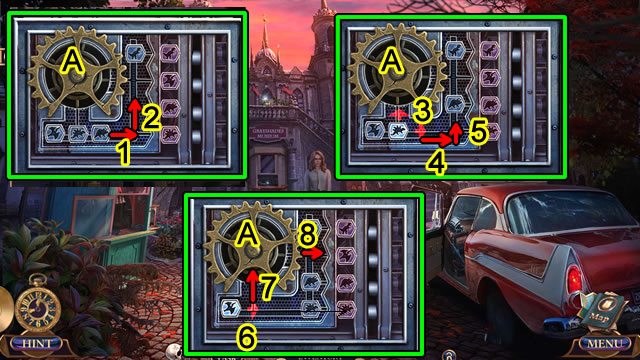
- Solution (A). (A-O-A)-(L-B)-(C-O-C)-(H-O-D)-(E-O-E)-(K-Ox2-M)-(H-Ox3-H)-(G-O-G)-(I-Ox3-J)-(N).
- Go left.
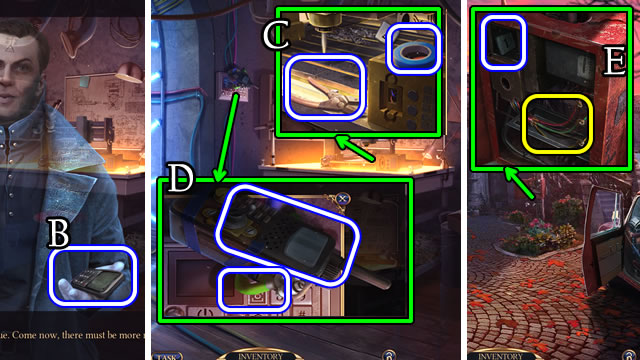
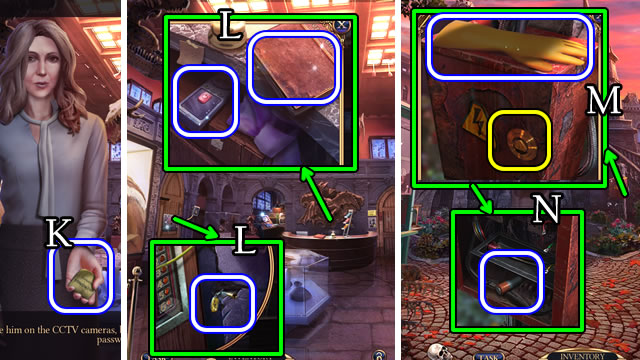
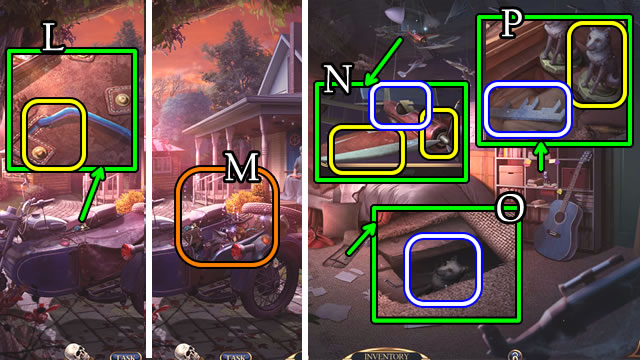
- Select Skull; speak to character; take OLD PHONE (B).
- Take WIRE CUTTERS and TAPE (C).
- Take WALKIE TALKIE; use WIRE CUTTERS for 3/3 WIRES (D).
- Go down 2x.
- Place 3/3 WIRES; take 1/2 NUMBERED BUTTONS (E).
- Return to Museum Storage.
- OLD PHONE for CODE and COIN.
- COIN on WALKIE TALKIE; take TOGGLE SWITCH.
- Place TOGGLE SWITCH; take 2/2 NUMBERED BUTTONS (F).
- Place 2/2 NUMBERED BUTTONS, CODE; select 5-1-6-7 (G).
- Solution (H). 1-4.
- Take MAGNET KEY (I).
- Go down 2x.
- Use MAGNET KEY (J); take WOODEN INLAY (K).
- Return to Museum Storage.
- Place WOODEN INAY (L); take LETTER OPENER, HAND EMBLEM (M).
- Go down.
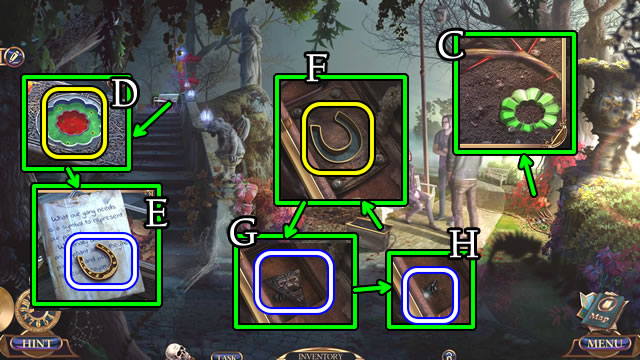
- Place HAND EMBLEM (N) for HOP (O); receive WHEEL.
- Go left.
- Place WHEEL (P); take Origami Elephant (Q).
Chapter 2: Abandon Factory
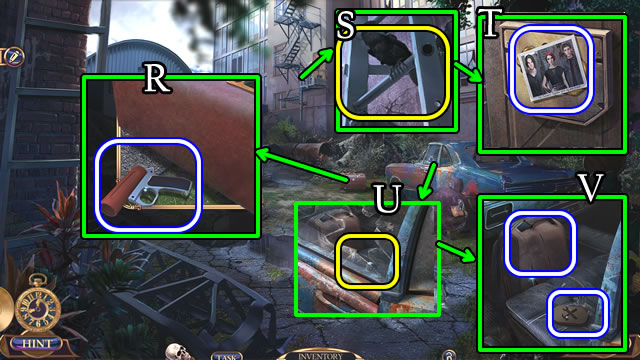
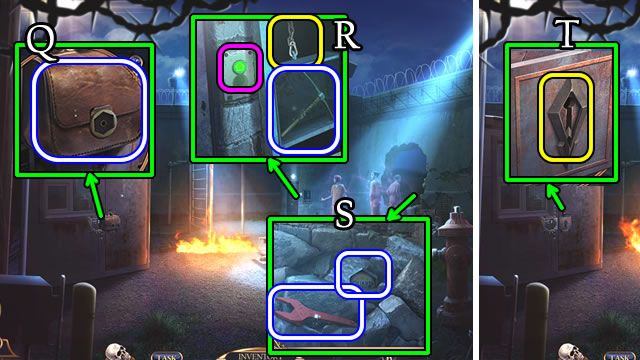
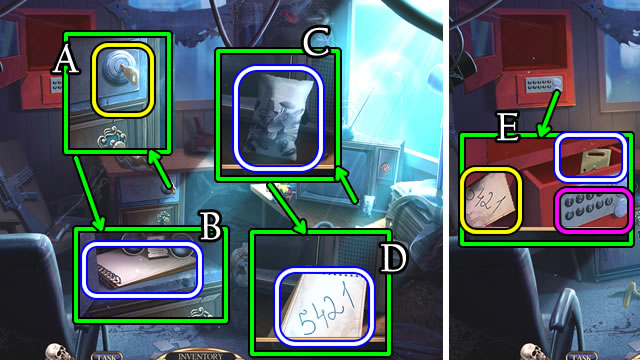
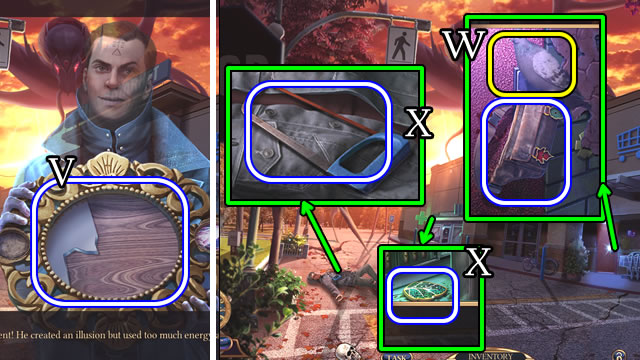
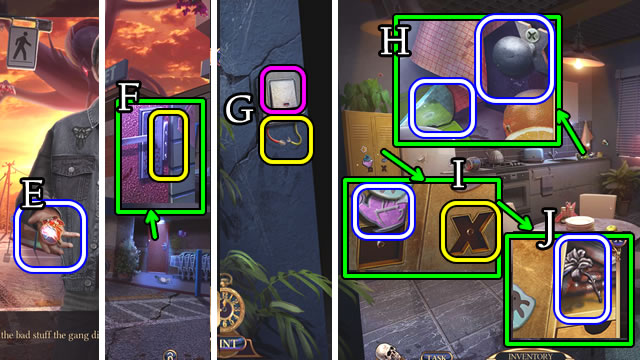
- Take FLARE GUN (R).
- Use FLARE GUN; (S) use LETTER OPENER for 1/3 PHOTOS; take FACTORY ADDRESS (T).
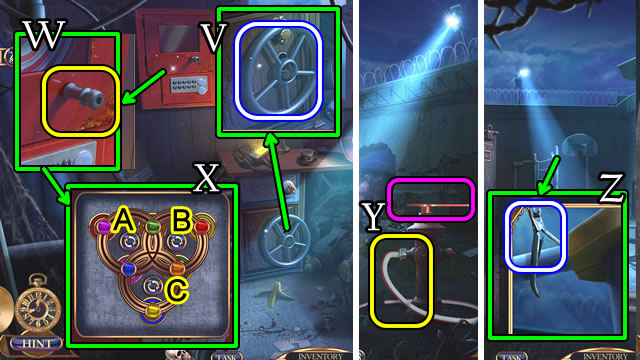
- Use LOUISA'S HANDKERCHIEF (U); lift lock; take TOOLKIT BUTTON, JARED'S BACKPACK (V).
- Place TOOLKIT BUTTON (W); open; take CARABINER and PLIERS (X).
- Use PLIERS (Y) for MINI-HOP; receive CAR BUTTON.
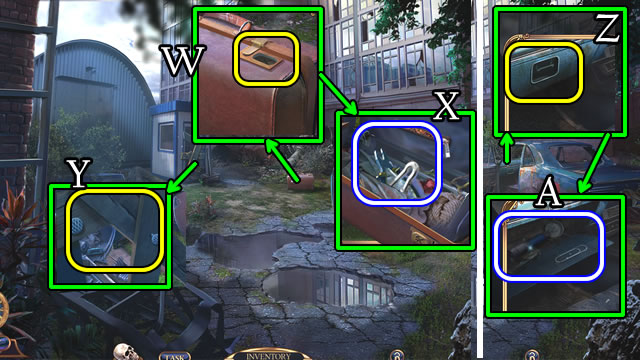
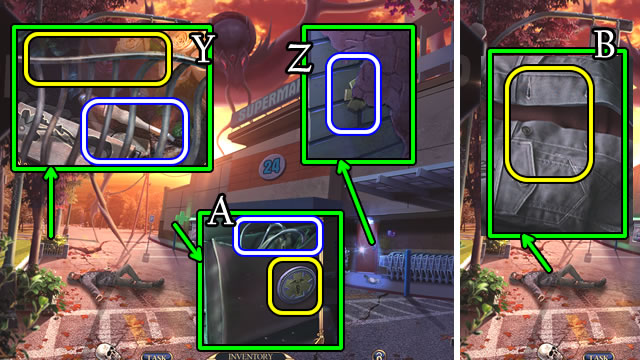
- Place CAR BUTTON (Z); take BROKEN FLASHLIGHT and PAPER CLIP (A).
- PAPER CLIP on JARED'S BACKPACK; open; take GOLDEN APPLE.
- Place GOLDEN APPLE (B).
- Solution (C).
- Go forward.
- Take JARED'S PENDANT (D).
- Take COTTON PAD; place JARED'S PENDANT (E); take 2/3 PHOTOS (F).
- Use ACETONE and COTTON PAD; take 3/3 PHOTOS (G).
- Place 3/3 PHOTOS; take GEAR KEY (H).
- Use GEAR KEY (I); take note and LEVER (J).
- Place, select LEVER (K).
- Go forward.
- Select Skull; speak to character; take MORPHING STAR (L).
- Use COIN (M); receive TRIANGULAR KEY.
- Use TRIANGULAR KEY (N); take LOCKED CASE and UMBRELLA (O).
- Go down.
- Use UMBRELLA (P); play HOP (Q) for IRON DAGGER.
- Go forward.
- Take BUTTON BATTERY; BULB (R).
- Go down.
- BUTTON BATTERY and BULB on BROKEN FLASHLIGHT for FLASHLIGHT.
- Place FLASHLIGHT; take TROWEL and FILE (S).
- Go down.
- Use TROWEL; take NUT KEY (T).
- NUT KEY on LOCKED CASE; take OIL and FIRE SALAMANDER.
- Use OIL; take SNAKE FIGURINE (U).
- Return to Common Room.
- Use FILE; receive DRAGON FIGURINE (V).
- Place SNAKE and DRAGON FIGURINES (W); play MINI-HOP for RED KEY.
- Use RED KEY; take CUP OF POWER (X).
- Place CUP OF POWER, FIRE SALAMANDER, MORPHING STAR and IRON DAGGER (Y).
- Solution (Z). Ax2-B-D-Ax2-Bx2-Cx2-Dx2-Ax2-Bx2-Cx2-Dx2.
- Take GEMSTONE.
- Place FACTORY ADDRESS (A).
Chapter 3: Guardian's House
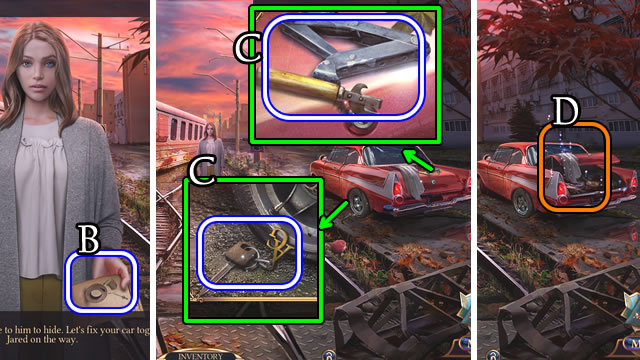
- Speak to character; take TIRE INSTRUCTIONS (B).
- Take TRUNK KEY; OPENER and BROKEN JACK (C).
- Use TRUNK KEY for HOP (D); receive PUMP.
- Take BLUNT KNIFE (E).
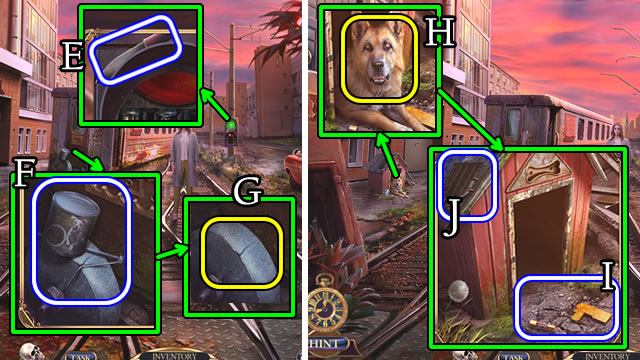
- Take DOG FOOD and JACK SCREW (F); place BLUNT KNIFE for SHARP KNIFE (G).
- OPENER on DOG FOOD.
- Give DOG FOOD (H); take FUSE and TRAIN INLAY (I); use SHARP KNIFE, take PATCH (J).
- Place FUSE (K).
- Solution (L). (G-I)-(F-K)-(A-E)-(C-G)-(F-A)-(G-F).
- Take DOGHOUSE SHAPE.
- Place DOGHOUSE SHAPE (M); take TRAIN INLAY and GLUE (N).
- Place 2 TRAIN INLAYS for MINI-HOP (O); receive LUG WRENCH.
- JACK SCREW on BROKEN JACK for JACK.
- Place TIRE INSTRUCTIONS, JACK; use LUG WRENCH (P), select tire; use GLUE and PATCH (Q); select tire, use LUG WRENCH; remove jack; use PUMP (R).
- Speak to character; receive JARED'S PHOTO (S).
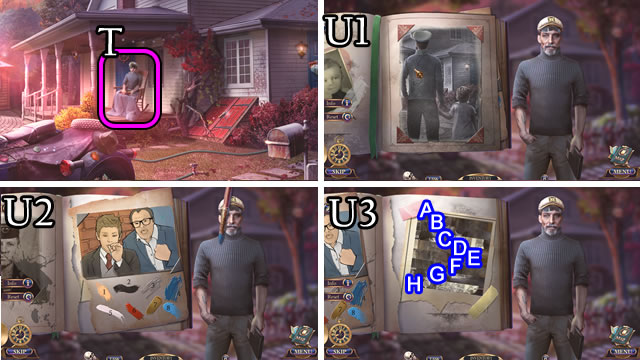
- Give JARED'S PHOTO (T).
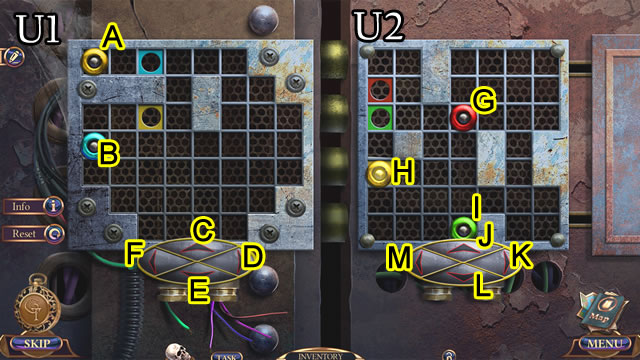
- Solutions (U1-U2).
- Solution (U3). (C-A)-(H-B)-(G-C)-(H-D)-(F-E)-(G-F).
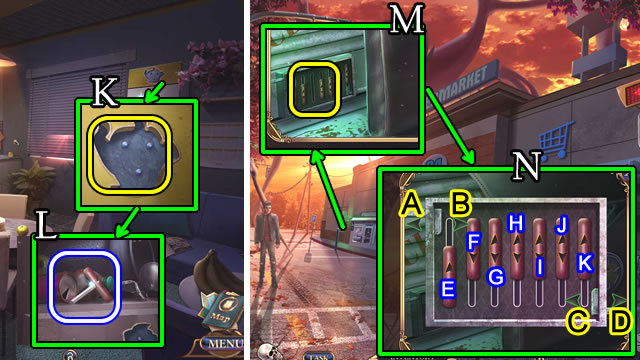
- Take JARED'S CASE.
- JARED'S CASE for 1/4 INSERT.
- Take JARED'S WALLET (V).
- JARED'S WALLET for ANCHOR SHAPE.
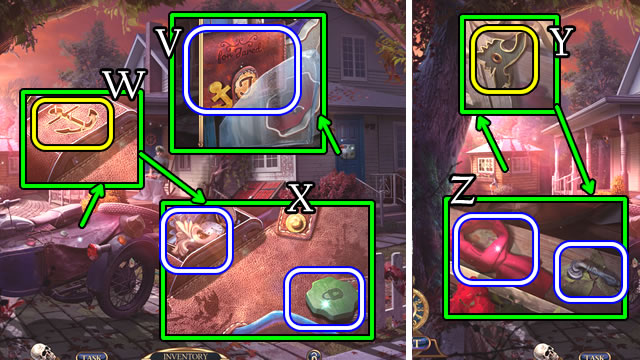
- Place ANCHOR SHAPE (W); take PATTERN PART and 2/4 INSERT (X).
- Place PATTERN PART (Y); take SCARF and CELLAR HANDLE (Z).

- Use SCARF for SHARD (A).
- Take CORKSCREW; use SHARD, receive BRANCH (B); place CELLAR HANDLE for MINI-HOP (C); receive MONOGRAM.
- Use BRANCH; receive 3/4 INSERT (D).
- MONOGRAM on JARED'S WALLET; open; take 4/4 INSERT.
- Place 4/4 INSERTS (E).
- Go forward.
- Select Skull; take RITUAL SCROLL (F).
- Place RITUAL SCROLL; select 1-7.
- Take PLANE WING; use SHARD (G); uncover, take GRAY FAMILY LOCKET (H).
- Place GEMSTONE (I); take SLEDGEHAMMER and MAGNIFIER (J).
- Place GRAY FAMILY LOCKET; take STAPLE REMOVER and JARED'S BOX (K).
- Go down.
- Use STAPLE REMOVER (L) for HOP (M); receive PLANE PROPELLER.
- Go forward.
- Place PLANE WING and PLANE PROPELLER; take 1/2 BOX LOCK PART (N).
- Use SLEDGEHAMMER; uncover; take WOLF FIGURINE (O).
- Place WOLF FIGURINE; take 2/2 BOX LOCK PART (P).
- 2/2 BOX LOCK PARTS on JARED'S BOX; take DIARY and photo.
Chapter 4: The Past
- Take GUARD'S BAG (Q).
- Use CARABINER; press button; take PICKAXE (R).
- Take HYDRANT WRENCH; use PICKAXE; take GUARD'S KEYCARD (S).
- GUARD'S KEYCARD on GUARD'S BAG; open; take BOOTH KEY.
- Use BOOTH KEY (T).
- Solution (U1). A-D-E-F-C-D-B-D-C-F-C-F-A-C-B-D-A-E-F-C.
- Solution (U2). H-J-G-M-J-H-K-L-K-J-M-L-M-J-I-M-J-H-K-J-M-L-M-J-I-J.
- Go forward.
- Take FIREHOSE KNOB (V); place FIREHOSE KNOB (W).
- Solution (X). B-A-B-A-Bx2-A-B-Cx2-Bx2-C.
- Take FIRE HOSE.
- Go down.
- Place FIRE HOSE; place, select HYDRANT WRENCH (Y).
- Take TONGS (Z).
- Go forward.
- Select key, use TONGS (A); take note and NOTEBOOK (B).
- Take SEEDS (C); place NOTEBOOK, use PEN; take CODE (D).
- Place CODE; select 5-4-2-1; take GUARD'S BADGE (E).
- Go down.

- Use GUARD'S BADGE (F).
- Go to Security Tower.
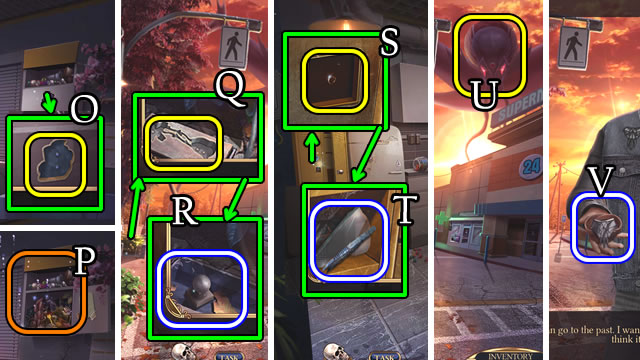
- Take SODA (G).
- Go down.
- Use SODA; take paper (H), JARED'S RING and TV SWITCH (I).
- JARED'S RING on DIARY for HOP (J); receive SMALL KEY.
- Return to Guard's Booth.
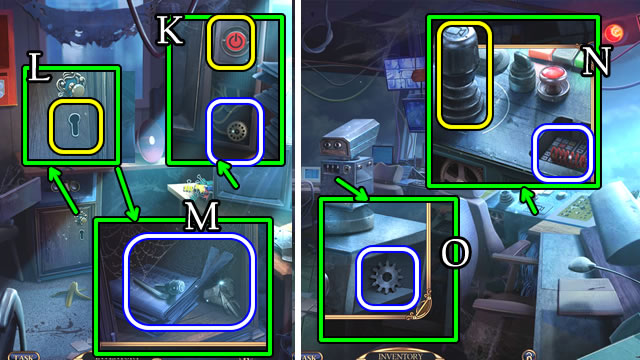
- Replace, select TV SWITCH; take MEDIUM GEAR (K).
- Use SMALL KEY (L); take LEVER, HEX KEY and STONE SYMBOL (M).
- Return to Security Tower.
- Place LEVER; take SPRING (N).
- Use HEX KEY; take SMALL GEAR (O).
- Go down.
- Place STONE SYMBOL (P); take note and KNOB (Q).
- Return to Security Tower.
- Place SPRING; place, select KNOB; take SCREWDRIVER (R).
- Use SCREWDRIVER; take LARGE GEAR (S).
- Place SMALL, MEDIUM and LARGE GEARS (T).
- Solution (U). I-O-K-B-D-L-H-I-D-E-H-J-N-P.
- Take PERSONAL NUMBER.
- PERSONAL NUMBER on JARED'S CASE; open; select photo.
Chapter 5: Supermarket
- Select Skull; speak to character; take BROKEN MIRROR (V).
- Give SEEDS; take BELT BAG (W).
- Take 1/2 BAG SHAPES; HACKSAW (X).
- Use HACKSAW; take note and CHISEL (Y).
- Use CHISEL; receive MEDICAL EMBLEM (Z).
- Place MEDICAL EMBLEM; take STETHOSCOPE (A).
- Place STETHOSCOPE (B).
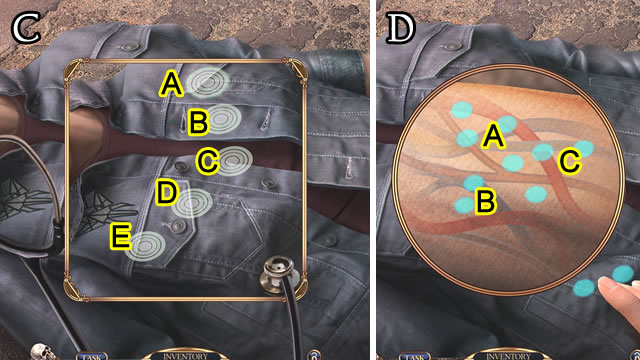
- Solutions (C). B-E-C-A; A-D-B-C-E; C-D-A-B-E.
- Solution (D). A-B-C.
- Take syringe.
- Speak to character; take GLOWING STONE and 2/2 BAG SHAPES (E).
- 2/2 BAG SHAPES on BELT BAG; take EMPLOYEE'S CARD and 1/4 MIRROR SHARD.
- Use EMPLOYEE'S CARD (F).
- Go forward.
- Use TAPE; select button (G).
- Take 2/4 MIRROR SHARD; use SCREWDRIVER; receive CROSS HANDLE (H).
- Take TEAPOT TOKEN; place, select CROSS HANDLE (I); take 1/2 STONE FLOWER (J).
- Place TEAPOT TOKEN (K); take DRUGSTORE LOCK PART (L).
- Go down.
- Place DRUGSTORE LOCK PART (M).
- Solution (N). Cx6-F-G-H-I-Bx10-E-F-G-H-I-Cx7-F-G-H-J-K-Bx3.
- Take COFFEE TOKEN and 3/4 MIRROR SHARD.
- Go forward.
- Place COFFEE TOKEN (O) for HOP (P); receive 2/2 STONE FLOWER.
- Go down.
- Place 2/2 STONE FLOWERS (Q); take SQUARE HANDLE (R).
- Go forward.
- Place SQUARE HANDLE (S); take TWEEZERS and 4/4 MIRROR SHARD (T).
- 4/4 MIRROR SHARDS and GLOWING STONE on BROKEN MIRROR for SOUL MIRROR.
- Go down.
- Use SOUL MIRROR (U); speak to character; take (V).
Chapter 6: Outcasts
- Take BROKEN PRUNER (W).
- Take DEVIL FIGURE; use TWEEZERS for OUTCASTS' KEY (X).
- Use OUTCASTS' KEY (Y); take PRUNER PART and ANGEL FIGURE (Z).
- Place ANGEL and DEVIL FIGURES (A).
- Solutions (B). (A4-A5)-(A6-A4)-(A9-A6)-(A3-A8)-(A7-A2)-(A9-A1)-(A9-A7).
- (B5-B3)-(B5-B1)-(B8-B7)-(B1-B6)-(B9-B2)-(B8-B4)-(B8-B9).
- (C1-C5)-(C4-C2)-(C9-C3)-(C9-C7)-(C8-C4)-(C1-C9).
- (D1-D3)-(D1-D5)-(D8-D7)-(D1-D2)-(D9-D6)-(D4-D9); G-H-F-G-F.
- Take 1/2 CRYSTAL.
- Take 2/2 CRYSTAL (C).
- Place 2/2 CRYSTALS (D); open; take note and LUCKY CHARM (E).
- Place LUCKY CHARM (F); take LION LOCKET (G) and BOLT (H).
- PRUNER PART and BOLT on BROKEN PRUNER for PRUNER.
- Use PRUNER (I); take TINMAN'S GLASSES (J).
- Give TINMAN'S GLASSES (K).
- Take PENCIL CASE (L); open book; take 1/4 FRIENDS' PHOTOS (M).
- Take CLOCK HANDS; place LION LOCKET (N); open, take GOLDEN TULIP (O).
- Place GOLDEN TULIP (P); take INITIAL T (Q).
- Place CLOCK HANDS (R); take SNAKE SHAPE (S).
- Place SNAKE SHAPE for MINI-HOP (T); receive SILVER TULIP.
- Place SILVER TULIP (U); take DRAGON SHAPE (V).
- INITIAL T on PENCIL CASE; take 2/4 FRIENDS' PHOTOS and WEIGHT.
- Place WEIGHT; take 3/4 FRIENDS' PHOTOS (W).
- Place DRAGON SHAPE (X); take 4/4 FRIENDS' PHOTOS (Y).
- Place 4/4 FRIENDS' PHOTOS (Z) for HOP (A); receive RAY OF FATE.
- Give RAY OF FATE (B); select Skull; speak to character; take FIREGIRL'S PENDANT (C).
- Give FIREGIRL'S PENDANT (D).

- Open door; take TONGS (E).
- Take POUCH; use CORKSCREW (F); take COOK HAT; open (G); use TONGS for KNIFE HANDLE (H).
- Place COOK HAT for MINI-HOP (I); receive DUST MOP.
- Use DUST MOP; place KNIFE HANDLE for KITCHEN KNIFE (J).
- KITCHEN KNIFE on POUCH; take LOCKPICK and MATCHES.
- Use LOCKPICK (K); take ROAD MAP (L).
- Place ROAD MAP (M).

- Solutions (N). A-F; Ax3-B-Cx3-Dx2-E; E-B-C.
- Take RAY OF FATE.
- Give RAY OF FATE (O).
- Select Skull; speak to character; take THUNDER'S ID TAG (P).
- Place THUNDER'S ID TAG (Q).
- Take INK (R).
- Use MATCHES; take INSIGNIA PART and GRIP BAG (S).
- Use SCREWDRIVER; receive CHILD'S KEY (T).
- Use CHILD'S KEY (U); take QUILL (V).
- Place INSIGNIA PART (W).
- Solution (X). (F-J)-(B-F)-(E-B)-(C-E)-(J-C)-(D-H)-(A-D)-(H-A).
- Take GRIP LATCH.
- GRIP LATCH on GRIP BAG for EMPTY SCROLL.
- Use MAGNIFIER; place EMPTY SCROLL, INK and QUILL; take SAFE CODE (Y).
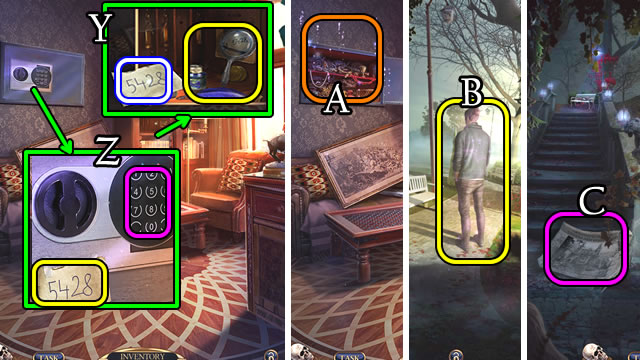
- Place SAFE CODE; select 5-4-2-8 (Z) for HOP (A); receive RAY OF FATE.
- Give RAY OF FATE (B).
- Take newspaper (C).
- Congratulations. You have completed Grim Tales: The Nomad.
Created at: 2019-04-19