

Walkthrough Menu
- General Tips
- Chapter 1 – Wishes
- Chapter 2 - Antidote
- Chapter 3 - The Second Wish
- Chapter 4 - Siberia
- Chapter 5 – Reunited
General Tips
- Select Menu (1) to adjust the Music, Effects, Environment and Voice Volume. You may also adjust Gamma, Special Effects, Full Screen, Wide Screen and Custom Cursor.
- You may select between Casual, Advanced and Hardcore Mode.
- Throughout the guide, we will use the acronym 'HOS' for Hidden Object Scenes.
- Items written in lavender in HOS require an extra step before they can be obtained.
- There is no penalty for random clicking.
- Puzzles can be skipped.
- Select the Info button on the left of a puzzle screen to get the instructions for the puzzle.
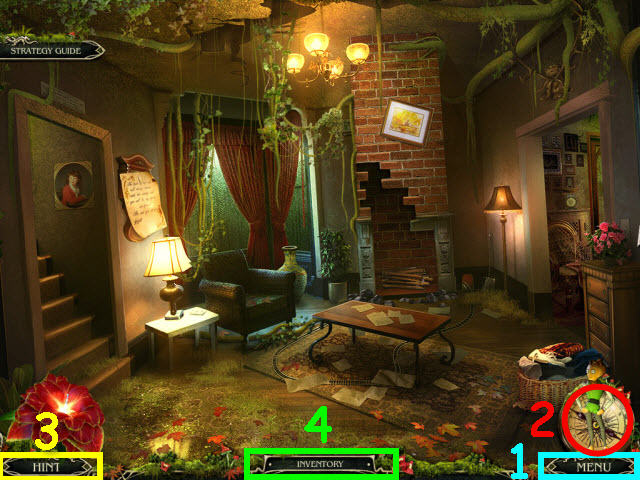
- You will receive a map (2) in the first chapter that will enable you to jump locations quickly.
- Select the Hint button (3) for a hint. There are unlimited hints and the button replenishes quickly.
- Move your cursor down to the bottom of the screen to see your inventory (4).
Chapter 1 – Wishes
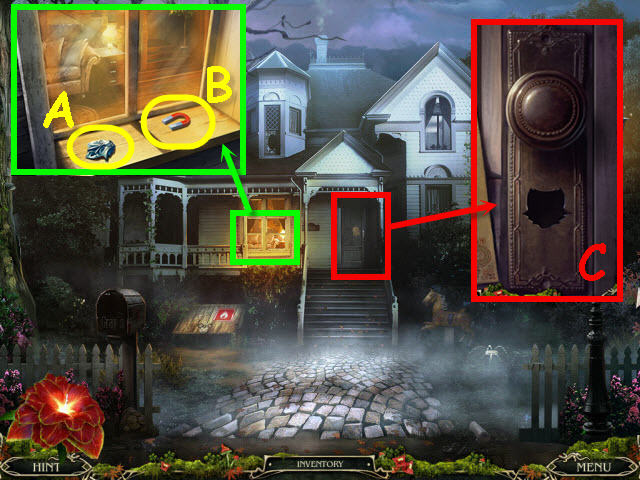
- Examine the front door.
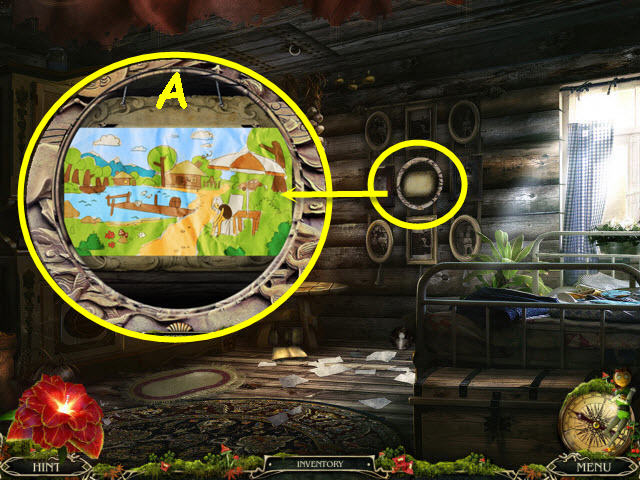
- Examine the window; take the COAT OF ARMS (A) and the MAGNET (B).
- Examine and use the COAT OF ARMS on the front door lock(C).
- Enter the house and go right.
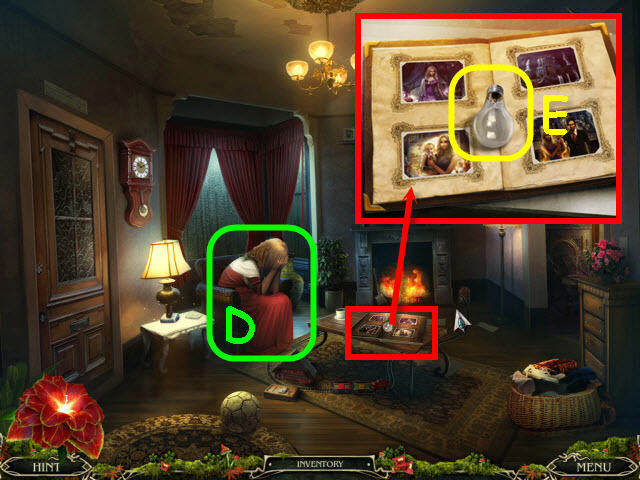
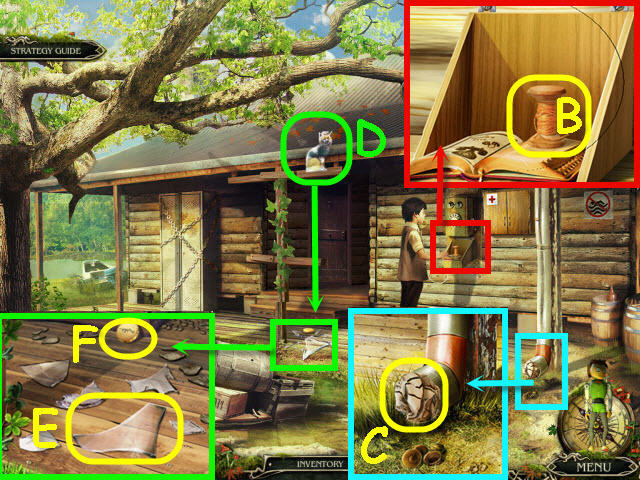
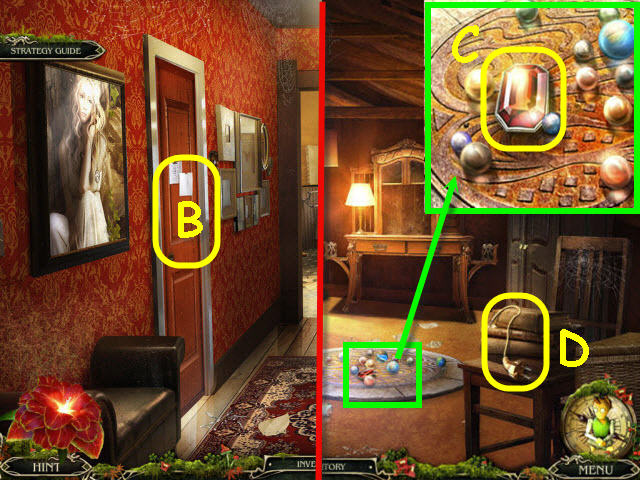
- Speak to Luisa (D).
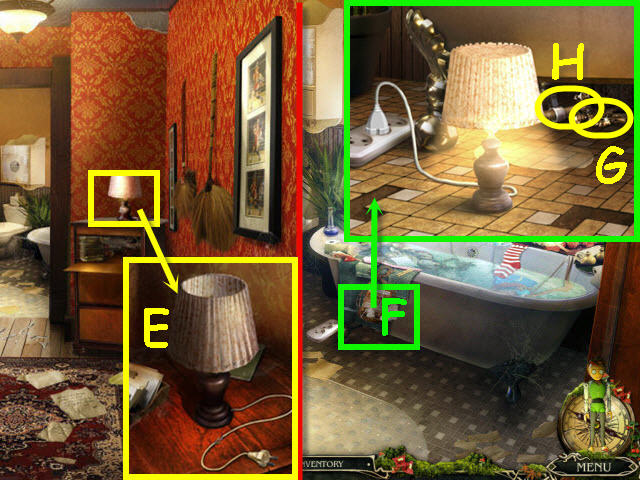
- Examine the photo album; take the LIGHT BULB (E).
- Go right.
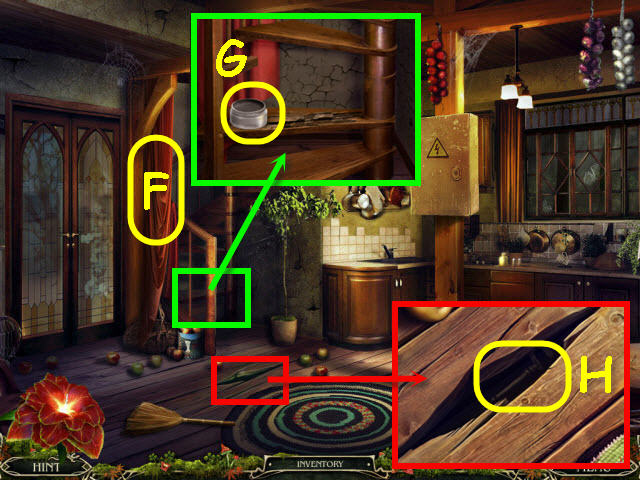
- Move the curtain (F).
- Examine the staircase; take the GRAY PAINT (G).
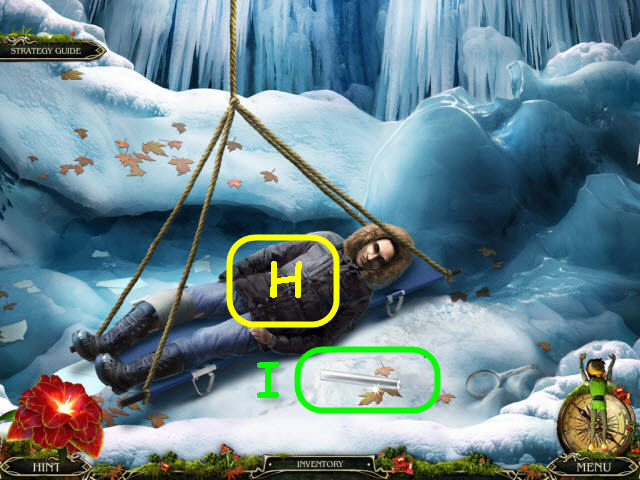
- Examine and use the MAGNET on the crack in the floor to get a KEY (H).
- Back out twice.
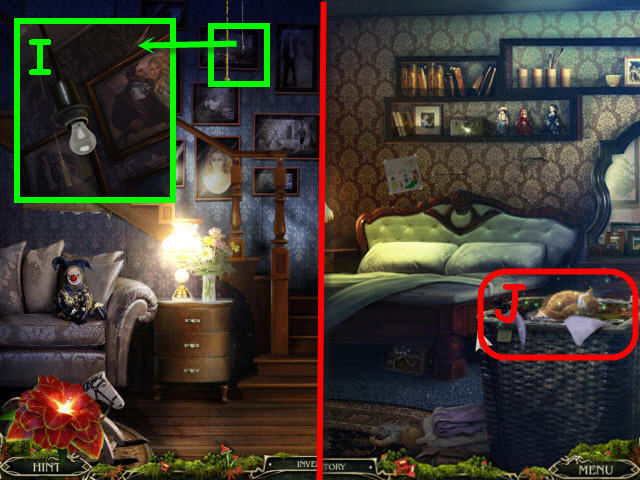
- Examine and place the LIGHT BULB in the light fixture; pull the cord (I).
- Go upstairs and right into Luisa's room.
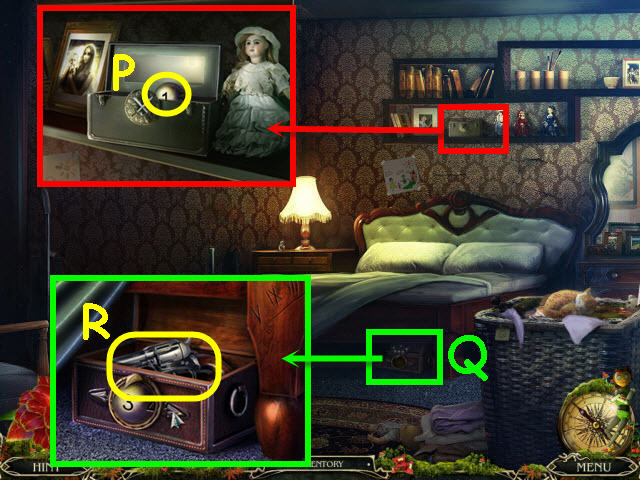
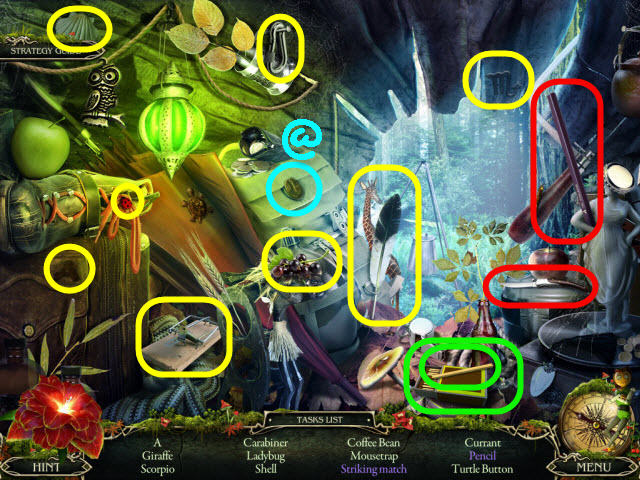
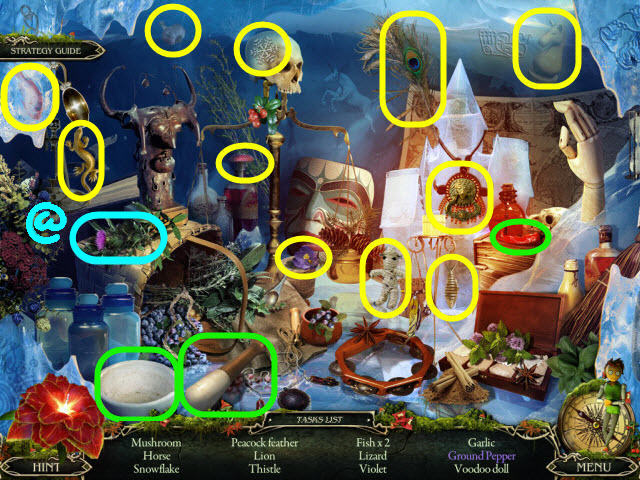
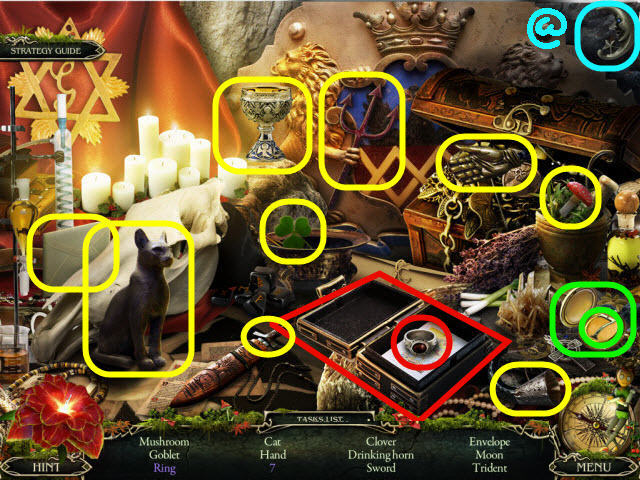
- Examine the basket (J) to access a HOS.
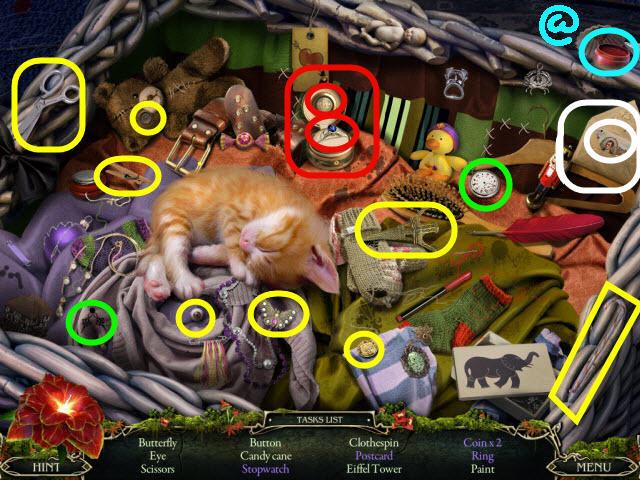
- Find the items listed.
- Marked in red: open the ring case to get the ring and coin.
- Marked in green: place the clock hands on the watch to get a stopwatch.
- Marked in white: open the envelope to get the postcard.
- You will earn RED PAINT (@).
- Back out.
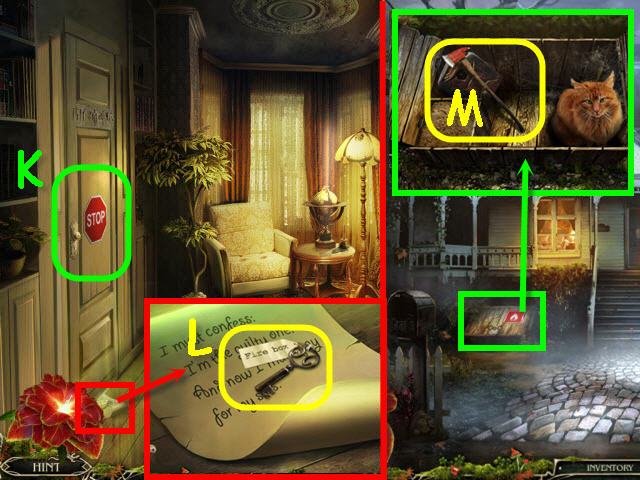
- Examine and use the KEY on the left door (K).
- Back out of the close-up after the cutscene.
- Examine the note; take the FIRE BOX KEY (L).
- Back out to the house entrance.
- Examine and use the FIRE BOX KEY on the fire box; take the AX (M).
- Go back to the second floor.
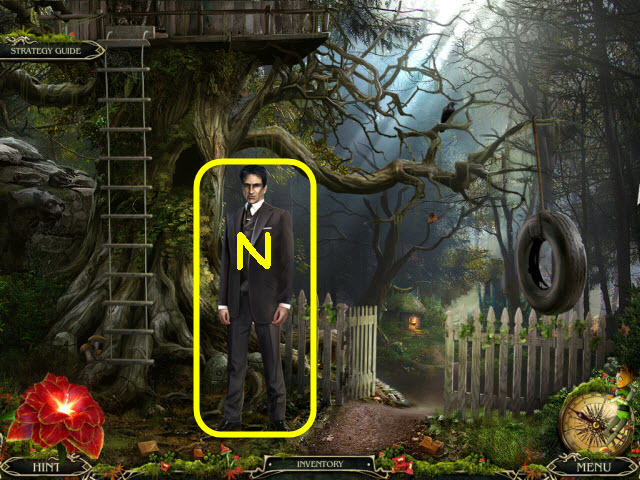
- Examine and use the AX on the left door (K).
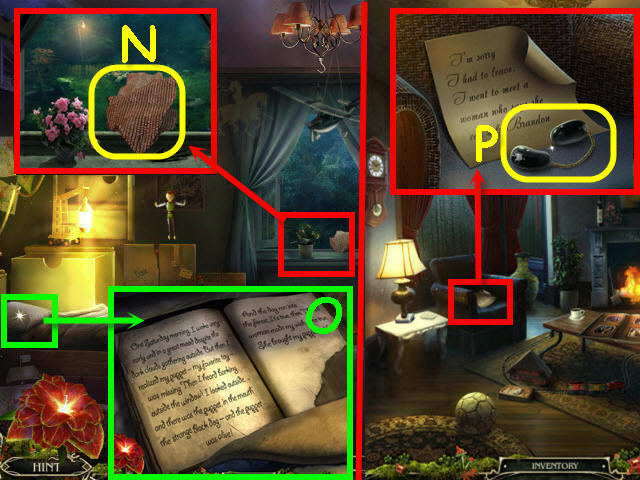
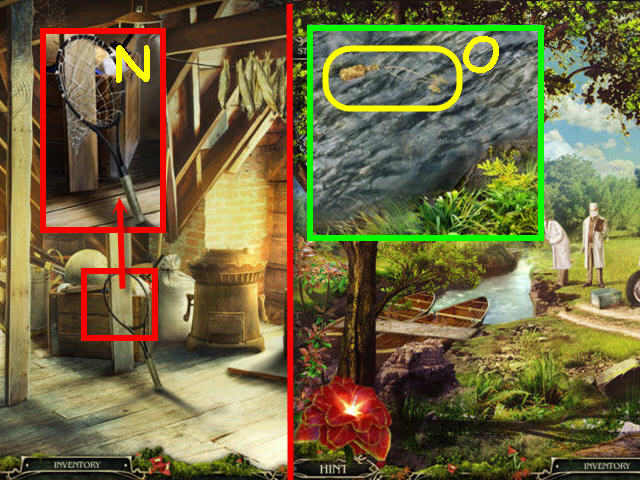
- Examine the window; take the SCARF (N).
- Examine and move the pillow; open the diary (O).
- Back out to the hall and go right.
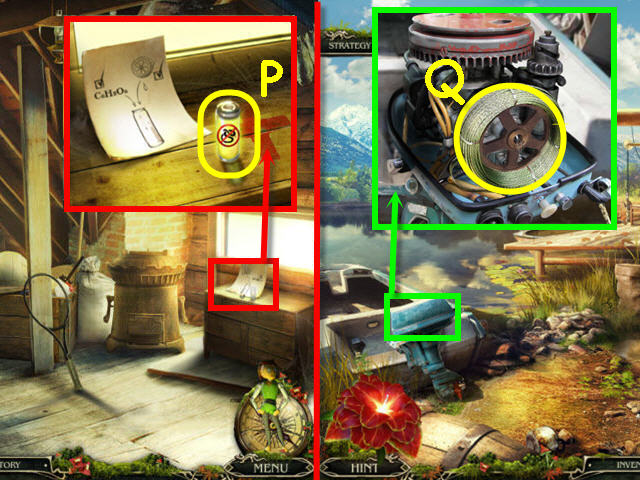
- Examine the chair; take the FLINT (P).
- Go right.

- Examine the table; take the GREEN PAINT (Q).
- Use the FLINT on the candle; take the CANDLE (R).
- Back out.
- Examine and use the CANDLE under the chair.
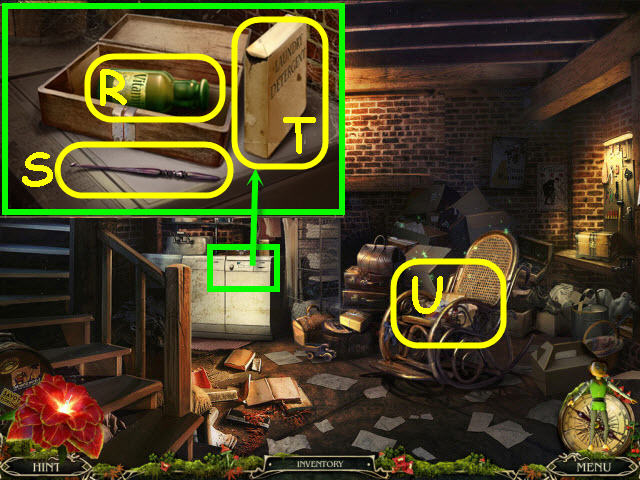
- Move the cloth; take the BOWL OF MILK (S) and BULLET (T).
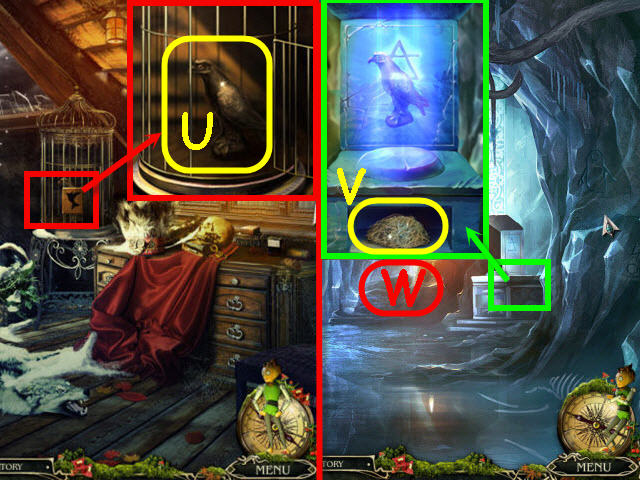
- Examine the fireplace; use the SCARF on the scoop handle and take the SCOOP (U).
- Back out twice.
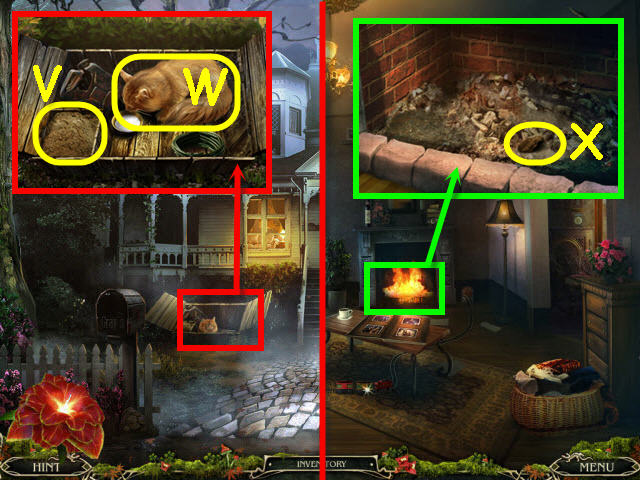
- Examine the fire box; use the SCOOP on the sand (V) to get a SCOOP WITH SAND.
- Give the BOWL OF MILK to the cat; take FLUFFY (W).
- Go to the fireplace room.
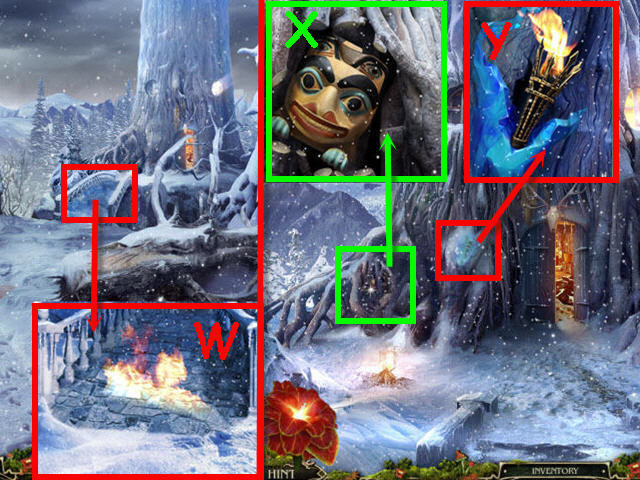
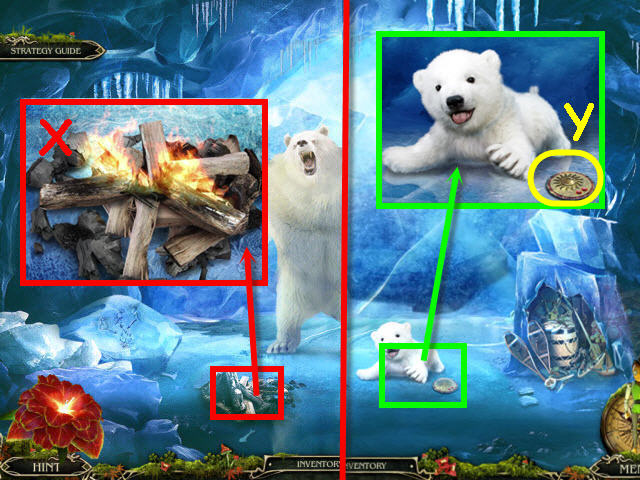
- Examine the fireplace and use the SCOOP WITH SAND on the fire; take the COAL (X).
- Back out, go upstairs and then left into Brandon's room.
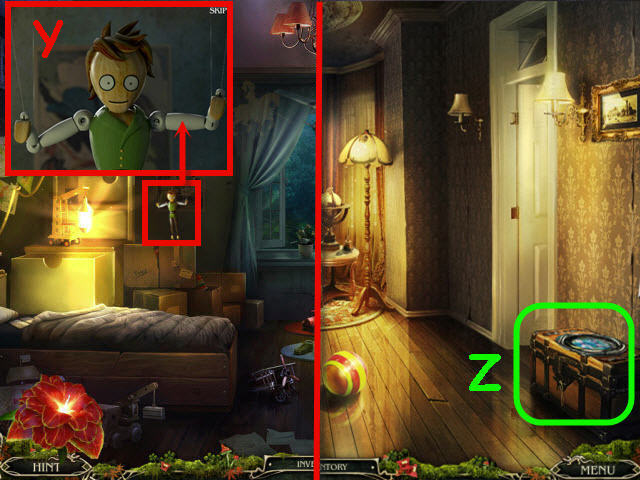
- Examine and use the COAL on the puppet (Y); get a STAINED-GLASS PIECE.
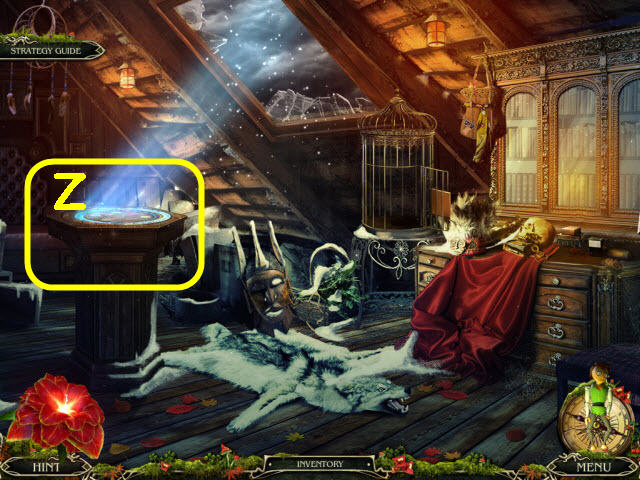
- Back out.
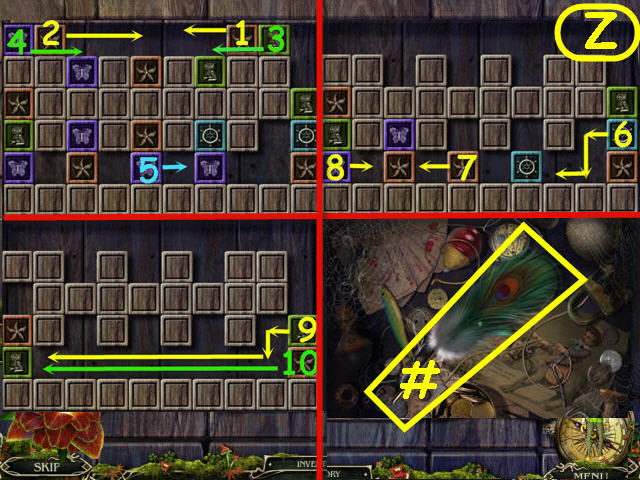
- Examine and place the STAINED-GLASS PIECE on the trunk (Z) to trigger a puzzle.
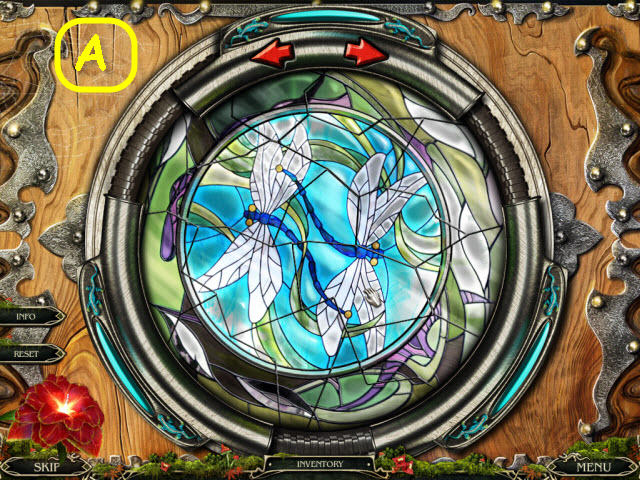
- Assemble the pieces of the puzzle to complete the picture.
- Use the arrows on top to rotate the frame.
- See screenshot for solution (A).
- Take the DOOR HANDLE.
- Go left.
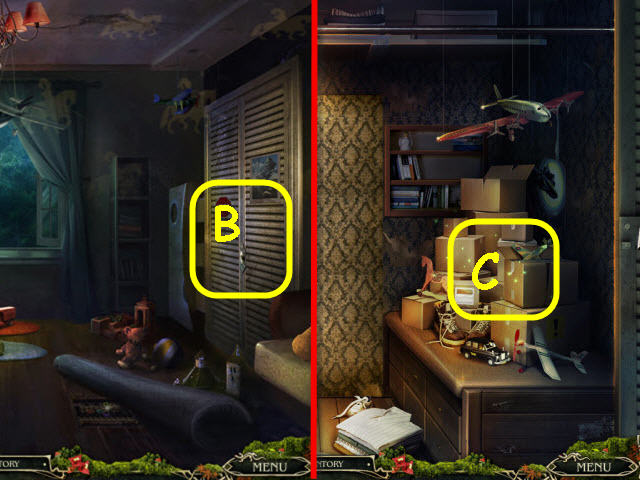
- Examine and place the DOOR HANDLE on the closet door (B).
- Go right into the closet.
- Move the clothes on the hangers out of the way.
- Examine the boxes (C) to access a HOS.

- Find the items listed.
- Marked in red: use the chalk on the chalkboard to get an 8.
- Marked in green: use the glue and the cup piece on the broken cup to get a cup.
- Marked in white: open the coin purse to get the paperclip.
- You will earn a KNIFE (@).
- Back out.

- Examine and use the KNIFE on the puppet (D).
- Go right.
- The puppet and the map will now appear on the lower right.
- Go to Luisa's room.
- Examine and straighten the pictures (E).
- Examine and use the KNIFE on the fallen picture; take the BEE (F).
- Go back to Brandon's closet.
- Examine and place the BEE on the door (G) to trigger a puzzle.
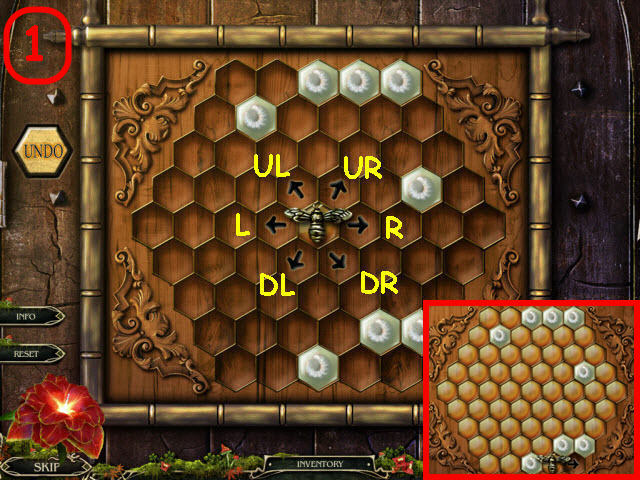
- Use the arrows to move the bee so that all spaces are filled in.
- To solve the puzzle select the arrows (R=Right, U=Upper, L=Left, D=Down) in the following order: R, UL, L, UL, L, DL, DR, R, UL, UR, R, DL, L, DL, R, DL, R, DL, L, DR, R, DR, and R (1).
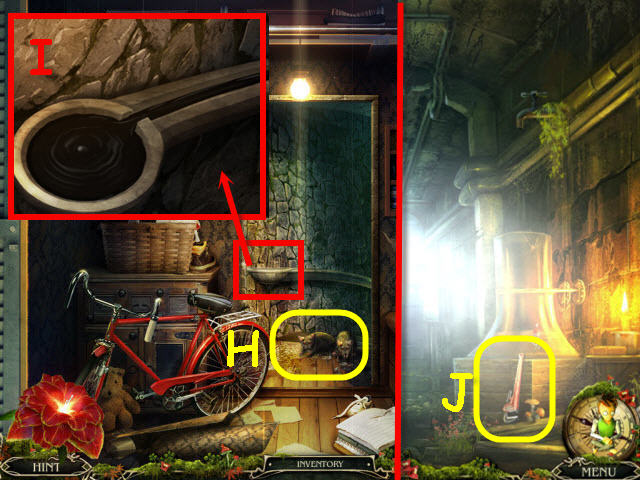
- Use FLUFFY on the rats (H).
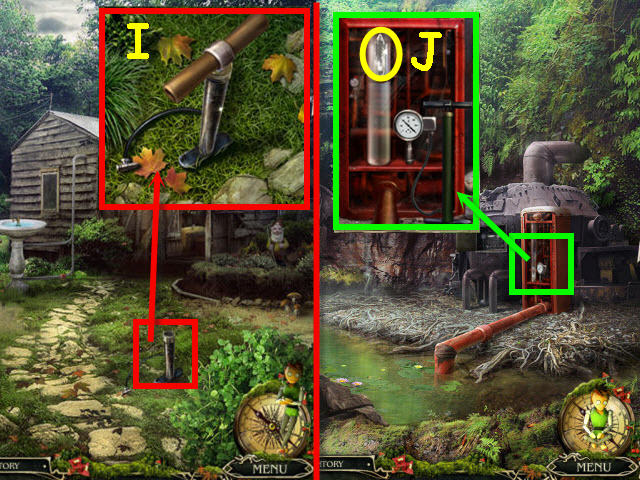
- Examine and use the FLINT on the oil trough (I).
- Go forward to the secret passage.
- Take the PIPE WRENCH (J).
- Go to the house entrance.
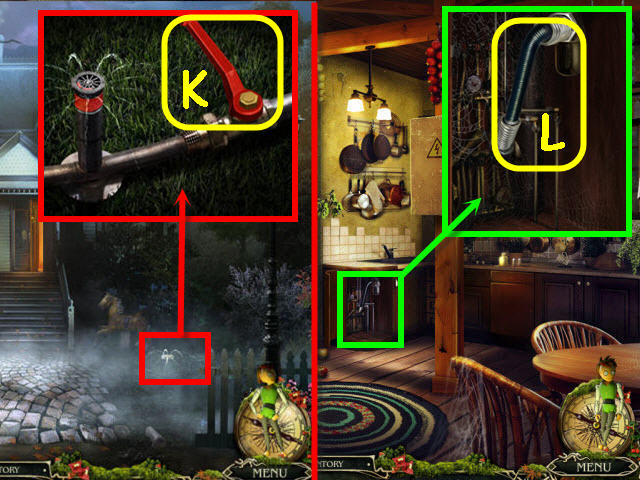
- Examine and use the PIPE WRENCH on the sprinkler to get a VALVE (K).
- Go to the kitchen.
- Examine and open the under sink cabinet; use the PIPE WRENCH to get the HOSE (L).
- Go back to the secret passage.
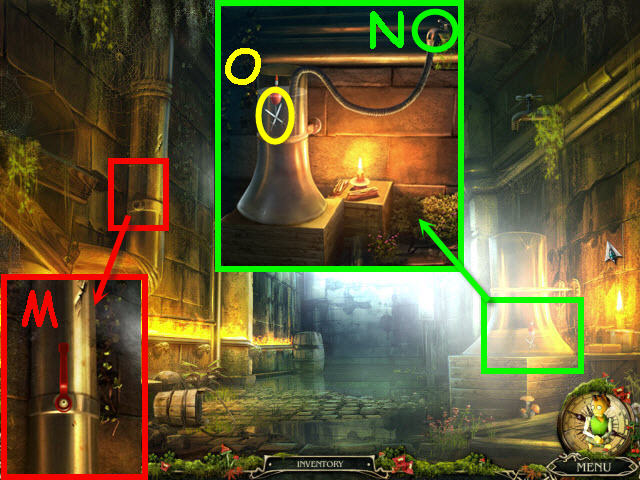
- Examine and use the VALVE on the pipe; turn the VALVE (M).
- Examine and place the HOSE on the glass tube; turn on the tap (N) and take the SWORD MEDALLION (O).
- Go to Luisa's room.
- Examine the shelf; place the SWORD MEDALLION on the box and take the BALL (P).
- Examine and place the BALL on the box under the bed (Q).
- Use the arrows on either side of the ball to select the numbers until all three light turns green.
- The solution is 593.
- Take the HANDGUN (R) and automatically combine the HANDGUN and the BULLET to get a LOADED HANDGUN.
- Go to the secret passage.
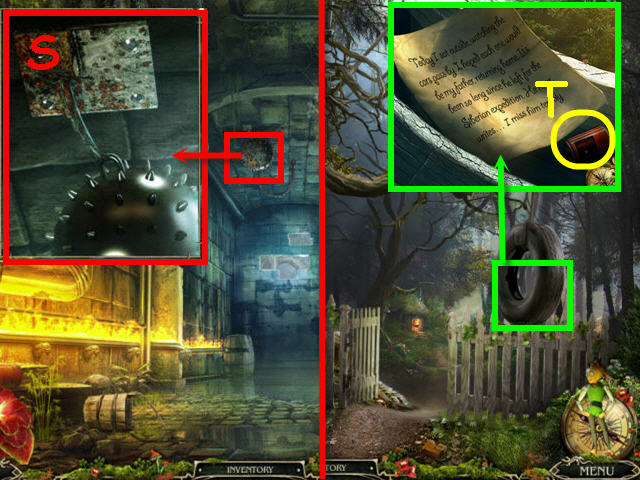
- Examine and use the LOADED HANDGUN on the mace (S).
- Go forward.
- Examine the tire; take the BATTERY (T) and exit out of the close-up.
- Go forward and into the shelter on the left.
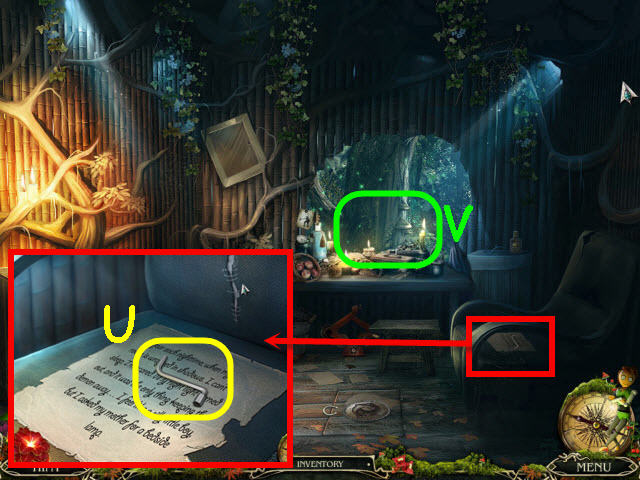
- Examine the note; take the HEXAGONAL WRENCH (U).
- Examine the windowsill (V) to access a HOS.
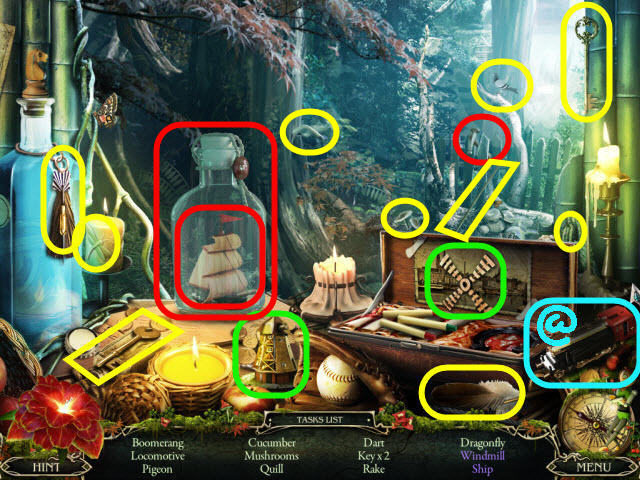
- Find the items listed.
- Marked in green: open the box and place the windmill blades on the windmill to get a windmill.
- Marked in red: use the hammer on the bottle to get a ship.
- You will earn a LOCOMOTIVE (@).
- Back out and go forward.
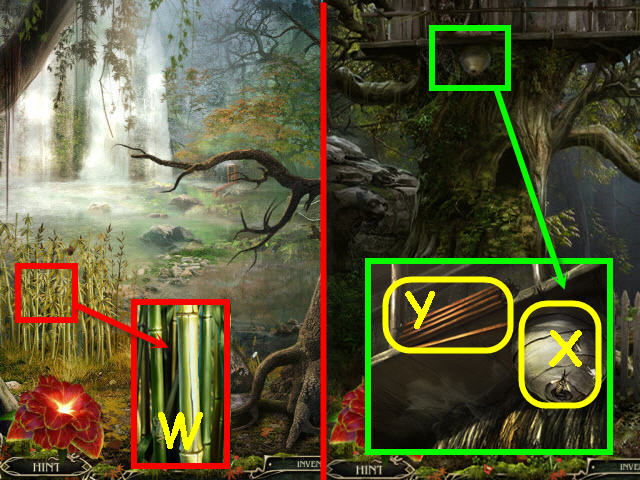
- Examine and use the KNIFE on the bamboo to get BAMBOO (W).
- Back out twice.
- Examine and use the BAMBOO on the beehive (X).
- Use FLUFFY on the ladder (Y).
- Go up into the tree house.
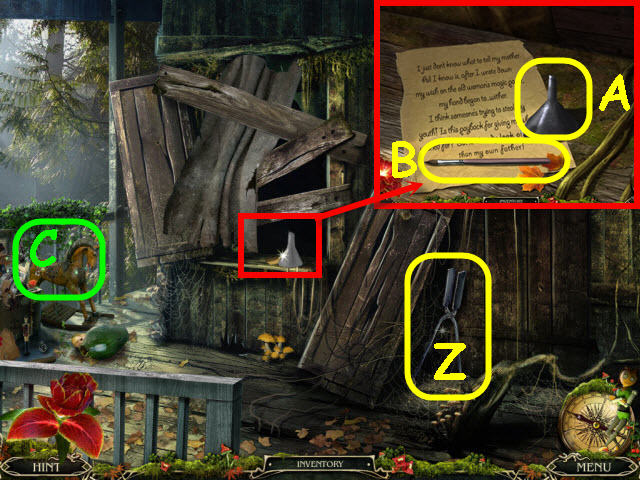
- Take the TONGS (Z).
- Examine the note; take the FUNNEL (A) and PAINTBRUSH (B).
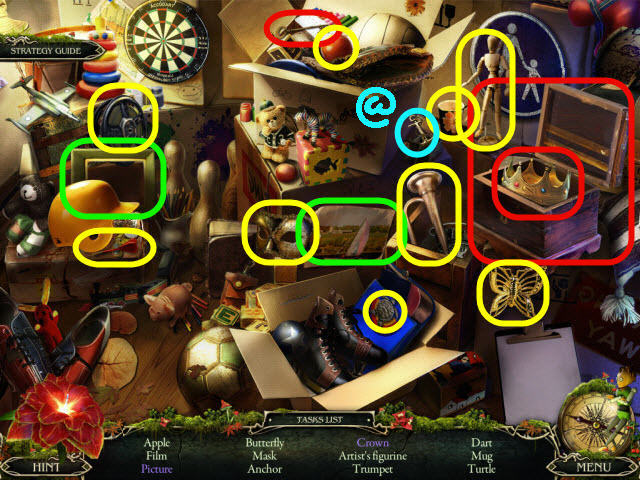
- Examine the rocking horse (C) to access a HOS.
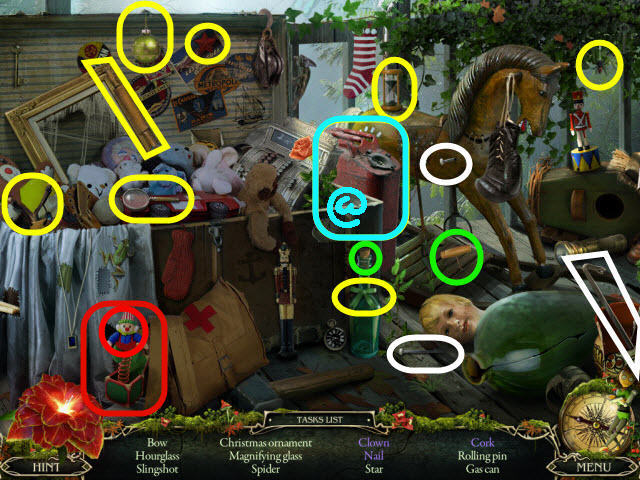
- Find the items listed.
- Marked in red: open the box to get a clown.
- Marked in green: use the cork screw on the cork to get a cork.
- Marked in white: use the crowbar on the nail and pick up the fallen nail to get a nail.
- You will earn a GAS CAN (@).
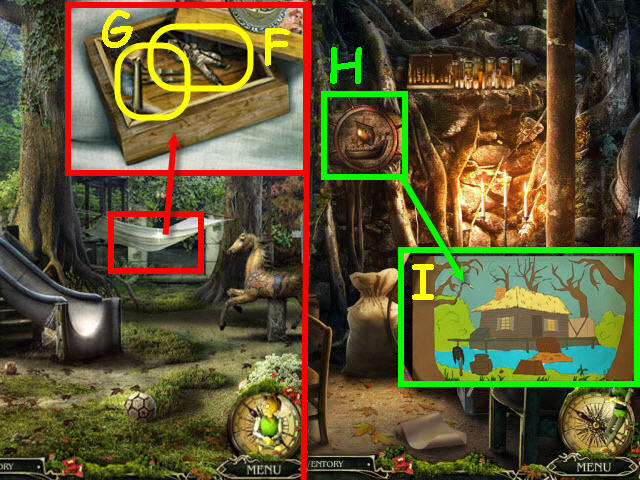
- Go to the swamp.
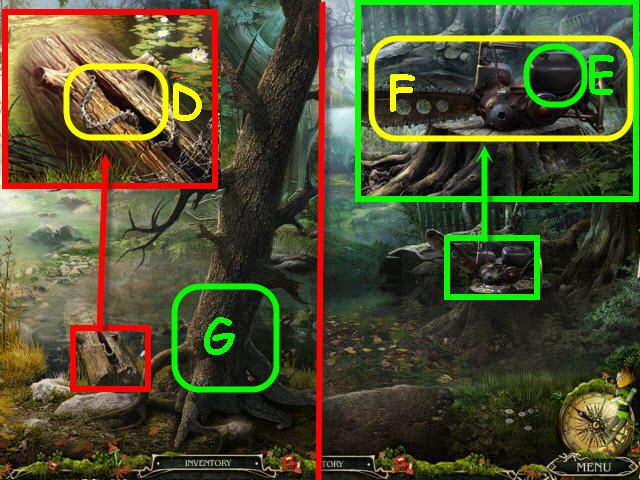
- Examine and use the TONGS on the log; take the CHAIN (D).
- Back out.
- Examine the chainsaw; remove the tank cap and use the FUNNEL and GAS CAN on the tank (E).
- Use the HEXAGONAL WRENCH and CHAIN on the chainsaw; crank the wrench twice and take the CHAINSAW (F).
- Go forward.
- Examine and use the CHAINSAW on the tree (G).
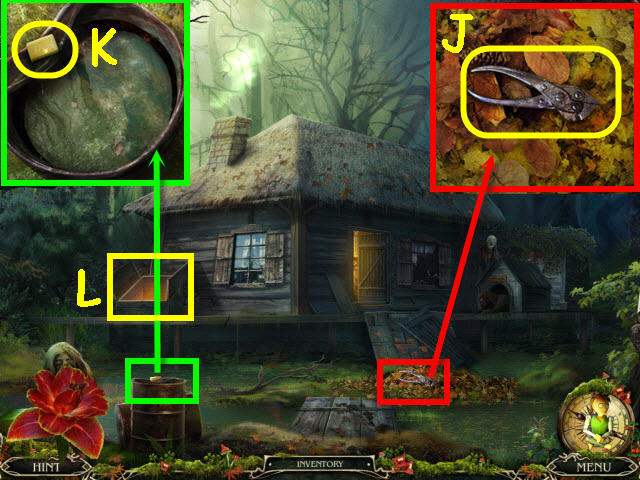
- Go forward on the right to the swamp house.
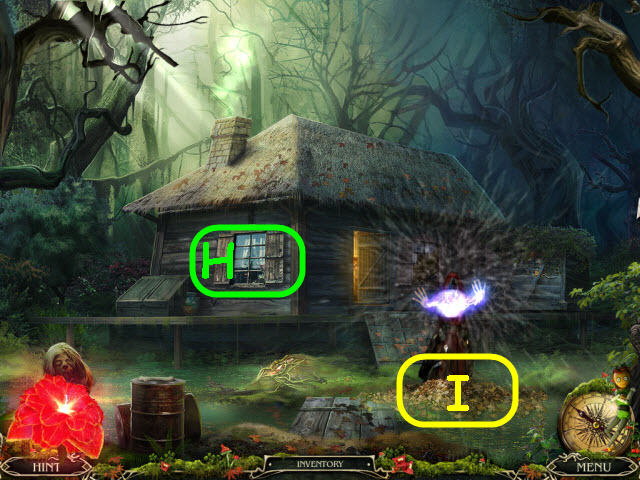
- Examine the window (H).
- Examine and use the FLINT on the leaf pile (I).
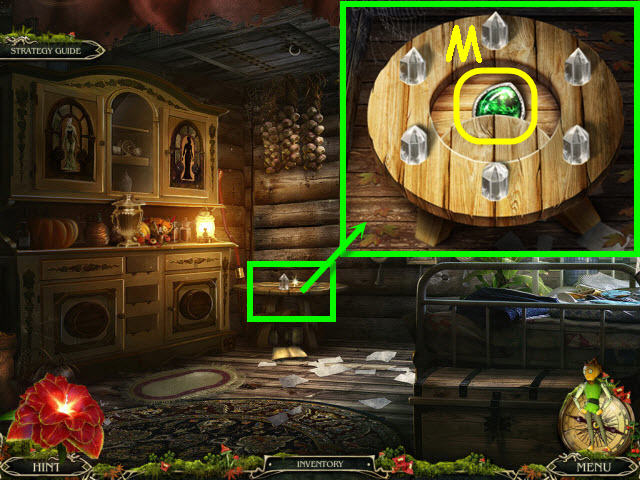
- Go forward into the demon house.
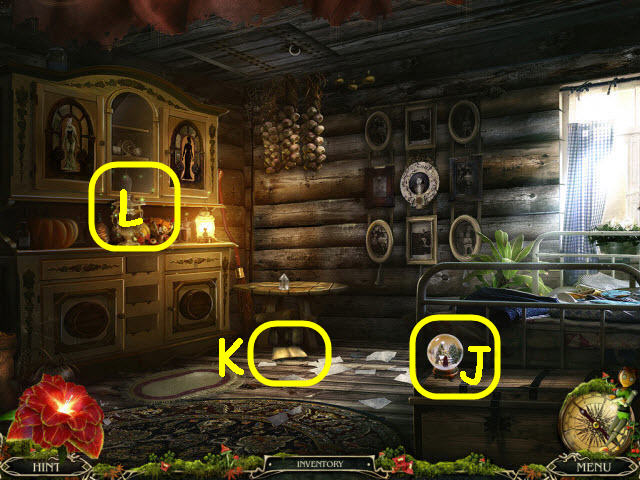
- Examine and take the CRYSTAL BALL (J).
- Examine the note (K).
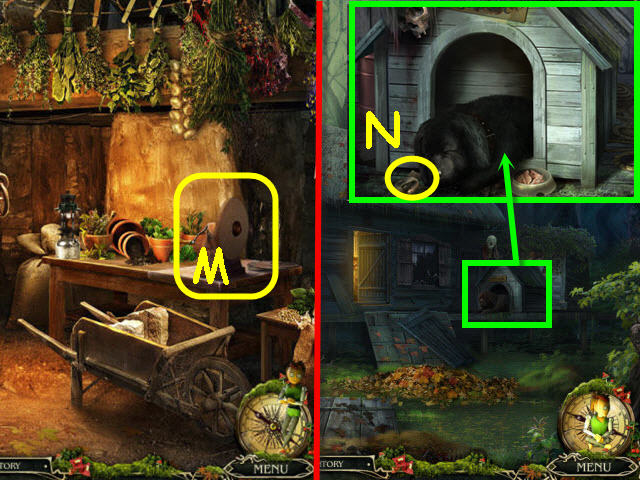
- Examine the hutch (L) to access a HOS.
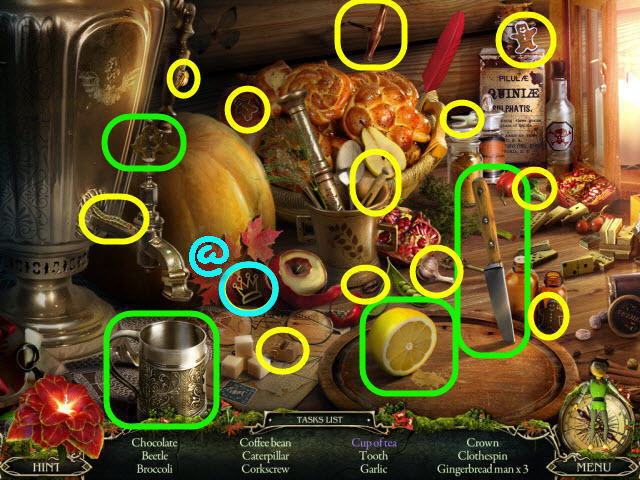
- Find the items listed.
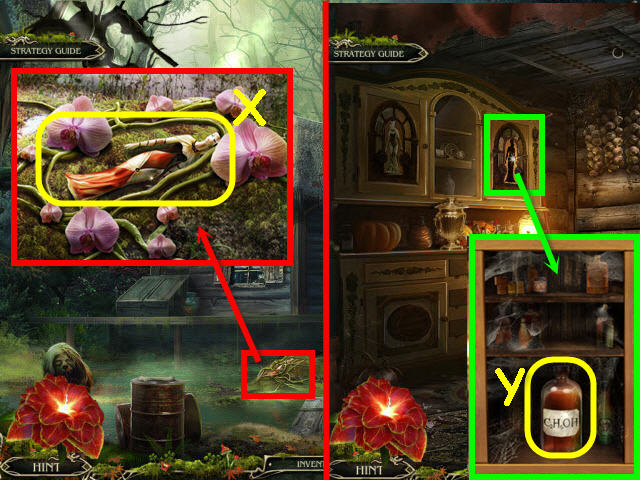
- Marked in green: turn the hot water tap and then use the knife on the lemon and place the lemon slice in the cup to get a cup of tea.
- You will earn a CROWN (@).
- Go to the fireplace room.
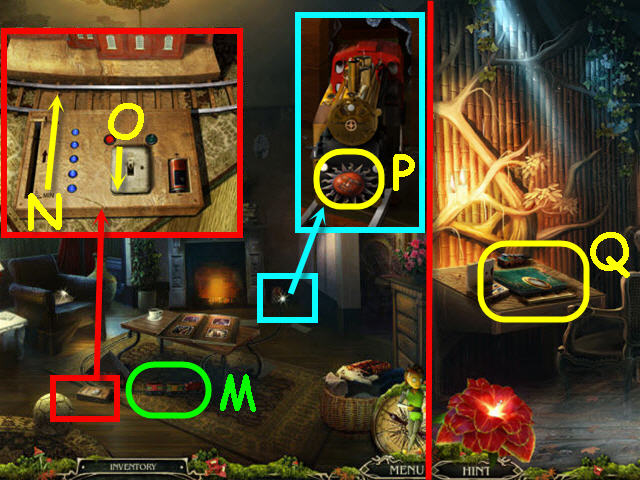
- Examine and place the LOCOMOTIVE on the train (M).
- Examine and place the BATTERY on the railroad controls; set the lever to max (N) and flip the switch (O).
- Examine the hole in the wall; take the SUN MEDALLION (P).
- Go to the shelter.
- Examine and place the RED PAINT, GREEN PAINT, GRAY PAINT, PAINTBRUSH and CROWN on the children's book (Q) to trigger a puzzle.
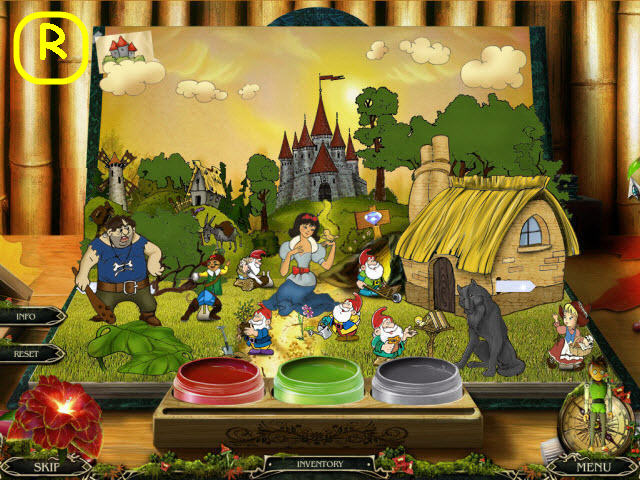

- Finish painting the photo.
- Select the paintbrush and dip in the color of your choice and then select the white area you wish to paint.
- See screenshot for solution (R).
- Place the characters in the correct spots.
- Move the tabs and leaves to find hidden characters (1-3).
- See screenshot for solution (S).
- Take the CHILD'S DRAWING.
- Go to the demon's living room.
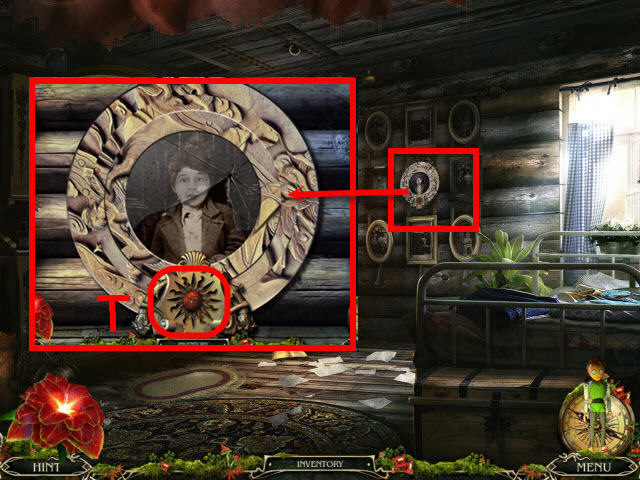
- Examine the frames.
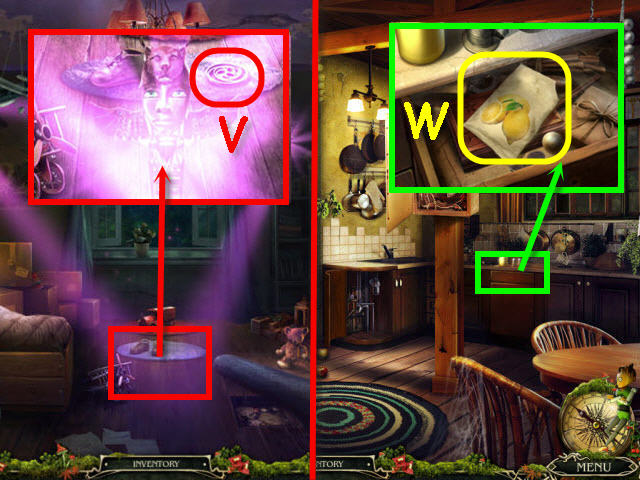
- Place the SUN MEDALLION in the slot (T) to trigger a puzzle.
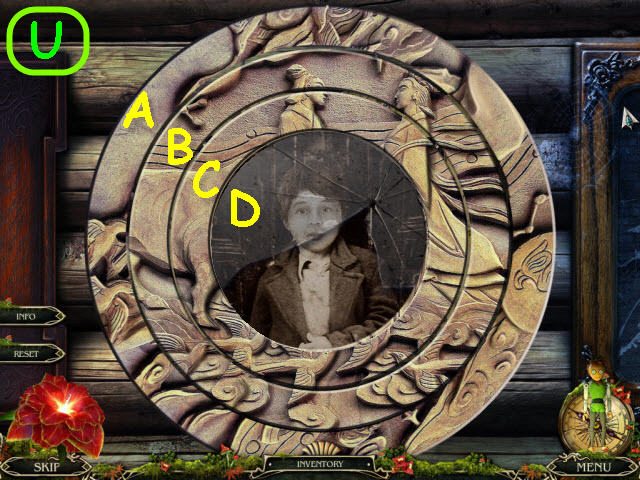
- Rotate the rings to complete the picture.
- To solve the puzzle, rotate the rings in the following order: A x 3, C x 7, A x 9, C x 3, B x 3, A x 5, and D x 5 (U).
- You will get PUZZLE BLOCKS.
- Go to Brandon's room.

- Move the carpet (V).
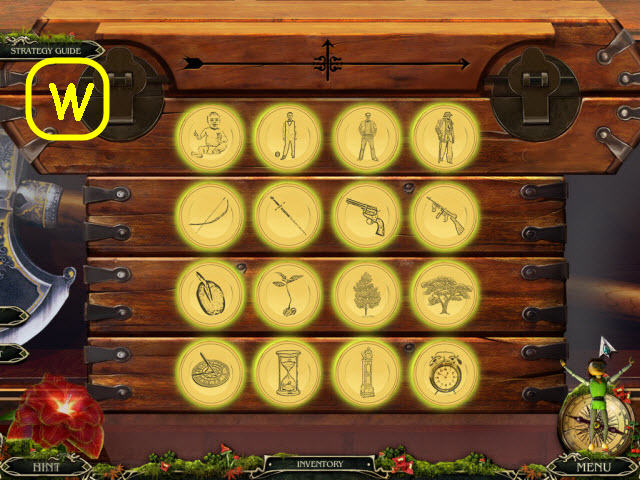
- Examine and place the PUZZLE BLOCKS on the area under the carpet to trigger a puzzle (W).
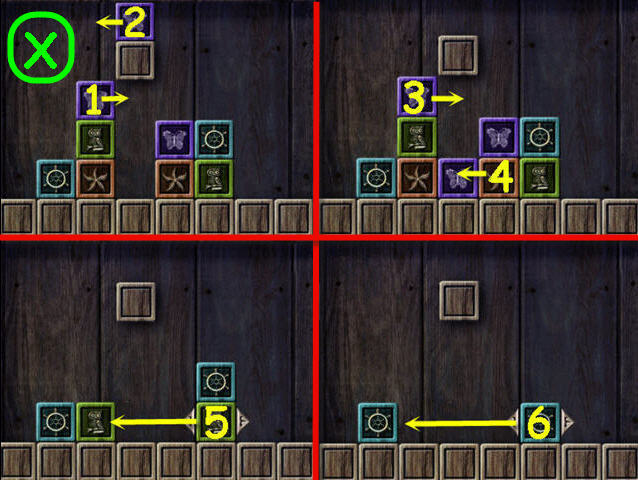

- Place identical cubes together to remove all blocks from the board.
- See screenshot (X) for the first part of the solution.
- See screenshot (Y) for the second part of the solution.
- See screenshot (Z) for the third part of the solution.
- Take the QUILL (#).
- Go to the demon's living room.
- Examine and place the CHILD'S DRAWING in the frame.
- Use the QUILL on the CHILD'S DRAWING (A).
Chapter 2 – Antidote
- Go forward to the house entrance.
- Examine the phone; take the THREAD (B).
- Examine the downspout; take the RAG (C).
- Examine and use FLUFFY on the cat jar (D).
- Examine the broken jar; take the GLASS SHARD (E) and the COIN (F).
- Back out.

- Examine the table; take the 2nd COIN (G).
- Examine and use the GLASS SHARD on the handbag (H).
- Examine the opened handbag to access a HOS.
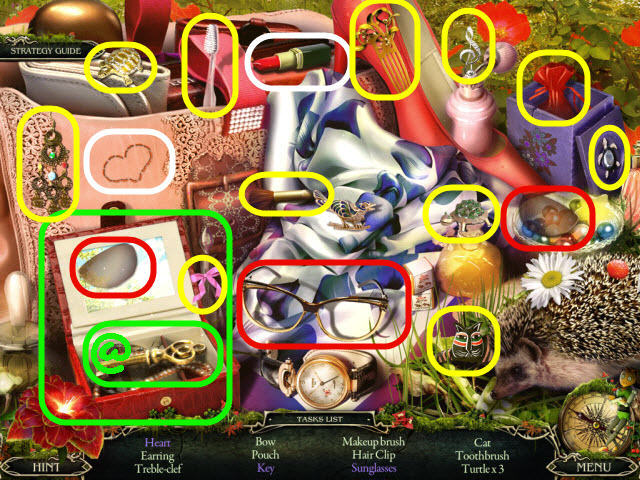
- Find the items listed.
- Marked in green: open the red box to get the key.
- Marked in red: place the lenses in the frame to get sunglasses.
- Marked in white: use the lipstick on the heart to get a heart.
- You will earn a HOUSE KEY (@).
- Go forward to the house.
- Examine the door; use the HOUSE KEY on the lock (I).
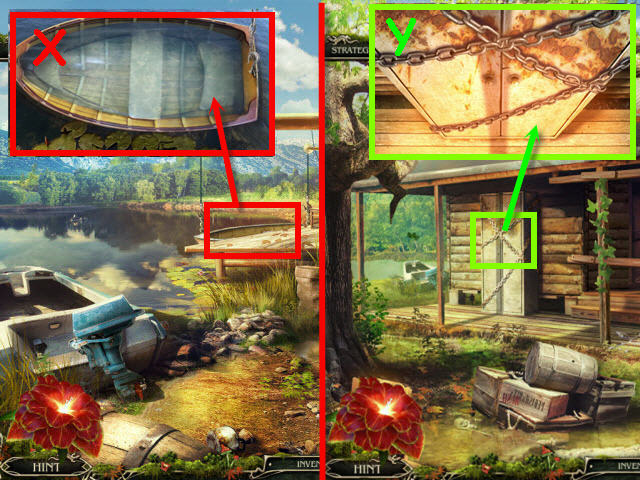
- Go left to the boat dock.
- Examine and use the RAG on the spotlight (J); shine the light on the bear.
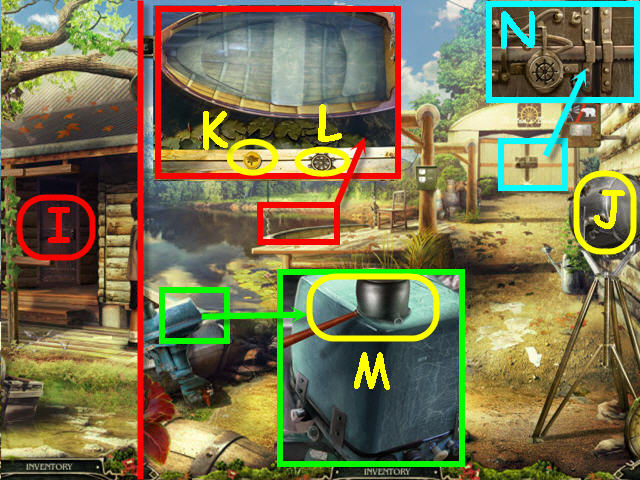
- Examine the boat; take the 3rd COIN (K) and STEERING WHEEL (L).
- Examine the motor; take the CRUCIBLE (M).
- Examine and use the STEERING WHEEL on the boathouse door (N).
- Enter the boathouse.
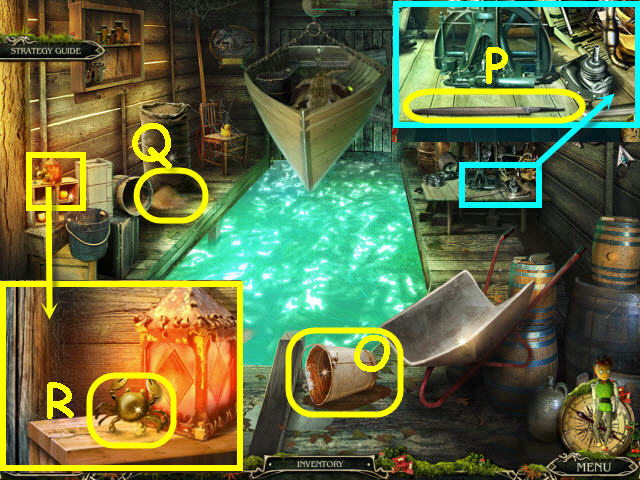
- Take the EMPTY BUCKET (O).
- Examine the engine; take the FILE (P).
- Examine the bag of grain; take the GRAIN (Q).
- Examine the boxes; take the CRAB AMULET(R).
- Go to the fishing pier.
- Examine the chest; place the CRAB AMULET on the shackle lock (S).
- Open the chest; take the LEAD PLUMMETS (T).
- Go to the house entrance and enter.
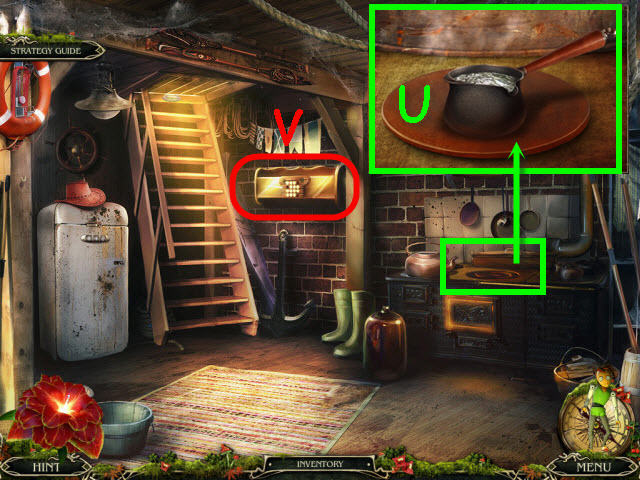
- Examine and place the CRUCIBLE and LEAD PLUMMETS on the stove; take the LEAD (U).
- Examine and place the 3 COINS on the casket to trigger a puzzle (V).
- Arrange the coins in chronological order.
- See screenshot for solution (W).
- Take the AX.
- Go to the boat dock.
- Examine and use the EMPTY BUCKET on the boat (X) to get a BUCKET WITH WATER.
- Back out.
- Examine and use the file on the cabinet (Y).
- Examine the opened cabinet to access a HOS.
- Find the items listed.
- Marked in green: use the key on the safe to get the butterfly.
- Marked in red: open the coin purse to get the domino.
- You will earn an ARROW (@).
- Back out and go straight on the right to the forest.
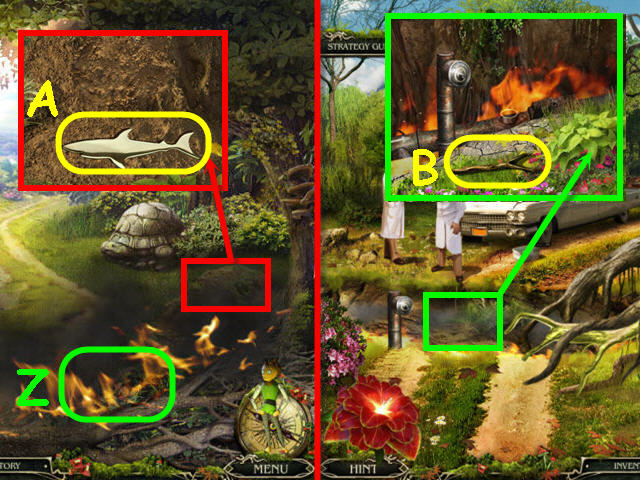
- Use the BUCKET WITH WATER on the fire (Z).
- Examine and use the LEAD on the clay; take the SHARK (A).
- Go forward.
- Examine the ditch; take the FORKED STICK (B).
- Go to the hall of the house.

- Examine and place the SHARK on the hatch lock (C).
- Go up to the attic.
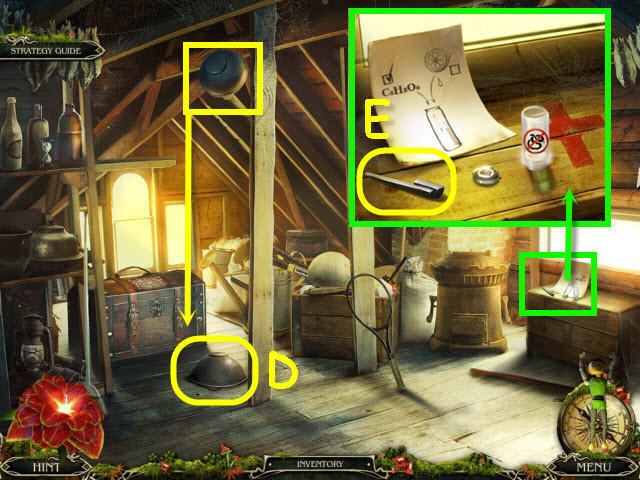
- Use FLUFFY on the stockpot; take the STOCKPOT (D).
- Examine the medicine chest; take the HANDLE (E).
- Back out.

- Examine and use the RAG on the refrigerator to get a clue (F).
- Place the HANDLE on the refrigerator to trigger a puzzle.
- Rotate the tumblers using the code on the fridge as your guide.
- To solve the puzzle, use the code on the lower left and enter: 3, 2, and 4.
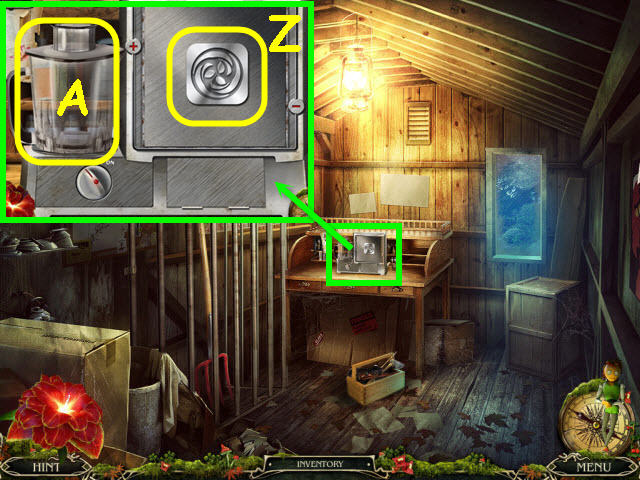
- Select the handle; take the JUICER (G) and FROZEN MEAT (H).
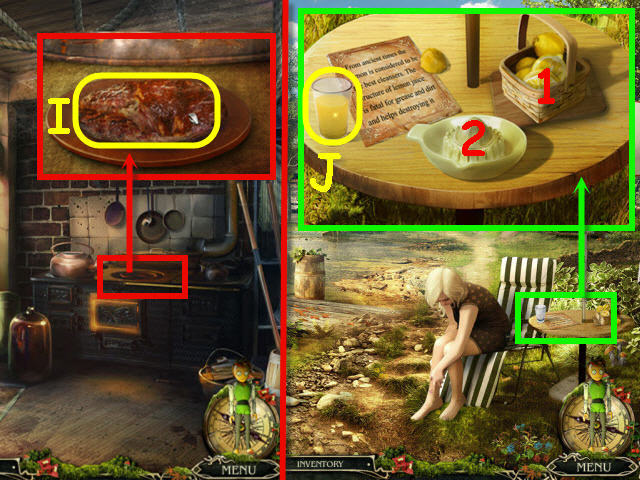
- Examine and place the FROZEN MEAT on the furnace; take the COOKED MEAT (I).
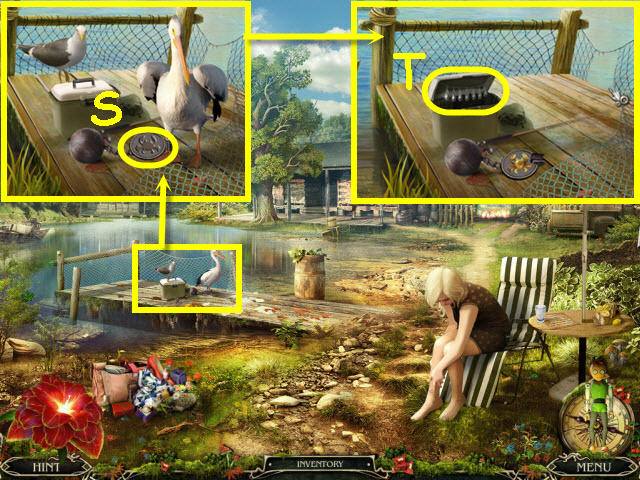
- Go to the fishing pier.
- Examine and place the JUICER on the table; select a lemon slice (1), then select the juicer (2) and take the LEMON JUICE (J).
- Go forward to the forest.
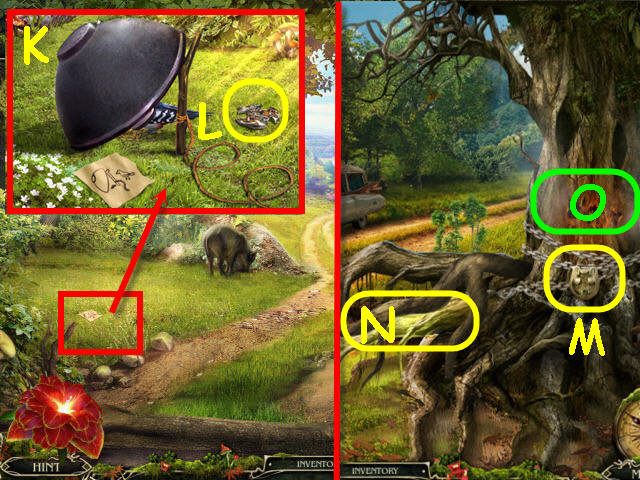
- Examine and place the STOCKPOT, FORKED STICK, THREAD and GRAIN on the clearing (K).
- Knock over the STOCKPOT; take the DRAGON AMULET (L).
- Go forward.
- Examine and place the DRAGON AMULET on the tree lock (M).
- Examine and use the AX on the demon's root (N).
- Examine the tree hollow (O) to access a HOS.
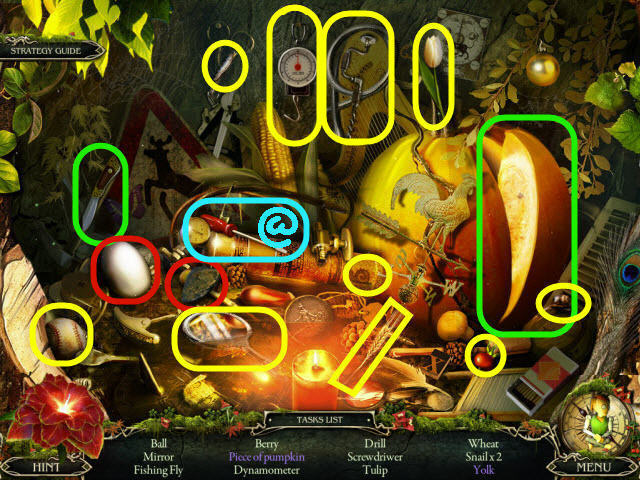
- Find the items listed.
- Marked in green: use the knife on the pumpkin to get a piece of pumpkin.
- Marked in red: use the rock on the egg to get a yolk.
- You will earn a SCREWDRIVER (@).
- Go to the attic.
- Examine and place the LEMON JUICE on the medicine chest; take the YELLOW VIAL (P).
- Go to the boat dock.
- Examine and use the SCREWDRIVER on the motor; take the CORD (Q).
- Go forward.
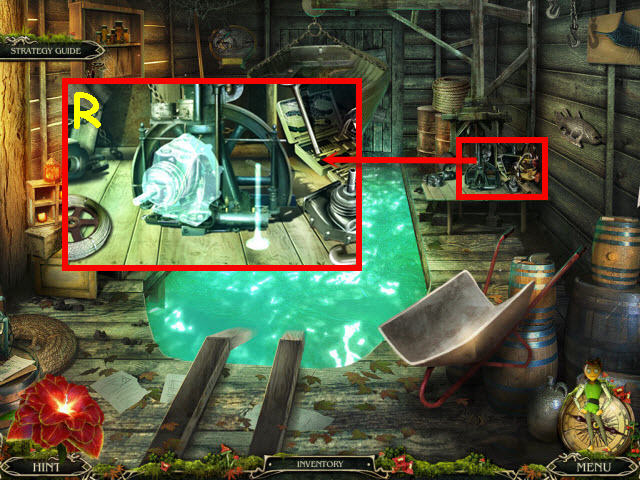
- Examine the engine (R).
- Place the CORD by the parts to trigger a puzzle.
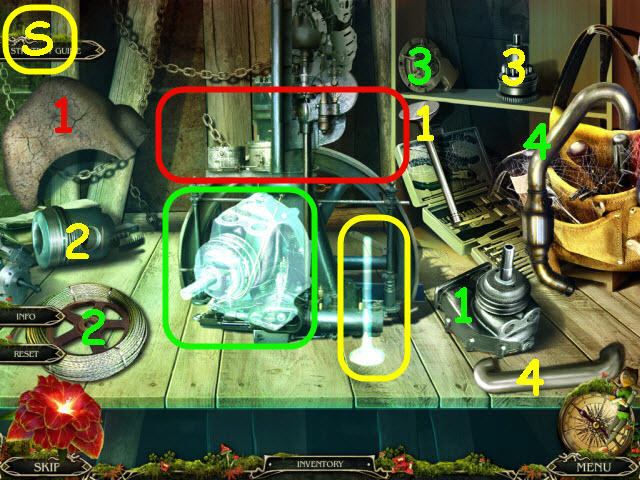
- Assemble the engine.
- To solve the puzzle, place the parts in numerical order by their matching colors as marked in the screenshot (S).
- Pull the cord when complete.
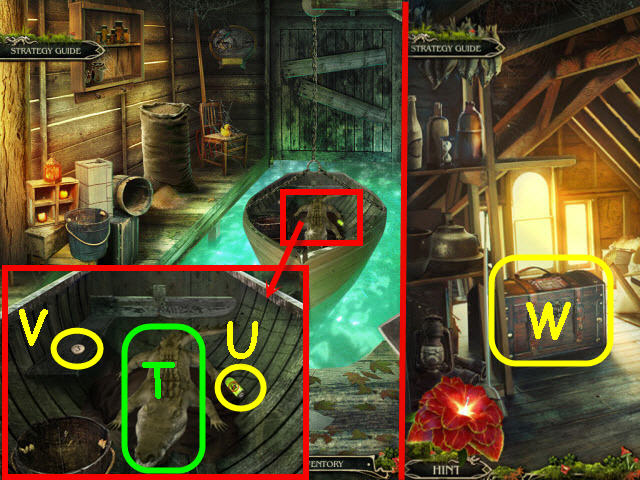
- Examine and give the COOKED MEAT to the crocodile (T).
- Examine the boat; take the GREEN VIAL (U) and WOODEN COIN (V).
- Go to the attic.
- Examine and place the WOODEN COIN on the chest (W) to trigger a puzzle.
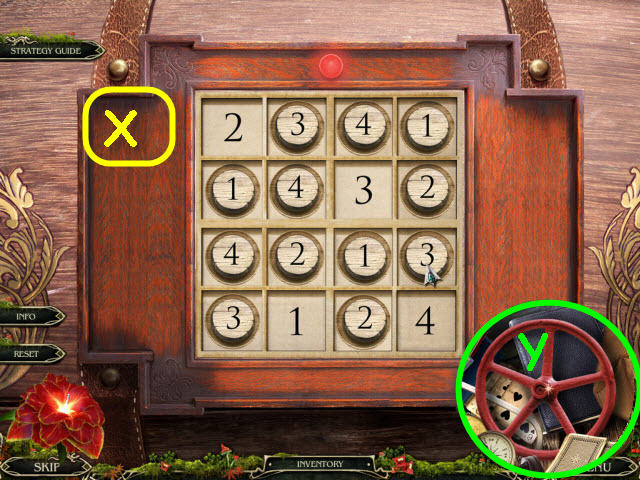
- Place the digits on the board so that each row, column, and block each contain one of every number.
- See screenshot for solution (X).
- Take the VALVE (Y).
- Go to the gap in the road.
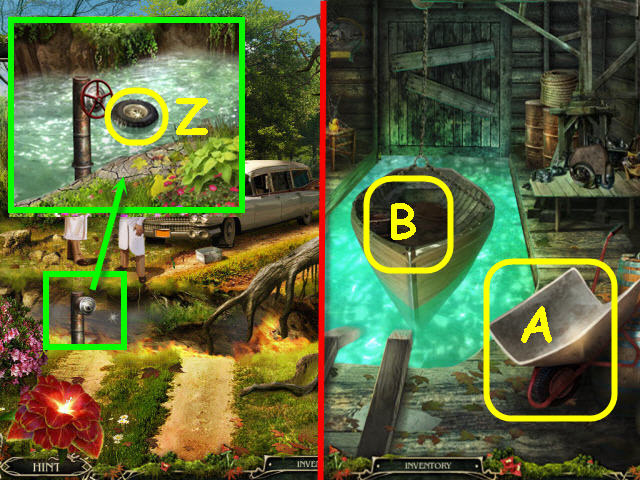
- Examine the ditch; place the VALVE on the pipe and take the WHEEL (Z).
- Go to the boathouse.
- Examine and place the WHEEL on the wheelbarrow; take the WHEELBARROW (A).
- Use the WHEELBARROW on the boat (B); take the BOAT.
- Go to the gap in the road.
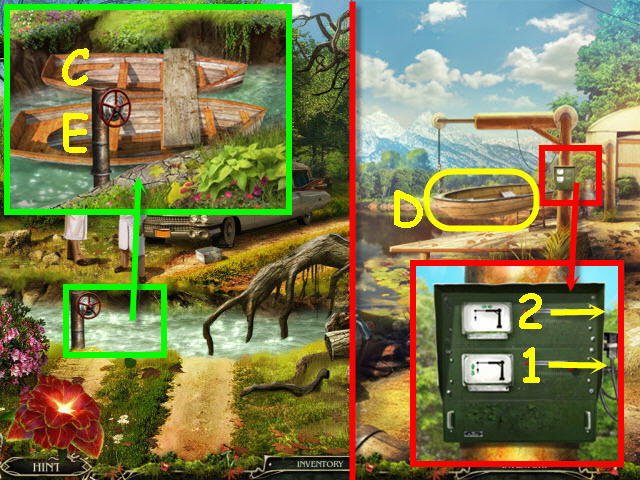
- Examine and place the BOAT in the ditch (C); get a WHEELBARROW.
- Go to the boat dock.
- Examine the crane controls; move the bottom lever to the right (1).
- Examine the crane controls; move the top lever to the right (2).
- Use the WHEELBARROW on the boat; take the BOAT (D).
- Go to the gap in the road.
- Examine and place the BOAT in the ditch (E).
- Go straight.
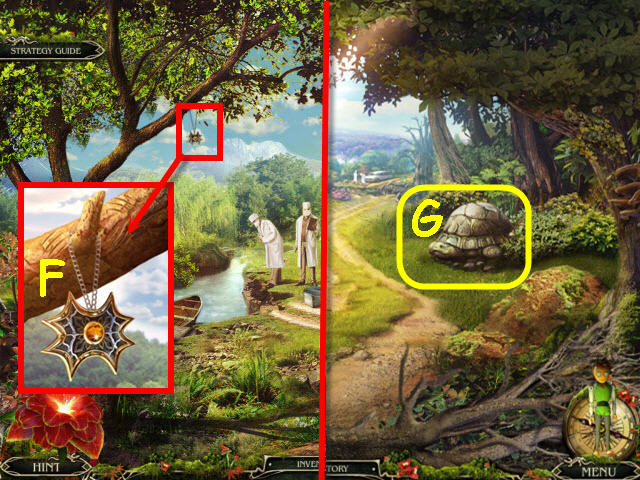
- Examine and use FLUFFY on the branch; get a MEDALLION (F).
- Go to the forest.
- Examine and use the MEDALLION on the tortoise (G) to trigger a puzzle.
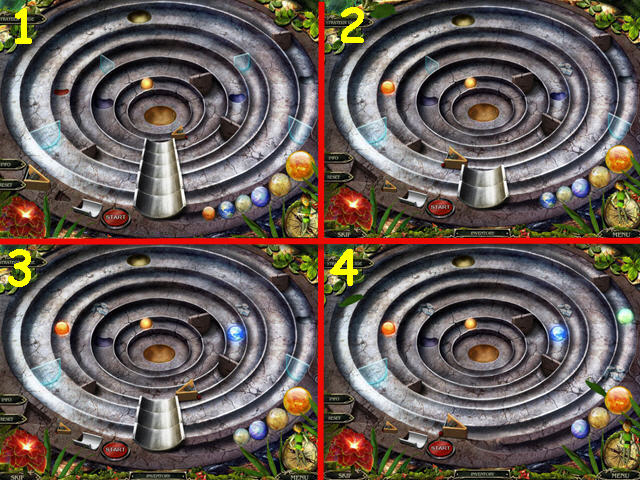
- Place the planets in their corresponding slots.
- Press the start button after you have the grooves and catapults in the proper position.
- The solutions are listed below.
- First planet; 5 grooves and small catapult on the right (1).
- Second planet: 2 grooves and large catapult on the left (2).
- Third planet: 3 grooves and large catapult on the right (3).
- Fourth planet: large catapult on the left (4).
- Fifth planet: 4 grooves and small catapult on the right (5).
- Sixth planet: 1 groove and large catapult on the left (6).
- Seventh planet: 7 grooves (7).
- Take the BOW and automatically combine the ARROW and BOW to get a CHARGED BOW.
- Go to the house entrance.

- Examine and use the CHARGED BOW on the target (H).
- Examine the downspout; take the ACORNS (I).
- Go to the forest.
- Examine and use the ACORNS on the anthill; take the LEAF AMULET (J).
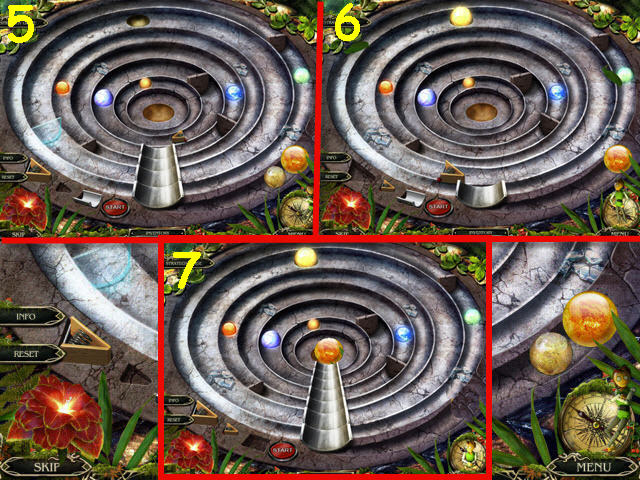
- Go to the ambulance.
- Examine and place the LEAF AMULET on the case; take the SYRINGE NEEDLE (K).
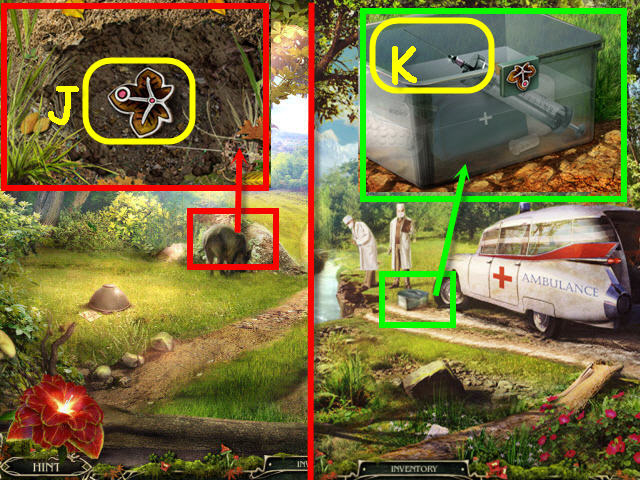
- Go inside the ambulance.
- Examine and use the SYRINGE NEEDLE on the glove compartment; take the SCISSORS (L).
- Go to the fishing pier.
- Examine the chest; use the SCISSORS to get the FISHNET (M).
- Go to the attic.
- Examine and place the FISHNET on the tennis racket; take the SCOOP NET (N).
- Go to the ambulance.
- Examine and use the SCOOP NET on the stream; get a CADUCEUS KEY (O).
- Go inside the ambulance.
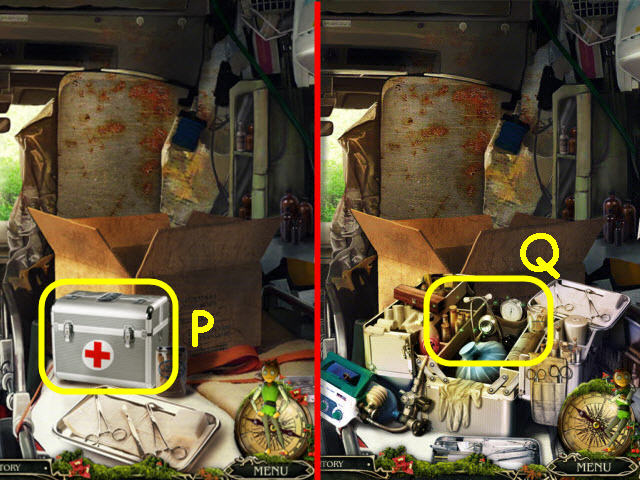
- Examine and place the CADUCEUS KEY on the medicine chest (P).
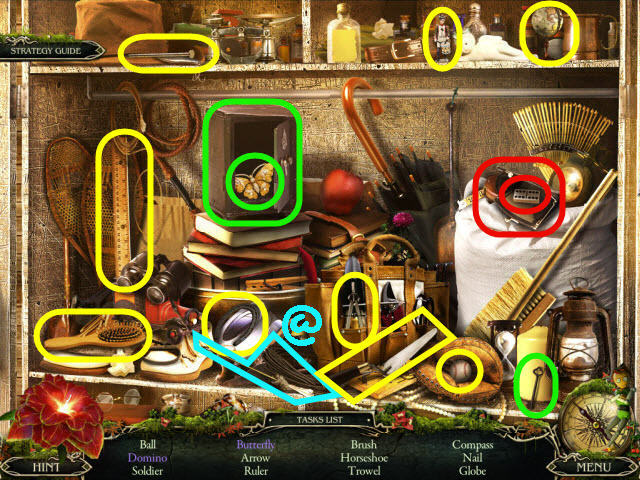
- Examine the opened medicine chest to access a HOS (Q).
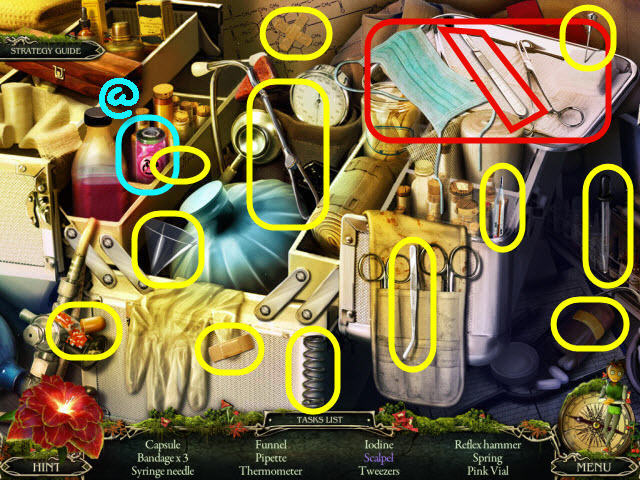
- Find the items listed.
- Marked in red: move the mask to get the scalpel.
- You will earn a PINK VIAL (@).
- Go to the house entrance.
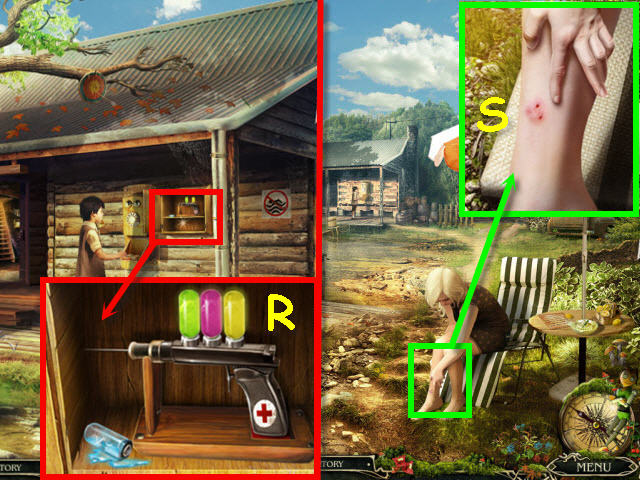
- Examine and open the medicine chest; place the YELLOW VIAL, GREEN VIAL, and PINK VIAL in the injector; take the ANTIDOTE (R).
- Back out.
- Examine and use the ANTIDOTE on Luisa's leg (S).
Chapter 3 – The Second Wish
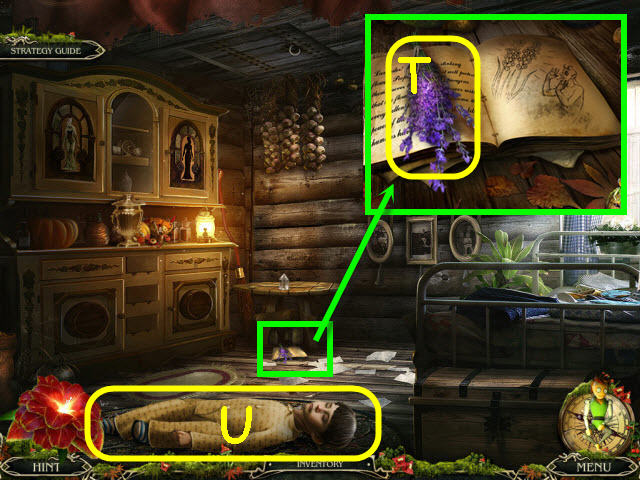
- Examine the note; take the LAVENDER (T).
- Take BRANDON (U).
- Go to Brandon's Room.
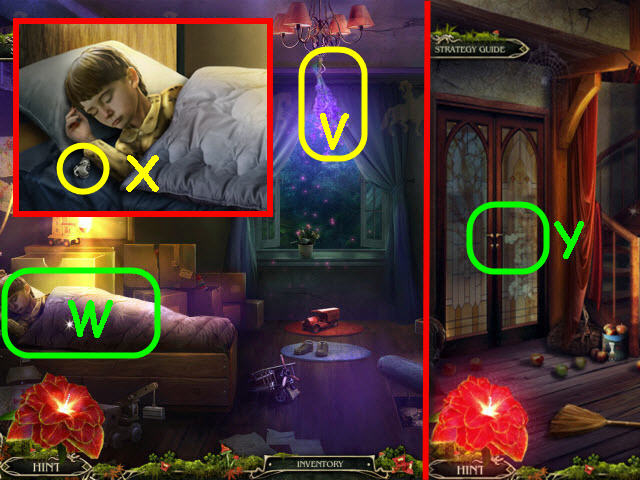
- Examine and hang the LAVENDER on the chandelier (V).
- Examine and place BRANDON in the bed (W).
- Examine Brandon; take the HORSE (X).
- Go to the kitchen.
- Examine and place the HORSE on the door lock (Y).
- Go through the newly-opened door to the backyard.
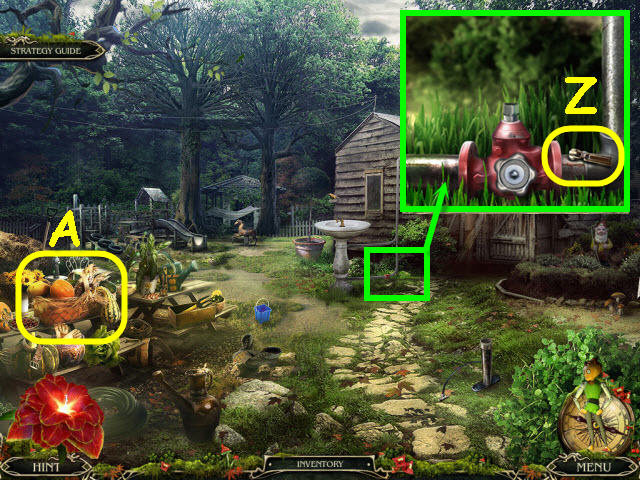
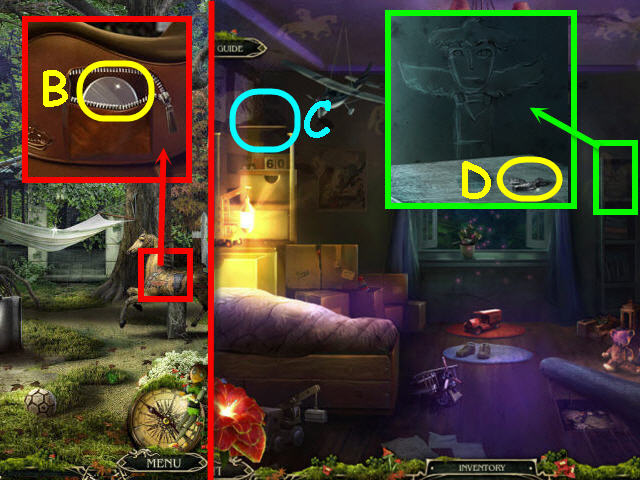
- Examine the pipe; take the ZIPPER PULL (Z).
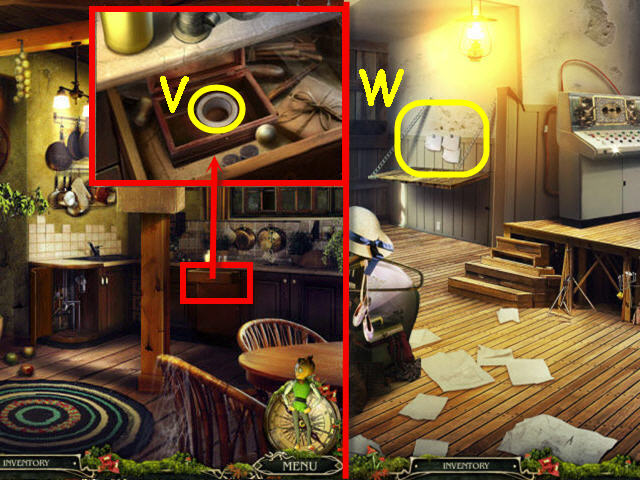
- Examine the table to access a HOS (A).
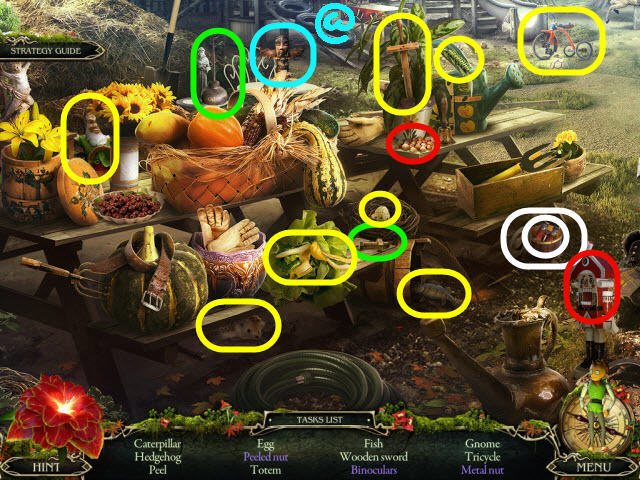
- Find the items listed.
- Marked in green: use the oiler on the bolt to get a screw nut.
- Marked in red: place the nut in the nutcracker and then select the nutcracker to get a peeled nut.
- Marked in white: open the case to get the binoculars.
- You will earn a TOTEM (@).
- Go forward to the playground.
- Examine the hobby horse; place the ZIPPER PULL on the zipper and take the GLASS (B).
- Go to Brandon's room.
- Examine and place the TOTEM in the left corner (C).
- Examine the right corner; take the DOVE (D).
- Go to the house entrance.
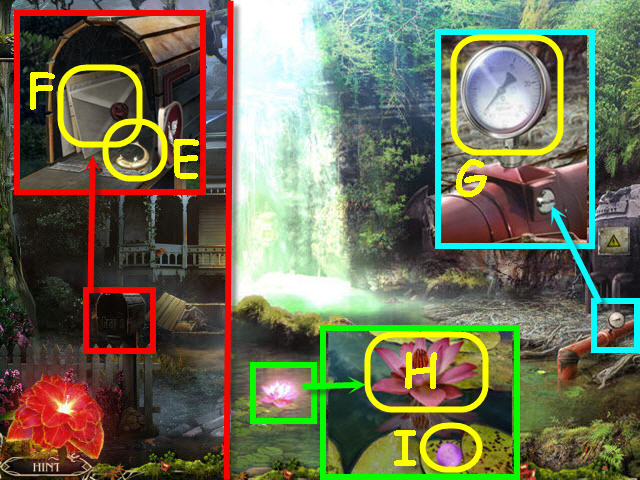
- Examine and place the DOVE on the mailbox; take the FISH (E).
- Open and read both pages of the letter (F).
- Go to the swamp.
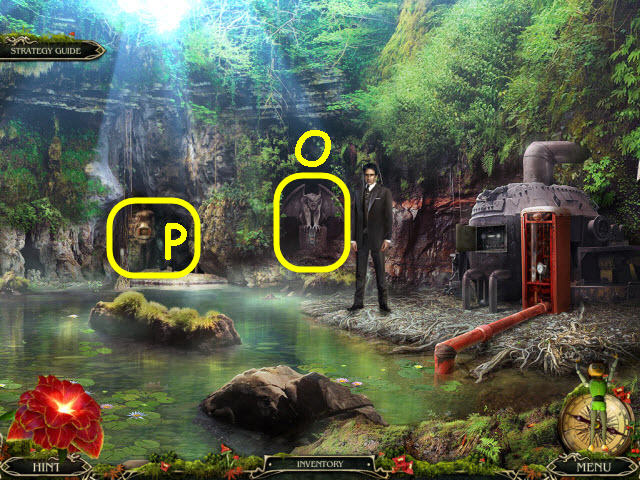
- Go forward to the waterfall.
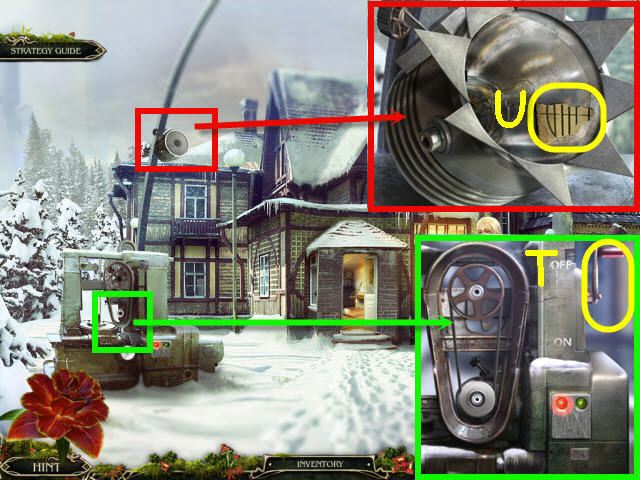
- Examine the sensor; remove the broken glass. Place the GLASS on the sensor and select the sensor twice to get the SENSOR (G).
- Examine and use the CUP on the water lily to get a FLOWER (H); take the GLASS BALL (I).
- Go to the backyard.
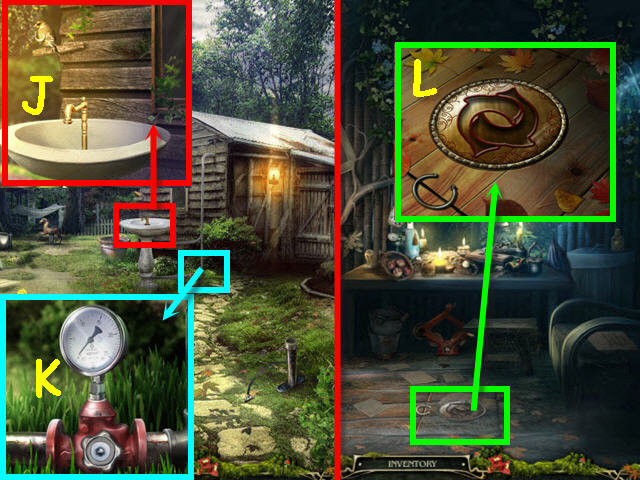
- Examine and place the MAGNET in the birdbath (J).
- Examine and place the SENSOR on the pipe (K); turn the valve to get the 2nd FISH.
- Go to the shelter.
- Examine and place the 2 FISH on the hatch (L).
- Go down the hatch.
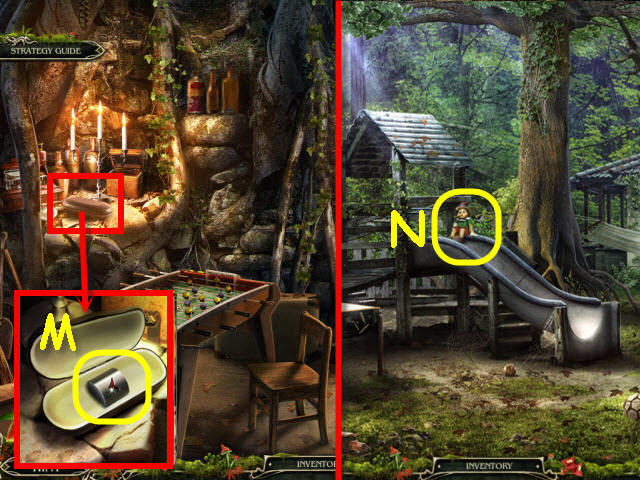
- Examine and open the case; take the CYLINDER (M).
- Go to the playground.
- Examine and place the CYLINDER on Pinocchio (N) to trigger a puzzle.
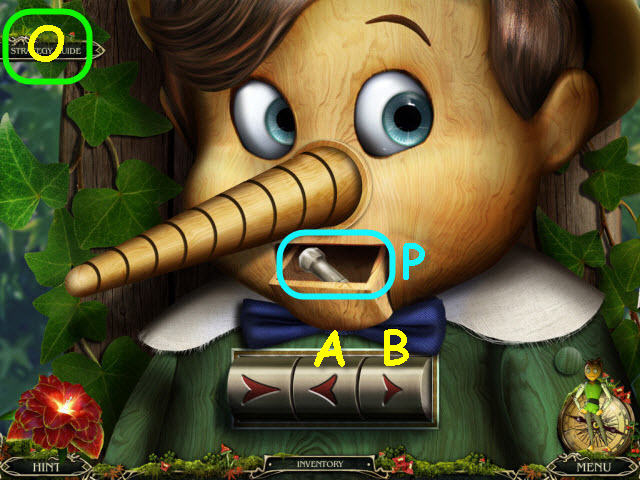
- Use the arrows to set the nose to the correct length.
- To solve the puzzles, select the arrows as follows: A, B, and A x 2 (O).
- Take the HANDLE (P).
- Back out.
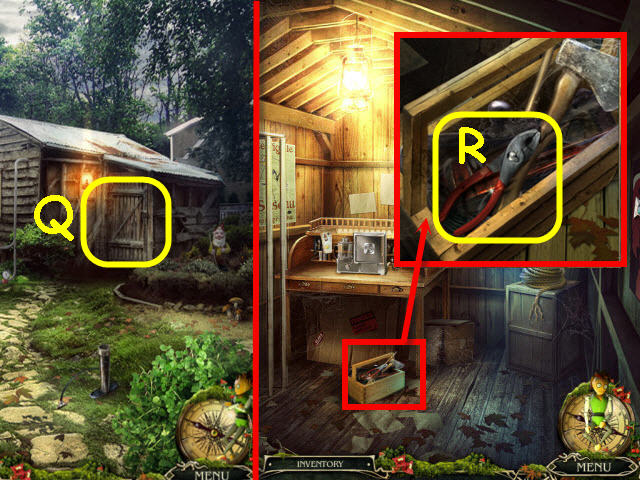
- Examine and place the HANDLE on the latch (Q).
- Enter the workshop.
- Examine the toolbox; take the PLIERS (R).
- Go to the shelter basement.
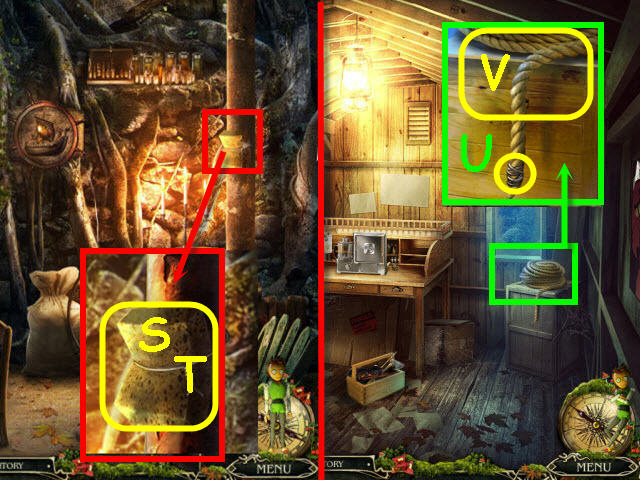
- Examine and use the PLIERS on the wire; get a SPONGE (S) and WIRE (T).
- Go to the workshop.
- Examine the rope; twist and use the WIRE on the end (U).
- Use the PLIERS on the WIRE; take the ROPE (V).
- Go to the tree house entrance.
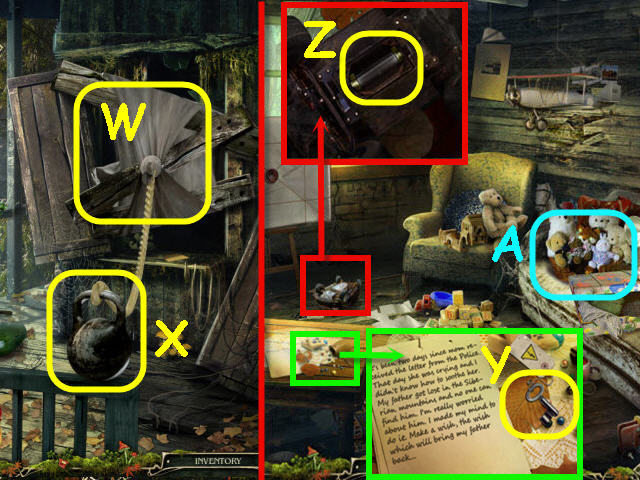
- Examine the window; select the curtains and apply the ROPE (W).
- Move the kettle bell (X) to open the window.
- Enter the tree house.
- Examine father's notes; take the KEY (Y).
- Examine and use the SCREWDRIVER on the car; take the FUSE (Z).
- Examine the couch (A) to access a HOS.
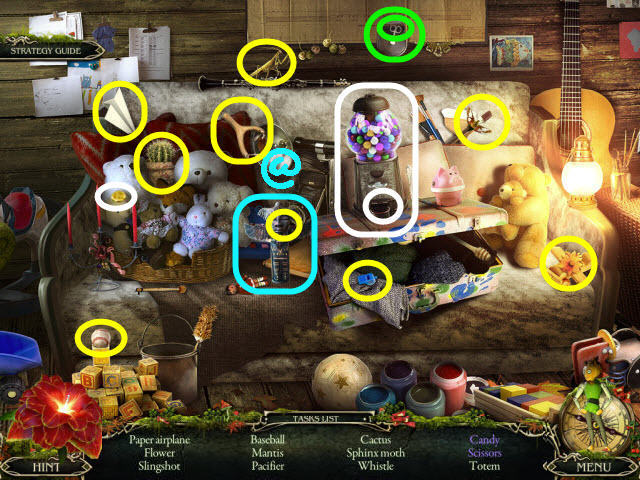
- Find the items listed.
- Marked in green: open the pouch and take the scissors.
- Marked in white: use the coin on the gumball machine, turn the handle to get the candy.
- You will earn a TOTEM (@).
- Go to Brandon's room.
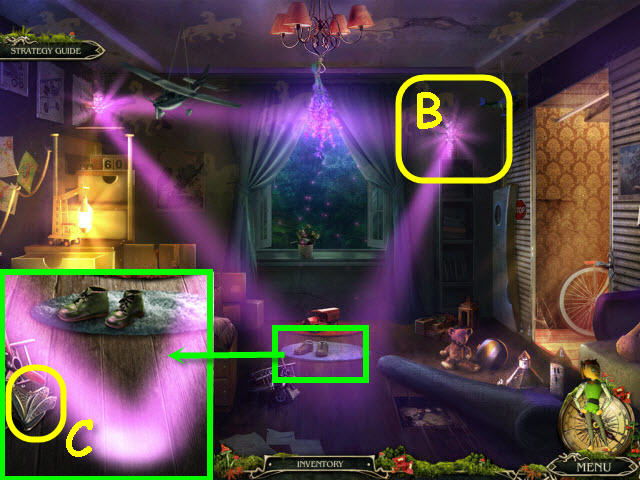
- Examine and place the TOTEM in the right corner (B).
- Examine the floor; take the MEDALLION (C).
- Back out.
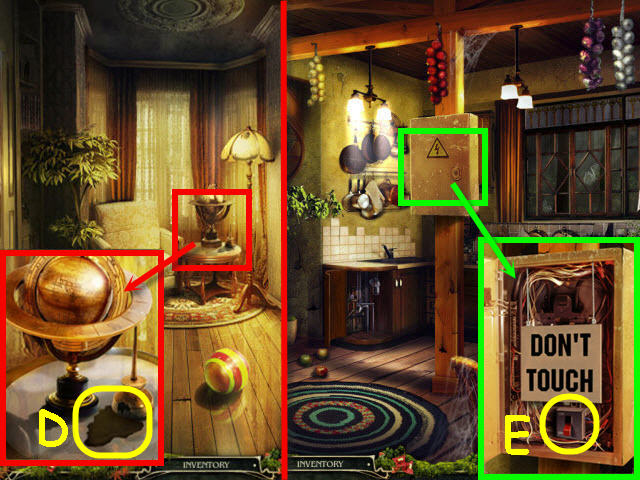
- Examine the globe; use the SPONGE on the oil to get OIL (D).
- Go to the kitchen.
- Examine and use the KEY on the electrical box; take the TOGGLE (E).
- Go to the waterfall.
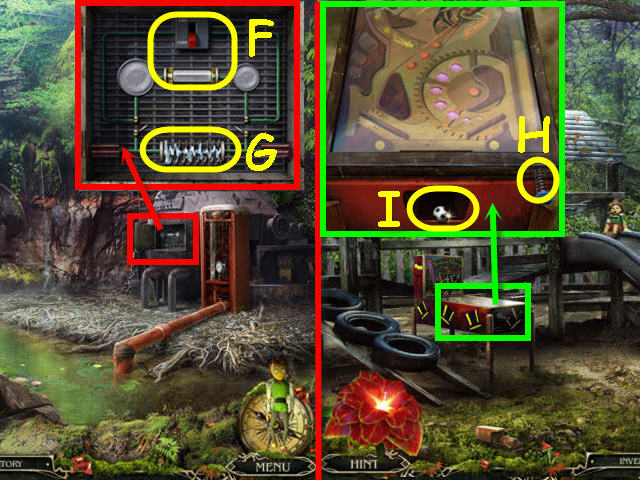
- Examine and open the wiring door; place the FUSE and TOGGLE in the slots (F).
- Flip the toggle switch up and get a SPRING (G).
- Go to the playground.
- Examine and place the SPRING on the pinball machine handle just behind the blue end (H); pull the handle and take the BALL (I).
- Go to the shelter basement.
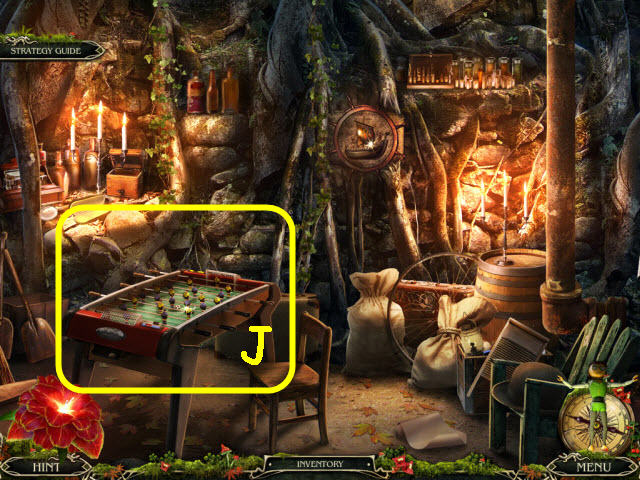
- Examine the soccer table (J).
- Place the BALL in the football field to trigger a puzzle.
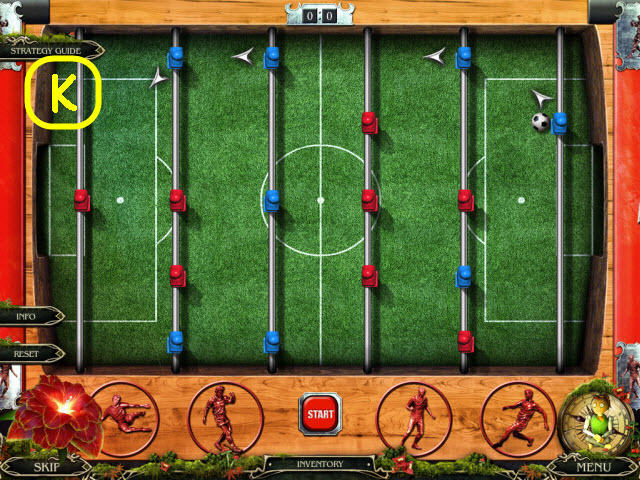

- Set the players to get the ball in the opposing goal using all the players.
- Select the start button when set.
- See screenshot for the 1st round solution (K).
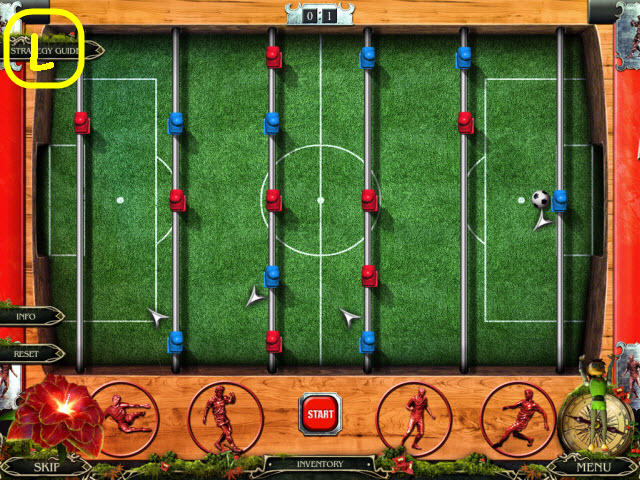
- See screenshot for the 2nd round solution (L).
- See screenshot for the 3rd round solution (M).
- Take the 2nd MEDALLION.
- Go to the hall.
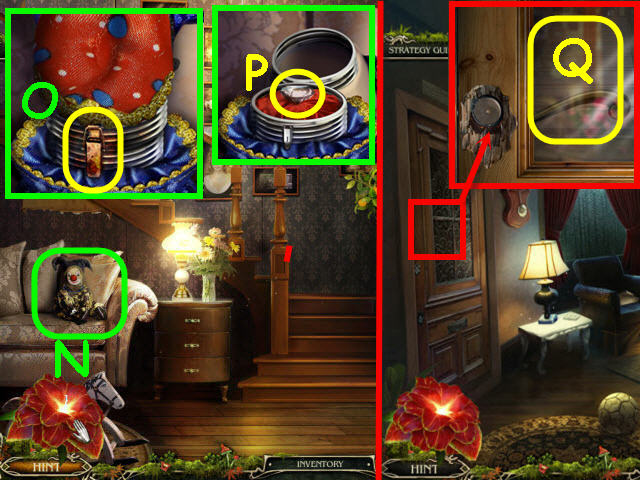
- Examine and place the 2 MEDALLIONS on the doll (N).
- Use the OIL on the latch (O); flip the latch and take the DIAMOND (P).
- Go right.
- Examine the door; use the DIAMOND on the glass (Q).
- Go left through the newly-opened door.
- Examine the washing machine; place the GLASS BALL on the chest and take the FERTILIZER (R), HOOK (S) and POWDER (T).
- Examine the chair (U) to access a HOS.
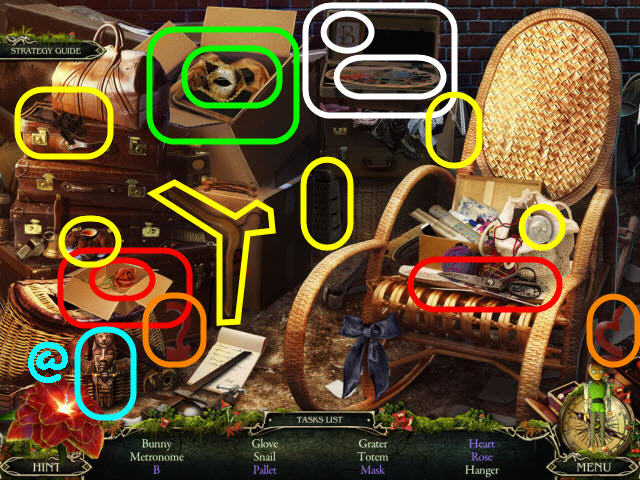
- Find the items listed.
- Marked in green: open the box to get the mask.
- Marked in white: open the suitcase to get the B and pallet.
- Marked in red: use the scissors on the package to get the rose.
- Marked in orange: place the heart half by the heart half to get a heart.
- You will earn a TOTEM (@).
- Go to Brandon's room.
- Examine and place the TOTEM on the floor; take the METAL ROSE (V).
- Go to the kitchen.
- Examine and use the HOOK on the drawer; take the CITRIC ACID (W).
- Go to the swamp house.
- Examine and place the FERTILIZER on the lianas; take the FIGURE (X).
- Enter the demon's house.
- Examine and place the FIGURE on the cabinet; take the ALCOHOL (Y).
- Go to the workshop.
- Examine and place the METAL ROSE on the mixer (Z).
- Place the POWDER, FLOWER, CITRIC ACID, and ALCOHOL in the container (A) to trigger a puzzle.
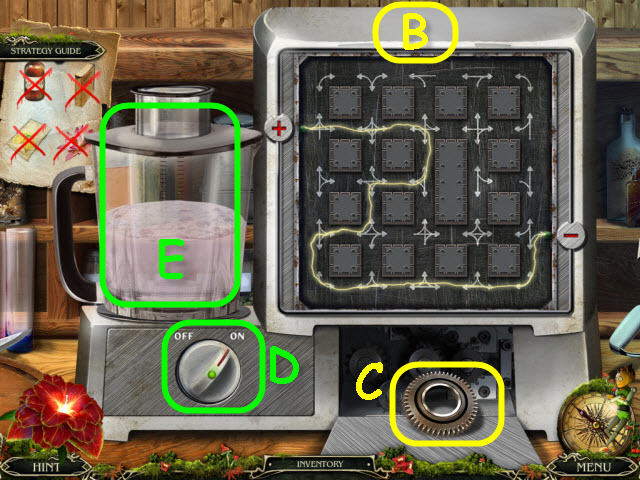
- Move the atom across the field to the exit.
- To solve the puzzle, select the arrows in the following order: Up, right, down, left, down, left, down, and right x 4 (B).
- Take the COGWHEEL (C).
- Turn on the mixer (D); take the SOLVENT (E).
- Go to the shelter.
- Examine and place the COGWHEEL on the jack; turn the handle and take the JACK (F).
- Go back to the workshop.
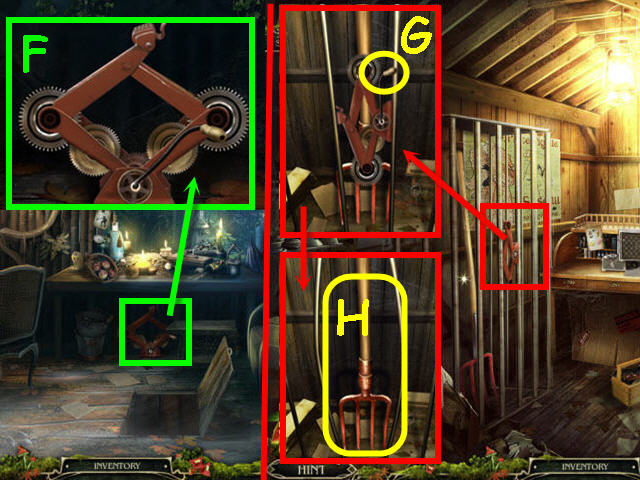
- Examine and use the JACK on the cage and crank the handle (G); take the PITCHFORK (H).
- Go to the forest thicket.
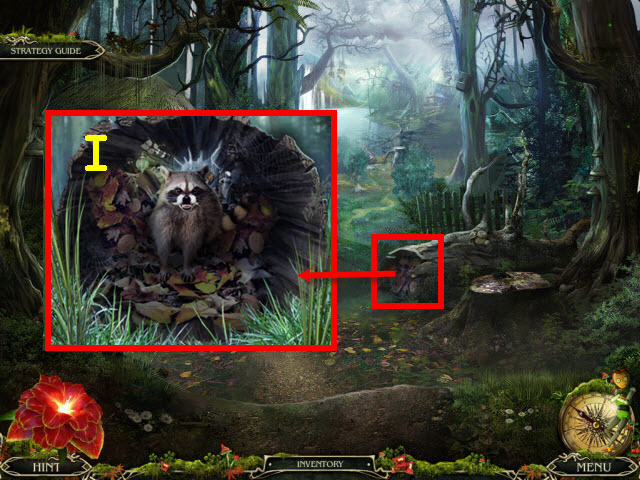
- Examine and use the PITCHFORK on the fallen tree; use FLUFFY on the raccoon (I).
- Examine the hollow to access a HOS.
- Find the items listed.
- Marked in green: strike the match on the matchbox to get a striking match.
- Marked in red: use the knife on the unsharpened pencil to get a pencil.
- You will earn a TURTLE BUTTON (@).
- Go to the tree house.
- Examine the picture.
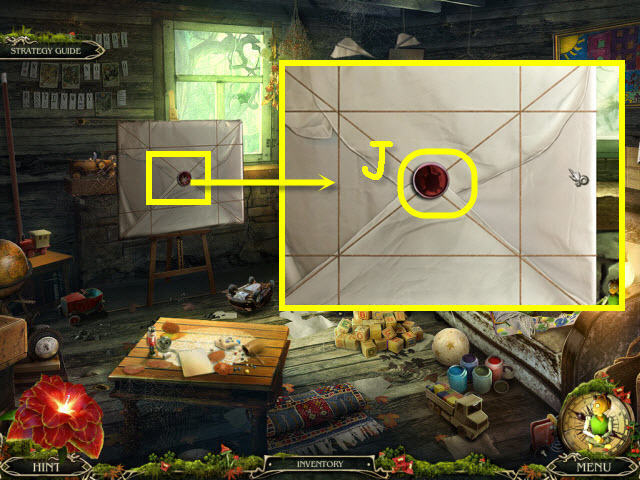
- Place the TURTLE BUTTON in the center (J) to trigger a puzzle.
- Switch adjacent squares to complete the picture.
- You may choose to create the daylight or nighttime pictures (K).
- See screenshot for solution (L).
- Use the SOLVENT and QUILL on the completed picture.
Chapter 4 – Siberia
- Go left to the landing.
- Take the CROSSPIECE (M).
- Examine the basket; take the SNOWSHOES (N).
- Back out.
- Use the SNOWSHOES on the path on the right (O).
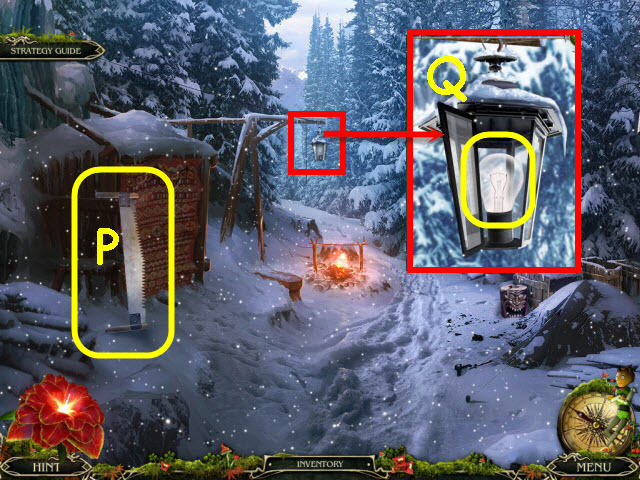
- Take the SAW (P).
- Examine and open the lantern; take the BULB (Q).
- Go forward to the forest well.
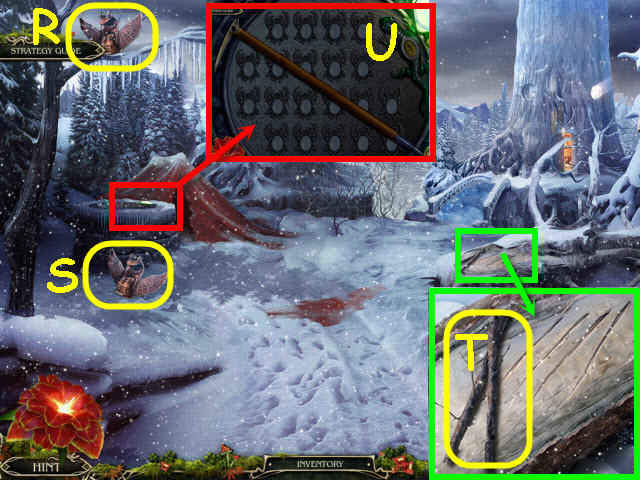
- Examine and use FLUFFY on the totem (R).
- Take the PART OF TOTEM (S).
- Examine the scratches on the tree; take the BRANCHES (T).
- Examine the well; take the ICE AX (U).
- Back out of the well close-up and back out again.
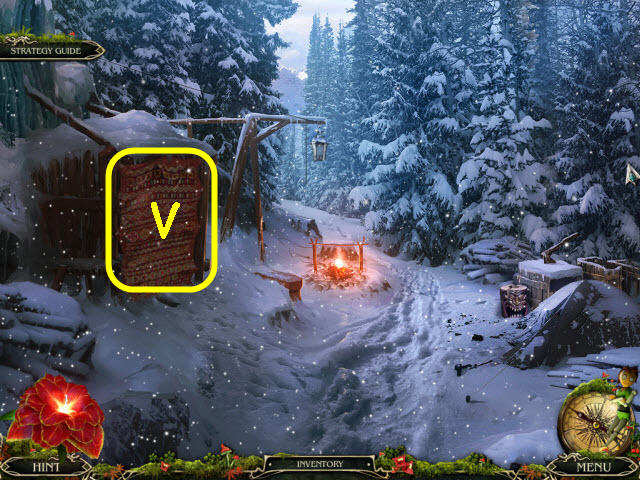
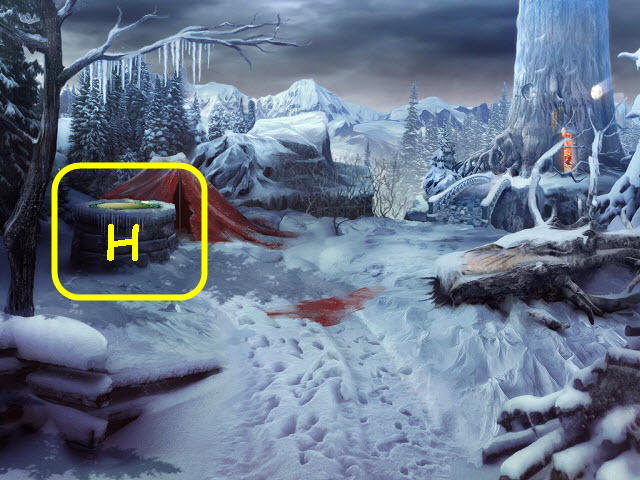
- Examine and use the ICE AX on the carpet (V).
- Examine the tent to access a HOS.
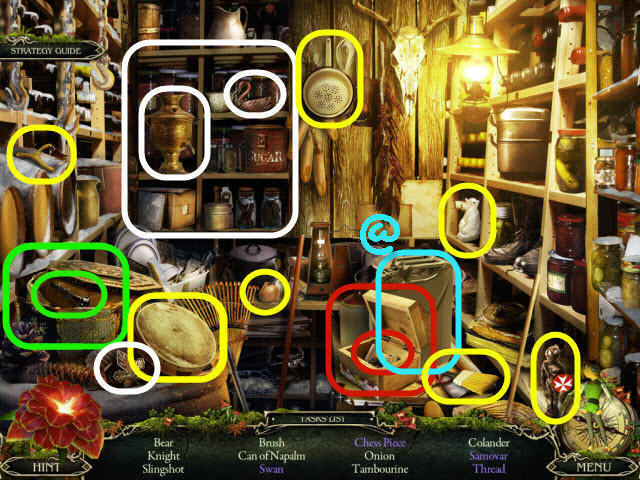
- Find the items listed.
- Marked in green: open the box to get the chess piece.
- Marked in red: open the chest to get a thread.
- Marked in white: use the leaf on the cabinet to get the swan and samovar.
- You will earn a GAS CAN (@).
- Go forward.
- Examine and use the GAS CAN and FLINT on the bridge (W).
- Cross the bridge.
- Examine and use the SAW on the tree root; take the 2nd PART OF TOTEM (X).
- Examine and use the ICE AX and FLINT on the niche; take the TORCH (Y).
- Go forward.
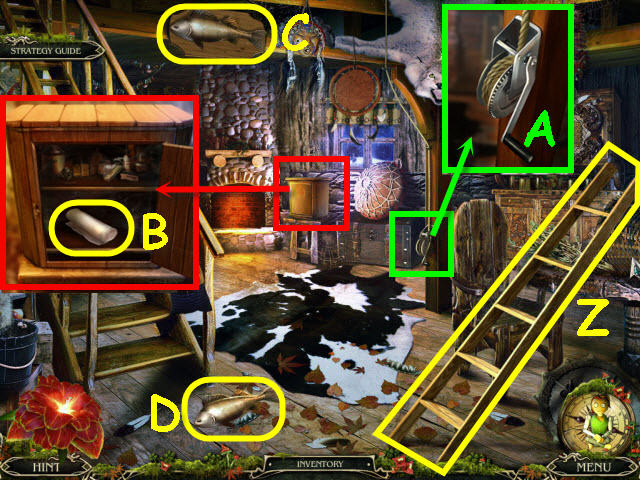
- Take the LADDER (Z).
- Examine and take the WINCH (A).
- Examine and open the first aid kit; take the BANDAGE (B).
- Use FLUFFY on the fish (C).
- Take the FISH (D).
- Go up the left stairs.
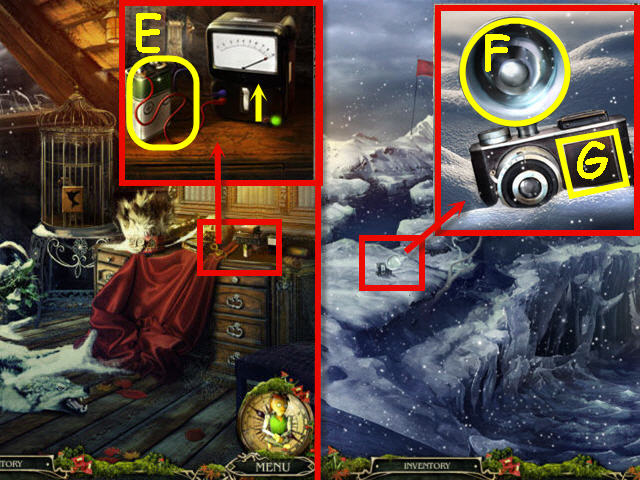
- Examine the table; flip the switch on the charger and take the BATTERY (E).
- Go back to the rock.
- Examine and place the BULB on the camera (F).
- Open and place the BATTERY in the compartment (G); take the CAMERA.
- Go to the forest well.
- Examine the well (H).
- Use the CAMERA on the well to trigger a puzzle.
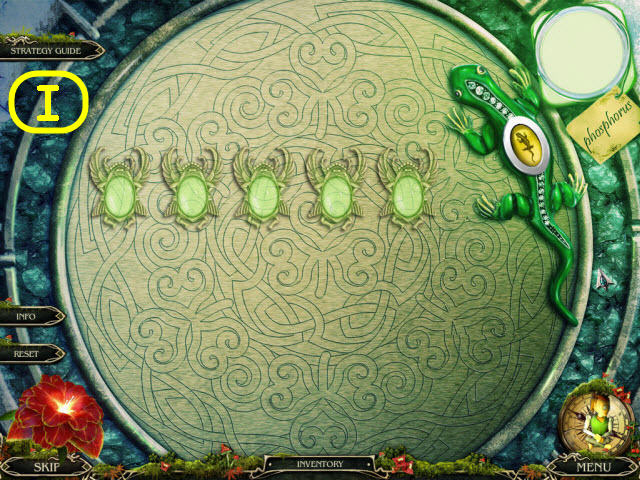
- The goal is to have the last move.
- Tip: To solve the puzzle try to get at least 5 beetles remaining in one row and then take only 1 for your second to last move forcing the computer to leave 1-3 for you to take (I).
- The computer generated moves are random.
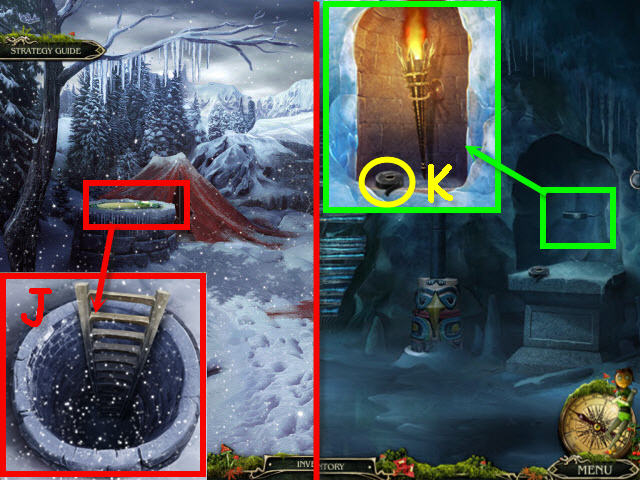
- Examine the well; remove the cover and place the LADDER inside (J).
- Go down the well.
- Examine the niche; place the TORCH in the holder and take the ELECTRICAL TAPE (K).
- Go to the Lumberjack's camp.
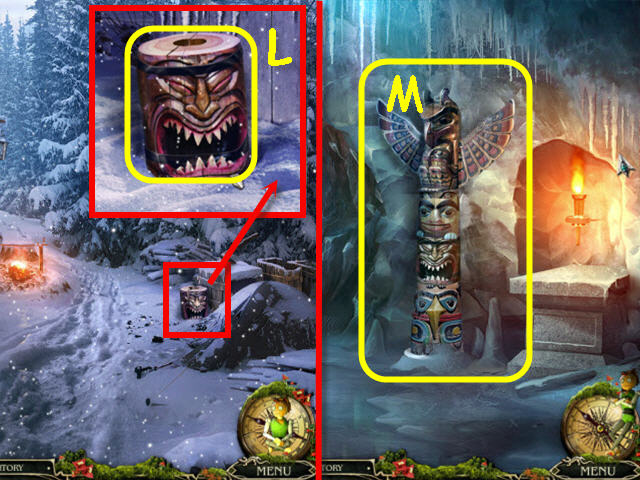
- Examine and use the ELECTRICAL TAPE on the totem; take the 3rd PART OF TOTEM (L).
- Go back to the bottom of the well.
- Examine and place the 3 PARTS OF TOTEM on the totem (M).
- Go forward to the icy corridor.
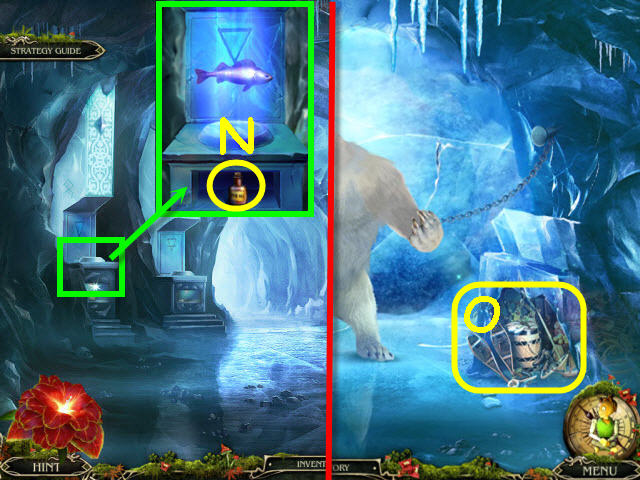
- Examine and place the FISH on the fish niche; take the FISH OIL (N).
- Go forward to the icy room.
- Examine the debris on the right to access a HOS (O).
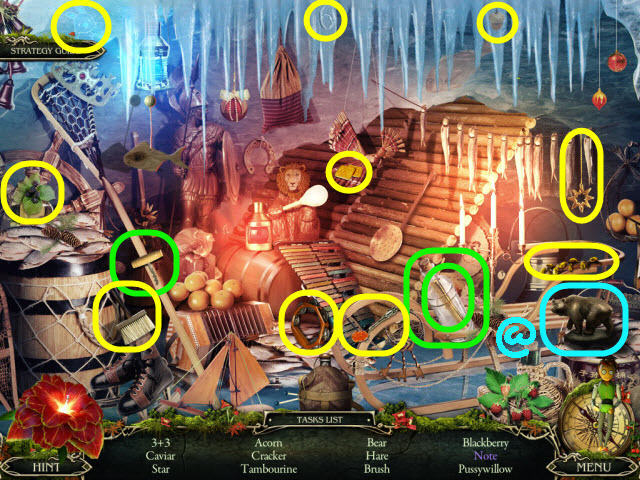
- Find the items listed.
- Marked in green: use the corkscrew on the cork to get a note.
- You will earn a BEAR (@).
- Examine the tips for fire; take the LEAF (P).
- Back out.
- Examine and place the BEAR on the bear niche; take the HUMMINGBIRD (Q).
- Go to the Shaman's house.
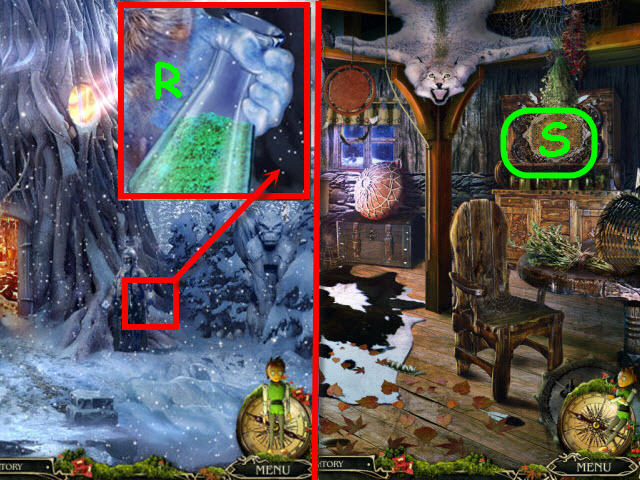
- Examine and use the FISH OIL on the shaman's hand; take the POWDER (R).
- Go forward into the house.
- Examine and place the LEAF on the chest with herbs to trigger a puzzle (S).
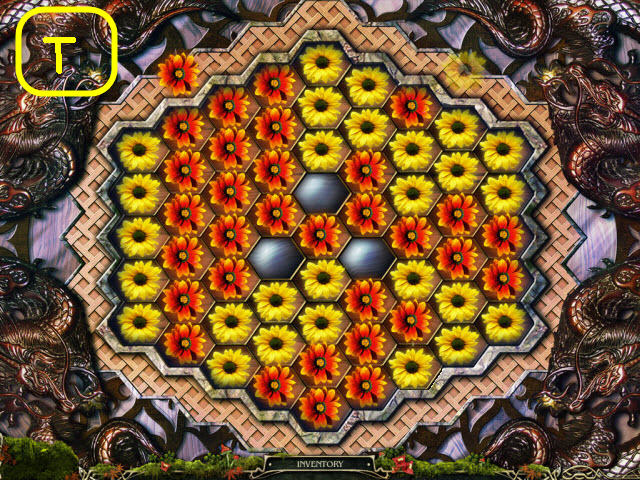
- The goal is to fill up the spaces with more red flowers than yellow.
- The yellow flower moves are random; see screenshot for a winning board (T).
- Take the MANDRAKE.
- Go up the stairs.
- Examine and use the HUMMINGBIRD on the cage; take the EAGLE (U).
- Go to the icy corridor.
- Examine and use the EAGLE on the eagle niche; take the HAY (V).
- Examine the icy niche (W) to access a HOS.
- Find the items listed.
- Marked in green: place the pepper in the mortar. Use the pestle on the mortar to get chili powder.
- You will earn a THISTLE (@).
- Go forward to the icy room.
- Examine and place the HAY, FLINT, MANDRAKE, THISTLE and POWDER on the place for fire (X).
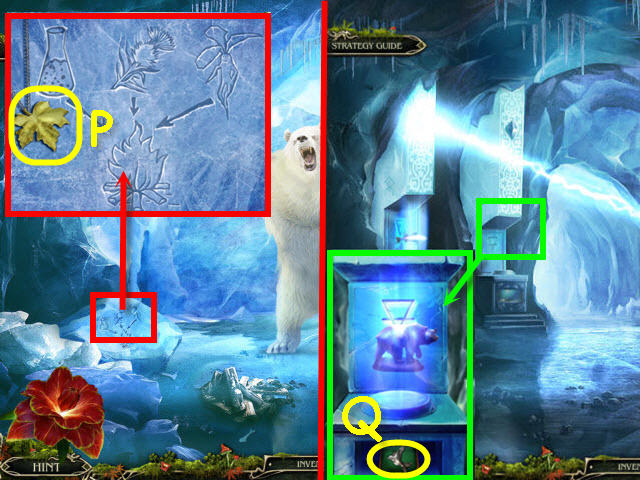
- Examine the bear; take the BAS-RELIEF (Y).
- Go to the Shaman's attic.
- Examine the altar (Z).
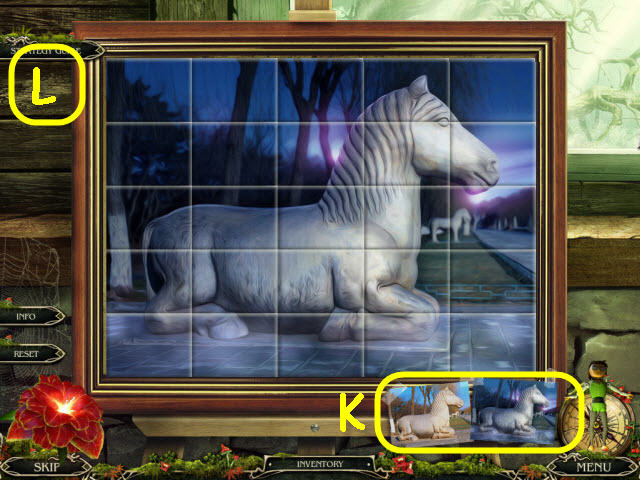
- Place the BAS-RELIEF on the altar to trigger a puzzle.
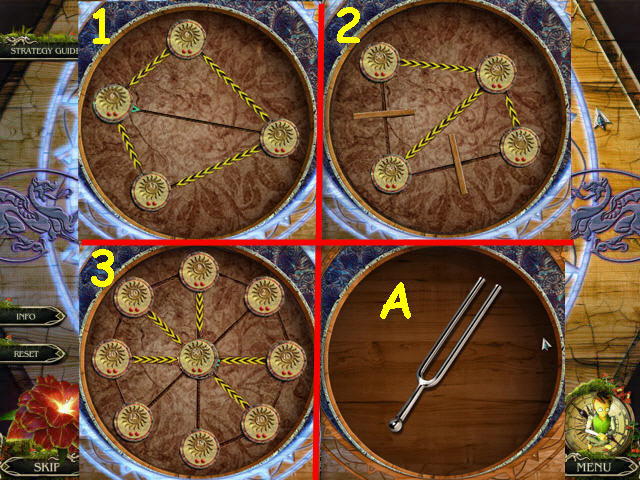
- The goal is to turn all the disks to a sun.
- Round 1 solution: Turn the sun rays on the cloudy disks with the smallest number first and then point the sun's rays on the largest cloudy one (1).
- Round 2 solution: Turn the upper right sun's rays to the smallest number cloudy disk to the left or under it first, and then point the charged sun's disk towards the upper right disk while shooting the rays to the lower left (2).
- Round 3 solution: Point the outer sunny rays to the center (3).
- Take the TUNING FORK (A).
- Go to the icy room.
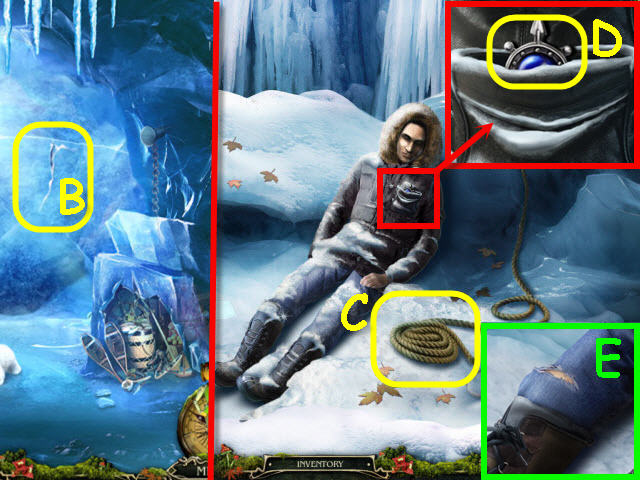
- Examine and use the TUNING FORK on the crack (B).
- Go forward.
- Take the ROPE (C).
- Examine Gray's pocket; take the STAR MEDALLION (D).
- Examine Gray's leg; remove the snow and use the BRANCHES and BANDAGE on his leg (E).
- Go to the rock.
- Examine and place the CROSSPIECE, WINCH and ROPE on the gap (F).
- Go to the landing.
- Examine and place the STAR MEDALLION on the wicker chest (G).
- Examine the opened chest to access a HOS.
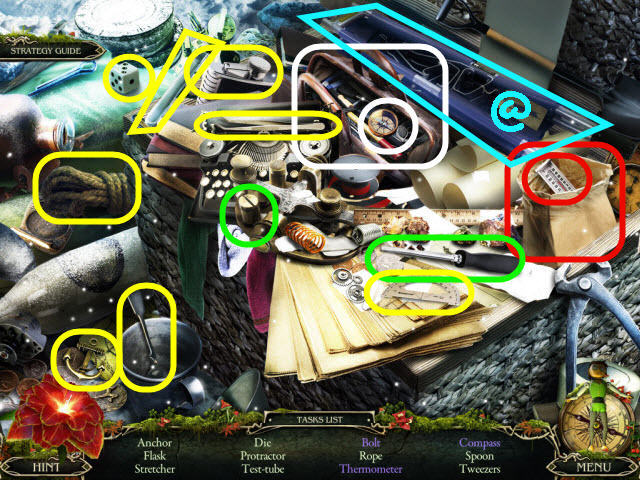
- Find the items listed.
- Marked in white: open the leather bag to get the compass.
- Marked in red: open the paper bag to get the thermometer.
- Marked in green: use the screwdriver to get the bolt.
- You will earn a STRETCHER (@).
- Go to the cave.
- Place the STRETCHER on Gray; select Gray to fasten the ropes (H).
- Take the GLASS TUBE (I).
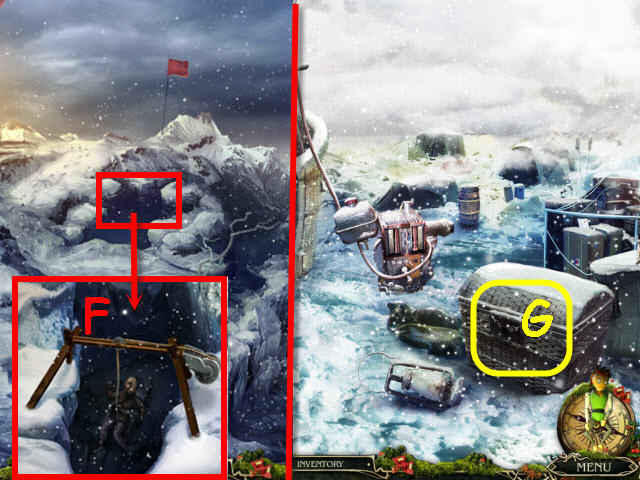
- Go to the rock.
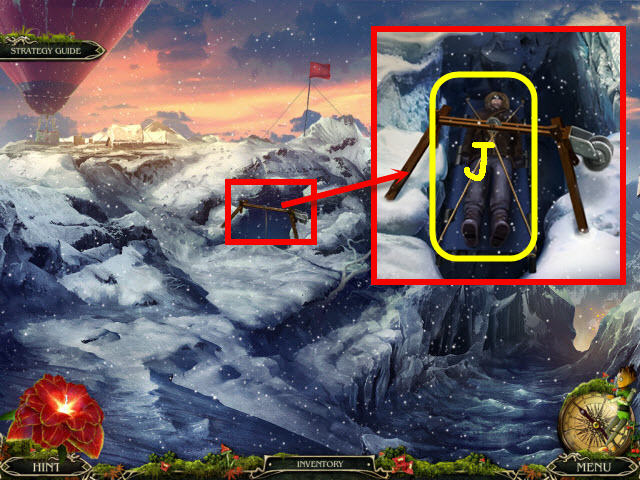
- Examine the gap; select the winch and take GRAY (J).
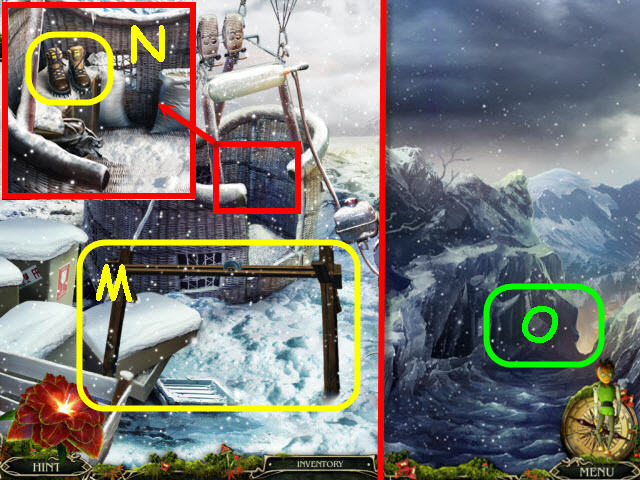
- Go to the landing.
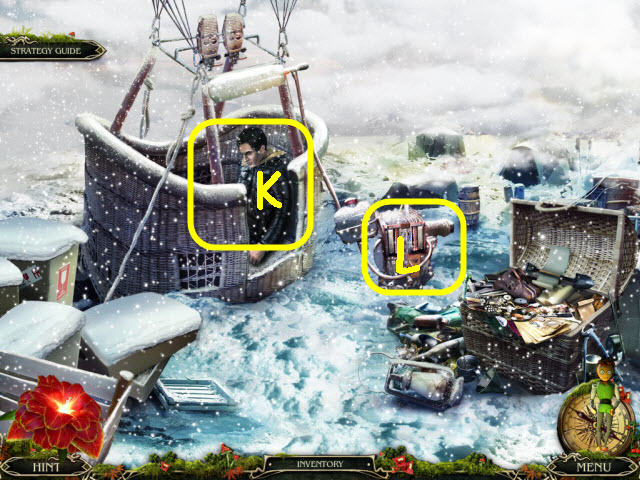
- Examine and place GRAY in the basket (K).
- Examine and place the GLASS TUBE on the balloon motor (L) to trigger a puzzle.
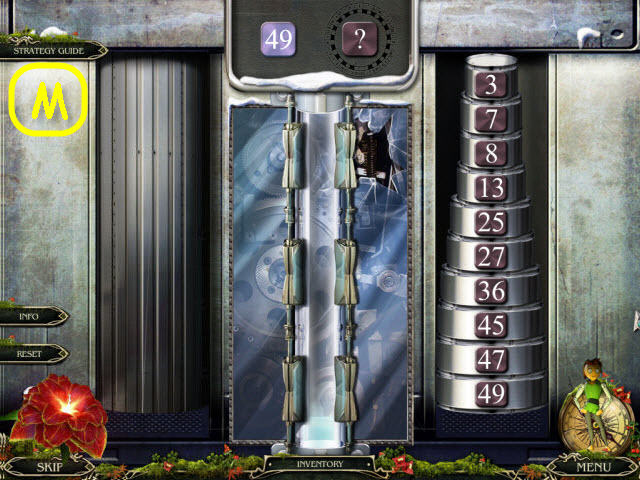
- The goal is to stack the right disks in numerical order.
- You can choose between a number from the left stack and a mystery number from the right stack.
- To solve the puzzle select the following pairs of numbers: 3-36, 45-13, 36-16, 25-23, 47-49, 7-12, 13-46, and 49-11 (M).
Chapter 5 – Reunited
- Back out twice to the forest edge.
- Select Gray (N) and get the EAGLE MEDALLION.
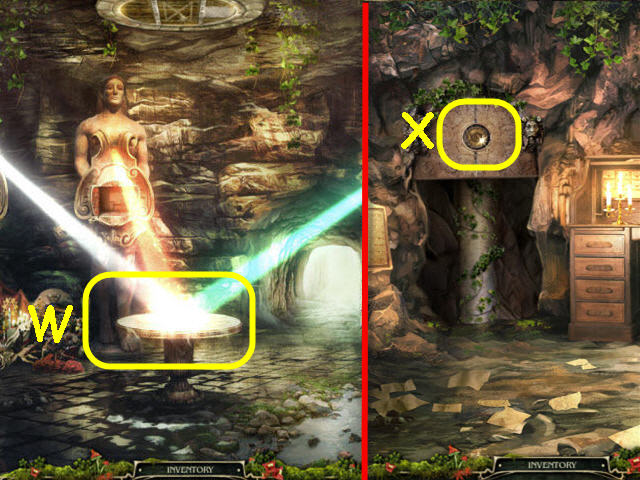
- Go to the waterfall.
- Examine and place the EAGLE MEDALLION on the creature (O).
- Go forward to the room with totems (P).
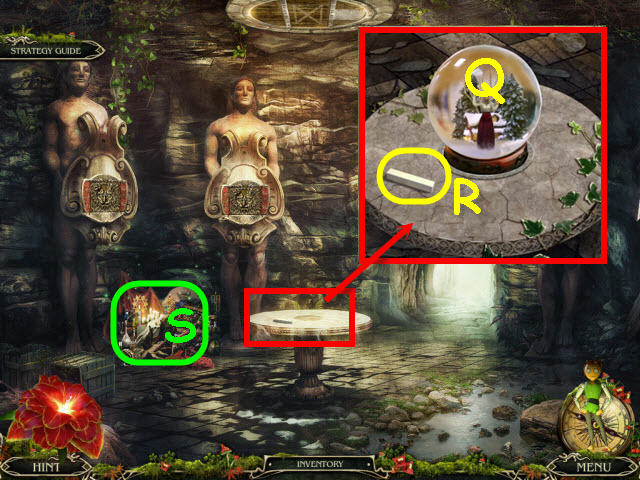
- Examine and place the CRYSTAL BALL on the pedestal (Q); take the CHALK (R).
- Examine the pile on the left to access a HOS (S).
- Find the items listed.
- Marked in red: open the case to get a ring.
- Marked in green: open the pocket watch to get the 7.
- You will earn a MOON SYMBOL (@).
- Go through the tunnel to the asylum.
- Speak to Gray.
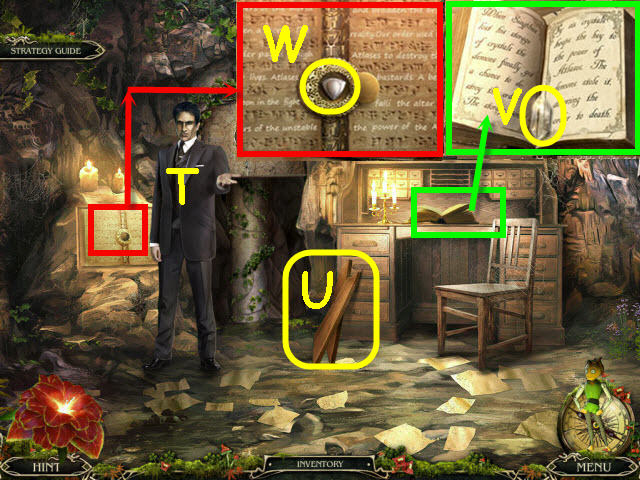
- Give the CHALK to Gray (T).
- Take the STEPS (U).
- Examine the book on the desk; take the CRYSTAL (V).
- Examine and place the MOON SYMBOL on the left book; take the MOON STONE (W).
- Go to the kitchen.
- Examine and place the STEPS on the kitchen ladder (X).
- Go up the stairs.
- Examine and use the SCREWDRIVER on the drawer; take the 2nd CRYSTAL (Y).
- Go forward.
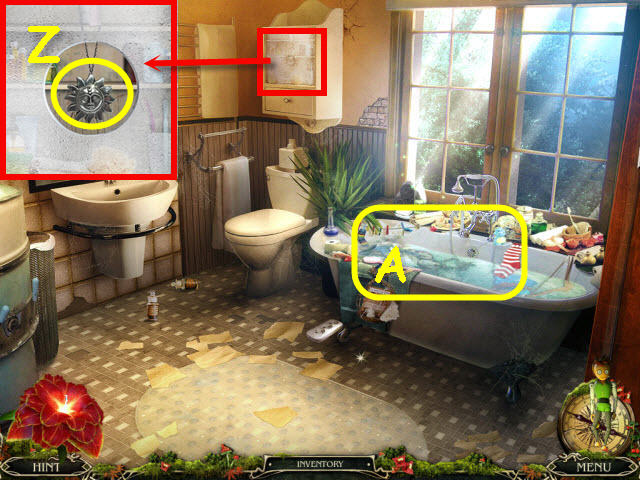
- Examine and use the DIAMOND on the cabinet; take the SUN (Z).
- Examine the tub to access a HOS (A).
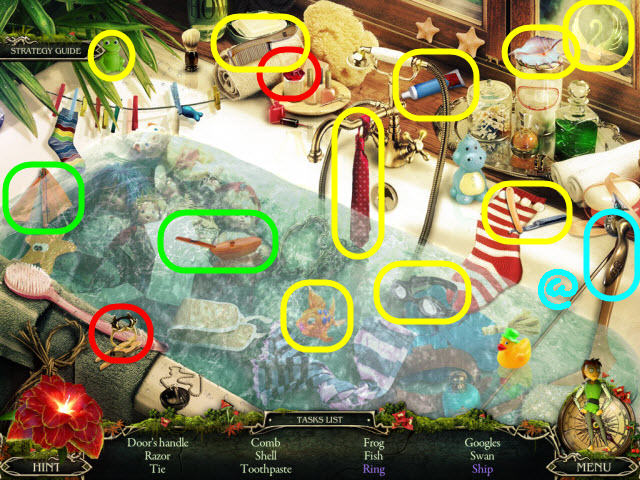
- Find the items listed.
- Marked in red: place the gem in the setting to get a ring.
- Marked in green: place the sail on the hull to get a ship.
- You will earn a DOOR HANDLE (@).
- Back out.
- Examine and place the DOOR HANDLE on the door (B).
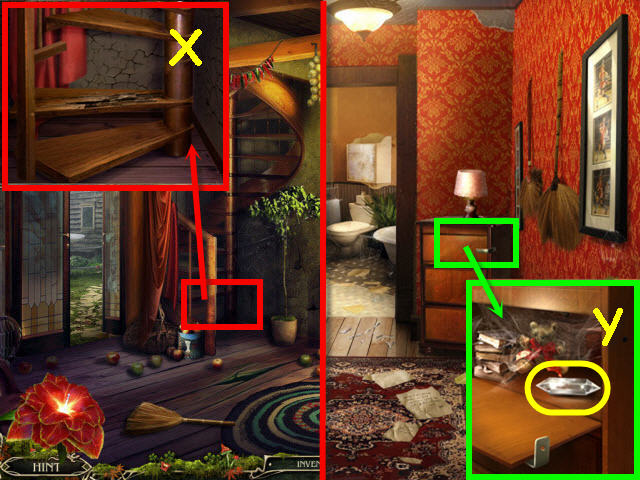
- Go left into the attic.
- Examine the floor; take the RUBY (C).
- Take the PLUG (D).
- Back out.
- Examine and place the PLUG on the lamp; take the READING LAMP (E).
- Go forward.
- Examine and place the READING LAMP under the bathtub (F).
- Plug in the READING LAMP; remove the cobweb and take the CAPTAIN (G) and PUMP HANDLE (H).
- Go to the backyard.
- Examine and place the PUMP HANDLE on the pump; take the PUMP (I).
- Go to the waterfall.
- Examine and place the PUMP on the pump; pump the handle and take the 3rd CRYSTAL (J).
- Go to the room with totems.
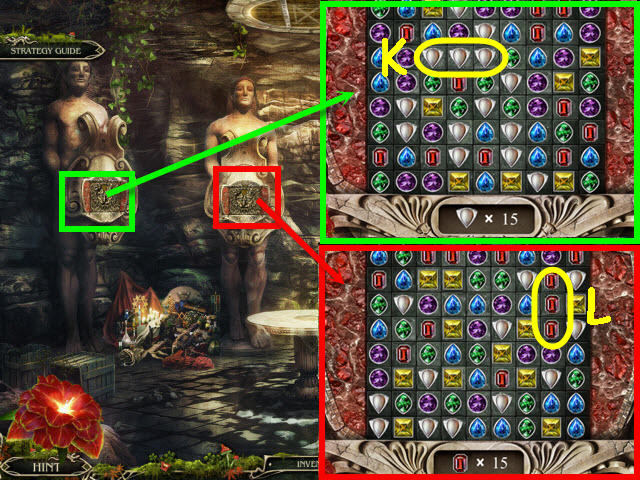
- Examine and place the MOON STONE on the left atlas to trigger a puzzle.
- Make 15 match 3 chains of the moon stones (K).
- Take the 4th CRYSTAL.
- Examine and place the RUBY on the center atlas to trigger a puzzle.
- Make 15 match 3 chains of the rubies (L).
- Take the 5th CRYSTAL.
- Go to the demon's living room.
- Examine and place the 5 CRYSTALS on the crystal shelf; take the EMERALD (M).
- Go to the room with totems.
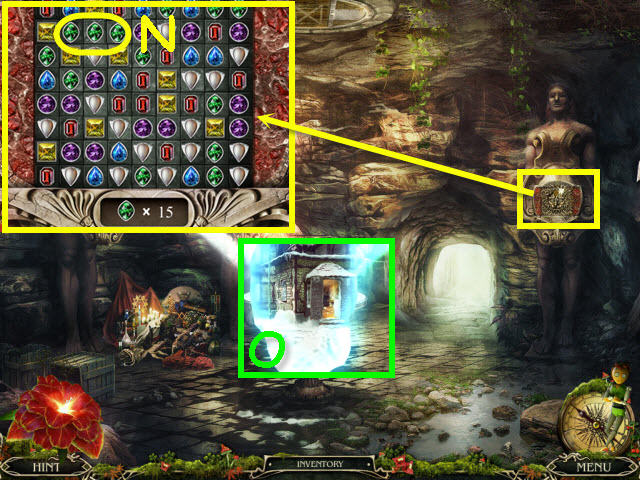
- Examine and place the EMERALD on the right atlas to trigger a puzzle.
- Make 15 matches of 3 chains of the emeralds (N).
- Take the PIECE OF CHART.
- Go through the crystal ball portal (O).

- Examine Luisa's feet; take the 2nd PIECE OF CHART (P).
- Go forward into the house.
- Examine the controls; take the HANDLE (Q).
- Examine and place the HANDLE on the planetarium; take the BELT (R).
- Examine the pile on the left to access a HOS (S).
- Find the items listed.
- Marked in green: open the box to get the stamp.
- You will earn a MOON (@).
- Back out.
- Examine and place the BELT on the projector; pull the lever (T).
- Examine and place the SUN on the searchlight; take the 3rd PIECE OF CHART (U).
- Go to the kitchen.
- Examine the drawer; place the MOON on the box and take the ADHESIVE TAPE (V).
- Go to the house in the crystal ball.
- Examine and place the 3 PIECES OF CHARTS on the chart to trigger a puzzle (W).
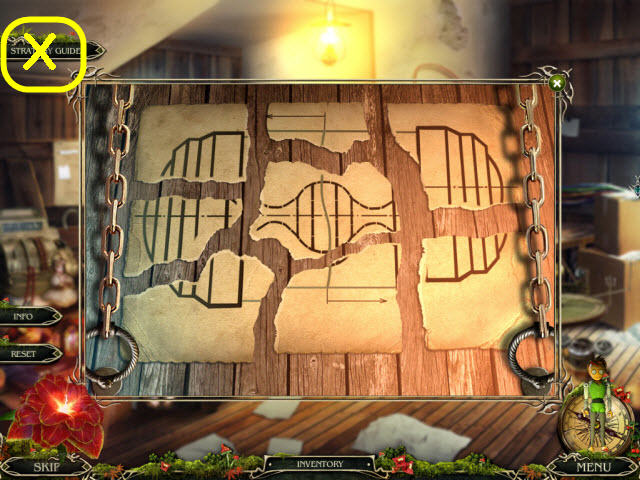
- Swap the pieces to complete the picture.
- See screenshot for solution (X).
- Use the ADHESIVE TAPE on the completed picture; take the SCHEME.
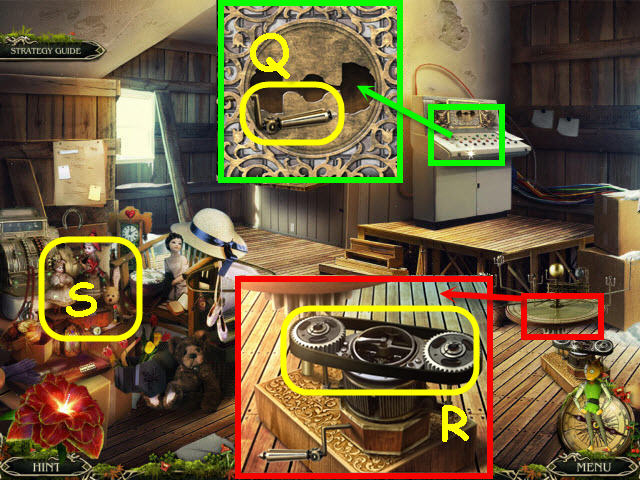
- Go to the attic.
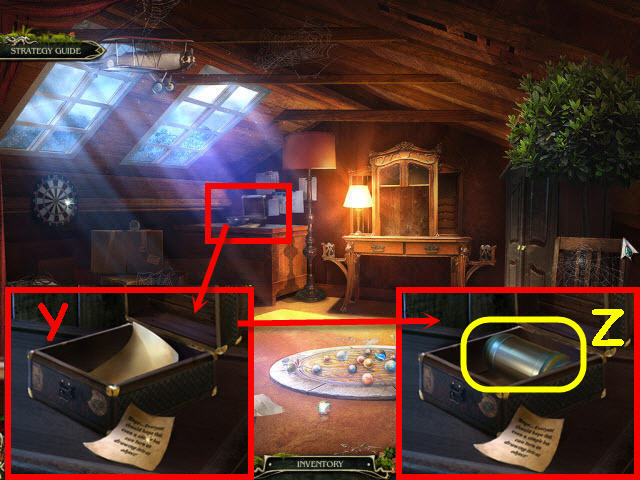
- Examine and place the SCHEME in the box (Y).
- Close and reopen the box and take the DEVICE (Z).
- Go to the house inside the crystal ball.
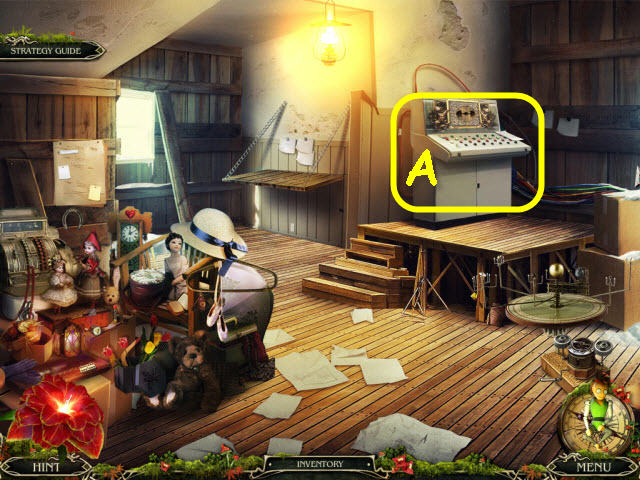
- Examine the controls (A).
- Place the DEVICE in the control panel to trigger a puzzle.
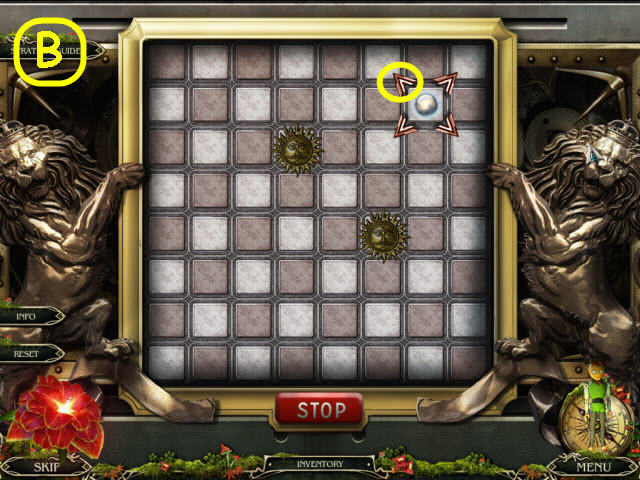
- Light all the suns without exploding them.
- See screenshot for first solution (B).
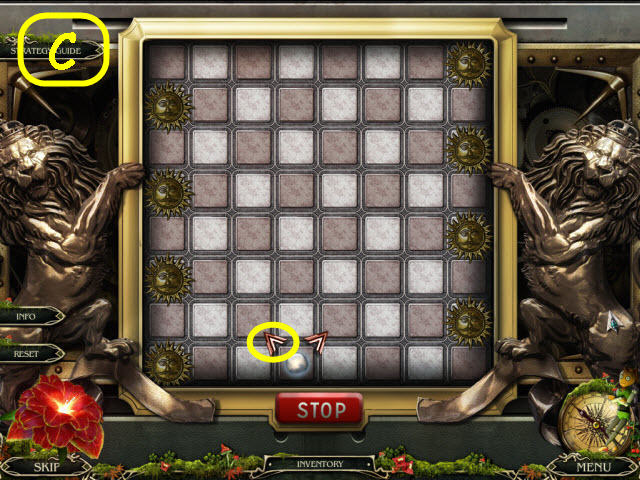
- See screenshot for second solution C).
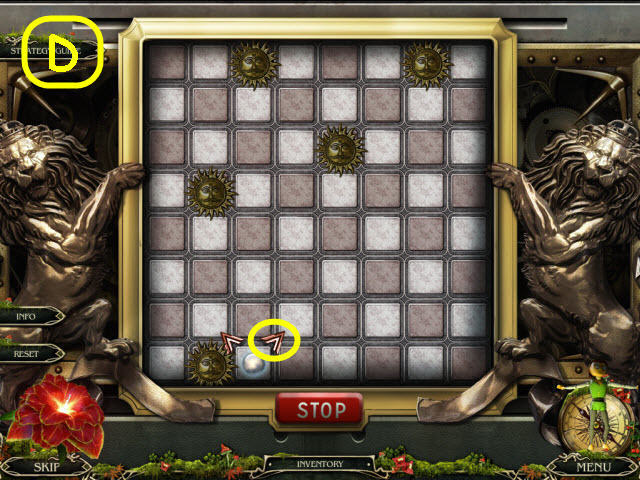
- See screenshot for third solution (D).
- Go to Brandon's room.

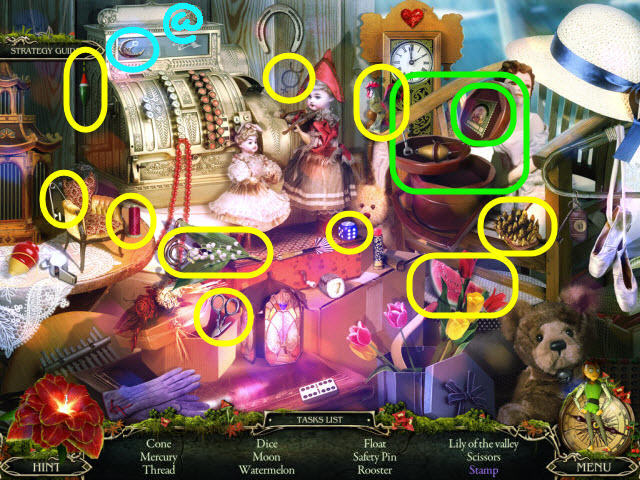
- Examine the boxes to access a HOS (E).
- Find the items listed.
- Marked in red: use the key on the box to get the crown.
- Marked in green: place the picture in the frame to get a picture.
- You will earn an ANCHOR (@).
- Go to the playground.
- Examine the hammock; place the ANCHOR on the box and take the PIRATE (F) and ENSIGN (G).
- Go to the shelter basement.
- Examine and place the ENSIGN, PIRATE and CAPTAIN on the ship (H).
- Use the QUILL on the drawing (I).
- Examine the pile of leaves; move the leaves and take the RUSTY NIPPERS (J).
- Examine the barrel; take the SOAP (K).
- Go into the basement (L).
- Examine and use the RUSTY NIPPERS on the grindstone; get SHARP NIPPERS (M).
- Back out.
- Examine the doghouse; use the SHARP NIPPERS to get the WIND MEDALLION (N).
- Go into the basement.
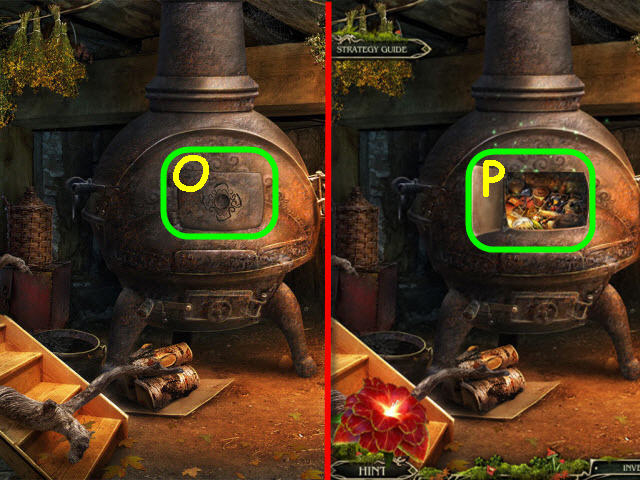
- Examine and place the WIND MEDALLION on the furnace (O).
- Examine the furnace door to access a HOS (P).
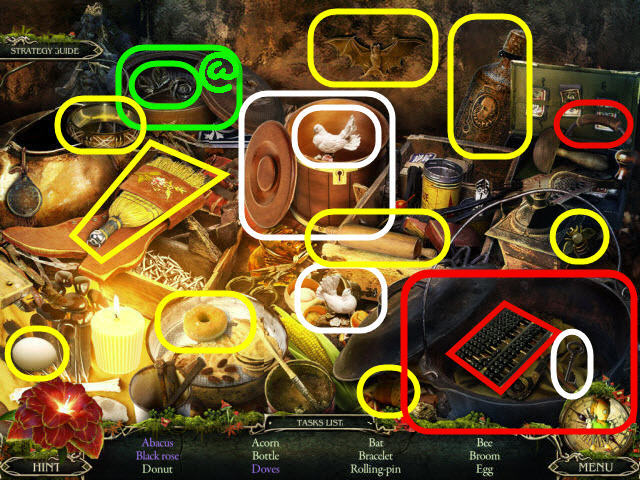
- Find the items listed.
- Marked in red: place the handle on the pot and remove the lid to get the abacus.
- Marked in green: remove the lid to get the black rose.
- Marked in white: use the key on the container, place the dove by the dove to get doves.
- You will earn a FORGED ROSE (@).
- Go to the swamp house and enter into the demon's living room.
- Examine and use the SOAP on the demon's hand; take the RING (Q).
- Examine and use the FORGED ROSE on the hatch (R).
- Go up to the attic.
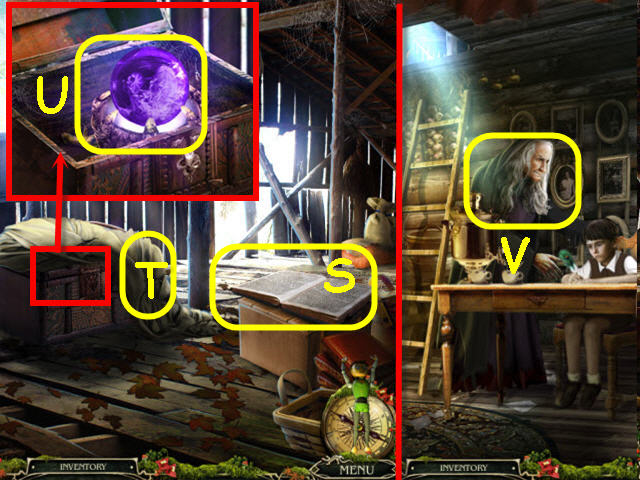
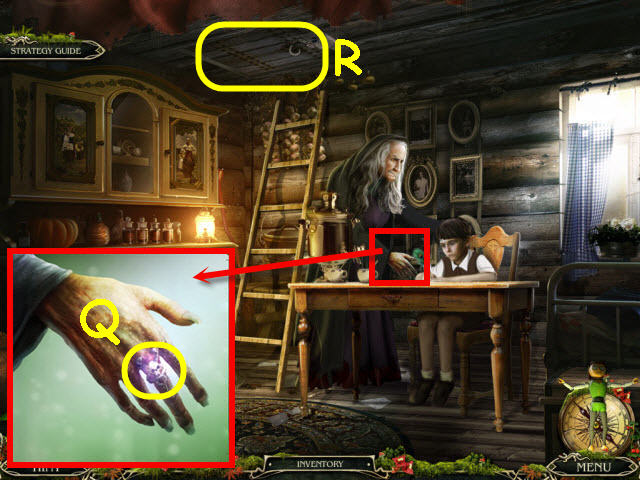
- Examine the book (S).
- Remove the cloth (T).
- Examine and use the RING on the trunk; take the CRYSTAL BALL (U).
- Back out.
- Use the CRYSTAL BALL on the demon (V); get a CAPTURED DEMON.
- Go to the room with totems.
- Examine and place the CAPTURED DEMON on the pedestal (W).
- Go straight through the tunnel to the asylum.
- Examine and use the RING on the control (X) to trigger a puzzle.
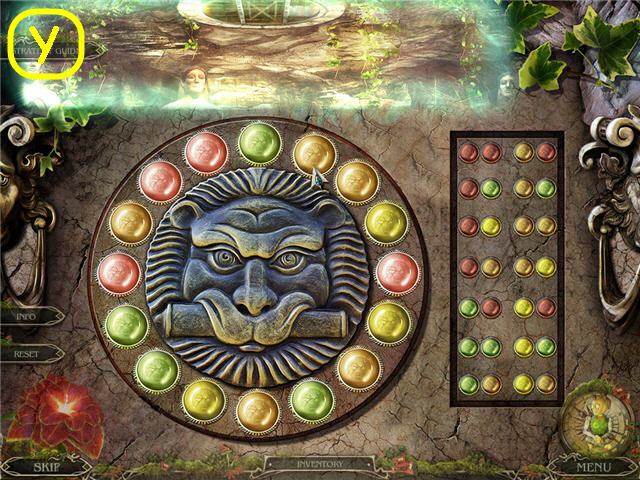
- Select the disks to change the colors and arrange the colors so that you are using every color combination from the right.
- See screenshot for solution (Y).
- Congratulations! You have successfully completed Grim Tales: The Wishes Standard Edition.
Created at: 2012-08-09