

Walkthrough Menu
- General Tips
- Chapter 1: The Haunted House
- Chapter 2: Garth's Secret
- Chapter 3: May
- Chapter 4: Following the Trail
- Chapter 5: A Family Tragedy
- Chapter 6: A Secret Revealed
General Tips
- This is the official guide for Harrowed Halls: Hell's Thistle.
- This guide won't tell you when to zoom into a location; the screenshots show each zoom scene.
- Hidden-object puzzles are referred to as HOPs. Only the locations of the HOPs will be shown.
- Use the Map to fast travel to a location.
Chapter 1: The Haunted House
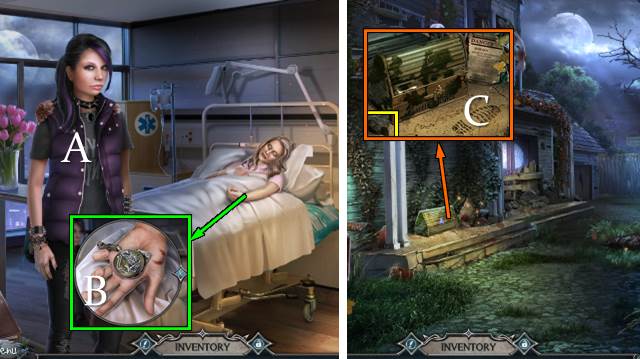
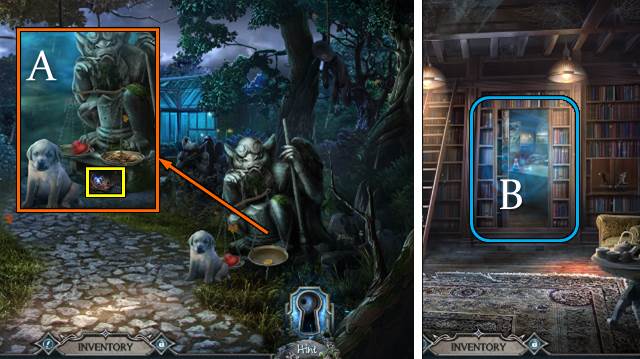
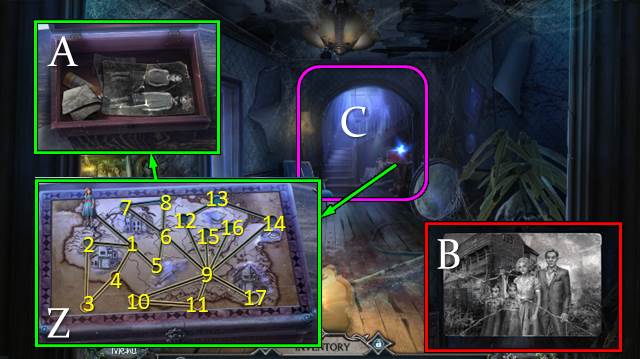
- Talk (A).
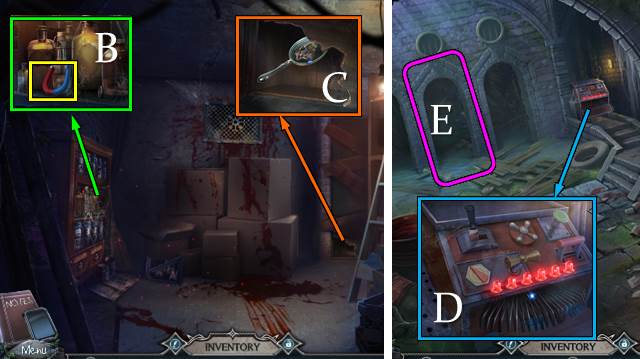
- Open hand; take LOCKET (B).
- Inspect LOCKET; receive OPEN LOCKET.
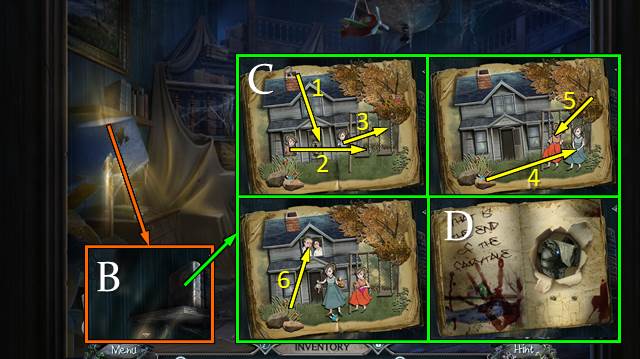
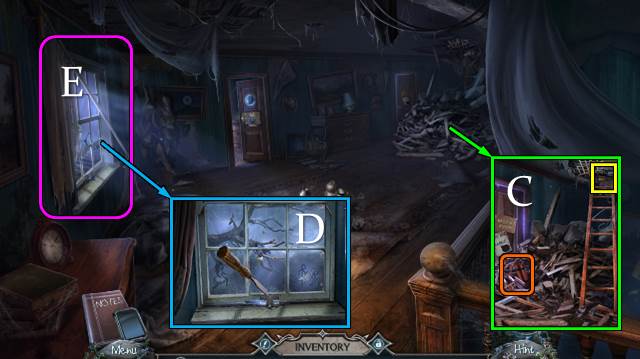
- Take STONE and note (C).
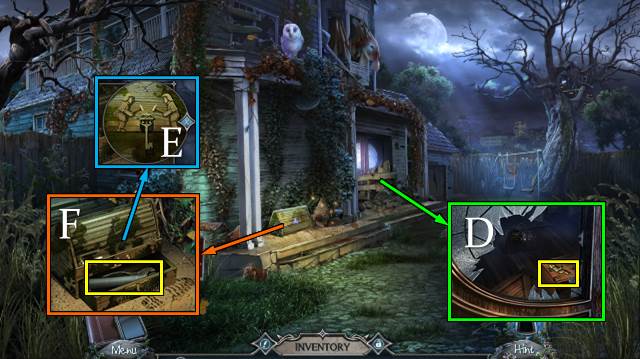
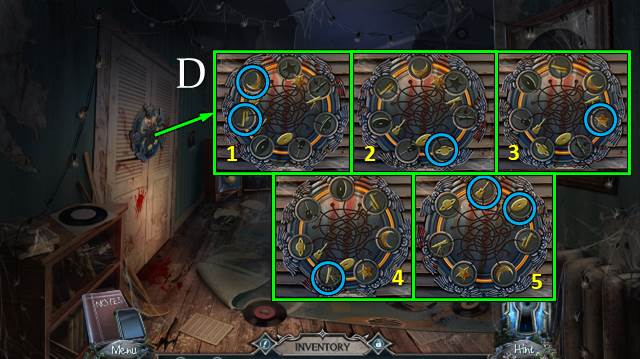
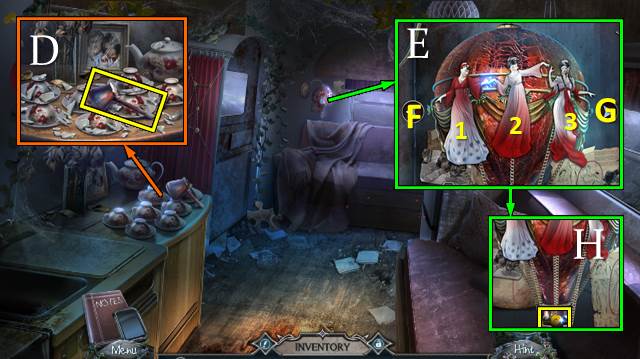
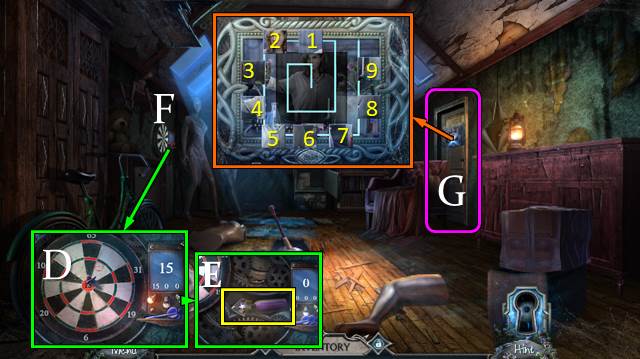
- Touch glass; use STONE twice. Take FIGURINE (D).
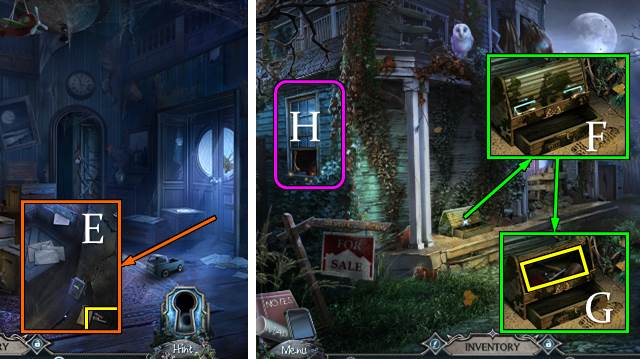
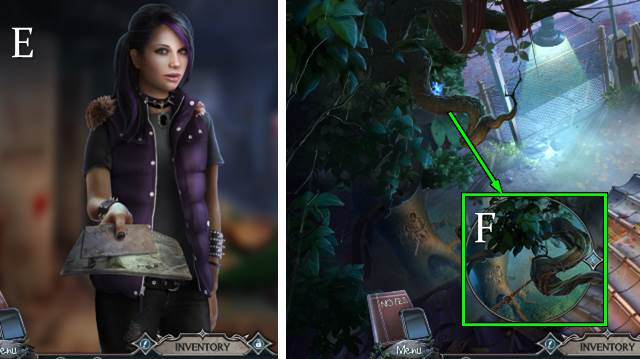
- Place FIGURINE; activate lock (E).
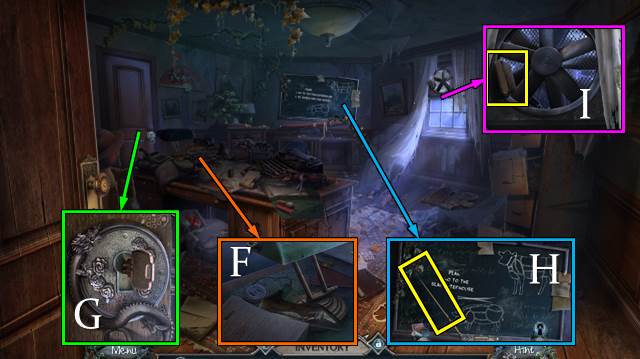
- Take map and PLIERS (F).
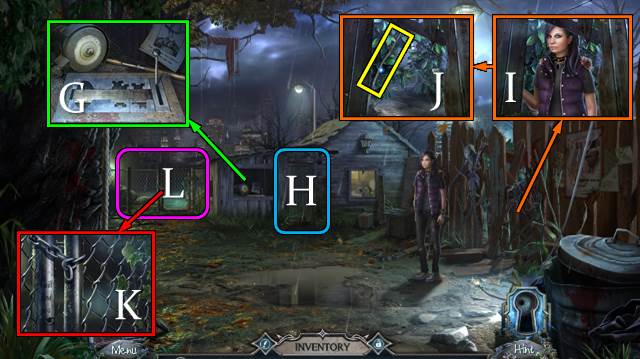
- Use WRENCH; take SHOVEL (G).
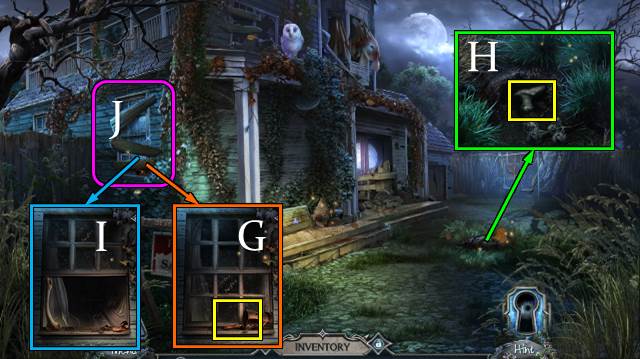
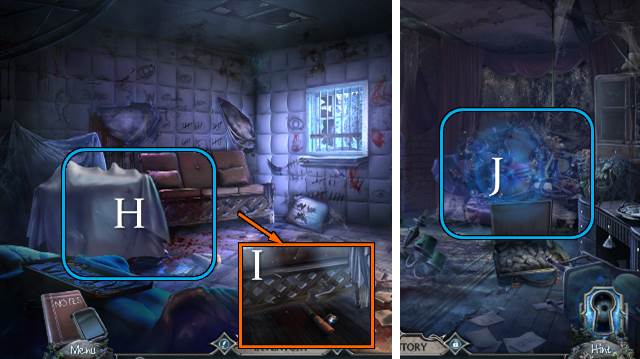
- Move grass; use SHOVEL. Take BONE (H).
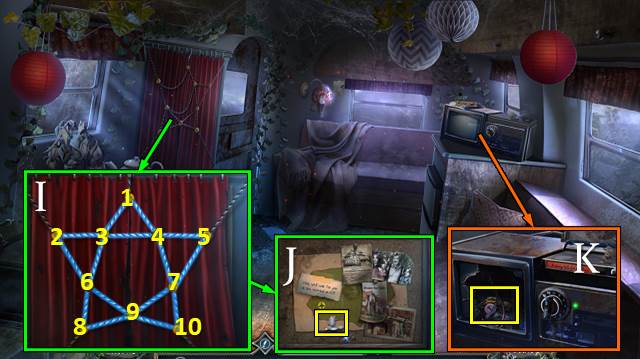
- Use BONE (I).
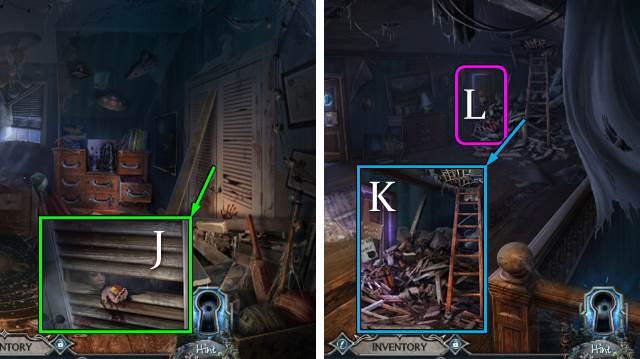
- Go (J).
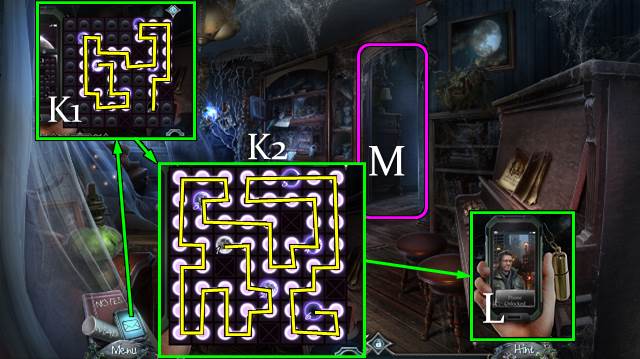
- Answer and unlock phone.
- Casual solution (K1).
- Hard solution (K2).
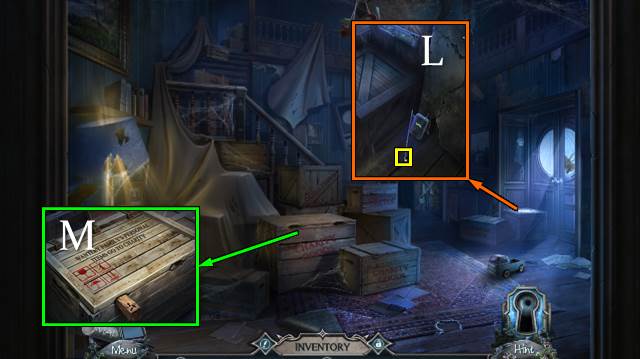
- Take LIGHTER; download app (L).
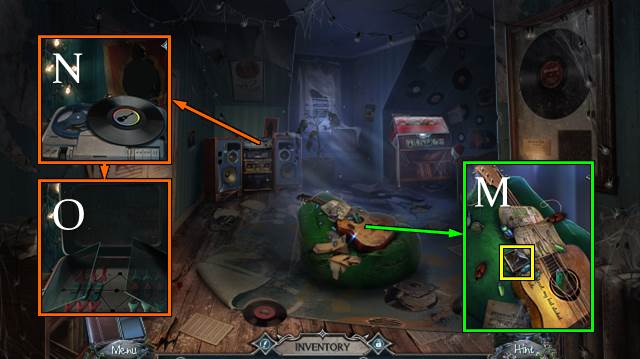
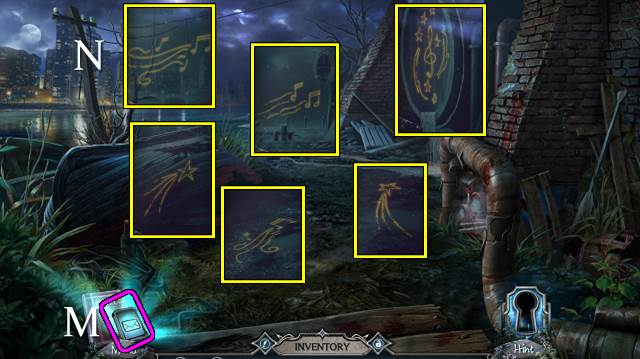
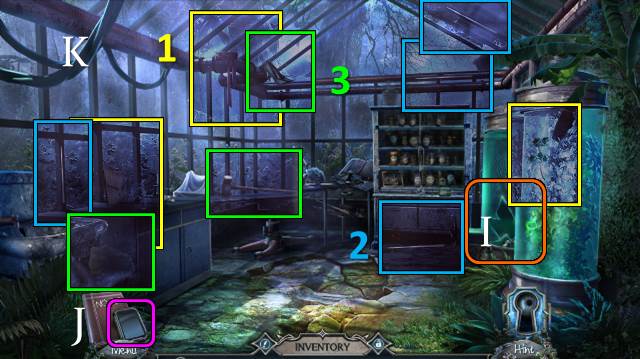
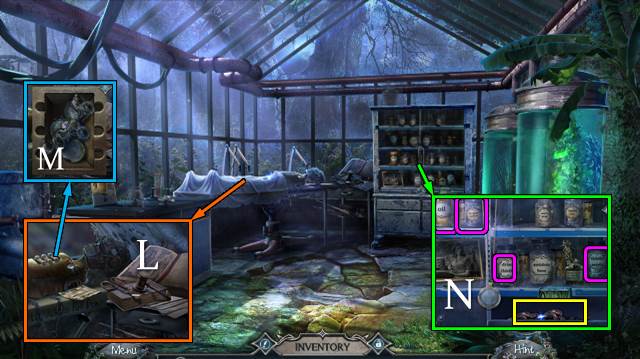
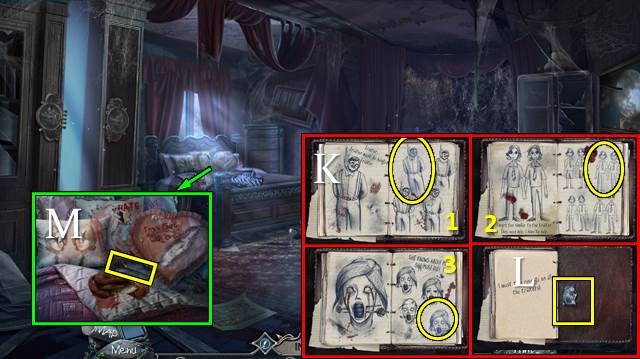
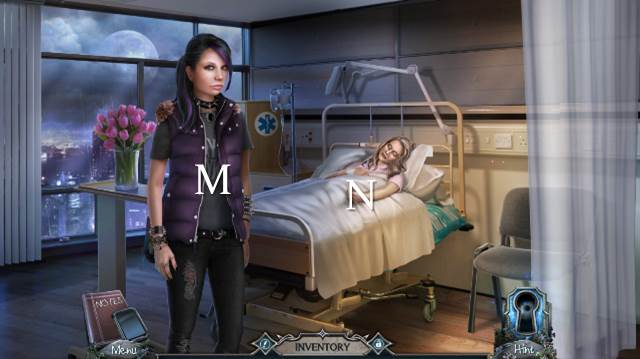
- Go (M).
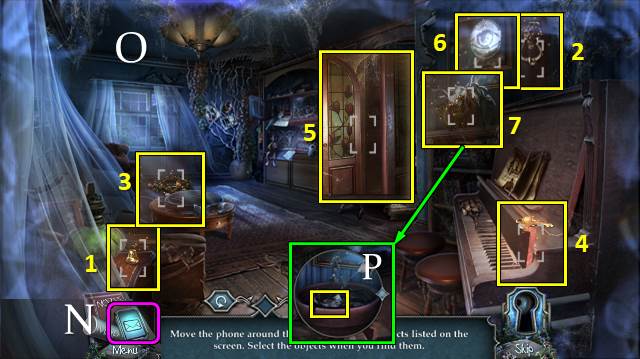
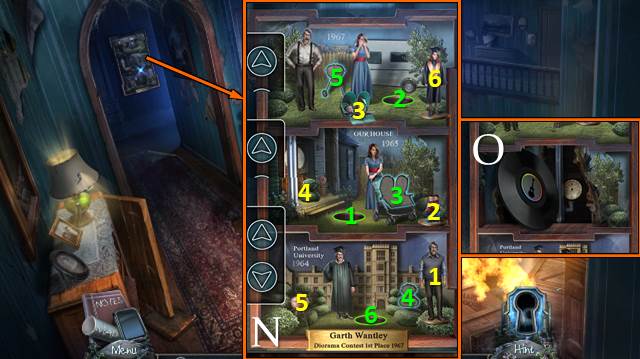
- Access phone (N); select memo pad.
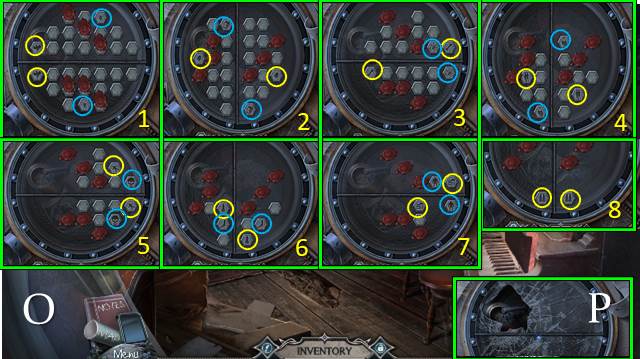
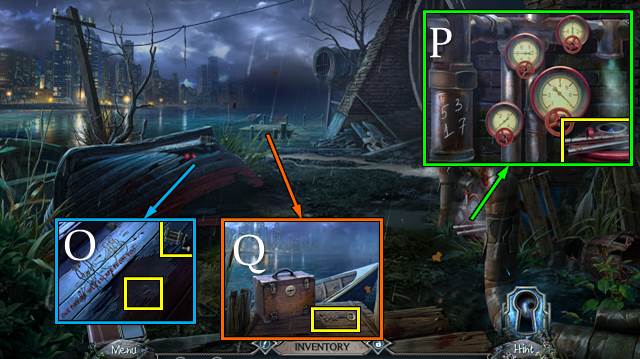
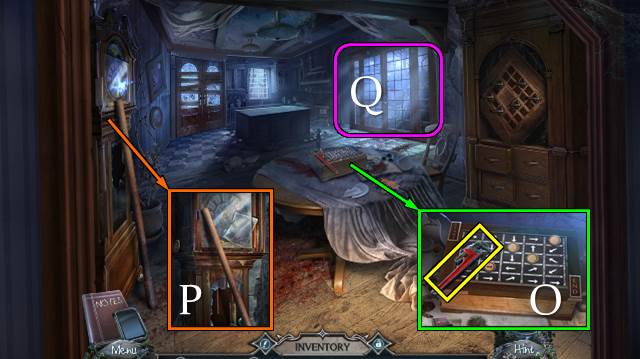
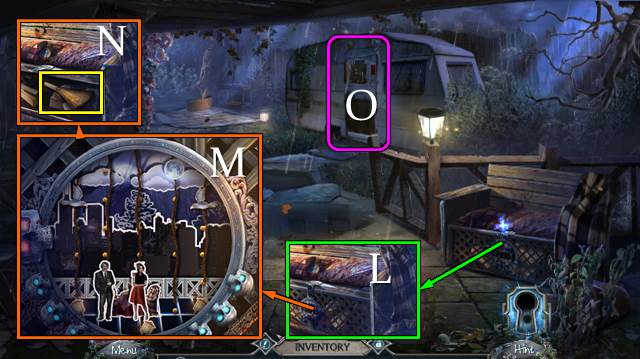
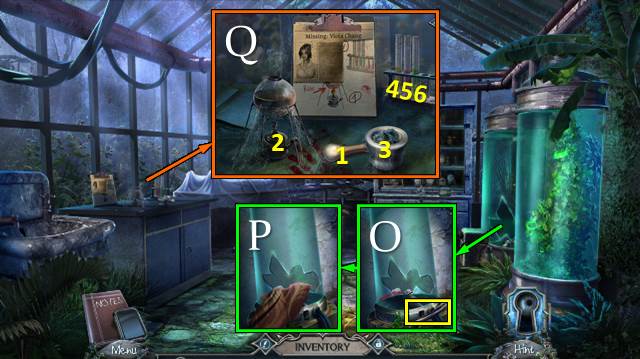
- Find items (O).
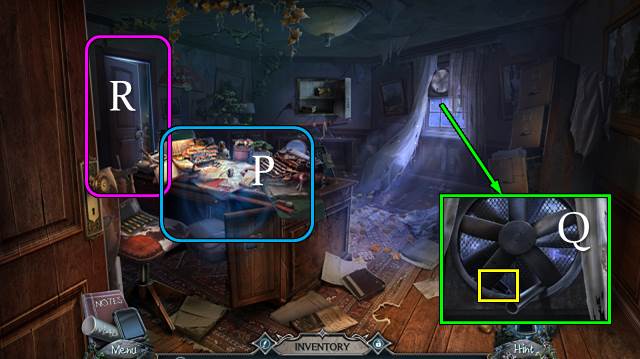
- Take PIN and PICTURE PART (P).
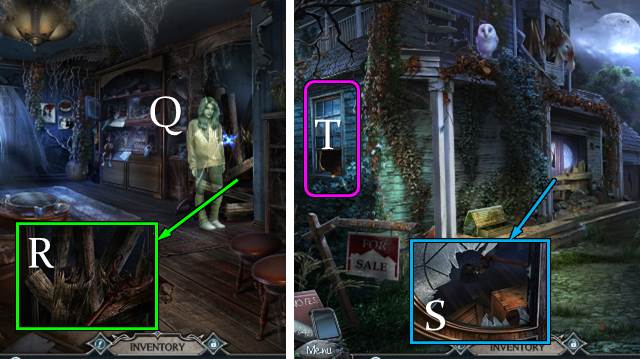
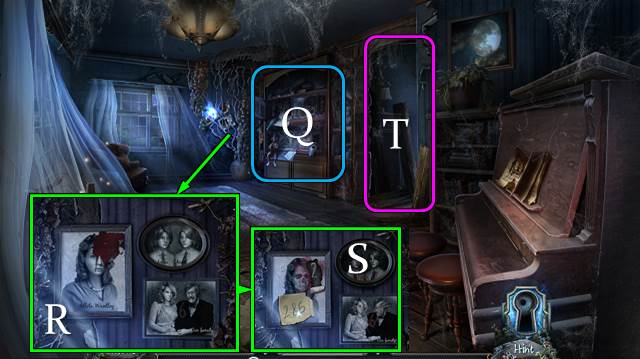
- Talk (Q).
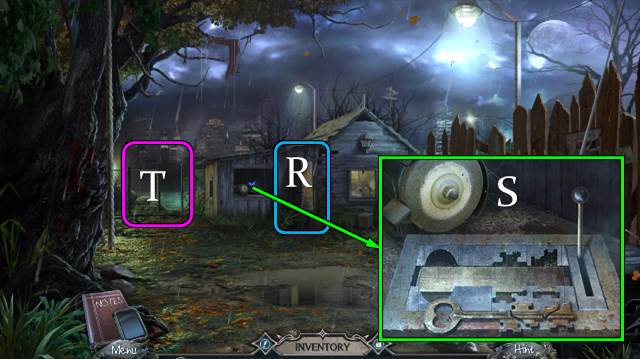
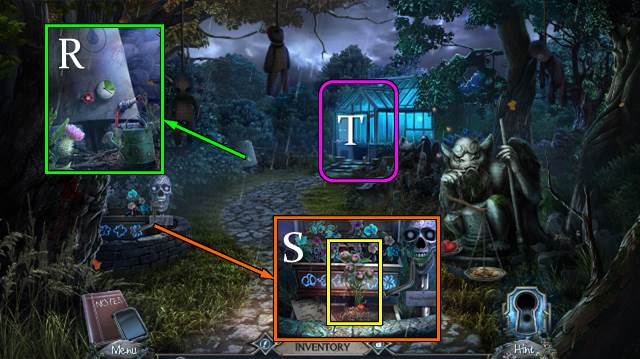
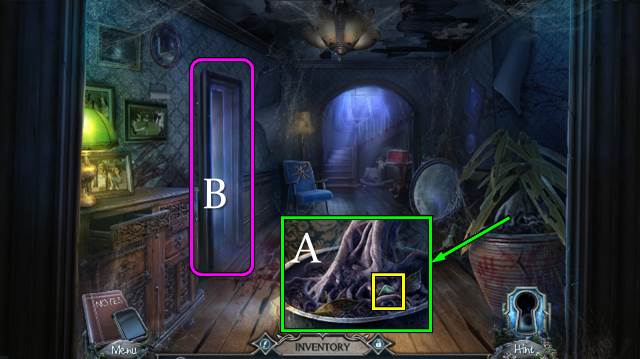
- Take COAT RACK (R).
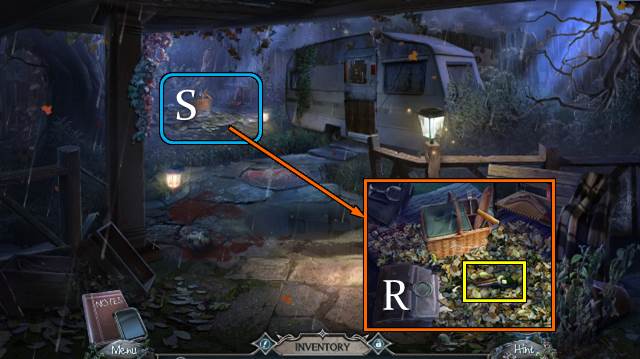
- Walk down.
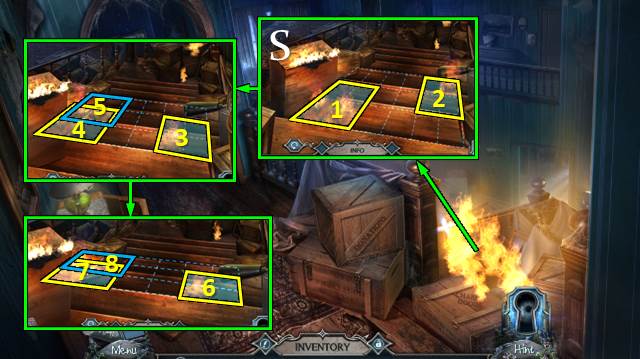
- Take BAG with COAT RACK (S).
- Go (T).
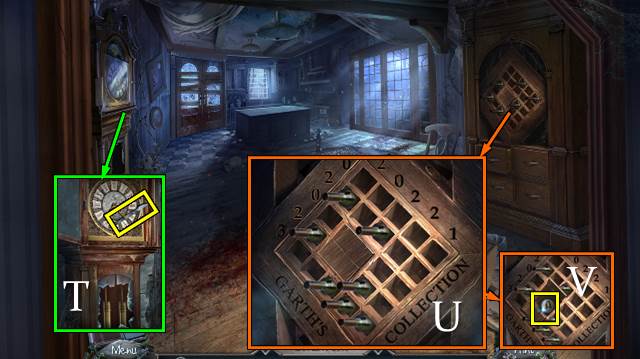
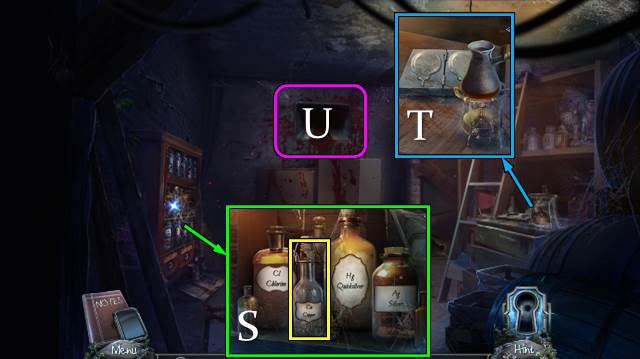
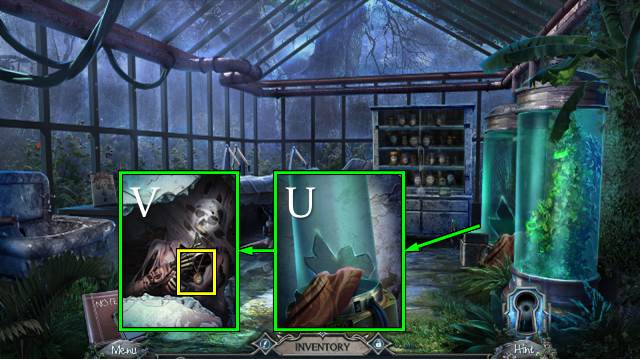
- Take SCARF from BAG. Open bag with PIN; take ULTRASONIC DEVICE, PENCIL AND PAPER, and TAPE.
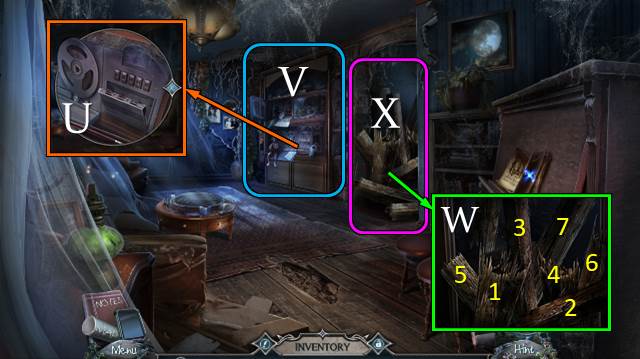
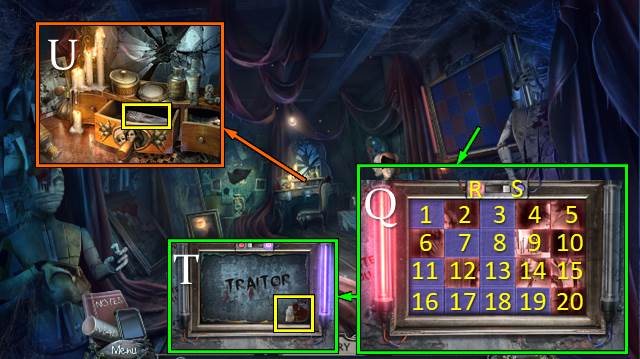
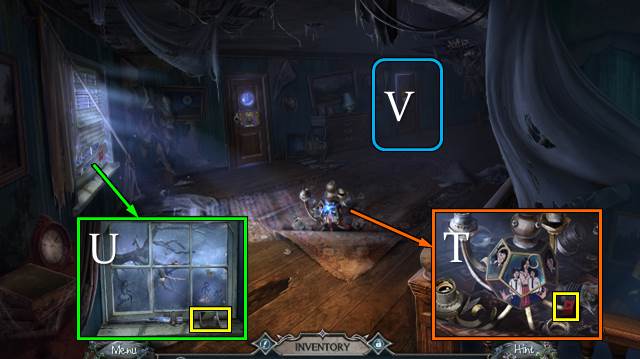
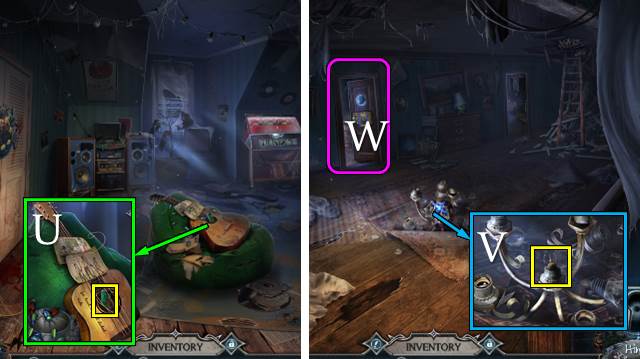
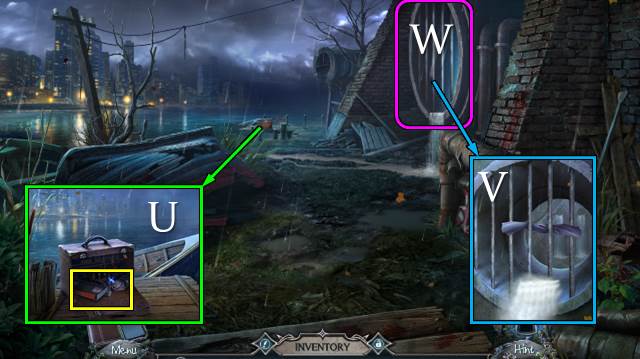
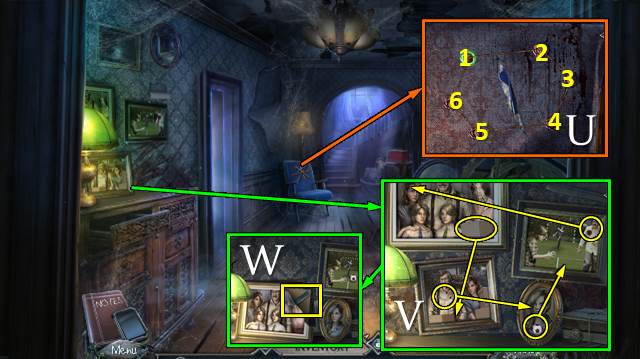
- Play TAPE (U).
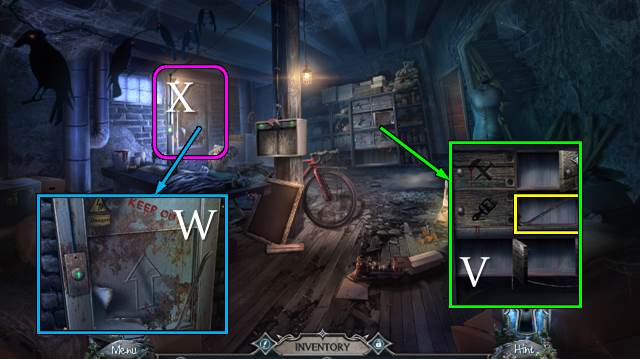
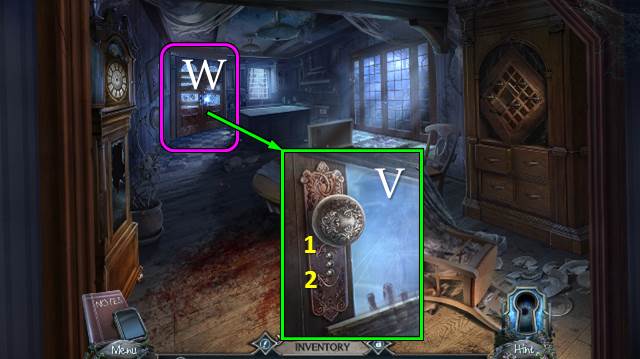
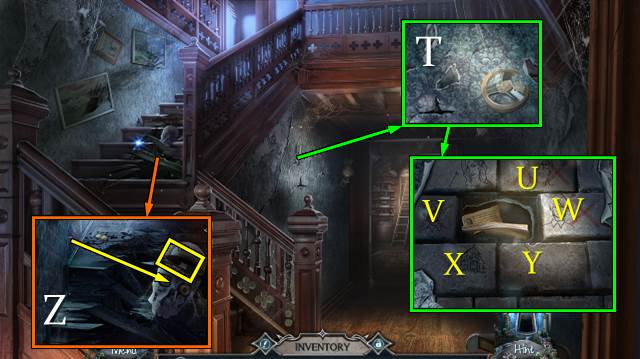
- Play HOP (V); receive BULB.
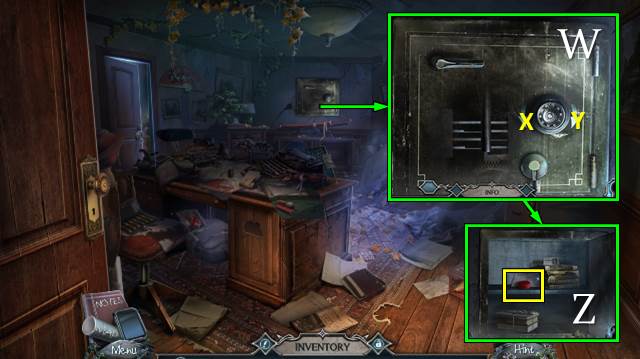
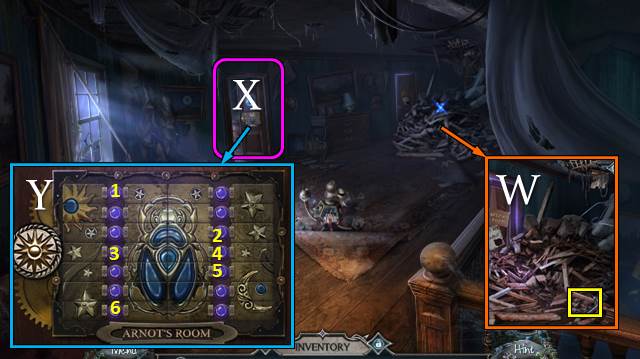
- Use SCARF; move boards (W).
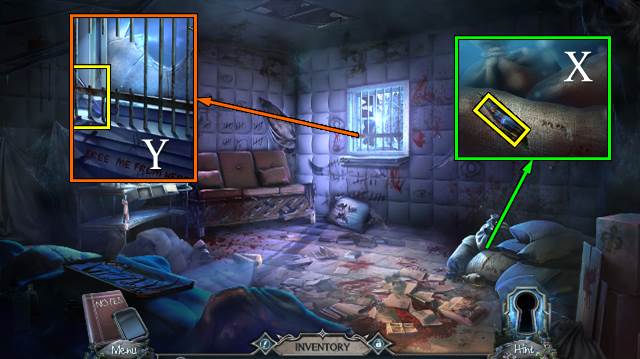
- Go (X).
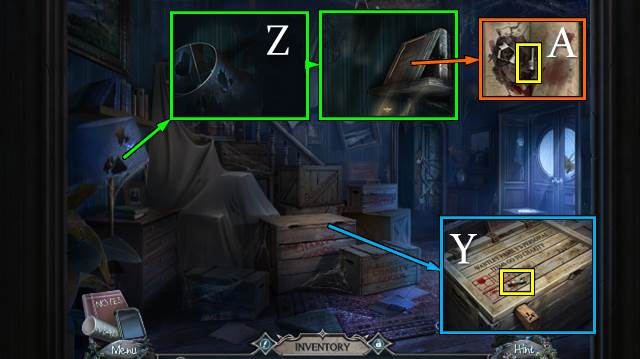
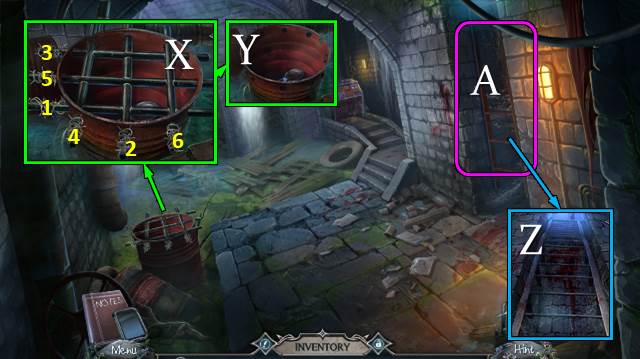
- Take TOOLBOX HANDLE (Y).
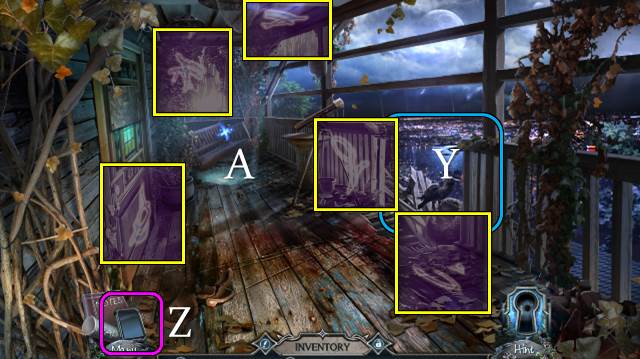
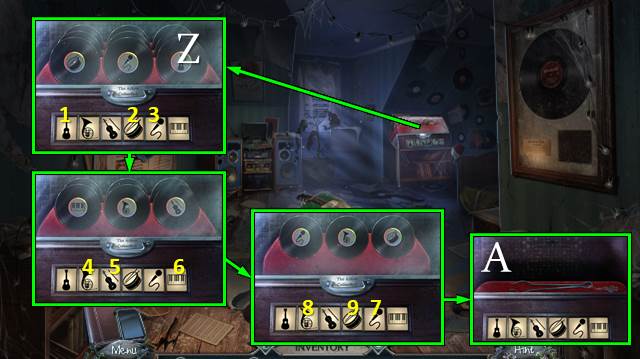
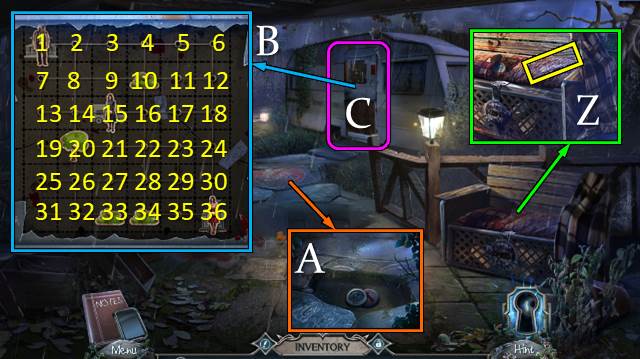
- Place BULB (Z).
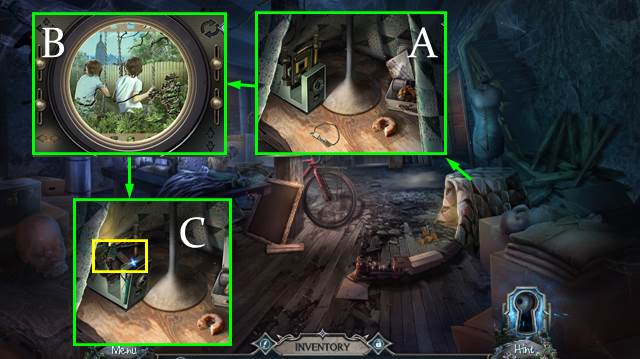
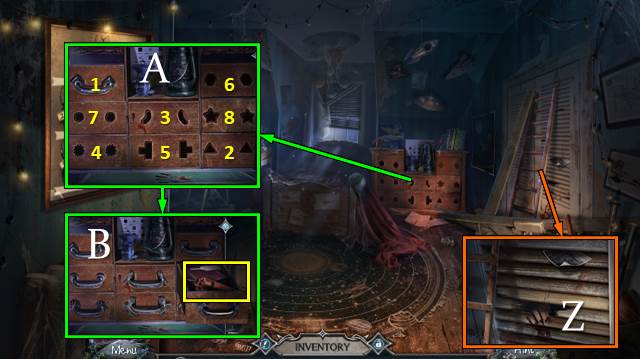
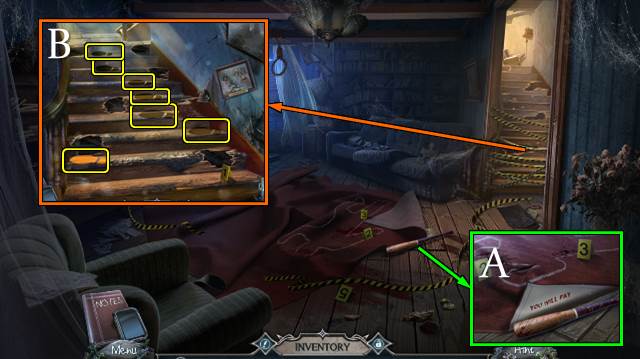
- Take PIANO KEYS 1/3 (A).
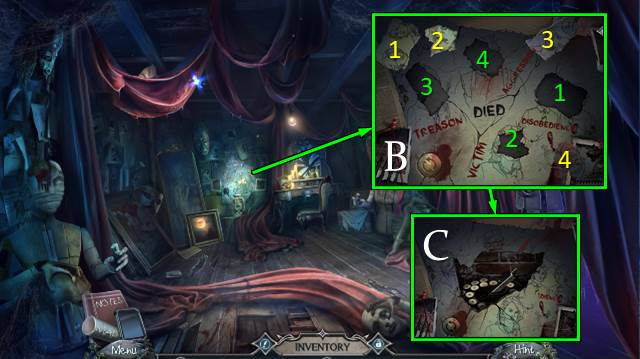
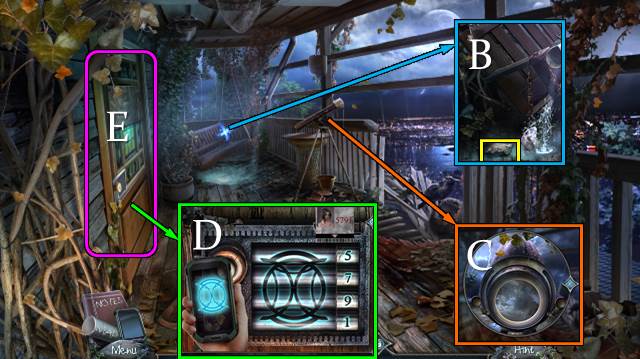
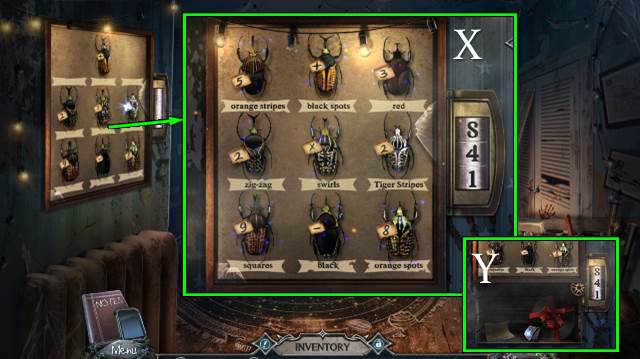
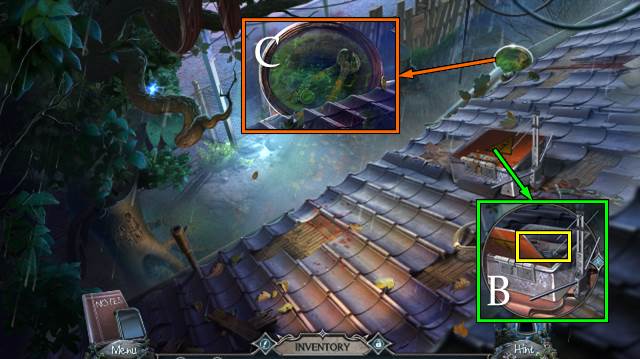
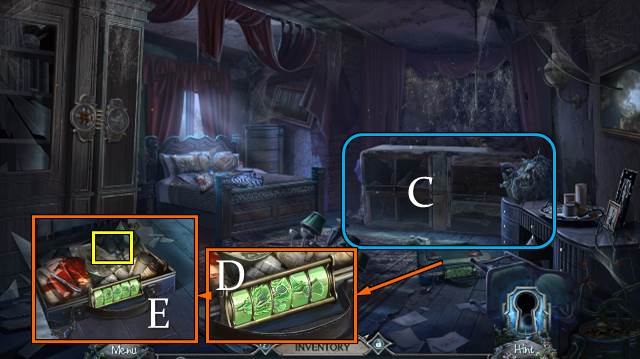
- Open book (B).
- Solution (C).
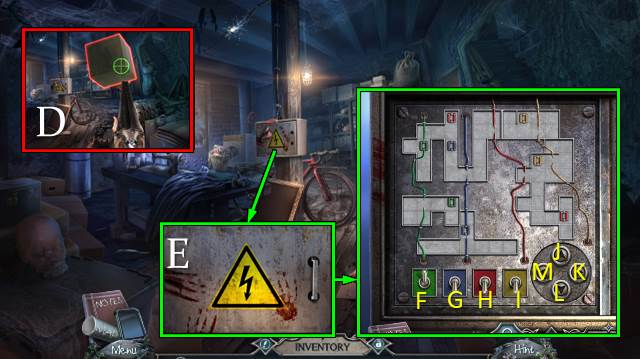
- Take PICTURE PARTS (D).
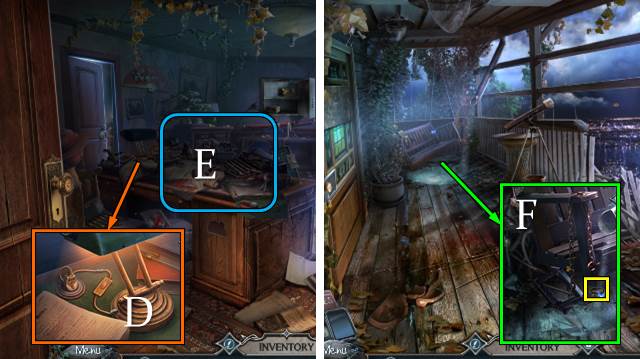
- Use ULTRASONIC DEVICE; take notes, BULLET, and PIANO KEYS 2/3 (E).
- Walk down twice.
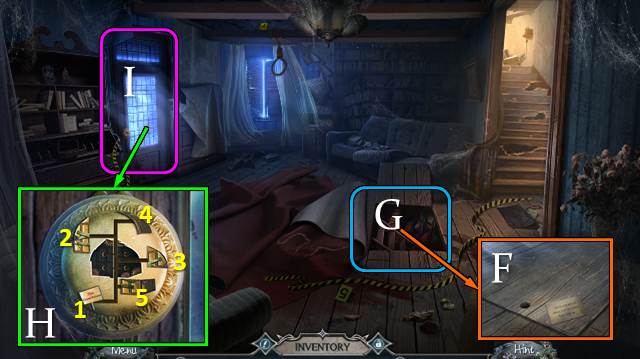
- Place TOOLBOX HANDLE; drag handles and open box (F).
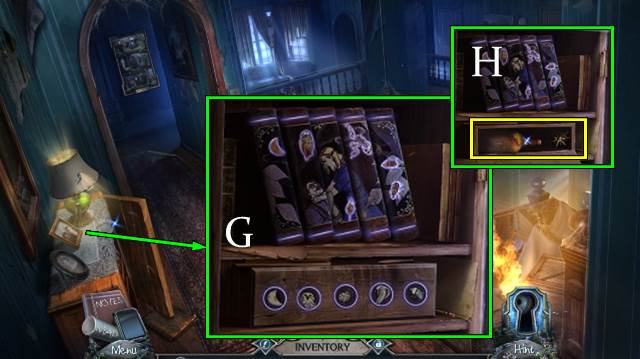
- Take PIANO KEYS 3/3, BEARINGS 1/2, MALLET (G).
- Go (H).
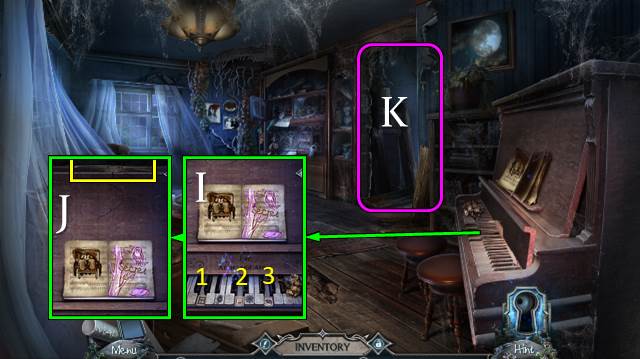
- Place PIANO KEYS. Select 1-2-3 (I).
- Take SPOKE (J).
- Go (K).
- Bend SPOKE; receive CURVED SPOKE.
- Take BEARINGS 2/2 with CURVED SPOKE (L).
- Use MALLET three times. Play HOP (M); receive SOLVENT.
- Walk down.
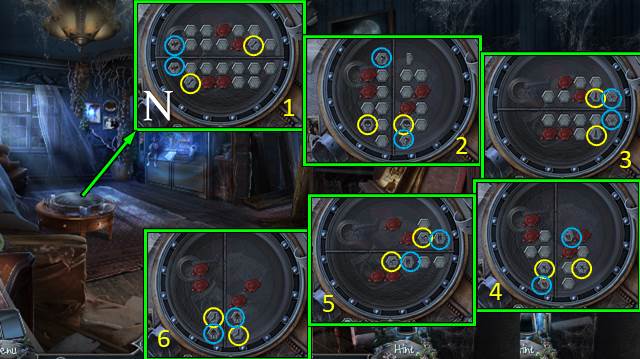
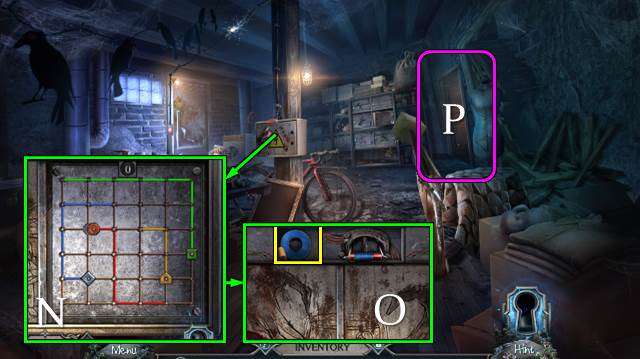
- Take note. Place BEARINGS. Casual solution (N).
- Hard solution (O).
- Take GUNPOWDER and KEY (P).
- Play HOP (Q); receive PICTURE PART.
- PICTURE PART on PICTURE PARTS; restore image. Receive PHOTO.
- Remove thorns; rotate pictures. Place PHOTO and use SOLVENT (R).
- Use PENCIL AND PAPER; take PAPER WITH HINT (S).
- Go (T).
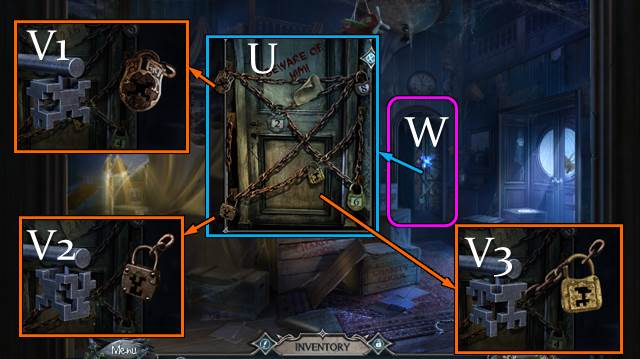
- Place PAPER WITH HINT; enter code (U).
- Place KEY. Create the correct keys (V1-3).
- Go (W).
Chapter 2: Garth's Secret
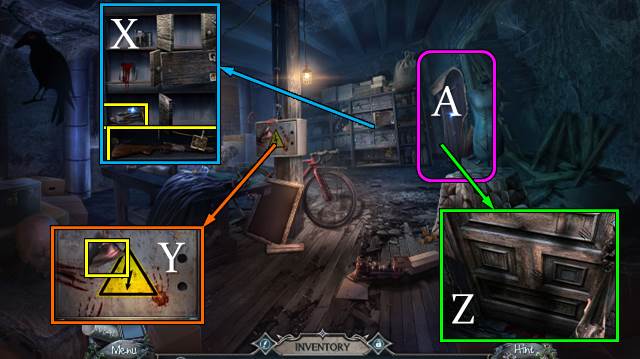
- Open doors; take UNLOADED GUN and WANTLEY FAMILY FIGURINES 1/3 (X).
- Take MASK PART 1/3 (Y).
- BULLET in ULOADED GUN; receive LOADED GUN.
- Take note; remove wallpaper. Use LOADED GUN; receive UNLOADED GUN (Z).
- Go (A).
- Use LIGHTER; place pieces (B).
- Take METAL HANDLE and BELT WITH EMPTY BULLETS (C).
- GUNPOWDER on BELT WITH EMPTY BULLETS; receive BELT WITH BULLETS.
- BELT WITH BULLETS on UNLOADED GUN; receive LOADED GUN.
- Walk down.
- Use LOADED GUN (D).
- Use METAL HANDLE (E).
- Solution: Mx3-K-G-Lx2-Kx2-Jx4-H-Lx4-Kx2-Jx3-K-G-L-H-L-Mx2-Jx3-I-L-K-G-J-H-M-L-G-Lx3-M-L-M-J.
- Solution 2 (N).
- Take CORK and ELECTRICAL TAPE; move lever (O).
- Go (P).
- Remove drape; use ELECTRICAL TAPE (Q).
- Solution: S-(7-11)-(5-13)-R-(4-12)-(10-13)-S-(15-16)-R-(8-16)-(13-16)-S-(9-17)-(13-18)-(17-18).
- Take note, COIN and BLOODY PASS (T).
- Use CORK; take notes and DRY HANDKERCHIEF (U).
- Walk down.
- Use COIN; take CROWBAR (V).
- Use CROWBAR (W).
- Go (X).
- Look (Y).
- Access phone (Z); select infrared.
- Find symbols (A).
- Receive CODE PHOTO.
- Take MASK PART 2/3. Use DRY HANDKERCHIEF; receive WET HANDKERCHIEF (B).
- Drag both handles; use WET HANDKERCHIEF. Take LENS (C).
- WET HANDKERCHIEF on BLOODY PASS; receive VIOLA CHANG PASS.
- Use VIOLA CHANG PASS and place CODE PHOTO; enter both codes (D).
- Go (E).
- Take SHOE (F).
- Break key (G).
- Take POINTER; remove board (H).
- Take GARTH'S DIARY (I).
- Walk down.
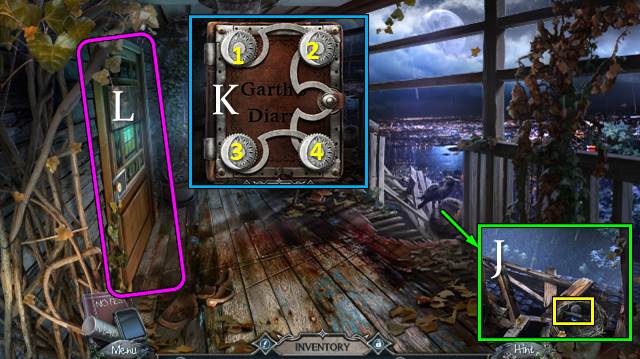
- Throw SHOE; take LOCKPICK and MOON LOCK PART (J).
- MOON LOCK PART on GARTH'S DIARY; select 1-2-3-4 (K).
- Play HOP; take SLIDES.
- Go (L).
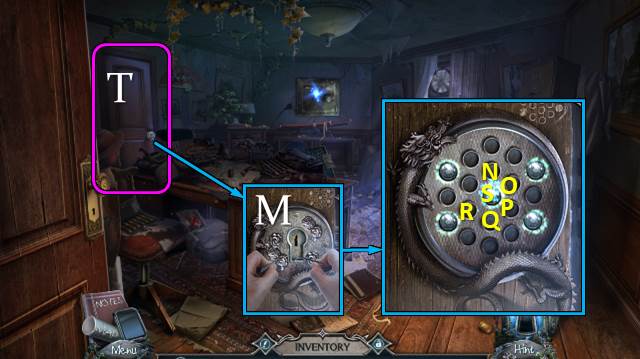
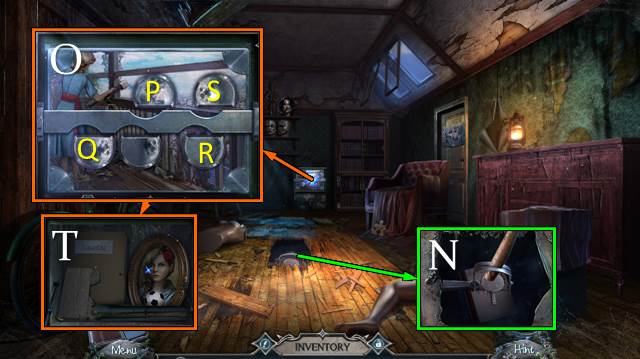
- Use LOCKPICK (T).
- Solution: Nx3-O-Px4-Q-Rx3-Sx2-Qx5.
- Go (T).
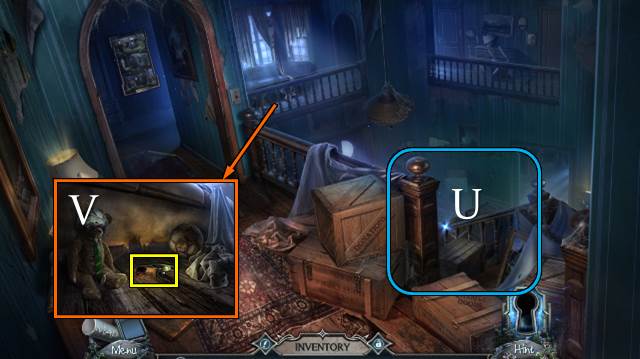
- Look (U).
- Walk down.
- Use POINTER; take note, STETHOSCOPE and BUG 1/2 (V).
- Walk down.
- Place STETHOSCOPE (W).
- Solution: Yx7-Xx5-Yx4.
- Take GIFT BOX (Z).
- Walk down twice.
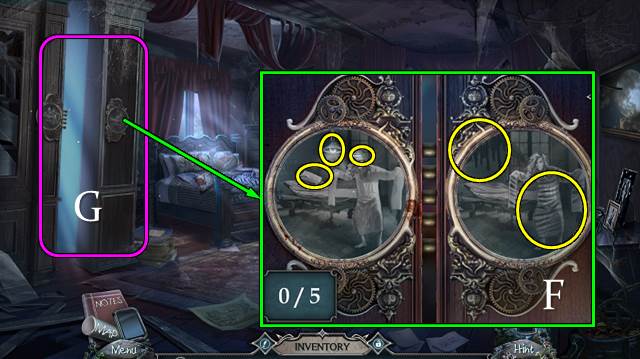
- Move quilt. Take bracelet and note. Place LENS and SLIDES (A).
- Restore images (B).
- Take SWITCH WITH PLUG (C).
- Go left twice.
- Use SWITCH WITH PLUG (D).
- Play HOP (E); receive BOX.
- Walk down.
- Take JACK from BOX.
- Use JACK; take ROUND BOOK PART (F).
- Go left twice.
- Place ROUND BOOK PART; solution (G).
- Take STAR and BOTTLE (H).
- Go to Secret Room.

- Take MASK PART 3/3 with POINTER (I).
- Place MASK PART (J).
- Solution: 1-L-1-2-L-2-1-L-1-2-L-2-3-L-3-4-L-4-3-L-3-4-L-4.
- Take BANDAGED FIGURINE (M).
- Go to Second Floor.
- Take RING from GIFT BOX.
- RING on BOTTLE; take WANTLEY FAMILY FIGURINES 2/3.
- Take WANTLEY FAMILY FIGURINES 3/3 from BANDAGED FIGURE.
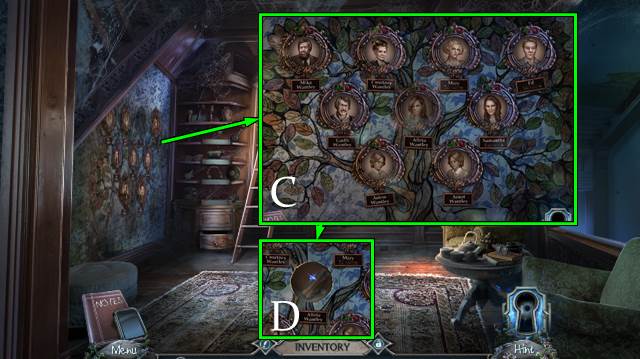
- Place WANTLEY FAMILY FIGURINES; solution (N).
- Take TUBE and VINYL RECORD 1/3 (O).
- Walk down.
- Play HOP (P); receive BROKEN FIRE EXTINGUISHER.
- Place TUBE; take FIRE EXTINGUISHER PART (Q).
- FIRE EXTINGUISHER PART on BROKEN FIRE EXTINGUISHER; receive FIRE EXTINGUISHER.
- Go (R).
- Use FIRE EXTINGUISHER (S).
Chapter 3: May
- Take TAPE RECORDER BUTTON (T).
- Raise blinds; take PART OF TABLE 1/2 (U).
- Look (V).
- Take HANDLE (W).
- Look (X).
- Place STAR. Select 1-2-3-4-5-6 (Y).
- Go (X).
- Take LADDER and note (Z).
- Place HANDLE. Place all handles (A).
- Take DYNAMITE and PART OF CHISEL (B).
- Walk down.
- Place LADDER; take BROKEN CHISEL. Place DYNAMITE (C).
- PART OF CHISEL on BROKEN CHISEL; take CHISEL.
- Use CHISEL (D).
- Go (E).
- Look (F).
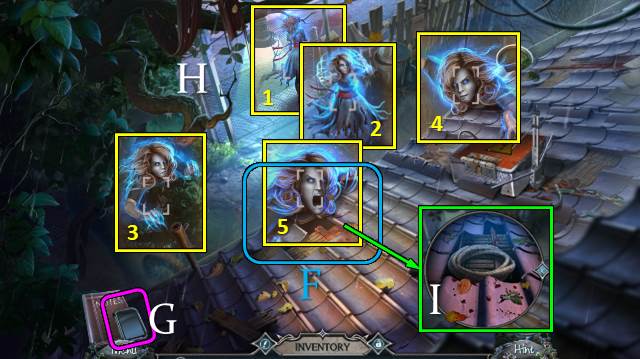
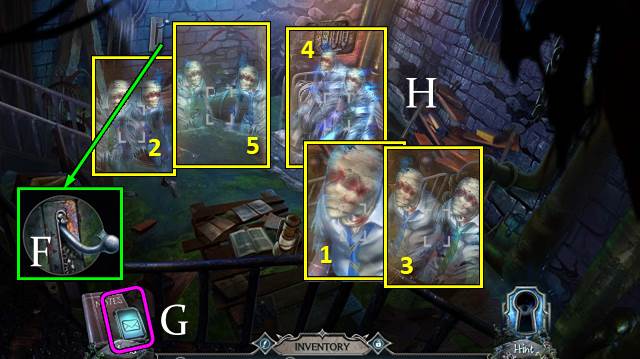
- Access phone (G).
- Find ghosts (H).
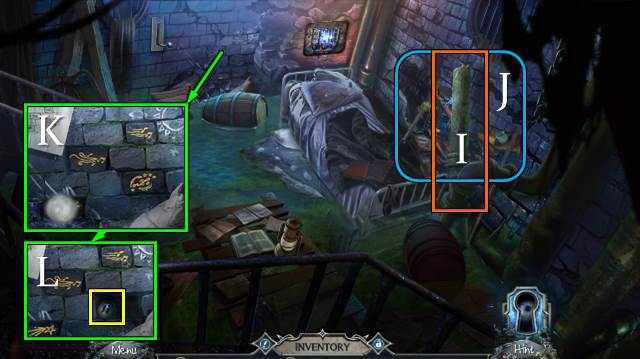
- Remove tile; take BROKEN ROPE (I).
- Go down and forward.
- Use CHISEL. Talk; take MATCHES (J).
- Walk down.
- Use MATCHES (K).
- Go (L).
- Take PART OF LOCK 2/2 (M).
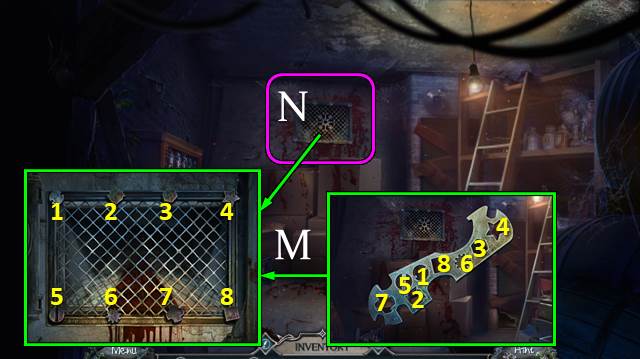
- Take VINYL RECORD 2/3. Use TAPE RECORDER BUTTON (N).
- Open box (O).
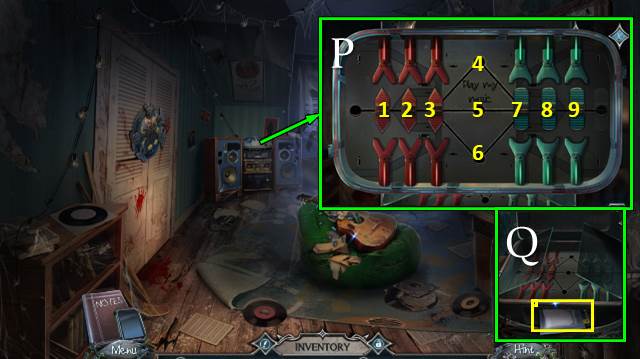
- Solution (P): (3-4)-(7-5-3)-(8-7-5)-(9-8-7-6)-(4-7-8-9)-(3-4-7)-(2-3-4)-(5-3)-(7-5)-(4-7-8)-(3-4-7)-(1-2-3-4)-(5-3-2-1)-(7-5-3-2)-(6-3)-(4-7).
- Take PACKAGE WITH OIL (Q).
- Go to Arnot's Room.
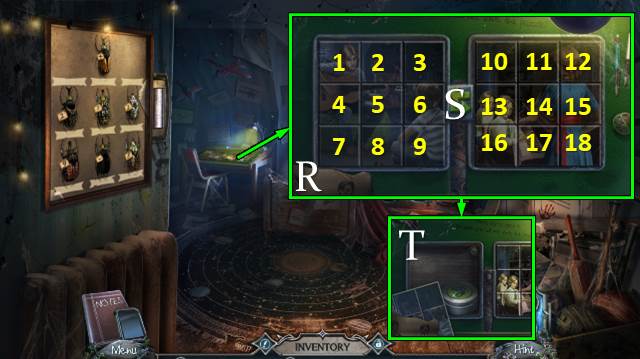
- Take note and place PART OF LOCK (R).
- Solution: (1-4)-(4-8)-(2-5)-(3-7)-(5-8)-(5-6)-(10-13)-S-(12-13)-(6-9)-S-(7-6)-(13-15)-S-(6-9)-(14-12)-(14-18)-(14-17)-(10-17)-(13-11)-(10-13)-(13-16).
- Take CONTAINER (T).
- Go to Arlow's Room.
- Place CONTAINER; move bugs. Take note and SCREWDRIVER (U).
- Walk down.
- Use SCREWDRIVER; take BUGS 2/2 (V).
- Go (W).
- Place BUGS; solution (X).
- Take PHOTO PART, VINYL RECORD 3/3 and note (Y).
- Go to Arlow's Room.
- Place VINYL RECORD (Z).
- Select 1-9.
- Take FORCEPS (A).
- Go to Garage Roof.
- Take OIL from PACKAGE WITH OIL.
- Use OIL; take note, GLOVES and BROTHER FIGURES 1/2 (B).
- Take RUSTY CLIPPERS and BROTHER FIGURES 2/2 with FORCEPS (C).
- Go to Arlow's Room.
- Place BROTHER FIGURES (D).
- Solution (1-6).
- Talk; receive PART OF ROPE (E).
- Go to Garage Roof.
- PART OF ROPE on BROKEN ROPE; take ROPE.
- Place ROPE (F).
Chapter 4: Following the Trail
- Take BROKEN FISHING ROD and note. Use RUSTY CLIPPERS; receive CLIPPERS (G).
- Open door. Play HOP (H); receive VALVE.
- Use GLOVES; remove planks. Talk (I).
- Take BRANCH (J).
- Use CLIPPERS (K).
- Go (L).
- Access phone (M); select infrared.
- Find symbols (N).
- Receive WALL INSTRUCTIONS.
- Use BRANCH; take HOOK and COIL (O).
- Place VALVE. Turn valves; take LINE and PARTS OF LADDER (P).
- COIL, LINE and HOOK on BROKEN FISHING ROD; take FISHING ROD.
- Use FISHING ROD; take BROKEN KEY PIECES (Q).
- Walk down.
- Play HOP (R); receive SPOKE.
- Place BROKEN KEY PIECES. Change mold parts; pull lever. Take KEY (S).
- Go (T).
- Use KEY; take CASSETTE and CLOTH (U).
- Use CLOTH and SPOKE (V).
- Go (W).
- Place GLOVES; remove bars (X).
- Take MIRROR (Y).
- Place PARTS OF LADDER (Z).
- Go (A).
- Take MAGNET (B).
- Place MIRROR; take LEVER (C).
- Walk down.
- Place all parts; place LEVER. Take BROKEN RAKE (D).
- Go (E).
- Use MAGNET; pull lever (F).
- Access phone (G).
- Find ghosts (H).
- Move pipe (I).
- Play HOP (J); receive KEY.
- Place WALL INSTRUCTIONS. Select bricks (K).
- Take PART FROM ARNOT'S PUZZLE 1/2 (L).
- Go to the Storeroom.
- Remove bolts with KEY (M).
- Go (N).
- Take WRENCH (O).
- Take RAKE HANDLE (P).
- Go (Q).
- RAKE HANDLE on BROKEN RAKE; take RAKE.
- Take BOTTLE OF WINE; use RAKE (R).
- Play HOP (S); receive WEIGHT FROM CLOCK.
- Walk down.
- Place WEIGHT FROM CLOCK; take note and SCALPEL (T).
- Place BOTTLE OF WINE. Solution (U).
- Take PART FROM ARNOT'S PUZZLE 2/2 (V).
- Go to Shelter in the Tunnel.

- Play HOP (W); receive TRAILER DOOR PART.
- Place PART FROM ARNOT'S PUZZLE (X).
- Solution: 3-1-2-1-3-3-2-2-3.
- Take RULER (Y) and notes.
- Go to Terrace.
- Use SCALPEL; take note, PART OF PUZZLE 1/2 and PART OF THE LAMP (Z).
- Use RULER; take SPECIAL STONE 1/3 and CIRCLE 1/2 (A).
- Place TRAILER DOOR PART (B).
- Casual solution: 36-35-29-28-27-21-15.
- Hard solution: (36-30)-(7-8-9-8)-(30-24-18-12)-(14-15-21-27-28)-(4-3-2)-(28-22)-(8-9)-(21-15).
- Go (C).
- Take CEZVE (D).
- Take notes; place PART OF THE LAMP (E).
- Solution: 1-F-1-F-1-3-G-3-G-3.
- Take PART OF PUZZLE 2/2 (H).
- Place PART OF PUZZLE (I).
- Solution: 1-3-2-6-8-9-10-7-5-4-3-6-9-7-4-1.
- Take PART OF LOCK and notes (J).
- Take notes, turn knob and play CASSETTE (K).
- Take COINS 1/2 and SPECIAL STONE 2/3.
- Walk down.
- Place PART OF LOCK (L).
- Solution (M).
- Take BROOM and notes (N).
- Go (O).

- Use BROOM. Find pairs; take SPECIAL STONE 3/3 (P).
- Walk down twice.
- Place SPECIAL STONE; solution (Q).
- Take CLOTH and LABELS (R).
- Walk down.
- Place LABELS; take COPPER (S).
- Place CEZVE and COPPER. Light burner, pour copper, close and open mold and take DOOR HANDLE (T).
- Go (U).
- Place DOOR HANDLE. Select 2-1-2 (V).
- Go (W).
Chapter 5: A Family Tragedy

- Look (X).
- Access phone (Y); select memo pad.
- Find items (Z).
- Take HURL, remove rug and take note (A).
- Remove tape and take note. Solution (B).
- Take HANDLE (C).
- Go (D).
- Take GREENHOUSE PART (E).
- Walk down twice.
- Use HANDLE (F).
- Play HOP (G); receive TAPE PLAYER.
- Place GREENHOUSE PART (H). Select 1-2-3-4-5.
- Go (I).
- Use rake; take CRUTCH (J).
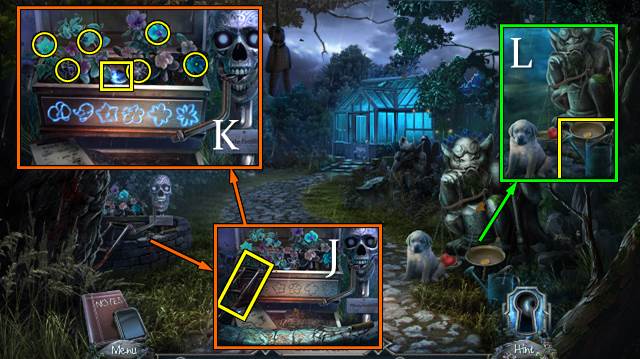
- Find flowers; take CIRCLE 2/2 (K).
- Take EMPTY CAN (L).
- Walk down.
- Take FIGURINE with CRUTCH (M).
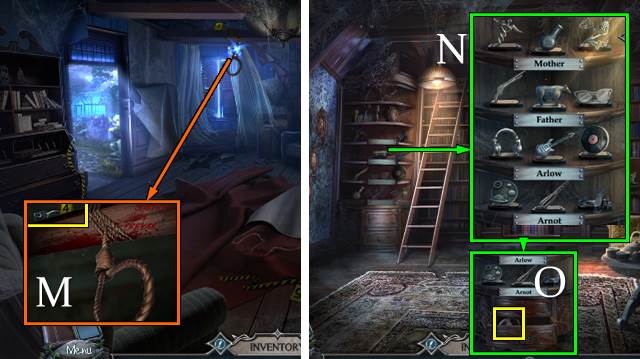
- Go to Reading Lounge.
- Place FIGURINE. Solution (N).
- Take note and REEL (O).
- Place CIRCLE (P).
- Find symbols 1-6.
- Play HOP (Q); receive TWINE.
- Walk down.
- Use TWINE. Solution (R).
- Take BUTTERFLY and COINS 2/2 (S).
- REEL on TAPE PLAYER; receive BROKEN REEL PART.
- Remove frame and wallpaper. Use BROKEN REEL PART twice (T).
- Select Ux2-V-W-X-Yx2. Take GLASS and notes.
- Release BUTTERFLY. Move eye; take CHAIN (Z).
- Go to Garden.
- Place CHAIN and COINS; take PORTRAIT (A).
- Go to Reading Lounge.
- Play HOP (B); receive FERTILIZER BASE.
- Place PORTRAIT; solution (C).
- Take BONE (D).
- Go to Garden.
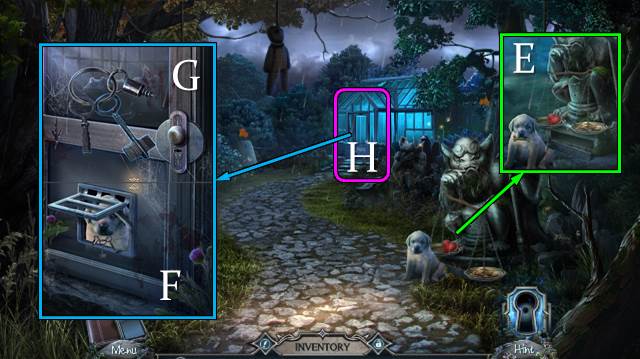
- Offer BONE; receive PUPPY (E).
- Release PUPPY; take KEYS (F).
- Scroll up.
- Place KEYS; select middle key (G).
- Go (H).
- Look (I).
- Access phone (J); select memo pad.
- Find objects (K).
- Take note (L). Use WRENCH; take DRY THISTLE (M).
- Place GLASS; find symbols. Take SEEDS (N).
- Take TWEEZERS (O).
- Place CLOTH; take CRANE (P).
- Place FERTILIZER BASE and DRY THISTLE (Q). Use pestle (1). Light burner (2) and add powder (3) and chemicals (4, 5, 6). Take FERTILIZER and note.
- Walk down.
- Take note. Place CRANE and EMPTY CAN. Rotate valve. Take CAN WITH WATER (R).
- Place FERTILIZER and SEEDS. Use CAN WITH WATER. Take POISONOUS THISTLE and BUTTON (S).
- Go (T).
- Place BUTTON. Remove wall (U).
- Take FIGURE PART (V).
- Go to Reading Lounge.

- Place FIGURE PART (W); take BOARDS (X).
- Walk down.
- Place BOARDS (Y).
- Go (Z).
Chapter 6: A Secret Revealed
- Take PIECE OF LOCK with TWEEZERS (A).
- Go (B).
- Move screen. Play HOP (C); receive SPONGE.
- Place PIECE OF LOCK. Turn lock parts (D).
- Take note and WATER (E).
- WATER on SPONGE; take WET SPONGE.
- Use WET SPONGE; find differences (F).
- Go (G).
- Remove sheet. Play HOP (H); receive BOX PART.
- Use HURL; take PICTURE PART 1/2 and FLUTE (I).
- Walk down.
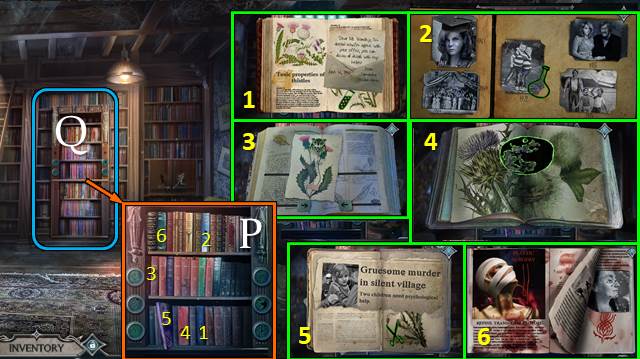
- Play HOP (J); receive DIARY.
- Open DIARY; find matching images (K).
- Take BOX PART (L).
- Use FLUTE; take PIN (M).
- Walk down and forward.
- Use HURL. Take ANTIDOTE RECIPE, BLADE and notes (N).
- Combine two BOX PARTS.
- Place BOX PART (O).
- Solution: Px4-Qx3-R-S.
- Take note and PORTRAIT (T).
- Walk down.
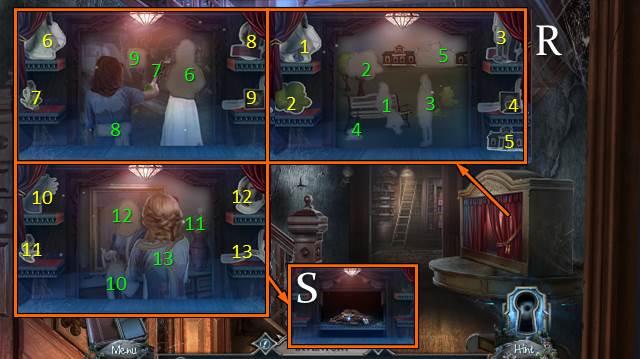
- Use PIN (U). Select 1-4-5-6-2-1. Take DART 1/3.
- Place PORTRAIT. Move items (V).
- Take NAIL FILE (W).
- Go to Padded Cell.
- Use BLADE; take BOX FIGURINE (X).
- Use NAIL FILE; take DART 2/3 (Y).
- Walk down twice.
- Place BOX FIGURINE (Z).
- Select 1-2-3-4-1-5-6-7-8-6-9-10-11-9-12-13-14-9-15-16-9-17.
- Take PHOTO, PHOTO PART and DART 3/3 (A).
- Three PHOTO PARTS on LOCKET; receive PHOTO (B).
- Combine two PHOTOS.
- Go (C).
- Place DART (D).
- Take NEUTRALIZING LIQUID and PICTURE PART 2/2 (E).
- Place PICTURE PART (F).
- Solution: (1-5)-(3-5)-(7-5)-(8-6)-(9-7).
- Go (G).
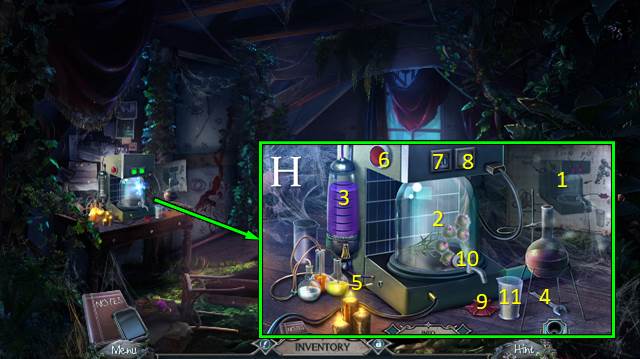
- Place ANTIDOTE RECIPE (1), POISONOUS THISTLE (2) and NEUTRALIZING LIQUID (3). Use wrench (4) on wires (5). Push button (6). Select 7x1, 8x2. Place valve (9) on tap (10) and use beaker (11) (H).
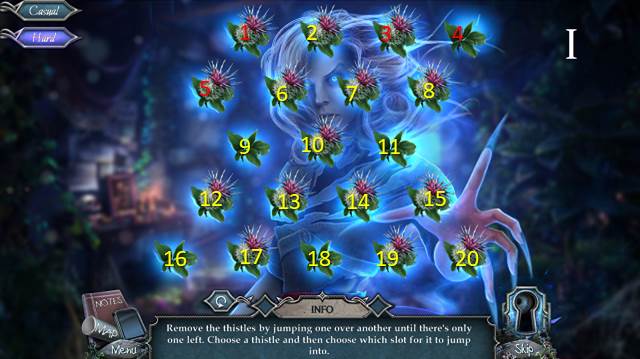
- Remove thistles (I).
- Casual solution: (2-9)-(9-11)-(17-10)-(7-13)-(11-18)-(12-14)-(18-11)-(11-20)-(20-18).
- Hard solution: (2-4)-(10-3)-(4-2)-(1-10)-(14-6)-(2-9)-(12-14)-(20-18)-(18-11)-(15-7)-(8-6)-(5-13)-(17-10)-(6-14).

- Repeat sequence (J).
- Casual: 4-6-1-3, 2-4-6-5-3, 1-5-3-6-4-2.
- Hard: 12-10-9-7, 8-10-11-12-9, 7-11-9-12-8-10.
- Find pairs.
- Casual (K).
- Hard (L).
- Talk (M).
- Use ANTIDOTE (N).
- Congratulations, you have completed Harrowed Halls: Hell's Thistle.
Created at: 2017-11-24