

Walkthrough Menu
- General Tips
- Chapter 1: Lakeview Lane
- Chapter 2: Laura and Diana
- Chapter 3: Mike
- Chapter 4: Brenda and Dexter
- Chapter 5: Vinnie and Elizabeth
- Chapter 6: Carson and Caroline
- Chapter 7: Gilmore and the Killer
General Tips
- This is the official guide for Harrowed Halls: Lakeview Lane.
- This guide will not show when you have to zoom into a location; the screenshots will show each zoom scene.
- Hidden-object puzzles are referred to as HOPs. This guide will not show screenshots of the HOPs, however, it will mention when an HOP is available and the inventory item you'll collect from it.
- Use the Map to fast travel to a location.
Chapter 1: Lakeview Lane
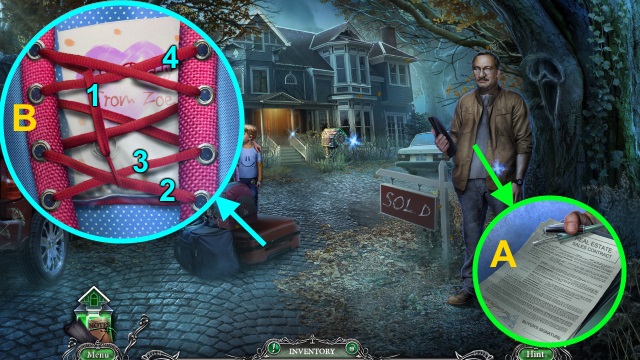
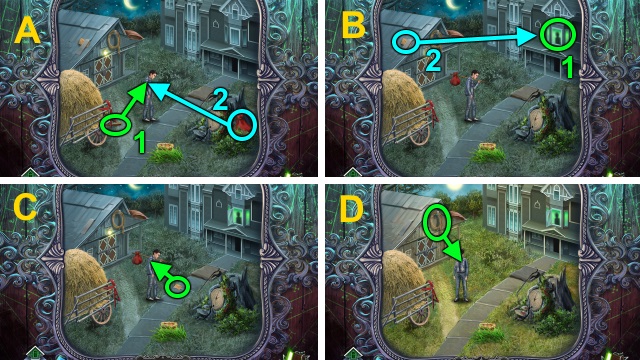
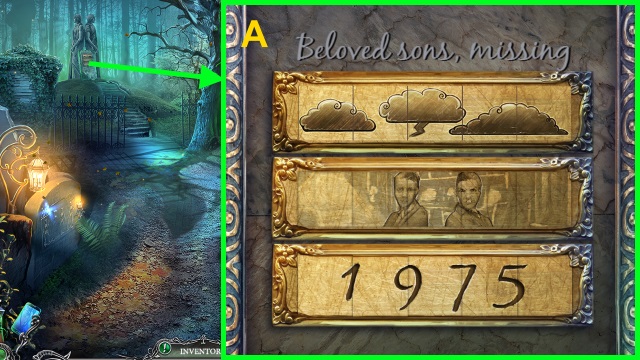
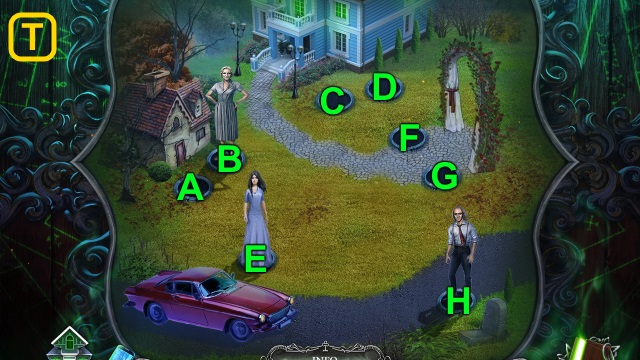
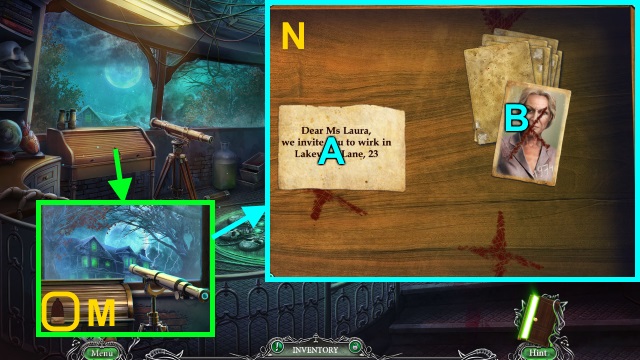
- Talk to the man; take the CONTRACT OF SALE (A).
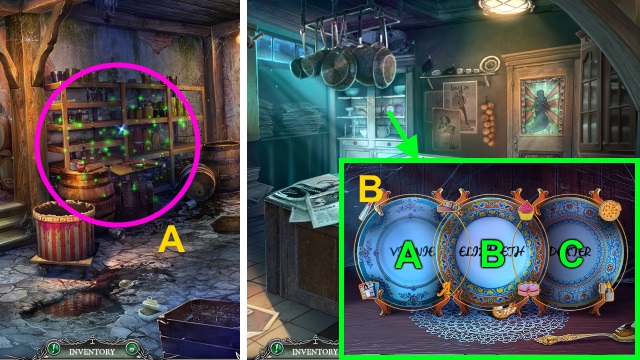
- Examine the suitcase for a mini-game; solution (B).
- Take the SLIDER and note.
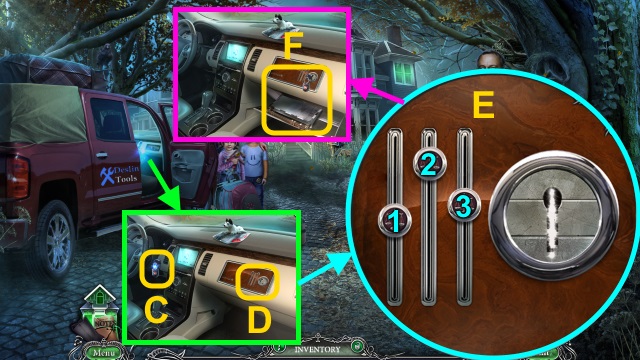
- Take the CAR KEYS (C); examine the glove compartment (D).
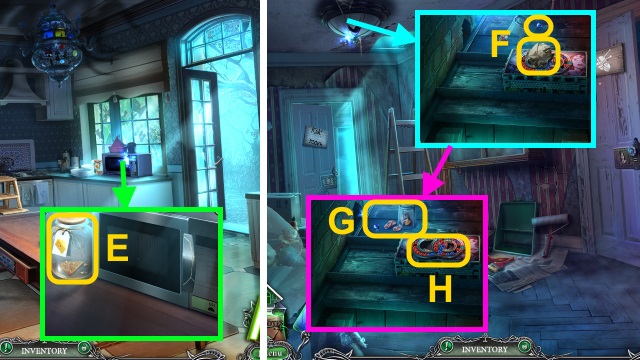
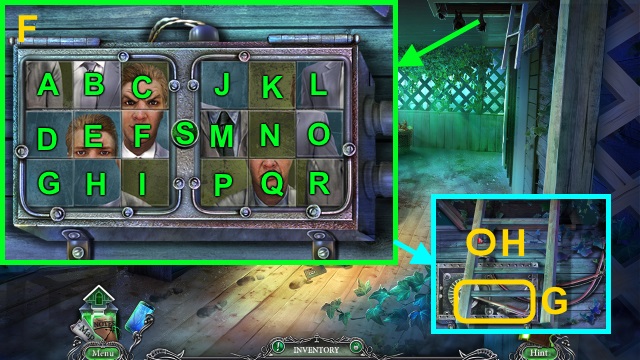
- Place the SLIDER for a mini-game; solution (E).
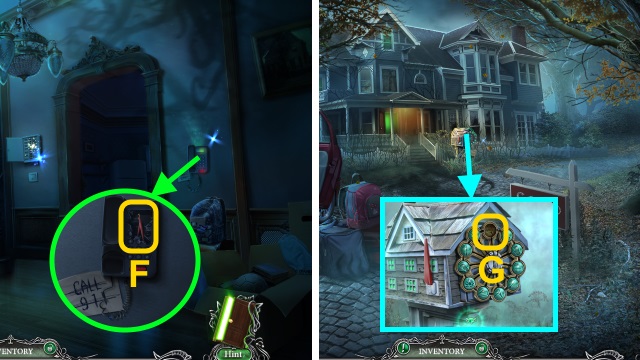
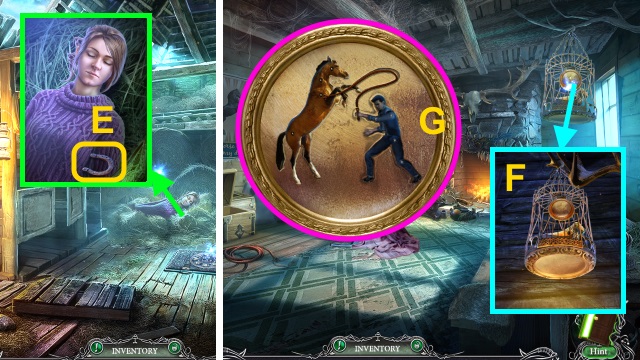
- Use the CAR KEYS; take the Map, notebook, and PEN (F).
- Combine the CONTRACT OF SALE and PEN; receive the SIGNED CONTRACT.
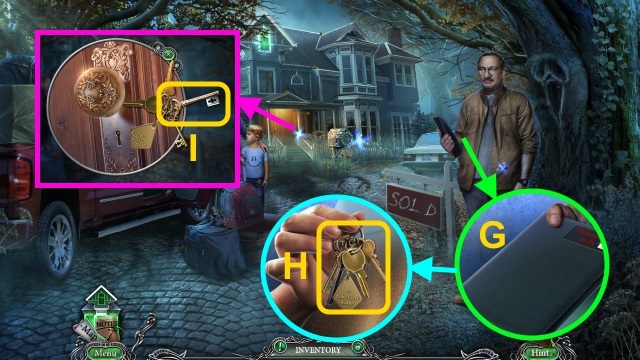
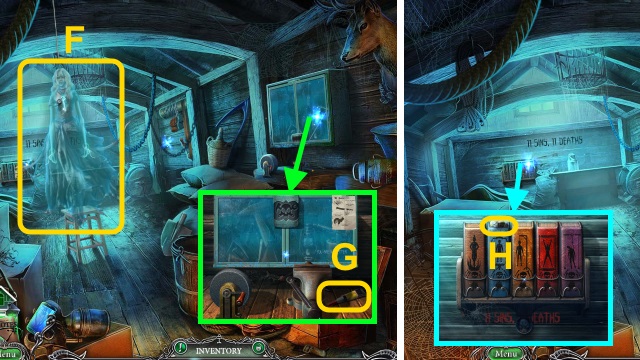
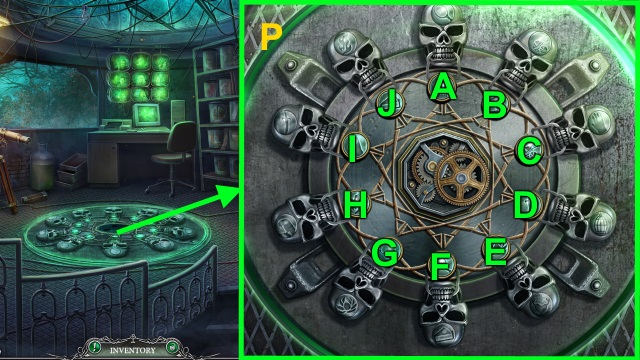
- Give the SIGNED CONTRACT (G).
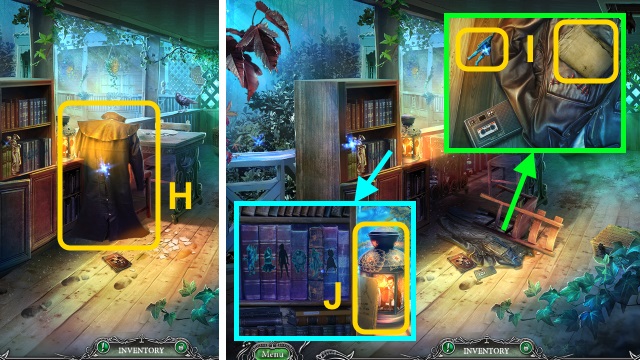
- Take the BUNCH OF KEYS (H).
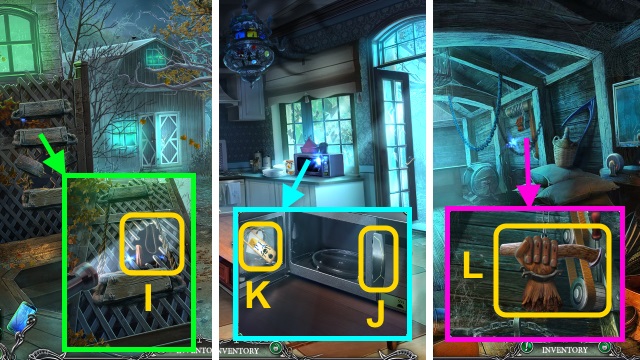
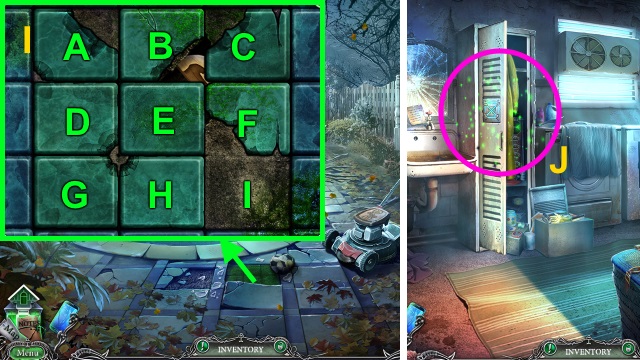
- Use the BUNCH OF KEYS; select the key (I). Open the door.
- Walk forward.
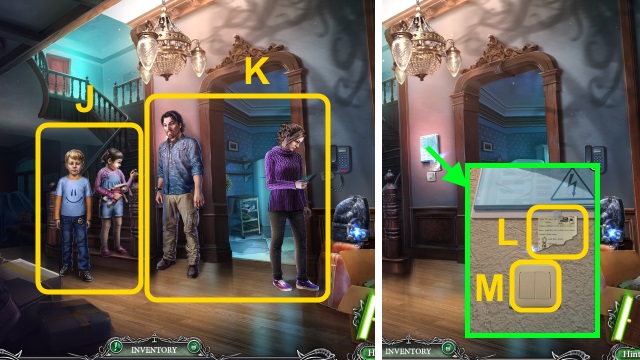
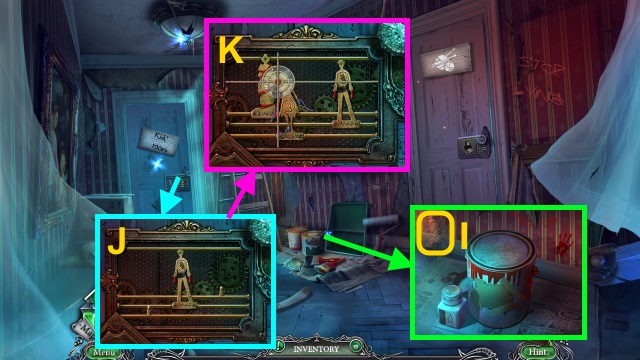
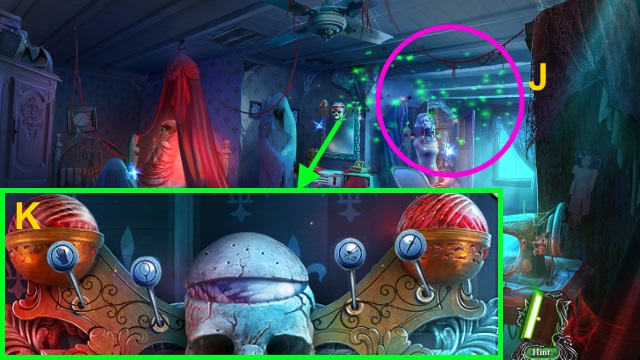
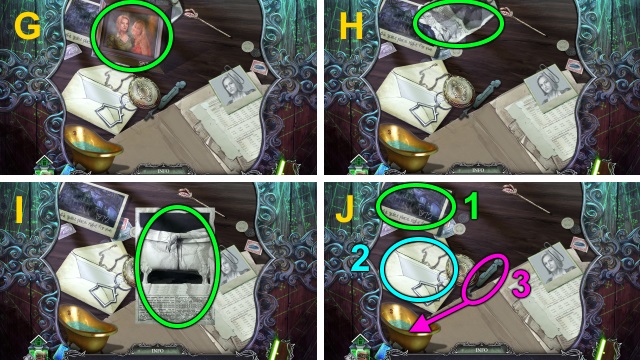
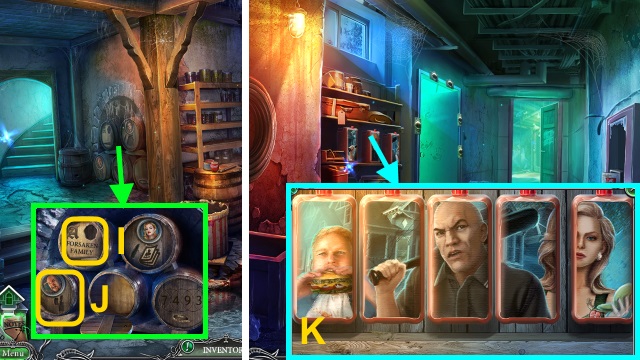
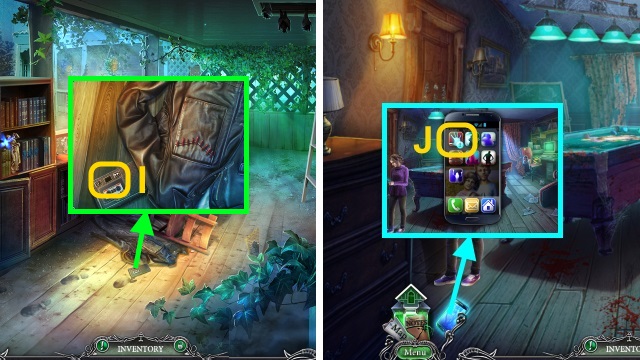
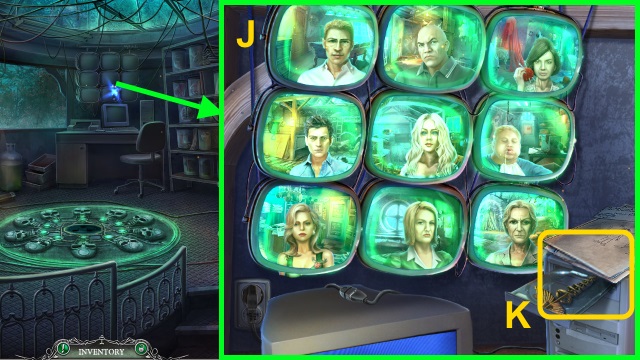
- Talk to the kids (J).
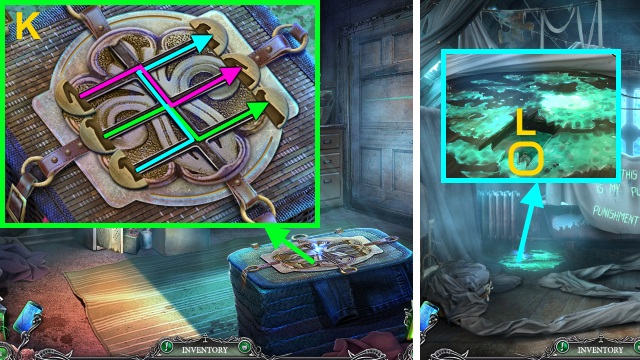
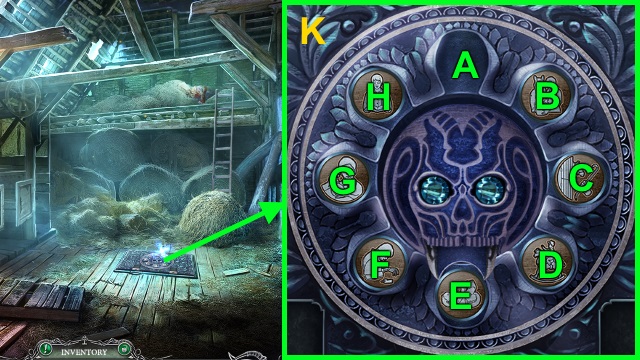
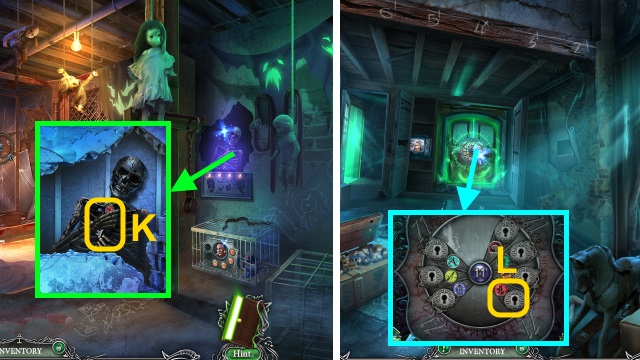
- Talk to Danny (K).
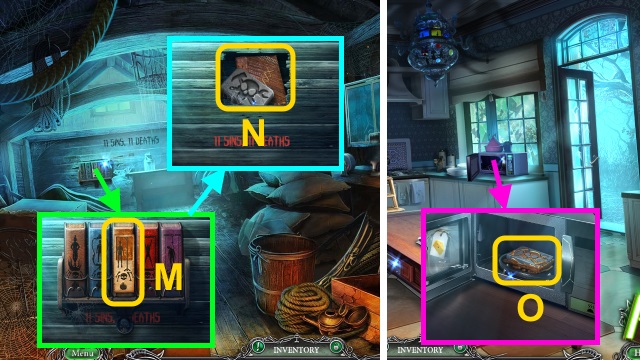
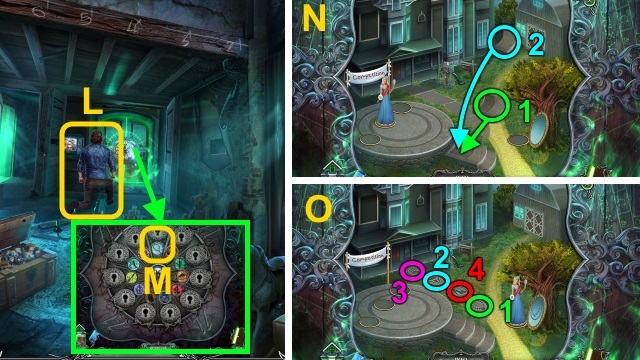
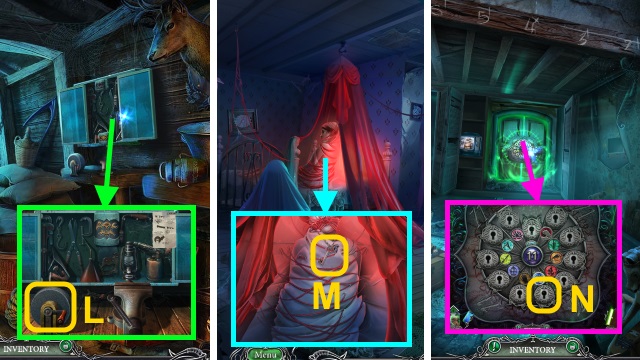
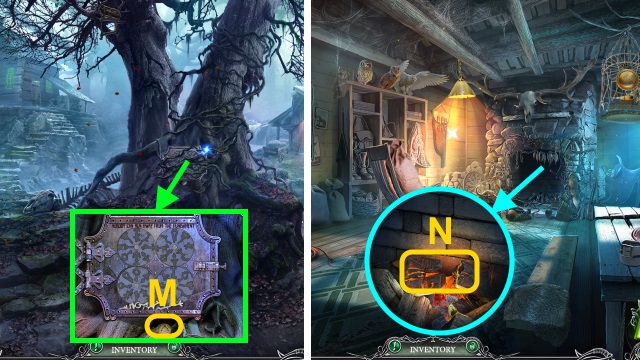
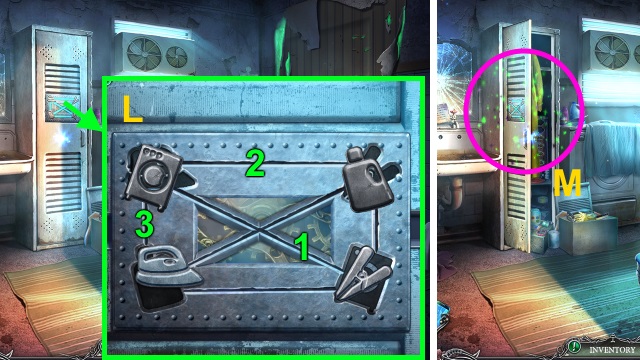
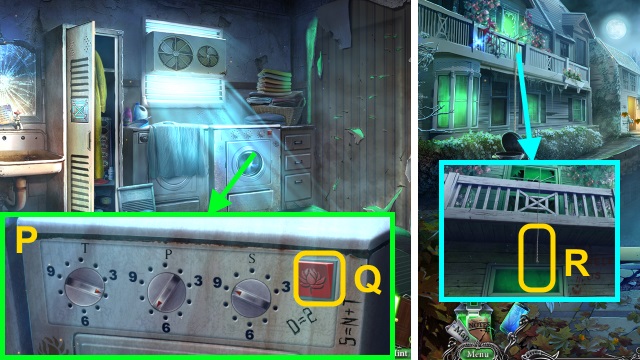
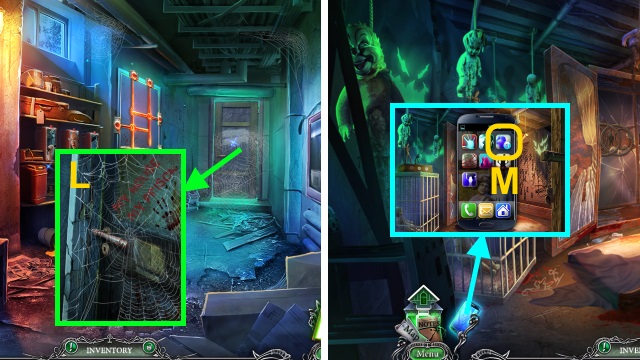
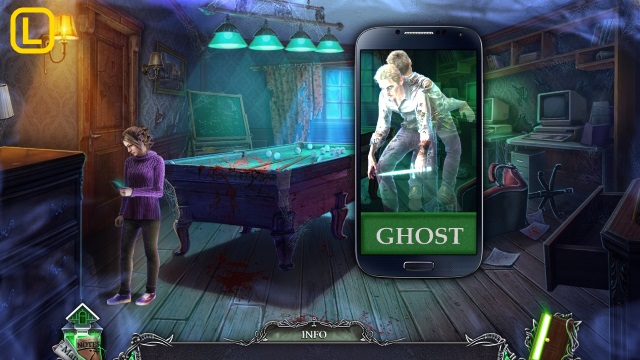
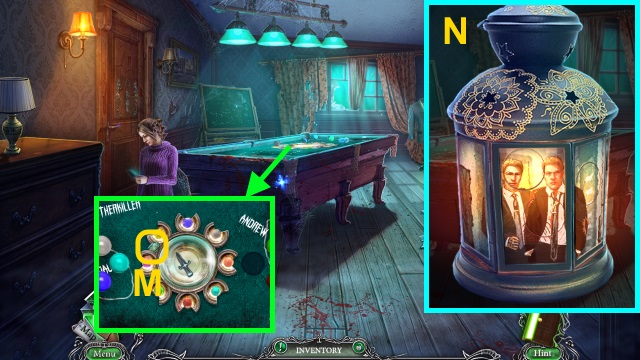
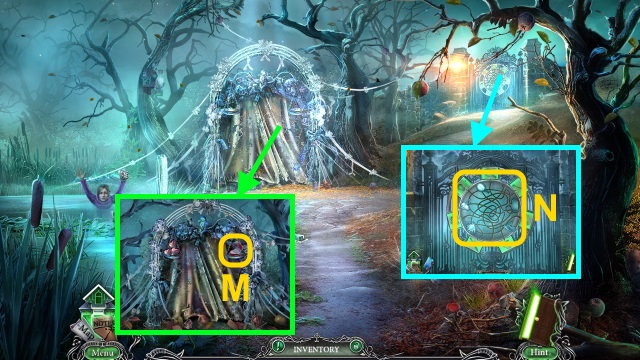
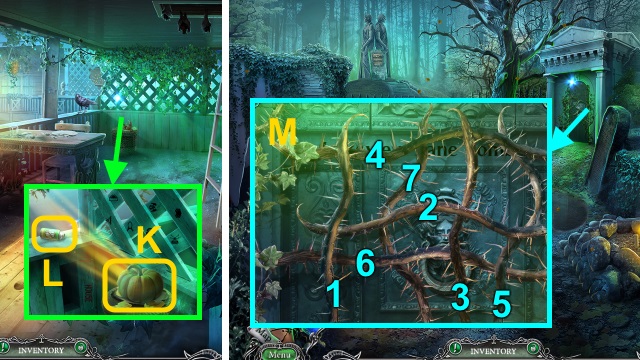
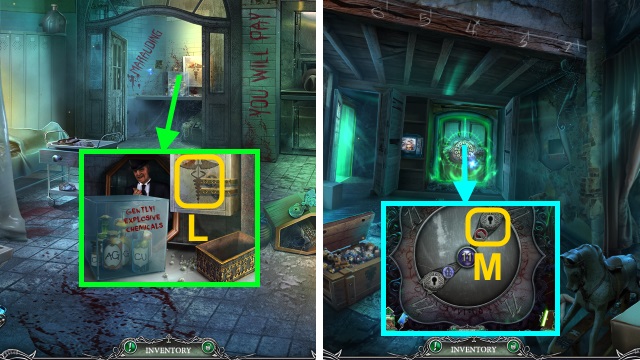
- Take the CODE PART (L); press the switch (M).
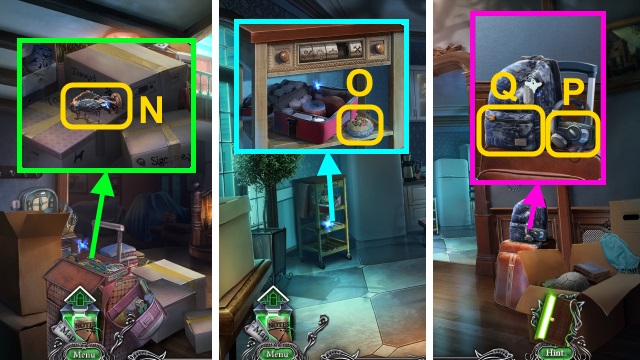
- Take the BROKEN THEMIS STATUETTE (N).
- Walk right.
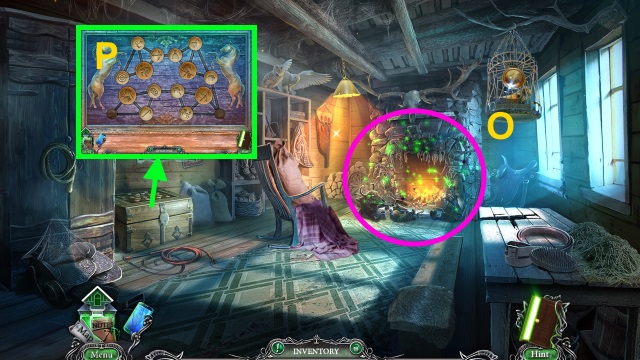
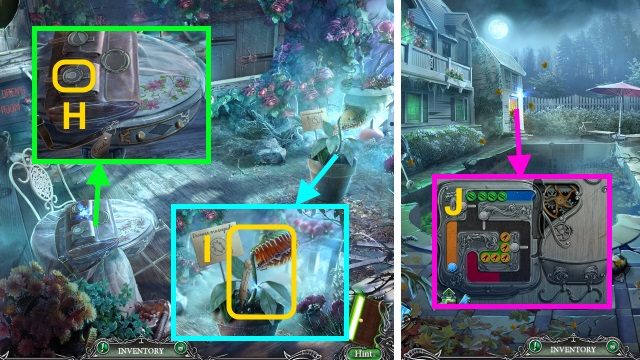
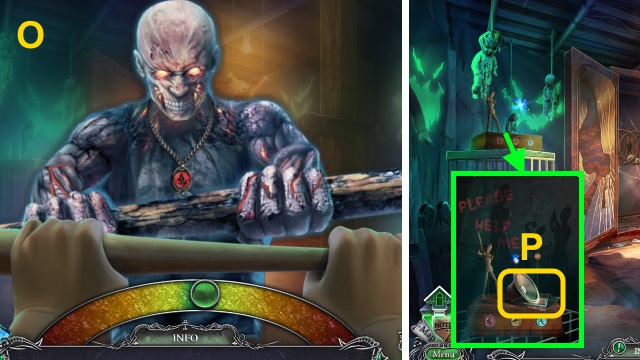
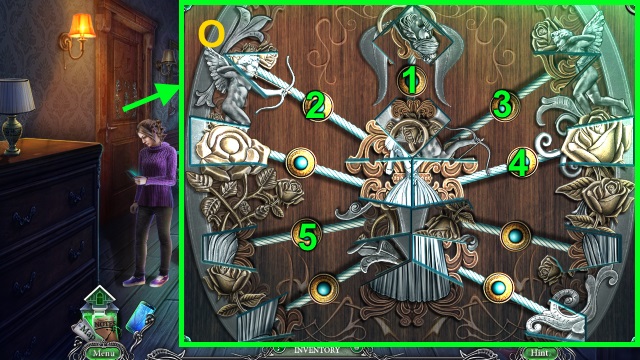
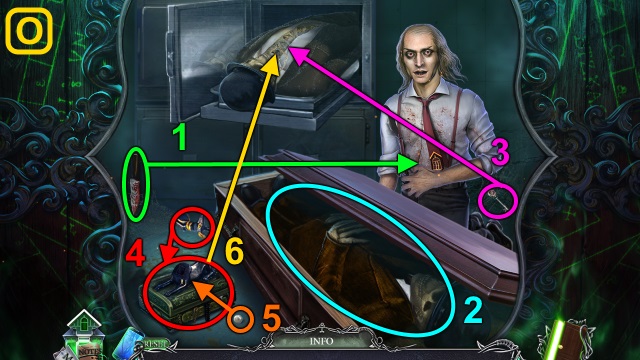
- Take the PINCUSHION (O).
- Examine the PINCUSHION; take the PIN.
- Walk down.
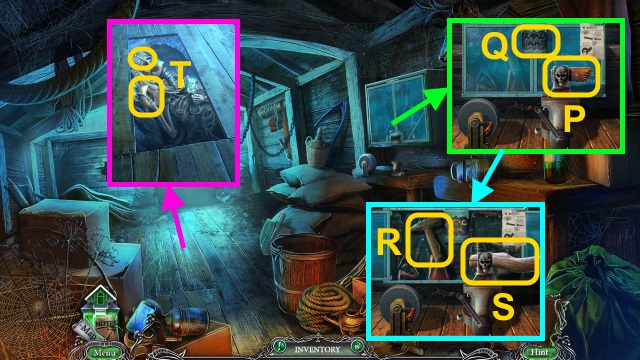
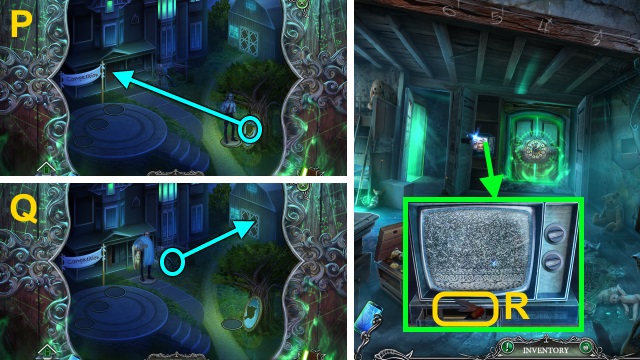
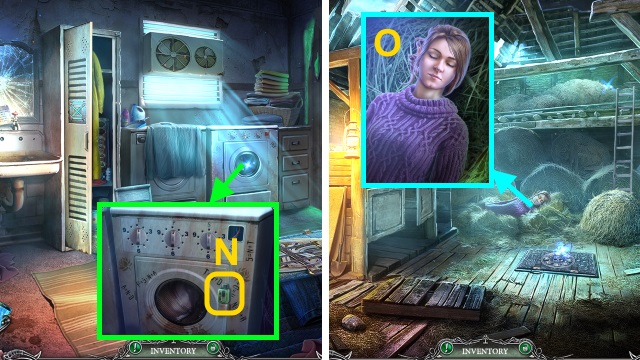
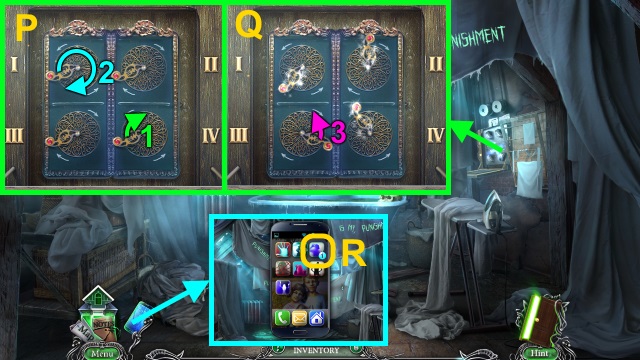
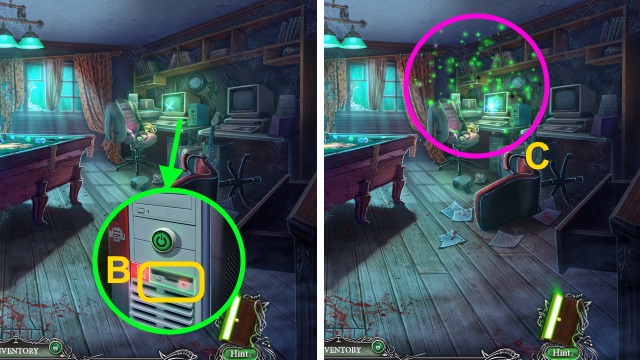
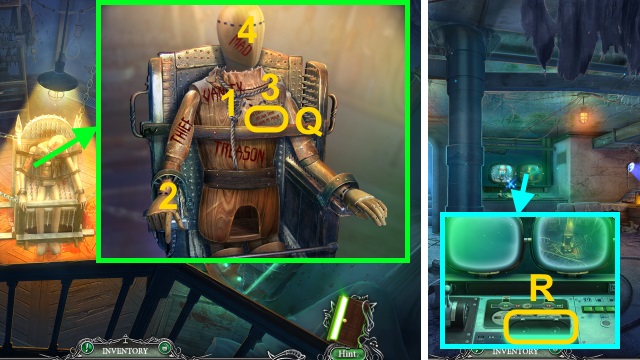
- Take the TAPE PLAYER (P).
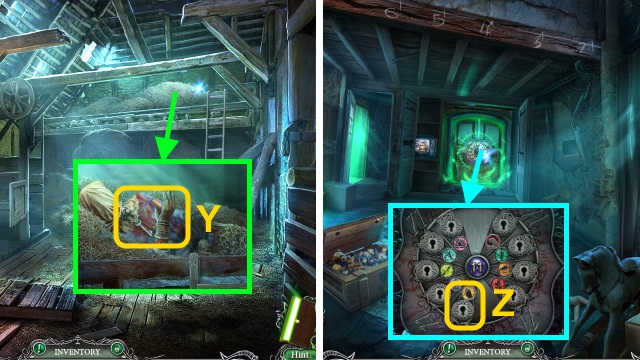
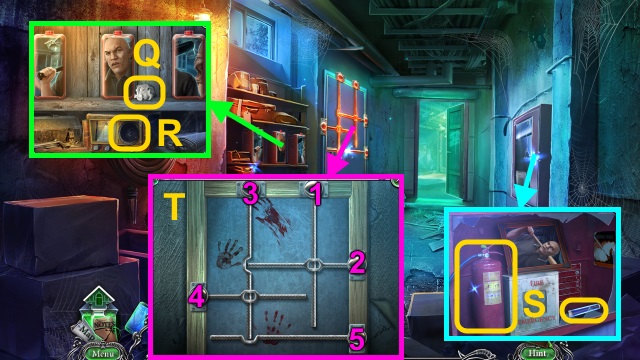
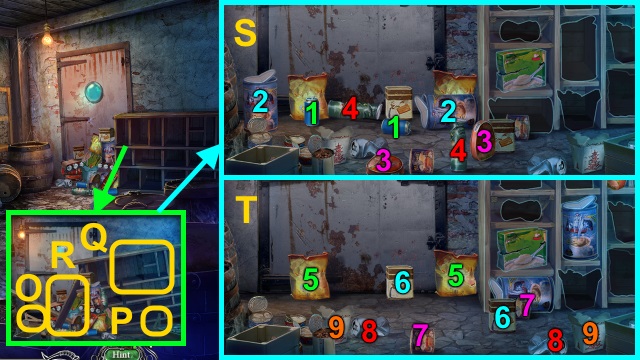
- Place the PIN (Q); open the backpack. Take the papers and sandwich.
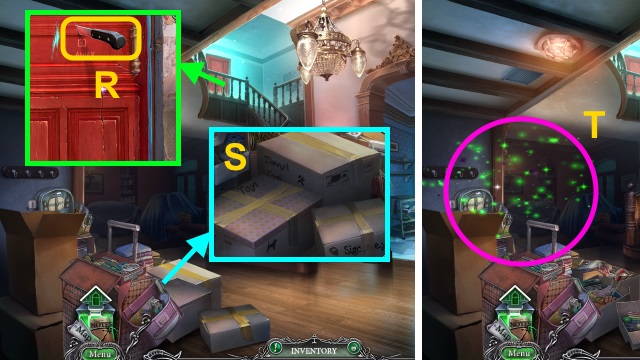
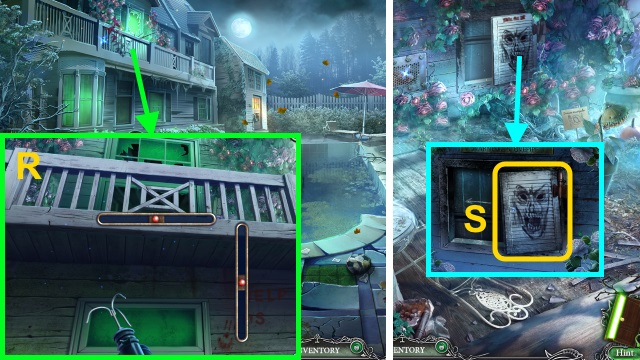
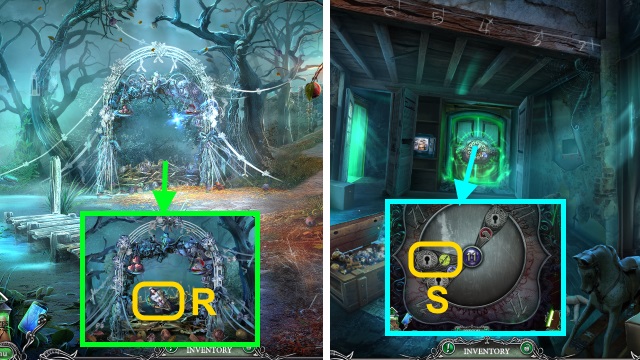
- Take the KNIFE (R).
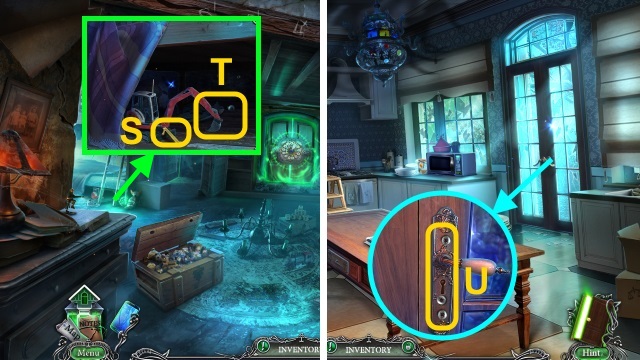
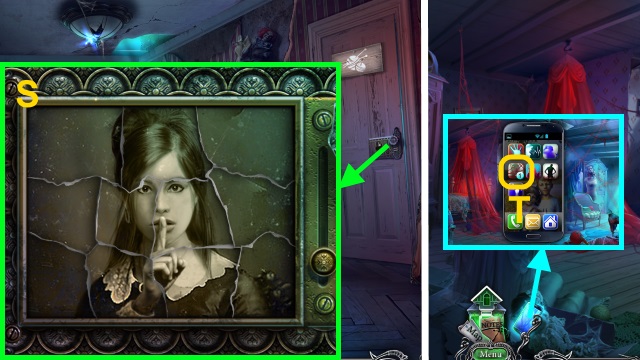
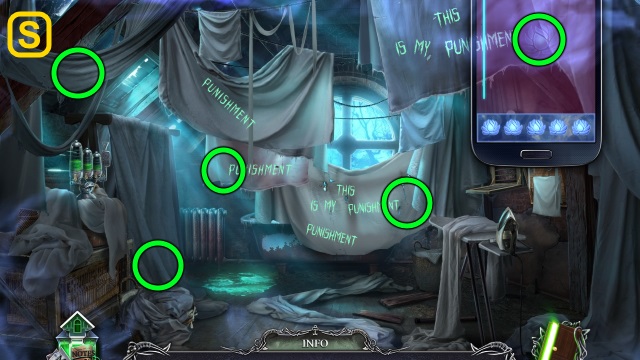
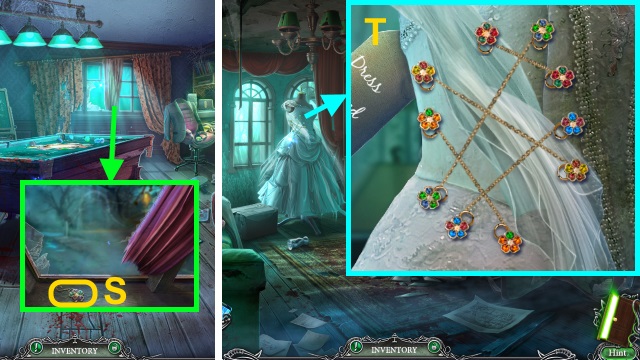
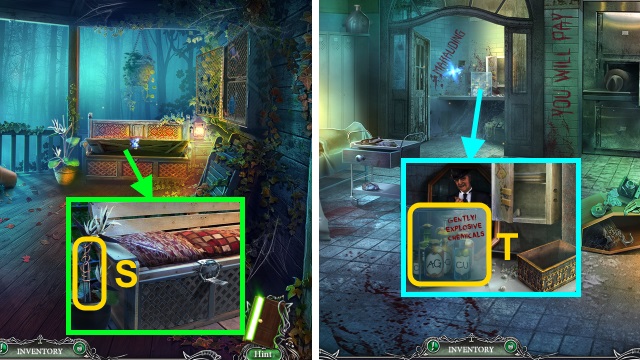
- Use the KNIFE (S).
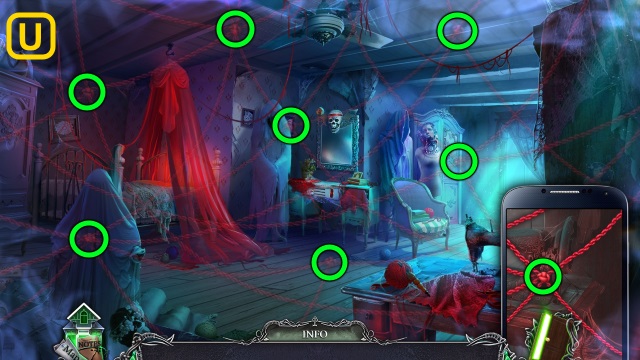
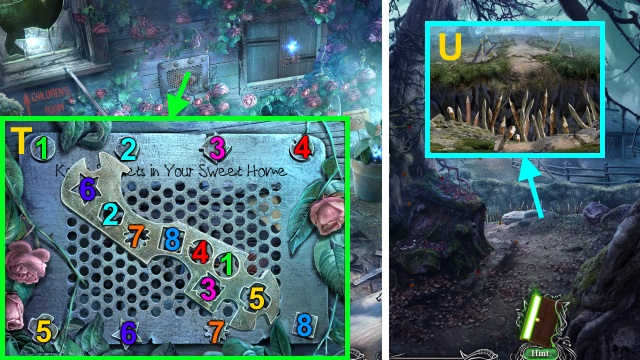
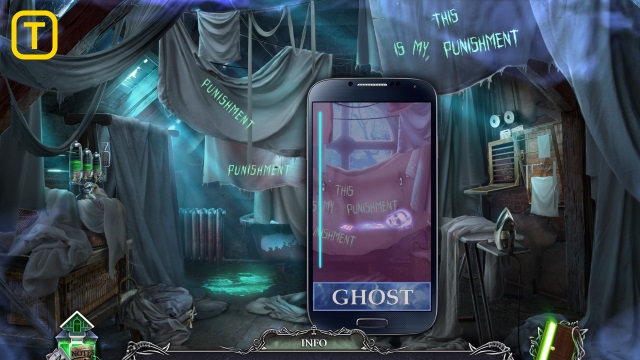
- Play the HOP; receive the CROWBAR (T).
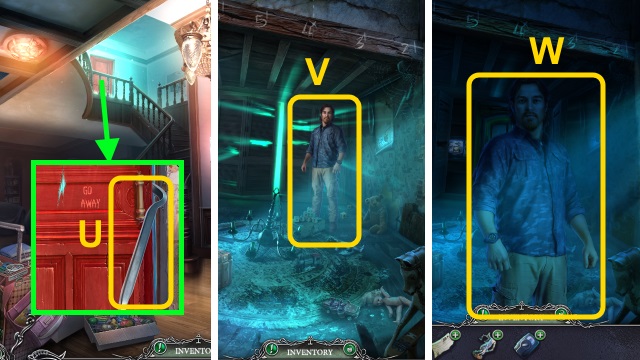
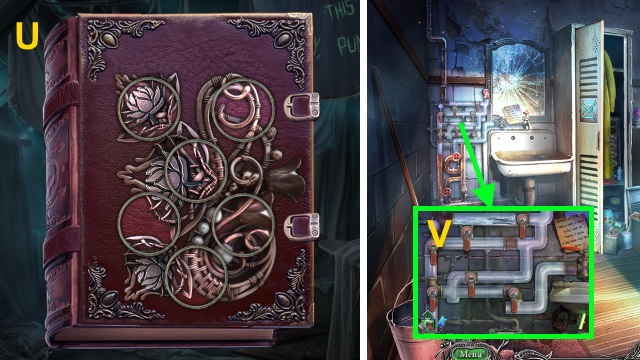
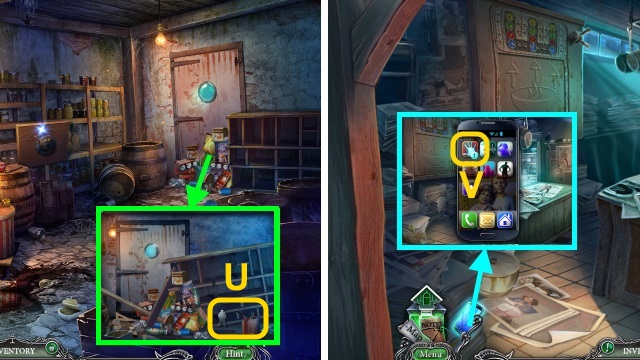
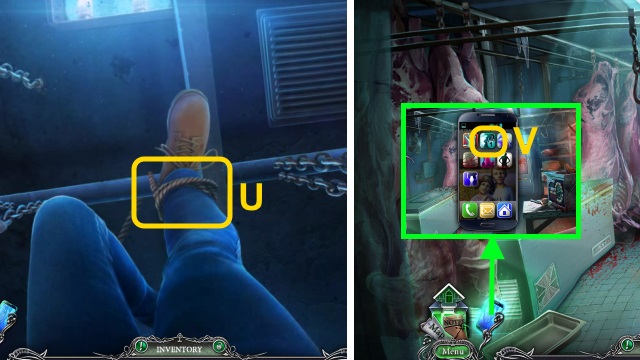
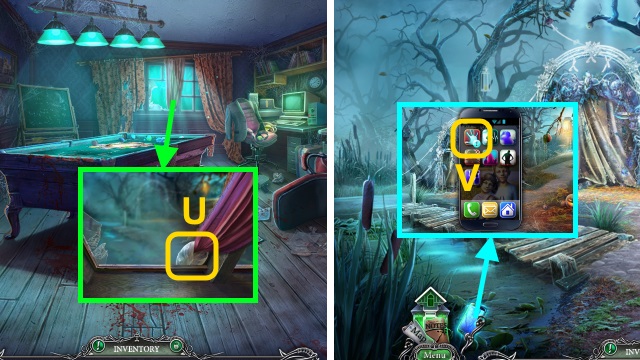
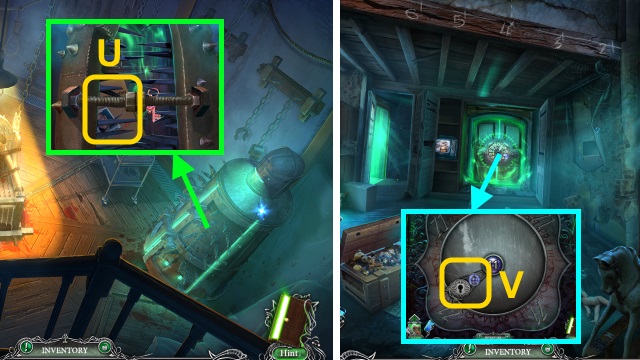
- Use the CROWBAR (U).
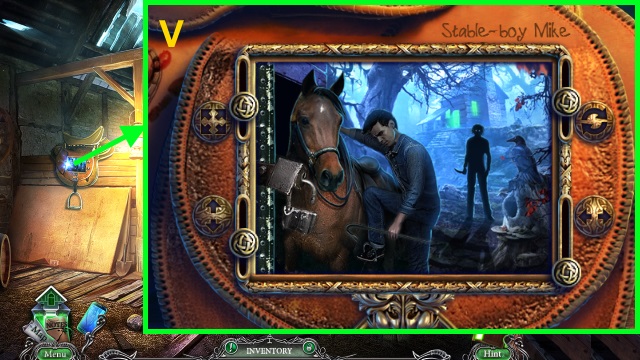
- Talk to Danny (V).
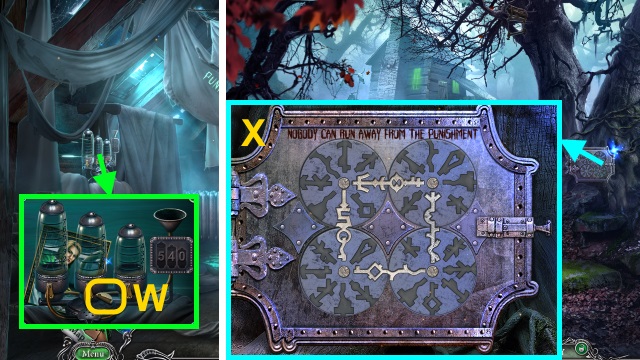
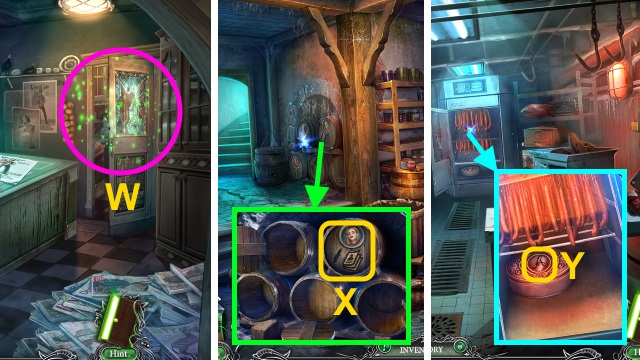
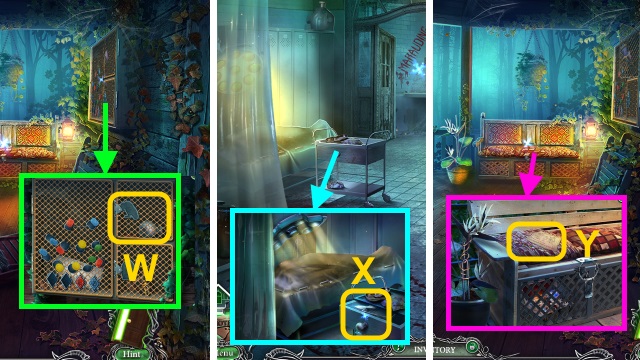
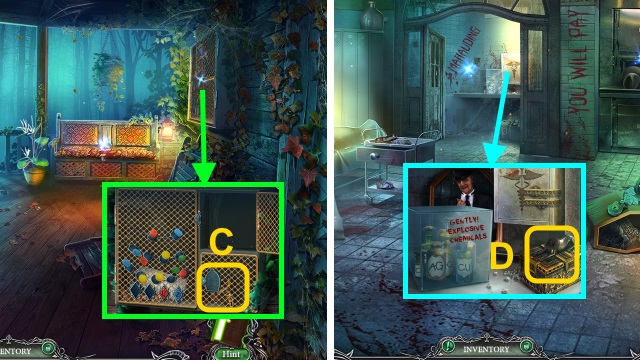
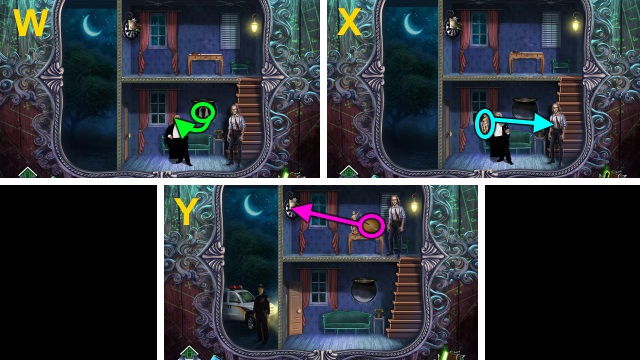
- Give the BUNCH OF KEYS (W).
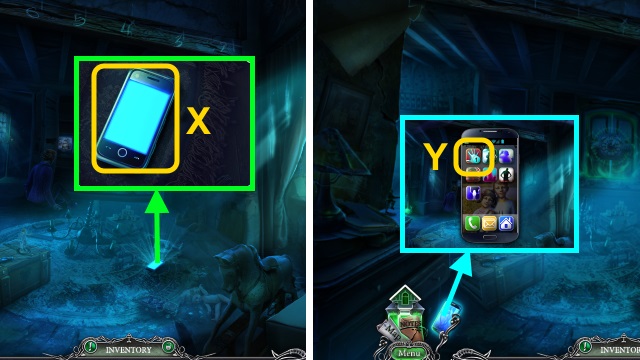
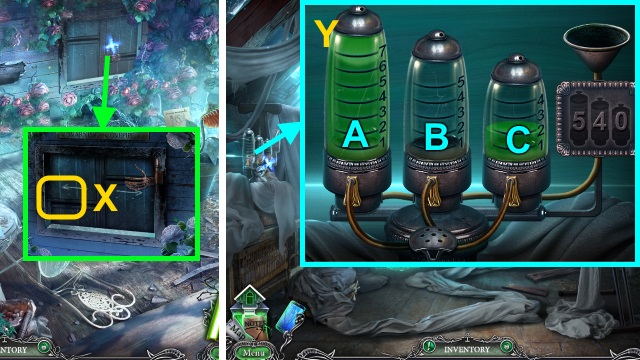
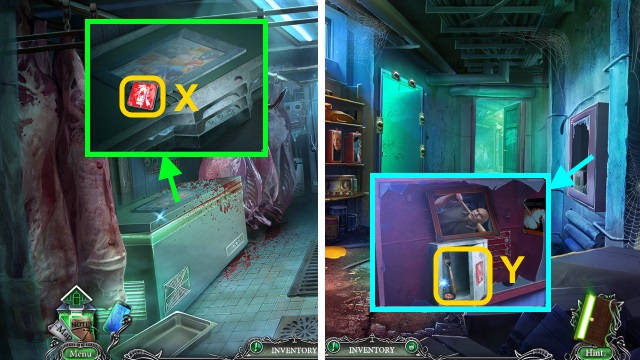
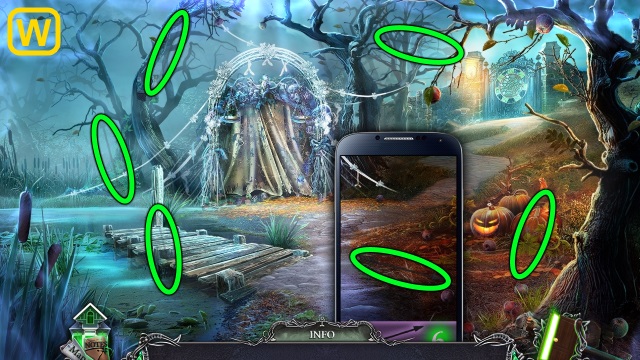
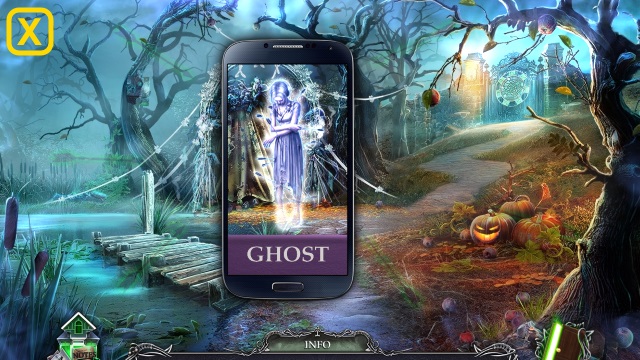
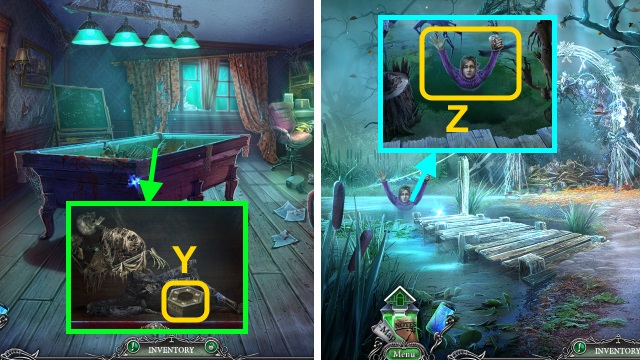
- Take the Smartphone (X).
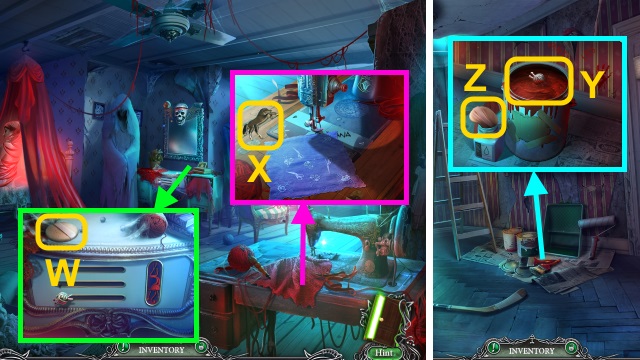
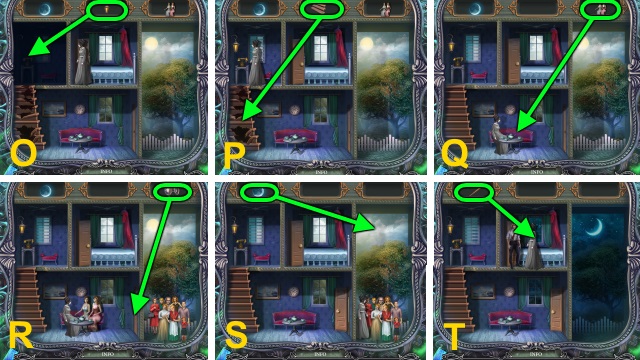
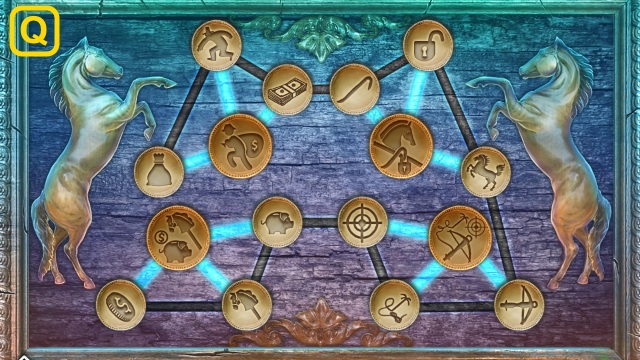
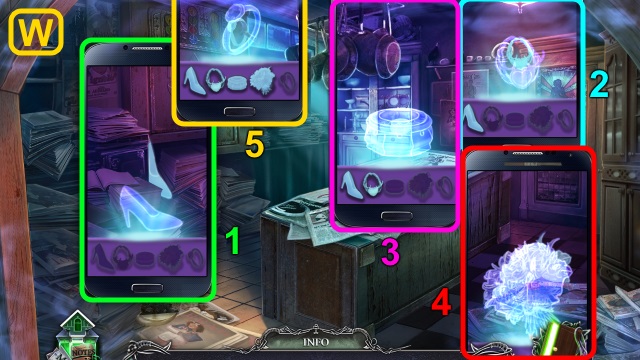
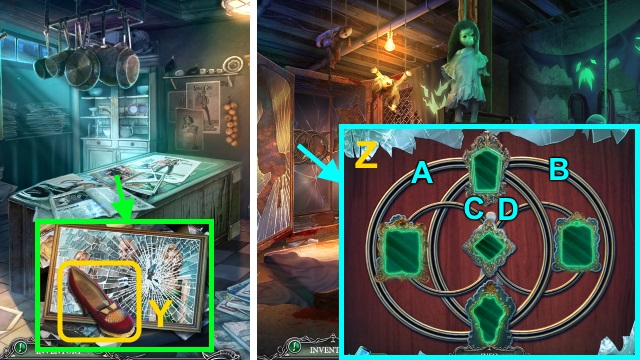
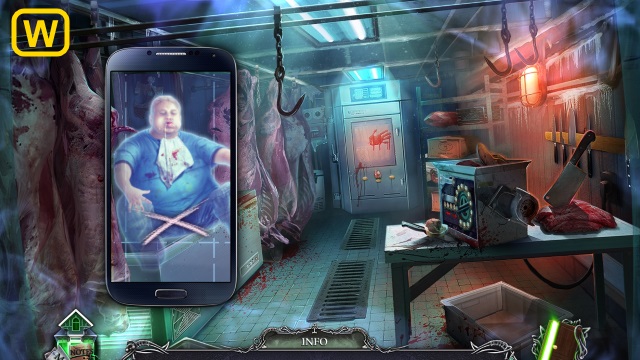
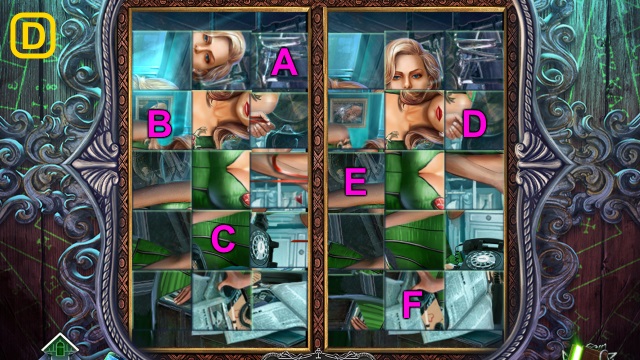
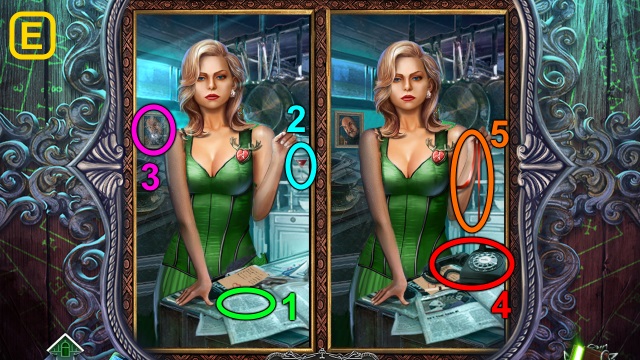
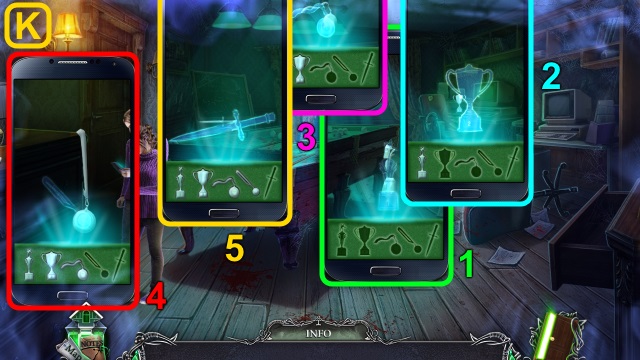
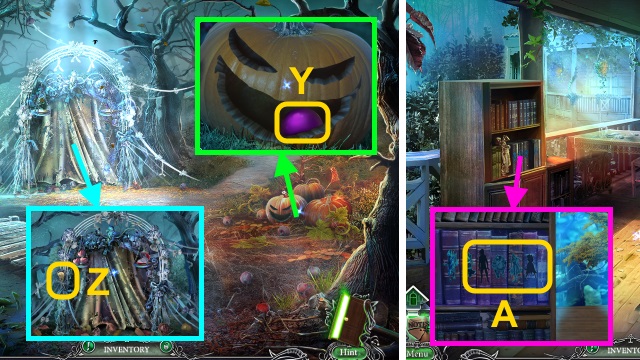
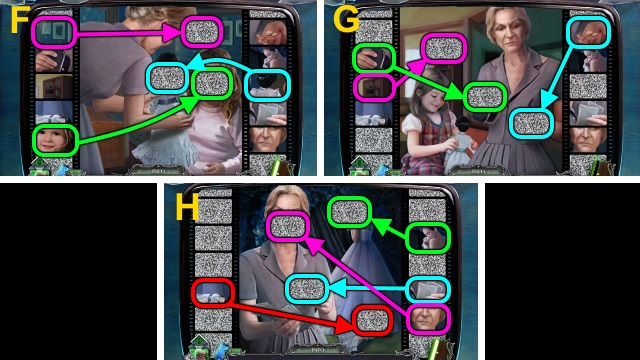
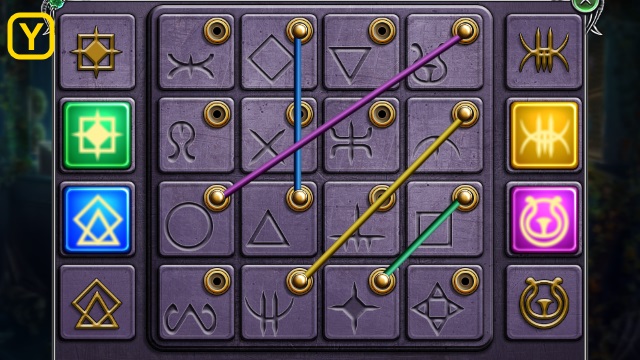
- Examine the Smartphone. Select the app (Y); run it for a mini-game.
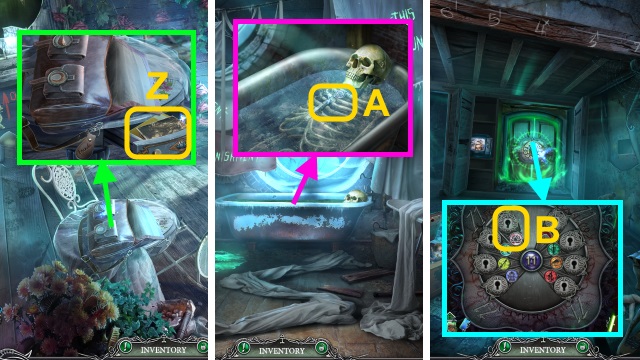
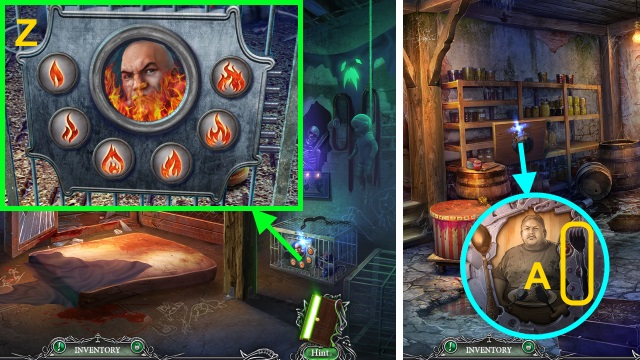
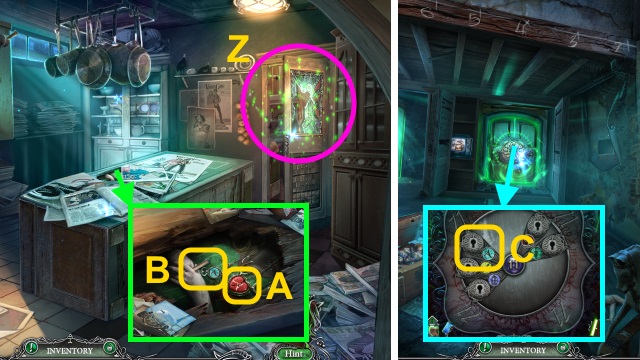
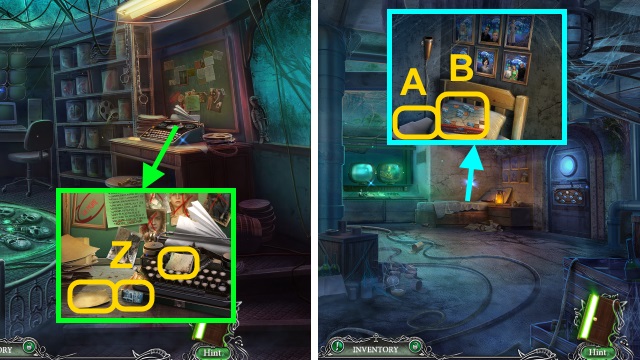
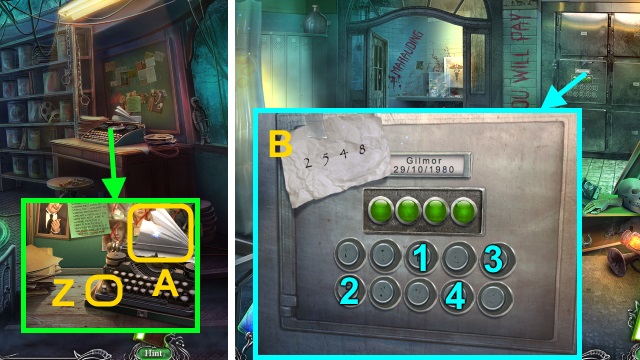
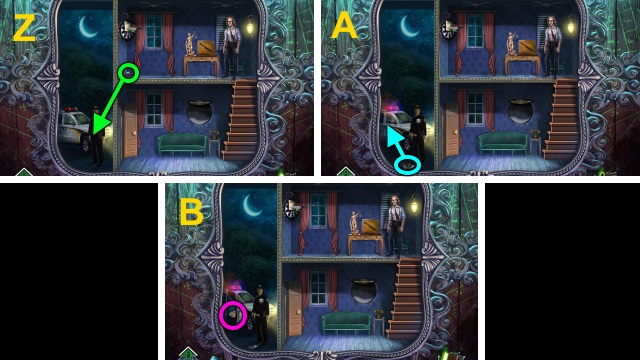
- Solution (Z).
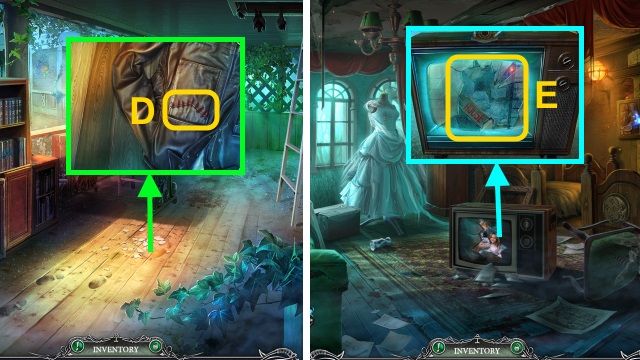
- Take the SCREWDRIVER (A).
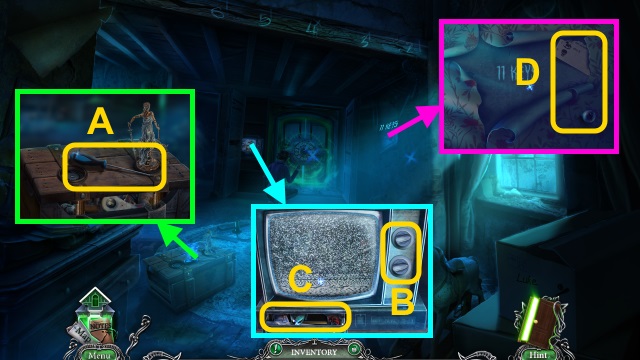
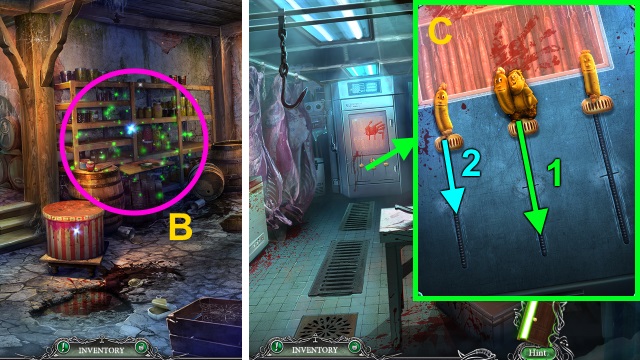
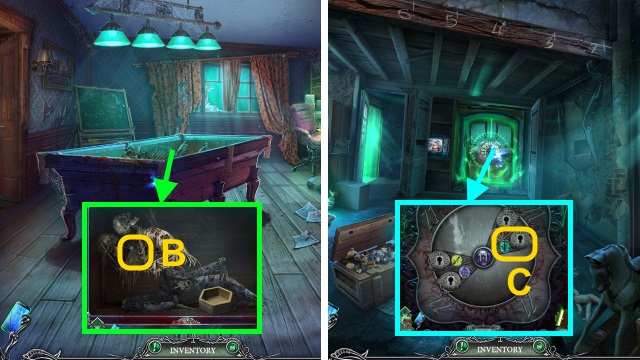
- Combine the TAPE PLAYER and SCREWDRIVER; take the TV KNOB. Open the TAPE PLAYER; take the BATTERIES (1/2).
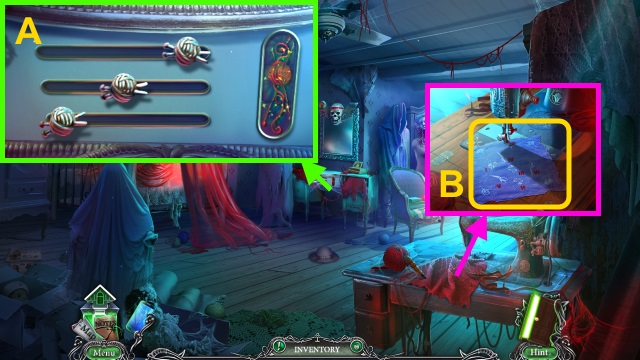
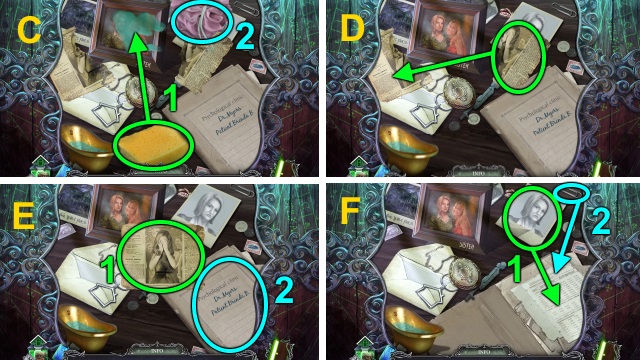
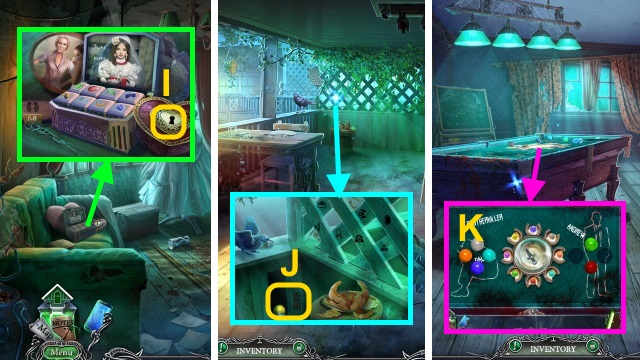
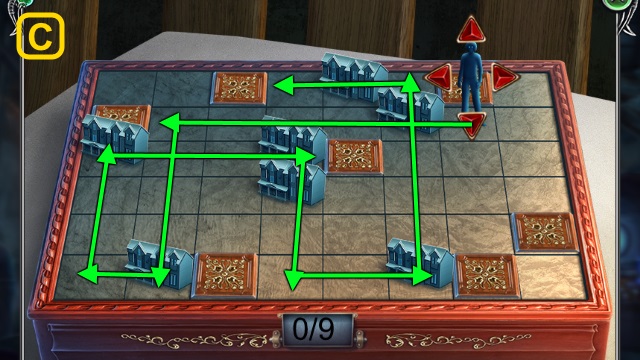
- Place the TV KNOB; turn the knobs (B). Take the KEY RING and HAMMER (C).
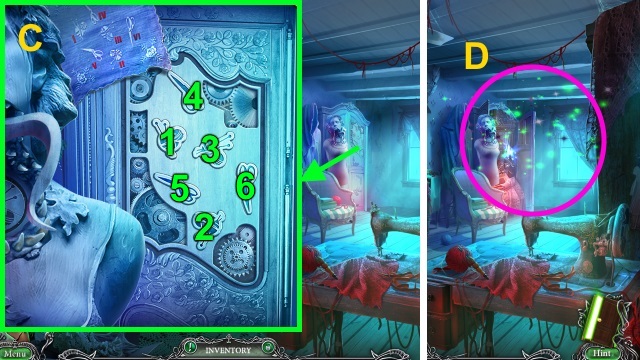
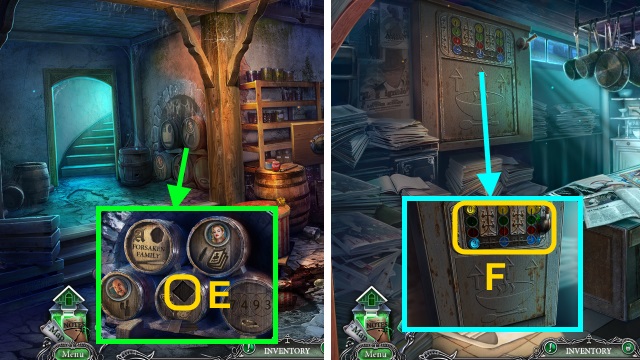
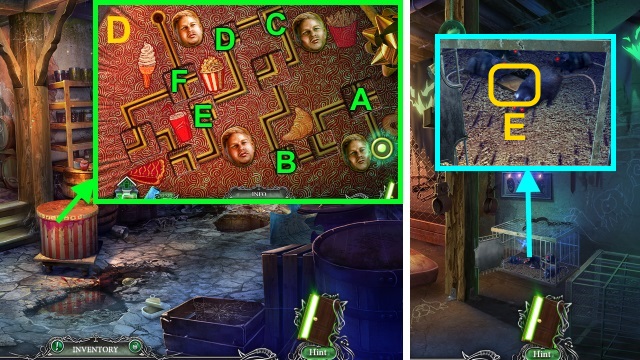
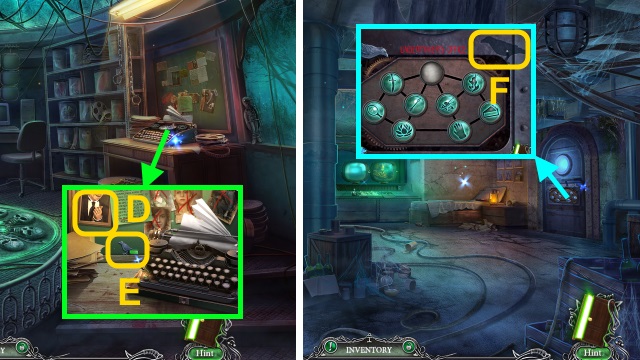
- Take the SCREWS (1/2) and CODE PART (D). Examine the wall for a mini-game.
- Solution (E); take the OLD BOX and MAILBOX CIRCLE.
- Combine the 2 CODE PARTS; receive the CODE.
- Walk down.
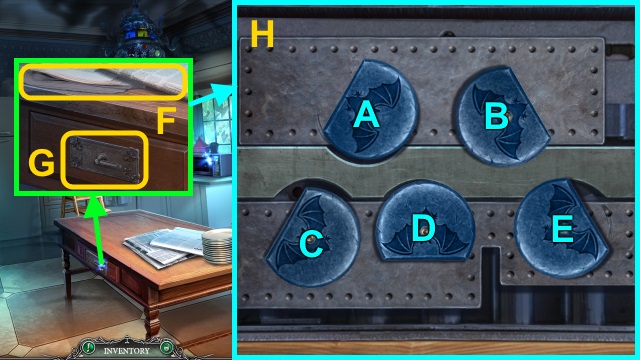
- Examine the phone; take the WIRE (F).
- Walk down.
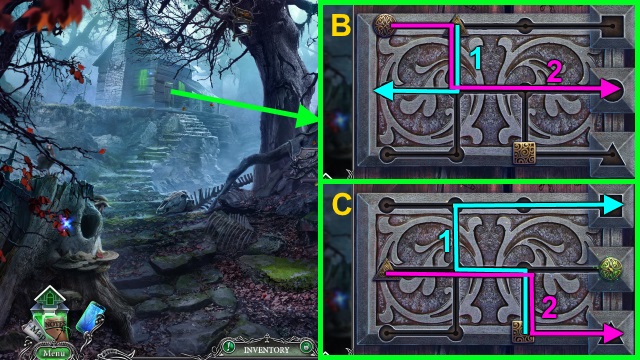
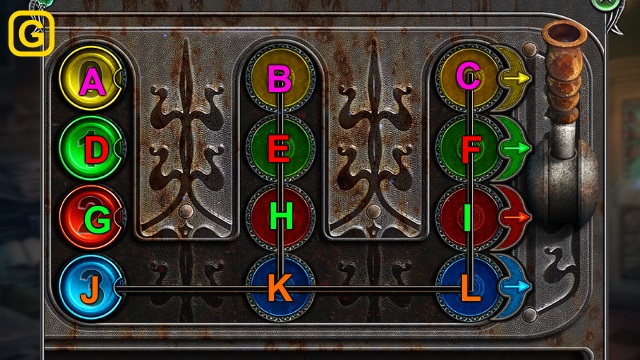
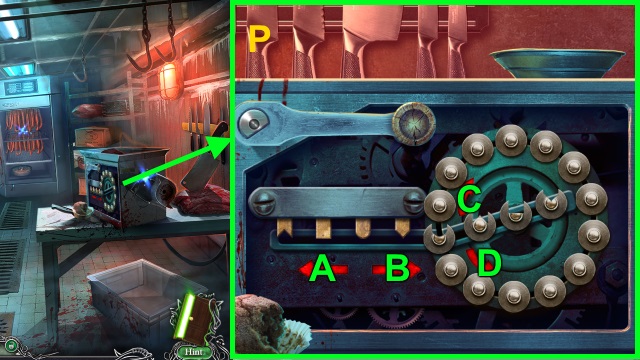
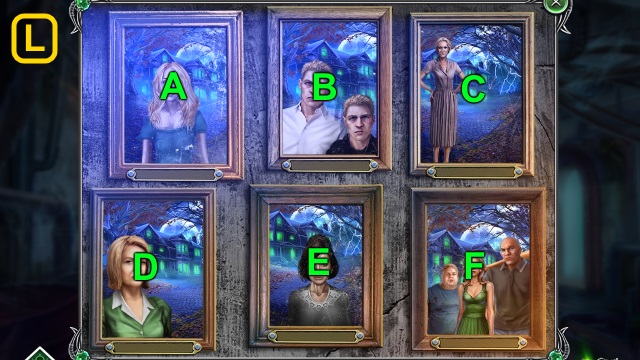
- Place the MAILBOX CIRCLE for a mini-game (G).
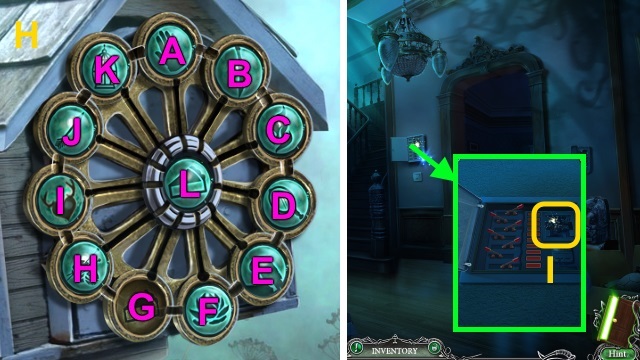
- Solution (H): (L-G)-(H-L)-(F-G)-(G-H)-(L-G)-(I-L).
- (L-F)-(E-L)-(L-I)-(J-L)-(L-E)-(B-L)-(L-J)-(G-L)-(L-B).
- (D-E)-(K-L)-(L-D)-(C-L)-(L-K)-(A-L)-(L-C)-(E-L)-(L-A).
- Take the CODE ROLLER, letter, and TAPE.
- Walk forward.
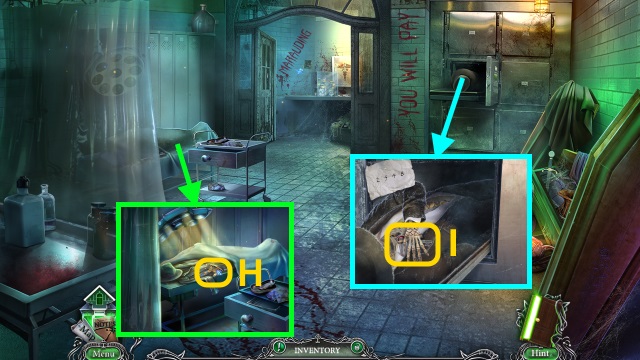
- Use the WIRE and TAPE for a mini-game (I).

- Solution (J).
- Walk right.
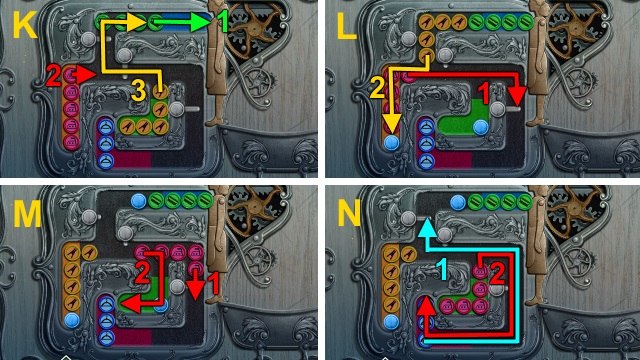
- Place the CODE ROLLER and CODE for a mini-game (K).
- Solution (L); take the BATTERIES (2/2) and CHARGER.
- Combine the DEAD SMARTPHONE and charger; receive the Smartphone.
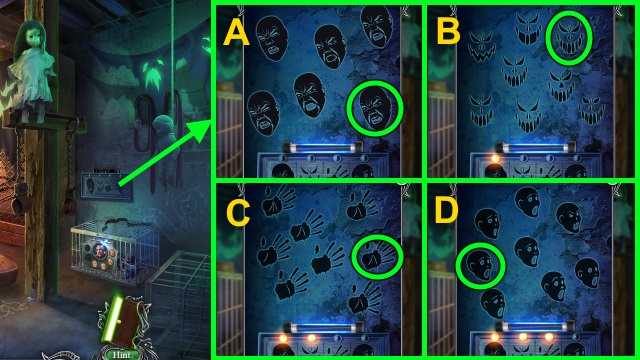
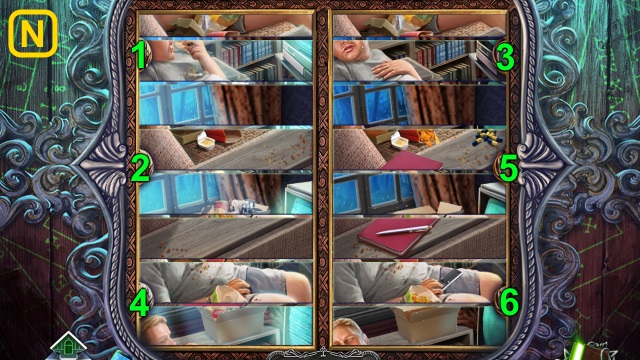
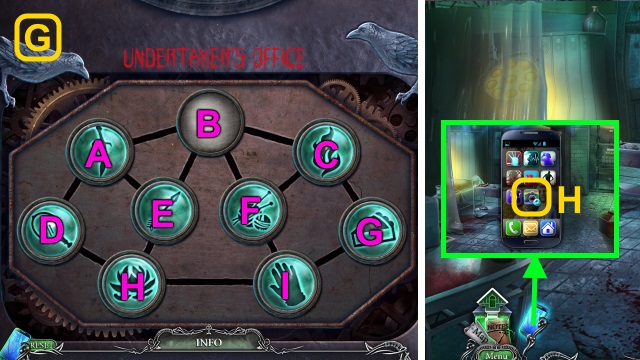
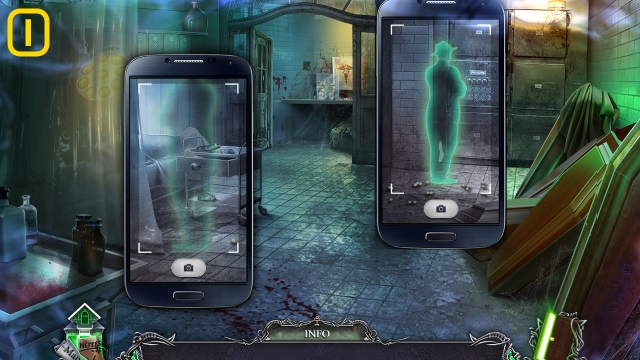
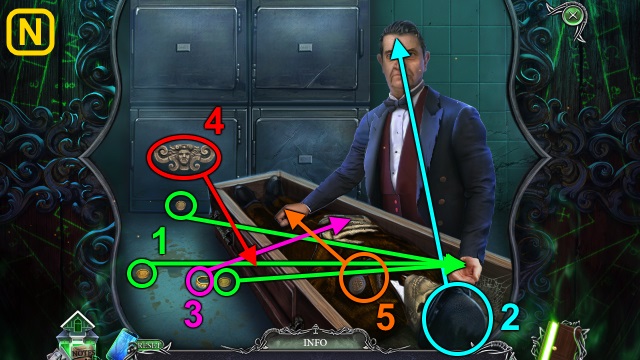
- Use the Smartphone. Select the app (M); run it for a mini-game.
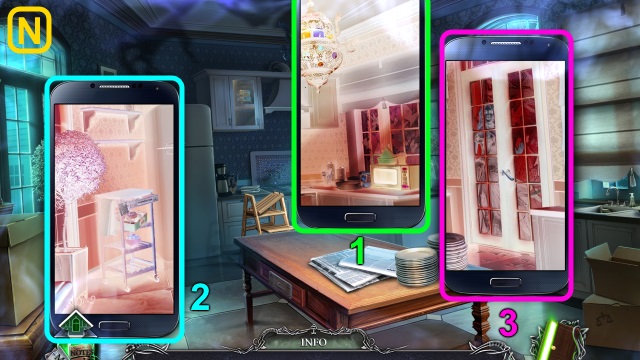
- Solution (N).

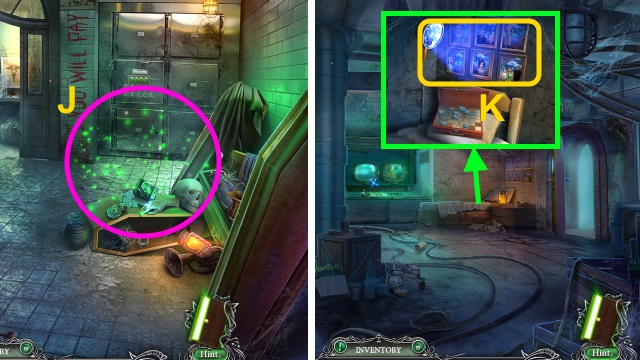
- Use the HAMMER (O).
- Open the cupboard; take the THEMIS HEAD, MATCHBOX, and FLASHLIGHT WITHOUT BULB (P).
- Combine the BROKEN THEMIS STATUETTE and THEMIS HEAD; receive the THEMIS STATUETTE.
- Walk down, then left.
- Place the THEMIS STATUETTE; position the statues (Q).
- Take the REMOTE WITHOUT BATTERIES and SILVER SKULL (1/2) (R).
- Combine the REMOTE WITHOUT BATTERIES and BATTERIES (2/2); receive the REMOTE.
- Take the BOOK KEY (1/2) (S).
- Use the REMOTE; take the SCREWS (2/2) (T).
- Walk down, then right.
- Use the SCREWS (2/2) (U); open the door.
- Walk right.
Chapter 2: Laura and Diana
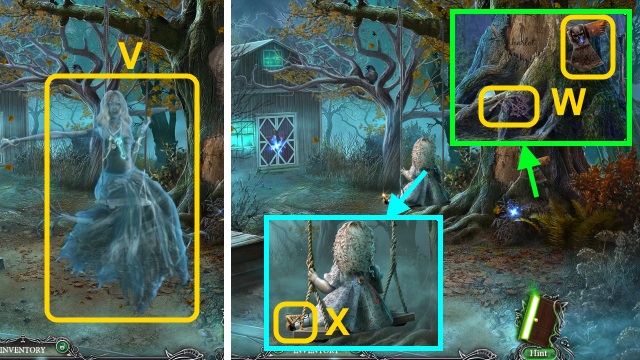
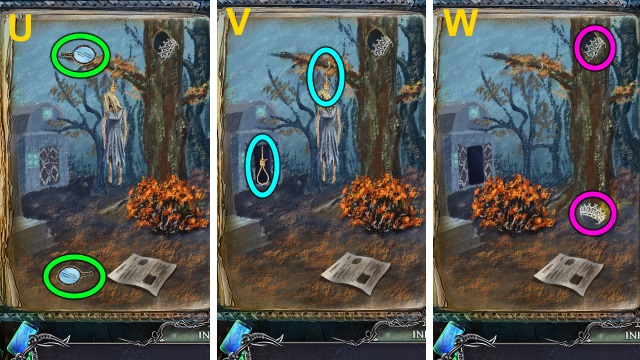
- Examine the ghost (V).
- Take the BROKEN AXE and BRANCHES (1/3) (W).
- Take the RING (X).
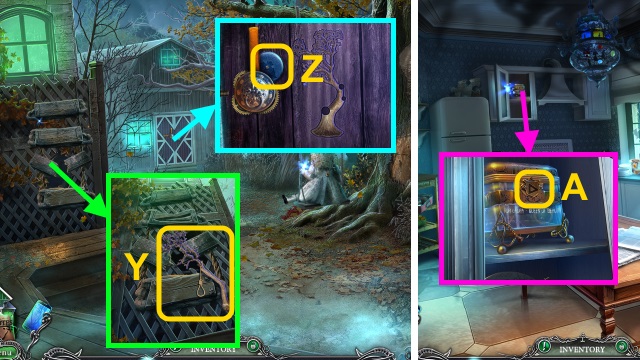
- Take the BRANCHES (2/3) (Y).
- Take the CIRCLE (1/2) (Z).
- Walk down.
- Use the RING (A); take the DOLL RING and BRANCHES (3/3).
- Walk right.
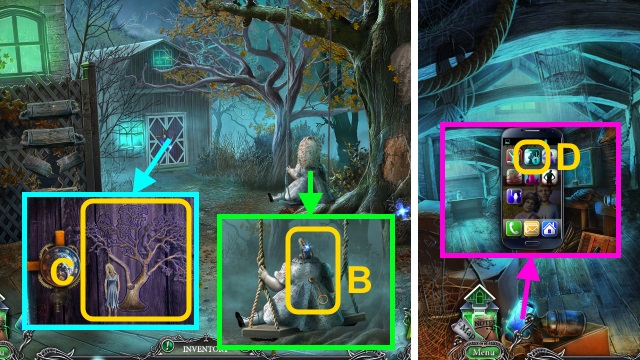
- Place the DOLL RING; take the LAURA STATUETTE (B).
- Place the BRANCHES (3/3) and LAURA STATUETTE (C).
- Walk forward.
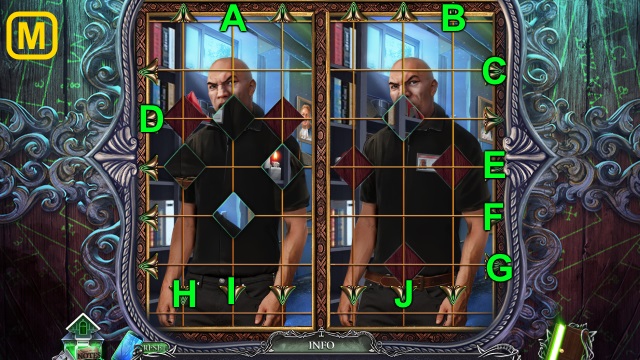
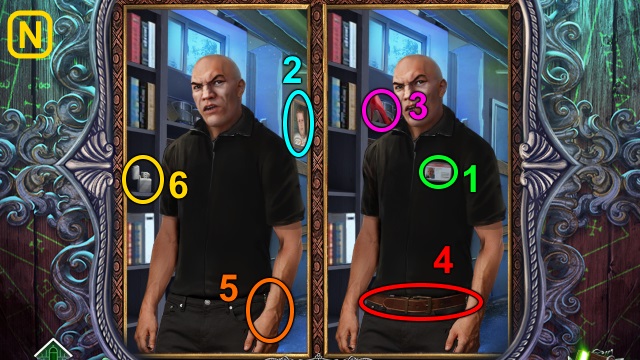
- Use the Smartphone for a mini-game (D).
- Solution (E).
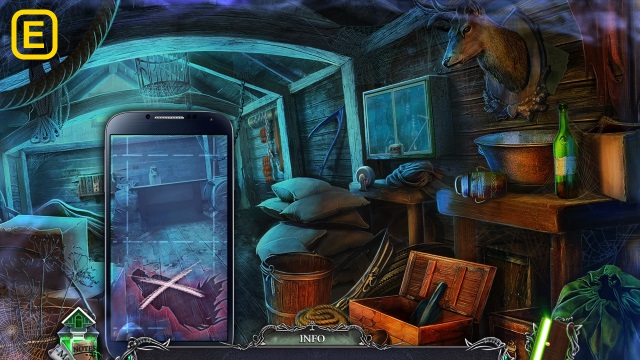
- Examine the GHOST (F).
- Take the GLUE (G).
- Take the BULB (H).
- Combine the FLASHLIGHT WITHOUT BULB and BULB; receive the FLASHLIGHT.
- Walk down.
- Move the plank; use the FLASHLIGHT. Take the BELT and CANDLE (I).
- Walk down.
- Use the GLUE (J); take the STENCIL (K).
- Walk right, then forward.
- Scroll down; place the belt. Take the AXE HANDLE (L).
- Use the STENCIL (M); move the boards and cloth.
- Take the FORM FOR KEY and OLD DIARY (N).
- Combine the FORM FOR KEY and CANDLE; receive the FORM WITH CANDLE.
- Walk down twice.
- Use the FORM WITH CANDLE; close the microwave. Take the SKULL KEY (O).
- Walk right, then forward.
- Place the BROKEN AXE (P) and SKULL KEY (Q).
- Use the hammer (R); place the AXE HANDLE (S). Use the hammer; take the SHARPENED AXE.
- Use the SHARPENED AXE (T); receive the WOODEN STEP (1/2). Take the note and BOOK KEY.
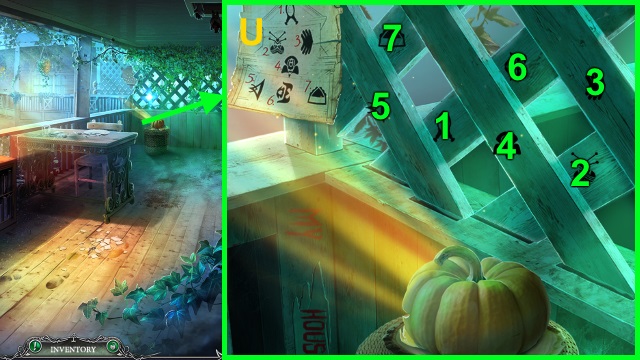
- Combine the OLD DIARY and BOOK KEY for a mini-game.
- Solution (U-W).
- Take the SILVER SKULL (2/2) and CAGE.
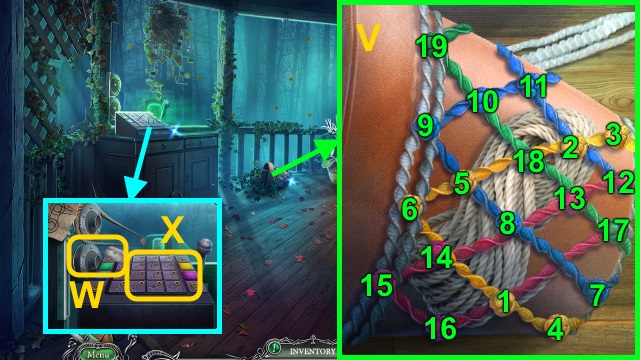
- Combine the OLD BOX and SILVER SKULL (2/2) for a mini-game.
- Solution (X): (A-B-A)-(C-D-C)-(E-F-E).
- Read the letter; take the HANDLE (1/2) and FIGURE OF LAURA.
- Walk down.
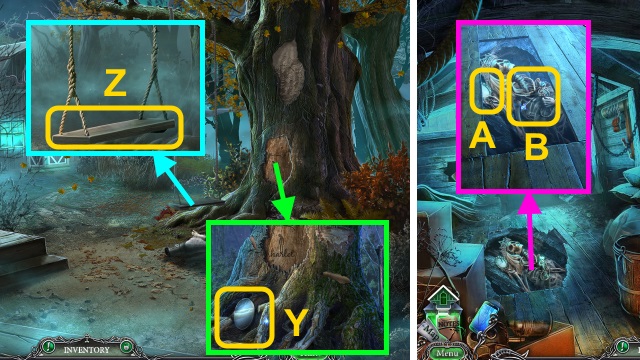
- Use the SHARPENED AXE; take the MIRROR (Y).
- Use the SHARPENED AXE; receive the WOODEN STEP (2/2) (Z).
- Walk forward.
- Place the MIRROR (A); take LAURA'S KEY and the ROPE (B).
- Combine the KEY RING and LAURA'S KEY; receive the KEYS.
- Walk down.

- Place the WOODEN STEP (2/2) and ROPE (C).
- Go left.
- Take the WRENCH (D).
- Take the CIRCLE (2/2) (E).
- Walk down twice.
- Read the newspaper (F); move the handle (G).
- Examine the drawer; place the CIRCLE (2/2) for a mini-game.
- Solution (H): Ax4-Cx3-E-B. Take the IMAGE PART (1/2) and MATCH.
- Combine the MATCHBOX and MATCH; receive the BURNING MATCH.
- Walk right, then left.
- Use the BURNING MATCH (I); receive the FIGURE OF GIRL.
- Place the FIGURE OF LAURA and FIGURE OF GIRL for a mini-game (J).
- Solution (K): shoot the 3 figures.
- Walk left.
- Examine Danny (L).
- Use the KEYS for a mini-game (M).
- Solution (N-Q). Take the IMAGE PART (2/2).
- Take the KNIFE (R).
- Walk left.
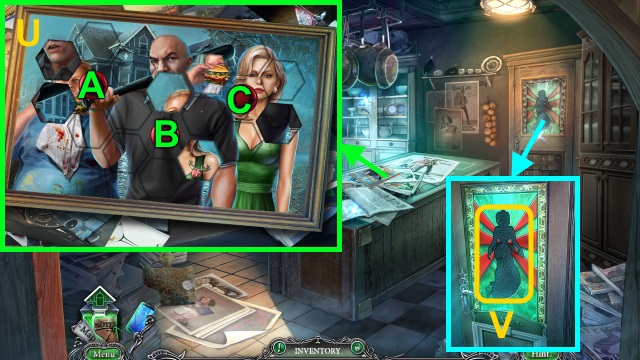
- Place the IMAGE PART (2/2) for a mini-game; solution (S).
- Walk right.
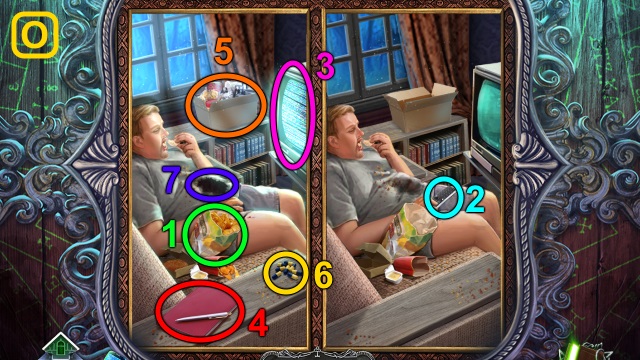
- Use the Smartphone. Select the app (T); run it for a mini-game.

- Solution (U-V).
- Take the SPONGE W).
- Take the HORSE FIGURE (X).
- Walk down.
- Use the KNIFE (Y); use the SPONGE (Z). Use the sponge on the handle; receive the HANDLE (2/2).
- Walk right.
- Place the HANDLE (2/2) for a mini-game: solution (A).
- Take the GLASS BALL (1/2) and NEEDLE.
- Place the NEEDLE; take the NAPKIN and CHIPS (1/2) (B).
- Place the NAPKIN for a mini-game; solution (C).
- Play the HOP; receive the CORKSCREW (D).
- Walk down three times.
- Use the CORKSCREW; take the CRACKER (E).
- Walk right, then left.
- Read the note; examine the ball (F).
- Use the CRACKER; take the GLASS BALL (2/2) (G). Place the GLASS BALL (2/2) for a mini-game (H).

- Solution (I): D-Ax2-Dx2-Ax5-D-A.
- Dx3-C-D-Ax3-D-Cx4-D-Cx3.
- Take the MAGIC BALL; read the letter.
- Walk right.
- Play the HOP; receive the BOX (J).
- Use the MAGIC BALL for a mini-game; solution (K). Take the PENDANT.
- Combine the BOX and PENDANT; take the RUSTY SCISSORS.
- Walk down twice, then forward.
- Use the RUSTY SCISSORS (L); receive the SCISSORS.
- Walk down, left, then right.
- Use the SCISSORS; take DIANA'S KEY (M).
- Combine the KEYS and DIANA'S KEY.
- Walk down, then left.
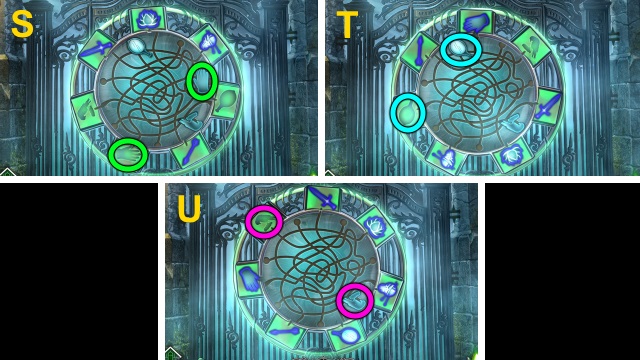
- Use the KEYS for a mini-game (N).
- Solution (O-T).
- Take the CODE.
Chapter 3: Mike

- Take the DOOR HANDLE (U).
- Take the CASE (V).
- Combine the CASE and CAGE; take the TRINKET.
- Read the note; examine the gate (W). Place the TRINKET for a mini-game (X).

- Solution (Y).
- Walk right.
- Take the CURRY COMB (Z); assemble the newspaper (A).
- Place the DOOR HANDLE for a mini-game; solution (B-C).
- Walk left.
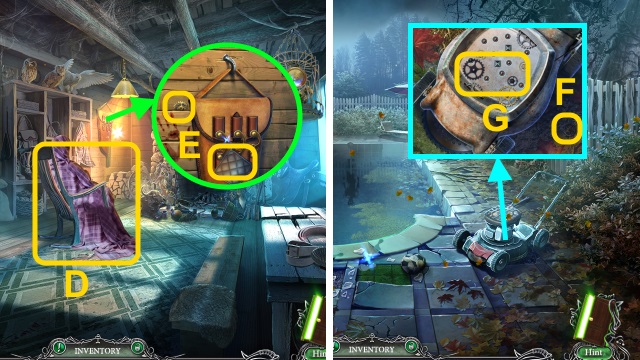
- Examine the chair (D).
- Take the POTHOLDER and GEAR (E).
- Walk down twice.
- Remove the cover; examine the gears. Place the gear (F) and GEAR on the lawn mower (G) for a mini-game.
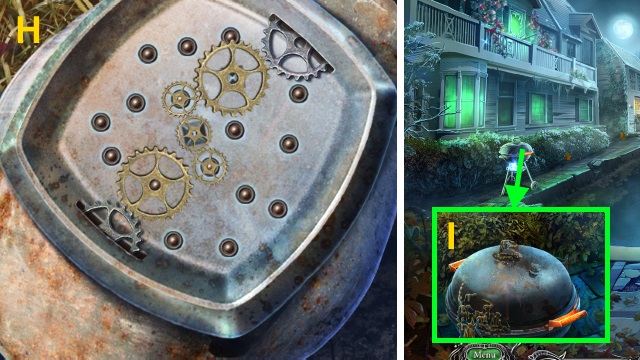
- Solution (H); take the HAY.
- Use the CURRY COMB (I).
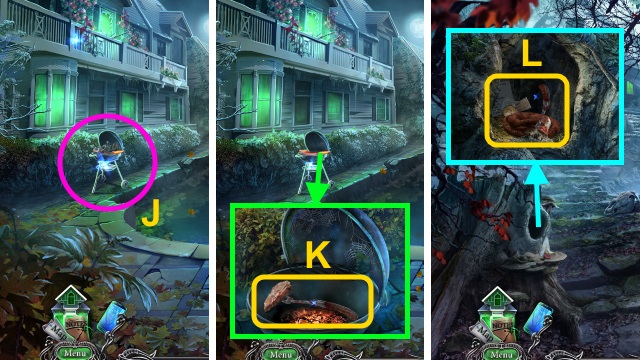
- Play the HOP; receive the PRUNING SHEARS (J).
- Use the POTHOLDER; take the MEAT FORK (K).
- Walk right.
- Use the MEAT FORK; take the COIN (1/2) and papers (L).
- Use the PRUNING SHEARS; take the COIN (2/2) (M).
- Walk left.
- Place the HAY (N).
- Play the HOP; receive the GRAPPLING HOOK (O).
- Place the COIN (2/2) for a mini-game (P).
- Solution (Q); take the GRAPPLING HOOK GUN, PHOTO of MIKE, and papers.
- Combine the GRAPPLING HOOK GUN and GRAPPLING HOOK; receive the HOOK WITH GUN.
- Walk down twice.
- Use the HOOK WITH GUN for a mini-game. Solution (R): stop the balls inside the brown bars.
- Walk left.
- Take the SHUTTER (S).
- Use the WRENCH for a mini-game; solution (T).
- Open the pouch; take the CHIPS (2/2), MAZE PART (1/2), and note.
- Walk down, then right.
- Place the SHUTTER (U).
- Walk right.
- Place the PHOTO OF MIKE for a mini-game; solution (V).
- Open the pouch; take the PLIERS and note.
- Walk down, then left.

- Play the HOP; receive the BRIDLE (W).
- Use the PLIERS; receive the WEAPON CASE (X).
- Examine the WEAPON CASE; place the BULLETS (Y). Take the note, RIDER FIGURE, and CONTAINER.
- Walk down, then right.
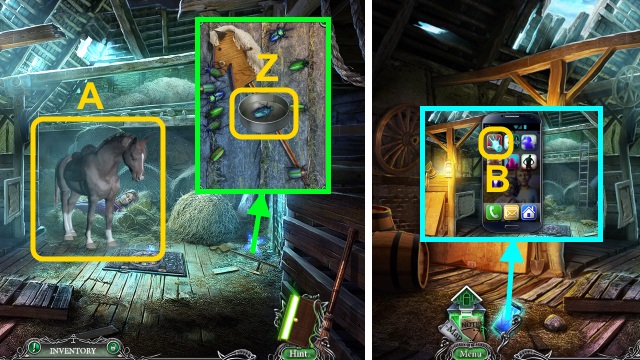
- Use the CONTAINER; move the beetle into it (Z). Close the lid; take the CONTAINER WITH BEETLE and HOBBY HORSE.
- Use the BRIDLE (A).
- Use the Smartphone. Select the app (B); run it for a mini-game.
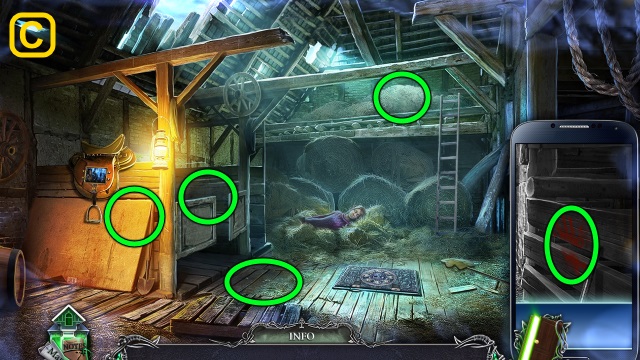
- Solution (C-D).
- Take the HORSESHOE BUTTON (E).
- Walk down, then left.
- Use the HOBBY HORSE (F); receive the CAGE.
- Combine the CAGE, HORSE FIGURE, and RIDER FIGURE; position the figures (G). Take the MECHANICAL BIRD.
- Go to the Balcony.
- Place the HORSESHOE BUTTON (H); take the LOCK PART.
- Give the CONTAINER WITH BEETLE; take the FIGURE (I).
- Walk down.
- Place the FIGURE and CHIPS (2/2) for a mini-game (J).
- Solution (K-Q).
- Walk forward.
- Place the LOCK PART for a mini-game; solution (L).
- Play the HOP; receive the TOOTHPICK (M).
- Take the SMELLING SALTS (N).
- Go to the Barn.
- Use the SMELLING SALTS (O); receive the WIND-UP KEY.
- Combine the MECHANICAL BIRD and WIND-UP KEY; take the WING BUTTON and WASHING MACHINE BUTTON.
- Walk down twice, then forward.
- Place the WASHING MACHINE BUTTON for a mini-game; solution (P).
- Push the button (Q); take the MAKESHIFT ROPE.
- Walk down.
- Use the MAKESHIFT ROPE (R).
- Go left.

- Place the WING BUTTON (S); take the NAIL.
- Use the TOOTHPICK (T); take the LOCK PART.
- Walk down, then forward.
- Remove the paper; use the NAIL (U). Take the ENVELOPE (V).
- Open the ENVELOPE; take the letter and SKULL'S EYE (1/2).
- Walk right.
- Take the LOCK PART (1/2) (W).
- Go to the Grove.
- Place the LOCK PART for a mini-game; solution (X).
- Take the GLOVES.
- Walk right.
- Move the hay; place the GLOVES. Take the note and MICHAEL'S KEY (Y).
- Combine the KEYS and MICHAEL'S KEY.
- Go to the Children's Room.
- Use the KEYS for a mini-game (Z).

- Solution (A-H).
- Take the PUTTY KNIFE.
- Walk right, then down.
Chapter 4: Brenda and Dexter
- Use the PUTTY KNIFE for a mini-game.
- Solution (I): H-G-D-E-F-C-B-A.
- D-G-H-I-F-E-B-C-F-I.
- Take the LOCK PART (2/2).
- Walk forward.
- Play the HOP; receive the HANGER (J).
- Examine the HANGER; receive the FOLDED HANGER.
- Use the LOCK PART (2/2) for a mini-game; solution (K).
- Take the DUSTER and PENDANT.
- Walk right.
- Use the FOLDED HANGER (L); receive the LILY BUTTON.
- Go to the Balcony.

- Place the LILY BUTTON (M); take the CREAM.
- Go to the Attic.
- Use the CREAM (N); open the door. Take the DIARY (O).
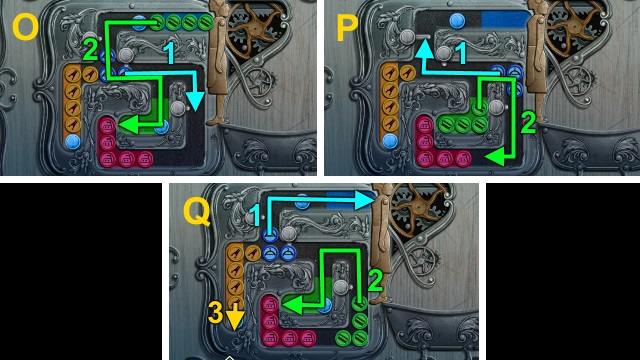
- Place the CODE for a mini-game; solution (P-Q).
- Use the Smartphone. Select the app (R); run it for a mini-game.
- Solution (S-T).
- Combine the DIARY and PENDANT for a mini-game.
- Solution (U). Read the diary; take the TUBE HANDLE.
- Walk down.
- Place the TUBE HANDLE for a mini-game (V).

- Solution (W).
- Take the SKELETAL HAND.
- Walk down, then left.
- Place the SKELETAL HAND (X). Read the book, take the AROMATIC.
- Go to the Attic.
- Use the AROMATIC for a mini-game. Solution (Y): A-B-C-A-B-C-B-A-C-B.
- Take the TABLE KEY.
- Go to the Balcony.
- Place the TABLE KEY; take the picture, POWDER, and FIRE TILE (1/2) (Z).
- Go to the Attic.
- Read the note; use the POWDER. Take BRENDA'S KEY (A).
- Combine the KEYS and BRENDA'S KEY.
- Go to the Children's Room.
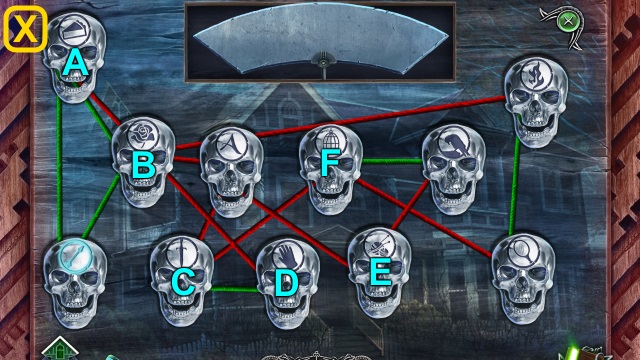
- Use the KEYS for a mini-game (B).
- Solution (C-J).
- Take the SKULL'S EYE.
- Go to the Barn.
- Place the SKULL'S EYE for a mini-game.
- Solution (K): (E-A)-(G-E)-(F-G)-(C-F)-(H-C)-(B-H)-(D-B)-(H-D).
- Go forward.
- Use the DUSTER (L); clear the web. Open the door.
- Walk forward.
- Use the Smartphone. Select the app (M); run it for a mini-game.
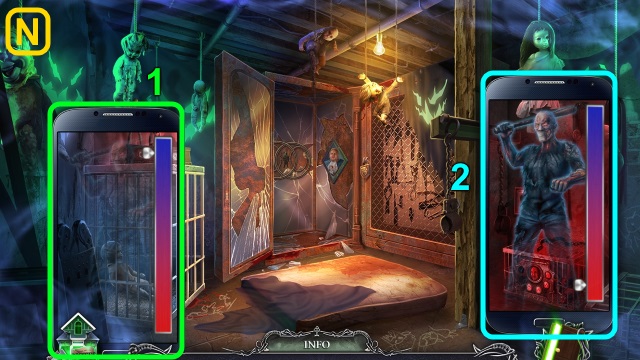
- Solution (N).
- Solution (O): keep the ball close to the green part of the meter.
- Receive the STONE.
- Take the DYNAMIC and papers (P).
- Walk down.
- Read the note (Q); place the DYNAMIC (R). Take the LIFT BUTTONS (1/2).
- Use the STONE; take the FIRE EXTINGUISHER and LIGHT BULB (S).
- Use the FIRE EXTINGUISHER for a mini-game; solution (T).
- Walk left.
- Take the GLUTTON FIGURE and JERRY CAN (1/2) (U).
- Walk left.
- Use the Smartphone. Select the app (V); run it for a mini-game.
- Solution (W-X).
- Take the LADY'S SHOE (Y).
- Walk down twice, then forward.
- Read the note; place the GLUTTON FIGURE for a mini-game.
- Solution (Z): (D-C-A-D)-(D-A-C-B-C-D).
- Receive the PORTRAIT OF VINNIE and CORNER (1/2).
- Use the LIGHT BULB for a mini-game; solution (A-D).
- Take the LIFT BUTTONS (2/2) and note.
- Walk down, then left.
- Place the PORTRAIT OF VINNIE (E); take the PUPPETS (1/2), SAUSAGE (1/2), and BASEBALL BAT.
- Walk left.
- Place the LIFT BUTTONS (2/2) for a mini-game (F).
- Solution (G): (J-B)-(G-E)-(D-H).
- (A-C)-(H-F)-(E-I)-(B-L).
- Pull the lever; take the papers.
- Go left.
- Examine the chair (H).
- Take the note and SYMBOL (1/2) (I).
- Read the note; take the LAMP (J).
- Go to the Punishment Room.
- Give the BASEBALL BAT (K); receive DEXTER'S KEY.
- Combine the KEYS and DEXTER'S KEY.
- Go to the Children's Room.
- Use the KEYS for a mini-game (L).
- Solution (M): Fx4-H-A-D-Bx2.
- Dx3-Cx3-Jx2-E-F-I-Gx3.
- Solution (N).
- Receive the CORNER (2/2) and KNIFE.
- Examine the KNIFE 5x; fold the tools.
- Go to the Cellar.
Chapter 5: Vinnie and Elizabeth
- Place the wood (O-P) and CORNER (2/2) on the shelf (Q).
- Examine the planks for a mini-game (R).
- Solution (S-T).
- Walk right.
- Examine the scene.
- Use the KNIFE (U); receive the ICE.
- Use the Smartphone. Select the app (V); run it for a mini-game.
- Solution (W).
- Take the MEDICINE CHEST ITEM (X).
- Walk down twice.
- Place the MEDICINE CHEST ITEM; take the FIRE TILE (2/2) and FORK (Y).
- Walk forward.
- Place the FIRE TILE (2/2) for a mini-game; solution (Z).
- Take the FATHER'S SHOE.
- Walk down, then left.
- Place the FORK (A).
- Play the HOP; receive the SAUSAGE (2/2) (B).
- Walk right.
- Place the SAUSAGE (2/2) for a mini-game; solution (C).
- Take the MAZE PART (2/2) and PUPPETS (2/2).
- Walk down.
- Place the MAZE PART (2/2) for a mini-game.
- Solution (D): Ax2-Bx5-Cx3-D-E-Fx3.
- Take the PIE and note.
- Walk down, then forward.
- Give the PIE (E); take the WOODEN LIGHTER.

- Place the PUPPETS (2/2) for a mini-game; solution (F).
- Take the PART OF MOSAIC.
- Go to the Fridge Room.
- Examine the freezer (G); place the PART OF MOSAIC for a mini-game.
- Solution (H).
- Open the freezer; take the WOODEN CAKE.
- Walk down.
- Place the WOODEN CAKE; take the HEATED CUP (I). Place the WOODEN LIGHTER; take the JERRYCAN (2/2) (J).
- Walk down.
- Place the JERRY CAN (2/2) for a mini-game; solution (K).
- Take the CODE and PICTURE PART (1/3).
- Combine the ICE and HEATED CUP; receive the HOT WATER.
- Walk left.
- Play the HOP; receive the PLATE (A).
- Walk left.
- Place the PLATE for a mini-game.
- Solution (B): Cx2-B-Cx2-A-Bx2.
- Take the LETTER HALF (1/2).
- Walk down, then right.

- Pour the HOT WATER; take the note and VINNIE'S KEY (L).
- Combine the KEYS and VINNIE'S KEY.
- Go to the Children's Room.
- Use the KEYS for a mini-game (M).
- Solution (N-O).
- Receive the GRINDER ARM.
- Go to the Fridge Room.
- Place the GRINDER ARM for a mini-game (P).
- Solution: D-A-D-A-Cx2-B-Dx3-A.
- D-A-Cx4-Bx3-D-A-D-A-D-A-D-A.
- Take the SON'S SHOE.
- Walk down.
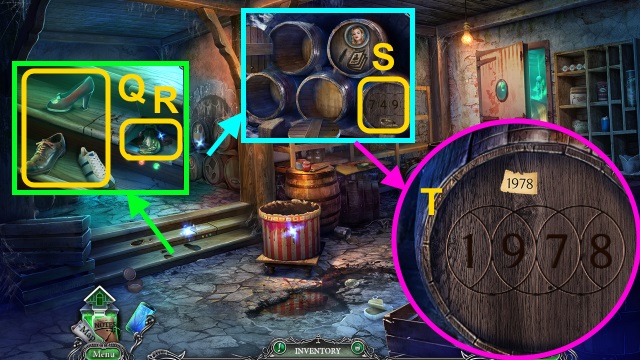
- Place the LADY'S SHOE, FATHER'S SHOE, and SON'S SHOE (Q); take the WOMAN FIGURINE, picture, and note (R).
- Place the CODE for a mini-game (S); solution (T).
- Take the SHAWL.
- Walk left.
- Use the SHAWL for a mini-game (U).
- Solution: Cx2-Bx5-Cx3-A-Bx4-Ax4.
- B-Ax3-Bx5-Ax3-B-Ax5-B-Ax5-B-C.
- Place the WOMAN'S FIGURINE (V); open the door.
- Play the HOP; receive the LIPSTICK FIGURE (W).
- Walk down.
- Place the LIPSTICK FIGURE (X); take the LETTER HALF (2/2) and MECHANISM PART (1/2).
- Walk right.
- Place the LETTER HALF (2/2) (Y); take the note and PART OF HEART.
- Walk down, then left.
- Play the HOP; receive the PART OF HEART (Z).
- Place the 2 PARTS OF HEART (A); take the note and ELIZABETH'S KEY (B).
- Combine the KEYS and ELIZABETH'S KEY.
- Go to the Children's Room.
- Use the KEYS for a mini-game (C).
- Solution (D): Ax3-Bx3-Cx3-Dx3-Ex3-Fx3.
- Solution (E).
- Take the MECHANISM PART (2/2).
- Walk right, then left.
Chapter 6: Carson and Caroline
- Place the MECHANISM PART (2/2) for a mini-game (F).
- Solution: (F-C)-(M-J)-(S)-(A-F)-(M-L).
- (S)-(I-F)-(M-O)-(S)-(A-D)-(B-E)-(G-C).
- (F-I)-(E-H)-(D-F)-(D-G)-(D-E)-(K-J).
- (L-K)-(Q-N)-(P-M)-(P-O)-(L-Q)-(P-R).
- Take the UNINFLATED LIFEBUOY.
- Pull the handle (G); take the RECORDER BUTTON (H).
- Place the RECORDER BUTTON (I); receive the PICTURE PART (2/3).
- Go right.
- Use the Smartphone. Select the app (J); run it for a mini-game.
- Solution (K-L).
- Take the PICTURE PART (3/3) (M).
- Combine the LAMP and PICTURE PART (3/3); arrange the parts (N). Take the DOOR PART.
- Place the DOOR PART for a mini-game; solution (O).
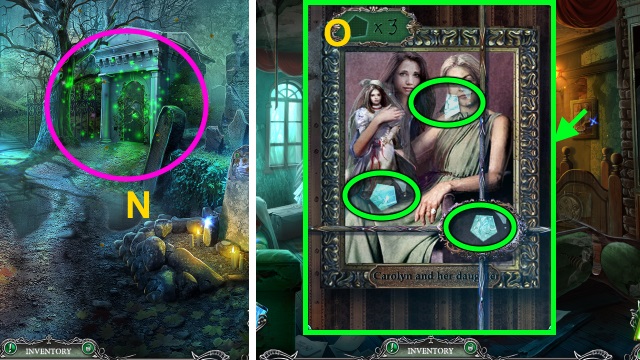
- Walk left.
- Receive the OLD PHOTO.

- Take the SYMBOL (2/2) (P).
- Walk down.
- Use the OLD PHOTO for a mini-game (Q).
- Solution (R).
- Take the DRESS FLOWER (S).
- Walk left.
- Place the DRESS FLOWER for a mini-game; solution (T). Take the VEIL.
- Examine the VEIL.
- Walk down.
- Use the VEIL (U).
- Go forward.
- Use the Smartphone. Select the app (V); run it for a mini-game.
- Solution (W-X).
- Take the POOL BALL (1/2) (Y).
- Take the HALF OF MONEY/HEART KEY (Z).
- Walk down twice.
- Place the SYMBOL (2/2) (A); take the LETTER.
- Open the LETTER; take the FLOPPY DISK.
- Walk right.
- Place the FLOPPY DISK (B).
- Play the HOP; receive the STAPLE REMOVER (C).
- Walk down.
- Use the STAPLE REMOVER (D); take the TIE.
- Walk right, then left.
- Use the TIE (E); receive the PLANK.
- Play the mini-game; solution (F-H).
- Receive the HALF OF MONEY/HEART KEY.
- Combine the 2 HALVES OF MONEY/HEART KEY; receive the MONEY/HEART KEY.
- Use the MONEY AND HEART KEY (I); take the WEDDING RING.
- Walk down twice.
- Place the PLANK; take the POOL BALL (2/2) (J).
- Walk right.
- Place the POOL BALL (2/2) for a mini-game (K).
- Solution (L).
- Take the GATE PART (1/2).
- Walk forward.
- Place the WEDDING RING (M); receive the GATES PART (2/2).
- Place the GATES PART (2/2) for a mini-game (N).

- Solution (O-U).
- Walk right.
- Take the KNITTING NEEDLE (V).
- Take the YIN YANG SYMBOL (W).
- Walk down twice.
- Play the HOP; receive the PUMP (X).
- Combine the UNINFLATED LIFEBUOY and PUMP; receive the LIFEBUOY.
- Place the YIN YANG SYMBOL (Y); take the note and GRAVE PLATE.
- Walk forward.
- Use the LIFEBUOY (Z); receive the METAL BOX.
- Walk right.
- Place the GRAVE PLATE for a mini-game; solution (A).
- Take the KNIFE.
- Walk down twice.
- Use the KNIFE (B); receive CARSON'S KEY.
- Combine the KEYS and CARSON'S KEY.
- Go to the Children's Room.
- Use the KEYS for a mini-game (C).
- Solution (D-F).
- Receive the BOX PART.
- Combine the METAL BOX and BOX PART for a mini-game.
- Solution (G).
- Take the SKELETON and WIRE.
- Go to the Cemetery.

- Place the SKELETON; arrange the skeletons (H).
- Take the CANDLE (I).
- Walk down.
- Place the CANDLE; take the SCARY PUMPKIN (J).
- Walk down twice.
- Place the SCARY PUMPKIN (K); take the AEROSOL (L).
- Go to the cemetery.
- Use the AEROSOL for a mini-game; solution (M).
- Play the HOP; receive the JEWELER'S LOUPE (N).
- Walk down twice, then left.
- Place the JEWELER'S LOUPE for a mini-game; solution (O).
- Receive the GRAVE PARTS (3/3).
- Go to the Cemetery.

- Place the GRAVE PARTS (3/3) for a mini-game (P).
- Solution: (A-B)-(F-A)-(Ix2)-(D-C)-(Ix2)-(G-H)-(I)-(E-G).
- Take the UNDRESSED DOLL and DIAMOND LOCK (1/2).
- Walk down twice, then left.
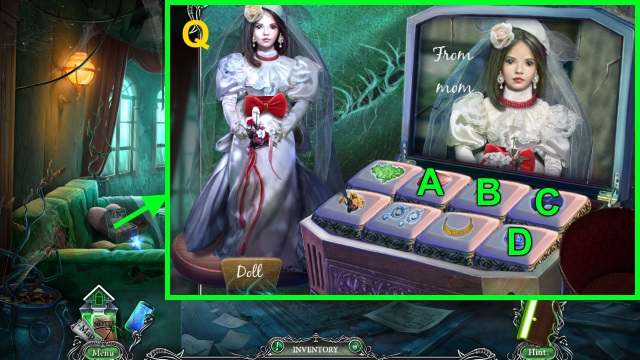
- Place the UNDRESSED DOLL for a mini-game (Q).
- Solution: Ax2-Bx2-C-D.
- Take the WEDDING DOLL.
- Walk down, then forward.
- Move the curtain; give the WEDDING DOLL. Take the notes and CAROLINE'S KEY (R).
- Combine the KEYS and CAROLINE'S KEY.
- Go to the Children's Room.
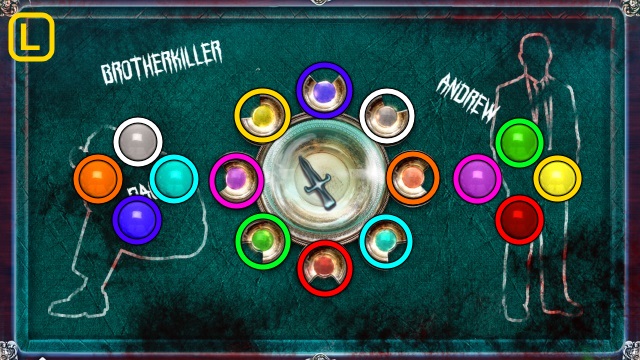
- Use the KEYS for a mini-game (S).
- Solution (T): A-C-D-E-F-G-E-C-F-H.
- Receive the HINT.
- Walk right, then left.
Chapter 7: Gilmore and the Killer
- Use the HINT for a mini-game; solution (U).
- Use the KNITTING NEEDLE for a mini-game; solution (V).
- Take the ROPE.
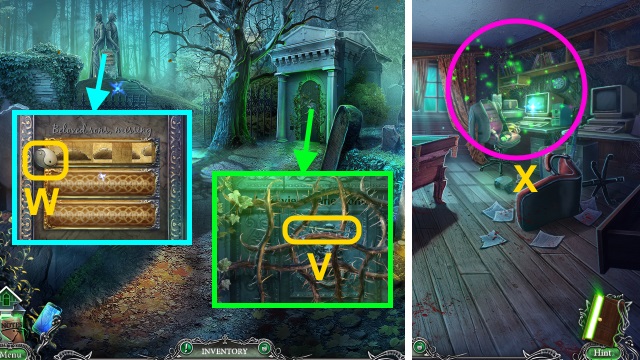
- Read the papers; place the ROPE (W). Examine the board (X); place the WIRE for a mini-game.
- Solution (Y).
- Take the SMALL HOUSE (1/2).
- Walk left twice.
- Take the notes and SMALL HOUSE (2/2) (Z).
- Walk down.
- Examine the board (A); place the SMALL HOUSE (2/2) for a mini-game (B).
- Solution (C); take the GILMORE PHOTO.
- Walk left.
- Place the GILMORE PHOTO (D); take the BUTTONS (1/3) and METAL RAVEN (E).
- Walk down.
- Place the METAL RAVEN for a mini-game (F).
- Solution (G): (A-B)-(D-A)-(H-D)-(I-H).
- (F-I)-(C-F)-(B-C)-(A-B)-(D-A)-(H-D)-(I-H).
- (F-I)-(B-F)-(A-B)-(D-A)-(H-D)-(I-H)-(G-I).
- (C-G)-(B-C)-(E-B)-(A-E)-(D-A)-(H-D)-(I-H).
- (G-I)-(C-G)-(B-C)-(A-B)-(D-A)-(H-D)-(E-H).
- (B-E)-(F-B)-(I-F)-(G-I)-(C-G)-(F-C)-(B-F).
- Walk right.
- Use the Smartphone. Select the app (H); run it for a mini-game.
- Solution (I).
- Examine the coffin. Play the HOP; receive the UV LAMP (J).
- Walk down.
- Place the UV LAMP; examine the pictures for a mini-game (K).
- Solution (L): (C-B-A-E)-(F-B-D-A-E)-(A-B-E-C-F-D).
- Take the BUTTONS (2/3) and CAGE.
- Walk left.
- Place the CAGE (M); examine the desk for a mini-game.
- Solution (N): Bx5-A-Bx6-A-Bx2-A-Bx3-A-Bx2-A-Bx2-A-B-Ax2.
- Take the BUTTONS (3/3) and CROW-SHAPED LOCK.
- Walk down.
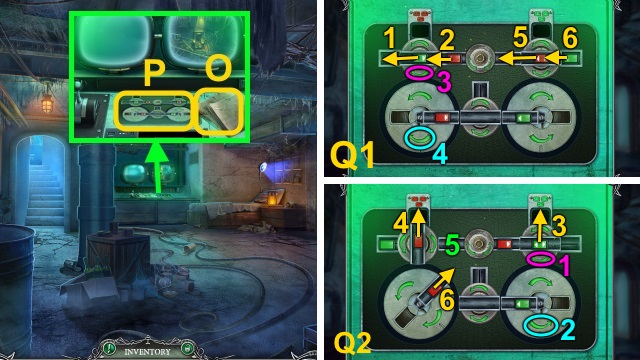
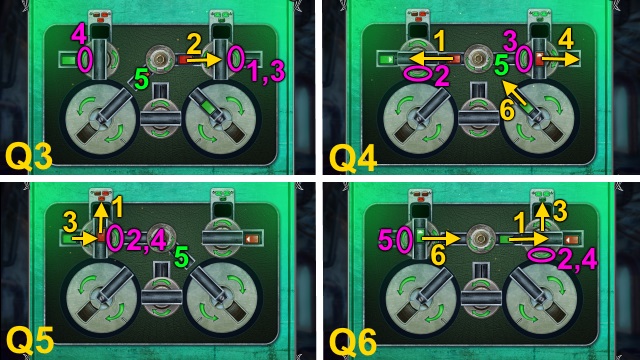
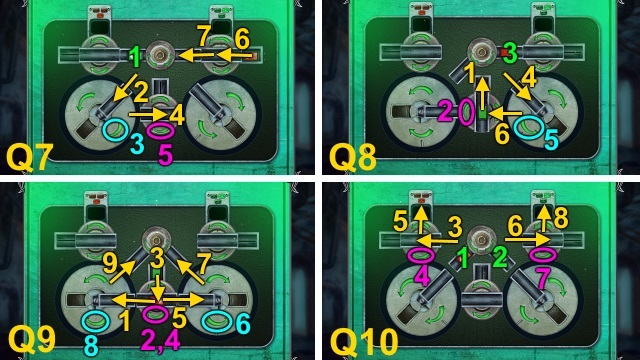
- Read the newspapers (O); examine the controls (P). Place the BUTTONS (3/3) for a mini-game.
- Solution (Q1-Q10).
- Take the CLIP.
- Walk down.
- Place the CROW-SHAPED LOCK; take the SURGERY TABLE PART (W).
- Walk left, then right.
- Place the SURGERY TABLE PART; open the drawer. Take the SCALPEL (X).
- Walk down twice.
- Read the paper; use the SCALPEL (Y). Take the SPRING.
- Walk left twice.
- Place the SPRING (Z); take the CODE (A).
- Walk down, then right.
- Place the CODE for a mini-game; solution (B).
- Take the LITTLE CLOCK and note.
- Combine the LITTLE CLOCK and CLIP; receive the CAGE-SHAPED LOCK.
- Walk down twice.
- Place the CAGE-SHAPED LOCK; take the ANUBIS HEAD (C).
- Walk left, then right.
- Place the ANUBIS HEAD (D); take the DIAMOND LOCK (2/2) and LATCH PART.
- Walk down twice.

- Place the LATCH PART (E); take the GILMORE JEWELS (F).
- Place the DIAMOND LOCK (2/2) for a mini-game; solution (G).
- Take the MEDICAL STAPLE EXTRACTOR.
- Walk left, then right.
- Use the MEDICAL STAPLE EXTRACTOR; move the cloth. Open the pocket; take the WIRE WITH CONNECTOR (H).
- Give the GILMORE JEWELS (I); take the note and GILMORE'S KEY.
- Combine the KEYS and GILMORE'S KEY.
- Walk down, then left.
- Place the WIRE WITH CONNECTOR for a mini-game; solution (J).
- Take the file and MEDICAL SIGN (K).
- Walk down, then right.
- Place the MEDICAL SIGN; take the HACKSAW (L).
- Go to the Children's Room.
- Use the KEYS for a mini-game (M).
- Solution (N-O).
- Receive the CLOCKWORK.
- Go to the Lookout Tower.
- Read the newspaper; place the CLOCKWORK for a mini-game (P).
- Solution: (G-D)-(D-A)-(A-H)-(H-E)-(I-F).
- (F-C)-(F-I)-(I-B)-(F-I)-(I-B)-(B-E)-(E-H).
- (H-A)-(E-B)-(B-I)-(J-C)-(C-F)-(C-J)-(J-G).
- (G-D)-(D-A)-(A-H)-(A-D)-(D-G)-(G-J)-(I-F).
- (F-C)-(C-J)-(J-G)-(J-C)-(C-F)-(F-I).
- Go forward.
- Read the note (Q); use the HACKSAW 4x (1-4). Take the TAPE.
- Walk down twice.
- Use the TAPE (R); Take the PLIERS.
- Walk down.
- Use the PLIERS; take the TUNING FORK (S).
- Walk left, then right.
- Use the TUNING FORK (T); take the ACID.
- Walk down, left, then forward.
- Read the file (U); use the ACID. Receive the MANIAC'S KEY.
- Combine the KEYS and MANIAC'S KEY.
- Go to the Children's Room.
- Use the KEYS for a mini-game (V).
- Solution (W-B).
- Receive the PHOTO and LIGHTER.

- Use the PHOTO (C).
- Use the LIGHTER (D).
- Congratulations! You have completed Harrowed Halls: Lakeview Lane.
Created at: 2016-11-18