

Walkthrough Menu
General Tips
- This is the official guide for Haunted Hotel: Personal Nightmare.
- This guide won't tell you when to zoom into a location; the screenshots show each zoom scene.
- Hidden-object puzzles are referred to as HOPs. Only the locations of the HOPs will be shown.
- Use the Map to fast travel to a location.
Chapter 1: Frank
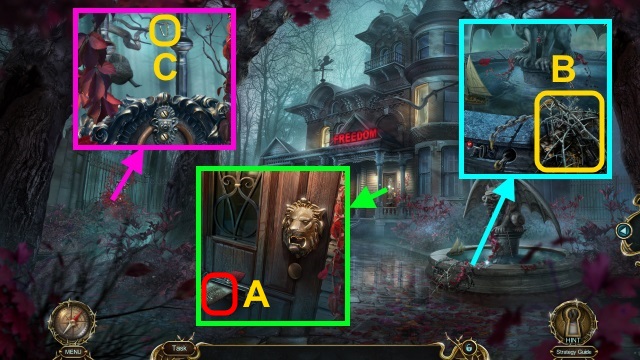
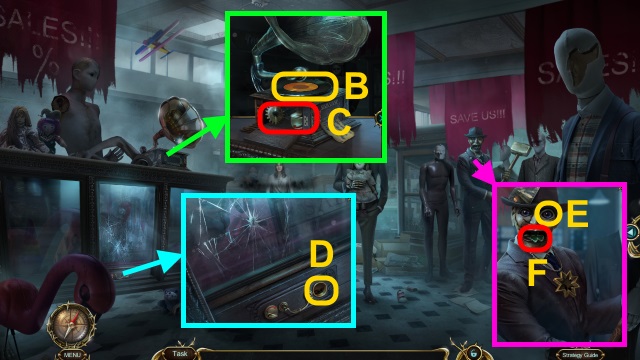
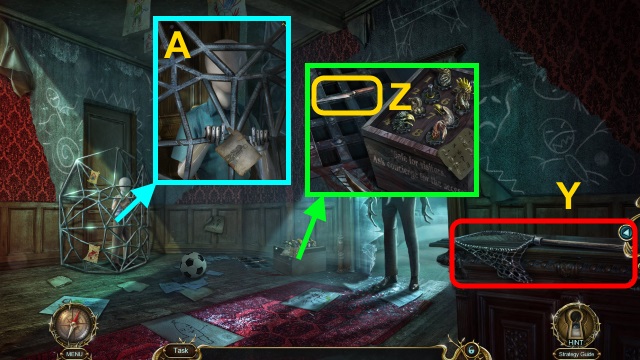
- Take NEWSPAPER (A).
- Open NEWSPAPER; take LIGHTER.
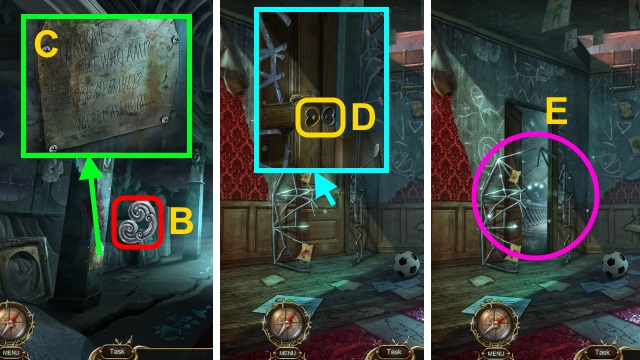
- Use LIGHTER (B); take CANE.
- Use CANE (C); take CARABINER.
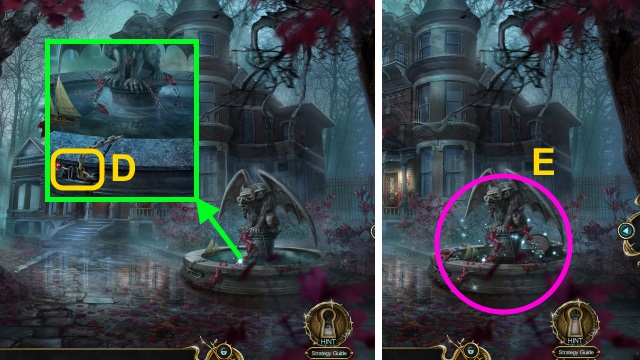
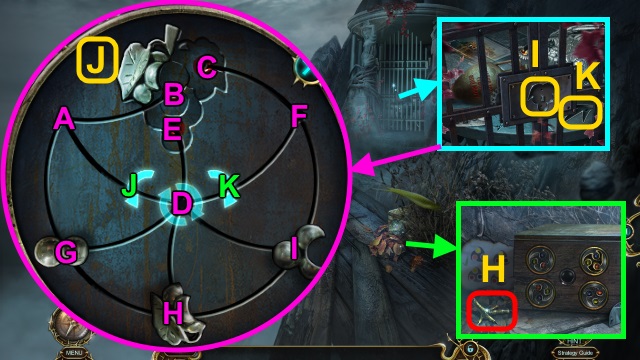
- Place CARABINER; flip switch (D).
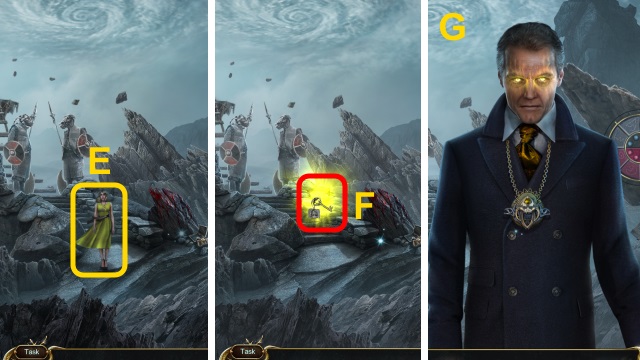
- Play HOP; receive COIN (E).
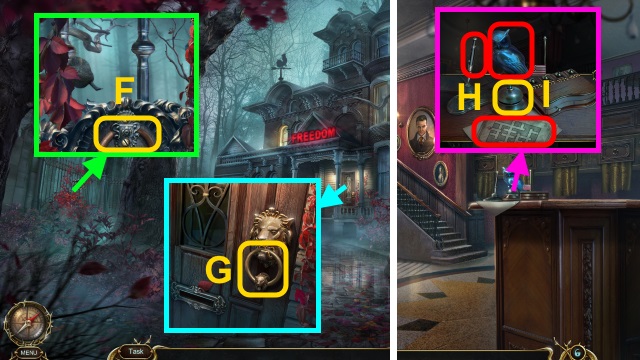
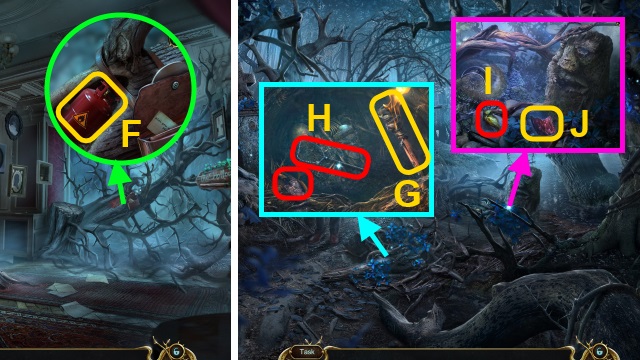
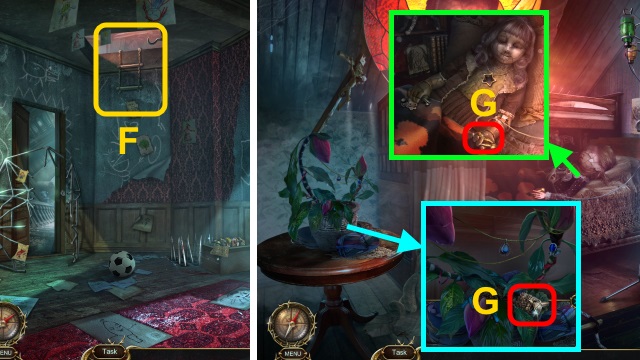
- Use COIN (F); take RING.
- Place RING (G); examine.
- Walk forward.
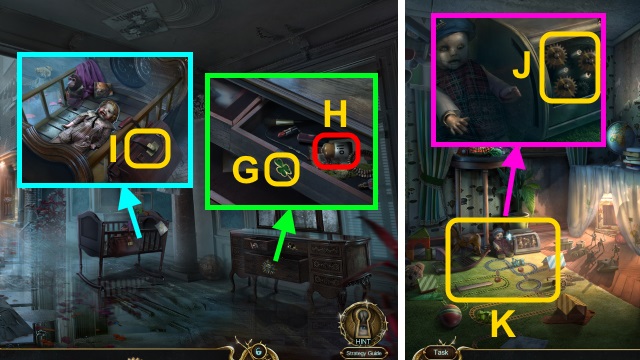
- Examine scene 2x.
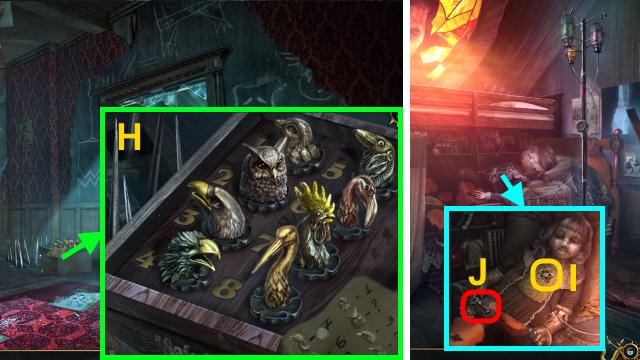
- Take LABYRINTH MAP, PAPER, OWLS (1/3), and PEN (H). Use bell (I).
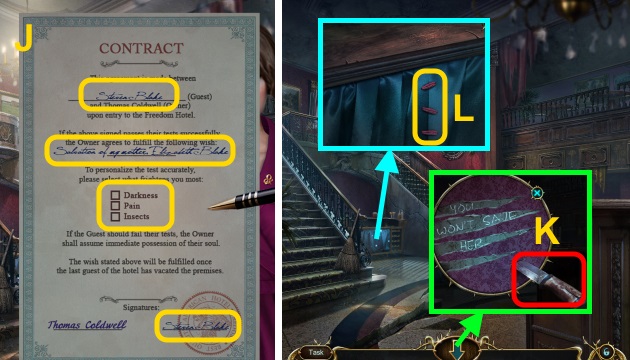
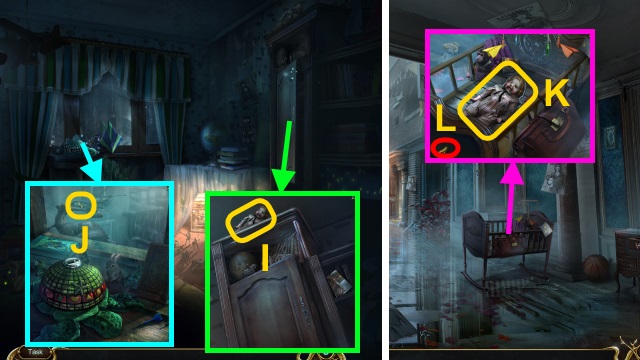
- Fill out document; select any option (J).
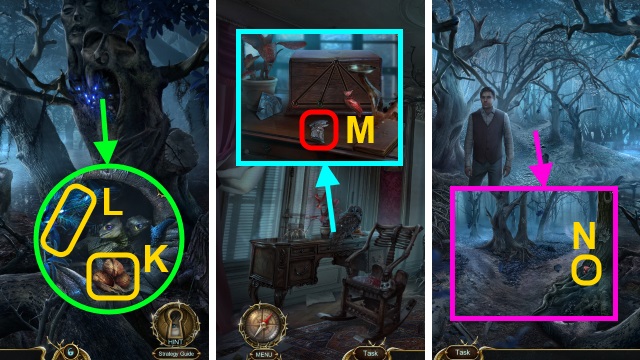
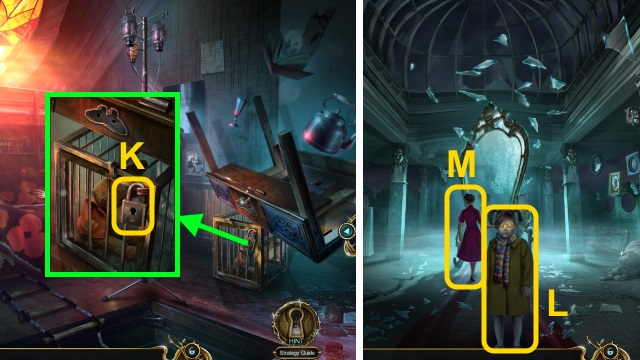
- Examine wall; take KNIFE (K).
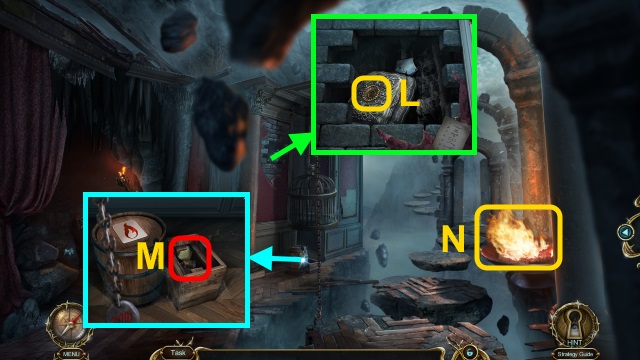
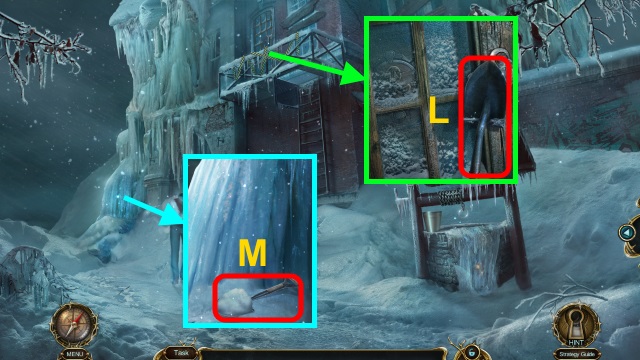
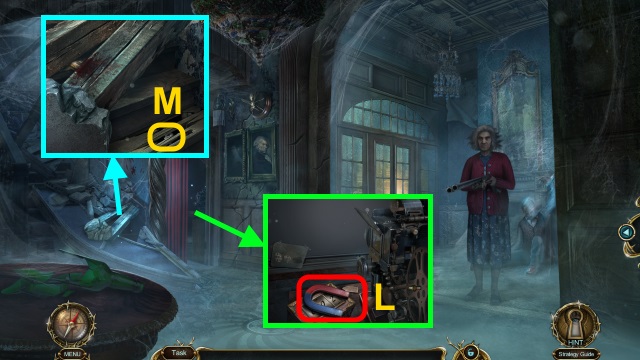
- Use KNIFE (L).
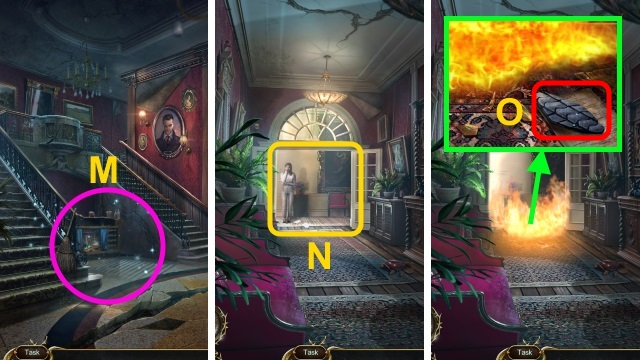
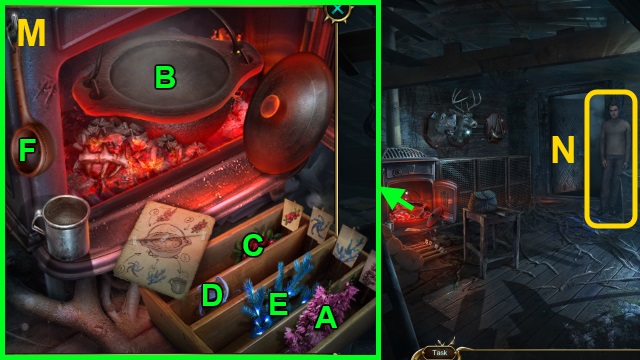
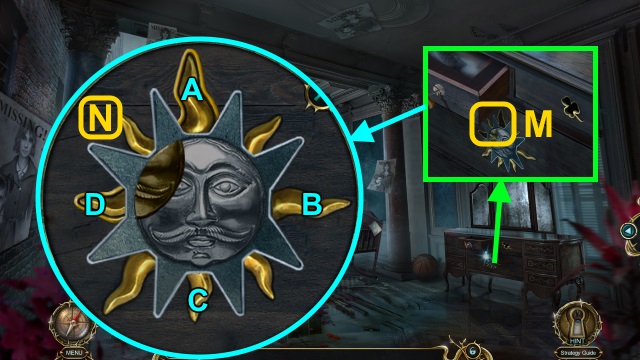
- Play HOP; receive GLUE (M).
- Walk forward.
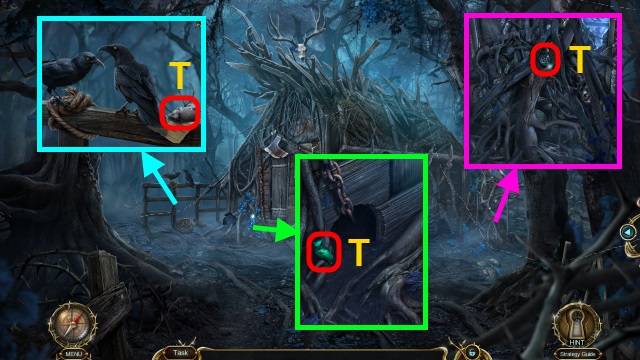
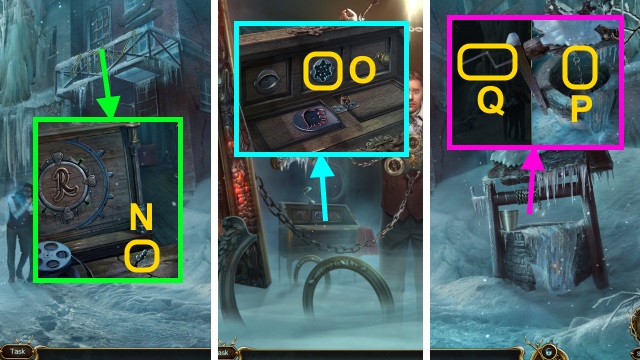
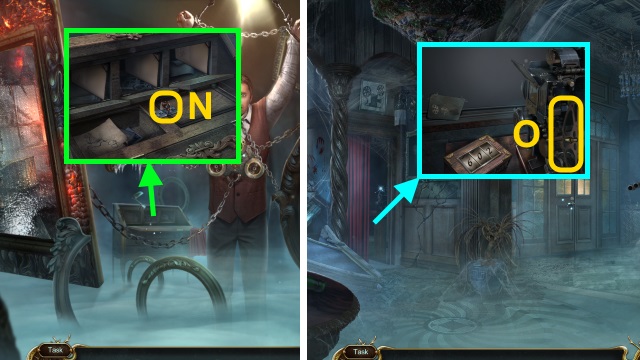
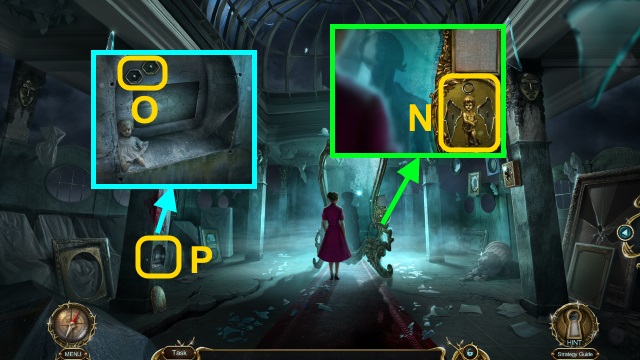
- Examine (N).
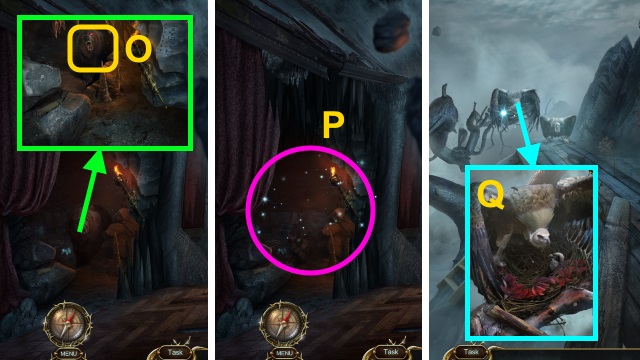
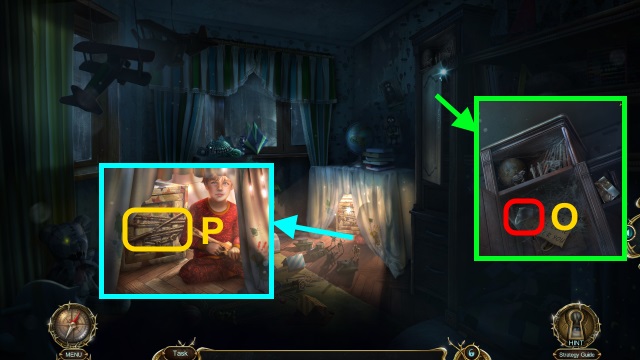
- Take RUBBER PIECE (O).
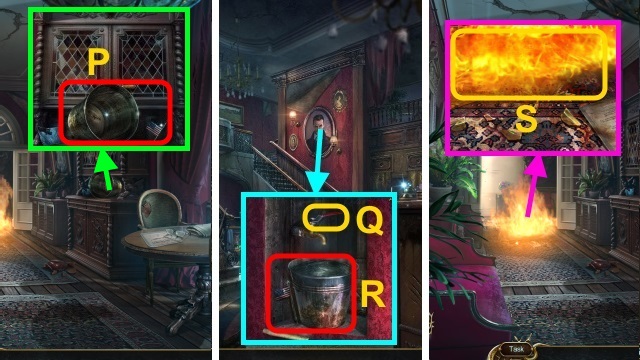
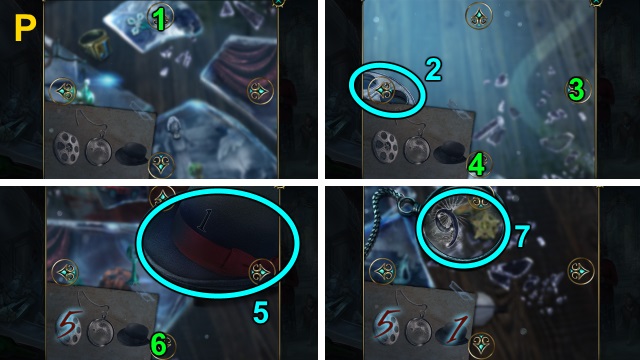
- Take BROKEN BUCKET and FLAGS (1/3) (P).
- RUBBER PIECE and GLUE on BROKEN BUCKET; take BUCKET.
- Walk down.
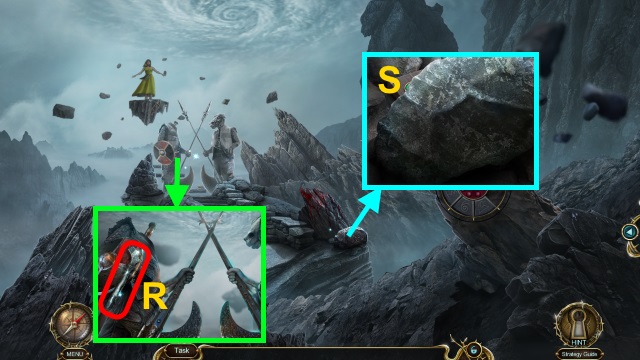
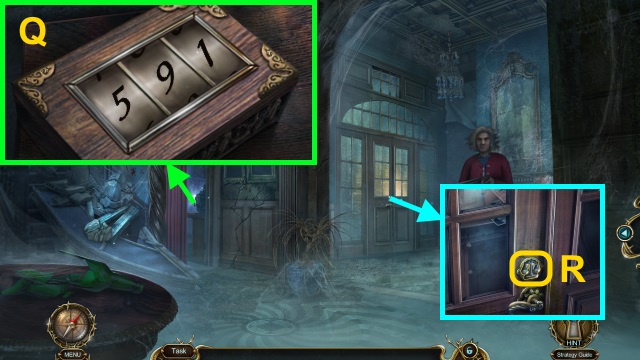
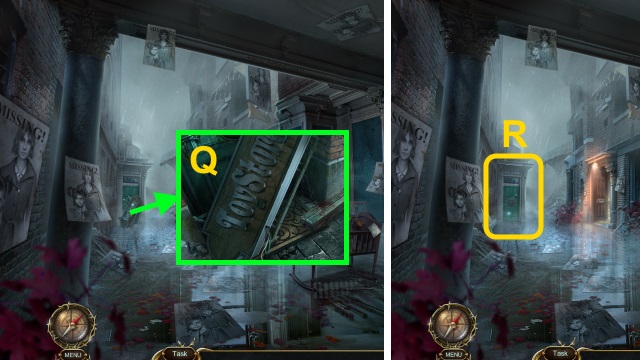
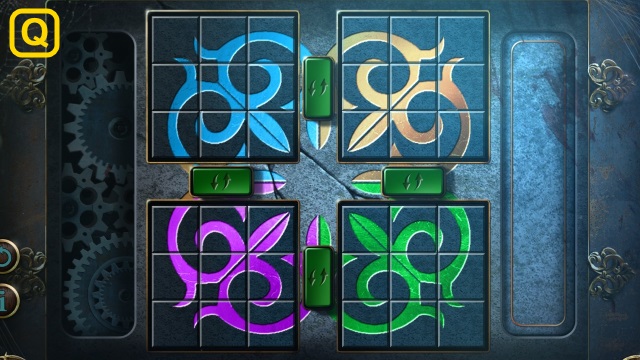
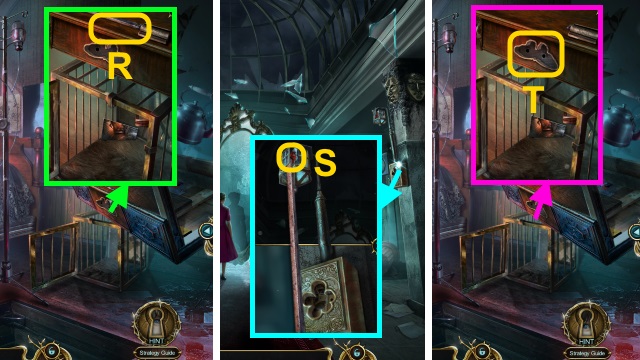
- Move painting. Place BUCKET; turn handle (Q). Take BUCKET WITH WATER and FLAGS (2/3) (R).
- Walk forward.
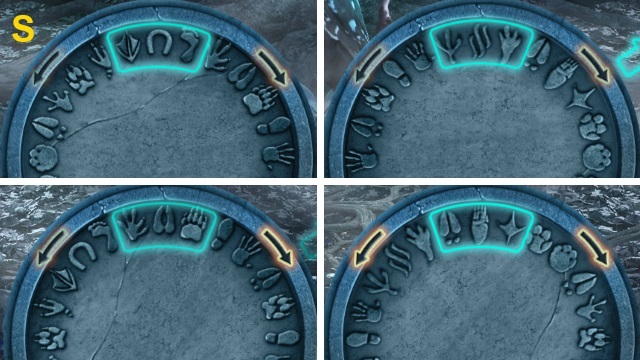
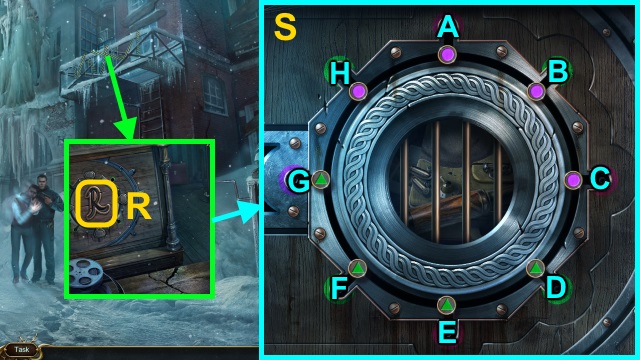
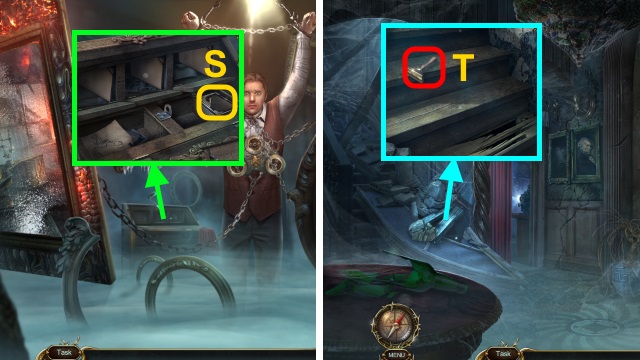
- Use BUCKET WITH WATER (S).
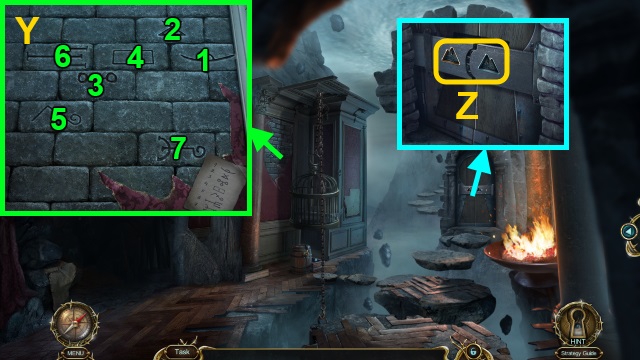
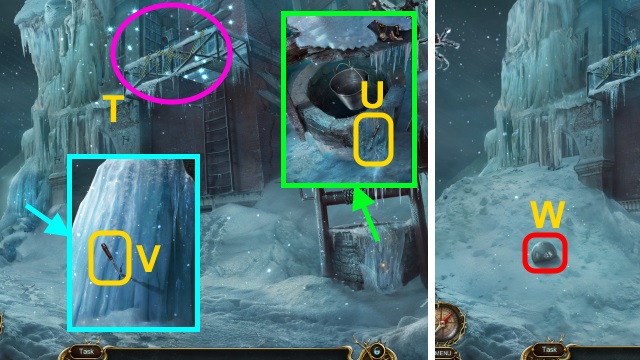
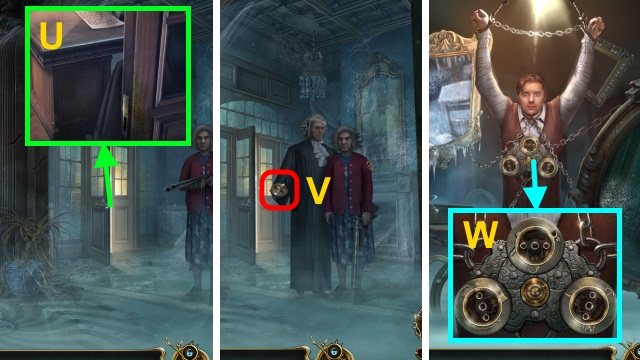
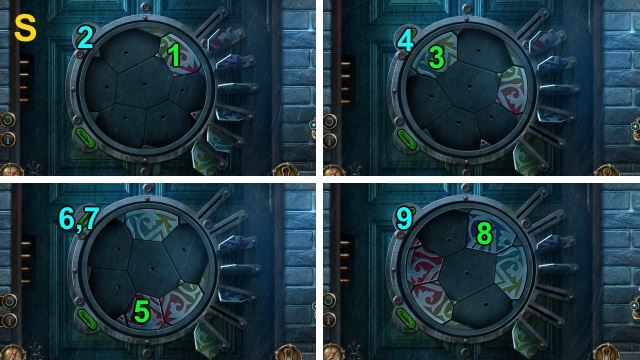
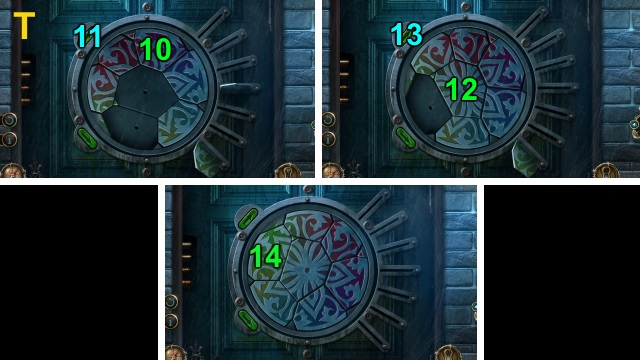
- Examine scene; use LABYRINTH MAP.
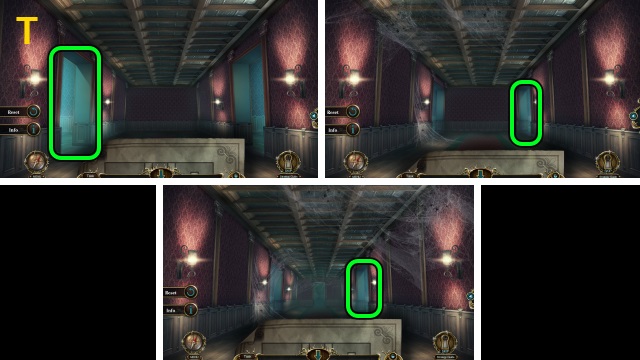
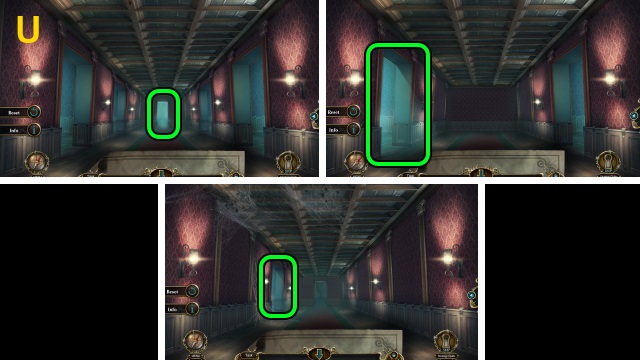
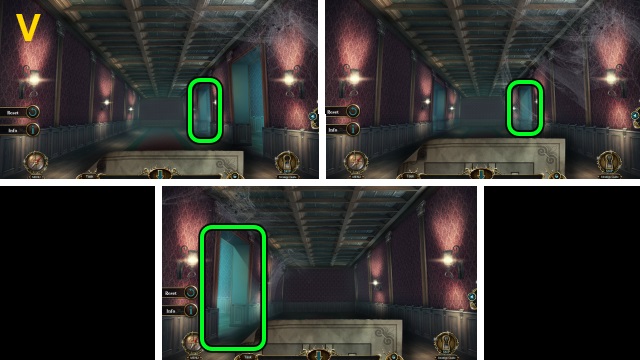
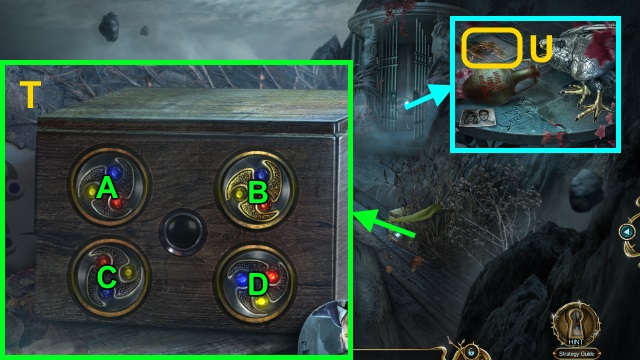
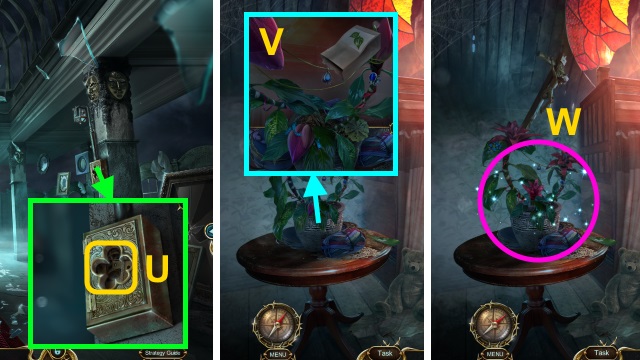
- Solution (T-V).
- Examine scene.
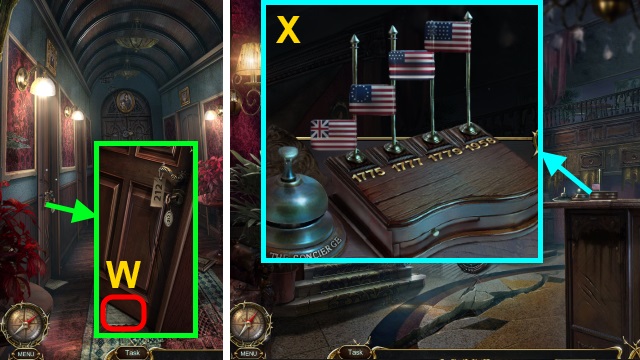
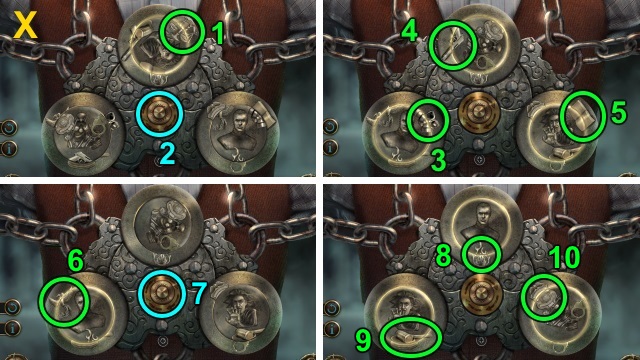
- Take note and FLAGS (3/3) (W).
- Walk down twice.
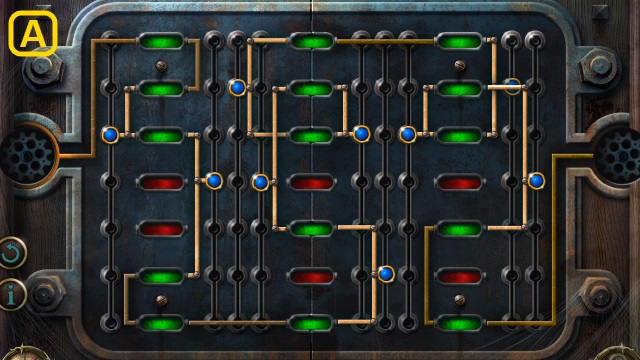
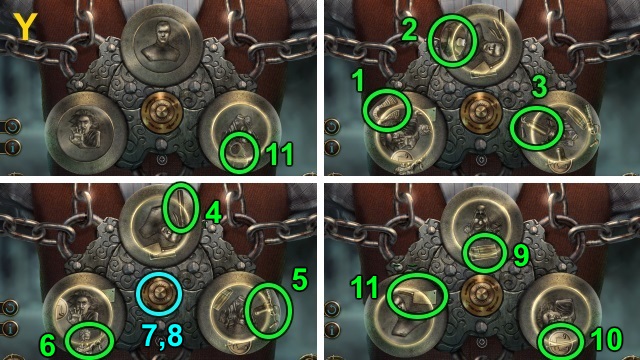
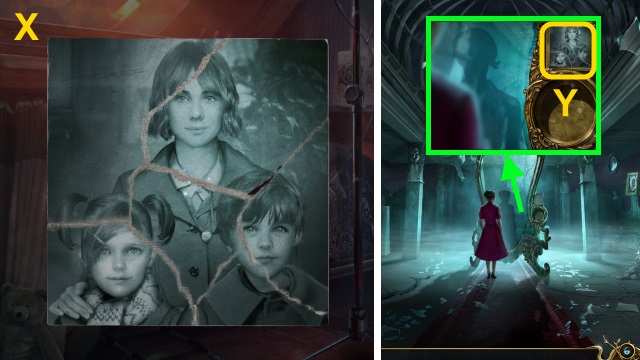
- Place FLAGS (3/3); solution (X).
- Take HANDLE.
- Walk forward.
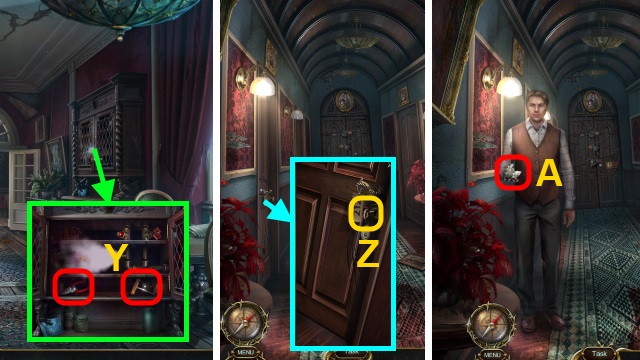
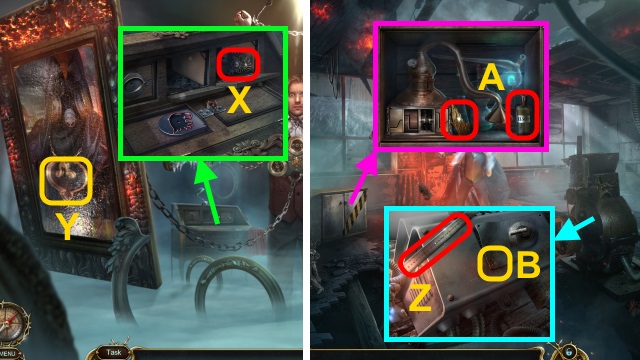
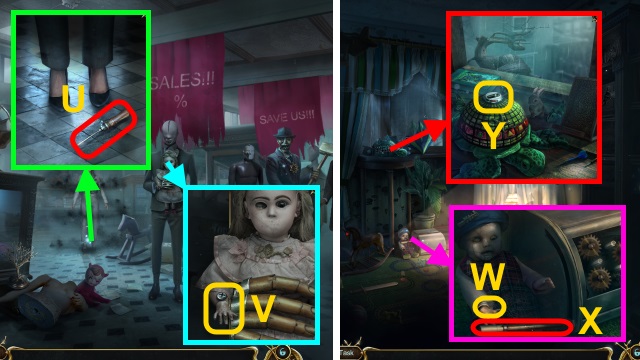
- Place HANDLE; take CORKSCREW and PLIERS (Y).
- Walk forward.
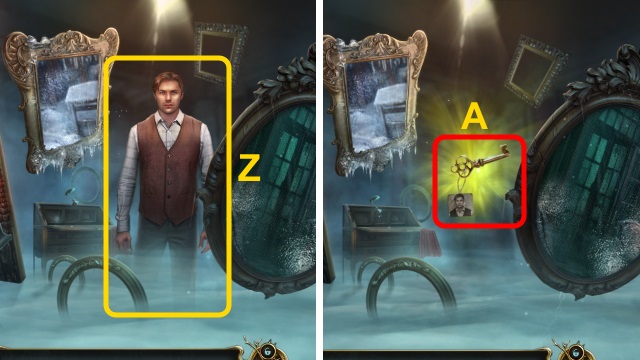
- Examine; use PLIERS (Z).
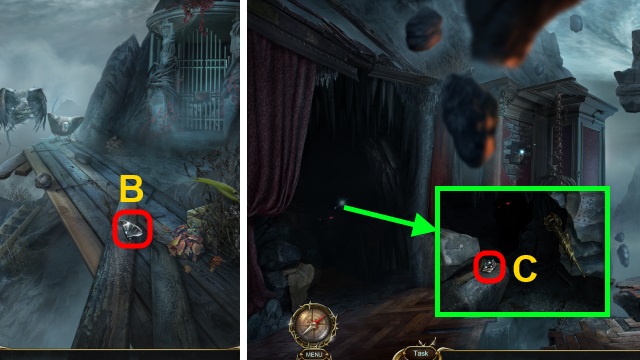
- Examine scene; take NOTE (A).
- Open NOTE; take BAG AMULET.
- Enter Man's Room.
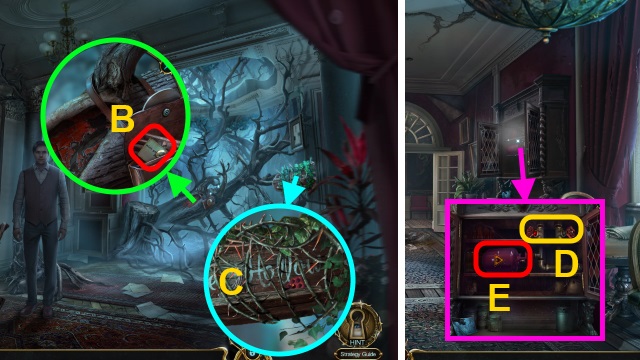
- Examine scene; receive FLARE GUN.
- Place BAG AMULET; take GOLD RING and LEATHER GLOVE (B).
- Use KNIFE and LEATHER GLOVE (C); take VALVE HANDLE and STONE FRAGMENTS (1/5).
- Walk down twice.
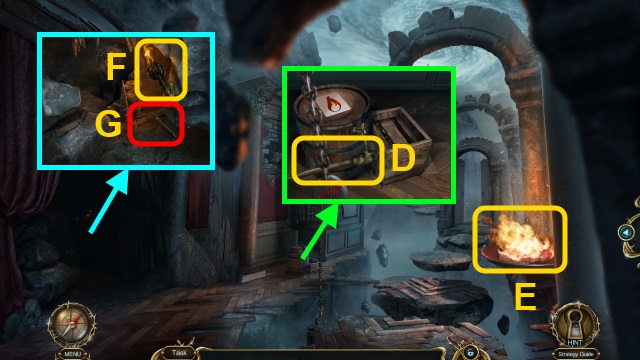
- Place VALVE HANDLE (D); turn valves. Take GAS CANISTER (E).
- Go to Man's Room.
- Use GAS CANISTER and FLARE GUN (F).
- Walk forward.
- Move branches; use LIGHTER (G). Take NET and STONE FRAGMENTS (2/5) (H).
- Take OWLS (2/3) (I). Use NET; receive STONE FRAGMENTS (3/5) (J).
- Use NET (K); receive NUTS. Use KNIFE (L); take DECORATED FIR NEEDLES.
- PLIERS on NUTS; take SHELLED NUTS.
- Walk down.
- Give SHELLED NUTS; take STONE FRAGMENTS (4/5) (M).
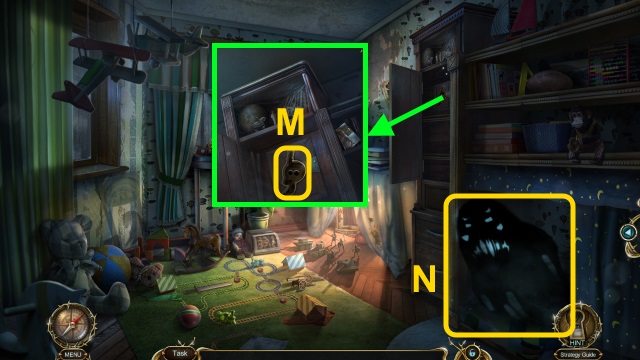
- Walk forward.
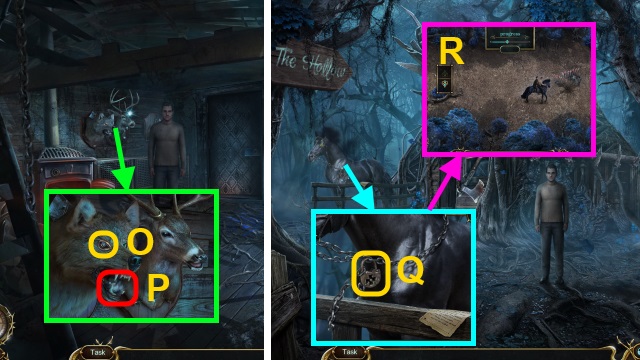
- Use PLIERS (N); take STONE FRAGMENTS (5/5).
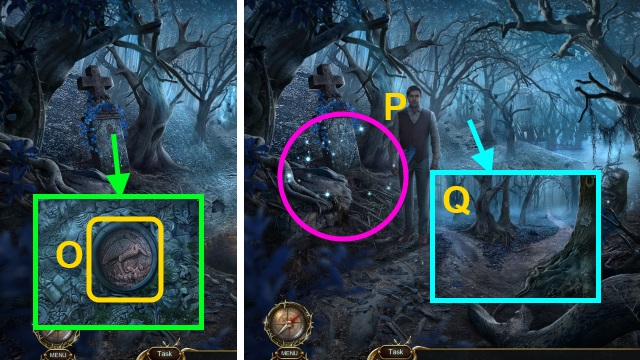
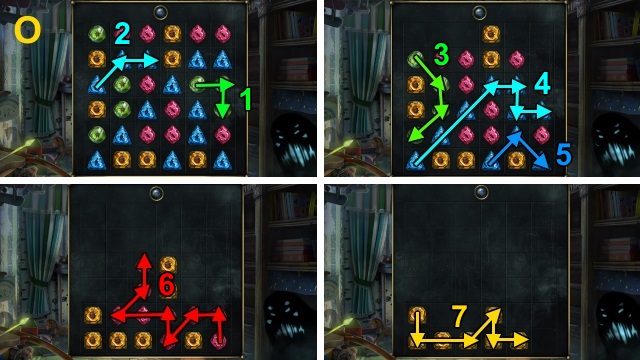
- Place STONE FRAGMENTS (5/5); arrange (O).
- Play HOP; receive STONE COMPASS (P).
- Use STONE COMPASS (Q).
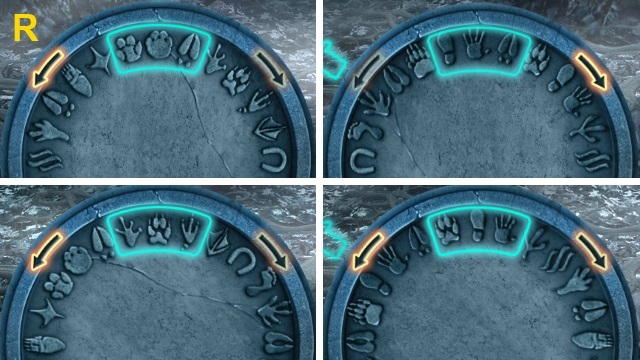
- Solution (R-S).
- Examine scene.
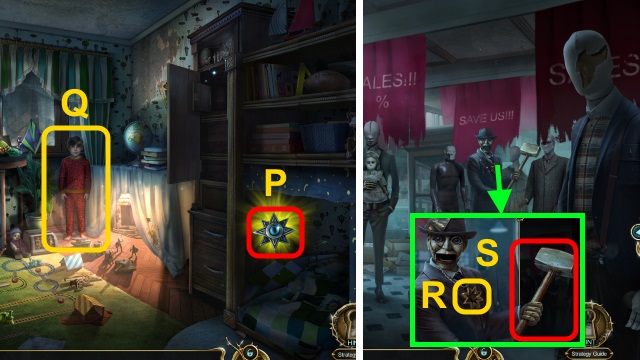
- Take OWLS (3/3), TOY MOUSE, and WHEEL (T).
- Walk down twice.
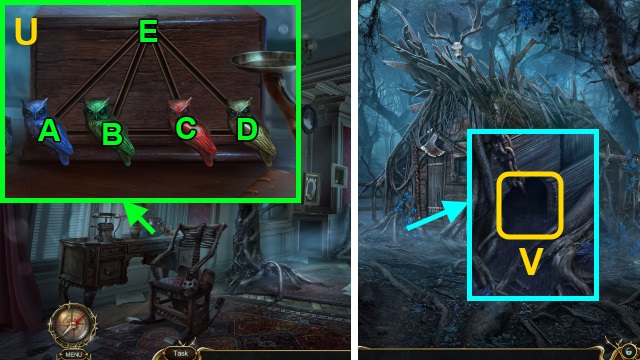
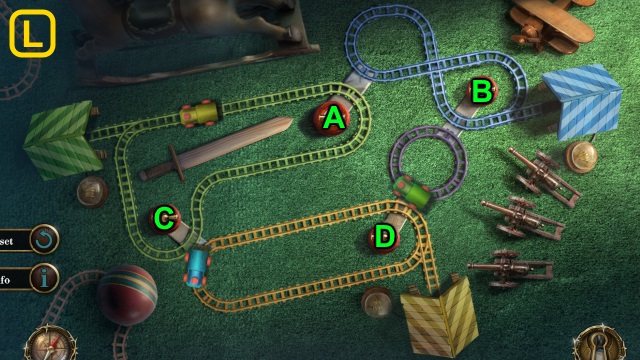
- Move object; place OWLS (3/3) (U).
- Solution: A-B-C-D-E-A-B-E.
- Take WINDING KEY.
- WHEEL and WINDING KEY on TOY MOUSE; take WINDUP MOUSE.
- Walk forward twice.
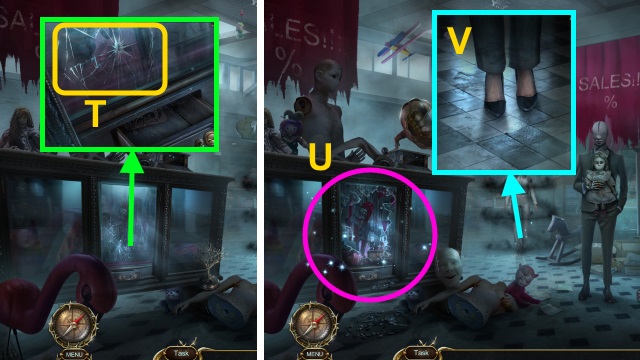
- Use WINDUP MOUSE (V).
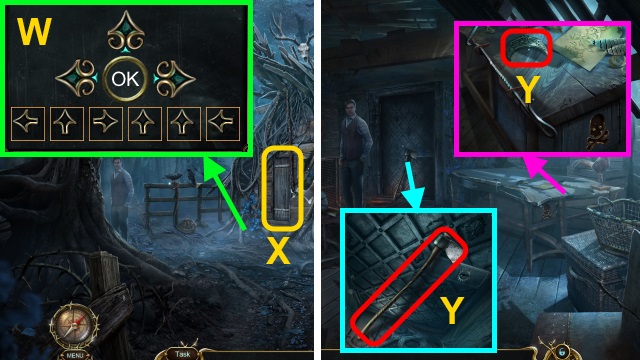
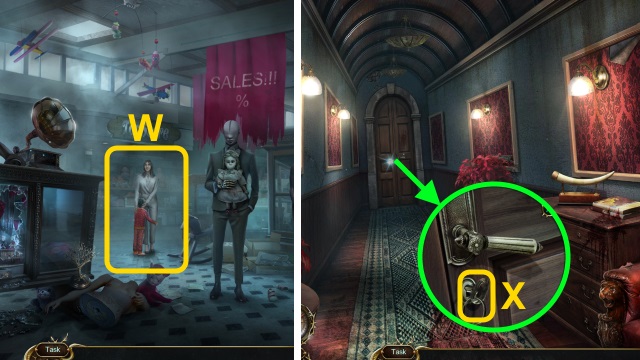
- Solution (W).
- Open door; go (X).
- Take AXE and MOON AMULET (Y).
- Walk down.
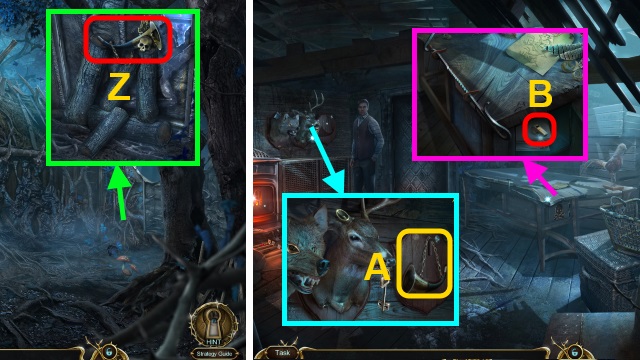
- Use AXE; take SKULL and HORN (Z).
- Walk forward.
- Place HORN (A); take BONES.
- Place SKULL and BONES; take HUNTER WHISTLE (B).
- Walk down.
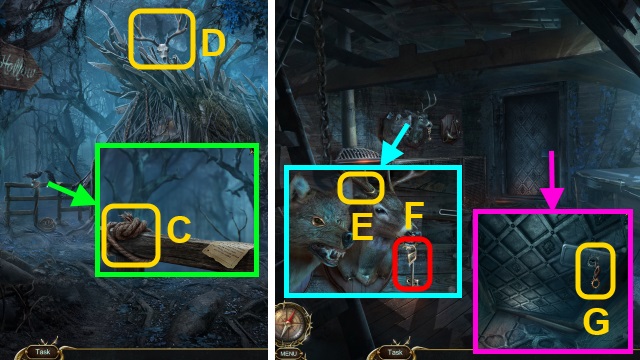
- Use HUNTER WHISTLE. Use KNIFE (C); take ROPE.
- Turn ROPE into LASSO.
- Use LASSO (D); receive DEER ANTLERS.
- Walk forward.
- Place DEER ANTLERS (E); take BASEMENT KEY (F).
- Use BASEMENT KEY (G).
- Examine scene; receive RECIPE.
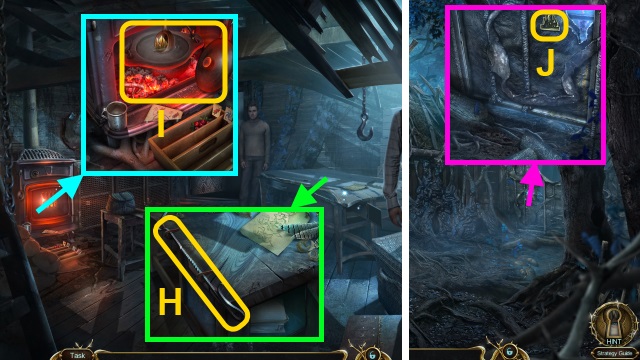
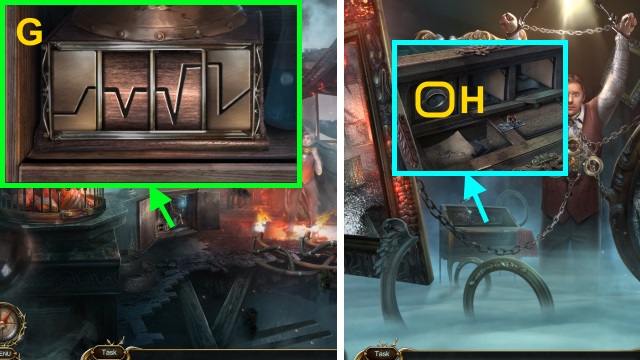
- Use PLIERS (H); take POKER.
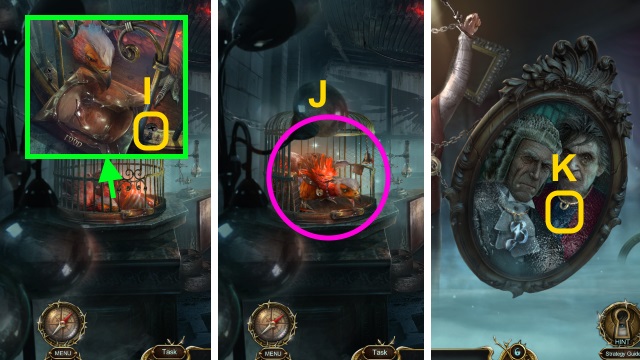
- Use POKER 2x; use spoon (I). Take FIRE AMULET.
- Walk down.
- Place FIRE AMULET (J).
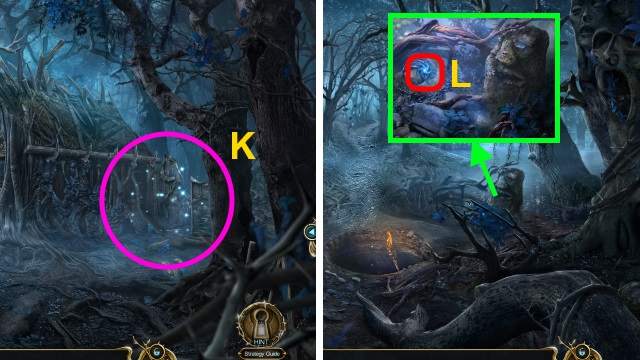
- Play HOP; receive HEATHER FLOWER (K).
- Walk down.
- Place MOON AMULET; take BLUE-EYED GRASS (L).
- Walk forward twice.
- Place RECIPE, DECORATED FIR NEEDLES, HEATHER FLOWER, and BLUE-EYED GRASS (M).
- Solution: (A-B)-(C-B)-(D-B)-(E-B)-(F-B).
- Take TEA.
- Give TEA (N). Talk; receive GLASS EYE.
- Place GLASS EYE (O); take PAPER (P).
- Open PAPER; take CROSS KEY.
- Walk down.
- Examine scene.
- Use CROSS KEY (Q).
- Solution (R): dodge obstacles.
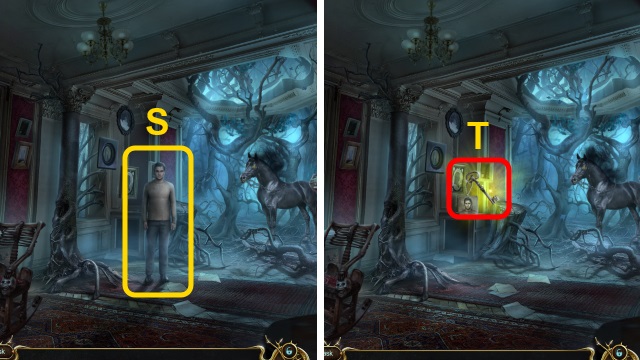
- Talk (S).
- Take FRANK'S KEY (T).
- Walk down.
Chapter 2: Mary
- Examine scene.
- Go to Mountain Base.
- Examine scene.
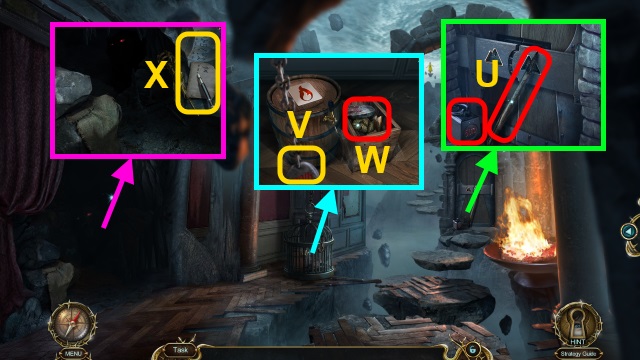
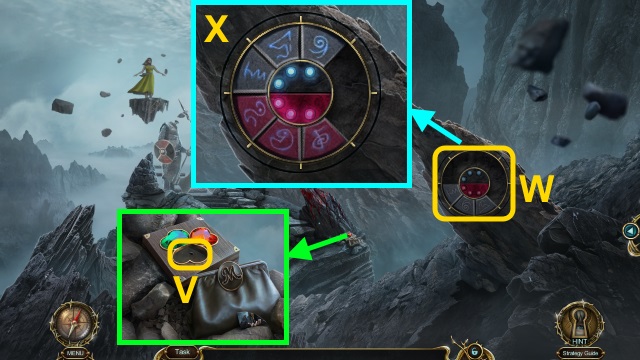
- Take LONG STICK and HEAVY WEIGHT (U).
- Place HEAVY WEIGHT (V). Use PLIERS; take SPUN FIBER, FROZEN MEAT, and MOUNTAIN SYMBOL (W).
- SPUN FIBER on LONG STICK; take TORCH.
- Use PAPER and PEN (X); take SYMBOL GUIDE.
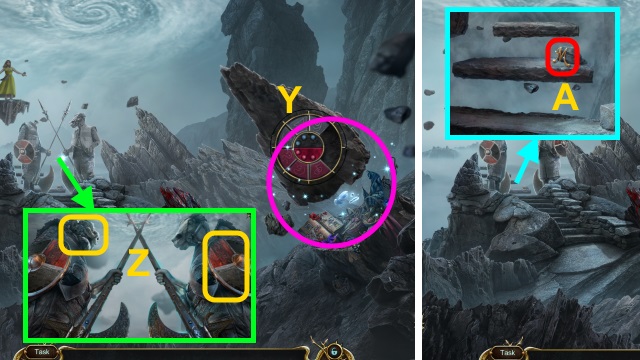
- Place SYMBOL GUIDE; solution (Y).
- Take MOUNTAIN SYMBOL.
- Place 2 MOUNTAIN SYMBOLS (Z).
- Solution (A).
- Walk forward.
- Take GLASS SHARD (B).
- Walk down.
- Use GLASS SHARD; take GRAPES SYMBOL (C).
- Use TORCH (D-F); take RAKE (G).
- Walk forward.
- Use RAKE; take CLAWS (H).
- Place GRAPES SYMBOL (I); examine.
- Solution (J): (G-D)-(K)-(D-A)-(A-B)-(H-D)-(Jx2)-(D-F)-(F-C)-(I-D)-(J)-(D-E).
- Place CLAWS (K); take MARY'S SYMBOL.
- Walk down.
- Place MARY'S SYMBOL (L); take SERRATED KNIFE and STONE FRAGMENT (1/3).
- Use SERRATED KNIFE; take SLEEPING PILLS and HEXAGON (M).
- Use FROZEN MEAT (N); receive THAWED MEAT.
- SLEEPING PILLS on THAWED MEAT; receive SLEEP-INDUCING MEAT.
- Give SLEEP-INDUCING MEAT (O).
- Play HOP; receive NESTLING (P).
- Walk forward.
- Give NESTLING (Q).
- Walk forward.
- Examine scene.
- Take BROKEN SPEAR (R).
- Use BROKEN SPEAR (S); take BOX SYMBOL.
- Walk down.
- Place BOX SYMBOL. Solution (T): Bx3-Dx3-Cx2-Ax3.
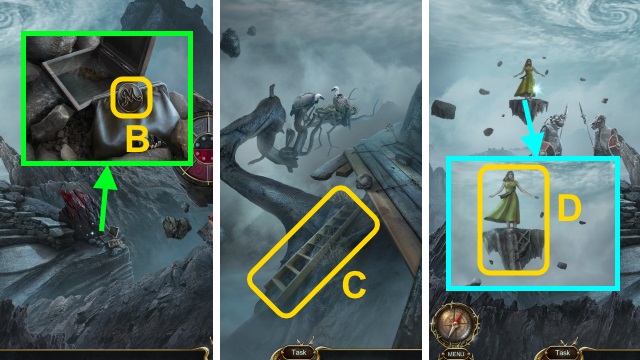
- Take STONE FRAGMENT (2/3) and ANTI-RUST SPRAY.
- Use ANTI-RUST SPRAY (U); open. Take SHIELD and HEART.
- Walk forward.
- Place HEART (V); take STONE FRAGMENT (3/3).
- Place STONE FRAGMENT (3/3) (W).
- Solution (X).
- Play HOP; receive HELMET (Y).
- Place SHIELD and HELMET (Z).
- Take MARY'S AMULET (A).
- Place MARY'S AMULET (B); take UMBRELLA.
- Walk down.
- Use UMBRELLA; take LADDER (C).
- Walk forward.
- Use LADDER (D).
- Talk (E).
- Take KEYS TO ROOM 211 (2/3) (F).
- Talk; receive JAMES' ROOM KEY (G).
- Walk down 3x.
Chapter 3: James

- Use JAMES' ROOM KEY (H).
- Walk left.
- Talk (I).
- Use UMBRELLA; take POLICE BADGE (J).
- Place POLICE BADGE (K).
- Go forward.
- Examine scene.
- Take SPADE (L).
- Use SPADE; take SHOVEL FULL OF SNOW (M).
- Examine SHOVEL FULL OF SNOW; take CURVED ROD and BALCONY HANDLE.
- Replace BALCONY HANDLE; open. Use PLIERS (N); take SNOWFLAKE SYMBOL.
- Walk down.
- Place SNOWFLAKE SYMBOL; take CHAIN.
- Walk forward.
- Use CHAIN (P). Examine handle; place CURVED ROD (Q). Turn handle; take RAY'S SYMBOL and CHISEL.
- Place RAY'S SYMBOL (R).
- Solution (S): A-C-E-B-H-Dx2-G-Fx2.
- Play HOP; receive HAMMER (T).
- Use CHISEL and HAMMER (U); receive DRAWER HANDLE.
- Use CHISEL and HAMMER (V).
- Take TURNER'S DISK (W).
- Walk down.
- Place DRAWER HANDLE; take PHOENIX SYMBOL (X).
- Place PHOENIX SYMBOL (Y).
- Walk left.
- Examine scene.
- Take RULER (Z).
- Use RULER; take WING and ACID (A).
- Use ACID (B); take SHARP METAL PIECE.
- Walk down.

- Use SHARP METAL PIECE (C); receive EAGLE SYMBOL.
- Place EAGLE SYMBOL (D); take PHOENIX FOOD.
- Walk left.
- Place PHOENIX FOOD (E); take SPINNER (F).
- Place SPINNER; solution (G).
- Take SNAKE EYE.
- Walk down.
- Place SNAKE EYE (H); take BLACKTHORNE'S SYMBOL and SCREWDRIVER.
- Walk left.
- Use SCREWDRIVER (I); open cage.
- Play HOP; receive CALLAHAN'S DISK (J).
- Walk down.
- Place BLACKTHORNE'S SYMBOL (K).
- Walk right.
- Examine scene.
- Take MAGNET and LOCK PART (L).
- Use MAGNET (M); take WIRE CUTTERS.
- Walk down.
- Use WIRE CUTTERS (N); take CASE.
- LOCK PART on CASE; take FILM REEL.
- Walk right.
- Place FILM REEL (O).
- Solution (P).
- Enter code (Q); take ESRAEL'S AMULET.
- Place ESREAL'S AMULET (R); take PHOTO OF JAMES and JUDGE'S FOLDER.
- Walk down.
- Place PHOTO OF JAMES (S); take IRON BAR.
- Walk right.
- Use IRON BAR; take ESRAEL'S STAMP (T).
- Read JUDGE'S FOLDER; use ESRAEL'S STAMP. Take ESRAEL'S DOCUMENTS.
- Give ESRAEL'S DOCUMENTS (U).
- Take BLACKTHORNE'S DISK (V).
- Walk down.
- Place TURNER'S DISK, CALLAHAN'S DISK, and BLACKTHORNE'S DISK (W).
- Solution (X-Y).
- Talk (Z).
- Take KEYS TO ROOM 211 (3/3) (A).
Chapter 4: Elizabeth and Kate
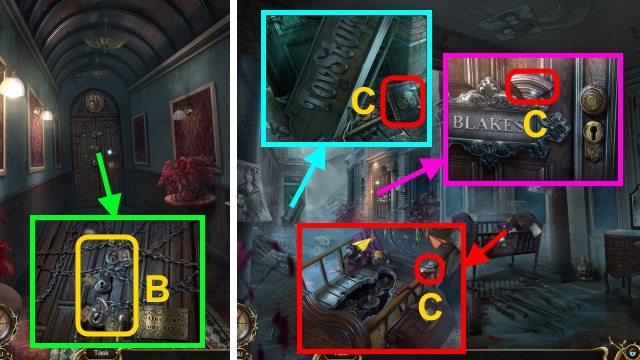
- Use KEYS TO ROOM 211 (3/3) (B).
- Walk forward.
- Examine scene.
- Take ELIZABETH'S DIARY and DIARY COVER PIECES (1/3)-(2/3) (C).
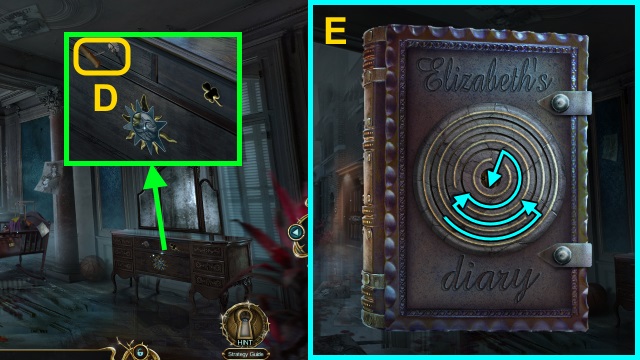
- Examine; use CORKSCREW (D). Take DIARY COVER PIECE (3/3).
- DIARY COVER PIECE (3/3) on ELIZABETH'S DIARY; solution (E).
- Take NURSERY KEY.
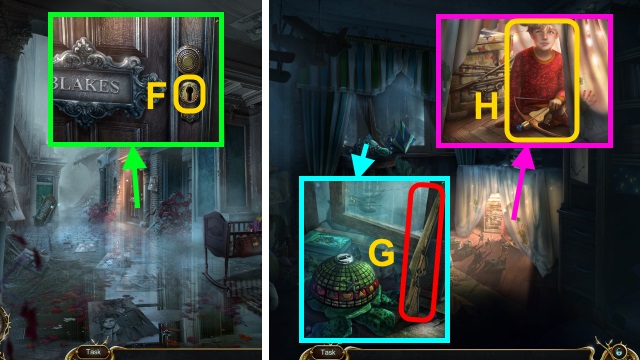
- Use NURSERY KEY (F).
- Walk forward.
- Examine scene.
- Take TOY GUN (G).
- Give TOY GUN (H); receive CROSSBOW WITH SUCTION CUP.
- Use CROSSBOW WITH SUCTION CUP (I); receive DOLL.
- Open window. Use CROSSBOW WITH SUCTION CUP (J); receive CROSSBOW. Take SUN RAY SYMBOL.
- Walk down.
- Place DOLL (K); take SUN RAY SYMBOL (L).
- Examine; place 2 SUN RAY SYMBOLS (M).
- Solution (N): Bx2-D-Cx2-A-C.
- Take DUSTER.
- Walk forward.
- Open door. Use DUSTER; take SHARD (O).
- Use SHARD (P); take PLANE and JACK.
- Walk down.
- Use the JACK (Q).
- Examine (R).
- Solution (S-T).
- Walk left.
- Examine scene.
- Take SCREWDRIVER (U).
- Use SCREWDRIVER (V); take DUMMY HAND and GEAR (1/3).
- Walk down, then forward.
- Place DUMMY HAND (W); take HANDLE (X).
- Place HANDLE (Y); pull.
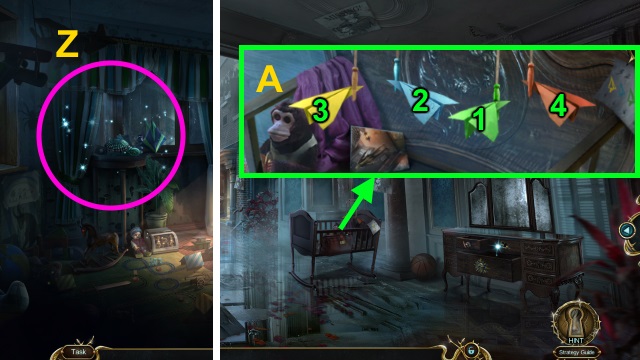
- Play HOP; receive PAPER (Z).
- Make PAPER into PLANE.
- Walk down.
- Place 2 PLANES; solution (A).
- Take RECORD.
- Walk left.
- Replace RECORD (B); take GEAR (2/3) and LOCK (C).
- Place LOCK (D); take PHOSPHORUS and MANNEQUIN EYE.
- Place MANNEQUIN EYE (E); take SHAMROCK SYMBOL (F).
- Walk down.
- Place SHAMROCK SYMBOL (G); take MINERAL OIL (H).
- Use MINERAL OIL (I); take GEAR (3/3).
- Walk forward.
- Place GEAR (3/3) (J).
- Examine (K).
- Solution (L): B-D-C-A-B.
- Take CANNON SYMBOL.
- Place CANNON SYMBOL (M); take TOY ARROWS.
- TOY ARROWS and PHOSPHORUS on CROSSBOW; take CROSSBOW WITH GLOWING ARROWS.
- Use CROSSBOW WITH GLOWING ARROWS (N).
- Solution (O).
- Take MONSTER'S SYMBOL (P).
- Talk (Q).
- Walk down, then left.
- Place MONSTER'S SYMBOL (R); take SLEDGEHAMMER (S).
- Use SLEDGEHAMMER (T).
- Play HOP; receive BELLOWS (U).
- Use BELLOWS (V).
- Talk (W); receive PASSAGE KEY.
- Walk down twice.
- Use PASSAGE KEY (X).
- Walk forward.
- Examine scene.
- Take NET (Y).
- Use NET (Z); receive SAW.
- Use SAW 2x (A).
- Walk forward.
- Examine scene.
- Take PIECE (B).
- Use SCREWDRIVER (C); take WING and PIECE.
- Walk down.
- Place 2 PIECES (D).
- Play HOP; receive LASSO (E).
- Use LASSO (F).
- Go up.
- Take 2 BIRD HEADS (G).
- Walk down.
- Place 2 BIRD HEADS; solution (H).
- Take PENDANT.
- Go up.
- Place PENDANT (I); take SILVER KEY (J).
- Use SILVER KEY (K); take STUFFED BUNNY.
- Walk down, then forward.
- Give STUFFED BUNNY (L).
- Talk (M); receive PHOTO FRAGMENTS.
- Place 2 WINGS and GOLDEN RING (N); take HEXAGON and PHOTO FRAGMENT (1/3).
- Place 2 HEXAGONS (O).
- Examine (P).
- Solution (Q).
- Take BOLT CUTTER.
- Go down, then up.
- Use BOLT CUTTER (R); take POLE.
- Walk down, then forward.
- Use POLE (S); receive KATE'S SYMBOL.
- Go down, then up.
- Place KATE'S AMULET (T); take PHOTO FRAGMENT (2/3) and FLOWER SYMBOL.
- Walk down, then forward.
- Place FLOWER AMULET (U); take FERTILIZER.
- Go down, then up.
- Use FERTILIZER (V).
- Play HOP; receive PHOTO FRAGMENT (3/3) (W).
- PHOTO FRAGMENT (3/3) ON PHOTO FRAGMENTS.
- Solution (X).
- Take FAMILY PHOTO.
- Walk down, then forward.
- Place FAMILY PHOTO (Y).
- Congratulations! You have completed Haunted Hotel: Personal Nightmare.
Created at: 2017-06-23