

Walkthrough Menu
- General Tips
- Chapter 1: The Foyer
- Chapter 2: The Old Man's Room
- Chapter 3: The Attic
- Chapter 4: The Third Floor
- Chapter 5: The Backyard
- Chapter 6: Find Matt
General Tips
- This is the official guide for Haunted Hotel: The Thirteenth.
- This guide will not mention when you have to zoom into a location; screenshots will show each zoom scene.
- The screenshots will show where to play a Hidden-Object Puzzle (HOP) and what inventory item will be received.
- Some inventory items require further actions.
- This guide will give step-by-step solutions for all puzzles which are not random. Read the instructions in the game for each puzzle.
Chapter 1: The Foyer
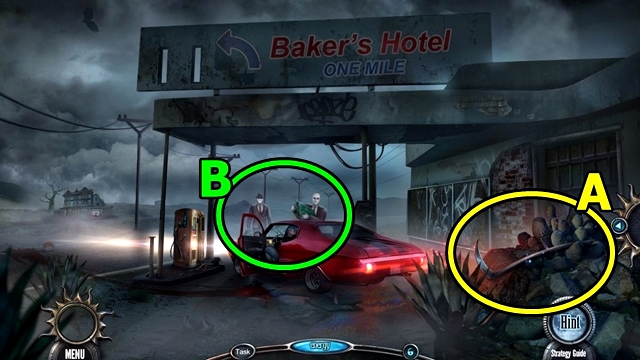
- Take the SCYTHE (A).
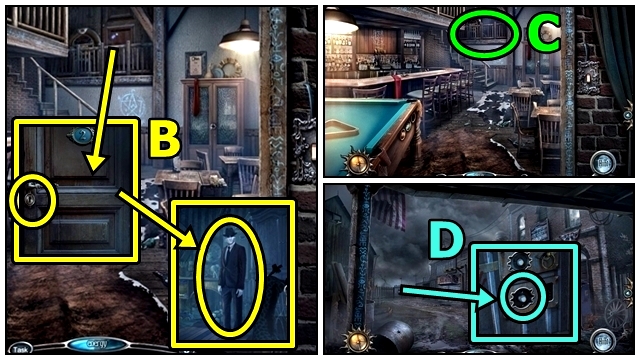
- Use the SCYTHE (B).
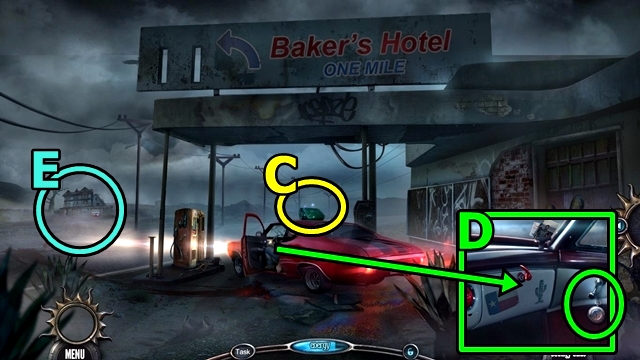
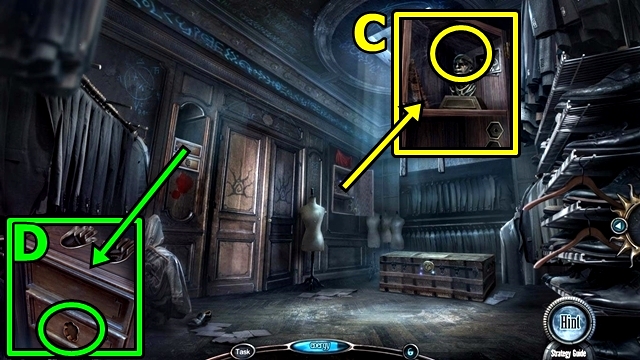
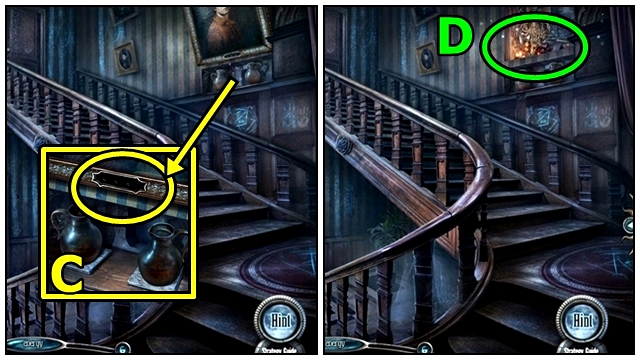
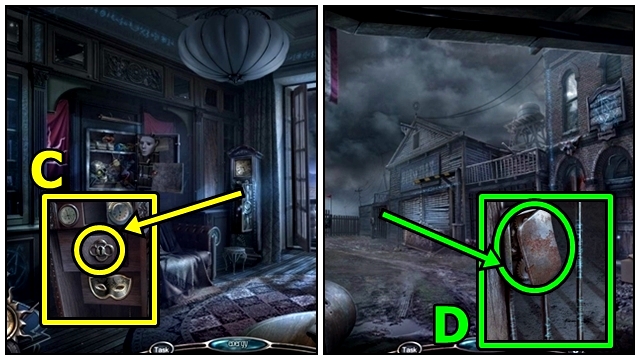
- Take the EMPTY GAS CAN (C).
- Take the WATCH (D).
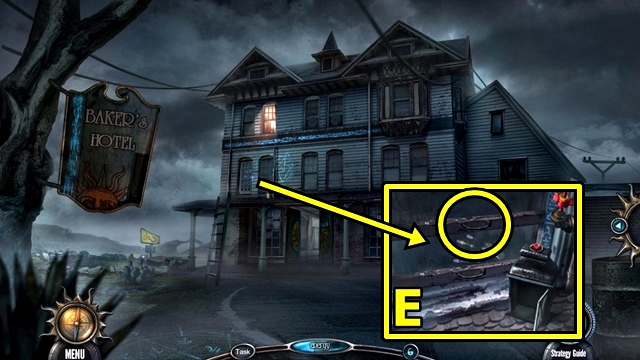
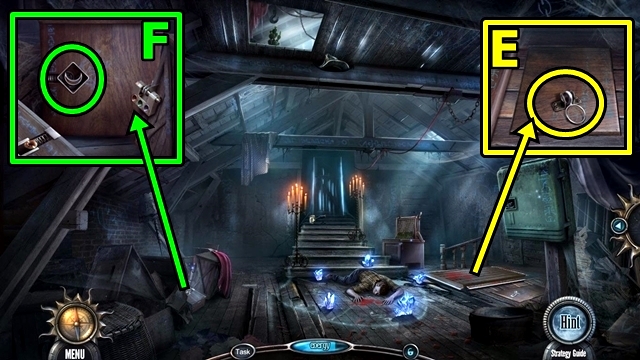
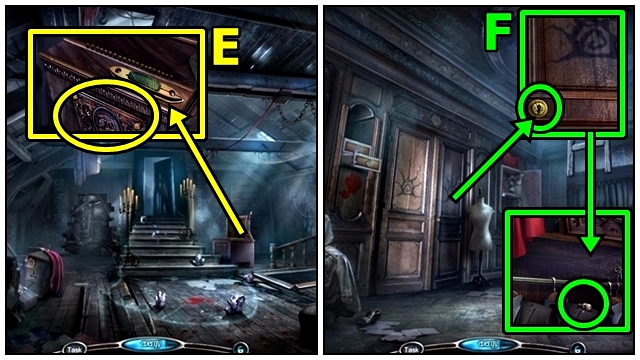
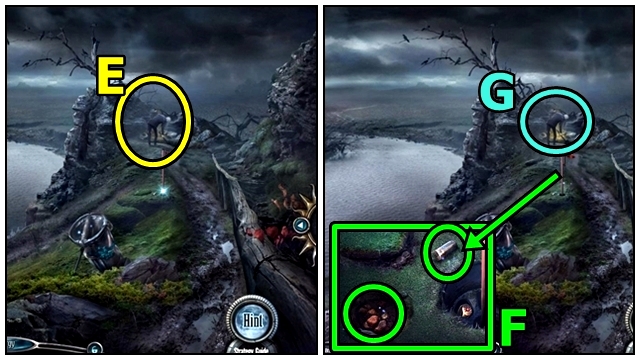
- Move towards the Porch (E).
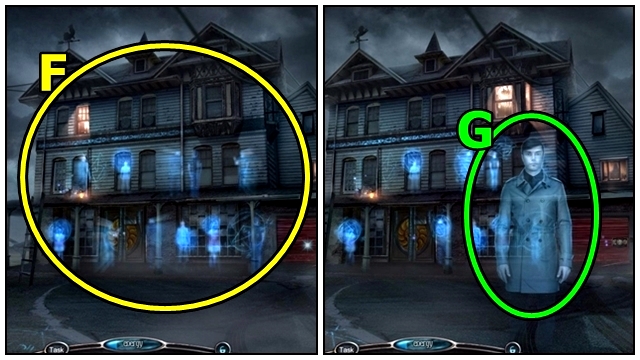
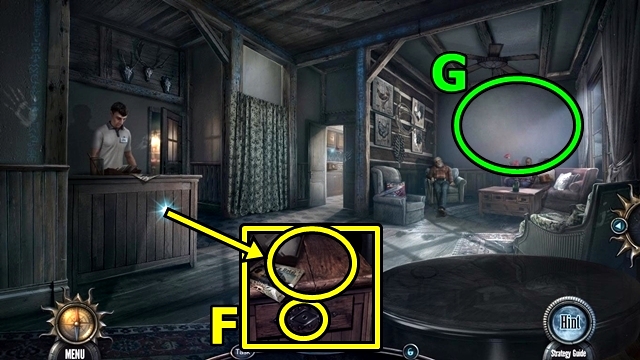
- Examine anywhere (F).
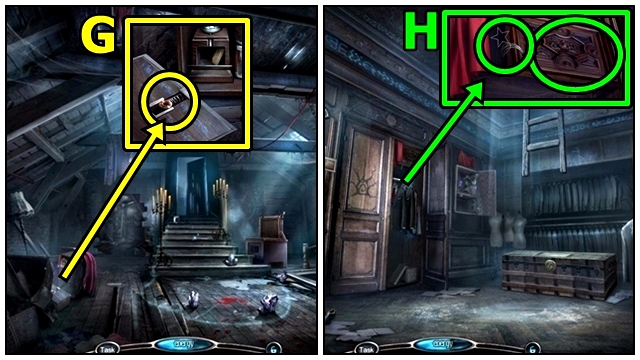
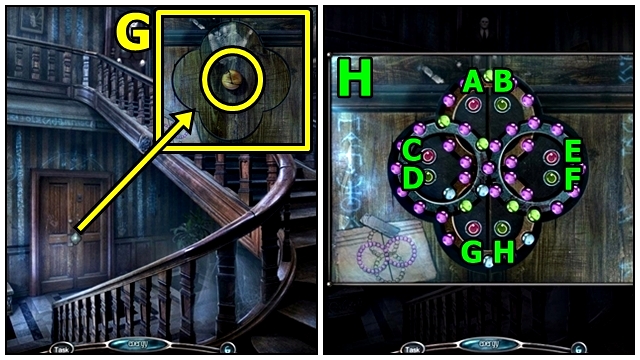
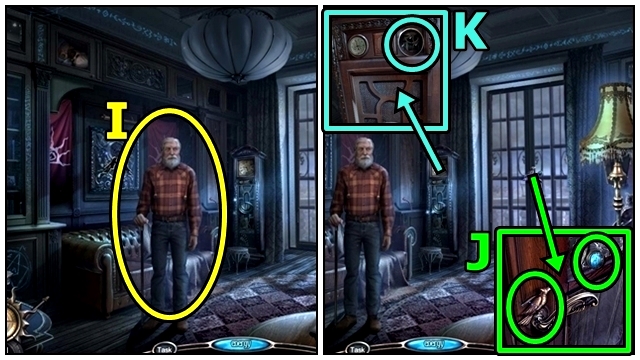
- Talk to the Man (G).

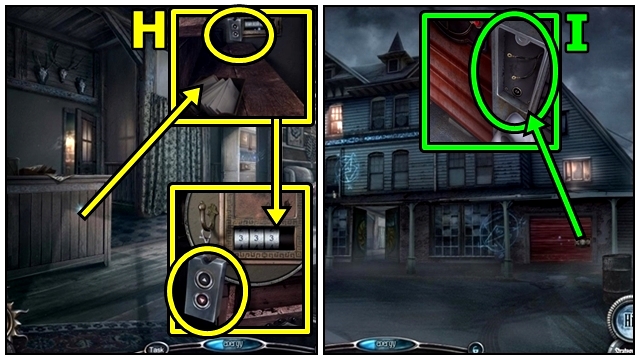
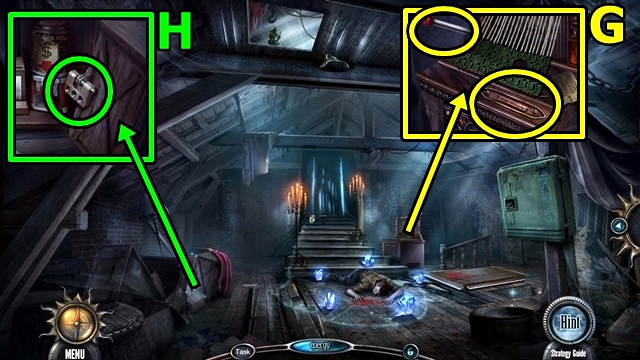
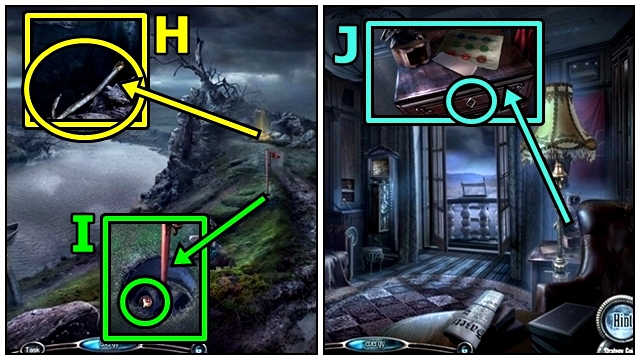
- Try to take the mask (H). Take the STICK.
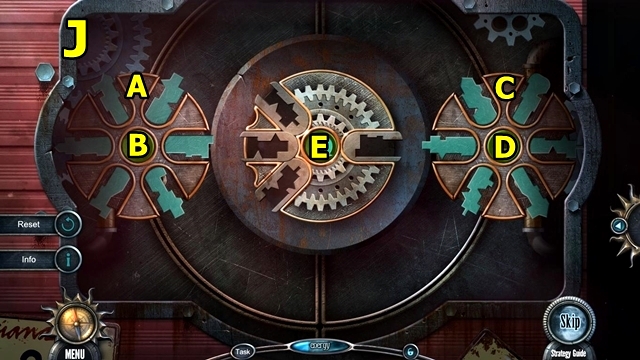
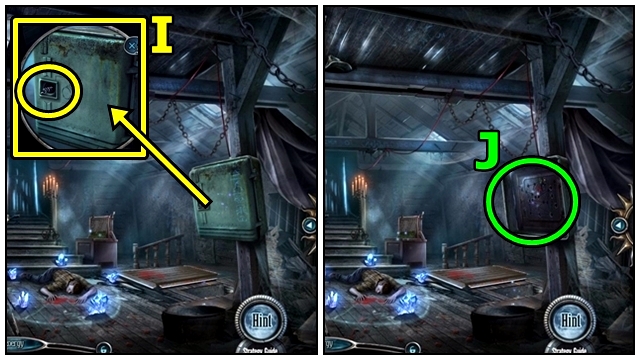
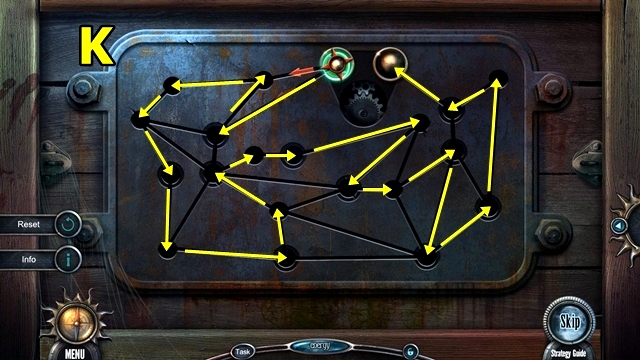
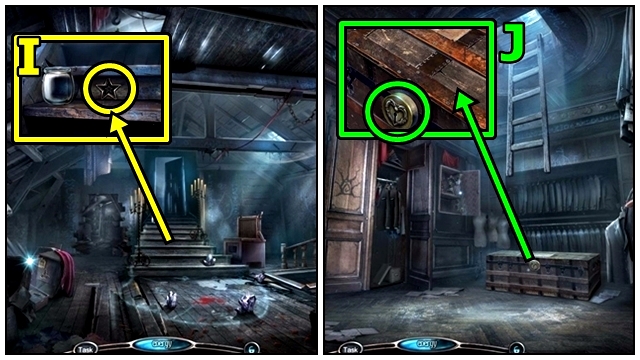
- Take the SHARD (I). Try to take the key; play the mini-game.
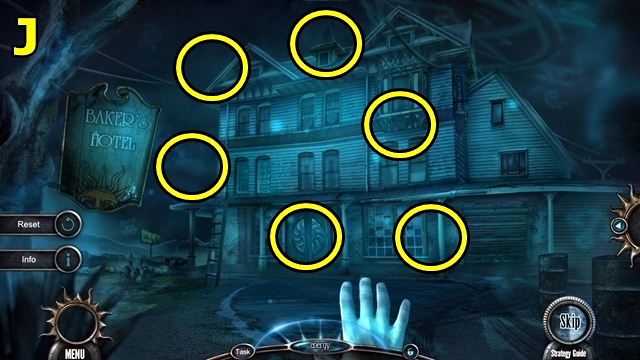
- Solution: (J).
- Move down.
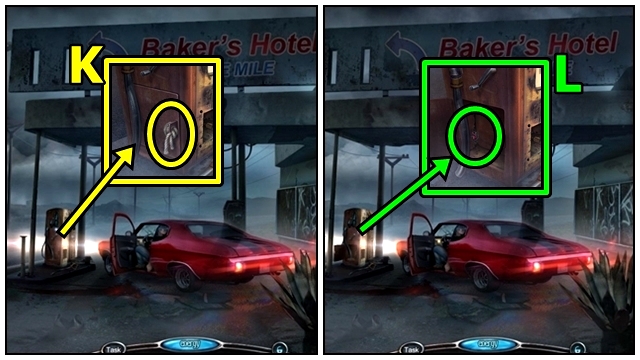
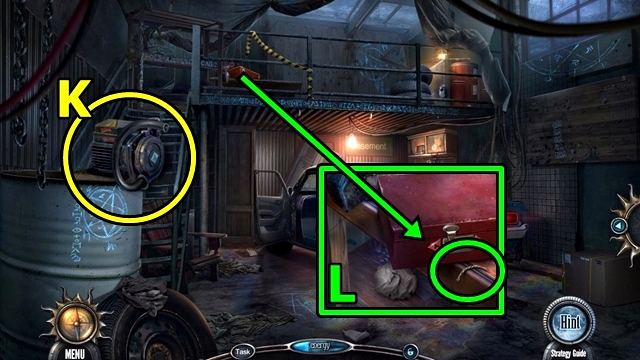
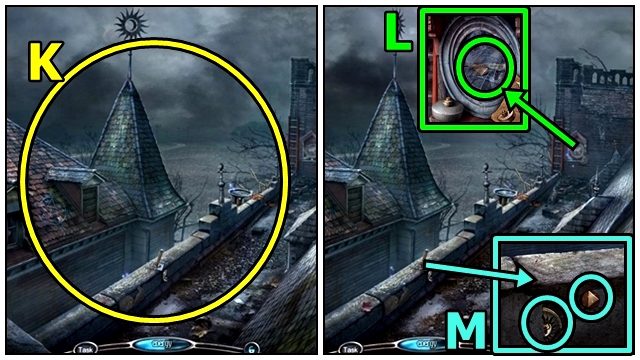
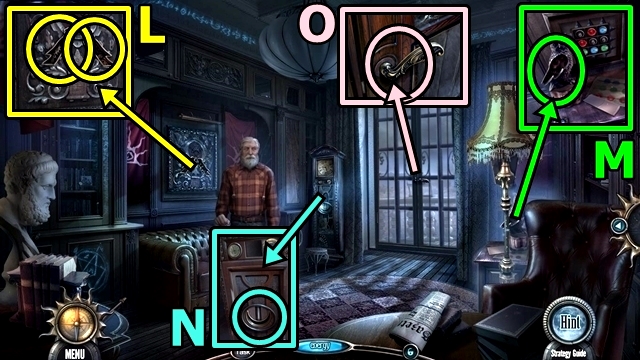
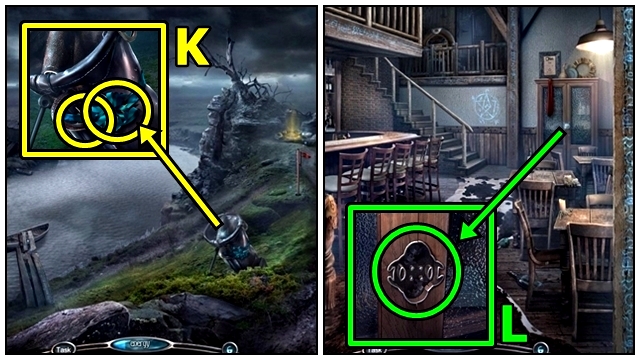
- Use the SHARD (K). Open the panel; take the SMALL SCREWDRIVER.
- Use the SMALL SCREWDRIVER on the WATCH (inventory); take the STOPWATCH and MAGNET.
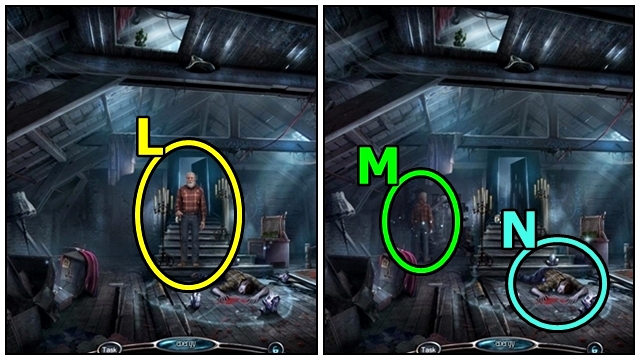
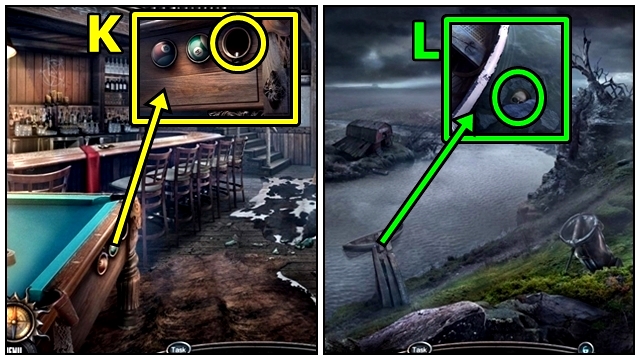
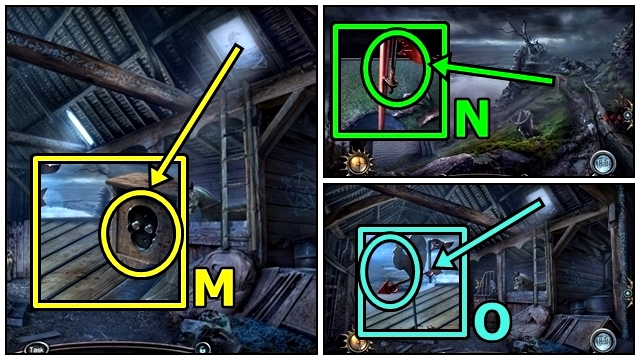
- Use the MAGNET (L); untangle the line; take the LATCH and STRING.
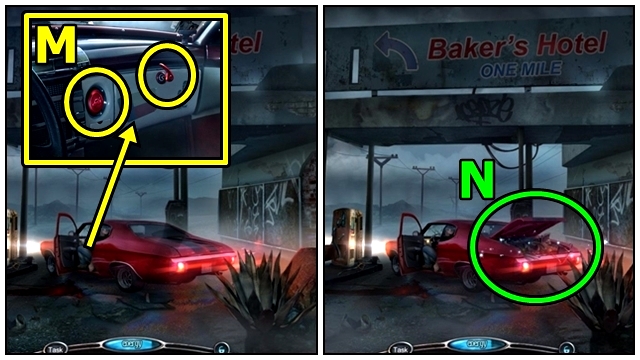
- Remove the latch (M); add the LATCH; take the map, MATT'S MEDALLION and ELECTRICAL TAPE. Press the button; use the ELECTRICAL TAPE; press the button.
- Play the HOP (N); receive the HOOK.
- Go to the Porch.
- Add the STRING and HOOK to the STICK (inventory); take the FISHING ROD.
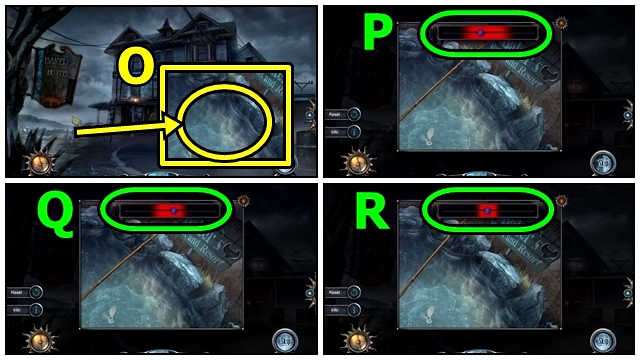
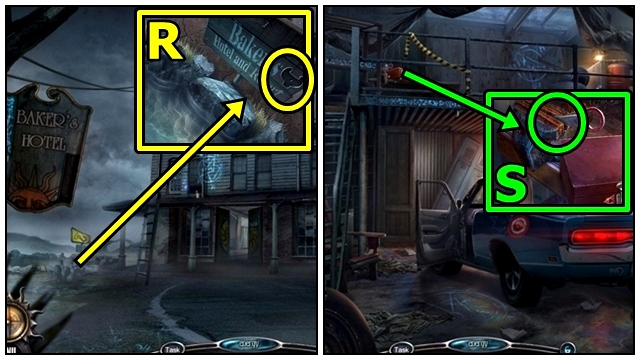
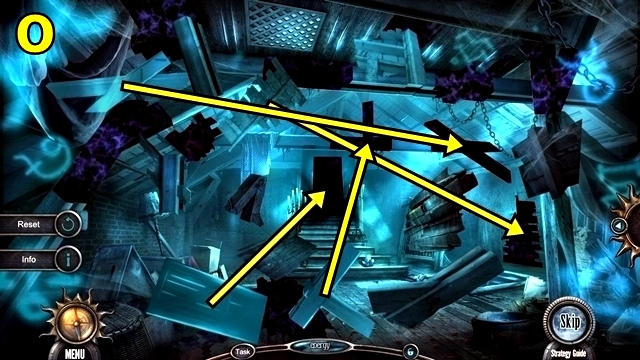
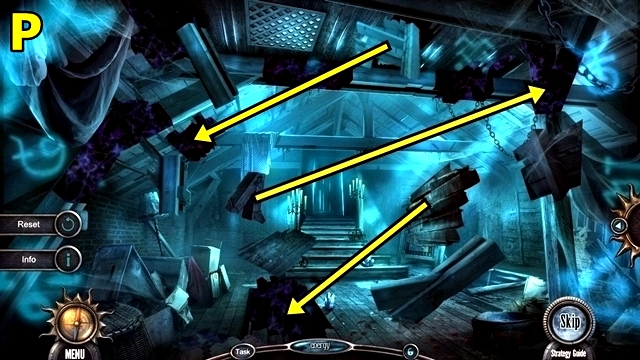
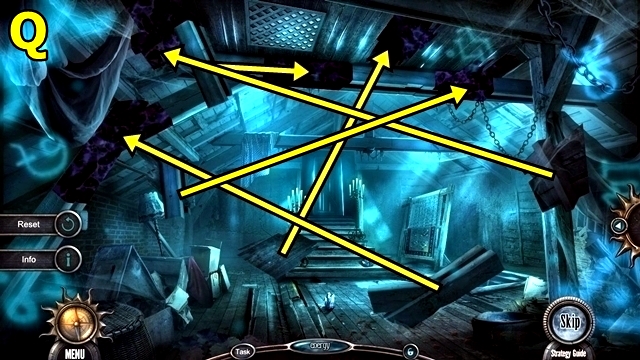
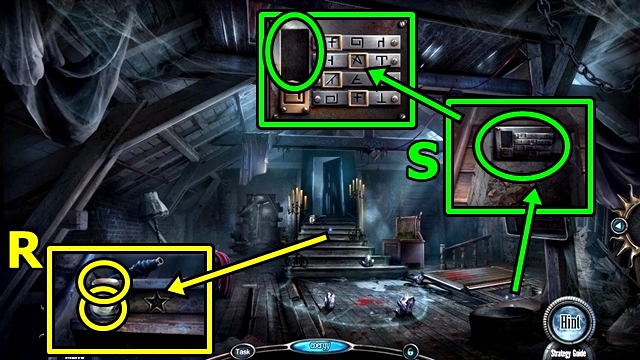
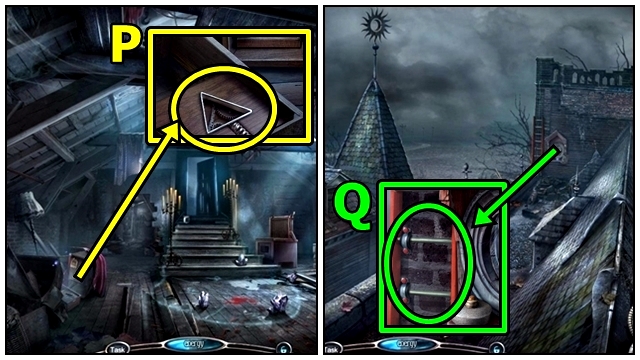
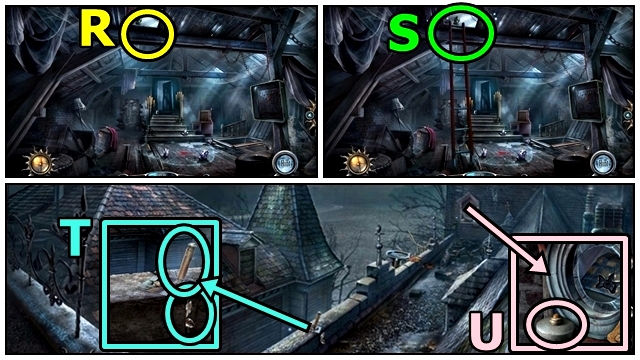
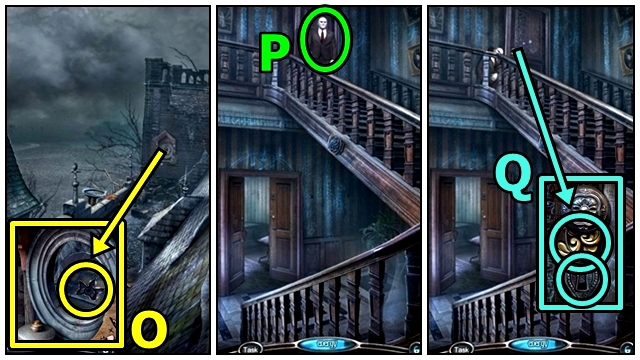
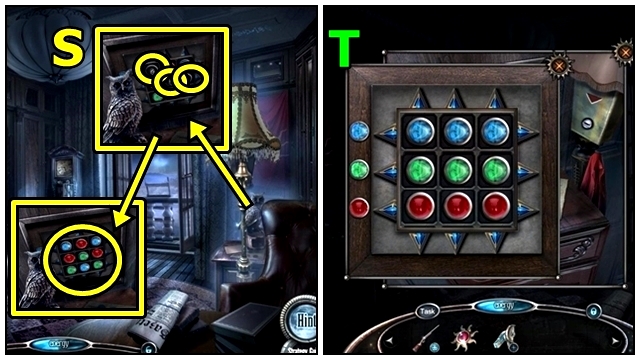
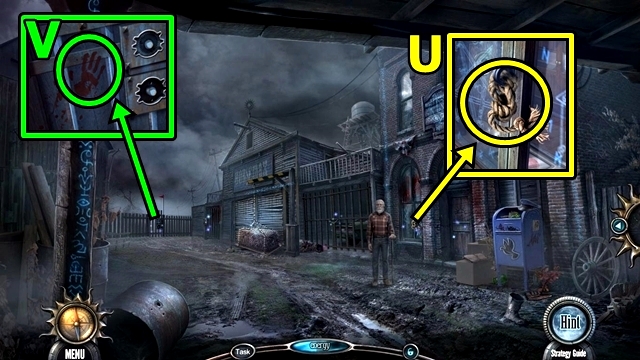
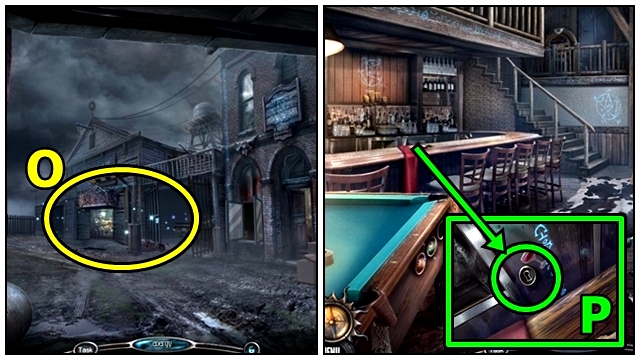
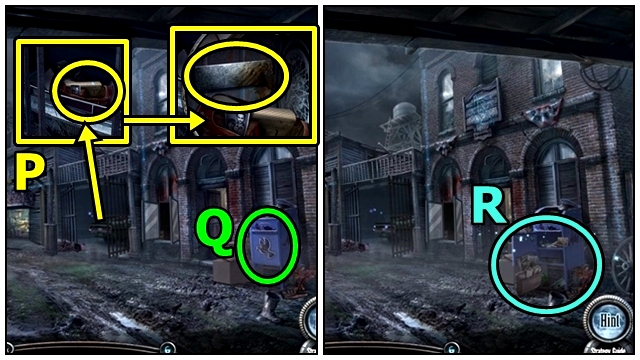
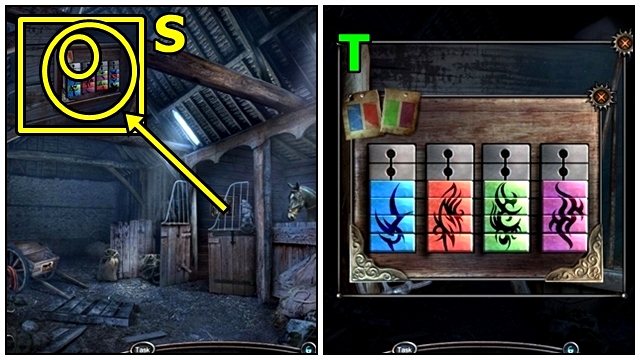
- Use the FISHING ROD (O); play the mini-game.
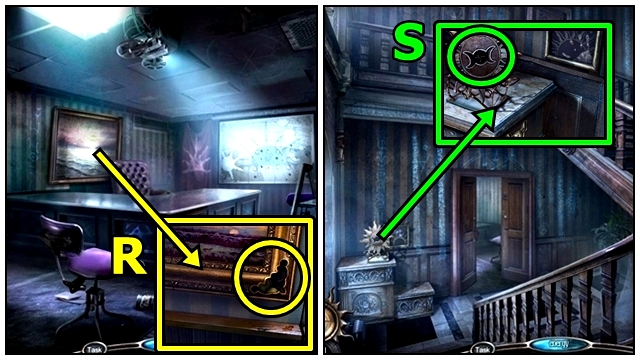
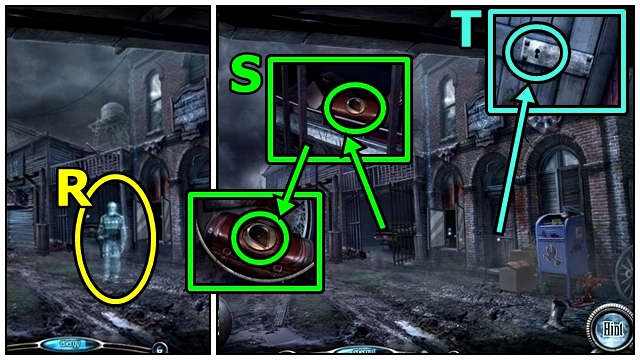
- Solution: (P-R). Take the HOTEL KEY.
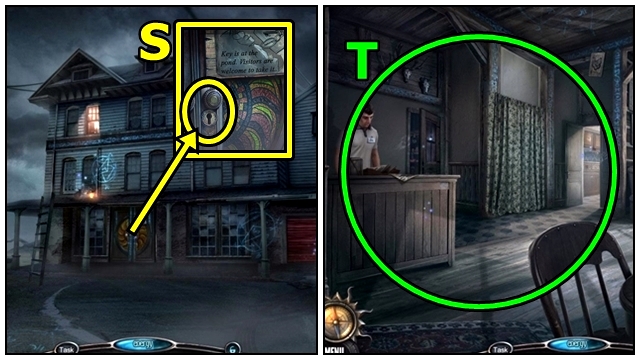
- Insert the HOTEL KEY (S).
- Enter the Lobby.
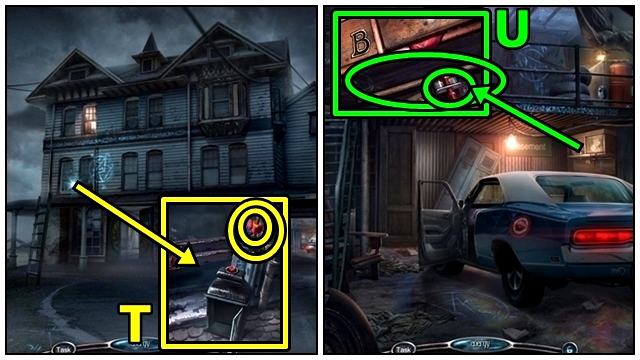
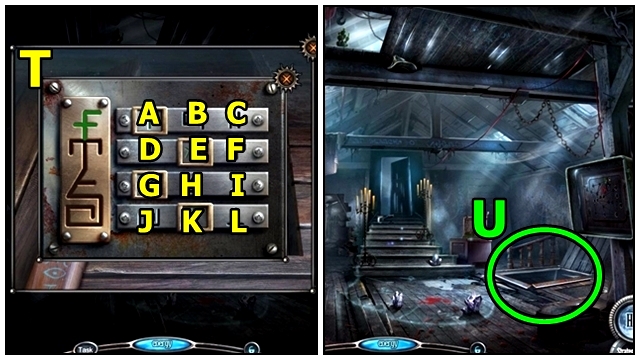
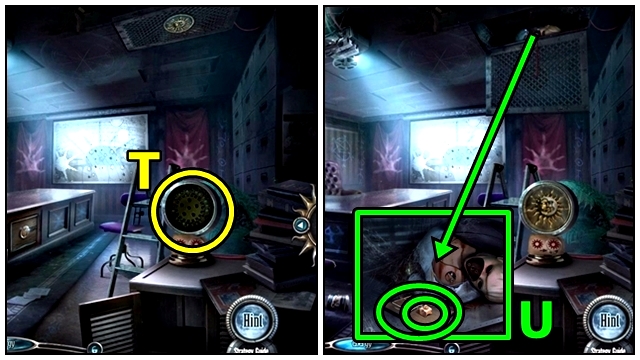
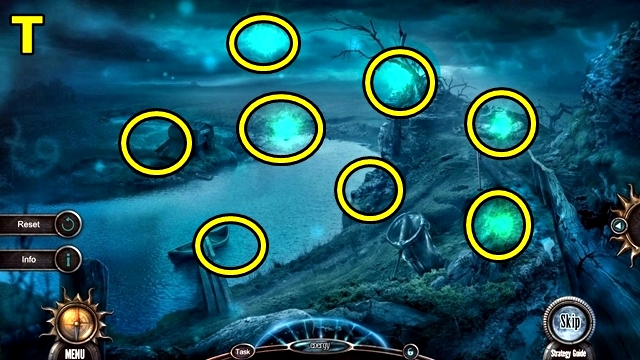
- Examine anywhere (T).
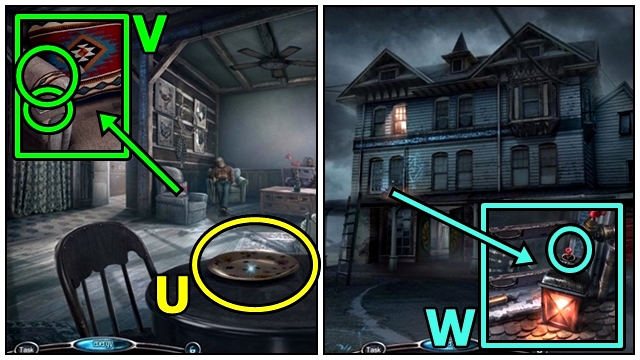
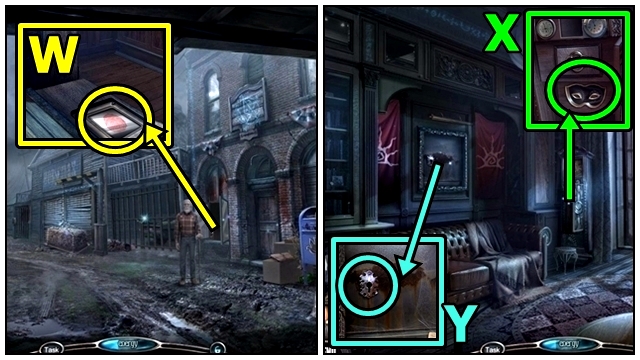
- Take the PLATE (1/3) (U).
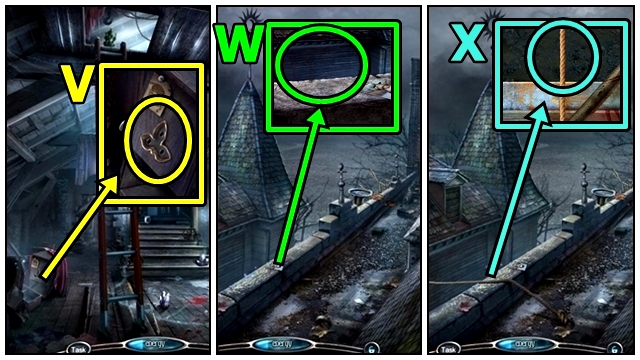
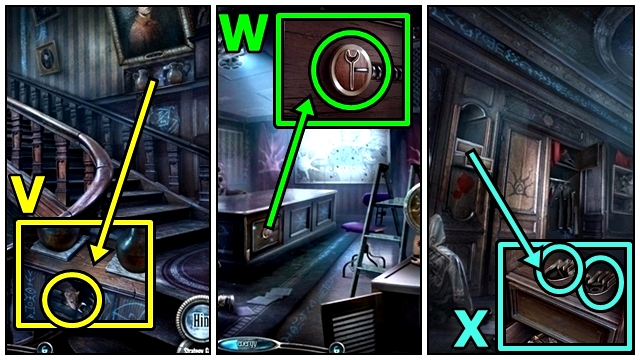
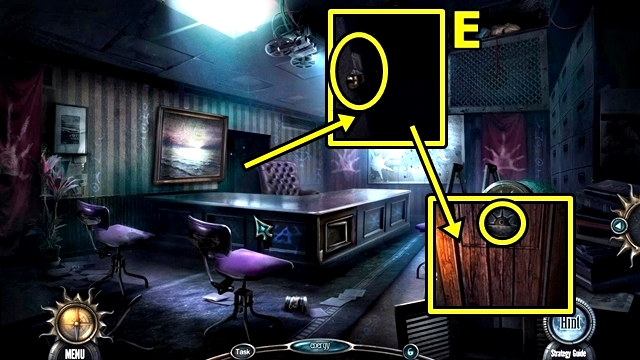
- Lift the armrest (V). Use the SMALL SCREWDRIVER; take the BUTTON.
- Move down.
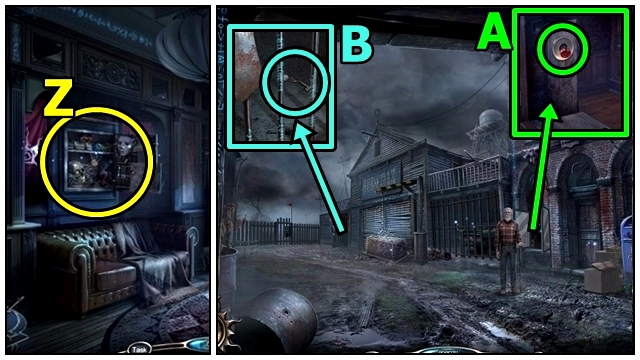
- Remove the button (W); add the BUTTON. Press the button; take the BULB.
- Enter the Lobby.
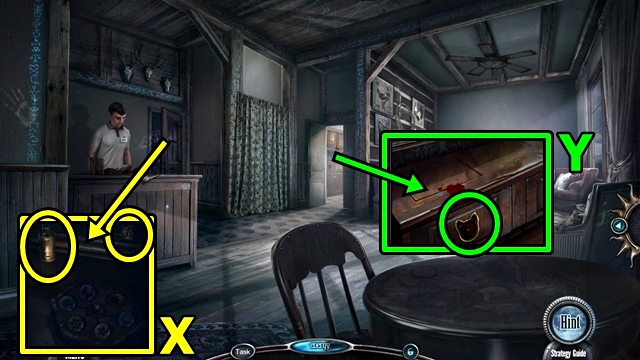
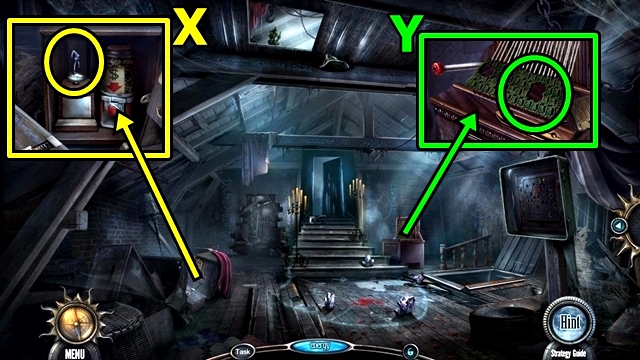
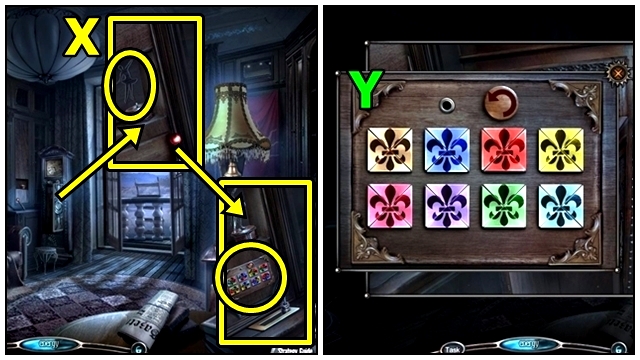
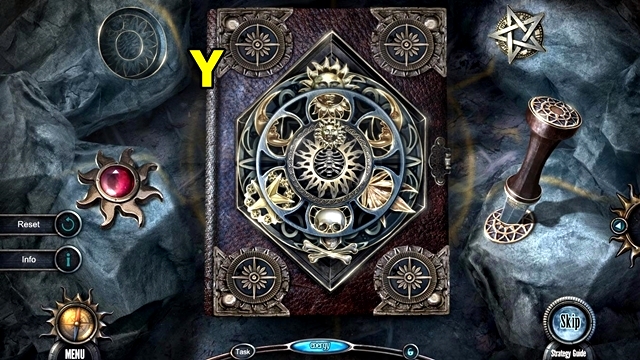
- Add the BULB (X). Take the CAT AMULET.
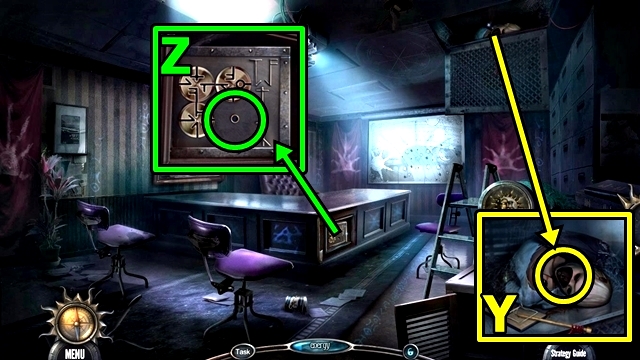
- Add the CAT AMULET (Y). Take the FOOD and CORKSCREW.
- Move down.
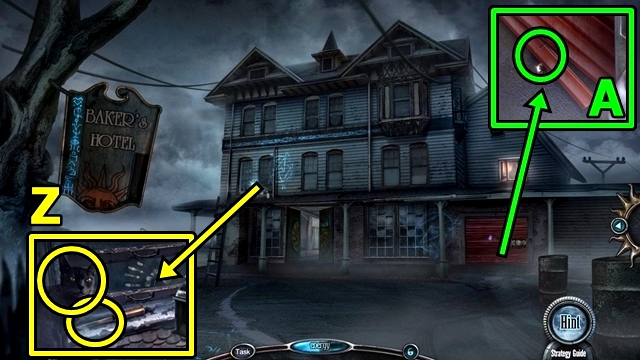
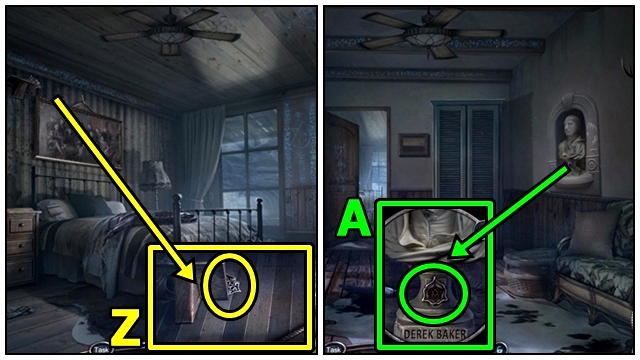
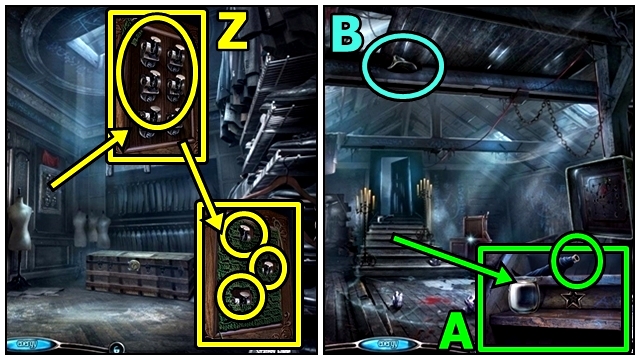
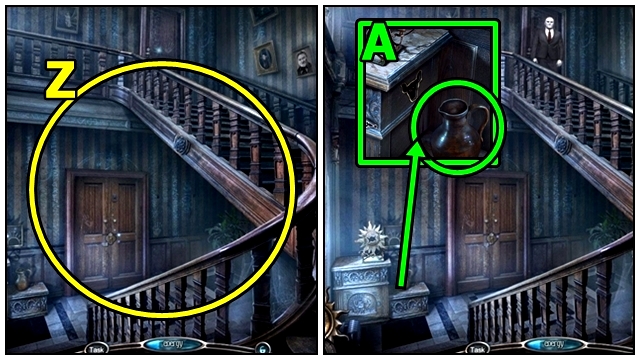
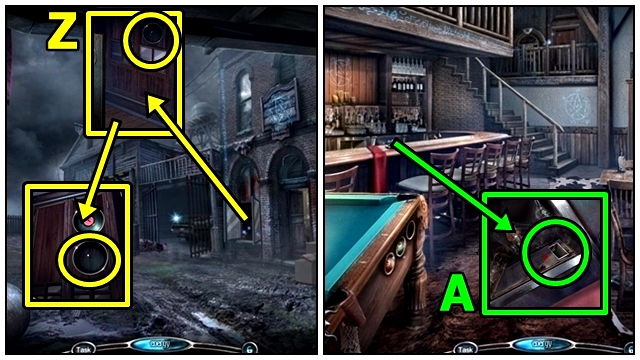
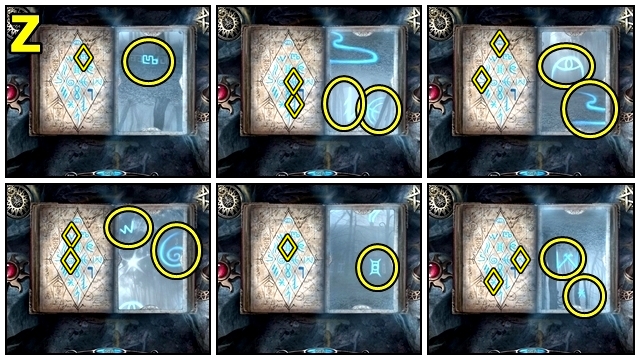
- Offer the FOOD (Z); take the KITCHEN SAW.
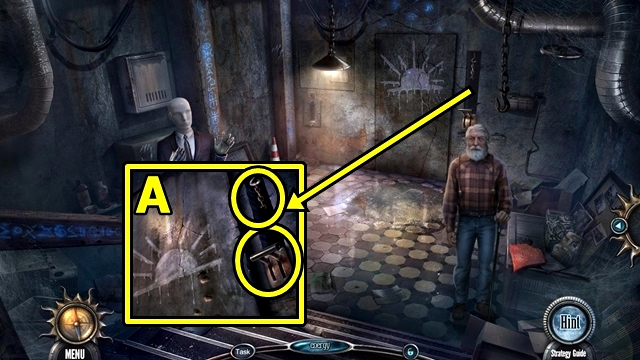
- Use the KITCHEN SAW (A); take the BROKEN SAW and BOX PART.
- Enter the Lobby.
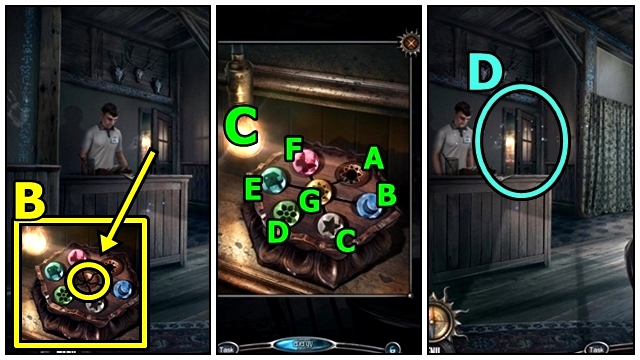
- Add the BOX PART (B); play the mini-game.
- Solution: (G-A)-(C-G)-(G-A)-(E-G)-(G-C)-(D-G)-(G-E)-(A-G)-(G-D)-(B-G)-(G-A)-(F-G)-(G-B)-(A-G)-(G-F) (C).
- Play the HOP (D); receive the THREAD.
- Move down.
- Use the THREAD (E); take the DRAWER PULL.
- Enter the Lobby.
- Examine the desk (F). Add the DRAWER PULL; take the KETCHUP.
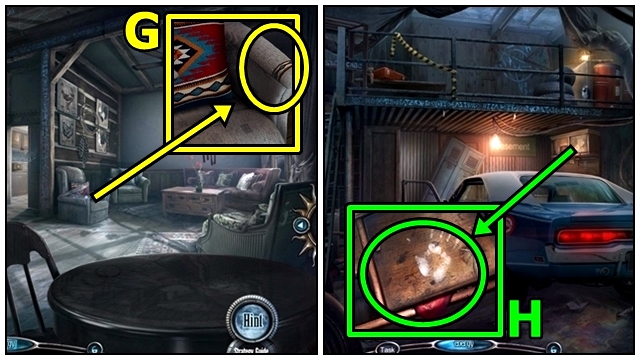
- Use the KETCHUP (G).
- Take the GARAGE DOOR CONTROLS (H).
- Move down.
- Add the GARAGE DOOR CONTROLS (I). Press the Up button. Play the mini-game.
- Solution: A-B-Ex2-Cx3-D-E-Ax5-B-E-Cx4-D (J).
- Enter the Garage.
- Take the ELECTRIC PUMP (K).
- Take the FUSE (L).
- Return to the Highway.
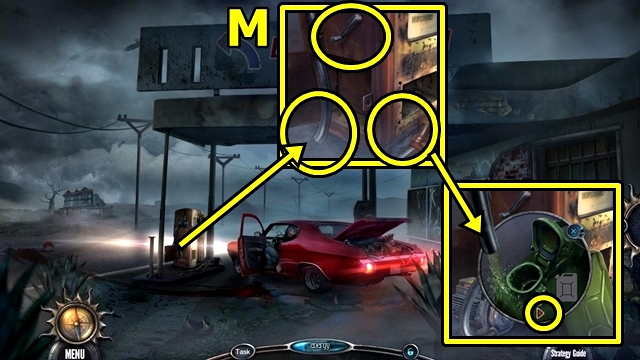
- Add the ELECTRIC PUMP (M) and EMPTY GAS CAN. Turn the lever. Press the right arrow to fill the can. Receive GAS.
- Return to the Garage.
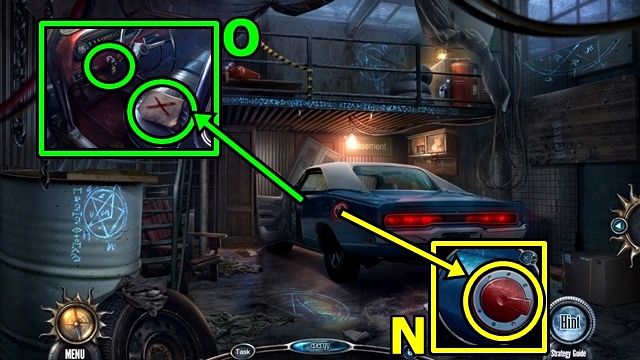
- Open the panel (N); pour the GAS.
- Read the note (O). Turn the key.
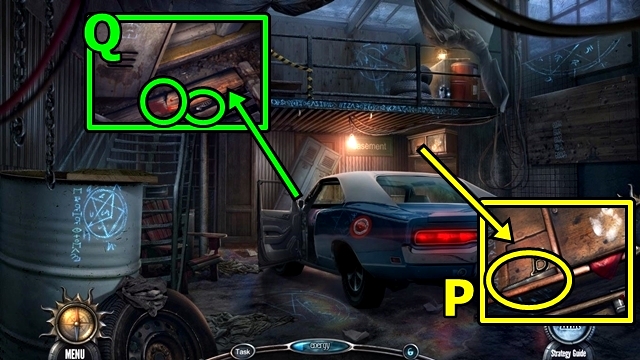
- Take the SAW BLADE (P).
- Remove the blade from the BROKEN SAW (inventory); add the SAW BLADE; take the KITCHEN SAW.
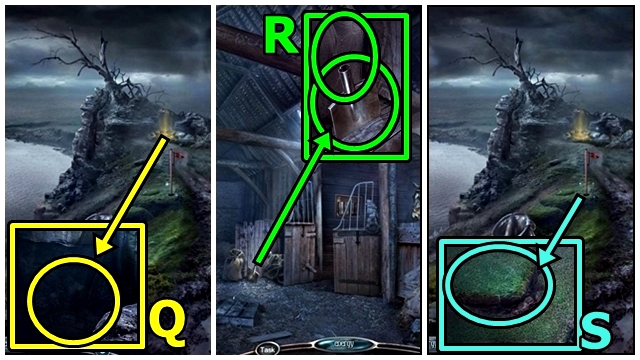
- Use the KITCHEN SAW (Q); take the POND DECORATION.
- Move down.
- Insert the POND DECORATION (R); take the PLIERS.
- Enter the Garage.
- Use the PLIERS (S); receive the WRENCH.
- Move down.
- Use the WRENCH (T); take the WING NUT.
- Enter the Garage.
- Add the WING NUT (U); take the LONG POLE.
- Return to the Lobby.
- Receive the ROOM KEY.
- Go to the Corridor.
Chapter 2: The Old Man's Room
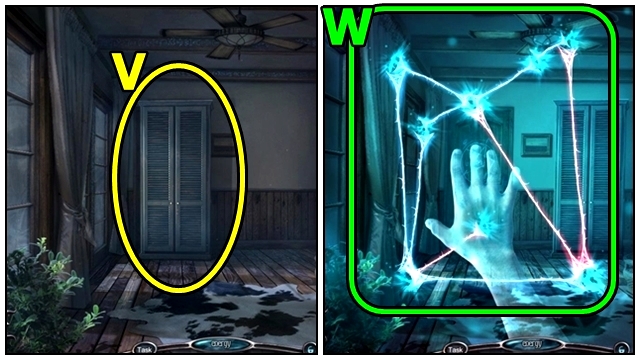
- Move the wardrobe (V); play the mini-game.
- Solution: (W).
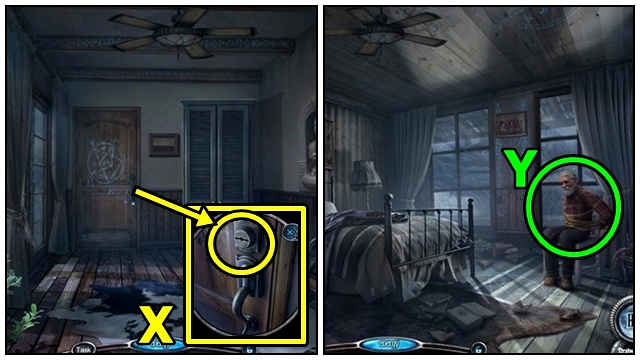
- Insert the ROOM KEY (X).
- Move forward.
- Use the KITCHEN SAW (Y).
- Receive the DYNAMITE CASING.
- Use the LONG POLE (Z); receive the BUST INLAY.
- Move down.
- Insert the BUST INLAY (A); take the INITIAL B.
- Return to the Garage.
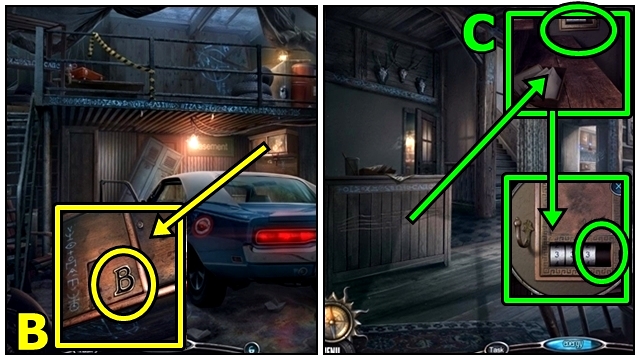
- Insert the INITIAL B (B); take the CYLINDER.
- Return to the Lobby.
- Add the CYLINDER (C); play the mini-game.
- Solution: (D). Take the PLATE (2/3) and TRIANGLE STAMP.
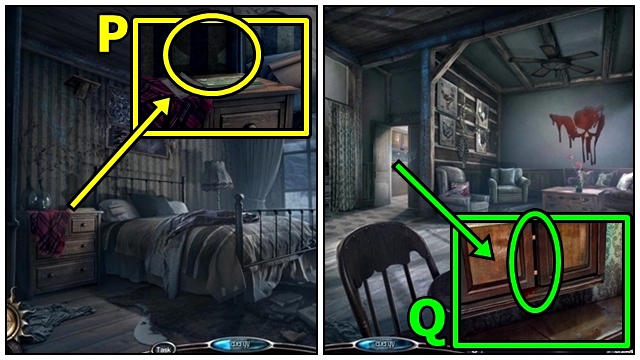
- Return to the Old Man's Room.
- Remove the painting (E). Insert the TRIANGLE STAMP.
- Play the HOP (F); receive the CHAIR KEY.
- Return to the Lobby.
- Lift the armrest (G); insert the CHAIR KEY; take the EXPLOSIVE RECIPE.
- Return to the Garage.
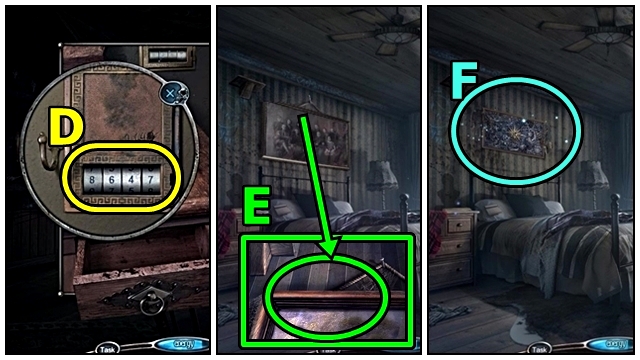
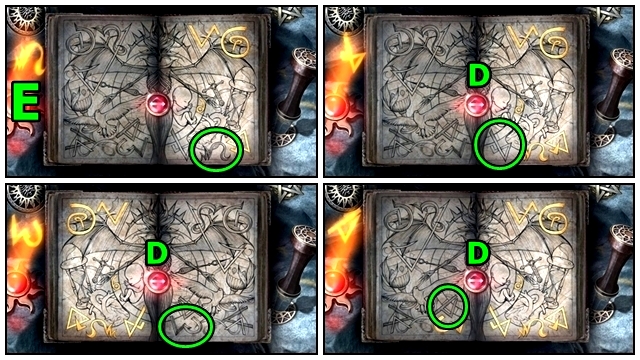
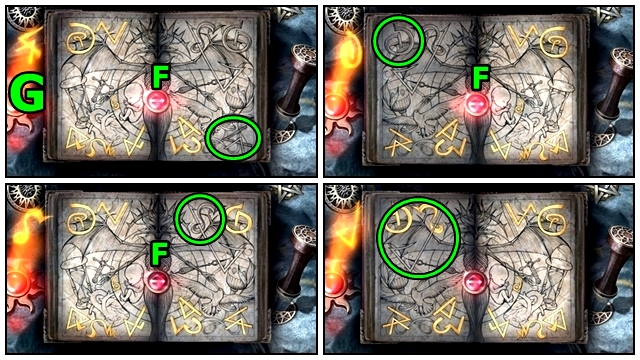
- Open the panel (H); add the EXPLOSIVE RECIPE. Play the mini-game.
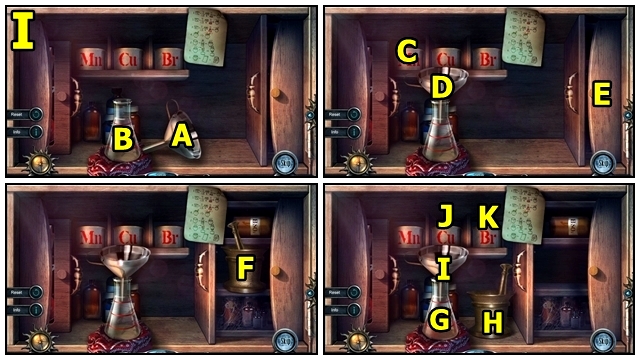
- Solution: (A-B)-(C-D)-E-F-(G-H)-(J-I)-(G-H)-(K-I)-(G-H) (I).
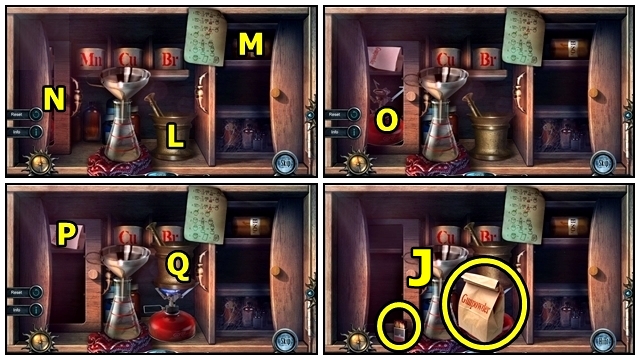
- Solution: (M-L)-N-O-(P-Q). Take the EXPLOSIVE and MATCHES (J).
- Remove the cap from the DYNAMITE CASING (inventory); insert the EXPLOSIVE and FUSE; take the DYNAMITE.
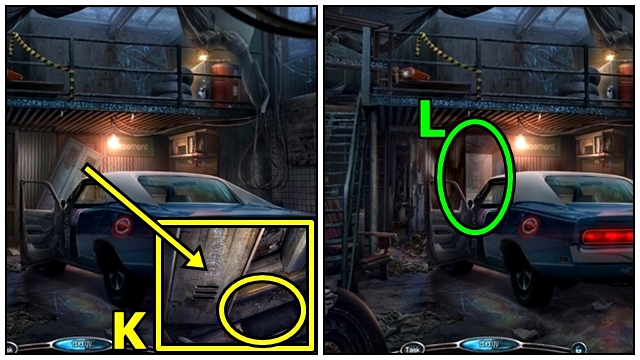
- Place the DYNAMITE (K) and MATCHES.
- Go into the Cellar (L).
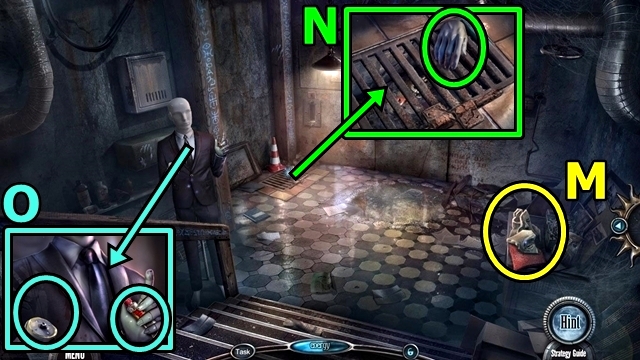
- Take the BROKEN BUST (M).
- Take the PLASTIC HAND (N).
- Add the PLASTIC HAND (O); take the GLUE.
- Return to the Old Man's Room.
- Use the GLUE on the BROKEN BUST (inventory); take the BUST.
- Add the BUST (P). Take the PLATE (3/3).
- Return to the Lobby.
- Use the KITCHEN SAW (Q). Add the PLATES; play the mini-game.
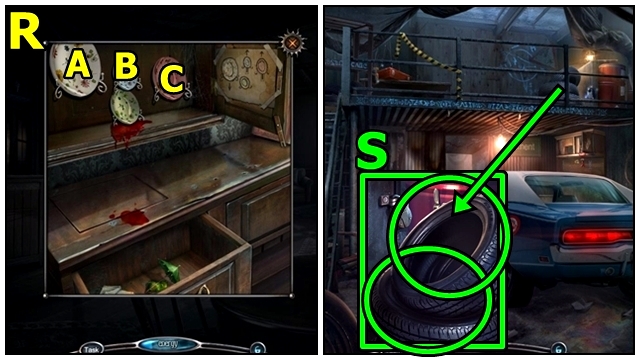
- Solution: Ax2-B-C (R). Take the BOTTLE.
- Return to the Garage.
- Use the CORKSCREW on the BOTTLE (inventory); pour out the wine; take the EMPTY BOTTLE.
- Move the tires (S). Place the EMPTY BOTTLE; take the RUST SOLVENT.
- Enter the Cellar.
- Talk to the Old Man (T).
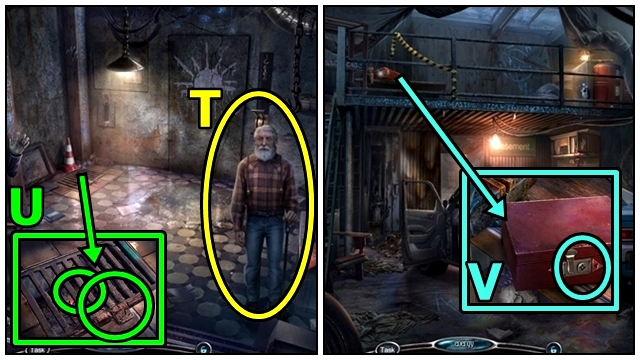
- Use the RUST SOLVENT (U); remove the dowel; take the RED KEY.
- Move down.
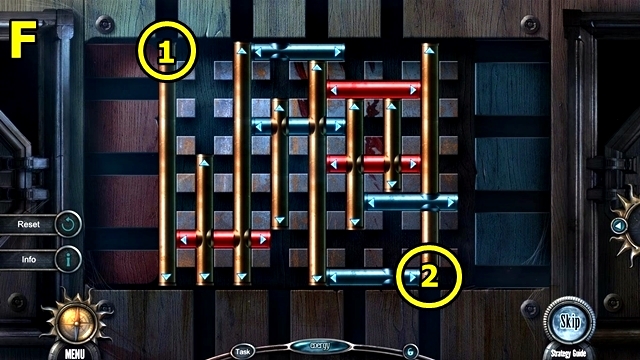
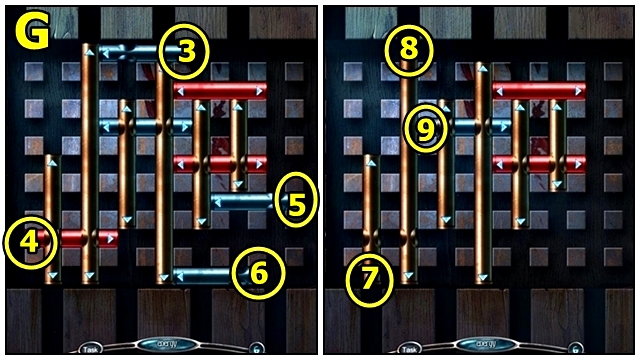
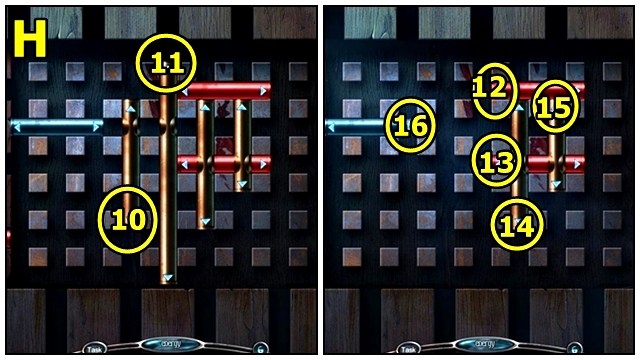
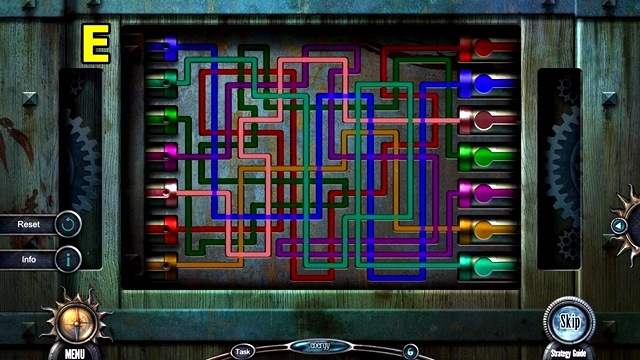
- Use the RED KEY (V); play the mini-game.
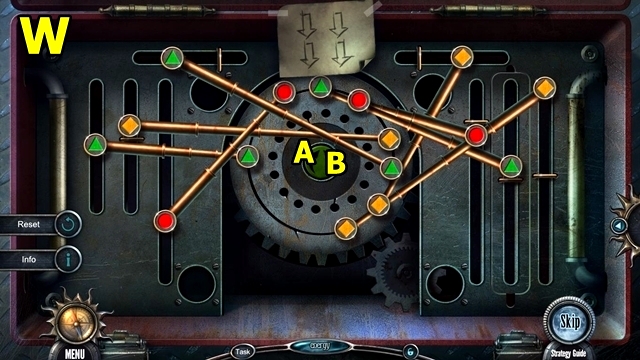
- Solution: Move the rod ends to match the image (W); press (B) until the rods clear (W).
- Solution: C-D-Bx2 (X). Take the BOLT CUTTER.
- Use the BOLT CUTTER (Y).
- Play the HOP (Z); receive the CHAIN.
- Enter the Cellar.
- Remove the broken chain (A); add the CHAIN. Pull the lever.
Chapter 3: The Attic
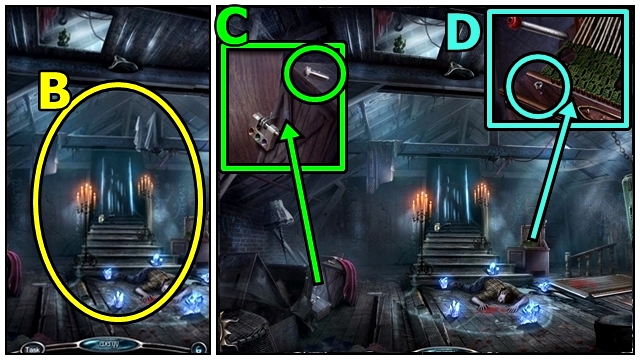
- Examine anywhere (B).
- Take the BOLT (C).
- Take the NUT (D).
- Insert the BOLT (E) and NUT. Take the HOOK and RED SIGN.
- Insert the RED SIGN (F). Take the SHUTTLE.
- Add the SHUTTLE (G); pull the handle; take the PART.
- Insert the PART (H); take the BUTTON.
- Add, then press the BUTTON (I).
- Play the mini-game (J).
- Solution: (K).
- Talk to the Old Man (L).
- Play the HOP (M); receive the SYMBOL SET.
- Take the BODY (N); play the mini-game.
- Solution: (O).
- Solution: (P).
- Solution: (Q).
- Use the CORKSCREW (R); take the HEXAGON (1/2).
- Add the SYMBOL SET (S); play the mini-game.
- Solution: (A-B)-(K-J)-(E-F) (T).
- Go down to the Dressing Room (U).

- Examine anywhere (V).
- Take the STATUETTE (W).
- Move up.
- Remove the statuette (X); add the STATUETTE. Take the YARN; read the note.
- Untangle the YARN (inventory); take the THREAD.
- Add the THREAD (Y); take the STENCIL.
- Enter the Dressing Room.
- Add the STENCIL (Z); pull the levers. Take the HAND SHAPE and WOODEN HANDLE.
- Move up.
- Add the WOODEN HANDLE (A); take the CANE.
- Use the CANE (B); receive the HAT.
- Enter the Dressing Room.
- Place the HAT (C); take the BROOCH.
- Insert the BROOCH (D); take the COMB.
- Move up.
- Use the COMB (E); take the GOLD TOKEN (1/3).
- Enter the Dressing Room.
- Take the tooth from the COMB (inventory); take the STICK.
- Use the STICK (F). Take the BOLT KNOB.
- Move up.
- Add the BOLT KNOB (G); take the CUTTERS.
- Enter the Dressing Room.
- Use the CUTTERS (H); take the COPPER STAR. Open the cupboard; read the note.
- Move up.
- Insert the COPPER STAR (I); take the CHEST KEY.
- Enter the Dressing Room.
- Insert and turn the CHEST KEY (J). Place your BODY; take the GEM.
- Move up, then forward.
- Examine anywhere (K).
- Use the GEM (L); take the GOLD TOKEN (2/3) and CHISEL.
- Take the GOLD TOKEN (3/3) (M). Use the CHISEL; take the WOOD PIECES.
- Return to the Dressing Room.

- Add the GOLD TOKENS (N); play the mini-game.
- Solution: Ax3-CX3 (O). Take the TRIANGLE.
- Move up.
- Insert the TRIANGLE (P); take the BOX WRENCH.
- Move forward.
- Use the BOX WRENCH (Q); receive the LADDER.
- Move down.
- Place the LADDER (R).
- Play the HOP (S); receive the PLIERS.
- Move forward.
- Use the PLIERS (T); take the BLUNT KNIFE and TREFOIL ORNAMENT.
- Use the BLUNT KNIFE (U); take the KNIFE.
- Move down.
- Insert the TREFOIL ORNAMENT (V); use the KNIFE; take the ROPE.
- Move forward.
- Add the ROPE to the HOOK (inventory); tie the rope; take the GRAPPLING HOOK.
- Throw the GRAPPLING HOOK (W).
- Step onto the rope (X); play the mini-game.
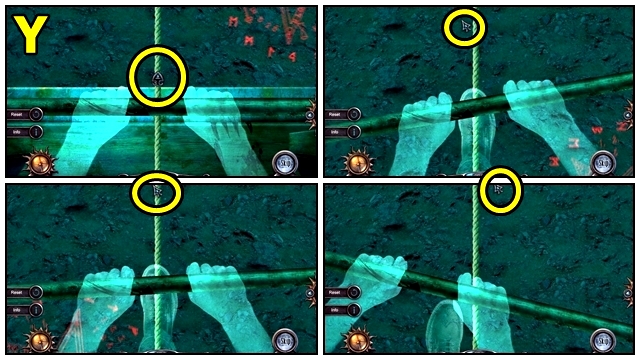
- Solution: Use the mouse for balance. The screenshot shows possible examples (Y).
Chapter 4: The Third Floor
- Examine anywhere (Z).
- Take the JUG (A).
- Move down.
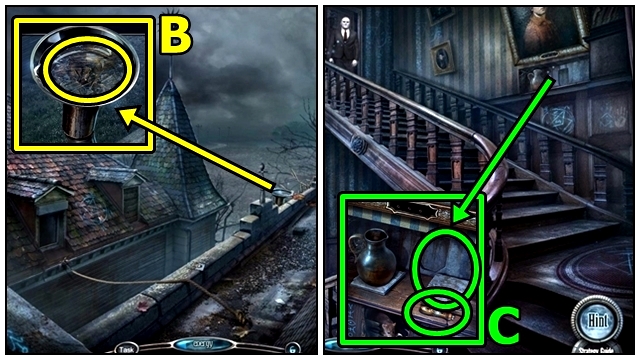
- Use the JUG (B); take the JUG OF WATER.
- Move forward.
- Take the FILE HANDLE (C). Place the JUG OF WATER; take the COIN.
- Return to the Attic.
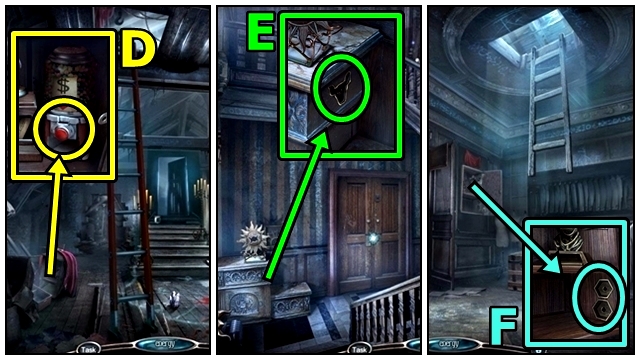
- Insert the COIN (D); press the button; take the HOTEL SYMBOL.
- Return to the Third Floor Hall.
- Insert the HOTEL SYMBOL (E); take the HEXAGON (2/2).
- Return to the Dressing Room.
- Insert the HEXAGONS (F); take the CARVING.
- Return to the Third Floor Hall.
- Use the KNIFE on the CARVING (inventory); take the DOOR LOCK PART.
- Remove the handle (G); add the DOOR LOCK PART. Play the mini-game.
- Solution: B-Dx2-Fx2-B-Dx2-Fx4-Bx2-F-B-Fx2-Bx2-Dx6-F-G-E-Hx3-Cx3-Gx3-Fx3-Gx3 (H).
- Move forward.
- Take the FILE BLADE (I).
- Put the FILE BLADE on the FILE HANDLE (inventory); take the FILE.
- Use the FILE (J); receive the POLE. Play the mini-game.
- Solution: (K).
- Go to the Rooftops.
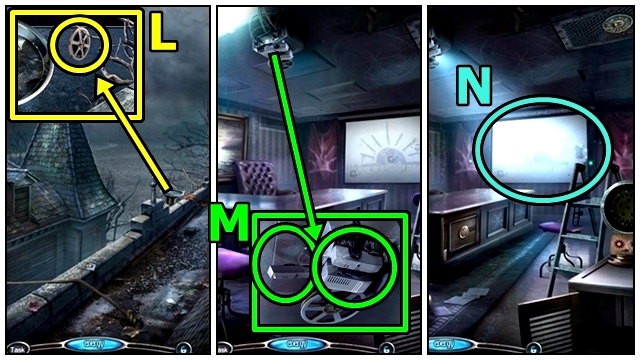
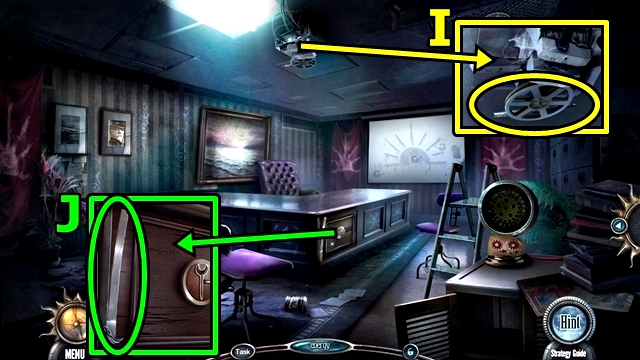
- Use the POLE (L); take the FILM REEL.
- Return to the Conference Room.
- Use the ADHESIVE BANDAGE (M); add the FILM REEL.
- Play the HOP (N); receive the SILVER KNOT.
- Go to the Rooftops.
- Insert the SILVER KNOT (O); take the DUMMY HEAD and KNITTING NEEDLE.
- Move forward.
- Use the DUMMY HEAD (P).
- Look through the keyhole (Q); take the FILIGREE.
- Move forward.
- Insert the FILIGREE (R). Take the DISPLAY PIECE.
- Move down.
- Insert the DISPLAY PIECE (S); take the HALO.
- Move forward.
- Put the sun and moon into the centre of the WOOD PIECES (inventory); then add the HALO; take the DECORATION.
- Add the DECORATION (T).
- Use the KNITTING NEEDLE (U); take the CHEESE.
- Move down.
- Offer the CHEESE (V); take the PIN.
- Move forward.
- Insert the PIN (W); take the HAND SHAPE.
- Return to the Dressing Room.
- Add the HAND SHAPES (X); take the FACE.
- Return to the Conference Room.
- Add the FACE (Y); take the MECHANISM.
- Pull the lever on the MECHANISM (inventory); take the DRUM.
- Add the DRUM (Z); play the mini-game.

- Solution: (Ax3)-(Bx2)-C-(Dx3) (A). Place the keys (B). Take the PORTRAIT PART.
- Move down.
- Insert the PORTRAIT PART (C).
- Play the HOP (D); receive the SECRET SIGN.
- Move forward.
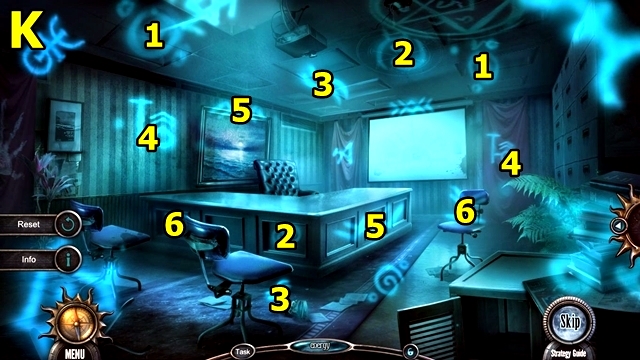
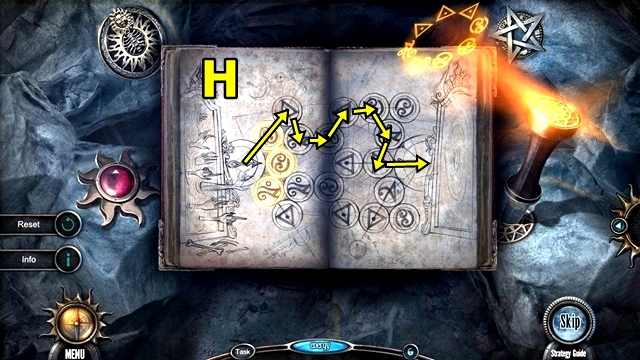
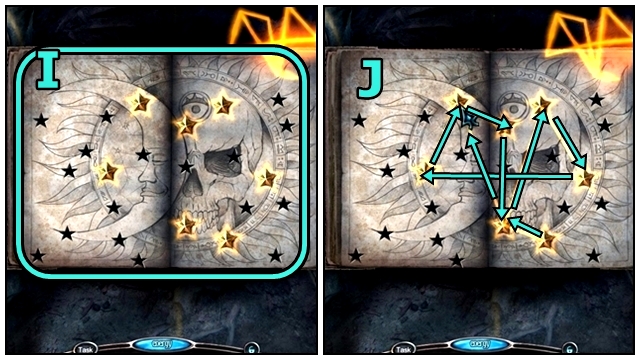
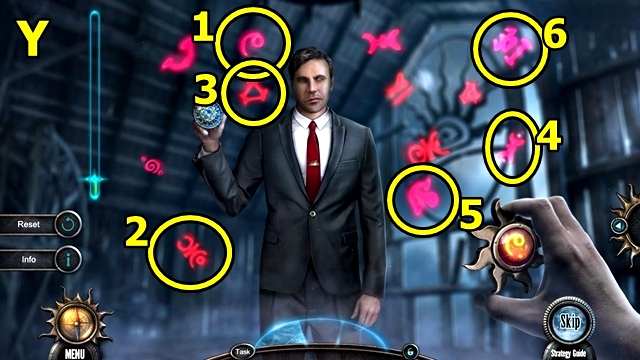
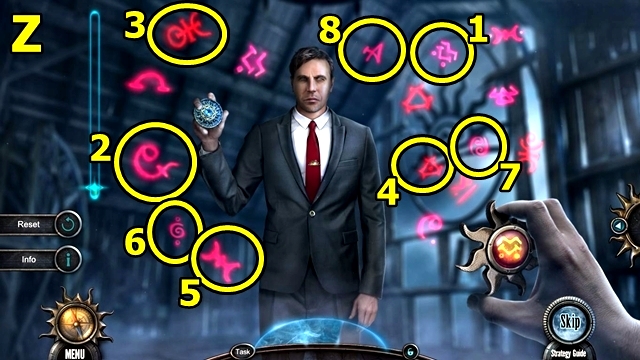
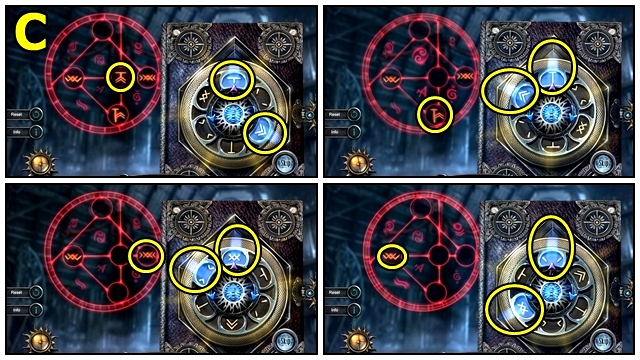
- Use the MATCHES (E). Insert the SECRET SIGN; play the mini-game.
- Solution: (F).
- Solution: (G).
- Solution: (H).
Chapter 5: The Backyard
- Talk to the Old Man (I).
- Take the CHIP (J) and BIRD.
- Add the STOPWATCH (K); take the BIRD.
- Add the BIRDS (L); take the WINGS.
- Add the WINGS (M); take the DUSK SYMBOL.
- Add the DUSK SYMBOL (N); take the GUN.
- Use the GUN (O).
- Move forward.

- Take the CHIP (P).
- Insert the SON'S MEDALLION (Q); take the SON'S MEDALLION and CHIP.
- Take the POWER SAW BASE (R).
- Move down.
- Insert the CHIPS (S); play the mini-game.
- Solution: This puzzle is random; the solution is shown in the screenshot (T). Take the RAZOR BLADE.
- Move forward.
- Use the RAZOR BLADE (U); open the window; take the ADHESIVE TAPE.
- Use the ADHESIVE TAPE (V); receive the FINGERPRINT.
- Place the FINGERPRINT (W); take the MASK.
- Move down.
- Insert the MASK (X); take the SAFE KEY.
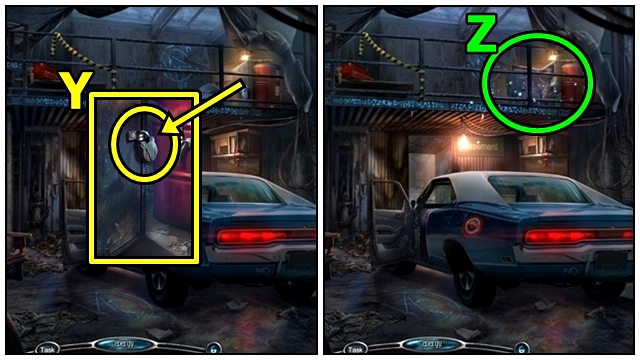
- Insert the SAFE KEY (Y).
- Play the HOP (Z); receive the BUTTON.
- Move forward.
- Remove the button (A); add, then press the BUTTON. Take the MOP.
- Use the MOP (B); take the CLOCK KEY.
- Move down.
- Insert the CLOCK KEY (C); take the GEAR.
- Move forward.
- Remove the panel (D). Add the GEAR; play the mini-game.
- Solution: (E).
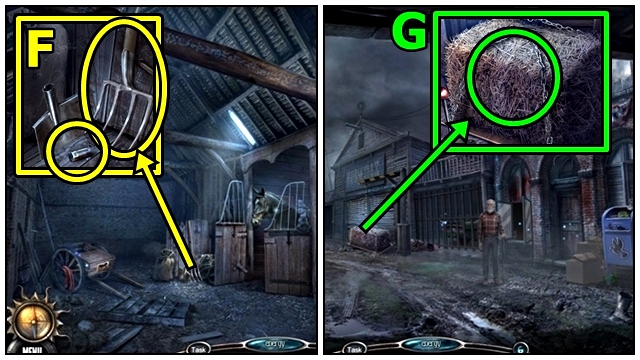
- Take the BATTERY (F) and PITCHFORK.
- Move down.
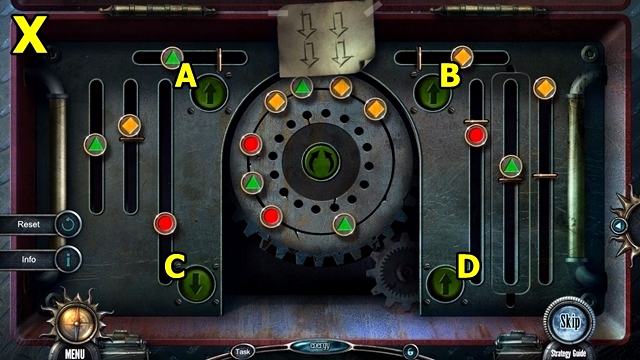
- Use the PITCHFORK (G); play the mini-game.
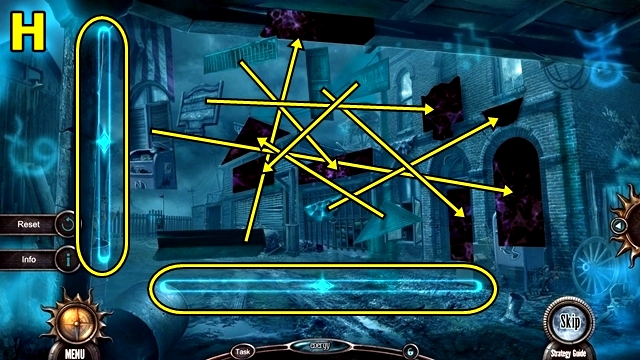
- Solution: Use the scroll bars to move the floating items (H). Receive the HAY.
- Enter the Stable.
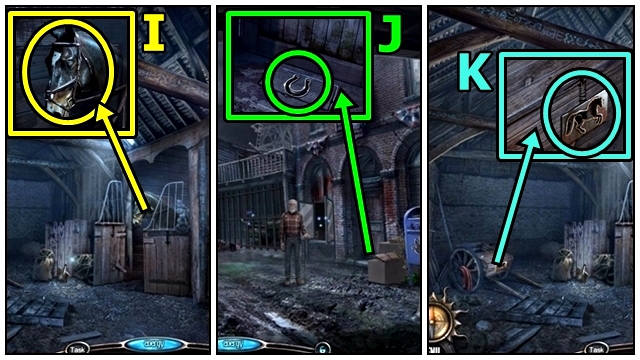
- Offer the HAY (I); take the HORSESHOE.
- Move down.
- Insert the HORSESHOE (J); take the HORSE.
- Enter the Stable.
- Insert the HORSE (K); take the REINS.
- Move down.
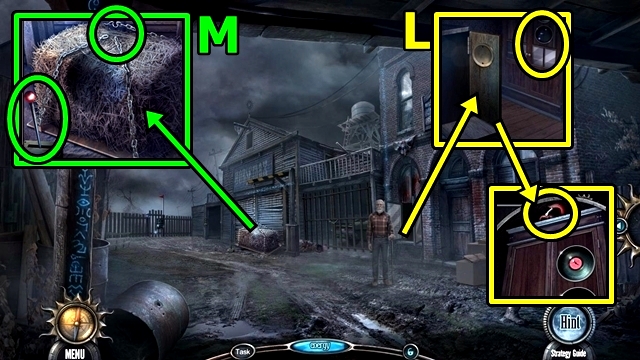
- Use the REINS (L); receive the HOOK.
- Add the HOOK (M); pull the lever; take the LEVER.
- Move down.
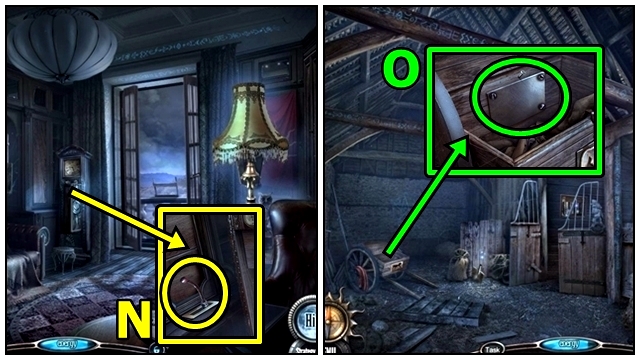
- Remove the lever (N); add the LEVER; take the SCREWDRIVER.
- Return to the Stable.
- Use the SCREWDRIVER (O); take the DISK.
- Return to the Owner's Study.
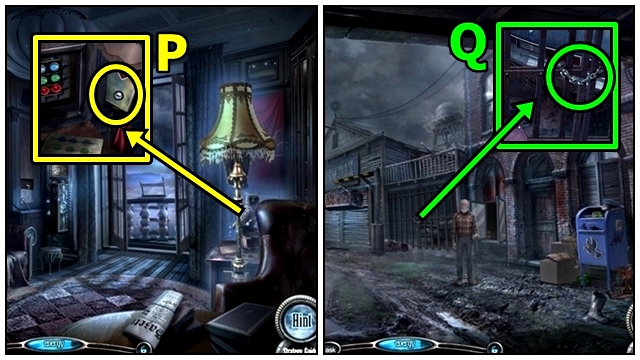
- Use the SCREWDRIVER (P); take the SAW BATTERY.
- Move forward.
- Put the SAW BATTERY and DISK on the POWER SAW BASE (inventory); take the POWER SAW.
- Use the POWER SAW (Q); open the gates.
Chapter 6: Find Matt
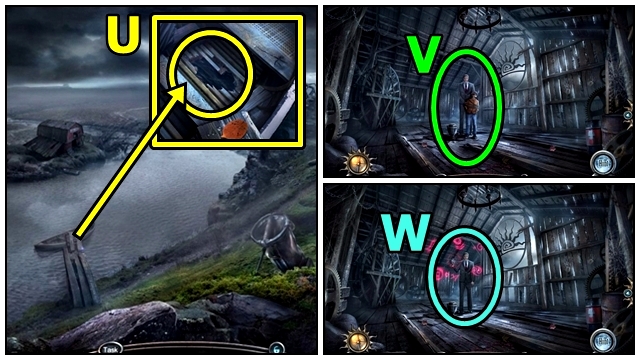
- Talk to the Old Man's Ghost (R); receive the OLD MAN'S AMULET.
- Examine the bag (S); insert the OLD MAN'S AMULET. Take the LOCKPICK SET.
- Use the LOCKPICK SET (T).
- Enter the Saloon.
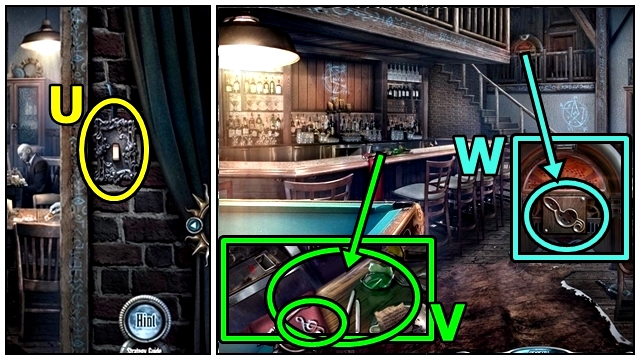
- Flip the switch (U).
- Take the TREBLE CLEF (V) and UTENSILS.
- Insert the TREBLE CLEF (W); take the DANCER FIGURINE.
- Return to the Owner's Study.
- Place the DANCER FIGURINE (X). Play the mini-game.
- Solution: (Y). Take the RECORD.
- Move forward.
- Insert the RECORD (Z); take the RECORD PLAYER.
- Enter the Saloon.
- Turn the handle of the RECORD PLAYER (inventory); take the CYLINDER.
- Insert the CYLINDER (A); take the LIGHTER and DUPLICATE KEY.
- Insert the DUPLICATE KEY (B); use the UTENSILS.
- Play the HOP (C); receive the NECRONOMIX.
- Move down.
- Take the ELEMENT from the NECRONOMIX (inventory); try to open it, then take the NECRONOMIX.
- Insert the ELEMENT (D).
- Move forward.
- Examine anywhere (E).
- Take the BATTERY (F) and WET CLAY.
- Throw the WET CLAY (G).
- Take the BRANCH (H).
- Use the BRANCH (I); take DEREK'S SIGNET.
- Return to the Owner's Study.
- Insert DEREK'S SIGNET (J); take the CEREMONIAL DAGGER.
- Return to the Golf Course.
- Use the CEREMONIAL DAGGER (K); take the RIBBON and STAR AMULET.
- Return to the Saloon.
- Untangle the RIBBON (inventory) take the DECORATION.
- Insert the DECORATION (L); take the TILE.
- Move down.

- Lift the board (M); examine the panel; insert the TILE; play the mini-game.
- Solution: (N).
- Play the HOP (O); receive the BAR KEY.
- Enter the Saloon.
- Insert the BAR KEY (P); take the FLASHLIGHT and STAR.
- Return to the Golf Course.
- Remove the cap and batteries from the FLASHLIGHT (inventory); insert the BATTERIES; replace the cap; turn on the flashlight; take the FLASHLIGHT.
- Use the FLASHLIGHT (Q); take the SHOVEL HANDLE.
- Return to the Stable.
- Insert the SHOVEL HANDLE (R); take the SHOVEL.
- Return to the Golf Course.
- Use the SHOVEL (S); receive the NECRONOMIX SYMBOL. Play the mini-game.
- Solution: (T).
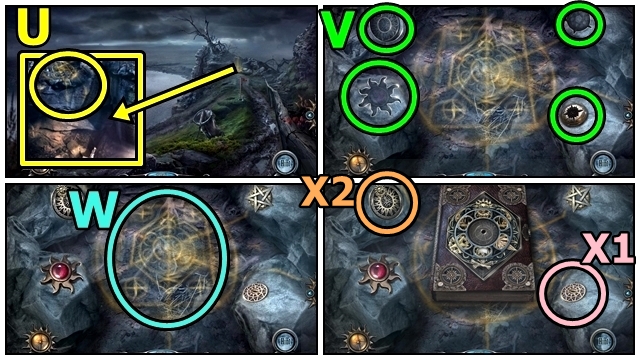
- Examine the area (U).
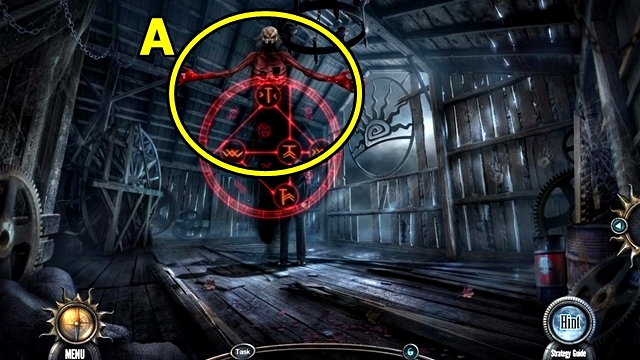
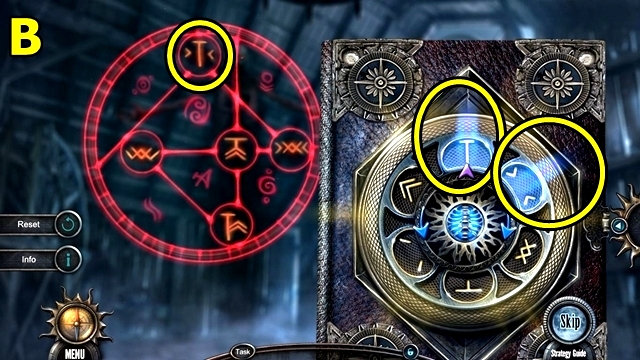
- Add the NECRONOMIX SYMBOL (V), STAR, STAR AMULET and SON'S MEDALLION. Place the NECRONOMIX (W). Insert the CEREMONIAL DAGGER (X1), then take the NECRONOMIX SYMBOL (X2). Play the mini-game.
- Solution: Align the disks (Y).
- Solution: Drag the screen to find the symbols (Z).

- Solution: Drag the screen to find the symbols (A).

- Solution: Find the symbol. Flip the scene (B), if necessary (C).
- Solution: Find the symbol. Flip the scene (D), if necessary (E).
- Solution: Find the symbol. Flip the scene (F), if necessary (G).
- Solution: (H).
- Solution: Place the stars (I). Connect the stars (J). Receive the NECRONOMIX. Take the BALL and SON'S MEDALLION.
- Return to the Saloon.
- Place the BALL (K); take the CUE.
- Return to the Golf Course.
- Use the CUE (L); take the SKULL.
- Return to the Stable.
- Insert the SKULL (M); take the ACID.
- Return to the Golf Course.
- Use the ACID (N); take the WEATHER VANE PART.
- Return to the Stable.
- Add the WEATHER VANE PART (O); take the DOVE and SHELL.
- Move down.
- Use the ACID (P); receive the METAL PLATE.
- Insert the DOVE (Q).
- Play the HOP (R); receive the CODE PART.
- Enter the Stable.
- Add the CODE PART (S); examine the panel. Play the mini-game.
- Solution: (T). Take the RESIN.
- Return to the Golf Course.
- Add the RESIN (U), then the METAL PLATE. Use the LIGHTER.
- Move forward.
- Open the chamber of the GUN (inventory). Add the SHELL; emtpy the gunpowder; add the shell; close the chamber; take the GUN WITH BLANK SHELL.
- Point the GUN WITH BLANK SHELL (V).
- Use the SON'S MEDALLION (W); play the mini-game.
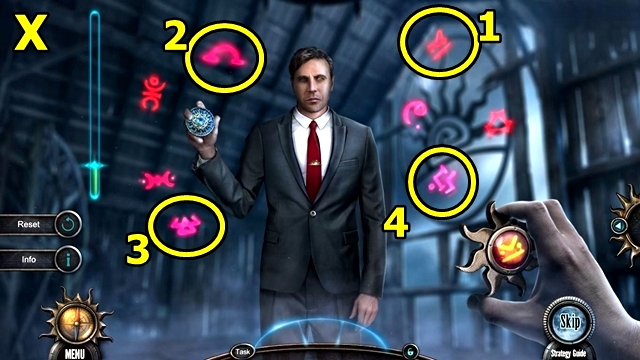
- Solution: (X).
- Solution: (Y).
- Solution: (Z).
- Use the NECRONOMIX (A); play the mini-game.
- Solution: (B).
- Solution: (C).
- Congratulations! You've completed Haunted Hotel: The Thirteenth.
Created at: 2017-01-22