

Walkthrough Menu
- General Tips
- Chapter 1: The Monastery
- Chapter 2: The Cardinal's Palace
- Chapter 3: Camilla's Shop
- Chapter 4: Armand's Mansion
- Chapter 5: The Wine Vault
- Chapter 6: Stephen's House
General Tips
- This is the official guide for Haunted Legends: The Black Hawk.
- This guide will not tell you when you have to zoom into a location; the screenshots will show each zoom scene.
- Hidden-object puzzles are referred to as HOPs. This guide will not show screenshots of the HOPs, however, it will mention when an HOP is available and the inventory item you’ll collect from it.
- Use the Map to fast travel to a location.
Chapter 1: The Monastery
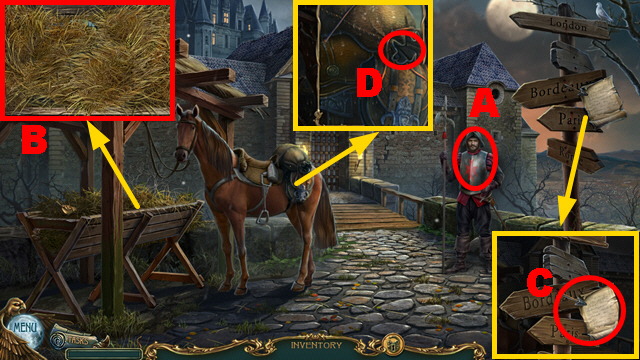
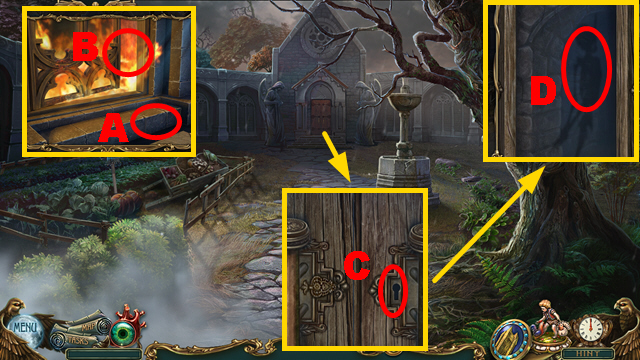
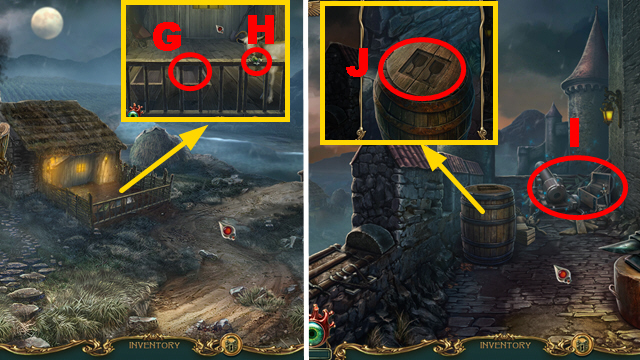
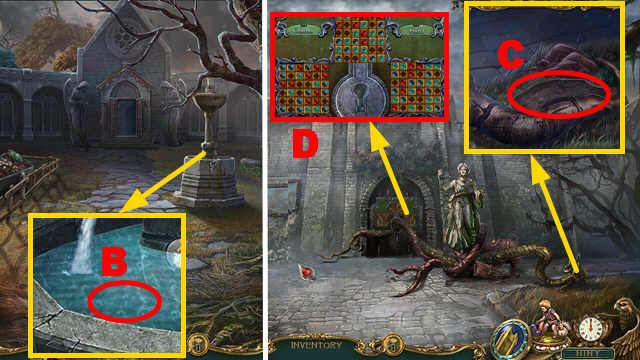
- Talk to the guard (A).
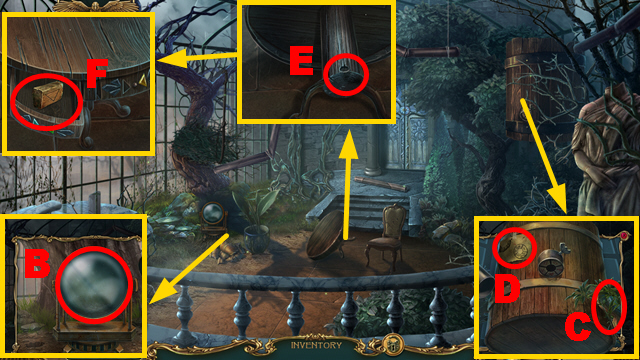
- Remove hay 3 times and take the METAL RING (B).
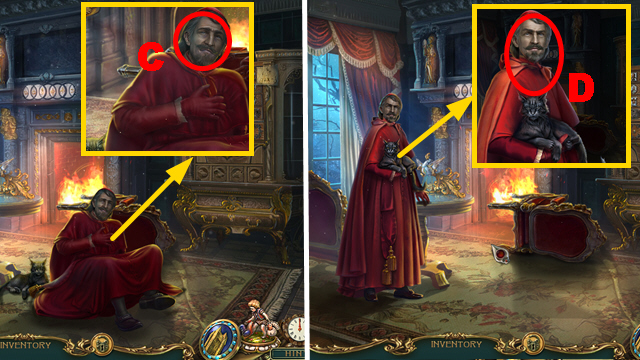
- Take the ARROWHEAD and read the note (C).
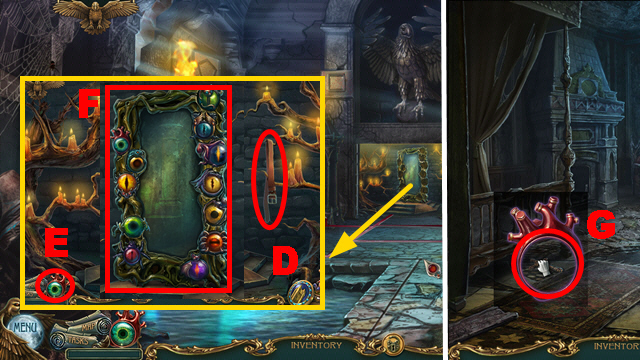
- Use the ARROWHEAD (D); receive the CORD.
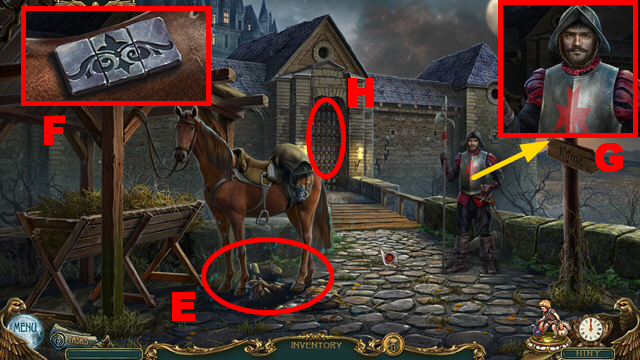
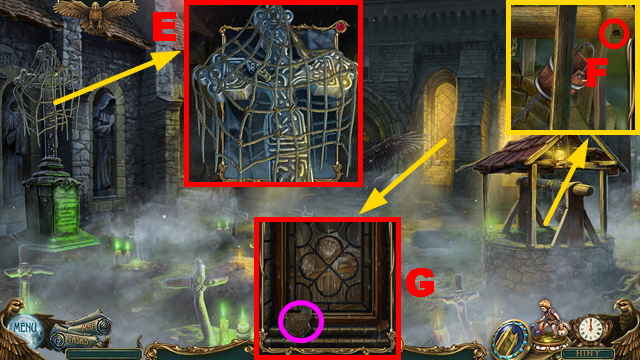
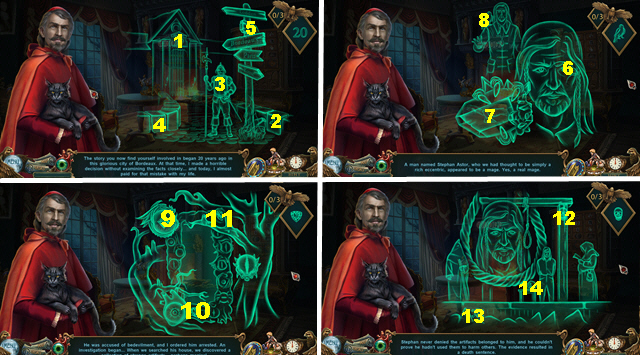
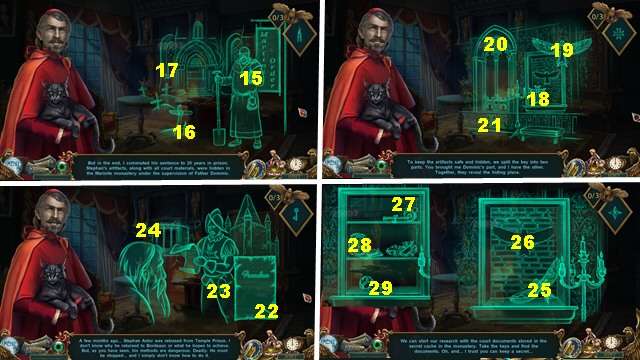
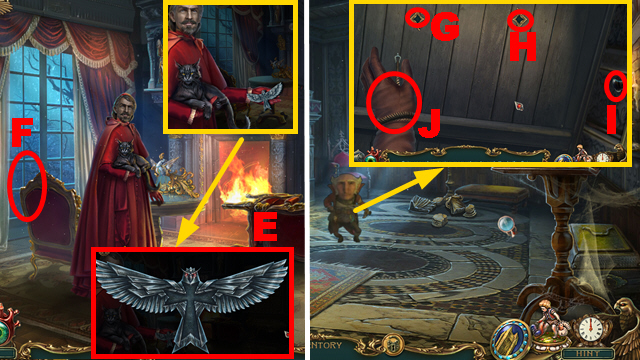
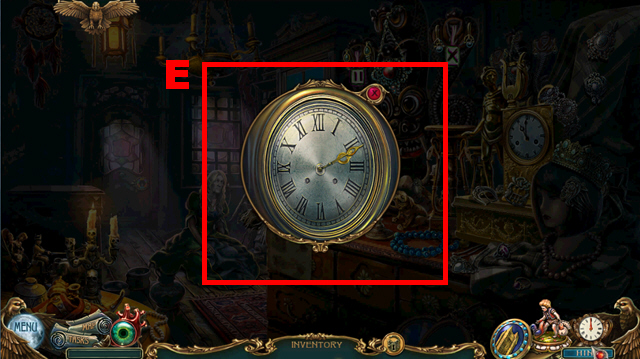
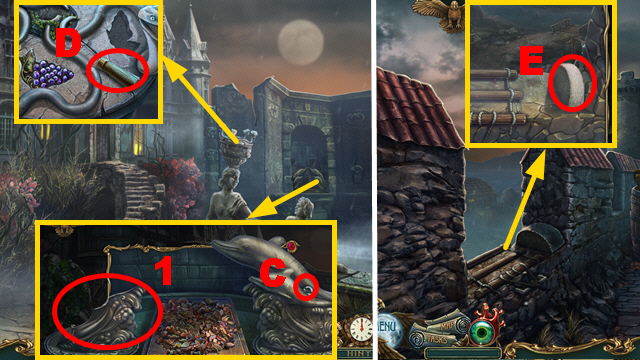
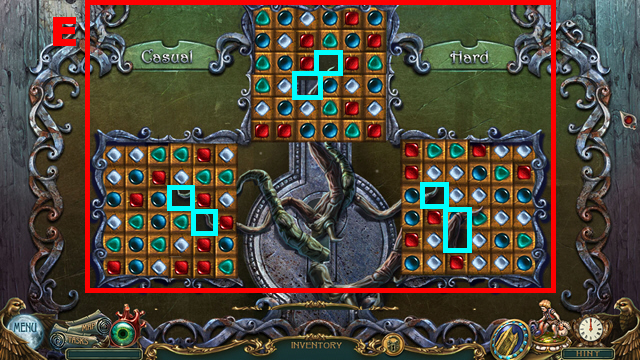
- Play the HOP (E); receive the COIN PURSE.
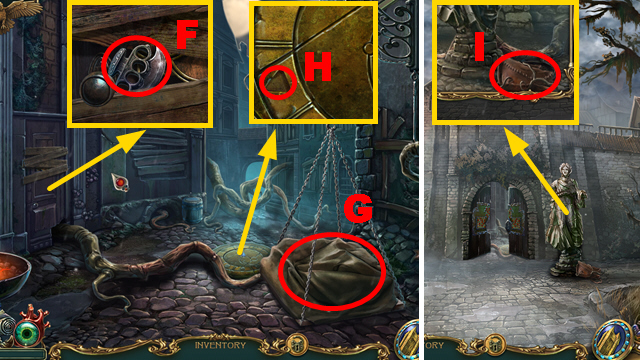
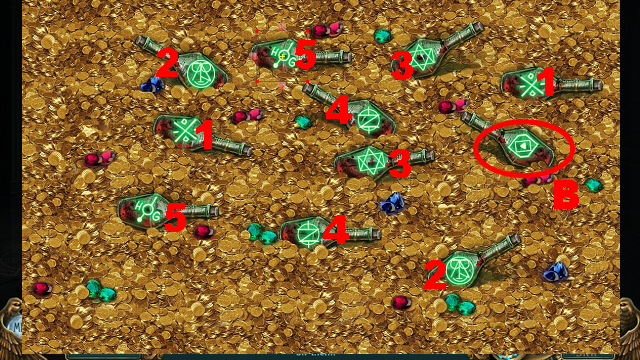
- Select the COIN PURSE; adjust its lock (F), move 3 coin piles, and take 2 SOU.
- Give 2 SOU (G).
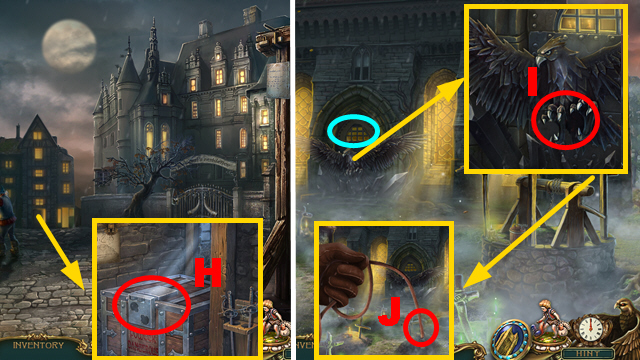
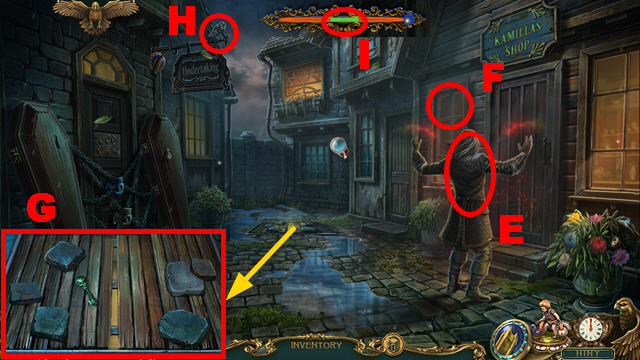
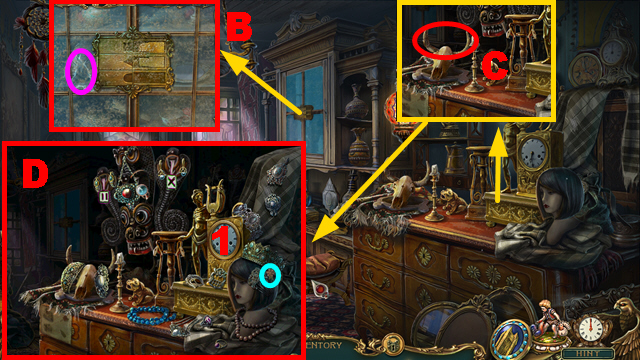
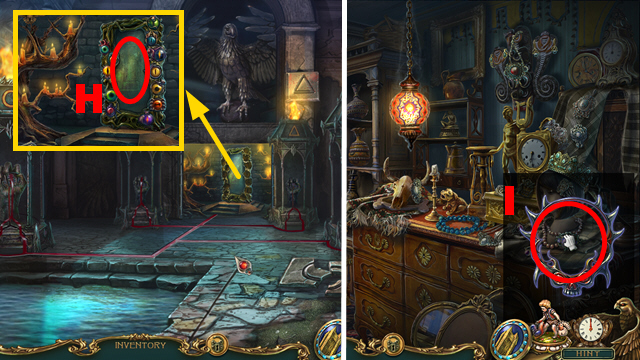
- Inspect the area (H); take the BELL.
- Go forward.
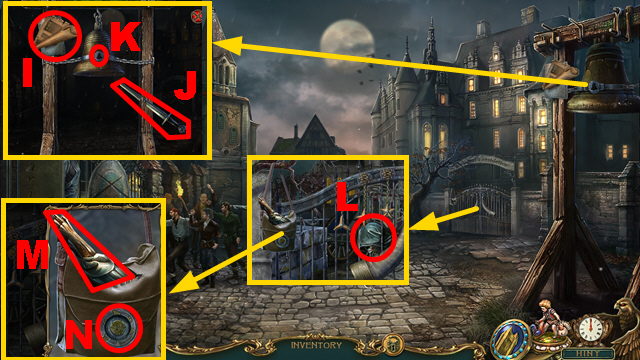
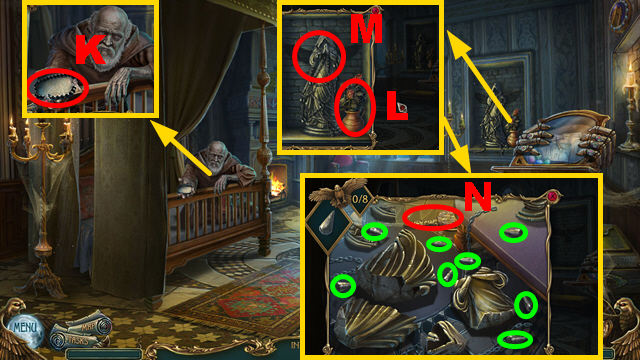
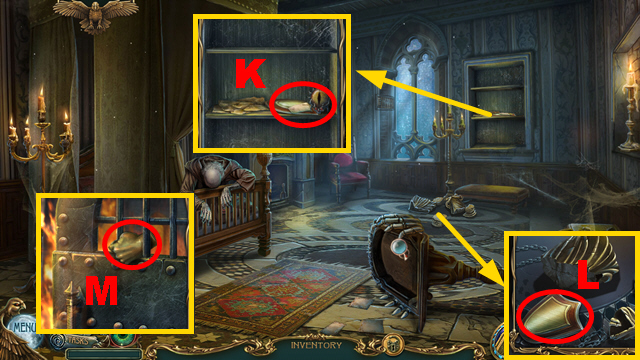
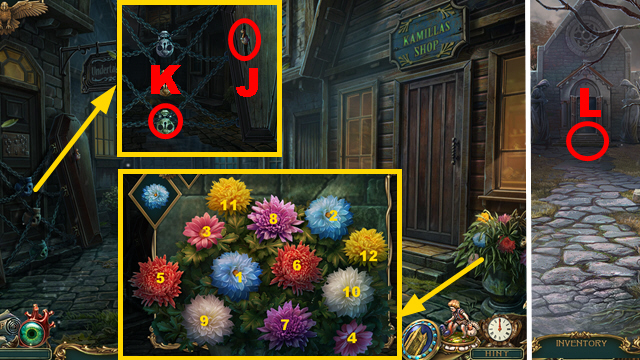
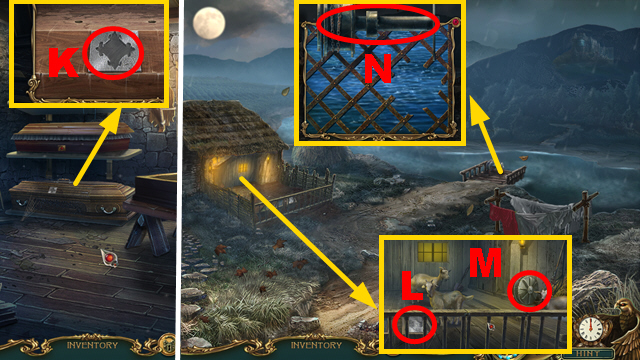
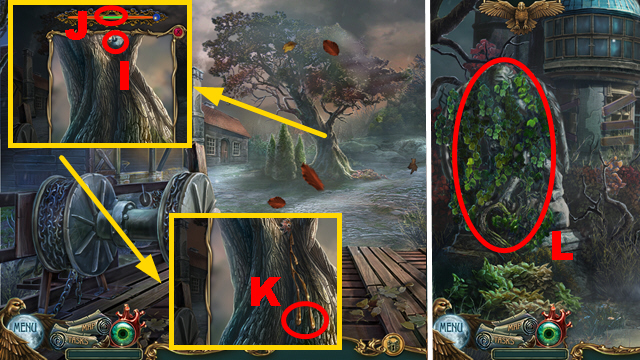
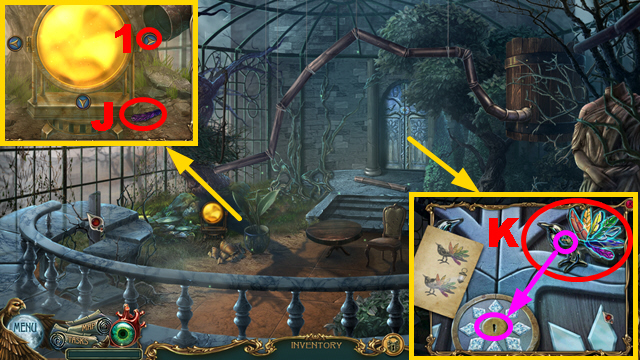
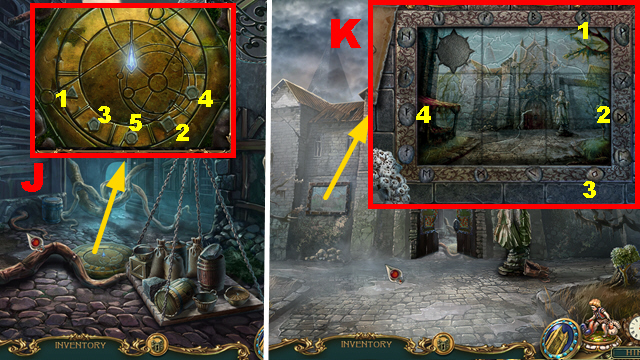
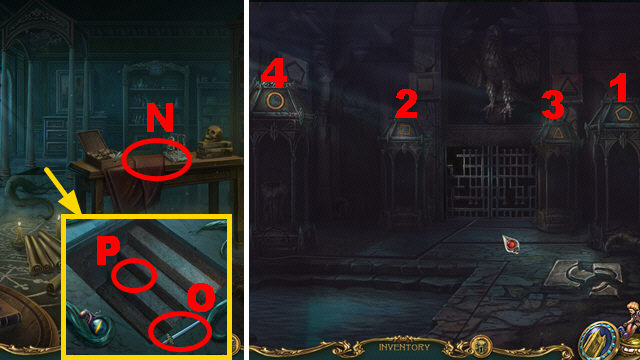
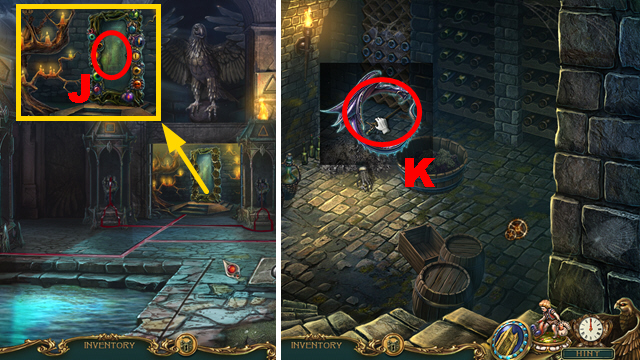
- Take the map, read the note (I), and grab the sword 3 times to collect the SWORD (J); place the BELL and select it twice (K).
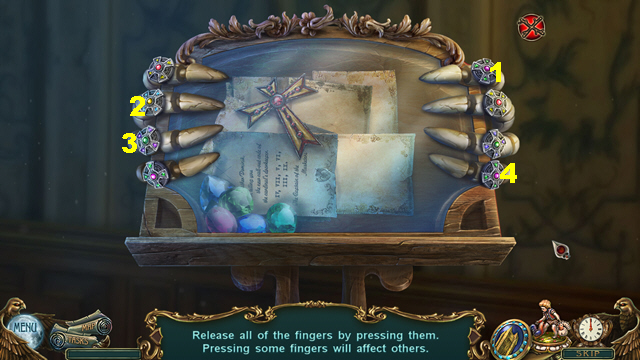
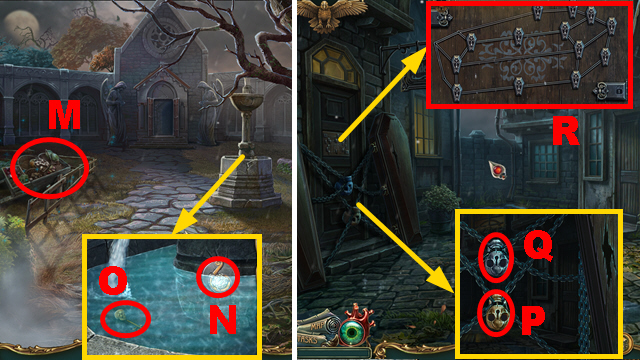
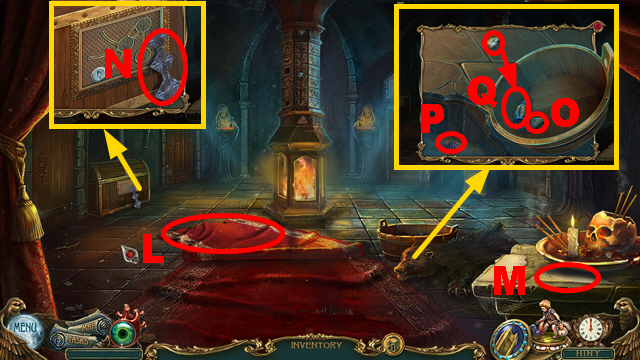
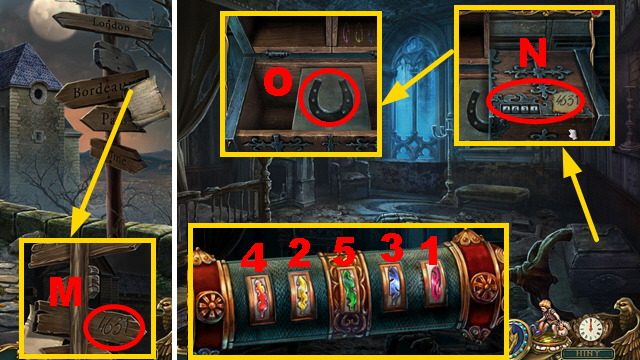
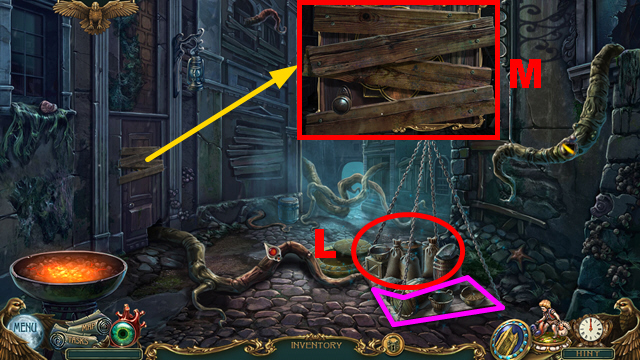
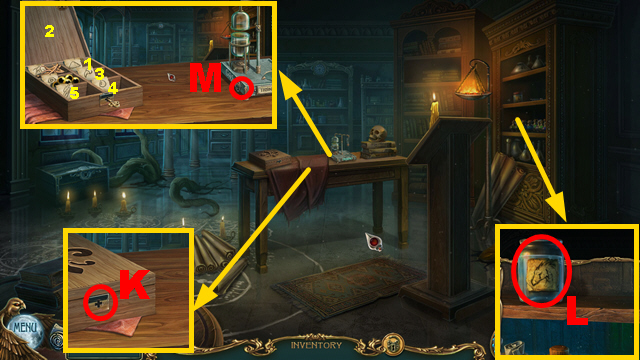
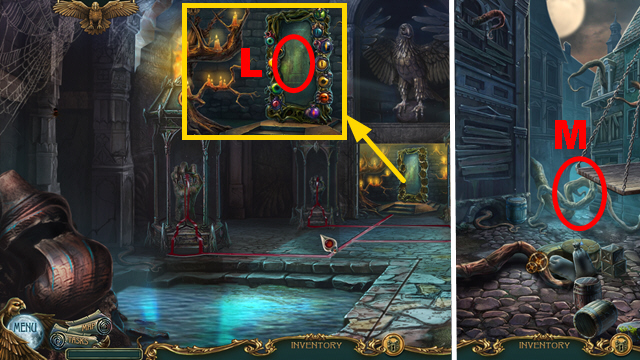
- Take the HEAD (L) and ARM (M); place the METAL RING and inspect it (N).
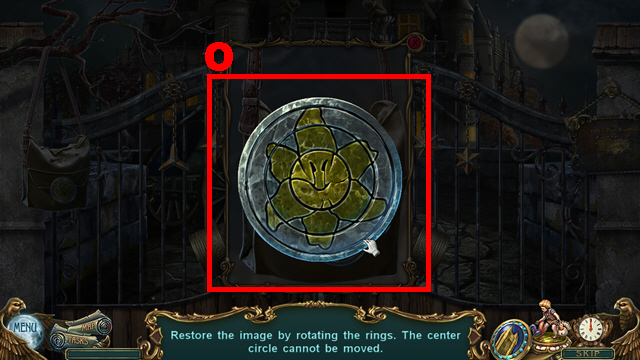
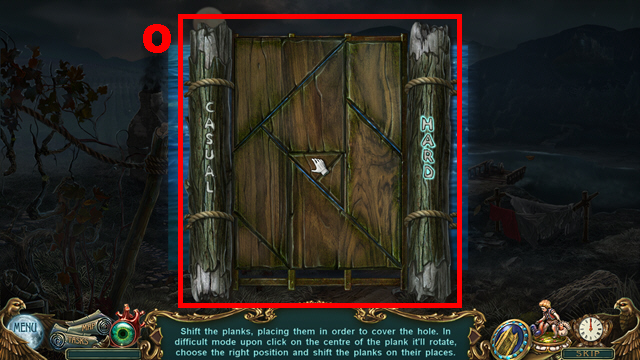
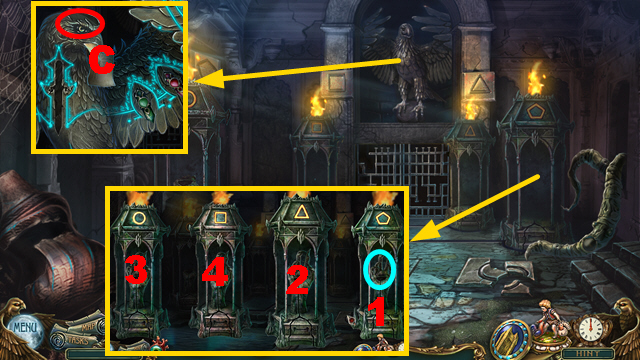
- Play the mini-game.
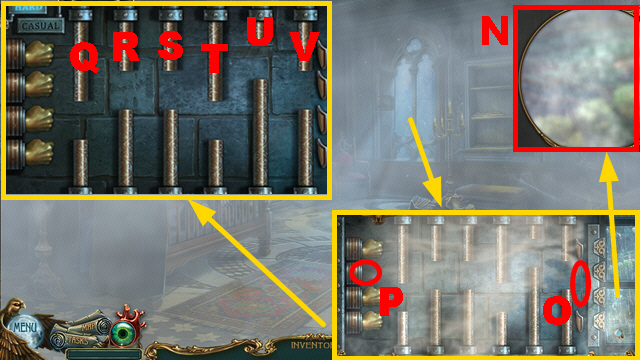
- Solution: (O).
- Take the CLAPPER.
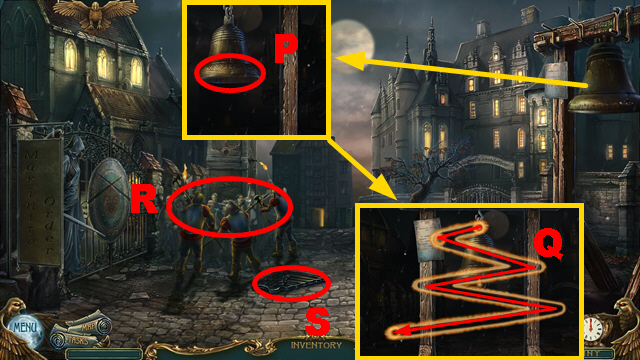
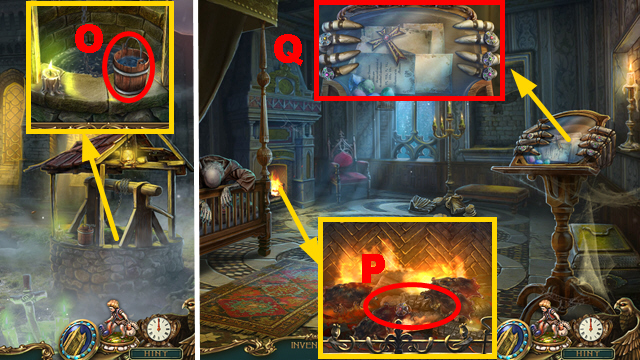
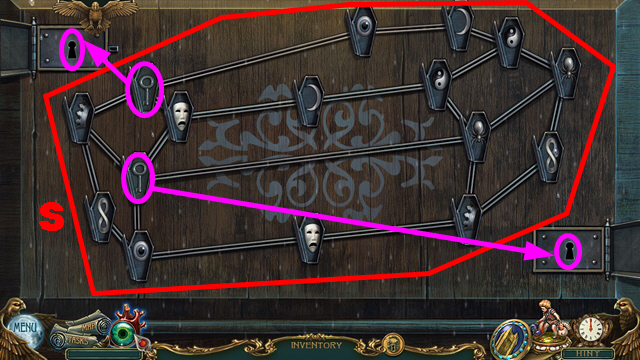
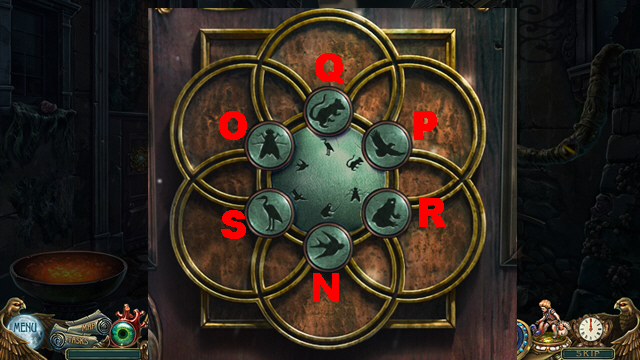
- Place the CLAPPER (P); play the mini-game.
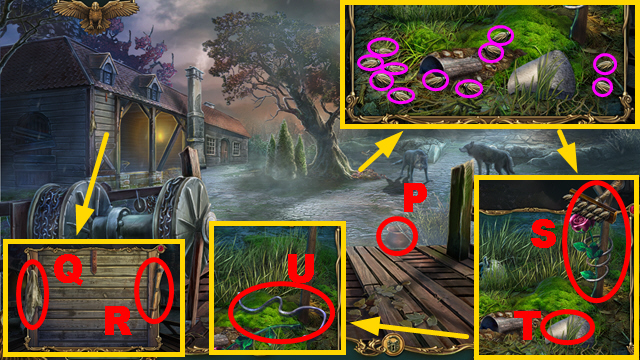
- Solution: Drag the ball through the shape (Q).
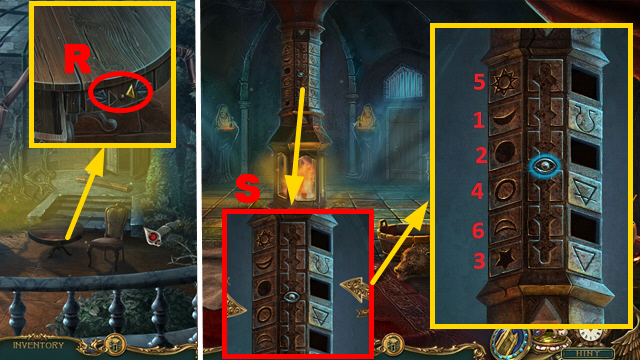
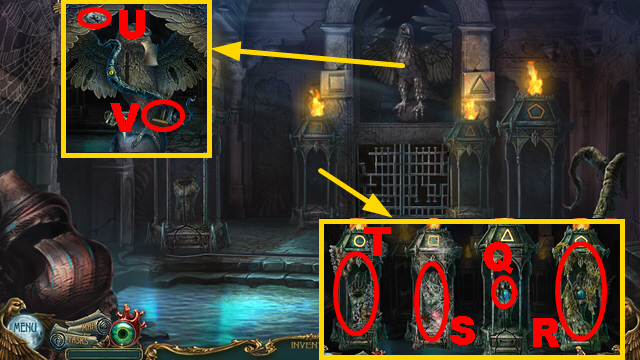
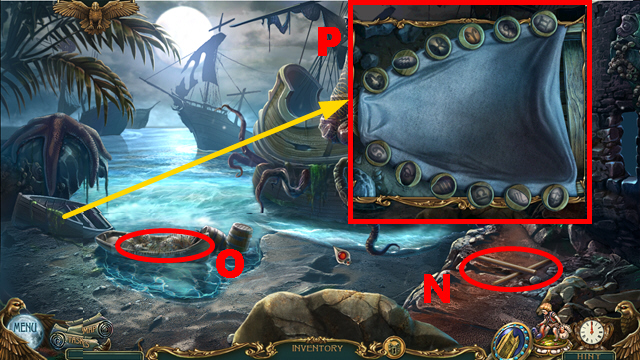
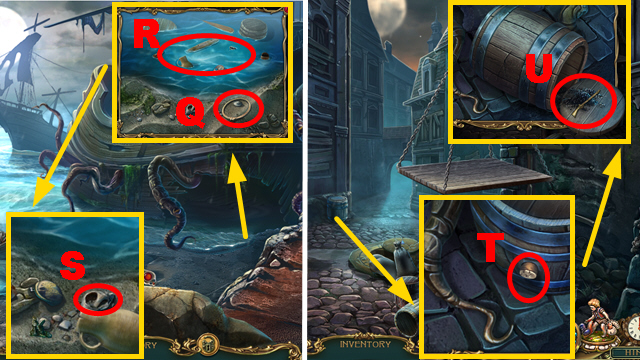
- Inspect the crowd (R); select the letter 3 times.
- Take the WING (S).
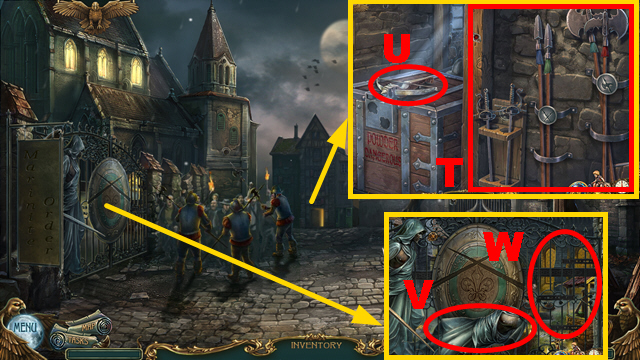
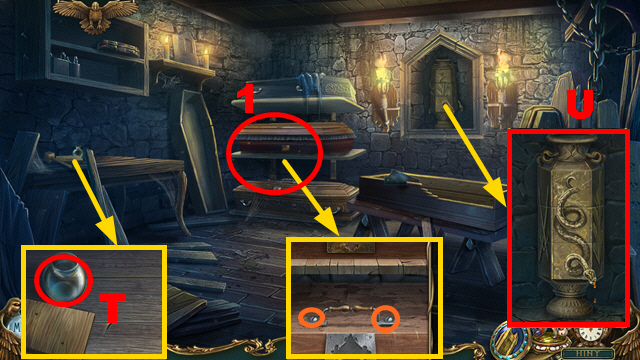
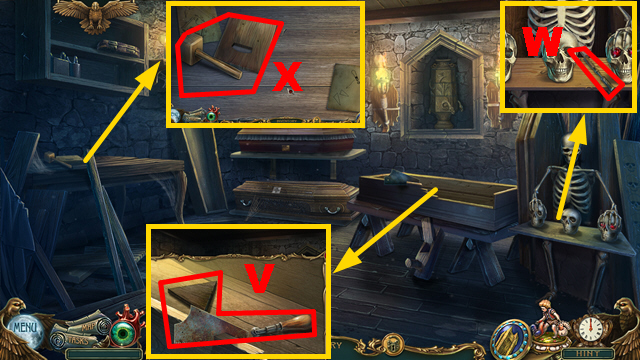
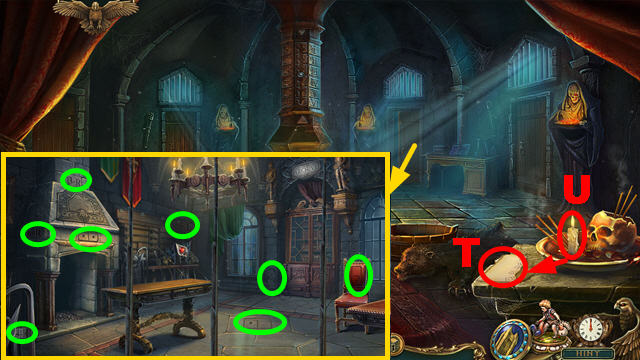
- Place 6 weapons (T); take the CROSSBOW (U).
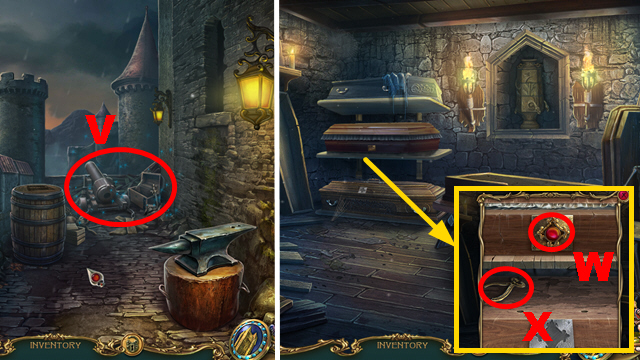
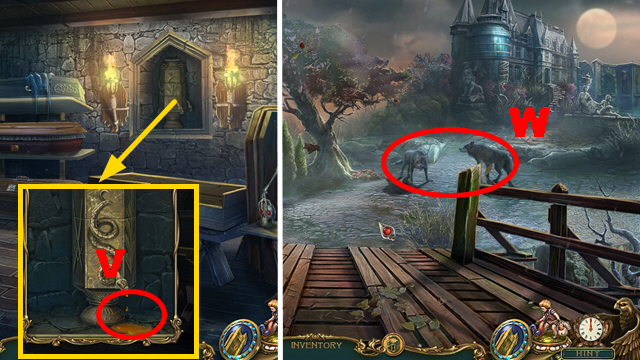
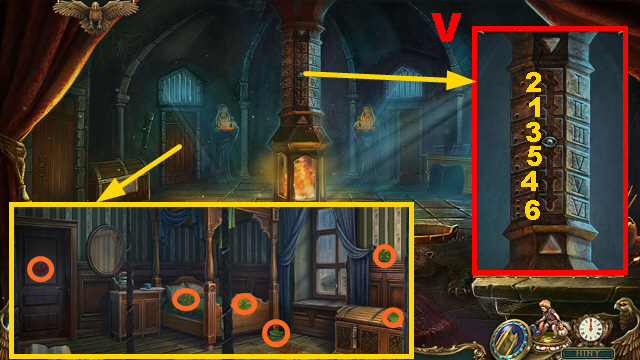
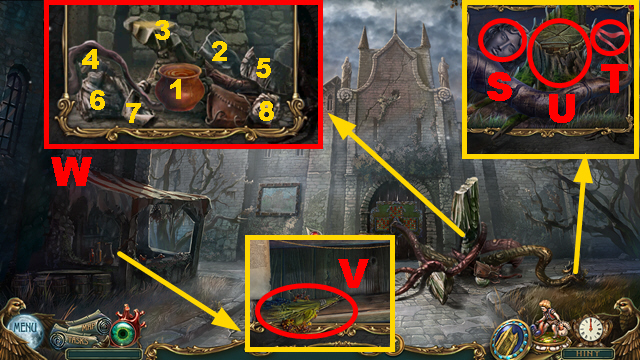
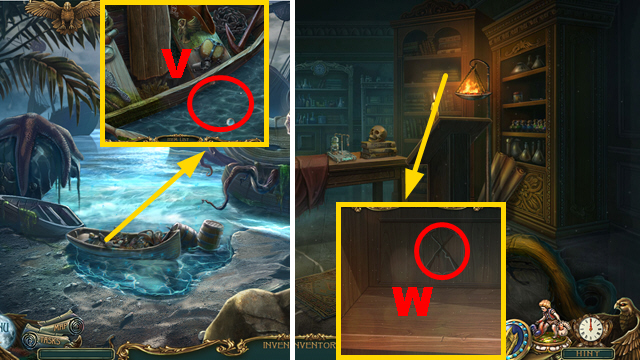
- Take the BROKEN ANGEL (V).
- Place the HEAD, ARM, SWORD, and WING on the BROKEN ANGEL; take the ANGEL STATUE.
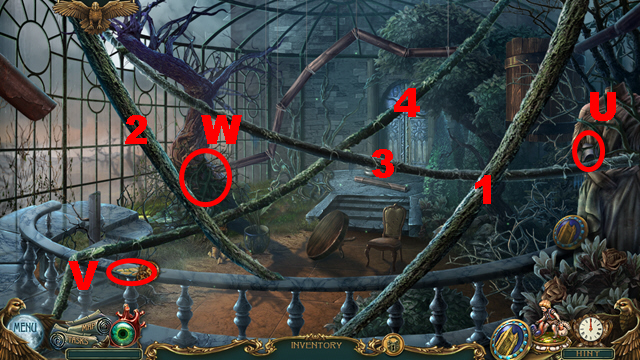
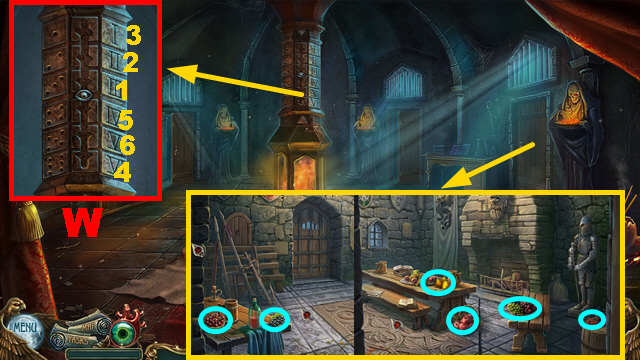
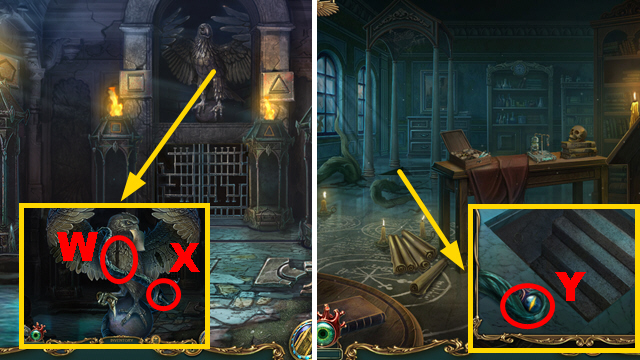
- Place the ANGEL STATUE (W).
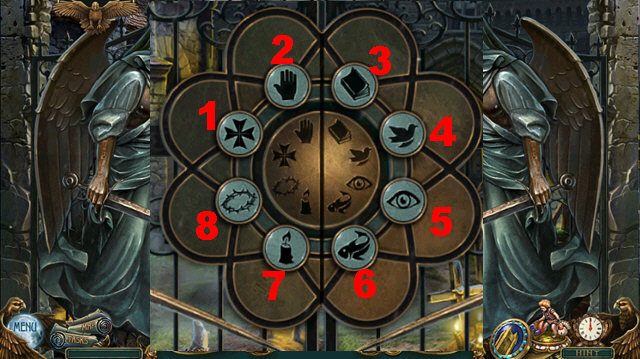
- Play the mini-game.
- Casual solution: (4-3)-(7-5)-(2-8)-(8-7)-(1-7)-(4-5)-(6-7)-(7-1).
- Hard solution: 6-5-4-3-2-6-6-5-7-7-6-7-7.
- Go forward.
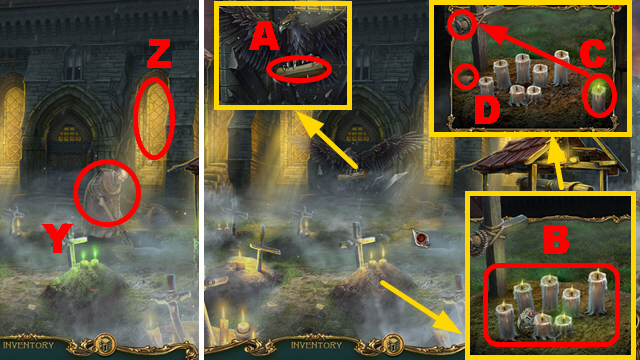
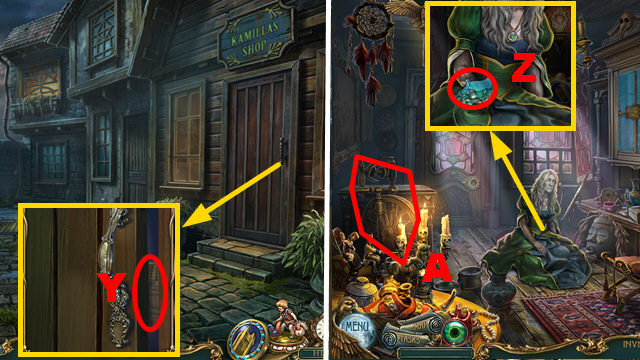
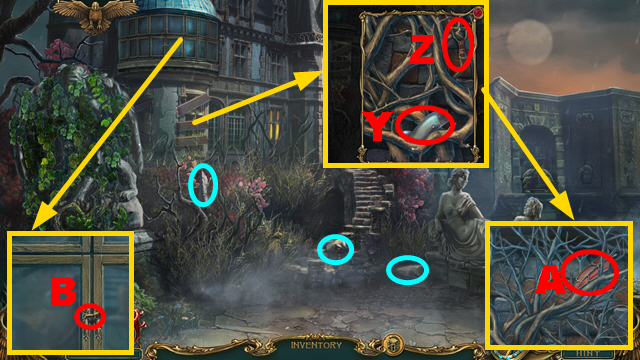
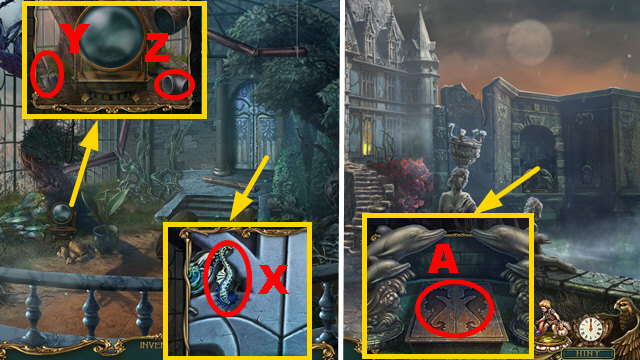
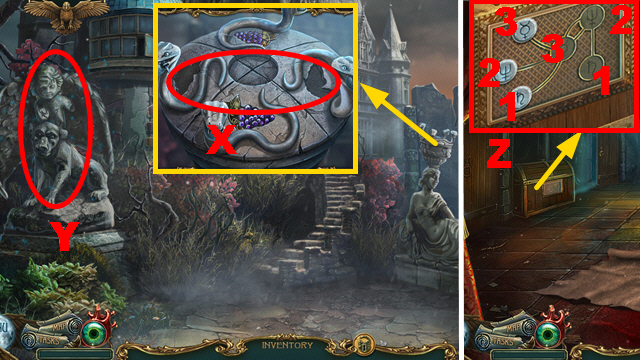
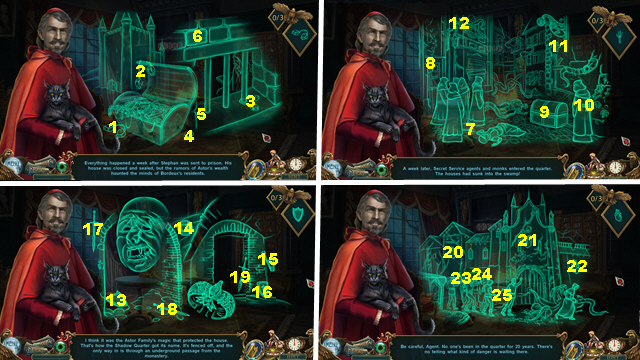
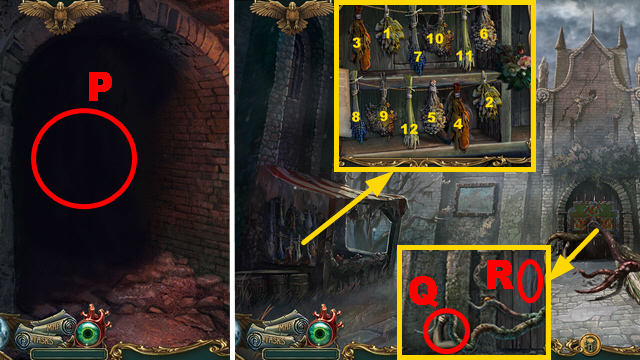
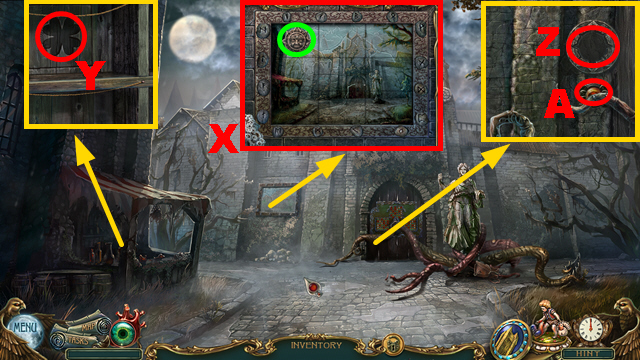
- Talk to Dominic (Y).
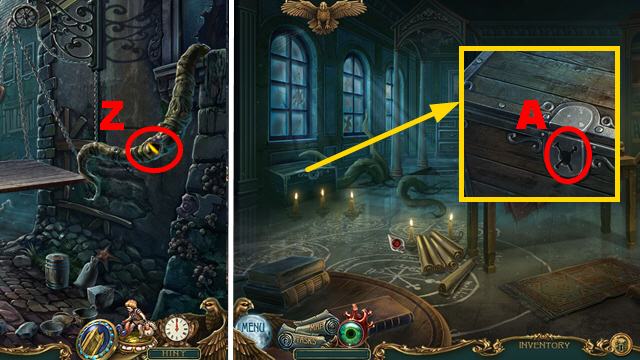
- Look through the window (Z).
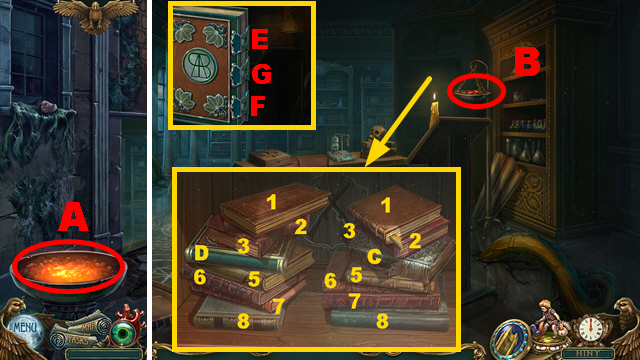
- Read the note (A).
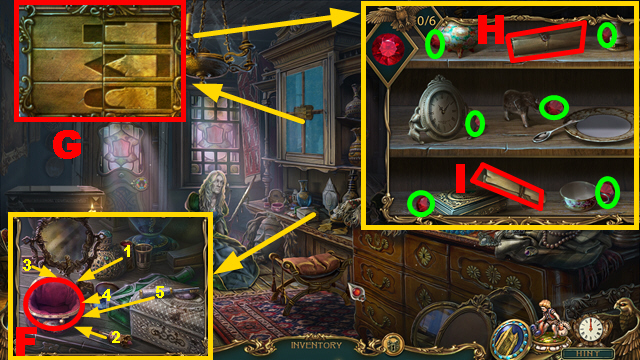
- Snuff out 7 candles and take RING 1/3 (B); use the candle (C), receive the CANDLE, and take TOKEN 1/2 (D).
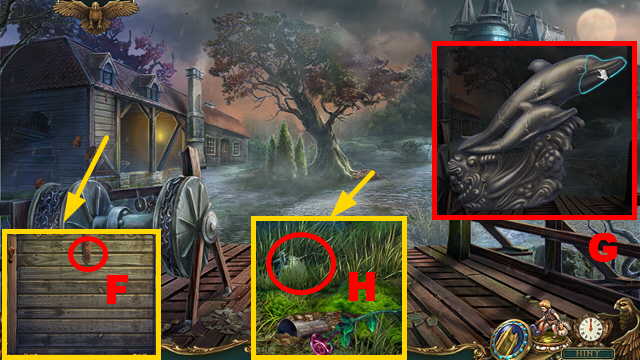
- Take COFFIN 1/3, grab the net 3 times to receive the NET, and take the CRANK (E).
- Place the CRANK and pull it (F).
- Inspect the window (G) and take TOKEN 2/2 (purple).
- Go back.
- Place 2 TOKENS and take the GUNPOWDER BARREL (H).
- Remove the cork from the GUNPOWDER BARREL, place the CORD on it, select the cord, and take the BOMB.
- Go left.
- Use the BOMB (I) and CANDLE (J).
- Open the door (blue).
- Go forward.
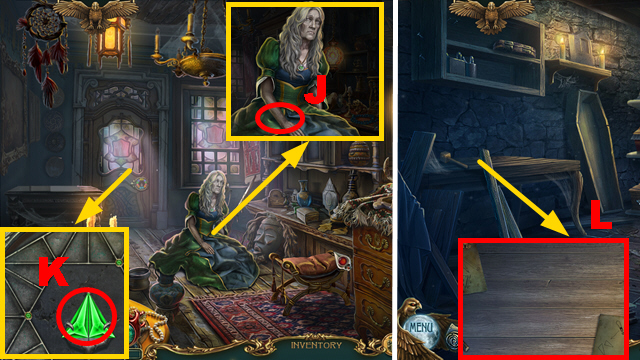
- Take the BEADS (K).
- Select the BEADS, take RING 2/3 from it, and read the note.
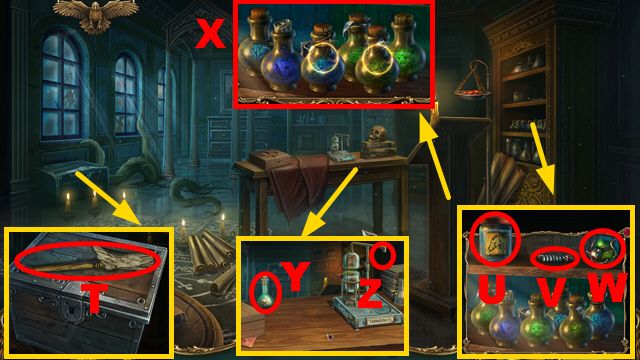
- Select the jug, remove the flowers, flip it, and receive the EMPTY JUG (L); shake the statue (M).
- Take the BRUSH (N); collect 8 TINY WEIGHTS (green).
- Place the NET and TINY WEIGHTS on the CROSSBOW; select the net twice and take the LOADED CROSSBOW.
- Go back.
- Use the EMPTY JUG and take the WATER (O).
- Go forward.
- Pour the WATER and take the DIRTY PASS (P).
- Collect RING 3/3 from the DIRTY PASS, apply the BRUSH to it, and take the PASS.
- Place 3 RINGS (Q).
- Play the mini-game.
- Solution: 1-4.
- Remove the cover, take DOMINIC'S KEY, move 2 gems, and take the GATE CODE.
- Go back twice.
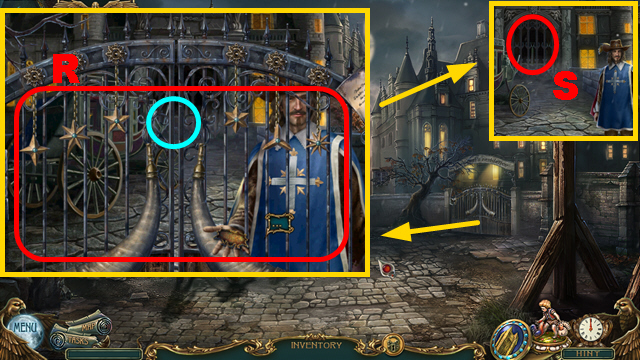
- Inspect the gate and place the GATE CODE (blue); arrange the stars, select the guard, give the PASS, select him again (R).
- Open the door (S).
- Go forward.
Chapter 2: The Cardinal's Palace

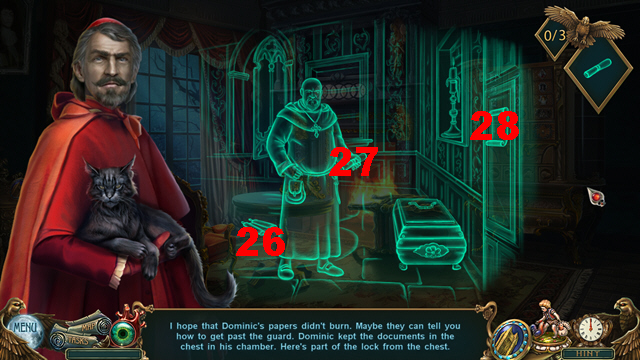
- Use the LOADED CROSSBOW and shoot it (T).
- Talk to the man (U).
- Inspect the area (1); move coins and take the GOLD COIN from the COIN PURSE.
- Insert the GOLD COIN (V); take the LOCK PART (W).
- Place the LOCK PART (X); play the mini-game.
- Solution: 3-2-1-4-3-2-5-4-5.
- Take the WINDING KEYS and MECHANICAL MOUSE.
- Place the WINDING KEYS on the MECHANICAL MOUSE, insert the correct key (Y), and rotate it.
- Use the MECHANICAL MOUSE (Z); insert the WINDING KEY and rotate it (A).
- Receive the PORTRAIT TILE.
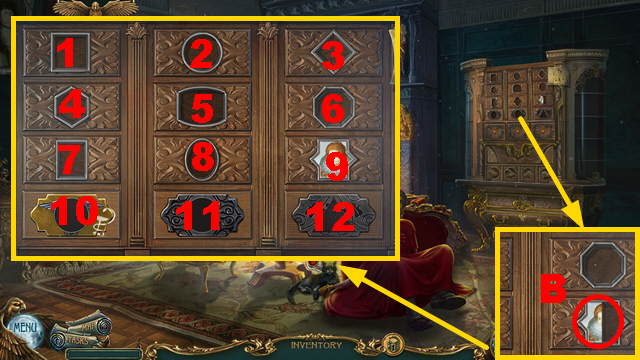
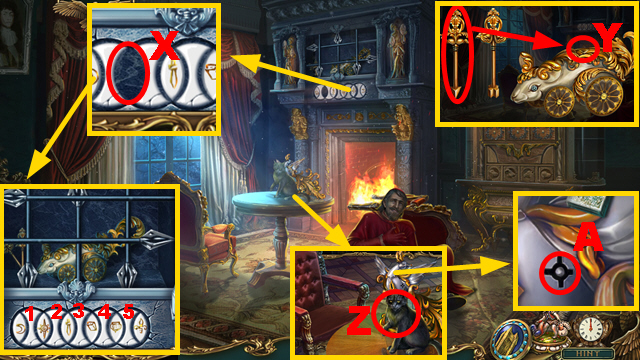
- Place the PORTRAIT TILE (B); play the mini-game.
- Solution: (9-3)-(3-2)-(2-1)-(1-7)-(7-6)-(6-4)-(4-5)-(6-5)-(9-1)-(1-5)-(5-8)-(3-8)-(7-8)-(8-10)-(6-10)-(9-11)-(2-12)-(1-10)-(4-12)-(7-12)-(12-11)-(11-10).
- Take the eye, note, and HEART MEDICINE.
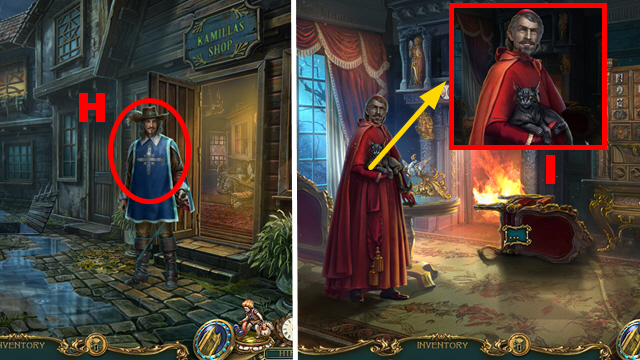
- Give the HEART MEDICINE (C).
- Give DOMINIC'S KEY and talk to him (D).
- Play the mini-game.
- Solution part 1: 1-14.
- Solution part 2: 15-16-17-(18-19)-19-20-21-22-23-24-(25-26)-27-28-29.
- Place the CROSS and take the HAWK KEY (E).
- Examine the window (F).
- Go to the Abbot's Chambers.
- Inspect anything.
- Play the mini-game.
- Solution: Select (G-H) alternately to gain enough momentum and take the KNIFE (I).
- Use the KNIFE (J).
- Inspect anything.
- Take the eye, TORN NOTE, and SHIELD 1/2 (K).
- Take SHIELD 2/2 (L).
- Try to go back.
- Take the FIST (M).
- Use the FIST (N).
- Place 2 SHIELDS (O) and the FIST (P); play the mini-game.
- Easy solution: (V-up-U-up-T-upx2-U-upx2-S-upx3-R-up-S-up-Q-upx3)-(V-down-U-down-T-down-U-down-S-down-R-down-S-down-Q-down)-(V-down-U-downx2-T-down-U-down-S-downx2-R-down-S-down-Q-downx2)-(V-down-U-downx2-T-down-U-down-S-downx2-R-down-S-down-Q-downx3).
- Hard solution: (S-downx2-R-downx3-Q-downx3-Q-upx3)-(V-downx3-U-down-S-downx3-R-downx2-Q-down-T-down)-(U-up-T-upx2-S-upx2-R-up)-(V-down-T-upx2-S-upx2-R-upx2-S-upx2-T-upx2-T-downx2).
- Go forward.
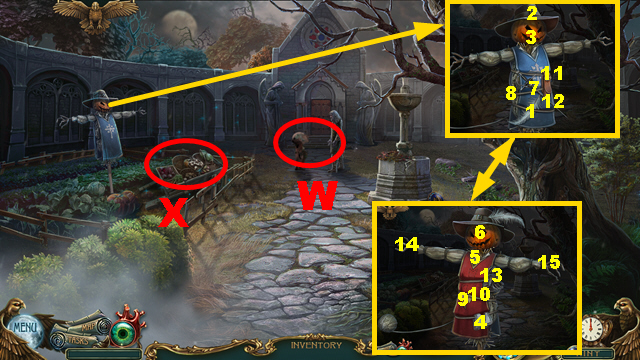
- Approach the dwarf (W).
- Play the HOP (X); receive the CRYPT KEY.
- Adjust the scarecrows: (1-2)-3-(4-5)-6-(7-8)-3-(9-10)-6-(11-12)-3-(13-14)-(13-15).
- Receive the TWINE.
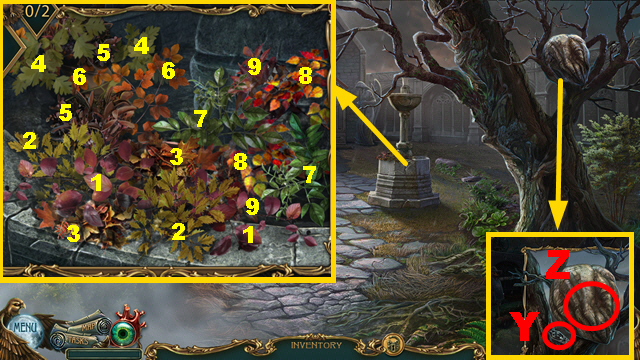
- Collect leaves pairs 1-9, take the OLD POT, and CANDLE MOLD.
- Take COFFIN 2/3 (Y); use the KNIFE (Z) to receive the BEESWAX.
- Put the BEESWAX into the OLD POT; take the BOWL OF WAX.
- Try to go back; place the BOWL OF WAX (A) to receive the HOT WAX.
- Open the CANDLE MOLD, take the note, put the TWINE into it, close it, pour the HOT WAX into it, select it twice, and take the CANDLE.
- Use the CANDLE (B); receive the BURNING CANDLE.
- Insert the CRYPT KEY and turn it (C); use the BURNING CANDLE (D).
- Inspect anywhere 5 times.
- Approach the man (E).
- Look through the window (F).
- Take the BRASS SKULL KEY and 2 STONES (G).
- Use the STONES (H) and throw them when the marker is in the area (I); receive COFFIN 3/3.
- Take the SYMBOL (J); insert the BRASS SKULL KEY and turn it (K).
- Collect flowers 1-12, receive the CHRYSANTHEMUMS, and take the SILVER SKULL KEY.
- Go back.
- Inspect the area (L).
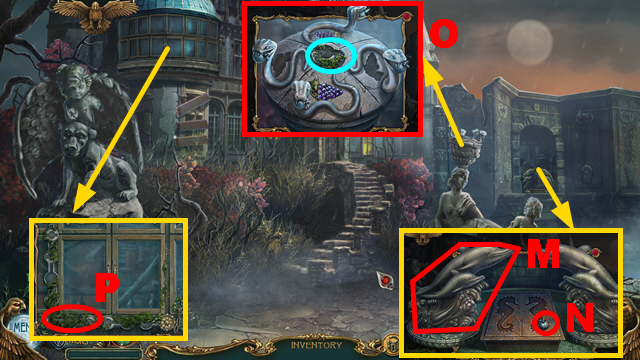
- Play the HOP (M); receive the JEWELRY BOX.
- Open the JEWELRY BOX; take the HEART HALF, MIRROR, and JEWELRY.
- Place the SYMBOL (N); take the COPPER SKULL KEY (O).
- Go forward.
- Insert the COPPER SKULL KEY and turn it (P); insert the SILVER SKULL KEY and turn it (Q).
- Place 3 COFFINS (R).
- Play the mini-game.
- Solution: (S).
- The puzzle is randomized.
- Insert 2 keys (purple) and turn them.
- Go left.
- Take the EMPTY POT (T).
- Inspect the area (1); open the COIN PURSE, move a coin, and take the SILVER COIN.
- Use the SILVER COIN twice (orange); receive the BOLTS.
- Adjust the tiles correctly, use the EMPTY POT, and take the OIL (U).
- Take the GLASS CUTTER, RUSTY SAW, BOARD 1/3 (V), and CHISEL (W).
- Place the CHISEL, select it, use the hammer 4 times, and take the HANDLE (X).
- Use the OIL, HANDLE, BOLTS, and SILVER COIN on the RUSTY SAW; take the SAW.
- Go back.
Chapter 3: Camilla's Shop
- Use the SAW (Y); pull it right and left.
- Go right.
- Take the HEART HALF (Z).
- Combine 2 HEART HALVES; take the MEDICINE.
- Take the CANDLE and SPINNING WHEEL (A).
- Use the CHRYSANTHEMUMS and clean the glass with it (B); take the GLASS (purple).
- Place the JEWELRY (C); arrange it correctly (D) and take the HAIRPIN (blue).
- Inspect the clock (1).
- Play the mini-game.
- Solution: (E).
- Insert the HAIRPIN; take the LOCK PART.
- Move items 1-5 and take the COSMETICS (F).
- Place the LOCK PART and adjust the parts (G); take the LETTERS (H), MAP (I), and 6 RUBIES (green).
- Give the MEDICINE, TORN NOTE, and take CAMILLA'S HEART (J).
- Take the GREEN GLASS (K).
- Go back, go left.
- Place the COSMETICS, GREEN GLASS, GLASS, MIRROR, and GLASS CUTTER (L).
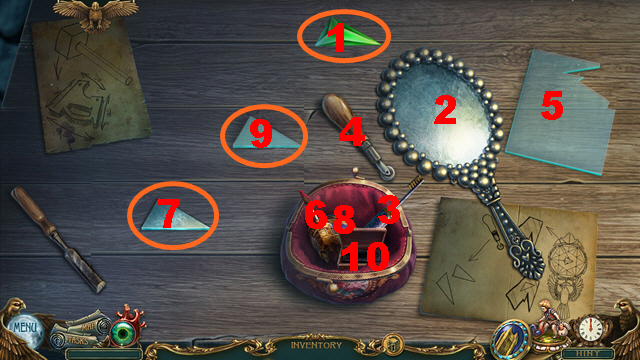
- Prepare the glasses: (1-2)-(3-10-2)-2-(4-2)-(3-5)-5-2-(4-5)-5-(6-7)-(8-9).
- Take 3 GLASSES (orange).
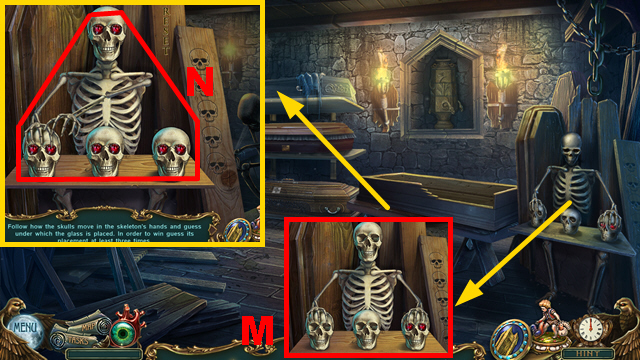
- Place the RUBIES (M); play the mini-game.
- Solution: Guess under which skull the glass is placed (N) 3 times.
- This puzzle is randomized.
- Receive GOBLET 1/2.
- Go back, go right.
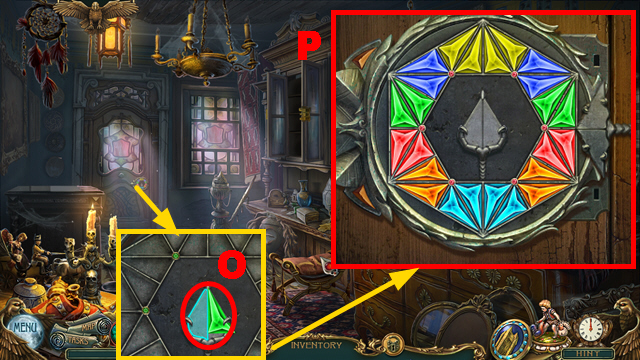
- Place 3 GLASSES (O); play the mini-game.
- Solution: (P).
- This puzzle is randomized.
- Go forward.
- Inspect anything.
- Take the HATCHET (Q) and BOARD 2/3 (R).
- Open the lamp, take DOLPHIN PART 1/10, use the OIL, wick (1), and CANDLE (S).
- Take the BOTTLE (T).
- Take the the COPPER CROSS (U) and use the HATCHET twice (blue) to receive the LEGS.
- Play the HOP (V); receive the ROPE.
- Go back twice, go left.
- Place the COPPER CROSS (W); take the TONGS (X).
- Apply the TONGS to the SPINNING WHEEL and select the wheel; use the HATCHET on it 4 times and take the SPOKES.
- Place the LEGS and SPOKES on the ROPE; take the ROPE LADDER.
- Go back, go right, go forward.
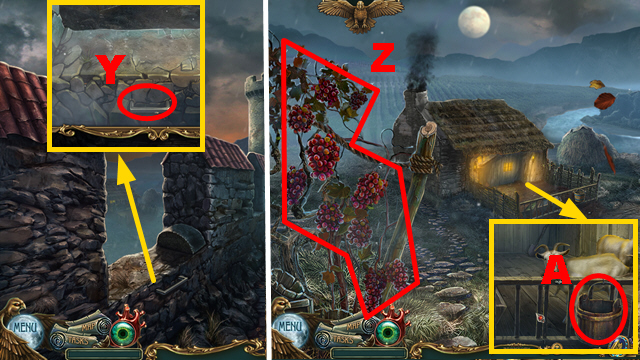
- Place the ROPE LADDER (Y); climb down.
- Collect 10 GRAPES (Z).
- Take the BUCKET (A).
- Collect DOLPHIN PART 2/10 from the BUCKET, place 10 GRAPES and the BOTTLE in it.
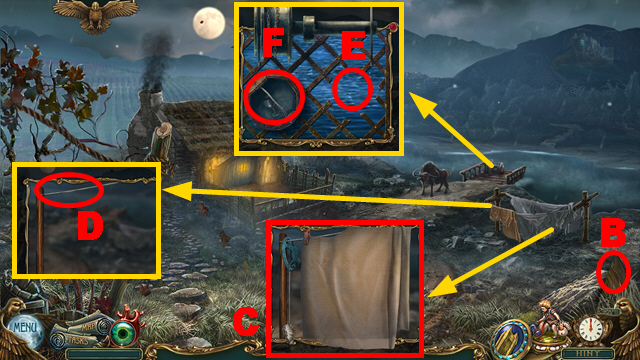
- Take BOARD 3/3 (B).
- Take the FLINT and FABRIC (C).
- Put the FABRIC into the BUCKET, receive the RED FABRIC, flip the BUCKET, and take the BUCKET.
- Place the RED FABRIC (D).
- Use the BUCKET (E); take GOBLET 2/2 and the BUCKET OF WATER (F).
- Use the BUCKET OF WATER (G); take the SILVER CROSS (H).
- Go back.
- Play the HOP (I); receive the CHAIN.
- Place 2 GOBLETS, take DOLPHIN PART 3/10, and the SALT (J).
- Go back twice, go left.
- Place the SILVER CROSS and take the SICKLE BLADE (K).
- Go back, go right, go forward, climb down.
- Use the SALT (L); take the WINCH DRUM (M).
- Place the CHAIN, WINCH DRUM, and 3 BOARDS (N).
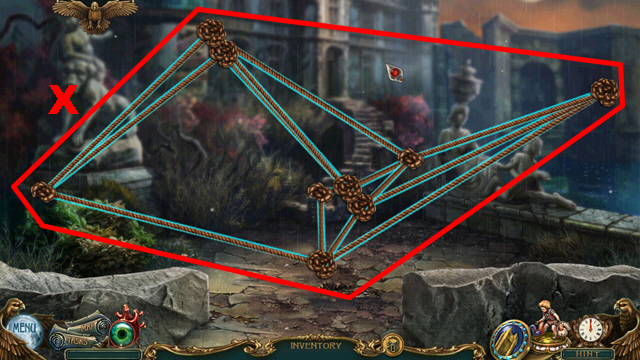
- Play the mini-game.
- Solution: (O).
- Go right.
- Take the POT (P).
- Collect DOLPHIN PART 4/10 from the POT.
- Take the BURLAP (Q) and TORCH BASE (R).
- Collect 11 pieces (purple); take the BRUSH, loosen the wire twice (S), take DOLPHIN PART 5/10 (T), and the WIRE (U).
- Go back 4 times, go left.
- Place and take the BURLAP (V).
- Use the BURLAP, WIRE, and FLINT on the TORCH BASE; take the BURNING TORCH.
- Go back, go right, go forward, climb down, go right.
- Use the BURNING TORCH and inspect the area (W).
- Play the mini-game.
- Solution: (X).
- This puzzle is randomized; receive the ROPE.
- Go right.
Chapter 4: Armand's Mansion
- Take 3 DOLPHIN PARTS (blue).
- Take DOLPHIN PART 9/10 and climb up (Y); take the STIRRUP (Z), climb up, and take FEATHER 1/4 (A).
- Take the CATCH (B).
- Take CIRCLE 1/4 (C) and the DOLPHIN STATUE BASE (1).
- Take the SICKLE HANDLE (D).
- Place the SICKLE HANDLE on the SICKLE BLADE; take the DULL SICKLE.
- Go back 3 times.
- Use the DULL SICKLE and take the SICKLE (E).
- Go left, go right.
- Place the STIRRUP, take the SCRAPER, and OLD BOOT (F).
- Select the OLD BOOT twice; take the SPUR and DOLPHIN PART 10/10.
- Place 10 DOLPHIN PARTS on the DOLPHIN STATUE BASE; assemble it correctly (G).
- Use the SICKLE, receive the GRASS, and take STONE APPLE 1/3 (H).
- Use the SPUR (I) and push when the marker is in area (J) to receive STONE APPLE 2/3; place the POT and take the POT WITH RESIN (K).
- Put the BRUSH into the POT WITH RESIN; take the RESIN.
- Apply the RESIN to the DOLPHIN STATUE BASE; take the DOLPHIN STATUE.
- Go forward.
- Use the SICKLE and play the HOP (L); receive CIRCLE 2/4.
- Place the DOLPHIN STATUE (M); take STONE APPLE 3/3 (N).
- Place 3 STONE APPLES (O); take CIRCLE 3/4 (blue).
- Use the SCRAPER (P).
- Go back twice.

- Place the GRASS (Q) and move the pitchfork (R); move hay twice, insert the CATCH, push it, and take CIRCLE 4/4 (S).
- Go right, go forward.
- Place 4 CIRCLES adjust them (T), and guide the flower token (green).
- Go forward.
- Use the SICKLE 1-4.
- Take the PIPE PART (U) and FEATHER 2/4 (V).
- Place the ROPE (W).
- Take SEAHORSE 1/2 (X).
- Take the TROWEL (Y) and PIPE (Z).
- Collect SEAHORSE 2/2 from the PIPE.
- Go back.
- Place 2 SEAHORSES and take the GLASS BIRD (A).
- Go forward.
- Open the compartment, use the FLINT, and close it (B).
- Take the TABLE LEG (C) and PIPE LAYOUT (D).
- Place the TABLE LEG, pull it up, take the BIRD HINT, and FEATHER 3/4 (E); open the drawer and take CONTROLLER TILE 1/3 (F).
- Go back twice.

- Use the TROWEL and take the PIPE PART (G).
- Place 2 PIPE PARTS and PIPE LAYOUT on the PIPE; adjust the symbols correctly (H) and take the PIPE.
- Go forward twice.
- Place the PIPE and fasten it (I).
- Take FEATHER 4/4 (J); push the button (1).
- Place the GLASS BIRD, 4 FEATHERS, BIRD HINT, and adjust the feathers correctly (K); insert the key and turn it (purple).
- Go forward.
- Pull the carpet and take CONTROLLER TILE 2/3 (L).
- Inspect and take the CONTROLLER HINT (M).
- Take WINE PLAQUE 1/3 (N).
- Empty the bucket and take the TRIANGLE KEY (O); take GLASS GRAPE 1/2 (P), use the stone, and take CONTROLLER HINT PART 1/2 (Q).
- Go back.
- Place the TRIANGLE KEY, open the drawer, and take SYMBOL 1/2 (R).
- Go forward.
- Place the CONTROLLER HINT (S); play the mini-game.
- Solution: 1-6.
- Collect 8 pieces (green); receive CONTROLLER HINT PART 2/2.
- Place 2 CONTROLLER HINT PARTS (T), use the candle on it (U), and take the CONTRIOLLER HINT.
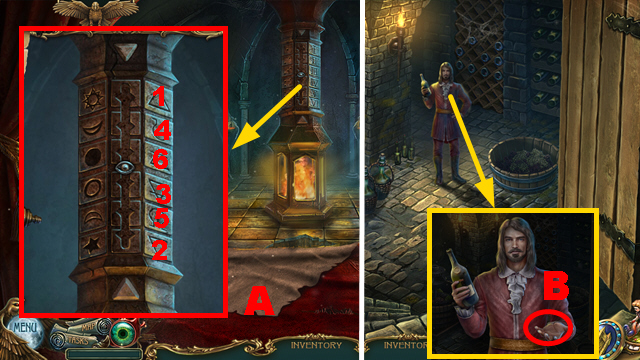
- Place the CONTROLLER HINT and rotate the column (V); play the mini-game.
- Solution: 1-6.
- Collect 6 leaves (orange); take the CONTROLLER HINT.
- Place the CONTROLLER HINT (W); play the mini-game.
- Solution: 1-6.
- Collect 6 fruits (blue); receive GLASS GRAPE 2/2.
- Go back twice.
- Place 2 GLASS GRAPES and take SYMBOL 2/2 (X).
- Play the HOP (Y); receive CONTROLLER TILE 3/3.
- Go forward twice.
- Place 2 SYMBOLS, move them 1-3, take the BRACELET PART, and CONTROLLER HINT (Z).
Chapter 5: The Wine Vault
- Flip the controller, place the CONTROLLER HINT and 3 CONTROLLER TILES (A); play the mini-game.
- Solution: 1-6.
- Go left.
- Give CAMILLA'S HEART and the LETTERS (B).
- Inspect anything.
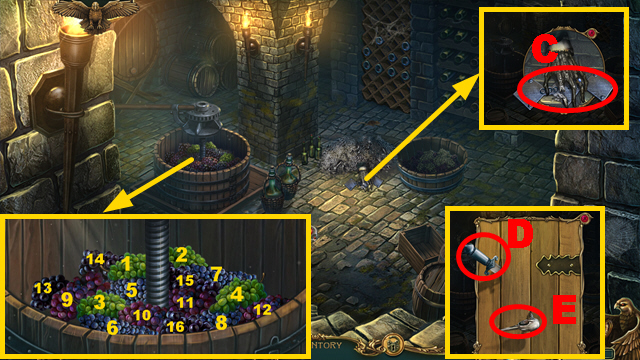
- Collect grapes 1-16; take WINE PLAQUE 2/3 and the eye.
- Take ARMAND'S RING and WINE PLAQUE 3/3 (C).
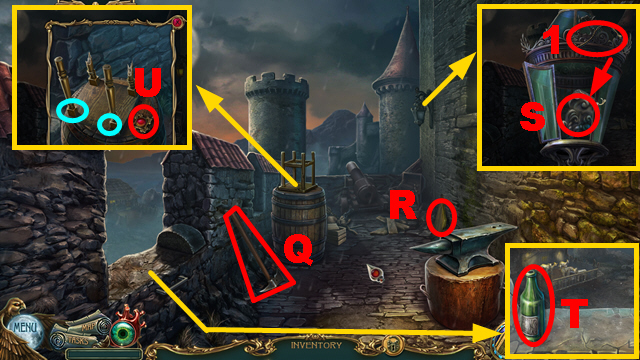
- Try to go back; take the BROKEN DAGGER (D) and CORKSCREW (E).
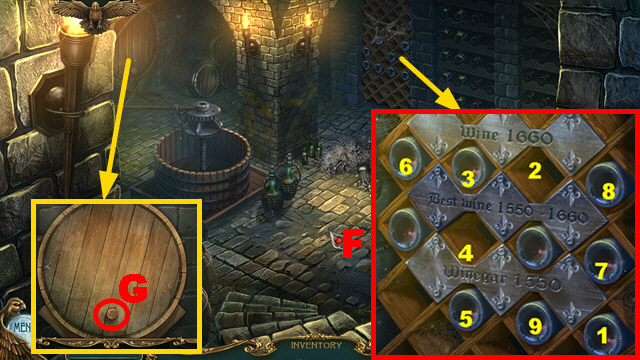
- Place 3 WINE PLAQUES (F); arrange bottles (1-2)-(3-4)-(5-3)-(6-5)-(7-6)-(8-7)-(9-8) to receive the VINEGAR.
- Use the CORKSCREW and VINEGAR (G).

- Play the mini-game.
- Solution: 1-8.
- Take QUATREFOIL 1/2.
- Go left.
- Inspect anywhere 3 times.
- Talk to the guard (H).
- Give ARMAND'S RING, the BROKEN DAGGER, and talk to him (I).
- Play the mini-game.
- Solution: 1-2-3-4-5-6-6-7-8-9-9-10-11-12-13-14-15-16-17-18-19-20-21-22-23-24-25-23-24-25-26-27-28.
- Take the LOCK PIECE and TUBE.
- Go back, go left, go forward.

- Take the CHARCOAL, remove ashes twice, place the LOCK PIECE, take the PAPER, and BLUE BIRD (J).
- Go back 3 times.
- Play the HOP (K); receive the HORSEHOE.
- Place the BLUE BIRD and take the TUMBLER (L).
- Turn around the signboard; use the PAPER, CHARCOAL, and take the CODE (M).
- Go forward, go left, go forward.
- Place the TUMBLER, CODE, enter the code '4631', take the eye, and PURIFICATION STONES (N); insert the HORSESHOE, take the note, BROKEN BRACELET, and FEATHER (O).
- Place the FEATHER on the TUBE; move the segment 1-5, take the BRACELET PART, and KEY TO THE QUARTER OF SHADOWS.
- Place 2 BRACELET PARTS on the BROKEN BRACELET; take the DEMON SLAYER.
- Go forward twice.
- Use the DEMON SLAYER (P).
- Go left.
- Collect herbs 1-12, take the WILDFLOWERS, and WATERING CAN.
- Look through the gap (R); take the STATUE HAND (Q).
- Take the STATUE HEAD (S) and RIBBON (T); shake the stump twice and use the TROWEL 3 times (U).
- Use the RIBBON and take the SHEAF (V).
- Place the STATUE HAND, RESIN, and STATUE HEAD (W); use items 1-(2-3)-1-(4-3)-1-(5-3)-1-(6-3)-1-(7-3)-1-(8-3).
- Use the SHEAF, take QUATREFOIL 2/2, arrange the image (X), and take the SUN (green).
- Place 2 QUATREFOILS and take the SAPLING (Y).
- Insert the SUN (Z); take the eye (A).
- Go back.
- Place the WATERING CAN (B); receive the WATER.
- Go forward, go left.
- Use the SAPLING, select it, and use the WATER (C).
- Use the PURIFICATION STONES (D).
- Play the mini-game.
- Solution: Match 3 or more similar gems next to the branches (blue) to remove them from the board (E).
- This puzzle is randomized.
- Insert the KEY TO THE QUARTER OF SHADOWS.
- Go forward.
- Take the BRASS KNUCKLES (F).
- Use the BRASS KNUCKLES and play the HOP (G); receive the RUNE.
- Place the RUNE (H).
- Go back.
- Use the BRASS KNUCKLES and take the RUNE (I).
- Go forward.
- Place the RUNE (J); play the mini-game.
- Solution: 1-5.
- Move the cover and take the SCROLL.
- Go back.
- Place the SCROLL (K); push symbols 1-4, take the DOOR CENTER, and eye.
- Go forward.
- Play the HOP (L); receive the TREE SCRAPER.
- Pull the platform up (purple); receive the POKER.
- Use the POKER 4 times, receive the NAILS, and place the DOOR CENTER (M).
- Play the mini-game.
- Solution: (N-O)-(P-Q)-(Q-R)-(R-S)-(R-Q)-(R-N).
- Go left.
Chapter 6: Stephen's House
- Take the TORCH (T).
- Open the glass (U), take the GLASS TUBE (V), and eye (W); arrange the vials and take the HOURGLASS (X).
- Take the ACID (Y) and place the GLASS TUBE (Z).
- Go back.
- Use the TORCH and WILDFLOWERS (A); receive the BURNING TORCH and SMOKY FLOWERS.
- Go left.
- Use the BURNING TORCH (B).
- Collect books 1-2, take HAGGARD'S BOOK (C), books 3, the ASTOR BOOK (D), books 5-8, and the HALBERD FOR KEY.
- Open the ASTOR BOOK (E-F-G), select it twice, turn 3 pages, take the ASTOR BONE POWDER, and eye.
- Go back.

- Place HAGGARD'S BOOK, inspect it, take the RECIPE, turn 2 pages, and take the CROSS-SHAPED KEY (H).
- Go back.
- Use the ACID and take the HAWK CLAWS (I).
- Use the TREE SCRAPER (J); pull it up and down to receive the METHUSELAH BARK.
- Go forward, go left.
- Insert the CROSS-SHAPED KEY, turn it, and take the EMPTY TEST TUBE (K).
- Use the EMPTY TEST TUBE (L); receive the DRAGON TEARS.
- Place the ASTOR BONE POWDER (1), RECIPE (2), HAWK CLAWS (3), DRAGON TEARS (4), and METHUSELAH BARK (5); turn the switch (M).
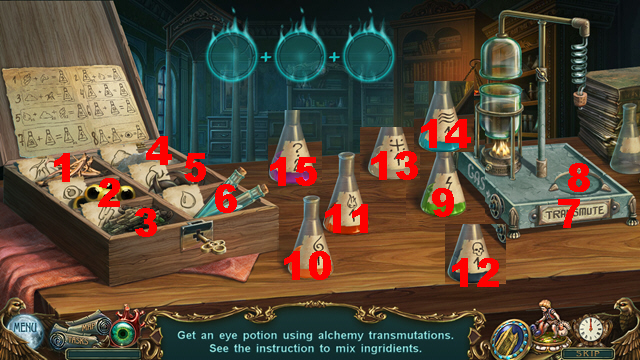
- Play the mini-game.
- Solution: (3-5-7-8)-(3-5-7-8-)-(9-9-6-7-8)-(4-1-7-8)-(3-5-7-8)-(9-11-7-8)-(6-6-4-4-3-3-7-8)-(13-12-7-8)-(4-1-7-8)-(10-11-7-8-8-8)-(15-15-14-2-7-8).
- Receive the MAGIC VISION POTION.
- Use the MAGIC VISION POTION (N).
- Open the trap door twice; take the SWORD FOR KEY (O).
- Go downstairs (P).
- Use the BURNING TORCH 1-4.
- Inspect anywhere.
- Select and take the WATER CRYSTAL (Q).
- Remove dirt twice and take the eye (R).
- Use the SMOKY FLOWERS, remove cobwebs, and take the FIRE CRYSTAL (S).
- Use the ACID twice and take the EARTH CRYSTAL (T).
- Take the SHIELD KEY (U) and MALLET (V).
- Hit the HOURGLASS with the MALLET twice; take the eye and AIR CRYSTAL.
- Place the BROKEN DAGGER, AIR CRYSTAL, EARTH CRYSTAL, FIRE CRYSTAL, WATER CRYSTAL, take the ASTOR DAGGER (W), and use the ASTOR DAGGER (X).
- Go back.
- Use the ASTOR DAGGER and take the eye (Y).
- Go back.
- Use the ASTOR DAGGER and take the eye (Z).
- Place the SWORD FOR KEY and HALBER FOR KEY on the SHIELD KEY.
- Go left.
- Insert the SHIELD-KEY (A).
- Play the mini-game.
- Solution: 1-5.
- Take the ASTOR BLOOD and LIFE CRYSTAL (B).
- Go downstairs.
- Place the LIFE CRYSTAL (C); receive the FINGER.
- Use the FINGER (blue); place the ASTOR BLOOD 1-4.
- Take the BELT (D).
- Activate the eyes (E); take the ALL-SEEING EYES.
- Use the ALL-SEEING EYES, arrange them, talk to them, and receive the ALL-SEEING EYE (F).
- Go back 5 times.
- Use the ALL-SEEING EYE and take DOMINIC'S CROSS (G).
- Go to the Chamber of Secrets.
- Use the ALL-SEEING EYE, DOMINIC'S CROSS, talk, and receive the ALL-SEEING EYE (H).
- Go to Camilla's Shop.
- Use the ALL-SEEING EYE and take CAMILLA'S RING (I).
- Go to the Chamber of Secrets.
- Use the ALL-SEEING EYE, CAMILLA'S RING, talk, and receive the ALL-SEEING EYE (J).
- Go to the Wine Cellar.
- Use the ALL-SEEING EYE and take ARMAND'S RAPIER (K).
- Go to the Chamber of Secrets.
- Use the ALL-SEEING EYE, ARMAND'S RAPIER, talk twice, and take the MIRROR OF TRUTH and receive ARMORY KEY 1/2 (L).
- Go back twice.
- Use the MIRROR OF TRUTH (M).
- Go forward.
- Take the STICKS (N).
- Take the FISHING NET and play the HOP (O); receive the ZODIAC STONES.
- Place the ZODIAC STONES, arrange them correctly, take the EMPTY BAG, and GUN STOCK (P).
- Take the WOODEN HOOP (Q).
- Select the STICKS, place the BELT, WOODEN HOOP, FISHING NET, and NAILS on it, secure the nails, and take the NET.
- Use the NET 3 times (R); take the FLINTLOCK (S).
- Go back.
- Place the EMPTY BAG, pull the cork, and take the GUNPOWDER (T); push the barrel, take the ARMORY KEY 2/2, and BARREL (U).
- Go forward.
- Place the BARREL (V) and play the HOP; receive the BULLETS.
- Go back, go left.
- Place 2 ARMORY KEYS and take the MUSKET MUZZLE (W).
- Place the FLINTLOCK, GUNPOWDER, MUSKET MUZZLE, and BULLETS on the GUN STOCK; select the gunpowder, bullets, and take the MUSKET.
- Go back, go forward.
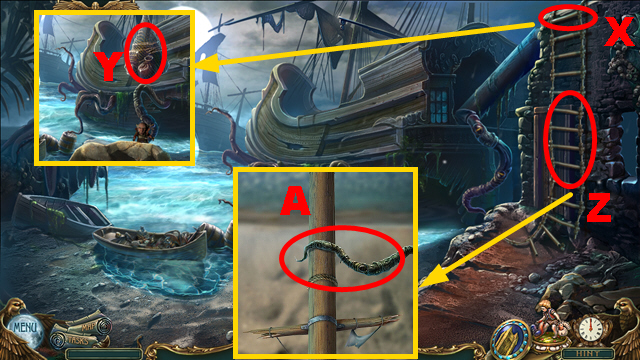
- Shoot the MUSKET (X); play the mini-game.
- Solution: Shoot until the net falls down (Y).
- Inspect the area (Z); play the mini-game.
- Solution: Move forward, hold the balance, and avoid the tentacles (A).
- Go forward.
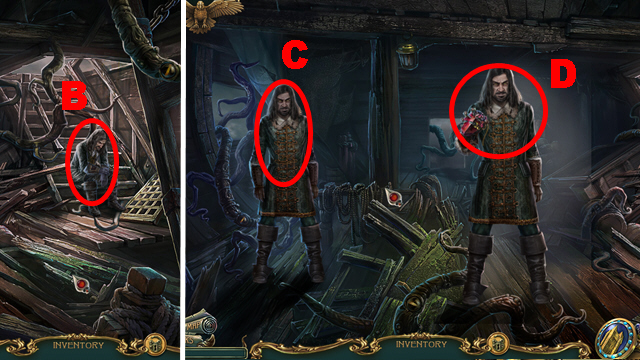
- Talk to the man (B).
- Scroll left; talk to the man (C) and use the MIRROR OF TRUTH (D).
- Inspect anywhere.
- Congratulations! You have completed Haunted Legends: The Black Hawk.
Created at: 2017-04-07