

Walkthrough Menu
General Tips
- This is the official guide for Haunted Legends: The Scars of Lamia.
- This guide won't tell you when to zoom into a location; the screenshots show each zoom scene.
- Hidden-object puzzles are referred to as HOPs. Only the locations of the HOPs will be shown.
- Use the Map to fast travel to a location.
Chapter 1: Sauvetage
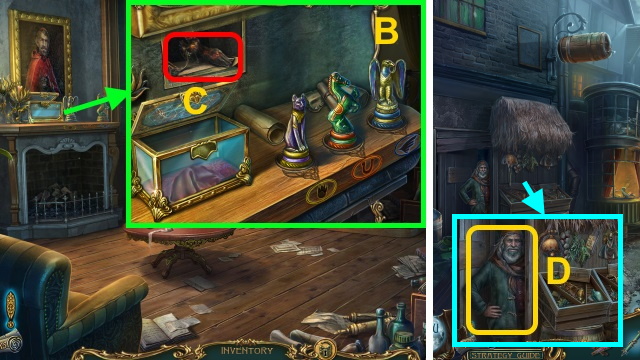
- Examine scene 2x.
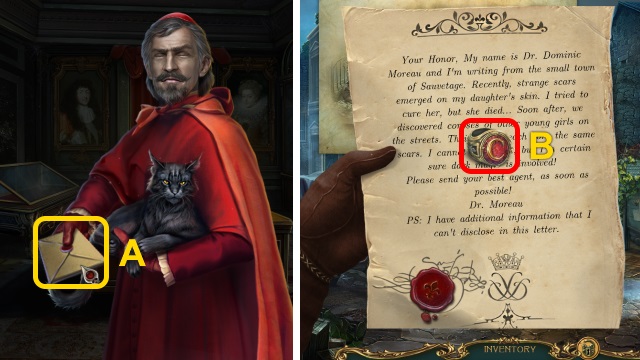
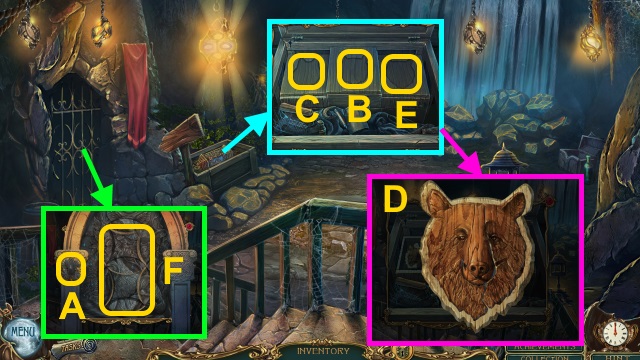
- Take letter; examine letter (A).
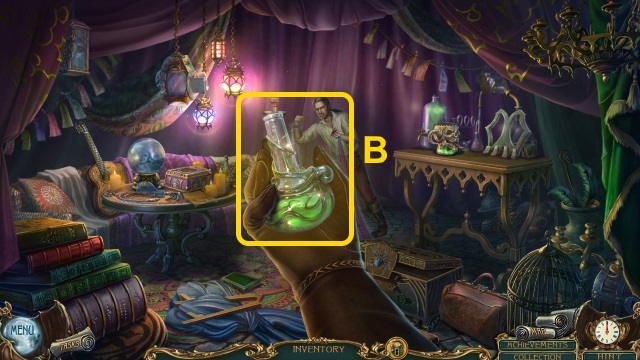
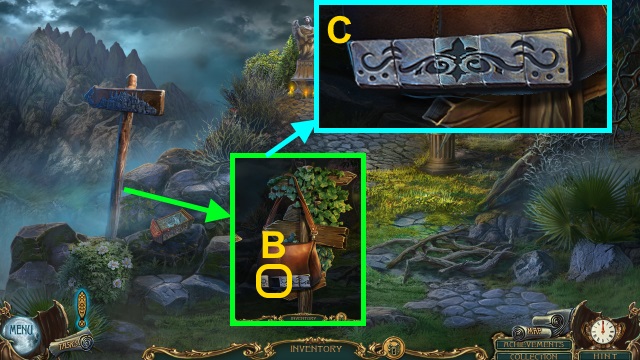
- Examine scene. Examine letters; take CARDINAL'S RING (B).
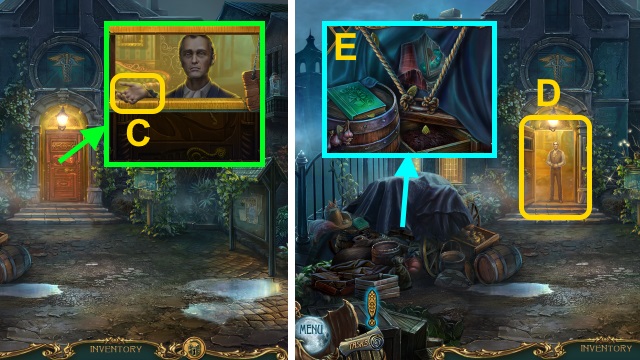
- Give CARDINAL'S RING (C).
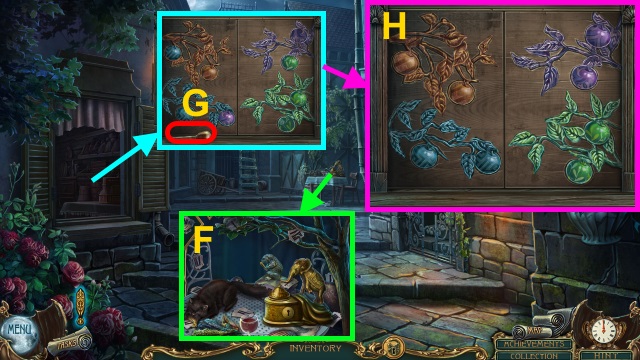
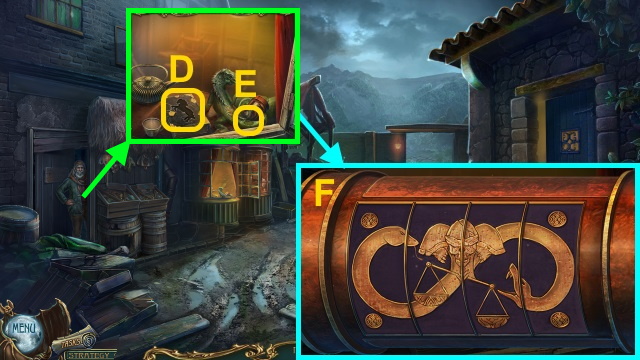
- Talk (D); examine doorway.
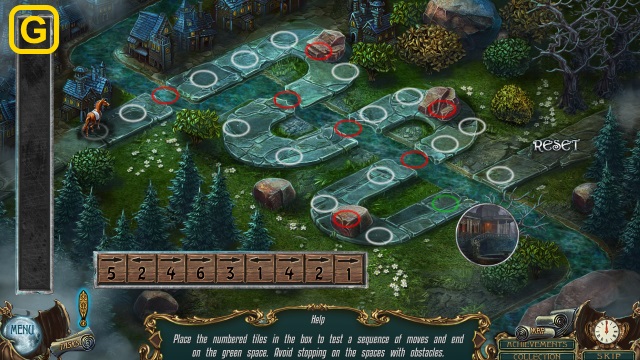
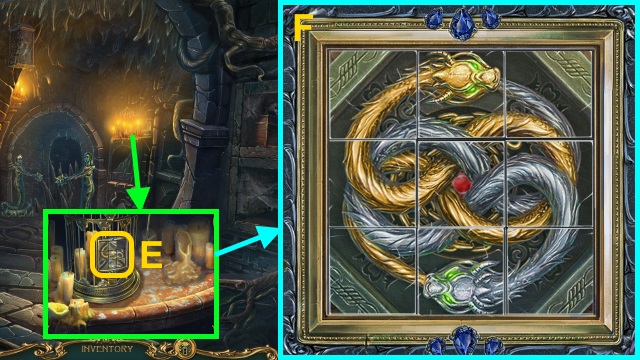
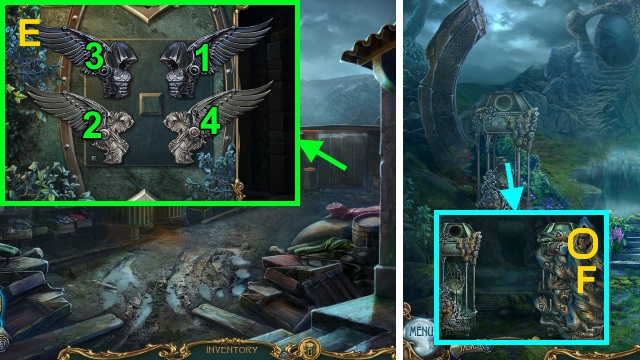
- Play HOP (E); receive LOCK PARTS.
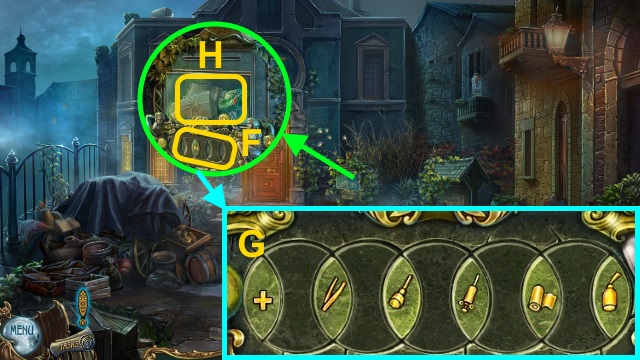
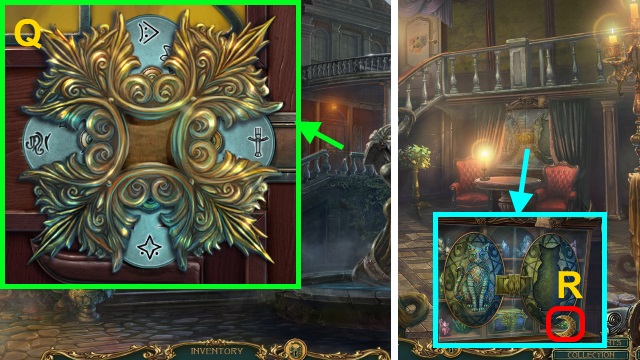
- Examine (F); place LOCK PARTS.
- Solution (G).
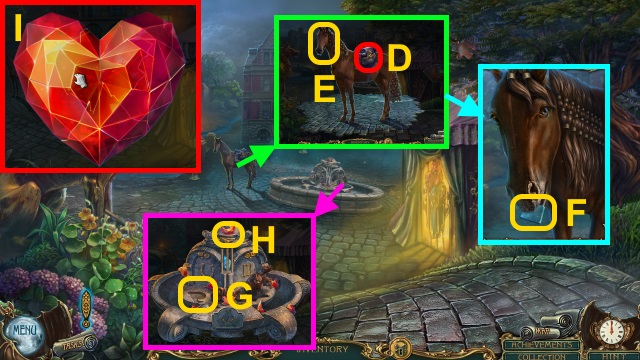
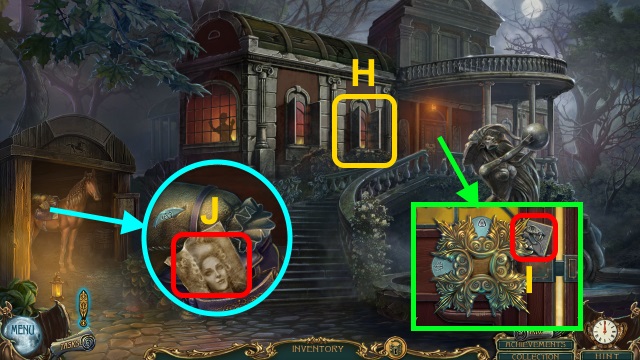
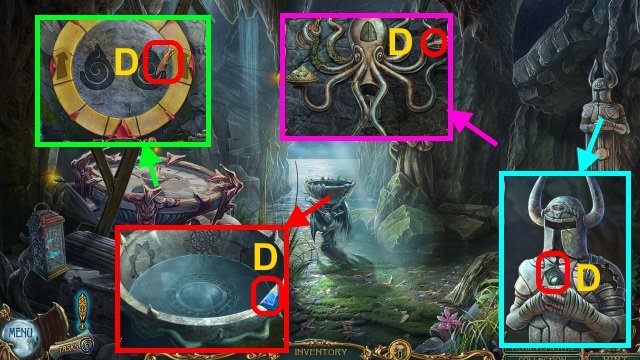
- Take PACKAGE (H). Examine newspaper; take SNAKE HEAD (1/3).
- Open PACKAGE; take GRINDSTONE.
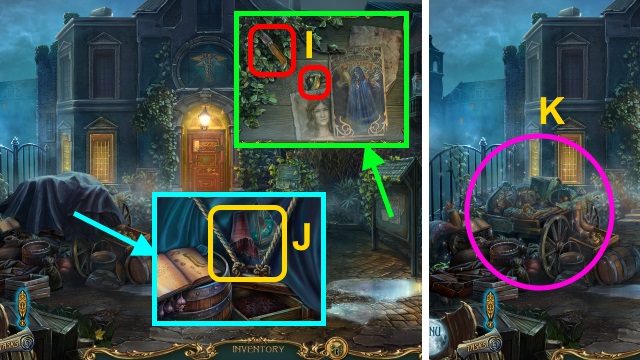
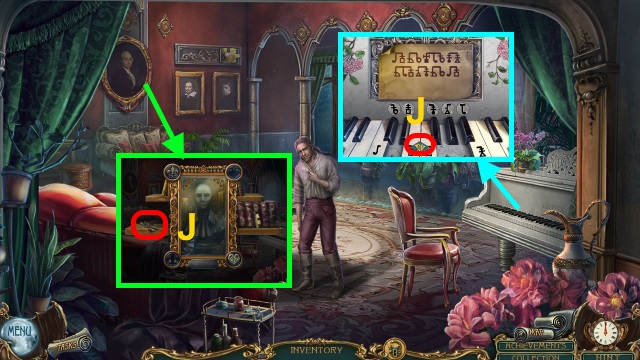
- Move plants; take RUSTY KNIFE and METAL EYE (I).
- GRINDSTONE on RUSTY KNIFE; take SHARPENED KNIFE.
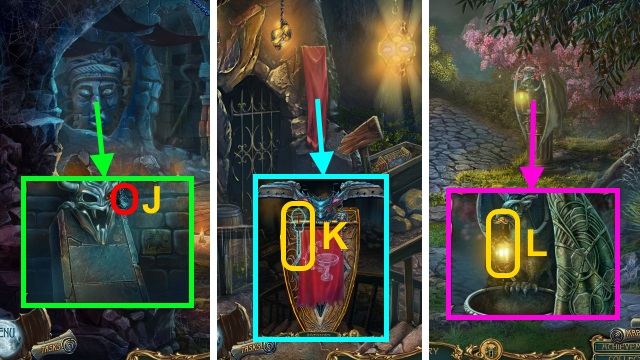
- Use SHARPENED KNIFE (J).
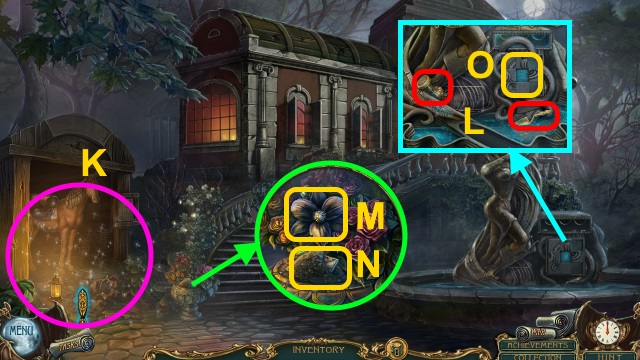
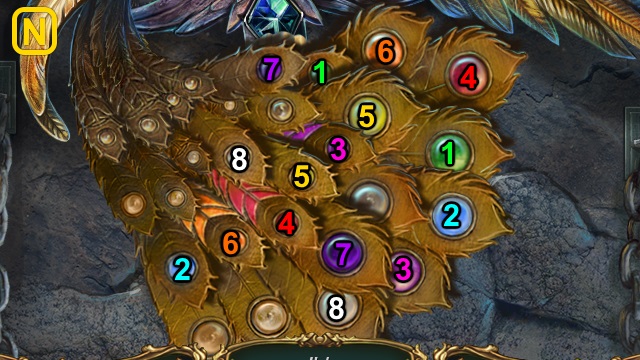
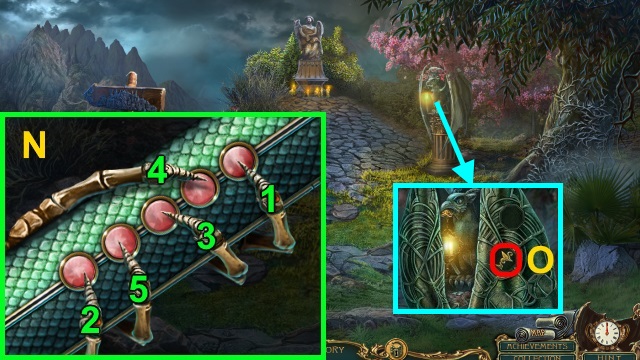
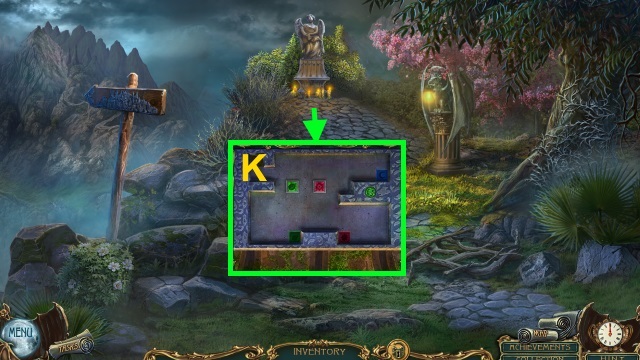
- Play HOP; receive SNAKE HEAD (2/3) (K).
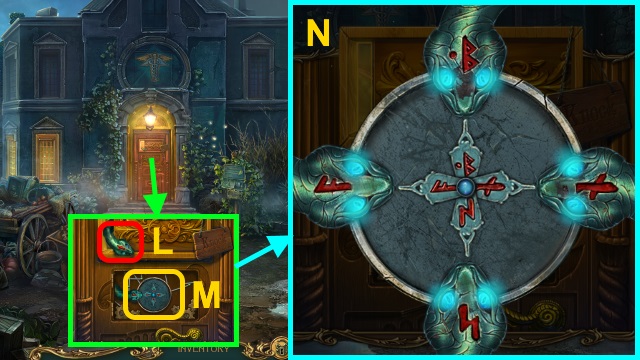
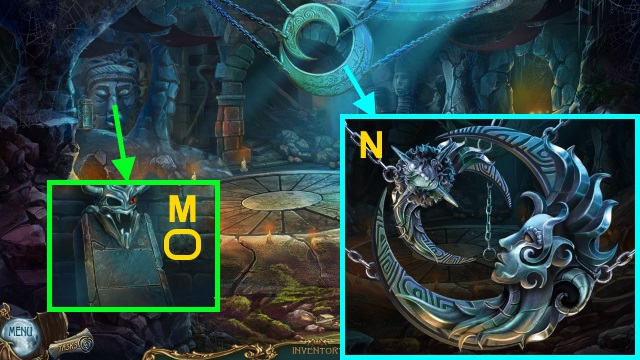
- Take SNAKE HEAD (3/3) (L). Examine (M); place SNAKE HEAD (3/3).
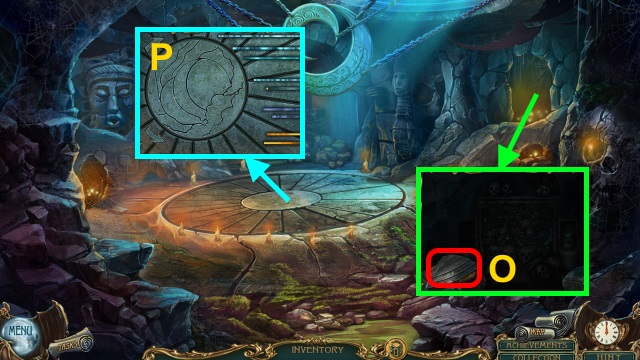
- Solution (N).
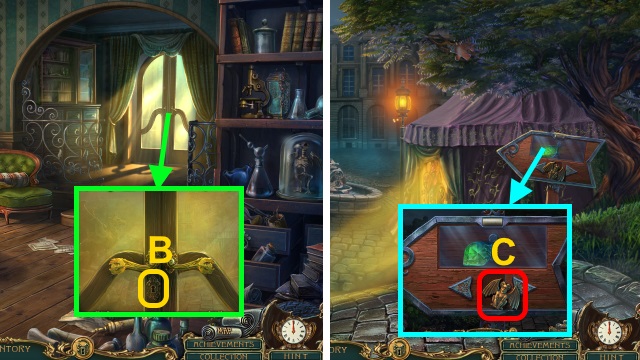
- Turn doorknob.
- Walk forward.
- Examine scene.
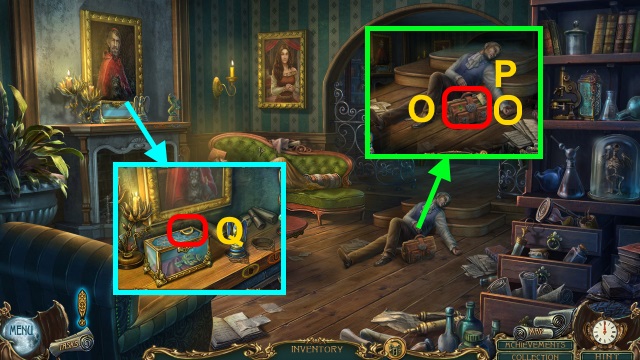
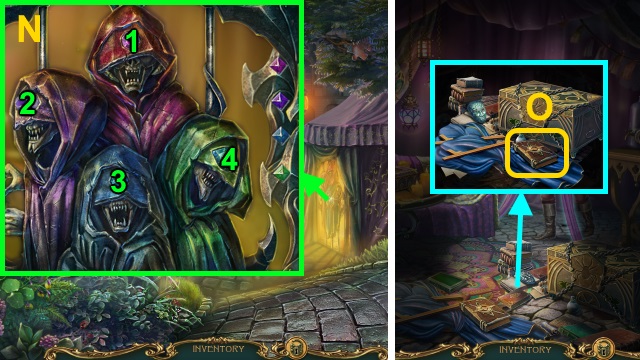
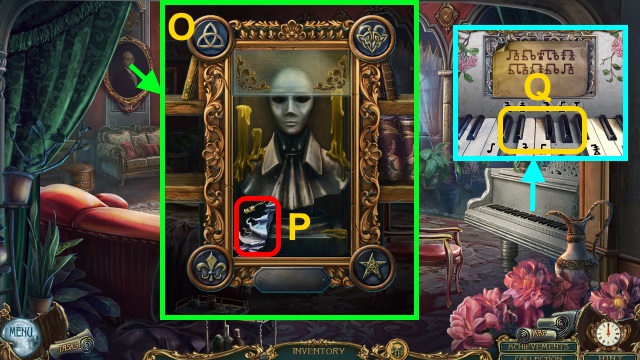
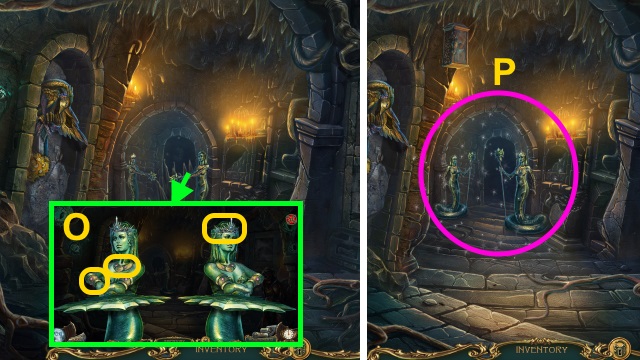
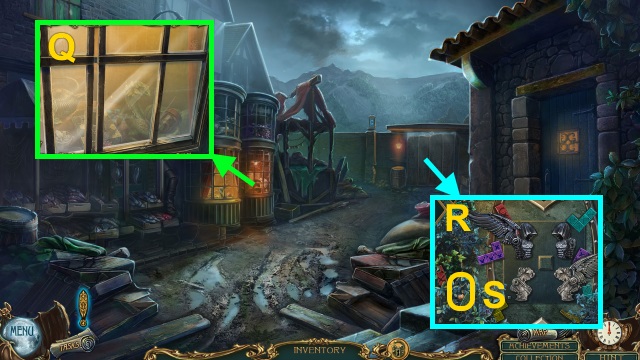
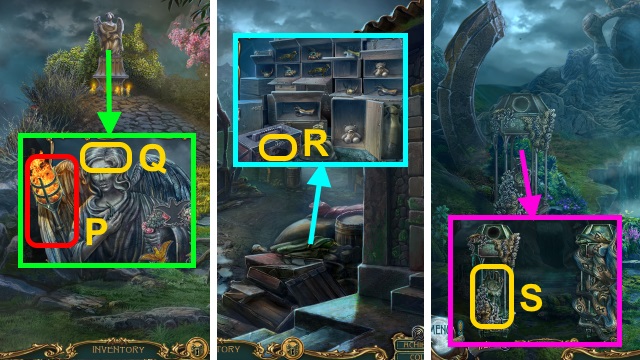
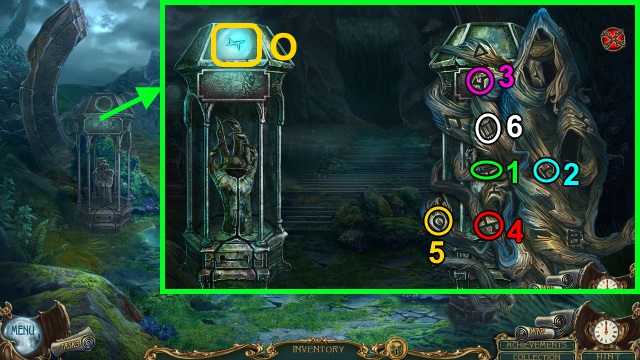
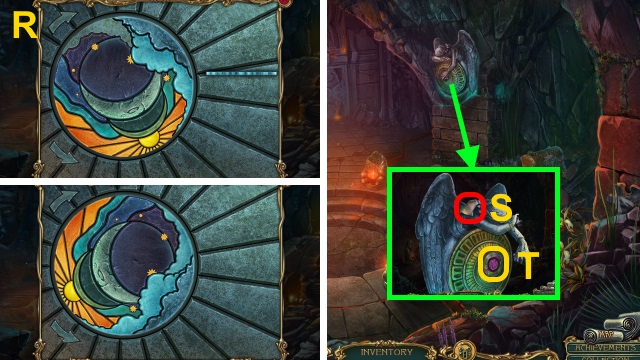
- Talk; take DOCTOR'S BAG (O). Hold hand (P); take LETTER M.
- Take LETTER D (Q).
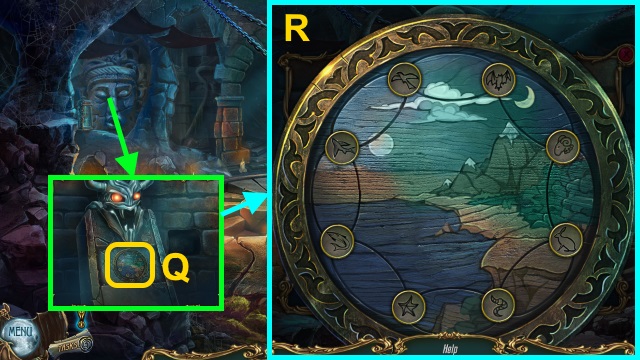
- LETTER M and LETTER D on DOCTOR'S BAG; play HOP.
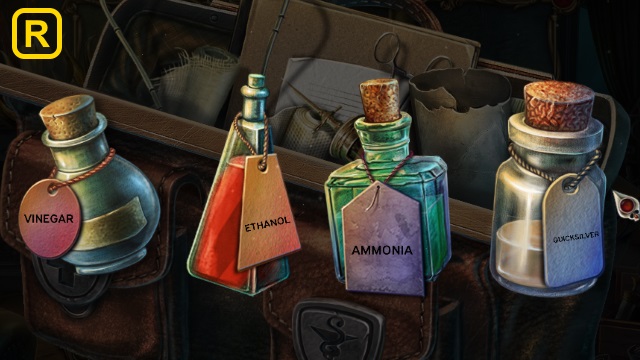
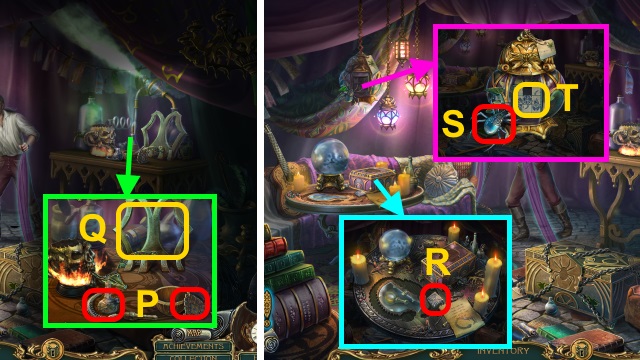
- Solution (R); receive AMMONIA.
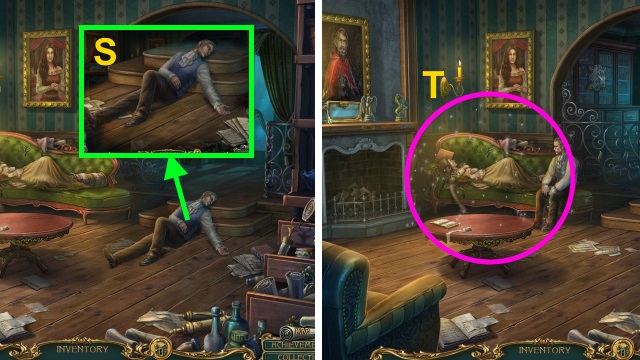
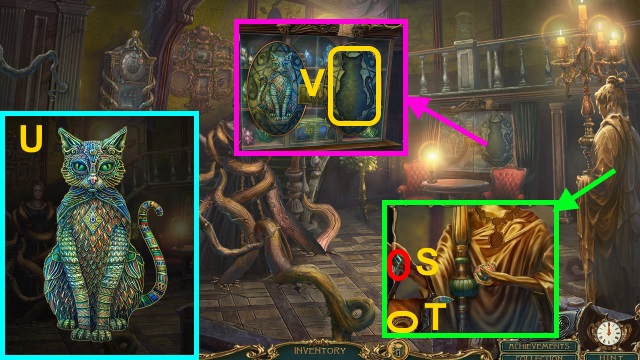
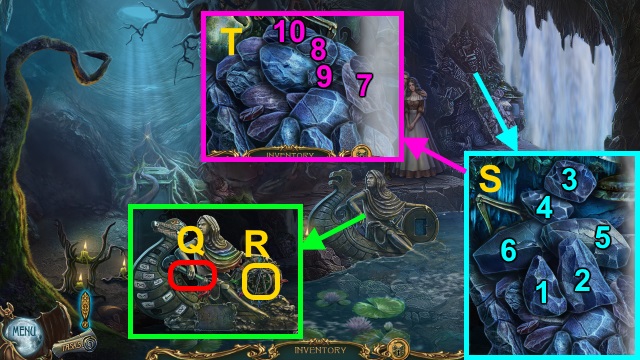
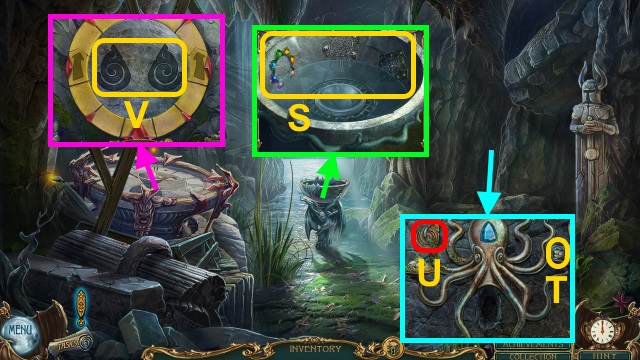
- Use AMMONIA (S).
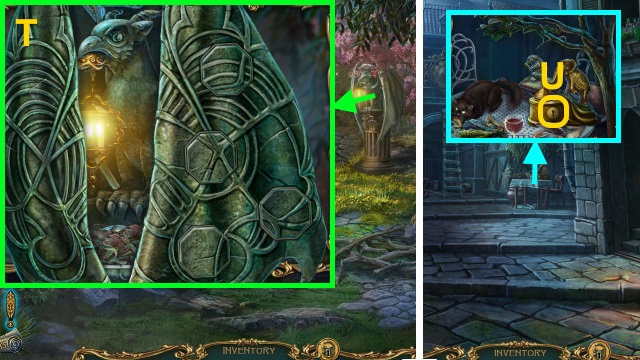
- Play HOP; receive METAL HEART (T).
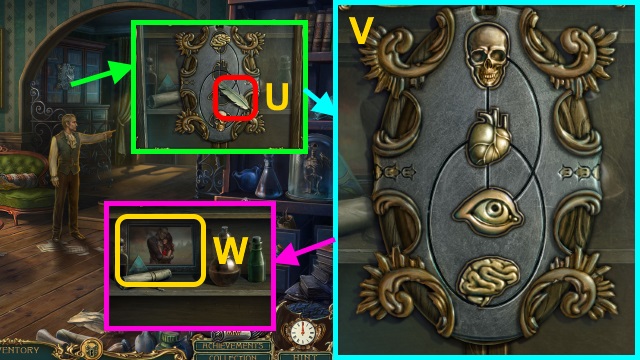
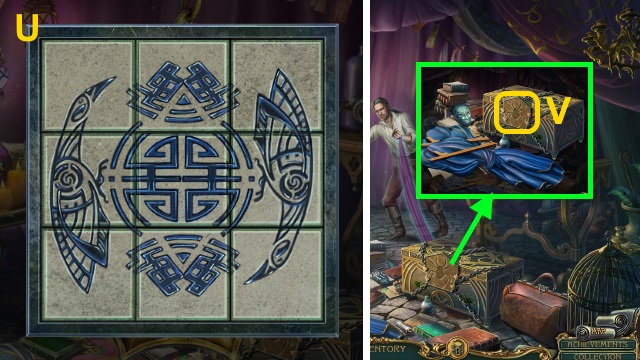
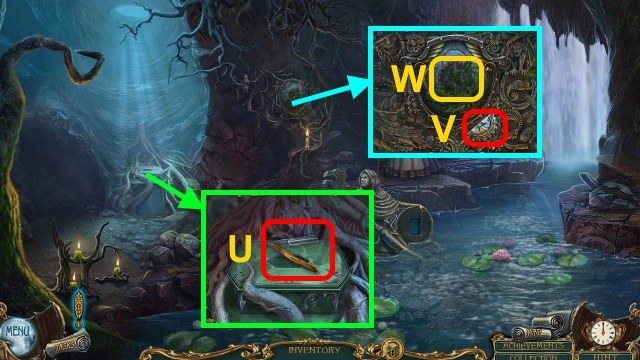
- Take FEATHER (U); place METAL HEART and METAL EYE.
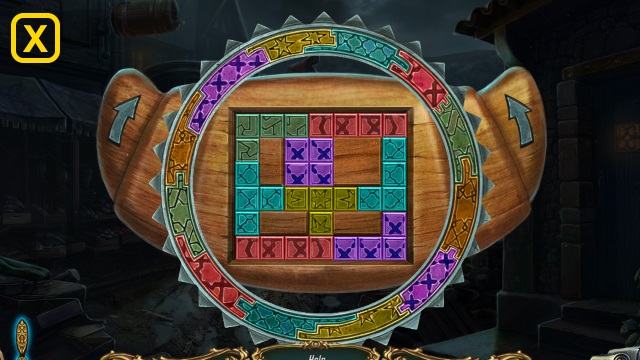
- Solution (V).
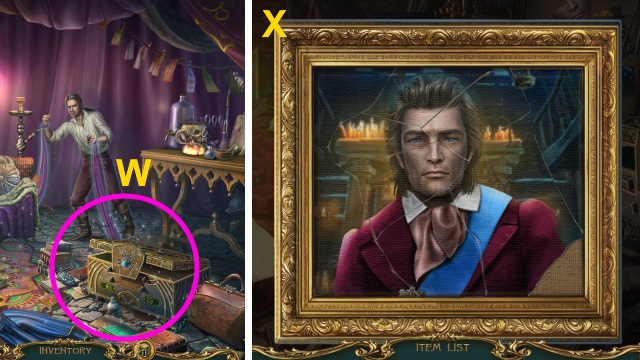
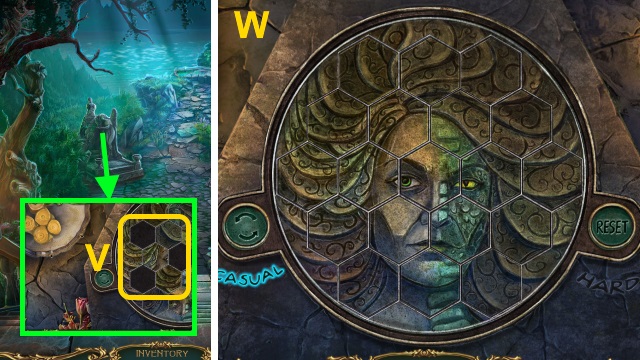
- Examine photo (W); take PUZZLE PART (1/2).
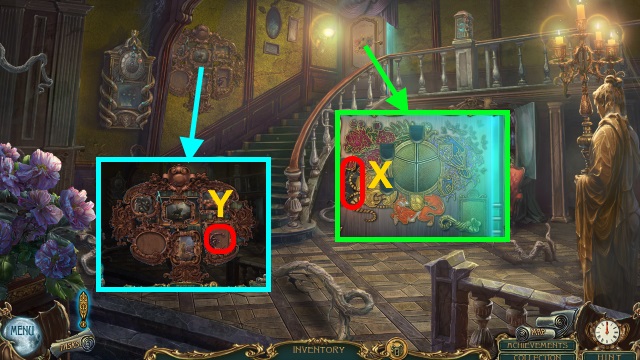
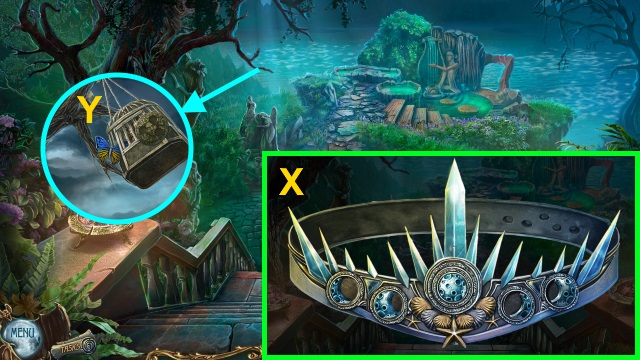
- Take ARTEMISIA (X).
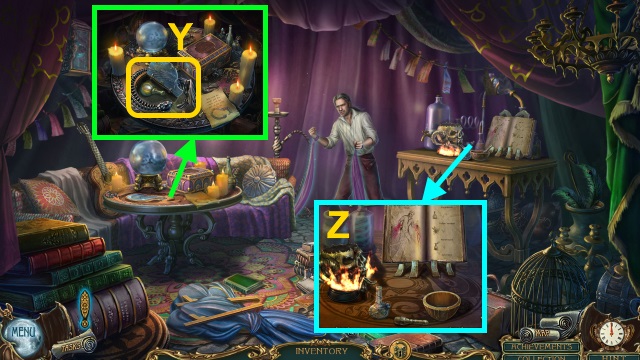
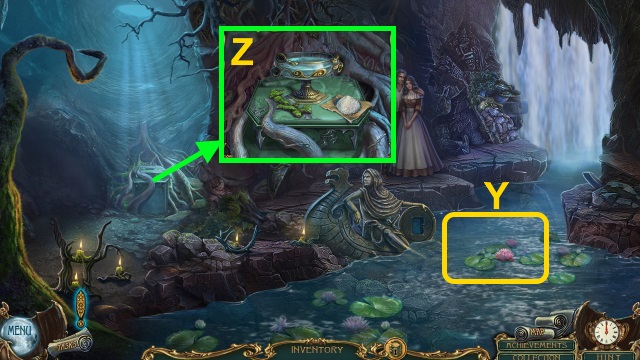
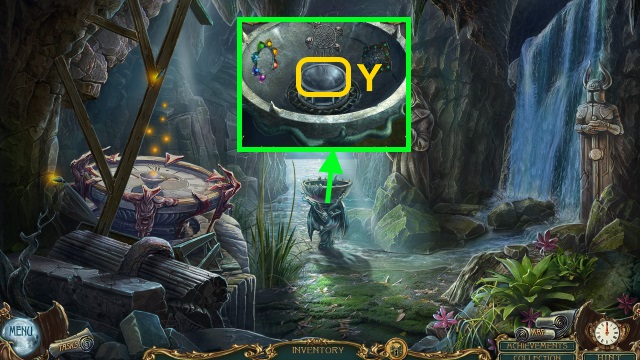
- Take PUZZLE PART (2/2) (Y).
- Place PUZZLE PART (2/2) (Z).
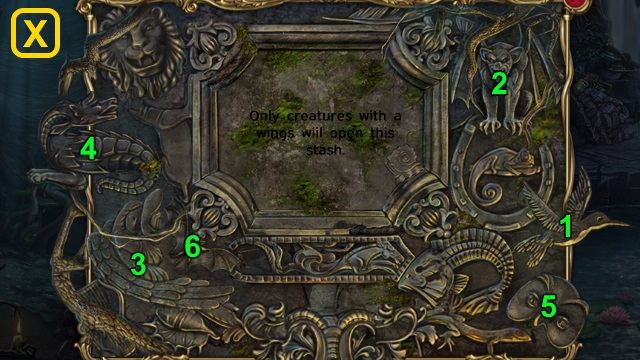
- Solution (A).
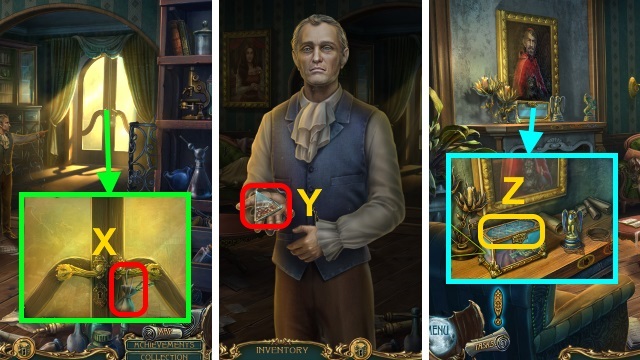
- Take BACKDOOR KEY.
- Use BACKDOOR KEY (B); open.
- Walk forward.
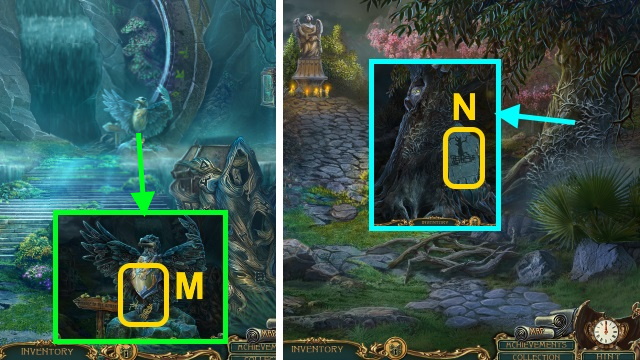
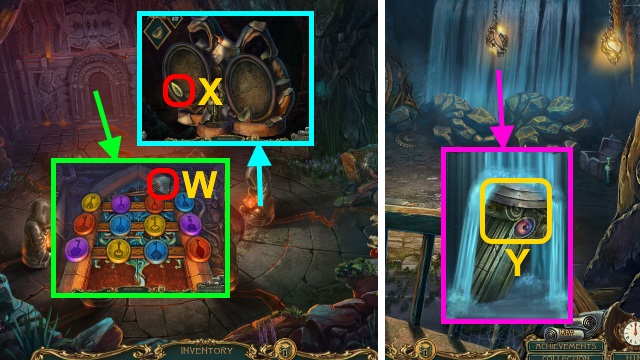
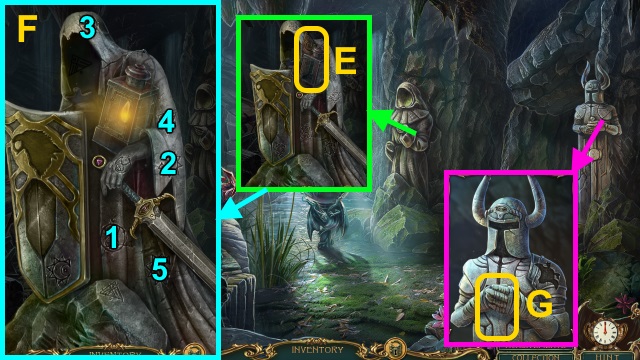
- Take GARGOYLE STATUETTE (C).
- Take HORSE STATUETTE (D); examine (E).
- Use FEATHER (F); receive MAGICIAN CARD HALF (1/2).
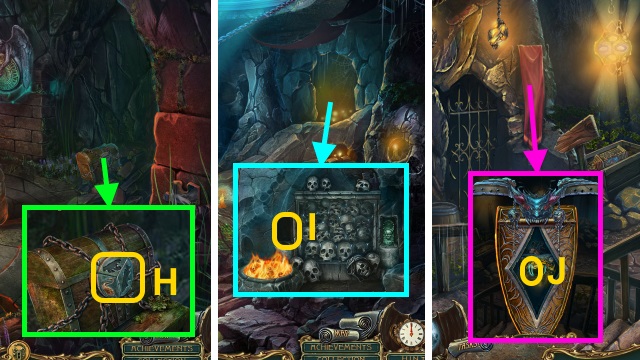
- Play HOP; receive BROKEN HEART. Place HORSE STATUETTE (G) and GARGOYLE STATUETTE (H); take BLUE GEM.
- Examine BROKEN HEART; place pieces (I). Take RUBY HEART.

- Take SCOOP NET; place RUBY HEART (J). Receive VIOLET GEM.
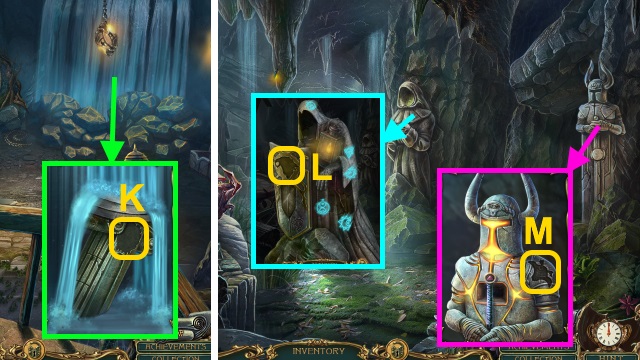
- Take MAGICIAN CARD HALF (2/2) (K).
- Place MAGICIAN CARD HALF (2/2) (L).
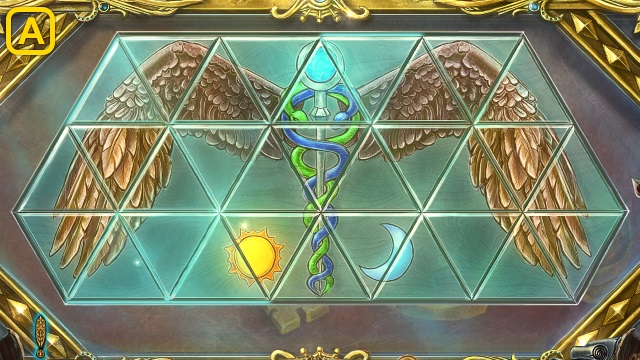
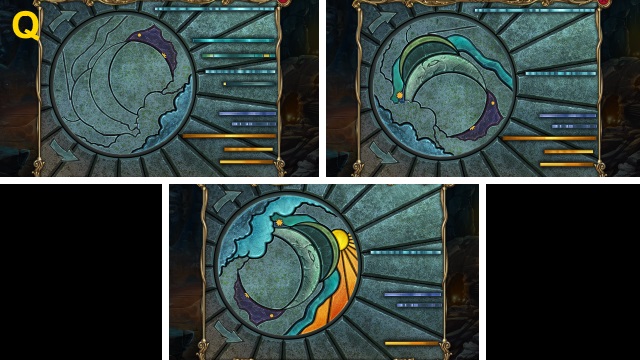
- Solution (M).
- Take GREEN GEM.
- Place VIOLET GEM, BLUE GEM, and GREEN GEM; solution (N).
- Walk right.
- Examine scene.
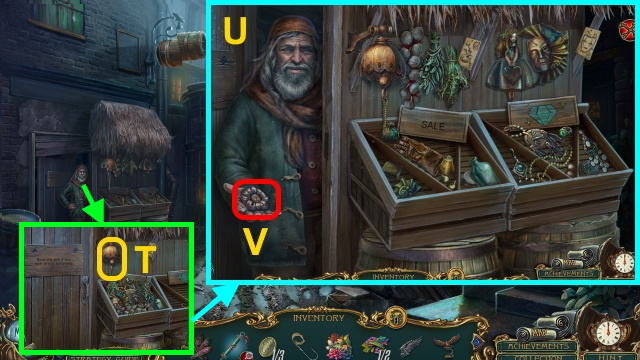
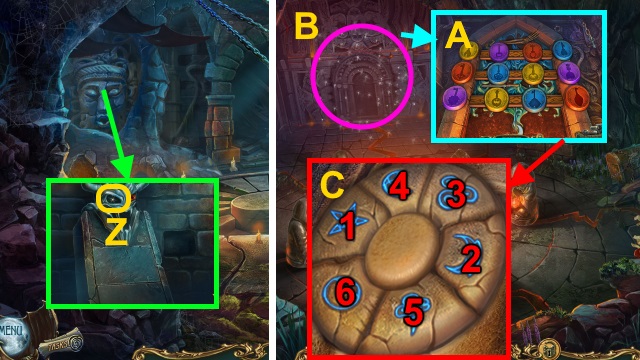
- Read book (O); take SPELLBOOK.
- Take SNAKE FOSSIL and GLASS CAT PARTS (P); place SPELLBOOK (Q).
- Take LANTERN TILE (R).
- Take SPIDER EMBLEM (S); examine (T). Place LANTERN TILE.
- Solution (U).
- Take MANDRAGORA.
- Place SPIDER EMBLEM (V).
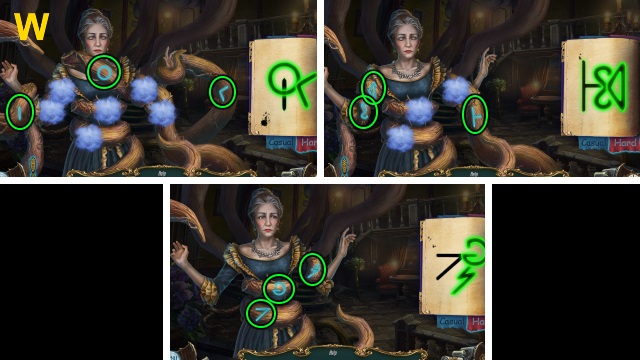
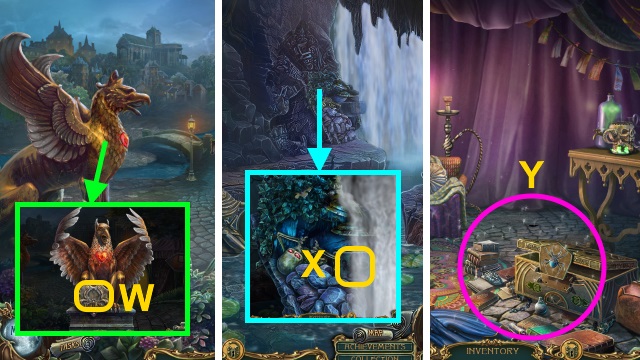
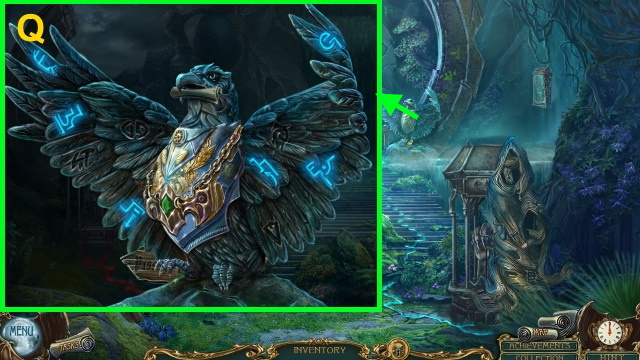
- Play HOP; receive RAVEN EMBLEM (W).
- HOP solution (X).
- Place SNAKE FOSSIL and RAVEN EMBLEM (Y); take REAGENT.
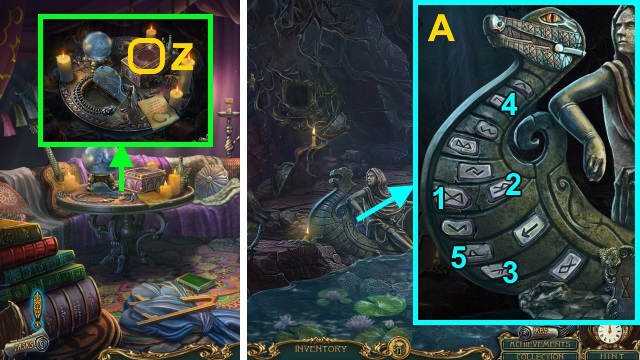
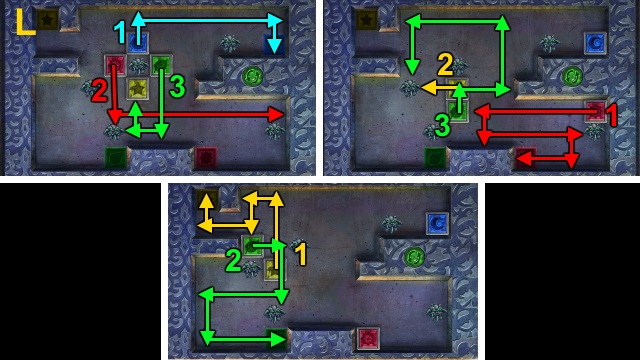
- Place ARTEMISIA, MANDRAGORA, and REAGENT (Z).
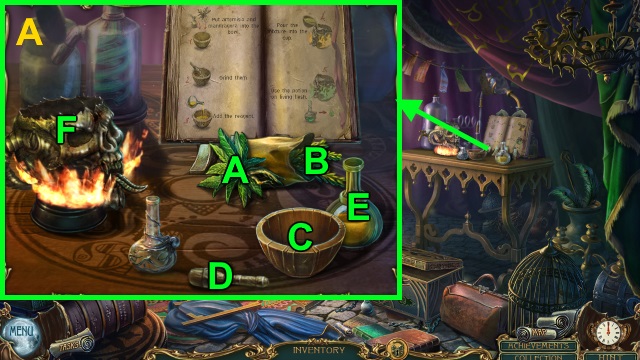
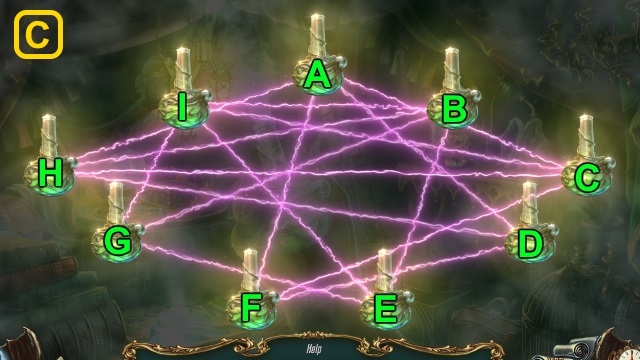
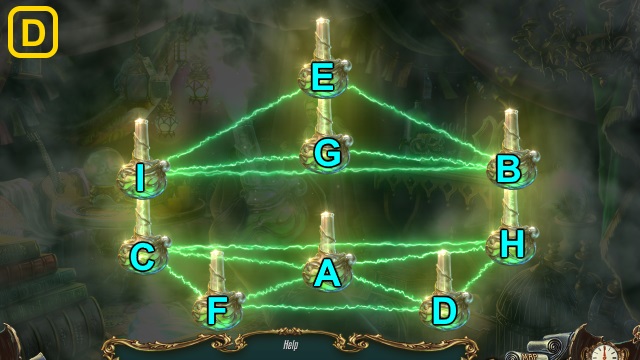
- Solution (A): (A-C)-(B-C)-(D-C)-(E-C)-(C-F).
- Take FLESH ANTIDOTE.
- Examine antidote (B).
- Solution (C-D).
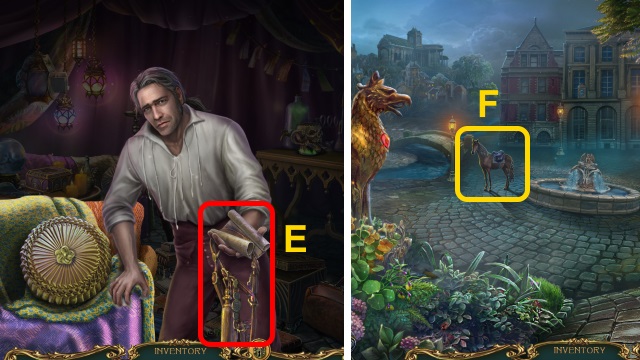
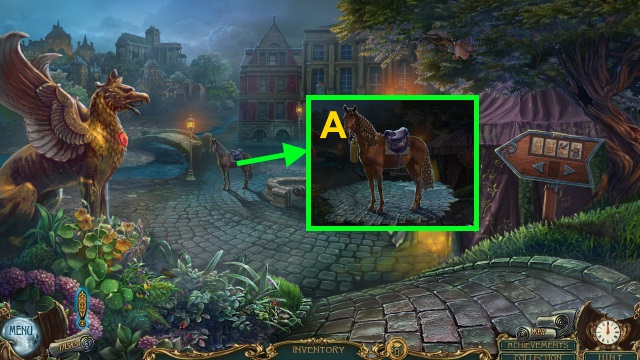
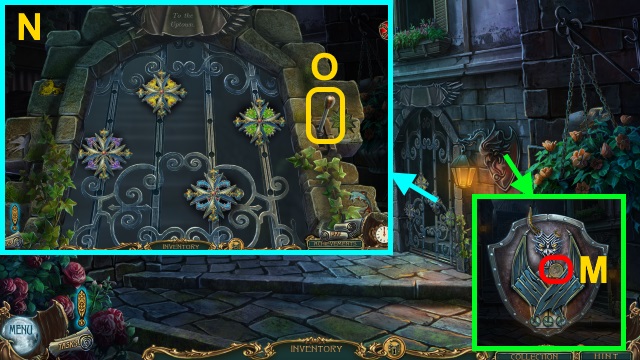
- Take BRIDLE and MAP (E).
- Walk down.
- Use BRIDLE (F).
- Solution (G).
- Examine (H).
- Take FOUNTAIN TILE (1/2) (I).
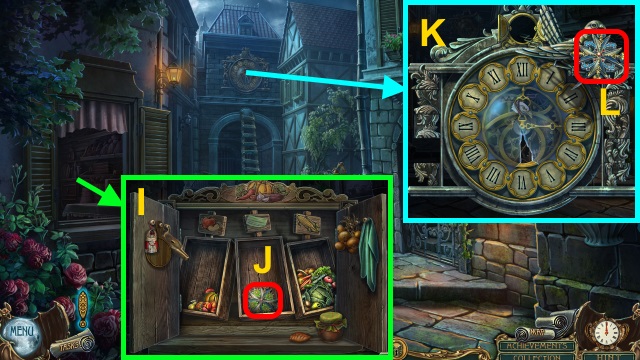
- Take PICTURE WITH DOOR CODE (J); use SHARPENED KNIFE.
- Play HOP; receive DOOR DISK (1/2) (K).
- Take TROWEL and STAMP (L).
- Examine (M); take FADED PETALS. Use TROWEL (N); take FOUNTAIN TILE (2/2).
- Examine (O); place FOUNTAIN TILE (2/2).
- Solution (P).
- Take DOOR DISK (2/2).
- Place DOOR DISK (2/2); arrange (Q).
- Walk forward.
- Examine scene 3x.
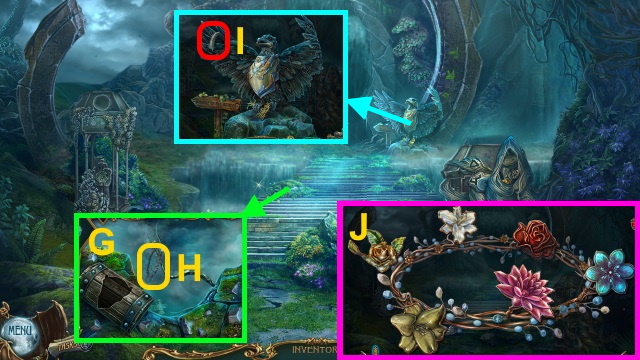
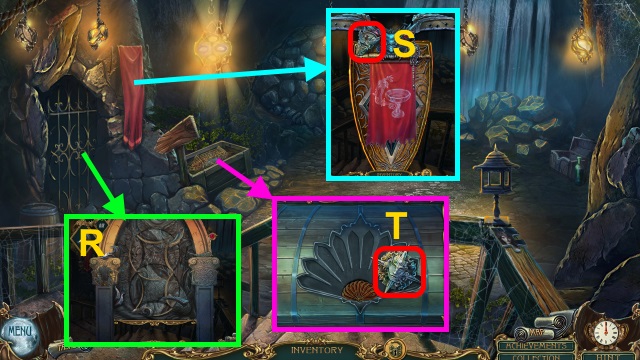
- Open curtain; take CRESCENT EMBLEM (R).
- Take MUSIC NOTE (1/2) (S). Place CRESCENT EMBLEM (T); take BROKEN GLASS CAT.
- Examine BROKEN GLASS CAT; arrange parts (U). Take GLASS CAT.
- Place GLASS CAT (V). Play HOP; receive MALACHITE.
- FADED PETALS and MALACHITE on SPELLBOOK; place ingredients in flask.
- Examine scene.
- Casual and hard solution (W).
- Take PICTURE (2/2) (X).
- Take DARK CRESCENT (Y); place PICTURE (2/2).
- Arrange photos (Z).
- Take DOOR PLATE (1/3) and MUSIC NOTE (2/2).
- Take PRICELESS NECKLACE (A); place MUSIC NOTE (2/2).
- Solution (B).
- Take DOOR PLATE (2/3).
- Place PRICELESS NECKLACE (C); take DOOR PLATE (3/3) (D).
- Place DOOR PLATE (3/3) (E).
- Solution (F); turn handle.
- Walk forward.
Chapter 2: The Estate

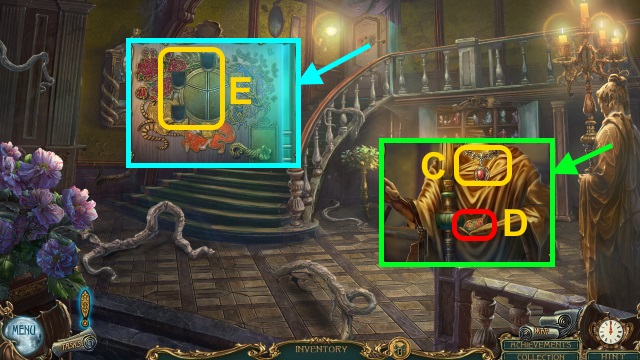
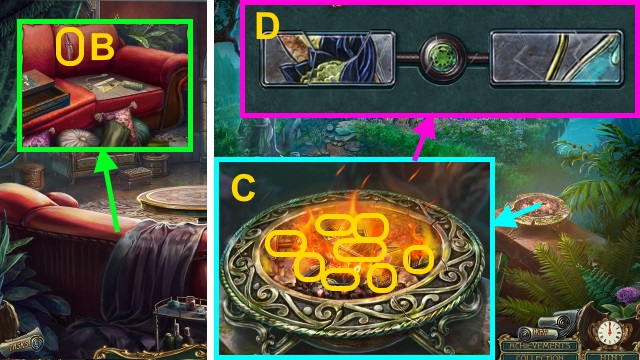
- Talk; take FRAME PART (1/2).
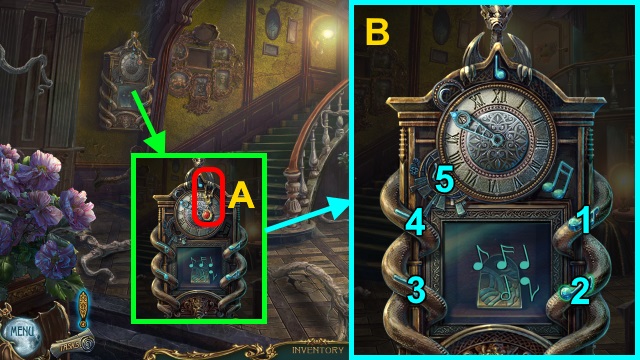
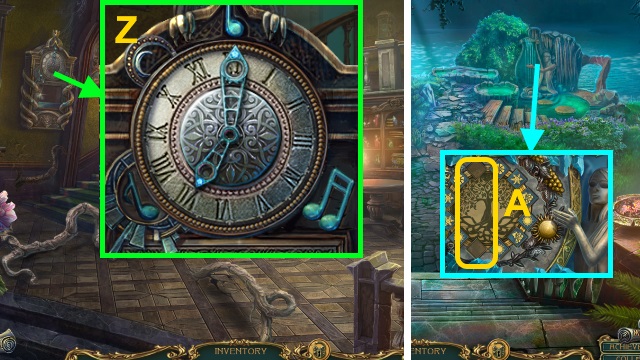
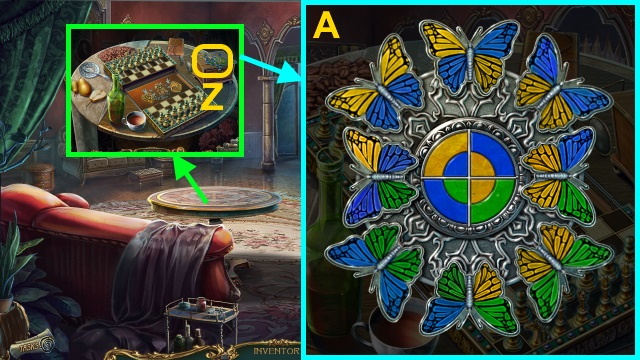
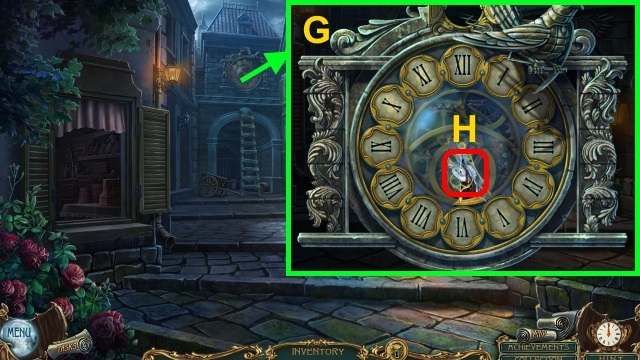
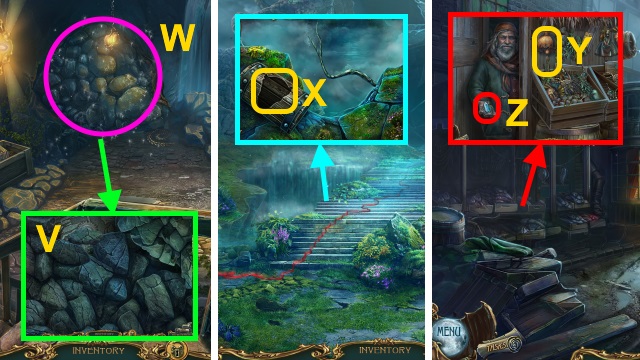
- Take SALT (G). Play HOP; examine board. Take CLOCK INSTRUCTIONS.
- Solution (H).
- Collect parts (1-4); place bee (I). Take BIRD EMBLEM (1/2). Move red cushion; take BRONZE SCORPION.
- Take BIRD EMBLEM (2/2) and LOCK TOKEN (1/2) (J).
- Walk down.
- Place BRONZE SCORPION (K); take OWL EMBLEM.
- Walk down.
- Place BIRD EMBLEM (2/2) (L); take FRAME PART (2/2).
- Walk forward twice.
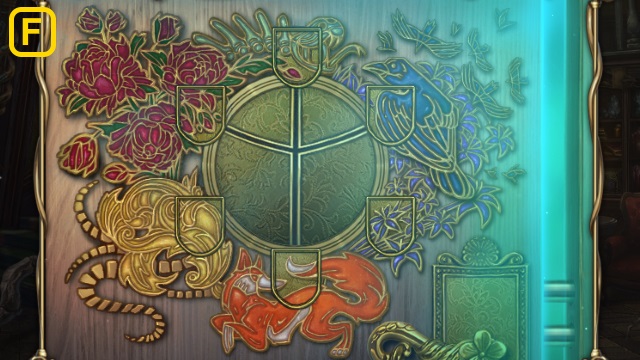
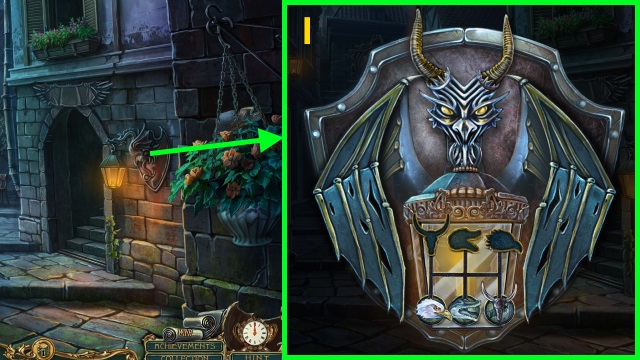
- Examine (M); place OWL EMBLEM.
- Solution (N).
- Take BEASTLY HAMMER.
- Place FRAME PART (2/2); solution (O).
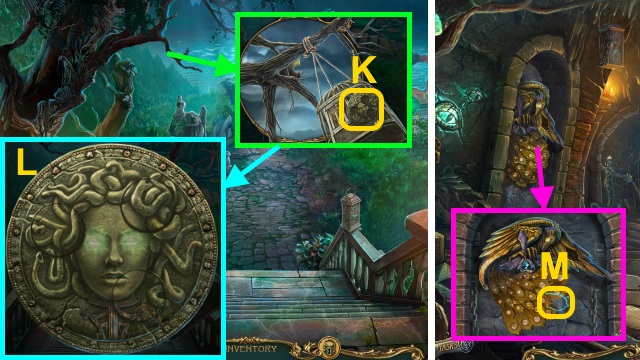
- Take GRIM EMBLEM PART (P).
- Examine GRIM EMBLEM PART; take PIANO KEYS.
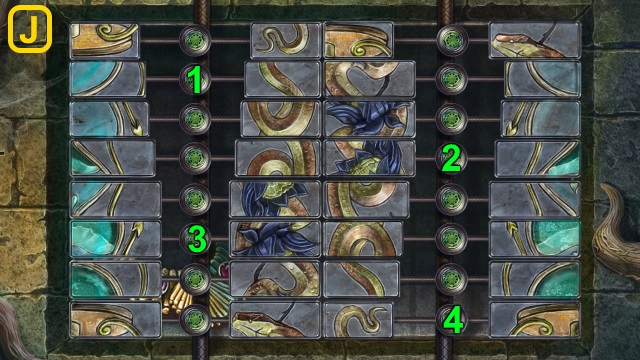
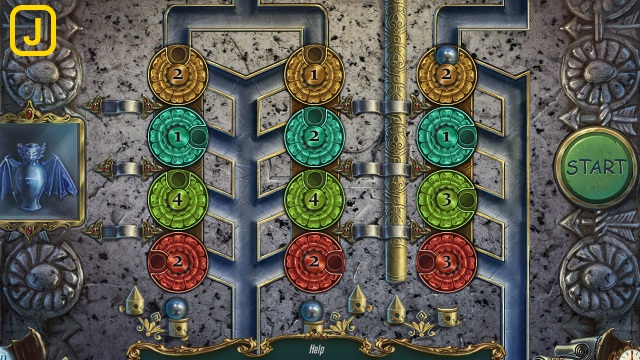
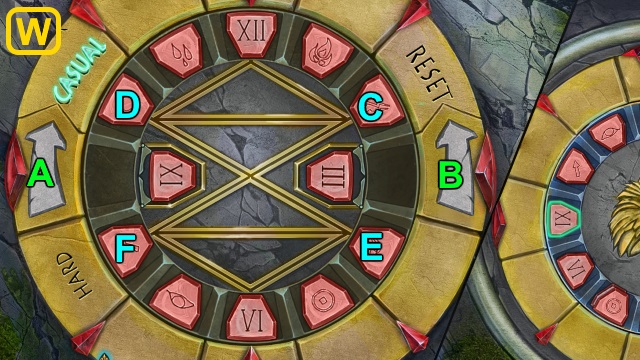
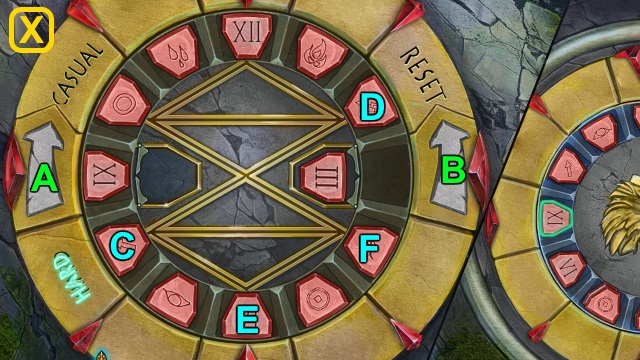
- Place PIANO KEYS (Q).
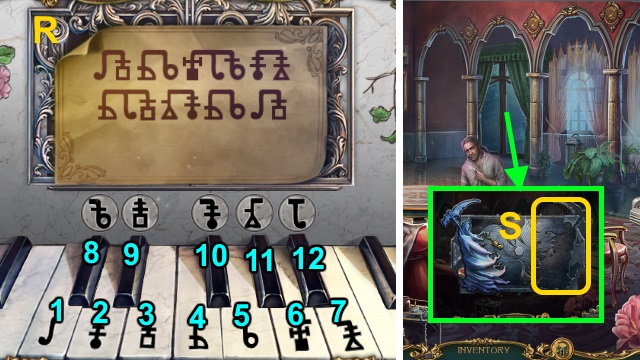
- Solution (R): 1-3-4-5-6-12-8-2.
- 7-4-12-3-11-10-4-5-1-3.
- Take GRIM EMBLEM PART.
- Combine GRIM EMBLEM PARTS; take DEATH EMBLEM.
- Place DEATH EMBLEM (S).
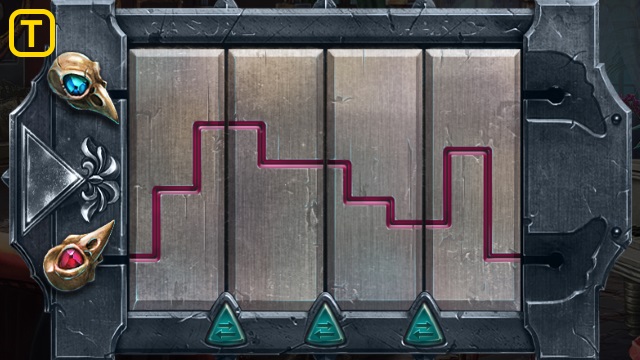
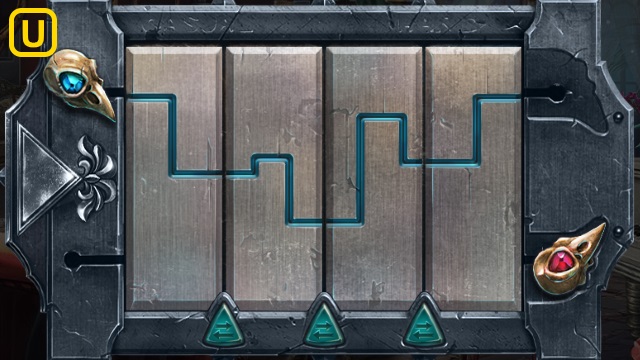
- Solution (T-U).
- Walk forward.
- Take CLOCK HAND (V).
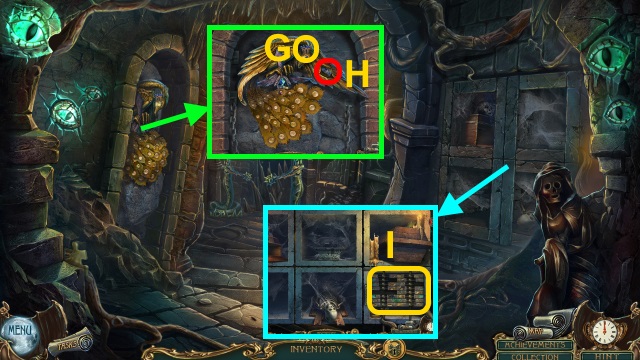
- Play HOP; receive NAILS (W).
- Take MOONSTONE (X). Use BEASTLY HAMMER (Y); take CANE HEAD. Use BEASTLY HAMMER 2x.
- Walk down twice.
- Place CLOCK HAND; arrange (Z).
- Take PAINTED PLATE (1/3) and LOCK TOKEN (2/2).
- Walk forward twice.
- Place LOCK TOKEN (2/2) (A).
- Solution (B).
- Walk forward.

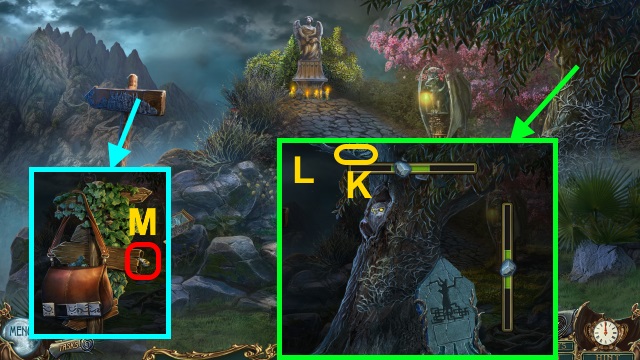
- Use STAMP (C); take SHIP WHEEL (D).
- Play HOP; receive GRAVE TILES (E).
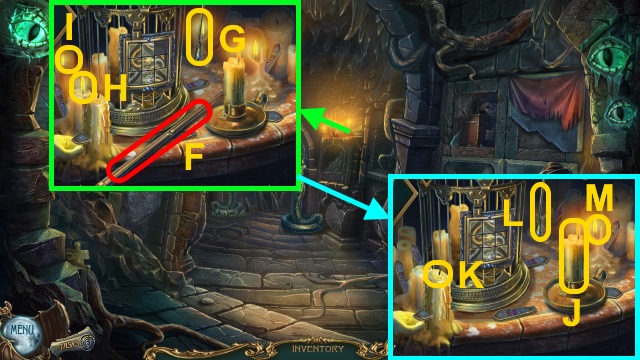
- Take CANE SHAFT (F). Use snuffer (G) on candles (H-I).
- Use CANDLE (J) on candle 2x (K); use snuffer (L) on candle (M). Play HOP; receive FAN BLADES.
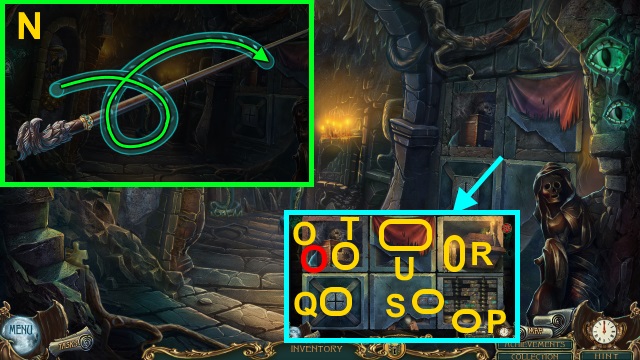
- CANE SHAFT on CANE HEAD; solution (N). Take CANE.
- Take GLASS SHARD (O). Remove cobwebs; place coin (P) in slot (Q). Use candle (R) on rat; use oil on lock (S). Place star on box (T). Remove cloth (U); place crescent and DARK CRESCENT. Take LABYRINTH MAP.
- Walk down.
- Place GRAVE TILES (V).
- Casual and hard solution (W).
- Take BROKEN DIADEM.
- MOONSTONE on BROKEN DIADEM; arrange (X). Take DIADEM.
- Use CANE (Y); take GLASS BUTTERFLY.
- Walk down.
- Examine; place GLASS BUTTERFLY (Z).
- Solution (A).
- Take PUZZLE TILE and TONGS.
- Use GLASS SHARD (B); take PEACOCK CROWN.
- Walk forward.
- Use TONGS 8x (C).
- Arrange pieces (D); take PAINTED PLATE (2/3).
- Walk forward.
- Examine (E); place PUZZLE TILE.
- Solution (F).
- Take CAGE DISC.
- Place PEACOCK CROWN (G); take PAINTED PLATE (3/3) (H).
- Place PAINTED PLATE (3/3) (I).
- Solution (J).
- Take JEWELRY (1/2).
- Walk down.
- Examine (K); place CAGE DISC.
- Solution (L).
- Take PEACOCK FEATHER.
- Walk forward.
- Place PEACOCK FEATHER (M).
- Solution (N).
- Take JEWELRY (2/2).
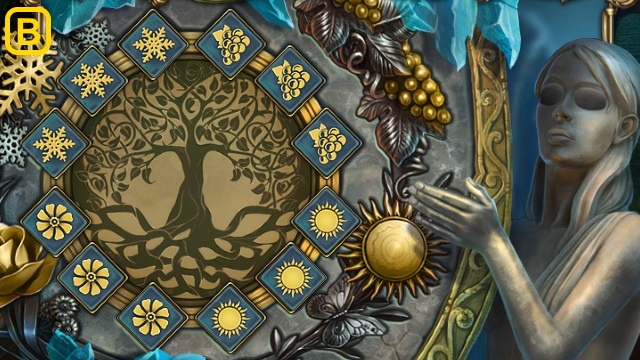
- Place DIADEM and JEWELRY (2/2); arrange (O).
- Play HOP (P).
Chapter 3: Scars
- Examine scene 2x; take ROOT MAGIC RECIPE.
- Take SKELETAL CYLINDER (Q). Remove chains; place SHIP WHEEL (R). Take RUBY.
- Remove stones (S); take STONE GLYPH (1/2). Remove stones (T). Place RUBY; take STAINED-GLASS HALF (1/2).
- Take RAZOR (U).
- Take STAINED-GLASS HALF (2/2) (V). Use RAZOR (W); receive MOSS. Place STAINED-GLASS HALF (2/2).
- Solution (X).
- Take GOBLET.
- Use GOBLET (Y); receive GOBLET WITH WATER.
- Place SALT, MOSS, and GOBLET WITH WATER (Z); place ingredients in water. Pour liquid.
- Walk left, then down.
- Examine scene; talk. Play HOP; receive TOWN MAP. Examine scene.
- Walk right.
- Use TOWN MAP (A).
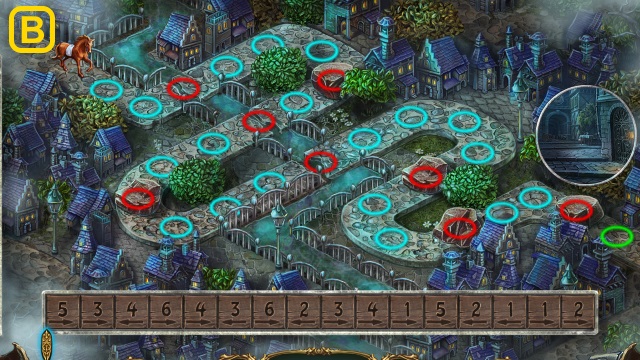
- Solution (B).

- Examine planks (C); play HOP. Receive BROKEN LADDER.
- NAILS and BEASTLY HAMMER on BROKEN LADDER; take LADDER.
- Use LADDER (D).
- Take COLORFUL APPLE (1/2)-(2/2) (E).
- Play HOP; receive NUMBERED TILES (F).
- Take LEVER (G); place COLORFUL APPLE (2/2).
- Solution (H).
- Place items (I); take GREEN MEDAL (J).
- Place NUMBERED TILES; arrange (K).
- Take BLUE MEDAL (L).
- Take ANIMAL CHIP (1/3) (M).
- Place GREEN MEDAL, BLUE MEDAL, and LEVER. Solution (N); pull lever (O).
- Walk right.
- Solution (P).
- Take ROPE WITH HOOK.
- Use CANE (Q). Play HOP; receive METAL FLOWERS.
- Play HOP; receive COLORED PUZZLE TILES (1/2) (R). Examine (S); take BELL.
- Place BELL (T); ring.
- Arrange items (U); take GRIFFIN ORNAMENT (V).
- Walk down twice.
- Place GRIFFIN ORNAMENT (W); take OCTOPUS EMBLEM.
- Go to Underground Waterfall.
- Place OCTOPUS EMBLEM (X); take CHEST DECORATION.
- Go to Magician's Tent.
- Play HOP; receive STONE GLYPH (2/2) (Y).
- Place CHEST DECORATION (Z); take CAT STATUETTE.
- Go to Underground Waterfall.
- Place STONE GLYPH (2/2); solution (A).
- Take DEMON WING.
- Go left, then down.
- Place CAT STATUETTE; arrange (B). Take GOLDEN HAWK STATUETTE (C).
- Go to Uptown.
- Give GOLDEN HAWK STATUETTE (D); take LION CLUE and ANGEL WING.
- Place DEMON WING and ANGEL WING; solution (E).
- Walk forward.
- Use ROPE WITH HOOK (F); receive ELEPHANT KEY.
- Play HOP; receive ROCKS (G). Use SCOOP NET (H); receive BROKEN WREATH.
- Take DRAGON HORN (I).
- METAL FLOWERS on BROKEN WREATH; arrange (J). Take DECORATIVE WREATH.
- Walk left.
- Use ROCKS (K).
- Solution (L): stop stones when both overlap the green sections.
- Receive SNAKE SYMBOL.
- Rotate; take SKELETON CLAW (M).
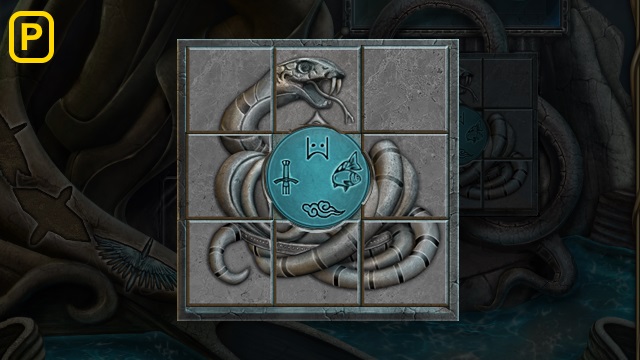
- SKELETON CLAW on SKELETAL CYLINDER; solution (N). Take ASTRONIMICAL TILE (1/2).
- Take CADUCEUS (O).
- CADUCEUS on DOCTOR'S BAG; take STONE TILE (1/2).
- Take TORCH (P). Place DECORATIVE WREATH (Q); take ANIMAL TOKEN (1/2).
- Walk down twice.
- Place SNAKE SYMBOL (R); take POISON.
- Walk forward.
- Pour POISON (S); take STONE TILE (2/2).
- Walk left.
- Place STONE TILE (2/2); arrange (T). Move leaves; take CRYSTAL BALL.
- Go to Clocktower.
- Use ELEPHANT KEY (U); take BAG TILE.

- Place HORN (V). Play HOP; receive COLORED PUZZLE TILES (2/2).
- Walk right.
- Place COLORED PUZZLE TILES (2/2) (W).
- Solution (X).

- Play HOP; receive TOY MOUSE (Y).
- Walk down.
- Give TOY MOUSE (Z); take GOLDEN BIRD.
- Go to Cliff.
- Place GOLDEN BIRD (A); take GEAR.
- Rotate; place BAG KEY (B).
- Arrange (C); receive HORSE EMBLEM.
- Walk down twice.
- Place HORSE EMBLEM (D); take CLOCK TILE.
- Place GEAR (E); arrange (F). Open; take ASTRONOMICAL TILE (2/2).
- Walk down.
- Place CLOCK TILE; arrange (G). Take ANIMAL TOKEN (2/2) (H).
- Place ANIMAL TOKEN (2/2); solution (I).
- Solution (J).
- Take BLUE GARGOYLE GLASS.
- Go to Cliff.
- Place ASTRONOMICAL TILE (2/2) (K).
- Solution (L).
- Take ARMOR DECORATION.
- Walk down.
- Place ARMOR DECORATION; take GOLDEN TREE (M).
- Walk left.
- Place GOLDEN TREE; take ANIMAL CHIP (2/3) and RED GARGOYLE GLASS (N).
- Walk down.
- Place CRYSTAL BALL (O); solution.

- Place BLUE GARGOYLE GLASS and RED GARGOYLE GLASS.
- Examine; solution (Q).
- Walk forward.
Chapter 4: The Source
- Play HOP; receive MOON PARTS (1/3) (R).
- Take CHEST DECORATION (S).
- Take STAR EMBLEM (T); place FAN BLADES.

- Solution (U).
- Move items; take PICKAXE.
- Use PICKAXE (V). Play HOP; receive LION STATUETTE (W).
- Walk down.
- Place CHEST DECORATION (X). Move items; take WOLF TILE PART (1/2).
- Walk down.
- Ring bell (Y). Give LION STATUETTE (Z); take CRYSTAL.
- Walk forward twice.
- Place CRYSTAL (A); take WOODEN OWL.
- Place WOODEN OWL (B); place wolf (C). Take LANTERN RING; examine.
- Arrange (D).
- Place bear (E); take WOLF TILE PART (2/2).
- Place WOLF TILE PART (2/2) (F).

- Solution (G).
- Walk left.
- Place STAR EMBLEM (H); take PICTURE FRAGMENTS (1/3).
- Take MOON PARTS (2/3) (I).
- Take DEMONIC EARRING (J).
- Walk down.
- Place DEMONIC EARRING (K); take ROSE RING.
- Walk down, then left.
- Place LANTERN RING (L); take SUN AMULET.
- Go to Ritual Room.
- Place SUN AMULET (M); take MOON PARTS (3/3).
- Place MOON PARTS (3/3); arrange (N). Take PICTURE FRAGMENTS (2/3).
- Take SHIELD (O); use TORCH. Take PICTURE FRAGMENTS (3/3).
- Place PICTURE FRAGMENTS (3/3) (P).
- Solution (Q-R).
- Go forward.
- Take MIRROR SHARD (1/3) (S). Examine (T); place ROSE RING.

- Solution (U).
- Take KEY (1/3).
- Take MIRROR SHARD (2/3) (V).
- Take MIRROR SHARD (3/3) (W).
- Take FIRE CRYSTAL (X); play HOP. Place MIRROR SHARD (3/3); take KEY (2/3).
- Walk down twice.
- Use SHIELD; take DEMON EYE (Y).
- Walk left.
- Place DEMON EYE (Z); take KEY (3/3).
- Walk forward.
- Use KEY (3/3) (A); play HOP (B).
- HOP solution (C).
- Take AQUATIC EMBLEM (1/2)-(2/2), SKULL DECORATION, and WATER CRYSTAL HALF (1/2) (D).
- Take ETERNAL DROPLET (1/2); place FIRE CRYSTAL (E).
- Solution (F); take SWORD.
- Give SWORD (G); take SNAKE FANG.
- Walk down.
- Place AQUATIC EMBLEM (2/2) (H). Move items; take LION DECORATION.
- Walk down.
- Place SKULL DECORATION (I); take RAVEN EMBLEM.
- Walk down.
- Place SNAKE FANG (J); take BAT EMBLEM.
- Place LION DECORATION (K); take WATER CRYSTAL HALF (2/2).
- Go to The Source.
- Place RAVEN EMBLEM (L); take EARTHEN NECKLACE.
- Place BAT EMBLEM (M); take ANIMAL CHIP (3/3).

- Place WATER CRYSTAL HALF (2/2) (N); take BRACELET.
- Walk down.
- Place BRACELET (O); receive GRAPES EMBLEM.
- Place GRAPES EMBLEM (P); take SILVER AMULET.
- Walk down.
- Examine (Q); place ANIMAL CHIP (3/3).
- Solution (R).
- Take DREAMCATCHER.
- Walk forward twice.
- Place EARTHEN NECKLACE, DREAMCATCHER and SILVER AMULET (S); take POUCH WITH GOLD.
- Place POUCH WITH GOLD (T); take ETERNAL DROPLET (2/2) (U).
- Place ETERNAL DROPLET (2/2) (V).
- Casual solution (W): (A)-(C-D)-(D-E)-(F-C)-(C-D)-(A).
- Hard solution (X): (B)-(C-D)-(E-C)-(Ax2)-(F-C)-(E-F)-(Ax2)-(E-C)-(F-E)-(B).
- Take ETERNAL VESSEL.
- Use ETERNAL VESSEL (Y).
- Congratulations! You have completed Haunted Legends: The Scars of Lamia.
Created at: 2019-09-13