

Walkthrough Menu
- General Tips
- Chapter 1: Entering the City
- Chapter 2: The House
- Chapter 3: The Orphanage
- Chapter 4: The Library and Cells
- Chapter 5: Through the Portal
- Chapter 6: The Mansion
General Tips
- This is the official guide for Haunted Legends: The Stone Guest!
- This guide does not mention each time you have to zoom into a location; the screenshots show each zoom scene.
- Hidden-object puzzles are referred to as HOPs. This guide does not show screenshots of the HOPs, however, it is mentioned when a HOP is available and the inventory item collected.
- This guide will give step-by-step solutions for all puzzles that are not random. Please read the instructions in the game for each puzzle.
- Use the map to travel quickly to a location.
Chapter 1: Entering the City
- Walk forward.
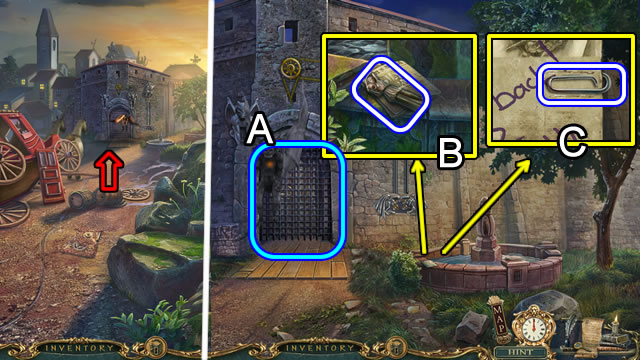
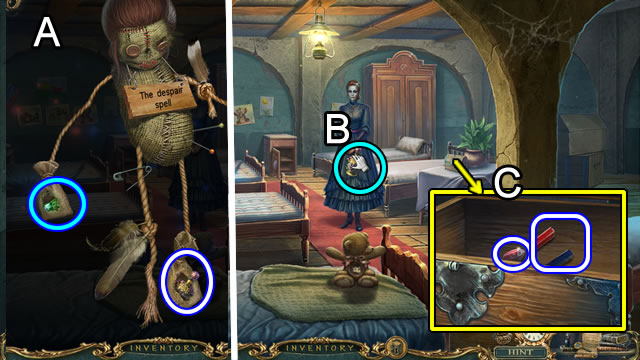
- Attempt to enter the city gate (A).
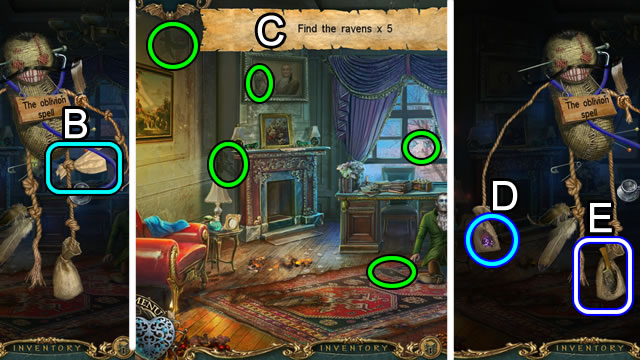
- Take the STATUETTE (B).
- Read the paper; take the PAPERCLIP (C).
- Walk down.
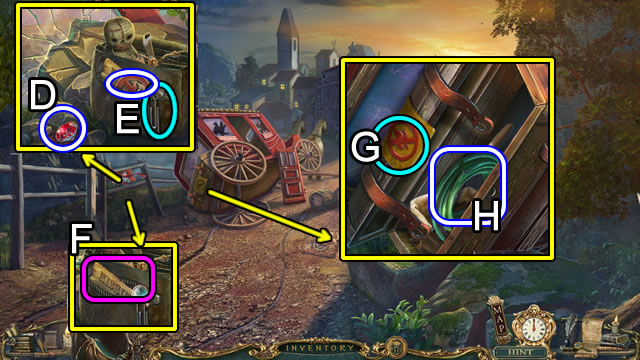
- Take the RUBY 1/2 (D).
- Open the bag; use the PAPERCLIP; take the FIRE EMBLEM (E).
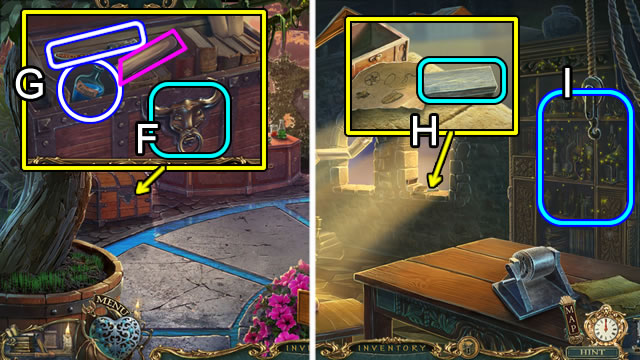
- Read the poster (F).
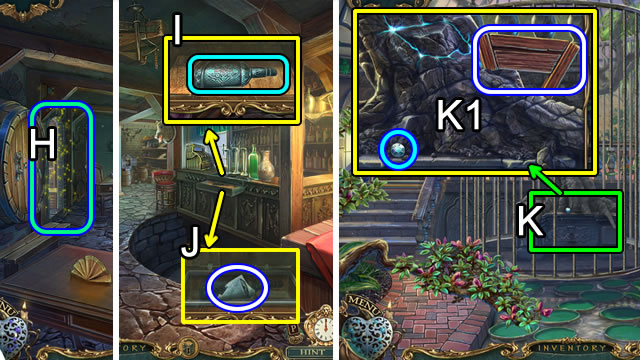
- Use the FIRE EMBLEM (G); unbuckle the straps, open the box; take the HOSE (H).
- Walk forward.
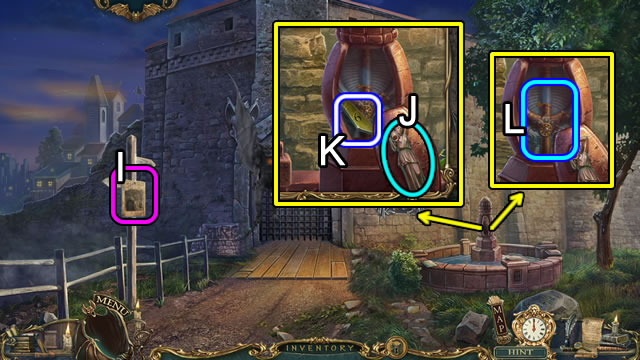
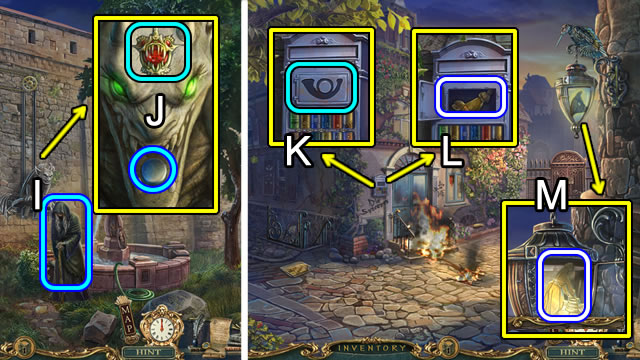
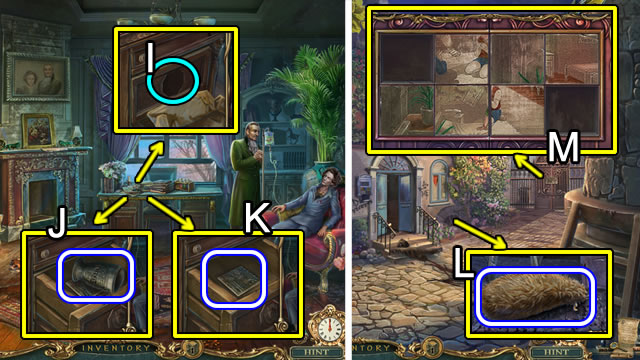
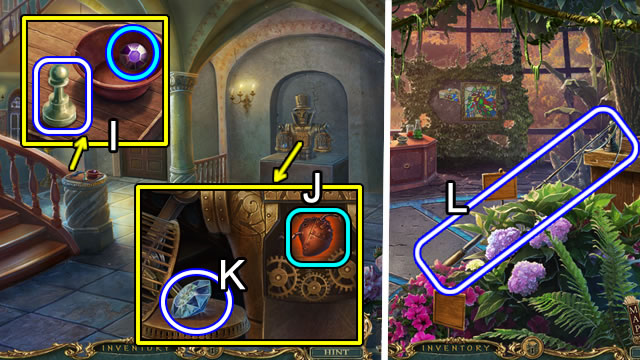
- Read the poster (I).
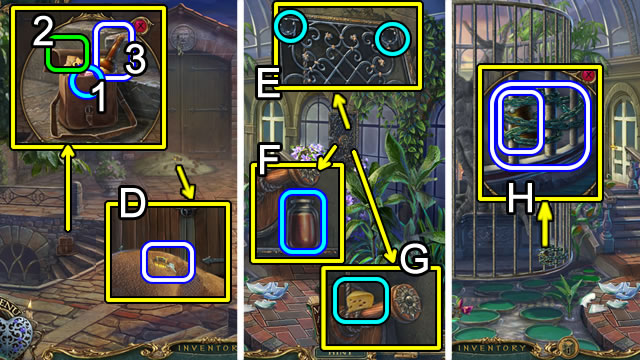
- Use the STATUETTE (J); open and take FEATHER 1/2 (K).
- Select the fountain top again (L) to open a puzzle.
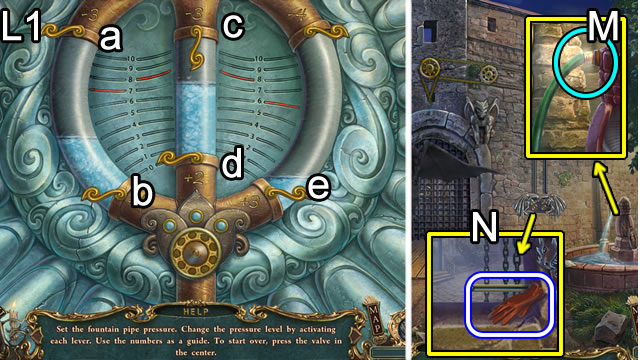
- Solution. b-ax2-b-a-b-c-dx2-ex2.
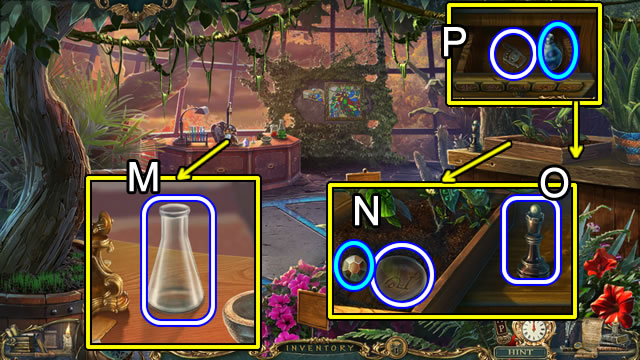
- Attach the hose (M).
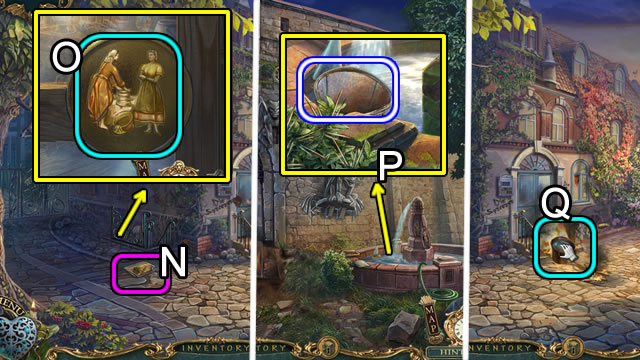
- Take the GLOVE (N).
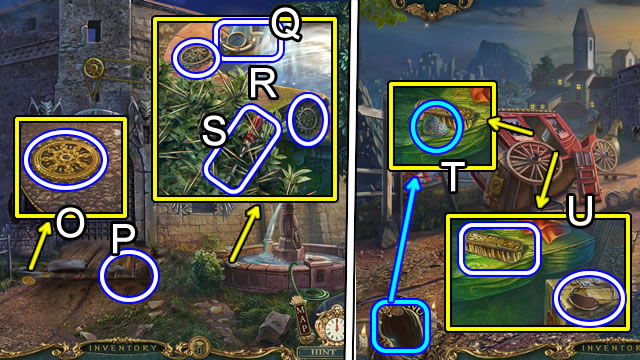
- Take GEAR 1/5 (O) and GEAR 2/5 (P).
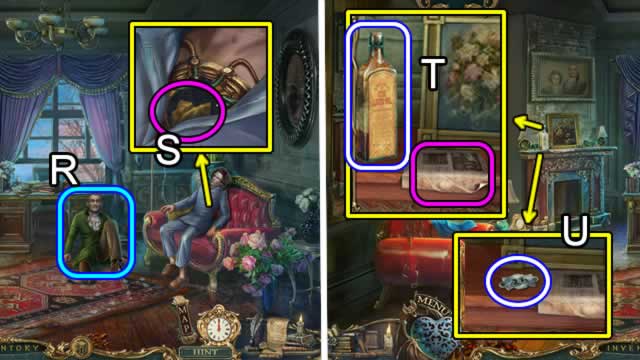
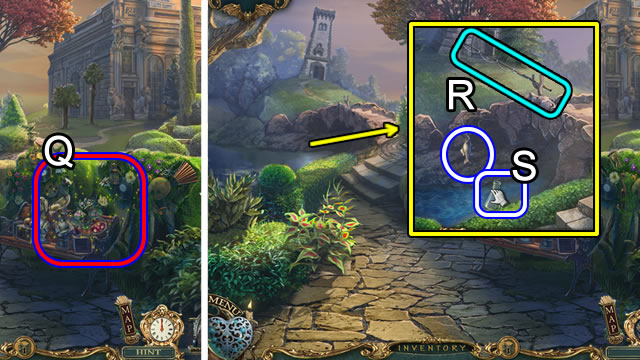
- Take the SYMBOL (Q); GEAR 3/5 and 4/5 (R); use the GLOVE to retrieve the SCREWDRIVER (S).
- Walk down.
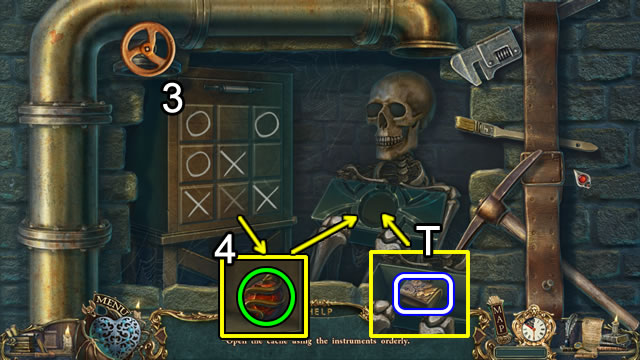
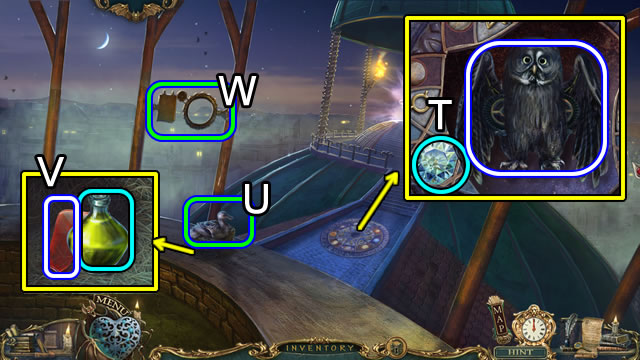
- Pick up the amulet (T) to add it to the User Interface.
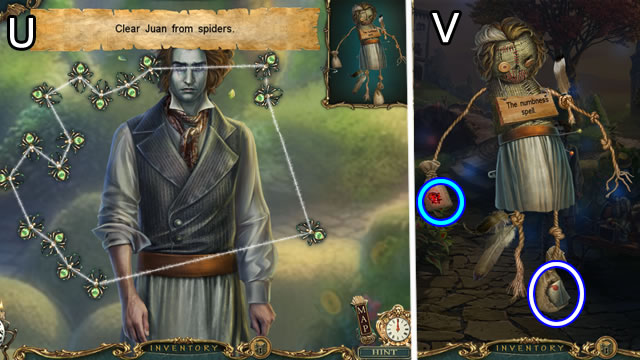
- Take the BRUSH and STRING (U).
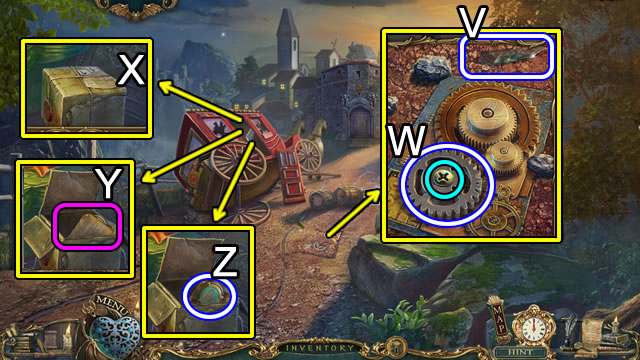
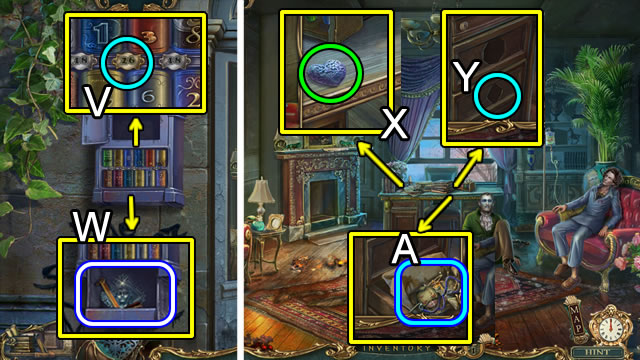
- Use the GLOVE for the GLASS SHARD (V).
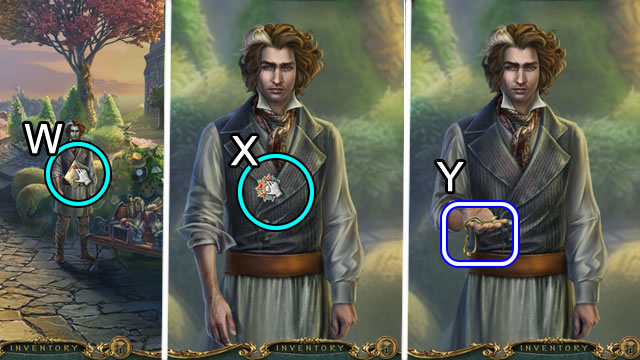
- BRUSH off the dirt; use the SCREWDRIVER; take GEAR 5/5 (W).
- Use the GLASS SHARD(X).
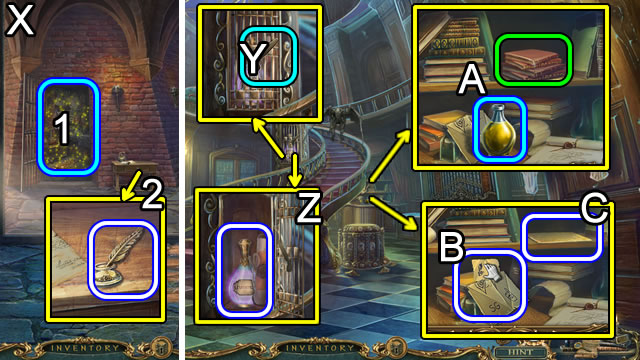
- Remove the string and open three box flaps; examine the blueprints (Y).
- Take the MAGNIFIER (Z).
- Walk forward.
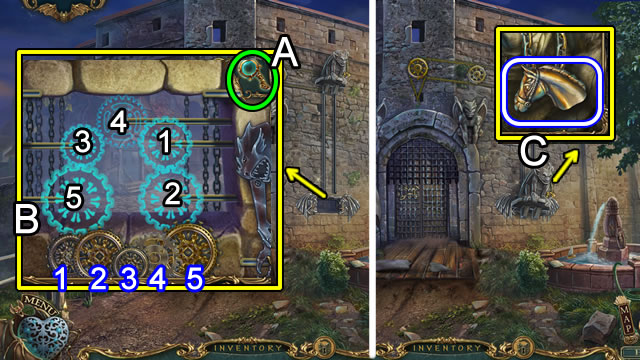
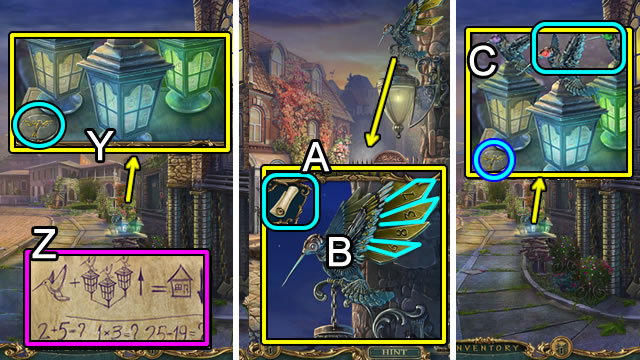
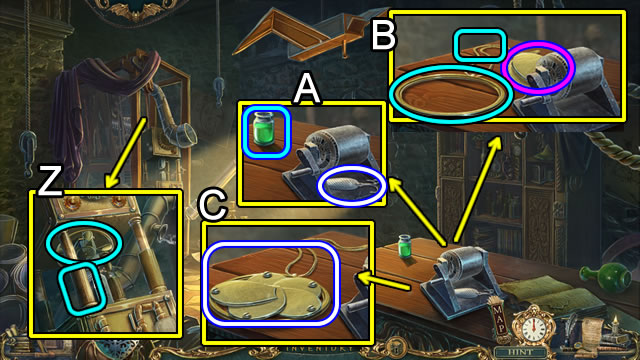
- Place the GEARS and MAGNIFIER (A) to open a puzzle.
- Always use the magnifier to add shadow images.
- Solution (B).
- Attempt to enter the city.
- Take the HORSE HEAD (C).
- Walk down.
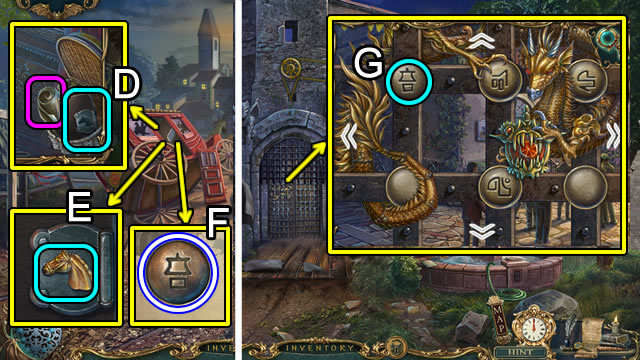
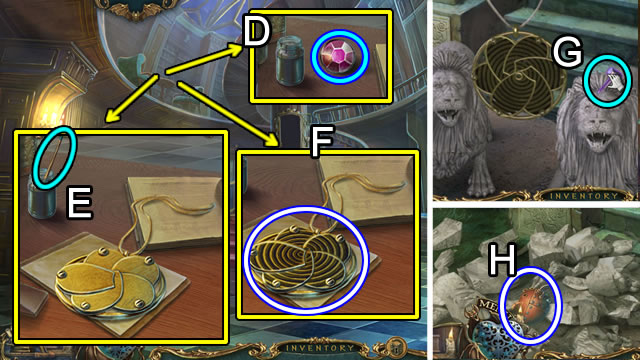
- Open the basket; read the poster; select the diary (D).
- Place the HORSE HEAD (E); take the BUTTON (F).
- Walk forward.
- Place the BUTTON (G) to trigger a puzzle.

- Press the magnifier. Scroll, highlight and select the symbols (1-4).
- Take the HORN SYMBOL (H).
- Speak to the crone (I).
- Place the HORN SYMBOL; press the button (J).
- Enter the city.
- Approach the burning steps; place the SYMBOL (K); take the DECORATION 1/2 (L).
- Step back.
- Open the lantern; take DECORATION 2/2 (M).
Chapter 2: The House
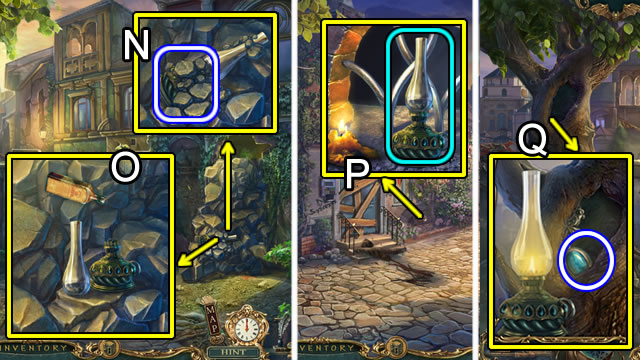
- Read the paper (N).
- Place DECORATIONS 2/2 (O) to trigger a HOP.
- Play the HOP to get a BUCKET.
- Walk down.
- Put the BUCKET (P); take the BUCKET OF WATER.
- Walk forward.
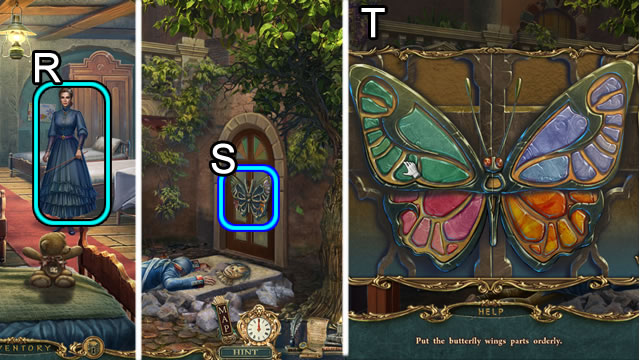
- Use the BUCKET OF WATER (Q).
- Open the door and enter the house.
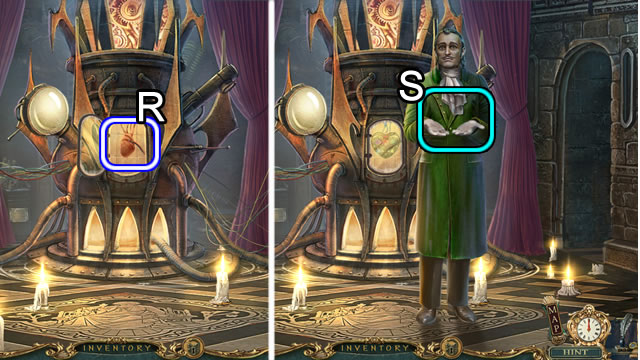
- Speak to the man (R).
- Open the man's shirt and Read the note (S).
- Take the COD-LIVER OIL; read the paper (T).
- Take the BOOK-CODE NUMBER (U).
- Walk down.
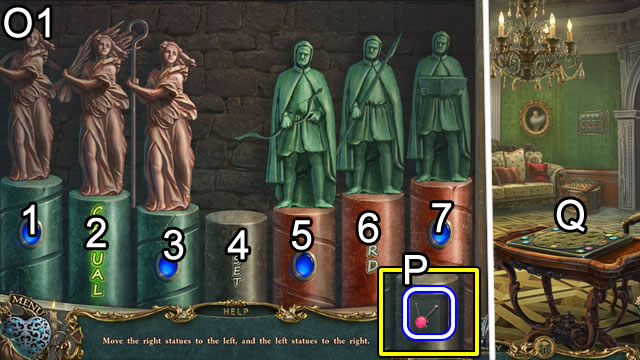
- Place the BOOK-CODE NUMBER (V) to trigger a puzzle.
- Solution. Top 12-10-1-8-6-3. Bottom 11-9-2-7-5-4.
- Take the HANDLE and PERSEUS (W).
- Walk forward.
- Take the amulet piece (X).
- Place the PERSEUS tile (Y).
- Open the package and select the doll (A).
- Open and read the message (B) and trigger a puzzle.
- Solution (C).
- Take the amulet piece (D); take LEPORELLO'S HAIR (E).

- Place LEPORELLO'S HAIR (F).
- Take the GATE PART 1/2 (G).
- Walk down.
- Play the HOP (H); receive a MEDUSA tile.
- Enter the house.
- Place the MEDUSA tile (I).
- Take the CUP (J) and GATE PART 2/2 (K).
- Exit the house.
- Take the BEAR PAW (L).
- Place the two GATE PARTS to open a puzzle (M).
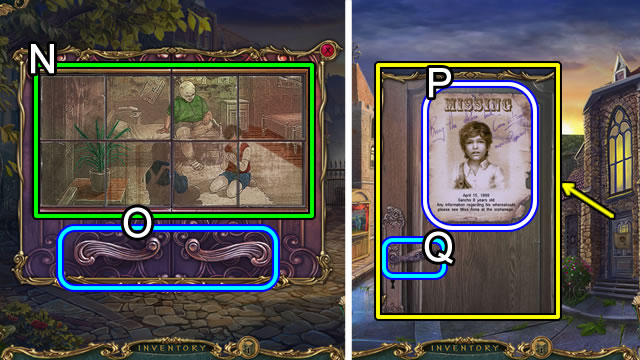
- Solution (N).
- Pull the handles (O); go forward.
- Take the 'MISSING' POSTER (P).
- Attempt to enter the building (Q).
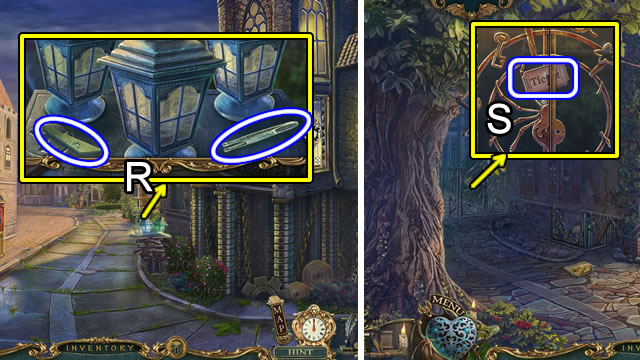
- Take the FEATHER 2/2 and TWEEZERS(R).
- Walk down.
- Attempt to take the ticket (S).
- Use the TWEEZERS to take the TICKET.
- Go through the right gate.
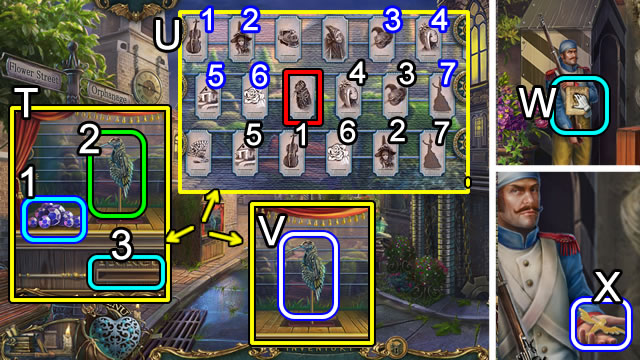
- Select the ticket booth (T). Take the beads for the amulet (1); select the bird (2); insert the TICKET (3).
- Select the tickets twice (U) to open a puzzle. Eliminate the scrolling pairs to find an unmatched ticket (red); select the ticket; take the BIRD 1/2 (V).
- Walk up.
- Speak with the guard; give him the 'MISSING' POSTER (W); take the LANTERN KEY (X).
- Walk down.
- Place the LANTERN KEY (Y).
- Read the CODE (Z).
- Walk down.
- Select the bird. Place the FEATHERS 2/2 and the CODE (A).
- Select feathers 7-3-6; take BIRD 2/2 (B).
- Walk through the right gate.
- Place BIRDS 2/2 (C); press the lantern key.
- Enter the laboratory; speak to the dwarf.
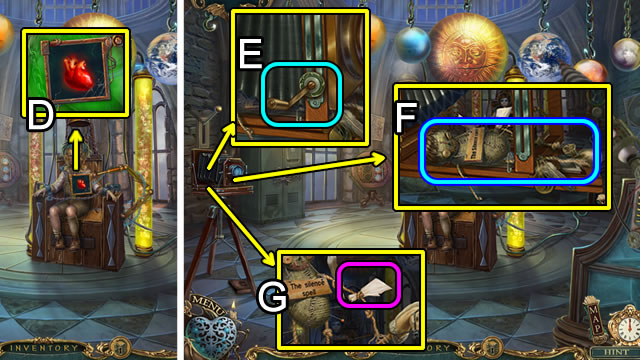
- Approach the boy and tap his heart (D); step back.
- Attach and turn the HANDLE (E).
- Take the knot doll (F).
- Select and read the message paper (G) to open a puzzle.
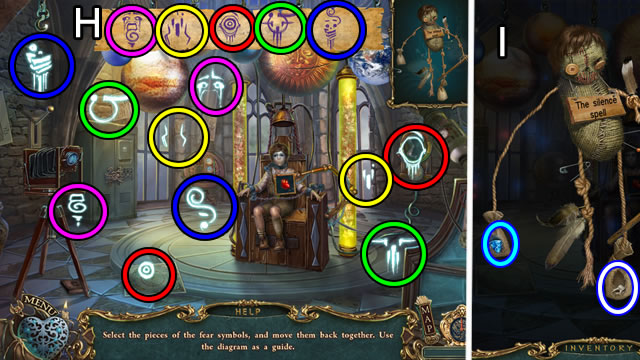
- Solution (H).
- Take the amulet piece and BOY'S TOOTH (I).
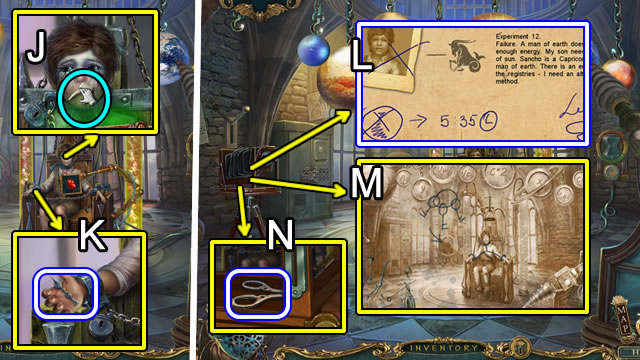
- Place the BOY'S TOOTH (J); take the CLOCK HAND (K); step back.
- Take a SOLUTION (L), hint page (M) and SCISSORS (N).
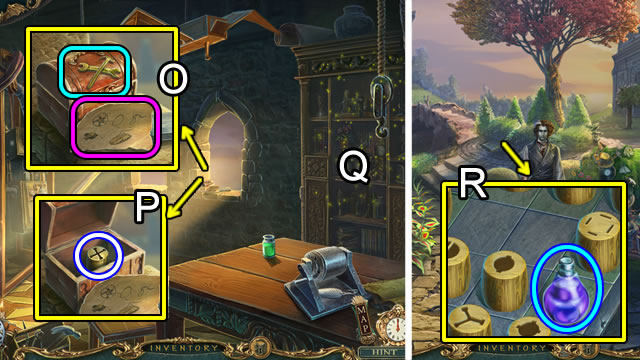
- Open the cover; take the amulet piece (O).
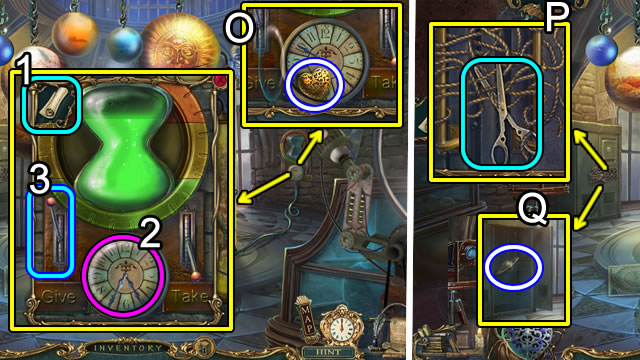
- Place the SOLUTION (1); add the CLOCK HAND; set the time to 5:35 (2); close the cover; pull the Give lever (3).
- Step back.
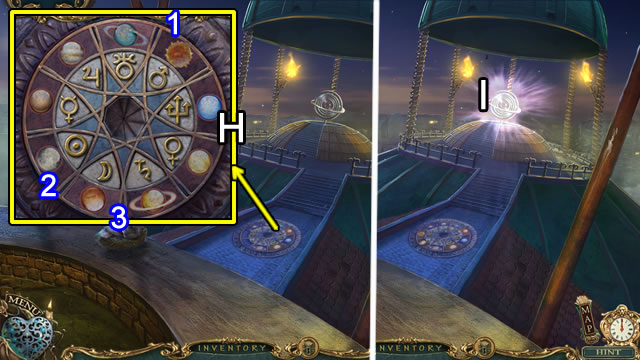
- Use the SCISSORS (P); take the PLANET (Q).
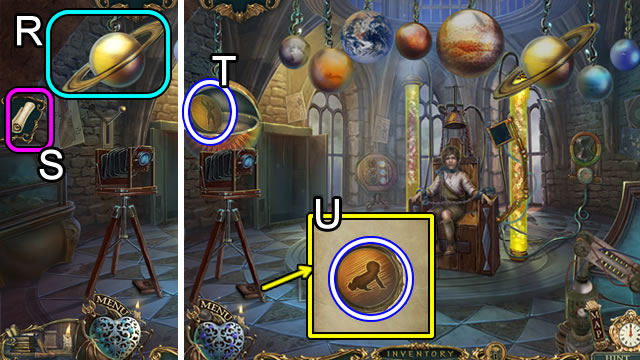
- Attach the PLANET (R) for a puzzle.
- Use the hint page (S) as necessary.
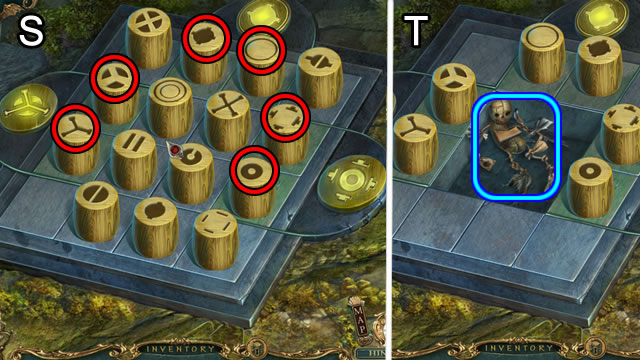
- Solution (T). Take the ADULT disc.
- Pick up the journal; turn the page; take the INFANT disc (U).
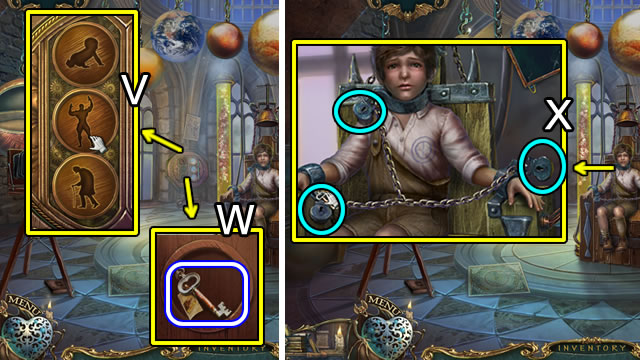
- Place the ADULT and INFANT discs and swap (V); take the KEY (W).
- Approach the boy.
- Use the KEY three times (X).
- Exit the building. Walk up.
Chapter 3: The Orphanage
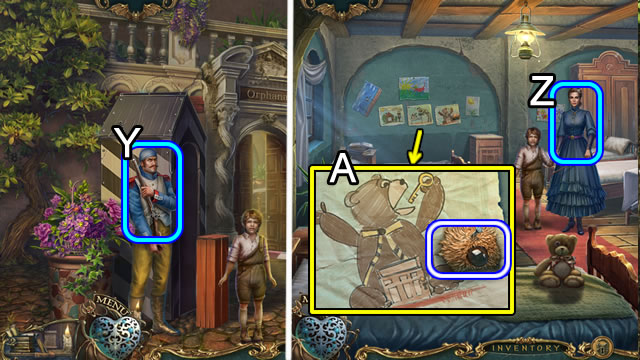
- Speak with the guard (Y); walk forward.
- Speak with Anna (Z).
- Examine the drawings; scroll right twice; take the BEAR EYE (A).
- Take the amulet piece (B).
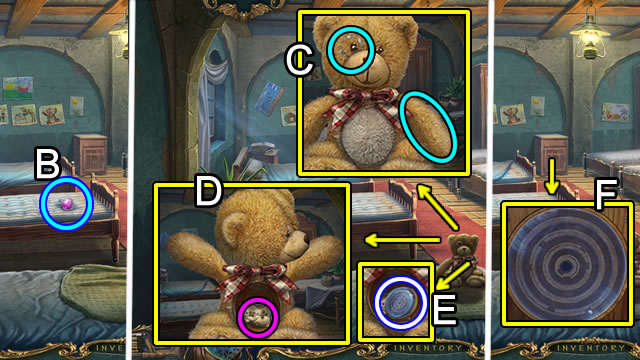
- Attach the BEAR PAW and BEAR EYE(C).
- Raise the arms, turn the head and unzip the middle. Read the note (D).
- Tale the LOCK (E).
- Add the LOCK for a puzzle (F).
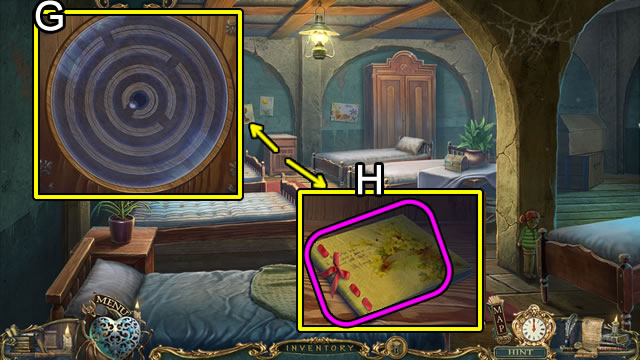
- Solution (G).
- Pick up the sketchbook (H) for a puzzle.
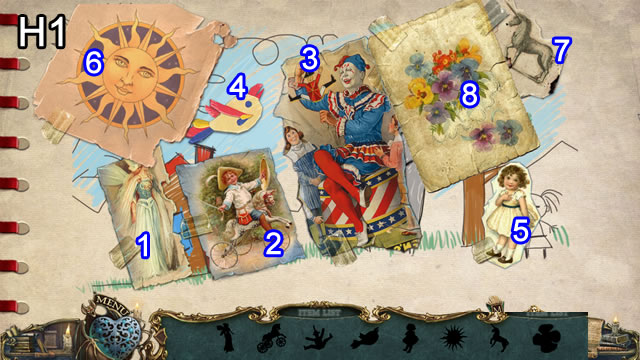
- Solution Page 1 (H1).
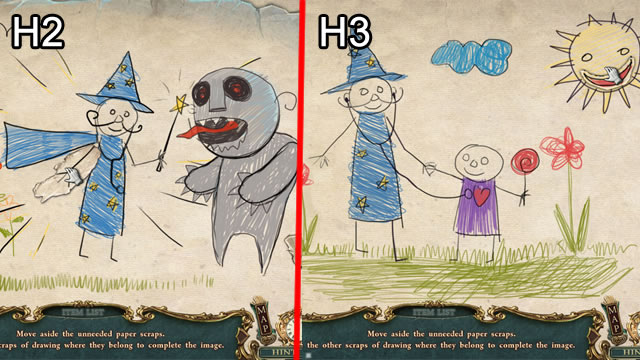
- Solution Page 2 (H2).
- Solution Page 3 (H3).
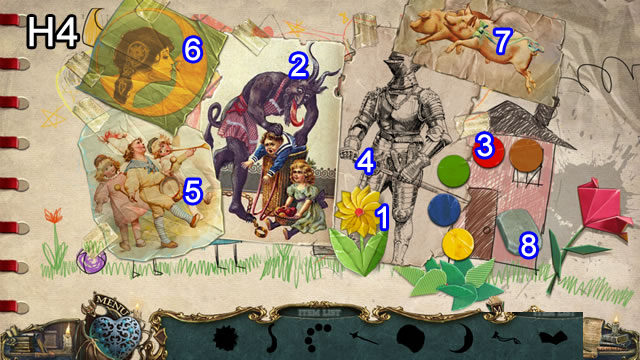
- Solution Page 4 (H4). Receive the SKETCHBOOK.
- Give the SKETCHBOOK; take the SPIDER (I).
- Walk down.
- Remove the mask; take the MATCHES (J).
- Walk down twice.
- Use the MATCHES (K); take the CODE (L).
- Attach the SPIDER and CODE (L).
- Press symbols 1-5.
- Walk forward.
- Add the STRING; take the SLINGSHOT (M).
- Select the debris (N); take the STONES.
- Select the lamp; remove the glass; pour the COD-LIVER OIL; replace the glass; take the LAMP (O).
- Walk down.
- Place the LAMP (P); receive the LIT LAMP.
- Return to the backyard.
- Place the LIT LAMP (Q); remove the poster; take the LOCKET.
- Return to the orphanage.
- Give Anna the LOCKET (R); take the WING.
- Walk down.
- Place the WING (S) for a puzzle.
- Solution (T).
- Enter the greenhouse.
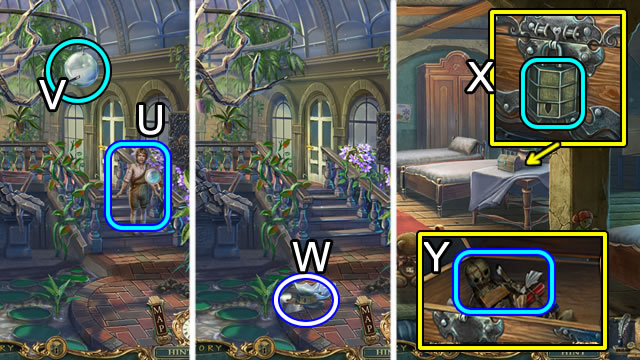
- Select the boy to bring him out of hiding (U); speak to him.
- Place the SLINGSHOT (V); add the STONES.
- Take the LOCK (W).
- Return to the orphanage; speak to Anna.
- Add the LOCK (X).
- Take the knot doll (Y), open and read the note for a puzzle.
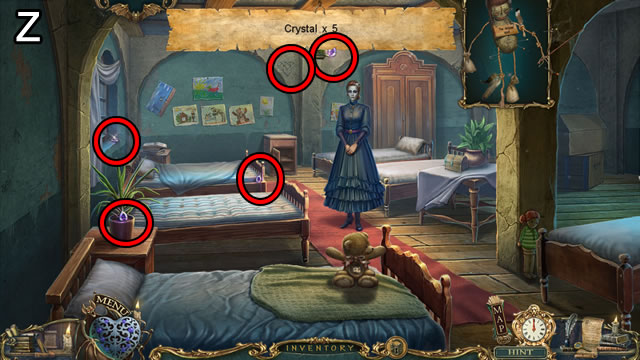
- Collect the crystals (Z).
- Take the amulet piece and the TEARS (A).
- Give Anna the TEARS; receive BEER 1/3 (B).
- Take RUBY 2/2 and a MAGNET (C).
- Walk down twice; go left.
- Open the bag; take the amulet piece (1); unwrap the CHEESE (2), take the ALE (3).
- Use the MAGNET for BEER 2/3 (D).
- Return to the greenhouse.
- Place the RUBIES 2/2 (E); open the grill; take the amulet piece (F); place the CHEESE (G).
- Adjust the CHAIN 4x to remove it; receive the BEER 3/3 (H).
- Return to outside the tavern.
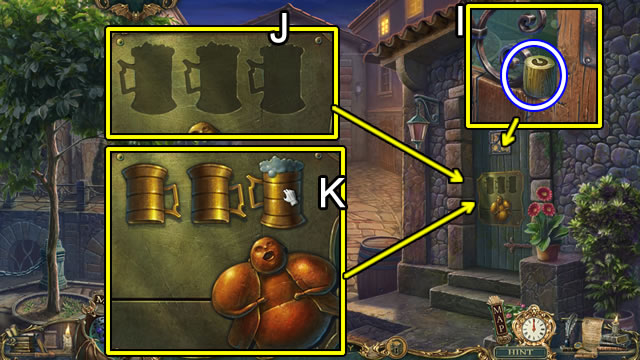
- Take BARREL 1/2 (I).
- Place BEERS 3/3 (J).
- Slide the man under each mug and tip them into his mouth (K).
- Enter the tavern.

- Play the HOP (L); receive a MEAD MUG.
- Take the amulet piece and place the MEAD MUG (M). Open the bottle; pick it up and pour it into the mug.
- Select the bottle again. Take the TILE and mug of MEAD (N).
- Remove the drape (O).
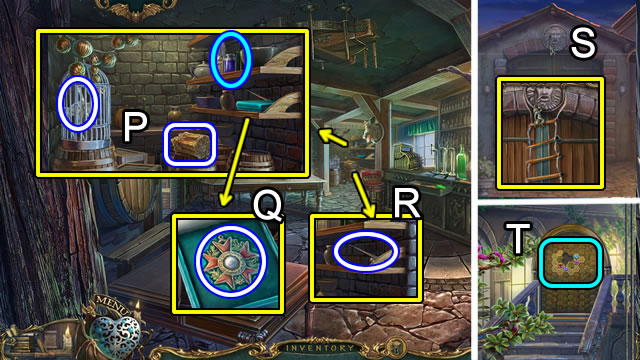
- Take the amulet piece; open the cage; take the BLADE; grab the ROPE LADDER (P).
- Open the box, read the note and take the MEDAL (Q).
- Take the BAYONET (R).
- Walk down.
- Place the ROPE LADDER (S); take the SATYR.
- Return to the greenhouse.
- Place the TILE on the back wall (T) for a puzzle.
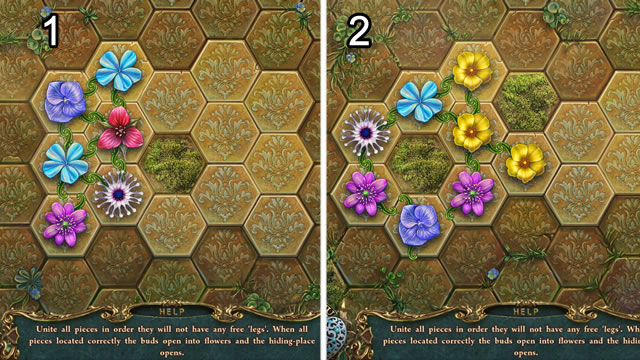

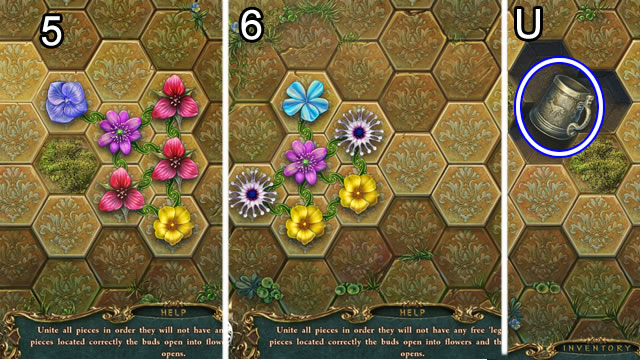
- The puzzles are random. Possible solutions 1-6.
- Take the MUG FOR ALE (U).
- Return to the tavern.
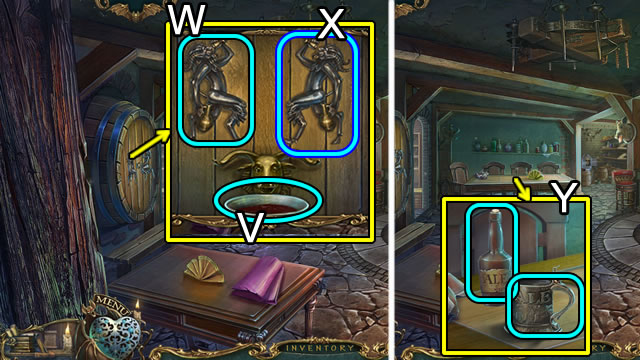
- Place the CUP (V) and SATYR (W).
- Move satyr (X) to match (W).
- Take WINE.
- Place the ALE and MUG FOR ALE (Y).
- Use the BAYONET; fill and take the ALE.

- Read the note; take the POTHOLDER (Z).
- Pull levers 1-2-3.
- Place the MEAD, WINE and ALE (A).
- Walk down the steps.
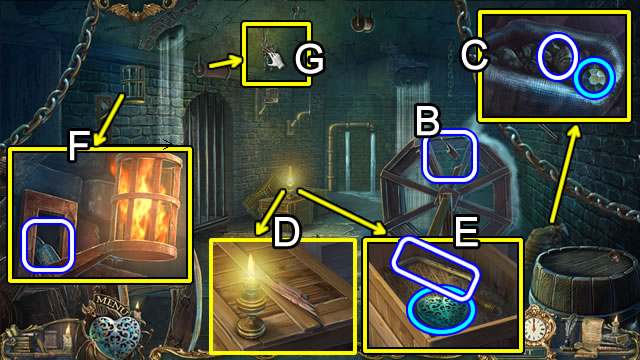
- Pick up the SLIVER (B).
- Untie the sack; take the amulet piece and COAL (C).
- Use the POTHOLDER; put the SLIVER (D); take the BURNING SLIVER.
- Use the BAYONET to open the crate; take the amulet piece and place the BLADE (E); take the SAW.
- Use the BURNING SLIVER (F); take the BOTTLE.
- Attach the CHAIN (G).
- Walk down.
- Play the HOP (H); receive BELL 1/2.
- Place the BOTTLE (I); take METAL PLATE 1/2 (J).
- Return to the greenhouse.
- Use the SAW (K).
- Take the amulet piece; take the WHEEL PART (K1).
- Return to the tavern basement.
- Place the WHEEL PART (L).
- Pick up METAL PLATE 2/2 (M).
- Place METAL PLATES 2/2 (N); arrange the pieces (O).
- Walk left.
- Use the COAL (P).
- Lift the leaf (Q).
- Set the numbers to 1-7-8-3-5-8.
- Take the VALVE (R).
- Walk down.
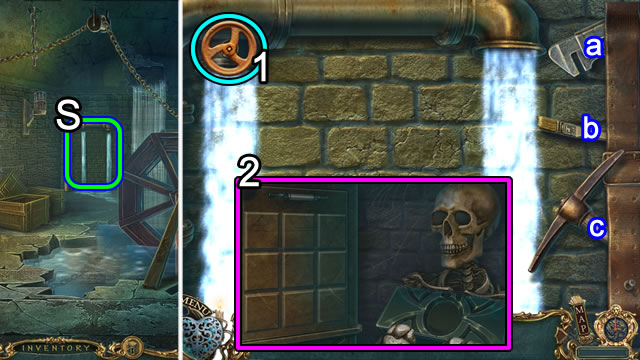
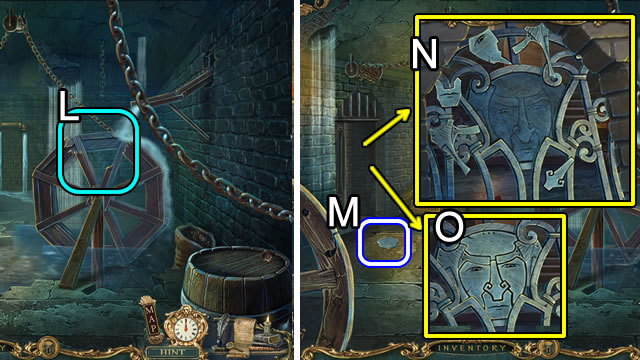
- Look at the wall (S).
- Place the VALVE (1) for a puzzle.
- Solution.a-1; c-2x3; b-2x4.
- Win (3); place (4).
- Take BELL 2/2 (T).
- Walk left.
Chapter 4: The Library and Cells
- Attach and ring BELLS 2/2 (U). Enter the library.
- Attempt to walk forward.
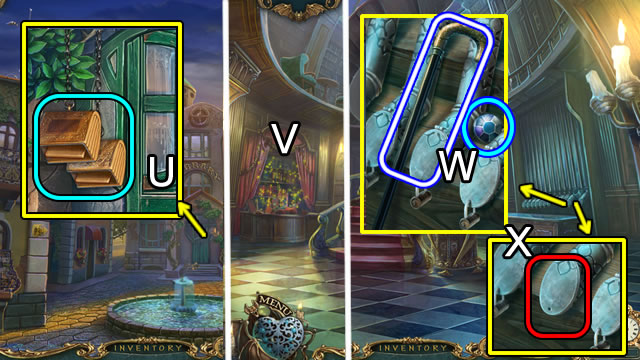
- Play the HOP (V); receive a KEY.
- Take the CANE and amulet piece (W).
- Use the KEY (X); open the tube.
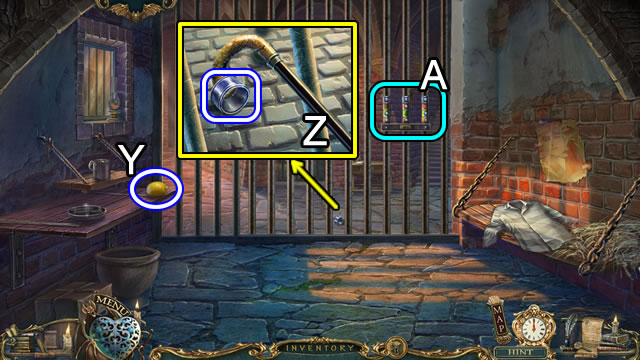
- Take the LEMON (Y).
- Use the CANE; take the RING (Z).
- Place the RING (A) for a puzzle.
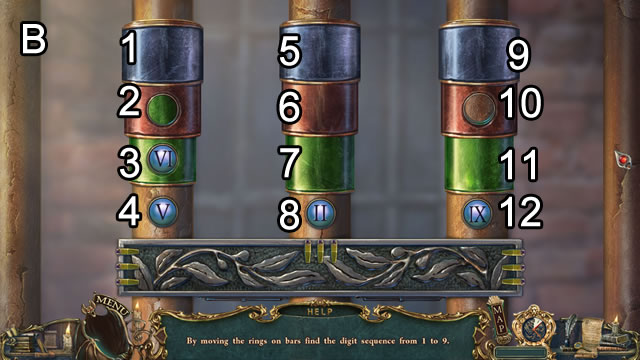
- Solution (B). 1 down 3x; 9 down 3x. Press I-II-III. 5 down 3x, 6 down. Press IV-V. 4 up. Press VI-VII-VIII. 12 up. Press IX.
- Remove the string; take the SKETCH and RUSTY KEY (C).
- Remove the poster; take the ORGAN KEY and amulet piece (D).
- Squeeze the LEMON (E). Rub the RUSTY KEY; take a KEY.
- Use the KEY (F) twice.
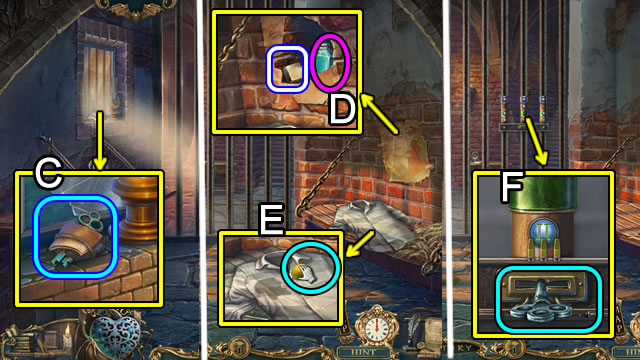
- Open the cell for a HOP. Get an EXTINGUISHER.
- Walk up.
- Speak to the guard; take a BULLET (G).
- Walk down.
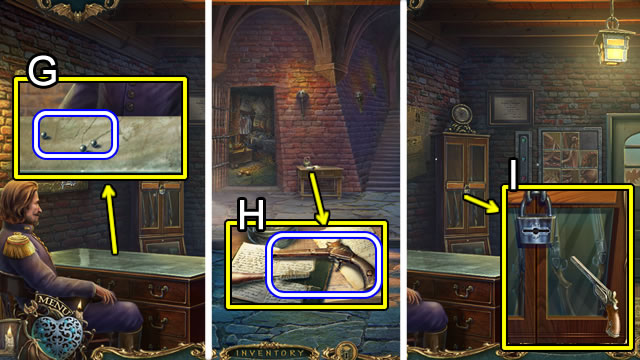
- Load the BULLET; use the ramrod; take the GUN (H).
- Go upstairs.
- Use the GUN (I). Remove the lock and open the cabinet for a puzzle.
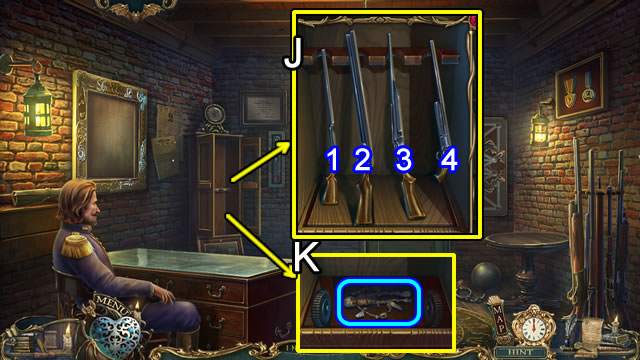
- Solution (J). 2-4; 1-2.
- Take the doll (K).
- Touch the doll twice for a puzzle.
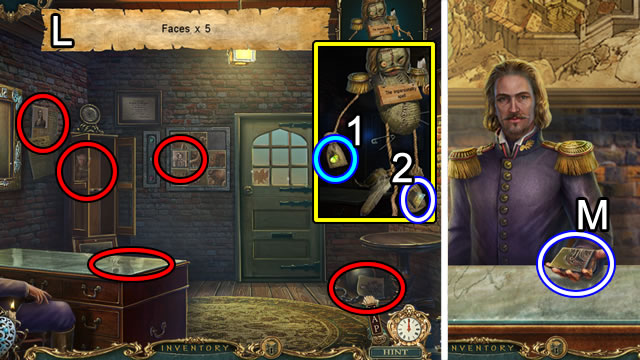
- Solution (L). Take an amulet part (1) and a FACE (2).
- Give the officer the FACE; take the PAINTING PART (M).
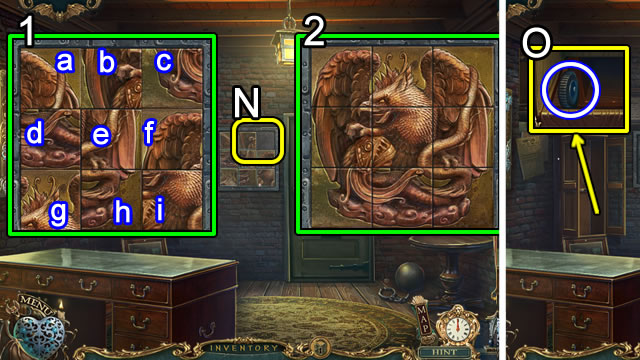
- Place the PAINTING PART (N).
- Solution (1). c-g-b-d-h-i-e-f-a-c. Completed image (2).
- Grab the GEAR (O).
- Walk forward.
- Speak to the crone; take a PLANET 1/2 (P).
- Walk down.
- Place the GEAR; take the BALL (Q).
- Walk left, then right.
- Place the BALL for a puzzle (R).
- Solution. 5-2-3-1-2-5-6-4-3-2-1-3-4-5-6.
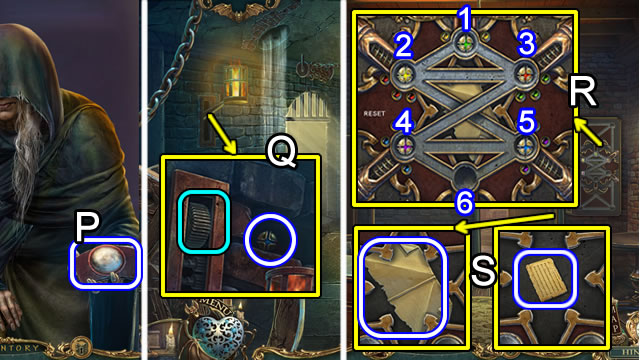
- Take the PAPER PIECE and NOTES (S).
- Return to the library.
- Play the HOP (T); receive a QUILL.
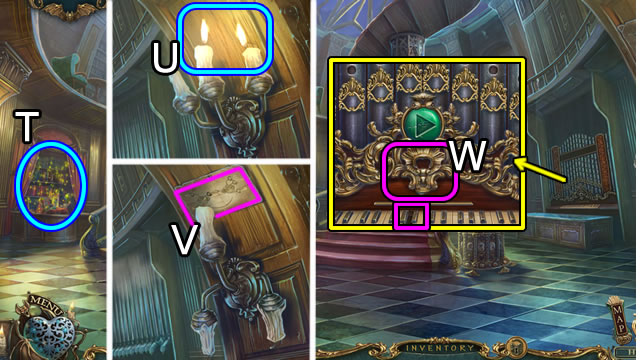
- Use the EXTINGUISHER (U).
- Place the SKETCH and position the candles (V).
- Place the NOTES and ORGAN KEY (W) for a puzzle.
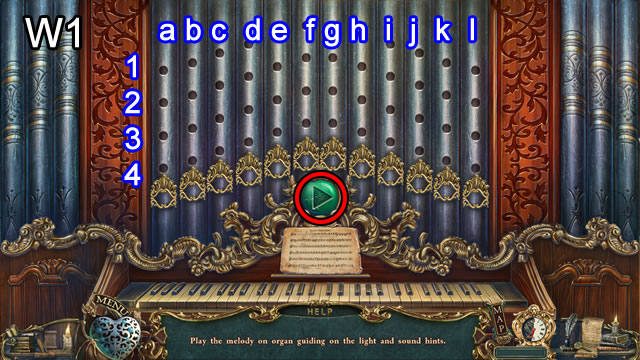
- Slide the tabs (a-l) over the holes (1-4).
- Solution (W1). a-1, b-4, c-3, d-2, e-3, f-3, g-4, h-2, i-3, j-4, k-3, l-2. Press the green button.
- Return to the cells (X). Play the HOP (1); receive a BEDPOST. Place the QUILL (2); take the INKWELL.
- Return to the library.
- Place the INKWELL (Y).
- Read the instructions; take the LEVITATION POTION (Z).
- Move the books; take the amulet part (A).
- Add the PAPER PIECE; take a CODE (B); grab the PEACOCK PICTURE (C).
- Return to the backyard.

- Pour the LEVITATION POTION; take a HAMMER (D).
- Return to the greenhouse.
- Use the HAMMER; take PLANET 2/2 (E).
- Return to the library.
- Throw the HAMMER (F).
- Open the door and enter (G).
- Place PLANETS 2/2 (H).
- Swap 1-2, 1-3.
- Examine and enter (I).
Chapter 5: Through the Portal

- Play the HOP (J); receive a TOOL KEY.
- Approach the lions (K).
- Take the FAN (L).
- Take the BRUSH (M).
- Enter the tower (N).
- Read the paper; place the TOOL KEY (O); take the BARREL 2/2 (P).
- Play the HOP (Q). Receive BOLTS.
- Walk down.
- Take the amulet bottle; place BARRELS 2/2 for a puzzle (R).
- Solution (S).
- Take the doll (T); select it twice for a puzzle.
- Solution (U).
- Take the amulet part and HANDKERCHIEF (V).
- Give the HANDKERCHIEF (W).
- Place the MEDAL (X).
- Take the CHAIN (Y).
- Return to the tower.
- Place the BEDPOST; insert the FAN (Z); receive FAN BLADES and a HOOP.
- Take the amulet piece and LURE (A).
- Place the HOOP; attach the CHAIN; use the machine for the FAN BLADES (B).
- Place the blades on the circle; add the BOLTS; take the PENDULUM BASE (C).
- Return to the library.
- Take the amulet part (D).
- Place the BRUSH. Read the note and place the PENDULUM BASE (E).
- Use the BRUSH; take the PENDULUM (F).
- Return to the park; approach the lions.
- Use the PENDULUM and HAMMER (G).
- Take the HEART (H).
- Enter the mansion.
- Take the amulet part and CHESS PIECE 1/3 (I).
- Open the chest plate; place the HEART (J).
- Take the CRYSTAL (K).
- Walk up.
- Take the FISHING ROD (L).
- Take the VIAL (M).
- Remove the dirt (N); take the amulet part and LENS.
- Take the QUEEN (O).
- Press the drawer symbols; take the amulet part and BUTTON (P).
- Exit the mansion.
- Play the HOP (Q); receive HENNA.
- Place the FISHING ROD; attach the LURE (R); take the FISH.
- Dip the VIAL (S); receive the WATER.
- Walk down.
- Place the CRYSTAL (T); take the MECHANICAL OWL.
- Give the FISH to the duck (U).
- Take the amulet part and RED GLASS 1/3 (V).
- Add the CODE and LENS (W) for a puzzle.
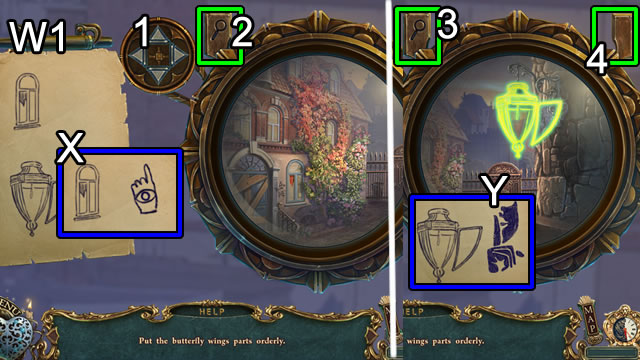
- Solution part 1 (W1). Scroll (1) down. Press (2) for image; select the image to transfer (X).
- Scroll (2) to find the lantern. Press (3) for image; select to transfer (Y).
- Select (4).
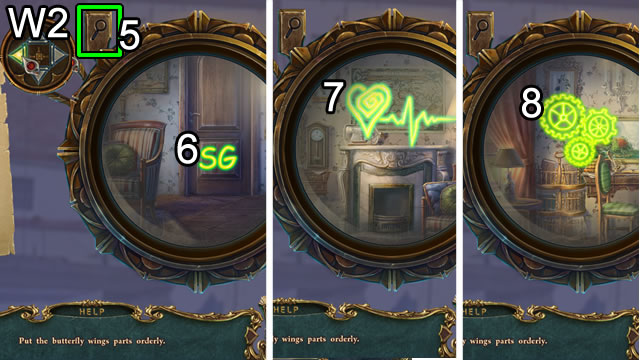
- Solution part 2 (W2). Press (5); scroll to find image (6). Select to transfer the image.
- Scroll, find and select images 7-8.
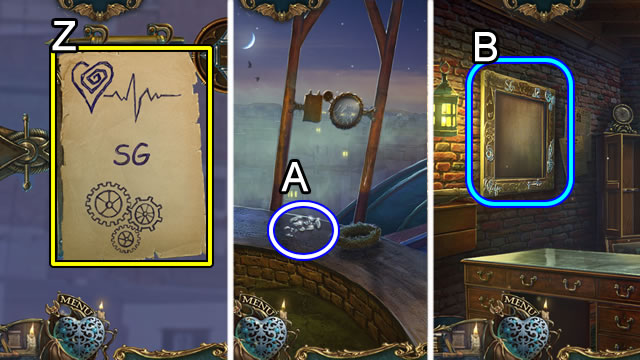
- View the completed transfers (Z).
- Pick up GLASS (A).
- Return to the police office.
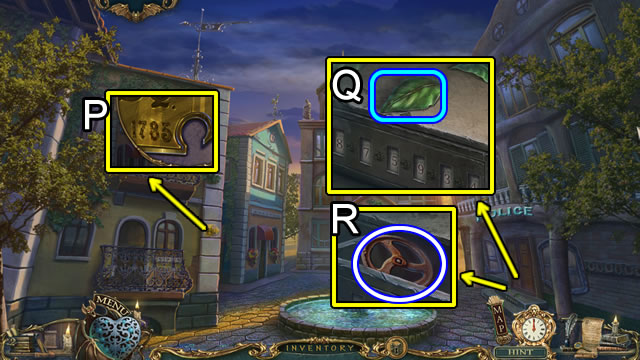
- Select the frame (B).
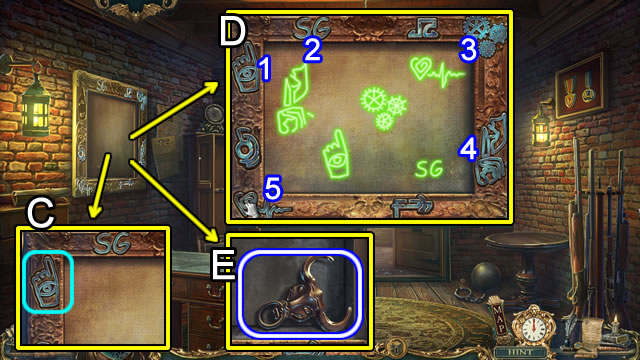
- Place the BUTTON (C).
- Select the magnifier. Select (1-5) (D).
- Take the BULL (E).
- Return to the mansion greenhouse.
- Place the BULL (F).
- Take the RUSTY RAZOR and REAGENT (G); read the document.
- Return to the tower.
- Place the RUSTY RAZOR (H); take a SHARP RAZOR.
- Play the HOP (I); receive a BRAIN.
- Return to the mansion.
Chapter 6: The Mansion
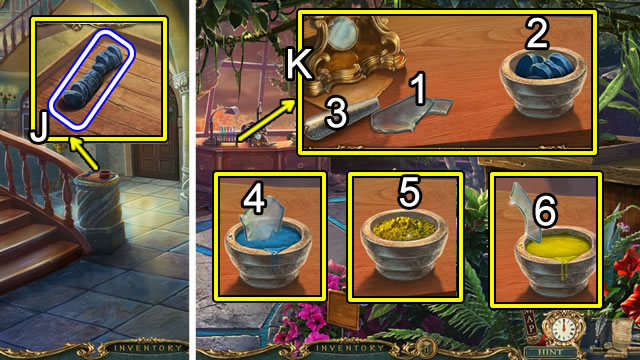
- Use the SHARP RAZOR; take BLUE ROOT (J).
- Walk up.
- Place the GLASS (1) and BLUE ROOT (2) (K); grind the root (3); dip the GLASS; receive the BLUE GLASS (4).
- Empty the bowl. Repeat steps 2-3 for the HENNA. Pour the WATER (5); dip the GLASS; receive the YELLOW GLASS (6).
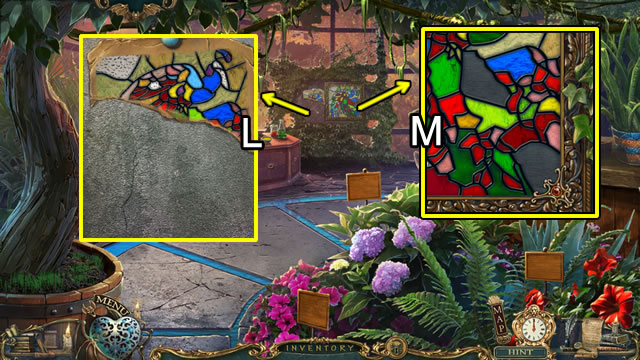
- Add the PEACOCK PICTURE (L).
- Place RED GLASS (3/3) (M) to open a puzzle.
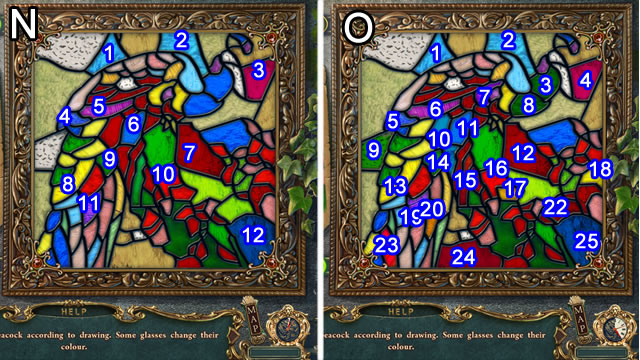
- Solution. Casual 1-12 (N).
- Solution. Hard 1-25 (O).
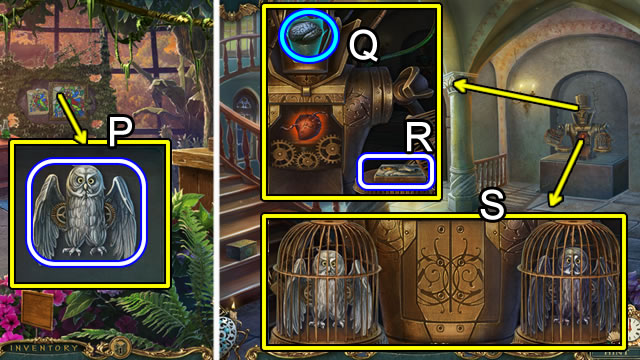
- Take the MECHANICAL OWL (P).
- Walk down.
- Open the face and place the BRAIN (Q); take CHIP 1/2 (R).
- Close the plates. Place the MECHANICAL OWLS (S).

- Speak to the crone (T).
- Take the KEY (U).
- Use the KEY (V); take the doll; select the doll twice for a puzzle.
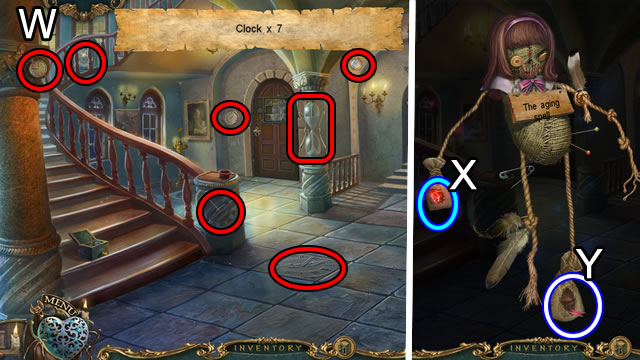
- Solution (W).
- Take the amulet piece (X); receive a HEART.
- Take the RIBBON (Y).
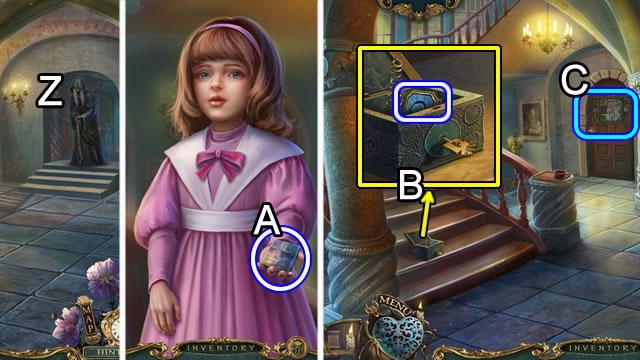
- Approach the crone (Z); give the RIBBON.
- Take CHIP 2/2 (A).
- Speak to the man.
- Take a BUTTON (B).
- Place CHIPS 2/2 (C) for a puzzle.
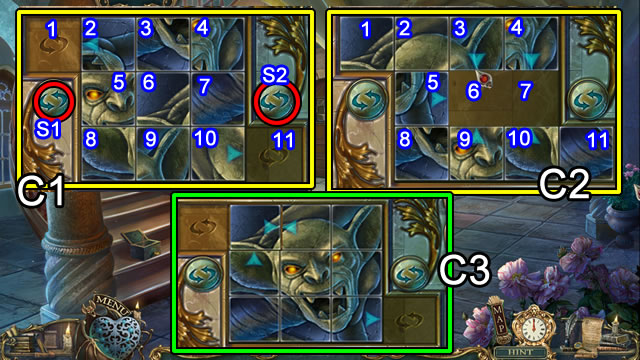
- Slide the tiles (U) up, (D) down, (R) right or (L) left based on the numbered squares. S1 and S2 shift buttons.
- Solution (C1). 2L-S1-10R-S2-3L-6U-7L-11L-10U-9R-6D-7L-10U-9R-10R-8R-5D-2D-1R-9R-8R-5D -2D-3L-6U-7L-2L-3L-6U.
- Solution (C2). 10U-9R-8R-5D-7L-6L-10U-7L-9R-10U-8R-5D-6L-7L-11L-10U-9R-10R- 7D-10L-6R-7D-4D-5R-8U-9L-10L-11L- 3R-2R-1R.
- Complete (C3).
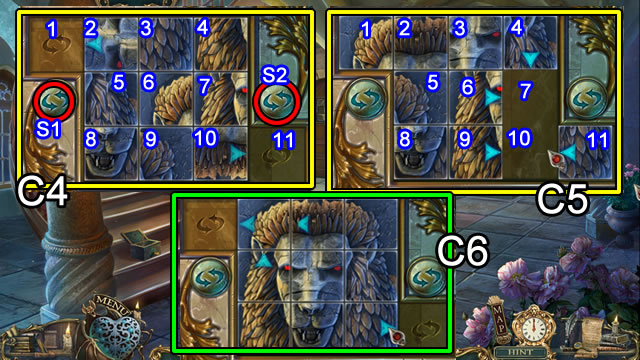
- Solution (C4). 2L-S1x3-10R-S2x2-9R-6D-7L-10U-3L-6U-11L-9U-10L-7D-4D-3R-2R-5U-6L-9U-10L- 7D-4D-3R-2R-1R-10R-7D-4D-3R-2R-5U-6L-9U-10L- 2L-5U-6L-9U-11L-10L-7D-10R.
- Solution (C5). 4D-7D-3R-6R-5R-6U-7L-6L-4D-7L-10U-7U-9R-10U- 8R-9R-5D-6L-7L-6D-4D-5R-8U-9L-10L-11L-3R-2R-1R.
- Complete (C6).
- Walk forward.
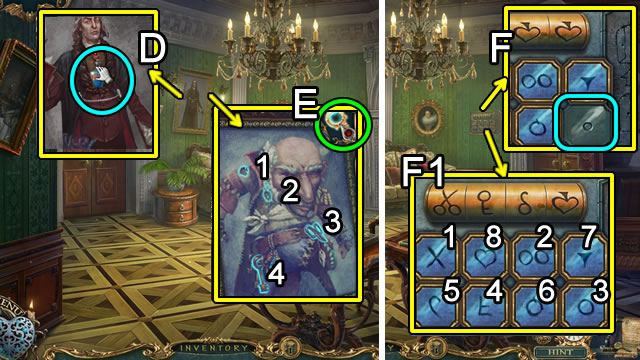
- Use the REAGENT (D).
- Press (E) and select the highlighted symbols (1-4).
- Place the BUTTON (F); Set the dials and touch the pad (F1) 1-8.
- Walk forward.
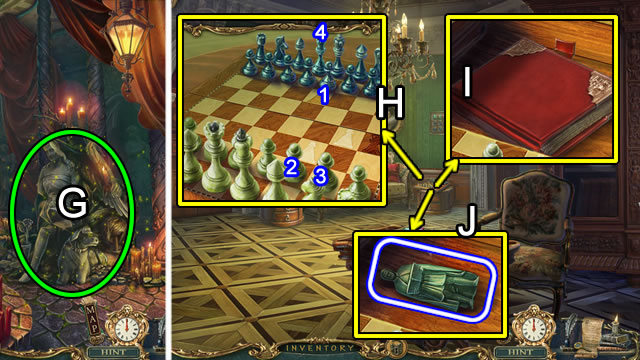
- Remove the drape; play the HOP (G); receive a CHESS PIECE 3/3.
- Walk down.
- Place CHESS PIECES 3/3 (H). Move 1-4.
- Open the book (I); take the STATUETTE (J).
- Walk right.
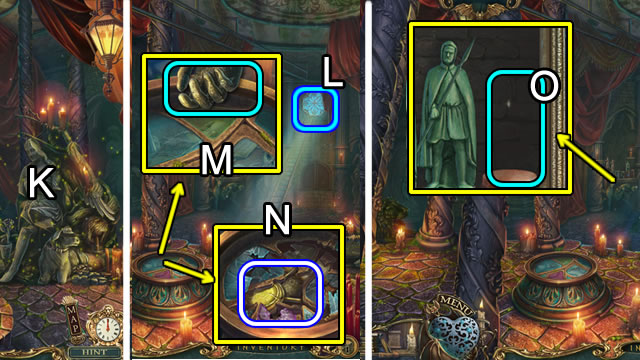
- Play the HOP (K); receive a STONE HAND.
- Remove the drape (L).
- Use the STONE HAND (M); take MOLECULE 1/2 (N).
- Place the STATUETTE (O) for a puzzle.
- Solution casual and hard (O1). 5-3-2-4-6-7-5-3-1-2-4-6-5-3-4.
- Take MOLECULE 2/2 (P).
- Walk down.
- Place MOLECULES 2/2 (Q) for a puzzle.
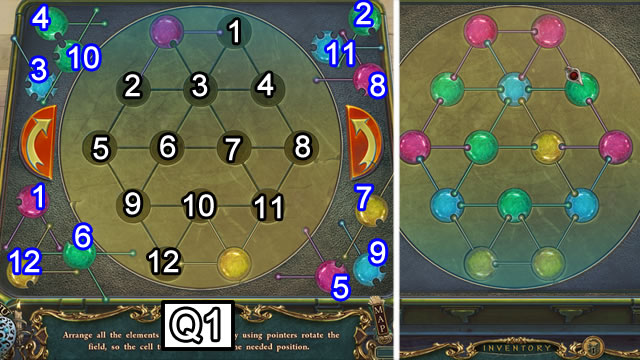
- Solution (Q1).
- Walk left.
- Open the door and replace the HEART (R) with the mechanical HEART.
- Place the human HEART (S).
- Congratulations. You have completed playing Haunted Legends: The Stone Guest.
Created at: 2014-12-15