

Walkthrough Menu
- General Tips
- Chapter 1: Reunion
- Chapter 2: Seeking Help
- Chapter 3: Finding Friends
- Chapter 4: Helping Norman
- Chapter 5: To Lighthouse
General Tips
- This is the official guide for Haunted Manor: The Last Reunion.
- This guide won't tell you when to zoom into a location; the screenshots show each zoom scene.
- Hidden-object puzzles are referred to as HOPs. Only the locations of the HOPs will be shown.
- Use the Map to fast travel to a location.
Chapter 1: Reunion
- Speak to character.
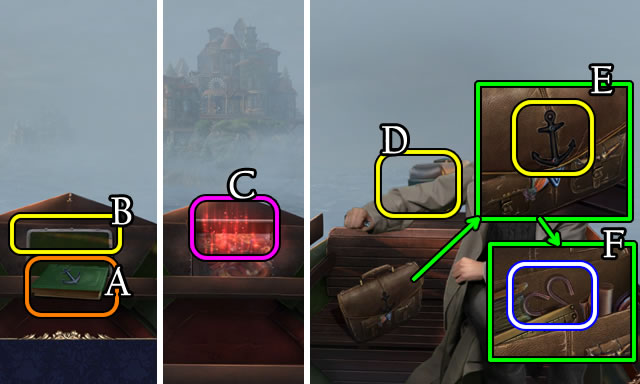
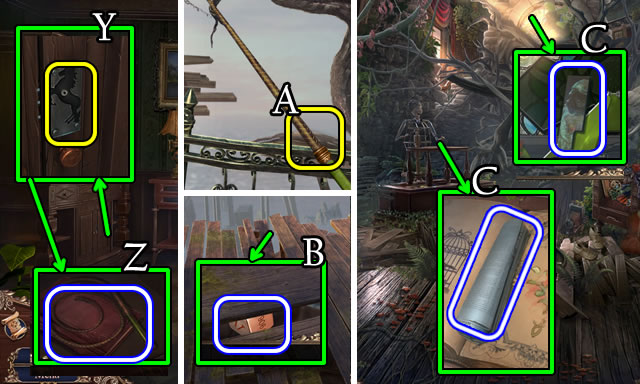
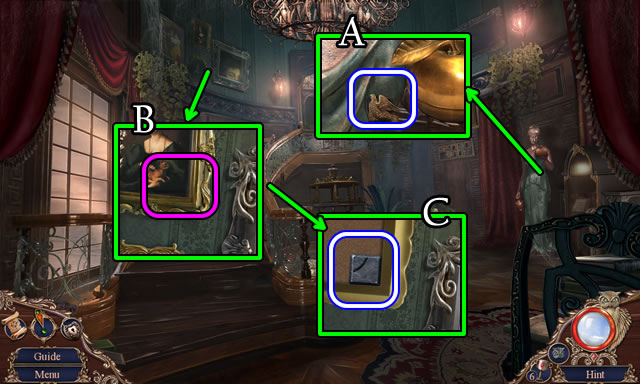
- Take ANCHOR and Yearbook (A).
- Open, read Yearbook.
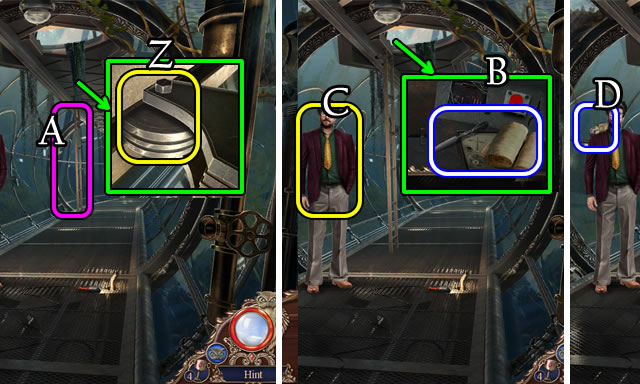
- Select (B).
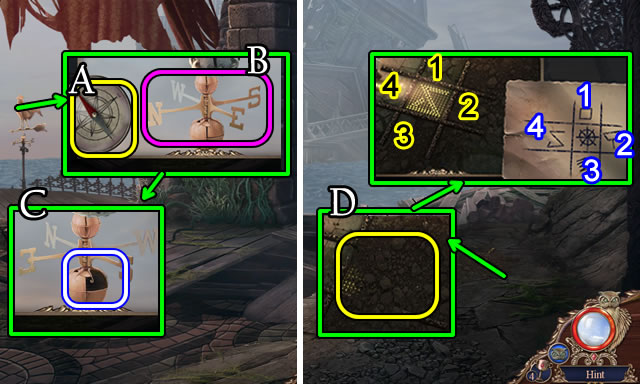
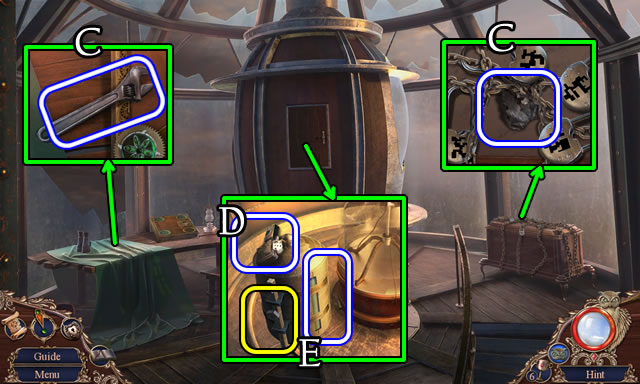
- Play HOP (C); receive FUEL.
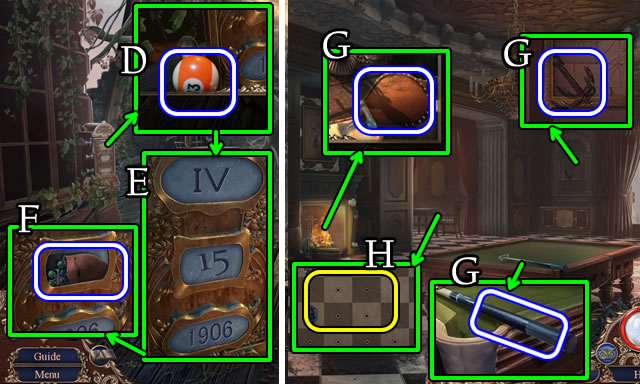
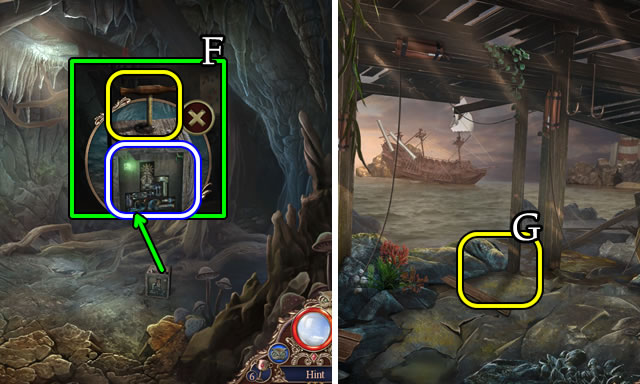
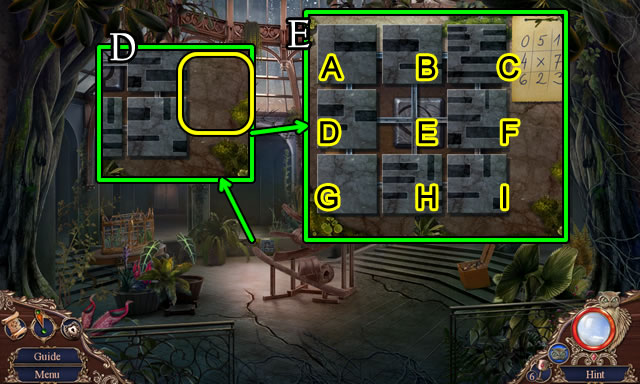
- Use FUEL (D).
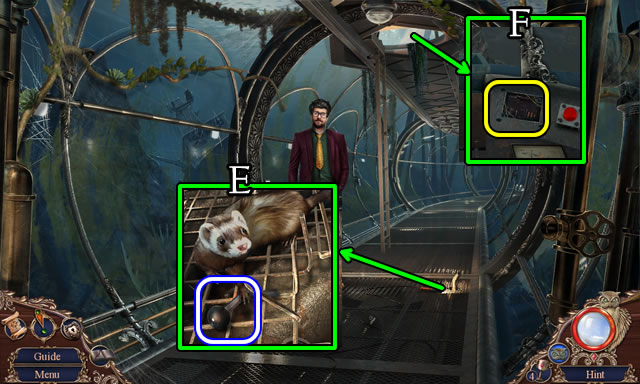
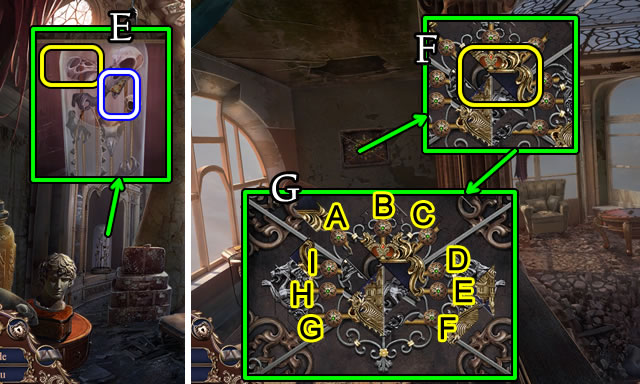
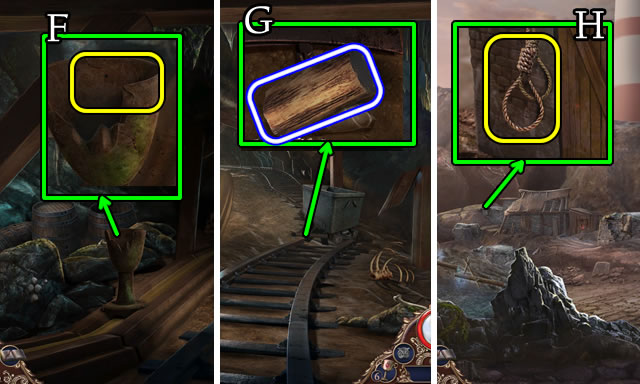
- Speak to characters; place ANCHOR (E); take HOOKS (F).
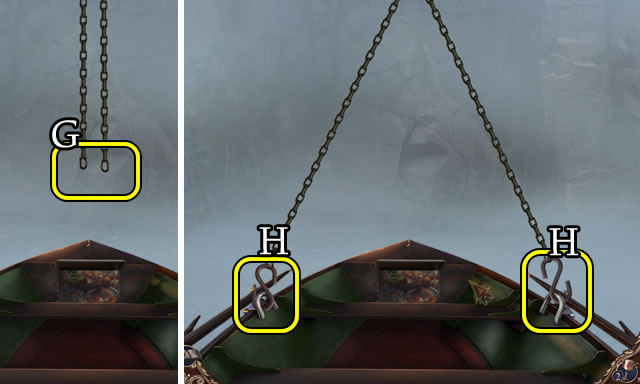
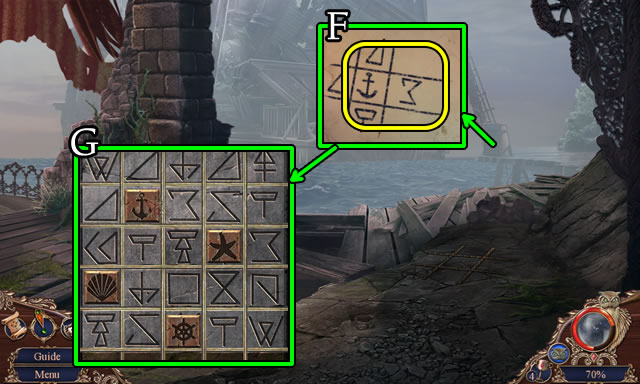
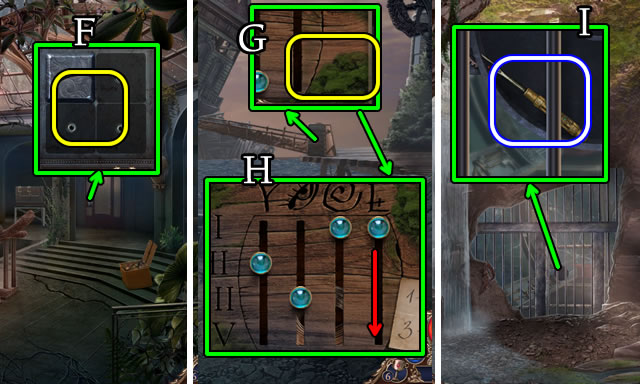
- Place HOOKS (G), secure hooks (H).
- Speak to characters.
- Go forward.
- Speak to characters.
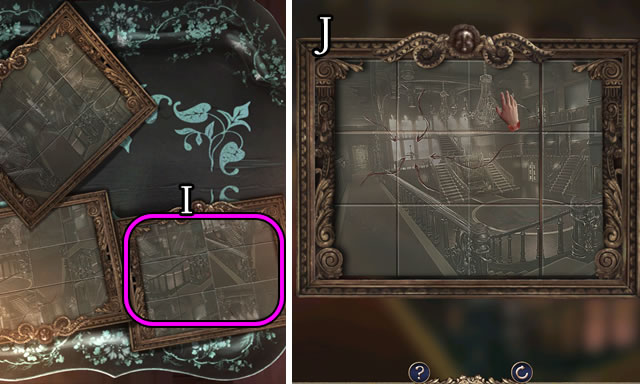
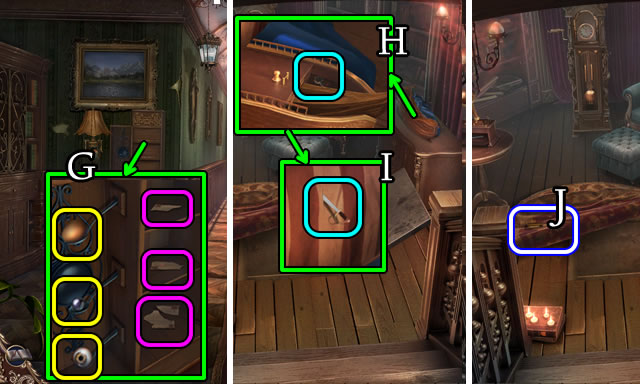
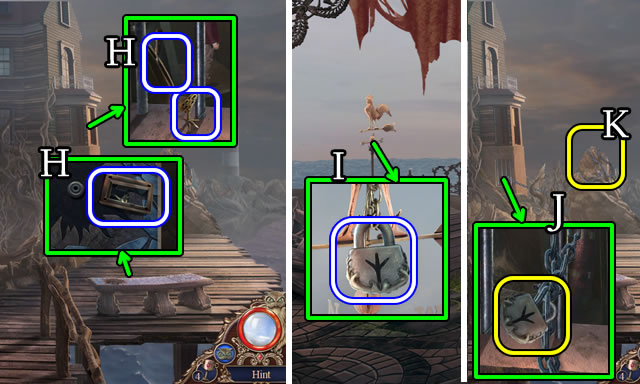
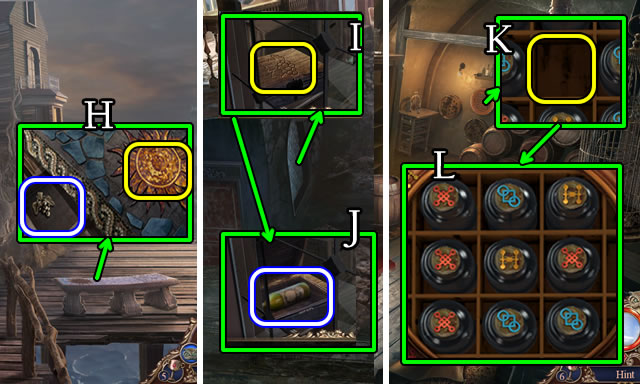
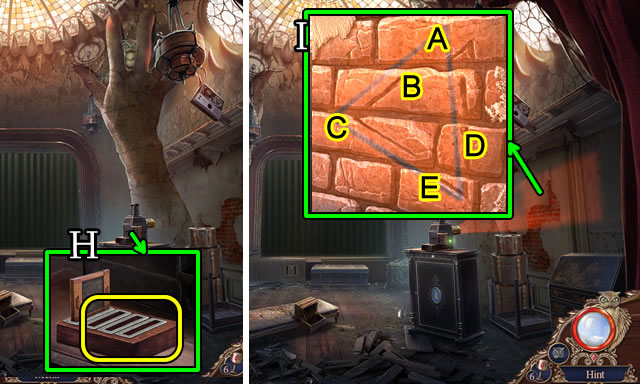
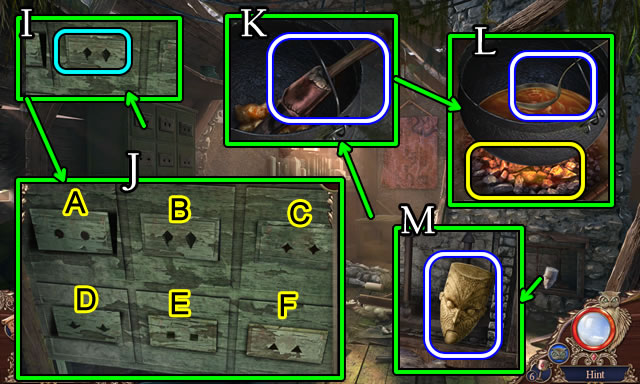
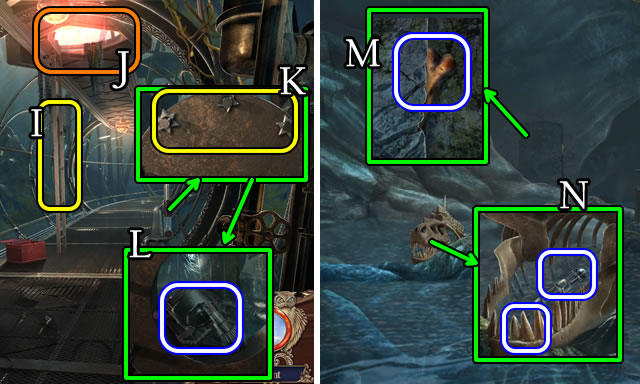
- Take ENGRAVED TILE (I).
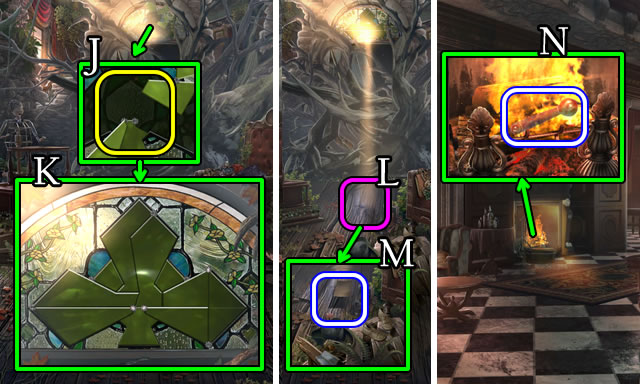
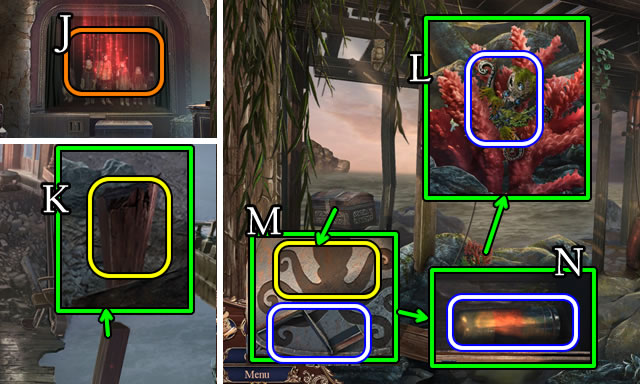
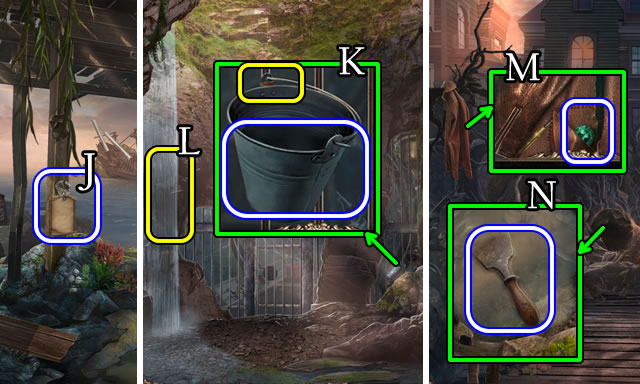
- Solution (J).
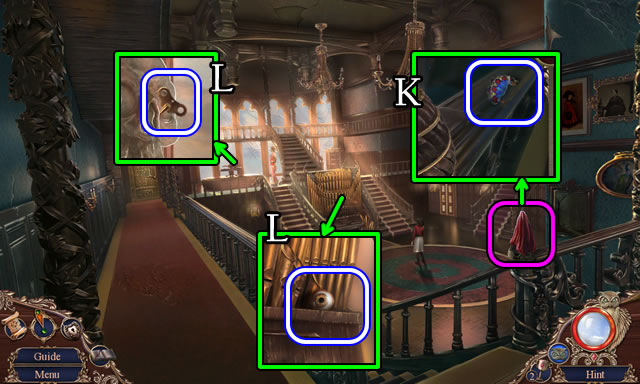
- Remove cloth; take 1/3 GLASS (K).
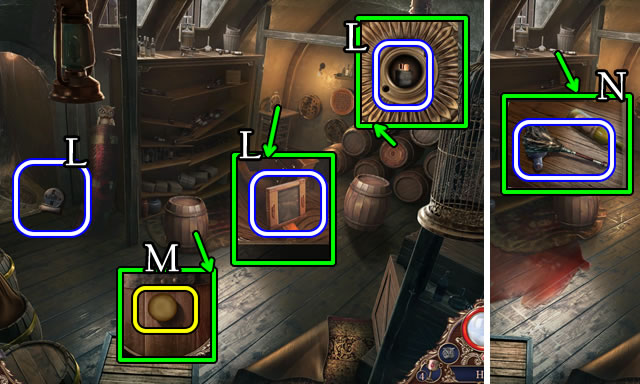
- Take WINDING KEY; GLASS EYEBALL (L).
- Go right.
- Speak to character.
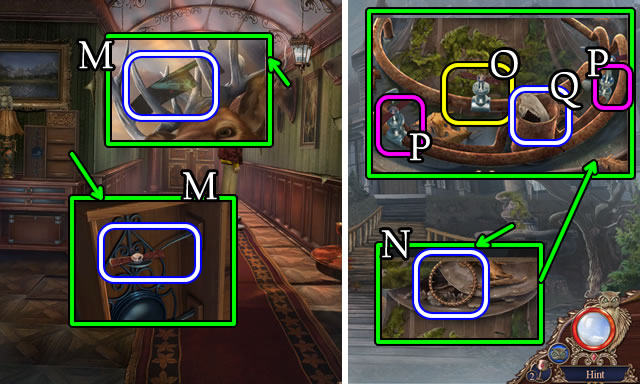
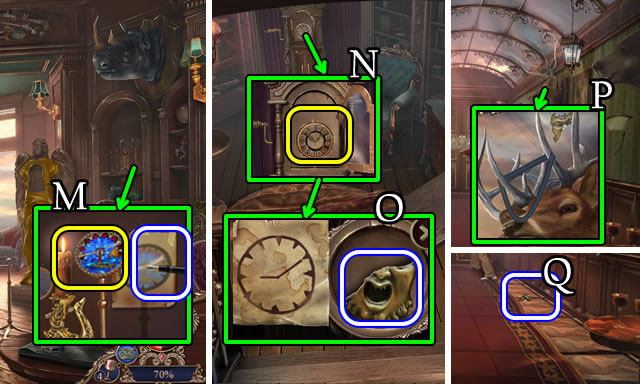
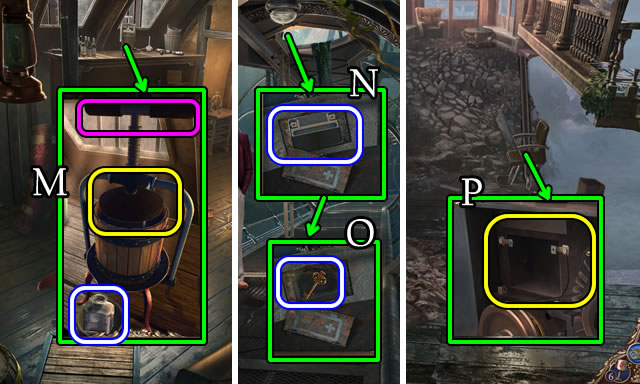
- Take FAUCET HANDLE; 1/3 PORTRAIT PARTS (M).
- Go down 2x.
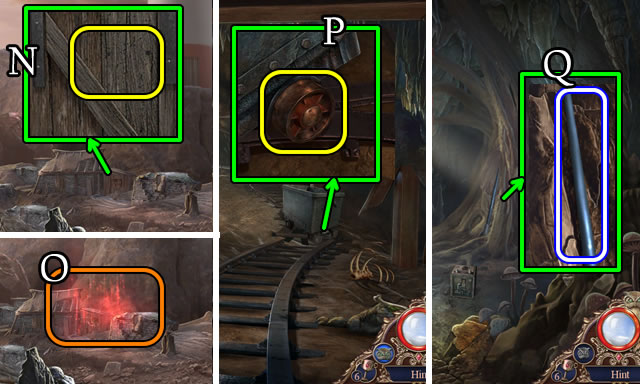
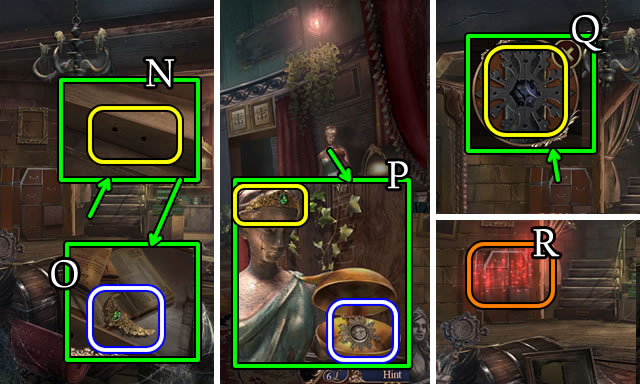
- Take METAL BASE (N).
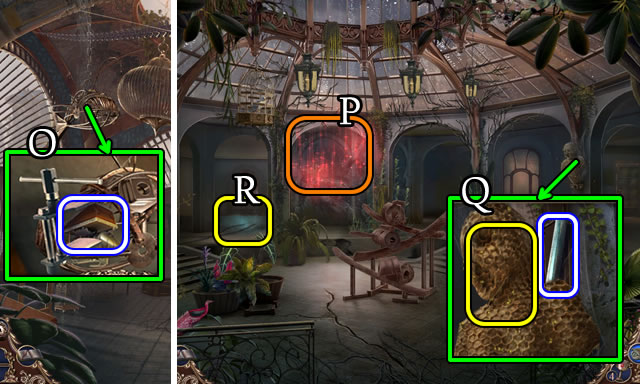
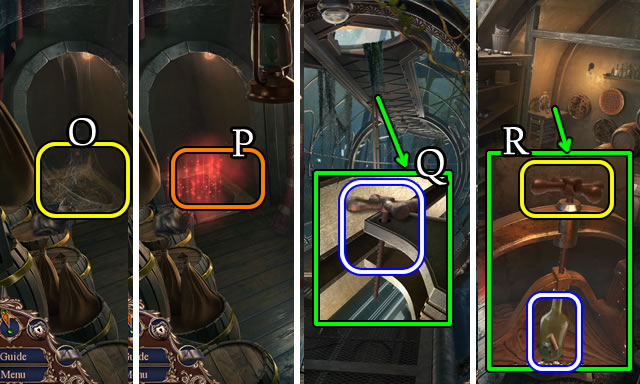
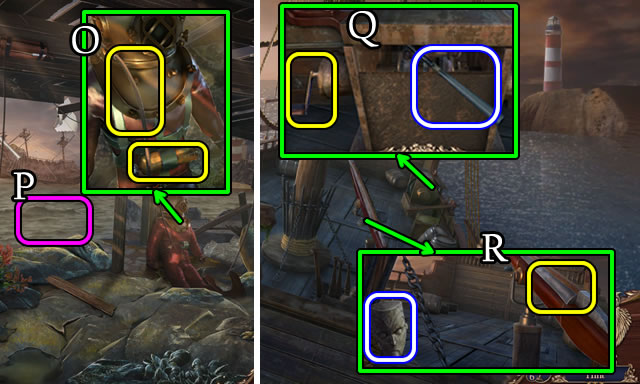
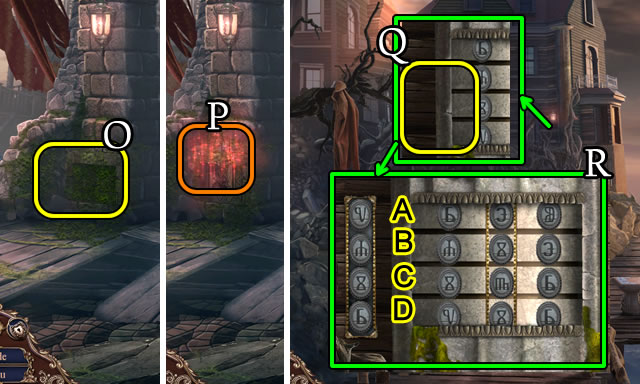
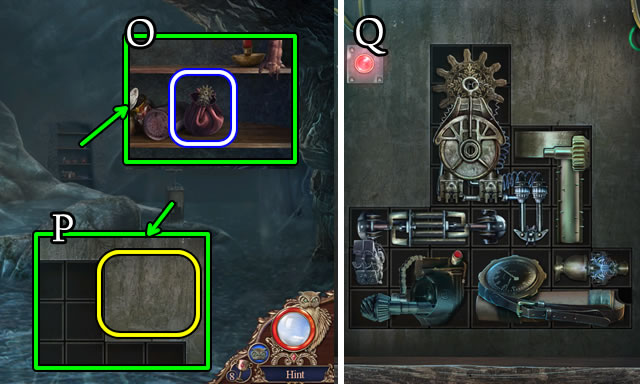
- Place, select FAUCET HANDLE (O); select (P), take MARBLE JAW (Q).
- Go forward.
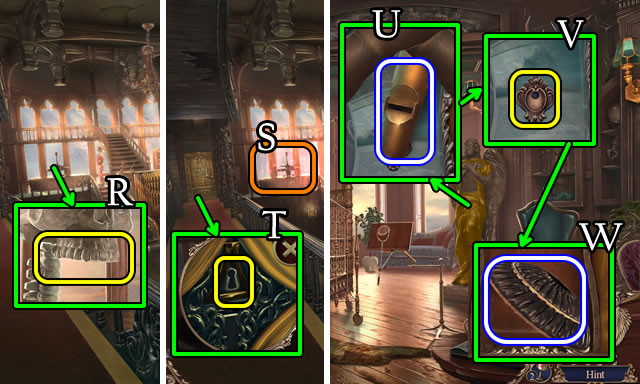
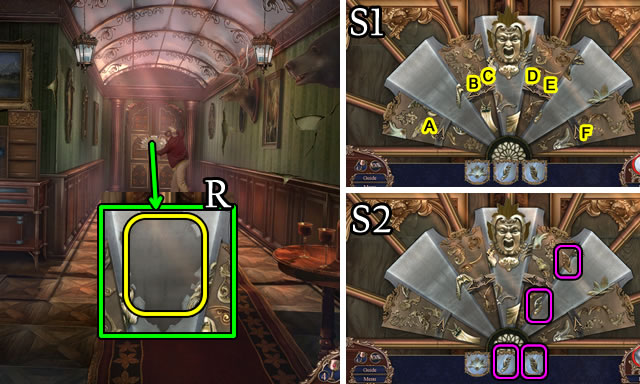
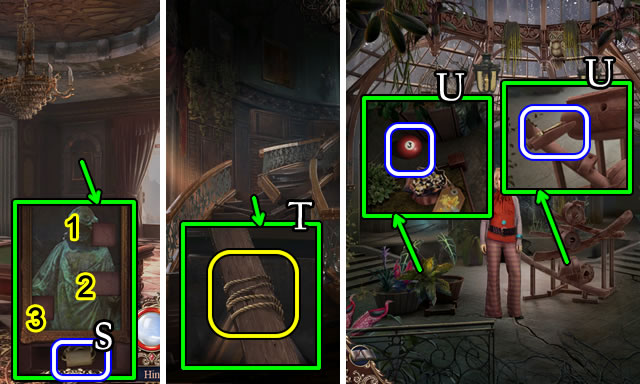
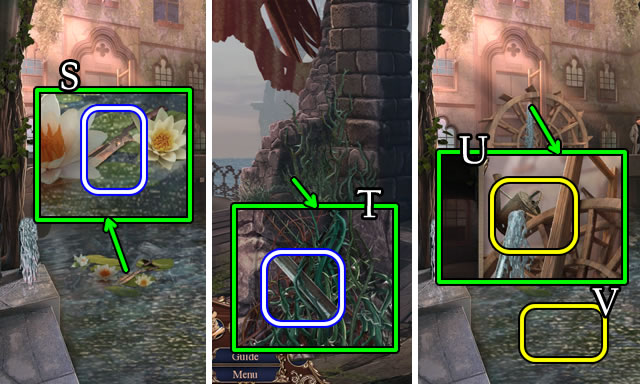
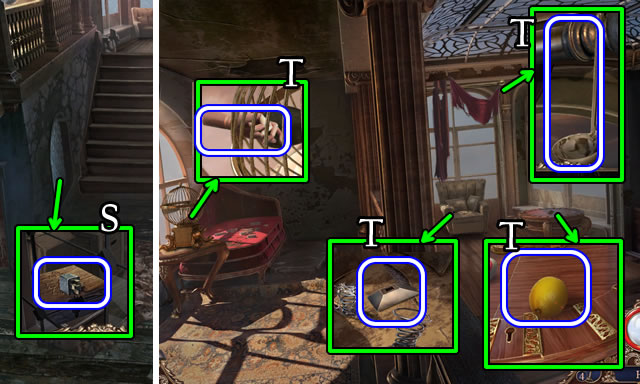
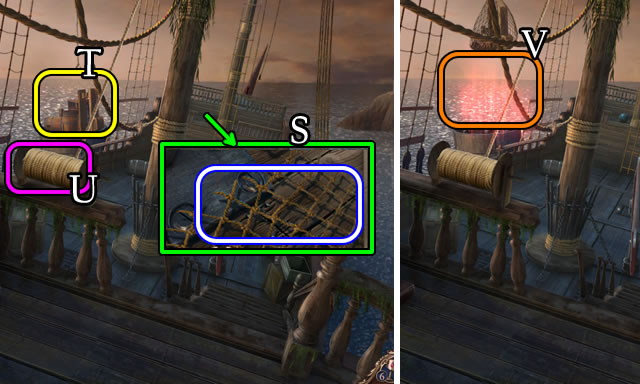
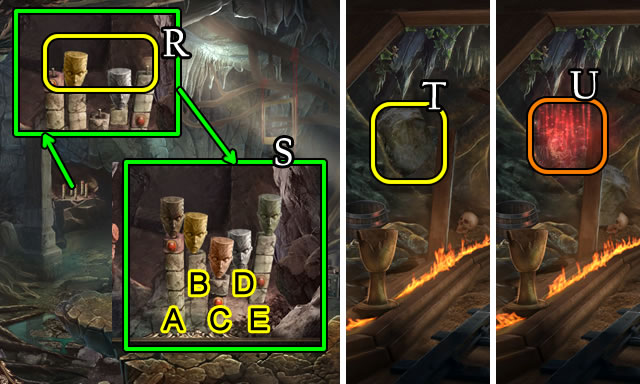
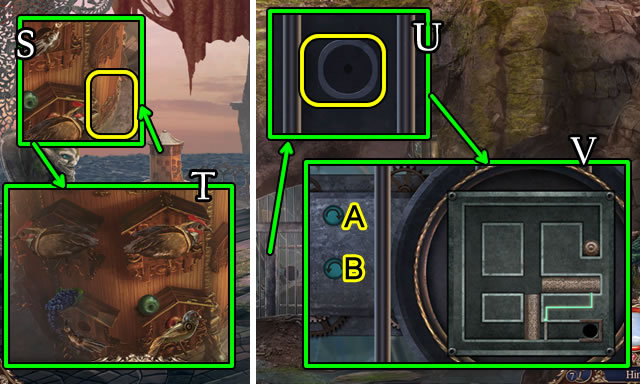
- Place MARBLE JAW (R) for HOP (S); receive COLLECTION ROOM KEY.
- Use COLLECTION ROOM KEY (T).
- Go left.
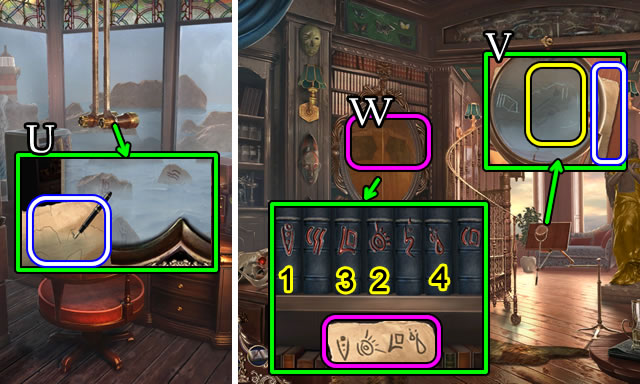
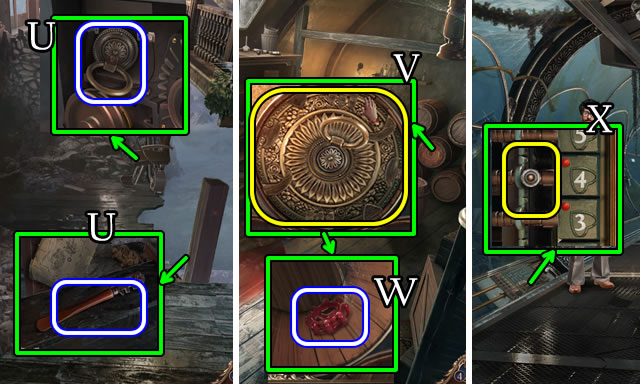
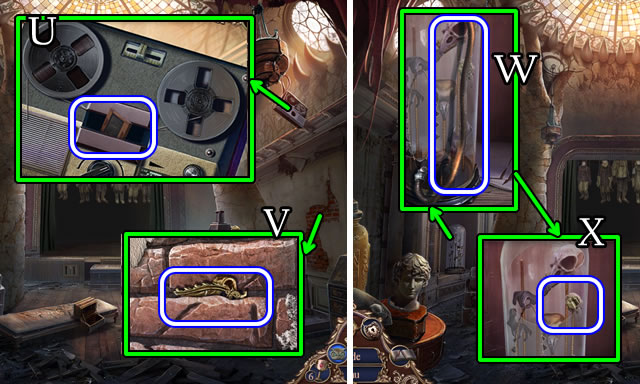
- Take 1/3 ORGAN PIPES (U).
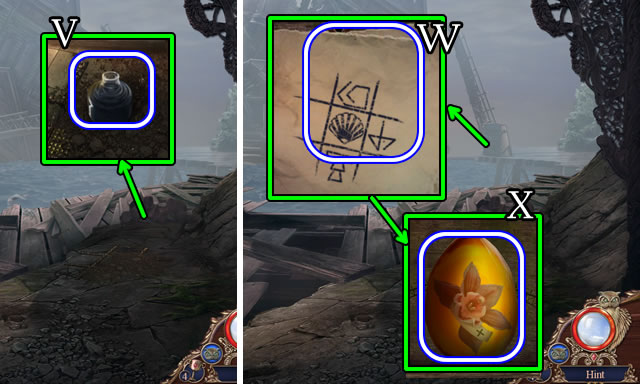
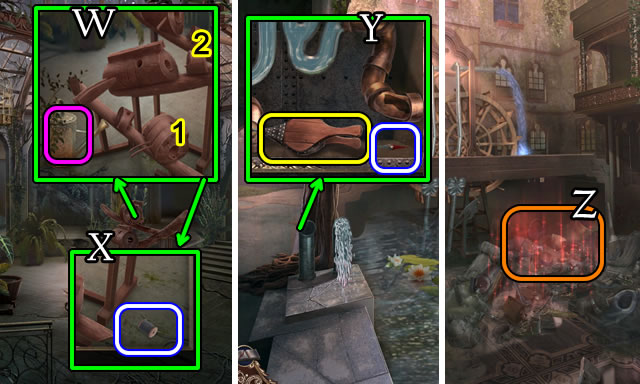
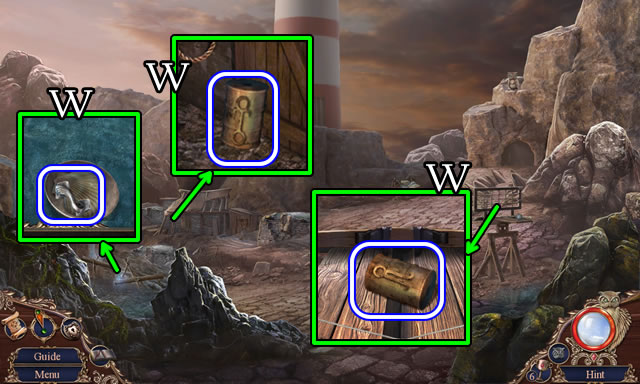
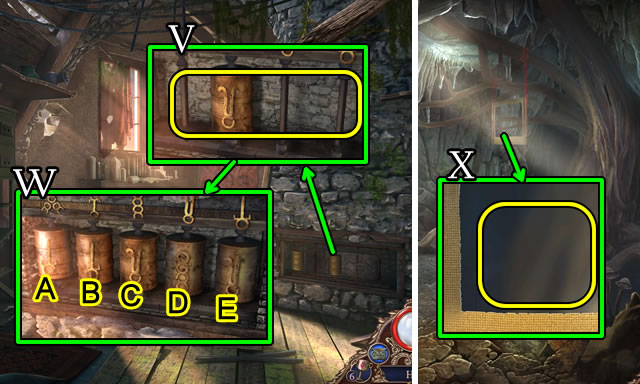
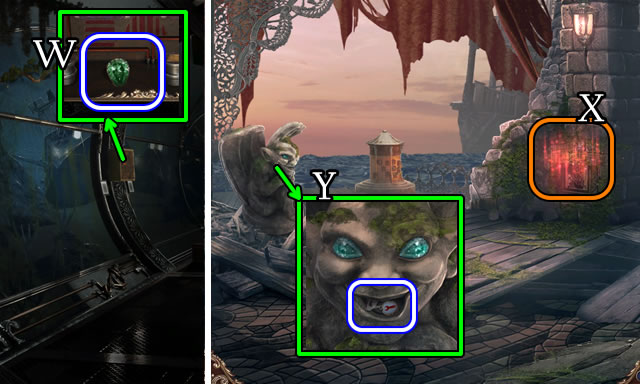
- Use WINDING KEY (V); take note and ROTATING RING (W).
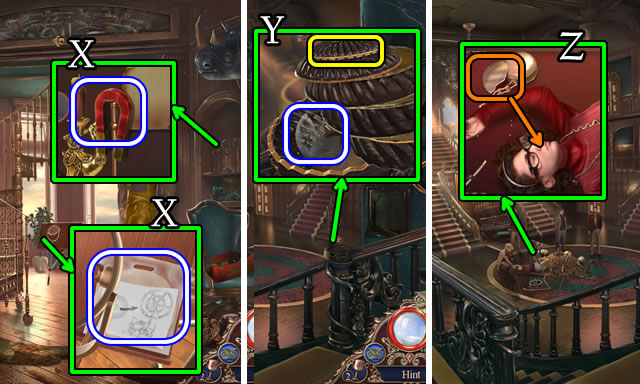
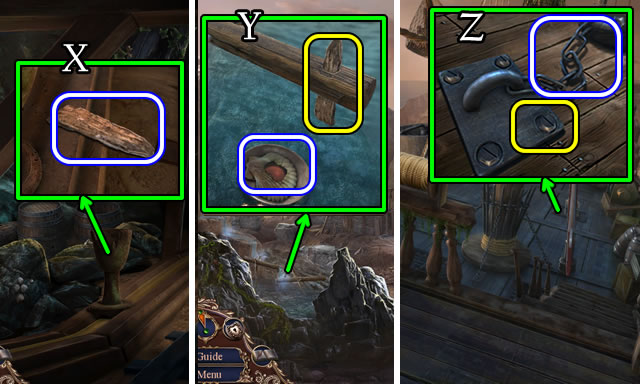
- Take MAGNET; PAPER TAPE (X).
- Go down.
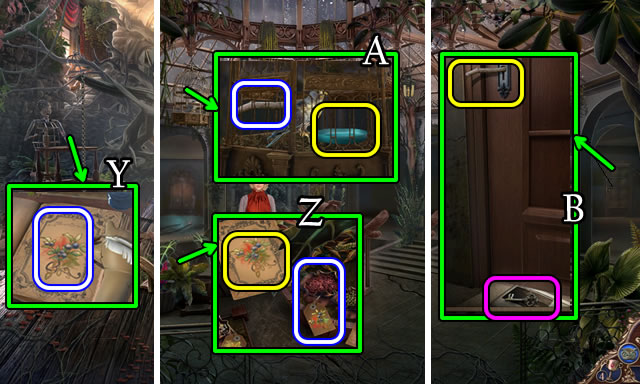
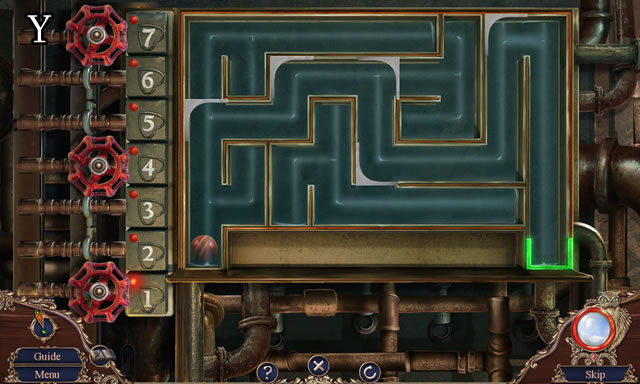
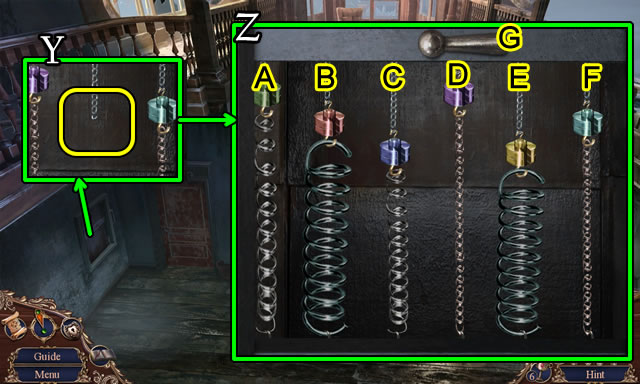
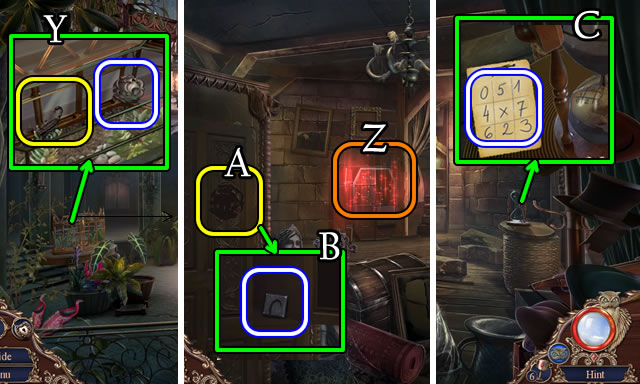
- Place ROTATING RING; take MAGNIFYING GLASS (Y).
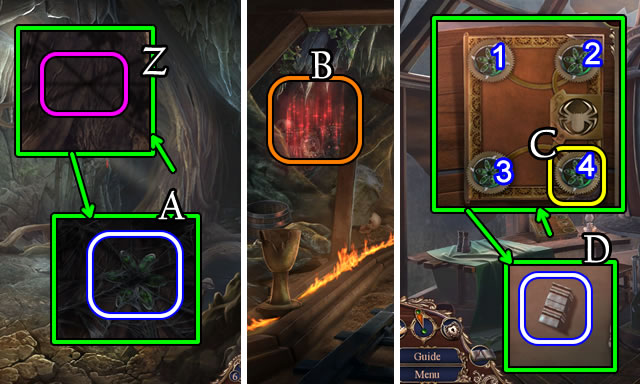
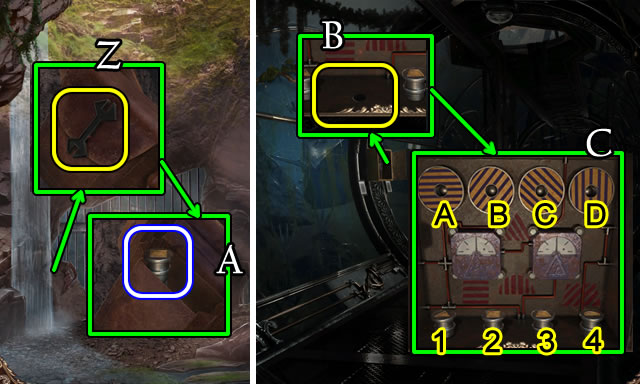
- Place (Z).
- Speak to characters.
- Go down.
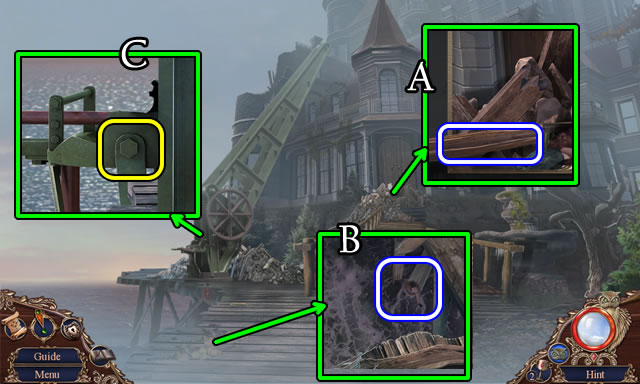
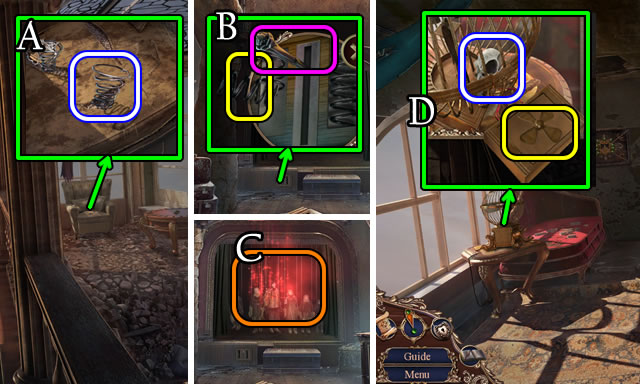
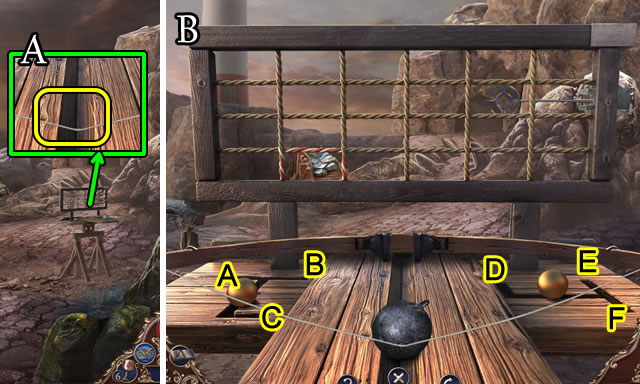
- Take POLE (A).
- Use POLE; take CRANE CRANK (B).
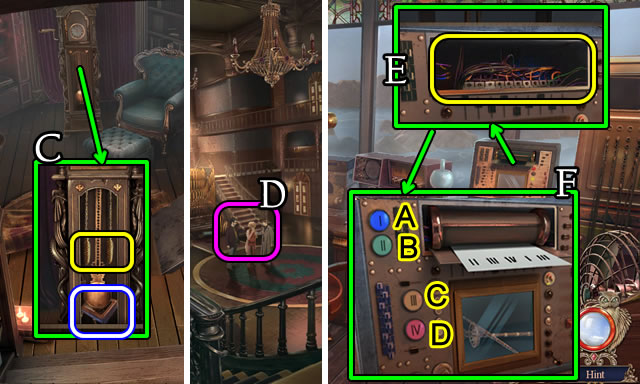
- Use CRANE CRANK (C).
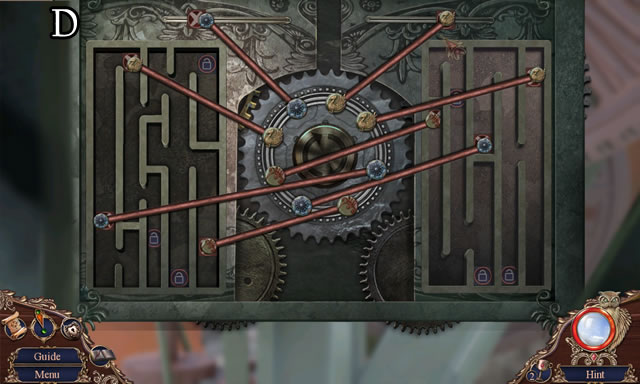
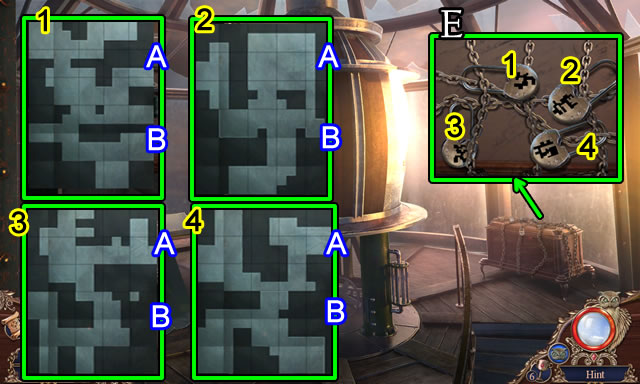
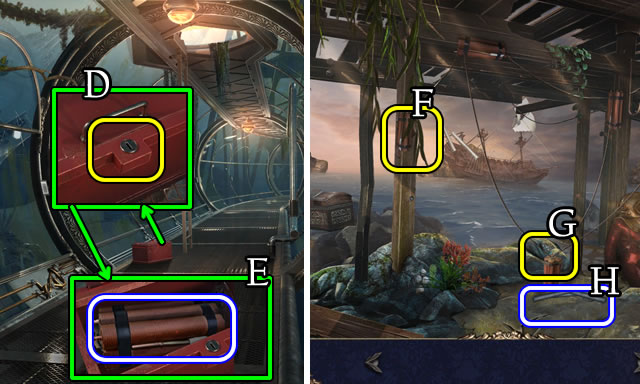
- Solution (D).
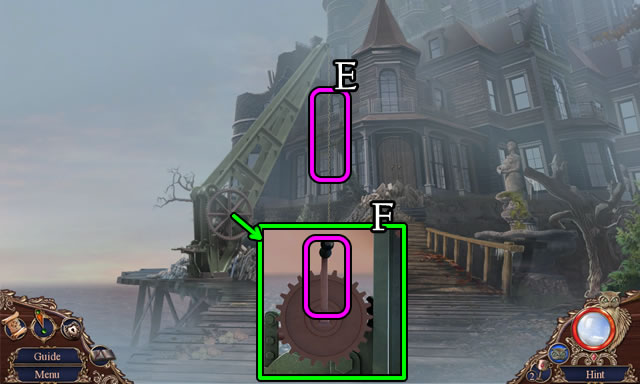
- Select (E); turn (F); receive 2/3 ORGAN PIPES.
- Go forward.
- Speak to character.
- Go to Communication Room.
Chapter 2: Seeking Help

- Speak to character; take 2/3 GLASS; WAX CYLINDER; 3/3 ORGAN PIPES (G).
- Take EGG; place PAPER TAPE (H); take MESSAGE PATTERN (I).
- Take SOLDERING IRON (J).
- Go down.

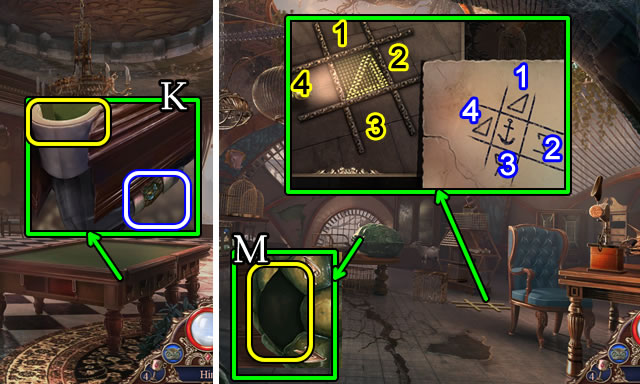
- Use 3/3 ORGAN PIPES; take GUN (K).
- Go left.
- Use GUN (L) for HOP (M); receive HANDSET.
- Return to Communication Room.
- Speak to character; give HANDSET (N).
- Select (O).
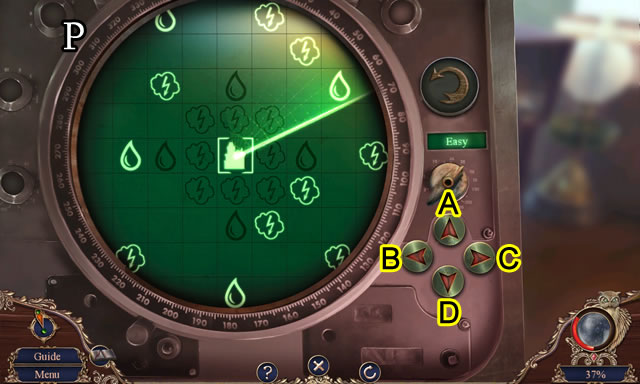
- Easy and Hard solutions (P). B-Dx3-B-C-Ax2-C-A-C-A-C-D-C-B-Dx2-A-Bx2-D.
- Ax2-B-A-Cx2-Ax2-Dx2-Bx3-A-Dx2-Cx2.
- Speak to character; take 1/2 BINOCULAR LENS.
- Go down.
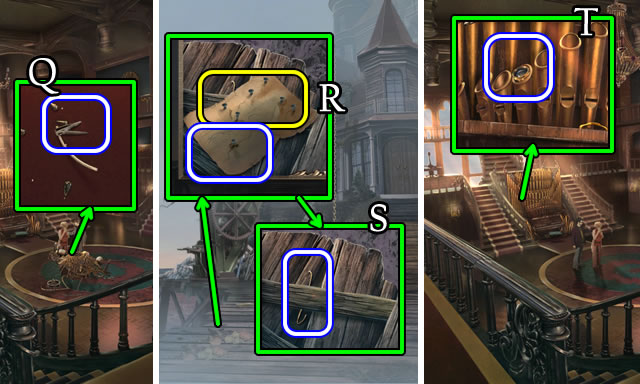
- Speak to characters; take NAIL CLIPPER (Q); speak to characters; receive INCOMPLETE FACE.
- Go down.
- Use NAIL CLIPPER; take ROCK MAP (R) and WIRE (S).
- Go forward.
- Speak to character; use WIRE for 2/2 BINOCULAR LENS (T).
- Return to Communication Room.
- Use 2/2 BINOCULAR LENS; place ROCK MAP; receive updated ROCK MAP (U).
- Return to Collection Room.
- Place MAGNIFYING GLASS and ROCK MAP for updated ROCK MAP (V).
- ROCK MAP for BOOK CODE.
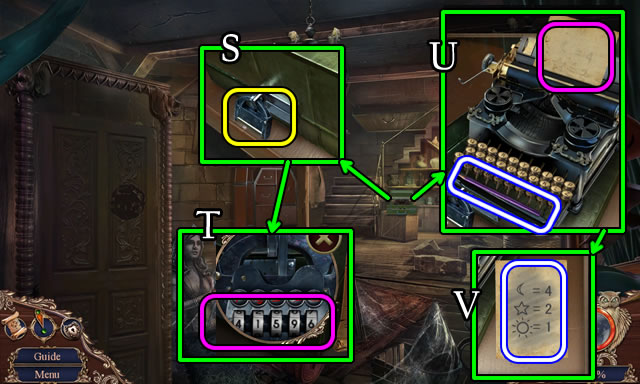
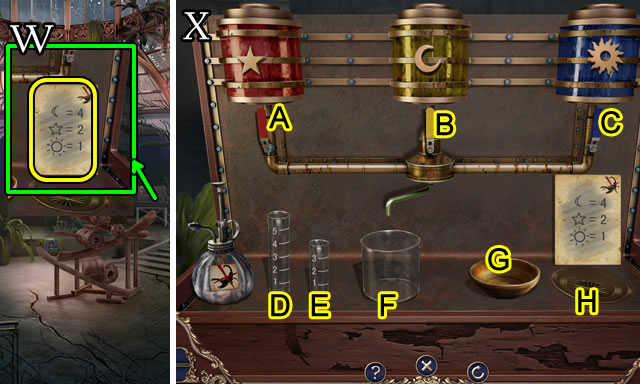
- Open (W); use BOOK CODE; select 1-4.
- Go left.
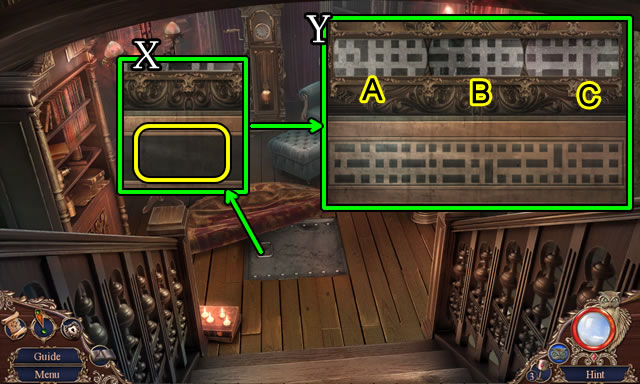
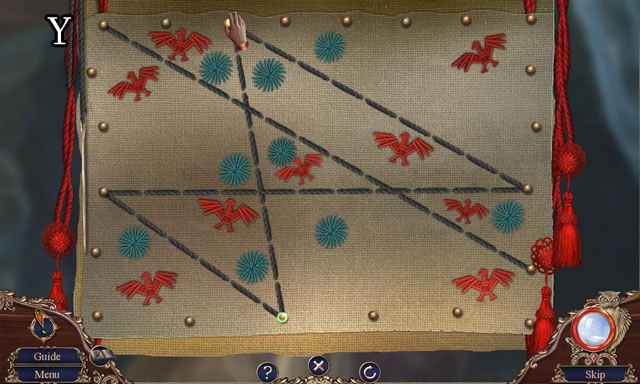
- Move carpet; place MESSAGE PATTERN (X).
- Solution (Y). Ax3-B-Cx2.
- Take RUBBER BAND.
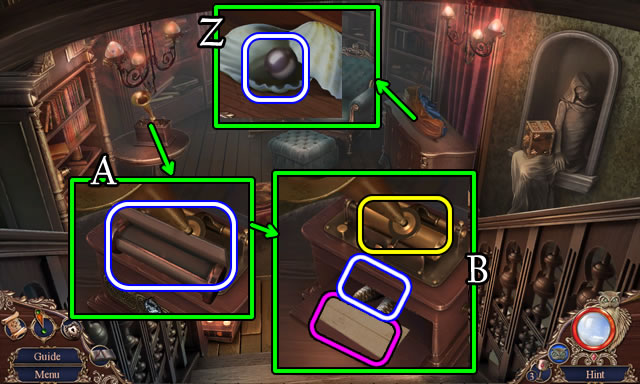
- Take BLACK PEARL (Z).
- Take PRINTER PART (A); use WAX CYLINDER; take note and CLOCK WEIGHTS (B).
- Use CLOCK WEIGHTS; take HOUSE TOUR BOOK and 1/2 MASTS (C).
- Go down 2x.
- Give HOUSE TOUR BOOK (D); speak to character; receive HOUSE INSIGNIA and HOUSE TOUR BOOK.
- Return to Communication Room.
- Place PRINTER PART (E).
- Solution (F). B-C-D-A-C.
- Take 2/2 MASTS.
- Return to Corridor.
- Place EGG, GLASS EYEBALL and BLACK PEARL; assemble SAFE CLUE (G).
- Return to Secret Room.
- Place 2/2 MASTS; press (H), select (I); take BULLET (J).
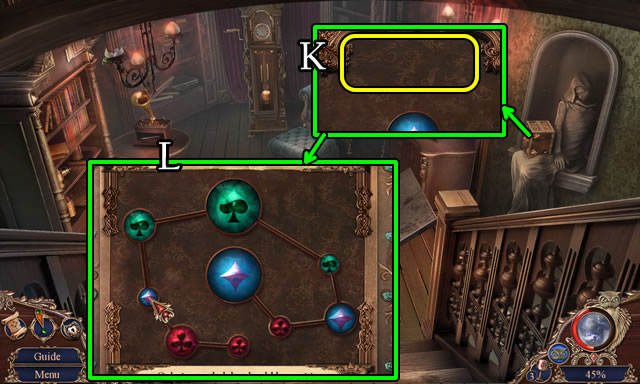
- Place SAFE CLUE (K).
- Solution (L).
- Take MATCHES.
- Go down.
- HOUSE INSIGNIA on HOUSE TOUR BOOK; take 3/3 GLASS.
- 3/3 GLASS on METAL BASE for STAINED GLASS.
- Place STAINED GLASS; use MATCHES; receive TIME CLUE (M).
- Go left.
- Open (N); place TIME CLUE; set to 9:10; take FACE PART (O).
- Return to Corridor.
- Place RUBBER BAND, BULLET (P); pick up FACE PART (Q).
- 2 FACE PARTS on INCOMPLETE FACE for WOODEN FACE.
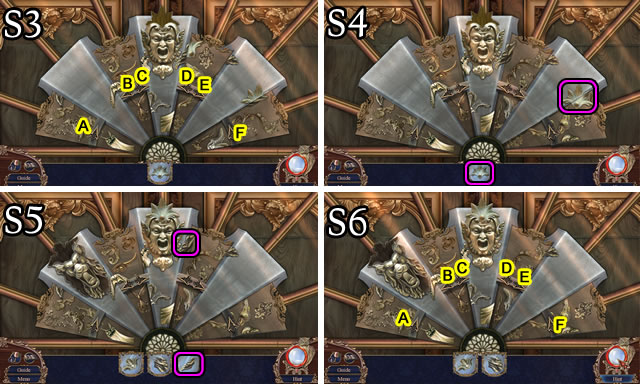
- Use WOODEN FACE (R).
- Solution (S1-S2). A-D.
- Solution (S3-S4). F.
- Solution (S5-S6). D.
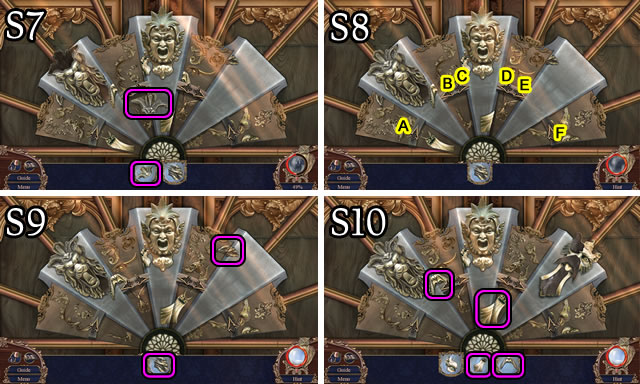
- Solution (S7-S8). A-D.
- Solution (S9-S10).
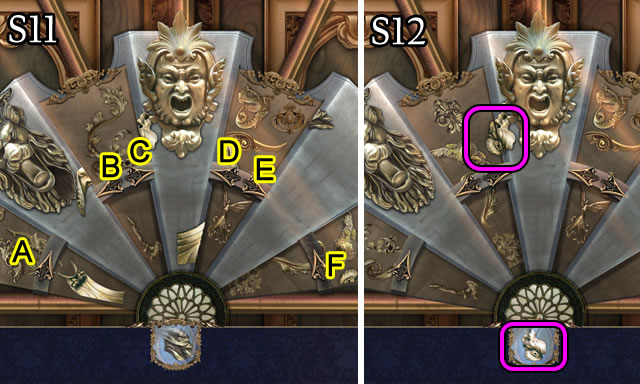
- Solution (S11-S12). F-D.
- Go forward.
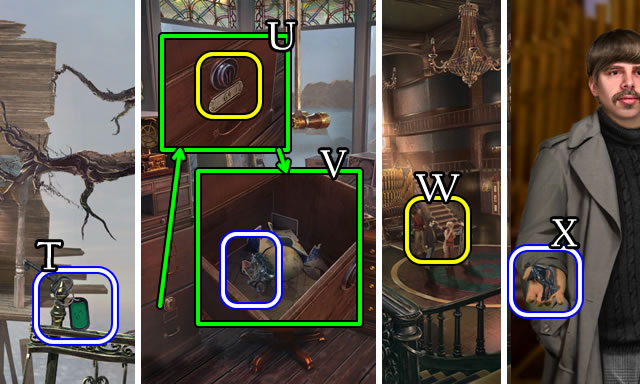
- Take FILING CABINET KEY (T).
- Return to Communication Room.
- Use FILING CABINET KEY (U); take 1/2 HORSE FIGURINE and HOUSE INSIGNIA (V).
- Go down.
- HOUSE INSIGNIA on HOUSE TOUR BOOK for MANSION PLAN.
- Give MANSION PLAN (W).
- Speak to character; take 2/2 HORSE FIGURINE (X).
- Return to Corridor.
- Speak to character; place 2/2 HORSE FIGURINES (Y); take WHIP (Z).
- Go forward.
- Use WHIP (A).
- Go forward.
- Use MAGNET for METAL CUBE (B).
- Go forward.
- Take NEWSPAPER; 2/3 PORTRAIT PARTS (C).
- Take 1/3 BILLIARD BALL; place METAL CUBE (D).
- Solution (E).
- Take SKULL AND CROSSBONES TOKENS (F).
- Go right.
- Speak to character.
- Take TORN BELLOWS; IRON HOOK; CUE STICK (G).
- Place SKULL AND CROSSBONES TOKENS (H).
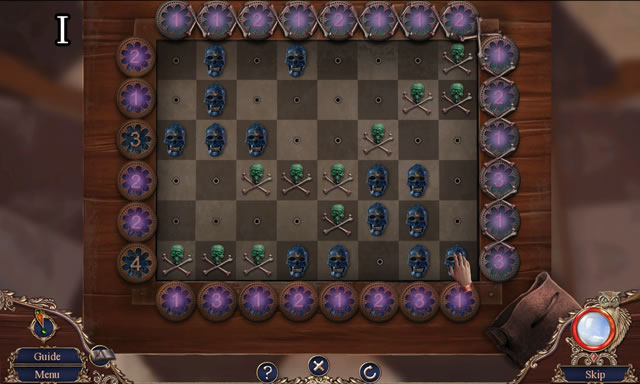
- Solution (I).
- Take SOLDERING WIRE.
- Go down.
- SOLDERING WIRE on SOLDERING IRON for SOLDERING EQUIPMENT.
- Use SOLDERING EQUIPMENT (J).
- Solution (K).
- Remove board (L); take note and TONGS (M).
- Go right.
- Use TONGS for HANDLE (N).
- Go down.

- Use HANDLE (O) for HOP (P); receive CHAIN.
- CHAIN on IRON HOOK for GRAPPLING HOOK.
- Use GRAPPLING HOOK (Q).
- Go forward.
- Speak to character; attempt to go forward; speak to character.
- Take 3/3 PORTRAIT PARTS (R).
- Return to Game Room.
Chapter 3: Finding Friends
- Place 3/3 PORTRAIT PARTS; select 1-3; take note and ROPE (S).
- Return to Staircase Bottom.
- Select boards; use ROPE (T).
- Go forward.
- Speak to character; take 2/3 BILLIARD BALL; FORK (U).
- Go forward, scroll right.
- Take INK (V).
- Take note, BRIDGE CLUE (W) and AMBER-ENCRUSTED ORCHID (X).
- Return to Owner's Study.
- Select quill; replace INK; select quill; take SEED DRAWING (Y).
- Return to Atrium.
- Place SEED DRAWING; take SEEDS (Z).
- Use SEEDS; take BIRD PERCH (A).
- Place NEWSPAPER; use BIRD PERCH; take key (B).
- Go right.

- Place AMBER-ENCRUSTED ORCHID; take ORCHID (C).
- Place ORCHID (D).
- Solution (E).
- Take TOKEN.
- Return to Game Room.

- Use TOKEN; take GUMBALL (F).
- Return to Staircase Bottom.
- Use GUMBALL (G); play HOP (H) for 3/3 BILLIARD BALL.
- Take 1/3 PIPES (I); place BRIDGE CLUE; select starfish; select and write symbol (1-4). Receive BRIDGE CLUE WITH FLASHLIGHT.
- Return to Game Room.
- Use 3/3 BILLIARD BALLS; take TURTLE SHELL TILE (K).
- Go to Taxidermy Collection.
- Place BRIDGE CLUE WITH FLASHLIGHT; select anchor; select and write symbol (1-4). Receive BRIDGE CLUE WITH FLASHLIGHT.
- Place TURTLE SHELL TILE (M).
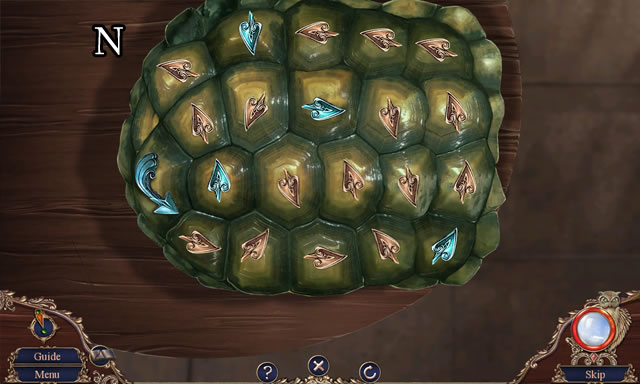
- Solution (N).
- Take SPREADER.
- Use SPREADER; take BEE SMOKER (O).
- Go down.
- Speak to character; play HOP (P); receive RUBBER GLOVES.
- Use BEE SMOKER; take 2/3 PIPES (Q).
- Use RUBBER GLOVES (R).
- Go left.
- Speak to character; use CUE STICK; take PRUNERS (S).
- Return to Yard.
- Use PRUNERS; take 3/3 PIPES (T).
- Return to Indoor Pool.
- Use 3/3 PIPES; receive EMPTY WATERING CAN (U).
- Use EMPTY WATERING CAN for FILLED WATERING CAN (V).
- Go down.
- Select 1-2; place and select FILLED WATERING CAN (W); take NEEDLE AND THREAD (X).
- Go left.
- NEEDLE AND THREAD on TORN BELLOWS for BELLOWS.
- Use BELLOWS; take COMPASS NEEDLE (Y).
- Play HOP (Z); receive COMPASS.
- Go to Yard.
- COMPASS NEEDLE on COMPASS.
- Place COMPASS (A); select (B) 3x; take WIRE BRUSH (C).
- Scroll right.
- Use WIRE BRUSH (D). Place BRIDGE CLUE WITH FLASHLIGHT; select ship's wheel; select and write symbol (1-4); receive BRIDGE CLUE.
- Place BRIDGE CLUE (F).
- Solution (G).
- Enter Outside Cellar.
- Take BIRD KEY and CHISEL; 1/3 CONTROLLER (H).
- Go down, scroll left.
- Use BIRD KEY; receive PADLOCK (I).
- Scroll right; return to Outside Cellar.
- Select chain on tree. Use PADLOCK (J), CHISEL (K).
- Go forward.
Chapter 4: Helping Norman
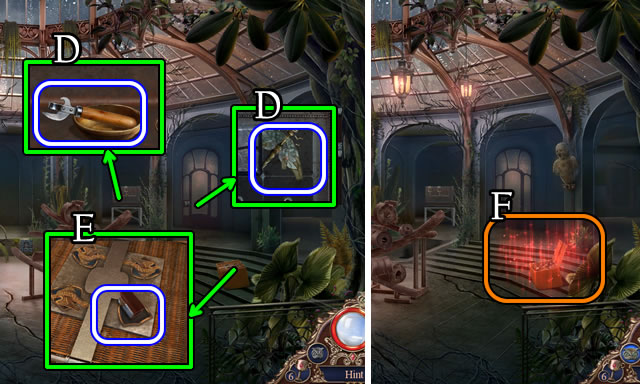
- Take note, TAPE REEL; 1/2 BATTERY PART; 1/3 SLIDE (L).
- Use FORK (M); move barrel; select recipe, take FEATHER DUSTER (N).
- Use FEATHER DUSTER (O); play HOP (P).
- Speak to character; take TURNING HANDLE (Q).
- Go down.
- Use TURNING HANDLE; take BOLT (R).
- Enter Glass Corridor; go forward.
- Take 2/2 BATTERY PART (S).
- Go forward.
- Take MANNEQUIN HAND; 2/3 CONTROLLER; LADLE; LEMON (T).
- Go down.
- Take BARREL HANDLE; GLASS CUTTER (U).
- Return to Wine Cellar.
- Place BARREL HANDLE, rotate (V); take VALVE (W).
- Return to Glass Corridor.
- Place VALVE (X).
- Solution (Y). 5-6-3-7-1.
- Take WHEEL.
- Use WHEEL and BOLT (Z); slide (A).
- Take BANDAGE, KNIFE (B).
- Use BANDAGE (C); speak to character; take FERRET (D).
- Use FERRET; take 3/3 CONTROLLER (E).
- Place 3/3 CONTROLLER (F).
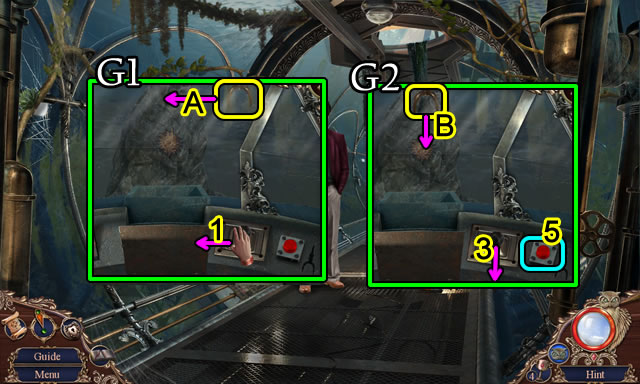
- Solution (G1-G2). (1-A)-(3-B)-5.
- Take SUN TILE.
- Return to Outside Cellar.
- Place SUN TILE; take note and GRAPE EMBLEM (H).
- Return to Hallway.
- Use GRAPE EMBLEM (I); take WINE BOTTLE (J).
- Return to Wine Cellar.
- Place WINE BOTTLE (K).
- Solution (L).
- Take BAKING SODA.
- Place LEMON, BAKING SODA; select handle; take RUST REMOVER (M).
- Return to Glass Corridor.
- Speak to character; use RUST REMOVER; take BROKEN BATTERY (N) and OLD KEY (O).
- Go forward; speak to character.
- 2/2 BATTERY PARTS on BROKEN BATTERY for BATTERY.
- Place BATTERY (P).
- Go forward.

- Use OLD KEY (Q) for HOP (R); receive FILE.
- Use FILE; take CURTAIN ROD (S).
- Go down.
- MANNEQUIN HAND on CURTAIN ROD for REACHING POLE.
- Use REACHING POLE (T); speak to character.
- Enter Trophy Room.
- Speak to character; place TAPE REEL; play; take 2/3 SLIDE (U).
- Take 1/2 CREST PUZZLE PART (V).
- Take AIR HOSE (W); use GLASS CUTTER; take MECHANISM WEIGHT (X).
- Go down.
- Place MECHANISM WEIGHT (Y).
- Solution (Z). (A-E)-(B-C)-(F-C)-(D-F)-(E-F)-G.
- Take WIRE CUTTER.
- Return to Viewing Room.
- Use WIRE CUTTER; take SPRING (A).
- Return to Trophy Room.
- Replace SPRING, pull lever (B); play HOP (C) for PROPELLER.
- Return to Viewing Room.
- Place PROPELLER; take SKULL (D).
- Return to Trophy Room.
- Place SKULL; take 2/2 CREST PUZZLE PART (E).
- Return to Viewing Room.
- Place 2/2 CREST PUZZLE PARTS (F).
- Solution (G). B-C-H-G-E.
- Take note and 3/3 SLIDE.
- Return to Trophy Room.
- Place 3/3 SLIDES (H).
- Solution (I). Ax2-B-Cx2-D-E.
- Take CLIMBING SPIKES.
- Play HOP (J) for BOOTS.
- Go down.
- CLIMBING SPIKES on BOOTS for CLIMBING BOOTS.
- Use CLIMBING BOOTS (K).
- Take note; use KNIFE; take OCTOPUS EMBLEM (L).
- Take ANCHOR CRANK; place, select OCTOPUS EMBLEM 2x (M); take OXYGEN TANK (N).
- Place AIR HOSE, OXYGEN TANK for DIVING SUIT (O).
- Use DIVING SUIT (P).
- Solutions vary.
- Replace ANCHOR CRANK; take HARPOON (Q).
- Take 1/3 PILLAR HEADS; place HARPOON (R).
- Take FISHING NET (S).
- Place FISHING NET (T); select (U).
- Play HOP (V).
- Go forward.
Chapter 5: To Lighthouse
- Take 1/3 CYLINDER; DRAWER HANDLE; 2/3 CYLINDER (W).
- Go forward.
- Take HAMMERHEAD (X).
- Go down.
- Use HAMMERHEAD; take COIN (Y).
- Go down.
- Use COIN; take IRON BALL (Z).
- Go forward.
- Place IRON BALL (A).
- Solution (B). D-C-D-C-B-D-C-D-C.
- Go left.
- Take COAL; WRENCH (C).
- Open, take LIGHTER (D); use WRENCH; take OIL (E).
- Return to Underground Tunnel.
- Use OIL, LIGHTER (F).
- Take LOG (G).
- Go down.
- Use LOG (H); enter shack.
- Place DRAWER HANDLE (I).
- Solution (J). A-D-C-E-F.
- Take 2/3 PILLAR HEADS.
- Take PEG LEG (K); use COAL, LIGHTER, LADLE for LADLE WITH RESIN (L).
- Take 3/3 PILLAR HEADS (M).
- Go down.
- Use PEG LEG (N); play HOP (O); receive CART WHEEL.
- Go Underground Tunnel.
- Place CART WHEEL; use LADLE WITH RESIN (P).
- Go forward.
- Take METAL POLE (Q).
- Place 3/3 PILLAR HEADS (R).
- Solution (S). (A-B)-(E-D)-(C-E)-(C-A).
- Take KEY HEAD.
- Go down.
- Use METAL POLE (T) for HOP (U); receive 3/3 CYLINDER.
- Return to Shack.
- Place 3/3 CYLINDERS (V).
- Solution (W). Ax3-Bx3-Cx2-Dx3-Ex2.
- Take TAPESTRY.
- Return to Cave.
- Place TAPESTRY (X).
- Solution (Y).
- Open (Z), take note, DIARY DECORATION (A).
- Go down.
- Play HOP (B) for DIARY LOCK.
- Return to Lighthouse.
- DIARY DECORATION on DIARY LOCK for DIARY DECORATION.
- Place DIARY DECORATION (C); select 1-4; take KEY TIP (D).
- KEY TIP on KEY HEAD for TRUNK KEY.
- Use TRUNK KEY (E).
- Solution (1-4). Ax3-Bx2.
- Take PLUNGER.
- Return to Cave.
- Take note, place PLUNGER; take DETONATOR (F). Speak to character.
- Return to Under the House.
- Use DETONATOR (G).
Bonus Chapter
- Take BIRD EMBLEM (A).
- Select (B), take 1/3 LOCK TILE (C).
- Go forward.
- Take DRAGONFLY EMBLEM; CAN OPENER (D).
- Take PENCIL SHARPENER; place BIRD EMBLEM (E) for HOP (F); receive FIGURINE.
- Go down.
- Place FIGURINE (G).
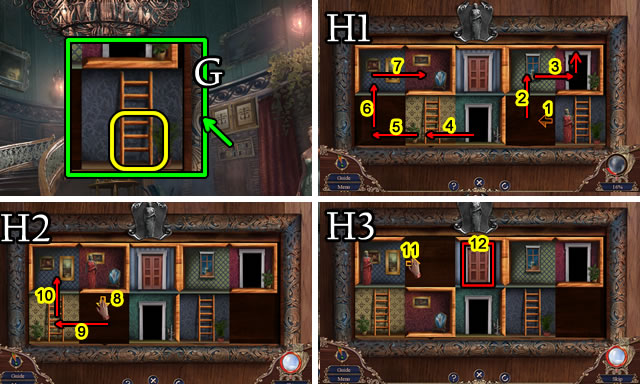
- Solution (H1-H3). 1-12.
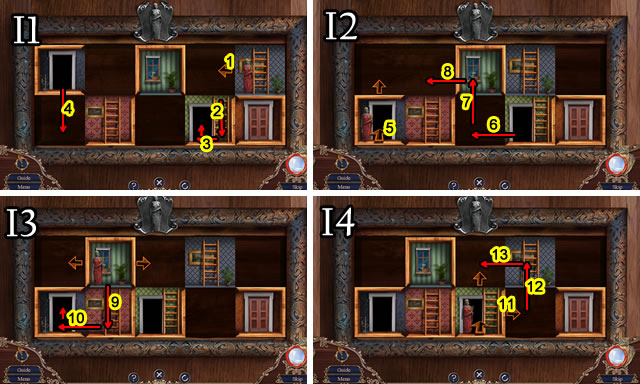
- Solution (I1-I4). 1-13.
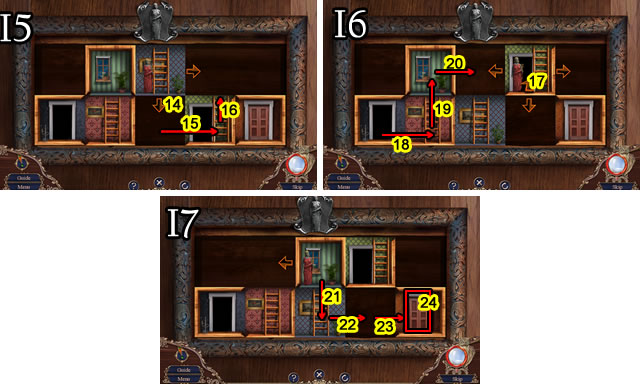
- Solution (I5-I7). 14-24.
- Go right.
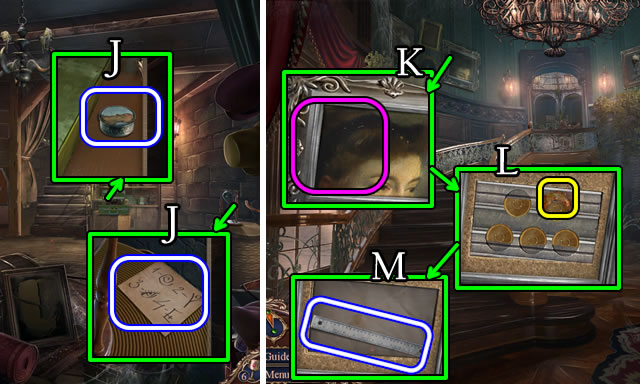
- Take GREASE CAN; SLIDERS CLUE (J).
- Go down.
- CAN OPENER on GREASE CAN for GREASE.
- Select (K), use GREASE (L); select tokens; take RULER (M).
- Go right.
- Use RULER (N); take note, TIARA (O).
- Go down.
- Place TIARA; take LOCK DECORATION (P).
- Go right.
- DRAGONFLY EMBLEM on LOCK DECORATION.
- Place LOCK DECORATION (Q) for HOP (R); receive LOCK COMBINATION.
- Use LOCK COMBINATION (S); enter 4-1-5-9-6 (T); take paper, PENCIL (U).
- PENCIL SHARPENER on PENCIL for SHARPENED PENCIL.
- Use SHARPENED PENCIL; take INSTRUCTIONS (V).
- Return to Atrium.
- Place INSTRUCTIONS (W).
- Solution (X). A-(F-D)-(D-E)-(D-G)-B-(F-D)-(D-E)-(E-H)-(D-E)-(F-D)-(D-E)-(D-G).
- C-(F-D)-(D-E)-(E-H)-(D-E)-(F-D)-(D-E)-(E-H)-(D-E)-(D-G).
- Take INSECT SPRAY.
- Use INSECT SPRAY; take SHIP EMBLEM (Y).
- Return to Basement.
- Play HOP (Z) for BLACK POWDER.
- Place SHIP EMBLEM (A); take 2/3 LOCK TILE (B).
- Open; place BLACK POWDER; take NUMBER PATTERN (C).
- Return to Atrium.
- Place NUMBER PATTERN (D).
- Solution (E). F-C-B-A-D-E-F-C-B-A-D-G-H-E-B-A-D-E-H-G-D-E-H-I-F.
- E-D-G-H-I-F-E-H-I-F-E-D-G-H-E-F-I-H-E.
- Take 3/3 LOCK TILE.
- Place 3/3 LOCK TILES (F).
- Go forward; scroll right.
- Place SLIDERS CLUE (G).
- Solution (H).
- Take WIRES.
- Enter Outside Cellar; go forward 2X.
- Take SEAM RIPPER (I).
- Go right.
- Take note, WIRE CUTTERS (J).
- Go down.
- Use WIRE CUTTERS; receive BUCKET (K).
- Use BUCKET for BUCKET WITH WATER (L).
- Go down.
- Use SEAM RIPPER; take 1/2 EMERALD EYE (M).
- Use BUCKET WITH WATER; take SCRAPER (N).
- Go down.
- Use SCRAPER (O) for HOP (P); receive DECORATIVE PLATE.
- Return to Outside Cellar.
- Place DECORATIVE PLATE (Q).
- Solution (R). Ax2-Bx4-Cx4-D.
- Take BIRDS CLUE.
- Go down; scroll left.
- Place BIRDS CLUE (S).
- Solution (T).
- Take GATE LOCK.
- Return to Glass Corridor Entrance.
- Place GATE LOCK (U).
- Solution (V). Bx3-Ax4-Bx4-Ax4-Bx2-Ax4-Bx2.
- Go forward.
- Open; take 2/2 EMERALD EYE (W).
- Return to Yard.
- Play HOP (X) for WRENCH EMBLEM.
- Place 2/2 EMERALD EYES; take MAINTENANCE KEY (Y).
- Return to Glass Corridor Entrance.
- Place WRENCH EMBLEM (Z); take FUSE (A).
- Go forward.
- Place FUSE (B).
- Solution (C). (1-C)-(2-A)-(3-B)-(4-D).
- Use MAINTENANCE KEY (D); take DYNAMITE STICKS (E).
- Return to Under the House.
- Place DYNAMITE STICKS (F); use WIRES (G); take LADDER RUNGS (H).
- Return to Glass Corridor.
- Use LADDER RUNGS (I); play HOP (J); receive STAR WRENCH.
- Use STAR WRENCH (K); take 1/3 DETONATOR PART (L).
- Take BONE (M).
- Use BONE; take TOOTH, 2/3 DETONATOR PART (N).
- Place TOOTH take 3/3 DETONATOR PART (O).
- Use 3/3 DETONATOR PARTS (P).
- Solution (Q).
- Congratulations, you've completed Haunted Manor: The Last Reunion.
Created at: 2018-06-22