

Walkthrough Menu
- General Tips
- Chapter 1: The Academy
- Chapter 2: Cabaret
- Chapter 3: Copenhagen Street
- Chapter 4: Museum
- Chapter 5: Research Lab
General Tips
- This is the official guide for Hidden Expedition: Midgard's End.
- This guide will not tell you when you have to zoom into a location; the screenshots will show each zoom scene.
- Hidden-object puzzles are referred to as HOPs. This guide will not show screenshots of the HOPs, however, it will mention when an HOP is available and the inventory item you'll collect from it.
- Use the Map to fast travel to a location.
Chapter 1: The Academy
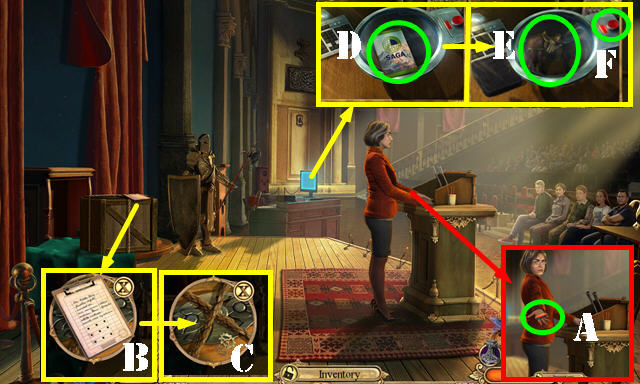
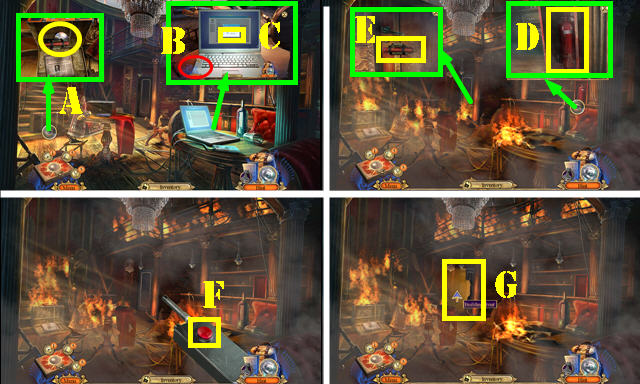
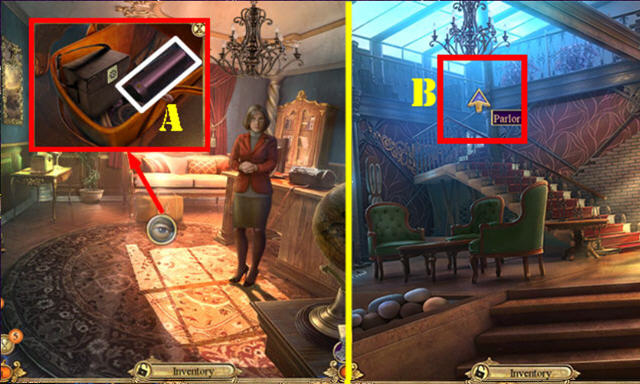
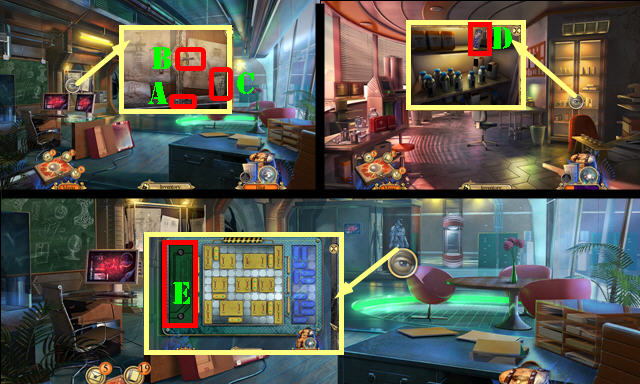
- Talk to the lady; take the MULTI-TOOL (A).
- Select the MULTI-TOOL twice; receive the PENKNIFE.
- Select the clipboard (B); receive the CODE PATTERN.
- Use the PENKNIFE (C); play the HOP to get the SLEIPNER FIGURINE.
- Look at the brochure (D); take the RUBIES 1/2.
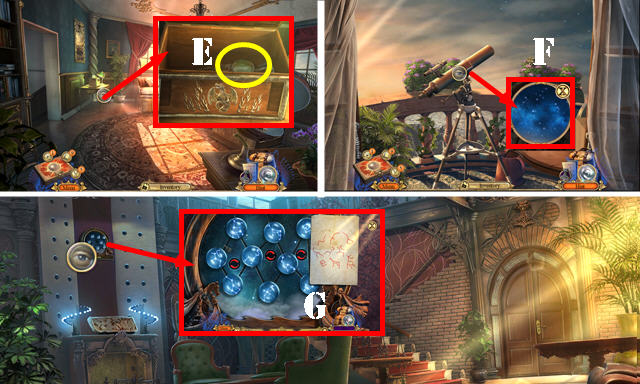
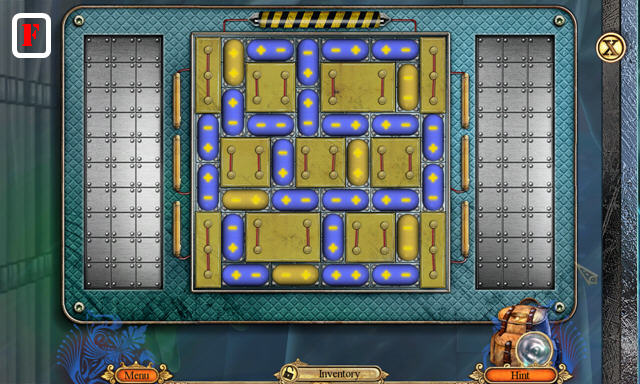
- Place the SLEIPNER FIGURINE (E); press the button (F).
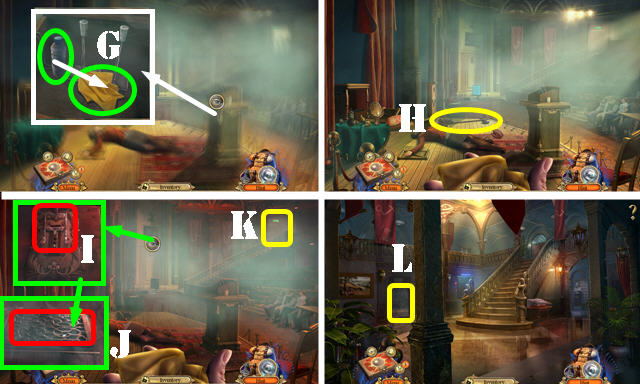
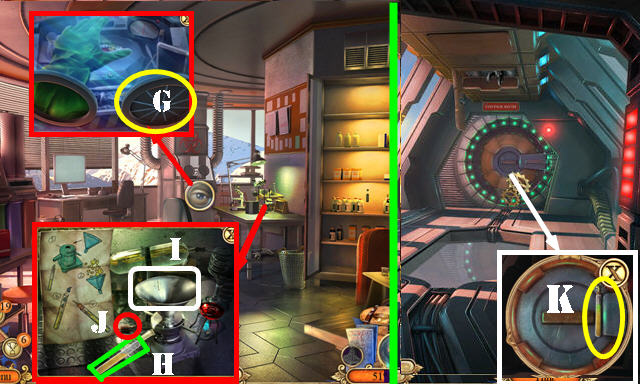
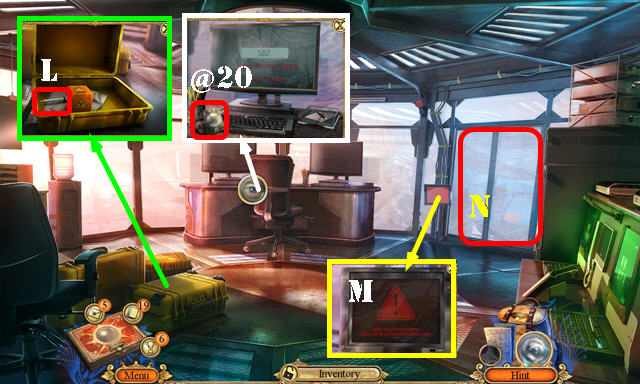
- Use the water bottle on the handkerchief; receive the WET HANDKERCHIEF (G).
- Use the WET HANDKERCHIEF on the scene.
- Take the HALBERD (H).
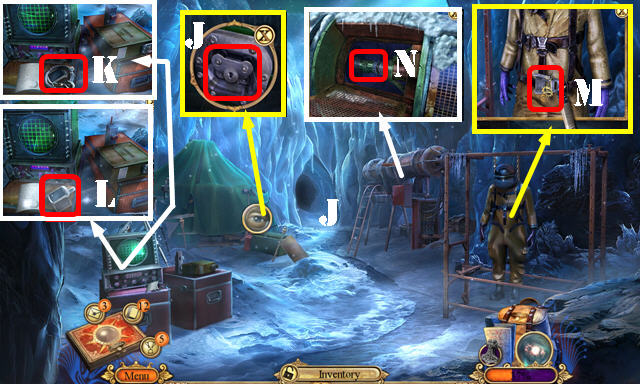
- Pull the switch (I). Use the HALBERD twice (J); receive the WRENCH.
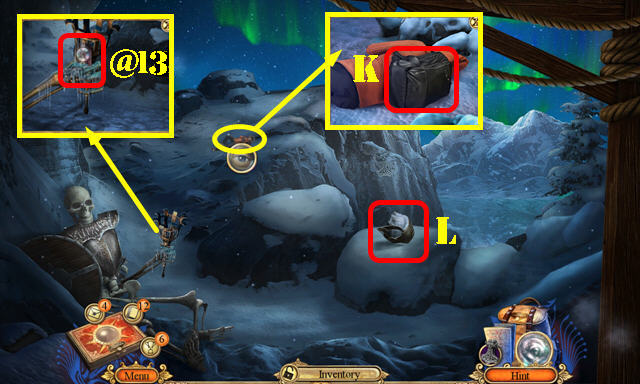
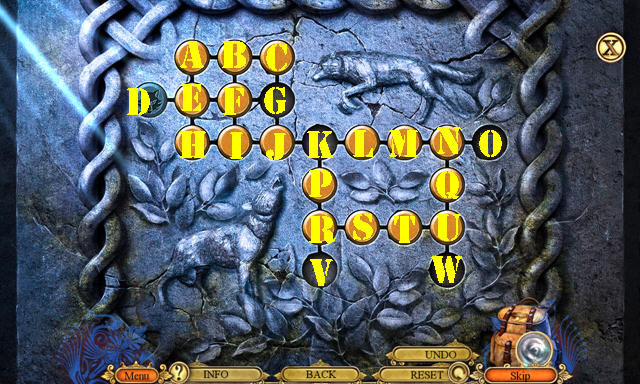
- Go to the Academy Hall (K) and then the Alley (L).
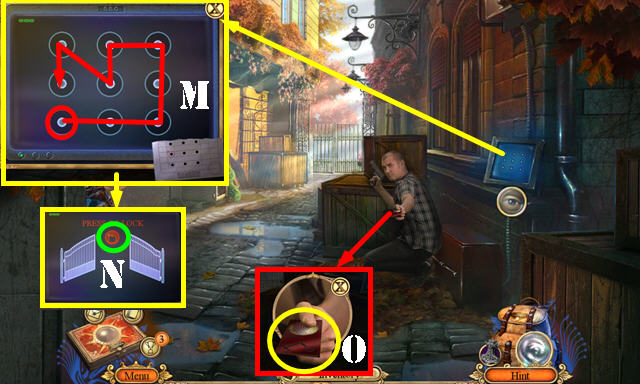
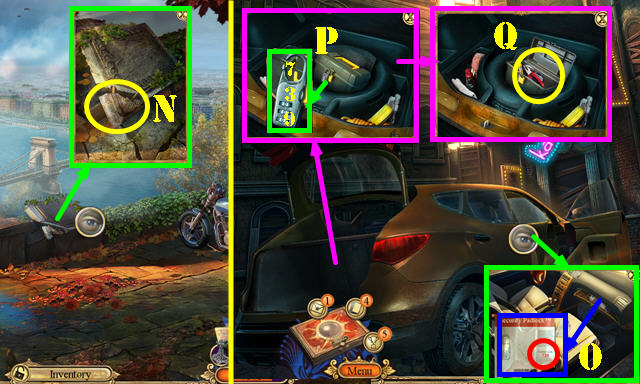
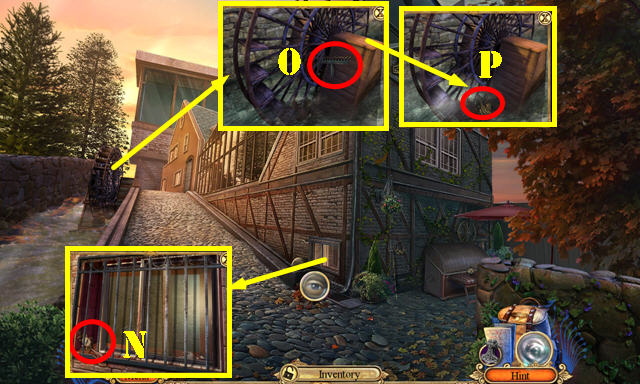
- Place the CODE PATTERN for a puzzle. Solution (M). Select the lock (N).
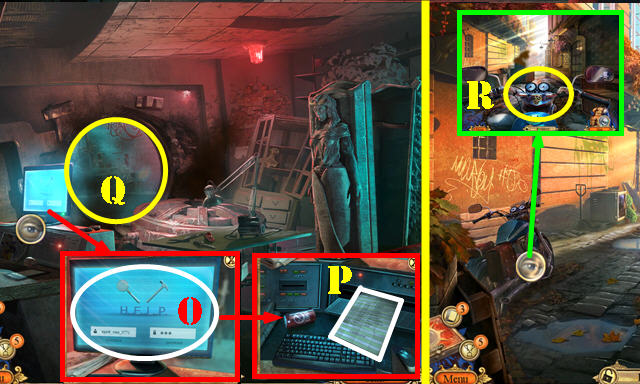
- Take the KEYCARD (O).
- Walk down.
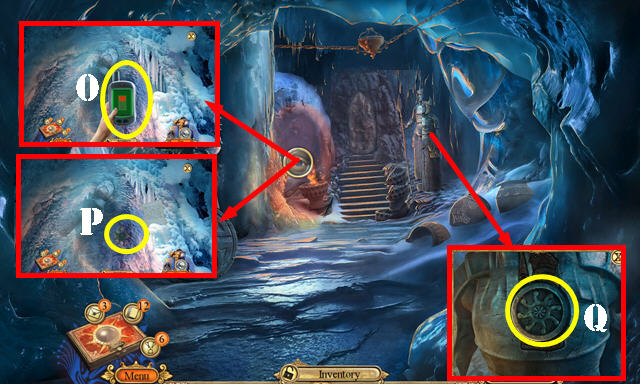
- Take the EMERGENCY HAMMER (P).
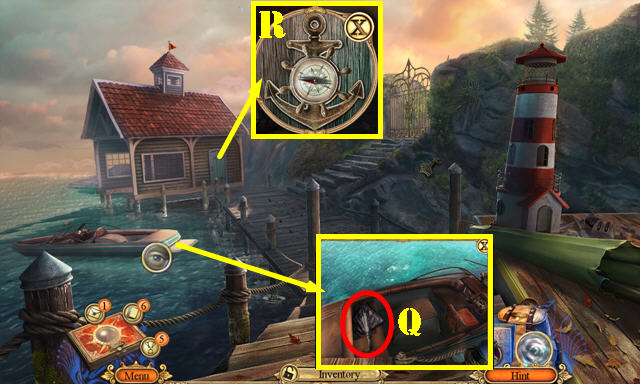
- Use the KEYCARD (Q) and pull the handle (R); go through the door.
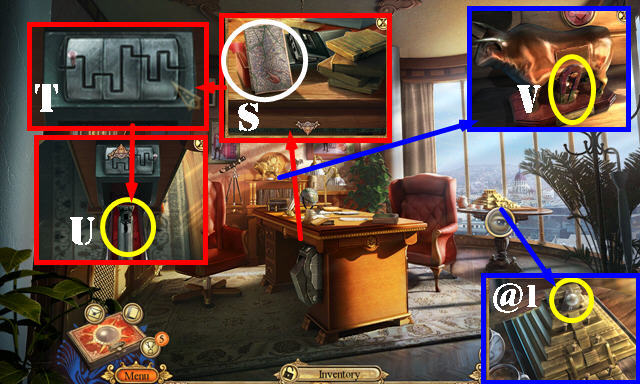
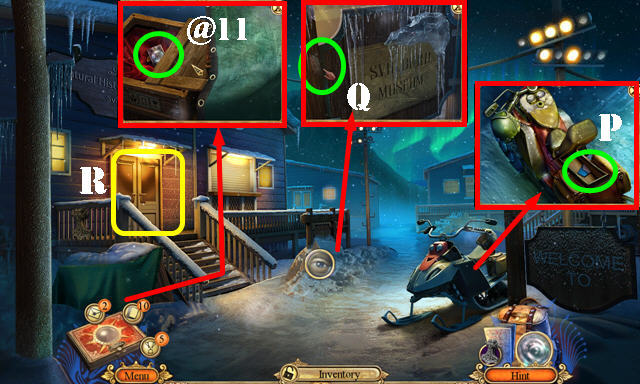
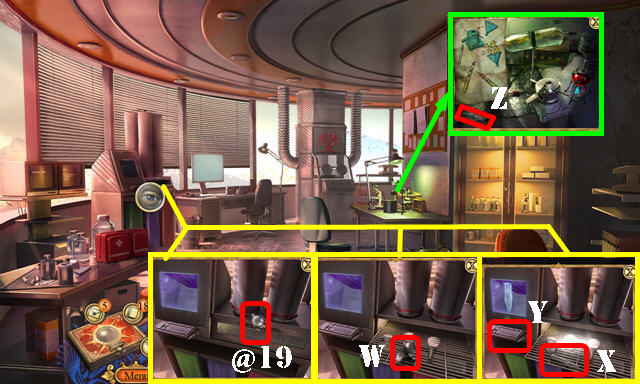
- Take the Fact Card (@1).
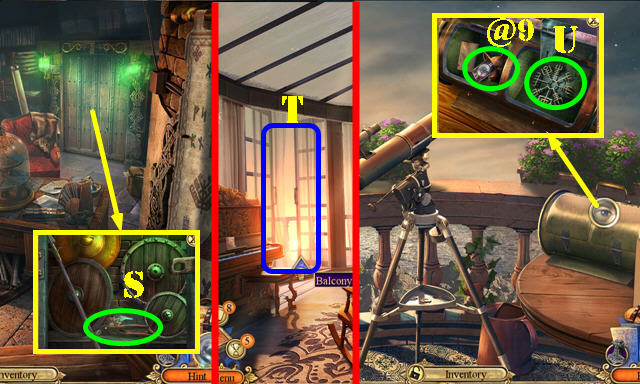
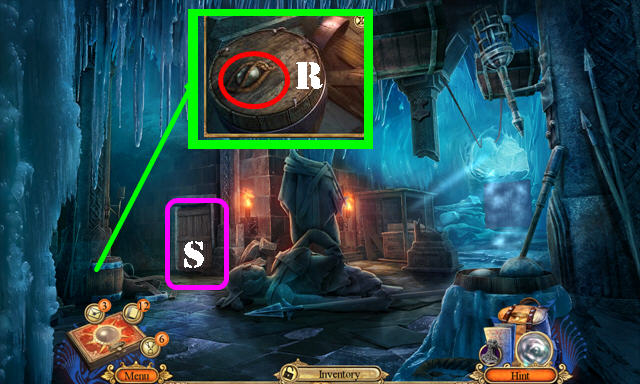
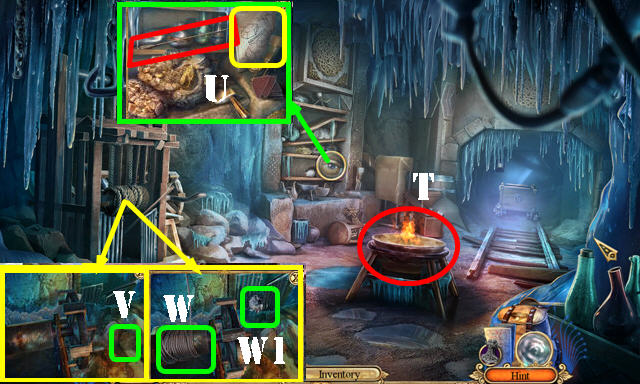
- Take the Map and TAPE (S). Scroll down and solve the puzzle (T); take the TRACKING GUN (U).
- Take the MAGNET (V).
- Return to the Alley.
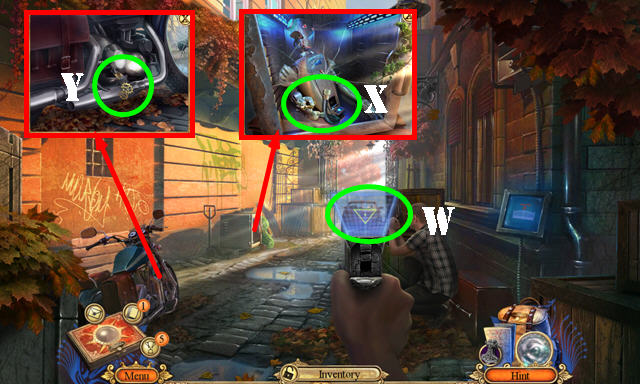
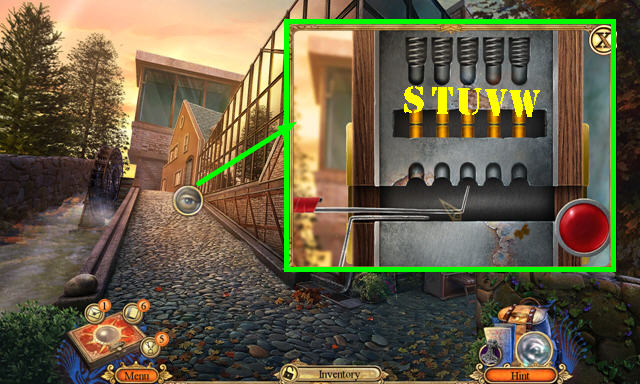
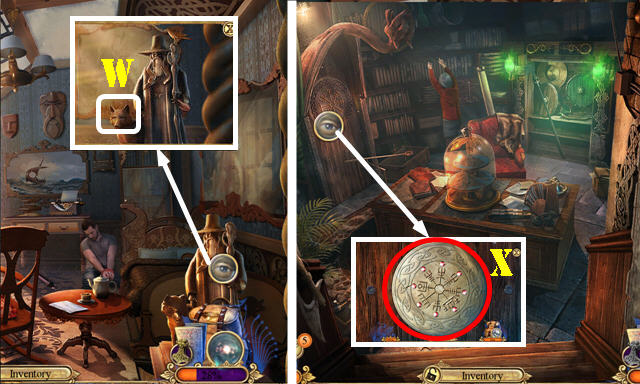
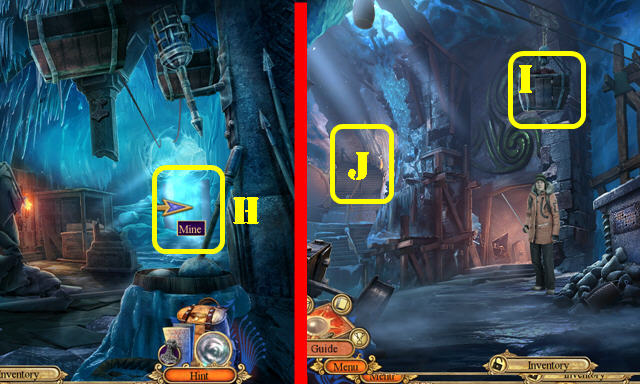
- Place the TRACKING GUN; select it (W).
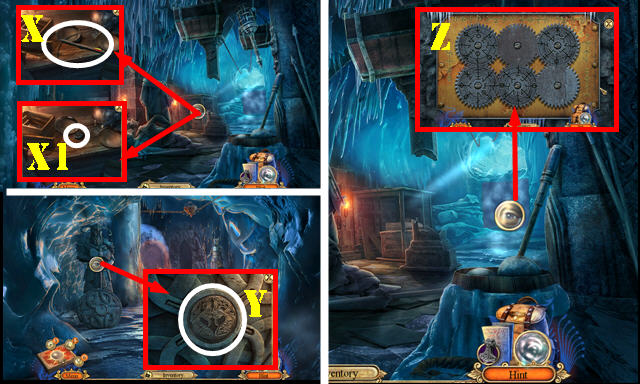
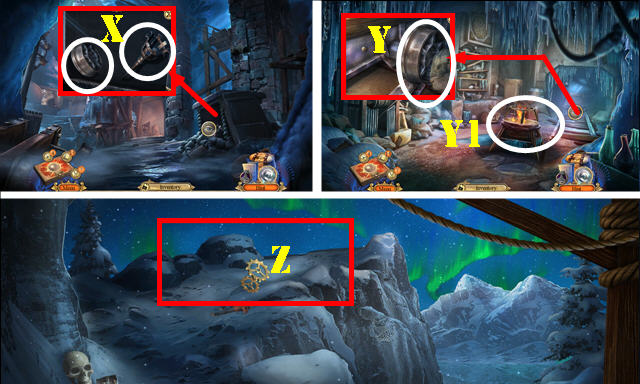
- Use the EMERGENCY HAMMER; take the FUEL LINE and ROBOT ARM (X).
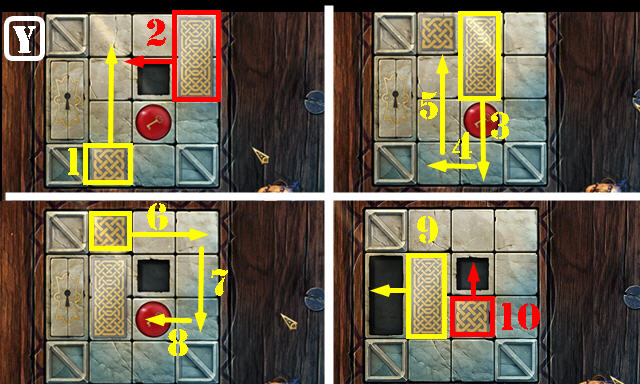
- Use the WRENCH and attach the FUEL LINE. Use the WRENCH again (Y).
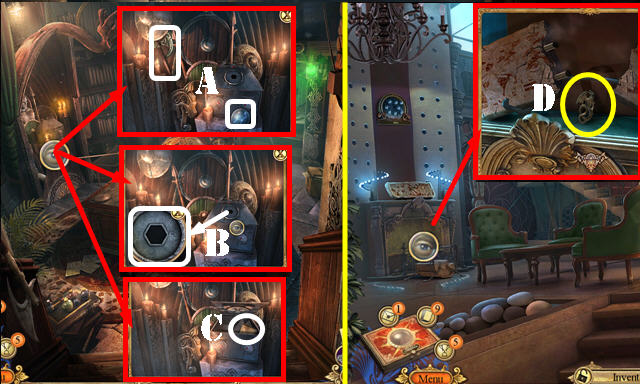
- Select the ROBOT ARM; take the NEFERTITI SHAPE; receive the ROBOTIC ARM.
- Return to Sam's office.
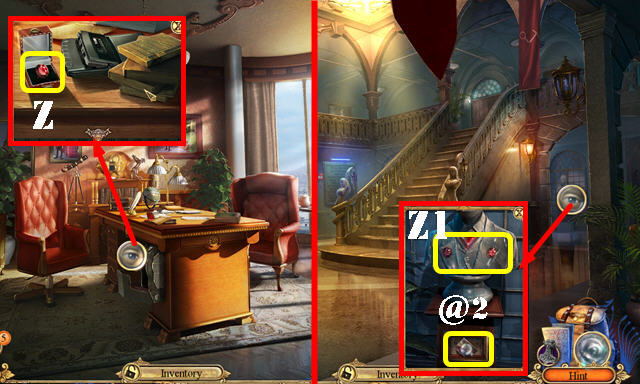
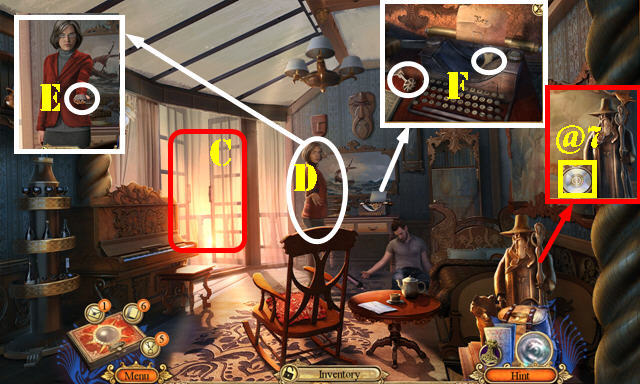
- Scroll up. Place the NEFERTITI SHAPE; take the RUBIES 2/2 (Z).
- Walk down.
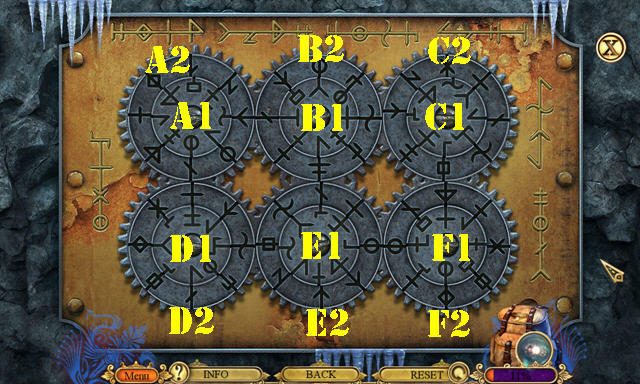
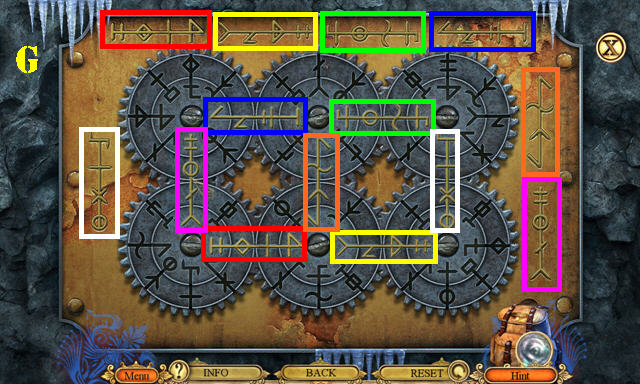
- Place the RUBIES 2/2 (Z1); take the Fact Card (@2); a puzzle automatically activates.
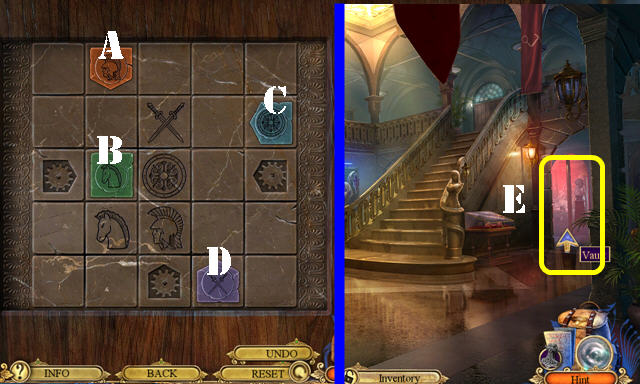
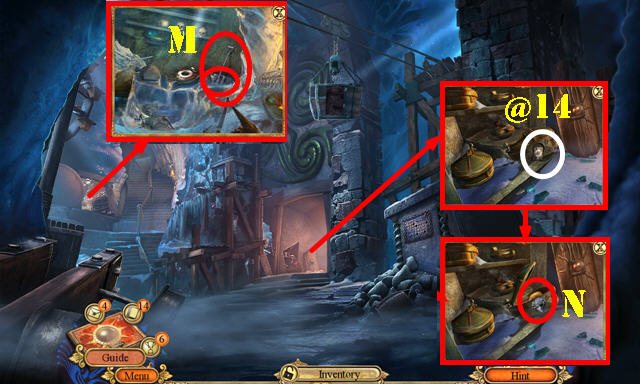
- Solution: Cx3-A-C-A-C-A-Cx3-Dx2-C-D-C.
- Enter the Vault (E).
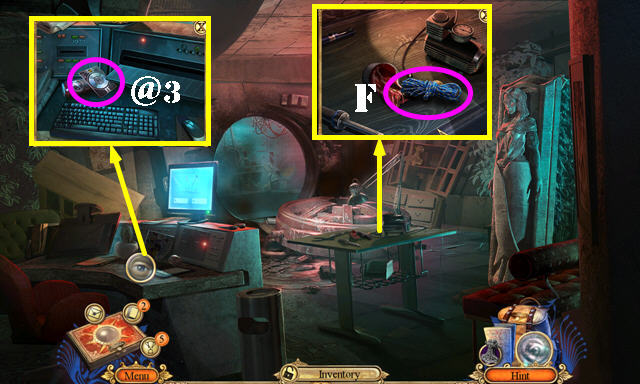
- Take the Fact Card (@3) and the RING below it.
- Take the THIN ROPE and SEAL WITH WAX (F).
- Select the THIN ROPE twice; receive the NOOSE.
- Return to Sam's office.
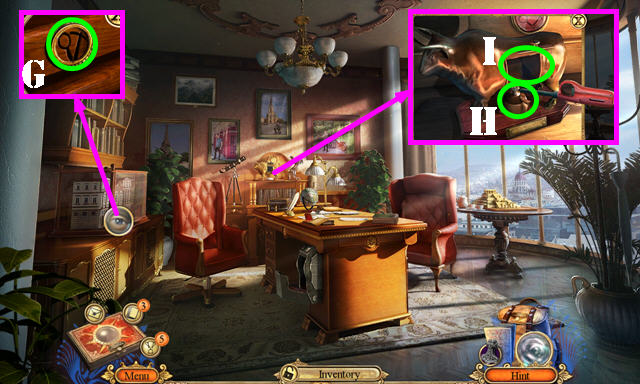
- Use the RING (G); play the HOP to get the LIGHTER.
- Use the LIGHTER (H) and SEAL WITH WAX (I); receive the ACADEMY SEAL.
- Walk down.
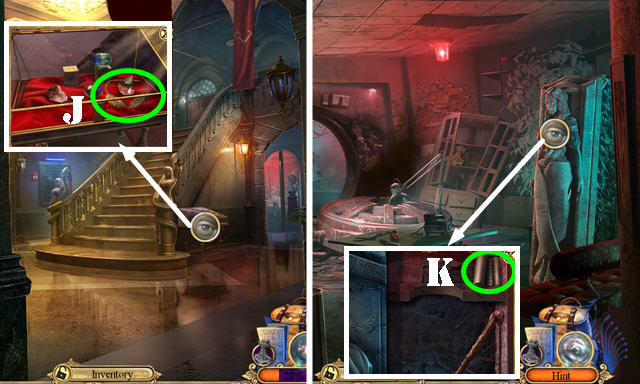
- Use the ACADEMY SEAL; take the GOLDEN WREATH (J).
- Go to the Vault.
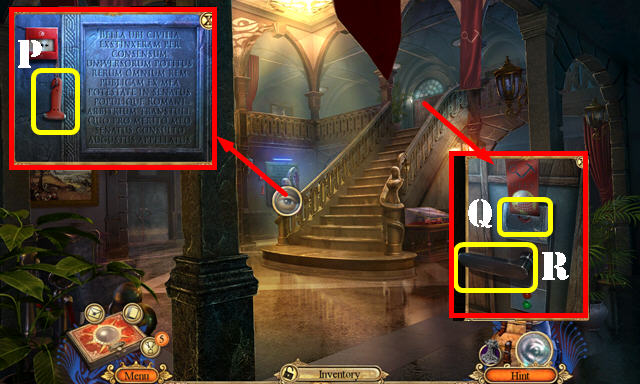
- Place the GOLDEN WREATH; take the LATIN SCROLL (K).
- Walk down.
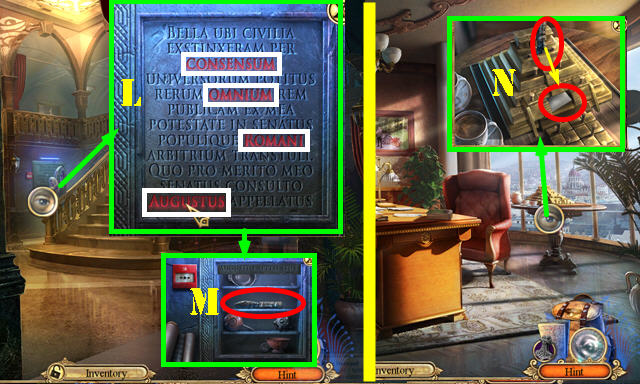
- Place the LATIN SCROLL; select the four names (L).
- Take the SACRIFICIAL KNIFE (M).
- Go to Sam's office.
- Use the SACRIFICIAL KNIFE; open the letter; take the USER INFO (N).
- Return to the Vault.
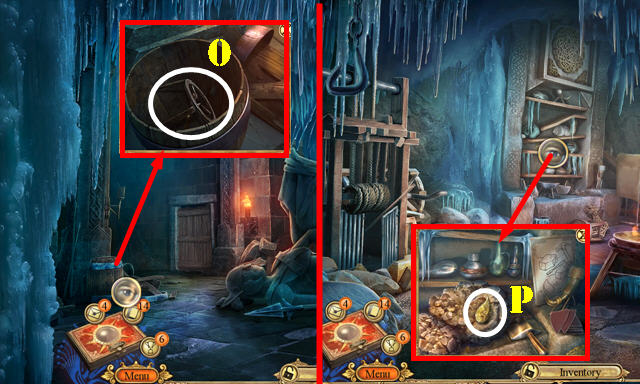
- Use the USER INFO (O). Select 'vault control-menu-vault list-print list'; take the VAULT LIST (P).
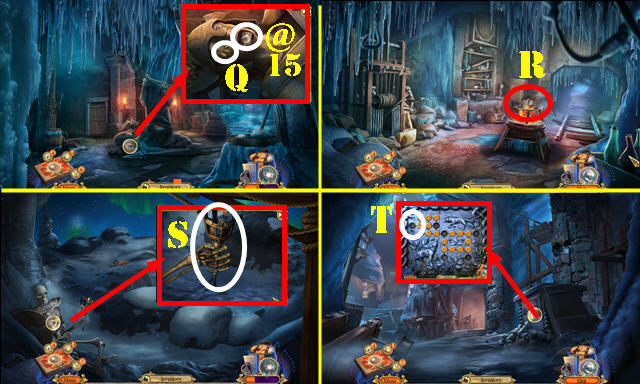
- Use the VAULT LIST (Q); play the HOP to get the GPS PROTOTYPE.
- You automatically receive the MOTORBIKE KEY from Sam.
- Return to the Alley.
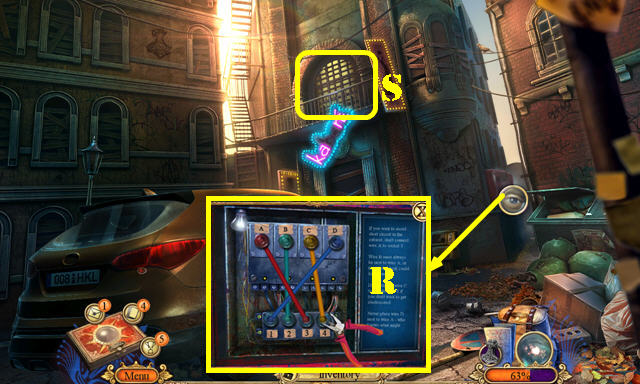
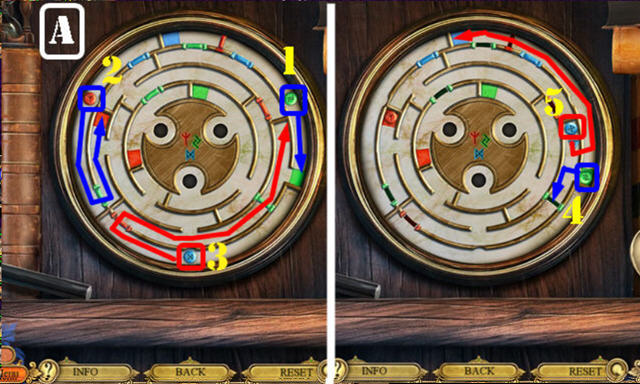
- Use the MOTORBIKE KEY for a puzzle (R).
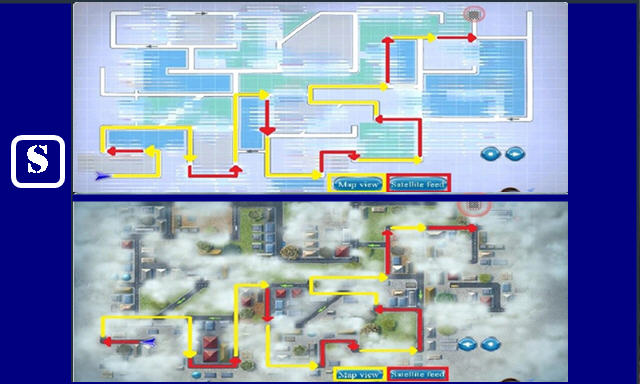
- Solution: follow the arrows leading the way. Use the buttons marked in yellow and red to switch views and continue until you reach the end (S).
Chapter 2: Cabaret
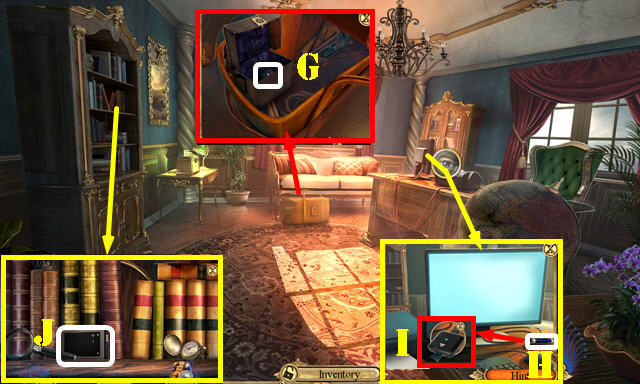
- Answer the phone on the screen. Use the GPS PROTOTYPE on the scene.
- Use the ROBOTIC ARM; receive the LIGHTBULB (G).
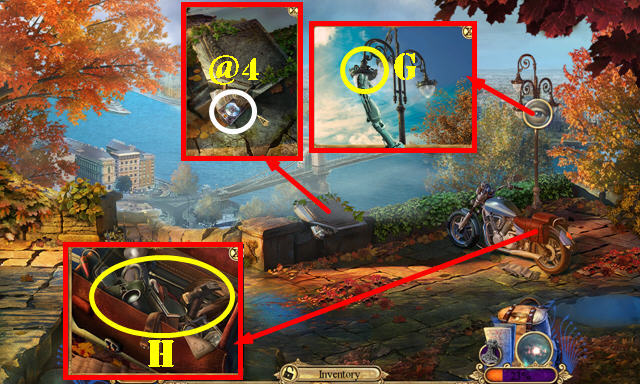
- Take the Fact Card (@4).
- Open the bag (H); play the HOP to get the MINI SCREWDRIVER.
- Go forward.
- Use the NOOSE and select it twice; select the lines once they intersect over the noose (I).
- Open the door; look at the note; take the GINFAXI KEY and press the button (J).
- Look at the tickets and move the bag (K).
- Open the cabinet; remove the broken bulb and place the LIGHTBULB (L).
- Use the MAGNET to get the METAL PIPE (M).
- Walk down.
- Use the METAL PIPE (N); receive the CONCRETE PIECE.
- Go forward.
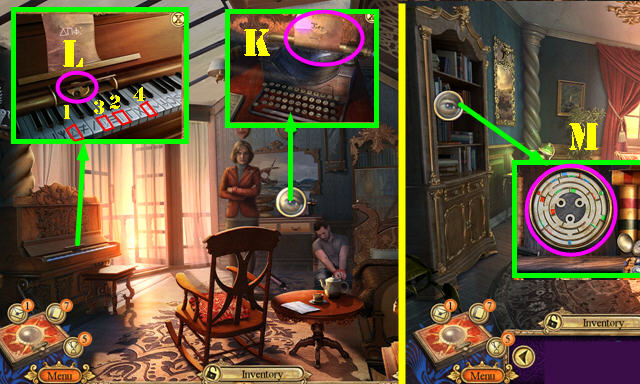
- Use the MINI SCREWDRIVER and CONCRETE PIECE; look at the code (O).
- Enter 739 (P); take the PLIERS (Q).
- Use the PLIERS for a puzzle. Solution (R).
- Go to the Cabaret (S).
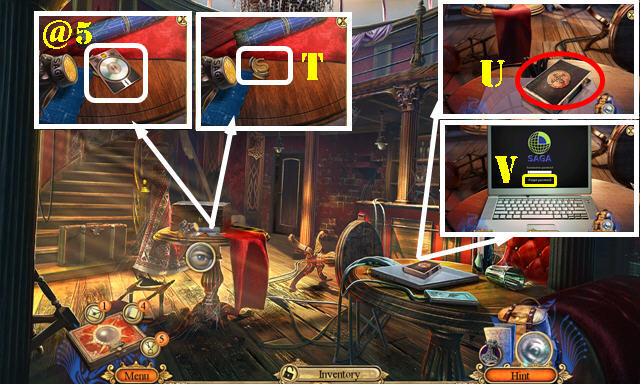
- Move the gas mask; take the BOMB REMOTE and Fact Card (@5). Take the 'S' CREST 1/2 (T).
- Take the NORSE SAGAS (U).
- Use the GINFAXI KEY on the NORSE SAGAS; take the TEARS OF HEL PAGE and 'S' CREST 2/2.
- Open the laptop and select 'forgot password' (V) for a puzzle.
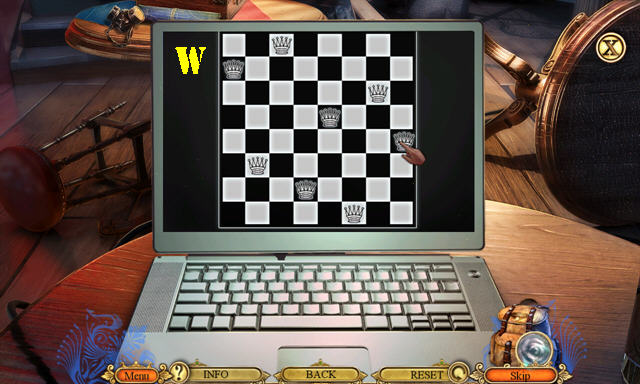
- Solution (W).
- Use the 'S' CREST 2/2 and look at the newspaper; take the STICKY BOMB and CD (A).
- Insert the CD (B) and select play video (C).
- Take the FIRE EXTINGUISHER (D). Use the FIRE EXTINGUISHER on the scene.
- Place the STICKY BOMB (E).
- Use the BOMB REMOTE on the scene and press the button (F).
- Go through the door (G).
Chapter 3: Copenhagen Street
- Talk to Sam (H); give him the TEARS OF HEL PAGE; take the PURSE (I).
- Take the Fact Card (@6).
- Open the PURSE and wallet; take the MONEY.
- Look at the brochure; take the EMPTY BLOWTORCH (J).
- Go forward.
- Remove the sign (K).
- Take the BUTANE FUEL and STICK (L).
- Use the BUTANE FUEL on the EMPTY BLOWTORCH; receive the BLOWTORCH.
- Use the BLOWTORCH (M); go through the gate.
- Take the ANCHOR KEY (N).
- Use the STICK (O); receive the RAKE. Take the WING (P).
- Walk down.
- Use the RAKE; take the BROKEN UMBRELLA (Q).
- Place the ANCHOR KEY (R); play the HOP to get the ROTARY TOOL.
- Use the ROTARY TOOL on the BROKEN UMBRELLA; select the metal pieces twice and use the TAPE; receive the LOCKPICK.
- Go to the Schumann house.
- Use the LOCKPICK for a puzzle. Solution: S-V-Ux2.
- Go through the door.
- Take the SIGN (X).
- Take the HOOK from the SIGN.
- Select the wood; take the CONTINENTS 1/3 (Y).
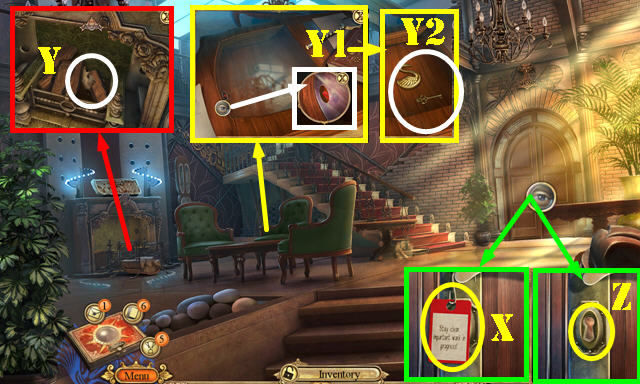
- Look at the note; use the HOOK (Y1); take the GOLDEN SWAN and STUDY KEY (Y2).
- Use the STUDY KEY (Z); go through the door.
- Open the bag; take the SLEEPING GAS (A).
- Walk down and go to the Parlor (B).
- Throw the SLEEPING GAS at the man.
- Open the doors (C).
- Give the TAPE (D).
- Take the SURVEILLANCE ROUTER (E). Press the button on the SURVEILLANCE ROUTER; take the MEMORY CARD.
- Take the PHOTOGRAPHER'S KEY and CONTINENTS 2/3 (F).
- Take the Fact Card (@7).
- Return to the Study.
- Use the PHOTOGRAPHER'S KEY; take the EMPTY CARD READER (G).
- Take the UV LIGHT (H). Insert the EMPTY CARD READER and MEMORY CARD (I).
- Take the BATTERY (J). Remove the five books and cover.
- Return to the Parlor.
- Use the UV LIGHT (K); receive the MUSIC CODE.
- Place the MUSIC CODE; select 1-4. Take the CENTER ORNAMENT (L).
- Return to the Study.
- Place the CENTER ORNAMENT for a puzzle (M).
- Solution: (A and B)
- Enter the Secret chamber on the left.
- Take the Fact Card (@8); open the envelope and take the CONTINENTS 3/3 (O).
- Walk down.
- Place the CONTINENTS 3/3; take the THOR FIGURINE; look at the note and take the MOON (P).
- Go to the Secret chamber.
- Place the THOR FIGURINE; take the GOLDEN EAGLE (Q).
- Return to the Schumann house.
- Place the GOLDEN SWAN and GOLDEN EAGLE (R); play the HOP to get the THREE-POINT STAR.
- Go to the Secret chamber.
- Place the THREE-POINT STAR; take the TONGS and SUN (S).
- Return to the Parlor; go to the Balcony (T).
- Place the MOON and SUN; look at the note; take the Fact Card (@9) and WOLF HEAD.
- Take the VEGVISIR (U).
- Walk down.
- Place the WOLF HEAD (W); receive the HEX TOOL.
- Go to the Secret chamber.
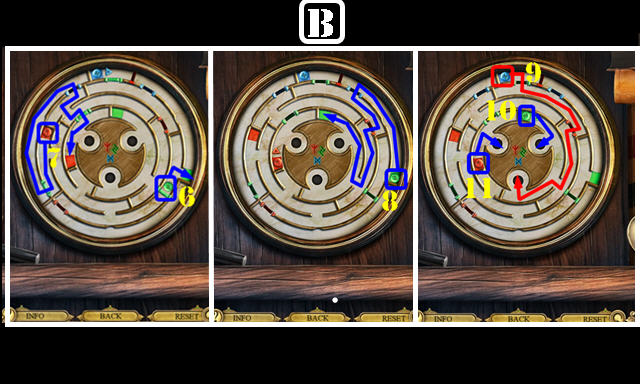
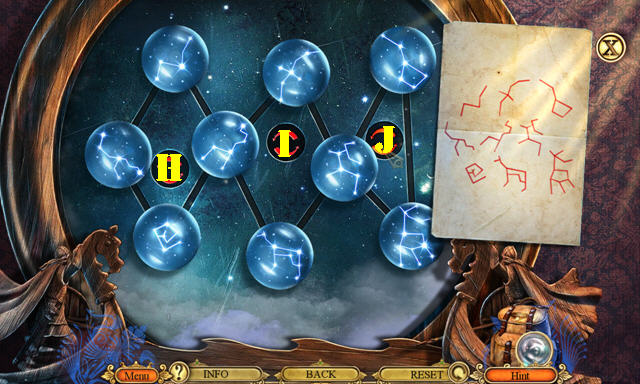
- Place the VEGVISIR for a puzzle (X).
- Solution 1-10 (Y).
- Take the AXES EMBLEM 1/2 and CONSTELLATION (A). Use the HEX TOOL (B); look at the note and take the VALKNUT (C).
- Return to the Ground floor.
- Scroll up; place the VALKNUT; take the DRAGON (D).
- Place the WING on the DRAGON; receive the NIDHOGG EMBLEM.
- Return to the Study.
- Place the NIDHOGG EMBLEM; take the TELESCOPE LENS (E).
- Return to the Balcony.
- Place the TELESCOPE LENS (F); play the HOP to get the CONSTELLATIONS SKETCH.
- Return to the Ground floor.
- Place the CONSTELLATION and CONSTELLATIONS SKETCH for a puzzle (G).
- Solution: H-Ix2-J-H-I-J-I-Jx2-H-Ix2-H-Ix3.
- Hx3-I-Hx3-I-Hx2-Ix3-Hx2-I-H-I.
- H-Ix3-Hx3-Ix2-H-Ix3-Hx3-I-J.
- Look at the note; take the TRANSPARENT OVERLAY and LIGHTHOUSE INLAY.
- Return to the Docks.
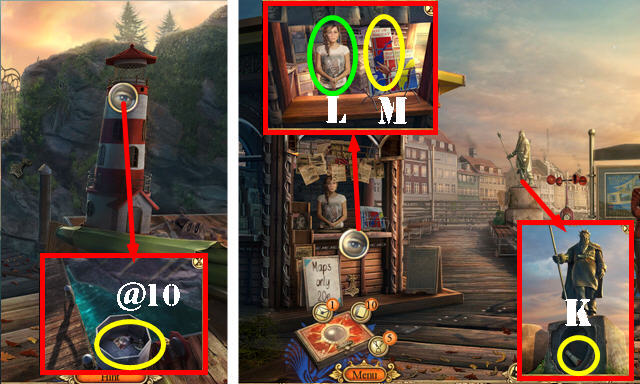
- Place the LIGHTHOUSE INLAY; take the Fact Card (@10) and AXES EMBLEM 2/2.
- Walk down.
- Place the AXES EMBLEM 2/2; take the COORDINATES (K).
- Give the MONEY (L); take the MAP OF NORWAY (M).
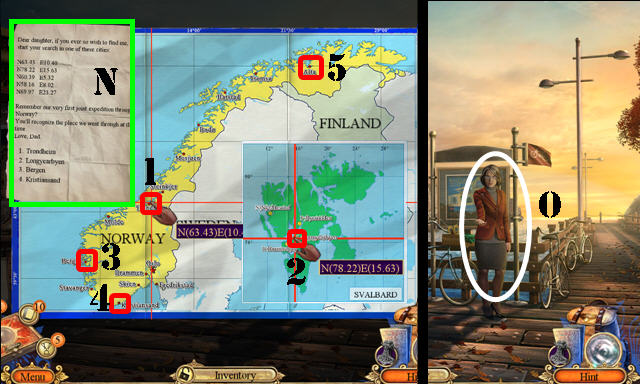
- Open the MAP OF NORWAY; place the COORDINATES. Select the five coordinates (1-5); take the CITY NAMES (N).
- Give the CITY NAMES (O).
- Answer the phone on the scene.
Chapter 4: Museum
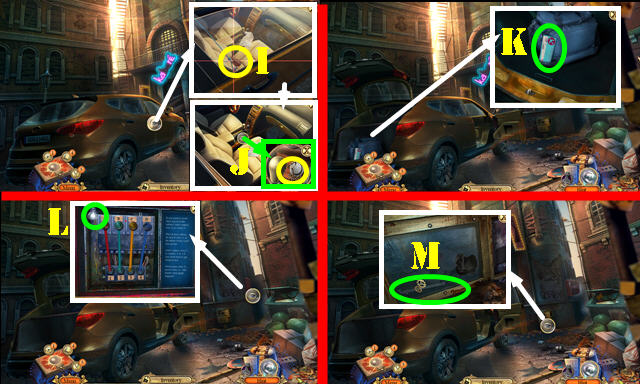
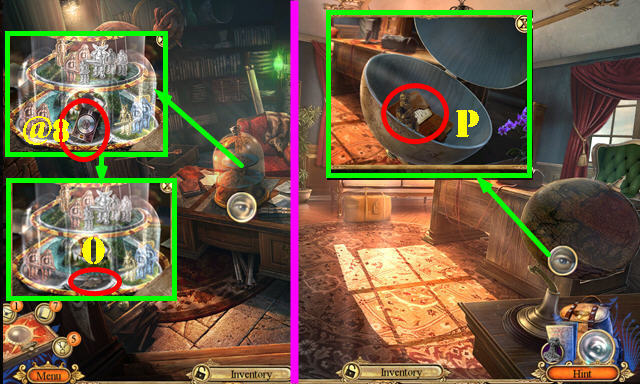
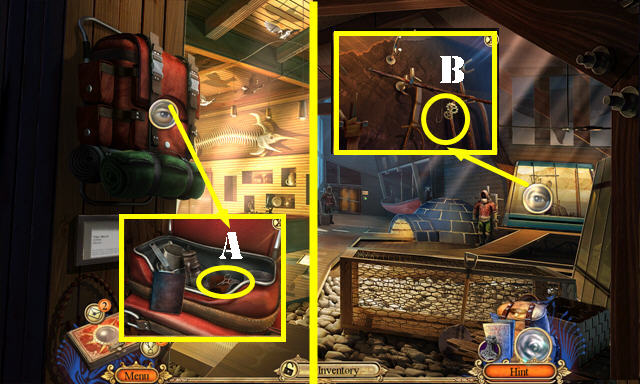
- Take the DISTRESS BEACON from the lady.
- Select the seat; take the LOGO PIECES 1/4 (P).
- Select the ice; take the SCREW PLATE (Q).
- Use the TONGS on the SCREW PLATE; receive the SCREWDRIVER TOP.
- Remove the snow; select the laces three times; use the SCREWDRIVER TOP; take the Fact Card (@11) and LOGO PIECES 2/4.
- Enter (R).
- Take the BRASS BEAR (S).
- Move two items; take the LOGO PIECES 3/4 (T).
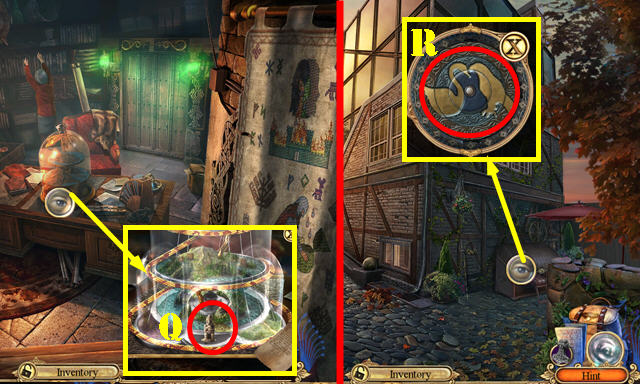
- Take the SMALL HARPOON (U) and MUSEUM LOGO (V).
- Walk down.
- Place the BRASS BEAR (W); play the HOP to get the ID CARD.
- Use the SMALL HARPOON; take the LIGHTNING SYMBOLS 1/2 (X).
- Go to the Svalbard museum.
- Use the ID CARD (Y); go through the door.
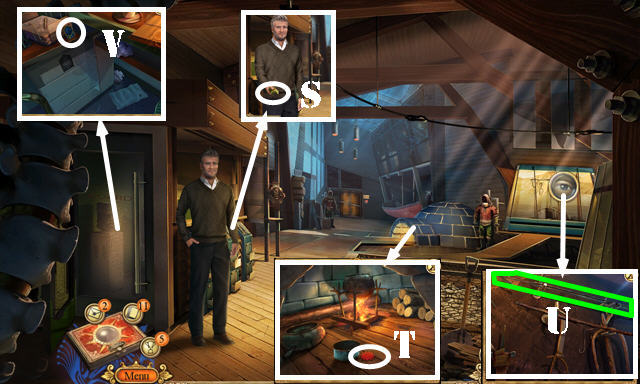
- Open the bag; select twice; look at the diary and take the SCISSORS (A).
- Walk down.
- Use the SCISSORS; receive the FISHING HOOK (B).
- Go forward.
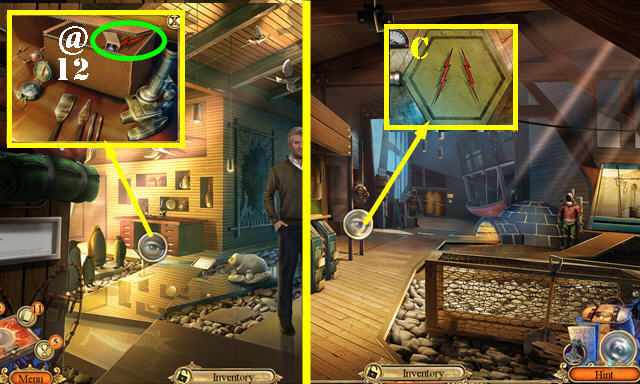
- Use the FISHING HOOK; take the Fact Card (@12), MATCHES and LIGHTNING SYMBOLS 2/2.
- Walk down.
- Place the LIGHTNING SYMBOLS 2/2 for a puzzle (C).
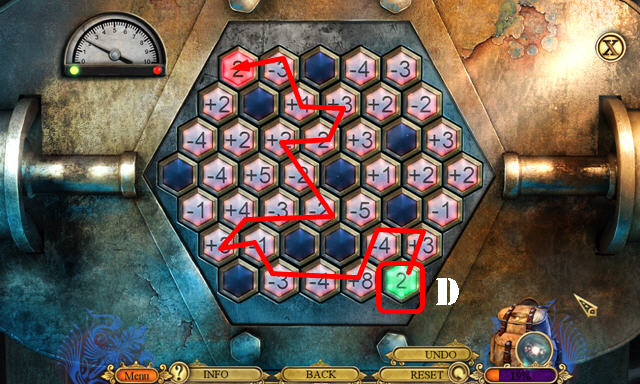
- Solution (D).
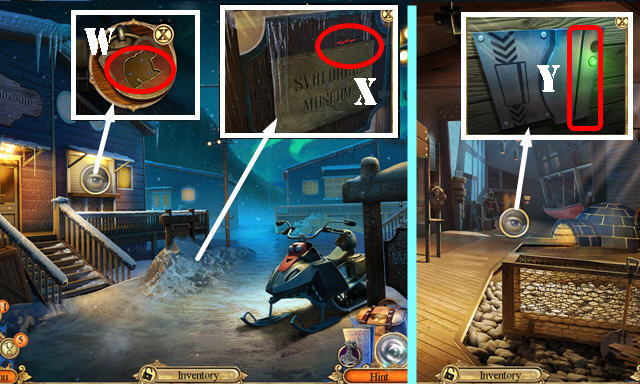
- Take the FLASHLIGHT.
- Go forward.
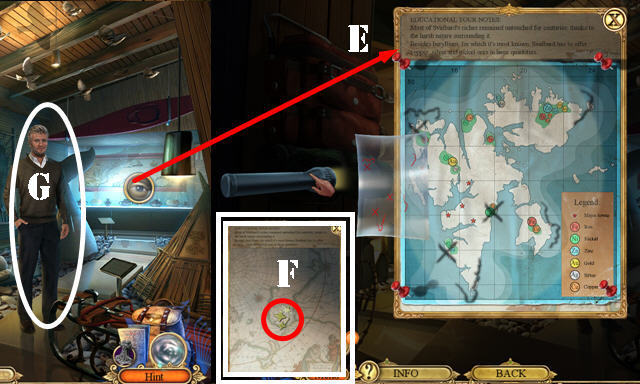
- Use the TRANSPARENT OVERLAY and FLASHLIGHT for a puzzle. Solution (E).
- You receive the POSSIBLE MINE LOCATIONS; remove the tape and take the LOGO PIECES 4/4 (F).
- Give the POSSIBLE MINE LOCATIONS; receive the MINE LOCATION (G).
- Place the LOGO PIECES 4/4 on the MUSEUM LOGO.
- Walk down.
- Place the MUSEUM LOGO; take the SNOWMOBILE KEYS (H).
- Walk down.
- Use the SNOWMOBILE KEYS and MINE LOCATION (I).
- Use the DISTRESS BEACON on the scene and answer the phone.
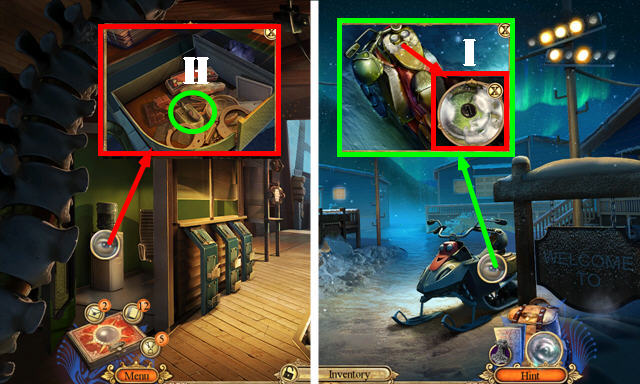
- Use the SMALL HARPOON (J); play the HOP to get the BUCKLE.
- Look at the note; take the WIRE CABLE (K). Place the BATTERY; receive the EM SENSOR (L).
- Place the BUCKLE (M); receive the ANTI-CORROSIVE SPRAY.
- Use the ANTI-CORROSIVE SPRAY; open the door and take the LASER CUTTER (N).
- Go forward.
- Select the ice; use the EM SENSOR in the spot shown and select it (O). Use the LASER CUTTER; look at the note and take the SHIELDMAIDEN PENDANT (P).
- Place the SHIELDMAIDEN PENDANT (Q).
- Go forward.
- Use the MATCHES in the center of the scene.
- Take the EYE DECORATION (R).
- Go to the Crafting room (S).
- Use the MATCHES (T).
- Take the CROSSBOW BOLT and look at the note (U).
- Take the MARBLE DISK 1/2 (V).
- Use the WIRE CABLE (W); take HEL'S FACE (W1).
- Walk down.
- Place the CROSSBOW BOLT; take the CROSSBOW (X). Move the plate and take the VIKING PENDANT (X1).
- Walk down.
- Place the VIKING PENDANT; take the MARBLE DISK 2/2 (Y).
- Go forward.
- Place the MARBLE DISK 2/2 for a puzzle (Z).
- Solution one: A1-A2x7-B2x6-C1x7-C2x5-D1x6-D2x4-E1x5-E2x3-F1x4-F2x2.
- Solution two (G).
- Enter the Mine (H).
- Use the CROSSBOW (I).
- Go to the Cliff (J).
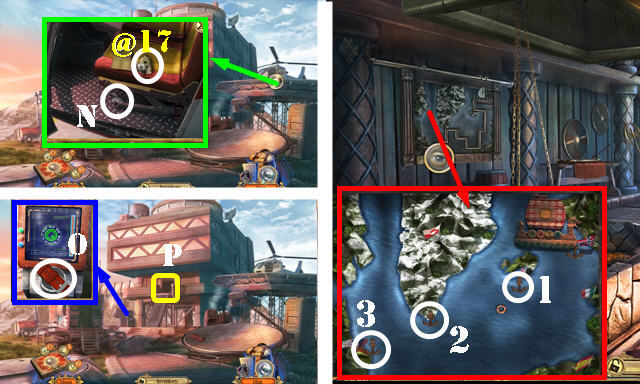
- Turn Sven over; take SVEN'S BACKPACK (K).
- Answer the phone on the screen.
- Select the phone in SVEN'S BACKPACK and slide the button from left to right. Press the phone; select Michael Anker. Take SVEN'S ID WATCH, DIRTY VIAL and HAMMER.
- Take the Fact Card (@13) and HELMET (L).
- Walk down.
- Take the Fact Card (@14).
- Place HEL'S FACE; take the GOLDEN TEARS 1/3 (N).
- Place the EYE DECORATION; take the SHOVEL and GOLDEN TEARS 2/3 (M).
- Walk down.
- Use the HAMMER; take the POT STAND and CHISEL (O).
- Go to the Crafting room.
- Use the CHISEL and HAMMER; receive the GOLDEN TEARS 3/3 (P).
- Walk down.
- Place the GOLDEN TEARS 3/3 (Q); take the Fact Card (@15) and FENRIR TOKEN.
- Go to the Crafting room.
- Place the POT STAND and HELMET; take the HOT WATER (R).
- Go to the Cliff.
- Use the HOT WATER; take the TORCHES 1/3 (S).
- Walk down.
- Place the FENRIR TOKEN for a puzzle (T).
- Solution:(P-K)-(S-R)-(Q-U)-(M-N)-(U-W)-(R-V)-(F-G)-(E-H)-(M-O).
- (B-A)-(G-C)-(K-H)-(G-J)-(L-M)-(E-D)-(J-G)-(M-N)-(P-K)-(G-C)-(N-O).
- (P-K)-(K-I)-(P-R)-(I-H)-(R-V)-(I-J)-(P-K)-(I-H)-(P-K)-(S-R)-(L-M).
- (Q-N)-(I-H)-(U-Q)-(M-N)-(Q-U)-(M-N)-(U-W)-(M-O).
- Take the WHEEL and TORCHES 2/3. (X).
- Return to the Crafting room.
- Place the WHEEL (Y); play the HOP to get the TORCHES 3/3.
- Use the TORCHES 3/3 (Y1); receive the LIT TORCHES.
- Go to the Cliff.
- Use the LIT TORCHES (Z).
Chapter 5: Research Lab

- Answer the phone on the screen.
- Take the MINIATURE SHIELD (A).
- Use the SHOVEL; open the box and take the ROTATING SEGMENT (B).
- Enter the Village hall (C).
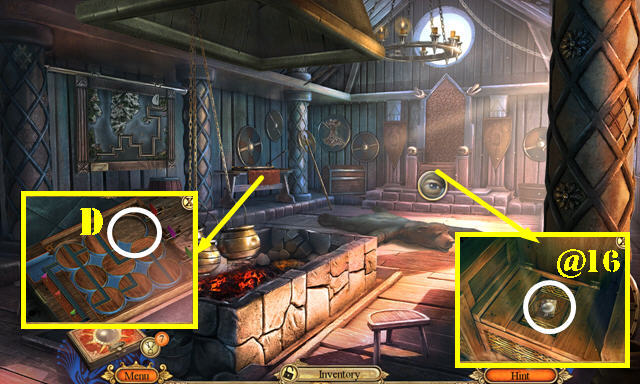
- Select the seat; take the Fact Card (@16).
- Place the ROTATING SEGMENT for a puzzle (D).
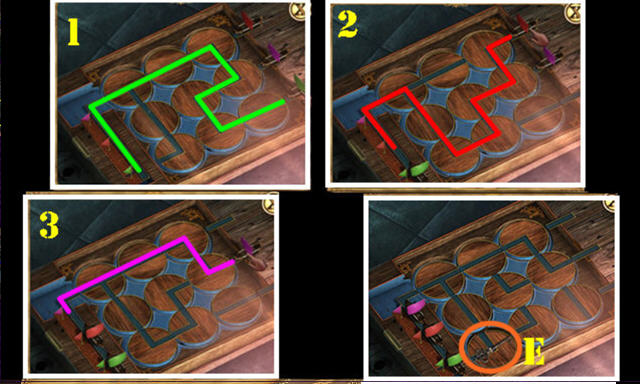
- Solutions (1-2-3).
- Take the CHURCH KEY (E).
- Walk down.

- Use the CHURCH KEY; take the PUTTY KNIFE and WOODEN SHIP (F).
- Use the PUTTY KNIFE (G); play the HOP to get the BRACELET. HOP puzzle solution (G1).
- Go to the Village hall.
- Place the BRACELET; take the GATE BUTTON (H).
- Walk down.
- Place the GATE BUTTON for a puzzle (I).
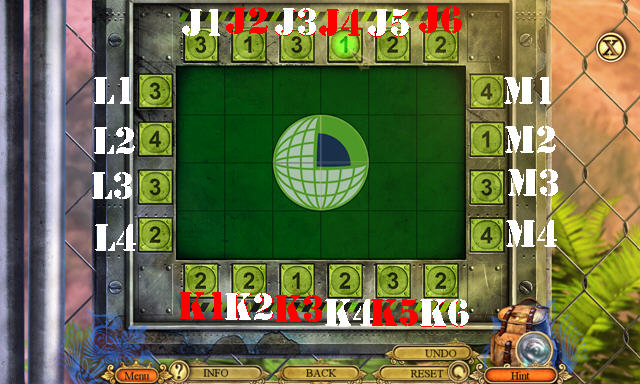
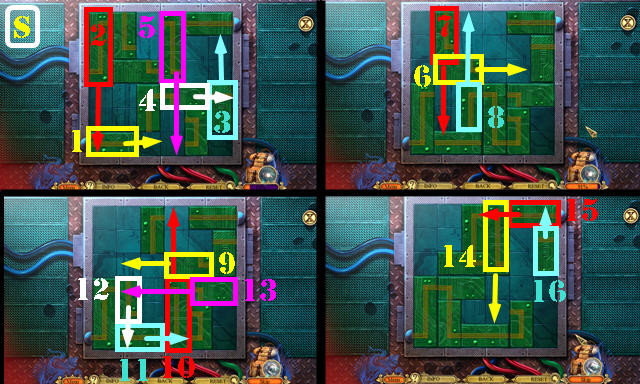
- Solution: L3-M3-K5-M1-J2-L1-J4-L2-M2-K5-M1-L1-J4.
- Go through the gate.
- Open the door. Take the LIGHTER (N). Look at the note; take the Fact Card (@17) and GLUE.
- Place the MINIATURE SHIELD and use the GLUE on the WOODEN SHIP; receive the SHIP EMBLEM.
- Return to the Village hall.
- Place the SHIP EMBLEM; select 1-3. Take the BOLAS and SENSOR.
- Return to the Facility entrance.
- Place the SENSOR and use SVEN'S ID WATCH (O).
- Enter the SAGA Facility (P).
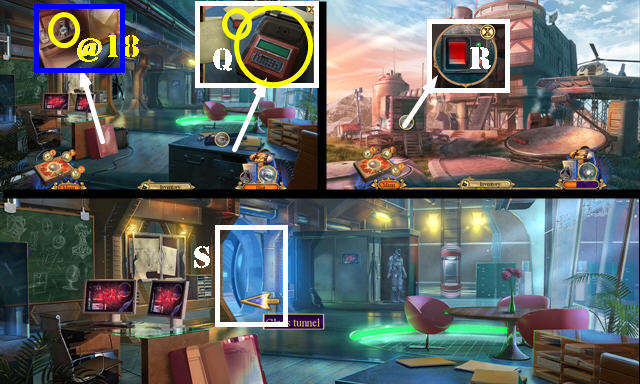
- Look at the note; take the BROKEN CODE BREAKER and SWITCH (Q).
- Open the case; take the Fact Card (@18) and SULFUR.
- Walk down.
- Place the SWITCH and select it (R); play the HOP to get the GRABBER TOOL.
- Go to the SAGA Facility and go to the Glass tunnel (S).
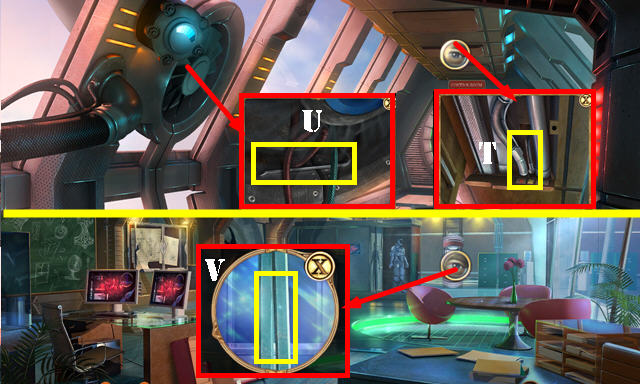
- Use the GRABBER TOOL twice (T).
- Take the CROWBAR (U).
- Walk down.
- Use the CROWBAR (V); go up to the Research lab.
- Take the Fact Card (@19). Open the drawer; take the FUNNEL (W).
- Place the DIRTY VIAL (X). Select the keyboard (Y). Open the door and take the CLEAN VIAL.
- Take the SCREW (Z).
- Walk down.
- Use the SCREW (A); take the HANDLE (B). Take the ASCLEPIUS SYMBOL (C).
- Return to the Research lab.
- Place the ASCLEPIUS SYMBOL; take the FUSES (D).
- Walk down.
- Place the FUSES for a puzzle (E).
- Solution (F).
- Take the HAZARD SYMBOL and RUBBER GLOVE.
- Go to the Research lab.
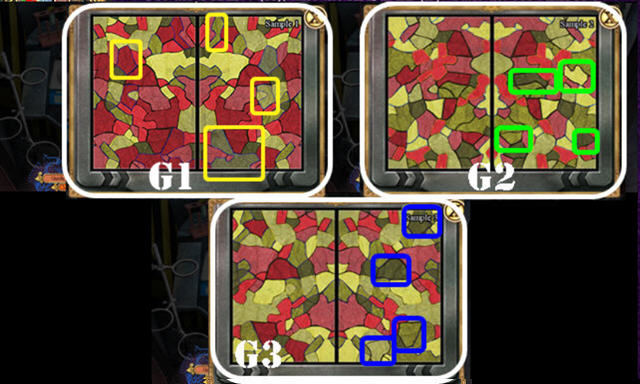
- Use the RUBBER GLOVE (G); play the HOP to get the TEARS OF HEL. HOP solutions: G1-G2-G3
- Place the CLEAN VIAL (H) and FUNNEL (I). Place the SULFUR in the funnel. Use the TEARS OF HEL in the vial. Place the stopper (J) on the vial to receive the BOMB.
- Return to the Glass Tunnel.
- Use the BOMB and LIGHTER (K); enter the Control room.
- Take the Fact Card (@20) and CABLE.
- Place the HAZARD SYMBOL; take the SOLDERING IRON (L).
- Select the cover on the BROKEN CODE BREAKER and place the CABLE. Use the SOLDERING IRON; receive the CODE BREAKER.
- Place the CODE BREAKER (M).
- Go to the Underground chamber (N).
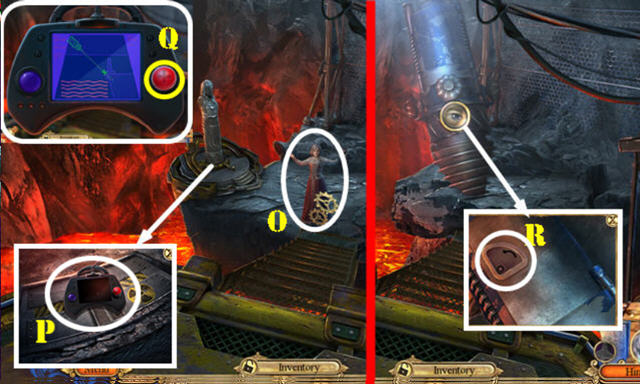
- Use the BOLAS (O).
- Take the DRILL REMOTE (P).
- Use the DRILL REMOTE on the scene and drag to the right (Q) until the beam hits the statue.
- Place the HANDLE for a puzzle (R).
- Solution (S). Select the Tears of Hel.
- Congratulations, you've completed Hidden Expedition Midgard's End!
Created at: 2016-07-01