
Walkthrough Menu
- General Tips
- Chapter 1: Turkey
- Chapter 2: Prague
- Chapter 3: The South Sandwich Islands
- Chapter 4: India
General Tips
- This is the official guide for Hidden Expedition: The Curse of Mithridates.
- This guide won't tell you when to zoom into a location; the screenshots show each zoom scene.
- Hidden-object puzzles are referred to as HOPs. Only the locations of the HOPs will be shown.
- Use the Map to fast travel to a location.
Chapter 1: Turkey
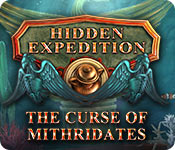
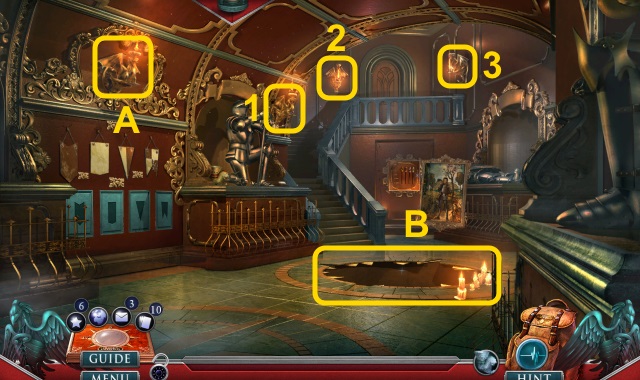
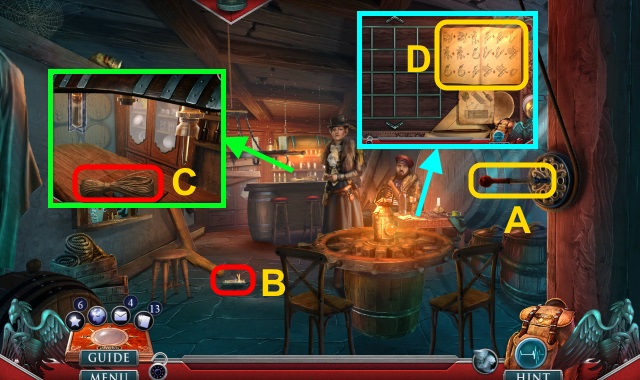
- Take HIKING STICK (A).
- Use HIKING STICK (B); receive BACKPACK.
- Open BACKPACK; take FIRE STARTER and CLIMBING ROPE.
- Use CLIMBING ROPE (C).
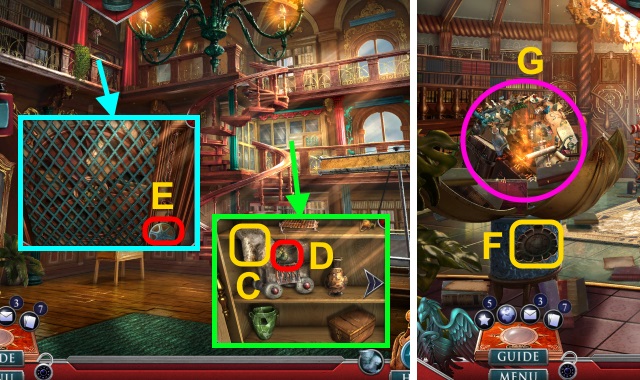
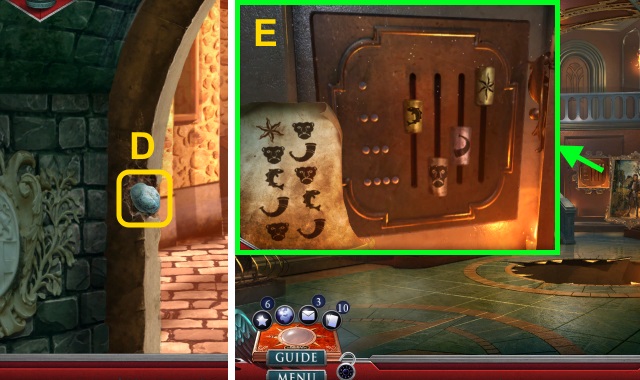
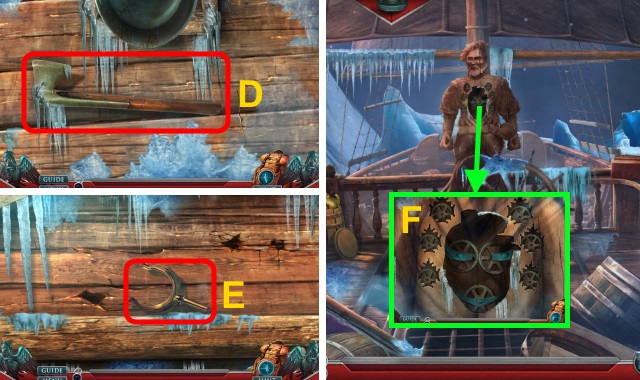
- Examine (D).
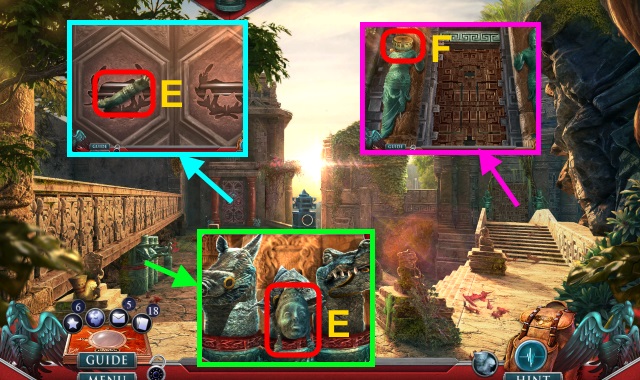
- Play HOP; receive MOON AND STAR EMBLEM (E).
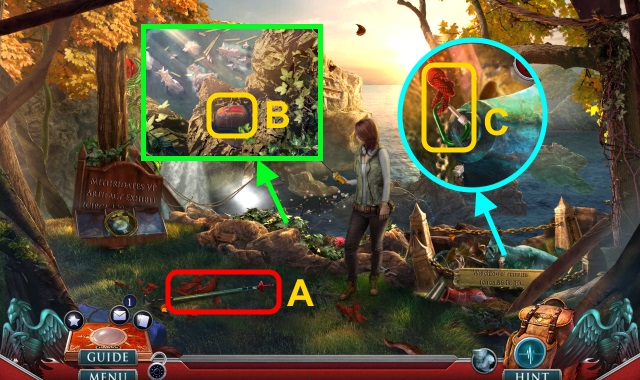
- Take Fact Card (@1); place MOON AND STAR EMBLEM. Read note; take MAZE FRAGMENTS (1/3), Map, and HERBICIDE.
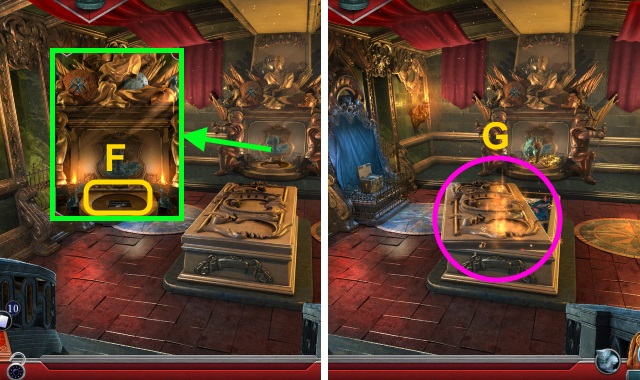
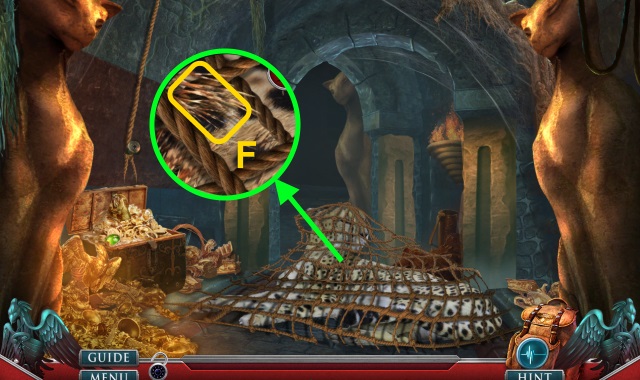
- Use HERBICIDE (F); examine.
- Go left, then right.
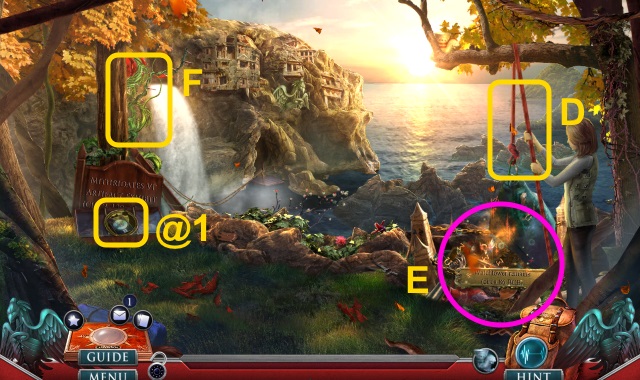
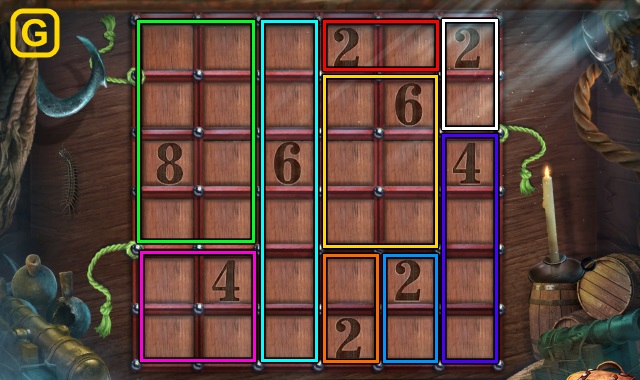
- Solution (G).
- Go right.
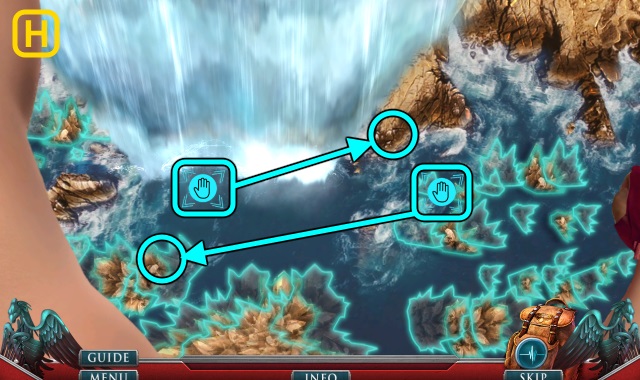
- Solution (H).
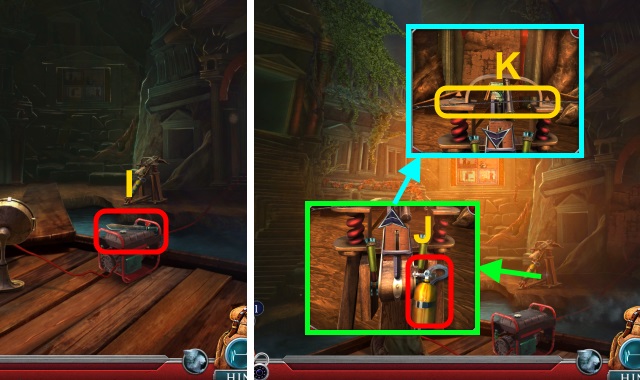
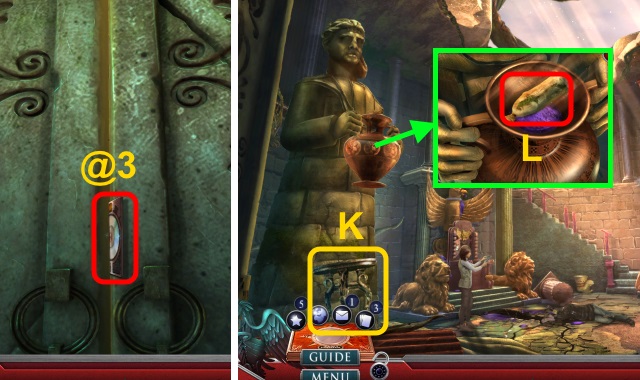
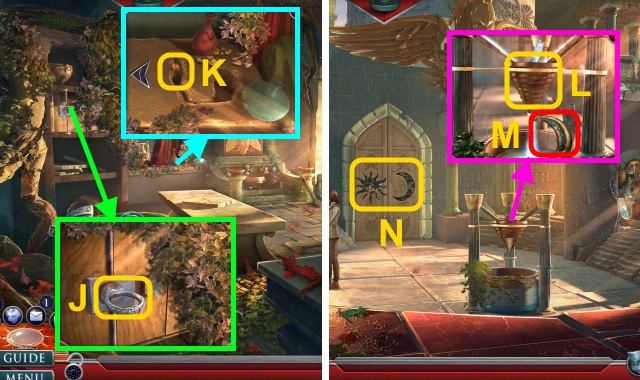
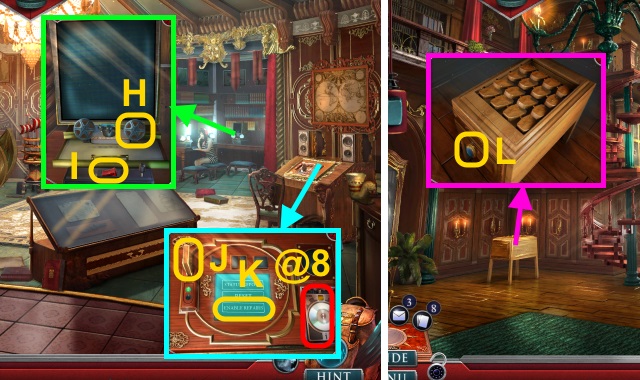
- Take MACHETE (I); examine.
- Take SCUBA TANK (J); scroll up.
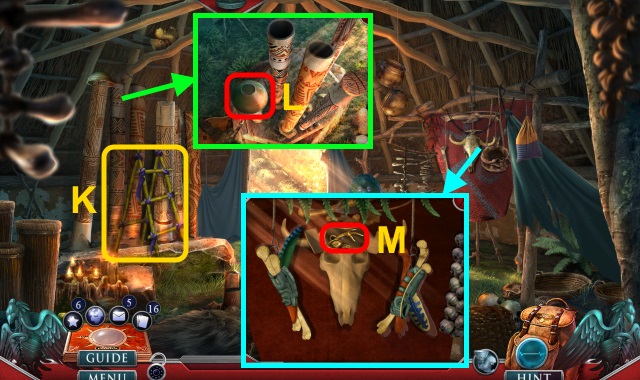
- Use MACHETE (K); receive PATTERN TILES (1/2).
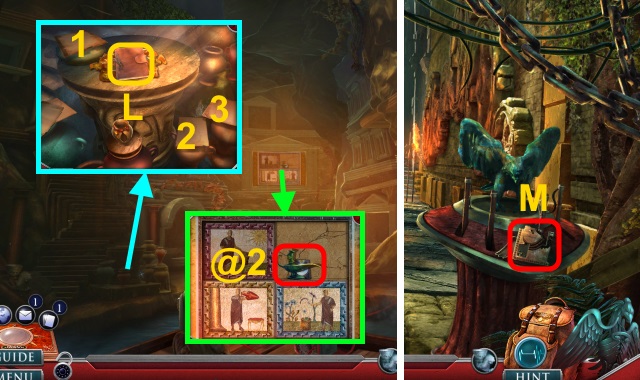
- Take BRONZE LAMP and Fact Card (@2).
- Read (L); take MAZE FRAGMENTS (2/3). Gather papers (1-3); use FIRE STARTER. Receive SOFT RESIN; take PATTERN BASE.
- Go left.
- Take PATTERN TILES (2/2) (M).
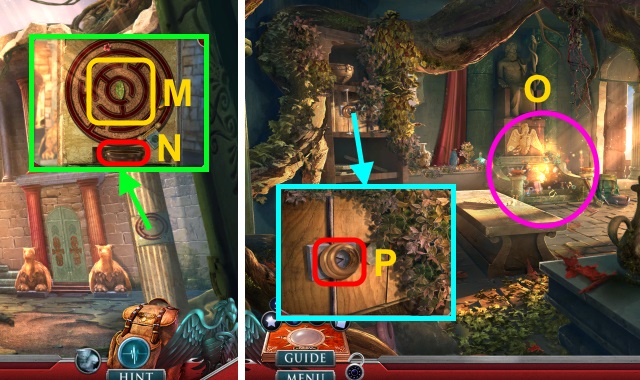
- PATTERN TILES (2/2) and SOFT RESIN on PATTERN BASE; take EAGLE PATTERN.
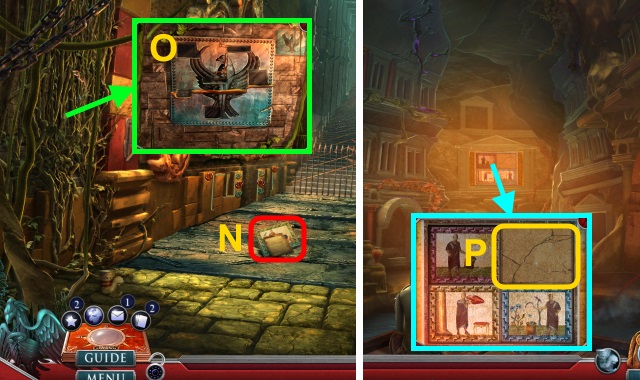
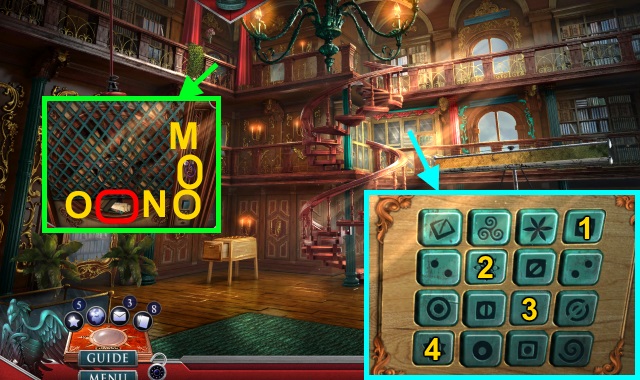
- Take MITHRIDATES MOSAIC (N); read note.
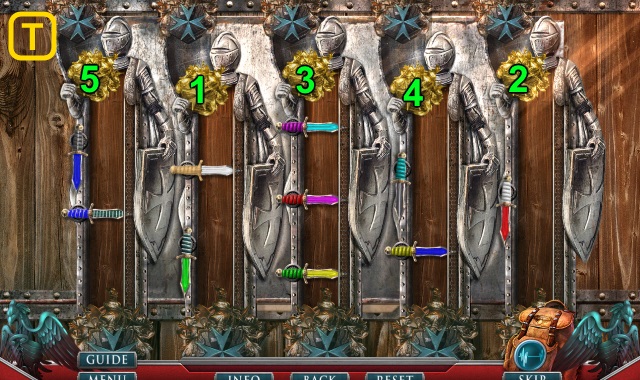
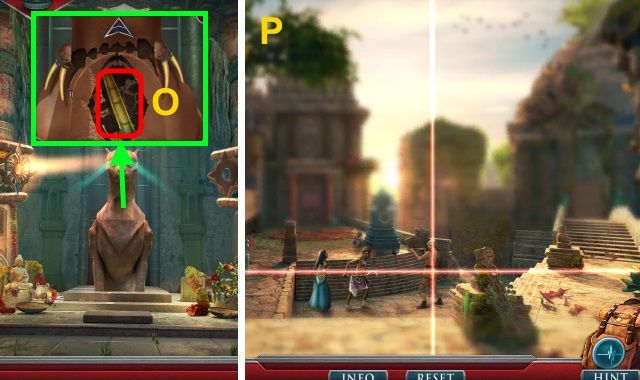
- Use MACHETE 2x; receive ANCIENT CHAIN. Place EAGLE PATTERN; press stones (O). Take RAM ARROWHEAD.
- Walk down.
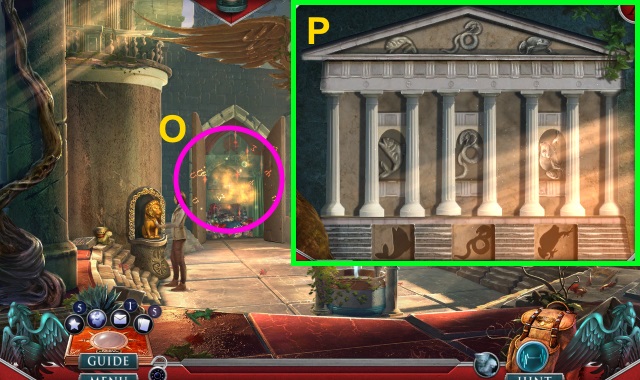
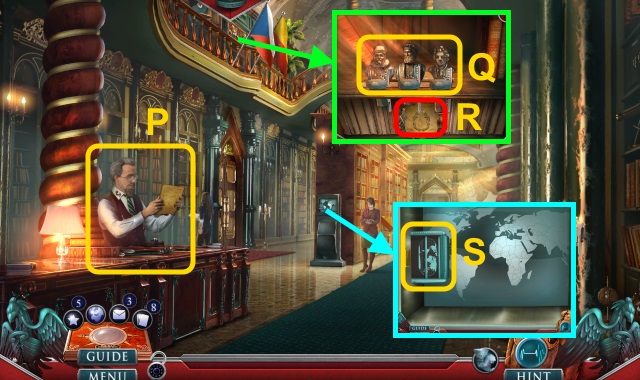
- Place MITHRIDATES MOSAIC (P).
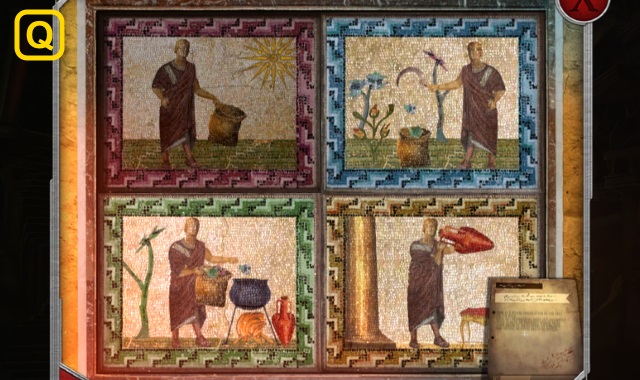
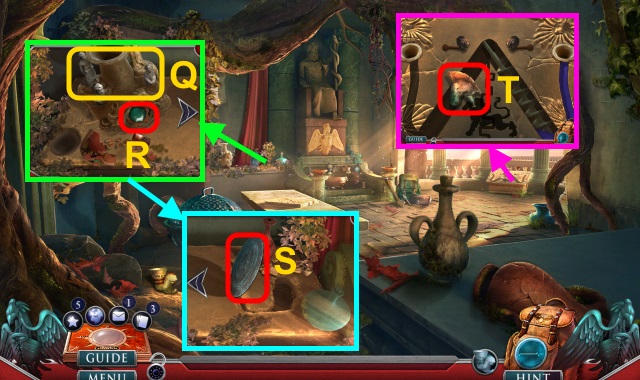
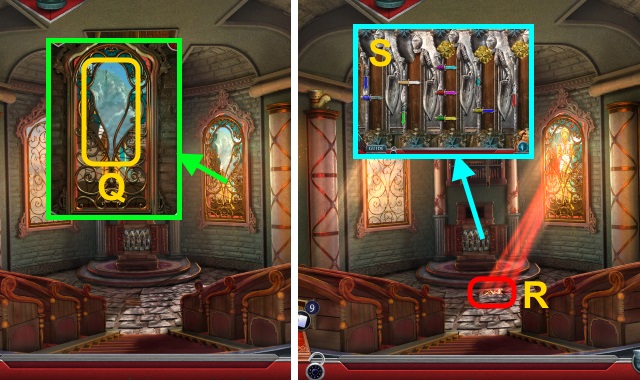
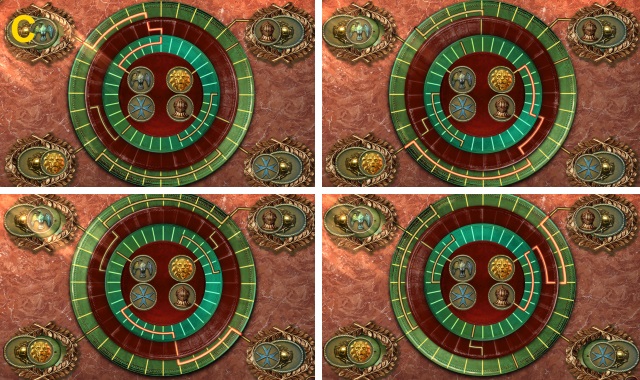
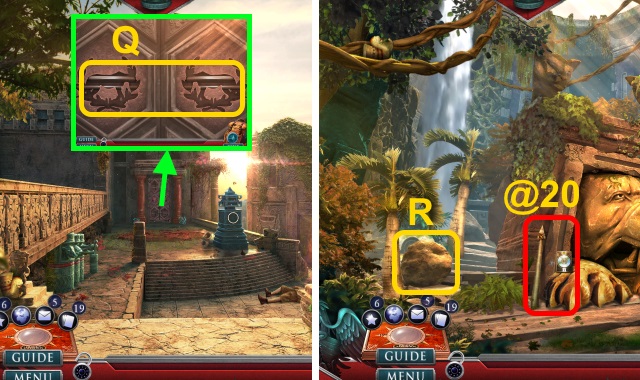
- Solution (Q).
- Take SCEPTER.
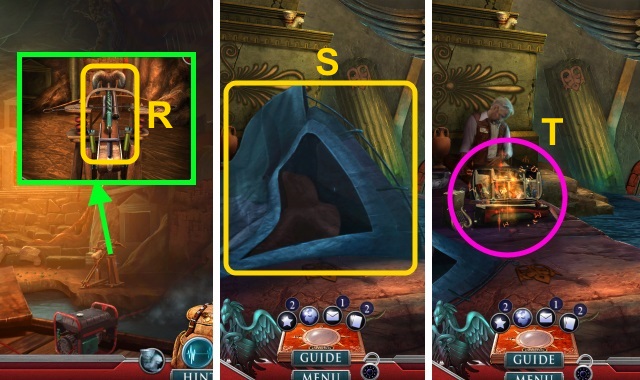
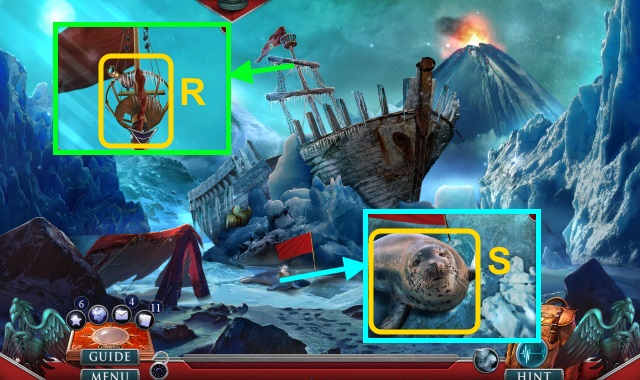
- Place SCEPTER and RAM ARROWHEAD; pull levers (R).
- Walk right.
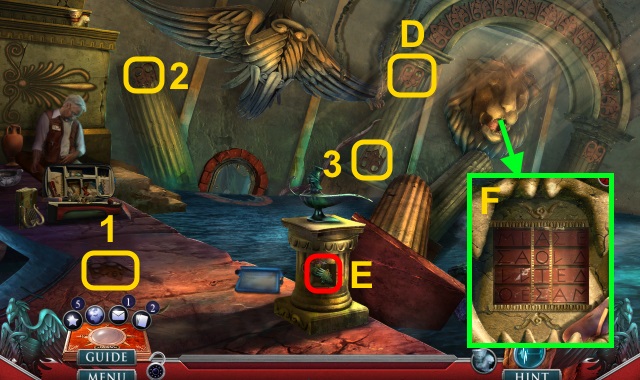
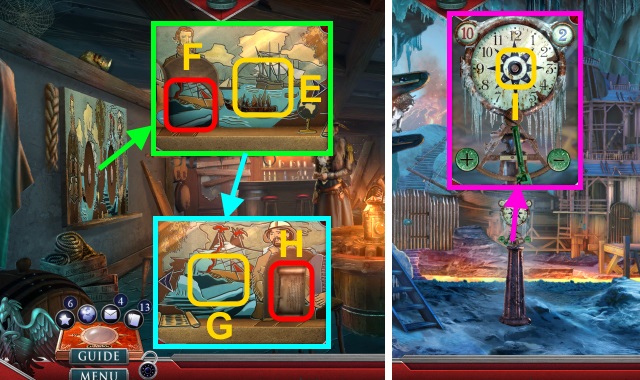
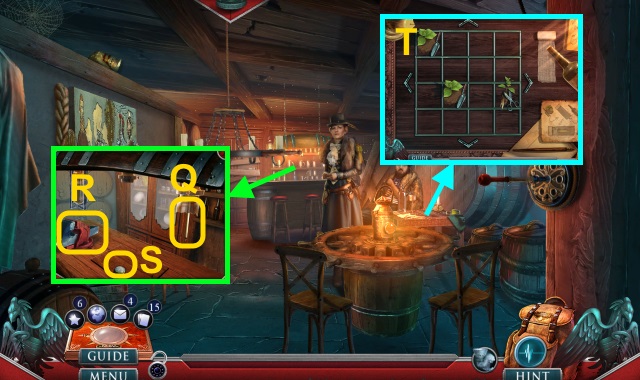
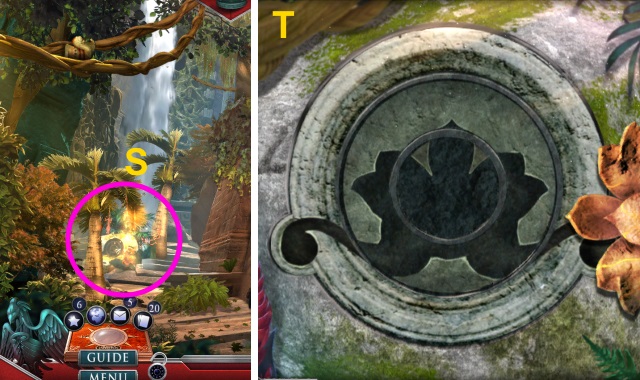
- Examine (S); take TRAPEZA TABLE.
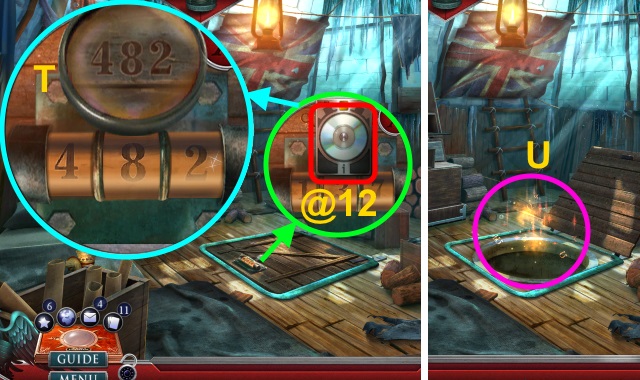
- Play HOP; receive DIVING MASK (T).
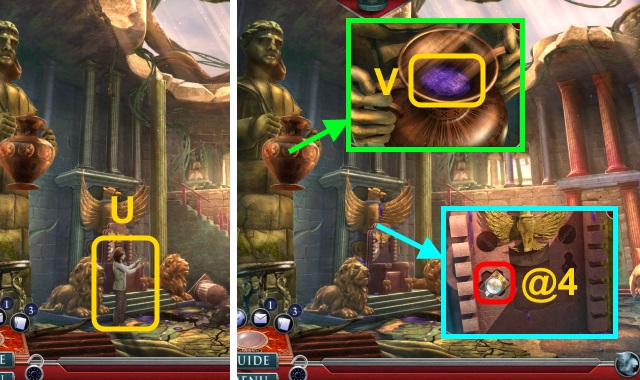
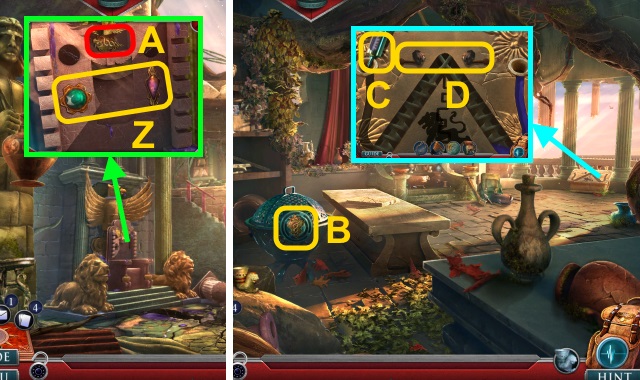
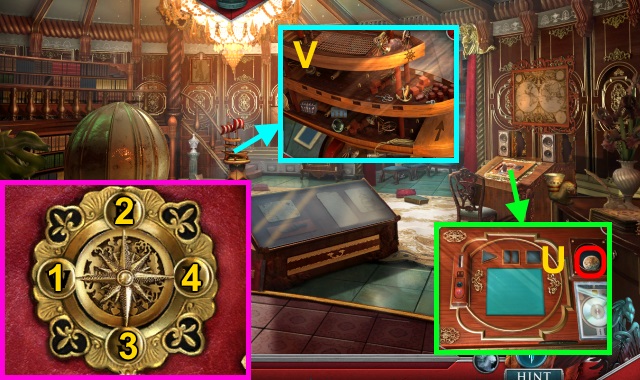
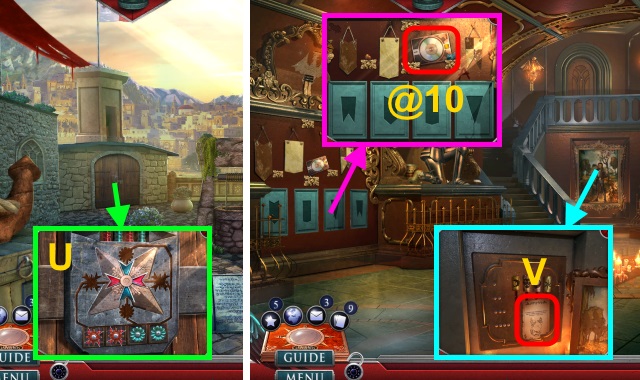
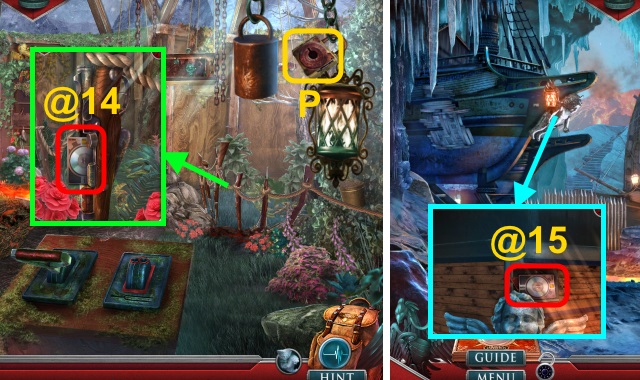
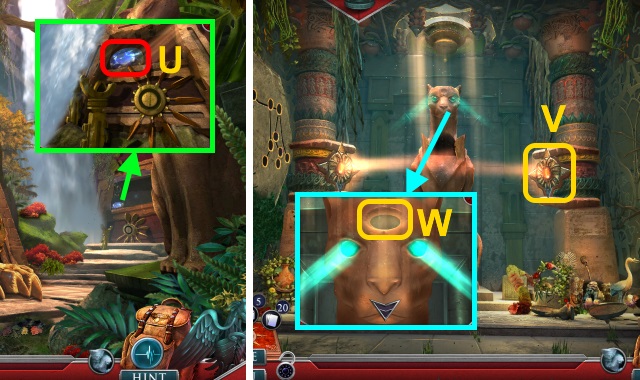
- Read note; take STAINED CAMERA. Place BRONZE LAMP (U).
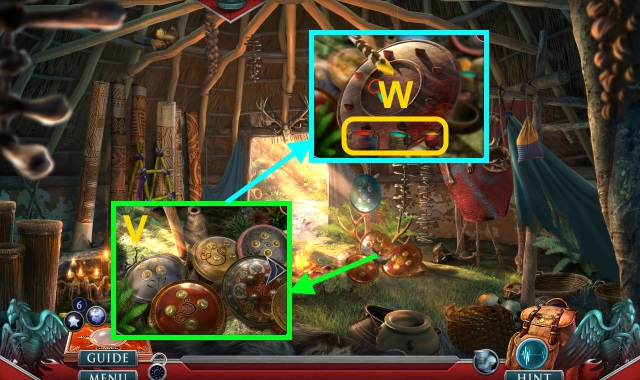
- Take SANDAL STRAP (V).
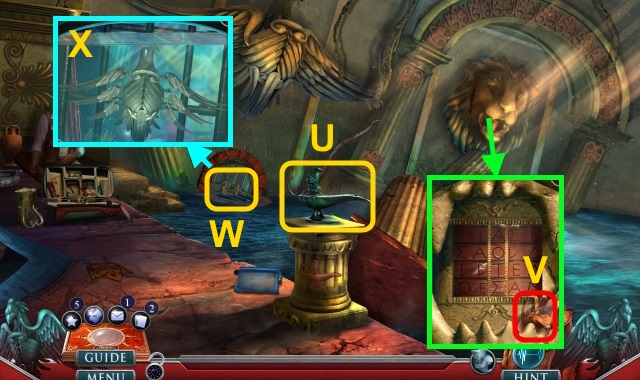
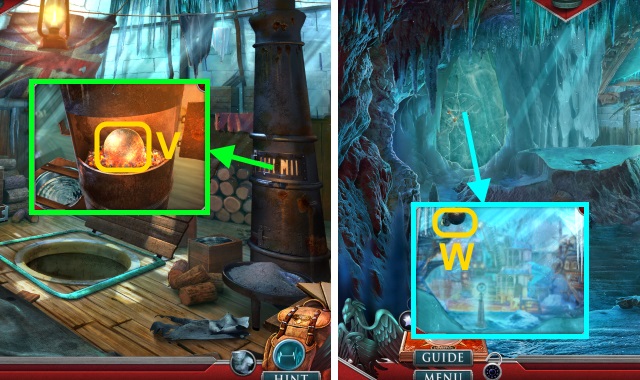
- SCUBA TANK and SANDAL STRAP on DIVING MASK; take SCUBA GEAR.
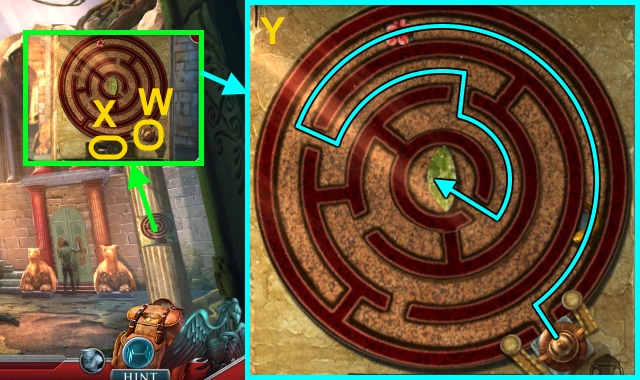
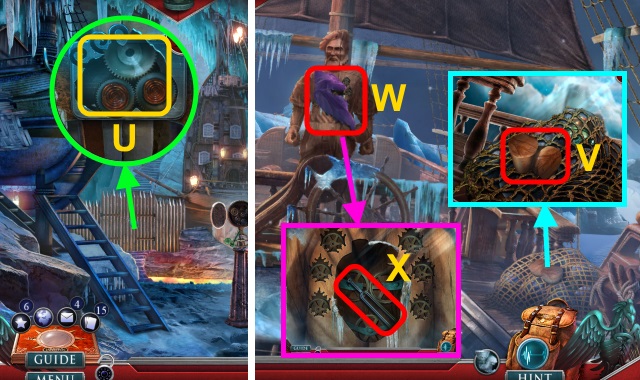
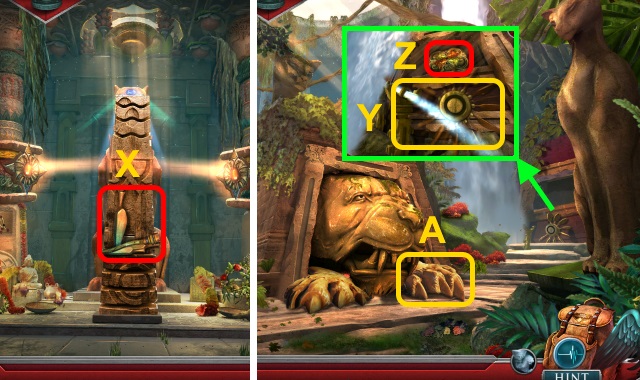
- Use SCUBA GEAR (W); examine each feather (X).
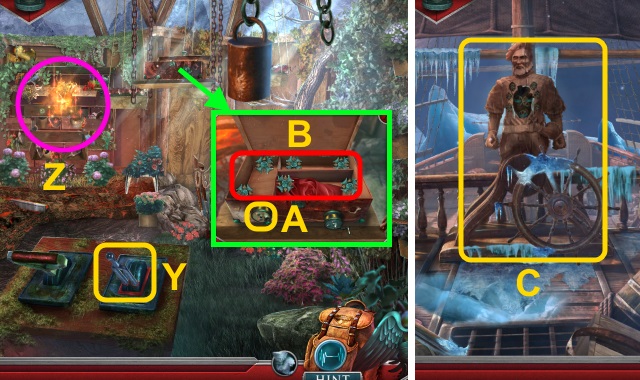
- Open; take GREEK BATH SCRAPER (Y).
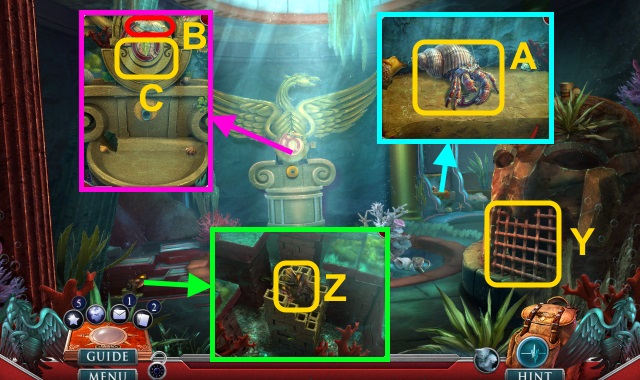
- Use GREEK BATH SCRAPER (Z); take LION EMBLEM (1/2) and MUSSELS.
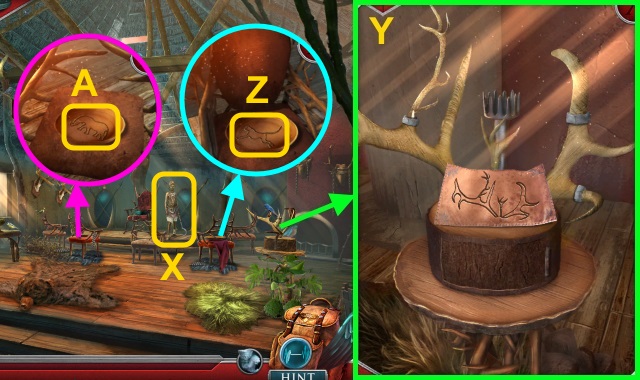
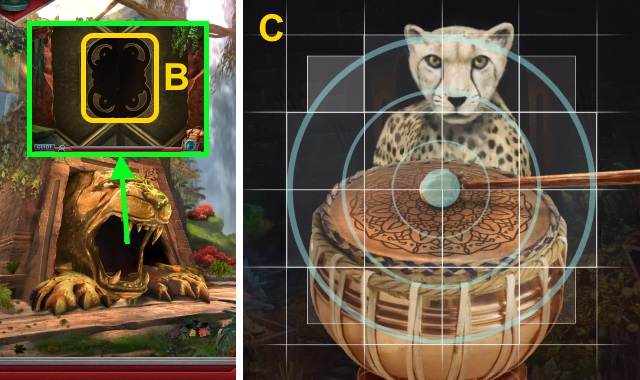
- Give MUSSELS (A); take MAZE FRAGMENTS (3/3).
- Take MITHRIDATES VI STATUETTE (B). Place MAZE FRAGMENTS (3/3) (C); receive MAZE PLATE. Press; take PHANACE'S SHIELD and SEA SPONGE.
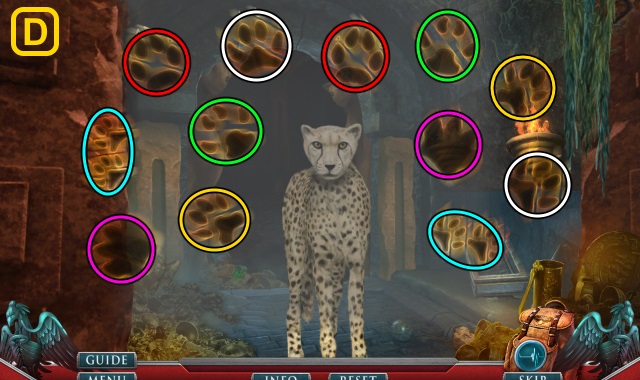
- SEA SPONGE on STAINED CAMERA. Press power button; scroll right 5x. Take PHOTO REFERENCE.
- Walk down.
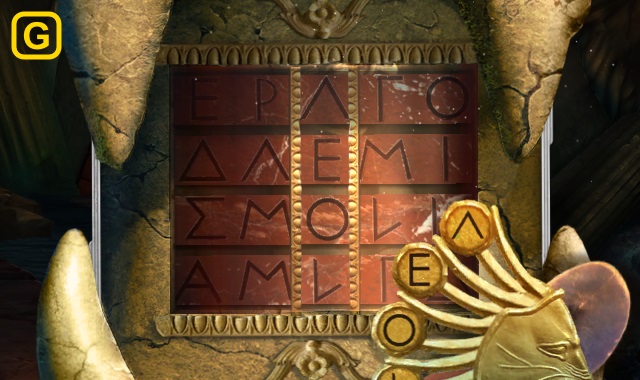
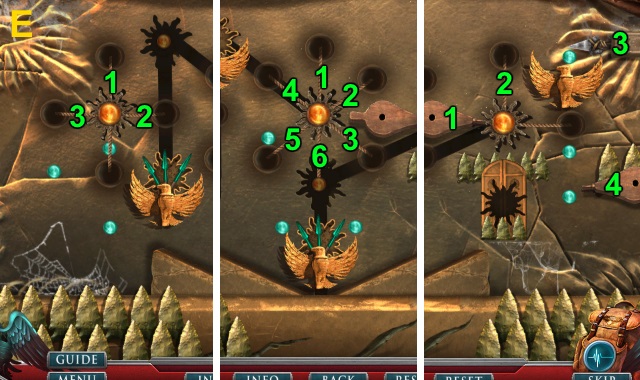
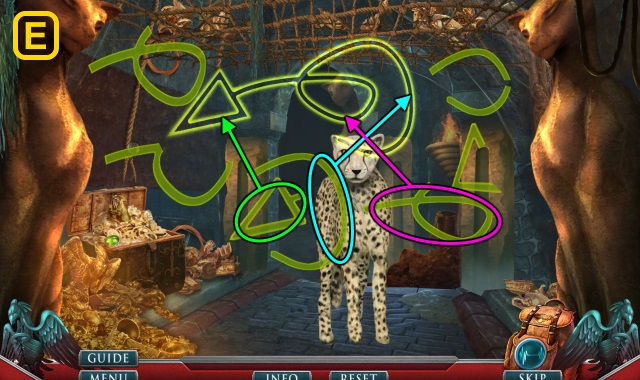
- Use PHOTO REFERENCE (D); press (1-3).
- Take LION EMBLEM (2/2) (E).
- Place LION EMBLEM (2/2) (F).
- Solution (G).
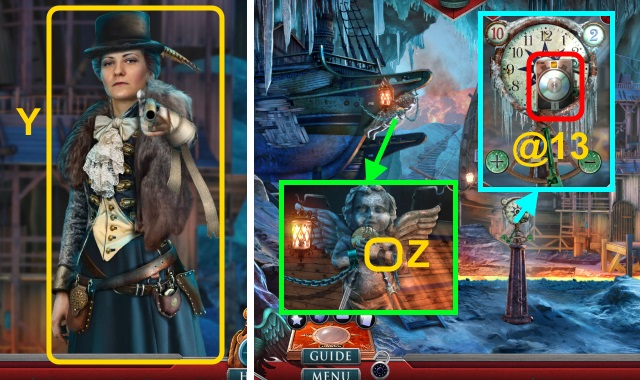
- Take PONTIC EAGLE.
- Walk down, then left.
- Place PONTIC EAGLE; pull each lever (H).
- Place PHARNACE'S SHIELD (I); examine.
- Solution (J).
- Walk forward.
- Take Fact Card (@3); open.
- Place TRAPEZA TABLE (K).
- Open; take LAODICE STATUETTE (L).
- Place MAZE PLATE (M); take CLEPSYDRA RINGS (1/3) (N).
- Go left.
- Examine; play HOP (O). Receive ARCHEOLOGISTS' LOGS.
- Take CLEPSYDRA RINGS (2/3) (P).
- Place MITHRIDATES VI STATUETTE and LAODICE STATUETTE (Q); take EMERALD AMULET (R).
- Scroll right; take DISCUS (S).
- Take HORSE HEAD (T).
- Walk down.
- Give ARCHEOLOGISTS' LOGS (U); receive EMPTY SYRINGE.
- Use EMPTY SYRINGE (V); receive TOXIC SYRINGE.
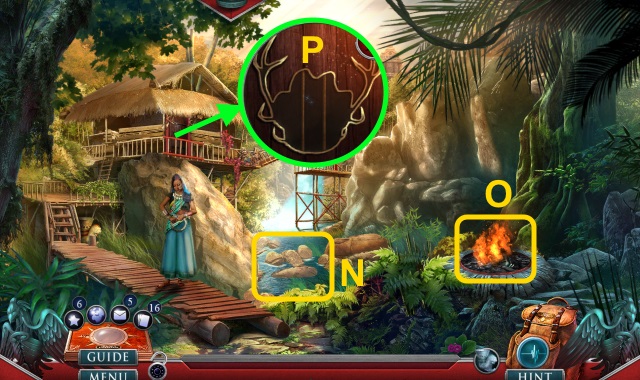
- Take Fact Card (@4) and MINIATURE AMPHORA.
- Place MINIATURE AMPHORA (W); pull lever (X).
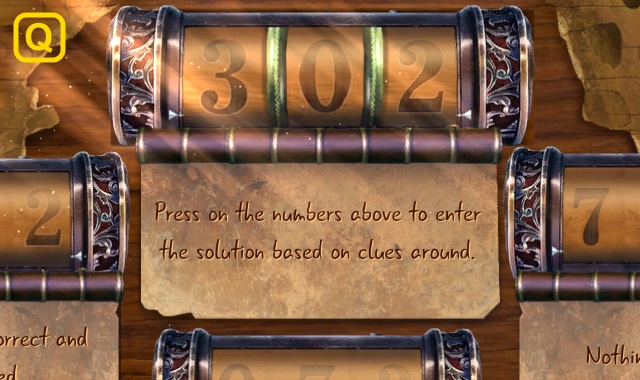
- Solution (Y).
- Take AMETHYST AMULET.
- Place AMETHYST AMULET and EMERALD AMULET (Z); take CADUCEUS (A).
- Walk left.
- Place CADUCEUS (B); open. Take ARCHIMEDES SCREW.
- Place ARCHIMEDES SCREW; use TOXIC SYRINGE (C). Pull levers (D).
- Solution (E).
- Walk down, then forward.
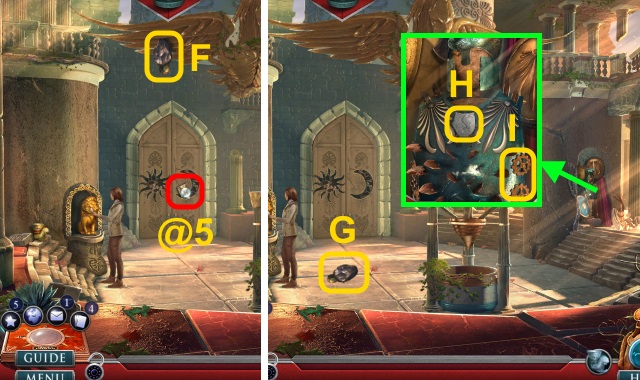
- Take Fact Card (@5).
- Use DISCUS (F).
- Examine (G); take ANCIENT PULLEY and MAGNETIC LODESTONE.
- Examine (H); place ANCIENT CHAIN (I). Take SILVER RING.
- Walk down, then left.
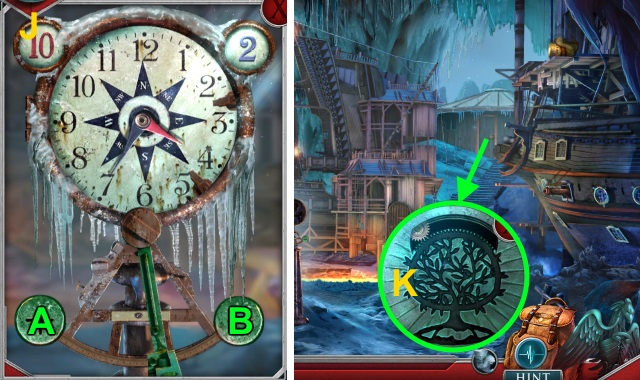
- Use SILVER RING (J); open. Take PONTIC SUN.
- Use MAGNETIC LODESTONE (K); receive CLEPSYDRA RINGS (3/3).
- Walk down, then right.
- Place CLEPSYDRA RINGS (3/3) (L); take CRESCENT MOON (M).
- Place PONTIC SUN and CRESCENT MOON (N).
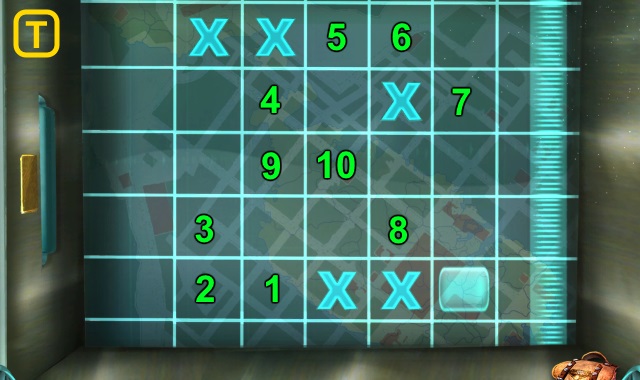
- Play HOP; receive RECIPE TABLET (O).
- HOP solution (P).
- Use RECIPE TABLET on scene. Select 'Send for translation'; examine scene.
Chapter 2: Prague
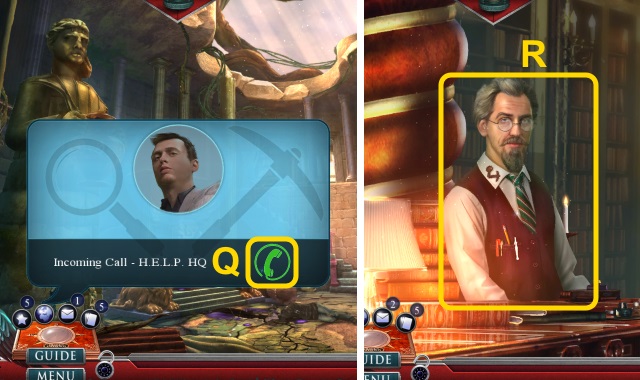
- Answer phone (Q).
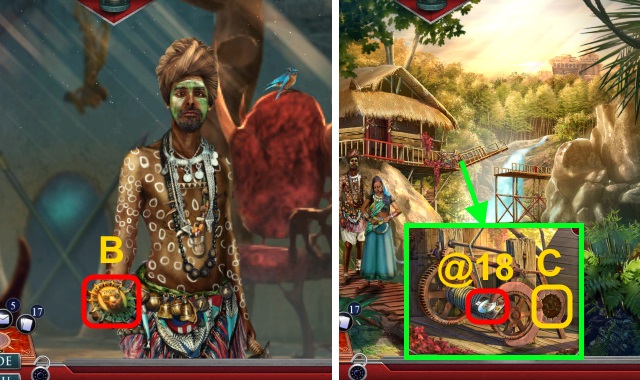
- Give RECIPE TABLET (R); take MITHRIDATES COIN (1/3).
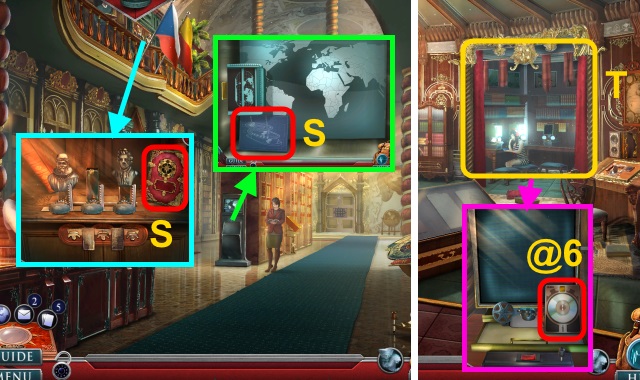
- Take SHIP BLUEPRINT and ENCYCLOPEDIA OF EXPLORERS (S).
- Walk left.
- Open (T).
- Take Fact Card (@6) and PLAQUE.
- Take MITHRIDATES COIN (2/3) (U).
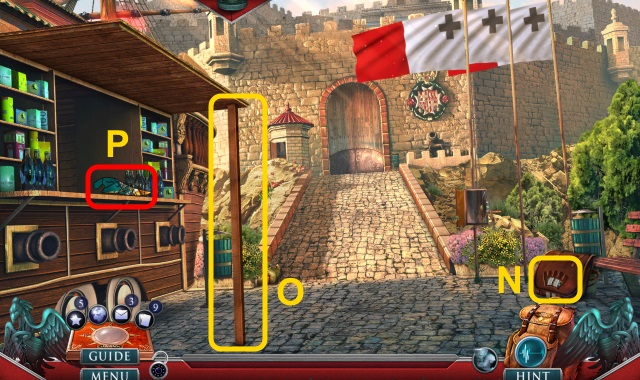
- Use SHIP BLUEPRINT (V). Play HOP; receive COMPASS ROSE.
- Answer phone.
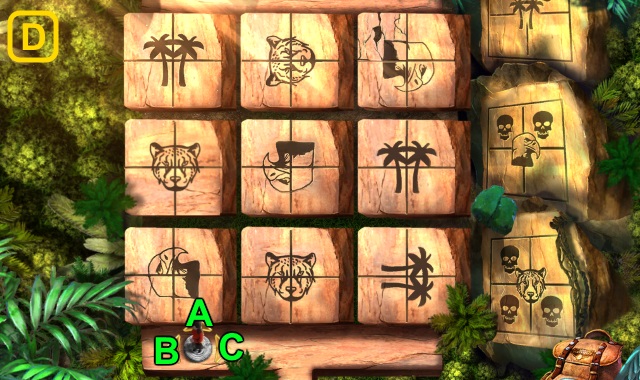
- PLAQUE and COMPASS ROSE on ENCYCLOPEDIA OF EXPLORERS. Solution (1-4).
- Read; take CLOCK HAND.
- Walk down.
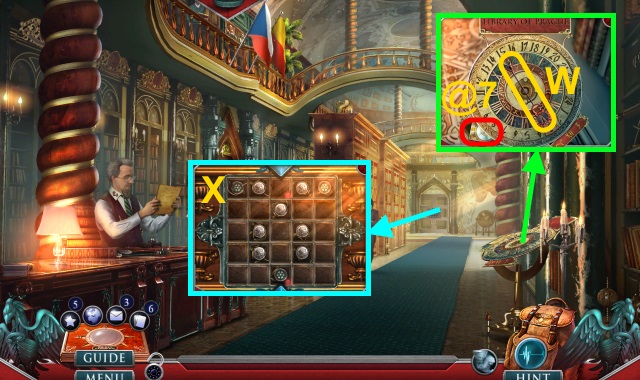
- Place CLOCK HAND; examine 3x (W). Take Fact Card (@7) and MITHRIDATES COIN (3/3).
- Place MITHRIDATES COIN (3/3) (X).
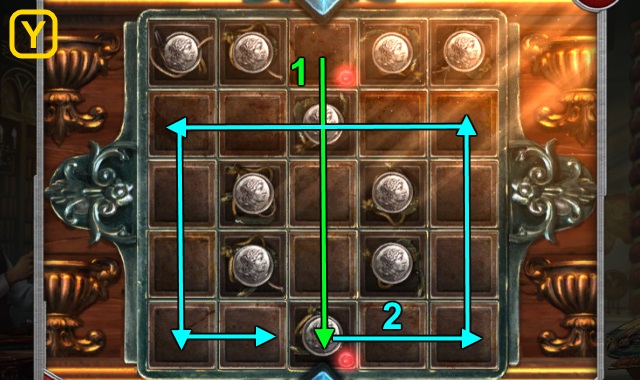
- Solution (Y).
- Walk forward.
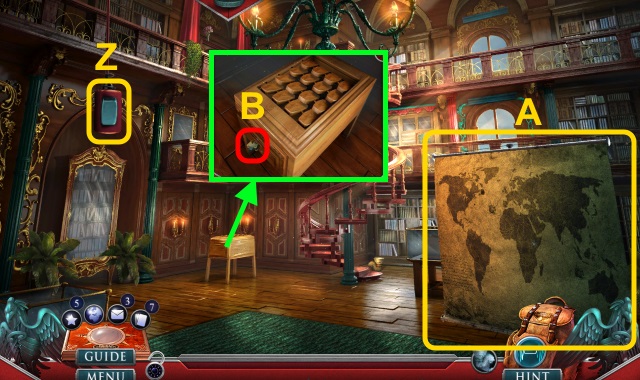
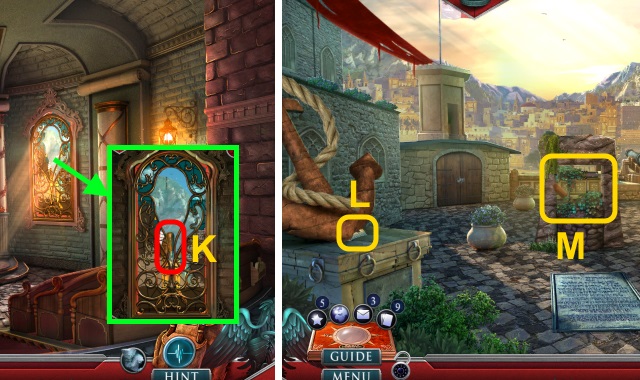
- Examine (Z).
- Examine (A); take EARTH INLAY.
- Take AUDIO SET (B).
- Scroll left; open. Place HORSE HEAD (C); take SPEAR SOLDIER (D).
- Take MICROFILM (E).
- Walk down, then left.
- Place EARTH INLAY (F). Play HOP; receive GLOBE KNOB (G).
- Place MICROFILM (H). Use SPEAR SOLDIER (I); press button. Take COORDINATES PART (1/3).
- Place AUDIO SET (J); select (K). Take Fact Card (@8) and AUDIO CABLE.
- Walk down, then forward.
- Use GLOBE KNOB (L); open.
- Place AUDIO CABLE (M); press button (N). Turn 2x; take note, FIBULA CLIP, and COORDINATES PART (2/3) (O).
- Press buttons (1-4).
- Take METAL BOOKMARK and GREEK DICTIONARY.
- Walk down.
- Give GREEK DICTIONARY (P); take MARCO POLO.
- Place MARCO POLO; examine each statue (Q). Take note, MALTESE CASTLE EMBLEM, and COORDINATES PART (3/3) (R).
- Place COORDINATES PART (3/3) (S).
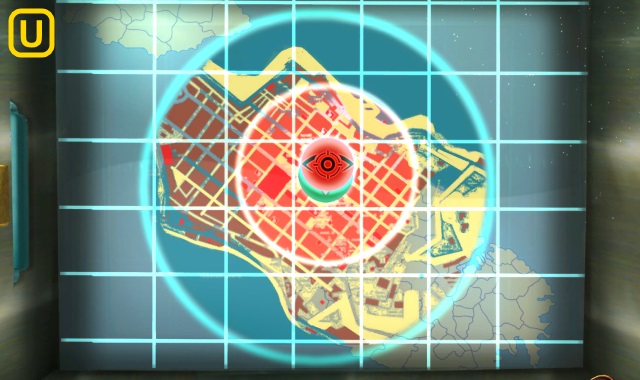
- Solution (T).
- Solution (U): stop icon inside red circle.
- Examine map.
- Take HANDLE (V).
- Place MALTESE CASTLE EMBLEM (W); take SILVER BARREL. Place ANCIENT PULLEY; turn handle 2x (X). Take COUNTERWEIGHT (1/2).
- Talk (Y).
- Select (Z).
- Use METAL BOOKMARK (A); take COUNTERWEIGHT (2/2). Place COUNTERWEIGHT (2/2) (B); examine. Pull lever (C).
- Walk forward.
- Place SILVER BARREL (D).
- Play HOP; receive ROPE (E).
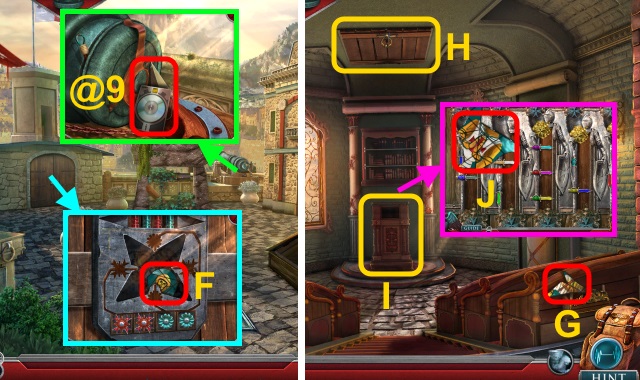
- Take Fact Card (@9) and KNIGHT'S BANNER. Place HANDLE; turn. Take WOODEN HOOK.
- WOODEN HOOK and FIBULA CLIP on ROPE; take ROPE HOOK.
- Take STAINED GLASS (1/4) (F).
- Walk right.
- Take STAINED GLASS (2/4) (G).
- Use ROPE HOOK (H); examine. Receive HERBICIDE.
- Open (I); take STAINED GLASS (3/4) (J).
- Take GLAZIER'S TOOL (K).
- Walk down.
- Use GLAZIER'S TOOL (L); receive CROWN SHAPE.
- Use HERBICIDE (M); take LONG BEAM.
- Walk down.
- Place CROWN SHAPE (N); take COAT OF ARMS (1/2).
- Use LONG BEAM (O); take STAINED GLASS (4/4) (P).
- Walk forward, then right.
- Place STAINED GLASS (4/4) (Q).
- Open; take WRENCH and COAT OF ARMS (2/2) (R).
- Place COAT OF ARMS (2/2) (S).
- Solution (T).
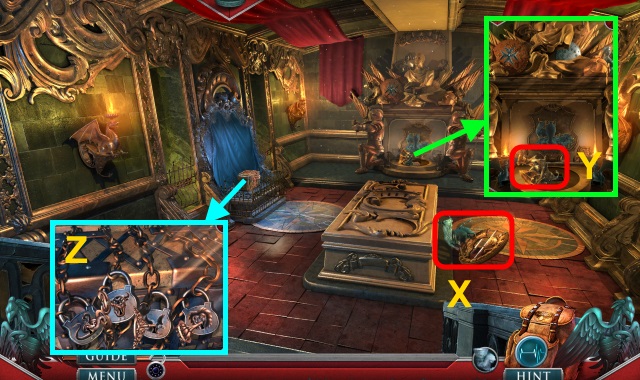
- Take note, METAL SHARD, and MALTESE SHIELD.
- Walk down.
- Place MALTESE SHIELD; examine each flower (U).
- Walk left.
- Use METAL SHARD. Read note; take SHIPSEY CREST (V).
- Take Fact Card (@10); place KNIGHT'S BANNER.
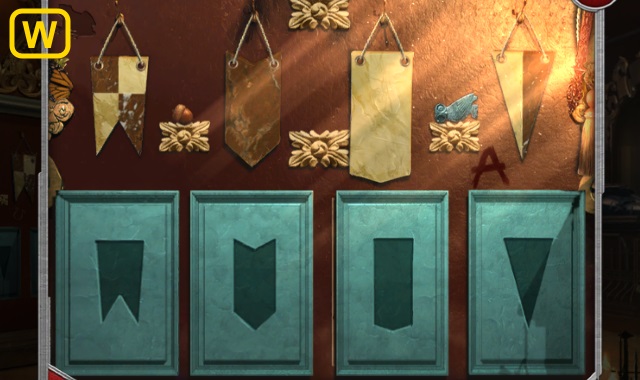
- Solution (W).
- Play HOP; receive KEYS.
- Walk forward.
- Take AUROCHS STATUETTE (X).
- Take DRAGON LAMP (Y).
- Use KEYS (Z); take note and SYMBOLS SKETCH.
- Walk down.
- Place DRAGON LAMP (A); examine each lamp (1-3).
- Examine (B).
- Solution (C).
- Take GRAND MASTER'S MEDAL.
- Examine (D).
- Place SYMBOLS SKETCH; solution (E).
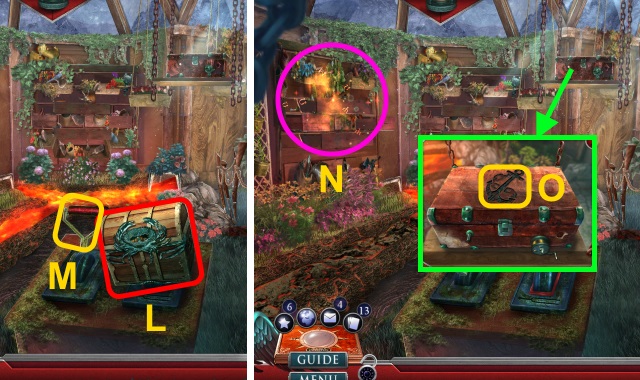
- Take EAGLE BEAK SHEARS and MARBLE URN.
- AUROCHS STATUETTE and GRAND MASTER'S MEDAL on MARBLE URN; Take DECORATIVE URN.
- Walk forward.
- Place DECORATIVE URN (F).
- Play HOP; receive HORN OF AUROCHS (G).
- Answer phone.
Chapter 3: The South Sandwich Islands
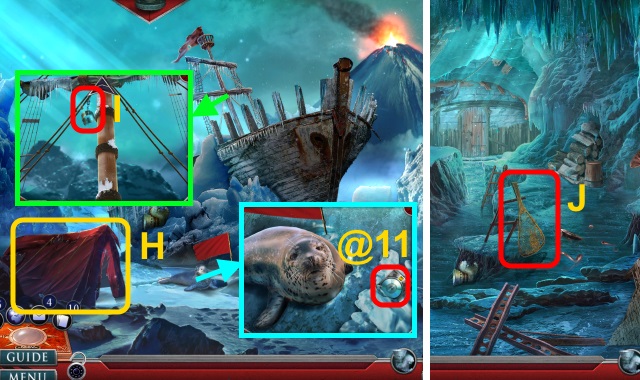
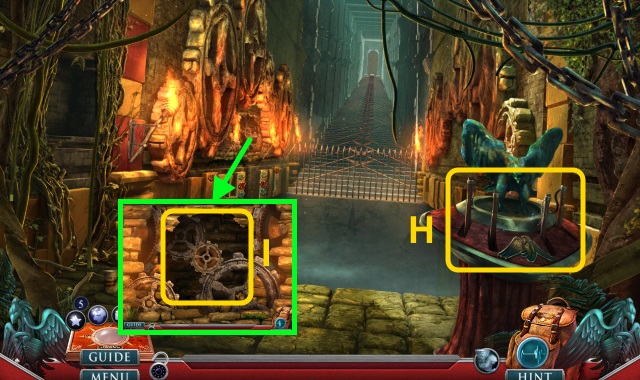
- Use EAGLE BEAK SHEARS (H); receive TENT CANVAS.
- Scroll down; take SHACKLE (I).
- Take Fact Card (@11) and NAUTICAL TOKENS (1/3).
- Walk right.
- Take SCOOP (J).
- Use WRENCH (K); take the NAUTICAL TOKENS (2/3).
- Examine 3x; take NAUTICAL TOKENS (3/3) (L).
- Place NAUTICAL TOKENS (3/3) (M).
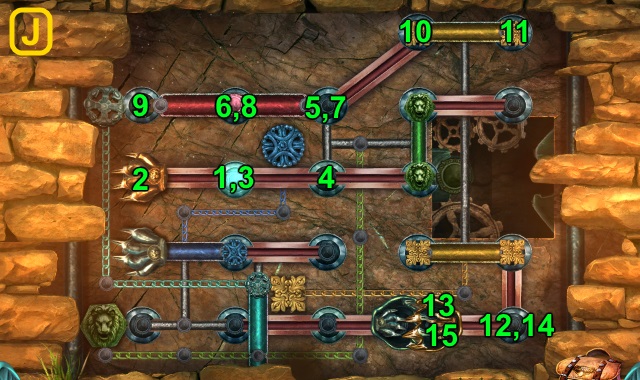
- Solution (N).
- Walk forward.
- Take CLOCK HANDS (1/2); place SHIPSEY CREST (O). Turn 3x. Take LADDER RUNG (P).
- Examine TENT CANVAS 2x; place LADDER RUNG. Take IMPROVISED ROPE HOOK.
- Take FISH (Q).
- Walk down twice.
- Scroll up. Use IMPROVISED ROPE HOOK (R); take SPYGLASS LENS.
- Give FISH (S); use SCOOP. Receive LEATHER GLOVE.
- Walk right, then forward.
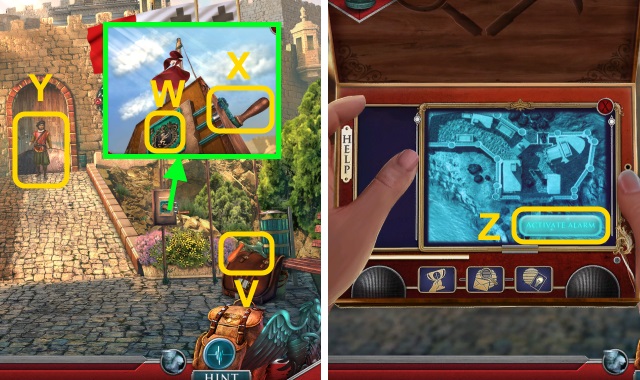
- Take Fact Card (@12); use SPYGLASS LENS. Enter code (T).
- Play HOP; receive FANG (U).
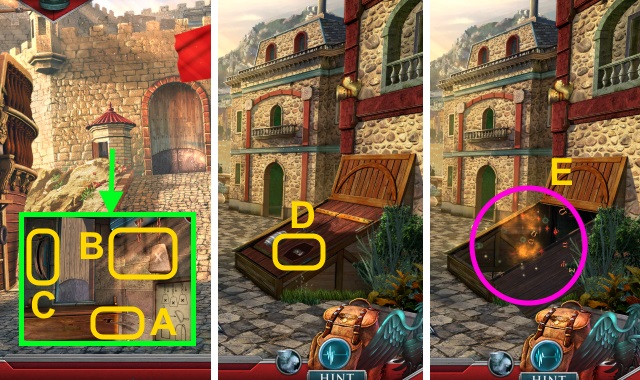
- Open. Use LEATHER GLOVE (V); receive SMALL CANNONBALL.
- Walk down.
- Use SMALL CANNONBALL and FANG (W).

- Solution (X).
- Walk left, then forward.
- Give SHIPSEY CREST (Y).
- Use SHACKLE (Z); receive MURAL PIECE.
- Take Fact Card (@13) and ANCHOR INSERT.
- Walk forward.
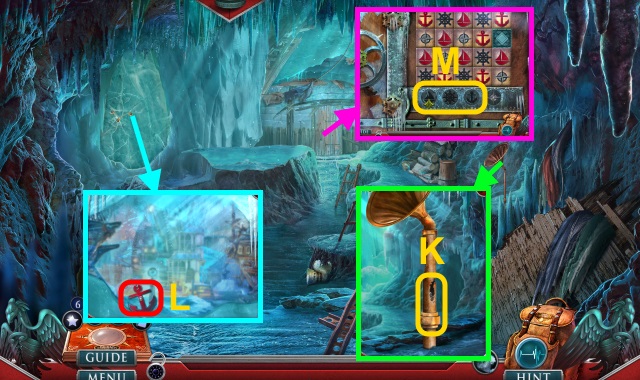
- Turn handle (A).
- Take GUN BOLT (B).
- Take HEMP ROPE (C).
- Read; take PLANT EMBLEM (D).
- Place MURAL PIECE (E); turn. Take MURAL PIECE (F).
- Scroll right. Place MURAL PIECE (G); turn. Take note and CLOCK HANDS (2/2) (H).
- Walk down.
- Place CLOCK HANDS (2/2) (I).
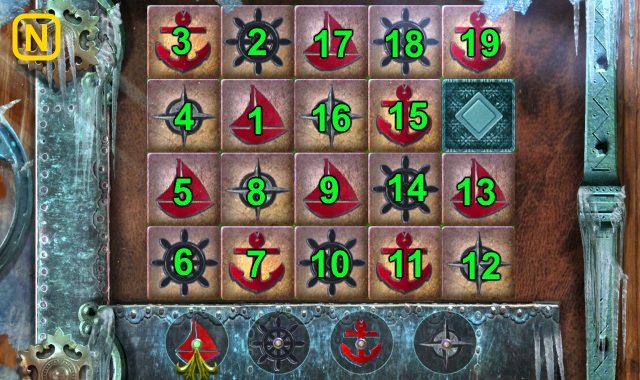
- Solution (J): Ax6-Bx5.
- Take VICE PART.
- Place PLANT EMBLEM (K).
- Walk right.
- Take CHEST (L); pull lever (M).
- Play HOP; receive HEALING PLANTS (N).
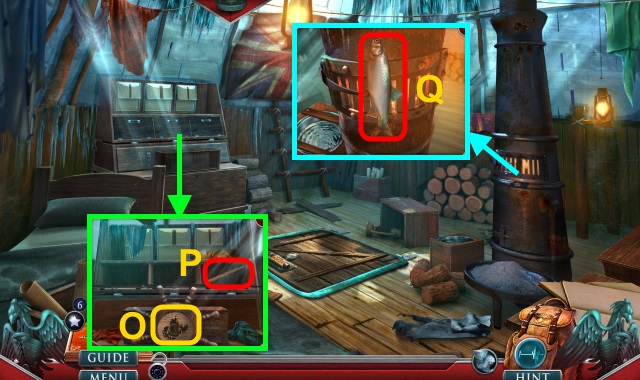
- Place ANCHOR INSERT (O); open. Take CUTLASS SCABBARD.
- Take Fact Card (@14). Place GUN BOLT; examine. Receive BULLET.
- Use BULLET (P); examine. Receive LANTERN.
- Walk down.
- Place LANTERN; examine. Place CUTLASS SCABBARD; take Fact Card (@15), VICE CLAMP, and BANDAGES.
- VICE PART on VICE CLAMP.
- Walk forward.
- Examine (Q). Place VICE CLAMP; examine pick (R). Use pick (S); take note, BAYONET, and ALCOHOL.
- Place BANDAGES, HEALING PLANTS, and ALCOHOL; solution is random (T).
- Receive VOLCANO KEY.
- Walk down.
- Place VOLCANO KEY (U).
- Walk left.
- Use HEMP ROPE on scene.
- Take CORKS (V); use BAYONET. Take FISHING REEL.
- Take TORN CLOTHES (W).
- Take TUNING FORK (X).
- Walk down, then right.
- Place TUNING FORK; pull (Y).
- Play HOP; receive CRAB (Z).
- CRAB on CHEST; examine. Take CAPTAIN'S HEART.
- Place FISHING REEL (A); examine. Take CAPTAIN'S MEDALS (1/6)-(6/6) (B).
- Walk down, then left.
- Examine (C).
- Take BOARDING AXE (D); use BOARDING AXE 3x.
- Take OARLOCK (E); use OARLOCK.
- Place CAPTAIN'S HEART and CAPTAIN'S MEDALS (6/6) (F).

- Solution (G-H).
- Take BITTER MELON.
- Answer phone.
Chapter 4: India
- Take TORN CLOTHES and CORKS (I).
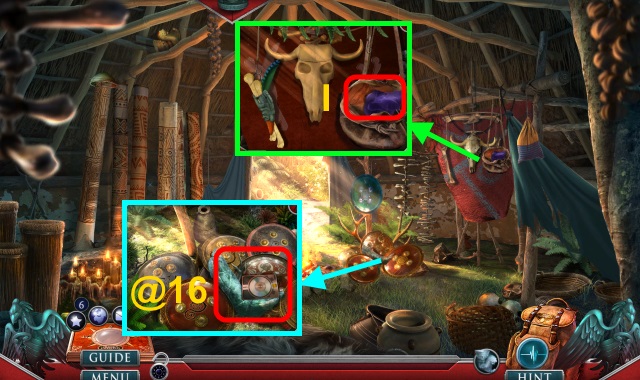
- Take Fact Card (@16), SCULPTURE PIECES (1/3), and HUNTER'S EMBLEM (1/3).
- Walk forward.
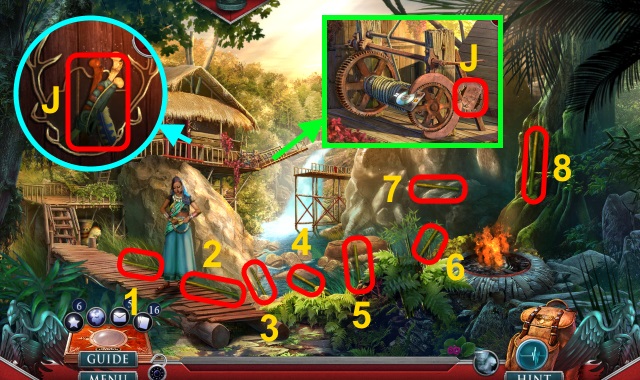
- Take BAMBOO STICKS (1/8)-(8/8) (1-8).
- BAMBOO STICKS (8/8) on TORN CLOTHES; take LADDER.
- Take LEATHER DRAWING and BONE CHARM (J).
- Walk down.
- Place LADDER (K).
- Take CLAY BOWL (L).
- Place BONE CHARM; arrange. Take HUNTER'S EMBLEM (2/3) (M).
- Walk forward.
- Use CLAY BOWL (N); receive WATER.
- Pour WATER (O); take HUNTER'S EMBLEM (3/3).
- Place HUNTER'S EMBLEM (3/3) (P).
- Walk left.
- Solution (Q).
- Take TRIBAL PAINT.
- Take BELLOWS (R).
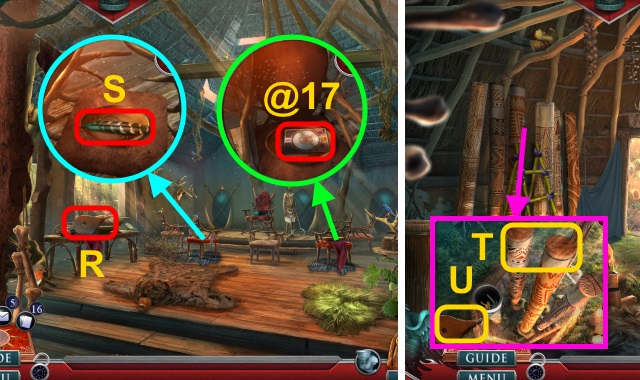
- Take Fact Card (@17).
- Take FEATHER (S).
- Walk down twice.
- Place CORKS (T); replace BELLOWS (U). Receive GOLDEN CHEETAH and ANTLER.
- Use TRIBAL PAINT and FEATHER (V).
- Play HOP. Examine paints (W); receive TRIBAL SHIELD.
- Go forward, then left.
- Give TRIBAL SHIELD (X).
- Place LEATHER DRAWING and ANTLER; arrange (Y).
- Take STRING and SILVER ELEPHANT.
- Place GOLDEN CHEETAH (Z).
- Place SILVER ELEPHANT (A).
- Take TRIBAL EMBLEM (B).
- Walk down.
- Place TRIBAL EMBLEM (C); receive Fact Card (@18) and BAMBOO BRUSH. Examine.
- Walk forward.
- Solution (D): Cx3-Ax4-Bx3-A-B-Ax2.
- Take SCULPTURE PIECES (2/3)-(3/3) (E).
- Take DRUM (F). Place SCULPTURE PIECES (3/3); examine each part.
- Enter Sacrificial Chamber.
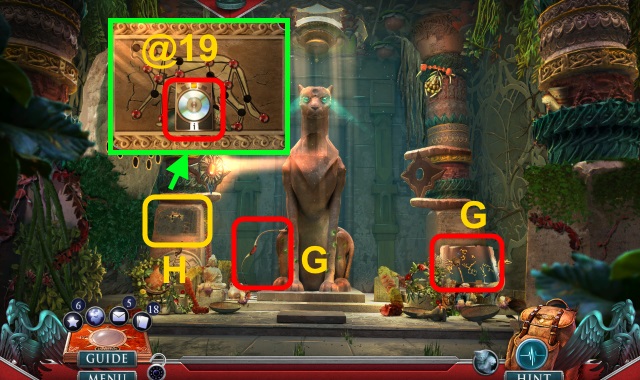
- Take BOW and CONSTELLATION MAP (G).
- Use BAMBOO BRUSH (H).
- Take Fact Card and BOAR TUSK (@19).
- Walk down.
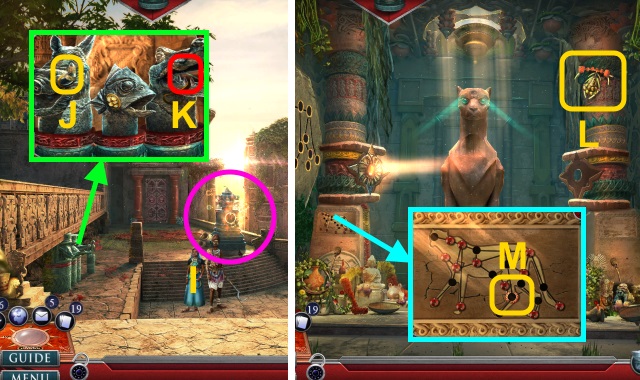
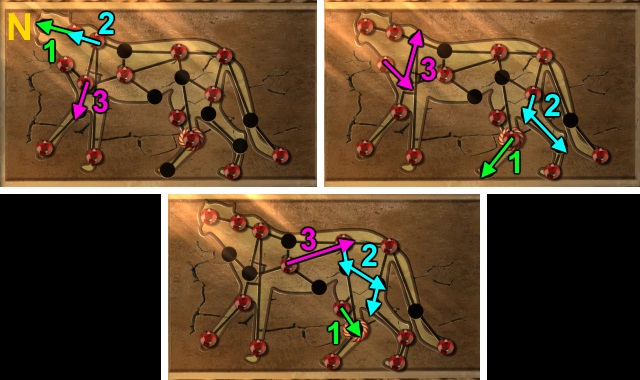
- Use CONSTELLATION MAP; play HOP (I). Receive RED DIAMOND.
- Place BOAR TUSK (J); examine boar. Examine fish; take QUIVER (K).
- STRING and QUIVER on BOW; take BOW AND ARROWS.
- Walk right.
- Use BOW AND ARROWS; shoot (L). Receive NECKLACE.
- Place RED DIAMOND (M).
- Solution (N).
- Scroll down. Take HALFPIPE (O); place NECKLACE. Take SLEEPING POWDER and TEMPLE INLAY (1/2).
- SLEEPING POWDER on BOW; take TRANQUILIZING ARROW.
- Walk down.
- Use TRANQUILIZING ARROW on scene. Solution (P): stop lines over man.
- Receive TEMPLE INLAY (2/2).
- Place TEMPLE INLAY (2/2) (Q).
- Move plants.
- SPEAR and Fact Card (@20).
- Use SPEAR (R).
- Play HOP; receive SUNSTONE (S).
- HOP solution (T).
- Take SAPPHIRE (U).
- Walk down, then right.
- Place SUNSTONE (V).
- Scroll up; place SAPPHIRE (W).
- Take CEREMONIAL TORCH and PLATES (X).
- Walk down, then forward.
- Place HALFPIPE and PLATES (Y); take CHEETAH EMBLEM (Z).
- Examine (A).
- Place CHEETAH EMBLEM (B).
- Go forward.
- Use DRUM on scene.
- Solution (C).
- Use CEREMONIAL TORCH on scene.
- Solution (D-E).
- Examine (F).
- Congratulations! You have completed Hidden Expedition: The Curse of Mithridates.
Created at: 2017-11-26