

Walkthrough Menu
- General Tips
- Chapter 1: Mausoleum
- Chapter 2: Emperor's Chamber
- Chapter 3: Artworks Research Center
- Chapter 4: Library
- Chapter 5: Garden
- Chapter 6: Tengger Desert
General Tips
- This is the official guide for Hidden Expedition: The Eternal Emperor.
- This guide will not tell you when you have to zoom into a location; the screenshots will show each zoom scene.
- Hidden-object puzzles are referred to as HOPs. This guide will not show screenshots of the HOPs, however, it will mention when an HOP is available and the inventory item you'll collect from it.
- Use the Map to fast travel to a location.
Chapter 1: Mausoleum
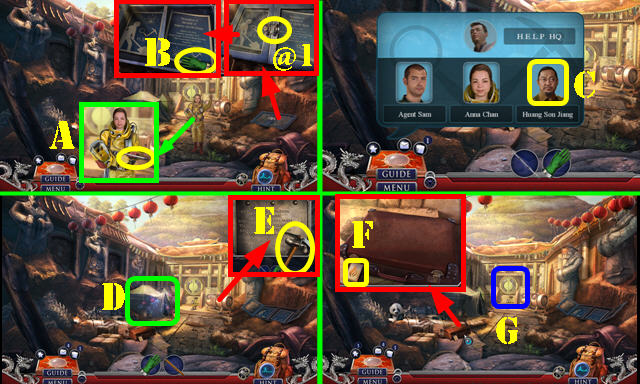
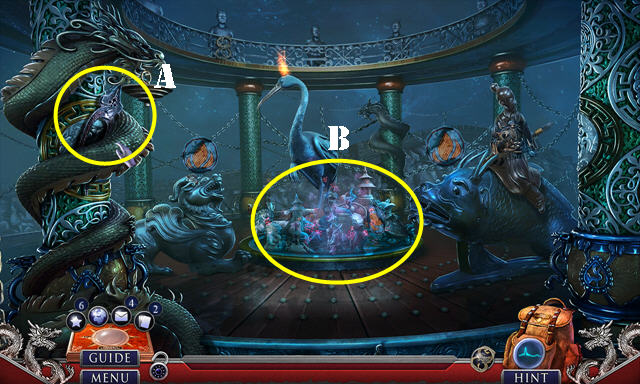
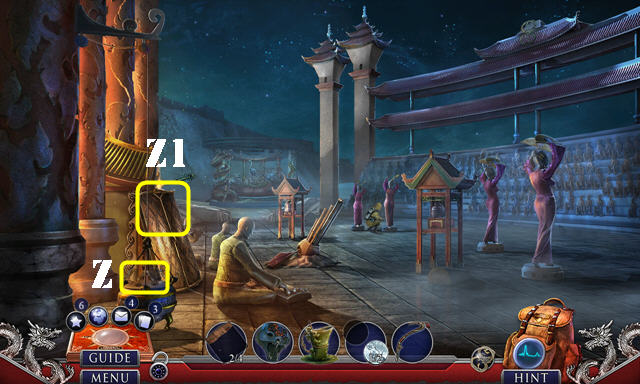
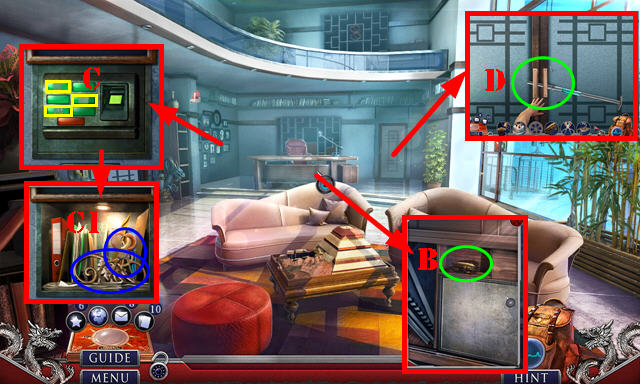
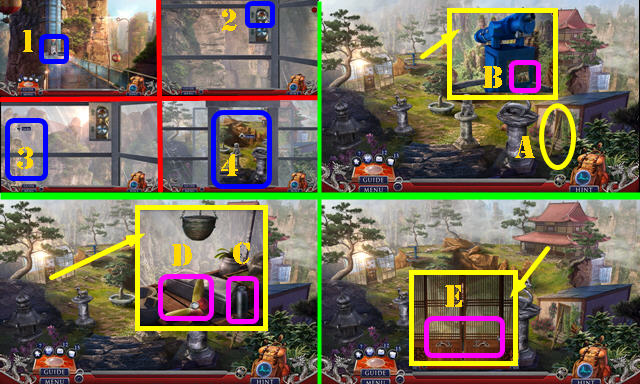
- Talk to Anna; take the TELESCOPIC POLE (A).
- Take the Fact Card (@1). Open the door; look at the note and take the RIGHT GLOVE (B).
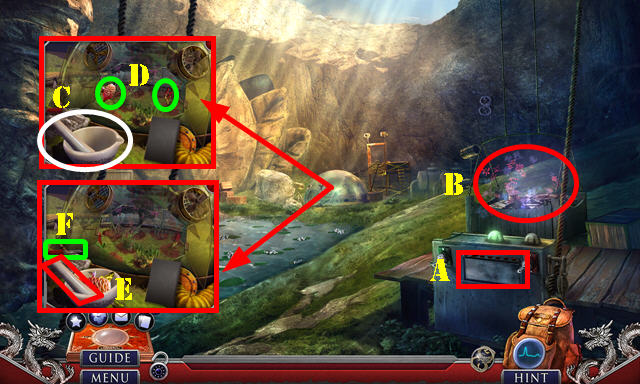
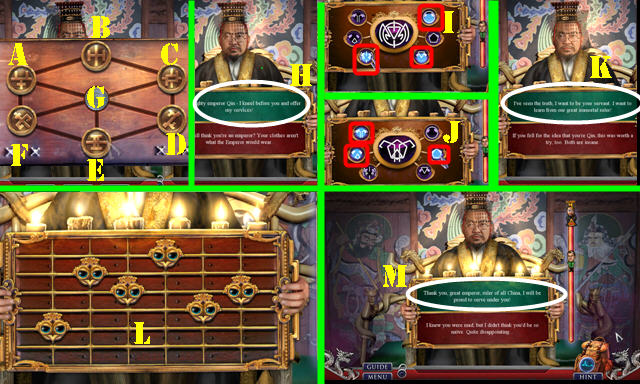
- Answer the phone on the screen. Choose Huang (C).
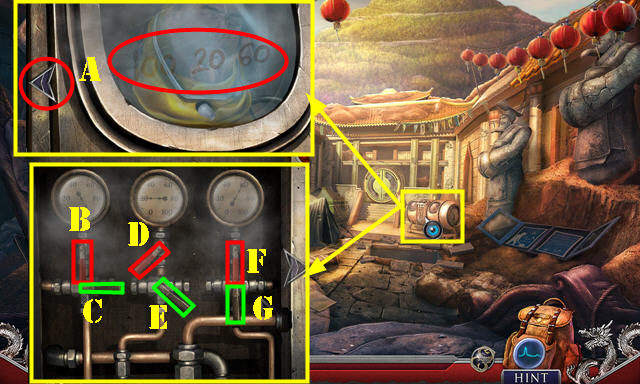
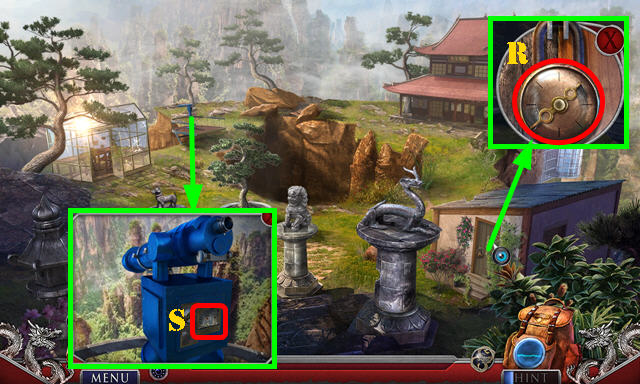
- Use the TELESCOPIC POLE (D); play the HOP to get the PRESSURE GAUGES.
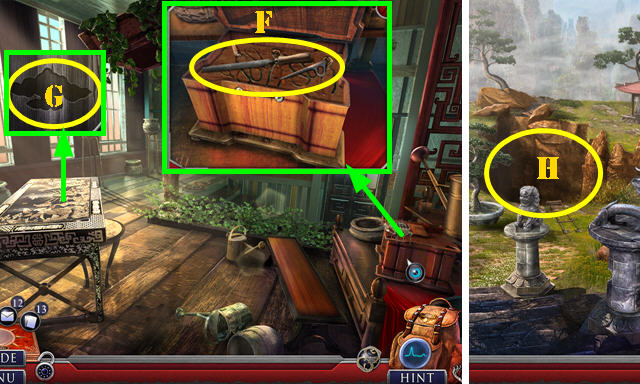
- Take the PICKAXE and pull the handle (E).
- Take the MATCHES (F).
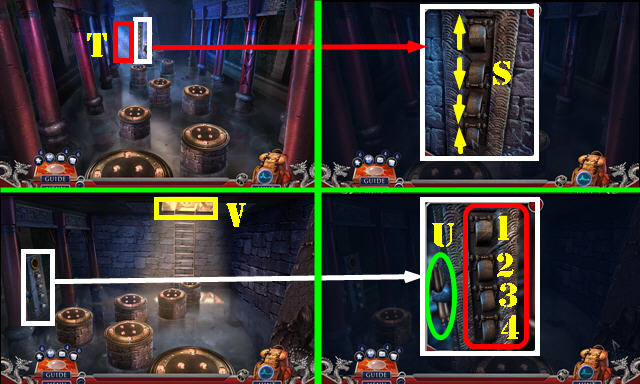
- Go to the Airlock (G).
- Take the CHAIN (H).
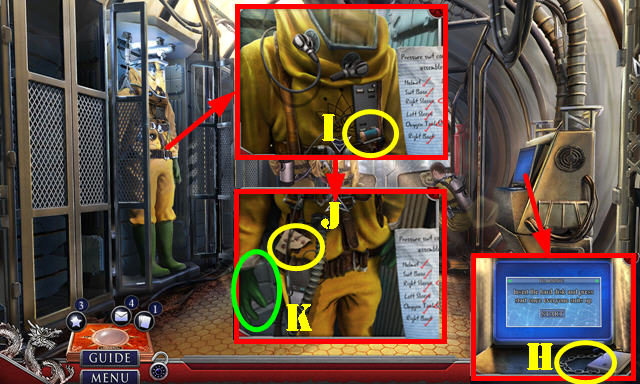
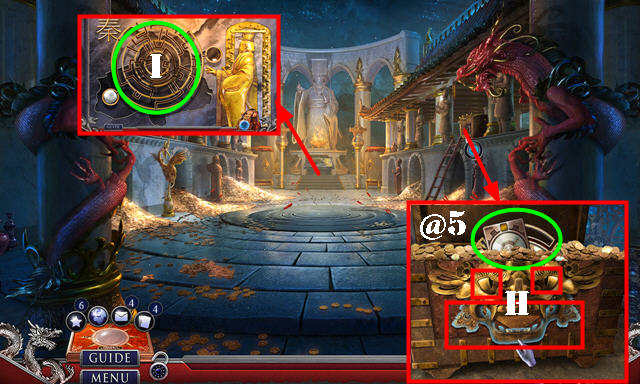
- Open the door; take the THREAD (I). Pan down and take the DRAWING (J). Place the RIGHT GLOVE (K).
- Walk down.
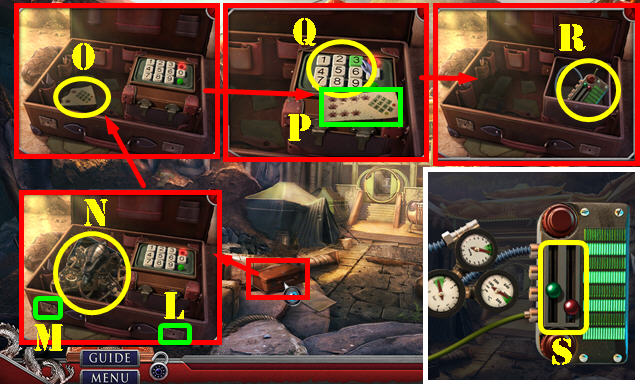
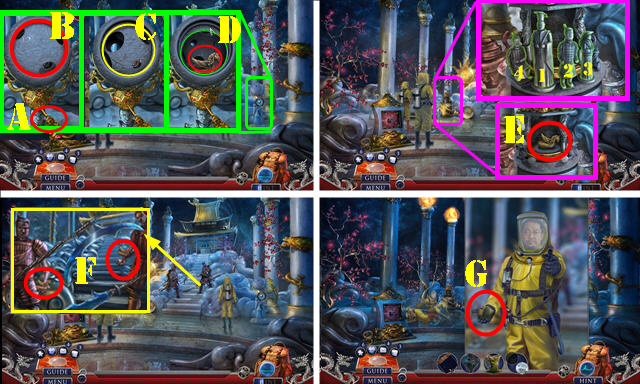
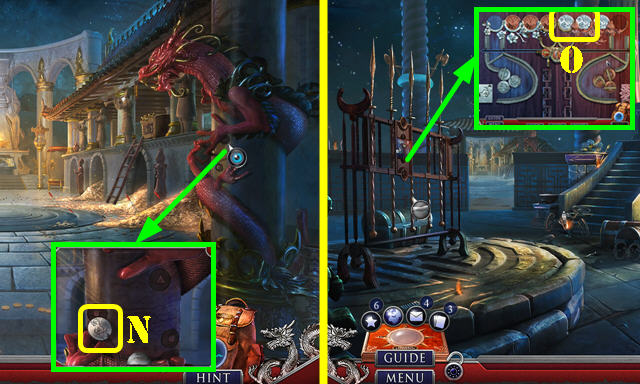
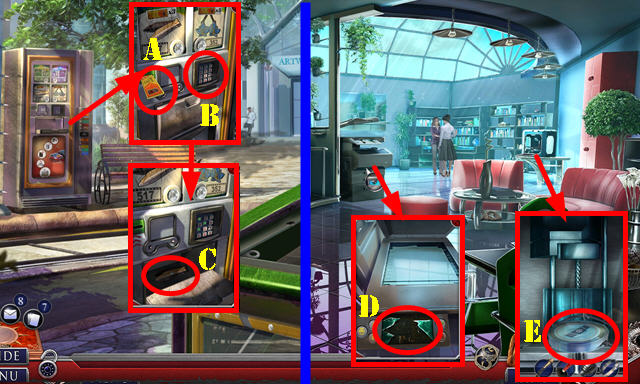
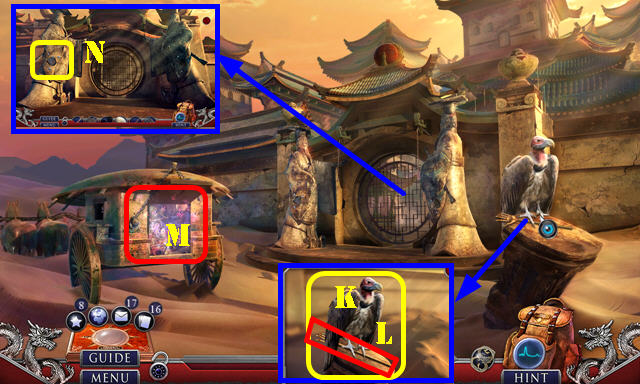
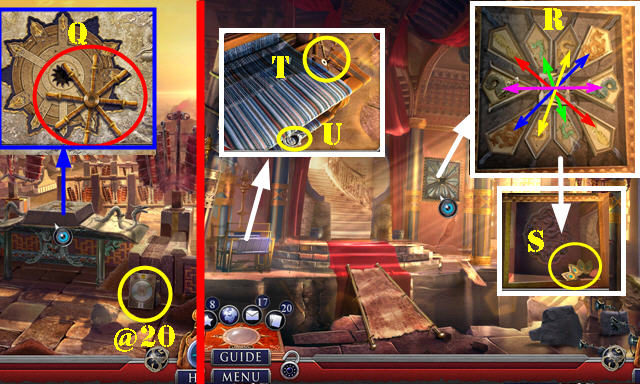
- Open the latch (L); use the PICKAXE (M). Open the briefcase and move the folder; take the MAPPING DRONE (N).
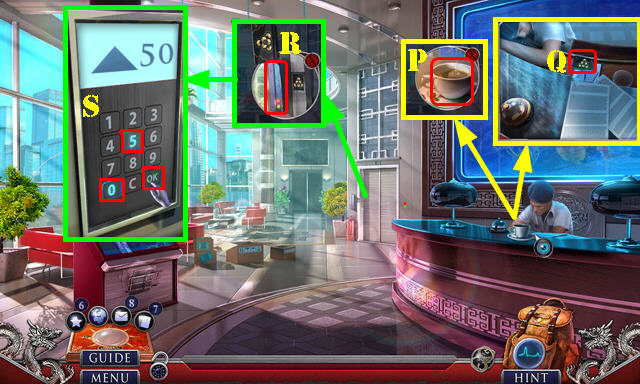
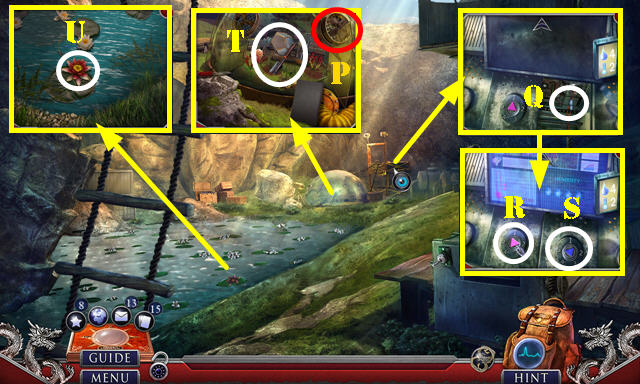
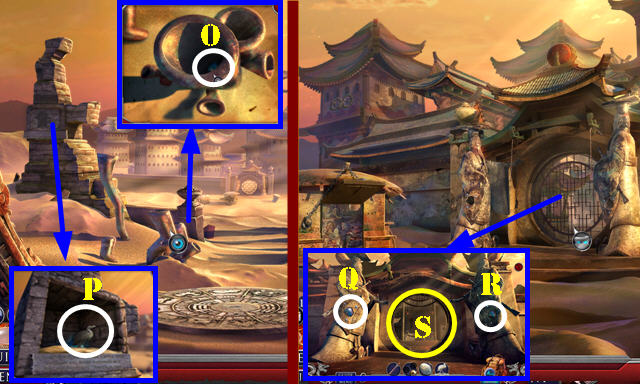
- Select the paper twice (O) and place the DRAWING (P). Enter 413 (Q). Take the OXYGEN REGULATOR (R).
- Place the PRESSURE GAUGES on the OXYGEN REGULATOR. Slide both buttons as shown (S).
- Go forward.
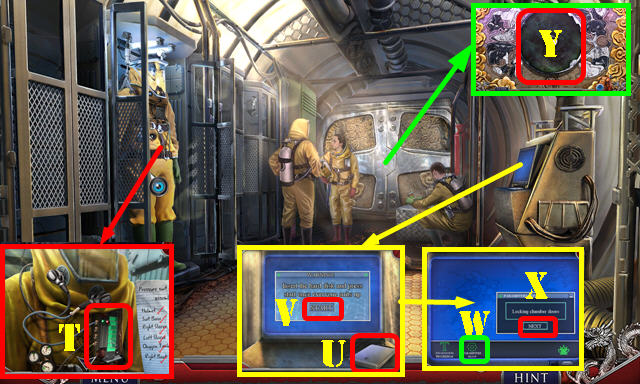
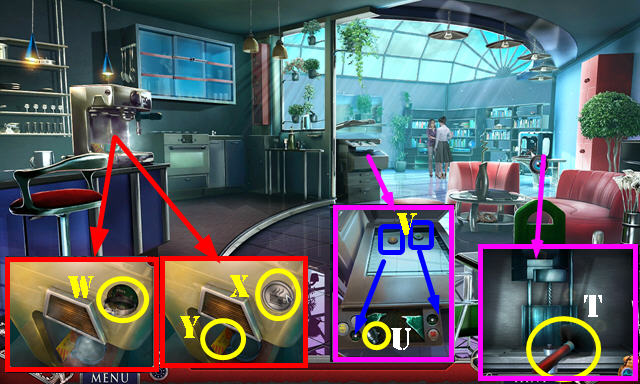
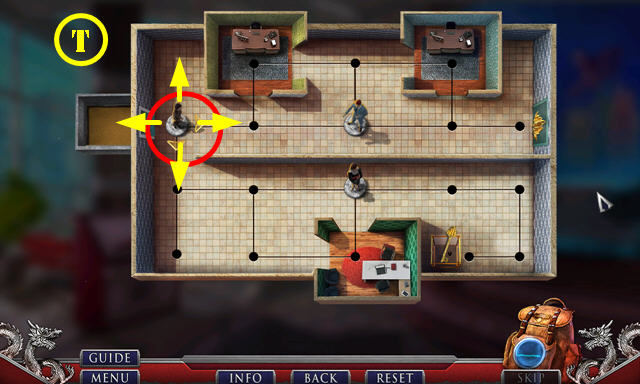
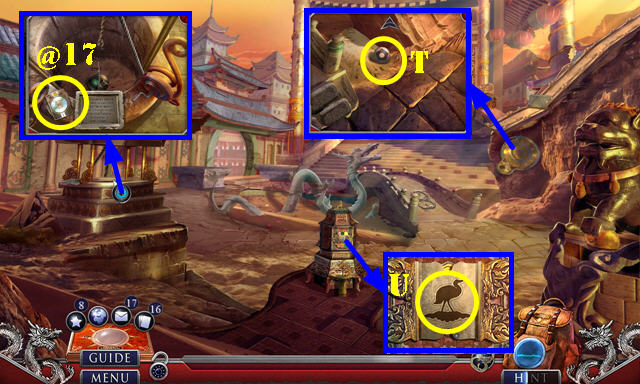
- Pan up. Place the OXYGEN REGULATOR (T).
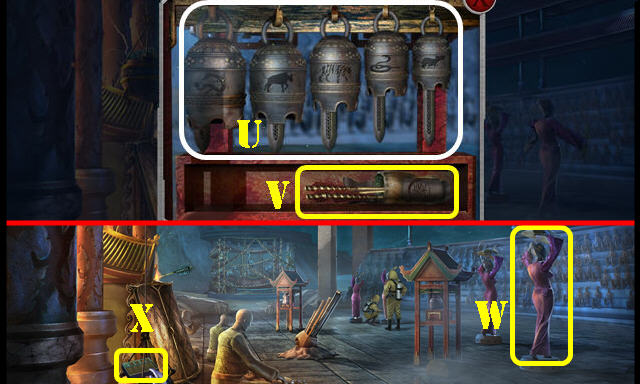
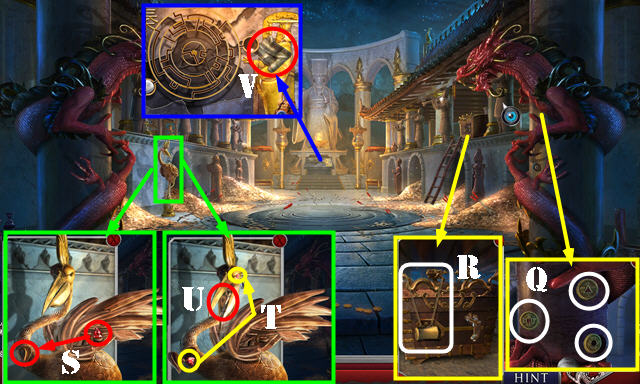
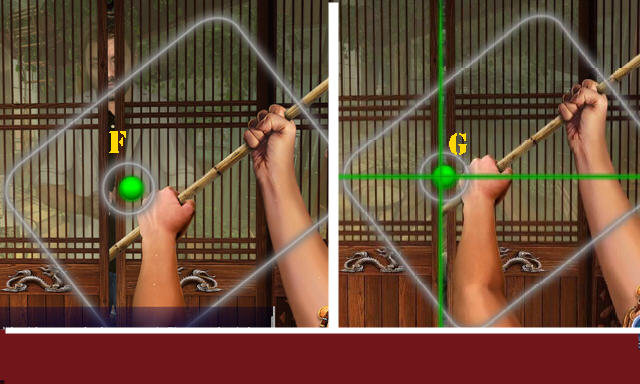
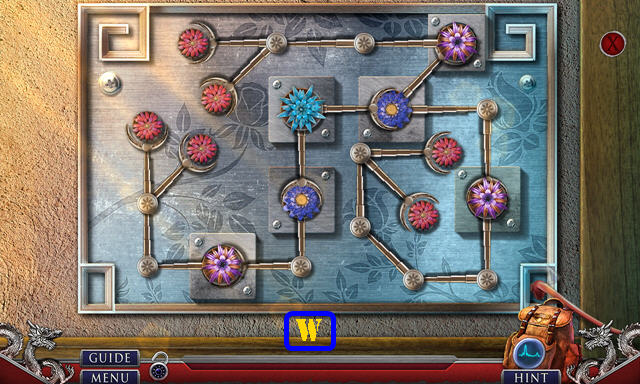
- Select the hard drive (U); press start (V). Select parameters setup (W), next 3x and engage (X).
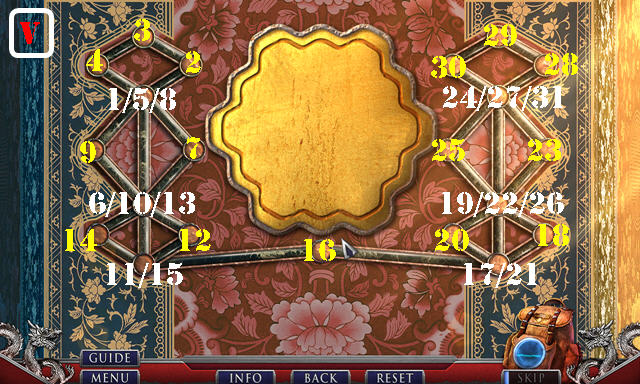
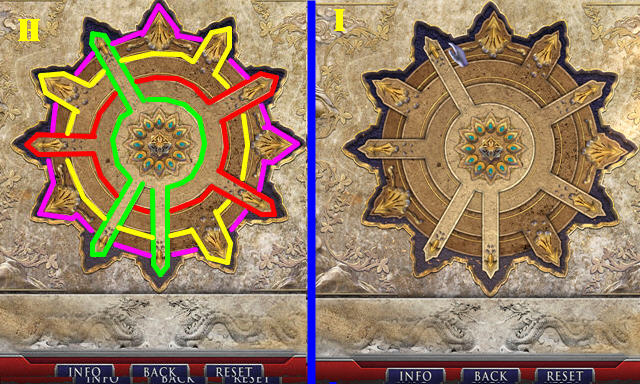
- Play the puzzle (Y).
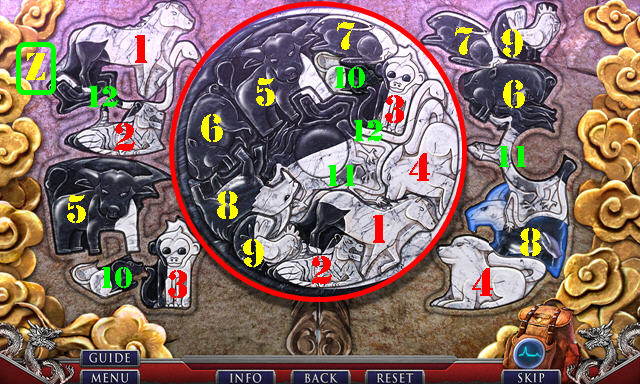
- Solution (Z).
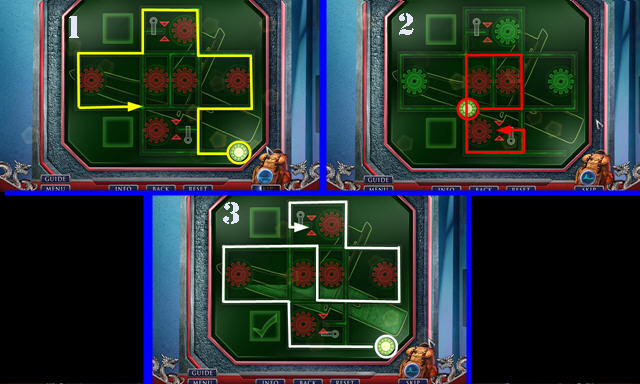
- Step forward twice for a puzzle.
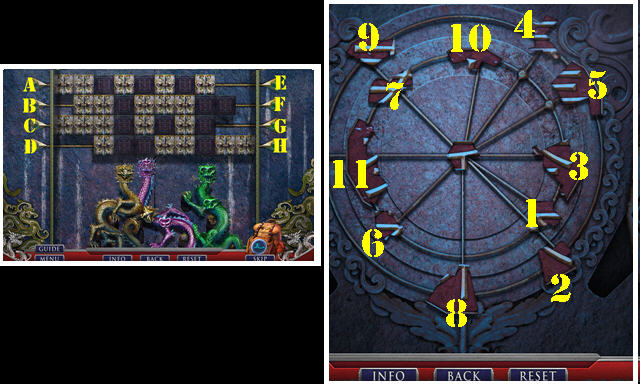
- Solution: E-D-Fx2-C-Gx2-B.
- Step forward twice for another puzzle.
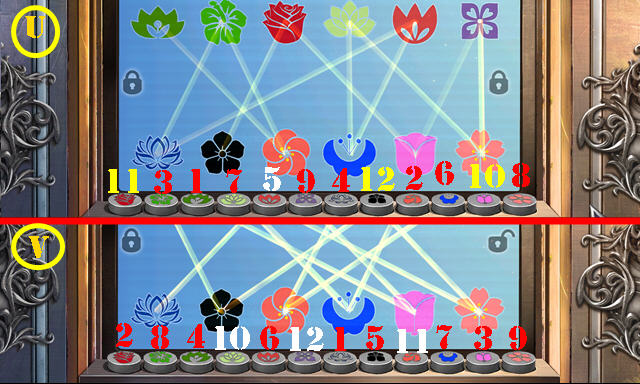
- Solution: (1-11).
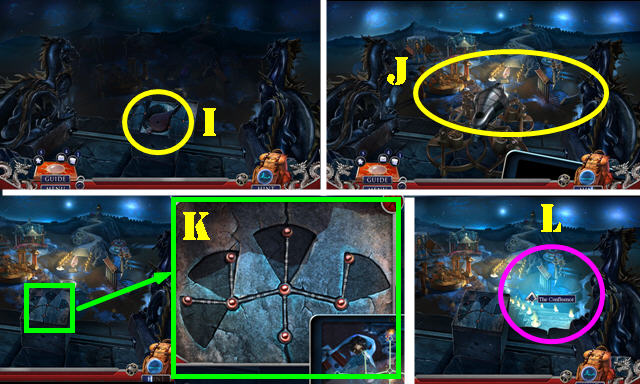
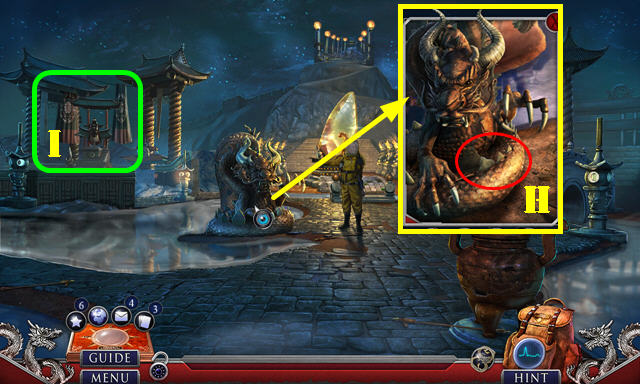
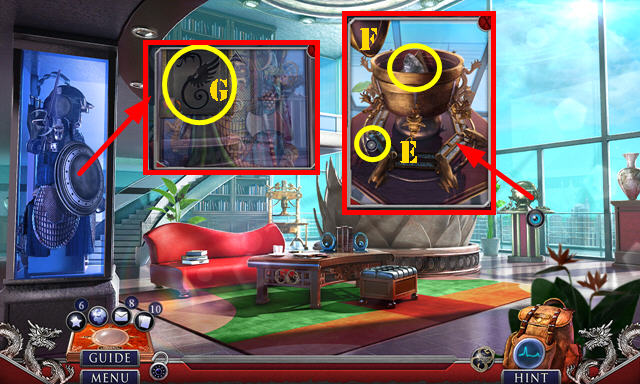
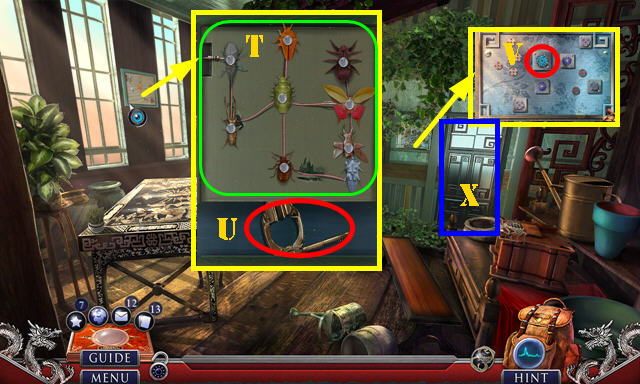
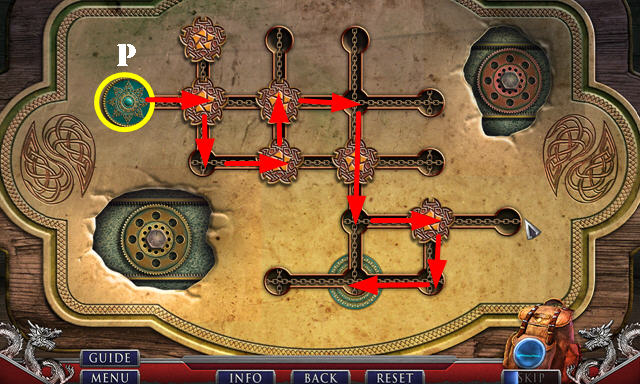
- Take the TORN BELLOWS and use the MATCHES (I).
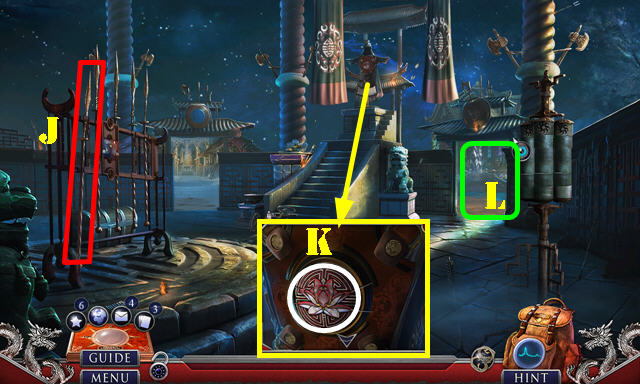
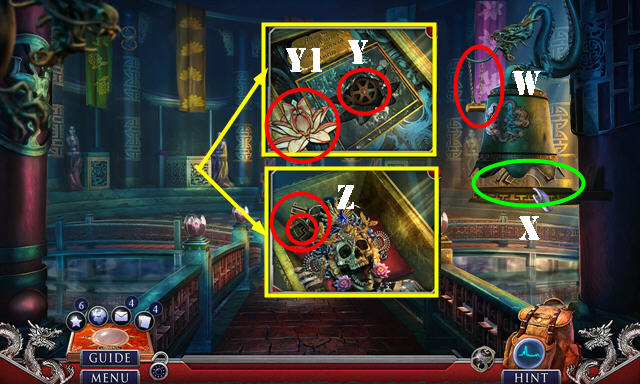
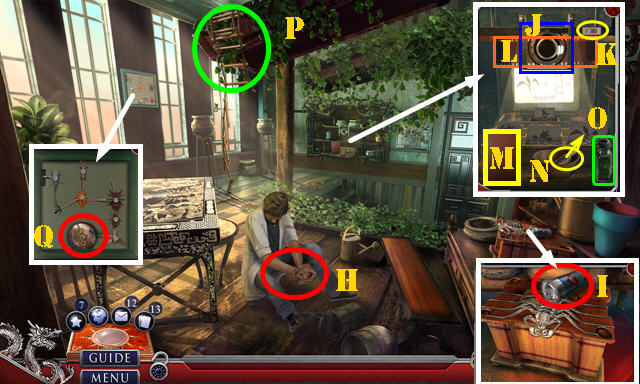
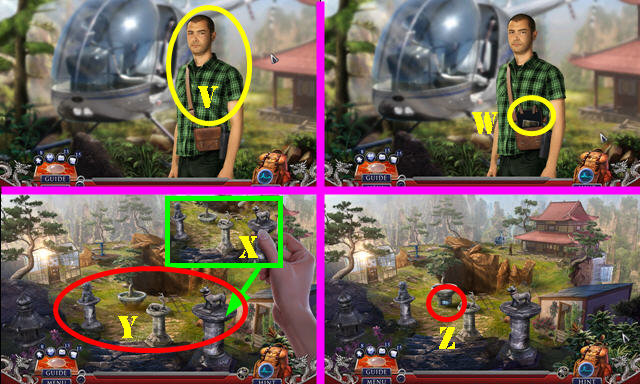
- Select the stone console. Use the MAPPING DRONE on the scene and select it; receive the AERIAL PHOTOGRAPH (J).
- Place the AERIAL PHOTOGRAPH and arrange the nodes as shown (K).
- Go to The Confluence (L).
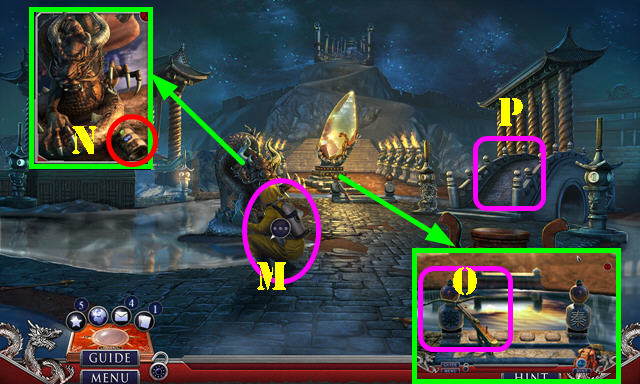
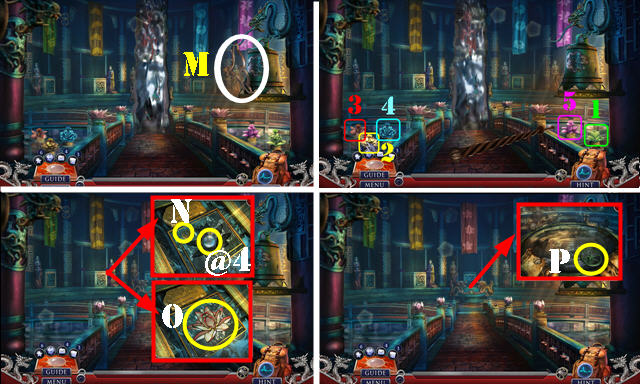
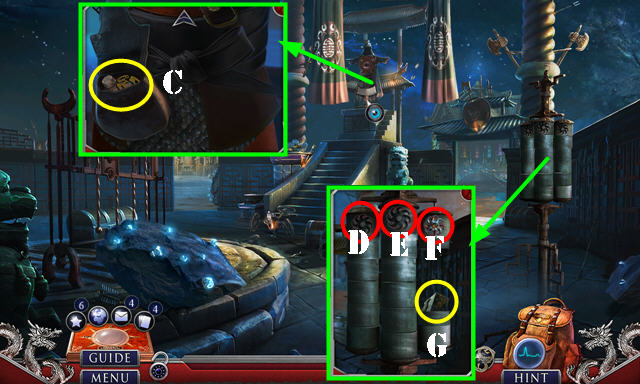
- Talk to the man (M).
- Take the BRACELET (N) and INCOMPLETE CROSSBOW (O).
- Go to the Amphitheater (P).
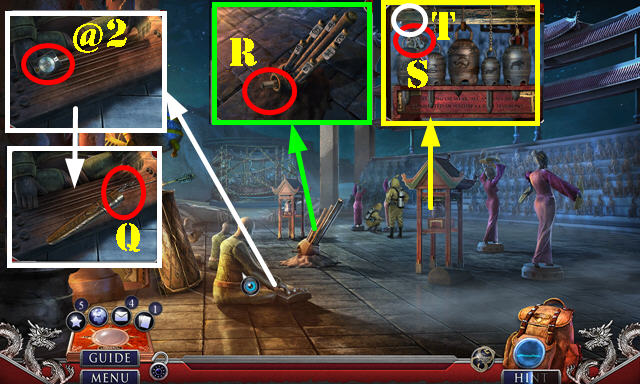
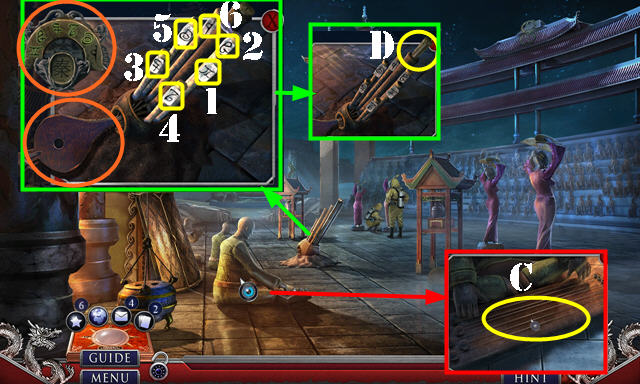
- Take the Fact Card (@2). Select the case and open it; take the NEEDLE (Q).
- Take the MAP 1/4 (R).
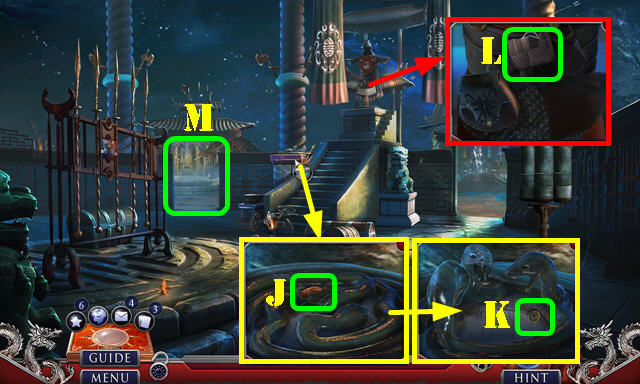
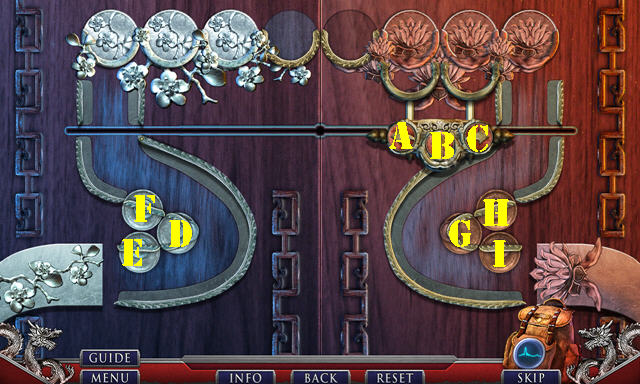
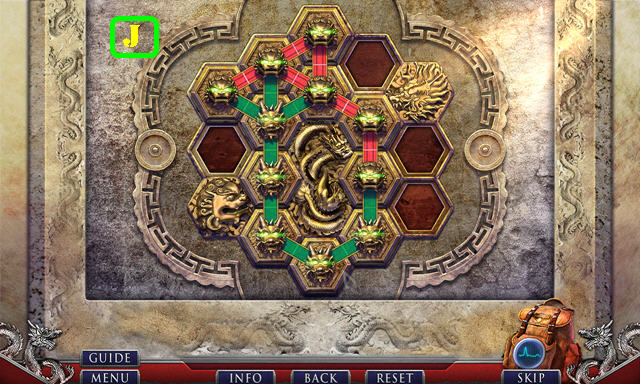
- Take the SNAKE HEAD (S); place the CHAIN (T) for a puzzle.
- Solution (U). Take the QUIVER (V).
- Select the statue twice (W); take the ANIMAL KEY CASE (X).
- Use the THREAD and NEEDLE on the TORN BELLOWS; select the thread and needle to get the BELLOWS.
- Go forward.
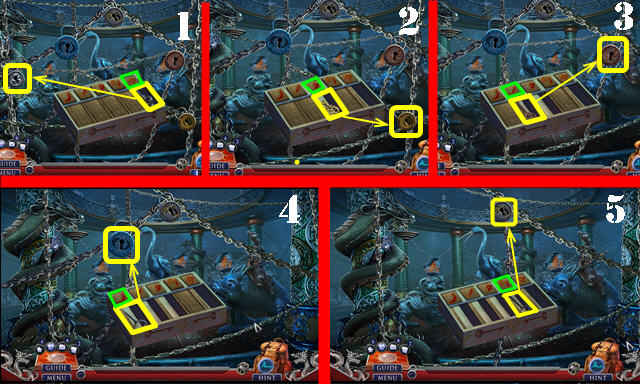
- Place the ANIMAL KEY CASE for a puzzle. Press the buttons (green) and place the keys as shown (Yellow) in order (1-5).
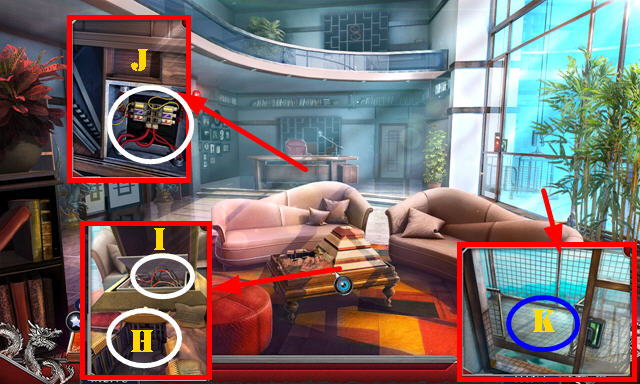
- Take the WIRECUTTERS (A).
- Play the HOP to get the TUNE SEQUENCE (B).
- Walk down.
- Use the WIRECUTTERS; take the STRING (C).
- Place the BELLOWS and the TUNE SEQUENCE (orange). Select 1-6. Press the bellows. Take the IRON SPIKE (D).
- Go forward.

- Use the QUIVER and STRING on the INCOMPLETE CROSSBOW; receive the CROSSBOW.
- Use the CROSSBOW on both targets (E-F).
- Take the Fact Card (@3) and BONE SYMBOL below it.
- Take the OIL LAMP (G).
- Place the BRACELET and select each ring once (H); take the HEAVY INKSTONE (I).
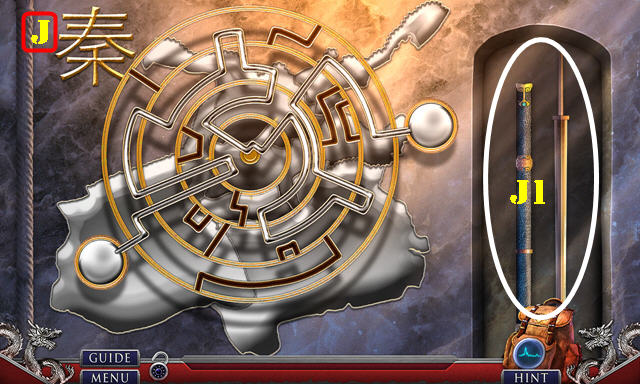
- Use the IRON SPIKE and HEAVY INKSTONE; take the QIN SYMBOL (J).
- Return to The Confluence.
- Place the QIN SYMBOL for a puzzle (K).
- Solution one: Mx2-O-N-O-M-L-M-O.
- Solution two: Q-S-Q-R-S-R-P-R-S-Q.
- Go forward.
Chapter 2: Emperor's Chamber
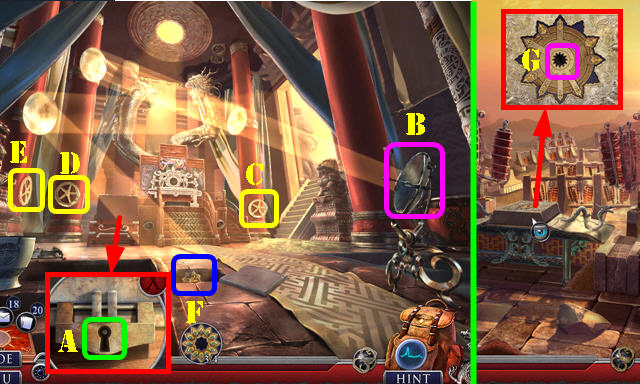
- Take the HANDLE (T).
- Place the BONE SYMBOL and select the 6 buttons (U).
- Select the hands in order (1-5).

- Take the MAP 2/4 (V) and CHERRY TOKENS 1/2 (W).
- Take the STAFF (X); press the handle (Y).
- Return to the Amphitheater.
- Place the HANDLE; take the FIGURINE (Z).
- Use the STAFF (Z1); play the HOP to get the STYLUS.
- Return to the Emperor's Chamber.
- Use the STYLUS (A). Move the two spheres as shown (B-C-D); take the GUARDIANS' OFFERINGS 1/2 (D).
- Place the FIGURINE; select 1-4; take the GUARDIANS' OFFERINGS 2/2 (E).
- Give the GUARDIANS' OFFERINGS 2/2 (F).
- Take the DRAGON SCALES (G).
- Walk down.
- Place the DRAGON SCALES (H).
- Go to the Armory (I).
- Take the FEATHER and place the SNAKE HEAD (J); take the QIN COINS 1/3 (K).
- Take the MAP 3/4 (L).
- Go to the Treasury (M).
- Take the CHERRY TOKENS 2/2 (N).
- Walk down.
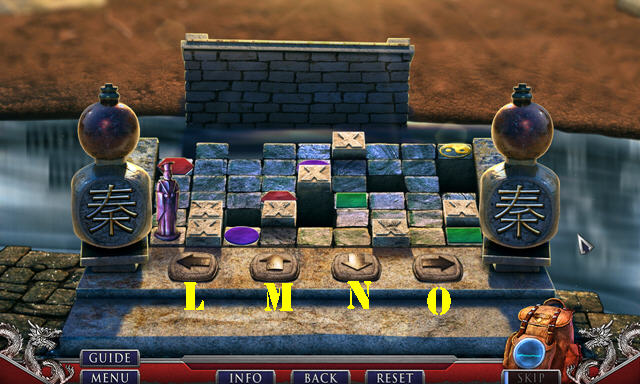
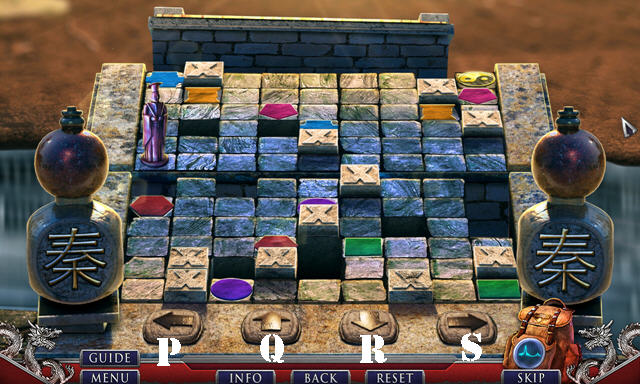
- Place the CHERRY TOKENS 2/2 for a puzzle (O).
- Solution: Ex2-Dx3-Fx2-Hx3-Gx2-I-Ax2-B-A-B-Cx3-B-A-B-Cx3-B-A-B-Ax3-B.
- Ax2-B-Cx5-B-Ax2-B-Ax3-B-A-B-Cx4-B-Ax2-B-Ax2-B-Cx5-B-Ax3-B-C-B-Cx2-B
- Take the SPEAR (J).
- Pan up. Use the SPEAR; take the LOTUS INSIGNIA (K).
- Go to the Concubines' Tomb (L).
- Take the OPENER (M).
- Use the SPEAR and select 1-5.
- Take the Fact Card (@4) and QIN COINS 2/3 (N).
- Place the LOTUS INSIGNIA (O).
- Use the OIL LAMP and turn the wheel (P); play the HOP to get the QIN COINS 3/3.
- Return to the Treasury.
- Place the QIN COINS 3/3 (Q).
- Take the GILDED MALLET (R).
- Place the FEATHER and select it twice; take the jewel and place it (S).
- Take the second jewel and place it (T). Take the DIRTY PEG and GEAR (U).
- Take the POLISHING CLOTH (V).
- Return to the Concubines' Tomb.
- Hang the GILDED MALLET and select it (W); take the METAL PIPING 1/3 (X).
- Place the GEAR (Y); select the flower (Y1). Take the ANCIENT BROOCH and METAL PIPING 2/3 (Z).
- Return to The Confluence.
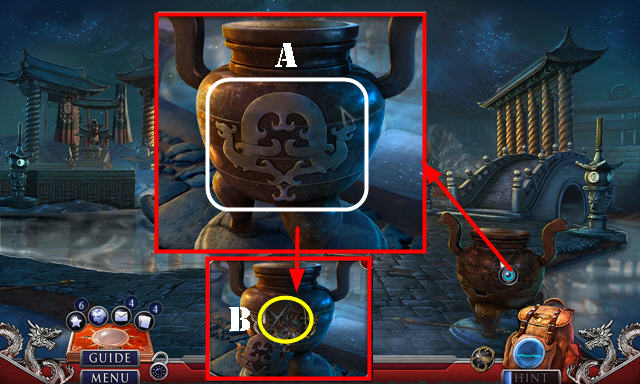
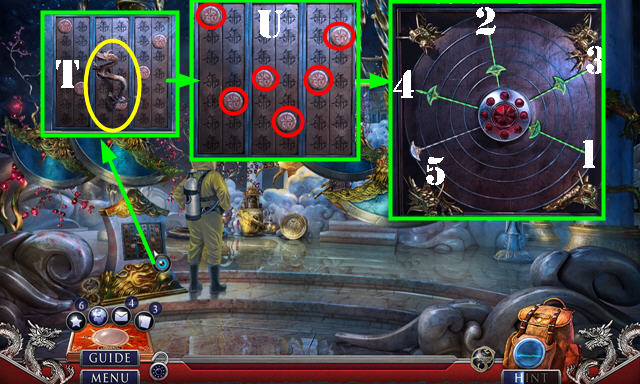
- Use the POLISHING CLOTH and wipe the urn with it. Arrange the parts as shown and select the symbol (A).
- Take the FOLDING STAR and HOOK-SWORD EMBLEM (B).
- Go to the Armory.
- Pan down. Place the HOOK-SWORD EMBLEM; take the SEAL PIECES (C).
- Place the FOLDING STAR on D, E and F; take the DAMAGED SEAL (G).
- Place the SEAL PIECES on the DAMAGED SEAL; select each piece to receive the ADORNED SEAL.
- Go to the Treasury.
- Place the ADORNED SEAL and select it; press the eyes and mouth (H).
- Take the Fact Card (@5) and the METAL PIPING 3/3 behind it.
- Place the METAL PIPING 3/3 for a puzzle (I).
- Solution (J). Select the sword parts (J1).
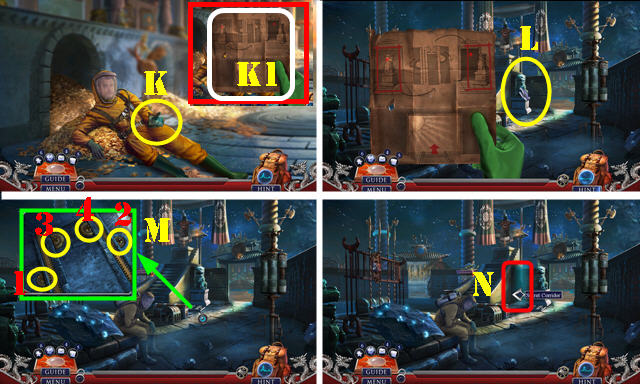
- Talk to Sam; take the ACCESS CARD and MAP 4/4 (K). Select the note (K1).
- Walk down.
- Place the MAP 4/4 on the statue and select the statue 2x(L).
- Use the OPENER 4x in order of 1-4 (M).
- Enter the Secret Corridor (N).
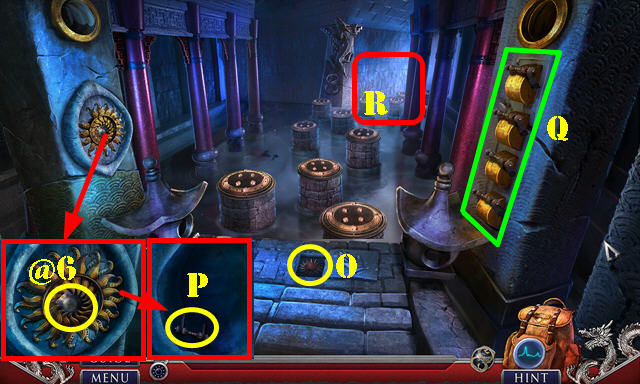
- Move the stone; take the STAR MEDAL (O).
- Take the Fact Card (@6).
- Place the STAR MEDAL; take the LEVER (P).
- Place the LEVER and pull all the levers once (Q).
- Go right (R).
- Arrange the levers as shown (S).
- Go left (T).
- Look at the scroll (U).
- Pull the levers 3-4-1-2.
- Go up (V).
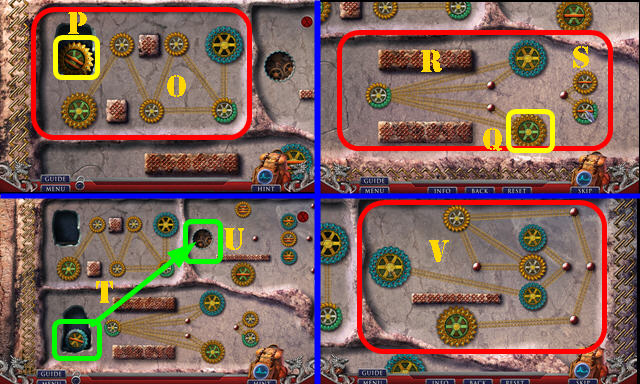
- Note the numbers on the glass; pan left (A).
- Select Bx2-Cx2-D-E-Fx2-Gx2.
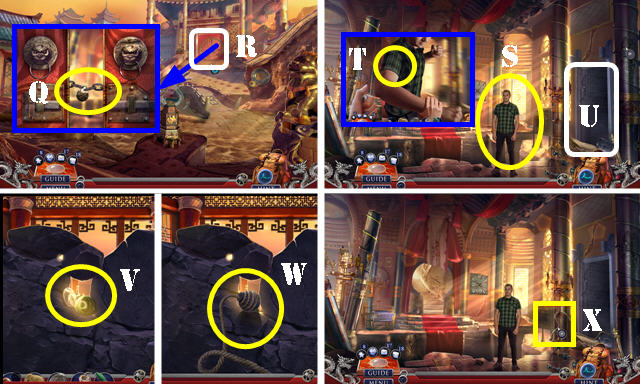
- Answer the phone. Select Artworks Research Center.
Chapter 3: Artworks Research Center
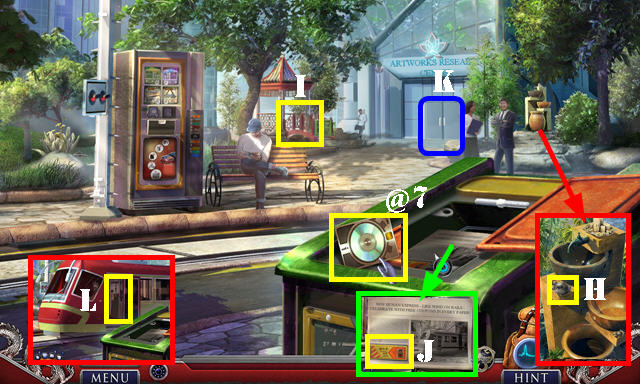
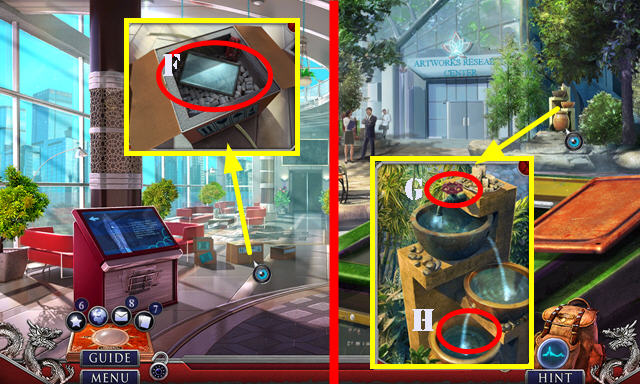
- Take the Fact Card (@7) and COFFEE BUTTON (H).
- Open the gate (I); play the HOP to get the 3D PRINTING MATERIAL.
- Use the ANCIENT BROOCH; take the COUPONS 1/3 (J).
- Try to go to the Lobby (K).
- Select the train door (L). Enter the Lobby (K).
- Take the COUPONS 2/3 (N); press the arrow twice (O).
- Take the 3D PRINTING CARTRIDGE (P).
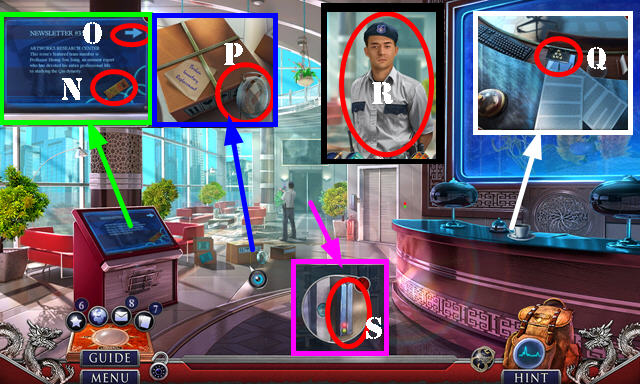
- Try to take the card (Q).
- Show the ACCESS CARD (R).
- Use the ACCESS CARD; go to the Break Room (S).
- Take the DUSTER (T).
- Take the FOCUS KNOB (U). Place the buttons as shown (V).
- Take the CLAMP (W). Place the COFFEE BUTTON and press it (X); take the COUPONS 3/3 (Y).
- Walk down twice.
- Place the COUPONS 3/3 (A); select 517 (B); take the SOUVENIR PIN (C).
- Return to the Break Room.
- Use the SOUVENIR PIN (D).
- Place the 3D PRINTING MATERIAL on the 3D PRINTING CARTRIDGE; take the 3D PRINTER CARTRIDGE.
- Place the 3D PRINTER CARTRIDGE for a puzzle (E).
- Solution (1-3).
- Take the QIN DAGGER MODEL.
- Walk down.
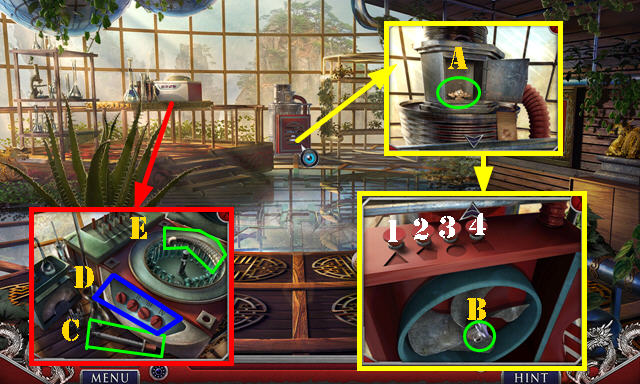
- Use the QIN DAGGER MODEL; select the box 3x; take the LED DISPLAY and SPIGOT KNOB (F).
- Walk down.
- Place the SPIGOT KNOB and turn it (G); wash the DIRTY PEG to get the PEG (H).
- Go to the Break Room.

- Place the PEG and select it (I); play the HOP to get the COFFEE MILL.
- Place the LED DISPLAY (J); select K-K-L.
- Take the COMPANY LOGO 1/6 and COMPANY LOGO 2/6 (M). Pan right.
- Take the COMPANY LOGO 3/6, COMPANY LOGO 4/6, COMPANY LOGO 5/6 and COMPANY LOGO 6/6 (N). Pan left.
- Place the COMPANY LOGO 6/6; take the CASE and the VALERIAN PILLS behind it (O).
- Place the VALERIAN PILLS on the COFFEE MILL; pull the handle and take the SLEEPING POWDER.
- Walk down.
- Use the SLEEPING POWDER (P); take the ELEVATOR CARD (Q).
- Use the ELEVATOR CARD (R); Select 5-0-OK for a puzzle (S).
- Solution: (down)-(right x 2)-(down)-(left)-(right)-(up)-(right x 2)-(down)-(left)-(right)-(up)-(left x 2).
- (down)-(left)-(up)-(left)-(up)-(right x 2)-(up)-(right)-(down)-(right) (T).
- You will automatically enter Huang's Office.
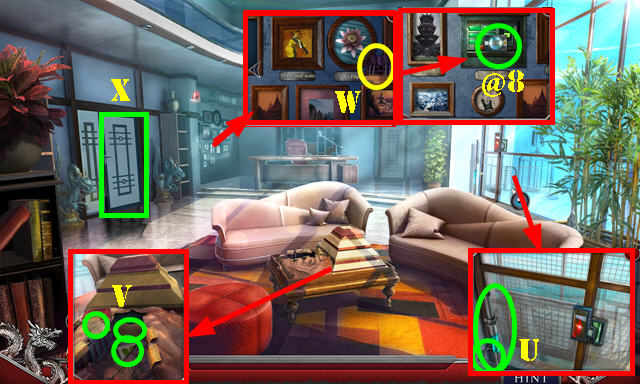
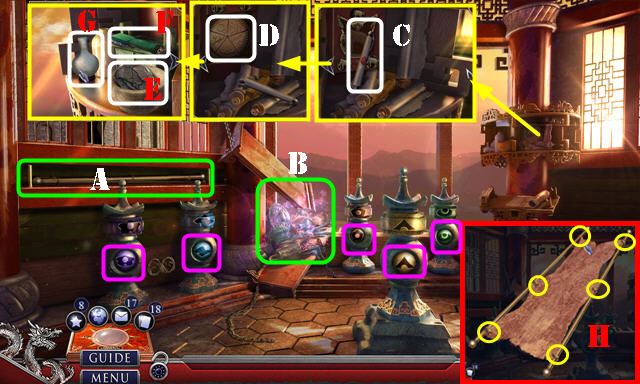
- Take the METAL BAR and CONCENTRIC SQUARES (U).
- Read the two notes and take the PLANT PLAQUE 1/2 (V).
- Take the MAUSOLEUM PARTS 1/3 (W). Pan left. Select the picture; take the Fact Card (@8).
- Go to the Research Room (X).
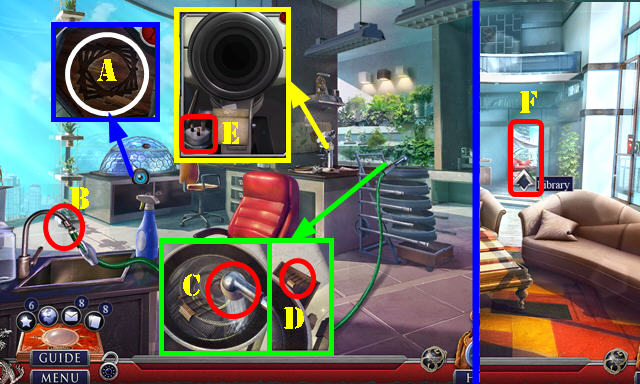
- Place the CONCENTRIC SQUARES (A); play the HOP to receive the CRYSTAL DROPLET.
- Place the CLAMP and select it (B).
- Select the faucet and move it around the parts (C); touch the screen; take the MAUSOLEUM PARTS 2/3 (D).
- Take the PLUG (E).
- Walk down and enter the Library (F).
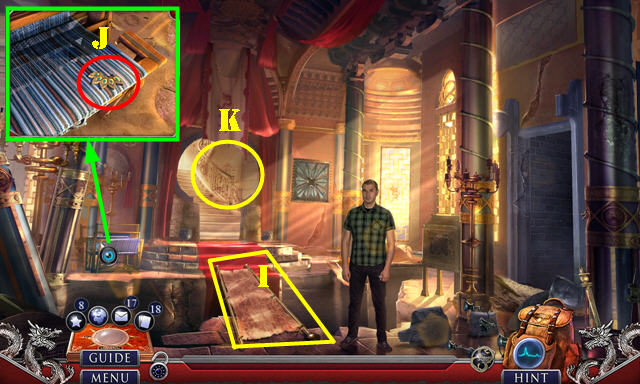
Chapter 4: Library
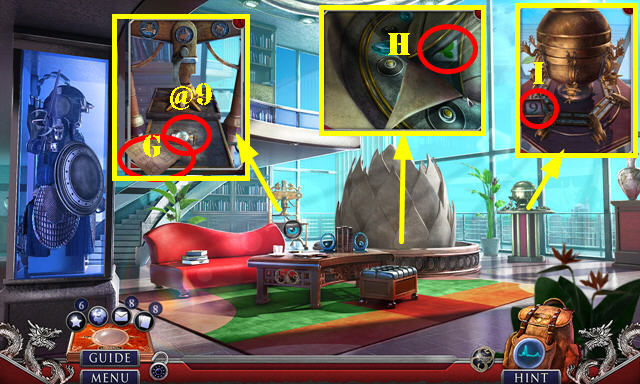
- Take the Fact Card (@9) and the MINIATURE WRITING below it. Look at the note (G).
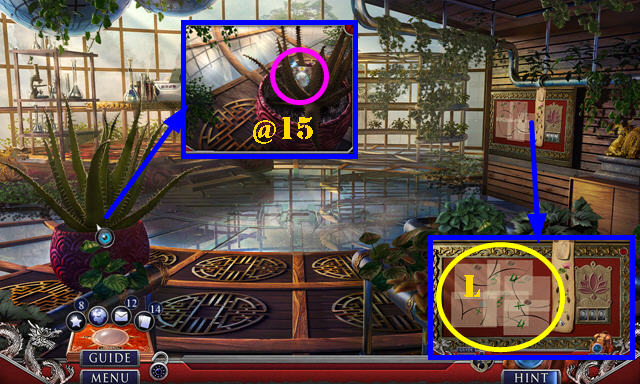
- Place the CRYSTAL DROPLET; take the PLANT PLAQUE 2/2 (H).
- Take the DIAL (I).
- Return to the Research Room.
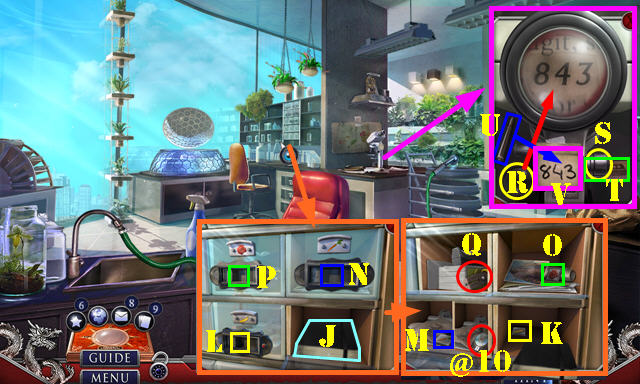
- Place the PLANT PLAQUE 2/2 and look at the book (J); take the tile (K) and place it (L).
- Take the Fact Card (@10). Take the tile (M) and place it (N).
- Look at the photo; take the tile (O) and place it (P).
- Take the PLIERS (Q).
- Place the lens (R) FOCUS KNOB (S), and MINIATURE WRITING (T). Turn the knob twice. Use the pen (U) and take the COMBINATION (V).
- Return to the Library.
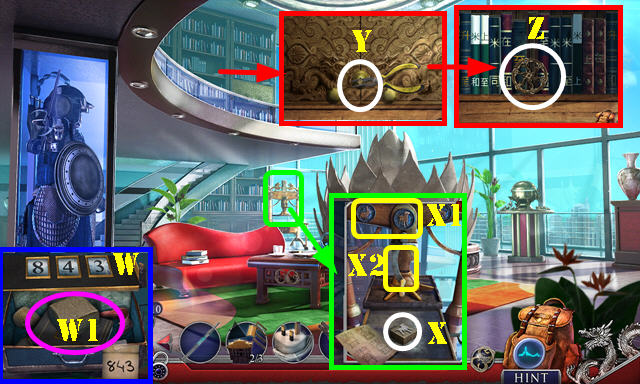
- Place the DIAL and the COMBINATION on the CASE. Select 843 (W); take the MODELING CLAY and BOOK (W1).
- Place the MODELING CLAY (X); switch the first two symbols (X1) and select the handle (X2). Take the PRINTED SEAL (X).
- Select the key and use the PLIERS (Y); take the ORNATE WHEEL (Z), then place the BOOK for a puzzle.
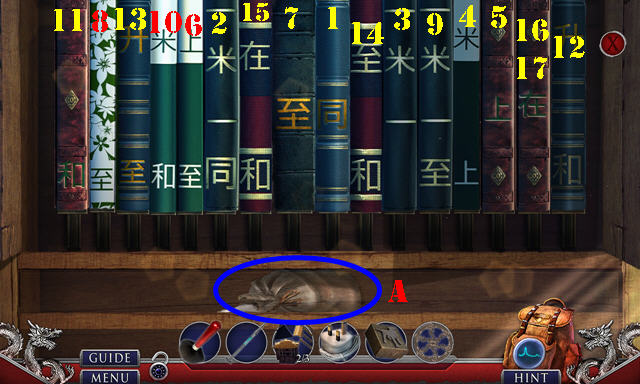
- Solution (1-16). Only select step one if you reset the puzzle, otherwise start with step two.
- Take the BAG OF POWDER (A).
- Walk down.
- Use the PRINTED SEAL; take the GILDED FROG (B).
- Use the BAG OF POWDER and the DUSTER; select the three buttons (C); select the red folder five times. Take the CIGAR CUTTER and DRAGON INLAY (C1).
- Use the METAL BAR (D).
- Go to the Library.
- Place the GILDED FROG and select the base 3x (E); take the FLINT and MAUSOLEUM PARTS 3/3 (F).
- Pan down. Place the DRAGON INLAY (G); play the HOP to get the DEER HORN KNIFE.
- Walk down.
- Place the MAUSOLEUM PARTS 3/3 (H); open the box and take the ELECTRICAL CLIPS (I).
- Use the DEER HORN KNIFE and open the door; use the ELECTRICAL CLIPS (J).
- Open the door and enter (K).
- Answer the phone; select Hunan National Park. Hop on the train. Select the postcard on the scene.
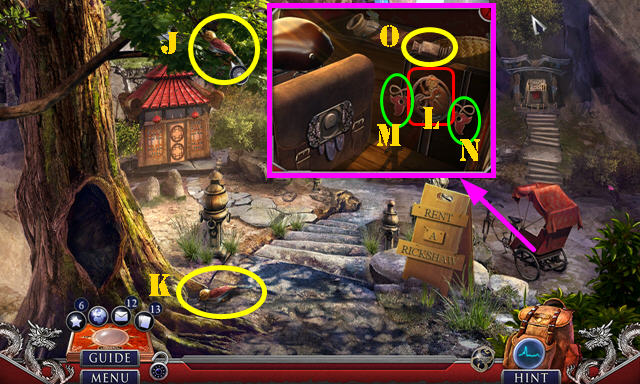
- Move the sign; take the Fact Card (@11) and ZIP TIE (L).
- Take the INSECTICIDE SPRAY (M).
- Place the ORNATE WHEEL for a puzzle (N).
- Connect (O) as shown.
- Place (P) on (Q); connect (R) and (S) as shown.
- Place (T) on (U). Connect (V) as shown.
- Take the GOLD ORNAMENT.
- Go forward to the Glass Bridge.
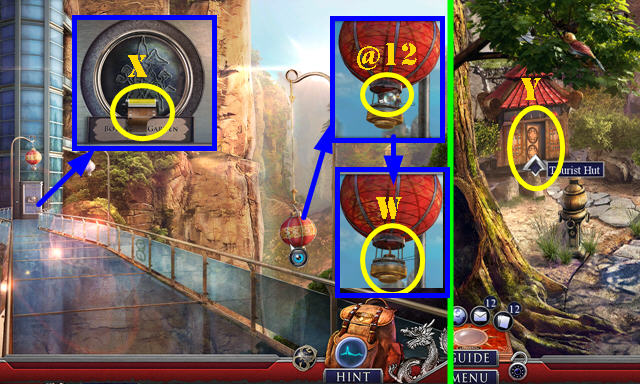
- Take the Fact Card (@12) and the BEETLE behind it.
- Use the CIGAR CUTTER 2x; receive the OIL BURNER (W).
- Take the FILM (X).
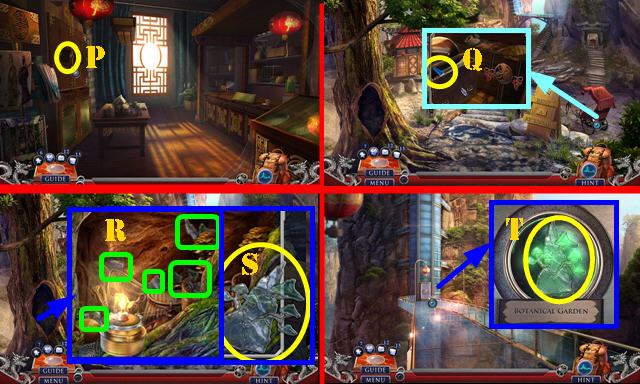
- Walk down and enter the Tourist Hut (Y).

- Open the curtains.
- Take the WALKING CANE (A).
- Remove the sheet; take the Fact Card (@13) and WIND-UP KEY (B).
- Place the GOLD ORNAMENT and select it (C); select the top 3x (D); take the STEEL (E).
- Take the BUTTON (F). Use the PLUG (G) and press the green button (H); take the MONKEY CLASP 1/2 (I).
- Walk down.
- Use the WALKING CANE (J); take the WIND-UP TOY (K).
- Use the WIND-UP KEY on the WIND-UP TOY; select the toy and take the MONKEY CLASP 2/2.
- Place the MONKEY CLASP 2/2 (L) and select the two latches (M-N); take the CHINESE WEIGHT (O).
- Go to the Tourist Hut.
- Place the CHINESE WEIGHT (P); play the HOP to receive the WREATH MEDALLION.
- Walk down.
- Place the WREATH MEDALLION; take the GLUE (Q).
- Use the FLINT and STEEL on the OIL BURNER; take the LIGHTED BURNER.
- Use the LIGHTED BURNER; select the five shards (R). Use the GLUE; take the GLASS TREE (S).
- Go to the Glass Bridge.
- Place the GLASS TREE for a puzzle (T).
- Solution one (U).
- Solution two (V).
Chapter 5: Garden
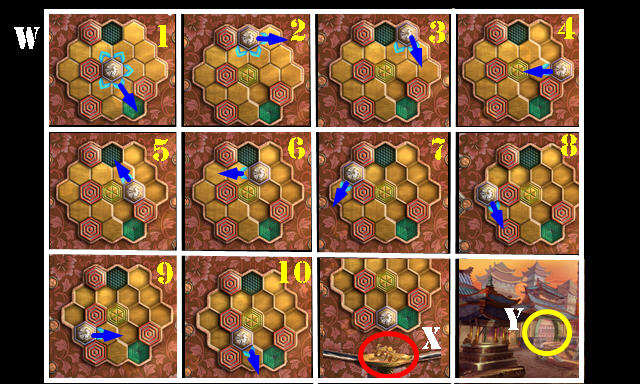
- Enter the Elevator (1). Press the up button (2), go left (3) and then forward to the Garden (4).
- Select the plants; take the BAMBOO STICK (A).
- Take the LEAFLET 1/2 (B).
- Take the ALCOHOL (C). Use the INSECTICIDE SPRAY; take the BUTTERFLY (D).
- Use the BAMBOO STICK for a puzzle (E).
- Select the ball once it's green (F).
- Select the lines when they intersect with the ball (G).
- Use the ZIP TIE (H).
- Take the CANNED MEAT (I).
- Select the mechanism (J); push the button (K). Place the FILM (L). Look at the book (M). Use the scoop (N). Place the ALCOHOL (N) and select it; take the SOLVENT (O).
- Take the BROKEN LADDER (P) and CLOCK DISK (Q).
- Walk down.
- Place the CLOCK DISK and select each hand once (R); play the HOP to receive the BOX.
- Open the BOX; take the CAN OPENER. Use the SOLVENT on the right side of the box; take the FLOWER.
- Use the CAN OPENER; take the LEAFLET 2/2 (S).
- Go to the Botanist's House.
- Place the BUTTERFLY, BEETLE and LEAFLET 2/2; swap as shown (T). Take the SPREADER (U).
- Place the FLOWER for a puzzle (V).
- Solution (W).
- Enter the Greenhouse Lab (X).
- Look at the note; use the SPREADER and select it; take the CLOUD (A). Pan down.
- Place the BUTTON; select 3-1-4-2. Remove the bolt (B); take the FAN BLADES.
- Take the SYRINGE (C). Press each button once (D); take the SCORPION TAIL (E).
- Walk down.
- Place the SCORPION TAIL; take the CLIMBING HOLD and FILE (F).
- Place the CLOUD (G); play the HOP to receive the STURDY ROPE.
- Use the STURDY ROPE and CLIMBING HOLD on the BROKEN LADDER; receive the ROPE LADDER.
- Walk down.
- Place the ROPE LADDER and go down to the Cave (H).
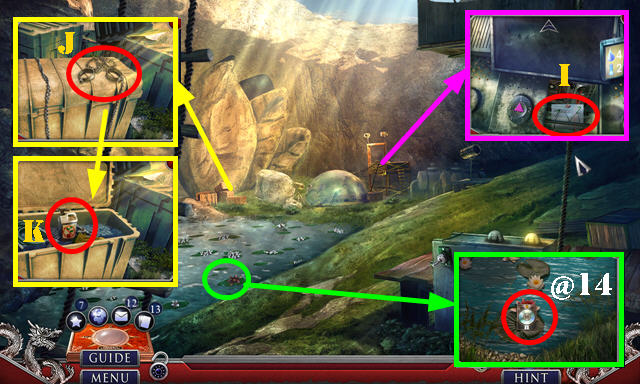
- Take the Fact Card (@14), RESEARCH SHEET (I) and SHACKLES (J).
- Use the FILE; open the box and select two items; take the HERBICIDE (K).
- Go to the Greenhouse Lab.
- Use the HERBICIDE; take the Fact Card (@15) and the INSULATION TAPE below it.
- Place the RESEARCH SHEET for a puzzle (L).
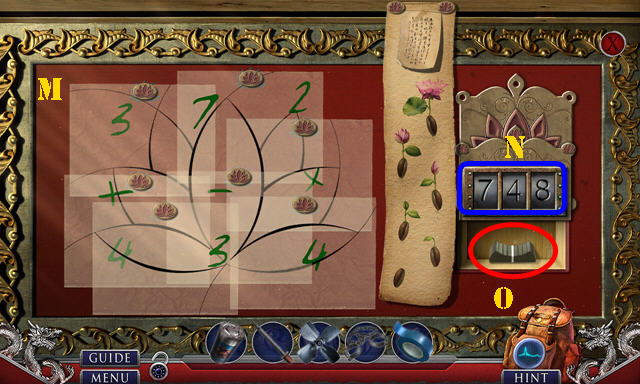
- Solution (M).
- Select 748 (N); take the SLIDER KNOB (O).
- Answer the phone.
- Return to the Cave.
- Place the FAN BLADES (P).
- Use the INSULATION TAPE (Q). Select R-Sx3.
- Look at the book; take the TROWEL and SPECIAL CONTAINER (T).
- Place the SLIDER KNOB on the SPECIAL CONTAINER and select it; receive the OPEN CONTAINER.
- Use the OPEN CONTAINER; receive the LOTUS (U).
- Go to the Garden.
- Give the LOTUS (V); open the bag; take the PHOTOGRAPH (W).
- Place the PHOTOGRAPH (X).
- Swap the statues as shown (Y). Take the BATTERY (Z).
- Go to the Cave.
- Place the BATTERY (A); play the HOP (B) to get the MORTAR AND PESTLE.
- Place the MORTAR AND PESTLE (C); Select the two plants (D). Select the pestle (E). Select the eyedropper (F) and use the SYRINGE to get the PLANT ANTIDOTE.
- Go to the Garden.
- Answer the phone; select Tengger Desert.
Chapter 6: Tengger Desert
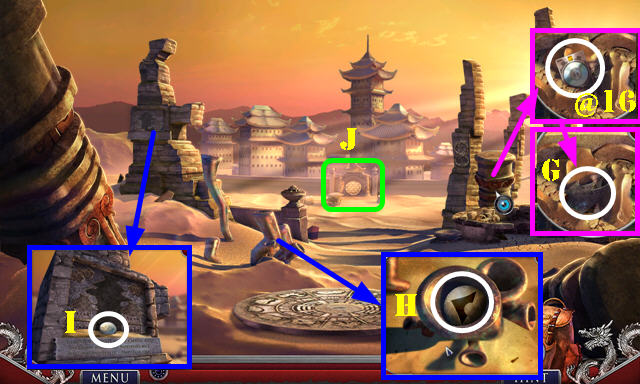
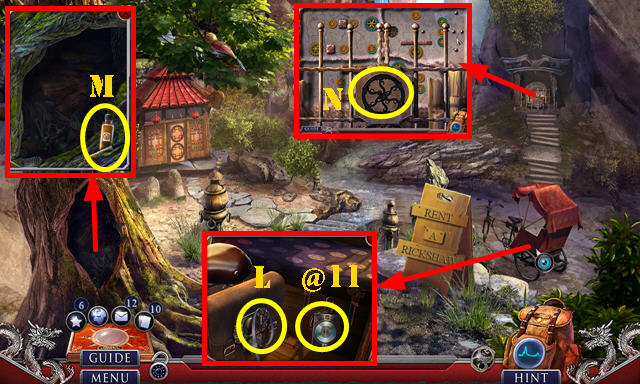
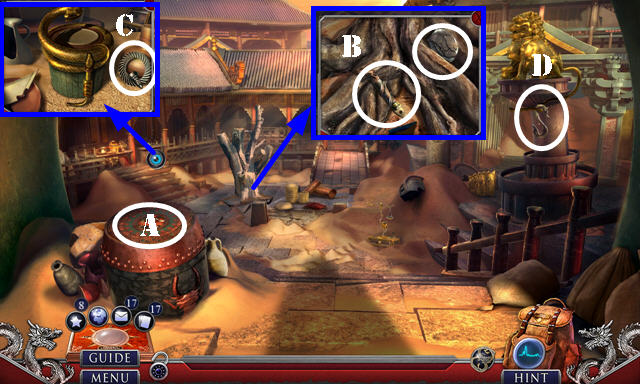
- Take the Fact Card (@16). Use the TROWEL; take the TOWER ROOF (G).
- Take the ORBS 1/3 (H) and SMALL ROCK (I).
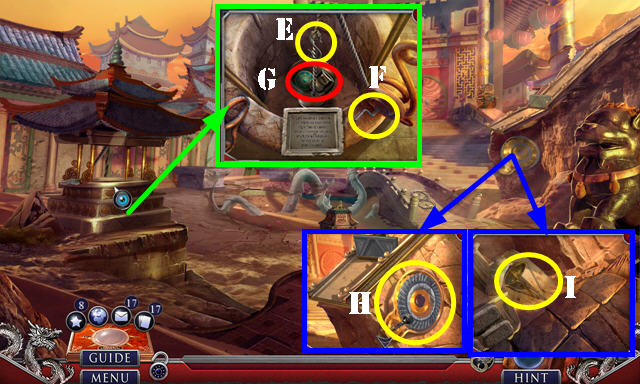
- Go to the Moon Gate (J).
- Give the CANNED MEAT (K); take the IRON HAND (L).
- Use the SHACKLES (M); play the HOP to get the TOWER BASE.
- Take the BROKEN TOWER (N).
- Walk down twice.
- Use the IRON HAND to receive the MOONSTONES 1/2 (O).
- Place the TOWER BASE and TOWER ROOF on the BROKEN TOWER; receive the TOWER PLAQUE.
- Place the TOWER PLAQUE; take the WHITE CRANE and MOONSTONES 2/2 (P).
- Go to the Moon Gate.
- Place the MOONSTONES 2/2 and select each one (Q-R).
- Go to the Courtyard (S).
- Pan down; take the ORBS 2/3 (T).
- Take the Fact Card (@17) and the STONE ELEPHANT below it.
- Place the WHITE CRANE for a puzzle (U).
- Select 1-31 (V).
- Select: 1-10 (W).
- Take the SERPENT'S TONGUE (X).
- Go to the Bazaar (Y).
- Use the SERPENT'S TONGUE (A); play the HOP to get the LEATHER STRAP.
- Take the DRAGON HANDLE and ENCRUSTED ARTIFACT (B).
- Take the RING AND PINION (C).
- Use the SMALL ROCK on the LEATHER STRAP; receive the SLINGSHOT.
- Use the SLINGSHOT to receive the HOOK (D).
- Walk down.
- Place the HOOK (E). Select the handle 2x (F). Take the CYLINDER and IMPERIAL MEDALLION (G).
- Pan up. Place the RING AND PINION (H). Take the WEIGHING PAN (I).
- Return to the Bazaar.
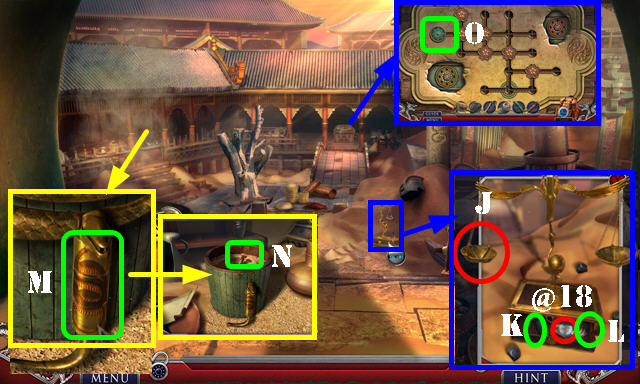
- Place the WEIGHING PAN (J). Take the Fact Card (@18). Take the STEEL BRUSH (K) and EXPLOSIVE (L).
- Place the CYLINDER; arrange each as shown (M). Take the SCREW (N).
- Place the IMPERIAL MEDALLION for a puzzle (O).
- Solution (P).
- Take the SAWBLADE.
- Walk down.
- Use the SAWBLADE and SCREW on the DRAGON HANDLE; receive the SAW.
- Use the SAW (Q); open the doors and go to the Imperial Hall (R).
- Use the PLANT ANTIDOTE (S); select the arm (T).
- Go to the Tower (U).
- Take the ORBS 3/3 and LENS (V).
- Use the EXPLOSIVE and select it (W).
- Walk down.
- Use the LENS (X); go back to the Tower.
- Place the ORBS 3/3; swap them as shown (magenta).Take the LONG RODS (A).
- Play the HOP (B) to receive the HARDENED LEATHER.
- Pan right. Look at the scroll (C). Place the STONE ELEPHANT; take the IVORY PLATE (D).
- Pan left. Place the ENCRUSTED ARTIFACT (E) and STEEL BRUSH (F). Select the bottle (G) and then the brush; take the PLATINUM SEAL.
- Place the HARDENED LEATHER on the LONG RODS; select the six ends to receive the STRETCHER (H).
- Walk down.
- Place the STRETCHER (I).
- Take the LOCK PIECES 1/4 (J).
- Go to the Throne Room (K) for a puzzle.
- Solution one: A-B-C-D-E-G-A-B-C-D-E-G-F-A-B-C-D-G. Select (H).
- Solutions two and three (I-J). Select (K).
- Solution four (L). Select (M).

- Select the Fact Card (@19).
- Place the IVORY PLATE; swap the plates as shown (orange).
- Look at the note; take the LOCK PIECES 2/4 (N).
- Place the PLATINUM SEAL (O); select the five handles (magenta); take the CANDLE HOLDER.
- Go to the Emitter Terrace (P).
- Take the Fact Card (@20) and ORNAMENTAL STONE behind it.
- Take the LOOM WHEEL (Q).
- Return to the Imperial Hall.
- Place the ORNAMENTAL STONE; select matching pairs (R). Take the LOCK PIECES 3/4 (S).
- Place the LOOM WHEEL (T) and select it. Take the BROOCH (U).
- Go to the Throne Room.
- Use the BROOCH (A) and play the HOP. Answer the phone; receive the BRONZE MIRROR from the HOP.
- Place the BRONZE MIRROR (B). Select C-Dx2-Ex2.
- Use the CANDLE HOLDER; take the LOCK PIECES 3/4 (F).
- Go to Emitter Terrace.
- Place the LOCK PIECES 4/4 for a puzzle (G).
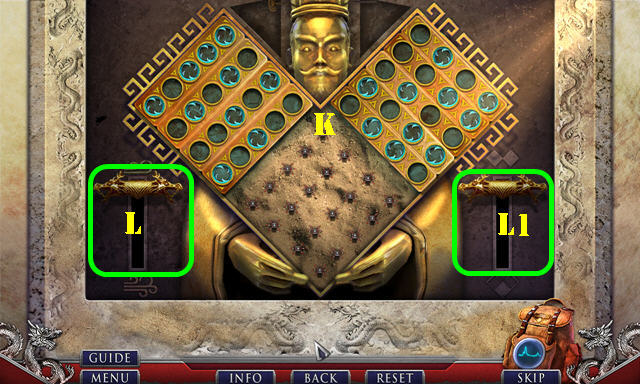
- Solution one (H). Final Image (I).
- Solution two (J).
- Solution three (K). Pull the levers (L-L1).
- Congratulations, you've completed Hidden Expedition: The Eternal Emperor!
Created at: 2016-09-30