

Walkthrough Menu
- General Tips
- Chapter 1: Tayal's House
- Chapter 2: Yatomo Industries
- Chapter 3: Cockpit
- Chapter 4: Murano Square
- Chapter 5: Venice
General Tips
- This is the official guide for Hidden Expedition: The Pearl of Discord.
- This guide will not tell you when you have to zoom into a location; the screenshots will show each zoom scene.
- Hidden-object puzzles are referred to as HOPs. This guide will not show screenshots of the HOPs, however, it will mention when an HOP is available and the inventory item you'll collect from it.
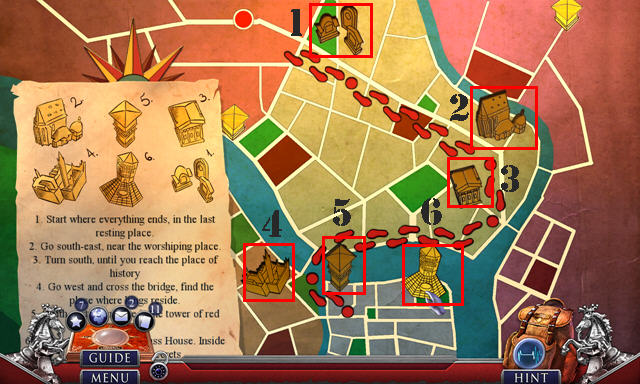
- Use the Map to fast travel to a location.
Chapter 1: Tayal's House
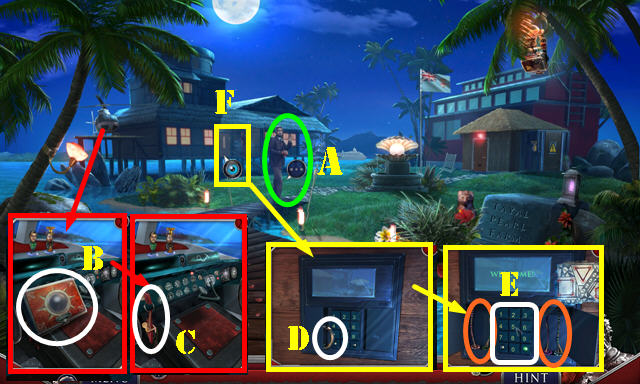
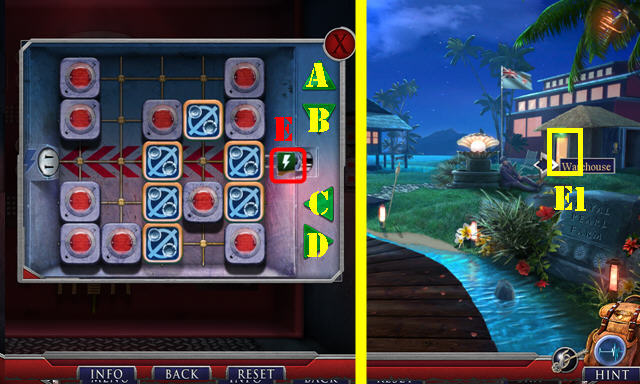
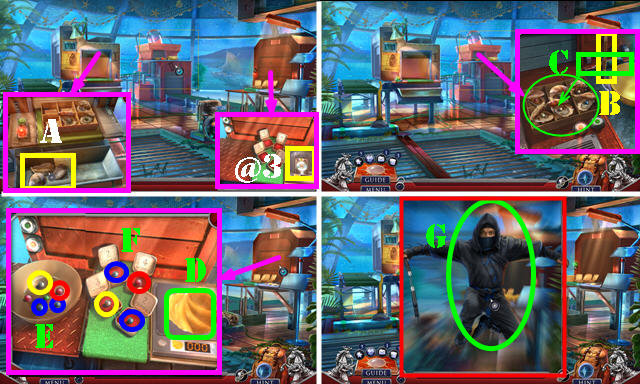
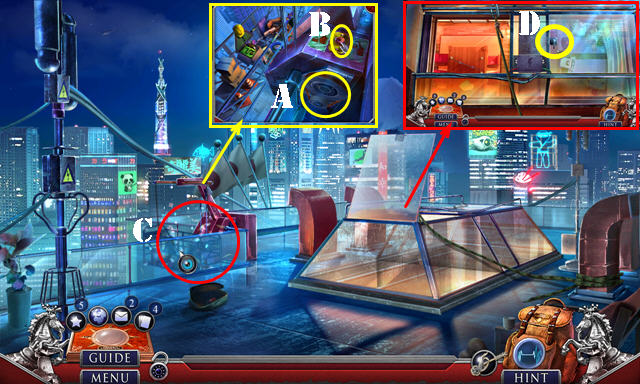
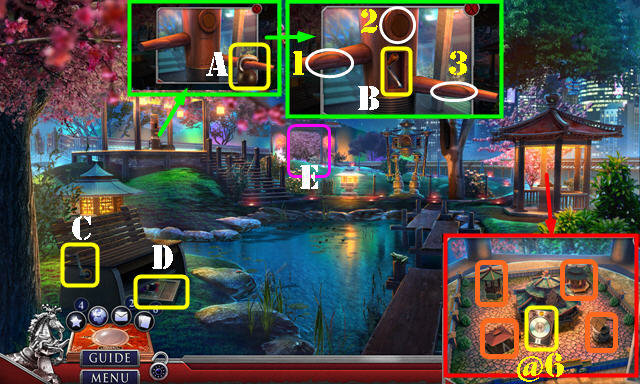
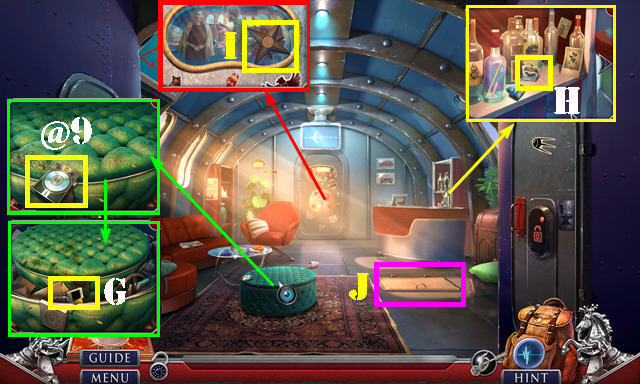
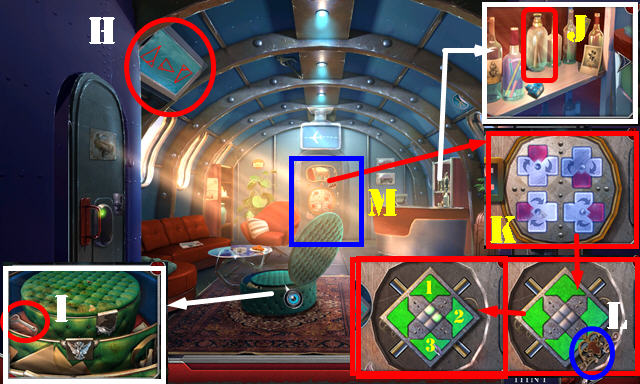
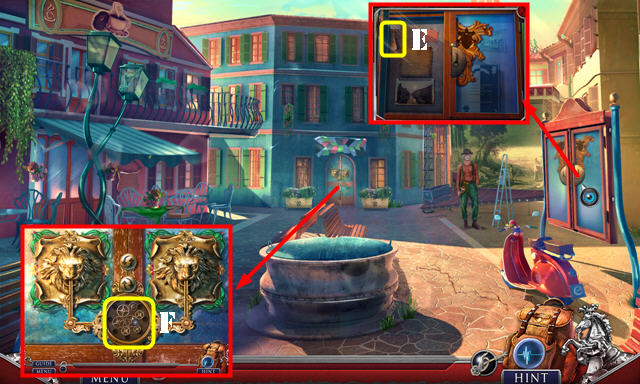
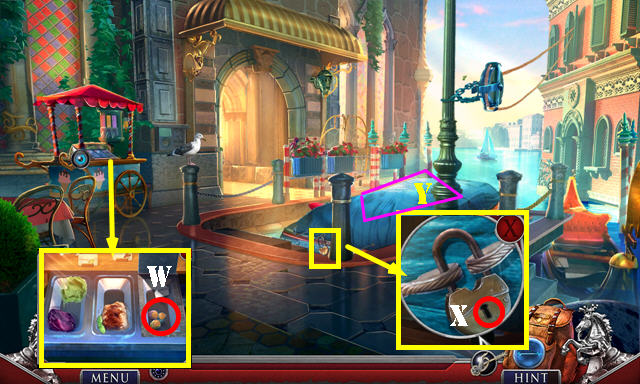
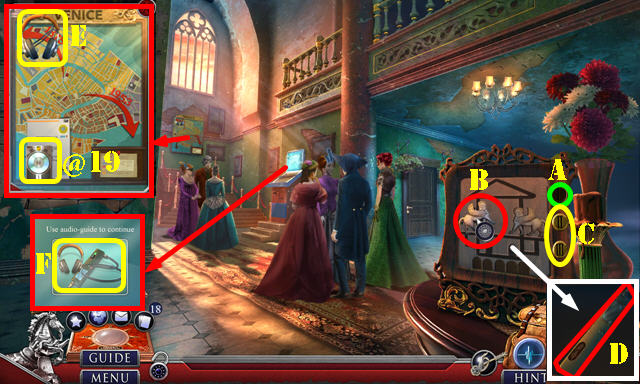
- Talk to the man (A).
- Take the H.E.L.P. Box (B) and KEYCHAIN TWEEZERS (C).
- Take the TUSK PENDANT (D); open both doors and use the KEYCHAIN TWEEZERS (orange); receive the H.E.L.P. KEY to start a puzzle.
- Enter 4365 (E).
- Enter Tayal's House (F).
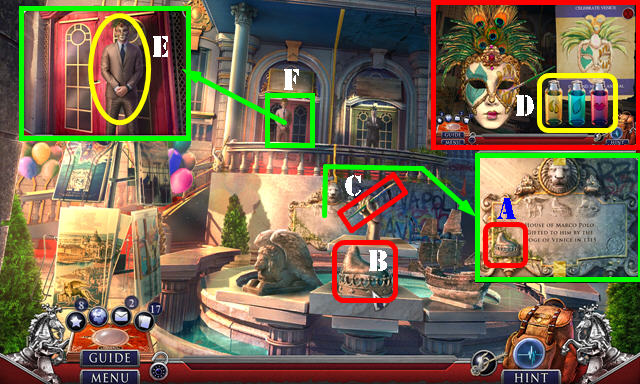
- Take the Fact Card 1/20 (@1).
- Play the HOP (G) to get the BROKEN SANDGLASS.
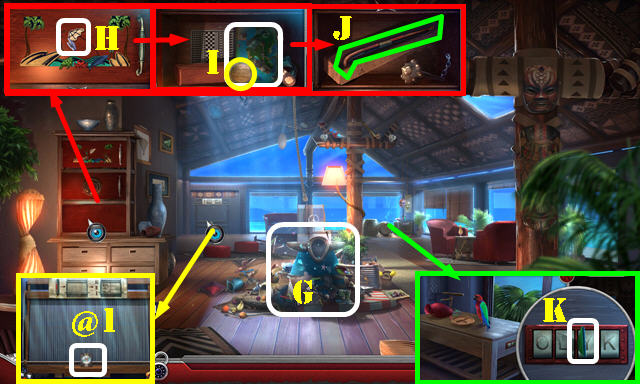
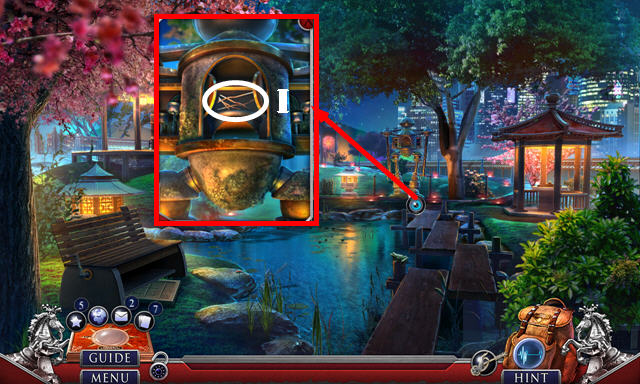
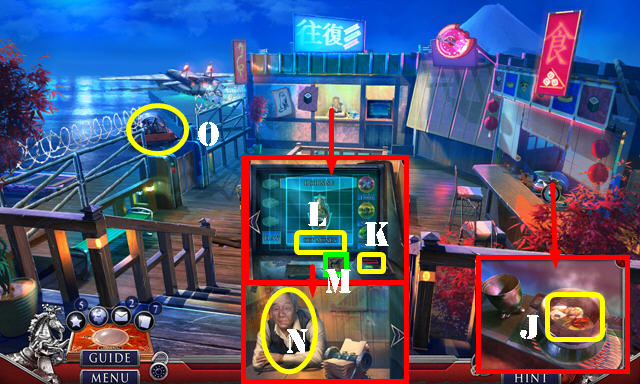
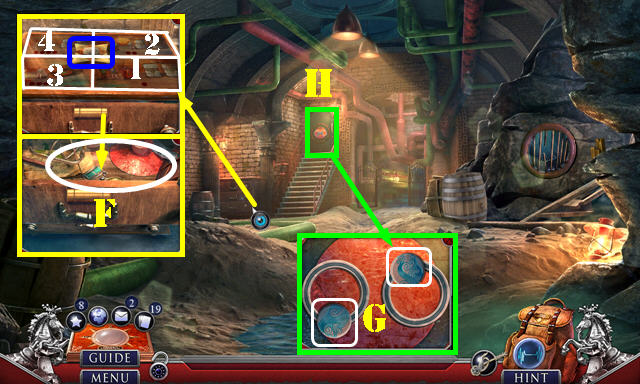
- Select the net (H). Look at the sign; take the Map and BOOMERANG (I).
- Look down; place the TUSK PENDANT; take the WAR CLUB (J).
- Take the ARROW BUTTONS 1/2 (K).
- Walk down.
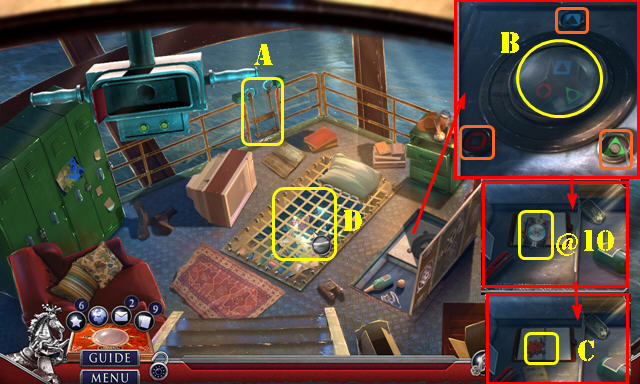
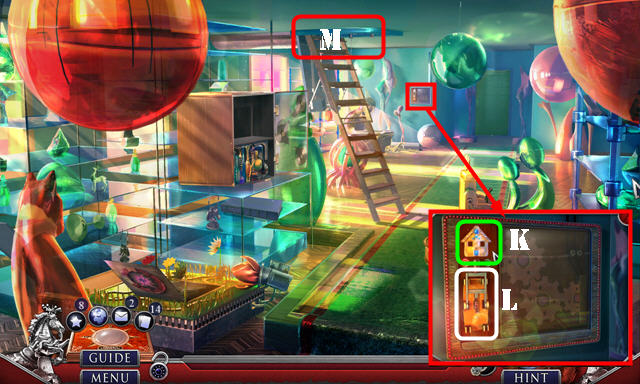
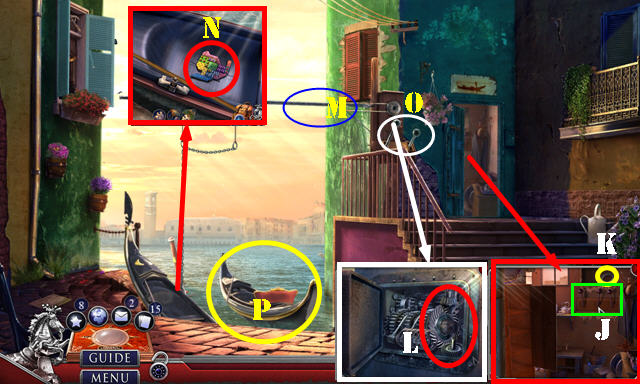
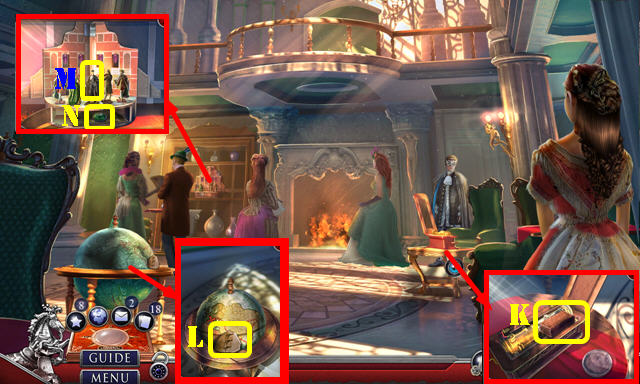
- Use the BOOMERANG (L) to receive the ELECTRICIAN'S BAG.
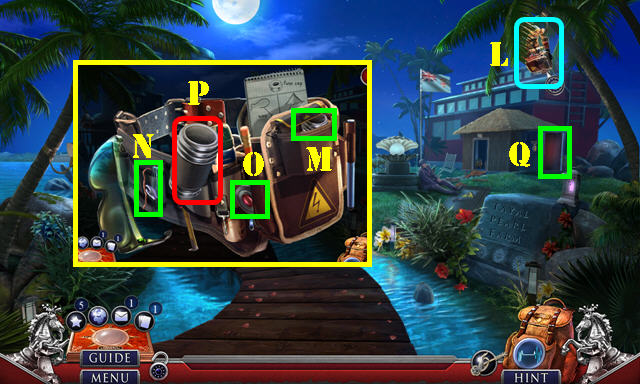
- Open the pocket in the ELECTRICIAN'S BAG; select the casing (M).
- Place the wire (N), BROKEN SANDGLASS, and cap (O) on the casing (P) to receive the FUSE.
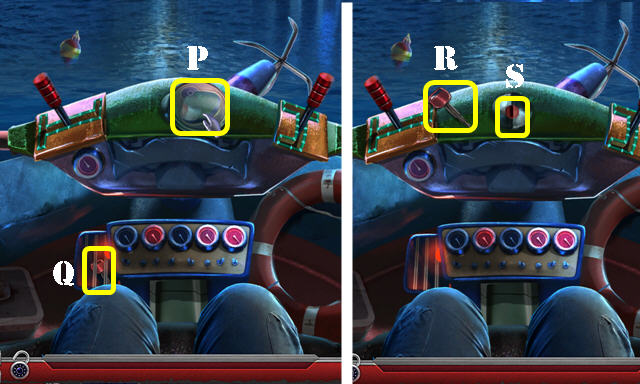
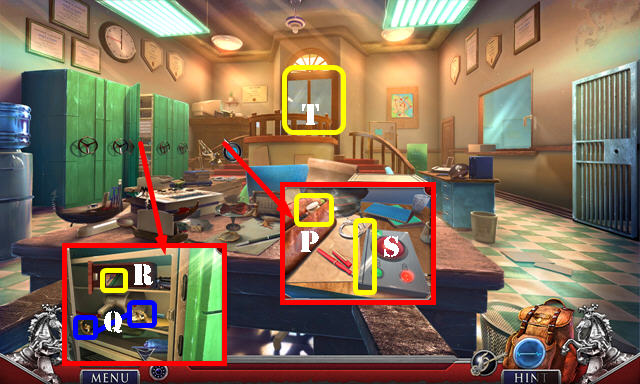
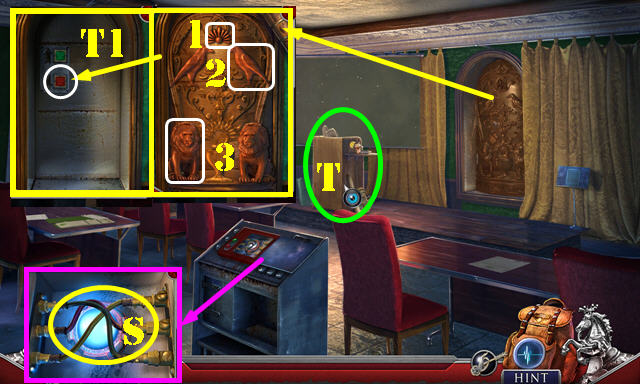
- Go to the Substation (Q).
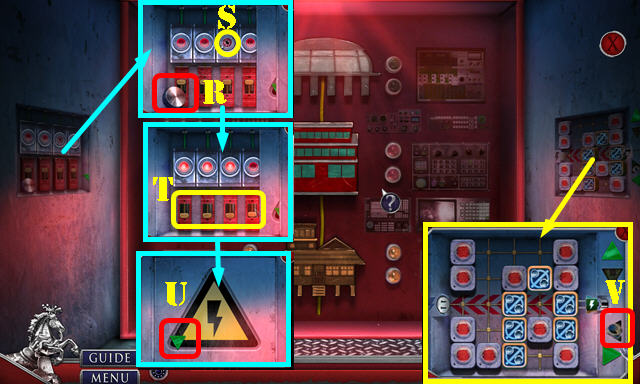
- Take the TEMPERATURE DIAL (R).
- Remove the broken fuse; place the FUSE (S).
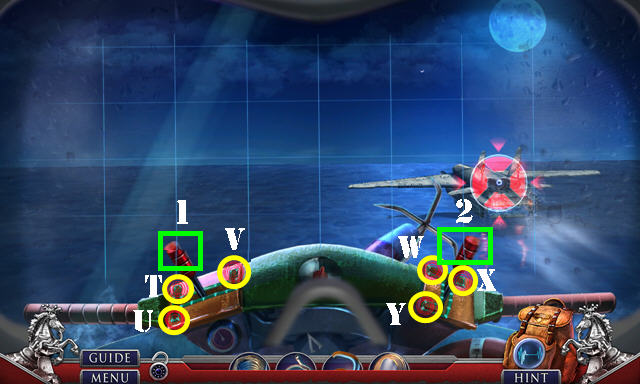
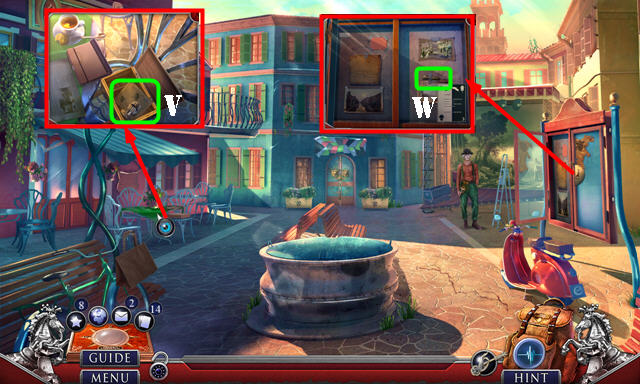
- Select the 4 buttons (T); take the ARROW BUTTONS 2/2 (U).
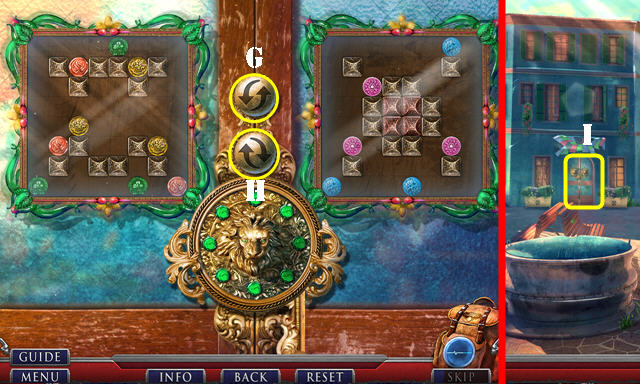
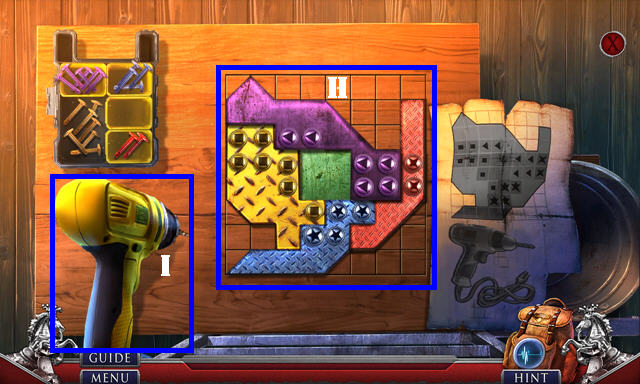
- Take the METAL NUT (V); place the ARROW BUTTONS 2/2 for a puzzle.
- Solution: A-C-A-D-B-D-B-Cx2-Ax2-D-Ax2-B-E.
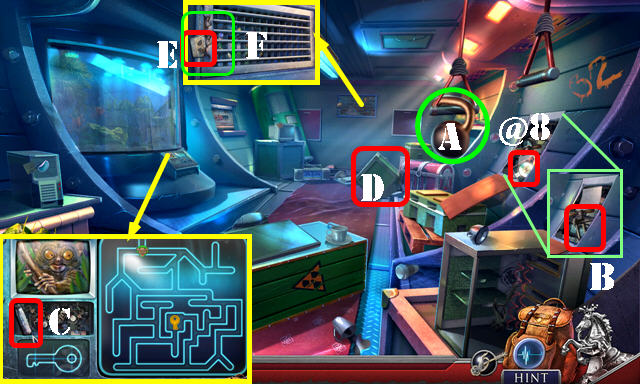
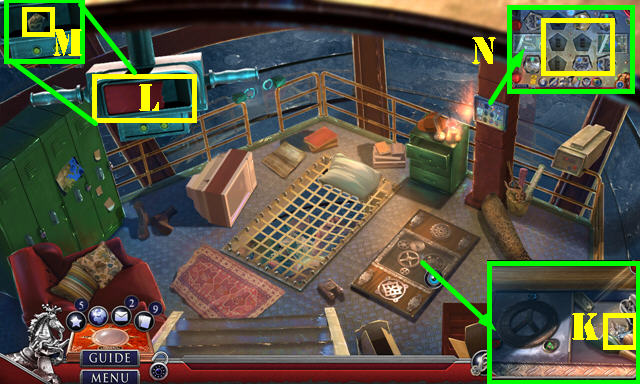
- Enter the Warehouse (E1).
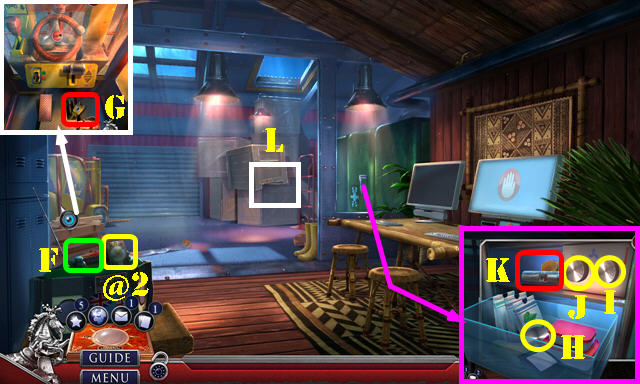
- Take the Fact Card 2/20 (@2), WEAVING SHUTTLE (F), and STUN GUN (G).
- Open the door and drawer; select the dial (H). Place the TEMPERATURE DIAL (I); select I-J.
- Open the door; take the NITROGEN TANK and SCALE TRAY (K).
- Use the WAR CLUB and select it (L). Play the HOP to get the BERRIES.
- Go to Tayal's House.
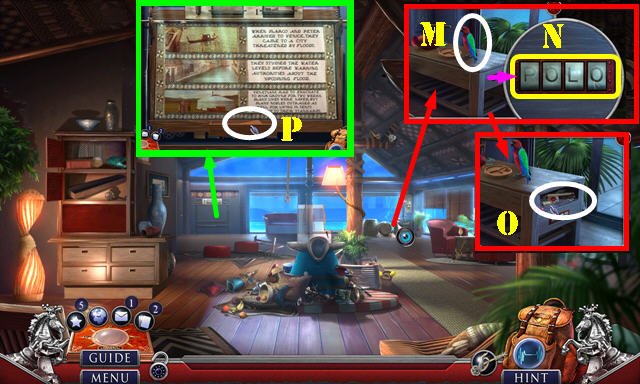
- Give the BERRIES (M). Enter POLO (N).
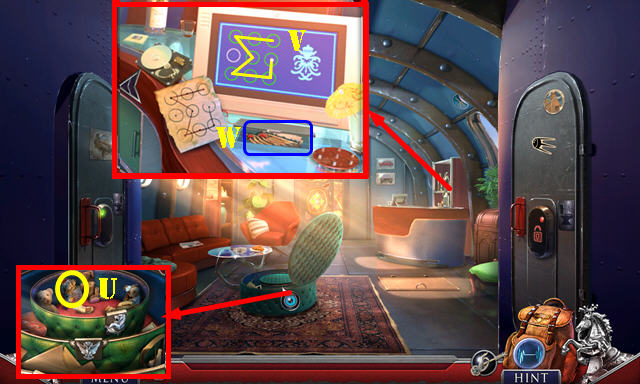
- Look at the scroll; take the NAIL FILE and ACCESS CARD (O).
- Use the WEAVING SHUTTLE; take the LOOM PEDAL (P).
- Go to the Warehouse.
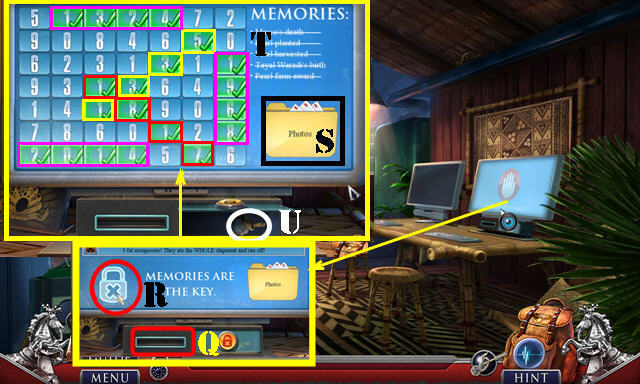
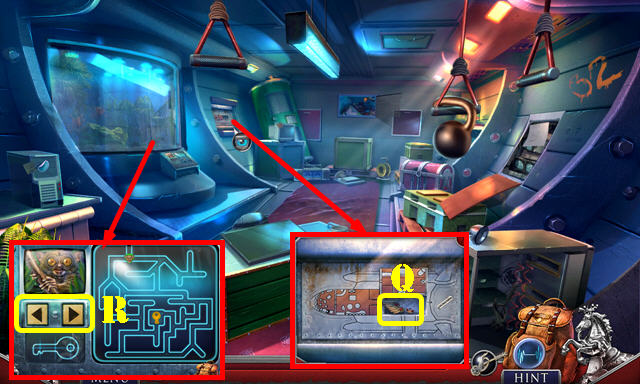
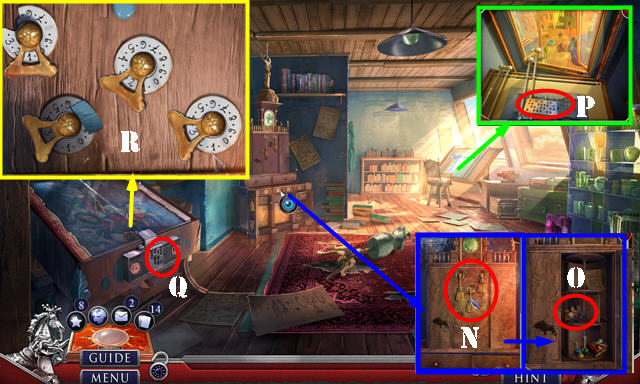
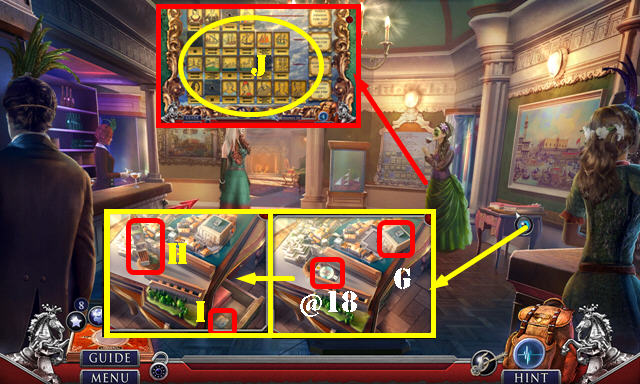
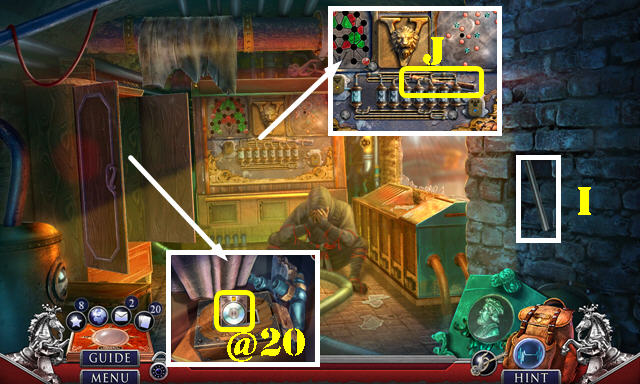
- Insert the ACCESS CARD (Q); select the lock for a puzzle (R).
- Select the photos folder (S) and scroll through.
- Solution (T): (1-3-2-4)-(1-3-3-5)-(1-8-1-7)-(1-9-6-8)-(2-0-1-4).
- Take the SWITCH (U).

- Place the LOOM PEDAL (V) and SWITCH (W). Select the switch and loom pedal.
- Pull the handle (X).
- Go to the Pearl Farm (Y).
- Take the Fact Card 3/20 (@3).
- Look at the note; use the NAIL FILE (A).
- Take the FLUTE TUBE (B). Use the tool (C).
- Place the SCALE TRAY (D) and weigh the pearls (E) on it. Place the pearls from the bowl (E) in the boxes (F).
- Use the STUN GUN (G).
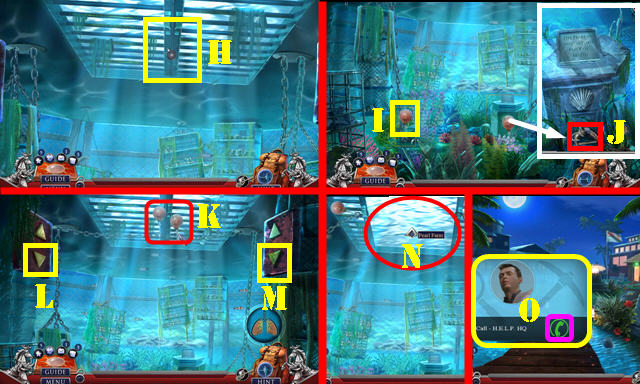
- Use the FLUTE TUBE (H).
- Select the balloon (I). Take the BENT FISHING HOOK and use the NAIL FILE (J).
- Select the two balloons (K).
- Select the two buttons (L-M).
- Go to the Pearl Farm (N) and walk down twice.
- Answer the phone (O) for a puzzle.
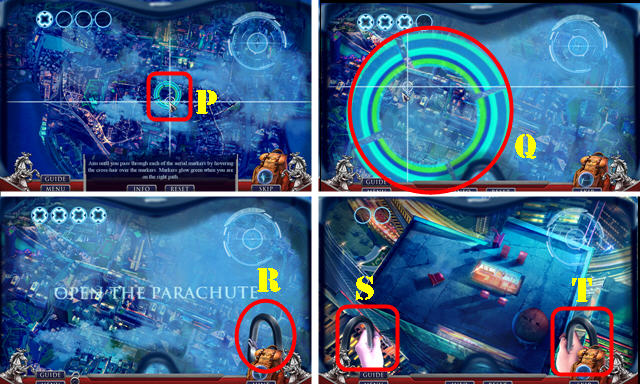
- Keep the crosshairs inside the aerial markers (P) until the markers glow green and grow large (Q). Complete four times.
- Open the parachute (R).
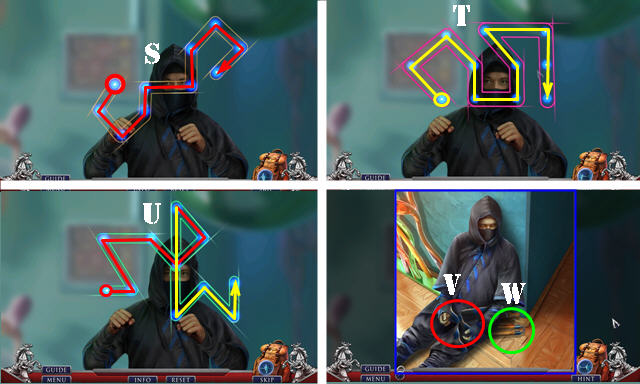
- Select: (S-T-S)-(T-S-S-T).
Chapter 2: Yatomo Industries
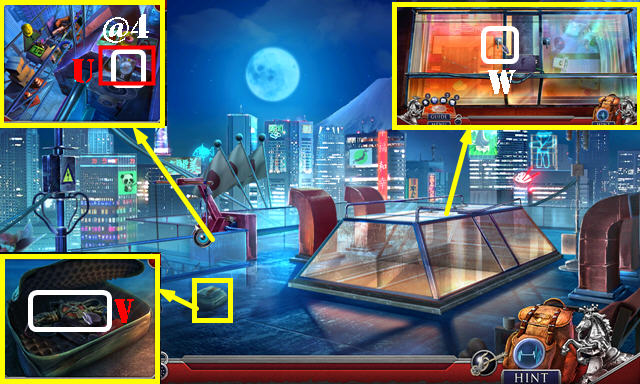
- Take the Fact Card 4/20 (@4) and EMPTY OILER (U).
- Open the case. Look at the tag and take the DROP ROPE (V).
- Pull the handle (W), use the DROP ROPE, and go to the Boardroom.

- Pick up the remote control (X); press 1 and 2.
- Look at the note; take the LEAVES EMBLEM (X1).
- Open the doors; look at the note; and take the KATANA BELT (Y).
- Go forward (Z) and walk down.
- Place the KATANA BELT (A). Press the button (B).
- Play the HOP (C) to get the SPRAY HEAD.
- Place the SPRAY HEAD on the NITROGEN TANK; receive the LIQUID NITROGEN.
- Use the LIQUID NITROGEN (D) and break off the handle. Enter the Research Lab.
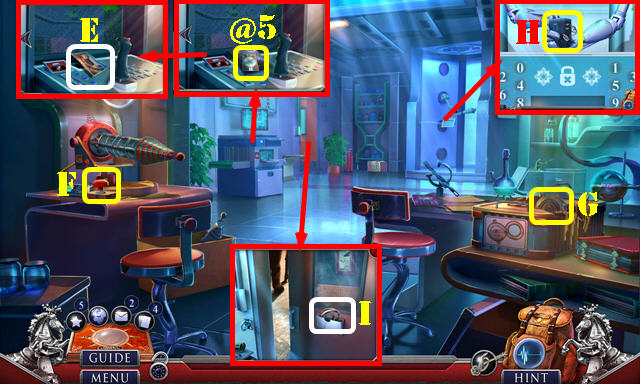
- Take the Fact Card 5/20 (@5). Look at the note; take the GARDEN POSTCARD (E).
- Press the button (F). Take the INCOMPLETE LOUPE (G).
- Take the BATTERY and FRAME (H).
- Take the EYE (I).
- Place the EYE and FRAME on the INCOMPLETE LOUPE; receive the LOUPE.
- Walk down.
- Remove the cover; place the LOUPE (J) and select the cable (K).
- Return to the Boardroom.
- Open the cover; place the BATTERY (L). Take the STRAP (M) to trigger an HOP. Play the HOP to get the CHERRY BLOSSOM EMBLEM.
- Place the CHERRY BLOSSOM EMBLEM and LEAVES EMBLEM; take the CODE BOX (N).
- Return to the Research Lab.
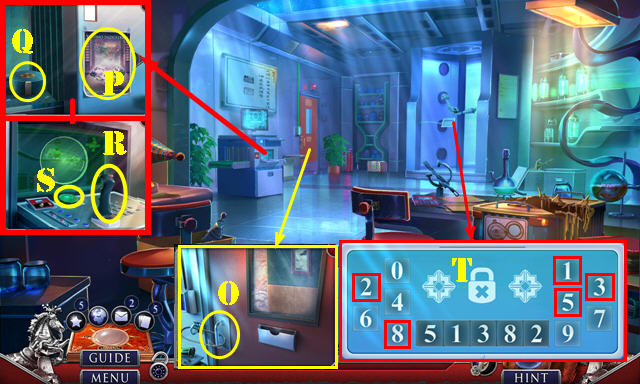
- Close the door; place the STRAP (O).
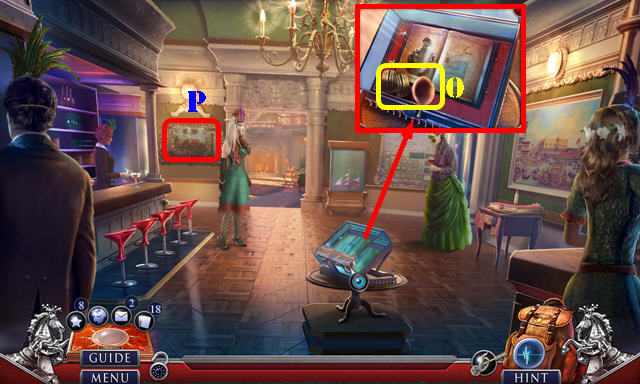
- Look left. Look at the flyer (P). Place the CODE BOX (Q).
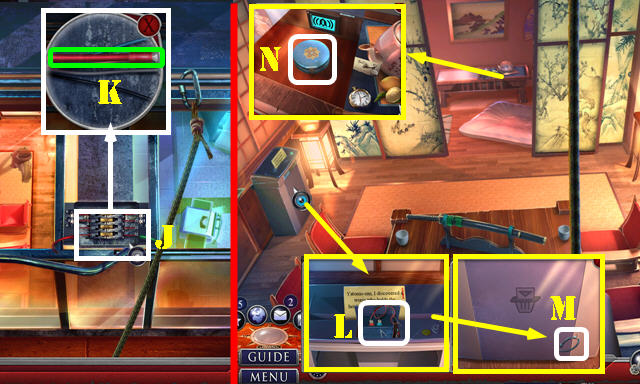
- Look right. Select the joystick (R). Press the button (S).
- Select 51382 for a puzzle (T).
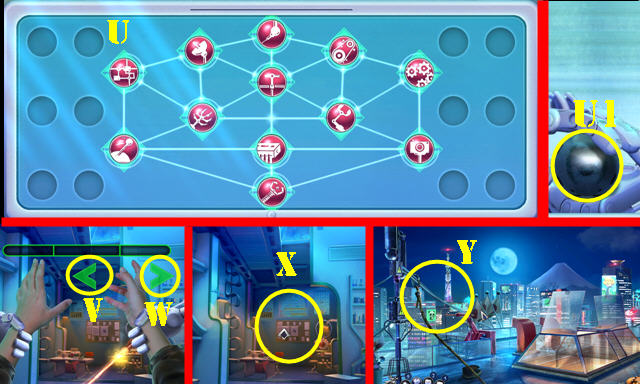
- Solution (U).Select the pearl (U1).
- Select V-W-W.
- Go forward (X) and walk down to automatically receive the ROPE.
- Use the ROPE and go down (Y).
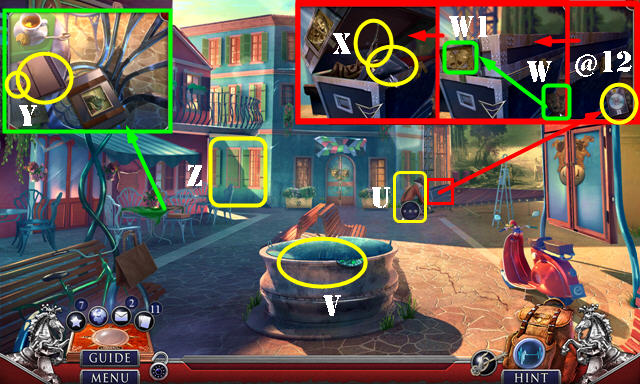
- Take the Fact Card 6/20 (@6). Place the GARDEN POSTCARD. Swap the buildings as shown for an HOP (orange). Play the HOP to get the METAL RAILS.
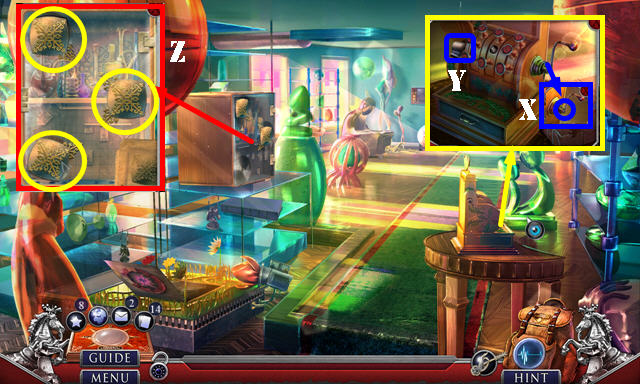
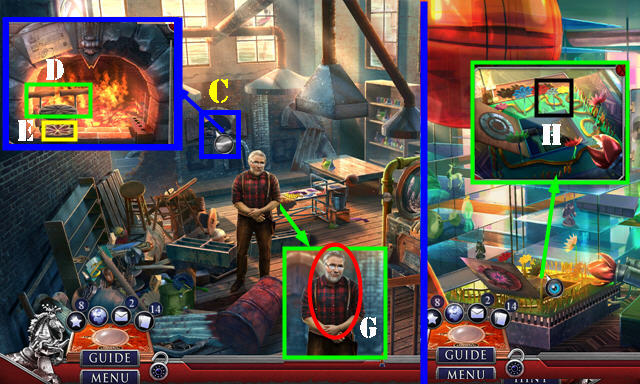
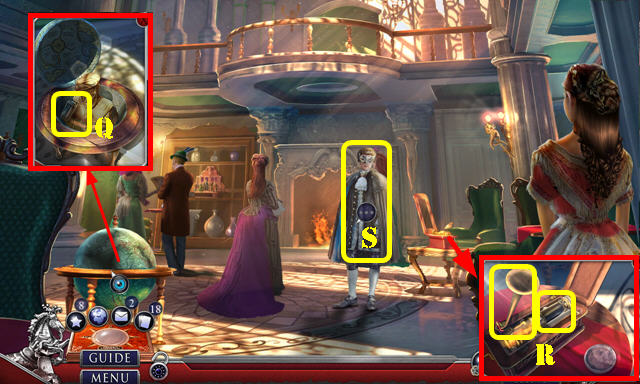
- Take the SMALL WEIGHT (A); select 1-3. Take the ROTATING HANDLE (B).
- Place the ROTATING HANDLE and select it (C); take the SOUVENIR MAGNET and NET (D).
- Go to the Pier (E).
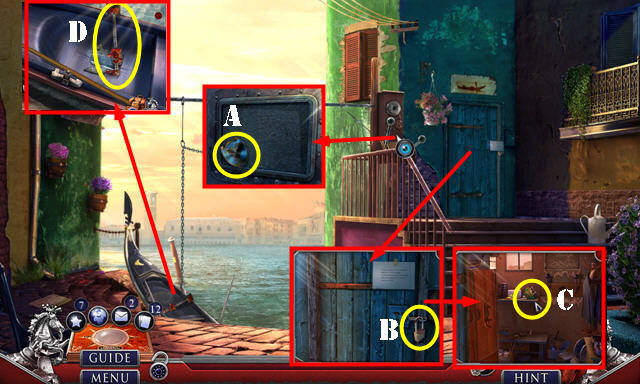
- Raise the blinds; remove the lid (F).
- Use the EMPTY OILER (G); receive the GREASE BOTTLE.
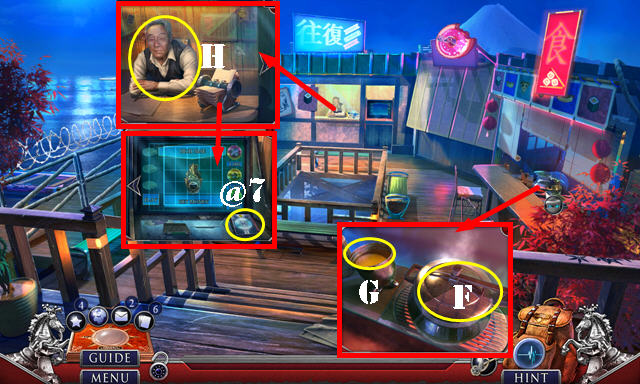
- Talk to the man (H). Look right; take the Fact Card 7/20 (@7).
- Walk down.
- Use the GREASE BOTTLE; take the SHORT WIRES (I).
- Select the METAL RAILS; place the NET and SHORT WIRES; receive the SIFTER.
- Go to the Pier.
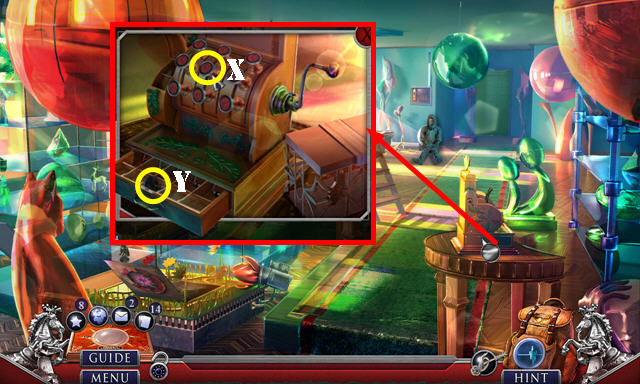
- Use the SIFTER (J); receive the ARCADE TOKEN.
- Use the ARCADE TOKEN (K). Select get money (L); take the MONEY (M).
- Look left; give the MONEY (N).
- Go to the Hovercraft (O).
- Take the GAUGE COVER (P).
- Use the SOUVENIR MAGNET (Q).
- Place the key (R) in the ignition (S) for a puzzle.
- Solution (1-V)-(2-Y)-(1-V)-(2-Y)-(1-V).
Chapter 3: Cockpit
- Place the SMALL WEIGHT (A); take the Fact Card 8/20 (@8).
- Look at the note and take the INCOMPLETE SPREADER (B).
- Place the METAL NUT on the INCOMPLETE SPREADER; receive the SPREADER.
- Take the SCREWDRIVER HANDLE (C).
- Select the crate (D); take the LEAD BAT 1/4 (E).
- Use the SPREADER (F); play the HOP to get the MANUAL. Crawl up once you complete the HOP.
- Take the Fact Card 9/20 (@9). Use the BENT FISHING HOOK; take the SNAKE CAMERA (G).
- Move the bottle; take the LEAD BAT 2/4 (H). Move two more bottles.
- Take the COMPASS ROSE (I).
- Go to Aleksey's Room (J).
- Remove the rug; place the COMPASS ROSE; take the METAL EAGLE and LEAD BAT 3/4 (K).
- Select the camera and place the SNAKE CAMERA (L); receive the DISPLAY CODE.
- Take the LEAD BAT 4/4 (M).
- Place the LEAD BAT 4/4 for a puzzle (N).
- Solution: O-P-Qx3-Rx2-S-T.
- Take the TOILET ACCESS CARD (U).
- Walk down.
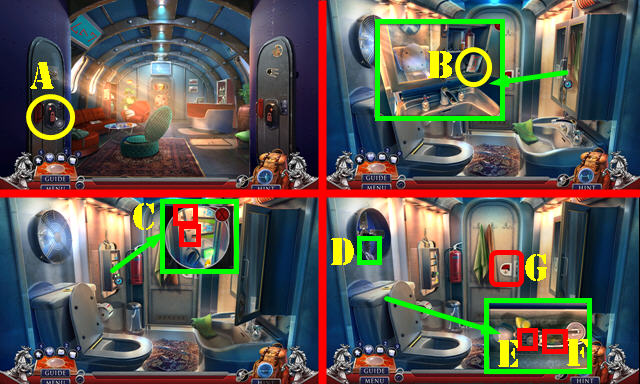
- Use the TOILET ACCESS CARD (A) to automatically enter the Lavatory.
- Open the door; take the FILM CODE and SLIDE SWITCH (B).
- Place the SLIDE SWITCH; select both switches (C).
- Remove the cover; take the FAN BLADE (D).
- Use the FAN BLADE and select the chain (E). Take the CISTERN PISTON and LAVATORY KEY (F).
- Use the LAVATORY KEY; go through the door (G).
- Place the FILM CODE (H).
- Place the METAL EAGLE; take the BOTTLE OPENER (I).
- Use the BOTTLE OPENER; look at the note and take the METAL STRAW (J).
- Place the DISPLAY CODE for a puzzle. Solution (K).
- Take the VENETIAN CROWN (L). Select 1-2-3.
- Enter the Cockpit (M).

- Place the VENETIAN CROWN (N); play the HOP to get the ANTIQUE WATCH.
- Look at the note; take the CARGO PIN (O).
- Use the CISTERN PISTON; take the TERRARIUM SWITCH (P).
- Select all the crowns on the ANTIQUE WATCH; take the RIDDLE SYMBOLS NOTE and CLOCK HAND.
- Go to the Cargo Hold.
- Place the CARGO PIN; take the GOLD WING 1/2 (Q).
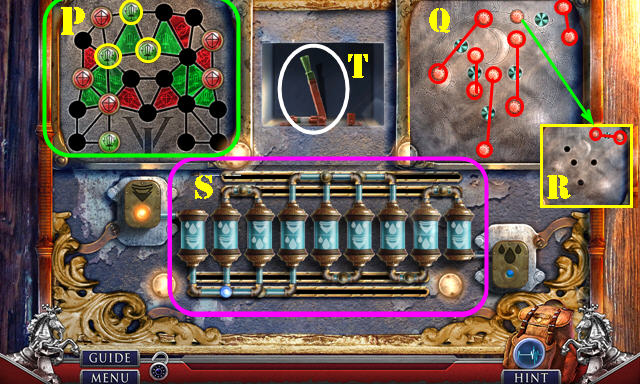
- Place the TERRARIUM SWITCH for a puzzle (R).

- Solution: T-Sx2-T-S-T-Sx2.
- Take the METAL BEAR.
- Go to the Lounge.
- Place the METAL BEAR; take the PAPERWEIGHT and UNLOCK PATTERN (U).
- Look right. Place the UNLOCK PATTERN for a puzzle. Solution (V).
- Take the GOLD WING 2/2 and RAZOR (W).
- Go to the Lavatory.
- Use the RAZOR; take the SMALL LENS (X).
- Place the GOLD WING 2/2; take the SMALL BULB and ROPE LADDER (Y).
- Go to Aleksey's Room.
- Place the ROPE LADDER (A).
- Place the SMALL LENS (B). Arrange the colored squares as shown (orange).
- Take the Fact Card 10/20 (@10). Look at the note; take the COGWHEEL and GAUGE SCREWS (C).
- Play the HOP (D) to get the INCOMPLETE GAUGE.
- Return to the Cockpit.
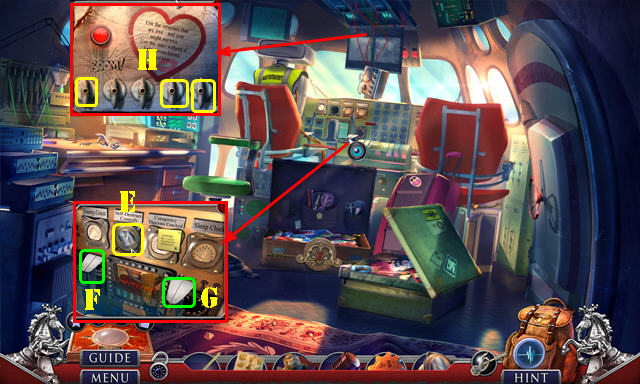
- Place the CLOCK HAND, GAUGE COVER, and GAUGE SCREWS on the INCOMPLETE GAUGE; receive the PRESSURE GAUGE.
- Place the PRESSURE GAUGE (E) and select both levers (F-G); receive the BENT LEVER.
- Place the SCREWDRIVER HANDLE, METAL STRAW, and SMALL BULB on the MANUAL; receive the ELECTRONIC TESTER.
- Use the ELECTRONIC TESTER on the marked knobs for a puzzle (H).
- Solution (I).
- Exit (J).
- Play the HOP to get the WINGED LION.
- Select the box; place the WINGED LION; take the PAPERCLIP and SPARE KEY (K).
- Use the SPARE KEY (L).
- Look at the window (M) automatically receive the SKETCH.
- Take the BENT LEVER, PAPERWEIGHT, CARLA'S INSTRUCTIONS, and COGWHEEL (N).
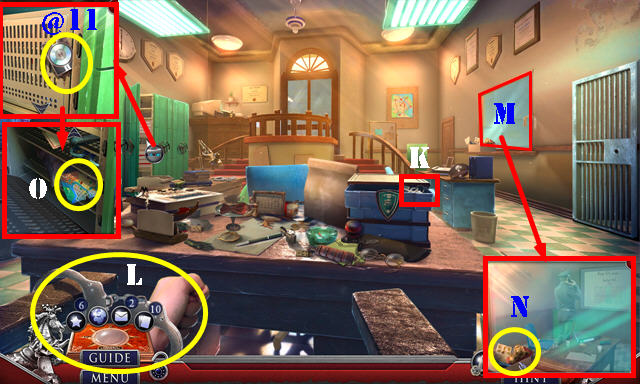
- Use the SKETCH; take the Fact Card 11/20 (@11).
- Look down and place the COGWHEEL; take the MURANO MAP and GOLDEN FIST (O).
- Place the GOLDEN FIST; take the GLUE and ACID VIAL (P).
- Look up; use the ACID VIAL. Select the two pieces (Q); take the OVERRIDE CARD (R).
- Use the OVERRIDE CARD (S).
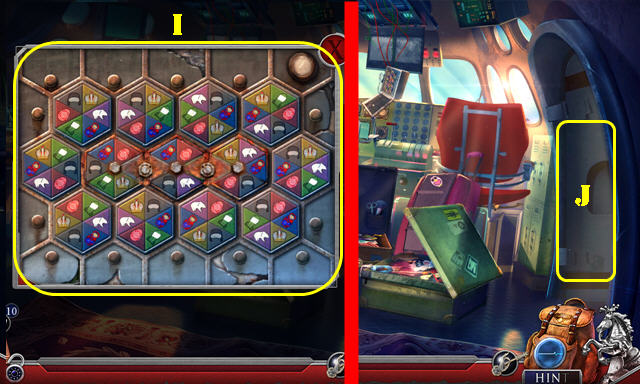
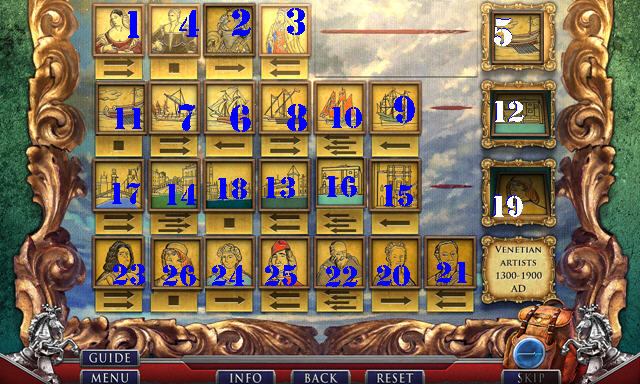
- Place the MURANO MAP and CARLA'S INSTRUCTIONS for a puzzle (T).
- Select 1-6.
Chapter 4: Murano Square
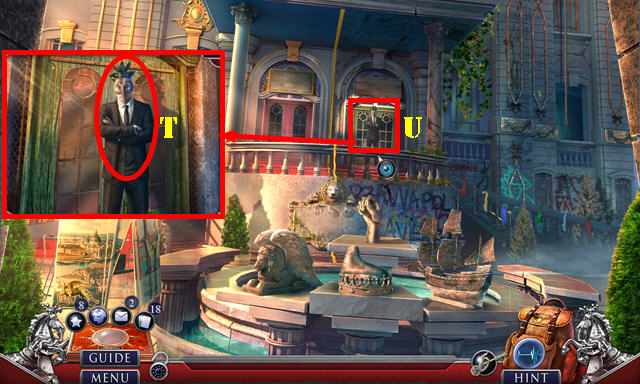
- Talk to the man (U).
- Use the BENT LEVER (V); receive the METAL DISK 1/2.
- Take the Fact Card 12/20 (@12).
- Use the GLUE (W); place the masks (W1). Take the INFLATABLE PILLOW and BUTTON HOOK (X).
- Look at the book; take the GLASS PENDANT (Y).
- Go to the Blind Alley (Z).
- Take the MURANO CREST (A) and open the door.
- Look at the note; use the PAPERWEIGHT (B). Take the METAL DISK 2/2 (C).
- Take the INCOMPLETE JACK (D).
- Walk down.
- Place the MURANO CREST; take the SMALL TASSEL (E).
- Place the METAL DISK 2/2 for a puzzle (F).
- Solution one (H-Gx2-Hx2-Gx2).
- Solution two (Hx5-Gx3-Hx2-G-H).
- Go to the Glass Shop (I).
- Take the Fact Card 13/20 (@13). Select the handle (J). Use the BUTTON HOOK (K); take the CAN OPENER (L).
- Take the HAND PUMP (M).
- Place the GLASS PENDANT; take the MECHANISM PART 1/3 (N).
- Go to the Workshop (O).
- Look right. Use the CAN OPENER; take the OLD PUNCH CARD 1/2 (P).
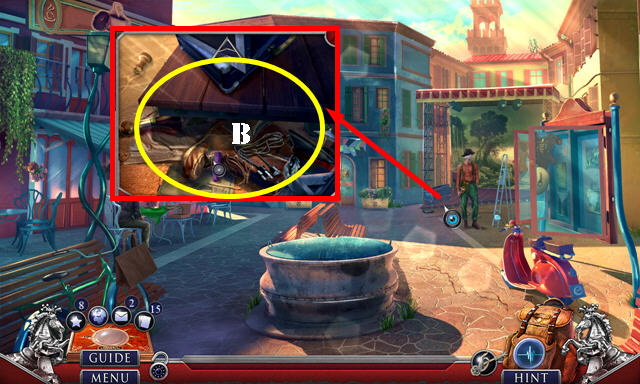
- Select the pile 3x; play the HOP (Q) to get the GLASS CUTTER.
- Talk to the man (R); receive the CABINET DECORATION.
- Take the Fact Card 14/20 (@14).
- Use the INFLATABLE PILLOW and PAPERCLIP on the HAND PUMP; receive the PILLOW PUMP.
- Use the PILLOW PUMP and select 3x. Take the DRILL CHUCK (S) and look at the instructions (T).
- Take the VENETIAN CREST (U).
- Go to Murano Square.
- Use the GLASS CUTTER; take the CABINET HINT NOTE and MECHANISM PART 2/3 (V).
- Place the VENETIAN CREST; look at the note and take the SCREW (W).
- Go to the Glass Shop.
- Place the SCREW on the handle and select it (X). Take the RECEIPT ROLL (Y).
- Place the CABINET DECORATION and CABINET HINT NOTE. Rotate the decorations as shown for a puzzle (Z).
- Solution (A).
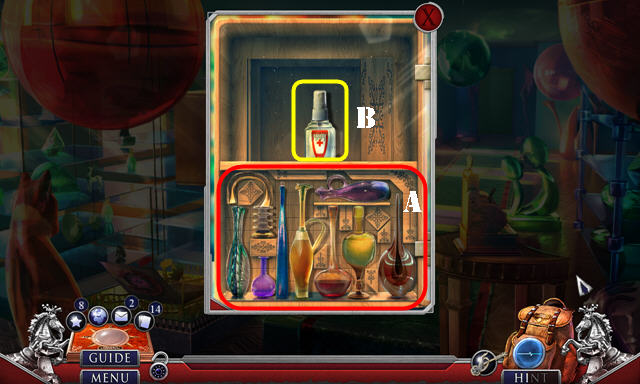
- Take the ANTISEPTIC SPRAY (B).
- Go to the Workshop.
- Use the RECEIPT ROLL in the fireplace. Select it (C) and the device (D); take the GLASS FLOWER (E).
- Use the ANTISEPTIC SPRAY (G); receive the HOUSE EMBLEM 1/2.
- Walk down.
- Place the GLASS FLOWER for a puzzle (H).

- Solution (I).
- Take the HOUSE EMBLEM 2/2 and GONDOLIER'S EMBLEM (J).
- Place the HOUSE EMBLEM 2/2 (K) and pull the handle (L).
- Go to the Attic (M).
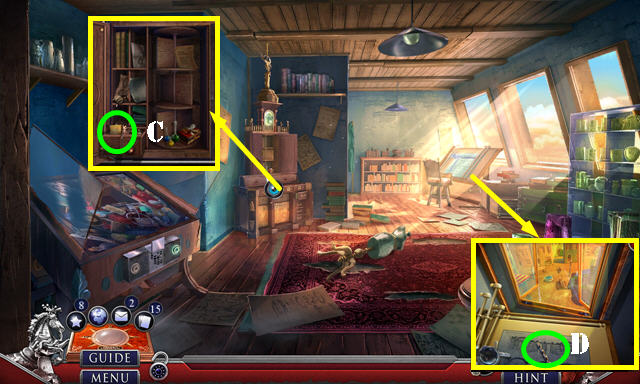
- Place the SMALL TASSEL and select all three (N). Look at the note; take the SMALL LION and REGISTER BUTTON (O).
- Take the OLD PUNCH CARD 2/2 (P).
- Place the OLD PUNCH CARD 2/2 (Q); play the HOP to get the INCOMPLETE DRILL.
- HOP puzzle solution (R).
- Walk down for a puzzle.
- Solutions (S-T-U).
- Select the arms (V). Take the NUNCHAKU (W).
- Place the REGISTER BUTTON (X); take the ROTATING KNOB (Y).
- Go to the Blind Alley.
- Use the NUNCHAKU (Z); receive the WOODEN BULL.
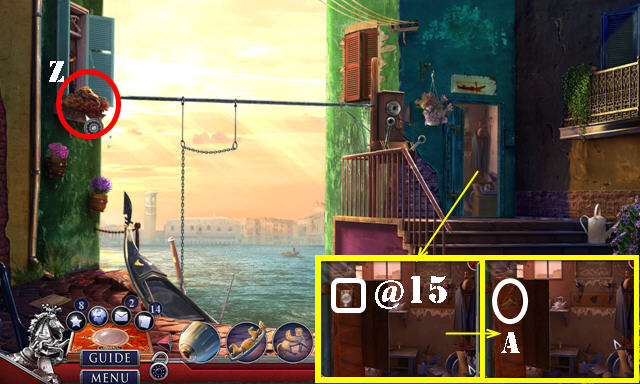
- Place the GONDOLIER'S EMBLEM; take the Fact Card 15/20 (@15).
- Take the WOODEN CONTRAPTION and JACK HANDLE (A).
- Walk down.
- Place the JACK HANDLE on the INCOMPLETE JACK; receive the SCISSOR JACK.
- Look down; use the SCISSOR JACK (B); play the HOP to get the CORD.
- Automatically receive the INCOMPLETE MASK.
- Go to the Attic.
- Place the WOODEN BULL and open the drawer; look at the note and take the DECORATIVE COMB (C).
- Place the ROTATING KNOB; take the DRILL BIT (D).
- Go to the Workshop.
- Look to the left. Use the DECORATIVE COMB (E). Take the METAL CABLE and CROWN HANGER HOOK (F).
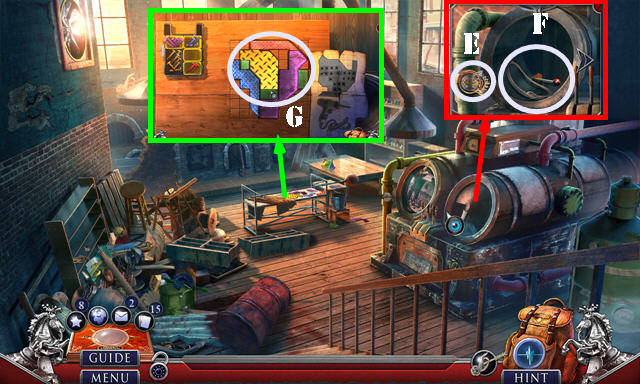
- Place the DRILL CHUCK, CORD, and DRILL BIT on the INCOMPLETE DRILL; receive the ELECTRIC DRILL.
- Use the ELECTRIC DRILL for a puzzle (G).
- Arrange as shown (H). Select the drill (I).
- Take the BOAT PATCH.
- Go to the Blind Alley.
- Place the CROWN HANGER HOOK; select all three hooks (J). Take the MECHANISM PART 3/3 (K).
- Place the MECHANISM PART 3/3 (L).
- Use the METAL CABLE (M).
- Place the BOAT PATCH (N).
- Pull the handles (O).
- Go to Venice (P).
Chapter 5: Venice
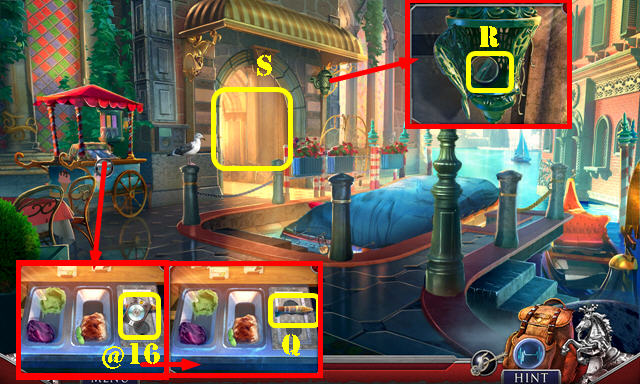
- Take the Fact Card 16/20 (@16) and VENETIAN MODEL (Q).
- Select the three hooks; take the SMALL THERMOMETER 1/2 (R).
- Go to the Masquerade Entrance (S).
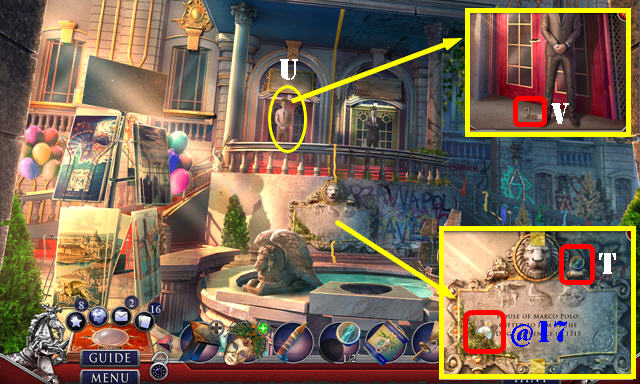
- Take the Fact Card 17/20 (@17) and SMALL THERMOMETER 2/2 (T).
- Talk to the man (U); receive the PAMPHLET. Take the BOAT KEY (V).
- Walk down.
- Place the SMALL THERMOMETER 2/2; take the ICE-CREAM DYE (W).
- Insert the BOAT KEY (X); play the HOP (Y) to get the STEEL WOOL.
- Go to the Masquerade Entrance.
- Use the STEEL WOOL; take the DOGE'S CROWN (A).
- Place DOGE'S CROWN (B). Take the PAINTBRUSH (C).
- Place the PAMPHLET, ICE-CREAM DYE, and PAINTBRUSH on the INCOMPLETE MASK. Select each dye (D); receive the CELEBRATION MASK.
- Give the CELEBRATION MASK (E).
- Go to the Day Party (F).
- Take the Fact Card 18/20 (@18). Select the building (G).
- Place the VENETIAN MODEL (H). Take the MINIATURE TILE (I).
- Place the MINIATURE TILE for a puzzle (J).
- Solution (1-26).
- Take the MASKED DANCER.
- Go forward.
- Take the BRICK 1/3 (K) and QUOTE PLAQUE (L).
- Place the MASKED DANCER (M); take the MEDIEVAL PARTS 1/4 and MOTIFS LIST (N).
- Walk down.
- Place the QUOTE PLAQUE; take the CYLINDER CAPS and PHONOGRAPH HORN (O).
- Use the MOTIFS LIST (P). Play the HOP to get the MINIATURE FLAG.
- Go to the Ballroom.
- Place the MINIATURE FLAG; take the PHONOGRAPH CYLINDER (Q).
- Place the PHONOGRAPH HORN and PHONOGRAPH CYLINDER (R).
- Talk to the man (S); receive the DARK MASK.
- Go to the Masquerade Entrance.
- Talk to the man; give him the DARK MASK (T).
- Enter the Night Party (U).
- Press the button (A); place the SMALL LION (B).
- Press the two buttons (C); look at the note and take the AUDIO GUIDE (D).
- Take the Fact Card 19/20 (@19) and look at the note. Take the HEADPHONES (E).
- Put the HEADPHONES on the AUDIO GUIDE and select it.
- Use the AUDIO GUIDE for a puzzle (F).
- Solution: H-I-G-J-H-I-K-J-G-H-I-J-G-K-H-I.
- Take the ELECTRICAL SYMBOL.
- Go to the Auditorium (L).
- Take the BRICK 2/3 (M).
- Place the ELECTRICAL SYMBOL; take the FOUNTAIN PEN and POINTING ARROW (N).
- Walk down.
- Place the POINTING ARROW (O); take the SMALL BELLOWS and BRICK 3/3 (P).
- Place the BRICK 3/3 (Q); take the RUBBER GLOVES (R).
- Go to the Auditorium.
- Use the RUBBER GLOVES (S).
- Play the HOP (T) to get the UNFINISHED CYLINDER.
- Use the CYLINDER CAPS on the UNFINISHED CYLINDER; take the PATTERN CYLINDER.
- Open the curtains. Place the PATTERN CYLINDER; select 1-3.
- Press the red button (T1) for a puzzle.
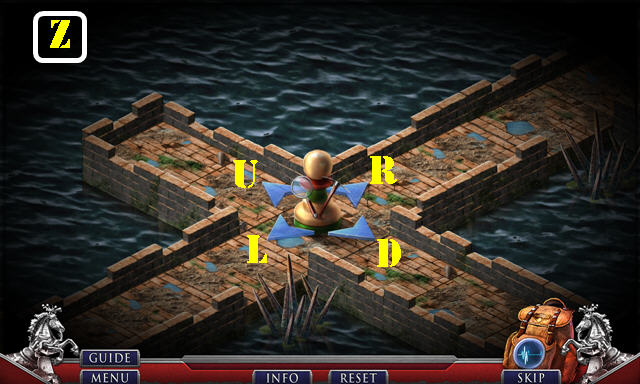
- Solution (Z): (U-R-Lx3-U-R-D-Ux2-R-L).
- (U-R-Dx2-R-L-Ux3-L-U-D-Rx2-D-R).
- Take the METAL ROD 1/4 (A).
- Use the FOUNTAIN PEN; receive the ENDLESS KNOT (B).
- Go to Marco's Machinery (C).
- Place the ENDLESS KNOT. Look at the note; take the MEDIEVAL PARTS 2/4 and MARCO POLO MEDALLION (D).
- Look at the note; place the SMALL BELLOWS; take the METAL ROD 2/4 and TILES (E).
- Walk down.
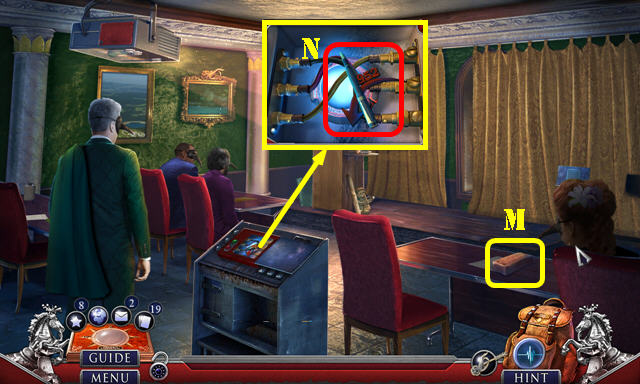
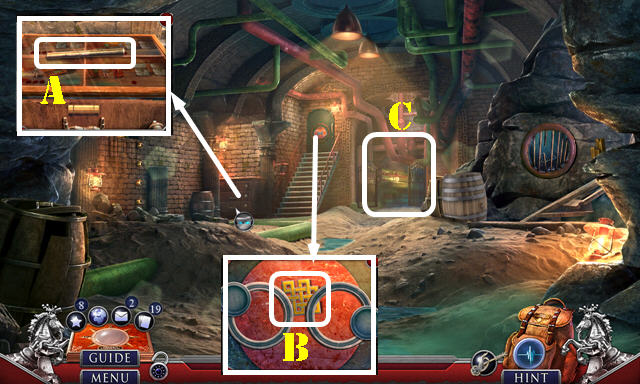
- Place the TILES on the WOODEN CONTRAPTION; take the WOODEN KEY.
- Use the WOODEN KEY (blue); select 1-4. Play the HOP (F) to get the CONTROL ROOM DISKS.
- Place the CONTROL ROOM DISKS (G).
- Enter the Control Room (H).
- Open the door; take the Fact Card 20/20 (@20).
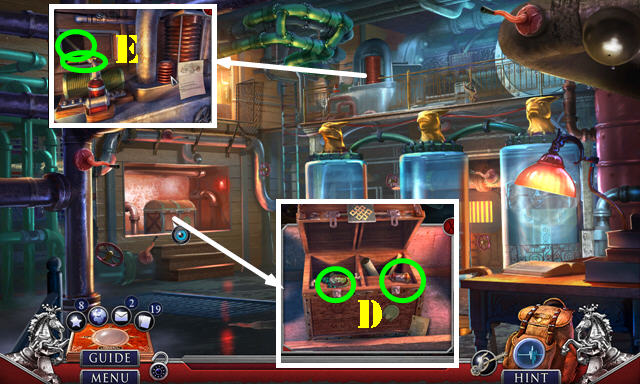
- Place the MARCO POLO MEDALLION and select it; take the METAL ROD 3/4 (I).
- Take the CHISEL (J).
- Walk down.
- Use the CHISEL; receive the METAL ROD 4/4. Take the MEDIEVAL PARTS 3/4 (K).
- Place the METAL ROD 4/4 (L); take the PASSWORD WHEEL (M).
- Go to the Control Room.
- Place the PASSWORD WHEEL; select twice. Take the MEDIEVAL PARTS 4/4 (N).
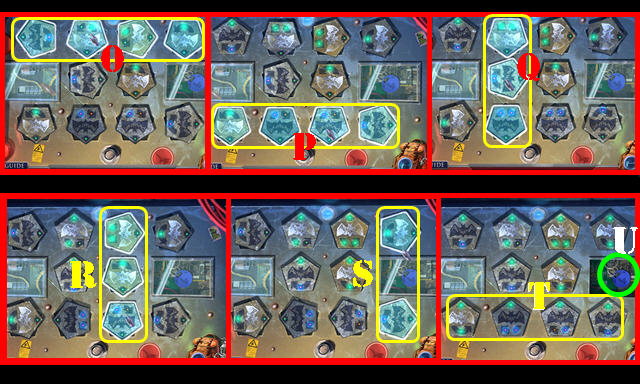
- Place the MEDIEVAL PARTS 4/4 for a puzzle (O).
- Place the colored marbles next to polygons of the same color to remove the polygons from the field. Solution is random (P).
- Select the spheres as shown (Q-R).
- Set the connectors on the tanks as shown (S).
- Pull the lever (T).
- Go to Marco's Machinery for an HOP.
- Play the HOP (U).
- Congratulations, you've completed Hidden Expedition: The Pearl of Discord!
Created at: 2017-05-07