

Walkthrough Menu
- General Tips
- Chapter 1: Howlville Entrance
- Chapter 2: Hotel Exterior
- Chapter 3: The Hotel
- Chapter 4: The Cafe
- Chapter 5: The Church and Lab
General Tips
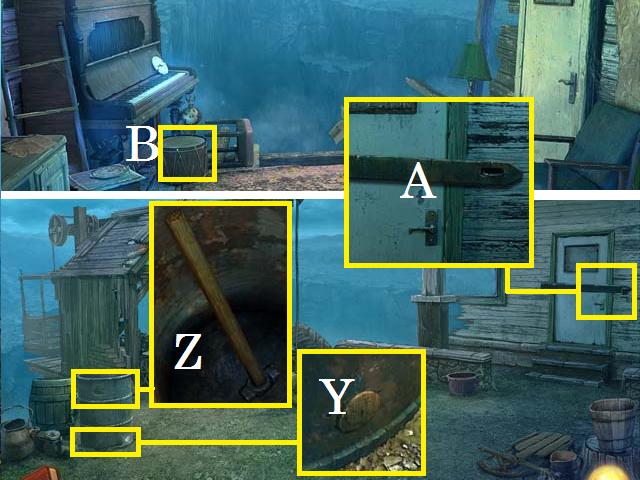
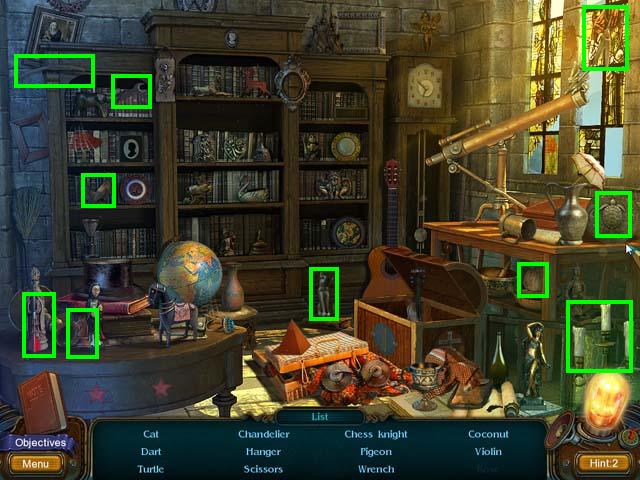
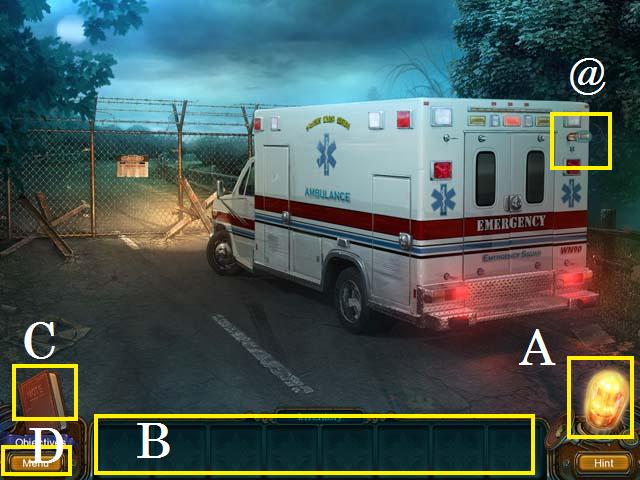 • This is the official guide for Howlville: The Dark Past. •
If you get stuck in your game play, you can use the Hint
Button (A). • You can gain 19 extra hints by collecting Lamps
throughout the game. All Lamps are marked with an (@) in this
walkthrough. If you are out of hints, you can wait for the
meter to refill. • Your inventory bar (B) will hold items
until they are needed. • In this guide we will use the acronym
‘HOS’ for Hidden Object Scenes. • For extra help use the
journal (C). • Click on the Menu (D) button to exit, pause or
resume the game. You can also adjust your options (sound,
music, and screen size).
• This is the official guide for Howlville: The Dark Past. •
If you get stuck in your game play, you can use the Hint
Button (A). • You can gain 19 extra hints by collecting Lamps
throughout the game. All Lamps are marked with an (@) in this
walkthrough. If you are out of hints, you can wait for the
meter to refill. • Your inventory bar (B) will hold items
until they are needed. • In this guide we will use the acronym
‘HOS’ for Hidden Object Scenes. • For extra help use the
journal (C). • Click on the Menu (D) button to exit, pause or
resume the game. You can also adjust your options (sound,
music, and screen size).
Chapter 1: Howlville Entrance
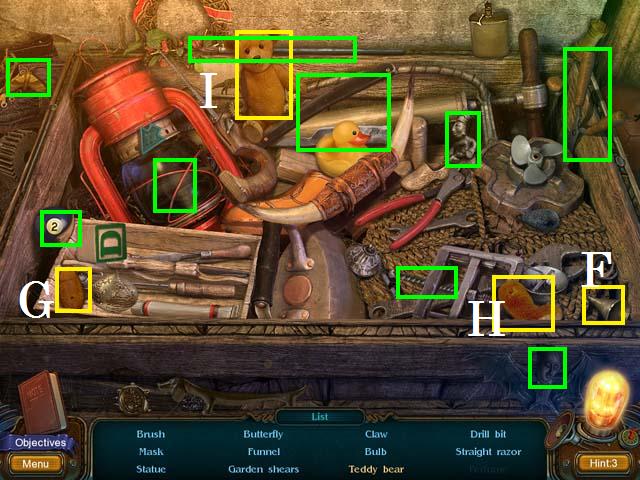
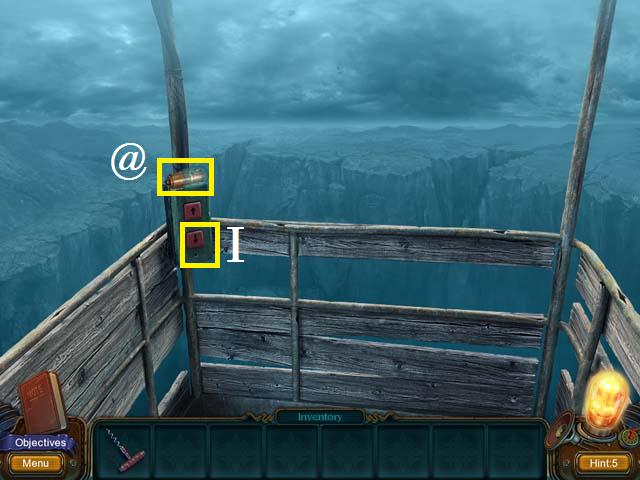
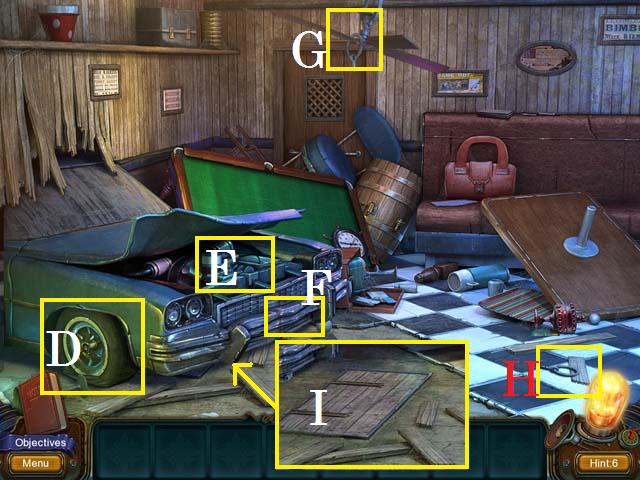
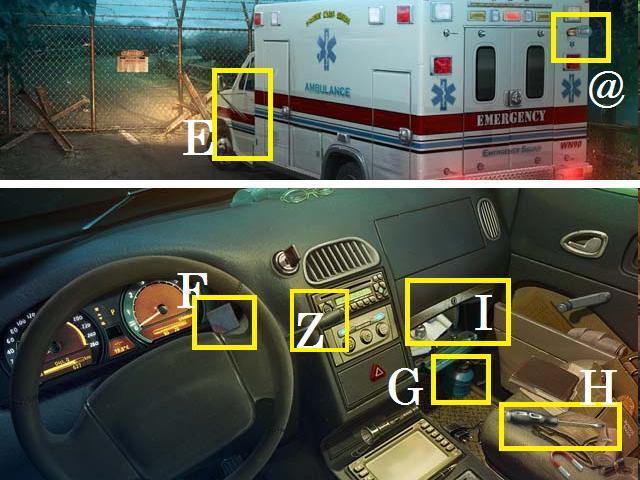 • Pick up the first Lamp (@). • Open the ambulance door (E)
and enter the cab. • Put the car in drive (Z). • Turn the
steering wheel to reveal the first PUZZLE PIECE (F). • Pick up
the OILER (G). • Move the items and pick up the SCREWDRIVER
(H). • Use the SCREWDRIVER to open the glove box (I). Zoom
into the glove box to trigger a HOS.
• Pick up the first Lamp (@). • Open the ambulance door (E)
and enter the cab. • Put the car in drive (Z). • Turn the
steering wheel to reveal the first PUZZLE PIECE (F). • Pick up
the OILER (G). • Move the items and pick up the SCREWDRIVER
(H). • Use the SCREWDRIVER to open the glove box (I). Zoom
into the glove box to trigger a HOS.
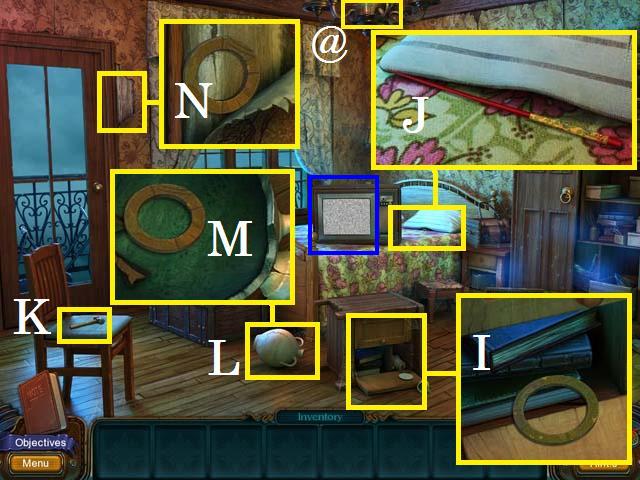
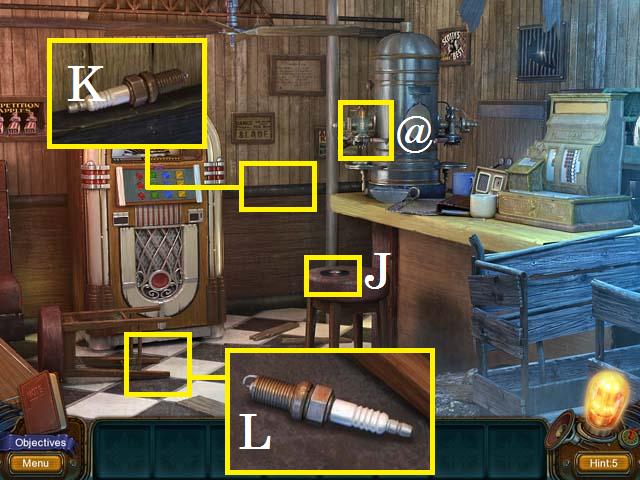
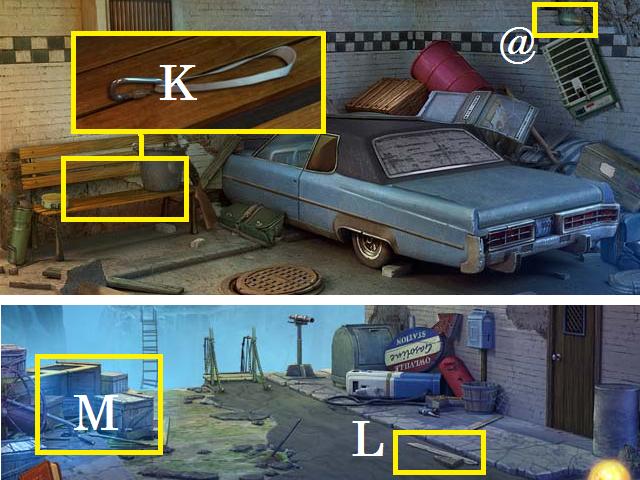
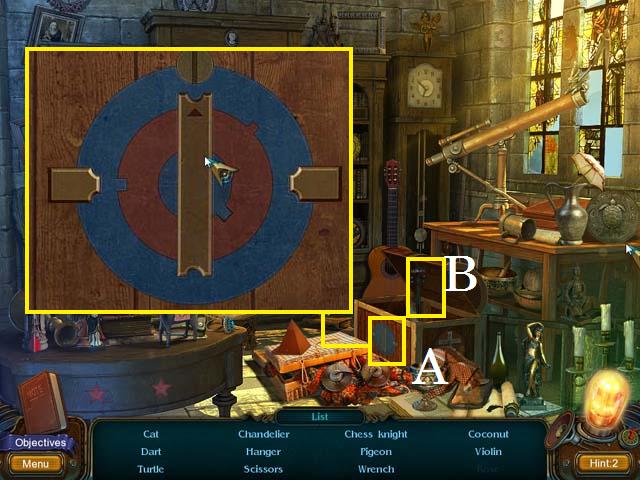
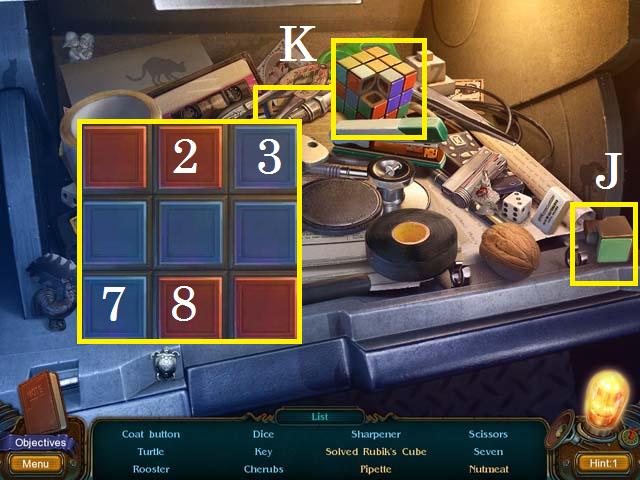 • Place the Rubik’s cube piece (J) on the cube (K) and zoom
in. Use the following sequence to get the Solved Rubik’s Cube:
2, 3, 8, and 7.
• Place the Rubik’s cube piece (J) on the cube (K) and zoom
in. Use the following sequence to get the Solved Rubik’s Cube:
2, 3, 8, and 7.
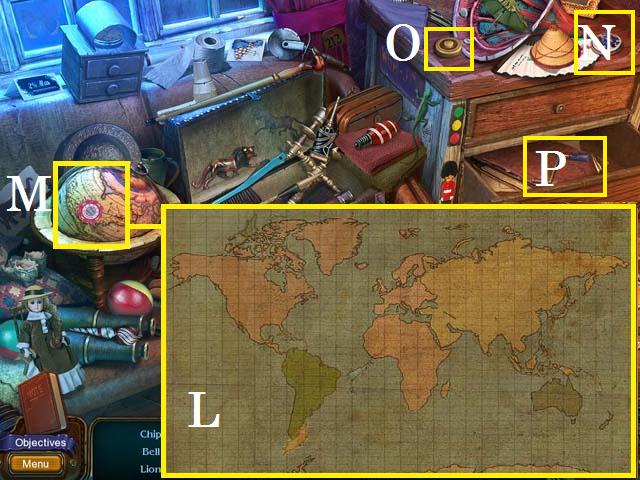
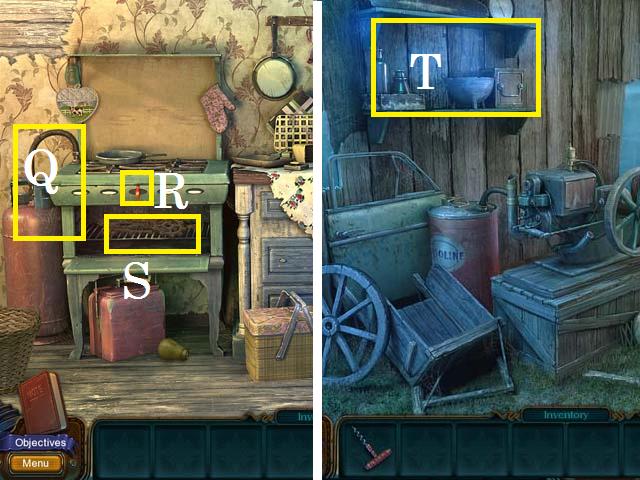
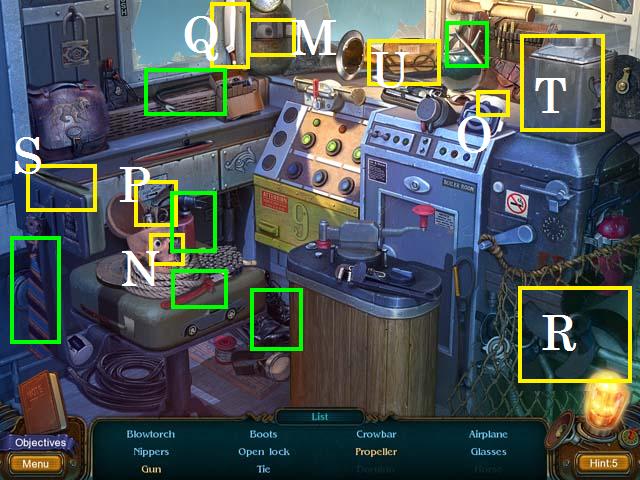
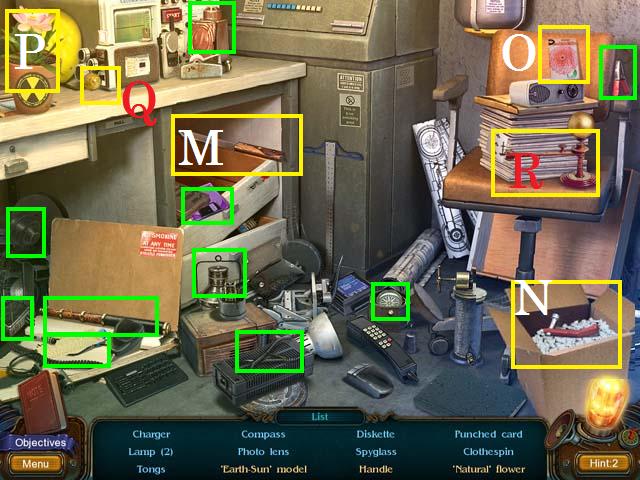
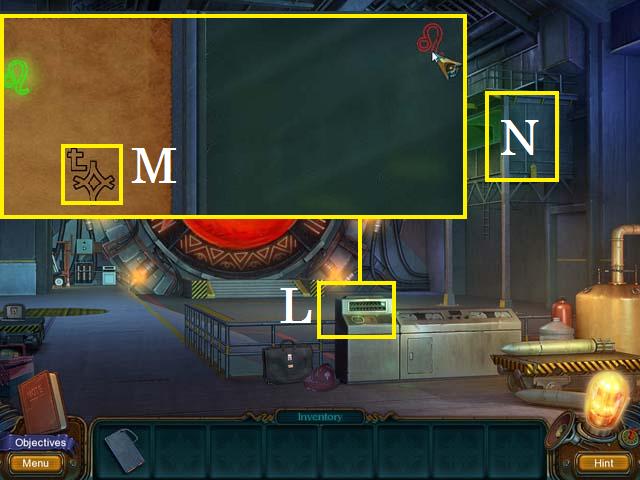
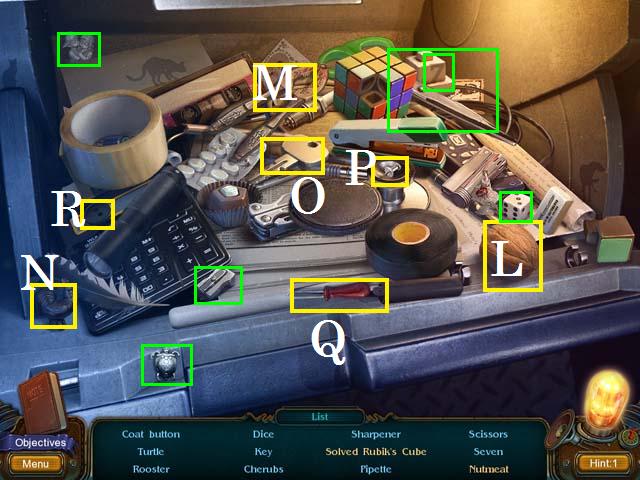 • Crack the nut (L) with the nutcracker (M) to get the
Nutmeat. • Move the chocolates to reveal the Rooster (N). •
Move the compact to reveal the Key (O). • Use the thumbtack
(P) to open the case and reveal the Pipette (Q). • Move the
flashlight to reveal the Coat Button (R). • Pick up the
remaining items (green) to receive THE KEY.
• Crack the nut (L) with the nutcracker (M) to get the
Nutmeat. • Move the chocolates to reveal the Rooster (N). •
Move the compact to reveal the Key (O). • Use the thumbtack
(P) to open the case and reveal the Pipette (Q). • Move the
flashlight to reveal the Coat Button (R). • Pick up the
remaining items (green) to receive THE KEY.
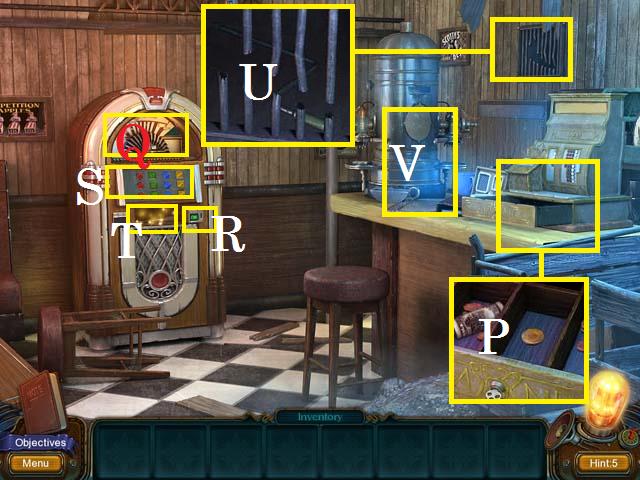
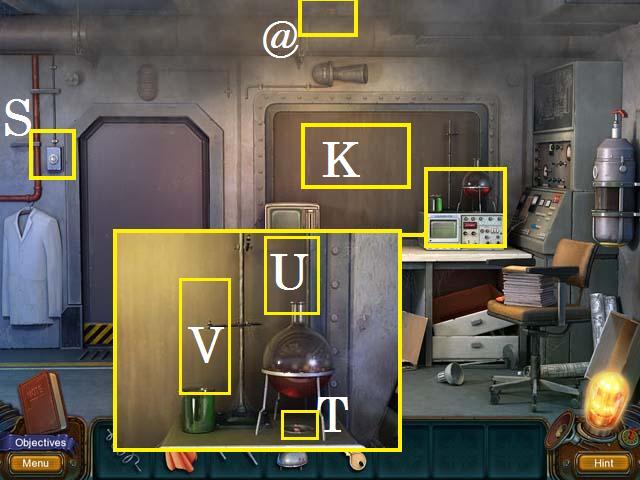
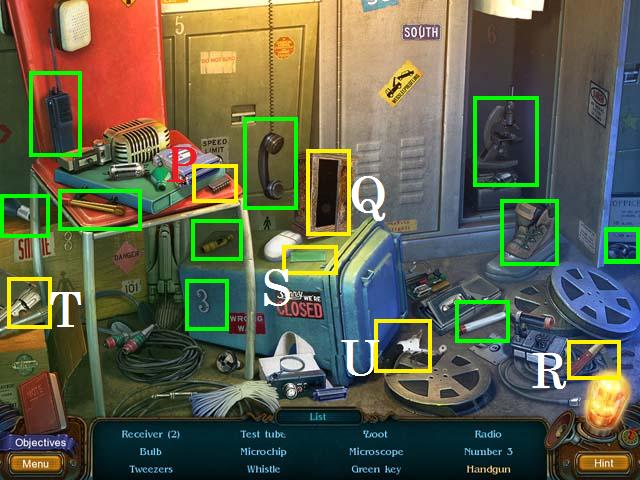
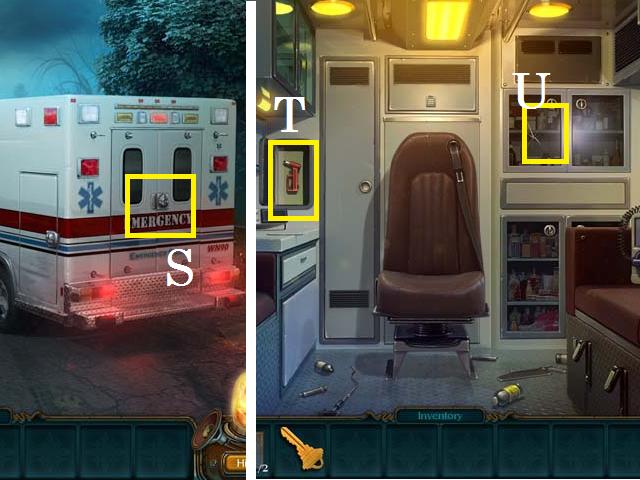 • Exit the ambulance and open the back door (S) with THE KEY.
Enter the back. • Open the small cabinet; pick up the HAMMER
FOR EMERGENCY ESCAPE (T). • Use the HAMMER FOR EMERGENCY
ESCAPE on the cracked glass (U) and zoom into trigger a HOS.
• Exit the ambulance and open the back door (S) with THE KEY.
Enter the back. • Open the small cabinet; pick up the HAMMER
FOR EMERGENCY ESCAPE (T). • Use the HAMMER FOR EMERGENCY
ESCAPE on the cracked glass (U) and zoom into trigger a HOS.
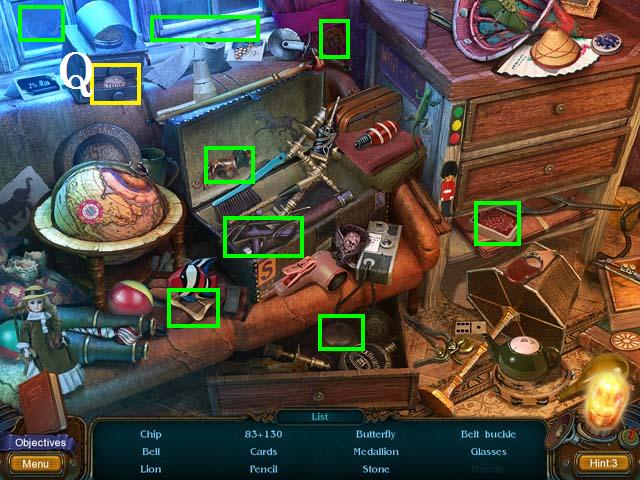
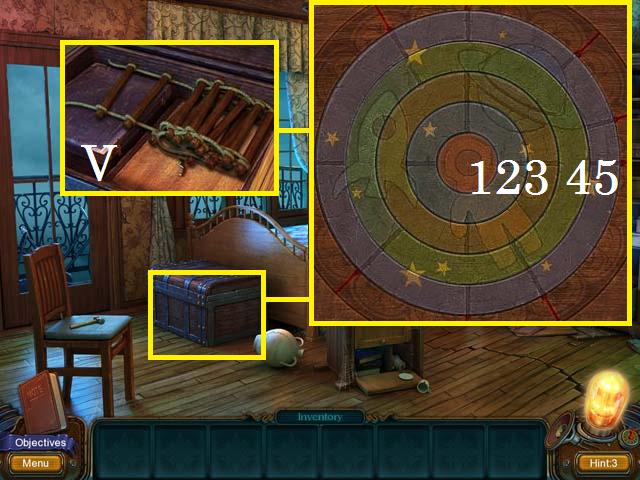
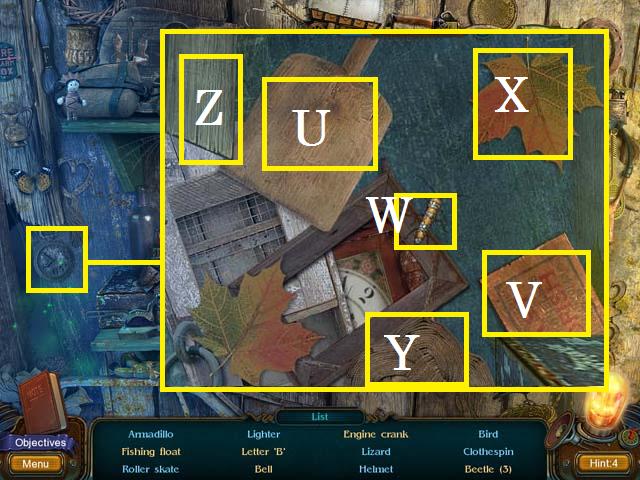
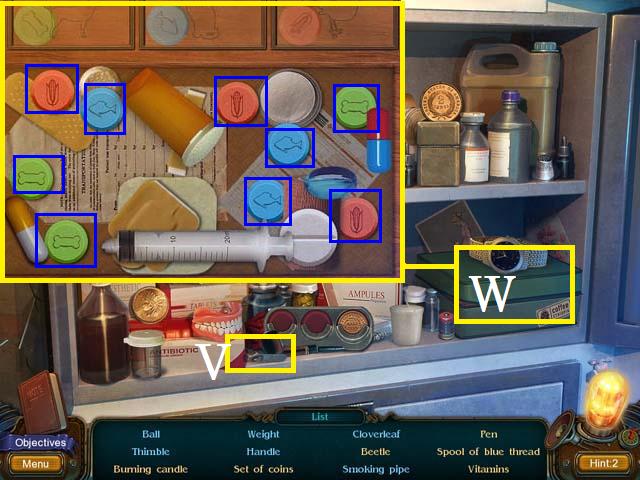 • Place the zipper puller (V) on the case (W) and open it and
zoom in. Move the items around to reveal the nine vitamins
(blue) and place them as shown in the screenshot. Collect the
Vitamins.
• Place the zipper puller (V) on the case (W) and open it and
zoom in. Move the items around to reveal the nine vitamins
(blue) and place them as shown in the screenshot. Collect the
Vitamins.
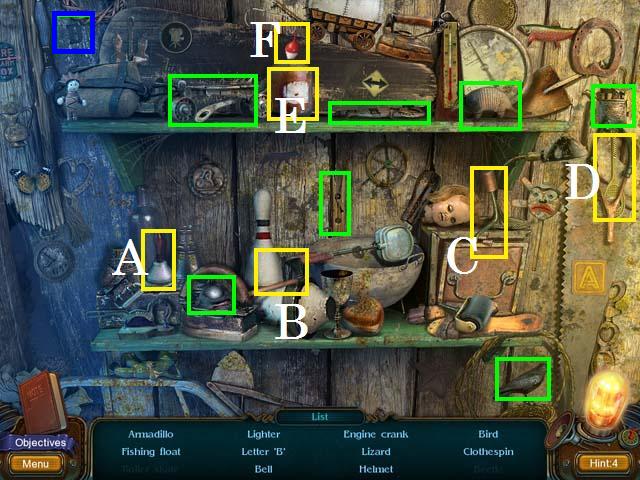
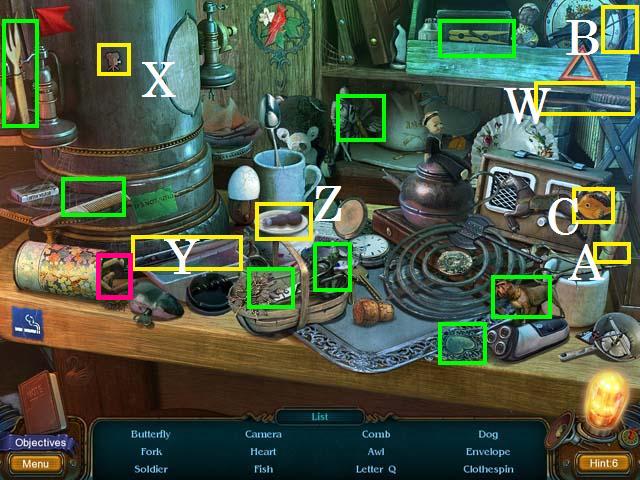
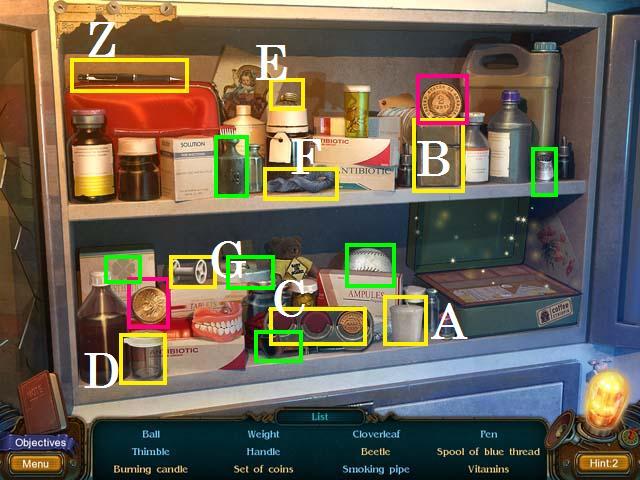 • Tear the paper down to reveal the Pen (Z). • Light the
Candle (A) with the lighter (B). • Place the two coins (pink)
in the Set of Coins (C). • Place the jar (D) over the Beetle
(E). • Place the thread (F) on the Spool of blue thread (G). •
Collect the remaining items (green) and receive the CUPBOARD
HANDLE.
• Tear the paper down to reveal the Pen (Z). • Light the
Candle (A) with the lighter (B). • Place the two coins (pink)
in the Set of Coins (C). • Place the jar (D) over the Beetle
(E). • Place the thread (F) on the Spool of blue thread (G). •
Collect the remaining items (green) and receive the CUPBOARD
HANDLE.
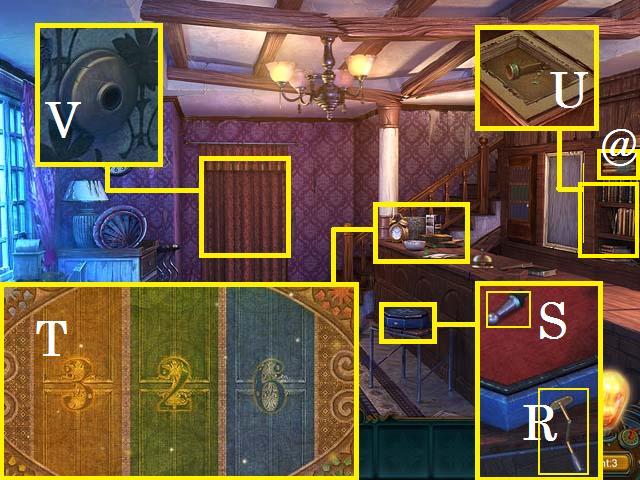
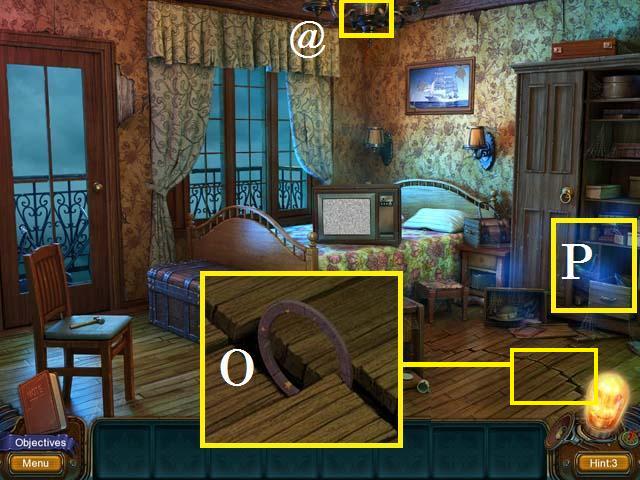
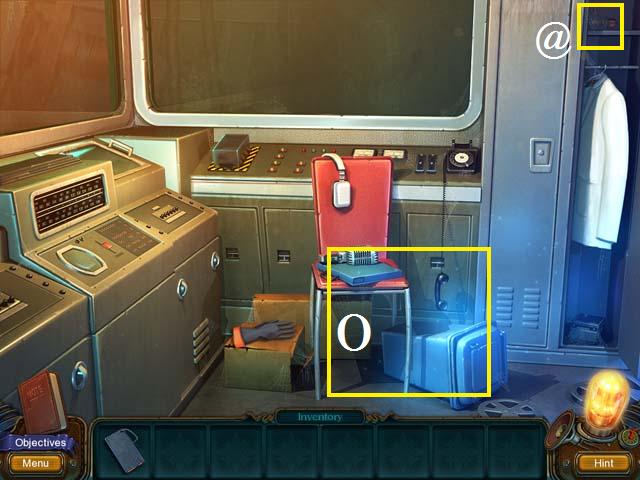
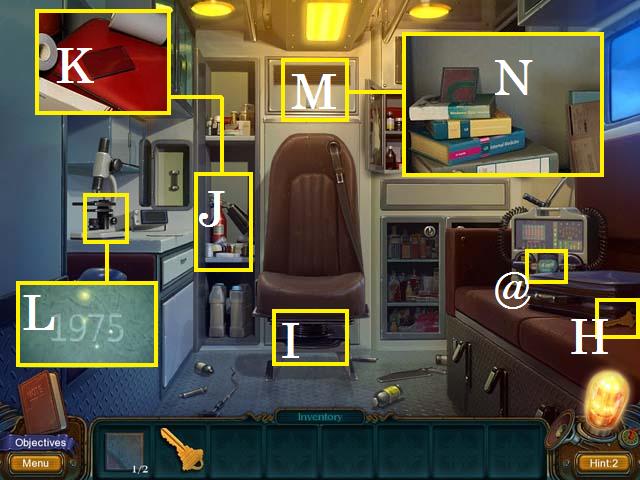 • Pick up the KEY (H) and the second Lamp (@). • Use the OILER
on the chair (I). • Zoom into the cabinet (J) and place the
CUPBOARD HANDLE. • Zoom into the open cabinet; move the items
around and pick up the ENGRAVING ON GLASS (K). • Zoom into the
microscope; place the ENGRAVING ON GLASS and spin the dials,
seven times each, until you reveal the code (L). • Zoom into
the locked cabinet (M): punch in the code 1975. • Zoom into
the unlocked cabinet; pick up the second PUZZLE PIECE (N). •
Exit the ambulance.
• Pick up the KEY (H) and the second Lamp (@). • Use the OILER
on the chair (I). • Zoom into the cabinet (J) and place the
CUPBOARD HANDLE. • Zoom into the open cabinet; move the items
around and pick up the ENGRAVING ON GLASS (K). • Zoom into the
microscope; place the ENGRAVING ON GLASS and spin the dials,
seven times each, until you reveal the code (L). • Zoom into
the locked cabinet (M): punch in the code 1975. • Zoom into
the unlocked cabinet; pick up the second PUZZLE PIECE (N). •
Exit the ambulance.
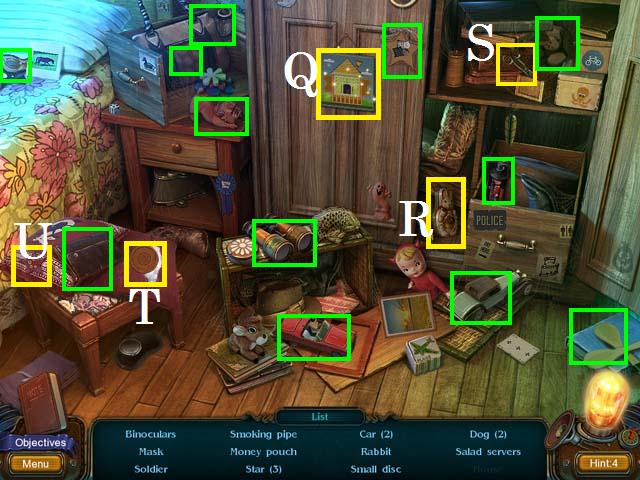
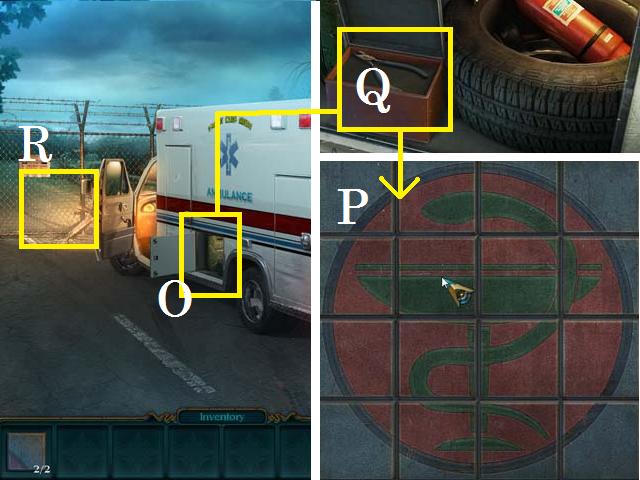 • Zoom into the side panel (O); unlock it and zoom in. • Zoom
into the puzzle box; place the two PUZZLE PIECES and arrange
the tiles as shown in the screenshot (P). • Pick up the
NIPPERS (Q). • Zoom into the fence (R); cut the fence with the
NIPPERS and enter Howlville.
• Zoom into the side panel (O); unlock it and zoom in. • Zoom
into the puzzle box; place the two PUZZLE PIECES and arrange
the tiles as shown in the screenshot (P). • Pick up the
NIPPERS (Q). • Zoom into the fence (R); cut the fence with the
NIPPERS and enter Howlville.
Chapter 2: Hotel Exterior
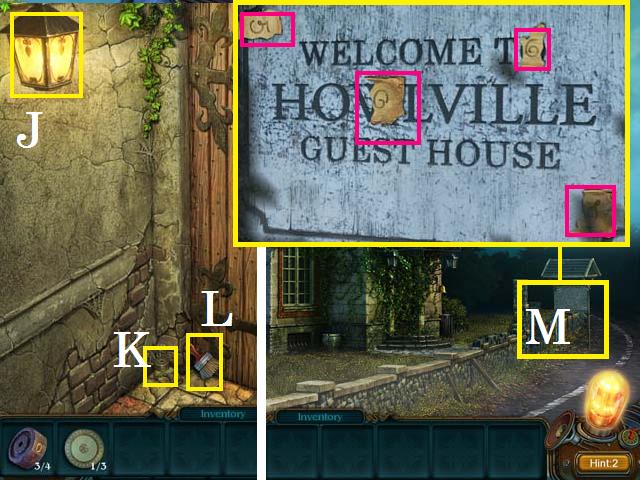
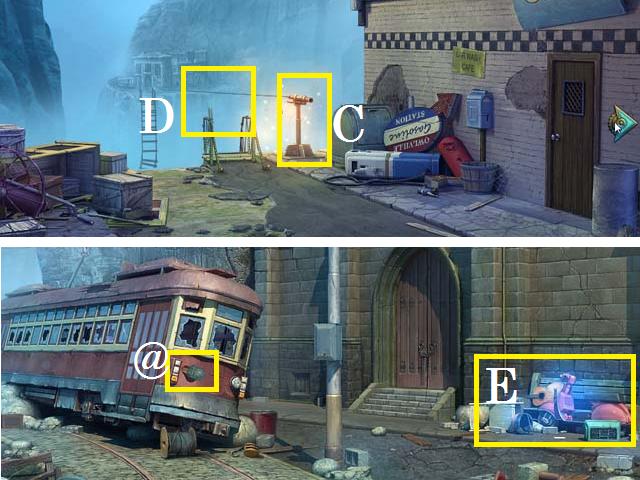
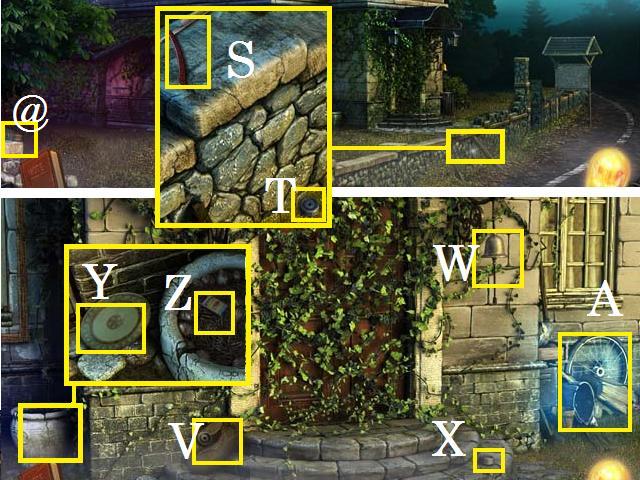 • Zoom into the stonewall; pick up the STRAIGHT RAZOR (S) and
the first DISK WITH ENGRAVED FIGURES (T). • Pick up the third
Lamp (@). • Move forward to the house’s door. • Slice the bag
with the STRAIGHT RAZOR and pick up the second DISK WITH
ENGRAVED FIGURES (V). • Ring the bell (W) and pick up the
third DISK WITH ENGRAVED FIGURES (X). • Zoom into the planter;
pick up the first DISH (Y) and the MATCHBOOK (Z). • Zoom into
the junk pile (A) to trigger a HOS.
• Zoom into the stonewall; pick up the STRAIGHT RAZOR (S) and
the first DISK WITH ENGRAVED FIGURES (T). • Pick up the third
Lamp (@). • Move forward to the house’s door. • Slice the bag
with the STRAIGHT RAZOR and pick up the second DISK WITH
ENGRAVED FIGURES (V). • Ring the bell (W) and pick up the
third DISK WITH ENGRAVED FIGURES (X). • Zoom into the planter;
pick up the first DISH (Y) and the MATCHBOOK (Z). • Zoom into
the junk pile (A) to trigger a HOS.
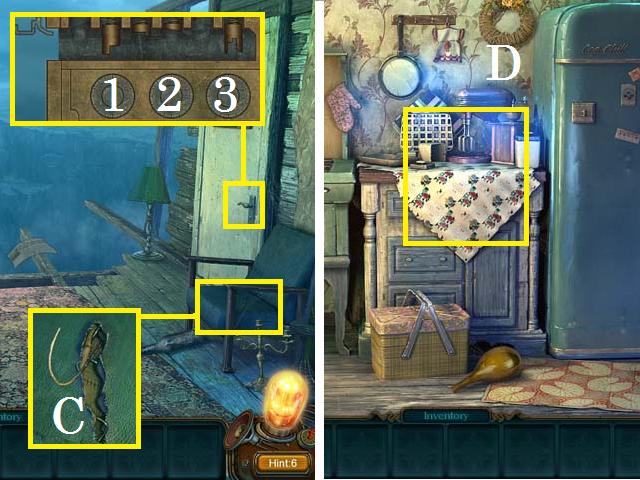
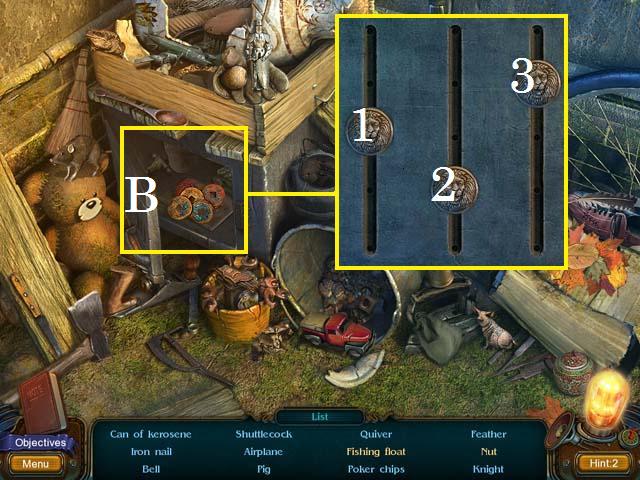 • Zoom into the safe; arrange the knobs as shown in the
screenshot. Set the middle knob (2), followed by the first
knob (1), and finish with the last knob (3) to reveal the
Poker Chips (B).
• Zoom into the safe; arrange the knobs as shown in the
screenshot. Set the middle knob (2), followed by the first
knob (1), and finish with the last knob (3) to reveal the
Poker Chips (B).
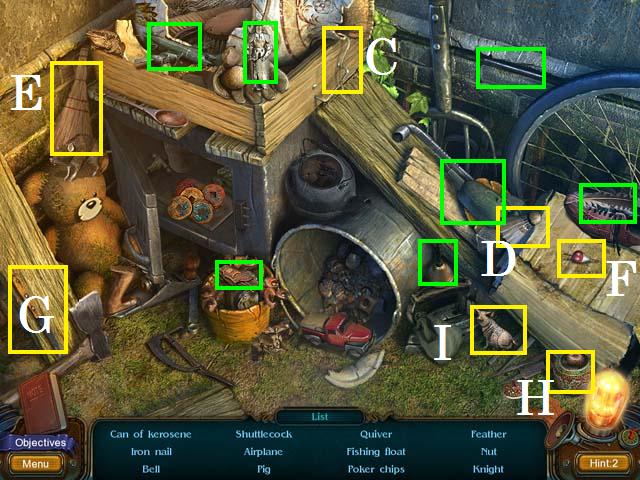 • Pull the string (C) to knock out the Shuttlecock (D). •
Clear the leaves with the broom (E) to reveal the Fishing
Float (F). • Use the knife (G) to open the pot and reveal the
Nut (H). • Move the bag to reveal the Pig (I). • Collect the
remaining items (green) to receive the CAN OF KEROSENE. • Exit
back one scene and take a left to the back door.
• Pull the string (C) to knock out the Shuttlecock (D). •
Clear the leaves with the broom (E) to reveal the Fishing
Float (F). • Use the knife (G) to open the pot and reveal the
Nut (H). • Move the bag to reveal the Pig (I). • Collect the
remaining items (green) to receive the CAN OF KEROSENE. • Exit
back one scene and take a left to the back door.
 • Zoom into the light (J); pour the CAN OF KEROSENE into the
lamp and light with the MATCHBOOK. • Pick up the fourth DISK
WITH ENGRAVED FIGURES (K) and the BRUSH (L). • Back up one
scene and zoom into the message board (M). • Completely clean
the board with the BRUSH (Note: go over it fully two times).
Collect the four numbers (pink) to get the code 0591. • Return
to the back door.
• Zoom into the light (J); pour the CAN OF KEROSENE into the
lamp and light with the MATCHBOOK. • Pick up the fourth DISK
WITH ENGRAVED FIGURES (K) and the BRUSH (L). • Back up one
scene and zoom into the message board (M). • Completely clean
the board with the BRUSH (Note: go over it fully two times).
Collect the four numbers (pink) to get the code 0591. • Return
to the back door.
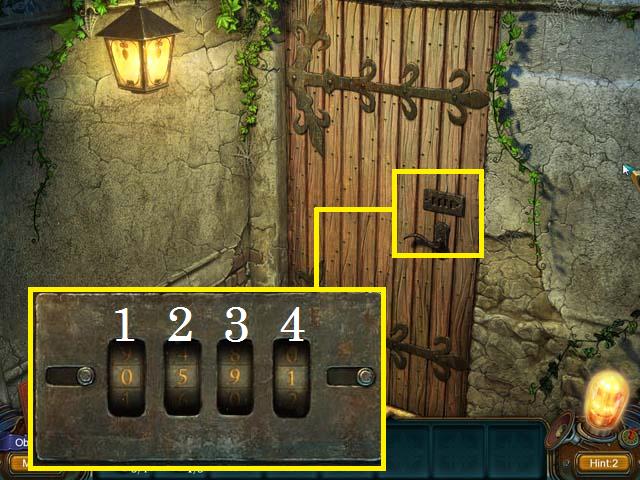 • Zoom into the door; place the four DISK WITH ENGRAVED
FIGURES and set the code to 0591 by setting the dials in the
following order: 4, 2, 1, and 3. • Enter the storage room.
• Zoom into the door; place the four DISK WITH ENGRAVED
FIGURES and set the code to 0591 by setting the dials in the
following order: 4, 2, 1, and 3. • Enter the storage room.
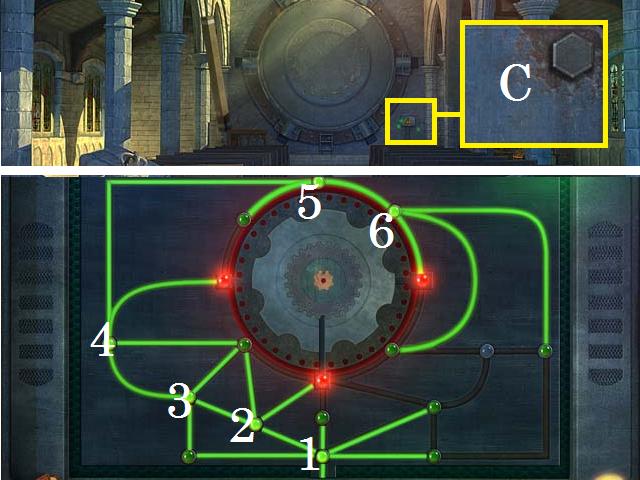
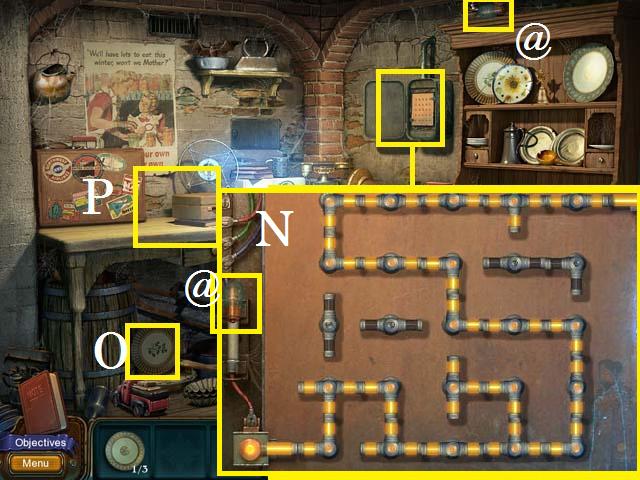 • Zoom into the fuse panel; pick up the fourth Lamp (@) and
then arrange the connections as shown in the screenshot (N). •
Pick up the fifth Lamp (@) and the second DISH (O). • Zoom
into the work bench (P) to trigger a HOS.
• Zoom into the fuse panel; pick up the fourth Lamp (@) and
then arrange the connections as shown in the screenshot (N). •
Pick up the fifth Lamp (@) and the second DISH (O). • Zoom
into the work bench (P) to trigger a HOS.
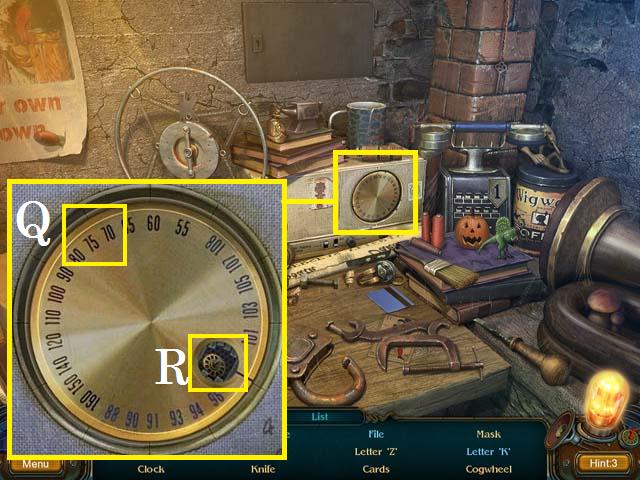 • Zoom into the dial; place the opening over 11 o’clock
position (Q) then move the number 12 to the 11 o’clock
position. Next, move the outer ring only to place the opening
over the four o’clock position and pick up the Cogwheel (R).
• Zoom into the dial; place the opening over 11 o’clock
position (Q) then move the number 12 to the 11 o’clock
position. Next, move the outer ring only to place the opening
over the four o’clock position and pick up the Cogwheel (R).
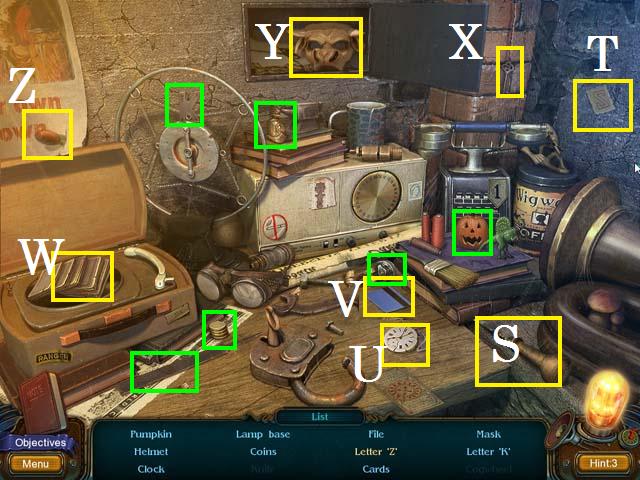 • Use the chisel (S) on the wall to reveal the Letter “Z” (T).
• Move the items to reveal the Clock (U). • Open the box with
the card (V) to reveal the Cards (W). • Use the key (X) to
open the panel and pick up the Mask (Y). • Remove the Knife
(Z) by pulling it several times. • Collect the remaining items
(green) to receive the KNIFE.
• Use the chisel (S) on the wall to reveal the Letter “Z” (T).
• Move the items to reveal the Clock (U). • Open the box with
the card (V) to reveal the Cards (W). • Use the key (X) to
open the panel and pick up the Mask (Y). • Remove the Knife
(Z) by pulling it several times. • Collect the remaining items
(green) to receive the KNIFE.
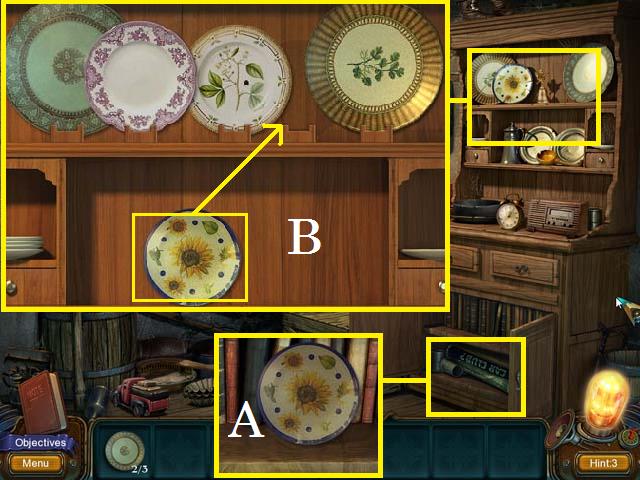 • Zoom into the cupboard; cut the rope with the KNIFE and pick
up the third DISH (A). • Zoom into the hutch; place the three
DISHES and arrange them as shown in the screenshot (B).
• Zoom into the cupboard; cut the rope with the KNIFE and pick
up the third DISH (A). • Zoom into the hutch; place the three
DISHES and arrange them as shown in the screenshot (B).
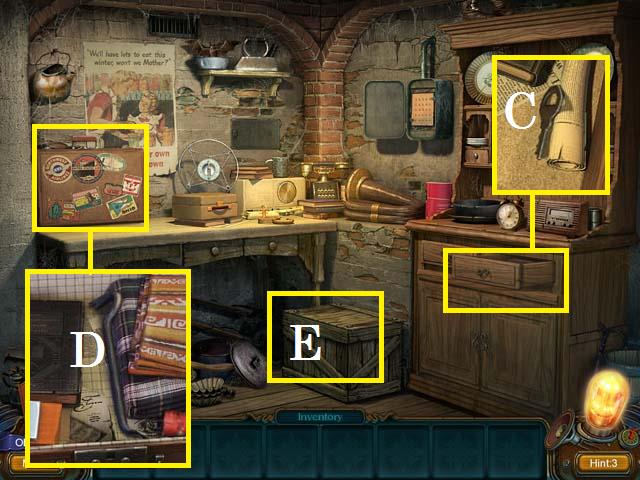 • Zoom into the now open drawer; pick up the SMALL KEY (C). •
Unlock the suitcase with the SMALL KEY and zoom in; pick up
the CROWBAR (D). • Open the crate (E) with the CROWBAR and
zoom into trigger a HOS.
• Zoom into the now open drawer; pick up the SMALL KEY (C). •
Unlock the suitcase with the SMALL KEY and zoom in; pick up
the CROWBAR (D). • Open the crate (E) with the CROWBAR and
zoom into trigger a HOS.
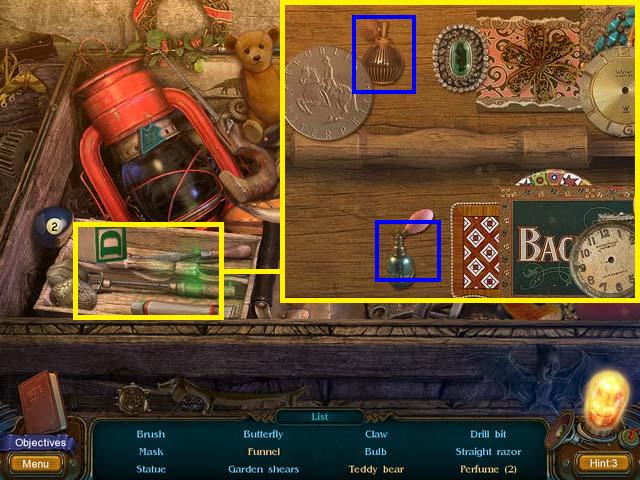 • Zoom into the box; move the items around and collect the two
Perfumes (blue).
• Zoom into the box; move the items around and collect the two
Perfumes (blue).
 • Move the ball to reveal the Funnel (F). • Move the ornament
to reveal the bear arm (G). • Place the arm (G) and leg (H) on
the Teddy Bear (I). • Collect the remaining items (green) to
receive the GARDEN SHEARS. • Return to the front door.
• Move the ball to reveal the Funnel (F). • Move the ornament
to reveal the bear arm (G). • Place the arm (G) and leg (H) on
the Teddy Bear (I). • Collect the remaining items (green) to
receive the GARDEN SHEARS. • Return to the front door.
 • Remove all of the vines (J) with the GARDEN SHEARS and enter
the house. • Zoom into the couch (K) to trigger a HOS.
• Remove all of the vines (J) with the GARDEN SHEARS and enter
the house. • Zoom into the couch (K) to trigger a HOS.
Chapter 3: The Hotel
 • Zoom into the globe; place the land pieces in their correct
positions (L) to spin the globe and reveal the Chip (M). •
Move the cone to reveal the Medallion (N). • Move the
handkerchief to reveal a door knob (O), place the knob on the
drawer, pick up the Handle (P), and then close the drawer.
• Zoom into the globe; place the land pieces in their correct
positions (L) to spin the globe and reveal the Chip (M). •
Move the cone to reveal the Medallion (N). • Move the
handkerchief to reveal a door knob (O), place the knob on the
drawer, pick up the Handle (P), and then close the drawer.
 • Open the little drawer to reveal the Stone (Q). • Pick up
the remaining items (green) to receive the HANDLE FOR MUSIC
BOX.
• Open the little drawer to reveal the Stone (Q). • Pick up
the remaining items (green) to receive the HANDLE FOR MUSIC
BOX.
 • Pick up the sixth Lamp (@). • Zoom into the music box; place
the HANDLE FOR MUSIC BOX (R) and pick up the SWITCH (S). •
Zoom into the bar; arrange the pieces to reveal the code 326
(T). • Zoom into the shelf; open the book and pick up the
first NUMBERED KEY (U). • Open the curtain and zoom in; place
the SWITCH in the hole (V). • Zoom into the closet to trigger
a HOS.
• Pick up the sixth Lamp (@). • Zoom into the music box; place
the HANDLE FOR MUSIC BOX (R) and pick up the SWITCH (S). •
Zoom into the bar; arrange the pieces to reveal the code 326
(T). • Zoom into the shelf; open the book and pick up the
first NUMBERED KEY (U). • Open the curtain and zoom in; place
the SWITCH in the hole (V). • Zoom into the closet to trigger
a HOS.
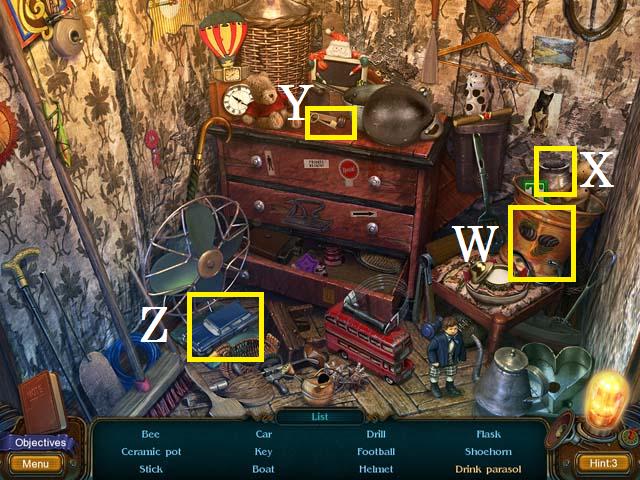 • Shake the bucket (W) several times to reveal the Ceramic pot
(X). • Move the pan to reveal the Key (Y). • Collect the Car
(Z) to reveal the fan button.
• Shake the bucket (W) several times to reveal the Ceramic pot
(X). • Move the pan to reveal the Key (Y). • Collect the Car
(Z) to reveal the fan button.
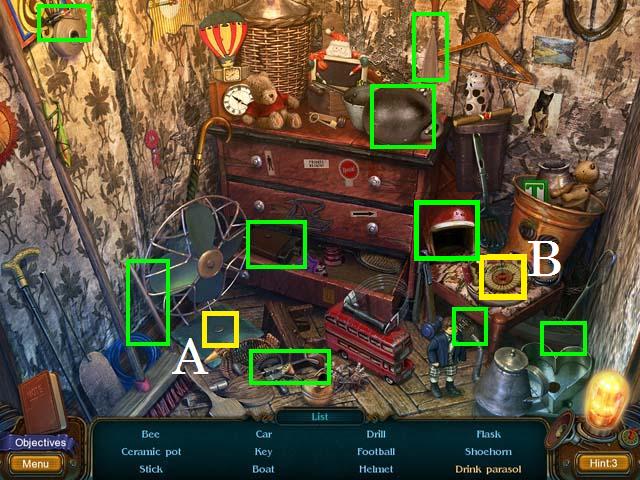 • Press the fan button (A) to get the Drink Parasol (B). •
Pick up the remaining items (green) to receive the second
NUMBERED KEY.
• Press the fan button (A) to get the Drink Parasol (B). •
Pick up the remaining items (green) to receive the second
NUMBERED KEY.
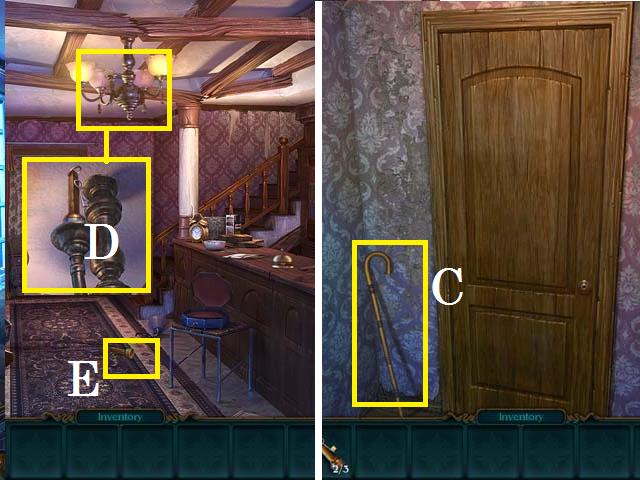 • Climb the stairs; pick up the LONG CANE (C). • Return
downstairs. • Zoom into the light; knock the NUMBERED KEY (D)
down with the LONG CANE. • Pick up the third NUMBERED KEY (E).
• Climb the stairs; pick up the LONG CANE (C). • Return
downstairs. • Zoom into the light; knock the NUMBERED KEY (D)
down with the LONG CANE. • Pick up the third NUMBERED KEY (E).
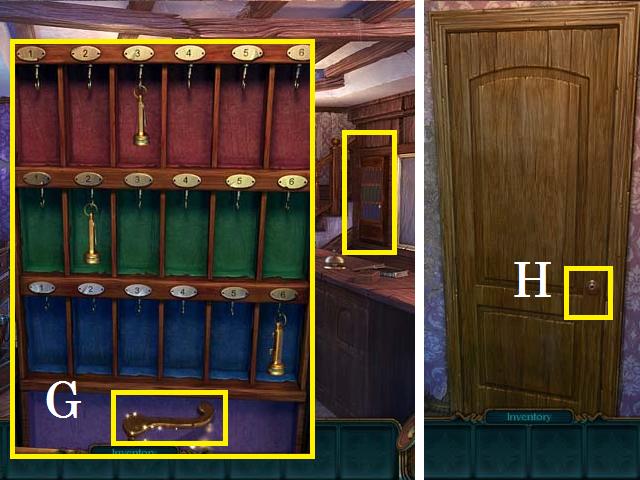 • Open the panel and zoom in; hang the three NUMBERED KEYS on
the hooks and arrange them as shown in the screenshot. • Pick
up the DOOR HANDLE (G). • Climb the stairs again. • Place the
DOOR HANDLE (H) and enter the bedroom.
• Open the panel and zoom in; hang the three NUMBERED KEYS on
the hooks and arrange them as shown in the screenshot. • Pick
up the DOOR HANDLE (G). • Climb the stairs again. • Place the
DOOR HANDLE (H) and enter the bedroom.
 • Zoom into the T.V. (blue). • Zoom into the night stand; move
the file and collect the first STRANGE DISKS (I). • Zoom into
the pillow; pick up the CHOPSTICK (J). • Use the HAMMER (K) to
smash the pot (L) and zoom in. • Move the broken pottery
pieces and pick up the second STRANGE DISKS (M). • Zoom into
the wall; pick up the third STRANGE DISK (N).
• Zoom into the T.V. (blue). • Zoom into the night stand; move
the file and collect the first STRANGE DISKS (I). • Zoom into
the pillow; pick up the CHOPSTICK (J). • Use the HAMMER (K) to
smash the pot (L) and zoom in. • Move the broken pottery
pieces and pick up the second STRANGE DISKS (M). • Zoom into
the wall; pick up the third STRANGE DISK (N).
 • Pick up the seventh Lamp (@). • Zoom into the floor; use the
CHOPSTICK to pick up the fourth STRANGE DISK (O). • Zoom into
the wardrobe (P) to trigger a HOS.
• Pick up the seventh Lamp (@). • Zoom into the floor; use the
CHOPSTICK to pick up the fourth STRANGE DISK (O). • Zoom into
the wardrobe (P) to trigger a HOS.
 • Zoom into the puzzle (Q); assemble the puzzle and then pick
it up. • Move the painting to reveal the Rabbit (R). • Use the
scissors (S) to open the pillow and reveal the Disk (T). •
Move the lizard to reveal the Star (U). • Collect the
remaining items (green) to receive the last STRANGE DISKS.
• Zoom into the puzzle (Q); assemble the puzzle and then pick
it up. • Move the painting to reveal the Rabbit (R). • Use the
scissors (S) to open the pillow and reveal the Disk (T). •
Move the lizard to reveal the Star (U). • Collect the
remaining items (green) to receive the last STRANGE DISKS.
 • Zoom into the chest; place the five STRANGE DISKS in the
lock. Rotate the disk into place, shown in the screenshot, in
the following order: 5, 3, 1, 4, and 2. • Zoom into the open
trunk; pick up the LONG ROPE LADDER (V). • Exit the bedroom to
the balcony.
• Zoom into the chest; place the five STRANGE DISKS in the
lock. Rotate the disk into place, shown in the screenshot, in
the following order: 5, 3, 1, 4, and 2. • Zoom into the open
trunk; pick up the LONG ROPE LADDER (V). • Exit the bedroom to
the balcony.
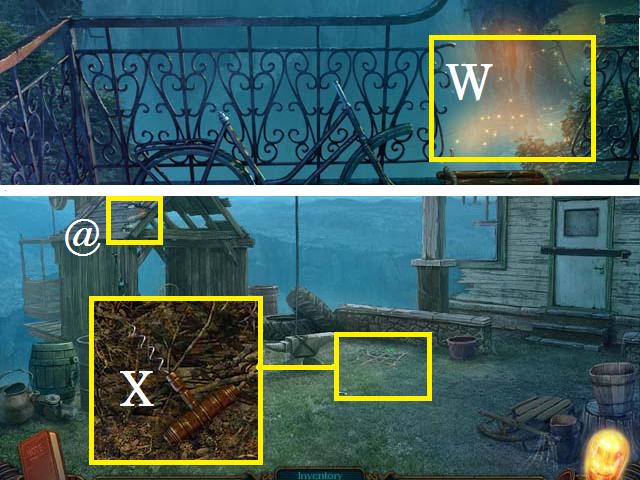 • Hang the LONG ROPE LADDER over the balcony (W) and climb
down. • Pick up the eighth Lamp (@). • Zoom into the ground;
remove the sticks, in order of top to bottom, and pick up the
CORKSCREW (X).
• Hang the LONG ROPE LADDER over the balcony (W) and climb
down. • Pick up the eighth Lamp (@). • Zoom into the ground;
remove the sticks, in order of top to bottom, and pick up the
CORKSCREW (X).
 • Zoom into the bottom of the cask; remove the cork (Y) with
the CORKSCREW. • Zoom into the top; pick up the HAMMER (Z). •
Zoom into the door; remove the lock (A) with the HAMMER and
enter the building. • Zoom into the drum (B) to trigger a HOS.
• Zoom into the bottom of the cask; remove the cork (Y) with
the CORKSCREW. • Zoom into the top; pick up the HAMMER (Z). •
Zoom into the door; remove the lock (A) with the HAMMER and
enter the building. • Zoom into the drum (B) to trigger a HOS.
 • Pick up all of the items (green) to receive the SNIPPERS.
 • Zoom into the chair; open the tear with the SNIPPERS and
pick up the PIECE OF WIRE FROM SOFA (C). • Place the PIECE OF
WIRE FROM SOFA into the door; spin the dials in the following
order: 1, 1, 1, 2, 3 and 3. • Enter the kitchen. • Zoom into
the counter (D) to trigger a HOS.
• Zoom into the chair; open the tear with the SNIPPERS and
pick up the PIECE OF WIRE FROM SOFA (C). • Place the PIECE OF
WIRE FROM SOFA into the door; spin the dials in the following
order: 1, 1, 1, 2, 3 and 3. • Enter the kitchen. • Zoom into
the counter (D) to trigger a HOS.
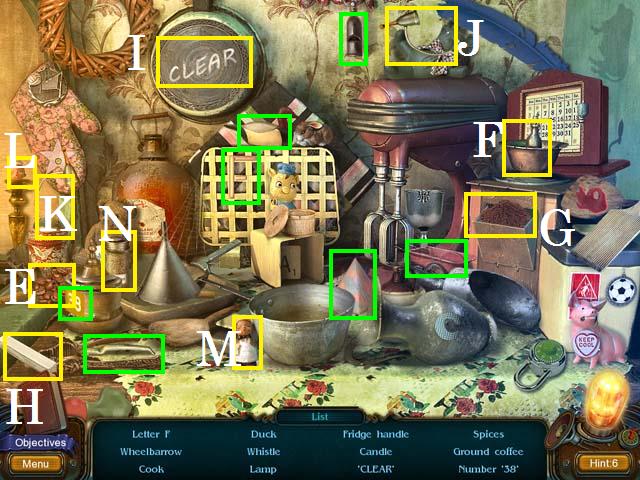 • Place the beans (E) in the grinder (F) to get the Ground
Coffee (G). • Use the chalk (H) on the pan to spell Clear (I).
• Place the lamp head (J) on the base for the Lamp (K). •
Place the head (L) on the Cook (M). • Move the funnel to
reveal the Spices (N). • Collect the remaining items (green)
to receive the FRIDGE HANDLE.
• Place the beans (E) in the grinder (F) to get the Ground
Coffee (G). • Use the chalk (H) on the pan to spell Clear (I).
• Place the lamp head (J) on the base for the Lamp (K). •
Place the head (L) on the Cook (M). • Move the funnel to
reveal the Spices (N). • Collect the remaining items (green)
to receive the FRIDGE HANDLE.
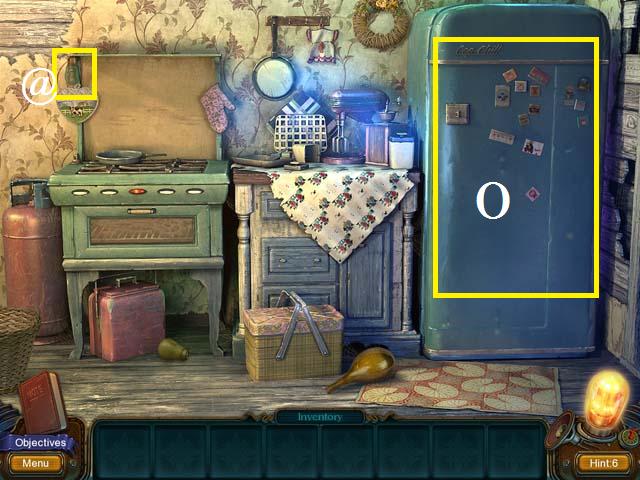 • Pick up the ninth Lamp (@). • Place the FRIDGE HANDLE (O)
and zoom in to trigger a HOS.
• Pick up the ninth Lamp (@). • Place the FRIDGE HANDLE (O)
and zoom in to trigger a HOS.
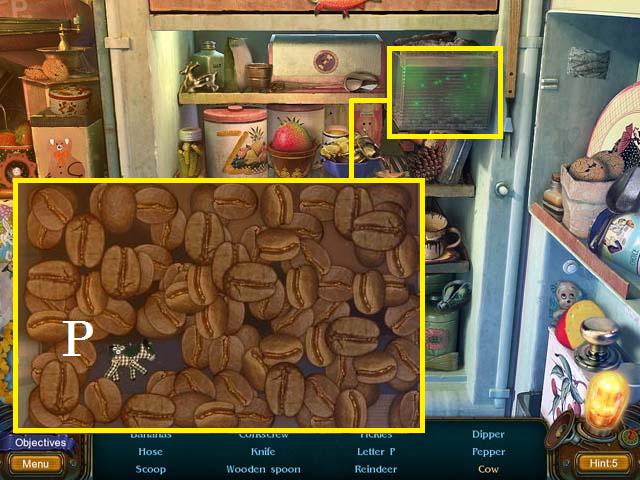 • Zoom into the ice box; move the beans around to reveal the
Cow (P).
• Zoom into the ice box; move the beans around to reveal the
Cow (P).
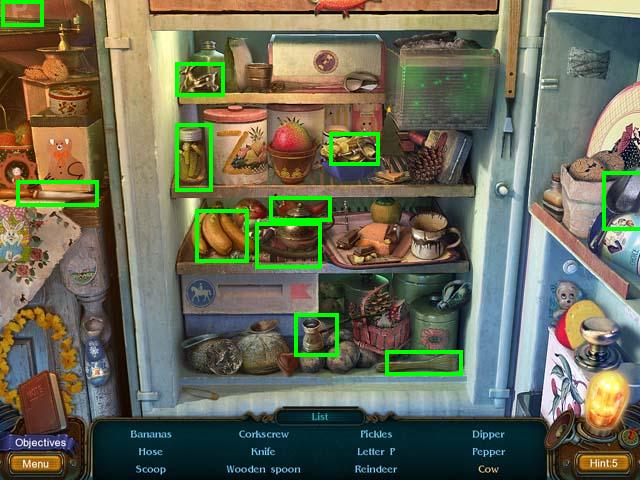 • Collect the remaining items (green) to receive the SEALED
HOSE.
• Collect the remaining items (green) to receive the SEALED
HOSE.
 • Zoom into the tank (Q); place the SEALED HOSE. • Zoom into
the stove button (R) and spin it. • Open the oven door and
pick up the GEARS (S). • Exit the building and enter the
elevator shack. • Zoom into the shelf (T) to trigger a HOS.
• Zoom into the tank (Q); place the SEALED HOSE. • Zoom into
the stove button (R) and spin it. • Open the oven door and
pick up the GEARS (S). • Exit the building and enter the
elevator shack. • Zoom into the shelf (T) to trigger a HOS.
 • Zoom into the clock; shake the ticket (V) and the wood (U)
to get the first Beetle (W) to run back and forth. Catch the
beetle while it is uncovered. Shake the leaf (X) and the knot
(Y) to move the second beetle and the plank (Z) to find the
third one.
• Zoom into the clock; shake the ticket (V) and the wood (U)
to get the first Beetle (W) to run back and forth. Catch the
beetle while it is uncovered. Shake the leaf (X) and the knot
(Y) to move the second beetle and the plank (Z) to find the
third one.
 • Move the belt to reveal the Bell (A). • Use the axe (B) to
open the box and reveal the Engine Crank (C). • Use the net
(D) to fish the Fishing float (E) out of the bottle (F). •
Move the cup to reveal the B (blue). • Pick up the remaining
items (green) to receive the ENGINE CRANK.
• Move the belt to reveal the Bell (A). • Use the axe (B) to
open the box and reveal the Engine Crank (C). • Use the net
(D) to fish the Fishing float (E) out of the bottle (F). •
Move the cup to reveal the B (blue). • Pick up the remaining
items (green) to receive the ENGINE CRANK.
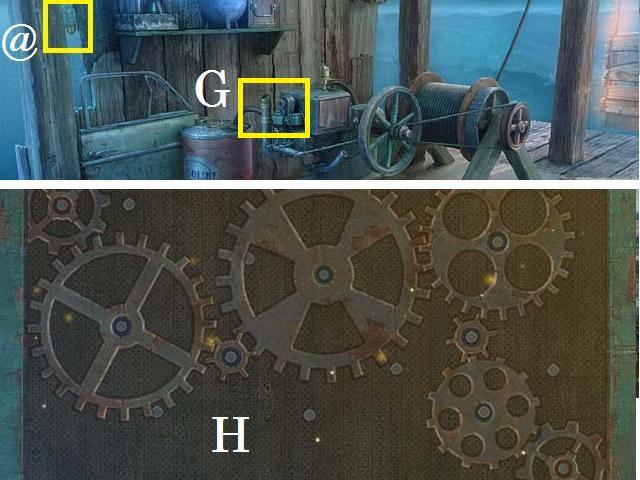 • Pick up the tenth Lamp (@). • Place the ENGINE CRANK in
place (G). Spin the crank. • Zoom into the engine; place the
GEARS and arrange them as shown in the screenshot (H). • Enter
the elevator.
• Pick up the tenth Lamp (@). • Place the ENGINE CRANK in
place (G). Spin the crank. • Zoom into the engine; place the
GEARS and arrange them as shown in the screenshot (H). • Enter
the elevator.
Chapter 4: the Café
 • Pick up the eleventh Lamp (@) and press the down arrow (I).
 • Pick up the twelfth Lamp (@). • Pick up the first RECORD
(J). • Zoom into the wall; pick up the first SPARK PLUG (K). •
Zoom into the floor; pick up the second SPARK PLUG (L). • Take
a left.
• Pick up the twelfth Lamp (@). • Pick up the first RECORD
(J). • Zoom into the wall; pick up the first SPARK PLUG (K). •
Zoom into the floor; pick up the second SPARK PLUG (L). • Take
a left.
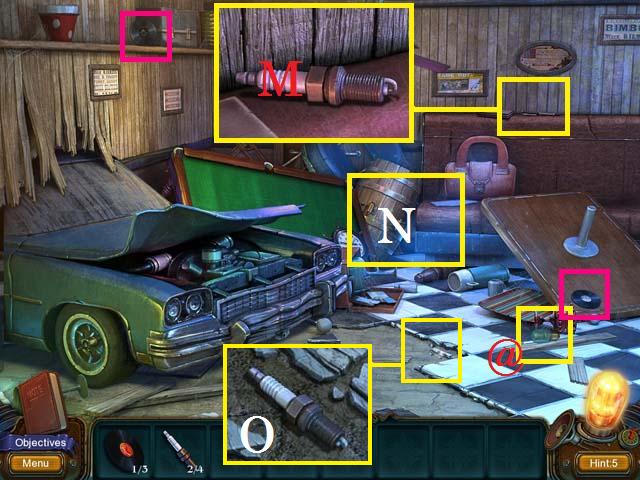 • Pick up the thirteenth Lamp (@). • Pick up the two RECORDS
(pink). • Zoom into the top of the booth seat; pick up the
third SPARK PLUG (M). • Zoom into the floor; pick up the
fourth SPARK PLUG (O). • Zoom into the rubble (N) to trigger a
HOS.
• Pick up the thirteenth Lamp (@). • Pick up the two RECORDS
(pink). • Zoom into the top of the booth seat; pick up the
third SPARK PLUG (M). • Zoom into the floor; pick up the
fourth SPARK PLUG (O). • Zoom into the rubble (N) to trigger a
HOS.
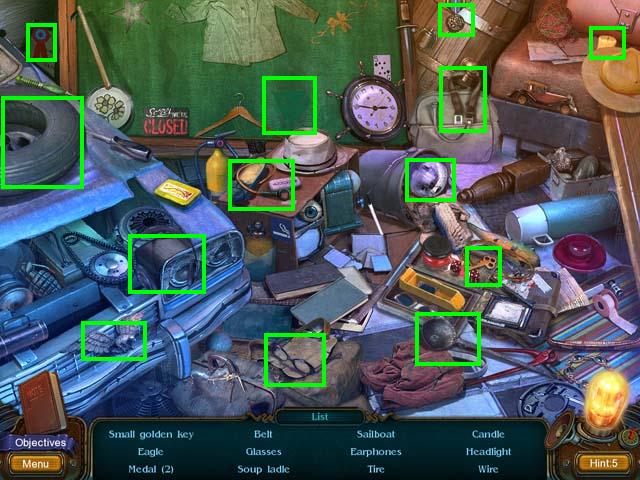 • Collect all of the items (green) to receive the KEY. • Back
up one scene.
• Collect all of the items (green) to receive the KEY. • Back
up one scene.
 • Zoom into the register; open it with the SMALL GOLD KEY and
pick up the COIN (P). • Place the three RECORDS into the top
of the jukebox (Q) and the COIN in the slot (R). • Zoom into
the buttons (S) and solve the Simon says style puzzle by
repeating the pattern. • Pick up the SCREWDRIVER (T). • Zoom
into the vent; open it with the SCREWDRIVER and pick up the
STARTER HANDLE (U). • Zoom into the urn (V) to trigger a HOS.
• Zoom into the register; open it with the SMALL GOLD KEY and
pick up the COIN (P). • Place the three RECORDS into the top
of the jukebox (Q) and the COIN in the slot (R). • Zoom into
the buttons (S) and solve the Simon says style puzzle by
repeating the pattern. • Pick up the SCREWDRIVER (T). • Zoom
into the vent; open it with the SCREWDRIVER and pick up the
STARTER HANDLE (U). • Zoom into the urn (V) to trigger a HOS.
 • Clean the urn with the brush (W) to reveal the Camera (X). •
Open the sugar bowl with the knife (Y) to reveal the Awl (Z).
• Open the hand (A) with the safety pin (B) to free the Fish
(C). • Shake the Q (pink) out of the can. • Collect the
remaining items (green) to receive the AWL. • Return to the
room with the car.
• Clean the urn with the brush (W) to reveal the Camera (X). •
Open the sugar bowl with the knife (Y) to reveal the Awl (Z).
• Open the hand (A) with the safety pin (B) to free the Fish
(C). • Shake the Q (pink) out of the can. • Collect the
remaining items (green) to receive the AWL. • Return to the
room with the car.
 • Use the AWL to flatten the tire (D). • Zoom into the engine
(E); pick up the map and place the four SPARK PLUGS. • Place
the STARTER HANDLE (F) and spin it to move the car. • Spin the
ceiling fan (G) to knock the METALLIC HANDLE off. • Pick up
the METALLIC HANDLE (H) and place it on the trap door (I). •
Open the trap door and take the path.
• Use the AWL to flatten the tire (D). • Zoom into the engine
(E); pick up the map and place the four SPARK PLUGS. • Place
the STARTER HANDLE (F) and spin it to move the car. • Spin the
ceiling fan (G) to knock the METALLIC HANDLE off. • Pick up
the METALLIC HANDLE (H) and place it on the trap door (I). •
Open the trap door and take the path.
 • Pick up the fourteenth Lamp (@). • Zoom into the bench; pick
up the MOUNTIANEERING BUCKLE (K). • Take a left to the rope
bridge. • Pick up the STONE (L). • Zoom into the crates (M) to
trigger a HOS.
• Pick up the fourteenth Lamp (@). • Zoom into the bench; pick
up the MOUNTIANEERING BUCKLE (K). • Take a left to the rope
bridge. • Pick up the STONE (L). • Zoom into the crates (M) to
trigger a HOS.
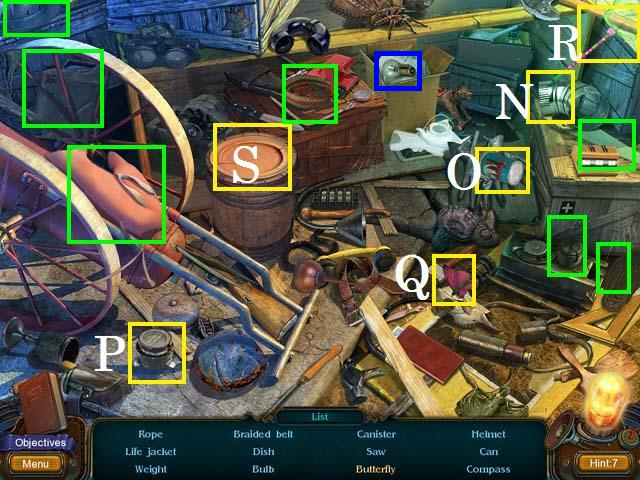 • Shake the pipe (N) to reveal the Can (O). • Move the tool
belt to reveal the Compass (P). • Catch the Butterfly (Q) with
the net (R). • Knock the items off of the Dish (S). • Move the
cloth to reveal the Bulb (blue). • Collect the remaining items
(green) to receive the VERY LONG ROPE. • Back up one scene.
• Shake the pipe (N) to reveal the Can (O). • Move the tool
belt to reveal the Compass (P). • Catch the Butterfly (Q) with
the net (R). • Knock the items off of the Dish (S). • Move the
cloth to reveal the Bulb (blue). • Collect the remaining items
(green) to receive the VERY LONG ROPE. • Back up one scene.
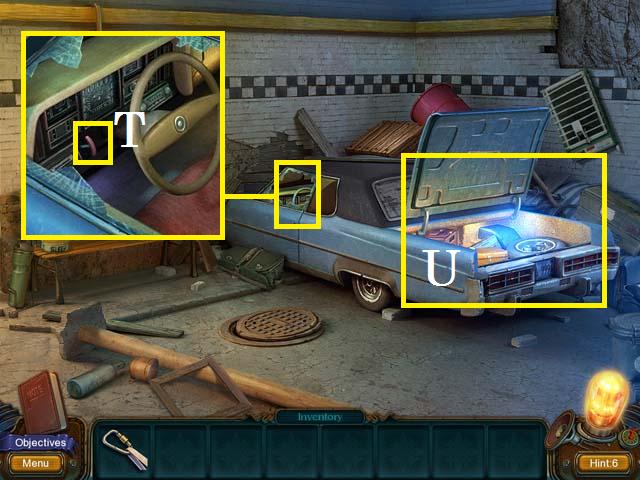 • Smash the car window with the STONE and pull the trunk
release (T). • Zoom into the trunk (U) to trigger a HOS.
• Smash the car window with the STONE and pull the trunk
release (T). • Zoom into the trunk (U) to trigger a HOS.
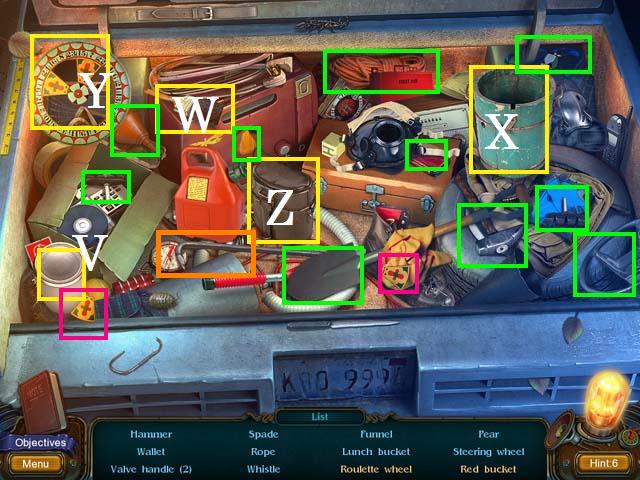 • Open the paint can (V) with the crowbar (orange), dip the
paintbrush (W) in the paint and use it on the Red bucket (X).
• Place the two pieces (pink) in the Roulette wheel (Y). •
Move the gas can to reveal the Lunch bucket (Z). • Collect the
remaining items (green) to receive the SPADE. • Return to the
rope bridge.
• Open the paint can (V) with the crowbar (orange), dip the
paintbrush (W) in the paint and use it on the Red bucket (X).
• Place the two pieces (pink) in the Roulette wheel (Y). •
Move the gas can to reveal the Lunch bucket (Z). • Collect the
remaining items (green) to receive the SPADE. • Return to the
rope bridge.
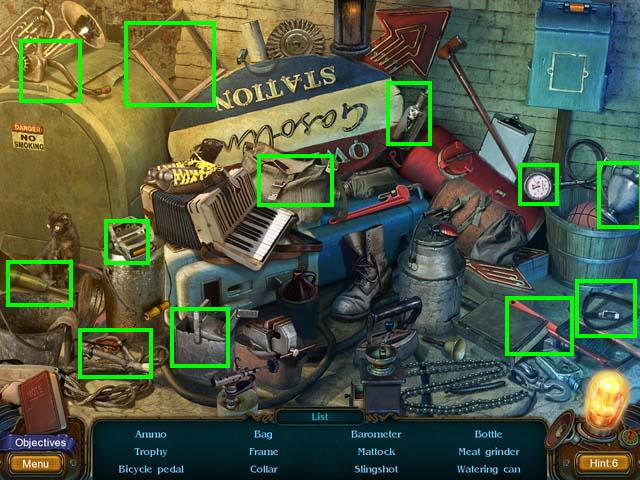
 • Zoom into the CLIMBING HOOK (A) and dig it out with the
SPADE. • Zoom into the junk pile (B) to trigger a HOS.
• Zoom into the CLIMBING HOOK (A) and dig it out with the
SPADE. • Zoom into the junk pile (B) to trigger a HOS.
 • Collect all of the items (green) to receive the EXPLOSIVE
CHARGE.
• Collect all of the items (green) to receive the EXPLOSIVE
CHARGE.
 • Zoom into the spear launcher (C). Place the VERY LONG ROPE,
EXPLOSIVE CHARGE, and the CLIMBING HOOK in the launcher. • Use
the MOUNTIANEERING BUCKLE on the rope (D) to get across the
canyon. • Pick up the fifteenth Lamp (@). • Zoom into the
bench (E) to trigger a HOS.
• Zoom into the spear launcher (C). Place the VERY LONG ROPE,
EXPLOSIVE CHARGE, and the CLIMBING HOOK in the launcher. • Use
the MOUNTIANEERING BUCKLE on the rope (D) to get across the
canyon. • Pick up the fifteenth Lamp (@). • Zoom into the
bench (E) to trigger a HOS.
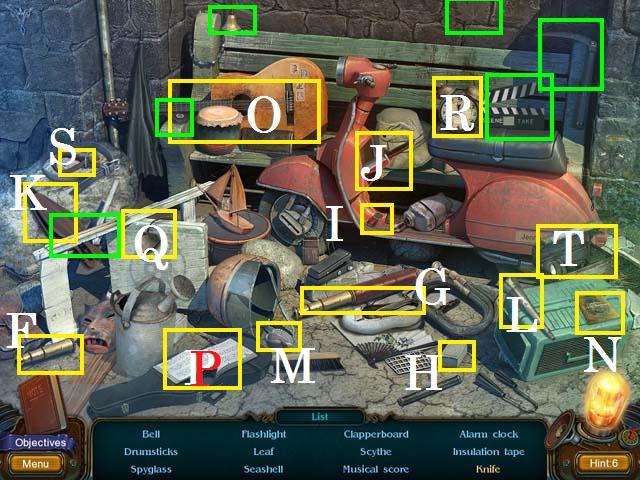 • Place the eyeglass (F) on the Spyglass (G). • Place the
brick (H) on the scooters peddle (I) to get the Knife (J). •
Use the billows (K) on the horn (L) to release the Seashell
(M). • Place the strings (N) on the guitar (O) to complete the
Musical score (P). • Place the bells (Q) on the Alarm clock
(R). • Place the handle (S) on the lunchbox to find the
Flashlight (T). • Collect the remaining items (green) to
receive the INSULATION TAPE.
• Place the eyeglass (F) on the Spyglass (G). • Place the
brick (H) on the scooters peddle (I) to get the Knife (J). •
Use the billows (K) on the horn (L) to release the Seashell
(M). • Place the strings (N) on the guitar (O) to complete the
Musical score (P). • Place the bells (Q) on the Alarm clock
(R). • Place the handle (S) on the lunchbox to find the
Flashlight (T). • Collect the remaining items (green) to
receive the INSULATION TAPE.
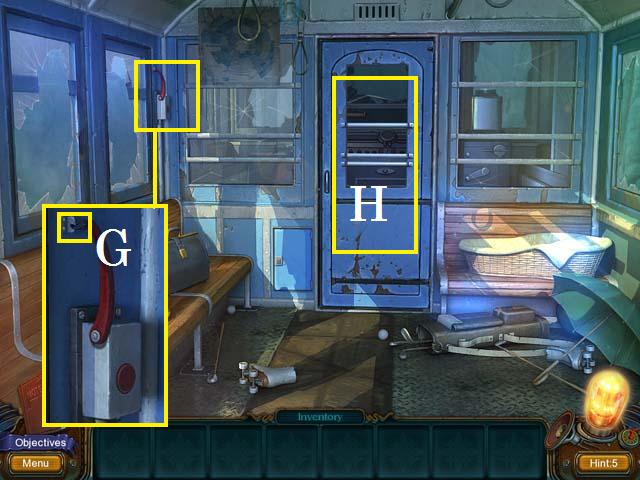
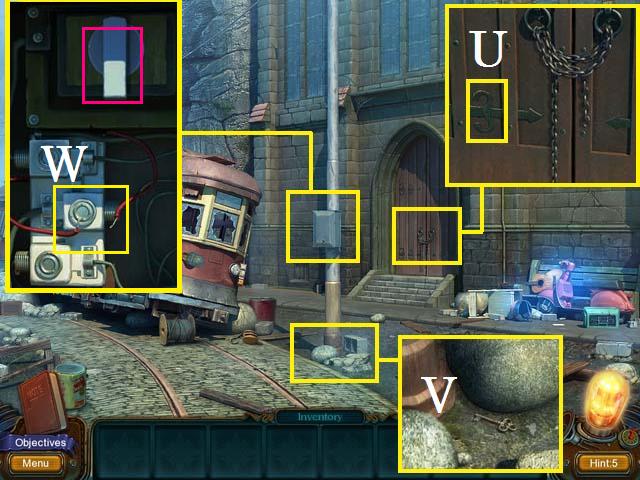 • Zoom into the door; pick up the IRON PIECE (U). • Zoom into
the post base; use the IRON PIECE to get the SMALL KEY (V). •
Zoom into the fuse box; open it with the SMALL KEY and repair
the wires (W) with the INSULATING TAPE and turn the switch
(pink). • Enter the streetcar.
• Zoom into the door; pick up the IRON PIECE (U). • Zoom into
the post base; use the IRON PIECE to get the SMALL KEY (V). •
Zoom into the fuse box; open it with the SMALL KEY and repair
the wires (W) with the INSULATING TAPE and turn the switch
(pink). • Enter the streetcar.
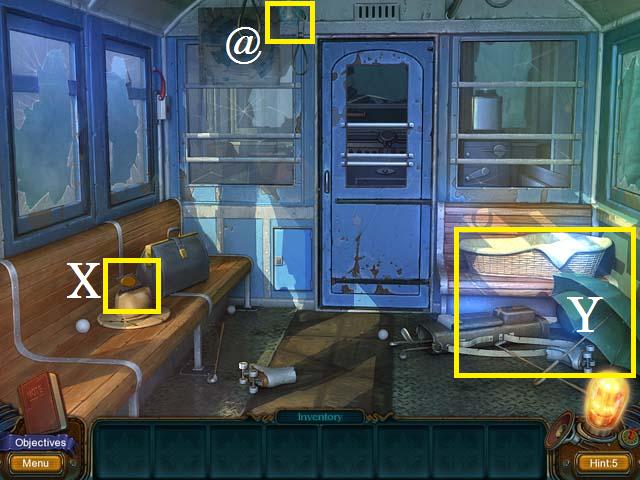 • Pick up the sixteenth Lamp (@) and the BUTTON WITH
PROTRUDING WIRES (X). • Zoom into the junk (Y) to trigger a
HOS.
• Pick up the sixteenth Lamp (@) and the BUTTON WITH
PROTRUDING WIRES (X). • Zoom into the junk (Y) to trigger a
HOS.
 • Zoom into the basket; pick up the Butterfly (Z) and place
the vegetables (blue) in the box (A) for the Vegetable box.
• Zoom into the basket; pick up the Butterfly (Z) and place
the vegetables (blue) in the box (A) for the Vegetable box.
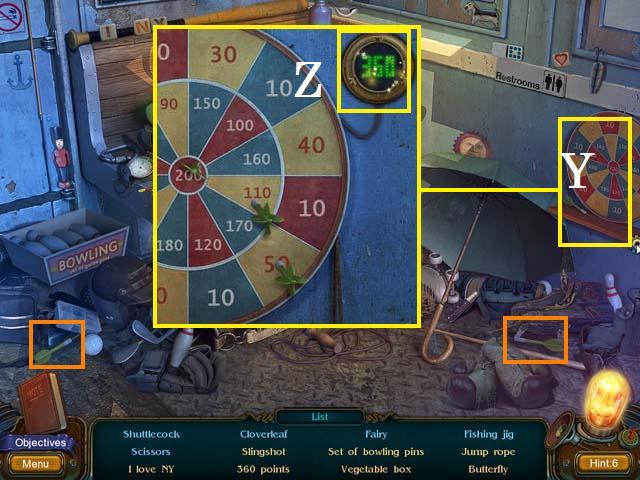 • Place the two darts (orange) with the dart board (Y) and
zoom in. Arrange the arrows, shown in the screenshot, to get
360 points (Z).
• Place the two darts (orange) with the dart board (Y) and
zoom in. Arrange the arrows, shown in the screenshot, to get
360 points (Z).
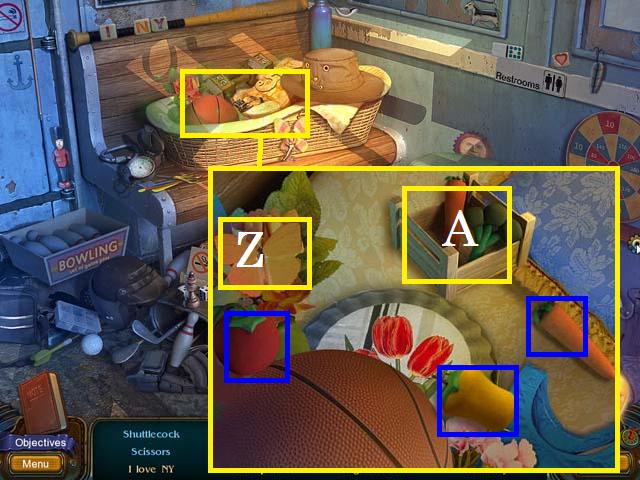
 • Place the three pins (pink) in the Set of bowling pins (A).
• Place the heart (B) to complete I Love NY (C). • Place the
hand grip (D) on the Jump rope (E). • Move the hat to reveal
the Slingshot (F). • Collect the remaining items (green) to
receive the SCISSORS.
• Place the three pins (pink) in the Set of bowling pins (A).
• Place the heart (B) to complete I Love NY (C). • Place the
hand grip (D) on the Jump rope (E). • Move the hat to reveal
the Slingshot (F). • Collect the remaining items (green) to
receive the SCISSORS.
 • Zoom into the door release; cut the rope (G) with the
SCISSORS and pull the lever. • Zoom into the open door (H) to
trigger a HOS.
• Zoom into the door release; cut the rope (G) with the
SCISSORS and pull the lever. • Zoom into the open door (H) to
trigger a HOS.
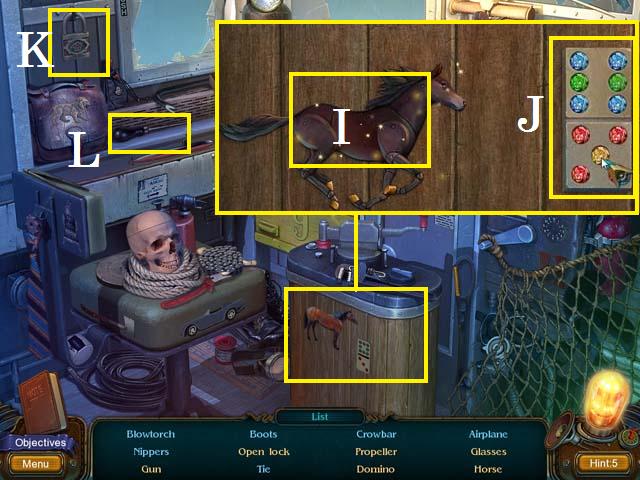 • Zoom into the horse; arrange the items, shown in screenshot,
to get the Horse (I) and the Domino (J). • Open lock (K) with
the awl (L).
• Zoom into the horse; arrange the items, shown in screenshot,
to get the Horse (I) and the Domino (J). • Open lock (K) with
the awl (L).
 • Open the face shield to reveal the eye (M) and place it in
the skull (N). Place the other eye (O) in the skull to open it
up and collect the Gun (P). • Cut the net with the knife (Q)
to reveal the Propeller (R). • Use the tweezers (S) to remove
the glasses from the container (T) and pick up the Glasses (U)
where they land. • Collet the remaining items (green) to
receive the BLOW TORCH. • Exit the streetcar.
• Open the face shield to reveal the eye (M) and place it in
the skull (N). Place the other eye (O) in the skull to open it
up and collect the Gun (P). • Cut the net with the knife (Q)
to reveal the Propeller (R). • Use the tweezers (S) to remove
the glasses from the container (T) and pick up the Glasses (U)
where they land. • Collet the remaining items (green) to
receive the BLOW TORCH. • Exit the streetcar.
 • Zoom into the rocks and then the puzzle box (U). Place the
BUTTON WITH PROTRUDING WIRES (V) and arrange the connections,
shown in the screenshot, and press the button. • Pick up the
HEX DRIVER (U). • Enter the streetcar.
• Zoom into the rocks and then the puzzle box (U). Place the
BUTTON WITH PROTRUDING WIRES (V) and arrange the connections,
shown in the screenshot, and press the button. • Pick up the
HEX DRIVER (U). • Enter the streetcar.
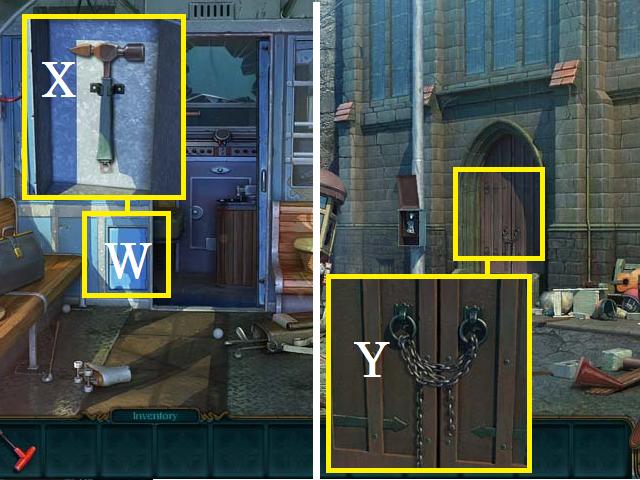 • Open the cabinet (W) with the HEX DRIVER and pick up the
HAMMER (X). • Exit the streetcar and zoom into the door; heat
the chain (Y) with the BLOW TORCH and smash it with the
HAMMER. • Enter the church.
• Open the cabinet (W) with the HEX DRIVER and pick up the
HAMMER (X). • Exit the streetcar and zoom into the door; heat
the chain (Y) with the BLOW TORCH and smash it with the
HAMMER. • Enter the church.
Chapter 5: The Church and Lab
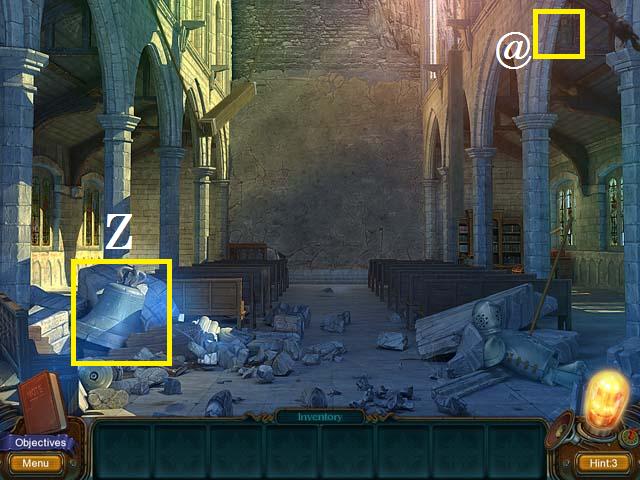 • Pick up the seventeenth Lamp (@). • Zoom into the bell (Z)
to trigger a HOS.
• Pick up the seventeenth Lamp (@). • Zoom into the bell (Z)
to trigger a HOS.
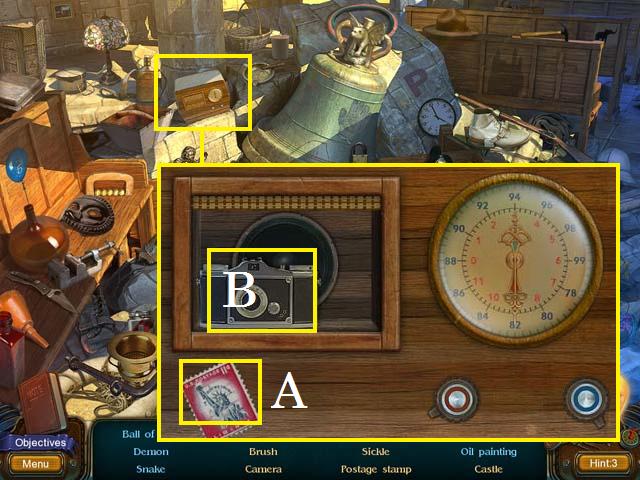 • Zoom into the radio; pick up the Stamp (A) and set the dial,
shown in the screenshot, and pick up the Camera (B).
• Zoom into the radio; pick up the Stamp (A) and set the dial,
shown in the screenshot, and pick up the Camera (B).
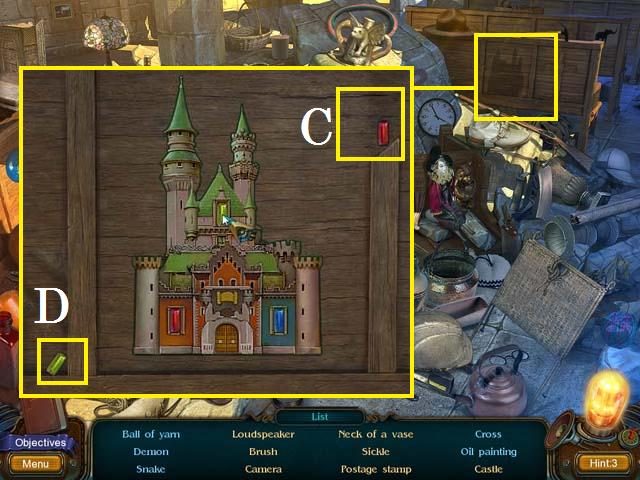 • Zoom into the Castle; arrange the castle pieces, shown in
the screenshot. Move the wood to reveal the red gem (C), and
clean the dust to reveal the yellow gem (D). • Move the helmet
to reveal the Sickle (D).
• Zoom into the Castle; arrange the castle pieces, shown in
the screenshot. Move the wood to reveal the red gem (C), and
clean the dust to reveal the yellow gem (D). • Move the helmet
to reveal the Sickle (D).
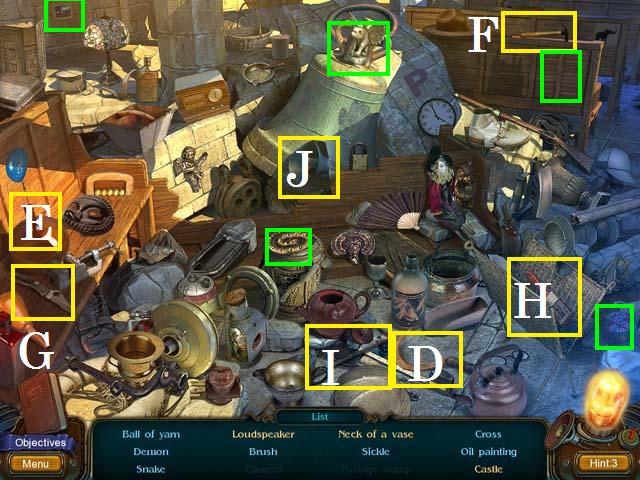 • Smash the bottle (E) with the (F) until the Neck of a vase
breaks free. • Cut open the magazine rack with the knife (G)
to reveal the Brush (H). • Break the bell with the crowbar (I)
to reveal the Loud speaker (J). • Collect the remaining items
(green) to receive the LOUD SPEAKER ENHANCES THE SOUND.
• Smash the bottle (E) with the (F) until the Neck of a vase
breaks free. • Cut open the magazine rack with the knife (G)
to reveal the Brush (H). • Break the bell with the crowbar (I)
to reveal the Loud speaker (J). • Collect the remaining items
(green) to receive the LOUD SPEAKER ENHANCES THE SOUND.
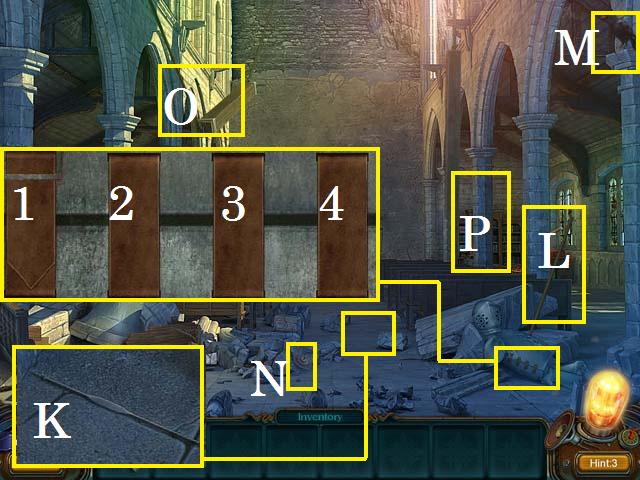 • Zoom into the floor; pick up the NEEDLE (K). • Zoom into the
armor; use the NEEDLE to remove the first (1) leather strip.
Remove the rest in the following order: 3, 2, and 4. • Pick up
the SHARP, LONG HALBERD (L). • Use the LOUD SPEAKER ENHANCES
THE SOUND to scare the crow (M) away and then pick up the
COGWHEEL (N). • Cut the beam (O) down with the SHARP, LONG
HALBERD. • Zoom into the alcove (P) to trigger a HOS.
• Zoom into the floor; pick up the NEEDLE (K). • Zoom into the
armor; use the NEEDLE to remove the first (1) leather strip.
Remove the rest in the following order: 3, 2, and 4. • Pick up
the SHARP, LONG HALBERD (L). • Use the LOUD SPEAKER ENHANCES
THE SOUND to scare the crow (M) away and then pick up the
COGWHEEL (N). • Cut the beam (O) down with the SHARP, LONG
HALBERD. • Zoom into the alcove (P) to trigger a HOS.
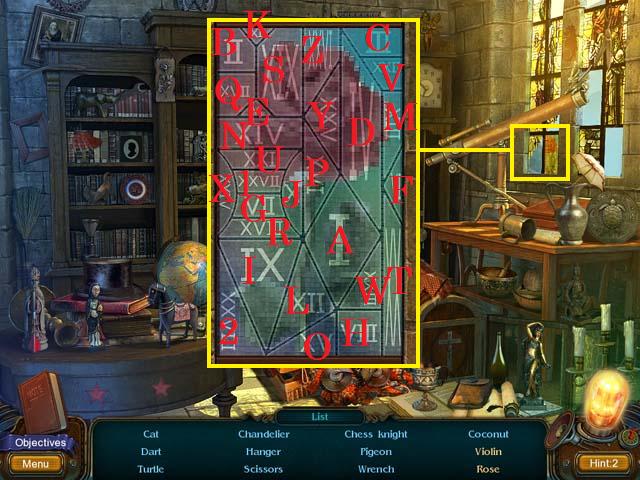 • Zoom into the window; press the glass in order of A-Z and
then 1-2. Collect the Rose.
• Zoom into the window; press the glass in order of A-Z and
then 1-2. Collect the Rose.
 • Zoom into the chest’s lock (A); arrange the lock, shown in
the screenshot, to open the chest and reveal the Violin (B).
• Zoom into the chest’s lock (A); arrange the lock, shown in
the screenshot, to open the chest and reveal the Violin (B).
 • Collect the remaining items (green) to receive the WRENCH.
 • Zoom into the power panel. Remove the bolts (C) with the
WRENCH. • Place the COGWHEEL in the middle and press the
buttons in order of 1-6. • Enter the lab.
• Zoom into the power panel. Remove the bolts (C) with the
WRENCH. • Place the COGWHEEL in the middle and press the
buttons in order of 1-6. • Enter the lab.
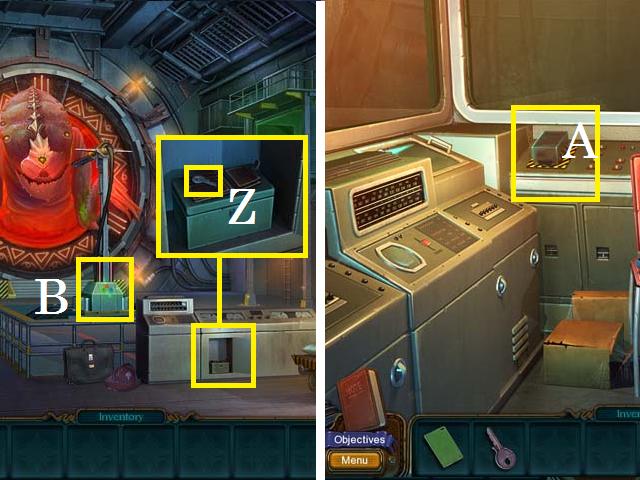
 • Pick up the COIL PIPE (D), CLOTH (E), LABORATORY BURNER (F),
and the CORNER PIPE (G). • Zoom into the lab coat; push the
KEY (H) out of the pocket and pick it up.
• Pick up the COIL PIPE (D), CLOTH (E), LABORATORY BURNER (F),
and the CORNER PIPE (G). • Zoom into the lab coat; push the
KEY (H) out of the pocket and pick it up.
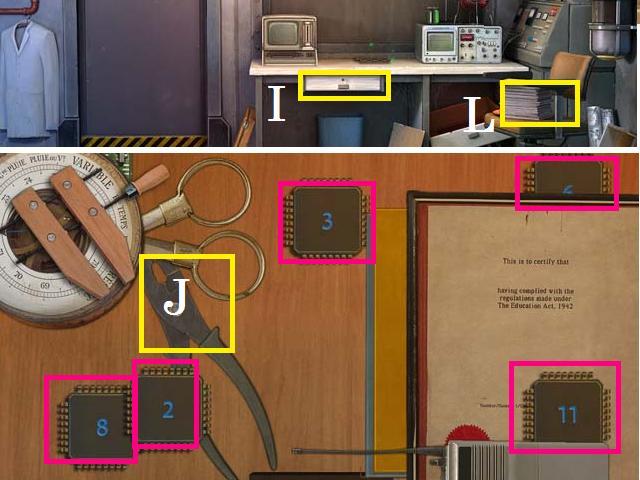 • Open the desk drawer (I) with the KEY and zoom in. Move the
items around and pick up the five MICROCHIPS (pink) and the
PLIERS (J). • Zoom into the chair (L) to trigger a HOS.
• Open the desk drawer (I) with the KEY and zoom in. Move the
items around and pick up the five MICROCHIPS (pink) and the
PLIERS (J). • Zoom into the chair (L) to trigger a HOS.
 • Open the box with the knife (M) to reveal the Handle (N). •
Plant the seeds (O) in the pot (P) to grow the Natural flower.
• Place the earth (Q) on the Earth-Sun model (R). • Collect
the remaining items (green) to receive the HANDLE.
• Open the box with the knife (M) to reveal the Handle (N). •
Plant the seeds (O) in the pot (P) to grow the Natural flower.
• Place the earth (Q) on the Earth-Sun model (R). • Collect
the remaining items (green) to receive the HANDLE.
 • Zoom into the fan switch (S); try to turn it and then use
the PLIERS on the broken switch. • Pick up the eighteenth Lamp
(@). • Clean the window (K) with the CLOTH to reveal the code
3491. • Zoom into the beakers; place the LABORATORY BURNER
(T), CORNER PIPE (U), and the COIL PIPE (V).
• Zoom into the fan switch (S); try to turn it and then use
the PLIERS on the broken switch. • Pick up the eighteenth Lamp
(@). • Clean the window (K) with the CLOTH to reveal the code
3491. • Zoom into the beakers; place the LABORATORY BURNER
(T), CORNER PIPE (U), and the COIL PIPE (V).
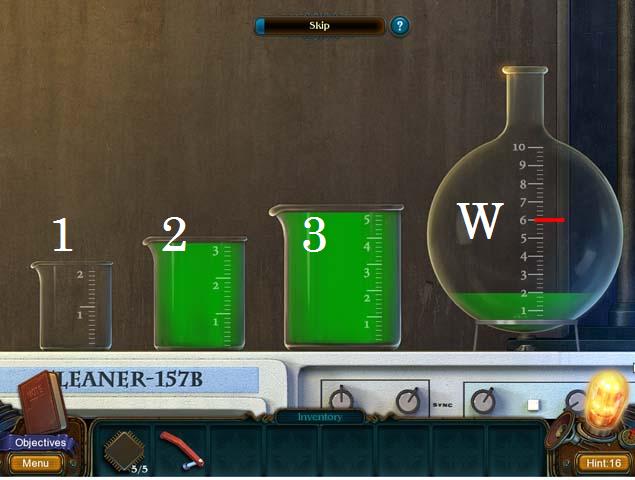 • Zoom back into the beakers; pour the first beaker (1) into
the vial (W). Pour the third (3) beaker into the first beaker
and then pour it into the vial. Repeat the last step. • Pour
the (2) beaker in the vial. Refill from it from (3) then pour
it into the vial. Fill beaker (2) again using (1) and (3) and
top off the vial. • Pick up the TUBE CONTAINING A VIOLET
CHEMICAL SOLUTION.
• Zoom back into the beakers; pour the first beaker (1) into
the vial (W). Pour the third (3) beaker into the first beaker
and then pour it into the vial. Repeat the last step. • Pour
the (2) beaker in the vial. Refill from it from (3) then pour
it into the vial. Fill beaker (2) again using (1) and (3) and
top off the vial. • Pick up the TUBE CONTAINING A VIOLET
CHEMICAL SOLUTION.
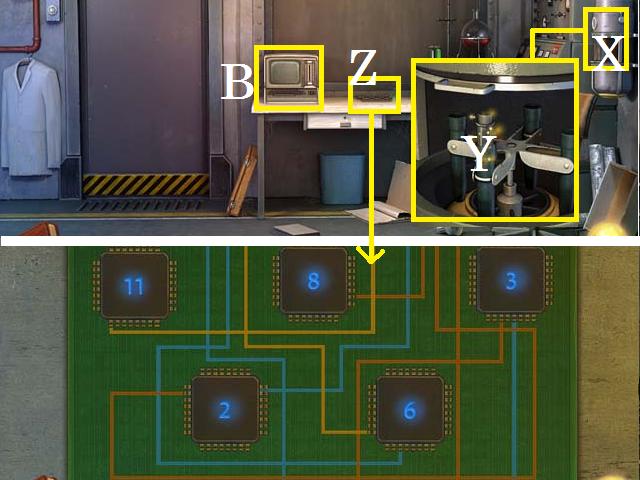 • Place the HANDLE on the centrifuge (X) and zoom in. • Place
the TUBE CONTAINING A VIOLET CHEMICAL SOLUTION in the
centrifuge and pick up the ACID (Y). • Zoom into the computer
board (Z); pour the ACID over the board and place the five
MICROCHIPS correctly, shown in the screenshot. • Pick up the
COMPUTER BOARD and then place it in the computer (B). • Zoom
into the computer and enter the code 3491.
• Place the HANDLE on the centrifuge (X) and zoom in. • Place
the TUBE CONTAINING A VIOLET CHEMICAL SOLUTION in the
centrifuge and pick up the ACID (Y). • Zoom into the computer
board (Z); pour the ACID over the board and place the five
MICROCHIPS correctly, shown in the screenshot. • Pick up the
COMPUTER BOARD and then place it in the computer (B). • Zoom
into the computer and enter the code 3491.
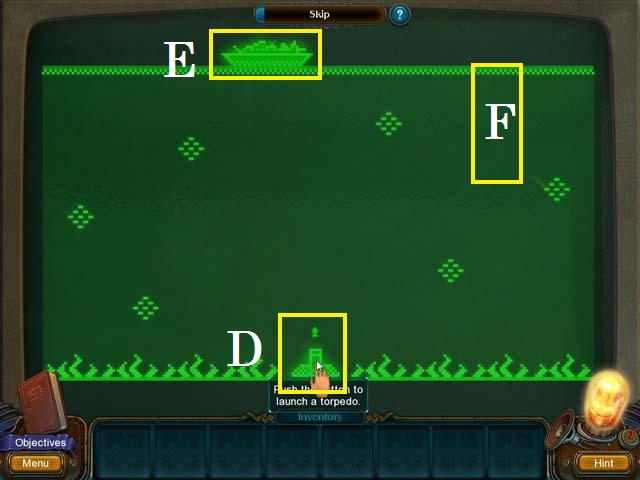 • Press the button (D) to shoot the boats (E). (Hint: to get
the first boat, shoot the missile when it is in between the
last two diamonds (F)). • Enter the portal room.
• Press the button (D) to shoot the boats (E). (Hint: to get
the first boat, shoot the missile when it is in between the
last two diamonds (F)). • Enter the portal room.
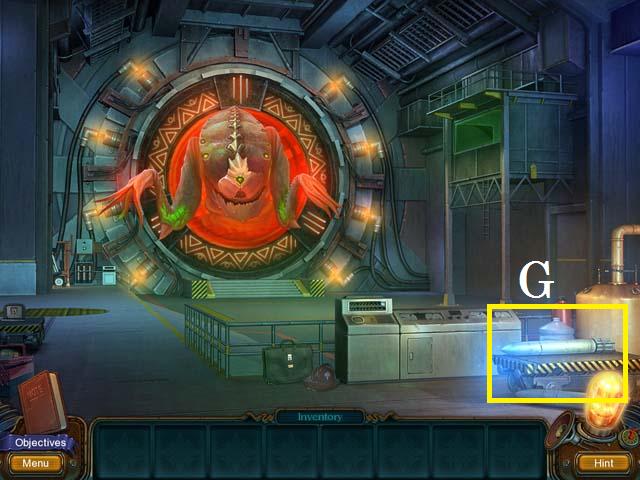 • Zoom into the missile (G) to trigger a HOS.
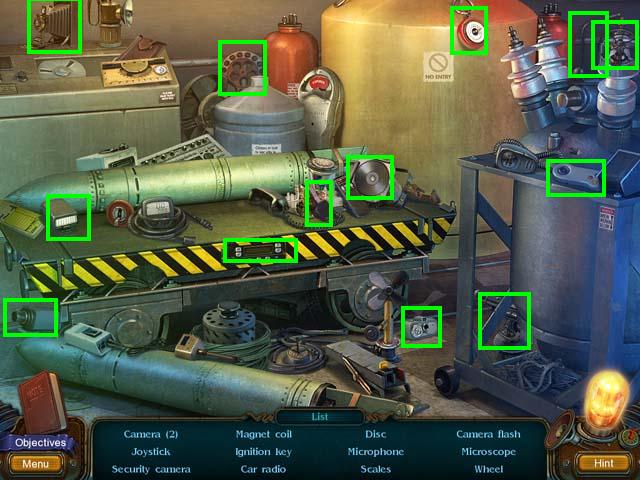 • Collect all of the items (green) to receive the IGNITION
KEY. • Take a left to the forklift.
• Collect all of the items (green) to receive the IGNITION
KEY. • Take a left to the forklift.
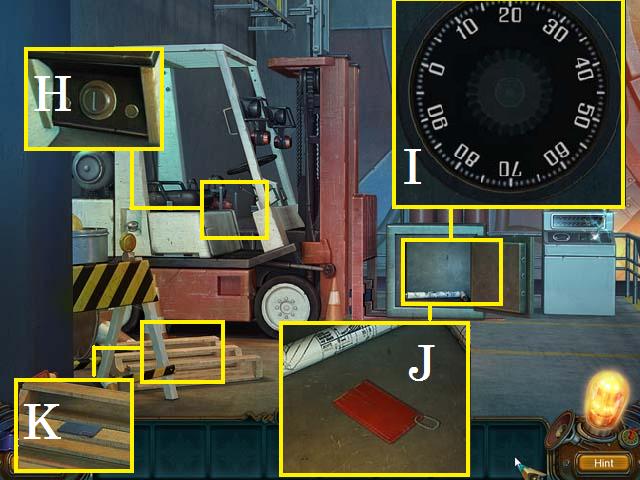 • Zoom into the forklift; insert the IGNITION KEY (H). • Zoom
into the safe; turn the dial (I) to 70, 10, 50, and then 20. •
Zoom into the safe; pick up the RED KEY (J). • Zoom into the
pallet; pick up the BLUE KEY (K). • Back up to the portal.
• Zoom into the forklift; insert the IGNITION KEY (H). • Zoom
into the safe; turn the dial (I) to 70, 10, 50, and then 20. •
Zoom into the safe; pick up the RED KEY (J). • Zoom into the
pallet; pick up the BLUE KEY (K). • Back up to the portal.
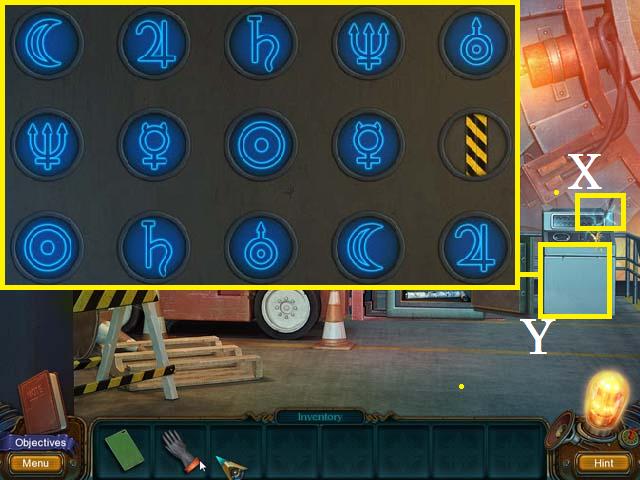
 • Zoom into the machine (L); place the RED KEY in the slot. •
Zoom back into the machine. Starting with the left side, press
a symbol and its match on the right side until only one symbol
is left (M). • Zoom into the control room (N).
• Zoom into the machine (L); place the RED KEY in the slot. •
Zoom back into the machine. Starting with the left side, press
a symbol and its match on the right side until only one symbol
is left (M). • Zoom into the control room (N).
 • Pick up the nineteenth Lamp (@). • Zoom into the chair (O)
to trigger a HOS.
• Pick up the nineteenth Lamp (@). • Zoom into the chair (O)
to trigger a HOS.
 • Move the rope to reveal the Microchip (P). • Open the box
(Q) with the knife (R) and pick up the Green key (S). • Place
the barrel of the gun (T) with the grip (U) to complete the
Gun. • Collect the remaining items (green) to receive the
GREEN KEY.
• Move the rope to reveal the Microchip (P). • Open the box
(Q) with the knife (R) and pick up the Green key (S). • Place
the barrel of the gun (T) with the grip (U) to complete the
Gun. • Collect the remaining items (green) to receive the
GREEN KEY.
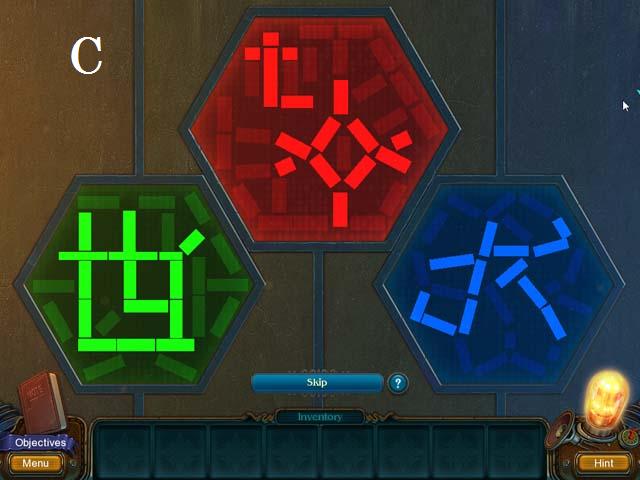
 • Zoom into the machine (V); pick up the schematic’s and place
the BLUE KEY in the slot. • See the screenshot for the final
puzzle image (C). • Pick up the GLOVE (W). • Return to the
forklift.
• Zoom into the machine (V); pick up the schematic’s and place
the BLUE KEY in the slot. • See the screenshot for the final
puzzle image (C). • Pick up the GLOVE (W). • Return to the
forklift.
 • Use the GLOVE to remove the CROWBAR (X) and pick it up. •
Zoom into the machine (Y); place the GREEN KEY in the slot and
zoom back in. • Use the screenshot as a key to make all of the
matches until you are left with one symbol. • Return to the
portal.
• Use the GLOVE to remove the CROWBAR (X) and pick it up. •
Zoom into the machine (Y); place the GREEN KEY in the slot and
zoom back in. • Use the screenshot as a key to make all of the
matches until you are left with one symbol. • Return to the
portal.
 • Zoom into the small cabinet; use the CROWBAR to open it and
then pick up the SMALL KEY (Z). • Return to the control booth.
• Zoom into the button (A) and open the case with the SMALL
KEY and then press the button. • Exit the control room. • Zoom
into the laser (B).
• Zoom into the small cabinet; use the CROWBAR to open it and
then pick up the SMALL KEY (Z). • Return to the control booth.
• Zoom into the button (A) and open the case with the SMALL
KEY and then press the button. • Exit the control room. • Zoom
into the laser (B).
 • Press the bars to create the strange symbols, use the
screenshot (C) as a key. • Congratulations you have
successfully completed Howlville: The Dark Past!
• Press the bars to create the strange symbols, use the
screenshot (C) as a key. • Congratulations you have
successfully completed Howlville: The Dark Past!
Created at: 2012-07-07