

Walkthrough Menu
- General Tips
- Chapter 1: The Glowing Sky
- Chapter 2: The Crime Scene
- Chapter 3: Translating the Runes
- Chapter 4: The Plane Wreck
- Chapter 5: The Mysterious Men
- Chapter 6: The Docks
- Chapter 7: The Ship Wreck
- Chapter 8: Free the Professor
- Chapter 9: Finding Peter Dweller
- Chapter 10: The Cult
- Chapter 11: The Altar
- Chapter 12: The Village
- Chapter 13: Researching the Spear of Odin
- Chapter 14: The Museum Path
- Chapter 15: Inside the Museum
- Chapter 16: The Bookstore
- Chapter 17: Chinatown
- Chapter 18: The Ritual
- Chapter 19: Trapped!
- Chapter 20: The Temple Path
- Chapter 21: Mimir’s Temple
General Tips
- Throughout the game if nothing is happening and there is a cut scene or title words on the screen, click in the middle of the scene to move the action forward.
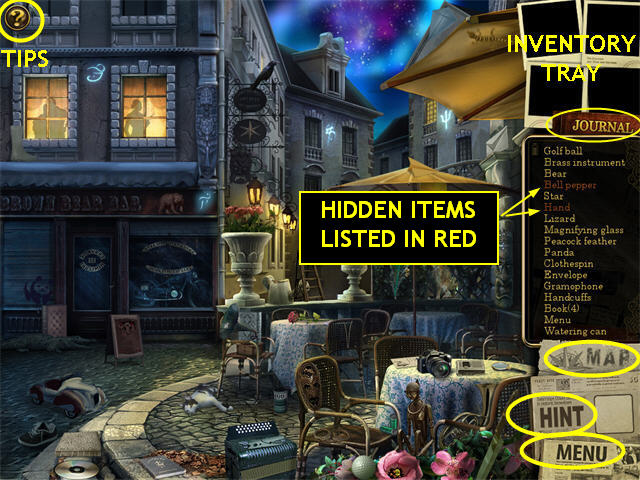
- Use the MENU icon that looks like a newspaper in the lower right to return to the Main Menu. The game autosaves automatically.
- Click on the MAP icon in the lower right to go to the Map and choose a different location.
- Click on the HINT icon in the lower right if you need a HINT. This will draw a glowing circle around one of the items on the Find List.
- The hint will recharge eventually. You can use it again when the word “HINT” is fully filled in. The last thing to fill in is the top part of the T.
- Click on the ? in the upper left for tips and instructions.
- Click on the Journal button just above the Find List to review Cathy’s notes.
- This is a Hidden Object Adventure game. Some of the items that you collect during a Hidden Object Scene will be used in the scene.
- Objects that you can use will be stored in your inventory tray above the Find List.
- All objects are generally appropriate to the scene and the right color, but may be larger or smaller than real life.
- There is no timer.
- If you have too many incorrect clicks in a row the cursor dances around for a few seconds, but there is no other penalty.
- If the cursor turns into a magnifying glass, you can click there to get a zoom view.
- In this game you must collect both Hidden Items (listed in red on the Find list) and Quest Objects.
- The Hidden Items cannot be immediately seen. They will be found in one of two ways. Some are hidden in zoom scenes. Locate places in the scene where the cursor turns into a magnifying glass. Click there and a zoom scene will open.
- In other cases you will have to use a Quest Object to get to a Hidden Item, such as using a KEY from your inventory to unlock a door, and then collecting something from behind the door.
- After you have found all of the items on the Find List, including the Hidden Items, you will be given task instructions. In order to complete the scene you will have to find Quest Objects, then use them to complete the Tasks.
- For example, a Task might be to “load the Camera.” You will have to locate FILM (a Quest Object) in the scene. When you click on it it will go into your inventory tray. Then you will click on the Camera to open a zoom scene. You will then be able to use the FILM in the zoom scene. Note that in this example “Film” never appeared on the Find List—you had to guess that you needed film because the task was “load the Camera.”
- Quest Objects will have a text label when you hover your cursor over them.
- The Find List will vary for different players or when you replay the game except for the Hidden Items and Quest Objects which will always be the same.
- If an area of the scene sparkles, you usually need to use a Quest Object there.
- To use a Quest Object, click on it in the inventory tray, move the cursor to where you want to use it in the scene, and then click again to use it.
- In some cases you have to prepare an item in the zoom scene before you can use an item from your inventory. For example, if you want to put BATTERIES from your inventory into a Voice Recorder in the scene, you will have to click 5 times. 1. Click on the Voice Recorder in the main scene to open a zoom scene. 2. Click on the Voice Recorder IN the zoom scene to open the battery compartment. 3. Click on the BATTERIES to pick them up. 4. Click on the battery compartment to put the BATTERIES into the Voice Recorder. 5. Click on the Voice Recorder again to close the battery compartment.
- Zoom scenes will close automatically once you have done everything needed there.
- If a zoom scene stays open, either you need to do something else in the zoom scene (like click to close the battery compartment) or you need a Quest Object you haven’t acquired yet.
- To close a zoom scene manually, click anywhere on the main scene.
- As you progress in the game, some Quest Objects will be in other locations. You will have to use the Map icon in the lower right to go to the other location, get the Quest Object, and then use the Map to return.
- If the Cursor turns into a Map, it means you need a Quest Object from another location.
- When you go to a different location to look for a Quest Object, check the text at the top of the screen at the new location. It will often be a clue as to what item you are looking for.
- When you have collected everything you can at a secondary location, the text at the top of the screen will say “Area Clear.” You should then go back to the Map and choose a different location.
- You will also be told to go to new locations during the story.
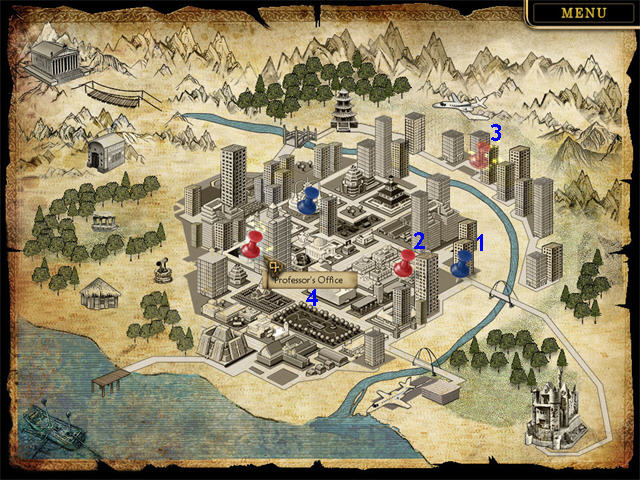
- When you want to go to another location, click on the MAP icon in the lower right corner to go to the Map and then click on the location you want to go to.
- Locked locations are marked in blue (1). They may become available again later in the game.
- Unlocked locations are marked in red (2). Click on any one of these to go there.
- Critical locations are marked in red and highlighted with a gold shimmer (3).
- Hover your cursor over the pushpins on the Map to see the name of that location (4).
General Tips for the Tracing Mini-Games
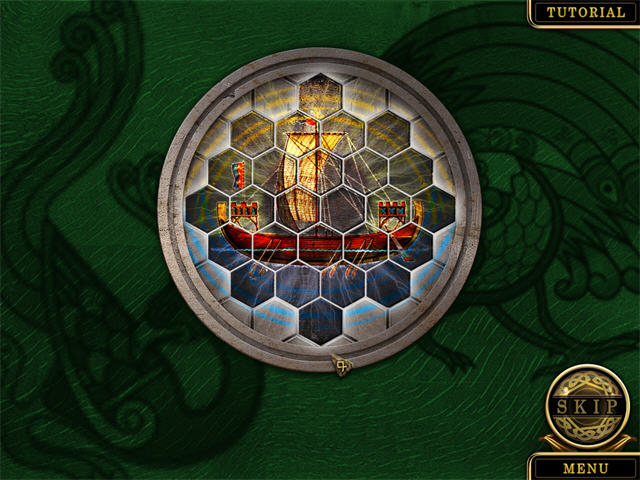
- Throughout the game you will trigger tracing mini-games which require you to use your cursor to trace a Rune shape. These all work the same way.
- Start wherever there is a round dot on the page. Hold down your cursor and trace along the figure.
- The game is quite relaxed about the tracing—you can touch the sides of the line or even cross a little into the whitespace on the paper. As long as you are touching some of the black line and you keep holding the cursor down and come back and complete the line, the mini-game will be counted as successful.
- If the drawing flashes red it means you went too far out of bounds and will have to start over.
- If the tracing is too difficult for you, wait for the SKIP meter to charge, then click it to skip the mini-game.
Chapter 1: The Glowing Sky
- Collect the items on the Find List.
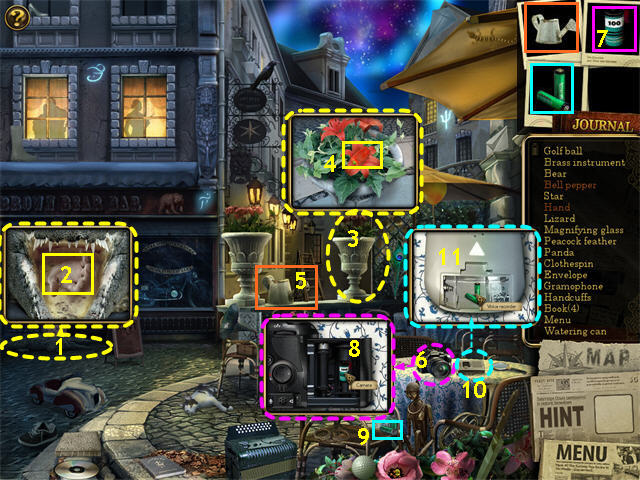
- Zoom in on the Alligator (1) and collect the HAND (2).
- Zoom in on the righthand Urn (3) and collect the RED PEPPER (4).
- Once you have collected all the items on the Find List, the Task List will appear.
- Collect the FILM. It is on the ground to the right of the chair next to the black and white cat.
- Zoom in on the Camera (6). Click on the Camera once to open it. Click on the FILM (7), then click on the Film Holder (8). If the zoom scene doesn’t close automatically, you need to click on the Camera to close the film holder.
- Collect the BATTERIES (9).
- Zoom in on the Voice Recorder (10). Click on the Voice Recorder once to open it. Click on the BATTERIES, then click on the battery slots as shown in the screenshot (11). Click on the Battery Compartment again to close it.
Take a Picture Mini-Game
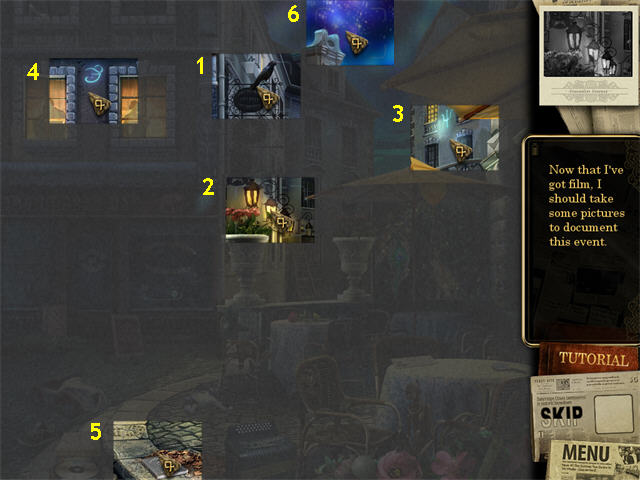
- Click on the matching object to make sure you’re lined up correctly. A green meter will appear. Click while the gold arrow is in the green. If the green meter doesn’t appear, you don’t have the picture centered correctly. Move it a little and try again.
- If you click at the wrong time, just try again. You may find it easier to time if you click on the arrow while it is moving up instead of down.
Cathy’s Office
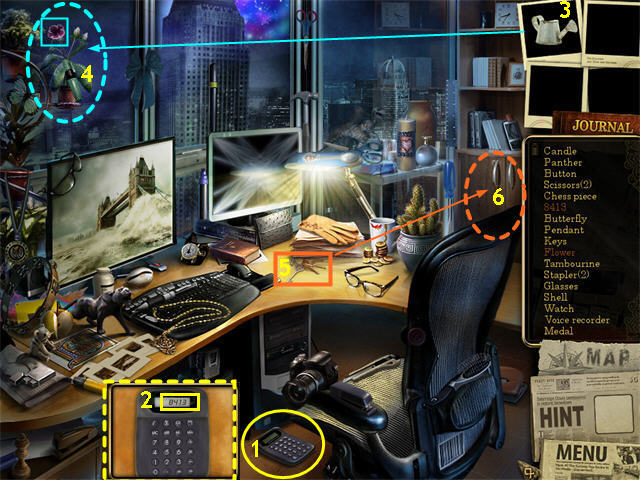
- Collect the items from the Find List. The items will be different for different players.
- Zoom in on the Calculator (1) and collect “8413” from the Solution Window (2).
- Use the WATERING CAN (3) on the Flower Buds (4) and collect the FLOWER that appears.
- Collect the KEYS (5) from the desk.
- After you have collected everything on the Find List, use the KEYS to unlock the Cabinet (6). Collect the FILE.
Chapter 2: The Crime Scene
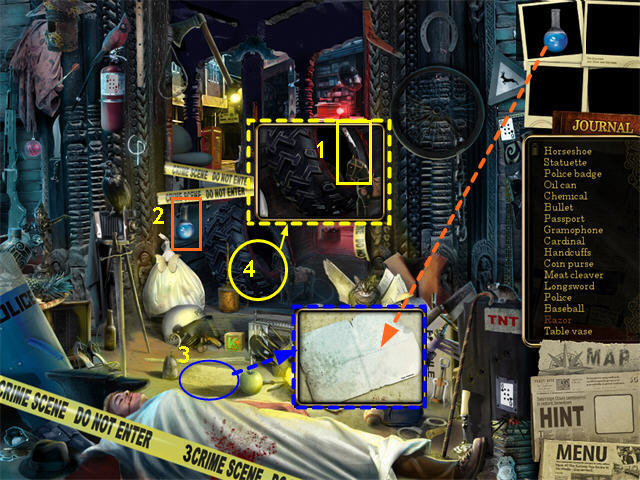
- Collect the items on the Find List. Different players may have different items.
- The only “Police” that counts is the one on the side of the Police Car towards the back of the scene.
- The only Bullet that counts is a silver Bullet standing vertically in the center of the scene. The shotgun shell does not count.
- Zoom in on the Tire (4) and collect the RAZOR (1).
- You can zoom in on the SUSPICIOUS PAPER (3), but you can’t do anything with it until you have the CHEMICAL (2) in your inventory. If you don’t have the CHEMICAL yet, click anywhere in the main scene to close the zoom scene until you’re ready.
- Once you have the CHEMICAL (2) in your inventory, use it on the SUSPICIOUS PAPER (3). This will trigger a tracing mini-game.
- When you have completed everything in the scene, you will go to the Map. You have a choice of several locations to go to. However to avoid a possible glitch you should go to the Professor’s Office first.
Chapter 3: Translating the Runes
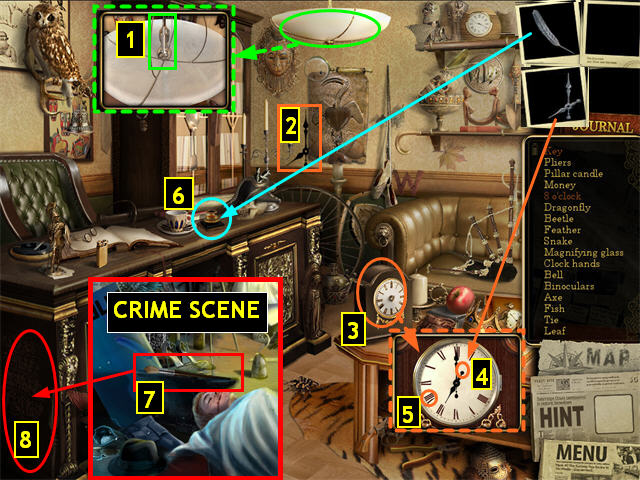
- Collect the items from the Find List. Different players may have different items.
- The Snake looks like a silver braid on the hat on the desk.
- Zoom in on the Ceiling Lamp and collect the KEY (1).
- After you have collected everything on the Find List, the CLOCK HANDS (2) will move to your inventory.
- Zoom in on the Clock (3) and put the CLOCK HANDS on the Clock Face.
- Now click on the Dot (4) at the end of the Hour Hand (the small hand) 8 times so it points to 8 o’clock (5).
- Put the FEATHER in the Inkwell (6).
- Use the Map to go to the Crime Scene. Collect the large BRUSH (7) on the lower left of the scene by the head of the victim.
- Use the BRUSH on the Carving (8) on the left side of the desk.
- Use the Map to go to the Victim’s Home.
The Victim’s Home
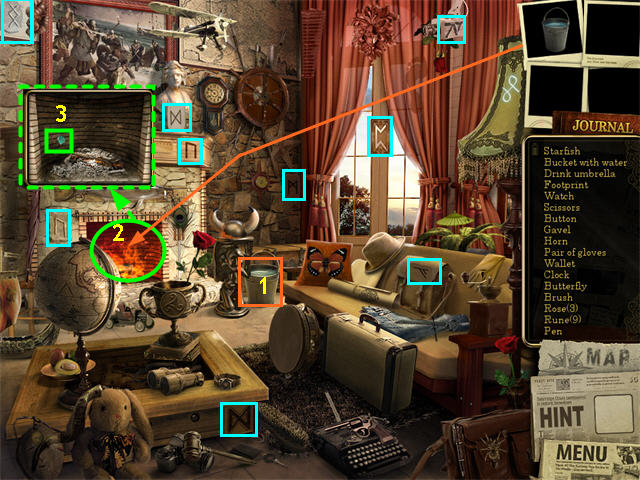
- Collect the items from the Find List. Different players may have different items.
- There are many graphics in the scene that look like they might be Runes but are not. We have marked the ones that count in cyan.
- One of the Roses is hanging upside down from the camera in the top right.
- The only Horn that counts is in the lower left on top of the toy rabbit.
- Because the clue specifies “Drink Umbrella,” the only Umbrella that counts is the tiny green one on the right of the scene.
- The Button is in the center of the Mask in the lower left.
- The Pen is on top of the Briefcase in the lower right.
- The “Wallet” is a leather keycase in the lower right.
- Use the BUCKET OF WATER (1) on the Fire (2). The Fire will go out. Click again to zoom in.
- Collect the PUZZLE PIECE (3).
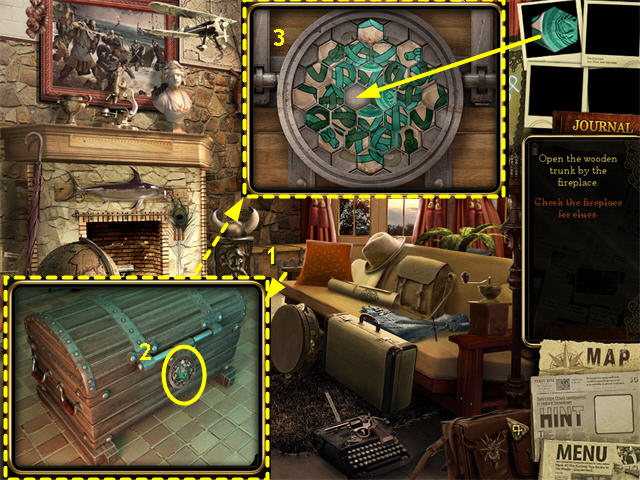
- Zoom in on the Trunk (1) to the right of the Fireplace and click on the lock (2) to turn it towards you.
- Put the PUZZLE PIECE on the lock (3) and trigger a mini-game.
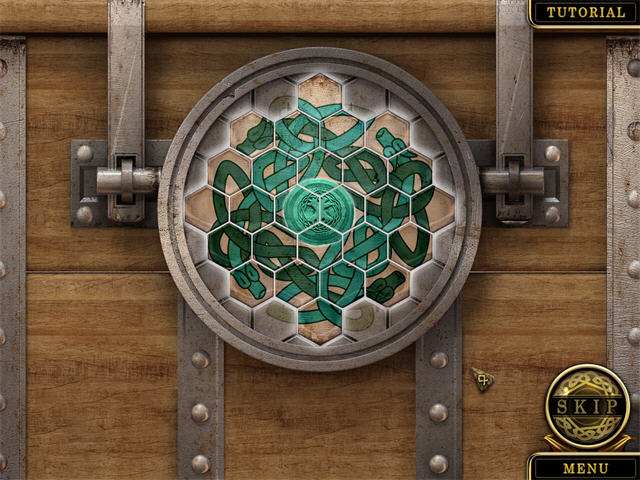
- Rotate each piece to match the screenshot. Note that you must include the grayed out lines on the tiles that you cannot turn. When the puzzle is complete, you will get a “Well Done” message and will return to the main scene.
- You will automatically receive the Book from the trunk. This will trigger another tracing mini-game.
- Once you have completed or skipped the tracing, you will be back at the Map. Go to the Professor’s Office. The Professor will tell you to investigate a plane crash.
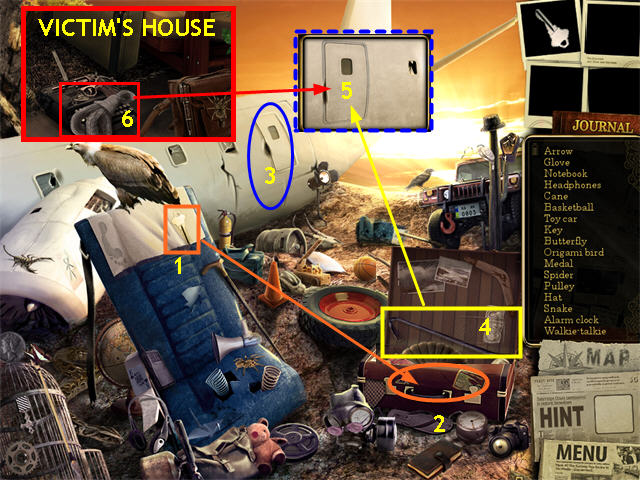
Chapter 4: The Plane Wreck
- You will be back at the Map. Although the plane crash is northwest of the city, you have to begin by going to Cathy’s House in the east.
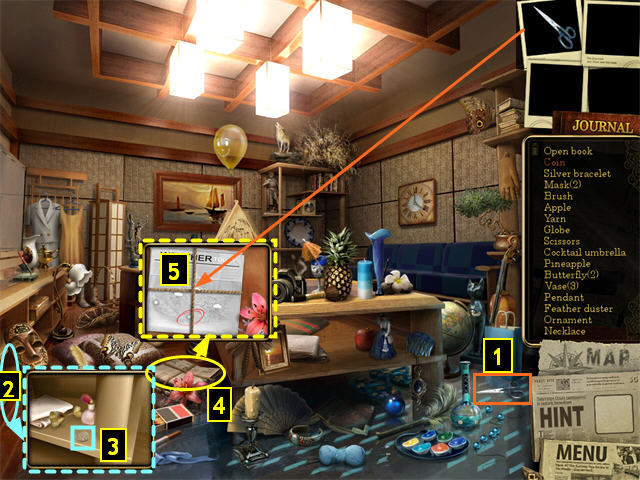
- Collect the items from the Find List. Different players may have different items.
- The SCISSORS (1) are on the lower right.
- Zoom in on the shelves (2) in the lower left and collect the COIN (3).
- Zoom in on Today’s Newspaper (4) and use the SCISSORS to cut the String (5) and trigger a telephone mini-game.
- Click on the START key. The numbers you should click will be circled in cyan.
- Repeat the sequence. If you get the number right, it will be circled in green. If you get the number wrong, the sequence will repeat so you can try again.
- Solution:4646 12895 20947
- You will return to the Map.
Wrecked Plane
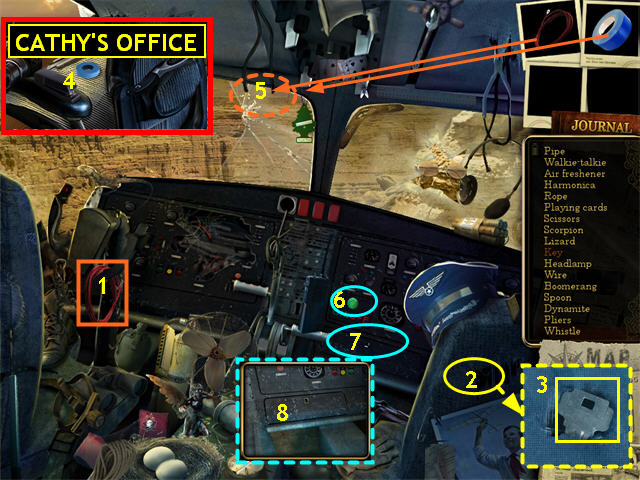
- Collect the items from the Find List. Different players may have different items.
- The WIRE that counts is the coil of red wire (1) hanging on the left side of the scene.
- Zoom in on the Tear in the Fabric (2) on the back of the Copilot’s seat and collect the KEY (3).
- Click on the Live Wires (5). You need something from another location.
- Go to the Map and choose Cathy’s Office.
- Collect the blue TAPE (4) from the seat of the chair. Use the Map to return to the Wrecked Plane.
- Use the WIRE (1) and then the TAPE (4) on the Live Wires (5). This will repair the circuit.
- The Green Button (6) on the console by the Copilot’s chair will start to glow. Click on it.
- Zoom in on the Copilot’s Compartment (7) below the Green Button.
- Click on the Compartment (8) in the zoom scene and it will open, revealing the papers. You will return to the Map.
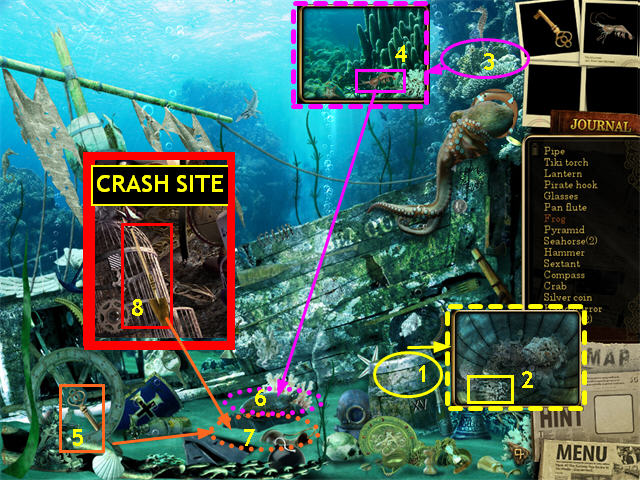
Crash Site
- Collect the items from the Find List. Different players may have different items.
- Use the KEY (1) to open the Suitcase (2).
- Zoom in on the Jammed Door (3).
- Collect the CROWBAR (4) from the unlocked Suitcase and use it on the Jammed Door (5).
- Now you need to go to another location. Use the Map to go to the Victim’s House.
- Collect the ROPE (6) from the bottom of the scene.
- Use the ROPE (6) on the door opening. This will trigger a telephone mini-game.
- Solution:1973 40267 83501 651945
Take a Picture Mini-Game
- Take the pictures as shown.
Chapter 5: Mysterious Men
- Cathy finds herself in the bottom of a Well.
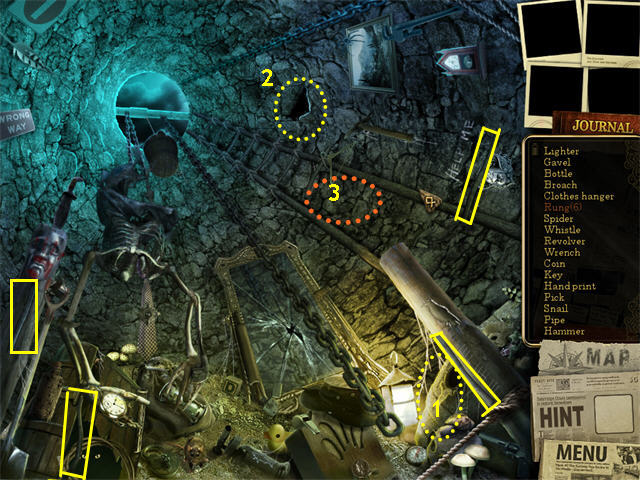
- Collect the items from the Find List. Different players may have different items.
- The RUNGS are just sticks. They can be straight or slightly curved. 4 are in the main scene. One is inside the Barrel (1). One is inside the space where there is a Missing Stone (2) in the upper right of the scene.
- The Key is on the long chain hanging down into the middle of the scene.
- The Hammer is on one of the Skeleton’s arms.
- Use the RUNGS on the Ladder (3) where the cursor turns into gears. This will place all 6 RUNGS.
- After the cut scene, you will be back at the Map.
Excavation Site
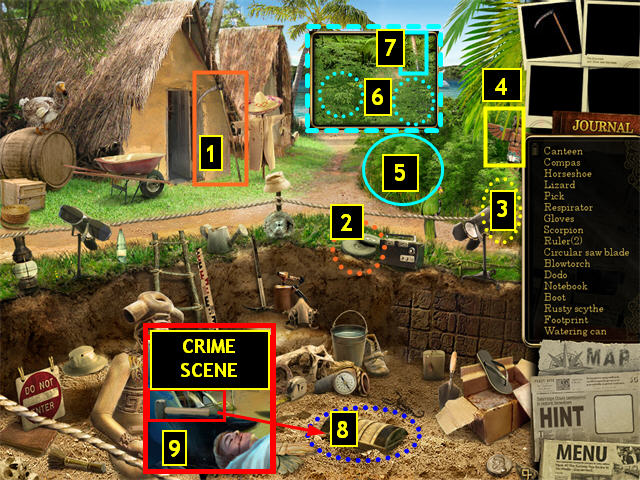
- Collect the items from the Find List. Different players may have different items.
- One of the “Rulers” is a Measuring Tape.
- Use the RUSTY SCYTHE (1) on the Grinding Stones (2) to sharpen it. It will go back into your inventory as a SCYTHE.
- Use the SCYTHE to clear away the far right Bush (3) that is sparkling and collect the TOTEM POLE (4) revealed behind the Bush.
- The SCYTHE will still be attached to your cursor. Zoom in on the Bush (5) just to the left of the Totem Pole.
- Use the Scythe twice in the zoom scene (6) to reveal a SHOVEL. Collect the SHOVEL (7) and it will go into your inventory, replacing the SCYTHE.
- Use the SHOVEL to dig up the Chest (8).
- Now you need an object from another location. Use the Map to go to the Crime Scene and collect the HAMMER (9). It is just to the left of the head of the victim.
- Use the Map to return to the Excavation Site.
- Use the HAMMER to break open the Chest (8).
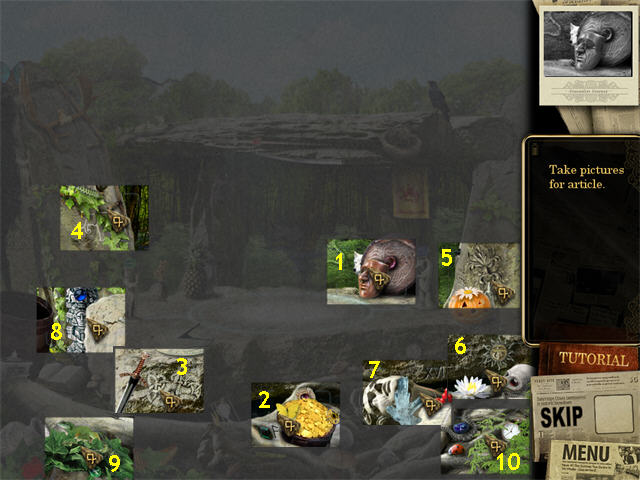
Take a Picture Mini-Game
- Take the pictures as shown.
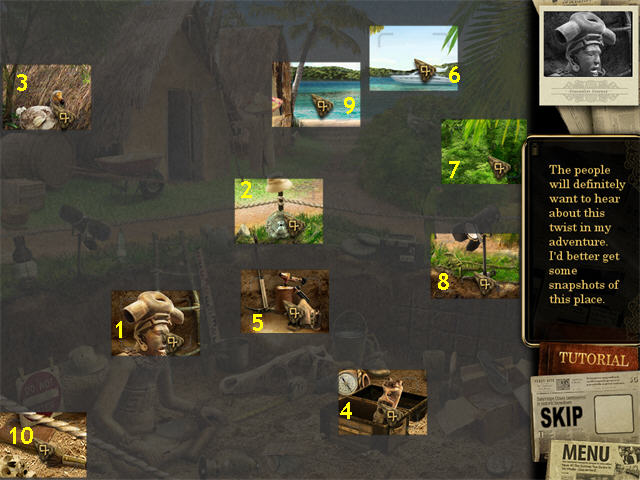
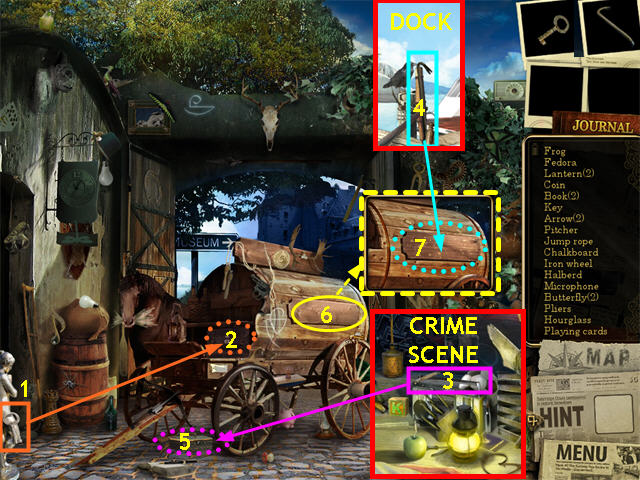
Chapter 6: The Docks
- Collect the items from the Find List. Different players may have different items.
- The “Compass Rose” is the star engraved into the post in the lower left.
- Collect the SNORKEL (2) from next to the Barrel.
- Click on the Barrel (3) to open a zoom scene. Collect the AIR TANKS (4).
- Click on the Boat Deck (5) to open a zoom scene. Collect the SCUBA MASK (6).
- Take the 4 items from your inventory and put them with the WETSUIT (7). Put the items one at a time, making sure to find a place where the cursor turns to gears each time before you click.
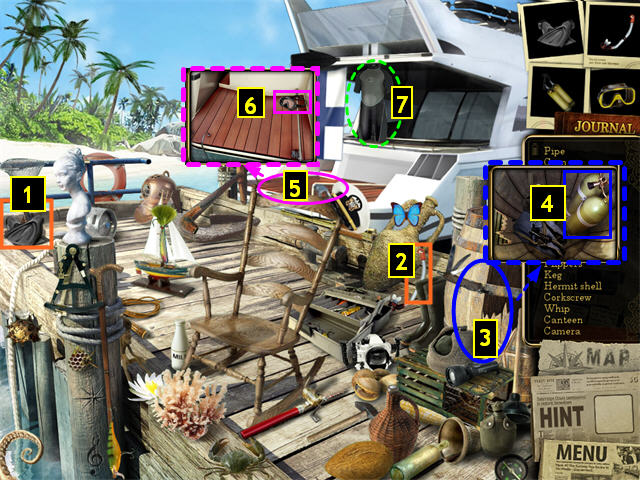
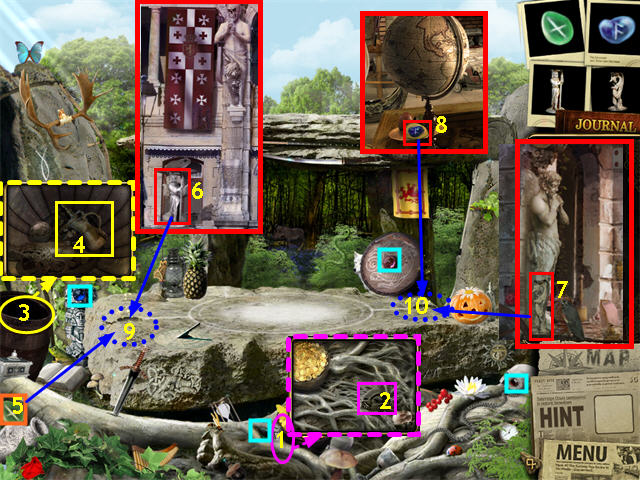
Chapter 7: The Shipwreck
- Collect the items from the Find List. Different players may have different items.
- Zoom in on the Barrel (1) and collect the FROG (2).
- Zoom in on the rocks in the top right (3) and collect the SHRIMP (4).
- Feed the SHRIMP (4) to the Hungry Turtle (6). The Turtle will swim away, revealing a Chest (7).
- Use the Map to go to the Plane Crash Site and collect the SHOVEL (8) from the lower left.
- Use the Map to return to the Shipwreck. Use the SHOVEL (8) on the Chest (7).
- Use the KEY (5) to unlock the Chest (7).
- You will return to the Map. Go to the Professor’s Office.
Chapter 8: Free the Professor
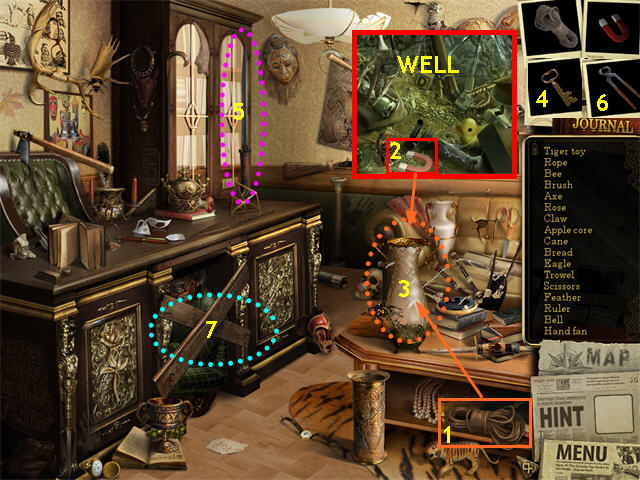
- Collect the items from the Find List. Different players may have different items.
- Once you have collected all the items, the ROPE (1) will go into your inventory.
- Now you need something from another location. Click Use the Map to go to the Well. Collect the MAGNET (2).
- Use the Map to return to the Professor’s Office.
- Use the ROPE and then the MAGNET on the Fragile Vase (3). You do not need to combine the items first.
- The KEY will appear at the top of the Fragile Vase. Collect it.
- Use the KEY (4) to open the Locked Cabinet (5) and collect the PLIERS (6).
- Use the PLIERS to remove the BOARDS (7) trapping the professor.
- You will find yourself back at the Map. Return to Cathy’s Office.
Chapter 9: Finding Peter Dweller

- Collect the items from the Find List. Different players may have different items.
- When you have collected all the items, the MONITOR CABLE (1) will go into your inventory.
- Use the MONITOR CABLE (1) on the Monitor (2). The Monitor will turn on.
- Now you need to go to another location. Use the Map to go to Cathy’s House.
- Collect the BLACKLIGHT (3) from the right side of the scene below the Wallclock. Use the Map to return to Cathy’s Office.
- Use the BLACKLIGHT (3) on the Tablet (4) on the right shelf.
- The PASSWORD (5) will go into your inventory. Click on the PASSWORD, then click on the Monitor (2) and trigger a mini-game.
Photo Search Mini-Game
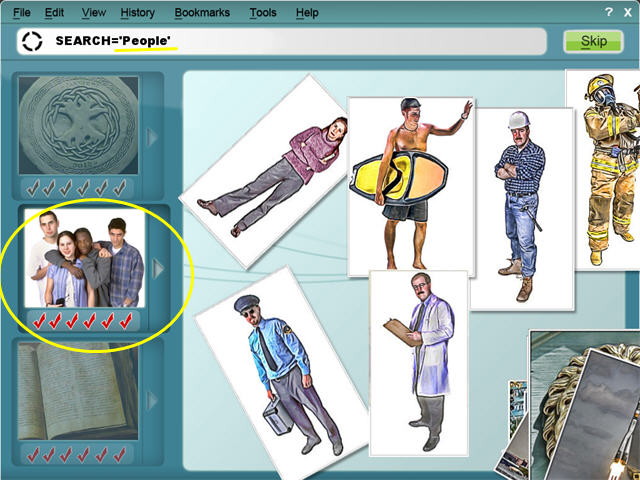
- For each round, you must find 6 pictures from the stack on the right that match the highlighted search term.
- Select a photo by dragging it to the search term icon on the left. If you are correct, a checkmark will turn green. If you are incorrect, the photo will go back onto the board on the right.
- You can stack photos you don’t want to get them out of the way. We stacked unwanted photos in the lower right corner.
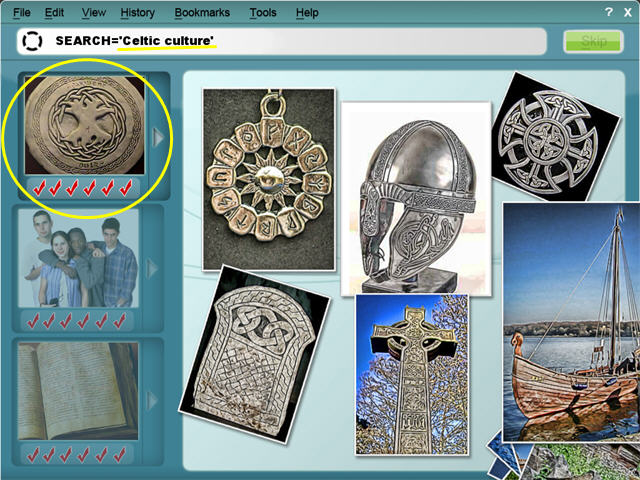
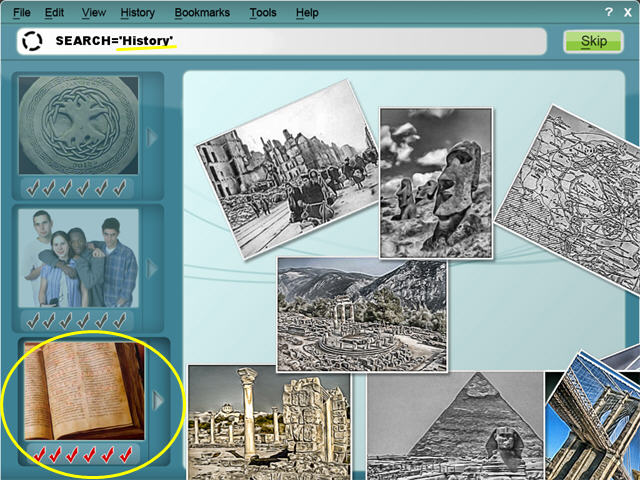
- Selections are somewhat arbitrary, particularly for the last search term, “History.”
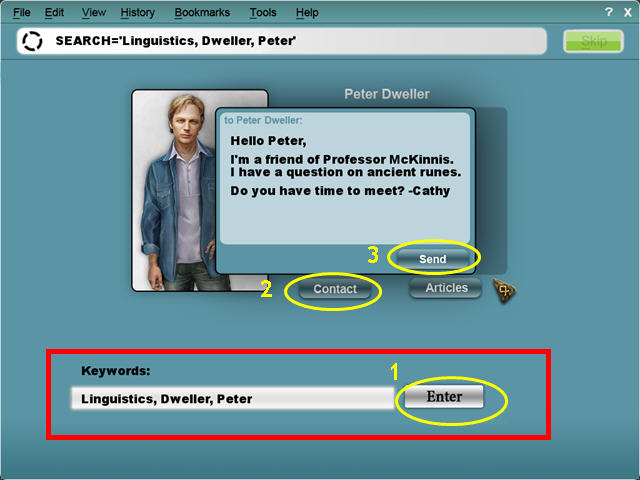
- Cathy will now find Peter Dweller’s contact information and send him an email. Click on ENTER, then CONTACT, then SEND.
- You will find yourself back on the Map. Choose the Airport location.
Airport
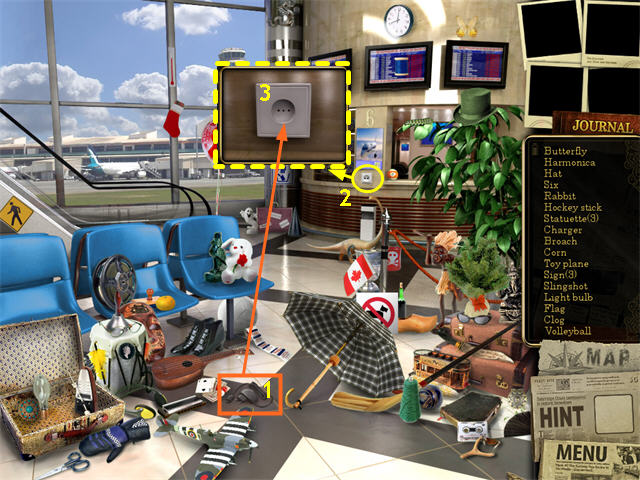
- Collect the items from the Find List. Different players may have different items.
- When you have collected all the items, the CHARGER (1) will go into your inventory.
- Zoom in on the Wall outlet (2) and use the CHARGER (3). This will trigger a telephone mini-game.
- Solution:5792 46503 15276 267489
- You will be back on the map. Choose the Coffee House location.
Coffee House

- Collect the items from the Find List. Different players may have different items.
- Zoom in on the Fish Tank (2) and collect the Car (3).
- Now you need to go to other locations. Use the Map to go to the Outdoor Café location.
- Collect the SPOON (4) from the Chair next to the Cat.
- Use the Map to go to Cathy’s House. Collect the COFFEE (5) from the left side of the scene. Use the Map to return to the Coffee House.
- Zoom in on the Coffee Cup (6). Put the COFFEE (5), SUGAR (1), and SPOON (4) into the Hot Water (7). This will make a cup of coffee and trigger a cut scene.
Chapter 10: The Cult
- Two locations are available for the Cult. Choose the one on the left to play as Peter.
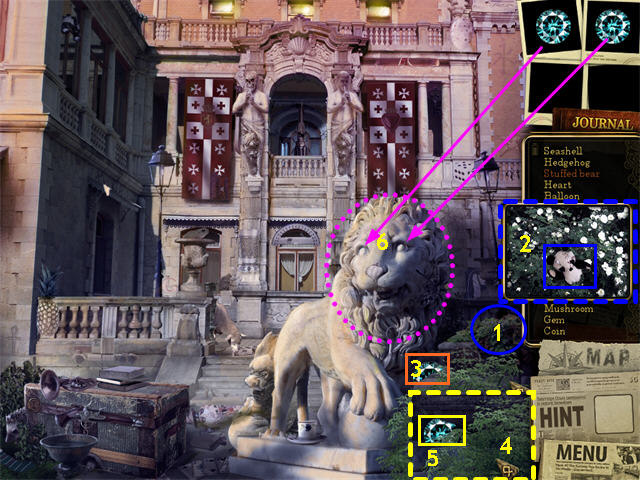
- You are now playing as Peter.
- Collect the items from the Find List. Different players may have different items.
- Zoom in on the bushes at the base of the Lamppost (1) and collect the STUFFED BEAR (2).
- Now click on the bushes in the lower right corner (4) to reveal another GEM (5). Collect it.
- Once the two GEMS are in your inventory, place them as eyes on the Lion (6).
- Return to the Map. This time choose the Cult location on the right.
Cult, right side
- You are now playing as Cathy.
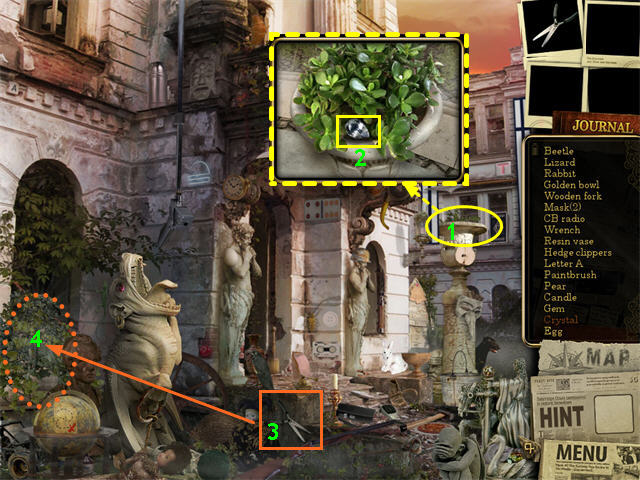
- Collect the items from the Find List. Different players may have different items.
- Zoom in on the Urn (1) on the right and collect the CRYSTAL (2).
- Use the CLIPPERS to trim the Bushes on the left (4). You will automatically receive a STAFF.
- When you have completed or skipped the tracing mini-game you will return to the Map. Go to the Stone Ruins.
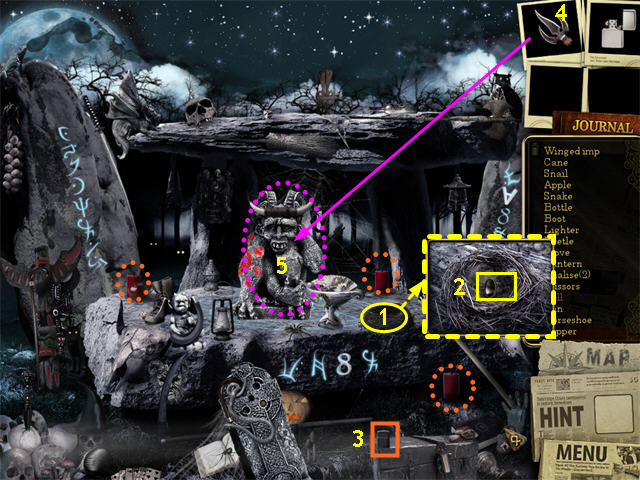
Chapter 11: The Altar
- You will be playing as Cathy.
- Collect the items from the Find List. Different players may have different items.
- The ladybug does not count as a Beetle. The Beetle that counts is green in the lower left.
- The Clover is on top of some ivy on the right side of the altar.
- The Scythe is on the left side of the altar. The easiest place to click on it is the horizontal metal piece above the antlers.
- Zoom in on the roots just to the right of the Rune that looks like an F (1) and collect the MASK (2).
- Zoom in on the Barrel (3) on the left side of the scene and collect the TEAPOT (4).
- We have marked the 4 Gems that count in cyan.
- You will need to go to another location. You will need to go to the left side of the Cult, the right side of the Cult, and the Victim’s House to collect items. The text at the top of the screen in each location will tell you what to look for.
- At the left side of the Cult, the STATUETTE (6) is below the leftmost Banner.
- At the right side of the Cult, the STATUETTE (7) is by the legs of the statue of the man on the left side of the doorway.
- At the Victim’s House, collect a BLUE RUNESTONE (8) below the Globe on the left.
- When you are done, use the Map to return to the Stone Ruins.
- Put the STATUETTE (6) from the left side of the Cult on the left side of the Altar (9).
- Put the STATUETTE (7) from the right side of the Cult on the right side of the Altar (10).
- Put the GREEN RUNESTONE (5) on the left STATUETTE (9) and the BLUE RUNESTONE (8) on the right STATUETTE (10).
Take a Picture Mini-Game
- Take the pictures as shown.
- This will trigger a tracing mini-game. When you have completed it or skipped it, you will return to the Map.
Chapter 12: The Village
- You will be playing as Peter.
- Collect the items from the Find List. Different players may have different items.
- Zoom in on the green stewpot (1). Remove the pot lid (2) and collect the Panda (3).
- Put the LIGHTBULB (4) in the Lamp (5) on the left. This will illuminate the SUSPICIOUS DOOR (10).
- You need the Emblem (9), but first you have to get the Cat to move.
- Zoom in on the Bucket (7). Put the ALARM CLOCK (6) into the Bucket (8).
- When the ALARM CLOCK rings, it will scare the Cat and you will be able to collect the EMBLEM (9).
- Put the EMBLEM on the SUSPICIOUS DOOR (10). This will trigger a puzzle mini-game.
- Rotate the tiles to make the picture shown. When you are done, you will return to the Map. Go to the Hotel.
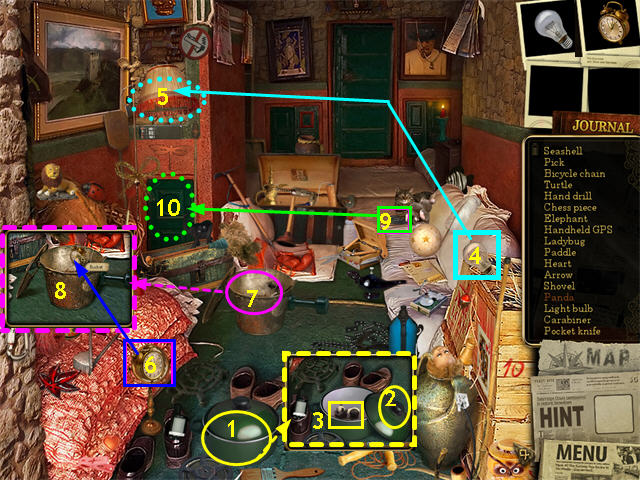
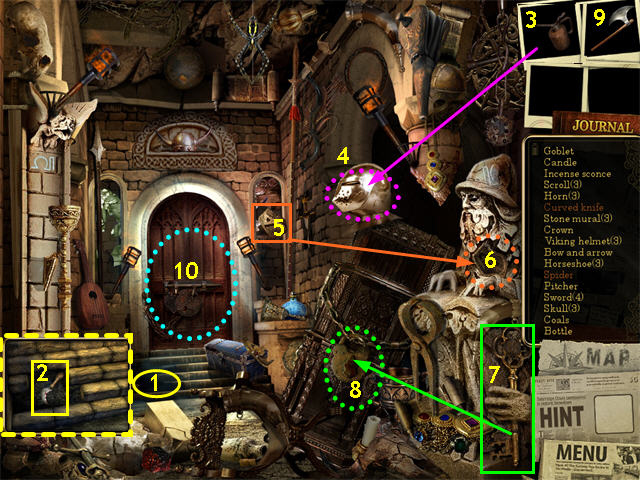
Chapter 13: Researching the Spear of Odin
- You will be playing as Cathy.
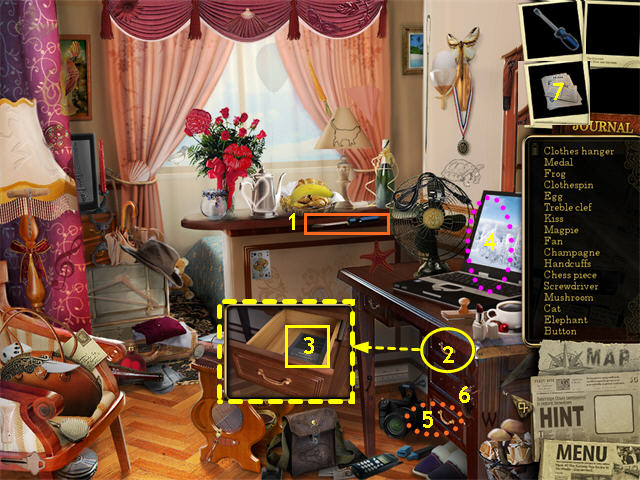
- Collect the items from the Find List. Different players may have different items.
- The only Fan that counts is the red hand Fan at the top of the Curtains.
- The Drawers of the Desk will start to glow. There are 3 Drawers.
- Zoom in on the Top Drawer (2) and collect the MODEM (3).
- Take the MODEM from your inventory and put it on the Laptop (4). It will connect.
- Try to open the Middle Drawer. It is missing a handle.
- Use the SCREWDRIVER (1) to remove the HANDLE (5) from the Bottom Drawer.
- Put the HANDLE on the Middle Drawer (6). It will open and you will receive the MODEM MANUAL (7).
- Put the MODEM MANUAL (7) on the MODEM on the desk. The Computer will connect to the Internet and trigger a mini-game.
Photo Search Mini-Game

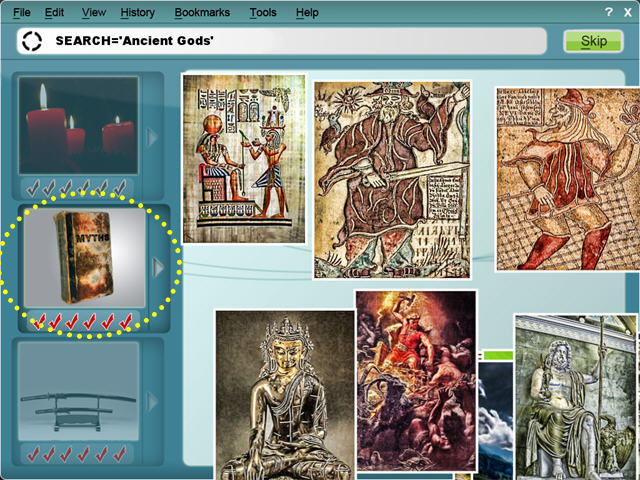
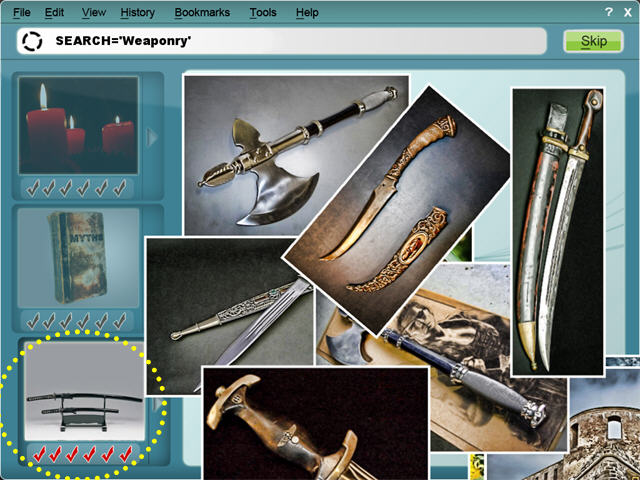
- Selections are somewhat arbitrary. The books, the mixing dish, and Stonehenge are all filed under “Occultism.”
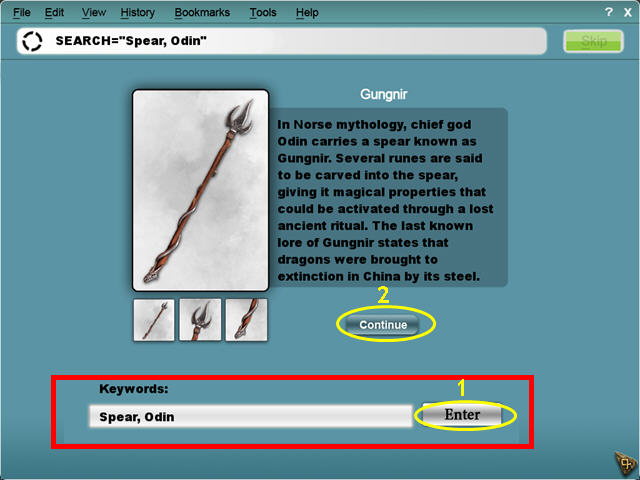
- After you sort the photos, you will start a search on the Sword of Odin. Click ENTER on the first screen and CONTINUE on the second screen.
- When you complete the mini-game you will be back at the Map. Go to the Museum Path.
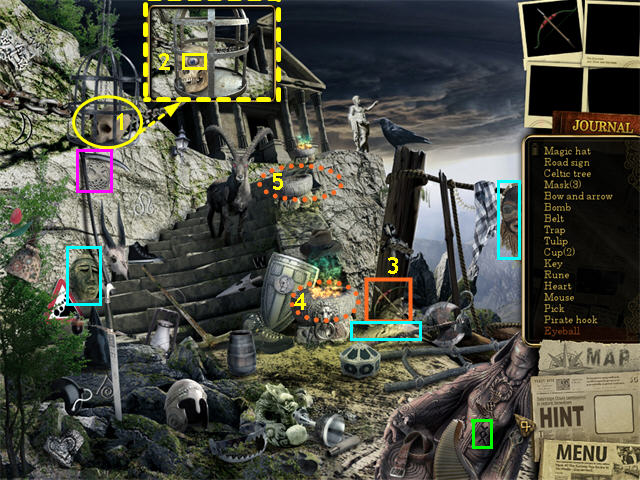
Chapter 14: The Museum Path
- Collect the items from the Find List. Different players may have different items.
- This scene required more precise clicking than most of the others. For example, the only way we could pick up the Halberd was by clicking on the left side of the blade. If you’re pretty sure you have the right item but your first click didn’t work, try clicking on a different part of the item.
- The Arrow in the Crossbow does not count. The two Arrows that count are the one on the sign pointing to the Museum and one on the left gate.
- Use the KEY (1) to open the Locked Suitcase (2). A scroll will automatically be collected.
- Now you need objects from other locations. You will need to visit The Docks and the Crime Scene.
- At the Crime Scene, collect the POCKET KNIFE (3). It is just above the Body.
- At the Docks, collect the CROWBAR (4). It is on a vertical post by the pier next to a bird.
- Use the Map to return to the Museum Path.
- Use the POCKET KNIFE (3) to open the Box (5).
- Zoom in on the side of the Wagon (6) and use the CROWBAR (4) on the Boards (7).
- This will trigger a Tracing mini-game. You will have to trace two Runes.
- When you are done with the mini-game, you will be back on the Map. Choose the Museum.
Chapter 15: Inside the Museum
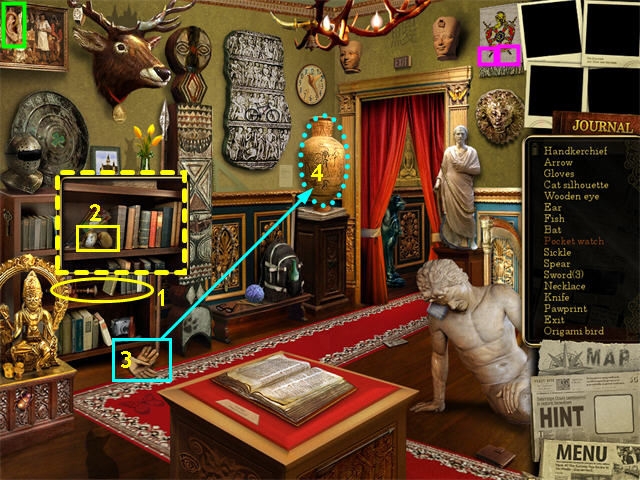
- Collect the items from the Find List. Different players may have different items.
- Zoom in on the Shelves (1) and collect the POCKETWATCH (2).
- The only Ear that counts is overlaid on the painting in the upper right. We have marked it in green.
- The Swords in the drawing in the upper right do count, but you have to click on their points to collect them. We have marked these in pink.
- Use the GLOVES (3) on the large Vase (4) to move it. You will then automatically review the ancient papers underneath it and trigger a telephone mini-game.
- Solution:1783 23504 59150 128940 358436
- You will be back on the map. Go to the Bookstore.
Chapter 16: The Bookstore
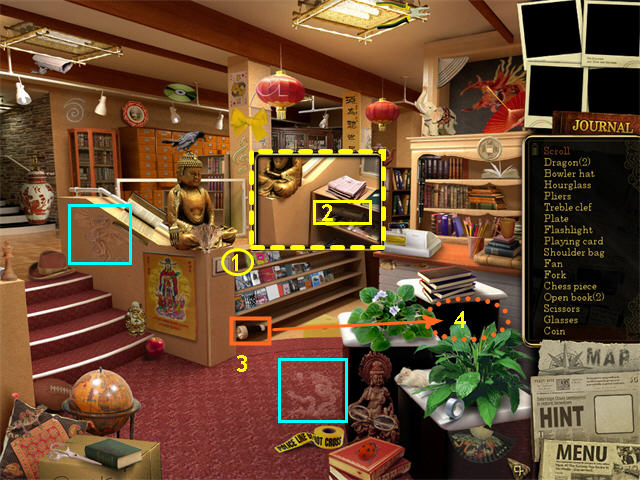
- Collect the items from the Find List. Different players may have different items.
- Zoom in on the Shelves (1) and collect the Scroll (2).
- The creature on the upper right is a Phoenix, not a Dragon. We have marked the two Dragons in cyan.
- The “Bowler hat” is a Fedora at the top of the stairs.
- Use the FLASHLIGHT (3) on the Dark Corner (4) and you will receive a map of Chinatown.
- Complete the two tracings and you will be back at the Map. Go to Chinatown.
Chapter 17: Chinatown

- Collect the items from the Find List. Different players may have different items.
- Zoom in on the Nest (1) and collect the CLOWN (2).
- Now you need objects from other locations. You will need to go to the Cult and the Well.
- At the Well, collect the NAILS (4) from the far left.
- At the Cult, collect the HAMMER (5) from the lower right. Use the Map to return to Chinatown.
- Put the PLANKS on the Broken Bridge (6). Put the NAILS on the PLANKS, then use the HAMMER to hammer them.
- Collect the MALLET (7) from the Statue across the Bridge.
- Use the MALLET (7) to ring the Gong (8).
- This will trigger a Tracing mini-game. You must complete two Runes. This will trigger a picture mini-game.
Take a Picture Mini-Game
- Take the pictures as shown.
- When you complete the mini-game you will be back at the Map. Choose the Stone Ruins location.
Chapter 18: The Ritual
- Note that you begin the scene with the SPEAR OF ODIN (4) already in your inventory.
- Collect the items from the Find List. Different players may have different items.
- Zoom in on the Nest (1) and collect the BELL (2).
- Use the LIGHTER (3) to light the three Candles marked in orange.
- Give the SPEAR OF ODIN (4) to the Statue (5).
- A Necklace will appear and be automatically collected.
- After the cutscene, Cathy will be taken to the Temple of Mimir.
Chapter 19: Trapped!
- Collect the items from the Find List. Different players may have different items.
- One of the Horseshoes is on the left side of the Ceiling. It is quite hard to see.
- Zoom in on the Steps (1) and collect the CURVED KNIFE (2).
- After you have collected everything, the OIL CAN (3) will go into your inventory. You never had to collect this from the scene.
- Use the OIL CAN on the Helmet (4) to reveal the Crystal Orb. It will automatically be collected.
- Collect the RUNESTONE (5) from the right of the Door.
- Put the RUNESTONE into the Socket (6) in the Statue on the left.
- The Hand holding the KEY (7) in the lower right will move, allowing you to collect the KEY.
- Use the KEY on the Chest (8) to reveal the AXE.
- Use the AXE (9) 3 times on the Door (10) to break it open.
- This will trigger a Tracing mini-game. You must complete two Runes.
- This will trigger a telephone mini-game.
- Solution:2508 74910 12537 016749 864027
- You will be back on the map. Go to the Temple Path.
Chapter 20: The Temple Path
- Collect the items from the Find List. Different players may have different items.
- The Celtic Tree is a stone tablet on the wall beneath the Cage on the left. We have marked it in pink.
- The 3 Masks are marked in cyan.
- The only Rune that counts is on the Statue in the lower right. We have marked it in green.
- Zoom in on the Cage (1) and collect the Eye (2).
- To scare off the Ram, use the BOW (3) on the Lit Brazier (4). The lit Bow will go back into your inventory.
- Now use the Bow on the Unlit Brazier (5) to light it.
- This will trigger a Tracing mini-game. You must complete 3 Runes.
- You will be back at the Map. Choose Mimir’s Temple.
Chapter 21: Mimir’s Temple
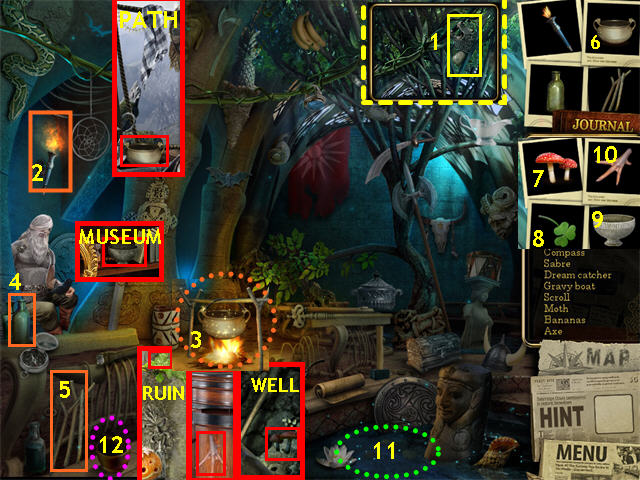
- Collect the items from the Find List. Different players may have different items.
- The Drum is a snare drum on the right side of the scene.
- Zoom in on the Branches high on the right side and collect the Dragon (1).
- Use the TORCH (2) on the Coals (3) to start a fire.
- Collect the EMPTY BOTTLE (4) and the STICKS (5).
- Use the Map. You will need to go to the Temple Path, the Well, the Stone Ruins, the Museum, and the Coffee House.
- From the Temple Path collect the COPPER BOWL (6) from the left side of the scene.
- From the Well, collect the RED MUSHROOMS (7) from the right side of the scene.
- From the Stone Ruins, collect the CLOVER (8) from the right side of the Altar above the Pumpkin.
- From the Museum, collect the SILVER BOWL (9) from the shelf on the left.
- From the Coffee House, collect the CHICKEN FOOT (10) from the lower right.
- Use the Map to return to Mimir’s Temple.
- Put the STICKS (5) on the Coals (3). They will create a frame.
- Put the COPPER BOWL (6) on the frame (3).
- Put the EMPTY BOTTLE (4) into the Water (11). It will go back into your inventory as a BOTTLE WITH WATER.
- Put the BOTTLE WITH WATER into the COPPER BOWL on the frame (3).
- Your inventory tray will refill with the other items you collected.
- Put the MUSHROOMS (7), CLOVER (8), and CHICKEN FOOT (10) into the Mortar (12) to make a POTION.
- Click once on the POTION to stir it and once to collect it.
- Put the POTION in the COPPER BOWL on the frame (3).
- Use the SILVER BOWL (9) to take some potion off the fire (3).
- Take the HEATED POTION from your inventory and give it to the injured man.
- After the cutscene you will have to complete a mini-game.

- The position of the symbols may be different for different players. This shows ours.
- Watch the ending.
Created at: 2010-05-19