

WALKTHROUGH MENU
- General Tips
- Chapter 1: Kelly’s Room
- Chapter 2: Mike’s Trailer
- Chapter 3: Studio Storehouse
- Chapter 4: Boss’s Office
- Chapter 5: Airline Office
- Chapter 6: The Island
- Chapter 7: The Bungalow
- Chapter 8: Jungles
- Chapter 9: The Yogi
- Chapter 10: The Temple
- Chapter 11: The Airplane
- Chapter 12: Escape the Island
- Chapter 13: Find your Father
- Hidden Object Scenes
General Tips
- From the main menu you can play the game, quit, or adjust options.
- There are options to adjust the music and sound volume and to make the game full screen or windowed.
- Click on the light bulbs around Kellie’s face to get hints.
- Two hint bulbs can be used to skip a mini-game.
- If you need more hints, go to search mode by clicking on the magnifying glass in the bottom left corner of the screen. You will need to find 10 hidden objects in every scene.
- You do not need to finish any of the search mode screens to finish the game.
- Things that can be looked into, or picked up, sometimes sparkle to tell you where they are.
- Every scene needs to be finished before you can continue to the next, and the game must be played in the order of the guide.
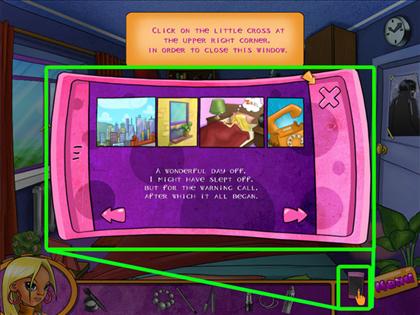
- Click the phone to the right of the inventory to go over the story.
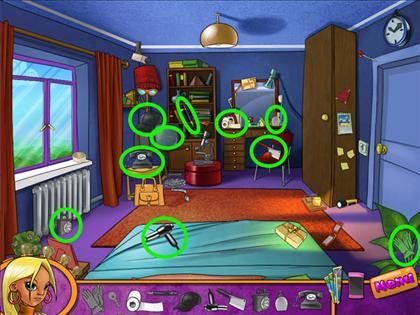
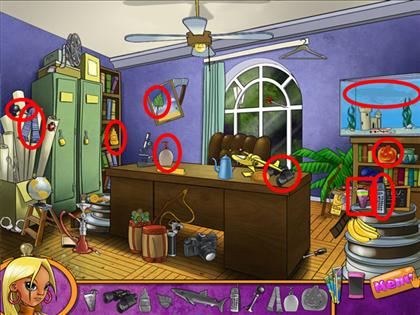
Chapter 1: Kellie’s Room
Kellie’s Room
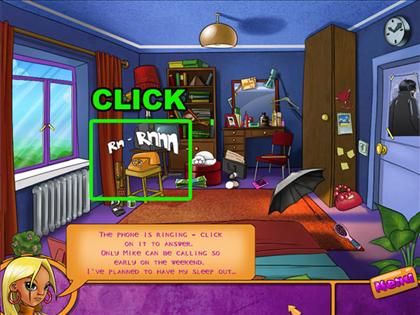
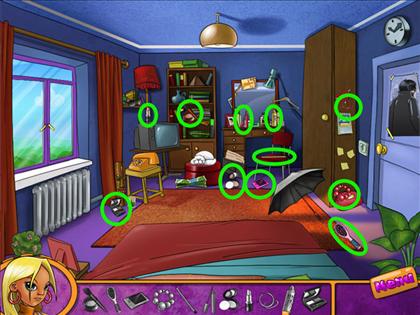
- First click the phone and read Kellie’s conversation with Mike.
- Find all of the hidden objects circled in green in the image.
- While finding objects you will need to click on Kellie’s phone. Follow the instructions when they appear.
- Refer to the image for the locations of the objects.
Apply Kellie’s Makeup
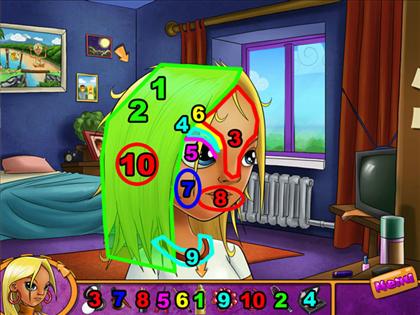
- Click on the inventory items and the then click on the corresponding parts of Kellie’s face.
- Click the numbers in the image, in the order specified.
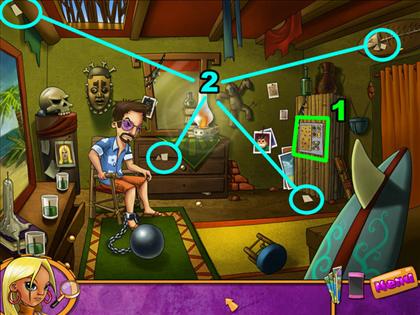
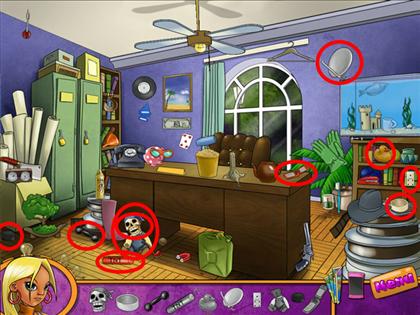
Escape the Apartment
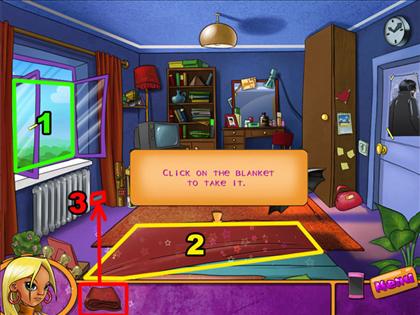

- Follow the instructions to help Kellie escape.
- First, click on the window; then click on the blanket to take it.
- Tie the blanket to a rod beside the radiator.
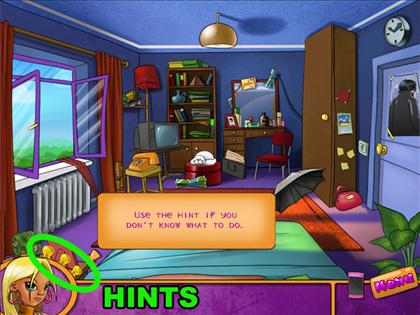
- Next, use a hint by clicking a light, and pick up the map once it is highlighted.
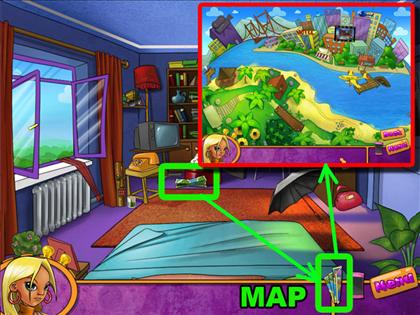
- Follow the instructions to open and close the map.
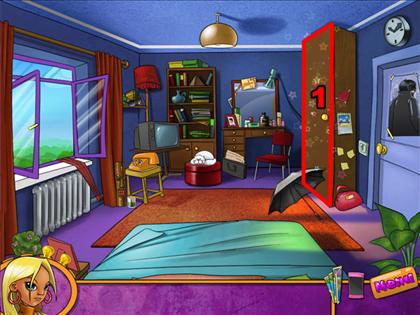
- Open the closet and then collect all the items circled in green in the image.
- Click on the circled objects in your inventory to join them; this will dye the wig black.
- Click on the second circled items to join them; this will give you a disguise.
- Click the door to exit the apartment and escape.
- Refer to the images for the solution.
Mini-game: Dark House
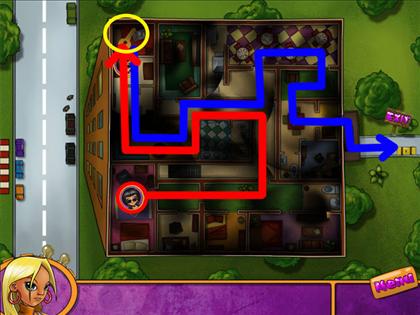
- Click on the map to move Kellie around.
- First follow the red line in the image to the key in the upper left corner of the house.
- After clicking on the key to collect it, follow the blue line to exit.
Chapter 2: Mike’s Trailer
The Magnifying Glass
- Click on the magnifying glass on the table to the left to collect it.
- Click the magnifying glass again, near Kellie’s face, to go to the map and find hidden object scenes.
- Finish the hidden object scenes to get more hints. You do not need to finish these scenes to continue in the game.
- Click the back button on the main map to return to the game.
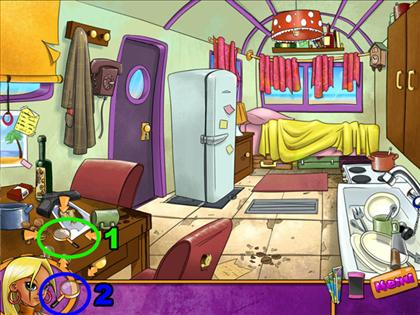
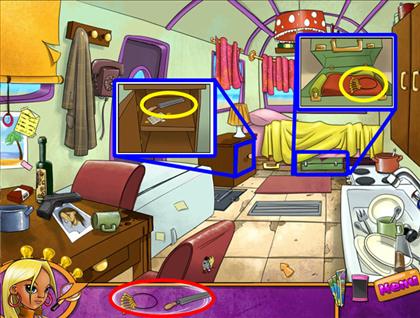
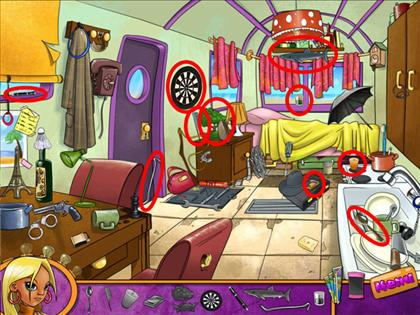
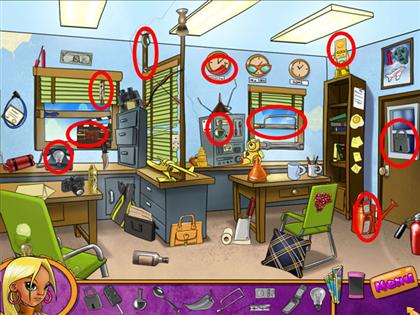
Mike’s Trailer
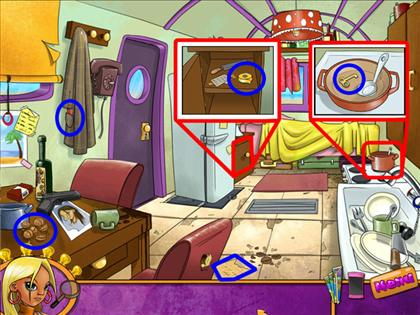
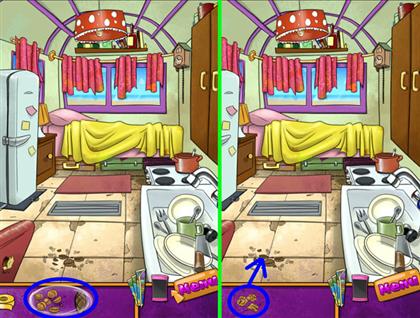
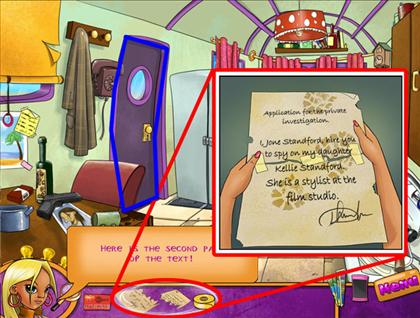
- Click on all of the objects circled in blue to put them in your inventory.
- You may need to click on some objects like the chest and the pot to get a closer view.
- Use the key on the cuckoo clock and then take the bottom of the chain.
- Combine the items circled in your inventory and then use the food on the floor to get the mouse out of hiding.
- Click the rug to pull it aside and remove the tile to get the other half of the note.
- Combine the note pieces and tape to finish the note.
- Click the door to exit the level and finish the level.
- Refer to the images for the solutions.
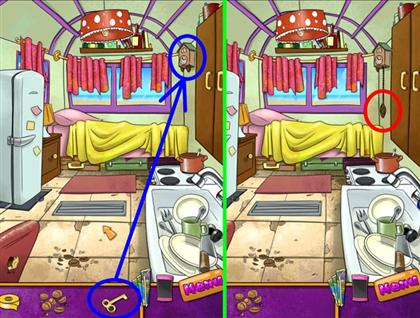
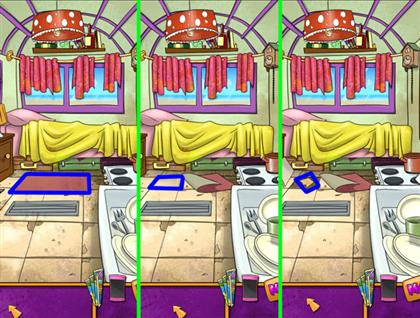
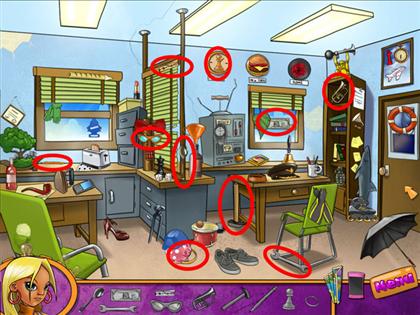
Escape the Trailer
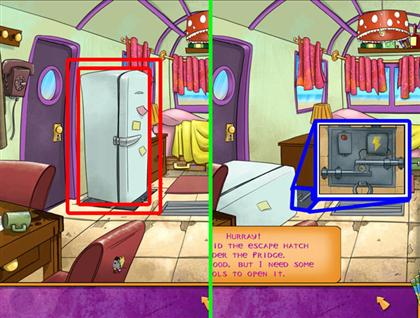
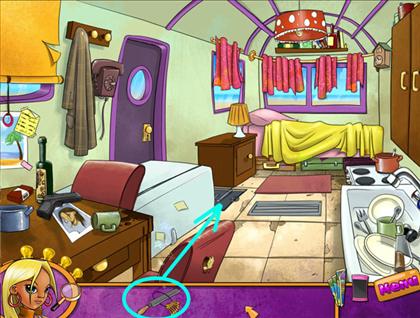
- Click the refrigerator to move it in front of the door and reveal a hidden door.
- Click the hatch to inspect it, but you will need more tools to open it.
- Get the file from the cabinet and the keys from the suitcase underneath the bed.
- Click them in your inventory to add them together and use them on the hatch to try to open it.
Mini-game: Open the Hatch
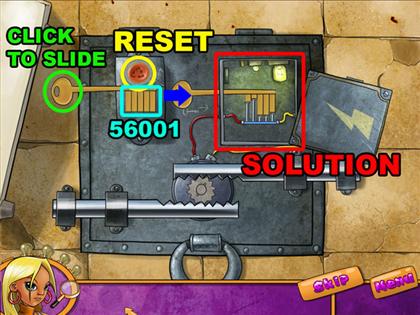
- To open the hatch you need to create a key that fits in the right side and connects the two wires.
- Click the teeth of the key to adjust their length. The tooth will become shorter every time you click it, and there is no way to make a tooth longer.
- The longer the metal nails on the right side, the shorter the teeth on the key need to be to lift the metal line up to connect the wires.
- Click the reset button to get a new key.
- When first starting this puzzle, click the key once to see how long the metal nails are, and then adjust the teeth on the key accordingly.
- The solution is different every time. See the image for an example solution.
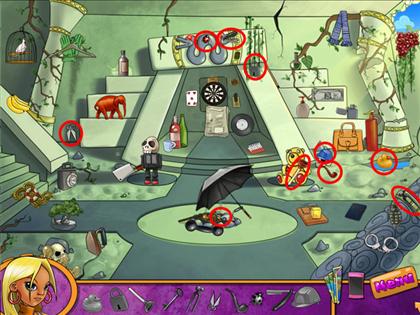
Chapter 3: Studio Storehouse
Finding the Right Card
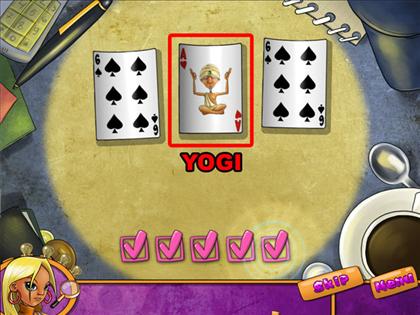
- Watch the three cards as they are mixed up, the yogi card ace will be in the middle at the start.
- Pick the Yogi card five times in a row to continue.
- Every correct guess will get a pink check mark, while every incorrect one will remove a checkmark.
- See the image for a picture of the Yogi card.
Studio Storehouse
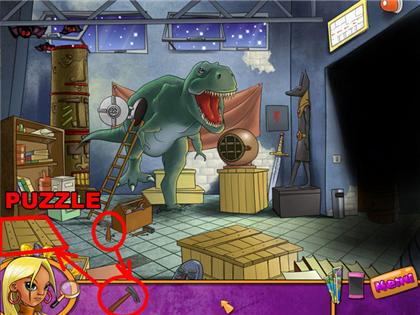
- Click the hammer at the bottom left corner of the screen to put it in your inventory.
- Use the hammer to open the crate in the right corner of the screen. This will open up the next mini-game.
- Click on the crate to play the mini-game.
Mini-game: Four in a Row
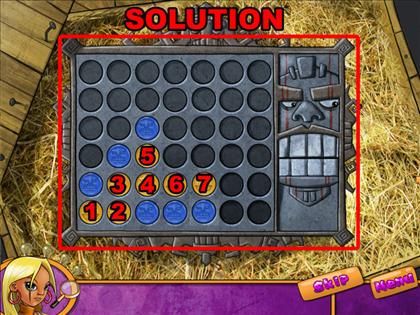
- Click the numbers in order on the screenshot to place pieces and win the mini-game.
- The computer will always place pieces in the same place.
- Take the fuse from the idol’s mouth after winning the game.
Enter the Staffroom
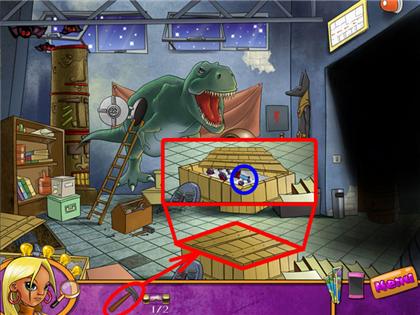
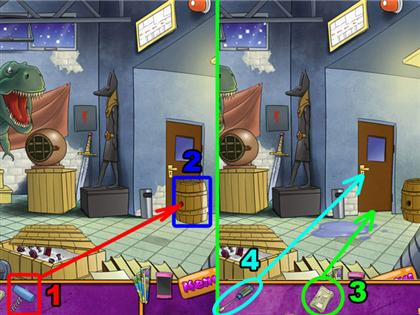
- Click the 3 objects circled in green to collect the fuse, newspaper, and screwdriver. Two objects are in the toolbox.
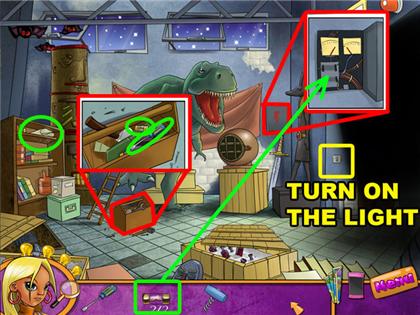
- Open the fuse box and attach the fuses from your inventory into the left bottom corner.
- Turn on the light switch on the left side of the screen.
- Use the corkscrew on the barrel blocking the door to the staffroom.
- Click on the barrel to move it out of the way.
- Use the newspaper underneath the door and use the screwdriver on the keyhole to push the key onto the newspaper.
- Click the newspaper, take the key and use it on the door to enter the staffroom.
- Refer to the images for the solution.
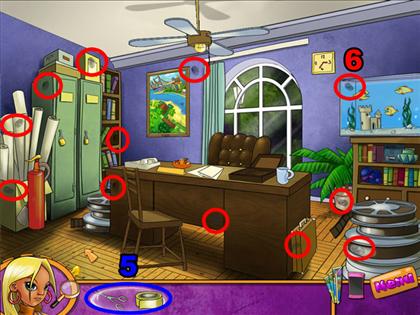
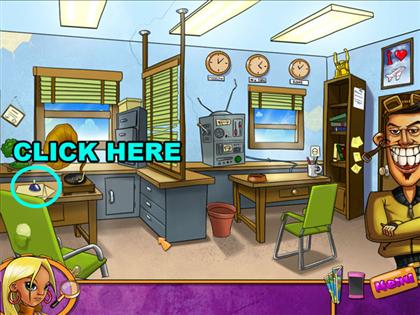
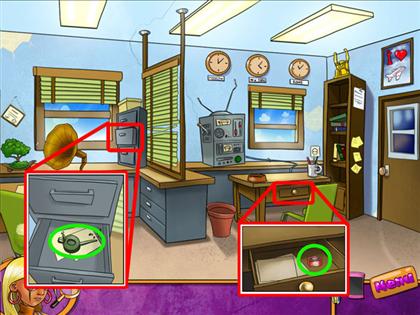
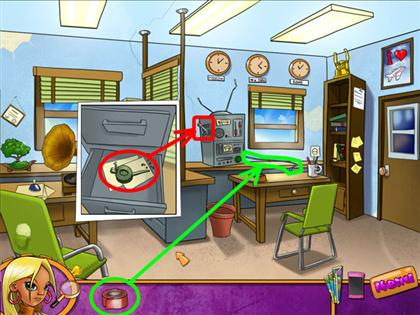
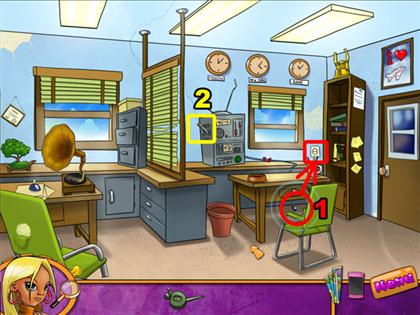
Chapter 4: Boss’s Office
Boss’s Office
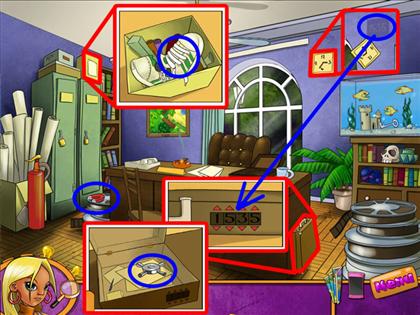
- Click the clock at the top right corner of the screen to reveal the combination to the suitcase.
- Click on the suitcase and enter the combination to open it and take the safe handle.
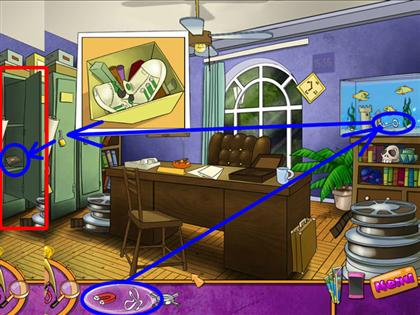
- Grab the shoelace from the box on top of the locker.
- Take the magnet to the left of the desk.
- Click on the magnet and the shoelace in your inventory to combine them.
- Use the magnet and shoelace on the key in the aquarium to get the key and use the key on the locker on the left of the screen.
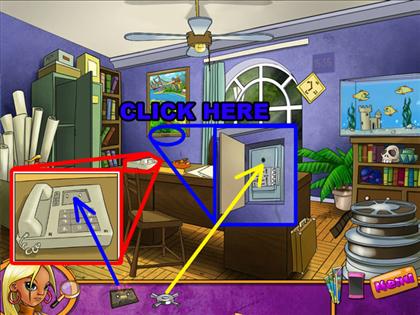
- Take the cassette tape from inside the locker.
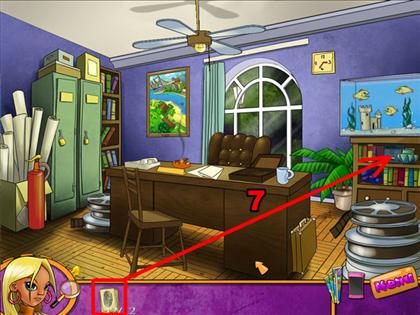
- Use the tape on the phone on the desk, afterwards you will be able to move the painting and reveal a safe.
- Click the painting twice to reveal the safe; then click the safe to start the next mini-game.
- Refer to the images for the solution.
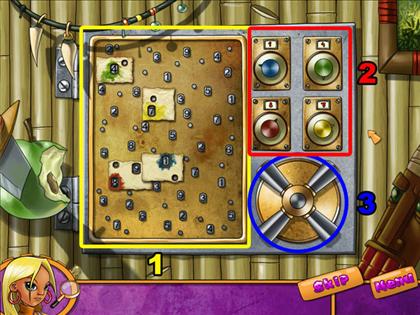
Mini-game: Opening the Safe
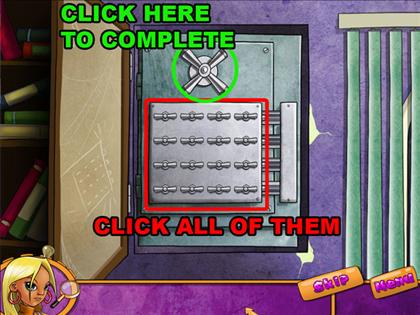
- Turn all of the handles to the left to open the safe.
- Clicking on one of the handles will turn all of the handles horizontally and vertically.
- To finish the puzzle, click all of the handles once; then turn the large spinner at the top of the safe.
Chapter 5: Airline Office
Talk to the Pilot
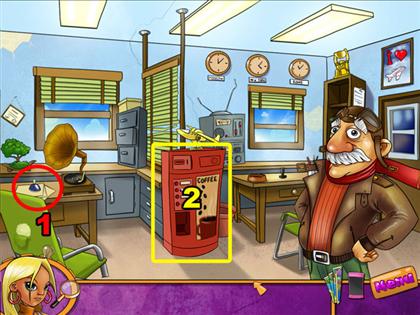
- Click the bell to call the pilot.
- After the pilot arrives, click on the coffee machine to play the wiring mini-game.
Mini-game: Fix the Wiring
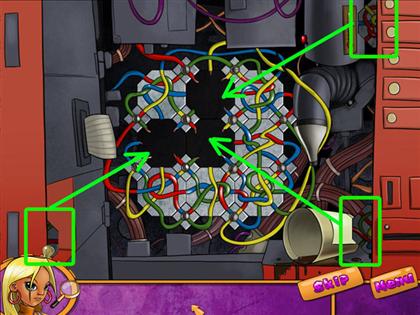
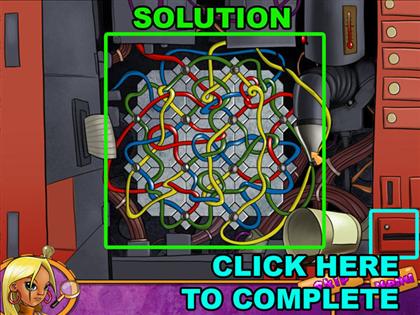
- Click the three missing pieces around the edge to complete the board.
- To finish the puzzle, all of the wires must connect to the correct color on all sides.
- Rearrange the board to look like the board in the solution image.
Make Coffee
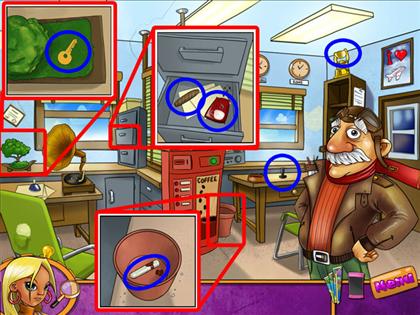
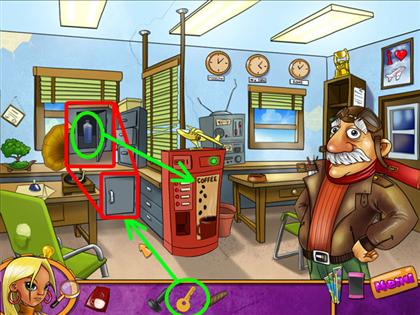
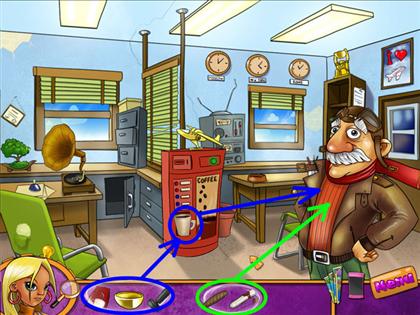
- Collect all of the items circled in blue in the image.
- Use the key on the cabinet to the left of the coffee machine to get water, and use the water on the coffee machine.
- Combine the cigar parts and the coffee parts that are circled in your inventory.
- Use the cigar on the pilot and use the coffee grinds on the machine. Give the coffee to the pilot.
- After the pilot arrives, click on the coffee machine to play the wiring mini-game.
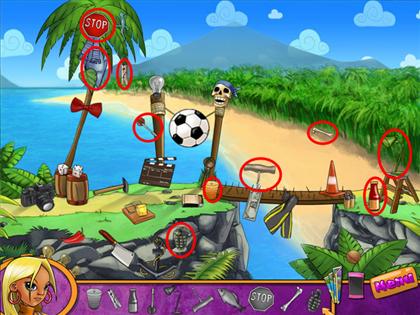
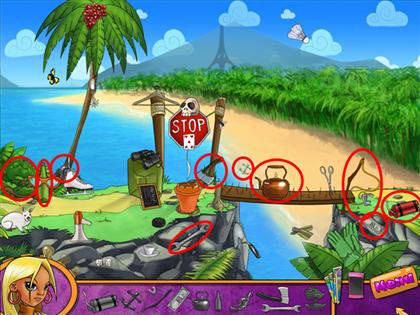
Chapter 6: The Island
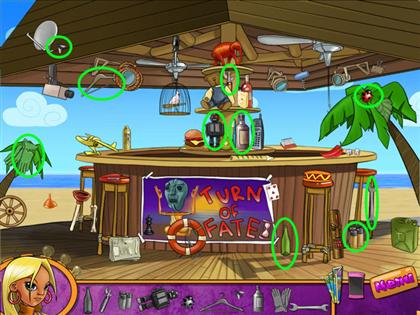
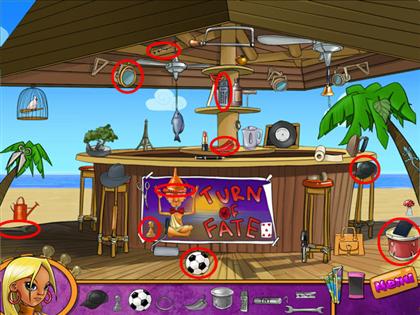
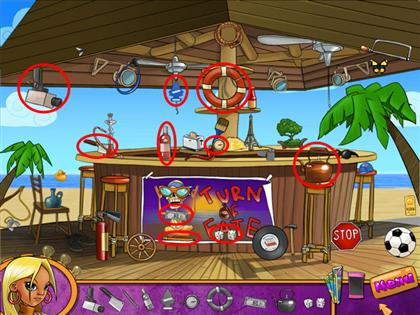
Island Bar
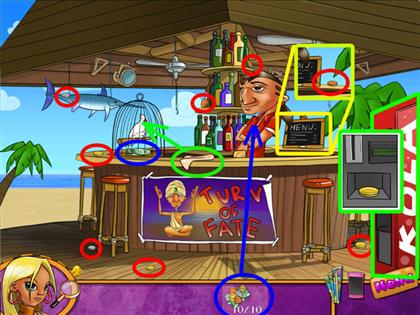
- Click the red bottle to wake up the bartender.
- You need to collect 10 pieces of money to continue.
- First, click all the coins circled in red, and move the menu out of the way to get another coin.
- Click the soda machine to get another coin.
- Next, use the rag to cover up the bird cage to collect the last bill.
- Use the money on the bartender to receive a cocktail.
Mini-game: Coins
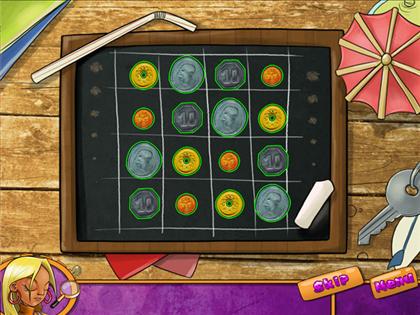
- To solve this puzzle you must lay out all of the coins so that there are 4 different types on each line, horizontally and vertically.
- Click on a coin and then another to switch them.
- Refer to the image for the solution.
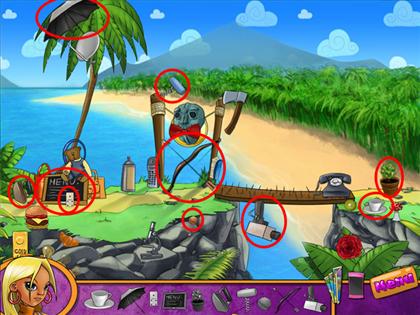
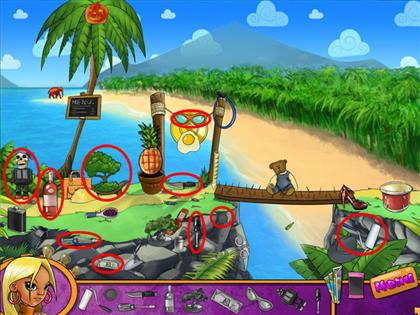
Chapter 7: The Bungalow
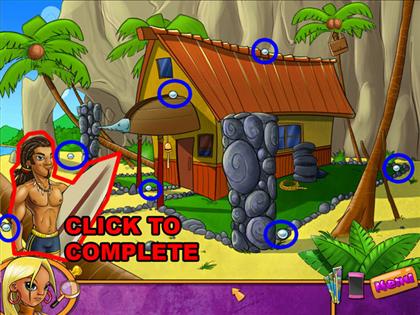
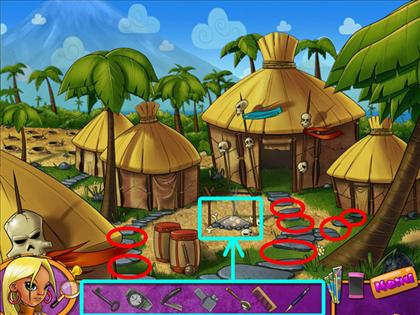
The Bungalow
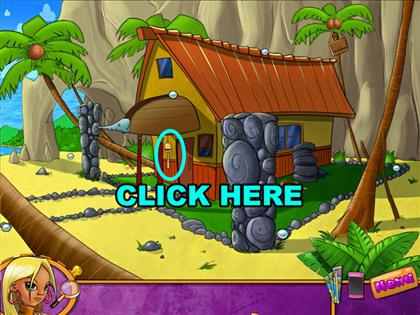
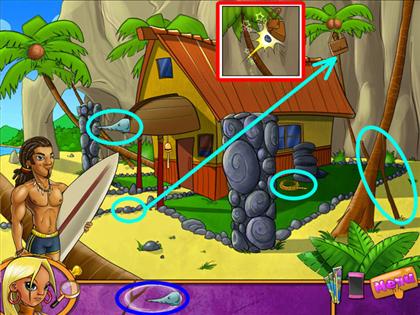
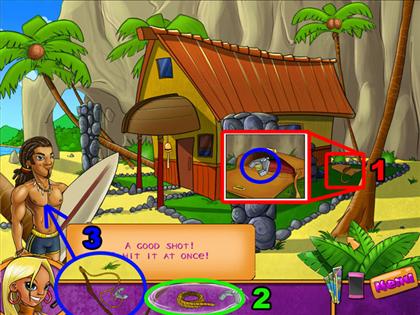
- Pull the cord in front of the bungalow to ring the bell and call the surfer onto the screen.
- Collect the 7 pearls circled in blue and give them to the surfer.
- Next, get the rock, swordfish head, stick, and rope circled in light blue in the image.
- Use the rock on the bag at the top of the palm tree on the right.
- Use the swordfish head on the stick to cut it into shape in your inventory.
- Take the metal gripper from the bag now on the ground and combine everything in your inventory into a fishing rod.
- Give the fishing rod to the surfer to finish this scene.
Mini-game: Fishing
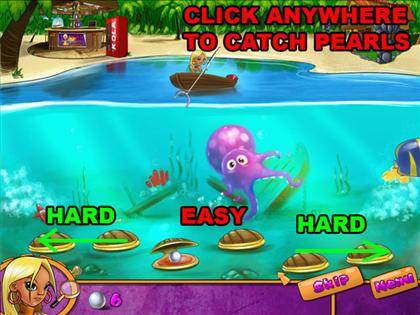
- As the fishing line moves back and forth, click to send out the metal grabber and catch the pearls.
- 6 pearls need to be collected to finish this mini-game.
- The easiest pearls to catch are the two in the middle, getting harder as you go towards the edge.
- Most times a shell will have a pearl when it opens once, and the next time it will not, rotating back and forth.
- The easiest way is to go for only one shell every time, focusing on timing instead of placement.
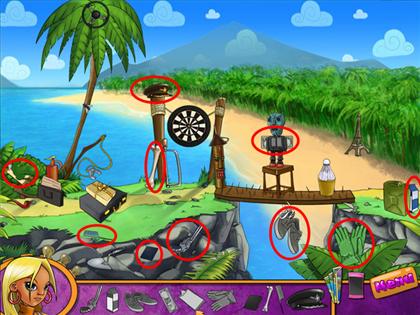
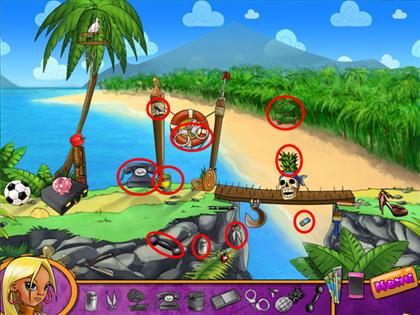
Chapter 8: Jungles
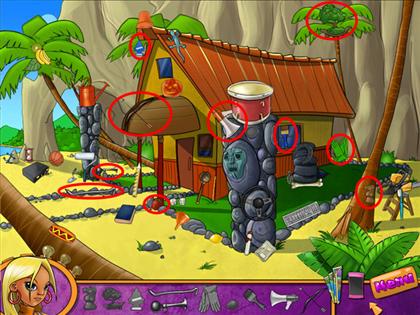
Cliffside
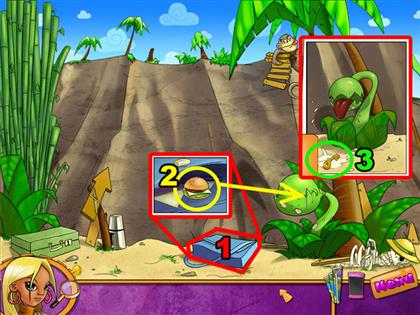
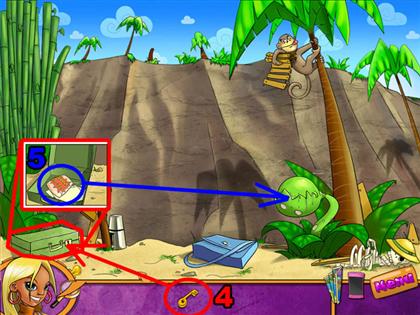
- Click the blue back at the foot of the cliff and take the hamburger.
- Feed the hamburger to the large plant and get the key.
- Next, use the key on the green briefcase on the left side of the screen.
- Take the plant fertilizer from the briefcase and give it to the plant to finish this scene.
- Refer to the images for the solution.
Mini-game: Catching Coconut Milk
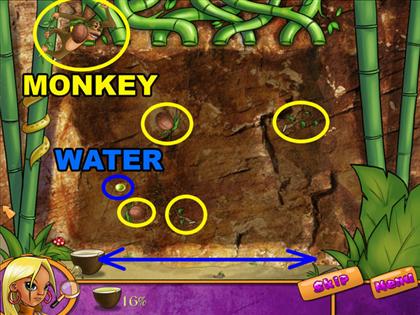
- Use the coconut half to catch water falling from the bamboo pipes.
- Moving the mouse will control the coconut shell.
- Each drop collected will give you 2% of the total water needed.
- Sometimes a monkey will appear and throw bananas and sticks. If you collect any of the things he throws, you will need to start over from 0% again.
- Refer to the image to see what the dropped objects look like.
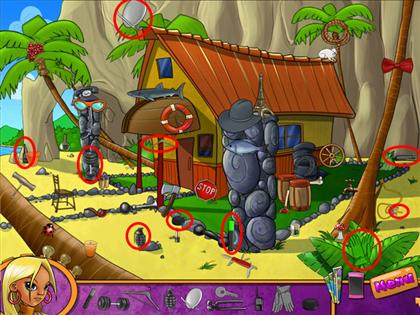
Cliffside
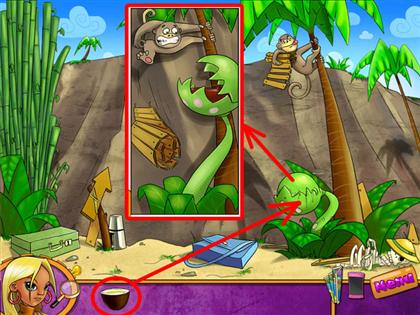
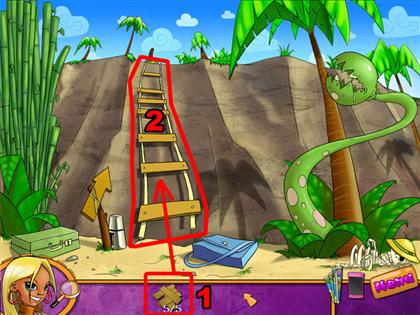
- Use the coconut half with water from your inventory on the plant. The plant will then scare off the monkey and drop a ladder.
- Place the ladder on the stick at the top of the cliff and then collect 5 pieces of wood to finish it.
- Drop the 5 ladder pieces from you inventory onto the broken ladder and click on it to finish this scene.
- Refer to the images for the solution.
Chapter 9: The Yogi
Talk to the Yogi
- Click on the leaf on the left side of the screen to play the frog mini-game.
Mini-game: Frogs
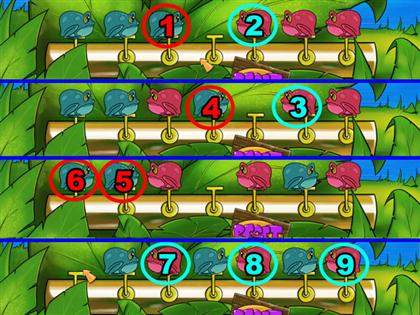
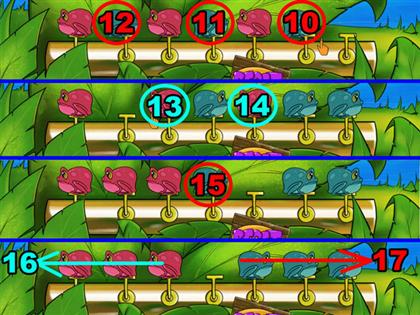
- To solve this puzzle you must have all the blue frogs exit the right side of the screen and all of the red frogs must exit on the left side of the screen.
- Frogs can only move forward, not backward.
- A frog can either jump one space or jump over another frog.
- Click on the frogs in the order in the images to switch the places of the frogs.
- After switching the red and the blue frogs, you can jump them off of the flute easily.
- Refer to the images for the solution.
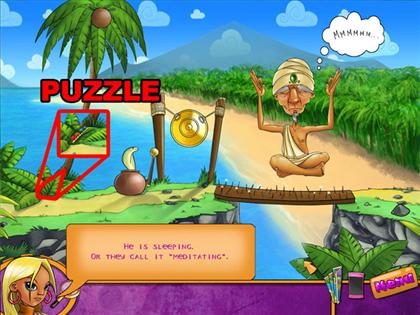
Talk to the Yogi
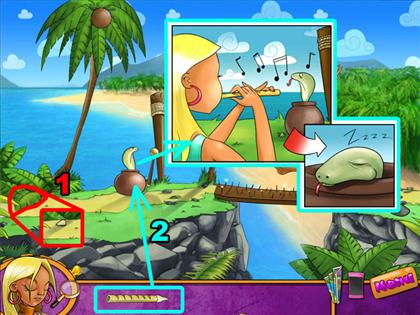

- Get the flute mouthpiece from under the leaf at the left side of the screen. Put it together with the flute shaft.
- Use the completed flute on the snake to put it to sleep.
- Next, use the hammer on the gong to wake up the Yogi.
- Talk to the Yogi to finish this scene.
- Refer to the images for the solution.
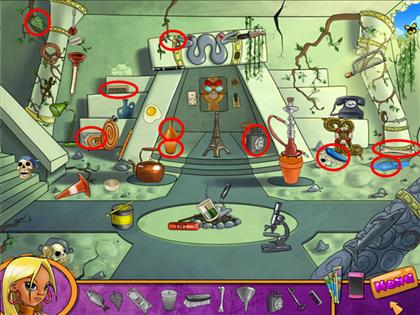
Chapter 10: The Temple
Mini-game: Maze
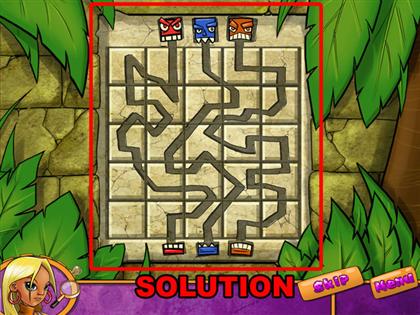
- Click the maze pieces to rearrange them into three unbroken paths.
- The paths must lead from the bottom jaw of the idol to the matching head.
- Refer to the image for the solution.
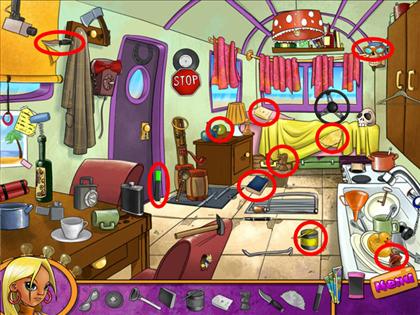
The Temple
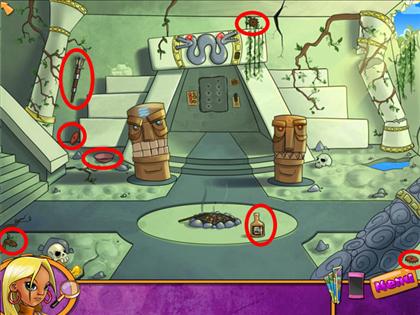
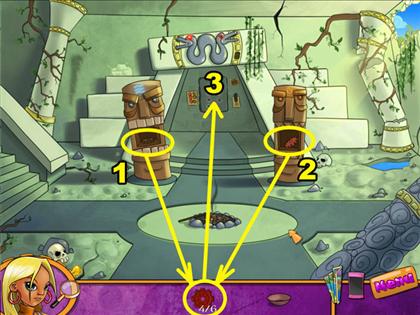
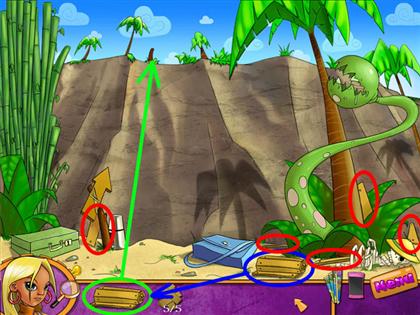
- Collect all of the objects circled in red, including four gears, a bowl, oil, and a torch.
- Combine the oil and the torch in your inventory.
- Use the oiled torch on the fire in the middle of the screen to light it. Then use the lighted torch on the right stone idol with the fire symbol on its forehead.
- Use the bowl on the water on the left of the screen to collect it.
- Use the bowl of water on the left stone idol with the water symbol on its forehead.
- Collect the last two gears from the mouths of the idols.
- Use the gears on the panel in the back of the scene to start the next mini-game.
- Refer to the images for the solution.
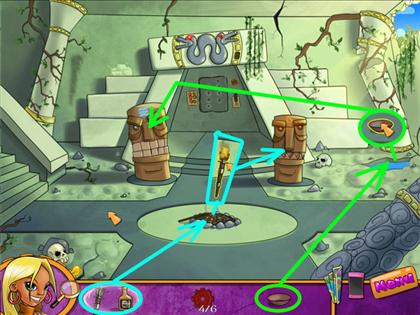
Mini-game: Gears
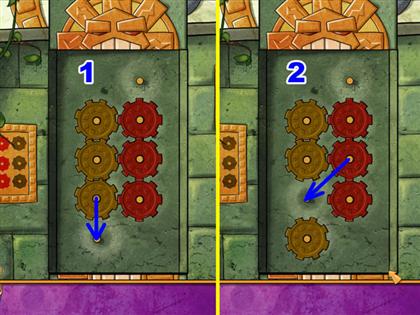
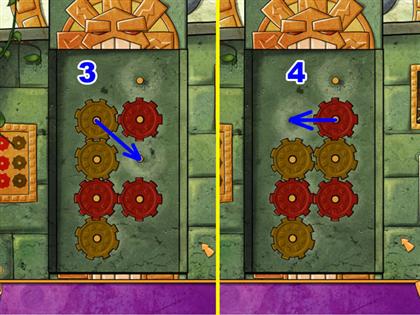
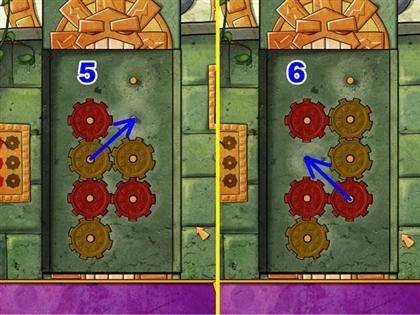
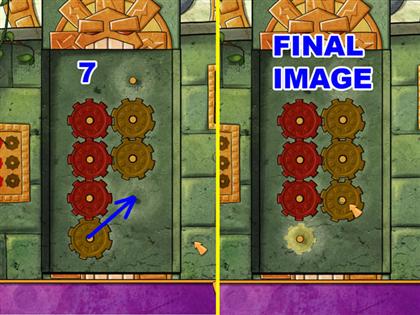
- Click on the lever on the right to open the center panel.
- Switch the positions of the red and yellow gears to finish the puzzle.
- The number on the right side of the screen counts down the number of turns you have to switch the gears. Every move counts down one, with a max of 7 moves.
- Follow the instructions in the images to complete the switch.
- If you make a mistake there is another lever that resets the puzzle.
The Temple
- Click the scroll that appears between the two idols to complete this chapter.
Chapter 11: The Airplane
Escape the Airplane
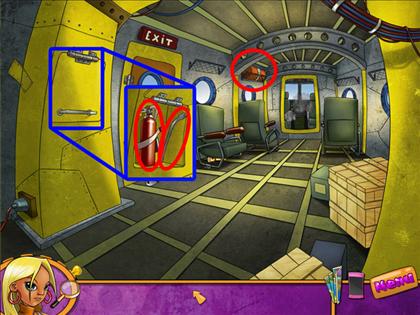
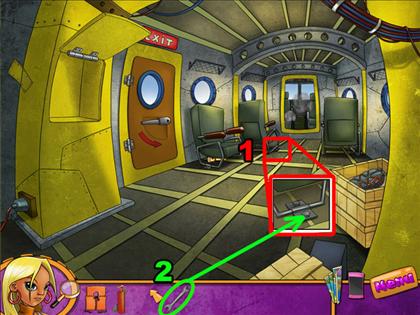
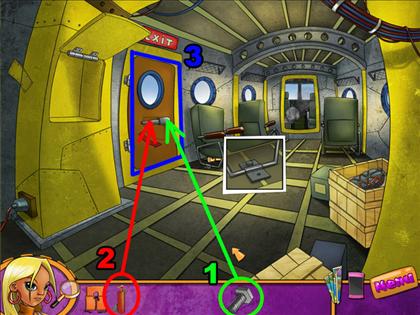
- Open the hatch on the left side on the screen and get the fire extinguisher and the crowbar.
- Grab the life vest from above the left of the cockpit.
- Use the crowbar from your inventory on the crate and take the wrench.
- Look at the front seat on the left and use the wrench to remove one screw.
- Use the screw on the door handle and then use the extinguisher to turn the handle.
- If the handle falls off, click it to pick it up and replace it on the door.
- Click the door to escape the airplane.
- Refer to the images for the solution.
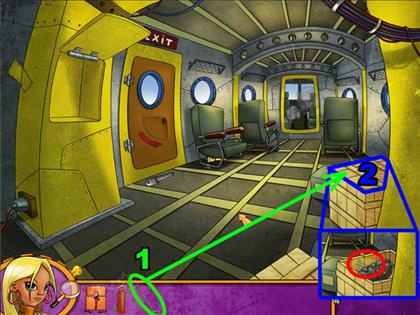
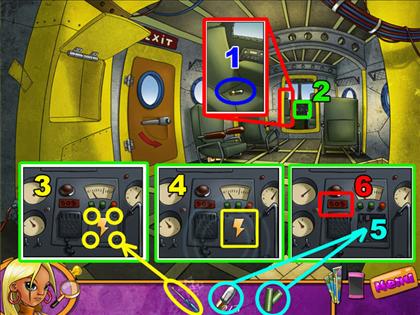
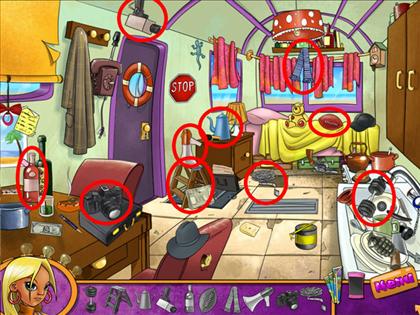
Crashed Airplane
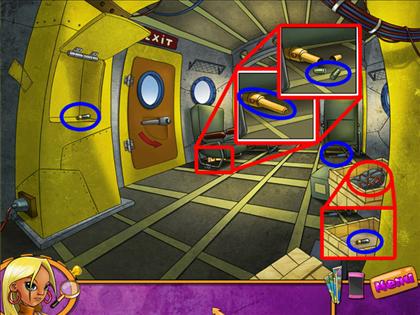
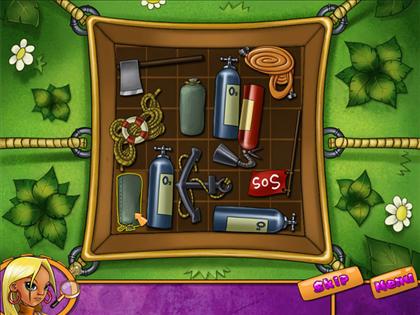
- You must power up the cockpit and start a SOS signal.
- First, collect all the items circled in blue in the image. There are two batteries in a flashlight underneath the left seat, and a screwdriver behind the right seat.
- Move the backpack in the crate to find a fuse.
- Find the other fuse behind the door on the left side of the screen.
- Click the pilot seat to find another fuse.
- Then click the cockpit to get a closer view.
- Use the screwdriver on the four screws to open the energy panel.
- Open the panel and install the batteries and the fuses.
- Click the SOS button to send the signal and finish the chapter.
- Refer to the images for the solution.
Chapter 12: Escape the Island
Wake the Yogi
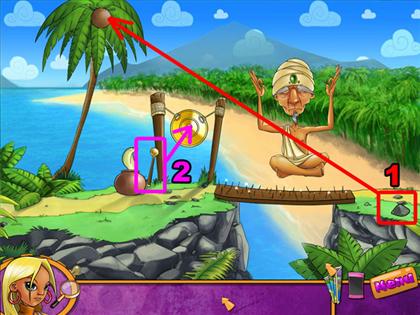
- Throw the rock on the right side of the screen at the coconut at the top of the left tree. This will cover up the snake’s pot.
- Use the mallet on the gong again and talk to the Yogi to play the next mini-game.
Mini-game: Fill the Basket
- Click on the objects and fill up the basket with no spaces.
- The objects cannot overlap and cannot be rotated, only moved horizontally or vertically.
- Refer to the image for the solution.
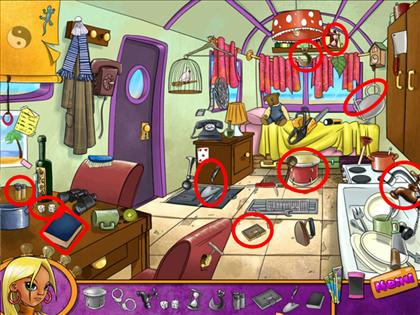
Rescuing Mike
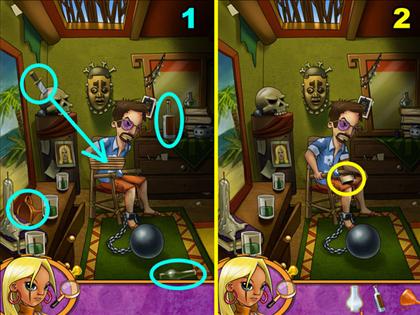
- First, collect all the items circled in blue in the image. This includes a knife, a funnel, a glass lamp, and alcohol.
- Use the knife on Mike’s ropes to free him and take the matches from his lap.
- Use the funnel on the lamp base in the middle of the screen; then use the alcohol from your inventory on the funnel to fill the lamp.
- Click the funnel to remove it and put the glass lamp on the base.
- Light the lamp with the matches to reveal the entire room.
- Click on the image on the bamboo cabinet to be able to search for stickers.
- Find all 4 stickers and click on the cabinet to play the next mini-game.
- Refer to the images for the solutions.
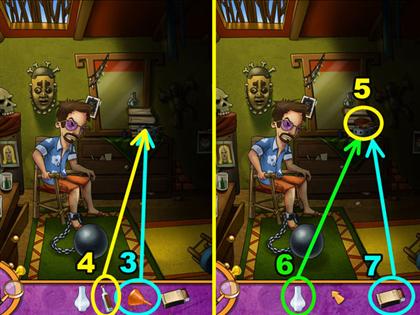
Mini-game: Number Puzzle
- You will have four stickers in your inventory with 4 colors on them that correspond to colored knobs on the right.
- The stickers are cut out in a way that they only fit on one place in the pegboard.
- When you find the right place for the sticker, enter the number in the colored square on the dials to the right.
- Refer to the image for the final solution.
- Once the correct solution is dialed in, turn the handle to finish.
Mini-game: Virus
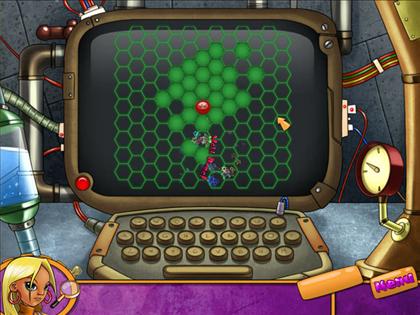
- In this puzzle you must surround the red virus by green spaces on all sides to win.
- The virus’s movement is randomized every time.
- Click the red button on the left to restart from the beginning.
- The best strategy is to never click on a hex beside the virus; always click in the direction the virus is moving.
- The virus cannot see more than one space around it.
- Unless it hits something, the virus will always go in the same direction until it reaches the end.
- Once the virus reaches the edge of the map, the game is over and you lose.
- Use what you know about the virus’s movements to set up traps near the edges of the grid to move it towards to the middle.
- Refer to the screenshot for a possible solution.
Chapter 13: Find your Father
Boss’s Office
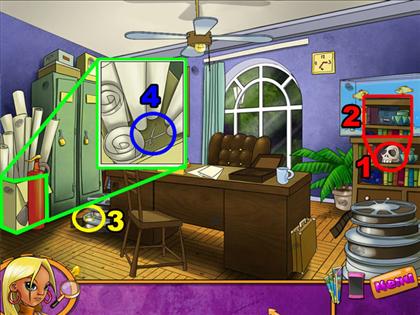
- Click the skull to reveal a safe.
- Pick up the tape on the left side of the screen. Then take the scissors from the box on the left side of the screen.
- Combine the scissors and the tape in order to collect fingerprints.
- Collect all of the fingerprints circled in red. There are 12 in all.
- Use the fingerprints from your inventory on the safe to start the next mini-game.
Mini-game: Fingerprint Safe
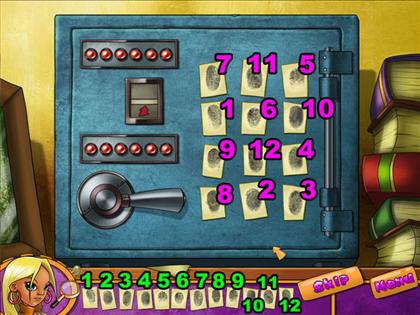
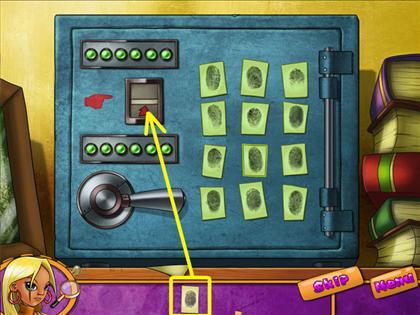
- Click on the fingerprints in your inventory on the button of the safe, matching the same shapes.
- Refer to the image, where the numbers on the bottom correspond to the numbers on top.
- After matching all 12 fingerprints, use the last fingerprint on the scanner to the left of the keypad.
Airline Office
- Click the bell to call the new pilot and talk to him. He will ask you to fix the radio.
- Open the middle drawer by the window and get the oilcan.
- Open the desk drawer on the right and take the tape.
- Use the oilcan on the lever on the radio, and the tape on the power cord.
- Finally, pick up and use the power plug on the outlet and turn the machine on with the lever to finish this scene.
- Refer to the images for the solution.
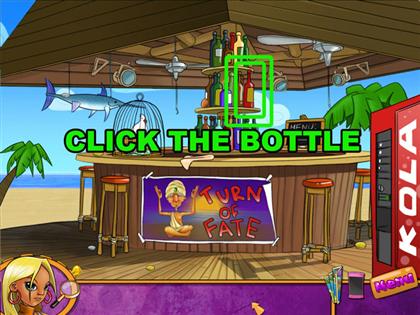
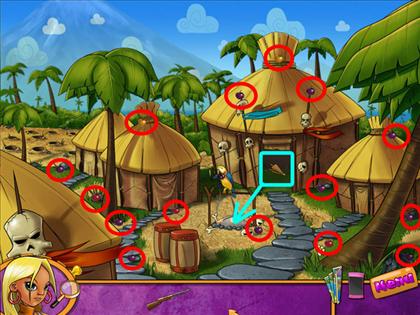
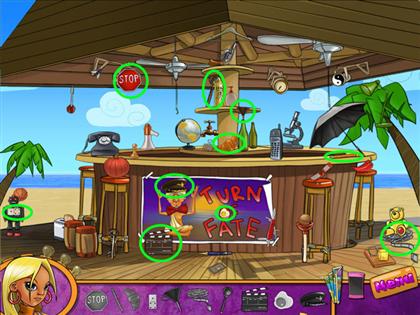
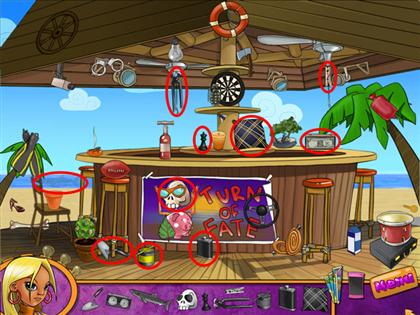
Bar: Aloha
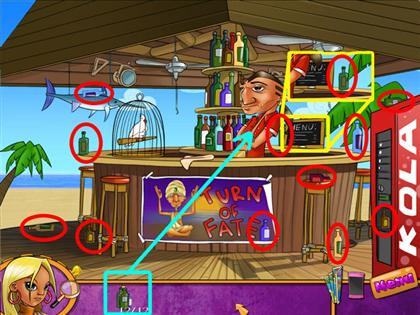
- Collect the 12 bottles circled in red in the image.
- After collecting the bottles, give them to the bar tender. You will then be able to play the next mini-game.
- Refer to the image for the locations of all the objects.
Mini-game: Matching Sides
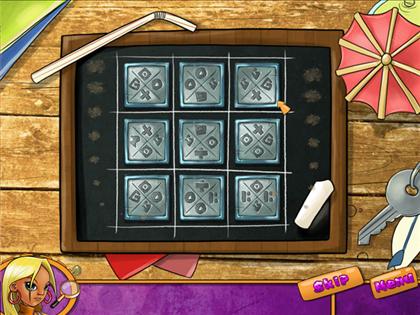
- Match the sides of the tiles to complete this puzzle.
- Only the inside edges matter. The edges on the outside do not have to match the other side.
- Click on one tile and then another to switch places.
- Refer to the image for the final solution.
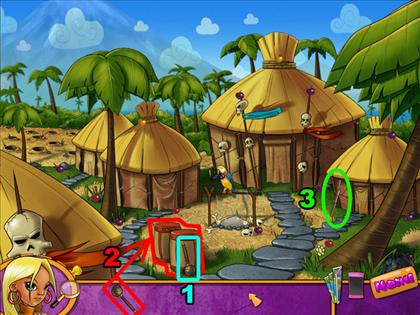
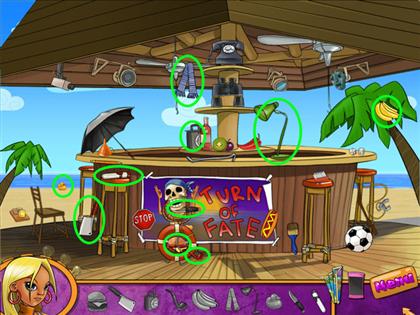
Convincing the Bartender
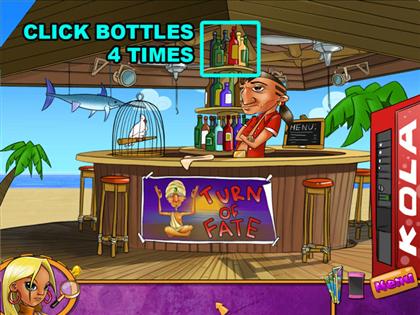
- Click the bottles above the bartender’s head to drop a bottle on him.
- Drop 4 bottles on him to get the map to the village.
- Refer to the image for the location of the bottles.
Mini-game: Village Maze
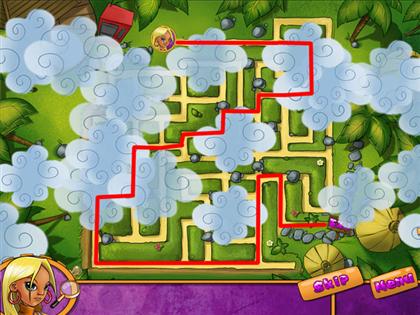
- Take Kellie through the maze to reach the village.
- Rocks block many passages, and clouds will make it hard to see as you try to get through the maze.
- Refer to the image for the correct path through the maze.
The Village
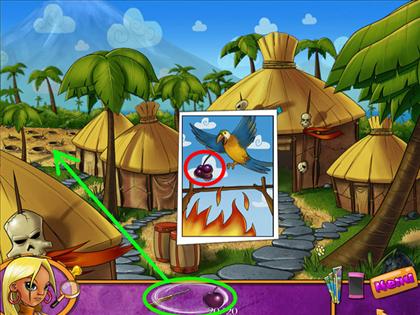
- Pick up the drumstick in front of the drums and use the stick from your inventory on the drum to call out the witch doctor.
- After he leaves, pick up the gun in front of the right hut.
- Pick up 15 cherries from around the village.
- Take the umbrella from inside the middle hut and use it on the fire.
- Grab the bunch of cherries from the ground that the parrot dropped. This is worth 5 cherries.
- Combine the gun and the cherries in your inventory.
- Use the gun on the field in the upper left corner of the screen to start the last mini-game.
Mini-game: Shooting Rodents
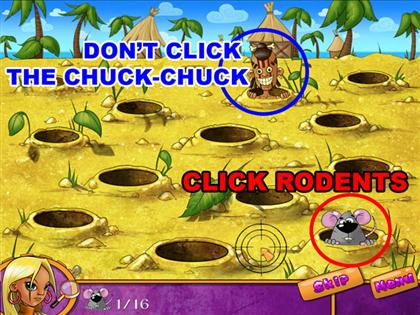
- Click your crosshairs on rodents to shoot them.
- Shooting 16 rodents in a row wins this mini-game.
- Don’t shoot the villager “Chuck-chuck,” or you will have to start over.
- Refer to the image for pictures of both characters.
Burning your Father’s Things
- Pick up the stones around the village to find 7 of your father’s things.
- After collecting them, drop them from your inventory to the fire in the middle of the screen.
- Refer to the image for the location of all the objects.
CONGRATULATIONS, YOU FINISHED THE GAME!
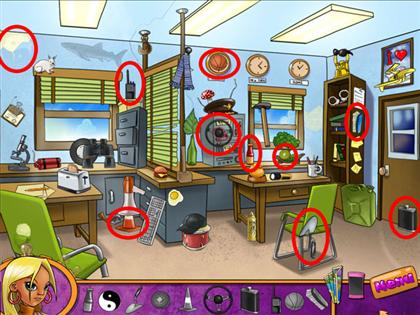
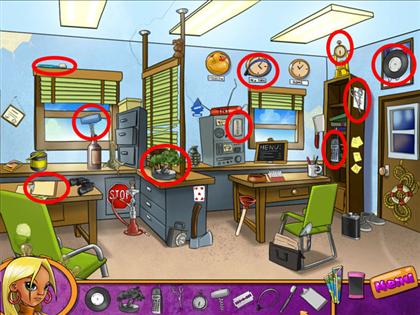
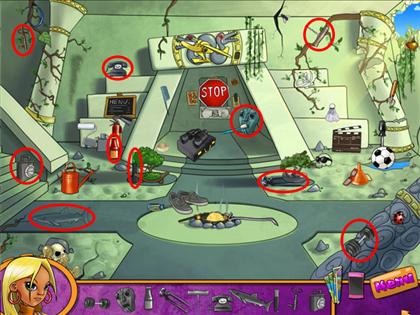
Hidden Object Scenes
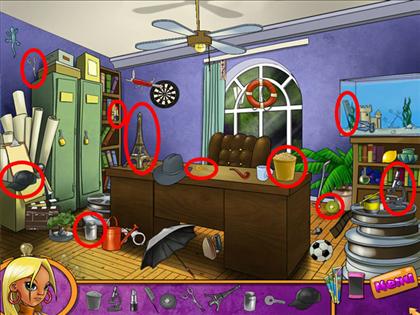
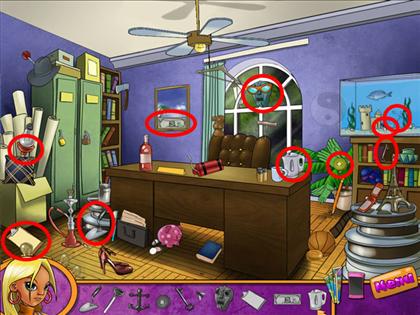
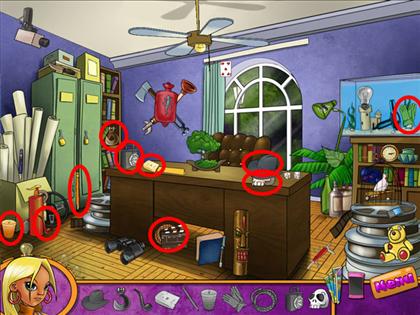
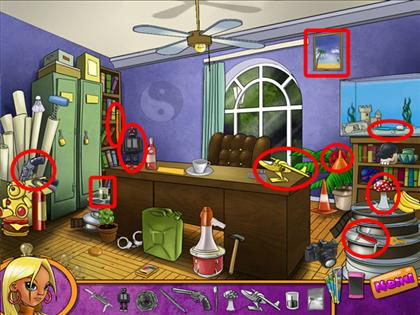
Kellie’s Flat


- There are five scenes in this location. Every time the hidden object scenes are randomized, but it will always be one of these scenes.
- Refer to the image for finding all locations of hidden objects.
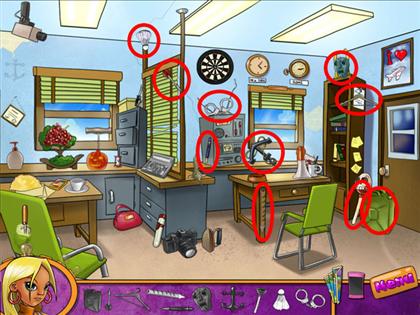
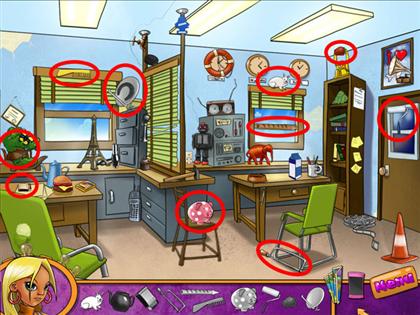
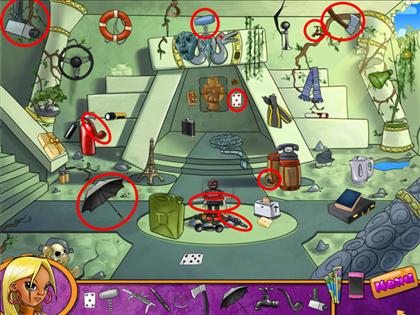
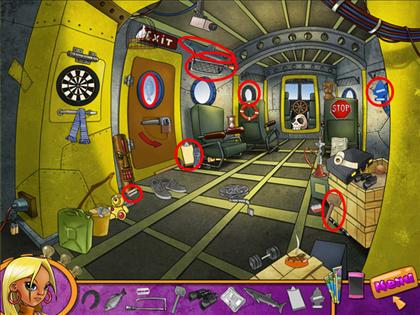
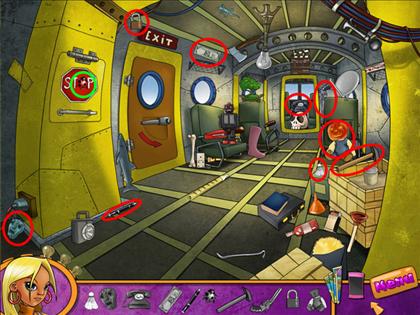
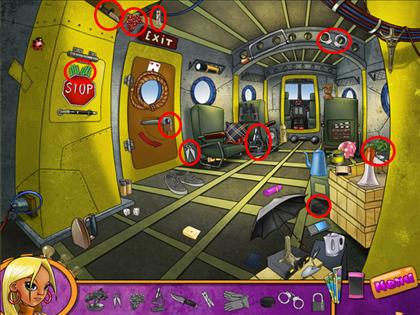
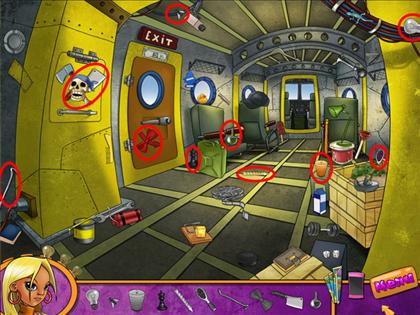
Mike’s Trailer
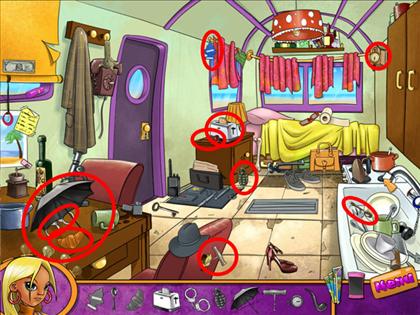
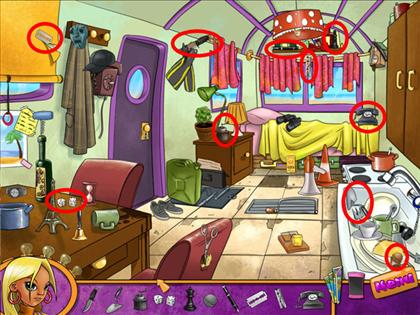
- There are six scenes in this location. Every time the hidden object scenes are randomized, but it will always be one of these scenes.
- Refer to the image for finding all locations of hidden objects.
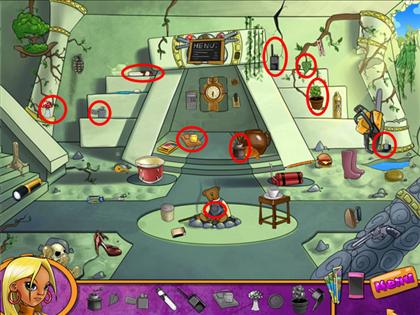
Studio Storeroom
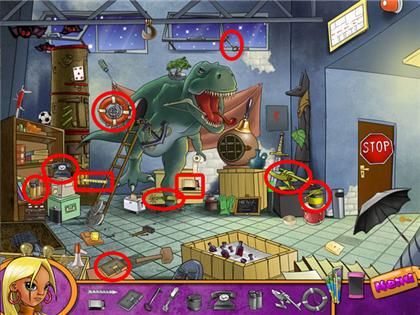
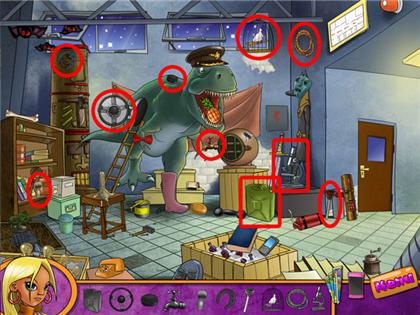
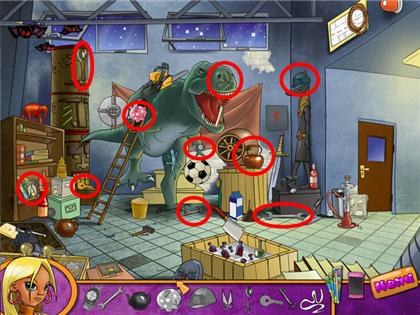
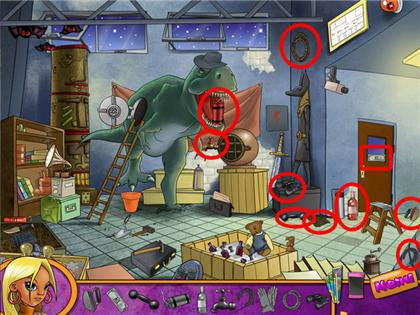
- There are six scenes in this location. Every time the hidden object scenes are randomized, but it will always be one of these scenes.
- Refer to the image for finding all locations of hidden objects.
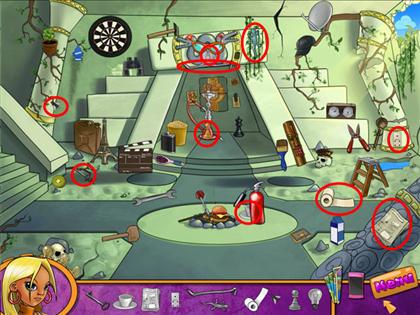
Boss’s Office
- There are six scenes in this location. Every time the hidden object scenes are randomized, but it will always be one of these scenes.
- Refer to the image for finding all locations of hidden objects.
Airline Office
- There are six scenes in this location. Every time the hidden object scenes are randomized, but it will always be one of these scenes.
- Refer to the image for finding all locations of hidden objects.
Bar: Aloha
- There are six scenes in this location. Every time the hidden object scenes are randomized, but it will always be one of these scenes.
- Refer to the image for finding all locations of hidden objects.
Bungalow

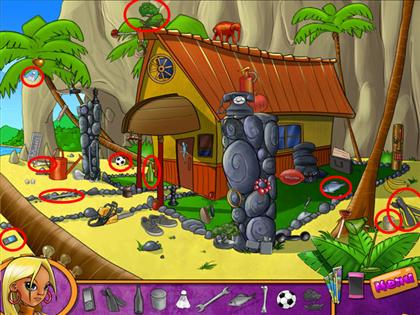
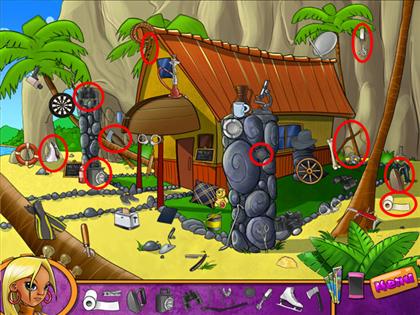
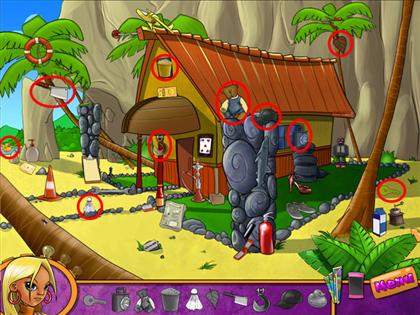
- There are six scenes in this location. Every time the hidden object scenes are randomized, but it will always be one of these scenes.
- Refer to the image for finding all locations of hidden objects.
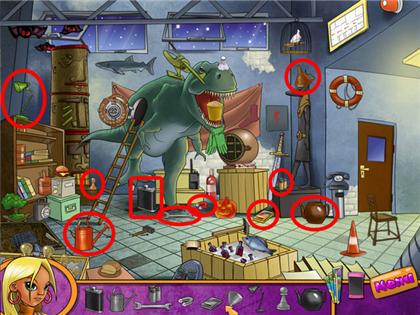
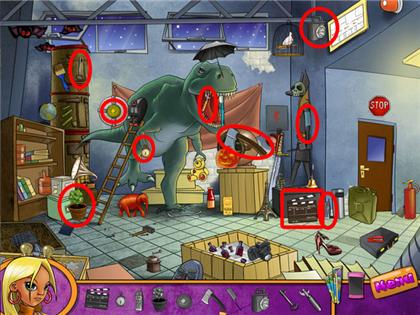
Jungles
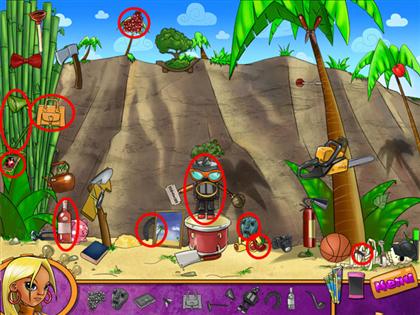
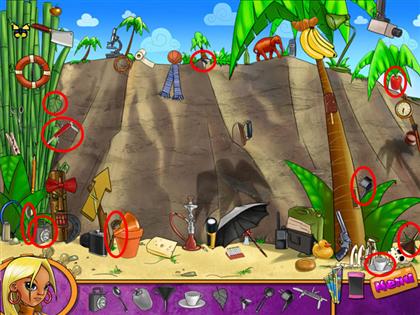
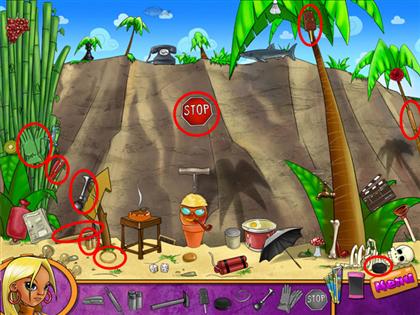
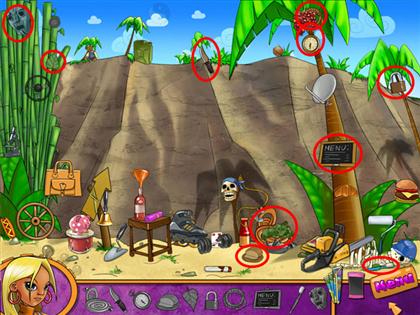

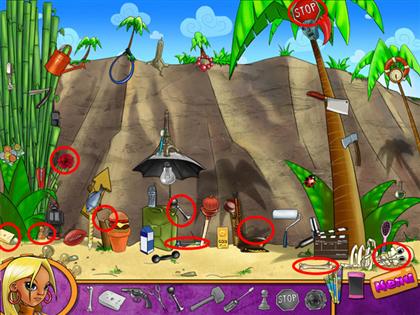
- There are six scenes in this location. Every time the hidden object scenes are randomized, but it will always be one of these scenes.
- Refer to the image for finding all locations of hidden objects.
Yogi
- There are six scenes in this location. Every time the hidden object scenes are randomized, but it will always be one of these 5 scenes.
- Refer to the image for finding all locations of hidden objects.
The Temple
- There are six scenes in this location. Every time the hidden object scenes are randomized, but it will always be one of these scenes.
- Refer to the image for finding all locations of hidden objects.
Crashed Plane
- There are six scenes in this location. Every time the hidden object scenes are randomized, but it will always be one of these scenes.
- Refer to the image for finding all locations of hidden objects.
Created at: 2009-11-09