

Walkthrough Menu
- General Tips
- Chapter 1: A Cure for Debby
- Chapter 2: Gunpowder
- Chapter 3: The Middle Ages
- Chapter 4: The Tower
- Chapter 5: Into the Renaissance
General Tips
- This is the official guide for Labyrinths of the World: Changing the Past.
- This guide will not mention each time you have to zoom into a location; the screenshots will show each zoom scene.
- Hidden-object puzzles are referred to as HOPs. This guide will not show screenshots of the HOPs, but it will mention when a HOP is available and the inventory item you'll collect from it.
- This guide will give step-by-step solutions for all puzzles that are not random. Please read the instructions in the game for each puzzle.
Chapter 1: A Cure for Debby
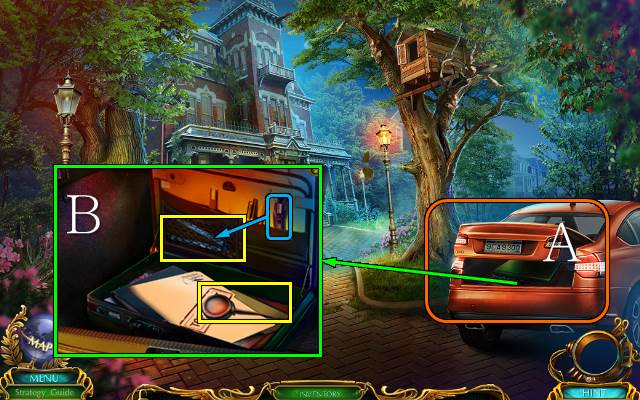
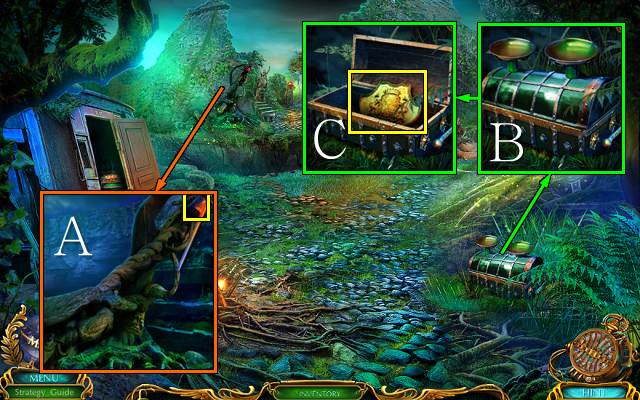
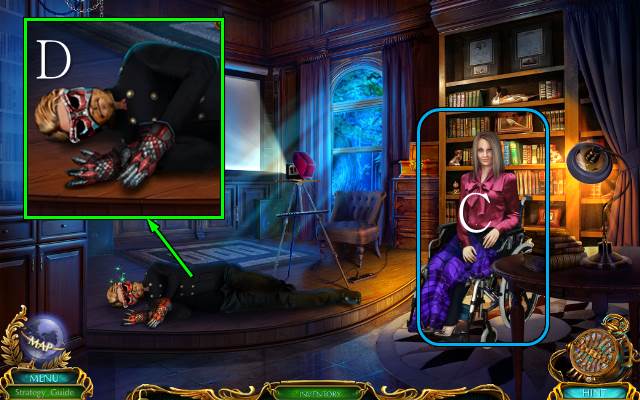
- Open the trunk (A).
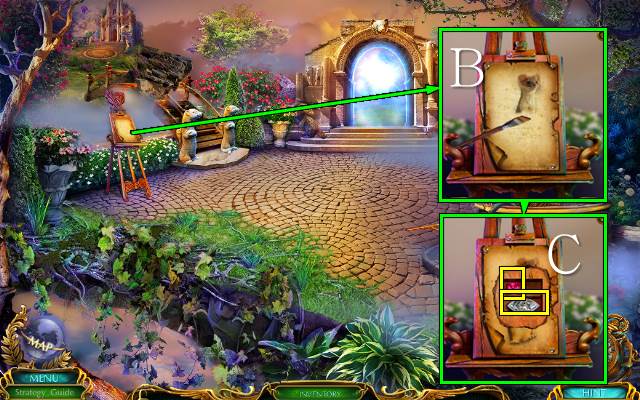
- Open the suitcase, take the OILER and read the file; cut the net with the knife and take the FOLDED RULER (B).
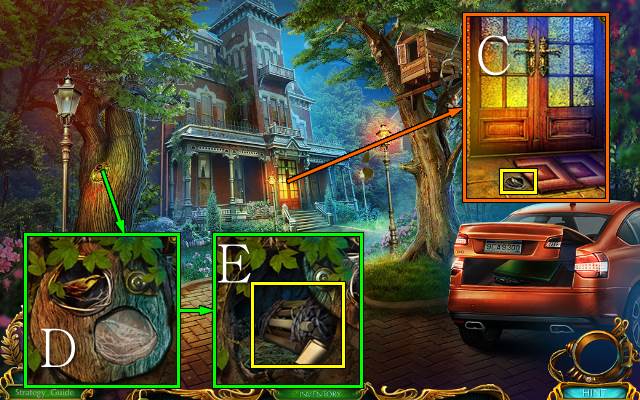
- Move the mat and take the BIRD EMBLEM (C).
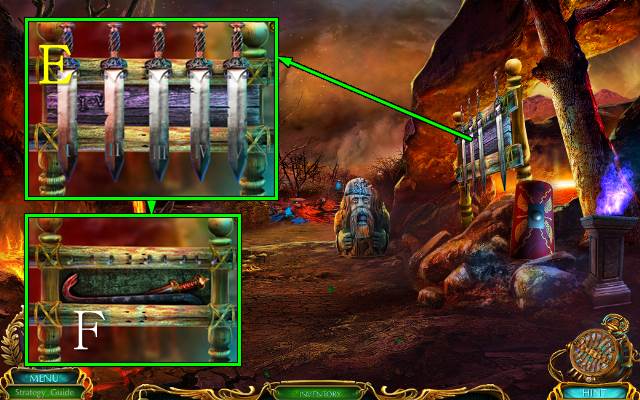
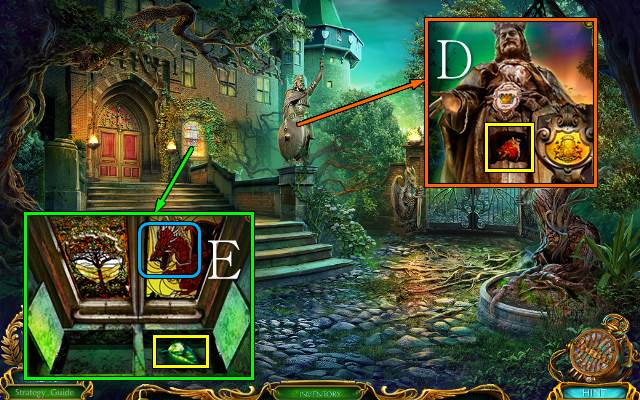
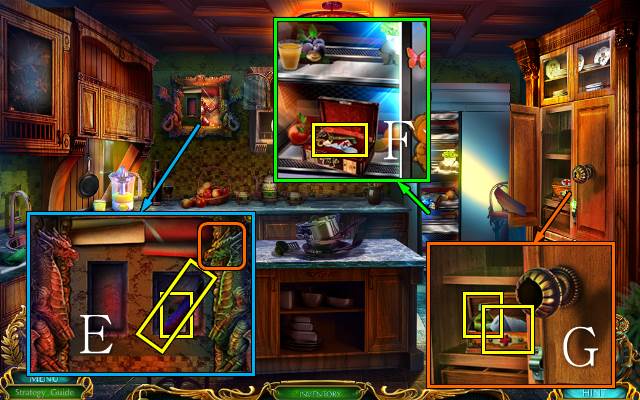
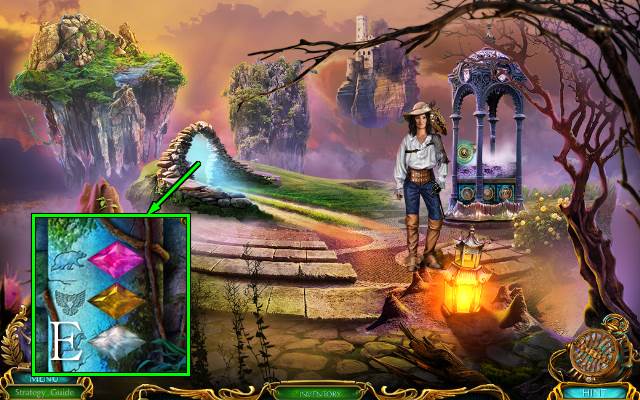
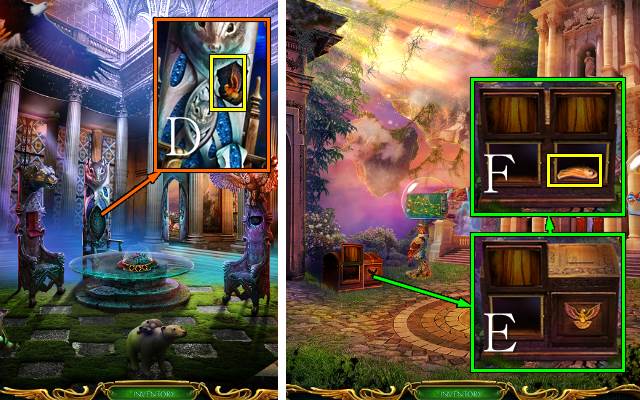
- Place the BIRD EMBLEM (D); take the note and ROPE LADDER (E).
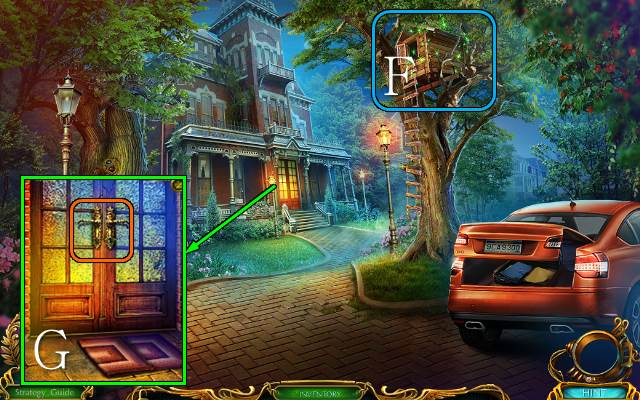
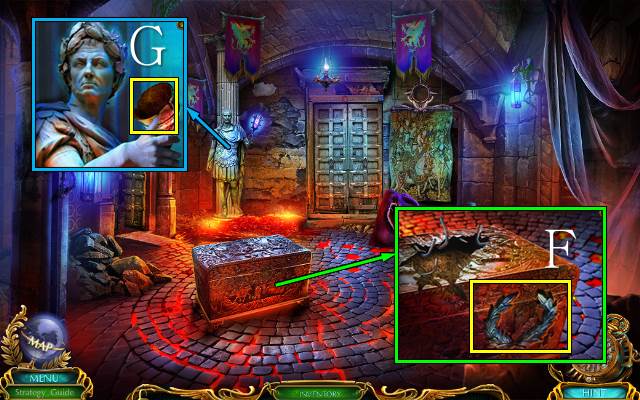
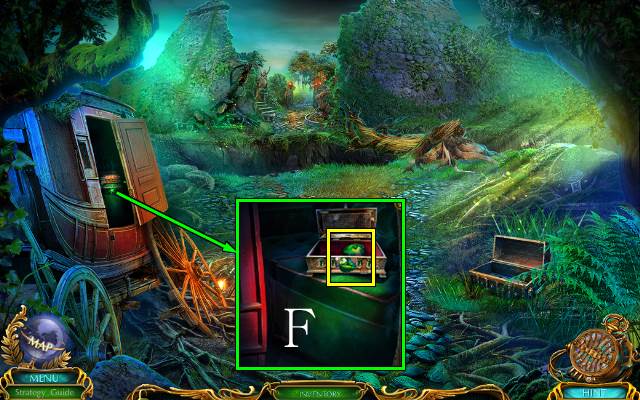
- Use the ROPE LADDER and play the HOP (F).
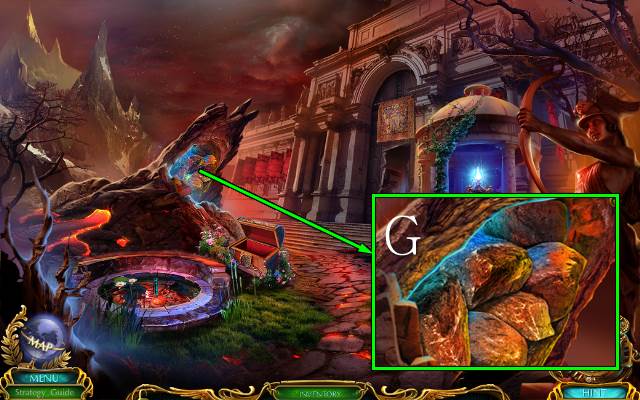
- You receive a DOOR KEY.
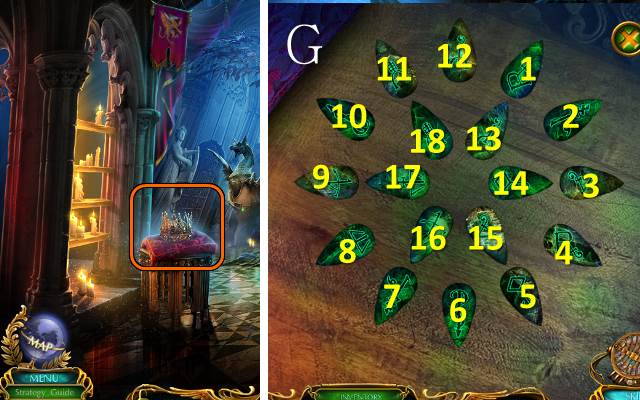
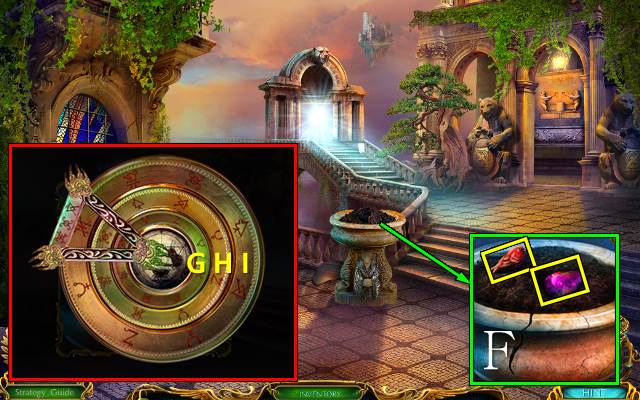
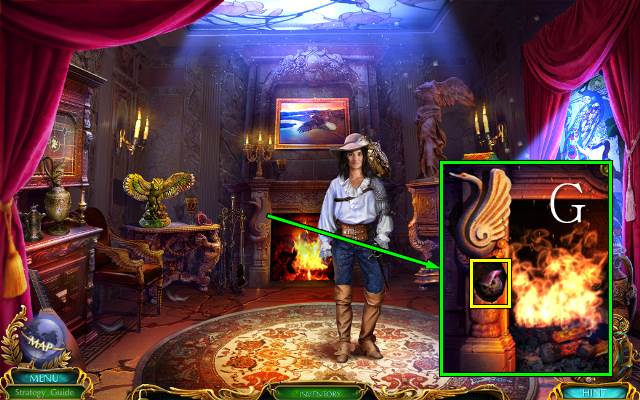
- Use the DOOR KEY (G).
- Go forward.

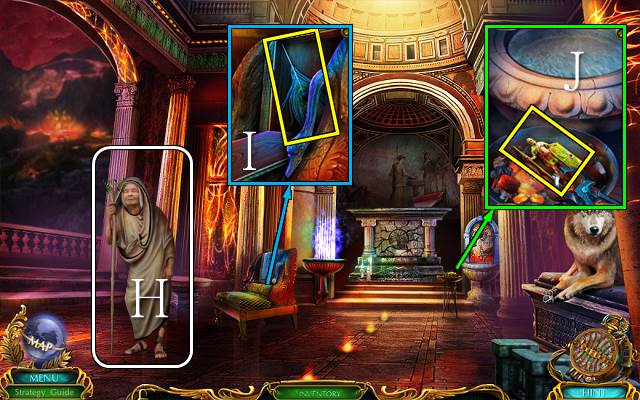
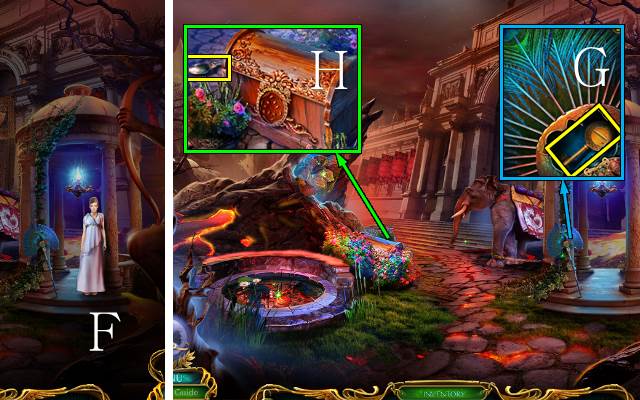
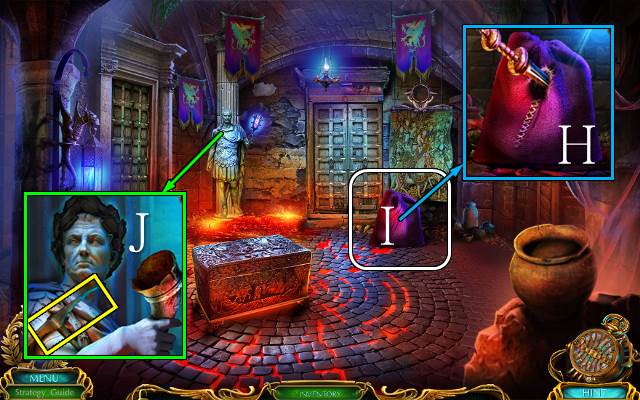
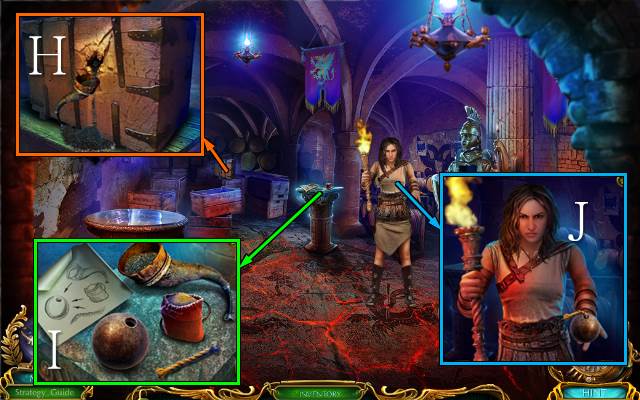
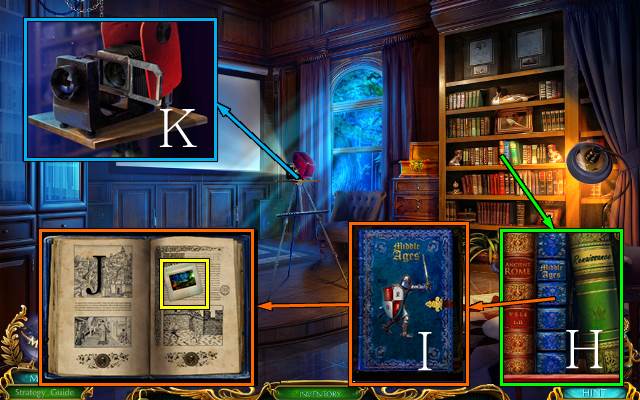
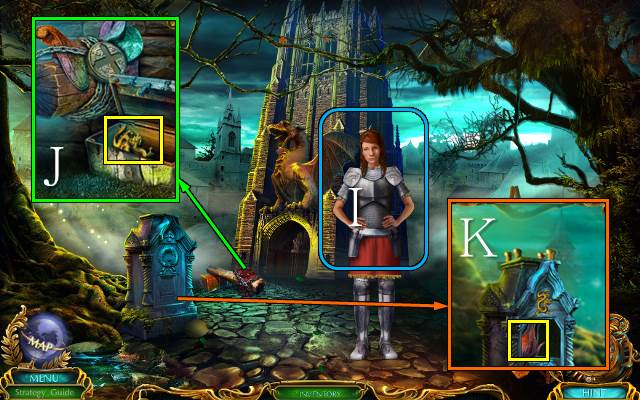
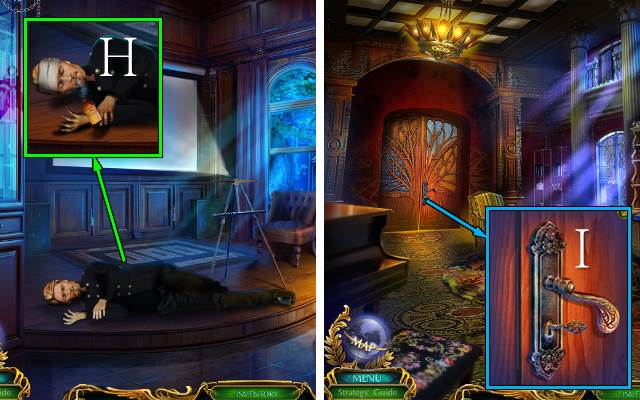
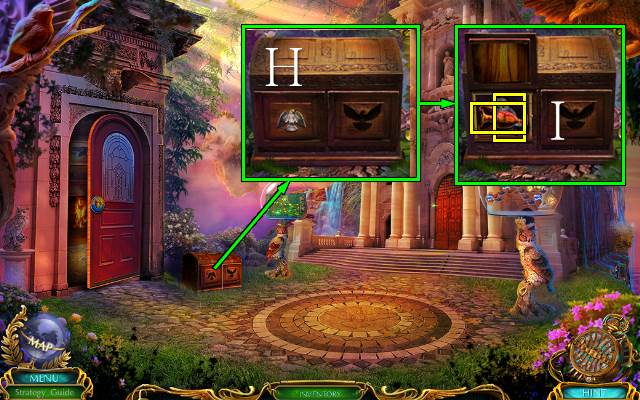
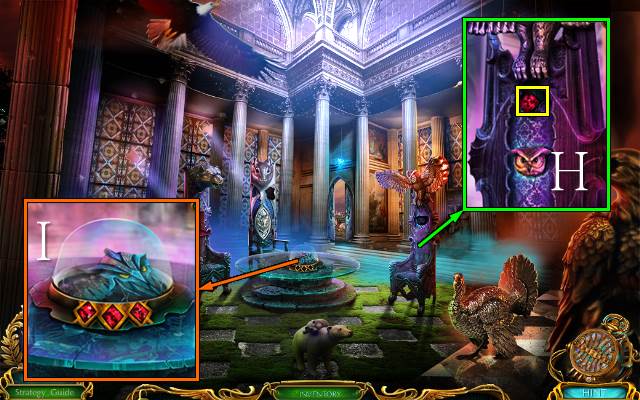
- Talk to Miss Watson (H); you receive a FRAMED PHOTO.
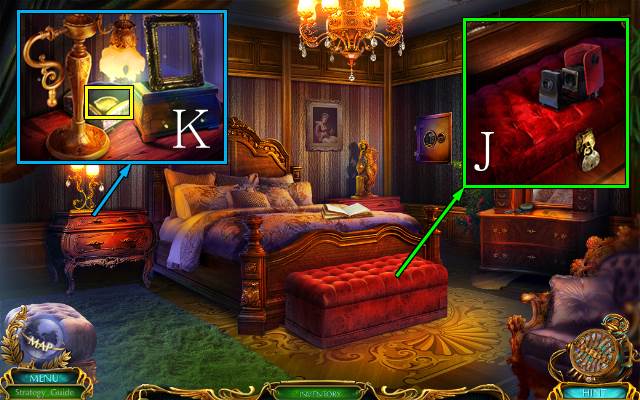
- Take the MASKED TOKEN (I).
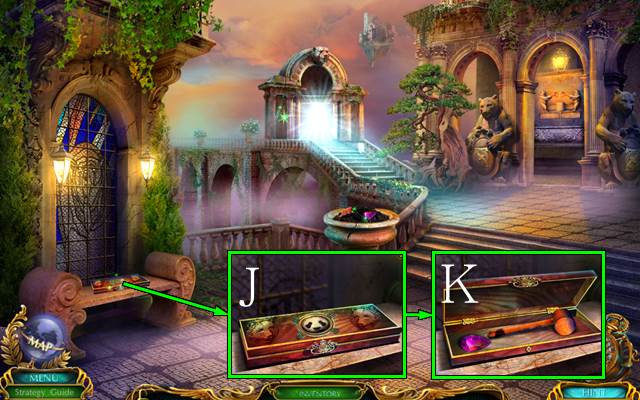
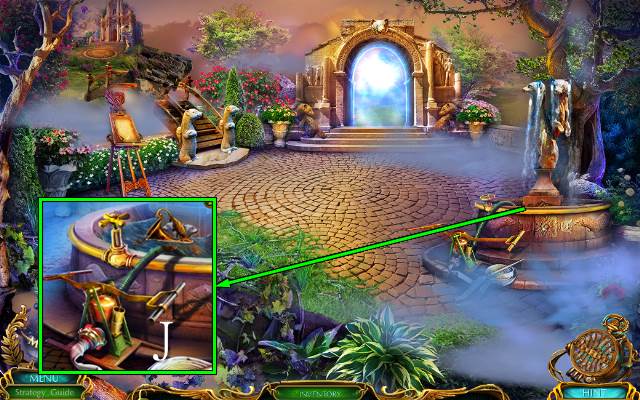
- Place the FRAMED PHOTO for a mini-game (J); take the GLASS ORBS and JEWELED TRIANGLE.
- Go forward.
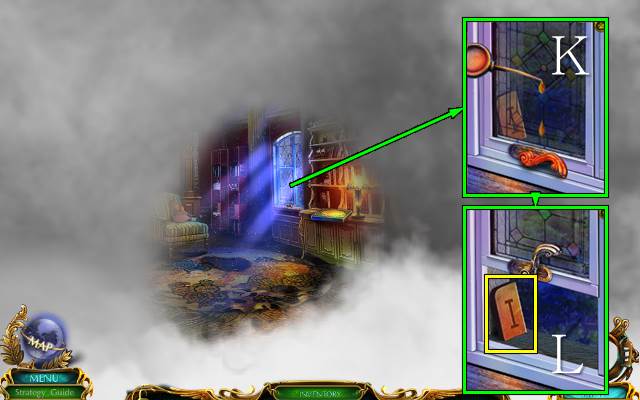
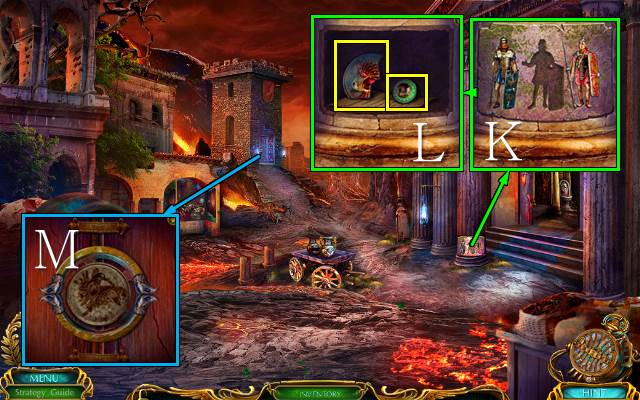
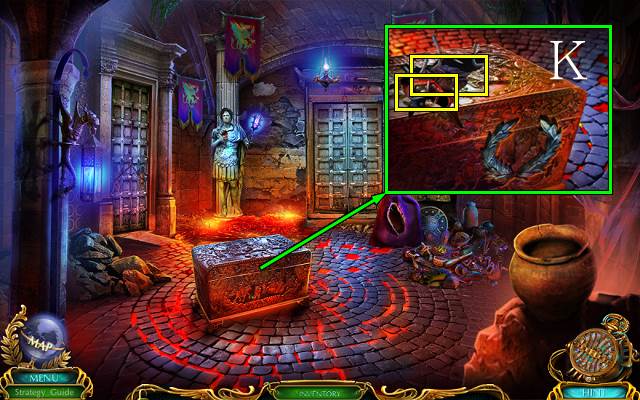
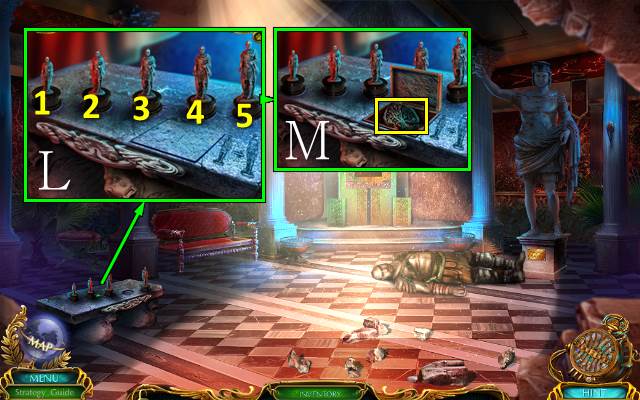
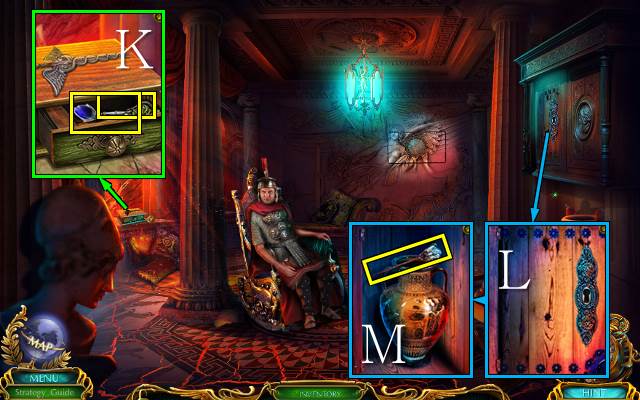
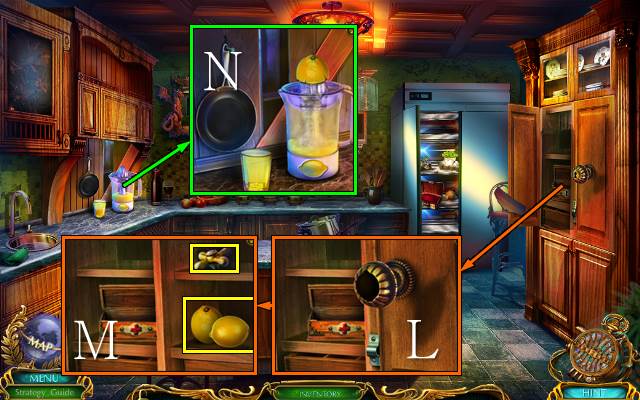
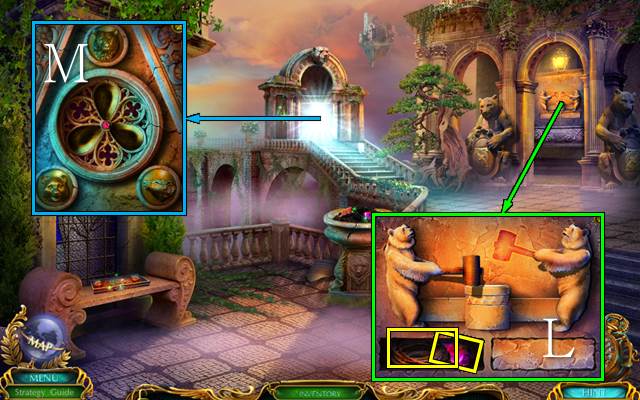
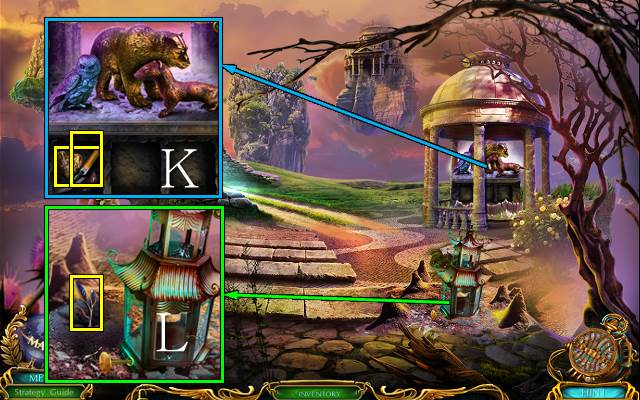
- Use the OILER and open the window (K); take NUMERALS 1/2 (L).
- You receive some LEMONADE.
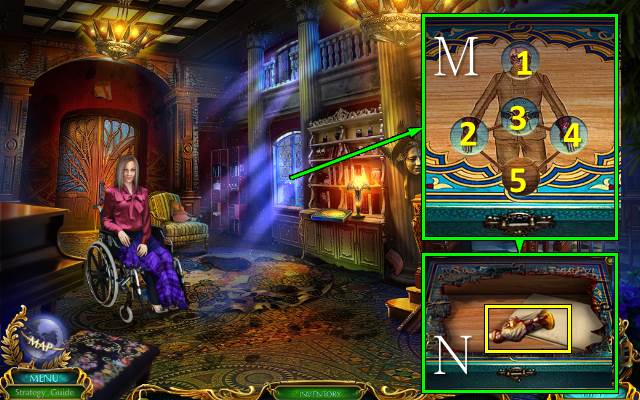
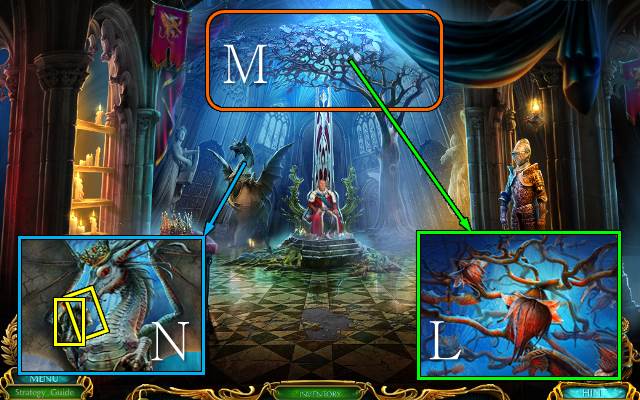
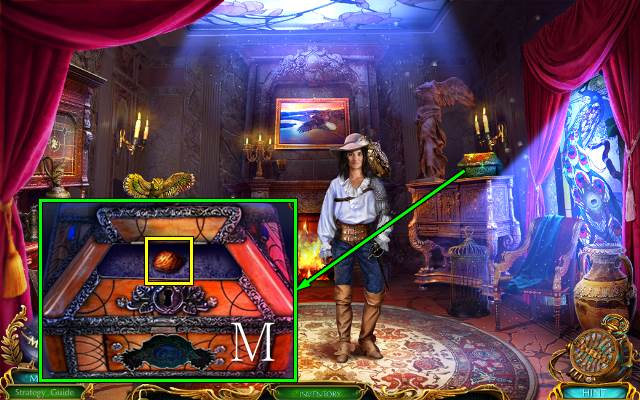
- Place the MASKED TOKEN for a mini-game (M).
- Solution: 4-1-2-3-4-1-2-5.
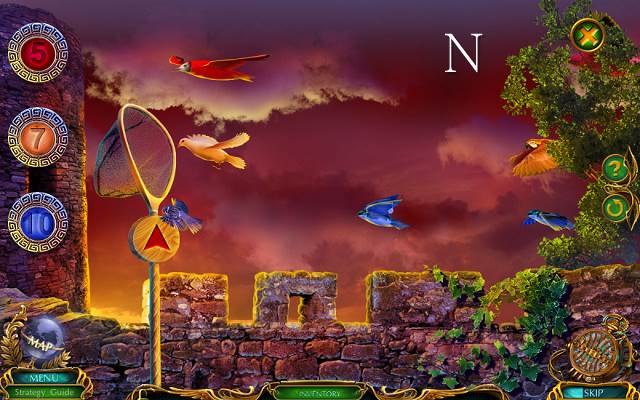
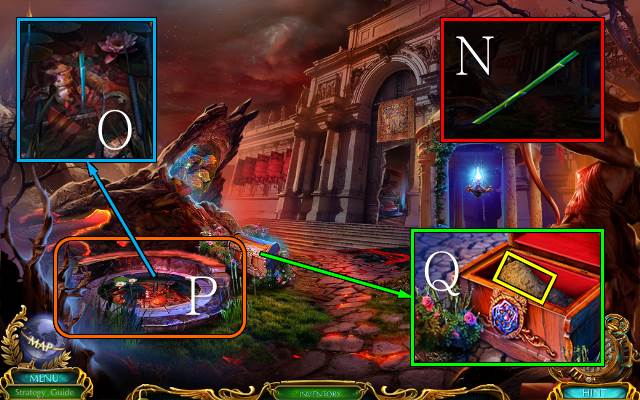
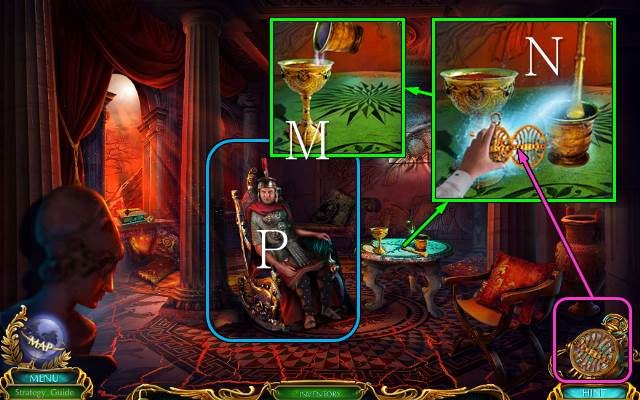
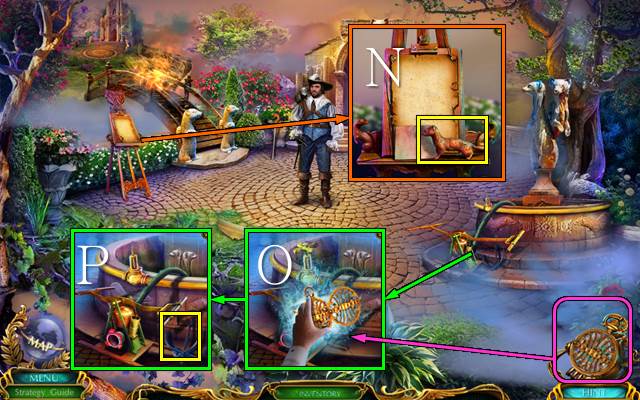
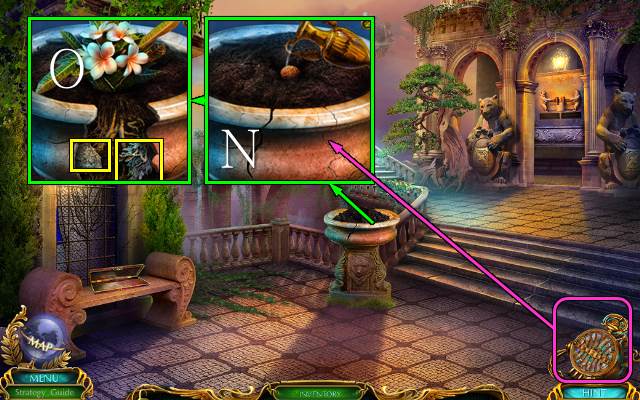
- Take the MUSKETEER FIGURINE and note (N).
- Walk down.
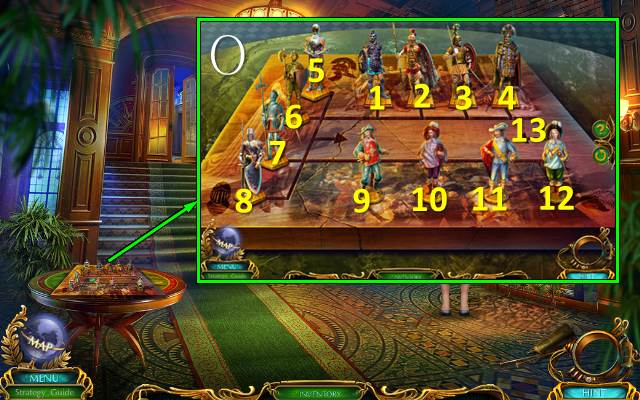
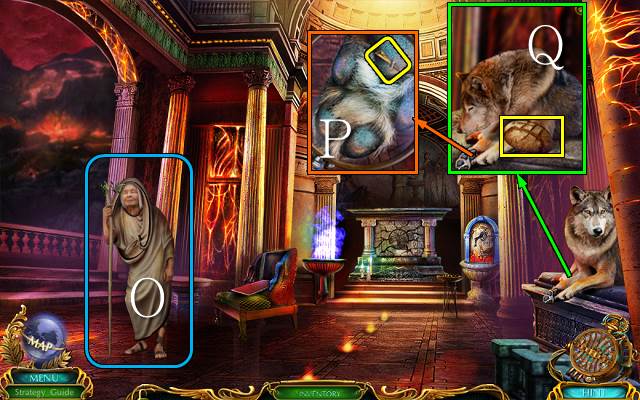
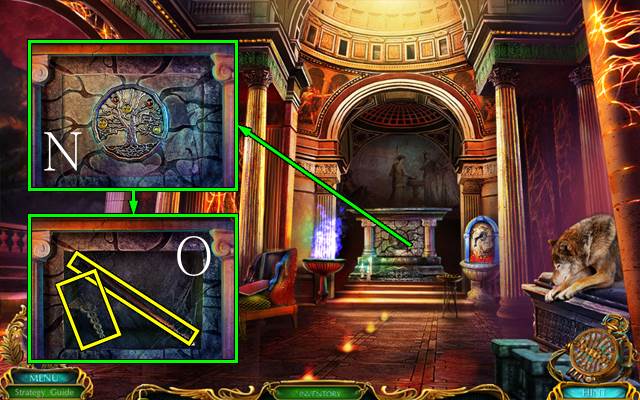
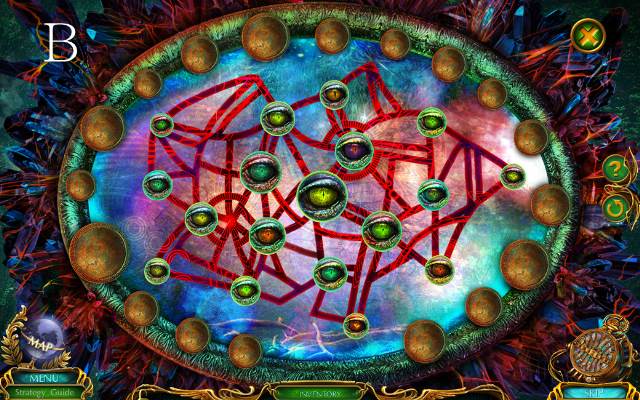
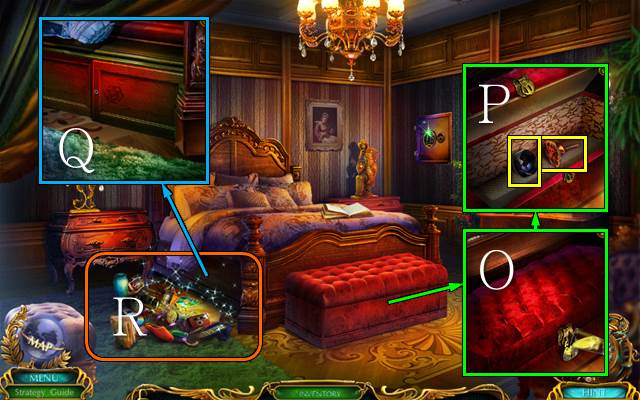
- Place the MUSKETEER FIGURINE for a mini-game (O).
- Solution: 12-13, 8-12, 9-8, 2-9, 5-2, 1-5, 7-1, 3-7, 10-3, 6-10, 13-6.
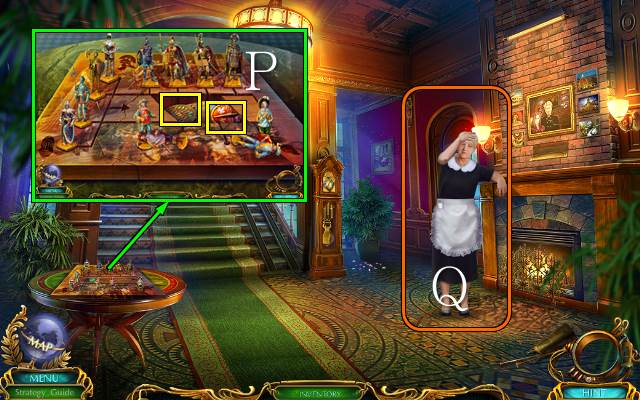
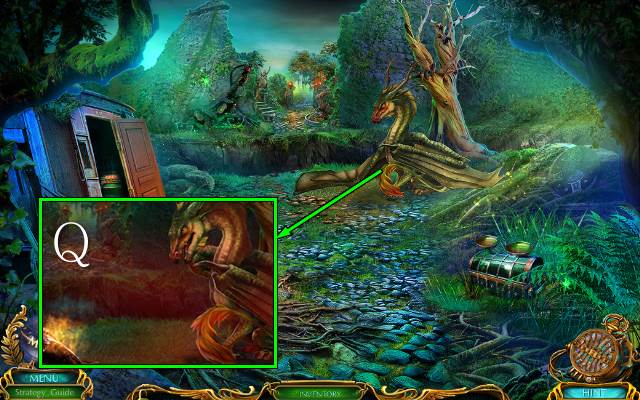
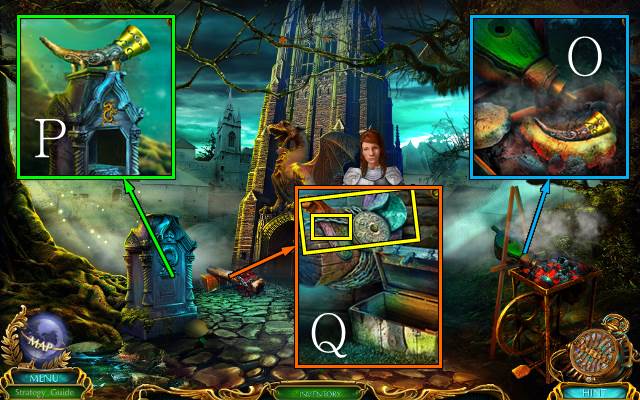
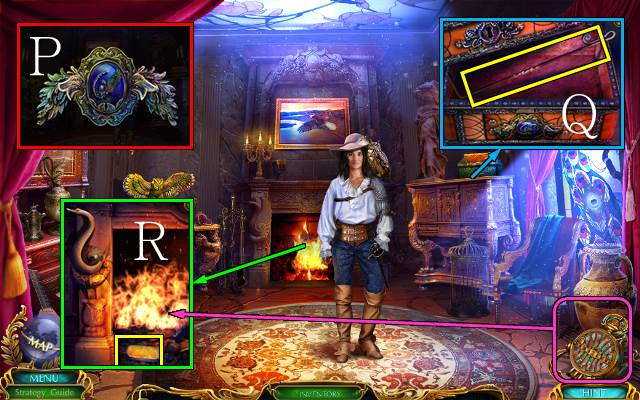
- Take the TIME DEVICE, TINY SHIELD and note (P).
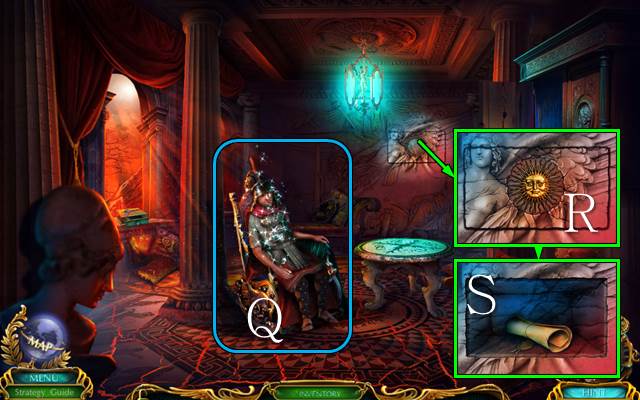
- Give the LEMONADE to Miss Watson (Q); you receive NUMERALS 2/2.
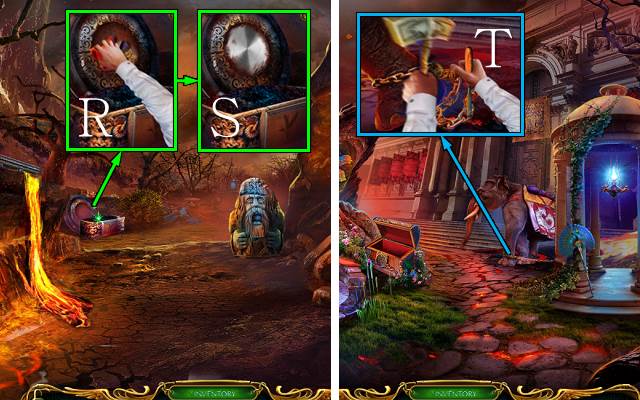
- Go forward.
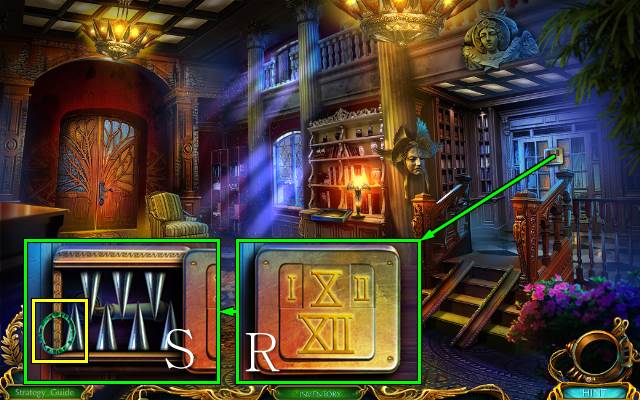
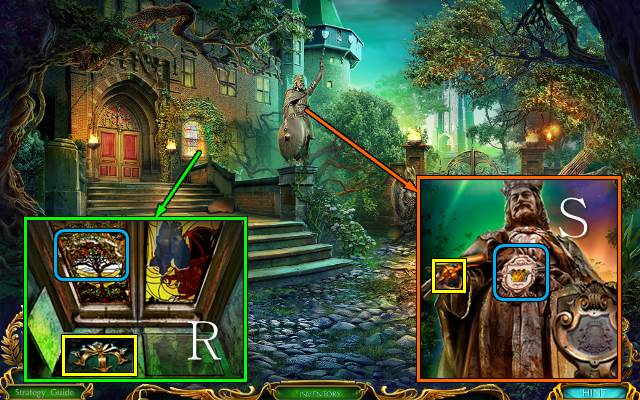
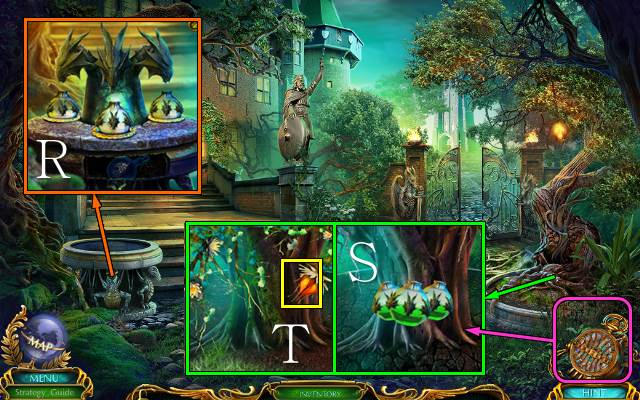
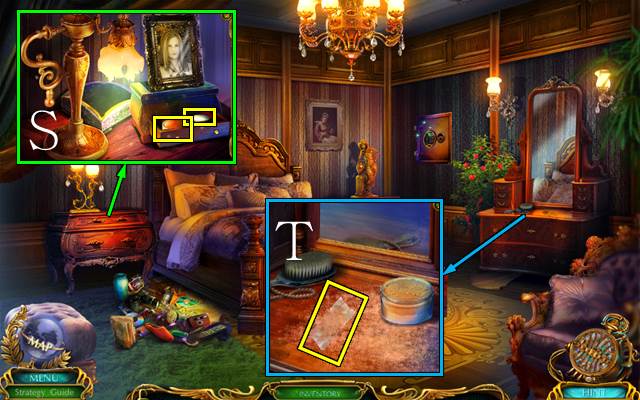
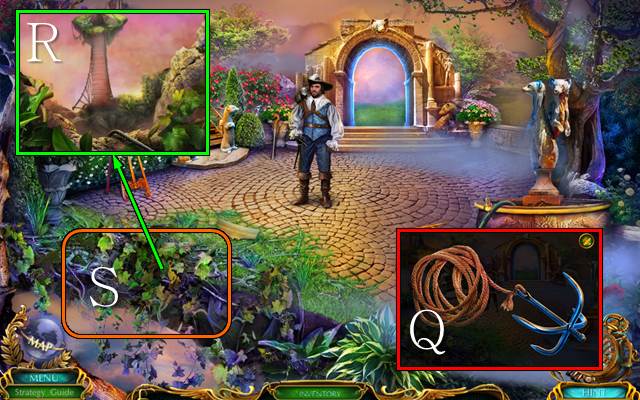
- Place the NUMERALS (R); take the STRANGE RING (S).
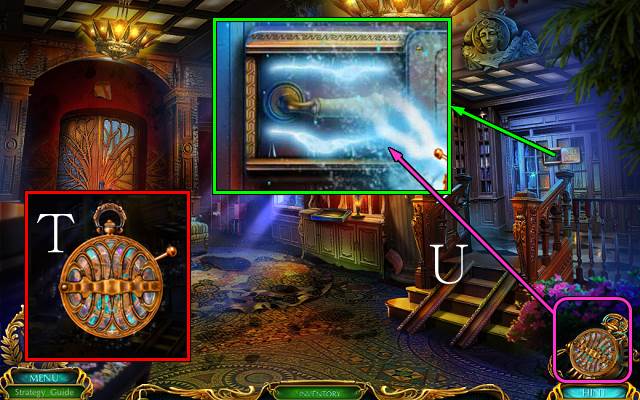
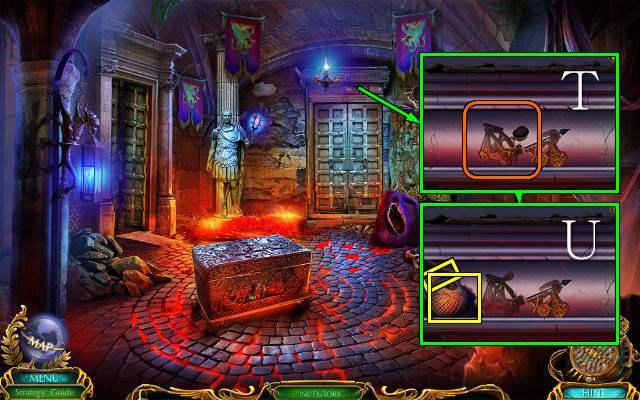
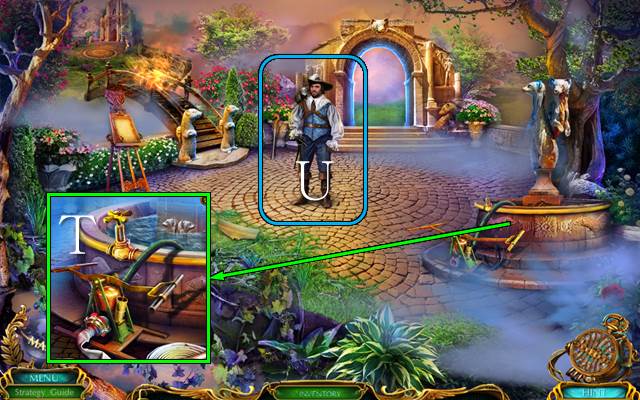
- Access the TIME DEVICE, open it and place the STRANGE RING; you receive your Time Device (T).
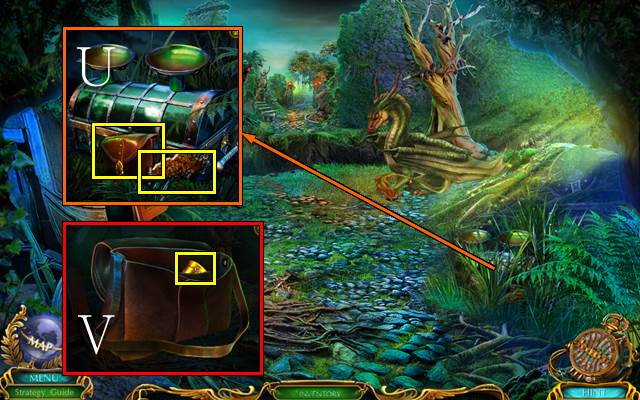
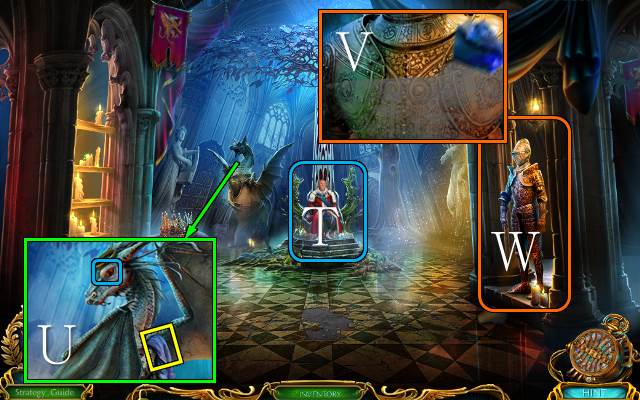
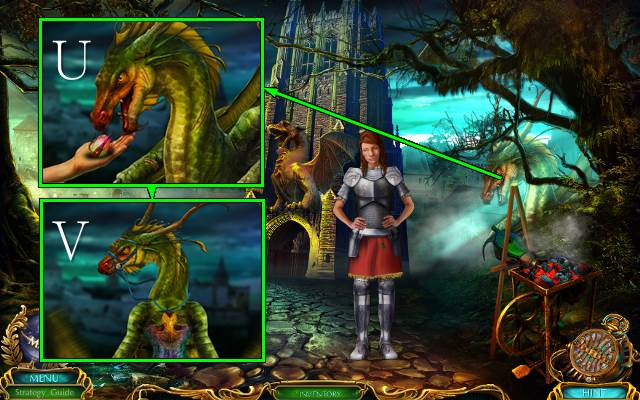
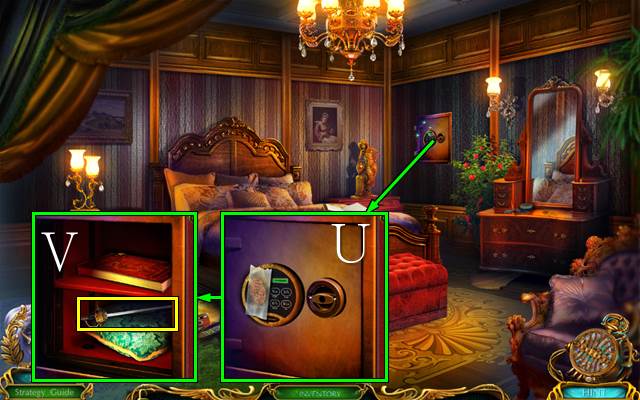
- Use the Time Device (U).
- Go right.
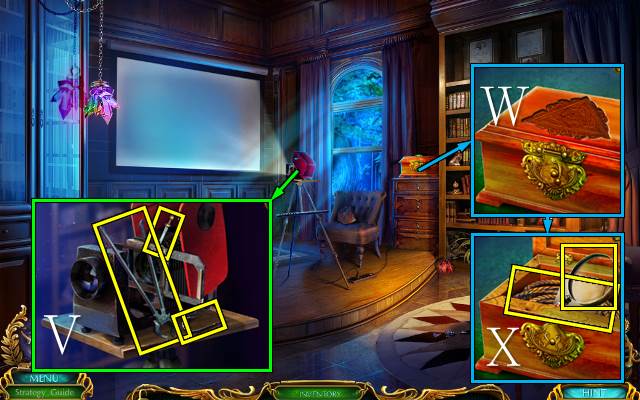
- Take the TONGS, TINY SWORD and HOOK (V).
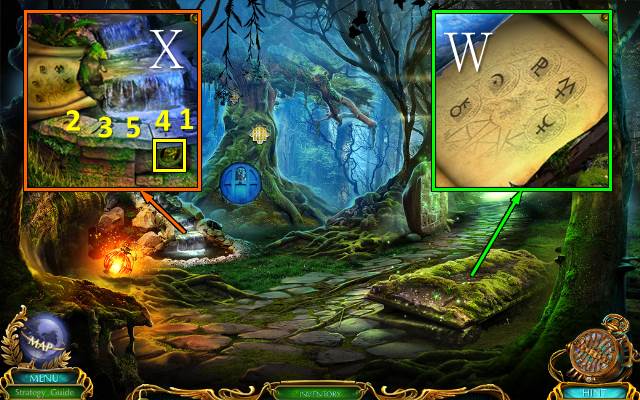
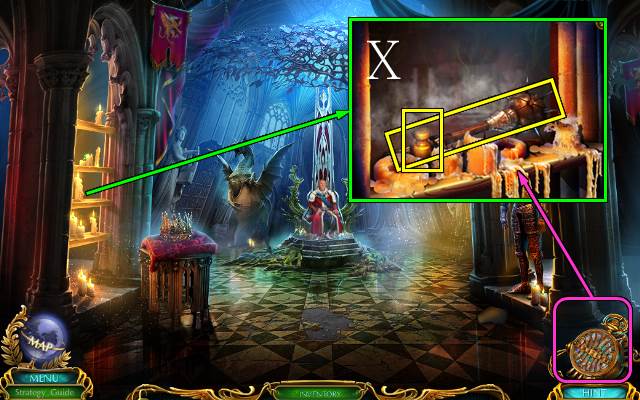
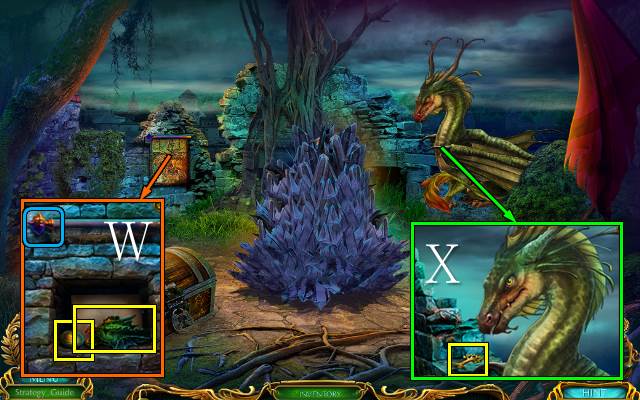
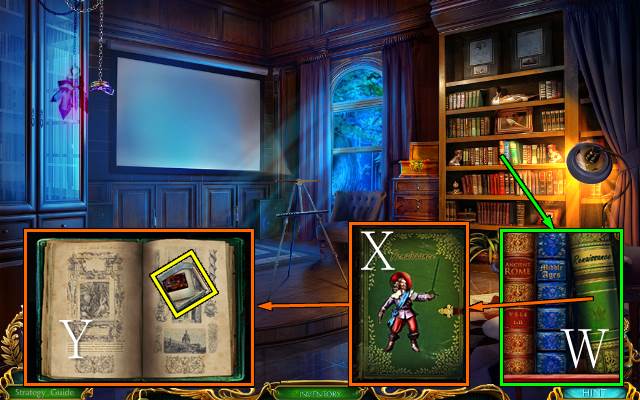
- Place the JEWELED TRIANGLE (W); take the MAGNIFIER, note and ROPE (X).
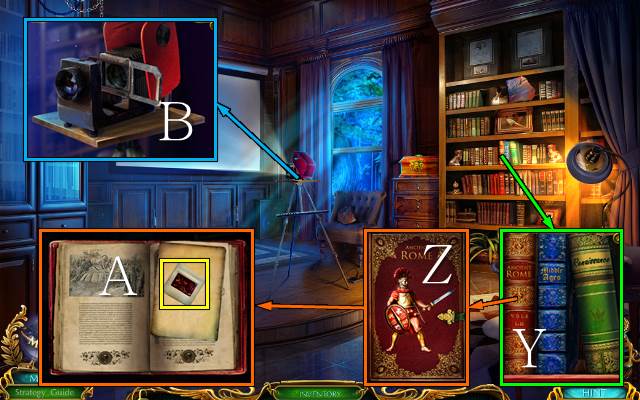
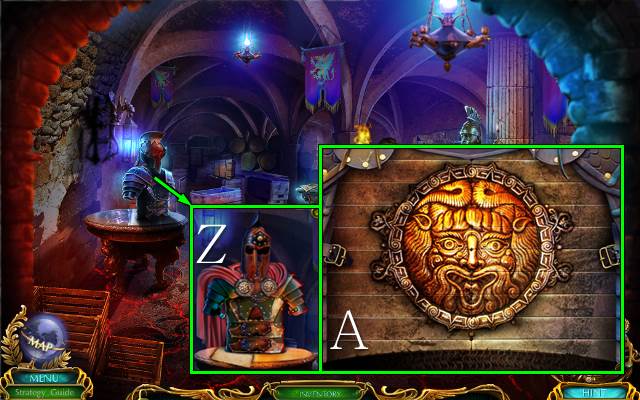
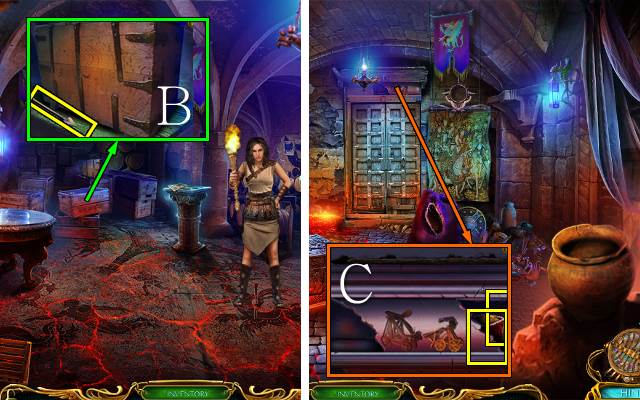
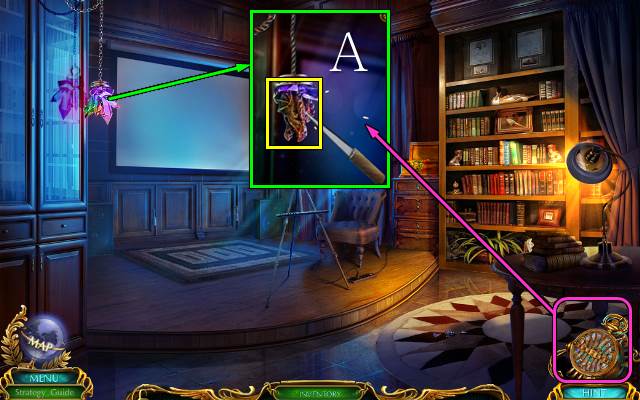
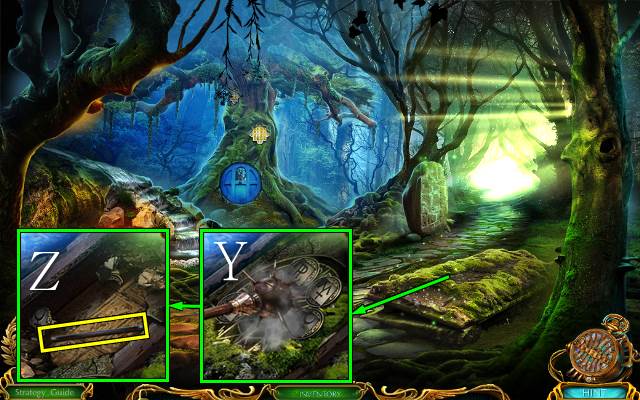
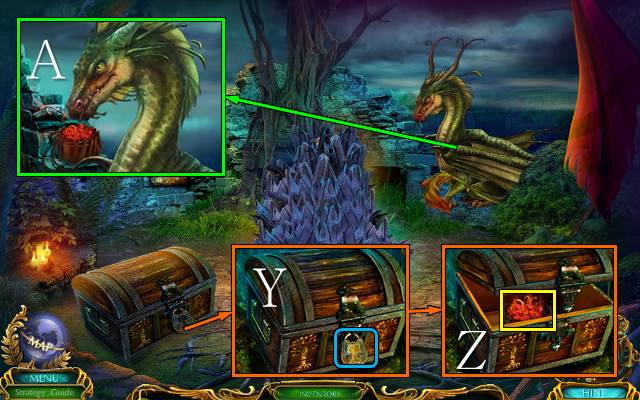
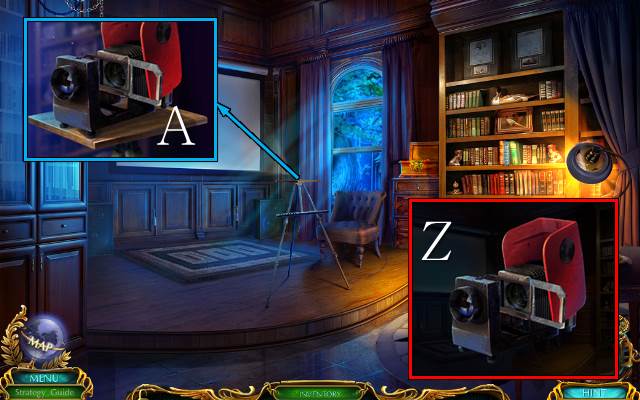
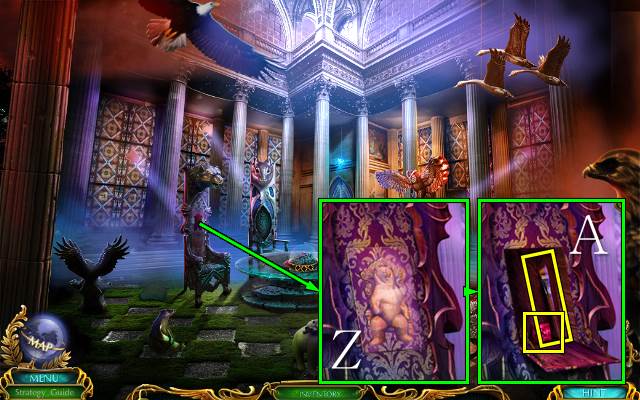
- Pick up the red book (Y) and place the TINY SWORD and TINY SHIELD (Z); take the ANCIENT ROME SLIDE and note (A).
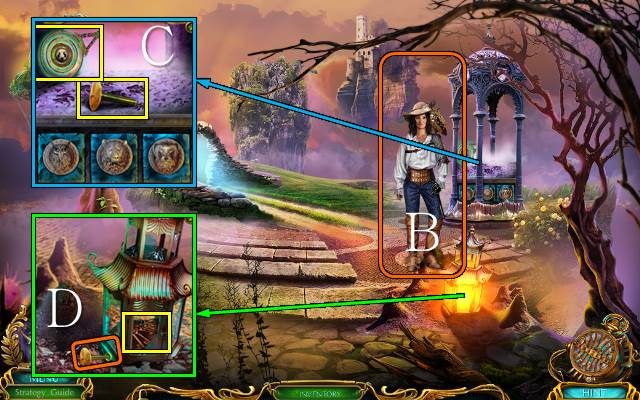
- Place the ANCIENT ROME SLIDE (B).

- Catch the red letters (C).
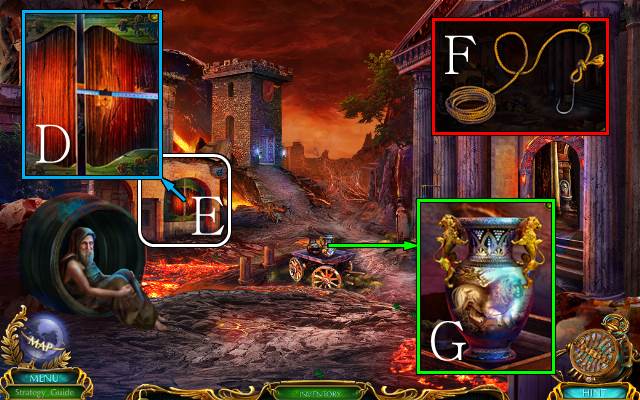
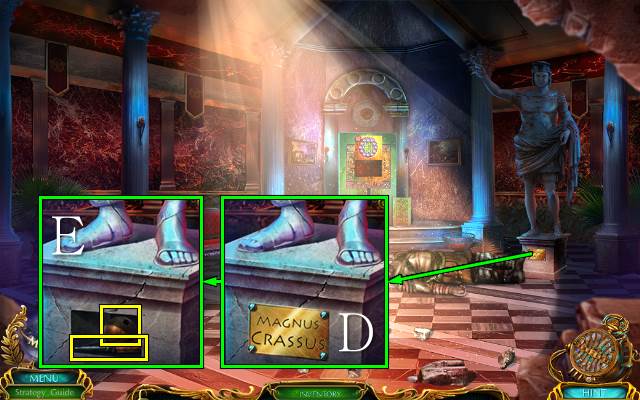
- Use the FOLDED RULER (D).
- Play the HOP (E).
- You receive a LION.
- Access the ROPE and attach the HOOK; take the ROPE WITH HOOK (F).
- Place the LION; take the SWAN HEAD with the ROPE WITH HOOK (G).
- Go right.
- Talk to the Oracle; you receive BIRD AMULET 1/2 (H).
- Place the SWAN HEAD; take the FEATHER (I).
- Take the LEGIONNAIRE with the TONGS (J).
- Walk down.
- Place the LEGIONARY (K); take BIRD AMULET 2/2, COLORFUL TOKEN 1/2 and the note (L).
- Place the BIRD AMULET (M).
- Play the mini-game (N).
- You receive a PHOENIX.
- Go right.
- Give the PHOENIX to the Oracle; you receive some TWEEZERS (O).
- Use the MAGNIFIER and use the TWEEZERS (P); take the BREAD (Q).
- Walk down.
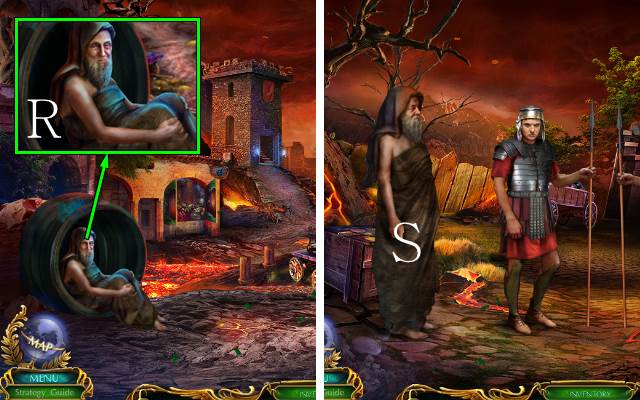
- Give the BREAD to the beggar (R); you receive a WOODEN HELMET.
- Talk to the beggar (S); give the GLASS ORBS to the beggar.
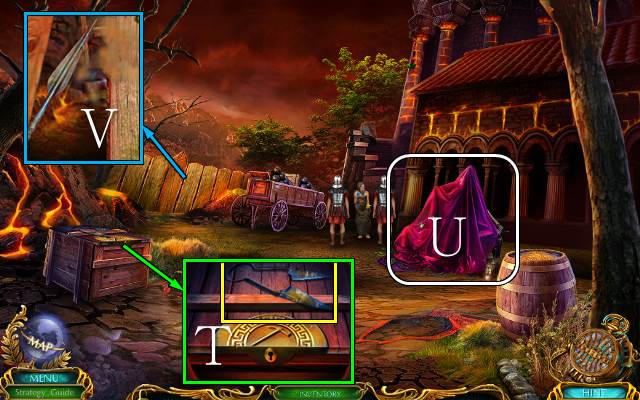
- Take the SHEARS (T).
- Remove the sheet; play the HOP (U).
- You receive a HALBERD.
- Use the HALBERD (V).
- Go left.
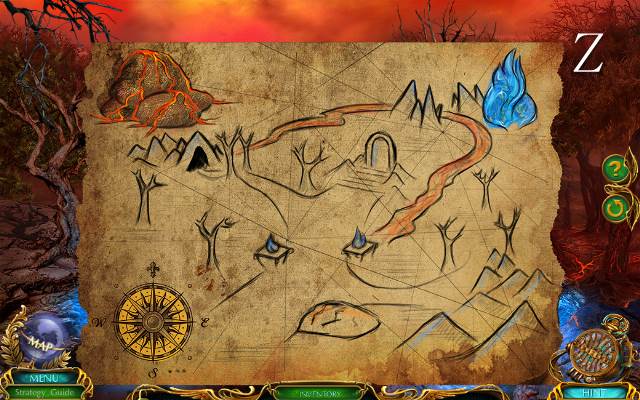
- You receive a MAP.
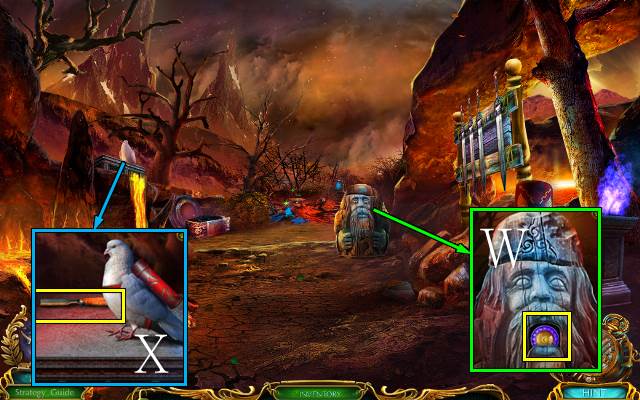
- Place the WOODEN HELMET and take COLORFUL TOKEN 2/2 (W).
- Take HAMMER AND CHISEL 1/2 (X).
- Go forward.
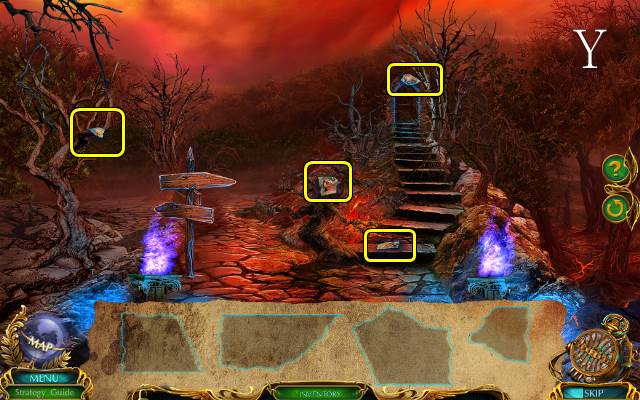
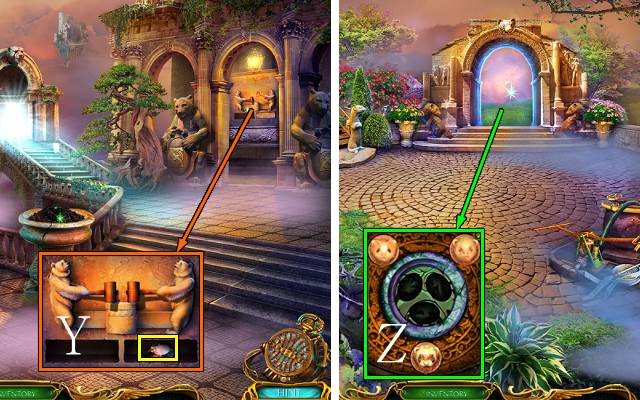
- Find the pieces (Y).
- Play the mini-game (Z).
- Go right.
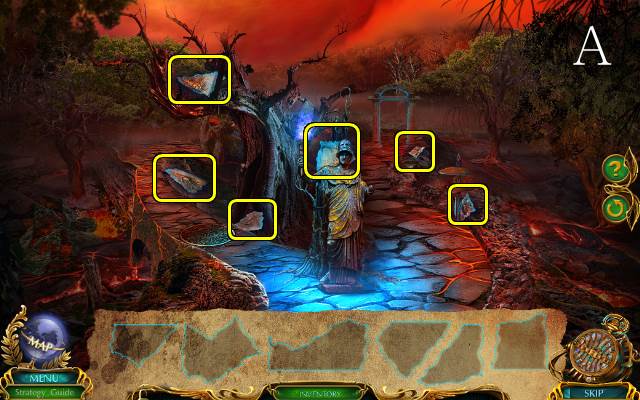
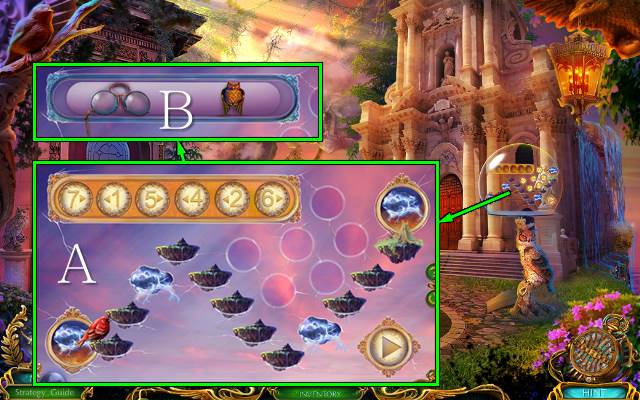
- Find the pieces (A).
- Play the mini-game (B).
- Go right.
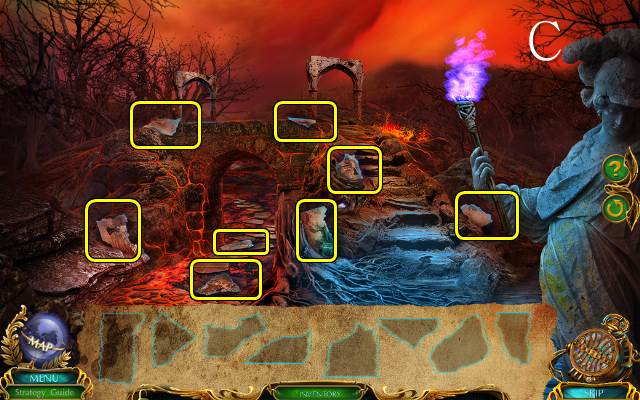
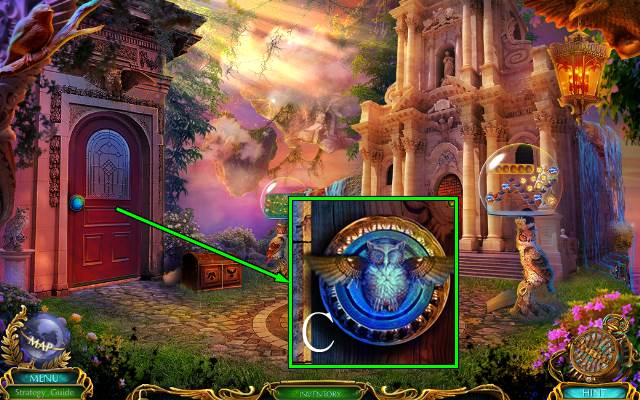
- Find the pieces (C).
- Play the mini-game.
- Solution: D-1-3-D-2-E-3-D-4-E-E-E-5-E-E-6-D-D-D-2-E-E-2-D-D-2-E-E-3-D-D-3-E-E-3-4-D-D-4-E-E-4.
- Go forward.
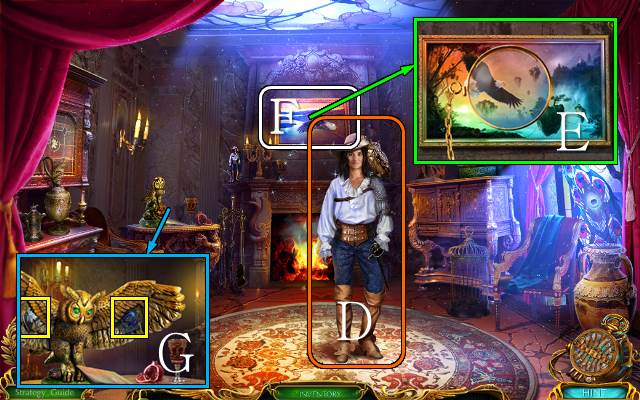
Chapter 2: Gunpowder
- Talk to Augustine (F); you receive AUGUSTINE'S LETTER.
- Place the FEATHER; take the PICKAXE KEY (G).
- Use the SHEARS and take the SCOOP (H).
- Walk down twice.
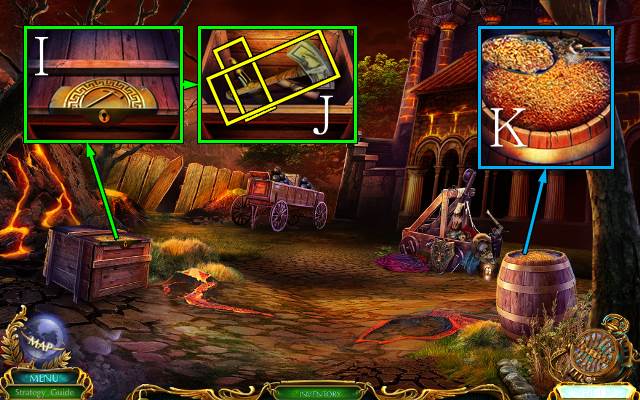
- Use the PICKAXE KEY (I); take HAMMER AND CHISEL 2/2, the KNIFE and the note (J).
- Take some GRAIN with the SCOOP (K).
- Go left.
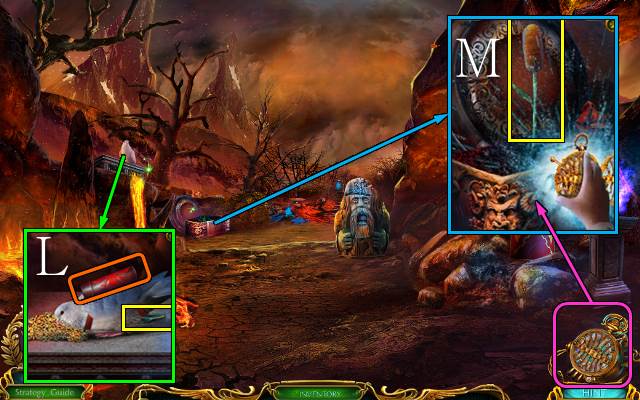
- Feed the bird some GRAIN and place AUGUSTINE'S LETTER; take the SPROUT (L).
- Take the note, place the SPROUT and use the TIME DEVICE; take the REED (M).
- Go forward.
- Access the REED and use the KNIFE; take the REED TUBE (N).
- Place the REED TUBE (O).
- Play the HOP (P).
- You receive a METAL ROSE.
- Place the METAL ROSE and take the SAND (Q).
- Walk down.
- Use the SAND (R); take the POLISHED SHIELD (S).
- Walk forward.
- Use the HAMMER AND CHISEL (T).
- Go forward.
- Use the POLISHED SHIELD (U).
- Take the ARM REST and note (V).
- Place the ARM REST and take the PEGASUS EMBLEM and note (W).
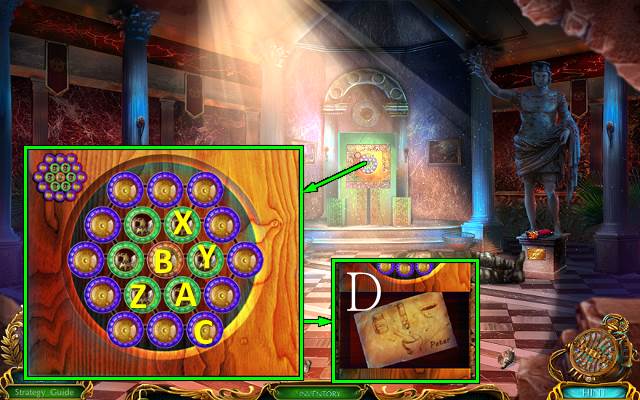
- Place the COLORFUL TOKENS for a mini-game.
- Solution: X2-Y2-Z2-A4-B-C.
- Try to take the note (D).
- You receive ANDRA'S SWORD.
- Place ANDRA'S SWORD for a mini-game (E); select the swords in order from I to V.
- Take the CROWBAR and KNIFE (F).
- Walk forward.
- Use the CROWBAR (G).
- Go left.
- Use the KNIFE (H).
- Play the HOP (I).
- You receive the TONGS.
- Take the PICKAXE (J).
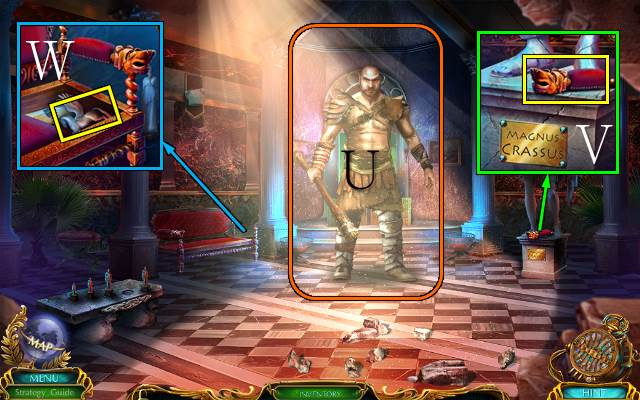
- Use the TONGS; take the GLADIATOR HELMET and CRASSUS STATUETTE (K).
- Walk down and forward.
- Place the CRASSUS STATUETTE for a mini-game (L).
- Solution: select 4-2-3-5.
- Take the TREE EMBLEM (M).
- Go to the Sacred Temple.
- Place the TREE EMBLEM (N); take the CADUCEUS EMBLEM and HALBERD (O).
- Go to the Palace Basement.
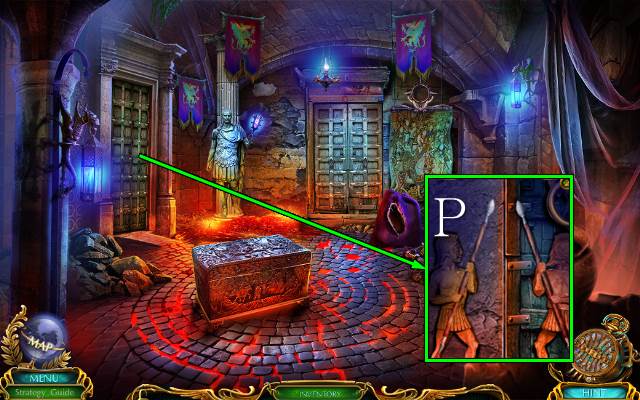
- Place the HALBERD (P).
- Go left.
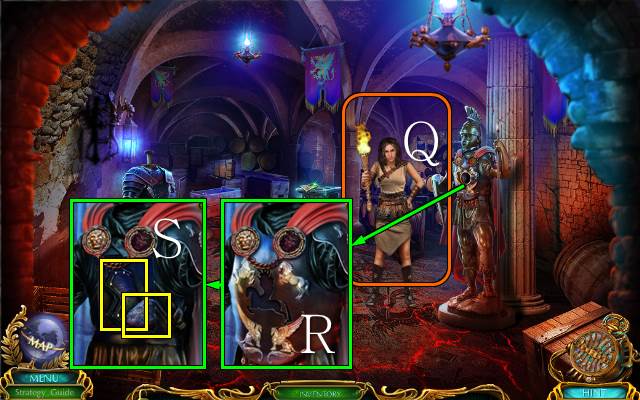
- Talk to Andra (Q).
- Place the PEGASUS EMBLEM (R); take the BOULDER EMBLEM and ARMOR PLATING (S).
- Walk down.
- Place the BOULDER EMBLEM (T); take the TWINE and COIN (U).
- Go left.

- Access the TWINE (V), unwind it and take the LION BUCKLE (W); turn the fibres into a WICK (X).
- Place the LION BUCKLE to receive a CLOAK (Y).
- Place the GLADIATOR HELMET, ARMOR PLATING and CLOAK (Z) for a mini-game (A).
- Take the TREBUCHET BOLT EMBLEM (B).
- Walk down.
- Place the TREBUCHET BOLT EMBLEM; take the SULFUR and CLOCK HANDS (C).
- Walk down and right.
- Use the COIN (D); take the AWL and EMPTY BALL (E).
- Go down and left.
- Take the LAURELS with the AWL (F).
- Place the LAURELS to receive the HORN (G).
- Go left.
- Use the PICKAXE and HORN to get a GUNPOWDER HORN (H).
- Place the EMPTY BALL, WICK, SULFUR and GUNPOWDER HORN; put the gunpowder, sulphur and wick in the ball and take the BOMB (I).
- Give the BOMB to Andra (J).
- Go forward.
- Take the note and place the CADUCEUS EMBLEM; take the SLUMBER FLOWER and GRAPEVINE KEY (K).
- Use the GRAPEVINE KEY (L); take the HAIRPIN and WINE JUG (M).
- Use the WINE JUG on the cup, place the SLUMBER FLOWER in the mortar and use the pestle and Time Device (N); put the powder in the wine and take the SLEEPING POTION (O).
- Give the SLEEPING POTION to the Emperor (P).
- Play the HOP (Q).
- You receive the EMPEROR'S INSIGNA.
- Place the EMPEROR'S INSIGNA (R) and take the scroll (S).
Chapter 3: The Middle Ages

- Walk down twice.
- Place the CLOCK HANDS for a mini-game (T).
- Take the SUN MAGNET (U).
- Use the HAIRPIN (V).
- Go right.
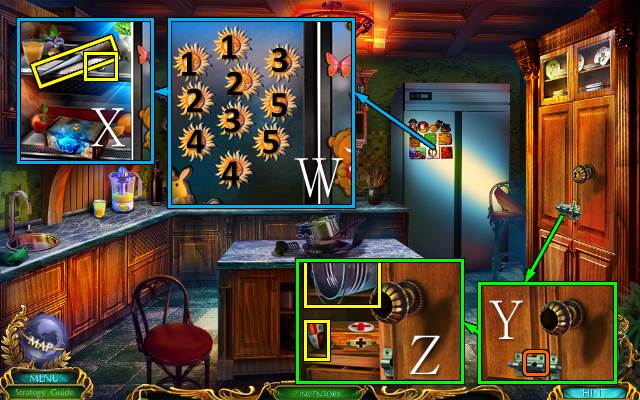
- Place the SUN MAGNET for a mini-game (W).
- Take the KNIFE and METAL KNOB (X).
- Place the METAL KNOB (Y); take the PAIL and TINY SHIELD (Z).
- Go to the Home Theater.
- Use the KNIFE; take the DRAGON HEAD (A).
- Go to the Kitchen.
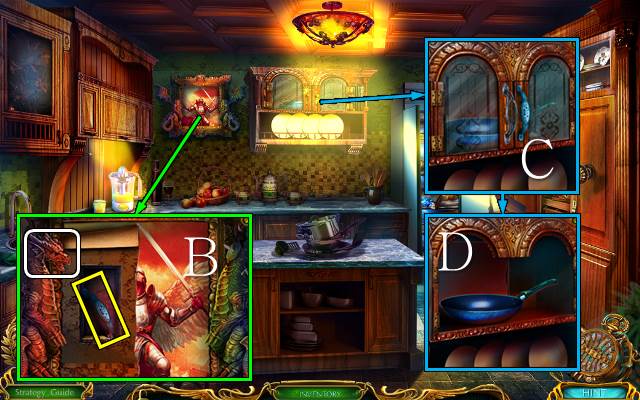
- Place the DRAGON HEAD; take the note and HANDLE (B).
- Place the HANDLE (C); take the PAN (D).

- Place the PAN and take the CHISEL (E).
- Use the CHISEL (F); take the TINY SWORD (G).
- Go to the Home Theater.
- Pick up the blue book (H) and place the TINY SHIELD and TINY SWORD (I); take the MIDDLE AGES SLIDE (J).
- Place the MIDDLE AGES SLIDE (K).
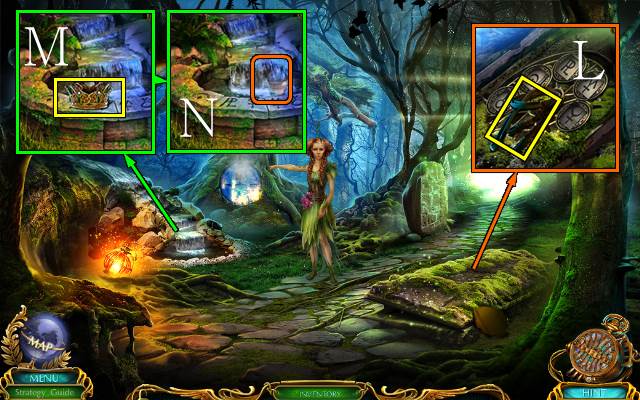
- Take RIDING EQUIPMENT 1/2 (L).
- Take CROWN 1/2 (M); use the PAIL to get a PAIL OF WATER (N).
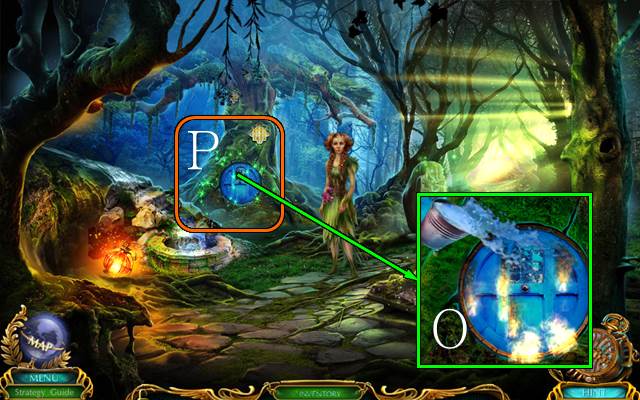
- Use the PAIL OF WATER (O).
- Play the HOP (P).
- You receive a SWORD.
- Go right.
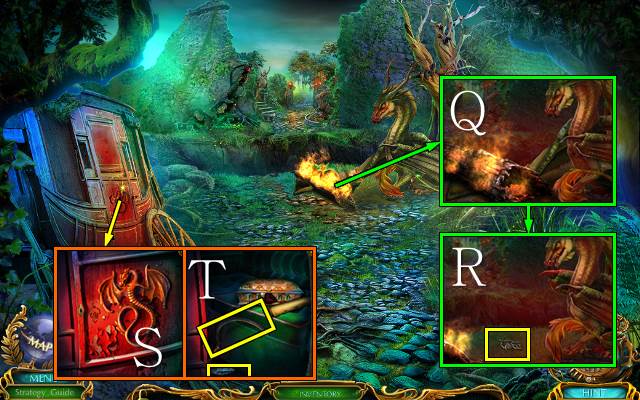
- Use the SWORD (Q); take the DRAGON HANDLE (R).
- Place the DRAGON HANDLE (S); take the SICKLE, CHARCOAL and note (T).
- Use the SICKLE; take the STAINED-GLASS TREE and KNAPSACK (U).
- Access the KNAPSACK and open it; go through the papers and take the PAPER and GOLDEN DECORATION (V).
- Walk down.
- Use the PAPER and CHARCOAL; take the NOTE WITH CODE (W).
- Place the NOTE WITH CODE for a mini-game (X); take the DRAGON CREST.
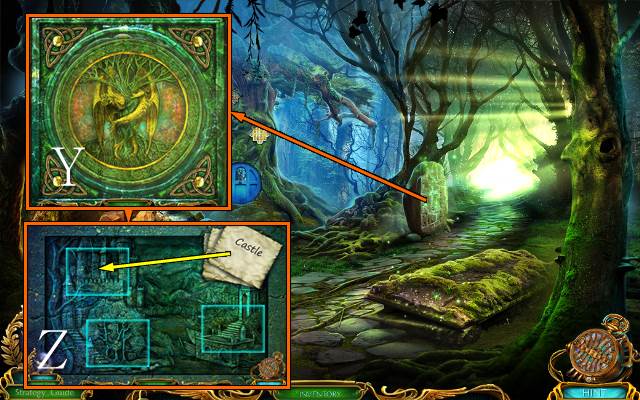
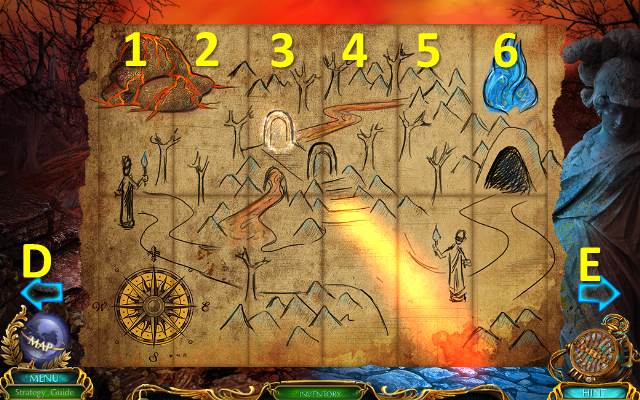
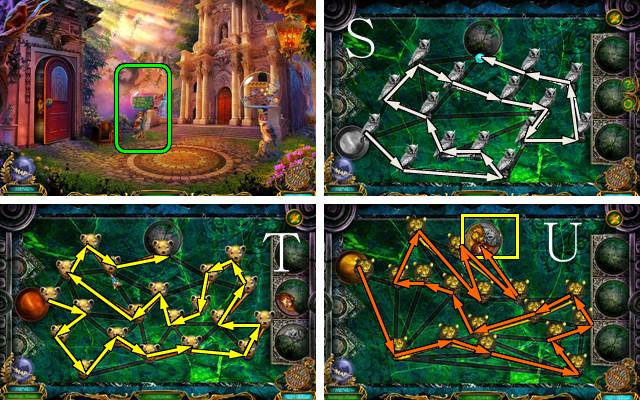
- Place the DRAGON CREST (Y); place the note on the castle for a mini-game (Z).
- Solution (A).
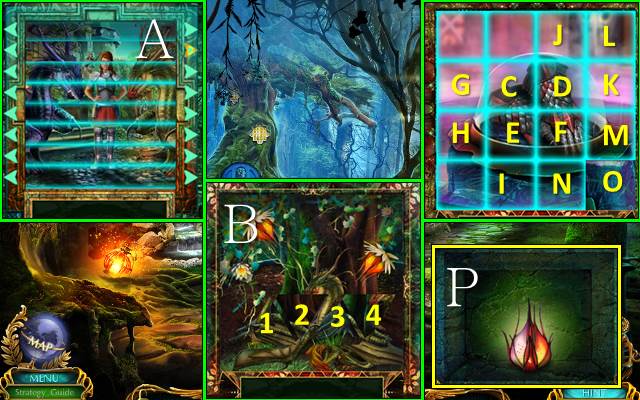
- Place the note on the forest for another mini-game.
- Solution: 2-3, 1-2, 3-4, 2-3 (B).
- Place the note on the tower for a third mini-game.
- Solution: C3-D2-E2-F2-G3-H-I-J3-K3-M-N3-O.
- Remove the tile and take the FRUIT OF HEALING (P).
- Go right.
- Give the FRUIT OF HEALING to the dragon (Q).
- Go forward.
- Place the STAINED-GLASS TREE and take CROWN 2/2 (R).
- Place the CROWN and take the note and CURTAIN ROD CAP (S).
- Go left.
- Talk to the King; you receive a DRAGON'S EYE (T).
- Place the DRAGON EYE'S and take the CLOTH (U).
- Use the CLOTH (V).
- Play the HOP (W).
- You receive the FLINT AND STEEL.
- Use the FLINT AND STEEL and Time Device; take the MACE and WEIGHT 1/2 (X).
- Walk down three times.
- Use the MACE (Y); take the METAL ROD (Z).
- Go right.
- Take WEIGHT 2/2 with the METAL ROD (A).
- Place the WEIGHTS (B); take the GOLDEN CREST (C).
- Go forward.
- Place the GOLDEN CREST and take the STAINED-GLASS DRAGON (D).
- Place the STAINED-GLASS DRAGON and take the EMERALD LEAF (E).
- Walk down.
- Place the EMERALD LEAF and take the EMERALD (F).
- Go forward and left.
- Place the EMERALD for a mini-game (G).
- Solution: 1-4, 2-7, 3-14, 5-14, 6-10, 8-13, 9-13, 11-16, 12-18.
- You receive the DRAGON WING.
- Walk down.

- Place the DRAGON WING (H).
- Go right.
Chapter 4: The Tower
- Talk to Rebecca (I); you receive a LATCHKEY.
- Use the LATCHKEY; take the GOLD DRAGON (J).
- Place the GOLD DRAGON and take the METAL MAGIC FRUIT (K).
- Go down and left.
- Place the METAL MAGIC FRUIT (L).
- Play the HOP (M).
- You receive a DRAGON CROWN.
- Place the DRAGON CROWN; take the PURE SILVER and MAGIC POTION (N).
- Go down and right.
- Read the note, place the PURE SILVER and push the bellows; place the GOLDEN DECORATION and take the SILVER HORN (O).
- Place the SILVER HORN (P).
- You receive the SILVER CROSS.
- Place the SILVER CROSS; take RIDING EQUIPMENT 2/2 and the FLASKS (Q).
- Walk down.
- Place the FLASKS and MAGIC POTION; take the MAGIC POTIONS (R).
- Use the MAGIC POTIONS and Time Device (S); take the MAGIC FRUIT (T).
- Go right.
- Give the MAGIC FRUIT to the dragon (U).
- Place the RIDING EQUIPMENT (V).
- Place the CURTAIN ROD CAP; take the DRAGON'S HEAD, WAX EGG and note (W).
- Place the WAX EGG; take the GOLDEN TREE (X).
- Place the GOLDEN TREE (Y); open the pouch and take the FIRE FRUITS (Z).
- Place the FIRE FRUITS for a mini-game (A).
- Solution (B).
- Talk to Debby (C).
- Remove Peter's magic costume (D).
- Go to the Kitchen.
- Place the DRAGON'S HEAD; take the BRUSH and LIGHTER (E).
- Use the LIGHTER; take the GREEN CROSS (F).
- Place the GREEN CROSS and take the BANDAGE and SMELLING SALTS (G).
- Go to the Home Theater.
- Use the BANDAGE and SMELLING SALTS; you receive DEBBY'S KEY (H).
- Walk down.
- Use DEBBY'S KEY (I).
- Go forward.
- Take the BROKEN PROJECTOR (J).
- Use the BRUSH; take the LEMON CHARM (K).
- Go to the Kitchen.
- Place the LEMON CHARM (L); take the LEMON and VALVE (M).
- Place the LEMON, pour the juice and take the LEMON JUICE (N).
- Go to Debby's Room.
- Use the LEMON JUICE (O) and take the FANCY KNOB and LENS (P).
- Place the FANCY KNOB (Q).
- Play the HOP (R).
- You receive DEBBY'S PHOTO.
- Place DEBBY'S PHOTO and take the POWDER and CLEAR TAPE (S).
- Use the POWDER and CLEAR TAPE and take the FINGERPRINT (T).
- Use the FINGERPRINT (U); take the TINY RAPIER, open the journal and take the notes (V).
- Go to the Home Theater.
- Pick up the green book (W) and place the TINY RAPIER (X); take the SLIDE FRAME and RENAISSANCE SLIDE (Y).
- Access the BROKEN PROJECTOR and place the LENS and SLIDE FRAME; take the SLIDE PROJECTOR (Z).
- Remove the broken projector and place the SLIDE PROJECTOR and RENAISSANCE SLIDE (A).
Chapter 5: Into the Renaissance
- Talk to Isabel (B); you receive some MAGIC CRYSTALS.
- Take the PANDA DEVICE and BRASS KNOB (C).
- Take the note, place the BRASS KNOB; take the KEYS (D).
- Place the MAGIC CRYSTALS (E).
- Go forward.
- Take the LITTLE BIRD and AMETHYST CRYSTAL 1/3 (F).
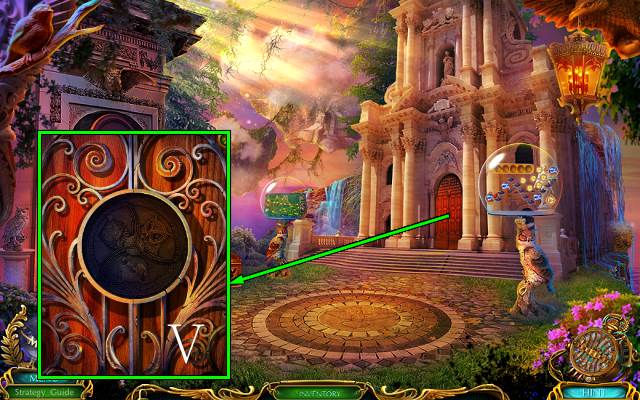
- Access the PANDA DEVICE and activate it for a mini-game.
- Solution: H2-G3-I2.
- Take the PANDA CREST.
- Read the note and place the PANDA CREST (J); take the HAMMER and AMETHYST CRYSTAL 2/3 (K).
- Place the HAMMER; take the ROPE and AMETHYST CRYSTAL 3/3 (L).
- Place the AMETHYST CRYSTALS (M).
- Go forward.
- Take the COPPER FERRET and note (N).
- Place the VALVE and use the Time Device (O); take the HOOK (P).
- Access the ROPE and place the HOOK; take the GRAPPLING HOOK (Q).
- Use the GRAPPLING HOOK (R).
- Play the HOP (S).
- You receive a FIRE HOSE.
- Place the FIRE HOSE (T).
- Talk to the musketeer (U); you receive DIAMOND CRYSTAL 1/3.
- Walk down twice.
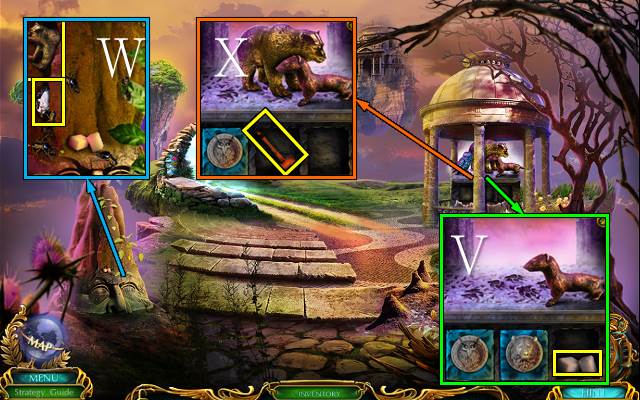
- Place the COPPER FERRET and take the SUGAR (V).
- Place the SUGAR; take the GOLDEN BEAR and DIAMOND CRYSTAL 2/3 (W).
- Place the GOLDEN BEAR and take the HAMMER (X).
- Go forward.
- Place the HAMMER and take DIAMOND CRYSTAL 3/3 (Y).
- Go forward.
- Place the DIAMOND CRYSTALS (Z).
- Go forward.
- Place the LITTLE BIRD for a mini-game (A).
- Take the OWL EMBLEM and GLASSES (B).
- Place the OWL EMBLEM (C).
- Go left.
- Talk to Isabel (D); you receive the KEY SKETCH.
- Place the GLASSES (E).
- Play the HOP (F).
- You receive the OWL EARS.
- Read the note and place the OWL EARS; take the SILVER BIRD and BIRD AMULET (G).
- Walk down.
- Place the SILVER BIRD (H); take the JAR and OWL STATUE (I).
- Walk down.
- Use the JAR to get a JAR OF WATER (J).
- Walk down twice.
- Place the OWL STATUE; take the SHOVEL and COPPER ORE (K).
- Use the SHOVEL and take the SPROUT KEY (L).
- Go to Isabel's House.
- Use the SPROUT KEY; take the SEED (M).
- Go to Bears Island.
- Plant the SEED, and use the JAR OF WATER and Time Device (N); take the SILVER ORE and METAL FEATHERS (O).
- Go to Isabel's House.
- Access the BIRD AMULET and place the METAL FEATHERS; take the WINGED AMULET (P).
- Place the WINGED AMULET and take the POKER (Q).
- Use the POKER and Time Device; take the GOLD ORE (R).
- Walk down.
- Place the KEY SKETCH and SILVER ORE for a mini-game (S).
- Place the COPPER ORE for a second mini-game (T).
- Place the GOLD ORE for a third mini-game; take the TEMPLE KEY (U).
- Use the TEMPLE KEY (V).
- Go right.

- Access the KEYS, move them all and take the FISH AMULET (W).
- Use the FISH AMULET (X).
- Play the HOP (Y).
- You receive the BEAR EMBLEM.
- Place the BEAR EMBLEM (Z); take the BRUSH and RUBY CRYSTAL 1/3 (A).
- Go to Ferrets Island.
- Use the BRUSH (B); take the FERRET EMBLEM and RUBY CRYSTAL 2/3 (C).
- Go forward and right.
- Place the FERRET EMBLEM and take the GOLDEN BIRD (D).
- Walk down.
- Place the GOLDEN BIRD (E); take the STONE WING (F).
- Go left.
- Place the STONE WING and take the OWL EMBLEM (G).
- Walk down and right.
- Place the OWL EMBLEM; read the note and take RUBY CRYSTAL 3/3 (H).
- Place the RUBY CRYSTALS for a mini-game (I).
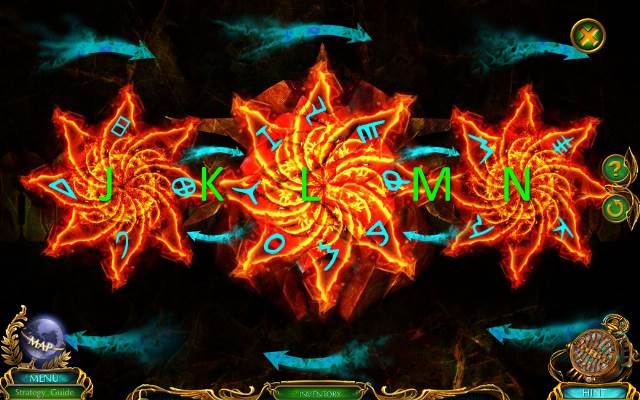
- Solution: J-L5-K-J2-L2-K-J2-L2-K-J2-L2-K-L-M-L2-N2-M-L2-N2-M-L2-N2-M.
- Congratulations, you have completed Labyrinths of the World: Changing the Past.
Created at: 2016-02-07