

Walkthrough Menu
- General Tips
- Chapter 1: The Shattered Essence
- Chapter 2: Calliope's Birds
- Chapter 3: The Composer
- Chapter 4: The Symphony
- Chapter 5: The Mystical Notebook
- Chapter 6: The Crystal of Power
- Chapter 7: A Muse Restored
General Tips
- This is the official guide for Labyrinths of the World: Forbidden Muse.
- This guide will not mention each time you have to zoom into a location; the screenshots will show each zoom scene.
- Hidden-object puzzles are referred to as HOPs. This guide will not show screenshots of the HOPs, but it will mention when a HOP is available and the inventory item you'll collect from it.
- This guide will give step-by-step solutions for all puzzles that are not random. Please read the instructions in the game for each puzzle.
Chapter 1: The Shattered Essence
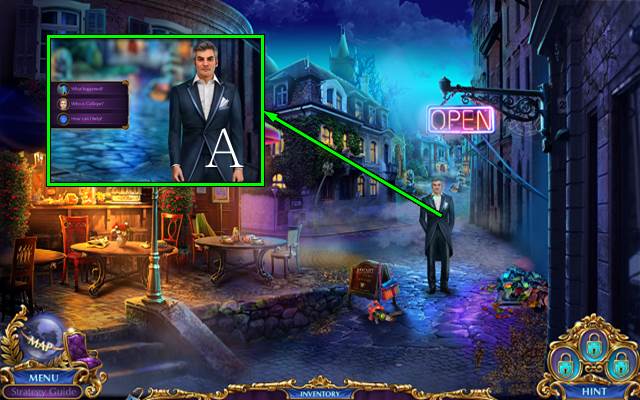
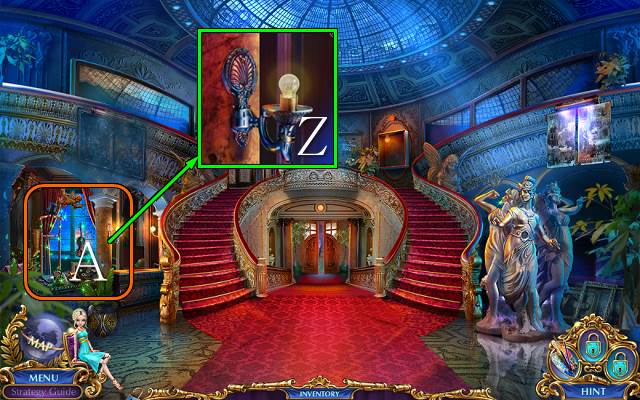
- Talk to Owen; go through the dialog options (A).
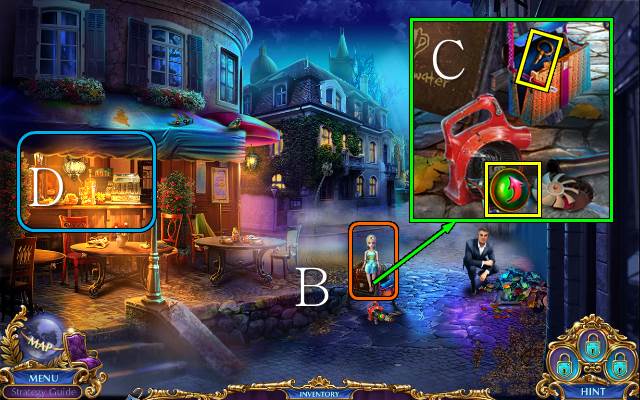
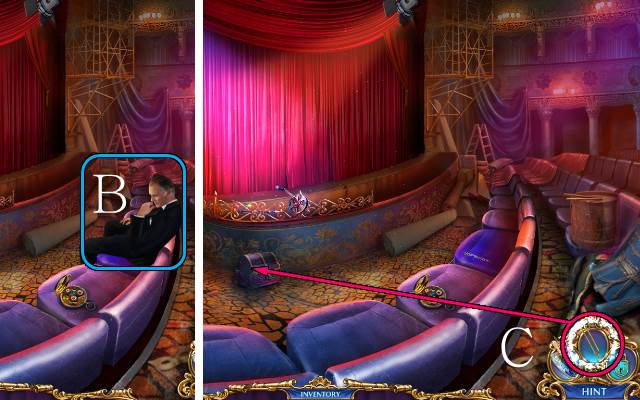
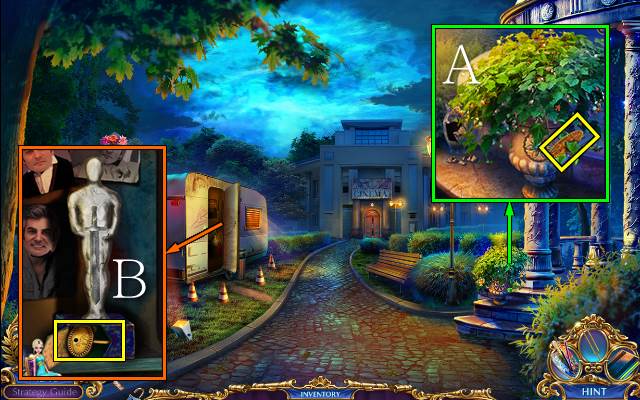
- Interact with Harlequin (B).
- Open the bag and take the TOOLBOX KEY and ARROW BUTTON (C).
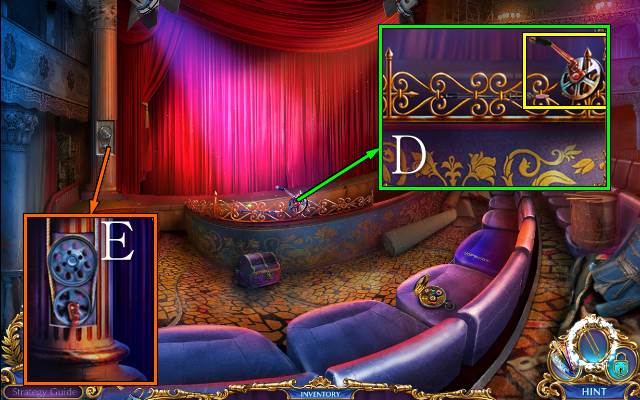
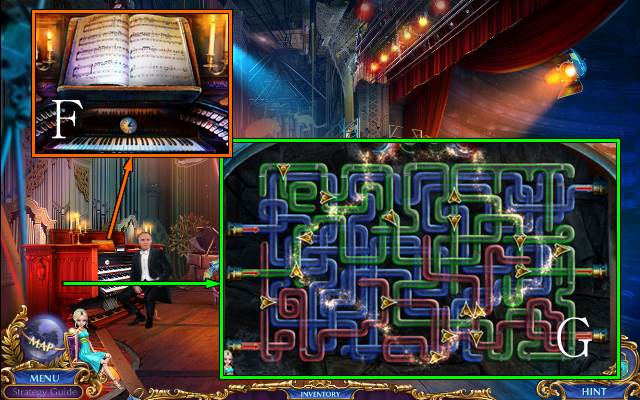
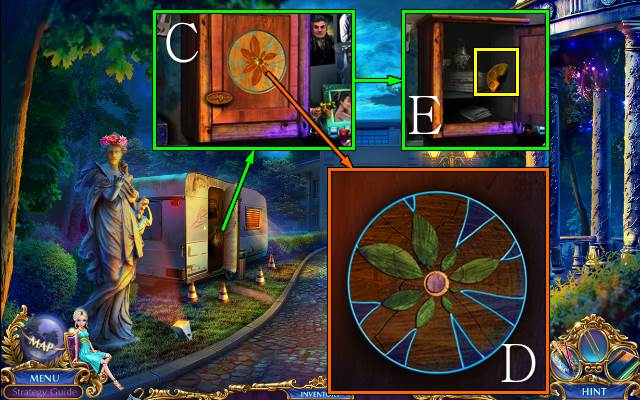
- Play the HOP (D).
- You receive a BANANA.
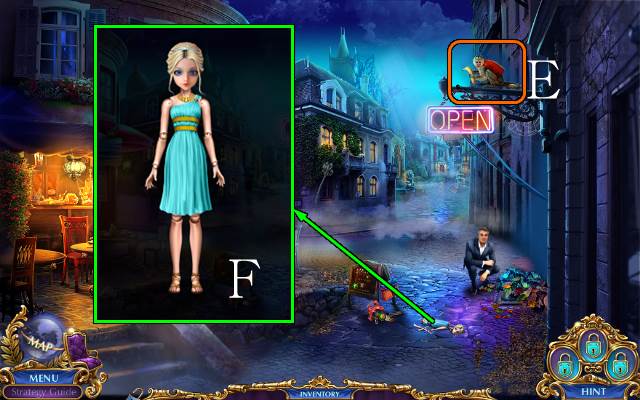
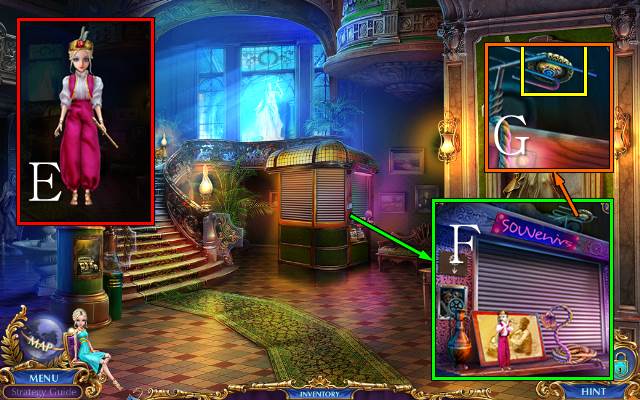
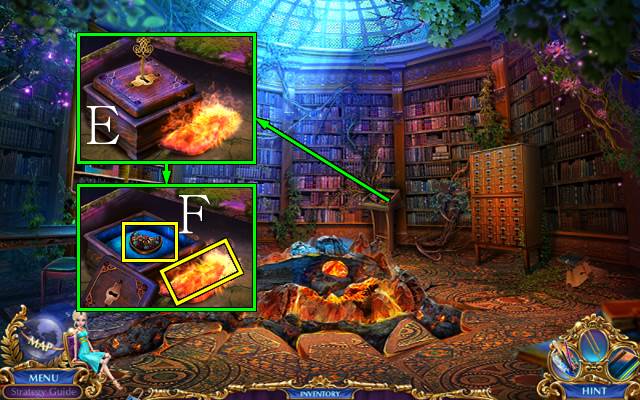
- Use the BANANA (E).
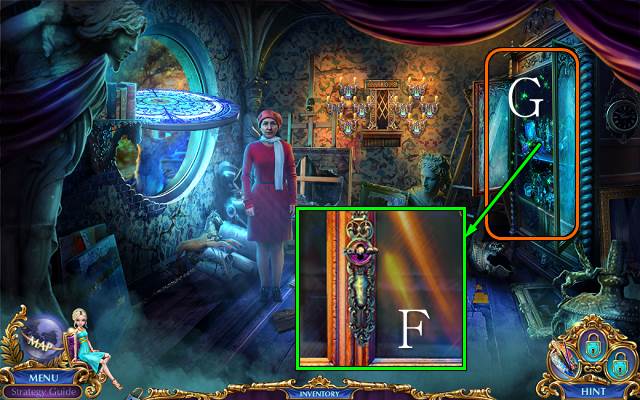
- Take Harlequin and put her back together (F).
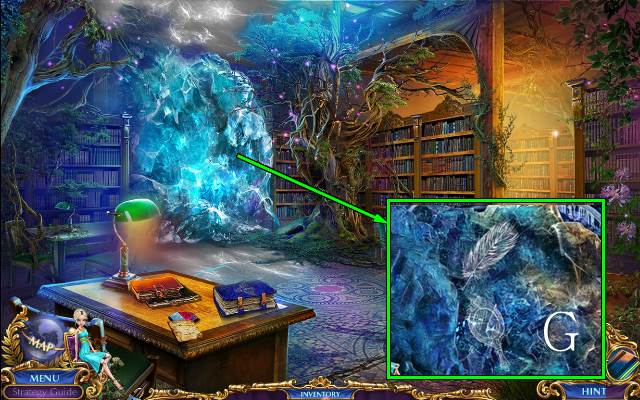
- Walk forward.
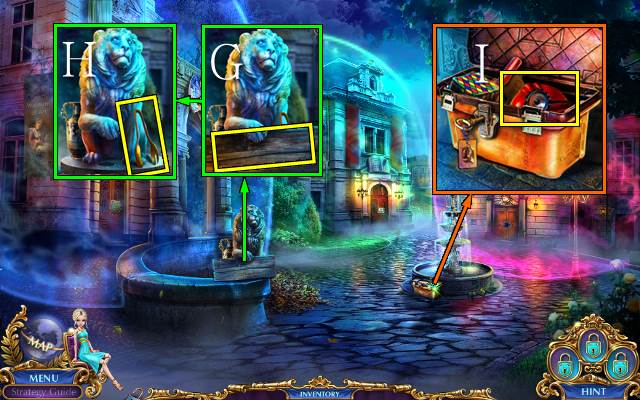
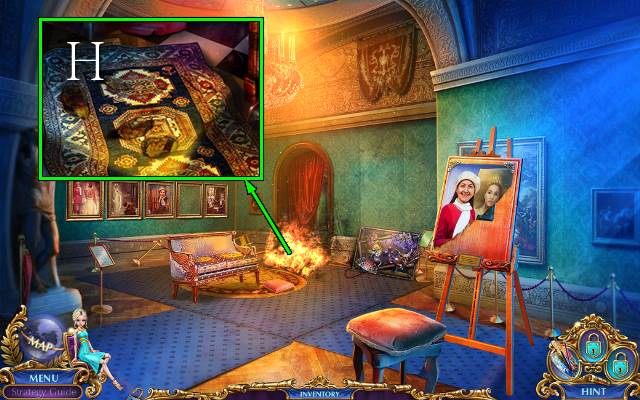
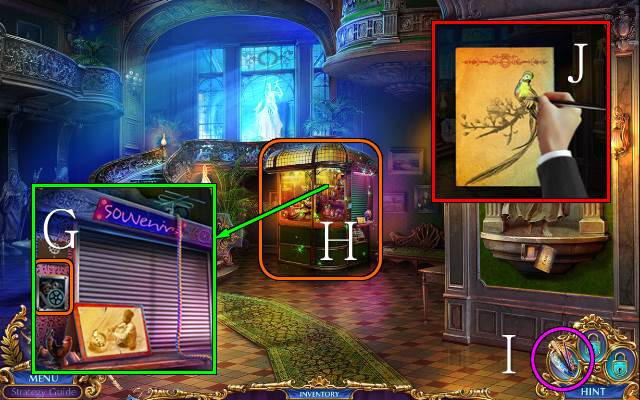
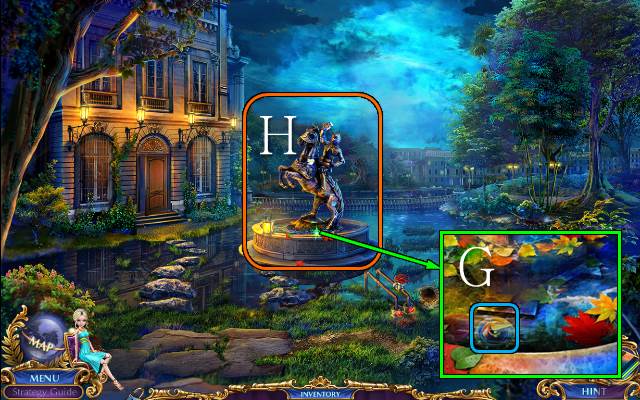
- Take BOARD 1/3 (G) and the TONGS (H).
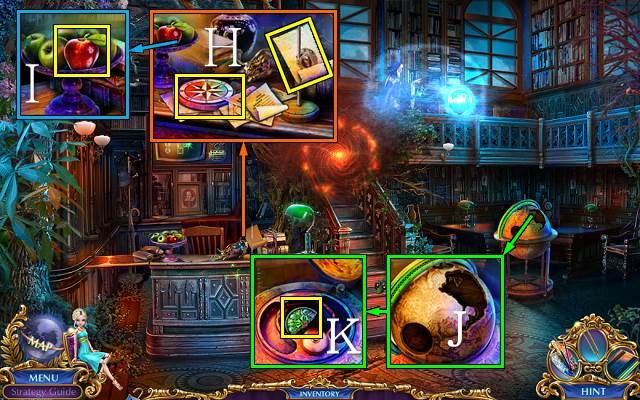
- Use the TOOLBOX KEY and take the REPAIRWOMAN COSTUME (I).
- Walk down.

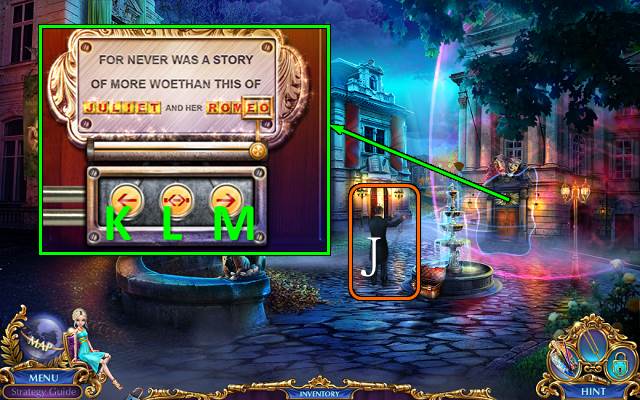
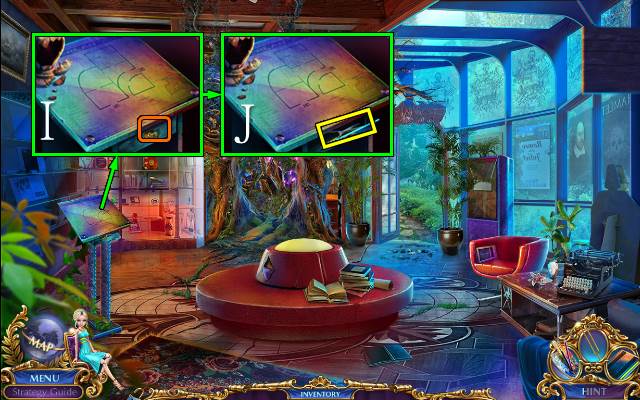
- Access the REPAIRWOMAN COSTUME and put Harlequin in it (J).
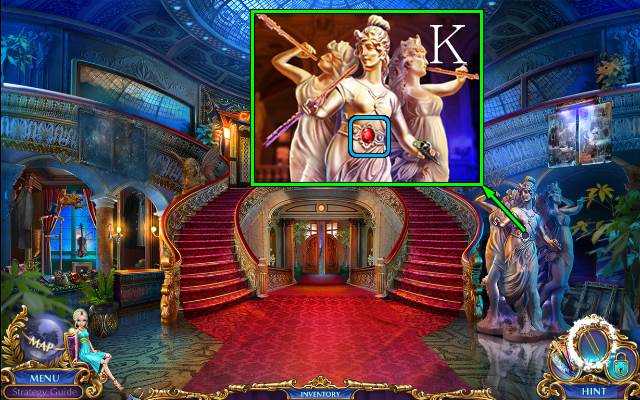
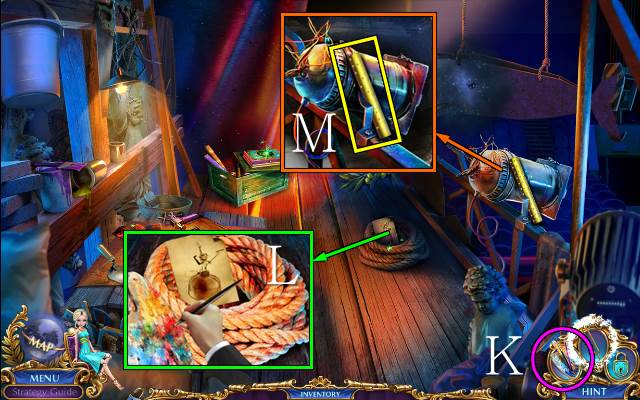
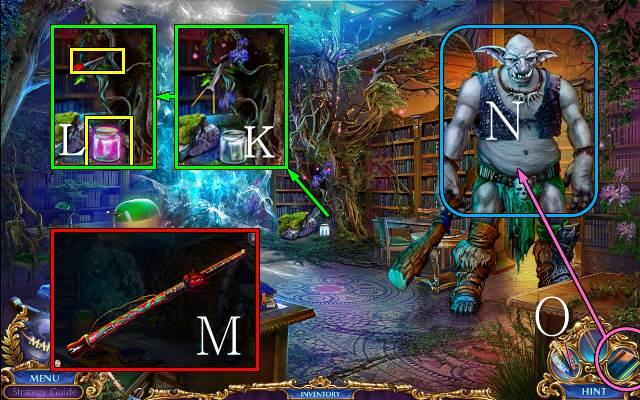
- Use Harlequin and take the LEAF BLOWER (K).
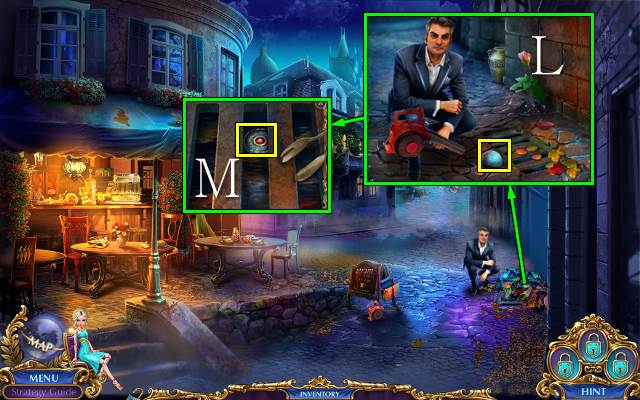
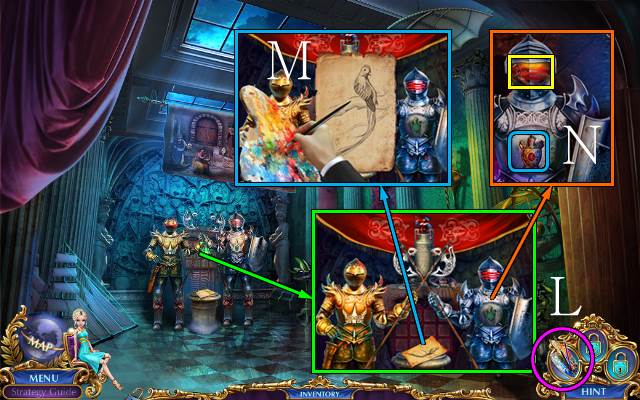
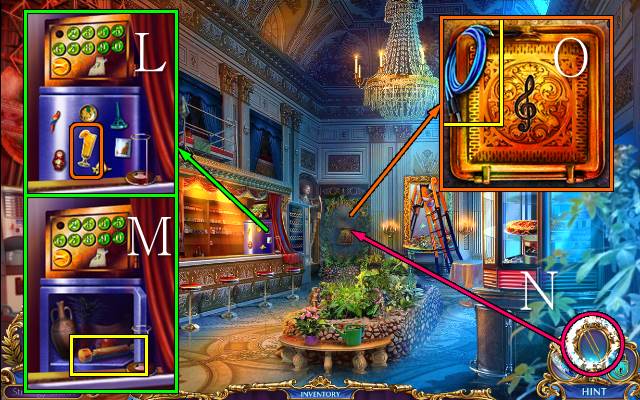
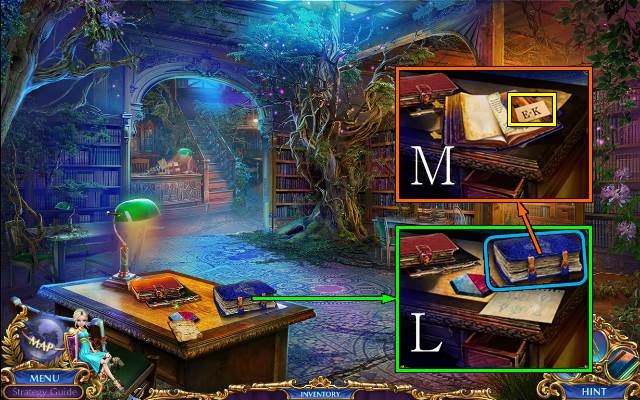
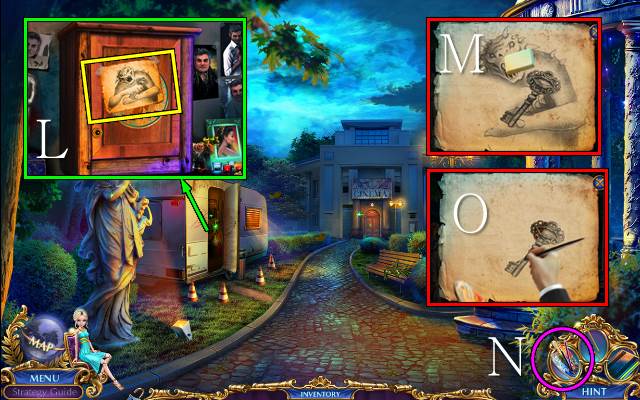
- Use the LEAF BLOWER and take the STONE ORB (L); take OWEN'S AMULET with the TONGS (M) and give it to Owen.
- You receive the ESSENCE BOTTLE.
- Walk forward.
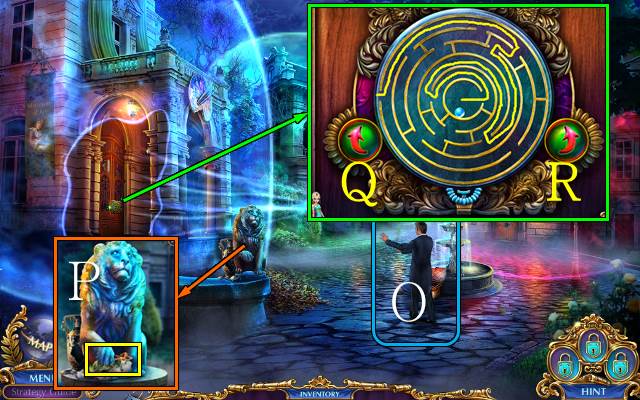
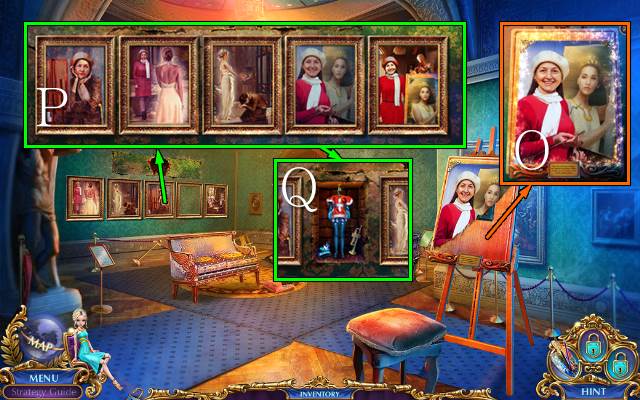
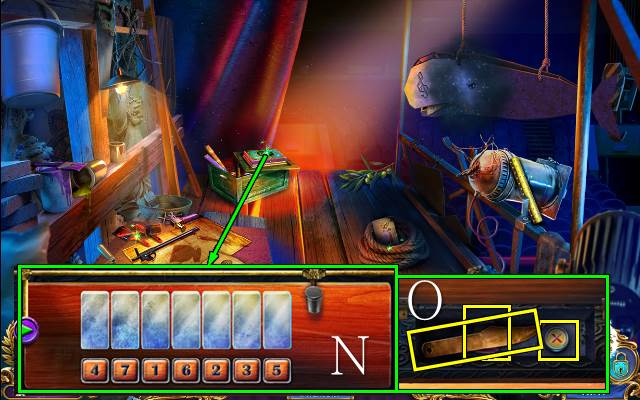
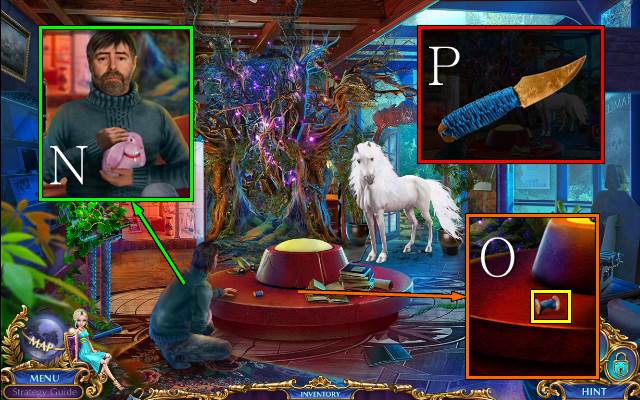
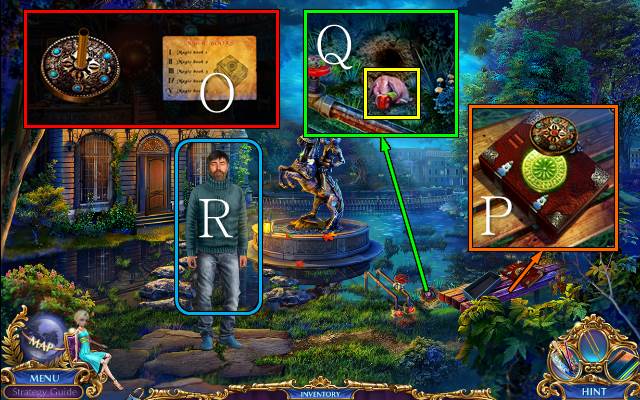
- Talk to Owen (O).
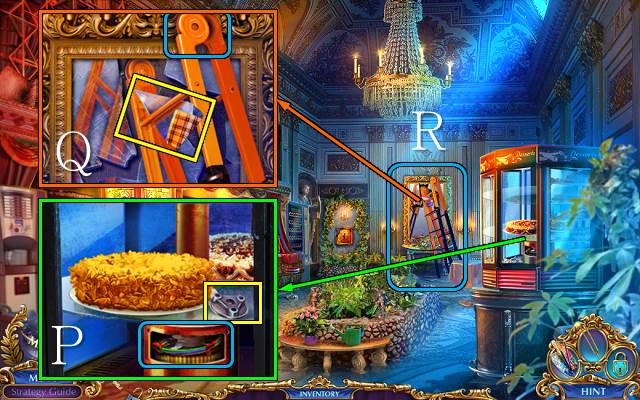
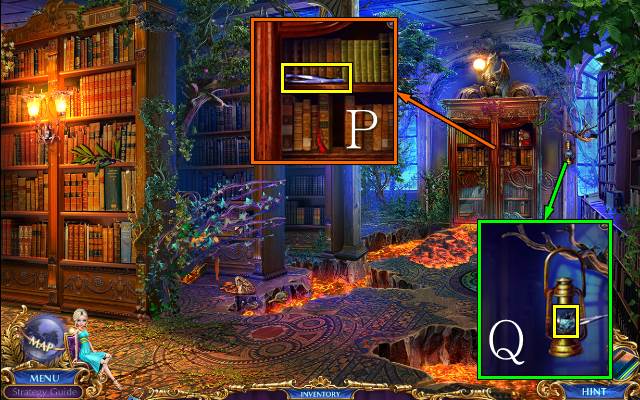
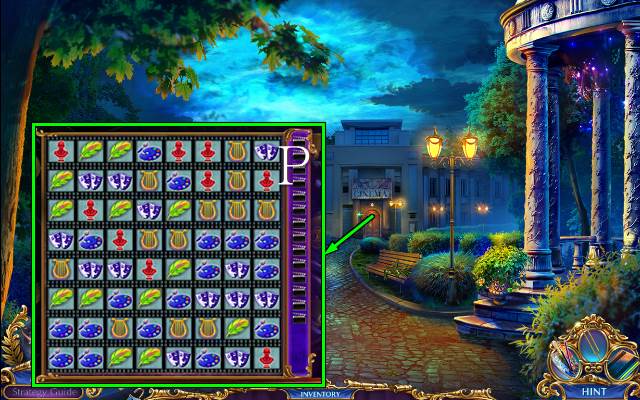
- Place the STONE ORB and take the NYMPH STATUETTE (P).
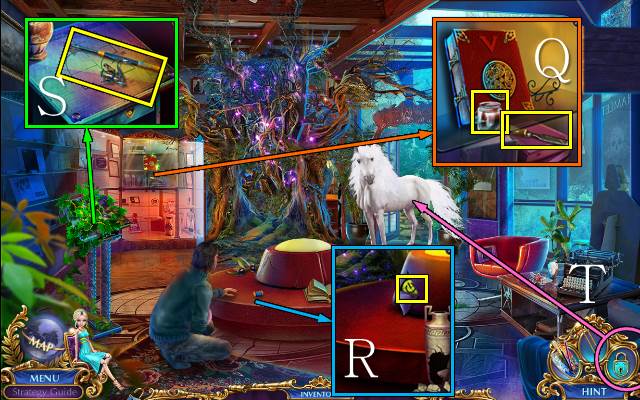
- Place the ARROW BUTTON for a mini-game.
- Solution: Q-Q-R-Q-R-Q.
- Go left.
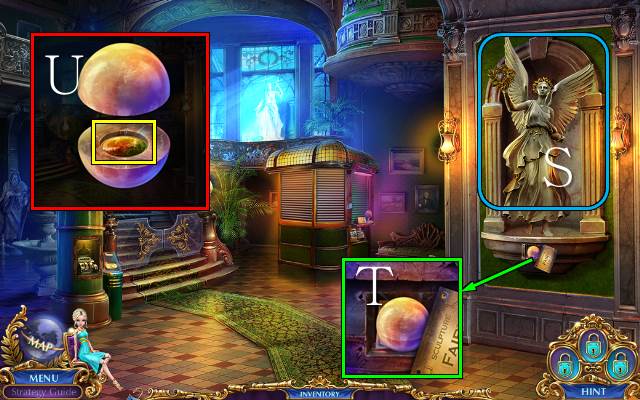
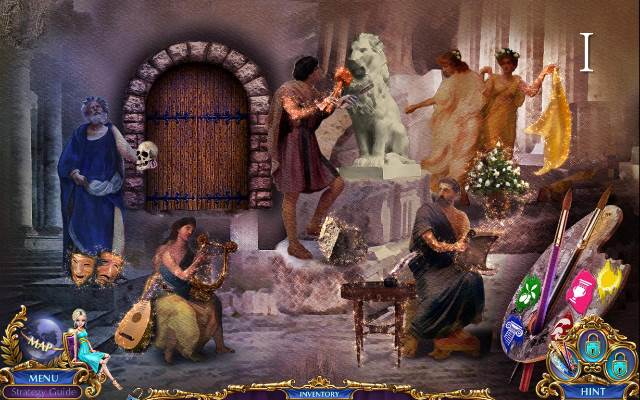
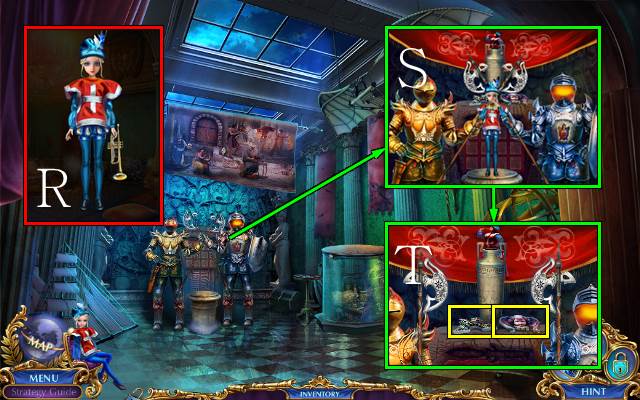
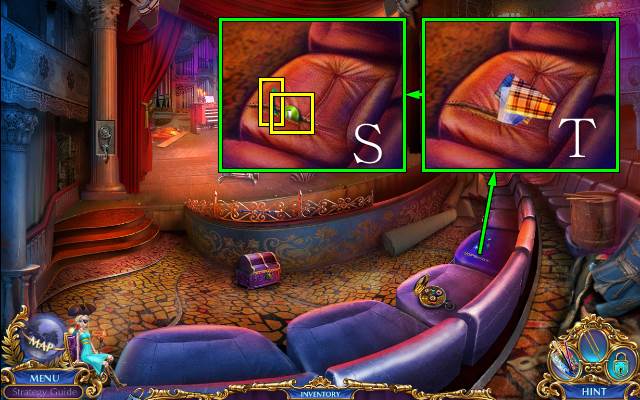
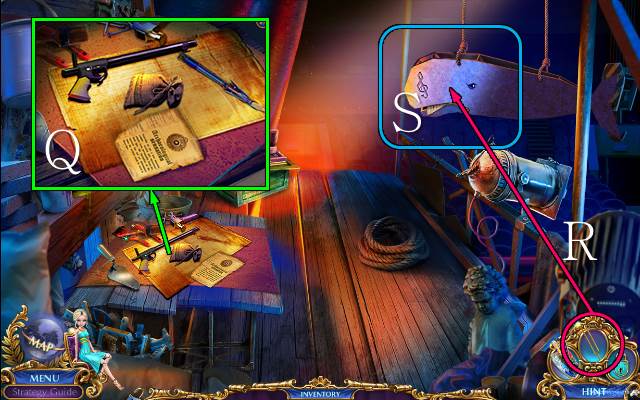
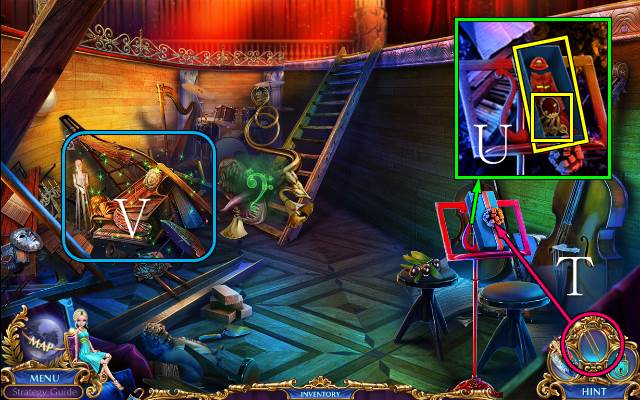
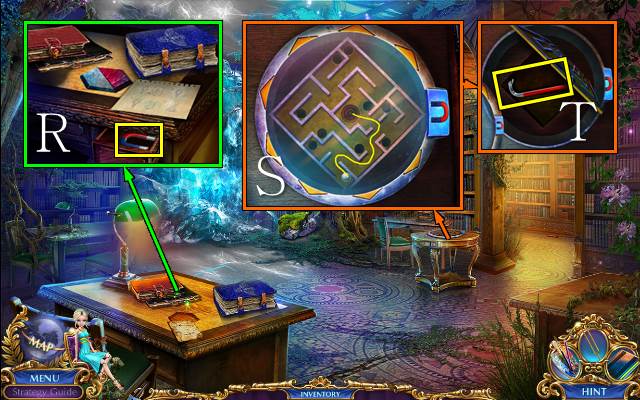
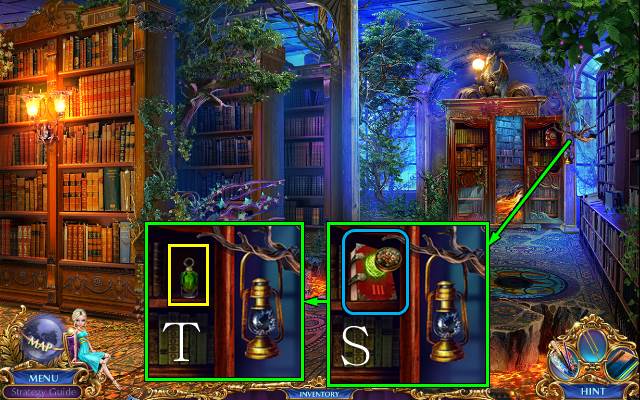
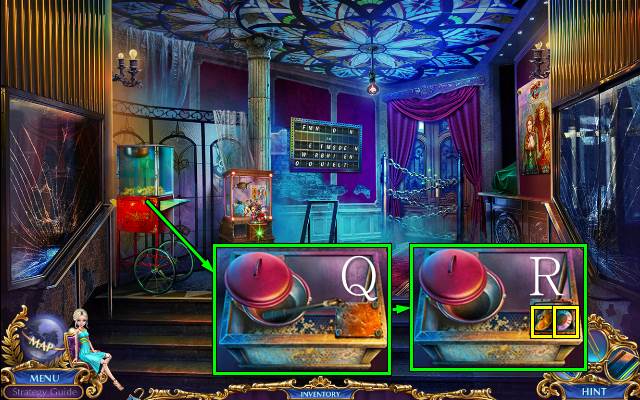
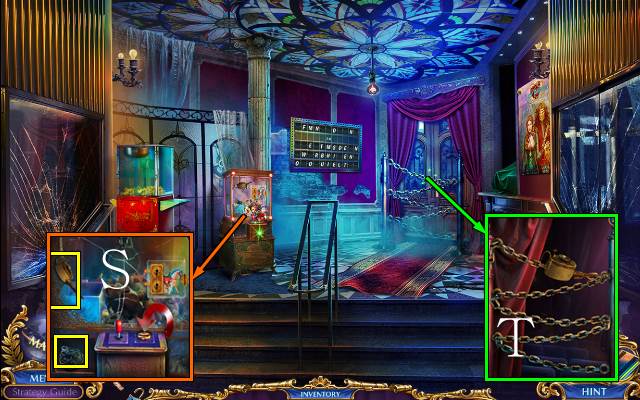
- Play the HOP (S).
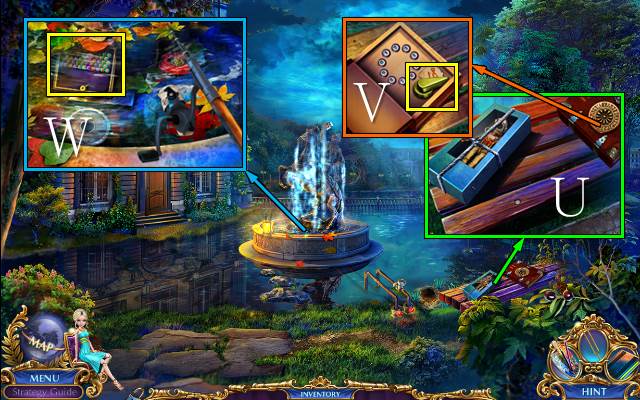
- Take the STONE SPHERE and read the pamphlet (T).
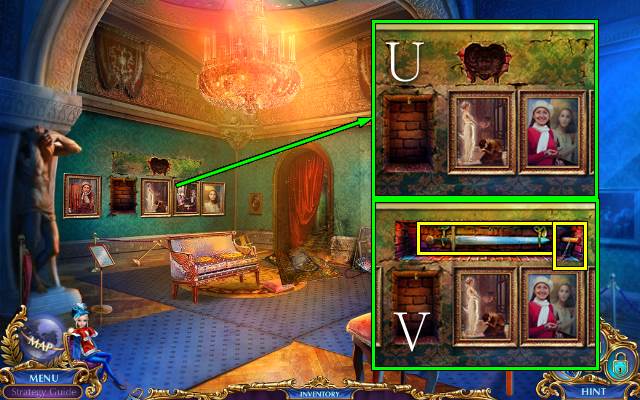
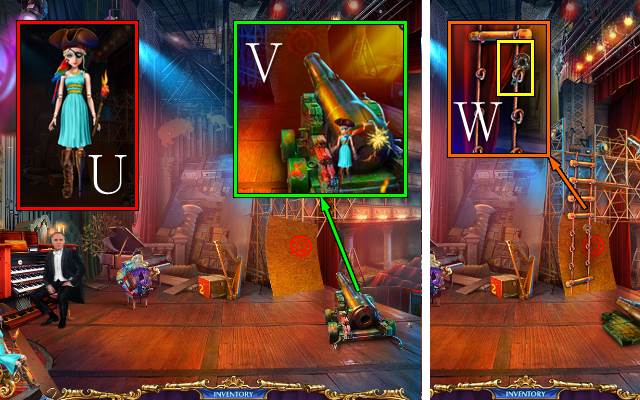
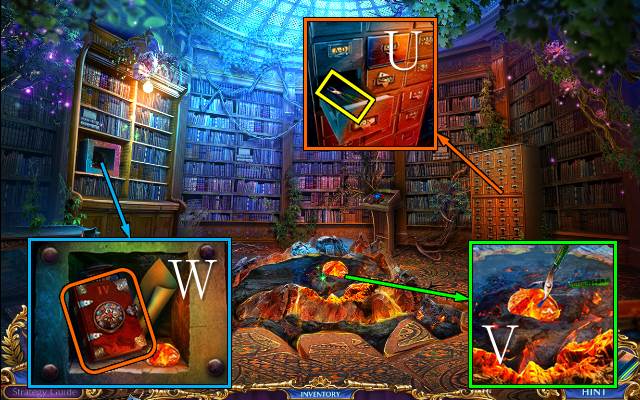
- Access and open the STONE SPHERE; take the COIN (U).
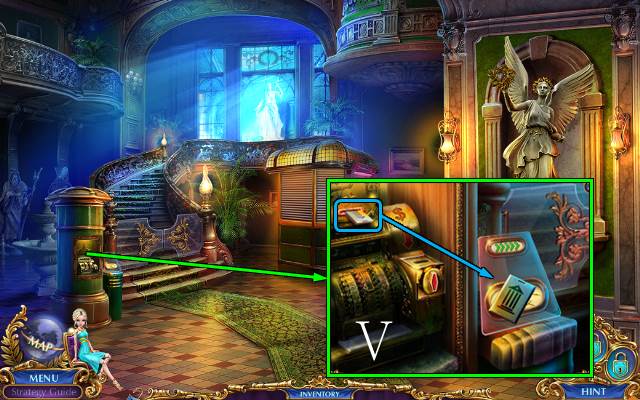
- Use the COIN, take the ticket and scan the ticket (V).
- Go forward.
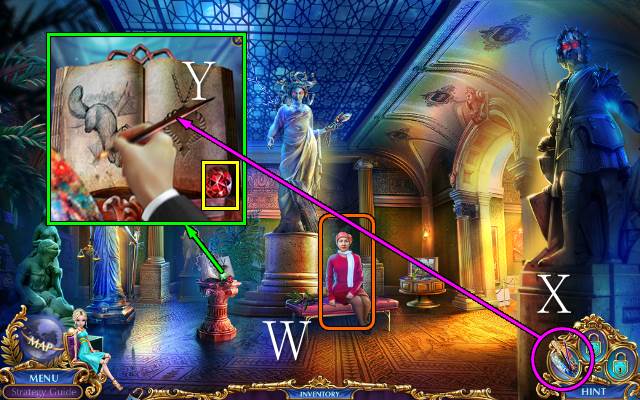
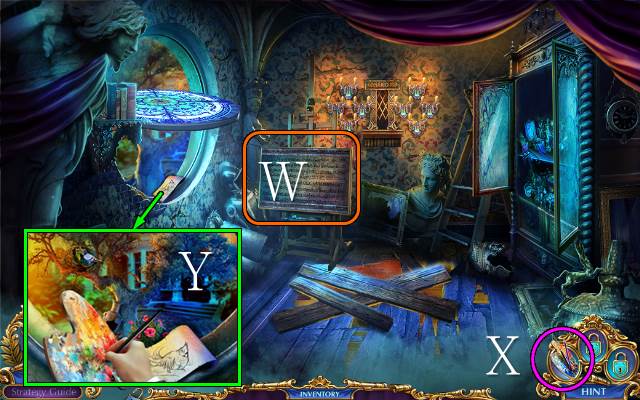
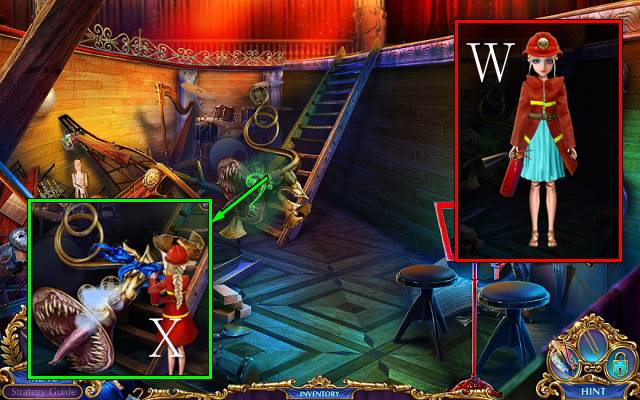
- Talk to Haley; go through all dialog (W).
- You receive the Magical Palette.
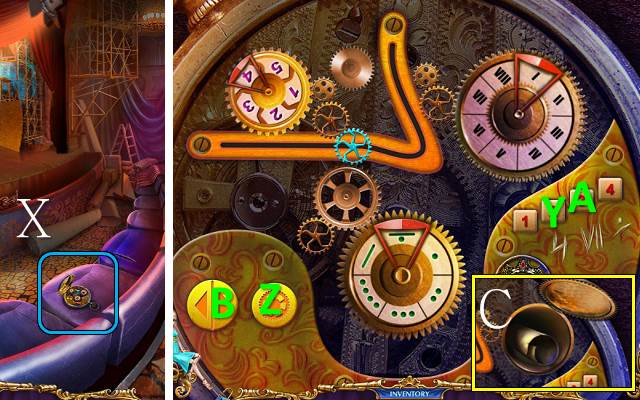
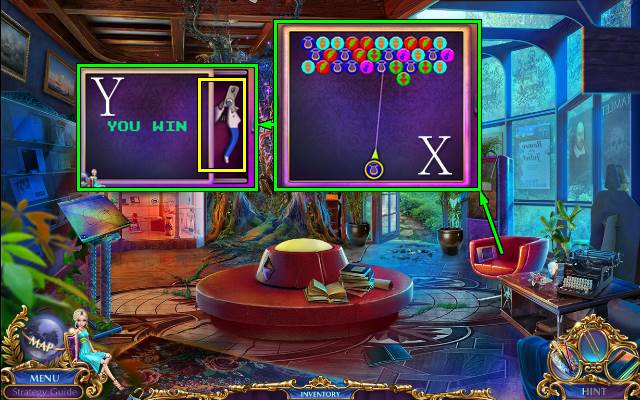
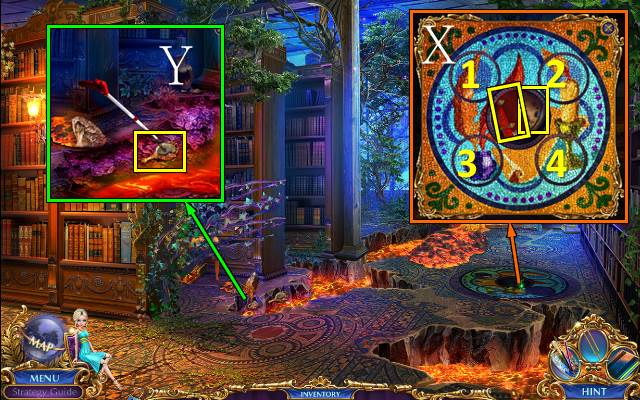
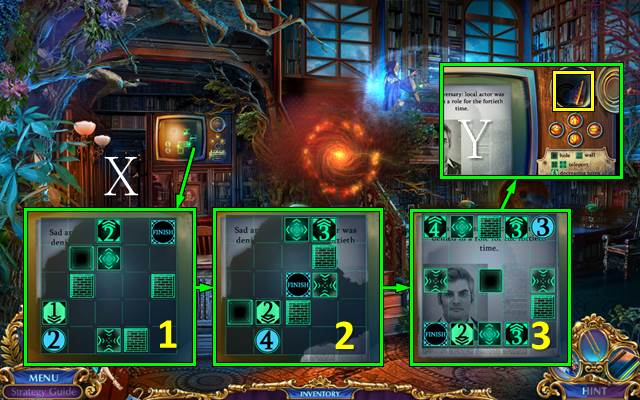
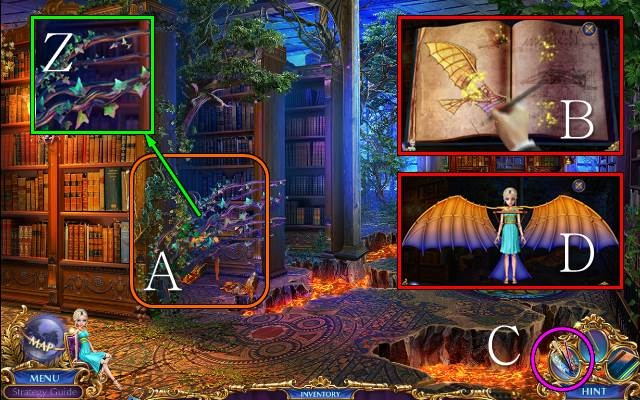
- Use the Magical Palette to get a MARTEN (X); take the RUBY (Y);.
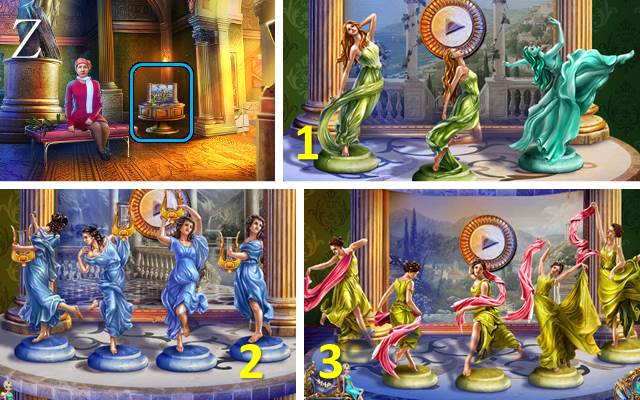
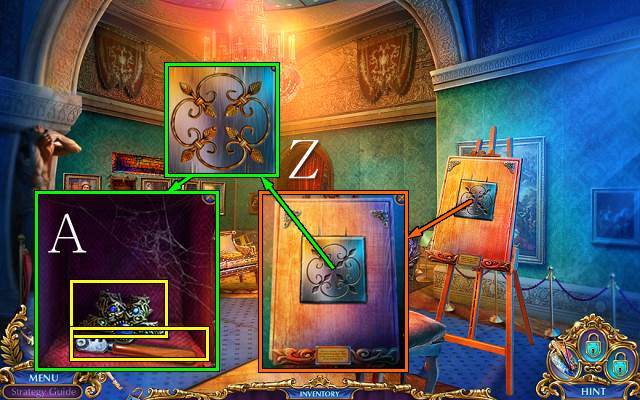
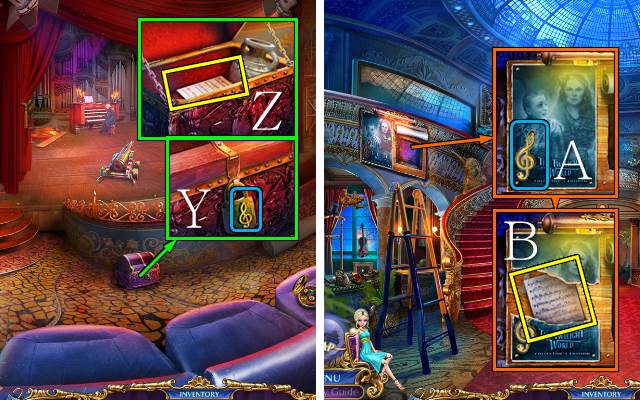
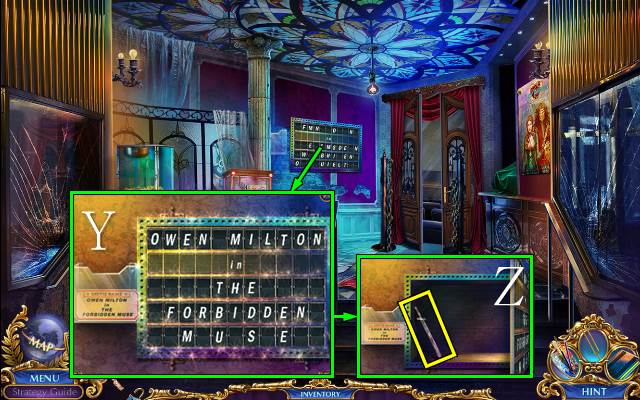
- Place the NYMPH STATUETTE for a mini-game (Z).
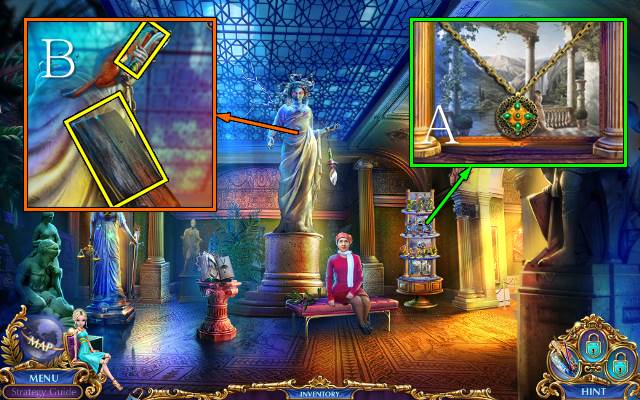
- Take BRILLIANT AMULET 1/3 (A).
- Take BOARD 2/3; have the MARTEN retrieve the SCREWDRIVER (B).
- Go right.
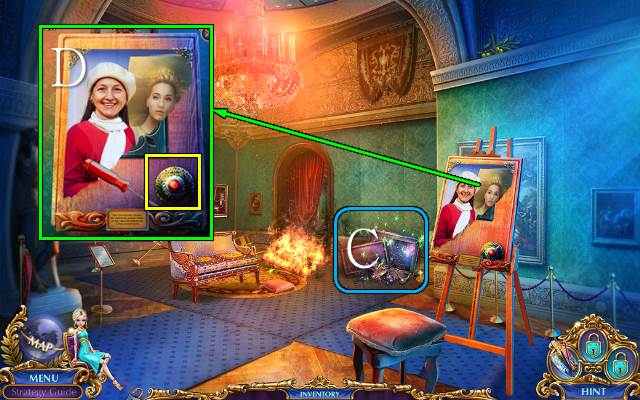
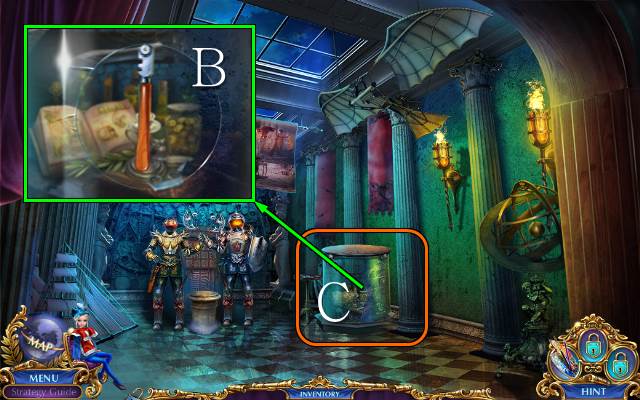
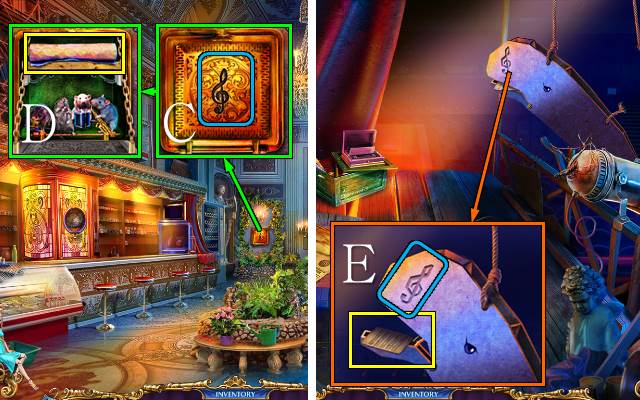
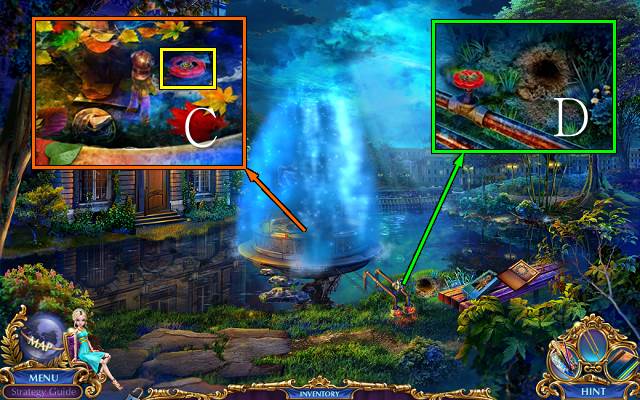
- Play the HOP (C).
- You receive the SNAKE CHARMER COSTUME.
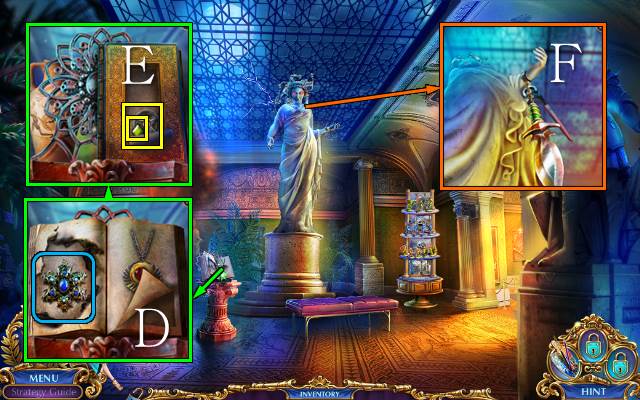
- Get BRILLIANT AMULET 2/3 with the SCREWDRIVER (D).
- Walk down twice.
- Access the SNAKE CHARMER COSTUME and put Harlequin in it (E).
- Use Harlequin (F); take BRILLIANT AMULET 3/3 (G).
- Walk forward.
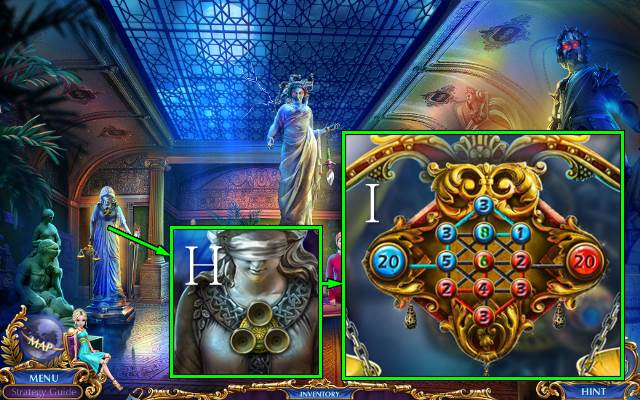
- Place the BRILLIANT AMULETS for a mini-game (H).
- Solution (I).
- Go left.
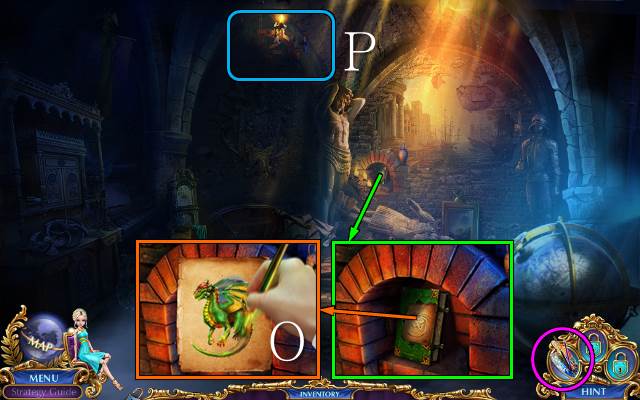
- Use the Magical Palette to receive a LITTLE DRAGON (O).
- Use the LITTLE DRAGON (P); you receive an AMULET OF CURIOSITY.
- Place the AMULET OF CURIOSITY, read the note and take the COWGIRL COSTUME (Q).
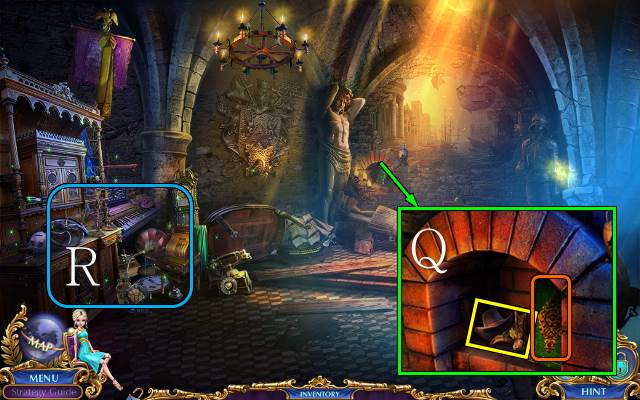
- Play the HOP (R).
- You receive a BELL.
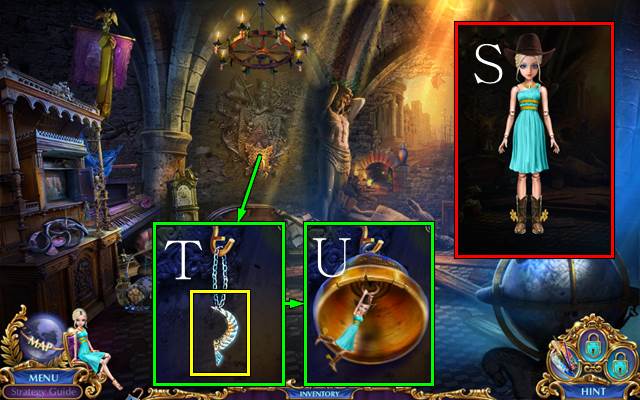
- Access the COWGIRL COSTUME and put Harlequin in it (S).
- Take PENDANT 1/2 (T); hang the BELL and use Harlequin (U).
Chapter 2: Calliope's Birds
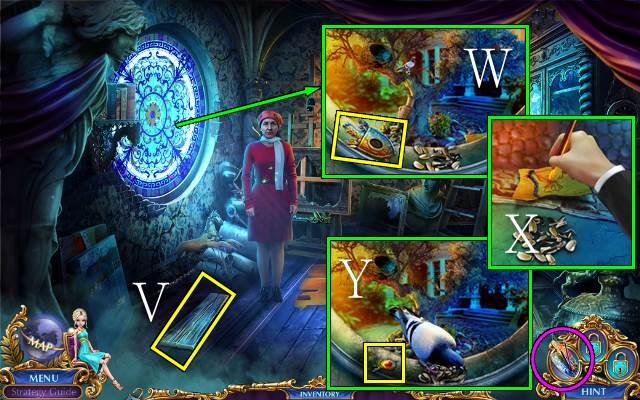
- You receive the BIRD SKETCH.
- Take BOARD 3/3 (V).
- Open the window and take the BROKEN MEDAL (W); use the Magical Palette, take the SEEDS (X), use the SEEDS and take PENDANT 2/2 (Y).
- Walk down.
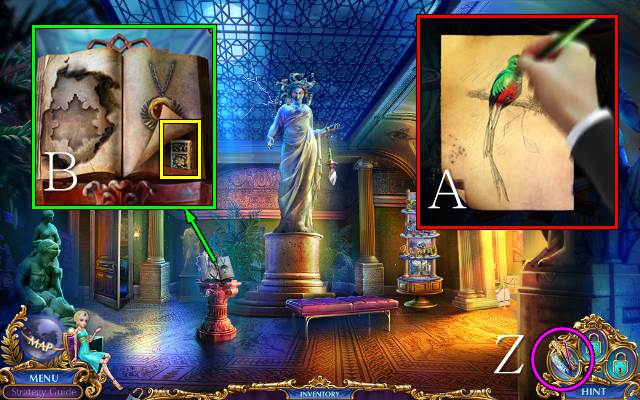
- Access the BIRD SKETCH and use the Magical Palette (Z) to receive BIRD 1/5 (A).
- Place the PENDANT and take the LIGHTER (B).
- Go left.
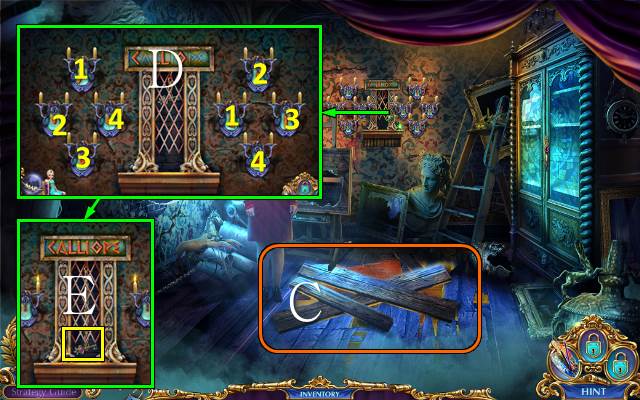
- Place the BOARDS (C).
- Use the LIGHTER for a mini-game (D).
- Take the CABINET KEY (E).
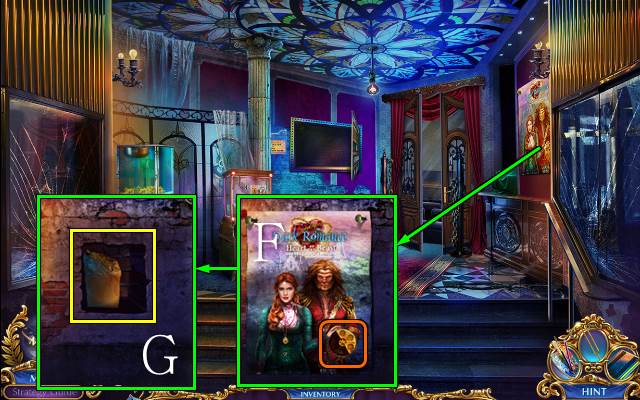
- Use the CABINET KEY (F).
- Play the HOP (G).
- You receive a CARPET.
- Walk down and right.
- Use the CARPET (H).
- Go forward for a mini-game.
- Solution (I).
- You receive a CANVAS PIECE.
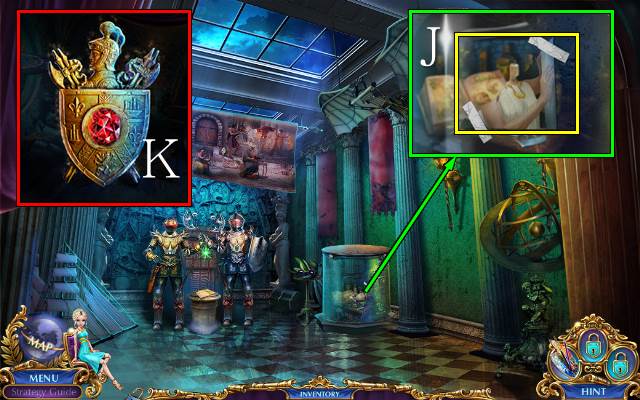
- Take the PORTRAIT HALF (J).
- Access the BROKEN MEDAL, place the RUBY and take the KNIGHT MEDAL (K).
- Use the Magical Palette (L) to get BIRD 2/5 (M); place the KNIGHT MEDAL and take the NIPPERS (N).
- Walk down.
- Place the PORTRAIT HALF; take the PORTRAIT (O).
- Place the PORTRAIT for a mini-game (P).
- Take the HERALD COSTUME (Q).
- Go forward.
- Access the HERALD COSTUME and put Harlequin in it (R).
- Use Harlequin (S); take JEWELED SNOWFLAKE 1/2 and the STONE ANGEL (T).
- Walk down.
- Place the STONE ANGEL (U); take SWORD 1/3 and the CORKSCREW (V).
- Walk down; walk left.
- Place the CANVAS PIECE (W).
- You receive a BRONZE AMULET.
- Use the Magical Palette (X) to receive BIRD 3/5 (Y).
- Go down and right.
- Place the BRONZE AMULET (Z); take the GLASS CUTTER and JEWELED SNOWFLAKE 2/2 (A).
- Go forward.
- Use the GLASS CUTTER (B).
- Play the HOP (C).
- You receive SWORD 2/3.
- Walk down twice.
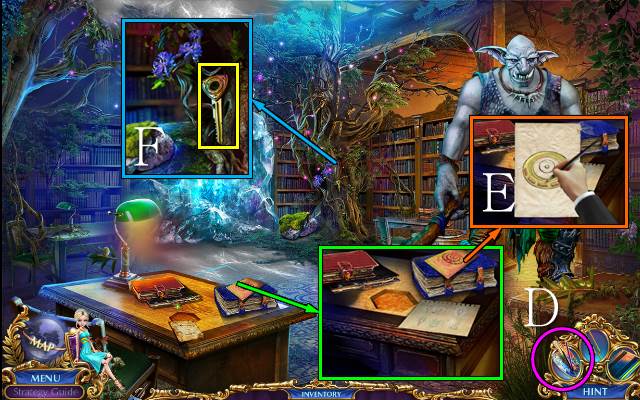
- Place the JEWELED SNOWFLAKE (D); remove the cover from the book and take the DIAMOND BUTTON and COG (E).
- Take SWORD 3/3 with the NIPPERS (F).
- Walk down.
- Place the COG (G).
- Play the HOP (H).
- You receive a BIRD SKETCH.
- Access the BIRD SKETCH and use the Magical Palette (I) to receive BIRD 4/5 (J).
- Go to the Hall of History.
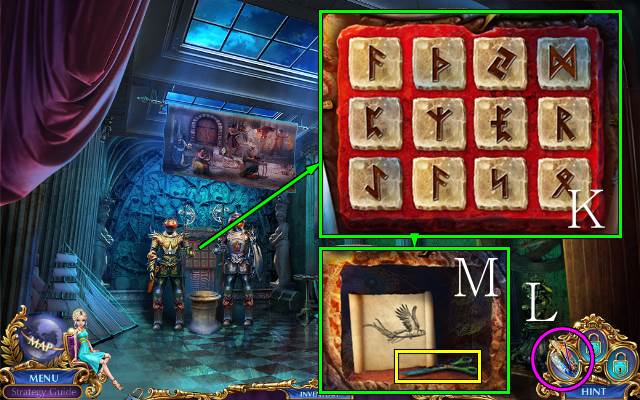
- Place the SWORDS for a mini-game (K).
- Use the Magical Palette (L) to receive BIRD 5/5; take the SCISSORS (M).
- Walk down twice.
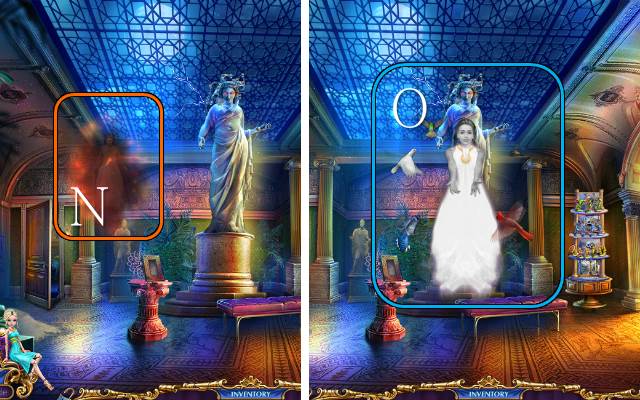
- Release the BIRDS (N).
- Use the ESSENCE BOTTLE; you receive CALLIOPES SOUL (O).
- Walk down twice.
Chapter 3: The Composer
- You receive the ESSENCE BOTTLE.
- Place the DIAMOND BUTTON for a mini-game (P).
- Walk forward.
- You lose the ESSENCE BOTTLE.
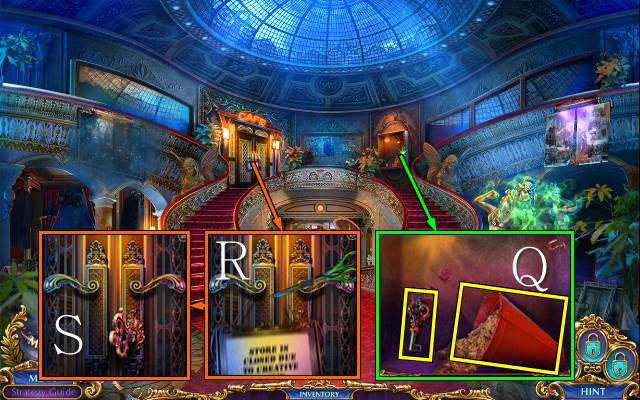
- Take the CAFE KEY and BUCKET WITH SAND (Q).
- Use the SCISSORS (R) and CAFE KEY (S).
- Go left.
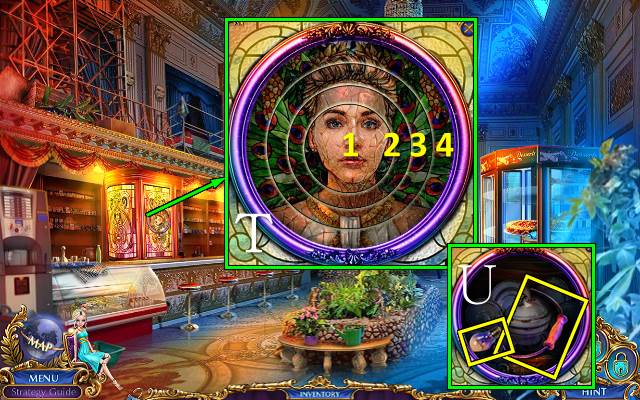
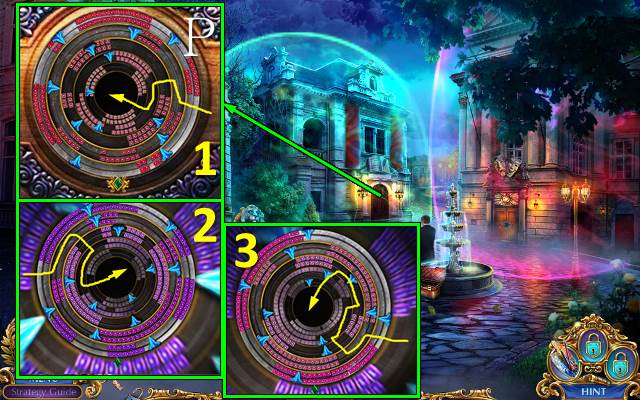
- Play the mini-game (T).
- Solution: rotate circles 1, 2, 4 and 3.
- Take the LIGHT BULB and BUCKET HANDLE (U).
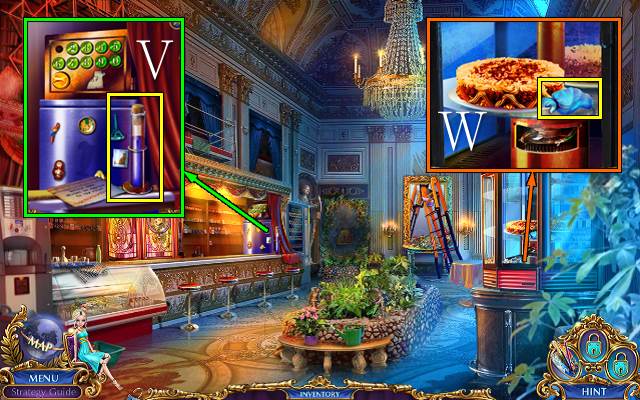
- Take the note, use the CORKSCREW and take the MAGICAL REAGENT (V).
- Take the DOLL ARM (W).
- Walk down.
- Access the BUCKET WITH SAND, place the BUCKET HANDLE and use the MAGICAL REAGENT; take the BUCKET WITH MAGIC SAND (X).
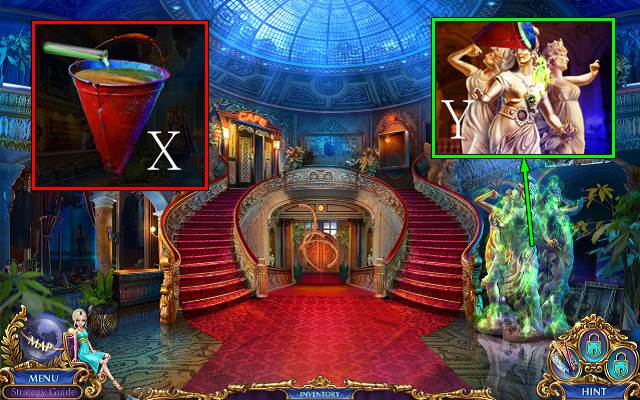
- Use the BUCKET WITH MAGIC SAND (Y).
- Place the LIGHT BULB (Z).
- Play the HOP (A).
- You receive the ESSENCE BOTTLE.
- Walk forward.
- Talk to the composer (B).
- You receive the Enchanted Tuning Fork.
- Use the Enchanted Tuning Fork (C).
- Take the PULLEY HANDLE (D).
- Place the PULLEY HANDLE (E).
- Go forward.

- Use the Enchanted Tuning Fork (F).
- Take the RUBY and SHAWL (G).
- Place the DOLL ARM for a mini-game (H).
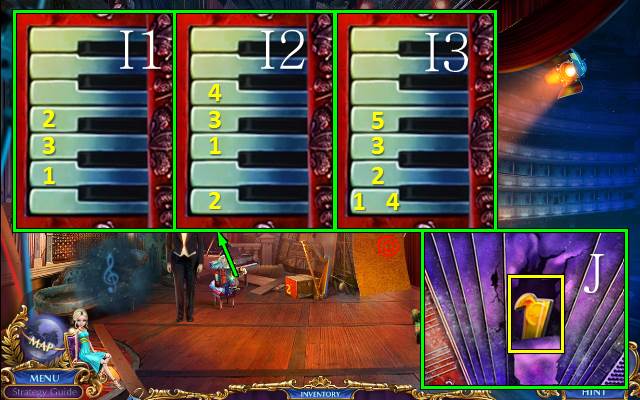
- Solution (I1-3).
- Take the MAGNET (J).
- Walk down twice.
- Place the RUBY to receive SKULL KEY 1/2 (K).
- Go left.
- Place the MAGNET (L); take WOODEN RUNG 1/3 (M).
- Use the Enchanted Tuning Fork (N).
- Take the WIRE (O).
- Place the WIRE and take the LADDER HINGE (P).
- Take the GLASS SHARD with the SHAWL; place the LADDER HINGE and take the LADDER (Q).
- Play the HOP (R).
- You receive a PIRATE COSTUME.
- Walk down and forward.
- Use the GLASS SHARD (S); take the SAFE BUTTON and WICK (T).
- Go forward.
- Access the PIRATE COSTUME and put Harlequin in it (U).
- Place the WICK and use Harlequin (V).
- Take the WIND-UP KEY (W).
- Walk down.
- Place the WIND-UP KEY for a mini-game (X).
- Solution: Y-Z-A-B-Zx2.
- Take the SAFE CODE PART (C).
- Walk down and left.
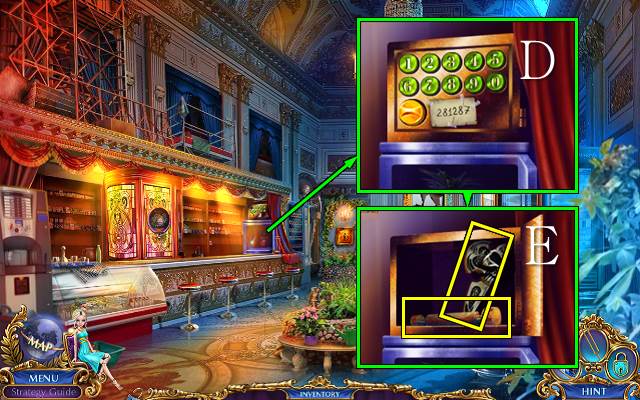
- Read the note, place the SAFE CODE PART and SAFE BUTTON (D); enter the code and take SKULL KEY 2/2 and WOODEN RUNG 2/3 (E).
- Walk down.
- Use the Enchanted Tuning Fork (F).
- Place the LADDER (G).
- Place the SKULL KEY (H); take WOODEN RUNG 3/3 (I).
- Go forward twice.

- Place the WOODEN RUNGS for a HOP (J).
- You receive the BAG OF GUNPOWDER.
- Go forward.
Chapter 4: The Symphony
- Use the Magical Palette (K) to get a BURNER (L).
- Take the MUSIC CYLINDER (M).
- Remove the cover and place the MUSIC CYLINDER for a mini-game (N).
- Take the KNIFE, PUZZLE BUTTON and GUN GRIP (O).
- Go to the Auditorium.
- Use the BURNER to get the HARPOON DART (P).
- Go to the Scaffolding.
- Place the BAG OF GUNPOWDER, GUN GRIP and HARPOON DART; take the HARPOON GUN (Q).
- Use the Enchanted Tuning Fork (R).
- Use the HARPOON GUN (S).
- Use the Enchanted Tuning Fork (T).
- Open the parcel and take the TREBLE CLEFS and FIREWOMAN COSTUME (U).
- Play the HOP (V).
- You receive the LASSO.
- Access the FIREWOMAN COSTUME and put Harlequin in it (W).
- Use the LASSO and use Harlequin (X).
- Go forward and down.
- Use the TREBLE CLEFS (Y); take MUSIC SHEET 1/4 (Z).
- Walk down.
- Use the TREBLE CLEFS (A); take MUSIC SHEET 2/4 (B).
- Go left.
- Use the TREBLE CLEFS (C); take MUSIC SHEETS 3/4 (D).
- Go to the Scaffolding.
- Use the TREBLE CLEFS; take MUSIC SHEETS 4/4 (E).
- Walk down.
- Place the MUSIC SHEETS (F).
- Play the mini-game (G).

- Use the ESSENCE BOTTLE (H).
- Go through the dialog (I).
- You receive CALLIOPE'S SOUL.
- Walk down three times.
Chapter 5: The Mystical Notebook
- Give CALLIOPE'S SOUL to Owen (J).
- You receive the ESSENCE BOTTLE.
- Place the PUZZLE BUTTON for a mini-game.
- First word: M-L-K-L-Mx4-L-K-L-K-L-K-L-Mx2-L-K-L-M-L-M-L
- Second word: Mx3-L-K-L-K-L-Mx2-L-K-L.
- Go right.
- Talk to the writer; go through the dialog (N).
- You receive the Mystical Notebook.
- Take the THREAD (O).
- Access the KNIFE and use the THREAD; take the KNIFE (P).
- Open the cabinet; take the JAR and CHISEL (Q).
- Use the KNIFE and take VIDEO GAME SCREEN 1/2 (R).
- Use the KNIFE; take the FISHING ROD (S).
- Use the Mystical Notebook (T).
- Go right.
- Use the CHISEL (U); take DIAL 1/2 (V).
- Get VIDEO GAME SCREEN 2/2 with the FISHING ROD (W).
- Walk down.
- Place the VIDEO GAME SCREEN for a mini-game (X).
- Take the CUTTING PLIERS (Y).
- Go right.

- Use the CUTTING PLIERS (Z); take the DIVER COSTUME (A).
- Access the DIVER COSTUME and put Harlequin in it (B).
- Use Harlequin to get the VALVE (C).
- Place the VALVE (D).
- Go left.
- Use the Magical Palette (D) to get DIAL 2/2 (E).
- Take the DESK KEY and place the JAR (F).
- Walk down.
- Place the DIAL (G).
- Play the HOP (H).
- You receive a BLOWGUN.
- Walk down.
- Use the DESK KEY (I); take the PRUNER (J).
- Go right and left.
- Use the PRUNER (K); take the DART and JAR WITH FIREFLIES (L).
- Access the BLOWGUN and place the DART; take the LOADED BLOWGUN (M).
- Use the LOADED BLOWGUN (N).
- Use the Mystical Notebook (O).
- You receive WOODEN HEXAGON 1/2.
- Go right.
- Use the JAR WITH FIREFLIES.
- Take the TWEEZERS (P).
- Take WOODEN HEXAGON 2/2 with the TWEEZERS (Q).
- Walk down.
- Place the WOODEN HEXAGON; take the MAGNET (R).
- Place the MAGNET for a mini-game (S).
- Take the CROWBAR (T).

- Use the CROWBAR (U); take the BOOK CODE and EXTENSION POLE (V).
- Walk down.
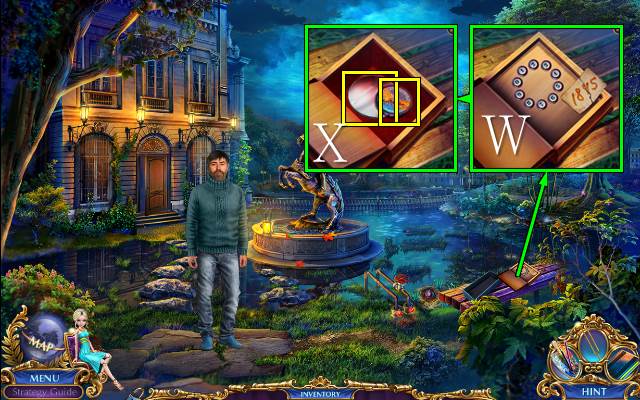
- Place the BOOK CODE and enter 1845 (W); take the MURAL PIECE and MIRROR 1/2 (X).
- Go left and right.
- Place the MURAL PIECE for a mini-game (X).
- Solution: 4-3-3-1-1-1-2.
- Take the ANCIENT BOOK and GLOBE FRAGMENT 1/2 (X).
- Take MIRROR 2/2 with the EXTENSION POLE (Y).
- Walk down.

- Use the MIRROR; you receive a FROZEN MIRROR (Z).
- Go right.
- Place the ANCIENT BOOK (A).
- Go forward.
Chapter 6: The Crystal of Power
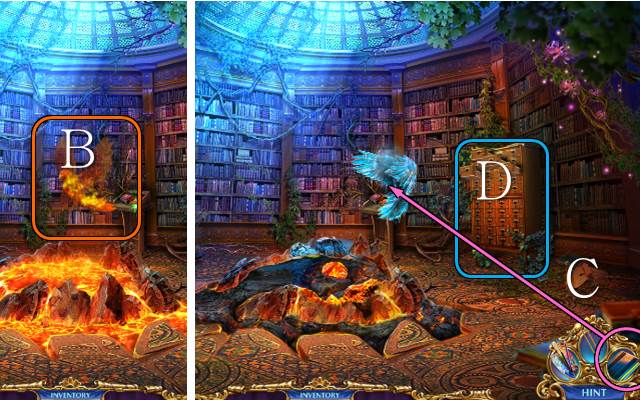
- Use the FROZEN MIRROR (B).
- Use the Mystical Notebook (C).
- Play the HOP (D).
- You receive the CASKET KEY.
- Use the CASKET KEY (E); take the TALISMAN KEY FRAGMENT and PHOENIX FEATHER (F).
- Walk down twice.
- Use the PHOENIX FEATHER (G).
- Go left.
- Move the papers and take the DISENCHANTMENT SCROLL and GLOBE FRAGMENT 2/2 (H); take the APPLE (I).
- Place the GLOBE FRAGMENTS (J); take the BROKEN TALISMAN KEY (K).
- Walk down.
- Use the DISENCHANTMENT SCROLL (L); take the FILE CARD (M).
- Walk down.
- Access the BROKEN TALISMAN KEY, place the TALISMAN KEY FRAGMENT and take the TALISMAN KEY (O).
- Use the TALISMAN KEY; you receive BOOK AMULET II (P).
- Place the APPLE and take MR. FLUFFY (Q).
- Give MR. FLUFFY to the writer (R).
- You receive a BUTTON.
- Go left and right.
- Use BOOK AMULET II to get BOOK AMULET III (S); take the RUST REMOVER (T).
- Go forward.
- Place the FILE CARD and take the TONGS (U).
- Take the SCORCHING STONE with the TONGS (V).
- Break the mosaic and place the SCORCHING STONE; use the BOOK AMULET III to get BOOK AMULET IV (W).
- Go to Reception.
- Place the BUTTON for a mini-game (X).
- Solution 1 (R=right, L=left, U=up, D=down): R-R-U-R-R.
- Solution 2: U-U-R.
- Solution 3: D-D-L-D-D-L-L.
- Take the MACHETE (Y).
- Go to the Book Depository.
- Use the MACHETE (Z).
- Play the HOP (A).
- You receive the SKETCHBOOK.
- Access the SKETCHBOOK (B), use the Magical Palette (C) and place Harlequin (D).
- Walk down three times.
- Place BOOK AMULET IV to get the AMULET COLLECTION (E).
- Access the AMULET COLLECTION and take the NULLIFICATION SCROLL (F).
- Go to Reception.
- Use the NULLIFICATION SCROLL (G).
- Use Harlequin to get the CRYSTAL OF POWER (H); use the CRYSTAL OF POWER, Mystical Notebook (I) and ESSENCE BOTTLE to receive CALLIOPE'S SOUL.
- Walk down four times.
- You receive a TORQUE WRENCH.
- Walk forward.
Chapter 7: A Muse Restored
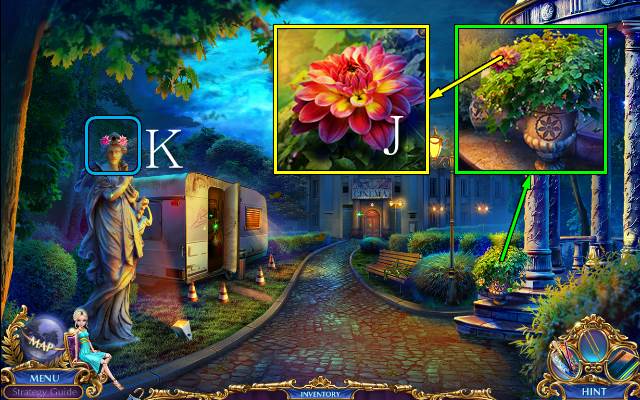
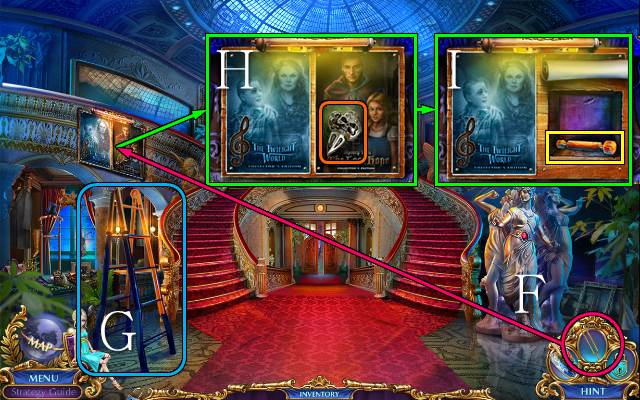
- Take the FLOWER (J).
- Place the FLOWER to receive an ERASER (K).
- Take the TERRIFYING SKETCH (L).
- Access the TERRIFYING SKETCH and use the ERASER (M); use the Magical Palette (N) to get the CINEMA KEY (O).
- Place the CINEMA KEY for a mini-game (P).
- Walk forward.
- Use the TORQUE WRENCH (Q); take the GOLDEN REEL HALF and TOKEN (R).
- Place the TOKEN; use the RUST REMOVER and take the FLOWER EMBLEM and MELTED BUTTER (S).
- Use the MELTED BUTTER (T).
- Go forward.

- Take the FILM REEL (U).
- Place the FILM REEL (V).
- Play the HOP (W).
- You receive a BOARD PULLER.
- Use the BOARD PULLER; take the CINEMA TICKET (X).
- Walk down.
- Place the CINEMA TICKET for a mini-game (Y).
- Take the CLAY SWORD (Z).
- Walk down.
- Place the FLOWER EMBLEM and take the CUPBOARD HANDLE (A).
- Place the CLAY SWORD and take the MACHINE KEY (B).
- Place the CUPBOARD HANDLE (C) for a mini-game (D).
- Take the GOLDEN REEL HALF (E).
- Walk forward.
- Place the two GOLDEN REEL HALVES (F); take the POPCORN KERNELS (G).
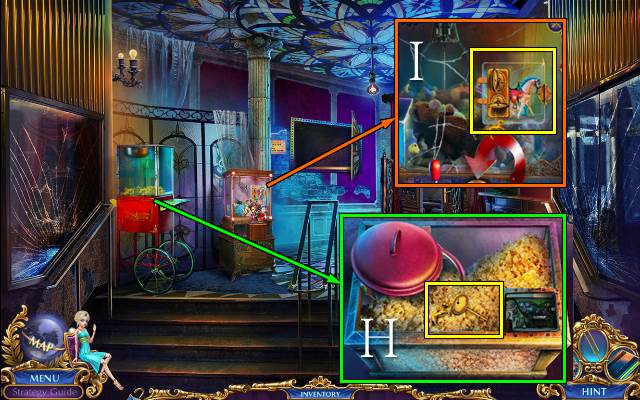
- Move the lid and place the POPCORN KERNELS; take the MACHINE KEY (H).
- Place the two MACHINE KEYS and take the TOY HORSE (I).
- Move forward.
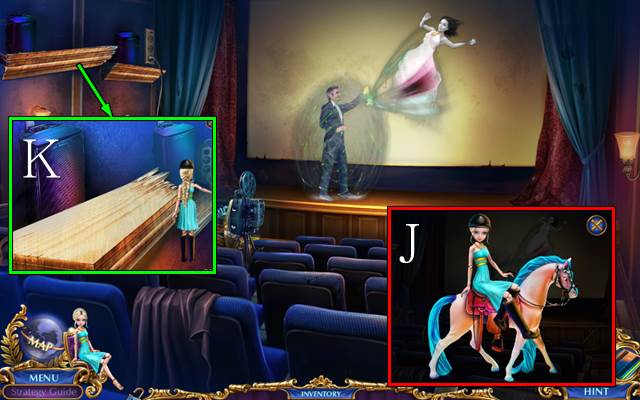
- Access the TOY HORSE and put Harlequin on it (J).
- Use Harlequin (K).
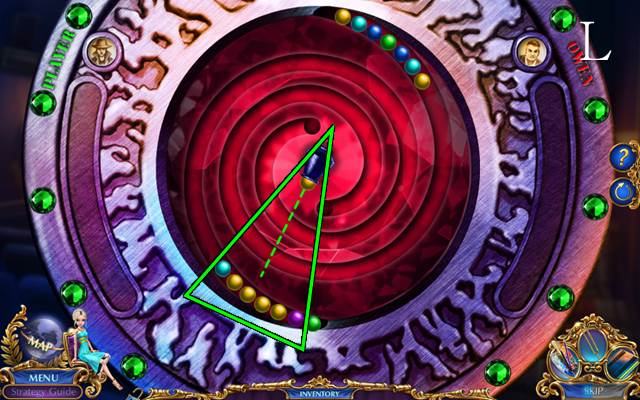
- Play the mini-game (L).
- Congratulations, you have completed Labyrinths of the World: Forbidden Muse.
Created at: 2015-07-12