

Walkthrough Menu
- General Tips
- Chapter 1: Simon's Home
- Chapter 2: Underwater City Square
- Chapter 3: Ravine
- Chapter 4: Prison Cell
- Chapter 5: Aerial Pier
- Chapter 6: Garden
- Chapter 7: Outside Dietrich's Hideout
General Tips
- This is the official guide for Labyrinths of the World: Lost Island.
- This guide will not mention each time you have to zoom into a location; the screenshots will show each zoom scene.
- Hidden-object puzzles are referred to as HOPs. This guide will not show HOP solutions. It will identify the location of the HOP and the inventory item acquired.
- This guide will show solutions for non-random puzzles. Please read the in-game instructions for each puzzle.
Chapter 1: Simon's Home
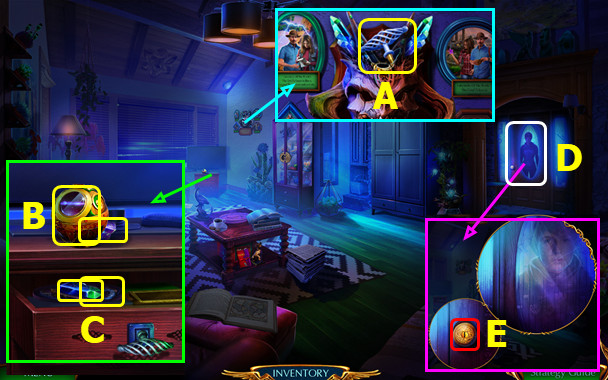
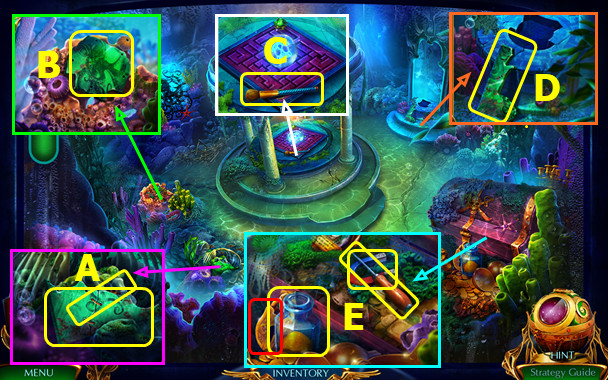
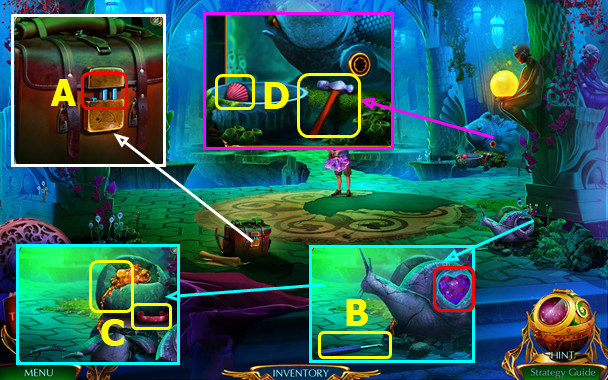
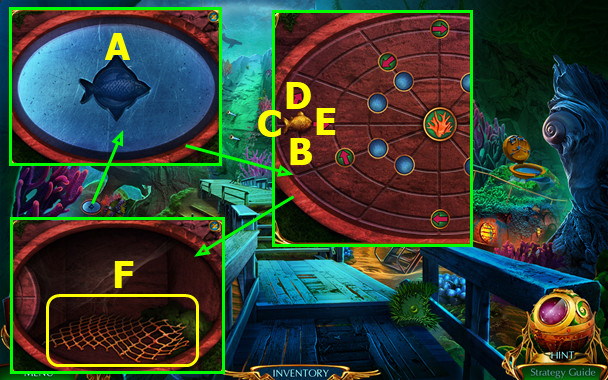
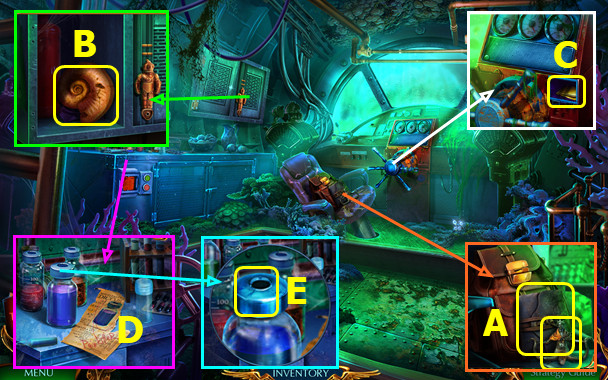
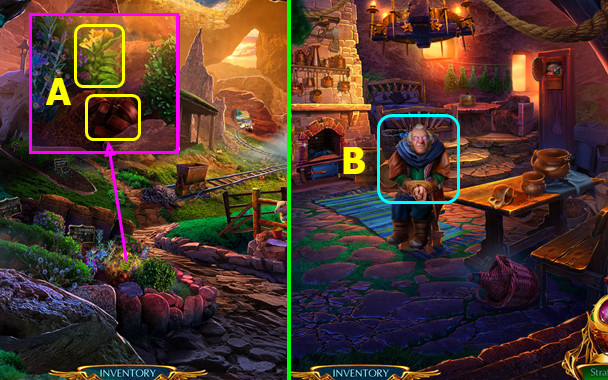
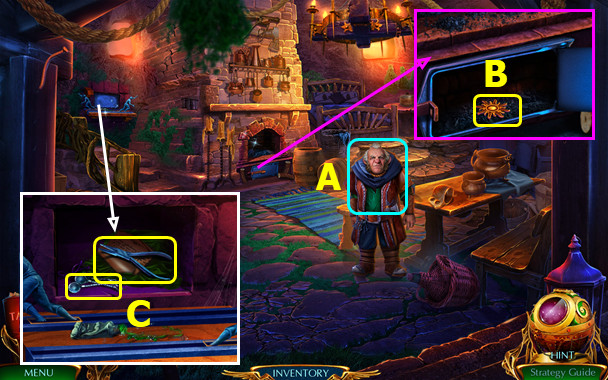
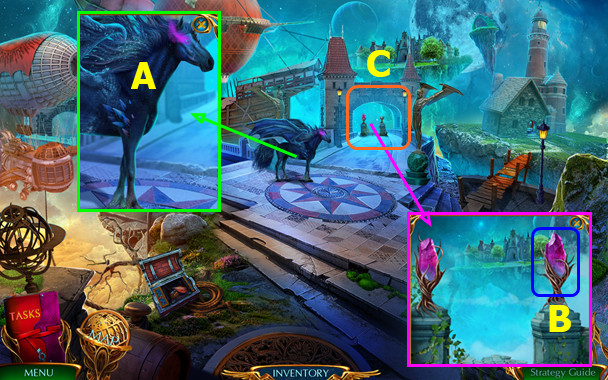
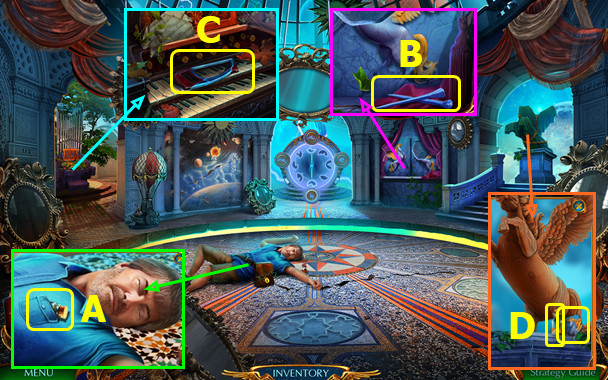
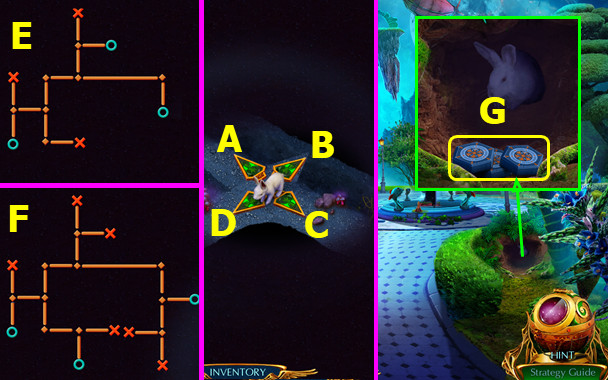
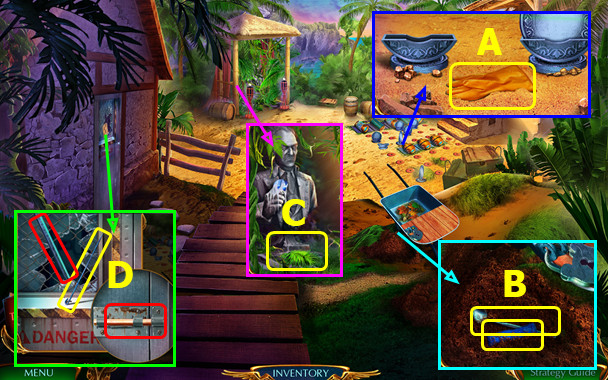
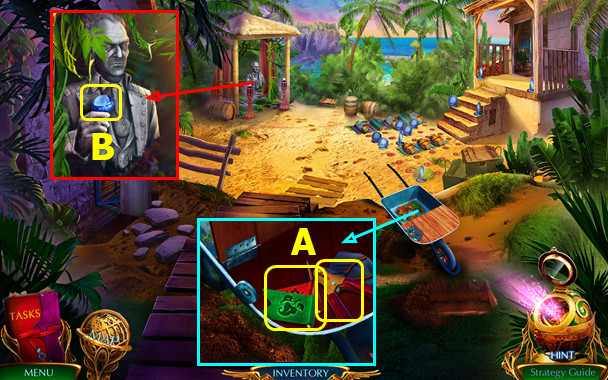
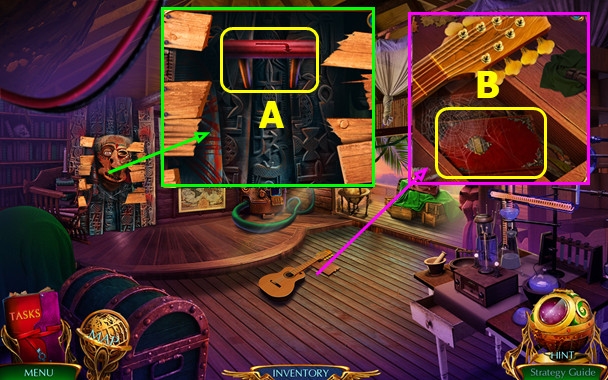
- Take DRAWER HANDLE (A).
- Take amulet and 1/3 MASK CRYSTALS (B).
- Use DRAWER HANDLE; take 2/3 MASK CRYSTALS and HOUSE KEY (C).
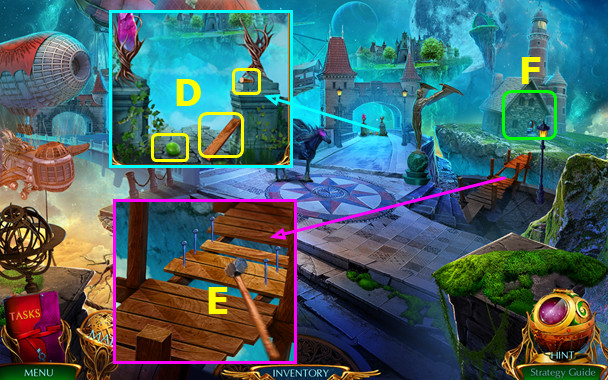
- Talk (D).
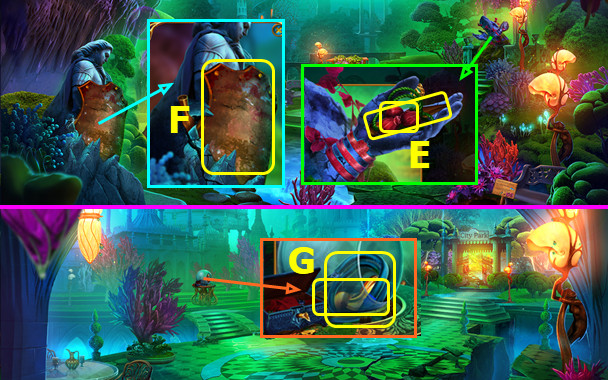
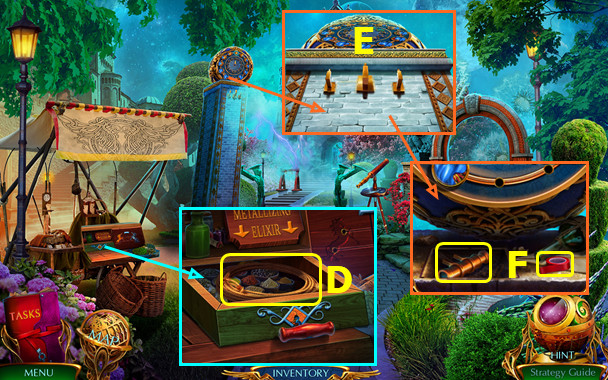
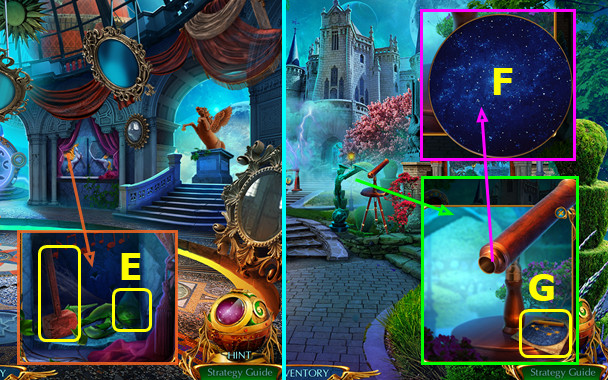
- Use HOUSE KEY (E); earn SIMON'S SEEKER BADGE.
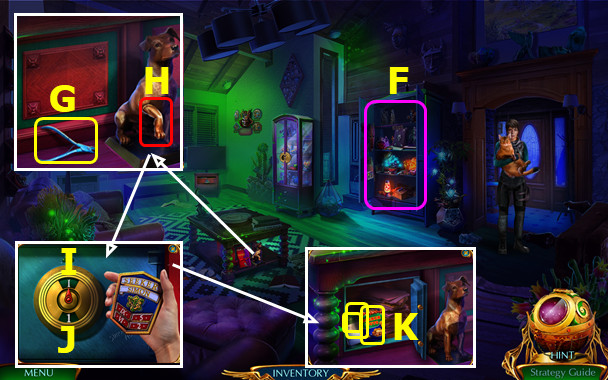
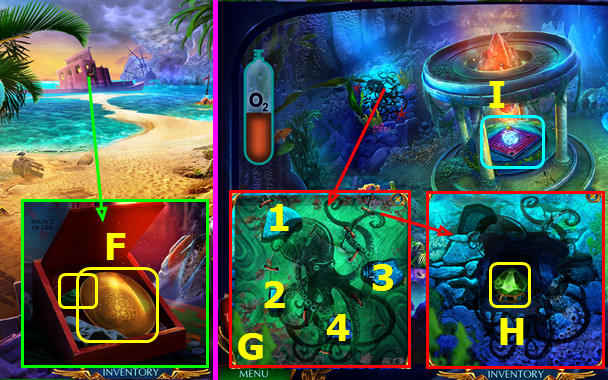
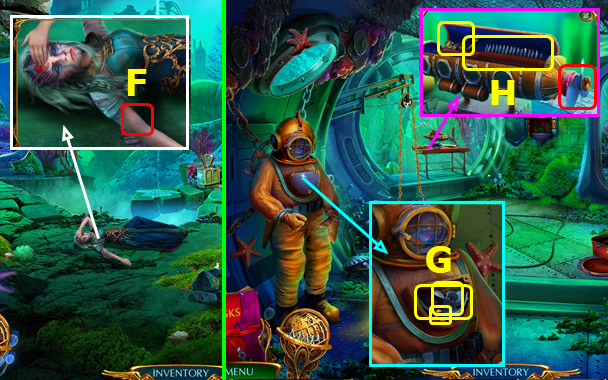
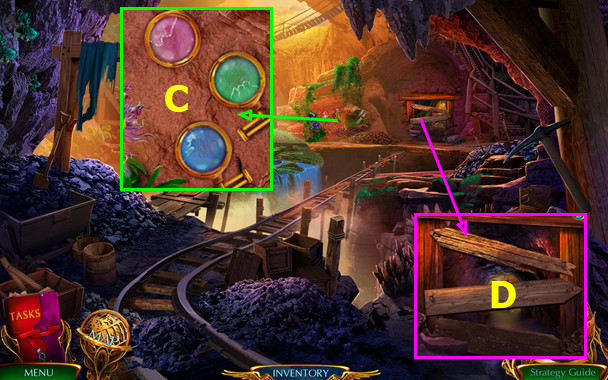
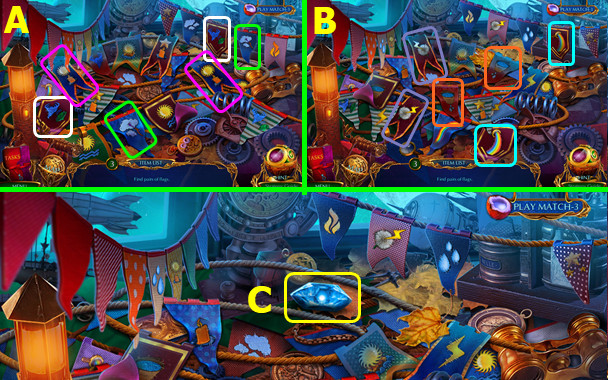
- Select; play HOP; earn FIREFLIES (F).
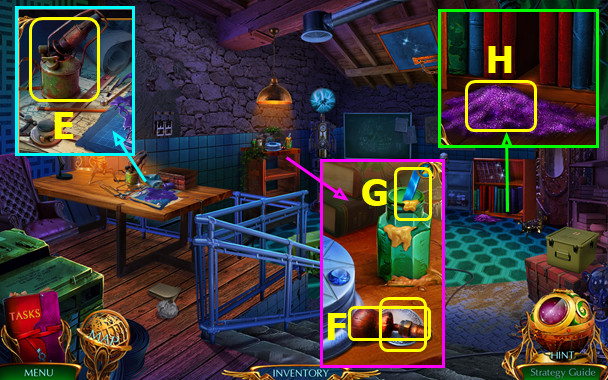
- Open FIREFLIES.
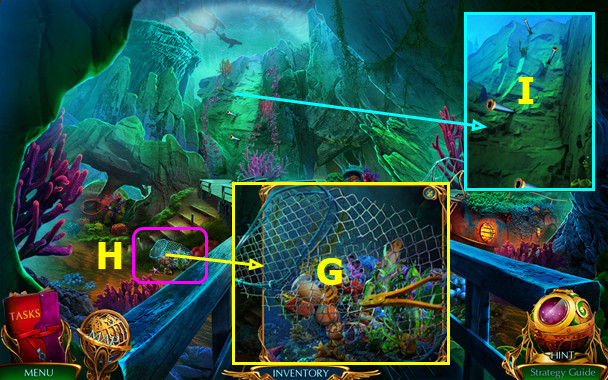
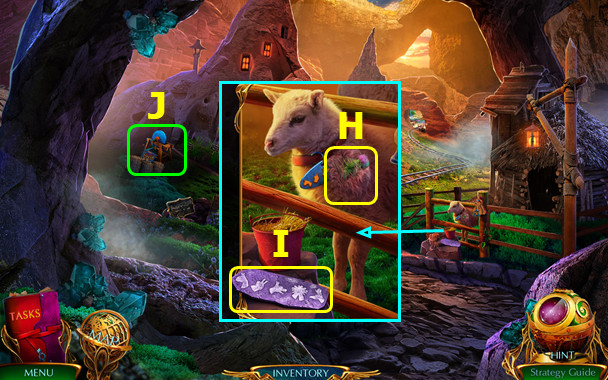
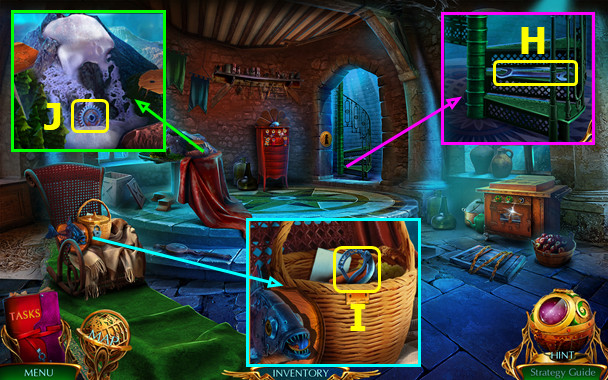
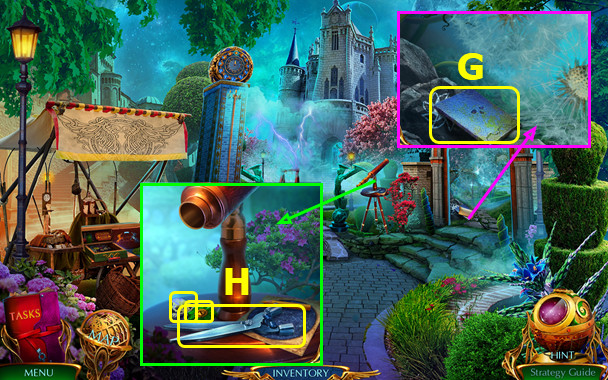
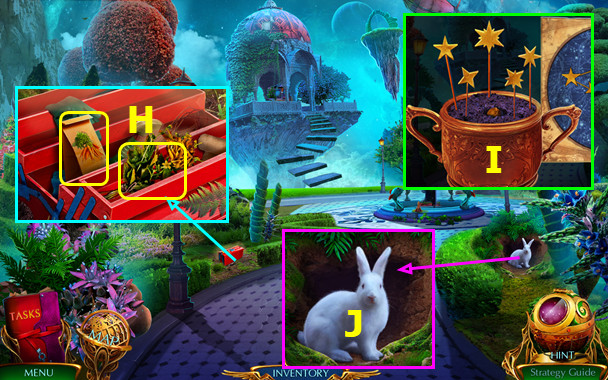
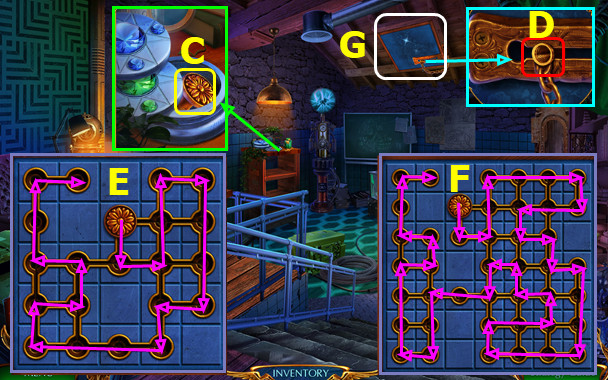
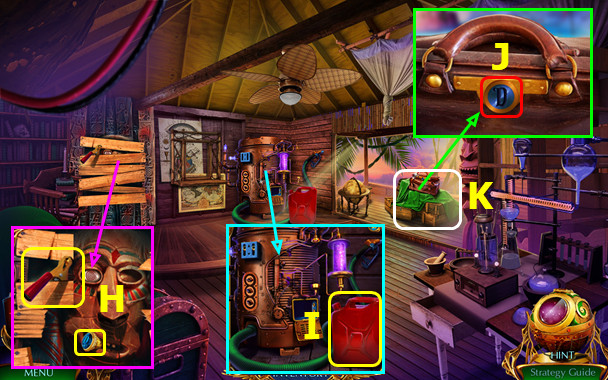
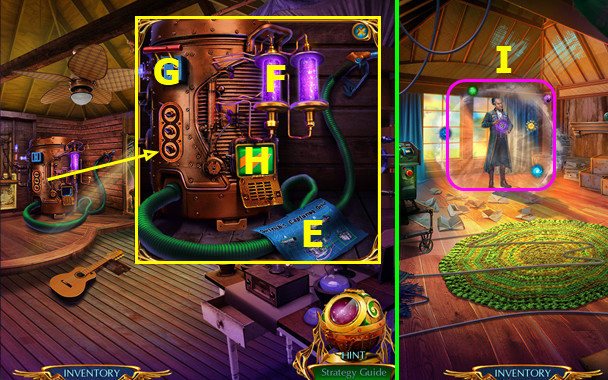
- Take the tasks book and CUTTERS (G); select (H).
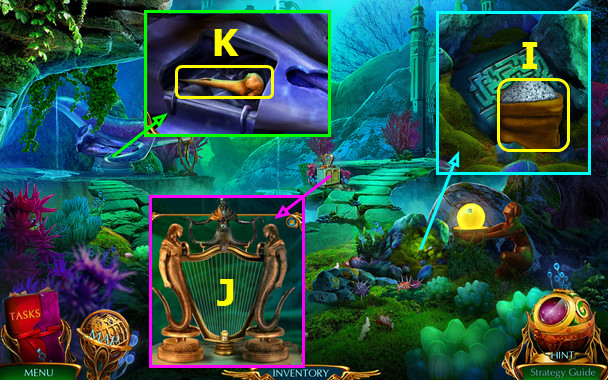
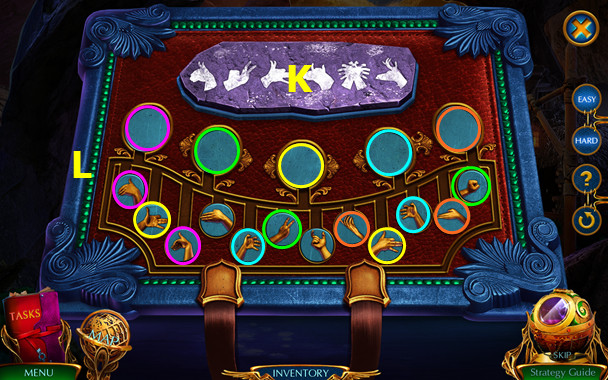
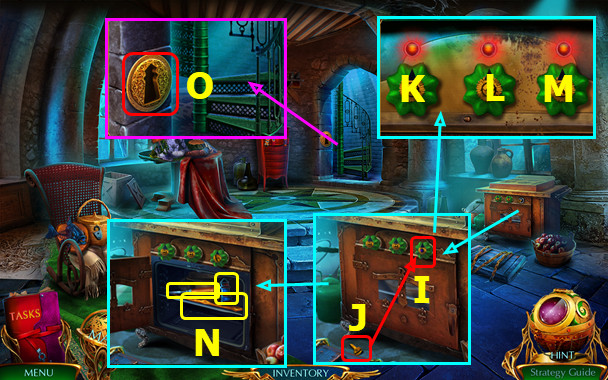
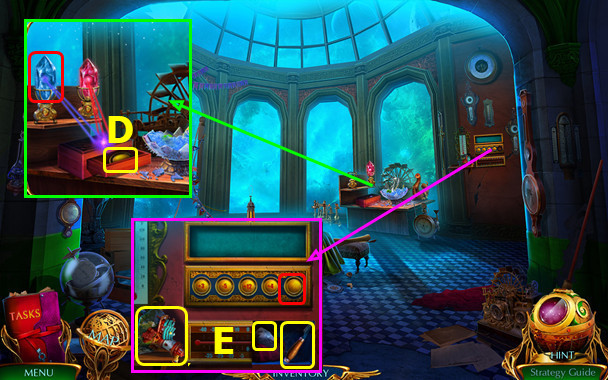
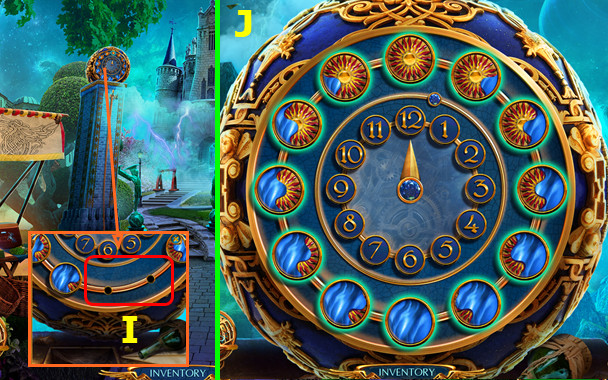
- Place SIMON'S SEEKER BADGE; solution Ix8-Jx4-Ix6-Jx6.
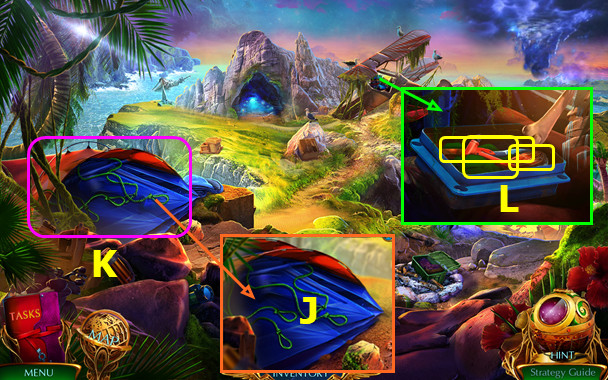
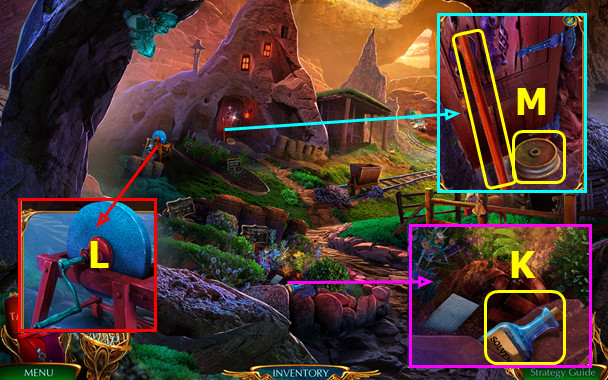
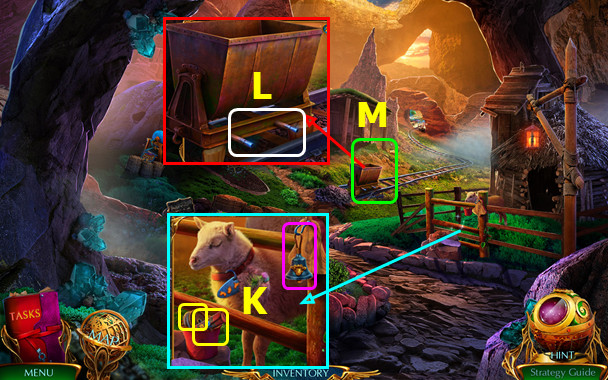
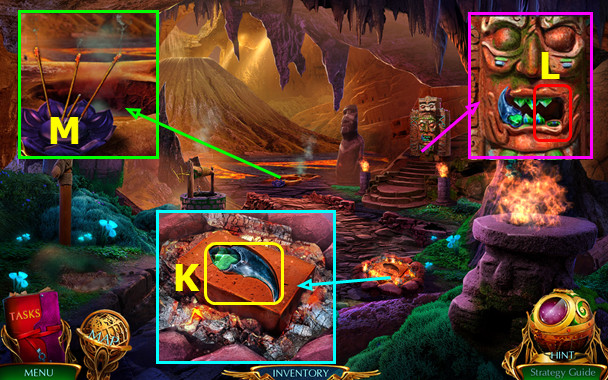
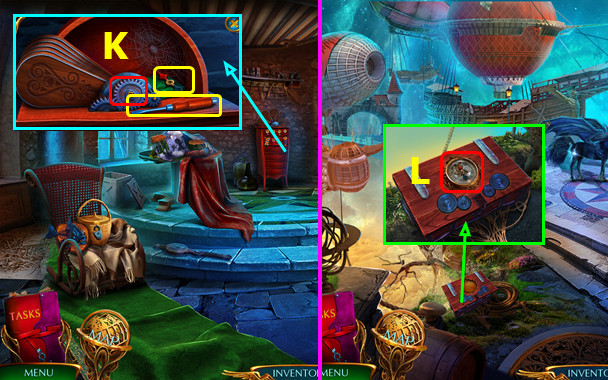
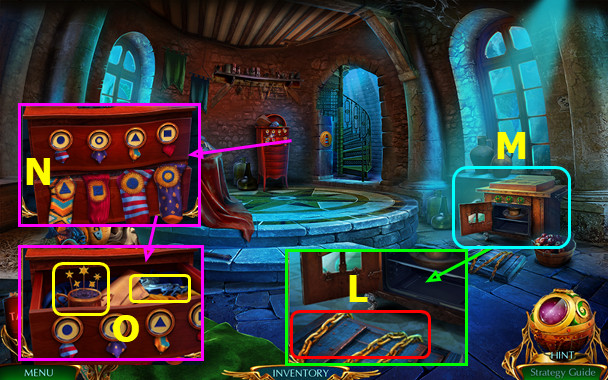
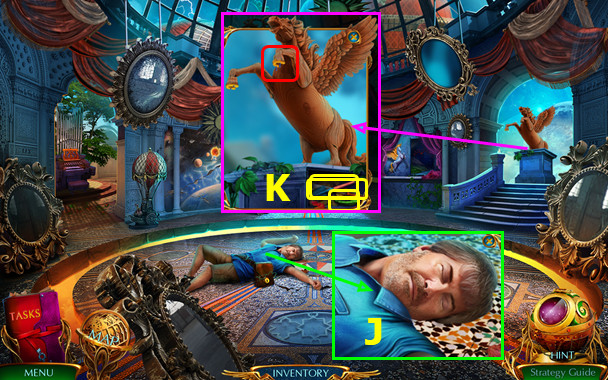
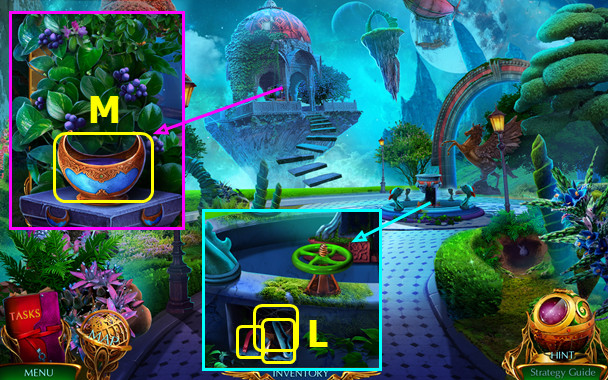
- Take PACK OF NUTS and read note; take DAMAGED PORTAL ARTIFACT and 3/3 MASK CRYSTALS (K).
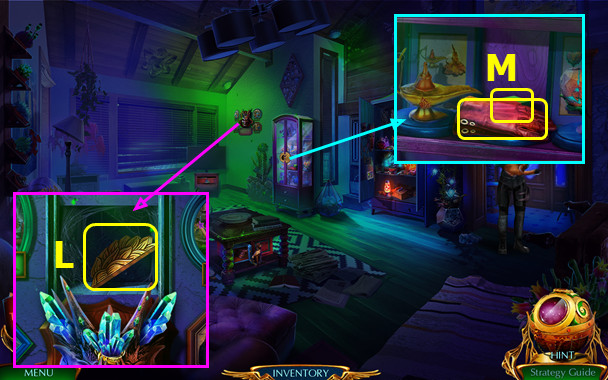
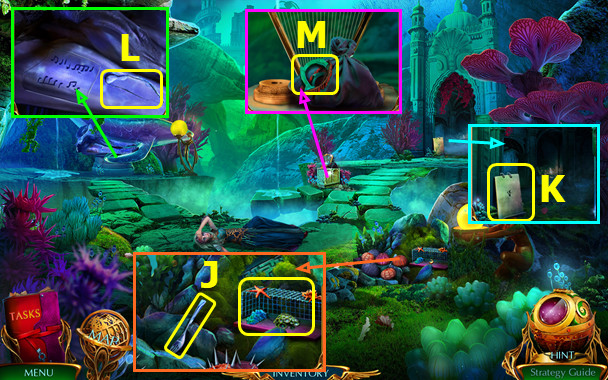
- Place MASK CRYSTALS; take LOCK HALF (L).
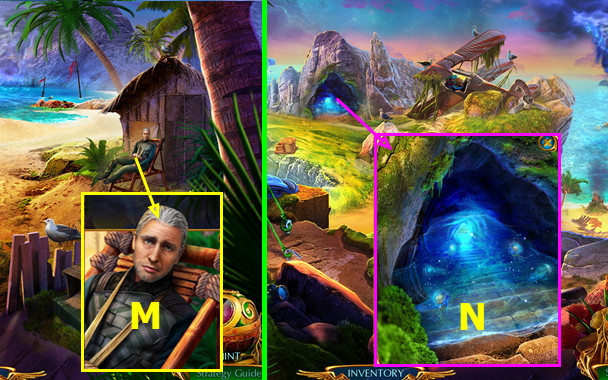
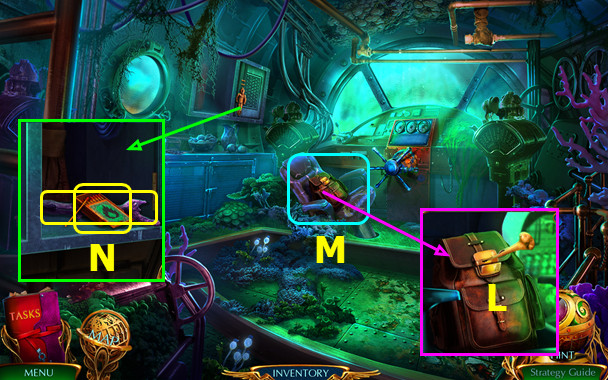
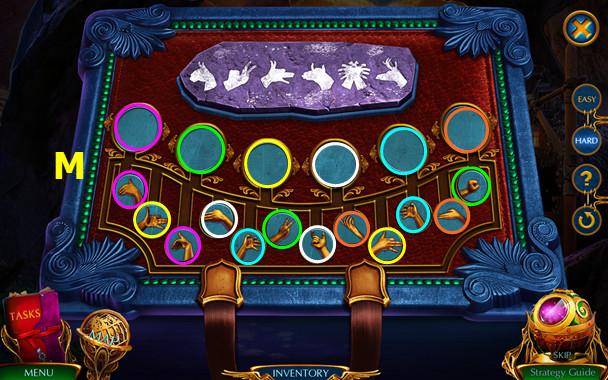
- Place LOCK HALF; take CLIMBING GLOVES and ARTIFACT BLOCK (M).
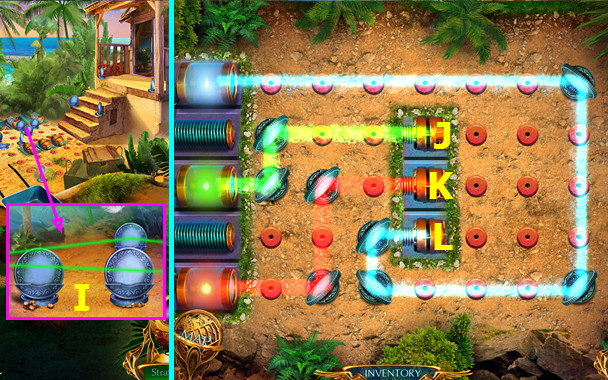
- ARTIFACT BLOCK on DAMAGED PORTAL ARTIFACT.
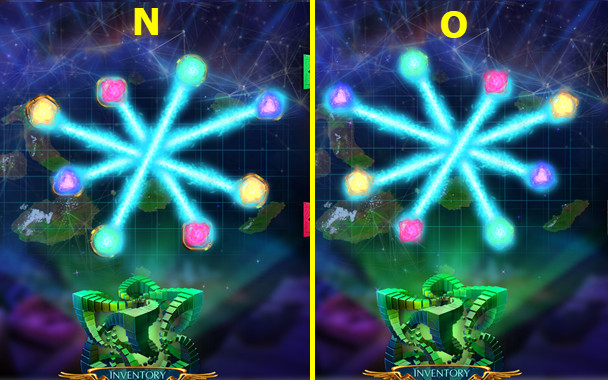
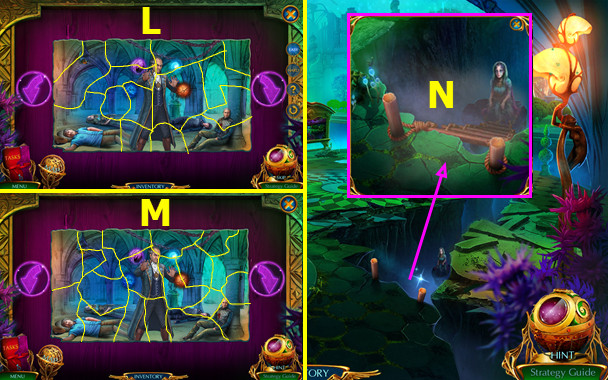
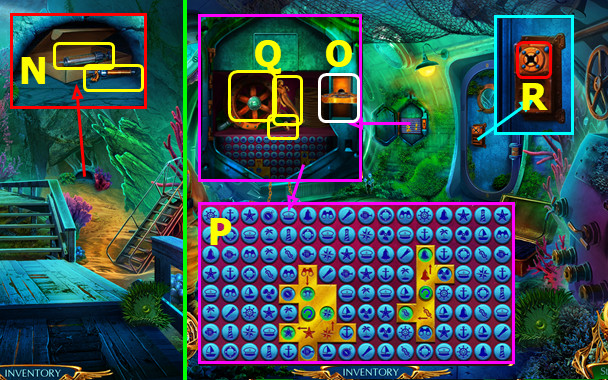
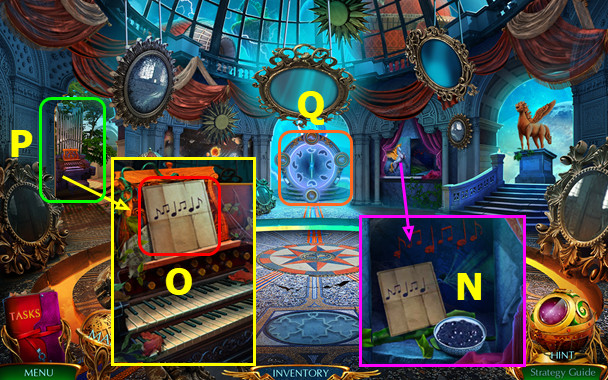
- Easy solution (N).
- Hard solution (O).
- Go forward.

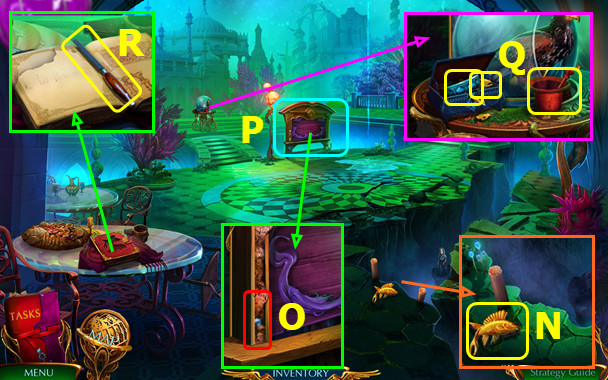
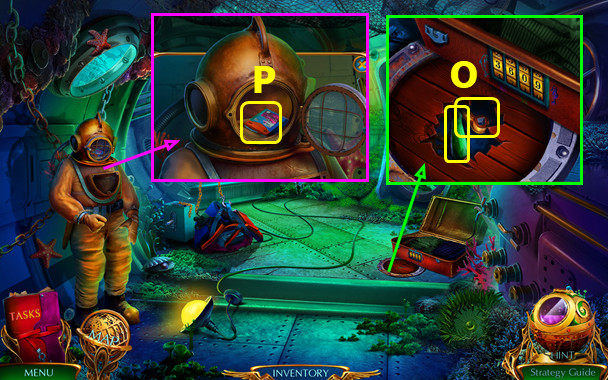
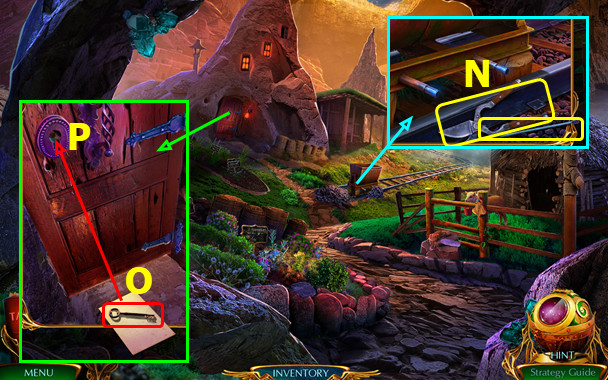
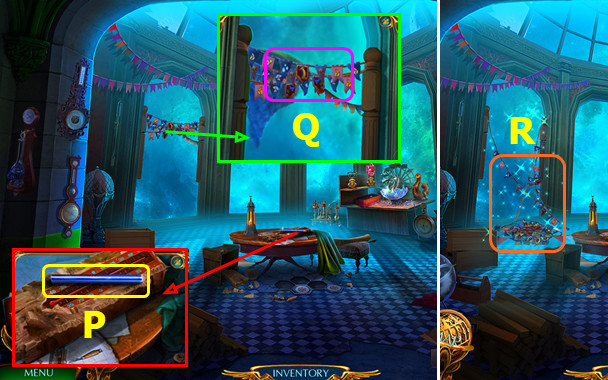
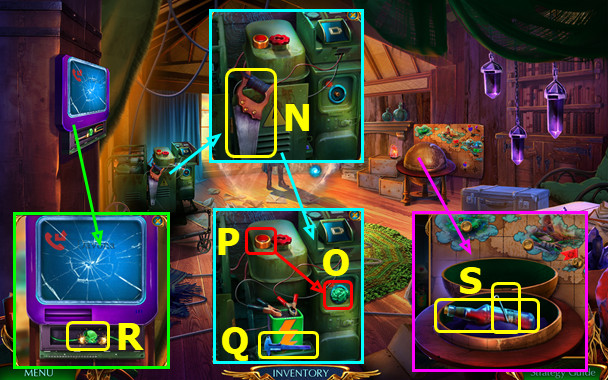
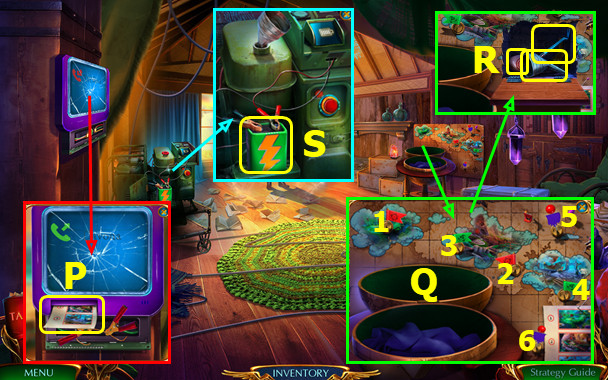
- Take SIMON'S BACKPACK and map (P).
- Open SIMON'S BACKPACK; use PACK OF NUTS; take phone and play message. Take 1/3 CARABINER and LIGHTER.
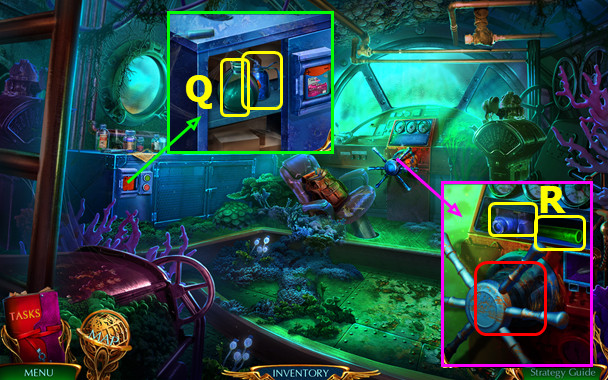
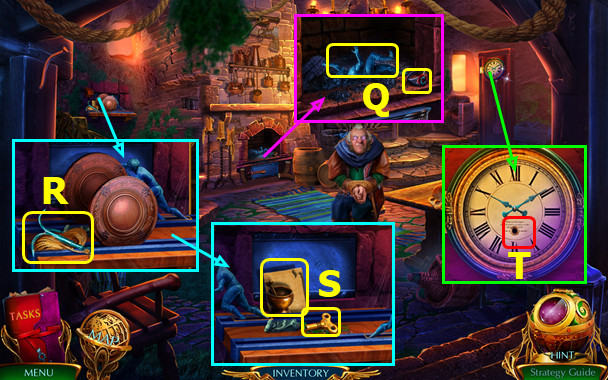
- Take 2/3 CARABINERS (Q).
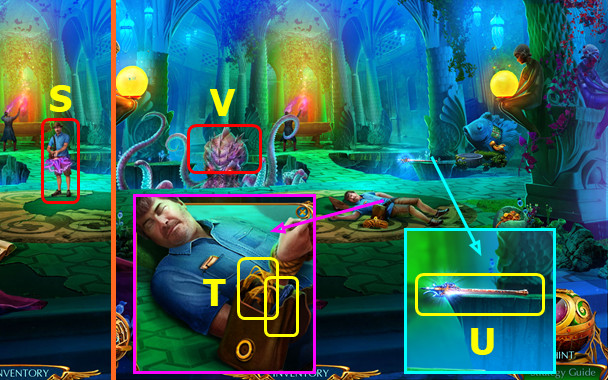
- Use CUTTERS; take 1/4 IMPROVISED TENT POLE, FIRE EXTINGUISHER, and MOUNTAINEER'S GEAR (R).
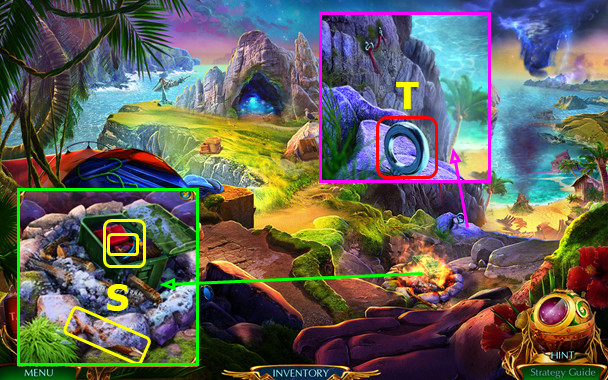
- Use FIRE EXTINGUISHER and open box; read notebook; take 3/3 CARABINERS, HOSE, and 2/4 IMPROVISED TENT POLE (S).
- GLOVES and 3 CARABINERS on MOUNTAINEER'S GEAR.
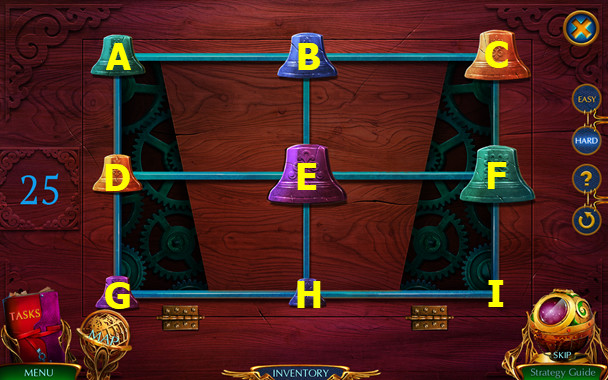
- Use MOUNTAINEER'S GEAR (T).
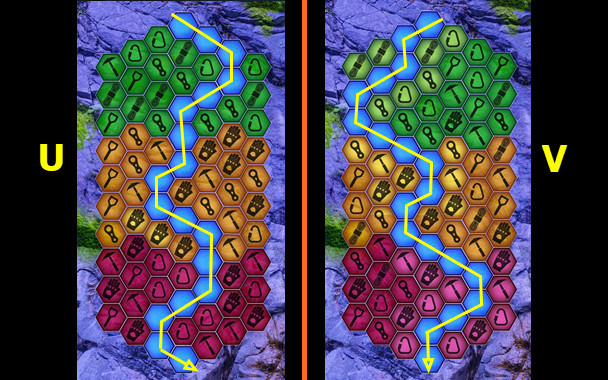
- Easy solution (U).
- Hard solution (V).
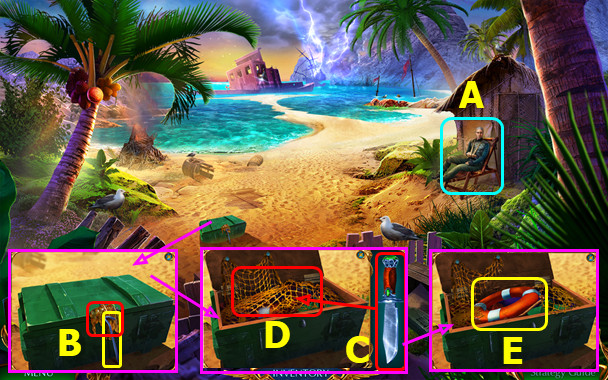
- Talk (A).
- Take 3/4 IMPROVISED TENT POLES; use LIGHTER (B).
- Play HOP; use (C-D).
- Take LIFE PRESERVER (E).
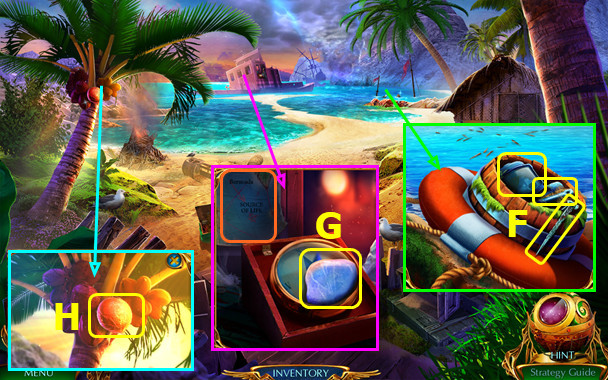
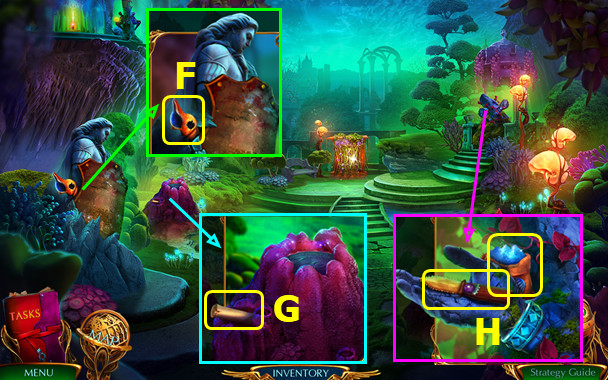
- Use LIFE PRESERVER; take SWIMMING MASK, 4/4 IMPROVISED TENT POLES, and TONGS (F).
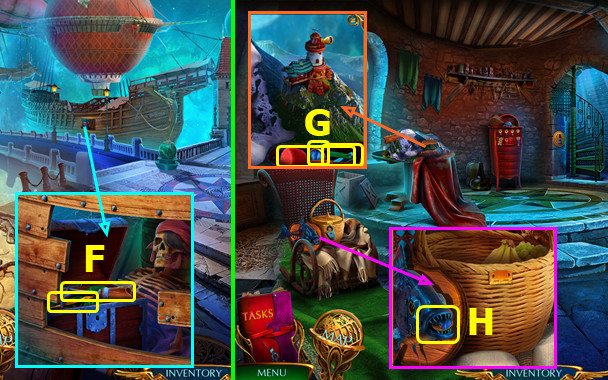
- Read note; take STONE; read map (G).
- Use STONE; earn COCONUT (H).
- Walk down.
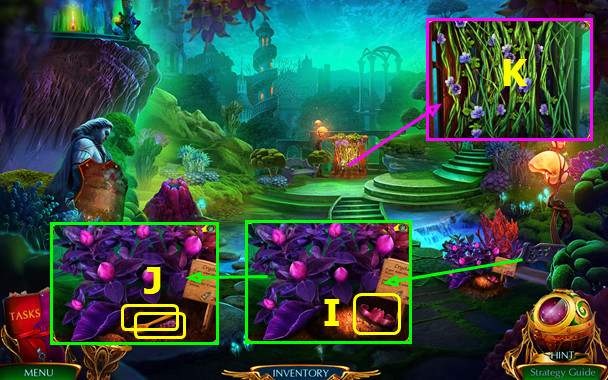
- Use IMPROVISED TENT POLES (J).
- Play HOP; earn WRENCH (K).
- Use WRENCH; take SMALL HAMMER, BENT SCRAPER, and WIRE (L).
- SMALL HAMMER on COCONUT; earn COCONUT MILK.
- Go right.
- Use COCONUT MILK; earn OXYGEN TANK (M).
- HOSE and OXYGEN TANK on SWIMMING MASK; earn OXYGEN MASK.
- Walk down.
- Use OXYGEN MASK (N).
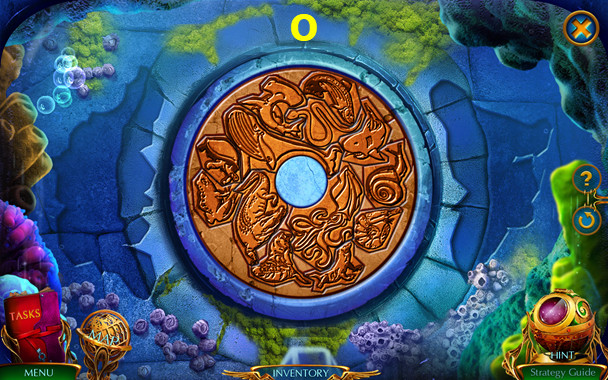
- Solution (O).
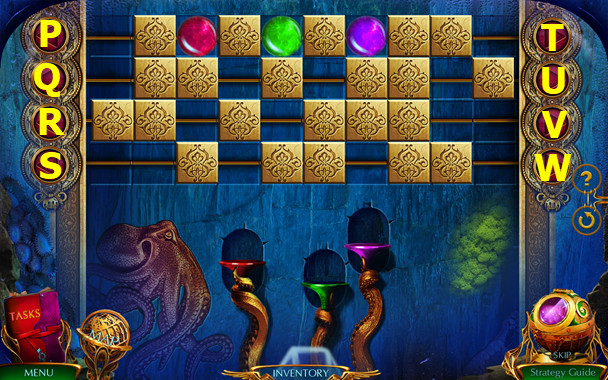
- Solution Q-V-S-W-R-P-U-Q-Vx2.
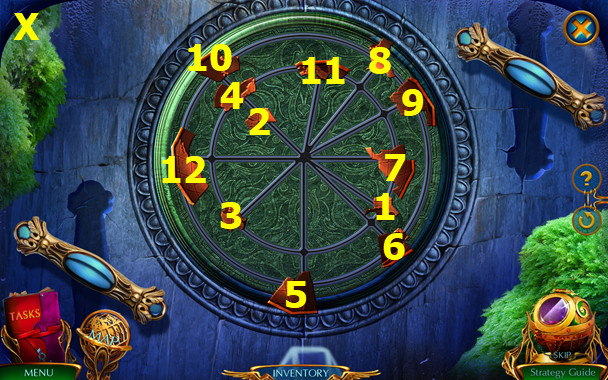
- Select 1-12 (X).
- Take BROKEN PLATE; use TONGS; earn CHEST KEY (A).
- Use BENT SCRAPER; take 1st PLATE PART (B).
- Take PAINTBRUSH (C).
- Take 2nd PLATE PART (D).
- Take JAR OF SAND; use CHEST KEY; take AWL and MAGNET (E).
- Go down, right.
- Use MAGNET; take GOLDEN PLATE and 3rd PLATE PART (F).
- 3 PLATE PARTS and WIRE on BROKEN PLATE; earn OCTOPUS PLATE.
- Walk down, forward.
- Place OCTOPUS PLATE; select 1-4 (G).
- Take GREEN CRYSTAL (H).
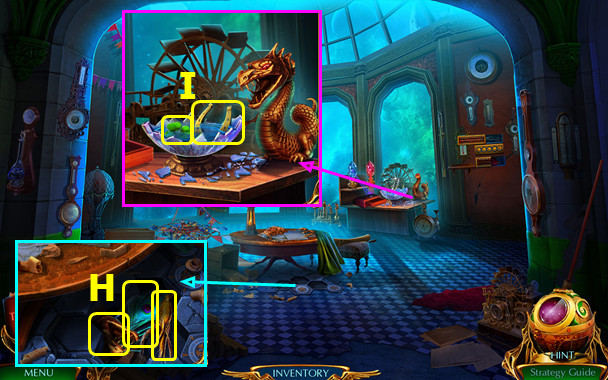
- Select (I).
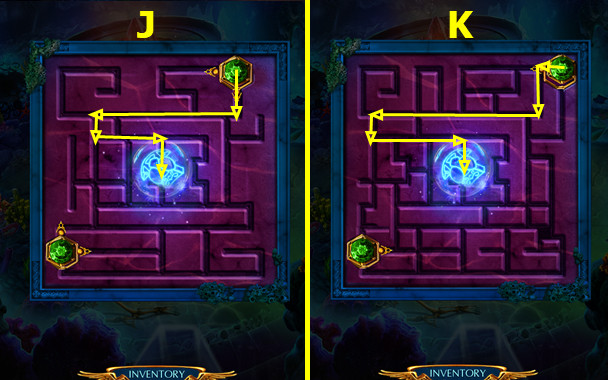
- Place GREEN CRYSTAL; easy solution (J).
- Hard solution (K).
- Take PORTAL AMULET.

- Place PORTAL AMULET (L).
- Enter portal (M).
Chapter 2: Underwater City Square
- Take 1/2 FISH AMULETS (N).
- Use AWL (O).
- Play HOP; earn CLIPPERS (P).
- Use CLIPPERS; take SAPPHIRE BRACELET. 2/2 FISH AMULET and MORTAR AND PESTLE (Q).
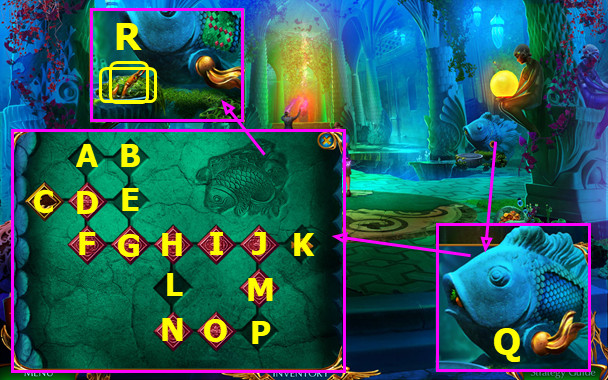
- Place FISH AMULETS; take FILE (R).
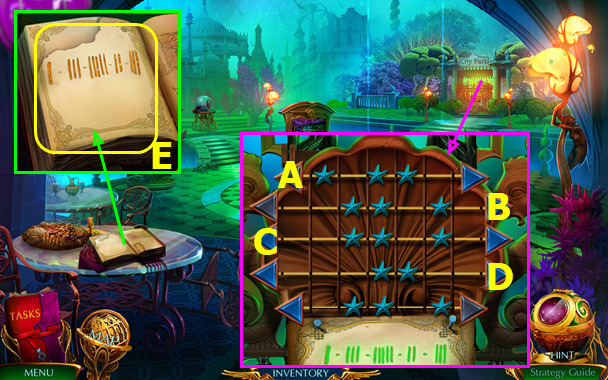
- Use JAR OF SAND and PAINTBRUSH; take GATE COMBINATION (E).
- Place GATE COMBINATION; easy solution (A-B-C-Dx2).
- Hard solution (A-B-D-B-C).
- Go right.
- Take DAMAGED SHELL (F).
- Take BUBBLE RECIPE (G).
- Place SAPPHIRE BRACELET; take KNIFE and JELLYFISH POWDER (H).
- Take 1/2 RUBY BRACELET (I).
- Use GOLDEN PLATE; take WOODEN SPOON and BITTER CRESS (J).
- Use KNIFE (K).
- Easy solution (L).
- Hard solution (M).
- Take ROPE LADDER.
- Walk down.
- Use ROPE LADDER (N); earn FLOWER POTION.
- Walk right.

- Use FLOWER POTION; play HOP; take CRYSTAL POLLEN (O).
- MORTAR AND PESTLE, JELLYFISH POWDER, BITTER CRESS, and CRYSTAL POLLEN on BUBBLE RECIPE; earn BUBBLE POWDER.
- Use BUBBLE POWDER (P).
- Go left (Q).
- Use FILE; play HOP; earn PURPLE HEART (A).
- Take LOCKPICK; place PURPLE HEART (B).
- Take 2/2 RUBY BRACELET; use WOODEN SPOON; earn SPOON WITH RESIN (C).
- Take SEASHELL and HAMMER (D).
- SPOON WITH RESIN and SEASHELL on DAMAGED SHELL; earn CONCH SHELL.
- Walk down.
- Place RUBY BRACELETS; take SLING and SPEARHEAD (E).
- Use SPEARHEAD and HAMMER; earn FILTHY SHIELD (F).
- Walk down.
- Use CONCH SHELL; take TUBE and FIN (G).
- Go right, left.
- Place FIN (Q).
- Easy solution (O-P)-(H-L)-(O-N)-(M-P)-(D-A)-(G-E)-(I-H)-(E-B)-(H-G)-(D-E)-(D-F)-(B-A)-(E-B)-(F-G)-(G-H)-(H-I)-(I-J)-(J-K).
- Hard solution (E-D)-(D-C)-(F-D)-(G-F)-(D-A)-(G-E)-(I-H)-(H-G)-(E-B)-(M-J)-(O-P)-(J-I)-(M-J)-(I-H)-(M-J)-(J-K).
- Take OLD HOOK and WET SEAWEED (R).
- WET SEAWEED on FILTHY SHIELD; earn SHINY SHIELD.
- Use SHINY SHIELD (S).
- Select rope; use LOCKPICK; take COAL and LASSO (T).
- Use LASSO; take MAGICAL TRIDENT (U).
- Use MAGICAL TRIDENT (V).

- Easy solution A-B-C-A-B-A-C-B-C-A.
- Hard solution A-B-C-B-A-C-B-A-B-C-B-A-B-A-C-A.
- Final hard solution (@).
Chapter 3: Ravine
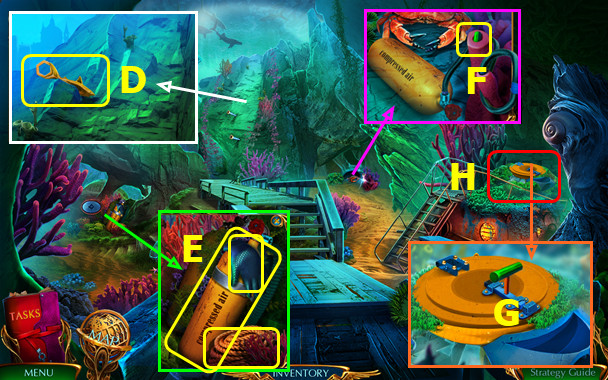
- Use SLING; earn BOTTLE OPENER (D).
- Take GLOVE and ROPE; use BOTTLE OPENER; take COMPRESSED AIR CYLINDER (E).
- Place COMPRESSED AIR CYLINDER and TUBE; earn BATHYSCAPHE HANDLE (F).
- Use BATHYSCAPHE HANDLE (G).
- Go right (H).
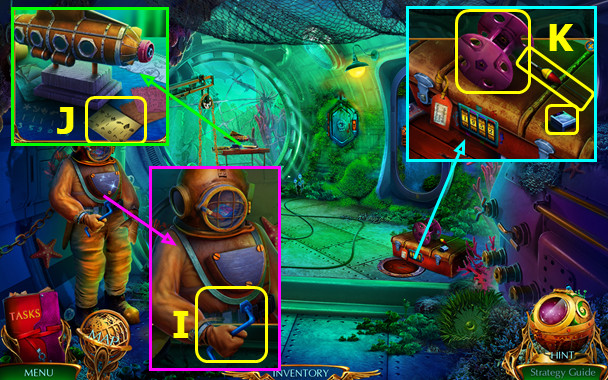
- Take CRANK (I).
- Use COAL; take SUITCASE CODE (J).
- Take BROKEN WINCH, FLOAT, and TAPE RECORDER BUTTON (K).
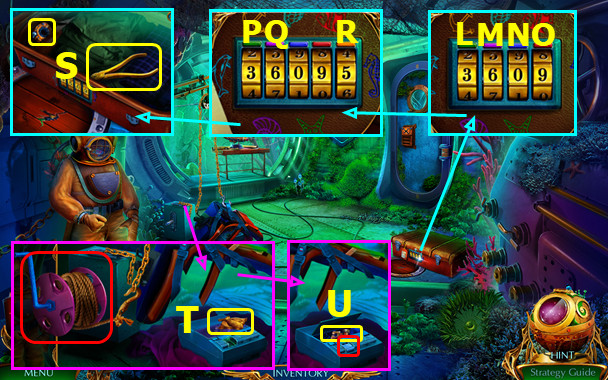
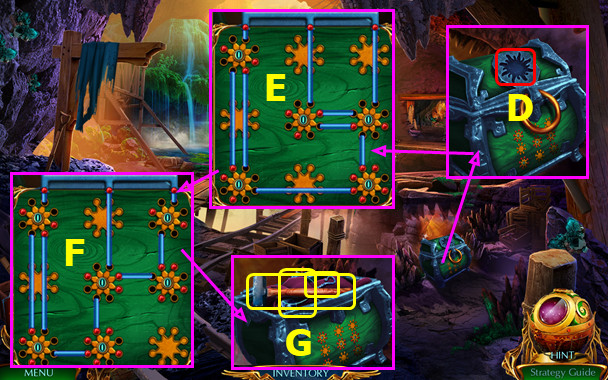
- Place SUITCASE CODE; easy solution Nx5-Mx2-Ox5-Lx5.
- Hard solution Rx5-Qx7-Px5.
- Take BROKEN KEY and CUTTERS (S).
- CRANK, ROPE, and OLD HOOK on BROKEN WINCH; earn WINCH.
- Place WINCH; take FISH AMULET (T).
- Place TAPE RECORDER BUTTON; take 1st KEY PART (U).
- Walk down.
- Place FISH AMULET (A).
- Easy solution Dx4-B-Ex3.
- Hard solution B-E-B-C-B-Dx2-E-B-C-B-D-E-B-Ex2.
- Take WIRE NET (F).
- Use CUTTERS (G).
- Play HOP; earn HARPOON GUN (H).
- Use HARPOON GUN (I).
- Go forward.
- Use GLOVE; take FORK and BROKEN CRAB TRAP (J).
- Take TRAPDOOR (K).
- TRAPDOOR, WIRE NET, and FLOAT on BROKEN CRAP TRAP; earn CRAB TRAP.
- Use FORK; earn SHARP SHARD (L).
- Use SHARP SHARD; take SHACKLES (M).
- Walk down.
- Use CRAB TRAP; take 2nd KEY PART and SYRINGE (N).
- 2 KEY PARTS on BROKEN KEY; earn KEY.
- Go right.
- Use KEY (O).
- Easy solution (P).
- Take SHIP WHEEL, 1/3 MERMAID FIGURINES, BOLT (Q).
- Use SHIP WHEEL (R).
- Go right.
- Read journal; take NECK TIE and 2/3 MERMAID FIGURINES (A).
- Use FORK; take HEAVY SHELL (B).
- Use SHACKLES; take FORMULA PAGE (C).
- Use FORMULA PAGE (D).
- Use SYRINGE; earn SYRINGE WITH PAINKILLER (E).
- Walk down 2x; go forward.
- Use SYRINGE WITH PAINKILLER (F); earn FLATFISH MEDALLION.
- Go down, right.
- Use FLAT FISH MEDALLION; take STRONG ARCHED BONE, MODEL PROPELLER, and NUT (G).
- Place MODEL PROPELLER and BOLT; take ROUGH BRUSH and 3/3 MERMAID FIGURINES (H).
- Walk down, forward.
- Use ROUGH BRUSH; take SALTPETER (I).
- Place MERMAID FIGURINES (J); play HOP; earn WHALE FLUTE.
- Use WHALE FLUTE; take SHARP BONE (K).
- Go to Navigation Room.
- Use SHARP BONE and HEAVY SHELL (L).
- Play HOP; earn SWIMMING FINS EMBLEM (M).
- Use SWIMMING FINS EMBLEM; take MATCHES and STRONG BRANCH (N).
- NECK TIE and STRONG BRANCH on STRONG ARCHED BONE; earn IMPROVISED PICKAXE.
- Walk down.
- Use IMPROVISED PICKAXE; take FILE and HANDLE (O).
- Use HANDLE and NUT; take BATTERY (P).
- Go right.
- Place BATTERY; take EMPTY FLASK and OILER (Q).
- Select; use OILER and ROUGH BRUSH; take DYNAMITE STICK and UNDERWATER CAMERA (R).
- Walk down 2x; go forward.
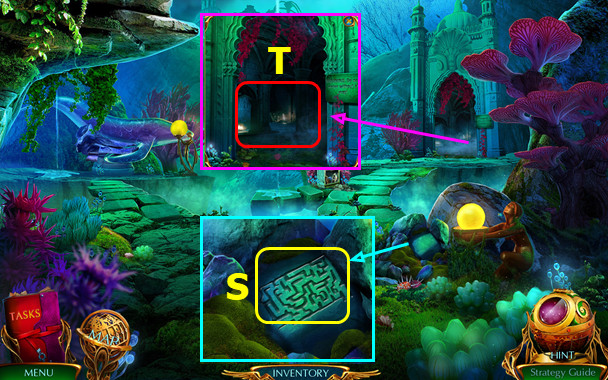
- Use UNDERWATER CAMERA; earn LABYRINTH MAP (S).
- Use LABYRINTH MAP (T).
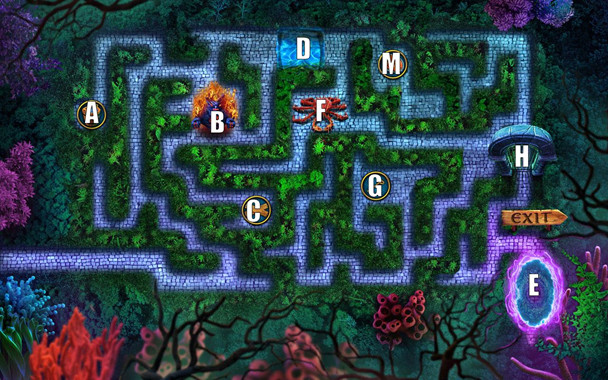
- Easy solution A-B-C-F-E.
- Hard solution A-B-C-D-M-F-G-H-E.
Chapter 4: Prison Cell
- Talk (N).
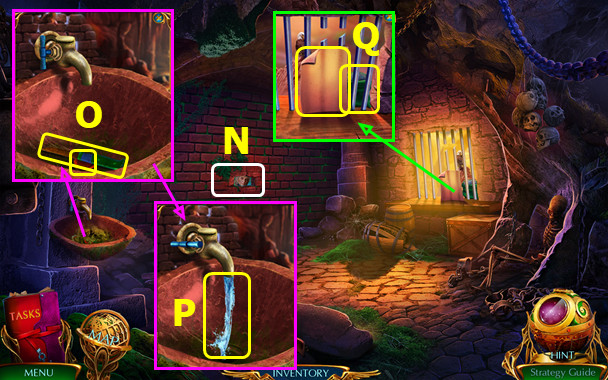
- Use MATCHES; take DULL KNIFE and DYNAMITE CAP WITH WICK (O).
- Turn on faucet; use EMPTY FLASK; earn FLASK OF WATER (P).
- Take PAPER; use FILE; take GUNPOWDER (Q).
- SALTPETER, DYNAMITE CAP WITH WICK, and GUNPOWDER on DYNAMITE STICK; earn DYNAMITE.
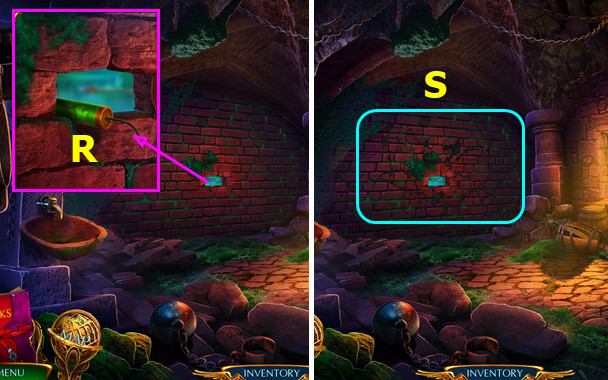
- Use DYNAMITE and MATCHES (R).
- Select 3x; earn EIDA'S HAIRPIN (S).
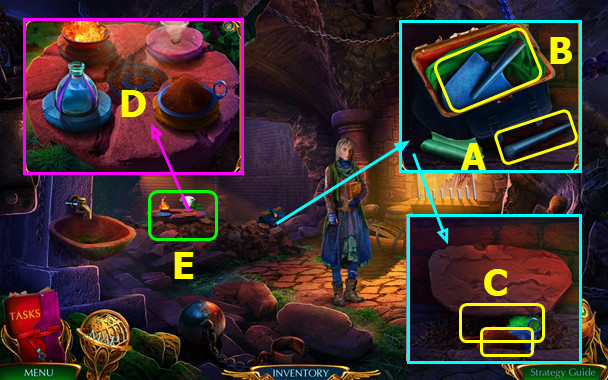
- Read note; take METAL ROD (A).
- Use EIDA'S HAIRPIN; take SHOVEL HEAD (B).
- Use METAL ROD; take SOIL and FEATHER DUSTER (C).
- Place FLASK OF WATER and SOIL (D).
- Play HOP; earn SUMMONING AMULET (E).
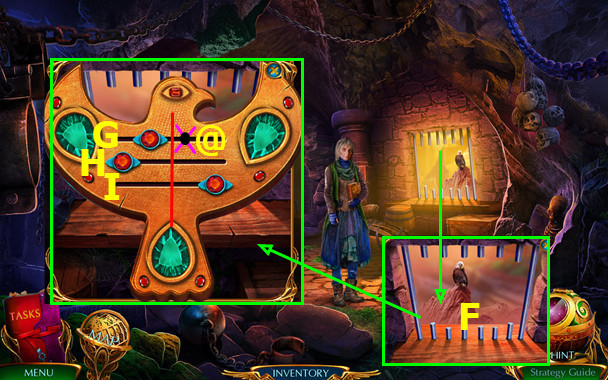
- Use SUMMONING AMULET (F).
- Easy solution: slide to center in order G-H-I-G.
- Hard solution: slide G-@; slide to center in order I-H.
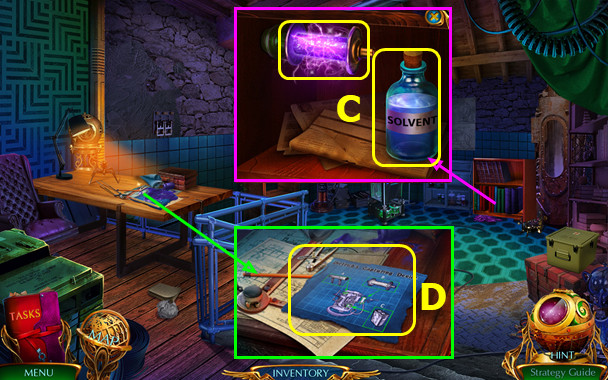
- Read note; take SOLVENT (K).
- Use DULL KNIFE; earn SHARP KNIFE (L).
- Take WOODEN SHAFT and 1/2 CART WHEEL (M).
- SHOVEL HEAD and SHARP KNIFE on WOODEN SHAFT; earn SHOVEL.
- Use SHOVEL; take SHEARS and SPIKE (N).
- Use PAPER and SPIKE; use (O-P).
- Go left.
- Use FEATHER DUSTER; take MAN FIGURINE and 1/2 CAYWEN'S SIGNET RING (Q).
- Take GRAPPLING HOOK; place MAN FIGURINE (R).
- Use SOLVENT; take WINDING KEY and MORTAR WITH RECIPE (S).
- Use WINDING KEY (T).
- Solution (F-I)-(E-F)-(D-E)-(G-D)-(H-G)-(G-D)-(D-G)-(E-D).
- (G-D)-(D-A)-(A-D)-(D-E)-(E-B)-(B-E)-(C-B)-(E-B).
- (B-E)-(E-H)-(F-C)-(C-B)-(I-F)-(F-E)-(H-E)-(E-B)-(B-E).
- Take SHEEP BELL.
- Walk down.
- Use SHEEP BELL; take 2/2 CART WHEEL and BRUSH SET (K).
- Place CART WHEELS (L).
- Go forward (M).

- Take ANCIENT BOWL; use SHEARS; earn WATER LILY (N).
- Take CHALK and HISSING STONE (O).
- Use GRAPPLING HOOK; take 2/2 CAYWEN'S SIGNET RING and OLD HAT (P).
- CAYWEN'S SIGNET RINGS on BRUSH SET; take PAINTBRUSH.
- Use PAINTBRUSH; earn BRUSH WITH POLLEN (Q).
- Walk down.
- Use OLD HAT; take HENBANE and LEATHER STRAPS (A).
- WATER LILY, HISSING STONE, BRUSH WITH POLLEN, and HENBANE on MORTAR WITH RECIPE; earn DEMESMERIZING POTION.
- Go left.
- Use DEMESMERIZING POTION; earn MAGICAL LENSES (B).
- Walk down, forward.
- Place MAGICAL LENSES (C). Play HOP; earn SAW.
- Use SAW (D).
- Go right.

- Read note; take SPINDLE (E).
- Use ANCIENT BOWL; take TRINKET WITH SUCTION CUP (F).
- Use LEATHER STRAPS; take WOOL COMB and ACTIVATING CRYSTAL (G).
- Walk down 2x.
- Use WOOL COMB; earn TANGLED SHEEP WOOL (H).
- Use CHALK; take STONE WITH CODE (I).
- Select (J).
- Place STONE WITH CODE (K).
- Easy solution color coded (L).
- Hard solution color-coded (M).
- Take ANCIENT MANUSCRIPT.
- Walk left.
- Give ANCIENT MANUSCRIPT; earn THIN WIRE (A).
- Use THIN WIRE; take SUN MEDALLION (B).
- Use TRINKET WITH SUCTION CUP; take FORCEPS and 1/3 SILVER SPOON (C).
- TANGLED SHEEP WOOL and FORCEPS on SPINDLE; earn YARN.
- Walk down, forward.
- Place SUN MEDALLION (D).
- Easy solution (E).
- Hard solution (F).
- Take HAMMER, WIRE, and 2/3 SILVER SPOON (G).
- Go right.

- Use YARN; take WEATHER VANE and 3/3 SILVER SPOON (H).
- Use WEATHER VANE; take NAILS, NAIL PULLER, and EMPTY BUCKET (I).
- Walk down.
- Use EMPTY BUCKET; earn BUCKET OF WATER (J).
- Go right.
- Use ACTIVATING CRYSTAL, SILVER SPOONS, and BUCKET OF WATER; take TOTEM'S TOOTH (K).
- Place TOTEM'S TOOTH (L); play HOP; earn SACRED INCENSE STICKS.
- Place SACRED INCENSE STICKS (M).
Chapter 5: Aerial Pier

- Use NAIL PULLER; earn 1/3 WOODEN BOARD. Read note; take BROKEN COMPASS (A).
- Take ANVIL (B).
- Use ANVIL; take CORKSCREW and 2/3 WOODEN BOARD (C).
- Take LIME, COMPASS BOLT, and 3/3 WOODEN BOARD (D).
- Use WOODEN BOARDS, NAILS, and HAMMER (E).
- Go right (F).
- Take WRENCH (H).
- Use WIRE; take SLICING DEVICE; read note (I).
- LIME on SLICING DEVICE; earn LIME HALF.
- Place LIME HALF; take COGWHEEL (J).
- Take SCREWDRIVER; place COGWHEEL; take COMPASS ARROW (K).
- COMPASS BOLT and COMPASS ARROW on BROKEN COMPASS; earn COMPASS.
- Walk down.
- Place COMPASS (L).

- Easy solution 1-8 (M-P).

- Hard solution 1-10 (Q-S).
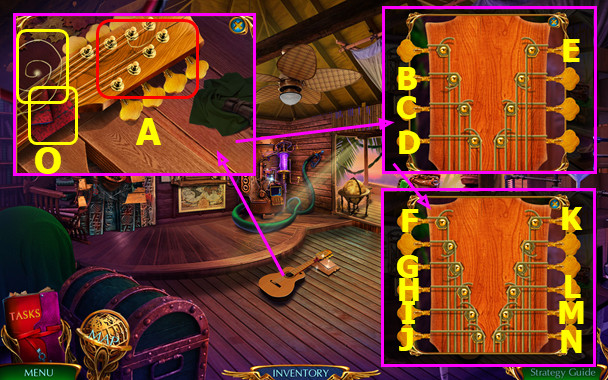
- Take MAGIC LUTE and 1/2 METAL ROD (T).
- Use MAGIC LUTE; earn RAINBOW CRYSTAL (A).
- Place RAINBOW CRYSTAL (B).
- Go forward (C).
- Read note; use CORKSCREW; take LASSO (D).
- Use LASSO (E).
- Use WRENCH; take SPYGLASS PART and DUCT TAPE (F).
- Read note; take METAL PLATE (G).
- Place SPYGLASS PART; take KNOB, BROKEN SKULL MOLD, and DAMAGED PRUNERS (H).
- Walk down, right.
- Place KNOB (I).
- Move (J-I); use SCREWDRIVER.
- Solution Mx2-L-K.
- Take CHISEL, LIGHTHOUSE EMBLEM, and 1/2 THIN STICK (N).
- Place LIGHTHOUSE EMBLEM (O).
- Go forward.
- Take 2/2 METAL ROD; read instructions (P).
- DUCT TAPE and METAL RODS on DAMAGED PRUNERS; earn PRUNERS.
- Use PRUNERS (Q).
- Select (R).
- Select pairs A-B.
- Take BLUE CRYSTAL (C).
- Place BLUE CRYSTAL; take BUTTON (D).
- Place BUTTON; take HEAVY STONE, 1/3 CARVING SET, and LIGHTHOUSE MODEL (E).
- BROKEN SKULL MOLD, CHISEL, and HEAVY STONE on METAL PLATE; earn PIRATE AMULET.
- Walk down 2x.
- Place PIRATE AMULET; take PIRATE'S WOODEN LEG and 2/2 THIN STICK (F).
- Go right.
- Place LIGHTHOUSE MODEL; take GONG STICK, 1st CLOCK TOKEN, and NAIL CUTTERS (G).
- Use THIN STICKS; earn 2nd CLOCK TOKEN (H).
- Walk down, forward.
- Place 2 CLOCK TOKENS (I).
- Easy solution (J).
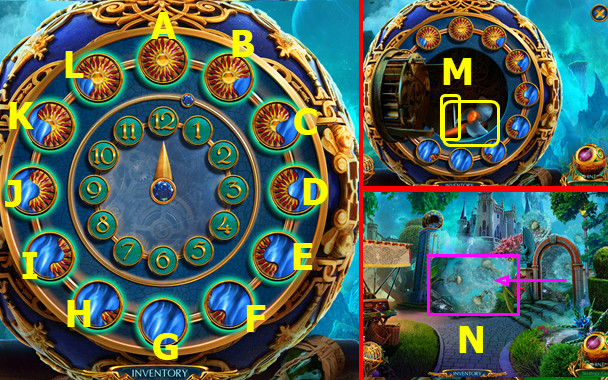
- Hard solution: set center clock numbers as shown; select A-B-Cx7-Dx10-Ex7-Fx11-Gx6-Ix9-Jx1-Kx6-Lx4.
- Take POCKET FAN and LONG CROCHET HOOK (M).
- Use POCKET FAN (N).
- Go right.
Chapter 6: Garden
- Take 1/2 UNICORN EMBLEM and 2/3 CARVING SET (A).
- Use PIRATE'S WOODEN LEG; take FOX LOCK PART (B).
- Use LONG CROCHET HOOK; take POUCH (C).
- NAIL CUTTERS on POUCH; take FISH STATUETTE; read note.
- Place FISH STATUETTE; take 3/3 CARVING SET and RAKE (D).
- Go to Viewing Point.
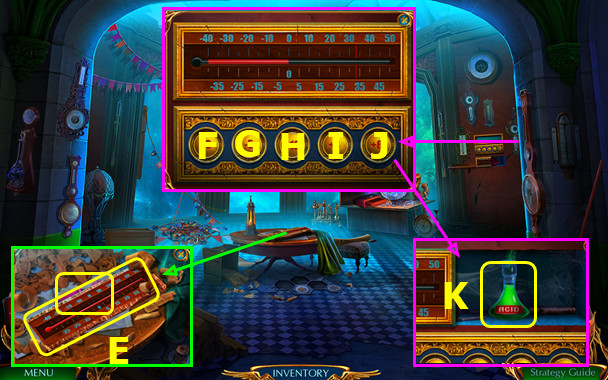
- Use CARVING SET; take THERMOMETER and RAG (E).
- Place THERMOMETER; easy solution H-I-G-H-I-G-H-H-I.
- Hard solution G-I-H-J-G-I-F-G-F-I-G-I.
- Take ACID (K).
- Walk down.
- Use ACID (L).
- Play HOP; earn SOCK WITH NUMBER (M).
- Place SOCK WITH NUMBER; solution (N).
- Read note; take 2/2 UNICORN EMBLEM and MAGIC POT WITH STARS (O).
- Walk down, forward.
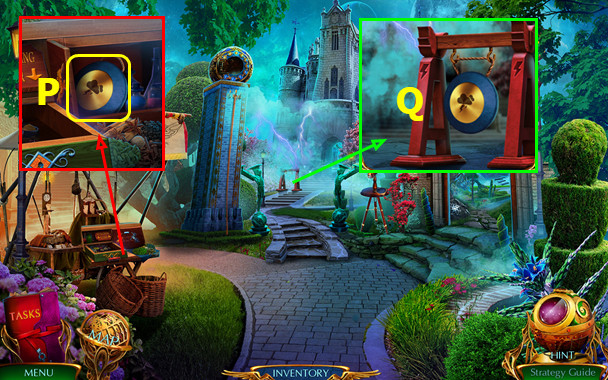
- Place UNICORN EMBLEMS; take GONG (P).
- Place GONG and GONG STICK (Q).
- Go forward.
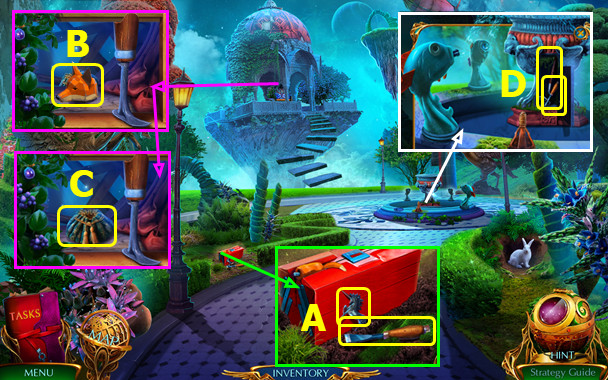
- Take RESIN (A).
- Take NAILS (B).
- Use RAKE; take HACKSAW (C).
- Use HACKSAW; take EMPTY FLASK and BAS-RELIEF PIECE (D).
- Place BAS-RELIEF PIECE; take MALLET. Use RAG; earn BROKEN BOTTLE (E).
- Walk down.
- Place BROKEN BOTTLE (F).
- Take STAR MAP SCHEMATIC (G).
- Go right.
- Use FOX LOCK PART and RESIN; take CARROT SEEDS and HEALING HERBS (H).
- STAR MAP SCHEMATIC and CARROT SEEDS on MAGIC POT WITH STARS; solution (I); earn MAGIC CARROT.
- Use MAGIC CARROT (J).
- Easy solution D-C-A-B-A-B-A-B-D-C-B-C.
- Hard solution D-C-A-B-C-B-C-A-D-Ax2-Bx2-C-B.
- Easy map (E).
- Hard map (F).
- Take FLOOR TILES (G).
- Return to Viewing Point.
- Place FLOOR TILES; take DRAGON HEAD, ROOT, and QUILL (H).
- Place DRAGON HEAD; take CLOVER and HORSESHOE (I).
- Remove cork on EMPTY FLASK; add HEALING HERBS, ROOT, and CLOVER; earn HEALING POTION.
- Go to White Hall.
- Use HEALING POTION; earn MAP OF WORLDS (J).
- Use HORSESHOE, NAILS, and MALLET; take SHOVEL, MACHETE, and VALVE (K).
- Walk down, right.
- Use VALVE; take FLINT AND STEEL, MAGNET, and BOWL (L).
- Place BOWL; play HOP; take BLACKBERRY JUICE (M).
- MAP OF WORLDS and BLACKBERRY JUICE on QUILL; earn WRITING TOOLS.
- Walk down, forward.
- Use WRITING TOOLS; earn SHEET MUSIC (N).
- Place SHEET MUSIC (O).
- Play HOP; earn PORTAL INSTRUCTIONS (P).
- Select (Q).
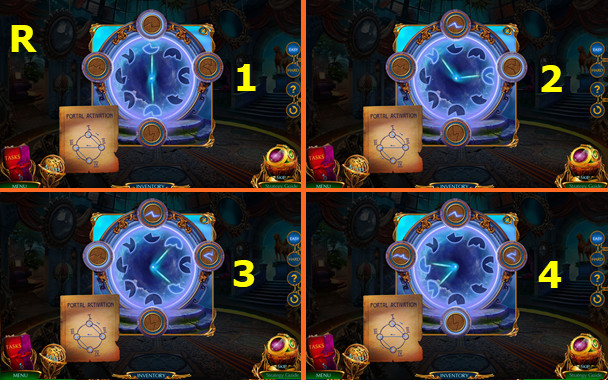
- Place PORTAL INSTRUCTIONS; easy solution 1-4 (R).
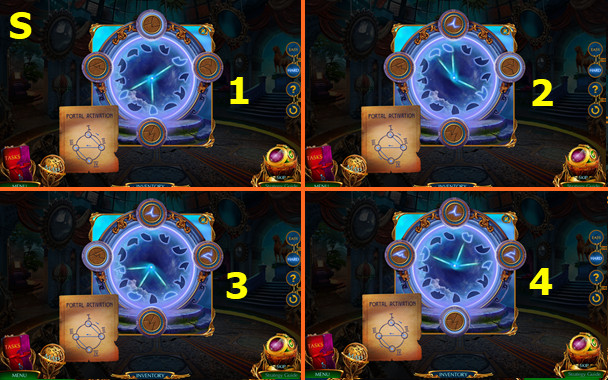
- Hard solution 1-4 (S).
- Go forward.
Chapter 7: Outside Dietrich's Hideout
- Take RUBBER GLOVE (A).
- Use SHOVEL; take CHEWING GUM and INSPECTION MIRROR (B).
- Use MACHETE; take PALM LEAVES (C).
- Select PALM LEAVES; add MAGNET; earn MAGNET ON A ROPE.
- Read note; take 1/2 LOCKPICK; use INSPECTION MIRROR and MAGNET ON A ROPE (D).
- Walk left.
- Take DAMAGED BURNER (E).
- Take BURNER PART and SILVER PLATE (F).
- FLINT AND STEEL and BURNER PART on DAMAGED BURNER; earn LIT BURNER.
- Use LIT BURNER; take SPOON (G).
- Use SPOON; earn DRY POWDER (H).
- Walk down.
- Use SILVER PLATE and DRY POWDER (I).
- Easy solution; place mirrors as shown; select J-Lx2.
- Hard solution; place mirrors as shown; select K-L-K-L-K-L-J.
- Go right.
- Take SAW (N).
- Place CHEWING GUM (O); move (P-O); take CALIPERS (Q).
- Use RUBBER GLOVE; earn GREEN EMERALD (R).
- Use CALIPERS; take 2/2 LOCKPICK and BOTTLE OF WHISKEY (S).
- Walk down.
- Use LOCKPICK; take FLAGS and 1/2 CLAMPS (A).
- Use BOTTLE OF WHISKEY; take BLUE SAPPHIRE (B).
- Go left.
- Place BLUE SAPPHIRE and GREEN EMERALD; take LATCH BUTTON (C).
- Use LATCH BUTTON (D).
- Easy solution (E).
- Hard solution (F).
- Go forward (G).
- Take 2/2 CLAMPS; use SAW; take DIETRICH'S SIGNET (H).
- Take GASOLINE (I).
- Use DIETRICH'S SIGNET (J).
- Play HOP; earn TUNING FORK (K).
- Read note; use TUNING FORK (A).
- Easy solution B-C-D-E.
- Hard solution F-G-H-J-I-Gx2-K-L-M-N.
- Take GUITAR STRING and NAPKIN (O).
- Walk down 2x; go right.
- Use GUITAR STRING and CLAMPS; take CRIME SCENES MAP (P).
- Place FLAGS and CRIME SCENES MAP; select 1-6 (Q).
- Take FUNNEL, CROWBAR, and IDOL EYE (R).
- Remove cap; use FUNNEL and GASOLINE; take CHARGED BATTERY (S).
- Go to Attic.
- Place IDOL EYE; take LEVER (A).
- Use CROWBAR; take BOOK (B).
- Go down.
- Place BOOK; use NAPKIN; earn MAGIC CAPSULE. Take SOLVENT (C).
- Use SOLVENT; take ABSORBING DEVICE SCHEMATIC (D).
- Go forward.
- Place ABSORBING DEVICE SCHEMATIC (E), MAGIC CAPSULE (F), LEVER (G), and CHARGED BATTERY (H).
- Select (G); take ABSORBING DEVICE.
- Go to Dietrich's Hideout.
- Use ABSORBING DEVICE (I).
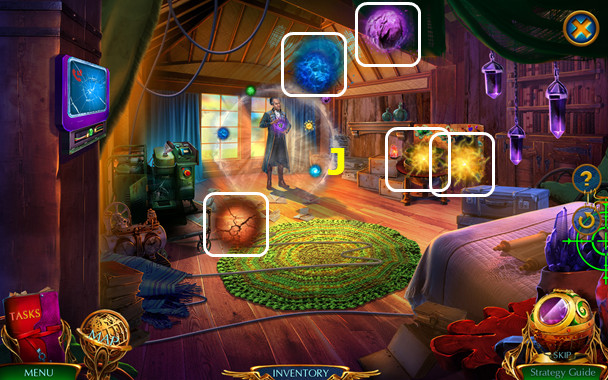
- Shoot the 5 spheres (J).
- Tip: chase the spheres to the outer edges to limit movement.
- Congratulations! You have completed Labyrinths of the World: Lost Island!
Created at: 2019-02-08