

Walkthrough Menu
- General Tips
- Chapter 1: The Dig Site
- Chapter 2: The Ice Ruins
- Chapter 3: Arren's House
- Chapter 4: The General's Office
- Chapter 5: The Bone Cemetery
- Chapter 6: The Dragon Cave
- Chapter 7: The Top of the Pyramid
General Tips
- This is the official guide for Labyrinths of the World: Secrets of Easter Island.
- Hidden-object puzzles are referred to as HOPs. This guide will not show screenshots of the HOPs, however, it will mention when an HOP is available and the inventory item you'll collect from it.
- This guide will not mention each time you have to zoom into a location; the screenshots will show each zoom scene.
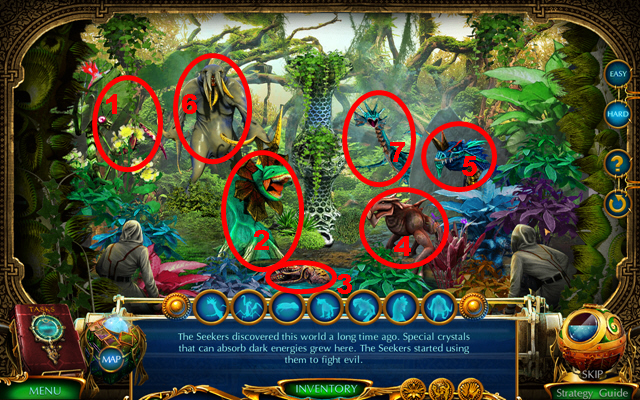
Chapter 1: The Dig Site
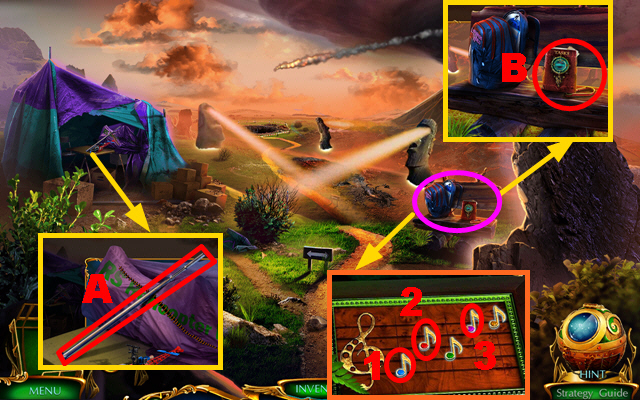
- Select anything.
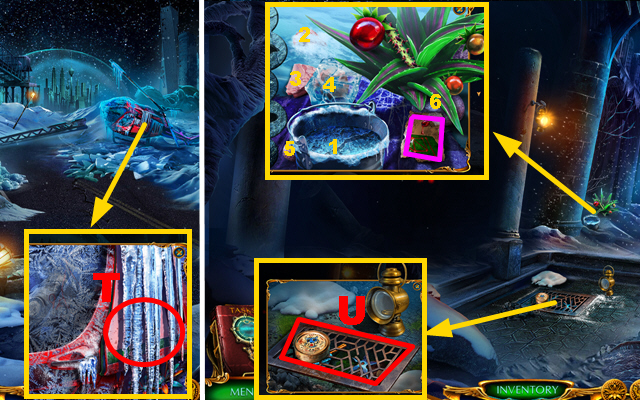
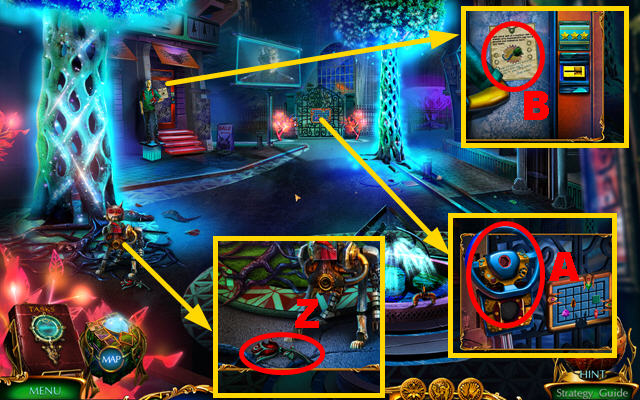
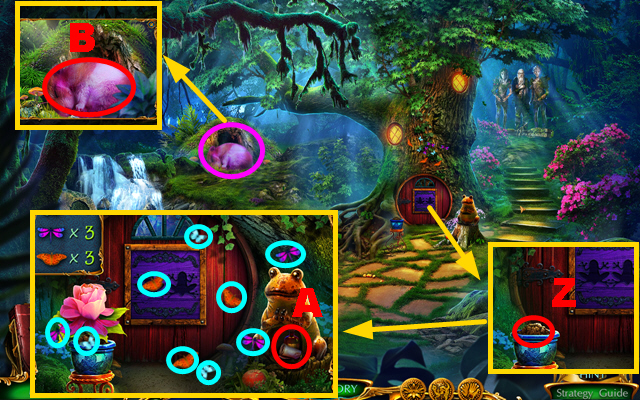
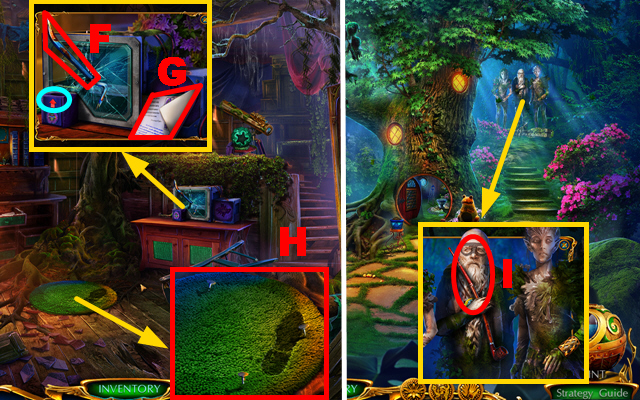
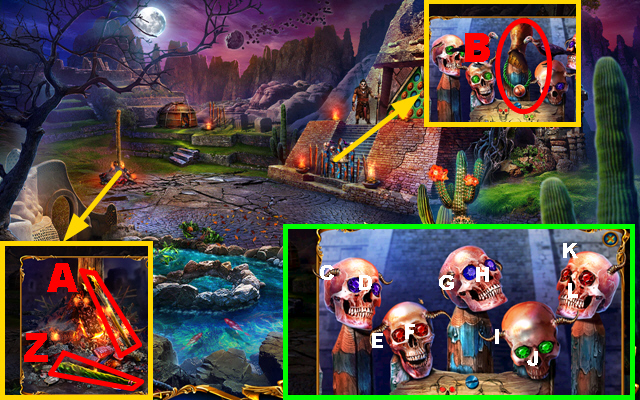
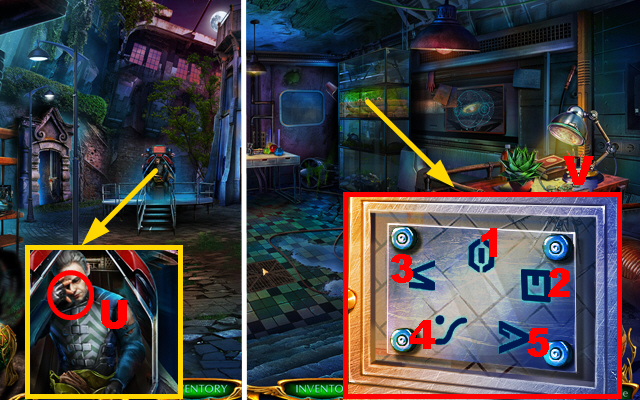
- Take the POLE (A), journal, and CARABINER (B).
- Play the HOP (purple).
- Play the mini-game.
- Easy solution: (Orange).
- Hard solution: 1-3.
- Receive the SCISSORS.
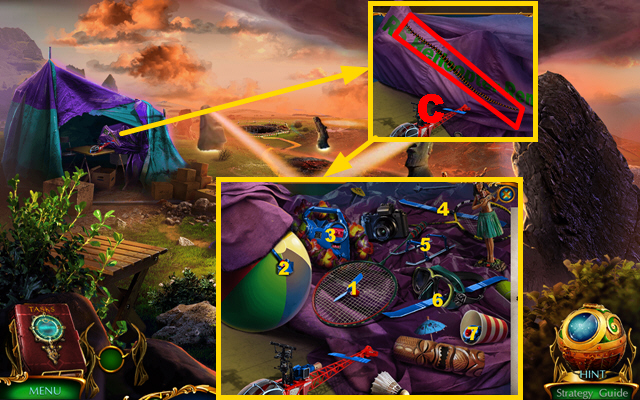
- Use the SCISSORS (C).
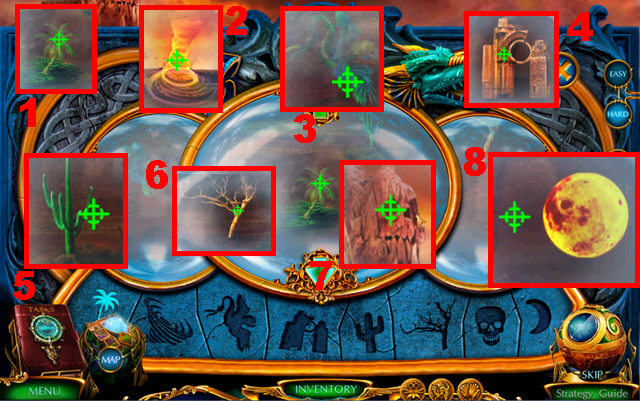
- Collect items 1-7.
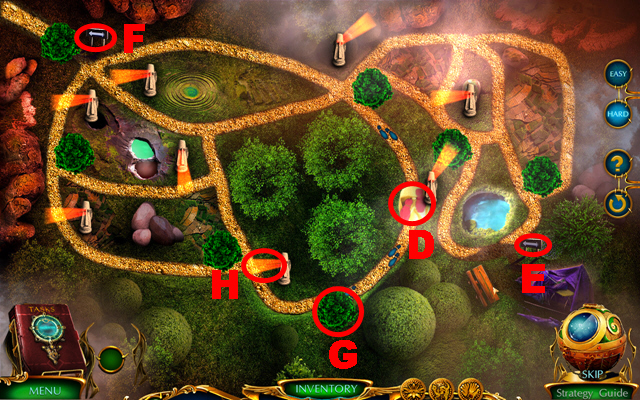
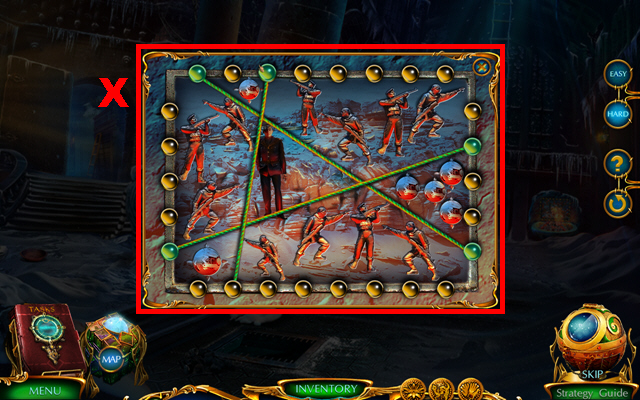
- Play the mini-game.
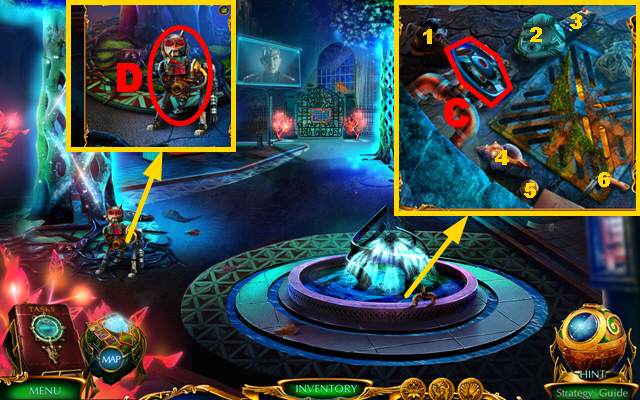
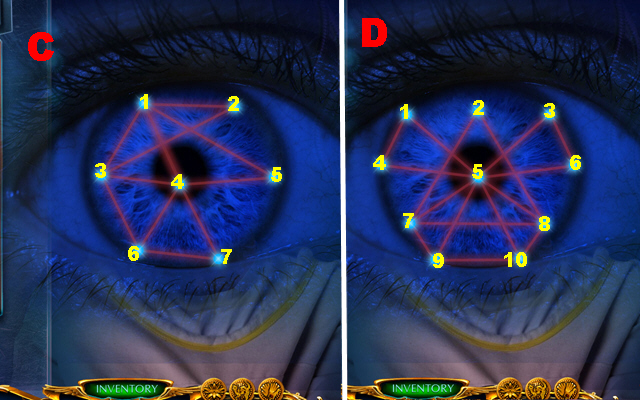
- Solution: Guide the feet (D) from sign to sign (E-F) by hiding behind bushes (G) and avoiding the beams (H).
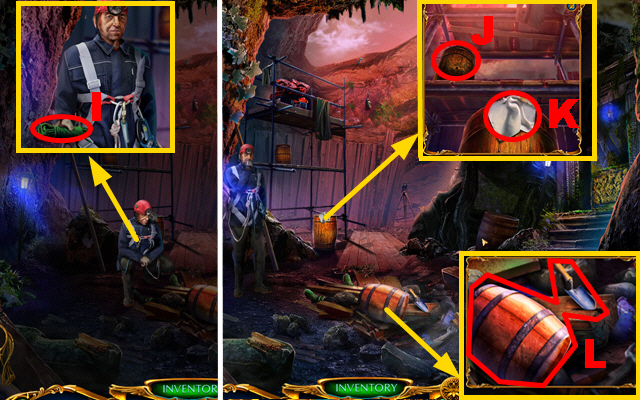
- Remove the wooden boards.
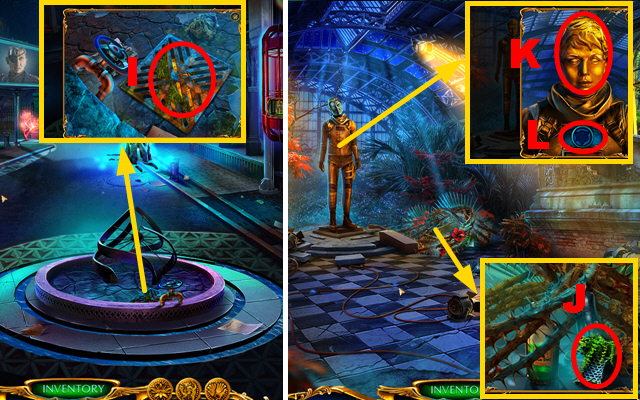
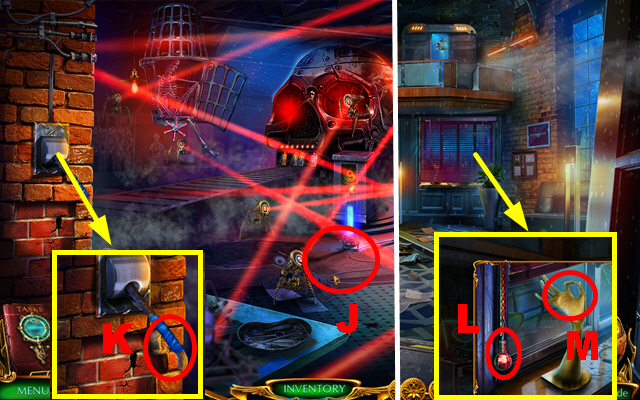
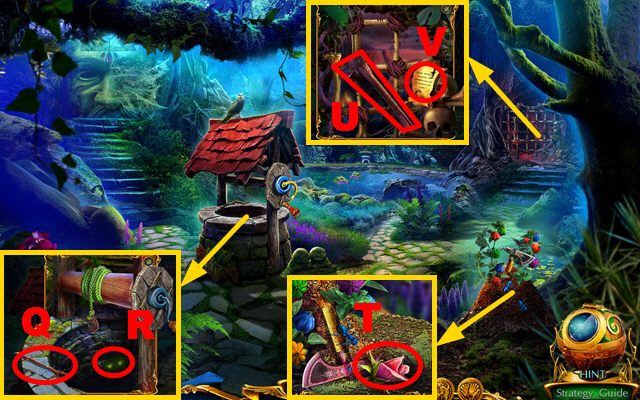
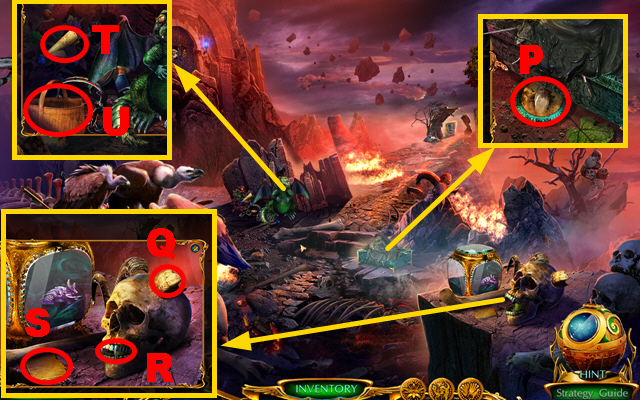
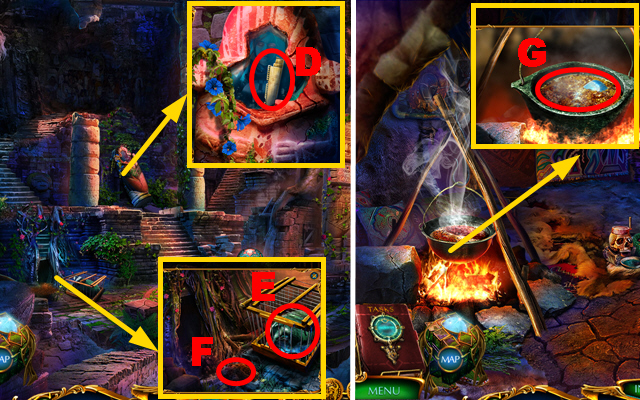
- Take the ROPE (I).
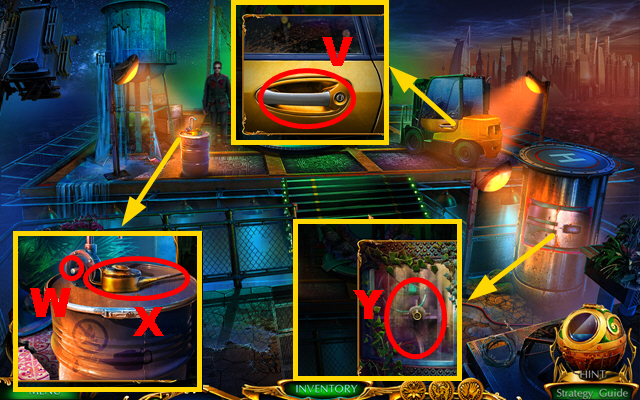
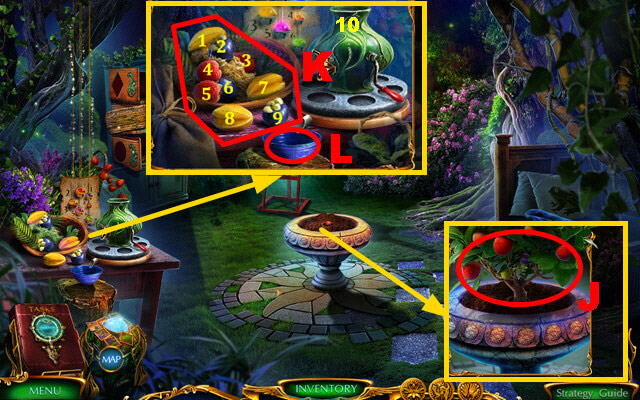
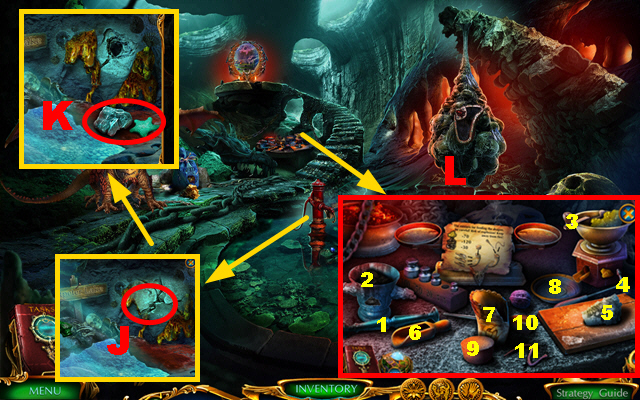
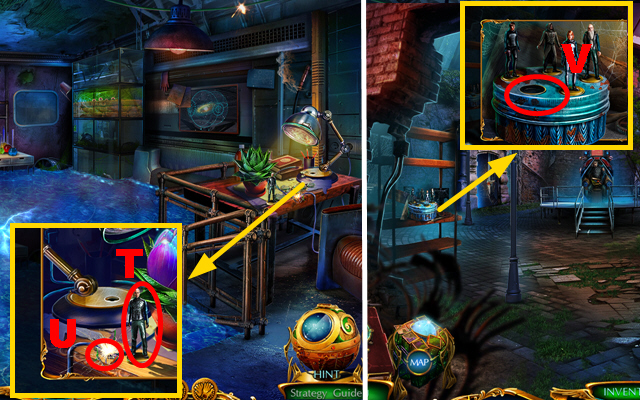
- Use the POLE (J) to collect BARREL 1/2; take the HANDKERCHIEF (K).
- Place the CARABINER on the ROPE; receive the CARABINER ON ROPE.
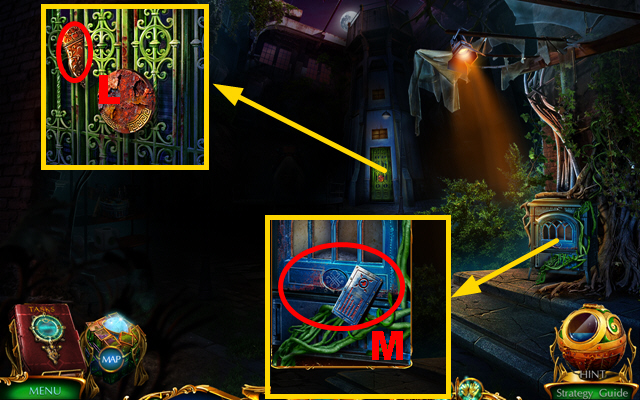
- Take the TROWEL and BARREL 2/2 (L).
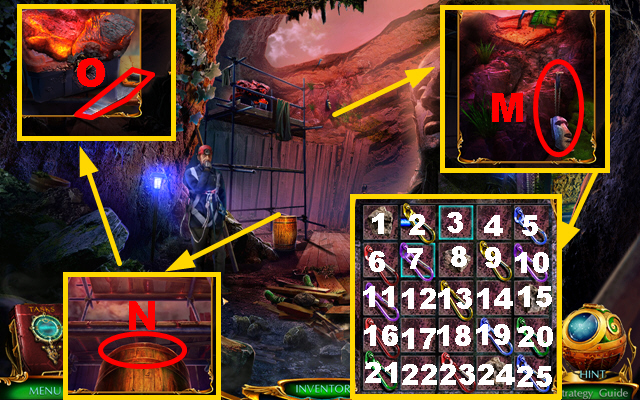
- Take the STONE EMBLEM and place the CARABINER ON ROPE (M).
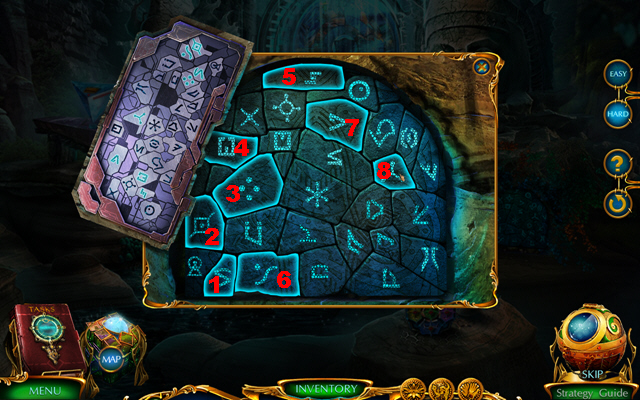
- Play the mini-game.
- Easy solution: 4-5-10-9-14-13-8-7-6-11-12-17-16-21-22-23-24-25-20-19.
- Hard solution: 3-4-5-10-9-14-13-12-7-6-11-16-21-22-23-18-19-20-25.
- Receive the VEST.
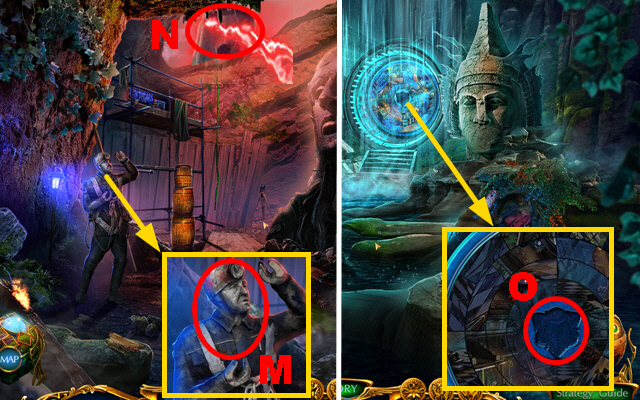
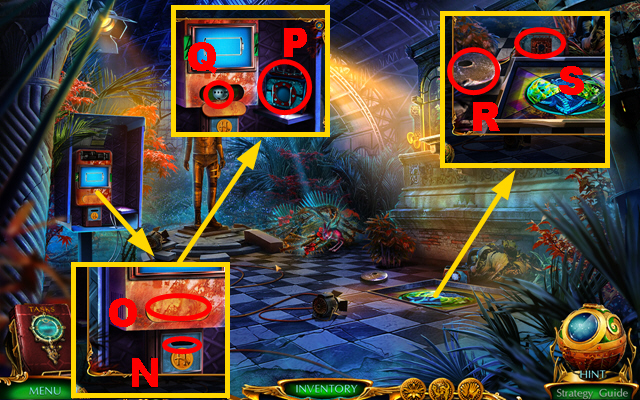
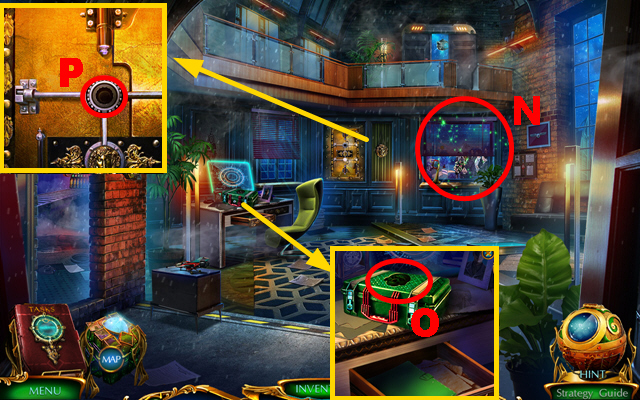
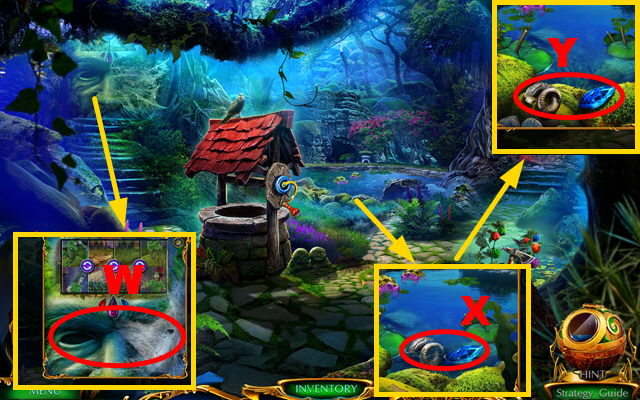
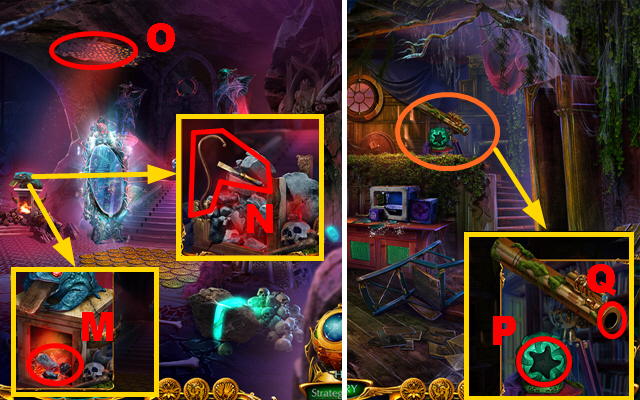
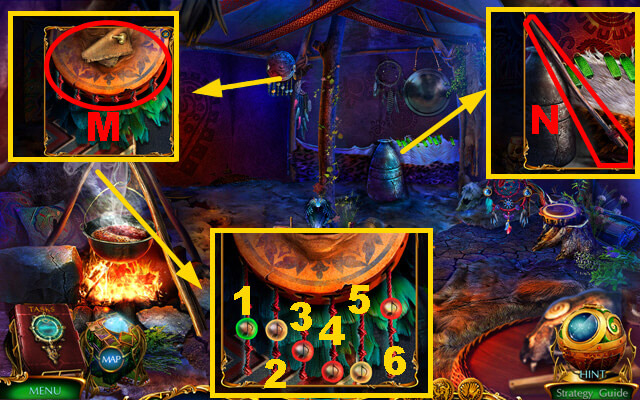
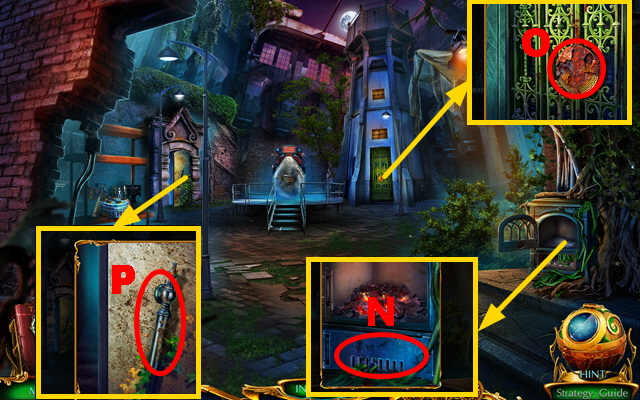
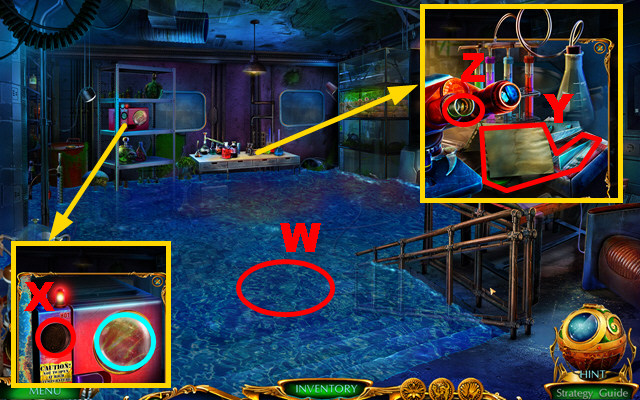
- Place 2 BARRELS (N); take the SAW (O).
- Take the MATCHES from the VEST.
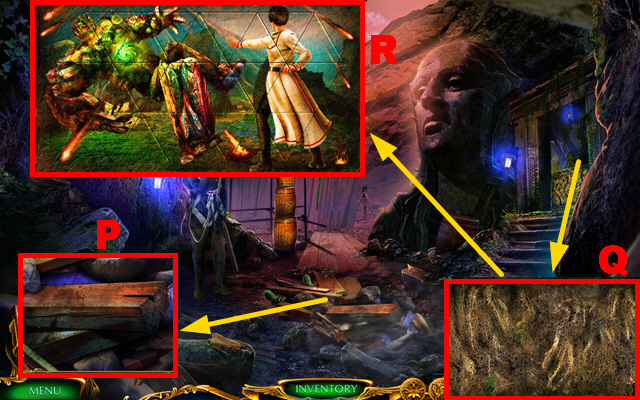
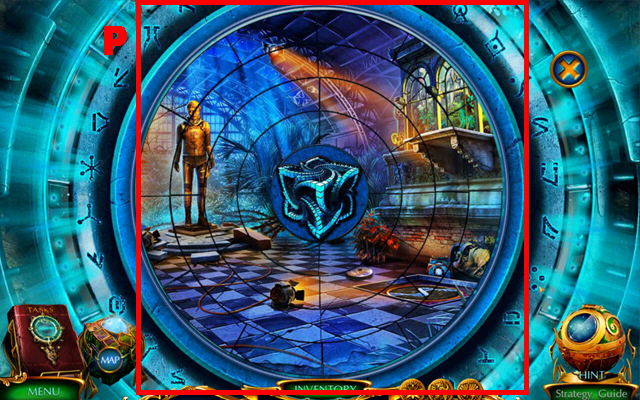
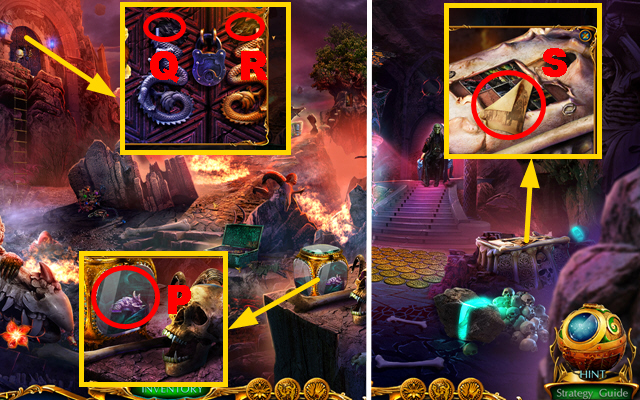
- Use the SAW and take the CAMERA CASE (P).
- Examine anything.
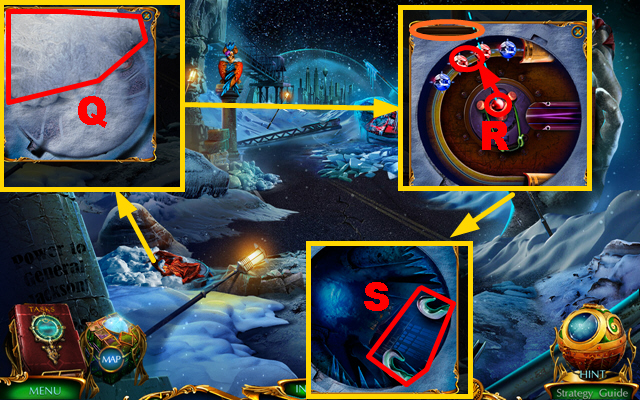
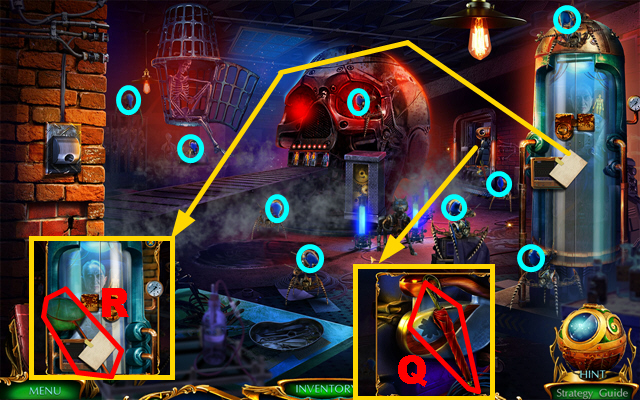
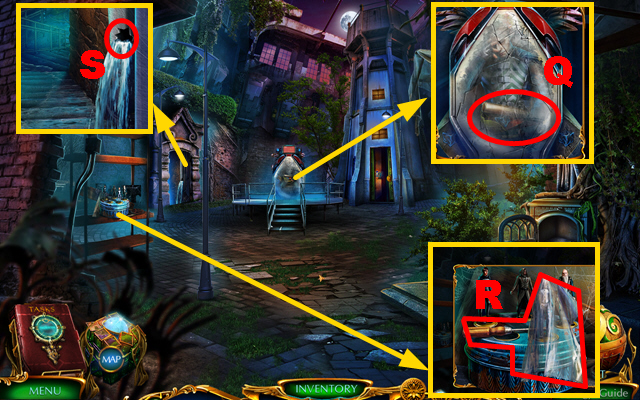
- Use the MATCHES (Q).
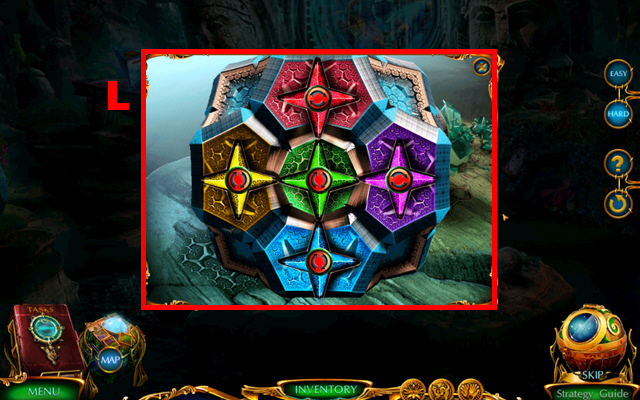
- Play the mini-game.
- Solution: (R).
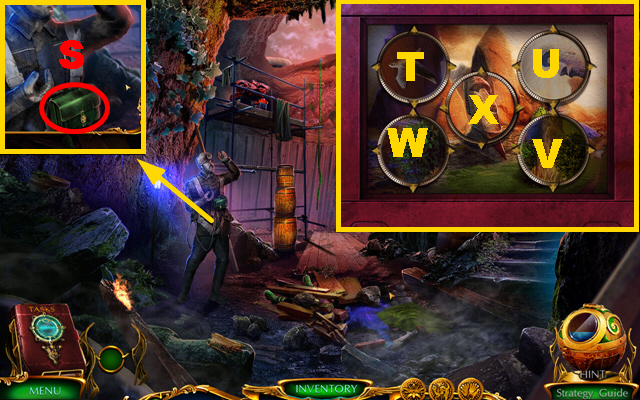
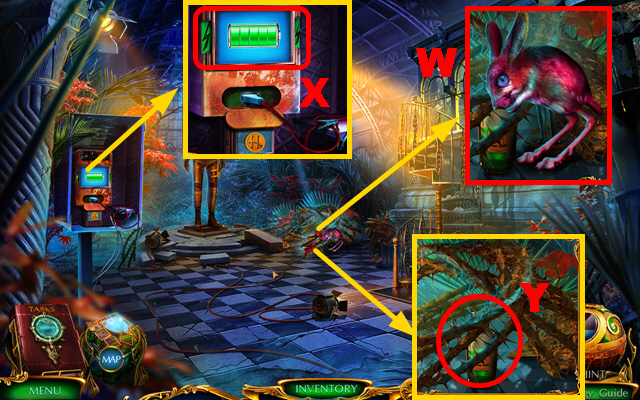
- Take the BAG (S).
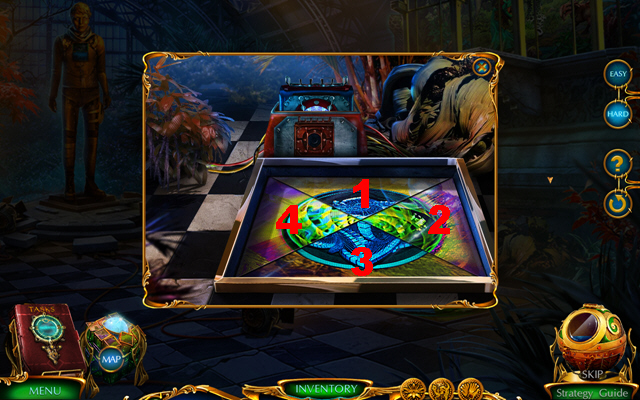
- Place the STONE EMBLEM on the CAMERA CASE.
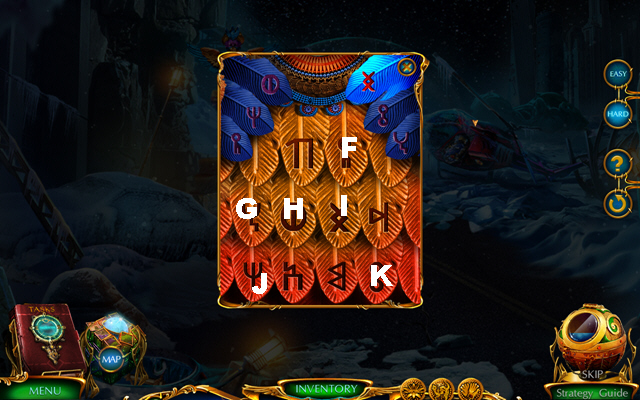
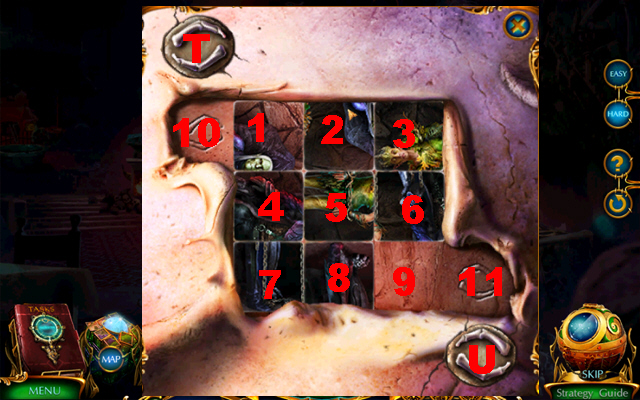
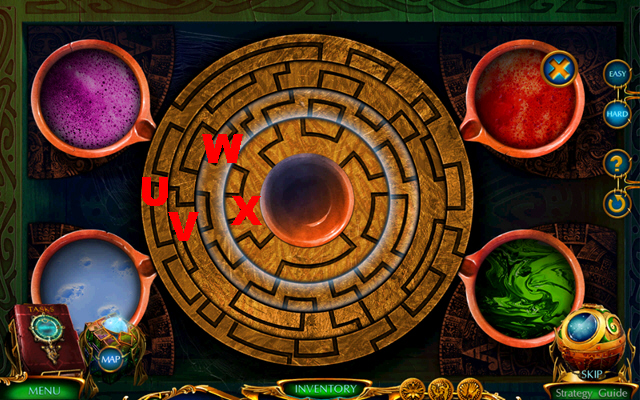
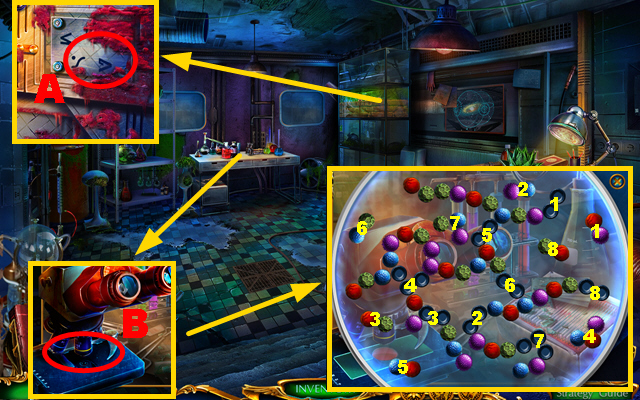
- Play the mini-game.
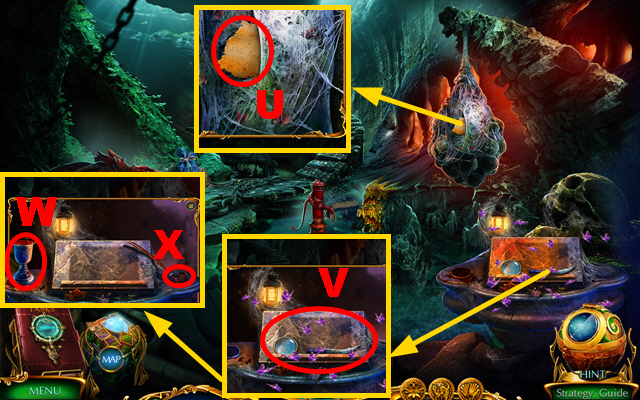
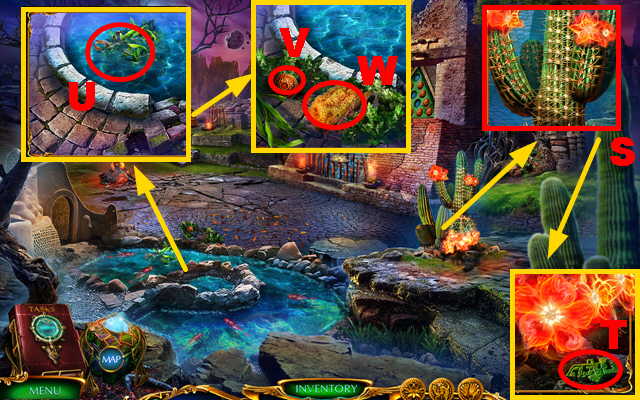
- Easy solution: Tx2-W-V-U.
- Hard solution: Tx2-W-Vx2-U-Xx2-V-Ux3.
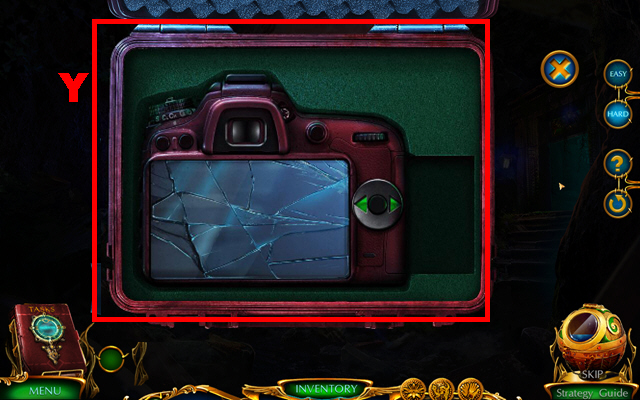
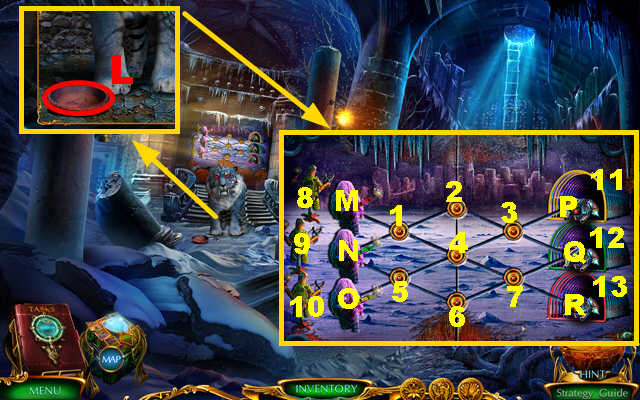
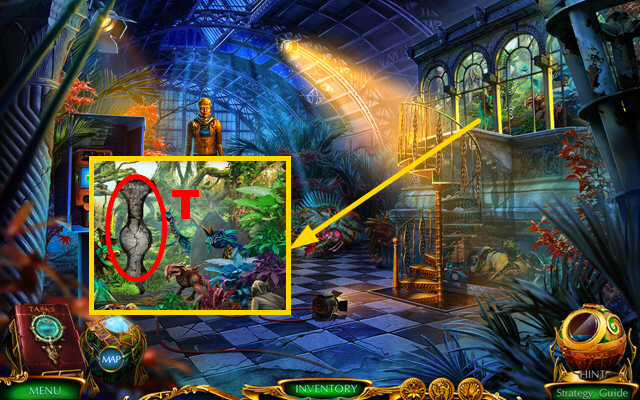
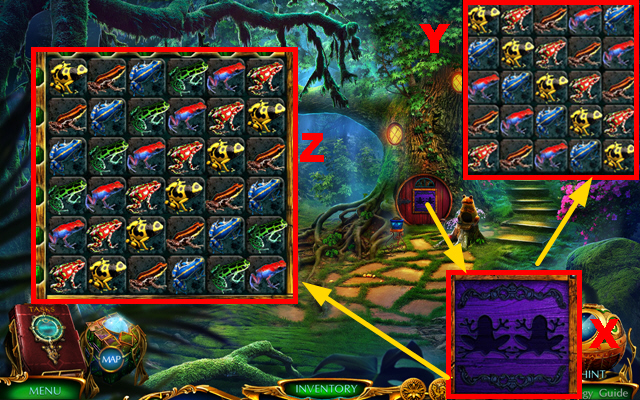
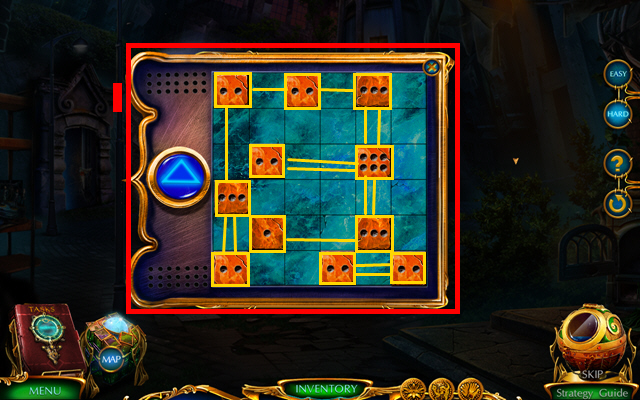
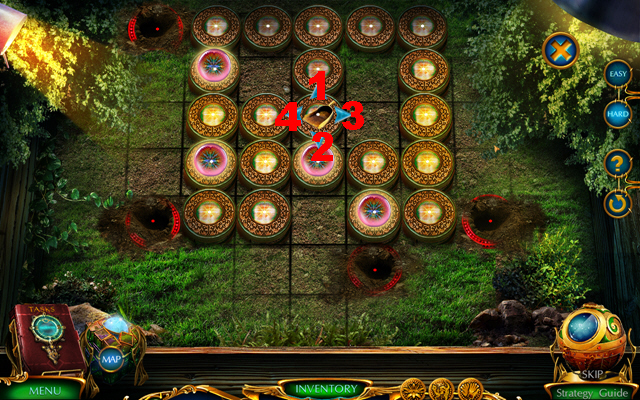
- Play the mini-game.
- Solution: (Y).
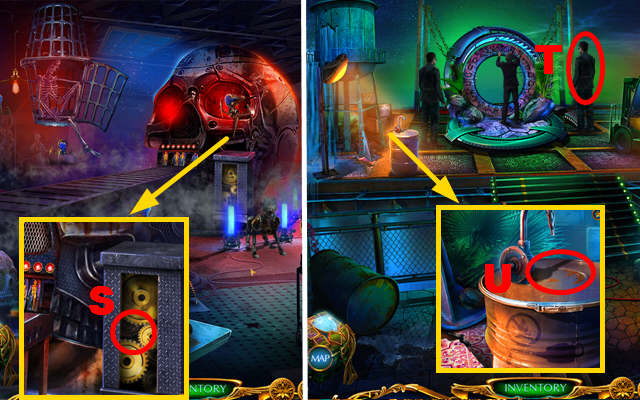
- Push the button 6 times and take the BATTERY.
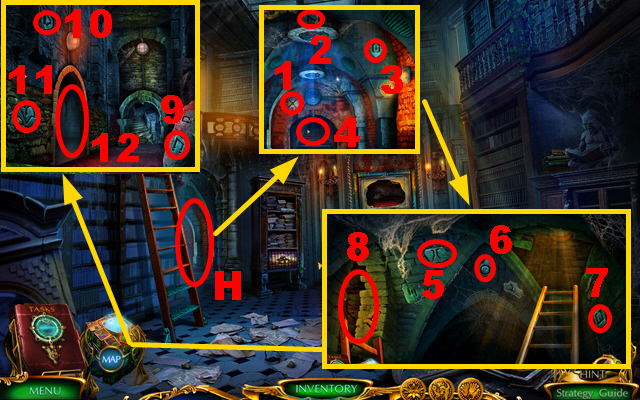
- Enter the Cave.
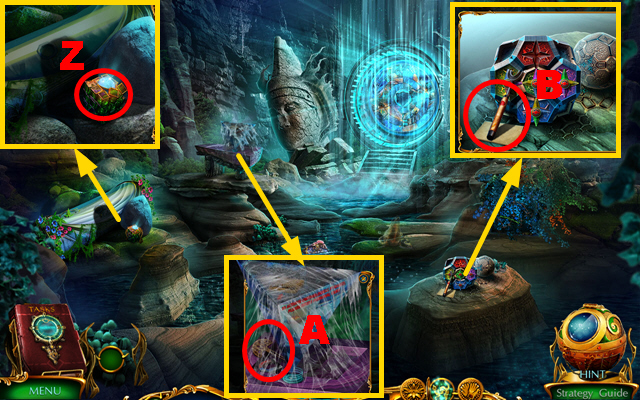
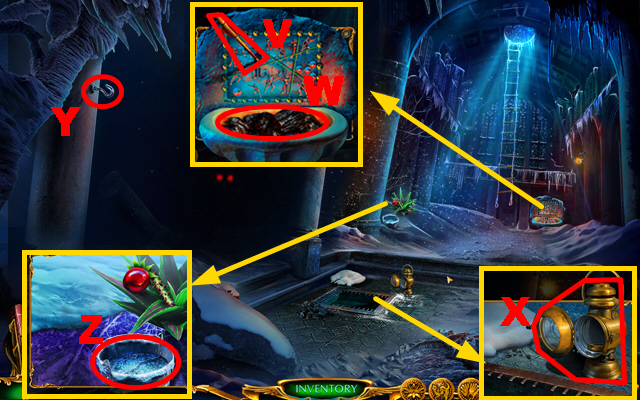
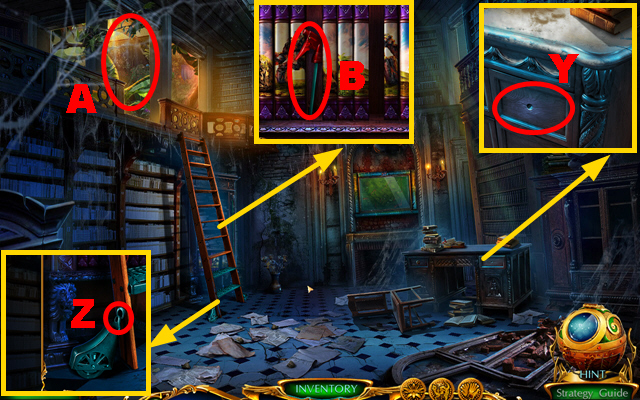
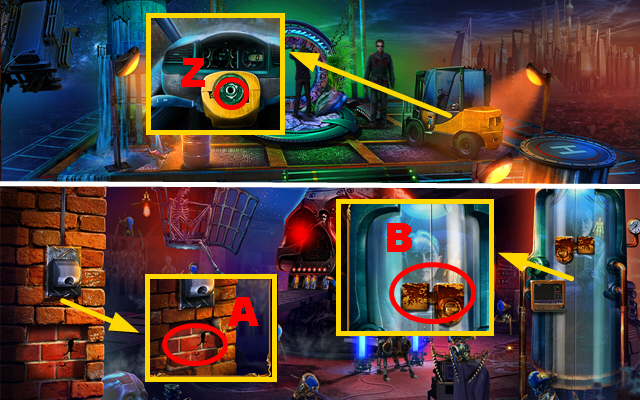
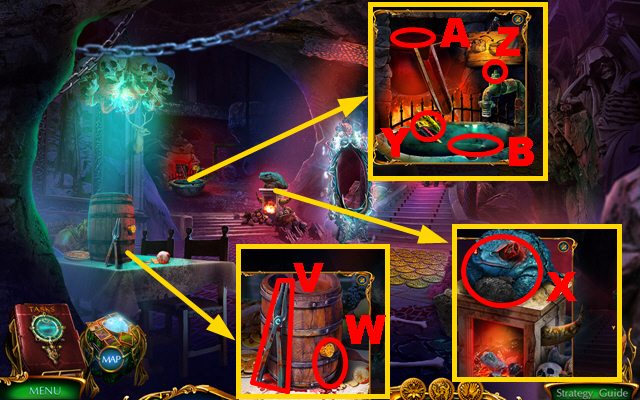
- Take the map (Z).
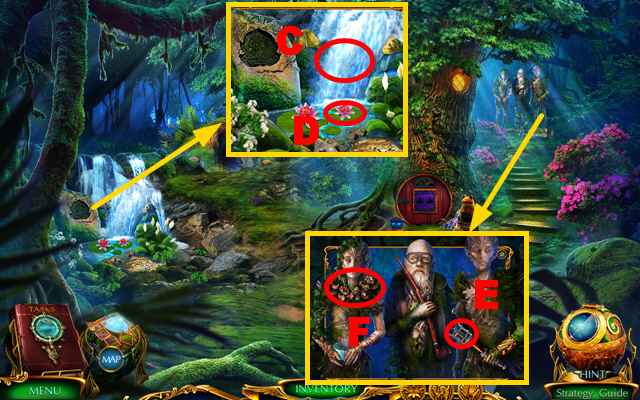
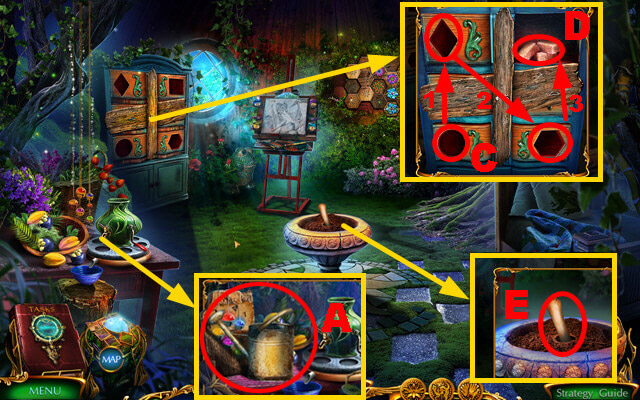
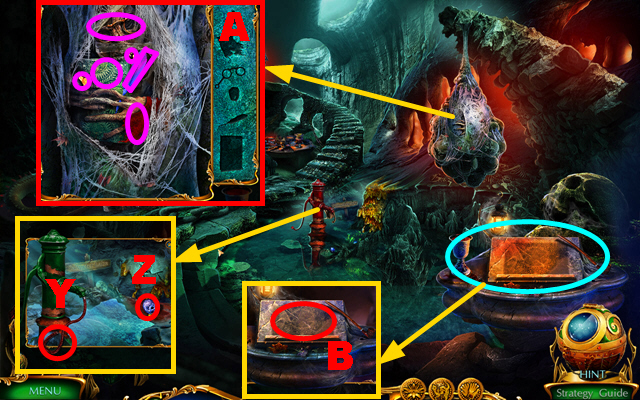
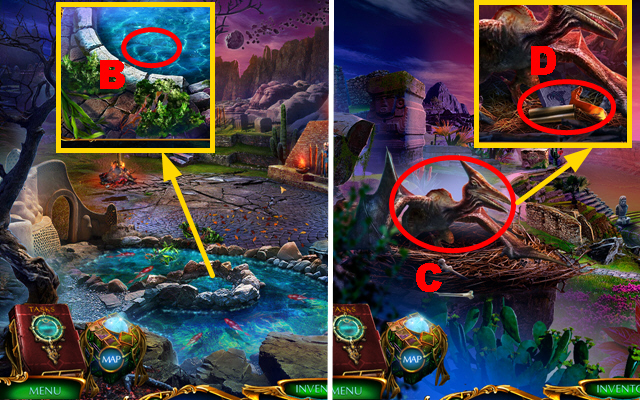
- Use the HANDKERCHIEF, take the HAIRPIN, and MAGNET (A).
- Insert the HAIRPIN into the BAG; take the BROKEN FLASHLIGHT, WIRE BRUSH, and HERBICIDE.
- Take the RETRACTED POLE and note (B).

- Take the VINE, use the HERBICIDE, and remove the leaves (C).
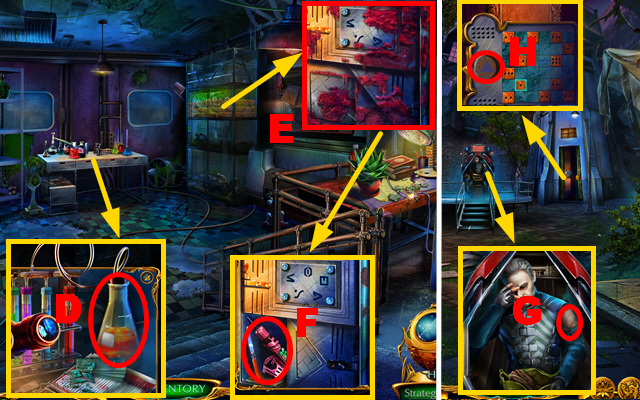
- Select the RETRACTED POLE, place the MAGNET and VINE on it; receive the EXTENDED CANE.
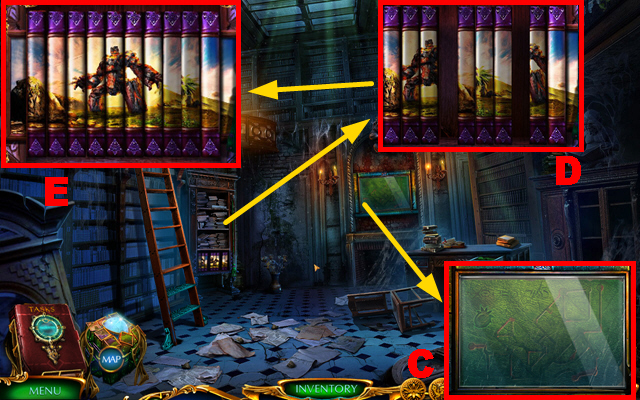
- Use the EXTENDED CANE (D); receive the DIRTY METAL PLATE.
- Apply the WIRE BRUSH to the DIRTY METAL PLATE; receive the CLEAN METAL PLATE.
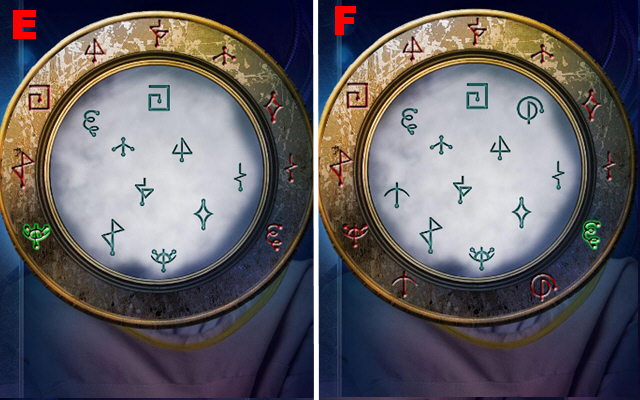
- Place the CLEAN METAL PLATE (E).
- Play the mini-game.
- Easy solution: 1-5.
- Hard solution: 1-8.
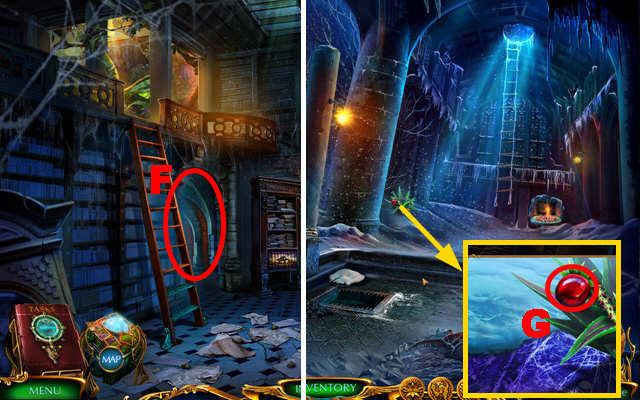
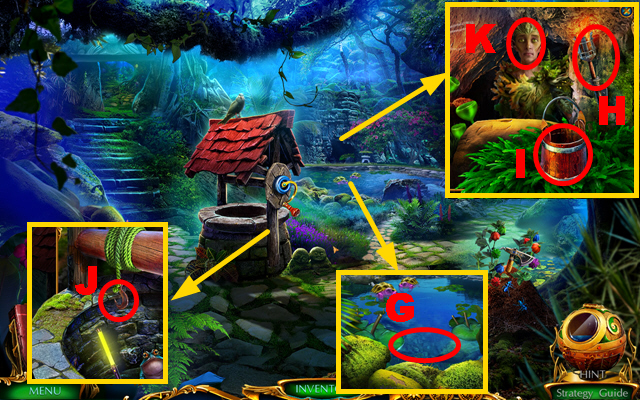
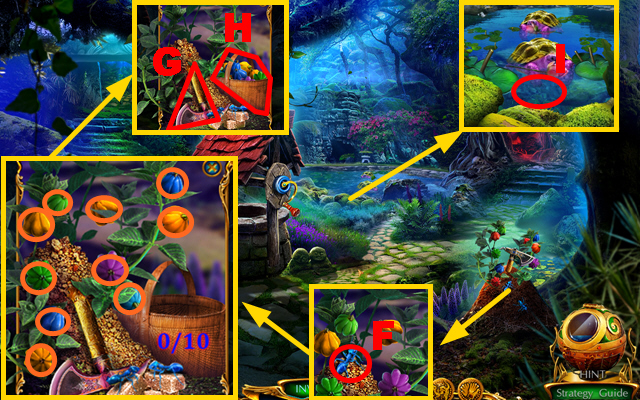
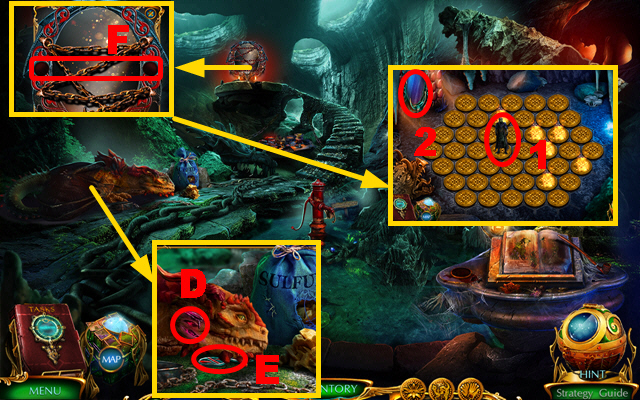
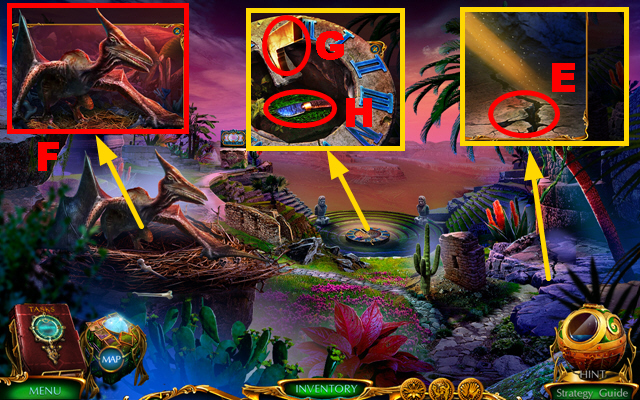
- Take the ROPE LADDER, PERSONAL CARD, and CROWBAR.
- Place the PERSONAL CARD (F).
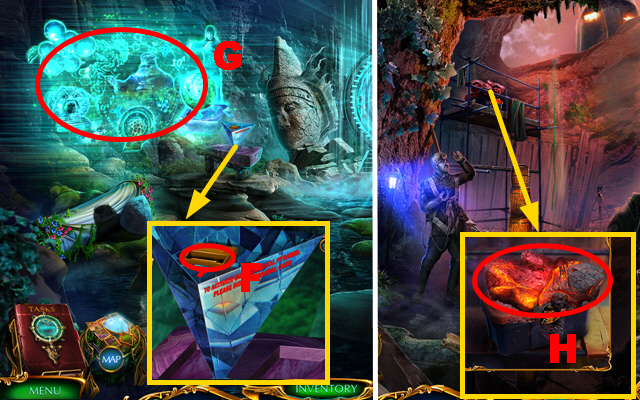
- Play the HOP (G); receive the CAPSULE ACTIVATOR.
- Walk down.
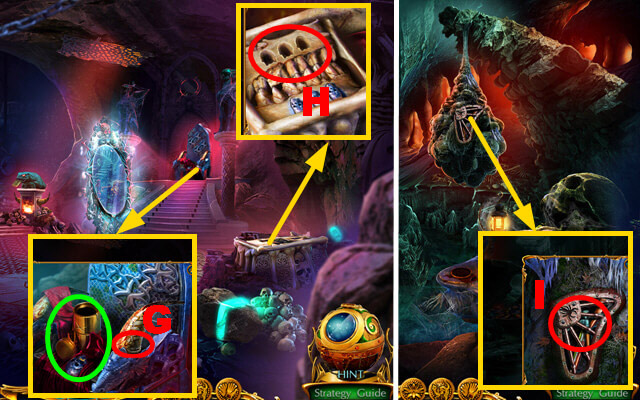
- Use the CROWBAR, take the CANDLE, DUCT TAPE, and LIGHTBULB (H).
- Place the BATTERY and LIGHTBULB on the BROKEN FLASHLIGHT; receive the FLASHLIGHT.
- Go right.
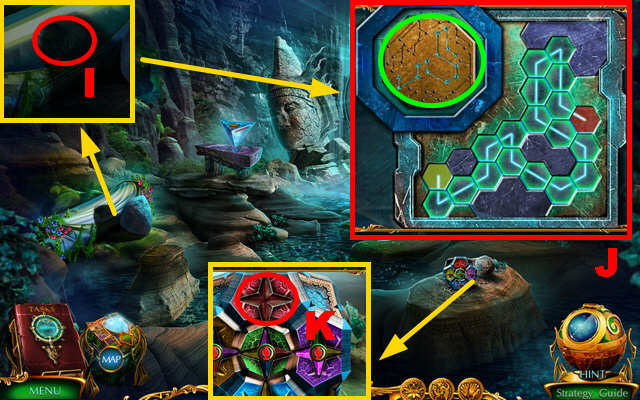
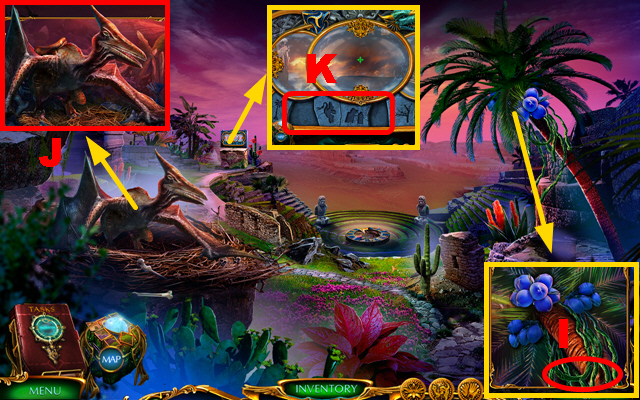
- Use the FLASHLIGHT (I); place the CAPSULE ACTIVATOR (green).
- Play the mini-game.
- Solution: (J).
- Take the FRACTAL KEY.
- Place the FRACTAL KEY (K).
- Play the mini-game.
- Solution: (L).
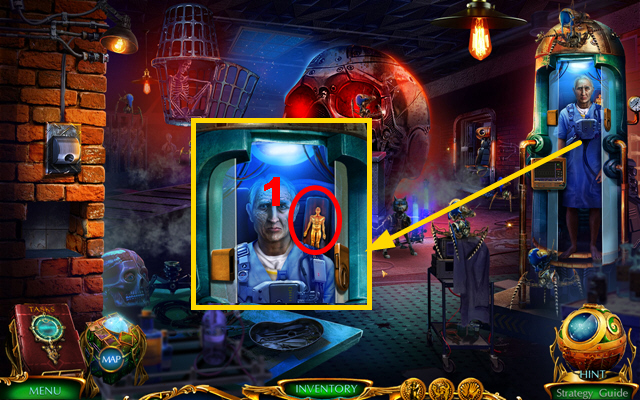
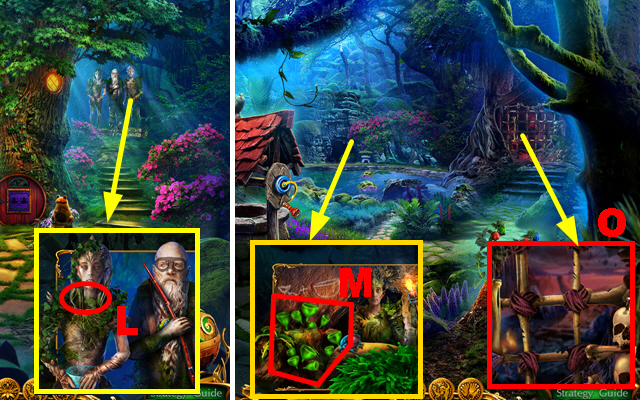
- Take the LIFE SPHERE or DEATH SHERE.
- Walk down.
- Use the LIFE SPHERE (M) or DEATH SPHERE (N); take the SEEKER'S AMULET.
- Go right.
- Place the SEEKER'S AMULET (O).
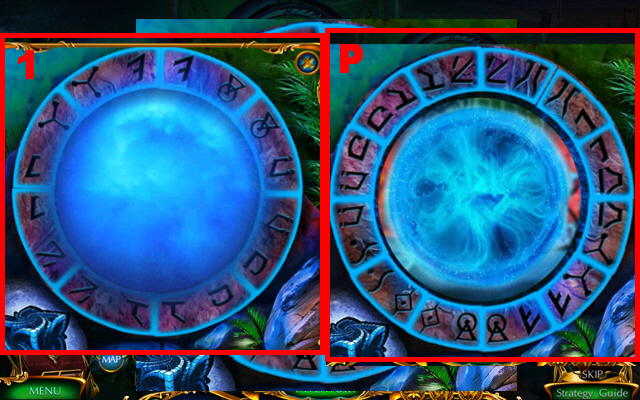
- Play the mini-game.
- Solution: (P).
- Make a choice; receive the GAS TORCH.
Chapter 2: The Ice Ruins
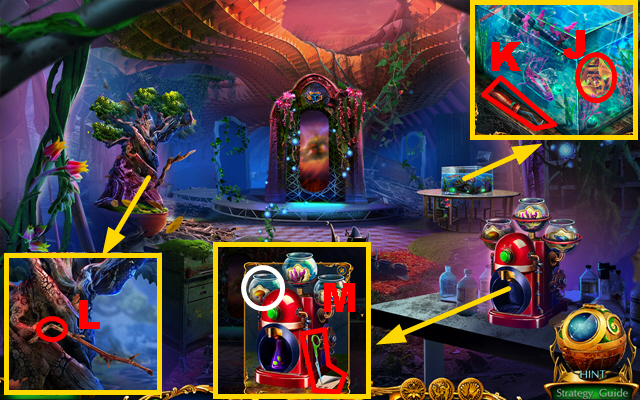
- Use the TROWEL, take the HACKSAW, and place the SEEKER'S AMULET (Q).
- Play the mini-game.
- Solution: Shoot matches of 3 or more identically colored orbs (R) until the bar is full (orange).
- This puzzle is randomized.
- Place the ROPE LADDER (S).
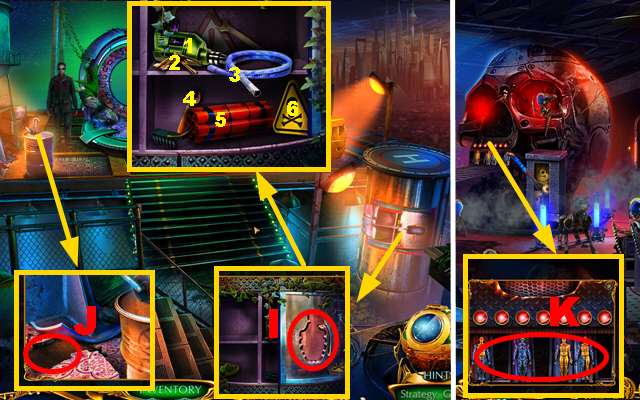
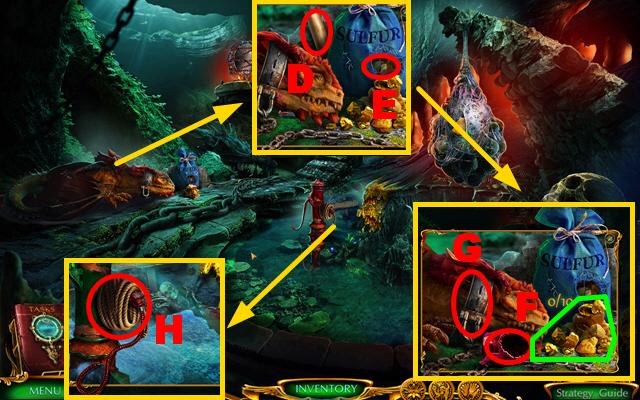
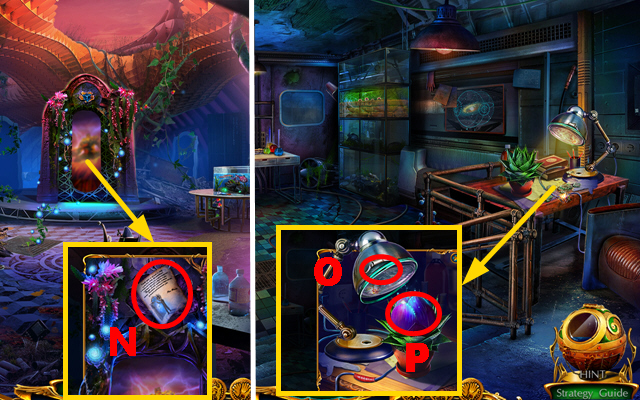
- Use the GAS TORCH, open the compartment, take the ROPE, and GASOLINE (T).
- Enter the Old Temple.
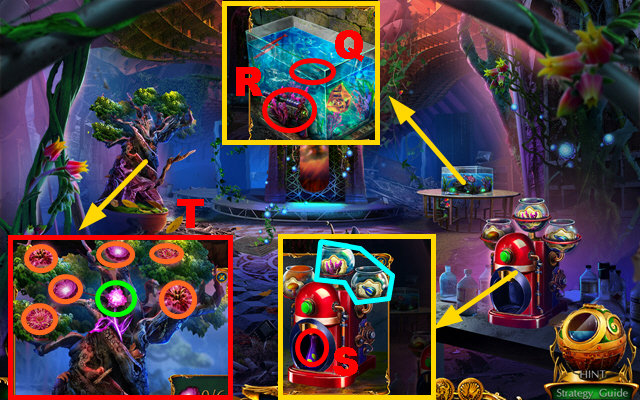
- Take the CANNED FISH, use the HACKSAW, take the SCOOP, and THROWING STAR (U).
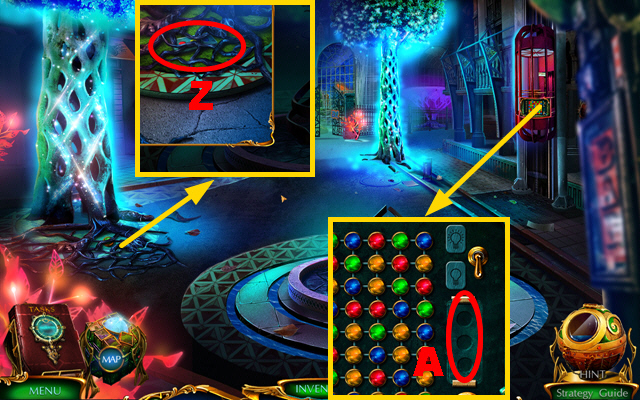
- Take the note (purple); select items 1-2-2-3-4-4-5-6-6 to receive the STONES.
- Take the ARROW (V); use the GASOLINE, CANDLE, receive the LIT CANDLE, place the STONES, and use the SCOOP to receive the HOT STONES (W).
- Open the lantern, place the LIT CANDLE in it, close it, and take the LANTERN (X).
- Place the LANTERN (Y).
- Use the HOT STONES and take the BUCKET OF WARM WATER (Z).
- Climb up.
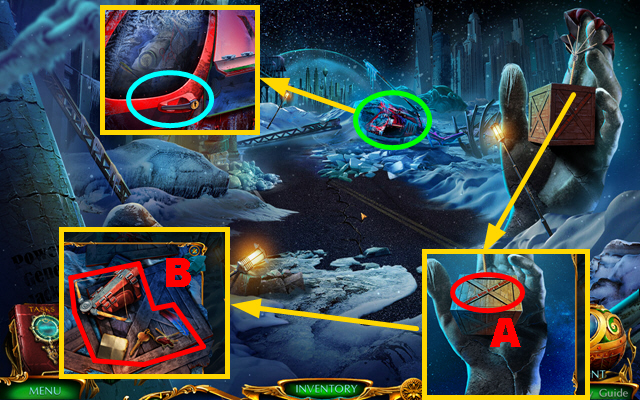
- Throw the THROWING STAR (A).
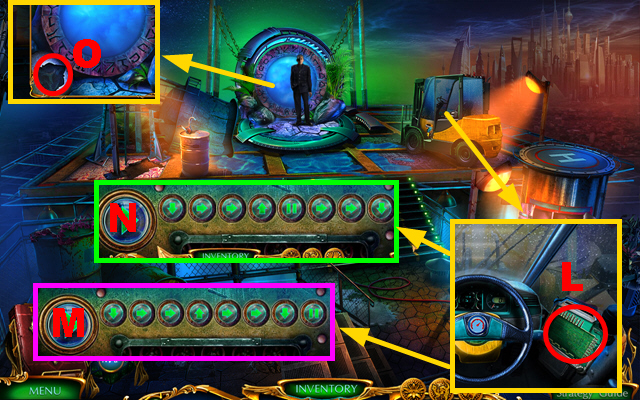
- Take the CROSSBOW, note, HELICOPTER KEY, and METAL FEATHER 1/2 (B).
- Use the BUCKET OF WARM WATER, insert the HELICOPTER KEY (blue), and play the HOP (green); receive the MASK HALF.
- Place the ARROW and ROPE on the CROSSBOW; receive the LOADED CROSSBOW.
- Climb down.
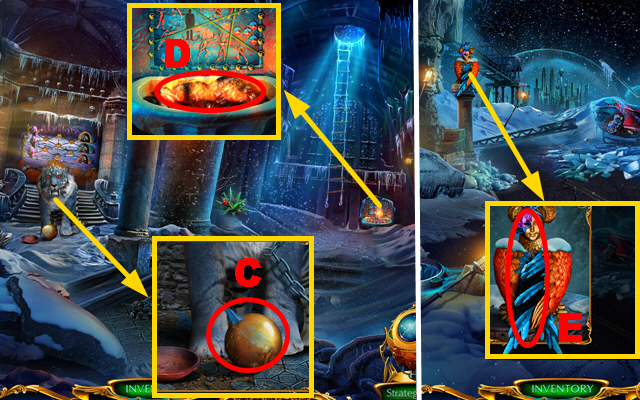
- Shoot the LOADED CROSSBOW (C); receive the WAX BALL.
- Place the WAX BALL (D); receive METAL FEATHER 2/2.
- Climb up.
- Place the MASK HALF, 2 METAL FEATHERS, take the note, and CAN OPENER (E).
- Play the mini-game.
- Easy solution: F-H-I-J-H-K-I-F-J-G-K-H.
- Hard solution: J-H-K-I-J-K-H-I-F-F-J-G-I-K-H.
- Take the TONGS and SCREWDRIVER.
- Use the CAN OPENER on the CANNED FISH; take the FISH.
- Climb down.
- Place the FISH (L).
- Play the mini-game.
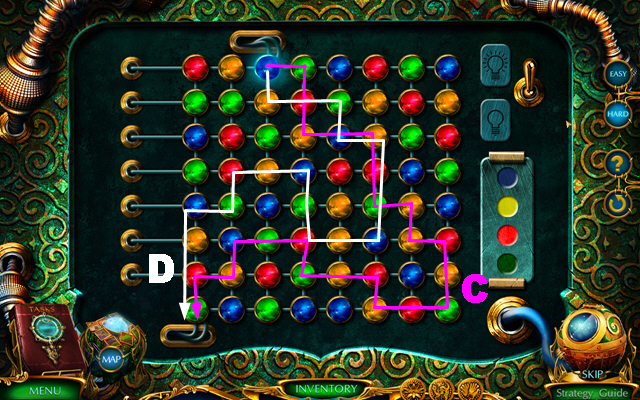
- Easy solution: (M-1)-(Q-7-6)-(P-3-12-7)-(M-2-3-11)-(N-1-2)-(P-12)-(Q-7)-(O-5-9-1-8)-(Q-6-5-10)-(P-7-6)-(N-3-12)-(O-1-2-3)-(P-5-9-1-8)-(Q-5-9)-(O-2)-(N-3)-(R-7-6-5-10)-(N-12)-(O-3-4-7-13).
- Hard solution: (M-1)-(Q-7-6)-(P-3-12-7)-(M-2-3-11)-(N-1-2)-(P-12)-(Q-7)-(O-5-9-1-8)-(Q-6-5-10)-(P-7-6)-(N-3-12)-(O-1-2-3)-(P-5-9-1-8)-(Q-5-9)-(O-2)-(N-3)-(R-7-6-5-10)-(N-12)- (M-3-4-7-13)-(O-3-11).
- Enter the Library Ruins.
- Collect branches 1-5; take the BRANCHES (S).
- Place the DUCT TAPE on the BRANCHES; receive the BROOM.
- Use the TONGS (T); receive the GENERAL FIGURINE.
- Use the BROOM, take the note, OIL CAN, and LADDER WHEEL (U).
- Place the LADDER WHEEL (V).
- Go back.
- Place the GENERAL FIGURINE (W).
- Play the mini-game.
- Solution: (X).
- Take the DRAWER KNOB and BOOK 1/2.
- Go left.
- Place the DRAWER KNOB, take the GLASS CUTTER, and SCREW (Y).
- Use the SCREW and SCREWDRIVER (Z).
- Play the HOP (A); receive the PRUNERS.
- Take the SPRAY BOTTLE HEAD (B).
- Use the GLASS CUTTER, take the FADED MAP, BOOK 2/2, and WRENCH (C).
- Place 2 BOOKS (D).
- Play the mini-game.
- Solution: (E).
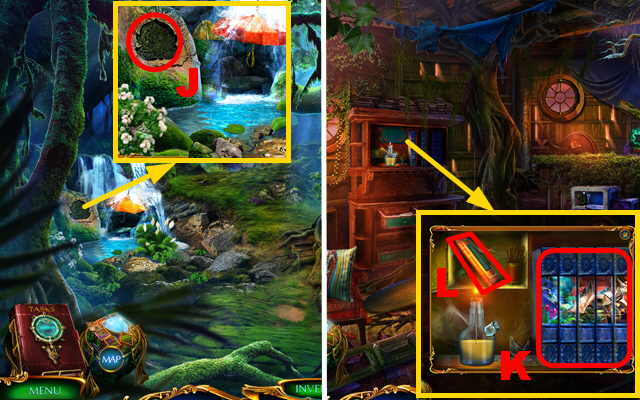
- Inspect the passage (F).
- Go back.
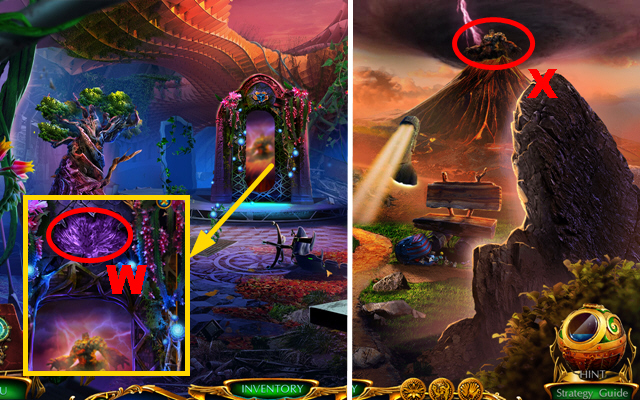
- Use the PRUNERS (G); receive the BERRY.
- Place the BERRY on the FADED MAP; receive the MAP.
- Go left.
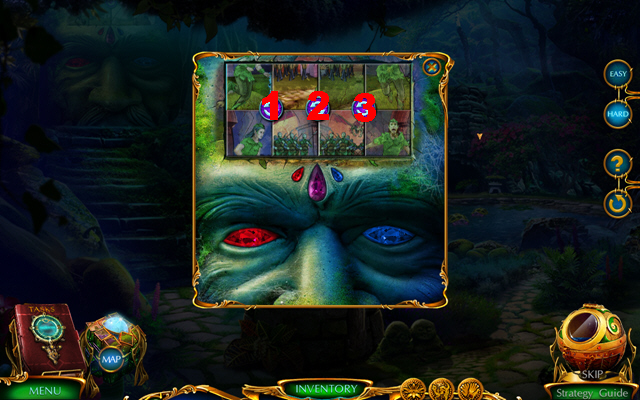
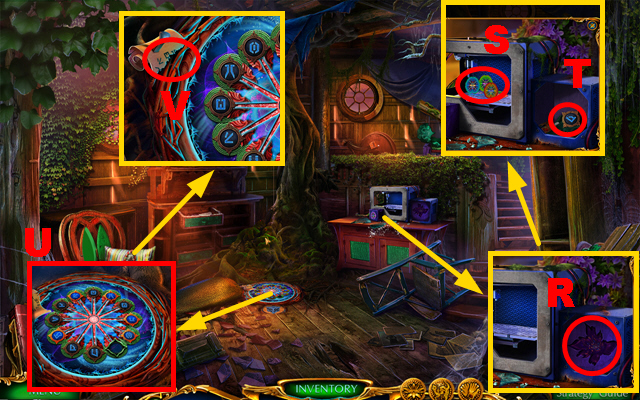
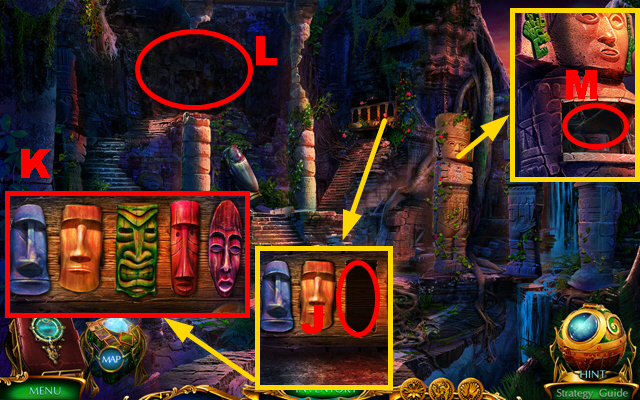
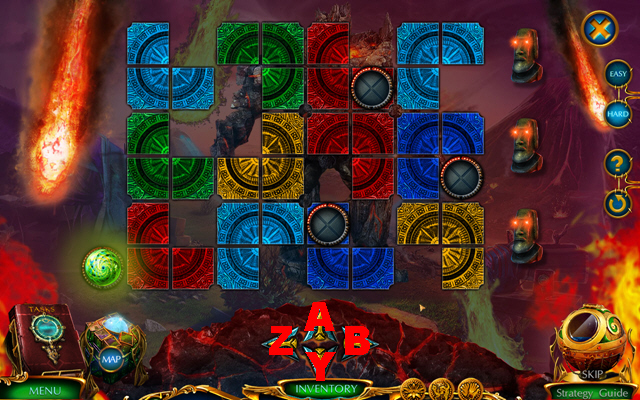
- Use the MAP (H).
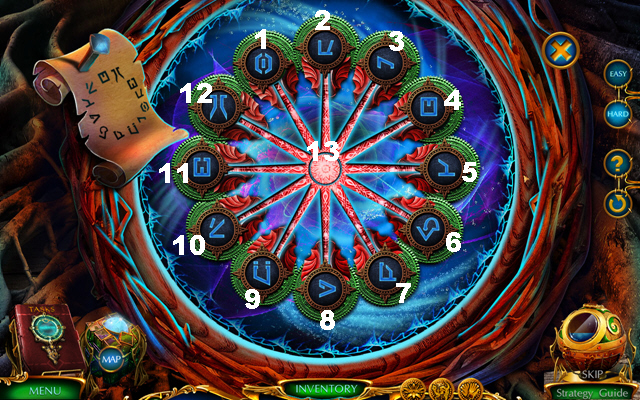
- Play the mini-game.
- Solution: 1-12.
- For each selected stone, answer correctly; the order of questions is randomized.
- Correct answers: Free different worlds from evil beings, crystals, with the help of amulets, fractals, rest in an anabiotic capsule, destroyed it with bombs, to grow crystals, with a crystal, Robin, justice and freedom, Takh Taash, a fire, fish, 10000 years, tiger.
Chapter 3: Arren's House
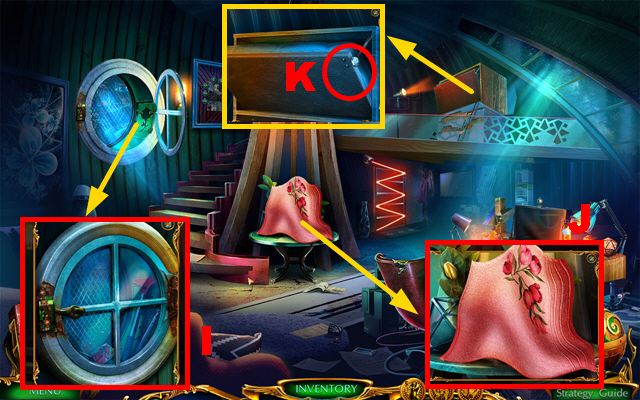
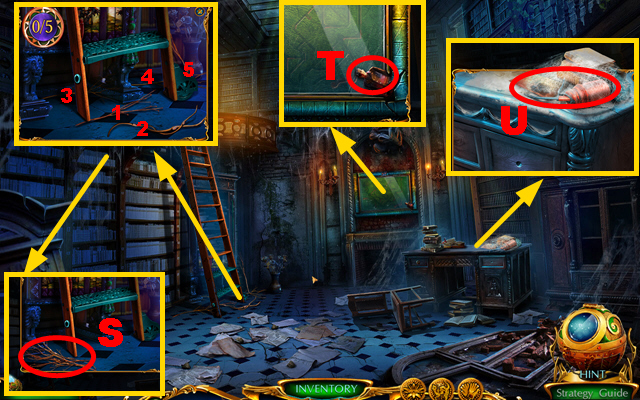
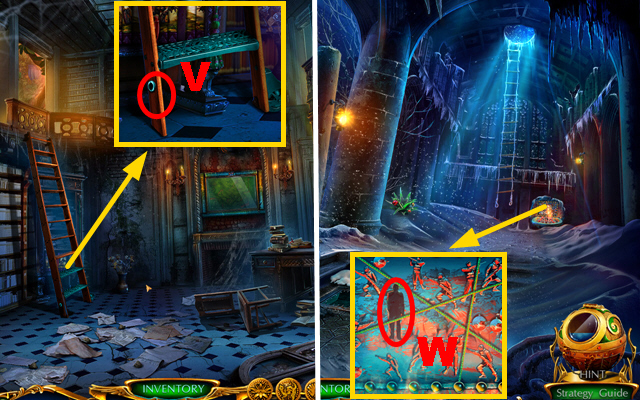
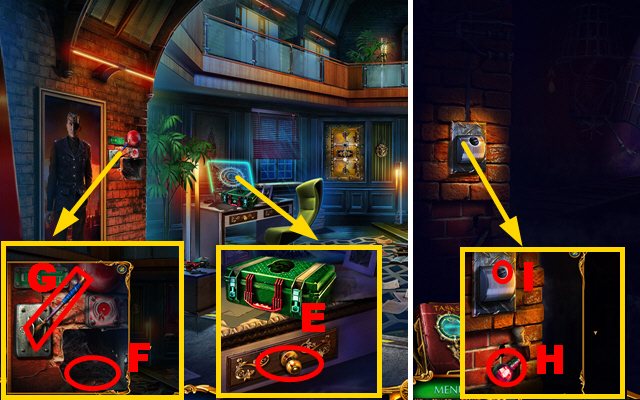
- Use the OIL CAN, open the window, take the WINDOW CLEANER, and ANTENNA (I).
- Take the CLOTH and note (J).
- Use the WRENCH, move the pillow, take the ALLEN WRENCH, and INSTRUCTIONS (K).
- Take the BOTTLE OF WATER and place the INSTRUCTIONS (L).
- Place the BOTTLE OF WATER on the SPRAY BOTTLE HEAD; receive the SPRAY BOTTLE WITH WATER.
- Use the SPRAY BOTTLE WITH WATER (green).
- Play the mini-game.
- Easy solution: 4-5-3-4.
- Hard solution: 3-5-4-2-1.
- Take the TAPE and SMARTPHONE.
- Use the TAPE (M) and play the HOP (purple).
- Easy mini-game solution: (2-6)-(4-3)-(3-2)-(5-4)-(4-3)-(6-4)-(4-5)-(3-4)-(2-3)-(1-2)-(2-6)-(3-2)-(3-1)-(4-3)-(3-2)-(6-4)-R.
- Hard mini-game solution: (9-12)-(8-9)-(9-10)-(13-11)-(11-9)(9-8)-(14-13)-(13-11)-(11-9)-(15-14)-(14-13)-(13-11)-(10-13)-(13-14)-(14-15)-(11-13)-(13-10)-(12-13)-(13-14)-(9-12)-(8-9)-(9-11)-(11-13)-(7-8)-(8-9)-(9-11)-(10-9)-(9-8)-(8-7)-(13-10)-(10-9)-(9-8)-(12-9)-(11-13)-Y.
- Go forward.
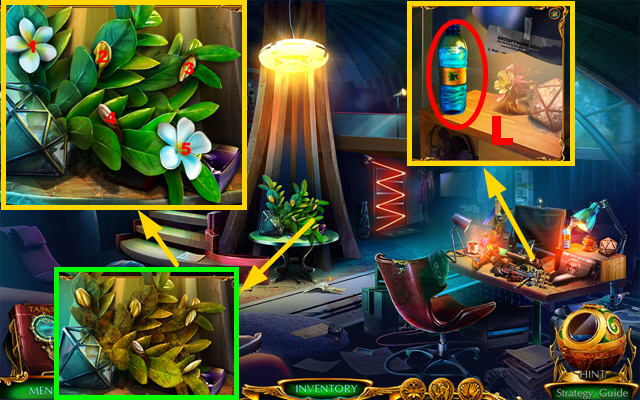
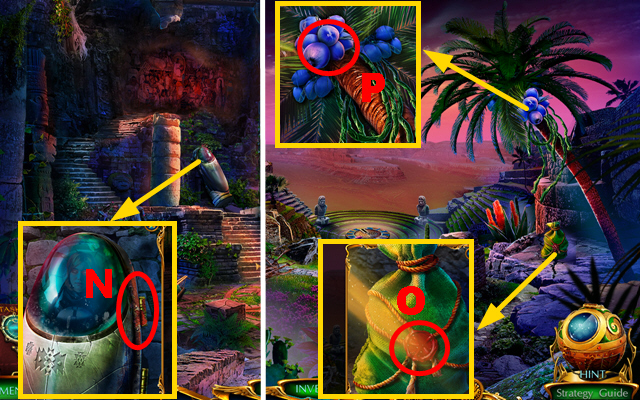
- Take the FLOWER AMULET (Z).
- Use the ALLEN WRENCH, receive the STEERING WHEEL, and take the UNCHARGED ENERGY UNIT (A).
- Take the note, use the WINDOW CLEANER, and SMARTPHONE (B); receive the SMARTPHONE WITH CODE.
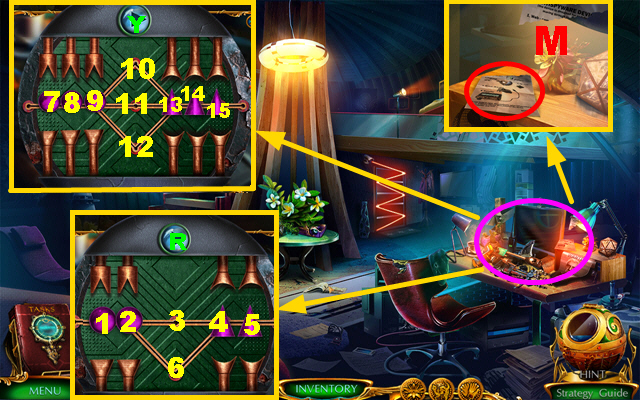
- Place the STEERING WHEEL (C); collect items 1-6 to receive the REMOTE CONTROL.
- Use the CLOTH and ANTENNA on the REMOTE CONTROL; receive the ROBODOG REMOTE.
- Use the ROBODOG REMOTE, take the PORTRAIT PIECE and ROBODOG (D).
- Go back.
- Place the FLOWER AMULET, take the GATE COMPONENT, and POWER CORD (E).
- Place the PORTRAIT PIECE (F).
- Play the mini-game.
- Easy solution: 1-5-8-16-11.
- Hard solution: 14-14-18-4-16-6-18-5-17-1-17-17-2-17-17-1-17-2-18-1-17-17-1-17.
- Take the note, SHORT SWORD, and LIGHTER.
- Open the LIGHTER.
- Go forward.
- Place the GATE COMPONENT (G).
- Play the mini-game.
- Easy solution: (1-left)-(2-up)-(3-down)-(4-right)-(1-right-down)-(4-left-up).
- Hard solution: (1-left)-(2-left-up)-(4-right)-(1-right-down)-(3-up)-(4-left-up-right-up)-(3-right-down).
- Use the SHORT SWORD (H); receive the HOOK.
- Use the HOOK and take the BRONZE HEAD (I).
- Go forward.
- Take CRYSTAL 1/2 (J).
- Remove the head and place the BRONZE HEAD (K); insert the SEEKER'S AMULET and take the COIN (L).
- Insert the COIN (N) and take CRYSTAL 2/2 (O).
- Place the UNCHARGED ENERGY UNIT (P) and POWER CORD (Q); make a choice and take the ENERGY UNIT.
- Take the GRINDSTONE (R) and place the ENERGY UNIT (S).
- Play the mini-game.
- Easy solution: 1-2-2-3-3-4-4.
- Hard solution: 1-1-1-2-2-3-3-3-4-4.
- Place 2 CRYSTALS (T).
- Easy solution part 1: 1-5.
- Hard solution part 1: 1-7.
- Easy solution part 2: 1-5.
- Hard solution part 2: 1-7.
- Easy solution part 3: 1-5.
- Hard solution part 3: 1-7.
- Grab the seeds; take the CARD.
- Insert the CARD (U); collect items 1-9 to receive the HYPNOSIS PENDULUM.
- Go back.
- Take the PHOTO HALF.
- Place the PHOTO HALF, take LIGHTNING BOLT 1/2, and the CORKSCREW (V).
- Go forward twice.
- Use the HYPNOSIS PENDULUM and take LIGHTNING BOLT 2/2 (W).
- Place 2 LIGHTNING BOLTS and take the BLUNT MACHETE (X).
- Place the BLUNT MACHETE on the GRINDSTONE; receive the MACHETE.
- Use the MACHETE, receive the TINDER, and take the ACID (Y).
- Go back.
- Use the ACID and take the ELEVATOR REMOTE (Z).
- Place the ELEVATOR REMOTE (A).
- Play the mini-game.
- Easy solution: (C).
- Hard solution: (D).
- Enter the General's Office.
Chapter 4: The General's Office
- Remove the knob, place the CORKSCREW, take the INK, and LIGHTER FLUID (E).
- Pour the LIGHTER FLUID into the LIGHTER.
- Use the TINDER and LIGHTER (F); take the LEVER (G).
- Go left.
- Take the CURTAIN PIECE (H); place the LEVER (I).
- Use ROBODOG (J); receive the SAFE HANDLE.
- Take the LEVER (K).
- Go back.
- Use the CURTAIN PIECE (L) and SMARTPHONE WITH CODE (M).

- Play the mini-game.
- Easy solution: (3-1)-(3-2)-(5-3)-(5-4)-(10-6)-(8-7)-(9-8)-(10-9).
- Hard solution: (3-2)-(2-1)-(5-4)-(4-3)-(10-9)-(9-8)-(8-7)-(7-6)-(9-8)-(8-7)-(10-9)-(9-8).
- Play the HOP (N); receive the SKULL AMULET.
- Insert the SKULL AMULET, take the FORKLIFT KEY, GLOW STICK, and push the button (O).
- Place the SAFE HANDLE, take the WATER GUN, note, and ATOM INLAY (P).
- Pour the INK into the WATER GUN; receive the INK GUN.
- Go left.
- Use the INK GUN 9 times (blue).
- Take the UMBRELLA, place the ATOM INLAY, take the EMPTY OILCAN, note, and WHEEL HANDLE (Q).
- Take the note and FISHING NET (R).
- Place the LEVER (S).
- Go back, enter the Top of the Tower.
- Select the man (T).
- Place the EMPTY OILCAN (U).
- Insert the FORKLIFT KEY, take the LIT CIGARETTE, CRANK HANDLE, and note (V).
- Place the CRANK HANDLE (W); take the OILCAN (X).
- Place the WHEEL HANDLE, take the STEERING WHEEL, and PICKAXE (Y).
- Place the STEERING WHEEL (Z).
- Go back, go left.
- Use the PICKAXE, take the GRENADE INLAY, and ANATOMY PIECE 1/3 (A).
- Use the OILCAN (B).
- Play the mini-game.
- Easy solution (C): 4-7-6-3-1-2-3-4-5-1-4-6.
- Hard solution (D): 9-7-8-10-5-4-1-5-3-6-5-8-2-7-5-9-10.
- Play the mini-game.
- Easy solution: (E).
- Hard solution: (F).
- The sequence is randomized.
- Play the mini-game.
- Easy solution: (G).
- Hard solution: (H).
- Take the CRYSTAL SEED.
- Take ANATOMY PIECE 2/3 (1).
- Go back, go forward.
- Place the GRENADE INLAY (I); collect items 1-6 to receive the DYNAMITE.
- Use the DYNAMITE and LIT CIGARETTE (J); receive ANATOMY PIECE 3/3.
- Go back, go left.
- Place 3 ANATOMY PIECES (K).

- Play the mini-game.
- Easy solution: (4-1)-(5-2)-(7-3)-(6-4)-(6-5).
- Hard solution: 3-1-4-2-1-2-6-4-5.
- Take the COMPUTER BOARD.
- Walk down, go forward.
- Place the COMPUTER BOARD (L).
- Play the mini-game.
- Easy solution: (Purple-Mx2).
- Hard solution: (Green-Nx2).
- Place the SEEKER'S AMULET (O).
- Play the mini-game.
- Easy solution: (1).
- Hard solution: (P).
- Go forward.
- Take the STICK (Q), use the GLOW STICK (R), and receive the RED EYE.
- Take the FLOWER (T).
- Grab the axe (U) and take the note (V).
- Use the FISHING NET (X); take the HORN and BLUE EYE (Y).
- Use the STICK, receive the WEB ON A STICK, take the FLINT AND STEEL, place the RED EYE and BLUE EYE (W).
- Play the mini-game.
- Easy solution: 3-3-2-2-1-1-2-2-3-3-2-2.
- Hard solution: 1-1-2-2-1-1-2-2.
- Go left.
- Place the FLOWER (Z).
- Collect 9 butterflies (blue); take the note and SHRINKING POTION (A).
- Use the SHRINKING POTION, take the MAGICAL SEED, BONE (B), and play the HOP (purple).
- Receive the SICKLE.
- Use the UMBRELLA, take FLOATING STONE 1/3 (C) and use the SICKLE (D) to receive the LOTUS.
- Use the FLINT AND STEEL (E) to receive the TORCH; grab the wreath (F).
- Go back.
- Place the LOTUS (G).
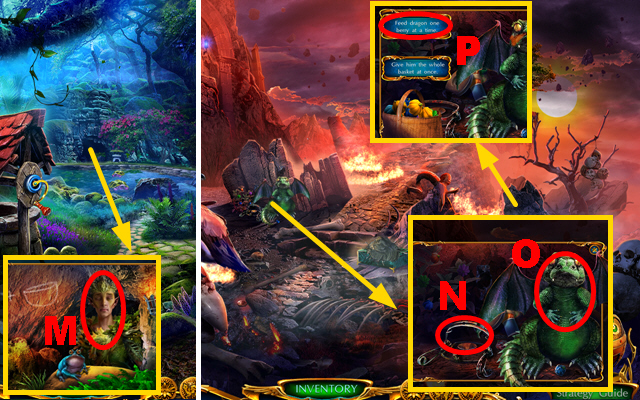
- Take the FLOWER NECKLACE and place the TORCH (H); take the BUCKET (I) and receive the DRAGON FIGURINE.
- Place the BUCKET (J); receive CROCS.
- Give CROCS (K) and take the RECIPE.
- Go left.
- Place the FLOWER NECKLACE (L); receive the BOWL.
- Go back.
- Place the BOWL, collect 11 mushrooms (M), and receive the ACID MUSHROOMS.
- Use the BONE on the ACID MUSHROOMS; receive the BOWL OF ACID.
- Use the BOWL OF ACID (O).
- Go right.
Chapter 5: The Bone Cemetery
- Take the MEDALLION (P).
- Place the HORN (Q), take FROG AMULET 1/2 (R), and the note (S).
- Take the note (T) and BASKET (U).

- Use the WEB ON A STICK (V); receive FROG AMULET 2/2.
- Go back.
- Place the BASKET (W).
- Go left.
- Place 2 FROG AMULETS (X).
- Play the mini-game.
- Easy solution: (Y).
- Hard solution: (Z).
- Enter Kamiel's House.
- Take the EMPTY WATERING CAN (A); place the RECIPE (B).
- Insert the MEDALLION (C); insert medallions 1-3 and take the SUGAR (D).
- Take the note and place the MAGICAL SEED (E).
- Go back twice.
- Use the SUGAR (F) and collect 10 berries (orange); take the TOMAHAWK AMULET (G) and BASKET OF BERRIES (H).
- Place the EMPTY WATERING CAN (I); receive the FULL WATERING CAN.
- Go to Kamiel's House.
- Use the FULL WATERING CAN and take the RED FRUIT (J).
- Place the RED FRUIT (K).
- Play the mini-game.
- Solution: (2-10)-(3-10)-(1-10)-(4-10)-(7-10)-(5-10)-(6-10)-(8-10)-(9-10).
- Take the CALMING POTION (L).
- Go back twice.
- Give the CALMING POTION (M); take the SPIKE.
- Go right.
- Use the SPIKE and DRAGON FIGURE (N); give the BASKET OF BERRIES (O), make a choice (P); depending on the choice select the basket ten times.

- Take the GRINDSTONE, GLOVE, and GREEN PAINT (Q).
- Use the GLOVE, place the TOMAHAWK AMULET, take the BLUNT AXE, and RED PAINT (R).
- Use the GRINDSTONE on the BLUNT AXE; receive the SHARP AXE.
- Go to Kamiel's House.
- Place the RED PAINT (S) and GREEN PAINT (T); use the brush (U).
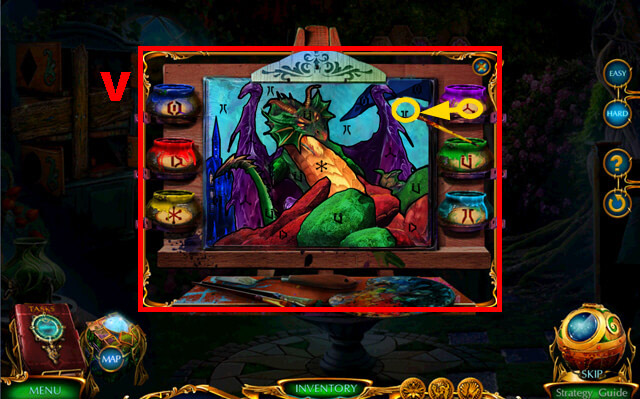
- Play the mini-game.
- Solution: (V).
- Take the FLOWER TOKEN.
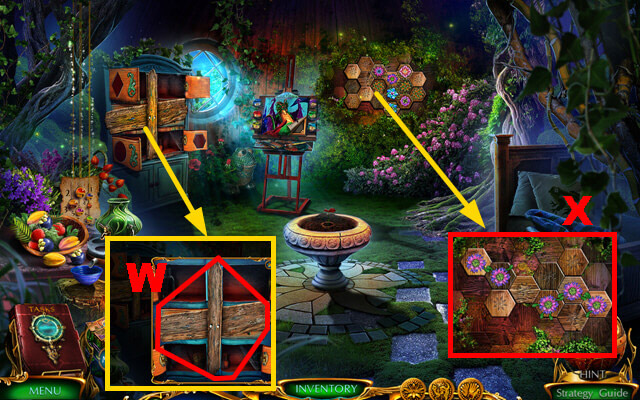
- Use the SHARP AXE, take FLOATING STONE 2/3, the LAMP OIL, and PIE (W).
- Place the FLOWER TOKEN (X).
- Play the mini-game.
- Easy solution: 1-3.
- Hard solution: 4-6.
- Take the STONES WITH SYMBOLS, GOLDEN HEAD, and MATCHES.
- Go to the Bone Cemetery.
- Use the PIE (Y); receive FLOATING STONE 3/3.
- Place 3 FLOATING STONES (Z) and the STONES WITH SYMBOLS (A).
- Play the mini-game.
- Easy solution: 4-2-5.
- Hard solution: 1-4-2-5-3.
- Go right.
- Use the LAMP OIL and MATCHES (B); take the GLASS SHARD (C).
- Take the note (D).
- Use the GLASS SHARD and take the GOGGLES (E).
- Place the CRYSTAL SEED (blue); take the CROWBAR (F) and note (G).
- Use the CROWBAR, take BOOK 1/2, and place the SEEKER'S AMULET (H).
- Go to the Forest Shelter.
- Place the GOGGLES, receive the PIPE, and take the LOTUS AMULET (I).
- Place the LOTUS AMULET, take the GOBLET, and BOOK 2/2 (J).
- Go to Grane's Tree House.
- Place 2 BOOKS (K); take the diary (L).
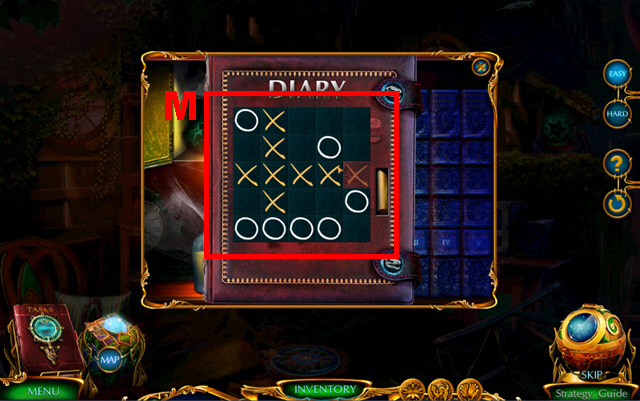
- Play the mini-game.
- Solution: Win a round of tic-tac-toe (M).
- This solution is randomized.
- Take the STAR AMULET.
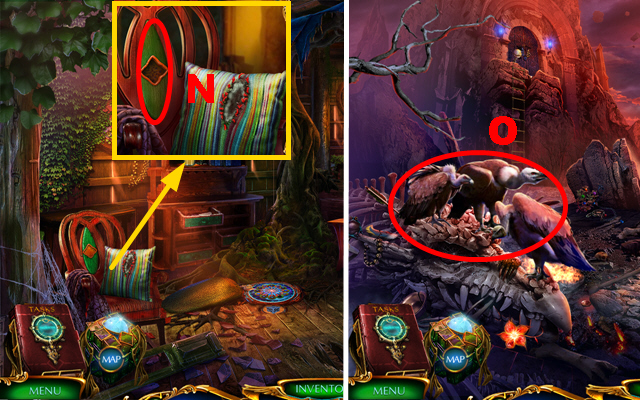
- Place the STAR AMULET, take the BRUSH and FIRECRACKER (N).
- Go back.
- Use the FIRECRACKER and play the HOP (O); receive the DIAMOND RING.
- Use the DIAMOND RING and take the SILVER HEAD (P).
- Place the SILVER HEAD (Q) and GOLDEN HEAD (R).
- Enter Darger's Residence.
- Take the CHEST TILE.
- Take the note and place the CHEST TILE (S).
- Play the mini-game.
- Easy solution: 6-5-4-1-2-3-6-5-2-3-6-5-4-7-8-5-4-1-2-5-6-9-8-5-2-3-6-5-2-3-6-9-8-5-2-3-6-5-2-3-6-9.
- Hard solution: (6-9)-(9-11)-Ux2-(11-9)-(9-6)-(8-9)-(9-11)-Ux2-(11-9).
- (5-8)-(1-10)-Tx3-(10-1)-(2-5)-(1-2)-(4-1)-(1-10)-Tx3-(2-1)-(1-4)-(5-2)-(2-1)-(4-5)-(1-4)-(10-1)-(1-2)-(4-1)-(1-10)-Tx2-(2-1)-(5-4)-(6-5)-(9-6)-(8-9)-(9-11)-U-(11-9)-(5-2)-(9-8)-(6-5)-(3-6)-(6-9)-(9-11)-Ux3-(2-3)-(8-9).
- (7-8)-(1-2)-(4-1)-(5-4)-(4-7)-(1-4)-(3-6)-(6-5)-(9-6)-(10-1)-(2-3)-(1-2)-(4-1)-(6-9)-(3-6)-(2-3)-(5-2)-(6-5)-(5-4)-(9-6)-(11-9)-(1-10)-(6-5)-(2-1)-(3-2)-(9-6)-(6-3)-(5-6)-(6-9)-(2-5)-(3-6)-(1-2)-(2-3)-(5-2)-(2-1)-(6-5)-(3-6)-(5-2)-(2-3)-(6-5)-(1-2)-(10-1)-(9-6).
- Take the CORKSCREW and ORE.
- Take the TONGS (V); use the CORKSCREW, GOBLET, take the FROG EYE, and GOBLET OF WINE (W).
- Use the TONGS to receive the HOT COAL, place the FROG EYE, use the BRUSH, and take the VALVE, POUCH, and CRYSTAL SKULL 1/3 (X).
- Place the HOT COAL on the PIPE; receive the SMOKING PIPE.
- Take the BRONZE AXE (Y); place the VALVE (Z), ORE (A), and use the TONGS to receive the MIRROR (B).

- Place the MIRROR (C).
- Play the mini-game.
- Solution: 1-20.
Chapter 6: The Dragon Cave
- Take the note (D), place the POUCH (E), collect 10 stones (green), and take the BAG OF SULFUR (F); use the BRONZE AXE (G).
- Take the ROPE (H).
- Take the note (U).
- Use the SMOKING PIPE, take the LENS, KNIFE, and HOSE NOZZLE (V); place the GOBLET OF WINE (W) and take the COAL (X).
- Place the HOSE NOZZLE (Y); take CRYSTAL SKULL 2/3 (Z).
- Use the KNIFE (A); collect items 6 items (purple) to receive the BOOK.
- Place the BOOK (B) and play the HOP (blue); receive the HEALING POTION.
- Use the HEALING POTION (D); take the MIRROR INLAYS (E).
- Place the MIRROR INLAYS (F).
- Play the mini-game.
- Solution: Lure Darger (1) to the mirror (2) by surrounding him with fire.
- The solution is randomized.
- Make a choice.
- Take the EYEPIECE and CRYSTAL SKULL 3/3 (green).
- Place 3 CRYSTAL SKULLS, take the SPIDER PENDANT, and SAW (H).
- Use the SAW (G); receive the HORN.
- Go forward.
- Place the SPIDER PENDANT, take the PICKAXE, and GUN (I).
- Use the PICKAXE (J); take the SALTPETER and STARFISH (K).
- Place the BAG OF SULFUR, COAL, SALTPETER, and HORN (L).
- Prepare the dynamite: (1-2)-3-(4-5)-(6-2-7)-(2-7)-(2-7)-(2-7)-(5-7)-(5-7)-(8-7)-(8-7)-(8-7)-(8-7)-(8-7)-(8-7)-(8-7)-(9-7)-(10-7)-(11-7)-7.
- Receive the DYNAMITE.
- Go forward.
- Place the DYNAMITE (M).
- Take the METAL HOOK and CHISEL (N).
- Place the METAL HOOK and ROPE on the GUN; receive the HARPOON GUN.
- Shoot the HARPOON GUN (O).
- Go to Grane's Tree House.
- Place the STARFISH and take the MAGIC FLOWER (P); place the EYEPIECE and LENS (Q).
- Play the HOP (orange); receive COORDINATES TO ANOTHER WORLD.
- Place the MAGIC FLOWER (R); take the CRYSTAL SEEDS (S) and SYMBOL TOKEN (T).
- Place the SYMBOL TOKEN (U) and COORDINATES TO ANOTHER WORLD (V).
- Play the mini-game.
- Easy solution: 11-12-13-1-12-11-13-2-1-12-13-11-10-13-12-11-13-2-1-12-13-5-6-7-8-9-10-11-12-13-7-8-9-10-11-13-3-4-13-10-9-8-13-5-6-7-8-9-13-10-9-13-5-6-7-13-4-5-6-13-4-5-13-8-7-6-5-13-6-7-8-13-9-8-7-6-13-8-9-13-6-5-13.
- Hard solution: 4-4-4-4-4-13-5-7-9-13-12-2-13-10-10-10-10-10-13–3-3-3-13-7-7-13-10-12-13-4-13-6-13-8-13-10-13-12-13.

- Take the MITTEN (W).
- Use the CHISEL, receive the STONE, and take the FLUTE (X).
- Throw the STONE (Y); receive the SKULL.
- Take the TAMBOURINE MALLET (Z); use the MITTEN (A) to collect the FIERY BRANCH.
- Use the FIERY BRANCH, take the BEAD, POT, note, and place the SKULL (B).
- Play the mini-game.
- Easy solution: (Green).
- Hard solution: C-Fx2-Gx2-Hx2-I-Gx2-L-Cx2-D-Fx2-G-Ex2.
- Take the note, place the TAMBOURINE MALLET, and BEAD (M).
- Play the mini-game.
- Easy solution: 2-3-3-4-4-5-5-5-6-6.
- Hard solution: 2-5-5-5-1-1-1-2-2-2-3-3-4-4-6-6.
- Take the CLOAK.
- Take the HOOK (N).

- Use the FLUTE, take the FANG, and mask (O); use and take the SCOOP (P).
- Use the FANG and take ENTRANCE TOKEN 1/2 (Q).
- Take the LID (R).
- Go back.
- Use the LID (S); take the EAR DECORATION (T).
- Use the POT and HOOK (U); receive the POT OF WATER, take ENTRANCE TOKEN 2/2 (V), and the SPONGE (W).

- Use the SCOOP, receive the COALS, and take the NUMBER (X).
- Place 2 ENTRANCE TOKENS (Y).
- Play the mini-game.
- Solution: (4-1)-(6-4)-(1-6)-(14-5)-(12-14)-(15-13)-(10-3)-(7-2)-(13-4)-(2-7)-(11-4)-(3-8)-(4-13).
- Enter the Cathedral.
- Take the LADLE (Z); use the SPONGE (blue).
- Place the EAR DECORATION (A); take RUNE 1/3 and the KNIFE (B).
- Take the CUP (C).
- Take the note and use the KNIFE (D); receive the ROD.
- Use the ROD and take the RAG (E); remove the soil, take RUNE 2/3, and the MAGNIFYING GLASS (F).
- Go to the Shaman's Yurt.
- Use the LADLE, receive the GREASE, use the RAG, take RUNE 3/3, and use the POT OF WATER (G).

- Place 3 RUNES (H); take the TEAPOT and GREEN MASK (I).
- Go back.
- Use the TEAPOT (green); receive the FIRE CACTUS JUICE.
- Enter the Cathedral.
- Place the GREEN MASK (J).
- Play the mini-game.
- Solution: (K).
- Play the HOP (L); receive the HAMMER.
- Use the HAMMER (M).
Chapter 7: The Top of the Pyramid
- Use the GREASE (N); take the NOID BOX.
- Go right.
- Use the MAGNIFYING GLASS, take the BOOMERANG, COFFEE BEAN EYE, and move the sack (O).
- Throw the BOOMERANG (P); receive the COCONUT.
- Take the MUSHROOM and place the NUMBER (Q).
- Go to the Shaman's Yurt.
- Place the COFFEE BEAN EYE (R); take the GROUND COFFEE (S).
- Use the GROUND COFFEE and CUP (T); receive the CUP OF COFFEE.
- Open the NOID BOX, pour the CUP OF COFFEE, COCONUT, and FIRE CACTUS JUICE into it.
- Play the mini-game.
- Easy solution: Ux5-V-Wx5-X-Ux3-Vx3-Wx3-Xx3-U-V-W-X-Ux3-Vx3-Wx3-Xx3.
- Hard solution: X-Wx4-U-Xx4-Ux4-Xx7-Ux7-Xx4-Ux4.
- Take the NOID.
- Go to the Cathedral.

- Give the NOID (Y); take the FRACTAL CACHE KEY.
- Place the FRACTAL CACHE KEY, take the ROPE LADDER, and EXPLOSIVE DEVICE (Z).
- Go back.
- Place the ROPE LADDER (A) and play the HOP (purple); receive the FISHING ROD.
- Use the FISHING ROD (B); receive the FISH.
- Go to the Top of the Pyramid.
- Give the FISH (C); take the note, SUNDIAL PIECE and SEEKER STONE 1/2 (D).
- Use the EXPLOSIVE DEVICE, take SEEKER STONE 2/2, and the SADDLE (E).
- Place the SADDLE (F).
- Insert the SUNDIAL PIECE (G); take the KNIFE and NET (H).
- Use the KNIFE (I); receive the VINE.
- Place the VINE (J).
- Place 2 SEEKER STONES (K).
- Play the mini-game.
- Solution: Maneuver to find shapes 1-8.
- Take the LIGHTER (L).
- Remove the plate, open the hatch, take the CLEANER, use the COALS, and LIGHTER (M).
- Take the ELEVATOR KEY (N).
- Use the CLEANER, insert the ELEVATOR KEY, and take the ELECTRICAL TAPE (O).
- Open the door (P).
- Select the capsule, take the note, and BELT (Q).
- Take the SCREWDRIVER and PLASTIC (R).
- Use the PLASTIC and BELT (S).
- Enter the Botanical Garden.
- Take the TAKH TAASH STATUETTE (T); place the ELECTRICAL TAPE (U).
- Go back.
- Place the TAKH TAASH STATUETTE, take the SCUBA MASK, and SCALPEL AND SLIDE 1/2 (V).
- Go forward.
- Use the SCUBA MASK (W) to play the HOP; receive the THERMOMETER.
- Place the THERMOMETER (X); take the EYEPIECE and LIGHT STONE (blue).
- Take the note, BROKEN SCISSORS, and SCALPEL AND SLIDE 2/2 (Y); place the EYEPIECE (Z).
- Use the SCALPEL AND SLIDE (A); receive the MOLD SAMPLE.
- Place the MOLD SAMPLE (B).
- Play the mini-game.
- Easy solution: 1-5.
- Hard solution: 1-8.

- Play the mini-game.
- Solution: (C).
- Take the FUNGICIDE (D).
- Use the FUNGICIDE (E); take the INJECTOR and SAW (F).
- Go back.
- Use the INJECTOR (G); take the UP BUTTON.
- Place the UP BUTTON (H).
- Play the mini-game.
- Solution: (I).
- Go forward.
- Place the LIGHT STONE (J); take the BOTTLE OPENER (K).
- Use the SAW (L); receive the STICK.
- Take the SCISSORS PART and note (M); place the MUSHROOM (white).
- Place the SCISSORS PART on the BROKEN SCISSORS, use the SCREWDRIVER on it, and receive the SCISSORS.
- Take the note (N).
- Go to the Botanical Garden.
- Use the BOTTLE OPENER (O) to receive the HOOP; use the SCISSORS (P) to receive the CRYSTAL FRUIT.
- Place the HOOP and STICK on the NET; receive the IMPROVED NET.
- Go to the Teleportarium.
- Use the IMPROVED NET (Q); take the SEAWEED and GUN (R).
- Place the SEAWEED and CRYSTAL FRUIT (blue); take the REVIVING POTION (S).
- Use the REVIVING POTION (T) and collect 6 flowers (orange); take the MEMORY FLOWER (green).
- Go back.
- Give the MEMORY FLOWER (U); take the CODE.
- Go left.
- Place the CODE (V), select symbols 1-5, and place the CRYSTAL SEEDS.
- Play the mini-game.
- Easy solution part 1: 2-4-4-2-3-1-3-2-3-1-4-1-3-2-4-4-1-1.
- Easy solution part 2: 2-1-3-1-2-4-1-4-4-4-1-1-3-3-3-3-2-4-4-4-4-3-3-3.
- 2-2-3-1-4-1-3-3-3-4-4-2-2-2-3-1-4-1-3-3-4-4-4-4-4-2-3-1-3-2-2-2-1-1-4-2.
- Easy solution part 3: 1-1-4-2-2-1-3-3-3-3-2-2-3-2-4-4-4-3-1-1-1-4-2-2-3-2-4-4-3-3-3-1-1-1-3-3-2-4-4-4-4-1-4-2.
- Hard solution part 1: 4-4-1-2-2-3-2-4-1-3-1-3-1-1-4-4-3-3-2-2-4-2-3-3-2-1-4-1-1-1-3-3-2-2-2-4-2-3.
- Hard solution part 2: 2-1-3-2-3-1-3-1-1-4-4-2-3-2-3-1-4-1-3-2-4-4-2-3-2-4-1-4-2-2-1-1-4-2.
- 4-1-1-4-1-1-3-2-3-2-3-3-3-3-4-4-2-2-4-4-1-4-4-1-1-3-3-2-4-4-3-2-2-3-1-3-1-4-2-4-1-3-1-4-4.
- Hard solution part 3: 3-3-2-2-3-3-1-4-3-1-4-1-1-4-4-4-4-2-2-1-1-3-3-3-3-2-2-4-4-4-3-3-3-1-1.
- 4-4-4-4-2-2-2-1-3-3-3-3-2-2-4-1-3-1-4-4-4-3-3-3-1-1-4-4-4-4-2-2-4-2-3-1-3-3-3-3.
- 3-3-1-4-2-4-4-4-4-4-1-1-3-3-3-3-2-3-2-4-4-4-4-3-3-3-1-1-4-4-4-4-2-2-4-2-3-1-3-2.
- Take the POWER CRYSTAL and CRYSTAL FLOWER.
- Place the POWER CRYSTAL on the GUN; receive the LOADED GUN.
- Go to the Teleportarium.
- Place the CRYSTAL FLOWER and SEEKER'S AMULET (W).
- Go forward.
- Use the LOADED GUN (X).
- Play the mini-game.
- Easy solution: B-A-B-A-B-A-Bx3-A-Yx3-Z.
- Hard solution: B-A-Bx5-A-Y-B-Y-A-B-A-Zx2-Ax2.
- Congratulations! You have completed Labyrinths of the World: Secrets of Easter Island.
Created at: 2017-02-03