

Walkthrough Menu
- General Tips
- Chapter 1: The Castle
- Chapter 2: The Flying Islands
- Chapter 3: Illusion World
- Chapter 4: The Mechanical World
- Chapter 5: The Phantom World
General Tips
- This is the official guide for Labyrinths of the World: Shattered Soul.
- This guide will not mention each time you have to zoom into a location; the screenshots will show each zoom scene.
- Hidden-object puzzles are referred to as HOPs. This guide will not show HOP solutions. It will identify the location of the HOP and the inventory item acquired. You have the option of playing a jigsaw game instead of the HOP.
- This guide will show solutions for non-random puzzles. Please read the in-game instructions for each puzzle.
Chapter 1: The Castle
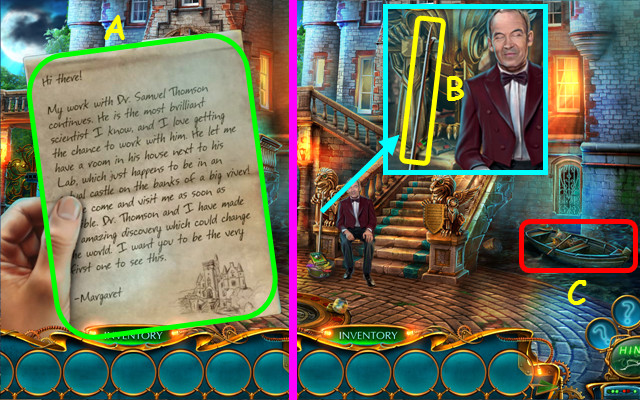
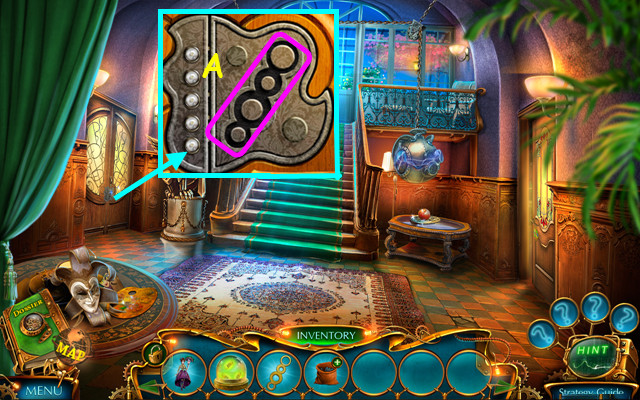
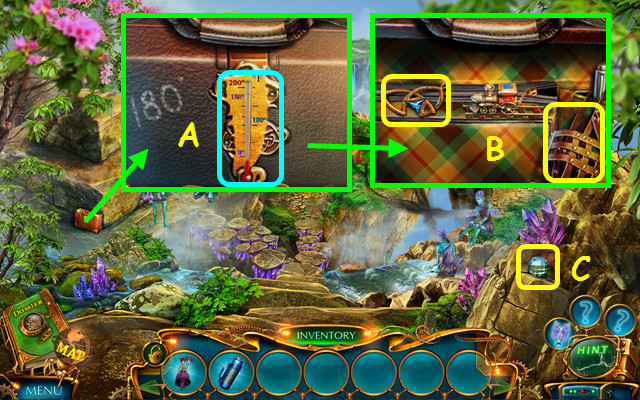
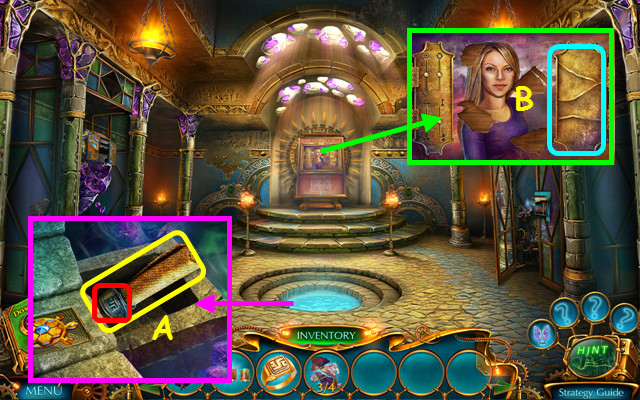
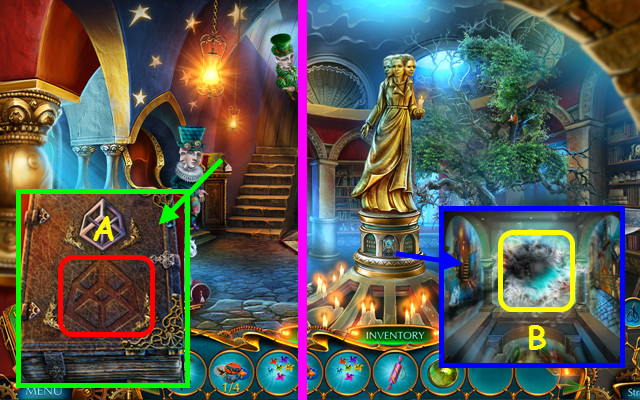
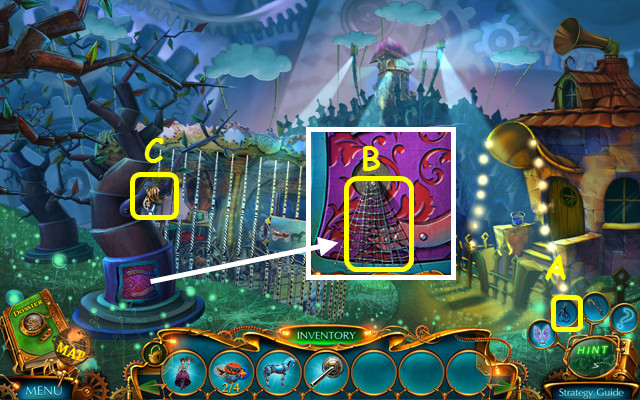
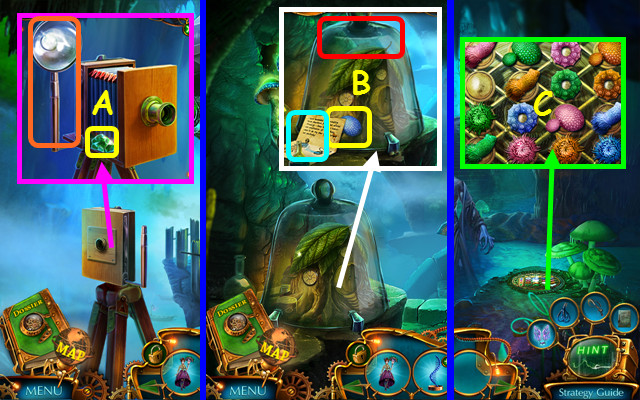
- Select the letter (A).
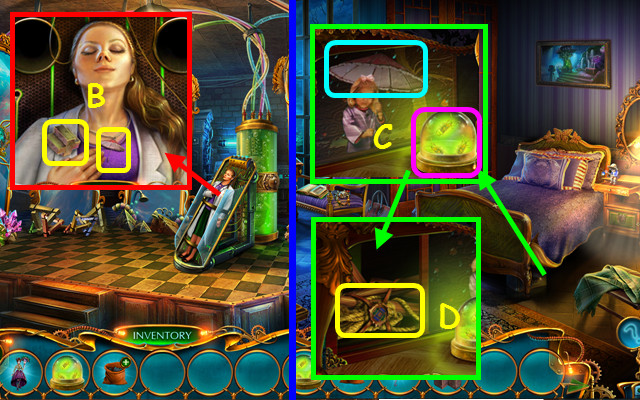
- Take the GAFF (B).
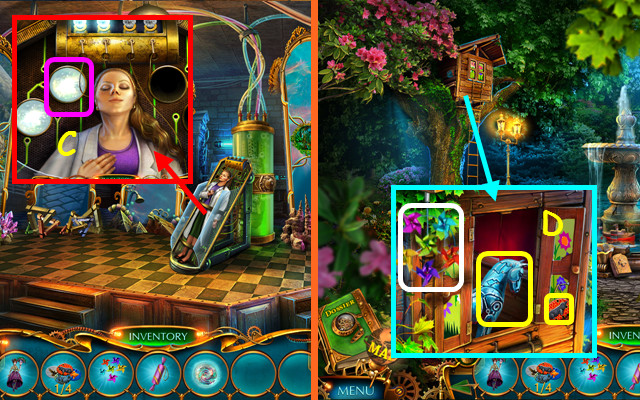
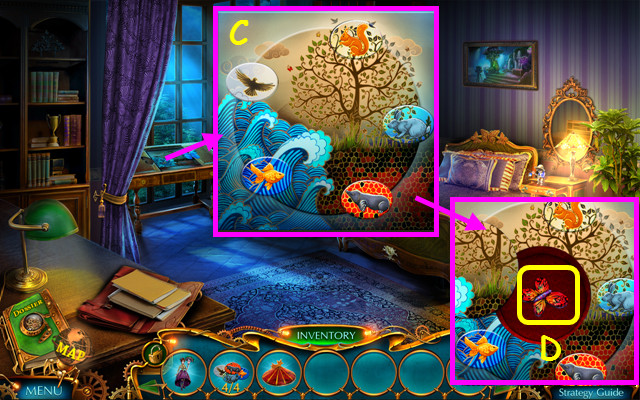
- Use the GAFF; select the boat to play the HOP and earn the BELL (C).
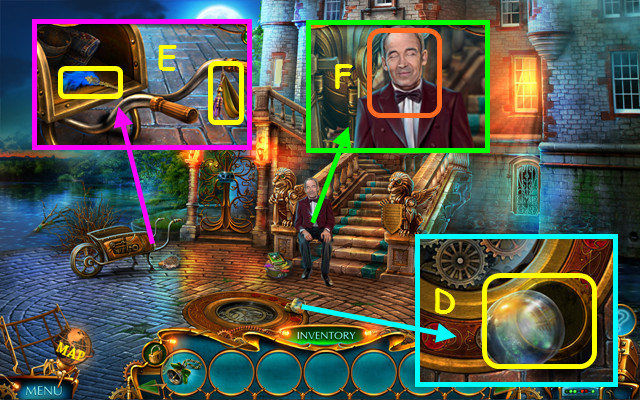
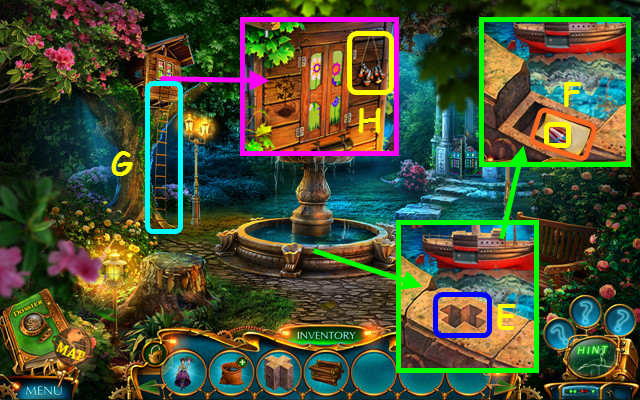
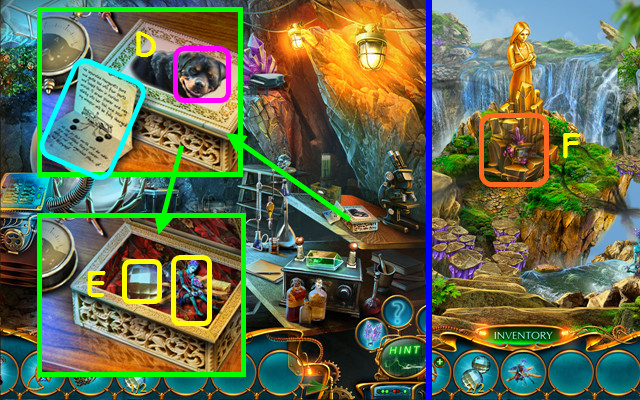
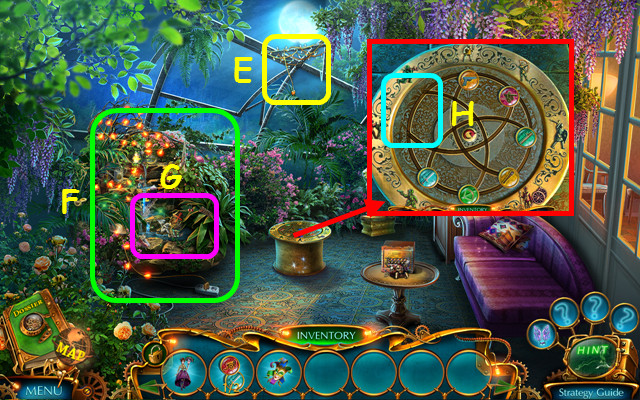
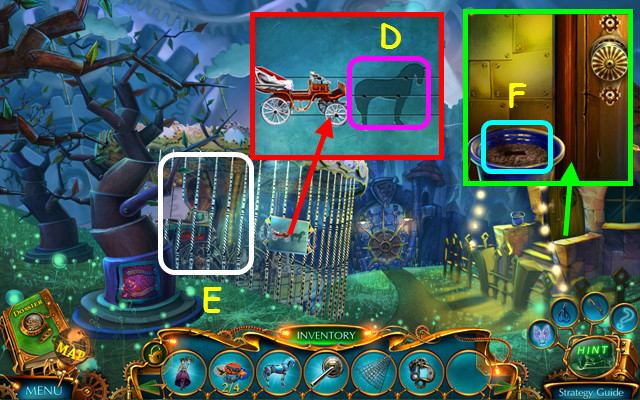
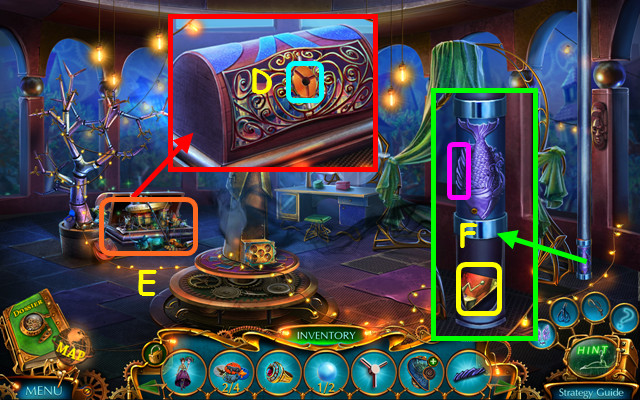
- Take the JAR (D), FEATHER and CURTAIN TIE (E).
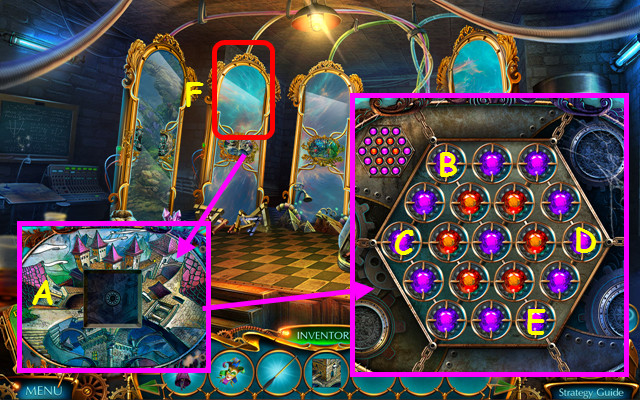
- Use the BELL (F).
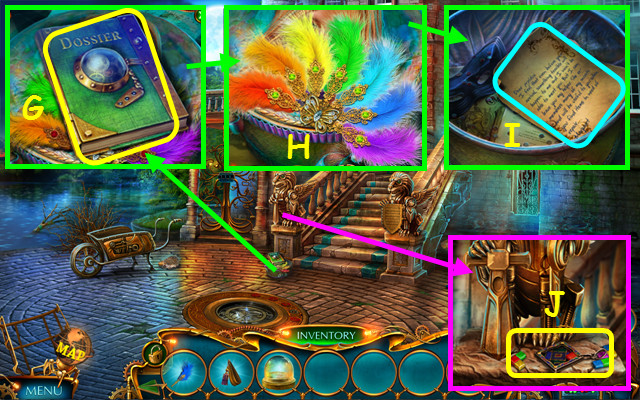
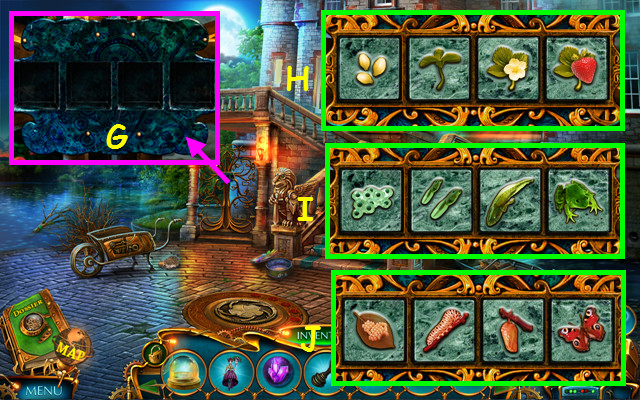
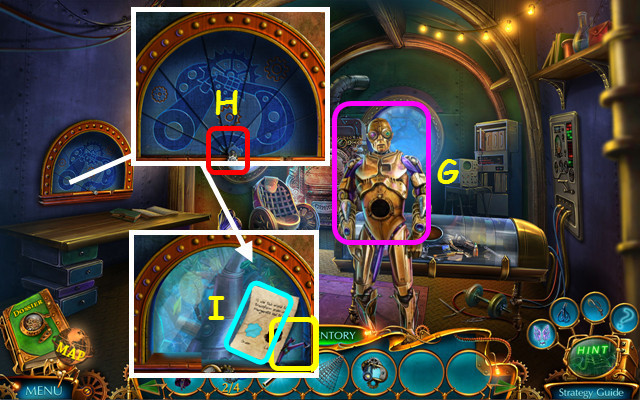
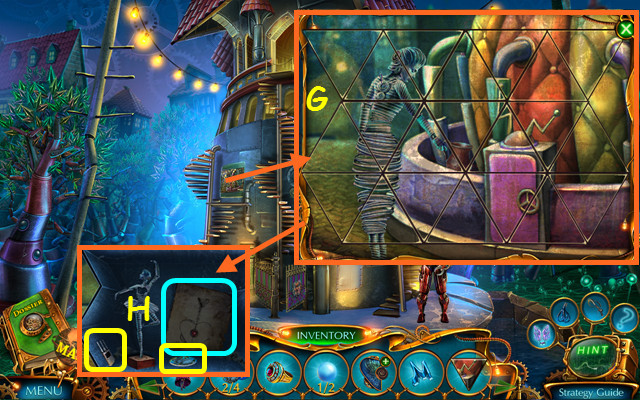
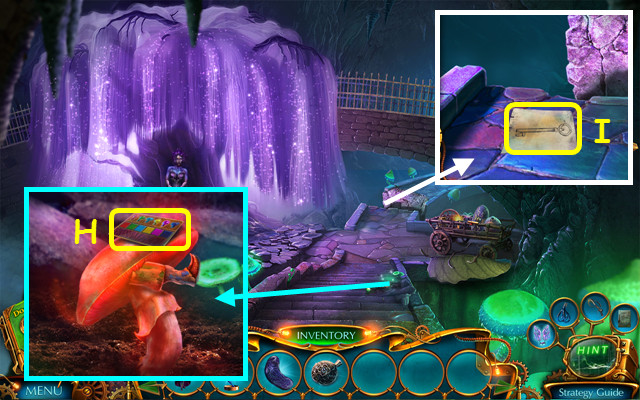
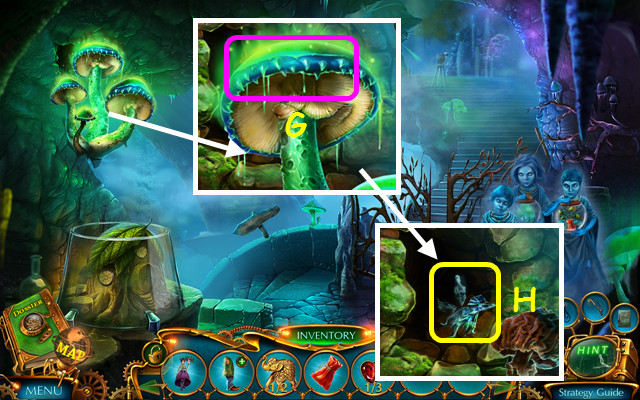
- Take the dossier (G).
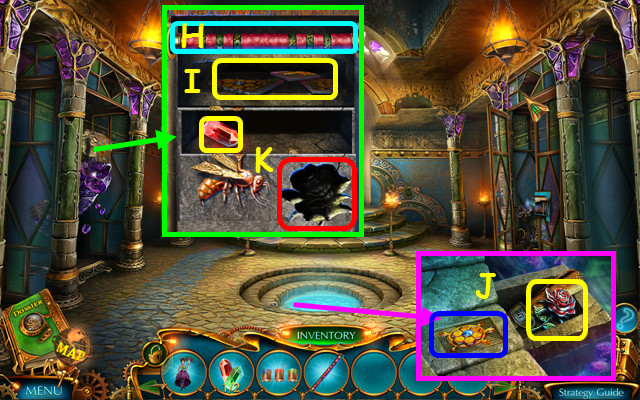
- Place the FEATHER; arrange the feathers as shown to earn the HARLEQUIN (H).
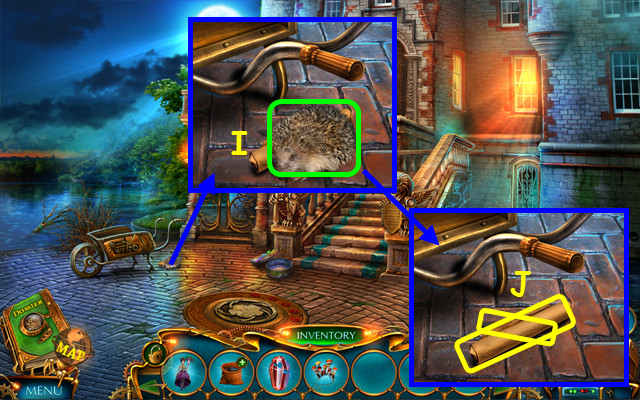
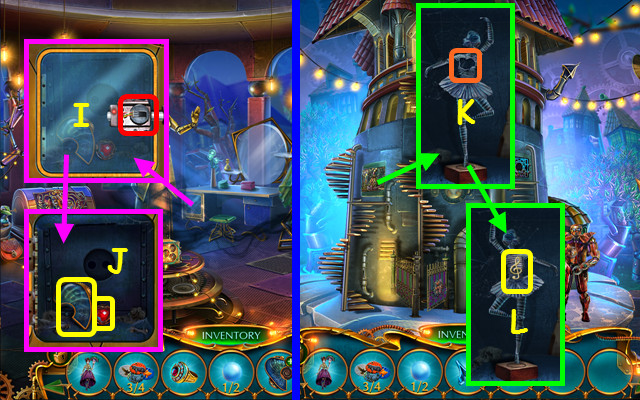
- Read the letter (I).
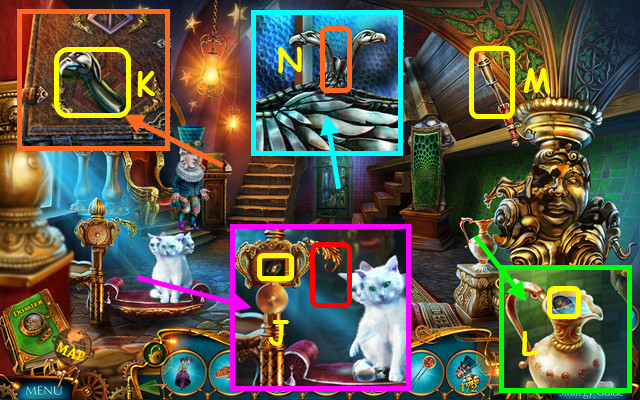
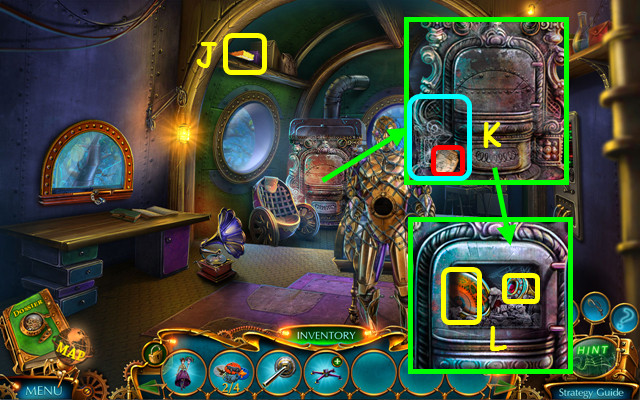
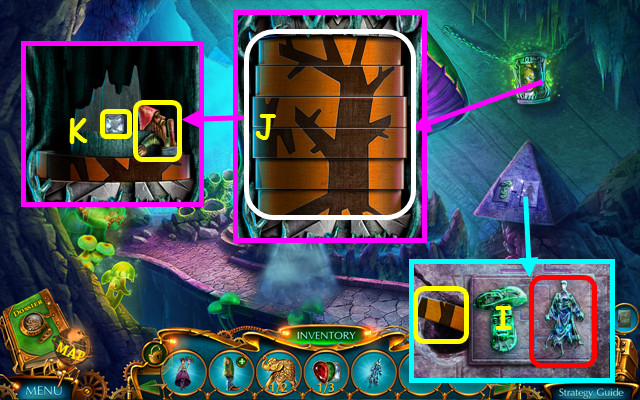
- Use the HARLEQUIN; take the CHARM (J).
- Walk forward.
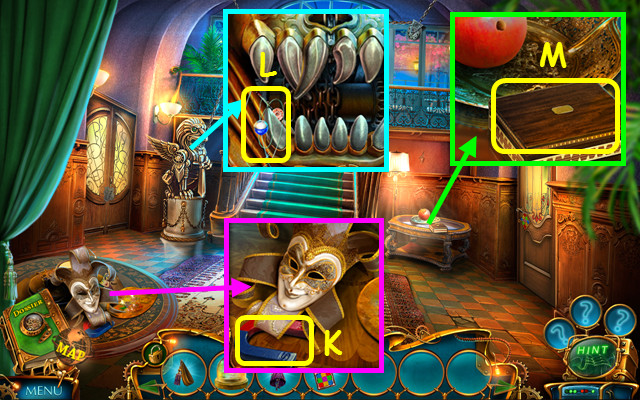
- Take the MAGNET (K) and FISHING ROD (L).
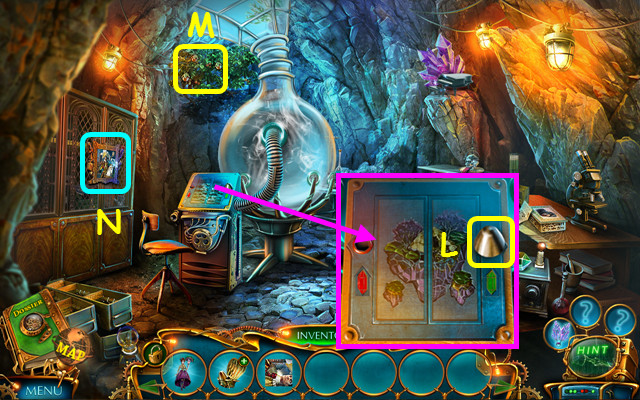
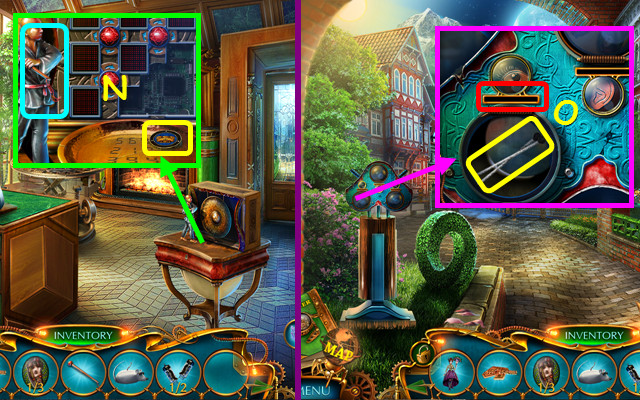
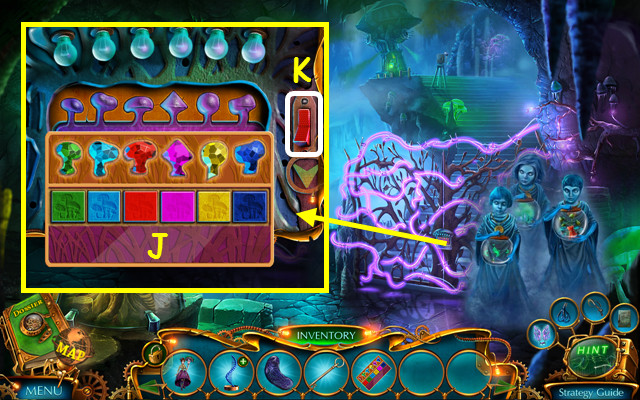
- Take the BOX (M).
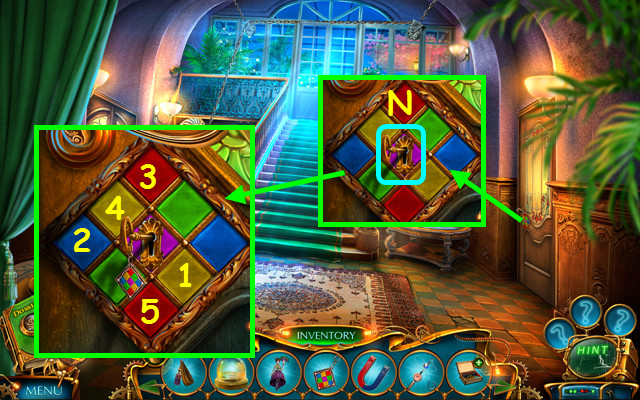
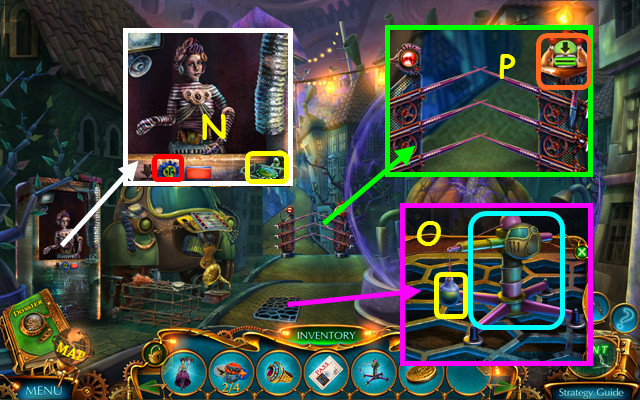
- Hang the CHARM (N).
- Select the squares in order (1-5).
- Walk right.
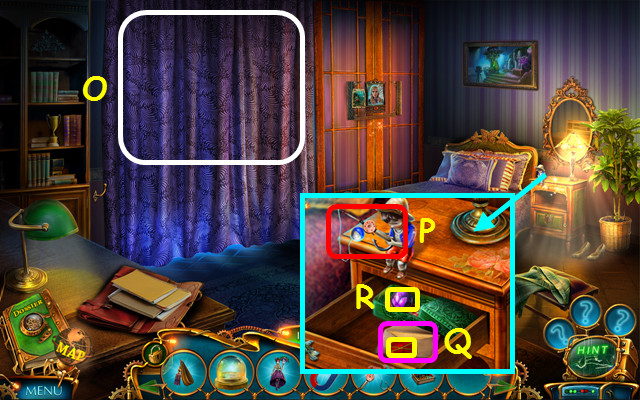
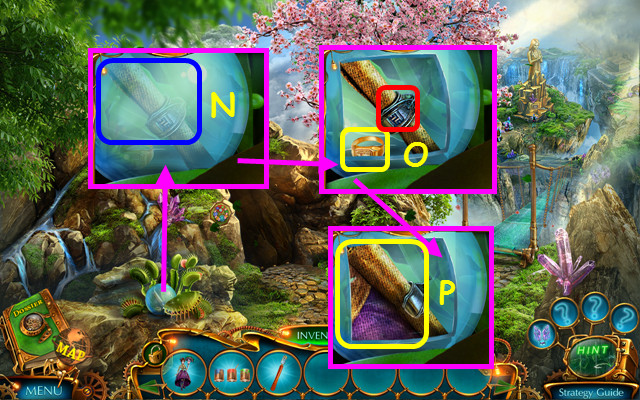
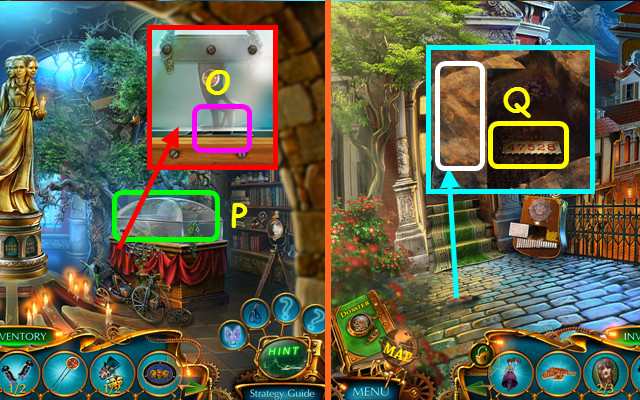
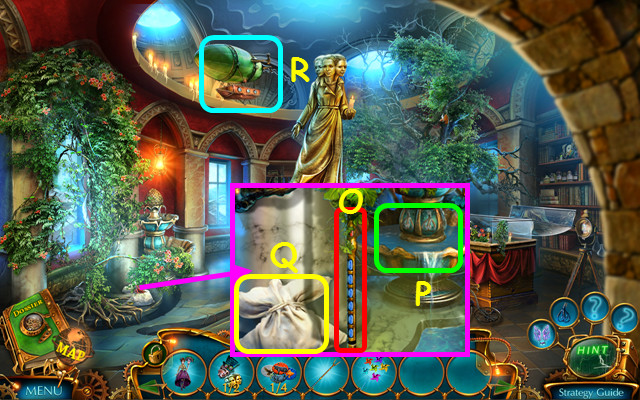
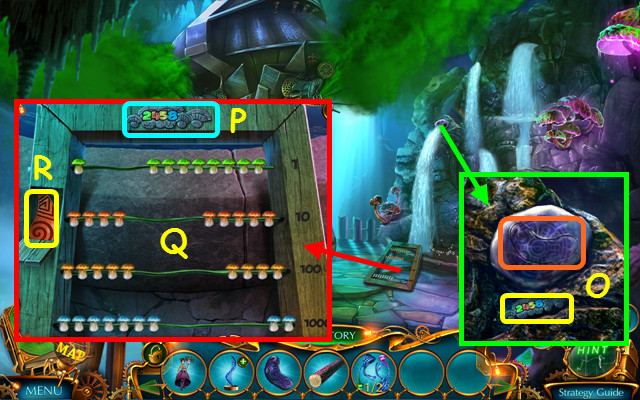
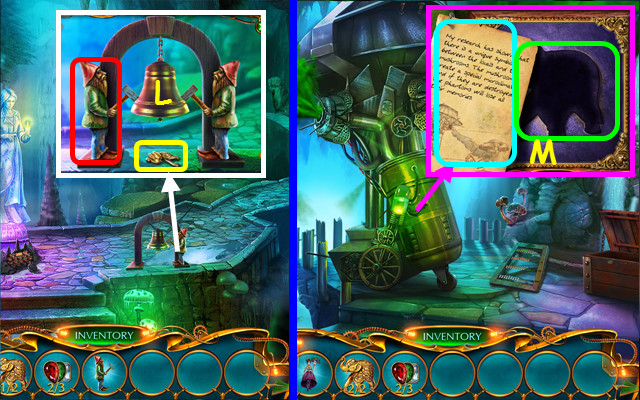
- Use the CURTAIN TIE (O).
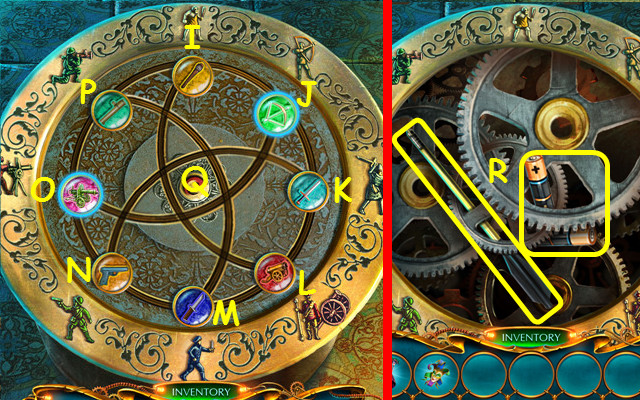
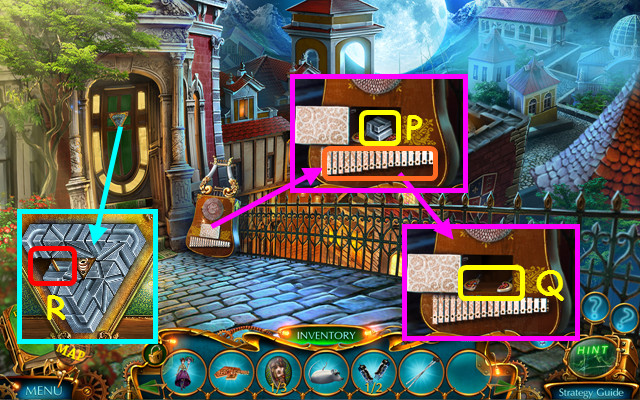
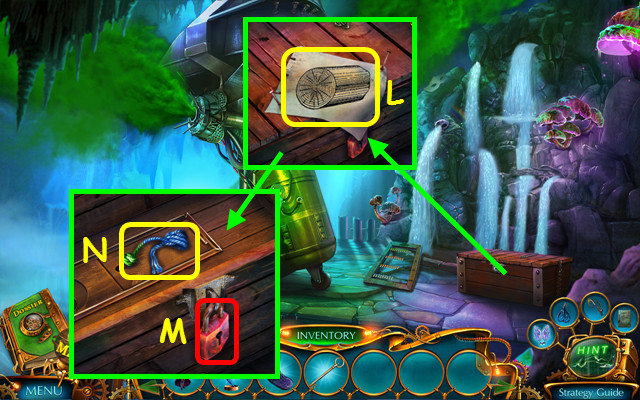
- Place the FISHING ROD (P).
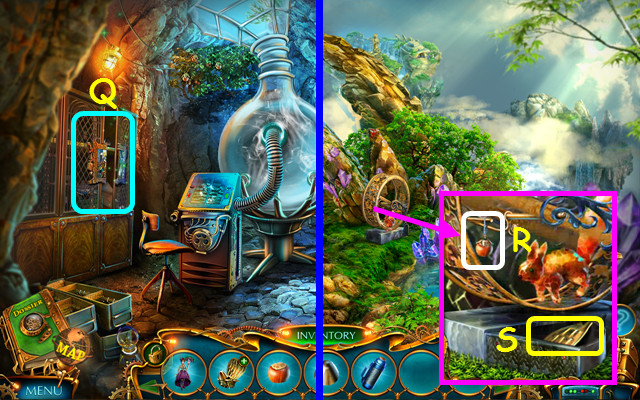
- Take the HATCH PIECE and read the letter (Q).
- Open the box; take the CRYSTAL PIECE (R).
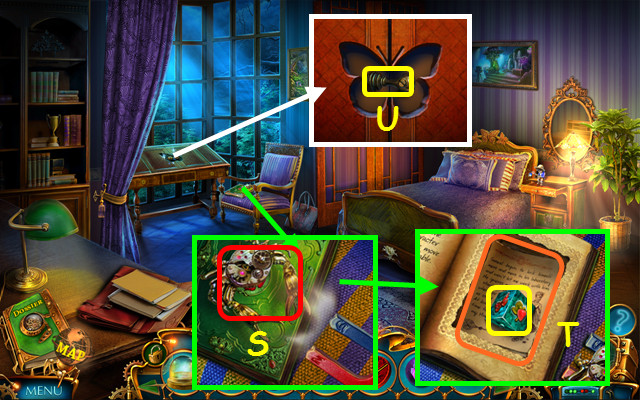
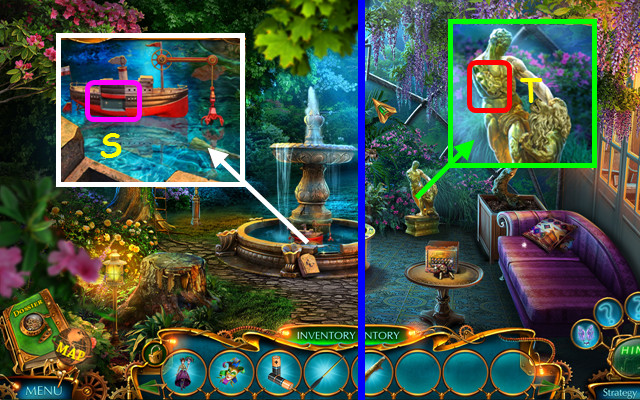
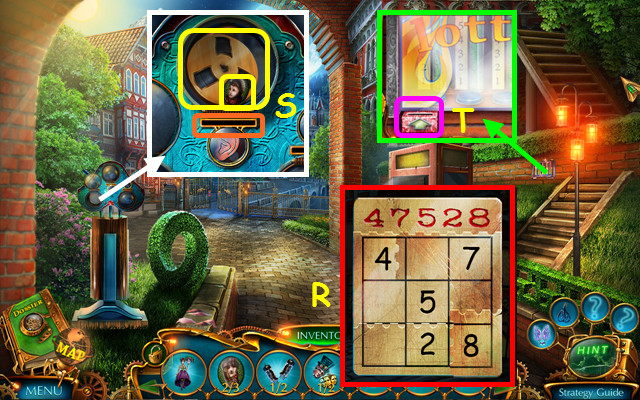
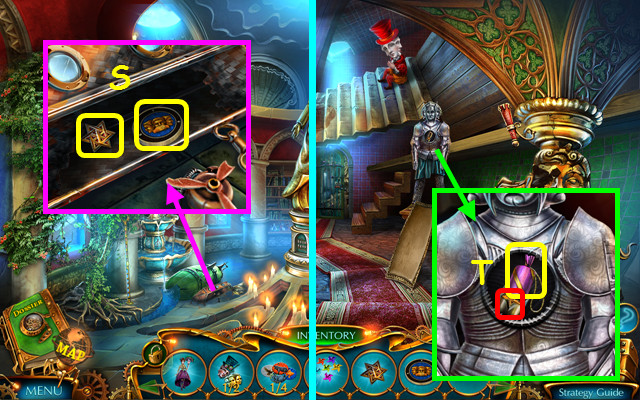
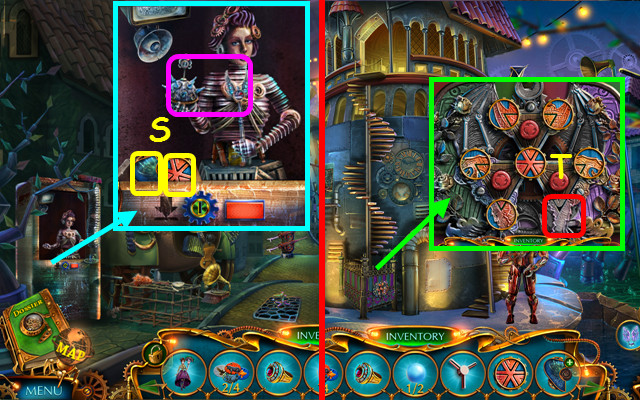
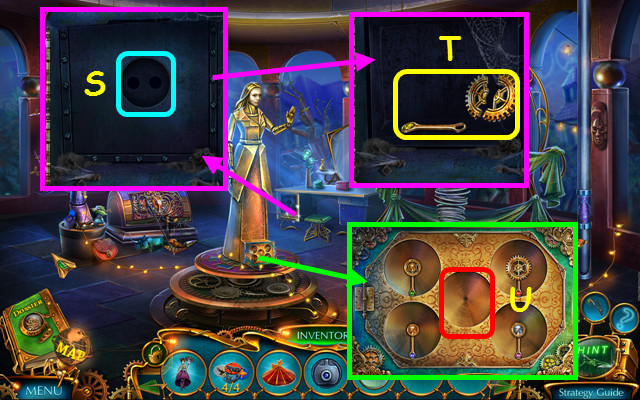
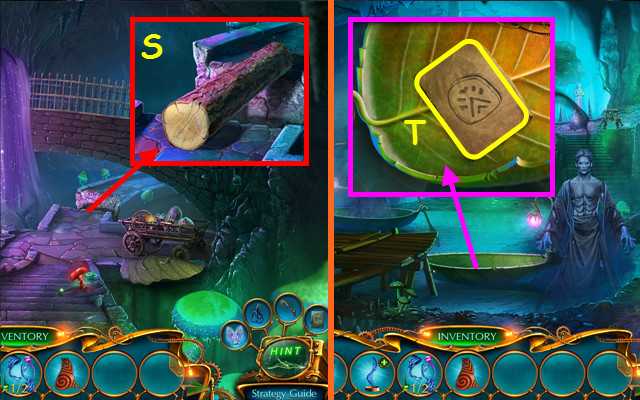
- Use the MAGNET (S).
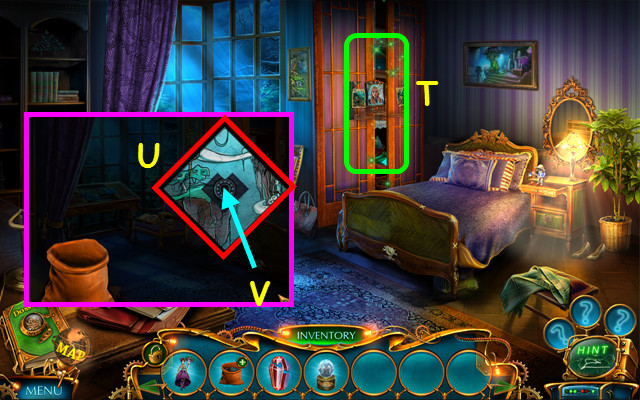
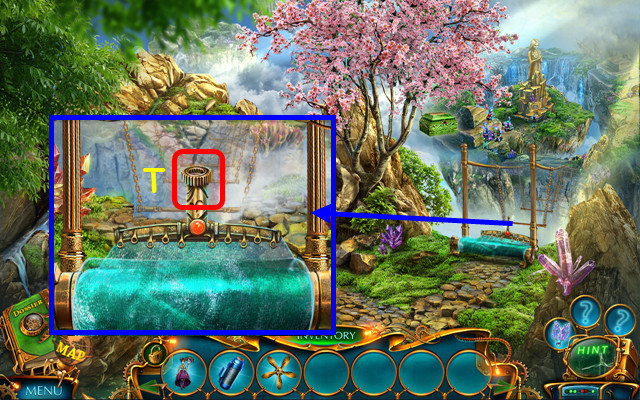
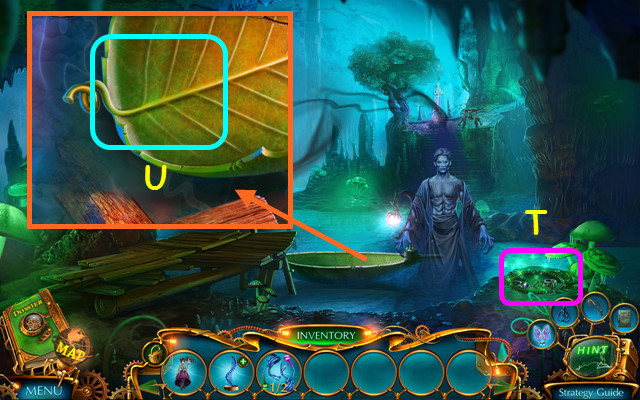
- Take the first GATE PART and note (T).
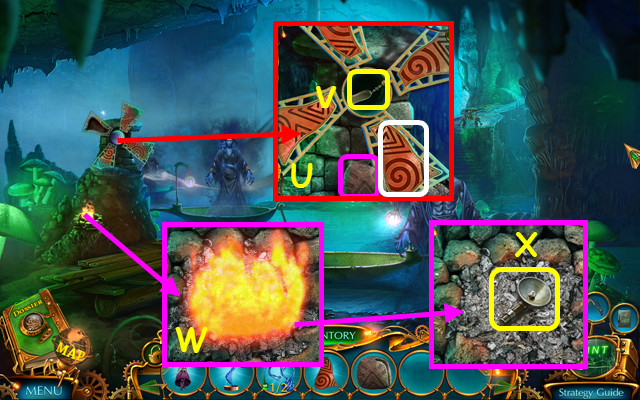
- Take the LEVER (U).
- Walk down twice.
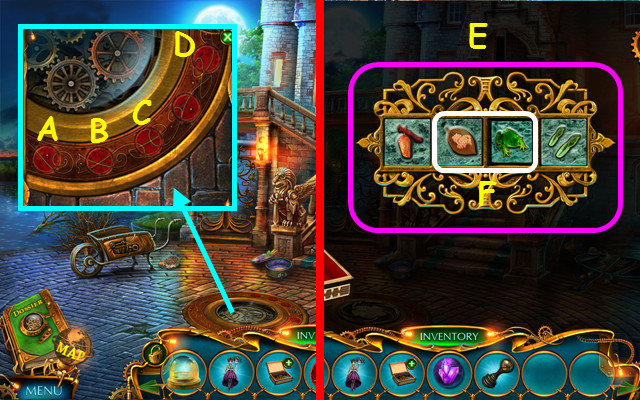
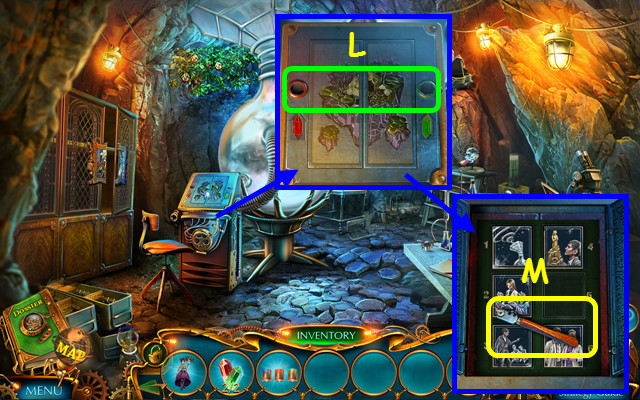
- Place the HATCH PIECE (B).
- Solution: A-A-C-D.
- You earn the second GATE PART.
- Select the BOX from inventory.
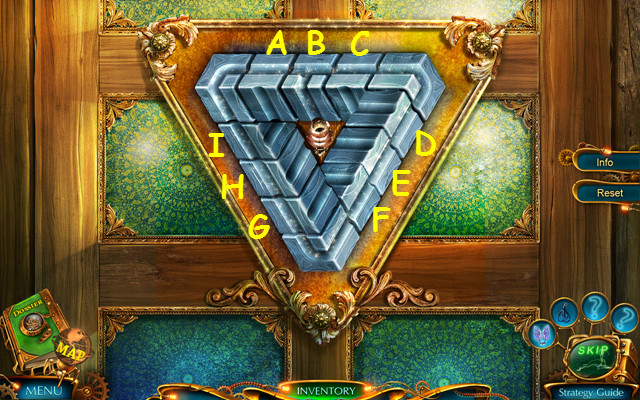
- Restore the frame and place the 2 tiles in the frame (E).
- Add the 2 GATE PARTS to make the GATE LOCK (F).
- Place the GATE LOCK (G).
- Restore the sequences (H-J).
- Enter the Garden to earn the TOOTH.

- Select the gazebo and place the CRYSTAL PIECE (K).
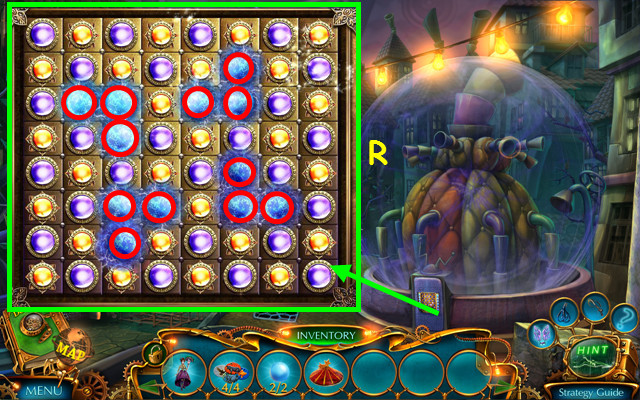
- Solution: 18-4-17-5-16-9-13-16-12-10-11-17-10-18-9-11-8-12-18-13-7-18-6-19-5-6-13-7-4-8-3-15-2-13-8-14-1-8-14-1-13-4-15-13-19-5-18-9-17-10-13-17-10-13-9-18-5-19-13-15-4-13-15-2-19-3.
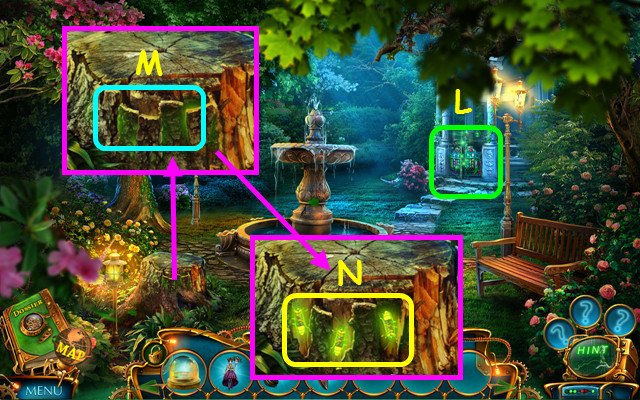
- Play the HOP to earn the DRAWKNIFE (L).
- Use the DRAWKNIFE (M).
- Use the JAR to take the FIREFLIES (N).
- Walk to the Hall.
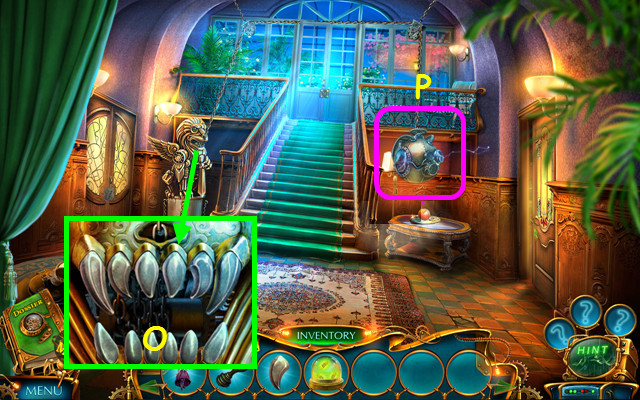
- Place the TOOTH in the mouth.
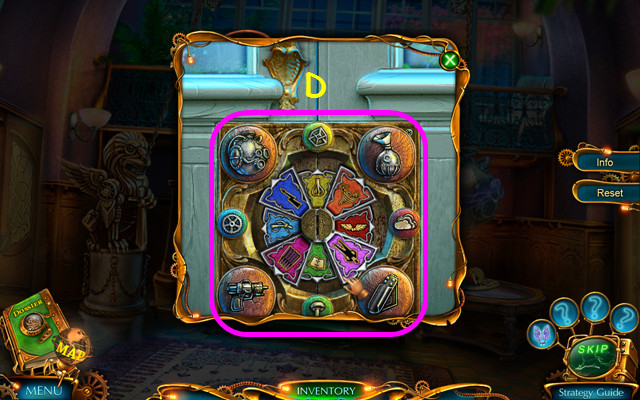
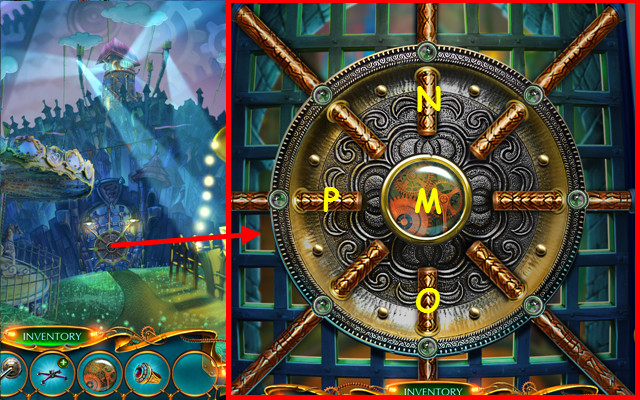
- Swap the teeth as shown (O).
- Select the device (P).
- Place the LEVER on the device.
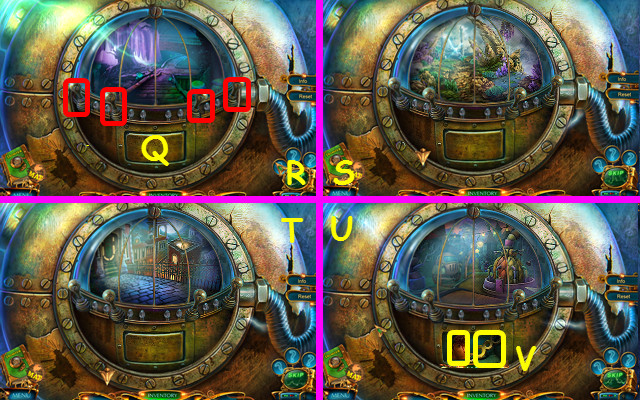
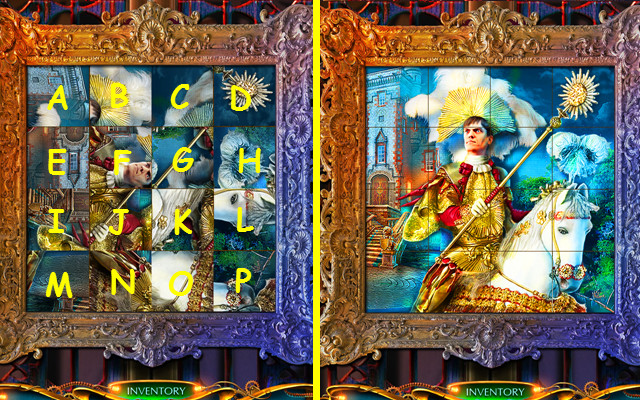
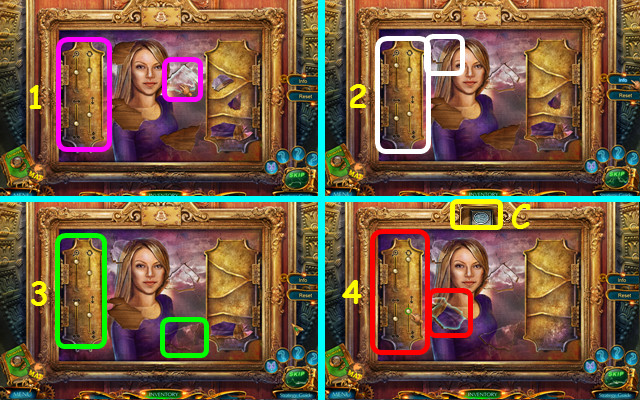
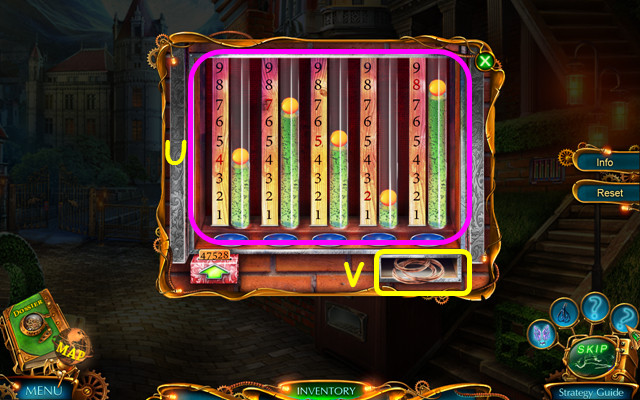
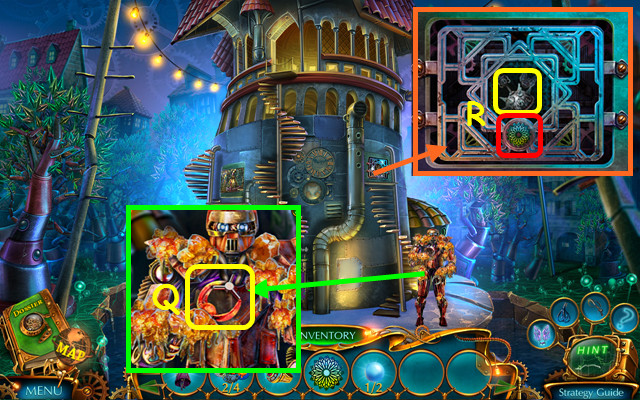
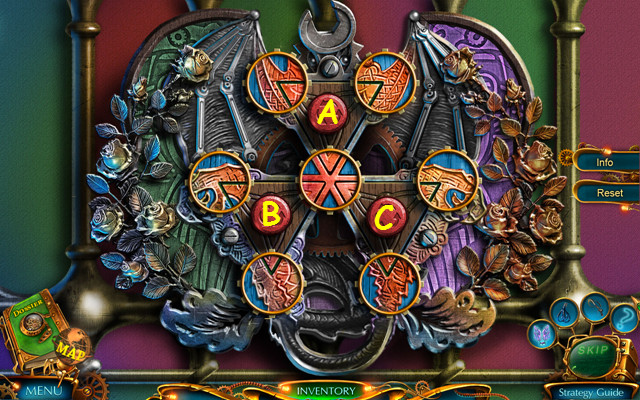
- Use the 4 levers to restore the pictures (Q).
- Restore the pictures R-S-T-U.
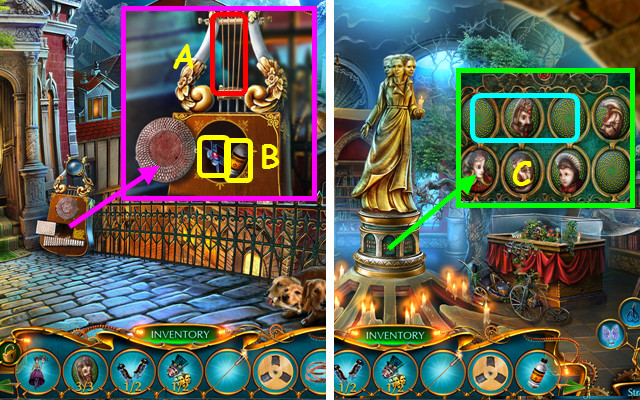
- Take the RINGS PIECE and POLYGON PIECES (V).
- Use the RINGS PIECE (A).
- Walk left.
- Take the UMBRELLA and CROSS SHAPE (B).
- Walk down and right.
- Place the FIREFLIES and the UMBRELLA (C).
- Use the HARLEQUIN; take the LADDER (D).
- Go to the Garden.
- Place the CROSS SHAPE (E).
- Take the CRYSTAL SEED and note (F).
- Place the LADDER (G).
- Take the BUNCH of MUSHROOMS (H).
- Walk down.
- Place the BUNCH OF MUSHROOMS (I).
- Take the CANVAS and KNIFE (J).
- Enter the Hall.
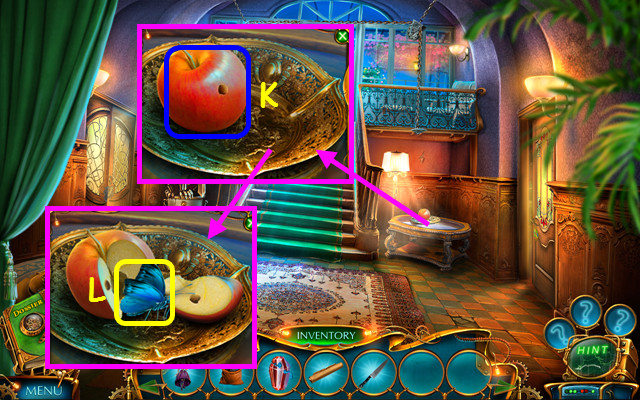
- Use the KNIFE (K).
- Take the BUTTERFLY (L).
- Walk right.
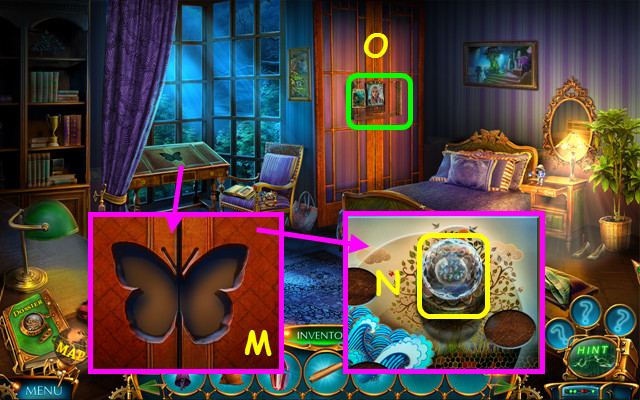
- Place the BUTTERFLY (M).
- Take the FISH FOOD (N).
- Select the painting (O).
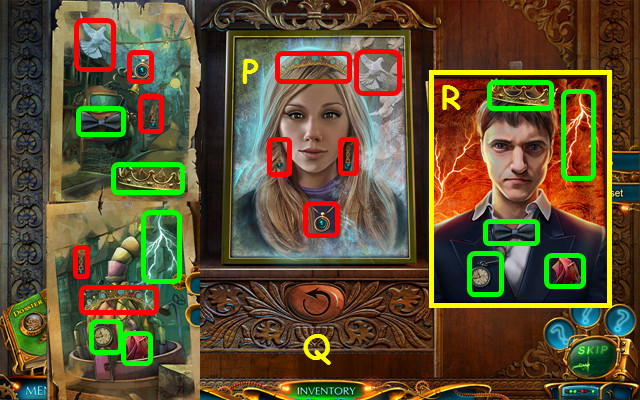
- Place the CANVAS on the right.
- Place the items (red) into the center portrait (P).
- Press the button (Q).
- Place the items (green) into the center portrait (R).
- Play the HOP to earn the TURQUOISE POLYGON (T).
- Open the POLYGON PIECES and place the pieces in the frame (U).
- Add the TURQUOISE POLYGON to make the PORTAL KEY (V).
- Walk down and left.
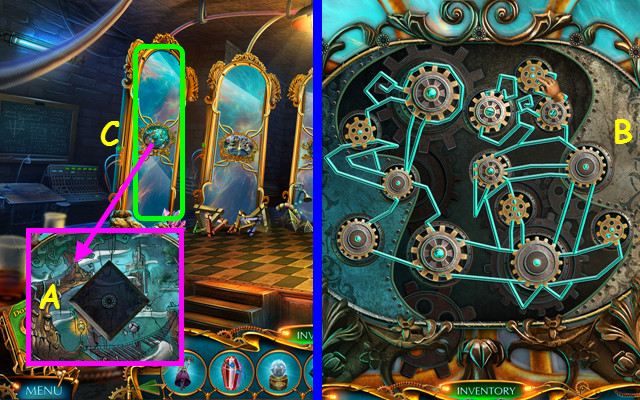
- Place the PORTAL KEY (A).
- Place the gears as shown (B).
- Enter the mirror (C).
Chapter 2: The Flying Islands
- Place the CRYSTAL SEED (A).
- Take the FAN and the 1/2 MIRRORS (B).
- Talk to Skaar (C) to earn the LEVITATION ability (D).
- Use LEVITATION to take the PUZZLE PIECE (E).
- Use the FISH FOOD to earn the 2/2 MIRRORS (F).
- Place the 2 MIRRORS (G).
- Walk forward.
- Use HARLEQUIN; take the TILE WITH NUMBERS (H).
- Place the TILE WITH NUMBERS (I).
- Move the numbers as shown (J).
- Enter the Cave (K).
- Take the FAN PART (L).
- Use LEVITATION to take the SMALL NUT (M).
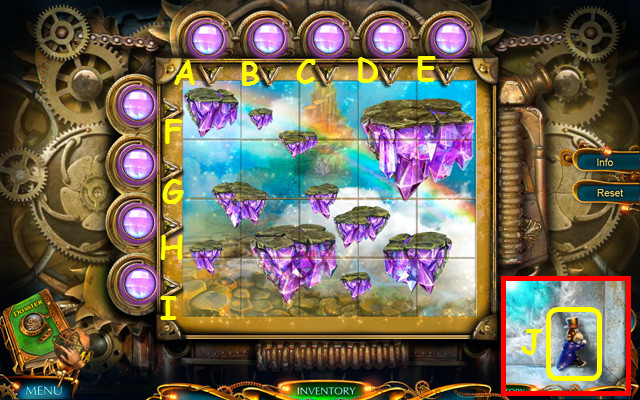
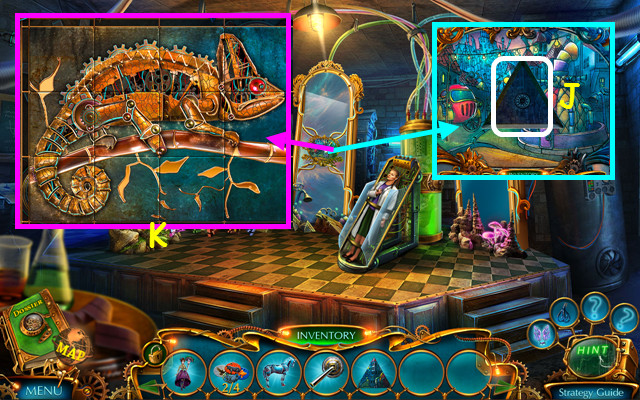
- Select the mini-game (N).
- Place the PUZZLE PIECE on the board.
- Solution: Cx3-D-Ex3-Fx3-Gx2-Hx3-I-Jx2-Kx2-L-N-Ox3-P.
- Play the HOP to earn the FULL VACUUM FLASK (Q).
- Walk down twice.
- Place the SMALL NUT (R); take the VANE (S).
- Combine the FAN, VANE, and FAN PART to make the FAN (inventory).
- Walk forward.
- Place the FAN (T).
- Walk right.
- Use the FULL VACUUM FLASK (A).
- Take the first TRINITY KNOT PIECE and the MUZZLE (B).
- Take the 1/2 ORBS (C).
- Walk down and left.
- Read the note and place the MUZZLE (D).
- Take the 2/2 ORBS and the MARIONETTE (E).
- Walk down and right.
- Select the mini-game (F).
- Place the 2 ORBS on the device.
- Solution: Bx3-Cx2-D-Gx3-Hx2-I.
- Take the MONKEY (J).
- Go to the Cave.
- Place the MONKEY; take the PROTECTIVE GLOVES and CRANK HANDLE (K).
- Use the CRANK HANDLE and take the second TRINITY KNOT PIECE (L).
- Combine the 2 TRINITY KNOT PIECES to make the TRINITY KNOT (inventory).
- Use the PROTECTIVE GLOVES to take the 1/2 CRYSTAL (M).
- Walk down.
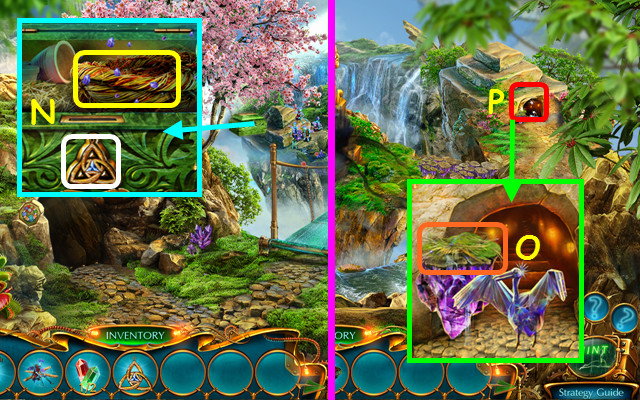
- Place the TRINITY KNOT; take the NEST (N).
- Walk right.
- Place the NEST (O).
- Enter the Pyramid (P).

- Use LEVITATION to take the PAINTS (Q).
- Place the MARIONETTE (R).
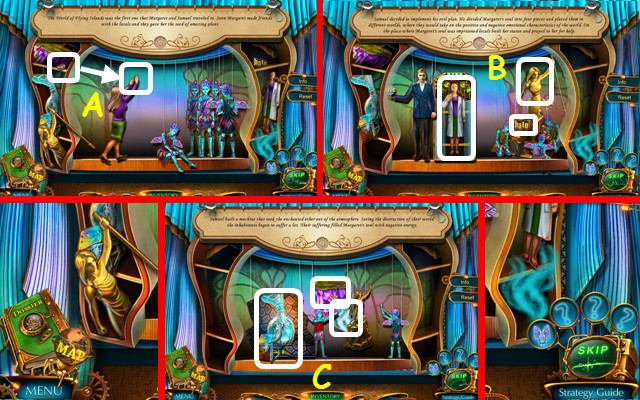
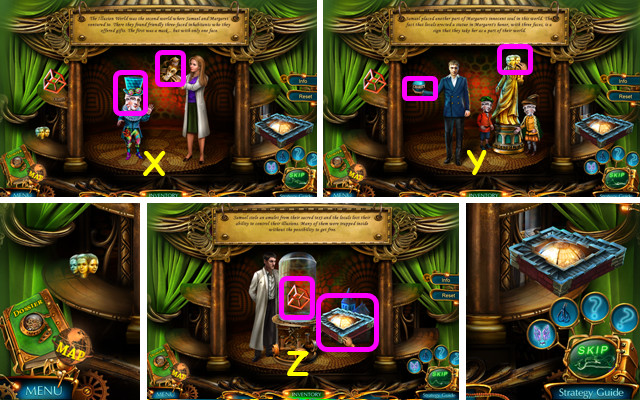
- Place the seed (A).
- Place Margaret, the statue, and hate (B).
- Place the machine, rock, and smoke (C).
- Play the HOP to earn the LADLE (D).
- Use the LADLE to take the PLANT TILE (E).
- Walk down twice.
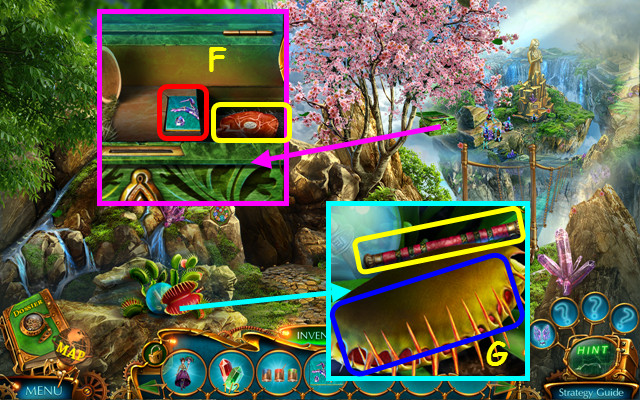
- Place the PLANT TILE; take the STEAK (F).
- Place the STEAK; take the STICK (G).
- Go to the Pyramid.
- Place the STICK (H).
- Use the HARLEQUIN to take the TURTLE TILE (I).
- Place the TURTLE TILE; take the ROSE (J).
- Place the ROSE; take the 2/2 CRYSTAL (K).
- Walk to the Cave.
- Place the 2 CRYSTALS (L).
- Take the GLASS CUTTER (M).
- Walk down.
- Use the GLASS CUTTER (N).
- Take the SIGNET RING and use it on the seal (O).
- Take the 1/4 PICTURE PIECE (P).
- Enter the Cave.

- Use the SIGNET RING on the seal; take the 2/4 PICTURE PIECE (Q).
- Use the SIGNET RING on the skull; take the 3/4 PICTURE PIECE (R).
- Go to the Pyramid.
- Use the SIGNET RING on the seal; take the 4/4 PICTURE PIECE (A).
- Place the 4 PICTURE PIECES (B).
- Move the levers to the positions shown for each piece (1-4).
- Take the PUZZLE PIECE (C).
- Return to the Cave.
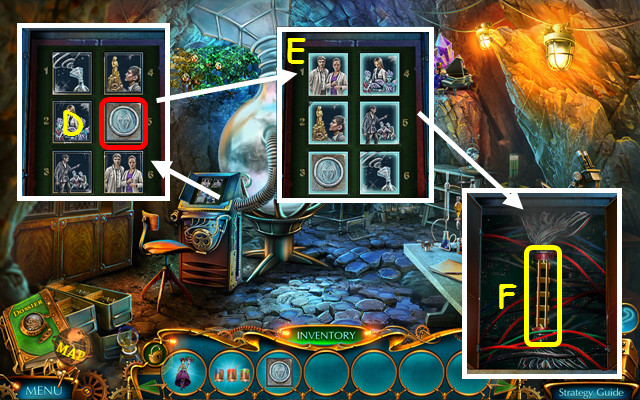
- Place the PUZZLE PIECE (D).
- Solution (E).
- Take the RAILS (F).
- Walk down and right.

- You earn the SOUL CONTAINER.
- Place the RAIL; take the TORN PICTURE and the 1/2 CHIPS (G).
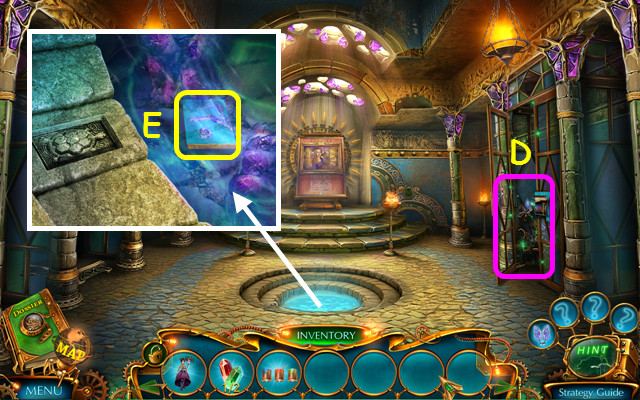
- Use the SOUL CONTAINER to take SOUL'S LOVE PART (H).
- Walk down 3 times.
- Place SOUL'S LOVE PART (I).
- Walk down.
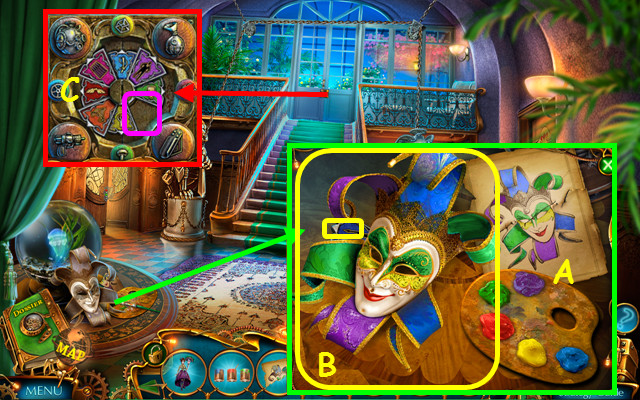
- Place the TORN PICTURE and the PAINTS; paint the mask to match the card (A).
- Take the MASK and the ARROW SLIDER (B).
- Place the ARROW SLIDER (C).
- Slide or swap the panels to these positions (D).
- Walk forward.
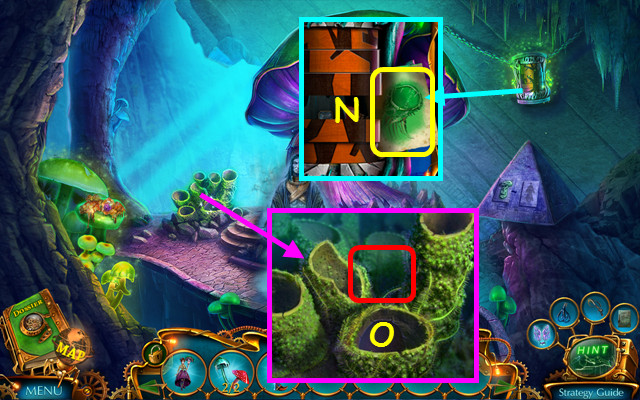
- Use LEVITATION to take the LIGHTS (E).
- Use the LIGHTS (F).
- Play the HOP to earn the 2/2 CHIPS (G).
- Place the 2 CHIPS (H).
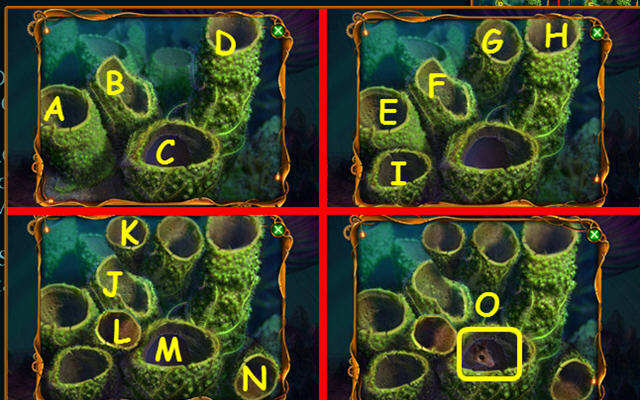
- Select P-M-Q-P-K-Q-K-N-Q-I-N-Q-I-L-Q-O-L-Q-O-J.
- Take the ARROW and BATTERIES (R).
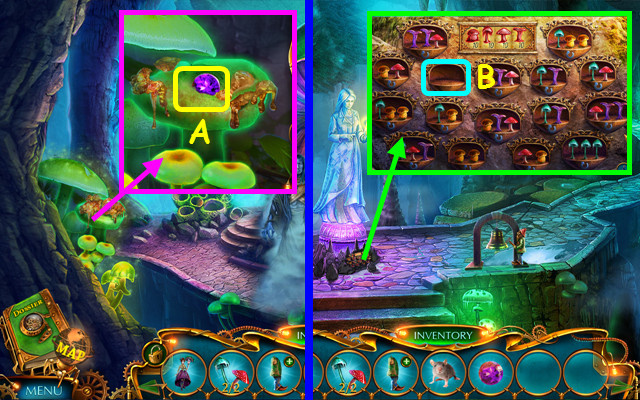
- Go to the Garden.
- Place the BATTERIES to earn the HAND (S).
- Return to the Greenhouse.
- Place the HAND to earn the PORTAL KEY (T).
- Walk down and left.
- Place the PORTAL KEY (A).
- Solution: Bx2-Cx2-Dx2-Ex2.
- Enter the mirror (F).
Chapter 3: Illusion World
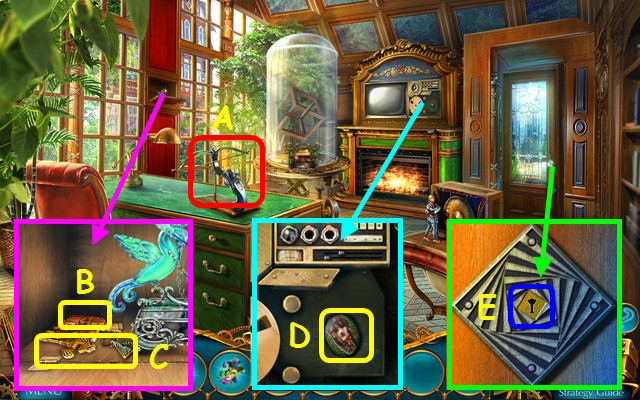
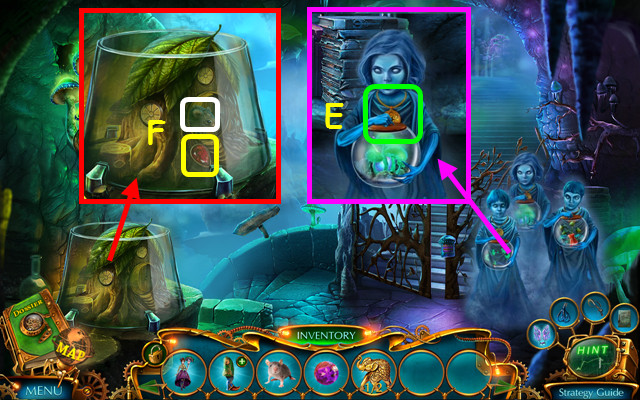
- Place the ARROW (A).
- Take the LOTTERY TICKET SCRAPS (B).
- Use the HARLEQUIN; take the KEY (C).
- Take the PUZZLE PORTRAIT (D).
- Use the KEY in the lock (E).
- Walk forward.
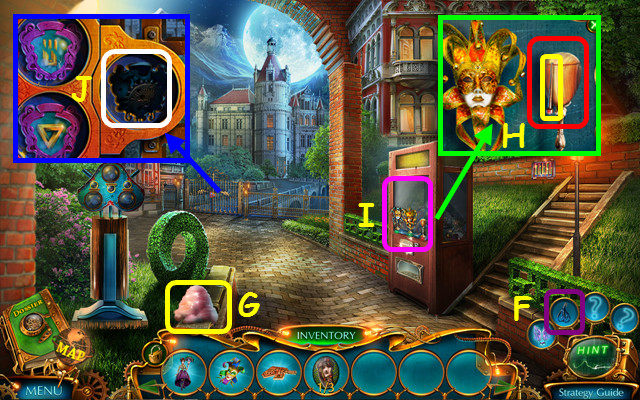
- You earn the PITCHER (F).
- Use the PITCHER to earn the HORN (G).
- Take the GONG HAMMER and place the MASK (H).
- Play the HOP to earn the GATES CHIP (I).
- Place the GATES CHIP (J).
- Walk forward.
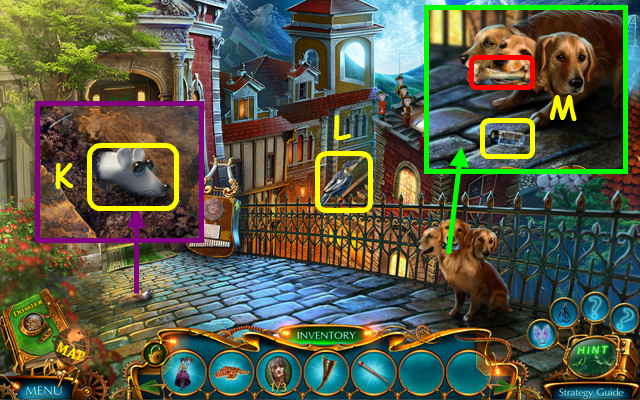
- Use the PITCHER to take the MOUSE TOY (K).
- Use the HORN on the bird to earn the MEATY BONE (L).
- Use the MEATY BONE on the dog; take the 1/2 TRANSISTOR (M).
- Walk down twice.
- Place the GONG HAMMER; take the BLIND COIN (N).
- Walk forward.
- Use the BLIND COIN; take the MALLETS (O).
- Walk forward.
- Place the MALLETS; take the DOOR CUBE (P).
- Use the HARLEQUIN to take the HAIRPIN (Q).
- Place the DOOR CUBE (R).
- Solution: Bx3-C-Ex2-Fx3-G-Hx2-Ix2.
- Walk forward.
- You receive the 1/2 PUZZLE PIECE.
- Place the MOUSE TOY; take the 2/3 PUZZLE PORTRAIT (J).
- Take the BIRD'S HEAD (K).
- Use the PITCHER; take the DEAF COIN (L).
- Take the TORCH (M).
- Place the BIRD'S HEAD (N).
- Walk forward.
- Use the HAIRPIN (O).
- Play the HOP to earn the CROWBAR (P).
- Walk down twice.
- Use the CROWBAR on the stone; take the LOTTERY TICKET (Q).
- Walk down.
- Combine the LOTTERY TICKET and the LOTTERY TICKET SCRAPS to make the TICKET (R).
- Place the DEAF COIN; take the 3/3 PUZZLE PORTRAIT and the REEL (S).
- Place the TICKET (T).
- Stop the balls on the matching numbers of the ticket (U).
- Take the STRINGS (V).
- Walk forward.
- Place the STRINGS (A).
- Take the SAFE PIECE and the KEROSENE (B).
- Walk forward twice.
- Place the 3 PUZZLE PORTRAITS (C).
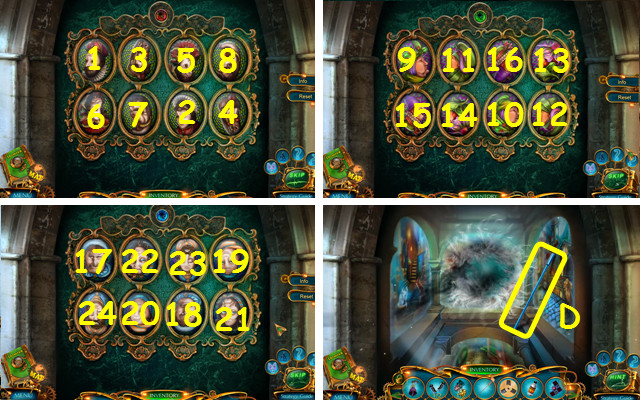
- Select 1-8.
- Select 9-16.
- Select 17-24.
- Take the PINWHEEL (D).
- Return to Illusion World Office.
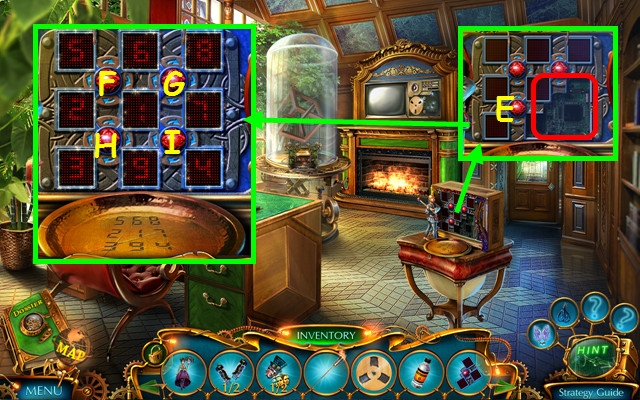
- Place the SAFE PIECE (E).
- Press G-H-F-Hx3-I-H.
- Take the 1/4 ANIMAL CHIP and the 2/2 TRANSISTOR (J).
- Place the REEL and the 2 TRANSISTORS to earn the KNIGHT'S HEAD (K).
- Return to the Tower.
- Place the KNIGHT'S HEAD (L).
- Use the KEROSENE and the TORCH (M).
- Take the SUPPORT and the PINWHEEL DETAIL (N).
- Combine the PINWHEEL and the PINWHEEL DETAIL to make the PINWHEEL (inventory).
- Walk forward.
- Place the SUPPORT (O).
- Use the PITCHER on the fountain (P).
- Take the SANDBAG (Q).
- Place the SANDBAG (R).
- Take the STAR AMULET and the MUTE COIN (S).
- Walk down.
- Place the STAR AMULET; take the FIRECRACKER (T).
- Walk down twice.
- Place the MUTE COIN; take the CRYSTAL BIRD (U).
- Walk down.
- Place the CRYSTAL BIRD; take the 2/2 PUZZLE PIECE (V).
- Place the 2 PUZZLE PIECES (W).
- Place the 3-faced head and the jester head (X).
- Place 'charity' and the statue head (Y).
- Place the cube and the stairs (Z).
- You receive the AMULET.
- Return to the Altar Room.
- Place the AMULET (A).
- You receive the SOUL CONTAINER.
- Walk forward.
- Use the SOUL CONTAINER to get SOUL'S CHARITY PART (B).
- Return to the Laboratory.
- Place SOUL'S CHARITY PART (C).
- Walk to the Garden.
- Place the PINWHEEL; take the 2/4 ANIMAL CHIP and the HORSE (D).
- Go to the Greenhouse.
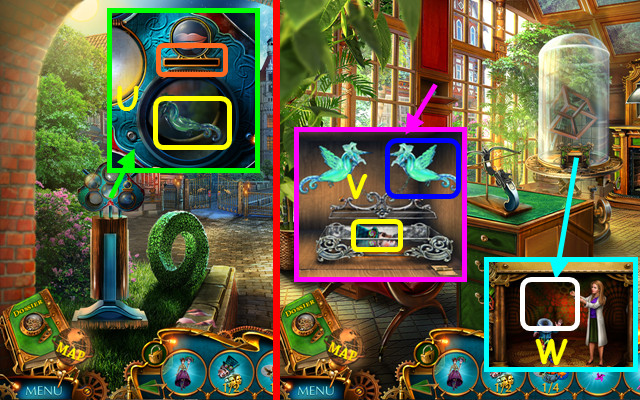
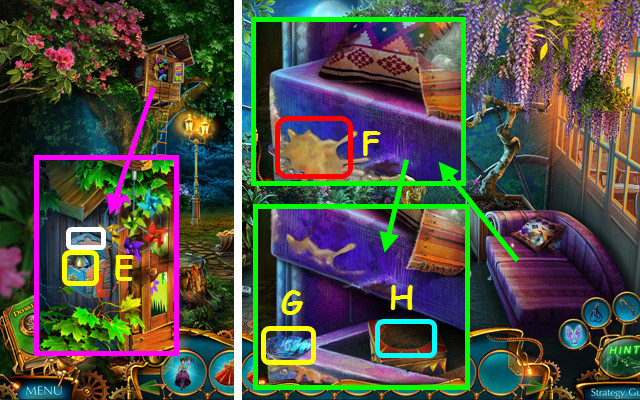
- Use the FIRECRACKER (E).
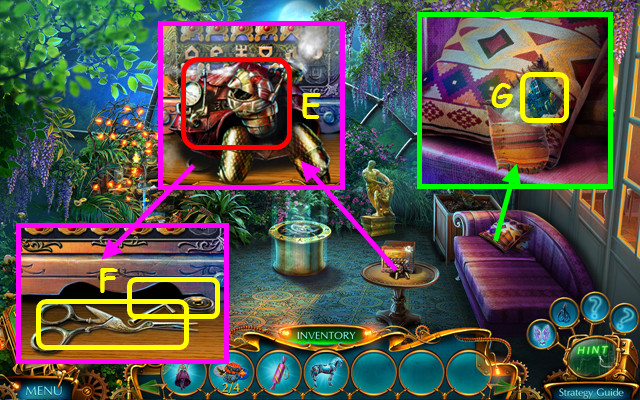
- Use the HARLEQUIN; take the LEVER and SCISSORS (F).
- Use the SCISSORS; take the PORTAL KEY (G).
- Go to the Laboratory.
- Place the PORTAL KEY (J).
- Restore the picture (K). This mini-game is randomly generated.
- Enter the mirror.
Chapter 4: The Mechanical World
- You receive the FLAMETHROWER (A).
- Take the NET (B).
- Use the FLAMETHROWER to take the MECHANICAL HANDLE (C).
- Place the HORSE (D).
- Play the HOP to earn the KEY (E).
- Place the KEY (F).
- Walk right.
- Use the NET (G).
- Place the MECHANICAL HANDLE (H).
- Take the CRANE and note (I).
- Use LEVITATION to take the SPONGE (J).
- Read the note and use the SPONGE on the cobwebs (K).
- Use the PITCHER; take the GATES DETAIL and the RING (L).
- Walk down.
- Place the GATES DETAIL (M).
- Select N-O-P.
- Walk forward.
- Use the FLAMETHROWER (Q).
- Use the HARLEQUIN; take the SPRING (R).
- Place the LEVER (S).
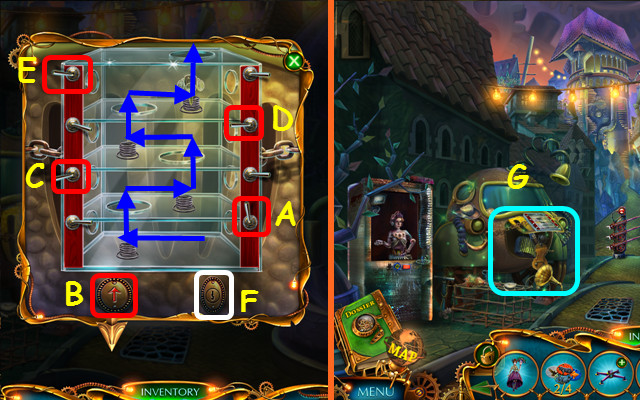
- Hold the levers to move the key over the springs, and then push the button.
- Solution: A-B-C-B-D-B-E-B.
- You earn the KEY.
- Use the KEY on the lock (F).
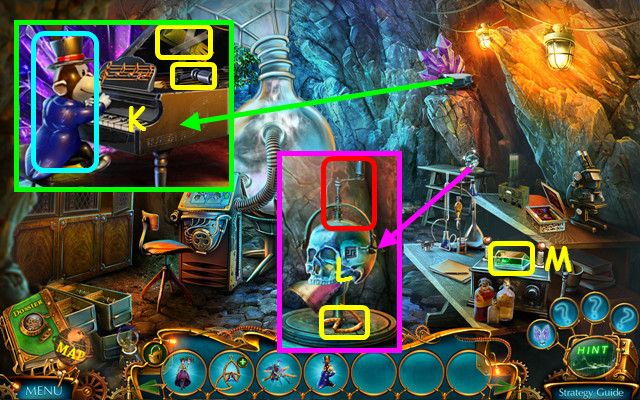
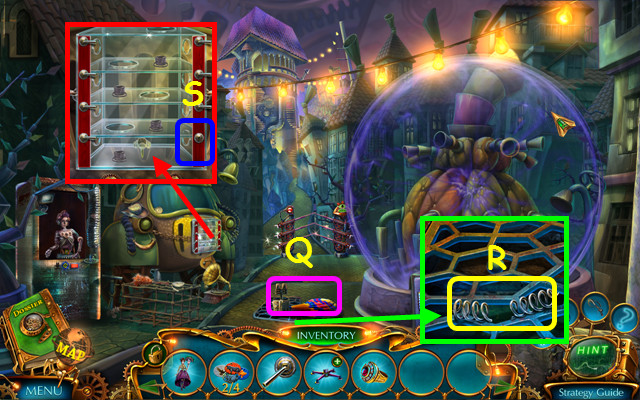
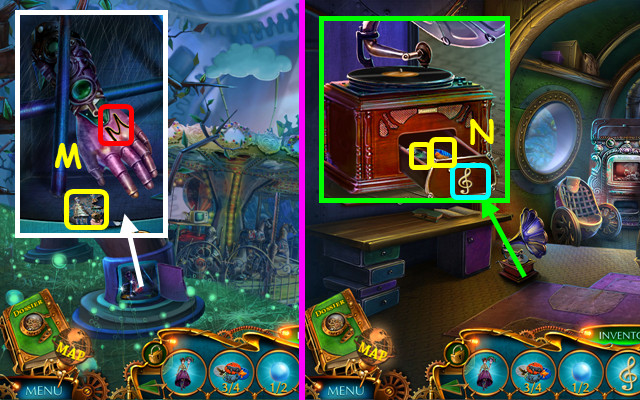
- Play the HOP to earn the RECORD (G).
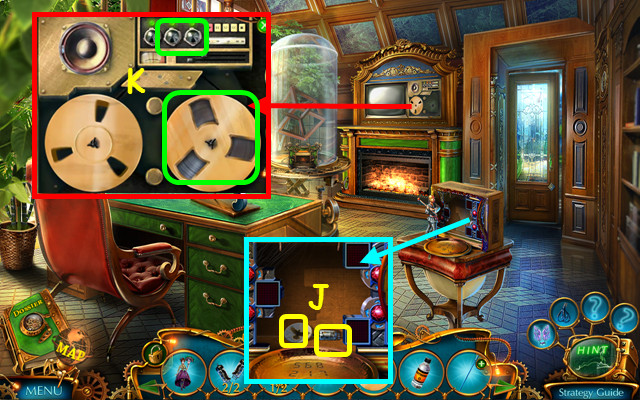
- Return to the House.
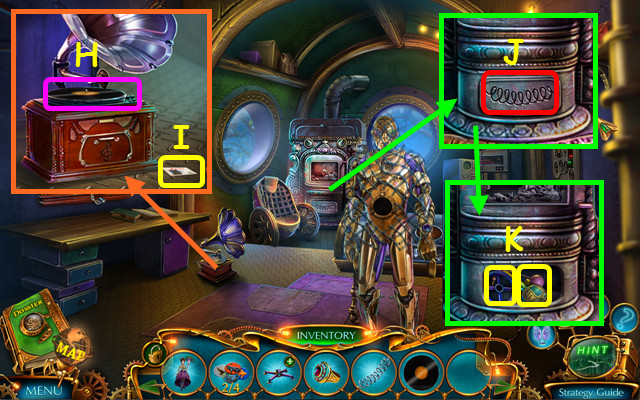
- Place the RECORD (H).
- Take the PASS (I).
- Place the SPRING (J).
- Take the WHEEL and the CRANE TOP (K).
- Combine the CRANE and the CRANE TOP to make the CRANE (inventory).
- Walk down.

- Place the WHEEL (L).
- Take the SLOT MACHINE COIN (M).
- Walk forward.
- Place the SLOT MACHINE COIN; take the FLOWER TOKEN (N).
- Use the CRANE to take the 1/2 SPHERES (O).
- Use the PASS (P).
- Walk forward.
- Use the FLAMETHROWER to receive the HANDLE (Q).
- Place the FLOWER TOKEN; take the ORB AND SCEPTER (R).
- Walk down.
- Place the ORB AND SCEPTER; take the GEAR PIECE and the BALLERINA HEART (S).
- Walk forward.
- Place the GEAR PIECE (T).
- Select B-A-C.
- Walk forward.
- You receive the FIN.
- Place the HANDLE (D).
- Play the HOP to earn the LETTER M (E).
- Place the FIN and take the FRESCO PIECE (F).
- Walk down.
- Place the FRESCO PIECE on the board and restore the picture (G).
- Take the DOOR LATCH, the 3/4 ANIMAL CHIP, and read the note (H).
- Walk forward.
- Place the DOOR LATCH (I).
- Take the 2 BALLERINA HEART PIECES (J).
- Combine the BALLERINA HEART, the 2 BALLERINA HEART PIECES, and the RING to make the BALLERINA HEART (inventory).
- Walk down.
- Place the BALLERINA HEART (K).
- Take the TREBLE CLEF (L).
- Walk down twice.
- Place the LETTER M; take the first PICTURE SCRAP (M).
- Walk right.
- Place the TREBLE CLEF; take the 4/4 ANIMAL CHIP and the ROBOT PART (N).

- Place the ROBOT PART; take the second PICTURE SCRAP and the CIRCUS ROOF (O).
- Place the 2 PICTURE SCRAPS (P).
- Play the HOP to earn the 2/2 SPHERES (Q).
- Walk to the Square.
- Place the 2 SPHERES on the board.
- Position the spheres as shown (R).
- You earn the PLUG.
- Go to the Princess's Quarters.
- You receive the SOUL CONTAINER.
- Place the PLUG (S).
- Use the HARLEQUIN; take the PUZZLE LEVER (T).
- Place the PUZZLE LEVER (U).
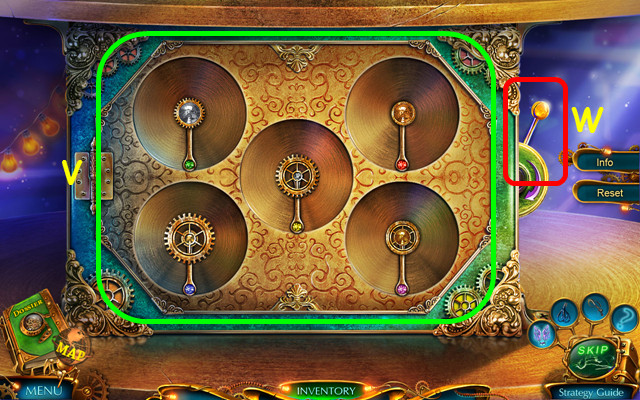
- Swap the gears as shown (V).
- Pull the lever (W).
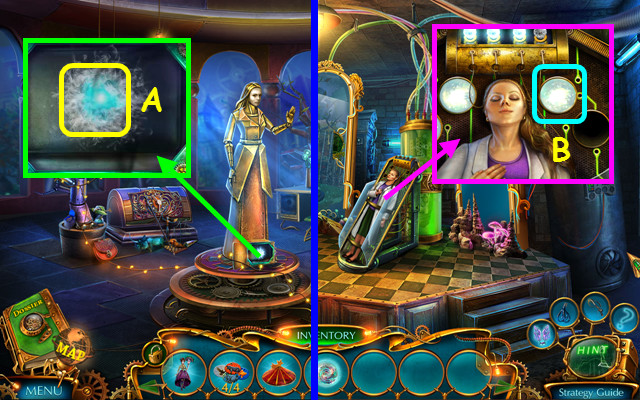
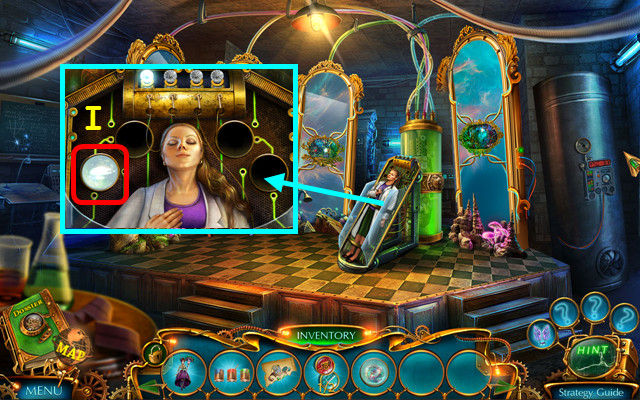
- Use the SOUL CONTAINER to take the SOUL'S LOGIC PART (A).
- Return to the Laboratory.
- Place the SOUL'S LOGIC PART (B).
- Go to Margaret's Room.
- Place the 4 ANIMAL CHIPS on the board.
- Move the chips to the correct location (C).
- Take the BUTTERFLY (D).
- Go to the Garden.
- Place the BUTTERFLY and take the TURPENTINE (E).
- Go to the Greenhouse.
- Use the TURPENTINE (F).
- Take the PORTAL KEY (G).
- Place the CIRCUS ROOF to earn the AMULET STONE (H).
- Return to the Laboratory.
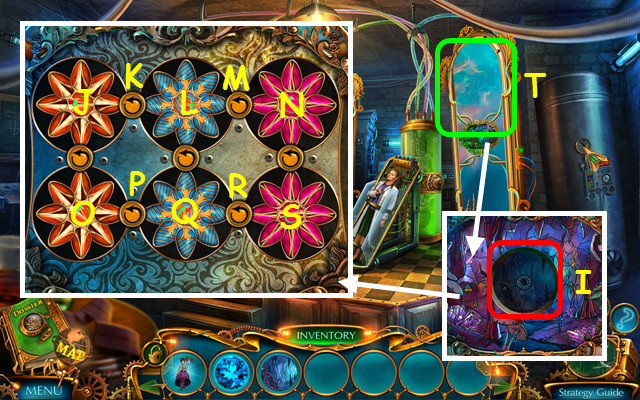
- Place the PORTAL KEY (I).
- Solution: K-J-L-M-L-K-Jx2-Lx2-N-M-L-N-M-L-K-J-Nx2-M-Lx2-K-J-Lx2-K-J-Nx2-M-N-Lx4-M-Lx4-K-Q-R-Sx2-Q-P-Ox2-Qx3-R-Qx2-P-O-S-R-Qx2-P-O-Qx2-S-R-Qx2-S-R-S-Qx2-P-Ox3-R-Qx4-P-Qx4-R.
- Enter the mirror (T).
Chapter 5: The Phantom World

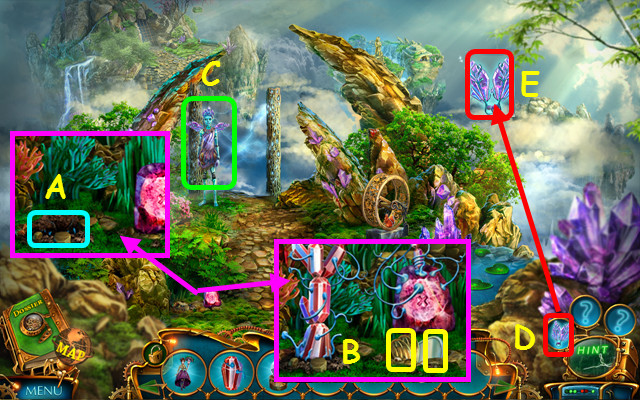
- Place the AMULET STONE to earn the first DNA (A).
- Use LEVITATION to take the RAZOR (B).
- Walk left (C).
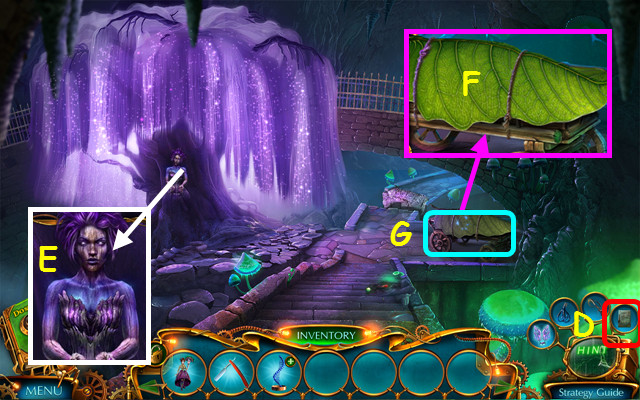
- You receive the SKETCHBOOK (D).
- Talk to the Tree Spirit and receive the WATERFALL STONE (E).
- Use the RAZOR on the ropes (F).
- Play the HOP to earn the ESSENCE VIAL (G).
- Place the ESSENCE VIAL; take the GATE CARD (H).
- Use the SKETCHBOOK to make the CHEST KEY (I).
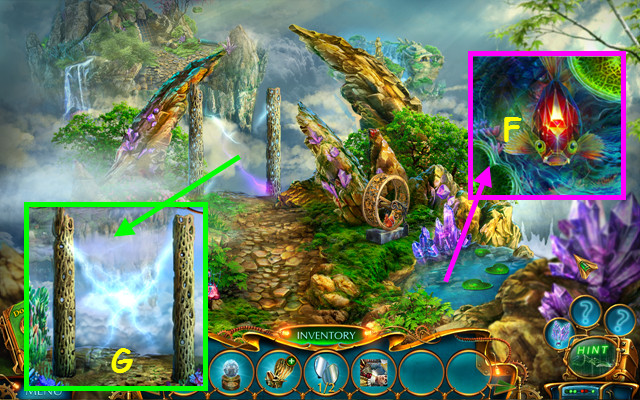
- Walk down.
- Place the GATE CARD and change the colors as shown (J).
- Push the switch (K).
- Walk forward.
- Use the SKETCHBOOK to make the LOG (L).
- Use the CHEST KEY on the lock (M).
- Take the 1/2 ROPE KNOTS (N).
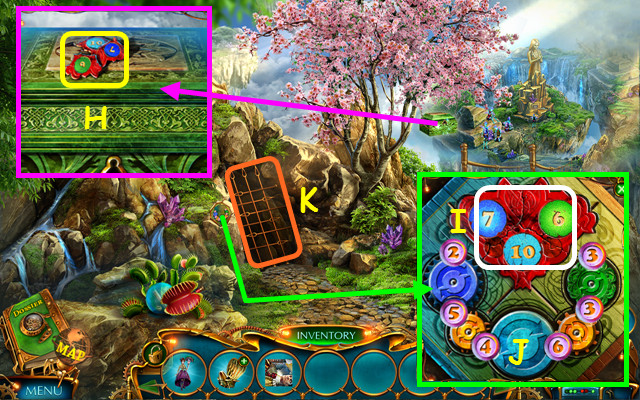
- Place the WATERFALL STONE; take the ABACUS PLATE (O).
- Place the ABACUS PLATE (P).
- Place the ABACUS PLATE and move the mushrooms as shown (Q).
- Take the WATERMILL DETAIL (R).
- Return to the Road.
- Place the LOG (S).
- Walk forward.
- Use the SKETCHBOOK to make the STONE (T).
- Place the STONE and the WATERMILL DETAIL (U).
- Take the SCOOP (V).
- Use the PITCHER on the flames (W).
- Use the SCOOP to find the FLASH (X).
- Return to the Waterfall.
- Place the FLASH and take the DIAMOND (A).
- Walk down.
- Use the DIAMOND on the dome; take the note and the PUZZLE PIECE (B).
- Return to the Lake.
- Place the PUZZLE PIECE (C).
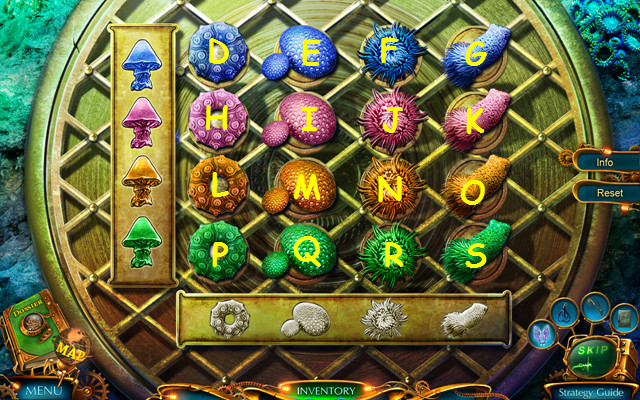
- Sort the items by shape and color.
- Swap JE-EF-DE-HM-MJ-JG-JK-FJ-JM-MP-FI-LP-LI-IM-MP-DH-NQ-JM-SO-KF-EI-IN-NS-NO-NJ-GJ-JM-JE-NJ-JI-EF-FI-IM-MQ-EI-IM-NS-NJ-JO-JG-FJ-JN-NR-KO.
- Play the HOP to earn the OAR (T).
- Place the OAR (U).
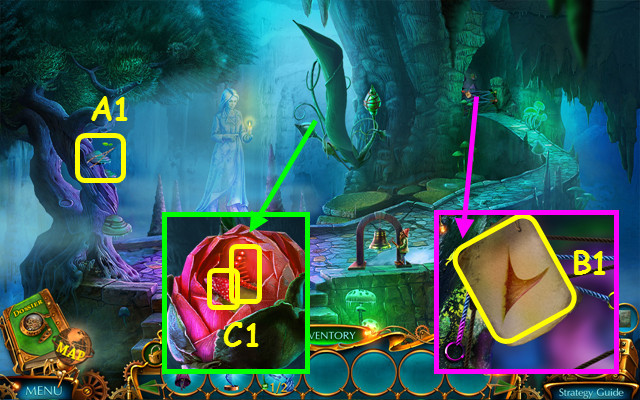
- Use LEVITATION to take the PINCERS (A1).
- Use the SKETCHBOOK to make the THORN (B1).
- Use the THORN on the bud; take the 1/2 MUSHROOM and the second DNA (C1).
- Combine the 2 DNAs to make the DNA (inventory).
- Walk to the Road.
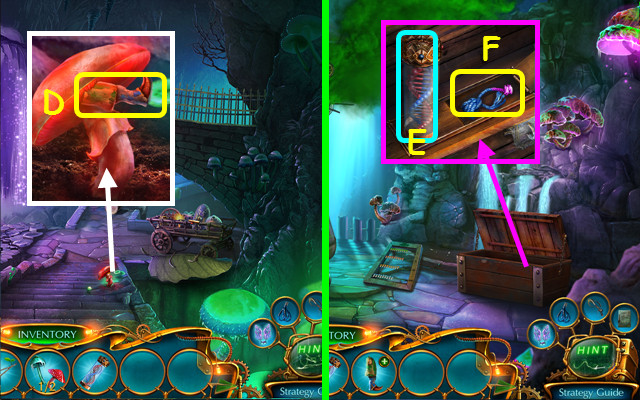
- Use the PINCERS to take the GNOME (D).
- Go to the Waterfall.
- Place the DNA (E).
- Take the 2/2 ROPE KNOTS (F).
- Go to the Island.
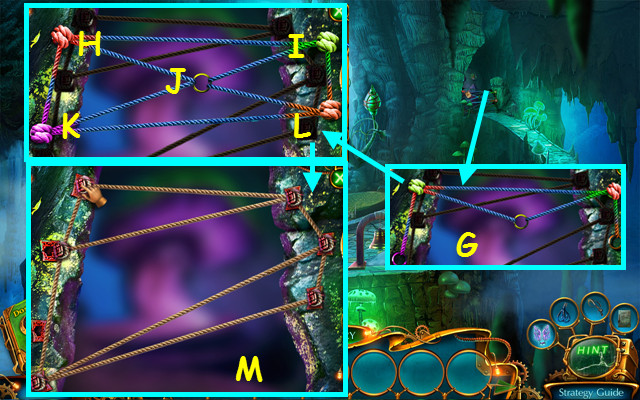
- Place the 2 ROPE KNOTS (G).
- Select K-L-J-I-H-J.
- Move the ropes as shown (M).
- Walk forward.
- You earn the 2/2 MUSHROOM.
- Use the SKETCHBOOK to make the POLYP (N).
- Place the POLYP (O).
- Select D-A-B-C-D.
- Select E-G-F-H-I.
- Select J-M-K-N-L.
- Take the MOUSE (O).
- Use the FLAMETHROWER; take the AMULET STONE (A).
- Walk down.
- Place the 2 MUSHROOMS (B).

- Change the mushrooms as shown (C).
- Take the 1/2 ELEPHANT (D).
- Walk down 3 times.
- Place the AMULET STONE to earn the POISON SACK (E).
- Place the MOUSE; take the 1/3 CASTLE SWORD GEM (F).
- Use the POISON SAC (G).
- Use the HARLEQUIN; take the TOTEM (H).
- Return to Mycelium.
- Place the TOTEM; take the SLIDER STRIP (I).
- Place the SLIDER STRIP; restore the design (J).
- Take the 2/3 CASTLE SWORD GEM and the GNOME PARTS (K).
- Combine the GNOME and the GNOME PARTS to make the GNOME (inventory).
- Walk down.
- Place the GNOME; take the 2/2 ELEPHANT (L).
- Go to the Waterfall.
- Take the note and place the 2 ELEPHANTS (M).
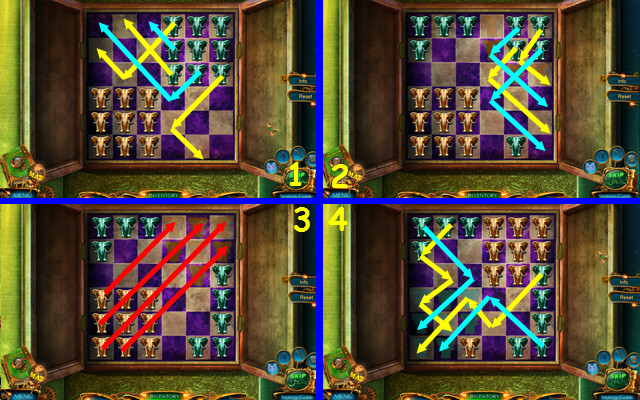
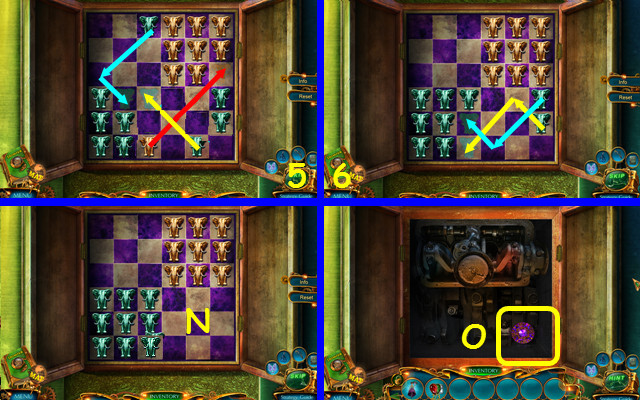
- Move the pieces as indicated (1-4).
- Move the pieces as indicated (5,6).
- Final solution (N).
- Take the AMULET STONE (O).
- Walk down.
- Place the AMULET STONE to earn the SACRED ELIXIR (A).
- Walk left.
- Place the SACRED ELIXIR to earn the SOUL CONTAINER (B).
- Go to the Island.
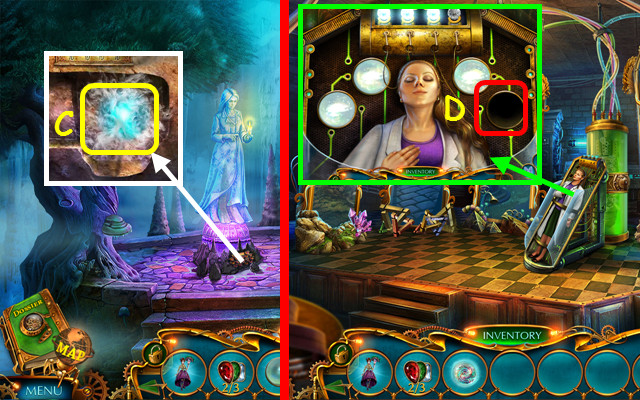
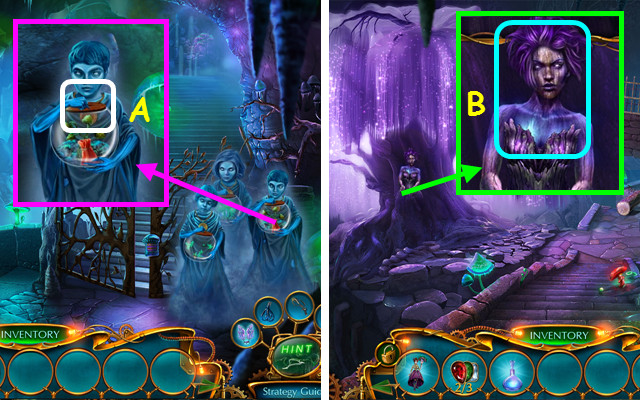
- Use the SOUL CONTAINER to collect the SOUL'S HONESTY PART (C).
- Go to the Laboratory.
- Place the SOUL'S HONESTY PART (D).
- You earn the 3/3 CASTLE SWORD GEM.
- Walk down twice.
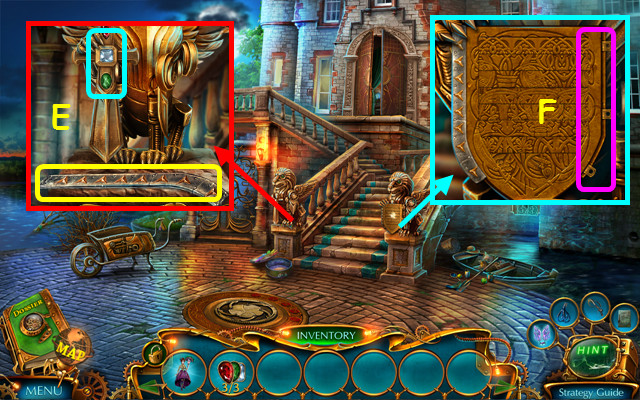
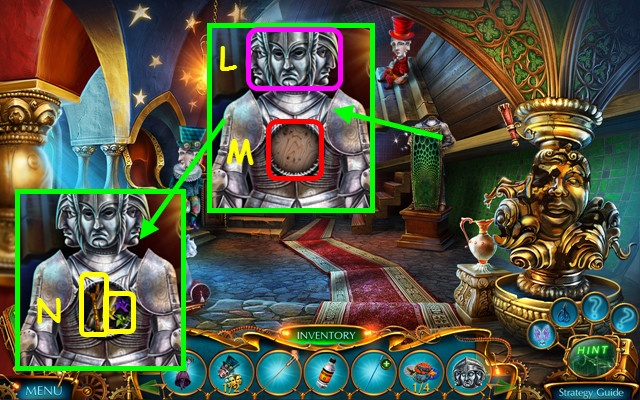
- Place the 3 CASTLE SWORD GEMS and take the CASTLE SHIELD PART (E).
- Place the CASTLE SHIELD PART (F).
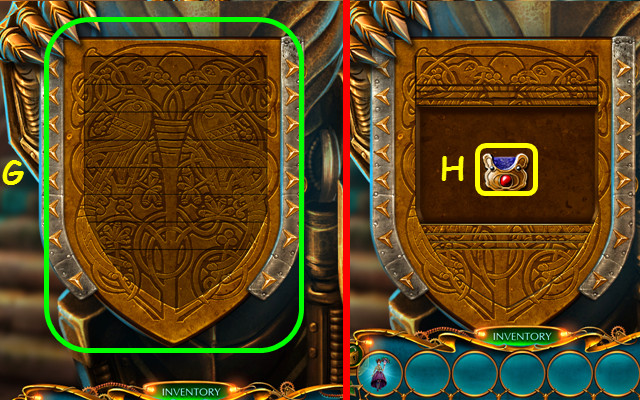
- Restore the shield (G).
- Take the GREENHOUSE SAFE PART (H).
- Go to the Greenhouse.
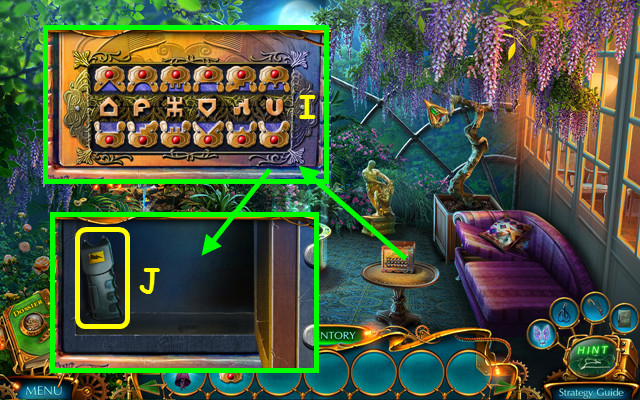
- Place the GREENHOUSE SAFE PART; move the pieces as shown (I).
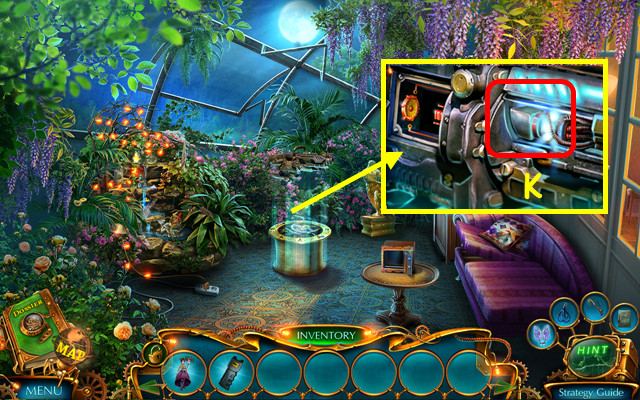
- Take the STUN GUN (J).
- Use the STUN GUN (K).
- Congratulations! You have completed Labyrinths of the World: Shattered Soul!
Created at: 2014-10-04