Walkthrough Menu
- General Tips
- Chapter 1: The Devil's Tower
- Chapter 2: Memory Storage
- Chapter 3: Sanderion's Realm
- Chapter 4: Margaret
- Chapter 5: The Crystal Realm
General Tips
- This is the official guide for Labyrinths of the World: The Devil's Tower.
- This guide will not show when you have to zoom into a location; the screenshots will show each zoom scene.
- Hidden-object puzzles are referred to as HOPs. This guide will not show screenshots of the HOPs, however, it will mention when an HOP is available and the inventory item you'll collect from it.
- Use the Map to fast travel to a location.
Chapter 1: The Devil's Tower
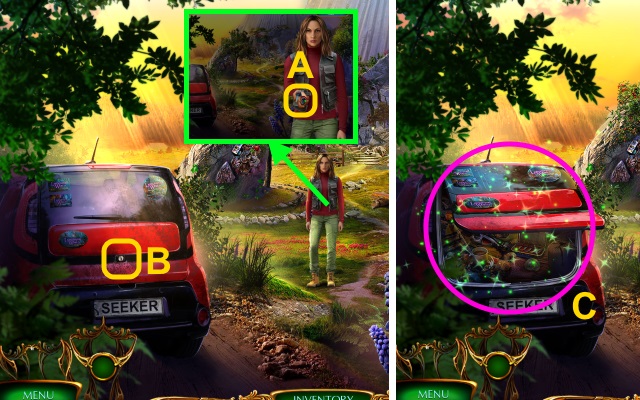
- Talk to Margaret; take the CAR KEY (A).
- Use the CAR KEY (B).
- Play the HOP; receive the RAKE (C).
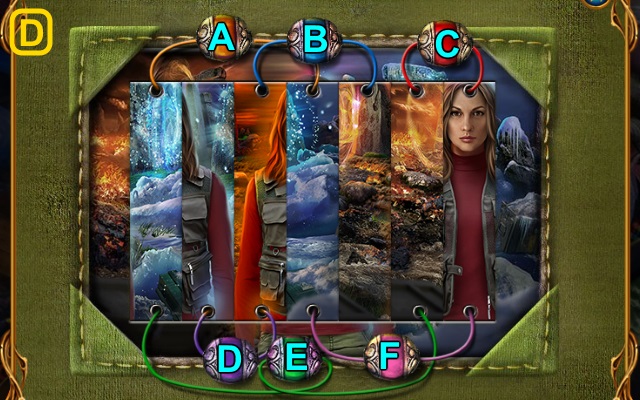
- HOP mini-game (D). Easy solution: A-D-C.
- Hard solution: F-A-F-C-F-A-B-D-B.
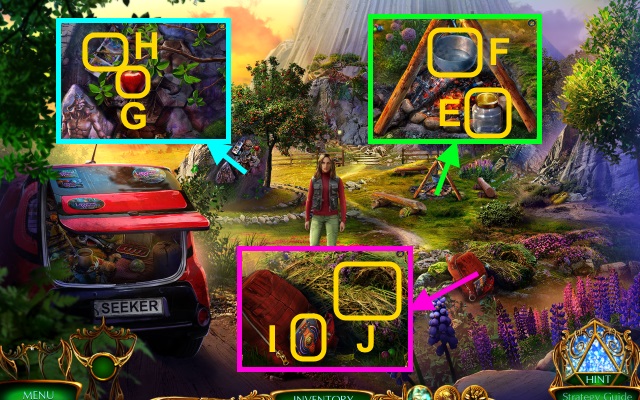
- Take the JAR (E). Pour the water (F); receive the EMPTY POT.
- Take the APPLE (G). Examine the pamphlet (H); take the STONE CHIPS (1/3).
- Take the Notebook (I). Give the APPLE; use the RAKE (J). Take the PAINTED TILE. Unzip the backpack; take the ROPE.
- Place the PAINTED TILE for a mini-game (H).
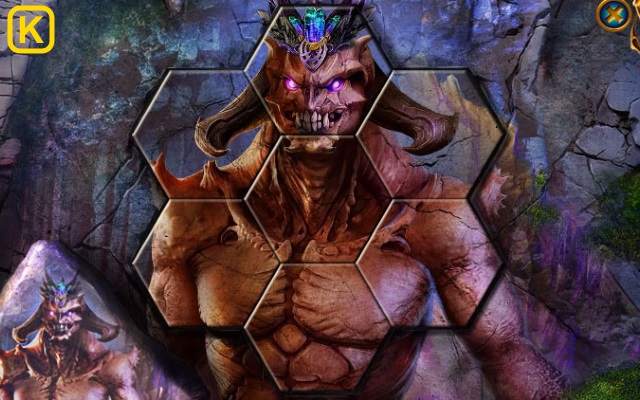
- Solution (K).
- Take the Map, HOOK, and SPECTRAL OCULUS.
- Combine the ROPE and HOOK; receive the GRAPPLING HOOK.
- Examine the SPECTRAL OCULUS; read the note. Press the power button.
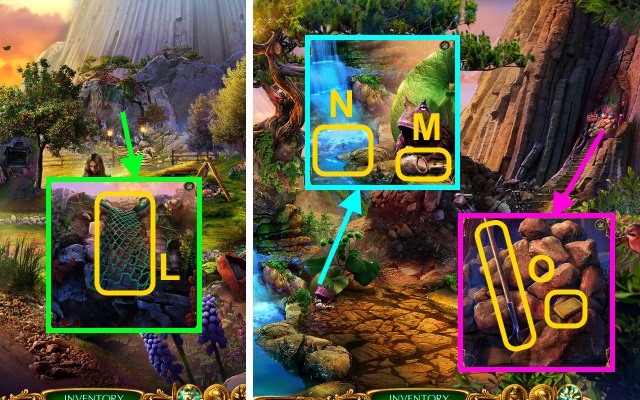
- Take the NET (L); use the GRAPPLING HOOK.
- Take the BIRD WHISTLE (M). Use the EMPTY POT (N); receive the POT OF WATER.
- Remove the sign; take the SHOVEL and LIGHTER (O).
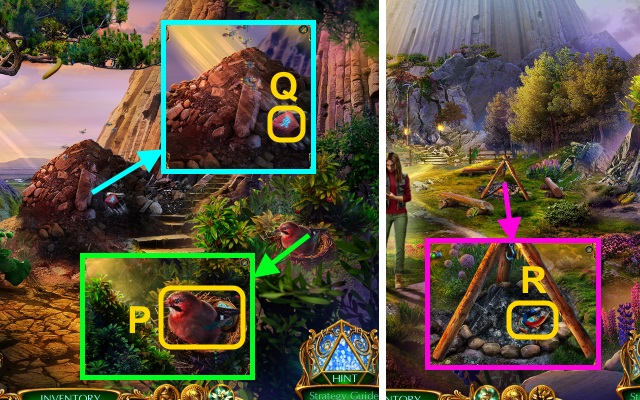
- Use the BIRD WHISTLE; take the STONE CHIPS (2/3) (P).
- Take the STONES (1/2) (Q); use the SHOVEL. Take the HANDLE and NOTE.
- Walk down.
- Pour the POT OF WATER; take the MAGNET and STONE CHIPS (3/3) (R).
- Walk forward.
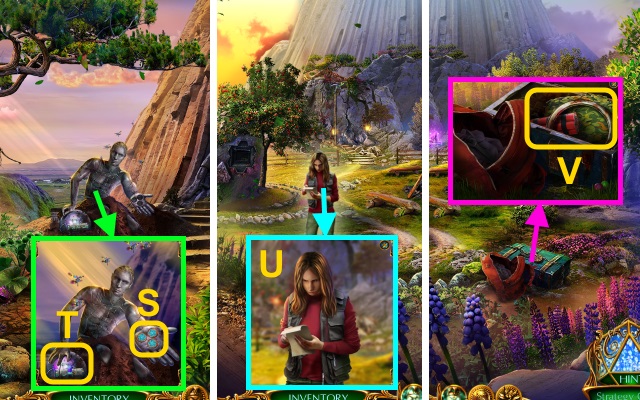
- Place the STONE CHIPS (3/3) (S); take the INITIATION ORB and COMMUNICATOR (T).
- Walk down.
- Give the INITIATION ORB (U).
- Play the HOP; receive the BOLT CUTTER.
- Use the BOLT CUTTER; open the box. Take the HOOP, DYNAMITE, and CAMOUFLAGE NET (V) for a mini-game.
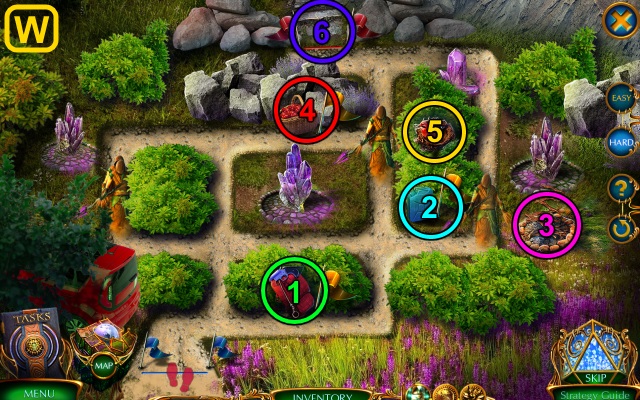
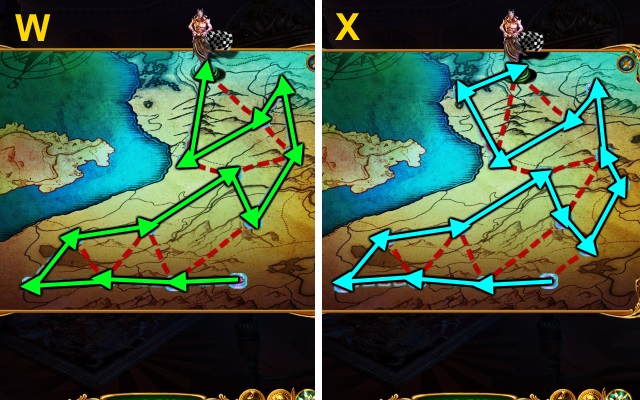
- Solution (W): go to the locations in order while avoiding the guards.
- Combine the NET, HANDLE, and HOOP; take the SCOOP NET.
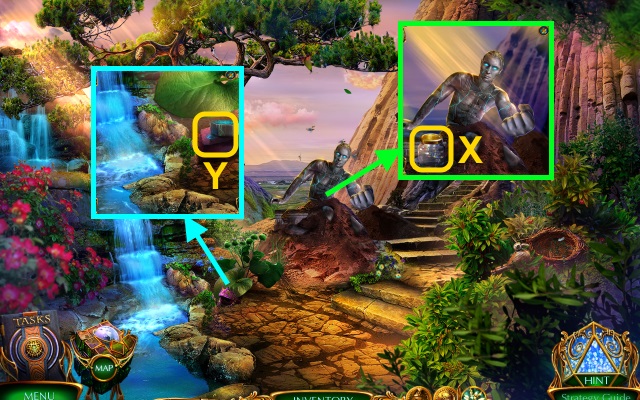
- Place the JAR; use the SCOOP NET. Take the DRAGONFLIES (X).
- Give the DRAGONFLIES; take the COMMUNICATOR RING and STONES (2/2) (Y).
- Combine the COMMUNICATOR and COMMUNICATOR RING for a mini-game.
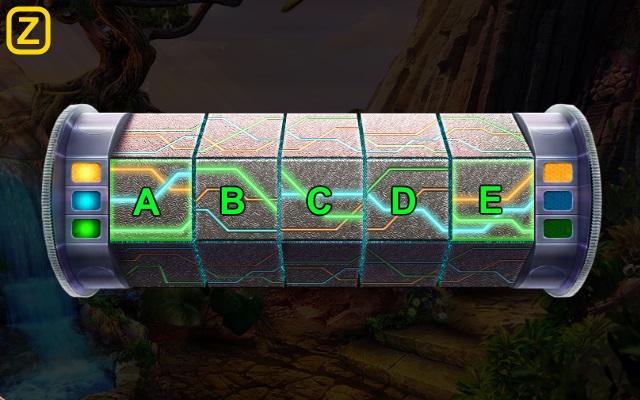
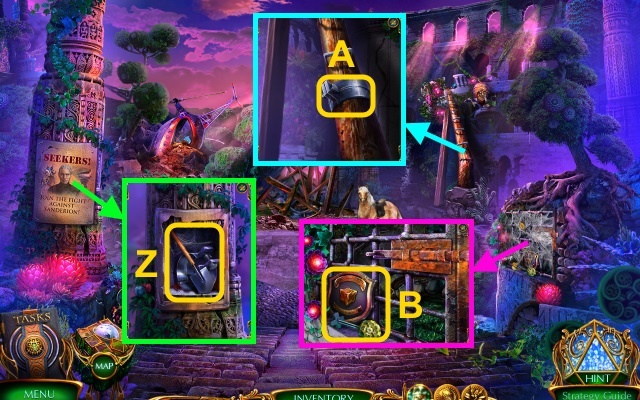
- Solution (Z).
- Easy: Bx4-Dx4-Ax4-Ex4-Cx5.
- Hard: Bx5-Dx7-Ax5-Ex4-Cx7.
- Take the note and SEEKER AMULET.
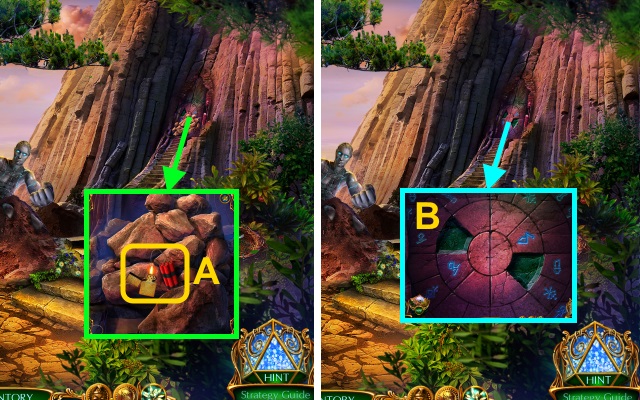
- Use the DYNAMITE and LIGHTER (A).
- Place the STONES (B); place the SEEKER AMULET for a mini-game.
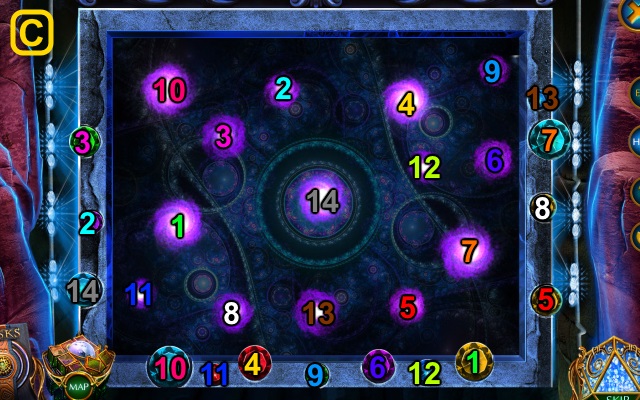
- Solution (C).
- Easy: (1-13).
- Hard: (1-14).
- Take the HERBICIDE.
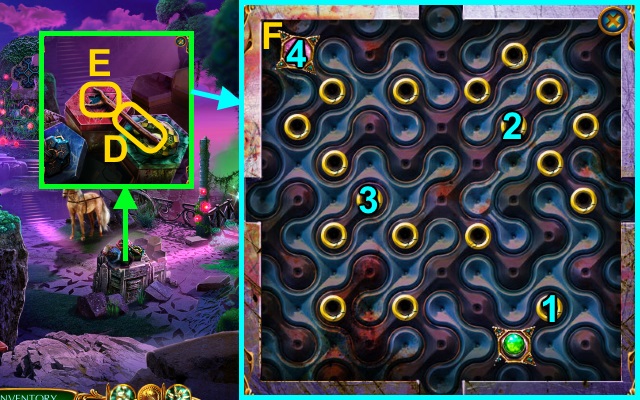
- Take the STICK (D); place the SEEKER AMULET for a mini-game (E).
- Easy and Hard solution (F).
- Take the GATE KEY.
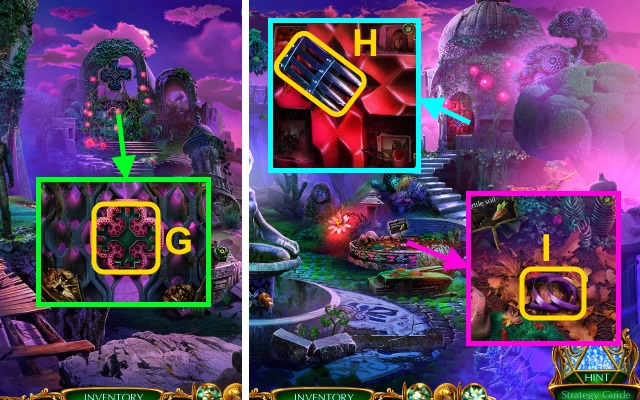
- Use the HERBICIDE; place the GATE KEY (G).
- Walk forward.
- Take the CLAWED GAUNTLET (H).
- Take the RIBBON (I); use the CLAWED GAUNTLET. Take the BROKEN COGWHEEL.
- Combine the MAGNET, STICK, and RIBBON; receive the MAGNET ON STICK.
- Walk down.
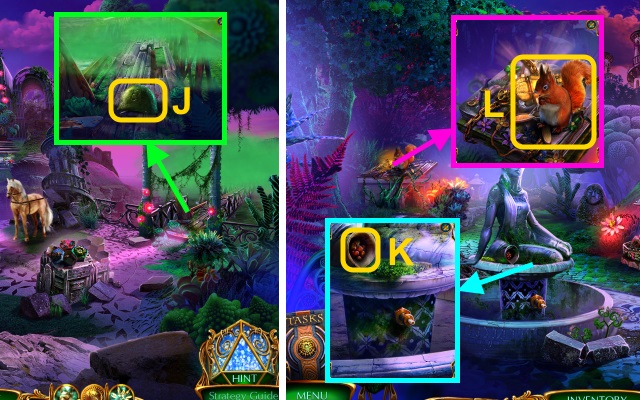
- Use the MAGNET ON STICK; take the HELMET, THIN METAL ROD, and LOCK PART (J).
- Walk forward.
- Use the THIN METAL ROD (K); receive the NUT.
- Give the NUT; take the LANTERN and FAUCET HANDLE (L). Place the LOCK PART for a mini-game.
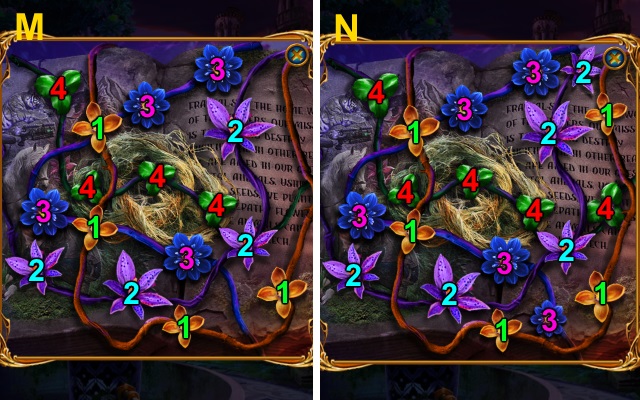
- Easy solution (M).
- Hard solution (N).
- Take the STRING.
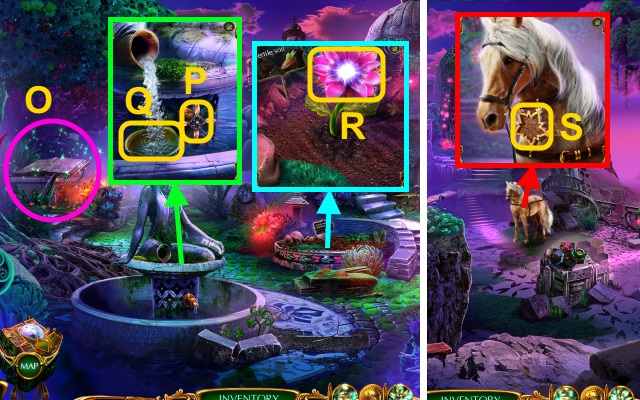
- Play the HOP; receive the TELEPATHY FLOWER SEED (O).
- Place the FAUCET HANDLE (P). Use the HELMET (Q); receive the HELMET WITH WATER.
- Place the TELEPATHY FLOWER SEED and HELMET WITH WATER; take the TELEPATHY FLOWER (R).
- Walk down.
- Place the TELEPATHY FLOWER for a mini-game (S).
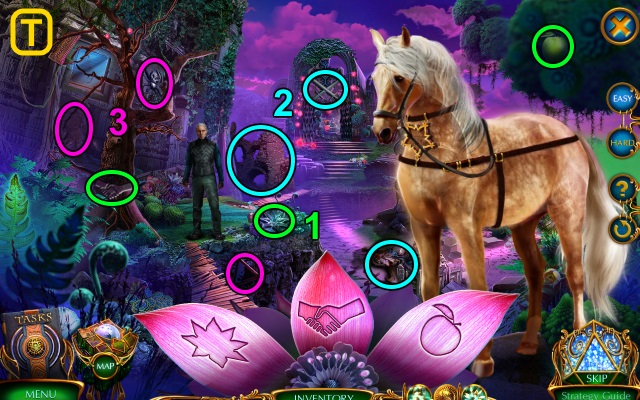
- Easy solution (T).
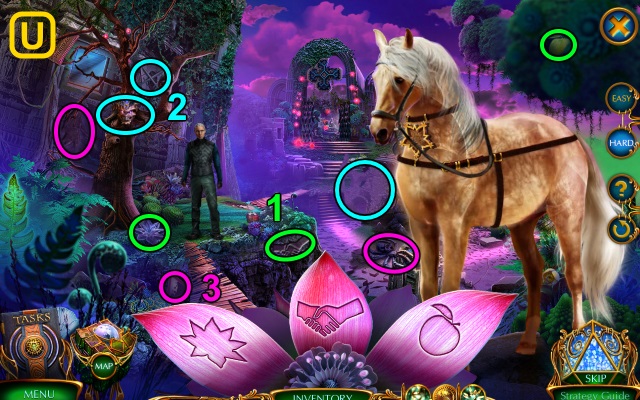
- Hard solution (U).
- Take the FRACTAL AMULET.
- Walk forward.
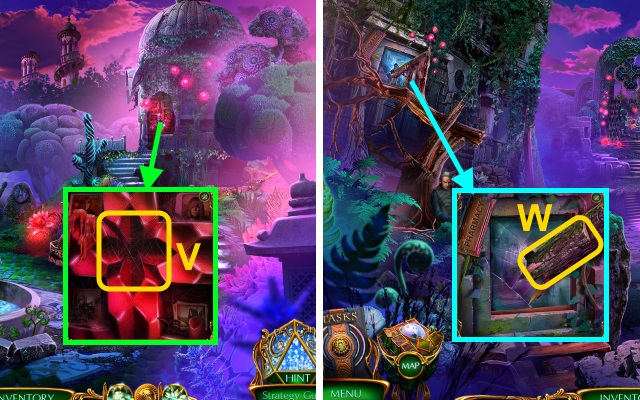
- Place the FRACTAL AMULET (V). Take the GAS MASK; place the LANTERN. Take the AXE HANDLE.
- Combine the BROKEN COGWHEEL, AXE HANDLE, and STRING; receive the AXE.
- Walk down.
- Use the AXE (W); receive the WOODEN BOARDS. Take the SHARP GLASS, BANDAGE, and EMPTY DART.
- Use the BANDAGE (X); take the FILTER.
- Combine the GAS MASK and FILTER.
- Use the GAS MASK (Y); place the WOODEN BOARDS.

- Use the SHARP GLASS; take the SHOVEL and SHACKLE (Z).
- Place the SHACKLE (A); take the GAS TORCH.
- Use the GAS TORCH; take the CACHE KEY and PLATE (1/2) (B).
- Walk down.
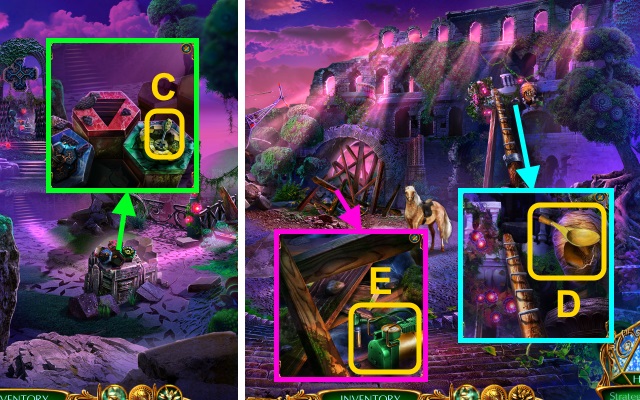
- Use the CACHE KEY (C); take the SPOON and BEE REPELLANT.
- Walk right.
- Use the BEE REPELLANT and SPOON (D); receive the WAX. Take the PUMP.
- Read the note; place the PUMP (E). Take the PLATE (2/2) and CROSSBOW.
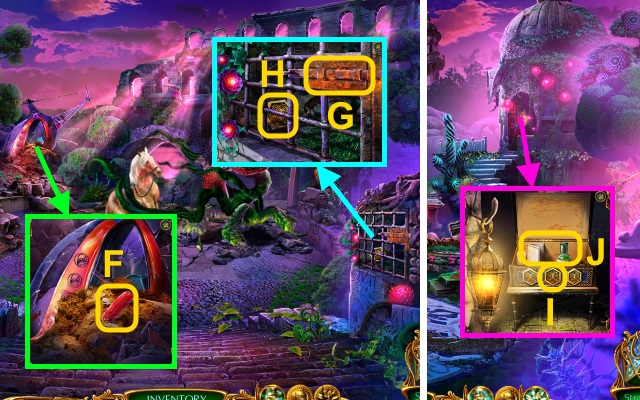
- Take the QUILL (F). Use the SHOVEL; place the PLATE (2/2). Take the OILCAN.
- Use the OILCAN (G); take the CHEST AMULET (H).
- Walk down, then forward.
- Place the CHEST AMULET (I); take the note and TRANQUILIZER (J).
- Combine the CROSSBOW, EMPTY DART, and TRANQUILIZER; receive the LOADED CROSSBOW.
- Walk down, then right.
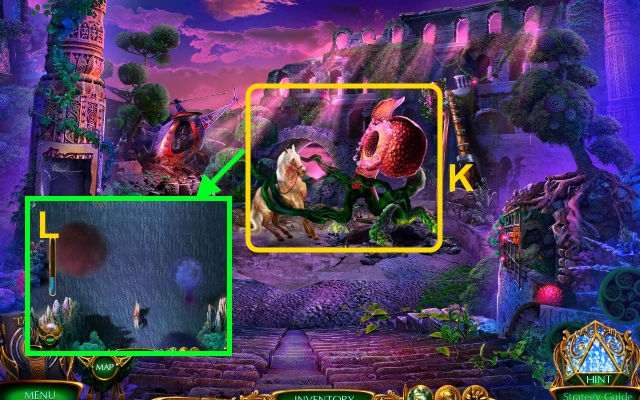
- Use the LOADED CROSSBOW for a mini-game (K).
- Solution (L): dodge the obstacles.
Chapter 2: Memory Storage
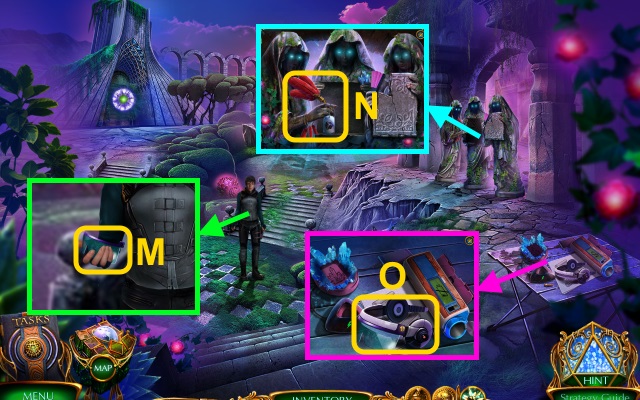
- Talk to Davona; take the FRAMELESS LENS (M).
- Place the QUILL; take the DOG TAG (N).
- Place the screw; use the FRAMELESS LENS and DOG TAG (O). Take the VISOR.
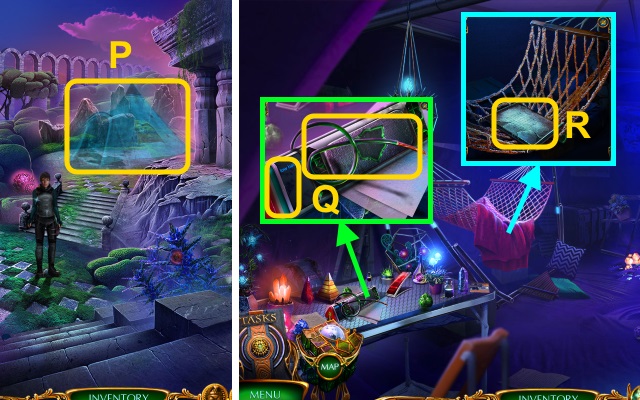
- Use the VISOR (P).
- Walk forward.
- Take the CORD and LOW BATTERY (Q).
- Move the blanket; take the SCROLL (R).
- Walk down.
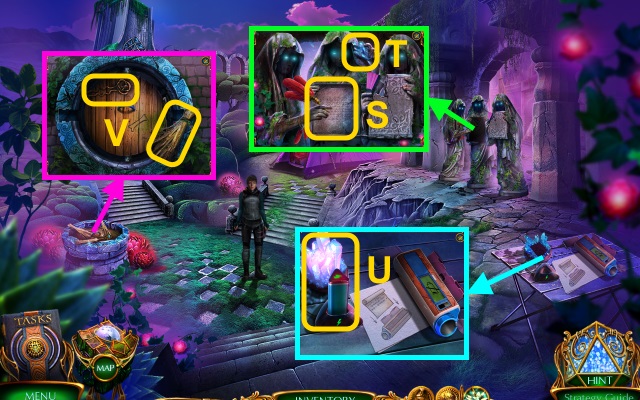
- Place the SCROLL (S); take the CRYSTAL (T).
- Place the CRYSTAL and LOW BATTERY (U); take the CHARGED BATTERY.
- Use the CORD; take the BROOM and HAIR PIN (V).
- Walk forward.
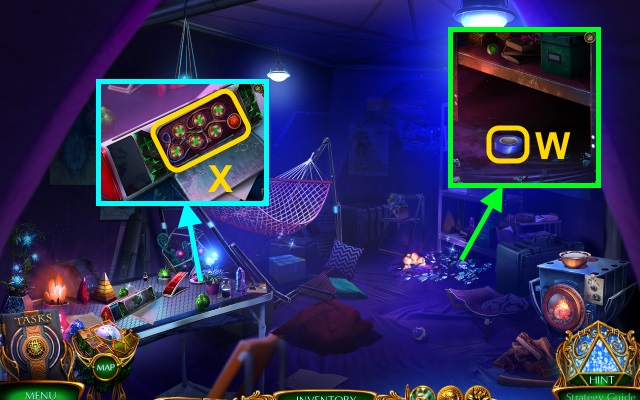
- Use the BROOM. Take the INSULATION TAPE (W) and LONG BONE.
- Place the CHARGED BATTERY and SEEKER AMULET; use the INSULATION TAPE for a mini-game (X).
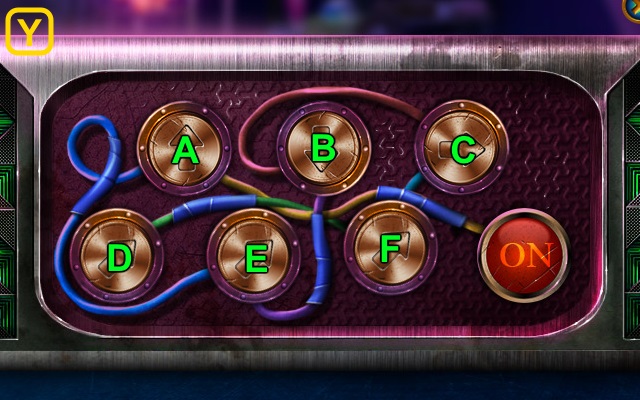
- Solution (Y).
- Easy: Ax3-Cx5-Ex4-Fx7.
- Hard: Fx7-Cx5-Ex4-Ax3.
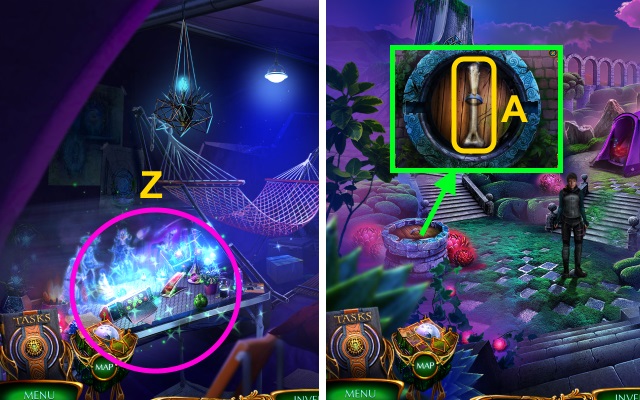
- Play the HOP; receive the GLOWING PYRAMID (Z).
- Walk down.
- Use the LONG BONE (A); take the STONE SHARD and CROWBAR.
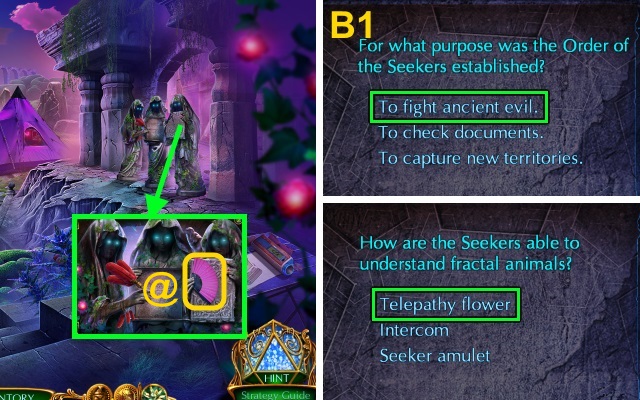
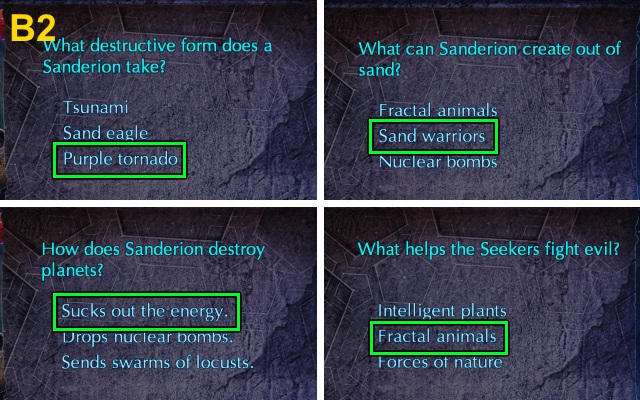
- Place the STONE SHARD; take the FAN for a mini-game (@).
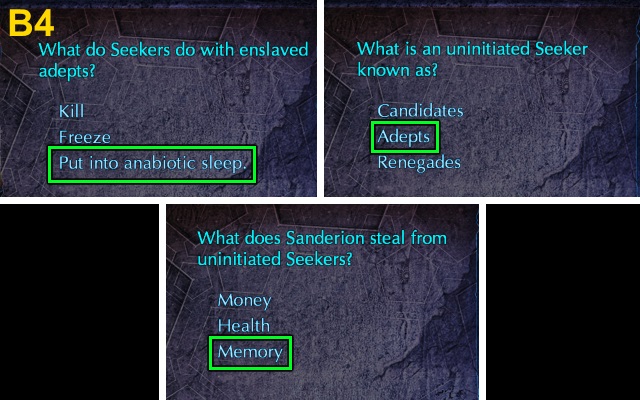
- Solution is random. Possible answers are shown (B1).
- Possible answers (B2).
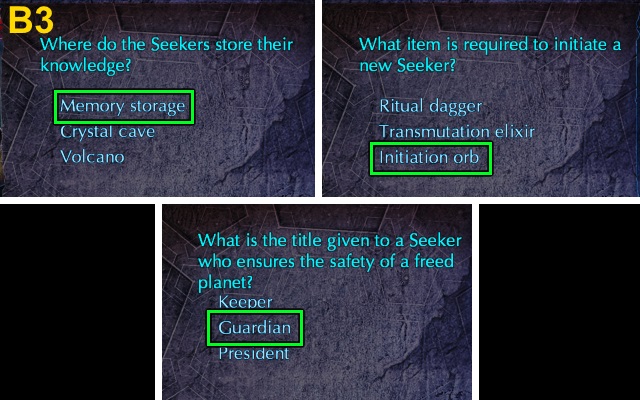
- Possible answers (B3).
- Possible answers (B4).
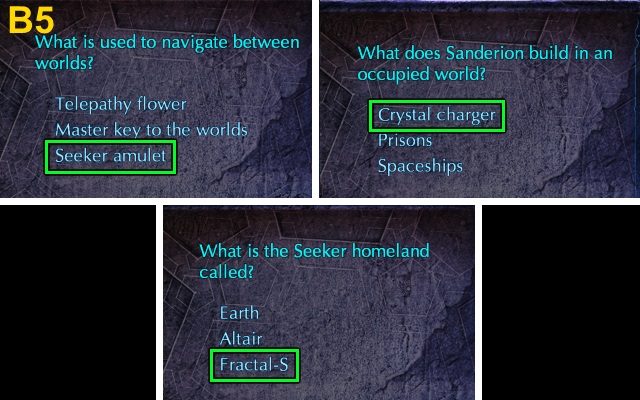
- Possible answers (B5).
- Walk right.
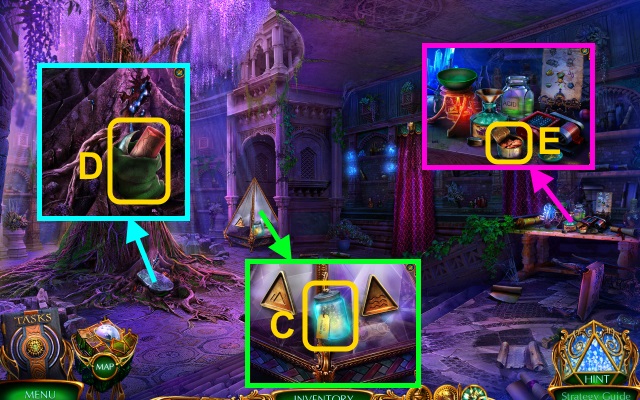
- Take the PHOSPHOR (C).
- Use the CROWBAR; take the ROLLER and SHARP CLAW (D).
- Take the CAT FOOD (E).
- Walk down, then forward.
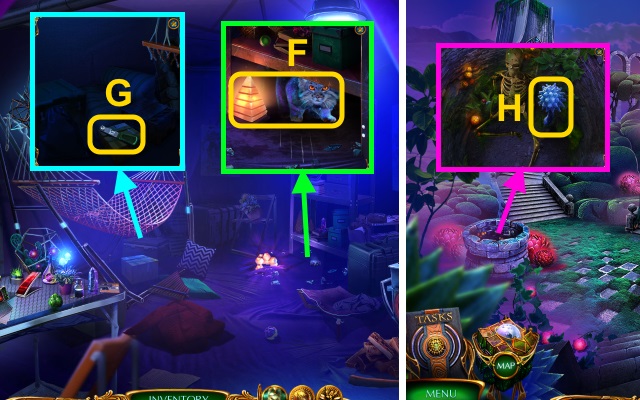
- Place the GLOWING PYRAMID; give the CAT FOOD (F). Receive the CAT.
- Use the SHARP CLAW; receive the HAMMOCK. Take the LEVER (G).
- Walk down.
- Use the HAMMOCK; take the FRACTAL MUSHROOM (H).
- Walk right.
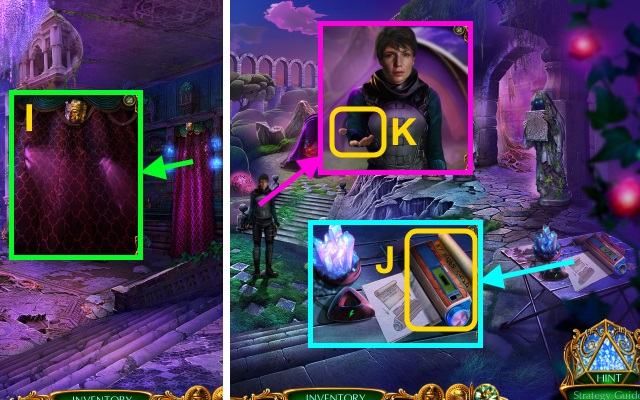
- Use the CAT (I); receive the GOLDEN MASK. Take the MANUSCRIPT.
- Walk down.
- Place the ROLLER and MANUSCRIPT (J); take the TRANSLATION.
- Give the TRANSLATION (K); take the FIREPROOF GLOVE.
- Walk forward.
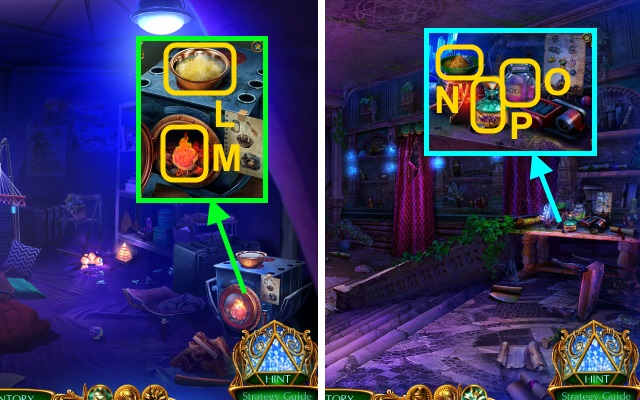
- Place the WAX and PHOSPHOR (L). Open the door; use the FIREPROOF GLOVE (M). Receive the FIRE FRUIT. Use the FAN; take the PHOSPHATE.
- Walk down, then right.
- Place the FRACTAL MUSHROOM and PHOSPHATE (N). Place the GOLDEN MASK in the grinder; place the powder in the bowl. Place the FIRE FRUIT (O); pour the acid into the bowl. Pour the mixture into the bottle (P); take the REVIVING POTION and ACID.
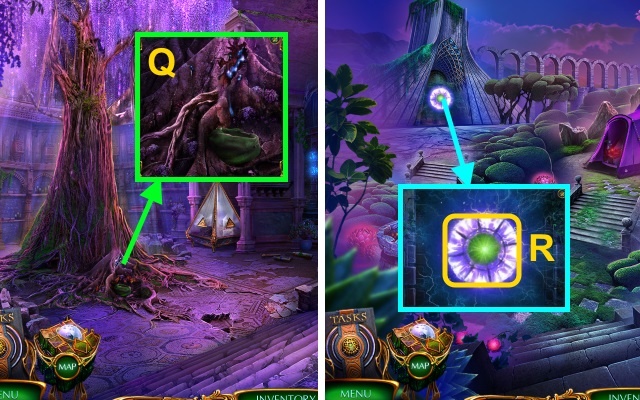
- Pour the REVIVING POTION (Q).
- Examine the butterfly; take the LIGHT FLOWER and SANDERION'S SEAL.
- Walk down.
- Use SANDERION'S SEAL for a mini-game (R).
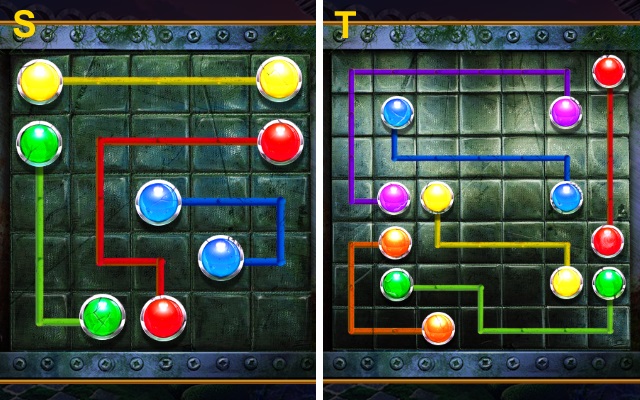
- Easy solution (S).
- Hard solution (T).
- Walk left.
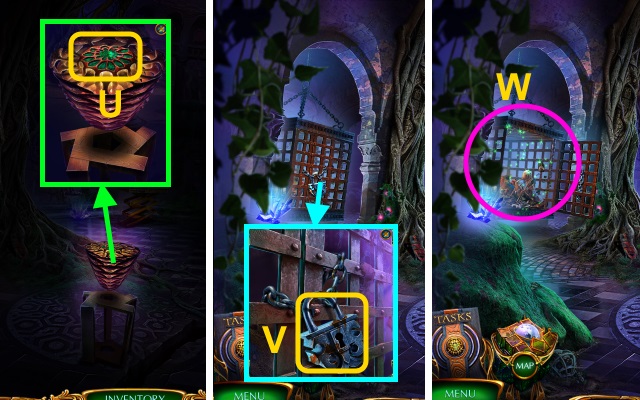
- Place the LIGHT FLOWER (U).
- Use the HAIR PIN (V).
- Play the HOP; receive the STEEL MEDALLION (W).
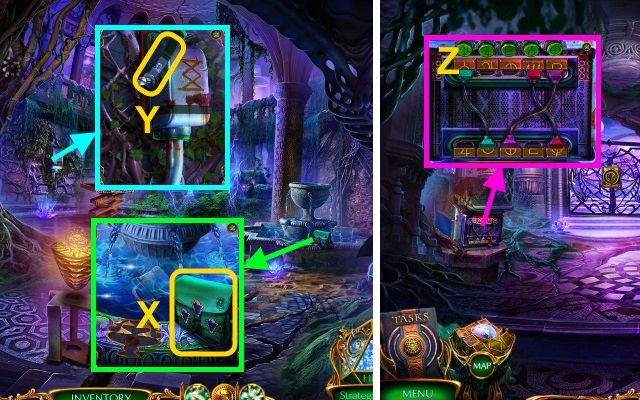
- Take the SEEKER'S BAG (X).
- Combine the SEEKER'S BAG and STEEL MEDALLION; open the pouch. Take the SCREWDRIVER, CORDS, and note.
- Place the LEVER (Y); use the SCREWDRIVER.
- Walk forward.
- Place the CORDS for a mini-game (Z).
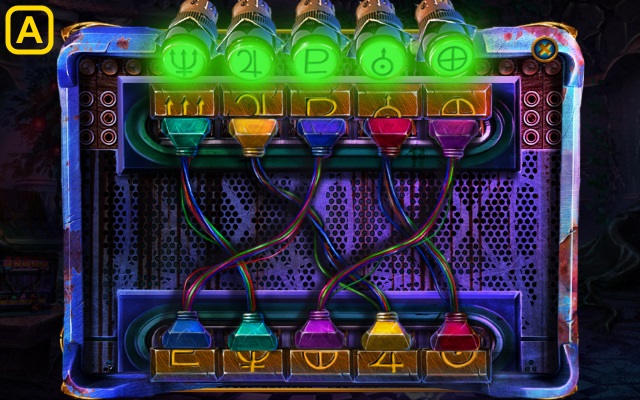
- Easy and Hard solution (A).
- Take the FIRST AID KIT.
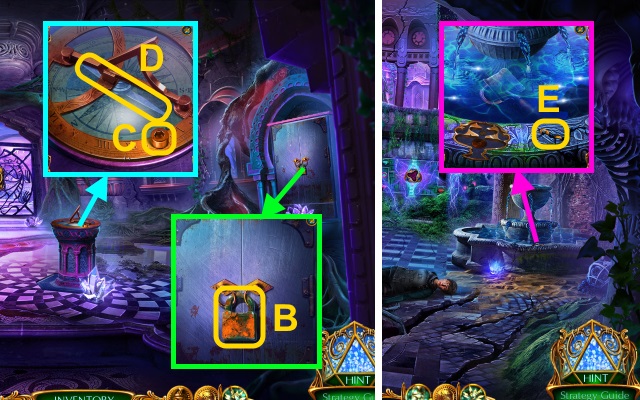
- Pour the ACID (B); take the note and HEX WRENCH.
- Use the HEX WRENCH (C); take the COMPASS NEEDLE (D).
- Walk down.
- Use the COMPASS NEEDLE (E); receive the LETTER N.
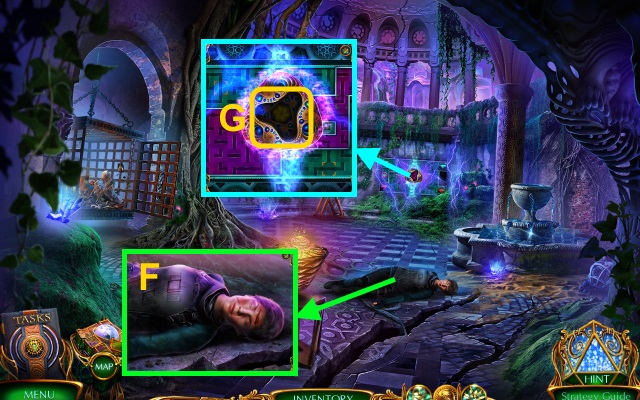
- Use the FIRST AID KIT (F); take the DISSIPATION AMULET.
- Place the DISSIPATION AMULET for a mini-game (G).
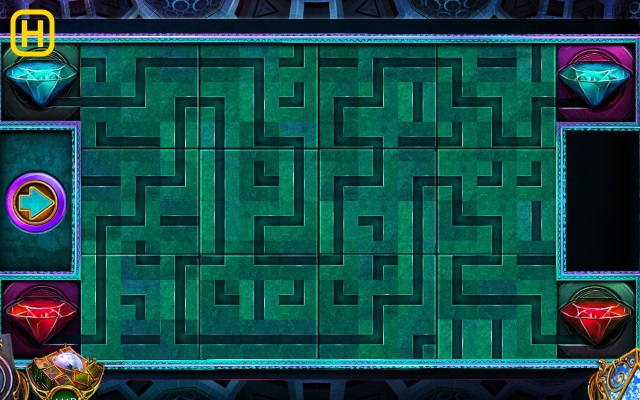
- Easy and Hard solution (H).
- Take the CHARGER CRYSTAL; receive the STEEL MEDALLION.
- Combine the SEEKER'S BAG and STEEL MEDALLION; take the KNIFE BLADE and METAL RULER.
- Walk forward.
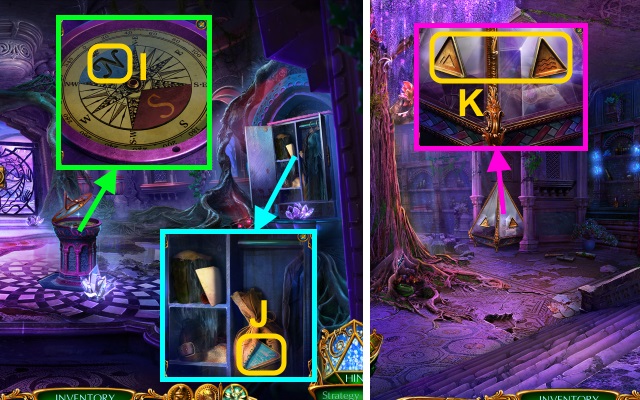
- Place the LETTER N (I); take the TRIANGULAR AMULET (1/2).
- Use the KNIFE BLADE; take the TRIANGULAR AMULET (2/2) (J).
- Go to Memory Storage.
- Place the TRIANGULAR AMULET (2/2) (K); take the FOUNTAIN AMULET.
- Walk down, then left.
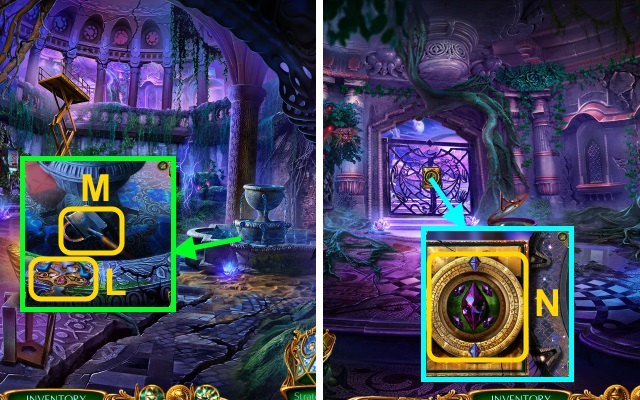
- Place the FOUNTAIN AMULET (L); take the SHOVEL and NAVIGATION CIRCLE (M).
- Walk forward.
- Place the CHARGER CRYSTAL and NAVIGATION CIRCLE (N).
- Walk forward.
Chapter 3: Sanderion's Realm
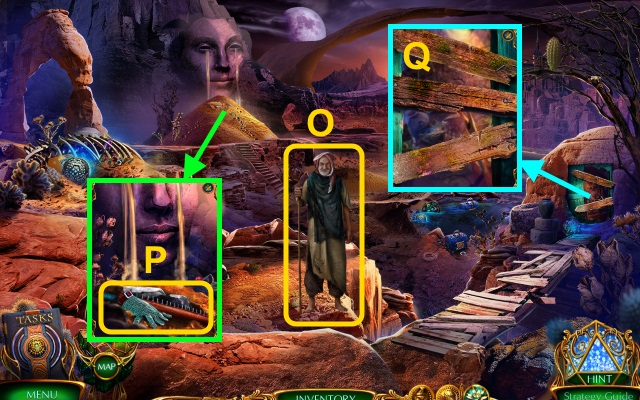
- Talk to Falk (O).
- Use the SHOVEL; take the GLOVE and MACUAHUITL (P).
- Use the MACUAHUITL (Q).
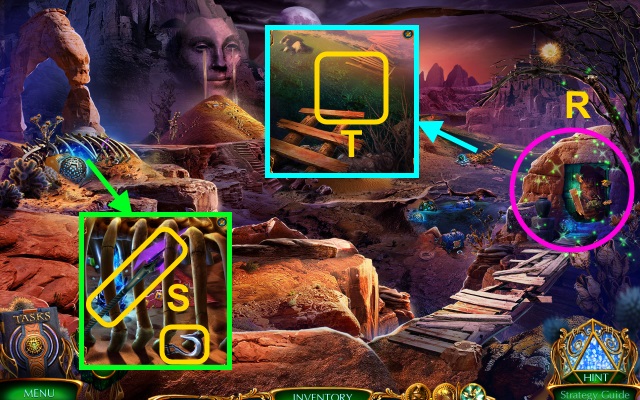
- Play the HOP; receive the WOODEN BOARD (R).
- Take the HOOK and SPEAR (S).
- Place the WOODEN BOARD (T).
- Walk right.
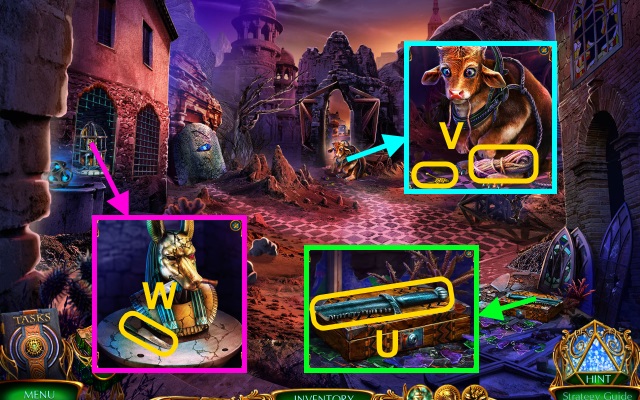
- Use the GLOVE; take the SWORD FRAGMENT (U).
- Take the ROPE and COLORED INLAY (1/3) (V).
- Use the METAL RULER; take the KNIFE (W).
- Combine the HOOK and ROPE; receive the HOOK ON A ROPE.
- Walk down.
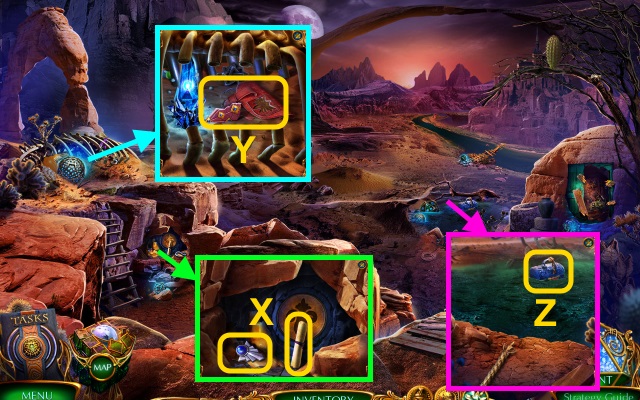
- Use the KNIFE; take the TRIANGLE PART (1/2), STEEL MEDALLION, and note (X).
- Combine the SEEKER'S BAG and STEEL MEDALLION. Take the LOCKPICKS.
- Use the SWORD FRAGMENT; take the TRIANGLE PART (2/2) and BAG (Y).
- Use the HOOK ON A ROPE for a mini-game (Z).
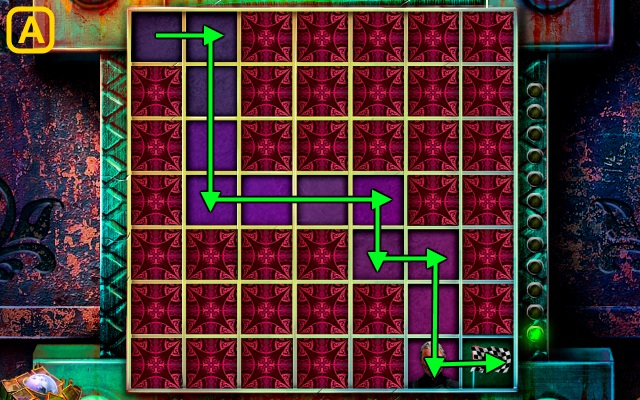
- Easy and Hard solution (A).
- Take the note and GROWTH POWDER.
- Walk right.
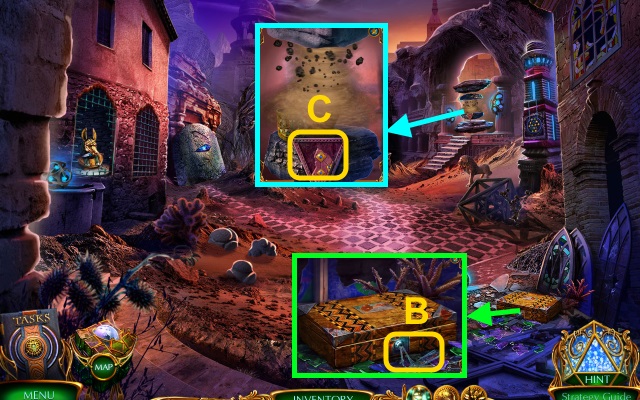
- Use the LOCKPICKS (B); take the JAR and CROWBAR.
- Place the TRIANGLE PART (2/2) for a mini-game (C).
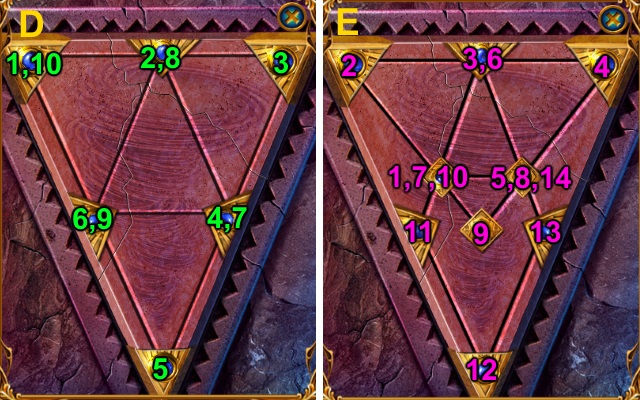
- Easy solution (D).
- Hard solution (E).
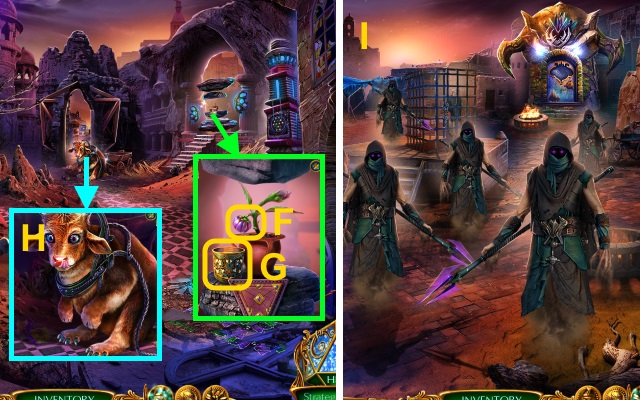
- Use the GROWTH POWDER (F); take the FRUIT and CUP (G).
- Give the FRUIT (H).
- Walk forward.
- Use the SPEAR (I).
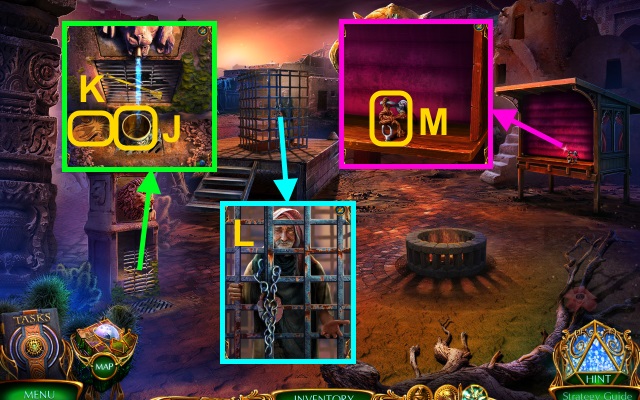
- Use the CUP (J); receive the CUP OF WATER. Take the JUG INLAY (K).
- Talk to Falk; give the CUP OF WATER (L). Take the LIGHTER.
- Use the LIGHTER (M).
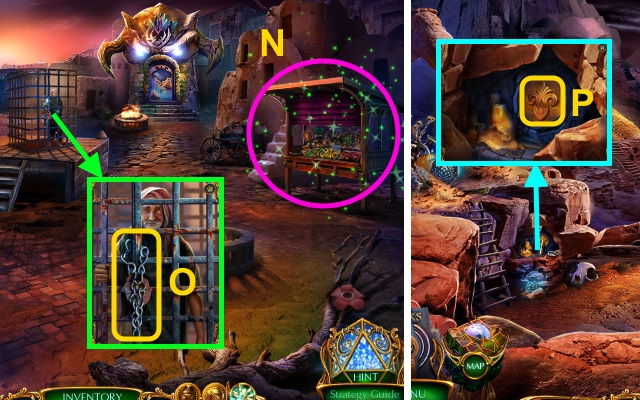
- Play the HOP; receive the BOLT CUTTER (N).
- Use the BOLT CUTTER (O); take the PICKAX.
- Walk down twice.
- Place the JUG INLAY (P); take the FLINT.
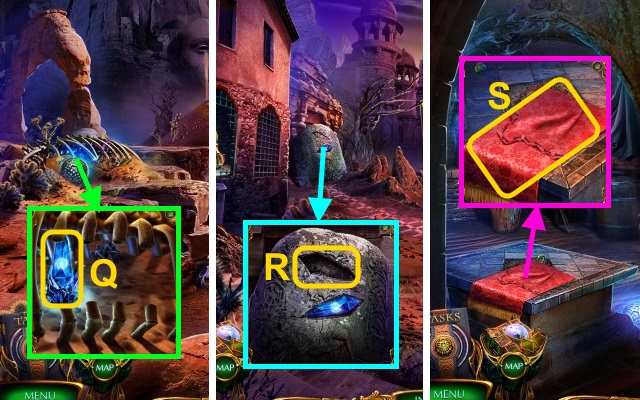
- Use the PICKAX (Q); receive the BLUE CRYSTAL.
- Walk right.
- Place the BLUE CRYSTAL (R).
- Walk left.
- Take the TAPESTRY (S); use the JAR. Remove the tile; take the COLORED INLAY (2/3) and RUBY EYE.
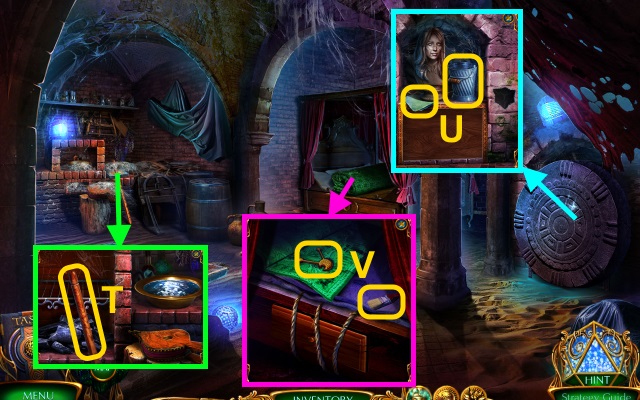
- Use the TAPESTRY; take the HANDLE (T).
- Use the CROWBAR; take the BUCKET and note (U).
- Examine the blanket; take the COLORED INLAY (3/3) and BRUSH (V).
- Walk down.
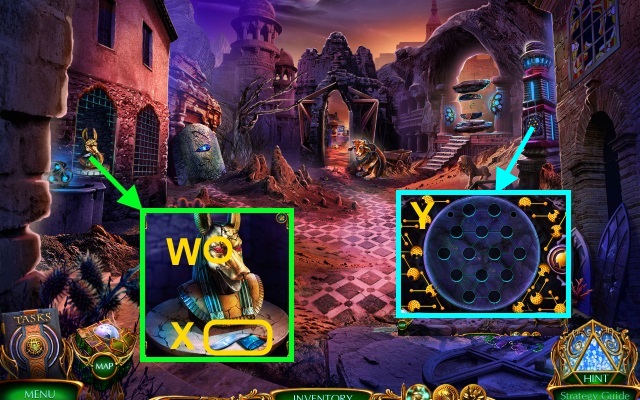
- Place the RUBY EYE (W); take the BLUE TILE (1/2) and KUKRI (X).
- Place the COLORED INLAY (3/3) for a mini-game (Y).
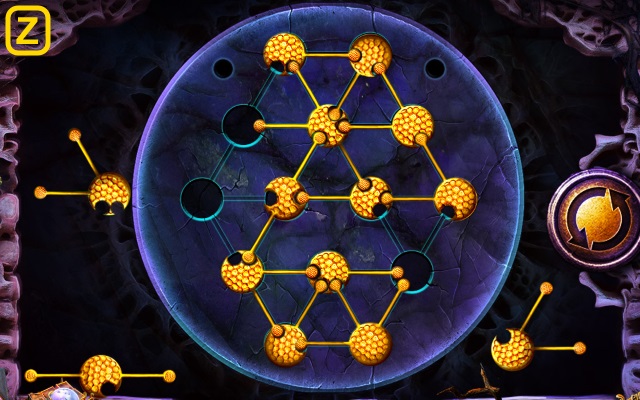
- Easy and Hard solutions (Z); rotate the board once.
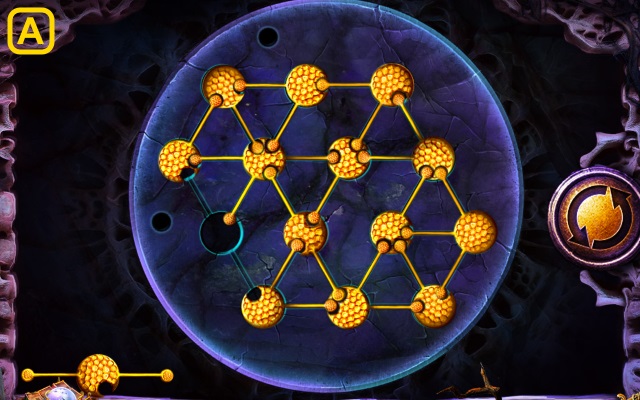
- Solution (A); rotate 4x.
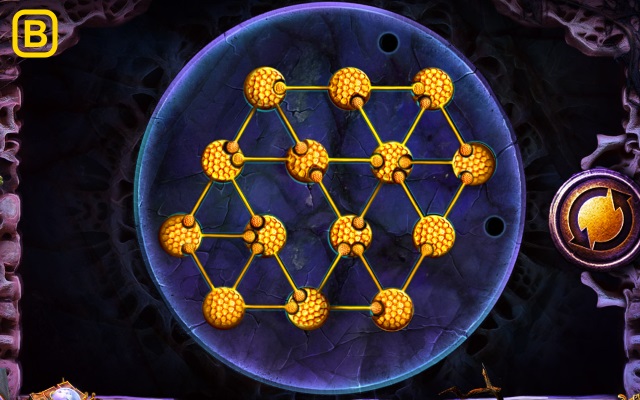
- Solution (B).
- Take the DRAGON HEAD.
- Combine the BAG and DRAGON HEAD; take the ACID and EMPTY MOLD.
- Walk left.
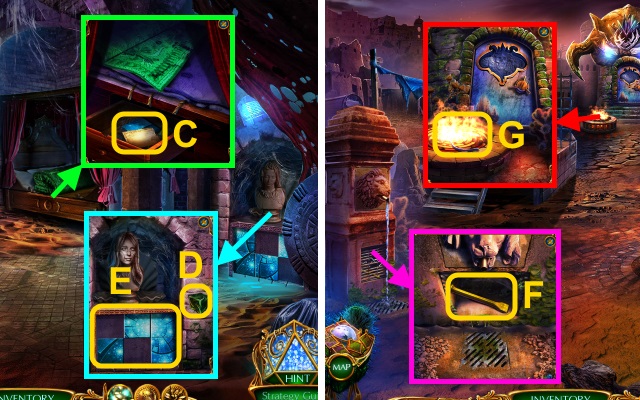
- Use the KUKRI; take the note and BLUE TILE (2/2) (C).
- Place the SEEKER AMULET (D) and BLUE TILE (2/2) (E); take the BROKEN METAL KEY.
- Combine the EMPTY MOLD and BROKEN METAL KEY; receive the UNFINISHED MOLD.
- Walk down, then forward.
- Use the BUCKET; receive the BUCKET OF WATER. Use the ACID; take the CHISEL (F).
- Use the BUCKET OF WATER (G); take the BROKEN FIRE IRON.
- Combine the HANDLE and BROKEN FIRE IRON; receive the FIRE IRON.
- Walk down, then left.
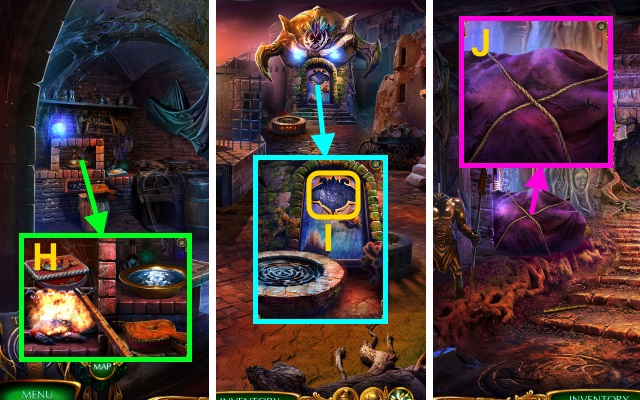
- Place the UNFINISHED MOLD; use the FLINT on the coals. Examine the bellows; use the FIRE IRON (H). Take the SKULL INLAY.
- Walk down, then forward.
- Place the SKULL INLAY (I).
- Walk forward.
- Use the KUKRI (J).
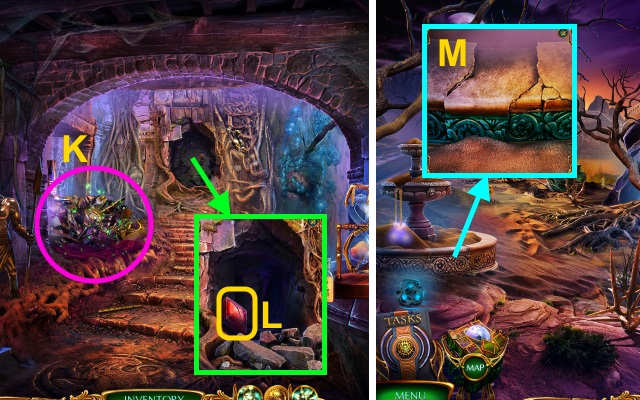
- Play the HOP; receive the MACE (K).
- Use the MACE; take the FIRE CRYSTAL SHARD (L).
- Walk forward.
- Use the CHISEL for a mini-game (M).
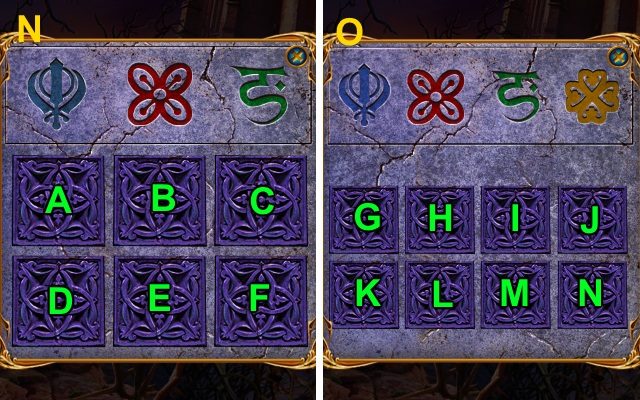
- Easy solution (N): B-E-D-A-D.
- Hard solution (O): G-L-J-Hx2-N.
- Take the AWL and HOOK.
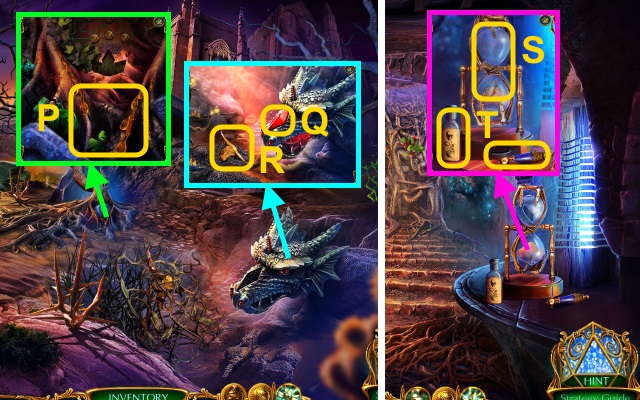
- Use the BRUSH; receive the RESIN ON A BRUSH (P).
- Place the FIRE CRYSTAL SHARD (Q); take the BROKEN MINOTAUR'S HEAD (R).
- Walk down.
- Use the RESIN ON A BRUSH; place the shard (S). Take the LEVER, RING, and HERBICIDE (T).
- Combine the BROKEN MINOTAUR'S HEAD and RING; receive the MINOTAUR'S HEAD.
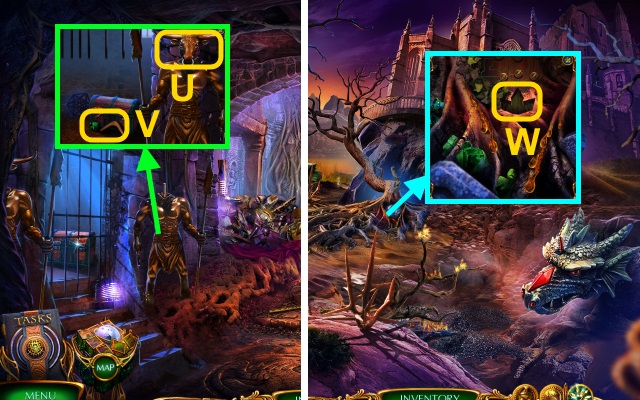
- Place the MINOTAUR'S HEAD (U); take the BOOMERANG and EMERALD INLAY (V).
- Walk forward.
- Place the EMERALD INLAY for a mini-game (W).
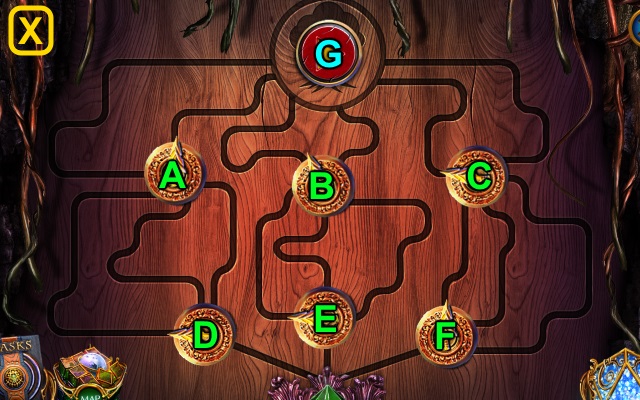
- Solution (X).
- Easy: D-E-A-F-G.
- Hard: Dx2-E-A-F-G.
- Take the LIANA VINE.
- Combine the HOOK and LIANA VINE; receive the GRAPPLING HOOK.
Chapter 4: Margaret
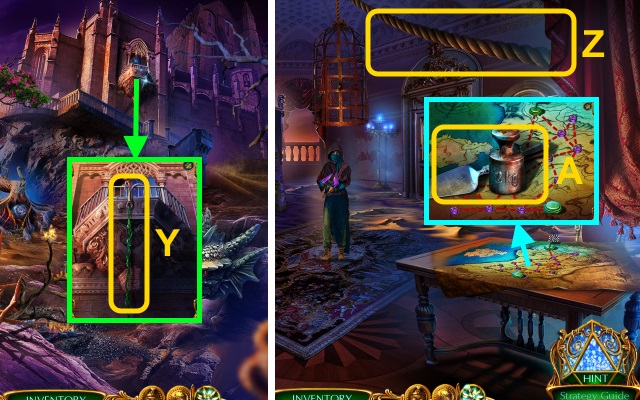
- Use the GRAPPLING HOOK (Y).
- Go forward.
- Use the BOOMERANG (Z).
- Take the WEIGHT and SCRAPER (A).
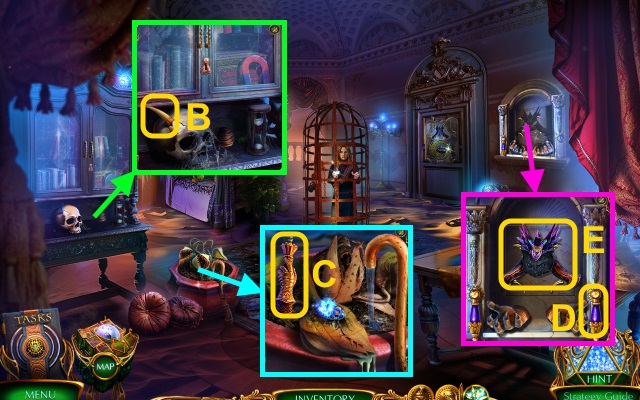
- Use the AWL; receive the HORN (B).
- Use the HERBICIDE; take the FISHING ROD (C).
- Place the LEVER (D); take the BROKEN MASK (E).
- Walk down.
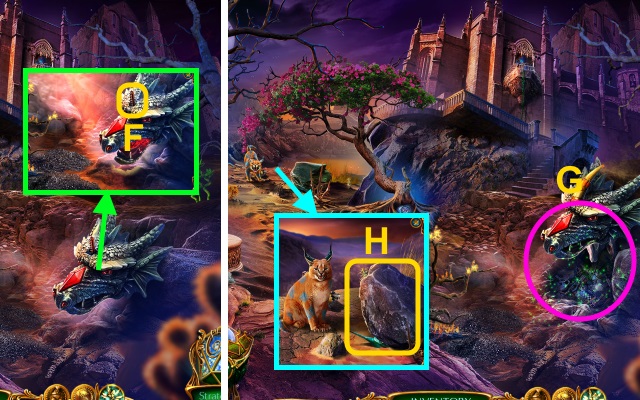
- Place the HORN (F).
- Play the HOP; receive the SHORT SPEAR (G).
- Use the SHORT SPEAR (H); take the OILCAN.
- Walk down.
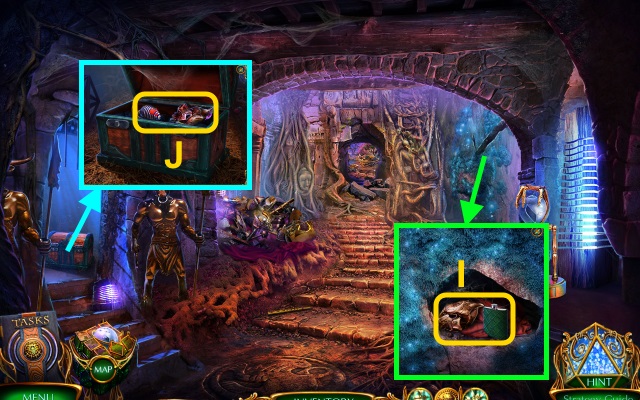
- Use the SCRAPER; take the MASK DETAIL (1/3) and EMPTY FLASK (I).
- Use the OILCAN; take the MASK DETAIL (2/3) and TOY MOUSE (J).
- Combine the FISHING ROD and TOY MOUSE; receive the MOUSE ON FISHING ROD.
- Walk forward.
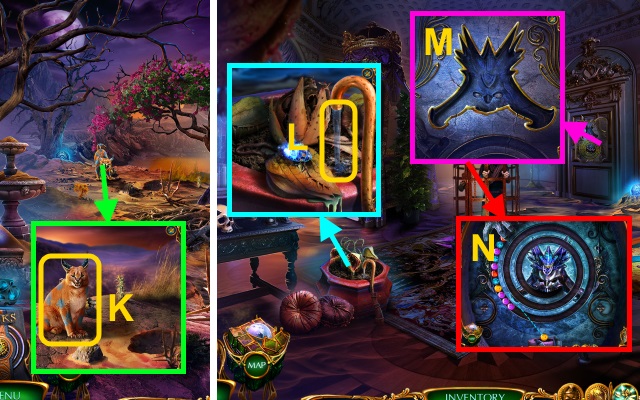
- Use the MOUSE ON FISHING ROD (K); take the MASK DETAIL (3/3) and TORCH.
- Combine the BROKEN MASK and MASK DETAIL (3/3); receive the MASK.
- Walk forward.
- Use the EMPTY FLASK (L); receive the FLASK OF WATER.
- Place the MASK for a mini-game (M); solution is random (N).
- Walk forward.
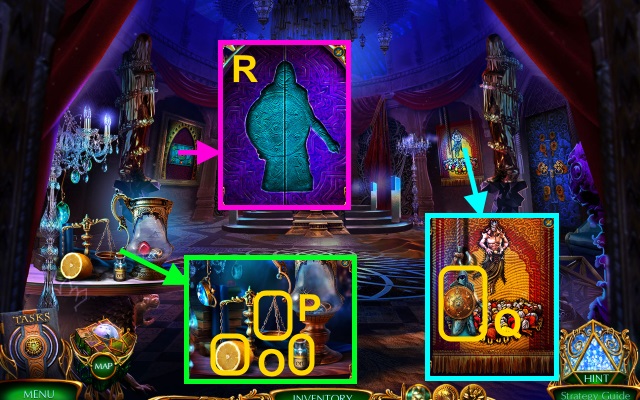
- Take the OIL and LEMON (O). Place the WEIGHT (P); take the SANDERION FIGURINE.
- Take the WARRIOR AMULET (Q).
- Place the WARRIOR AMULET for a mini-game (R).
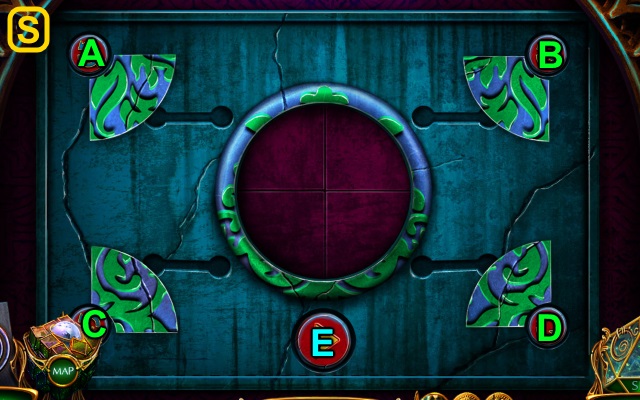
- Solution (S).
- Easy: Ax3-B-Dx2-E.
- Hard: Ax3-B-Dx2-Cx3-Bx3-E.
- Take MARGARET'S SOUL PART.
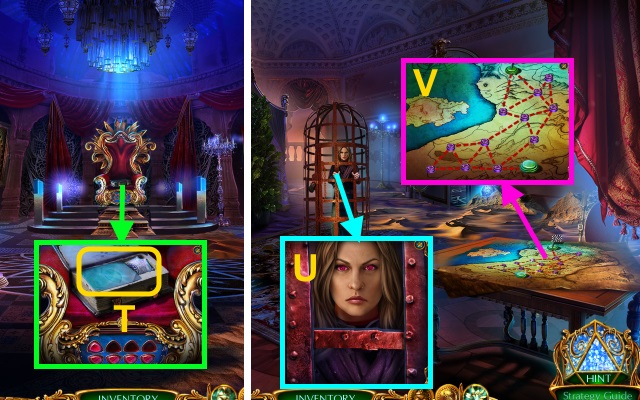
- Use the LEMON; take the note and METAL PLATE (T).
- Walk down.
- Give MARGARET'S SOUL PART (U); receive the TREASURY KEY.
- Place the SANDERION FIGURINE for a mini-game (V).
- Easy solution (W).
- Hard solution (X).
- Take the RED GEMSTONE (1/3) and SCEPTER.
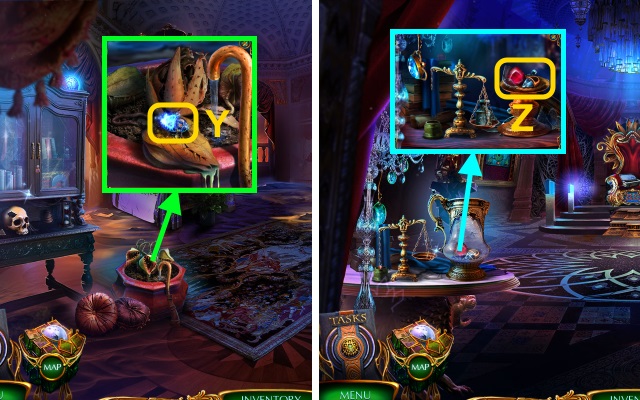
- Use the METAL PLATE (Y); receive the FIRE BUG.
- Combine the TORCH, OIL, and FIRE BUG; receive the LIT TORCH.
- Walk forward.
- Use the SCEPTER; take the RED GEMSTONE (2/3) and DIAMOND RING (Z).
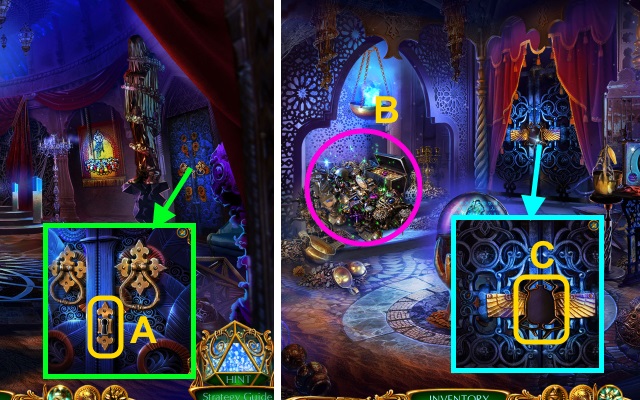
- Use the TREASURY KEY (A).
- Walk right.
- Use the LIT TORCH. Play the HOP; receive the BEETLE INLAY (B).
- Place the BEETLE INLAY (C). Take the WEIGHT and NIPPERS.
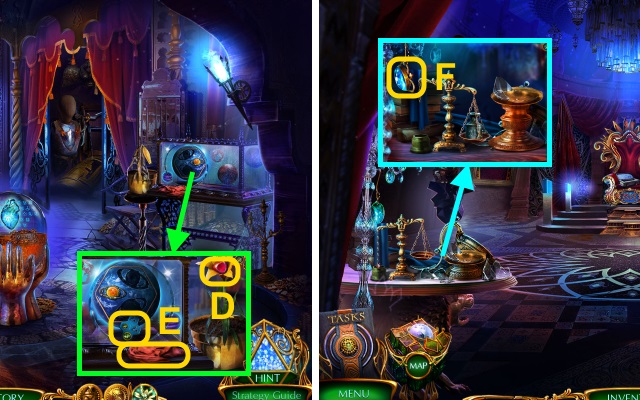
- Use the FLASK OF WATER; take the RED GEMSTONE (3/3) (D). Use the DIAMOND RING; take the PUZZLE PIECE (1/2) and RAG (E).
- Walk down.
- Use the NIPPERS (F); receive the CRYSTAL LENS.
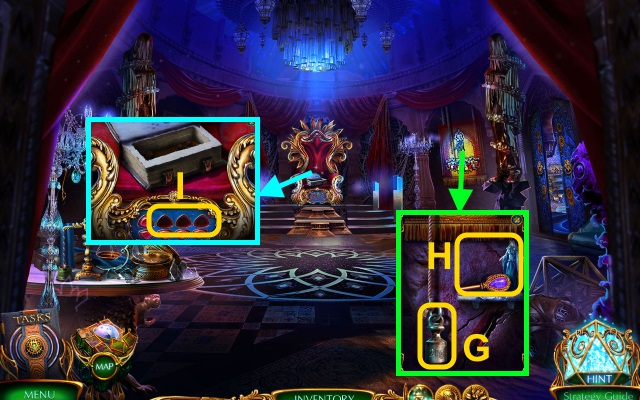
- Place the WEIGHT (G); take the AMETHYST KET and TRITTA FIGURE (H).
- Place the RED GEMSTONE (3/3) for a mini-game (I).
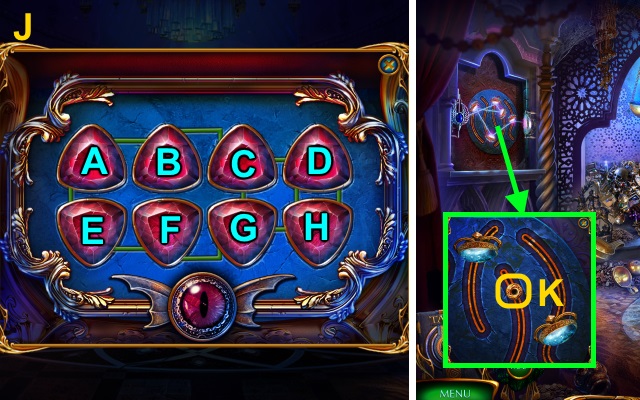
- Easy and Hard solution (J): (H-C)-(G-D)-(C-G)-(F-E)-(A-B)-(D-H).
- Walk right.
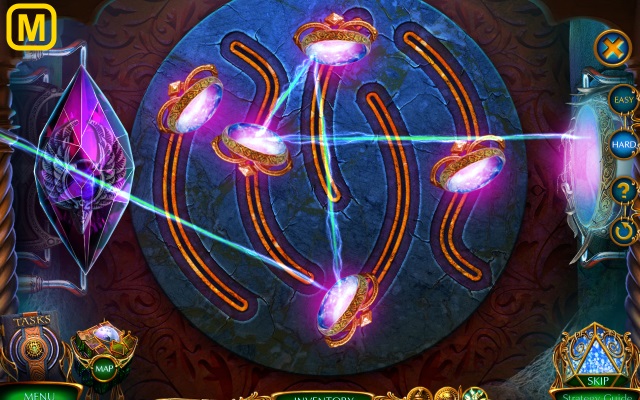
- Place the CRYSTAL LENS for a mini-game (K).
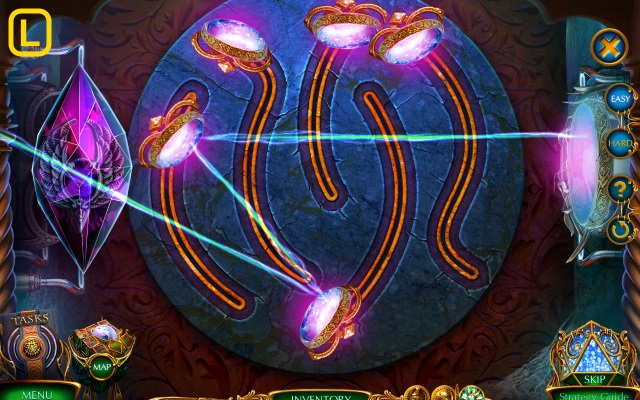
- Easy solution (L).
- Hard solution (M).
- Take the SAPPHIRE MEDALLION.
- Walk down twice.
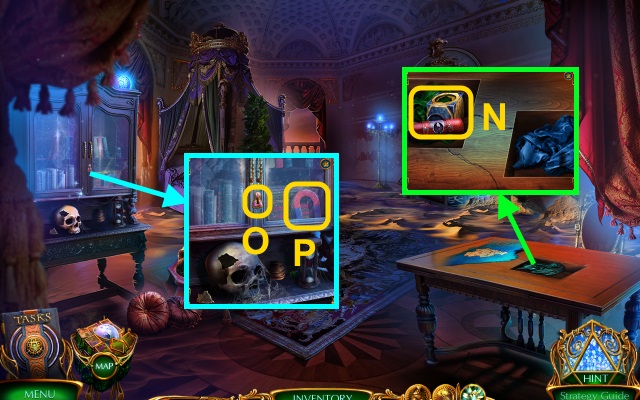
- Place the TRITTA FIGURE; take the TUBE and PUZZLE BOX (N).
- Combine the TUBE and SAPPHIRE MEDALLION; take the SAND PLANET and note.
- Use the AMETHYST KEY (O); take the MAGNET (P).
- Walk forward.
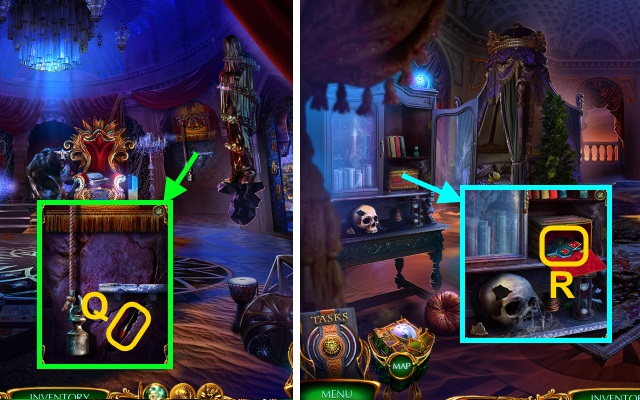
- Use the MAGNET (Q); receive the LOCKPICK.
- Walk down.
- Use the LOCKPICK; take the PUZZLE PIECE (2/2) (R).
- Combine the PUZZLE BOX and SEEKER AMULET; place the PUZZLE PIECE (2/2) for a mini-game.
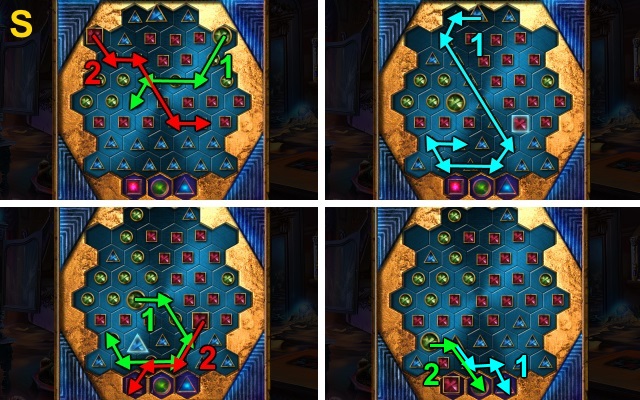
- Easy solution (S).
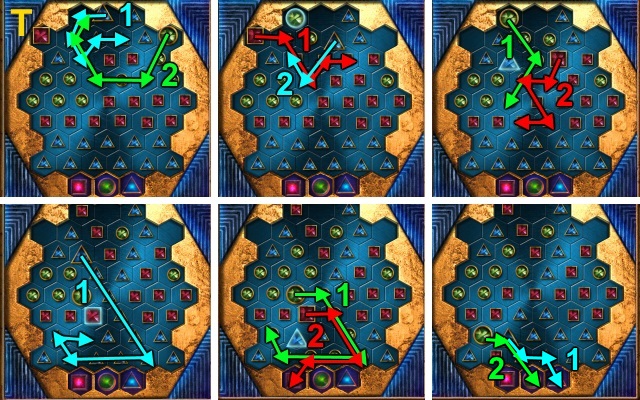
- Hard solution (T).
- Read the note; take EARTH.
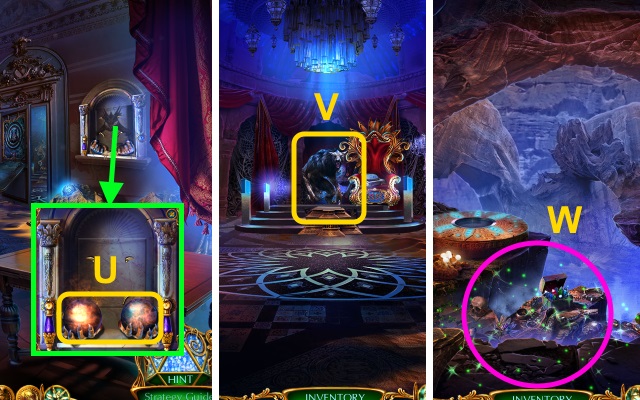
- Place the SAND PLANET and EARTH (U); take SANDERION'S GLOVE, the WOODEN BEATER, and note.
- Walk forward.
- Use the WOODEN BEATER (V).
- Walk forward.
- Remove the blanket. Play the HOP; receive the METAL DISK (W).
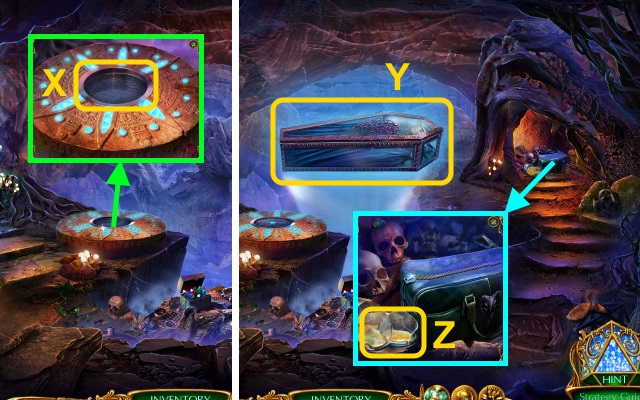
- Place the METAL DISK (X).
- Examine the coffin (Y).
- Use the RAG (Z); receive the OILY RAG.
- Walk down, then right.
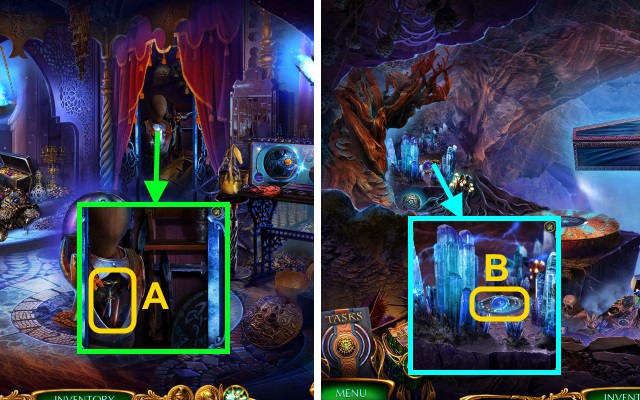
- Use the OILY RAG; take the SWORD TRINKET and TONGS (A).
- Walk down, then forward.
- Use the TONGS (B); receive the DISPLAY PART (1/2).
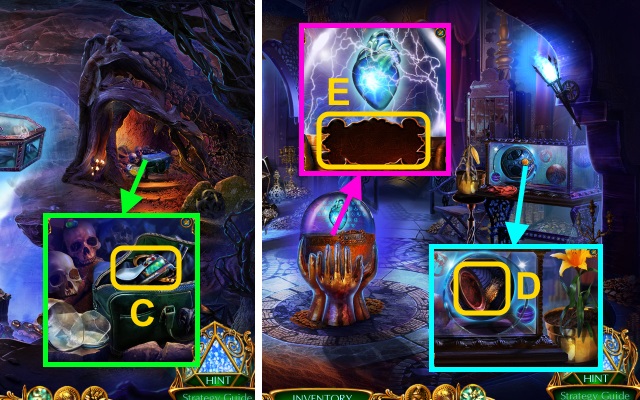
- Use the SWORD TRINKET; take the SPOON, DISPLAY PART (2/2), and NAIL PULLER (C).
- Walk down, then right.
- Place the DISPLAY PART (2/2); take the COPPER PLATE and COMBINATION PLATE (D).
- Place the COMBINATION PLATE for a mini-game (E).
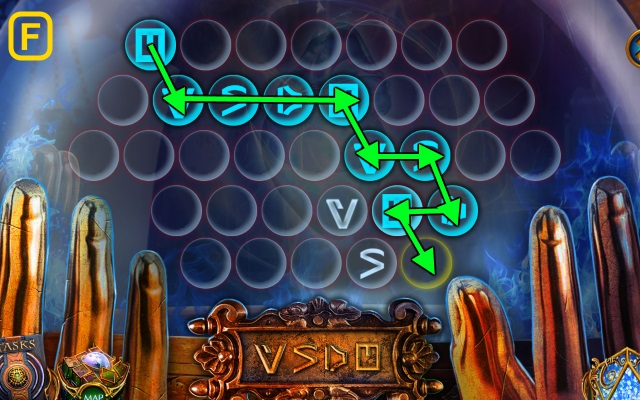
- Easy solution (F).
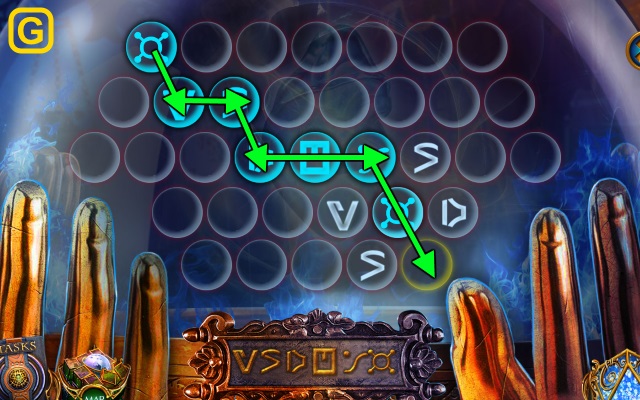
- Hard solution (G).
- Take TRITTA'S HEART.
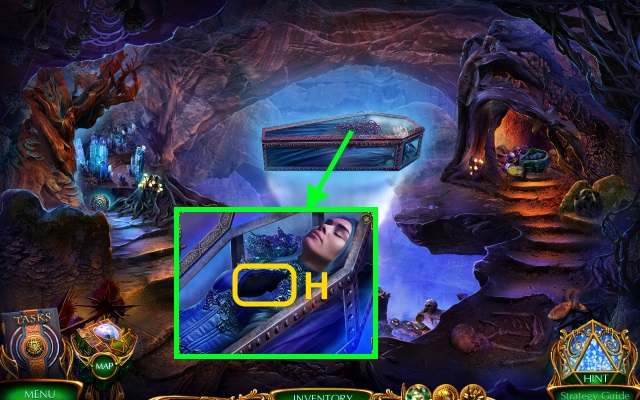
- Walk down, then forward.
- Open the lid; place TRITTA'S HEART (H).
Chapter 5: The Crystal Realm
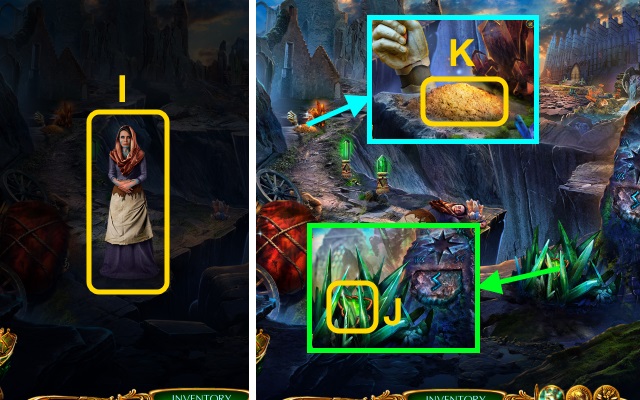
- Talk to Gretta (I).
- Use SANDERION's GLOVE (J); take the EMERALD AMULET (1/2).
- Use the COPPER PLATE for a mini-game (K).
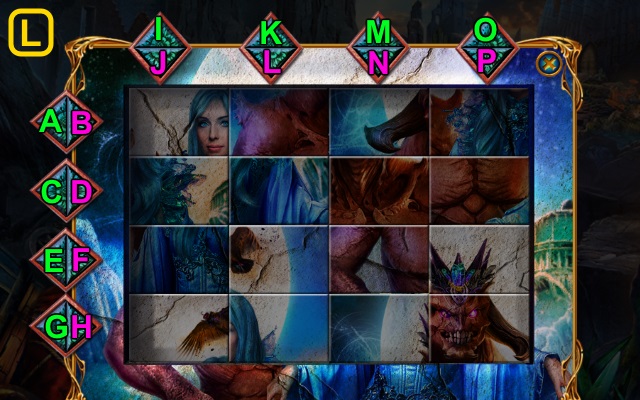
- Solution (L).
- Easy: J-Fx3-Bx2-Dx2-Hx2.
- Hard: L-P-D-J-L-N-P-Ax2-Cx2-Ex2-Gx2.
- Take the PURPLE HILT and EMERALD AMULET (2/2).
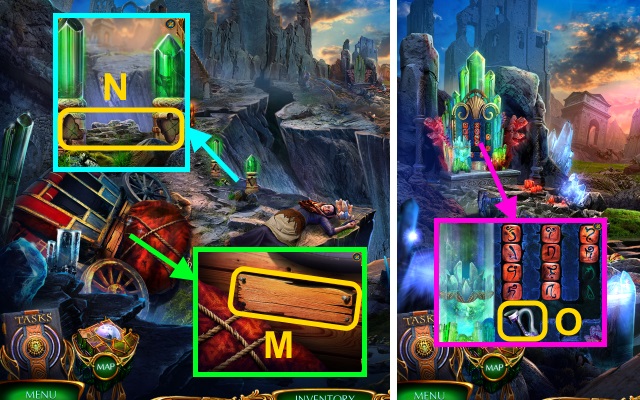
- Use the NAIL PULLER (M); receive the BOARD. Take the GOBLET.
- Place the EMERALD AMULET (2/2) (N).
- Walk forward.
- Take the JUG PIECE (O).
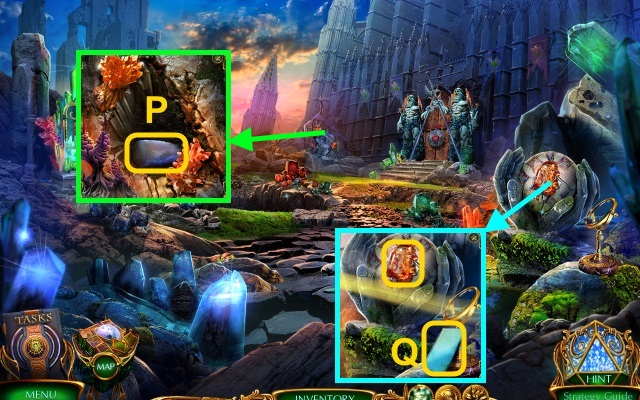
- Use the BOARD; take the GONG STICK TOPPER (P).
- Read the note (Q). Use the SPOON; receive the SPOONFUL OF RESIN (R). Use the GOBLET; receive the REVITALIZING WATER.
- Walk down.
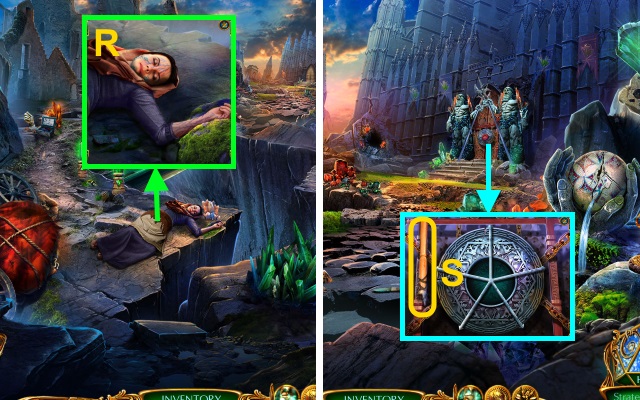
- Give the REVITALIZING WATER (R); receive the BELT.
- Walk forward.
- Place the GONG STICK TOPPER and BELT for a mini-game (S).
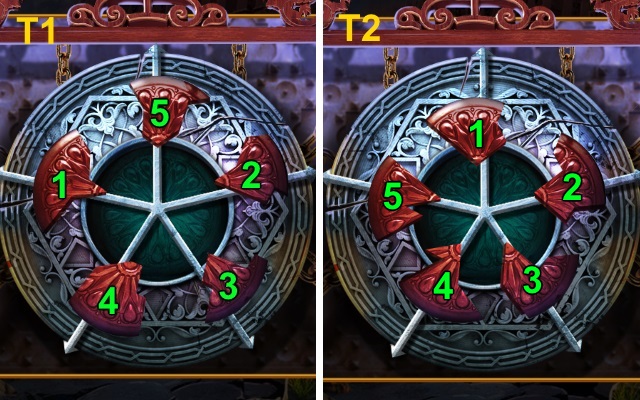
- Easy Solution (T1).
- Hard solution (T2).
- Walk forward.
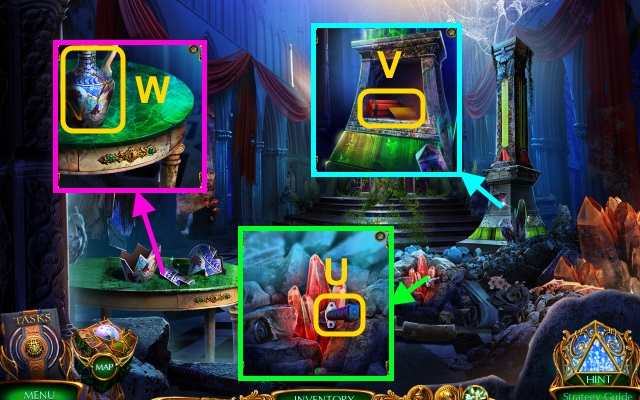
- Place the PURPLE HILT; take the DAGGER (U).
- Place the SEEKER AMULET; take the note and DYNAMITE (V).
- Place the JUG PIECE and SPOONFUL OF RESIN; take the JUG (W).
- Walk down.
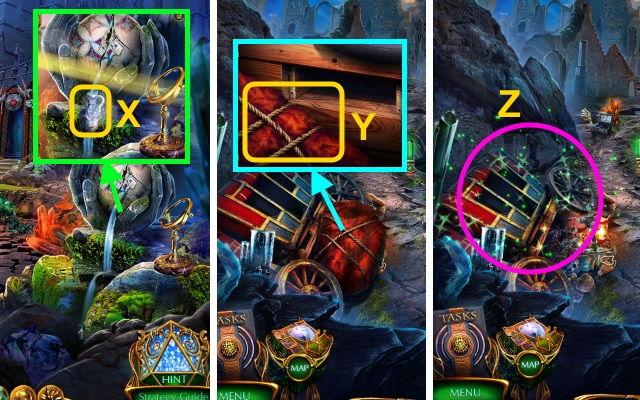
- Use the JUG (X); receive the JUG OF WATER.
- Walk down.
- Use the DAGGER (Y).
- Play the HOP; receive the WIND ROSE INLAY (Z).
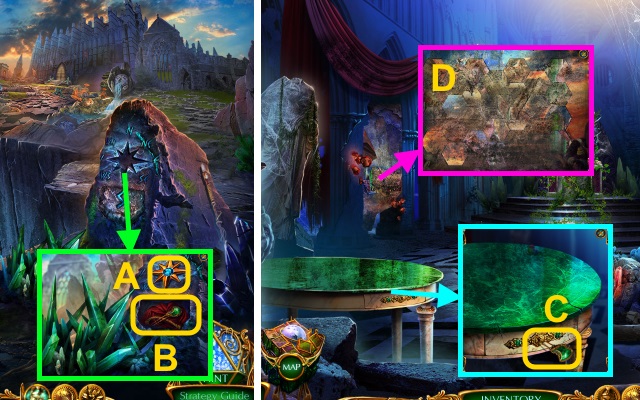
- Place the WIND ROSE INLAY (A); take the HAIR PIN and FUSE (B).
- Combine the DYNAMITE and FUSE.
- Walk forward twice.
- Use the HAIR PIN (C); take the BRACELET and SIEVE.
- Pour the JUG OF WATER for a mini-game (D).
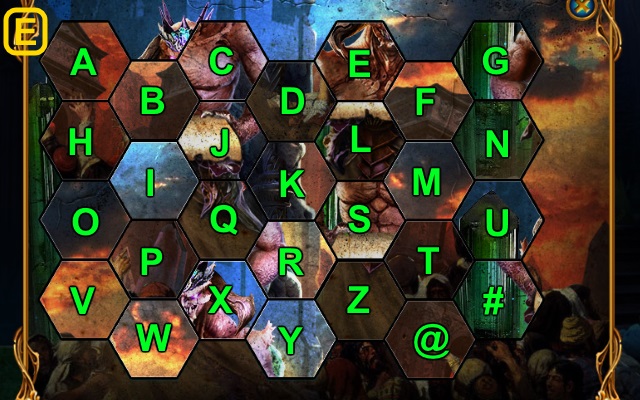
- Solution (E).
- Easy: Tx3-Fx3-Dx3-Rx3-Bx2-X-Qx3.
- Bx2-Jx2-Q-O-P-Sx2-Q-I-R-Jx2.
- Tx3-R-P-Zx2-Kx3-Mx3-R-X-Y.
- Xx2-@-Z-X-L-S-L-S-F-M-F-T.
- Hard: Tx3-Rx3-X-Ix3-B-H-Fx3-Dx3.
- Bx2-P-Xx2-Ox2-Mx3-Kx4-Xx2.
- Px3-K-J-M-L-C-Jx4-L-J-Q-Tx3.
- R-Kx2-J-K-Q-M-L-Q-M-S.
- T-R-T-R-F-U-F-M-T-N.
- Take the RED STONE (1/2) and LENS.
- Walk down.
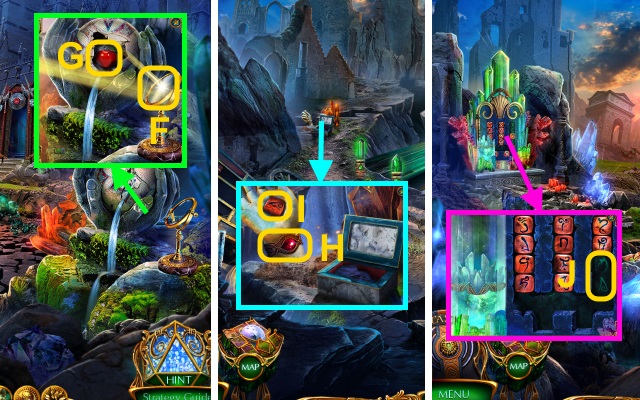
- Replace the LENS (F); take the APPLE (G).
- Walk down.
- Place the BRACELET (H); take the RED STONE (2/2) (I).
- Walk forward.
- Place the RED STONE (2/2) for a mini-game (J).
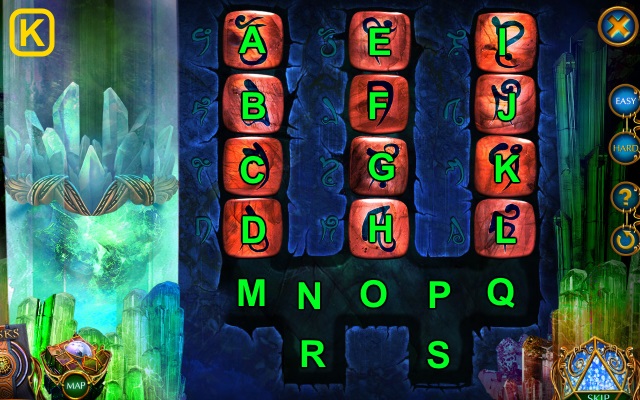
- Easy and Hard solution: (H-M)-(G-S)-(L-R)-(K-N).
- (J-G)-(I-H)-(S-I)-(N-S)-(M-J)-(D-K)-(C-L).
- (R-C)-(S-D)-(L-S)-(K-O)-(S-K)-(O-L)-(D-R).
- (C-Q)-(B-S)-(A-O)-(R-A)-(O-R)-(Q-B).
- (H-Q)-(G-P)-(F-C)-(E-D)-(R-E)-(P-R)-(S-F).
- (Q-G)-(R-H)-(D-R)-(C-O)-(R-C)-(O-D).
- Take the CROWN.
- Walk forward.
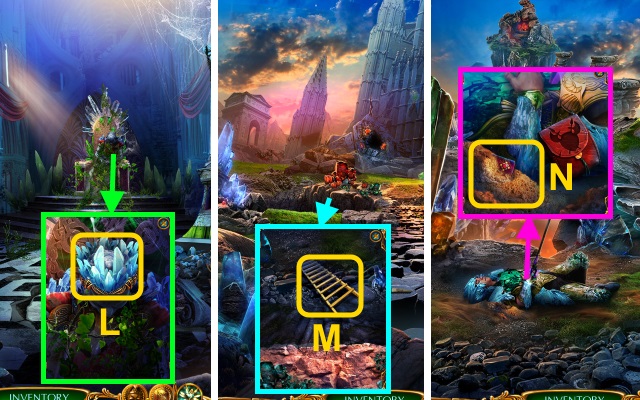
- Place the CROWN (L); receive the HALBERD.
- Use the HALBERD (M).
- Walk forward.
- Use the SIEVE (N); receive the RED BAG.
- Open the RED BAG; take the GLOWING AMULET and LIGHTER.
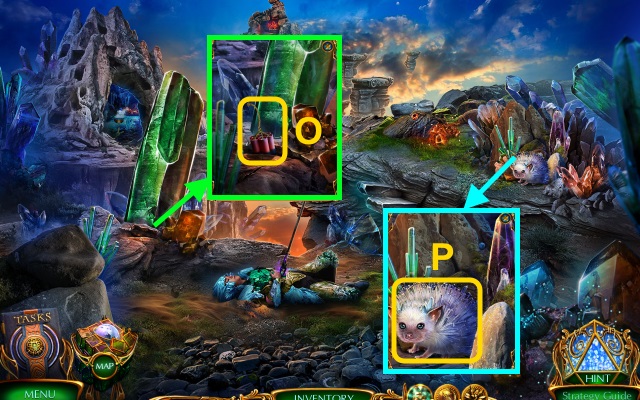
- Use the DYNAMITE and LIGHTER (O).
- Give the APPLE (P); take the SAW.
- Walk left.
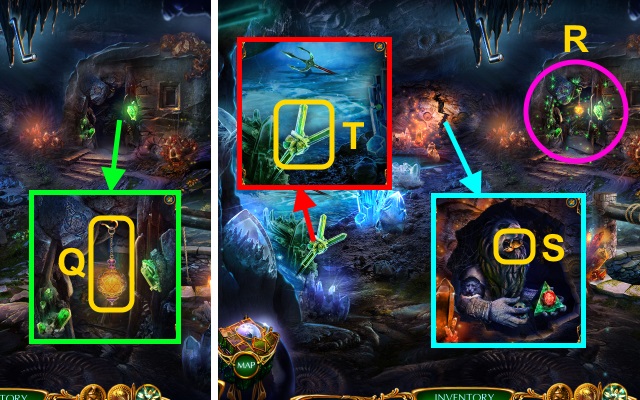
- Place the GLOWING AMULET (Q).
- Play the HOP; receive the PICKAX (R).
- Use the PICKAX; receive the ROCKS. Take the GOLDEN AMULET (S).
- Use the SAW (T); receive the BROKEN SLINGSHOT.
- Walk down.
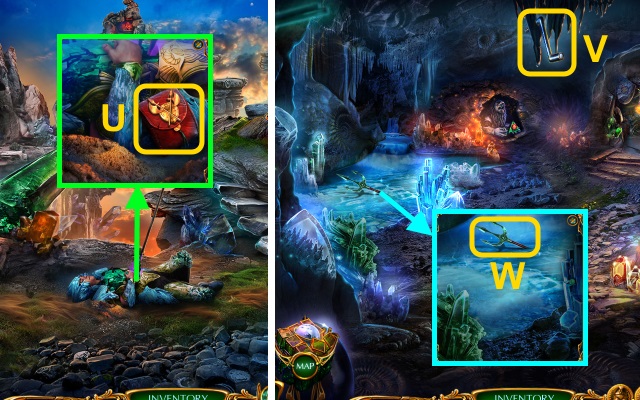
- Place the GOLDEN AMULET (U); take the LASSO and BAND AND POUCH.
- Combine the BROKEN SLINGSHOT, BAND AND POUCH, and ROCKS; receive the LOADED SLINGSHOT.
- Walk left.
- Use the LOADED SLINGSHOT (V); receive the CRANK.
- Use the LASSO (W); receive the GRAVITY TRIDENT.
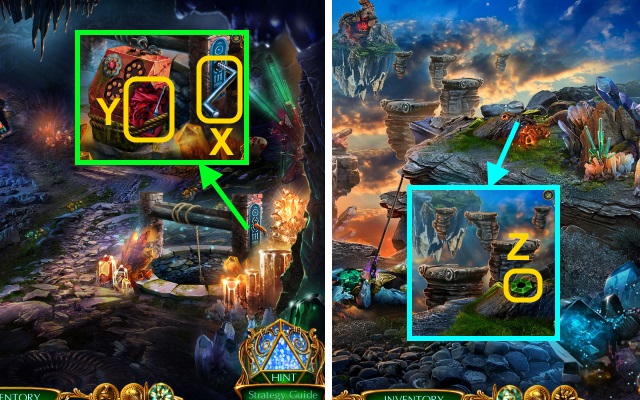
- Replace the CRANK (X); take the LOCKPICK and CLOTH (Y).
- Walk down.
- Place the GRAVITY TRIDENT for a mini-game (Z).
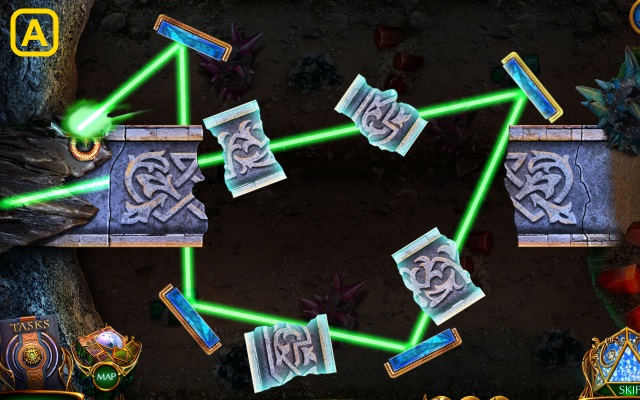
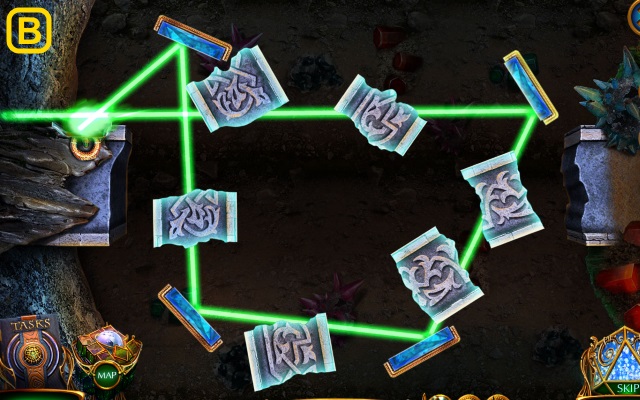
- Easy solution (A).
- Hard solution (B).
- Walk forward.
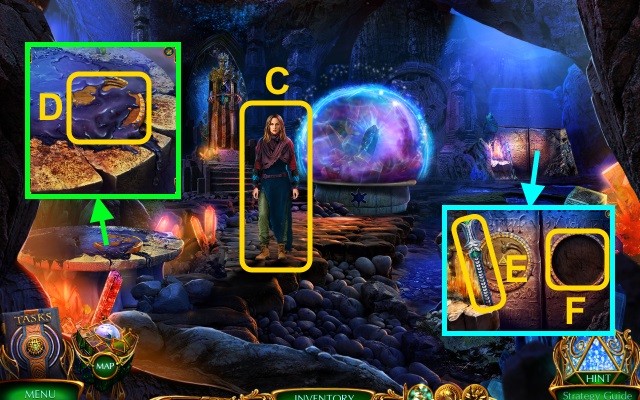
- Talk to Margaret (C); receive MARGARET'S SPEAR.
- Use the CLOTH (D); take the YELLOW DISK.
- Take the STAFF (E). Place the YELLOW DISK (F); take the LION BRACELET and METAL TOKEN (1/2).
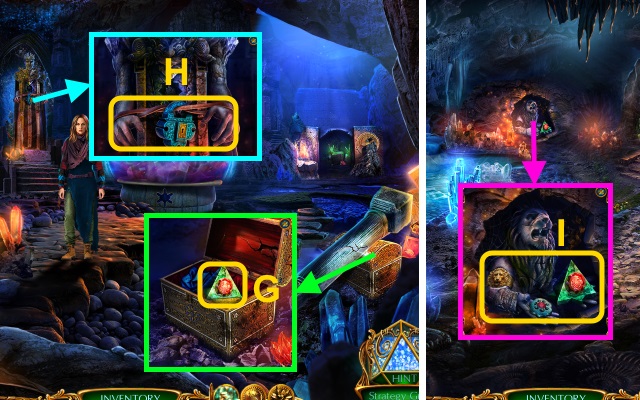
- Use the STAFF; take the PYRAMID (1/3) (G).
- Use the LOCKPICK (H); receive the BELT.
- Walk down, then left.
- Place the LION BRACELET; take the METAL TOKEN (2/2) and PYRAMID (2/3) (I).
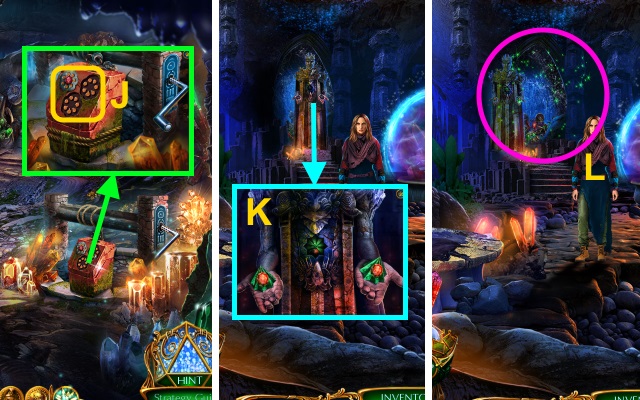
- Place the METAL TOKEN (2/2) (J); take the PYRAMID (3/3).
- Walk down, then forward.
- Place the PYRAMID (3/3) (K).
- Play the HOP; receive the CRYSTAL AMULET (L).
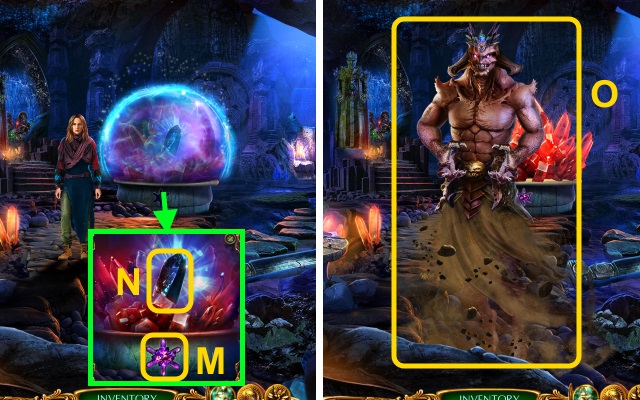
- Place the CRYSTAL AMULET (M); take the SHARD OF HEART (N).
- Combine MARGARET'S SPEAR, the SHARD Of HEART, and BELT; receive the SPEAR.
- Use the SPEAR for a mini-game (O).
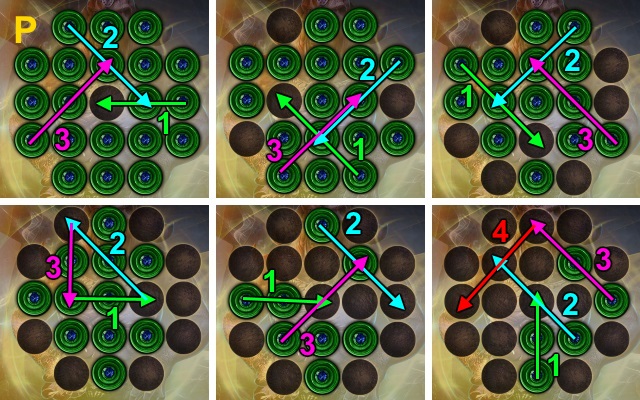
- Easy solution (P).
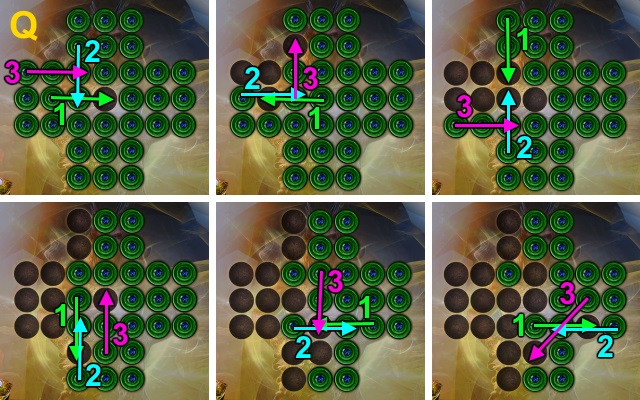
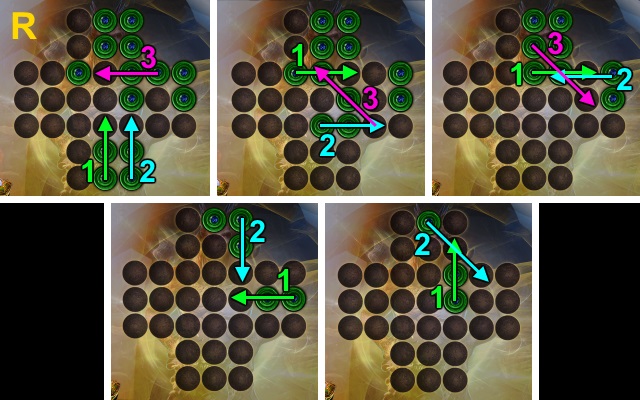
- Hard solution (Q-R).
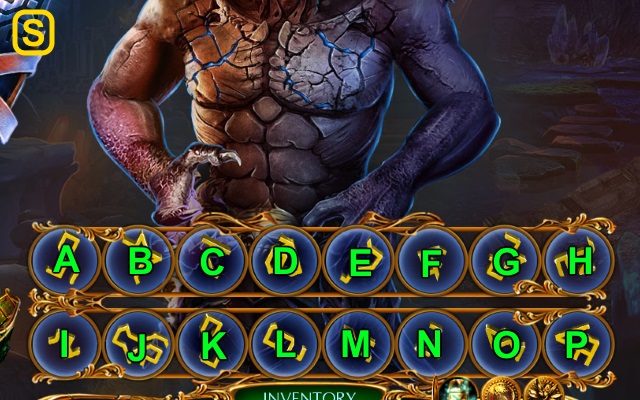
- Solution (S).
- Easy: D-F-O-L-I.
- Hard: H-F-M-P-J-L-I-D.
- Congratulations! You have completed Labyrinths of the World: the Devil's Tower.
Created at: 2017-05-28

