
Walkthrough Menu
- General Tips
- Chapter 1: The Library
- Chapter 2: Magicians' Quarters
- Chapter 3: Outside Keira's Tower
- Chapter 4: Outside Rebel Base
- Chapter 5: Catacombs
General Tips
- This is the official guide for Labyrinths of the World: When Worlds Collide.
- This guide will not mention each time you have to zoom into a location; the screenshots will show each zoom scene.
- Hidden-object puzzles are referred to as HOPs. This guide will not show HOP solutions. It will identify the location of the HOP and the inventory item acquired.
- This guide will show solutions for non-random puzzles. Please read the in-game instructions for each puzzle.
- In this game, you will sometimes have to select the new scene to trigger dialog, cut-scenes, or tasks prior to interacting with the scene.
Chapter 1: The Library
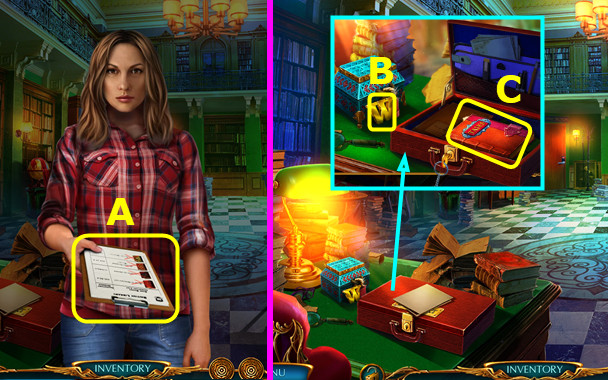
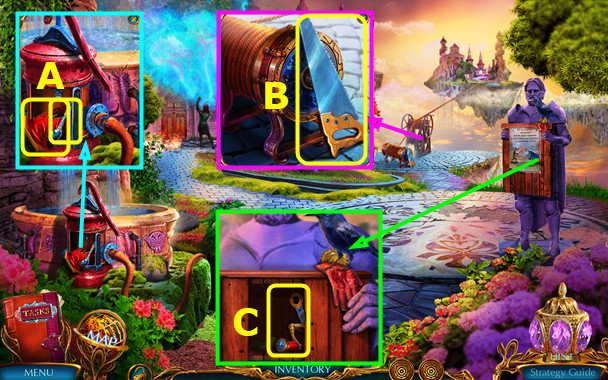
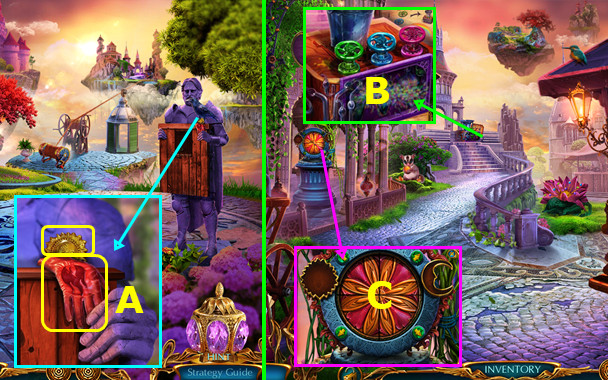
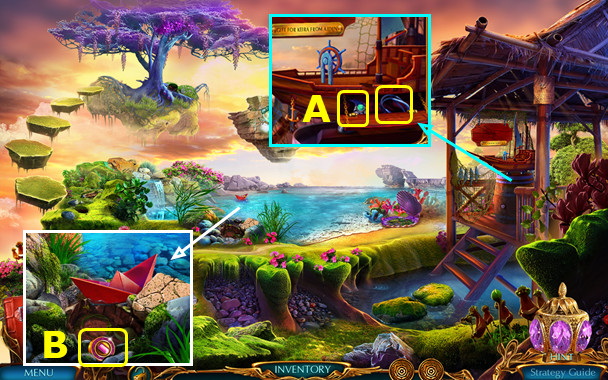
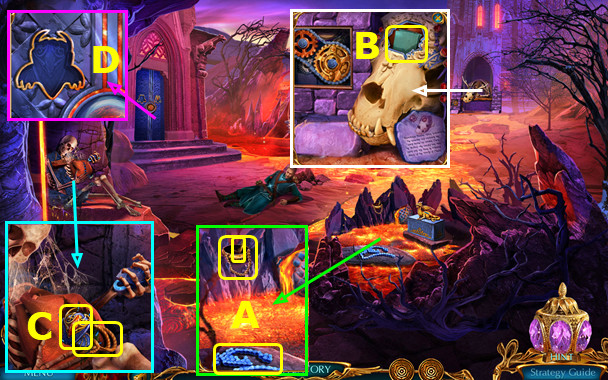
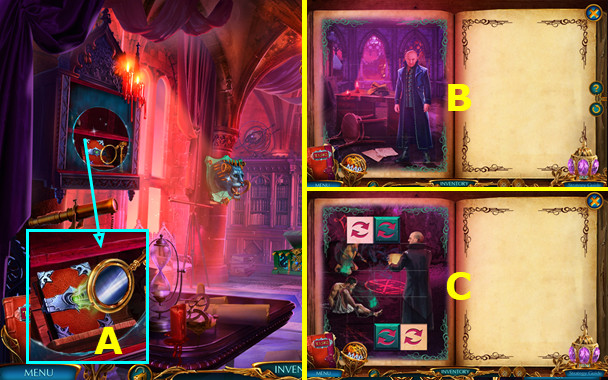
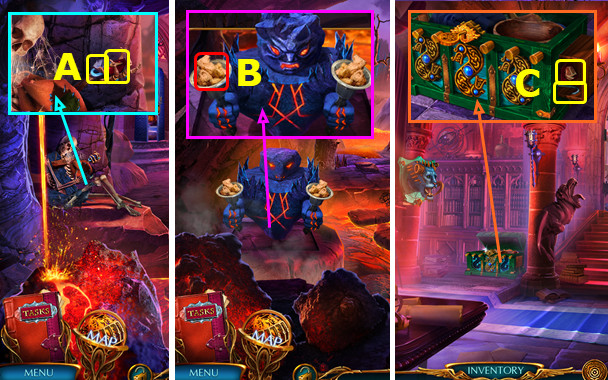
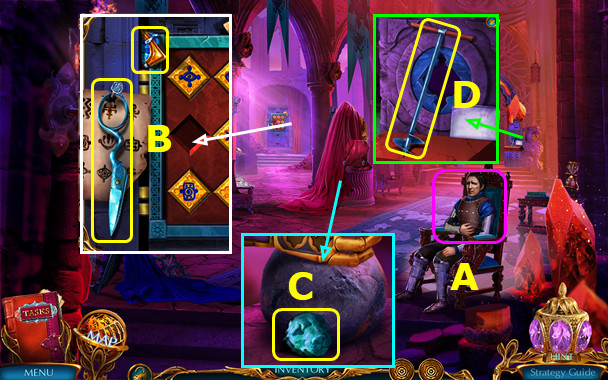
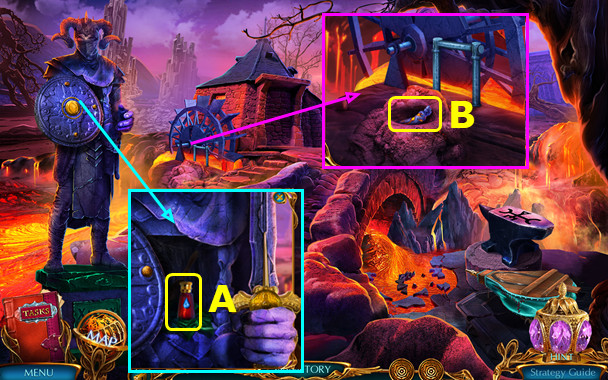
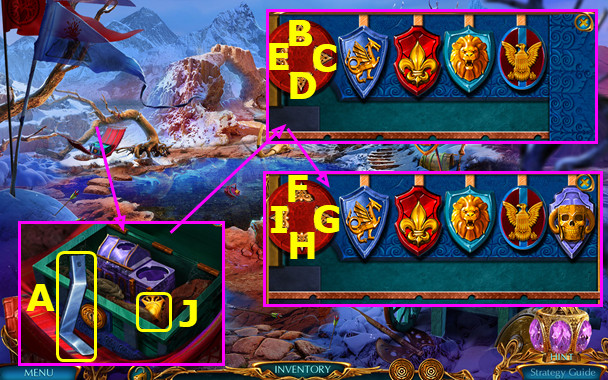
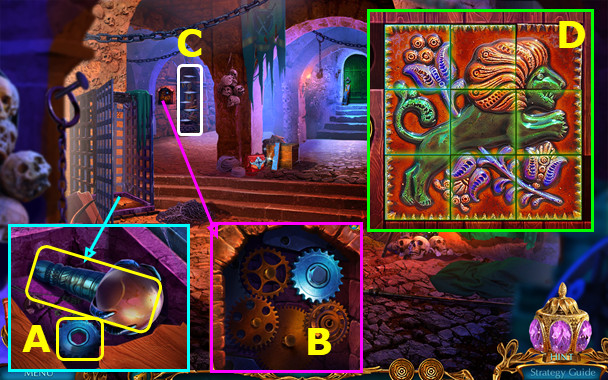
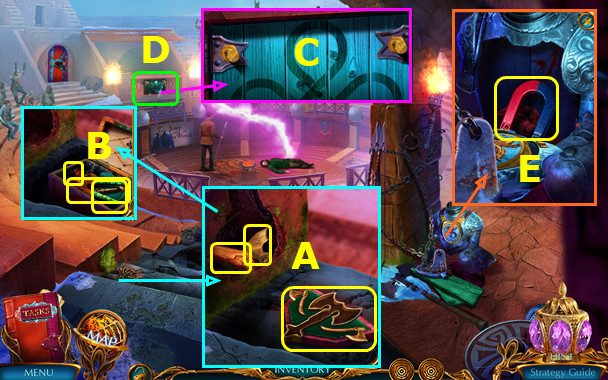
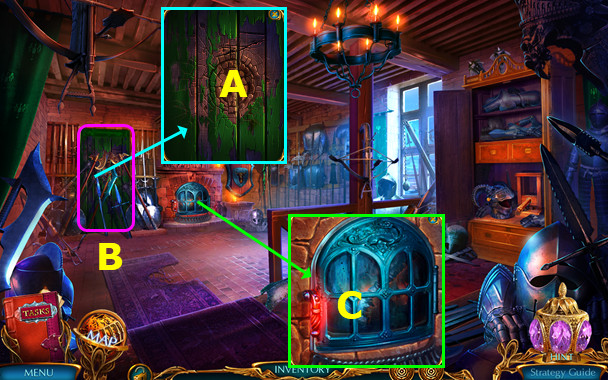
- Take and read clipboard; take WALLET (A).
- Open WALLET; take CASE KEY and examine photo.
- Take 1st BAG AMULET (B).
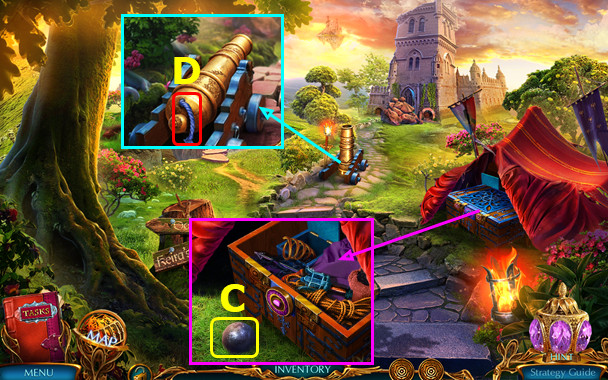
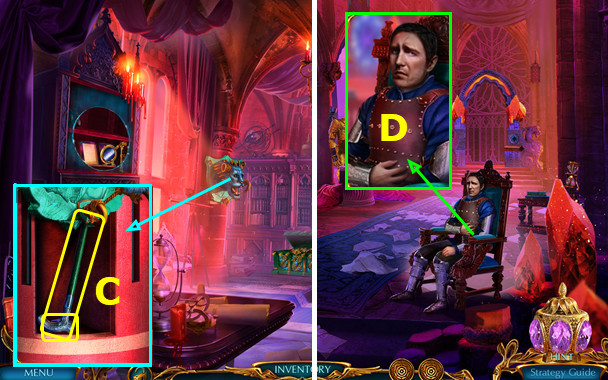
- Read notice and use CASE KEY; read tasks book and take ACCESS CARD (C).
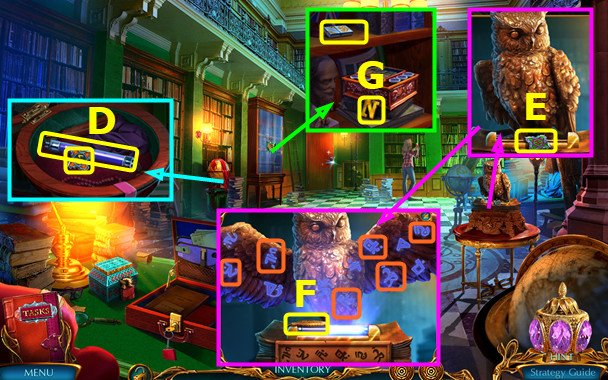
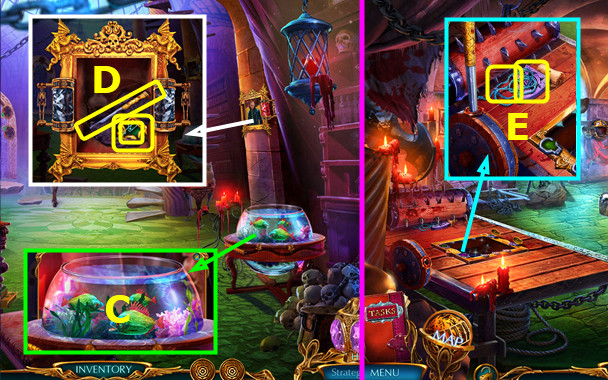
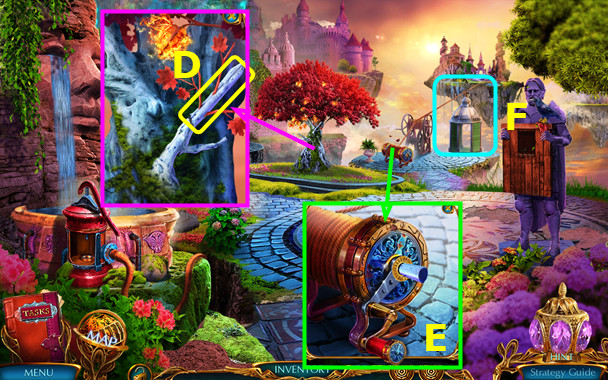
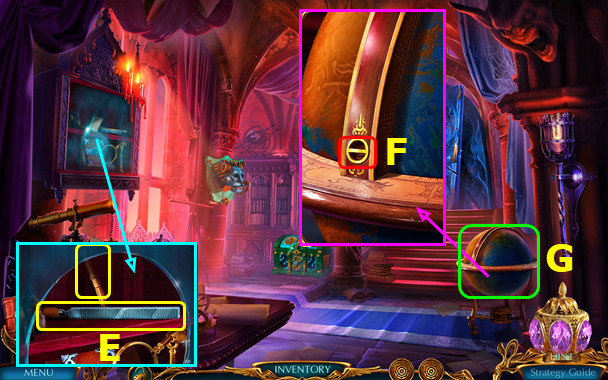
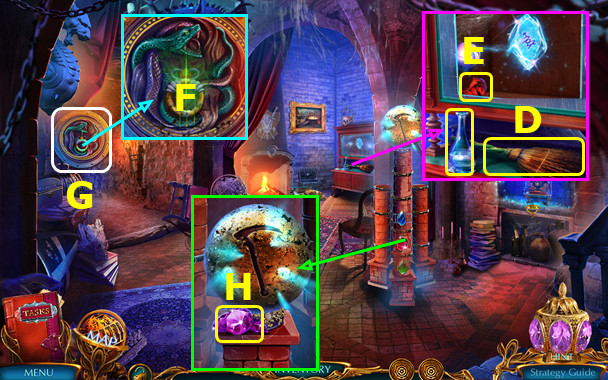
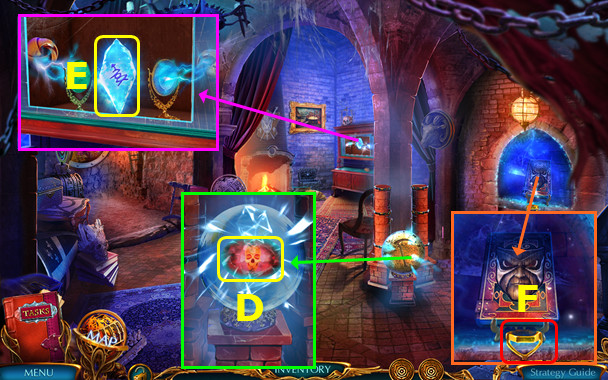
- Remove scarf, open globe, and read leaflet; take 1/2 PUZZLE PIECE and UV LAMP (D).
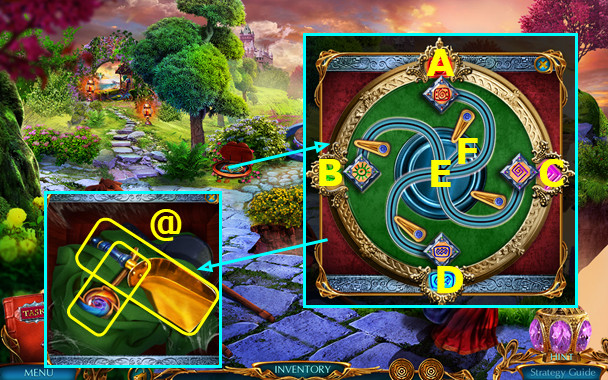
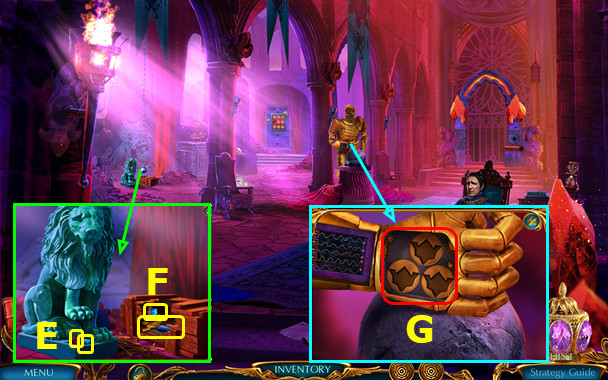
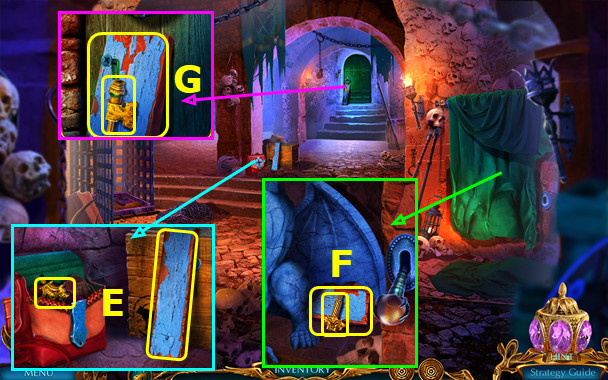
- Take 2/2 PUZZLE PIECE; place UV LAMP (E).
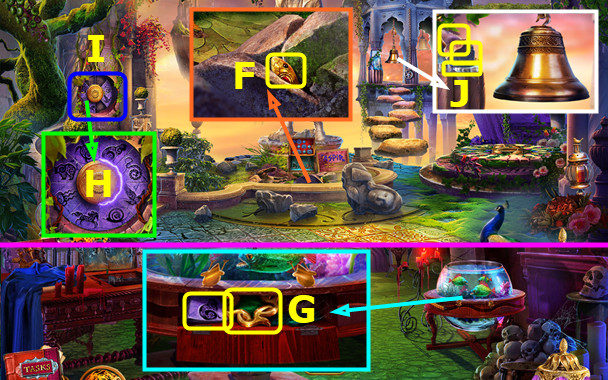
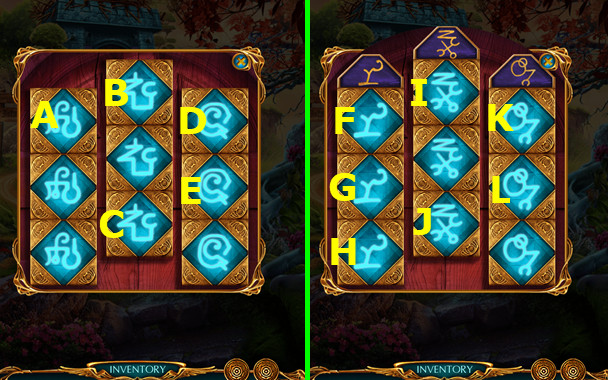
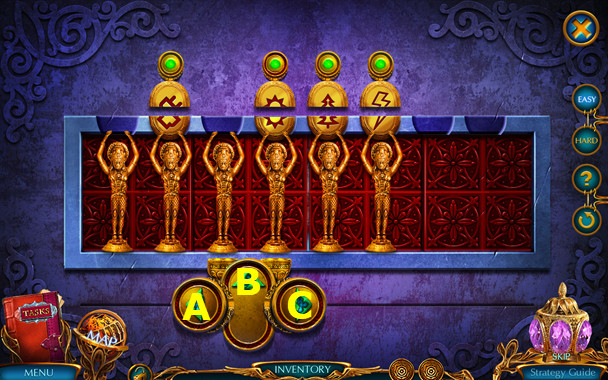
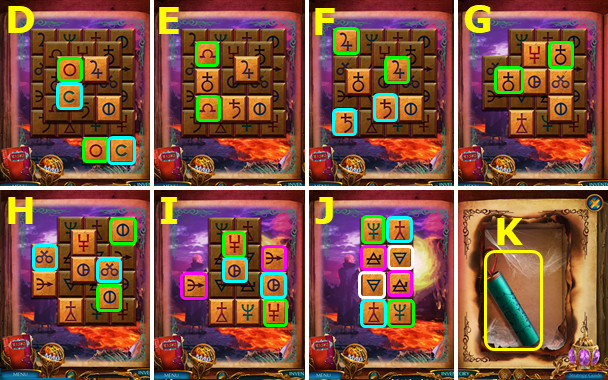
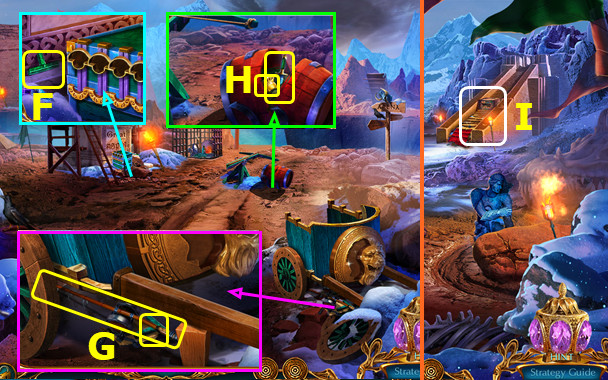
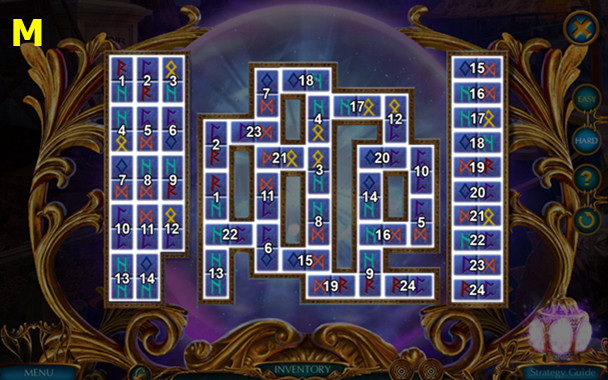
- Select 6 runes; take METAL FEATHER (F).
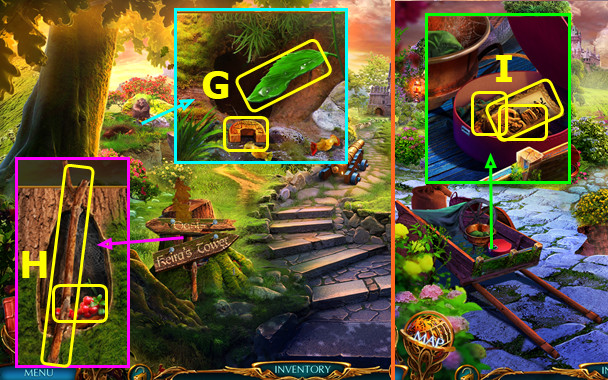
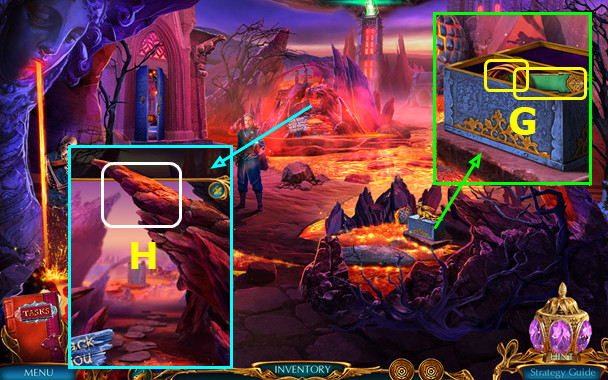
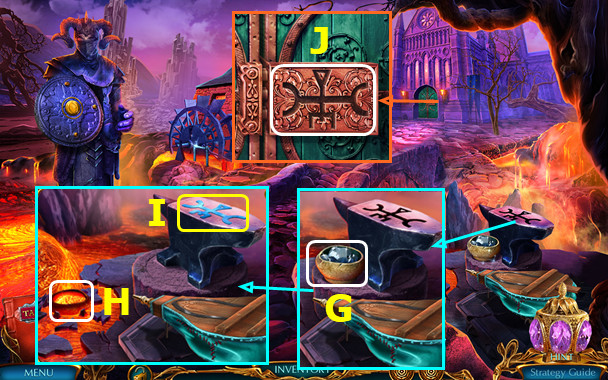
- Place METAL FEATHER; take EMPTY LIGHTER and 2nd BAG AMULET (G).
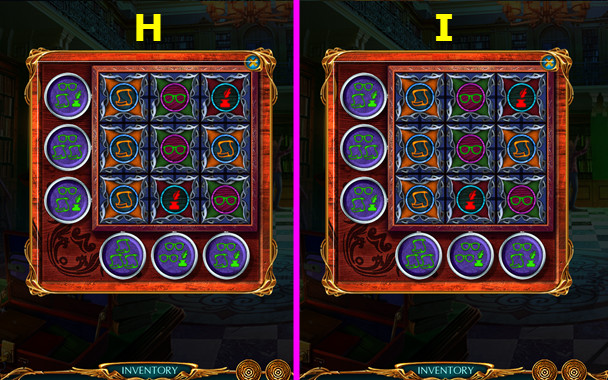
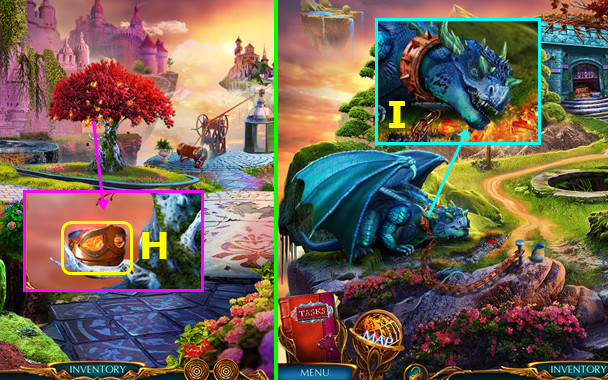
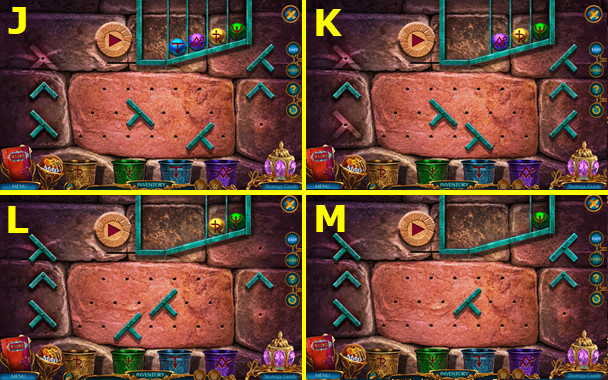
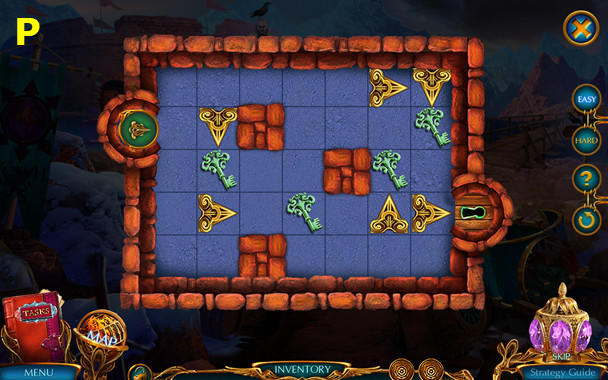
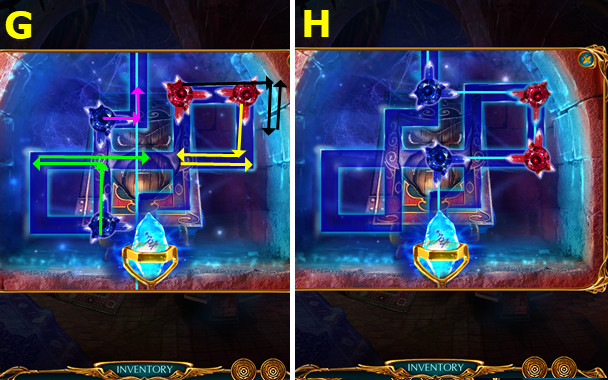
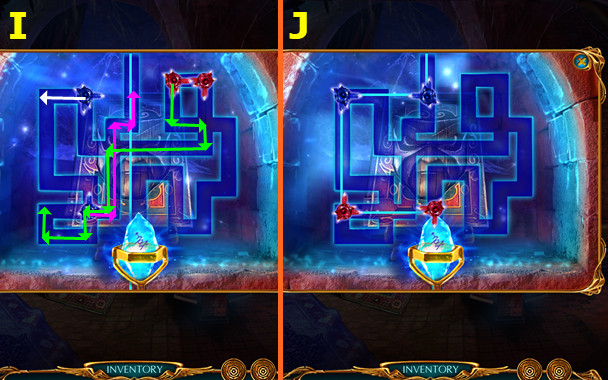
- Place 2 PUZZLE PIECES; easy solution (H).
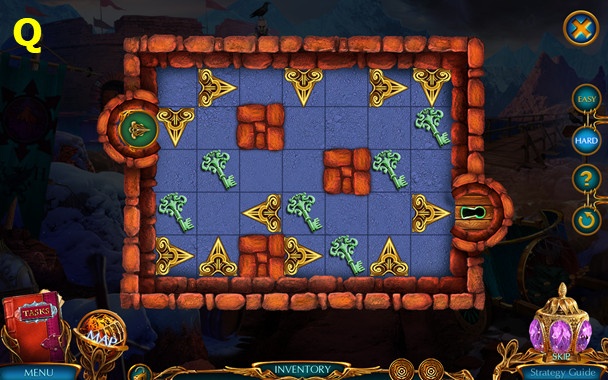
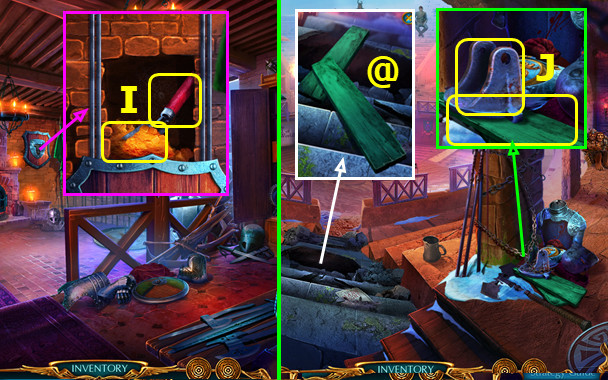
- Hard solution (I).
- Take LIGHTER FLUID.
- LIGHTER FLUID in EMPTY LIGHTER; earn LIGHTER.
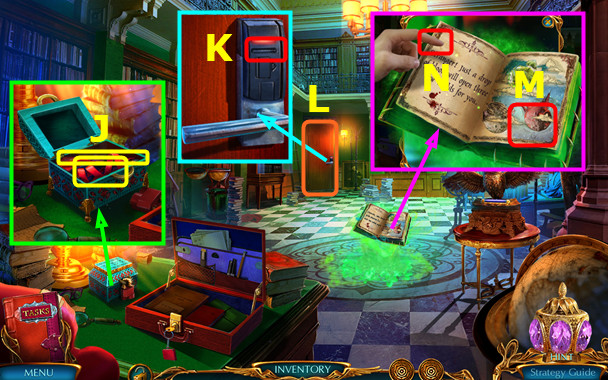
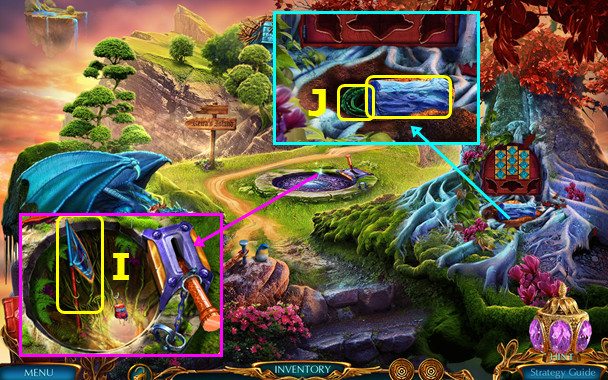
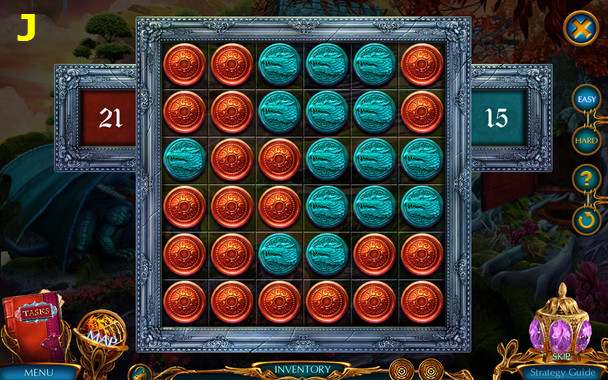
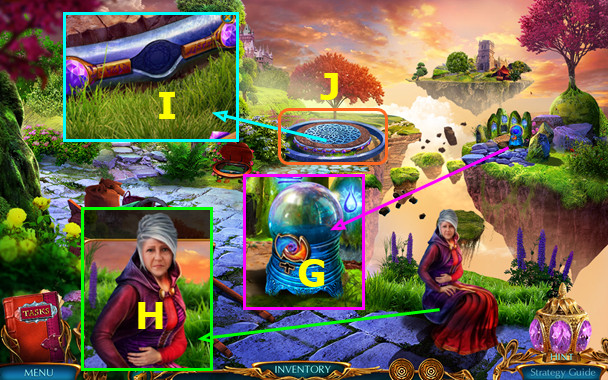
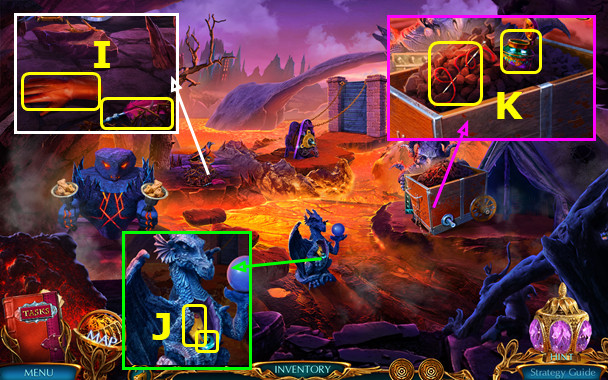
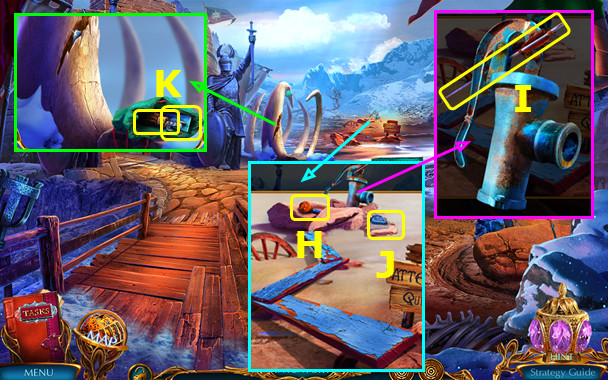
- Use LIGHTER; open lid; take RIBBON and ARROW (J).
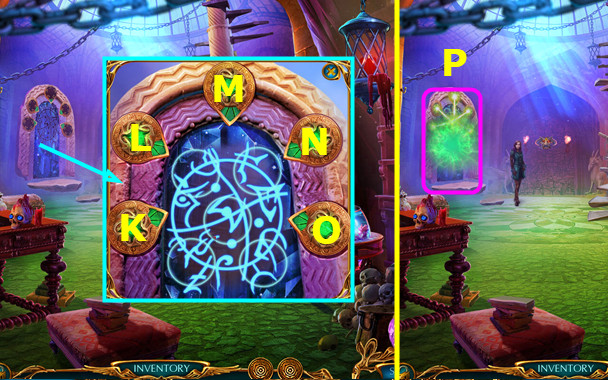
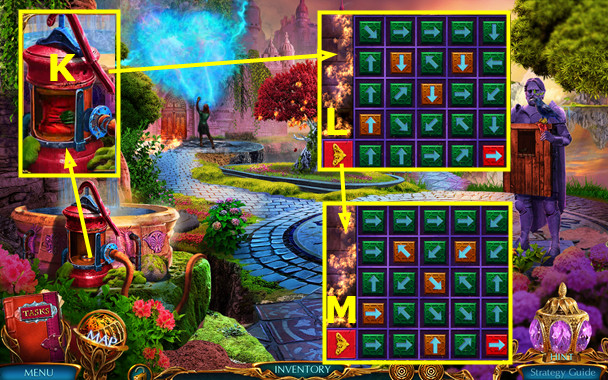
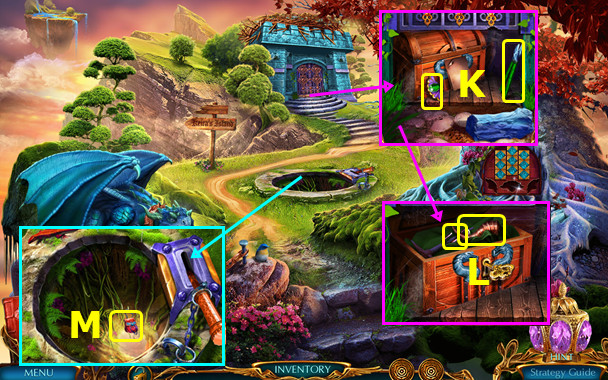
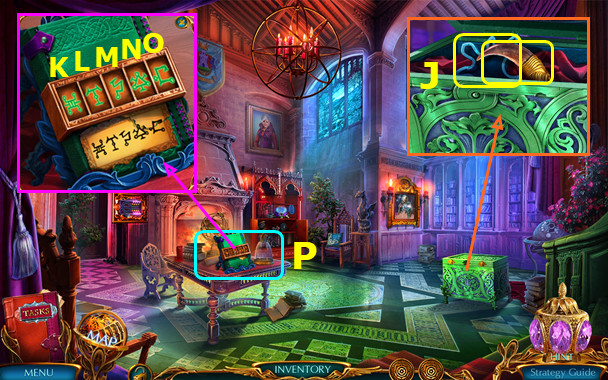
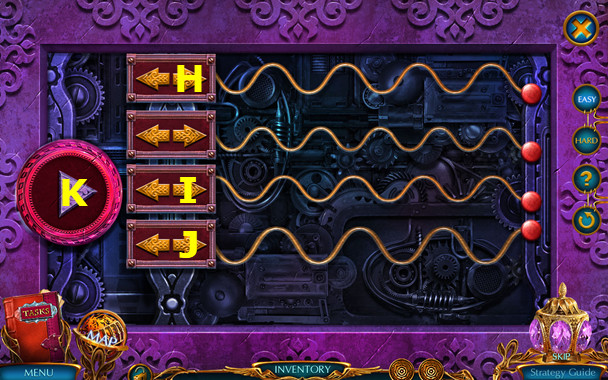
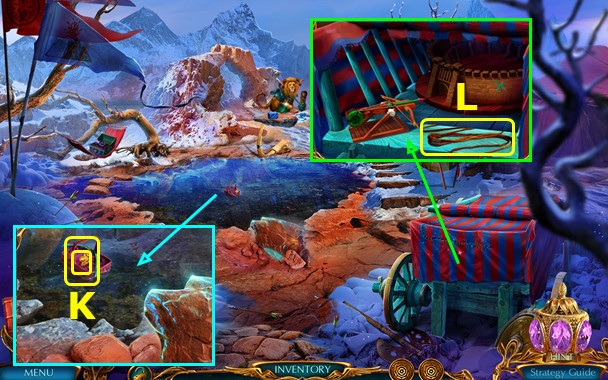
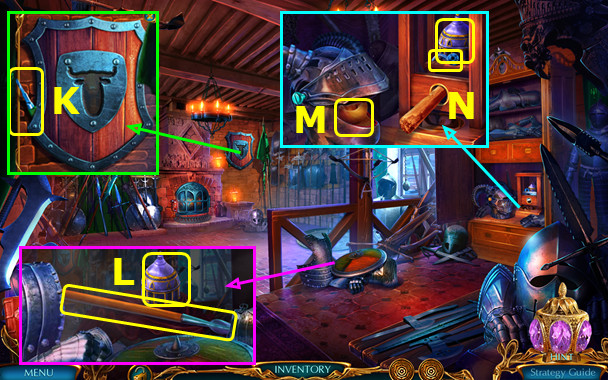
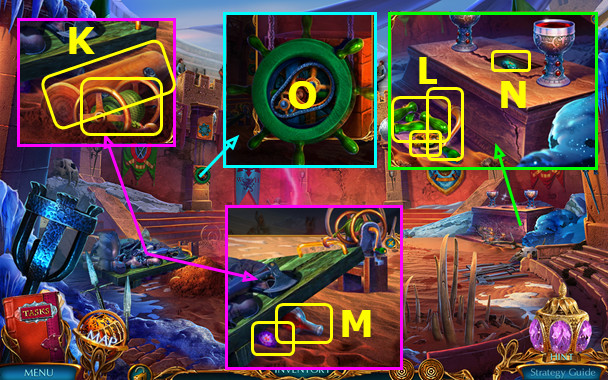
- Use ACCESS CARD (K).
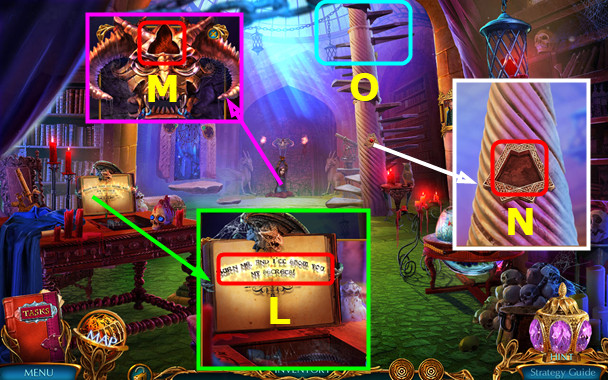
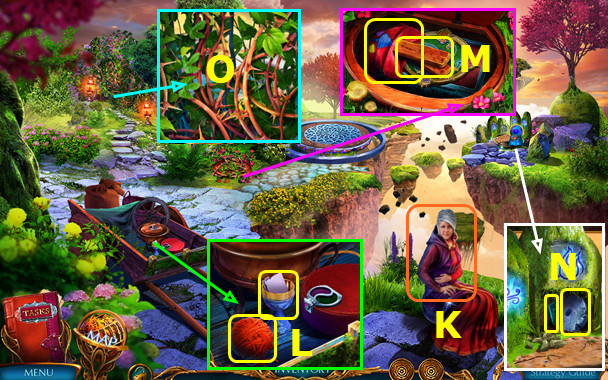
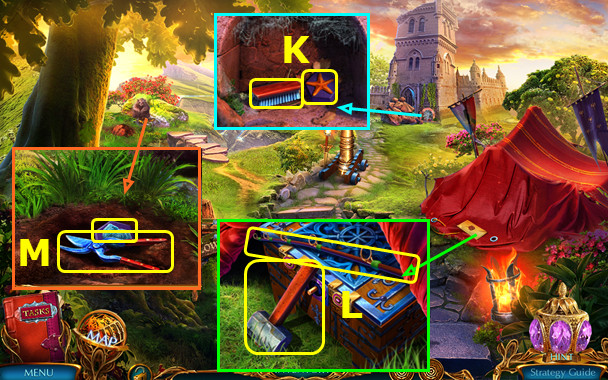
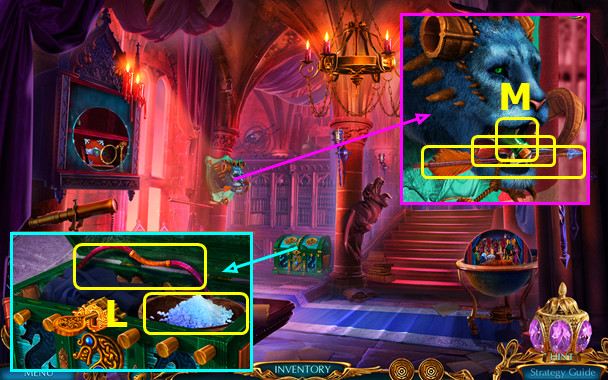
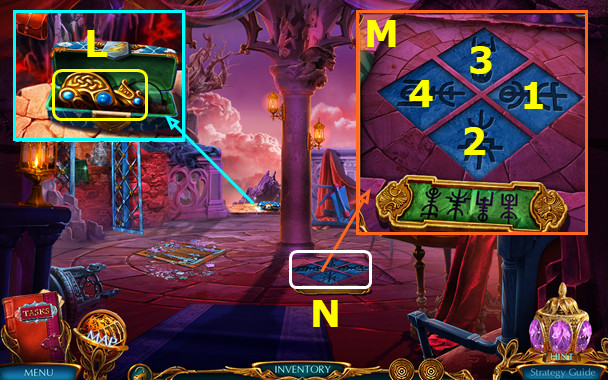
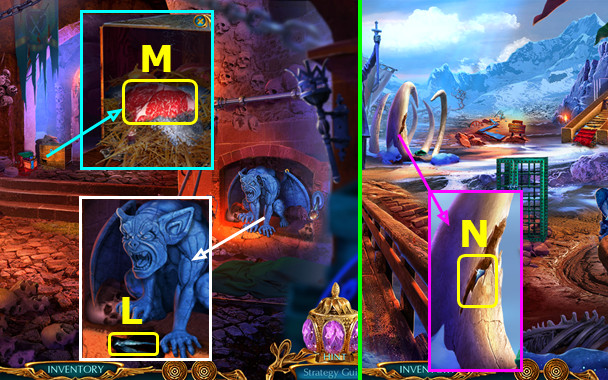
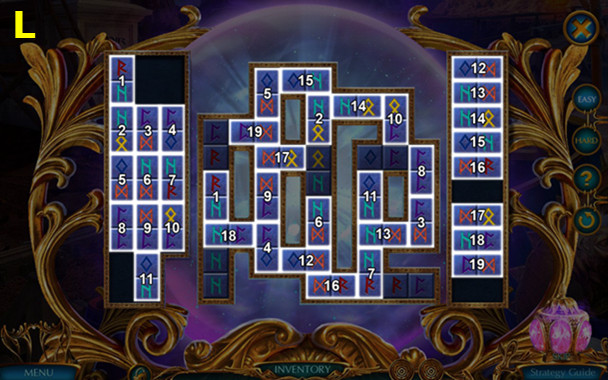
- Play HOP; earn THE GATES BOOK (L).
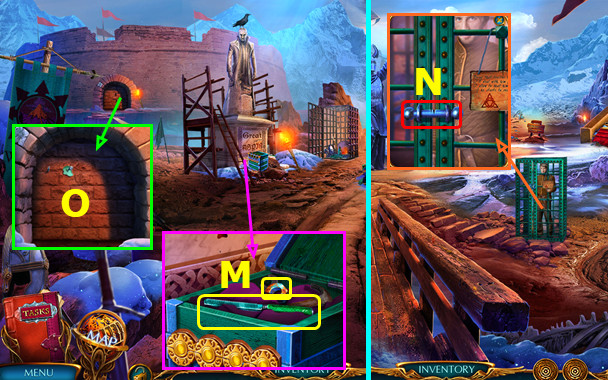
- Select (M).
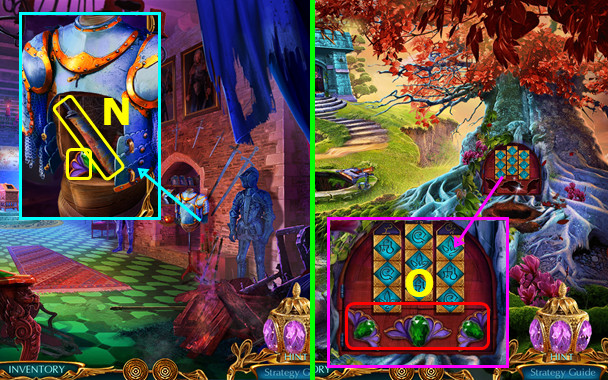
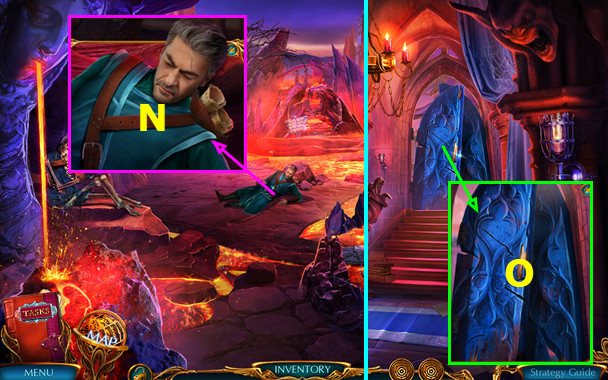
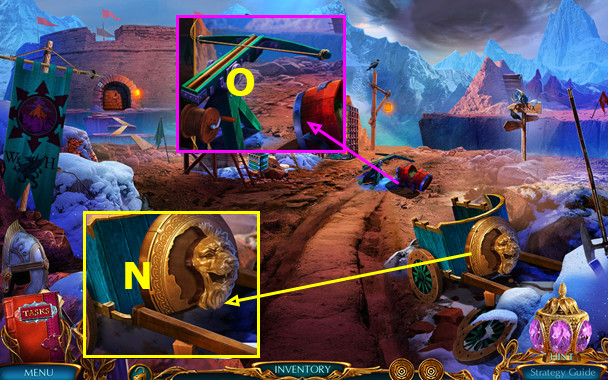
- Use ARROW (N).
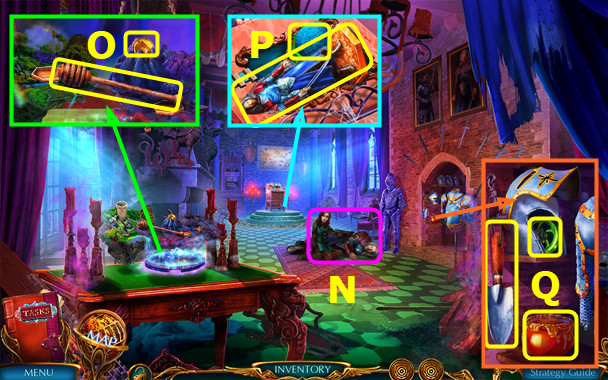
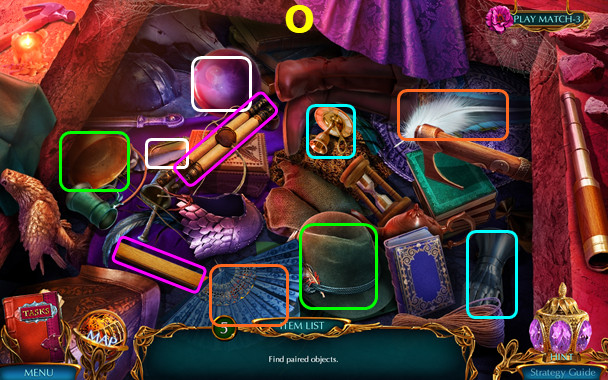
- Play HOP.
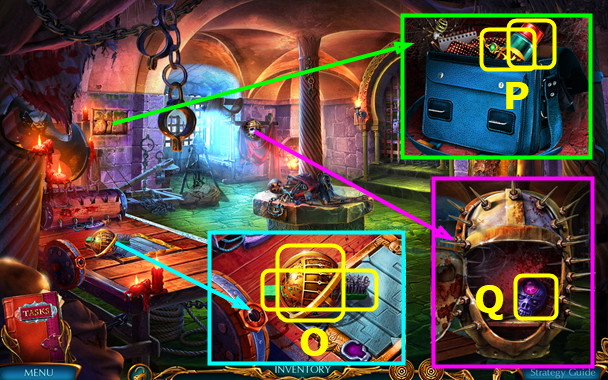
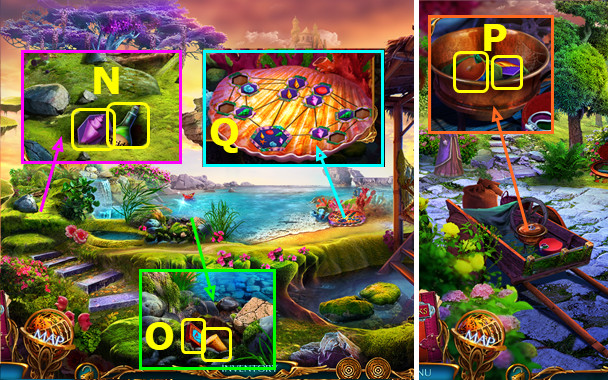
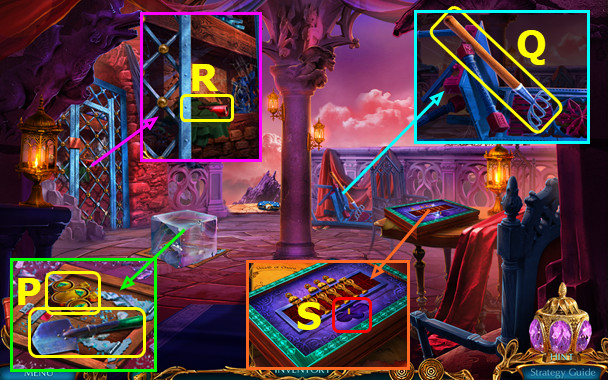
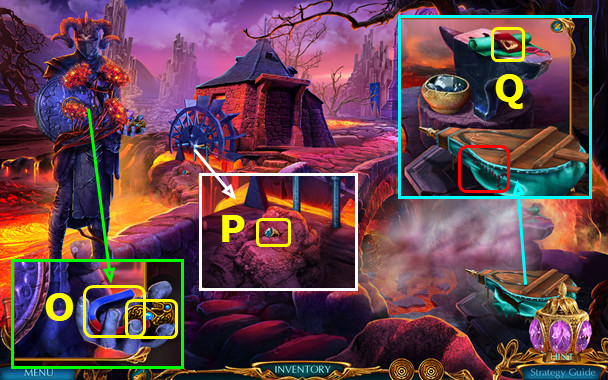
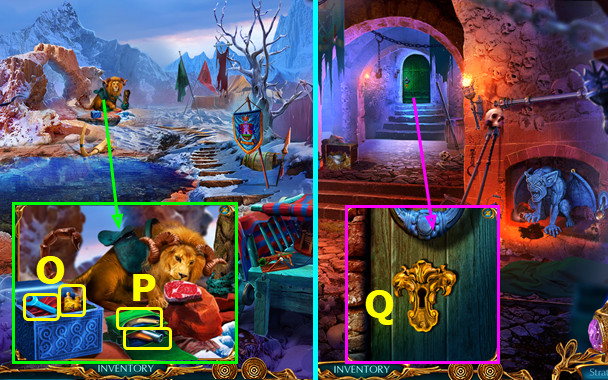
- Take map and BRUSH (O).
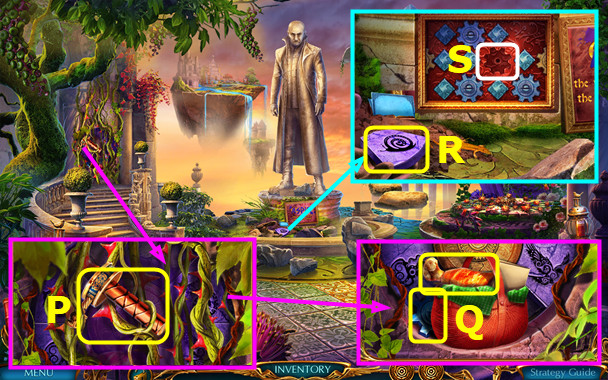
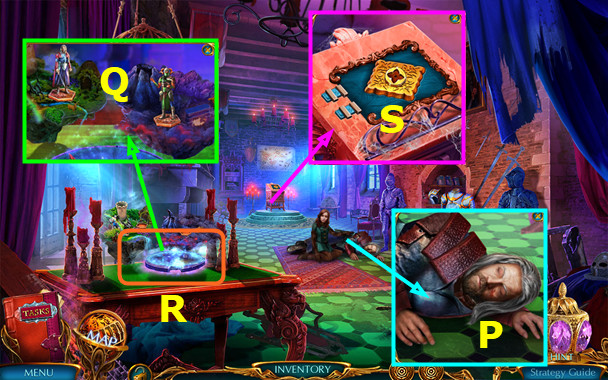
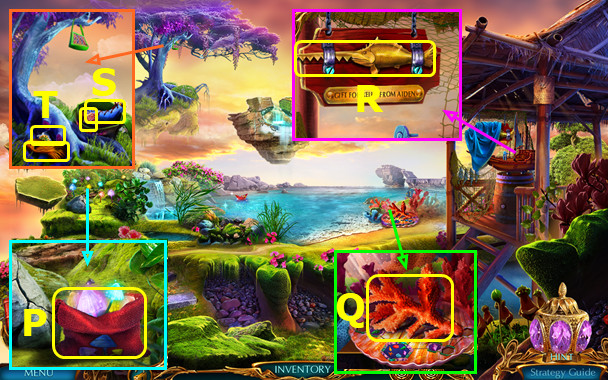
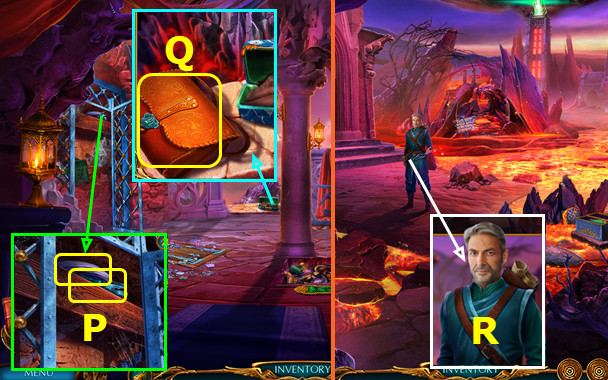
- Remove bricks, read note, and place 2 BAG AMULETS; read journal; take ANTI-RUST SPRAY and EARRING (P).
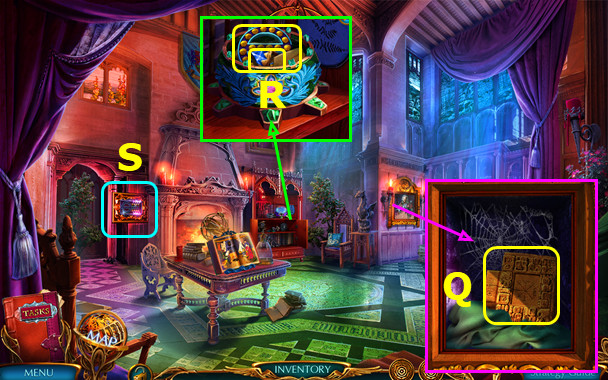
- Open face; take 1/2 PUZZLE DETAILS (Q).
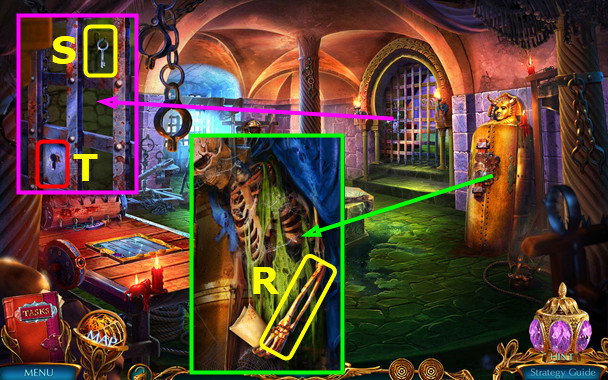
- Use ANTI-RUST SPRAY and BRUSH; open; read note; take SKELETON ARM (R).
- Use SKELETON ARM; earn CELL KEY (S).
- Use CELL KEY (T).
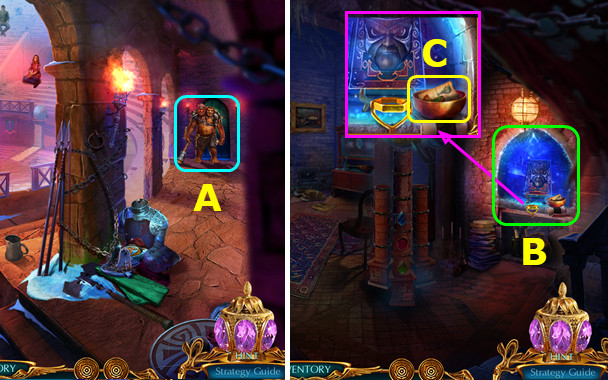
- Go right.
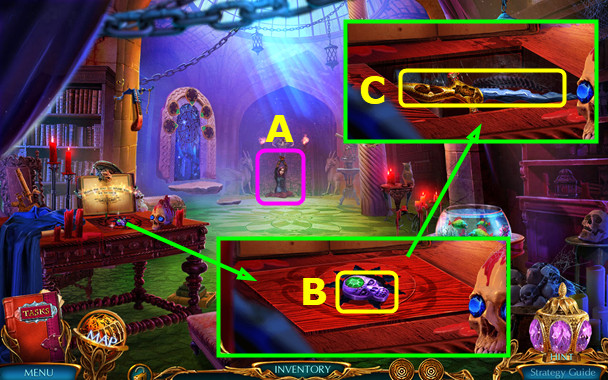
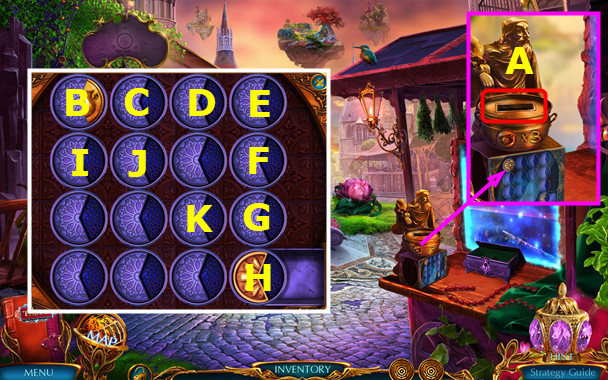
- Talk; earn ASPIR'S STAMP (A).
- EARRING on ASPIR'S STAMP; take 1/2 DAGGER CRYSTALS and TABLE STAMP.
- Take 2/2 PUZZLE DETAILS; place TABLE STAMP (B).
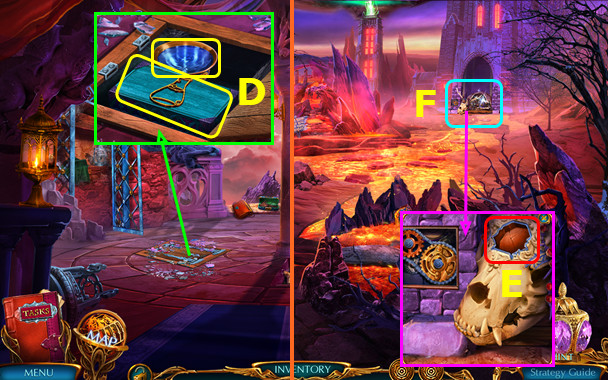
- Remove pages; take BROKEN DAGGER (C).

- Take BROKEN CROSSBOW (D).
- RIBBON and ARROW on BROKEN CROSSBOW; earn CROSSBOW.
- Use CROSSBOW; earn MAGNET (E).
- Use MAGNET; earn SHACKLES KEY (F).
- Walk down.

- Use SHACKLES KEY; take MATCHES, CHAIN, and 2/2 DAGGER CRYSTALS (G).
- 2 DAGGER CRYSTALS on BROKEN DAGGER; earn MAGIC DAGGER.
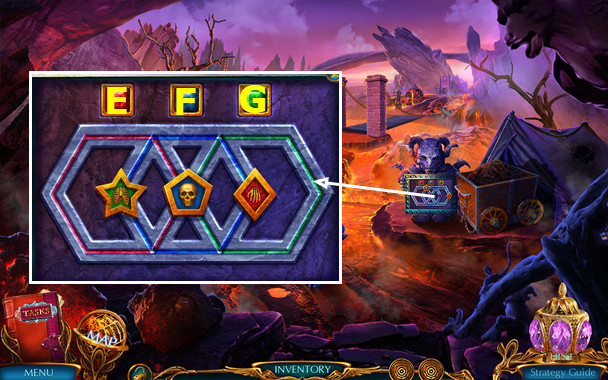
- Place 2 PUZZLE DETAILS (H).

- Easy solution (A-D-Bx2-G-F-E-F-G)-(A-D-Bx2).
- Hard solution (Dx2-Ax2-Cx2-E-F-G)-(A-Bx2-C-Dx2).
- 1st PATH (1); 2nd PATH (2).
- Take CARABINER and MATCHBOX.
- MATCHES in MATCHBOX.
- Go right.
- Use MATCHBOX (L); play HOP; earn FIERY SYMBOL.
- Place FIERY SYMBOL; earn PILLAR AMULET (M).
- Place PILLAR AMULET (N).
- Go up (O).
- Take BROKEN CRYPTEX; use MAGIC DAGGER (P).
- Take MEAT, read note, remove basket, and take COGWHEEL (Q).
- Read note; take 1/3 ANIMAL PLATES (R).
- Move sign; place COGWHEEL (S).
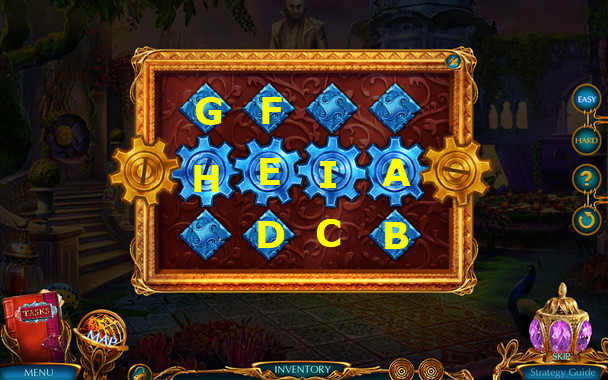
- Easy solution A-B-C-D-E-F-G-H-E-I-C.
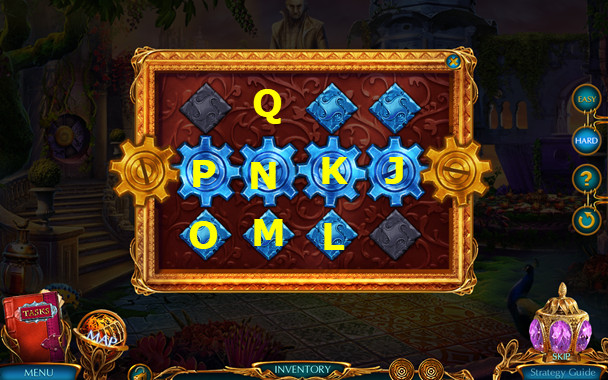
- Hard solution J-K-L-M-N-K-L-M-O-P-N-Q.
- Take 1st CRYPTEX PART.
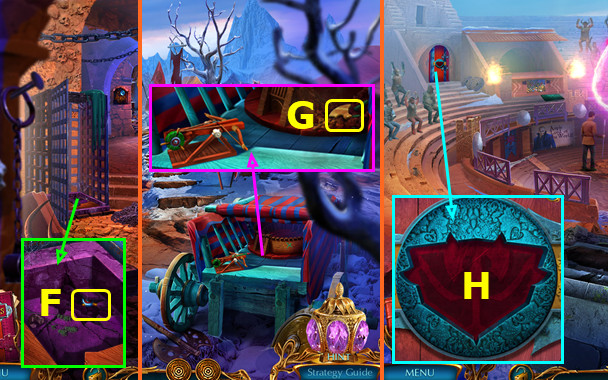
- Place CHAIN and CARABINER; take 1/5 PORTAL DETAILS (R).
- Select valve; take FLAG (S).
- Use FLAG (T).

- Easy solution (A).
- Hard solution (B).
- Take 2nd CRYPTEX PART and 2/5 PORTAL DETAILS.
- 2 CRYPTEX PARTS on BROKEN CRYPTEX; earn CRYPTEX.
- Walk down.
- Use MEAT; earn SHARP BONE (C).
- Place CRYPTEX; take LOCKPICK, 3/5 PORTAL DETAILS, and LEVER (D).
- Walk down.
- Use LEVER; take ROPE and 2/3 ANIMAL PLATES; read note (E).
- Go right, up.
- Use SHARP BONE; earn SNAKE HEAD (F).
- Walk down.
- Place SNAKE HEAD; take 4/5 PORTAL DETAILS and 3/3 ANIMAL PLATES (G).
- Go up.
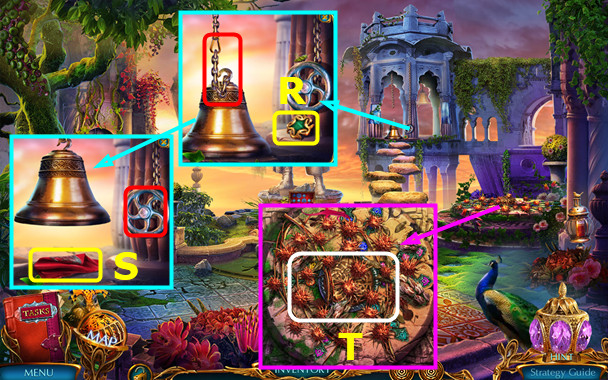
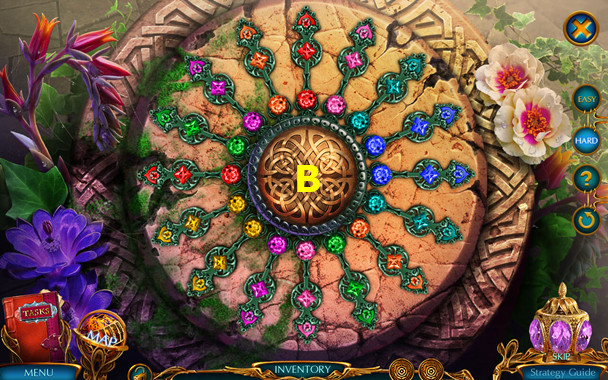
- Place 3 ANIMAL PLATES (H).
- Play HOP; earn BELL MALLET (I).
- Use BELL MALLET; take ROCK, SHELL, and 5/5 PORTAL DETAILS (J).
- Walk down.
- Place 5 PORTAL DETAILS; easy solution L-M-Nx2-K.
- Hard solution Kx3-O-Nx2.
- Go (P).
- Take THIN SPOON and BROKEN PUMP (A).
- Take SAW (B).
- Remove poster; use THIN SPOON; take CRANK (C).
- Use SAW; earn PEG (D).
- Use CRANK, PEG, and ROCK (E).
- Go (F).
Chapter 2: Magicians' Quarters
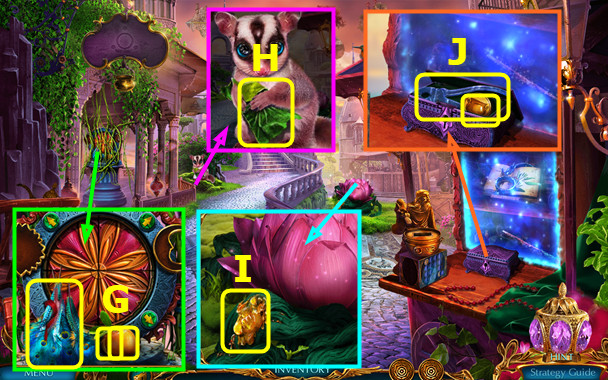
- Use ROPE; select; take FEATHERS, ORANGE, and 1/3 WORLD OF ORDER COINS (G).
- Give ORANGE; earn LEATHER (H).
- Use SHELL; earn RESIN (I).
- LEATHER and RESIN on BROKEN PUMP earn PUMP.
- Use LOCKPICK; take 2/3 WORLD OF ORDER COINS and PLIERS (J).
- Walk down.
- Place PUMP (K).
- Easy solution (L).
- Hard solution (M).
- Go left.
- Talk; earn MORTAR (N).
- Read instructions in MORTAR.
- Take HONEY DIPPER; use PLIERS to take 3/3 WORLD OF ORDER COINS (O).
- Take ELDOR'S FIGURINE and use FEATHERS; take ASH (P).
- Open VISOR; take 1/2 VALVES and TROWEL; use HONEY DIPPER; earn HONEY (Q).
- Walk down, right.
- Place 3 WORLD OF ORDER COINS (A).
- Easy solution Cx4-Dx3-Ex2-D-Ex2-F-E-Fx4-Gx4-H-G-H.
- Hard solution B-Ix4-Jx5-Hx3-Kx5-Gx5-Hx3.

- Read book; take HERBS 3x (M).
- Take MAGIC LOTUS WAND and SHACKLES (N).
- Use MAGIC LOTUS WAND; play HOP; take PETAL WITH POLLEN (O).
- ASH, HONEY, 3 HERBS, and PETAL WITH POLLEN in MORTAR; earn HEALING OINTMENT.
- Walk down, left.
- Use HEALING OINTMENT; earn XARFAX'S FIGURINE (P).
- Place ELDOR'S FIGURINE and XARFAX'S FIGURINE (Q).
- Play HOP; earn ELDOR'S SIGNET RING (R).
- Use ELDOR'S SIGNET RING (S).
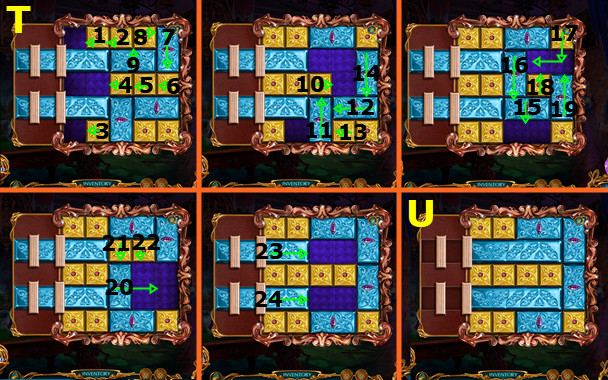
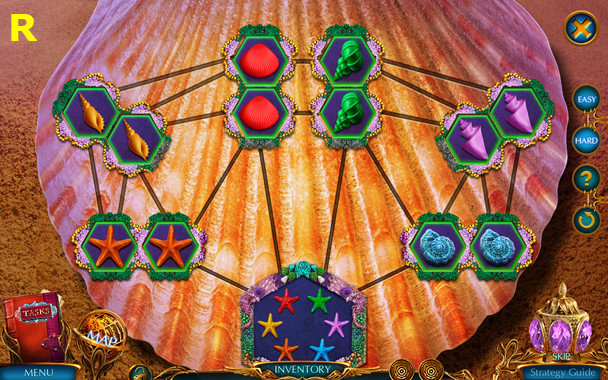
- Easy solution 1-24 (T).
- Final (U).
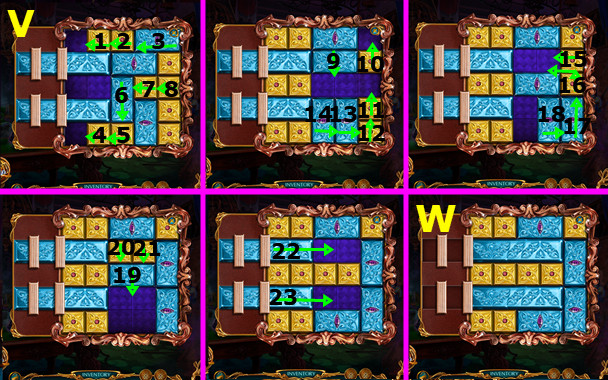
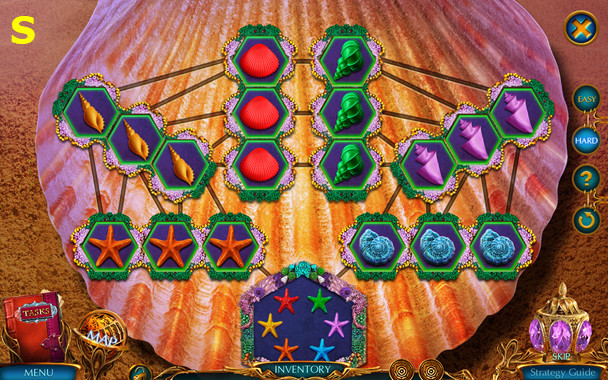
- Hard solution 1-23 (V).
- Final (W).
- Take HORN, 1/2 SUN AND MOON, and 2/2 VALVES.
- Walk down.
- Use HORN; take 1/2 GLOVE AND HELMET and 2/2 SUN AND MOON (A).
- Go right.
- Place 2 VALVES (B).
- Place 2 SUN AND MOON (C).
- Solution D-E-Fx2-Gx2.
- Take DRAGON SCEPTER and CHEST KEY.
- Go forward.
- Use SHACKLES; take WORLD OF ORDER FLAG (I).
- Take LOG; use TROWEL; take WHIP (J).
- Use LOG and WORLD OF ORDER FLAG; take 1/3 GEMSTONES and CLIPPERS; read note (K).
- Use CHEST KEY; take HORN and HOOK (L).
- HOOK on WHIP; earn HOOK AND WHIP.
- Use HOOK AND WHIP; open bag; take SLING and 2/3 GEMSTONES; read note (M).
- Walk down 2x; go left.
- Use CLIPPERS; take BROKEN MACHETE and 3/3 GEMSTONES (N).
- Walk down; go right, and forward.
- Place 3 GEMSTONES (O).
- Easy solution A-C-Bx2-E-D-E.
- Hard solution L-K-J-Ix2-G-F-H.
- Take HARNESS and 2/2 GLOVE AND HELMET.
- Walk down 2x.
- Place GLOVE AND HELMET; play HOP; take HELMET WITH DRAGON FRUIT (H).
- Go right, forward.
- Use HELMET WITH DRAGON FRUIT and HARNESS (I).
- This mini-game is randomly generated.
- One possible solution is shown (J).
- Talk (K).
- Take YARN and POTION OF LIFE RECIPE (L).
- Read recipe in POTION OF LIFE RECIPE.
- Move debris and use HORN; take WOODEN PLATES and SACK (M).
- Use DRAGON SCEPTER; take GRINDSTONE and THIN MEDALLION (N).
- GRINDSTONE, WOODEN PLATES, and YARN on BROKEN MACHETE; earn MACHETE.
- Use MACHETE (O).
- Go left.
- Place SACK; play HOP; take GLOWING MUSHROOMS (P).
- Take CORAL (Q).
- Take RAG; use THIN MEDALLION; earn SAWFISH (R).
- Use SLING; take 1/2 LOCK CHIPS and WINESKIN OF WATER (S).
- Use SAWFISH; take 2/2 LOCK CHIPS and ROPE (T).
- Walk down.
- Place 2 LOCK CHIPS; solution B-E-F-D-E-B-C-E-D-A-E-C-F-E-A.
- Take SCOOP and MAGIC SPHERE KEY (@).
- Use MAGIC SPHERE KEY (G); Play HOP; earn VITALITY CRYSTAL.
- GLOWING MUSHROOMS, WINESKIN OF WATER, CORAL, and VITALITY CRYSTAL on POTION OF LIFE RECIPE; earn POTION OF LIFE.
- Give POTION OF LIFE; earn CHARGING GEM (H).
- Place CHARGING GEM (I).
- Go forward (J).
Chapter 3: Outside Keira's Tower
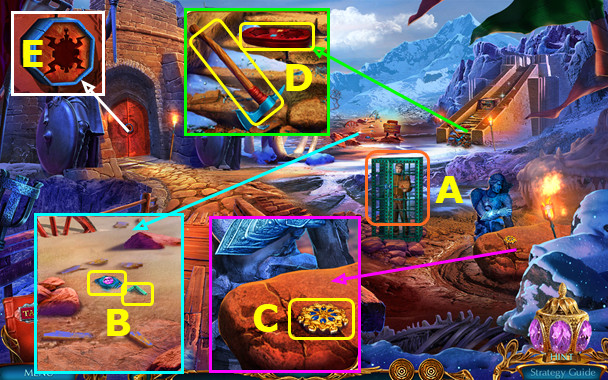
- Use RAG; take ROUGH BRUSH and 1/4 STARFISH CHIPS (K).
- Read note; use ROPE; take HAMMER and UNEQUIPPED FISHING ROD (L).
- Use SCOOP; take PRUNERS and 2/4 STARFISH CHIPS (M).
- Walk down and left.
- Use HAMMER; take 3/4 STARFISH CHIPS and ACID (N).
- Use ROUGH BRUSH; move stone; take CORK and MATCHES (O).
- Walk down.
- Use CORK; take FISHING LINE and 4/4 STARFISH CHIPS (P).
- Go left.
- Place 4 STARFISH CHIPS (Q).
- Easy solution (R).
- Hard solution (S).
- Take SHIP'S WHEEL.
- Place SHIP'S STEERING WHEEL; take 1/2 ORNATE LOCK DETAILS and WIRE (A).
- FISHING LINE and WIRE on UNEQUIPPED FISHING ROD; earn FISHING ROD.
- Use FISHING ROD; take CHEST LOCK (B).
- Walk down, forward.
- Place CHEST LOCK; play HOP; take CANNONBALL (C).
- Use CANNONBALL and MATCHES (D).
- Go forward.

- Use ACID; read note; take APPLE and 2/2 ORNATE LOCK DETAILS (E).
- Take PLIERS; use PRUNERS; take MAGIC ELEMENT GUIDE (F).
- Walk down.
- Give APPLE; take 1st PLATE PART and DEW (G).
- Use PLIERS; take LONG STICK and RED BERRIES (H).
- Walk down.
- Place 2 ORNATE LOCK DETAILS; take PLATE DETAIL, CHEST AMULET, and BOOK CODE (I).
- Go forward 2x.
- Place CHEST AMULET; take CLAW and DISCHARGED MAGIC AMULET (J).
- Place BOOK CODE; easy solution Kx3-L-Mx2-Ox4.
- Hard solution Nx4-Mx2-Kx4-Ox4.
- Play HOP; earn MAGIC PAINT AND BRUSH (P).
- Use MAGIC PAINT AND BRUSH; take 2nd PLATE PART (Q).
- 2nd PLATE PART and PLATE DETAIL on 1st PLATE PART; take DIRT and PLATE OF CHAOS.
- DEW, RED BERRIES, DISCHARGED MAGIC AMULET, and DIRT on MAGIC ELEMENT GUIDE; earn ACTIVATED MAGIC ELEMENT.
- Place ACTIVATED MAGIC ELEMENT; take DIAMOND RING and PORTAL CENTERPIECE (R).
- Select (S).
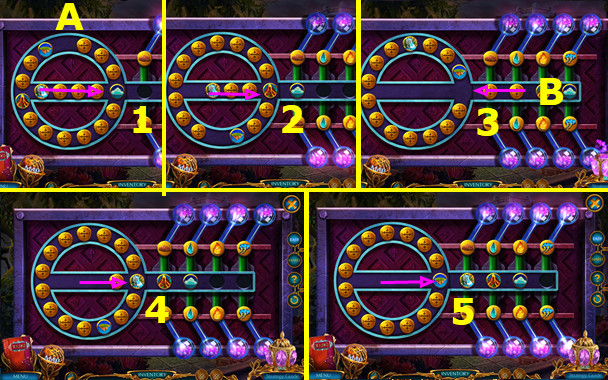
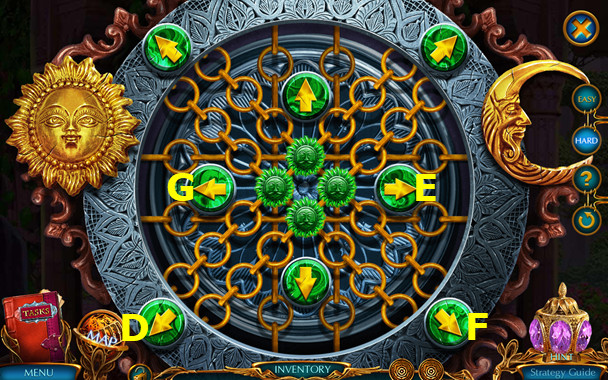
- Place PORTAL CENTERPIECE (A).
- Easy solution.
- Rotate ring as shown (1); slide ring center one space right.
- Rotate ring as shown (2); slide ring center three spaces right.
- Rotate ring as shown (3); slide B two spaces left.
- Rotate ring as shown (4); slide ring center one space right.
- Rotate ring as shown (5); slide ring center one space right.

- Hard solution (C).
- Rotate ring as shown (1); slide ring center one space right.
- Rotate ring as shown (2); slide ring center one space right.
- Rotate ring as shown (3); slide ring center two spaces right.
- Rotate ring as shown (4); slide D one space right.
- Rotate ring as shown (5); slide ring center one space right.
- Rotate ring as shown (6); slide ring center one space right.
- Walk left.
- Take CHAIN; use LONG STICK; take BROKEN COMB and MORTAR (A).
- Replace CHAIN; take REVIVING SALT RECIPE and read note (B).
- Use CLAW; take REBEL MEDALLION and ROPE (C).
- Place REBEL MEDALLION (D).
- Walk left.
- Use DIAMOND RING; read poster; take FILE and PESTLE (E).
- Use BROKEN COMB (F).
- Select (G).

- Restore items (H-I-J).
- Take CHEST KEY (K).
- Use CHEST KEY; take BOW and SALT (L).
- Use ROPE; take ARROW, ETHER, and ICE PICK (M).
- MORTAR, PESTLE, SALT, and ETHER on REVIVING SALT RECIPE; earn REVIVING SALT.
- Walk down.
- Use REVIVING SALT; earn AXE (N).
- Go left.
- Use AXE (O).
- Go forward.
- Use ICE PICK; take TROWEL and PUZZLE PART (P).
- Take RAKE (Q).
- Use FILE; take DYNAMITE (R).
- Place PUZZLE PART (S).
- Easy solution Ax2-B-A-B-Cx5-B-C-B-Ax3-B-C-B-Cx2-B-Ax4-B.
- Hard solution Ax2-B-A-B-Cx5-B-C-B-Ax3-B-C-B-C-B-Ax3-B-A.
- -B-Cx4-B-A-B-Ax3-B-Cx5-B-Ax2-B-A-B-Cx3-B-Ax5-B-Cx2-B.
- -Cx3-B-Ax5-B-C-B-Cx4-B-Ax6-B-Cx2-B-Cx4-B-Ax6-B.
- Take DRAGON WING.
- Walk down 2x.
- Place DRAGON WING; take LEATHER LACE and FADED SCROLL (G).
- ARROW, DYNAMITE, and LEATHER LACE on BOW; earn BOW AND EXPLOSIVE ARROW.
- Use BOW and EXPLOSIVE ARROW (H).
- Go forward.
- Use RAKE; take GLOVE and QUILL (I).
- Take LIGHTNING INLAY and NUT (J).
- Take NEEDLE AND THREAD; use TROWEL; take INK (K).
- QUILL and INK on FADED SCROLL; earn CACHE PLATE.
- Walk down, left, and forward.
- Place LIGHTNING INLAY; take 1/2 CHEST INLAYS (L).
- Place CACHE PLATE; select 1-4 (M).
- Select (N).
- Select PAIRS (O).
- Take CANE.
- Use CANE; take HOOK ON A ROPE and TONGS (P).
- Use HOOK ON A ROPE; open case and take AIDEN'S BOOK (Q).
- Walk down 2x.
- Give AIDEN'S BOOK; earn MAGIC LENS (R).
- Walk left.
- Place MAGIC LENS (A).
- Solution (B).
- Solution (C).
- Select pairs D-J.
- Take FIRECRACKER (K).
- Walk down, forward.

- Use FIRECRACKER; take WHEEL and BROKEN MONSTER MEDALLION (L).
- Use WHEEL and NUT; take CRANK (M).
- Use CRANK (N).
- Go forward.
Chapter 4: Outside Rebel Base
- Use GLOVE; take MAGNET and 2/2 CHEST INLAYS (O).
- Use TONGS; earn RING (P).
- Use NEEDLE AND THREAD; take 1st MEDALLION PART and read note (Q).
- Walk down 2x.
- Place RING; take 2nd MEDALLION PART and FLINT AND STEEL (A).
- Go forward.
- Use FLINT AND STEEL (B).
- Play HOP; earn NIPPERS.
- Walk down, left.
- Place 2 CHEST INLAYS; take 3rd MEDALLION PART and HOOK (C).
- 3 MEDALLION PARTS on BROKEN MONSTER MEDALLION; earn MONSTER MEDALLION.
- Go forward.
- Use MAGNET; take BOWL OF WATER and POTION-MAKING KIT (D).
- Walk down 2x.
- Place MONSTER MEDALLION (E).
- Play HOP; earn STONE FORK (F).
- Go forward 2x.
- Select (G).
- Use STONE FORK (H).
- Use BOWL OF WATER; take TOWER EMBLEM (I).
- Place TOWER EMBLEM (J).
- Go forward.
- Talk (A).
- Take SCISSORS PART and 1/3 GOLEM MECHANISM (B).
- Use HOOK; take STATUE PART (C).
- Take HAND DRILL; read note (D).
- Place STATUE PART; take POWDER and 2/3 GOLEM MECHANISM (E).
- Use NIPPERS; take 3/3 GOLEM MECHANISM and STONE SWORD (F).
- Place 3 GOLEM MECHANISM (G).
- Easy solution H-I-Jx5-K.

- Hard solution Lx2-M-Nx5-O.
- Take THICK CLOTH and HORN.
- Walk down.
- Place STONE SWORD; take XARFAX'S TEARS (A).
- Use HAND DRILL; take ROOT (B).
- Walk down 2x; go left.
- Place HORN; take CANE and CRYSTAL (C).
- Open POTION-MAKING KIT; place POWDER, XARFAX'S TEARS, ROOT, and CRYSTAL; take HEALING POTION.
- Walk down; go forward 3x.
- Use HEALING POTION; earn PAINTED CHIP (D).
- Walk down 2x.
- Place PAINTED CHIP; easy solution Gx4-Ex3-F-Ex2.
- Hard solution Ex3-Gx2-Fx5-Ex4.
- Take PEG and PURSE.
- SCISSORS PART on PURSE; take CACHE DETAIL.
- Go forward 2x.

- Place CACHE DETAIL; select 1-9 (H).
- Play HOP; earn XARFAX'S SEAL (I).
- Use XARFAX'S SEAL (J).
- Go forward.
- Talk (A).
- Use CANE; take WORLD OF CHAOS SEAL and 1/3 CORNERPIECES (B).
- Take WORLD OF ORDER SEAL (C).
- Take WOODEN CASE and AXE; place THICK CLOTH (D).
- WORLD OF CHAOS SEAL and WORLD OF ORDER SEAL on WOODEN CASE; read note; take ARENA ENTRANCE SEAL.
- Place ARENA ENTRANCE SEAL (E).
- Go left.
- Play HOP; earn LOCKPICK.
- Take 2/3 CORNERPIECES (F).
- Use PEG; take FISHING ROD and 3/3 CORNERPIECES; read note (G).
- Use AXE; take 1/4 BOX LOCKS and DAGGER (H).
- Walk down.
- Select (I).
- Place 3 CORNERPIECES; solution (J-K-L-M).
- Take SHIELD PART and 2/4 BOX LOCKS.
- Go left.
- Place SHIELD PART; play HOP; earn ARROW ON ROPE (N).
- Use ARROW ON ROPE (O).
- Go right.
- Take IRON ROD; use LOCKPICK (A).
- Easy solution (C-B-E-D-Cx2-B-C-D-C-B-D-Ex2-B-D-Ex3-B-C-D-C-B).
- (B-C-D-C-B-D-Cx2-B-Ex2-D-C-B-D-Ex2-B).
- Hard solution (Gx4-F-G-H-Ix2-F-Ix2-H-G-F-H-G-F-Ix3-H-G-F-Gx4-H-Ix5-F-Gx4-H-G-F).
- (Gx5-F-I-H-I-F-H-Ix2-F-Gx2-H-G-F-H-Ix2-F).
- Take 3/4 BOX LOCKS (J).
- Use FISHING ROD; take 4/4 BOX LOCKS and BROKEN BOW (K).
- Use DAGGER; take BOWSTRING (L).
- Walk down.
- Place 4 BOX LOCKS; take FILE and NUT (M).
- Walk down.
- Read note; use FILE; earn MARKED MAP (N).
- Go left.
- Place MARKED MAP (O).
- Easy solution (P).
- Hard solution (Q).
Chapter 5: Catacombs
- Use IRON ROD; take GEAR and LEVER (A).
- Place GEAR (B).
- Play HOP (C).
- Solution (D).
- Take BAG CENTERPIECE.
- Place BAG CENTERPIECE; read note; take BROKEN KEY and 1/3 WOODEN BOARDS (E).
- Remove cloth; use LEVER; take 1st KEY DETAIL and 2/3 WOODEN BOARDS (F).
- Take 2nd KEY DETAIL and 3/3 WOODEN BOARDS (G).
- Walk down 2x.
- Place 3 WOODEN BOARDS; take BOX HANDLE (H).
- Take ARROW; place NUT (I).
- Take GARGOYLE STATUE DETAIL (J).
- BOWSTRING and ARROW on BROKEN BOW; earn BOW.
- Use BOW; take OPENER and SCRAPER (K).
- Go left 2x.
- Place GARGOYLE STATUE DETAIL; take TONGS (L).
- Use BOX HANDLE; take MEAT (M).
- Walk down 2x.
- Use TONGS; earn CHISEL (N).
- Go left, right.
- Use OPENER; take WRENCH and 3rd KEY DETAIL (O).
- 3 KEY DETAILS on BROKEN KEY; earn DOOR KEY.
- Place MEAT; take HEAVY BONE and UNEQUIPPED HARPOON (P).
- Walk down, left.
- Use DOOR KEY (Q).
- Go forward.
- Use SCRAPER; select; take WOODEN STAKE, 1st ENTRANCE SEAL ELEMENT, and DAMAGED ENTRANCE SEAL (A).
- Use CHISEL and HEAVY BONE; open lid; take PINCERS, CRYSTAL RING, and 2nd ENTRANCE SEAL ELEMENT (B).
- Use WRENCH (C).
- Play HOP; earn ARMOR AMULET (D).
- Place ARMOR AMULET; take MAGNET (E).
- Walk down.
- Use MAGNET; earn BALLISTA DETAIL (F).
- Walk down, right.
- Use BALLISTA DETAIL; take 3rd ENTRANCE SEAL ELEMENT (G).
- 3 ENTRANCE SEAL ELEMENTS on DAMAGED ENTRANCE SEAL; earn ENTRANCE SEAL.
- Walk down, left, and forward.
- Use ENTRANCE SEAL (H).
- Easy solution (I).
- Hard solution (J).
- Walk left.
- Use PINCERS; earn SCREWDRIVER (K).
- Move armor; take LANCE and 1/2 DOMES (L).
- Use SCREWDRIVER; take POUCH (M).
- Use WOODEN STAKE; take TRIGGER and 2/2 DOMES (N).
- Walk down 4x.

- Place LANCE; take LIGHTER (O).
- Go left, right.
- Place 2 DOMES; take NET and MAGICAL MONOCLE (P).
- Use MAGICAL MONOCLE; play HOP; take SHIELD AMULET (Q).
- TRIGGER and NET on UNEQUIPPED HARPOON; earn HARPOON WITH NET.
- Walk down, left, and forward.
- Use HARPOON WITH NET (A).
- Go right.
- Select (B).
- Take BOWL; read note (C).
- Take WATER and BROOM (D).
- Use CRYSTAL RING; take RAG (E).
- Use RAG (F).
- Play HOP; earn PILLAR CRYSTAL (G).
- Place PILLAR CRYSTAL; take CATALYST AGENT (H).
- Walk down, left.
- Place SHIELD AMULET; use POUCH; earn SULFUR; take SCOOP (I).
- LIGHTER, CATALYST AGENT, WATER and SULFUR on BOWL; earn ACID.
- Walk down.
- Use ACID; take DAMAGED WINCH and STEPS (J).
- Place STEPS (@).
- Go forward.
- Use SCOOP; take HAND RAM and WINCH PART (K).
- Use BROOM; take WINCH CRANK, EMPTY SOULSTONE AMULET, and WHEEL HANDLES; read note (L).
- WINCH PART and WINCH CRANK on DAMAGED WINCH; earn WINCH.
- Place WINCH; take 1st SOULSTONE and VESSEL OF BLOOD (M).
- Use VESSEL OF BLOOD; take 2nd SOULSTONE (N).
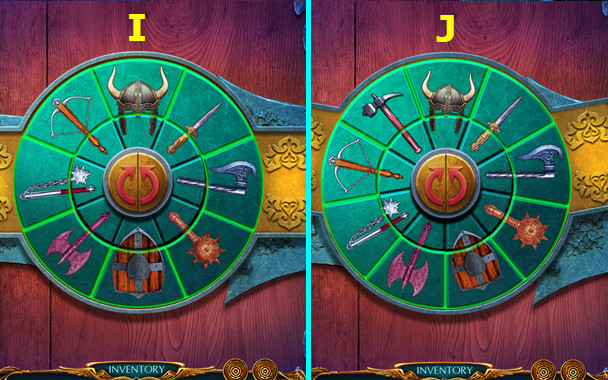
- Place WHEEL HANDLES (O).
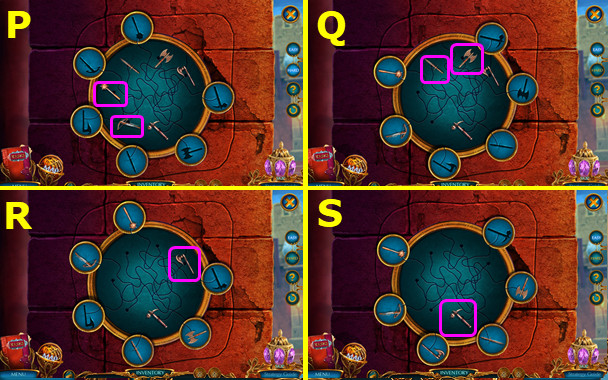
- Easy solution: rotate as indicated and select marked weapon(s) (P-Q-R-S).
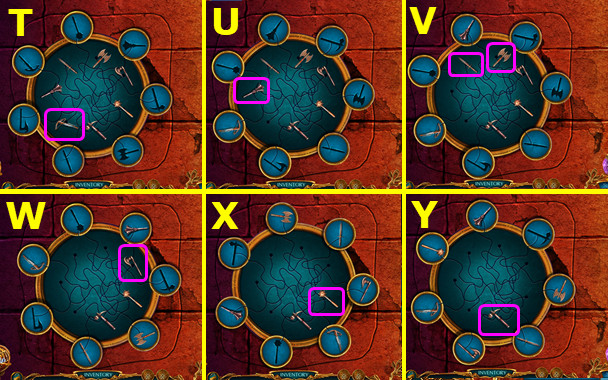
- Hard solution: rotate as indicated and select marked weapon(s) (T-U-V-W-X-Y).
- Take MIRRORS.
- Walk down, left.
- Remove weapons; use HAND RAM (A).
- Play HOP; earn GAUNTLET (B).
- Use GAUNTLET; earn SCYTHE INLAY (C).
- Walk down, right.
- Place SCYTHE INLAY; take 3rd SOULSTONE (D).
- 3 SOULSTONES on EMPTY SOULSTONE AMULET; earn ACTIVATED SOULSTONE AMULET.
- Use MIRRORS; take RUNIC STONE (E).
- Place RUNIC STONE (F).
- Easy solution: move pieces on indicated paths (G).
- Final positions (H).
- Hard solution: move pieces on indicated paths (I).
- Final positions (J).
- Take MAGICAL BOOK.
- Walk down, forward.

- Place ACTIVATED SOULSTONE AMULET and MAGICAL BOOK (K).
- Easy solution (L).
- Hard solution (M).
Created at: 2018-07-13