

Walkthrough Menu
- General Tips
- Chapter 1:Stoneville
- Chapter 2: Under the City
- Chapter 3: Blackrock
- Chapter 4: Roland
- Chapter 5: The Devastator
General Tips
- This is the official guide for League of Light: Silent Mountain.
- This guide will not show when you have to zoom into a location; the screenshots will show each zoom scene.
- Hidden-object puzzles are referred to as HOPs. This guide will not show screenshots of the HOPs, however, it will mention when an HOP is available and the inventory item you'll collect from it.
- Use the Map to fast travel to a location.
Chapter 1: Stoneville
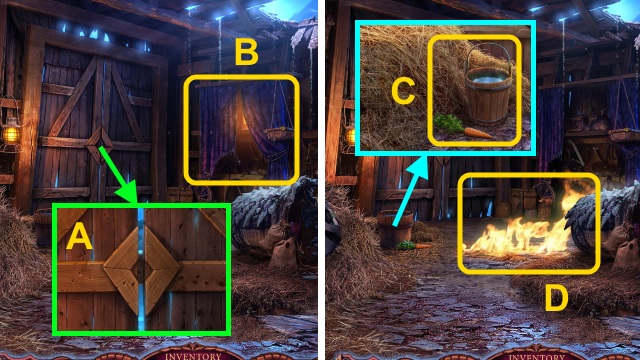
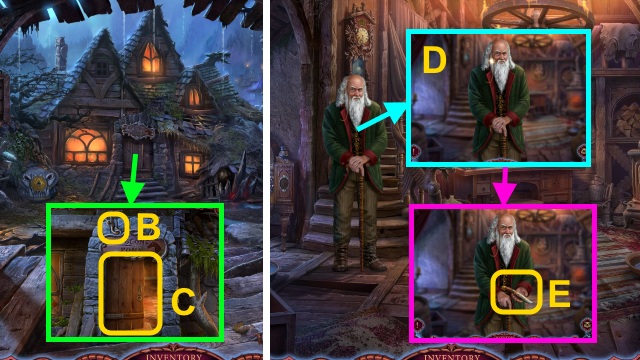
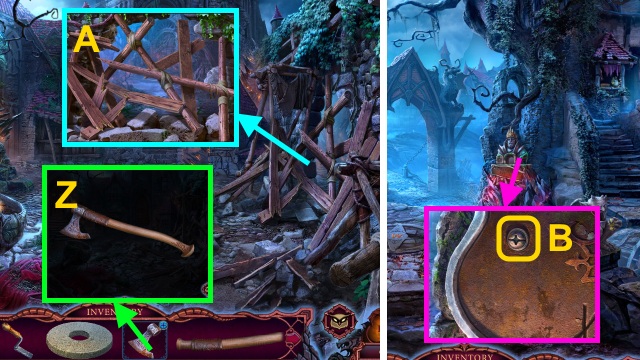
- Examine the door (A).
- Move the curtain (B).
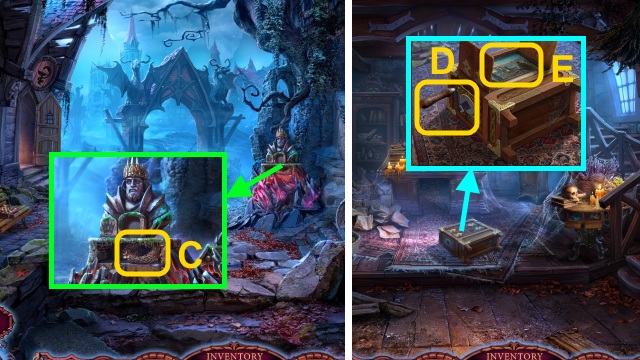
- Take the BUCKET and CARROT (C).
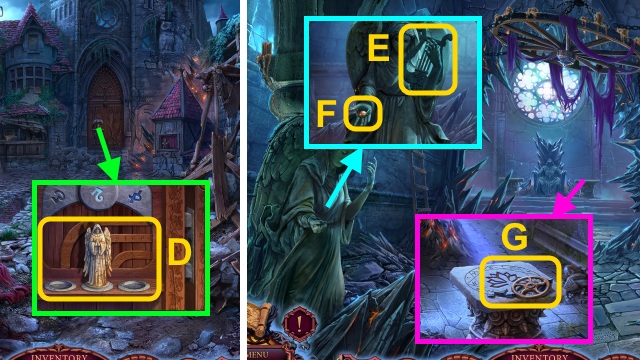
- Use the BUCKET (D).
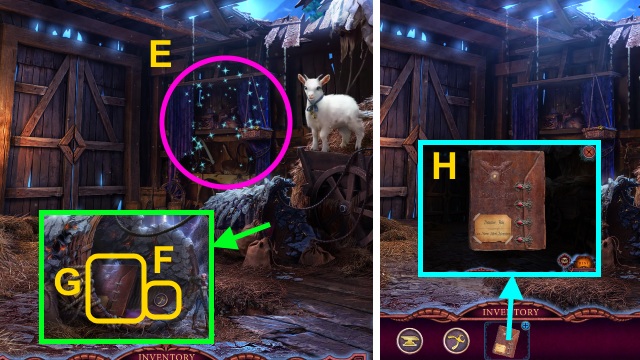
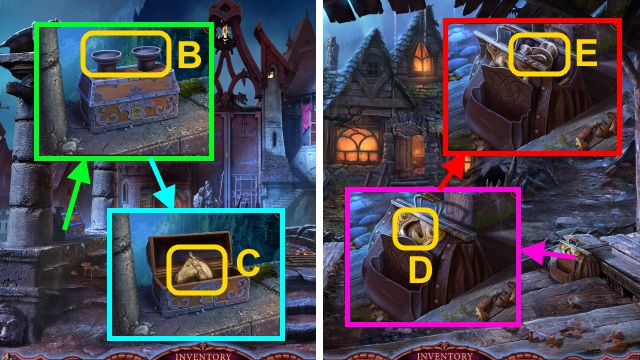
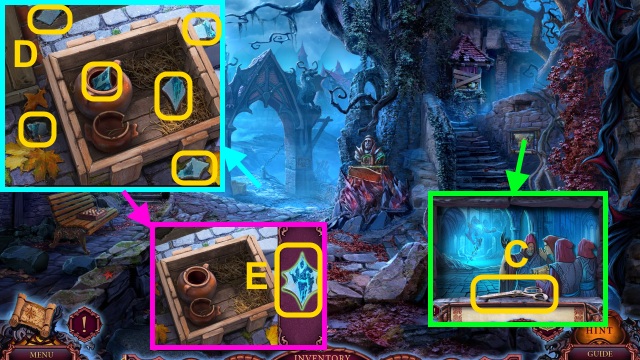
- Play the HOP to receive the ANVIL TOKEN (E).
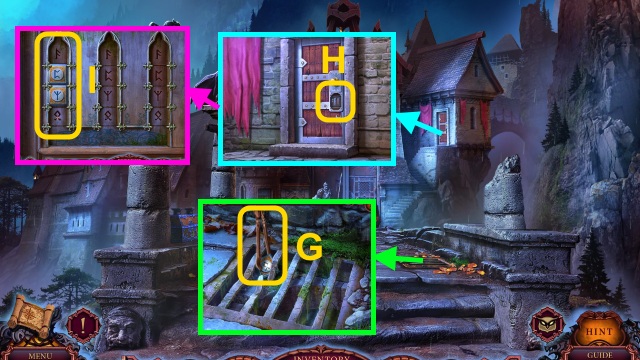
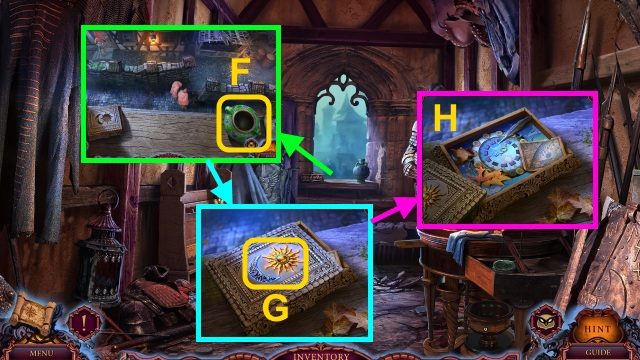
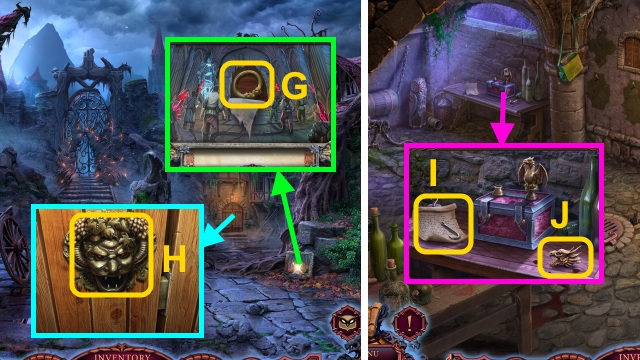
- Take the TONGS TOKEN (F) and CASE FILE (G).
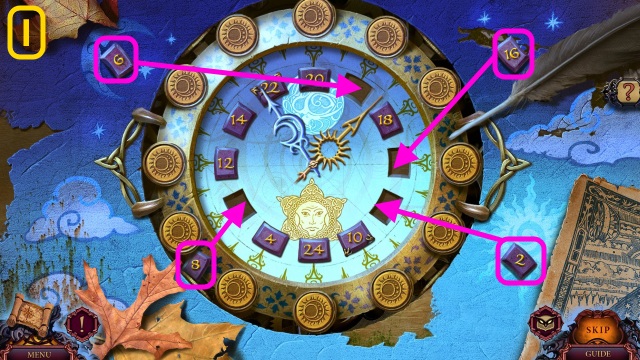
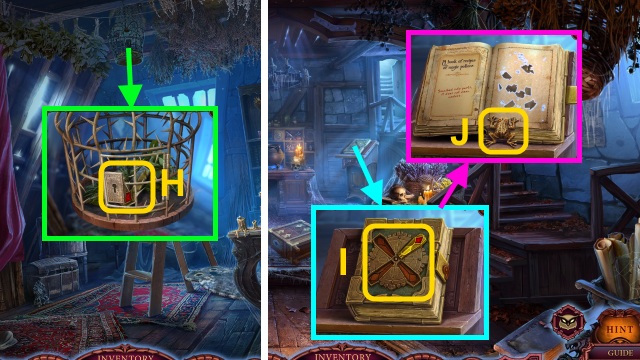
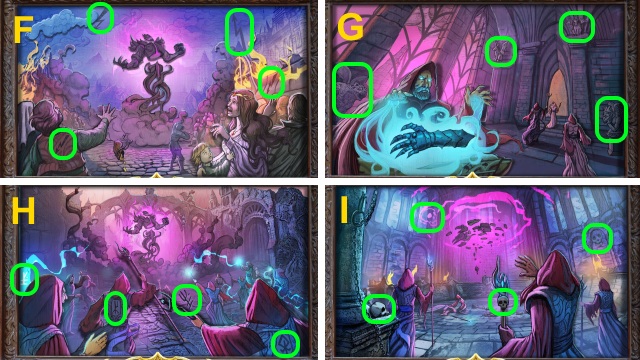
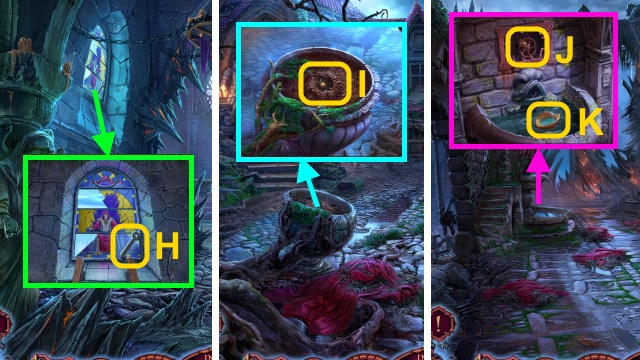
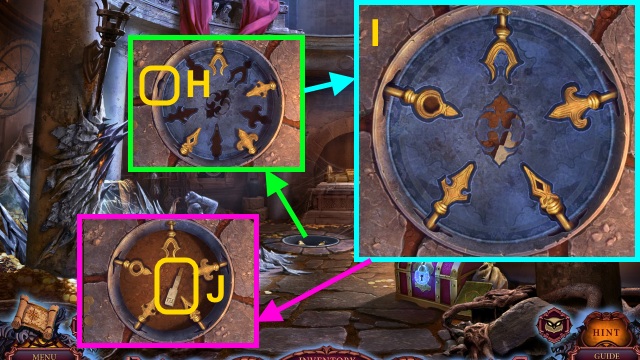
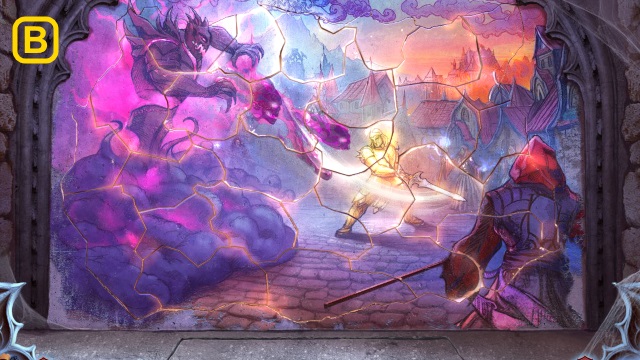
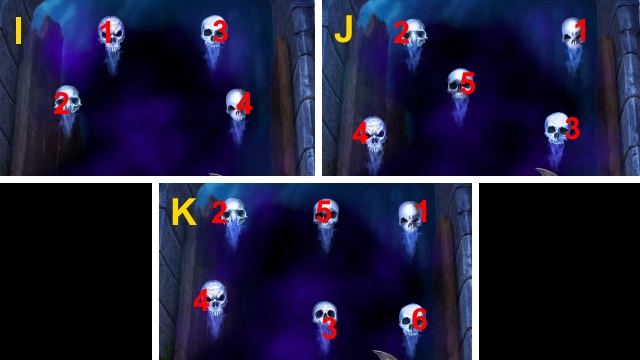
- Examine the CASE FILE for a mini-game (H).
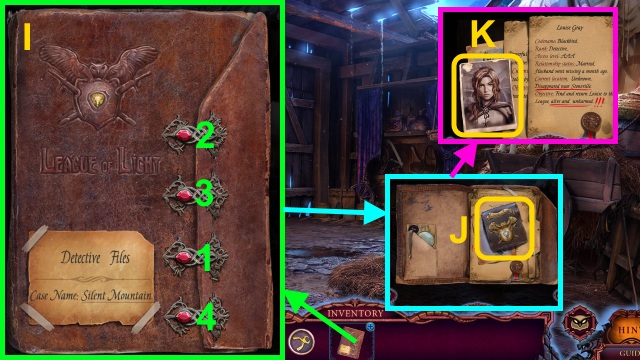
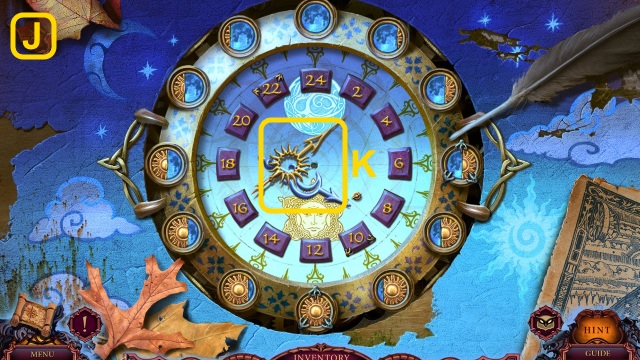
- Solution (I).
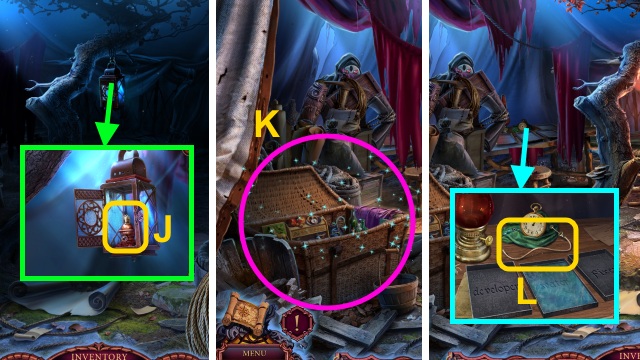
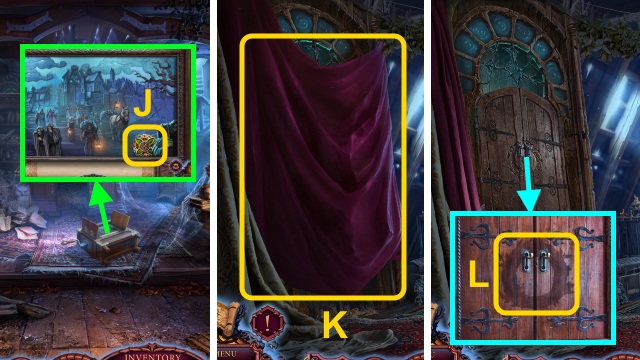
- Open the file; take the LEAGUE BADGE (J).
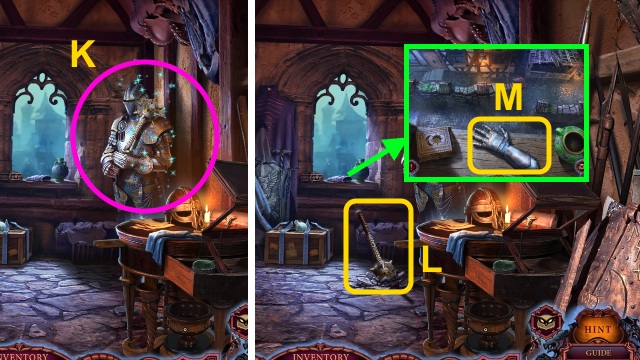
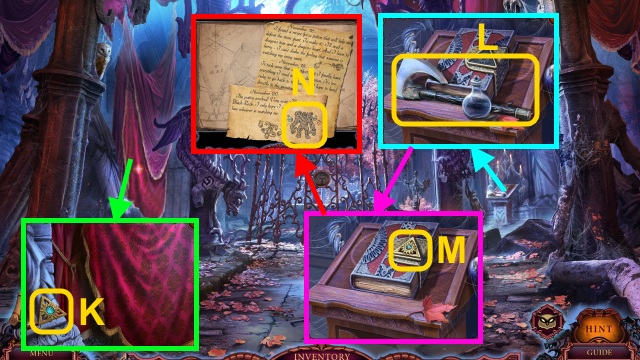
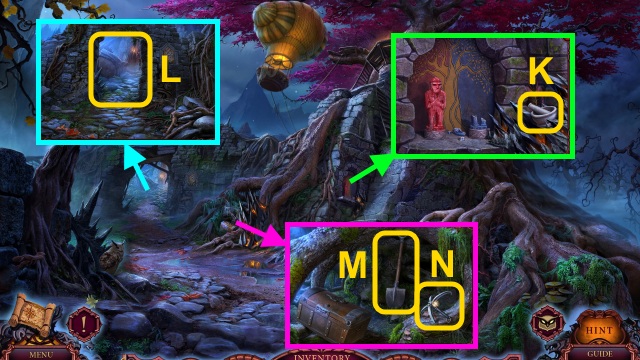
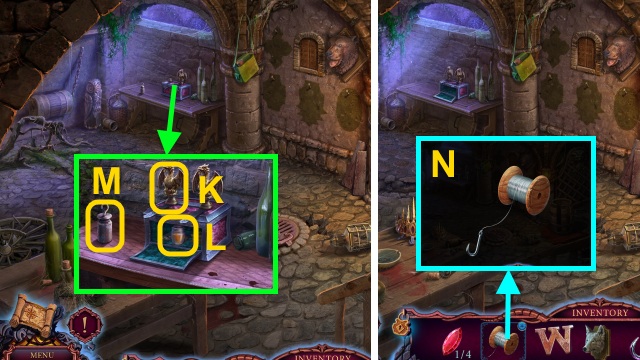
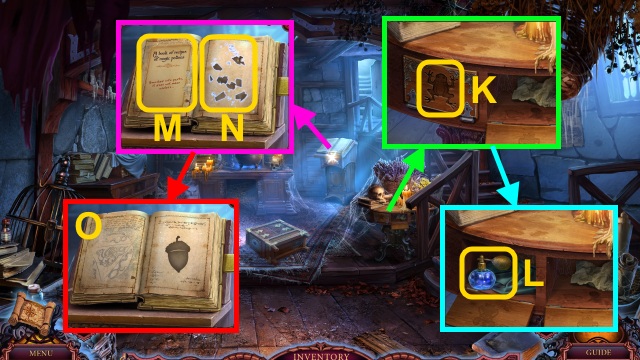
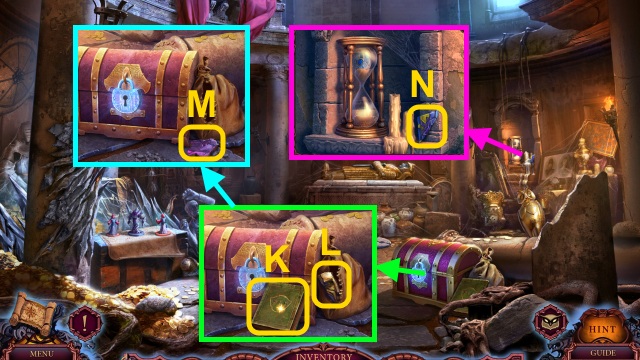
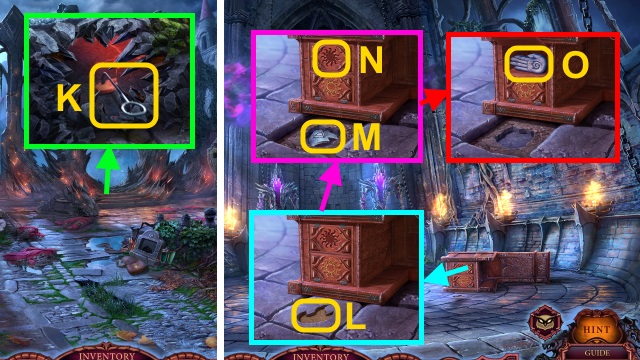
- Read the files; take the PHOTO OF LOUISE (K).
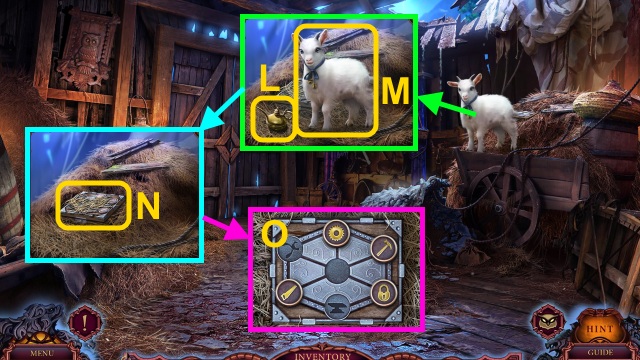
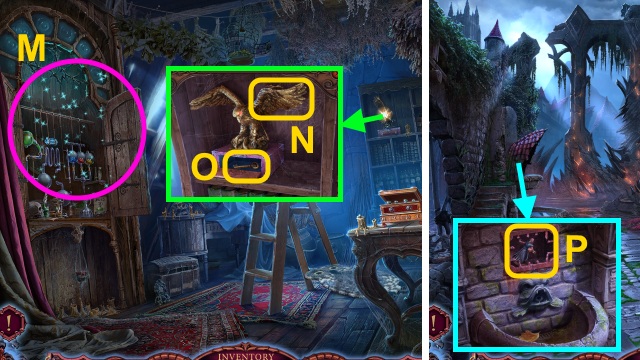
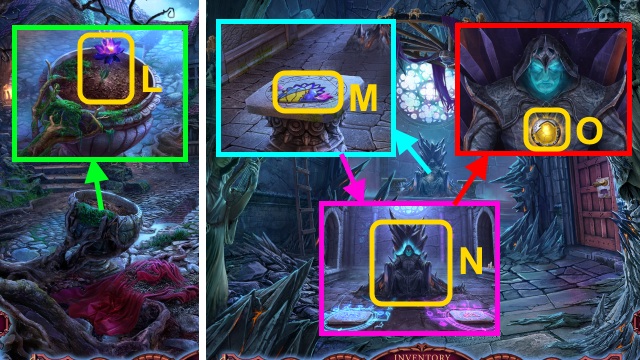
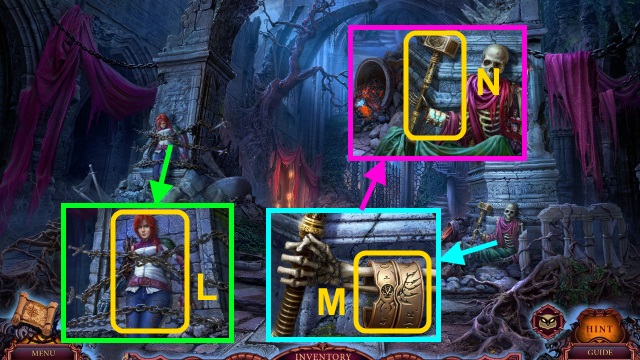
- Take the OILCAN (L); give the CARROT (M).
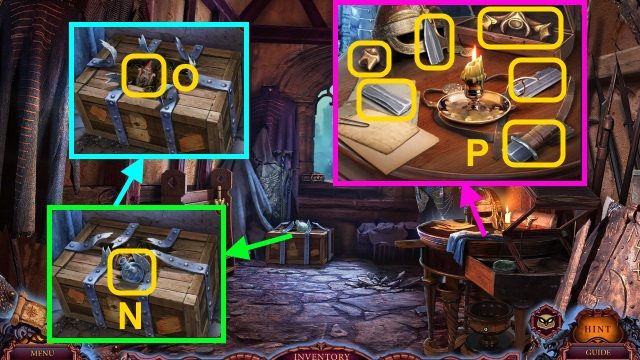
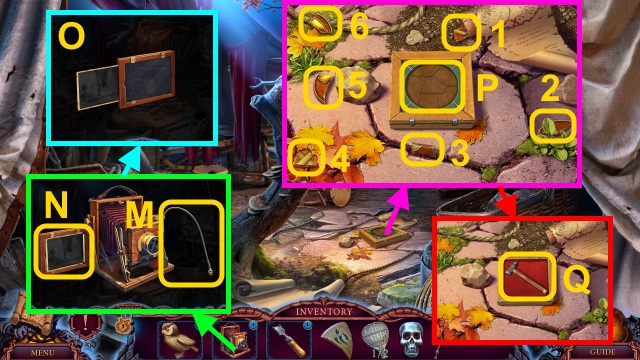
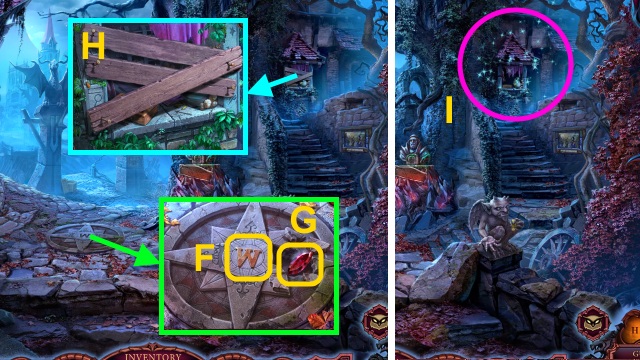
- Move the hay; examine the box (N).
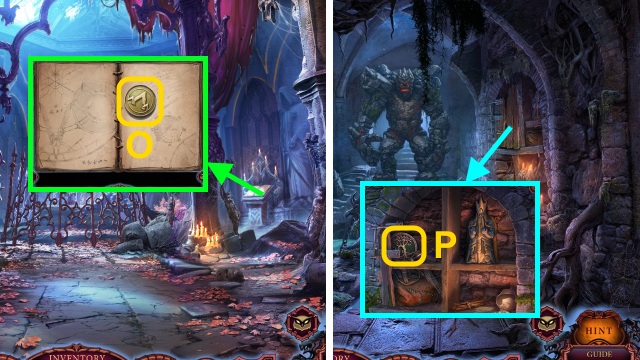
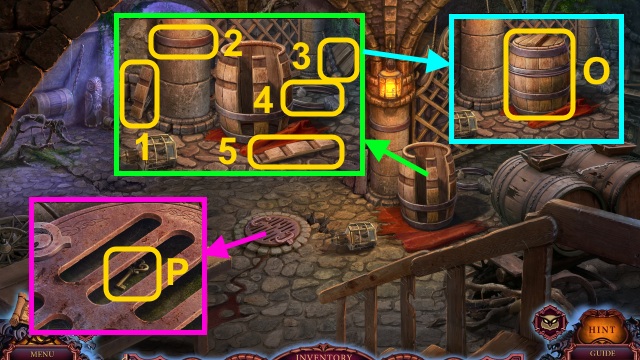
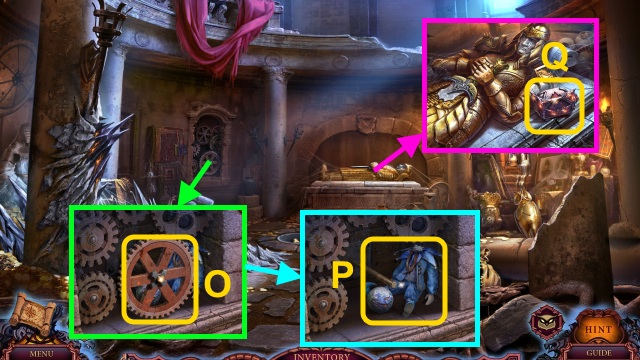
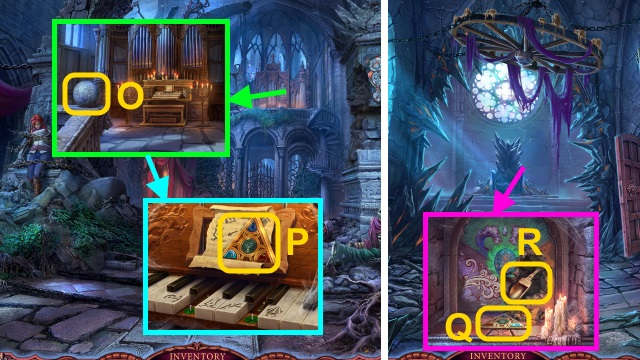
- Place the ANVIL TOKEN and TONGS TOKEN for a mini-game (O).
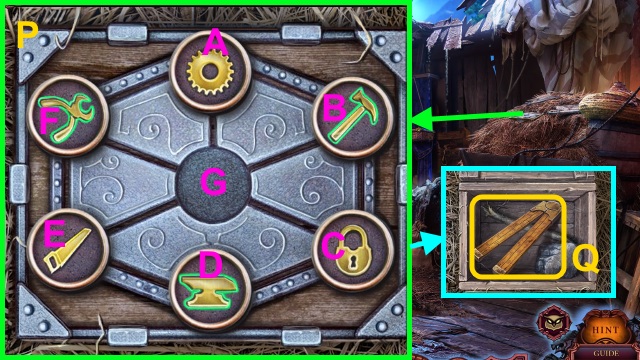
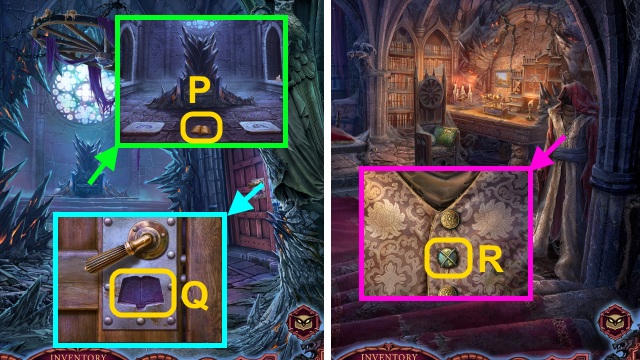
- Solution (P): E-F-A-B-G-E-F-G-C-B-A-G.
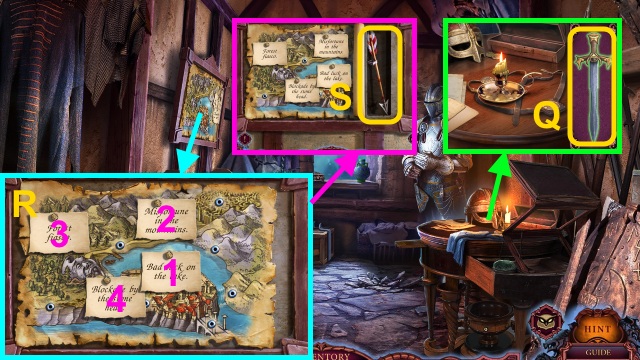
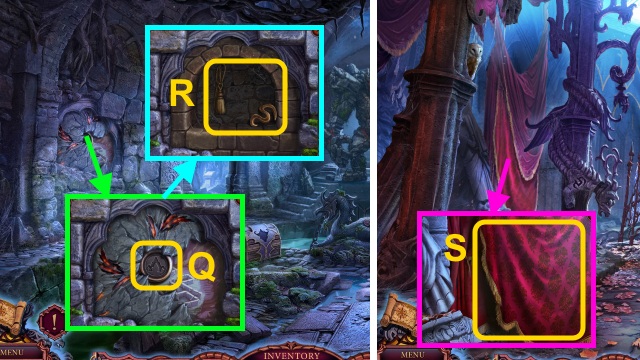
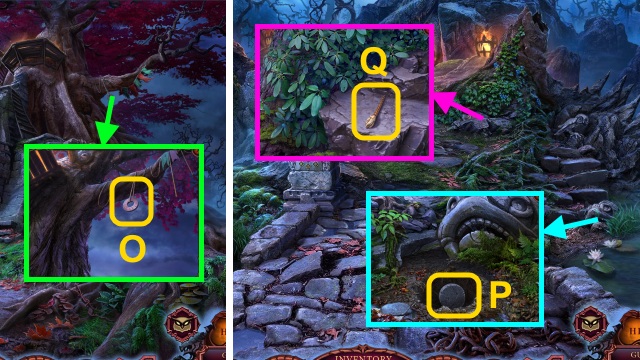
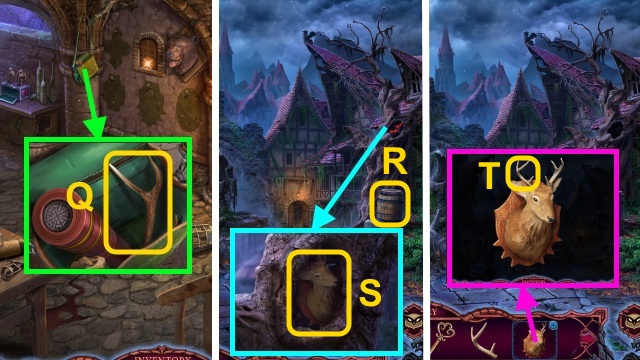
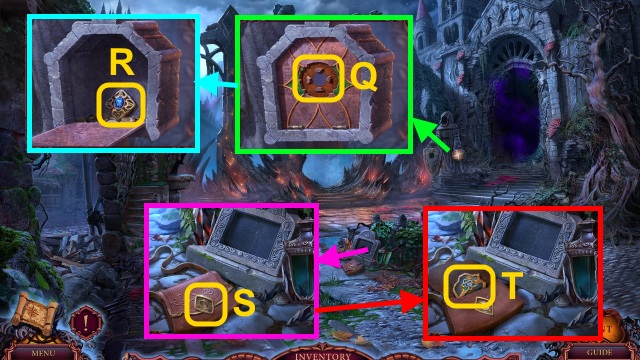
- Take the FOLDED RULER (Q).
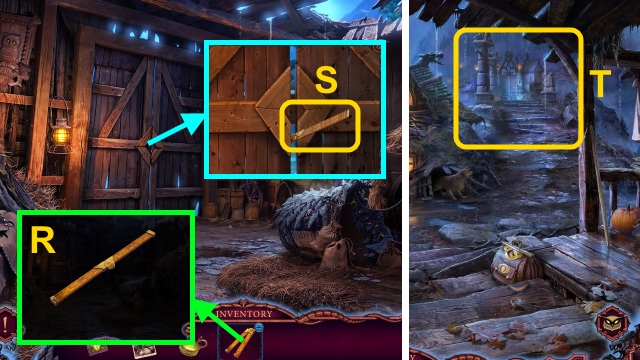
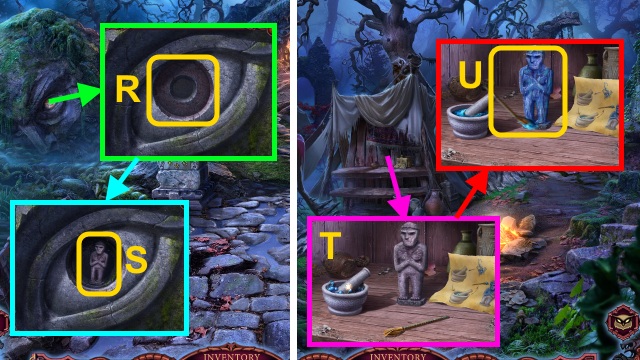
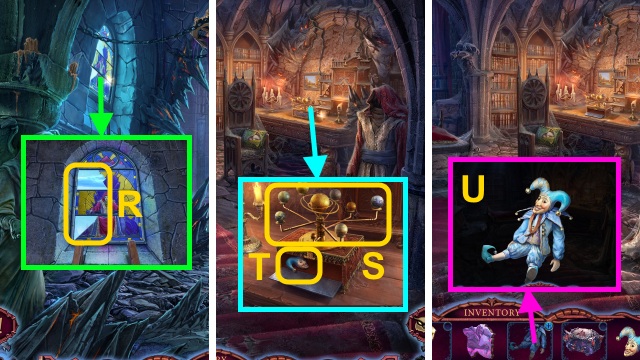
- Unfold the FOLDED RULER (R); take the OPEN RULER.
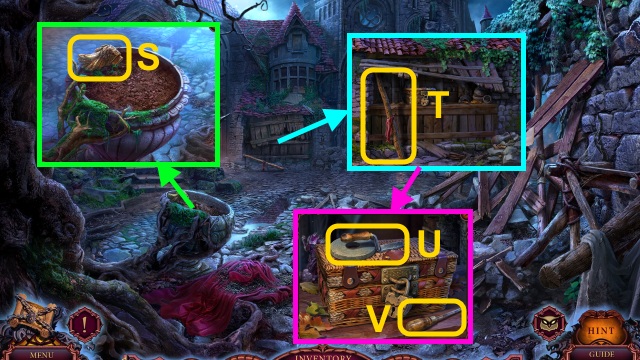
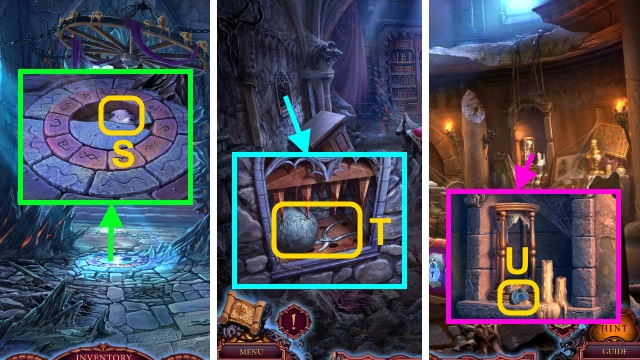
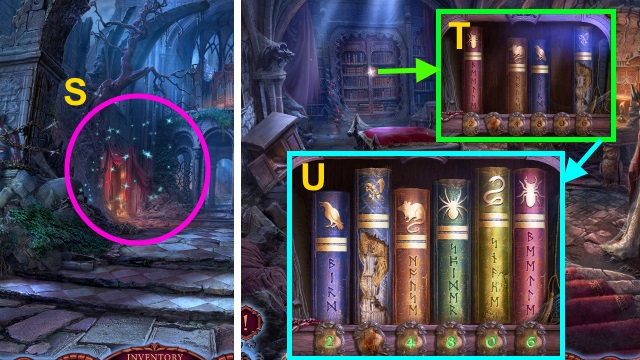
- Use the OPEN RULER (S).
- Walk forward.
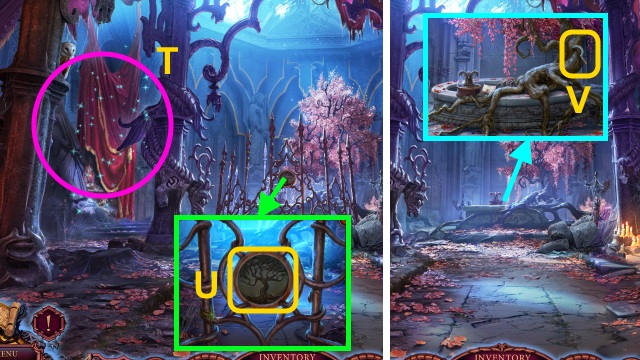
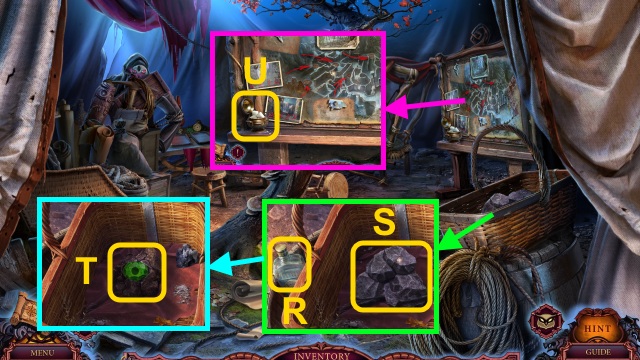
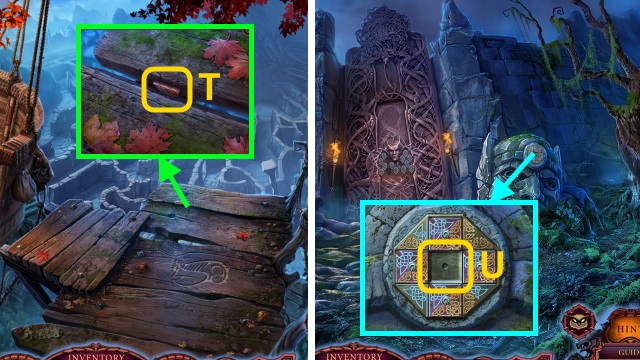
- Try to walk right (T).
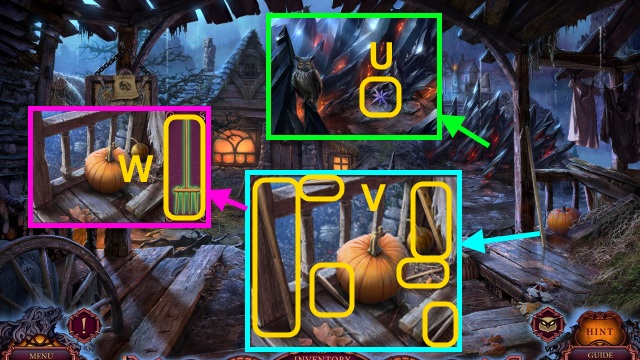
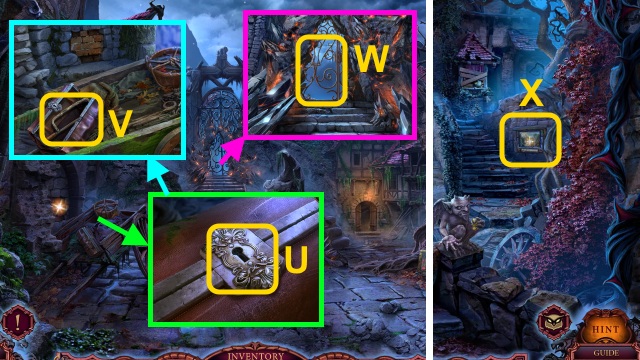
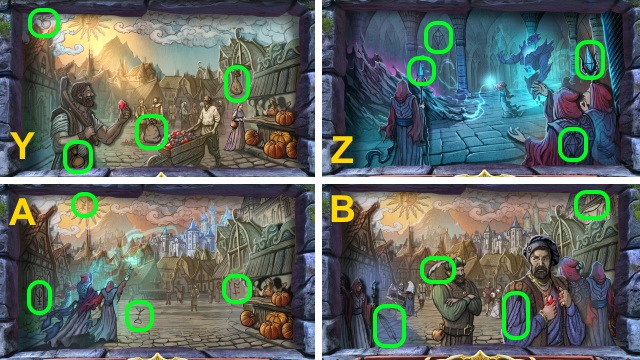
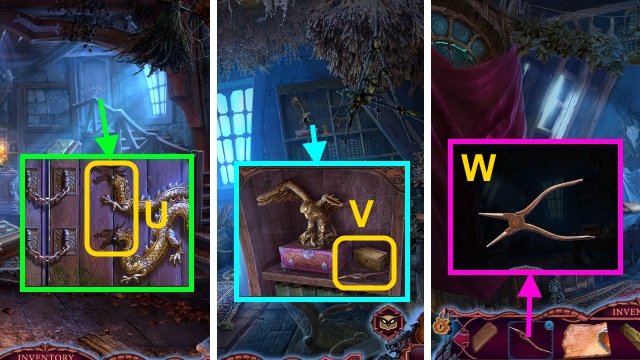
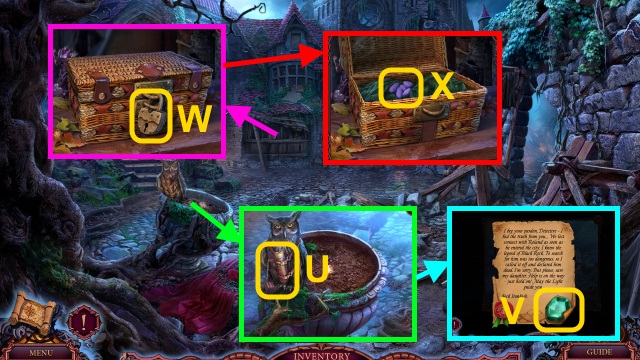
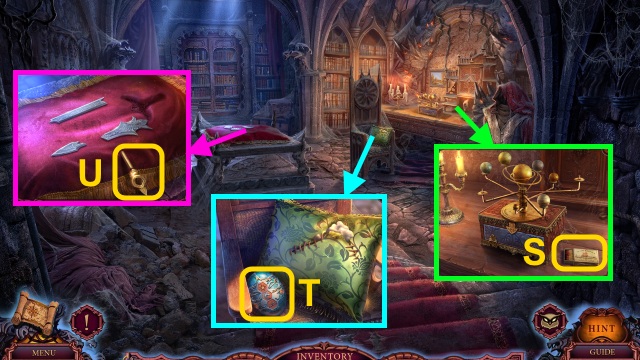
- Take the WIND ROSE (U).
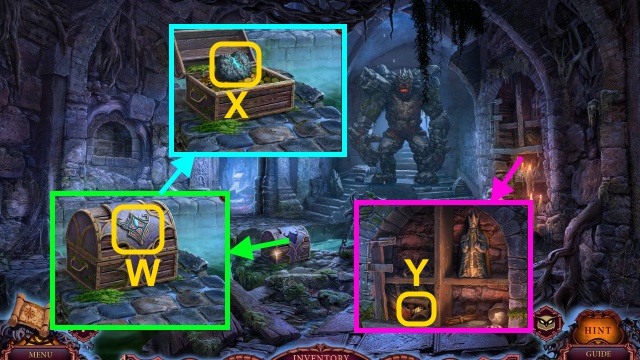
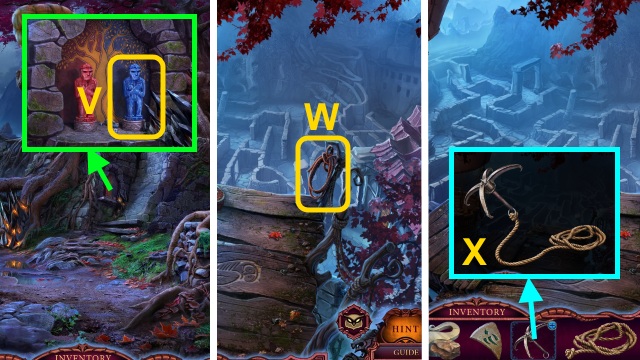
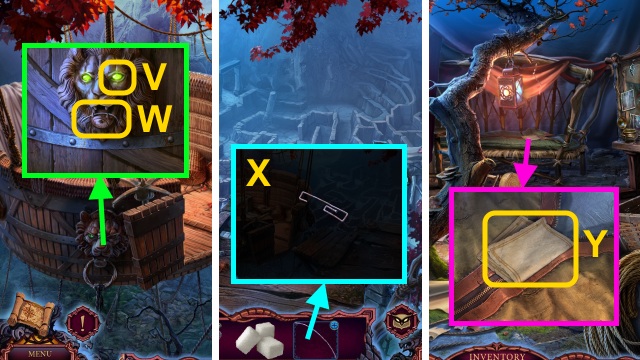
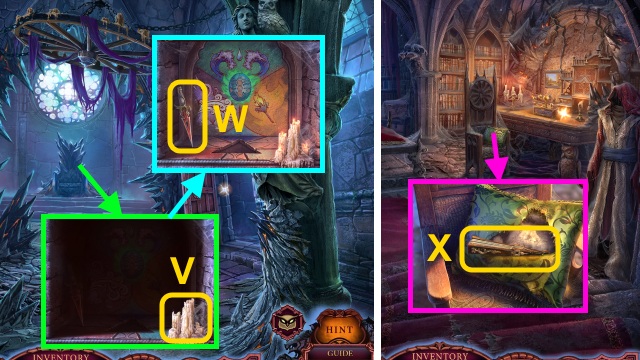
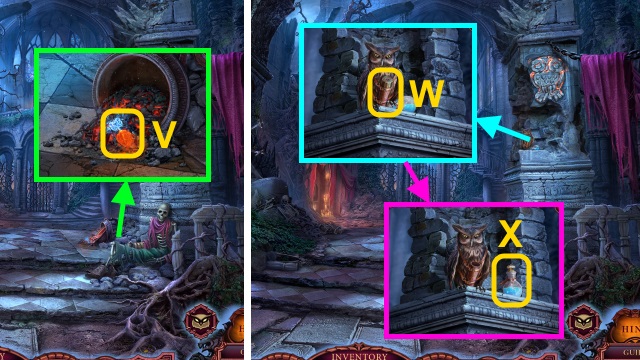
- Move the pumpkin, curtain, and dirt; gather the pieces (V).
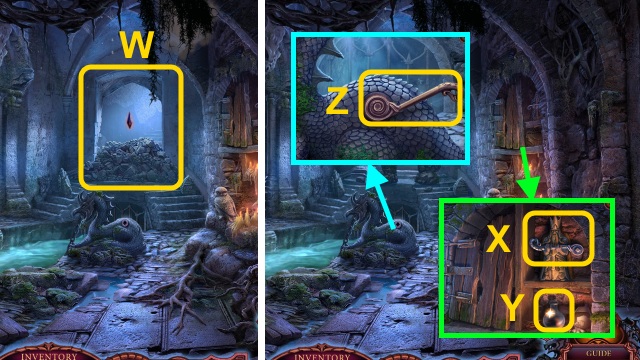
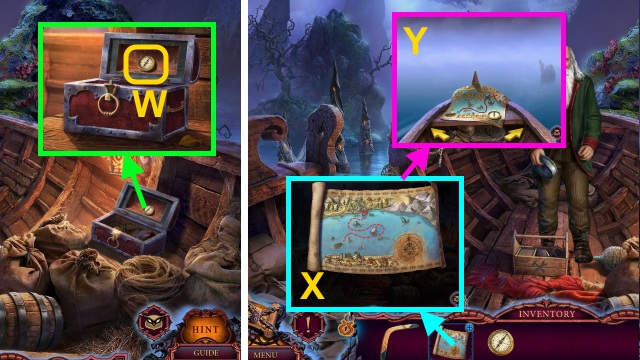
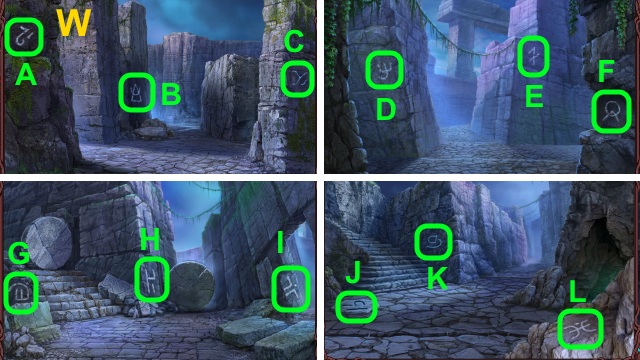
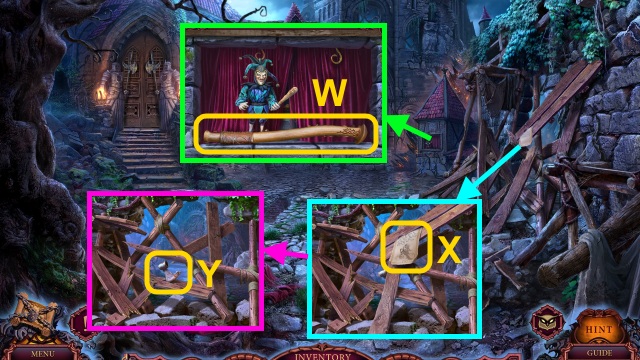
- Take the PITCHFORK (W).
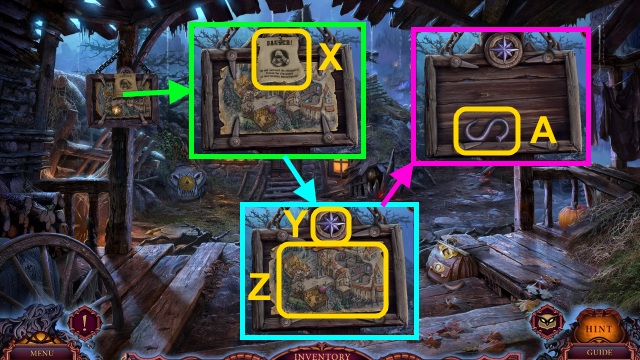
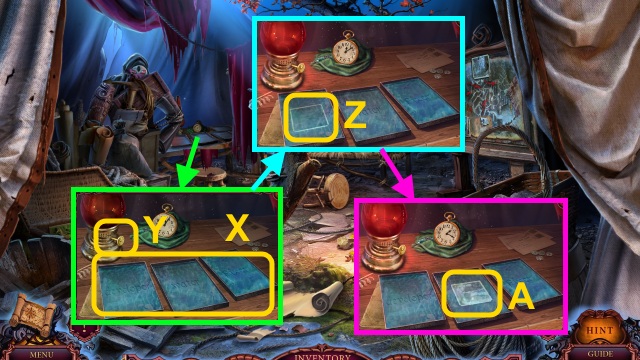
- Move the flyer (X).
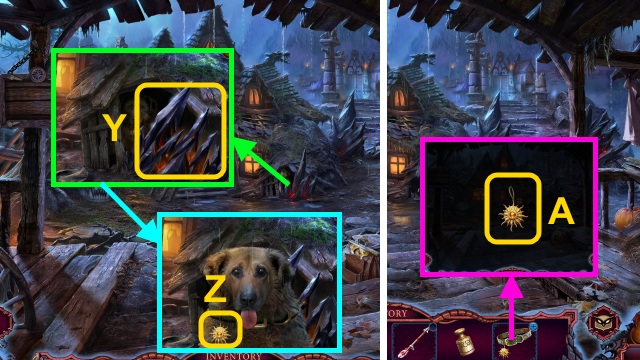
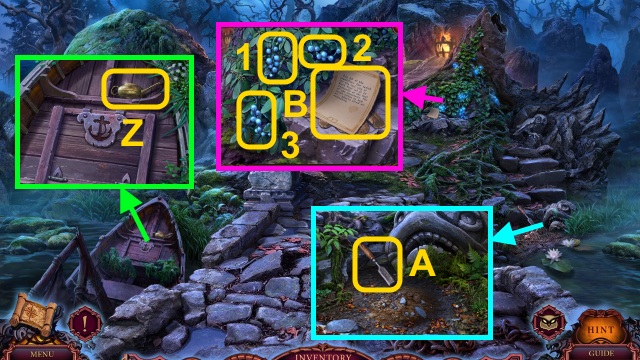
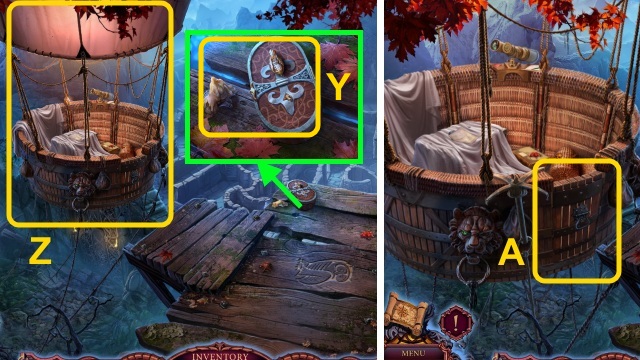
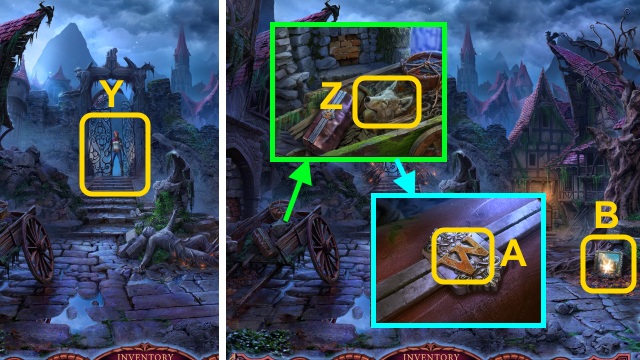
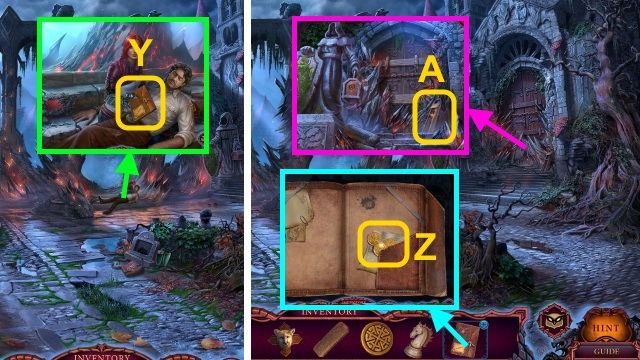
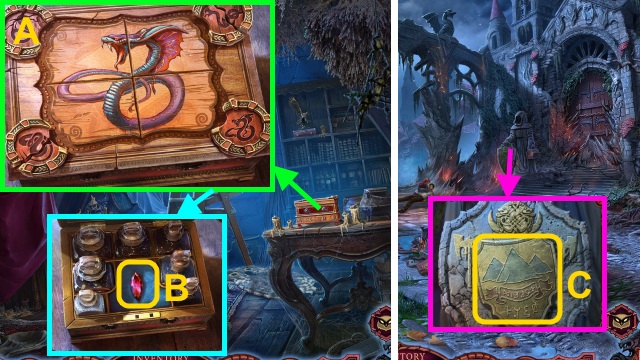
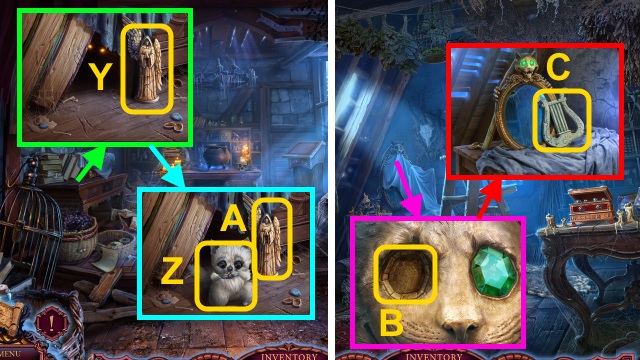
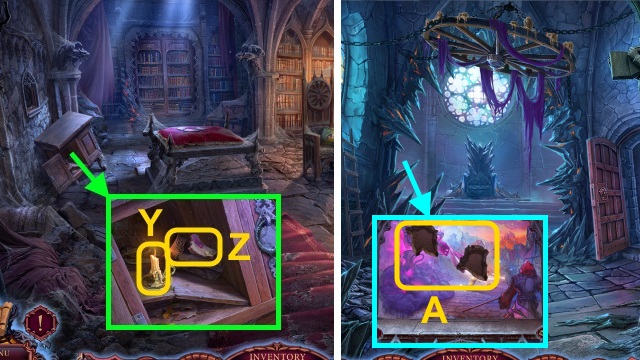
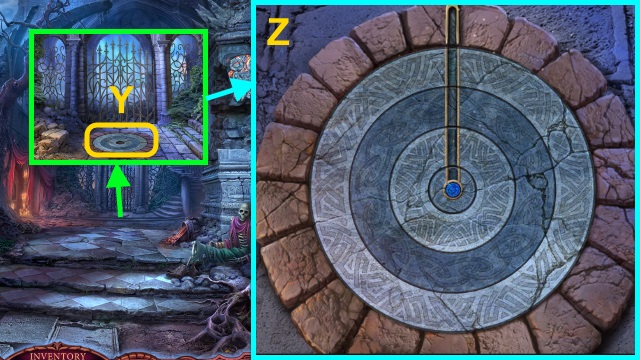
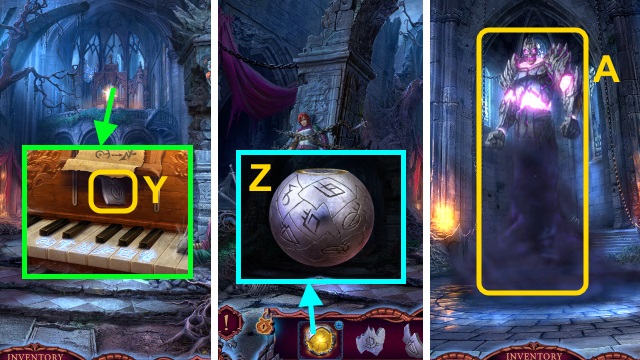
- Place the WIND ROSE (Y); take the Map (Z).
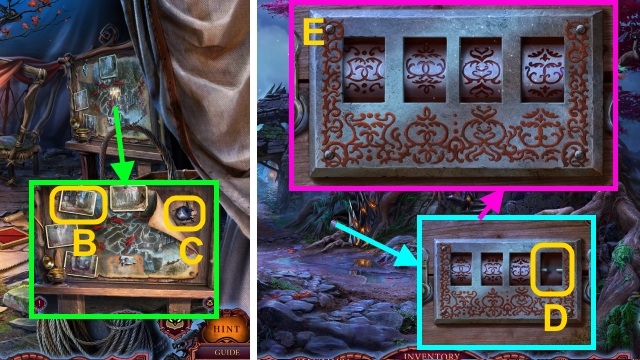
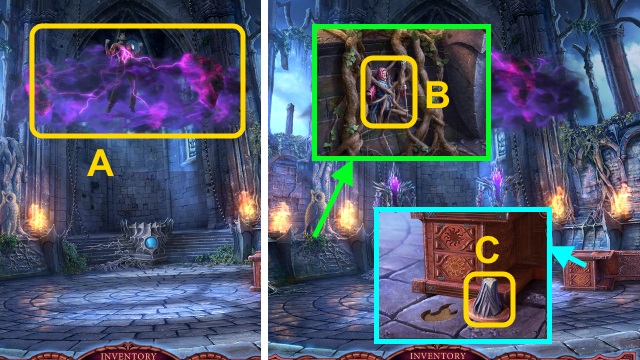
- Take the S-HOOK (A).
- Place the S-HOOK (B); open the door (C).
- Walk forward.
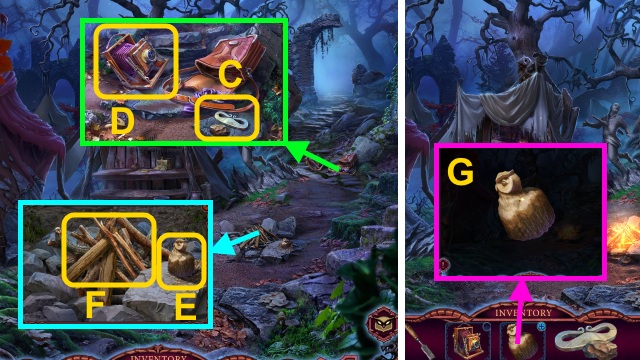
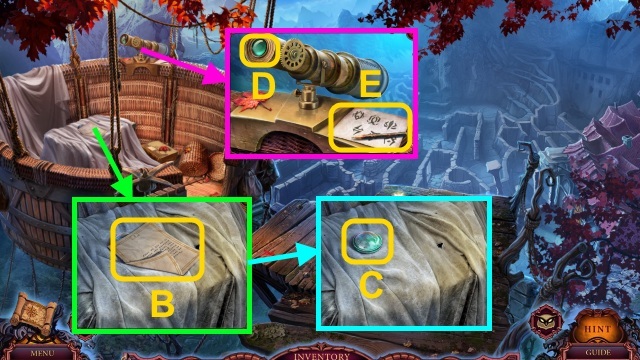
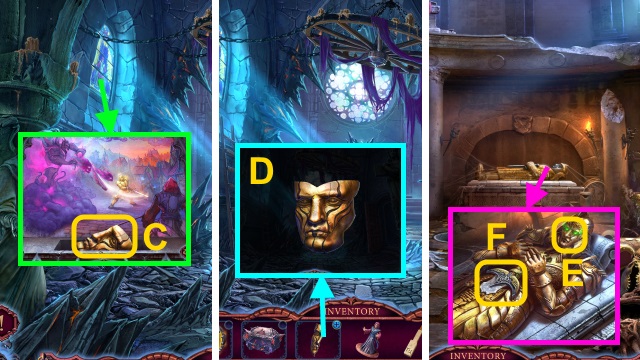
- Talk to the man (D); give the LEAGUE BADGE.
- Give the PHOTO OF LOUISE; take the RUSTY KNIFE (E).
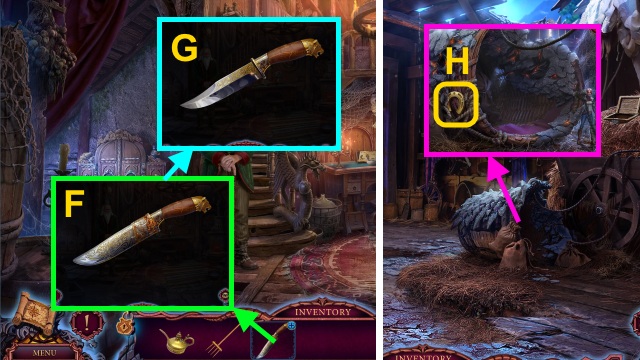
- Use the OILCAN on the RUSTY KNIFE (F).
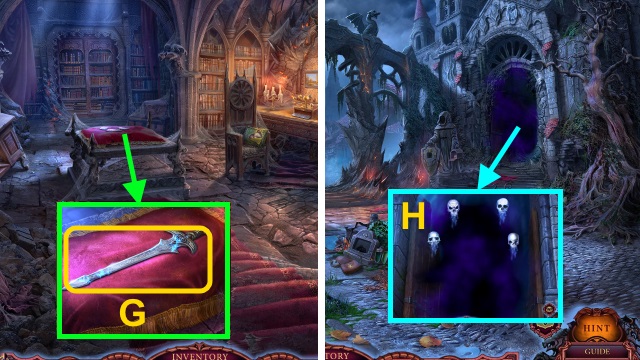
- Remove the scabbard; take the KNIFE (G).
- Walk down twice.
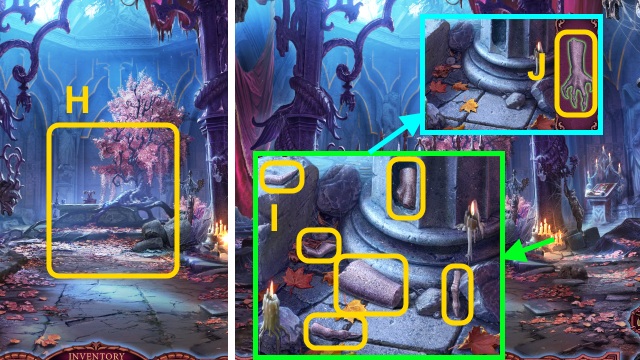
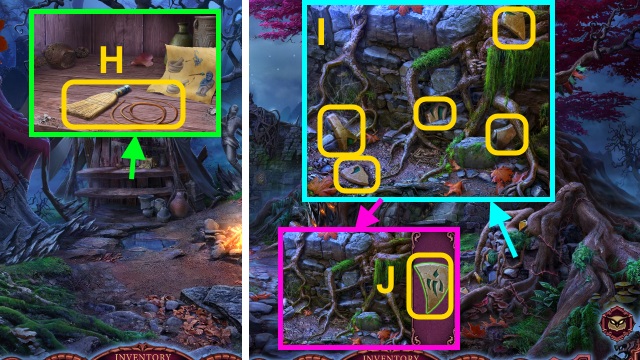
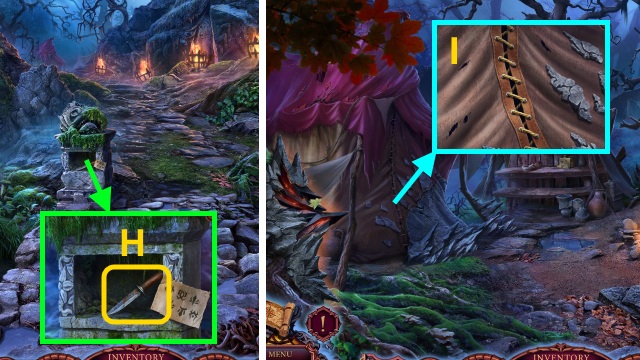
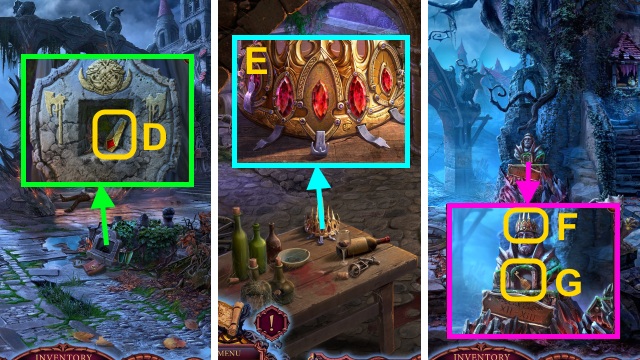
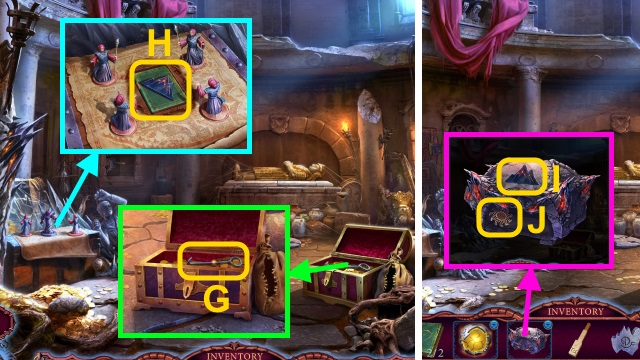
- Use the KNIFE; take the HORSESHOE (H).
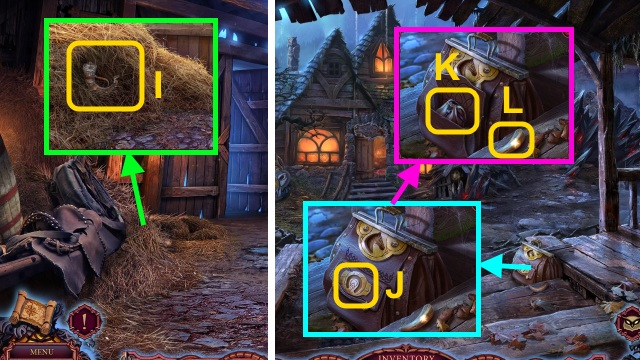
- Use the PITCHFORK; take the GUNPOWDER (I).
- Walk forward.
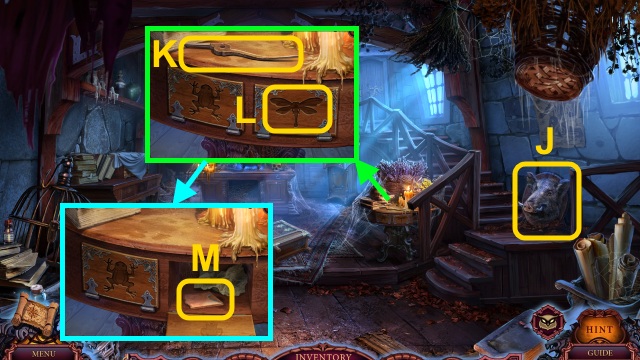
- Place the HORSESHOE (J); take the SULFUR (K) and BOAR TUSK (L).
- Walk forward.
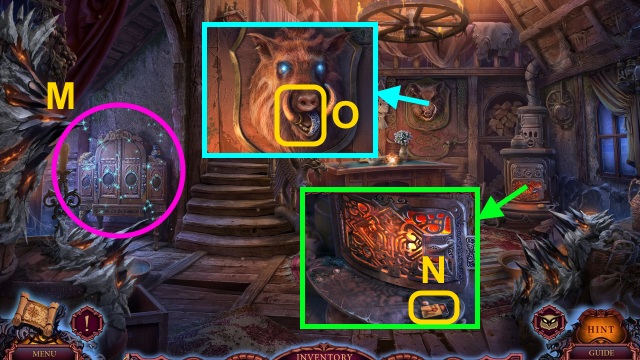
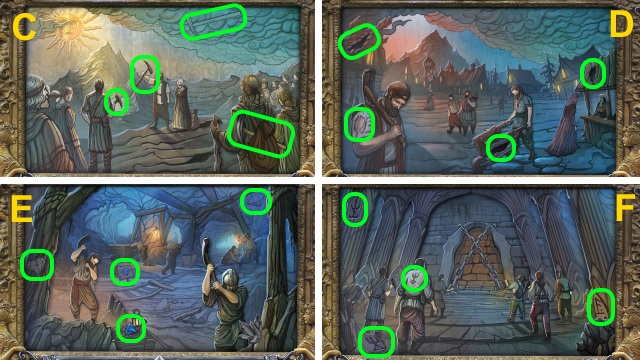
- Play the HOP to receive the WICK (M).
- Take the MATCHES (N).
- Place the BOAR TUSK; take the MOON (O).
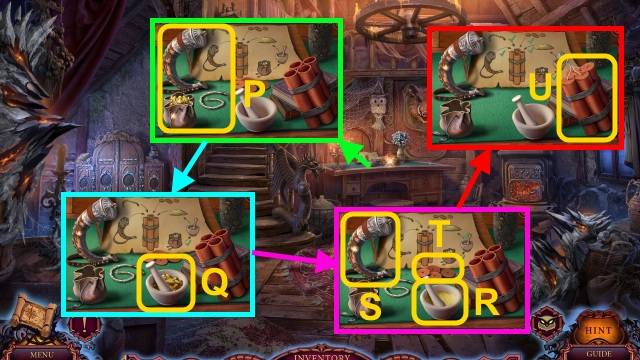
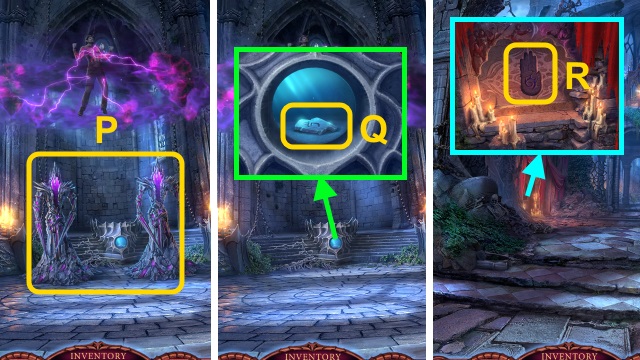
- Place the SULFUR, WICK, and GUNPOWDER (P).
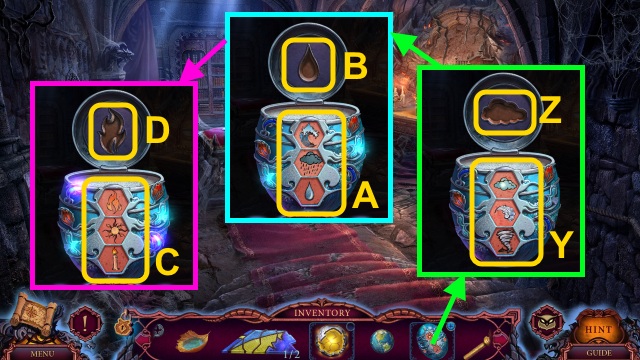
- Examine the sulfur (Q); use the pestle.
- Pour the sulfur (R) and gunpowder (S); place the lids (T).
- Place the wick; take the DYNAMITE (U).
- Walk down.
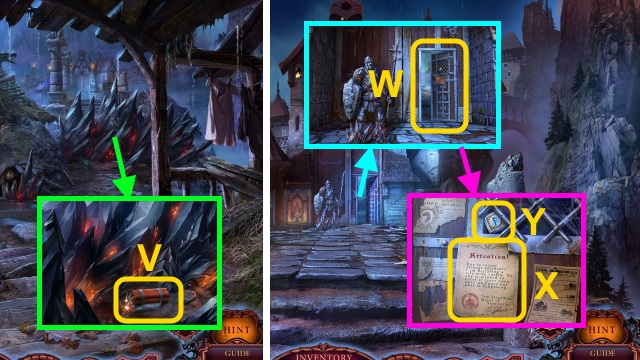
- Place the DYNAMITE; use the MATCHES (V).
- Walk right.
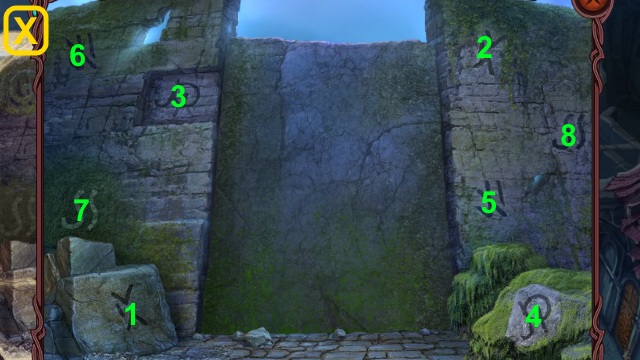
- Try to go forward (W).
- Read the flyer (X); take the RUNE (Y).
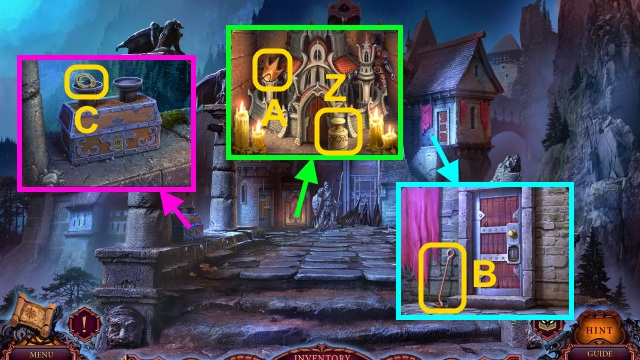
- Take the WEIGHT (Z) and CROWN (A).
- Take the FIREPLACE POKER (B).
- Take the CRYPTEX RING (C).
- Walk down, then forward.
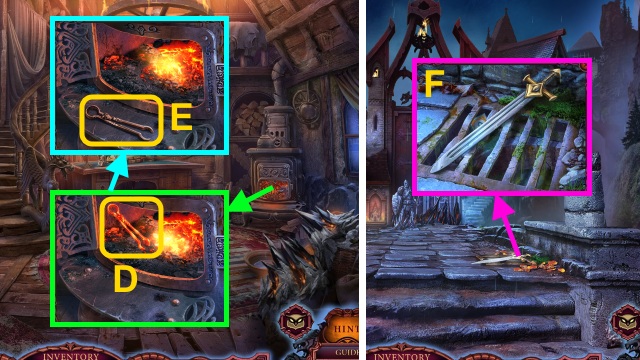
- Open the door; use the FIREPLACE POKER (D).
- Take the TONGS (E).
- Walk down, then right.
- Take the DECORATIVE SWORD (1/3) (F).
- Use the TONGS (G); receive the RUNE.
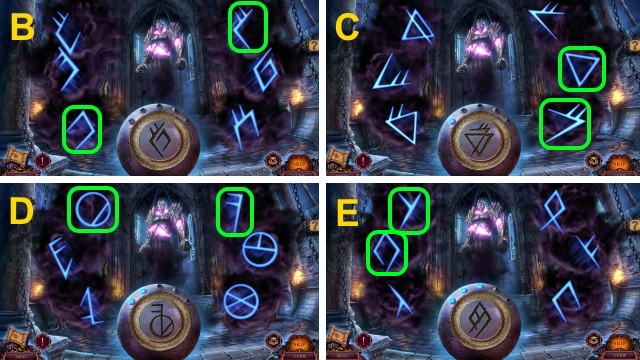
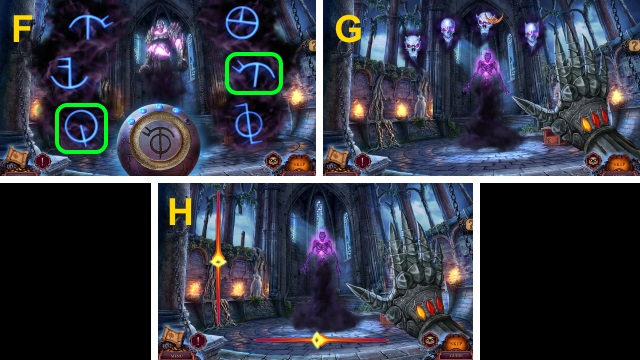
- Examine the door (H); place the RUNES for a mini-game (I).
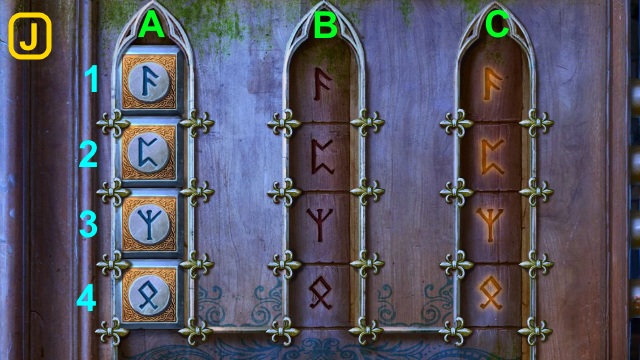
- Solution (J): (A4-B4)(A3-C3)(B4-C4)(A2-B2)(C4-A4)(C3-B3)(A4-B4).
- (A1-C1)(B4-C4)(B3-A3)(C4-A4)(B2-C2)(A4-B4)(A3-C3)(B4-C4).
- Go through the door.
- Play the HOP (K).
- Take the MACE (L).
- Take the GLOVE (M).
- Take the VIAL (1/3) (N); use the GLOVE.
- Take the CASTLE TOWER (O).
- Move the papers and cloth, then open the chest; gather the pieces (P).
- Take the DECORATIVE SWORD (2/3) (Q).
- Place the notes (R).
- Open the panel; take the ARROW (S).
- Walk down.
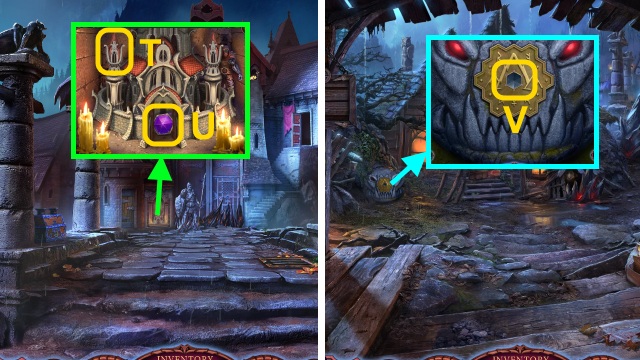
- Place the CASTLE TOWER (T); take the HEXAGONAL CRYSTAL (U).
- Walk down.
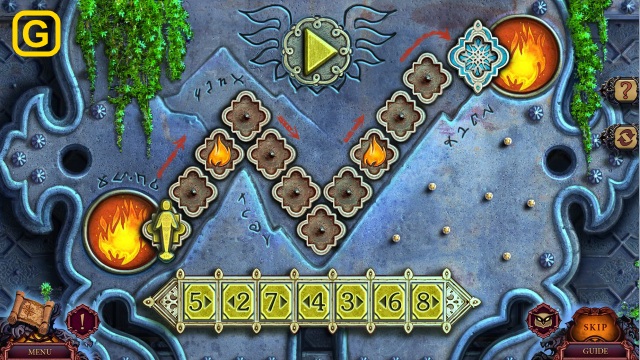
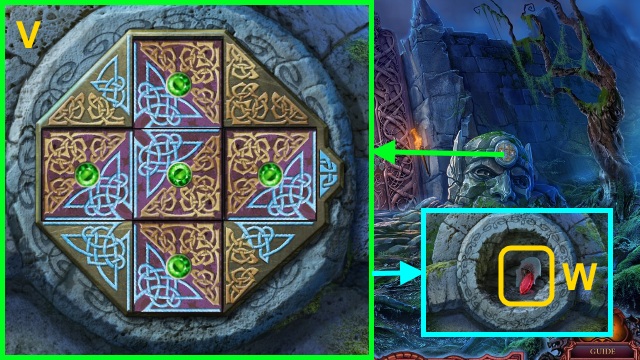
- Place the HEXAGONAL CRYSTAL for a mini-game (V).
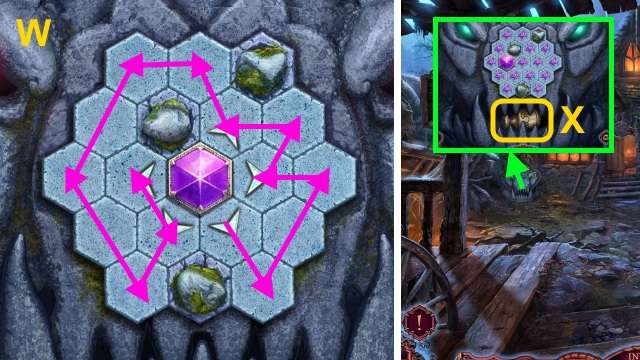
- Solution (W).
- Take the WEIGHT (X).
- Use the MACE (Y); take the COLLAR (Z).
- Unbuckle the COLLAR; take the SUN (A).
- Walk right.
- Place the WEIGHTS (B); take the HORSE HEAD (C).
- Walk down.
- Place the HORSE HEAD (D); take the PULLEY (E).
- Walk right twice.
- Drop the pot (F).
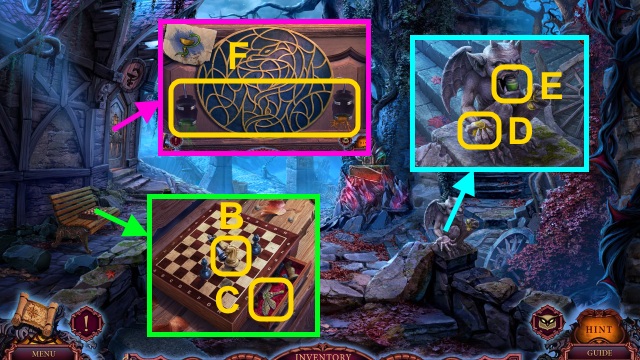
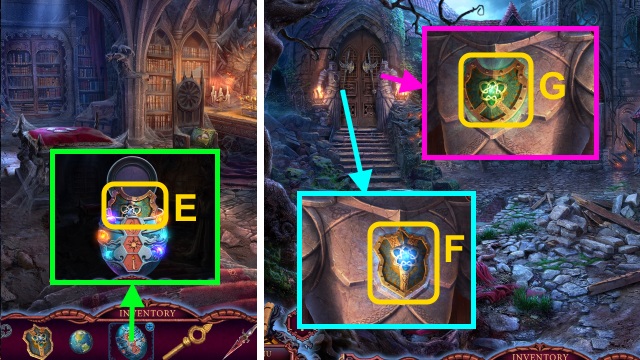
- Place the MOON and SUN (G); examine the box for a mini-game (H).
- Solution (I-J).
- Take the CLOCK HANDS (K).
- Go to the House.
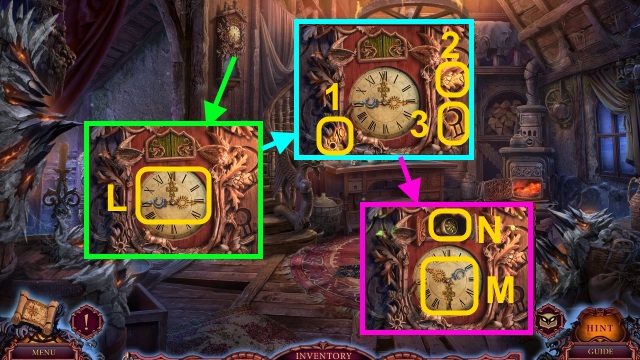
- Place the CLOCK HANDS (L).
- Examine the symbols (1-3).
- Turn the hands (M); take the DOORKNOB (N).
- Walk down, then right.
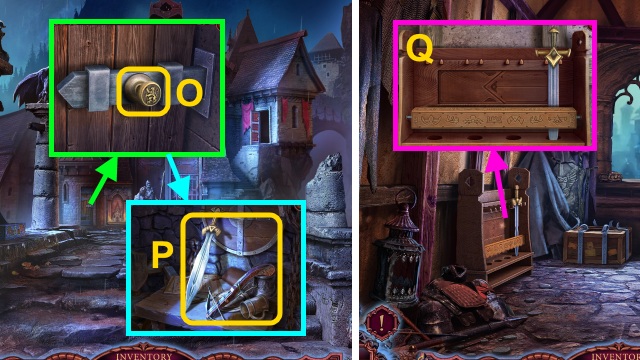
- Place the DOORKNOB; open the door (O).
- Take the UNLOADED CROSSBOW and DECORATIVE SWORD (3/3) (P).
- Walk right.
- Place the DECORATIVE SWORDS (3/3) for a mini-game (Q).
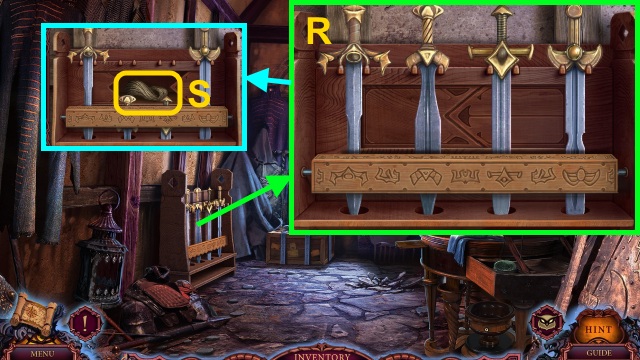
- Solution (R).
- Take the ROPE (S).
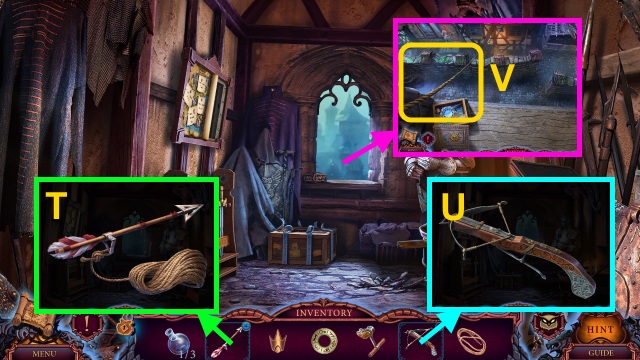
- Attach the ROPE to the ARROW (T); take the ARROW WITH ROPE.
- Examine the UNLOADED CROSSBOW; use the ARROW WITH ROPE to receive the CROSSBOW (U).
- Use the CROSSBOW (V); use the PULLEY.
Chapter 2: Under the City
- Try to walk forward (W).
- Place the CROWN; take the LEVER (X) and VIAL (2/3) (Y).
- Place the LEVER; pull it (Z).
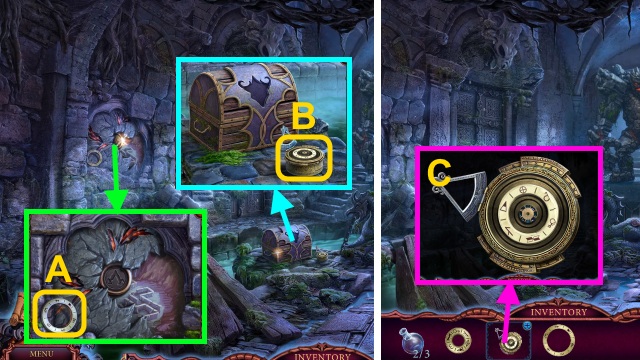
- Take the CRYPTEX RING (A).
- Take the CRYPTEX (B).
- Open the CRYPTEX; place the CRYPTEX RINGS for a mini-game (C).

- Solution (D).
- Take the NUMBER TILES (E).
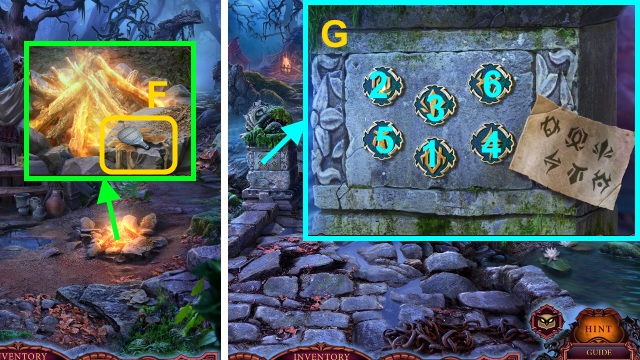
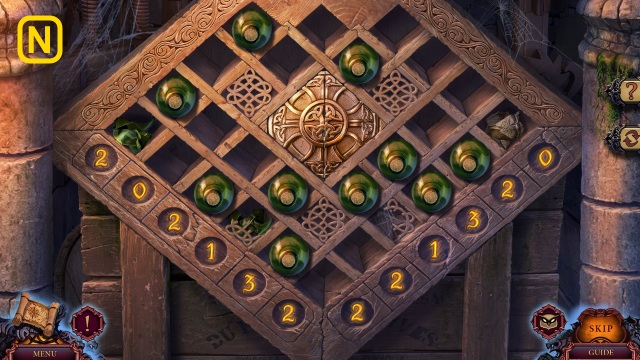
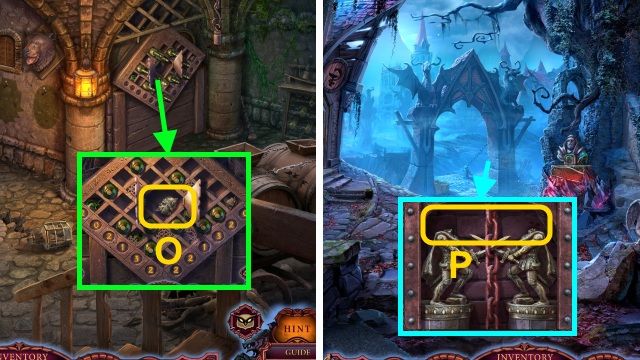
- Move the moss 2x; place the NUMBER TILES for a mini-game (F).
- Solution (G).
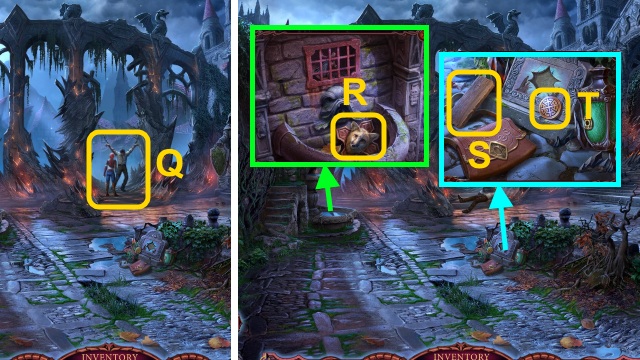
- Walk left.
- Try to walk forward (H).
- Move the leaves and stone; gather the pieces (I).
- Take the DRAGON CLAW (J).
- Take the BOOK SYMBOL (K).
- Take the VIAL (3/3) and AXE (L).
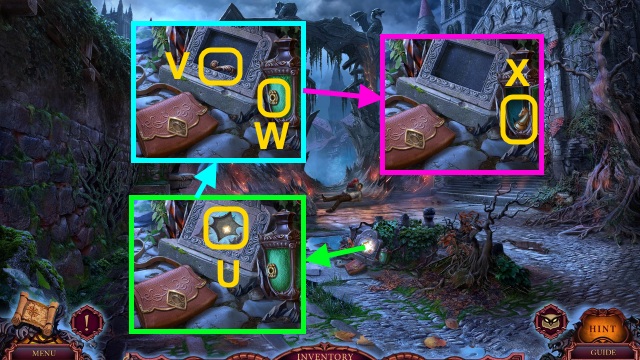
- Place the BOOK SYMBOL (M); open the book.
- Read the papers; take the DIARY FRAGMENT (N).
- Move the papers; take the ROCK SYMBOL (O).
- Walk down.
- Use the AXE; take the TREE SYMBOL (P).
- Place the ROCK SYMBOL (Q); take the DRAGON SYMBOL and CURTAIN TIE (R).
- Walk left.
- Place the CURTAIN TIE (S).
- Play the HOP to receive the CHEST SYMBOL (T).
- Place the TREE SYMBOL (U).
- Take the SICKLE (V).
- Walk down.
- Place the CHEST SYMBOL (W); open the chest.
- Take the DRAGON HEART (X).
- Use the SICKLE; take the DRAGON COLLAR (Y).
- Walk left.
- Place the DRAGON CLAW, DRAGON SYMBOL, and DRAGON COLLAR; take the DRAGON TEAR (Z).
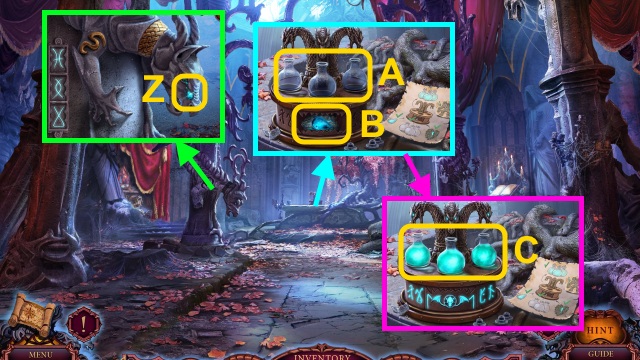
- Remove the vial; place the VIAL (3/3) (A).
- Place the DRAON HEART and DRAGON TEAR (B); take the POTION VIALS (C).
- Walk down.
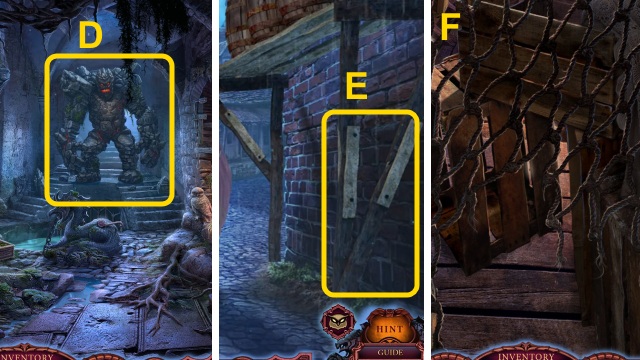
- Use the POTION VIALS (D).
- Walk forward.
- Push the boards (E).
- Examine the net (F).
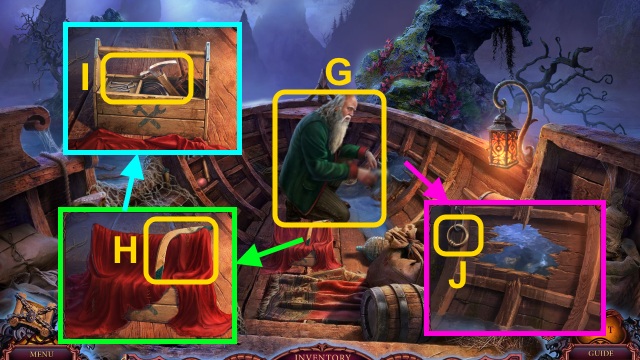
- Talk to the man (G).
- Take the BOOMERANG (H); move the cloth.
- Take the HAMMER and NAILS (I).
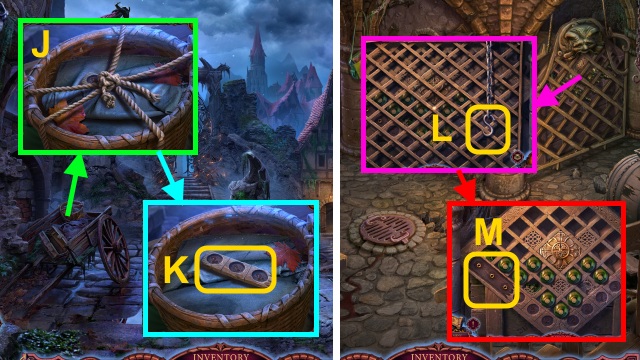
- Take the RING (J).
- Take the PLANK (1/3) (K).
- Place the RING (L); open the chest.
- Take the BOTTLE RESIN (M).
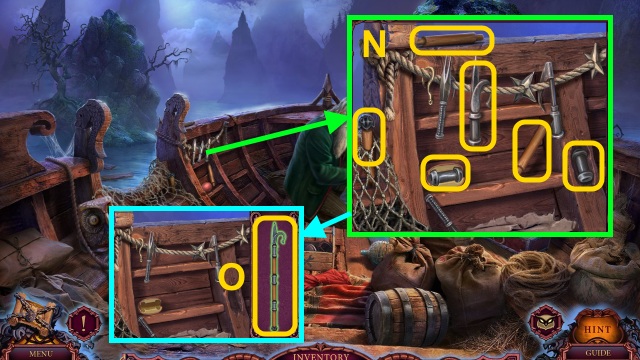
- Move the wood and lid; gather the pieces (N).
- Take the HOOK (O).
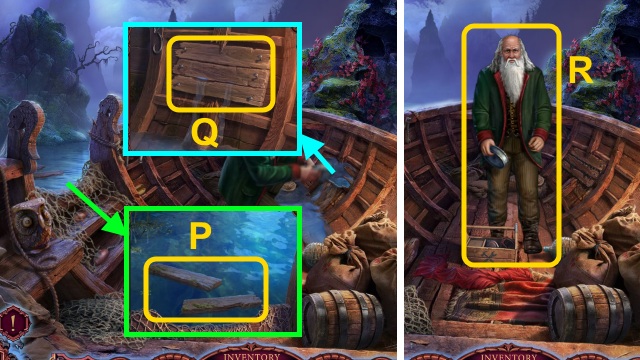
- Use the HOOK; take the PLANK (2/3) and PLANK (3/3) (P).
- Place the PLANK (3/3) and NAILS (Q); use the HAMMER and BOTTLE RESIN.
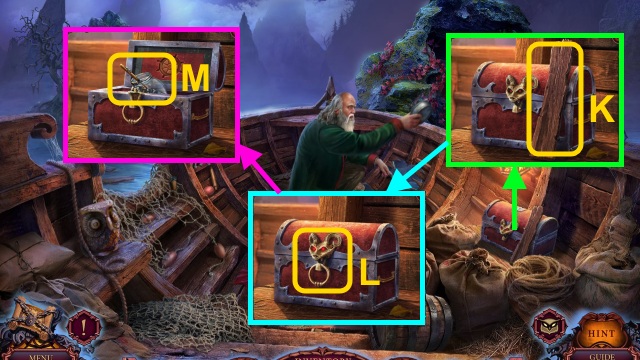
- Talk to the man (R).
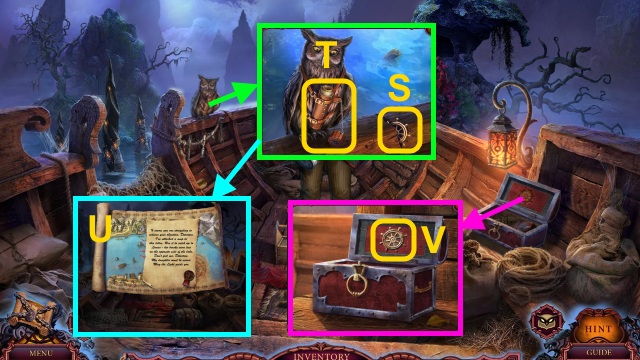
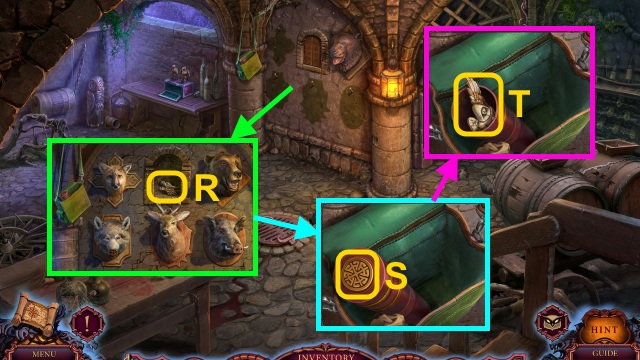
- Take the STEERING WHEEL (S); open the case (T).
- Open the message (U); receive the MAP.
- Place the STEERING WHEEL (V); remove the cover.
- Take the COMPASS (W).
- Combine the COMPASS and MAP for a mini-game (X).
- Steer the boat (Y).
- Take the OIL CAN (Z).
- Take the CHISEL (A).
- Move the leaves; take the BERRIES (1/3)-(3/3) (1-3).
- Read the letter (B).
- Walk forward.
- Take the FLINT(C) and CAMERA (D).
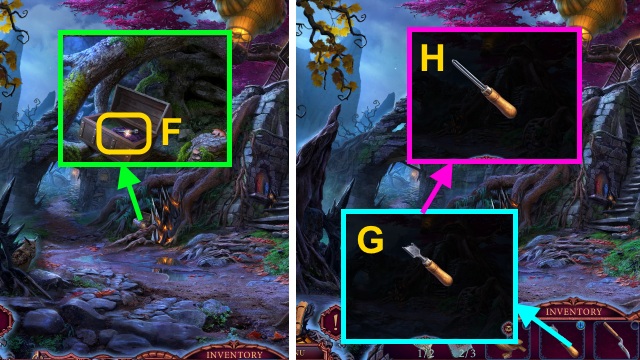
- Take the WOOD CARVING (E); use the OIL CAN and FLINT (F).
- Use the CHISEL on the WOOD CARVING (G); receive the WOODEN OWL and BROKEN CHISEL.
- Take the LACE and BROOM (H).
- Walk forward.
- Move the stone and moss; gather the pieces (I).
- Take the STONE BUTTON (J).
- Take the MORTAR AND PESTLE (K).
- Try to walk left (L).
- Use the BROOM; take the SHOVEL (M) and HOOK (N).
- Use the BOOMERANG (O); receive the EYE PART.
- Walk down twice.
- Use the SHOVEL; take the EYE PART (P).
- Gather the feathers; use the LACE (Q).
- Take the BRUSH.
- Place the EYE PARTS (R); take the IDOL (S).
- Walk forward.
- Place the MORTAR AND PESTLE, BERRIES, IDOL, and BRUSH (T); use the pestle.
- Use the brush and paint; take the BLUE IDOL (U).
- Walk forward.
- Move the stone; place the BLUE IDOL (V).
- Go up.
- Take the ROPE (W).
- Combine the HOOK and ROPE (X); receive the HOOK WITH ROPE.
- Take the WAX MOLD and CHEST (Y).
- Use the HOOK WITH ROPE (Z).
- Open the door (A).
- Read the letter (B).
- Take the LENS (C); move the cloth.
- Remove the glass; place the LENS (D).
- Take the CODE (E).
- Walk down twice.
- Place the WAX MOLD; take the BALLOON (1/2) (F).
- Walk down.
- Press the symbols (G).
- Take the KNIFE (H).
- Walk forward.
- Use the KNIFE (I).
- Walk left.
Chapter 3: Blackrock
- Open the lantern; use the FLINT (J).
- Open the basket; play the HOP to receive the SKULL (K).
- Move the cloth; take the CAMERA CABLE (L).
- Combine the CAMERA CABLE and CAMERA; press the button (M).
- Take the frame (N).
- Remove the slide (O); take the PHOTONEGATIVE.
- Move the rock and leaf (1-6); place the pieces (P).
- Take the HAMMER (Q).
- Take the FIXATIVE (R); move the rocks (S).
- Use the HAMMER (T); take the JEWELED EYE.
- Take the SUGAR (U).
- Go to the Air Wharf.
- Place the JEWELED EYE (V); take the WIRE (W).
- Bend the WIRE 2x; take the CLIP (X).
- Go to the Tent.
- Read the letter (Y).

- Place the CLIP; pull it (Z).
- Take the BONES (A).
- Walk down, then right.
- Place the SKULL and BONES for a mini-game (B).
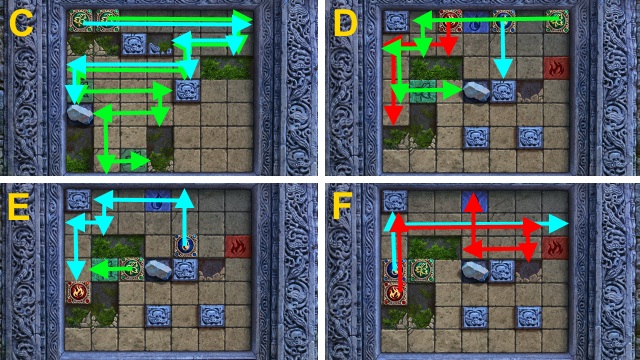
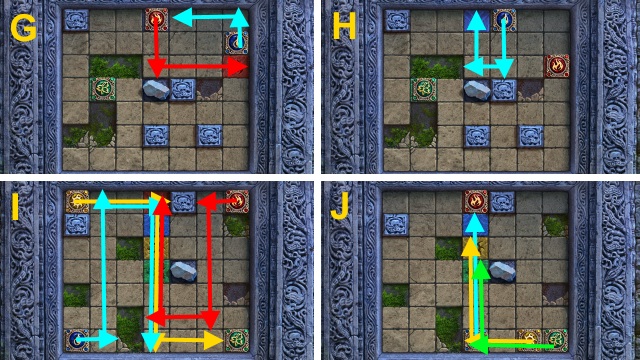
- Solution (C-J).
- Walk forward.
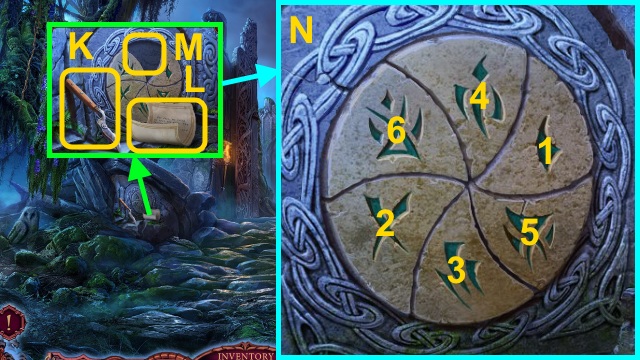
- Take the BROKEN PRUNER (K); read the letter (L).
- Place the STONE BUTTON for a mini-game (M).
- Solution (N).
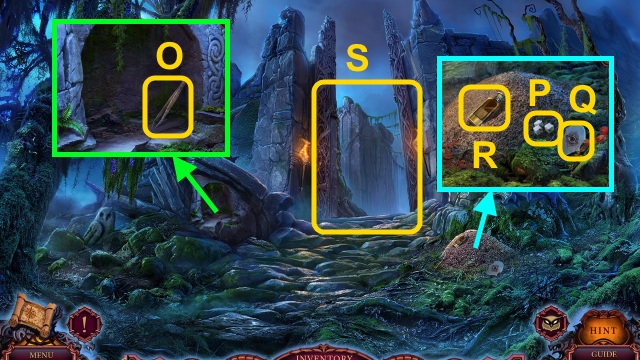
- Take the TWEEZERS (O).
- Place the SUGAR (P); take the EYE (1/3) (Q) and PHOTO DEVELOPER (R).
- Try to walk forward (S).
- Walk down, then up.
- Use the TWEEZERS (T); receive the TILE.
- Walk down, then left.
- Place the TILE for a mini-game (U).
- Solution (V).
- Take the RED CRYSTAL (1/4) and EYE (2/3) (W).
- Go to the Tent.
- Pour the FIXATIVE and PHOTO DEVELOPER (X); press the button (Y).
- Place the PHOTONEGATIVE (Z); examine it 2x.
- Take the PHOTO (A).
- Place the PHOTO (B); take the ROLLER (C).
- Walk down, then right.
- Place the ROLLER for a mini-game (D).
- Solution (E).
- Take the CHISEL PART (F).
- Examine the BROKEN CHISEL (G); remove the metal.
- Place the CHISEL PART (H); receive the CHISEL.
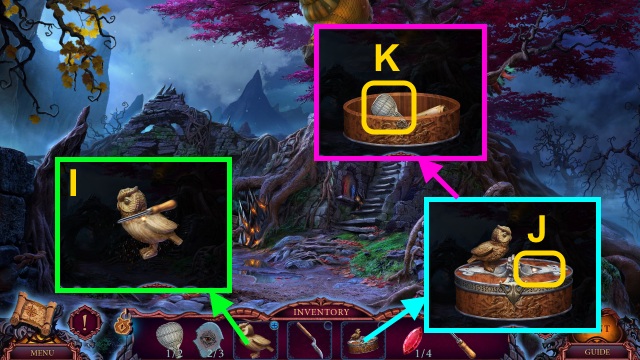
- Use the CHISEL on the WOODEN OWL (I).
- Examine the CHEST; place the WOODEN OWL (J).
- Take the BALLOON (2/2) (K).
- Go up.

- Place the BALLOON (2/2) (L); take the THREAD and ANCHOR (M).
- Walk down three times.
- Place the ANCHOR (N); open the compartment.
- Take the DRAGON FIGURINE and PART OF PRUNER (O).

- Combine the BROKEN PRUNER and PART OF PRUNER (P); receive the PRUNER.
- Go to the Gate.
- Use the PRUNER; take the EYE (3/3) (Q).
- Place the EYE (3/3) for a mini-game (R).
- Solution (S).
- Walk forward.

- Take the letter and PHOTO (T).
- Go to the Tent.
- Place the PHOTO (U); take the MAP.
- Go to the Gate.
- Use the MAP for a mini-game (V).
- Solution (W): B-C-A-F-D-F-D-E-G-I-H-L-J-K-J-L.
- Solution (X).
- Walk forward.
- Try to walk forward (Y).
- Take the STUFFED WOLF (Z) and LETTER W (A).
- Examine the frame for a mini-game (B).
- Solution (C-F).
- Take the DOOR KNOCKER (G).
- Place the DOOR KNOCKER (H).
- Walk right.
- Take the HOOK, letter (I), and DRAGON HEAD (J).
- Place the DRAGON FIGURINE (K); take the YELLOW PAINT (L) and WEIGHT (M).
- Combine the HOOK and THREAD; receive the THREAD WITH HOOK (N).
- Move the cloth and boards; place the pieces (1-5).
- Take the BARREL (O).
- Use the THREAD WITH HOOK (P); receive the KEY.
- Take the HORN (Q).
- Walk down.
- Place the BARREL (R).
- Examine the hollow; take the BROKEN STUFFED DEER and CROWBAR (S).
- Place the HORN on the BROKEN STUFFED DEER (T); receive the STUFFED DEER.
- Use the KEY (U); take the HACKSAW (V).
- Use the HACKSAW (W).
- Walk forward.
- Examine the frame for a mini-game (X).
- Solution (Y-B).
- Take the SCISSORS (C).
- Move the lid, hay, leaf, and stone; gather the pieces (D).
- Take the PART OF FRESCO (E).
- Place the LETTER W (F); take the RED CRYSTAL (2/4) (G).
- Use the CROWBAR (H).
- Play the HOP to receive the GUARD'S HEAD (I).
- Walk down.
- Use the SCISSORS (J); move the rope and cloth.
- Take the WOOD PIECE (K).
- Walk right.
- Place the WEIGHT (L); place the WOOD PIECE for a mini-game (M).
- Solution (N).
- Take the GUARD'S HEAD (O).
- Walk down, then forward.
- Place the GUARD'S HEADS (P).
- Walk forward.
Chapter 4: Roland
- Examine Louise (Q).
- Take the STUFFED FOX (R).
- Move the plants; take the RUNG (S) and TUBE KEY (T).
- Place the PART OF FRESCO (U).
- Take the HANDLE (V); use the HANDLE (W).
- Take the CHESS KNIGHT (X).
- Take the DETECTIVE CASE FILES (Y).
- Read the DETECTIVE CASE FILES; take the COINS (Z).
- Take the BROKEN LADDER (A).
- Walk down.
- Place the CHESS KNIGHT (B); move it.
- Take the DRAGONFLY (C).
- Give the COINS (D); take the GREEN PAINT (E).
- Remove the jar; place the GREEN PAINT and YELLOW PAINT for a mini-game (F).

- Solution (G-I).
- Walk left.
- Take the STUFFED BOAR (J).
- Take the ROUND-NOSED PLIERS (K); place the DRAGONFLY (L).
- Take the SNAKE PLATE (M).

- Move the paper, board, coal, and decanter; gather the pieces (N).
- Take the PICK (O).
- Walk down twice.
- Use the PICK; take the RED CRYSTAL (3/4) (P) and BOOK LOCK PIECE (1/3) (Q).
- Walk right.
- Place the STUFFED WOLF, STUFFED DEER, STUFFED FOX and STUFFED BOAR; take the DRAGON HEAD (R).
- Place the TUBE KEY (S); remove the cap.
- Take the ANGEL (T).
- Go to the Healer's House.
- Place the DRAGON HEADS (U).
- Walk right.
- Take the ROUND-NOSED PLIERS PIECE and BRUSH (V).
- Combine the ROUND-NOSED PLIERS and ROUND-NOSED PLIERS PIECE; receive the ROUND-NOSED PLIERS (W).

- Read the letter; take the RUNG (X).
- Open the BROKEN LADDER; place the RUNGS to receive the LADDER (Y).
- Place the LADDER (Z).
- Place the SNAKE PLATE; arrange the plates (A).
- Take the RED CRYSTAL (4/4) (B).
- Go to the Town Square.
- Use the BRUSH; move the shield (C).
- Take the BOOK LOCK PIECE (2/3) (D).
- Go to the Wine Cellar.
- Place the RED CRYSTAL (4/4); use the ROUND-NOSED PLIERS (E).
- Take the CROWN.
- Walk down, then forward.
- Place the CROWN (F); take the KEY (G).
- Walk left, then right.
- Use the KEY (H); take the BOOK LOCK PIECE (3/3).
- Walk down.
- Place the BOOK LOCK PIECE (3/3) (I).
- Take the TOAD (J).
- Place the TOAD (K); take the MAGIC SPRAY (L).
- Read the note (M); use the MAGIC SPRAY (N).
- Take the RECIPE BOOK (O).
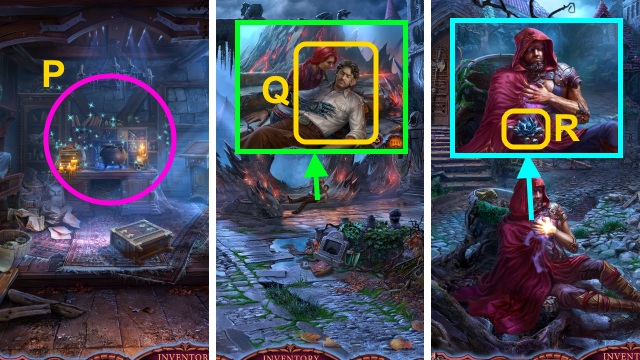
- Play the HOP to receive the HEALING POTION (P).
- Walk down, then forward.
- Use the HEALING POTION (Q).
- Talk to the man; take the STONE FLOWER (R).
- Take the WING (S).
- Place the pole (T); take the SCREWDRIVER (U), HANDLE, and GRINDSTONE (V).
- Take the AXE HANDLE (W).
- Read the letter (X); move the boards.
- Remove the handle; take the AXE BLADE (Y).
- Combine the AXE BLADE and AXE HANDLE (Z); use the GRINDSTONE to receive the AXE.
- Use the AXE (A).
- Walk right, then down.
- Use the SCREWDRIVER (B).
- Move the sign; take the WREATH (C).
- Walk left.
- Place the HANDLE (D); examine the picture for a mini-game (E).
- Solution (F-I).
- Take the QUATREFOIL (J).
- Walk right.
- Move the cloth (K).
- Place the WREATH (L).
- Place the HOP to receive the ACID (M).
- Place the WING (N); take the KEY (O).
- Go to the Town Square.
- Pour the ACID; take the MAGE FIGURINE (P).
- Place the QUATREFOIL (Q); take the TILE FOR BAG (R).
- Place the TILE FOR BAG (S); open the bag.
- Take the SHIELD (T).
- Walk left.
- Remove the cap (U); read the message.
- Take the GREEN GEM (V).
- Use the KEY (W); take the NUTS (X).
- Go to the Healer's House.
- Examine the angel (Y).
- Give the NUTS (Z); take the ANGEL (A).
- Walk right.
- Place the GREEN GEM (B); take the HARP (C).
- Go to the Street.
- Place the ANGELS (D).
- Walk forward.
- Give the HARP (E); take the SEED (F).
- Take the VALVE; place the STONE FLOWER (G).
- Take the SCREW KEY (H).
- Walk down.
- Move the dirt; place the SEED (I).
- Cover the seed.
- Walk right.
- Place the VALVE; turn it (J).
- Take the LEAF WITH WATER (K).
- Walk left.
- Use the LEAF WITH WATER; take the FLOWER (L).
- Walk forward.
- Take the PIECE OF STAINED GLASS (1/2); place the FLOWER (M).
- Examine the statue (N); take the DISASSEMBLED ENERGY SPHERE (O).
- Take the BOOK SYMBOL (P).
- Place the BOOK SYMBOL (Q).
- Walk right.
- Move the thread; take the PLANET (R).
- Take the MATCHES (S).
- Take the EGG (T).
- Take the SPEARHEAD (U).
- Walk down.
- Use the MATCHES (V); take the DAGGER (W).
- Walk right.
- Use the DAGGER; take the FAN (X).
- Examine the EGG; arrange the symbols (Y).
- Use the FAN (Z).
- Arrange the symbols (A); use the LEAF WITH WATER (B).
- Arrange the symbols (C); use the MATCHES (D).
- Take the SHIELD (E).
- Walk down twice.
- Place the SHIELDS (F-G).
- Walk forward.
Chapter 5: The Devastator
- Place the SPEARHEAD for a mini-game (H).
- Solution (I).
- Take the ORGAN KEY (J).
- Use the DAGGER; take the PART OF MASK (K) and BOOK (1/2) (L).
- Take the PART OF FRESCO (M).
- Take the PIECE OF STAINED GLASS (2/2) (N).
- Use the SCREW KEY; move the gear (O).
- Take the PLANET and HEADLESS DOLL (P).
- Take the STONE CASKET (Q).
- Walk down, then forward.
- Place the PIECE OF STAINED GLASS (2/2) (R).
- Walk right.
- Place the PLANETS (S); take the DOLL HEAD (T).
- Combine the HEADLESS DOLL and DOLL HEAD (U); receive the DOLL.
- Walk down twice.

- Place the DOLL (V).
- Take the CROSS KEY (W).
- Walk forward, then right.
- Use the CROSS KEY (X).
- Use the MATCHES (Y); take the PART OF FRESCO and PART OF BRACER (Z).
- Walk down.
- Place the PARTS OF FRESCO for a mini-game (A).
- Solution (B).
- Take the PART OF MASK (C).
- Combine the PART OF MASKS (D); take the GOLD MASK.
- Walk down, then left.
- Place the GOLD MASK (E); take the SWORD HILT (F).
- Go to the Library.
- Place the SWORD HILT; take the SWORD (G).
- Go to the Town Square.
- Use the SWORD for a mini-game (H).
- Solution (I-K).
- Walk forward.
- Talk to Louise (L).
- Place the PART OF BRACER (M); take the HAMMER (N).
- Take the STONE BALL (O).
- Take the PYRAMID OF ELEMENTS (P).
- Go to the Old Temple.
- Place the PYRAMID OF ELEMENTS (Q); take the SHOVEL (R).
- Use the HAMMER; take the ENERGY RUNE (S).
- Walk right.
- Place the STONE BALL; take the PRUNING SHEARS (T).
- Go to the Treasury.
- Use the HAMMER; take the CIRCLE (U).
- Go to the Sanctuary.
- Use the SHOVEL (V); receive the SILVER KEY.
- Remove the cap (W); read the message.
- Take the HEALING POTION (X).
- Place the CIRCLE for a mini-game (Y).
- Solution (Z).
- Walk forward.
- Examine the Devastator (A).
- Use the PRUNING SHEARS (B); take the BROKEN FIGURINE.
- Take the BROKEN FIGURINE (C).

- Combine the BROKEN FIGURINES (D); take the MAGE FIGURINE.
- Walk down.
- Use the HEALING POTION (E); receive the MAGIC GLOVE.
- Go to the Treasury.
- Use the SILVER KEY (F).
- Take the HOOK (G).
- Place the MAGE FIGURINES; take the MOUNTAIN SYMBOL and BOOK (2/2) (H).
- Place the MOUNTAIN SYMBOL on the STONE CASKET (I); take the SUN SYMBOL (J).
- Go to the Town Square.
- Use the HOOK (K); receive the FIRE TILE.
- Walk right, then forward.
- Place the FIRE TILE (L); move the stone.
- Take the ENERGY RUNE (M).
- Place the SUN SYMBOL (N); open the compartment.
- Take the STONE HAND (O).
- Use the MAGIC GLOVE (P).
- Take the ENERGY RUNE (Q).
- Walk down.
- Place the STONE HAND (R).
- Play the HOP to receive the ENERGY RUNE (S).
- Go to the Library.
- Place the BOOK (2/2) for a mini-game (T).
- Solution (U).

- Play the HOP to receive the ORGAN KEY (V).
- Go to the Sanctuary.
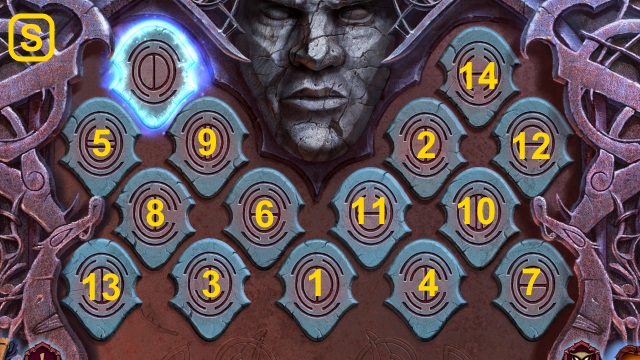
- Place the ORGAN KEYS for a mini-game (W).
- Solution (X).
- Take the ENERGY RUNE (Y).
- Combine the DISASSEMBLED ENERGY SPHERE and ENERGY RUNES (Z); turn the sphere.
- Take the ENERGY SPHERE.
- Walk forward.
- Use the ENERGY SPHERE for a mini-game (A).
- Solution (B-F).
- Solution: shoot the skulls (G) then stop the indicators (H) 3x.
- Congratulations! You have completed League of Light: Silent Mountain.
Created at: 2015-10-09