

Walkthrough Menu
- General Tips
- Chapter 1: The Town Gate
- Chapter 2: The Bridge
- Chapter 3: The Pier
- Chapter 4: The Hold
- Chapter 5: The Crystal Hall
- Chapter 6: The Soaring Tower
General Tips
- This is the official guide for League of Light: The Gatherer.
- Hidden-object puzzles are referred to as HOPs. This guide will not show screenshots of the HOPs, however, it will mention when an HOP is available and the inventory item you'll collect from it.
- This guide will not mention each time you have to zoom into a location; the screenshots will show each zoom scene.
Chapter 1: The Town Gate
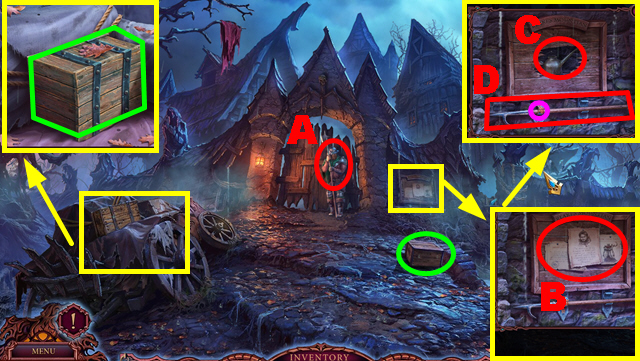
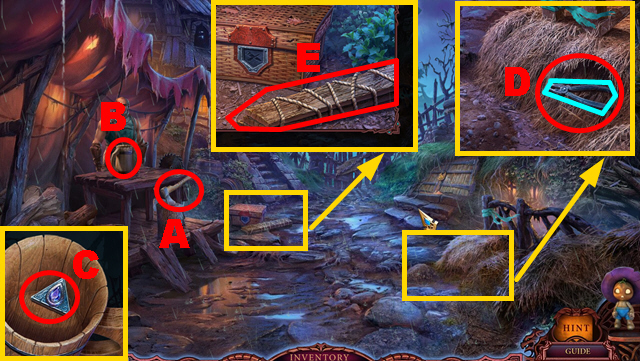
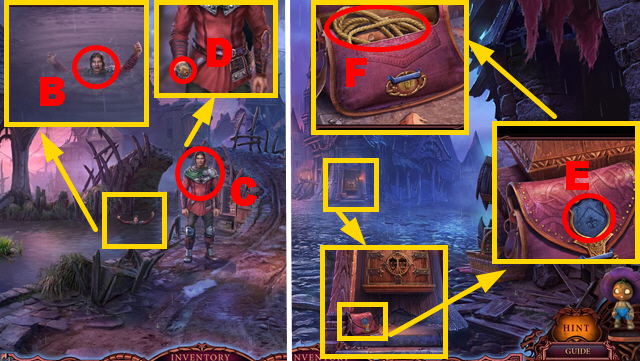
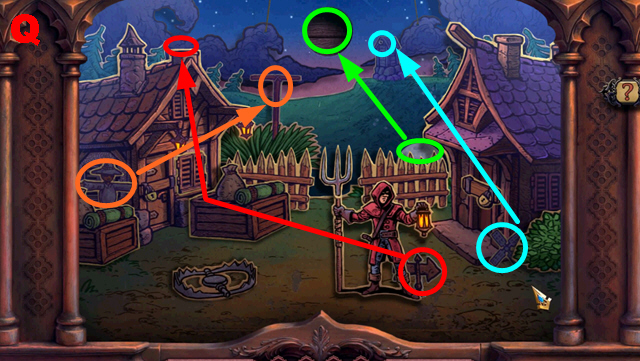
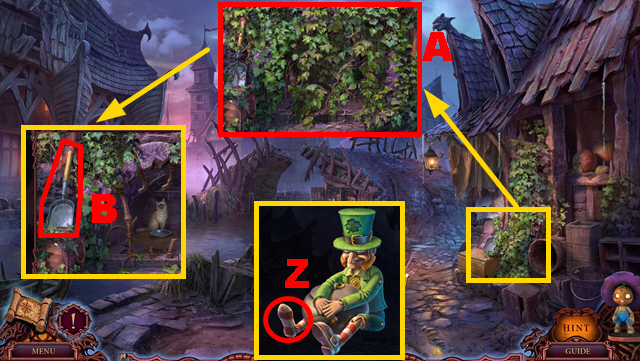
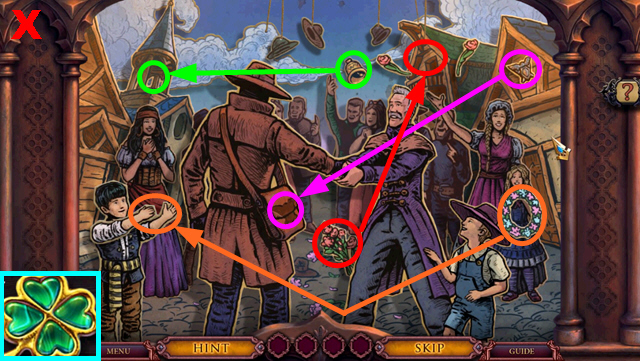
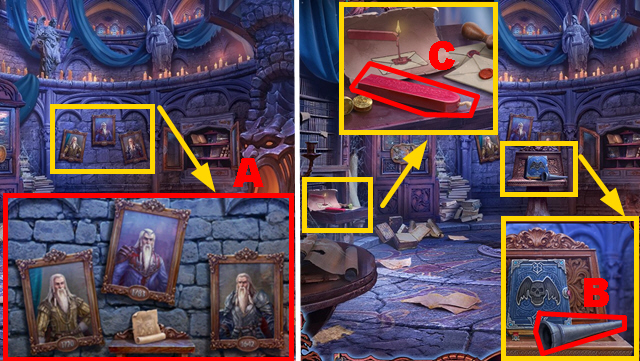
- Talk to the guard (A).
- Take 2 BOXES (green).
- Read 3 notes (B); take the OILCAN (C).
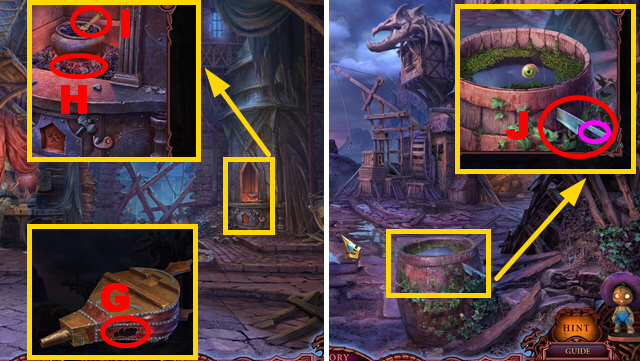
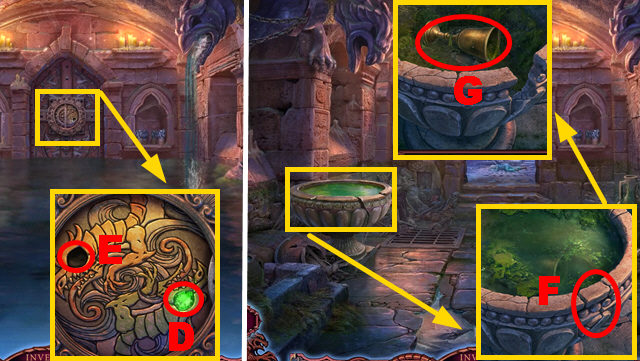
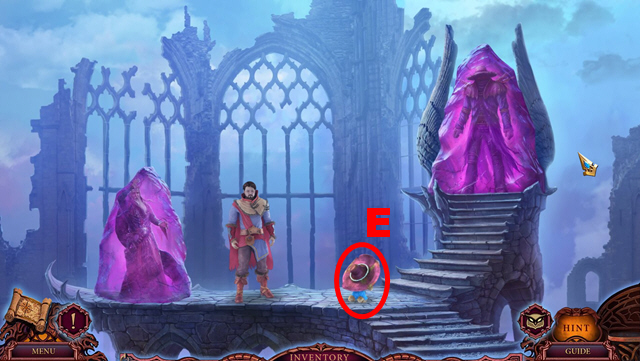
- Use the OILCAN (purple); take the HARPOON (D).
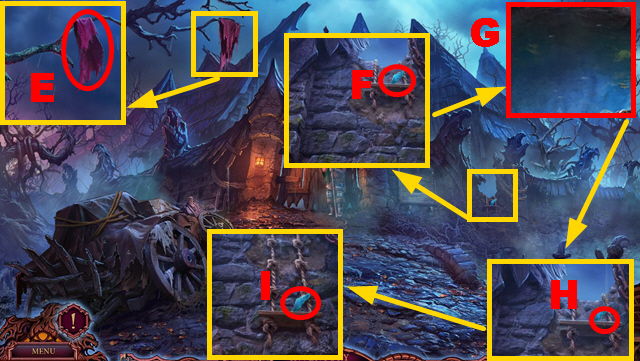
- Use the HARPOON to collect the RAG (E).
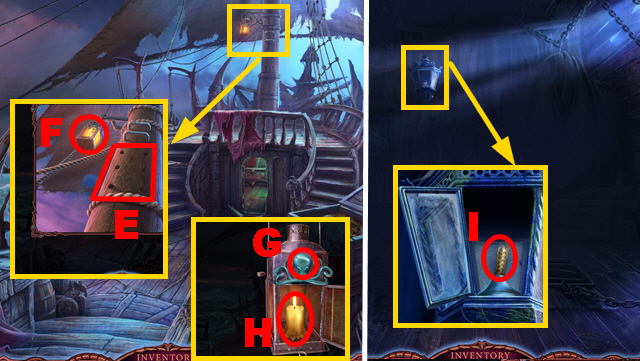
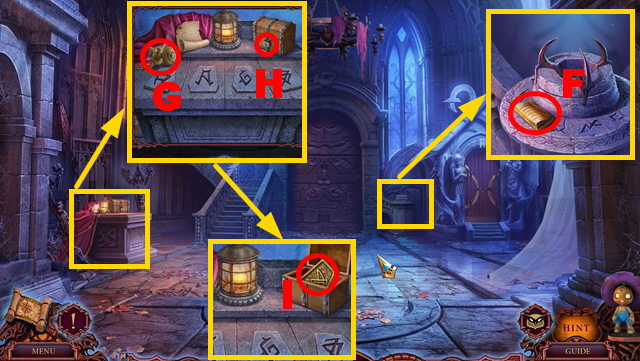
- Reach up (F); place 2 BOXES (G).
- Move forward.
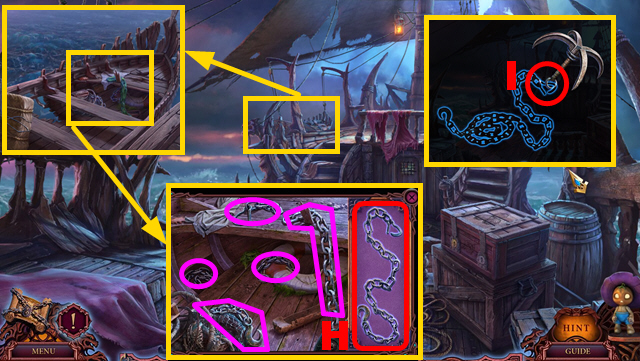
- Use the HARPOON (H).
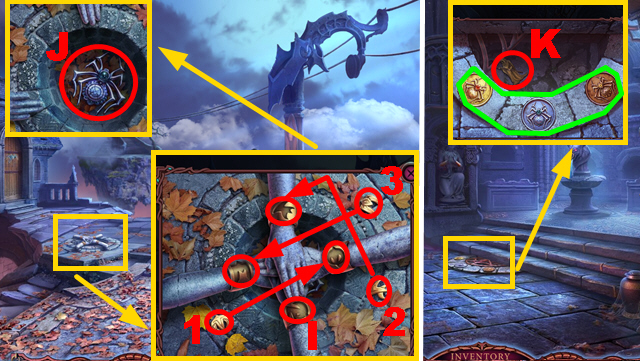
- Use the RAG to collect the GLASS (I).
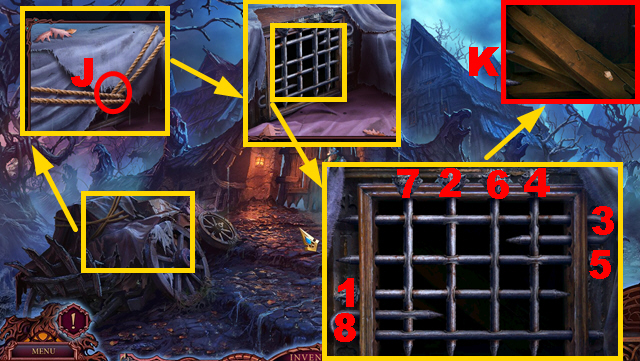
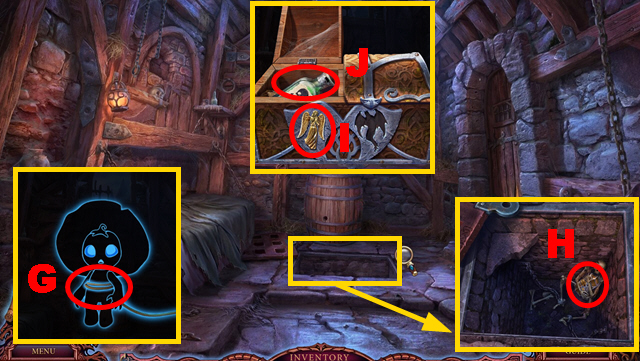
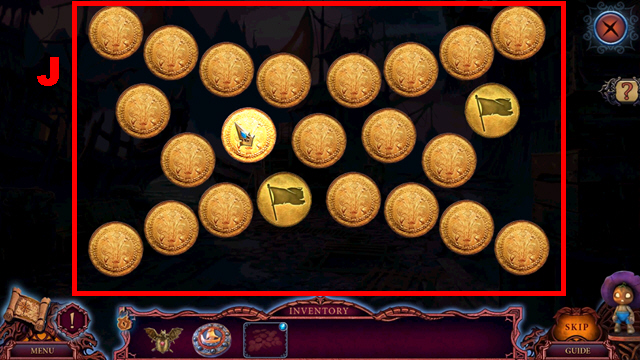
- Use the GLASS (J).
- Play the mini-game.
- Solution: 1-8.
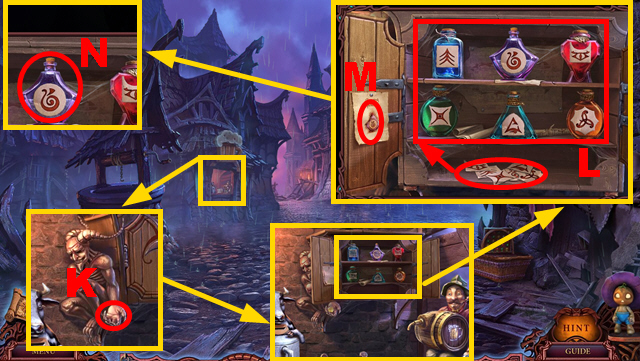
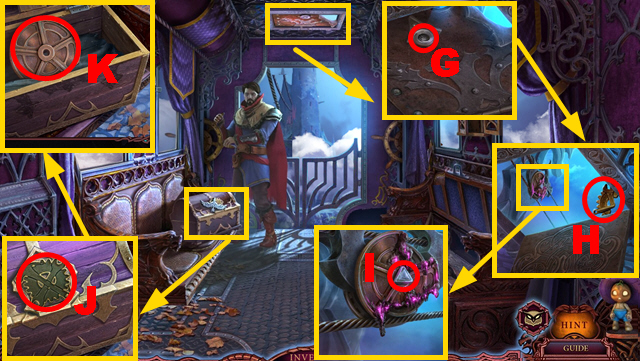
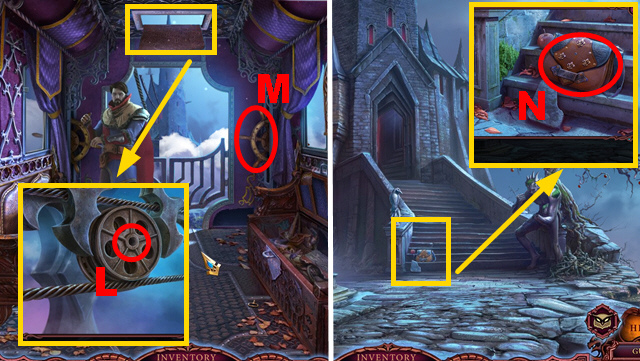
- Take the STEPS (K).
- Place the STEPS (L).
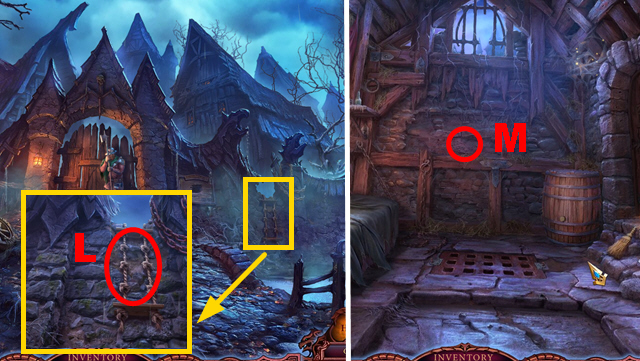
- Climb up.
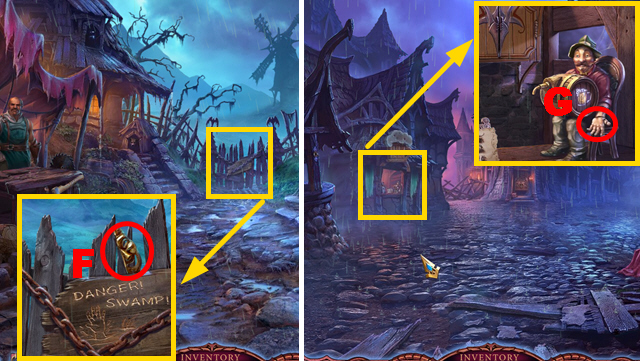
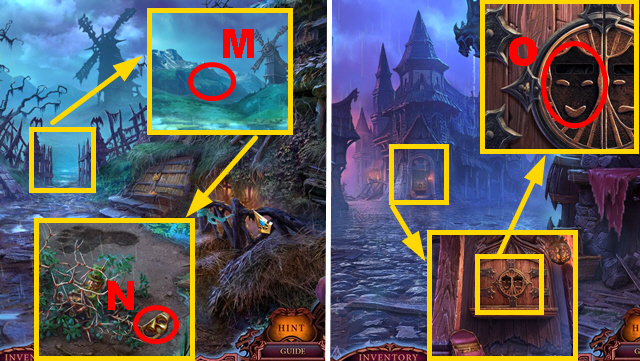
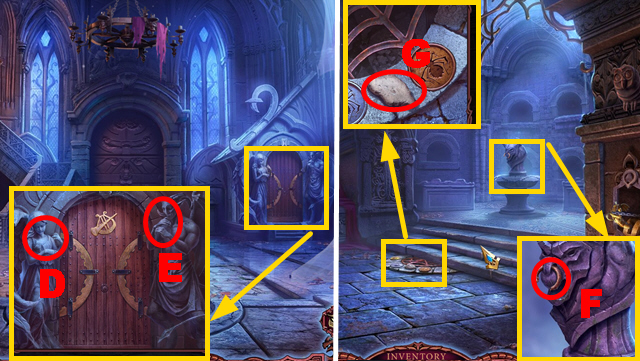
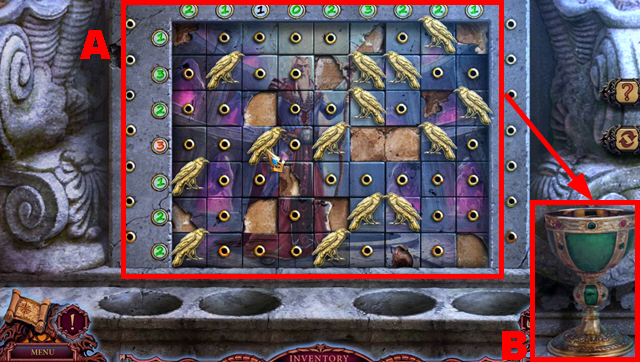
- Look up; try to move forward twice (M).
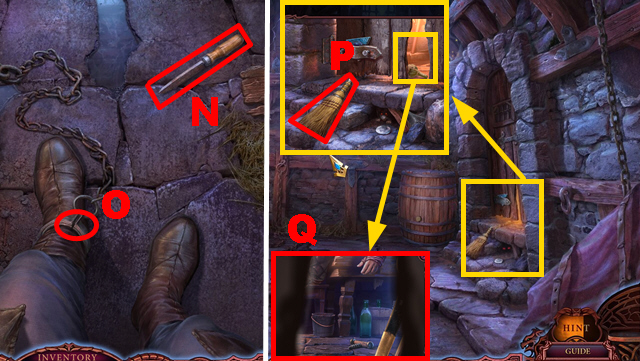
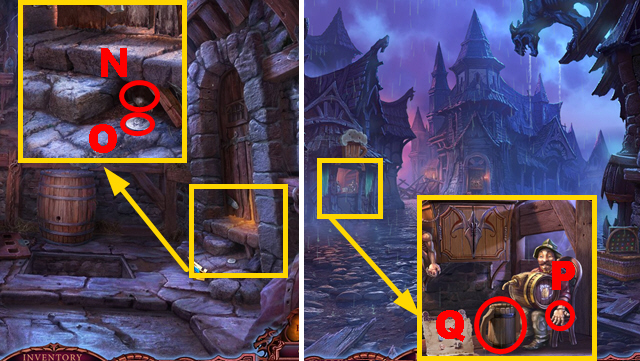
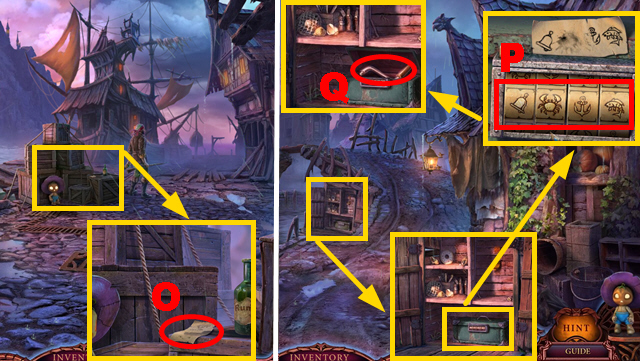
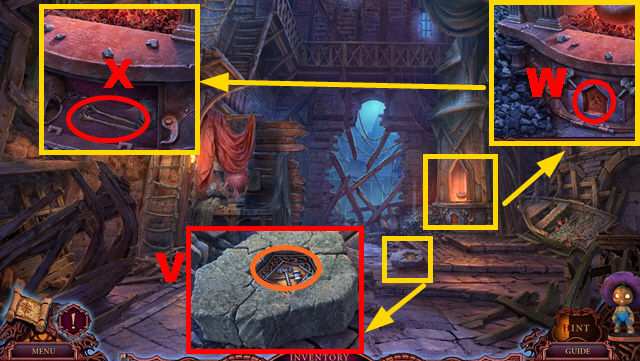
- Use the file (N) to cut the chain (O).
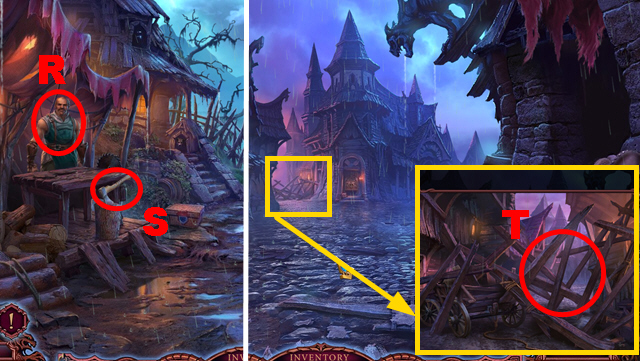
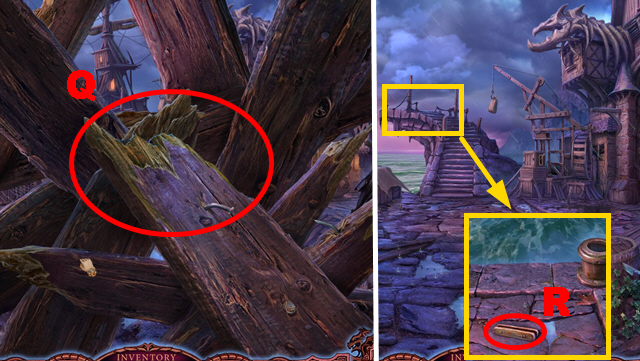
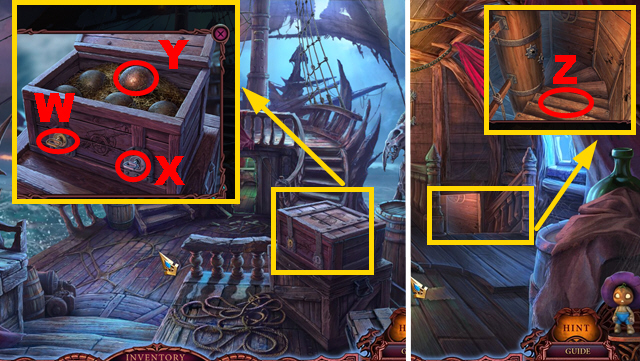
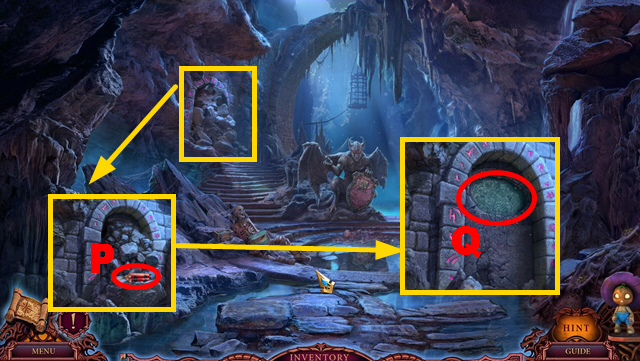
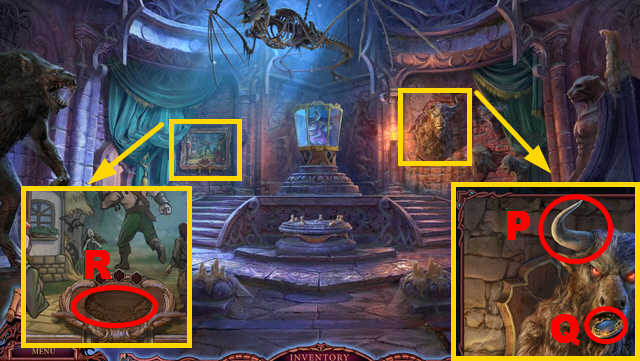
- Take the BROOM (P); peek right (Q).
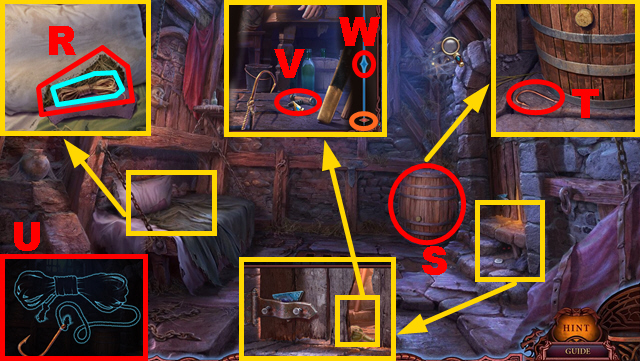
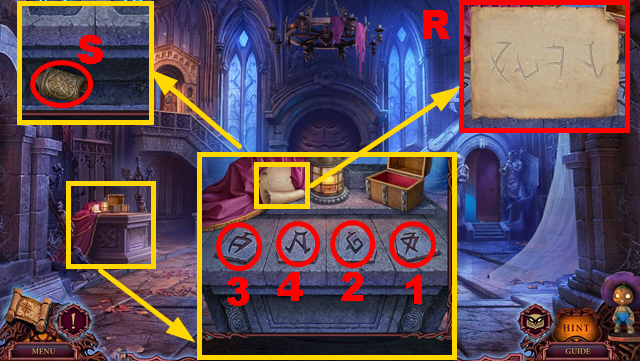
- Use the GLASS (R); take the TWINE (blue).
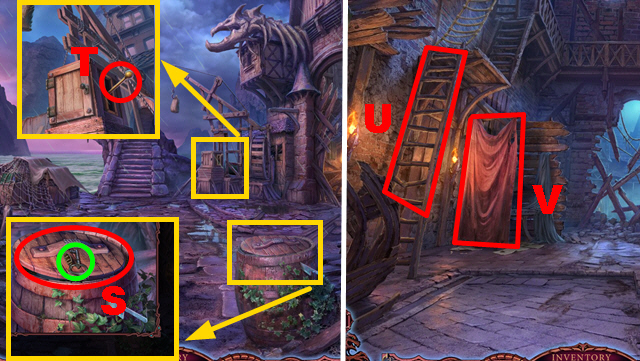
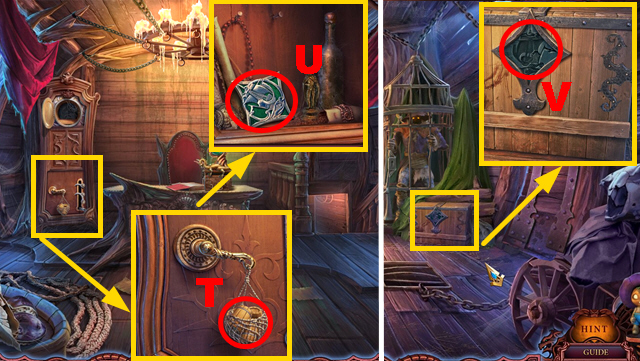
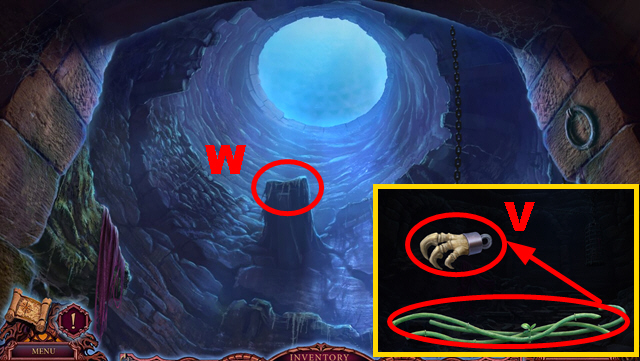
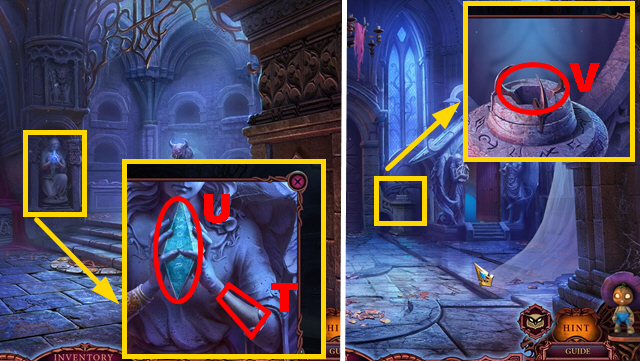
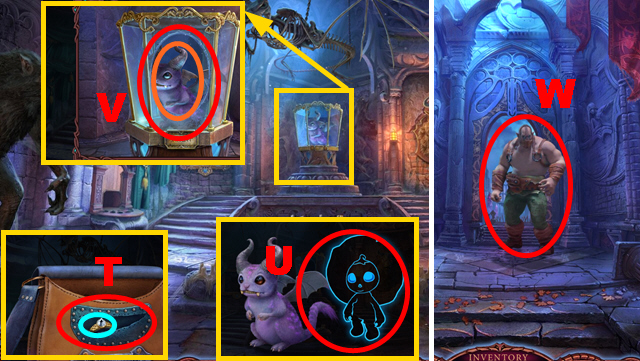
- Push the barrel (S); take the HOOK (T).
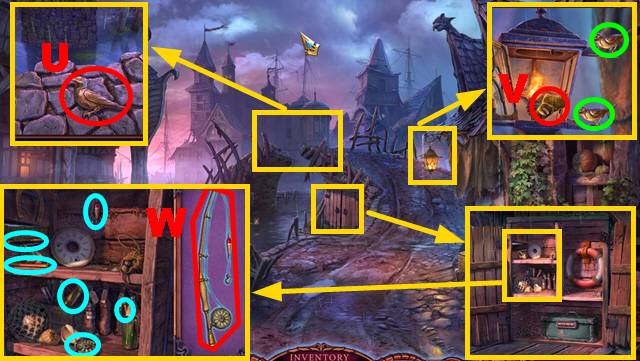
- Connect the TWINE to the HOOK (U); take the HOOK ON ROPE.
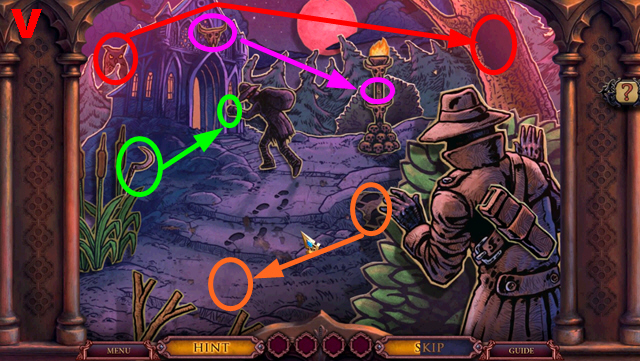
- Use the HOOK ON ROPE (V); collect the CORKSCREW when the marker (orange) hits the area (W).
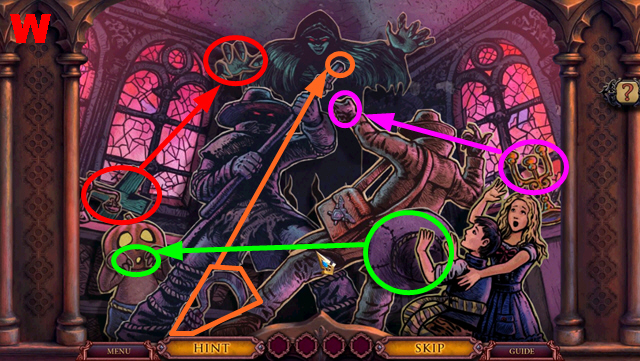
- Place the CORKSCREW (X).
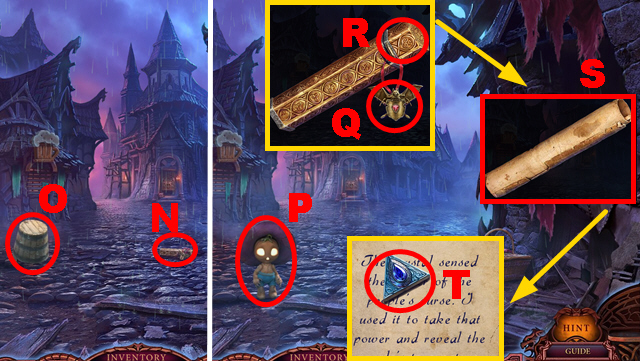
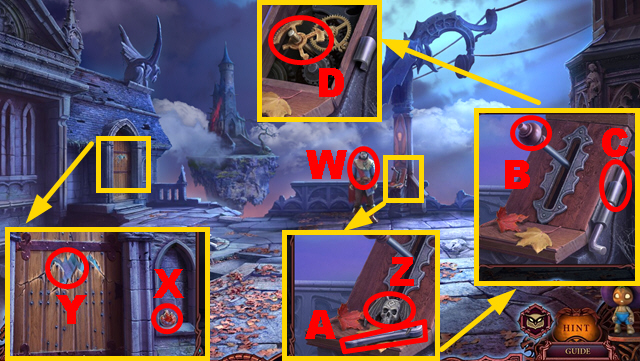
- Use the BROOM (Y); take the FISH TAIL (green).
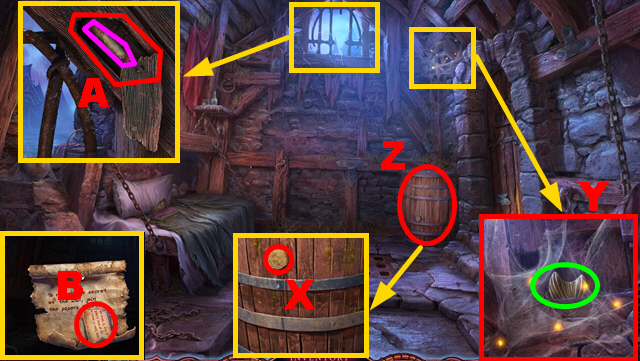
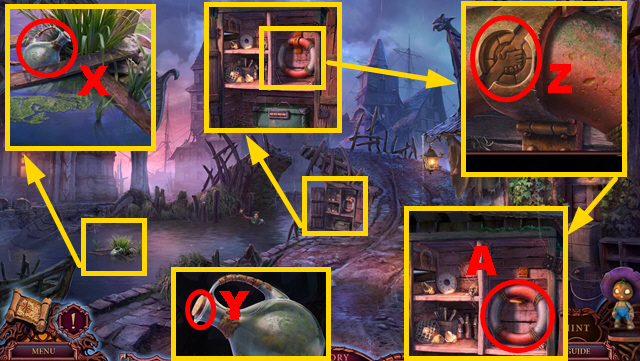
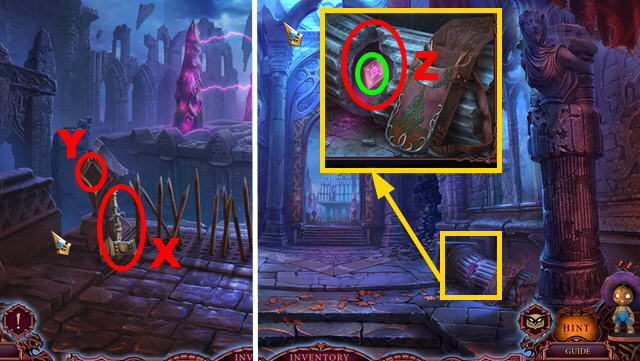
- Move the barrel (Z).
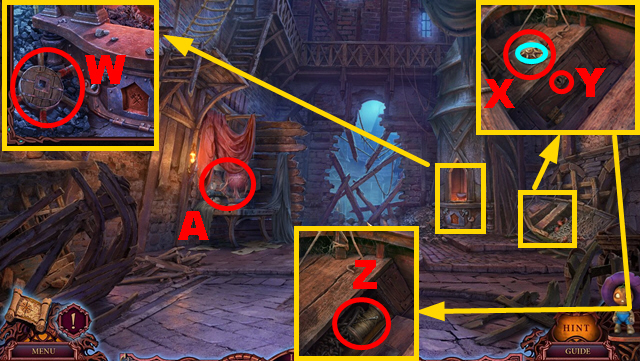
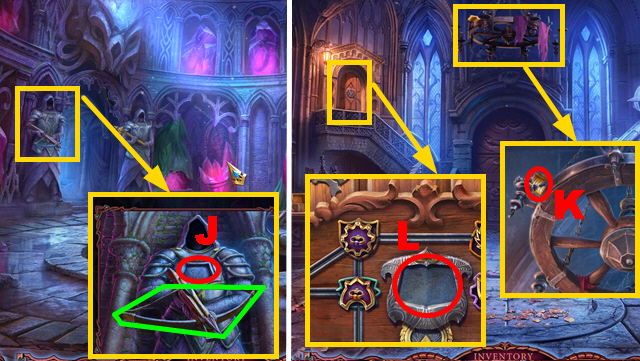
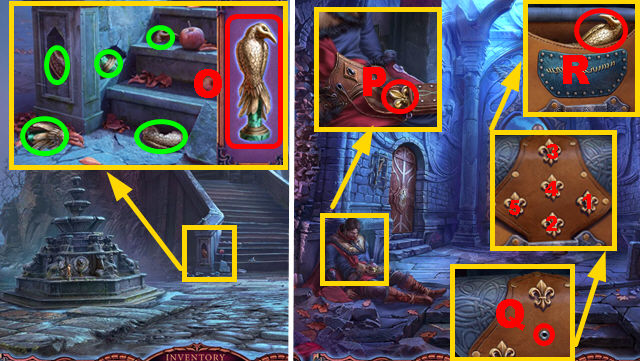
- Remove the wood (A); take the SCROLL (purple).
- Unfold the SCROLL; take the PAPER PIECES (B).
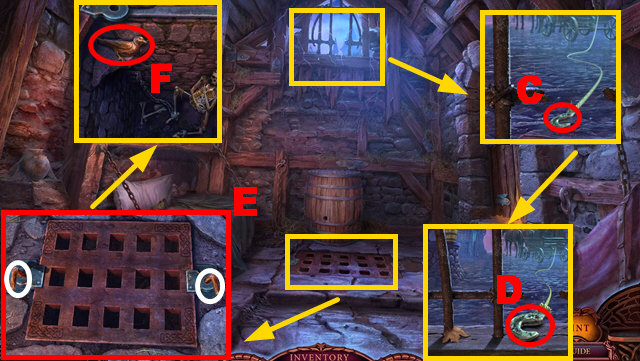
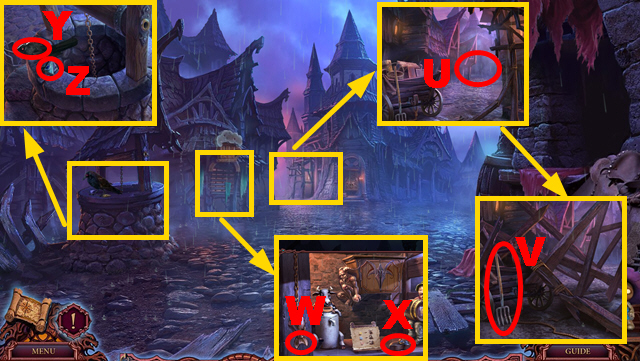
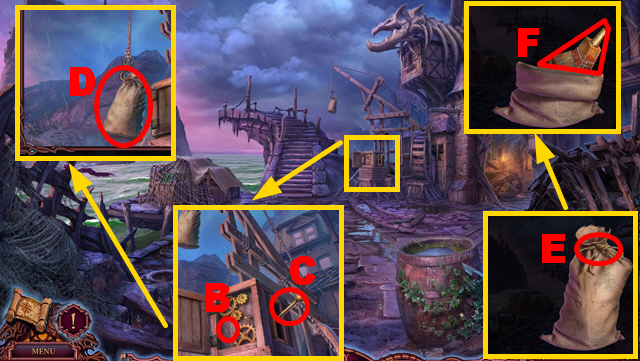
- Throw the HOOK ON ROPE (C); move the hook (D).
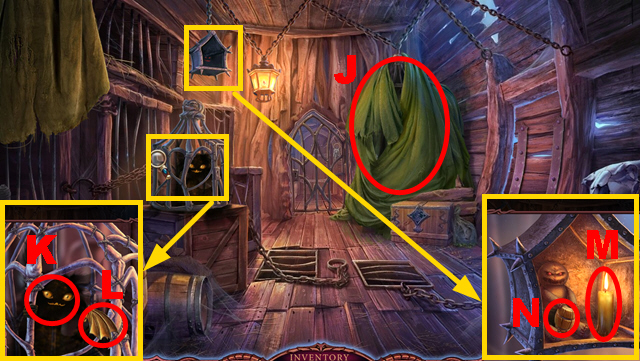
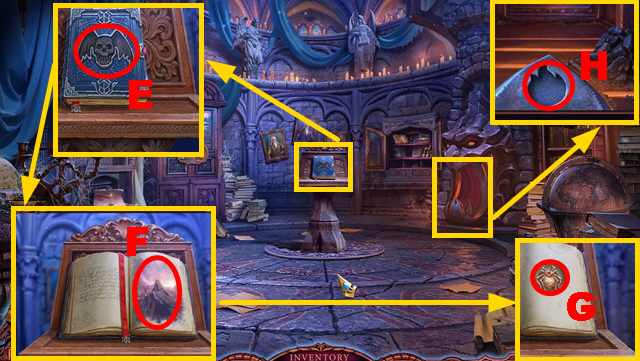
- Remove the locks (white); open the grate (E).
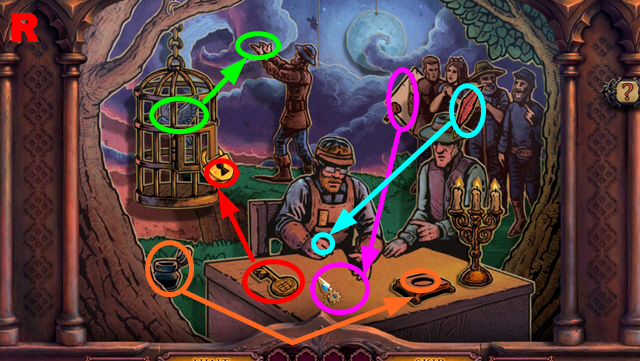
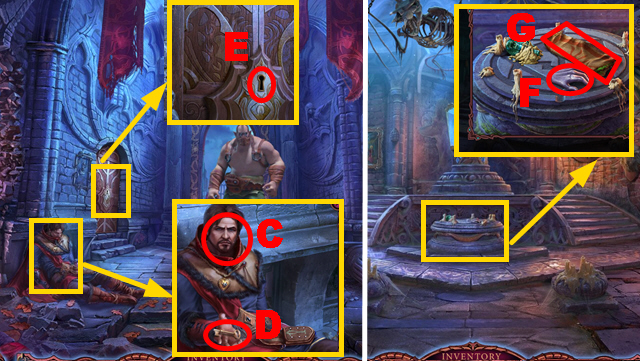
- Take the BIRD (F).
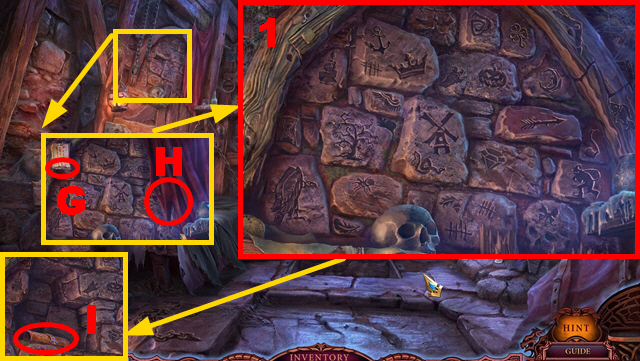
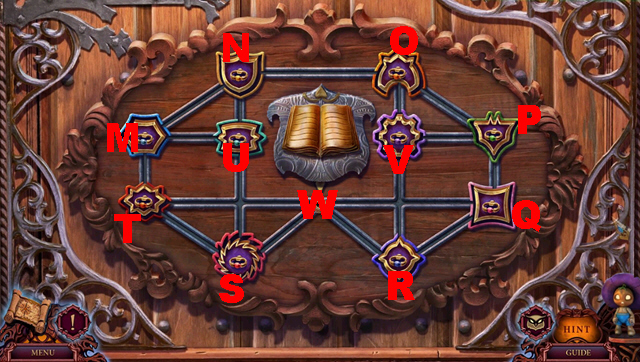
- Move the curtain (H); place the PAPER PIECES (G).
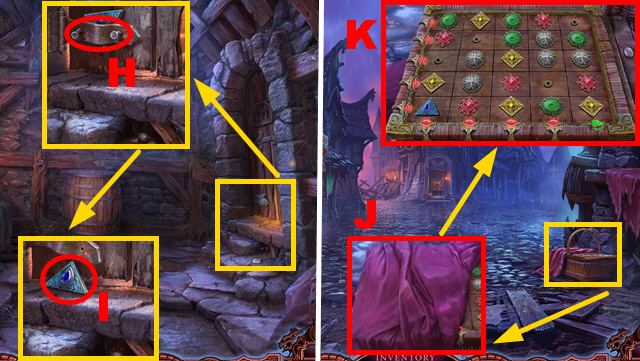
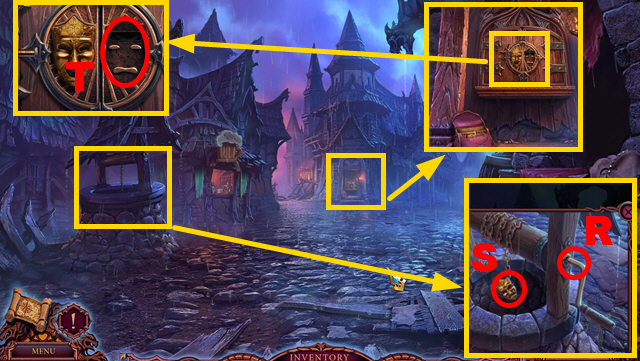
- Select 6 correct symbols (1); the required symbols are randomized.
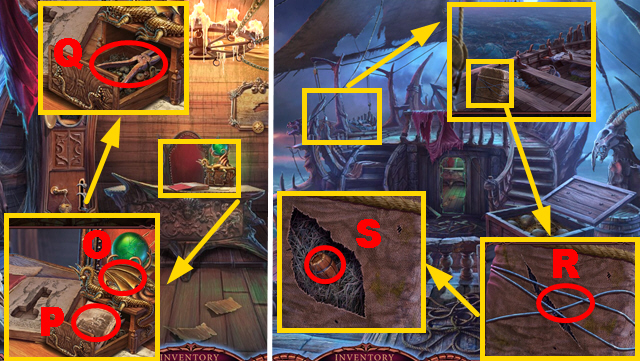
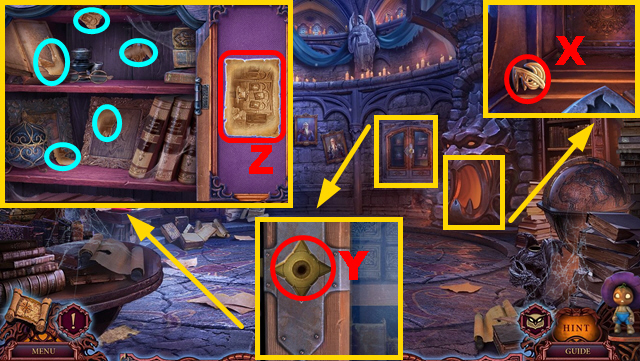
- Remove 3 stones; take the LEATHER CASE (I).
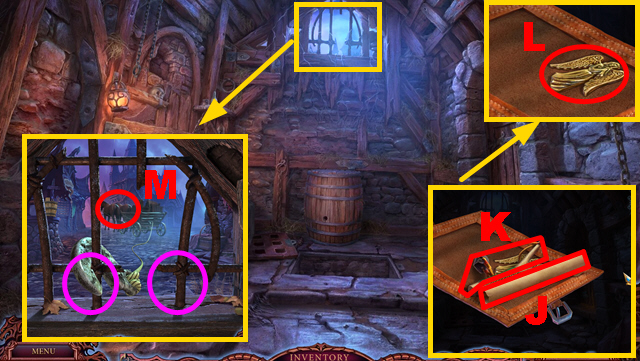
- Unfold the LEATHER CASE twice; take the map (J), SLINGSHOT (K), and ANGEL (L).
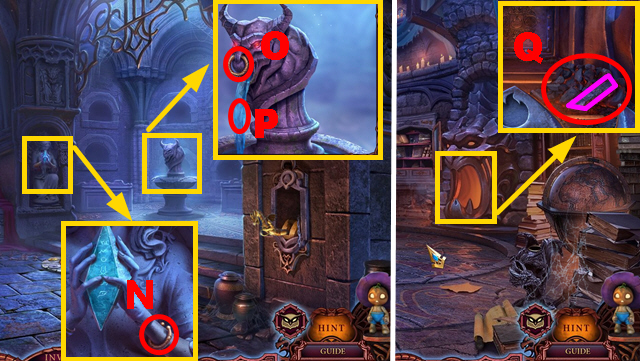
- Use the SLINGSHOT (M); remove 2 metal bars (purple).
- Move forward.
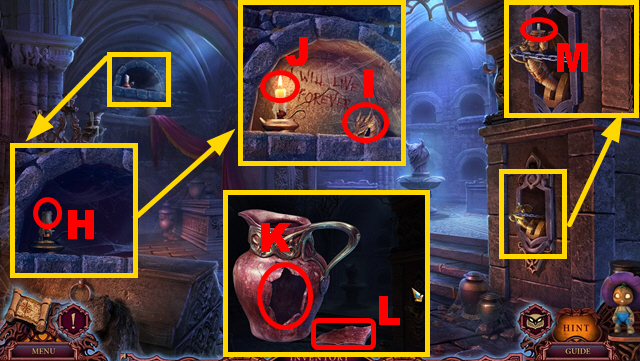
- Take the GOLDEN TUBE (N).
- Remove the bucket (O).
- Take the scarecrow boy (P).
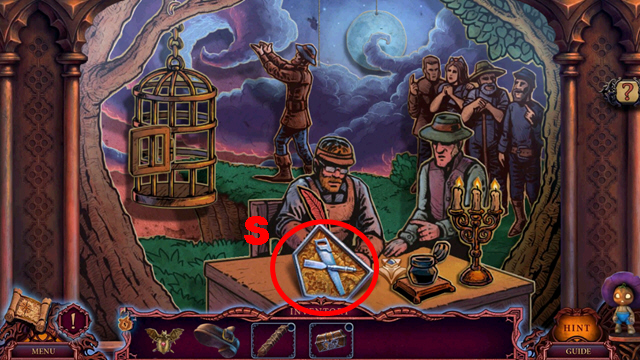
- Take the BADGE (Q) of the GOLDEN TUBE; open the GOLDEN TUBE (R).
- Unfold the scroll (S); take the photo and TILE 1/4 (T).
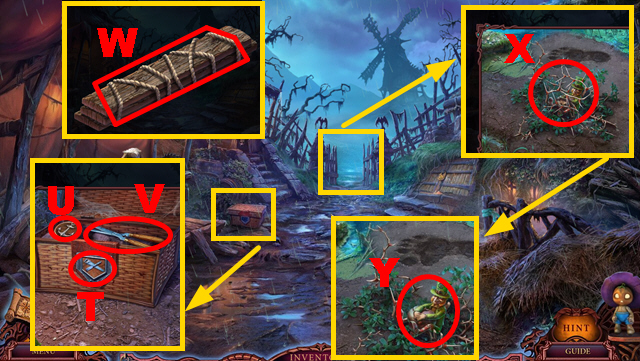
- Attempt to move forward (U); take the PITCHFORK (V).
- Place the FISH TAIL (W); take the BOOT (X).
- Use the scarecrow boy (Y); take TILE 2/4 (Z).
- Turn right.
- Try to take the axe (A); take the MUG (B).
- Take TILE 3/4 (C) from the MUG.
- Use the PITCHFORK (D); take the PLIERS (blue).
- Take the BOARDS (E).
- Grab the mask (F).
- Walk down.
- Place the MUG (G).
- Walk down.
- Use the PLIERS (H); take TILE 4/4 (I).
- Move forward.
- Remove the blanket (J); place 4 TILES (K).
- Play the mini-game.
- Solution: (L).
- Take the CHEESE (M).
- Walk down.
- Use the CHEESE (N); take the SILVER COIN (O).
- Move forward.
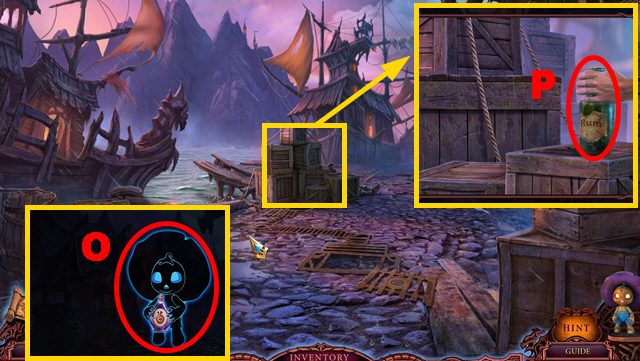
- Use the SILVER COIN (P); take the BEER (Q).
- Turn right.
- Use the BEER (R).
- Take the AXE (S).
- Walk down.
- Use the AXE (T).
- Move forward.
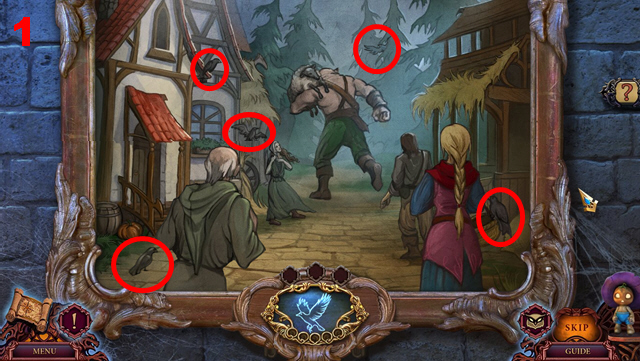
Chapter 2: The Bridge
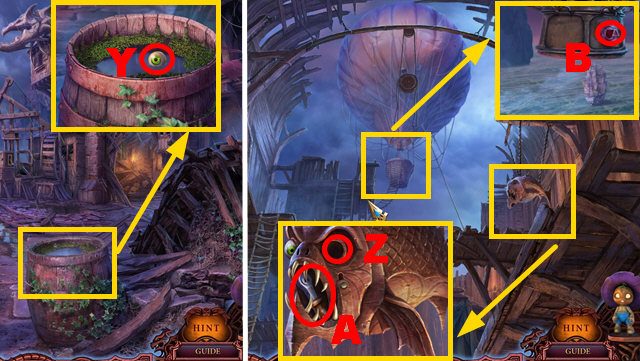
- Take the BIRD (U).
- Place 2 BIRDS (green); take the MASK HALF (V).
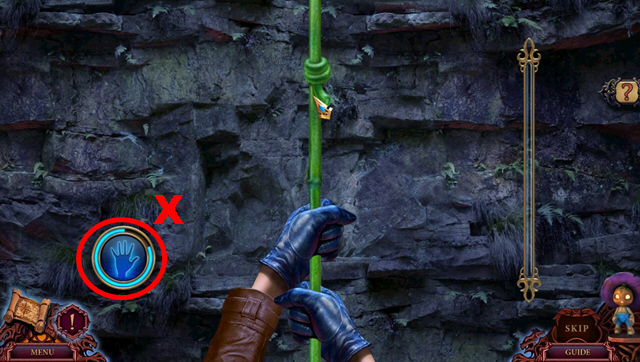
- Open the door; assemble the rod (blue).
- Take the FISHING ROD (W).
- Use the FISHING ROD to collect the JUG (X).
- Use the CORKSCREW to open the JUG (Y); you acquire the EMPTY JUG and RESCUE SYMBOL.
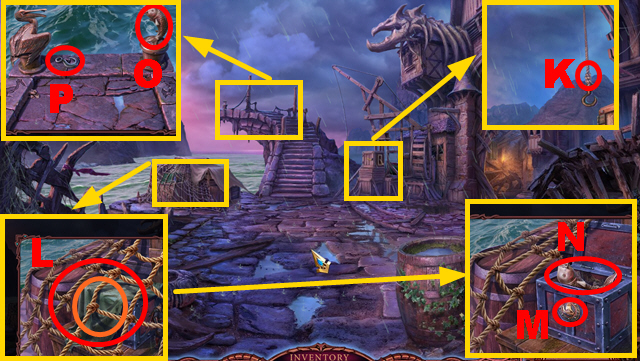
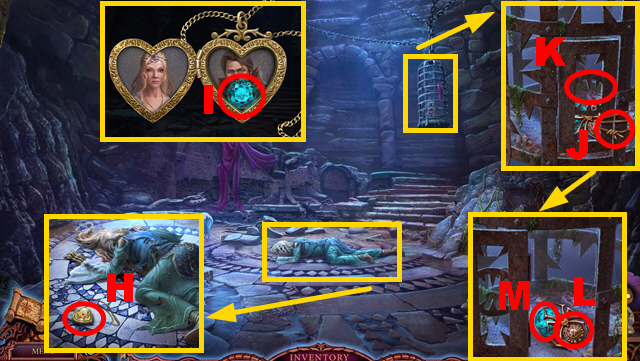
- Place the RESCUE SYMBOL (Z); take the LIFE PRESERVER (A).
- Throw the LIFE PRESERVER (B).
- Talk to the guard (C); take the GUARD BADGE (D).
- Walk down.
- Place the GUARD BADGE (E); take the ROPE (F).
- Walk down.
- Connect the scarecrow boy to the ROPE (G).
- Use the scarecrow boy to acquire the CHEST (H).
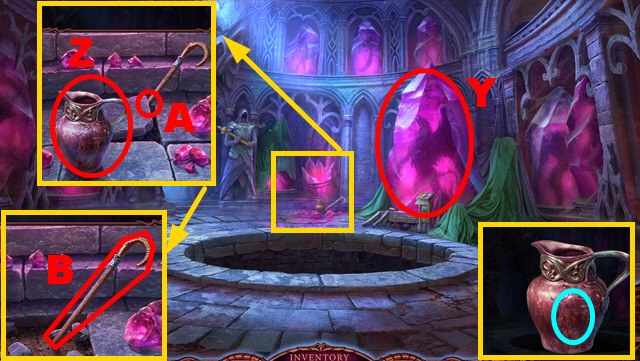
- Place the ANGEL on the CHEST (I); take the ACID (J).
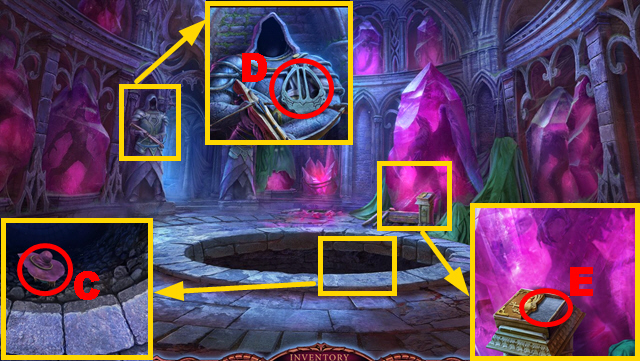
- Move forward.

- Place the EMPTY JUG (K).
- Turn right.
- Use the ACID (L).
- Examine the area (M); take the MASK HALF (N).
- Walk down.
- Place 2 MASK HALVES (O).
- Play the mini-game.
- Solution: P-R.
- Take the CARPENTER EMBLEM (S).
- Turn right.
- Place the CARPENTER EMBLEM (T); take the ANCHOR (U) and CLIPPERS (V).
- Cut the BOARDS loose with the CLIPPERS (W); remove the rope pieces and move the boards.
- Use the CLIPPERS (X); take the MONEYPOT (Y).
- Go to the Bridge.
- Place the BOOT on the MONEYPOT (Z).
- Use the CLIPPERS (A); take the SHOVEL (B).
- Walk down, turn right.
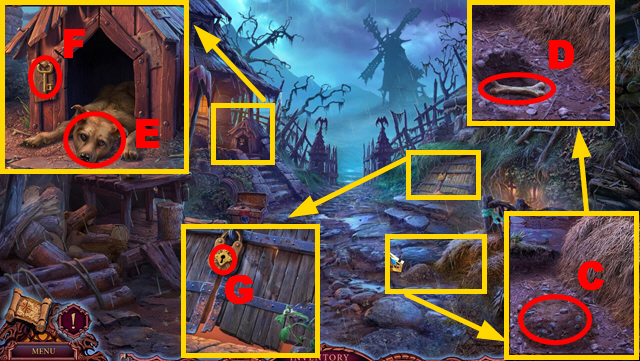
- Use the SHOVEL (C); take the BONE (D).
- Place the BONE (E); take the KEY (F).
- Insert the KEY (G).
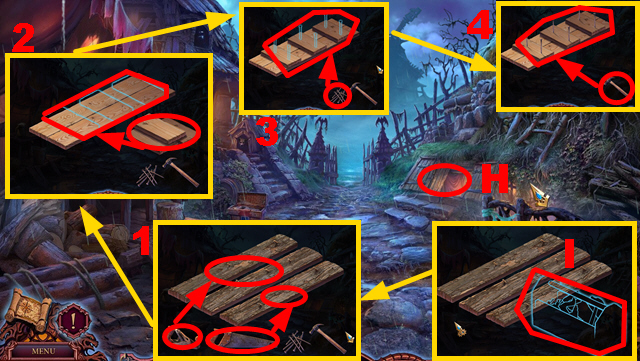
- Play the HOP (H) to receive the TOOLBOX.
- Combine the TOOLBOX and BOARDS (I); take out the tools.
- Assemble the boards: 1-4.
- You acquire the MAKESHIFT BRIDGE.
- Go to the Bridge.
- Place the MAKESHIFT BRIDGE (J).
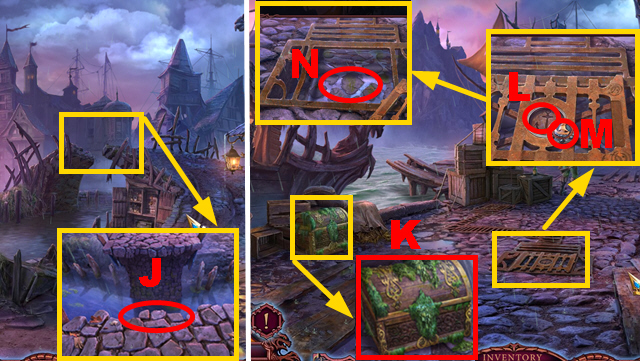
- Move forward.
- Remove the moss twice (K).
- Take the SHIP TILE (L); place the ANCHOR (M).
- Use the scarecrow boy (N).
- Take the CODE (O).
- Walk down.
- Enter the code (P); take the CRANK HANDLE (Q).
- Walk down.
- Place the CRANK HANDLE (R); take the MASK (S).
- Place the MASK (T).

- Play the mini-game.
- Solution: U-X.
- Take the SHAMROCK (blue).
- Place the SHAMROCK on the MONEYPOT (Y); take the BRONZE COIN (Z).
- Insert the BRONZE COIN (A); take the MILK (B).
- Combine the scarecrow boy and MILK (C).
- Turn left.
- Use the scarecrow boy (D) to acquire the DEMON.
- Place the DEMON on the CHEST (E); take the LOCKPICK (F).
- Move forward.
- Use the LOCKPICK (G).
- Play the HOP (H) to acquire the BAG WITH COINS.
- Open the BAG WITH COINS (I); pull out the coins.
- Play the mini-game.
- Find pairs (J) of coins.
- This puzzle is randomized.
- You receive the GOLD COIN.
- Walk down twice.
- Place the GOLD COIN (K).
- Arrange the labels correctly (L); look at the note (M).
- Take the SLEEPING POTION (N).
- Go to the Harbor.
- Combine the scarecrow boy and SLEEPING POTION (O).
- Use the scarecrow boy (P).
- Move forward.
- Play the mini-game.
- Solution: 1-9.
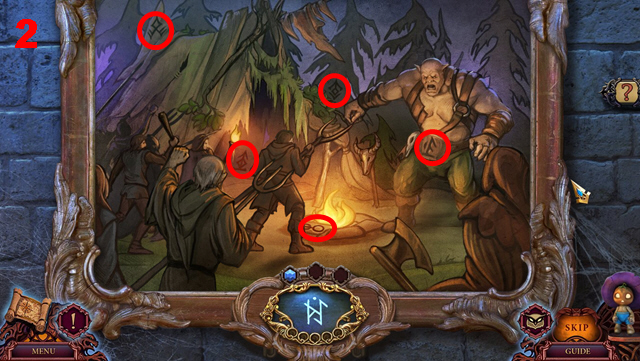
Chapter 3: The Pier
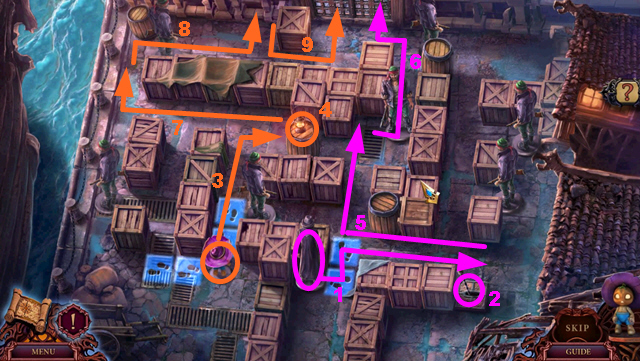
- Remove the boards twice (Q).
- Take the KNIFE HANDLE (R).
- Take the BOAT KEY (green); remove the lid (S).
- Pull the lever (T).
- Turn right.
- Try to climb up the ladder (U).
- Move the curtain (V).
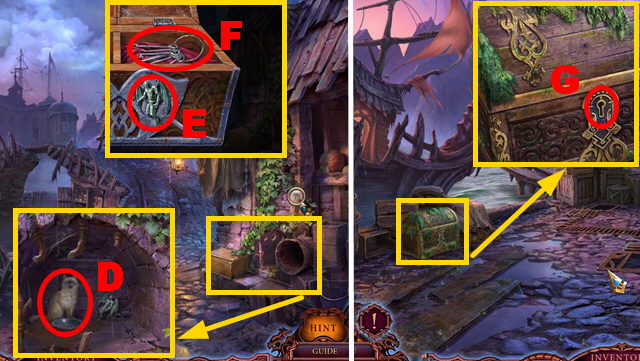
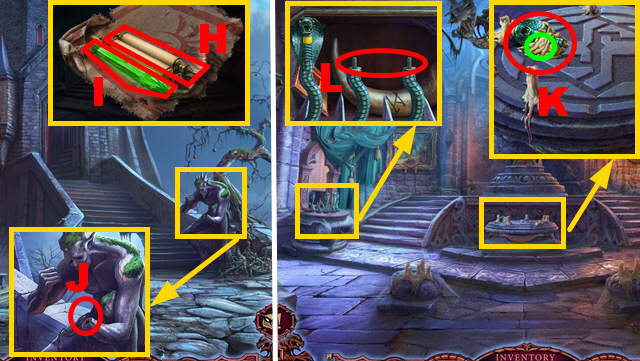
- Take the WHEEL (W), BROKEN TOKEN (blue), and LEATHER (X).
- Insert the BOAT KEY (Y); take the NEEDLE (Z).
- Play the HOP (A) to acquire the GEAR.
- Walk down.
- Place the GEAR (B); pull the lever (C).
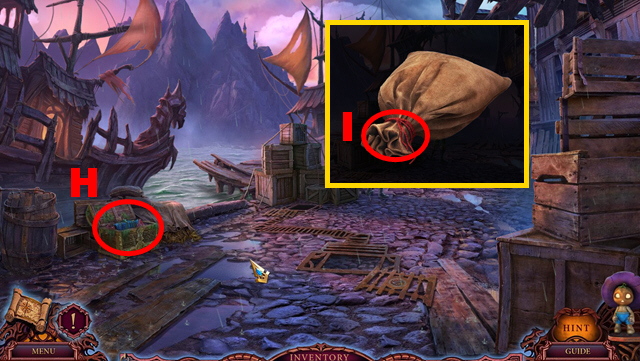
- Take the BAG (D).
- Open the BAG twice (E); take the BROKEN BELLOWS (F).
- Turn right.
- Use the LEATHER and NEEDLE to repair the BROKEN BELLOWS (G); you receive the BELLOWS.
- Use the BELLOWS (H); take the BRUSH WITH RESIN (I).
- Walk down.
- Use the BRUSH WITH RESIN and KNIFE HANDLE (purple); take the KNIFE (J).
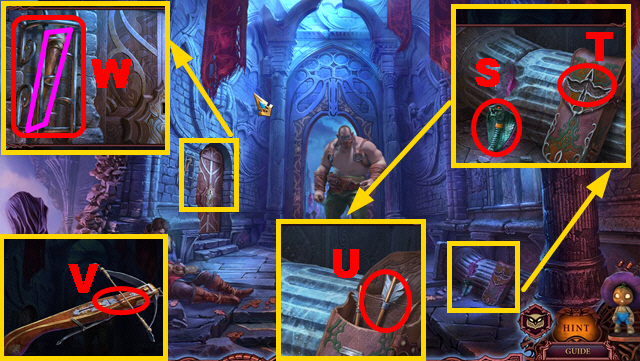
- Use the KNIFE to collect the HOOK (K).
- Use the KNIFE to acquire the NET PIECES (L); remove the cloth (orange).
- Place the SHIP TILE (M); take the FISH (N).
- Place the FISH (O); take the HOOK (P).
- Turn right.
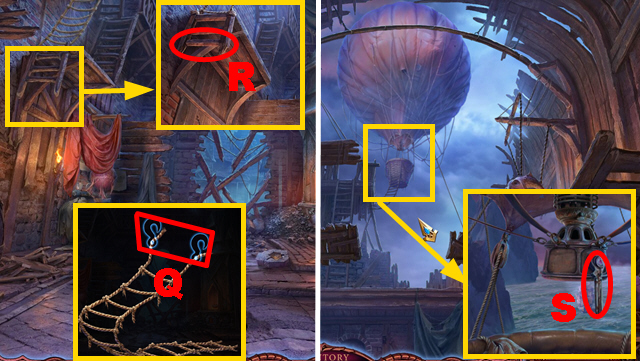
- Place 2 HOOKS on the NET PIECES (Q); take the LADDER.
- Place the LADDER (R).
- Climb up.
- Try to turn the handle (S).
- Take the PICKAXE (T); place the WHEEL (U).
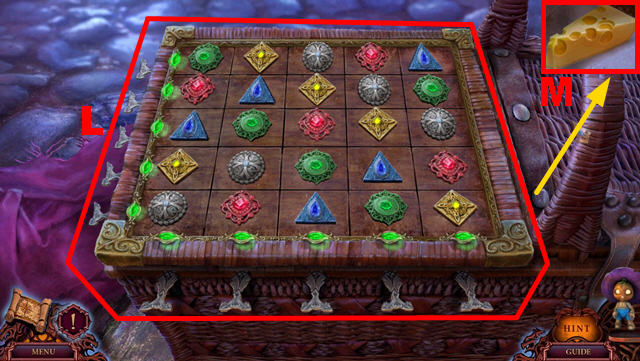
- Activate buttons 1-2.
- Walk down.
- Use the PICKAXE (V); take the TILE (orange).
- Place the TILE (W); take the TONGS (X).
- Walk down.
- Use the TONGS to collect the FISH EYE (Y).
- Turn right, climb up.
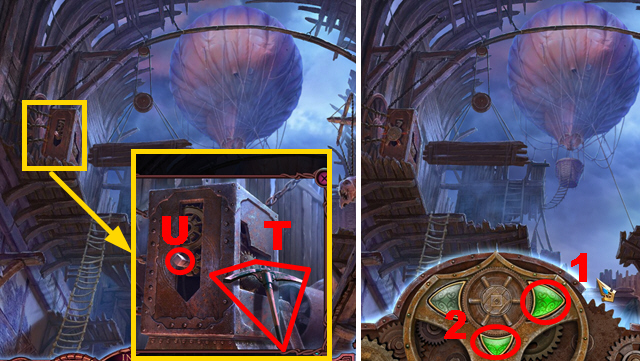
- Place the FISH EYE (Z); take the HANDLE (A).
- Place the HANDLE (B).
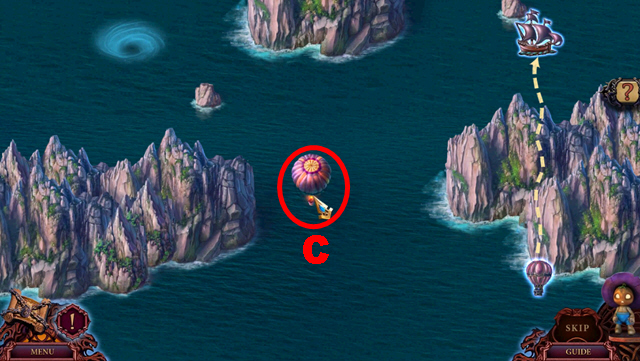
- Play the mini-game.
- Guide the balloon (C) away from obstacles.
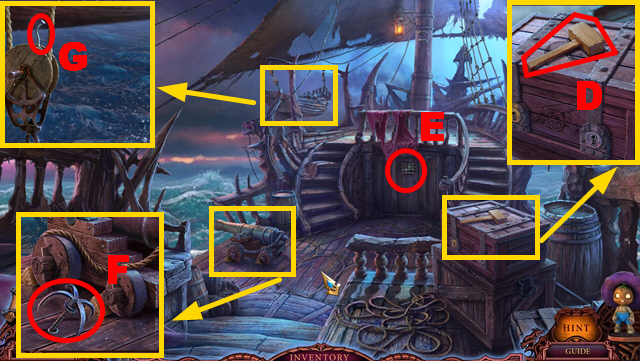
- Take the MALLET (D).
- Examine the door (E).
- Take the HOOK (F).
- Use the TONGS to remove the nail (G).
- Collect 5 parts (purple); take the CHAIN (H).
- Connect the CHAIN to the HOOK (I); take the HOOK WITH CHAIN.
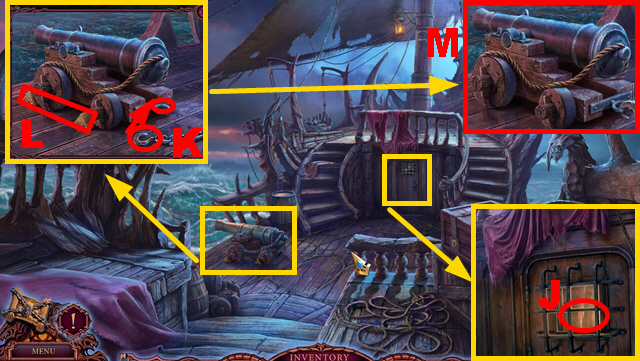
- Connect the HOOK WITH CHAIN to the door (J) and cannon (K).
- Use the MALLET (L); push the cannon (M).
- Move forward.
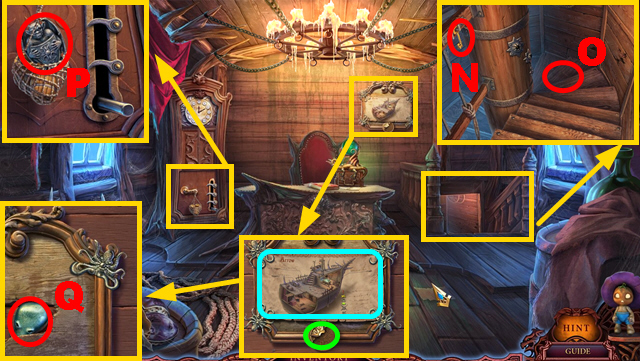
- Take the COPPER KEY (N).
- Try to go downstairs (O).
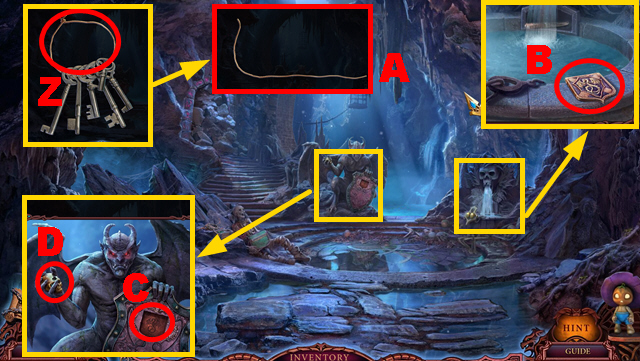
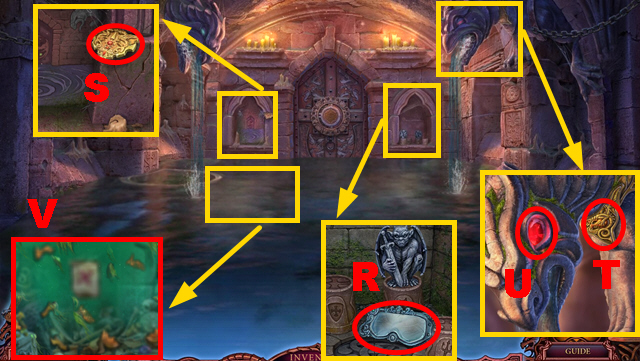
- Take the GARGOYLE (P).
- Place the BROKEN TOKEN (green); take the map (blue) and OCTOPUS HEAD (Q).
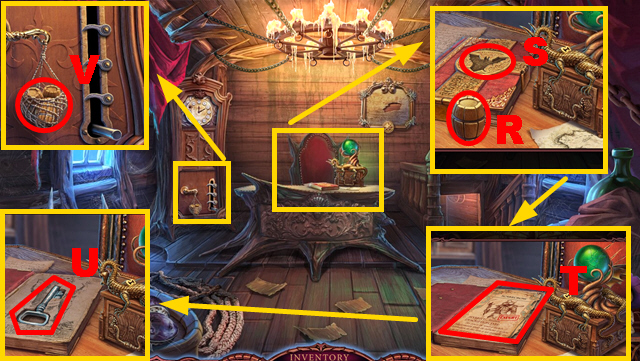
- Take the BARREL (R); place the BADGE (S).
- Take the notes (T) and SILVER KEY (U).
- Place the BARREL (V).
- Walk down.
- Insert the COPPER KEY (W) and SILVER KEY (X); take the CANNONBALL (Y).
- Move forward.
- Use the CANNONBALL (Z).
- Go downstairs.
Chapter 4: The Hold

- Take the NUMBER (A).
- Walk down.
- Place the NUMBER (B).
- Play the mini-game.
- Solution: (C).
- Take the STEPS (D).
- Walk down.
- Place the STEPS (E); hit them with the MALLET.
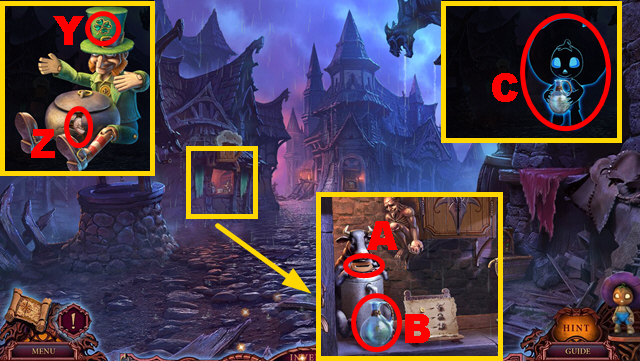
- Use the scarecrow boy (F) to acquire the LAMP.
- Place the OCTOPUS HEAD on the LAMP (G); take the CANDLE (H).
- Move forward twice.
- Use the CANDLE (I).
- Examine the cage (J).
- Talk to the creature (K); take the WING (L).
- Place the CANDLE (M); take the BARREL (N).
- Walk down.
- Place the WING (O); take the notes (P) and WIRE CUTTERS (Q).
- Walk down.
- Use the WIRE CUTTERS (R).
- Open the package; take the BARREL (S).
- Move forward.
- Place 2 BARRELS (T); take the BOX BADGE (U).
- Move forward.
- Place the BOX BADGE (V).

- Play the HOP (W) to acquire the GRAPES.
- Use the GRAPES (X).
- Play the mini-game.
- Solution: 1-3.
- Take the KEYS (Y).
- Turn right.
- Bend the wire from the KEYS three times (Z); remove the keys.
- Bend the wire twice (A); take the CLIP.
- Take the SHIELD PLATE (B).
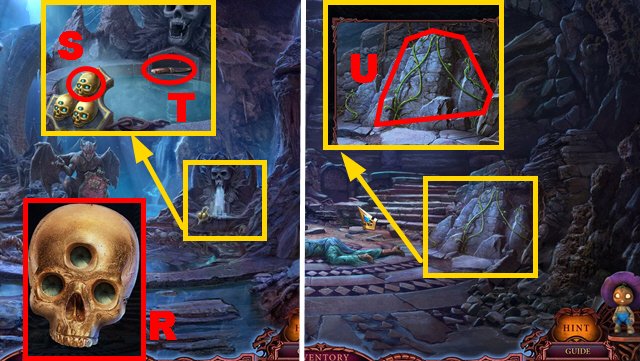
- Place the SHIELD PLATE (C); take the SKULL (D).
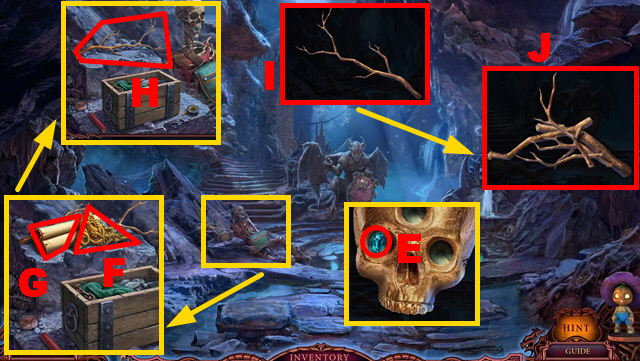
- Remove the gem from the SKULL (E).
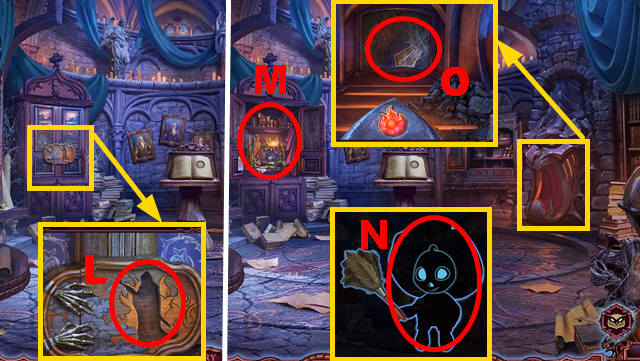
- Take the GOLD TILE (F), map (G), and BRANCH (H).
- Break the BRANCH four times (I); take the KINDLING (J).
- Collect 5 pieces (green); take the DYNAMITE (K).
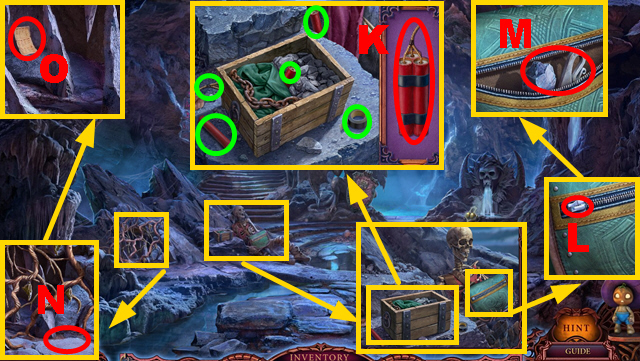
- Place the CLIP (L); take the FLINT (M).
- Place the KINDLING (N); light it with the FLINT.
- Use the scarecrow boy (O) to acquire the PAPER.
- Place the DYNAMITE (P); light it with the FLINT.
- Play the HOP (Q) to open the door.
- Turn left, try to move forward.
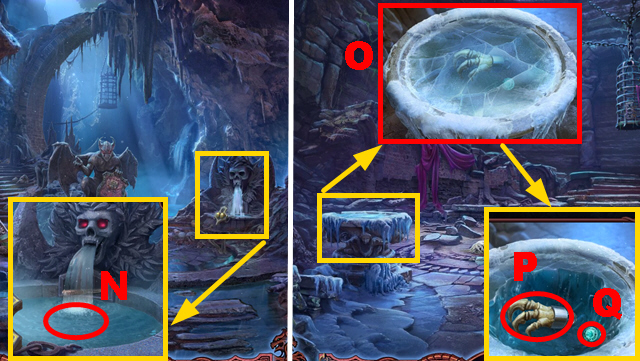
- Take the DIVING MASK (R).
- Grab the medallion (S).
- Place the GOLD TILE (T); take the RED EYE (U).
- Use the DIVING MASK (V) to play the HOP; you receive the BROKEN MEDALLION.
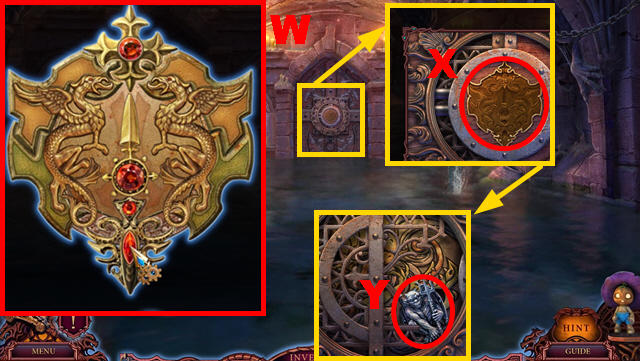
- Assemble the BROKEN MEDALLION (W) to acquire the MEDALLION.
- Place the MEDALLION (X); take the GARGOYLE (Y).
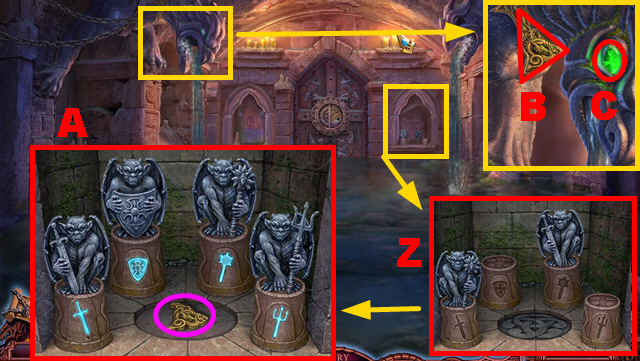
- Place 2 GARGOYLES (Z).
- Play the mini-game.
- Solution: (A).
- Take the GOLD TILE (purple).
- Place the GOLD TILE (B); take the GREEN EYE (C).
- Place the GREEN EYE (D) and RED EYE (E).
- Use the MALLET (F); take the GOBLET (G).
- Move forward.
- Take the LOCKET (H).
- Open the LOCKET; take the EYE (I).
- Unfold the wire 3 times (J); open the door (K).
- Take the SPIDER (L) and EYE (M).
- Walk down twice.
- Hold the GOBLET (N) to acquire the HOT WATER.
- Move forward twice.
- Use the HOT WATER (O); take the CLAW (P) and EYE (Q).
- Walk down twice.
- Place 3 EYES on the SKULL (R) to acquire the FULL SKULL.
- Place the FULL SKULL (S); take the KNIFE (T).
- Move forward twice.
- Use the KNIFE to acquire the VINES (U).
- Move up.
- Connect the VINES to the CLAW (V) to acquire the ROPE WITH CLAW.
- Throw the ROPE WITH CLAW (W).
- Climb up.
- Play the mini-game.
- Select the icons (X) in time to climb up.
Chapter 5: The Crystal Hall
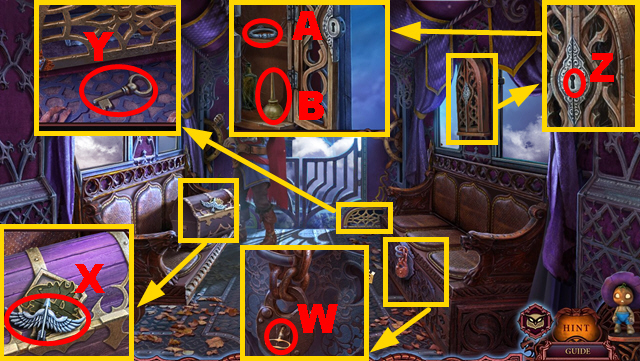
- Examine the area (Y).
- Take the BROKEN JUG (Z); use the KNIFE (A).
- Remove the stones; take the CANE (B).
- Remove the shard from the BROKEN JUG (blue).
- Use the CANE (C) to acquire the GRIFFIN TILE.
- Take the HARP (D).
- Place the GRIFFIN TILE (E) to play the HOP; you acquire the KEY.
- Turn left.
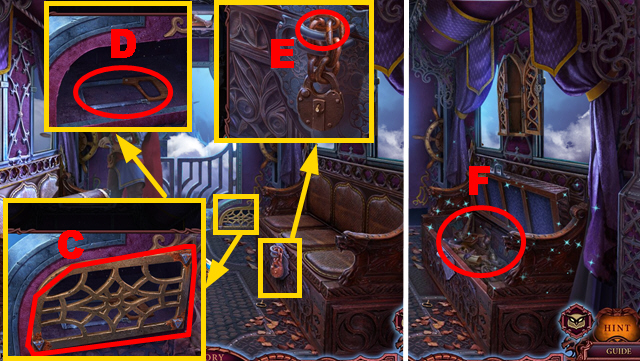
- Take the BOOK PART (F).
- Take the KNOB (G); use the KEY (H).
- Take the CROSSBOW PLATE (I).
- Walk down.
- Place the CROSSBOW PLATE (J); take the CROSSBOW (green).
- Turn left.
- Shoot the CROSSBOW (K) to acquire the BOOK PART.
- Place 2 BOOK PARTS (L).
- Play the mini-game.
- Solution: T-S-U-M-T-W-Q-P-O-N-M-T-S-W-R-Q-P-V-O-N-U-M-T-S-W-R-Q-P-O-N-M-T-S-W-R-V-O-N-U-S-W-Q-P-V-R-W-T-M-U-N-M-T-S-W-R-Q-P-O-N-U-S-W-Q-R-V-O-N-U-S-T-M-U-N-O-V-R-W-S-T-M-N-U-S-T-M-U-S-T-M-U-N-M-T-W-S-T-M.
- N-O-P-Q-R-W-Q-P-V-R-Q-W-T-M-U-S-W-T-M-N-U-S-T-M-N-U-S-W-T-M-N-U-S-T-M-N-U-M-T-S-W-T-M-U-S-T-M-U-S-W-Q-P-O-N-U-M-N-O-P-Q-W-R-V-P-Q-W.
- Turn left.
- Take the MYSTICAL SYMBOL (X).
- Place the KNOB (Y); turn it.
- Collect 5 pieces (blue); take the PAPER (Z).
- Arrange the portraits correctly (A).
- Take the HORN (B) and SEALING WAX (C).
- Walk down.
- Place the HARP (D) and HORN (E).
- Turn right.
- Grab the ring (F).
- Take the STONE (G).
- Use the FLINT (H).
- Take the DRAGON HEAD (I); use the SEALING WAX (J) to acquire the BURNING WAX.
- Apply the BURNING WAX to the BROKEN JUG (K); put the shard (L) on it and take the FIXED JUG.
- Place the DRAGON HEAD (M); pull the dragon.
- Take the RING (N).
- Place the RING (O); hold the FIXED JUG (P) to acquire the WATER.
- Walk down, turn left.
- Use the WATER (Q); take the COAL (purple).
- Walk down.
- Apply the COAL (R); activate symbols 1-4.
- Take the BRACELET (S).
- Turn right.
- Place the BRACELET (T); take the CRYSTAL (U).
- Walk down.
- Place the CRYSTAL (V).
- Move forward.
- Talk to the man (W).
- Take the FIRE TILE (X); peek through the door (Y).
- Take the SKULL KEY (Z) and WRENCH (A); pull the lever (B).
- Use the STONE (C); open the mechanism.
- Remove the broken gear (D).
- Walk down, turn left.
- Place the SKULL KEY (E); open the book.
- Examine the book (F); take the SPIDER (G).
- Place the FIRE TILE (H).
- Walk down, move forward.
- Place symbols 1-3 and the SYMBOL (I); take the SPIDER (J).
- Walk down, turn right.
- Place 3 SPIDERS (green); take the MAGE (K).
- Walk down, turn left.
- Place the MAGE (L).
- Play the HOP (M) to acquire the FEATHER DUSTER.
- Combine the scarecrow boy and FEATHER DUSTER (N).
- Use the scarecrow boy (O) to acquire the MACE PLATE.
- Walk down twice.

- Place the MACE PLATE (P); take the MACE (Q).
- Turn left, move forward.
- Use the MACE (R); move forward.
- Use the WRENCH (orange) and remove the plate; take the GEAR (S).

- Place the GEAR (T); close the mechanism.
- Pull the lever (U).
- Move forward.
- Turn the wheel three times (V).
- Grab the key (W).
- Take the ARROW KEY (X) and KEY (Y).
- Insert the KEY (Z); turn it.
- Take the HATCH HANDLE (A) and OILCAN (B).
- Use the OILCAN and WRENCH (C); take the HACKSAW (D).
- Use the HACKSAW (E).
- Play the HOP (F) to acquire the HALF EMBLEM.
- Place the HATCH HANDLE (G); pull it.
- Take the HALF EMBLEM (H); use the WRENCH (I).
- Place 2 HALF EMBLEMS (J); take the WHEEL (K).
Chapter 6: The Soaring Tower
- Place the WHEEL (L).
- Rotate the steering wheel (M).
- Take the BAG (N).
- Collect 5 pieces (green); take BIRD 1/3 (O).
- Move forward.
- Take the FLEUR-DE-LYS (P).
- Place the FLEUR-DE-LYS on the BAG (Q); activate the sequence 1-5.
- Take BIRD 2/3 (R).
- Take the ORANGE SNAKE (S); place the ARROW KEY (T).
- Take the ARROW (U).
- Place the ARROW on the EMPTY CROSSBOW (V); take the LOADED CROSSBOW.
- Use the HACKSAW (W); take the TORCH (purple).
- Walk down.

- Shoot the LOADED CROSSBOW (X); use the scarecrow boy (Y) to acquire BIRD 3/3.
- Place 3 BIRDS (Z).
- Play the mini-game.
- Solution: (A).
- Take the CUP WITH WATER (B).
- Move forward.
- Use the CUP WITH WATER (C); take the KEY (D).
- Insert the KEY (E).
- Turn left.
- Take the HAND (F) and PACKAGE (G).
- Walk down twice.
- Open the PACKAGE; take the scroll (H) and TOURMALINE (I).
- Use the HAND and TORCH (J) to acquire the LIGHTED TORCH.
- Move forward, turn left.
- Use the LIGHTED TORCH (green); take the BLUE SNAKE (K).
- Place the BLUE SNAKE and ORANGE SNAKE (L).
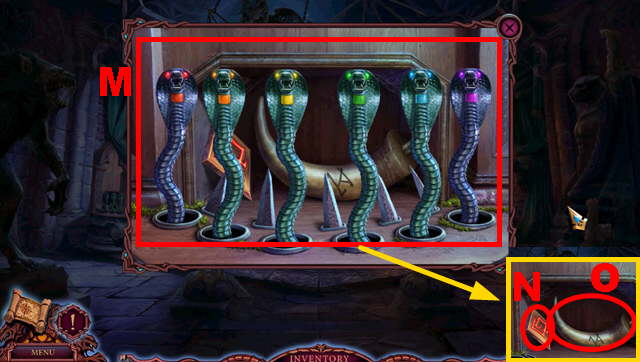
- Play the mini-game.
- Solution: (M).
- Take the RUNE (N) and HORN (O).
- Place the HORN (P); take the ORNAMENT (Q).
- Place the ORNAMENT (R).
- Play the mini-game.
- Solution: 1-3.
- Take the DAGGER (S).
- Use the DAGGER to open the BAG (T); take the DIAMOND RING (blue).
- Use the DIAMOND RING (V); take the MENGOSAUR (orange).
- Combine the MENGOSAUR and scarecrow boy (U).
- Walk down.
- Use the scarecrow boy (W).
- Move forward.
- Take the MAUL (X).
- Place the RUNE (Y).
- Walk down.
- Use the MAUL (Z); take the RUNE (green).
- Move forward.
- Place the RUNE (A).
- Move forward.

- Play the mini-game.
- Solution part (B): 1-9.
- Solution part (C): 1-10.
- Take the POTION (D).
- Use the POTION (E).
- Congratulations! You have completed League of Light: The Gatherer.
Created at: 2016-08-12