

Walkthrough Menu
- General Tips
- Chapter 1: Beginning
- Chapter 2: Scarecrow
- Chapter 3: Hooded Figure
- Chapter 4: Dark Wood
- Chapter 5: Red Moon
General Tips
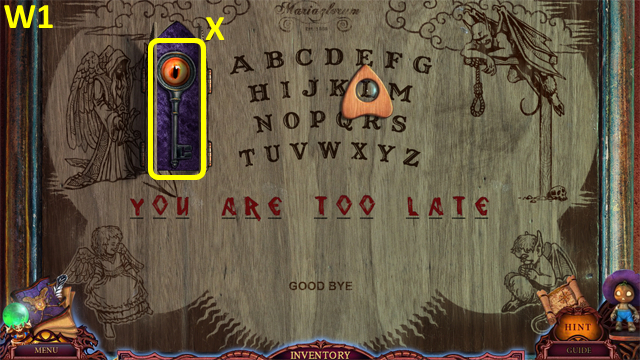
- This is the official guide for League of Light: Wicked Harvest.
- This guide will not mention each time you have to zoom into a location; the screenshots will show each zoom scene.
- Hidden-object puzzles are referred to as HOPs. This guide will not show screenshots of the HOPs, however, it will mention when an HOP is available and the inventory item you'll collect from it.
- This guide will give step-by-step solutions for all puzzles which are not random. Please read the instructions in the game for each puzzle.
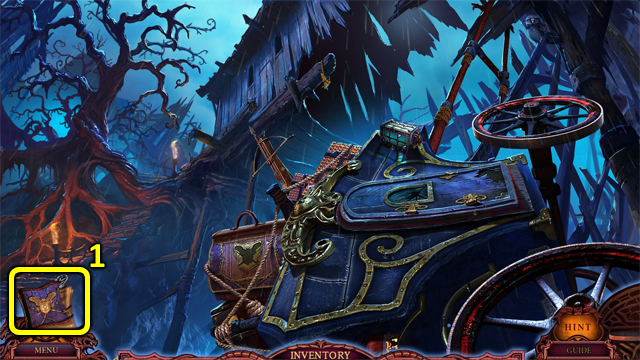
- Select the book (1) for story information.
Chapter 1: Beginning
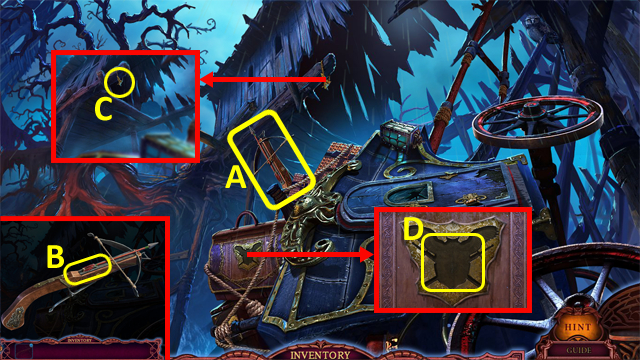
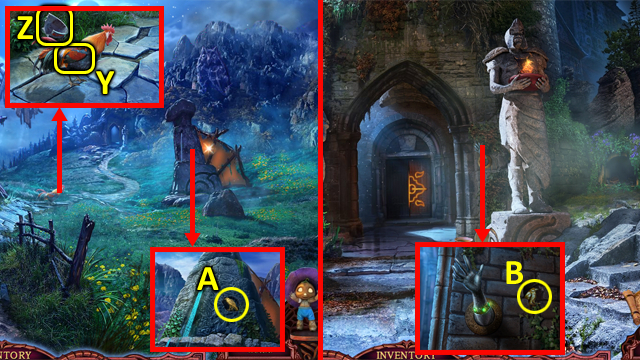
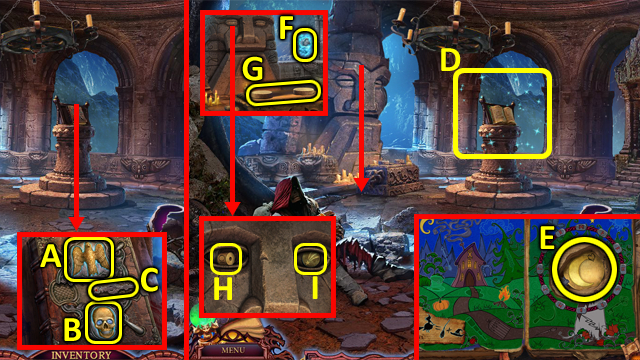
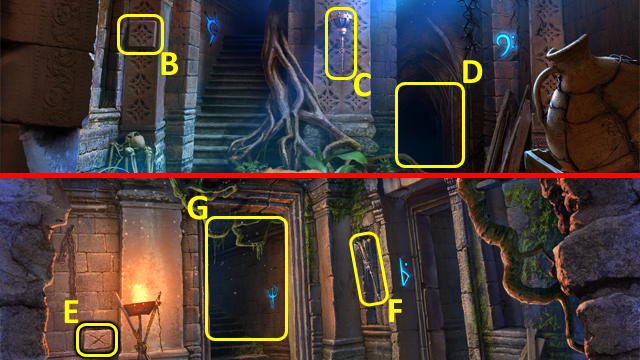
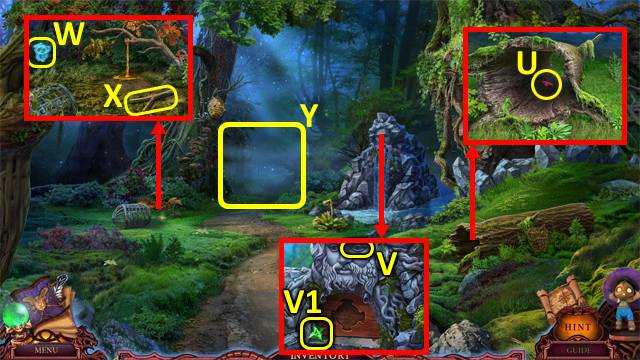
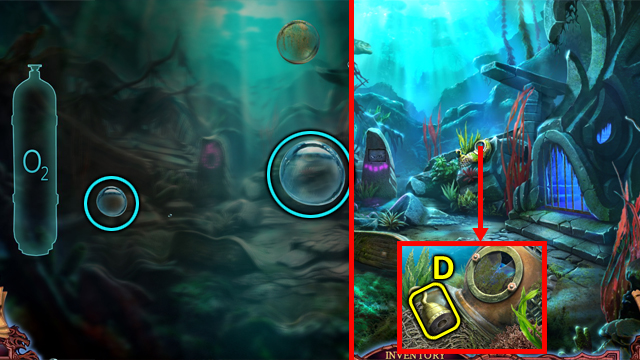
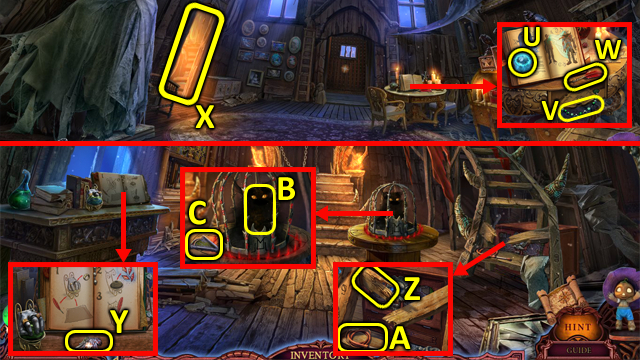
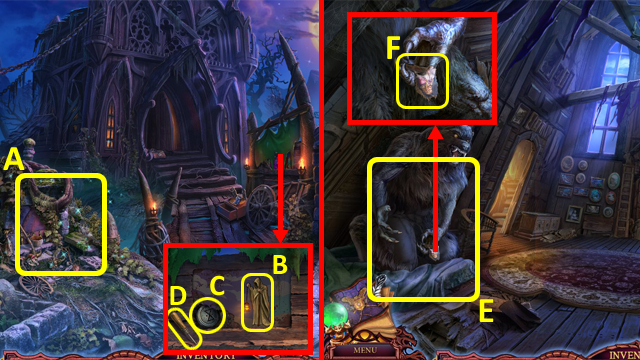
- Grab the CROSSBOW (A); select it in the Inventory and cock it (B).
- Use the CROSSBOW (C); receive an OWL BADGE.
- Place the OWL BADGE in the space (D) to trigger a puzzle.
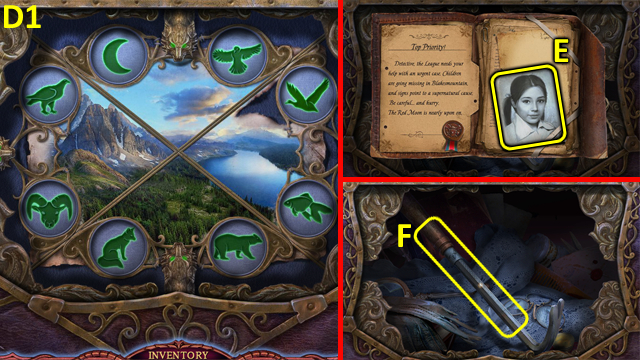
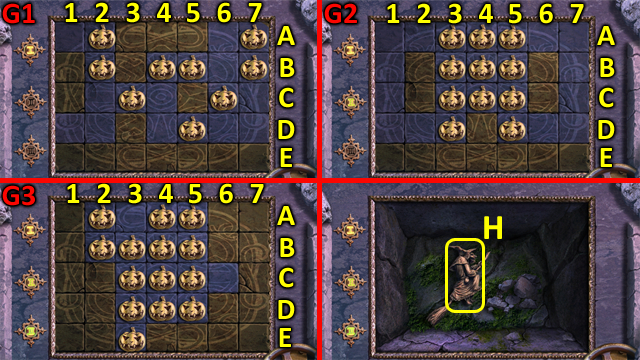
- Solution (D1).
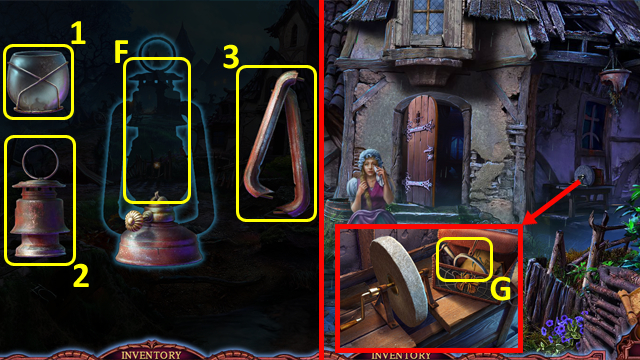
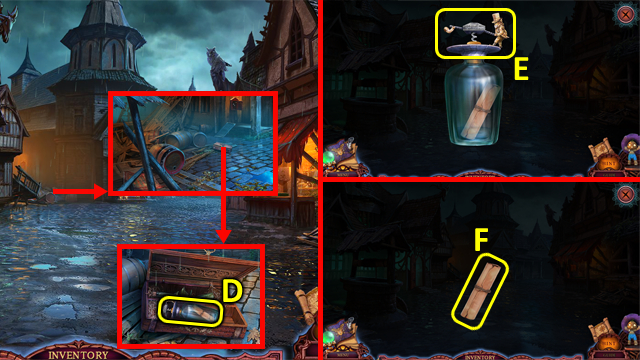
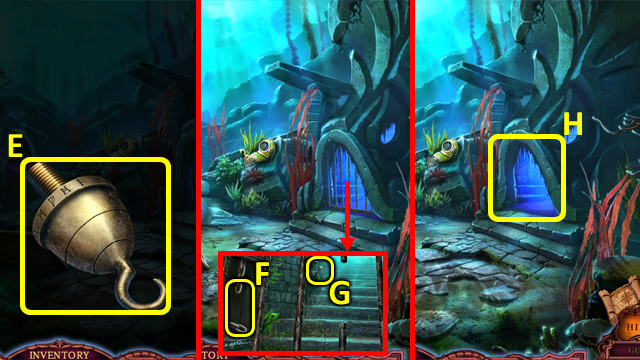
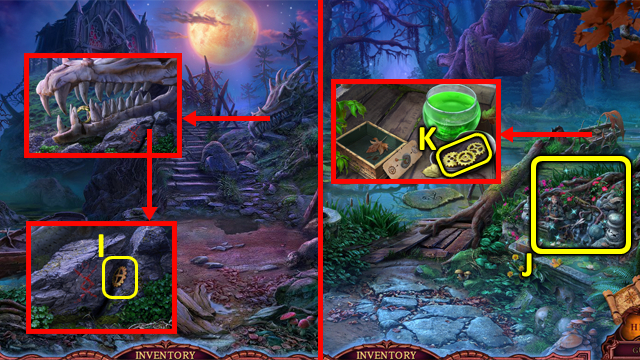
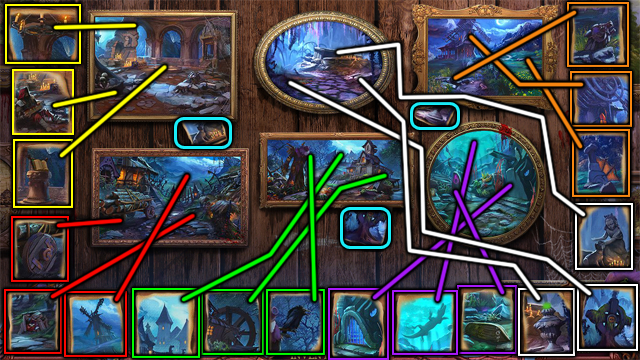
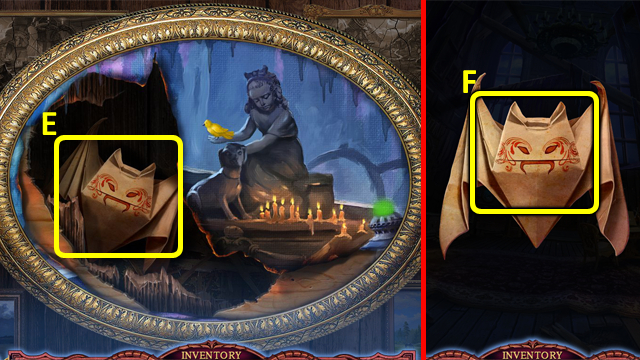
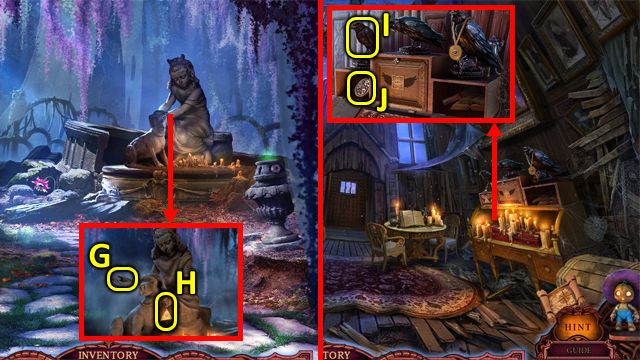
- Open the file; read the letter, then take the PHOTO (E) and CROWBAR (F).
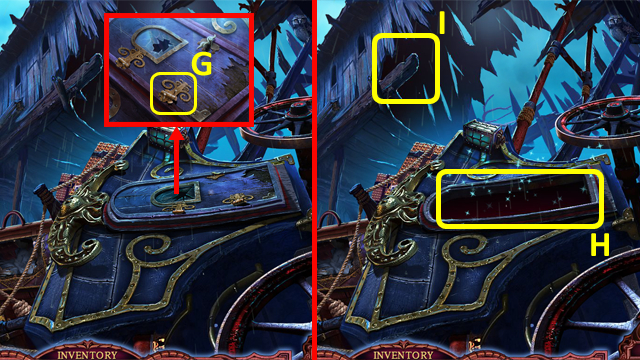
- Use the CROWBAR (G).
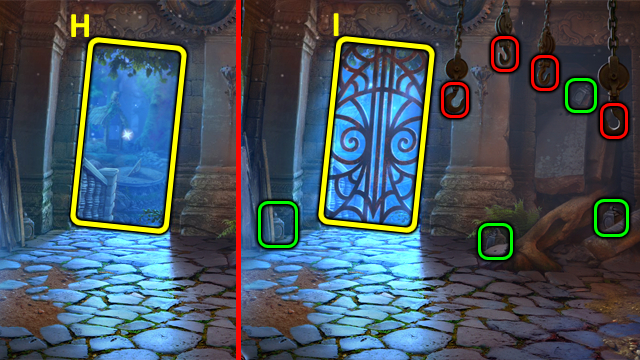
- Play the HOP (H); receive a GRAPPLING HOOK.
- Use the GRAPPLING HOOK (I).
- Select the scene.
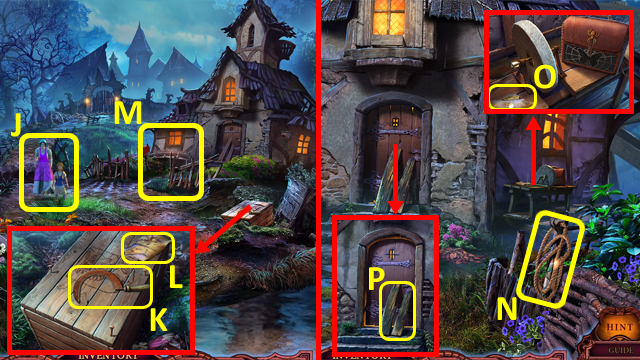
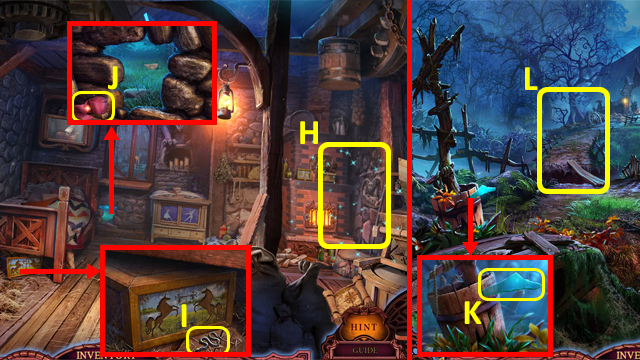
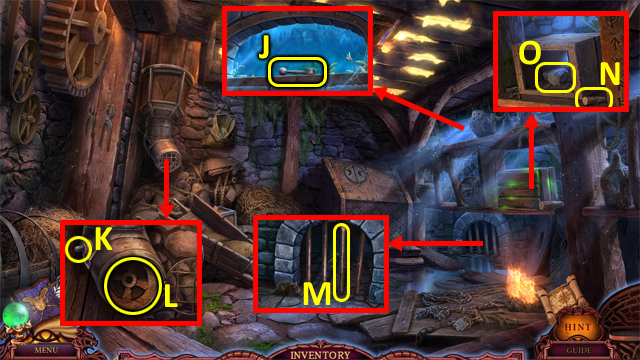
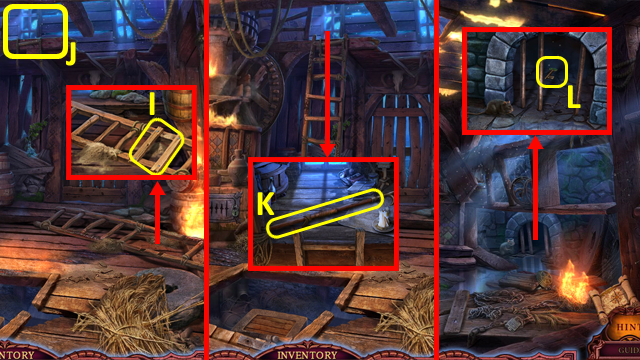
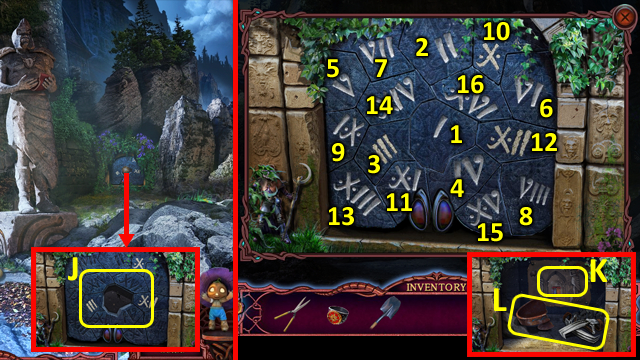
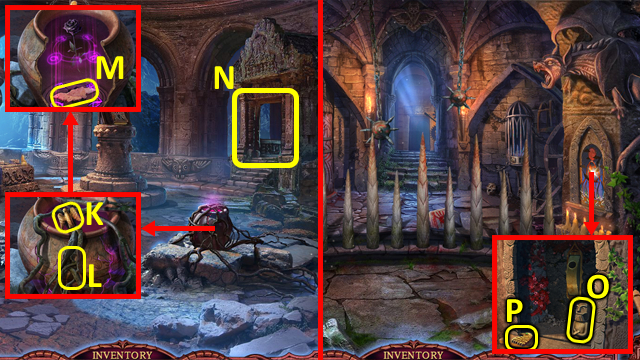
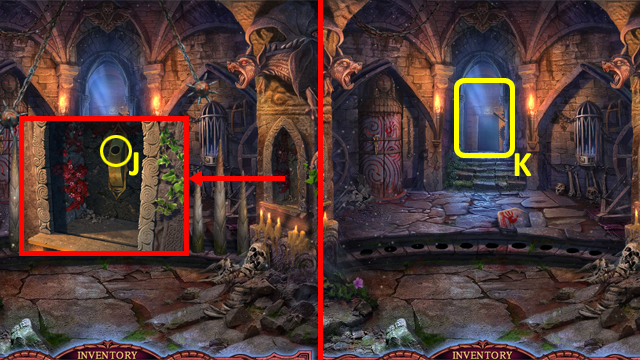
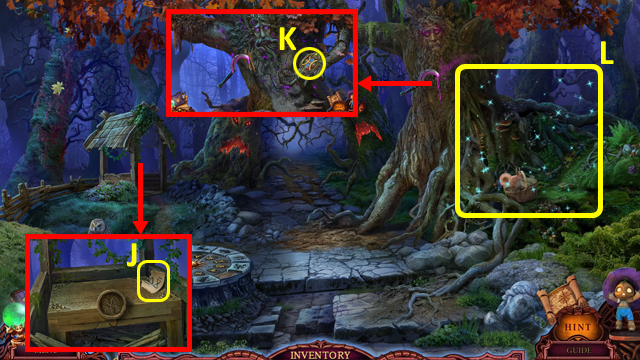
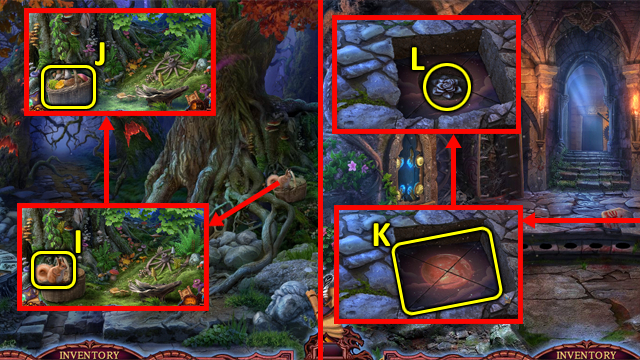
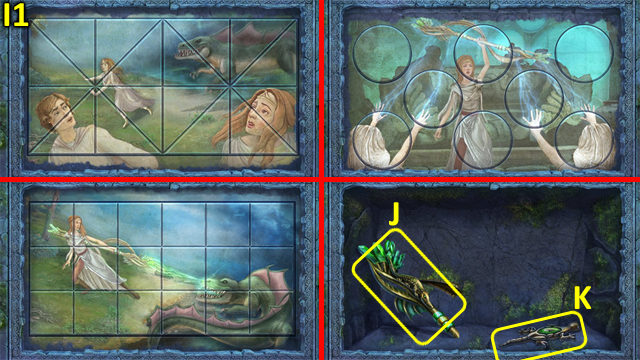
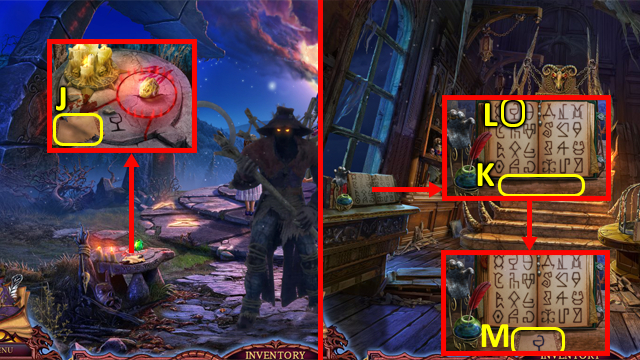
- Talk to the woman (J).
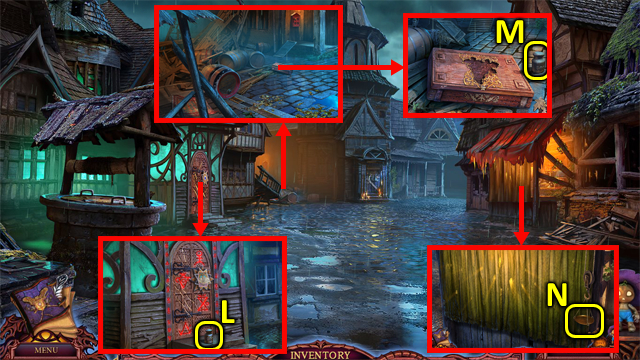
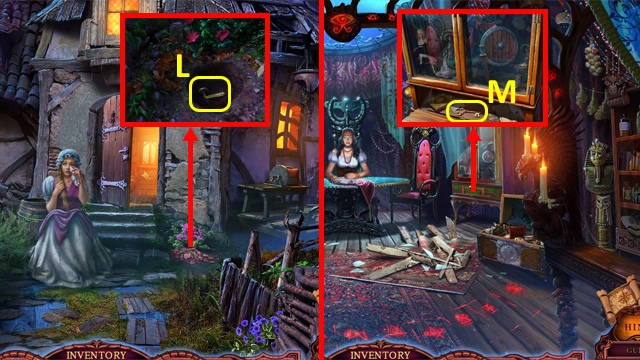
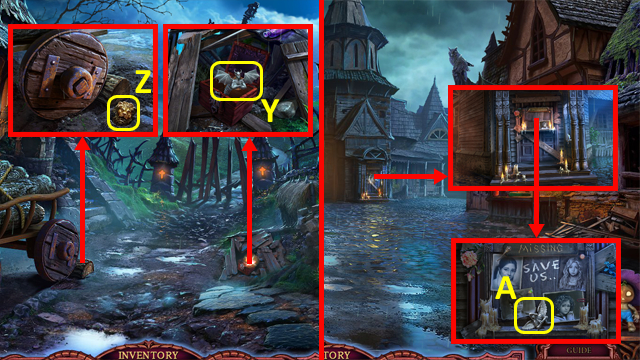
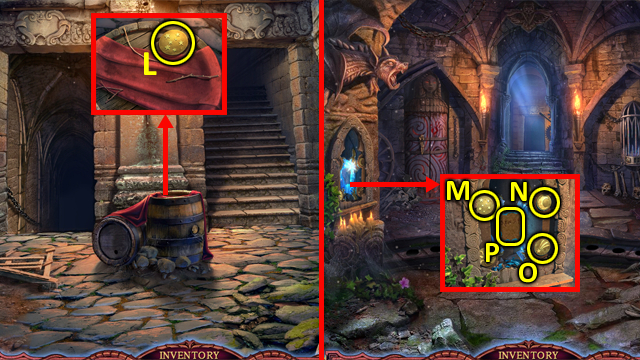
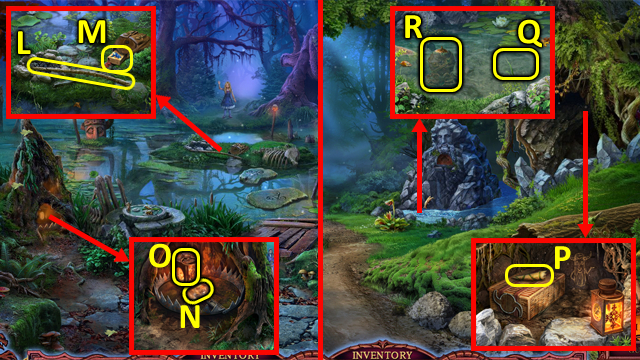
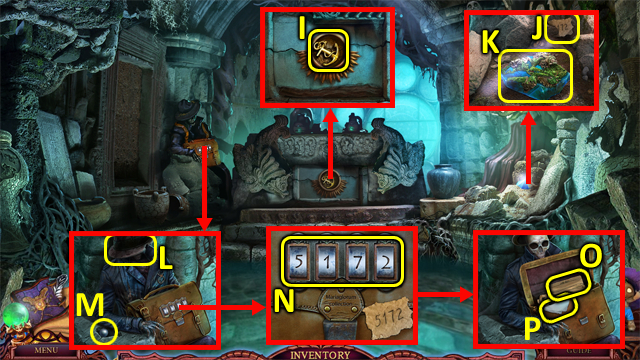
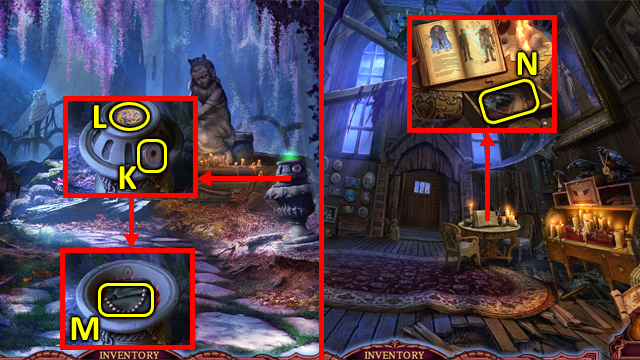
- Grab the DULL SICKLE (K) and MAP PIECE (L).
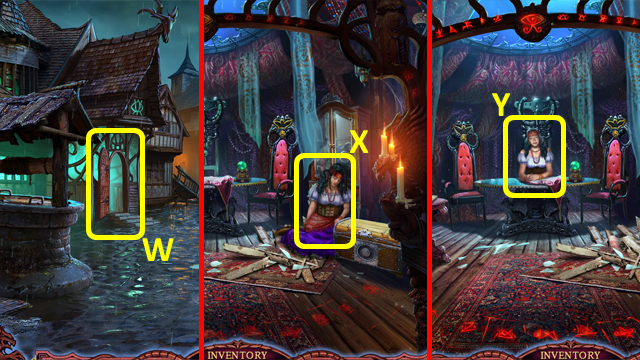
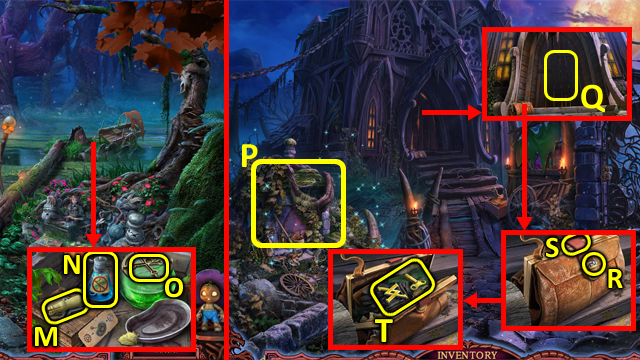
- Walk to the Front of House. (M).
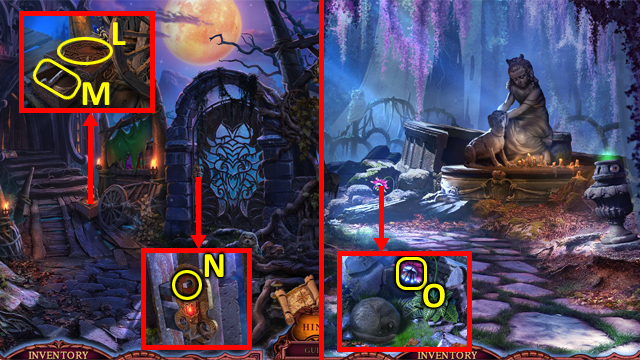
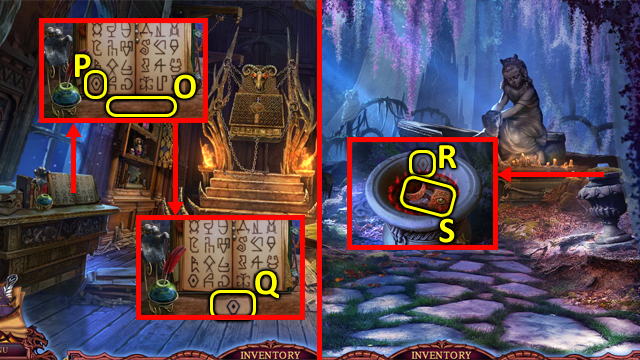
- Grab the ROPE (N) and MAP PIECE (O).
- Remove the boards (P), then open the door.
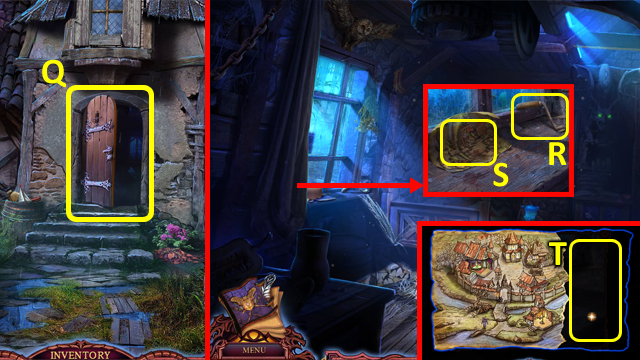
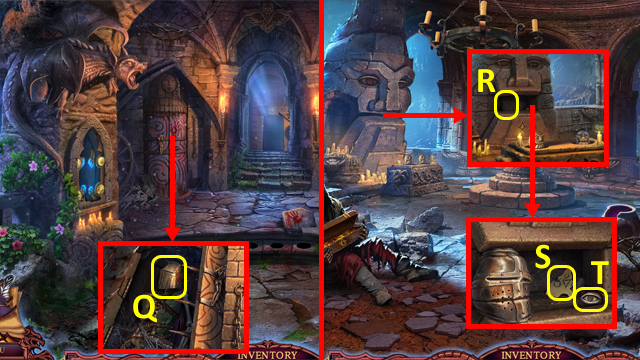
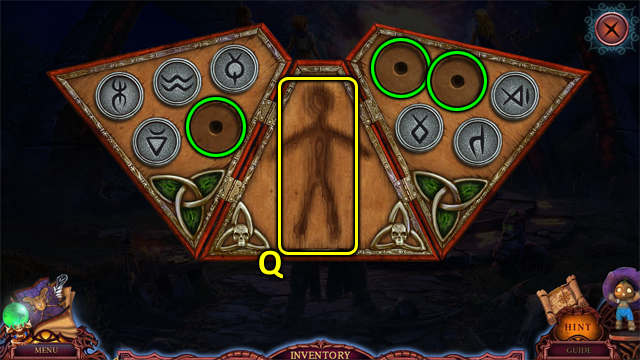
- Enter the House Interior (Q).
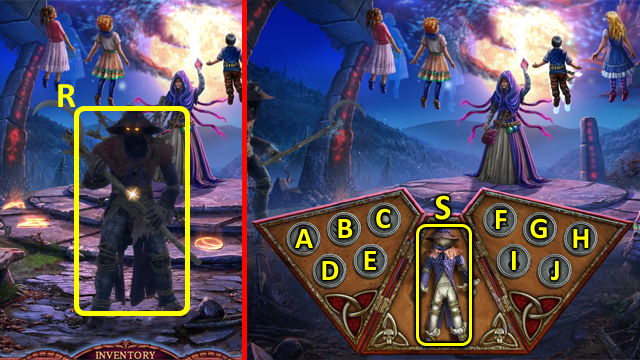
- Grab the HANDLE (R).
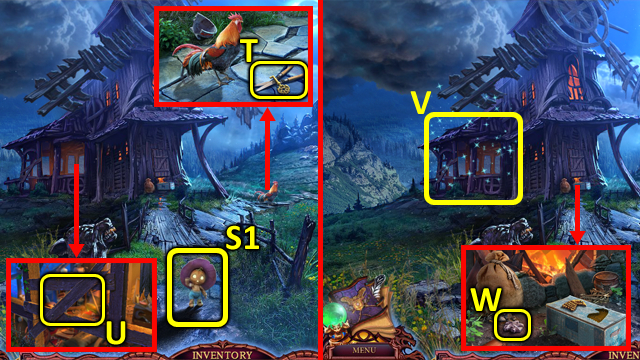
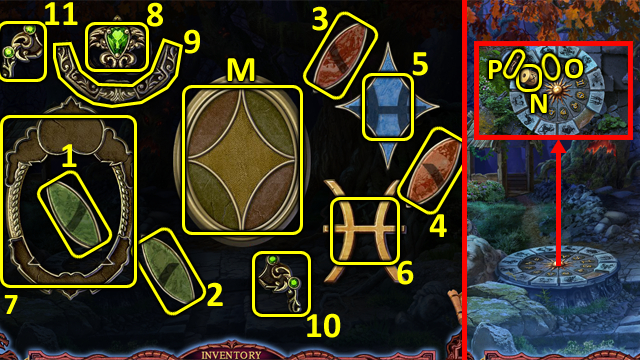
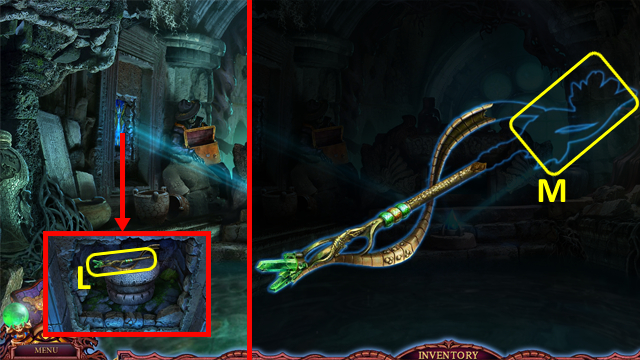
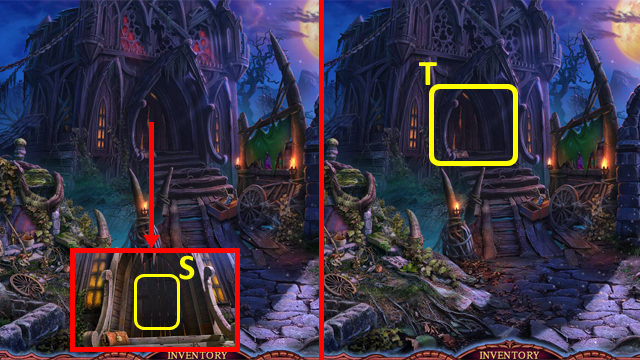
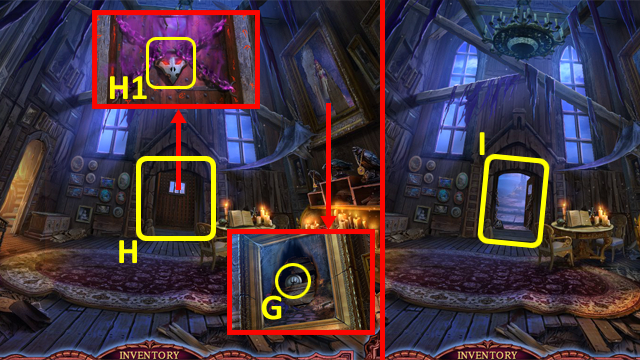
- Select the map (S), and add the MAP PIECES (T); take the map.
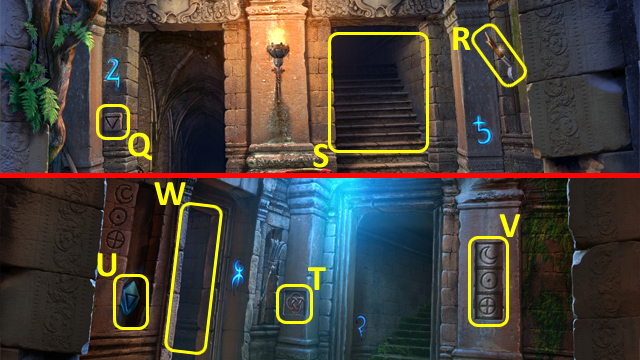
- Walk down.
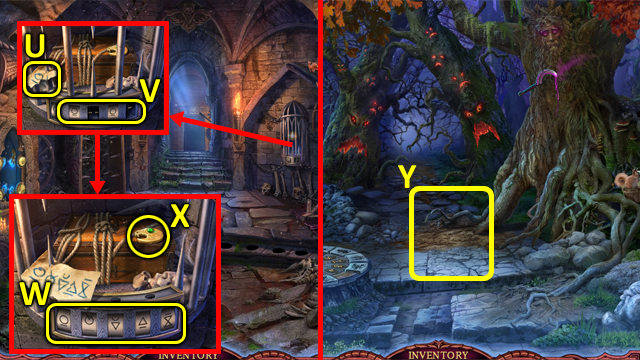
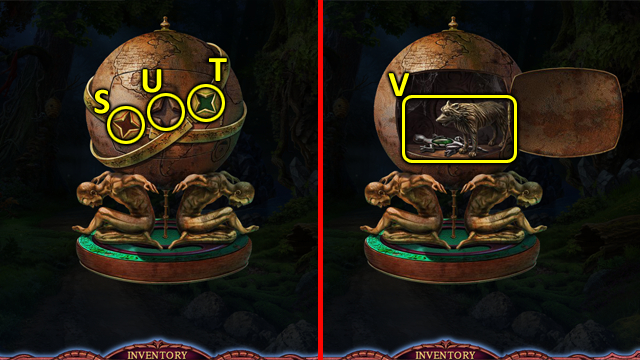
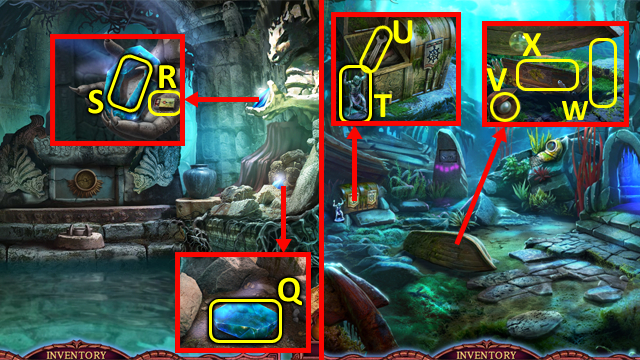
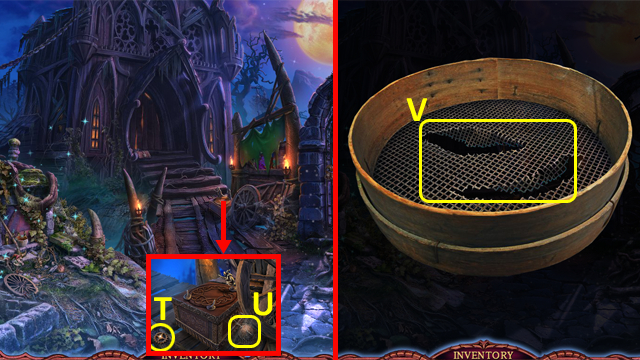
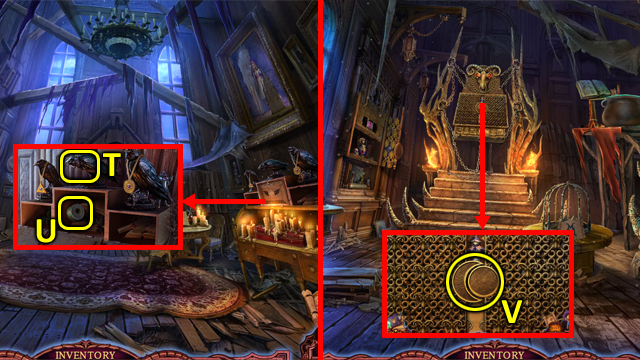
- Select the map to travel to locations (U).
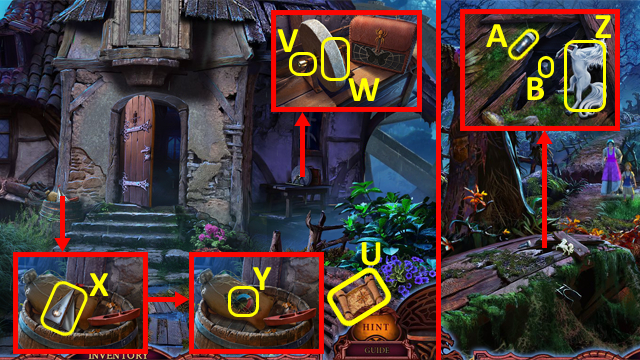
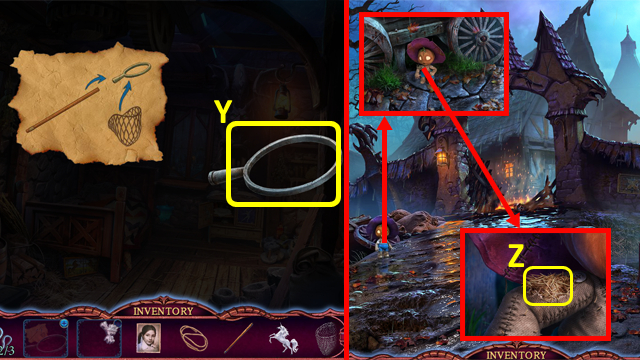
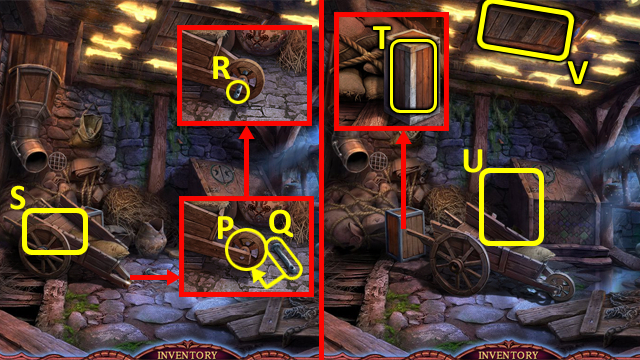
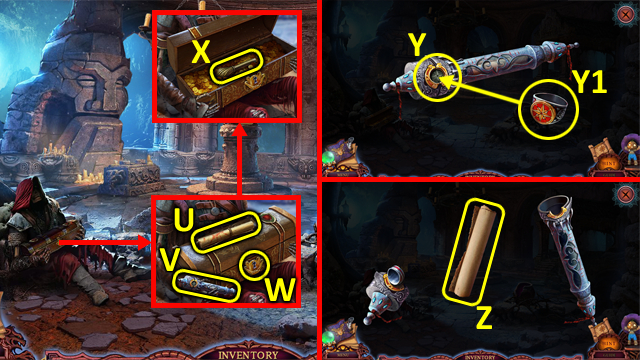
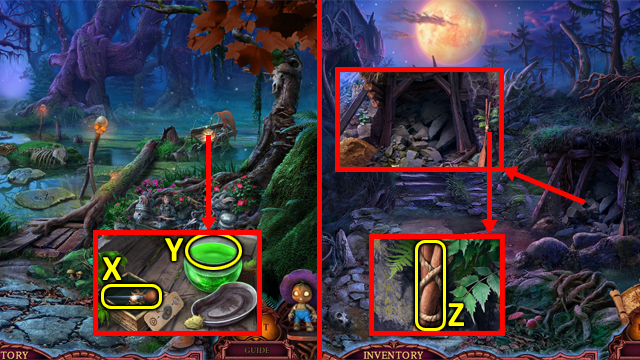
- Place the HANDLE (V), then sharpen the DULL SICKLE (W); receive a SICKLE.
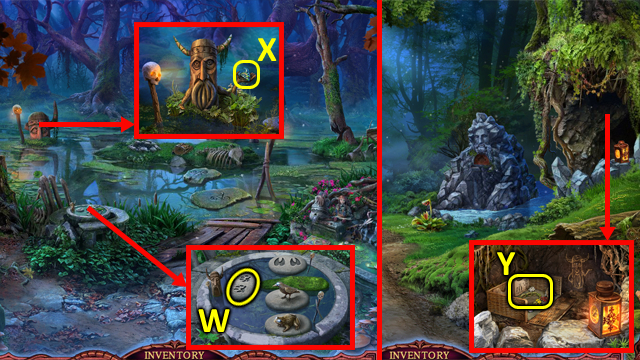
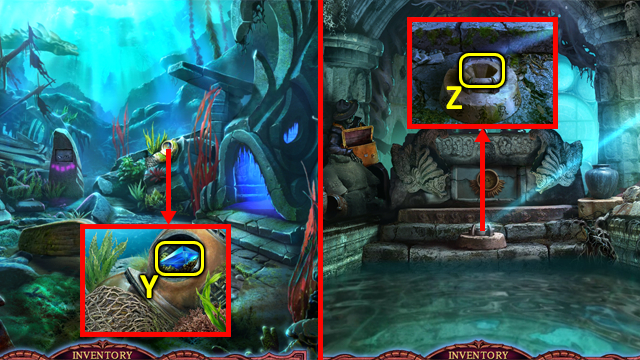
- Grab the SAIL (X); cut the stitches with the SICKLE, pull open the bag, then take the MAGNET (Y).
- Walk down.
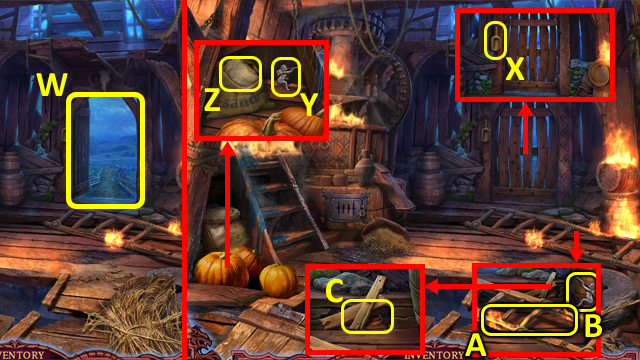
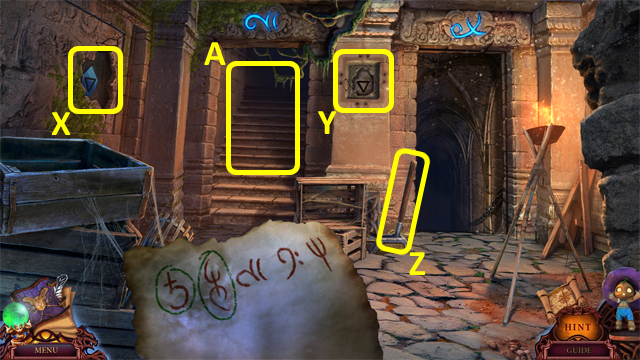
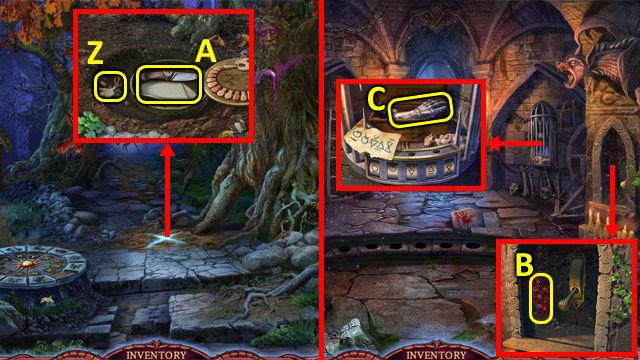
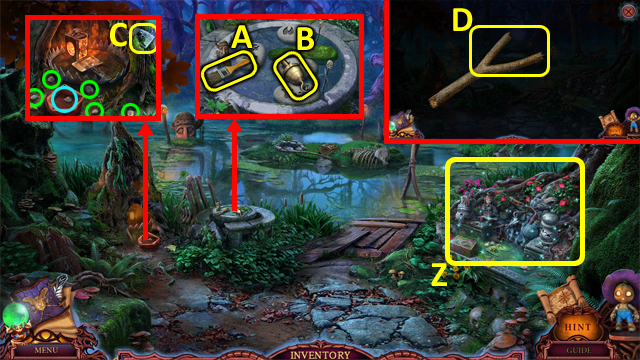
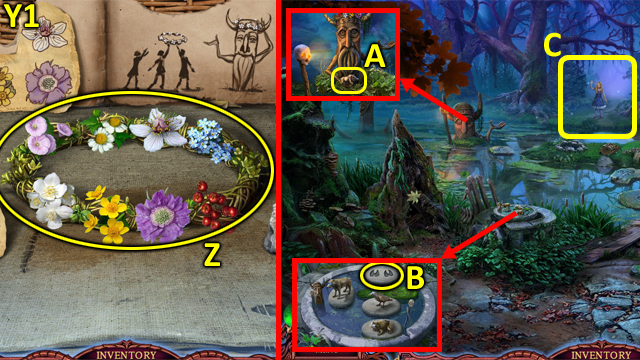
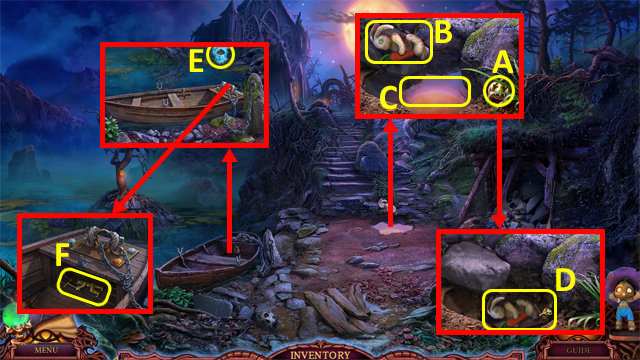
- Grab the UNICORN (Z); select the bolt (A), then get the BOLT (B) with the MAGNET.
- Return to the House Interior.
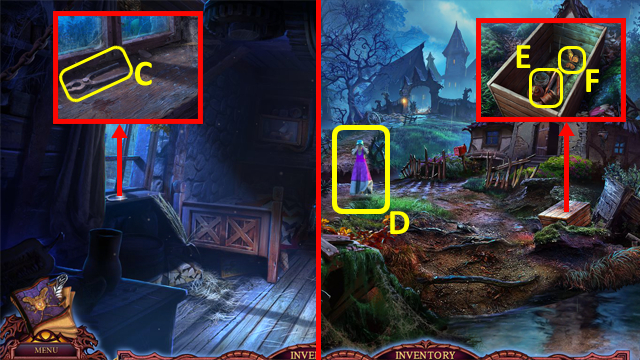
- Select the broken pliers; add the BOLT, then take the PLIERS (C).
- Talk to the woman (D).
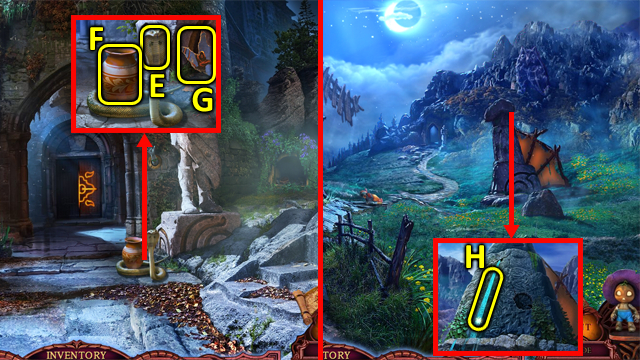
- Open the crate with the PLIERS; grab the BROKEN LANTERN (E) and BUTTERFLY (F).
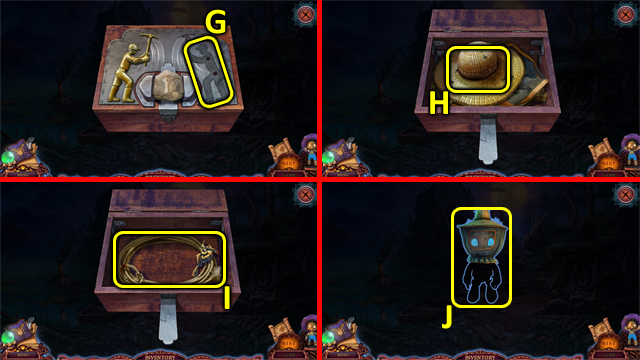
- Select the BROKEN LANTERN in the Inventory.
- Add the parts (1-3) to the lantern (F); take the LANTERN.
- Return to Front of House.
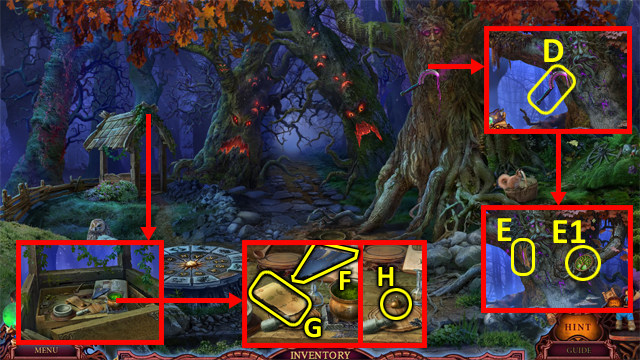
- Place the BUTTERFLY in the case; grab the NET PARTS (G).
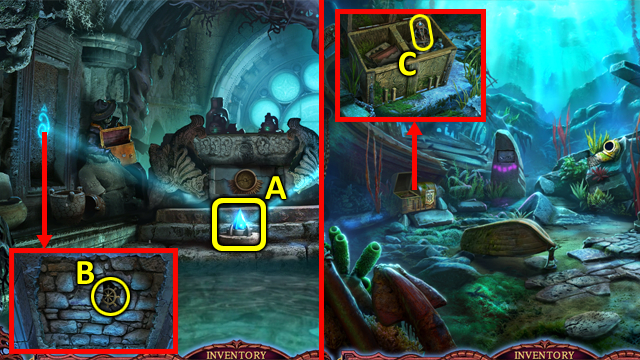
- Enter the House Interior; use the LANTERN with the scene.
- Play the HOP (H); receive some TONGS.
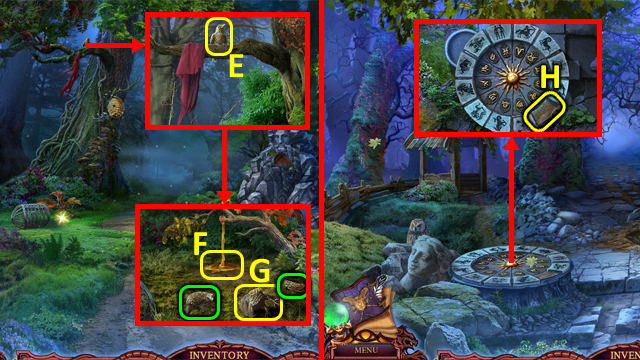
- Grab the SNAKE 1/3 (I) and RIBBON (J).
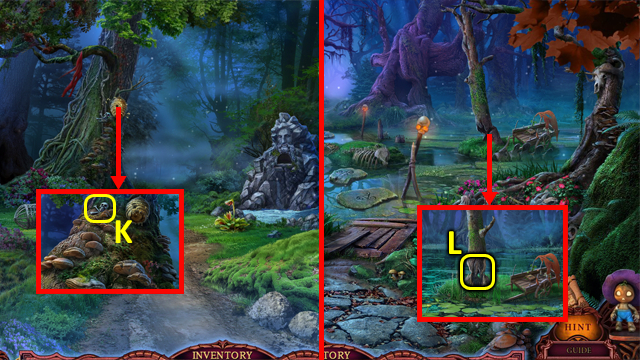
- Return to the Riverbank.
- Place the RIBBON around the GLASS (K); take it.
- Walk to the Gate (L).

- Use the TONGS to get the DOVE (M).
- Grab the LEAF (N) and STICK (O).
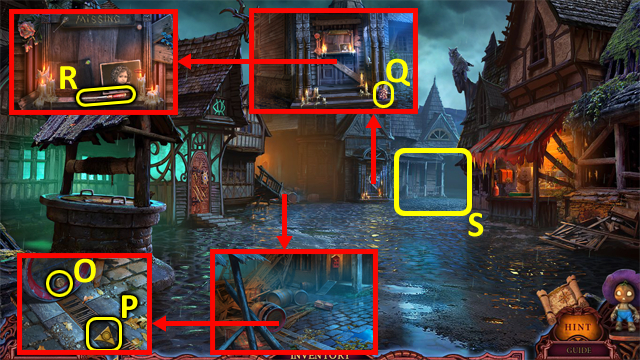
- Return to Front of House.
- Place the DOVE in the post box; take the PACKAGE (P) and SNAKE 2/3 (Q).
- Select the PACKAGE in the Inventory.
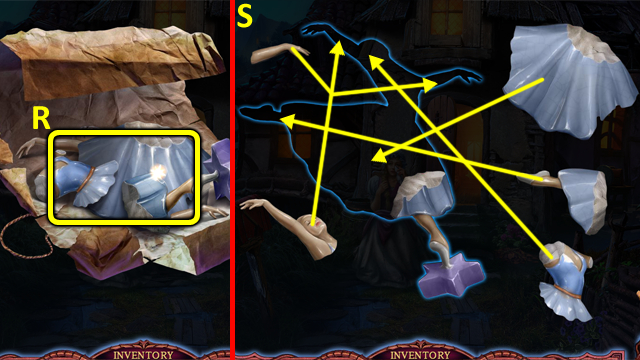
- Use the GLASS to cut the string; select the broken figurine (R).
- Put the figurine back together; solution (S). Receive a BALLERINA FIGURINE.
- Enter the House Interior.
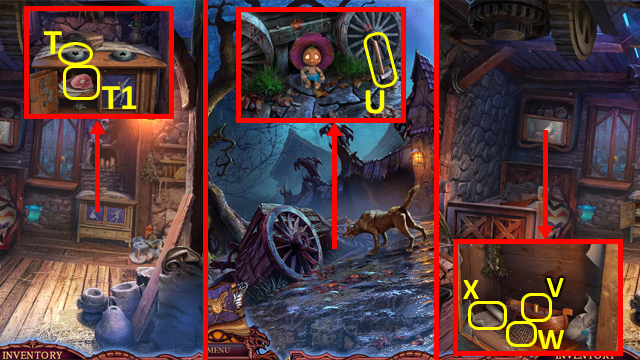
- Place the BALLERINA FIGURINE (T); grab the HAM (T1).
- Return to the Gate.
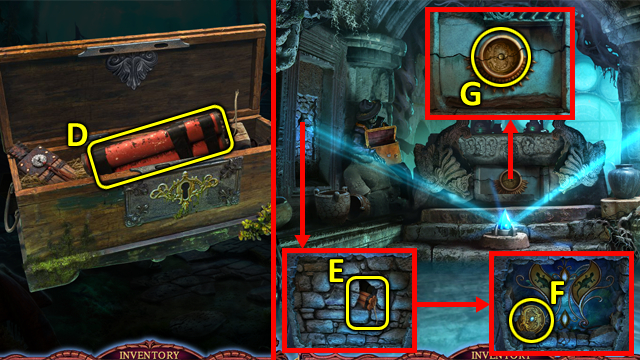
- Give the HAM to the dog; take the HAMMER (U).
- Return to the House Interior.
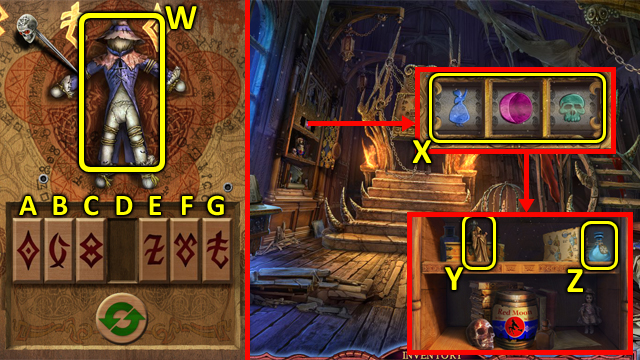
- Break the glass with the HAMMER, move the old sail, then add the SAIL (V); grab the NET (W) and BANDAGE (X).
- Select the NET PARTS in the Inventory.
- Add the NET and STICK (Y); receive a NET.
- Return to the Gate.
- Use the BANDAGE (Z).
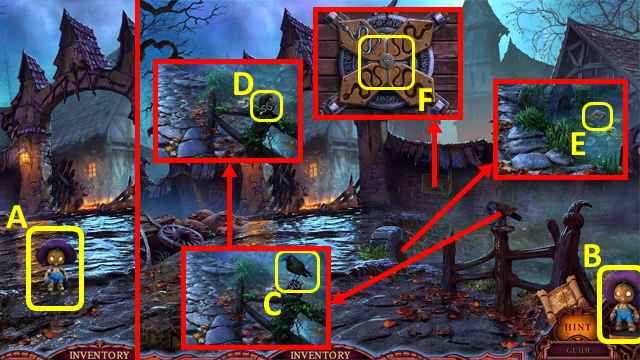
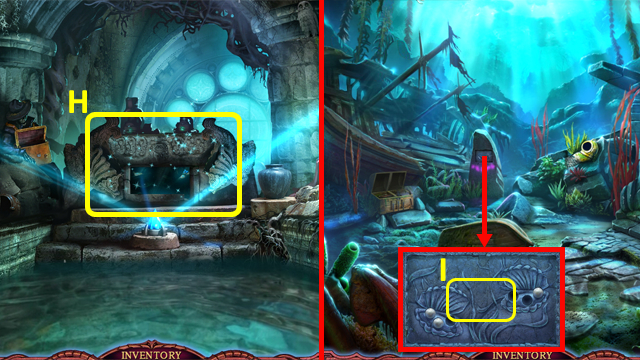
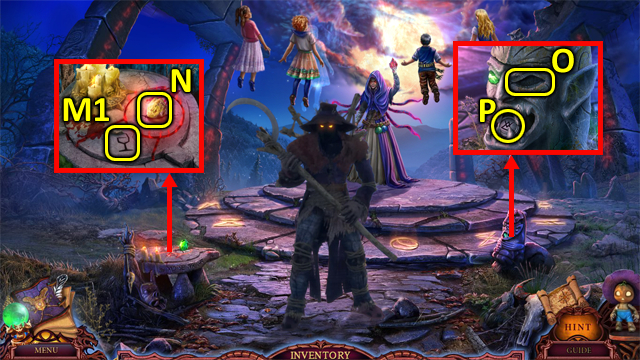
- Select the Little Scarecrow (A).
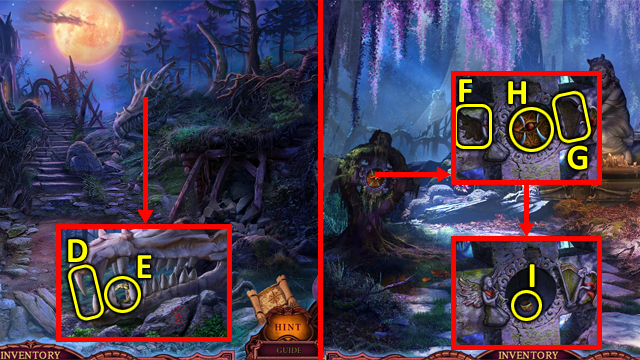
- Use the Little Scarecrow (B) to scare the crow (C); grab the SNAKE 3/3 (D).
- Use the NET to get the CHEST (E).
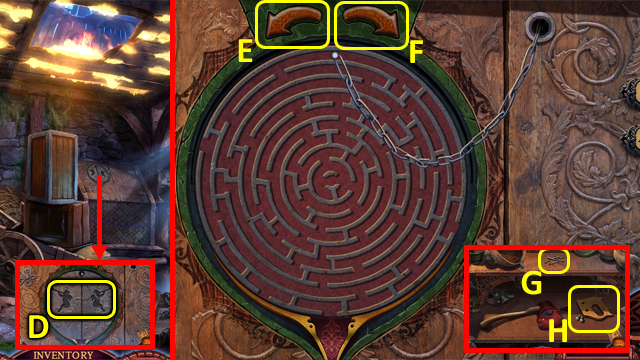
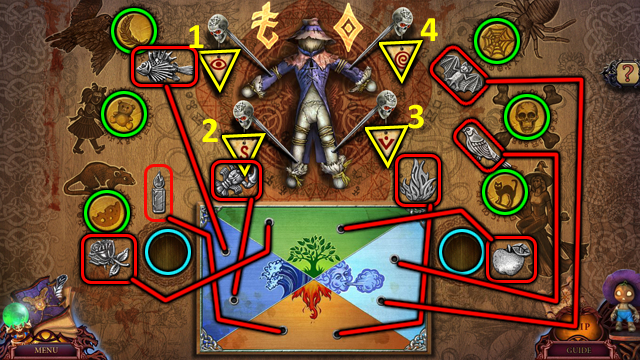
- Remove the notices; place the SNAKES in the cover (F) to trigger a puzzle.
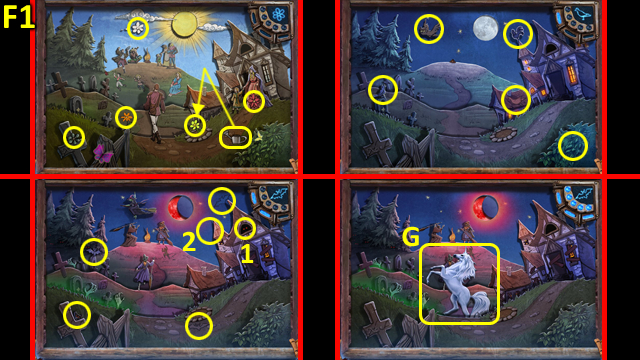
- Solution (F1).
- Grab the UNICORN (G).
- Return to the House Interior.
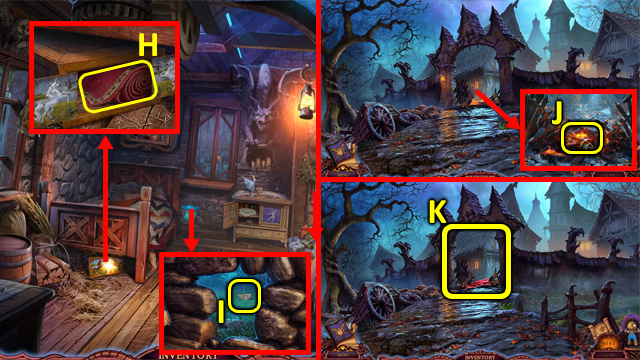
- Place the UNICORNS in the box; grab the RUG (H).
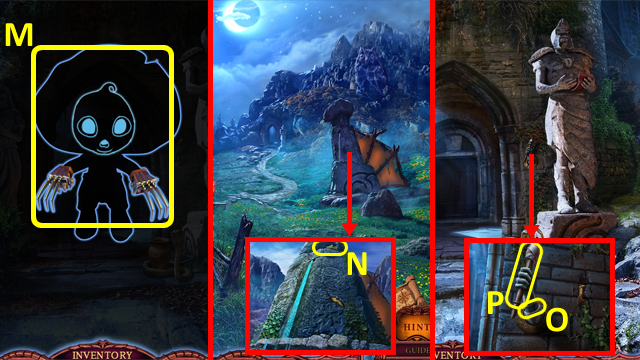
- Use the Little Scarecrow to get the RUNE 1/3 (I).
- Return to the Gate.
- Lay the RUG (J).
- Enter the Square (K).
- Grab the WEIGHTS (L) and (M); place them on the scale (N).
- Play the HOP; receive a CORKSCREW.
Chapter 2: Scarecrow
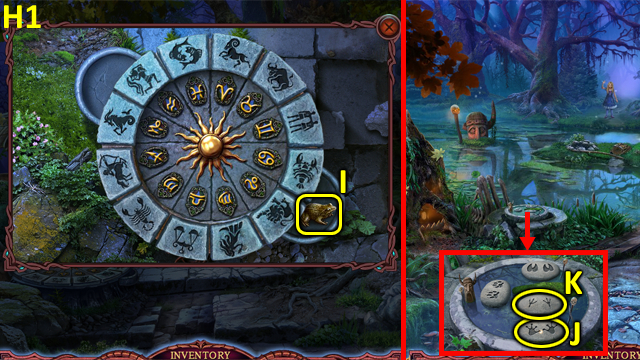
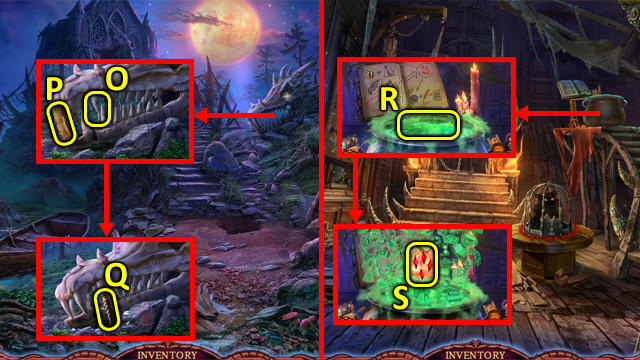
- Use the CORKSCREW (O); grab the RUNE 2/3 (P).
- Take the GRAPES (Q) and CHISEL (R).
- Enter the Yard (S).
- Use the CHISEL to get the SNAKE RING (T); grab the RUNE 3/3 (U).
- Walk down.
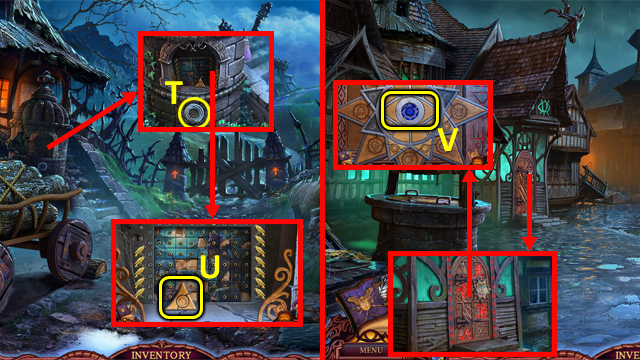
- Remove the notices; place the RUNES (V) to trigger a puzzle.
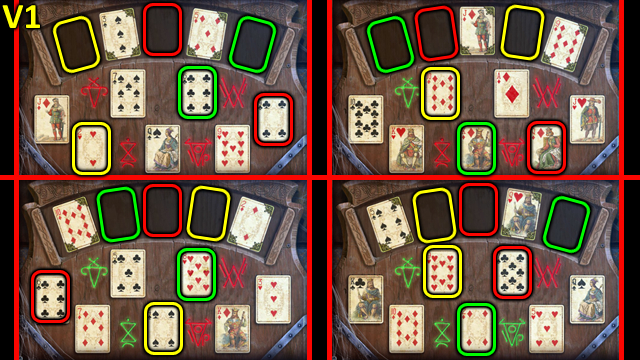
- Solution (V1).
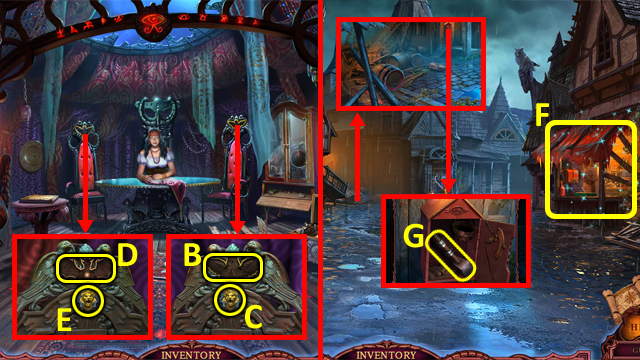
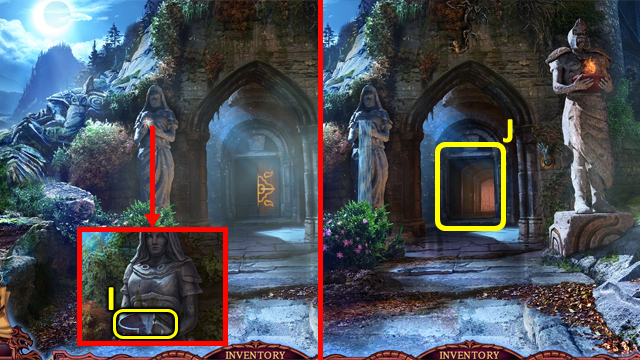
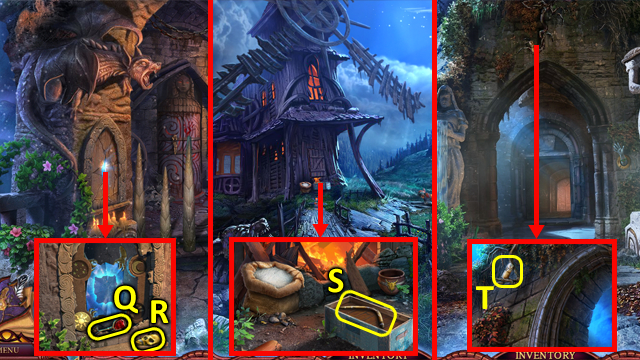
- Enter the Fortune-teller's (W).
- Check on the Fortune-teller (X), then speak to her (Y).
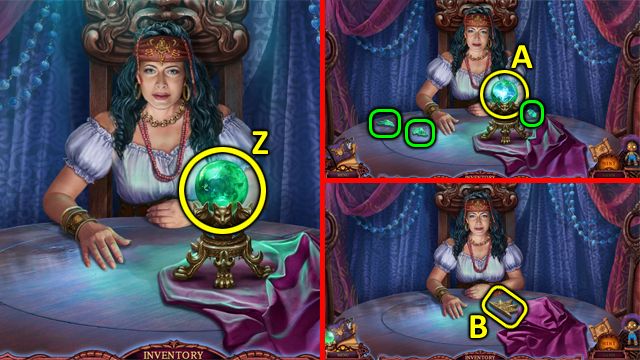
- Select the eye (Z).
- Put the broken pieces (green) into the eye (A); take it.
- Take the STAR HALF (B).
- Grab the SOLVENT (C).
- Place the SNAKE RING in the chest; take the PHOTO (D) and GRAPES (E).
- Grab the BROKEN FIGURINE (F).
- Select the BROKEN FIGURINE in the Inventory, and put it back together (G); receive a DANCER FIGURINE.
- Return to the House Interior.
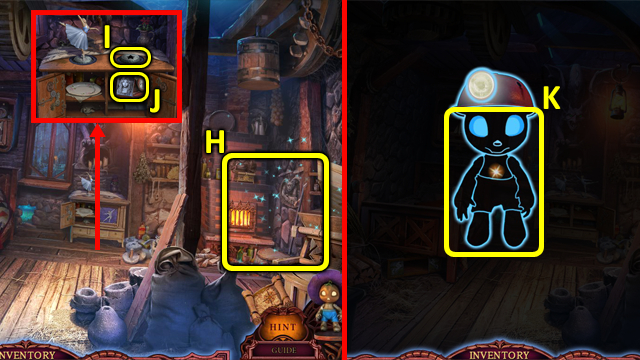
- Play the HOP (H); receive a RAKE.
- Place the DANCER FIGURINE (I); grab the PHOTO and MINER'S HELMET (J).
- Select the MINER'S HELMET in the Inventory; place the Little Scarecrow (K).
- Walk down.
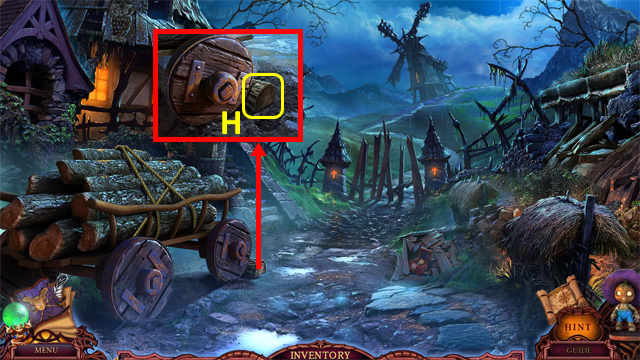
- Clear the leaves twice, then use the RAKE on the soil; take the HANDLE (L).
- Return to the Fortune-teller.
- Place the HANDLE on the bottom compartment; grab the WELL KEY (M).
- Walk down.
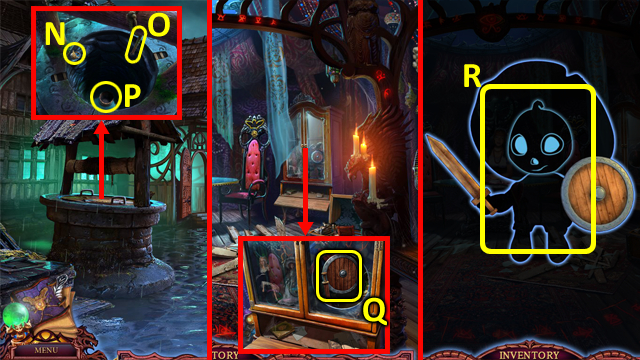
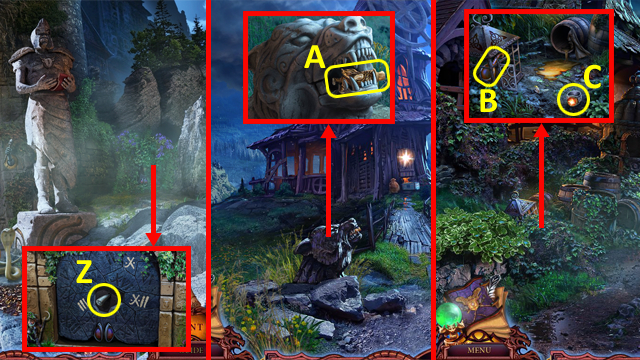
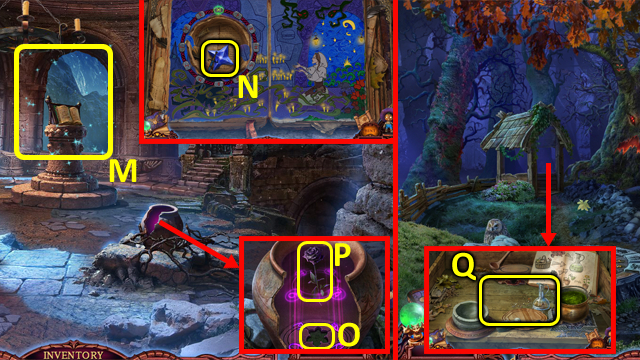
- Open the well with the WELL KEY. Select the ring (N), add the ROPE (O), then use the Little Scarecrow (P); receive a DIAMOND RING.
- Enter the Fortune-teller's.
- Cut the glass with the DIAMOND RING; take the SHIELD AND SWORD (Q).
- Select the SHIELD AND SWORD in the Inventory; add the Little Scarecrow (R).
- Walk down.
- Use the Little Scarecrow (S).
- Enter the Yard.
- Remove the three boards; grab the FANG 1/2 (T).
- Use the SOLVENT; take the STAR HALF (U).
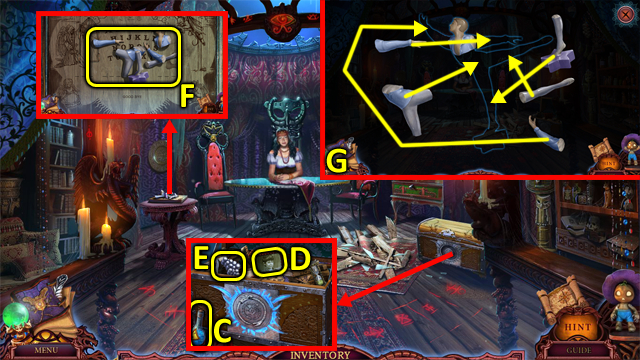
- Select the CHEST in the Inventory.
- Remove the debris twice, then place the STAR HALVES into the top of the chest; take the POINTER (V).
- Return to the Fortune-teller.
- Place the POINTER (W) to trigger a puzzle.
- Solution (W1).
- Take the EYE KEY (X).
- Return to the Yard.
- Use the EYE KEY in the chest; take the DEMON (Y).
- Move the soil twice; grab the LION (Z).
- Walk down.
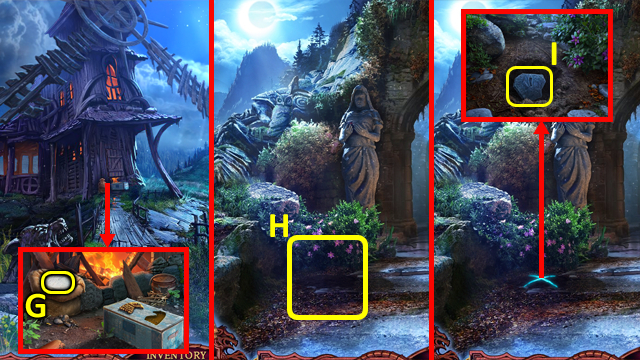
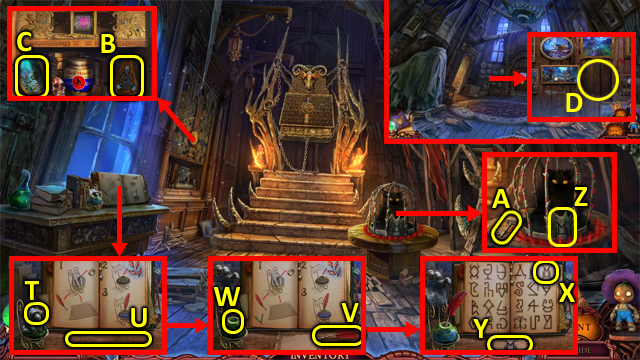
- Place the PHOTOS on the notice board; take the ANGEL (A).
- Enter the Fortune-teller's.
- Place the ANGEL (B); take the LION (C).
- Place the DEMON (D); grab the LION (E).
- Walk down.
- Play the HOP (F); receive an OILCAN.
- Place the LIONS on the box, then use the OILCAN on the SLEDGEHAMMER (G); take it.
- Return to the Yard.
- Use the SLEDGEHAMMER (H).
Chapter 3: Hooded Figure
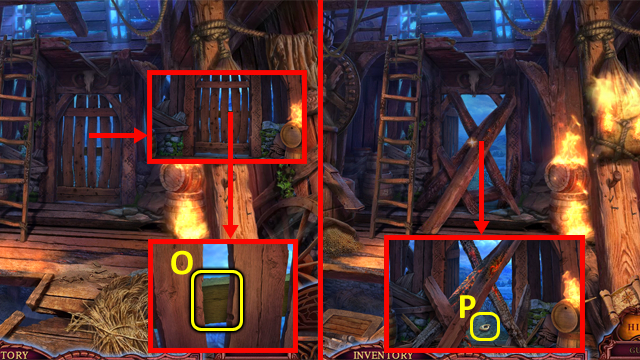
- Grab the LEVER (J).
- Place the LEVER (K), then pull it; take the WHEEL (L).
- Grab the ROD (M), and WEDGE (N).
- Open the box with the ROD, then move the three items; take the STONE and BOX 1/2 (O).
- Add the WHEEL (P), then the bolt (Q).
- Add the WEDGE (R), then use the STONE to hammer it in.
- Select the cart (S).
- Grab the BOX 2/2 (T).
- Place the BOXES (U).
- Open the hatch (V); enter the Mill.
- Try to leave the Mill (W).
- Grab the SCOOP (X).
- Take the ANGEL (Y), then use the SCOOP (Z); receive some SAND.
- Use the SAND (A); grab the ANGEL (B), and PLANKS and BELT (C).
- Walk down.
- Place the ANGELS (D) to trigger a puzzle.
- Solution: E-F-E-F-E-F-E-F-Ex3-F-E-F-Ex4.
- Grab the NAILS (G) and SAW HANDLE (H).
- Climb up.
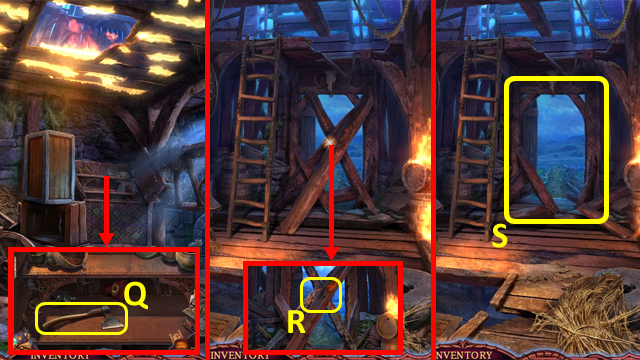
- Place the PLANKS, then NAILS. Use the STONE to hammer the nails in; take the LADDER (I), and place it (J).
- Select the broken hook, then tie it with the BELT; take the HOOK (K).
- Walk down.
- Use the HOOK to get the KEY (L).
- Climb up.
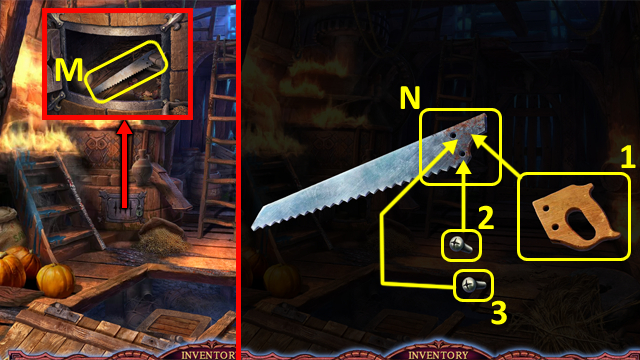
- Use the KEY in the stove door; open it and take the SAW BLADE (M).
- Select the SAW BLADE in the Inventory, and add the SAW HANDLE (N), then the parts (1-3); receive a SAW.
- Use the SAW (O).
- Try to leave the Mill again.
- Use the HOOK to get the AXE SYMBOL (P).
- Walk down.
- Place the AXE SYMBOL in the cover. Remove the cover; take the AXE (Q).
- Climb up.
- Use the AXE (R).
- Enter the Glade (S).
- Grab the Little Scarecrow (S1), CAGE KEY and SHEARS (T).
- Use the AXE (U).
- Play the HOP (V); receive a SHOVEL.
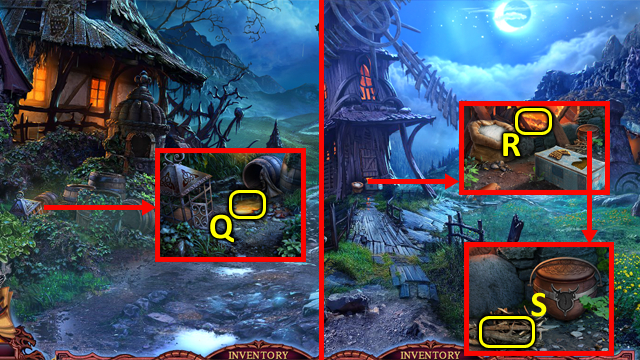
- Move the broken pot; take the GRAPE LEAF (W).
- Select the GRAPES in the Inventory.

- Place the GRAPES and GRAPE LEAF (X); receive GRAPES.
- Enter the Ruins (Y).
- Cut the overgrowth with the SHEARS; grab the FANG 2/2 (Z).
- Walk down.
- Place the FANGS in the dog's mouth; take the LEPRECHAUN (A).
- Walk down.
- Unlock the cage with the CAGE KEY; grab the LADLE (B) then RING (C).
- Walk down.
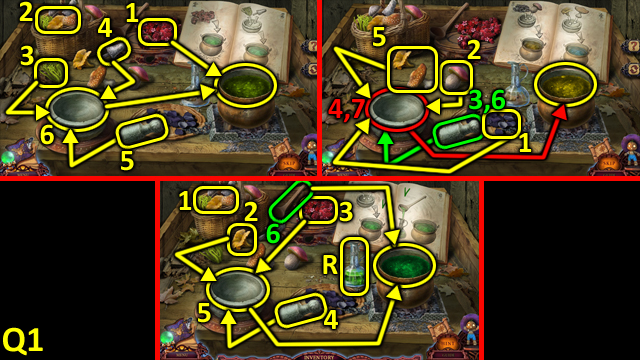
- Place the GRAPES in the box; grab the BOTTLE (D).
- Select the BOTTLE in the Inventory, then add the LEPRECHAUN (E) and select it; select the MAP PIECE (F) then take it.
- Return to the Glade.
- Open the sack, then use the LADLE (G); receive some FLOUR.
- Return to the Ruins.
- Place the MAP PIECE (H).
- Use the SHOVEL to dig; grab the STONE PLATE (I).
- Place the STONE PLATE (J), then add the flour, and clean it off twice.
- Press the stones (1-16); look at the image (K), then grab the BOWL OF FIRE and CLAWS (L).
- Select the CLAWS in the Inventory.
- Add the Little Scarecrow (M).
- Walk down.
- Use the Little Scarecrow to get the BRACELET (N).
- Return to the Ruins.
- Place the BRACELET (O); grab the TORCH (P).
- Return to the Yard.
- Place the TORCH (Q); receive an OILED TORCH.
- Return to the Glade.
- Place the OILED TORCH (R); receive a BURNING TORCH.
- Grab the BRUSHWOOD (S).
- Return to the Ruins.
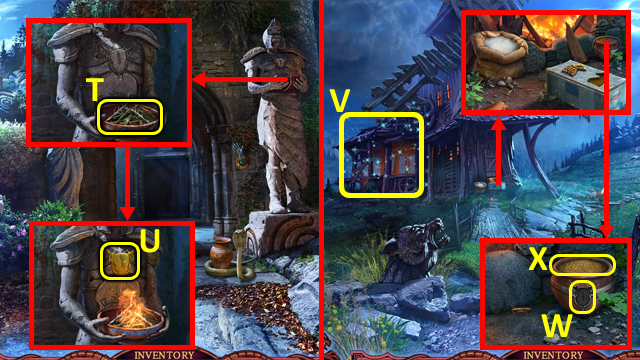
- Place the BOWL OF FIRE, then BRUSHWOOD; light the BRUSHWOOD with the BURNING TORCH (T), and take the SPICA (U).
- Walk down.
- Play the HOP (V); receive a MALLET AND CHISEL.
- Place the SPICA (W); remove the lid, and grab the MILLET (X).
- Give the MILLET to the chicken (Y); take the BOWL OF WATER (Z).
- Use the MALLET AND CHISEL, then grab the GOLDEN RAVEN 1/2 (A).
- Return to the Ruins.
- Use the MALLET AND CHISEL, then take the GOLDEN RAVEN 2/2 (B).
- Return to the Yard.
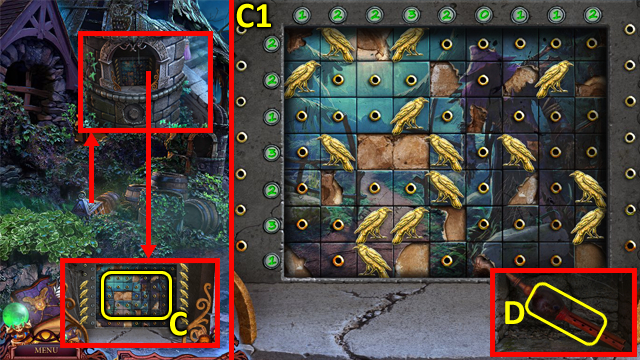
- Place the GOLDEN RAVENS (C) to trigger a puzzle.
- Solution (C1).
- Grab the FLUTE (D).
- Return to the Ruins.
- Use the FLUTE (E), grab the VASE (F) and FRESCO PIECE 1/2 (G).
- Walk down.
- Place the VASE (H); receive a VASE WITH WATER.
- Return to the Ruins.
- Place the BOWL OF WATER, then the VASE WITH WATER (I).
- Enter the Catacombs (J).
- Grab the EAGLE (K); cut the roots (L) with the SHEARS.
- Break the vase twice; take the FRESCO PIECE 2/2 (M).
- Enter the Trap Room (N).
- Place the FRESCO PIECES in the fresco, then take the IDOL (O) and EAGLE HEAD (P).
- Use the MALLET AND CHISEL in the wall, then grab the KEY (Q) and SKULL (R).
- Return to the Glade.
- Place the EAGLE HEAD in the box; take the BOOMERANG (S).
- Return to the Ruins.
- Throw the BOOMERANG (T); receive an IDOL.
- Enter the Catacombs.
- Read the letter (U) and grab the SCROLL (V); use the KEY (W) and take the LEVER (X).
- Select the SCROLL in the Inventory, and add the RING (Y).
- Insert the RING (Y1), then turn it; unroll the MAP PIECE (Z) and take it.
- Place the EAGLE (A) and SKULL (B); open the book (C).
- Play the HOP (D); take the MOON COIN (E).
- Select the floating head (F), then place the IDOLS (G); grab the ROLL 1/2 (H) and COMET COIN (I).
- Return to the Trap Room.
- Place the LEVER (J); pull it.
- Enter the second Trap Room (K).
- Grab the STAR COIN (L).
- Walk down.
- Place the STAR COIN (M), MOON COIN (N) and COMET COIN (O); take the LABYRINTH MAP (P).
- Walk forward.
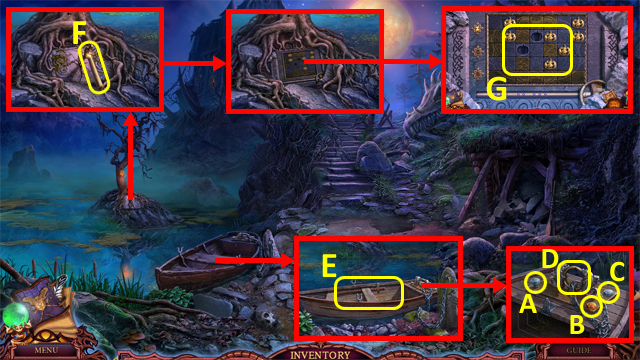
- Remove the stone (Q) and pull the lever (R); walk up (S).
- Press the button (T); remove the stone and press the button (U).
- Arrange the dials as shown (V); exit through the door (W).
- Remove the stone; press the button (X).
- Remove the cover; press the button (Y).
- Move the crates; pull the lever (Z).
- Walk up (A).
- Remove the stone (B) and twist the lever (C); walk down (D).
- Remove the stone (E); pull the lever (F).
- Walk up (G).
- Try to exit (H).
- Place the weights (green) on the hooks (red).
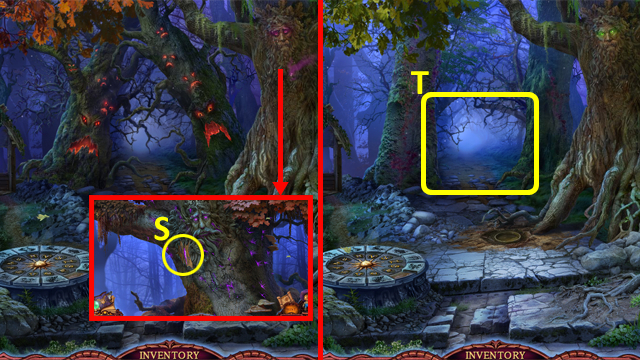
- Exit to the Spirit of the Forest (I).
Chapter 4: Dark Wood
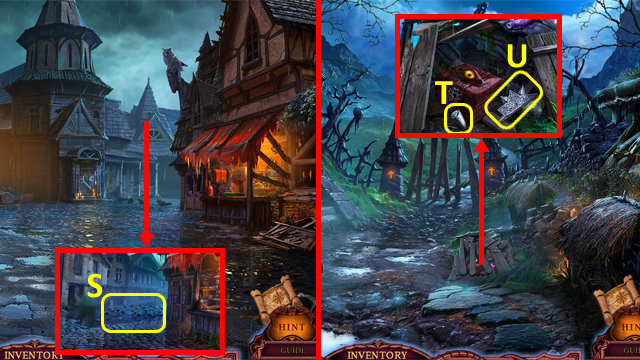
- Grab the PAPER CODE 1/2 (J).
- Select the amulet (K).
- Play the HOP (L); receive an AMULET.
- Walk down.
- Select the AMULET in the Inventory.
- Add the parts (1-11) to the main part (M); receive ZODIAC AMULET.
- Grab the ROLL 2/2 (N); place the ZODIAC AMULET (O) and take the HANDLE (P).
- Walk down.
- Place the HANDLE on the door; grab the HELMET (Q).
- Walk down.
- Place the HELMET (R); take the PAPER CODE 2/2 (S) and STONE EYE (T).
- Return to the Trap Room.
- Place the PAPER CODES (U) and ROLLS (V).
- Set the code as shown (W); grab the SNAKE HEAD (X).
- Return to the Spirit of the Forest.
- Place the MAP PIECE (Y).
- Dig in the soil with the SHOVEL; grab the SLINGSHOT (Z).
- Place the SNAKE HEAD in the box; take the KNIFE and CLOTH (A).
- Walk down.
- Use the KNIFE (B); receive some RED MOSS.
- Cut the ropes with the KNIFE, then open the chest; grab the GAUNTLET (C).
- Return to the Spirit of the Forest.
- Use the GAUNTLET to remove the sickle (D); use the CLOTH (E), then grab the TREE SYMBOL (E1).
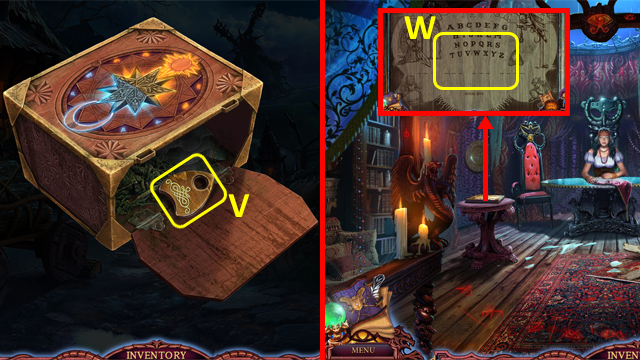
- Place the TREE SYMBOL in the table, then open it; take PLATE (F), LIST (G) and ACORN (H).
- Give the ACORN to the squirrel (I), then play the HOP; take the BASKET OF MUSHROOMS (J).
- Walk down.
- Use the Little Scarecrow with the stone slab, then select it. Add the PLATE and arrange as shown (K); take the SYMBOL OF ROSE (L).
- Walk down.
- Play the HOP (M); take the BLUE CRYSTAL (N).
- Place the SYMBOL OF ROSE (O); grab the BLACK ROSE (P).
- Return to the Spirit of the Forest.
- Place the BASKET OF MUSHROOMS, RED MOSS, and BLACK ROSE (Q) to trigger a puzzle.
- Solution (Q1).
- Take the ELIXIR OF LIFE (R).
- Use the ELIXIR OF LIFE (S).
- Enter the Covert (T).
- Use the Little Scarecrow to get the RED CRYSTAL (U).
- Place the STONE EYE (V); grab the GREEN CRYSTAL (V1).
- Select the object (W); take the SLINGSHOT (X).
- Enter the Swamp (Y).
- Play the HOP (Z); receive FLOWER PART.
- Grab the PAINTBRUSH (A) and HOOK (B).
- Take the LION PLATE (C). Add the stones (green) to the bag (blue); take the BAG OF STONES.
- Select the SLINGSHOT in the Inventory, and add the SLINGSHOT and BAG OF STONES (D); receive a SLINGSHOT.
- Walk down.
- Use the SLINGSHOT (E).
- Place the PAINTBRUSH (F); receive PAINTBRUSH WITH GLUE.
- Select the bird body (G), then use the PAINTBRUSH WITH GLUE. Place the bird pieces (green) on the body to make a full BIRD; take it.
- Walk down.
- Place the LION PLATE (H) to trigger a puzzle.
- Solution (H1); grab the TOAD (I).
- Return to the Swamp.
- Place the TOAD (J) and BIRD (K).
- Grab the STICK (L); open the bag and take the FISH FOOD (M).
- Place the STICK in the trap (N); grab the LAMP (O).
- Walk down.
- Use the LAMP in the darkness; take the HORN (P).
- Pour the FISH FOOD (Q); grab the GLOBE (R).
- Select the GLOBE in the Inventory.
- Place the RED CRYSTAL (S), GREEN CRYSTAL (T), and BLUE CRYSTAL (U).
- Take the WOLF and LIZARD 1/2 (V).
- Enter the Swamp.
- Place the WOLF (W).
- Place the HORN on the head; grab the FLOWER PART (X).
- Walk down.
- Place the FLOWER PARTS on the basket, then open it and select inside (Y) to trigger a puzzle.
- Solution (Y1); take the CROWN OF FLOWERS (Z).
- Enter the Swamp.
- Place the CROWN OF FLOWERS on the head; grab the BOAR (A).
- Place the BOAR (B).
- Walk forward (C).
- Select the scene to trigger a puzzle.
- Collect the oxygen bubbles (blue) until the tank is full.
- Cut the net with the KNIFE; take the HOOK PART (D).
- Select the HOOK in the Inventory.
- Place the HOOK PART (E); receive HOOK PART.
- Place the HOOK PART (F); use the Little Scarecrow (G).
- Enter the Swamp Cave (H).
- Grab the ANCHOR (I) and CODE (J); use the KNIFE (K).
- Select the hat (L) and take the PEARL 1/3 (M). Enter the code as shown (N); examine the three documents (O), and take the SCARF (P).
- Use the SCARF to clean the MIRROR STONE (Q); take it.
- Grab the MATCHES (R); place the MIRROR STONE (S).
- Walk down.
- Take ATLAS (T); place the ANCHOR in the box and grab the WRENCH (U).
- Open the oyster and take the PEARL 2/3 (V); place ATLAS (W) and grab the CHEST (X).
- Unscrew the bolts with the WRENCH; grab the CRYSTAL (Y).
- Return to the Swamp Cave.
- Place the CRYSTAL (Z).
- Select the crystal (A) twice.
- Grab the WHEEL (B).
- Walk down.
- Place the WHEEL in the box; take the PIN (C).
- Select the CHEST in the Inventory.
- Clean the moss from the chest three times, unlock it with the PIN, then open it; take the DYNAMITE (D).
- Return to the Swamp Cave.
- Place the DYNAMITE in the hole (E), then light the fuse with the MATCHES; take the CROCODILE MEDALLION (F).
- Place the CROCODILE MEDALLION (G).
- Play the HOP (H); receive a PEARL 3/3.
- Walk down.
- Place the PEARLS (I) to trigger a puzzle.
- Solution (I1).
- Grab the MAGIC STAFF (J) and LIZARD 2/2 (K).
- Return to the Swamp Cave.
- Place the LIZARDS in the cover; take the MAGIC STAFF (L).
- Select the MAGIC STAFF in the Inventory, and add the MAGIC STAFF (M); receive a MAGIC STAFF.
- Walk down.
- Use the MAGIC STAFF (N).
- Exit the Swamp Bottom (O).
- Enter the House on the Hill (P).
- Walk up to the Witch's Hut (Q).
- Enter the Cemetery (R).
- Grab the SIEVE and FEATHER DUSTER (S).
- Walk down.
Chapter 5: Red Moon
- Grab the RUSTY GEAR 1/3 (T); brush away the cobwebs with the FEATHER DUSTER and take the NEEDLE AND THREAD (U).
- Select the SIEVE in the Inventory, and use the NEEDLE AND THREAD (V); receive a SIEVE.
- Walk down.

- Use the SIEVE in the dirt; grab the ANCIENT RUNE (W).
- Use the Little Scarecrow (X); take the MINER BOX (Y).
- Return to the Covert.
- Place the ANCIENT RUNE in the panel; grab the CUP (Z).
- Return to the House on the Hill.
- Move the grass, and take the PUMPKIN 1/2 (A). Select the bunny (B), then use the CUP (C); grab the BUNNY and KEY (D).
- Select the object (E). Use the KEY to unlock the compartment; open it and take the GOLD MINER (F).
- Select the MINER BOX in the Inventory.
- Place the GOLD MINER (G); open the box.
- Take the BEEKEEPER'S HAT (H), and WITCH FIGURE and LASSO (I).
- Select the BEEKEEPER'S HAT in the Inventory.
- Place the Little Scarecrow (J).
- Return to the Covert.
- Use the Little Scarecrow to get the POISON EMBLEM (K).
- Enter the Swamp.
- Use the LASSO (L).
- Take the HANDLE (M) and HERBICIDE (N). Place the POISON EMBLEM in the jar (O); open it.
- Return to the Witch's Hut.
- Select the area, use the HERBICIDE, then play the HOP (P); receive some SCISSORS.
- Select the door (Q).
- Select the key (R), then use the SCISSORS (S); open the case and take the ALCHEMICAL SYMBOL and TOY KEY (T).
- Select the BUNNY in the Inventory.
- Remove the carrot (U), then open the bunny's stomach.
- Place the TOY KEY (V). Remove the gears (green); take the RUSTY GEAR 2/3 (W).
- Return to the Swamp.
- Place the ALCHEMICAL SYMBOL in the box; open it, and take the EMPTY PIPETTE and PUMPKIN 2/2 (X).
- Use the EMPTY PIPETTE (Y); receive PIPETTE WITH ACID.
- Return to the House on the Hill.
- Cut the rope with the SCISSORS; remove it, then take the OARS (Z).
- Remove the bolt (A). Use the PIPETTE WITH ACID (B), then use the WRENCH (B) and (C); remove the chain (D), then place the OARS (E).
- Take the PICK (F); place the PUMPKINS (G) to trigger a puzzle.
- Solution (G1): A2-C2/A7-C7/C2-C4/B4-D4/D4-D6/D6-B6/B5-B7/B7-D7.
- Solution (G2): A4-A6/C5-A5/B3-B5/D3-B3/A3-C3/A5-C5/D5-B5/C3-C5/C5-A5/A5-A7.
- Solution (G3): C3-A3/E3-C3/B5-B3/D5-B5/A5-C5/D4-B4/A4-C4/B3-D3/C5-C3/D3-B3/A2-A4/B2-B4/A4-C4.
- Grab the WITCH FIGURE (H).
- Use the PICK on the rock; grab the RUSTY GEAR 3/3 (I).
- Walk down.
- Play the HOP (J); receive a BOTTLE.
- Place the RUSTY GEARS in the dish, then use the PIPETTE WITH ACID; take the GEARS (K).
- Return to the Witch's Hut.
- Place the WITCH FIGURES (L); grab the HANDLE and WIRE (M).
- Place the HANDLE (N); enter the Cemetery.
- Use the BOTTLE (O); receive BOTTLE OF SLEEPING POTION.
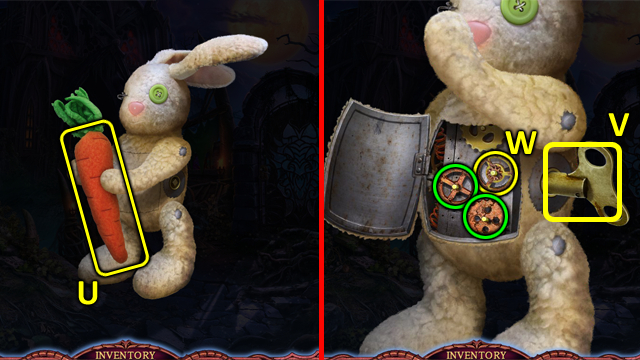
- Select the BUNNY in the Inventory.

- Place the GEARS (P).
- Turn the key (Q).
- Place the BOTTLE OF SLEEPING POTION (R); receive RABBIT WITH SLEEPING POTION.
- Walk down.
- Place the RABBIT WITH SLEEPING POTION (S).
- Enter the Hall (T).
- Select the object (U). Remove the handle (V); grab the FEATHER (W).
- Enter the Ritual Room (X).
- Grab the WING (Y), BOARD (Z) and WHIP (A).
- Talk to the creature (B); take the HARP (C).
- Return to the House on the Hill.
- Place the BOARD (D); grab the DOOR KNOCKER (E).
- Return to the Cemetery.
- Place the WING (F) and HARP (G); take ROOT AMULET (H) and RING (I).
- Return to the Hall.

- Place the ROOT AMULET (J); grab the PARCHMENT (K).
- Enter the Ritual Room.
- Open the compartment with the DOOR KNOCKER. Select the horn (L); take the HORN IN ICE (M) and GOLD SUN (N).
- Return to the House on the Hill.
- Place the HORN IN ICE (O). Use the WHIP (P); take the HORN (Q).
- Return to the Ritual Room.
- Place the HORN (R). Play the HOP; take the MAGIC CRYSTALS (S).
- Place the RING (T), and PARCHMENT and FEATHER (U).
- Place the MAGIC CRYSTALS and FEATHER (V) into the well (W).
- Select the symbol (X); take the MAGIC SYMBOL (Y).
- Place the MAGIC SYMBOL (Z); take the KEY (A).
- Unlock the cabinet with the KEY. Take the ALTAR OF CONTROL (B); remove the cover and take the PICTURE (C).
- Walk down.
- Place the PICTURE (D) to trigger a puzzle.
- Place the pieces (yellow), (red), (green), (purple), and (orange).
- Select the pieces (blue).
- Place the pieces (white).
- Take the ORIGAMI (E).
- Select the ORIGAMI in the Inventory, and select it (F) seven times; receive a PAPER CRANE.
- Return to the Cemetery.
- Place the PAPER CRANE (G); grab the TRIANGLE AMULET (H).
- Return to the Hall.
- Place the TRIANGLE AMULET (I); take the URN LOCK (J).
- Return to the Cemetery.
- Grab the ROLLER 1/2 (K), then place the URN LOCK (L); take the NECKLACE HANDLE (M).
- Return to the Hall.
- Attach the NECKLACE HANDLE to the drawer; open it and take the PICTURE PART and PARCHMENT (N).
- Enter the Ritual Room.
- Place the PARCHMENT (O), then select the symbol (P); take the MAGIC SYMBOL (Q).
- Return to the Cemetery.
- Place the MAGIC SYMBOL (R); grab the GOLD MOON and ROOT AMULET (S).
- Return to the Hall.
- Place the ROOT AMULET (T); grab the ROLLER 2/2 (U).
- Enter the Ritual Room.
- Place the GOLD MOON and GOLD SUN (V) to trigger a puzzle.
- Select the objects (1-4).
- Move the tokens (blue) to the positions shown (green).
- Place the items (red).
- Solution: E-C-B-D-C-A-B-D-F-E-C-D-B-C-E-G-F-D-E-C-D.
- Take the SCARECROW DOLL (W).
- Place the ROLLERS and arrange as shown (X); grab the FIGURE (Y) and FROZEN POTION (Z).
- Return to the Witch's Hut.
- Play the HOP (A); receive a CHANDELIER.
- Move the curtain, then place the FIGURE (B); take the RUNE OF ALTAR (C).
- Remove the makeshift handle, add the HANDLE, then the WIRE; take the AWL (D).
- Return to the Hall.
- Remove the cover (E); grab the PICTURE PART (F).
- Place the PICTURE PARTS in the painting, then select it; take the RUNE OF ALTAR (G).
- Select the doorway (H). Use the FROZEN POTION, then CHANDELIER (H1); open the door.
- Enter the Red Hill (I).
- Move the stones; take the PARCHMENT (J).
- Return to the Ritual Room.
- Place the PARCHMENT (K), then select the symbol (L); take the MAGIC SYMBOL (M).
- Return to the Red Hill.
- Place the MAGIC SYMBOL (M1); use the AWL to get the IDOL EYE (N).
- Place the IDOL EYE (O); take the RUNE OF ALTAR (P).
- Select the ALTAR OF CONTROL in the Inventory, and open it.
- Place the SCARECROW DOLL (Q) and the ALTAR RUNES (green).
- Receive ALTAR OF CONTROL.
- Use the ALTAR OF CONTROL with the Scarecrow (R) to trigger a puzzle.
- Select the scarecrow (S).
- Solution: C-E-G.
- Select the scarecrow (S).
- Solution: A-D-B-H.
- Select the scarecrow (S).
- Solution: E-F-B-J.
- Select the scarecrow (S).
- Solution: A-D-I-F-B.
- Select the scarecrow (S).
- Solution: J-F-I-C-A.
- Scarecrow (S).
- Solution: A-D-G-C-J-E.
- Congratulations, you have completed League of Light: Wicked Harvest.
Created at: 2014-11-07