

Walkthrough Menu
- General Tips
- Chapter 1: The Harbor
- Chapter 2: The Ship's Deck
- Chapter 3: Below Deck
- Chapter 4: Deeper into the Ship
- Chapter 5: The Captain's Cabin
- Chapter 6: Finding a Ship
- Chapter 7: Devil's Island
- Chapter 8: Underground
- Chapter 9: The Lighthouse
General Tips
- This is the official guide for Left in the Dark: No One On Board.
- This guide will not mention each time you have to zoom into a location; the screenshots will identify each location.
- Hidden-object puzzles are referred to as HOPs in this guide. Items listed in blue are hidden or require additional actions to locate. Interactive items in HOPs are color-coded.
- Mini-games and HOPs are sometimes randomized; your solution may vary.
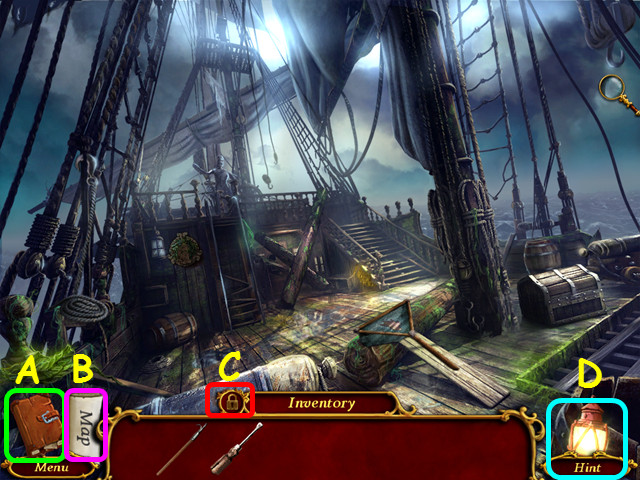
- Refer to your Journal for notes, objectives, and map (A).
- Use your map to see where actions are available and quickly travel (B).
- Prevent your inventory from auto-hiding by selecting the lock (C).
- Select the lantern for a hint (D).
Chapter 1: The Harbor
- You will have the option of some interactive help.
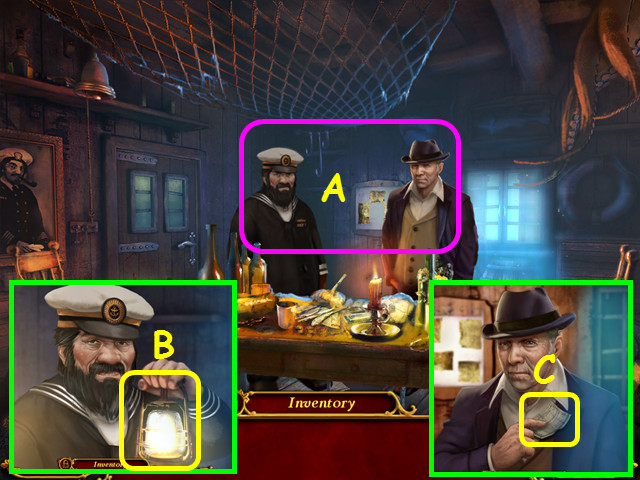
- Talk to the Mayor and the Harbormaster (A).
- Take the LANTERN from the Harbormaster (B).
- Take the PASS from the Mayor (C).
- Walk left.
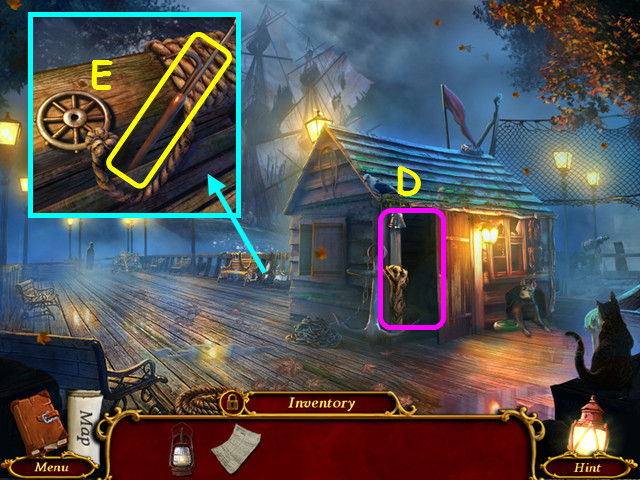
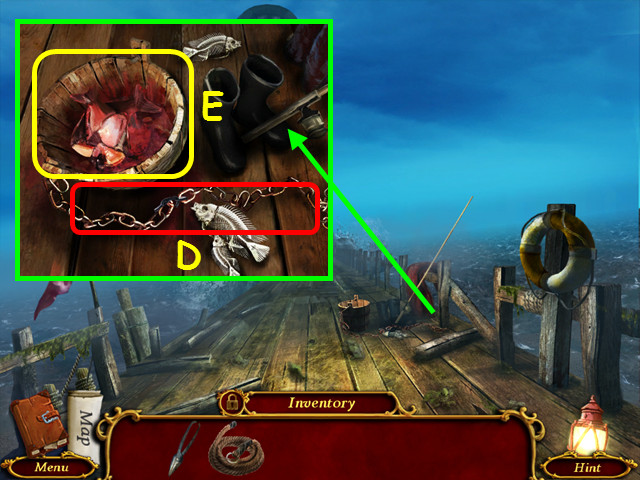
- Note the entrance to the shack (D).
- Take the BOATHOOK (E).
- Walk forward.
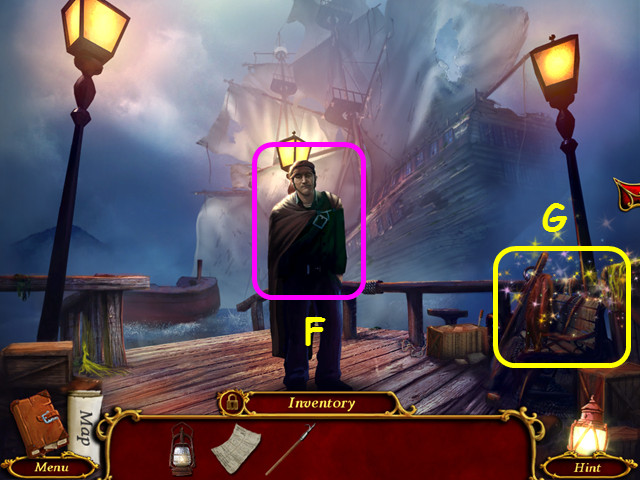
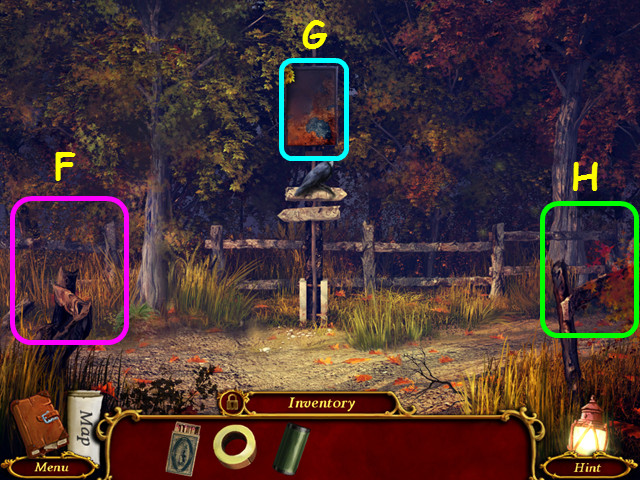
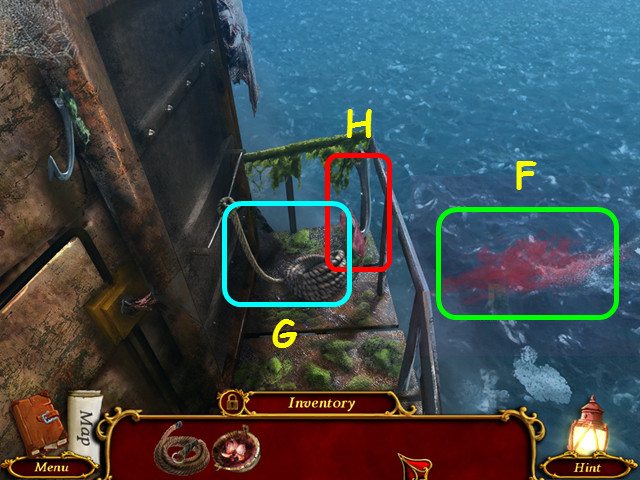
- Give the PASS to the sailor (F).
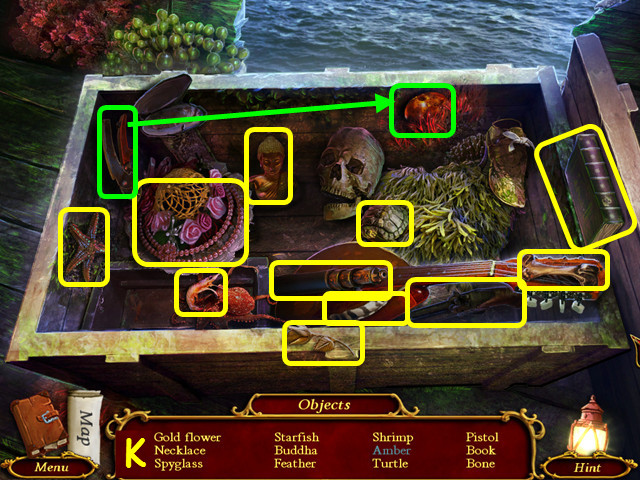
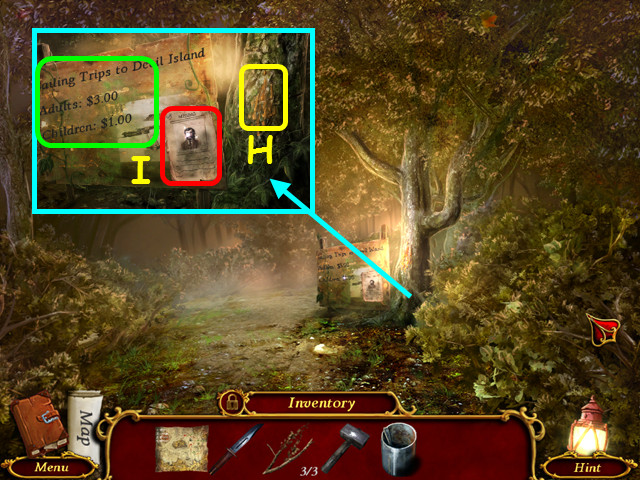
- Select the bench (G).
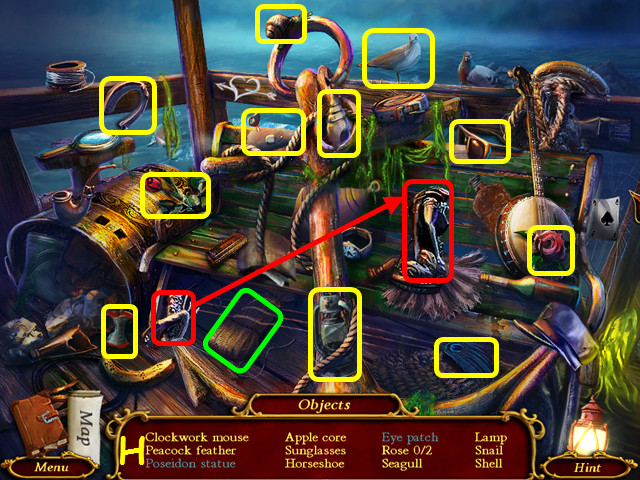
- Play the HOP to earn the CLOCKWORK MOUSE (H).
- Walk down and enter the Shack.
- Use the LAMP anywhere on the darkness.
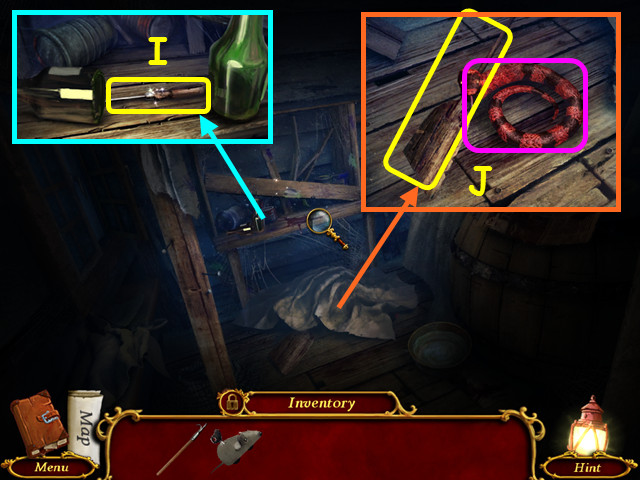
- Move the bottles and take the SCREWDRIVER (I).
- Remove the cloth, use the CLOCKWORK MOUSE on the snake, and take the OAR (J).
- Walk down. After the cut-scene, go forward.
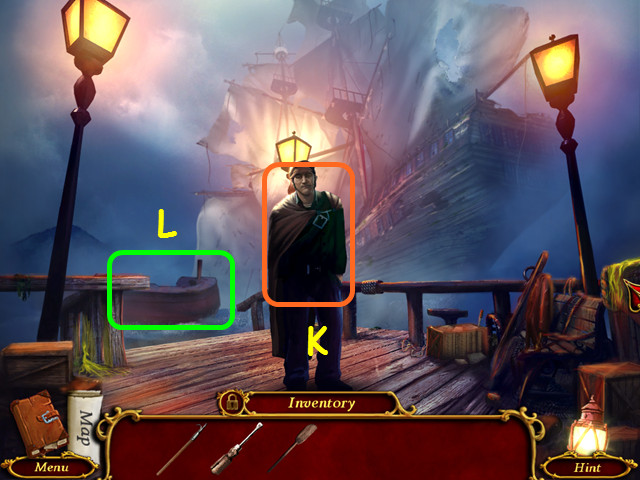
- Give the OAR to the sailor (K).
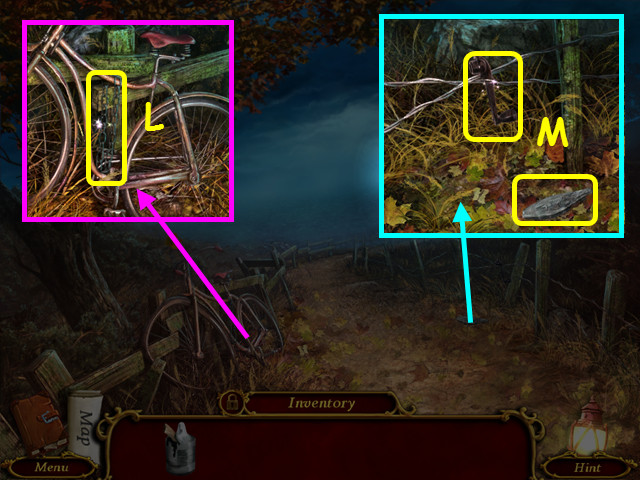
- Go forward to the boat (L).
Chapter 2: The Ship's Deck

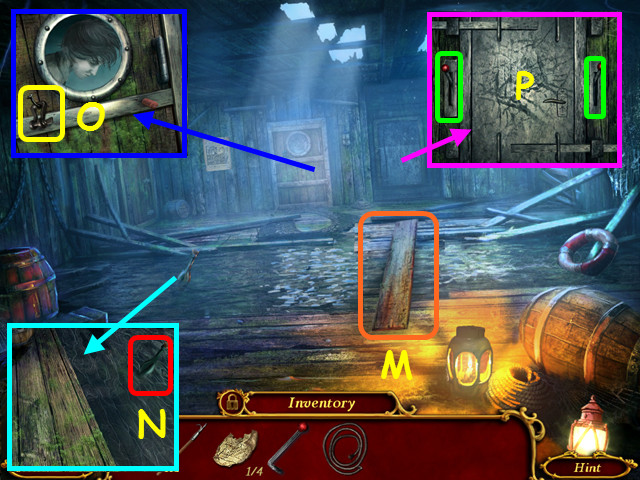
- Take the HOOK (M).
- Remove the seaweed (N).
- Walk forward.
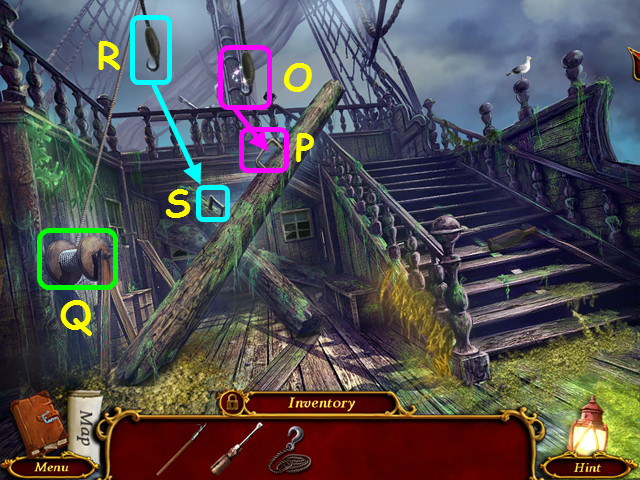
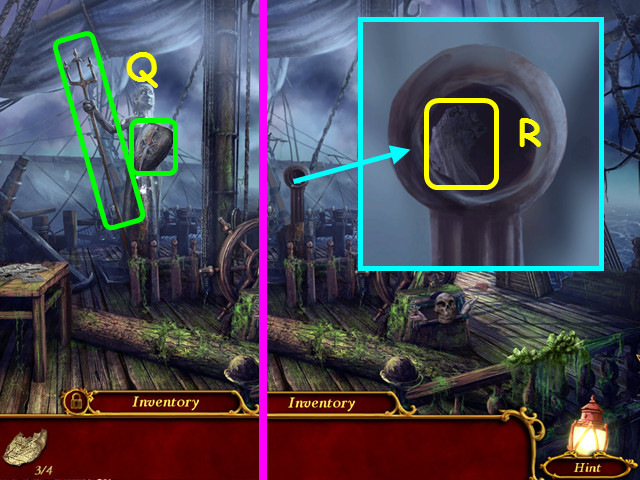
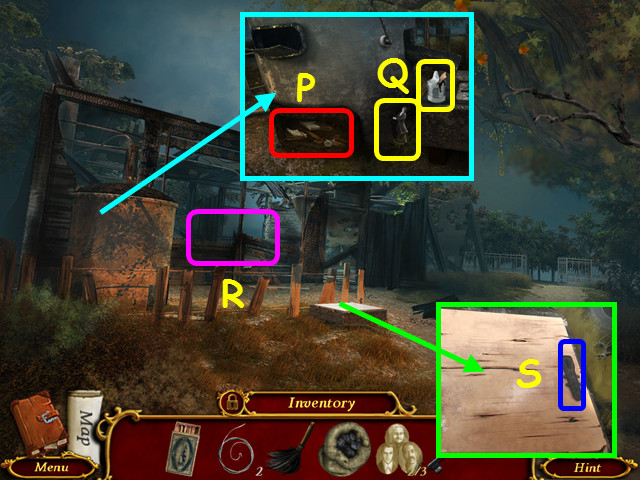
- Place the right hook (O) on the beam (P) and turn the winch (Q).
- Use the BOATHOOK to lower the left hook (R), attach it to the beam (S), and turn the winch.
- Walk up the stairs.
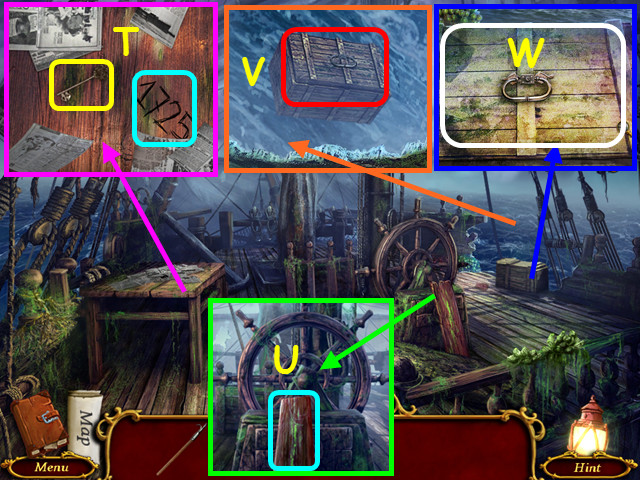
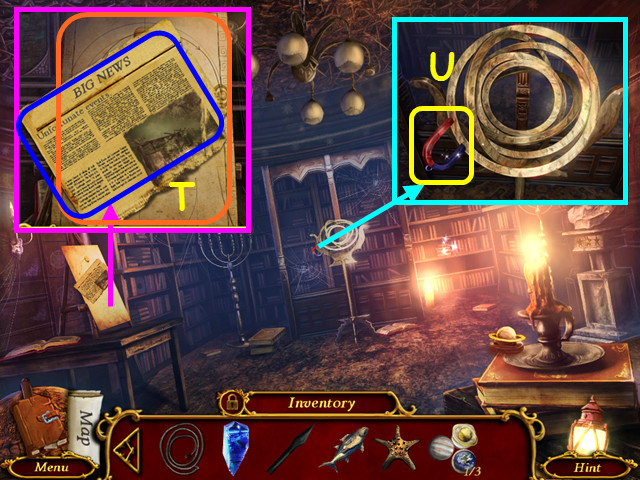
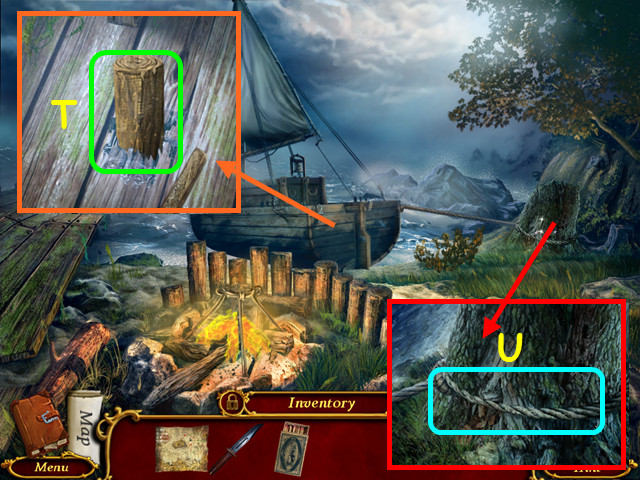
- Move the newspapers; take the KEY and note the 1725 code (T).
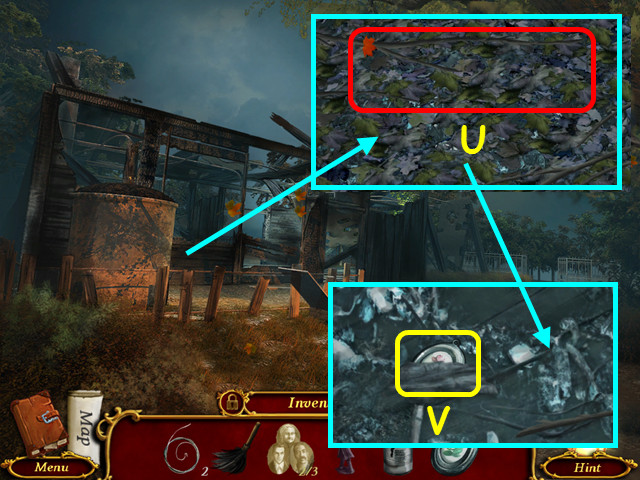
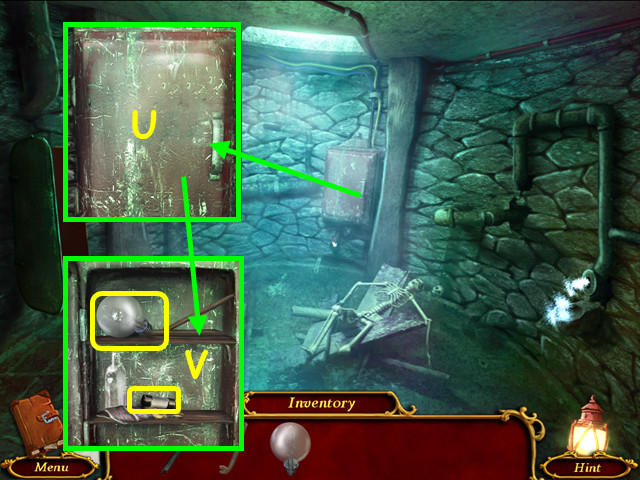
- Move the board (U).
- Use the HOOK to bring the chest aboard (V).
- Use the SCREWDRIVER on the lid and open the crate (W).
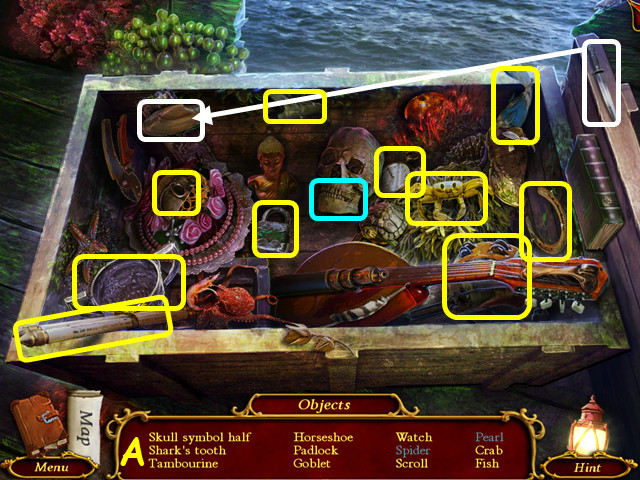
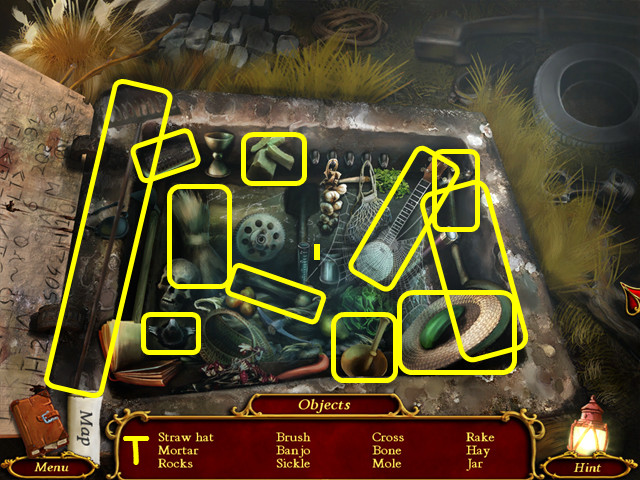
- Play the HOP to earn the 1/2 SKULL SYMBOL (A).
- Walk down twice.
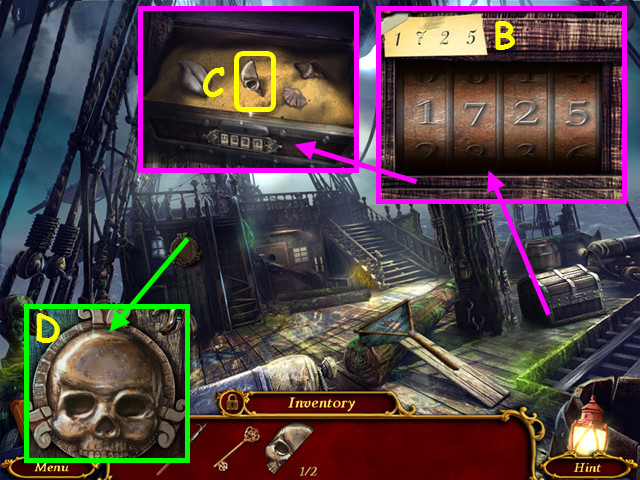
- Enter the code 1725 (B).
- Open the chest and take the 2/2 SKULL SYMBOL (C).
- Place the 2/2 SKULL SYMBOL in the indentation (D).

- Rotate the skulls to the 3 gems are a solid color (E).
- Take the SAW and 1/4 MAP PIECE (F).
- Walk forward.

- Use the SAW to cut the beam (G).
- Turn the KEY in the lock and turn the handle (H).
- Walk forward.
Chapter 3: Below Deck
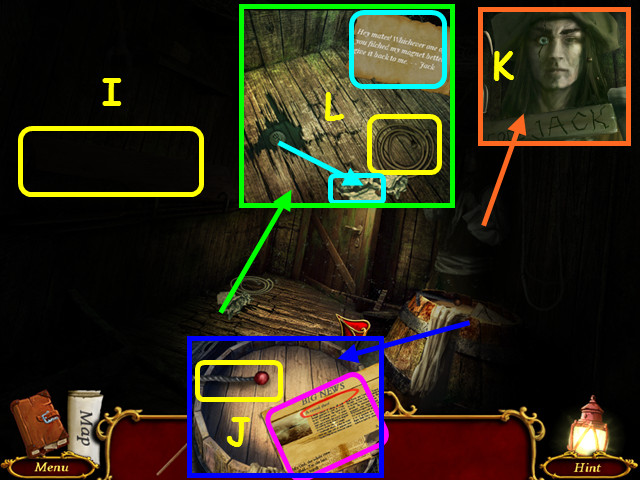
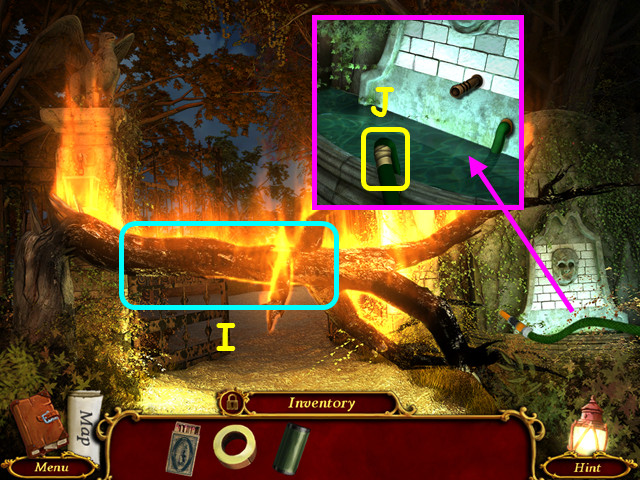
- Take the PLANK (I).
- Look at the newspaper and take the LEVER (J).
- Note the code JACK (K).
- Move the rag, take the STRING, and read the note (L).
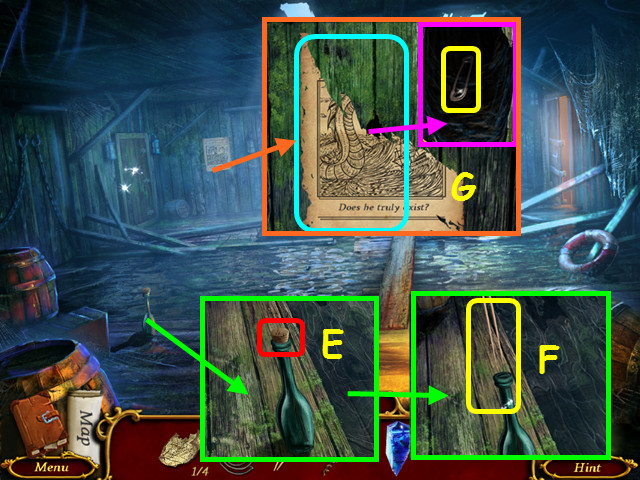
- Walk forward.
- Place the PLANK across the water (M).
- Use the BOATHOOK to retrieve the bottle (N).
- Take the 1/2 SHACKLE (O).
- Place the LEVER on the left, and then pull both levers down (P).
- Turn the handle and walk forward.
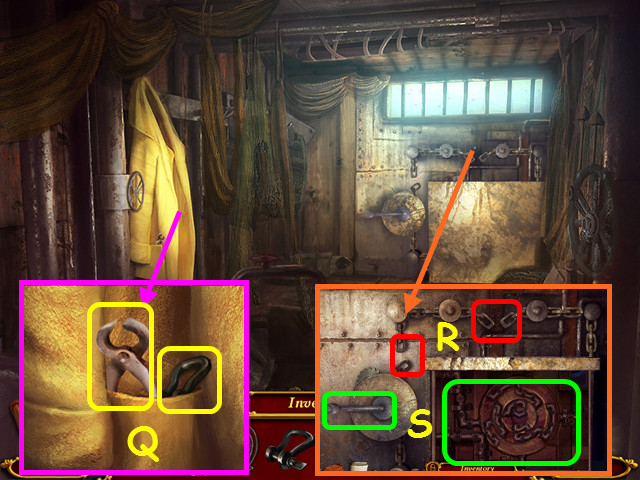
- Take the 2/2 SHACKLES and the PLIERS (Q).
- Use the 2 SHACKLES on the breaks in the chain (R).
- Turn the handle and look inside (S).
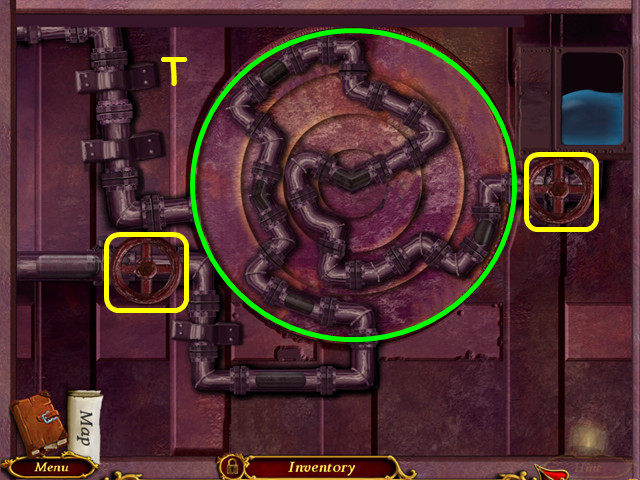
- Rotate the rings to connect the 2 valves (yellow).
- Drag the rings to rotate them into position (T).
- Turn both valves.
- Walk down.
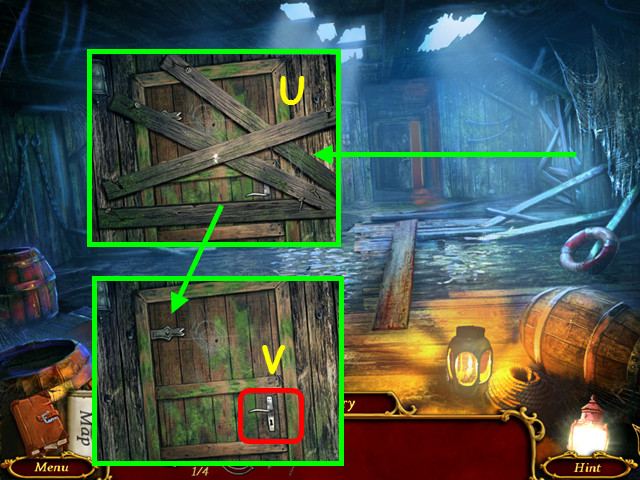
- Use the PLIERS to remove the boards (U).
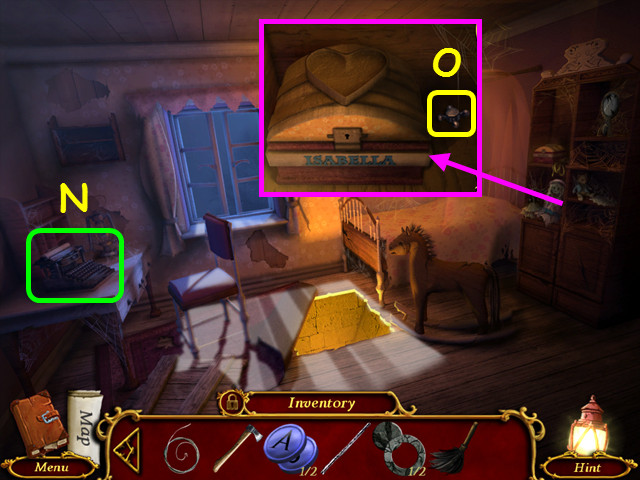
- Turn the handle and walk to the right (V).
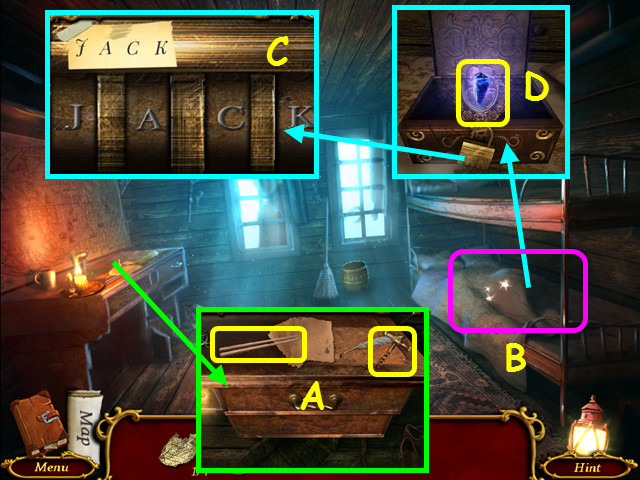
- Take the CHOPSTICKS and the CORKSCREW (A).
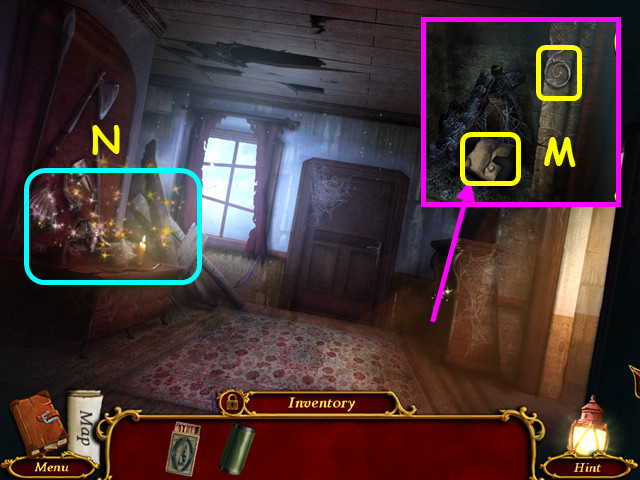
- Remove the blanket (B).
- Enter the code JACK (C).
- Take the CRYSTAL (D).
- Walk down.
- Use the CORKSCREW to remove the cork (E).
- Use the CHOPSTICKS in the bottle to get the HOUR HAND (F).
- Remove the poster and use the CHOPSTICKS to take the SAFETY PIN (G).
- Walk to the right.
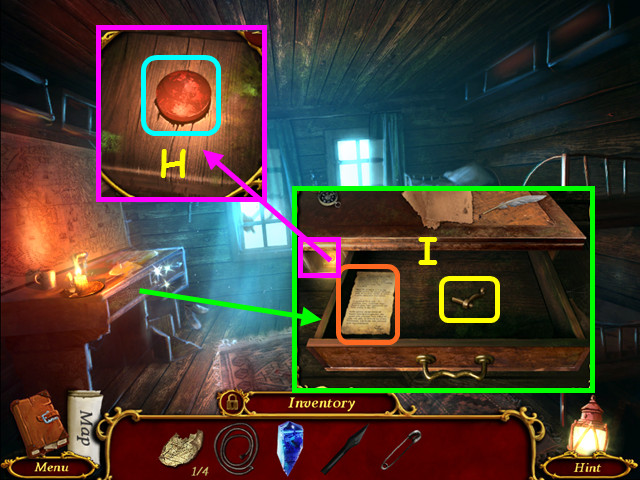
- Use the SAFETY PIN to raise the BUTTON, and then press it (H).
- Read the entry and take the DOOR HANDLE (I).
- Walk down.
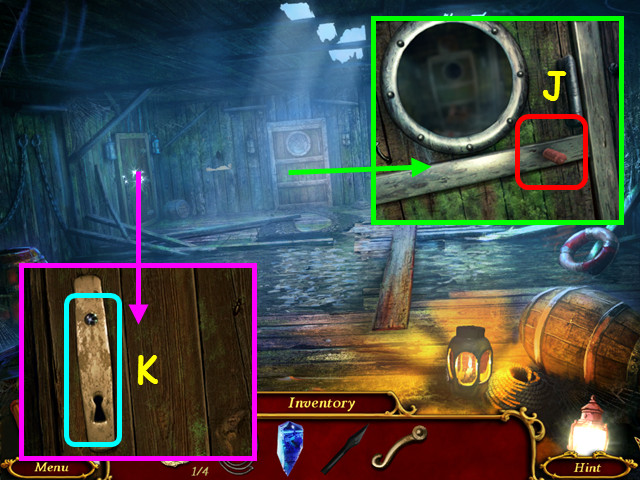
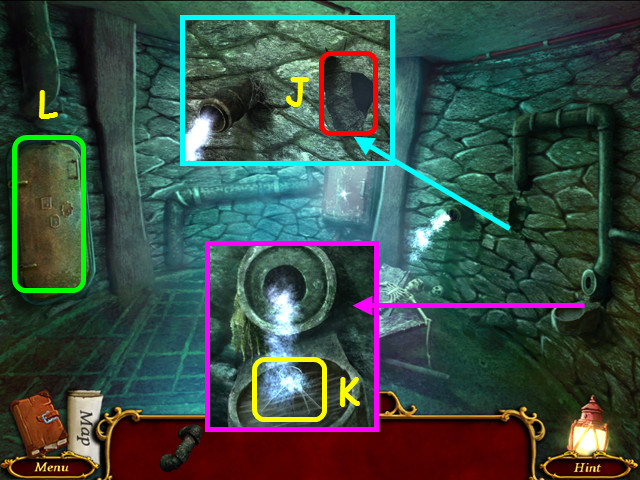
- Note the location for a handle wheel (J).
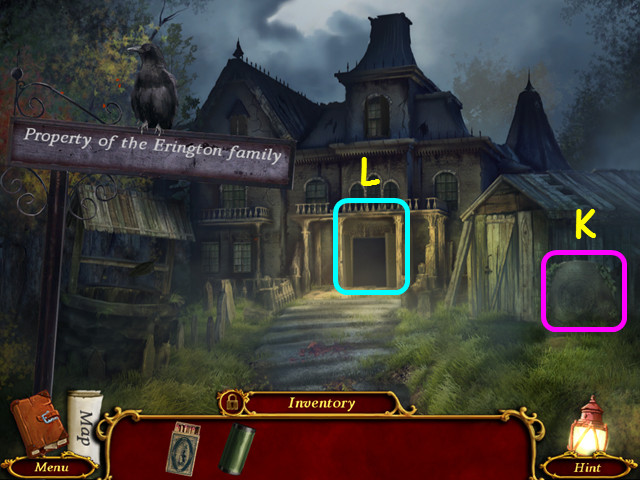
- Place the DOOR HANDLE on the door and pull it down (K).
- Select the room.
- Play the HOP to earn the HANDLE WHEEL (L).
- Place the HANDLE WHEEL on the door, turn it, and enter the Corridor.
Chapter 4: Deeper into the Ship

- Take the FISH FIGURE (M).
- Take the ORANGE STARFISH (N).
- Walk forward.
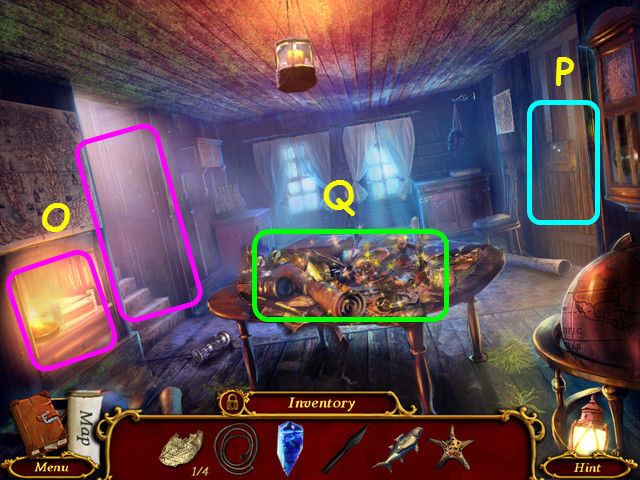
- Note the planets mini-game and the Hallway to the Captain's Room (O).
- Note the mini-game on the right door (P).
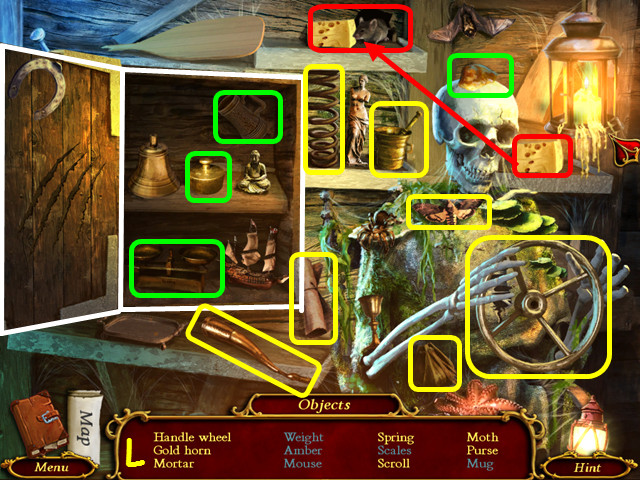
- Select the table (Q).
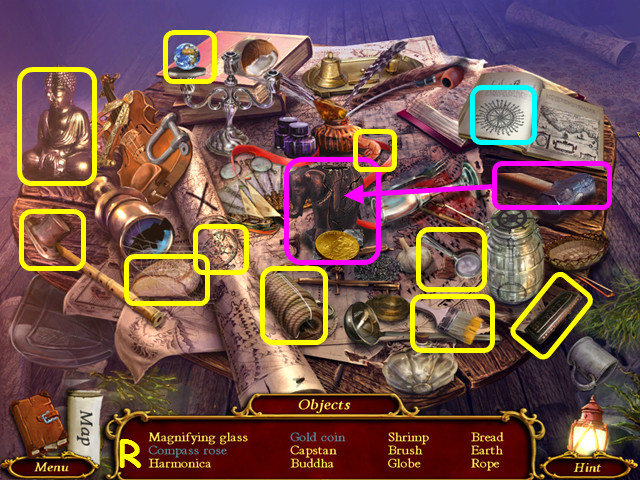
- Play the HOP to earn the 1/3 PLANET (R).
- Look at the right door.
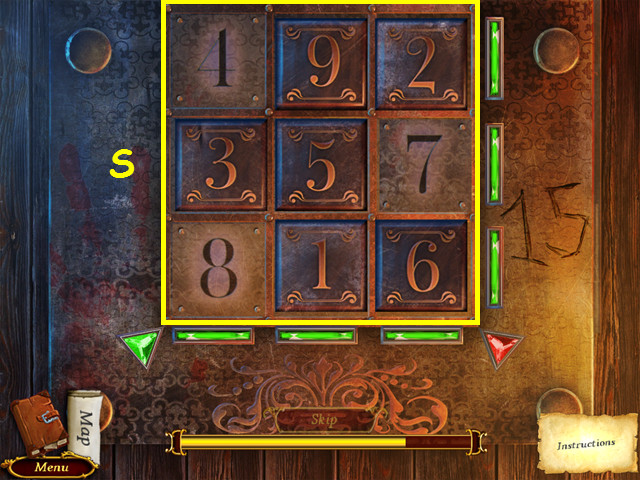
- Swap the tiles so they add to 15 vertically and horizontally (S).
- Note the 4, 7, and 8 tiles do not move.
- Pull the handle that appears, and then walk to the right.
- Read the newspaper and note the positions of the planets (T).
- Use the STRING on the magnet to get the MAGNET AND ROPE (U).
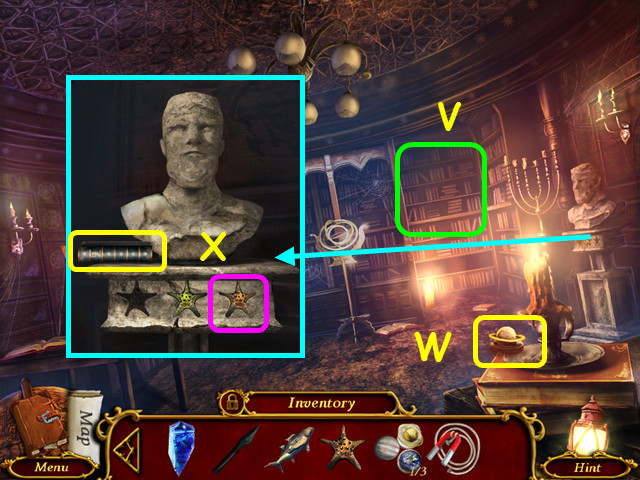
- Note the mini-game on the bookcase (V).
- Take the 2/3 PLANET (W).
- Take the 1/3 BOOKS and place the ORANGE STARFISH on the base of the bust (X).
- Walk down and left.
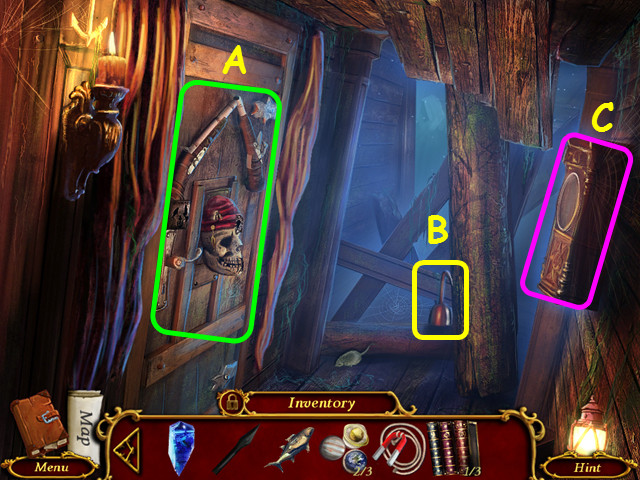
- Note the Captain's door (A).
- Take the PIRATE'S HOOK (B).
- Note the clock on the right (C).
- Walk down 4 times.

- Use the MAGNET AND ROPE to take the NEPTUNE SYMBOL (D).
- Place the PIRATE'S HOOK on the right (E).
- Take the 1/2 EYE (F).
- Walk down and go up the stairs.
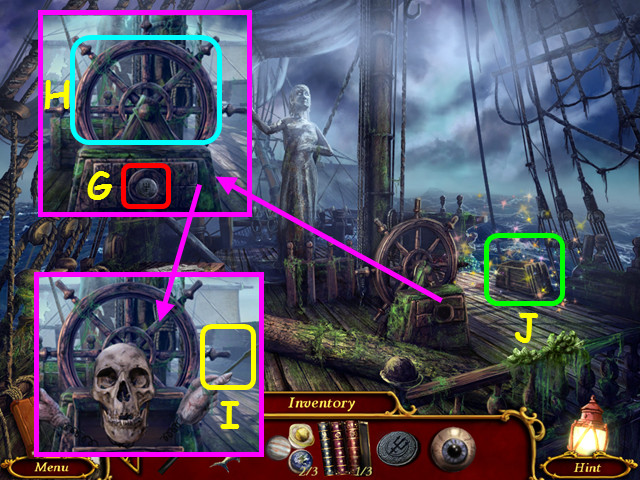
- Place the NEPTUNE SYMBOL in the circle (G).
- Spin the wheel (H).
- Take the MINUTE HAND (I).
- Select the chest (J).
- Play the HOP to earn the 2/3 BOOK (K).
- Return to the Hallway to the Captain's Room.
- Select the clock on the right.
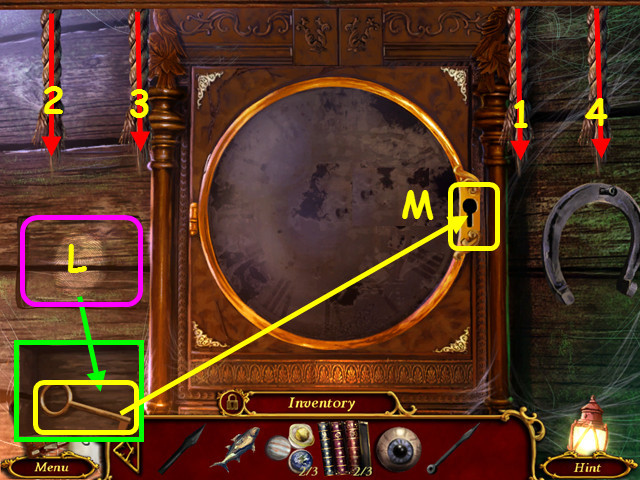
- Press the wooden button (L).
- Find the order to pull all the ropes down (1-4).
- Take the KEY and use it in the lock (M).
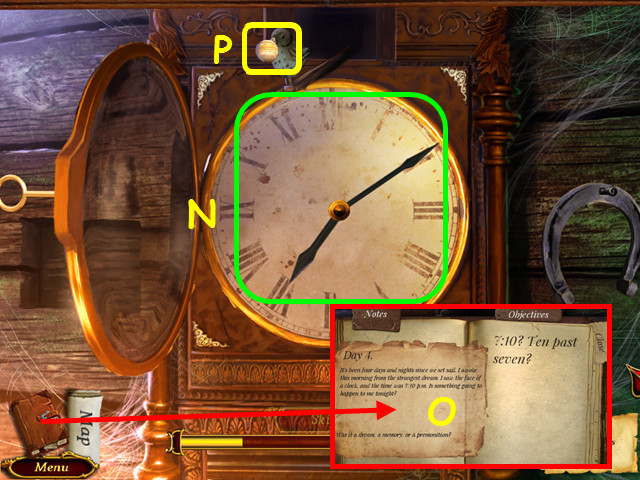
- Place the HOUR HAND and the MINUTE HAND on the face and set the clock to 7:10 (N).
- Refer to your journal for the time (O).
- Take the 3/3 PLANET (P).
- Walk down and select the planets mini-game on the left.
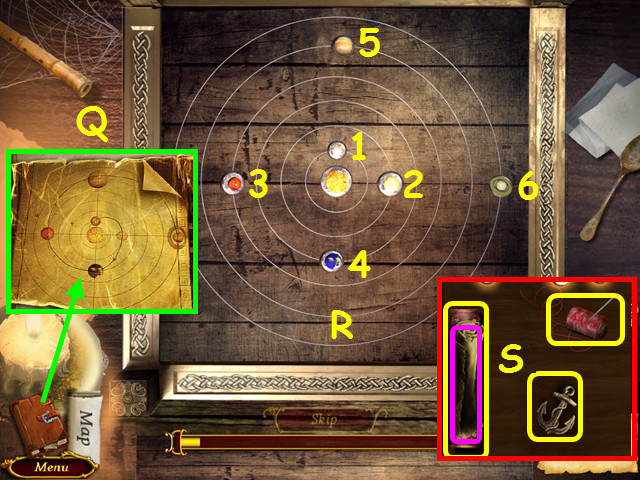
- Place the 3 PLANETS on the board.
- Refer to your journal for the planets diagram (Q).
- Move the planets to match the diagram (R).
- Moving some planets may move others.
- Move the planets into position in numerical order (1-6).
- Read the diary page, take the ANCHOR FIGURINE, NEEDLE AND THREAD, and the 3/3 BOOKS (S).
- Walk right and select the bookcase on the right.
- Place the 3 BOOKS on the shelf.
- Refer to your journal for the order of the books (T).
- Select 2 books to swap positions and place them in the correct order (U).
- Take the 2/4 MAP PIECES and the RED STARFISH (V).

- Place the RED STARFISH in the base (W).
- Take the 2/2 EYE (X).
- Walk down 6 times.
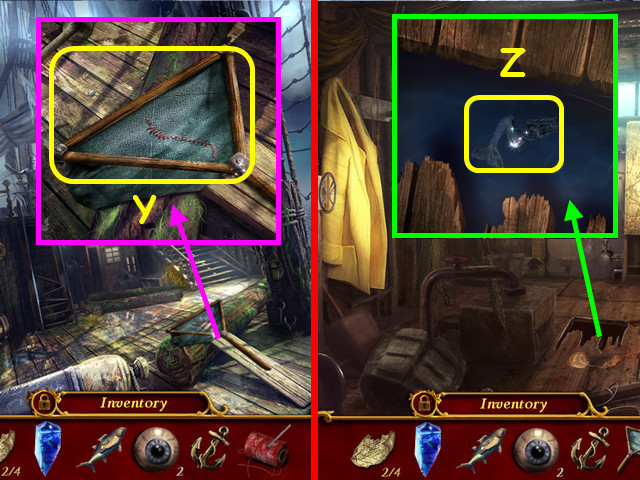
- Use the NEEDLE AND THREAD to repair and take the FISHING NET (Y).
- Go forward 3 times and enter the Utility room.
- Use the FISHING NET to take the MERMAID FIGURE (Z).
- Go to the Captain's door.
Chapter 5: The Captain's Cabin
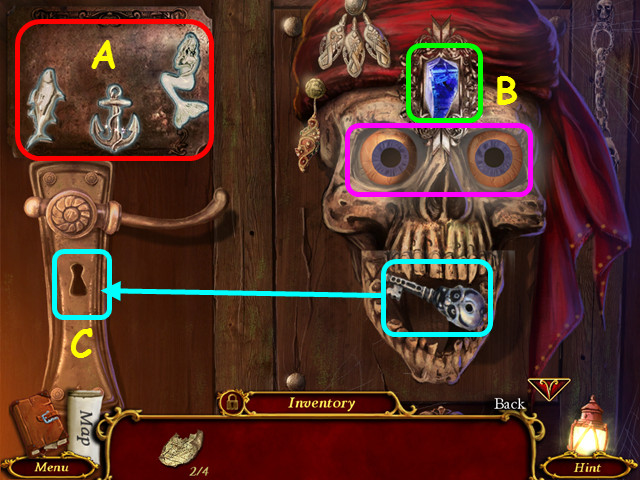
- Place the FISH FIGURE, ANCHOR FIGURE, and MERMAID FIGURE on the left (A).
- Place the CRYSTAL in the center of the skull and the 2 EYES in the sockets (B).
- Take the key and use it in the lock; pull down the handle (C).
- Enter the cabin.
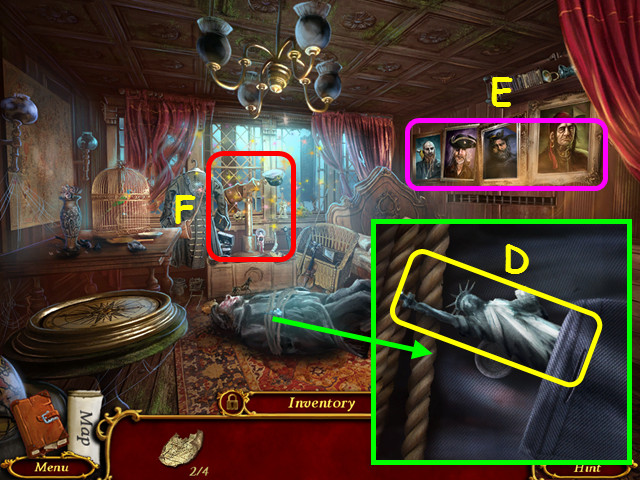
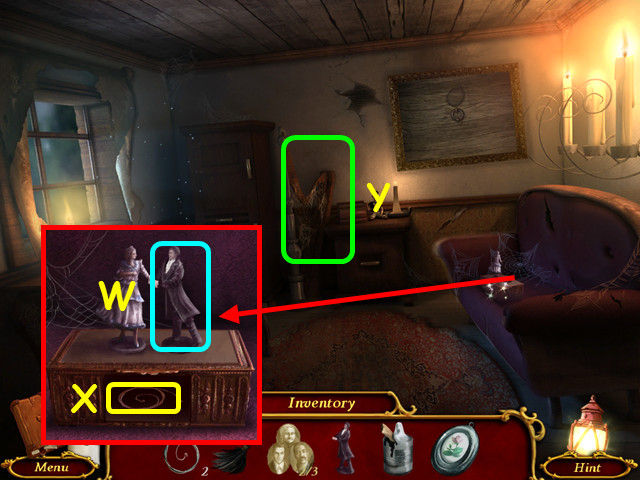
- Take the 1/2 STATUE (D).
- Note the portraits on the wall (E).
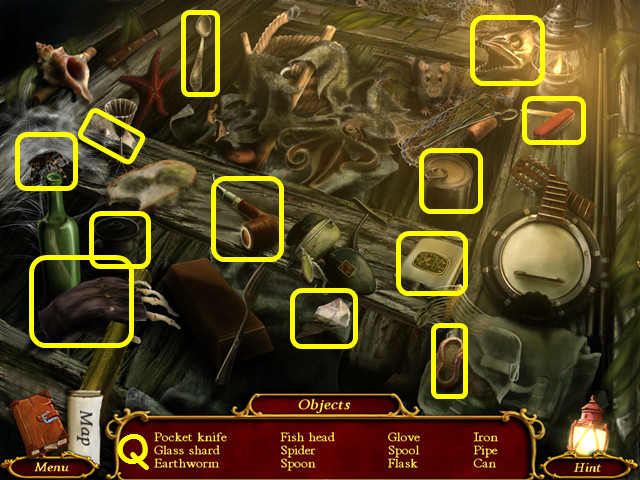
- Select the telescope (F).
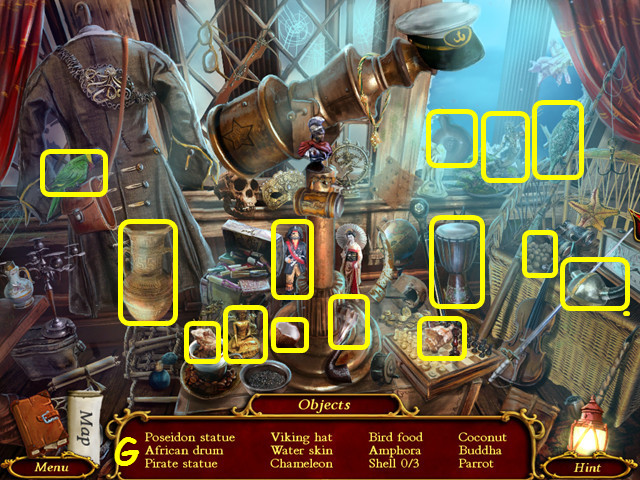
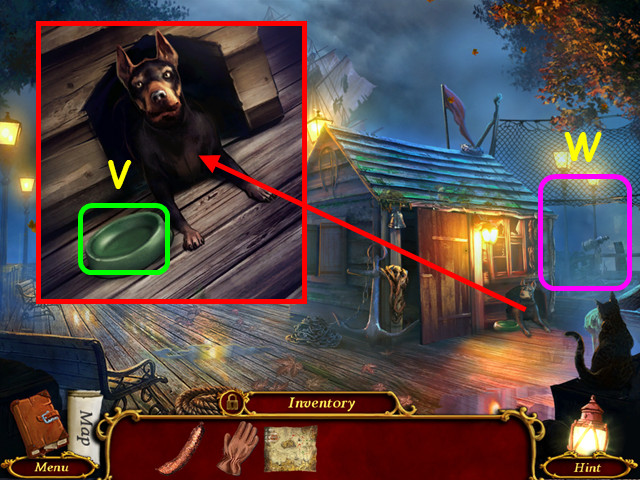
- Play the HOP (G).
- You will earn the BIRD FOOD.
- Place the BIRD FOOD in the bowl (H).
- Open the cage (I).
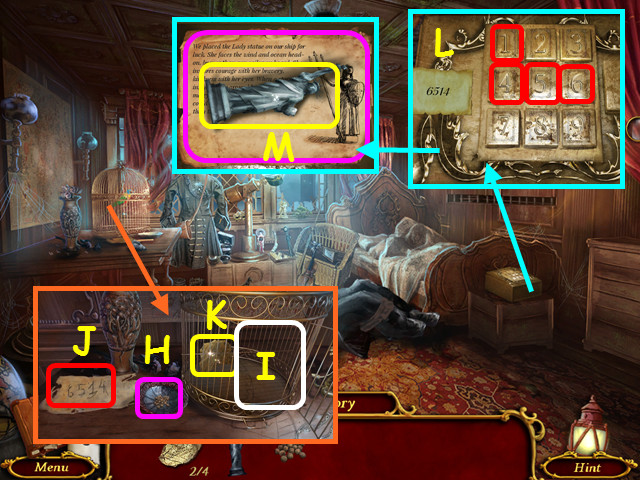
- Note the code 6514 (J) and take the 3/4 MAP SCRAP (K).
- Enter the code (L).
- Take the 2/2 STATUE and read the page (M).
- Select the portraits.
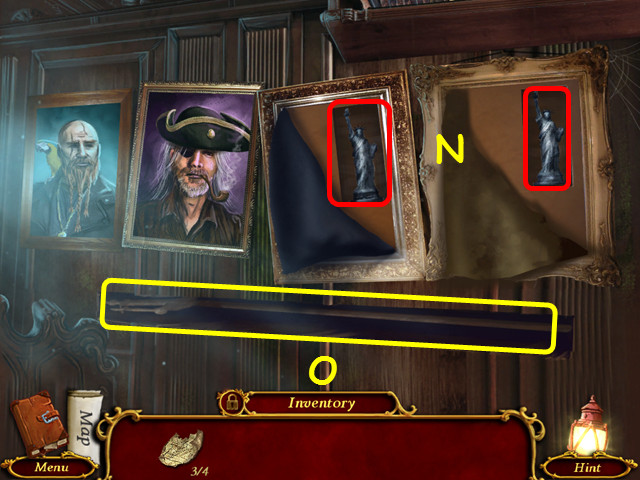
- Tear the 2 right canvases open and place the 2 STATUES in the openings (N).
- Take the TRIDENT (O).
- Walk down twice and select the table.
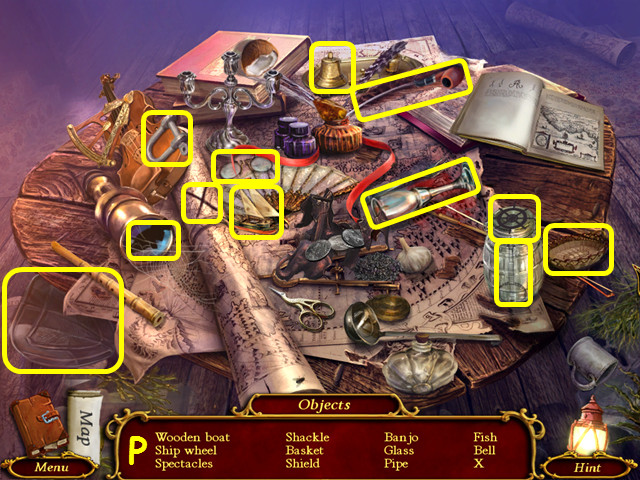
- Play the HOP to earn the SHIELD (P).
- Walk down 4 times and go up the stairs.
- Place the TRIDENT and the SHIELD on the statue (Q).
- Take the 4/4 MAP PIECE (R).
- Walk down 3 times and select the bench.
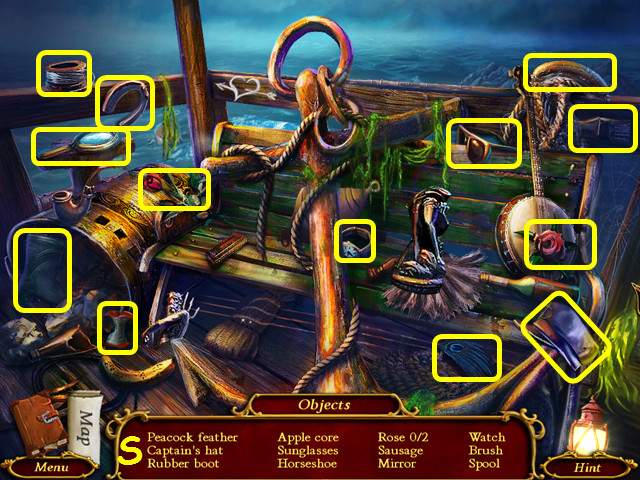
- Play the HOP to earn the SAUSAGE (S).
- Walk down twice and select the table.
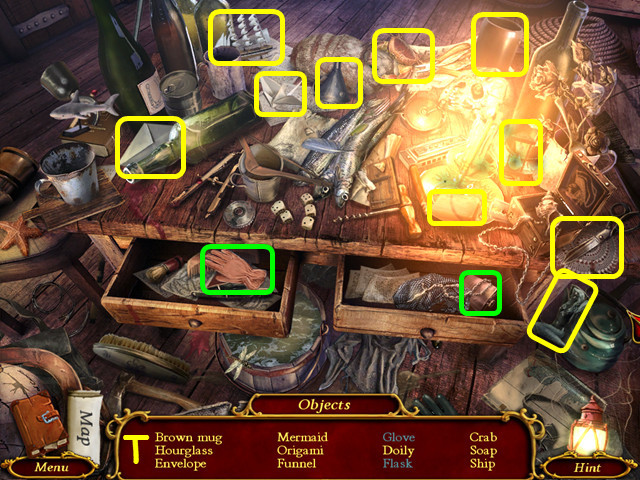
- Play the HOP to earn the GLOVE (T).
- Select the map board on the back wall.
- Place the 4 MAP PIECES on the board.
- Restore the map by dragging the pieces into position (U).
- Select a piece to rotate it in place.
- Take the MAP and walk to the left.
Chapter 6: Finding a Ship
- Place the SAUSAGE in the bowl (V).
- Walk to the right (W).
- Use the GLOVE to take the KNIFE (A).
- Take the SHOVEL (B).
- Use the SHOVEL on the X (C).
- Read the ID and take the COIN (D).
- Walk down.
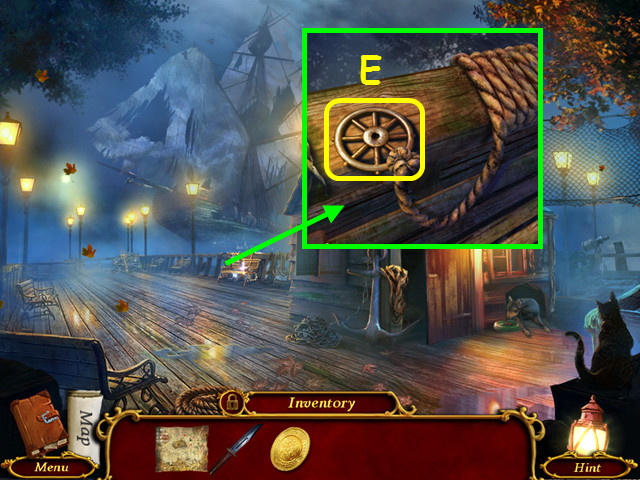
- Use the KNIFE to cut the rope, and then take the KNOB (E).
- Walk to the right.
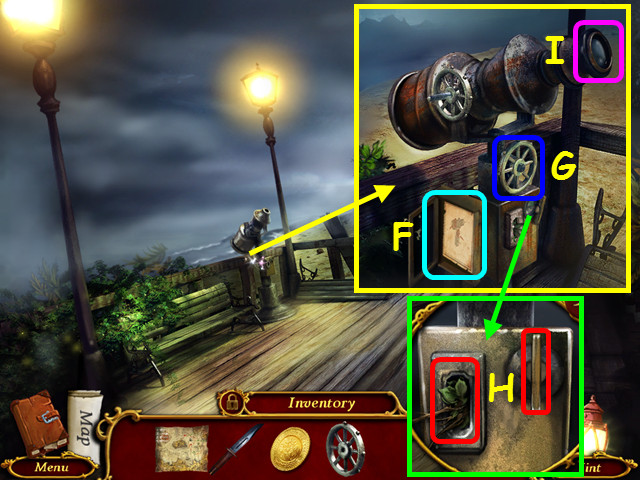
- Open the case and read the instructions (F).
- Place the KNOB on the post (G).
- Remove the debris from the slot, insert the COIN, and turn the knob (H).
- Look in the lens (I).
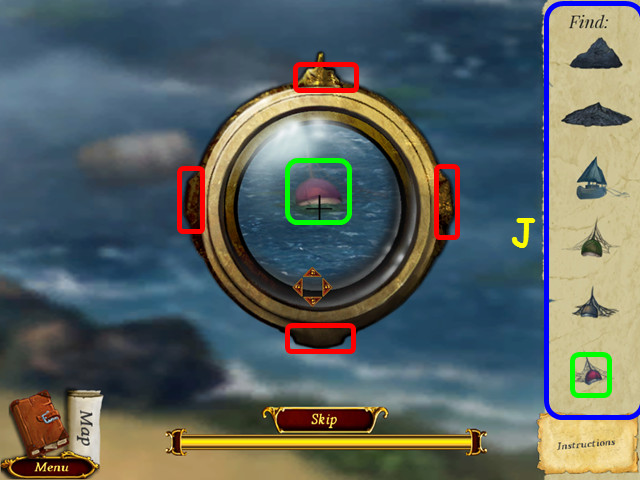
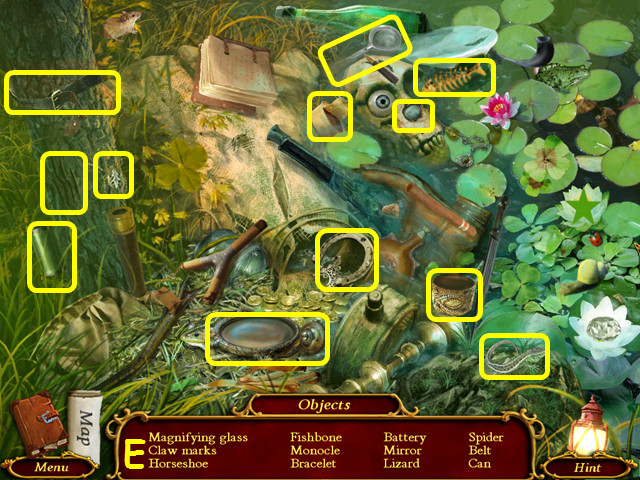
- Tap the top, bottom, left, and right edges of the lens to move it (red).
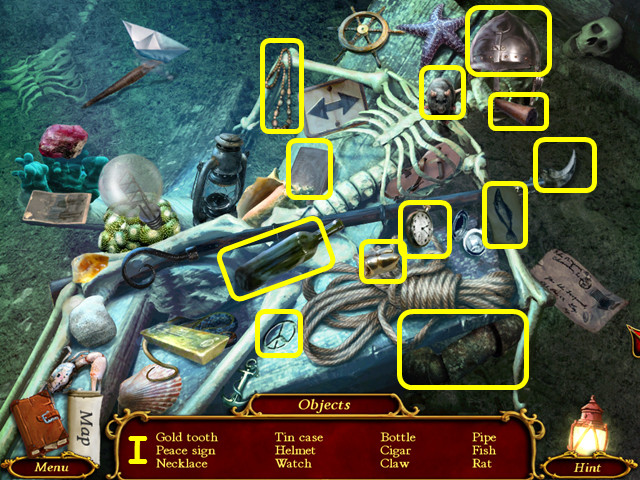
- Find the items in the lens to play the HOP (J).
- Walk forward.
- Select the debris on the right.
- Play the HOP to earn the GATE KEY (K).
- Use the GATE KEY on the gate lock and turn the handle.
- Walk forward.
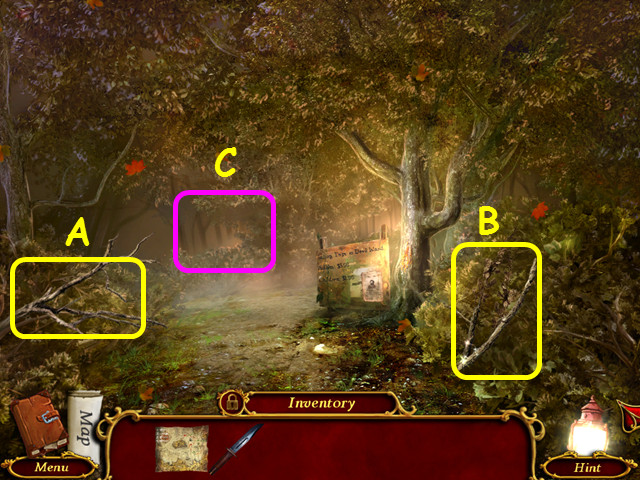
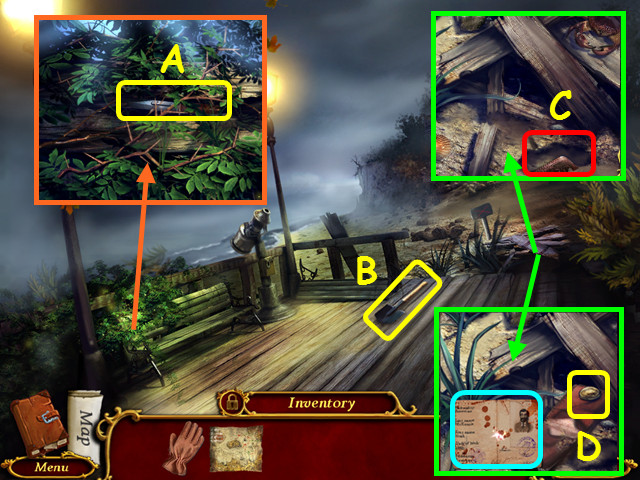
- Take the 1/3 (A) and 2/3 BRANCHES (B).
- Walk forward (C).
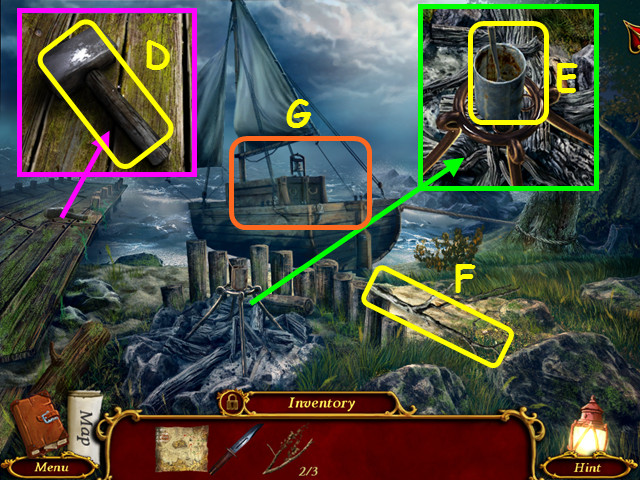
- Take the HAMMER (D).
- Take the CAN WITH SPOON (E).
- Take the 3/3 BRANCH (F).
- Note the ship (G).
- Walk down.
- Use the CAN WITH SPOON on the tree to get the CAN OF RESIN (H).
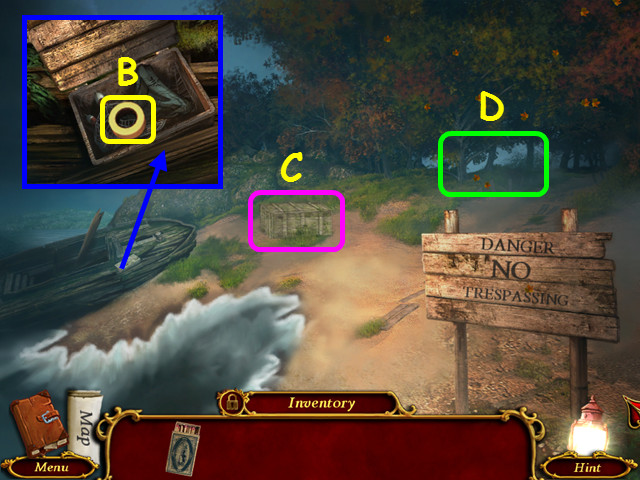
- Read the missing poster and sign (I).
- Walk forward and get on the ship.

- Open the box and take the WET RAG (J).
- Use the KNIFE 4 times on the pole (K) and place it in the hole (L).
- Use the HAMMER on the pole.
- Exit the close-up and walk down twice.
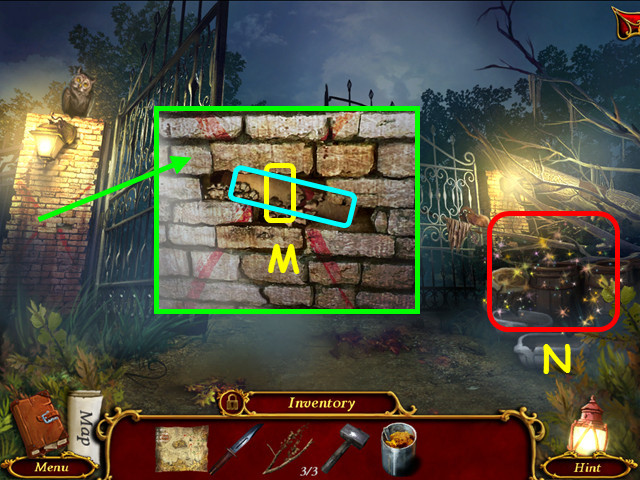
- Use the HAMMER on the bricks; read the newspaper and take the MATCHES (M).
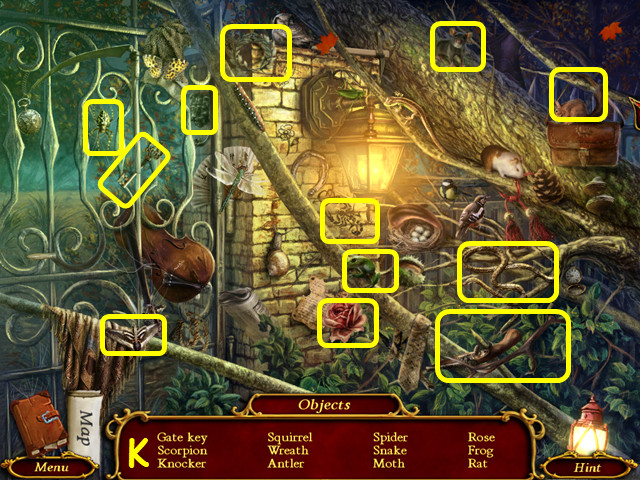
- Select the debris on the right (N).
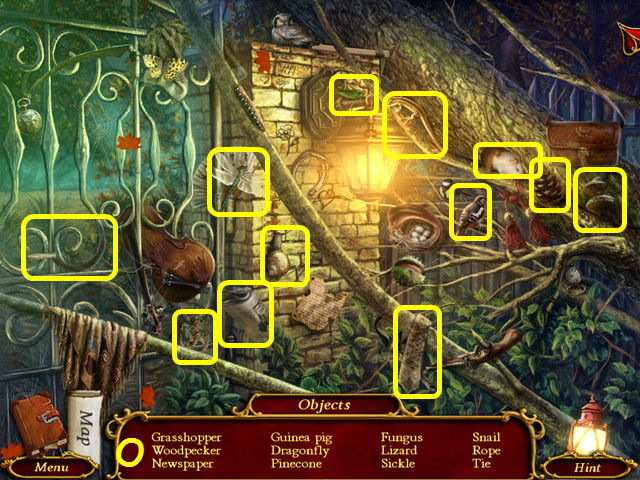
- Play the HOP to earn the NEWSPAPER (O).
- Walk forward twice.
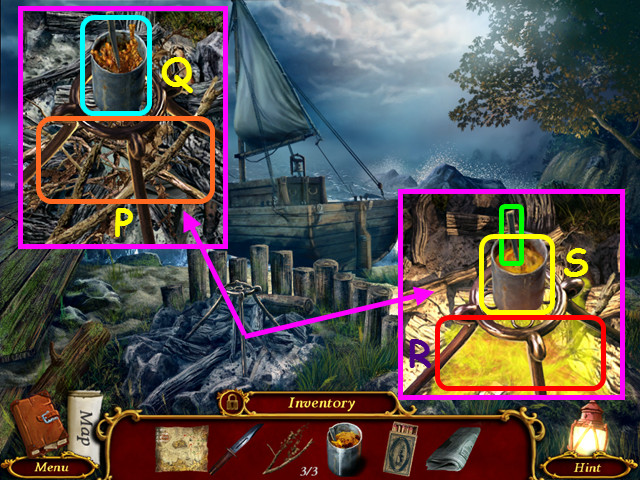
- Place the NEWSPAPER and the 3 BRANCHES in the campfire (P).
- Place the CAN OF RESIN on the stand (Q).
- Use the MATCHES to light the fire (R).
- Select the spoon to stir the resin, and then use the WET RAG to take the HOT RESIN (S).
- Pour the HOT RESIN on the pole (T).
- Use the KNIFE to cut the rope (U).
- Go forward.
Chapter 7: Devil's Island
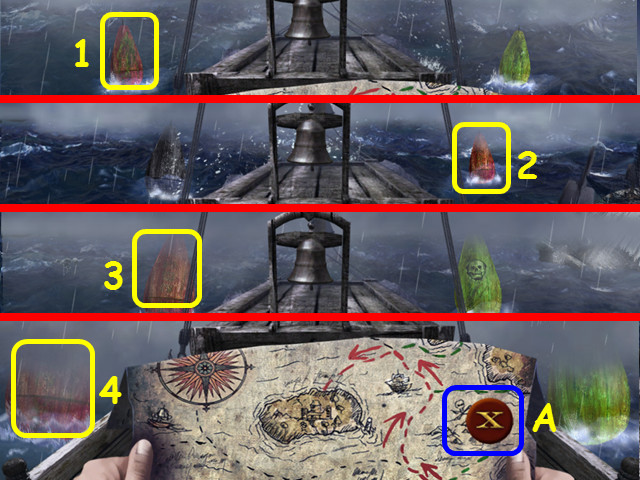
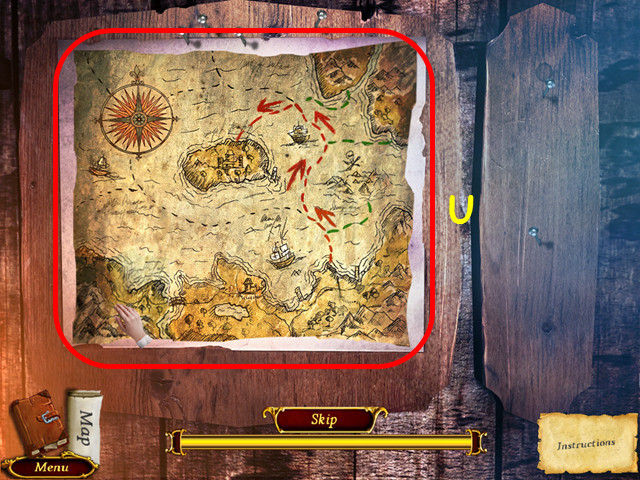
- Select all the red route buoys (1-4).
- You do not need to keep the map open (A).
- Open the box and take the TAPE (B).
- Note the crate of coal (C).
- Walk to the bridge (D).
- Select the debris on the right.
- Play the HOP to earn the BATTERY (E).
- Walk forward.
- Note the path to the Mansion (F).
- Note the circuit box mini-game (G).
- Walk right to the Stables (H).
- Note the fire (I).
- Use the TAPE on the hose (J).
- Walk down and go left.
- Note the tombstone mini-game (K).
- Enter the Foyer (L).
- Read the notebook and take the HARP STRING (M).
- Select the weaponry on the left (N).
- Play the HOP to earn the HATCHET (O).
- Walk to the right.
- Take the 1/2 KEY (P).
- Open the box and take the FUSE (Q).
- Open the drawer; open the book and look at the photograph (R).
- Note the harp (S).
- Walk down 3 times and select the circuit box mini-game.
- Open the cover and look inside.
- Place the battery in the left opening (T) and the FUSE in the right opening (U).
- Swap the batteries so the power of two batteries equals the circuit (V).
- Walk to the left.
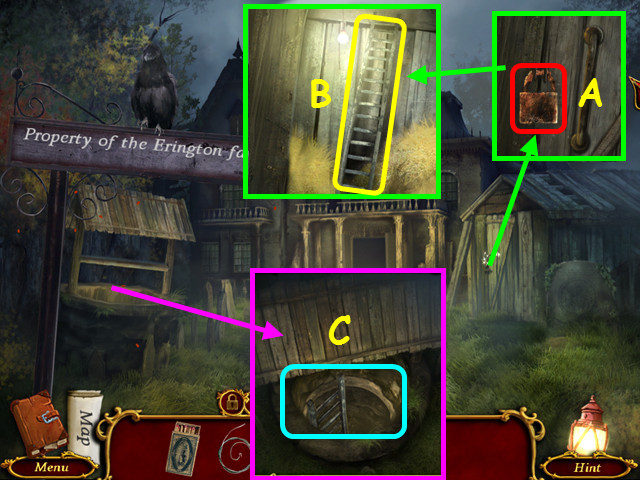
- Use the HATCHET on the lock (A).
- Open the door and take the LADDER (B).
- Place the LADDER in the well and climb down (C).
Chapter 8: Underground
- Take the METAL ROD (D).
- Select the table (E).
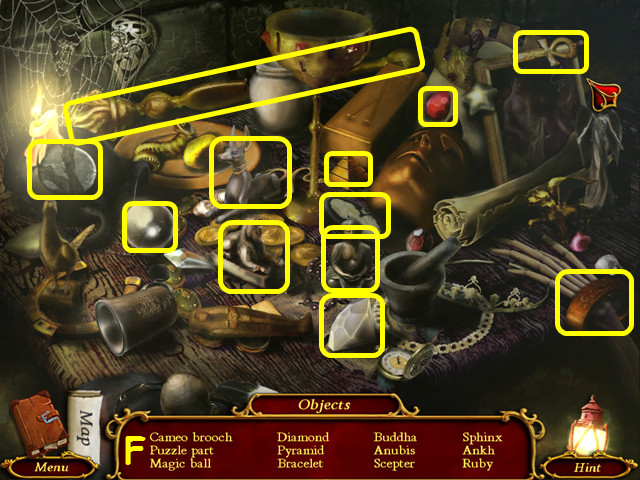
- Play the HOP to earn the 1/2 PUZZLE PART (F).
- Walk forward.
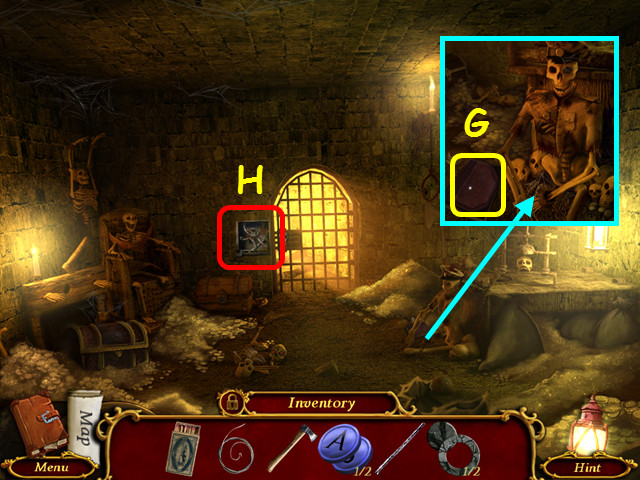
- Read the journal (G).
- Select the lock (H).

- Drag the blades back into the recesses (red).
- Take the KEY (I) and use it in the lock (J).
- Walk forward.
- Take the BRUSH (K).
- Note the path back to the dungeon (L).
- Walk up to the Girl's Room (M).
- Note the typewriter mini-game (N).
- Take the KNOB (O).
- Enter the hole in the floor and go forward on the left to the dungeon.
- Walk down, go up the ladder, walk down, and right.
- Place the KNOB on the pipe and turn it on (P).
- Walk forward (Q).
- Take the SACK (R).
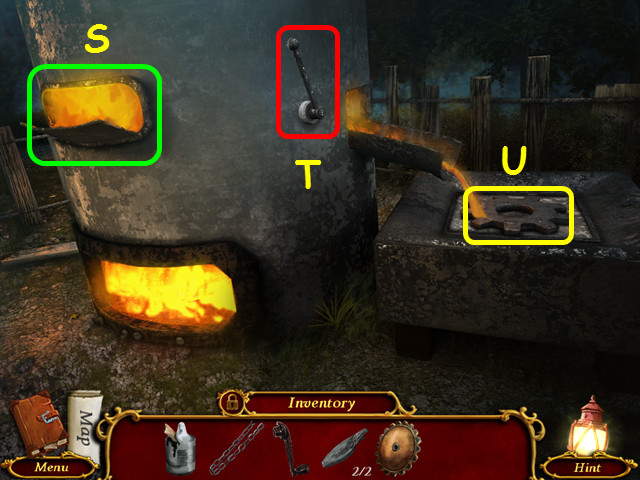
- Note the furnace area (S).
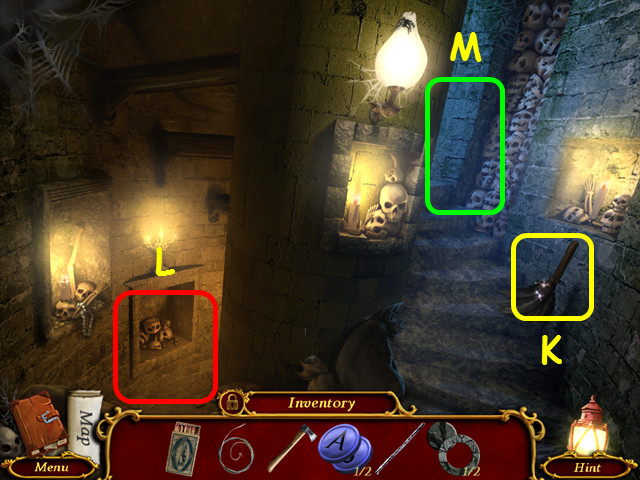
- Walk down 3 times.

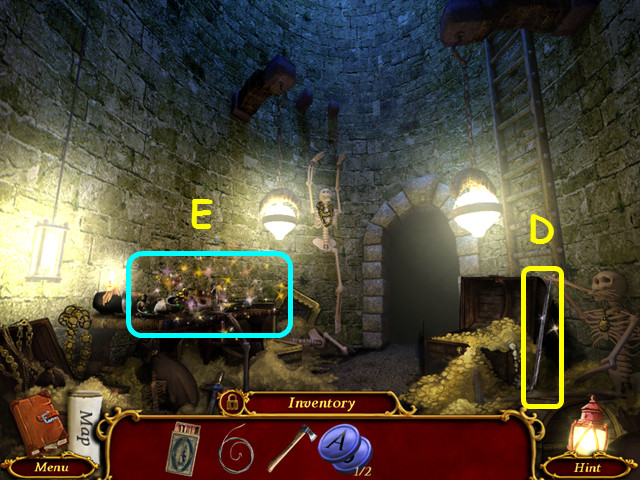
- Use the METAL ROD to lift the rock (T).
- Take the 2/2 PUZZLE PARTS (U).
- Select the debris on the right (V).
- Play the HOP to earn the TUSK (W).
- Walk down.
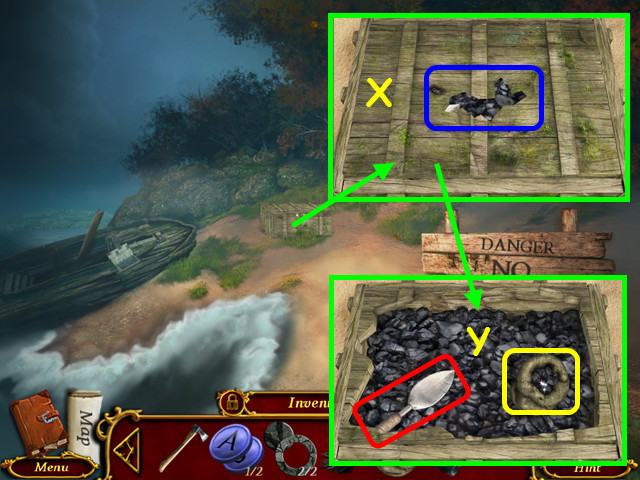
- Use the HATCHET on the crate (X).
- Place the SACK on the coal and use the scoop to fill it up (Y).
- Take the COAL.
- Walk forward twice, go left, and select the tombstone mini-game.
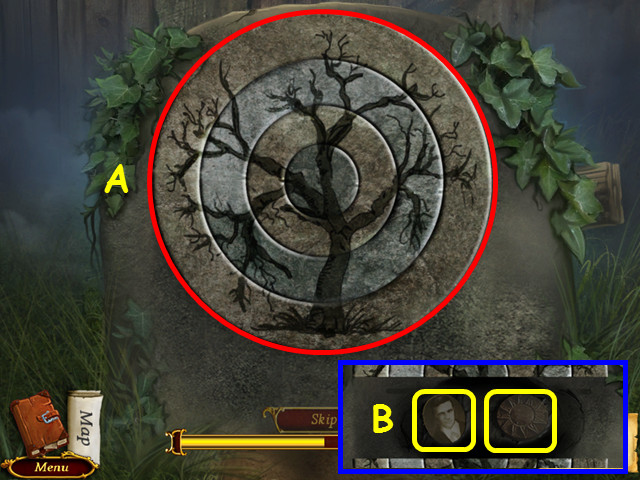
- Place the 2 PUZZLE PARTS in the rings.
- Restore the image of the tree by rotating the rings (A).
- Start with the outer ring and work towards the center.
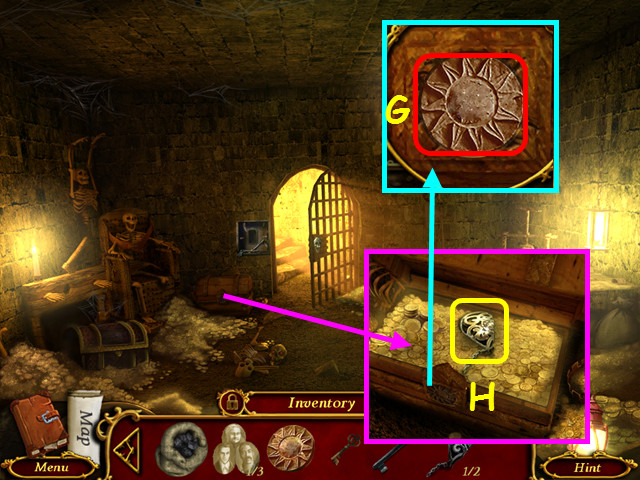
- Take the 1/3 PHOTOGRAPH and the SUN RELIEF (B).
- Walk forward.
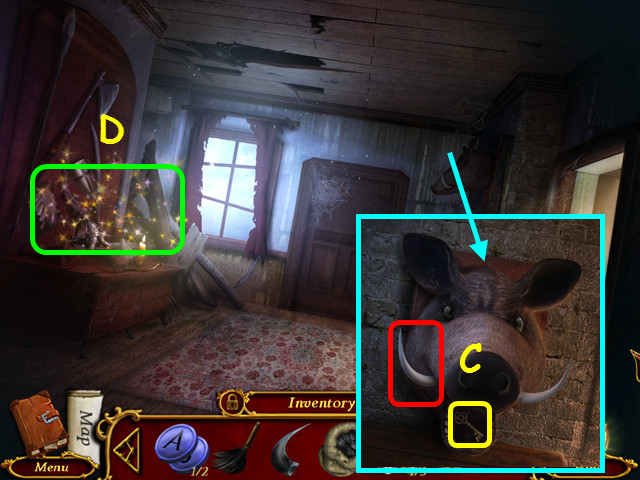
- Place the TUSK on the boar and take the SMALL KEY (C).
- Select the weaponry on the left (D).
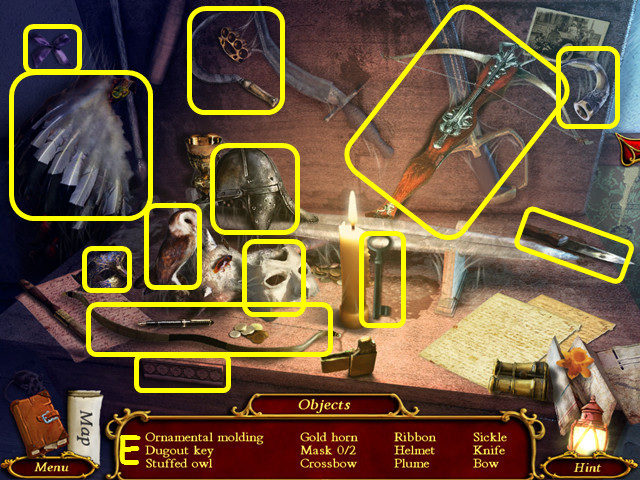
- Play the HOP to earn the DUGOUT KEY (E).
- Walk down and enter the well.
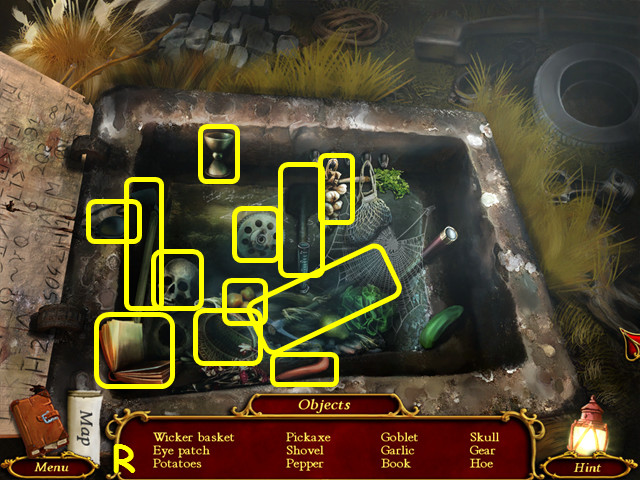
- Select the table on the left.
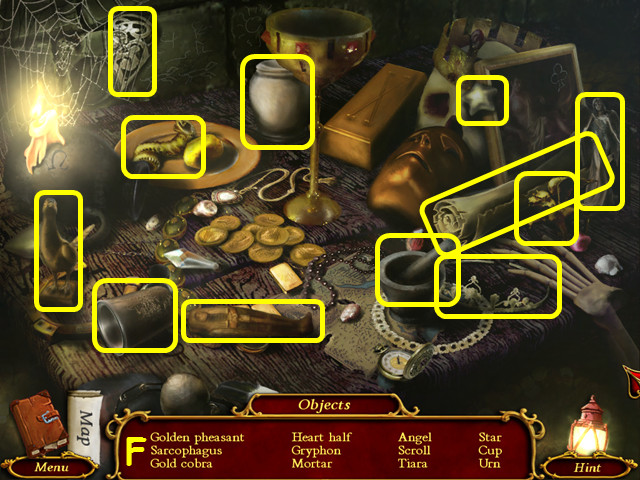
- Play the HOP to earn the 1/2 HEART HALF (F).
- Walk forward.
- Place the SUN RELIEF in the lock and push (G).
- Take the 2/2 HEART HALF (H).
- Walk forward and go up the stairs.
- Place the 2 HEART HALVES in the indentation (I).
- Use the SMALL KEY in the lock (J).
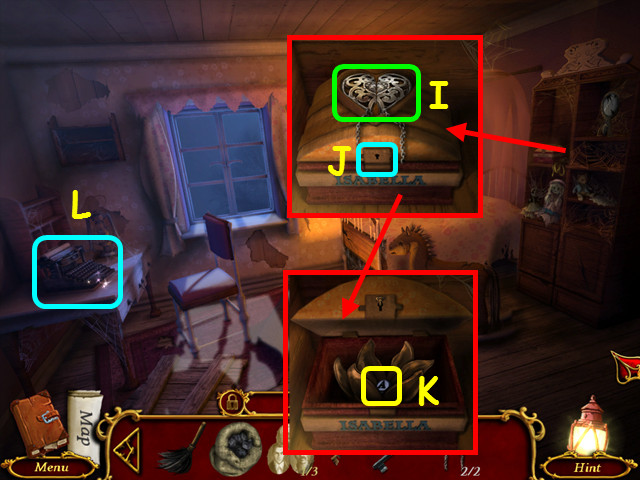
- Take the 2/2 KEYS (K).
- Select the typewriter (L).
- Place the 2 KEYS on the board.
- Press all the blue keys down by selecting the 3 circled keys (red).
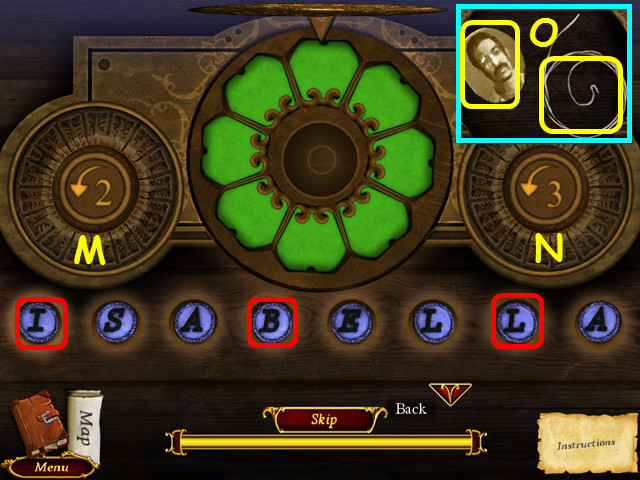
- Use the 2 buttons to change all the petals to green.
- Press the buttons in this order: Mx4, Nx3, Mx1, Nx3, M, and N.
- Take the 2/3 PHOTOGRAPHS and the 2/2 HARP WIRE (O).
- Go down 3 times, up the ladder, down, right, and forward.
- Place the COAL in the furnace, and then use the MATCHES (P).
- Take the DANCER STATUE and the GREASE (Q).
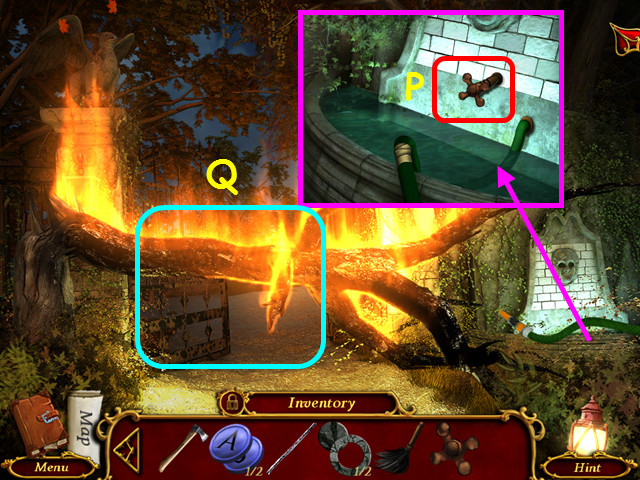
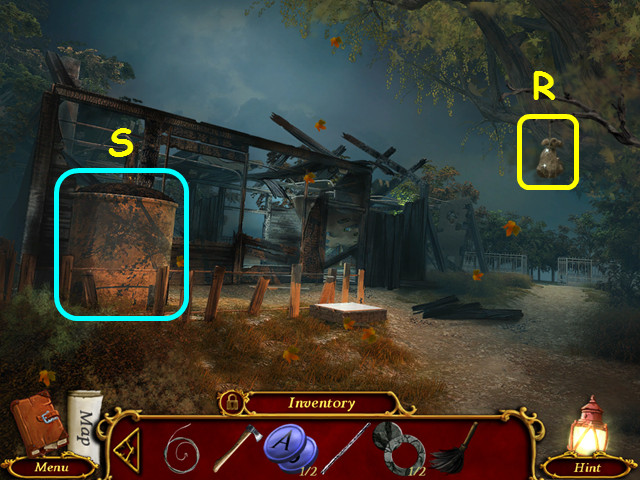
- Note the leaves (R).
- Use the DUGOUT KEY on the lock (S).
- Play the HOP to earn the RAKE (T).
- Look at the leaves.
- Use the RAKE on the leaves (U).
- Take the MEDALLION (V).
- Walk down twice, go left, forward, and right.
- Place the DANCER STATUE on the music box (W).
- Take the 3/3 HARP STRING (X).
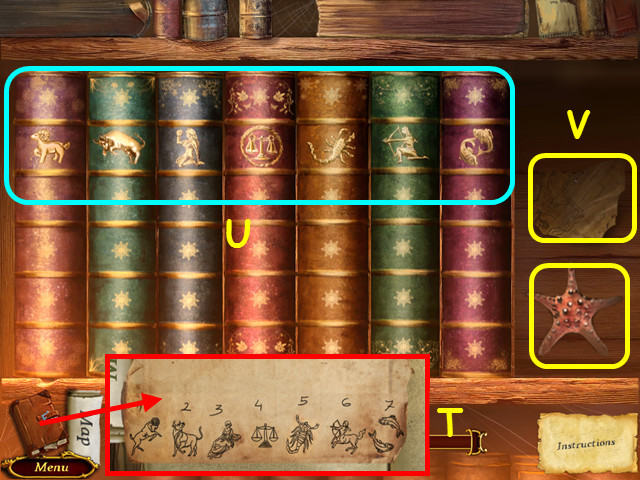
- Look at the harp (Y).
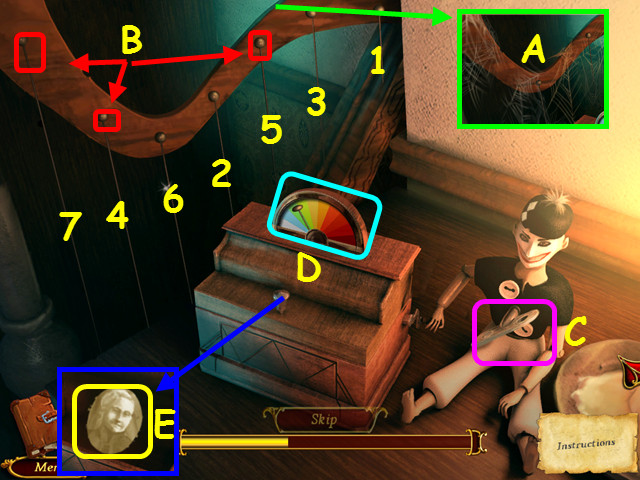
- Use the BRUSH on the cobwebs (A).
- Place the 3 HARP STRINGS on the harp (B).
- Turn the key in the doll (C).
- Watch the strings light up, and then repeat the tune by selecting the strings in the order they were played, before the timer (D) expires.
- Play the strings in numerical order (1-7).
- Take the 3/3 PHOTOGRAPHS (E).
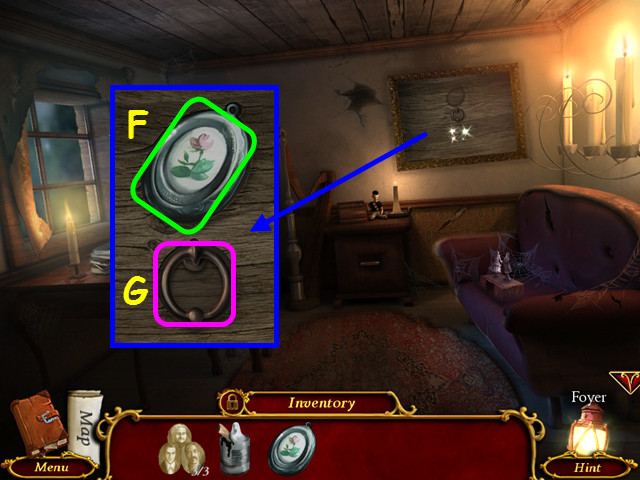
- Place the MEDALLION in the indentation (F).
- Pull the ring (G).
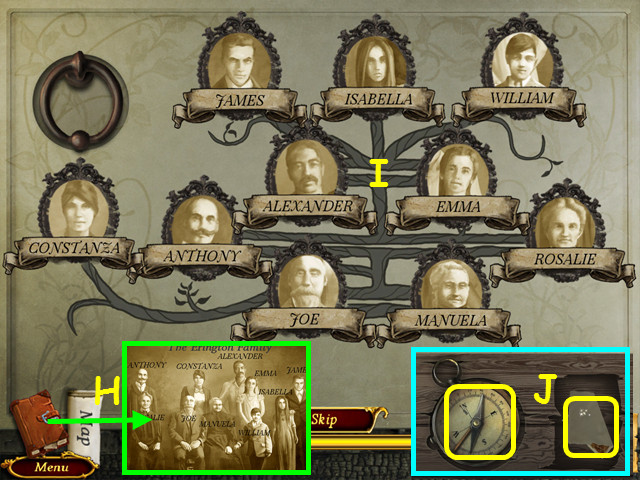
- Place the 3 PHOTOGRAPHS on the board.
- Refer to your journal for the family photograph (H).
- Place the photographs with the correct name (I).
- Take the COMPASS and look at the photo (J).
- Walk down 3 times, go right, and forward.
- After the cut-scene, walk forward.
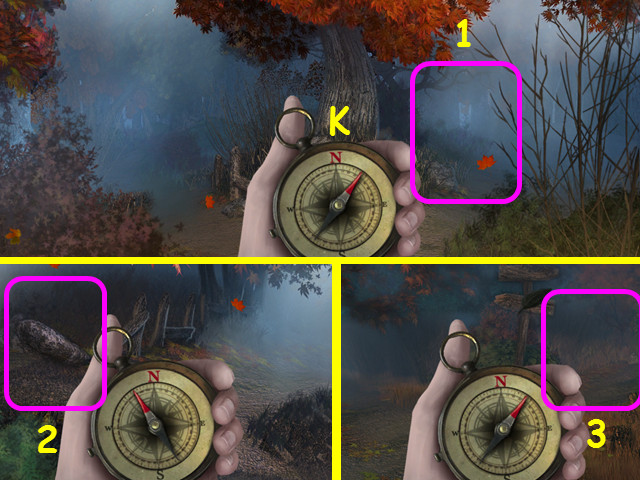
- Use the COMPASS to guide you to the North side of the island (K).
- Walk right, left, and right (1-3).
Chapter 9: Lighthouse
- Take the CHAIN (L).
- Take the 1/2 IRON and the CRANK (M).
- Walk forward twice.
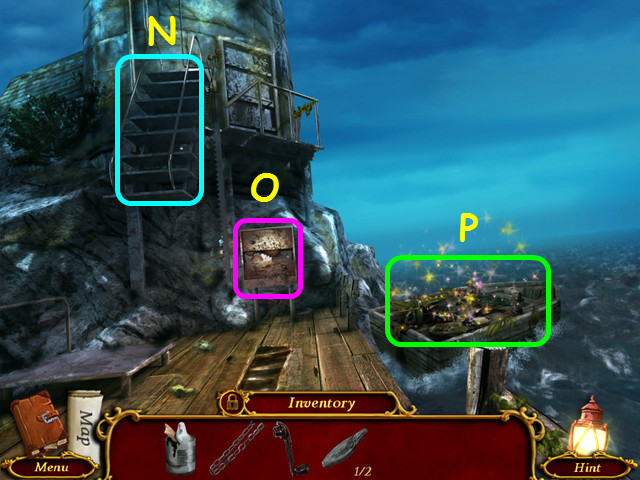
- Note the stairs to the lighthouse (N).
- Note the stair control (O).
- Select the boat (P).
- Play the HOP to earn the 2/2 IRON (Q).
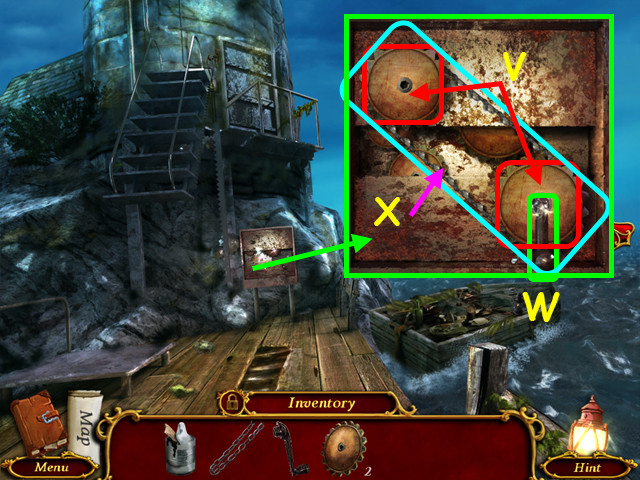
- Walk down 3 times and select the dugout.
- Play the HOP to earn the 1/2 GEAR (R).
- Look at the furnace.
- Place the 2 IRONS in the opening (S).
- Pull the lever (T).
- Take the 2/2 GEAR (U).
- Walk forward 3 times.
- Place the 2 GEARS on the spindles, and then attach the CHAIN (V).
- Place the CRANK on the lower gear (W).
- Use the GREASE on the chain (X).
- Turn the crank.
- Walk up the stairs.
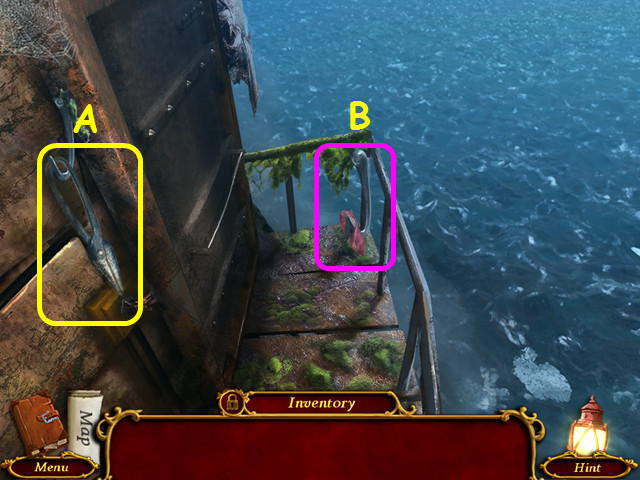
- Take the BOLT CUTTERS (A).
- Note the hook (B).
- Walk down and select the boat.
- Play the HOP to earn the ROPE (C).
- Walk down.
- Use the BOLT CUTTERS on the chain (D).
- Take the BUCKET OF CHUM (E).
- Walk forward and go up the stairs.
- Use the BUCKET OF CHUM on the water (F).
- Use the ROPE on the hook (G).
- Toss the hook in the water (H).
- Walk left.
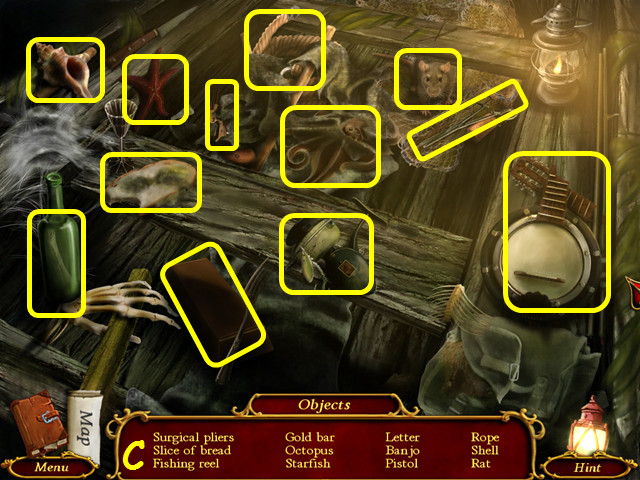
- Select the skeleton.
- Play the HOP to earn the PIPE (I).
- Use the PIPE on the hole (J).
- Take the LOCK PICK (K).
- Select the door (L).
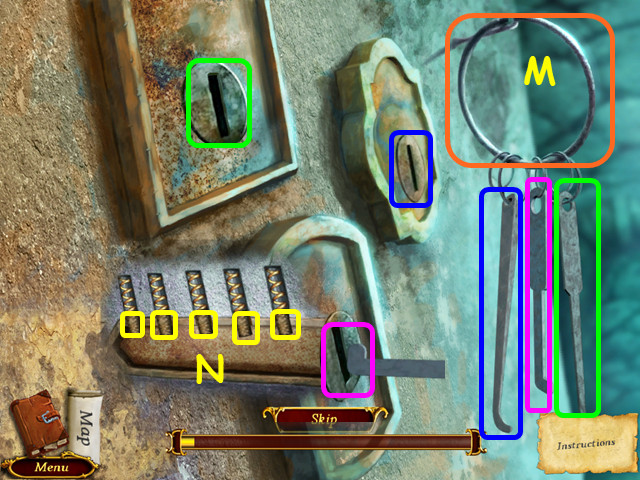
- Hand the LOCK PICK on the ring (M).
- Place the picks in the locks (color-coded).
- Click to push the tumbler up when the end of the pick is under it. You must lift all the tumblers in a lock in one pass (N).
- Walk to the left.
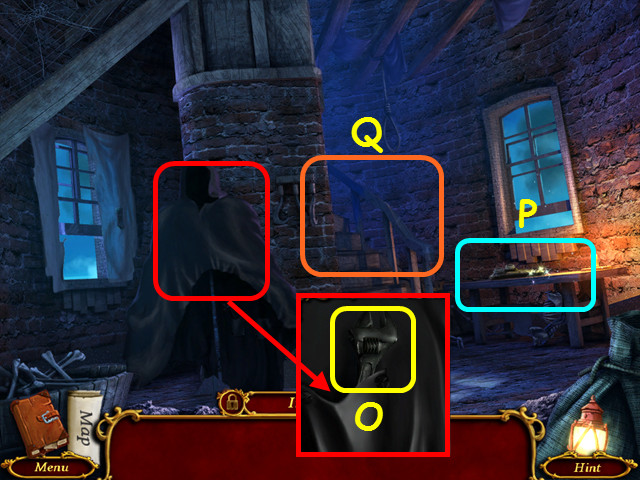
- Turn the cloak around; take the WRENCH (O).
- Note the mini-game on the table (P).
- Go up the stairs (Q).
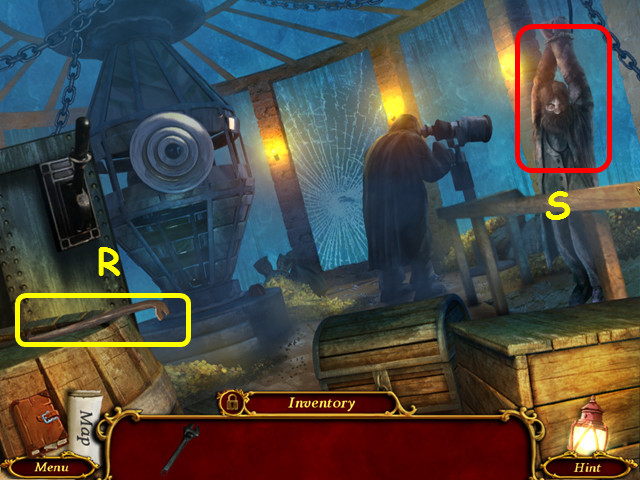
- Take the CROWBAR (R).
- Note the detective (S).
- Walk down twice and select the skeleton.
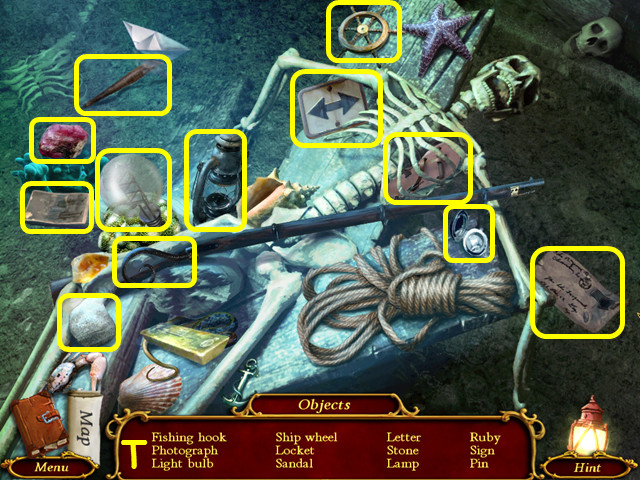
- Play the HOP (T).
- You will earn the 1/2 LIGHT BULB.
- Use the CROWBAR to open the cover (U).
- Take the 2/2 LIGHT BULB and the FUSE (V).
- Walk left and look at the table.
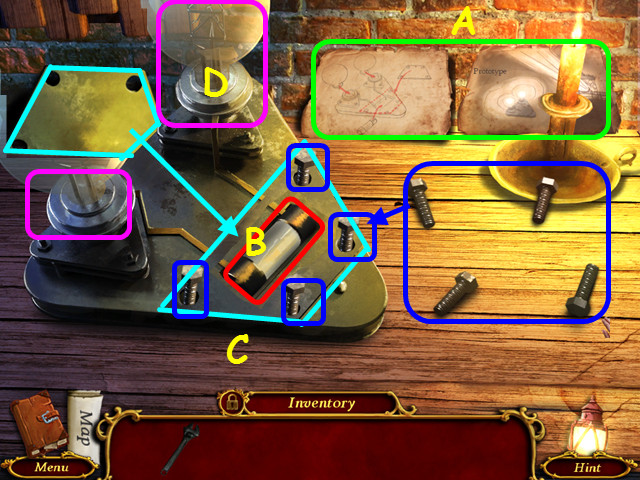
- Read the directions and diagram (A).
- Place the FUSE in the opening (B).
- Put the plate over the fuse and place the 4 bolts in the holes (C).
- Use the WRENCH on the 4 bolts.
- Place the 2 LIGHT BULBS in the large holes (D).
- Take the LIGHTHOUSE LAMP.
- Walk up the stairs.
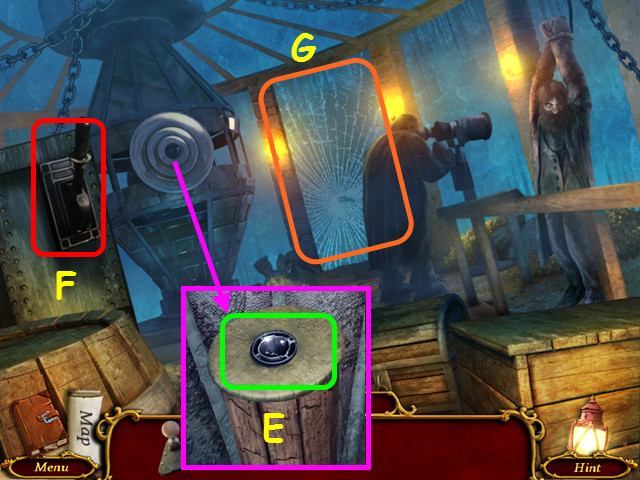
- Place the LIGHTHOUSE LAMP on the post (E).
- Pull the lever (F).
- Look out the window (G).
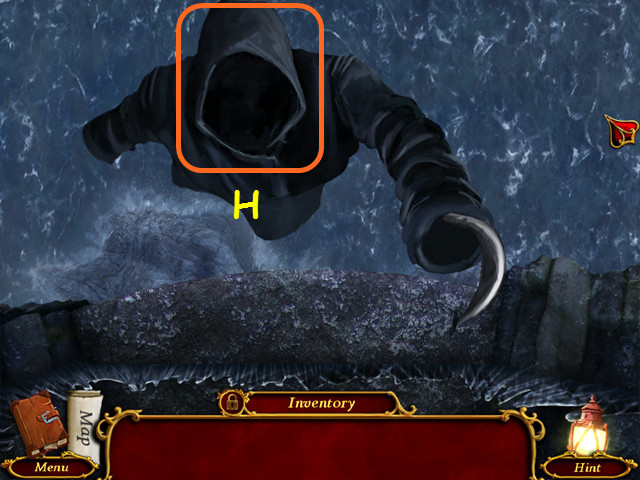
- Remove the hood (H).
- Congratulations! You have completed Left in the Dark: No One on Board!
Created at: 2013-08-28