
Walkthrough Menu
- General Tips
- Chapter 1: The Port of Cochin
- Chapter 2: Crowefelter Mansion
- Chapter 3: Finding the Enemy
- Chapter 4: The Other Side
- Chapter 5: Chasing a Legend
- Chapter 6: The Lost Ship
General Tips
- This is the official guide for Legends of the East: The Cobra's Eye.
- The Hidden-object puzzle scenes will be referred to as HOPs throughout the guide. Items labeled in orange in the find list require an extra step to find.
- HOPs may be random; our lists may vary from yours. Interactive items in HOPs are color-coded.
- Puzzles may be skipped after a short wait. You can reset a puzzle by exiting it.
- Open your Journal (1) to view your story updates and stored clues.
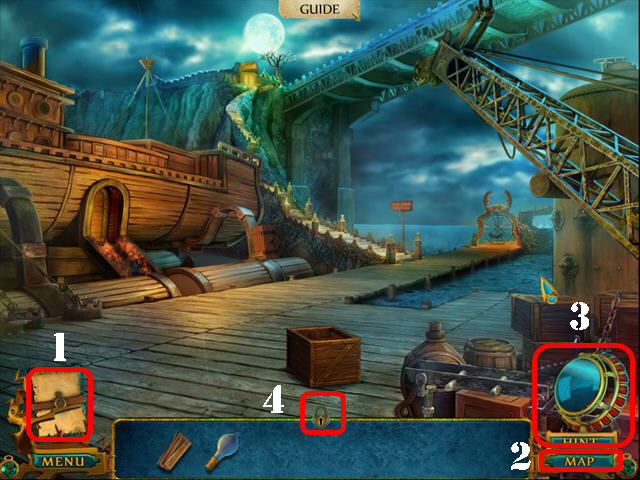
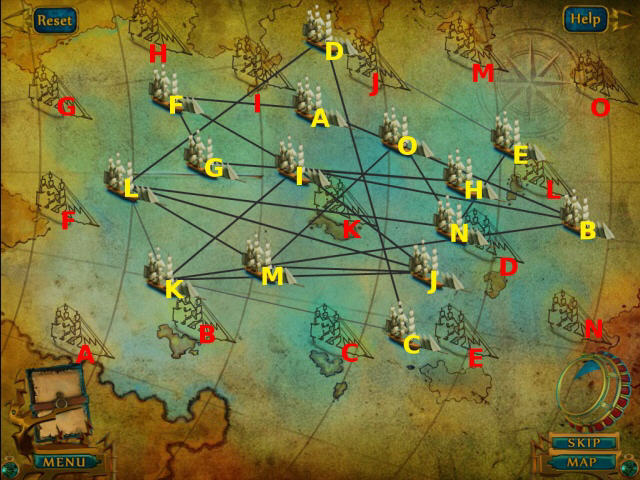
- Select the Map (2) here. You can fast travel to any location by selecting the desired area on the map.
- Scan the scene using the Cryptic Disk to discover hidden symbols. This will unlock a hidden entry in the journal.
- The Cryptic Disk will glow if there are hidden symbols in an area. Pick up the disk and scan the scene to find them.
- You may select the Hint button (3) for help in-game play or for HOPs.
- Select the help button in the upper right corner of the puzzles to get the instructions.
- Move your cursor to the bottom of the screen to pull up the Toolbar. You may lock the toolbar in the raised position by locking the padlock (4).
Chapter 1: The Port of Cochin
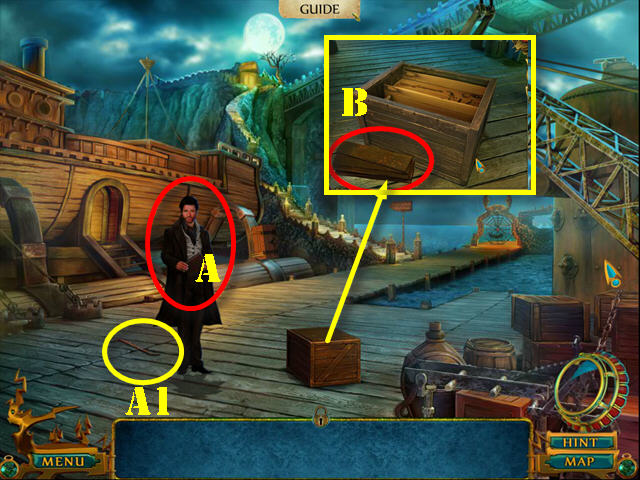
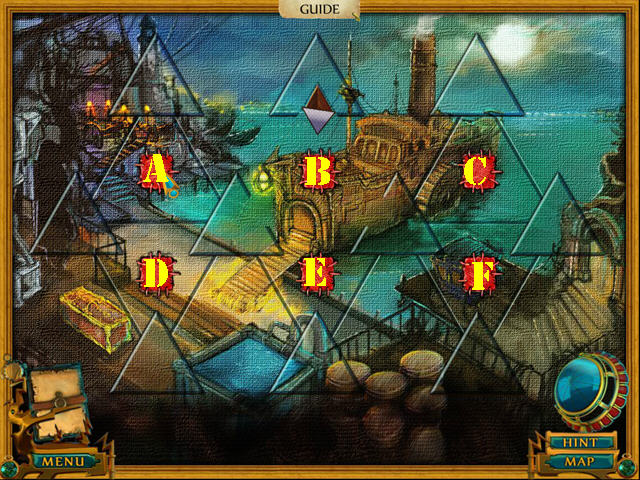
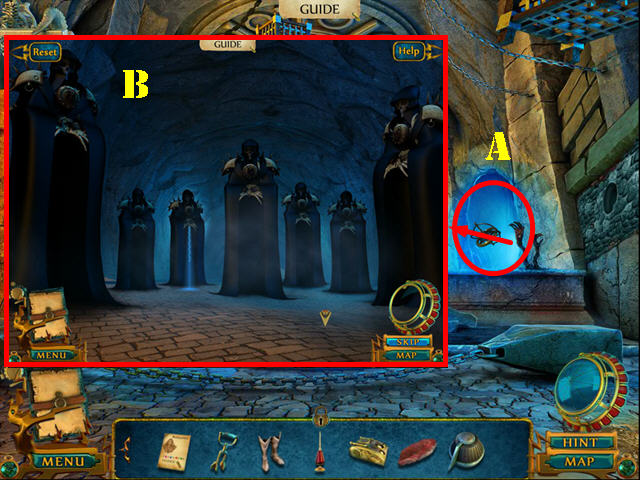
- Talk to the man (A).
- Take the CROWBAR (A1).
- Zoom into the crate; use the CROWBAR on it and take the WOODEN PLANKS (B).
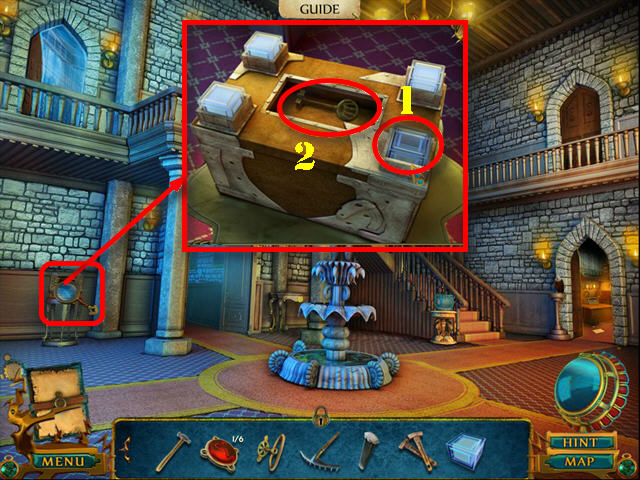
- Examine the crate for a puzzle.
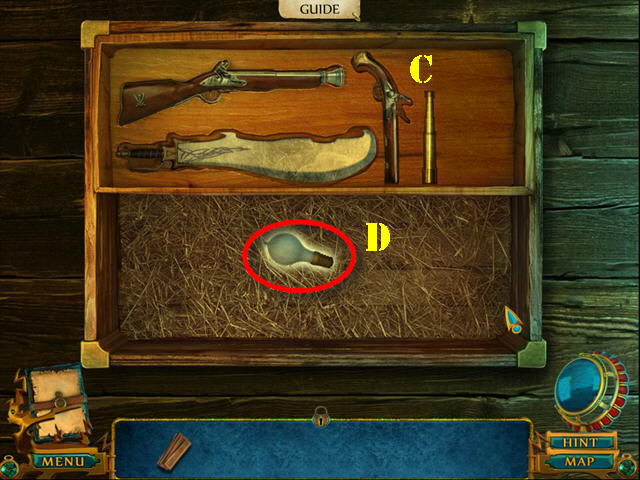
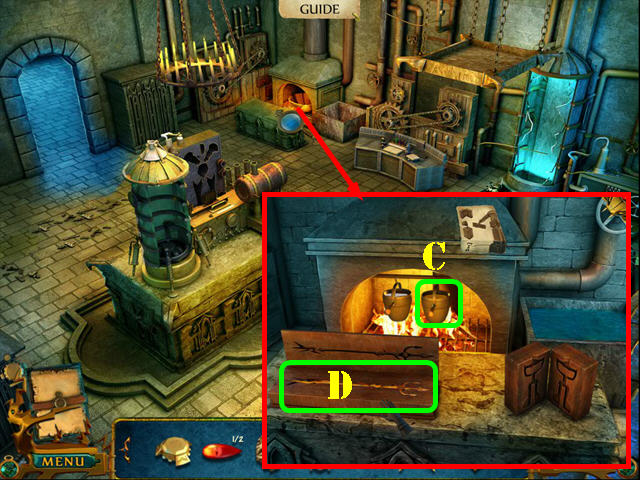
- Remove the hay and put the discovered items into the right slots (C).
- Take the BULB (D).
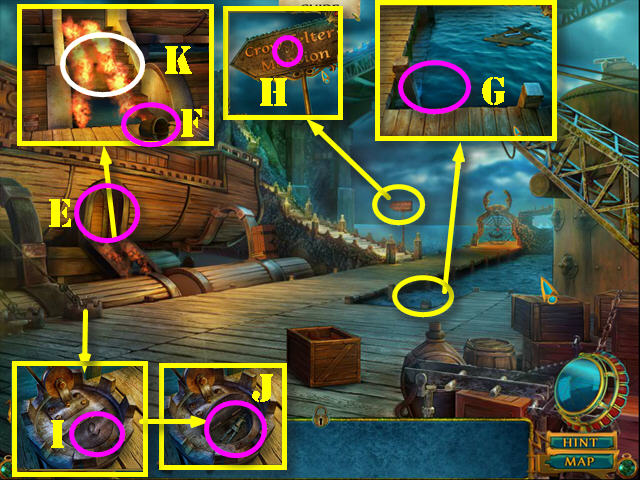
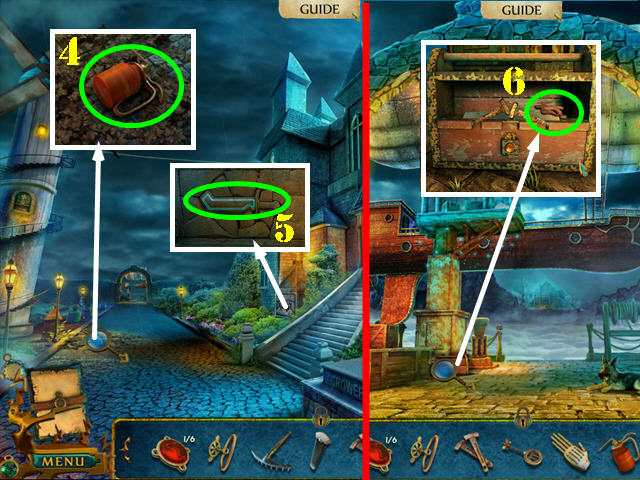
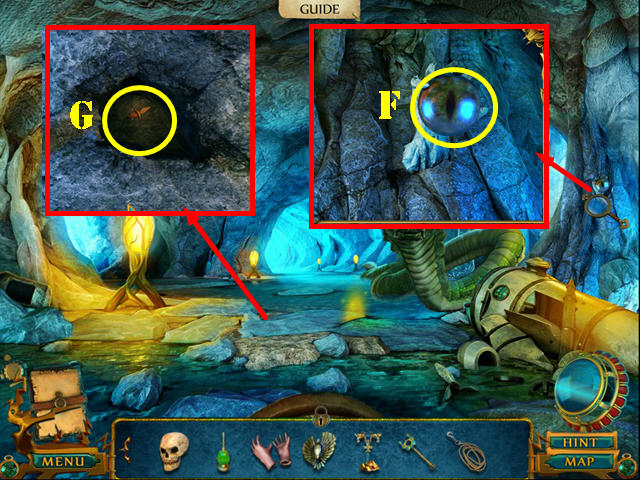
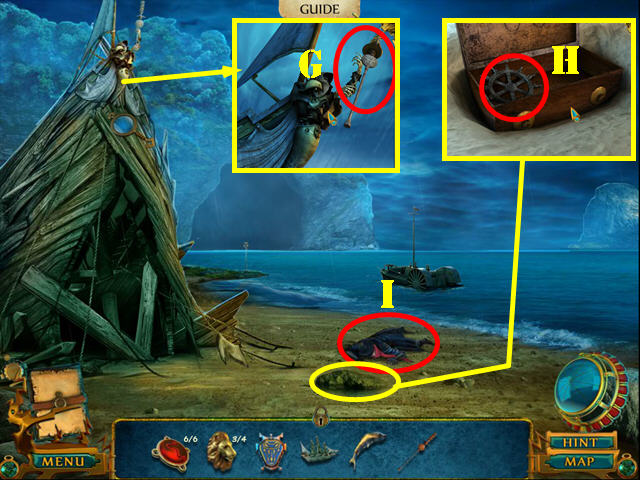
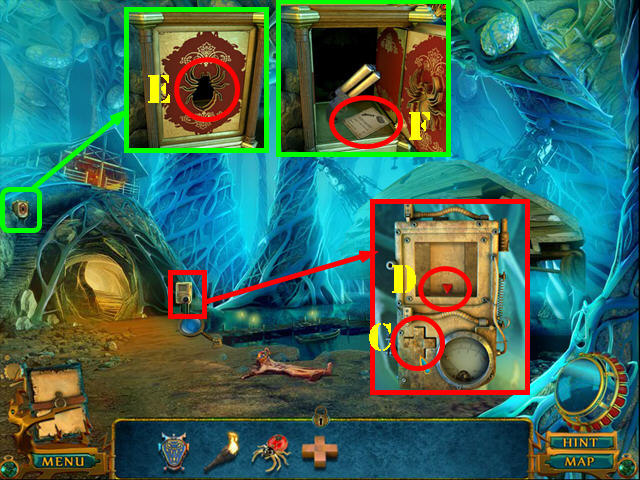
- Zoom into the door for a cut scene (E). Zoom into the fire and take the BUCKET (F).
- Zoom into the water; use the BUCKET in it to get the BUCKET WITH WATER (G).
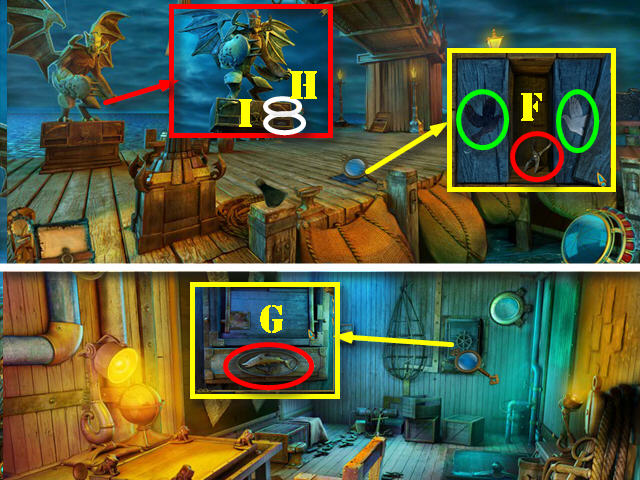
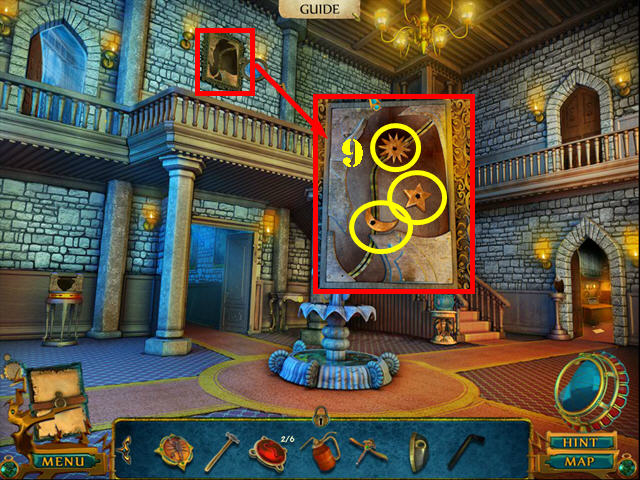
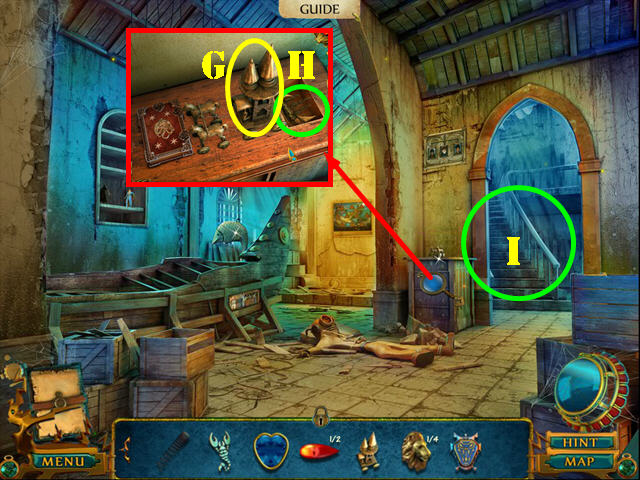
- Look at the sign and take the LETTER E (H).
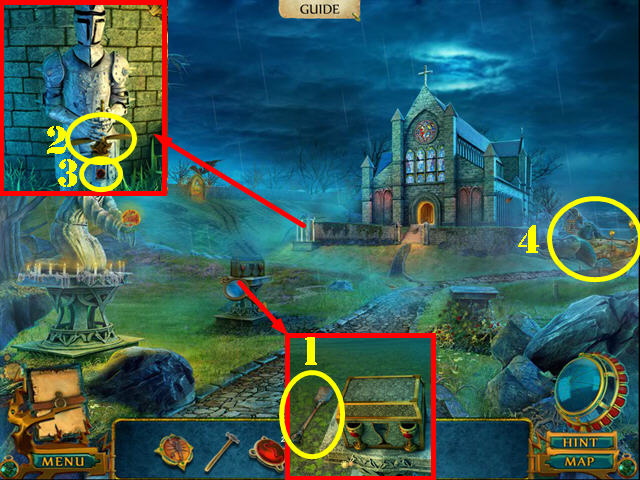
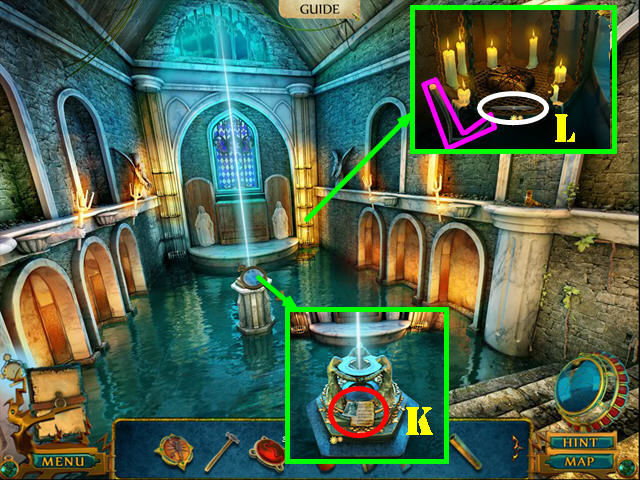
- Zoom into the mechanism and put the LETTER E in the slot (I). Take the KNIGHT (J).
- Zoom into the fire and use the BUCKET WITH WATER on it (K) and then put down the WOODEN PLANKS.
- Enter Daniel's Chamber.
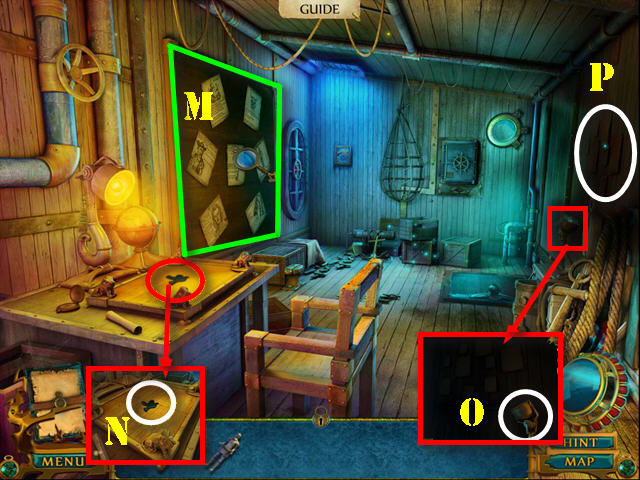
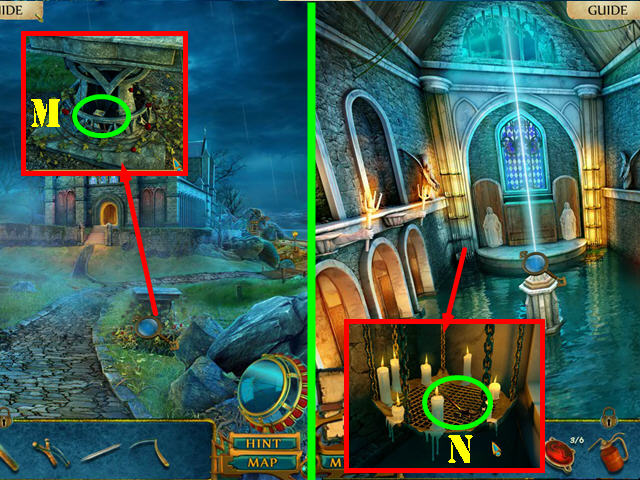
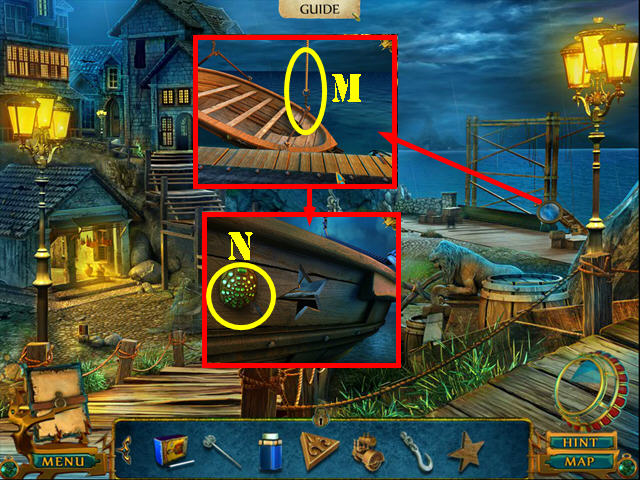
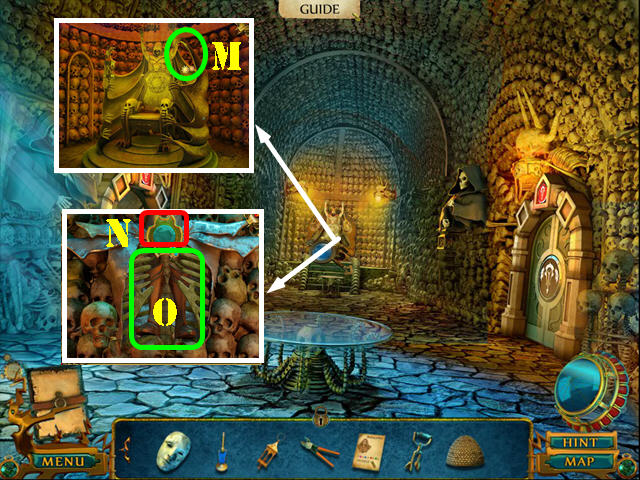
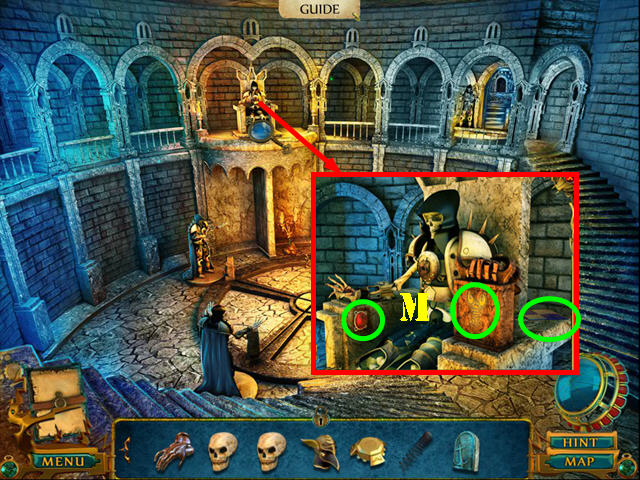
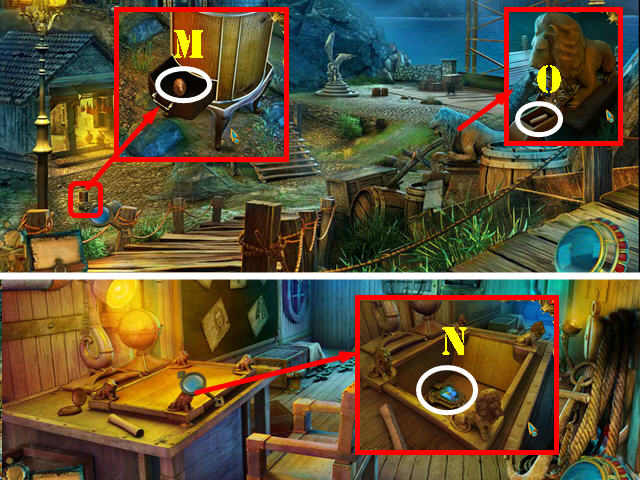
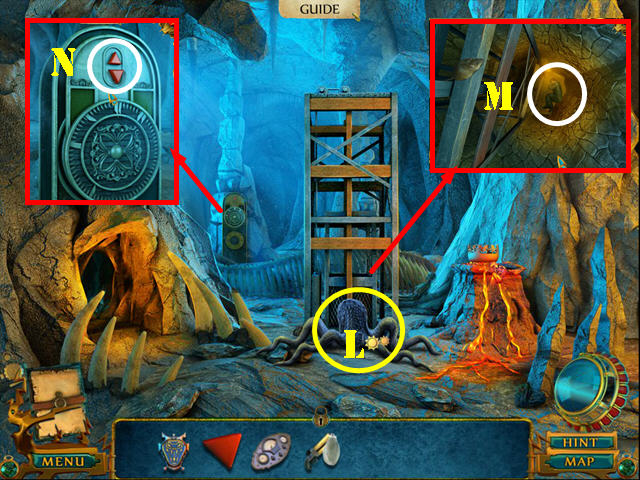
- You'll begin this scene with a close-up of the board (M). Read the notes.
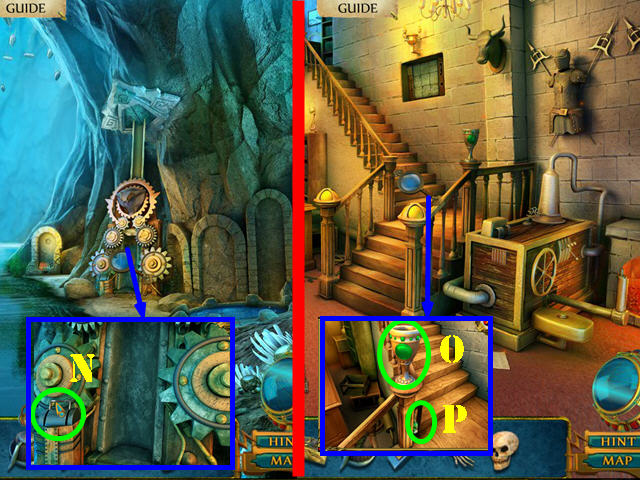
- Examine the table and take the BLACK DOVE (N).
- Zoom into the light and place the BULB in it (O).
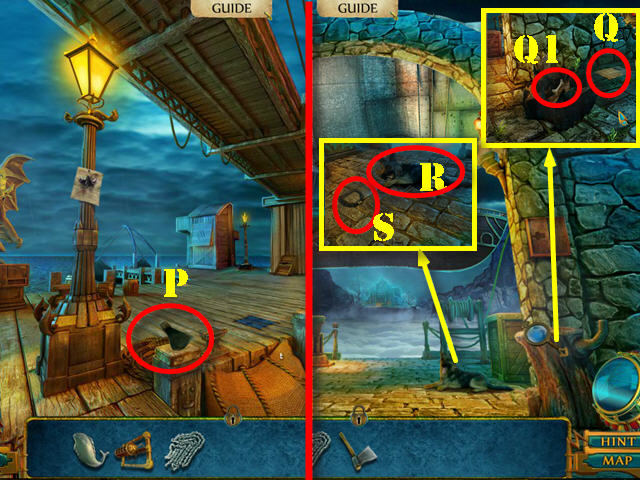
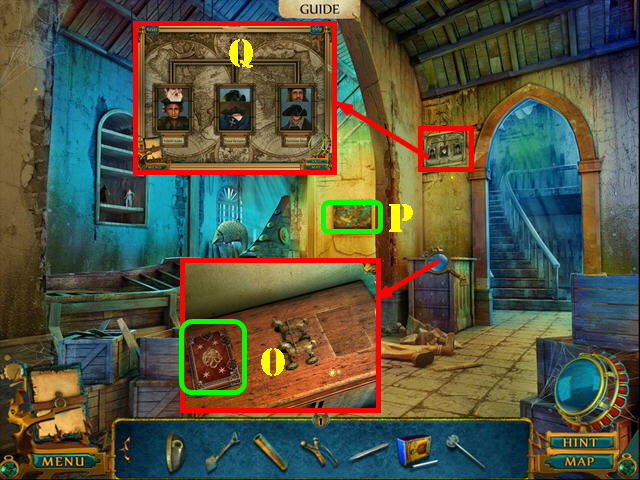
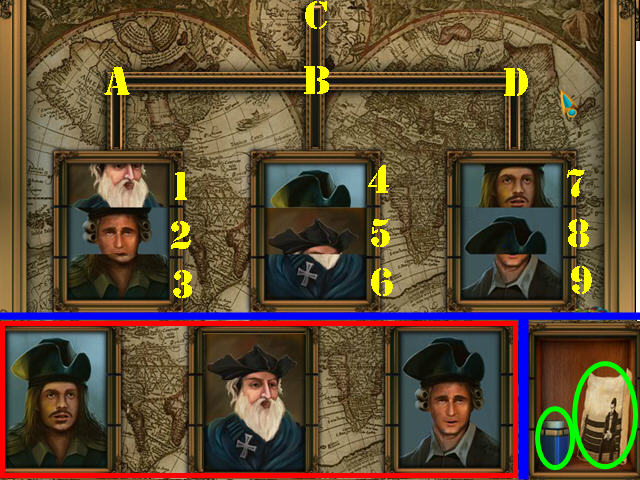
- Zoom into the wall for a puzzle (P).
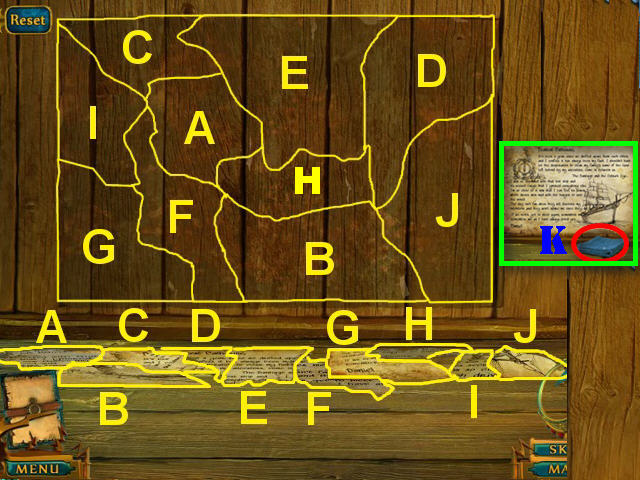
- Reassemble the letter. Left-click to rotate a piece and then put in place once a glow appears around the pieces.
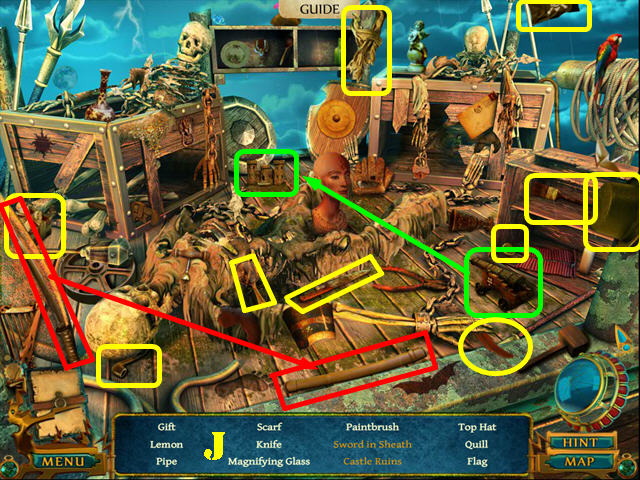
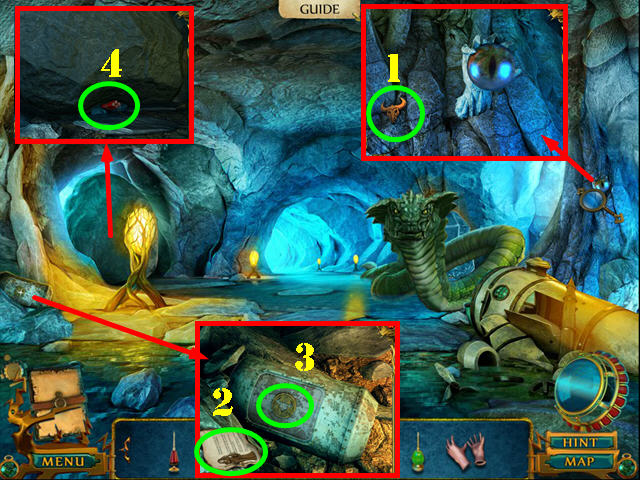
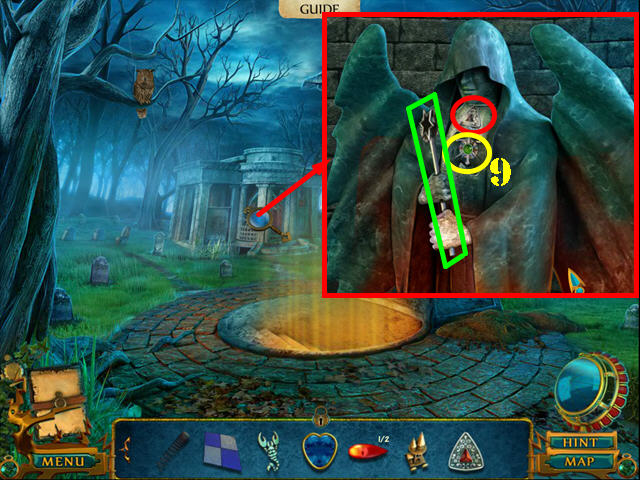
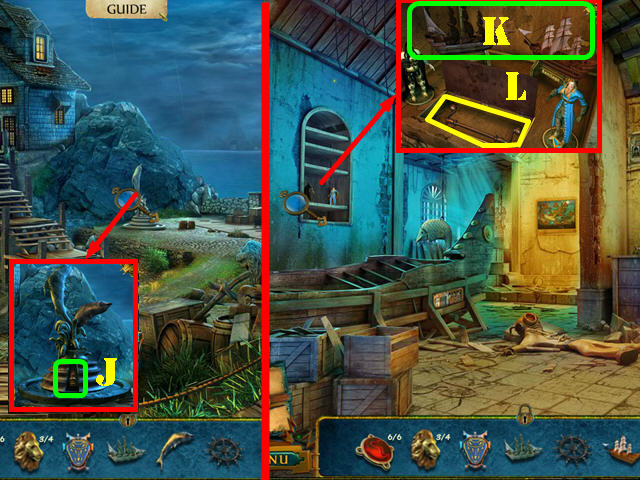
- Please see the screenshot for the solution (A-J). Take the RAG (K).
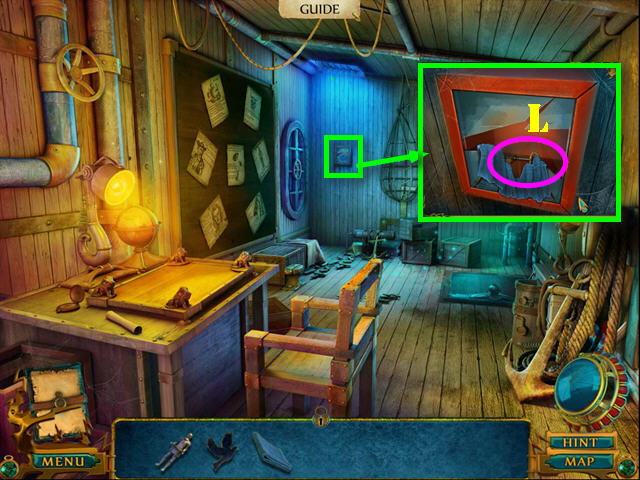
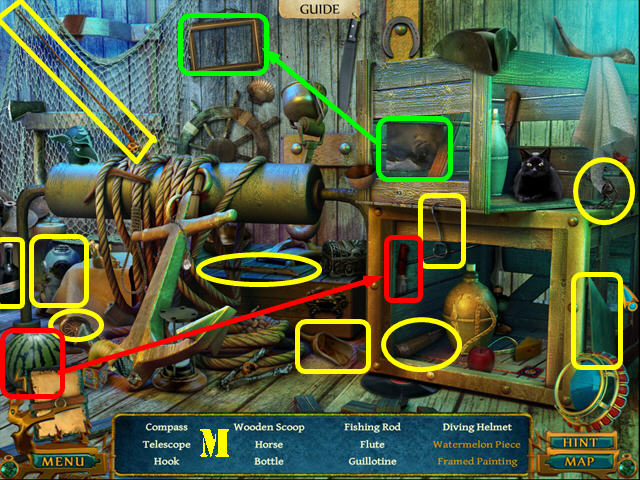
- Zoom into the case; use the RAG on the glass and take the GATE KEY (L).
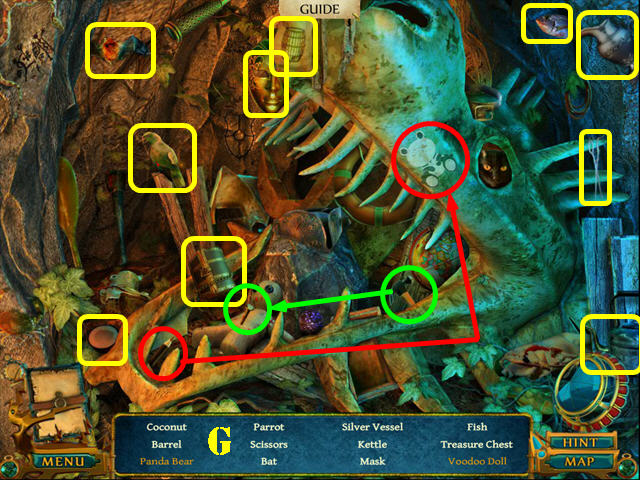
- Play the HOP.
- You will receive the FISHING ROD (M).
- Walk down to automatically talk to the man.
- Use the Cryptic Disk to find the 4 hidden symbols (red).
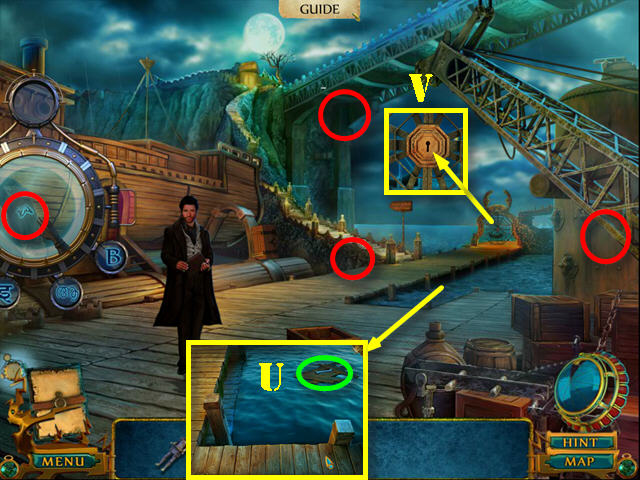
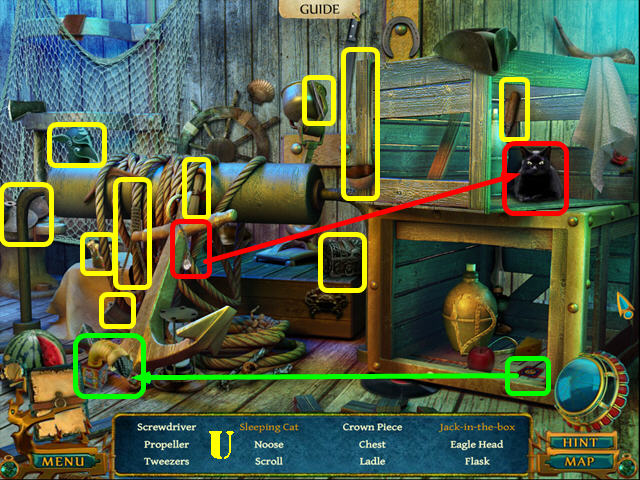
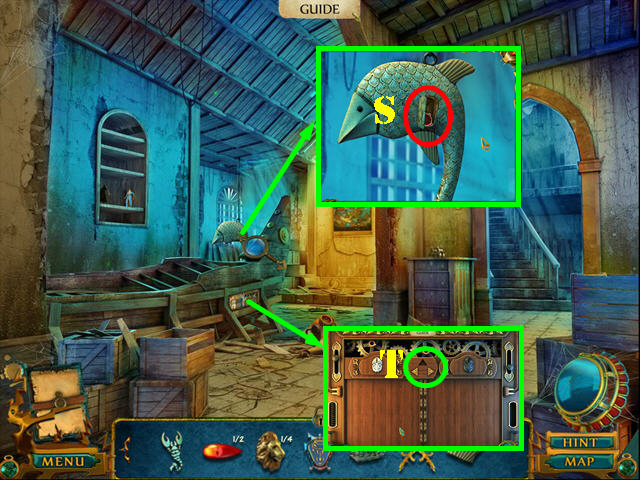
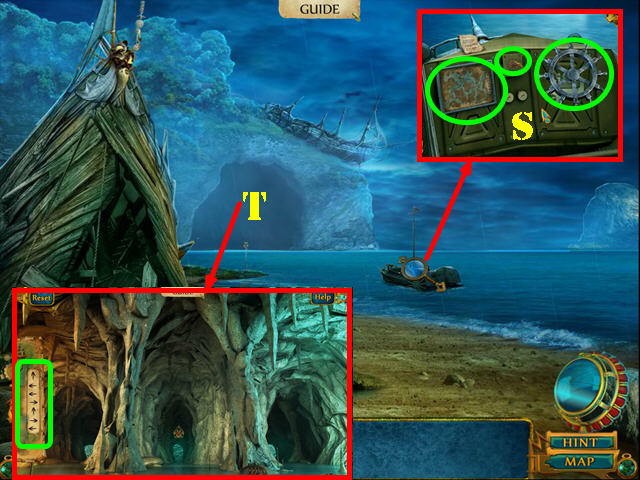
- Examine the water and use the FISHING ROD to retrieve the WRENCH (U).
- Examine the gate and use the GATE KEY in the lock (V).
- Go forward to the Fishing Nets.
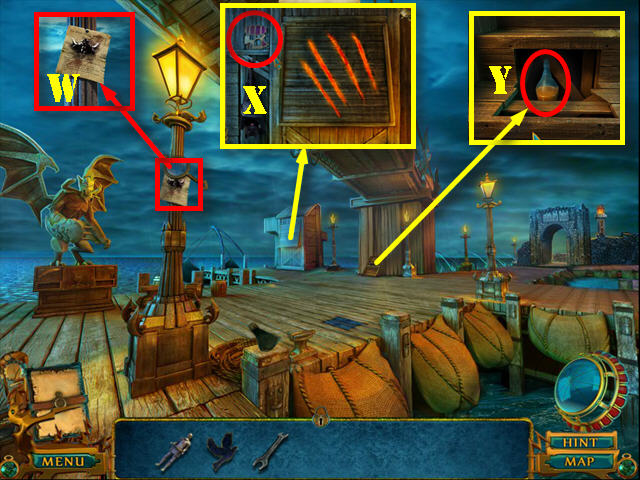
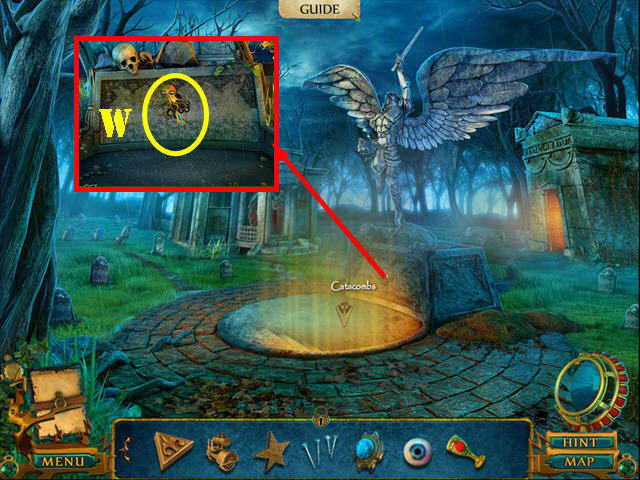
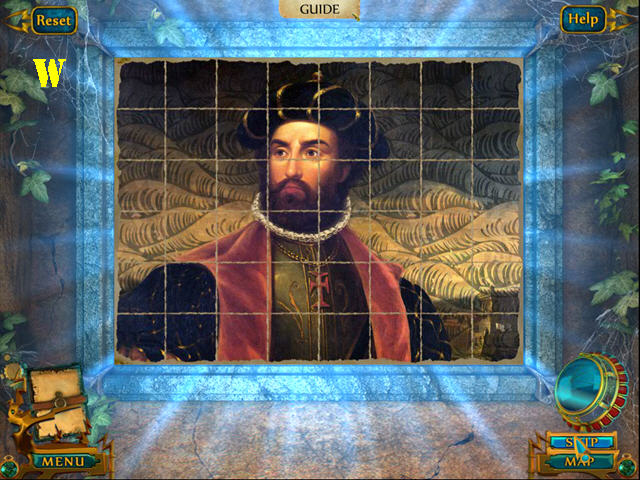
- Look at the note for a cut scene (W). Zoom back into the note and read it.
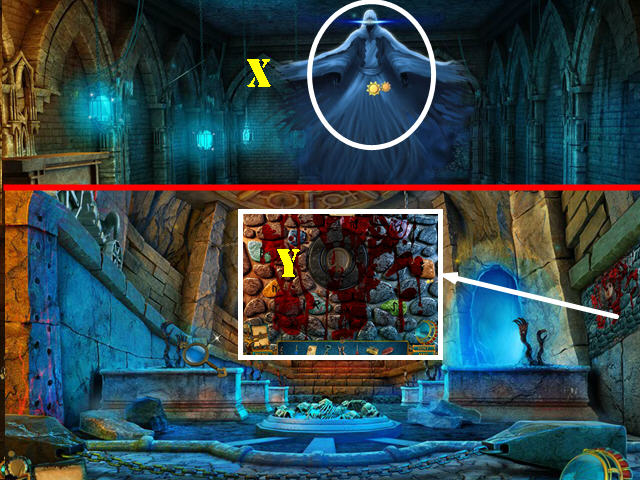
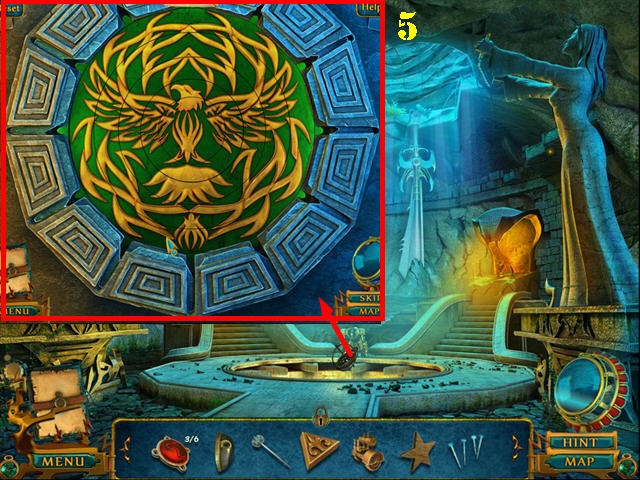
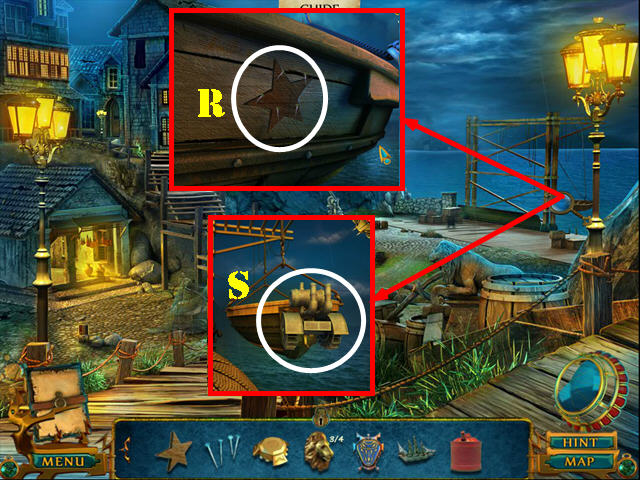
- Zoom into the stand and take the AIRSHIP SYMBOL (X).
- Zoom into the steps and use the WRENCH on the nuts; take the ACID (Y).
- Walk down for a cut scene and then go in the upper left to Crowefelter Gate.
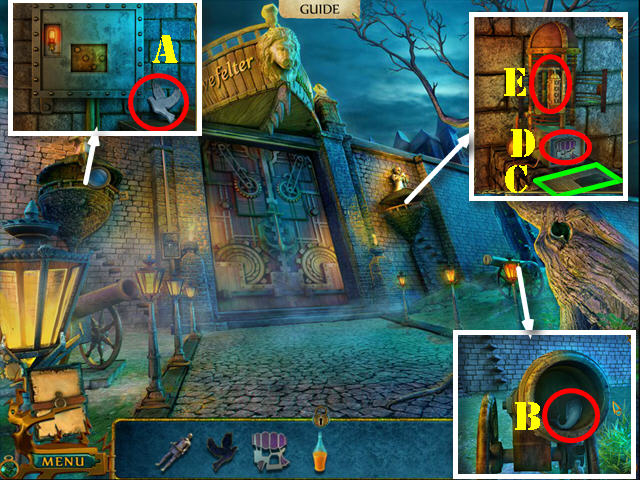
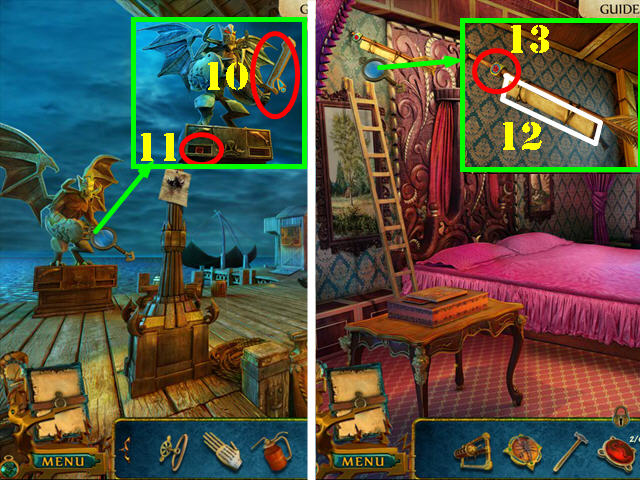
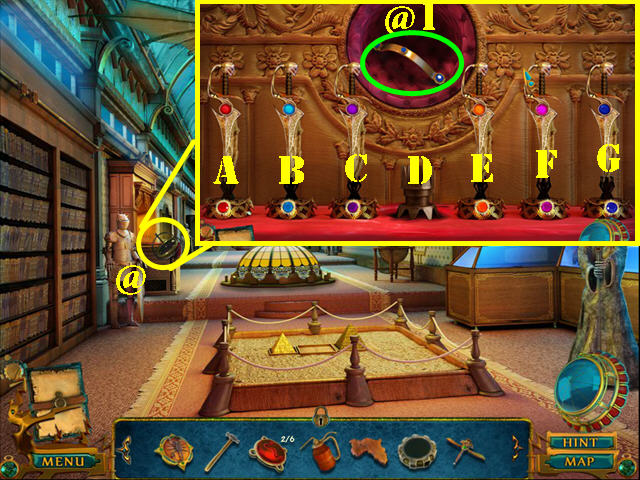
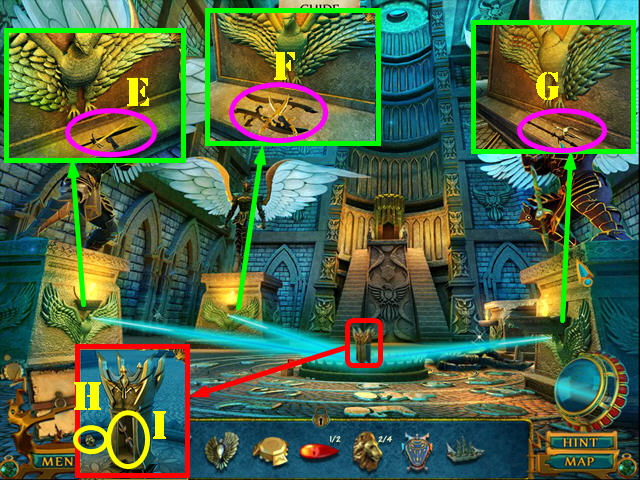
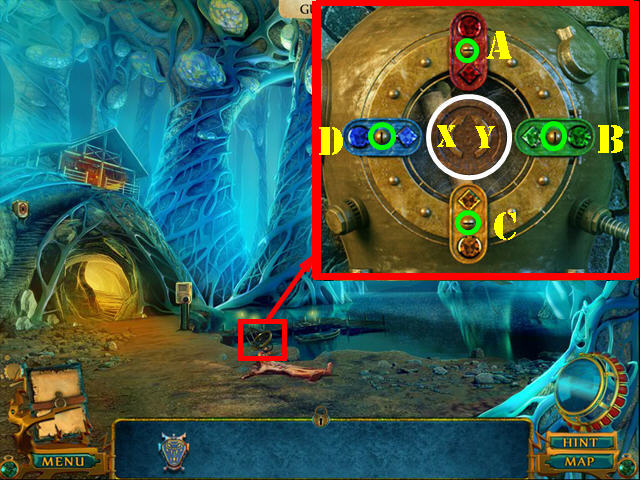
- Zoom into the device and take the WHITE DOVE (A).
- Zoom into the right cannon; place the KNIGHT in the slot and take the MARBLE FISH (B).
- Zoom into the contraption and read the note (C). Place the AIRSHIP SYMBOL in the slot (D) and take the NUMBER LOCK (E).
- Return to the Fishing Nets.
- Zoom into the ground; place the BLACK DOVE and the WHITE DOVE in the slots (green). Take the PLIERS (F).
- Return to Daniel's Chamber.
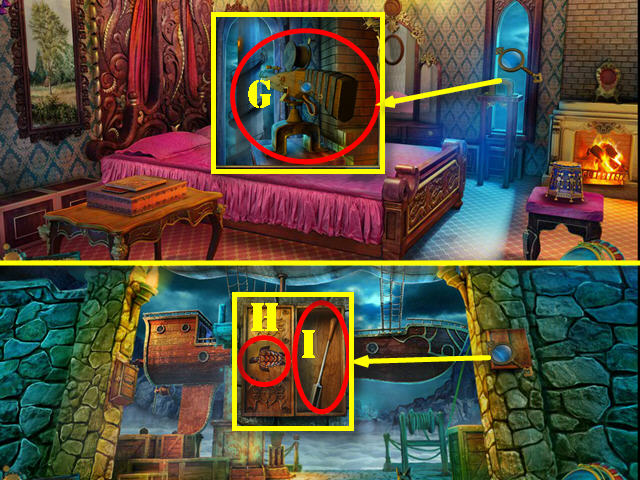
- Zoom into the locker; use the PLIERS on the nails and take the SHARK MOTIF (G).
- Return to the Fishing Nets.
- Zoom into the statue; place the SHARK MOTIF (H) and take the ENTRY CARD (I).
- Return to Crowefelter Gate.
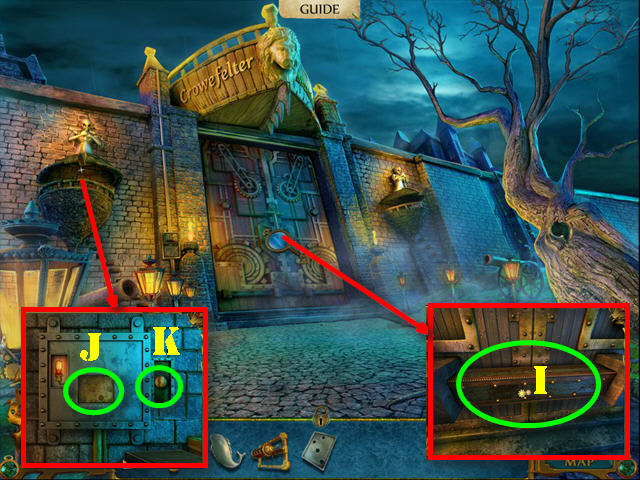
- Zoom into the door and throw the ACID on it (I).
- Zoom into the gate mechanism; place the ENTRY CARD on it (J) and turn the switch (K).
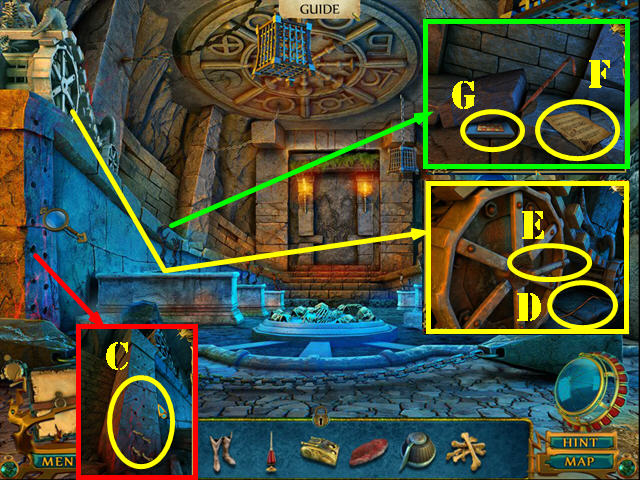
- Go through the gate to access the Courtyard and then go forward to the Bridge.
Chapter 2: Crowefelter Mansion
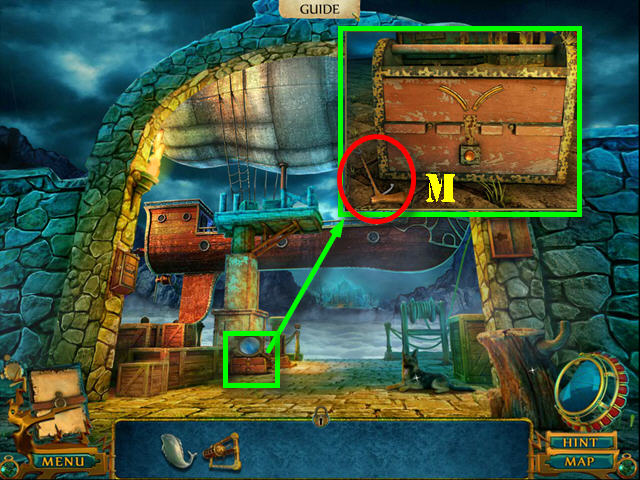
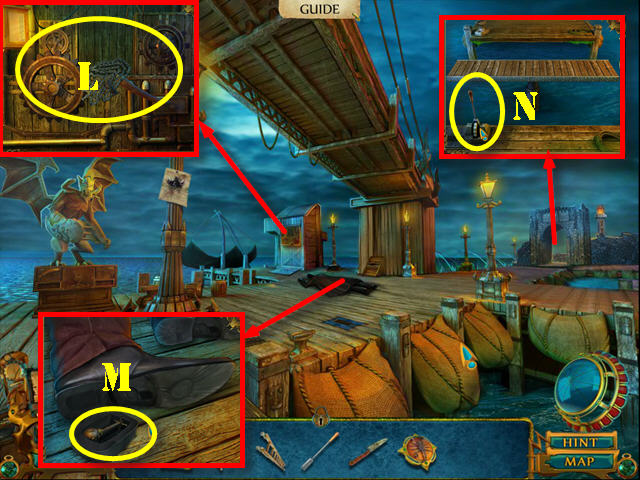
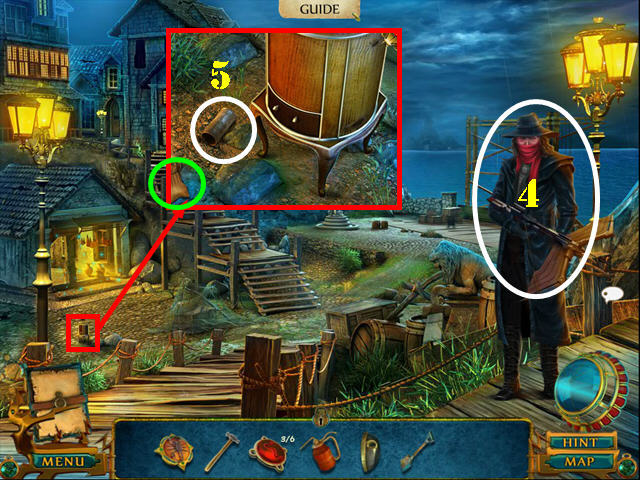
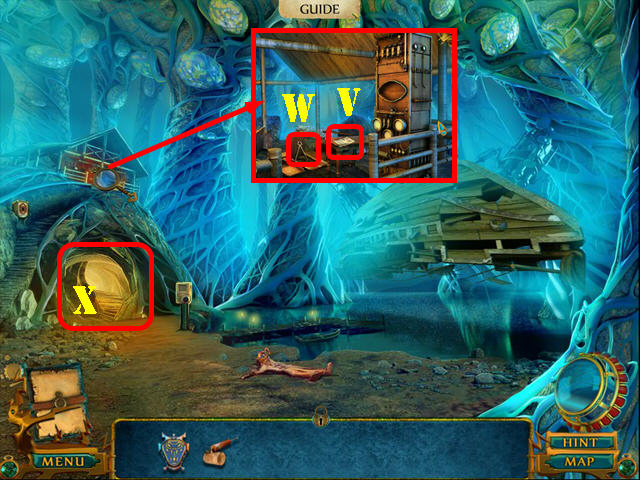
- Zoom into the toolkit and take the SNAKE CATCHER (M).
- Walk down twice.
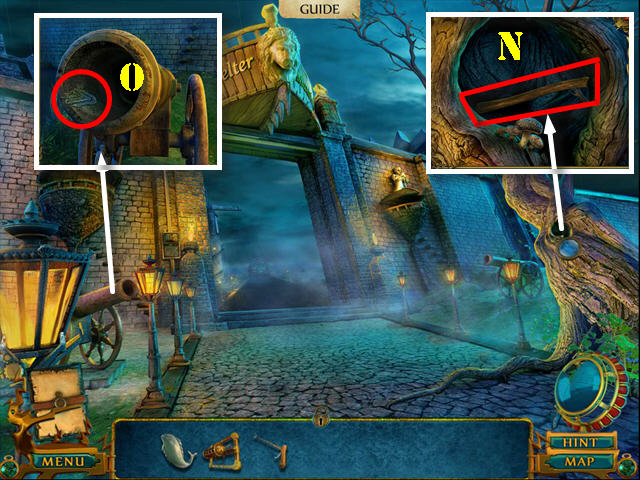
- Zoom into the tree hole; use the SNAKE CATCHER in it and take the AXE HANDLE (N). The SNAKE CATCHER goes back into inventory.
- Zoom into the left cannon; use the SNAKE CATHER in it and take the CHAIN (O).
- Return to the Fishing Nets.
- Place the AXE HANDLE on the axe head to get the AXE (P).
- Return to the Bridge.
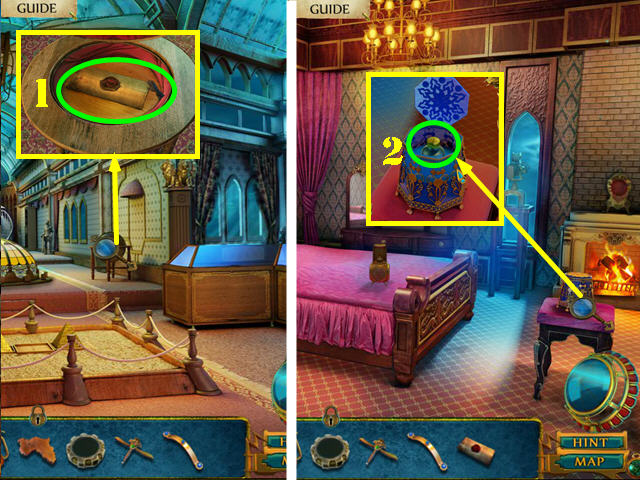
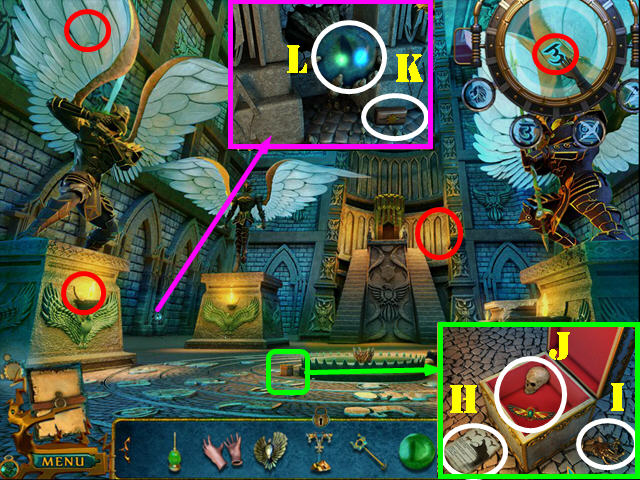
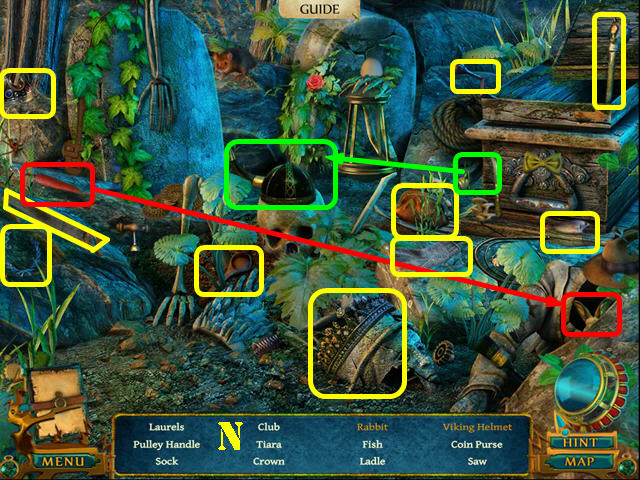
- Zoom into the tree stump; read the note (Q); use the AXE on the stump and take the BONE (Q1).
- Zoom into the dog; give it the BONE (R) and take the DOOR KNOCKER (S).
- Walk down.
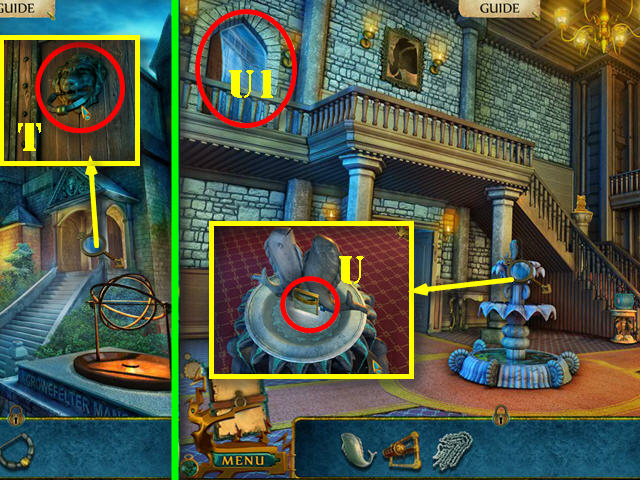
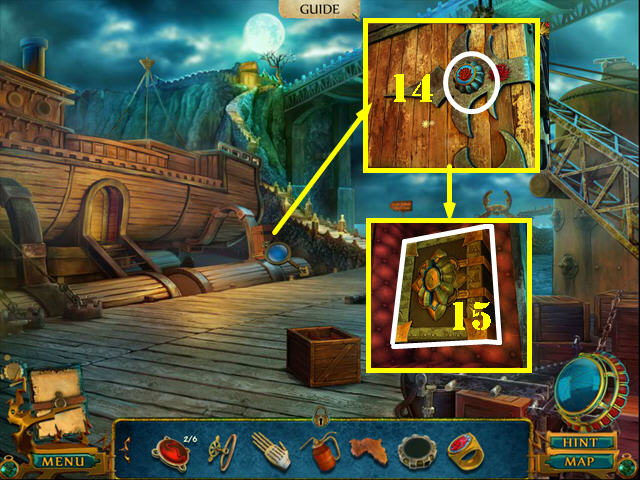
- Zoom into the door and place the DOOR KNOCKER on it (T). Enter the Grand Hall.
- Talk to the man.
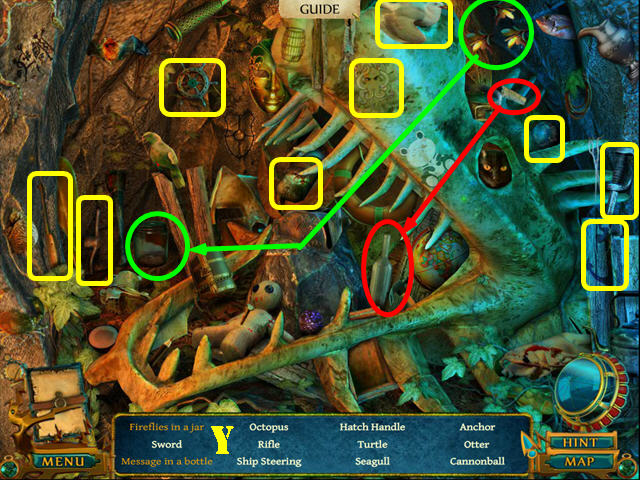
- Zoom into fountain and place the MARBLE FISH on it; take the TILE PIECE (U).
- Go into the Guest Room in the upper left (U1).
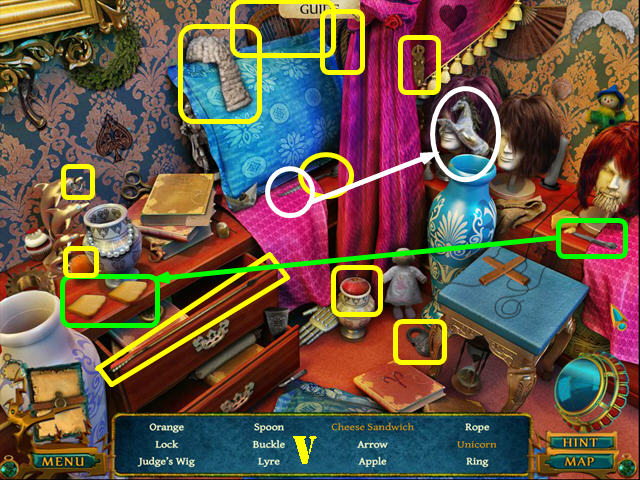
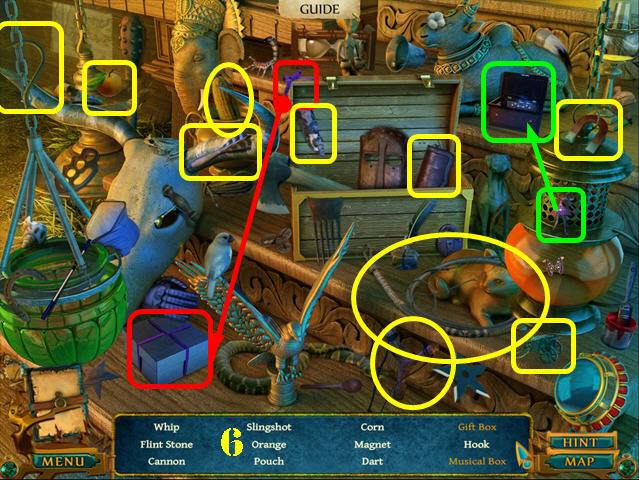
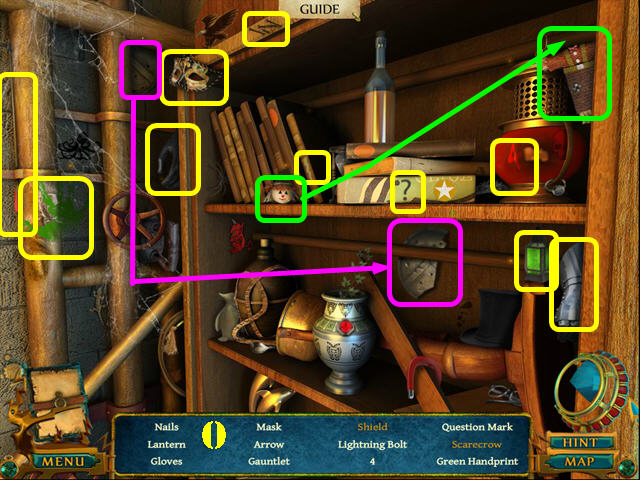
- Play the HOP.
- You will receive the ROPE (V).
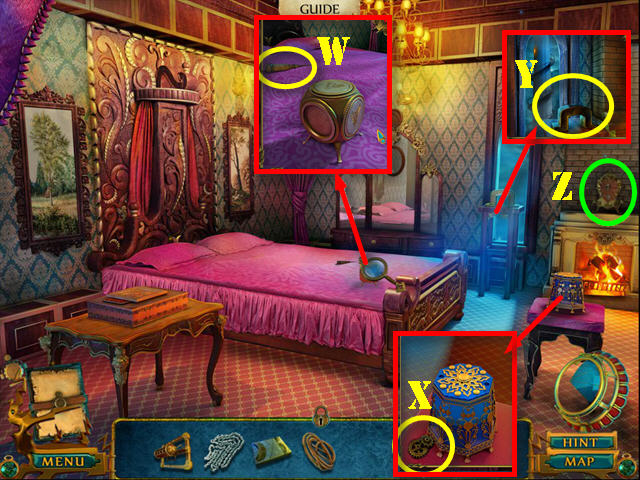
- Zoom into the bed and take the SCREWDRIVER (W).
- Zoom into the inkwell and take the WOODEN GEARS (X).
- Zoom into the window and touch the stand for a cut scene (Y).
- Examine the puzzle above the fireplace (Z).
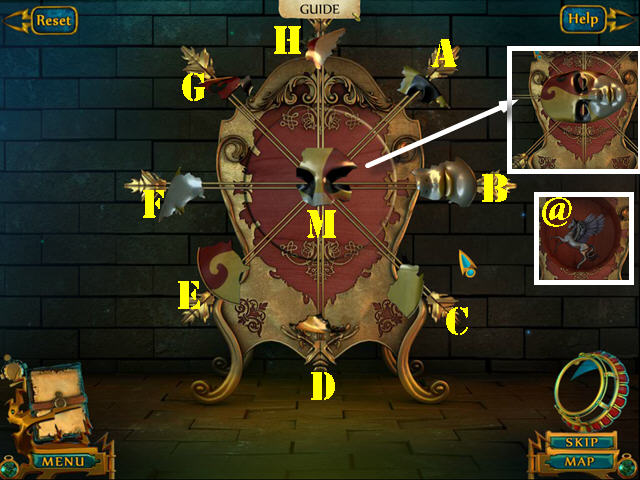
- Reassemble the mask by pushing the outside pieces into the center piece and by rotating the center piece as needed.
- To solve the puzzle, select the pieces in this order: M, F, M, D, M, A, M, C, M, H, E, M, B, and G.
- Take the PEGASUS (@).
- Walk down and go into the lower center door for a cut scene. Go through the door to access the Museum.
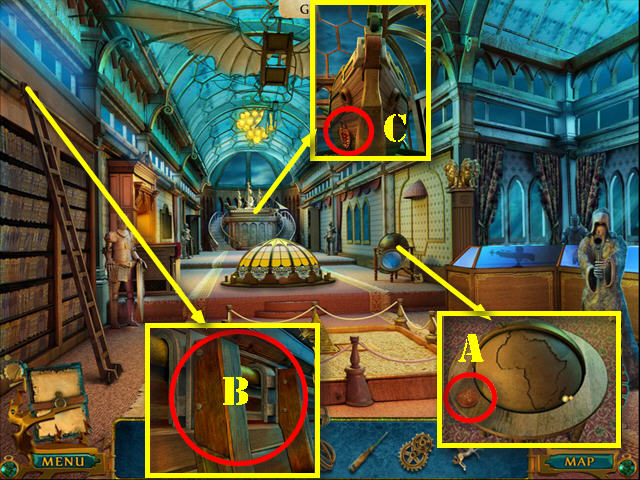
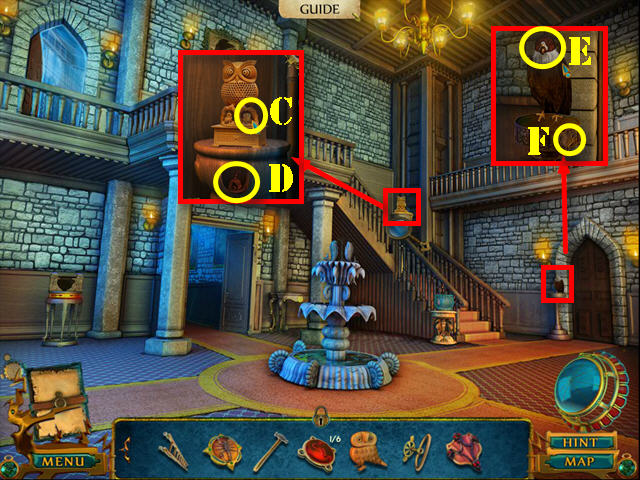
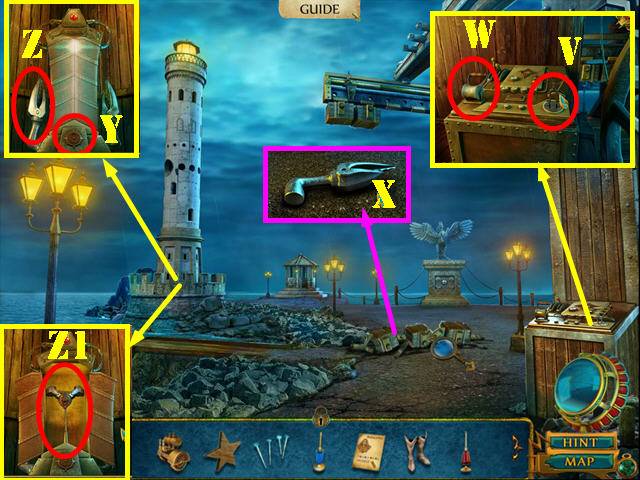
- Examine the globe and take the JEWELRY BOX KEY (A).
- Zoom into the top of the ladder; use the SCREWDRIVER on the screws and take the LADDER (B).
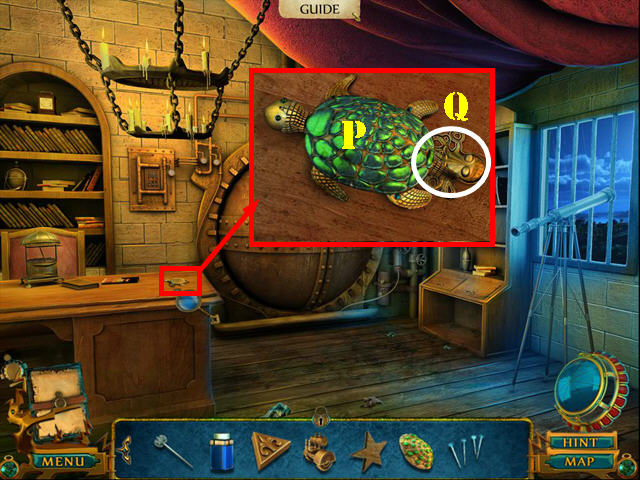
- Zoom into the ship and take the TURTLE (C).
- Return to the Guest Room.
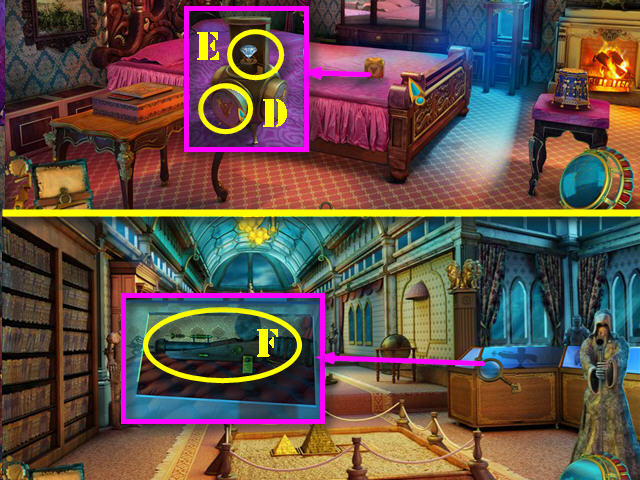
- Zoom into the box on the bed and use the JEWELRY BOX KEY on it (D); take the DIAMOND (E).
- Return to the Museum.
- Zoom into the case; use the DIAMOND on the glass and take the HARPOON GUN (F).
- Return to the Guest Room.
- Zoom into the window and put the HARPOON GUN on the stand. Attach the ROPE to it and shoot it (G). You will be taken to the Courtyard. Return to the Bridge.
- Zoom into the box; place the TURTLE in the slot (H) and take the LEVER (I).
- Play the HOP.
- You will receive the KNIFE (J).
- Walk down twice.

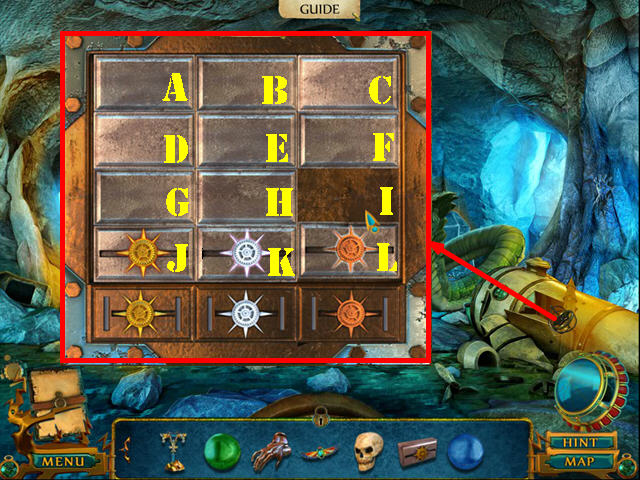
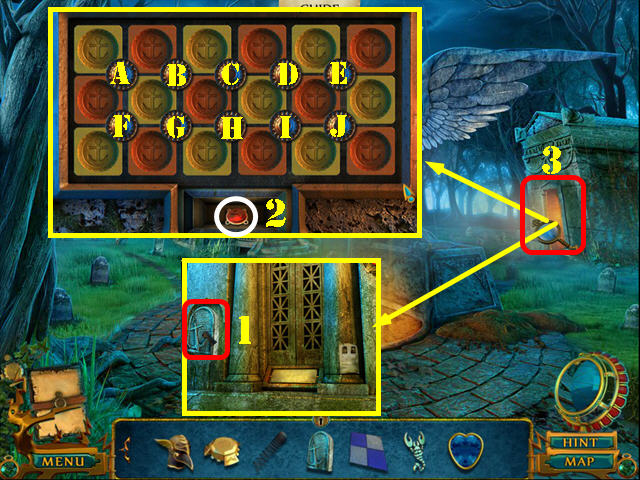
- Zoom into the mechanism and place the TILE PIECE on it to activate a puzzle.
- Select two tiles to swap their positions until they form the right image (K).
- Take the SCORPION PENDANT.
- Return to the Fishing Nets.
- Zoom into the contraption; place the WOODEN GEARS and the CHAIN on it (L).
- Speak with Antonio and then zoom into his shoe. Cut the heel with the KNIFE and take the HELMET KEY (M).
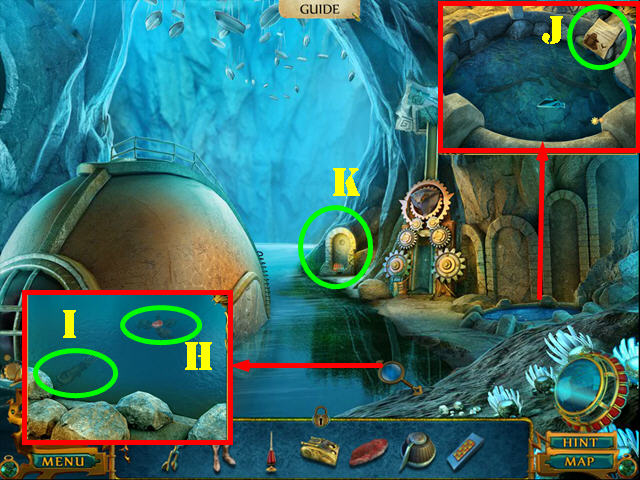
- Zoom into the swing bridge and place the LEVER (N). Go forward to Scorpion Cove.
Chapter 3: Finding the Enemy
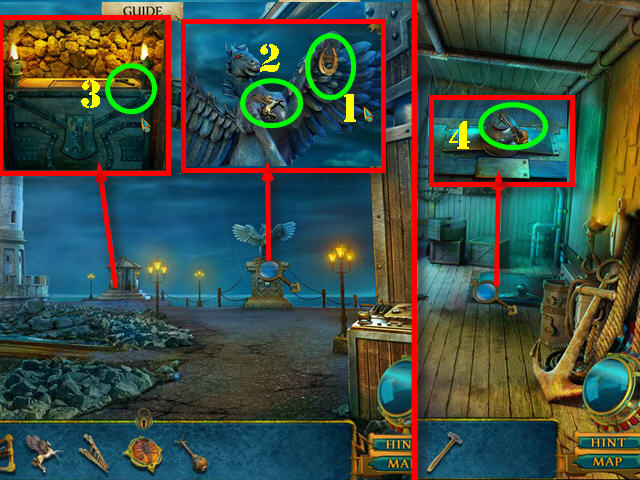
- Zoom into the statue; put the PEGASUS in the slot (1) and take the HORSESHOE (2).
- Zoom into the structure and take the HAMMER (3).
- Return to Daniel's Chamber.
- Zoom into the lock and place the HELMET KEY in it (4). Go down into Hull Lab.
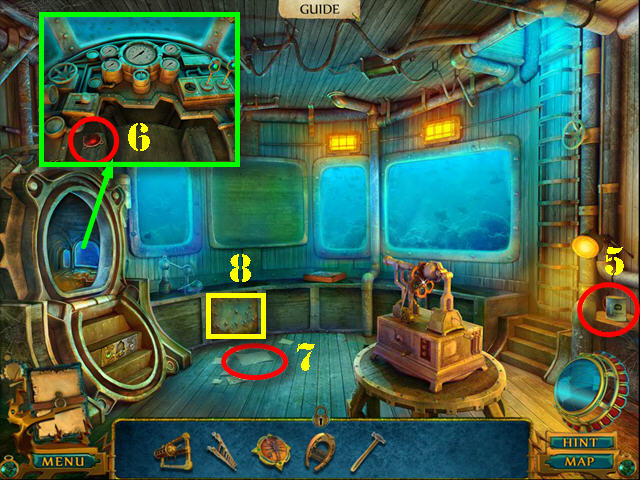
- Take the FISH FOOD (5).
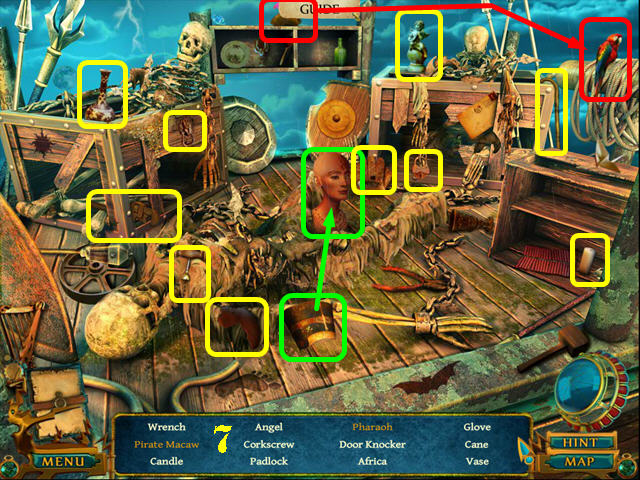
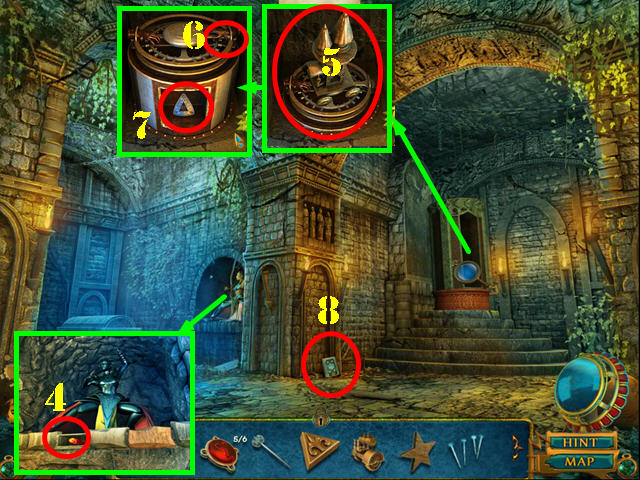
- Zoom into the doorway; take the PROJECTOR LENS 1/6 (6).
- Read the note (7).
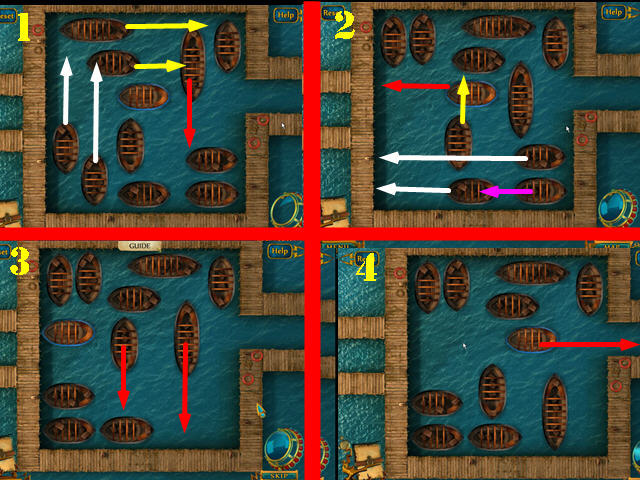
- Zoom into the puzzle (8).
- Move the ships marked in yellow (initial position) to the targets marked on the corresponding red letters (A-O).
- Take the OWL.
- Return to the Grand Hall.
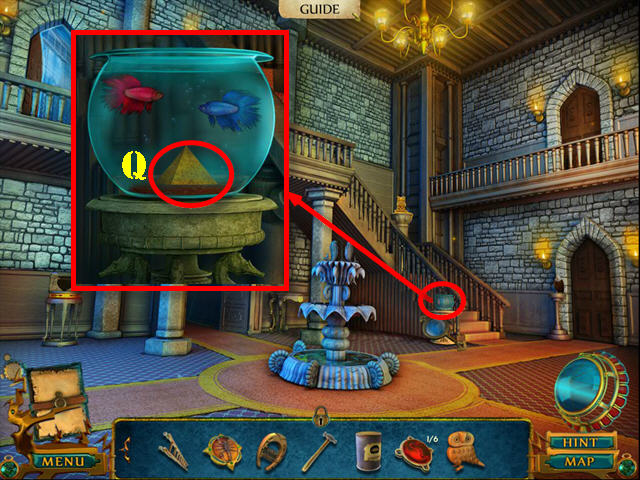
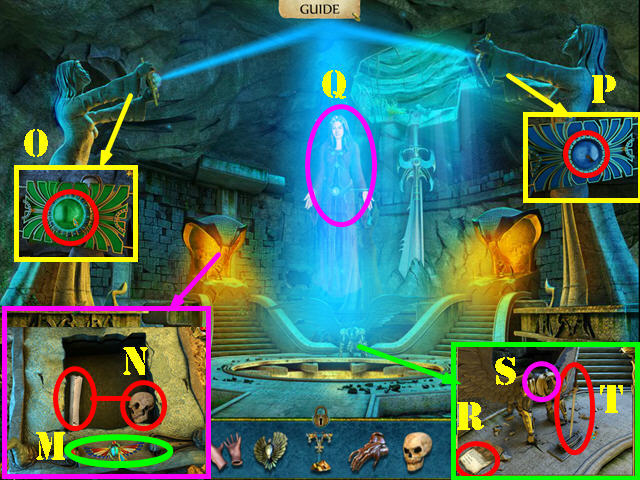
- Examine the fish bowl; put the FISH FOOD in it and take the PYRAMID (Q).
- Return to the Museum.
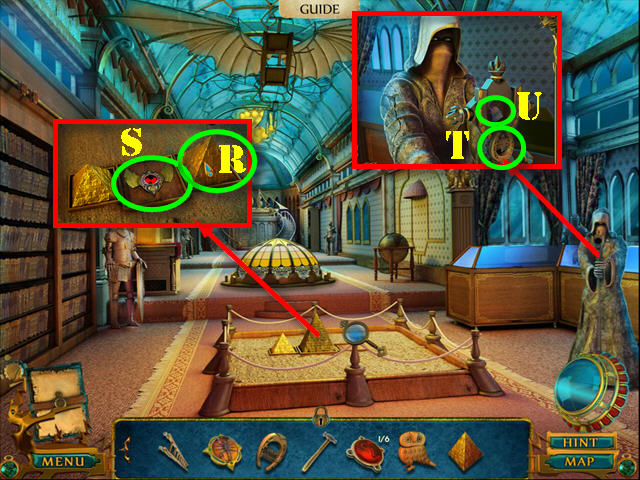
- Zoom into the pyramids and put down the PYRAMID (R). Take the WINGED GEM (S).
- Examine the statue; put the HORSESHOE in the slot (T) and take the EAGLE CREST (U).
- Return to the Guest Room.
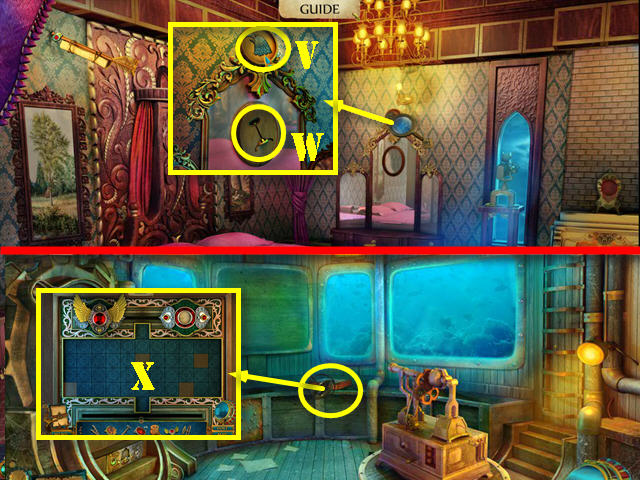
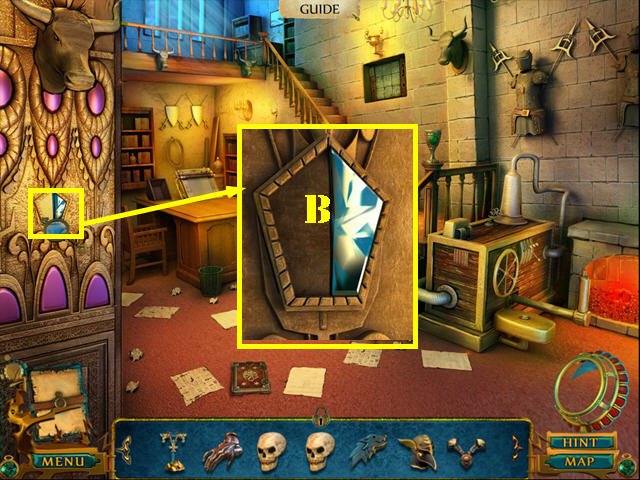
- Zoom into the top of the mirror. Place the EAGLE CREST in the slot (V) and take the CODEX KEY (W).
- Return to Hull Lab.
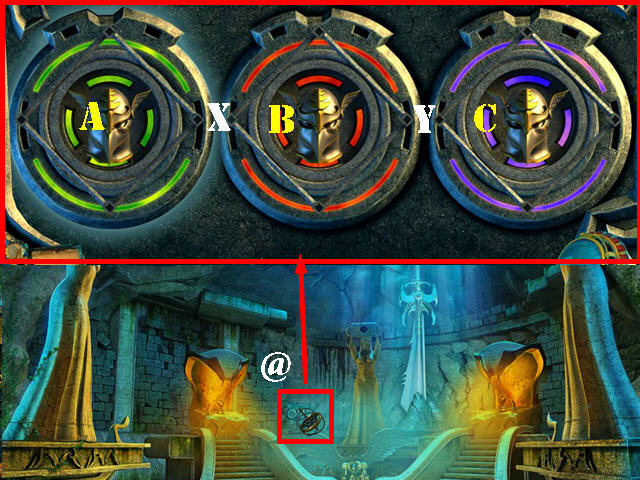
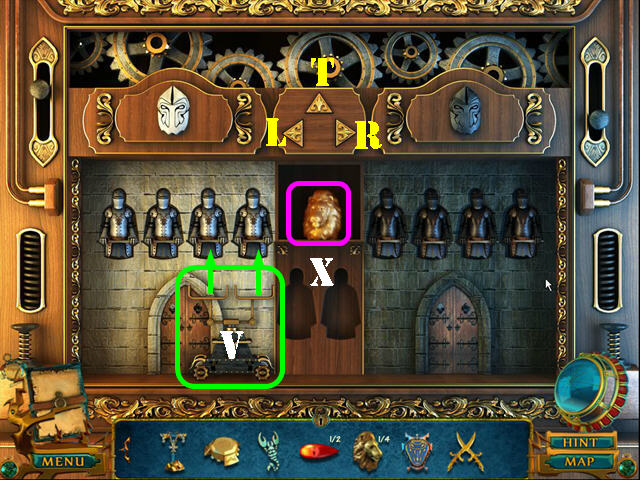
- Zoom into the puzzle box and place the WINGED GEM in the slot to activate a puzzle (X).
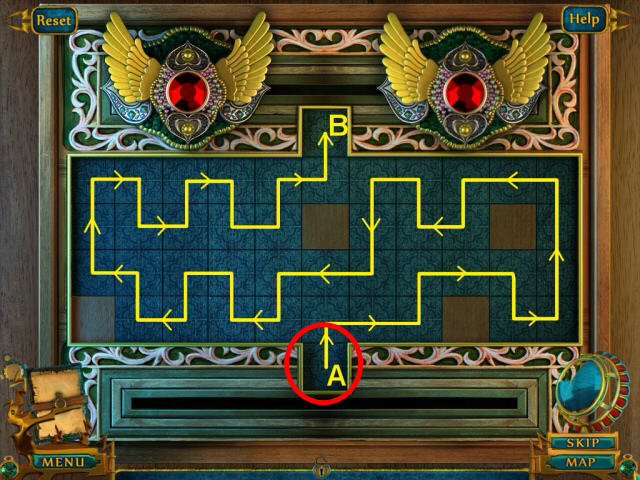
- Crate a path that passes through all the blocks just once.
- Please look at the screenshot for the solution; go from point A to point B.
- Take the SHIELD.
- Return to the Grand Hall.
- Zoom into the statuette; place the OWL in the slot (C) and take the BIRD PACIFIER (D).
- Zoom into the bird and place the BIRD PACIFIER on its head (E). Put the SHIELD in the slot (F).
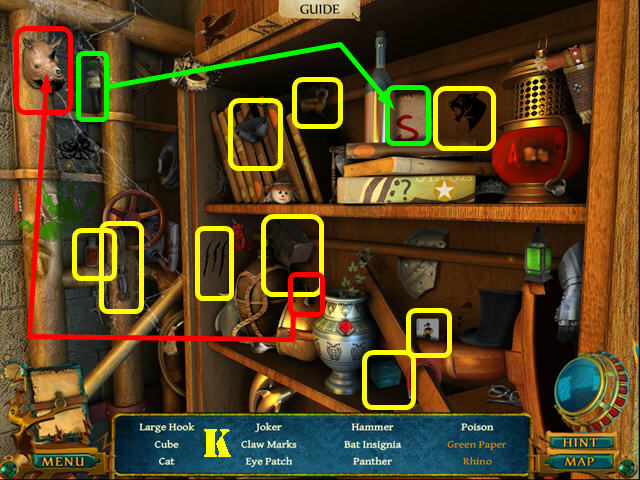
- Go into Clive's Chamber.
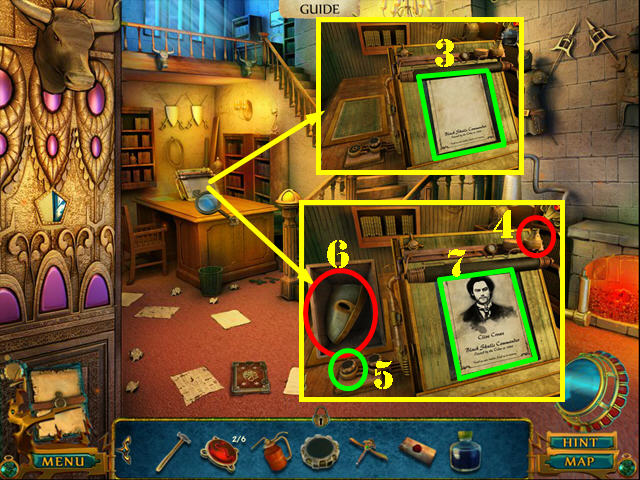
- Read the Book (G).
- Take the GARDEN RAKE (H).
- Examine the steps and take the CHISEL (I).
- Zoom into the bookstand and take the TOOLKIT LATCH (J).
- Zoom into the puzzle (K).
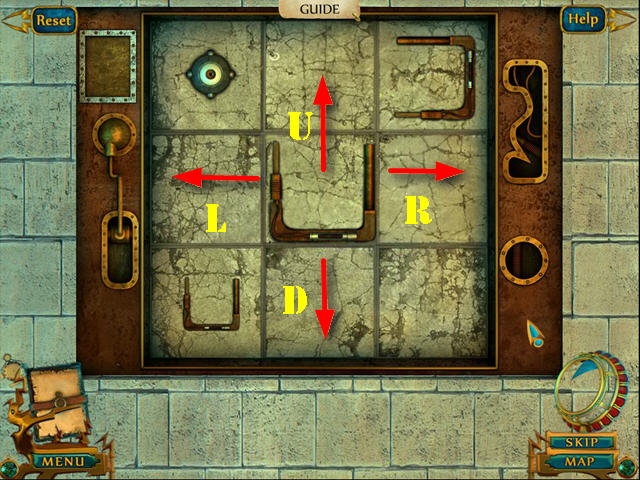
- Move the orb into all the brackets. Select a tile (other than the one the orb is on) to move the orb in that direction.
- To solve the puzzle, select the tiles in this order: R, D, L, U, Rx2, Dx2, L, Ux2, L, D, R, U, L, Dx2, Rx2, U.
- U, Lx2, D, U, R, D, R, D, U, L, U, R, D, L, U, L, D, Rx2, and D.
- Take the GLASS CUBE.
- Walk down.
- Zoom into the box and place the GLASS CUBE on it (1). Take the STAR KEY (2).
- Return to the Guest Room.

- Play the HOP.
- You will receive the STEEL PALM (3).
- Return to the Courtyard.
- Zoom into the leaves and use the GARDEN RAKE on them; take the OIL CAN (4).
- Zoom into the wall; place the CHISEL on it and then use the HAMMER on it (5). Take the STONE SWORD.
- Return to the Bridge.
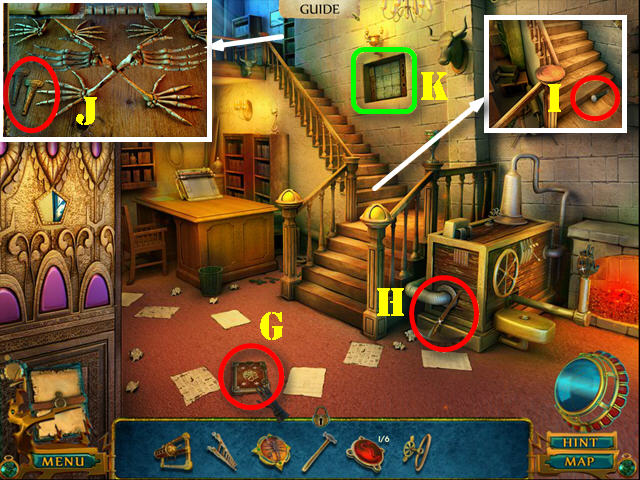
- Zoom into the toolkit; use the TOOLKIT LATCH on it and take the HANDSAW (6).
- Play the HOP.
- You will receive AFRICA (7).
- Return to Daniel's Chamber.
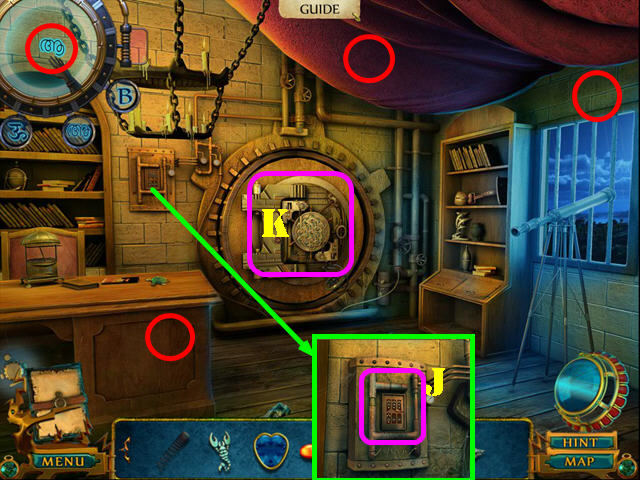
- Zoom into the porthole and use the STAR KEY in the slot (8).
- Take the KNOB (9).
- Return to the Fishing Nets.
- Zoom into the statue and place the STONE SWORD in its hand (10). Take the PROJECTOR LENS 2/6 (11).
- Return to the Guest Room.
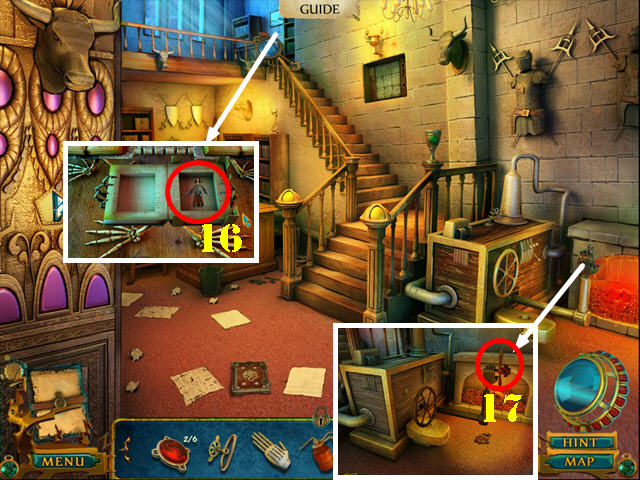
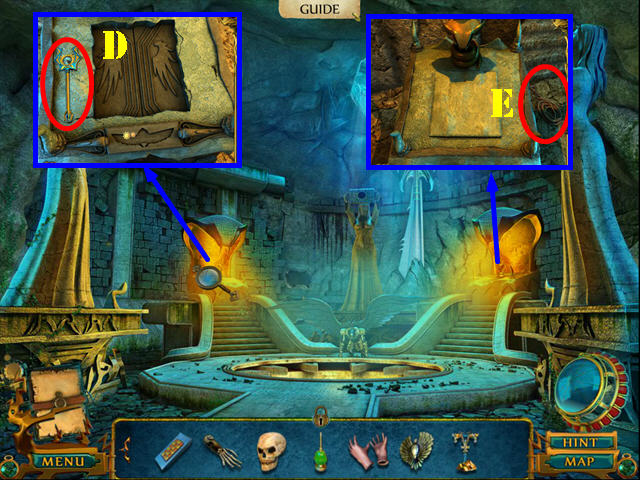
- Place the LADDER against the wall; zoom into the note and read it (12). Use the HANDSAW on the arrow and take the SIGNET RING (13).
- Return to the Houseboat.
- Zoom into the cabinet; use the SIGNET RING in the slot (14).
- Take the LOCKED CODEX (15).
- Return to Clive's Chamber.
- Zoom into the book stand and put down the LOCKED CODEX. Use the CODEX KEY on the locked codex and take the WARRIOR FIGURINE (16).
- Zoom into the robotic arm and place the STEEL PALM on it; take the SWORD HANDLE (17).
- Return to the Guest Room.
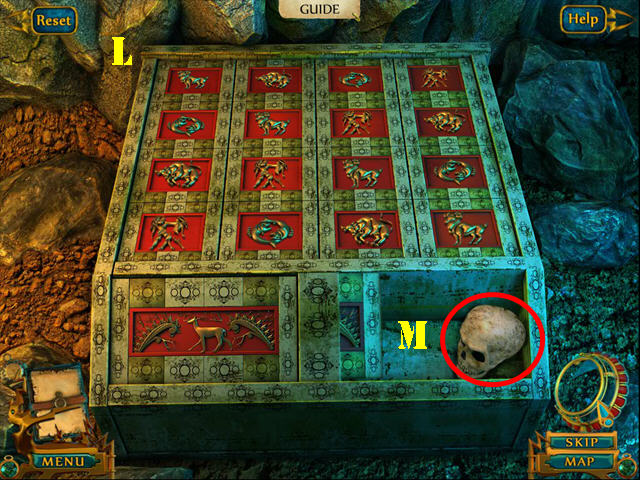
- Zoom into the box on the left table and place the WARRIOR FIGURINE on it to activate a puzzle.
- Pick up all the pieces and place them in the center without the snake catching up to you.
- Use the arrow buttons on the right side to move, pick up and drop off the pieces.
- Follow these steps to solve the puzzle: Bx3, C, D, Bx3, C, Bx3, C, D, Bx2, C, Bx3, C, D, Bx3, C, D, C, D, Ax3, C, D, Ax3, C, D, Ax2, C, Ax3, C, D, Ax3, C, and D..
- Take the SKULL DAGGER.
- Return to the Museum.
- Zoom into the daggers (@) and put down the SKULL DAGGER.
- To solve the puzzle, select the daggers in this order: D, F, G, E, C, D, B, A, C, E, D, B, C, D, F, G, E, C, B, D, C, A, B, D.
- Take the INKWELL HANDLE (@1).
- Zoom into the globe and place AFRICA on it. Take the CODED LETTER (1).
- Return to the Guest Room.
- Zoom into the inkwell; place the INKWELL HANDLE on it and take the INK BOTTLE (2).
- Return to Clive's Chamber.
- Zoom into the device; place the CODED LETTER on it and then press on it (3).
- Use the INK BOTTLE in the reservoir (4) and place the KNOB in the slot (5).
- Take the FACEPLATE (6). Read the letter (7).
- Return to the Courtyard.
- Play the HOP.
- You will receive the HEX WRENCH (8).
- Return to the Grand Hall.
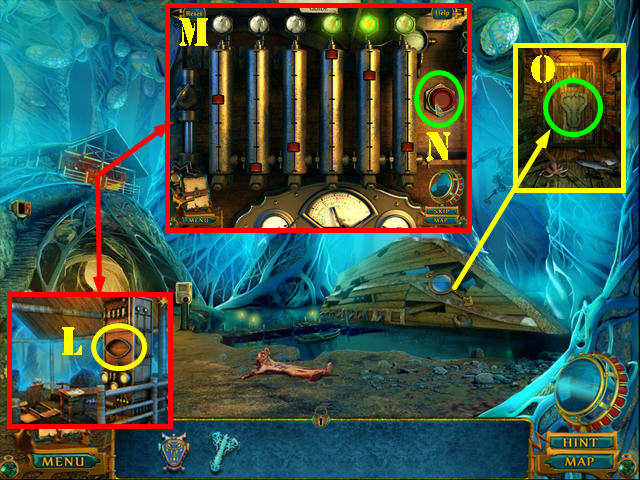
- Zoom into the frame and use the HEX WRENCH on the MOON, STAR, and SUN (9).
- Return to the Courtyard.
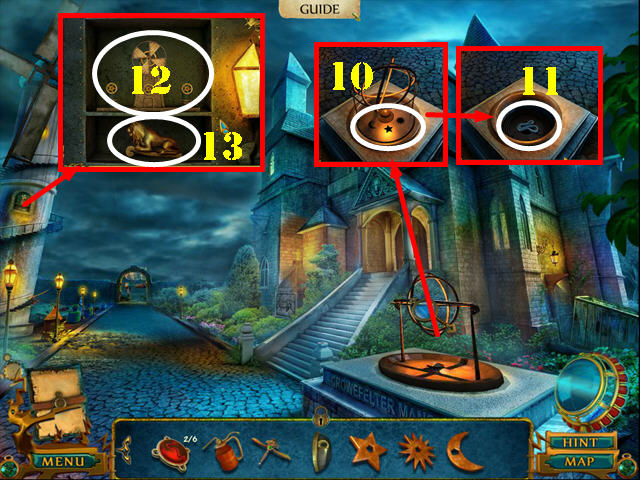
- Zoom into the gyroscope; place the MOON, STAR, and SUN on it (10).
- Take the BELT (11).
- Zoom into the windmill; use the BELT on it (12) and take the MASTHEAD (13).
- Return to the Museum.
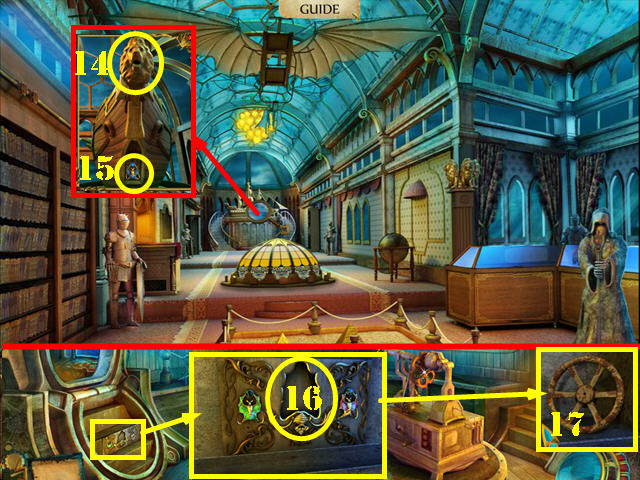
- Zoom into the ship and place the MASTHEAD on it (14); take the BAT INSIGNIA (15).
- Return to the Hull Lab.
- Zoom into the stand and place the BAT INSIGNIA in the slot (16); take the CRANK WHEEL (17).
- Return to the Bridge.
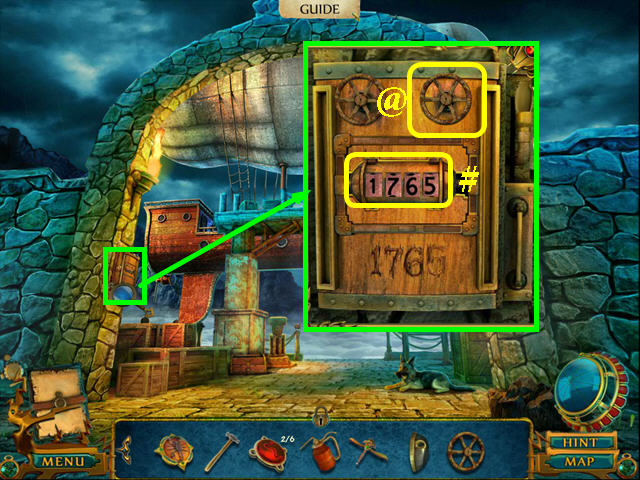
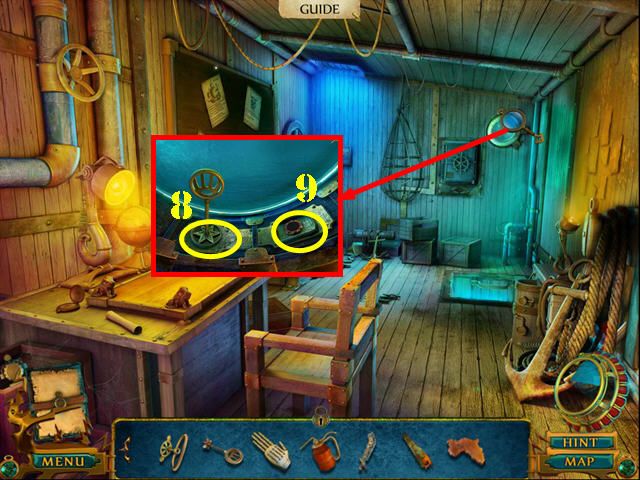
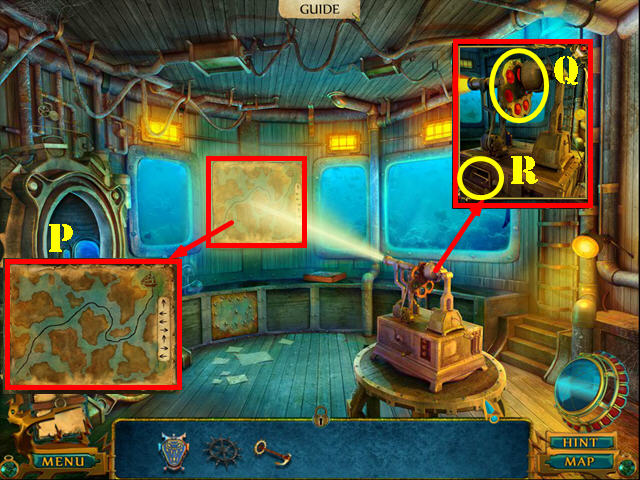
- Zoom into the device and place the NUMBER LOCK on it (#).
- Use the OIL CAN on the device and then place the CRANK WHEEL in the slot (@).
- Change the numbers to 1765 (#).
- Go forward to the Chapel.
Chapter 4: The Other Side
- Zoom into the chest and take the SHOVEL (1).
- Zoom into the knight and place the SWORD HANDLE on the blade (2); take the PROJECTOR LENS 3/6 (3).
- Head right to the Antique Street Docks (4).
- Talk to the man to receive the SHIP MEDALLION (4).
- Zoom into the cabinet, read the note on the left hand side and take the PIPE (5).
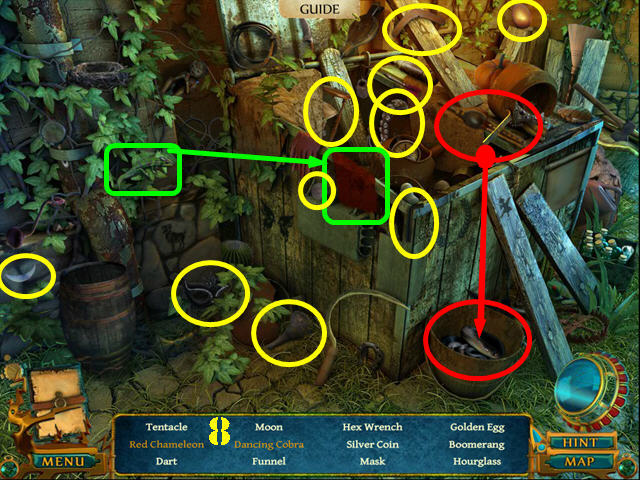
- Play the HOP.
- You will receive the SLINGSHOT (6).
- Walk down.
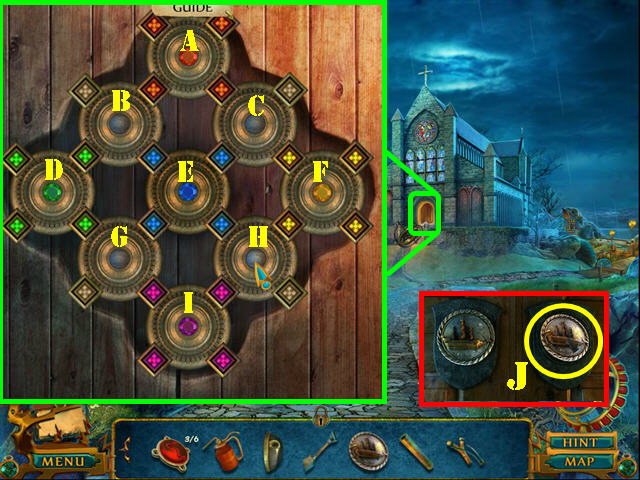
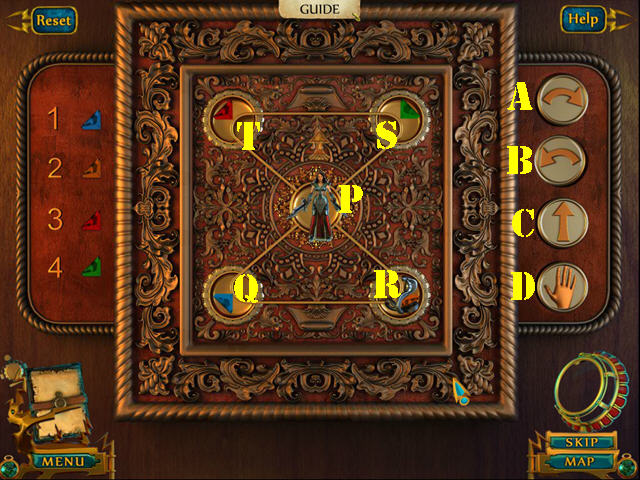
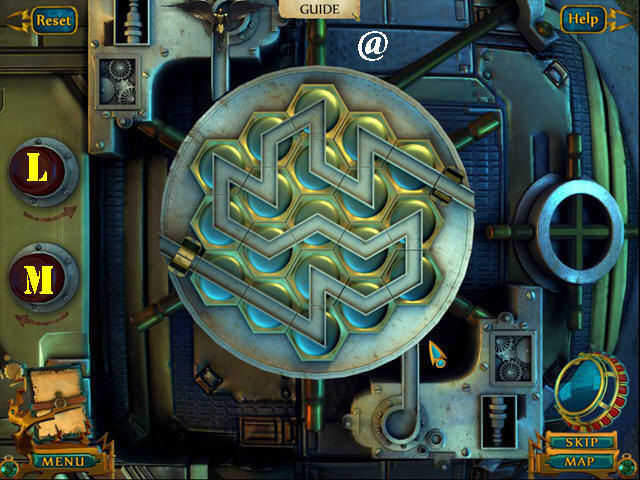
- Zoom into the door for a puzzle. Press the center dial to rotate the gems until the gems on the outside match the one in the center.
- To solve the puzzle, rotate the buttons in this order: I, H, I, E, G, I, G, E, C, A, E, C, E, Ax2, B, Fx2, C, Fx3, Cx2, B, Ex2, F, H, F, Hx2, F, E, H, D, G, Ex3, D, Gx2, I, G, Ix2, E, D, G, Ix2, Ex2, H, Ix2, H, E, Hx3, I, and H.
- Place the SHIPS MEDALLION in the slot (J).
- Go into the Chapel Hall.
- Zoom into the fountain and read the letter (K).
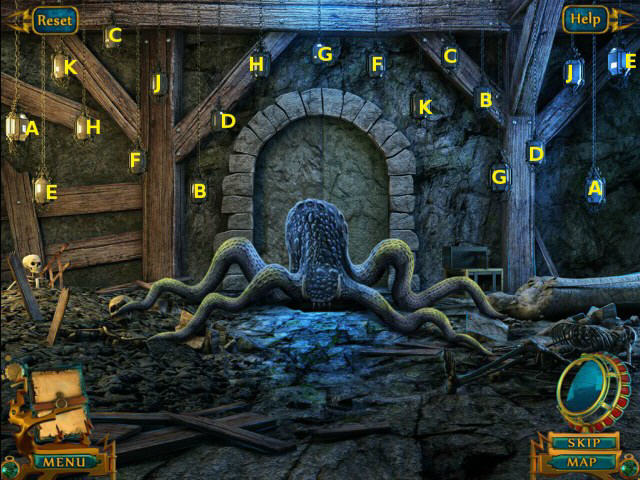
- Examine the device; take the TWEEZERS and the SCYTHE (L).
- Walk down.
- Zoom into the thorny branches and use the SCYTHE on them; take the MATCHBOX (M).
- Return to Chapel Hall.
- Zoom into the unlit candles and use the MATCHBOX on them; take the ANGEL WAND (N).
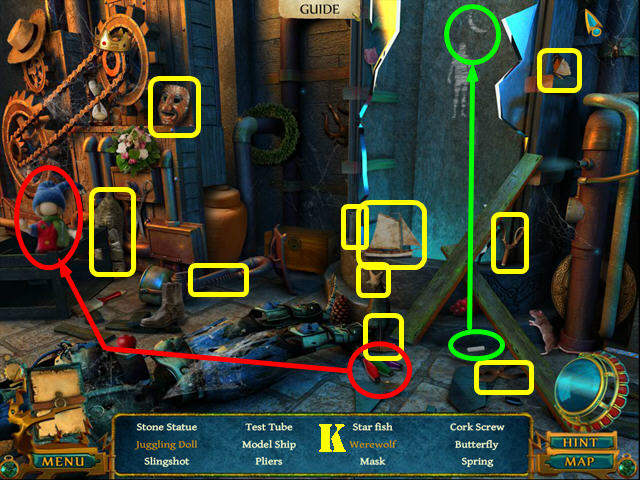
- Return to the Antique Street Docks and go to the Warehouse in the upper left.
- Zoom into the dresser and open the book (O).
- Note the picture puzzle (P).
- Zoom into the puzzle by the door (Q).
- Arrange the portraits correctly. Select a piece and then an arrow in the direction you want to move.
- Move the pieces in this order: 4-D, 5-C, 1-5, 2-4, D-2, 7-1, 8-A, 4-8, A-7, 1-D, 2-4, D-2, 4-1, and C-4.
- The final image is shown here (red).
- Take the SOLVENT and read the note (green).
- Open the picture puzzle on the wall. Use the red patches (A-E) to rotate the pieces.
- To solve the puzzle, select the patches in this order: Dx2, E, D, C, B, Fx2, B, C, A, Bx2, and Ax2. If you reset the puzzle this solution may not work. Exit the puzzle to restart.
- Take the ARROW BUTTON.
- Go through the doorway to reach the Vault.
- Zoom into the engine and place the PIPE on it (G); take the BOAT ENGINE (H).
- Zoom into the telescope and note the clue (I).
- Zoom into the desk and look at the note (J).
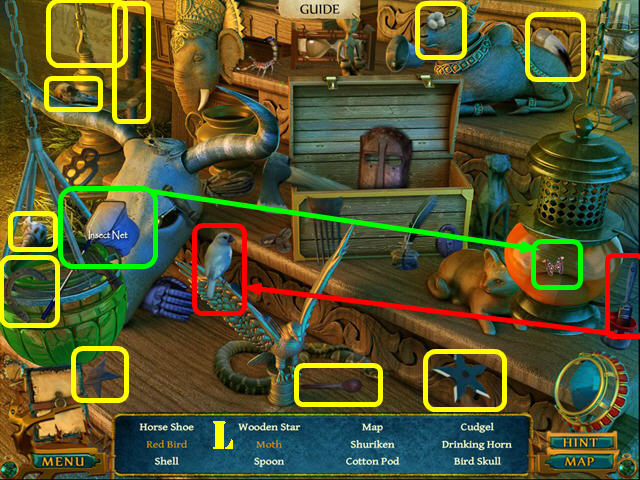
- Play the HOP.
- You will receive the LARGE HOOK (K).
- Walk down twice.
- Play the HOP.
- You will receive the WOODEN STAR (L).
- Zoom into the boat and attach the LARGE HOOK to the rope (M).
- Take the SHELL (N).
- Return to the Vault.
- Play the HOP.
- You will receive the NAILS (O).
- Zoom into the desk; attach the SHELL to the turtle (P) and take the OCTOPUS (Q).
- Return to the Chapel and go left to the Cemetery.
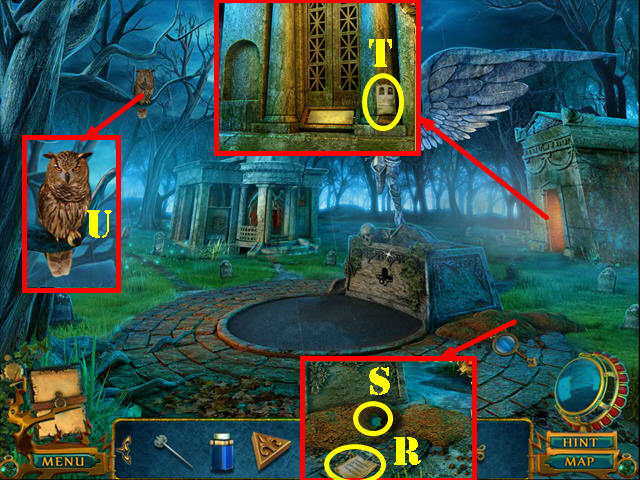
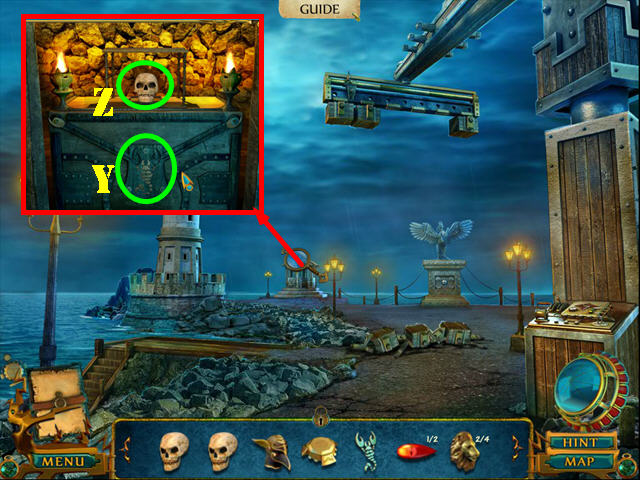
- Examine the grave and read the note (R).
- Use the SHOVEL in the mud and take the TRINKET (S).
- Zoom into the crypt and read the note (T).
- Zoom into the owl; use the SLINGSHOT on it to get the EYEBALL (U).

- Play the HOP.
- You will receive the RUBY GOBLET (V).
- Zoom into the base of the statue and place the OCTOPUS in the slot (W).
- Go down into the Catacombs.
Chapter 5: Chasing a Legend
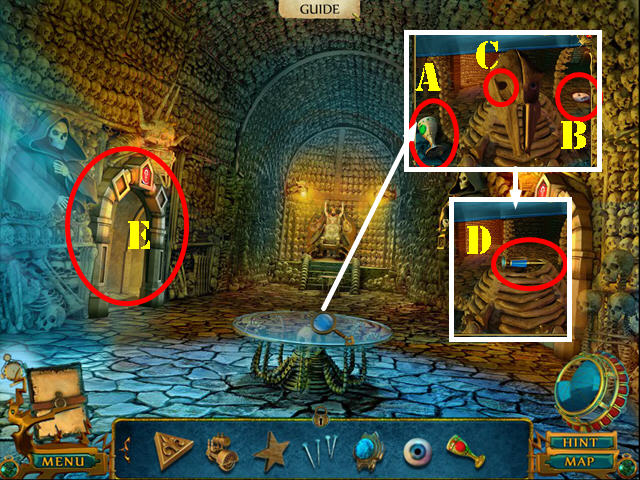
- Zoom into the table; take the EMERALD GOBLET (A) and the ANGEL FACE (B).
- Place the EYEBALL in the socket (C) and take the PEARL SERUM (D).
- Go left to the Workshop (E).
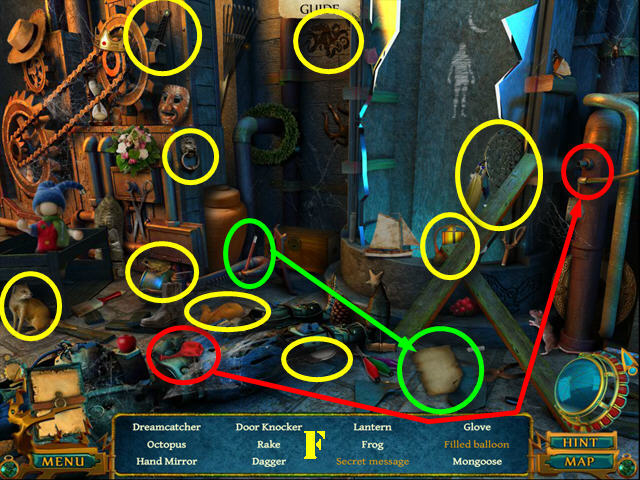
- Play the HOP.
- You will receive the LANTERN (F).
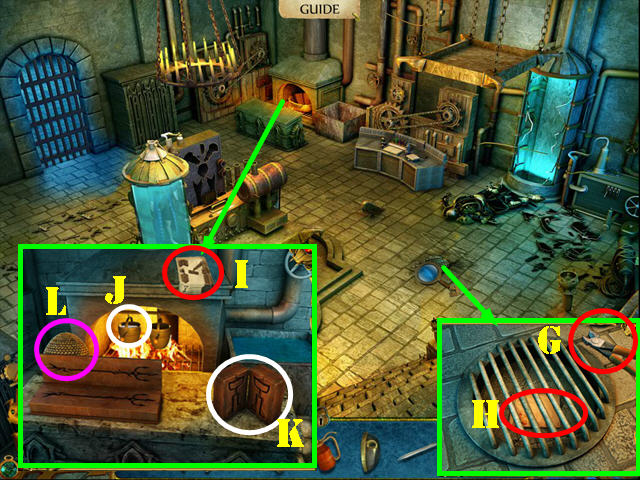
- Zoom into the grate and take the WIRE CUTTER (G).
- Use the TWEEZERS on the POTION NOTE and then take it (H).
- Zoom into the fireplace and read the note (I).
- Touch the left cauldron (J) and then touch the mold (K). Open the mold and take the CRANE KEY.
- Take the BASKET (L).
- Walk down.
- Zoom into the throne; place the LANTERN on it (M).
- Zoom into the ribcage; place the TRINKET in the slot (N) and take the BOOTS (O).
- Walk down twice.

- Zoom into the chest; place the RUBY GOBLET in the slot and take the KRAKEN's BLOOD (P).
- Zoom into the statue and put the ANGEL FACE on it (Q) to get the GLOWING ORB.
- Return to Chapel Hall.

- Examine the device and cut the wires with the WIRE CUTTER. Take the VAULT POD (R).
- Zoom into the ledge and cover the creature with the BASKET (S).
- Take the MEATLOAF (T).
- Zoom into the fountain and place the GLOWING ORB on it (U).
- Zoom into the area the light is pointing to access a puzzle (V).
- Select two rows or columns to swap their positions.
- The solution is random; please look at the screenshot for the final image (W).
- Go into the Tomb of da Gama.
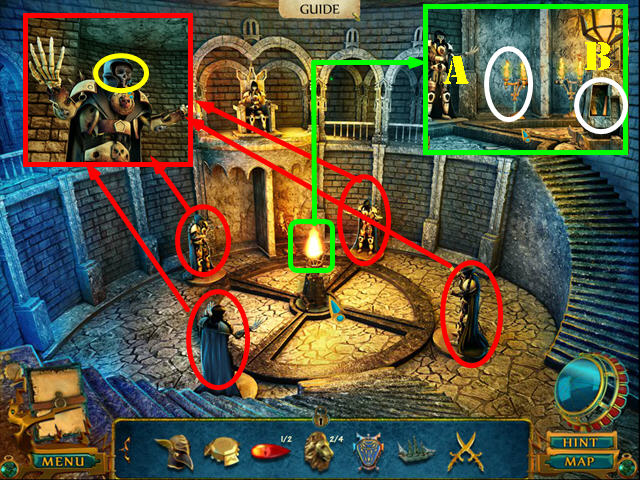
- Touch the Draug (X) to be automatically transported to the Dungeon.
- Zoom into the right wall and use the SOLVENT on it to activate a puzzle (Y).
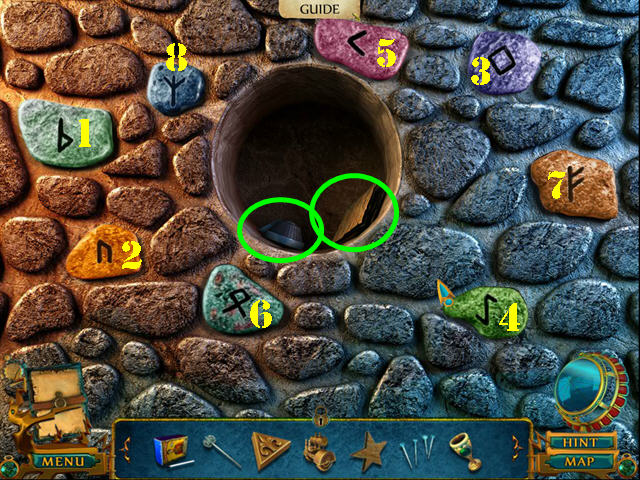
- Press the runes in the right order (1-8).
- Take the LOCKER KNOB and read the letter (green).
- Zoom into the puzzle (A).
- Repeat the energy sequence coming from the statues. The solution is random (B).
- Take the BONES.
- Zoom into the left wall; use the BONES on it (C).
- Zoom into the battering ram and take the CROWBAR (D).
- Use the OIL CAN on the handle (E).
- Zoom into the ledge and read the note (F). Use the CROWBAR on the stone and take the TABLET (G).
- Zoom into the battering ram and touch it to automatically go to the Submarine Cave.
- Zoom into the water and throw the MEATLOAF in it (H) and take the SKELETAL ARM (I).
- Zoom into the pool and read the note (J).
- Zoom into the puzzle (K).
- Arrange the tiles and columns so that each section has a set of 4 different symbols. Select two symbols to swap their positions.
- Please look at the screenshot for the solution (L).
- Take the SKULL (M).
- Zoom into the mechanism and pull the lever (N).
- Go up to the Museum and then return to Clive's Chamber.
- Zoom into the banister and place the EMERALD GOBLET on it (O). Take the JELLYFISH POISON (P).
- Return to the Courtyard.
- Play the HOP.
- You will receive the RUBBER GLOVES (Q).
- Return to Daniel's Chamber.
- Zoom into the locker and place the LOCKER KNOB on it (R).
- Take the SUBMERSIBLE KEY (S).
- Go down to the Hull Lab (T).
- Zoom into the controls and insert the SUBMERSIBLE KEY into the lock (U).
- Go through the doorway to reach the Serpent's Nest (V).
- Zoom into the wall and take the BULL HEAD (1).
- Zoom into the barrel; read the note (2) and place the BULL HEAD in the slot (3). Take the EXPLOSIVES.
- Zoom into the boulder and put the EXPLOSIVES on it. Use the MATCHBOX on the explosives (4).
- Go into Vajra's Sanctum.
- Zoom into the puzzle on the ground.
- Rotate the rings until you form the image on the screenshot (5).
- Take VAJRA'S SHIELD.
- Zoom into the puzzle (@).
- To solve the puzzle, select the buttons in this order: X, Ax2, Bx2, X, Y, Cx2, Bx2, Y, C, Bx3, Y, Cx2, Bx2, Y, Cx3, A, X, A.
- Bx2, X, B, X, B, X, Bx3, X, Ax3, and Bx3.
- Take the DRAGON STAND.
- Zoom into the left statue and take the EYE COLLECTOR (D).
- Examine the right statue and take the HOOK (E).
- Walk down.
- Zoom into the wall; use the EYE COLLECTOR to get the GREEN EYE (F).
- Zoom into the crevice; use the HOOK to get the KINGFISHER and then take it (G).
- Go forward to the Eagle Warriors.
- Use the Cryptic Disk to find the 4 hidden symbols (red).
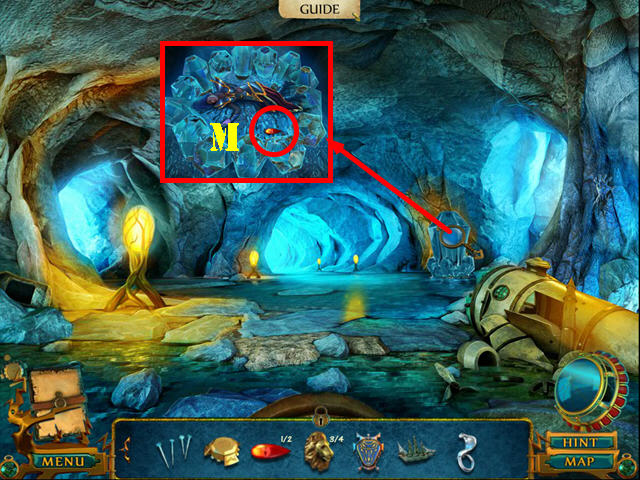
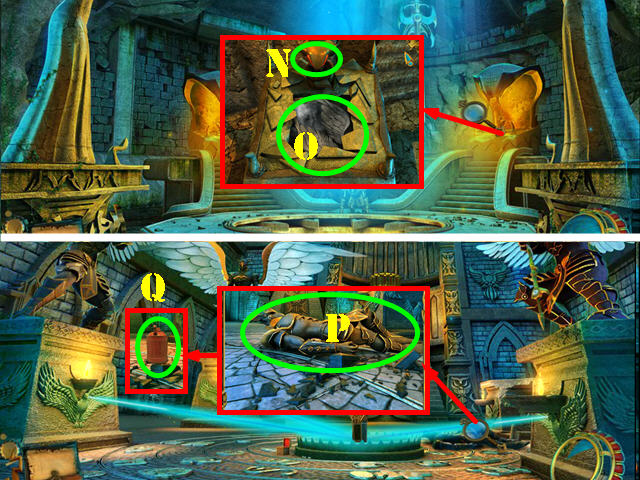
- Zoom into the box; read the note (H) and take the ANCHOR PIN (I). Put the KINGFISHER in the slot on top of the box; take the SKULL and the SCARAB (J).
- Examine the wall and take the SLIDER TILE (K).
- Use the EYE COLLECTOR to get the BLUE EYE (L).
- Walk down.
- Zoom into the puzzle and add the SLIDER TILE to it (C).
- Align the tiles properly.
- Select the tiles in this order: I, F, C, B, A, D, G, J, K, L, I, F, C, B, A, D, G, J, K, L, I, F, C, B, A, D, G, J, K, L, I, F, C, B, A, D, G, J, K, L, and I.
- Take the GUN and then use it on the serpent.
- Return to Vajra's Sanctum.
- Zoom into the statue and put the SCARAB in the slot (M). Read the note and take the skull (N).
- Zoom into the plaque and insert the GREEN EYE (O).
- Zoom into the plaque and insert the BLUE EYE (P).
- Talk to the spirit (Q) to receive the WOLF.
- Return to Daniel's Chamber.
- Play the HOP.
- You will receive the EAGLE HEAD (U).
- Return to Vajra's Sanctum.
- Zoom into the statue; look at the note (R) and place the EAGLE HEAD on the statue (S). Take the GOLD SWORD (T).
- Return to Scorpion Cove.
- Zoom into the crane and use the CRANE KEY in the slot (V). Pull the handle (W).
- Zoom into the boards and remove them all; take the SCORPION CLAW (X).
- Zoom into the base of the lighthouse; insert the SCORPION PENDANT in the slot (Y). Place the SCORPION CLAW on it (Z) and take the ARMOR (Z1).
- Return to the Submarine Cave.

- Zoom into the pool; use the RUBBER GLOVES on the PENTAGON PIECE and then take it (A).
- Return to Clive's Chamber.
- Zoom into the wall and insert the PENTAGON PIECE in the slot (B). Take the PENTAGON BLOCK.
- Return to the Dungeon.
- Use the Cryptic Disk to find the 4 hidden symbols (red).
- Try to walk down and then talk to the man (C).
- Put the PENTAGON BLOCK in the slot (D) to be transported to the Workshop.
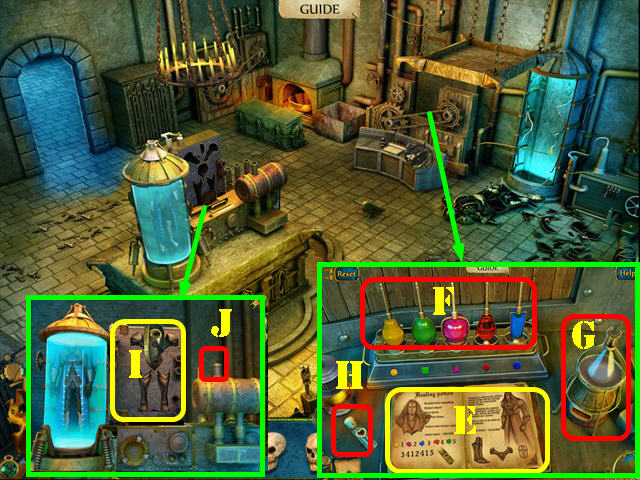
- Zoom into the table; put the POTION NOTE on the left page and read both pages (E).
- Put down the PEARL SERUM, KRAKEN'S BLOOD, and the JELLYFISH POISON to activate a puzzle.
- Take the colored bottles (F) and transfer them in this order to the container (G): Blue, Red, Yellow, Pink, Red, Yellow, and Green.
- Dip the bottle (H) into the container and then take the HEALING POTION.
- Zoom into the device; put the FACE PLATE, ARMOR, and BOOTS in the slots (I).
- Place the HEALING POTION in the mechanism (J). The man will give you the SANTIAGO MEDALLION.
- Play the HOP.
- You will receive the SPRING (K).
- Walk down.
- Zoom into the right door and place the WOLF in the slot (L).
- Go through the door to access the Black Skull Coffins.
- Play the octopus puzzle in the upper right.
- Select matching pairs of symbols as shown on the screenshot (A-K).
- Take the EPITAPH.
- Examine the statue and place the SKELETAL ARM on it. Take the STAINED GLASS, PROJECTOR LENS 4/6, and the SCORPION FIGURINE (M).
- Walk down twice.
- Play the HOP.
- You will receive the HEART (N).
- Zoom into the crypt and place the EPITAPH in the slot (1).
- Zoom into the crypt again; place the TABLET in the slot to activate a puzzle.
- To solve the puzzle, select the buttons in this order: C, B, Ax2, Hx2, G, F, Gx2, Ix2, Cx2, H, Dx3, E, D, J, E, J, E.
- Take the PROJECTOR LENS 5/6 (2).
- Go into Christiano's Crypt (3).
- Zoom into the statue and take the RED EYE 1/2 (4).
- Zoom into the niche and take the IRON CHARIOT (5).
- Place the ANCHOR PIN on the device (6) and take the TRIANGLE PENDANT (7).
- Open the book (8).
- Walk down.
- Examine the angel statue; place the ANGEL WAND (green) in its hands and then place the TRIANGLE PENDANT on it (red).
- Take the MAGNUS SEAL (9).
- Return to Chapel Hall.
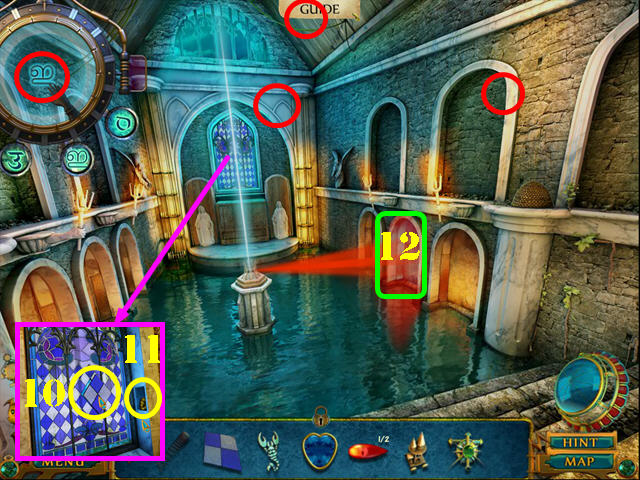
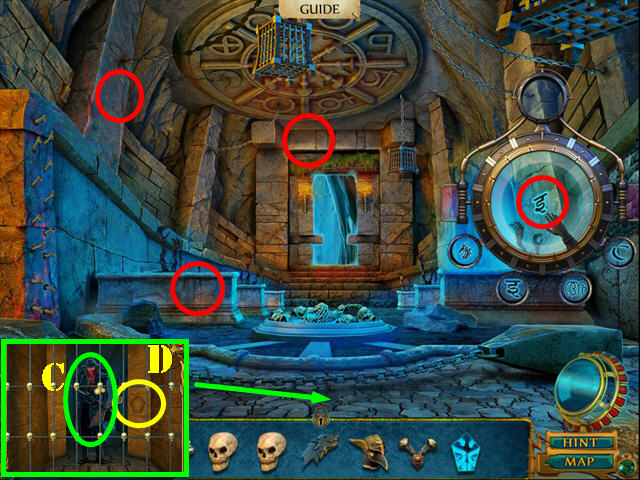
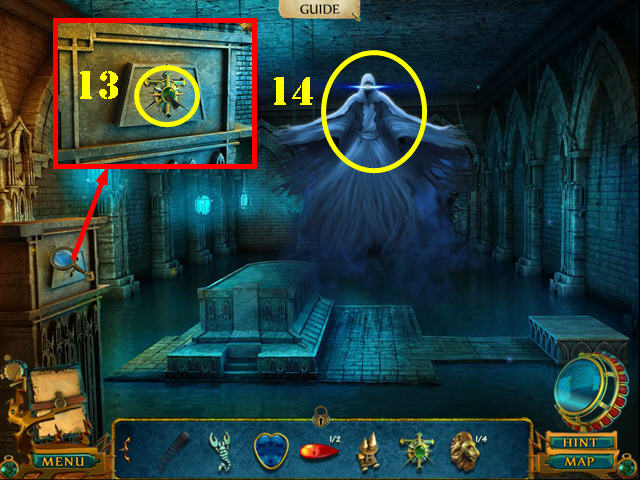
- Use the Cryptic Disk to find the 4 hidden symbols (red).
- Zoom into the window and place the STAINED GLASS on it (10).
- Take the LION HEAD 1/4 (11).
- Go through the door (12).
- Zoom into the wall and place the MAGNUS SEAL into the slot (13).
- Use the SANTIAGO MEDALLION on the Draug (14).
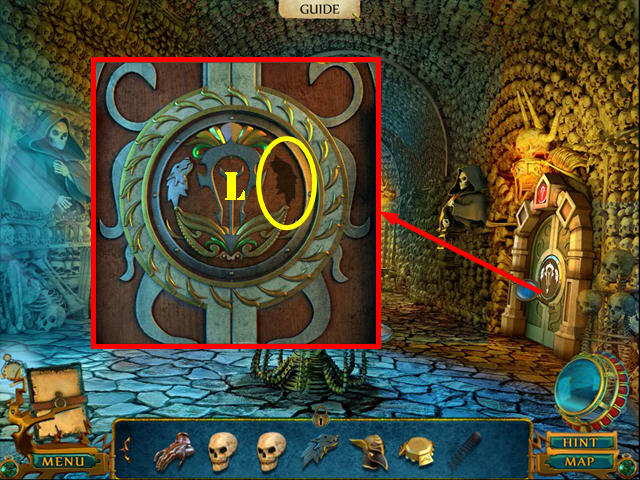
- Zoom into the tomb for a puzzle.
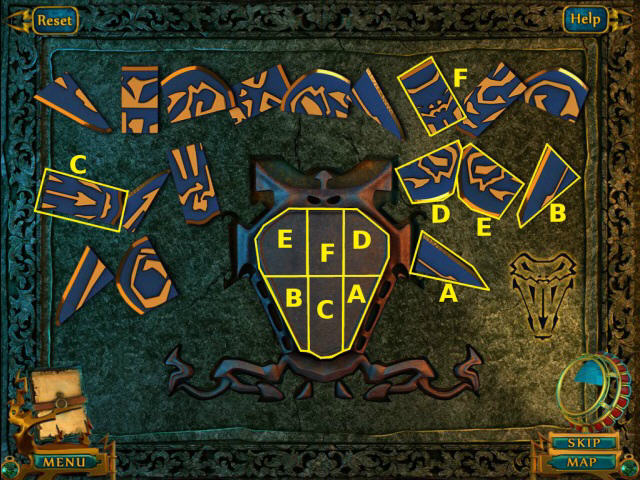
- Assemble the cobra plaque as shown in the screenshot (A-F).
- Take the COBRA PLAQUE.
- Return to the Warehouse.
- Zoom into the dresser; place the IRON CHARIOT on the horses (G).
- Take the BLACK SKULL TOY (H).
- Return to the Vault (I).
- Use the Cryptic Disk to find the 4 hidden symbols (red).
- Zoom into the controls and place the VAULT POD on it (J).
- Zoom into the vault for a puzzle (K).
- Rotate the hexagons to form the image in the screenshot (@).
- Guide the angel to its destination by selecting the buttons in this order: Lx2, Mx2, Lx3, Mx3, Lx2, Mx4, L, M, Lx4, Mx2, and Lx2.
- Zoom into the vault and take the GOLD DAGGERS.
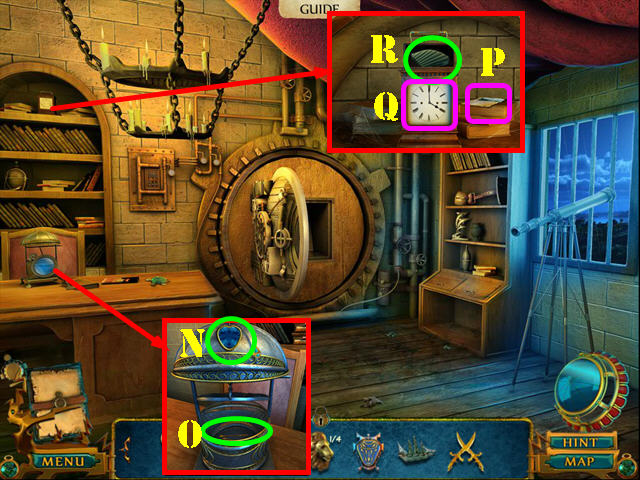
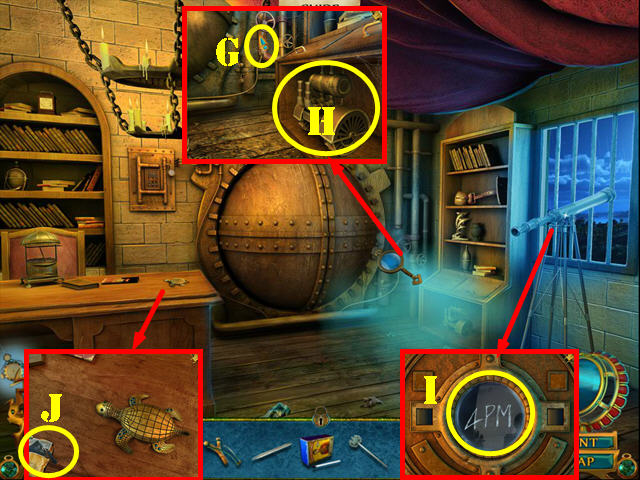
- Zoom into the case and place the HEART in the slot (N). Take the CLOCK HANDS (O).
- Zoom into the shelf; read the note (P).
- Place the CLOCK HANDS on the clock and change the time to 4:00 o'clock (Q). Take the FISH FIN (R).
- Walk down.
- Zoom into the fish and place the FISH FIN on it; take the PROJECTOR LENS 6/6 (S).
- Zoom into the device; place the ARROW BUTTON and the SPRING on it to activate a puzzle (T).
- Move the knights to their matching locations. Use the arrows to move the claw (V) so it can pick up and drop off the knights.
- You can only pick up two knights at a time.
- To solve the puzzle, select the arrows in this order: Rx7, T, Lx3, T, Lx4, T, Rx7, T, Lx3, T, Lx4, T, R, T, Rx3, T, Rx4, T, Lx7, T, Rx3, T, Rx4, and T.
- Take the LION HEAD 2/4 (X).
- Return to Scorpion Cove.
- Zoom into the structure and place the SCORPION FIGURINE in the slot (Y).
- Take the SKULL (Z).
- Return to the Black Skull Coffins.
- Zoom into the 4 armors and place the 4 SKULLS on them (red).
- Zoom into the fire and put down the DRAGON STAND (A).
- Look at the note and take the GOLD BLOCK (B).
- Return to the Workshop.
- Zoom into the forge; place the GOLD BLOCK in the cauldron and then touch it (C).
- Touch the mold and open it; take the GOLDEN TRIDENT (D).
- Return to the Eagle Warriors.
- Examine the base of the statue and place the GOLD SWORD in the slot (E).
- Examine the base of the statue and place the GOLD DAGGERS in the slot (F).
- Zoom into the base of the statue; place the GOLDEN TRIDENT in the slot (G).
- Examine the stand; take the LION HEAD 3/4 (H). Touch the stand and take VAJRA'S SWORD (I).
- Return to Christiano's Crypt.

- Zoom into the statue. Place VAJRA'S SHIELD and VAJRA'S SWORD on the statue (J).
- Take the SNAKE CHARM (K).
- Return to the Serpent's Nest.
- Zoom into the crystal and place the SNAKE CHARM in the slot. Zoom back into the crystal and take the RED EYE 2/2 (M).
- Return to Vajra's Sanctum.
- Zoom into the statue and place the 2 RED EYES in the sockets (N).
- Take the EAGLE WINGS (O).
- Return to the Eagle Warriors.
- Zoom into the warrior and place the EAGLE WINGS on it (P).
- Take the FUEL (Q).
- Return to the Antique Street Docks.
- Zoom into the boat and put the WOODEN STAR in the slot (R). Use the NAILS on the star and the HAMMER on the nails.
- Zoom back into the boat and place the BOAT ENGINE on it (S). Use the FUEL in the engine.
- Zoom back into the boat for a puzzle.
- Touch the tip of the boat to move it in that direction.
- To solve the puzzle, follow the steps in the screenshot in this order: Red, Yellow, White, and Purple (1-4).
- You will arrive at the Raven Island Shore.
Chapter 6: The Lost Ship
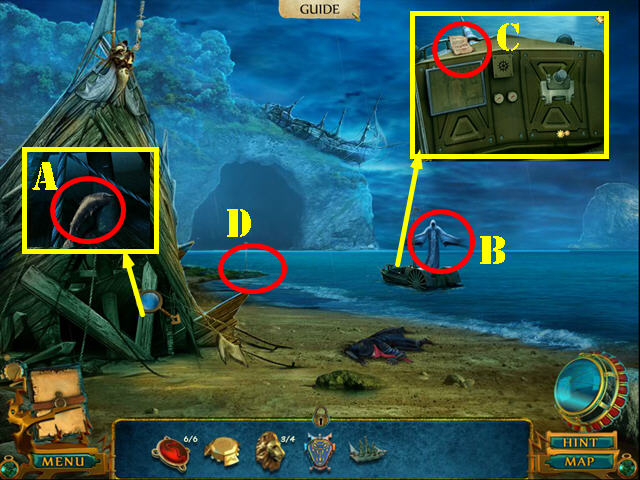
- Zoom into the ship and take the DOLPHIN (A).
- Zoom into the Draug and give it the SANTIAGO MEDALLION (B).
- Zoom into the boat and read the note (C).
- Zoom into the shore for a puzzle (D).
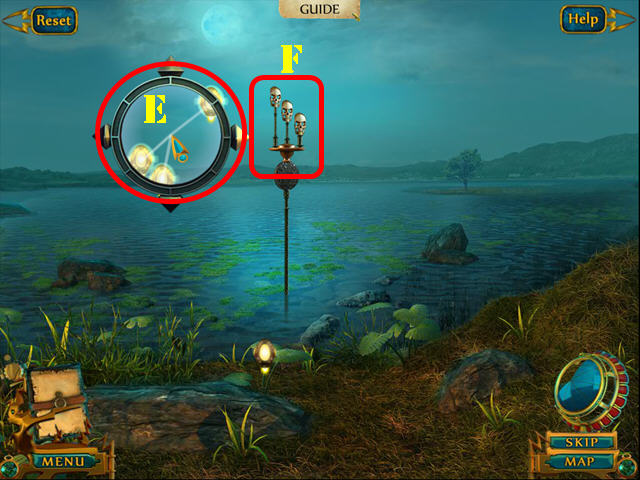
- Place the floating orbs inside the metal ring and press on them once 3 orbs are inside. You must destroy 6 sets of rings to complete the puzzle (E).
- Take the SKULL STAFF (F).
- Zoom into the masthead and place the SKULL STAFF on it (G).
- Examine the sand; press on it several times, open the chest and take the STEERING WHEEL (H).
- Touch the man for a cut scene (I).
- Return to the Antique Street Docks.
- Zoom into the dolphin statue; place the DOLPHIN on it and take the SANTIAGO TOY (J).
- Return to the Warehouse.
- Zoom into the shelf; put down the BLACK SKULL TOY and the SANTIAGO TOY (K).
- Take the ANTIQUE CABINET HANDLE (L).
- Return to the Antique Street Docks.
- Zoom into the cabinet and place the ANTIQUE CABINET HANDLE on it. Take the LION HEAD 4/4 (M).
- Return to Daniel's Chamber.
- Zoom into the desk; put down the 4 LION HEADS and take the CHEST PIECE (N).
- Return to the Antique Street Docks.
- Zoom into the lion and place the CHEST PIECE in the slot. Take the CAVE MAP (O).
- Return to Hull Lab.
- Zoom into the wall; place the CAVE MAP on it (P).
- Zoom into the projector and place the 6 PROJECTOR LENSES on it (Q).
- Take the STEAMER KEY (R).
- Zoom into the map and take the MARKED MAP (P).
- Return to the Raven Island Shore.
- Zoom into the boat; place the STEERING WHEEL, the MARKED MAP, and the STEAMER KEY on it (S).
- Zoom into the cave (T).
- Go into the caves in the order shown on the clue (green): Center, Left, Left, Right, Center, Right, and Left.
- Zoom into the puzzle on the ground.
- Use the arrows to rotate the wheel clockwise and counterclockwise (X and Y).
- Press the arrows in the center to swap the gems (A-D).
- To solve the puzzle, select the controls in this order: B, Y, A, Y, B, A, D, X, A, C, Y, A, and C.
- Take the INSECTICIDE.
- Zoom into the hut; read the note (V) and take the TONGS (W).
- Go through the door to access the Serpent Skull (X).
- Play the HOP.
- You will receive the TORCH (Y).

- Use the Cryptic Disk to find the 4 hidden symbols (red).
- Zoom into the spiders; use the INSECTICIDE on them and then take the SPIDER SEAL (A).
- Zoom into the fire; read the note on the left, then use the TONGS on the coals and take the CROSS BUTTON (B).
- Walk down.
- Zoom into the device and place the CROSS BUTTON in the slot (C). Take the ELEVATOR BUTTON (D).
- Zoom into the Box and place the SPIDER SEAL in the slot (E).
- Read the note (F).
- Return to the Serpent Skull.
- Play the HOP.
- You will receive the SCISSORS (G).
- Walk down twice.
- Zoom into the dark corner and use the TORCH (H) in it. Take the CONTROL DIALS (I).
- Return to the Antique Street Docks.
- Zoom into the net; use the SCISSORS on it and take the NET (J).
- Return to the Santiago Wreck.
- Zoom into the Box. Place the NET on the gun and take the NET GUN (K).
- Return to the Serpent Skull.
- Use the NET GUN on the octopus (L).
- Examine the shaft to see Daniel (M).
- Zoom into the panel and place the ELEVATOR BUTTON in the slot (N) to receive the GUN BARREL KEY.
- Return to Christiano's Crypt.

- Zoom into the tomb and place the GUN BARREL KEY in the slot. Zoom back into the tomb to activate a puzzle.
- Remove the scarabs with matching wings (A-K).
- Remove all the remains and take the HULL KEY.
- Return to the Santiago Wreck.
- Zoom into the shaft and put the CONTROL DIALS in the slot to activate a puzzle (L).
- Position the nodes as shown in the screenshot (M) and then press the button (N).
- Zoom into the Santiago wreckage and place the HULL KEY in the lock (O). Enter the Cargo Vault.
- Touch Arthur Crowe to activate the puzzle.
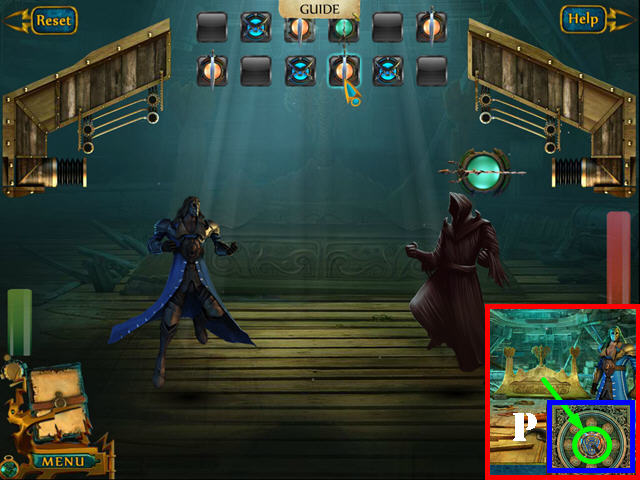
- Move the flickering shields above to launch an attack at Arthur. The rules of engagement are as follows:
- Trident beats Sword, Sword beats Dagger, and Dagger beats Trident. The solution to this puzzle is random.
- Talk to Valerio Andre.
- Zoom into the pedestal and insert the COBRA PLAQUE in the slot (P) and the touch the Cobra's Eye.
- Congratulations, you have completed Legends of the East: The Cobra's Eye.
Created at: 2013-08-18