

Walkthrough Menu
- General Tips
- Chapter 1: The Festival
- Chapter 2: Bremen
- Chapter 3: Rapunzel
- Chapter 4: The Mountain
- Chapter 5: The Ruins
General Tips
- This is the official guide for Living Legends: Beasts of Bremen.
- This guide will not show when you have to zoom into a location; the screenshots will show each zoom scene.
- Hidden-object puzzles are referred to as HOPs. This guide will not show screenshots of the HOPs, however, it will mention when an HOP is available and the inventory item you'll collect from it.
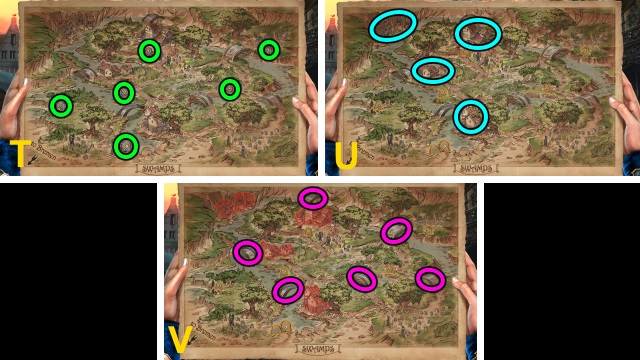
- Use the Map to fast travel to a location.
Chapter 1: The Festival
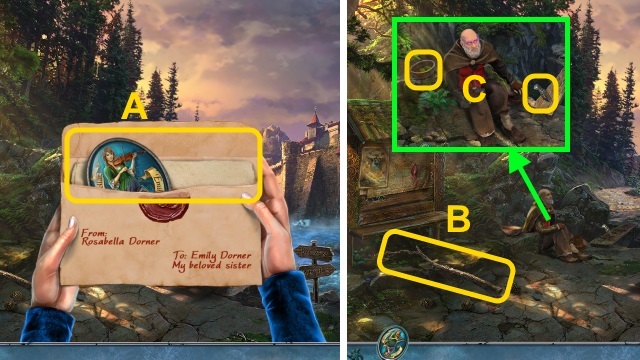
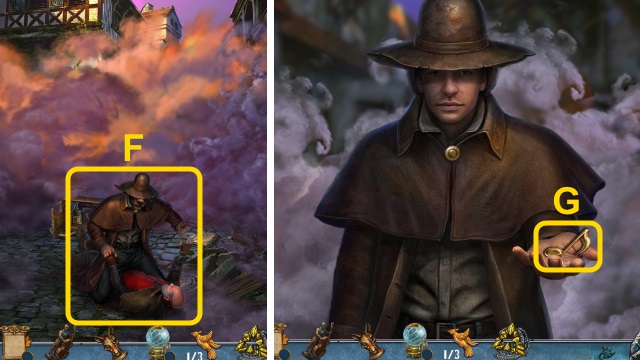
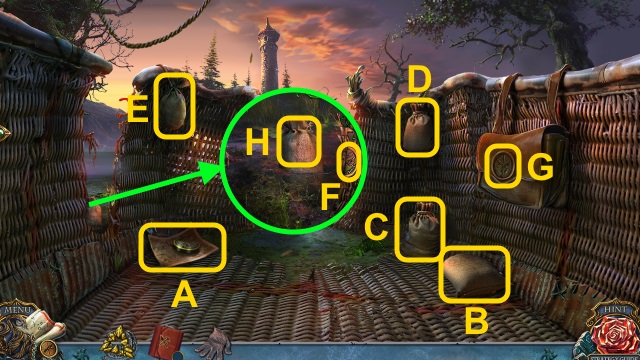
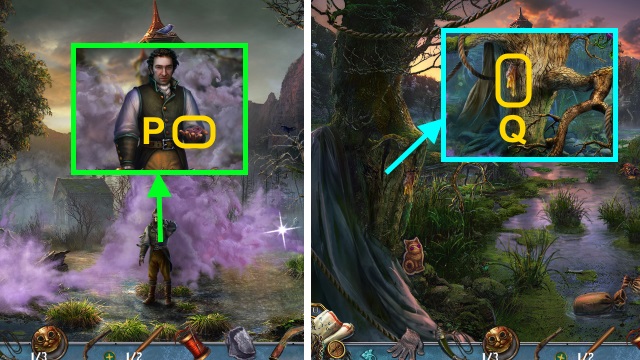
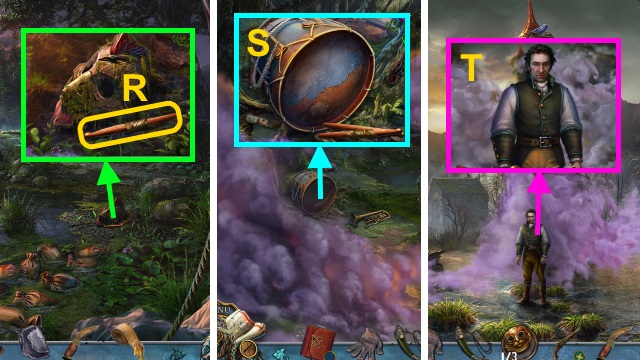
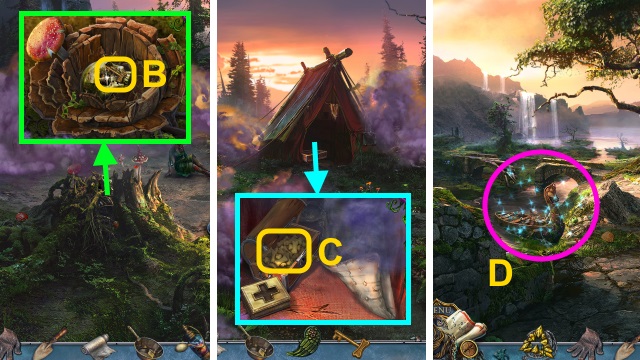
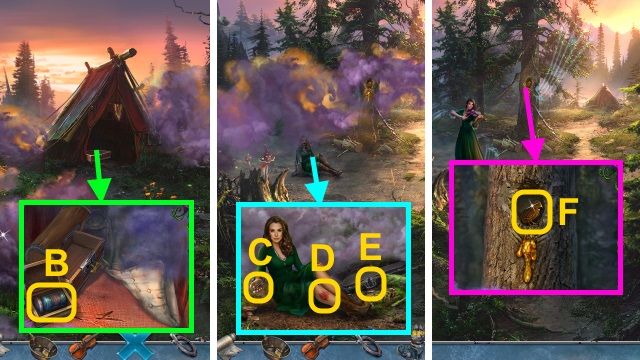
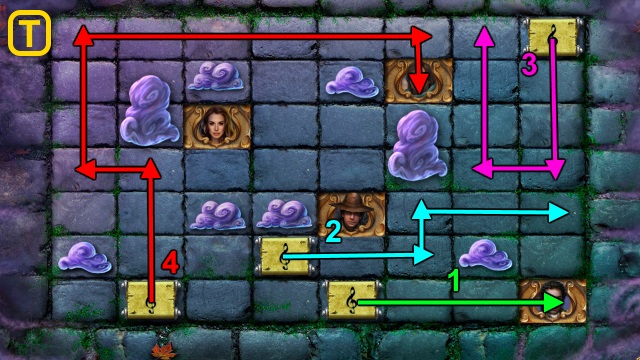
- Open the envelope; take the OVAL MEDALLION (A). Read the letter; examine the rose. Examine the paper.
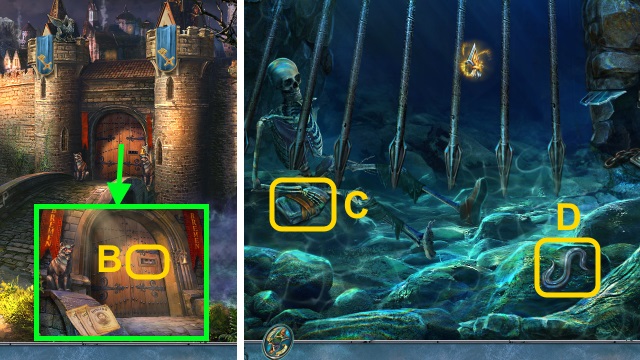
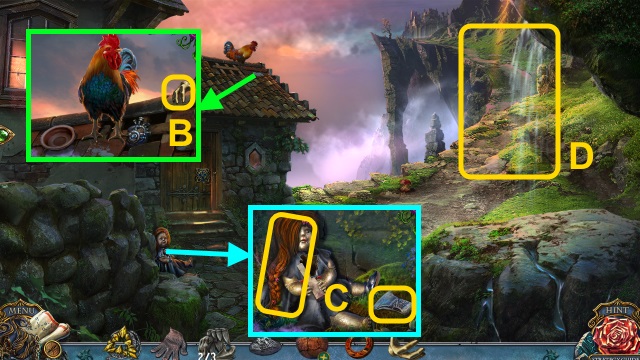
- Take the STICK (B).
- Talk Waldemar; take the HAMMERHEAD and EMPTY BOWL (C).
- Take the RIBBON (D).
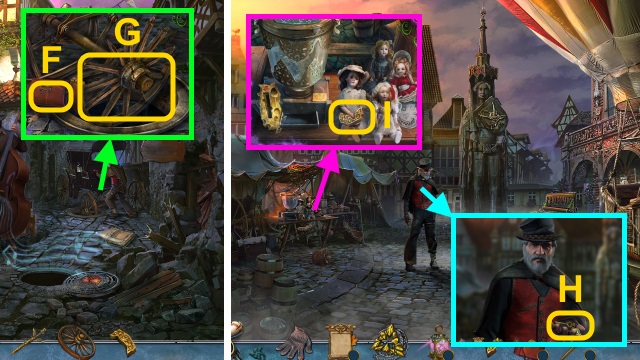
- Use the EMPTY BOWL (E); receive the WATER. Use the STICK (F); receive the OLD SHOE.
- Examine the OLD SHOE; take the SILVER FIGURINE and SHOE.
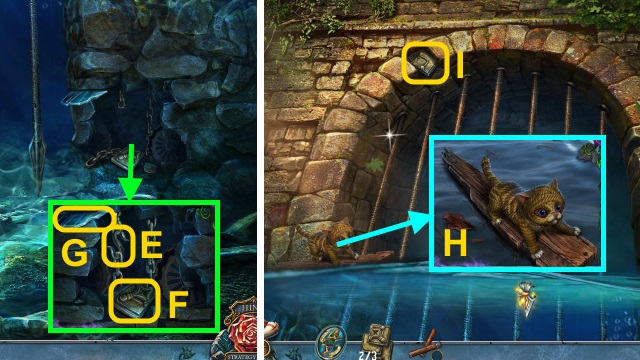
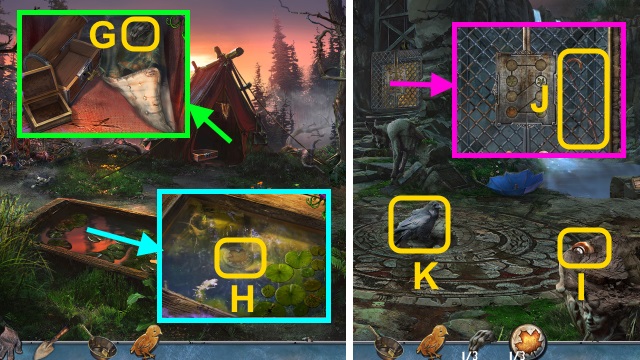
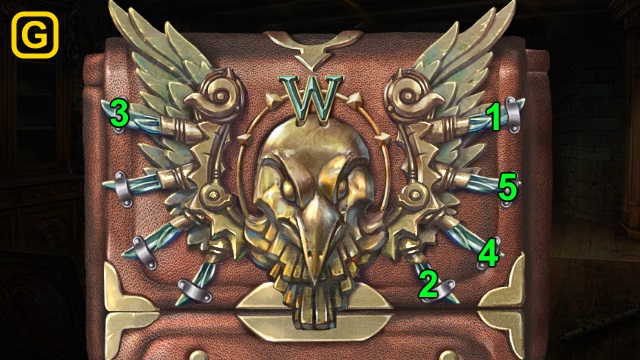
- Use the WATER; take WALDEMAR'S BOX (G).
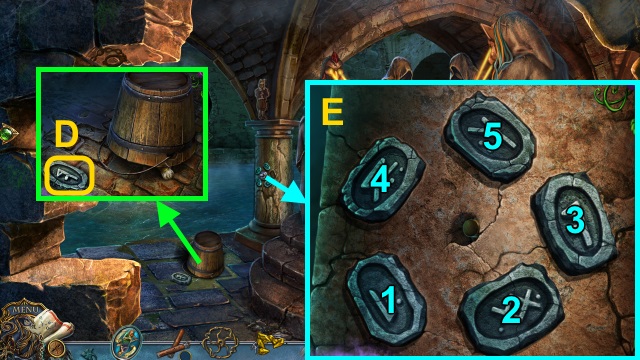
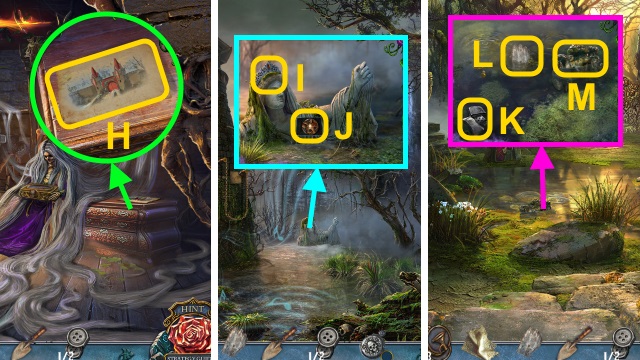
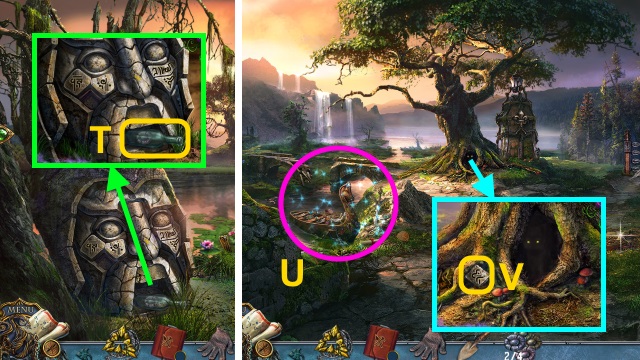
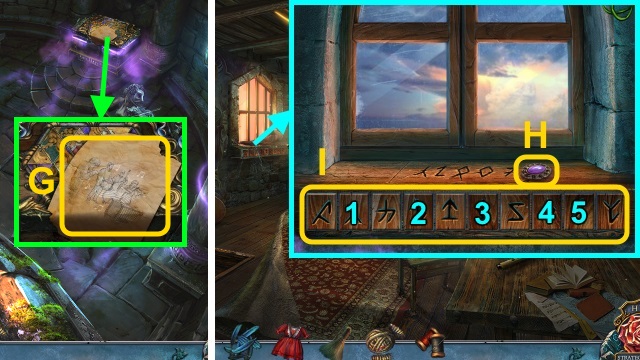
- Examine WALDEMAR'S BOX; examine the lock for a mini-game.
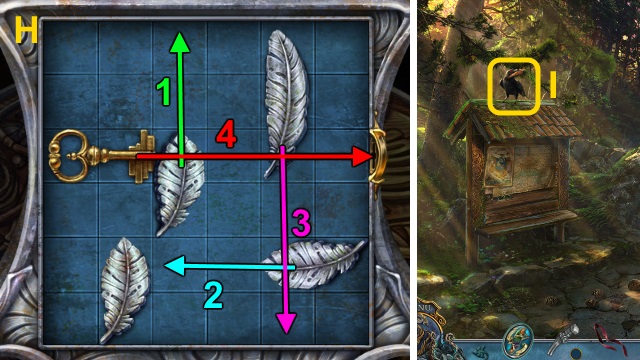
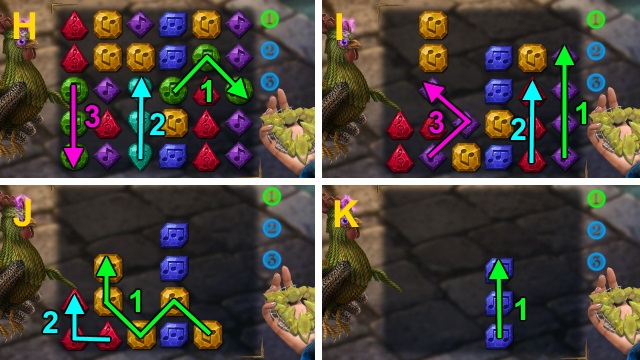
- Solution (H).
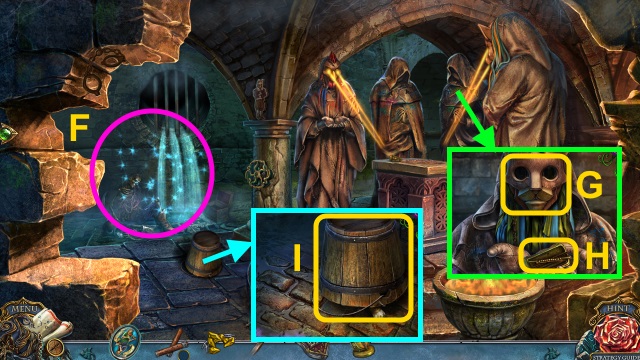
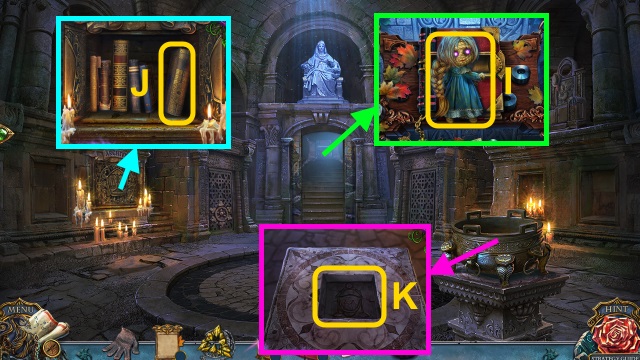
- Take the KNIFE.
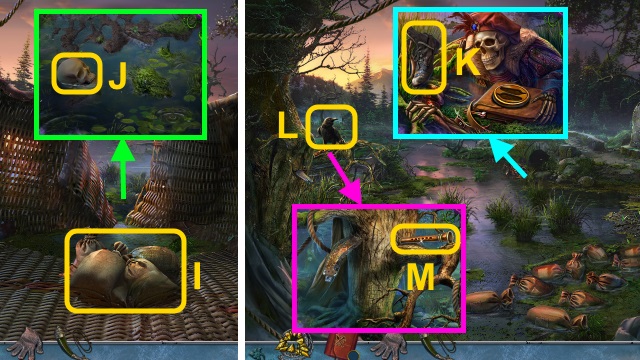
- Use the SHOE (I).
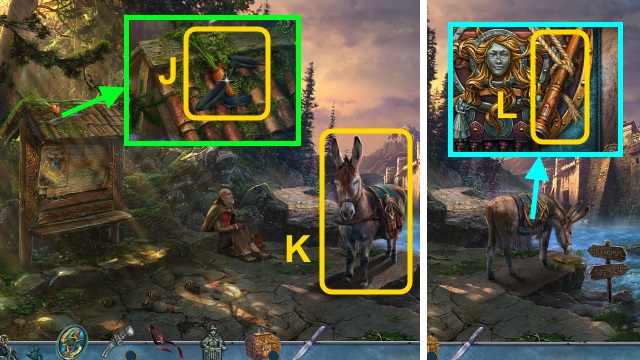
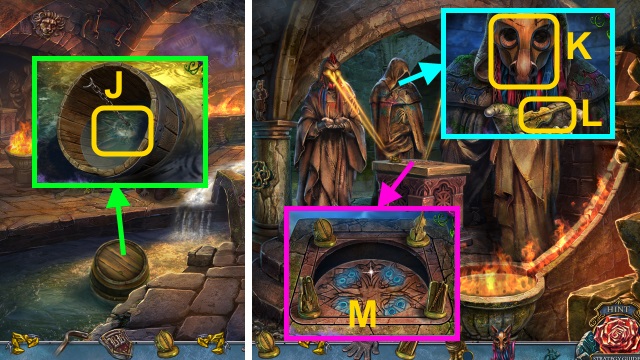
- Examine the feathers; take the CARROT (J).
- Give the CARROT (K).
- Use the KNIFE; take the HAMMER HANDLE (L).
- Combine the HAMMERHEAD, HAMMER HANDLE, and RIBBON; receive the HAMMER.

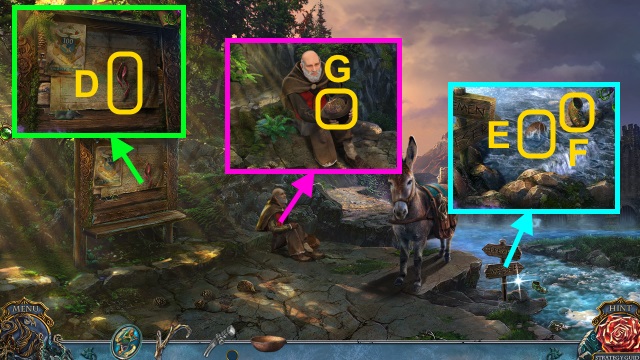
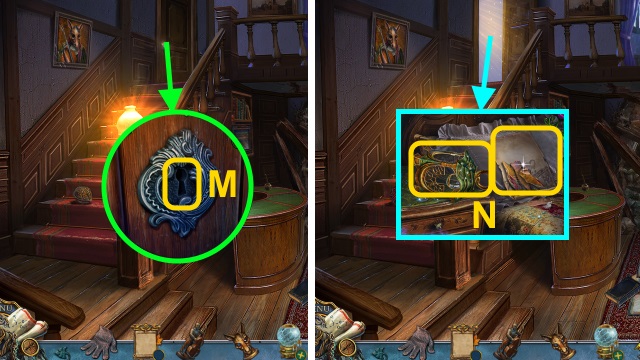
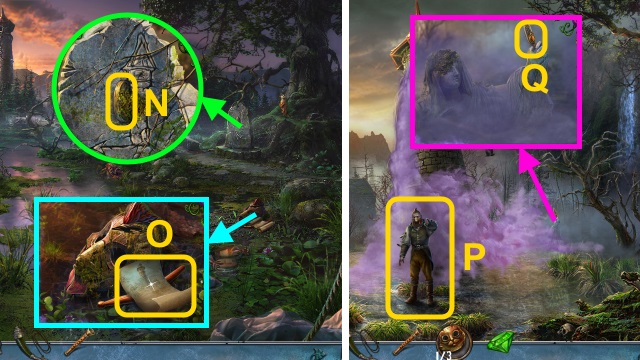
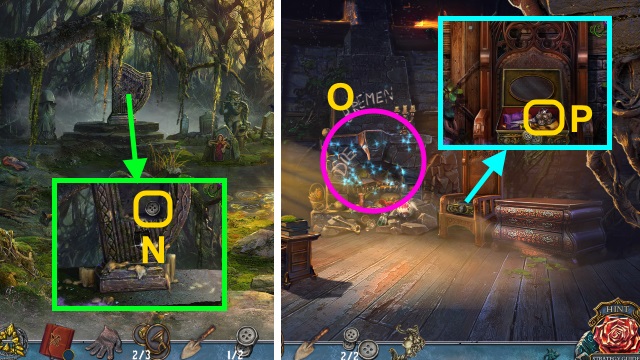
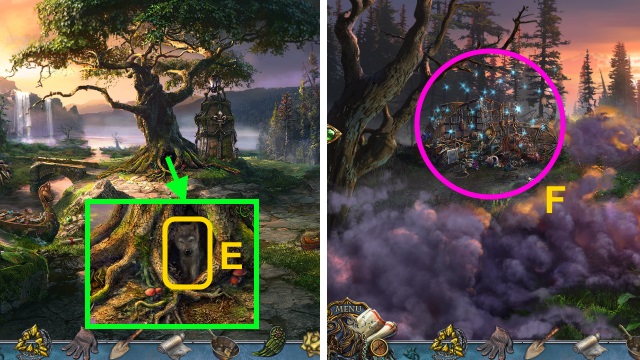
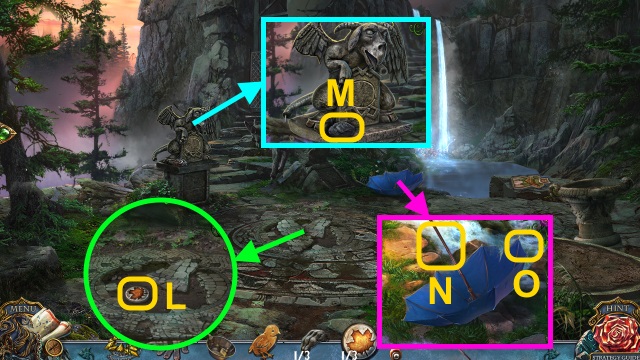
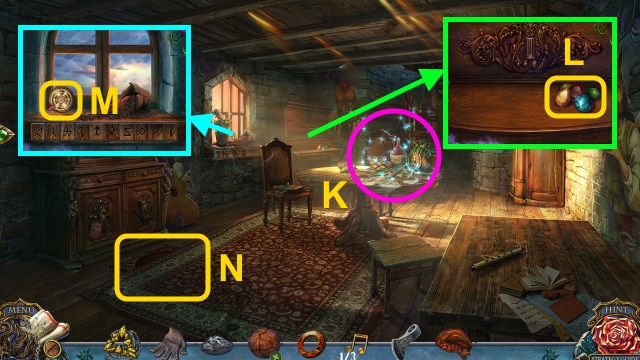
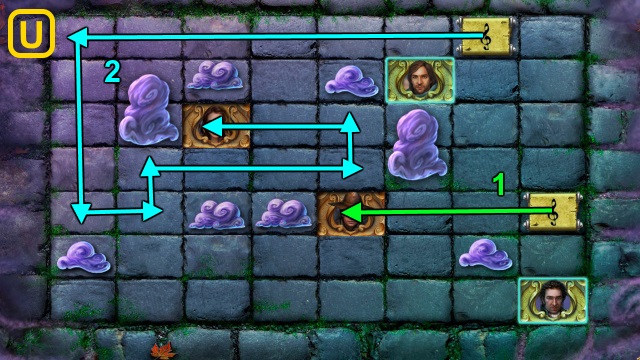
- Take the Map. Use the HAMMER (M); receive the BOARDS.
- Place the BOARDS (N).
- Go forward.
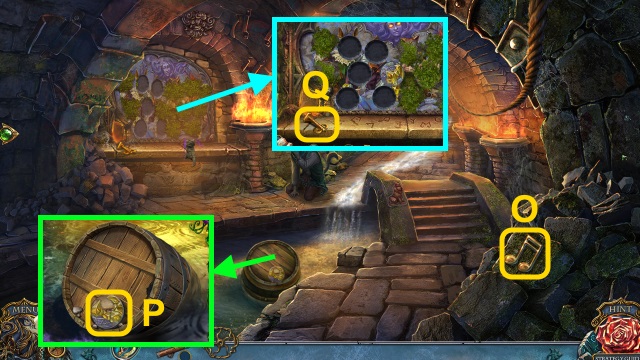
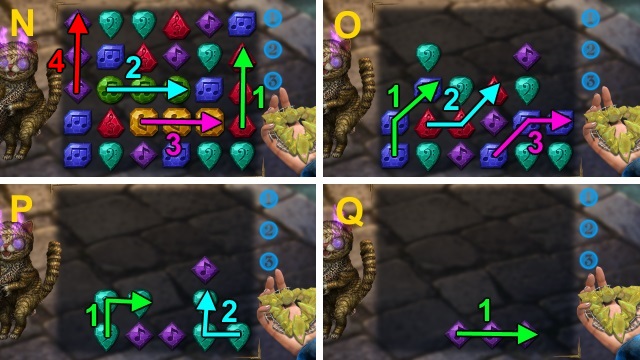
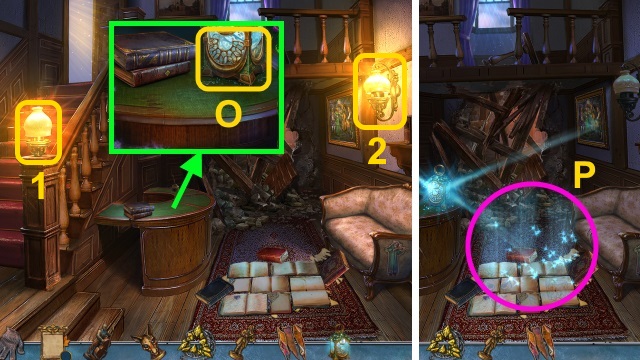
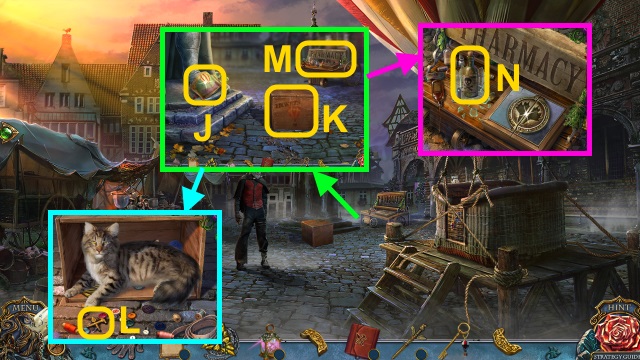
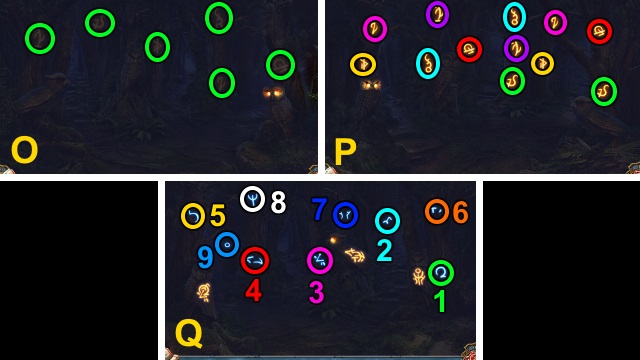
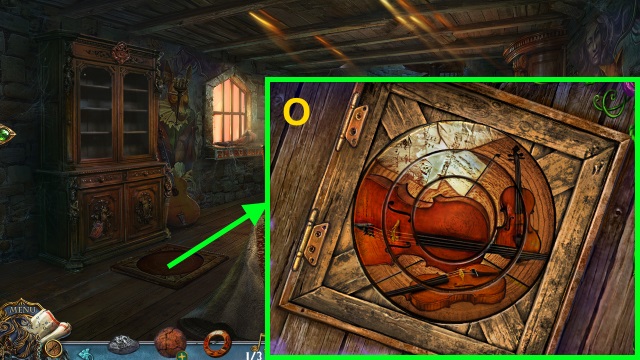
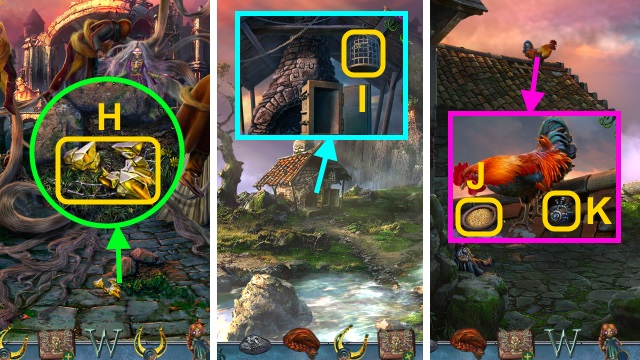
- Take the DONKEY DOLL and BELL (O).
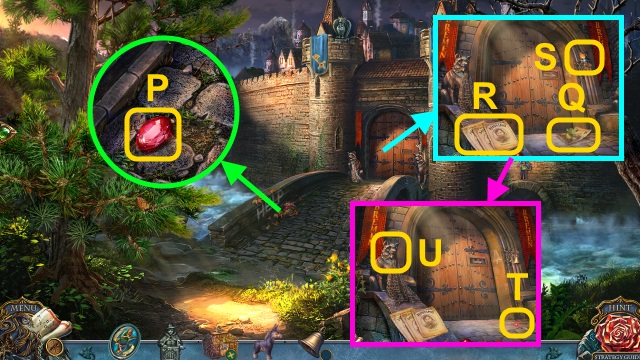
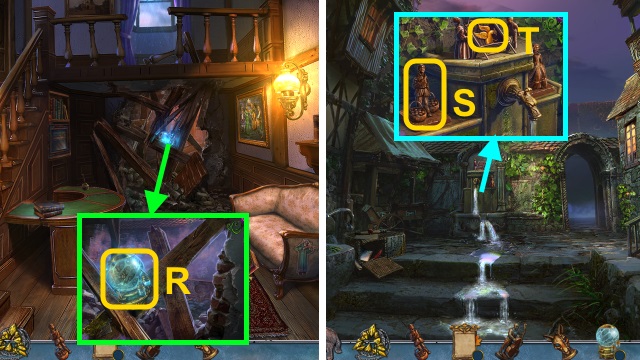
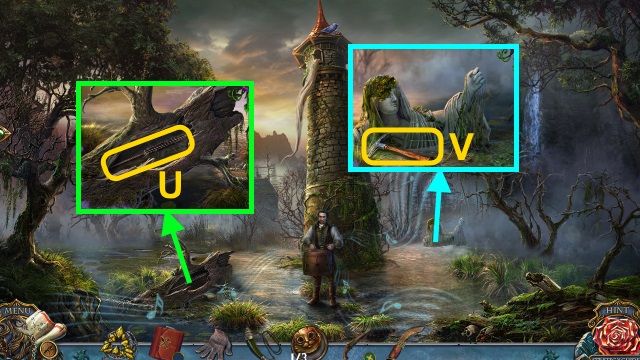
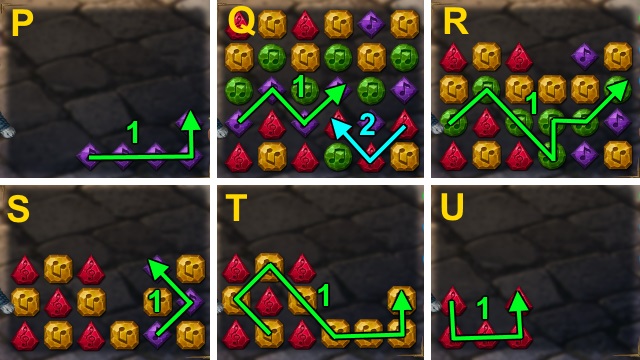
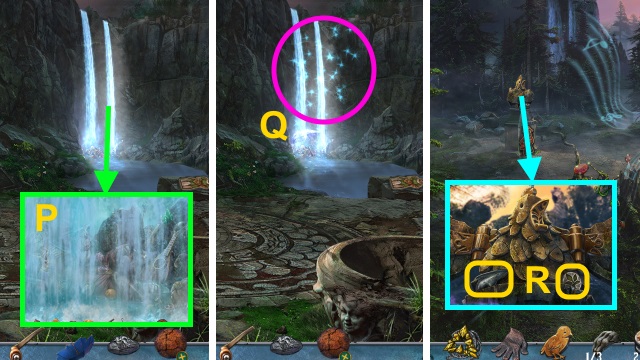
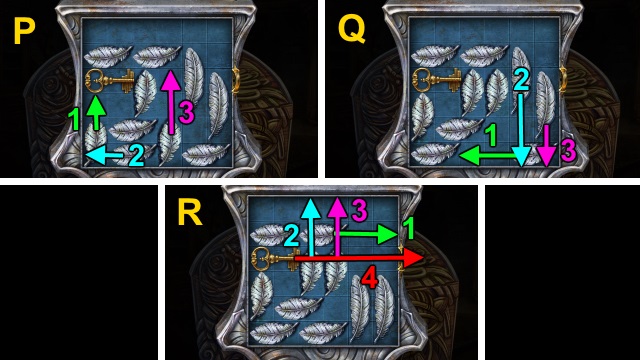
- Move the leaves; take the EYE (1/2) (P).
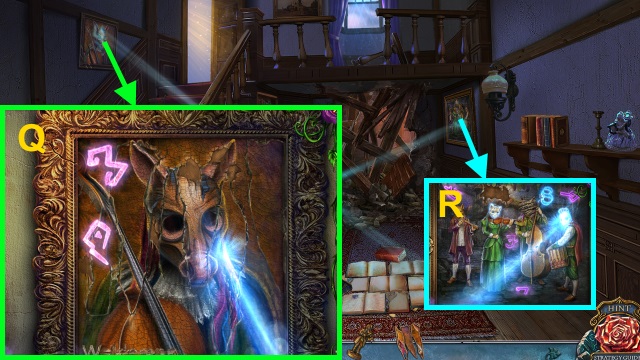
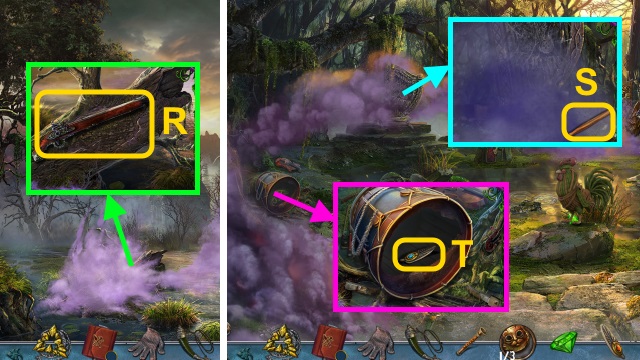
- Take the ROOSTER DOLL; examine the flyer (Q). Take the GLOVE.
- Examine the papers 2x (R); take the BELL CLAPPER.
- Combine the BELL and BELL CLAPPER; take the BELL.
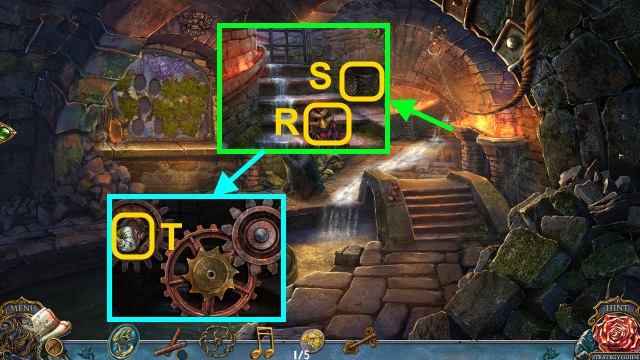
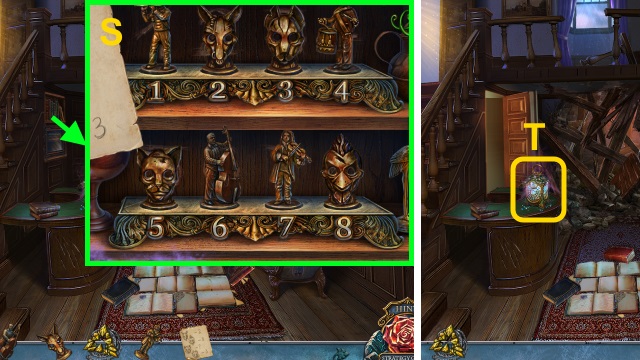
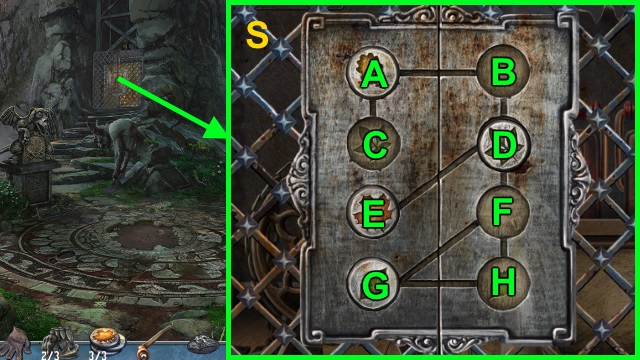
- Place the BELL; ring it (S).
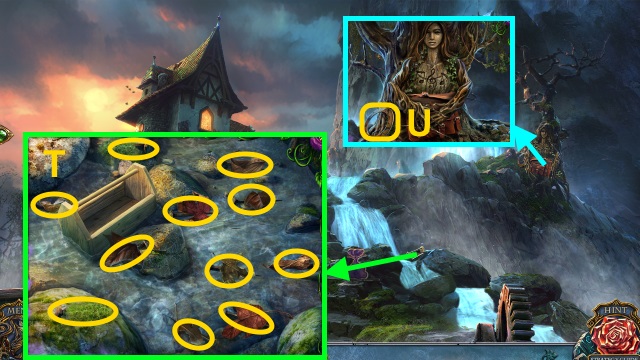
- Take the EYES (2/2) (T).
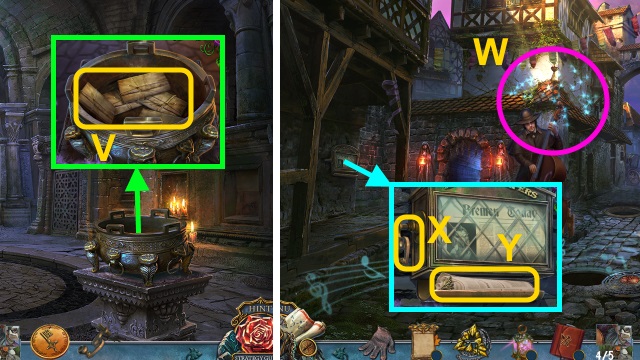
- Place the EYES (2/2) (U); take the NET.
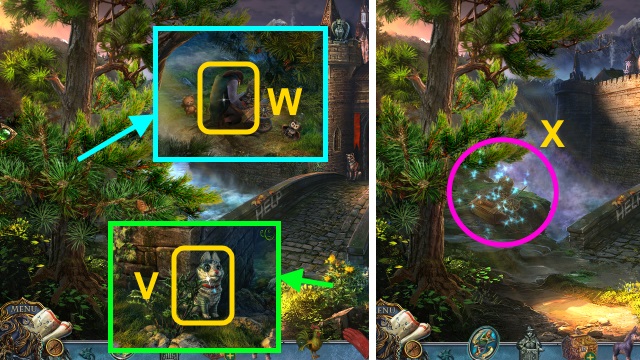
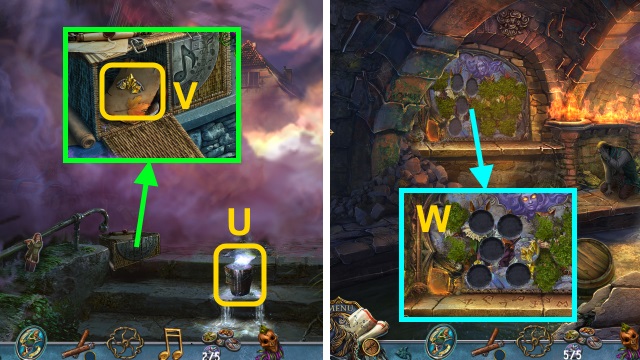
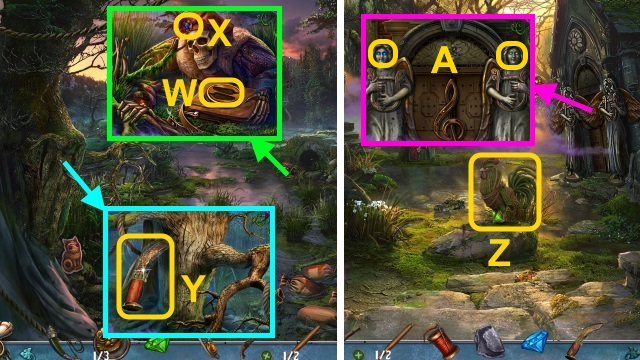
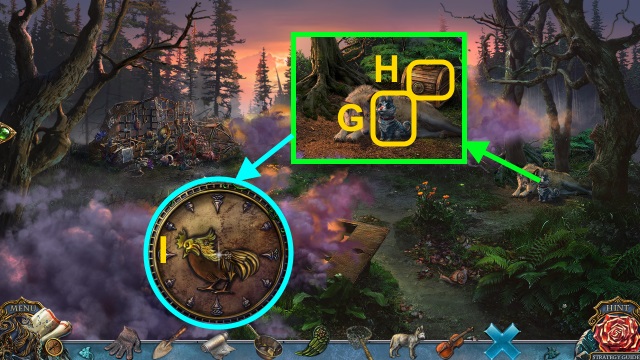
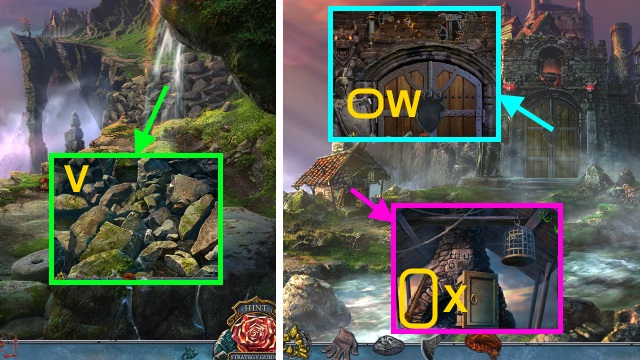
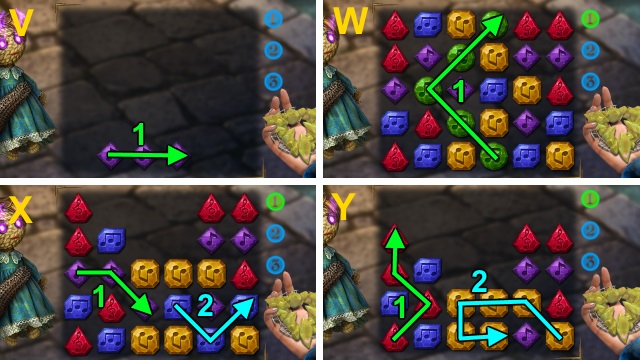
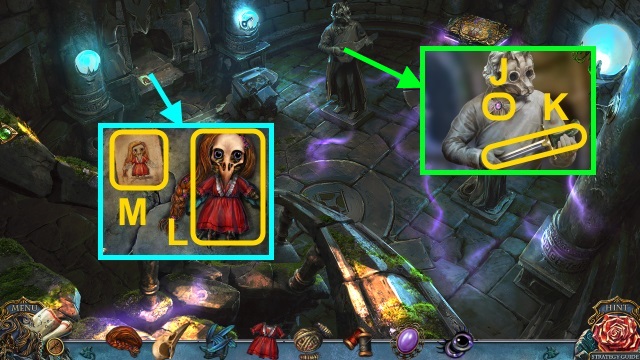
- Use the GLOVE 3x; take the DOG DOLL (V).
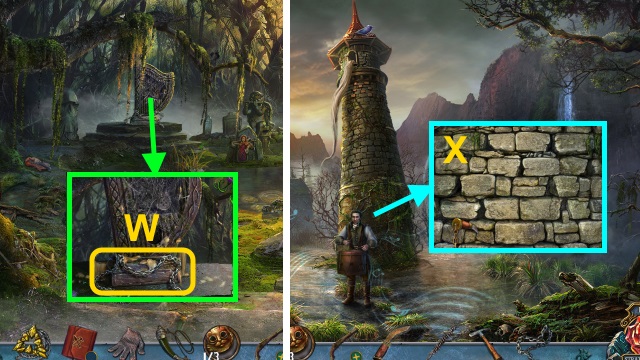
- Move the branches; use the NET (W).
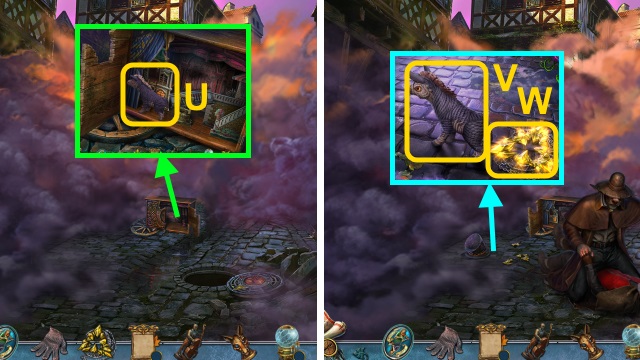
- Play the HOP; receive the CAT DOLL (X).
- Combine WALDEMAR'S BOX, the DONKEY DOLL, ROOSTER DOLL, DOG DOLL, and CAT DOLL; examine them. Receive the BOX OF DOLLS.
- Walk down.
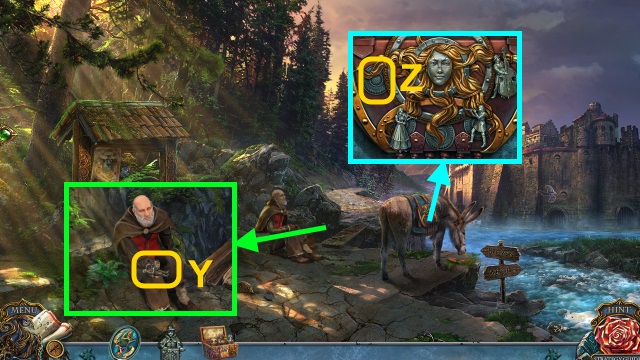
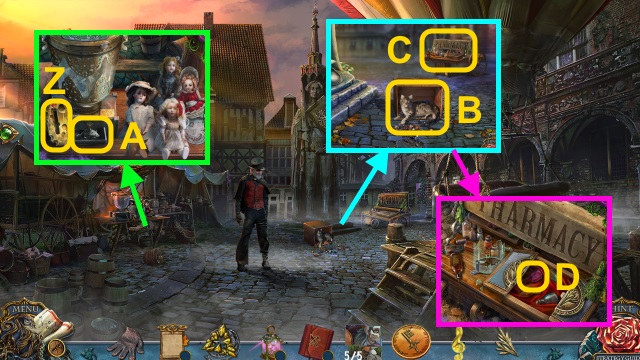
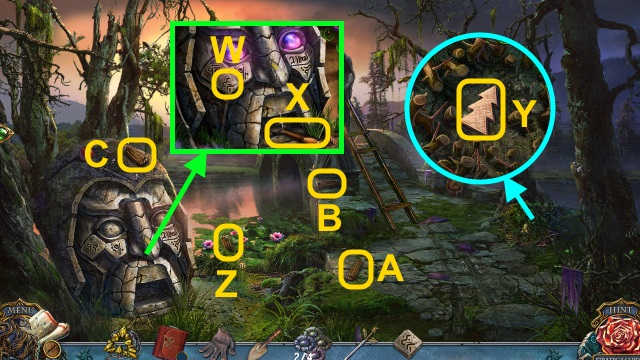
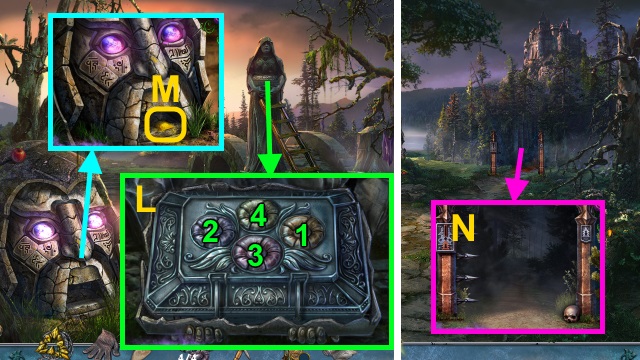
- Give the BOX OF DOLLS; take the SILVER FIGURINE (Y).
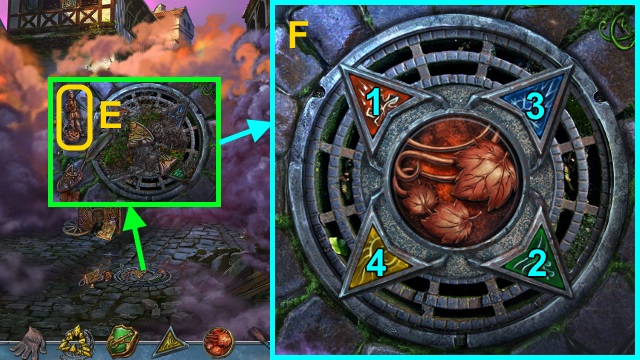
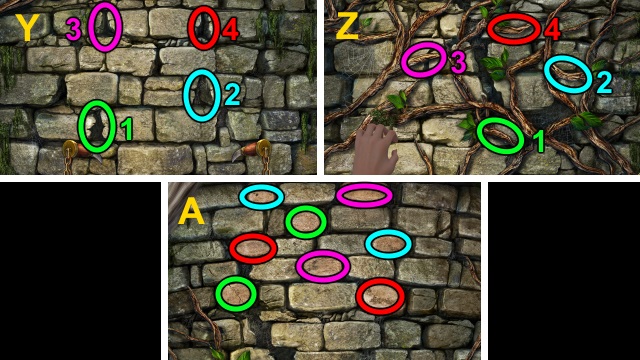
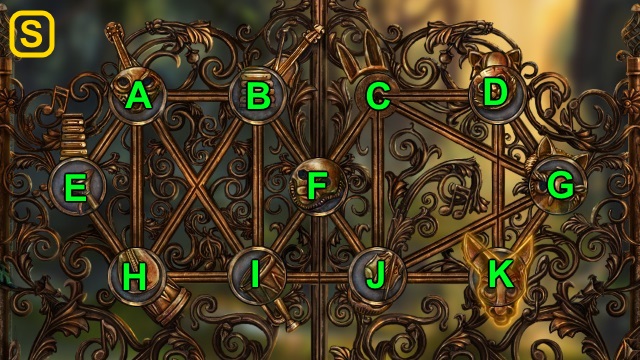
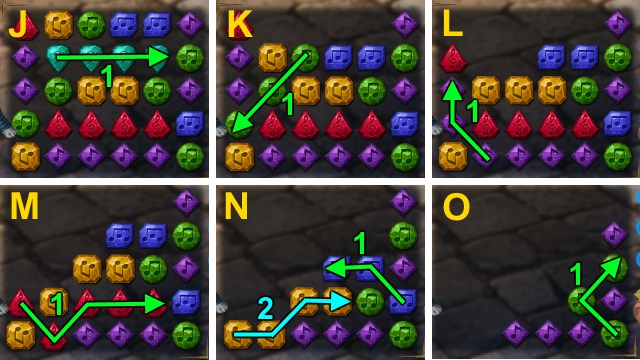
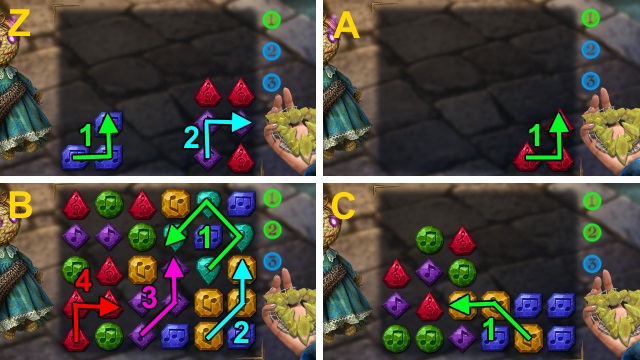
- Place the 2 SILVER FIGURINES for a mini-game (Z).
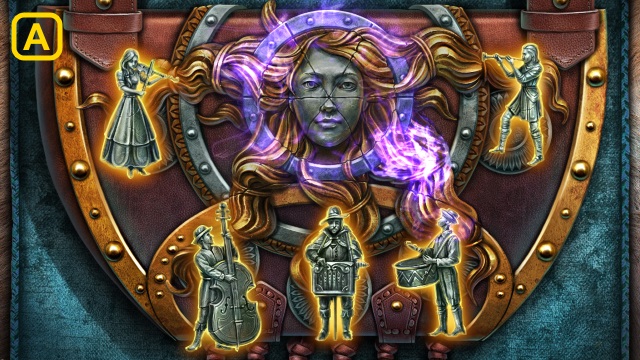
- Solution (A).
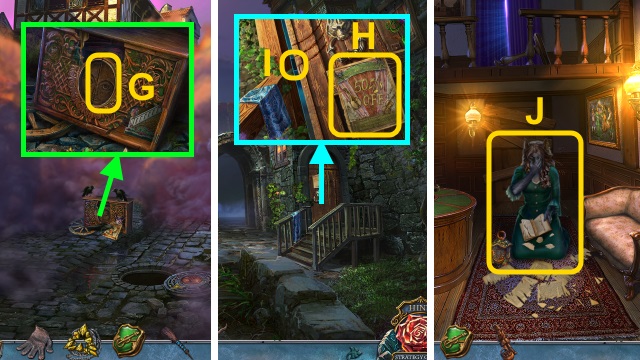
- Read the paper; take the CITY PASS TOKEN.
- Walk forward.
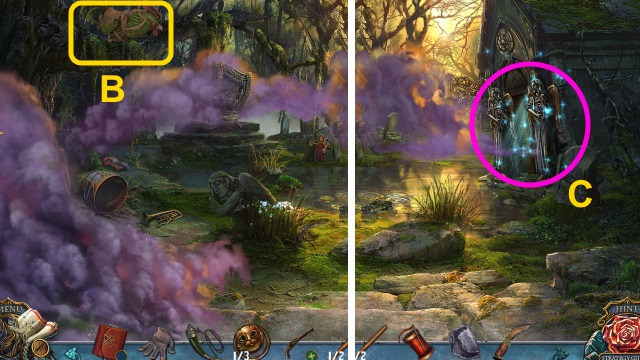
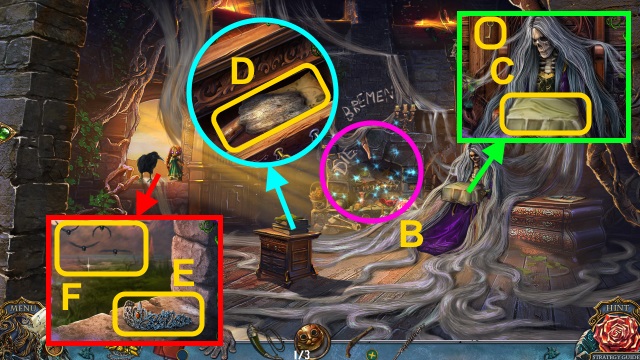
- Give the CITY PASS TOKEN (B).
- Take the OLD BUNDLE (C).
- Take the HOOK (D).
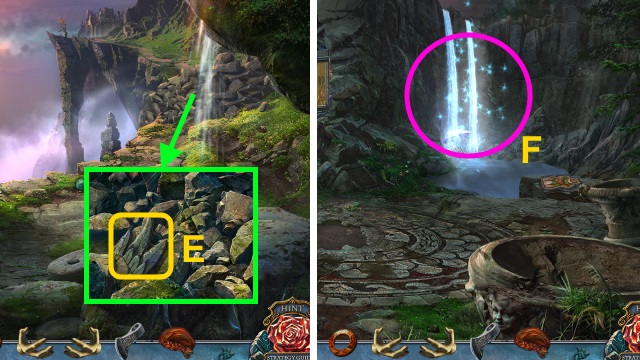
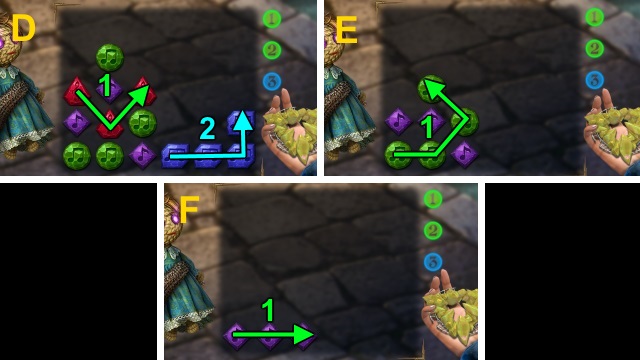
- Place the HOOK; examine it (E). Take the STONE TILE (1/3) (F) and GLASS SHARD (G).
- Combine the OLD BUNDLE and GLASS SHARD. Open the bundle; take the BROKEN FLUTE and STONE TILES (2/3).
- Scroll up.
- Take the MAGIC CAT DOLL and BOARD (H).
- Use the BOARD (I); receive the STONE TILES (3/3).
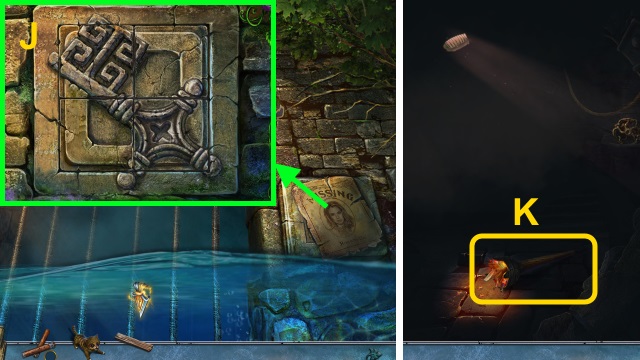
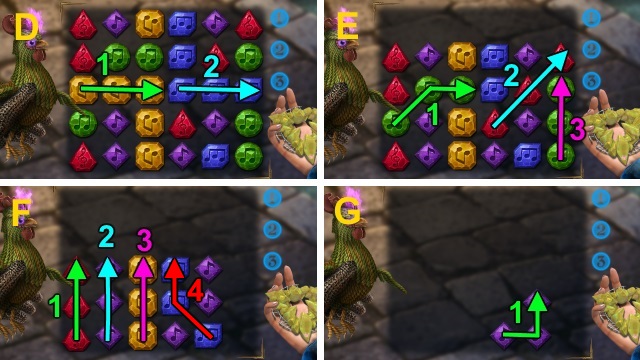
- Read the paper; place the STONE TILES (3/3) for a mini-game. Solution (J).
- Place the BOARD; pull it.
- Go forward.
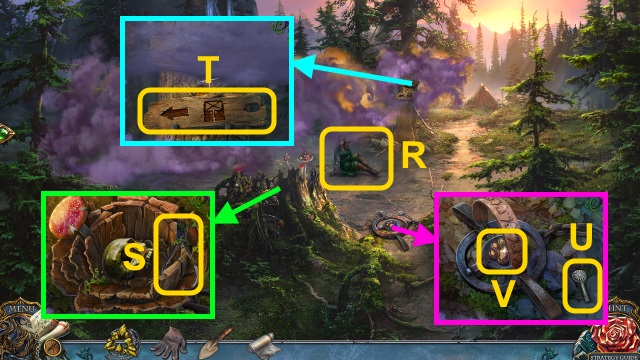
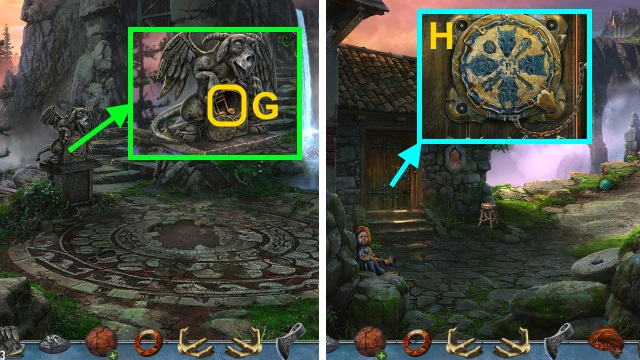
- Take the SMOLDERING TORCH (K).
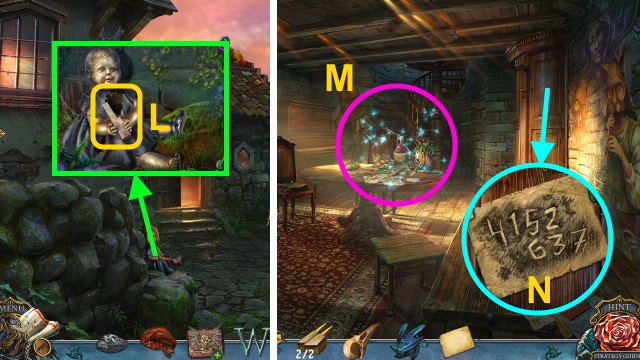
- Take the POSTER (L).
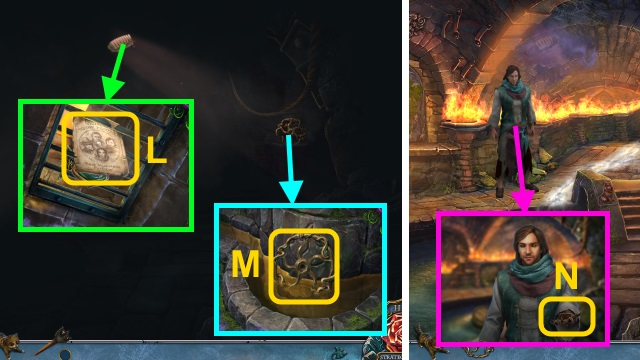
- Combine the SMOLDERING TORCH and POSTER; take the LIT TORCH.
- Take the VALVE HANDLE (M); use the LIT TORCH.
- Talk to Theodore; give the MAGIC CAT DOLL (N).
- Take the MUSIC NOTE (O).
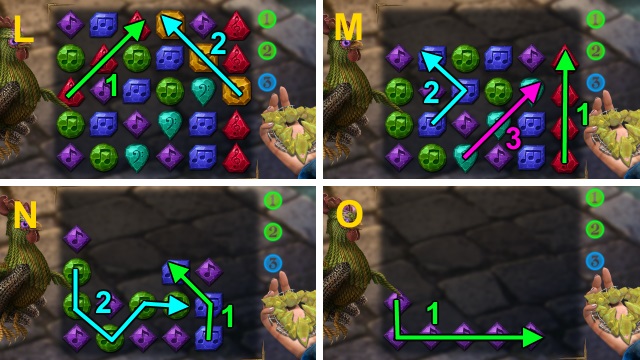
- Take the FRESCO PIECE (1/5) (P).
- Take the GEAR KEY (Q).
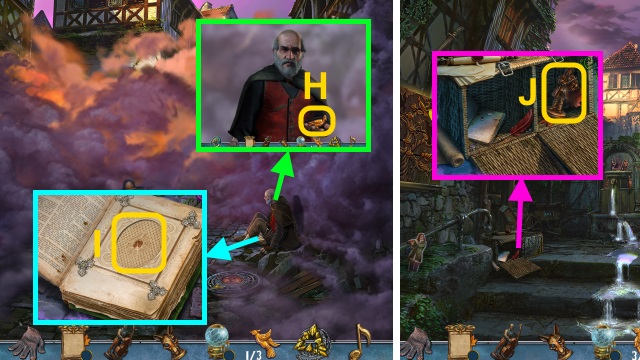
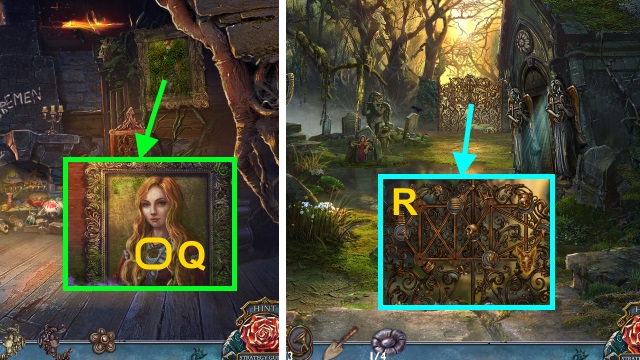
- Take the ROOSTER MASK (R); examine the gear (S). Examine the gears.
- Take the FRESCO PIECES (2/5) (T); use the GEAR KEY.
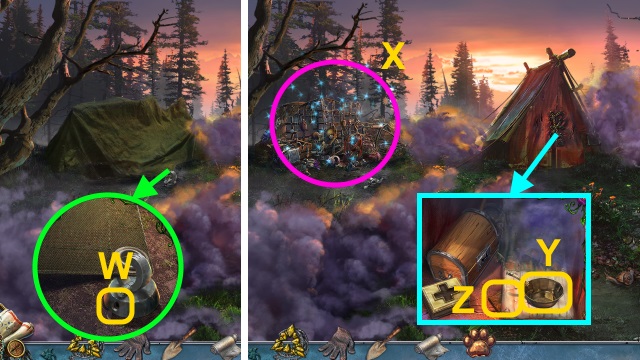
- Walk forward.
- Take the BUCKET OF WATER (U).
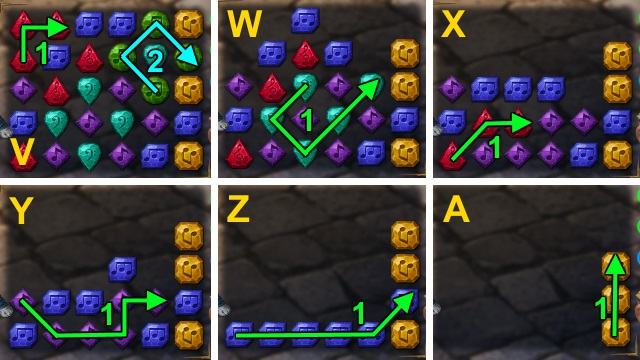
- Place the MUSIC NOTE. Read the note (V); take the AMULET PART. Take the FRESCO PIECES (5/5).
- Walk down.
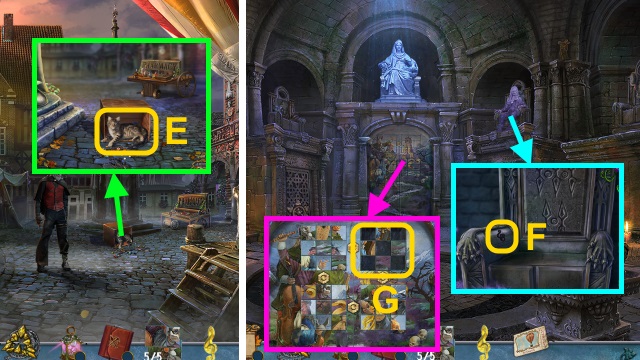
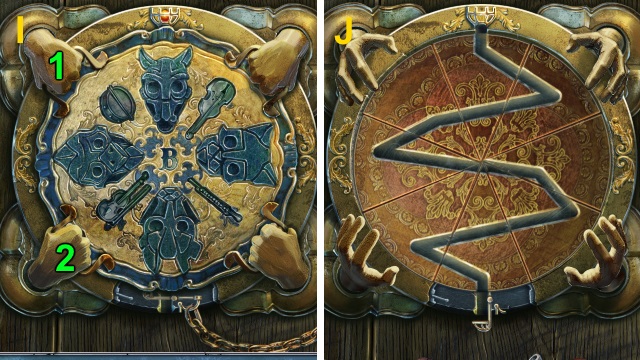
- Place the FRESCO PIECES (5/5) for a mini-game (W).
- Solution (X).
- Walk left.

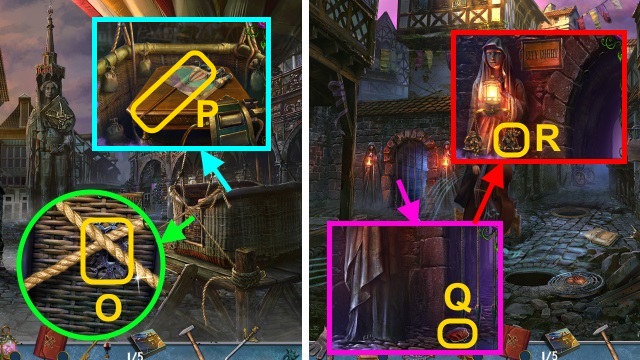
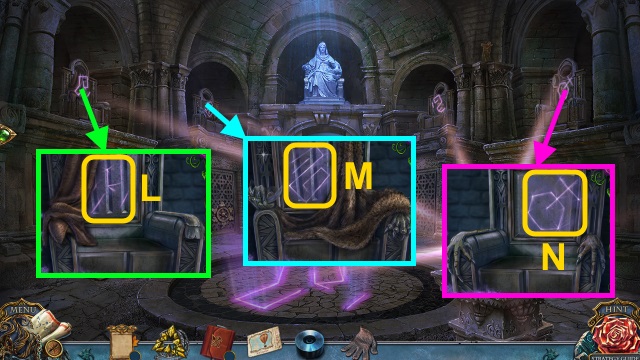
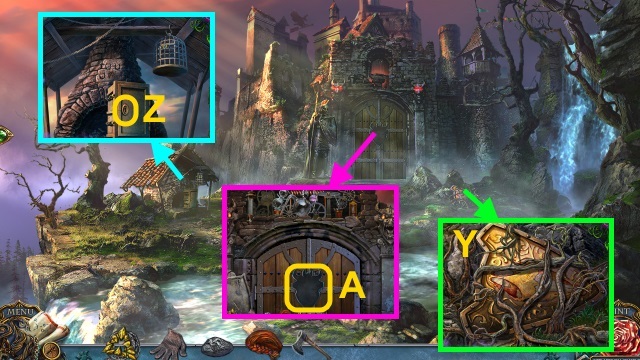
- Take the CROWBAR (Y).
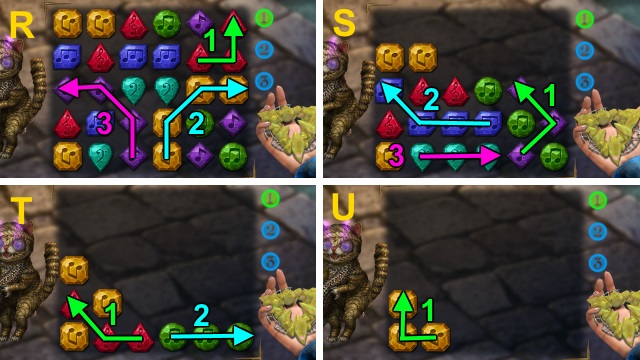
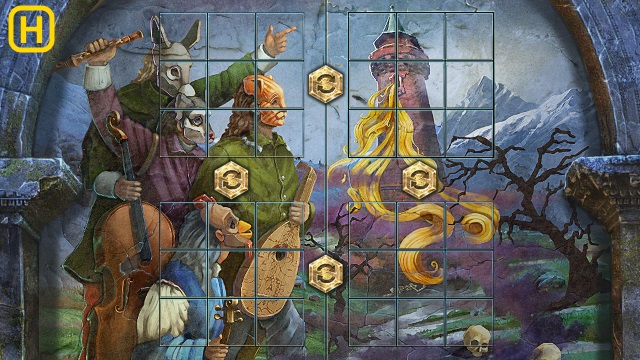
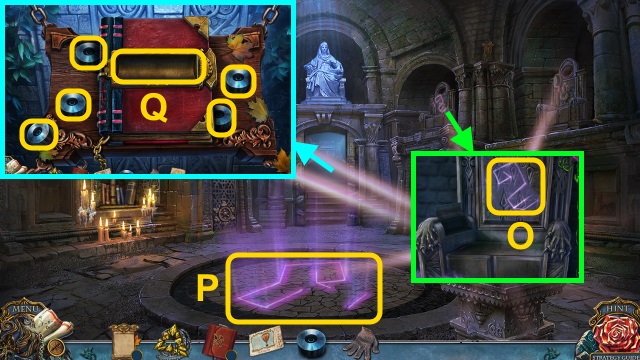
- Place the ROOSTER MASK (Z); take the BROTHERHOOD SYMBOL and DRUM (A).
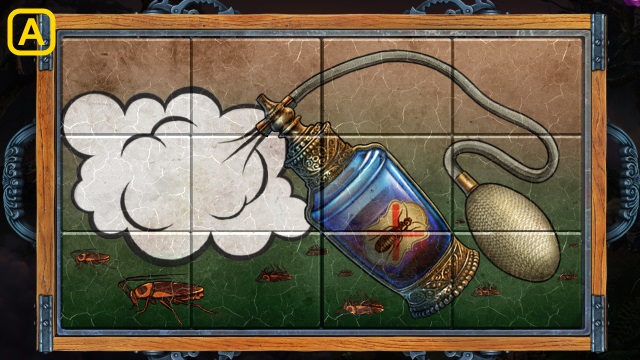
- Use the BUCKET OF WATER for a mini-game (B).
- Solution (C).
- Take the RUNE (D).
- Place the RUNE for a mini-game; solution (E).
- Place the VALVE HANDLE; turn it.
- Play the HOP; receive the CAT MASK (F).
- Examine the CAT MASK 2x; take the AMULET PART, note, METAL GLOVE, and CAT MASK.
- Place the CAT MASK (G); take the FLUTE (H).
- Use the METAL GLOVE (I); receive the CURSED CAT DOLL.
- Walk down.
- Use the CROWBAR; take the DONKEY MASK (J).
- Walk left.
- Place the DONKEY MASK (K); take the CONTRABASS (L).
- Place the figurine; place the DRUMS, FLUTE, and CONTRABASS (M). Take the FLUTE PIECE and BROTHERHOOD CODEX.
- Combine the BROKEN FLUTE and FLUTE PIECE; take the FLUTE.
- Open the BROTHERHOOD CODEX; take the BROKEN AMULET.
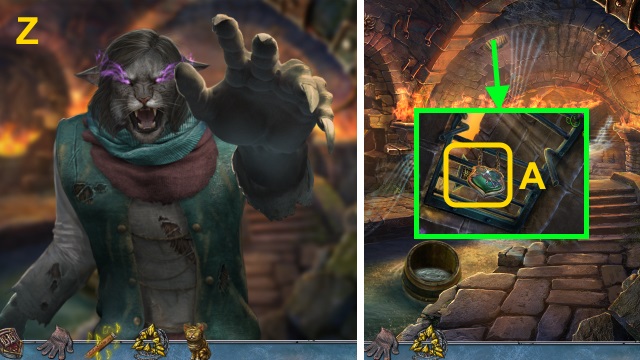
- Combine the BROKEN AMULET and 2 AMULET PARTS; take the ANTI-MAGIC AMULET.
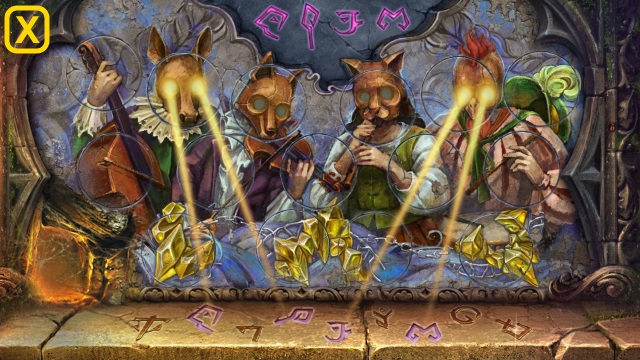
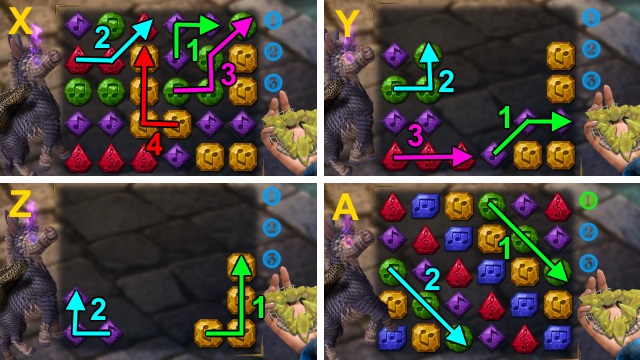
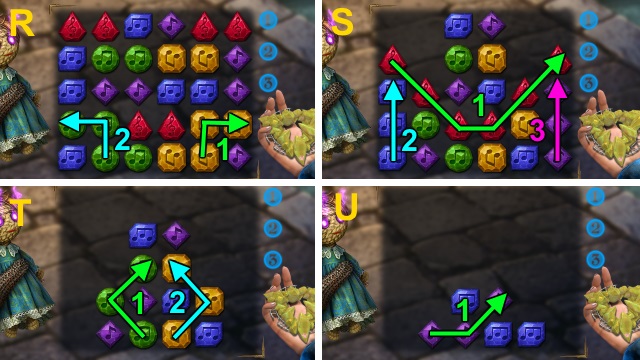
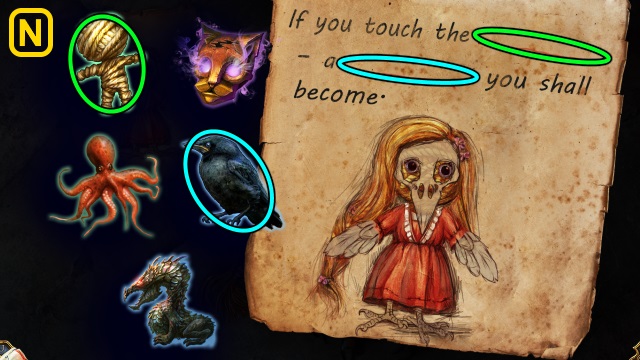
- Combine the CURSED CAT DOLL and ANTI-MAGIC AMULET for a mini-game.
- Solution (N-Q).
- Solution (R-U).

- Solution (V-Y).
- Receive the CAT DOLL.
- Walk down.
- Use the CAT DOLL (Z); give the FLUTE.
- Take ROSABELLA'S MEDALLION and the YELLOW TILE (A).
- Walk right.
Chapter 2: Bremen
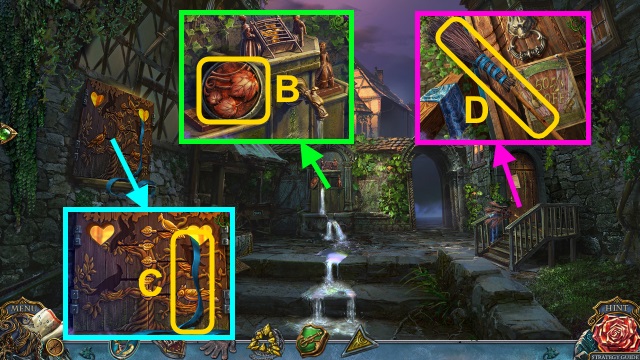
- Take the CIRCULAR TILE (B).
- Take the RIBBON (C).
- Use the RIBBON; take the BROOM (D).
- Walk forward.
- Move the debris; take the BOY FIGURINE (E). Use the BROOM; place the YELLOW TILE and CIRCULAR TILE for a mini-game.
- Solution (F).
- Move the leaves; take the SUN EMBLEM PART.
- Use the BROOM; place the SUN EMBLEM PART (G). Examine the doll 2x. Examine the flyer; take the HOOK.
- Walk down.
- Read the flyer (H); use the HOOK (I).
- Walk right.
- Talk to Rosabella (J).
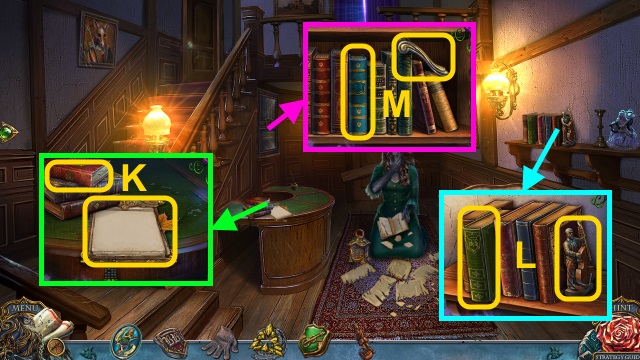
- Take the NOTEPAD and BROTHERHOOD BOOK (1/5) (K).
- Take the BROTHERHOOD BOOKS (2/5) and MUSCICIAN FIGURINE (L).
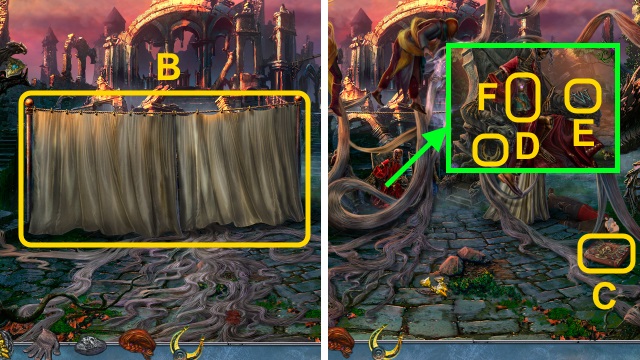
- Place the BROTHERHOOD SYMBOL; take the WINDOW HANDLE and BROTHERHOOD BOOKS (3/5) (M).

- Open the curtain; take the BROTHERHOOD BOOKS (4/5) (N). Place the WINDOW HANDLE.
- Play the HOP; receive the BROTHERHOOD CODEX (O).
- Combine the BROTHERHOOD CODEX and ROSABELLA'S MEDALLION for a mini-game.
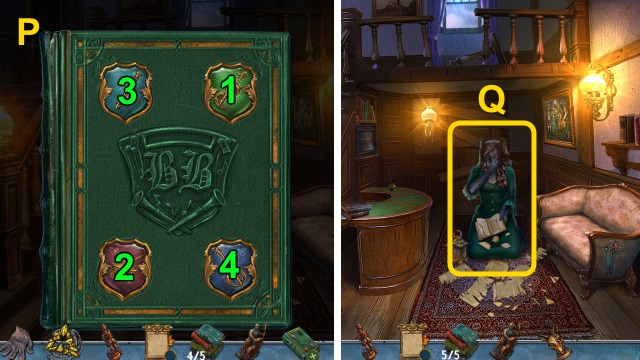
- Solution (P).
- Read the book; take the DONKEY FIGURINE and BROTHERHOOD BOOKS (5/5).
- Give the BROTHERHOOD BOOKS (5/5) (Q).
- Take the BROTHERHOOD LANTERN and SUN EMBLEM PART (R).
- Walk down.
- Place the BOY FIGURINE (S); take the GOLDEN BIRD (1/3) (T).
- Walk forward.
- Place the SUN EMBLEM PART; use the METAL GLOVE (U).
- Move the hat; use the METAL GLOVE (V). Receive the CURSED DONKEY DOLL. Place the pieces; take the ANTI-MAGIC AMULET (W).
- Combine the CURSED DONKEY DOLL and ANTI-MAGIC AMULET for a mini-game.
- Solution (X-A).
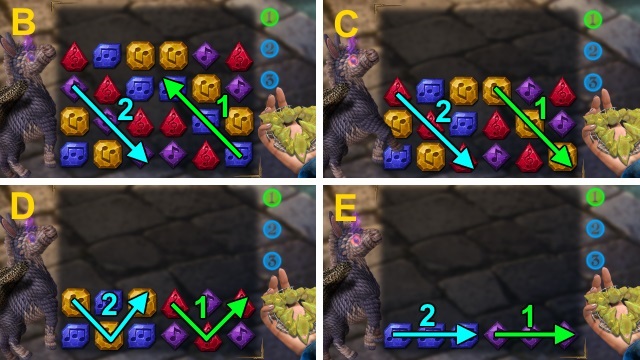
- Solution (B-E).
- Solution (F-I).
- Receive the DONKEY DOLL.
- Use the DONKEY DOLL (F).
- Take the MUSIC NOTE (G).
- Talk to Waldemar; take the GOLDEN BIRDS (2/3) (H).
- Turn the page; place the OVAL MEDALLION (I). Take the GOLDEN BIRDS (3/3); read the note. Take the KEY.
- Walk down.
- Place the MUSIC NOTE; take the MUSICIAN FIGURINE (J).
- Place the GOLDEN BIRDS (3/3) for a mini-game; solution (K).
- Play the HOP; receive the LANTERN POWDER (L).
- Walk right.
- Use the KEY (M).
- Take the LANTERN FRAME. Read the note; take the CANVAS PIECES (N).
- Combine the BROTHERHOOD LANTERN, LANTERN POWDER, and LANTERN FRAME. Open the containers; place the powder. Place the glass; take the BROTHERHOOD LANTERN.
- Place the BROTHERHOOD LANTERN (O).
- Examine the lights (1-2).
- Play the HOP (P).
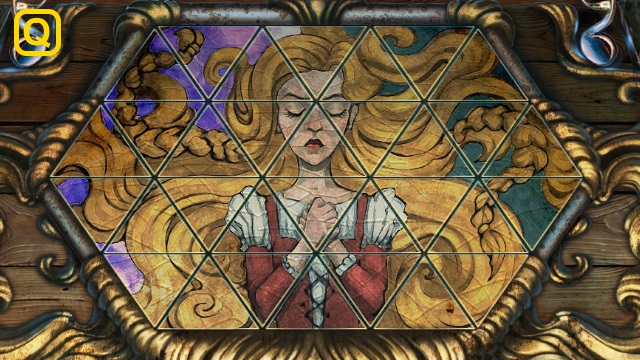
- Place the CANVAS PIECES. Arrange the parts (Q); examine the picture.
- Examine the painting (R).
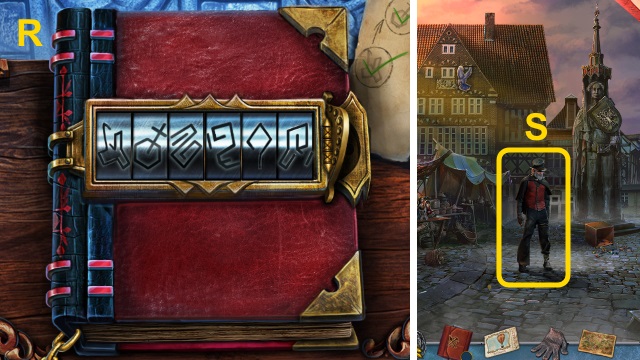
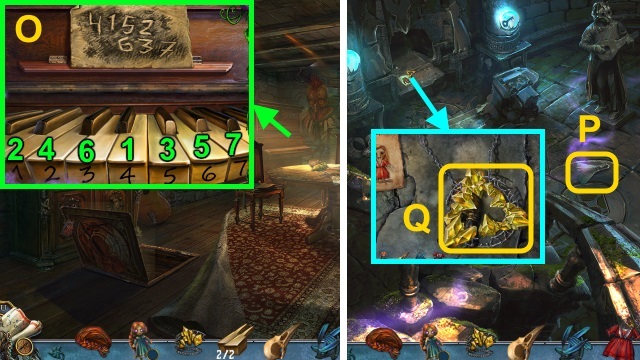
- Examine the NOTEPAD; take the SECRET CODE.
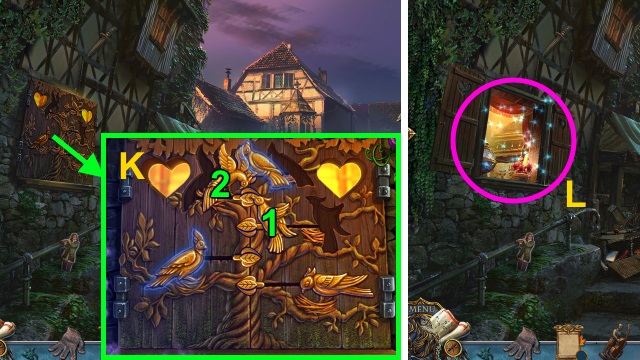
- Open the door; place the DONKEY FIGURINE, 2 MUSICIAN FIGURINES, and SECRET CODE for a mini-game; solution (S).
- Take the BROTHERHOOD LANTERN (T).

- Use the matches (U) on the lantern (V).
- Take the SCALE; move the book and mask. Place the keys in the locks (W).
- Examine the contrabass 2x (X); use the bow (Y) on it. Move the clothes; place the neck (Z). Read the note; place the strings (A). Take the CONTRABASS.
- Walk down, then forward.

- Give the CONTRABASS (B).
- Play the HOP; receive the OLD SWORD (C).
- Place the SCALE (D); take the WHEEL.
- Take the BUCKLE PART (E).
- Try to walk forward.
- Take the TOOLKIT (F). Remove the wheel (G); place the WHEEL. Use the OLD SWORD.
- Walk forward.
- Talk to Waldemar; take the BALLOON KEY (H).
- Examine the dolls; take the BUCKLE PART (I).
- Examine the statue (J). Read the flyer; place the 2 BUCKLE PARTS. Take the FRESCO TILE (1/5).
- Examine the box (K); open it.
- Take the TOOLKIT EMBLEM (L).
- Combine the TOOLKIT and TOOLKIT EMBLEM; take the HAMMER.
- Examine the cart (M).
- Use the HAMMER; take the ACID (N).
- Combine the OLD SWORD and ACID. Remove the hilt; take the SWORD.
- Use the SWORD and BALLOON KEY (O).
- Examine the flyer; take the CANE (P).
- Walk down.
- Use the CANE; examine the purse (Q). Open the PURSE; take the COIN and WEIGHT.
- Place the WEIGHT (R).
- Walk left.
Chapter 3: Rapunzel
- Examine the chair; take the FRESCO TILES (2/5) (S).
- Examine the chair; move the blanket. Take the HANDLE (T).
- Examine the chair; use the HAMMER. Take the FRESCO TILES (3/5) (U).
- Read the letters; take the FRESCO TILES (4/5) (V).
- Walk down.
- Play the HOP; receive the TREBLE CLEF (W).
- Place the HANDLE (X); pull it. Read the newspaper (Y); take the HERB EMBLEM and FRESCO TILES (5/5).
- Walk forward.
- Use the COIN (Z); take the MECHANICAL MOUSE (A).
- Examine the cat (B); give the MECHANICAL MOUSE. Receive the BROKEN MECHANICAL MOUSE. Take the HERB EMBLEM.
- Examine the cart (C). Place the 2 HERB EMBLEMS.
- Examine the bottle (D); take the CATNIP INFUSION.
- Assemble the BROKEN MECHANICAL MOUSE; use the CATNIP INFUSION. Take the IMPROVED MECHANICAL MOUSE.
- Give the IMPROVED MECHANICAL MOUSE (E); take the TICKET.
- Walk down, then left.
- Examine the chair; place the TREBLE CLEF (F). Examine the paper; take the LOCK DIAL.
- Place the FRESCO TILES (5/5) for a mini-game (G).
- Solution (H).
- Examine the doll; use the METAL GLOVE (I). Take the SCALE EMBLEM.
- Place the SCALE EMBLEM. Read the book (J); take the LANTERN POWDER.
- Combine the BROTHEHOOD LANTERN and LANTERN POWDER; take the BROTHERHOOD LANTERN.
- Move the bowl; place the BROTHERHOOD LANTERN (K).
- Examine the symbols (L-N).
- Examine the symbols (O-P).
- Examine the NOTEPAD; take the SECRET CODE.
- Move the leaves; find the pieces. Use the LOCK DIAL and SECRET CODE for a mini-game (Q).
- Solution (R).
- Take the OLD MAP.
- Walk down, then forward.
- Use the OLD MAP for a mini-game (S).

- Solution (T-X).
- Take the MAP.
- Use the TICKET (Y) and MAP (Z); examine the burners.
- Examine the scene.
- Examine the map (A); take the BAG BUCKLE (1/2).
- Gather the sandbags (B-E).
- Take the BAG BUCKLE (2/2) (F).
- Place the BAG BUCKLE (2/2) (G); take the GUNPOWDER and HOOK.
- Use the HOOK (H).
- Take the SANDBAGS (I).
- Examine the skull (J); use the SANDBAGS.
- Take the SHOE (K).
- Use the SHOE (L).
- Take the FLUTE (M).
- Take the BRASS TOKEN (1/3) (N).
- Read the note (O); take the GREEN GEM.
- Walk forward.
- Talk to Jacob (P).
- Take the FEATHER EMBLEM (Q).
- Take the UNLOADED GUN (R).
- Walk left.
- Take the DRUMSTICKS (1/2) (S).
- Use the FLUTE; take the FEATHER EMBLEM (T).

- Take the SCISSORS (U).
- Walk down.
- Use the SCISSORS; take the NEEDLE AND THREAD (V).
- Walk down.
- Place the 2 FEATHER EMBLEMS (W). Read the paper; take the KUKRI KNIFE HANDLE and LEATHER. Use the SCISSORS (X); receive the BLUE GEM.
- Place the KUKRI KNIFE HANDLE; take the KUKRI KNIFE (Y).
- Walk forward, then left.
- Examine the doll; take the GREEN GEM (Z).
- Place the 2 GREEN GEMS and BLUE GEM (A).
- Examine the doll (B).
- Play the HOP; receive the CURSED ROOSTER DOLL (C).
- Combine the CURSED ROOSTER DOLL and ANTI-MAGIC AMULET for a mini-game.
- Solution (D-G).
- Solution (H-K).
- Solution (L-O).
- Receive the ROOSTER DOLL.
- Walk down.
- Give the ROOSTER DOLL; take the THICK RIBBON (P).
- Walk down.
- Use the THICK RIBBON (Q); receive the TAPE.
- Use the TAPE; take the DRUMSTICKS (2/2) (R).
- Walk forward, then left.
- Use the LEATHER, NEEDLE AND THREAD, and DRUMSTICKS (2/2) (S); take the DRUM.
- Walk down.
- Give the DRUM (T).
- Take the CLEANING ROD (U).
- Take the PICK (V).
- Walk left.
- Take the CHAIN (W).
- Walk down.
- Use the KURKI KNIFE and CHAIN for a mini-game (X).
- Solution (Y-A).
- Use the PICK. Play the HOP; receive the SILVER KEY (B).
- Take the HANDKERCHIEF and GOLDEN KEY (C).
- Use the GOLDEN KEY and SILVER KEY; open the drawer. Take the COTTON BALL, TROWEL HANDLE, and BULLETS (D).
- Combine the TOOLKIT and TROWEL HANDLE; take the TROWEL.
- Combine the UNLOADED GUN, GUNPOWDER, CLEANING ROD, and BULLETS; take the LOADED GUN.
- Take the SILVER DIADEM (E); use the LOADED GUN for a mini-game (F).
- Solution (G).
- Take the BUTTON EMBLEM (1/2).
- Examine the picture (H); take the BROKEN LIGHTER.
- Walk down.
- Use the TROWEL; place the SILVER DIADEM (I). Take the BRASS TOKENS (2/3) (J).
- Walk left.
- Take the LIGHTER TOP (K). Use the COTTON BALL (L); receive the OILY COTTON BALL. Use the HANDKERCHIEF; take the BRONZE PROFILE (M).
- Combine the BROKEN LIGHTER, LIGHTER TOP, and OILY COTTON BALL; assemble the lighter. Take the LIGHTER.
- Use the LIGHTER; take the BUTTON EMBLEM (2/2) (N).
- Walk down, then forward.
- Play the HOP; receive IRON PROFILE (O).
- Place the BUTTON EMBLEM (2/2); take the LOCKET (P).
- Use the TROWEL; place the LOCKET (Q). Take the METAL FLOWER (1/4) and RAPUNZEL'S DIARY.
- Combine RAPUNZEL'S DIARY, the BRONZE PROFILE, and the IRON PROFILE; read the book. Take the BRASS TOKENS (3/3).
- Walk down, then left.
- Place the BRASS TOKENS (3/3) for a mini-game (R).
- Solution (S): F-J-G-C-J-I-A-E.
- H-B-I-J-F-B-A-E-H-I-J-F.
- B-I-F-C-J-G-C-D-G-J-F.
Chapter 4: The Mountain
- Examine the bottle; take the METAL FLOWERS (2/4) (T).
- Walk forward.
- Play the HOP; receive the SWORD (U).
- Take the RUNE STONE (V).
- Walk down.
- Place the RUNE STONE (W); take the PERFECT HAMMER (X).
- Combine the TOOL KIT and PERFECT HAMMER; take the HAMMER AND NAILS.
- Use the SWORD; take the ENTRANCE TOKEN (Y).
- Collect the boards (Z-C).

- Use the HAMMER AND NAILS (D).
- Take the COAT OF ARMS (E).
- Walk down.
- Play the HOP; receive the UNLIT LANTERN (F).

- Place the COAT OF ARMS (G); take the METAL FLOWERS (3/4) (H).
- Walk forward twice.
- Examine the hair. Use the ENTRANCE TOKEN (I); take the R-SHAPED EMBLEM (J).
- Place the R-SHAPED EMBLEM (K); take the BANDAGE and METAL FLOWERS (4/4).
- Walk down.
- Use the HAMMER AND NAILS; place the METAL FLOWERS (4/4) for a mini-game. Solution (L).
- Read the note; take the YELLOW CRYSTAL.
- Place the YELLOW CRYSTAL; take the LANTERN POWDER (M).
- Combine the UNLIT LANTERN and LANTERN POWDER; take the BROTHERHOOD LANTERN.
- Walk forward.
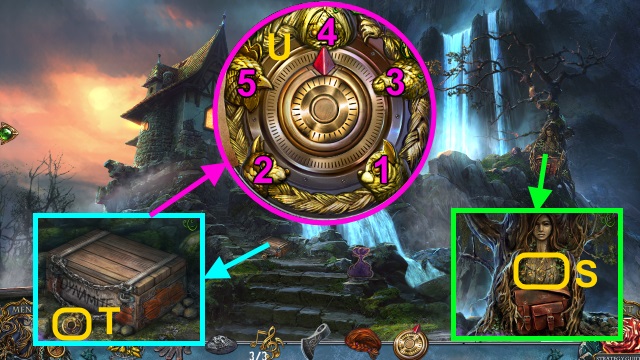
- Use the BROTHERHOOD LANTERN for a mini-game (N).
- Solution (O); walk right.
- Solution (P); walk left.
- Solution (Q); walk forward.
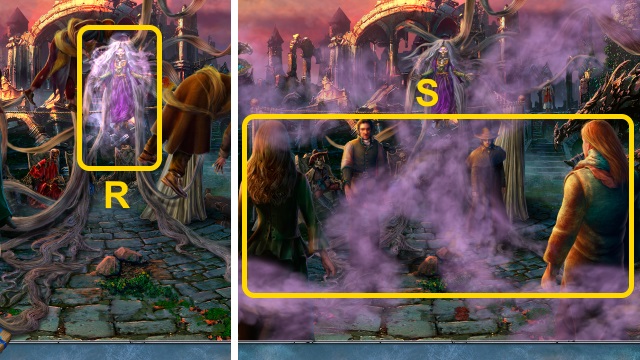
- Examine Rosabella (R).
- Take the PLIERS (S).
- Use the PLIERS (T); receive the WOODEN BOARD.
- Take the PIN KEY (U). Use the WOODEN BOARD; take the PAW EMBLEM (V).
- Walk right.
- Use the PIN KEY (W).
- Play the HOP; receive the SUPPLY BOX (X).
- Place the PAW EMBLEM. Take the PAN (Y); move the sleeping bag. Read the book (Z); take the TILE.
- Examine the SUPPLY BOX; place the TILE for a mini-game.
- Solution (A).
- Take the INSECTICIDE and WING.
- Walk down.
- Use the INSECTICIDE; take the BONE KEY (B).
- Walk right.
- Use the BONE KEY; take the BONES (C).
- Walk down twice.
- Play the HOP; receive the FISHING NET (D).
- Examine the hollow; give the BONES (E). Receive the WOLF CUB; take the BROKEN VIOLIN.
- Walk right twice.
- Play the HOP; receive the CROSS (F).
- Examine the doll (G); give the WOLF CUB. Use the FISHING NET and METAL GLOVE; receive the CURSED DOG DOLL. Examine the chest (H).
- Use the WING (I); take the VIOLIN STRINGS.
- Combine the CURSED DOG DOLL and ANTI-MAGIC AMULET for a mini-game.
- Solution (J-O).
- Solution (P-U).
- Solution (V-A).
- Receive the DOG DOLL.
- Place the CROSS; take the OINTMENT (B).
- Walk down.
- Use the DOG DOLL; take the VIOLIN CASE KEY (C). Use the OINTMENT and BANDAGE (D). Use the VIOLIN CASE KEY (E); place the BROKEN VIOLIN and STRINGS. Take the REPAIRED VIOLIN; give the REPAIRED VIOLIN.
- Take the GOLDEN CHICK (F).
- Walk right.
- Take the STONE PIECE (1/3) (G).
- Use the PAN; take the METAL BUTTON (1/3) (H).
- Walk down, then forward.
- Use the TROWEL; take the CRANK HANDLE (I).
- Take the UMBRELLA HANDLE (J).
- Examine the raven (K).
- Examine the feathers. Move the rock; take the METAL BUTTONS (2/3) (L).
- Take the COAL (M).
- Place the UMRELLA HANDLE (N); take the UMBRELLA. Use the PAN (O); receive the BALL OF CLAY.
- Place the UMBRELLA (P).
- Play the HOP; receive the GOLDEN CHICK (Q).
- Walk down.
- Place the 2 GOLDEN CHICKS; take the STONE PIECES (2/3) and METAL BUTTONS (3/3) (R).
- Walk forward.
- Place the METAL BUTTONS (3/3) for a mini-game.
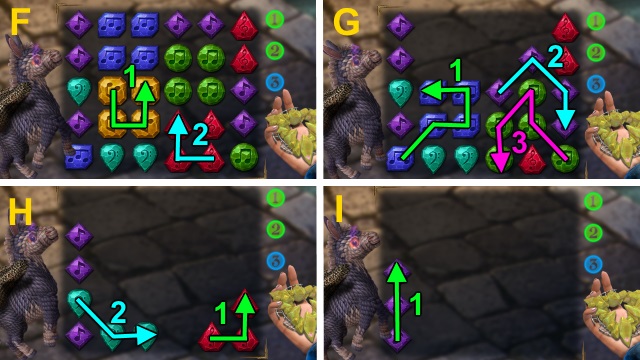
- Solution (S): (G-H)-(D-B)-(E-D)-(D-F).
- (F-G)-(B-D)-(D-E)-(A-B)-(B-D)-(D-F).
- (E-D)-(D-B)-(B-A)-(A-C)-(F-D).
- Place the CRANK HANDLE; turn it.
Chapter 5: The Ruins
- Move the leaves and moss; collect the nails (T). Take the NAILS.
- Take the WOODEN RING (U).

- Examine the flyer (V); take the BRASS HAND.
- Walk forward.
- Take the STONE (W).
- Collect the wood (X-Z).
- Arrange the wood; use the NAILS and STONE (A).
- Take the BRASS HAND (B).
- Take the AX HEAD and WIG (C).
- Examine the hill (D).
- Take the STONE PIECES (3/3) (E).
- Walk down twice.
- Play the HOP; receive the BRASS HAND (F).
- Use the STONE PIECES (3/3); arrange the parts. Take the MUSIC SYMBOL (1/3) (G).
- Go forward twice.
- Place the 3 BRASS HANDS for a mini-game (H).
- Solution (I-J).
- Walk left.
- Play the HOP; receive the WOODEN RING (K).
- Take the GEMS (L).
- Examine the CLAY 3x; place the GEMS. Take the MUSIC SYMBOLS (2/3).
- Move the plant; take the LOCK DETAIL (M).
- Move the rug (N).
- Place the 2 WOODEN RINGS for a mini-game.
- Solution (O).
- Take WALDEMAR'S BOX.
- Examine WALDEMAR'S BOX; examine the lock for a mini-game.
- Solution (P-R).
- Take the paper and MUSIC SYMBOLS (3/3).
- Walk down twice.
- Place the MUSIC SYMBOLS (3/3) (S); open the bag. Read the note; take the LOCK CODE and TIMER.
- Examine the lock (T); place the LOCK CODE and LOCK DETAIL for a mini-game.
- Solution (U).
- Take the DYNAMITE.
- Combine the DYNAMITE and TIMER; take the BOMB.
- Walk forward.
- Use the BOMB (V).
- Walk right.
- Take the WEDGE (W).
- Take the AX HANDLE (X).
- Combine the AX HANDLE, AX HEAD, and WEDGE; take the AX.
- Use the AX (Y); take the SHIELD, HORSESHOE, and SAFE KEY.
- Use the SAFE KEY (Z); take the DRAGON CREST.
- Use the SHIELD; place the DRAGON CREST (A).
- Walk forward.
- Examine the curtain (B).
- Take WALDEMAR'S BAG (C).
- Take the HORSESHOE (D) and W-SHAPED EMBLEM (E). Use the GLOVE (F); receive the CURSED RAPUNZEL DOLL.
- Combine WALDEMAR'S BAG and the W-SHAPED EMBLEM for a mini-game.
- Solution (G); open the bag.
- Take the SKULL, FEATHERS, PAPER, and PIANO KEY(1/2).
- Take the AMULET PART (H).
- Walk down.
- Examine the cage (I). Place the 2 HORSESHOES; take the BIRDSEED.
- Walk down.
- Give the BIRDSEED (J); take the HEART (K).
- Place the HEART; receive the PIANO KEYS (2/2) (L).
- Walk left.
- Play the HOP; receive the DRESS (M).
- Use the PAPER and COAL; take the SECRET CODE (N).
- Open the cover; place the PIANO KEYS (2/2) and SECRET CODE for a mini-game. Solution (O).
- Walk right.
- Take the BROOM (P).
- Place the AMULET PART; take the ANTI-MAGIC AMULET (Q).
- Combine the CURSED RAPUNZEL DOLL and ANTI-MAGIC AMULET for a mini-game.
- Solution (R-U).
- Solution (V-Y).
- Solution (Z-C).
- Solution (D-F).
- Receive the DOLL PARTS.
- Examine the paper (G); take the NEEDLE AND THREAD.
- Walk down.
- Use the BROOM; take the BROOCH (H).
- Enter the code (I); take the DOLL EYES.
- Walk right.
- Place the BROOCH (J); take the SWORD (K).
- Place the DRESS, WIG, DOLL PARTS, DOLL EYES, NEEDLE AND THREAD, FEATHERS, and SKULL (L); assemble the doll. Examine the paper for a mini-game (M).
- Solution (N).
- Place the paper on the doll; take the RAVEN DOLL and TRIANGLE TILE.

- Use the SWORD (O); take the TRIANGLE TILES.
- Place the TRIANGLE TILE and TRIANGLE TILES for a mini-game (P).
- Solution (Q).
- Move the masks; take the SHEET MUSIC.
- Walk down twice, right, then forward.
- Use the RAVEN DOLL and SWORD (R).
- Give the SHEET MUSIC for a mini-game (S).
- Solution (T-U).
- Congratulations! You have completed Living Legends: Beasts of Bremen.
Created at: 2017-03-17