

Walkthrough Menu
- General Tips
- Chapter 1: The Miller
- Chapter 2: The Prince
- Chapter 3: the King
- Chapter 4: Walter
- Chapter 5: Martha
- Chapter 6: Augustine
General Tips
- This is the official guide for Living Legends: Bound by Wishes.
- This guide will not show when you have to zoom into a location; the screenshots will show each zoom scene.
- Hidden-object puzzles are referred to as HOPs. This guide will not show screenshots of the HOPs, however, it will mention when an HOP is available and the inventory item you'll collect from it.
- Use the Map to fast travel to a location.
Chapter 1: The Miller
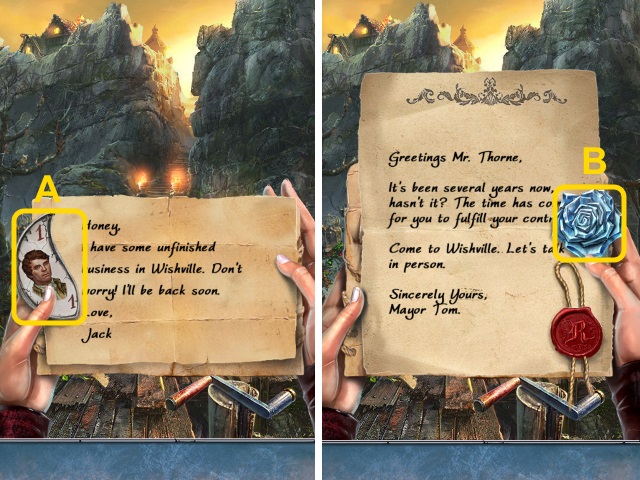
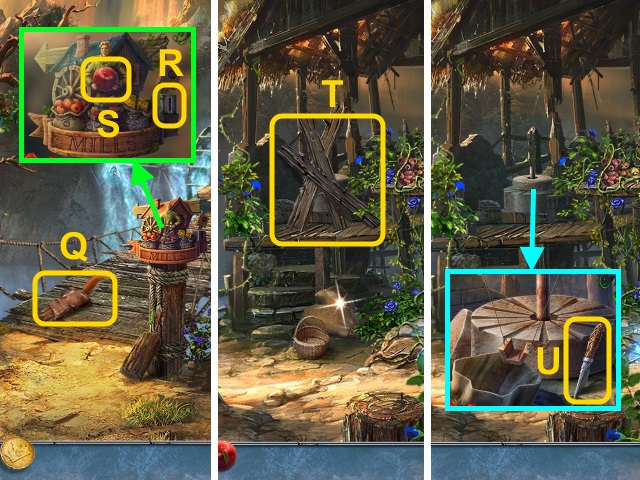
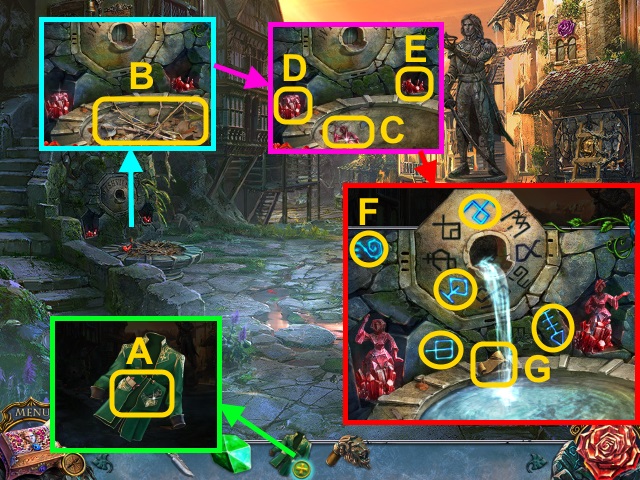
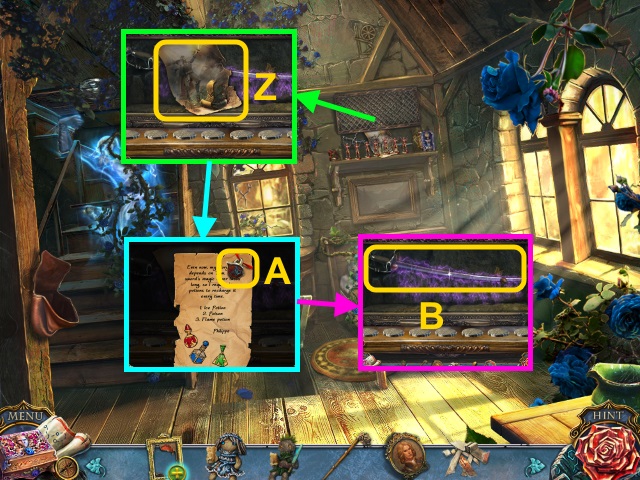
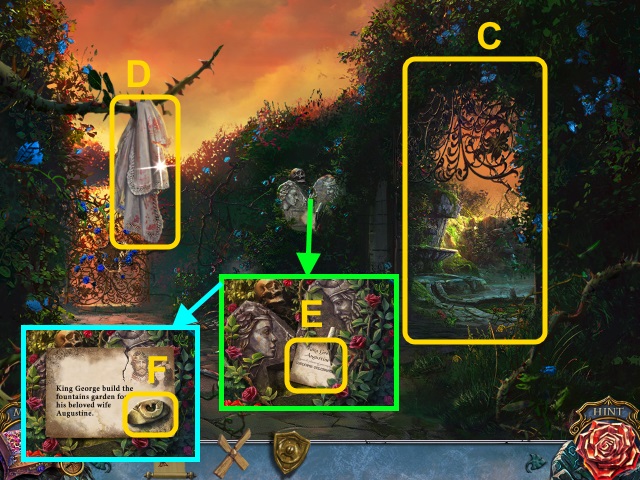
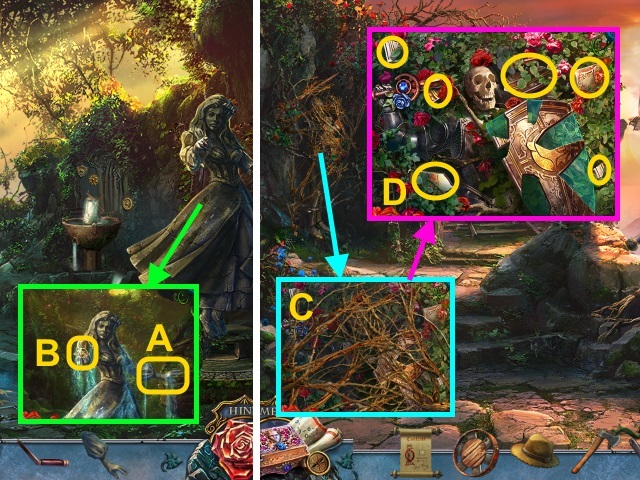
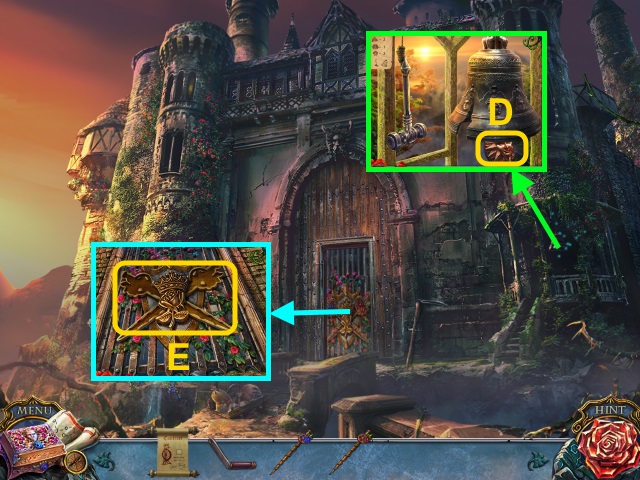
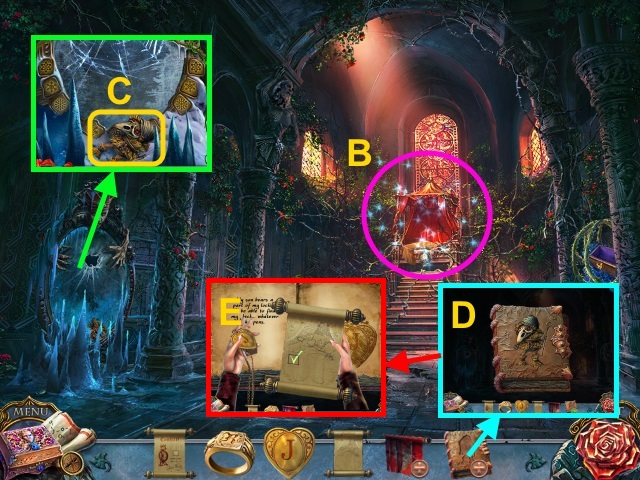
- Take JACK'S PORTRAIT (A).
- Read the note and letter; take the rose (B).
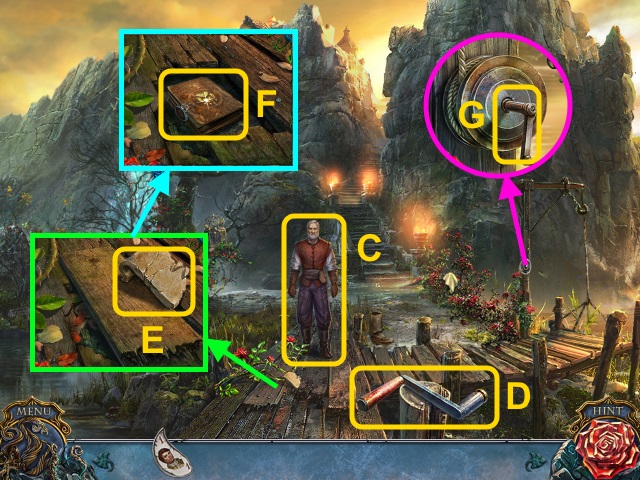
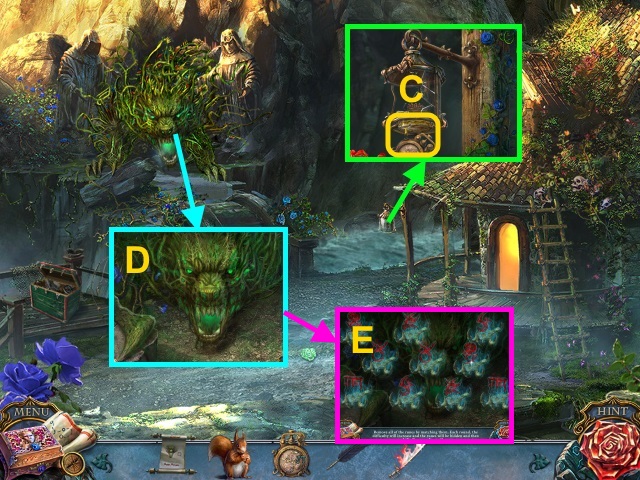
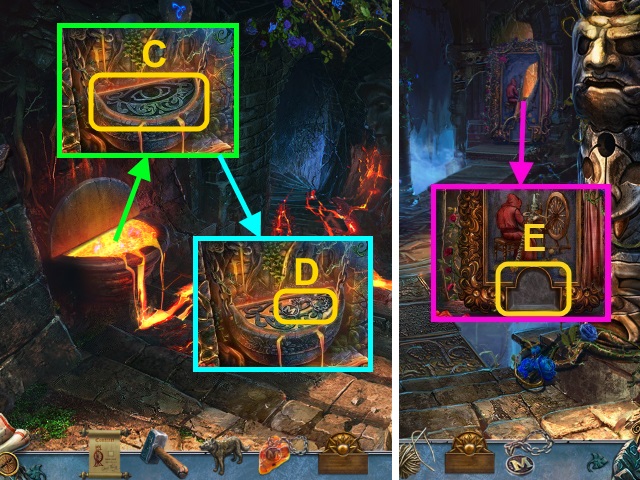
- Talk to the miller (C).
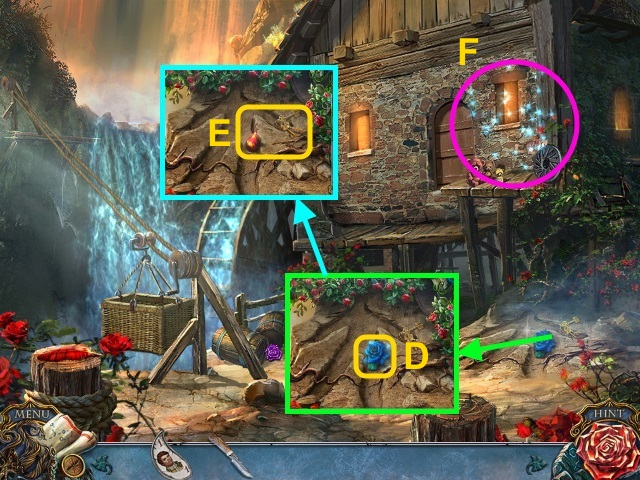
- Take the CRANK (D).
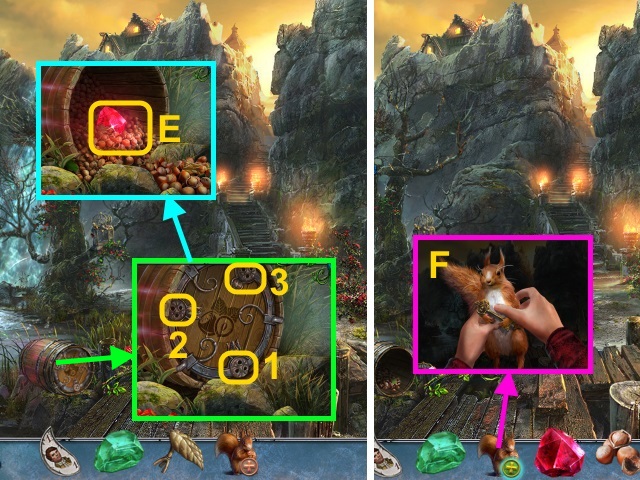
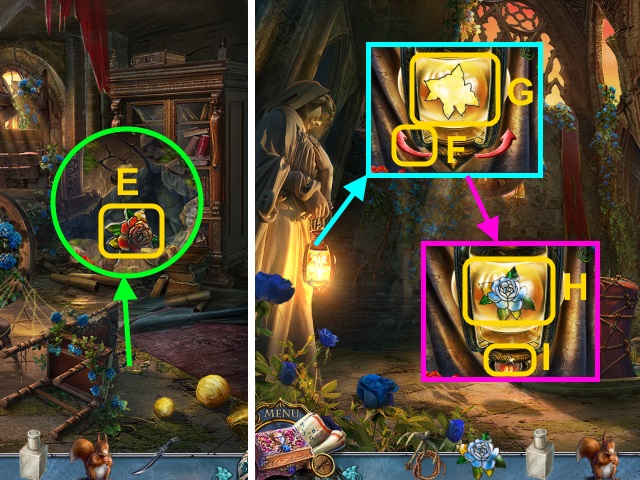
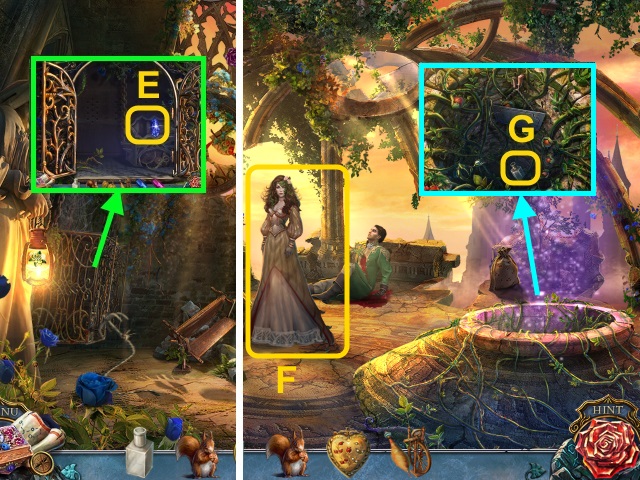
- Take the STONE SCROLL PART (E); move the board.
- Move the leaves; take the TRAPPER'S JOURNAL (F).
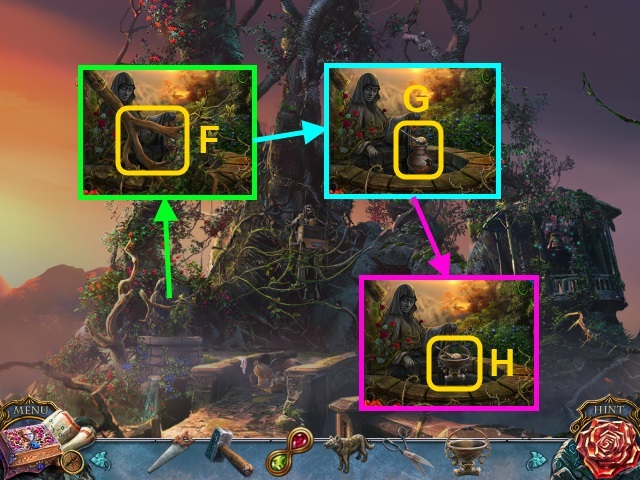
- Use the CRANK (G).
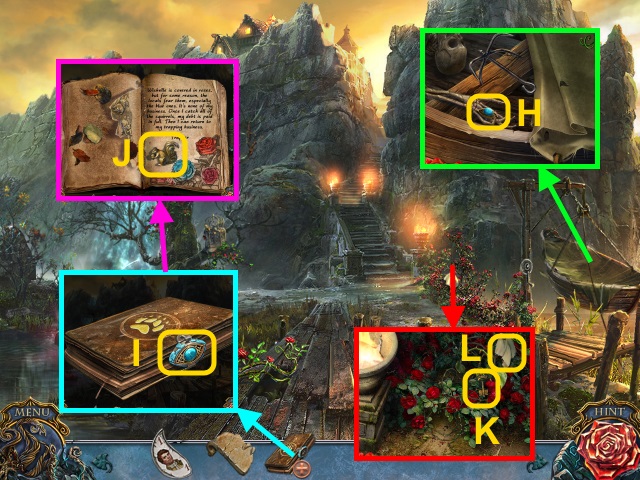
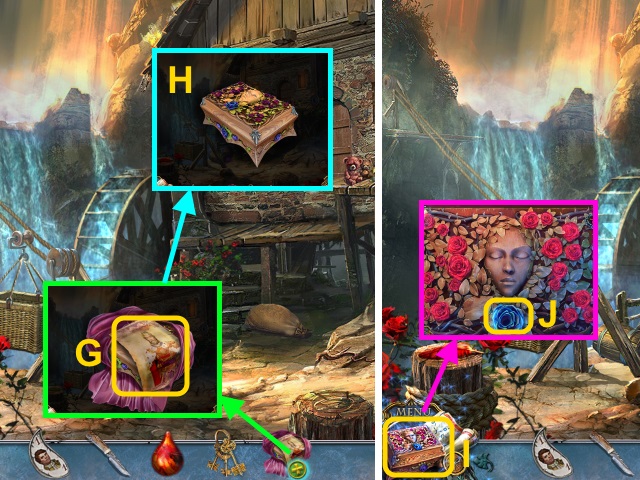
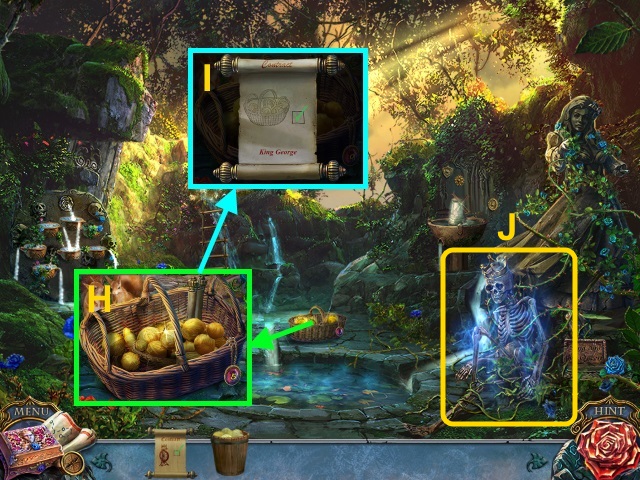
- Move the cloth; take the TURQUOISE EYE (H).
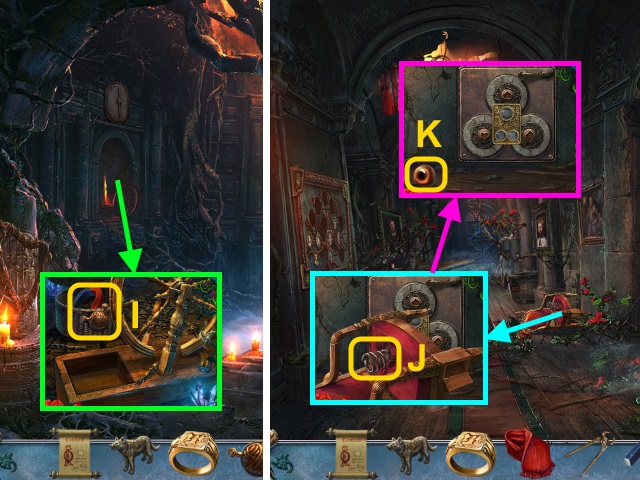
- Combine the TRAPPER'S JOURNAL and TURQUOISE EYE (I); open the book.
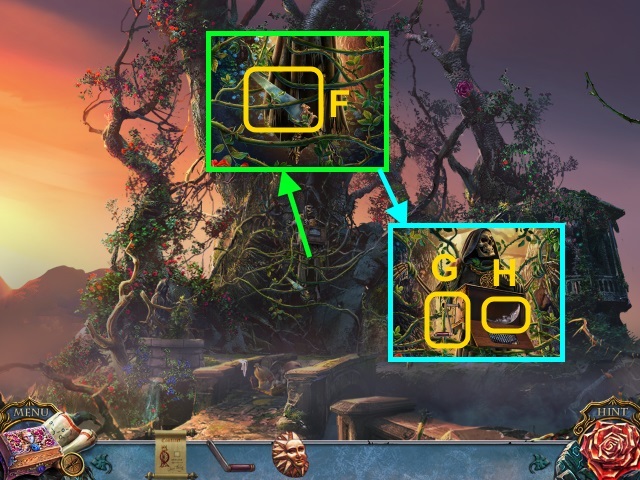
- Play the HOP; turn the page.
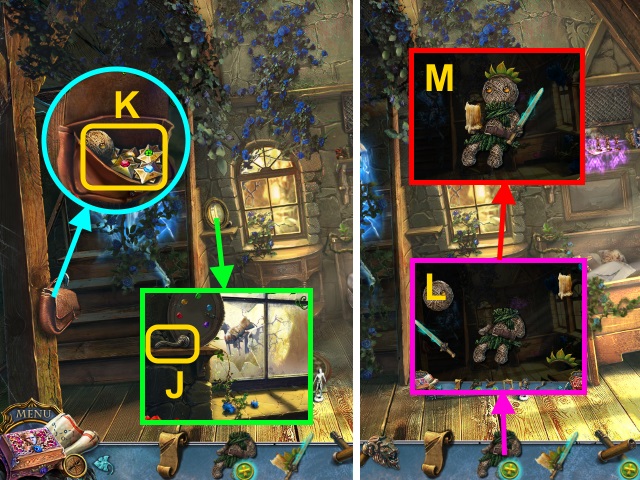
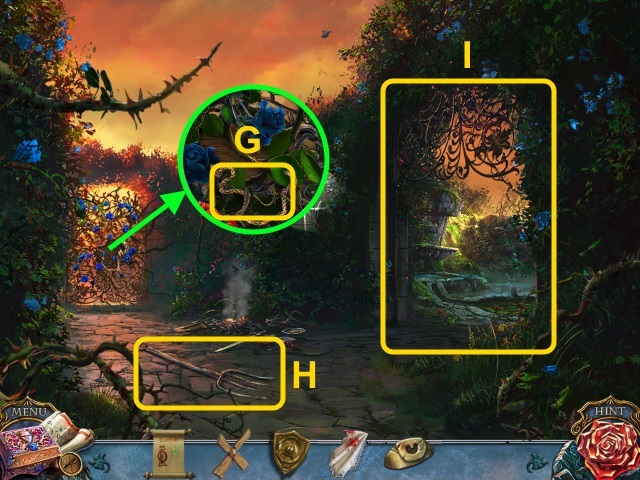
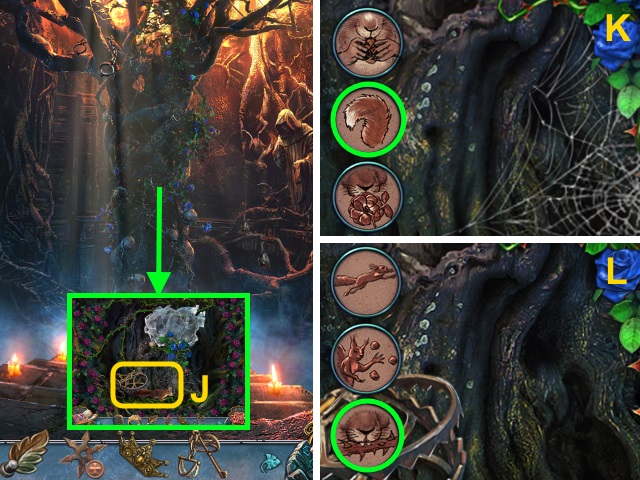
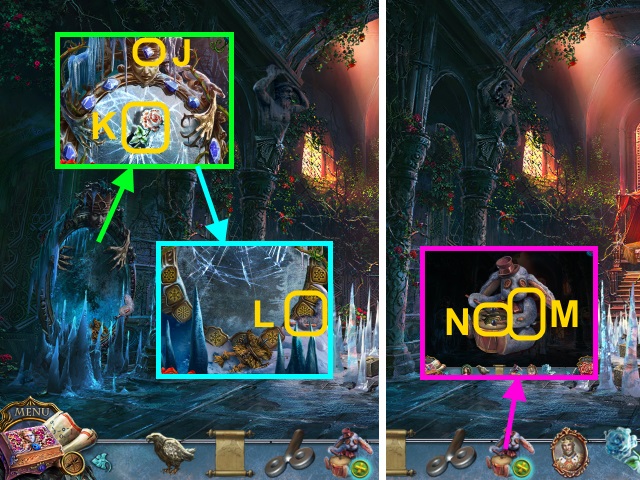
- Take the SQUIRREL FIGURINE (J).
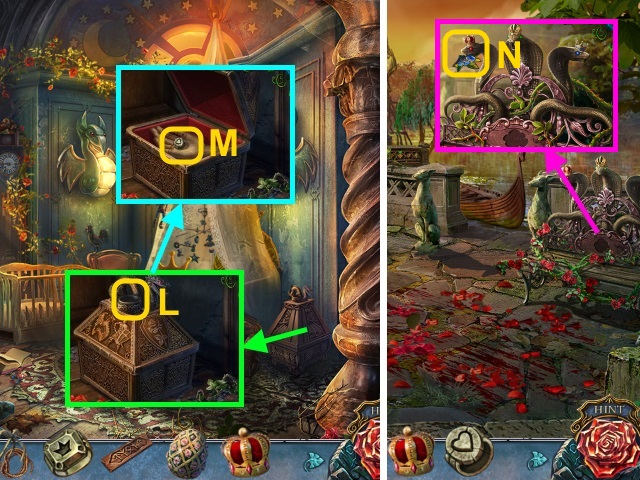
- Examine the key (K); take the RAG (L).
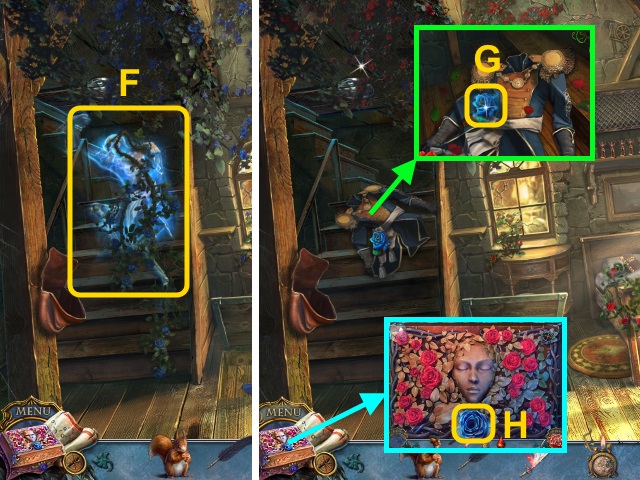
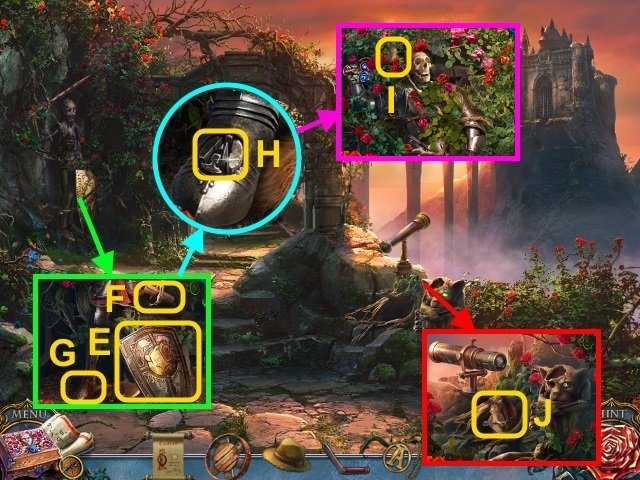
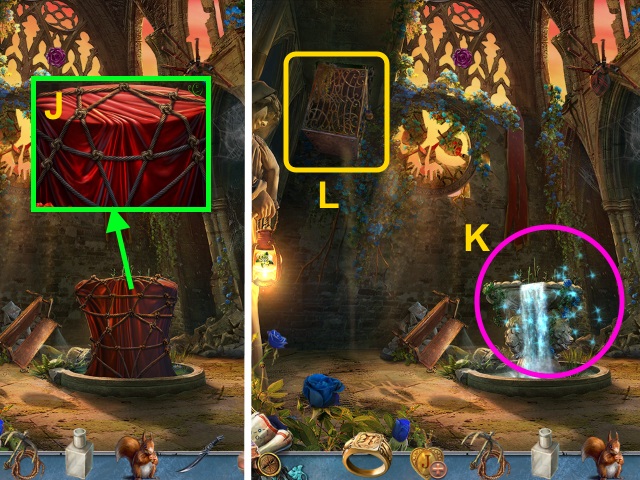
- Walk forward.
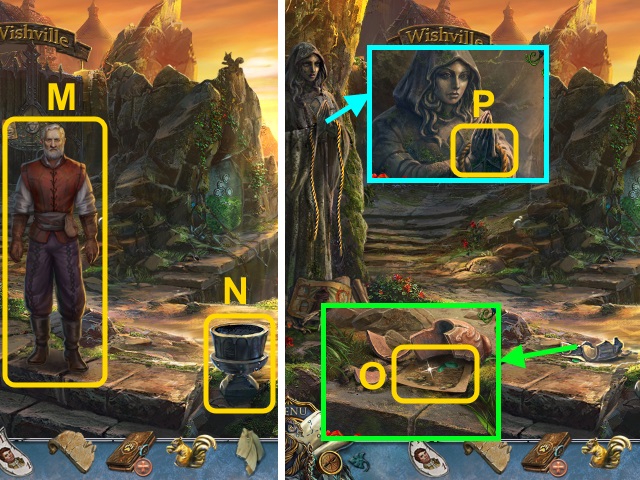
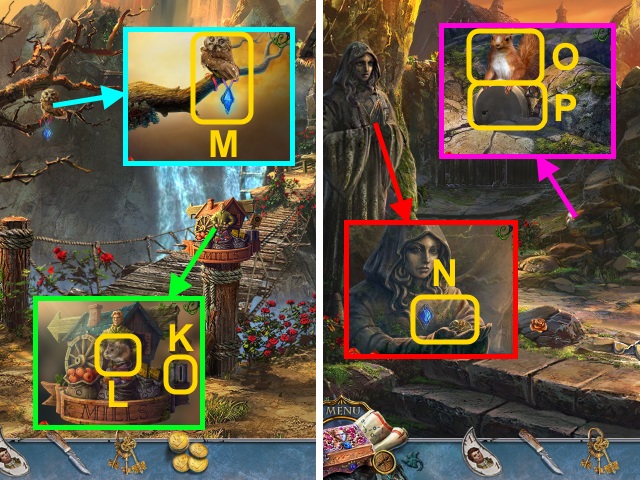
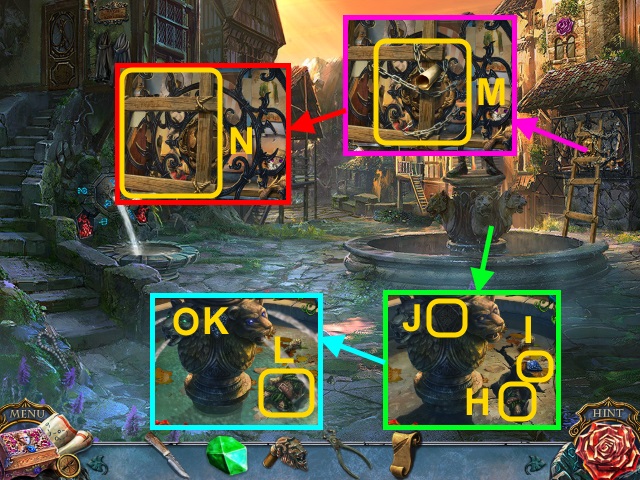
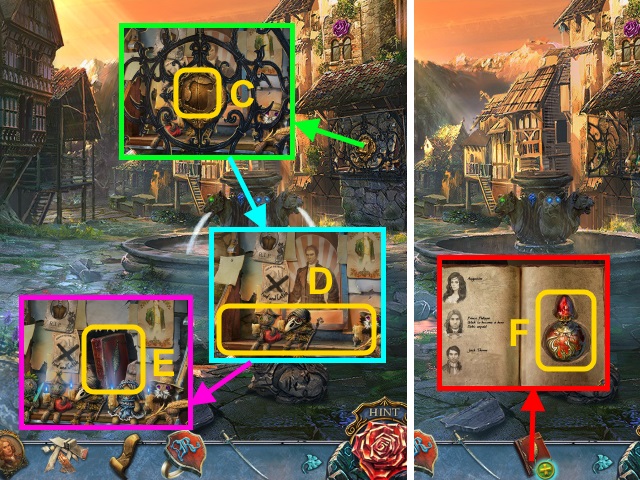
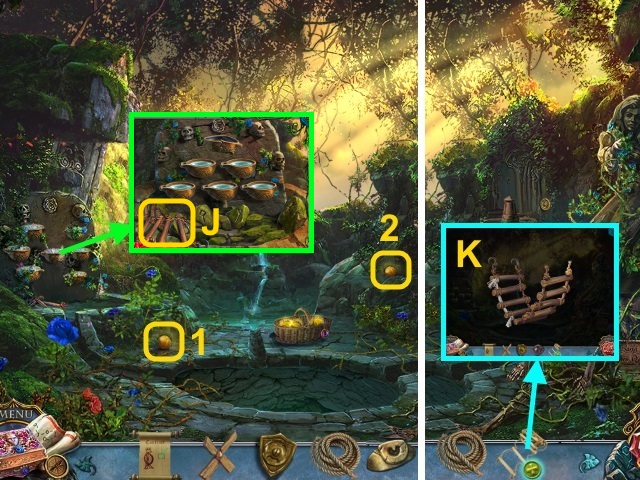
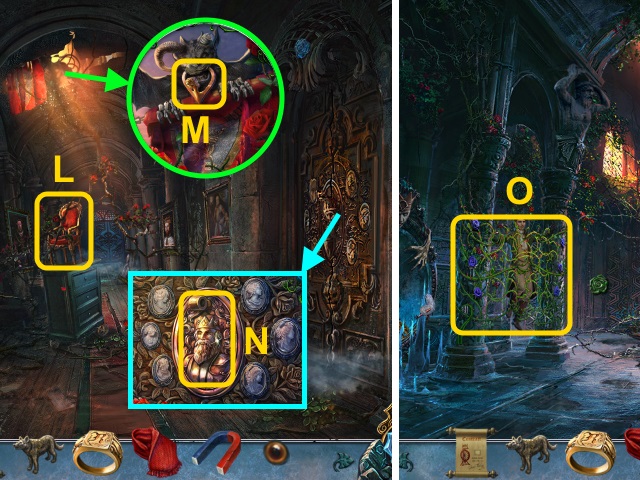
- Talk to the miller (M); receive the Map.
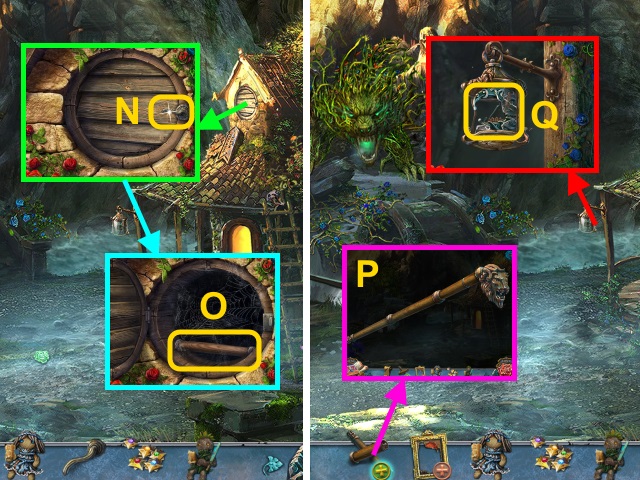
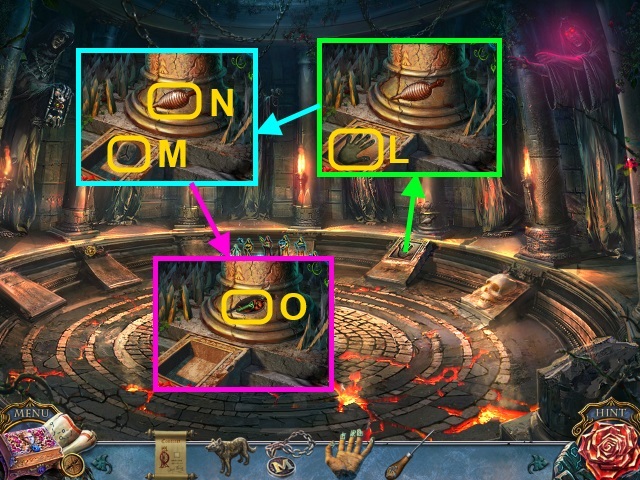
- Examine the pot (N).
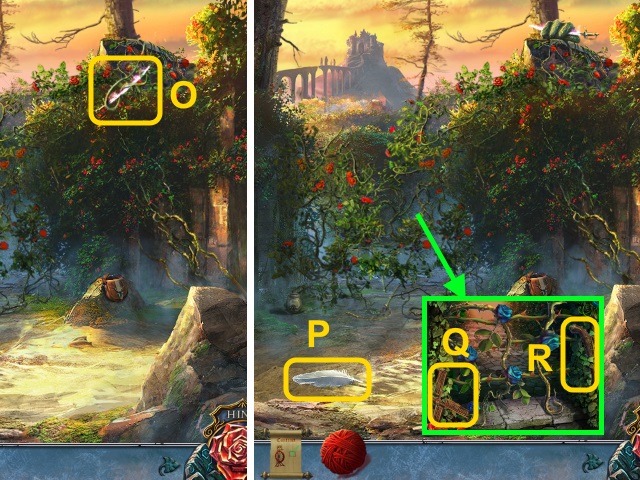
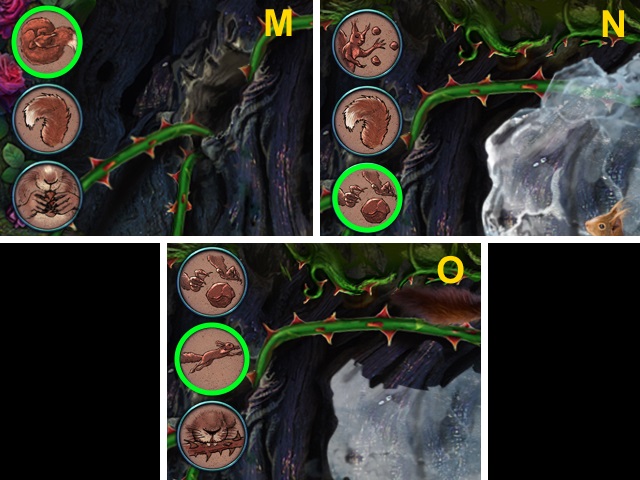
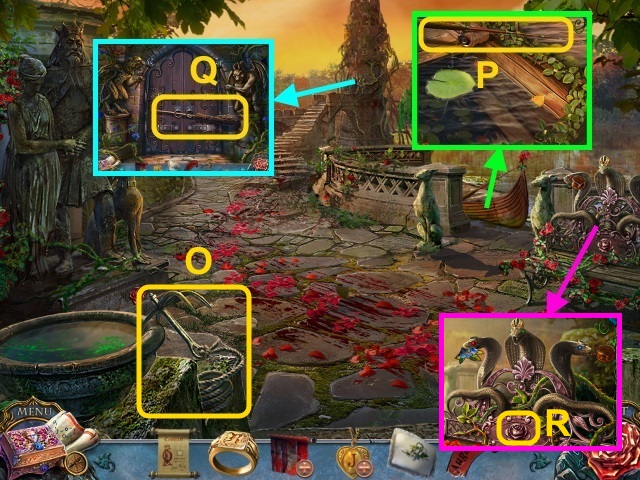
- Move the pieces; take the TORN PAGE and EMERALD (O).
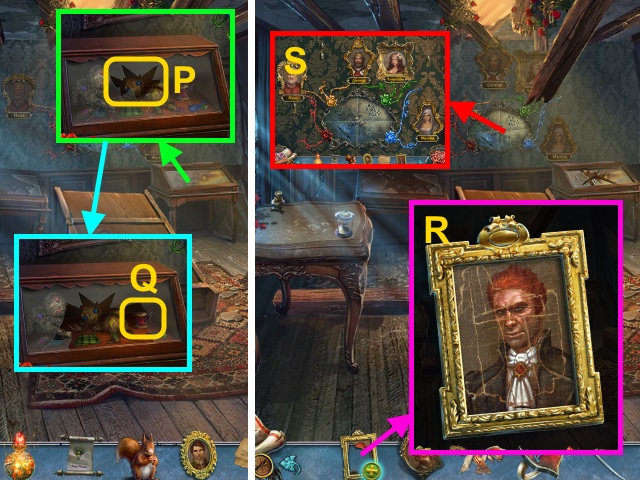
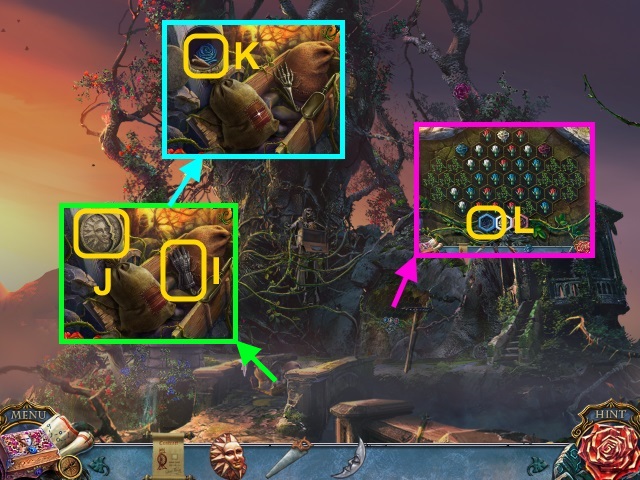
- Take the ROPE (P).
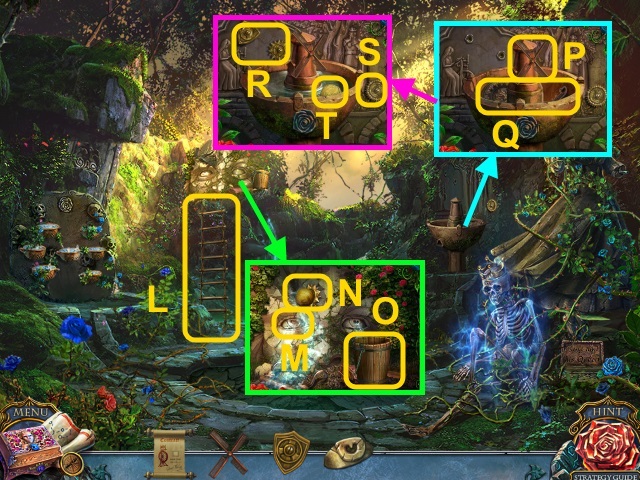
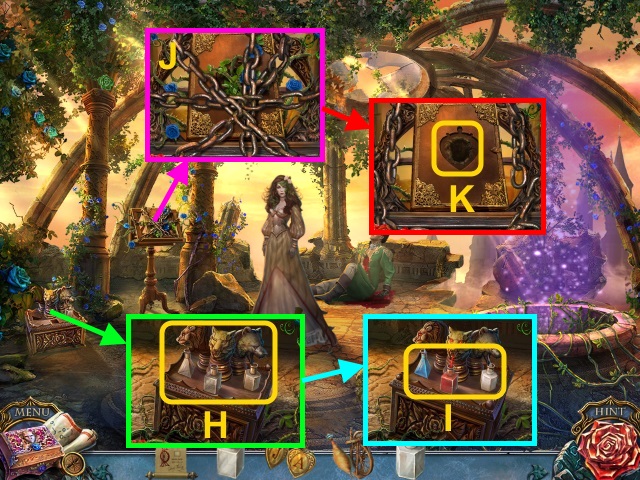
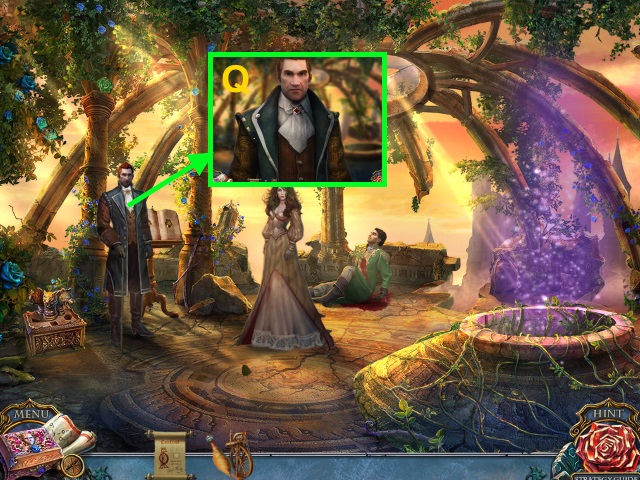
- Combine the TRAPPER'S JOURNAL and TORN PAGE; take the CAGE SKETCH (Q).
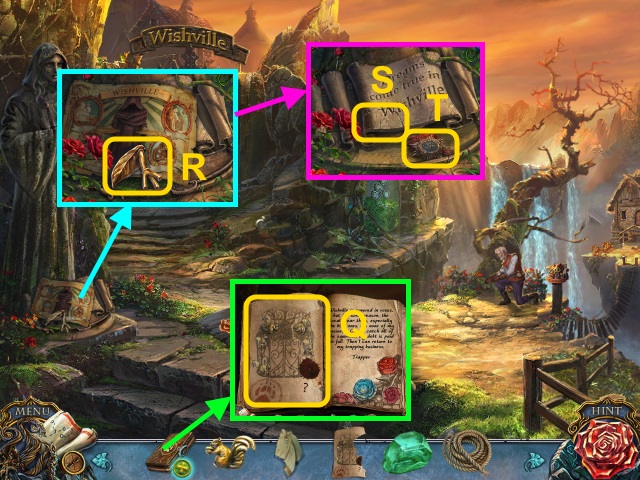
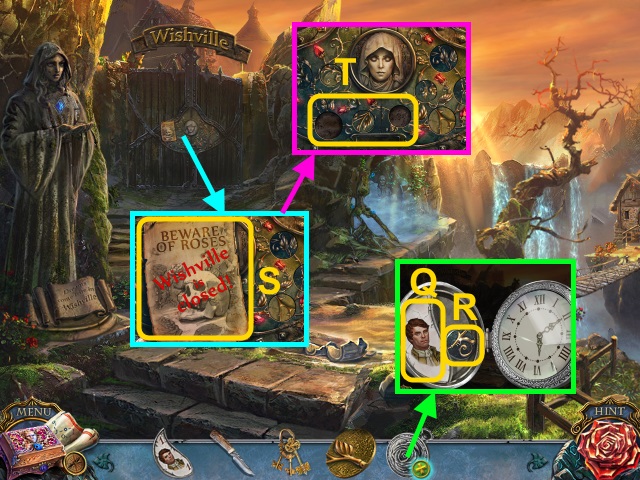
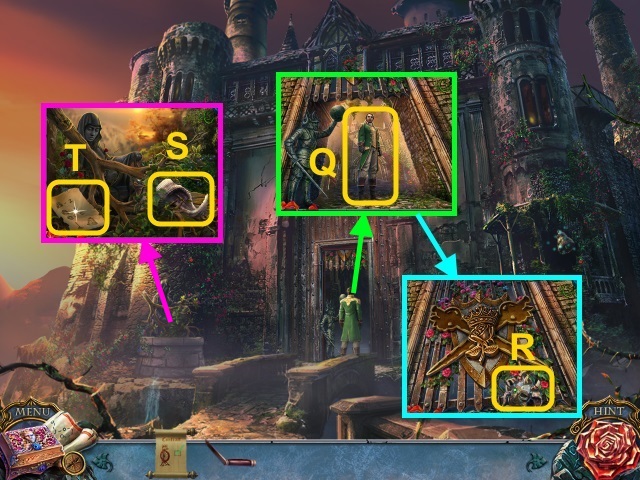
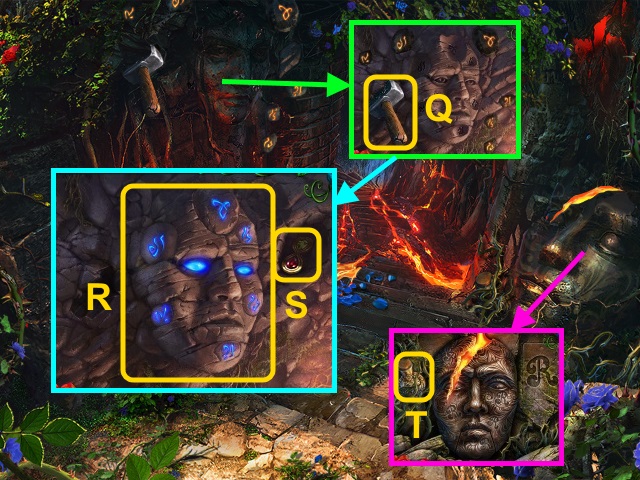
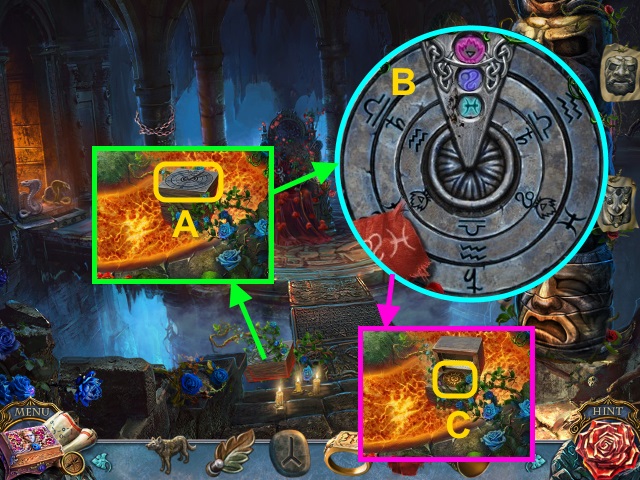
- Take the PRONGED KEY (R); read the flyer.
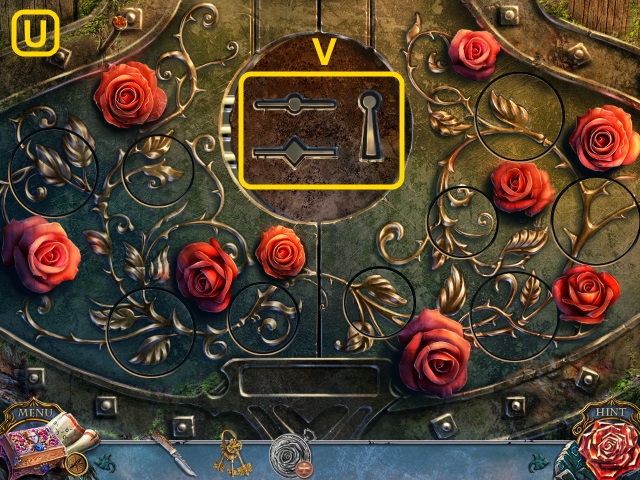
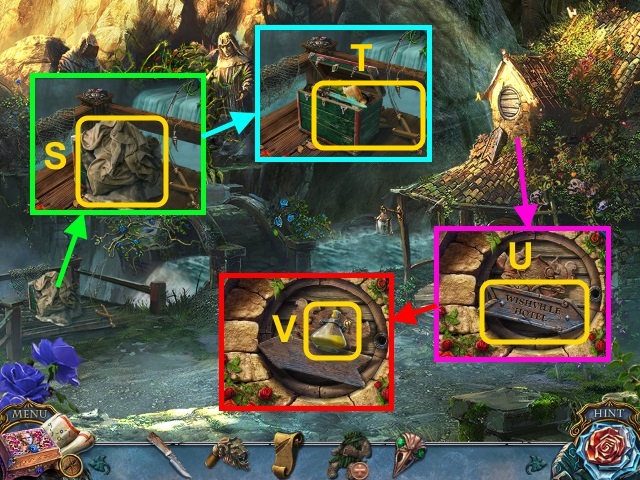
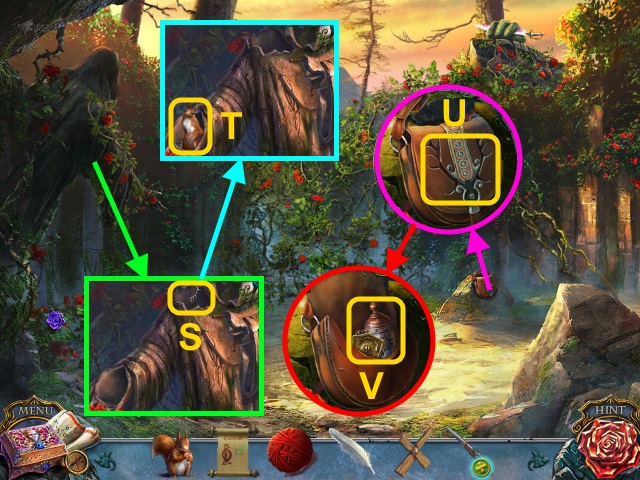
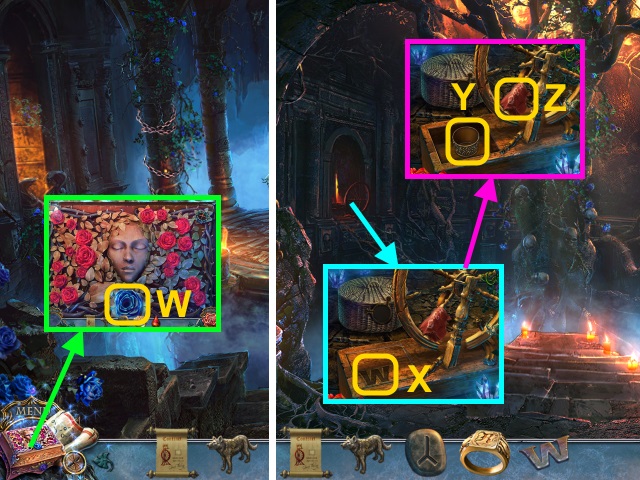
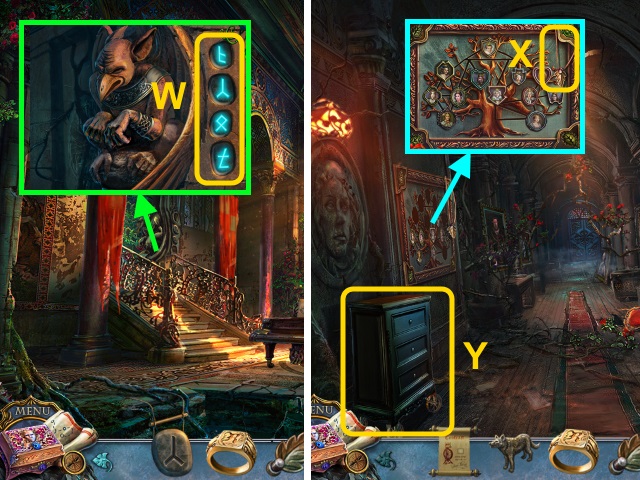
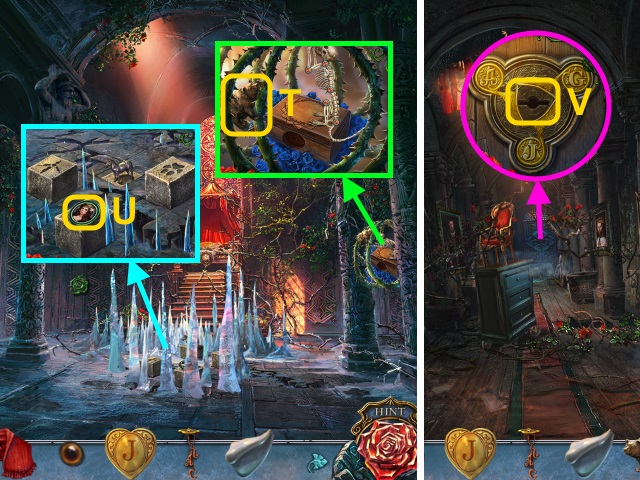
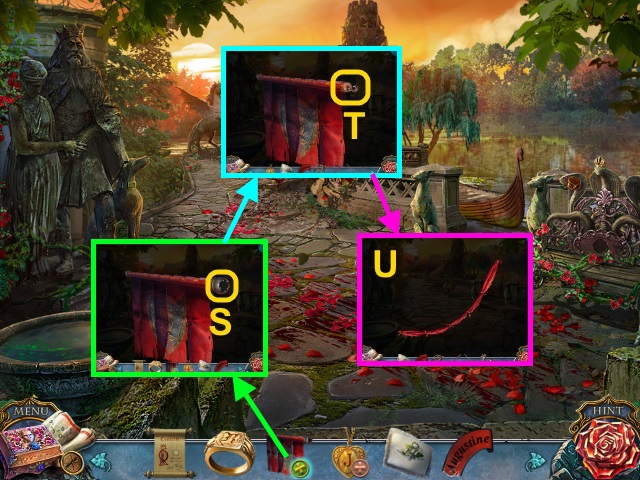
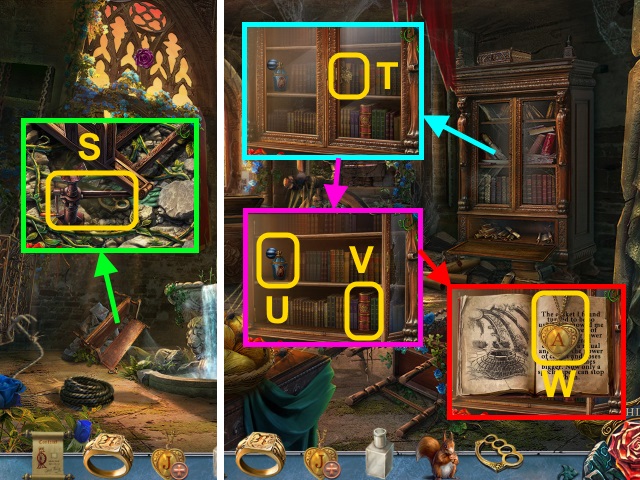
- Place the STONE SCROLL PART (S); take the MONOGRAM SEAL (T).
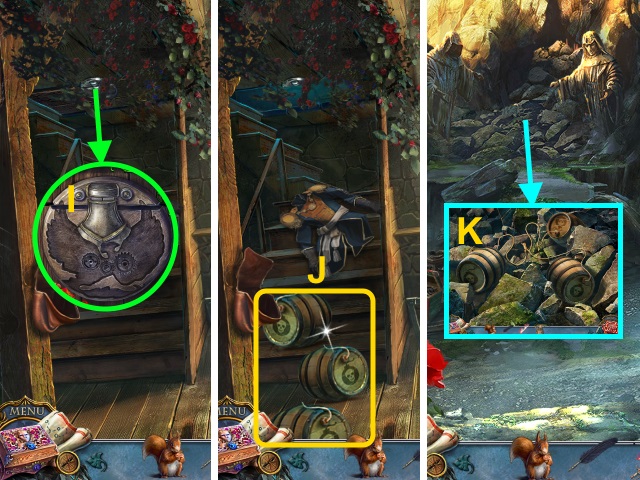
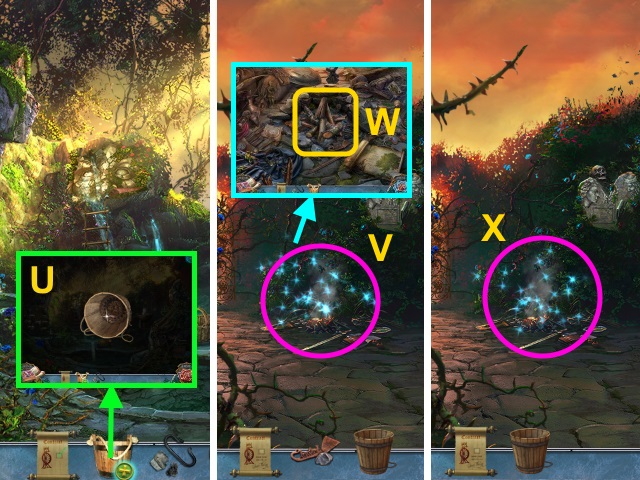
- Use the RAG (U).
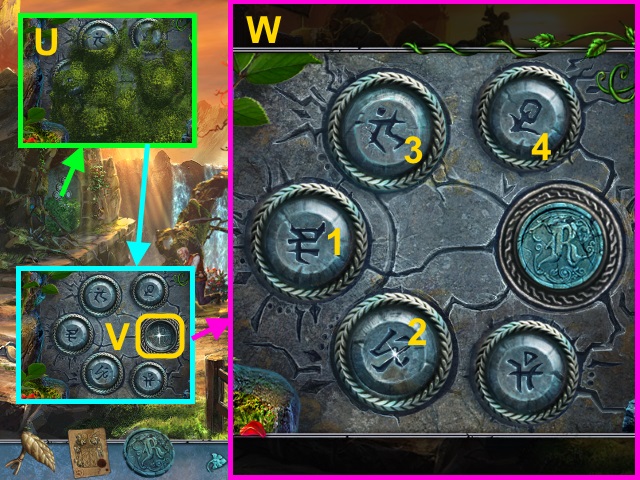
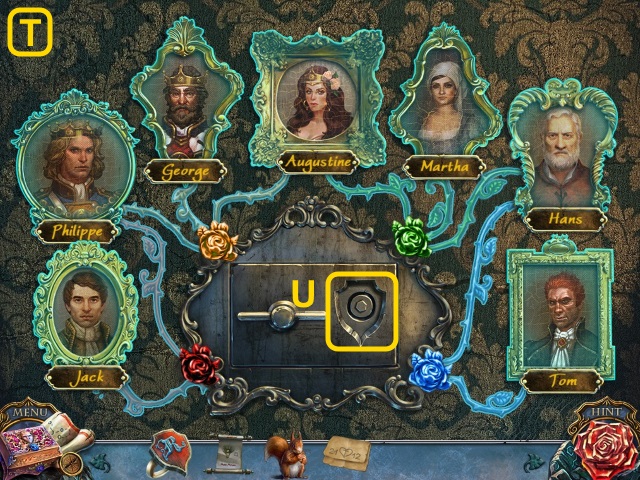
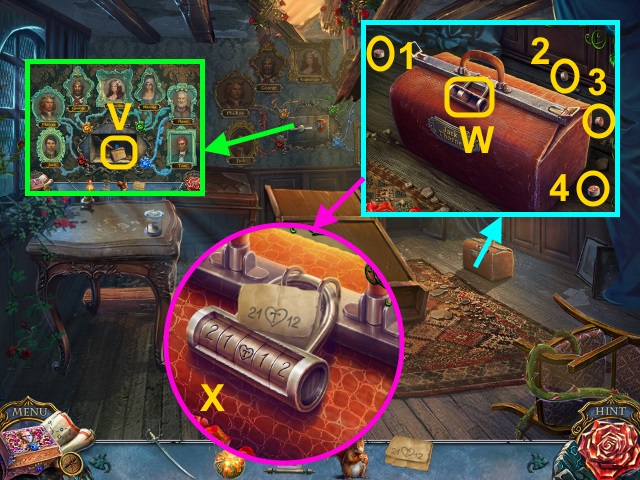
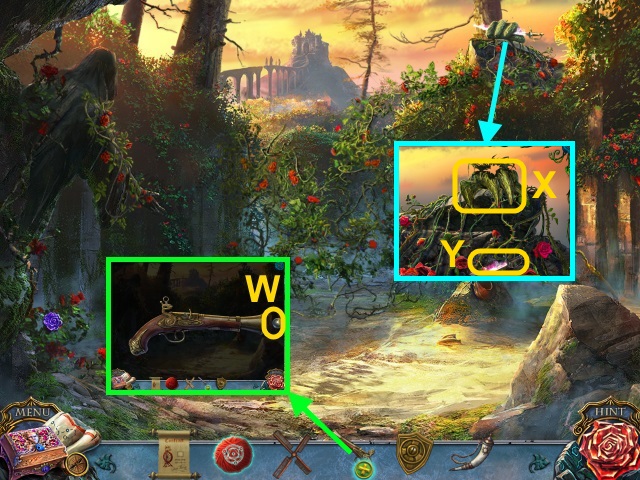
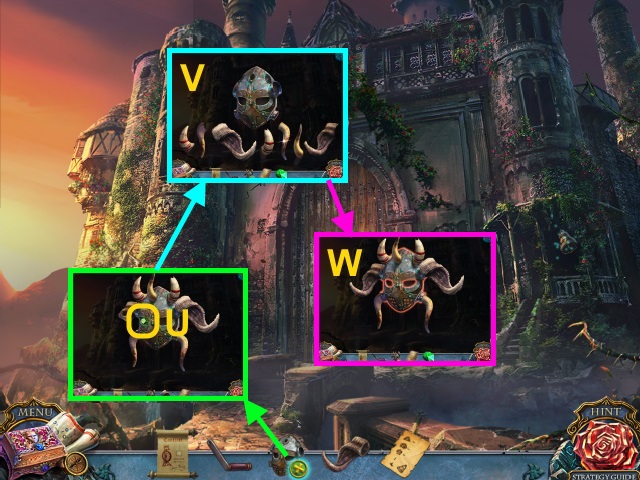
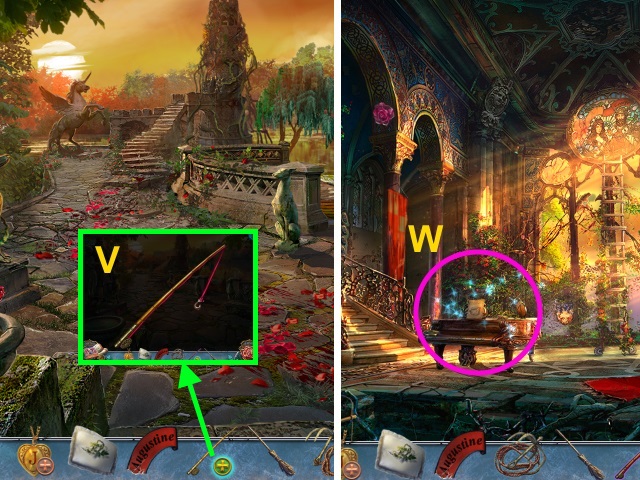
- Place the MONOGRAM SEAL for a mini-game (V).
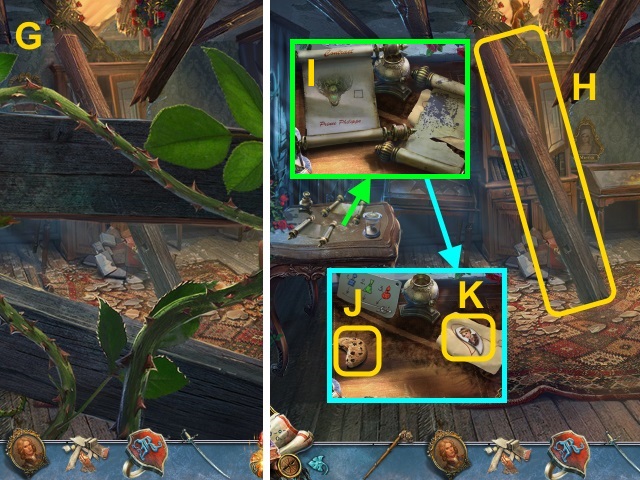
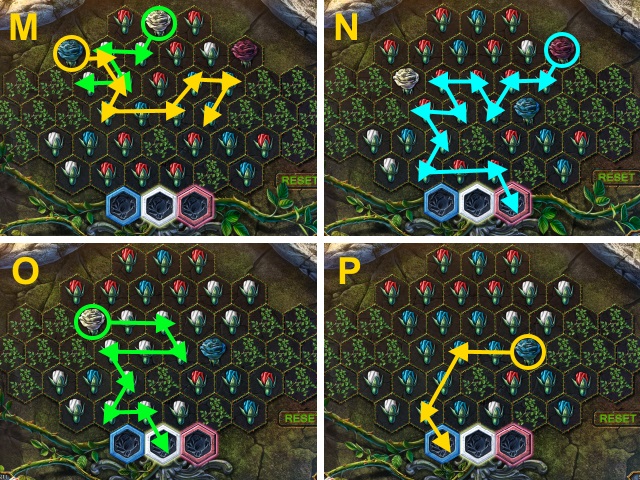
- Solution (W).
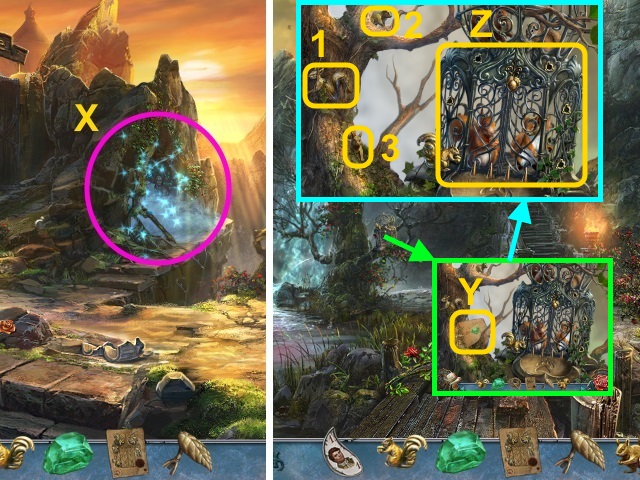
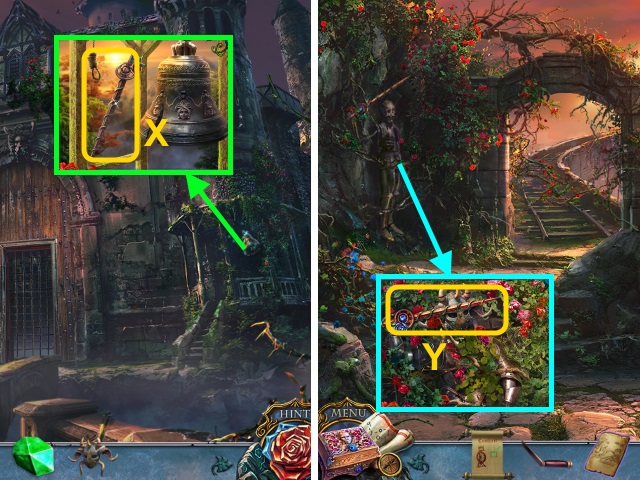
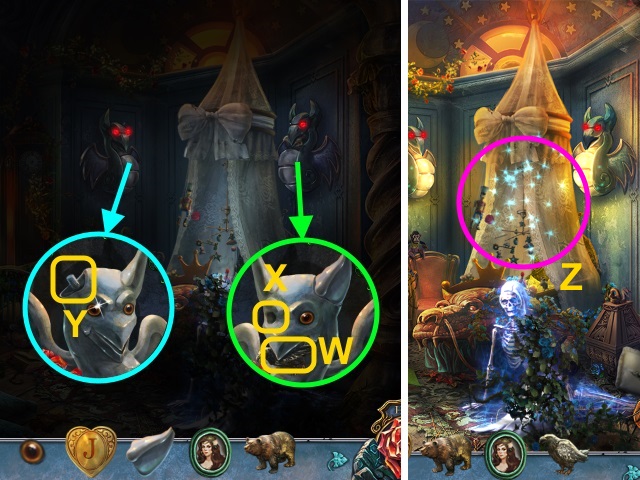
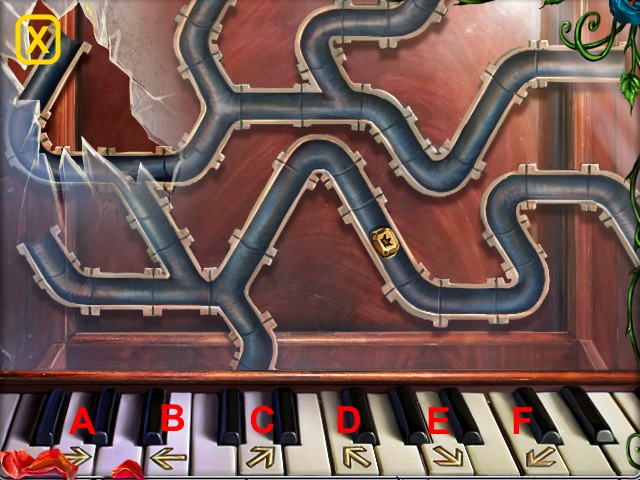
- Play the HOP; receive the SQUIRREL FIGURINE (X).
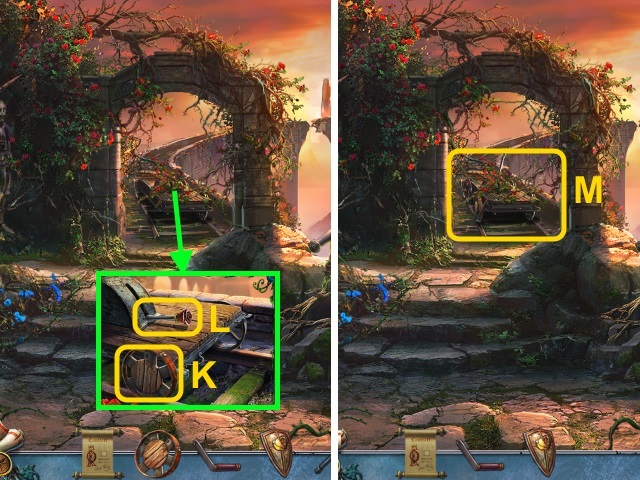
- Walk down.
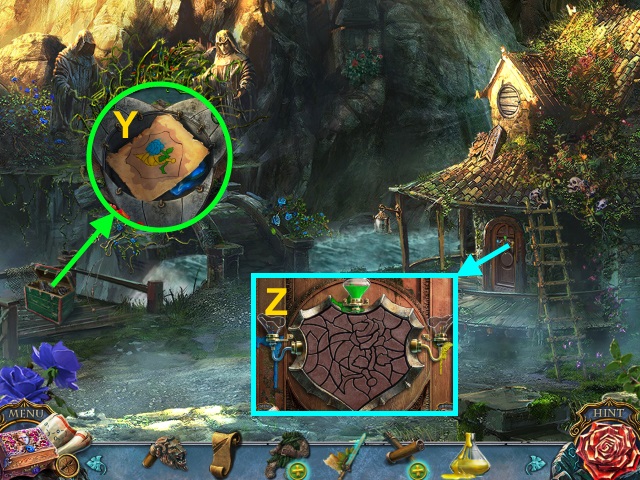
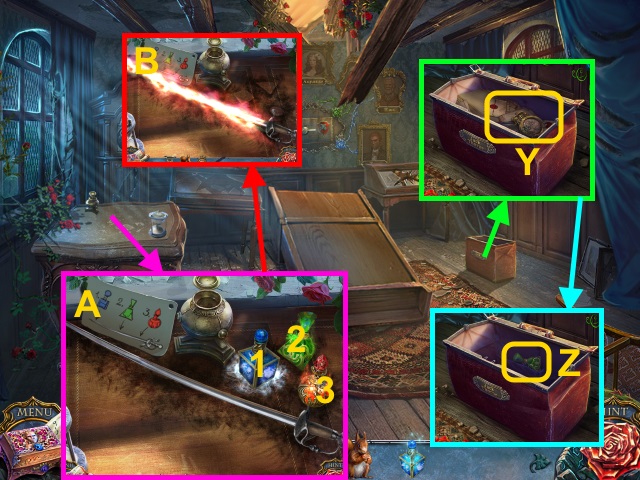
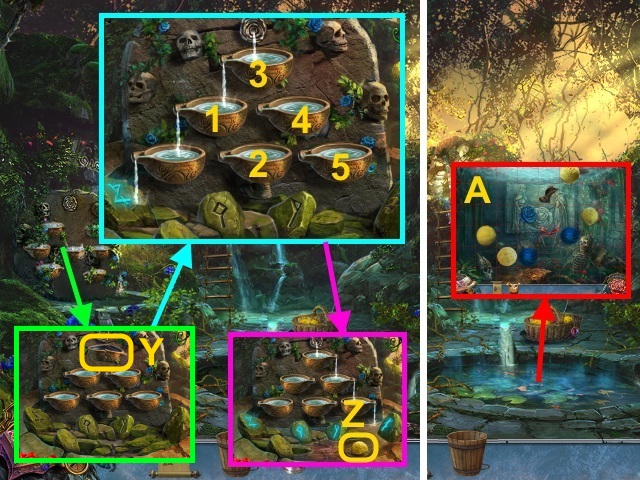
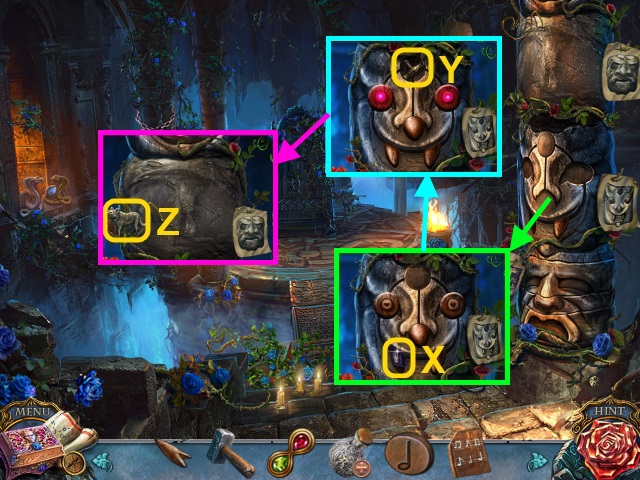
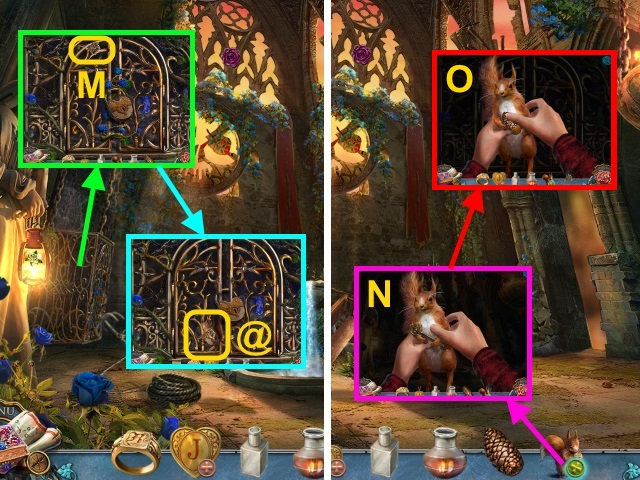
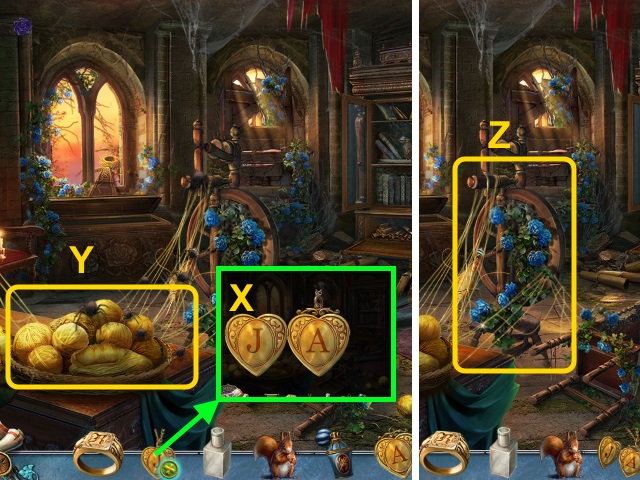
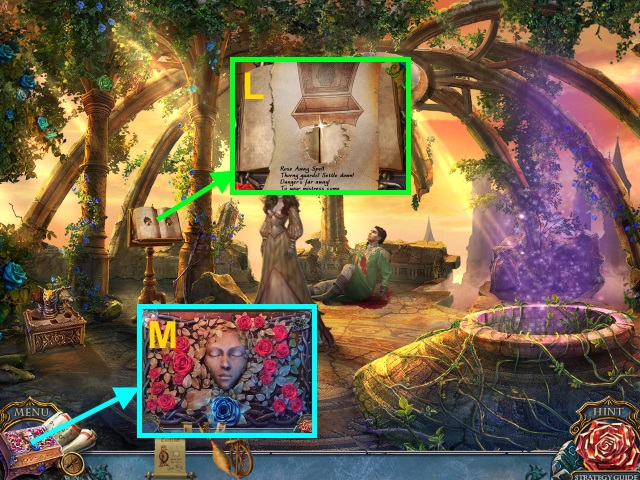
- Read the note (Y).
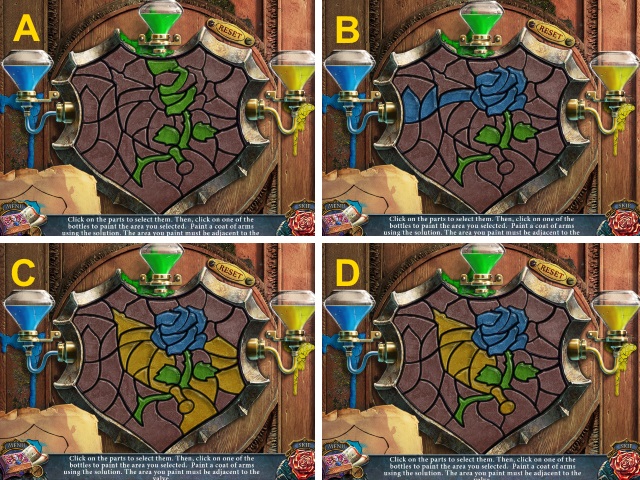
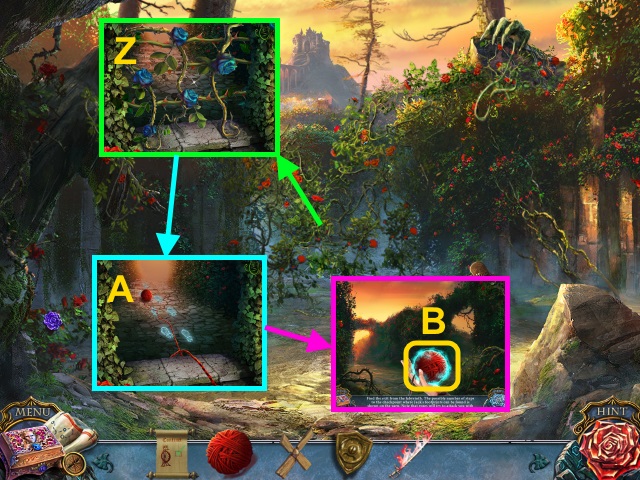
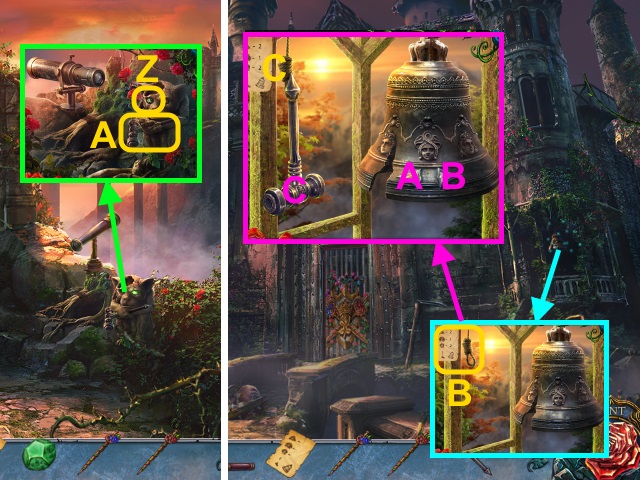
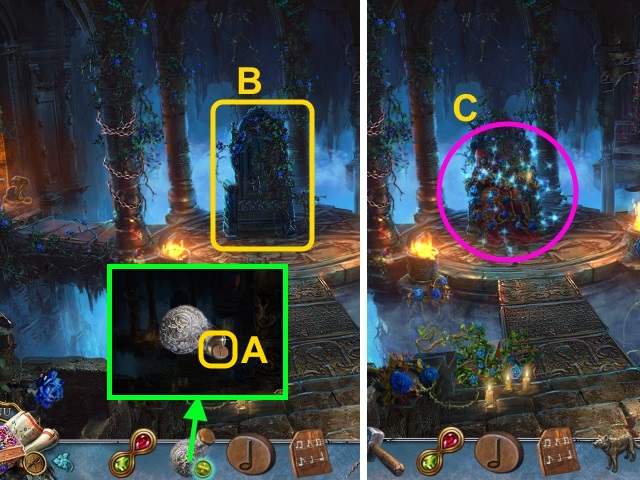
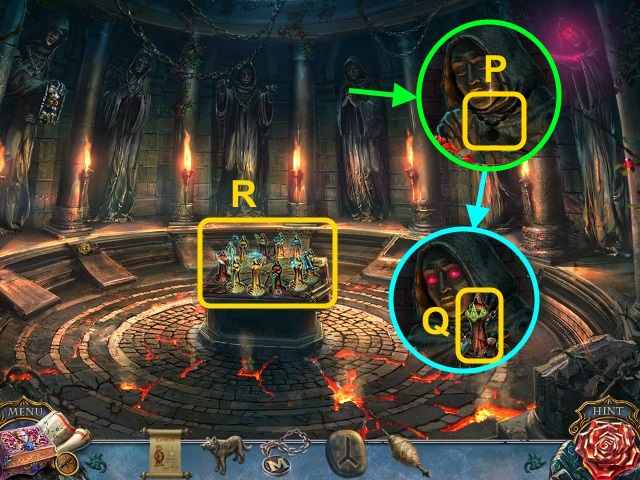
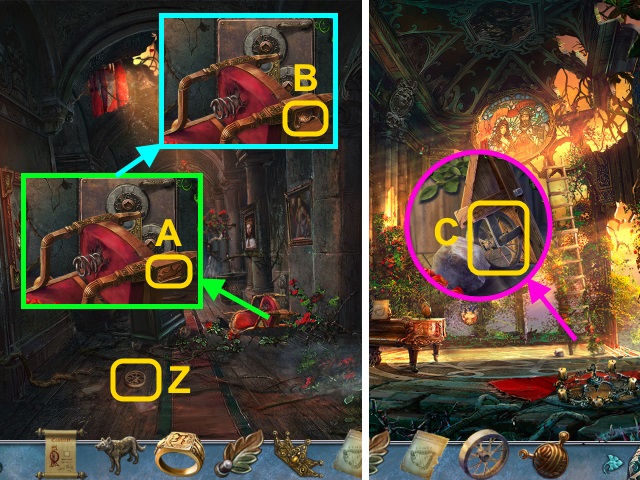
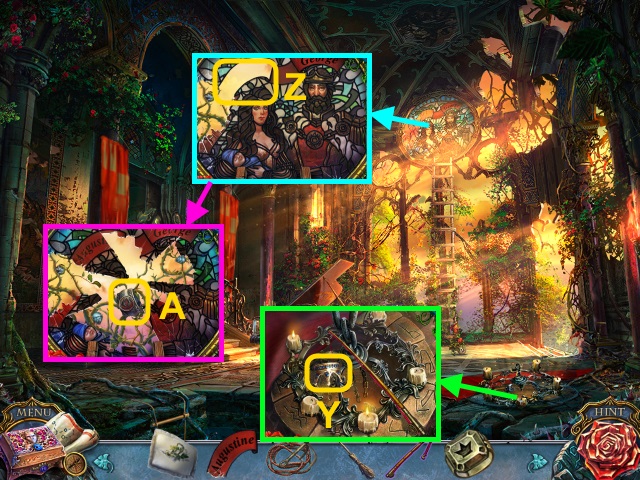
- Collect the figurines (1-3); place the 2 SQUIRREL FIGURINES and CAGE SKETCH for a mini-game (Z).
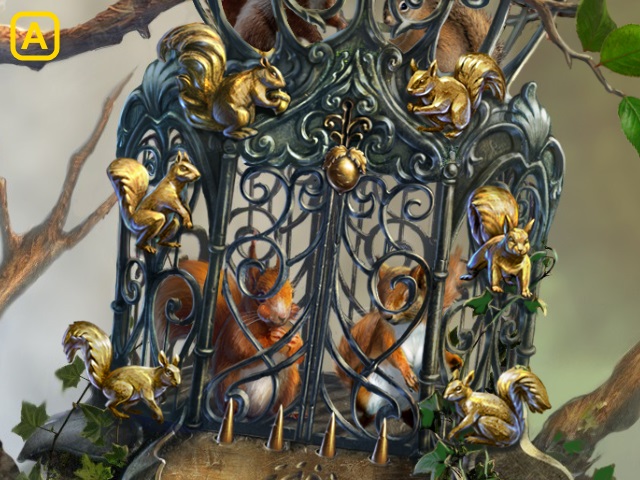
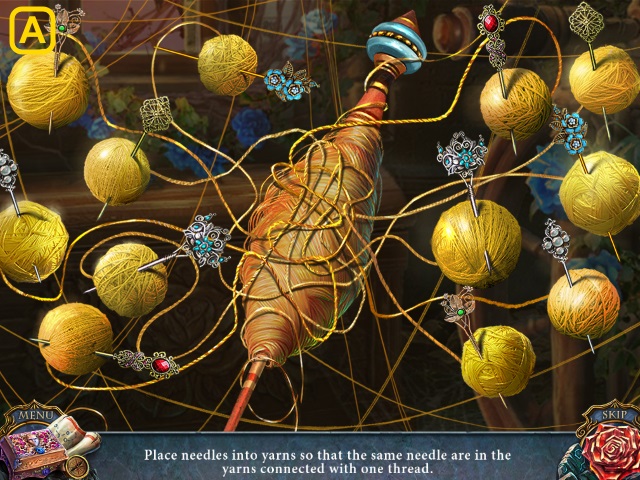
- Solution (A).
- Receive the SQUIRREL.

- Use the SQUIRREL (B); receive the SQUIRREL WITH A KEY.
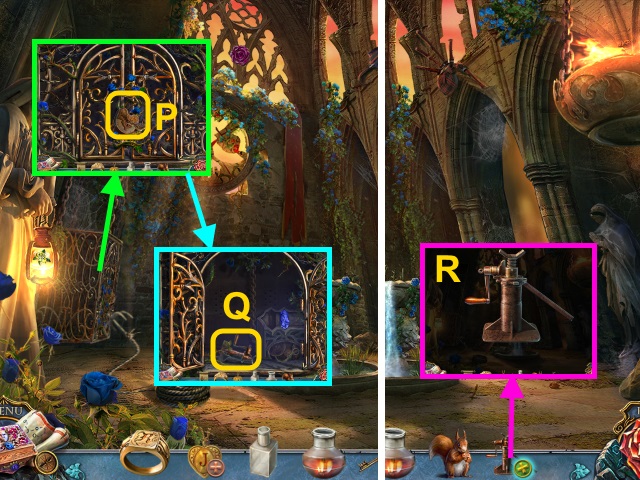
- Use the ROPE; take the GRAPPLING HOOK (C).
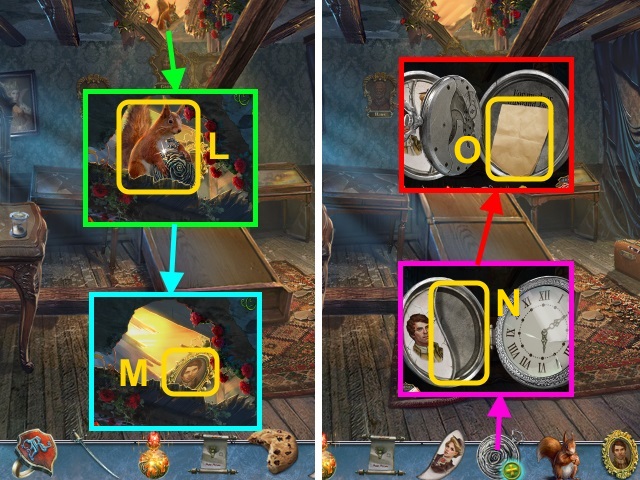
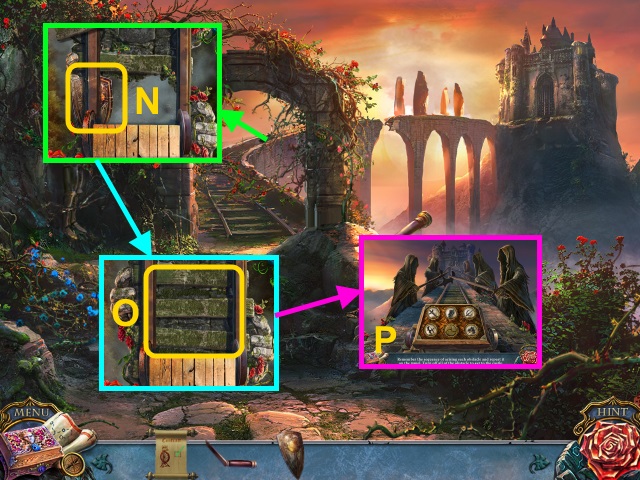
- Use the GRAPPLING HOOK (D).
- Use the PRONGED KEY (1-3).
- Take the RUBY and NUTS (E).
- Combine the SQUIRREL WITH A KEY and NUTS (F); receive the MILLER'S KEY.
- Walk forward, then right.
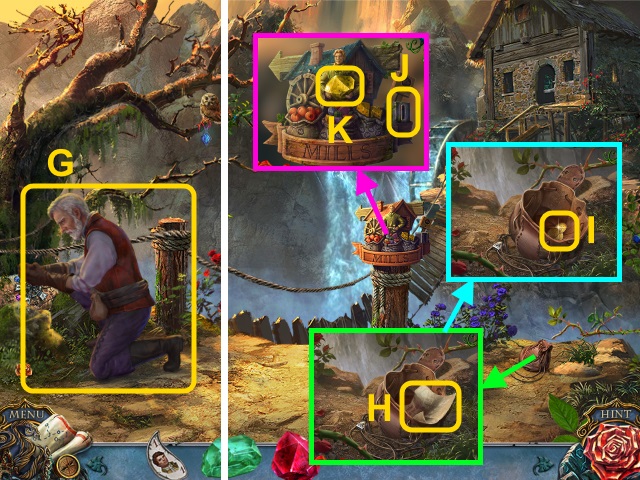
- Give the MILLER'S KEY (G).
- Open the bag; take the note (H).
- Take the 3 COINS (I).
- Use the 3 COINS (J); take the TOPAZ (K).
- Take the 1 COIN (L).
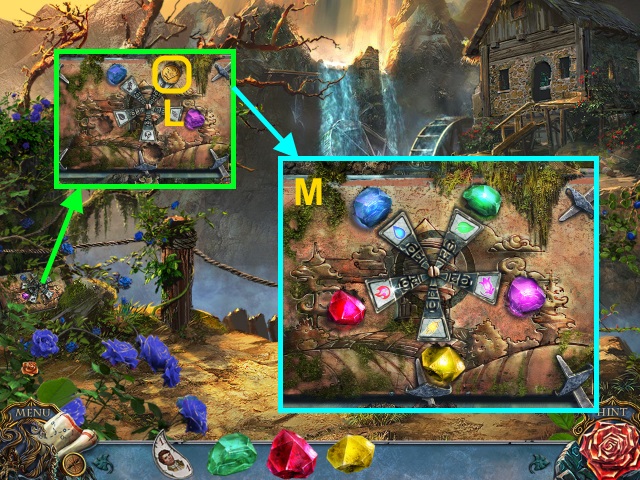
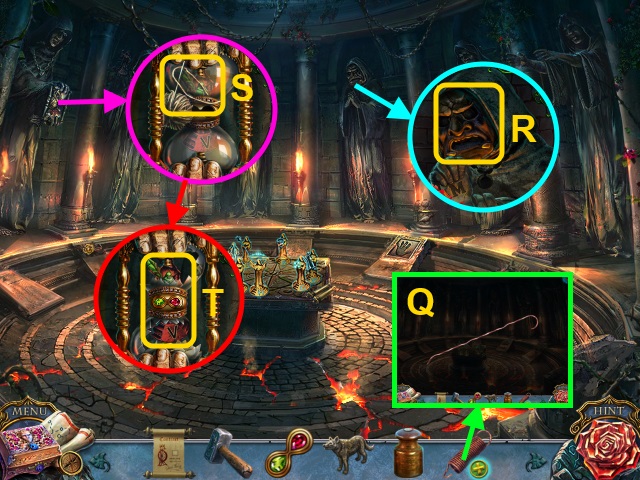
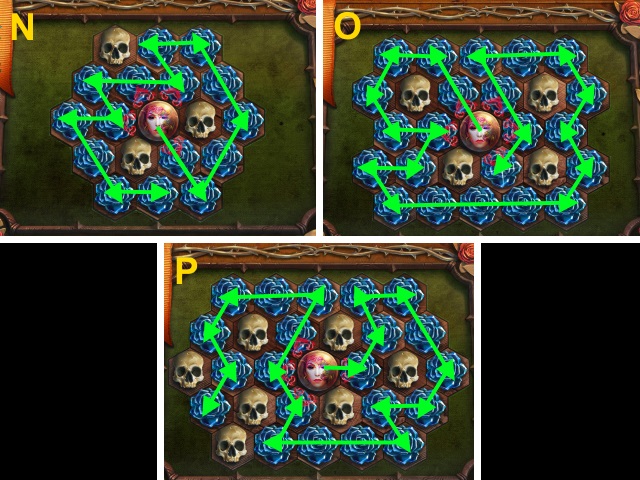
- Place the EMERALD, TOPAZ, and RUBY; arrange the blades for a mini-game (M).
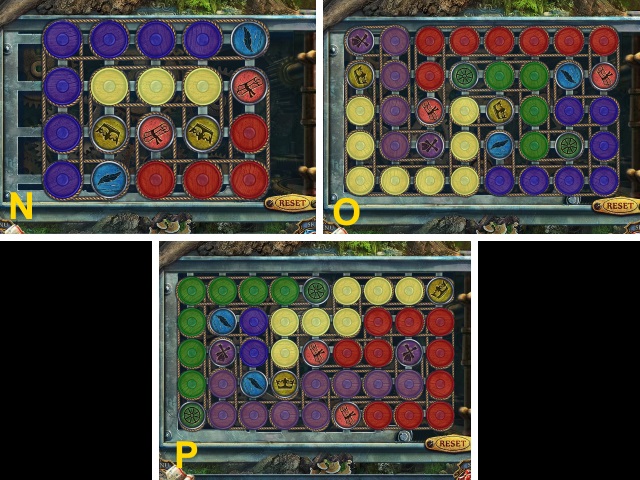
- Solution (N-P).
- Take the MILLER'S GLOVE (Q).
- Use the 1 COIN (R); take the APPLE (S).
- Walk forward.
- Use the MILLER'S GLOVE (T).
- Take the KNIFE (U).
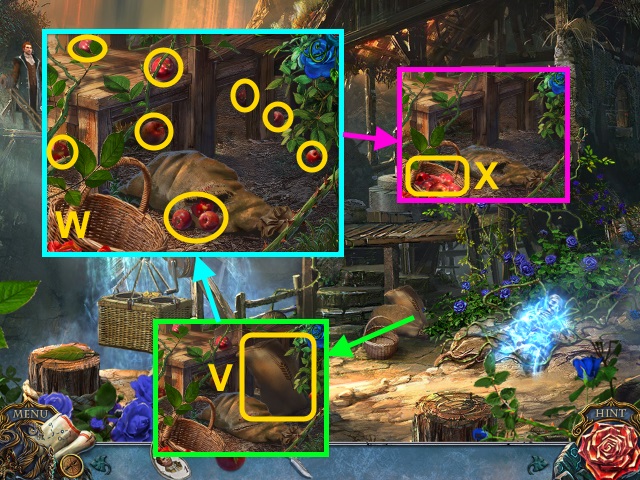
- Take the GRAIN BAG (V).
- Open the bag; collect the apples (W).
- Place the APPLE; take the APPLE BASKET (X).
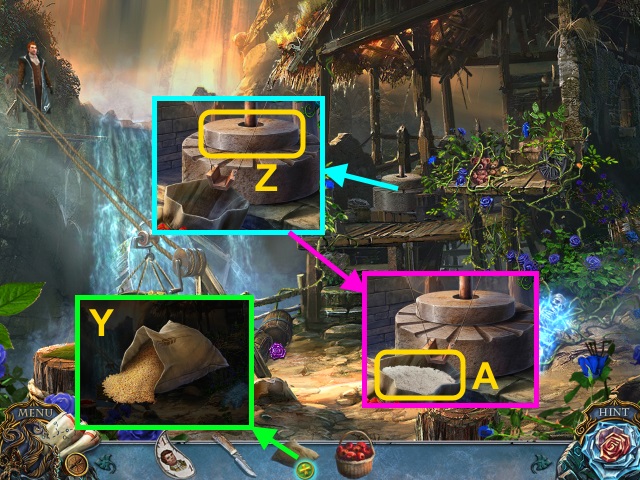
- Combine the GRAIN BAG and KNIFE (Y); take the GRAIN.
- Place the stone; pour the GRAIN (Z).
- Take the FLOUR (A).
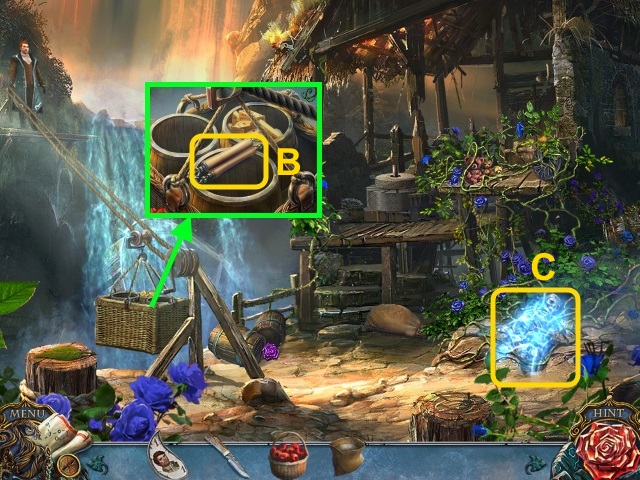
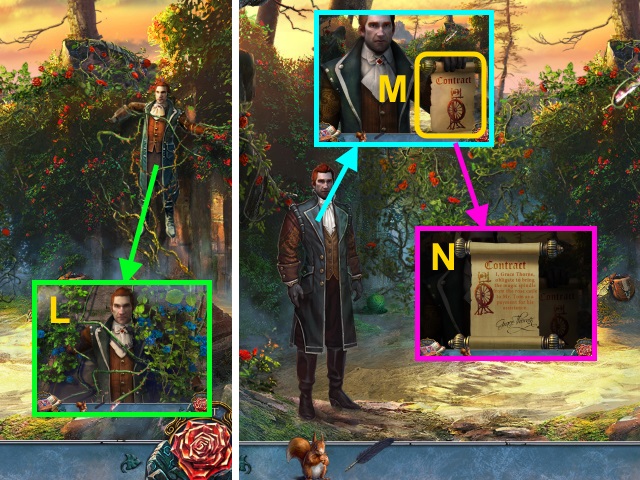
- Read the list (B); place the APPLE BASKET and FLOUR.
- Receive the MILLER'S CONTRACT.
- Use the MILLER'S CONTRACT (C).
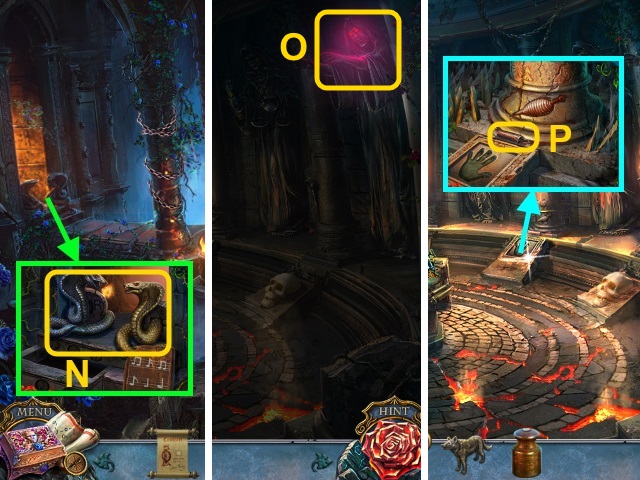
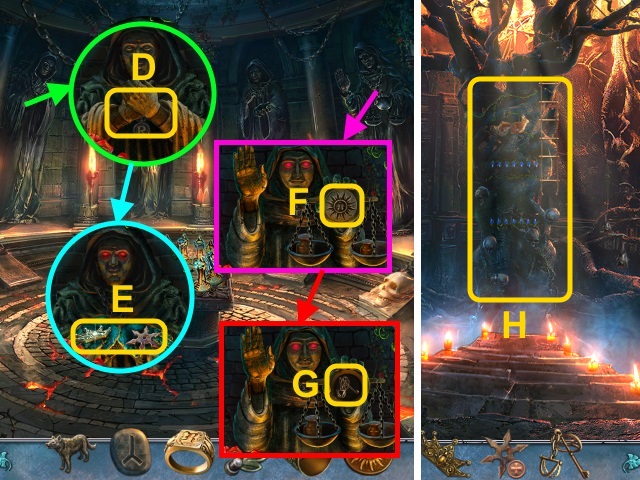
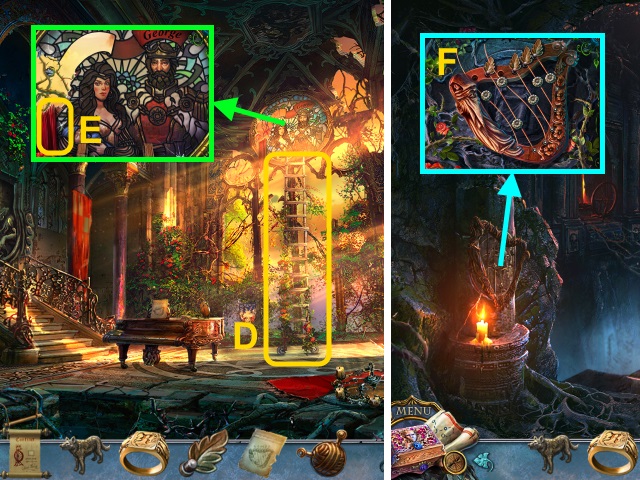
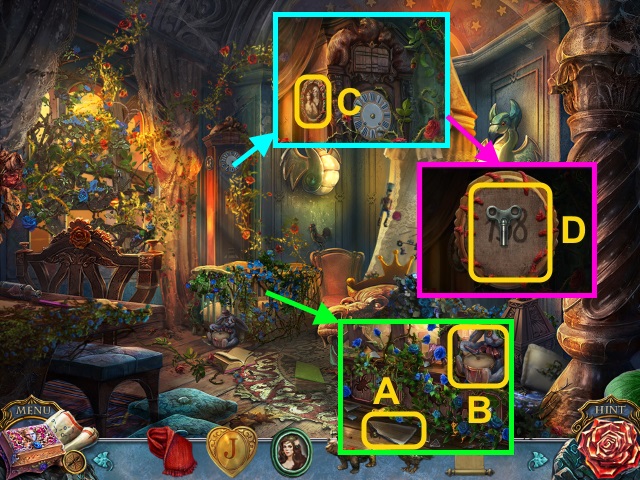
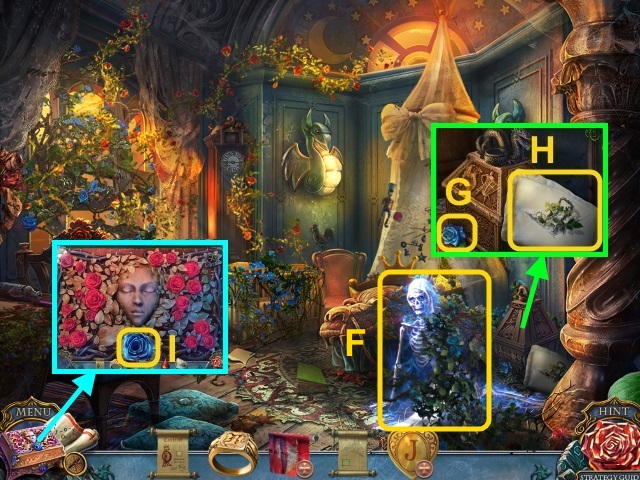
- Examine the rose (D); take the MILLER'S BLOOD and MILLER'S KEYS (E).
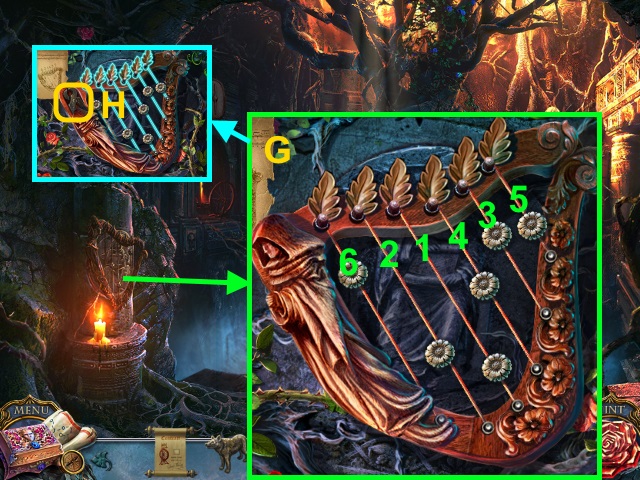
- Play the HOP; receive AUGUSTINE'S CASKET (F).
- Examine AUGUSTINE'S CASKET; read the letter (G).
- Remove the cloth; take the Casket (H).
- Examine the Casket (I); give the MILLER'S BLOOD (J).
- Receive the 5 COINS.
- Walk down.
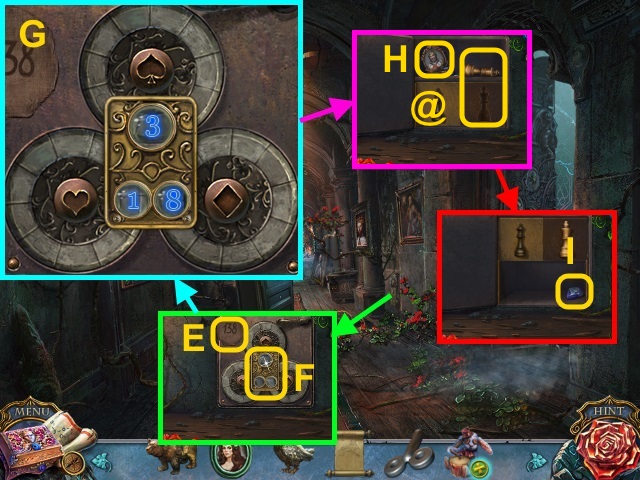
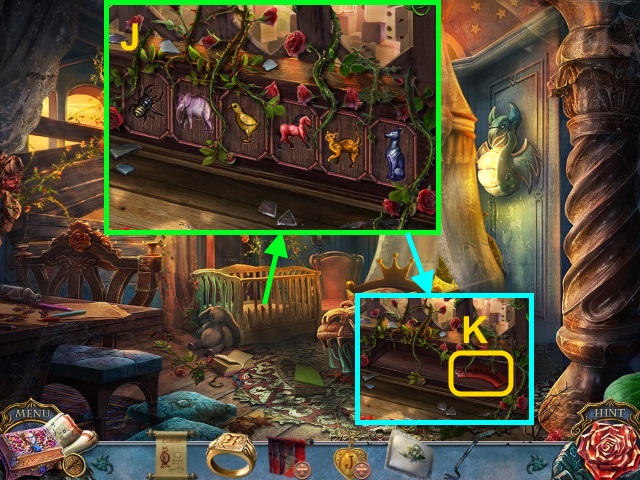
- Place the 5 COINS (K); take the MOUSE (L).
- Give the MOUSE; take the SAPPHIRE PENDANT (M).
- Walk down.
- Place the SAPPHIRE PENDANT; take the THORN TOKEN (N).
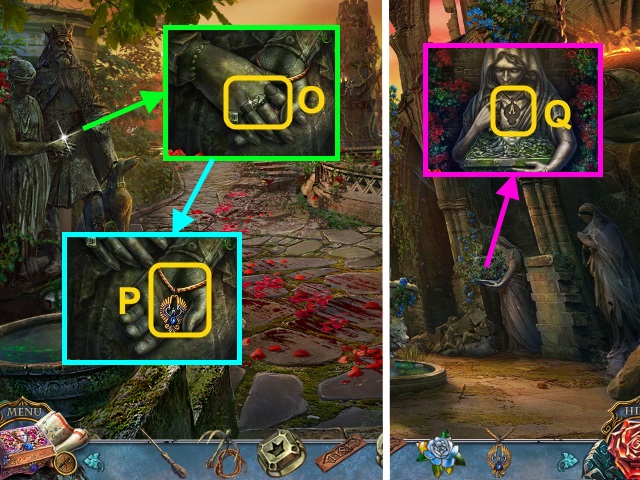
- Examine the squirrel (O); use the KNIFE (P).
- Receive JACK'S WATCH.
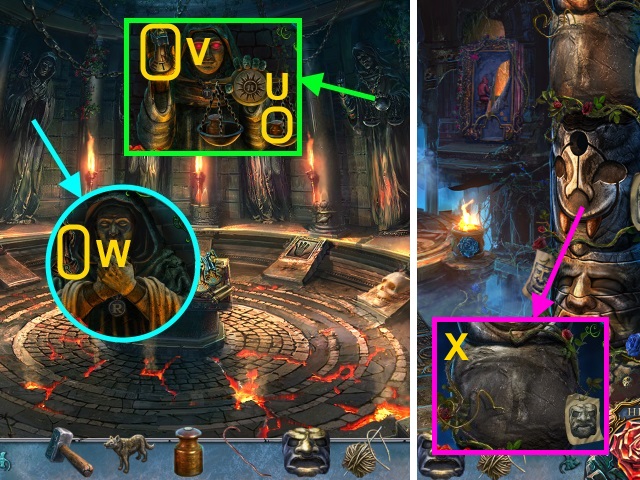
- Open JACK'S WATCH; place JACK'S PORTRAIT (Q).
- Take the THORN TOKEN (R).
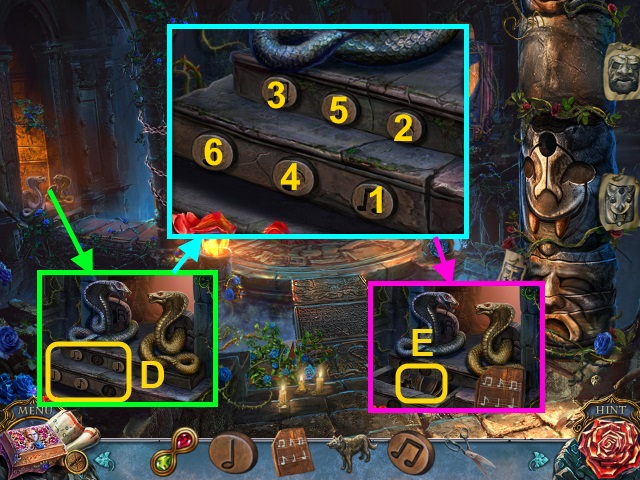
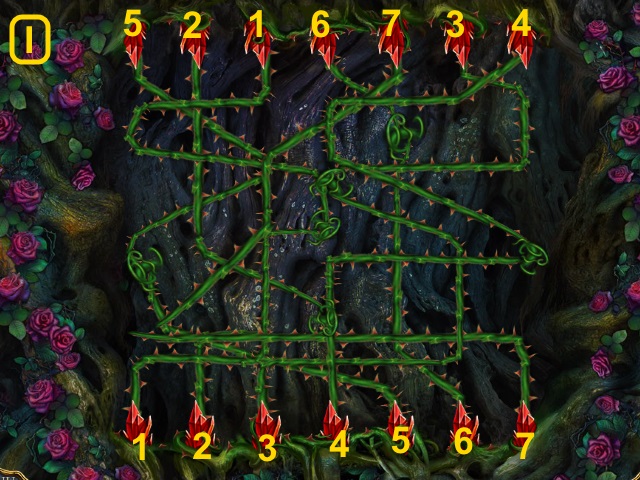
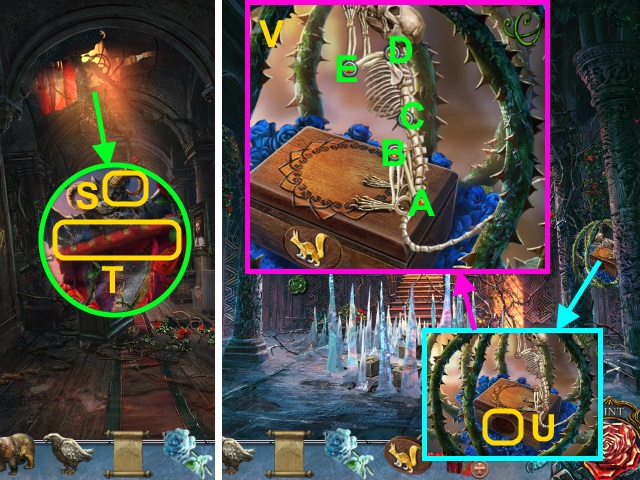
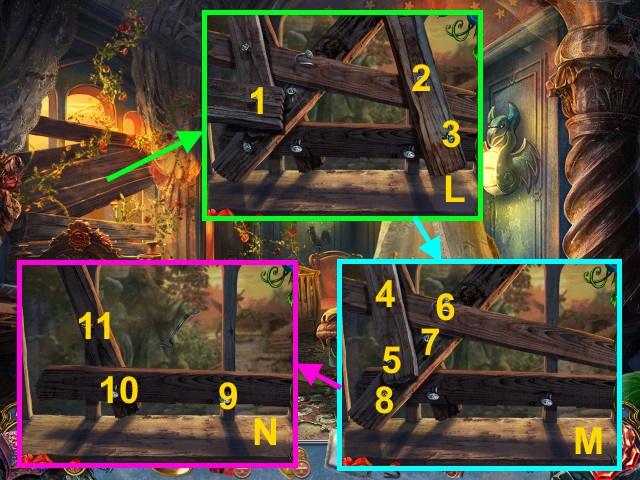
- Move the paper (S); place the 2 THORN TOKENS for a mini-game (T).
- Solution (U).
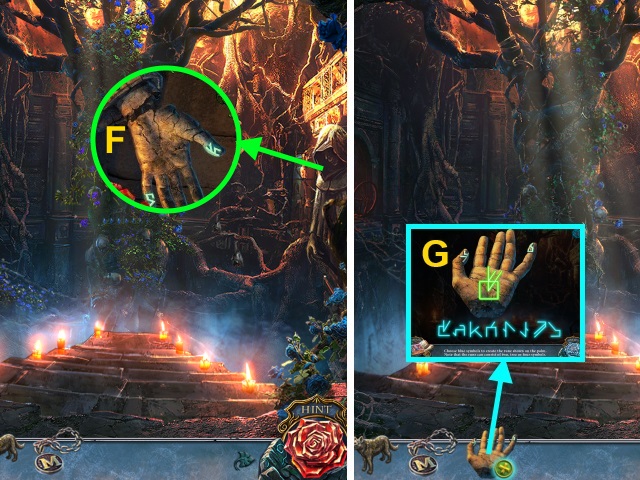
- Use the MILLER'S KEYS (V).
- Walk left.
Chapter 2: The Prince

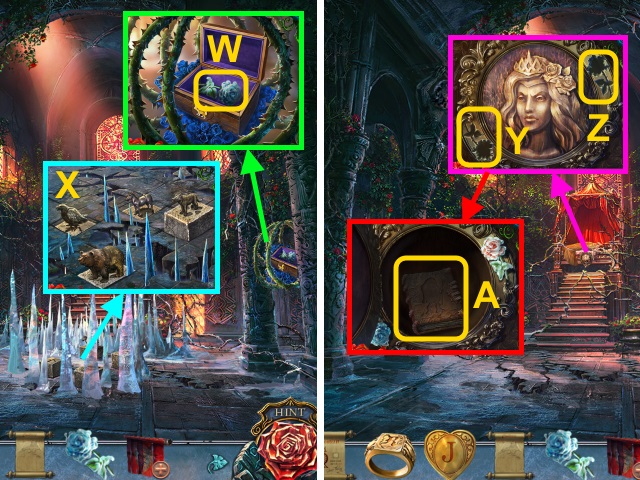
- Talk to Tom (W).
- Take the EMERALD EYE (X).
- Take JACK'S COAT (Y).
- Take the CANE HANDLE (Z).
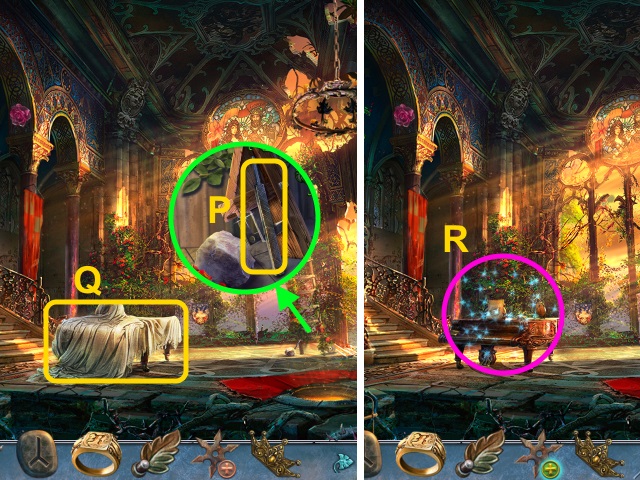
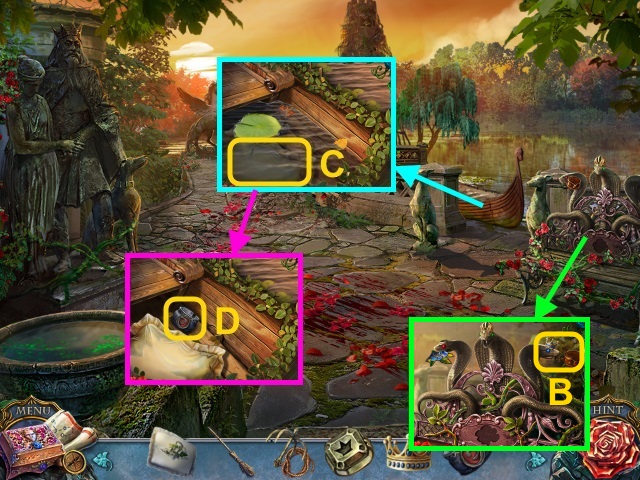
- Examine JACK'S COAT. Read the note; take the RUBY FIGURINE and WIRE CUTTERS (A).
- Move the leaves 3x (B).
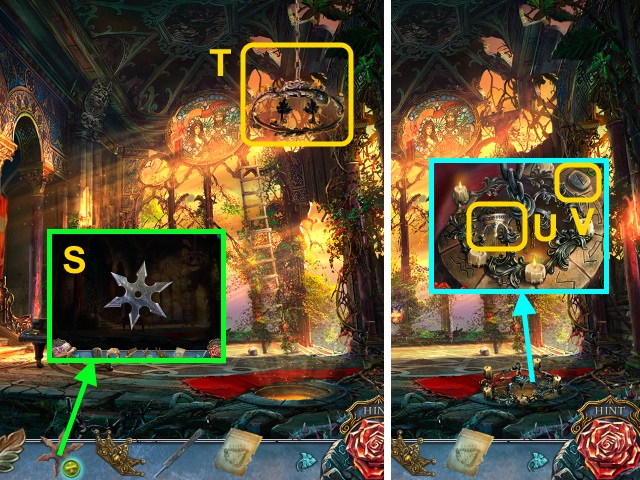
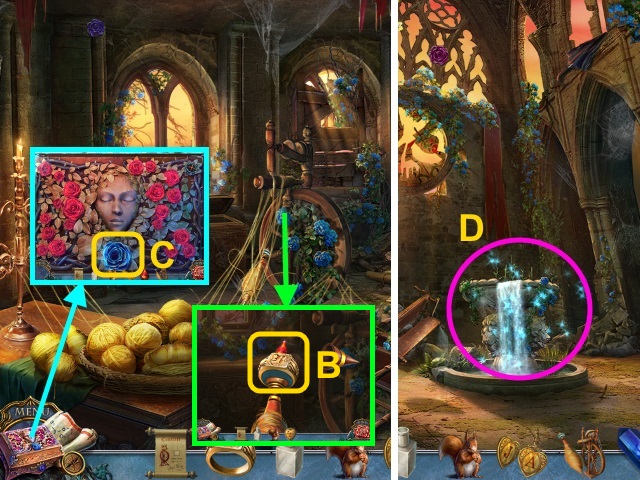
- Place the figurine (C) on the stand (D); place the RUBY FIGURINE (E).
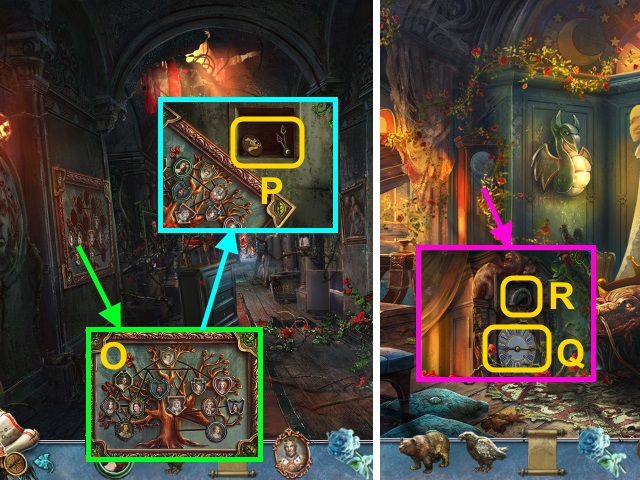
- Examine the SYMBOLS (F); take the METAL SCROLL PART (G).
- Examine the doll (H); place the decoration (I) on the fountain (J).
- Place the EMERALD EYE (K); take the BROKEN DOLL (L).
- Read the scroll; use the WIRE CUTTERS (M).
- Take the LADDER (N).
- Walk forward.
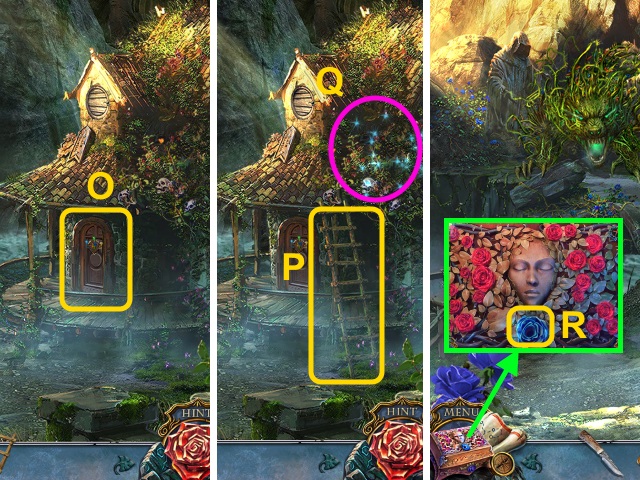
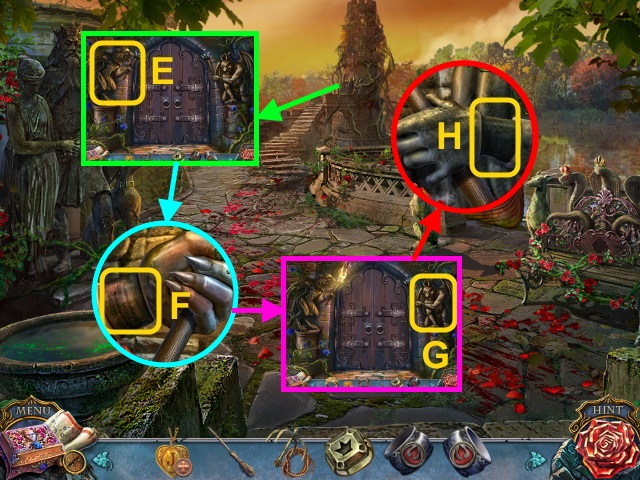
- Examine the door (O).
- Place the LADDER (P).
- Play the HOP; receive JACK'S BLOOD (Q).
- Examine the Casket; use JACK'S BLOOD (R).
- Receive the BIRD SKULL.
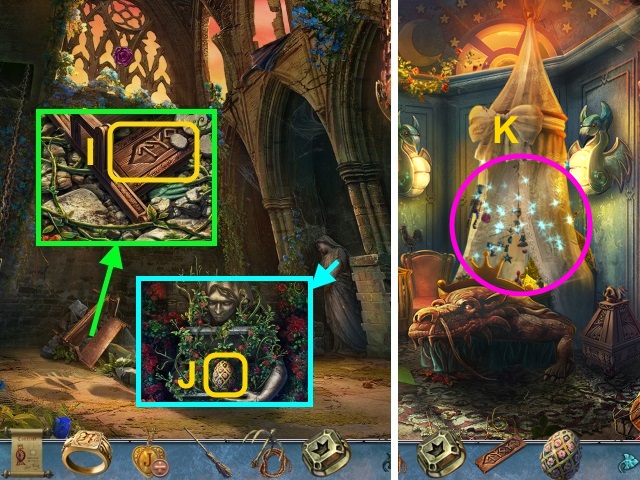
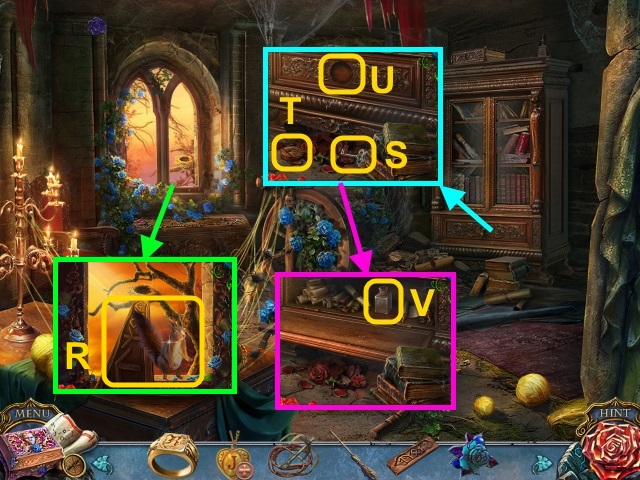
- Move the rags (S).
- Open the chest; take the DOLL ACCESSORIES and BROKEN CANE (T).
- Examine the sign 2x (U).
- Use the KNIFE; take the YELLOW PAINT (V).

- Examine the decoration (W); place the BIRD SKULL (X).
- Select the skulls (1-3).
- Take the CREST PICTURE and BLUE PAINT (Y).
- Use the YELLOW PAINT, BLUE PAINT, and CREST PICTURE for a mini-game (Z).
- Solution (A-D).
- Walk right.
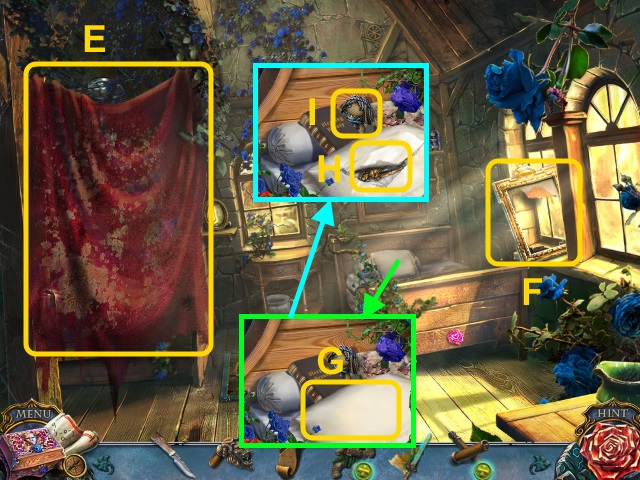
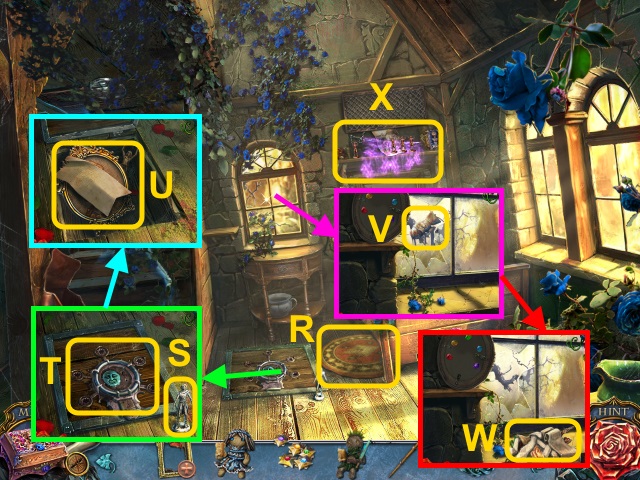
- Move the cloth (E).
- Take the EMPTY FRAME (F).
- Move the pillow (G); use the KNIFE.
- Take the figurine (H) and PRINCESS DOLL (I).
- Move the mirror; take the HANDLE (J).
- Open the bag; take the STAR BUTTONS and DOLL'S HEAD (K).
- Combine the BROKEN DOLL, DOLL ACCESSORIES, and DOLL'S HEAD (L).
- Assemble the doll; take the PRINCE DOLL (M).
- Walk down.
- Use the HANDLE (N); open the window.
- Take the CANE PART (O).
- Combine the BROKEN CANE, CANE HANDLE, and CANE PART (P); take the CANE.
- Use the CANE; take the SILVER MOON (Q).
- Walk right.
- Move the rug (R).
- Take the figurine (S); place the STAR BUTTONS and SILVER MOON (T).
- Read the note; take the PRINCE'S PORTRAIT and figurine (U).
- Use the CANE (V).
- Examine the bundle; take the SLASHED PORTRAIT and figurine (W).
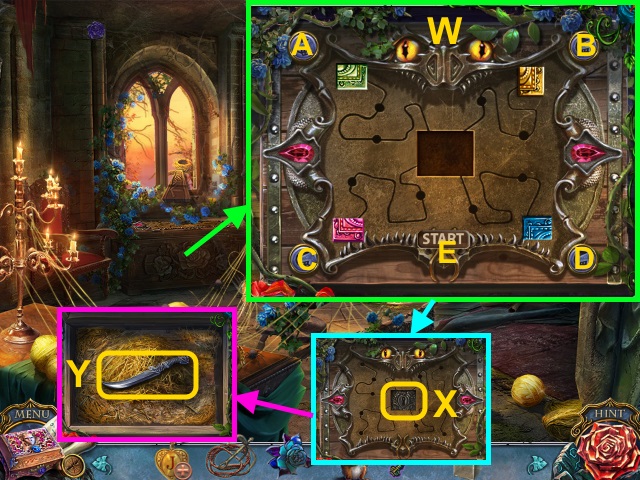
- Examine the shelf for a mini-game (X).
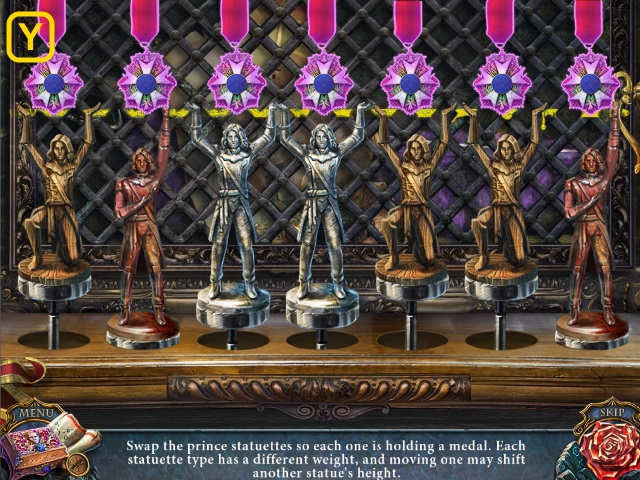
- Solution (Y).
- Take the METAL SCROLL PART; read the note (Z).
- Take the MAYOR'S RING (A) and note.
- Take the UNCHARGED SWORD (B).
- Walk down twice.
- Place the 2 METAL SCROLL PARTS (C).
- Place the PRINCESS DOLL and PRINCE DOLL (D).
- Play the HOP; take the BOOK OF WISHES (E).
- Read the BOOK OF WISHES; take the FLAME POTION (F).
- Go left.
- Use the UNCHARGED SWORD (G).
- Move the beam (H).
- Take the PRINCE'S CONTRACT (I).
- Take the COOKIE (J) and MY PORTRAIT (K).
- Give the COOKIE (L); receive the WEDDING PENDANT and GREEDY SQUIRREL.
- Take JACK'S PORTRAIT (M).
- Combine the WEDDING PENDANT and MY PORTRAIT (N); take the CODE (O).
- Use the CANE (P); remove the glass.
- Take the NEEDLE AND THREAD (Q).
- Combine the EMPTY FRAME and SLASHED PORTRAIT; use the NEEDLE AND THREAD (R).
- Take the MAYOR'S PORTRAIT.
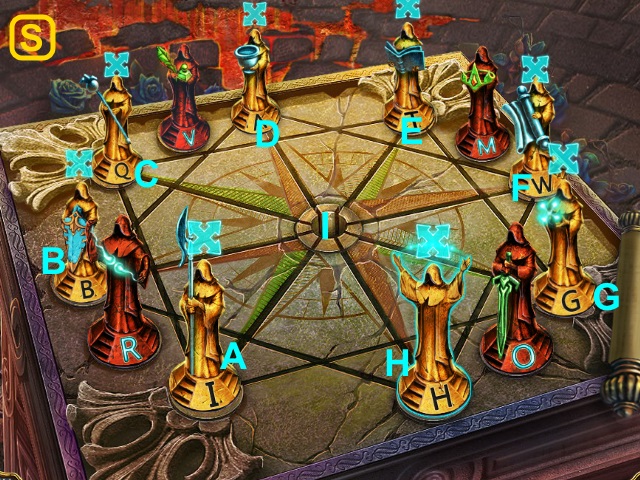
- Place the PRINCE'S PORTRAIT, JACK'S PORTRAIT, and the MAYOR'S PORTRAIT for a mini-game (S).
- Solution (T).
- Use the MAYOR'S RING (U).
- Take the note and ICE POTION (V).
- Collect the parts (1-4); examine the lock (W).
- Place the CODE; enter it (X).
- Take the EMPTY LIGHTER and QUILL (Y); read the notes.
- Take the POISON (Z).
- Place the FLAME POTION, UNCHARGED SWORD, ICE POTION and POISON (A); pour the potions in order (1-3).
- Take the ENCHANTED SWORD (B).
- Walk down, then forward.
- Use the EMPTY LIGHTER (C); receive the LIGHTER.
- Use the ENCHANTED SWORD for a mini-game (D).
- Solution is random (E); receive the COMPLETED CONTRACT.
- Walk right.
- Use the COMPLETED CONTRACT (F).
- Examine the rose (G); take the PRINCE'S BLOOD.
- Examine the box; use the PRINCE's BLOOD (H).
- Receive the ATTIC KEY.
- Use the ATTIC KEY (I).
- Take the GUNPOWDER BARRELS (J).
- Walk down.
- Place the GUNPOWDER BARRELS (K); use the LIGHTER.
- Walk forward.
Chapter 3: The King
- Talk to Tom; use the ENCHANTED SWORD (L).
- Talk to Tom; examine the contract (M).
- Use the QUILL; take MY CONTRACT (N).
- Receive the MAGIC YARN.
- Examine the sword (O).
- Take the FEATHER (P).
- Take the MILL BLADES FIGURINE (Q) and UNLOADED GUN (R).
- Examine the latch (S); use the GREEDY SQUIRREL.
- Use the FEATHER (T); receive the BAG LATCH.
- Place the BAG LATCH (U).
- Take the SHIELD VALVE and POWDER (V).
- Combine the UNLOADED GUN and POWDER; examine the bullet (W).
- Take the GUN.
- Use the GUN (X); take the ENCHANTED SWORD (Y).
- Use the ENCHANTED SWORD (Z).
- Use the MAGIC YARN (A).
- Walk forward.
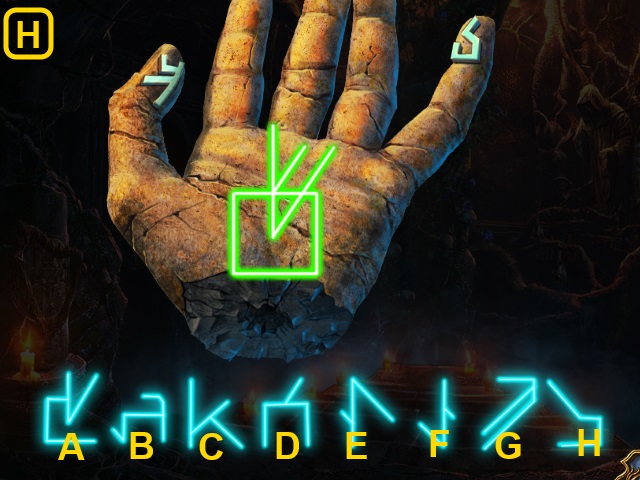
- Examine the yarn for a mini-game (B).
- Solution: left x2, forward.
- Right, left x2, forward, right.
- Left, forward x2, left, right, forward.
- Try to walk right (C).
- Take the scarf (D).
- Read the note (E); take the STONE EYE (F).
- Take the ROPE (G).
- Place the pitchfork (H) under the gate (I).
- Walk right.
- Gather the yarn (1-2).
- Take the BROKEN ROPE LADDER (J).
- Combine the BROKEN ROPE LADDER, SCARF, and ROPE (K); take the ROPE LADDER.
- Use the ROPE LADDER (L).
- Place the STONE EYE (M); take the yarn, SUN VALVE (N), and LEAKY BUCKET (O).
- Place the MILL BLADES FIGURINE (P); take the FLINT and PLATE (Q).
- Place the SUN VALVE and SHIELD VALVE (R); turn them.
- Turn the valve (S); collect the yarn (T).
- Combine the LEAKY BUCKET and PLATE (U); take the BUCKET.
- Walk down.
- Play the HOP (V); use the FLINT (W).
- Play the HOP; receive the BOWL (X).
- Walk right.
- Remove the bowl; place the BOWL for a mini-game (Y).
- Select the bowls in order (1-5).
- Collect the yarn (Z).
- Use the BUCKET for a mini-game (A).
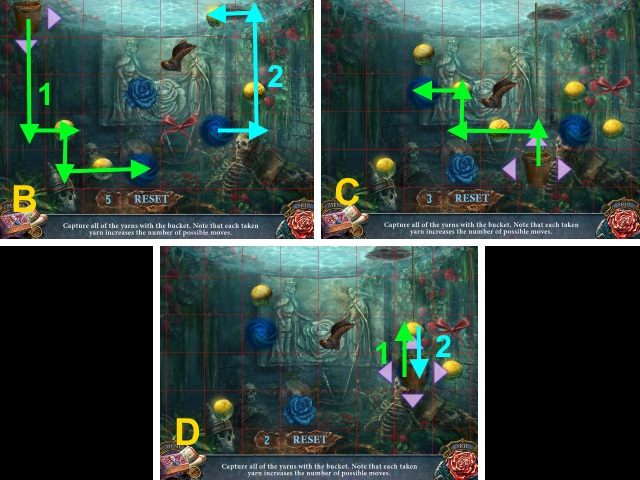
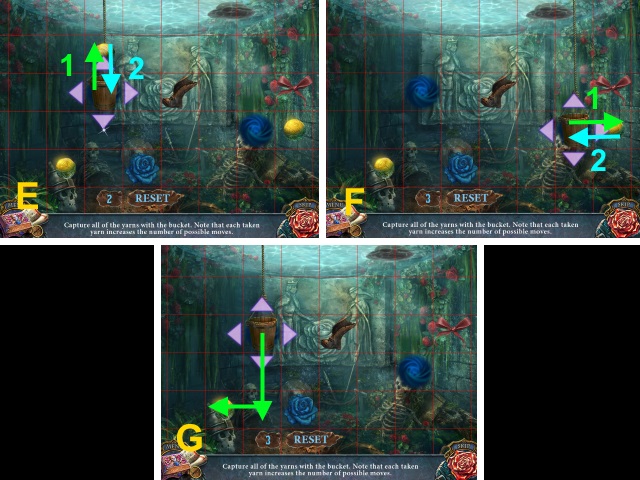
- Solution (B-G).
- Receive the GOLDEN YARN.
- Place the GOLDEN YARN (H); take the KING'S CONTRACT (I).
- Use the KING'S CONTRACT (J).
- Examine the rose (K); take the KING'S BLOOD and STONE TABLET (L).
- Use the KING'S BLOOD (M); receive the FISH FIGURINE.
- Walk down.
- Place the STONE TABLET (N); take the LENS (O).
- Place the FISH FIGURINE (P).
- Walk left.
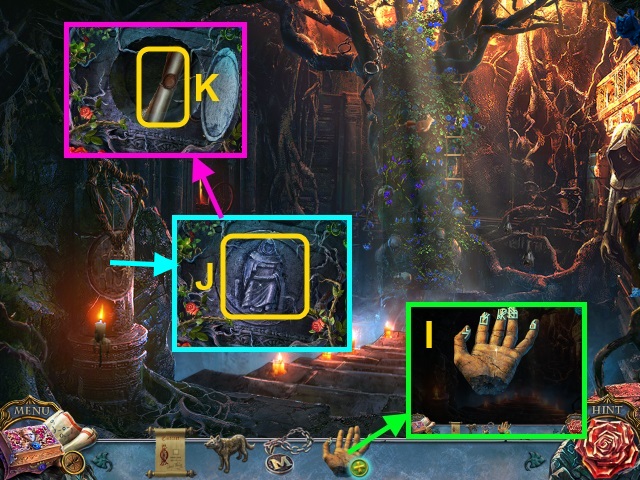
- Examine the vines; take the BROKEN WHEEL (Q).
- Examine the BROKEN WHEEL; repair it (R).
- Take the WHEEL.
- Take the TROWEL (S).
- Take the HAT (T).
- Remove the lens (U); place the LENS.
- Take the AX HANDLE (V).
- Walk down.

- Play the HOP; receive the ACID (W).
- Place the AX HANDLE; take the AX (X).
- Walk right.
- Use the TROWEL; take the HANDLE (Y).
- Pour the ACID; take the STATUE HAND (Z).
- Place the STATUE HAND (A); take the 'A' MEDALLION (B).
- Walk down, then left.
- Use the AX (C).
- Collect the pieces (D).
- Take the SHIELD (E) and note (F).
- Examine the shoe (G); place the 'A' MEDALLION (H).
- Use the HAT (I); receive the SQUIRREL.
- Use the SQUIRREL; take the LEVER (J).
- Place the WHEEL (K) and LEVER (L).
- Examine the cart 2x (M).
- Place the SHIELD and rail (N).
- Move the planks for a mini-game (O).
- Solution is random (P).
- Examine Jack (Q).
- Take the HELMET (R).
- Take the HELMET HORN (S) and BELL MELODY (T).
- Examine the HELMET; take the IMP EYE (U).
- Examine the horns; use the HELMET HORN (V).
- Place the horns; take the HELMET (W).
- Take the SWORD DECORATION (X).
- Walk down.
- Place the HELMET; take the SWORD DECORATION (Y).
- Place the IMP EYE (Z); take the HAMMER (A).
- Walk forward.
- Place the BELL MELODY; use the HAMMER for a mini-game (B).
- Solution (C): B-Cx2-B-C-B-Cx2.
- Take the SUN FIGURINE (D).
- Place the 2 SWORD DECORATIONS (E).
Chapter 4: Walter
- Take the SAW (F).
- Place the HANDLE (G); turn it.
- Take the MOON FIGURINE (H).
- Take the GAUNTLET (I).
- Place the SUN FIGURINE and MOON FIGURINE (J); take the STONE TOOTH and STONE ROSE (K).
- Use the STONE ROSE for a mini-game (L).
- Solution (M-P).
- Take the HAMMER (Q).
- Place the stones (R); take the WISH MASTER SYMBOL (S).
- Use the GAUNTLET (T); take the BOTTLE.
- Walk forward.

- Take the NOTE BUTTON (U).
- Take the CLUE FOR NOTE BUTTONS (V).
- Arrange the totem pole (W).
- Move the stone; place the STONE TOOTH (X).
- Take the CORKSCREW (Y).
- Take the WOLF STATUETTE (Z).
- Combine the BOTTLE and CORKSCREW; take the NOTE BUTTON (A).
- Examine the chair (B).
- Play the HOP; receive the SCISSORS (C).
- Place the 2 NOTE BUTTONS and CLUE FOR NOTE BUTTONS (D).
- Press the BUTTONS (1-6); take the GOBLET (E).
- Walk down twice.
- Use the SAW (F); examine the bucket (G).
- Use the GOBLET; take the FLUTE (H).

- Use the SCISSORS (I); use the SCOOP (J) on the flour.
- Take the FLOUR (K).
- Walk forward.
- Use the FLOUR (L); examine the statue.
- Examine the marks (1-3); take the WEIGHT (M).
- Walk forward.
- Use the FLUTE (N).
- Walk left.
- Examine the statue (O).
- Take the SPRING (P).
- Examine the SPRING 2x (Q); take the LONG HOOK.
- Take the ANGRY MASK (R).
- Take the NEEDLE AND THREAD (S).
- Place the WISH MASTER SYMBOL; collect the figurine (T).
- Place the WEIGHT (U); collect the figurine (V).
- Collect the figurine (W).
- Walk down.
- Place the ANGRY MASK (X).

- Use the NEEDLE AND THREAD (Y); take the ENCRUSTED MEDALLION (Z).
- Walk down.
- Examine the plate; use the LONG HOOK (A).
- Take the FRAME PLATE (B).
- Close the lid (C); place the ENCRUSTED MEDALLION.
- Take the STATUE MEDALLION (D).
- Walk forward.
- Place the FRAME PLATE (E).
- Walk right.
- Use the HAMMER 2x; take the STONE HAND (F).
- Examine the STONE HAND for a mini-game (G).
- Solution (H): (A-D)-(C-F-G)-(B-E-F-H).
- Take the STONE HAND (I).
- Open the door (J); take the scroll and AWL (K).
- Walk down, then left.
- Place the STONE HAND (L).
- Take the RUNE STONE (M).
- Use the AWL (N); receive the SUPPORTED SPINDLE.
- Collect the figurine (O).
- Place the STATUETTE MEDALLION (P); collect the figurine and LEAF BUTTON (Q).
- Examine the board for a mini-game (R).
- Solution (S): C-E-I-D-F-I-B-H-I-A-G-I.
- Place the SUPPORTED SPINDLE; take TOM'S SIGNET RING (T).
- Take WALTER'S CONTRACT.
- Walk down.
- Use WALTER'S CONTRACT (U).
- Play the HOP; receive the LATE WISH MASTER'S BLOOD (V).
- Use the LATE WISH MASTER'S BLOOD (W); receive the LETTER 'W'.
- Walk right.
- Place the LETTER 'W' (X); take the STATUE BRACELET (Y) and PATCH WITH CODE (Z).
- Walk down.
- Examine the box (A).
- Place the PATCH WITH CODE for a mini-game; solution (B).
- Take the SUN SYMBOL (C).
- Walk left.
- Place the STATUE BRACELET (D).
- Take the BLUNT SHURIKEN and CROWN FIGURINE (E).
- Place the SUN SYMBOL (F).
- Take the TRAP KEY (G).
- Walk down, then right.
- Examine the thorns for a mini-game (H).
- Solution (I).
- Use the TRAP KEY for a mini-game (J).
- Solution (K-O).
- Go up.
Chapter 5: Martha
- Take the FILE (P).
- Move the cloth (Q).
- Play the HOP; receive the SHEET MUSIC (R).
- Combine the BLUNT SHURIKEN and FILE (S); take the SHURIKEN.
- Use the SHURIKEN (T).
- Examine the crown (U); take the RUNE STONE (V).
- Place the 2 RUNE STONES; press the stones (W).
- Go left.
- Take the LEAF BUTTON (X).
- Move the cabinet (Y).
- Take the LADDER WHEEL (Z).
- Place the CROWN FIGURINE (A).
- Take the YARN CLASP (B).
- Walk down.
- Place the LADDER WHEEL (C); move the rock.
- Move the ladder (D).
- Take the SCARF (E).
- Walk down.
- Place the 2 LEAF BUTTONS and SHEET MUSIC for a mini-game (F).
- Solution (G).
- Take the NIPPERS (H).
- Place the YARN CLASP; take the MAGNET (I).
- Go up, then left.
- Use the NIPPERS (J); take the CHAIR.
- Take the GLASS EYE (K).
- Place the CHAIR (L).
- Use the MAGNET (M); take the DOOR HANDLE.
- Place the DOOR HANDLE (N).
- Walk right.
- Examine Jack for a mini-game (O).
- Solution (P).
- Receive JACK'S MEDALLION.
- Play the HOP; receive AUGUSTINE'S BLOOD (Q).
- Use AUGUSTINE'S BLOOD (R); receive the ROOM KEY.
- Take the GLASS EAR (S).
- Take the BEAR STATUETTE (T).
- Take the PORTRAIT (U).
- Walk down.
- Use the ROOM KEY (V).
- Walk forward.
- Take the EAGLE STATUETTE (W); place the GLASS EYE (X).
- Place the GLASS EAR (Y).
- Play the HOP; receive MARTHA'S CONTRACT (Z).
- Use the SCARF (A); receive the SHARP SPLINTER.
- Take the BROKEN TOY (B).
- Examine the painting (C); flip it over.
- Use the SHARP SPLINTER; take the WINDING KEY and SAFE CODE (D).
- Walk down.
- Place the SAFE CODE (E); examine the safe for a mini-game (F).
- Solution (G).
- Take the PORTRAIT (H); place the chess piece (@).
- Take the CRYSTAL (I).
- Walk right.
- Remove the crystal; place the CRYSTAL (J).
- Take the ICE ROSE (K).
- Take the TOY PAW (L).
- Combine the BROKEN TOY, WINDING KEY, and TOY PAW (M); take the PORTRAIT (N).
- Walk down.
- Place the 3 PORTRAITS and portraits (O).
- Take the SQUIRREL MEDALLION and CLOCK HANDS (P).
- Walk forward.
- Place the CLOCK HANDS (Q); take the STONE HORN (R).
- Walk down.
- Examine the horn; place the STONE HORN (S).
- Take the BANNER (T).
- Walk right.
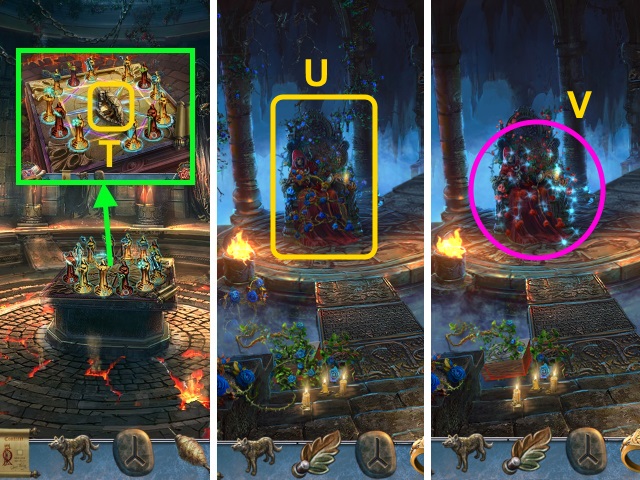
- Place the SQUIRREL MEDALLION for a mini-game (U).
- Solution (V): A-Bx2-C-Ex2.
- Take the ICE ROSE (W).
- Place the BEAR STATUETTE, WOLF STATUETTE, and EAGLE STATUETTE (X).
- Place the 2 ICE ROSES (Y-Z).
- Take AUGUSTINE'S DIARY (A).
- Play the HOP; receive the CROW DOLL'S HEAD (B).
- Place the CROW DOLL'S HEAD; take the CROW DOLL (C).
- Combine the CROW DOLL and AUGUSTINE'S DIARY (D); open it.
- Play the HOP; turn the page.
- Use JACK'S MEDALLION; take the FULFILLED MARTHA'S CONTRACT and HEART LOCKET.
- Walk down, then forward.
- Use FULFILLED MARTHA'S CONTRACT (F).
- Examine the rose (G); take MARTHA'S BLOOD and the PILLOW (H).
- Use MARTHA'S BLOOD (I); receive the NAIL PULLER.
- Place the animals (J).
- Take the STAINED-GLASS PIECE (K).
- Use the NAIL PULLER; remove the nails (L-N).
- Walk left.
Chapter 6: Augustine
- Take the HOOK WITH ROPE (O).
- Take the FISHING ROD (P).
- Take the BROOM (Q).
- Take the ROSE FIGURINE (R).
- Combine the BANNER and ROSE FIGURINE (S).
- Take the HOOK (T); examine the flag 3x.
- Take the RIBBON (U).
- Combine the FISHING ROD, RIBBON, and HOOK (V); take the FISHING ROD.
- Walk down three times.
- Play the HOP (W).
- HOP mini-game solution (X): Dx2-Fx2-B-Dx2-Bx2-C.
- Receive the STONE RING.
- Use the FISHING ROD; take the SMALL CROWN (Y).
- Place the STAINED-GLASS PIECE (Z).
- Take the BRACELET (A).
- Go to the Garden.
- Place the SMALL CROWN; take the LADLE (B).
- Use the PILLOW; use the LADLE 2x (C).
- Take the BRACELET (D).
- Examine the statue (E); place the BRACELET (F).
- Examine the statue (G); place the BRACELET (H).
- Walk forward.
- Take the BOARD (I).
- Open the casket; take the DRAGON EGG (J).
- Walk down twice.
- Play the HOP; receive the SMALL CROWN (K).
- Place the DRAGON EGG (L).
- Take the STONE RING (M).
- Walk left.
- Place the SMALL CROWN; take the GLASS ROSE (N).
- Place the 2 STONE RINGS (O).
- Take the BIRD PENDANT (P).
- Walk forward.
- Place the BIRD PENDANT (Q).
- Walk right.
- Place the BOARD; take the SQUIRREL (R).
- Use the BROOM; take the CHEST KEY (S).
- Place the decoration (T) on the cupboard (U).
- Take the FLASK (V).
- Examine the chest for a mini-game; solution (W): A-Bx2-C-Dx3-E .
- Use the CHEST KEY (X).
- Take the KNIFE (Y).
- Move the rocks; take the GLASS ROSE (E).
- Walk down.
- Select the left arrow (F); place the GLASS ROSE (G).
- Select the left arrow 2x; place the GLASS ROSE (H).
- Take the OIL (I).
- Use the KNIFE (J).
- Play the HOP; receive the PINECONE (K).
- Use the HOOK WITH ROPE (L).
- Examine the key (M); use the SQUIRREL.
- Take the SQUIRREL (@).
- Examine the SQUIRREL; give the PINECONE (N).
- Receive the ELEVATOR KEY; take the SQUIRREL (O).
- Use the ELEVATOR KEY (P).
- Take the RUSTY HAND SCREW (Q).
- Combine the RUSTY HAND SCREW and OIL (R); take the HAND SCREW.
- Use the HAND SCREW; take the KNUCKLES (S).
- Walk right.
- Use the KNUCKLES (T); open the door.
- Take the INSECT REPELLENT (U); open the book (V).
- Take the HEART MEDALLION HALF (W).
- Combine the HEART LOCKET and HEART MEDALLION HALF (X); take AUGUSTINE'S LOCKET.
- Use the INSECT REPELLENT (Y).
- Examine the spindle for a mini-game (Z).
- Solution (A).
- Use TOM'S SIGNET RING (B); take TOM'S BLOOD.
- Receive the SPINDLE.
- Use TOM'S BLOOD (C); receive the BLUE CRYSTAL.
- Walk down.
- Play the HOP; receive the RED CRYSTAL (D).
- Move the crystal; place the BLUE CRYSTAL and RED CRYSTAL (E).
- Go left.
- Use AUGUSTINE'S LOCKET (F).
- Use the SQUIRREL (G); take the FLASK.
- Place the 2 FLASKS; examine the statues (H).
- Take the POTIONS (I).
- Use the POTIONS (J); move the thorns.
- Place AUGUSTINE'S LOCKET (K).
- Examine the book; take the BOOK PAGE (L).
- Combine the Casket and BOOK PAGE for a mini-game (M).
- Solution (N-P).
- Talk to Tom; give the SPINDLE (Q).
- Congratulations! You have completed Living Legends: Bound by Wishes.
Created at: 2016-04-01