

Walkthrough Menu
- General Tips
- Chapter 1: To Etherfell
- Chapter 2: Etherfell
- Chapter 3: Town Hall
- Chapter 4: Forgotten City
- Chapter 5: Cloud Kingdom
General Tips
- This is the official guide for Living Legends: Fallen Sky.
- This guide won't tell you when to zoom into a location; the screenshots show each zoom scene.
- Hidden-object puzzles are referred to as HOPs. Only the locations of the HOPs will be shown.
- Use the Map to fast travel to a location.
Chapter 1: To Etherfell
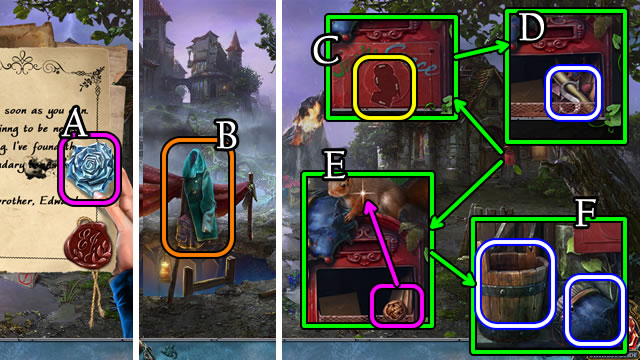
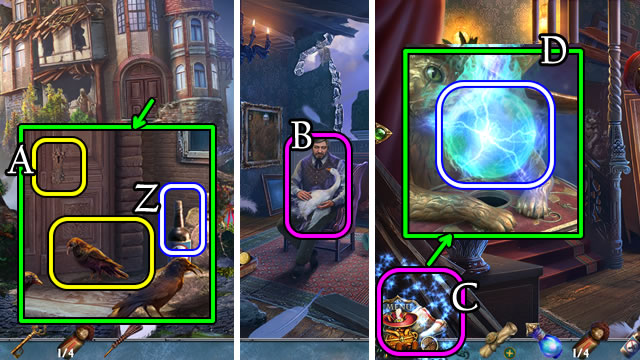
- Open envelope, take Rose (A), notes; receive BEAN TOKEN.
- Take JACKET (B).
- JACKET for note; select note for OWL EMBLEM.
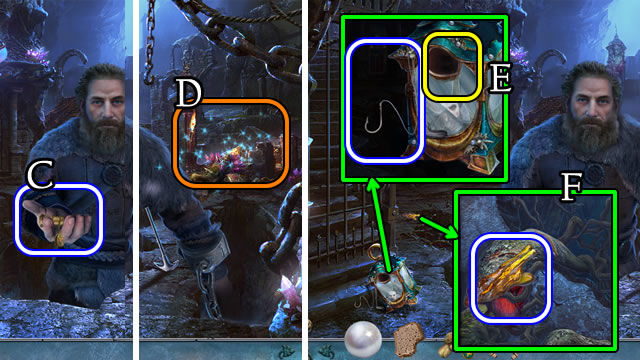
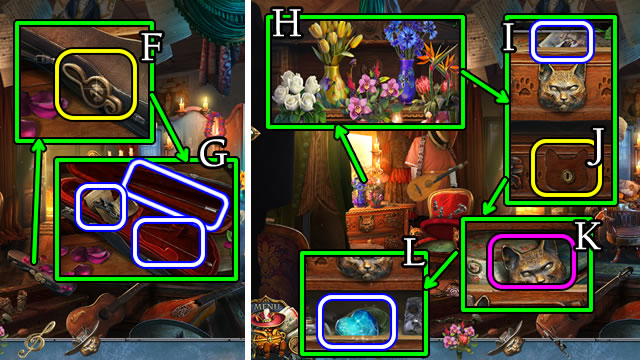
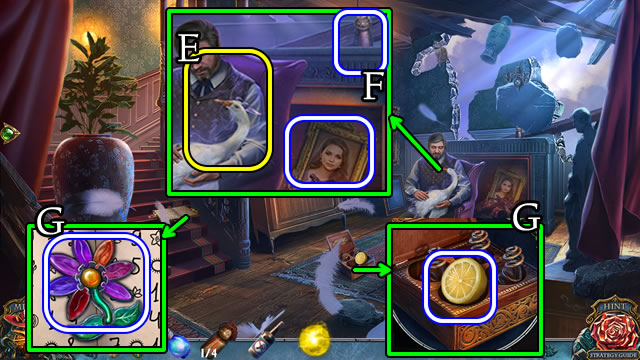
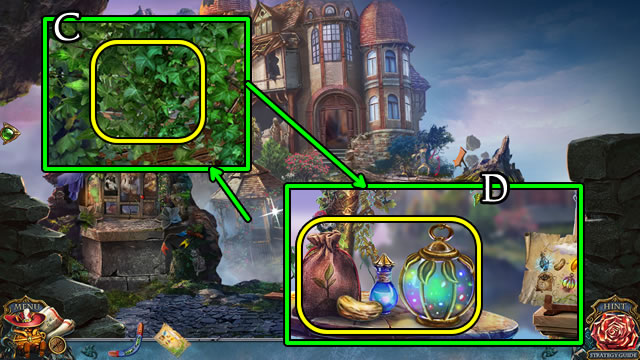
- Use OWL EMBLEM (C); take 1/2 LETTER, note, talisman (D), give nut (E). Take BROKEN TALISMAN and BUCKET (F).
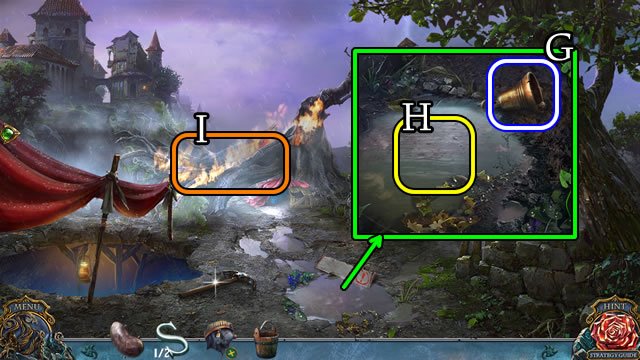
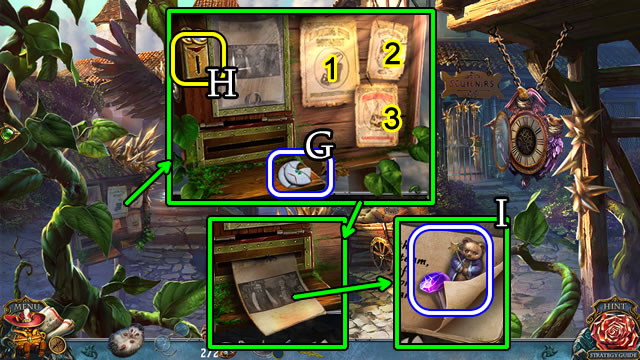
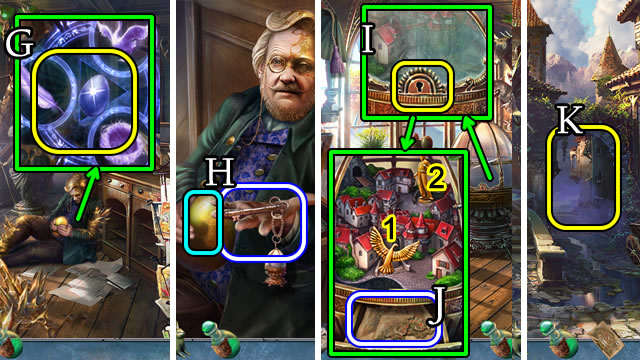
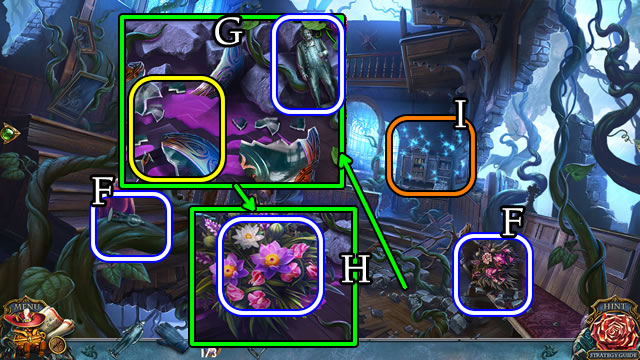
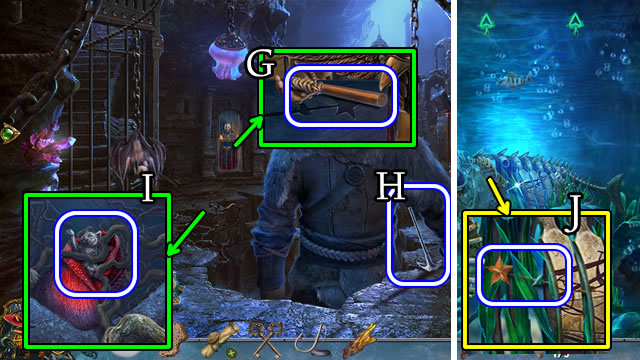
- Move sign, take BELL (G).
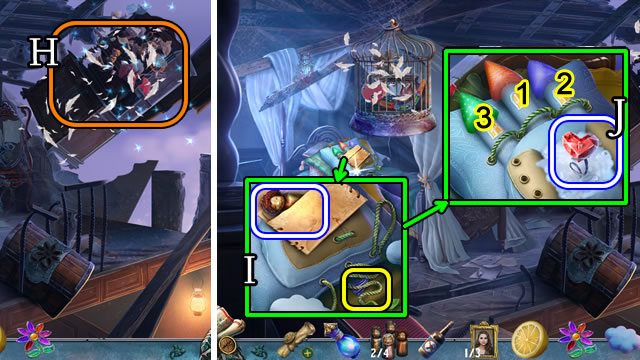
- Use BUCKET take BUCKET OF WATER (H).
- Use BUCKET OF WATER (I).
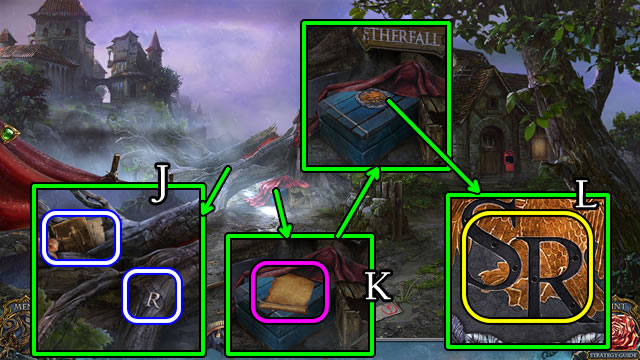
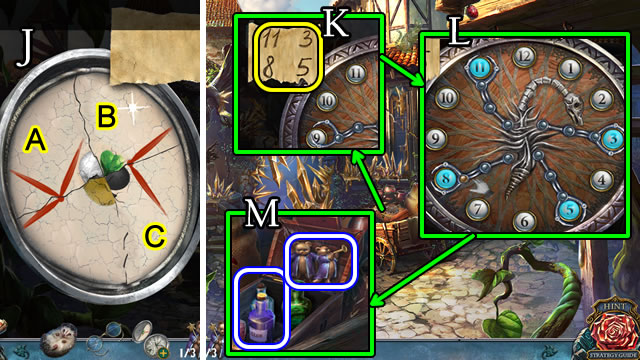
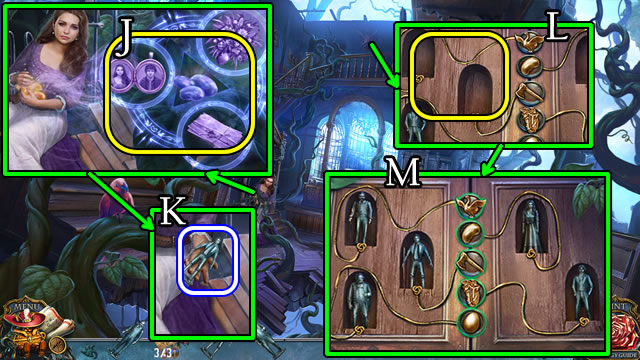
- Take 2/2 METAL LETTERS; PHOTO (J).
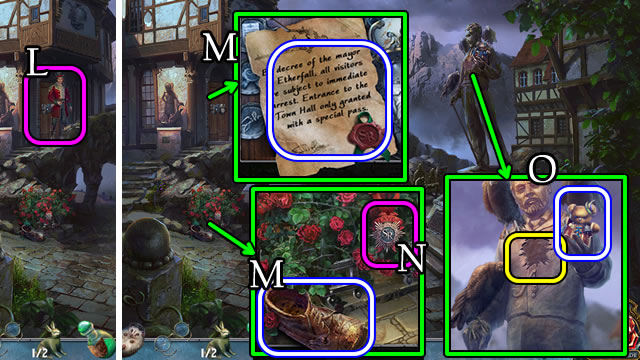
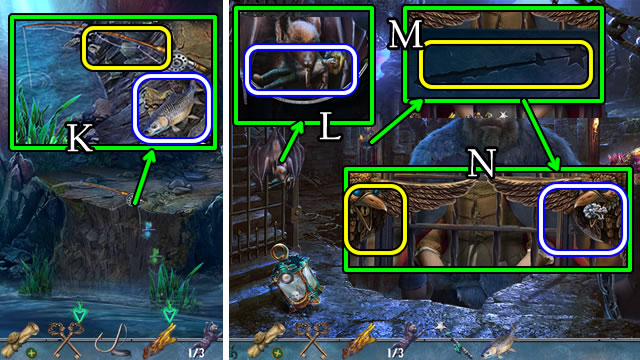
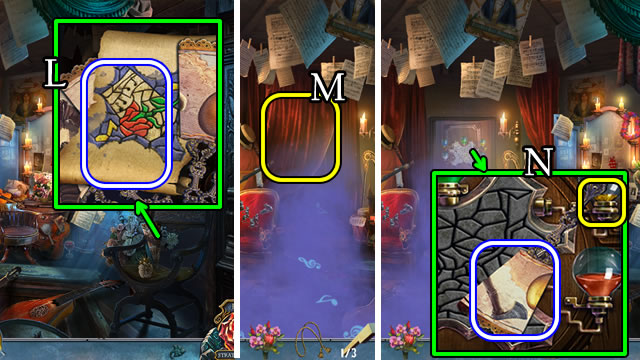
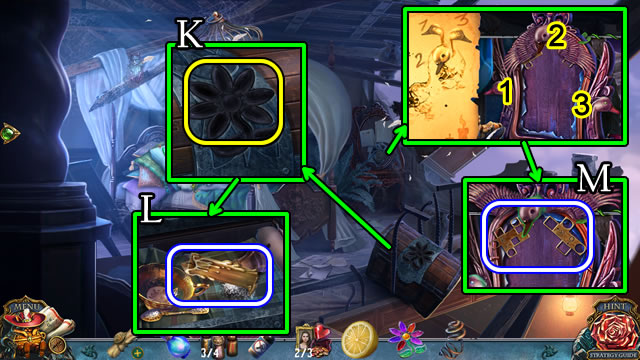
- Uncover, take Map (K); place 2/2 METAL LETTERS (L).
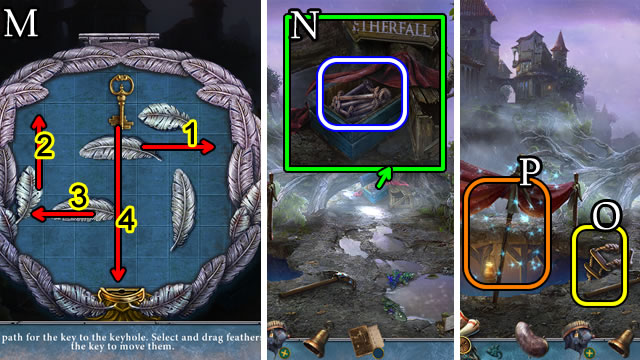
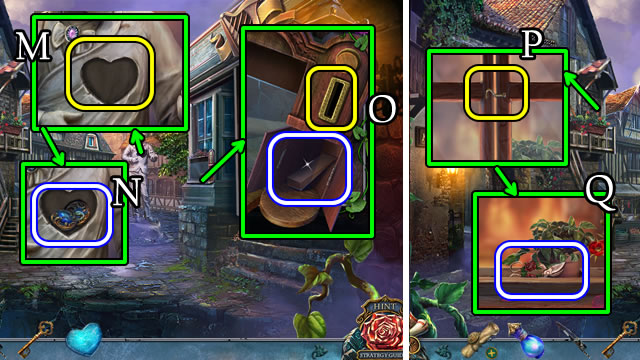
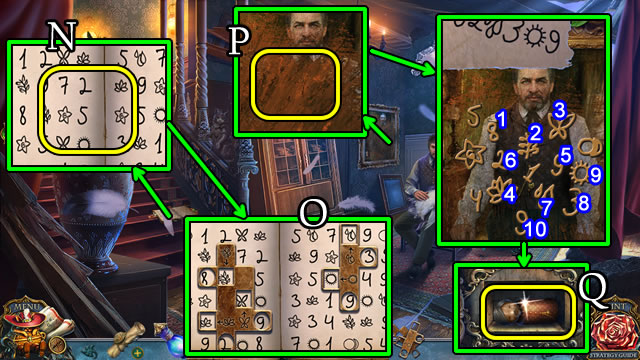
- Solution (M).
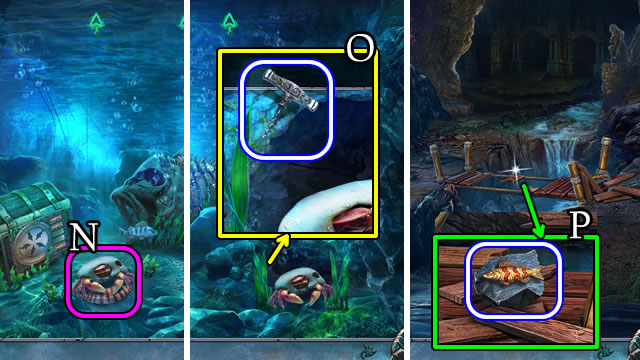
- Take ROPE LADDER (N).
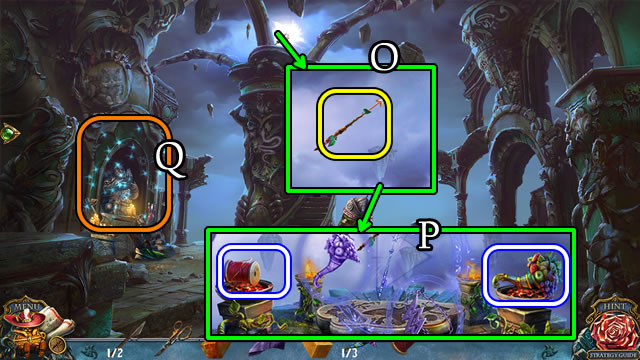
- Use ROPE LADDER (O); play HOP (P); receive BAG.
- BAG pouches for REPAIR KIT and HOUSE KEY.
- BELL, REPAIR KIT on BROKEN TALISMAN for TALISMAN.
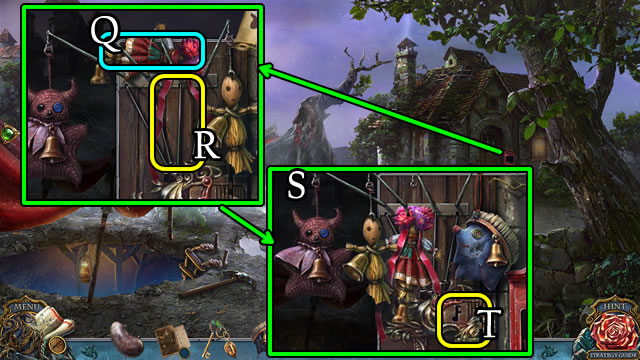
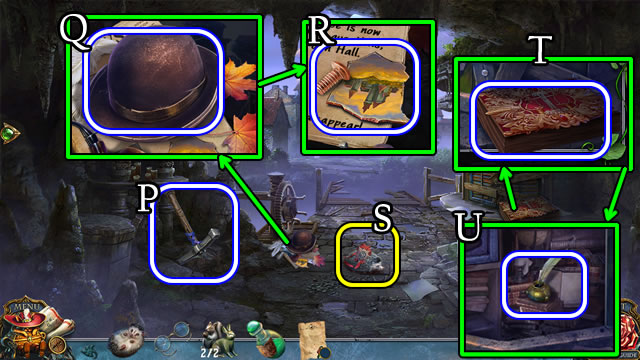
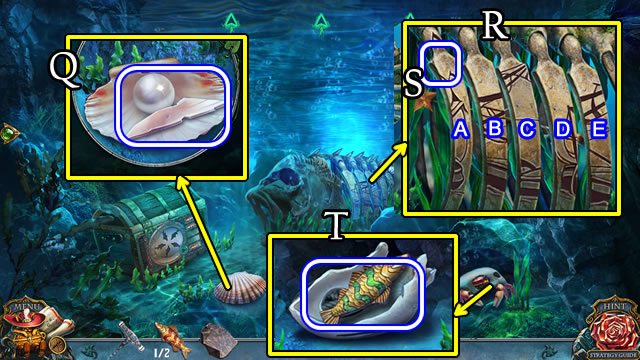
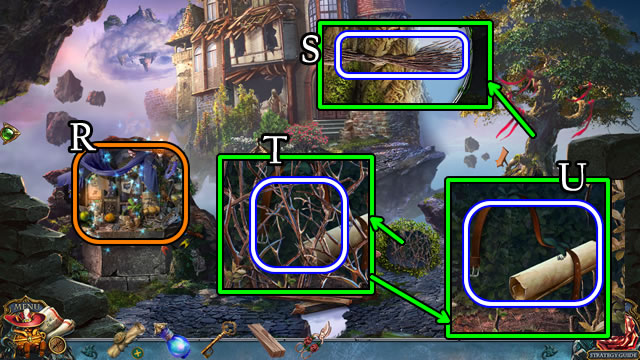
- Select (Q); use TALISMAN (R); solution (S); use HOUSE KEY (T).
- Go forward.
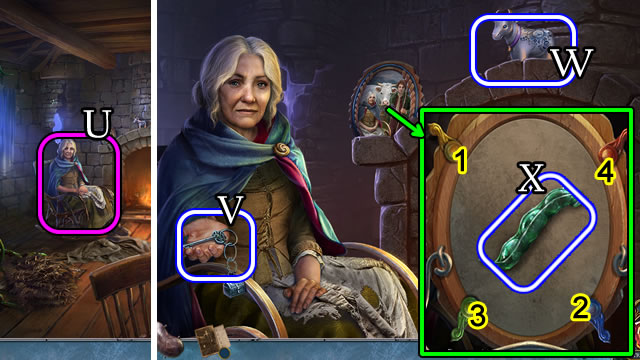
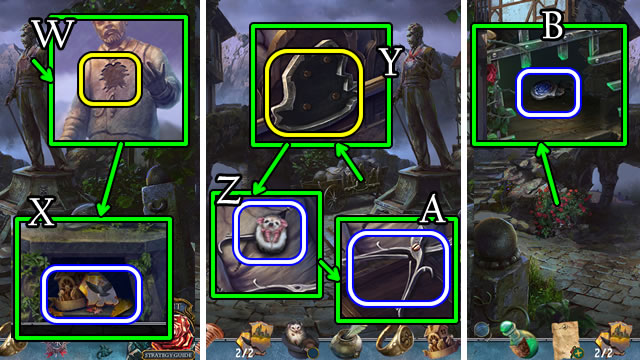
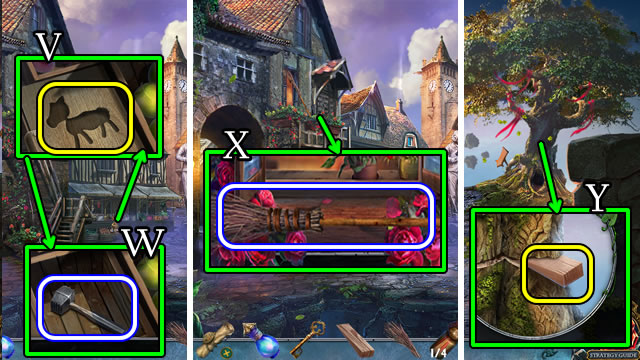
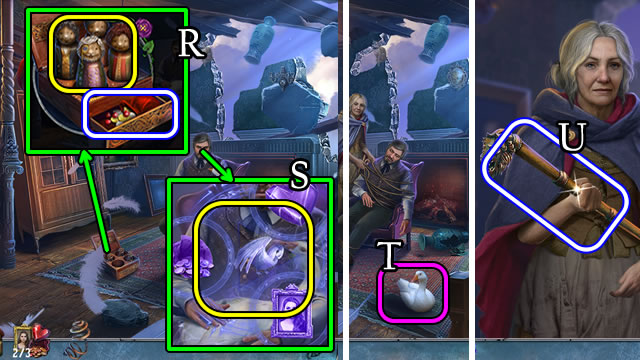
- Remove cloth; speak (U); take CHEST KEY (V), 1/3 COW DOLL (W); select 1-4; take 1/3 GLASS BEAN POD (X).
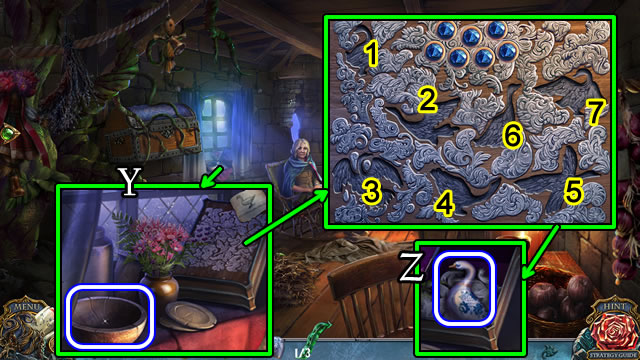
- Take BOWL (Y); select 1-7; take 2/3 DOLLS (Z).
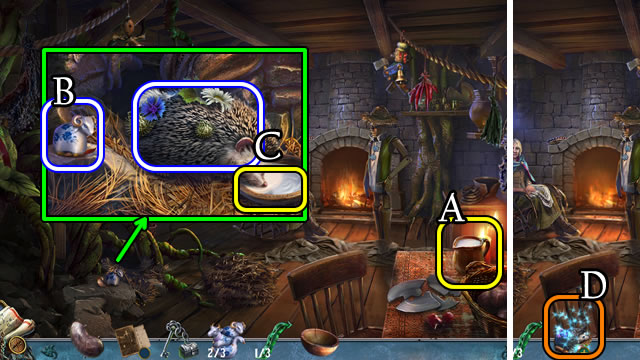
- Use BOWL; receive BOWL OF MILK (A).
- Take 3/3 DOLLS (B); place BOWL OF MILK; take HEDGEHOG (C).
- HEDGEHOG for HOP (D); receive 2/3 GLASS BEAN POD. Take HEDGEHOG, HAY.
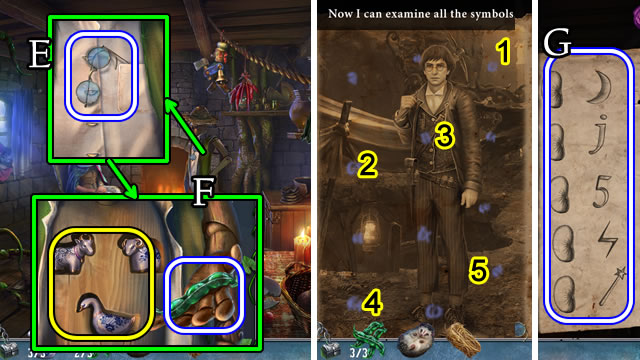
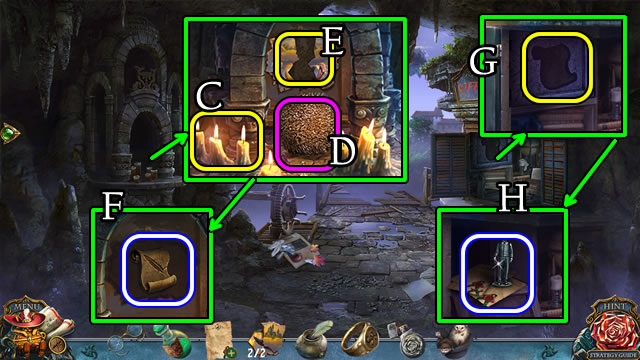
- Take GLASSES (E); open shirt, place 3/3 DOLLS; take 3/3 GLASS BEAN PODS (F).
- GLASSES on PHOTO. Select 1-5; take EDWARD'S CODE (G).
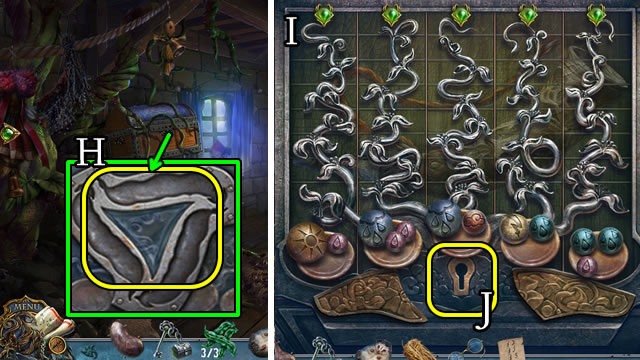
- Use 3/3 GLASS BEAN PODS (H).
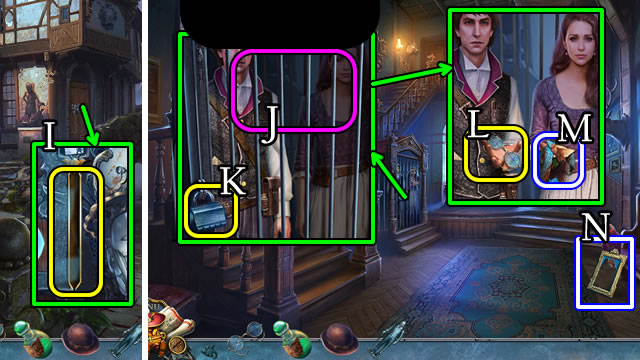
- Solution (I).
- Place, select CHEST KEY (J).
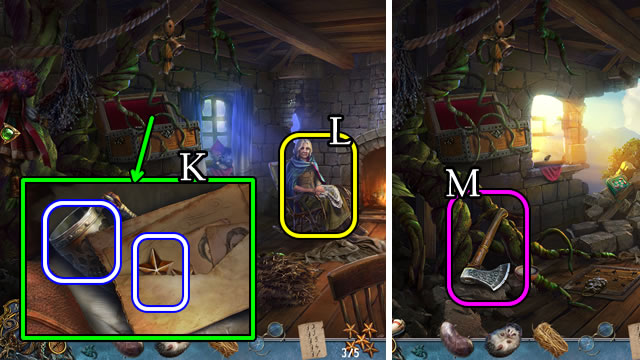
- Uncover, take 3/5 STARS and HORN (K).
- Give HORN (L).
- Select (M).
- Solutions are random.
- Receive CRYSTAL.
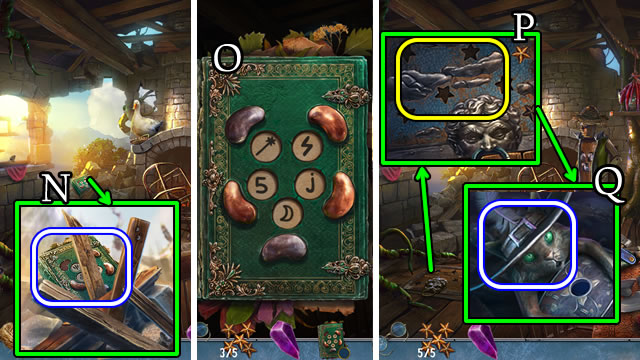
- Take BROTHER'S DIARY (N).
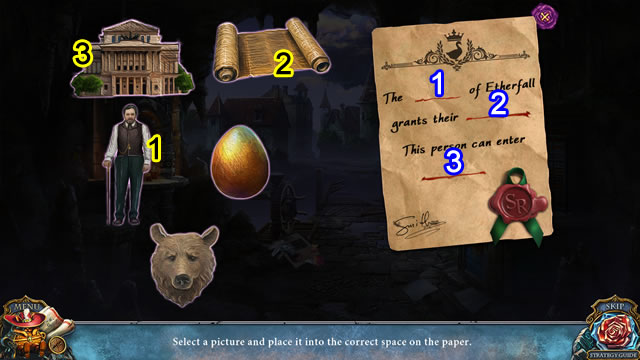
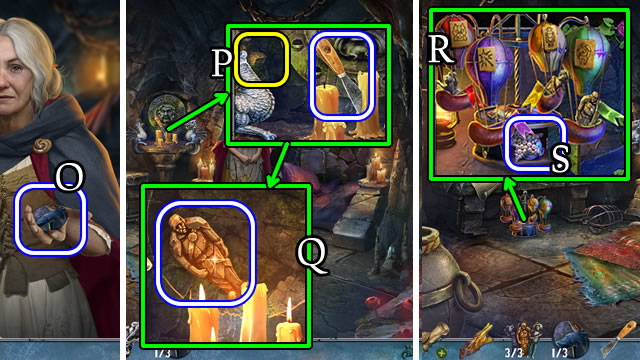
- BEAN TOKEN and EDWARD'S CODE on BROTHER'S DIARY; solution (O); open diary; take 5/5 STARS.
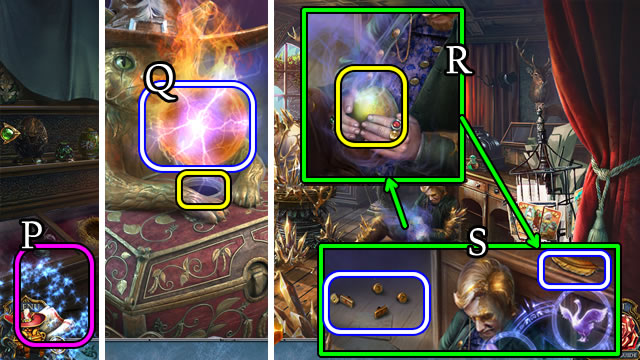
- Place 5/5 STARS (P); take Cat (Q).
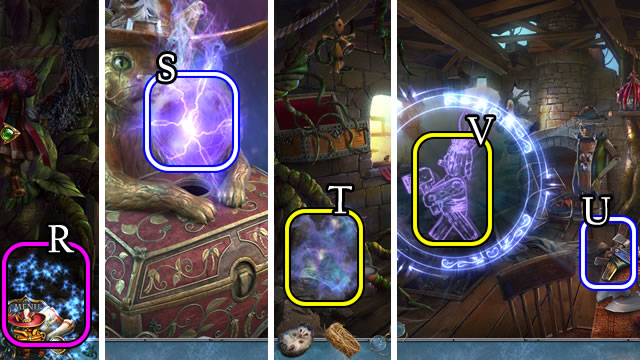
- Select, speak to Cat (R); give CRYSTAL; take ANTI-MAGIC SPHERE (S).
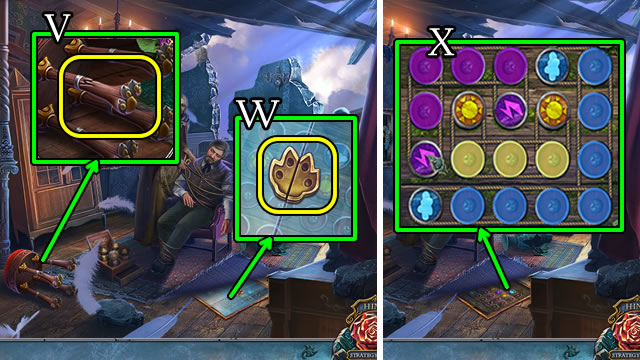
- Use ANTI-MAGIC SPHERE (T); take (U), use LUMBERJACK (V).
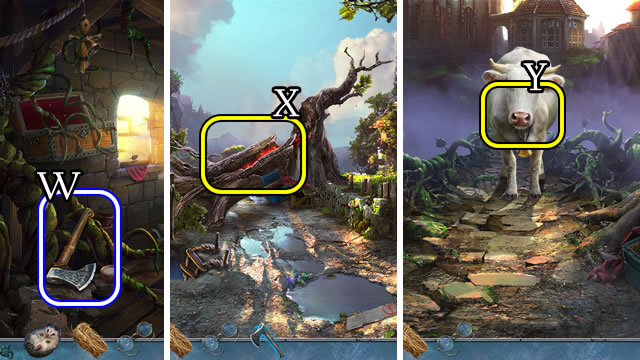
- Take AXE (W).
- Go down.
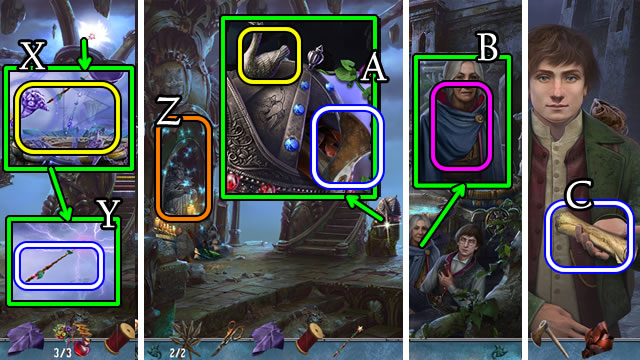
- Use AXE (X); give HAY (Y).
- Go forward.
Chapter 2: Etherfall
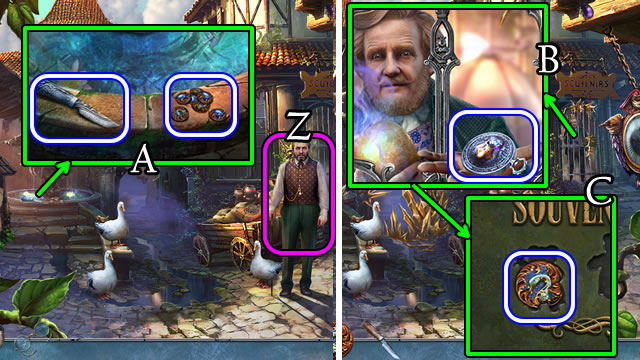
- Speak (Z); take 1/2 COIN; uncover, take KNIFE (A).
- Speak to character; take POCKET WATCH (B); 2/2 COINS (C).
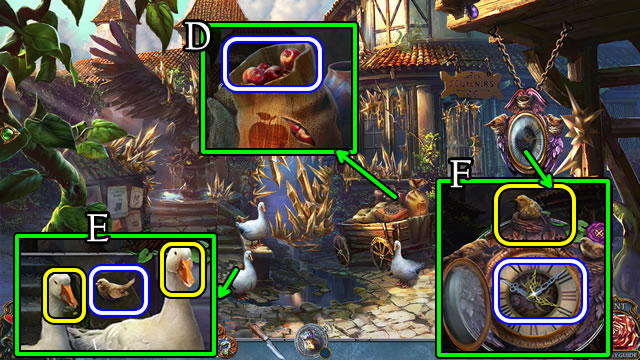
- Use KNIFE; take APPLES (D).
- Give APPLES; take METAL BIRD (E).
- Place METAL BIRD; take CLOCK HANDS (F).
- Select 1-3; take PORCELAIN PLATES (G).
- Use 2/2 COINS (H); take PIN-EYE and 1/3 BEAR (I).
- PIN-EYE, PORCELAIN PLATES and CLOCK HANDS on POCKET WATCH.
- Solution (J). Ax3-C-B.
- Take TIME CODE.
- Place TIME CODE (K).
- Solution (L).
- Take GLUE; 3/3 BEARS (M).
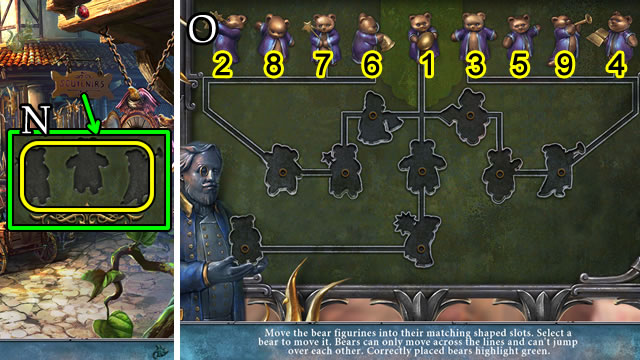
- Place 3/3 BEARS (N).
- Solution (O). 1-9.
- Go forward.
- Speak to, select character.
- Solutions are random.
- Receive CRYSTAL.
- Select (P); use CRYSTAL, take ANTI-MAGIC SPHERE (Q).
- Use ANTI-MAGIC SPHERE (R); take BUTTONS, 1/3 GOLDEN FEATHER (S).
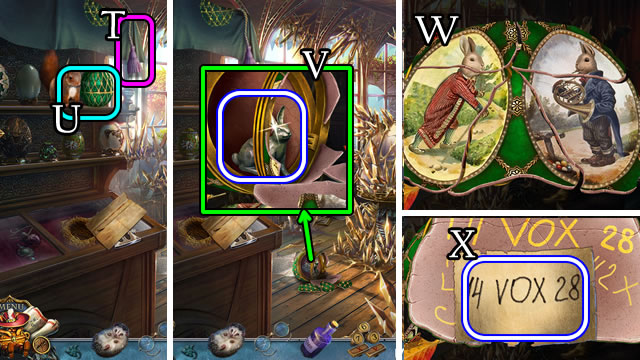
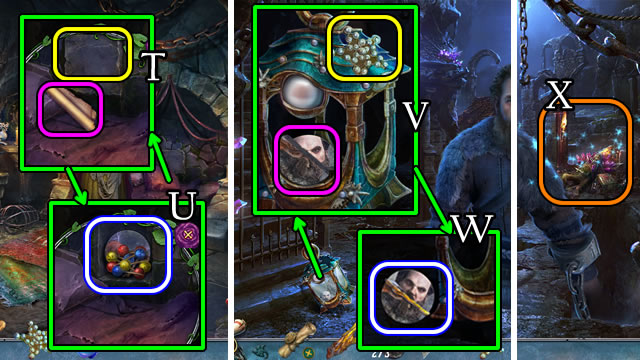
- Raise curtain (T); select (U).
- Take 1/2 RABBIT FIGURE (V).
- Select egg shards; solution (W); use GLUE; select, take CODE (X).
- Take ACID (Y).
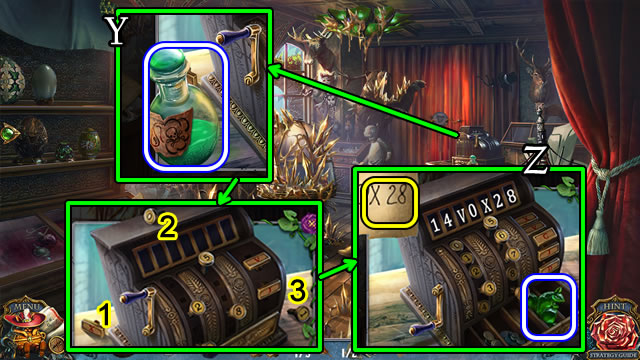
- Select 1-3.
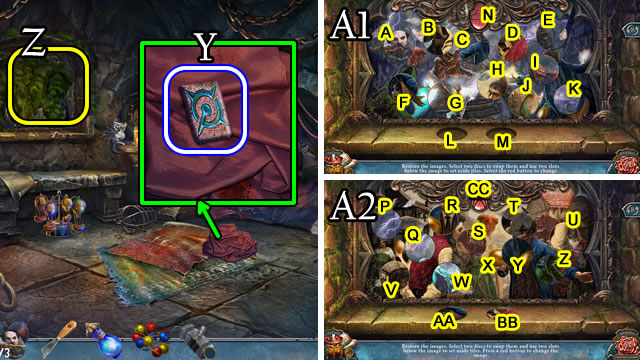
- Place BUTTONS, CODE; enter 1-4-V-0-X-2-8. Take CRYSTAL SQUIRREL (Z).
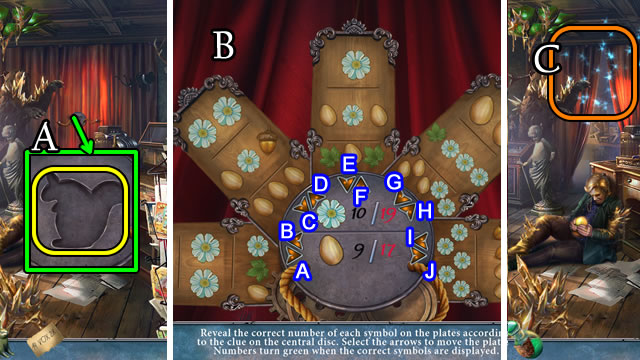
- Place CRYSTAL SQUIRREL (A).
- Solution (B). Ax3, Cx2, Ix2.
- Play HOP (C); receive 2/3 GOLDEN OBJECTS.
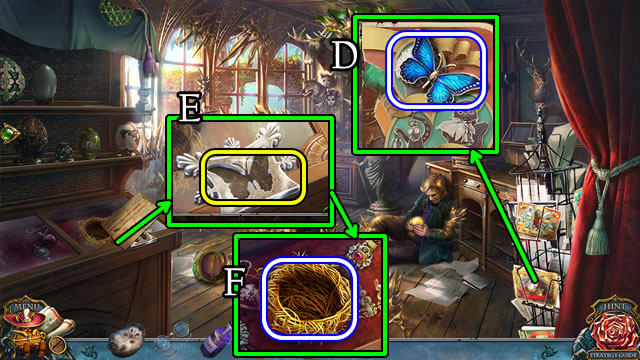
- Select cards; take JEWELRY BUTTERFLY (D).
- Take note; place JEWELRY BUTTERFLY (E); take 3/3 GOLDEN OBJECTS (F).
- Place 3/3 GOLDEN OBJECTS; (G) speak to character; take STAND KEY and egg (H).
- Use STAND KEY (I); place 1-2; take TORN MAP (J).
- GLUE on TORN MAP for MAP.
- Go down.
- Place MAP (K).
Chapter 3: Town Hall
- Speak (L).
- Take MAYOR'S DECREE; BOOT (M). Select (N).
- Use BOOT; take BEAR (O).
- BEAR for RIBBON and 2/2 ANIMAL FIGURES.
- Go forward.
- Use RIBBON; take PICK (P).
- Take HAT (Q), SCREW and 1/2 MURAL PART (R).
- Use HAT for hedgehog in HAT (S).
- Take CASKET (T).
- Use PICK; take INK (U).
- 2/2 ANIMAL FIGURES on CASKET.
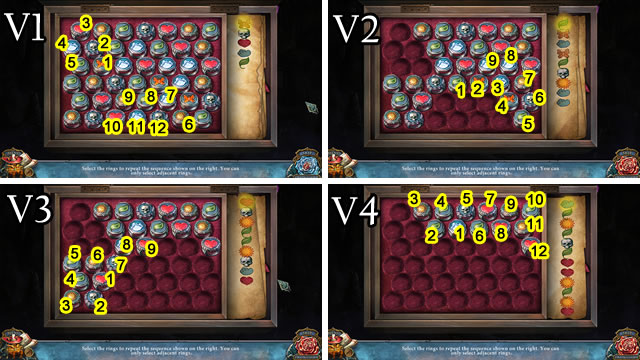
- Solution (V1-V4). 1-12; 1-9; 1-9; 1-12.
- Take MAYOR'S RING.
- Go down.
- HAT for MEDAL; place HEDGEHOG.
- Use MEDAL (W); take 2/2 MURAL PARTS and MILL EMBLEM (X).
- Use MILL EMBLEM (Y).
- Take HEDGEHOG (Z).
- Select handle; place SCREW for PRUNER (A).
- Use PRUNER, ACID; take LIGHTER (B).
- Go forward.
- HEDGEHOG in HAT for HAT WITH HEDGEHOGS.
- Use LIGHTER (C); place HAT WITH HEDGEHOGS (D); receive HAT; Place 2/2 MURAL PARTS (E).
- Take METAL SCROLL (F).
- Use METAL SCROLL (G); take MAYOR FIGURINE and PAPER (H).
- INK, MAYOR'S RING, PAPER on MAYOR'S DECREE; select paper, ink, mayor's ring; place 1-3; take PASS.
- Go down.
- Use PASS (I).
- Go left.
- Speak (J); use ACID (K); speak to character; give GLASSES (L); take PORTRAIT PARTS (M).
- Take BROKEN PORTRAIT (N).
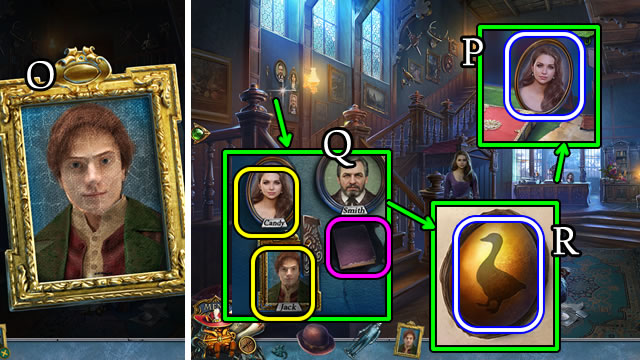
- PORTRAIT PARTS on BROKEN PORTRAIT; solution (O); take JACK'S PORTRAIT.
- Take CANDY'S PORTRAIT (P).
- Place JACK'S PORTRAIT and CANDY'S PORTRAIT; take book (Q).
- Take GOLDEN EGG (R).
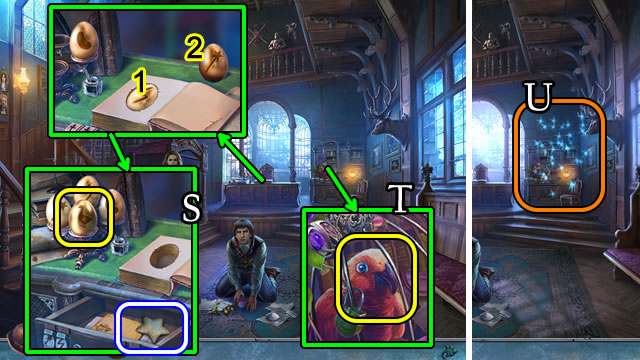
- Open book, select 1-2; place GOLDEN EGG. Take COOKIE (S).
- Give COOKIE (T); play HOP (U) for DRIED BEANS.
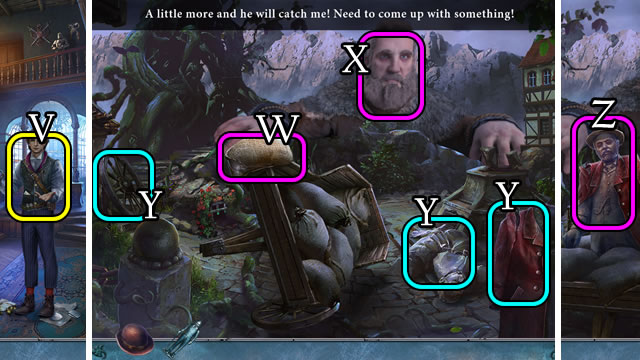
- Give DRIED BEANS (V).
- Take FLOUR (W); use FLOUR (X).
- Take wheel, bags and coat (Y). Place HAT and select (Z).
- Go forward.
- Select 2x (A).
- Solutions are random.
- Receive CRYSTAL.
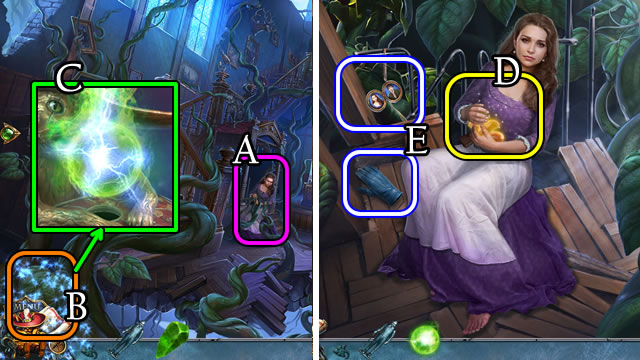
- Select (B); give CRYSTAL; take ANTI-MAGIC SPHERE (C).
- Use ANTI-MAGIC SPHERE (D); take GLOVE, 1/3 MEDALLION (E).
- Take OLD BOUQUET; PETER FIGURINE (F).
- Take MERCHANT FIGURINE; use GLOVE; place OLD BOUQUET (G); receive 2/3 SYMBOLS (H).
- Play HOP (I); receive 3/3 SYMBOLS.
- Place 3/3 SYMBOLS (J); speak to character; take PETER FIGURINE (K).
- Place MAYOR, MERCHANT, JACK and PETER FIGURINES (L).
- Solution (M).
Chapter 4: Forgotten City
- Select (N); take CORKSCREW (O).
- Go up.
- Take 1/2 FISH TOKEN and STONE (P).
- Go down.
- Use STONE; take SHARD and PEARL (Q).
- Solution (R). (D-A)-(C-E)-(D-E).
- Take BONE (S).
- Use BONE; take 2/2 FISH TOKENS and ROPE (T).
- Go up.

- Place boards; use ROPE (U).
- Take JAR (V).
- Use SHARD (W); take note, BREAD; use CORKSCREW, take CAVE MAP (X).
- Go down.
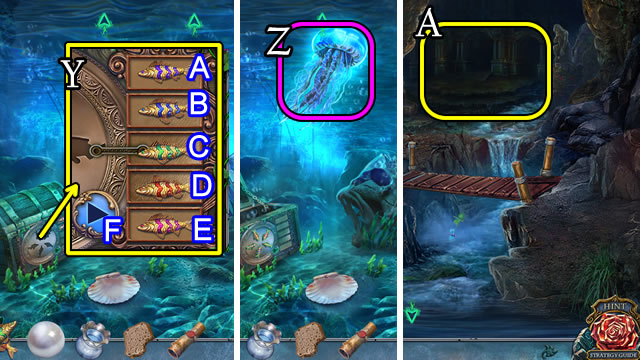
- Place 2/2 FISH TOKENS; solution (Y). (A-C)-(B-C)-F.
- Use JAR (Z) for JELLYFISH IN JAR.
- Go up.
- Place CAVE MAP; use JELLYFISH IN JAR (A).
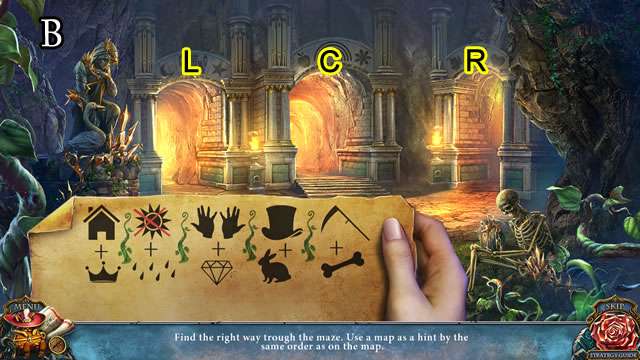
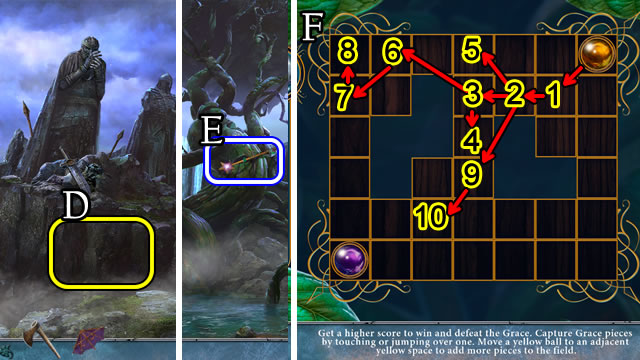
- Solution (B). L-C-L-Rx2.
- Speak to character; take RECIPE (C).
- Play HOP (D); receive RAVEN KEYS.
- Take HOOK WITH FISHING LINE; place PEARL (E).
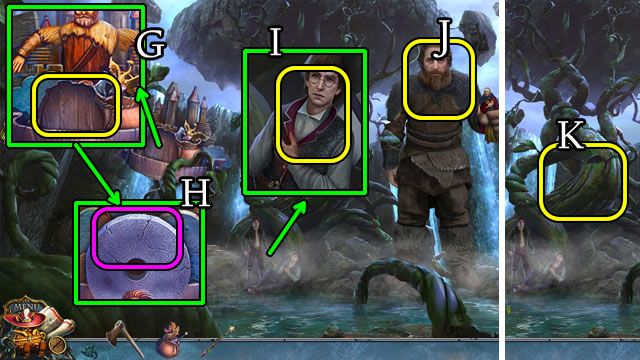
- Take RESIN (F).
- Speak to character; take HARPOON HANDLE (G).
- Use HARPOON HANDLE for HARPOON (H).
- Use HARPOON; take 1/3 CAT FIGURINE (I).
- Go down 2x.
- Use HARPOON for IRON WAND (J).
- Go up.
- Use HOOK WITH FISHING LINE and BREAD; take FISH (K).
- Go forward.
- Give FISH; receive 2/3 FIGURINES (L).
- Use IRON WAND (M); take DRAGON HEAD; use RAVEN KEYS (N).
- Go forward.
- Speak to character; take 1/3 TILE (O).
- Take SCRAPER; use DRAGON HEAD (P); take 3/3 FIGURINES (Q).
- Place 3/3 FIGURINES; solution (R); take STAR and MAGIC WATER (S).
- Uncover, take note; use SCRAPER (T); take CANDY and 2/3 TILES (U).
- Go down.
- Place STAR; select (V); use RESIN; take 3/3 TILES (W).
- Play HOP (X) for HAMMER.
- Go forward.

- Uncover, take 1/2 HAMMER RUNE (Y).
- Use SCRAPER; place 3/3 TILES (Z).
- Solution (A1-A6). (C-I)-(A-C)-(E-K)-(G-H)-(J-K)-(F-L)-(D-M)-N-(U-W)-(S-U)-(P-T)-(R-V)-(V-Y)-(AA-Z).
- (BB-Q)-CC-(L-F)-(M-B)-(G-L)-N-(AA-T)-(BB-V)-CC-(L-D)-(M-K)-N-(BB-S)-CC.
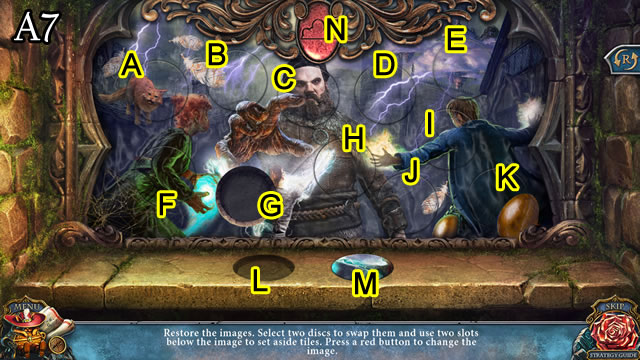
- Solution (A7). (M-G).
- Take FLUTE; 2/2 HAMMER RUNES.
- Go down.
- RECIPE for BEAN.
- 2/2 HAMMER RUNES on HAMMER.
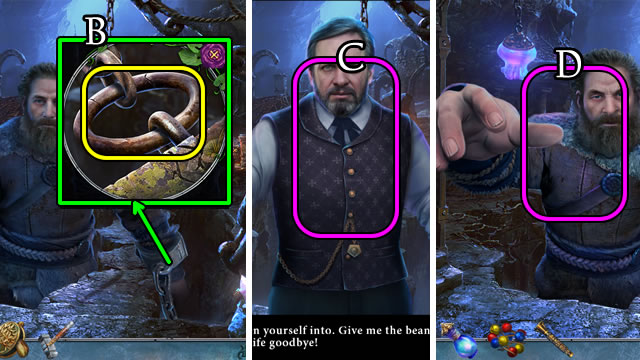
- Use HAMMER (B).
- Speak to (C); give BEAN.
- Use FLUTE (D).
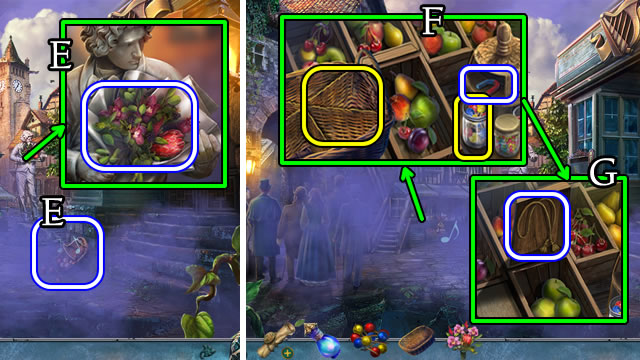
- Take BASKET; FLOWERS (E).
- Place BASKET, CANDY; take MAGNET (F); select, then replace fruit; take TASSEL (G).
- Take notice; use MAGNET for HARPIST FIGURINE (H).
- Use HARPIST FIGURINE (I).
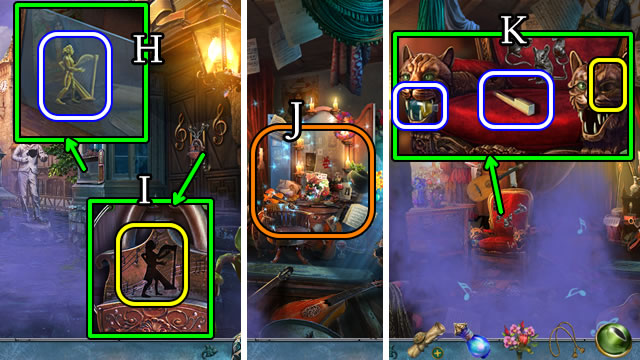
- Go right.
- Move screen; play HOP (J) for CAT'S EYE.
- Take 1/3 PIANO KEY; place CAT'S EYE; take PAINT (K).
- Take COLOR CLUE (L).
- Use TASSEL (M).
- Take FAN PART; place COLOR CLUE, replace PAINT (N).
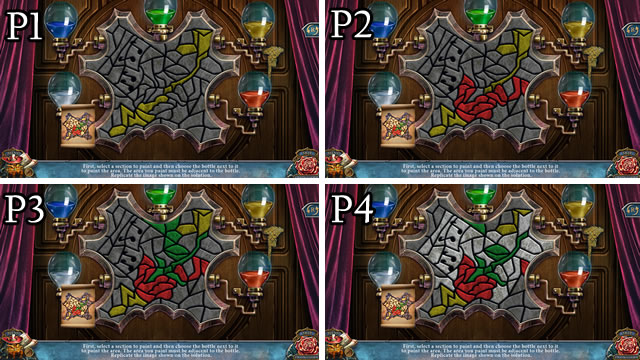
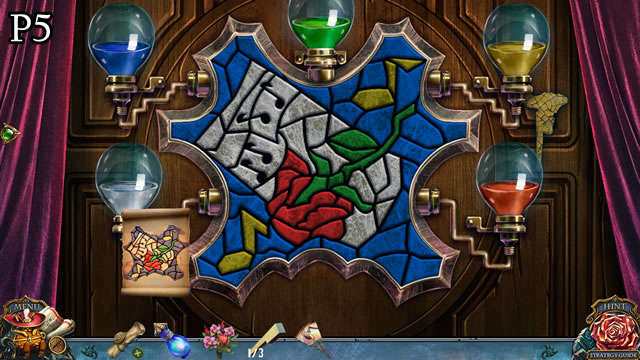
- Solution (P1-P5).
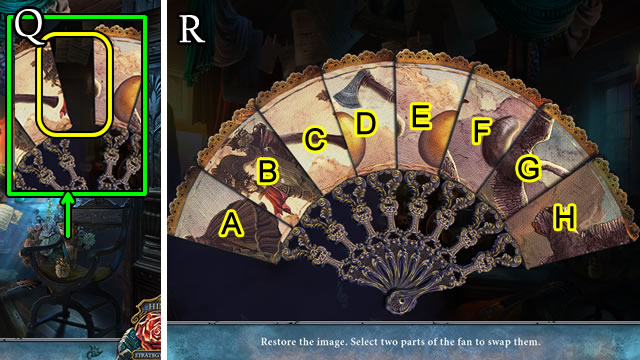
- Place FAN PART (Q).
- Solution (R). (D-E)-(A-H)-(B-G)-(C-F).
- Take 2/3 PIANO KEYS.
- Go forward.
- Select character.
- Solutions are random.
- Receive CRYSTAL.
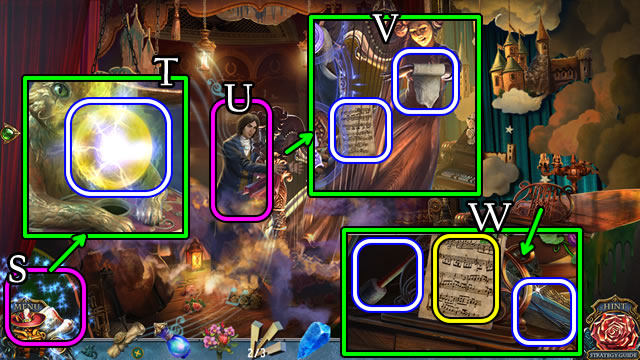
- Select (S); give CRYSTAL; take ANTI-MAGIC SPHERE (T).
- Use ANTI-MAGIC SPHERE (U).
- Take MUSICAL SCORE; 1/3 BANDAGE (V).
- Place MUSICAL SCORE; take DRUMSTICK, 2/3 MUSICIAN OBJECTS (W).
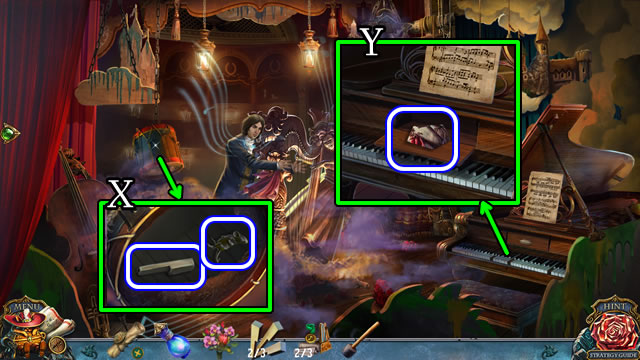
- Use DRUMSTICK; take 3/3 PIANO KEYS, MOUSE (X).
- Place 3/3 PIANO KEYS; take 1/2 CHANDELIER PART (Y).
- Go down.
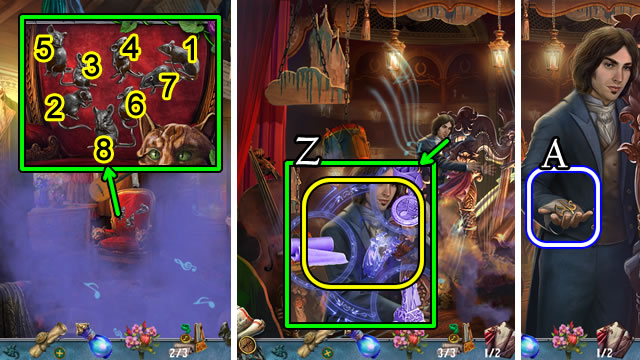
- Use MOUSE; solution (1-8); take REEL, 3/3 MUSICIAN OBJECTS.
- Go forward.
- Place 3/3 MUSICIAN OBJECTS (Z); speak to character; take 2/2 CHANDELIER PARTS (A).
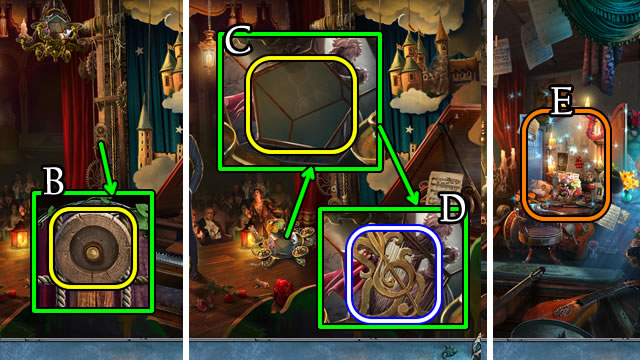
- Place REEL (B); 2/2 CHANDELIER PARTS (C); take TREBLE (D).
- Go down.
- Play HOP (E); receive CAT FACE.
- Use TREBLE (F); uncover, select parts (G); take BOW.
- Place FLOWERS; solution (H); take MAYOR'S HOUSE KEY (I); place CAT FACE (J).
- Take (K); take ICE HEART (L).
- Go down.
- Place ICE HEART (M); take COINS (N).
- Use COINS; take WEDGE (O).
- Use BOW (P); take note, GARDEN PRUNER (Q).
- Go forward.
- Play HOP (R); receive BULL.
- Take BRANCHES (S).
- Take note, use GARDEN PRUNER (T); take scroll for 1/4 PETER FIGURE and BELT (U).
- Go down.
- Use BULL (V); take MEAT MALLET (W).
- Use BRANCHES and BELT; take BROOM (X).
- Go forward.
- Place WEDGE; use MEAT MALLET (Y).
Chapter 5: Cloud Kingdom
- Use BROOM; take SOLVENT (Z).
- Use MAYOR'S HOUSE KEY (A).
- Go forward.
- Speak to, select (B).
- Solutions are random.
- Receive CRYSTAL.
- Select (C); give CRYSTAL; take ANTI-MAGIC SPHERE (D).
- Use ANTI-MAGIC SPHERE (E); take 1/3 CANDY'S PORTRAIT, 2/4 TOYS (F).
- Take LEMON; FLOWER (G).
- Go forward.
- Play HOP (H); receive CLOUD.
- Take 3/4 TOYS; place CLOUD (I); select 1-3; take 2/3 MAYOR'S OBJECTS, SPRING (J).
- Use FLOWER (K); take note, uncover and take CANDLE (L).
- Take paper, use LEMON, CANDLE and matches on candle; place candle on paper; select 1-3; take DECODER (M).
- Go down.
- Place DECODER (N).
- Solution (O).
- Take CODE.
- Use SOLVENT, CODE (P); select 1-10; take note, 4/4 TOYS (Q).
- Use SPRING, 4/4 TOYS; take 3/3 MAYOR'S OBJECTS (R).
- Use 3/3 MAYOR'S OBJECTS (S); speak to character.
- Select (T).
- Speak to character; take CANE (U).
- Take CHAIR LEG (V); use CHAIR LEG (W).
- Solution (X).
- Take note, DRY BEAN and CAGE KEY.
- Go forward.
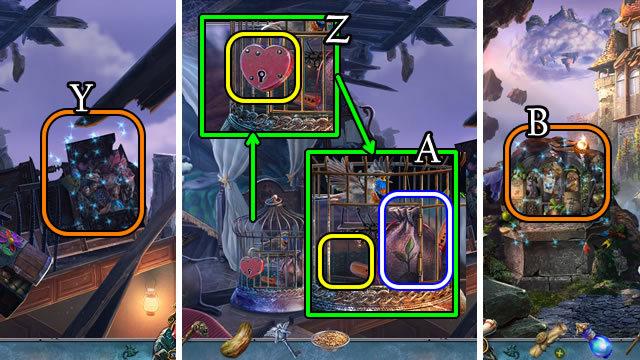
- Play HOP (Y); receive SEEDS.
- Use CAGE KEY (Z); place SEEDS; take MAGIC EARTH, BOOMERANG (A).
- Go down 2x.
- Play HOP (B); receive FAIRY LIGHT.
- MAGIC WATER, DRY BEAN, MAGIC EARTH and FAIRY LIGHT on RECIPE for INGREDIENTS.
- Use CANE (C); place INGREDIENTS, select each object (D).
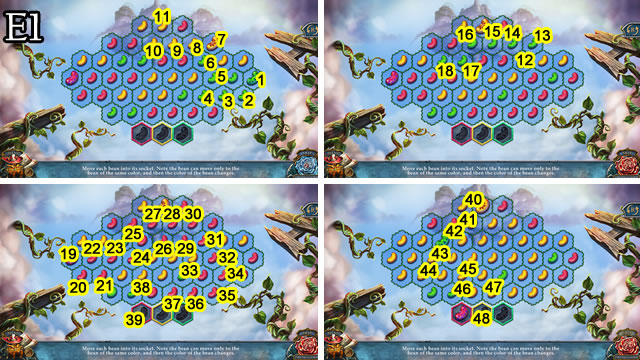
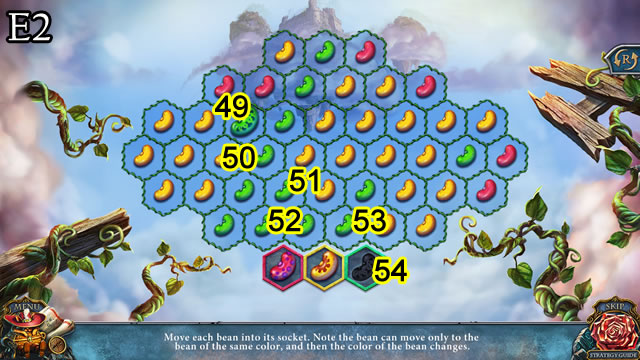
- Solution (E1-E2). 1-54.
- Go to Cliff.
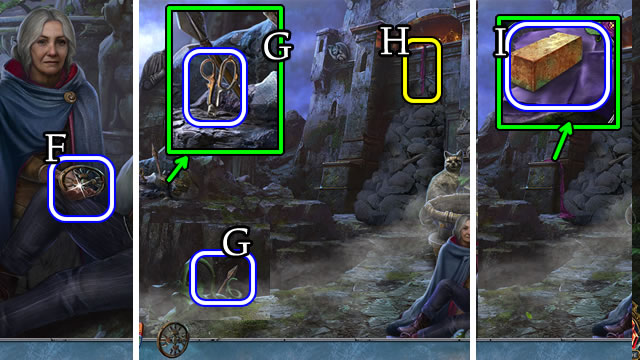
- Speak to character; take VALVE (F).
- Take 1/2 SPEAR; SCISSORS (G).
- Use BOOMERANG (H); take BRONZE INGOT and FABRIC (I).

- Place VALVE (J); select 1-2; take GOLDEN INGOT (K).
- Go forward.
- Select (L).
- Solutions are random.
- Receive CRYSTAL.
- Select (M); give CRYSTAL; take ANTI-MAGIC SPHERE (N).
- Use ANTI-MAGIC SPHERE (O); take 1/3 FRUIT and THREAD (P).
- Play HOP (Q); receive SILVER INGOT.

- Place GOLDEN, BRONZE and SILVER INGOTS (R).
- Solution (S).
- Take CASTLE EMBLEM, 2/3 FAIRY OBJECTS.
- Go down.
- Use CASTLE EMBLEM (T); take STONE SPHERE (U).
- Use STONE SPHERE (V).
- Take 3/3 FAIRY OBJECTS, 2/2 SPEARS (W).
- Go forward.
- Use 3/3 FAIRY OBJECTS (X); take MAGIC WAND (Y).
- Play HOP (Z) for GOOSE.
- Use GOOSE; take BLUNT AXE, LEATHER (A).
- Go down.
- Give MAGIC WAND (B); speak to characters; take DELTA-PLANE SCHEME (C).
- 2/2 SPEARS, LEATHER, THREAD, SCISSORS and FABRIC on DELTA-PLANE SCHEME for DELTA-PLANE.
- Use DELTA-PLANE (D).
- Solution varies.
- Play HOP; take BAG.
- Attempt to take magic wand (E).
- Solution (F). 1-10.
- Take MAGIC WAND.
- Use BAG (G); place BLUNT AXE for AXE (H).
- Use MAGIC WAND (I); receive CASKET WITH TREASURES.
- Give CASKET WITH TREASURES (J).
- Use AXE (K).
- Congratulations, you've completed Living Legends: Fallen Sky.
Created at: 2018-10-26