

Walkthrough Menu
- General Tips
- Chapter 1: The Forbidden Magic
- Chapter 2: Fairy Godmother
- Chapter 3: Lucille
- Chapter 4: The Blacksmith
- Chapter 5: The Mines
- Chapter 6: Cinderella
General Tips
- This is the official guide for Living Legends: The Crystal Tear.
- This guide won't tell you when to zoom into a location; the screenshots show each zoom scene.
- Hidden-object puzzles are referred to as HOPs. Only the locations of the HOPs will be shown.
- Use the map for fast travel to a location.
Chapter 1: The Forbidden Magic
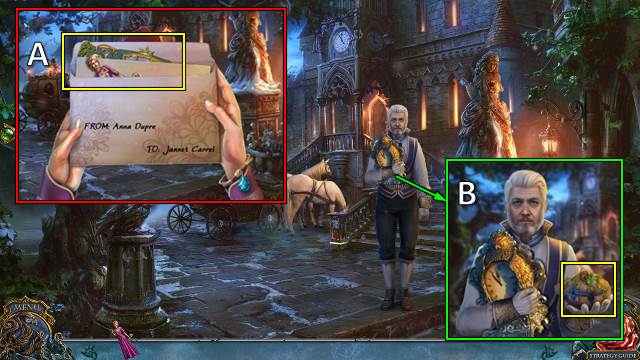
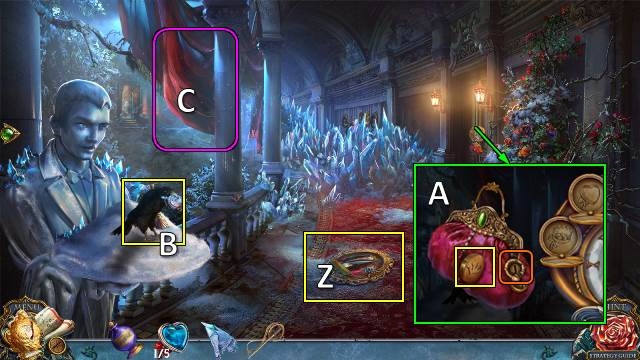
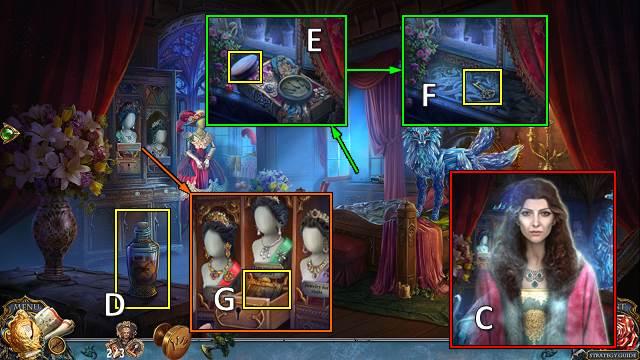
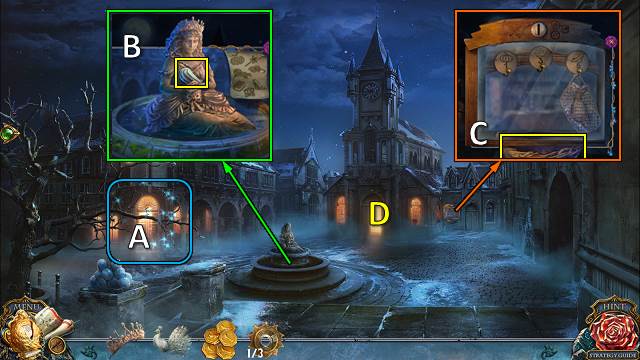
- Open envelope; take hint rose, GUEST FIGURINE and invitation (A).
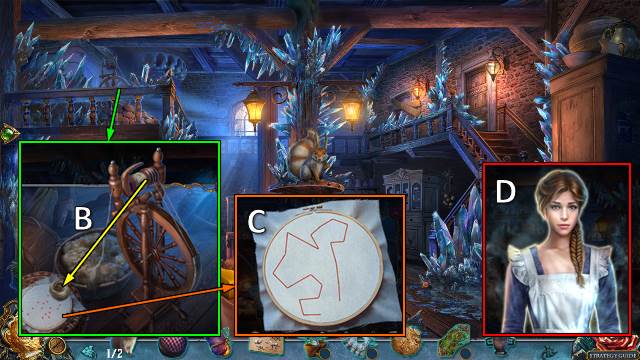
- Talk; take PUMPKIN JAR (B).
- CINDERELLA'S NECKLACE from PUMPKIN JAR.
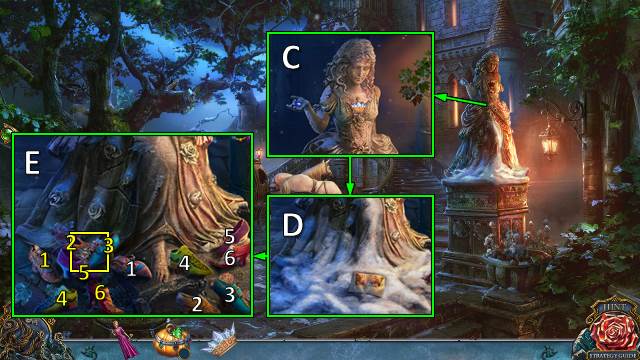
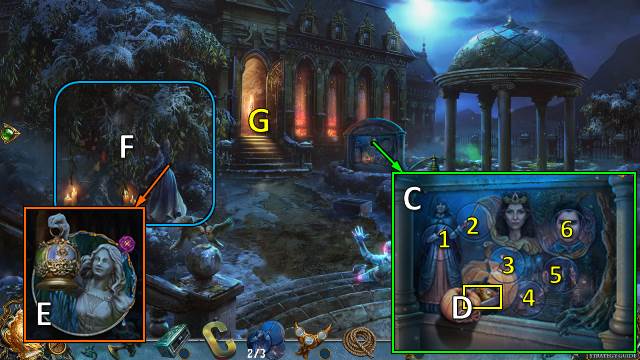
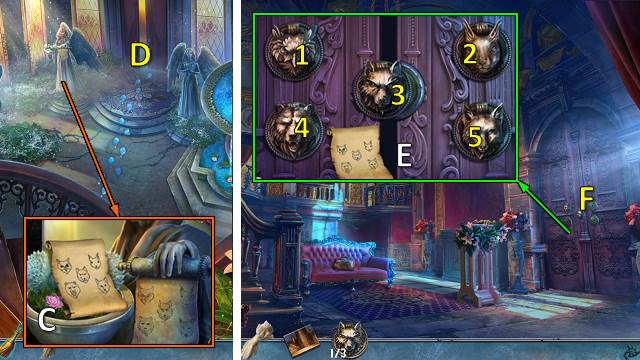
- Place CINDERELLA'S NECKLACE (C).
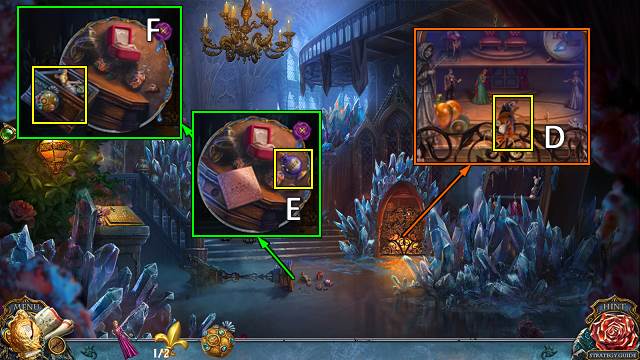
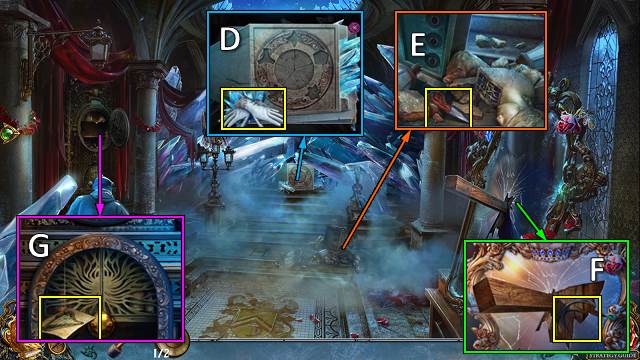
- Move note and snow (D).
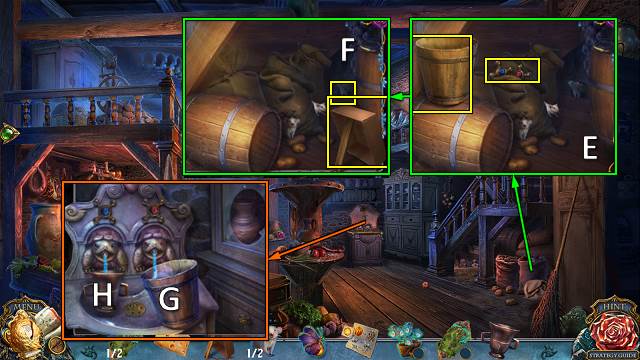
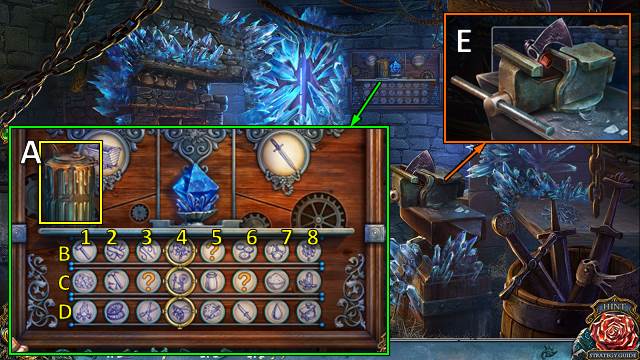
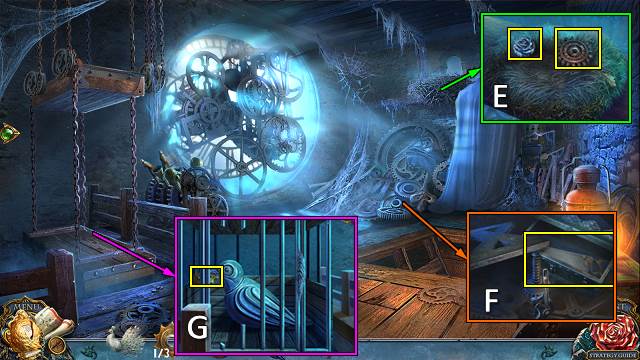
- Find pairs; take CINDERELLA'S SLIPPER 1/2 and EYE (F).
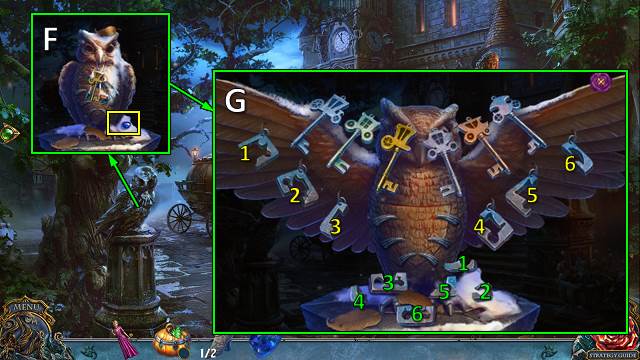
- Move SNOW; place eye and EYE (F).
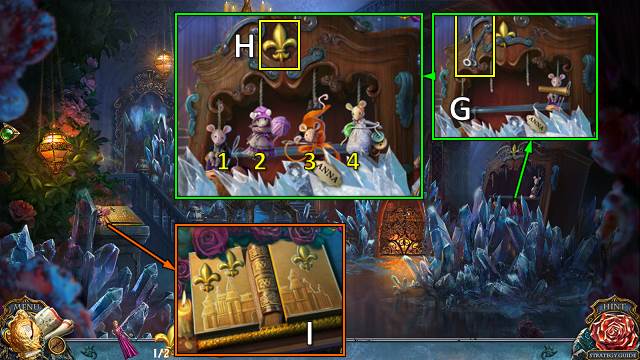
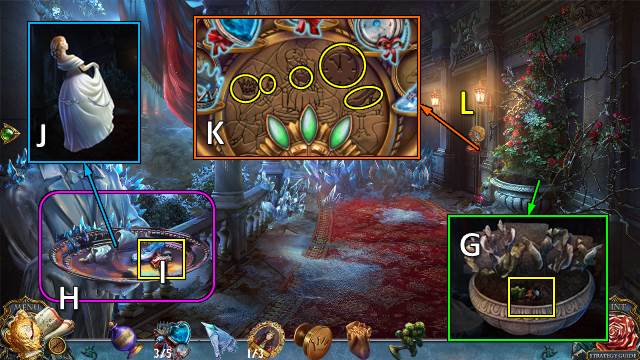
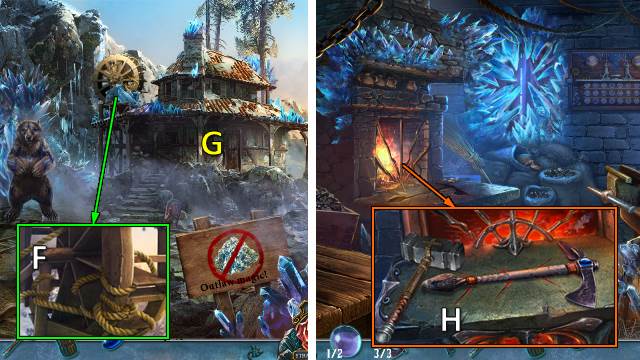
- Solution 1 (G).
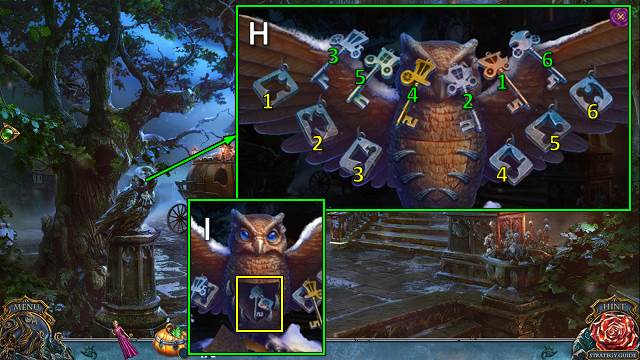
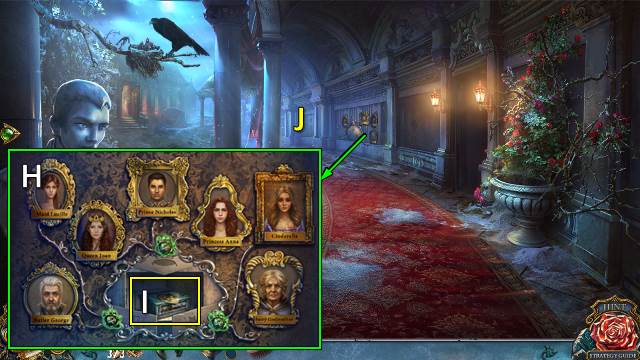
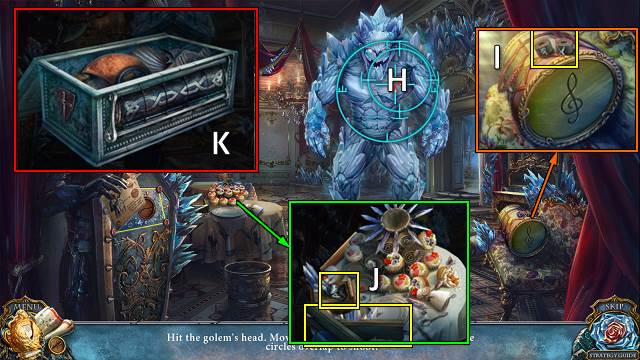
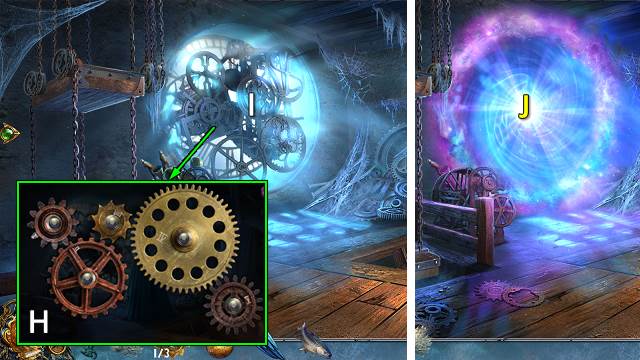
- Solution 2 (H).
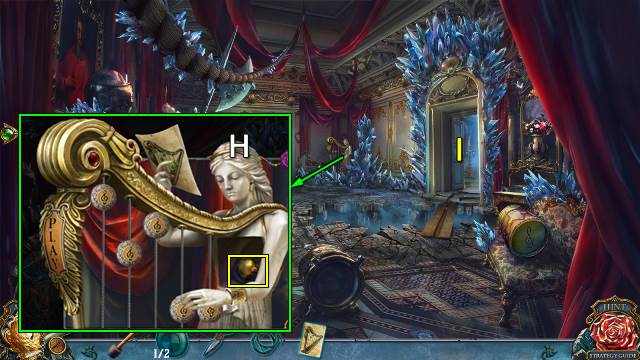
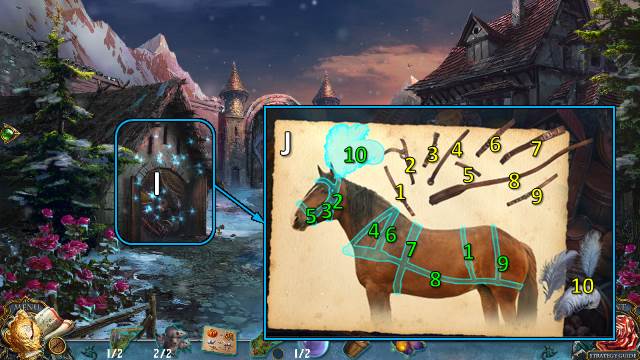
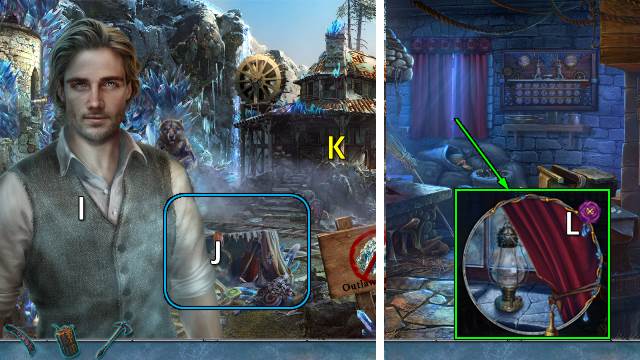
- Take CARRIAGE KEY (I).

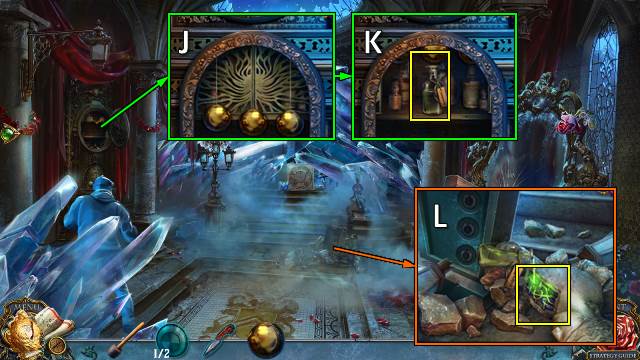
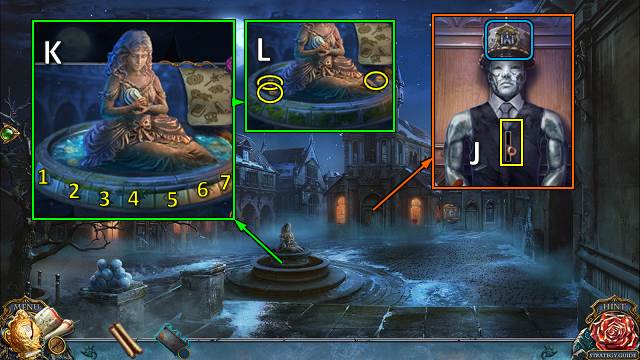
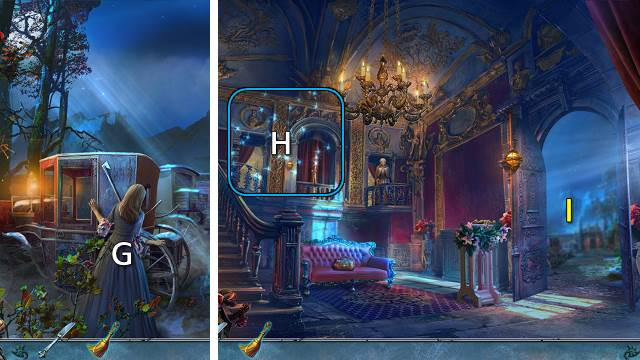
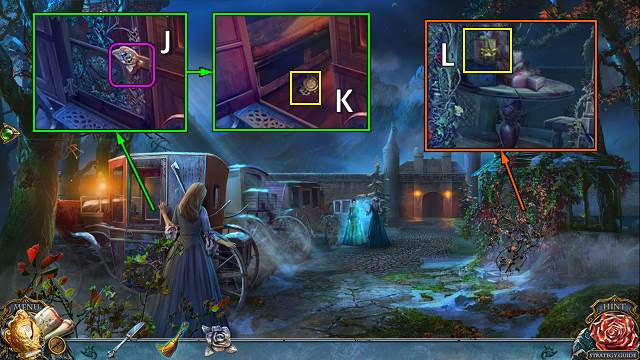
- Use CARRIAGE KEY (J).
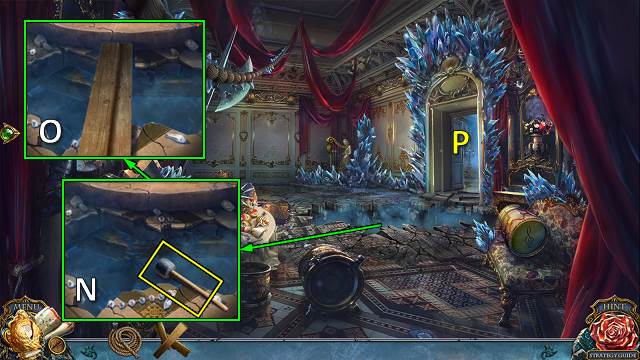
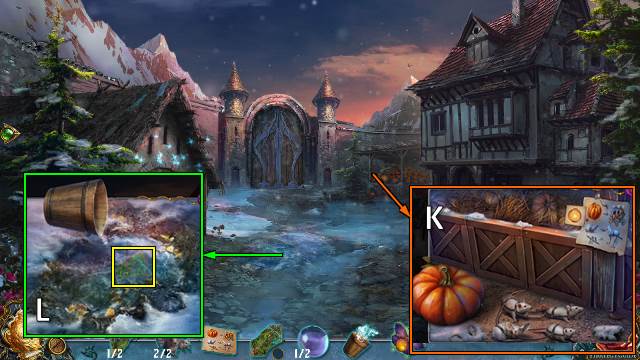
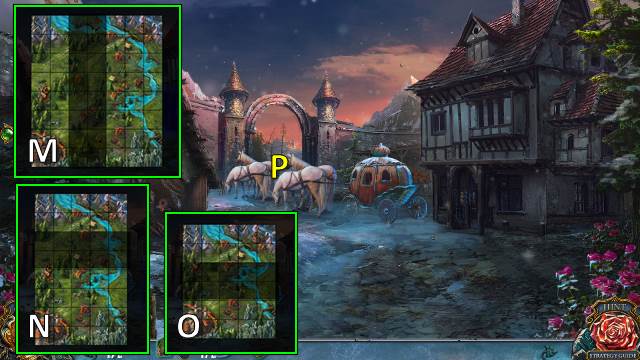
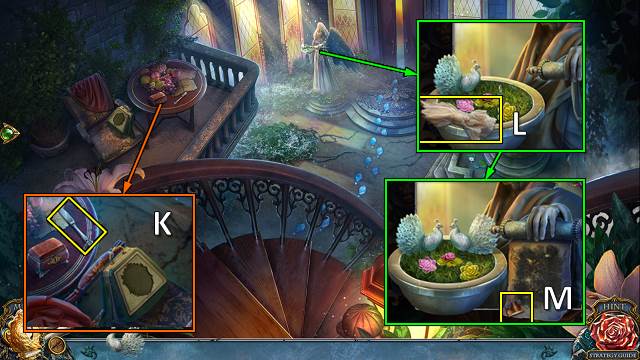
- Take map and CINDERELLA'S SLIPPERS 2/2 (K).
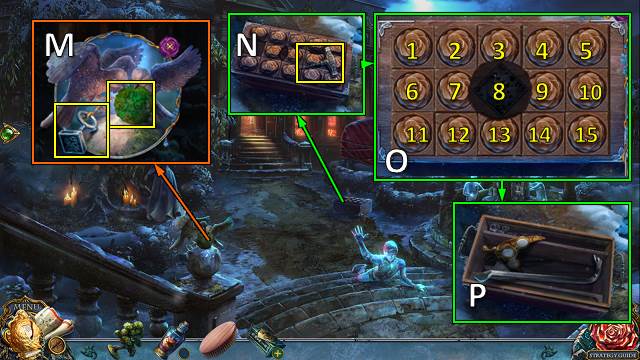
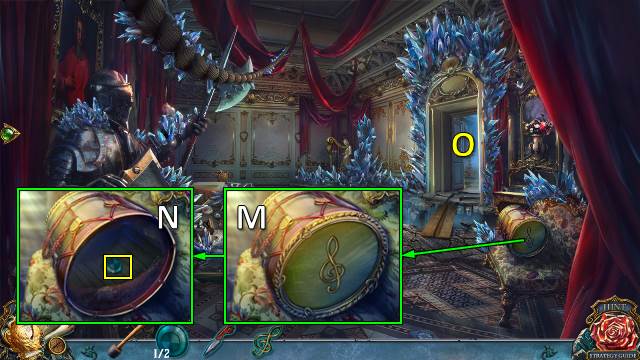
- Place CINDERELLA'S SLIPPERS (L); take LEAF and CLOCK HANDS 1/2 (M).
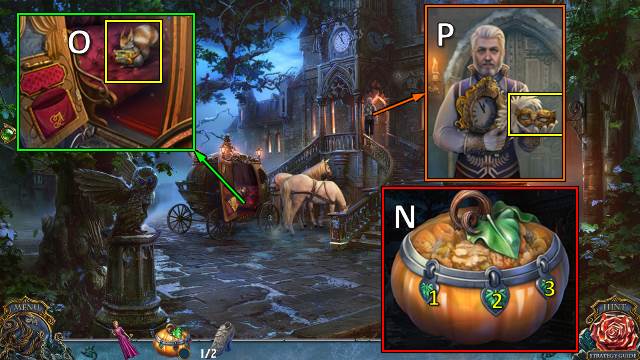
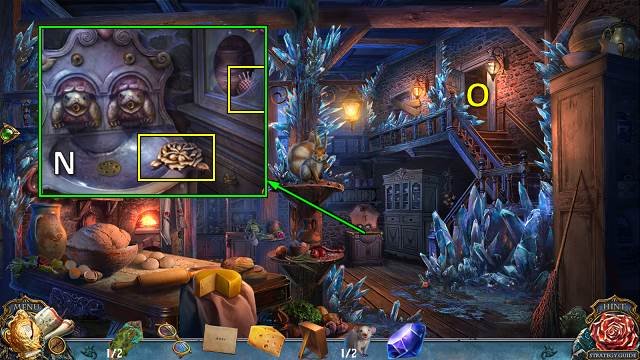
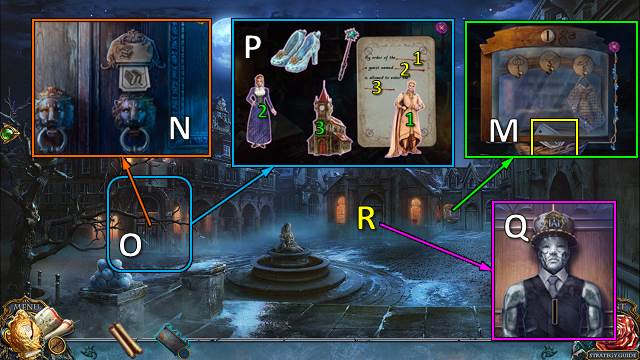
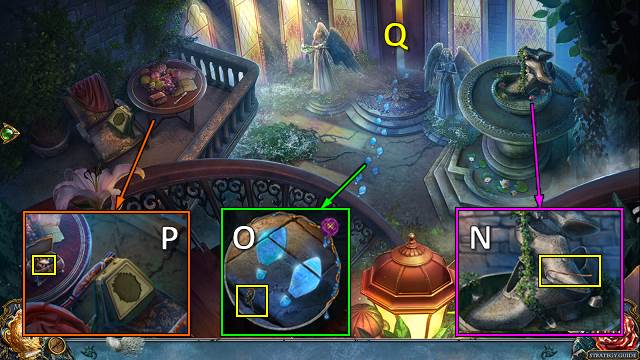
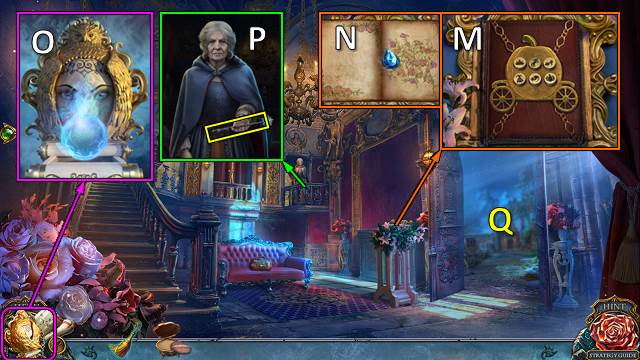
- LEAF on PUMPKIN JAR; select 1-3-2 (N). Take NUTS.
- Offer NUTS (O); take INVITATION.
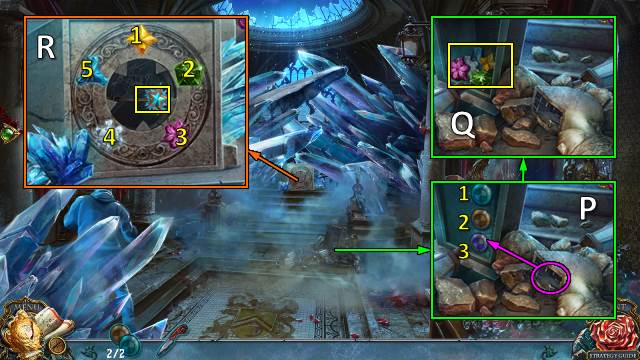
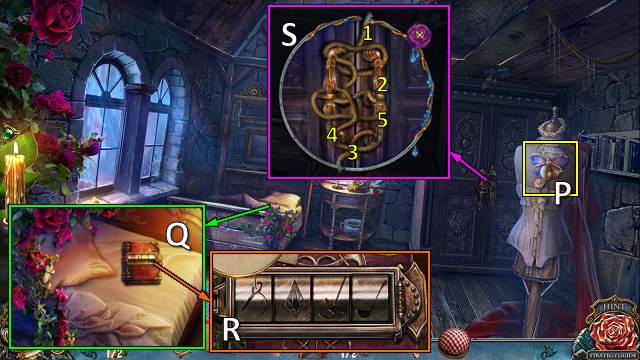
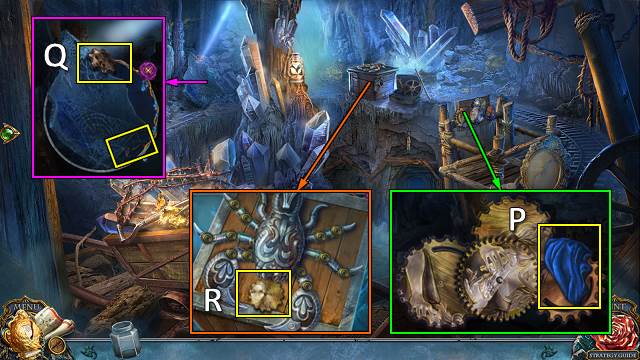
- Offer INVITATION; take mask (P).
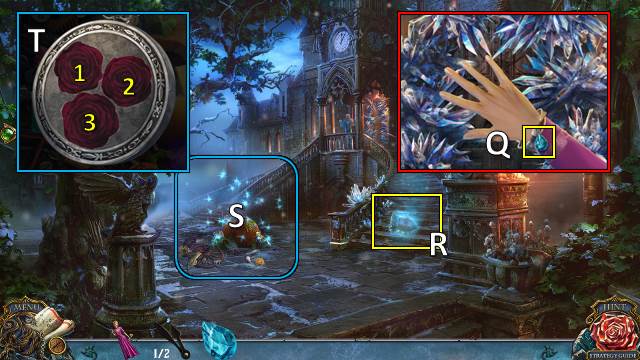
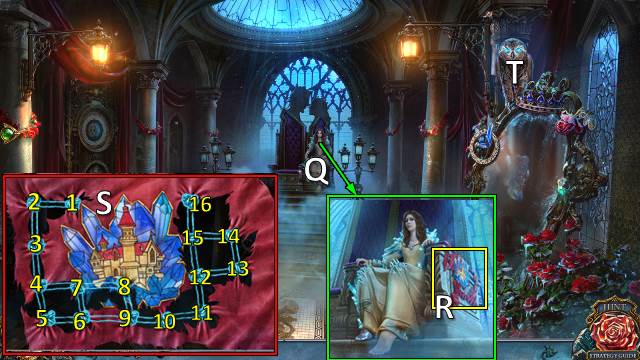
- Take MY TEAR (Q).
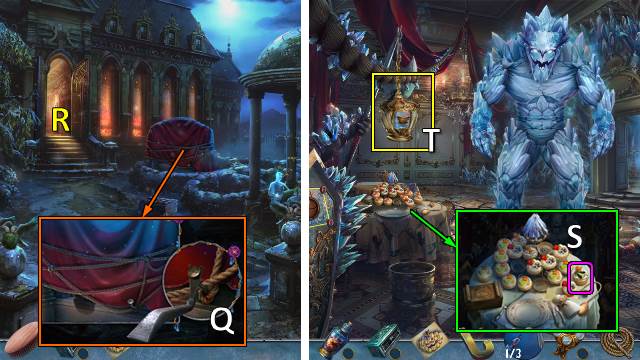
- Walk down.
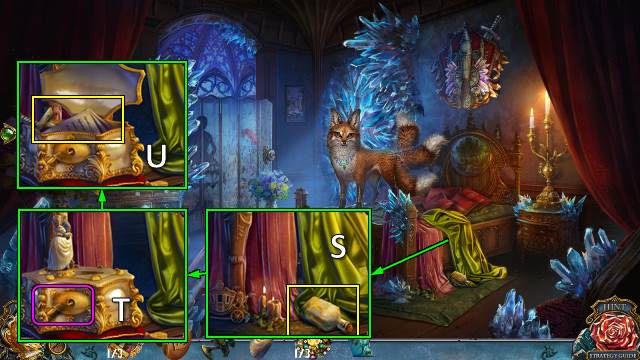
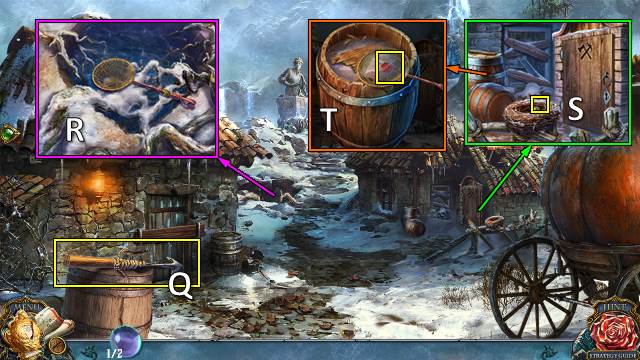
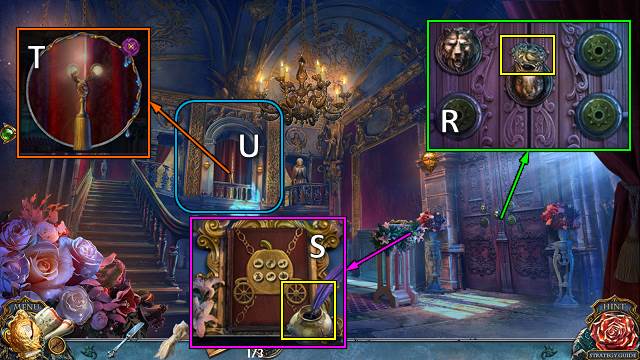
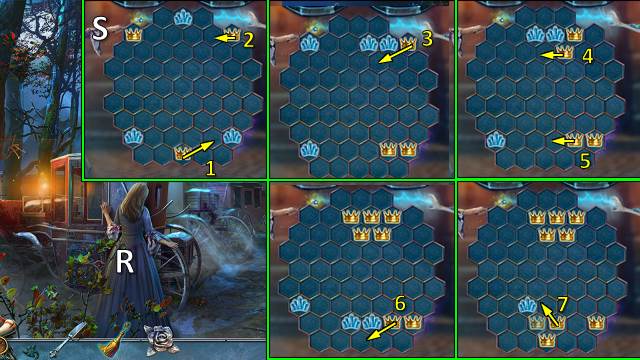
- Take MAGIC CLOCK (R).
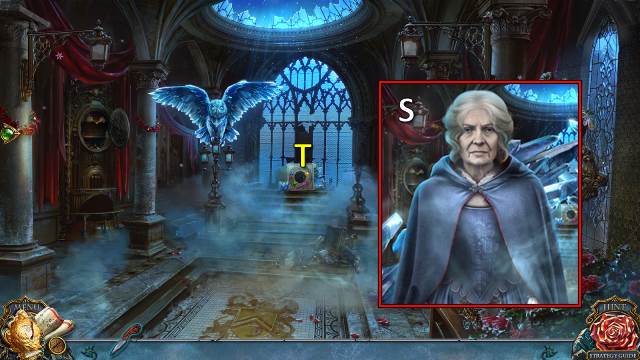
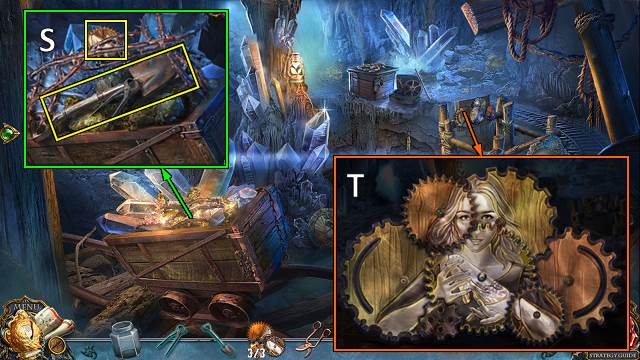
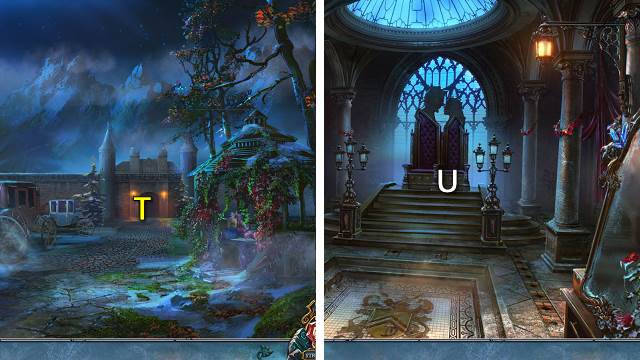
- Play HOP (S).
- Select 1-2-3 (T).
- Receive CLOCK PIECES 2/2.
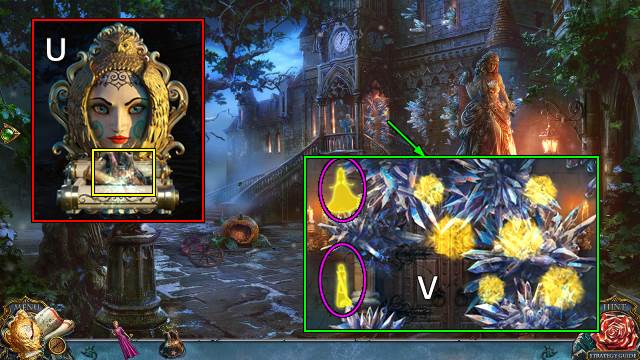
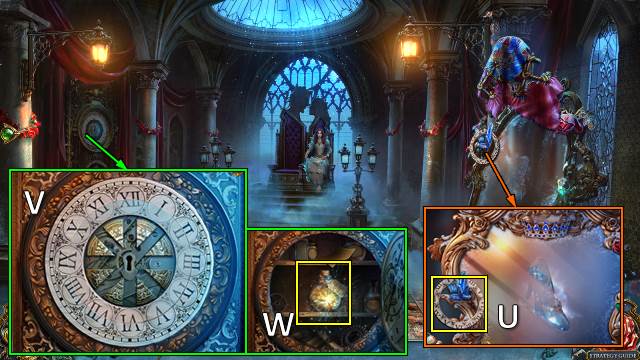
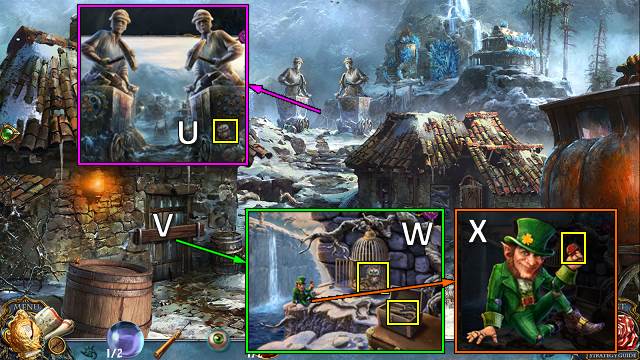
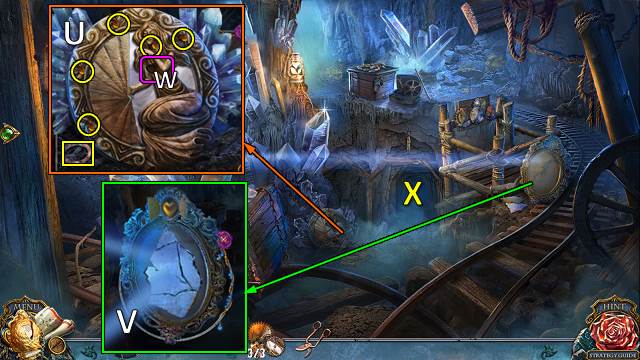
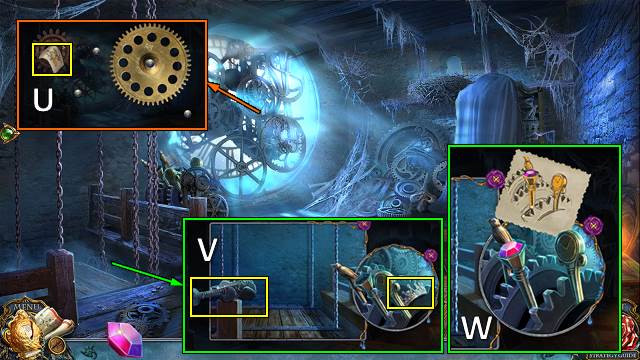
- Note from MAGIC CLOCK; place CLOCK PIECES. Place MY TEAR; take note and ANTI-MAGIC POWDER (U).
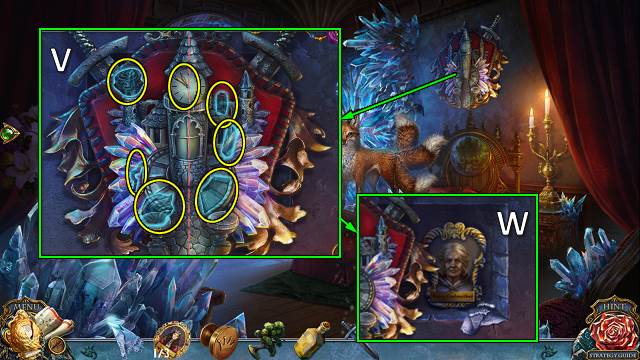
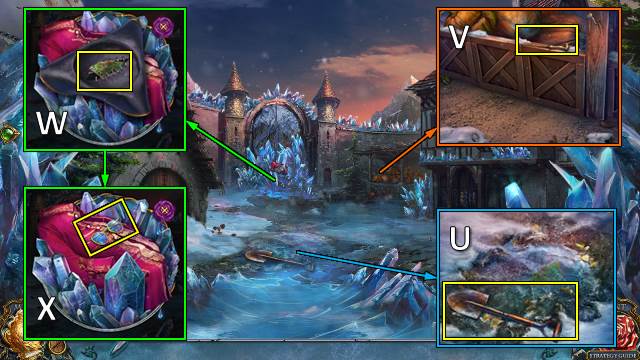
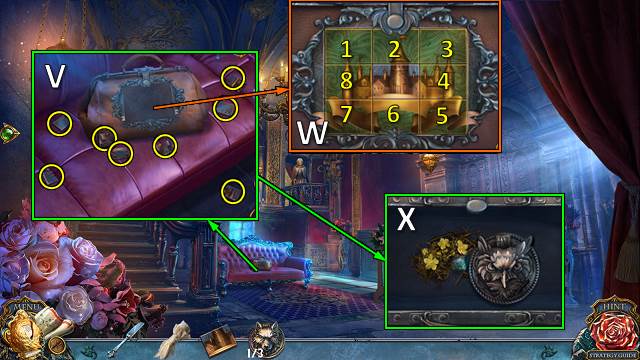
- Use ANTI-MAGIC POWDER; find pairs of similar items (random) (V).
- Go (V).
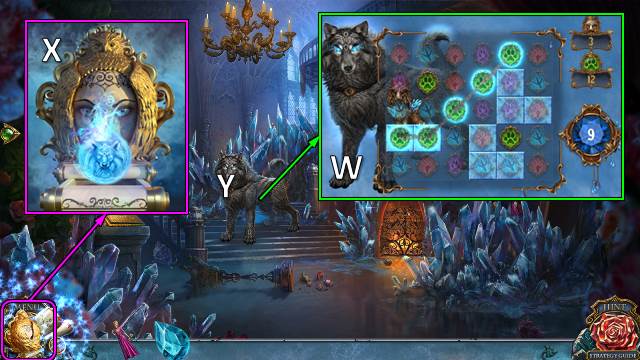
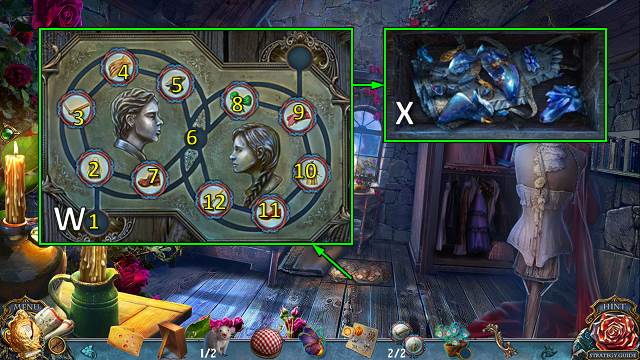
- Fight wolf (W); solution is random.
- Receive WOLF TEAR.
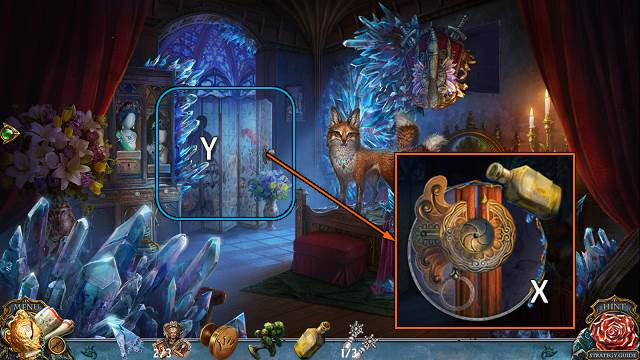
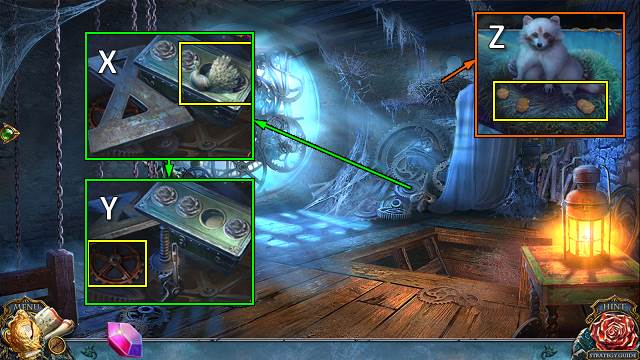
- Offer WOLF TEAR; take ANTI-MAGIC SPHERE (X).
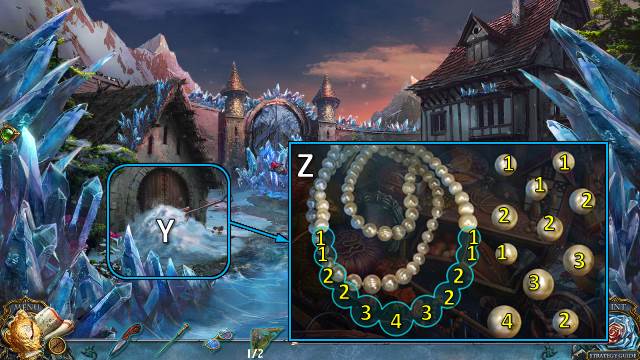
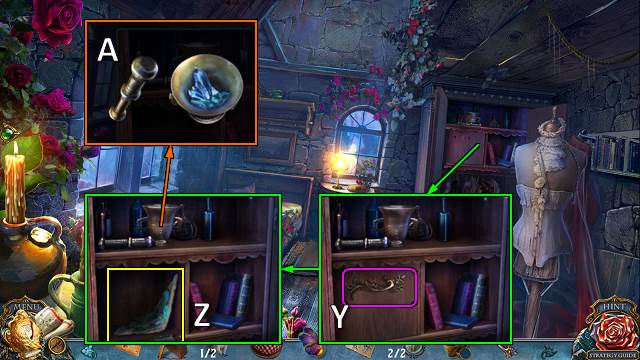
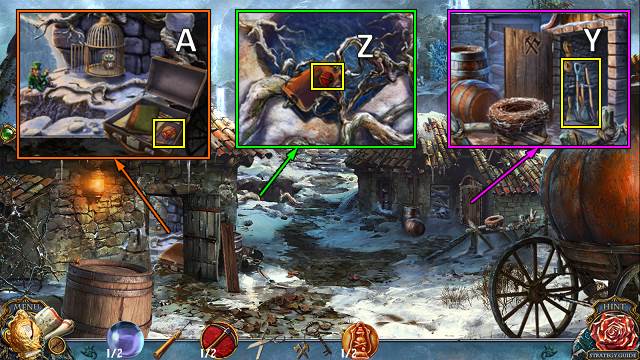
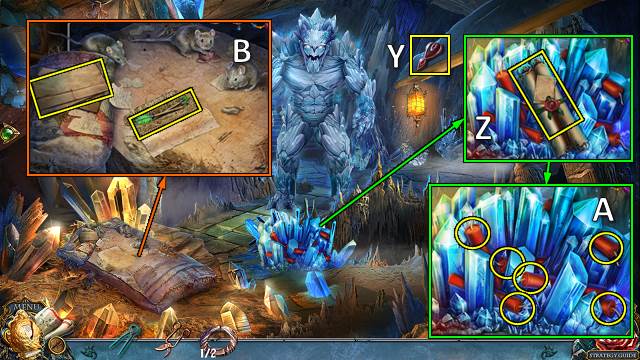
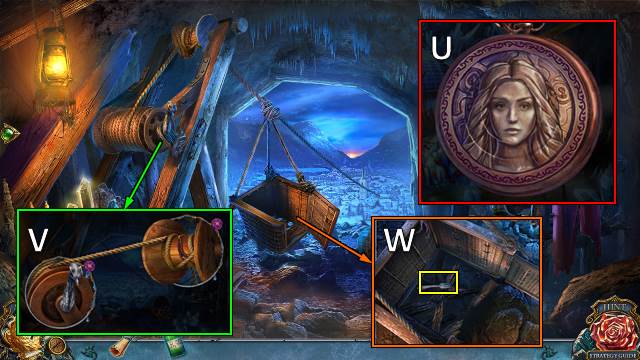
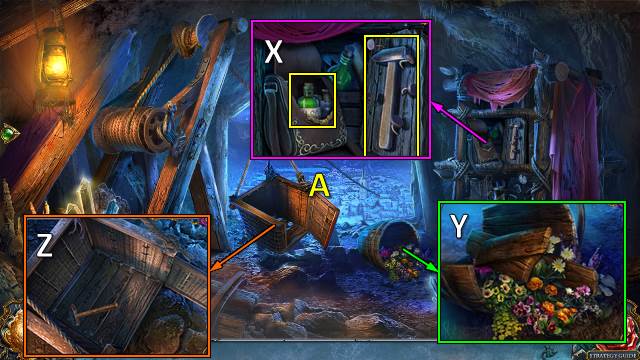
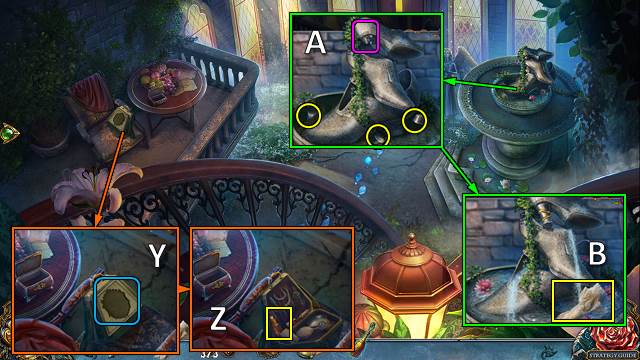
- Use ANTI-MAGIC SPHERE (Y).
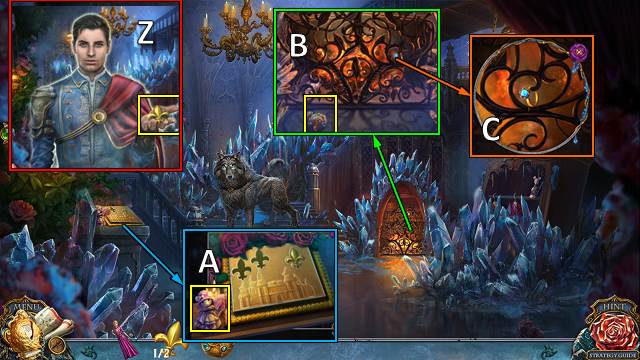
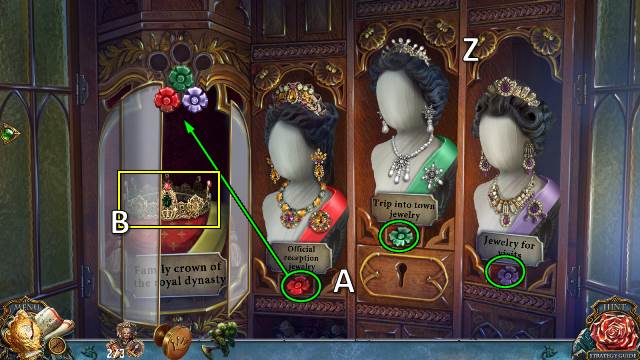
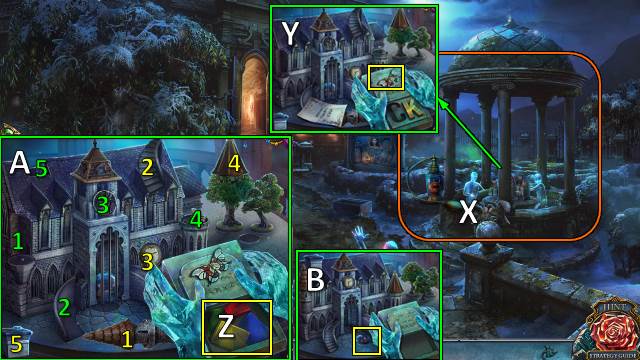
- Take FLEUR-DE-LIS 1/2 (Z).
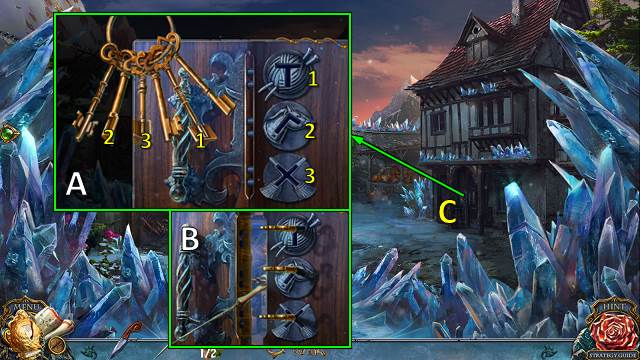
- Take MOUSE TOY 1/3 (A).
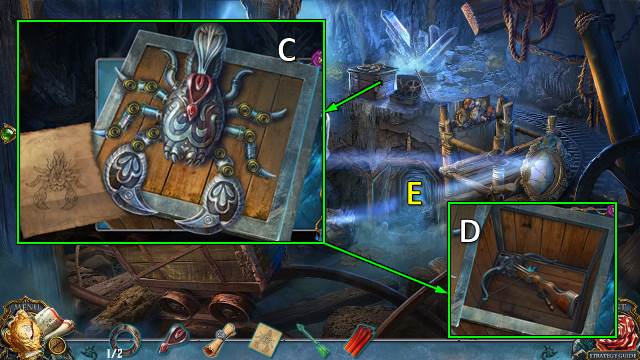
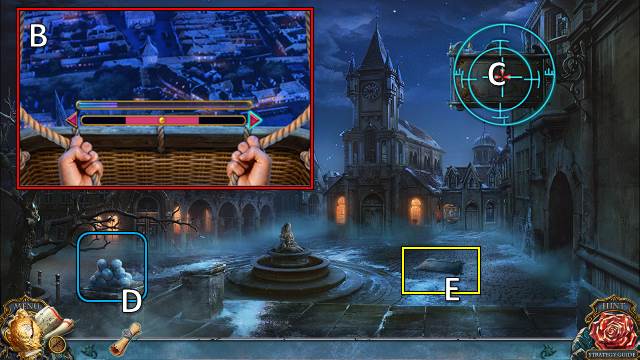
- Take HANDLE (B); try to take ring (C).
- Take MOUSE TOYS 2/3 (D).
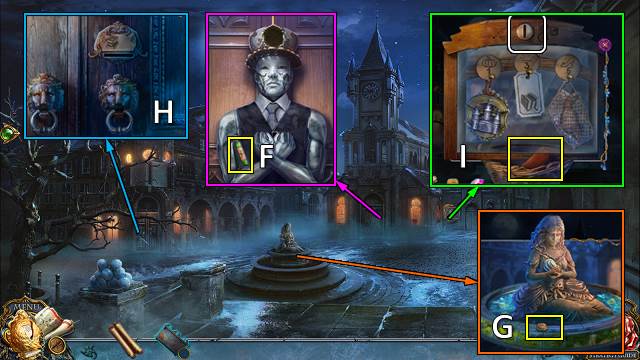
- Take note and GLUE (E). Place HANDLE; take MOUSE TOYS 3/3 (F).
- Take FORCEPS and clue; place MOUSE TOYS (G).
- Swap (1-4)-(2-4)-(3-4); take FLEUR-DE-LIS 2/2 (H).
- Place FLEUR-DE-LIS; open book (I).
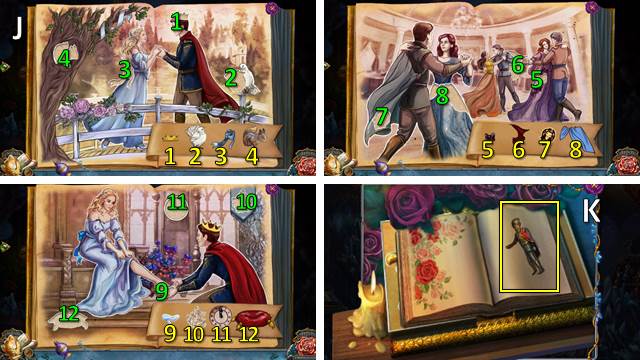
- Solution: 1-12 (J).
- Take PRINCE FIGURINE (K).
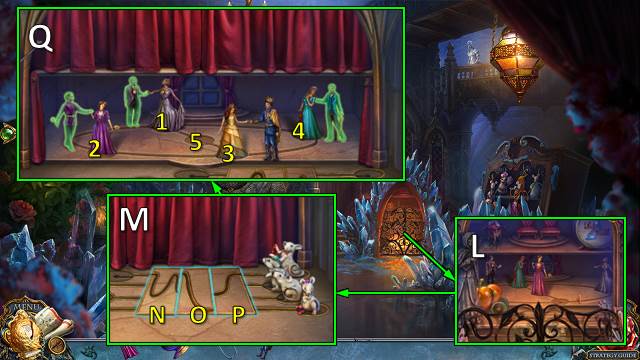
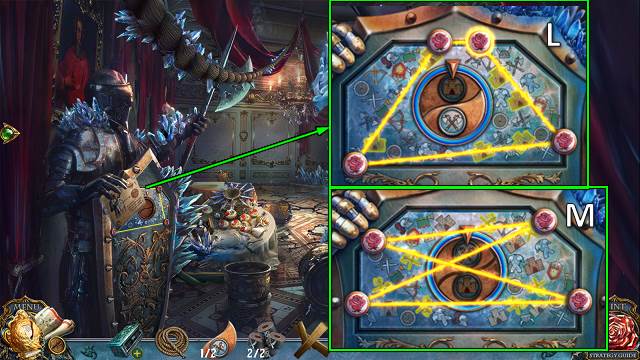
- Place GUEST FIGURINE and PRINCE FIGURINE (L).
- Solution 1 (M): O; N-O-Px3; N-O-Px3; N-O-Px3.
- Solution 2 (Q): 1-5-3-2-1-4-3-5.
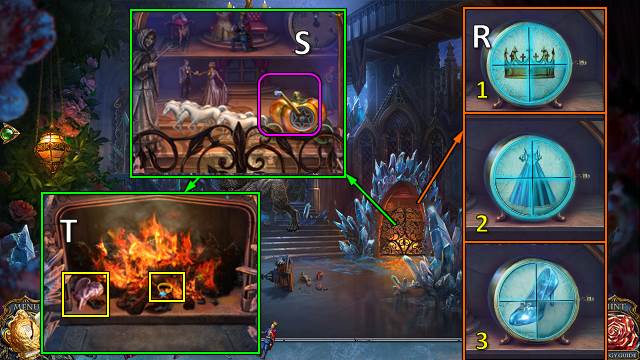
- Solution 3 (R).
- Pull handle (S).
- Take FAMILY RING and ANGEL FIGURINE with FORCEPS (T).
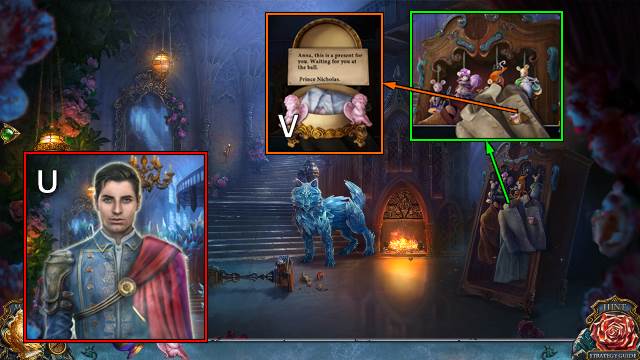
- Offer FAMILY RING (U).
- Place ANGEL FIGURINE; take HANDKERCHIEF and FIGURINE 1/5 (V).
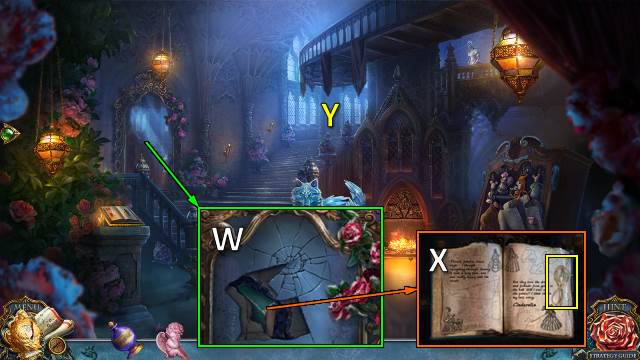
- Take MIRROR SHARD with HANDKERCHIEF (W).
- Take NEEDLE AND THREAD (X).
- Go (Y).
- Take PORTRAIT (Z).
- FIGURINES 2/5 from PORTRAIT. Use NEEDLE AND THREAD; take PIN and QUEEN'S PORTRAIT 1/3.
- Take QUEEN'S SIGNET. Use PIN; take SEEDS (A).
- Scare bird; take SPOON (B).
- Move (C).

- Offer SEEDS; receive FIGURINES 3/5. Take BROOCH 1/3 with MIRROR SHARD (D).
- Find pairs (E); assemble and take FEATHER DUSTER (F).
- Use SPOON; take FIGURINES 4/5 and BONSAI TREE (G).
- Use FEATHER DUSTER (H).
- Take FIGURINES 5/5 (I).
- Use GLUE; take PRINCESS (J).
- Place FIGURINES; select items (K).
- Go (L).
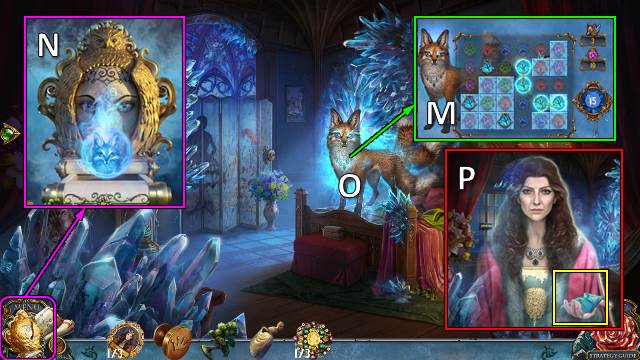
- Fight fox (M); solution is random.
- Receive FOX TEAR.
- Offer FOX TEAR; take ANTI-MAGIC SPHERE (N).
- Use ANTI-MAGIC SPHERE (O).
- Take ORIGAMI CODE (P).
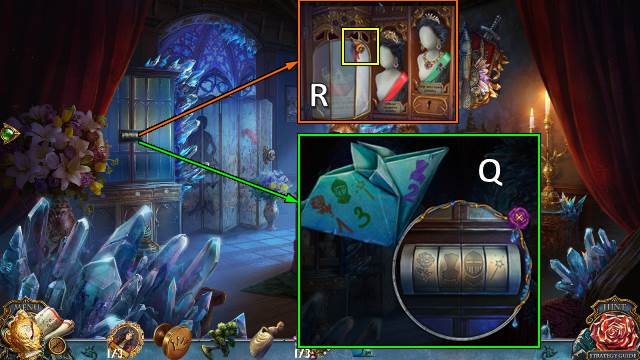
- Place ORIGAMI CODE; enter code (Q).
- Take LEVER (R).
- Take OIL (S); move drape and music box.
- Place LEVER and PRINCESS; use lever (T).
- Read notes; take SWORD (U).
- Place SWORD; find differences (V).
- Take PORTRAITS 2/3 and JEWELRY 2/3 (W).
- Use OIL (X).
- Play HOP (Y); receive JEWELRY 3/3.
- Place and move JEWELRY; solution (Z).
- Move flowers (A).
- Take FAMILY CROWN (B).
- Offer FAMILY CROWN (C).
- Take INSECTICIDE (D).
- Move curtain; take BRUSH and place QUEEN'S SIGNET. Read book (E).
- Take KEY (F).
- Use KEY; take PORTRAITS 3/3 (G).
- Walk down.
- Place and move PORTRAITS; solution (H).
- Take CASKET (I).
- Go (J).
Chapter 2: Fairy Godmother

- Combine 1-8 (K).
- Take LETTER C (L).
- Take KEY. Use BRUSH; take TOKEN 1/3 (M).
- Take CORKSCREW (N).
- Solution (O): 7-8-9-14-13-8-3-4-5-10-9-8-3-2-1-6-7-2-1-6-7-2-3-8-7-2-3-4-9-8-3-2-1-6-7-2-3-8.
- Use KEY; take NAIL PULLER and SLINGSHOT (P).
- Use NAIL PULLER; take ROPE (Q).
- Go (R).
- PATTERN from CASKET.
- Move firefly (S).
- Take BROKEN LANTERN (T).
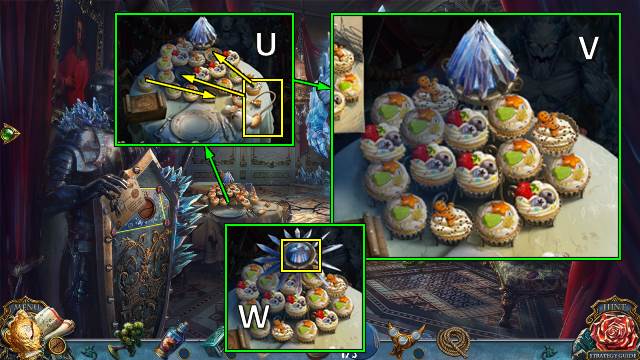
- Take SPRAYER. Move cupcakes; place PATTERN (U).
- Solution (V).
- Take TOKENS 2/3 (W).
- Walk down.
- CORKSCREW and SPRAYER on INSECTICIDE.
- Use INSECTICIDE (X).
- Place LETTER C; take note and BUTTERFLY TOKEN (Y).
- Take STAINED GLASS (Z). Place BONSAI TREE; restore castle (A).
- Take TOKENS 3/3 (B).
- Place TOKENS (C). Swap (1-6)-(2-5)-(3-5)-(4-5).
- Take RUBBER PIECE and BUTTON 1/2 (D).
- BUTTERFLY TOKEN and STAINED GLASS on BROKEN LANTERN; take LANTERN.
- Place LANTERN (E).
- Play HOP (F); receive FIREFLIES.
- Go (G).
- RUBBER PIECE and FIREFLIES on SLINGSHOT.
- Use SLINGSHOT. Shoot golem (H).
- Take LOCK PART 1/2 (I).
- Take BOARDS and LOCK PART 2/2 (J).
- LOCK PARTS on CASKET. Restore image. Take BUTTON 2/2 (K).
- Take note; place BUTTON. Solution 1 (L).
- Solution 2 (M).
- Take STICK (N); place BOARDS (O).
- Go (P).
- Talk (Q); receive KEY.
- Take TORN FLAG (R).
- ROPE on TORN FLAG. Solution (S): 1-16. Take FLAG.
- Throw FLAG (T).
- Take CLOCK PART (U).
- Place and turn CLOCK PART; use KEY (V).
- Take note and MAGIC SAND (W).

- Use MAGIC SAND; find shoes x6 (X). Touch mirror; receive CRYSTAL SLIPPER.
- Offer CRYSTAL SLIPPER (Y).
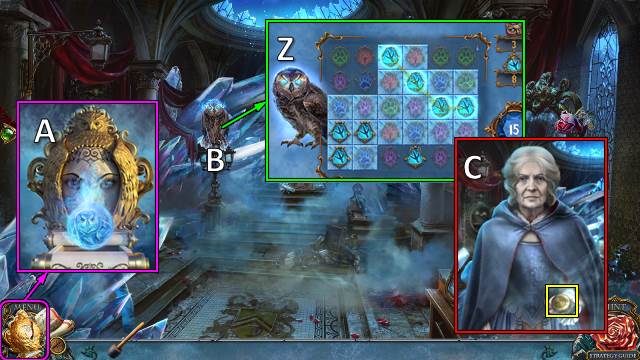
- Fight owl (Z).
- Receive OWL TEAR.
- Place OWL TEAR; take ANTI-MAGIC SPHERE (A).
- Use ANTI-MAGIC SPHERE (B).
- Take TOKEN 1/2 (C).
- Take GLOVES (D).
- Take KNIFE (E).
- Use GLOVES; take STRING (F).
- Take CODE (G).
- Walk down.
- Place STRING and CODE. Move buttons; push play. Take BALL (H).
- Go (I).
- Place BALL (J); take ACID (K).
- Use ACID; take CLEF (L).
- Walk down.
- Place CLEF; use STICK (M). Take TOKENS 2/2 (N).
- Go (O).
- Place TOKENS; move token. Select 1-3-2 (P). Take NOTES (Q).
- Place NOTES; swap (1-5)-(2-4)-(4-5)-(3-4). Take MAGIC WAND (R).
- Offer MAGIC WAND (S).
- Go (T).
Chapter 3: Lucille
- Take SHOVEL (U).
- Take STICK (V).
- Use KNIFE; take PIECE OF MAP 1/2 (W).
- Take GLASSES (X).
- Use SHOVEL; play HOP (Y).
- Solution (Z).
- Receive BUNCH OF KEYS.
- Use BUNCH OF KEYS; place keys (A).
- Use STICK (B).
- Go (C).
- Fight squirrel (D); solution is random.
- Receive SQUIRREL TEAR.
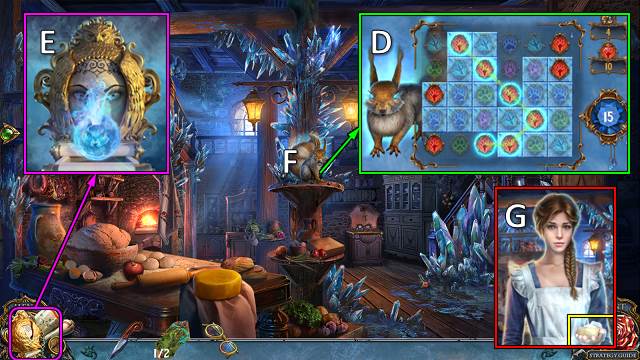
- Offer SQUIRREL TEAR; take ANTI-MAGIC SPHERE (E).
- Use ANTI-MAGIC SPHERE (F).
- Take CODE (G).
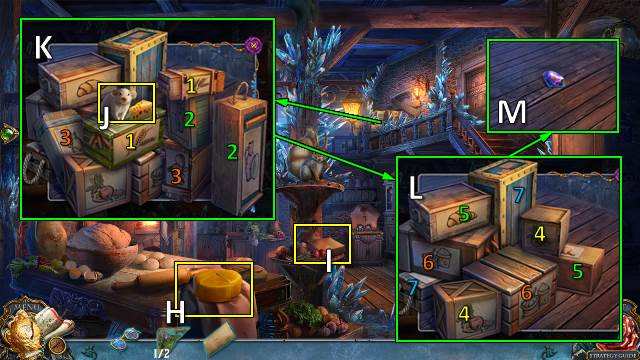
- Use KNIFE; take CHEESE (H).
- Take TRAP (I).
- Place CHEESE; take MOUSE 1/2 (J). Remove boxes in pairs (K-L); take DIAMOND (M).
- Use DIAMOND; take METAL ROSE and NEEDLE SET (N).
- Go (O).
- Take MECHANICAL BUTTERFLY (P).
- Move pillow (Q).
- Place CODE and GLASSES; enter code (R). Take TRANSFORMATION INSTRUCTIONS, and TOKEN 1/2.
- Remove 1-5 (S).

- Take STAR (T).
- Take note; place METAL ROSE and STAR. Take TOKENS 2/2 and FLOWER (U).
- HANDLE from FLOWER.
- Move (V).
- Place TOKENS (W).
- Solution: (2-1)-(7-2)-(12-6)-(6-7)-(11-12)-(10-11)-(9-10)-(8-9)-(5-6)-(4-5)-(3-4)-(2-3)-(1-2)-(6-8)-(5-6)-(4-5)-(3-4)-(2-3)-(7-2)-(2-1)-(6-7)-(7-2).
- Repeat this 3 times: (12-6)-(6-7)-(11-12)-(10-11)-(9-10)-(8-9)-(5-6)-(6-8)-(4-5)-(3-4)-(2-3)-(7-2).
- End with: (12-6)-(6-7)-(11-12)-(10-11)-(9-10)-(8-9)-(5-6)-(6-8)-(4-5)-(3-4)-(2-3)-(1-2).
- Take TORN FAMILY APRON and MAGIC CRYSTAL (X).
- Place HANDLE (Y); take MAP OF THE CRYSTAL KINGDOM (Z).
- Place and grind MAGIC CRYSTAL; take BOWL WITH CRYSTAL (A).
- Walk down.
- Note and WOOL from TORN FAMILY APRON.
- Place WOOL; move yarn (B).
- Place NEEDLE SET; connect all crosses (C). Take PIECE OF CLOTH.
- PIECE OF CLOTH on TORN DAMILY APRON. Restore and take FAMILY APRON.
- Offer FAMILY APRON (D).
- Take FAUCETS and BUCKET (E).
- Place TRAP and CHEESE; take MICE 2/2 and LENS 1/2 (F).
- Place FAUCETS and BUCKET; take BUCKET OF HOT WATER (G).
- Place BOWL WITH CRYSTAL; take BOWL OF MAGIC WATER (H).
- Walk down.
- Play HOP (I).
- Solution (J).
- Receive BRIDLE.
- BOWL OF MAGIC WATER and MECHANICAL BUTTERFLY on FLOWER; take ANTI-MAGIC POWDER.
- Place TRANSFORMATION INSTRUCTIONS, MICE and BRIDLE. Remove pumpkins; move pumpkin. Place ANTI-MAGIC POWDER (K).
- Use BUCKET OF HOT WATER; take PIECES OF MAP 2/2 (L).
- PIECES OF MAP on MAP OF THE CRYSTAL KINGDOM.
- Solution (M-N-O).
- Take MAP OF THE CRYSTAL KINGDOM.
- Place MAP OF THE CRYSTAL KINGDOM; go (P).
Chapter 4: The Blacksmith
- Take SPEAR (Q).
- Take NET (R).
- Take DOLL EYE (S).
- Use NET; take PICKAXE TOKEN 1/2 (T).
- Take OWL EMBLEM (U).
- Open (V).
- Place OWL EMBLEM; take SCISSORS and KEY (W).
- Place DOLL EYE; take TOKEN 1/2 (X).
- Use KEY; take SCRAPER and SCYTHE (Y).
- Remove snow. Use SPEAR; use SCYTHE. Take TOKENS 2/2 (Z).
- Use SCRAPER; read book and take PICKAXE TOKENS 2/2 (A).

- Place TOKENS (B).
- Solution: E-D-C-E-D-E.
- Place PICKAXE TOKENS (F).
- Solution: (11-7)-(7-1)-(1-11)-(13-3)-(3-1)-(11-13)-(13-7)-(7-3).
- Take FEATHER DUSTER (G).
- Go (H).
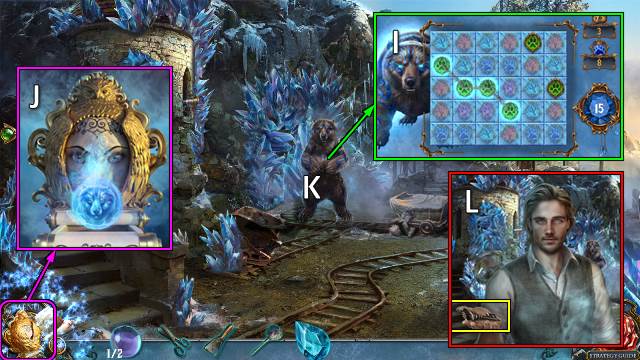
- Fight bear (I); solution is random.
- Receive BEAR TEAR.
- Offer BEAR TEAR; take ANTI-MAGIC SPHERE (J).
- Use ANTI-MAGIC SPHERE (K).
- Take KEY (L).
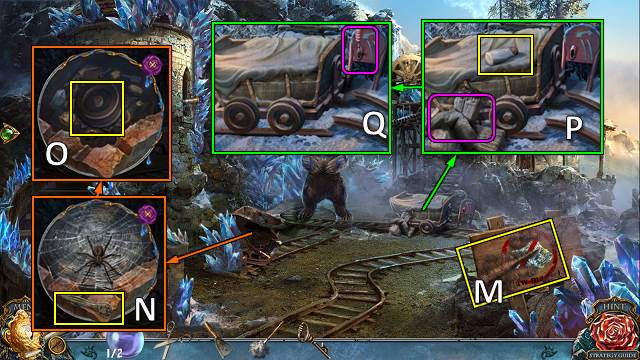
- Use SCRAPER; take LEVER (M).
- Take TWEEZERS; use FEATHER DUSTER (N). Remove items; take WHEEL (O).
- Take MILK; move items (P). Place WHEEL and LEVER; pull lever (Q).
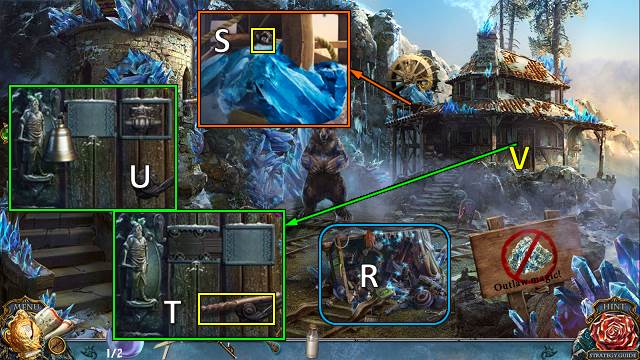
- Play HOP (R); receive BELL.
- Take BLACKSMITH FIGURINE 1/2 (S).
- Take PICK PART 1/3 (T); place BELL and KEY (U).
- Go (V).
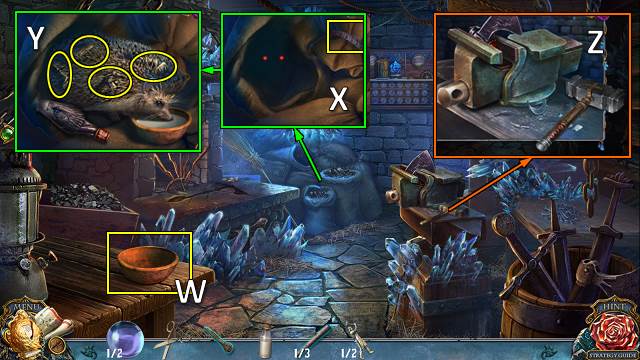
- Use MILK; take SAUCER WITH MILK (W).
- Take TIES; offer SAUCER WITH MILK (X).
- Take pieces with TWEEZERS; take BLACKSMITH FIGURINES 2/2 and PICK PARTS 2/3 (Y).
- Take HAMMER (Z).
- Take OIL; place BLACKSMITH FIGURINES (A).
- Solution: B1-C5-D8; B2-C7-D6; B4-C4-D3; B3-C3-D3; B5-C1-D4; B6-C3-D5; B7-C2-D7; B8-C6-D8.
- Receive ROD and FAMILY GEMSTONE.
- Use ROD; take PICK PARTS 3/3 (E).
- Walk down.
- Use HAMMER; remove all pieces of rope with SCISSORS (F).
- Go (G).
- Place and position PICK PARTS; place FAMILY GEMSTONE and HAMMER. Use hammer; take FAMILY PICKAXE (H).
- Walk down.
- Offer FAMILY PICKAXE (I).
- Play HOP (J); receive LENSES 2/2.
- Go (K).
- Use TIES; take INCOMPLETE LAMP (L).
- Walk down.

- OIL on INCOMPLETE LAMP; take LAMP.
- Place LAMP and LENSES (M).
- Move log; take BOTTLE. Move ribbon; take AXE (N).
- Use AX; go (O).
Chapter 5: The Mines
- Take PIECE OF CLOTH (P).
- Take GEAR 1/3. Use PIECE OF CLOTH; take SCISSORS (Q).
- Take GEARS 2/3 (R).
- Take TONGS and SHOVEL. Use SCISSORS x7; take GEARS 3/3 (S).
- Place and turn GEARS (T).
- Use SHOVEL; take MEDALLION PART 1/2. Place BOTTLE; select resin x5. Take JAR OF RESIN (U).
- Place JAR OF RESIN; restore mirror. Take HEART (V).
- Place HEART (W).
- Go (X).
- Take STINGER (Y).
- Take note and SPELLS SCROLL (Z).
- Move dynamite x6 with TONGS (A); take DYNAMITE.
- Use SCISSORS; take CODE and ARROWS (B).
- Walk down.
- Place STINGER and CODE; solution (C).
- Move items; take CROSSBOW and WAND (D).
- Go (E).
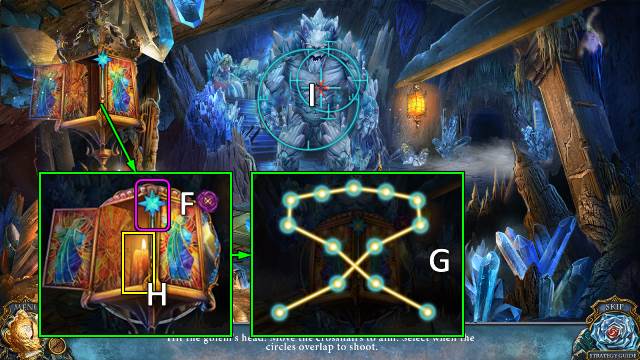
- Place WAND (F); connect lights (G). Take CANDLE (H).
- ARROWS, DYNAMITE and CANDLE on CROSSBOW. Load bow. Take LOADED CROSSBOW.
- Use LOADED CROSSBOW; aim and shoot (I).
- Take CHAIN (I).
- Play HOP (J); receive CRYSTAL TEAR.
- Offer CRYSTAL TEAR; take ANTI-MAGIC POWDER (K).
- Go (L).
- Use ANTI-MAGIC POWDER (M).
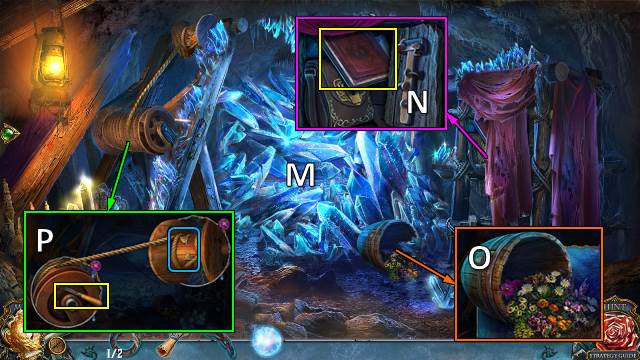
- Move drape; take BOOK (N).
- Place BOOK; take SEEDS (O).
- Take FILE; place CHAIN (P).
- Walk down.
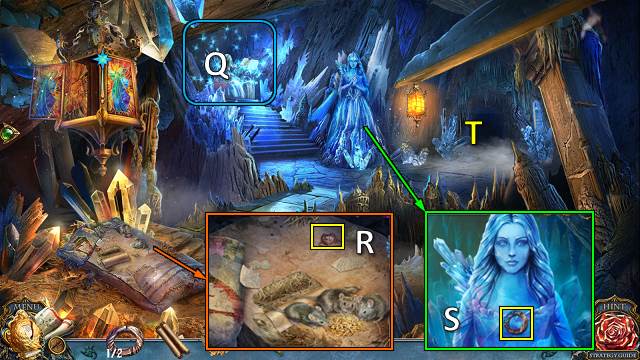
- Play HOP (Q); receive LEVER.
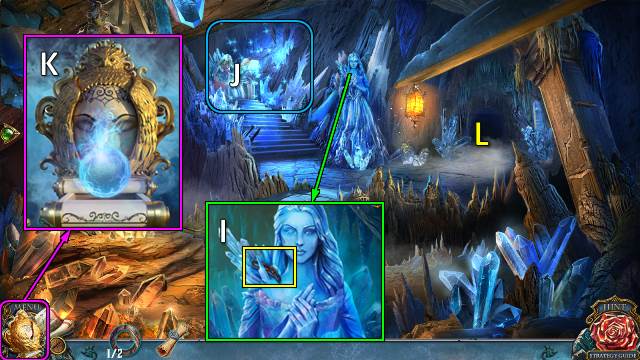
- Offer SEEDS; take MEDALLION (R).
- Use FILE; take MEDALLION PARTS 2/2 (S).
- Go (T).
- MEDALLION PARTS on MEDALLION; restore image (U). Take KEY.
- Use LEVER (V).
- Take FORK (W).
- Use KEY and FORK; take ACID and HAMMER AND NAILS (X).
- Use ACID; take BOARDS (Y).
- Place BOARDS and HAMMER AND NAILS; use hammer on all nails (Z).
- Go (A).
Chapter 6: Cinderella
- Fly balloon (B); solution is random.
- Shoot board (C) with snowballs x2 (D).
- Take SIGNBOARD (E).
- Take ACID (F).
- Take COIN (G).
- ACID on SIGNBOARD; take TOKEN.
- Take GEM; place TOKEN (H).
- Take BRUSH; use COIN. Take TOWN EMBLEM (I).
- Place TOWN EMBLEM; take CODE (J).
- Use BRUSH and place CODE; select 1-7-3-4-2-6-5 (K).
- Take COINS 1-3/3 (L).
- Use COINS; take TICKET (M).
- Use TICKET (N).
- Play HOP (O); solution (P).
- Receive KING'S PERMISSION.
- Offer KING'S PERMISSION (Q).
- Go (R).

- Use SPELLS SCROLL (S).
- Solution (T1-3).
- Take CODE (U).
- Take CROWN and JACK; place GEM and CODE (V).
- Move levers (W).
- Take PEACOCK (X). Place JACK; take COGWHEEL 1/3 (Y).
- Take COINS (Z).
- Walk down.
- Play HOP (A); receive MAGIC POWDER.
- Place CROWN; take WING (B).
- Use COINS; take FISH (C).
- Go (D).
- Offer FISH; take ROSE and COGWHEELS 2/3 (E).
- Place ROSE; take SAW (F).
- Use SAW, remove drape and place WING; take COGWHEELS 3/3 (G).
- Place COGWHEELS; solution (H).
- Use MAGIC POWDER (I).
- Go (J).
- Take KNIFE (K).
- Take RAG (L). Place PEACOCK; take TOKEN (M).
- Take THREAD (N).
- Use THREAD; take KEY (O).
- Use KEY; take DOOR PART 1/3 (P).
- Go (Q).
- Take EMBLEM (R).
- Take INKWELL (S).
- Use KNIFE; take TASSEL (T).
- Play HOP (U); receive DOOR PARTS 2/3.
- Find pieces; place TOKEN (V).
- Select 1-8 (W).
- Take DOOR PARTS 3/3 (X).
- Walk down.
- Place EMBLEM (Y); take GLUE (Z).
- Use GLUE; select pieces (A).
- Use RAG; take WET RAG (B).
- Use WET RAG and INKWELL; take CODE (C).
- Go (D).
- Place DOOR PARTS and CODE (E).
- Swap (1-5)-(2-3)-(3-4)-(4-5).
- Go (F).
- Talk (G).
- Walk down.
- Play HOP (H); receive HANDLE.
- Go (I).
- Use HANDLE (J); take LIGHTER (K).
- Use LIGHTER and KNIFE; take POWDER BOX (L).
- Walk down.
- Use POWDER BOX and TASSEL; push buttons (M).
- Take CRYSTAL TEAR (N).
- Offer CRYSTAL TEAR; take ANTI-MAGIC POWDER (O).
- Use ANTI-MAGIC POWDER; take MAGIC WAND (P).
- Go (Q).
- Use MAGIC WAND (R).
- Solution (S): 1-7.
- Go (T).
- Use MAGIC WAND (U).
- Congratulations, you have completed Living Legends: The Crystal Tear.
Created at: 2020-03-06