

Walkthrough Menu
- General Tips
- Chapter 1: At Home
- Chapter 2: The Mountain Road
- Chapter 3: Father's Home
- Chapter 4: The Paw
- Chapter 5: Amaretta' House
- Chapter 6: The Bear Bedroom
General Tips
- This is the official guide for Living Legends: Wrath of the Beast.
- Hidden-object puzzles are referred to as HOPs. This guide will not show screenshots of the HOPs, however, it will mention when an HOP is available and the inventory item you'll collect from it.
- This guide will not mention each time you have to zoom into a location; the screenshots will show each zoom scene.
Chapter 1: At Home
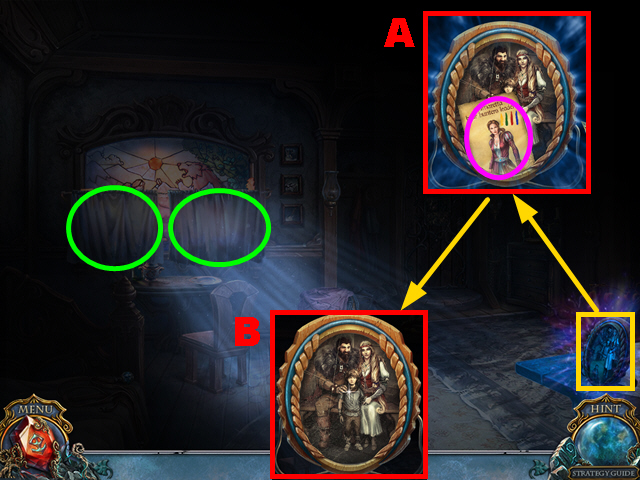
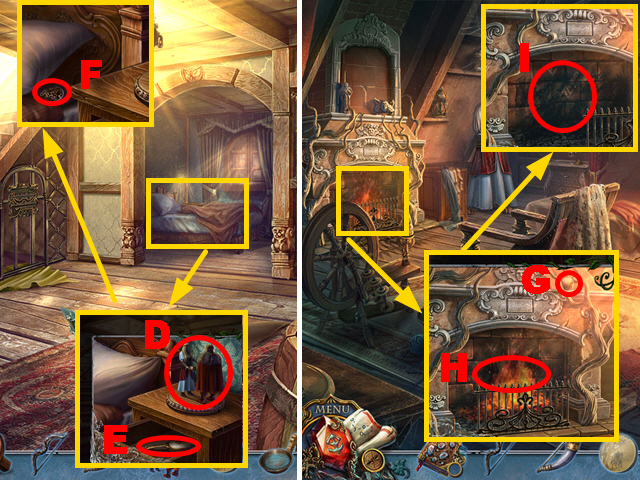
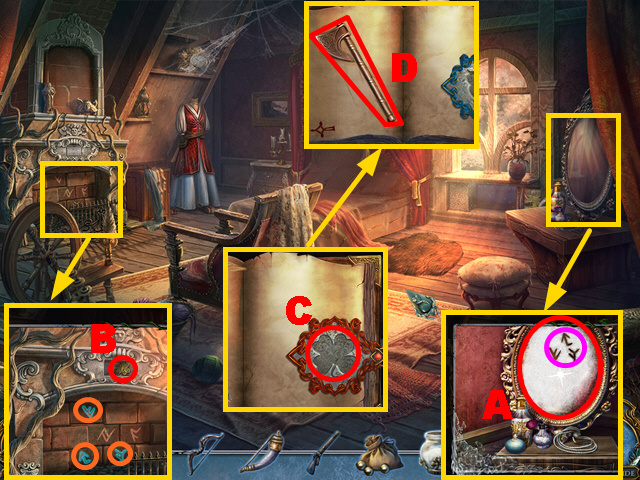
- Take the note (purple) and FAMILY PORTRAIT (A).
- Open the curtains (green).
- Turn around the FAMILY PORTRAIT (B).
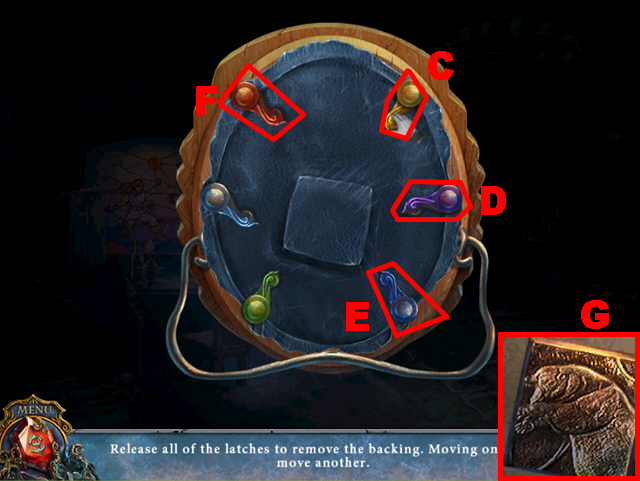
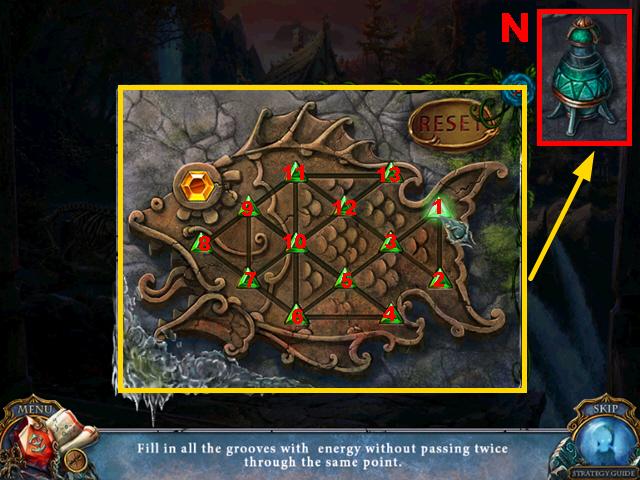
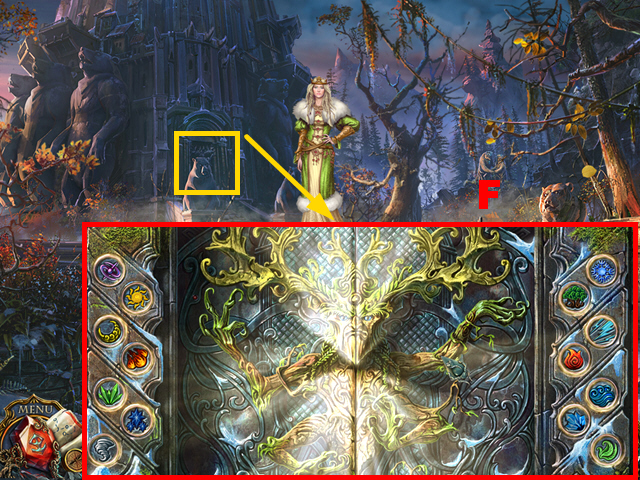
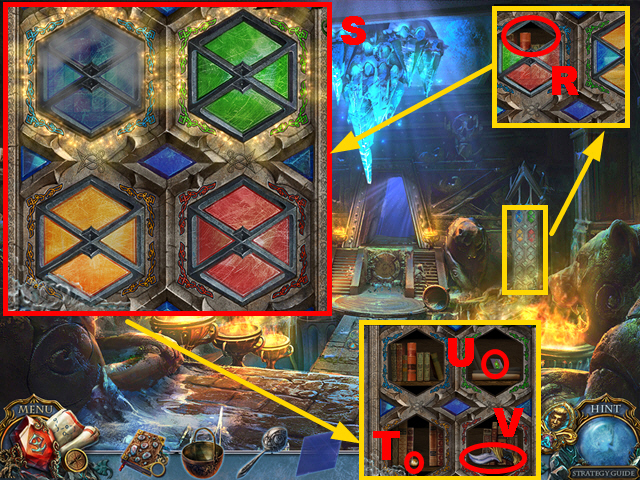
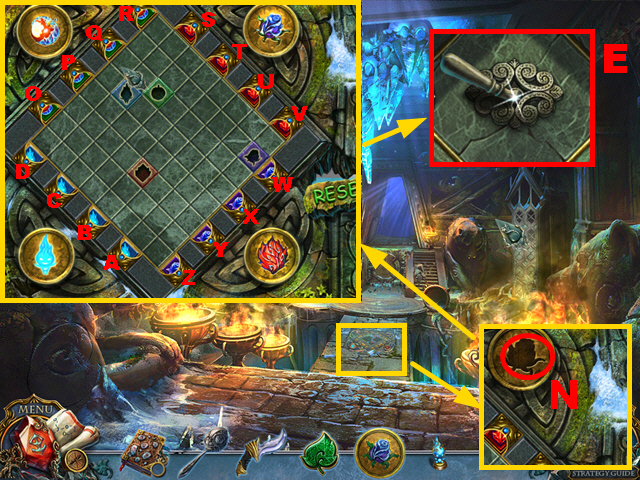
- Play the mini-game.
- Solution: C-D-E-F.
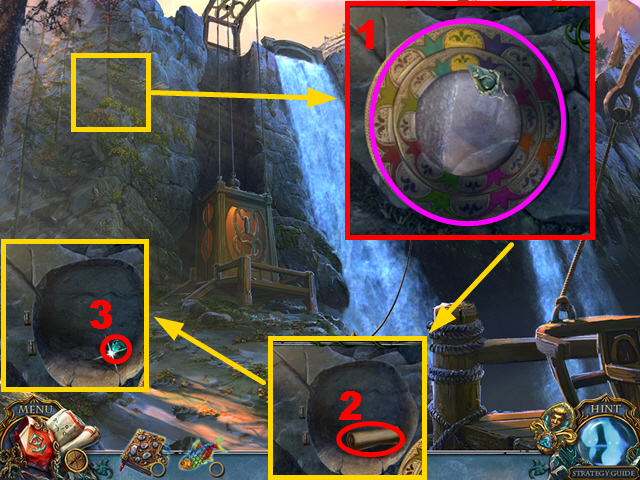
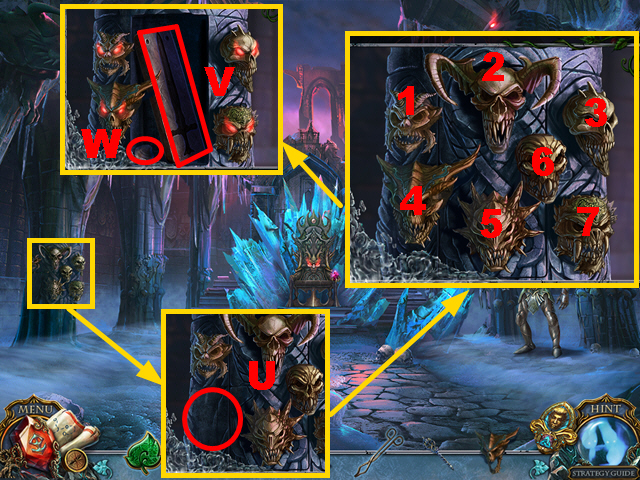
- Take the BEAR TILE (G).
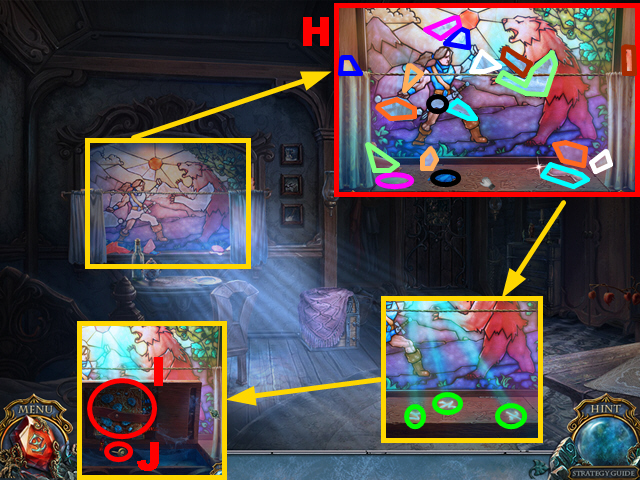
- Arrange the stained glass pieces correctly (H).
- Push 3 symbols (green).
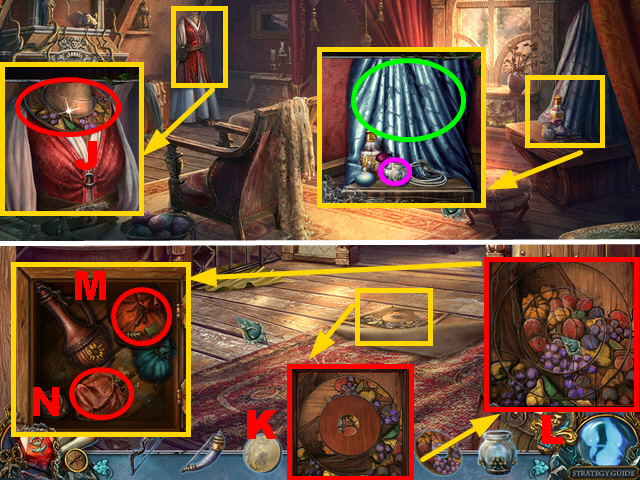
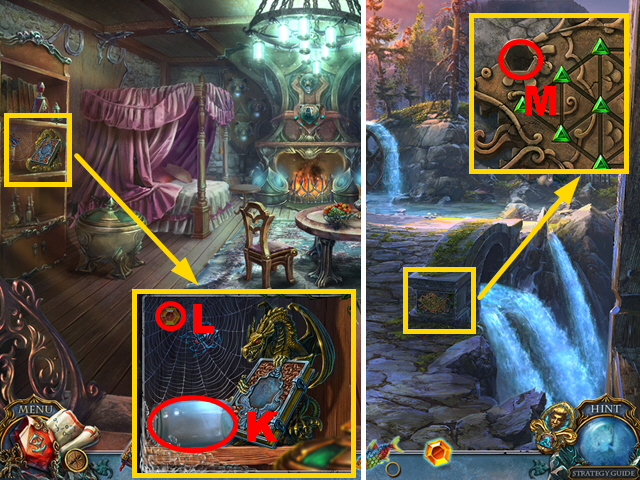
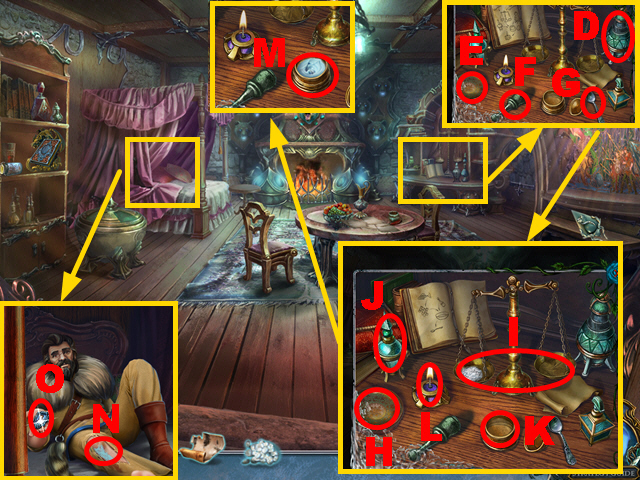
- Take MOM'S DIARY (I) and the KNOB (J).
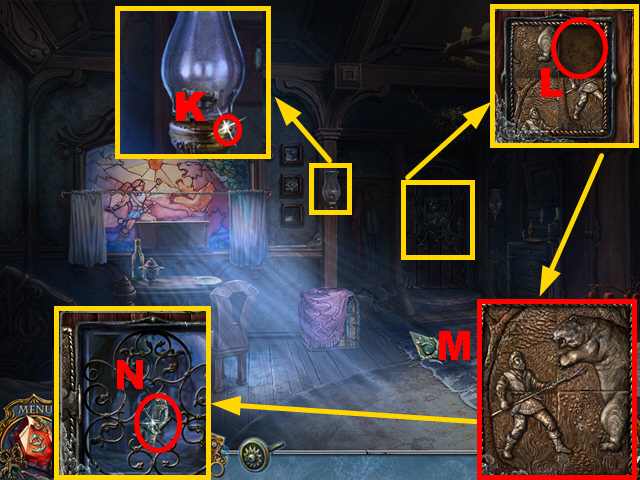
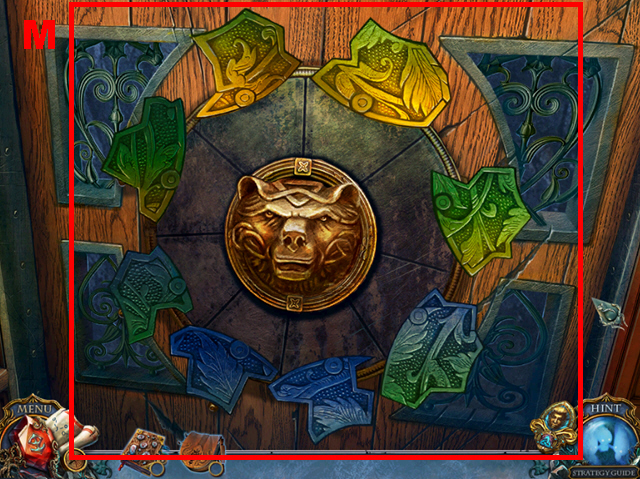
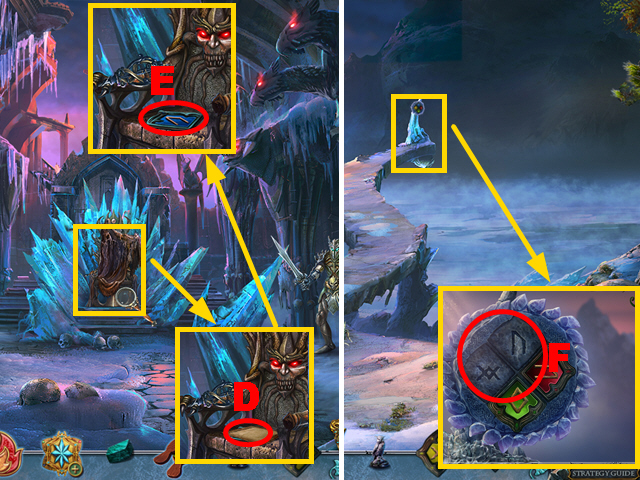
- Place the KNOB (K); pull it.
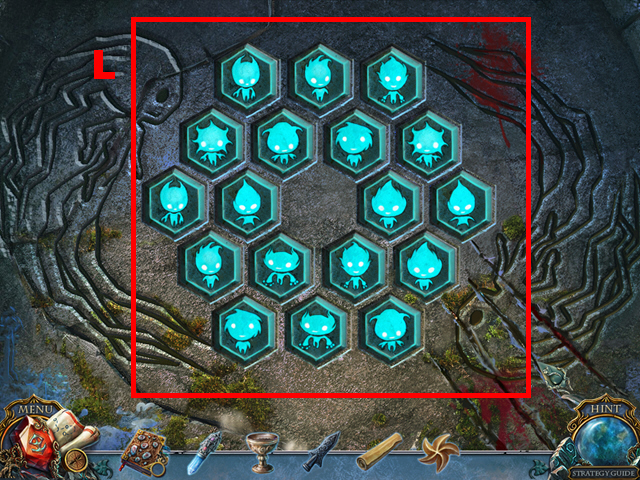
- Place the BEAR TILE (L); arrange the tiles correctly (M).
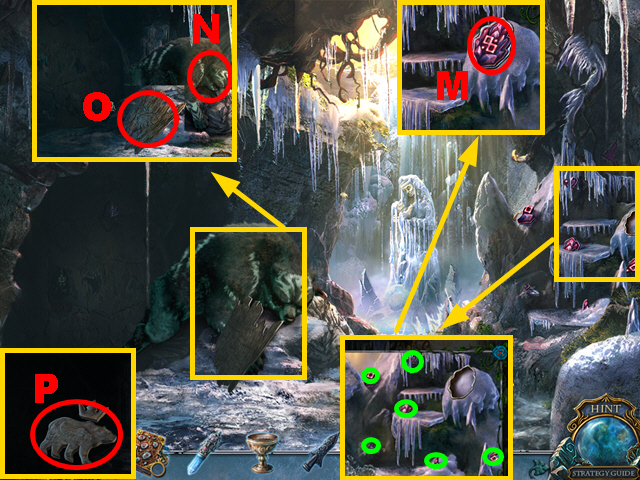
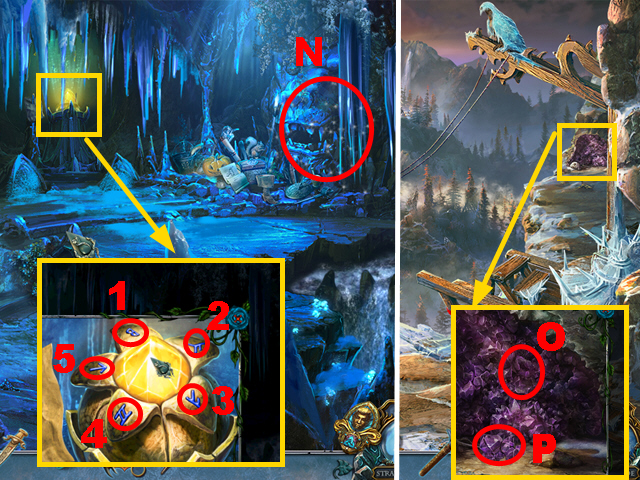
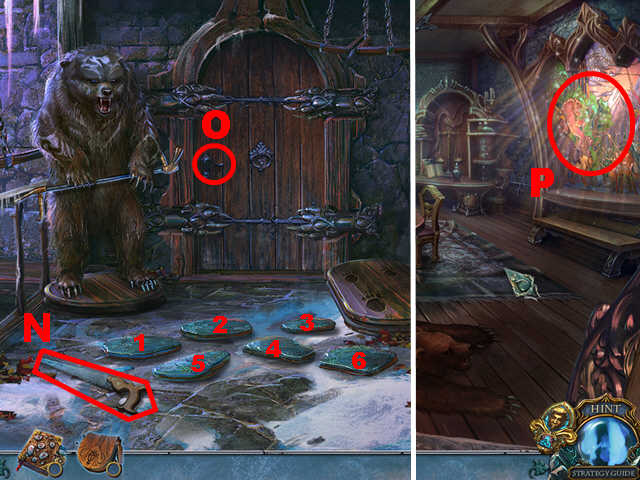
- Take the HUNTER FIGURE (N).
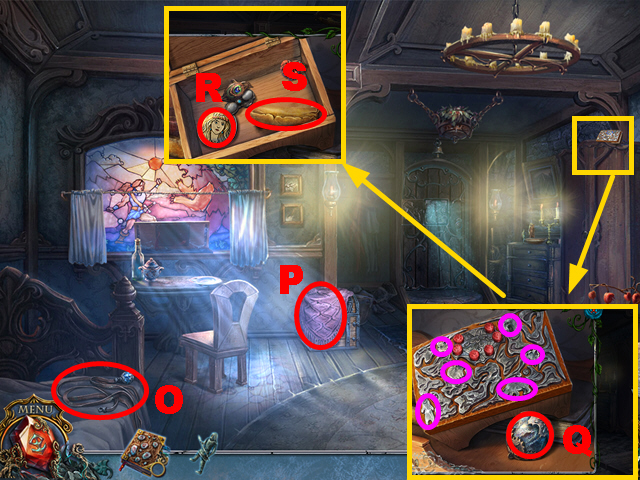
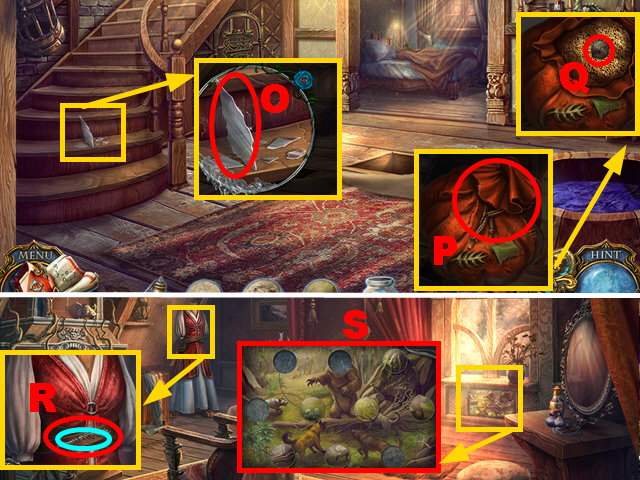
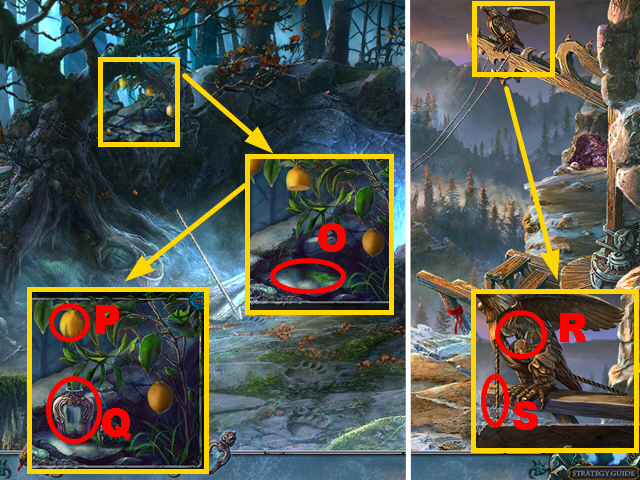
- Take the BROKEN BOLA (O).
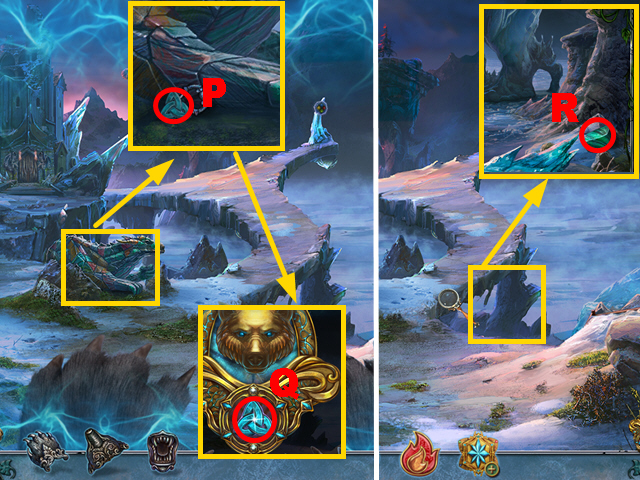
- Remove the blanket (P).
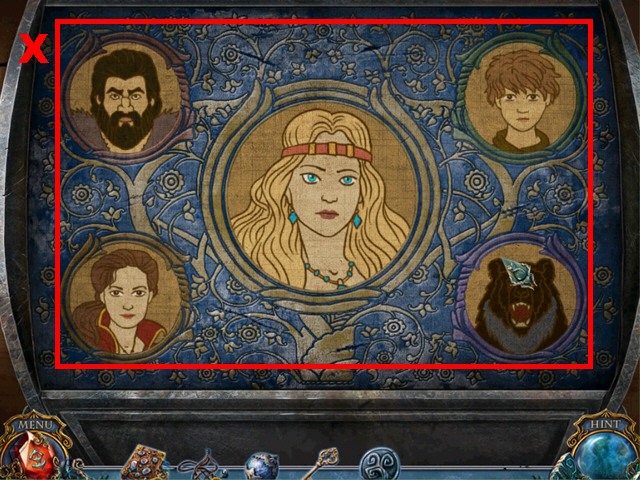
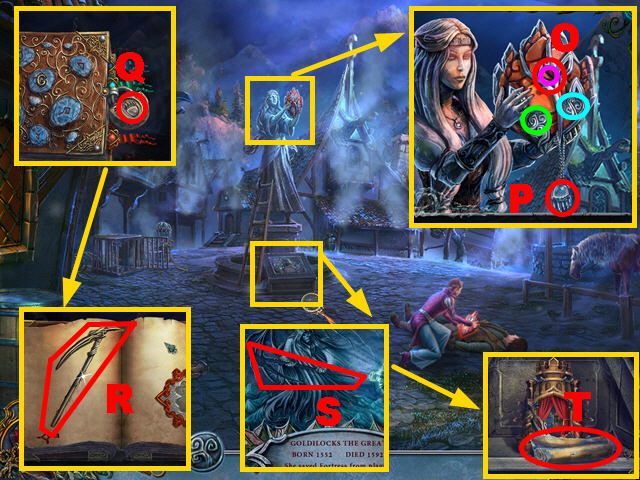
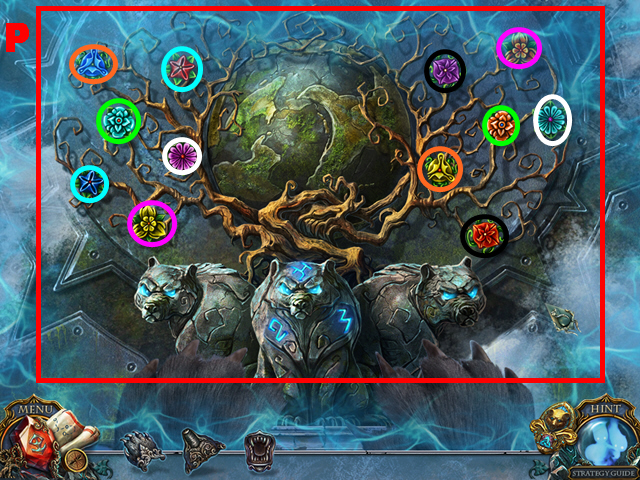
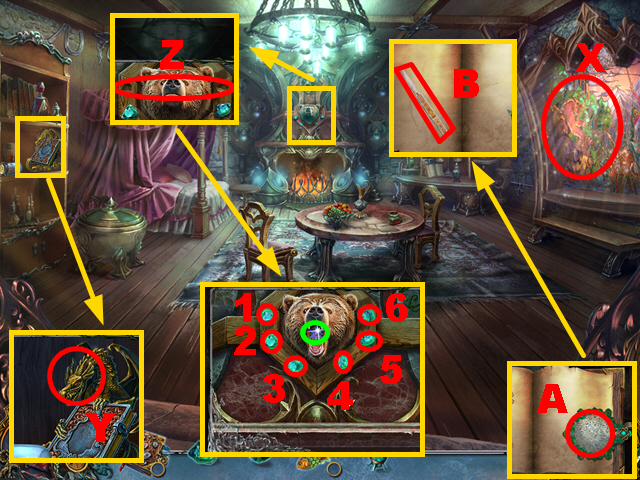
- Take the WEIGHT (Q); select six bears (purple).
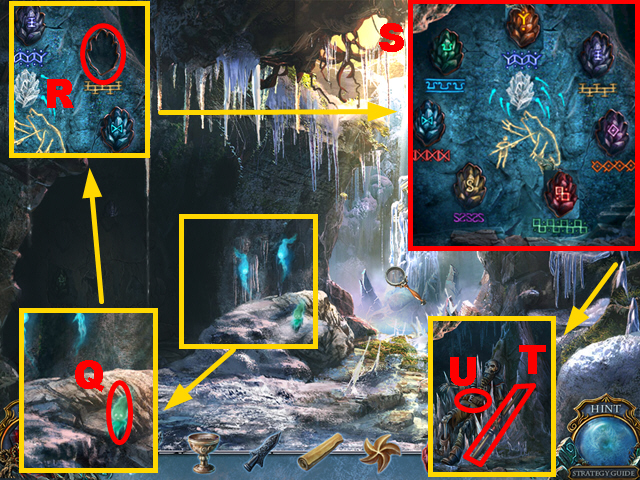
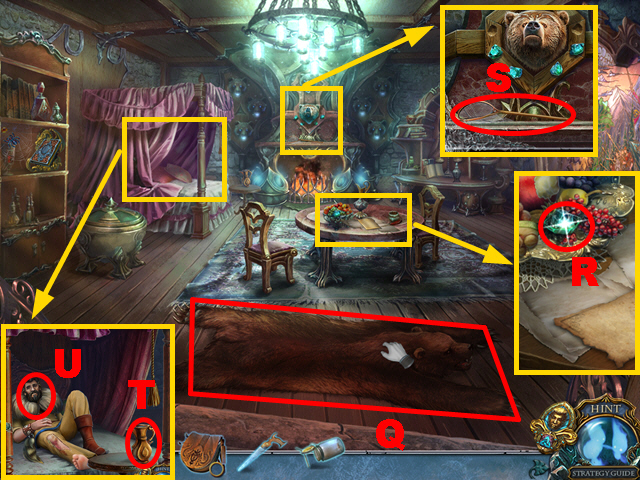
- Remove 4 items; take MOM'S PORTRAIT (R).
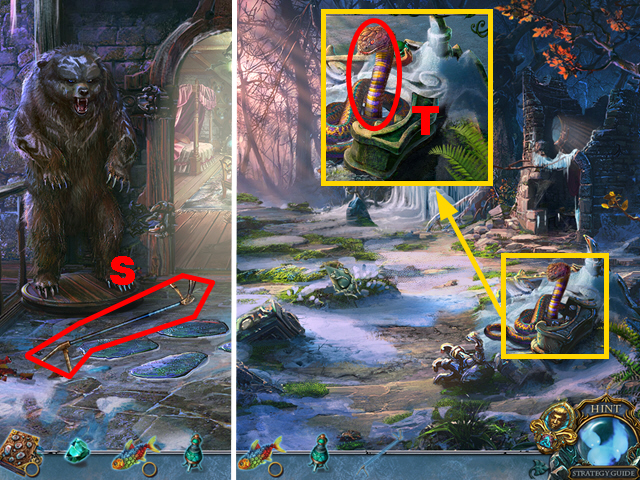
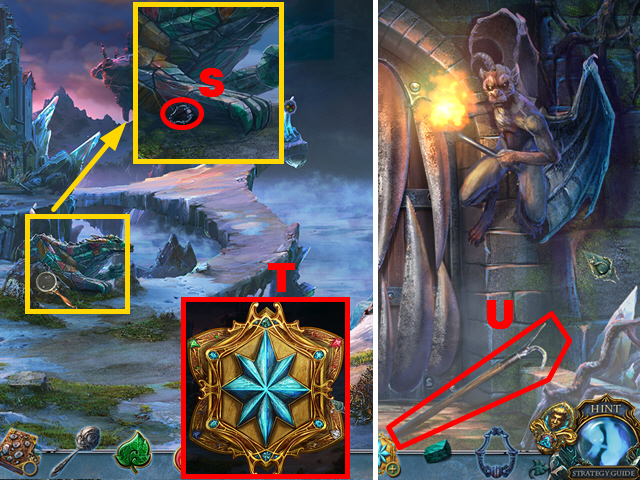
- Read the note (S).
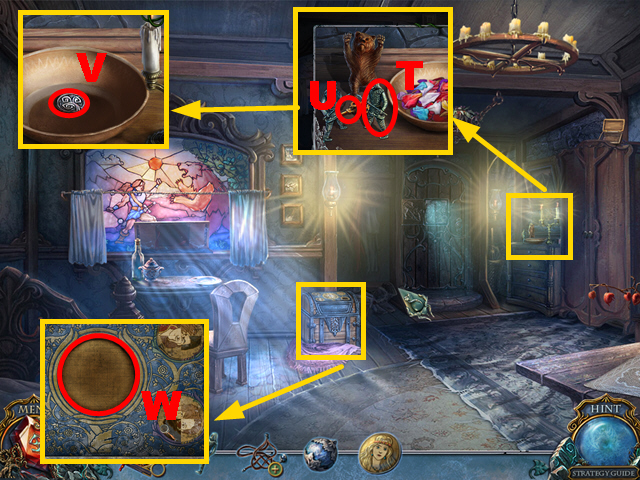
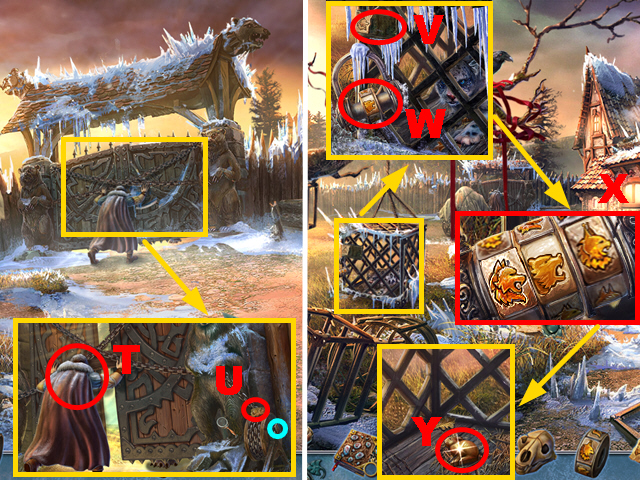
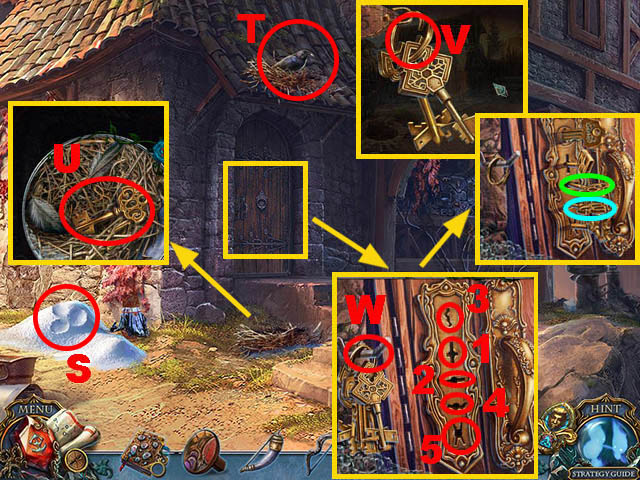
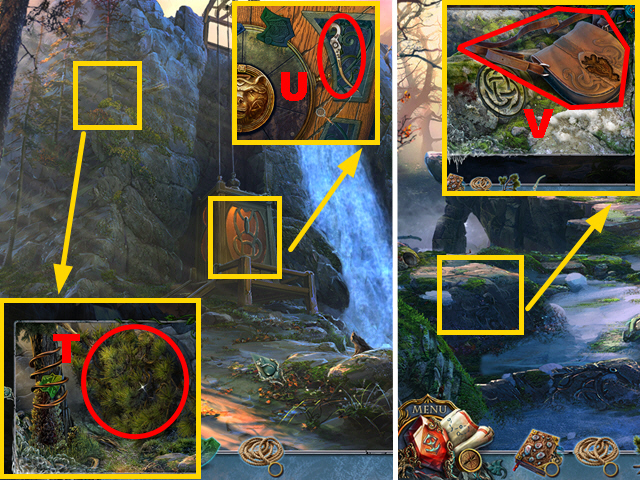
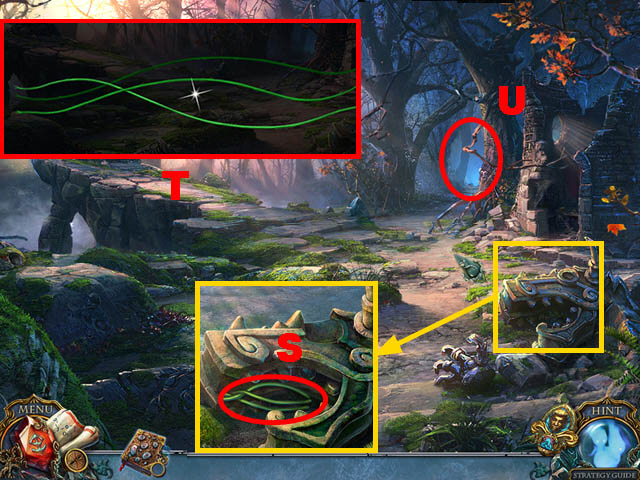
- Place the HUNTER FIGURE (T); take the HOUSE KEY (U).
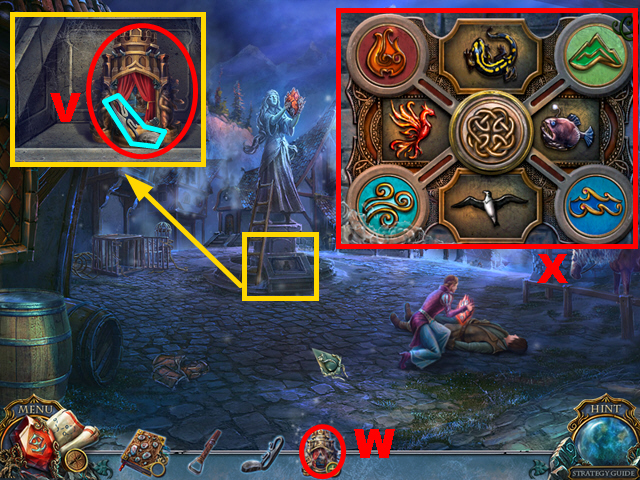
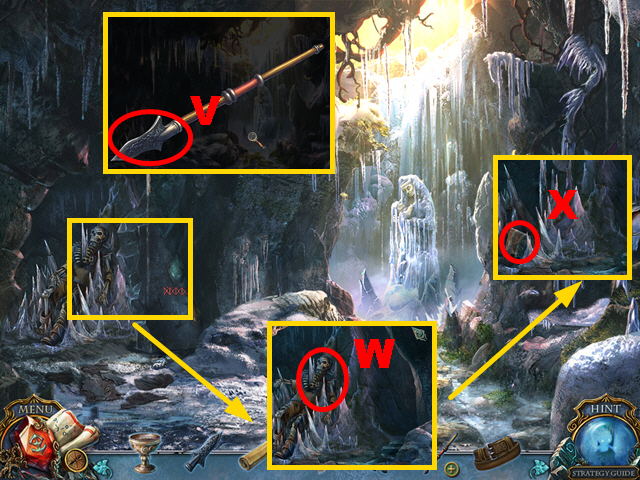
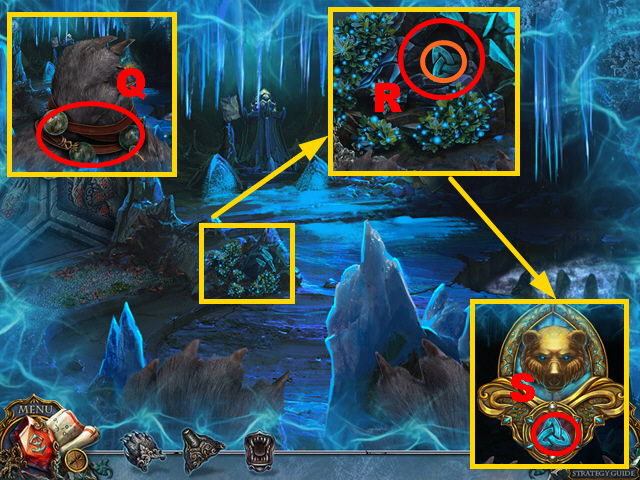
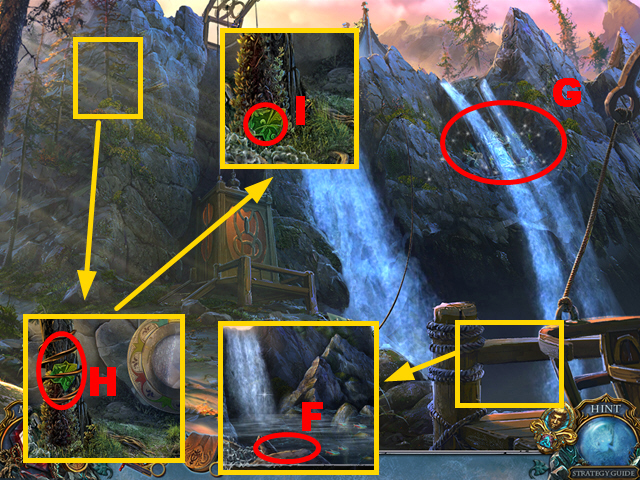
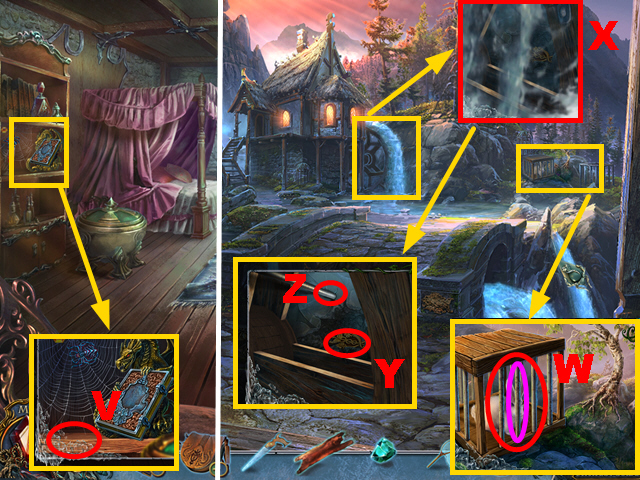
- Remove leaves three times; take the PEWTER CHARM (V).
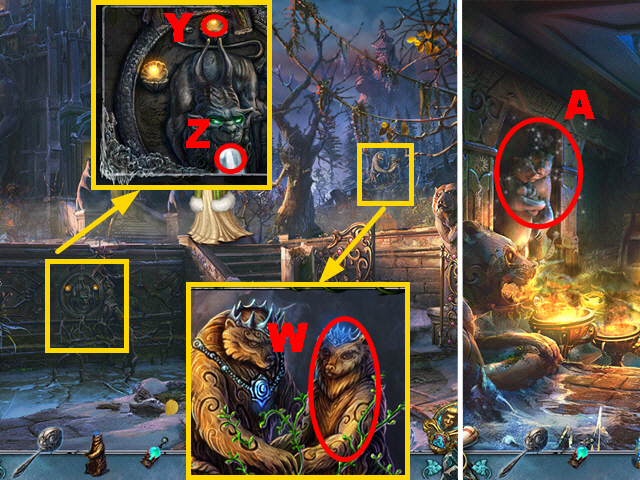
- Place MOM'S PORTRAIT (W).
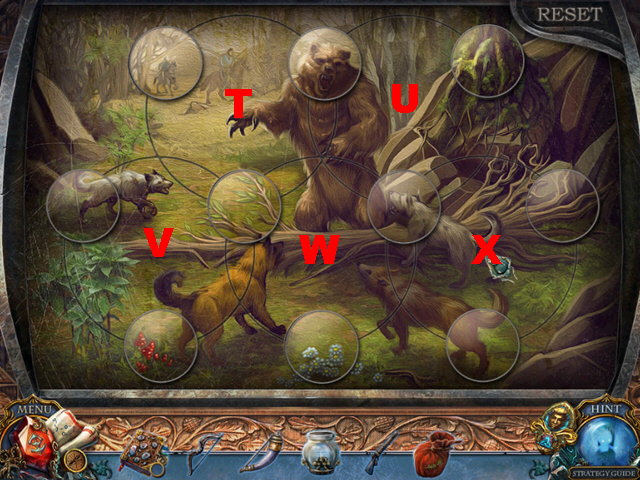
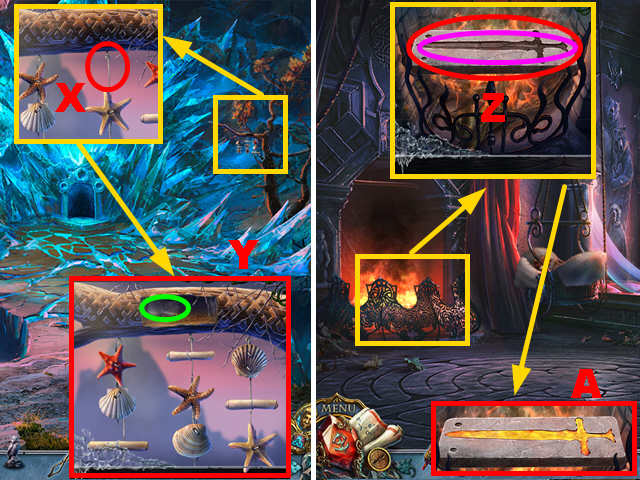
- Play the mini-game.
- Solution: (X).
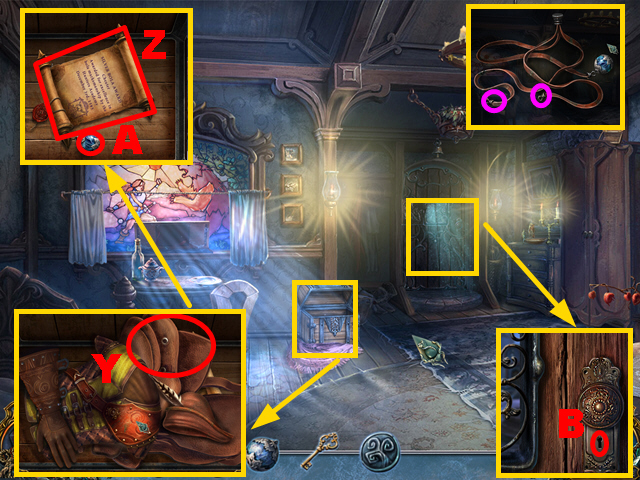
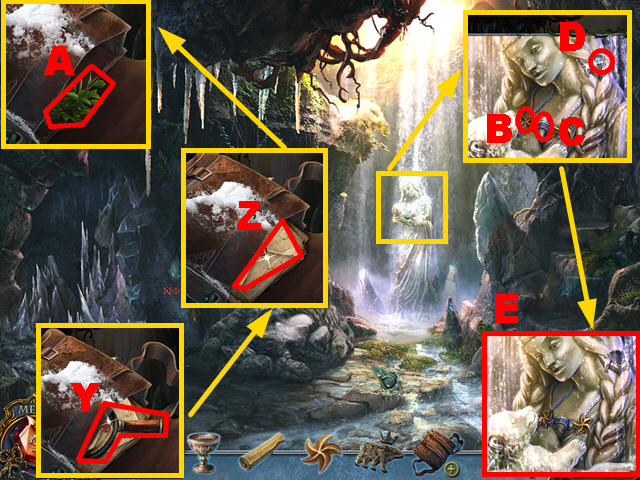
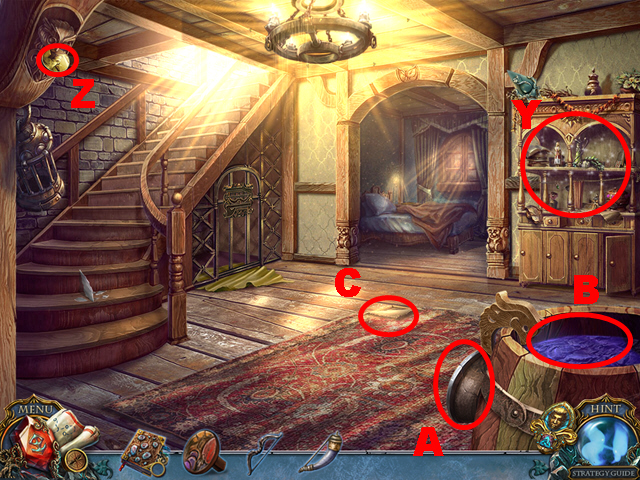
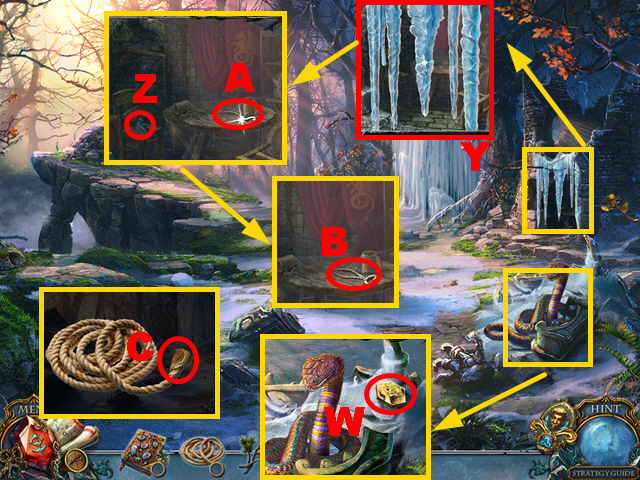
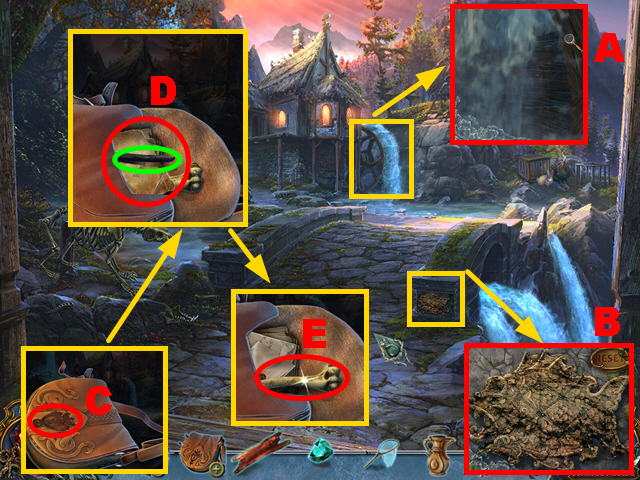
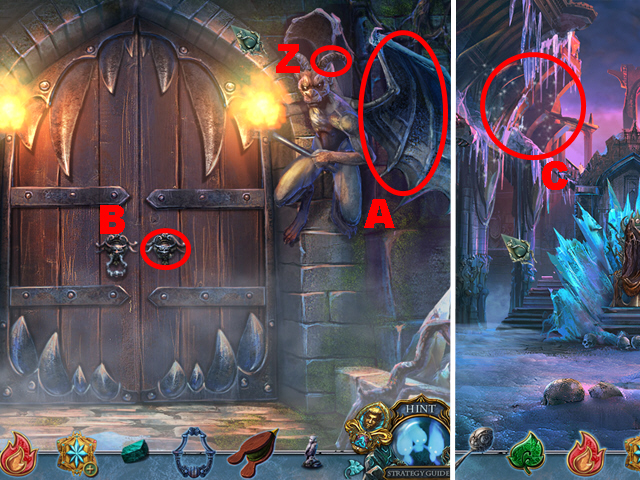
- Remove 3 hunting gears; take the SADDLE (Y), note (Z), and WEIGHT (A).
- Place 2 WEIGHTS on the BROKEN BOLA (purple) to acquire the BOLA.
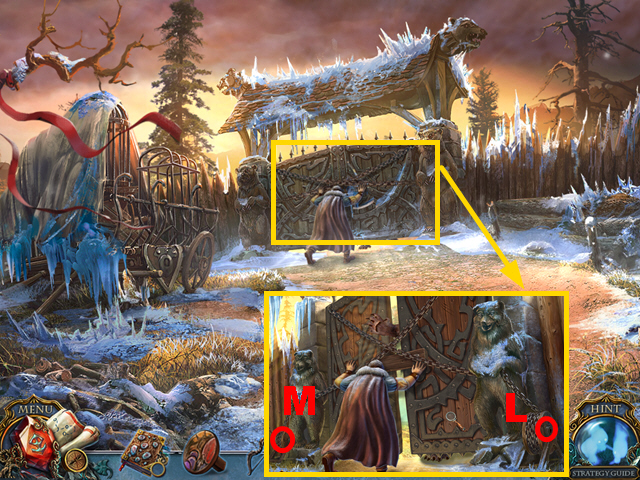
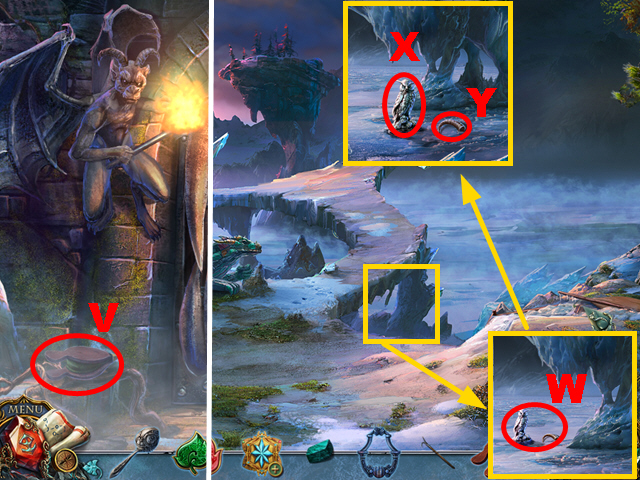
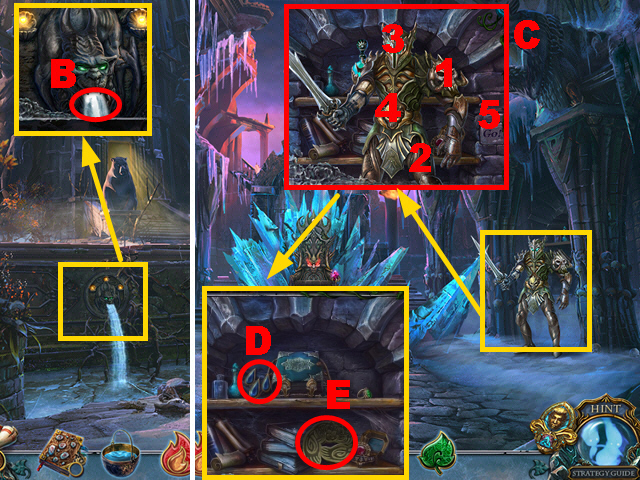
- Place the HOUSE KEY (B); turn it twice.
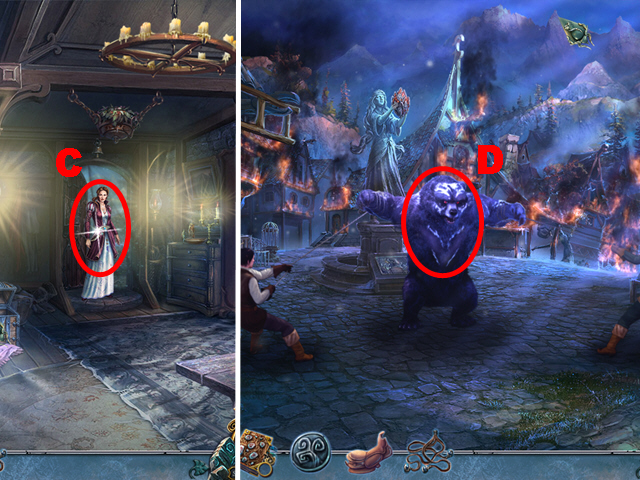
- Talk to the woman (C).
- Move forward.
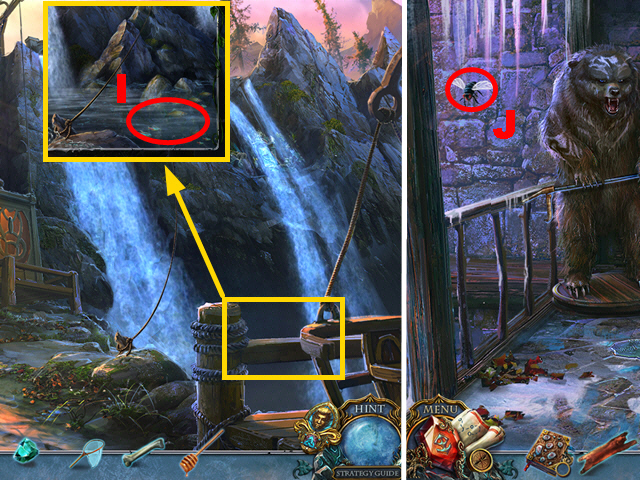
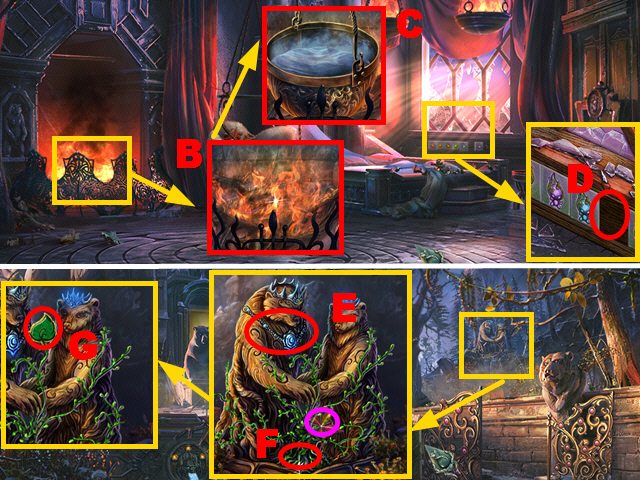
- Use the BOLA (D).
- Talk to the woman (E); take the KNIFE (F).
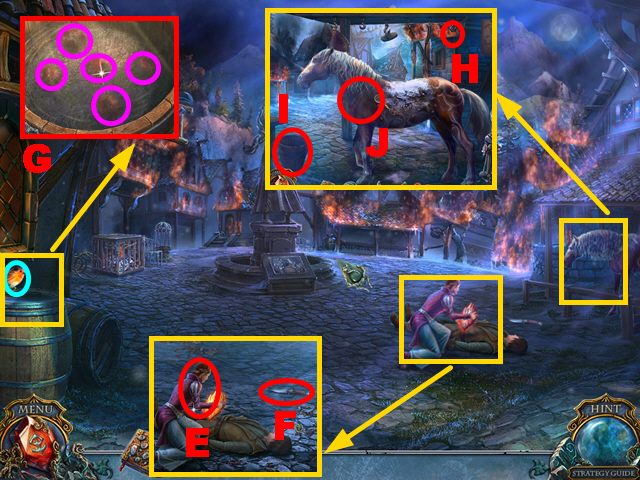
- Chase the bird (blue).
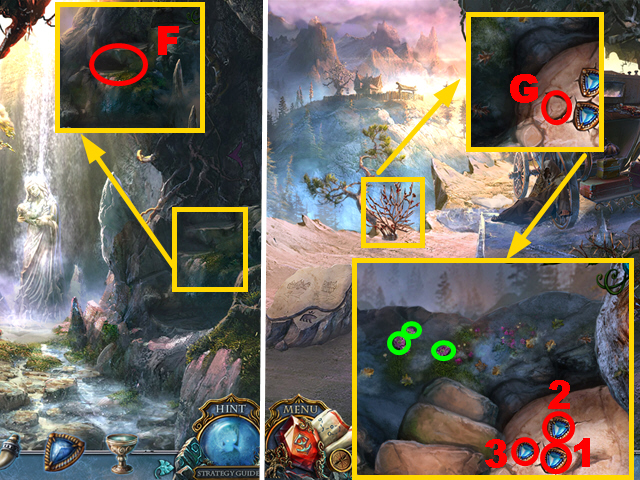
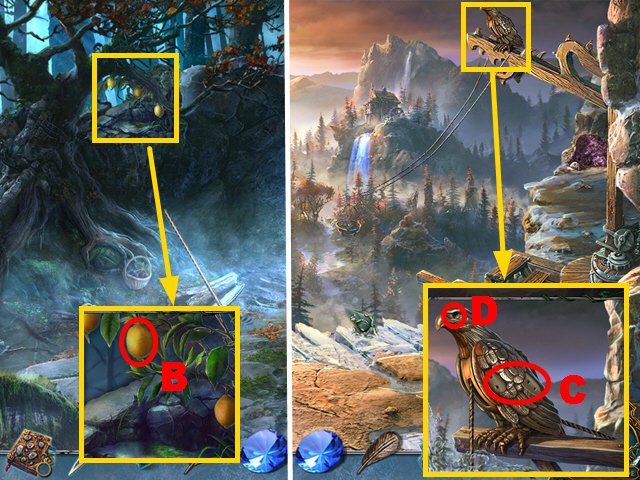
- Break the ice (G); take the APPLES (purple).
- Place the SADDLE (H); take the PAIL (I).
- Use the APPLES (J).
- Place the PAIL (K) to acquire the PAIL OF WATER.
- Use the PAIL OF WATER: 1-3.
- Use the KNIFE (L); open the cage.
- Use the PAIL OF WATER (M).
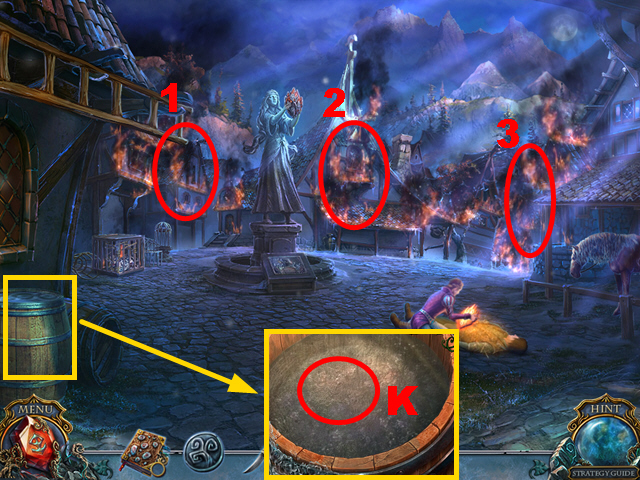
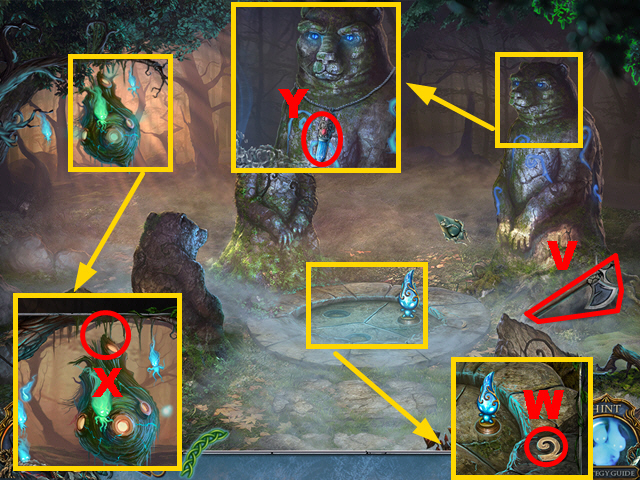
- Remove the dirt; take the STIRRUPS (blue).
- Move the ladder (N).
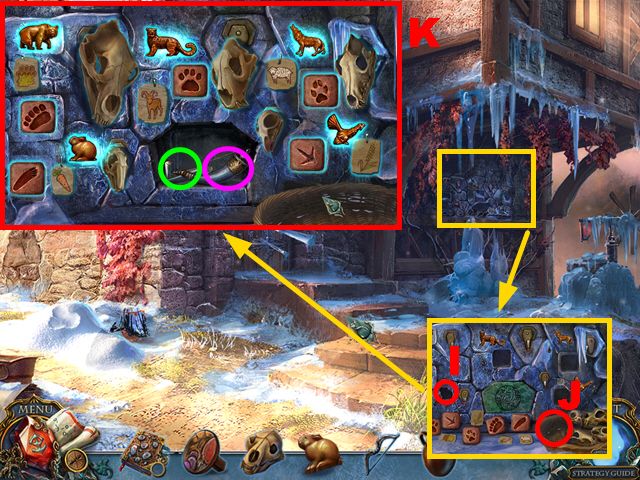
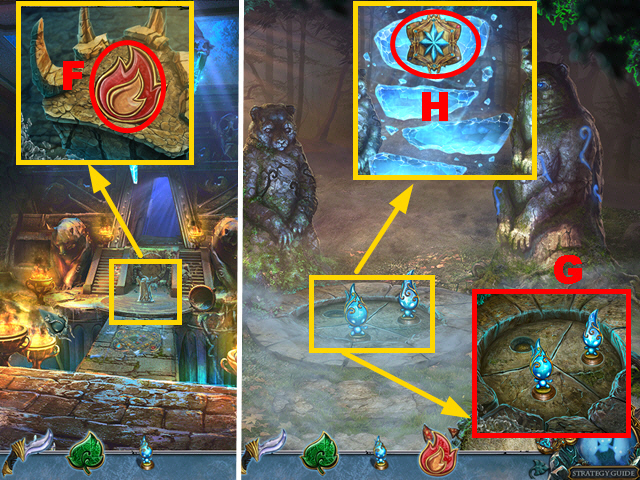
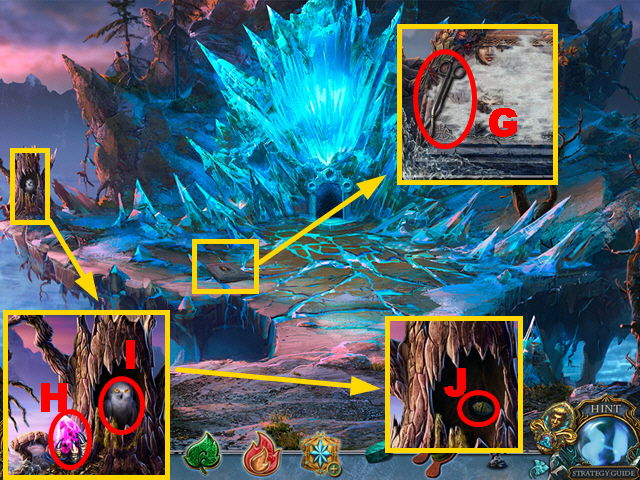
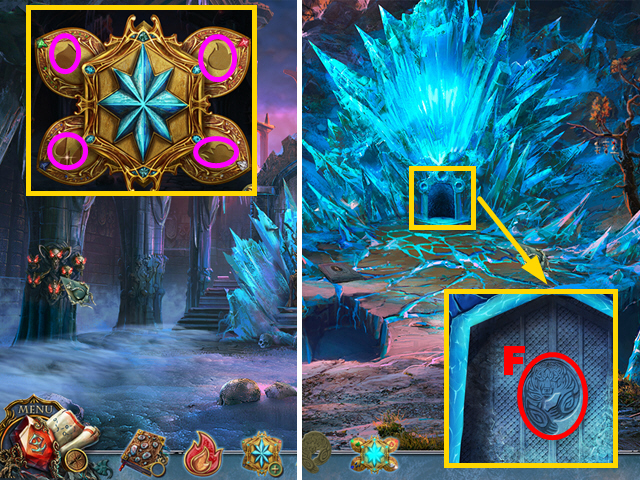
- Place the PEWTER CHARM (O); move charm (purple) once, charm (green) three times, and charm (blue) twice.
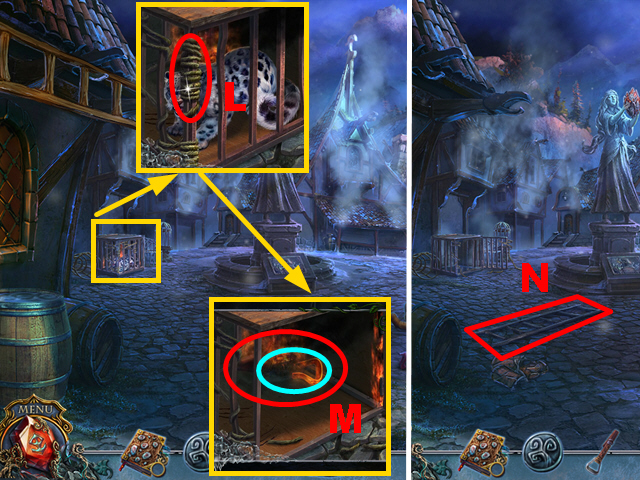
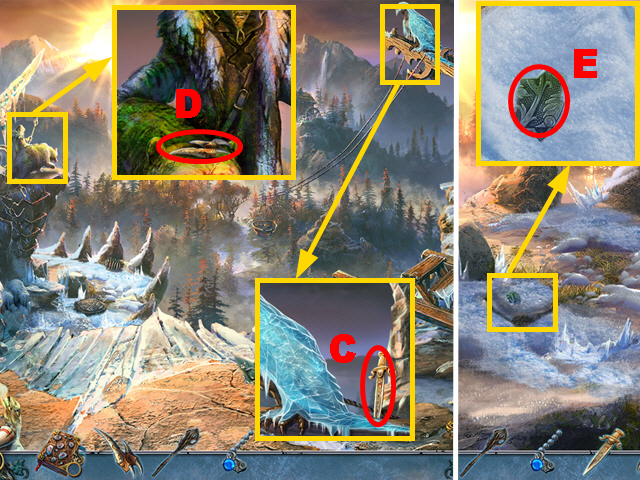
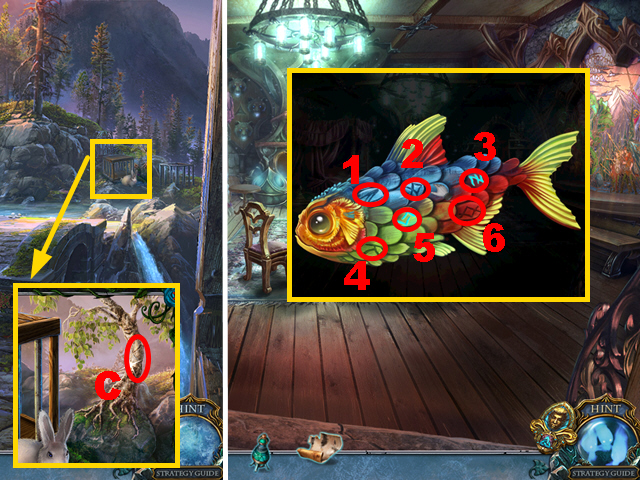
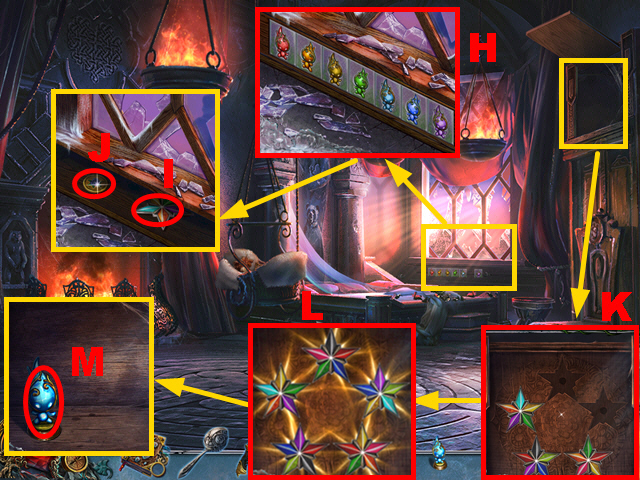
- Take the PAW PENDANT (P).
- Place the PAW PENDANT on MOM'S DIARY (Q) to play the HOP; take the TINY SCYTHE (R).
- Remove snow three times; place the TINY SCYTHE (S).
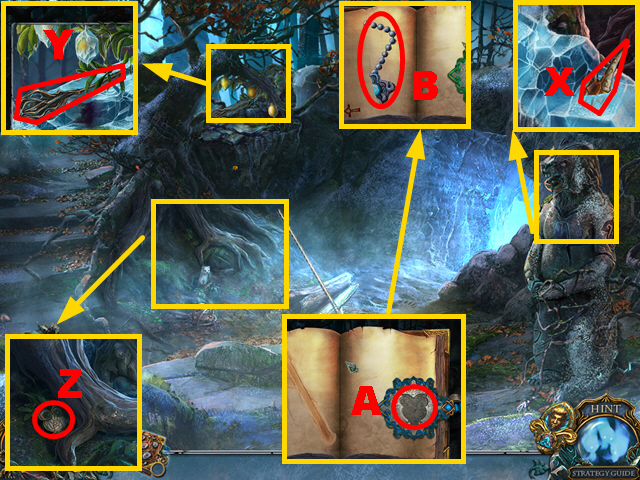
- Take the map (T).
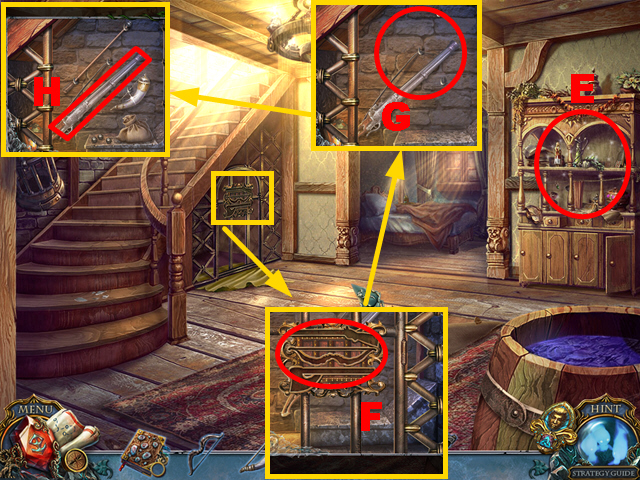
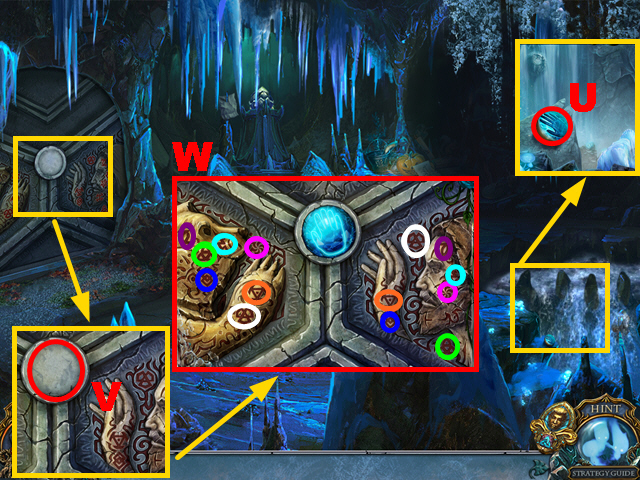
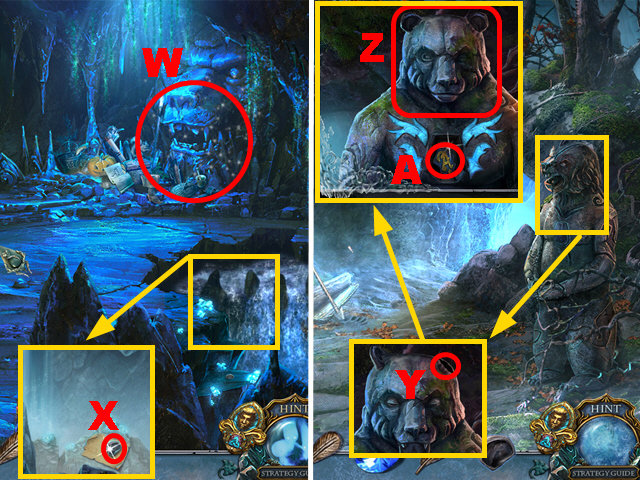
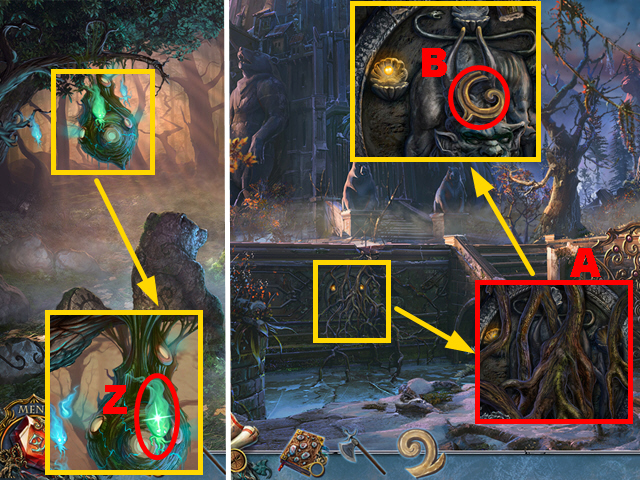
- Take the FLINT AND STEEL (blue) and BEAR DOLL HOUSE (V).
- Play the HOP in the BEAR DOLL HOUSE (W).
- HOP puzzle solution: (X).
- You receive the GRIFFIN HEAD.
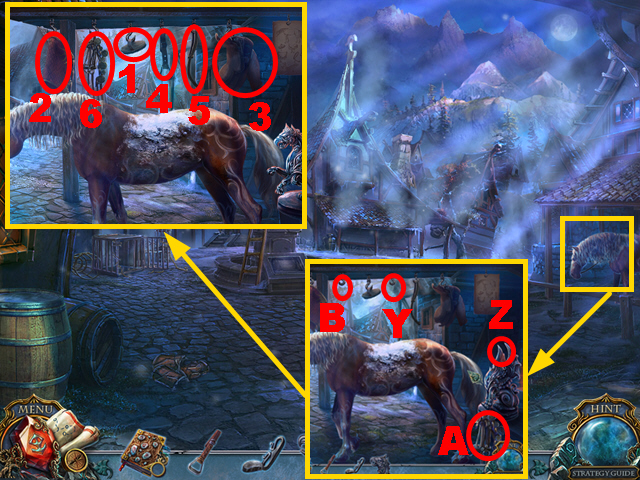
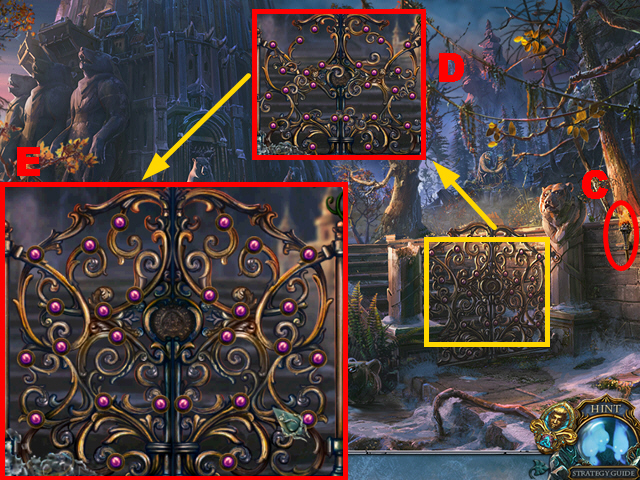
- Place the STIRRUPS (Y) and GRIFFIN HEAD (Z); take the BRIDLE (A).
- Place the BRIDLE (B).
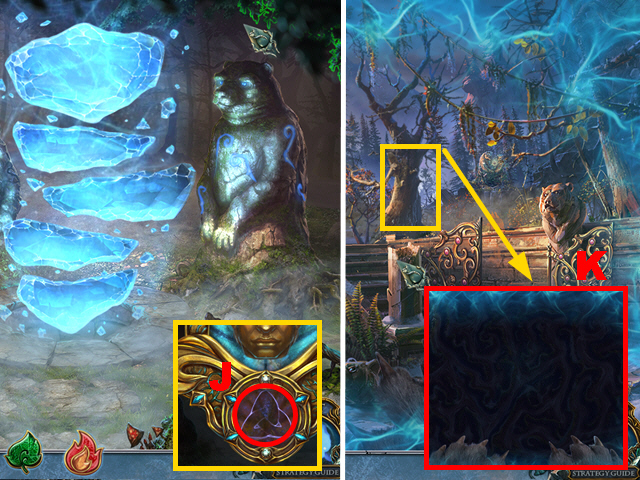
- Use items: 1-6.
- Mount the horse.
Chapter 2: The Mountain Road

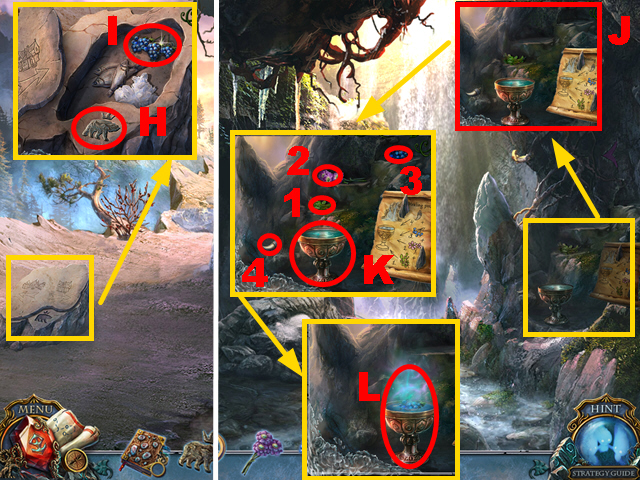
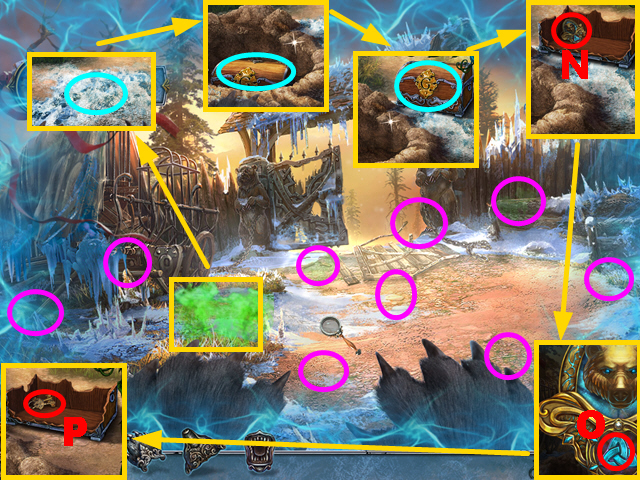
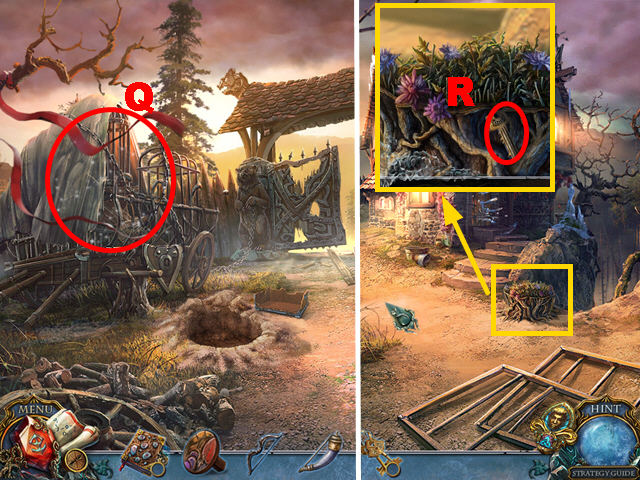
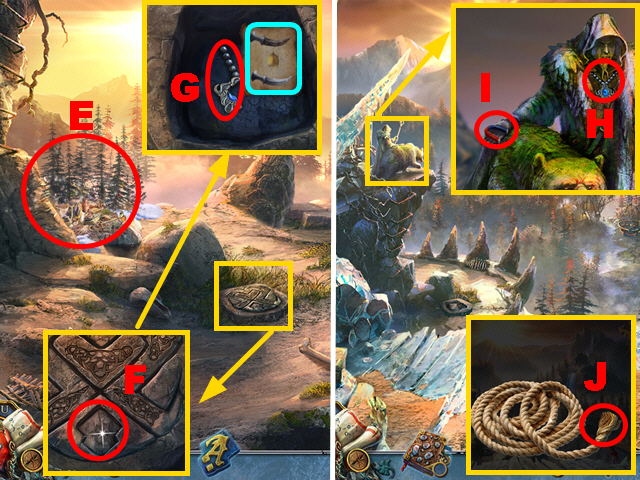
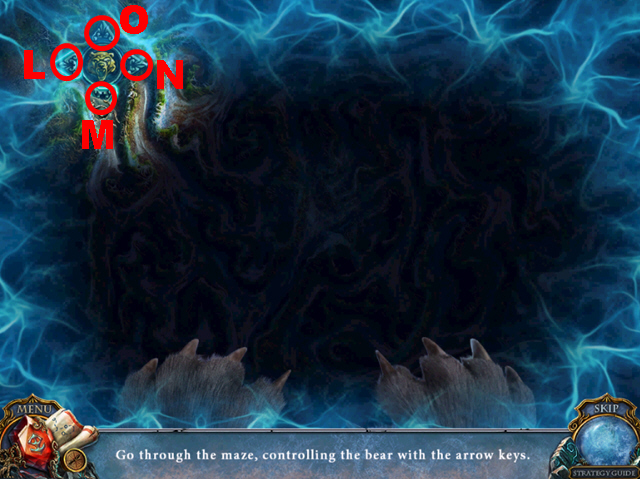
- Talk to the hooded man (C); take the ENCHANTED CRYSTAL (D) and 2 pieces (green).
- Take the GOBLET (E); place the box piece (blue).
- Take the crystal (1).
- Take the SPEARHEAD (purple) and RECIPE (F).
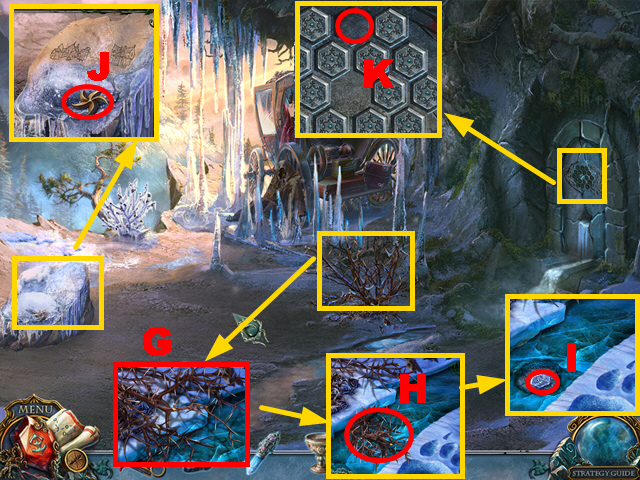
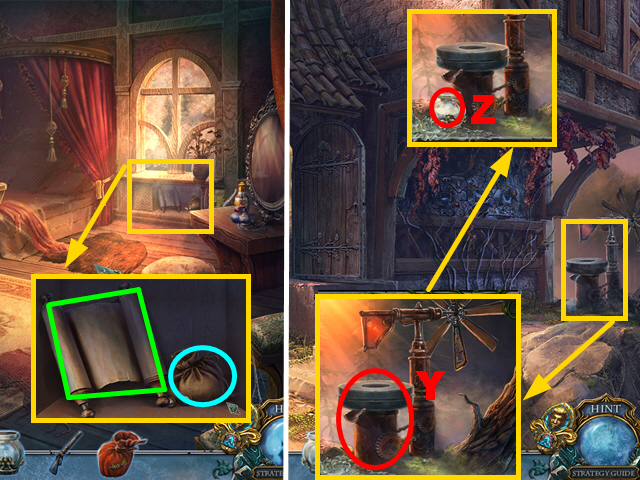
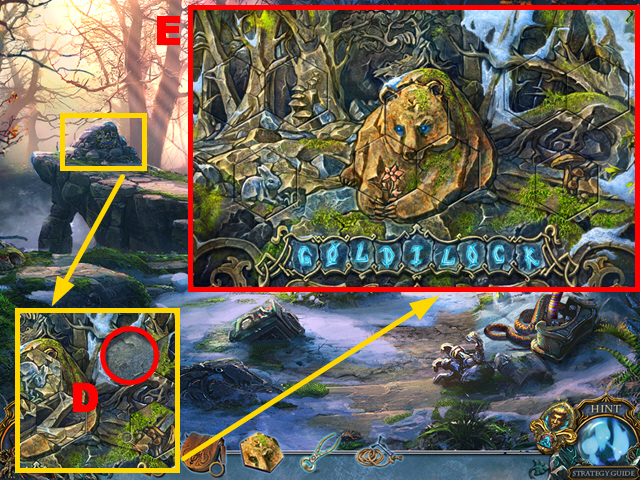
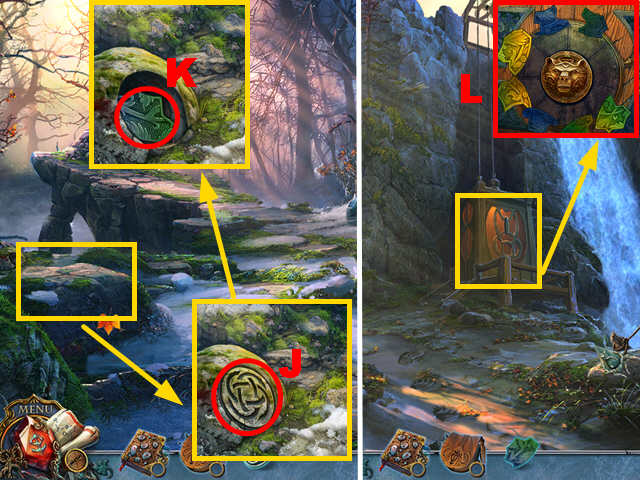
- Use the SPEARHEAD (G) and FLINT AND STEEL (H); take the STONE TOKEN (I).
- Remove snow three times; take the GOLD STAR (J).
- Place the STONE TOKEN (K).
- Play the mini-game.
- Solution: (L).
- Turn right.
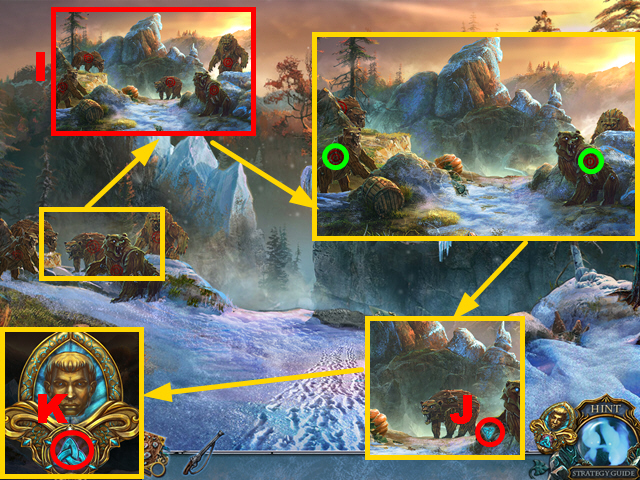
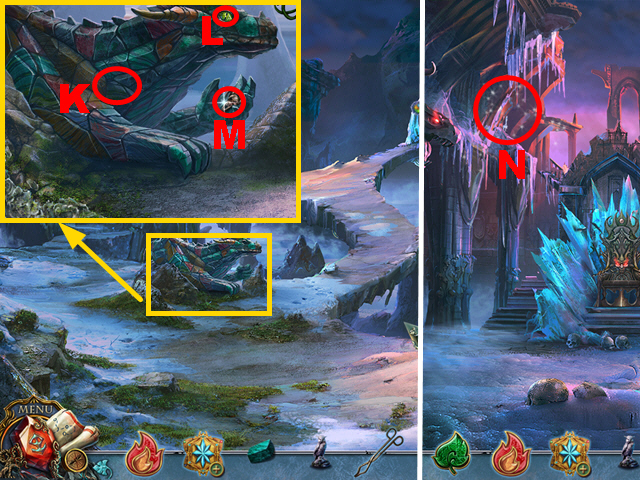
- Collect six pieces (green); take the CARVED CRYSTAL (M).
- Awaken the bear (N); take the CRUST (O).
- Remove 5 pieces from the CRUST; take the CROWNED BEAR (P).
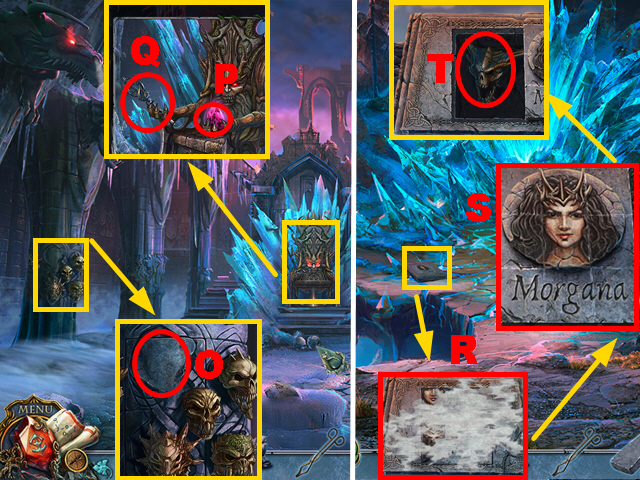
- Use the ENCHANTED CRYSTAL (Q).
- Remove 5 rock pieces; place the CARVED CRYSTAL (R).
- Play the mini-game.
- Solution: (S).
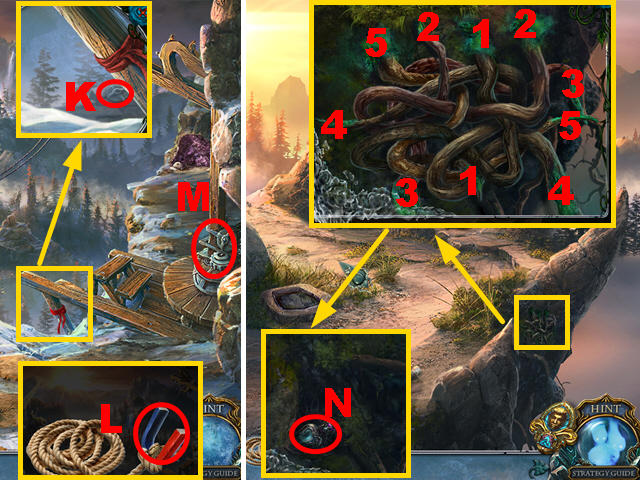
- Take the BROKEN SPEAR (T) and BELT (U).
- Place the SPEARHEAD and BELT on the BROKEN SPEAR (V) to receive the SPEAR.
- Place the SPEAR (W); take the BAG (X).
- Open the BAG; take the SICKLE (Y), letter (Z), and WINTER FERN (A).
- Place the GOLD STAR (B); take the BEAR TOOTH (C) and CRYSTAL (D).
- Place the GOBLET (E) to acquire the GOBLET OF WATER.
- Place the RECIPE, GOBLET OF WATER, WINTER FERN, and BEAR TOOTH (F).
- Walk down.
- Place the CRYSTAL (G); push crystals 1-3.
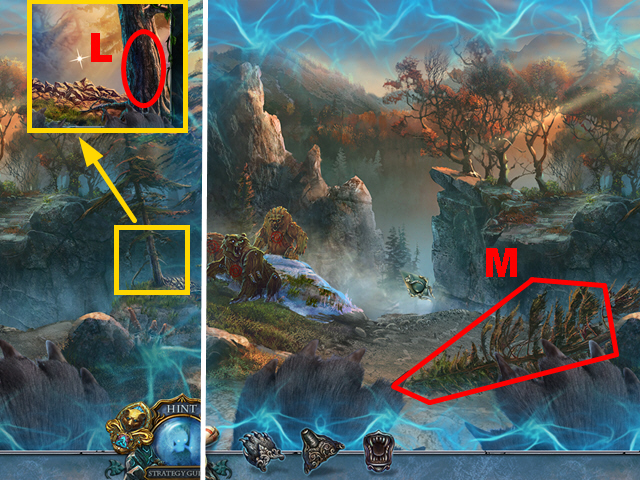
- Collect 3 FLOWERS (green).
- Place the CROWNED BEAR (H); take the BERRIES (I).
- Turn right.
- Place the BERRIES and FLOWERS (J); put ingredients 1-4 into the goblet (K).
- Take the MEDICINE (L).
- Walk down.
- Use the MEDICINE (M).
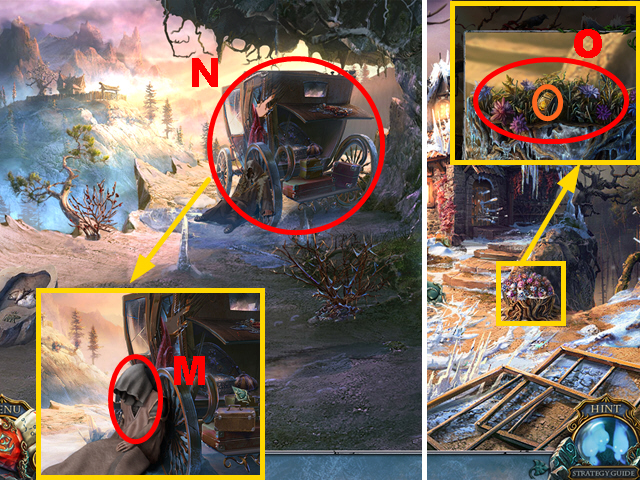
- Push the carriage (N).
- Attempt to move forward, move forward.
- Use the SICKLE (O); take the TUMBLER (orange).
- Turn right.

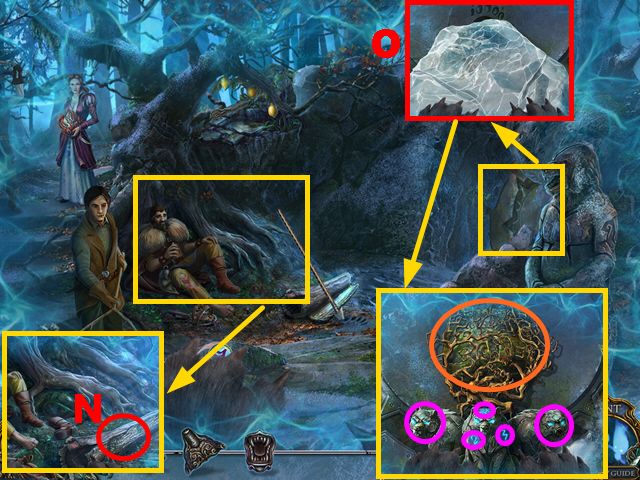
- Remove branches three times (P).
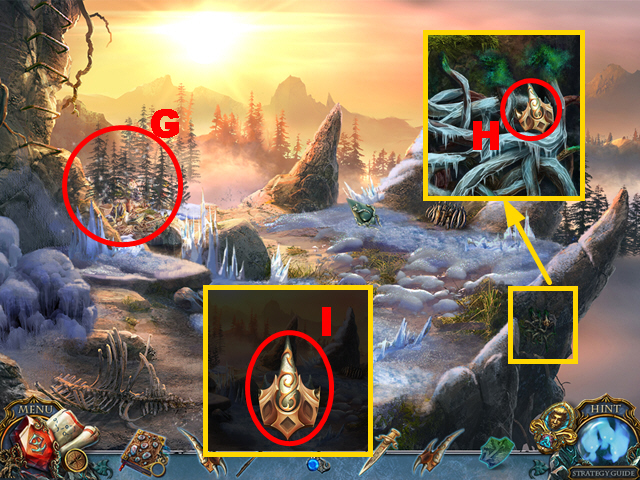
- Take the PAINTED TOKEN (Q).
- Walk down, move forward.
- Take the BEAR SKULL (R); use the SICKLE (S) to acquire the TUMBLER.
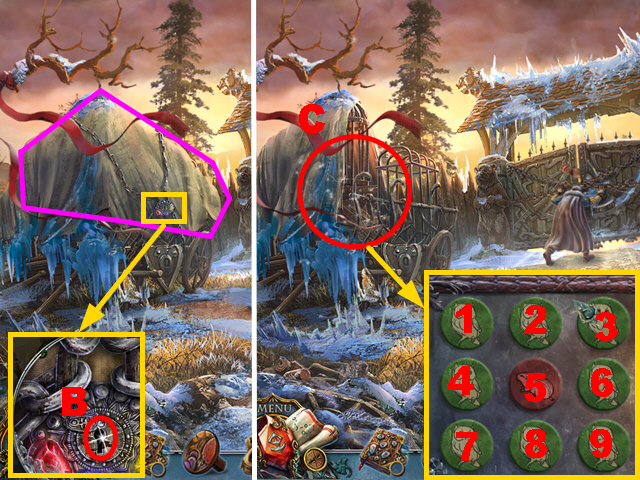
- Push buttons 1-3.
- Talk to the man (T); take the NOTE (U).
- Remove the broken crank (blue).
- Walk down.
- Place the NOTE (V) and 2 TUMBLERS (W).
- Enter the correct code (X); take the HARE FIGURE (Y).
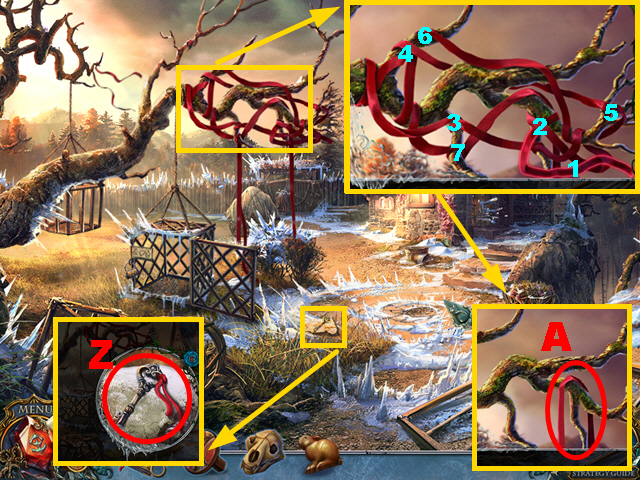
- Take the SILVER KEY (Z).
- Untangle the knots 1-7; take the RIBBON (A).
- Move forward.
- Use the SILVER KEY (B).
- Remove the tarp (purple).
- Play the HOP (C).
- HOP puzzle solution: 3-9-4-1-6-8-3-2-5-9-1.
- You receive the TEDDY BEAR.
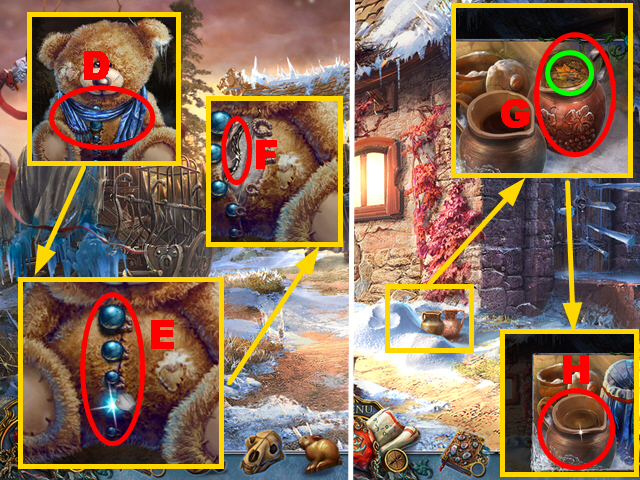
- Take the CLOTH from the TEDDY BEAR (D).
- Arrange the buttons correctly (E); take the TINY BOW (F).
- Walk down, turn right.
- Use the CLOTH and RIBBON (green); move the jar (G).
- Take the JAR OF OIL (H).
- Place the HARE FIGURE (I) and BEAR SKULL (J).
- Play the mini-game.
- Solution: (K).
- Take the GUNPOWDER HORN (purple) and CRANK (green).
- Walk down, move forward.
- Place the CRANK (L); use the JAR OF OIL (M) and pull the cranks.
- Move forward, walk down.
- Use the NOSE nine times (purple).
- Use the CLAWS three times (blue).
- Take the medallion (N); activate it (O).
- Take the (P).
- Play the HOP (Q) to receive the KEY.
- Walk down.
- Take the KEY (R).
- Turn right.
- Dig three times (S) to acquire the SNOWBALL.
- Throw the SNOWBALL (T); take the KEY (U).
- Place 3 KEYS on the KEY (V) to acquire the KEYS.
- Place the KEYS (W); use the keys in sequence 1-5.
- Turn all 5 keys once, key (green) twice, and key (blue) twice.
- Move forward.
Chapter 3: Father's House
- Play the HOP (Y) to receive the STATUETTES.
- Take the PICTURE PART (Z).
- Put the dipper (A) into the water (B); take the DIPPER OF WATER.
- Pull the carpet (C).
- Place the STATUETTES (D); take the BRUSH (E).
- Move the pillow; take the PICTURE PART (F).
- Go upstairs.
- Take the PICTURE PART (G).
- Use the DIPPER OF WATER (H); move the grate.
- Use the BRUSH (I).
- Take the PAINTED CIRCLE (J) and JAR (purple).
- Remove the blanket (green).
- Walk down.
- Place the PAINTED TOKEN and PAINTED CIRCLE (K).
- Arrange the image correctly (L); take the GRAIN (M) and RAG (N).
- Use the RAG (O) to acquire the GLASS.
- Open the GRAIN with the GLASS (P).
- Remove grain three times; take the PICTURE PART (Q) to receive the BAG OF GRAIN.
- Go upstairs.
- Use the GLASS (R); take the TINY GUN (blue).
- Place 4 PICTURE PARTS (S).
- Play the mini-game.
- Solution: Tx2-Wx2-Vx2-W-X-W-Vx2-T-W-T-Vx2-W-Vx2-W-V-Wx2-Vx2-Wx2.
- Take the note (green) and BULLETS (blue).
- Walk down twice.
- Use the JAR and BAG OF GRAIN (Y); take the FLOUR (Z).
- Move forward twice.
- Use the FLOUR (A) to read the code (purple).
- Activate three symbols (orange); take the CLOVER (B).
- Place the CLOVER on MOM'S DIARY (C) to play the HOP.
- Take the TINY AXE (D).
- Walk down.
- Play the HOP (E) to receive the RAMROD.
- Place the TINY GUN, TINY BOW, and TINY AXE (F).
- Place the GUNPOWDER HORN, BULLETS, and RAMROD (G).
- Use the gunpowder horn, bullet, and ramrod on the gun (H); take the MUSKET.
- Walk down twice, move forward twice.
- Use the MUSKET (I).
- Play the mini-game.
- Shoot the targets of five bears (green).
- Take the symbol (J); activate the medallion (K).
- Use the TEETH twice, then use the CLAWS (L).
- Move the tree (M).
- Move forward.
- Write on the bark (N).
- Use the CLAWS three times (O).
- Activate three symbols and 2 bears (purple); move 4 branches (orange).
- Select 6 pairs of flowers (P).
- Turn right.
- Use the TEETH three times (Q).
- Use the CLAWS (R); take the symbol (orange).
- Activate the medallion (S).
- Take the HAND TOKEN (U).
- Place the HAND TOKEN (V); push it.
- Activate 7 pairs of symbols (W).
- Turn left.
- Take the CROWN PART (X), STAFF TOP (Y), and OWL (Z).
- Place the OWL on MOM'S DIARY (A) to play the HOP.
- Take the MEDALLION (B).
- Turn left.
Chapter 4: The Paw
- Take the KNIFE (C) and CROWN PART (D).
- Move forward.
- Take the PUZZLE PART (E).
- Play the HOP (G) to receive the BERRIES.
- Take the MAGIC CROWN (H).
- Place 2 CROWN PARTS on the MAGIC CROWN (I); move both parts.
- Walk down twice.

- Place the BERRIES (J); take the FEATHER (K).
- Turn left.
- Place the STAFF TOP (L) and MEDALLION (M).
- Walk down, turn right.
- Push symbols: 1-2-3-2-5.
- Play the HOP (N) to receive the PICK.
- Turn left twice.
- Use the PICK (O); take the STONE (P).
- Move forward.

- Use the PICK three times (Q); take the JEWELRY TOOLS (R) and CRYSTAL (S).
- Apply the JEWELRY TOOLS 1-3 to the STONE; take the AMETHYSTS (T).
- Walk down.
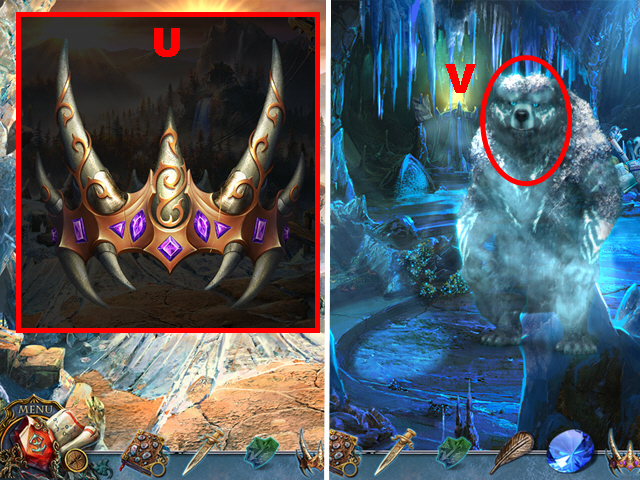
- Place the AMETHYSTS on the MAGIC CROWN (U) to acquire the CROWN OF EVIL.
- Walk down, turn right.
- Give the CROWN OF EVIL to the bear (V).
- Play the HOP (W) to receive the FEATHER.
- Take the EAR (X).
- Turn left.
- Place the EAR (Y).
- Arrange the bear correctly (Z); take the LETTER A (A).
- Use the KNIFE (B).
- Turn left.
- Place 2 FEATHERS (C) and the CRYSTAL (D).
- Move forward.
- Play the HOP (E) to receive the ROPE.
- Place the LETTER A (F); take the MEDALLION (G) and note (blue).
- Walk down.
- Place the MEDALLION (H); take the MAGNET (I).
- Place the MAGNET on the ROPE (J) to acquire the HOOK.
- Collect the GEAR with the HOOK (K).
- Remove the magnet from the HOOK (L).
- Place the GEAR (M).
- Move forward.
- Remove roots 1-5; take the BOTTLE (N).
- Walk down twice.
- Place the BOTTLE (O); open it.
- Squeeze the lemon (P); take the LEMON JUICE (Q).
- Turn left.
- Use the LEMON JUICE (R); pull the rope (S).
- Move forward.
- Remove branches three times (T) to acquire the STICK.
- Take the NIPPERS PART (U).
- Turn left.
- Take GOLDILOCKS BAG (V).
- Use the STICK (W); take the HEX TILE.
- Remove ice three times (Y); take the HOOK (Z).
- Place the NIPPERS PART (A); take the NIPPERS (B).
- Place the HOOK on the ROPE (C) to acquire the ROPE WITH HOOK.
- Place the HEX TILE (D).
- Play the mini-game.
- Solution: (E).
- Take the CIRCLE PART.
- Walk down.
- Place the CIRCLE PART (1); arrange it correctly (purple).
- Read the note (2); take the CRYSTAL (3).
- Place the ROPE WITH HOOK (F); adjust it.
- Play the HOP (G) to receive the ORNAMENT.
- Use the NIPPERS (H); take the PUZZLE PART (I).
- Turn left.
- Place the ORNAMENT (J); take the PUZZLE PART (K).
- Walk down.
- Place 3 PUZZLE PARTS (L).
- Play the mini-game.
- Solution: (M).
- Move forward twice.
Chapter 5: Amaretta's House
- Take the SAW (N).
- Push stones 1-6.
- Open the door (O).
- Move forward.
- Play the HOP (P) to receive the TRAP.
- Take the FUR (Q), CRYSTAL (R), and NET (S).
- Talk to the man (U); take the JUG (T).
- Place the TRAP (V).
- Walk down twice.
- Use the SAW (W); take the CROWBAR (purple).
- Place the CROWBAR (X); take the STATUETTE (Y).
- Remove the crowbar (Z).
- Place the JUG (A) to acquire the JUG WITH WATER.
- Use the JUG WITH WATER (B).
- Place the STATUETTE on GOLDILOCKS BAG (C); take the LEAD (green), note (D), and BONE (E).
- Move forward twice.

- Use the LEAD (purple); take the RECIPE (F).
- Open the book (G); place the RECIPE in it.
- Walk down three times.
- Play the HOP (H) to acquire the HONEY.
- Use the NET (I) to acquire the FISH.
- Move forward twice.
- Use the HONEY (J) to acquire the FLY.
- Move forward.
- Place the FLY (K); remove the cobweb.
- Take the FISH EYE (L).
- Walk down twice.
- Place the FISH EYE (M).
- Play the mini-game.
- Solution: 1-2-3-5-4-6-5-10-6-7-10-9-8-7-9-11-10-12-11-13-12-3-1.
- Take the FLASK (N).
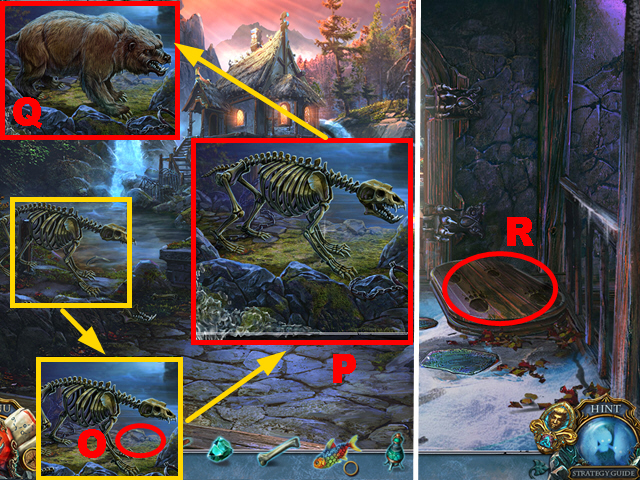
- Place the BONE (O).
- Arrange the skeleton correctly (P); place the FUR on the skeleton.
- Take the STUFFED BEAR (Q).
- Move forward.
- Place the STUFFED BEAR (R).
- Take the SNAKE CATCHER STICK (S).
- Walk down twice, turn left.
- Use the SNAKE CATCHER STICK and FLASK (T) to acquire the POISON.
- Walk down, move forward three times.
- Play the HOP (X) to acquire the DRAGON'S HEAD.
- Place the DRAGON'S HEAD (Y).
- Place 2 CRYSTALS (Z).
- Activate crystals: 1-3-2-6-2-4.
- Take the SNOWFLAKE (green).
- Place the SNOWFLAKE on MOM'S DIARY (A) to play the HOP.
- Take the SCALPEL (B).
- Walk down twice.
- Use the SCALPEL (C); take the BIRCH BARK.
- Move forward twice.
- Activate the symbols on the FISH: 2-5-4-1.
- You receive the FISH SCALES.
- Place the POISON (D) and FISH SCALES (E).
- Pound the fish scales with the pestle (F); collect the fish scales with the spoon (G).
- Place the BIRCH BARK (H); pound the birch bark with the pestle.
- Collect the birch bark with the spoon twice.
- Put 2 ingredients from the scale (I), flask (J) and poison into the container (K); put the container on the candle (L).
- Take the OINTMENT (M).
- Use the OINTMENT (N); take the PORTRAIT (O).

- Place the PORTRAIT (P); open the book (Q).
- Take the DIARY.
- Walk down three times, turn left.
- Use the DIARY (R).
- Take the THREADS (S).
- Fold the THREADS twice (T) to acquire the ROPE.
- Play the HOP (U) to proceed.
- Take the AXE (V) and GATES PART (W).
- Place the ROPE (X).
- Take the ENCHANTED CRYSTAL (Y).
- Use the ENCHANTED CRYSTAL (Z).
- Turn left.
- Use the AXE (A) to acquire the FIREWOOD; take the GATES PART (B).
- Take the TORCH (C).
- Place 2 GATES PARTS (D).
- Arrange the gate correctly (E).
- Set the symbols correctly (F).
- Move forward.
- Use the TORCH twice (purple).
- Play the HOP (G) to receive the SHARP JEWELED RING.
- Take the BLUE PAINT (H).
- Move forward.
Chapter 6: The Bear Bedroom
- Take the KETTLE (green); use the FIREWOOD and TORCH (I).
- Remove the blanket, photo, and doll; take the FRESCO PART (J) and SILVER RATTLE (K).
- Use the BLUE PAINT and SHARP JEWELED RING (L); take the BLUE GLASS (purple).
- Take the BEAR FIGURINE (M).
- Walk down.
- Place the FRESCO PART (N); arrange it correctly (O).
- Take the CONCENTRATED ESSENCE (P) and FIREFLY FIGURINE (Q).
- Place the BLUE GLASS (R); arrange the glasses correctly (S).
- Take the PEARL (T), FIGURINE (U), and DIAMOND KNIFE (V).
- Walk down.
- Place the BEAR FIGURINE (W).
- Place the PEARL (Y); use the KETTLE (Z) to acquire the KETTLE WITH WATER.
- Move forward.
- Play the HOP (A) to receive the CHAIN.
- Move forward.
- Place the KETTLE WITH WATER and CONCENTRATED ESSENCE (B); take the POTION (C).
- Place the FIGURINE (D).
- Walk down twice.
- Place the CHAIN (E) and take the STAR (purple); use the POTION (F).
- Take the FORCE OF EARTH (G).
- Move forward twice.
- Arrange the figurines correctly (H); take the STAR (I) and CHIP (J).
- Place 2 STARS (K).
- Arrange the stars correctly (L); take the note and FIREFLY FIGURINE (M).
- Walk down.
- Place the CHIP (N).
- Play the mini-game.
- Solution: Qx3-Ux6-Yx3-Cx5-Xx6-Qx2-Sx3-Ux2-Yx6-Bx6-Sx4-Yx3-Rx4-T-Cx4-Px3.
- Pull the lever (E).
- Take the FORCE OF FIRE (F).
- Walk down twice.
- Place 2 FIREFLY FIGURINES (G).
- The bear will talk to you.
- Use the DIAMOND KNIFE (H); you acquire the MAGIC CRYSTAL.
- Activate the medallion (J).
- Move forward.
- Use the NOSE (K).
- Play the mini-game.
- Solution: N-Mx2-N-M-Nx3-M-L-Mx2-Nx2-O-L-Ox2-Nx2.
- Take the symbol (P); activate the medallion (Q).
- Take the STONE SCALE (R).
- Open the MAGIC CRYSTAL (S).
- Take the HANDLE (T).
- Move forward.
- Take the GAFF (U).
- Take the BELLOWS (V).
- Walk down.
- Use the GAFF (W); take the SILVER STATUETTE (X) and HORN (Y).
- Move forward.
- Place the HORN (Z); move the horn and wing (A).
- Place the HANDLE (B).
- Move forward.
- Play the HOP (C) to acquire the RUNE.
- Remove the fur; take the note (D) and RUNE (E).
- Walk down twice.
- Place 2 RUNES (F).
- Turn right.
- Take the TONGS (G).
- Take the THRONE CRYSTAL (H); use the BELLOWS (I).
- Take the DRAGON EYE (J).
- Walk down.
- Place the STONE SCALE (K) and DRAGON EYE (L); take the SKULL (M).
- Turn left, move forward.
- Play the HOP (N) to receive the GRINDING STONE.
- Place the SKULL (O).
- Place the THRONE CRYSTAL (P); take the SILVER SCEPTER (Q).
- Walk down twice, turn right.
- Use the GRINDING STONE (R); arrange the image (S).
- Take the note and SKULL (T).
- Walk down, turn left, move forward.
- Place the SKULL (U).
- Activate skulls: 3-2-4-7-4-2-5-1-5-1-3-2-7-4-6.
- Take the SWORD FORM (V) and SHELL (W).
- Walk down twice, turn right.
- Place the SHELL (X).
- Arrange the figures correctly (Y); take the FORCE OF AIR (green).
- Walk down twice, turn left, move forward.
- Place the SWORD FORM (Z); use the SILVER RATTLE, SILVER SCEPTER, and SILVER STATUETTE (purple).
- Use the TONGS (A) to acquire the HOT SWORD.
- Walk down twice.
- Place the HOT SWORD (B) to acquire the SILVER SWORD.
- Turn right, turn left, move forward.
- Use the SILVER SWORD (C).
- Play the mini-game.
- Solution: 1-5.
- Take the FORCE OF WATER (D) and BEAR SEAL (E).
- Place the FORCE OF AIR, FORCE OF EARTH, FORCE OF FIRE, and FORCE OF WATER on the MAGIC CRYSTAL (purple) to acquire the CRYSTAL OF LIFE.
- Walk down twice, turn right.
- Place the BEAR SEAL (F).
- Try to move forward, move forward.
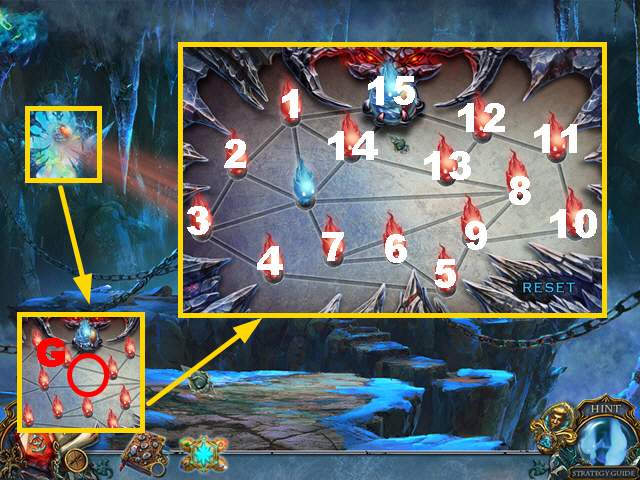
- Use the CRYSTAL OF LIFE (G).
- Play the mini-game.
- Solution: 1-15.
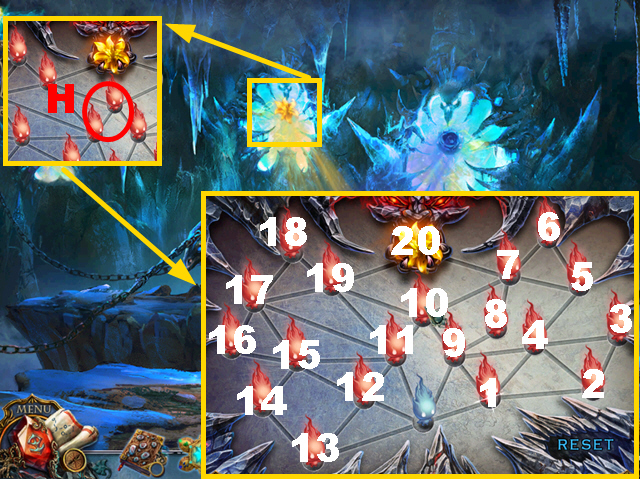
- Use the CRYSTAL OF LIFE (H).
- Play the mini-game.
- Solution: 1-20.
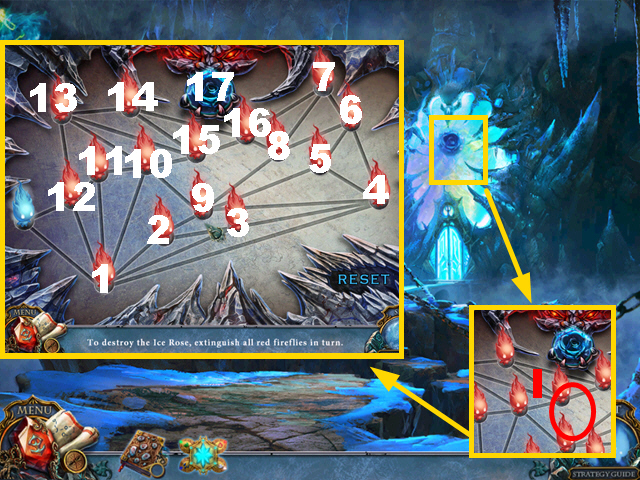
- Use the CRYSTAL OF LIFE (I).
- Play the mini-game.
- Solution: 1-17.
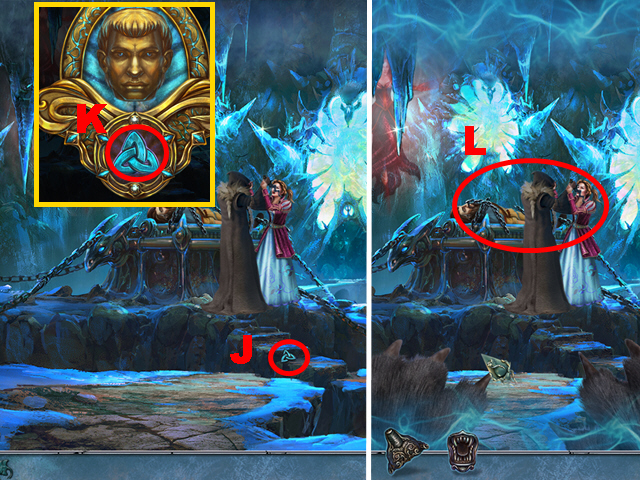
- Take the symbol (J); activate the medallion (K).
- Use the CLAWS (L).
- Congratulations, you have completed Living Legends: Wrath of the Beast.
Created at: 2015-02-20