
Walkthrough Menu
General Tips
- This is the official guide for Lost Grimoires: Shard of Mystery.
- This guide won't tell you when to zoom into a location; the screenshots show each zoom scene.
- Hidden-object puzzles are referred to as HOPs. Only the locations of the HOPs will be shown.
- Use the Map to fast travel to a location.
Chapter 1: Fern
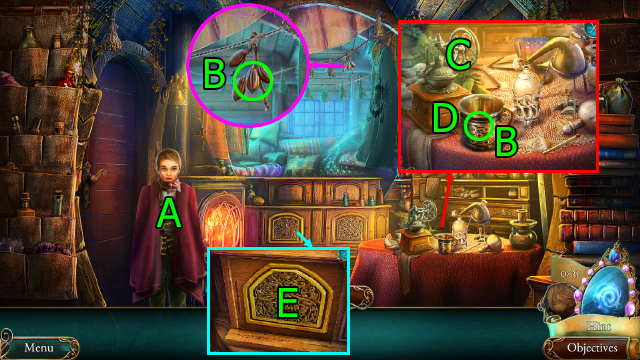
- Press (A).
- Get MUG and COCOA BEANS (B).
- Use COCOA BEANS and press (C); press (D), get MILLED COCOA.
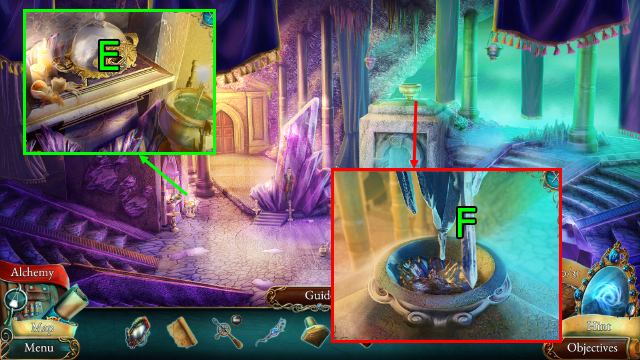
- Press (E).
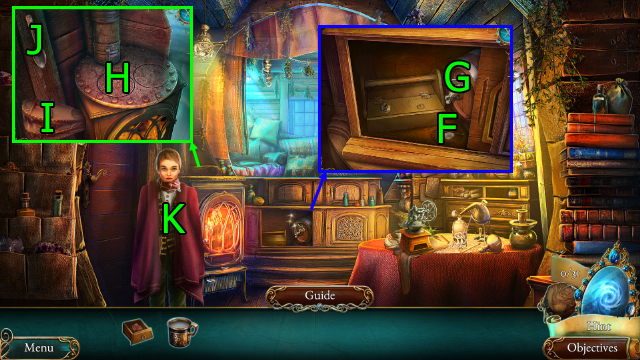
- Use MUG on (F), press (G); get MUG WITH MILK.
- Use MUG WITH MILK on (H), press (I).
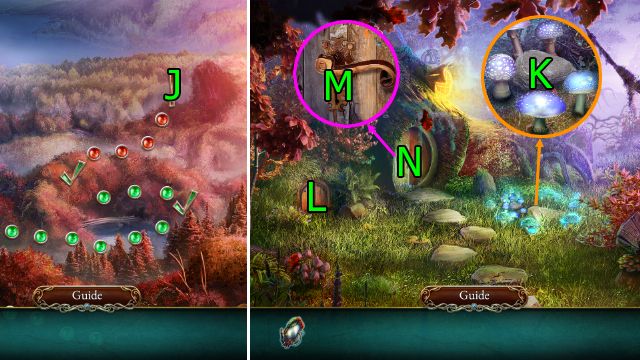
- Use MILLED COCOA on (H), drag (J) to (H); get HOT COCOA.
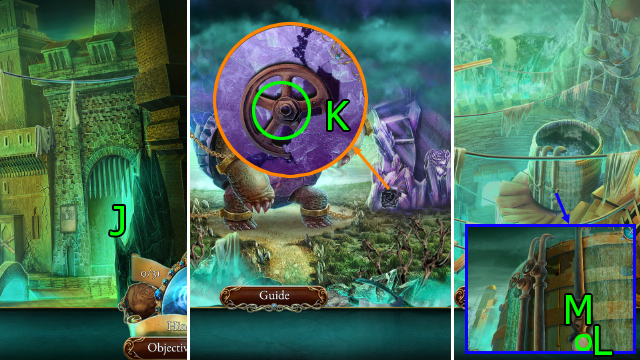
- Use HOT COCOA on (K); get BROKEN BIRD TOY.
- Use BROKEN BIRD TOY; get KNOB.
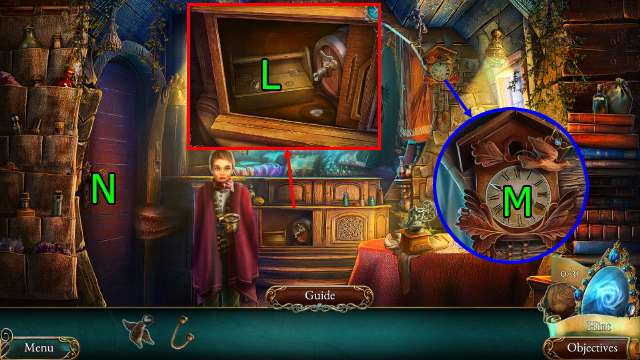
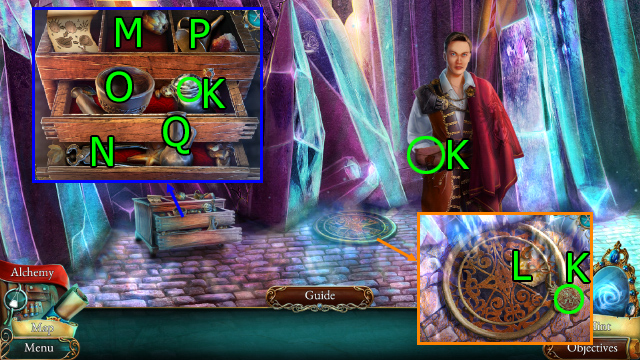
- Press, use KNOB, and press (L); get SCREWDRIVER.
- Use SCREWDRIVER on (M); get SPRINGS (1/2).
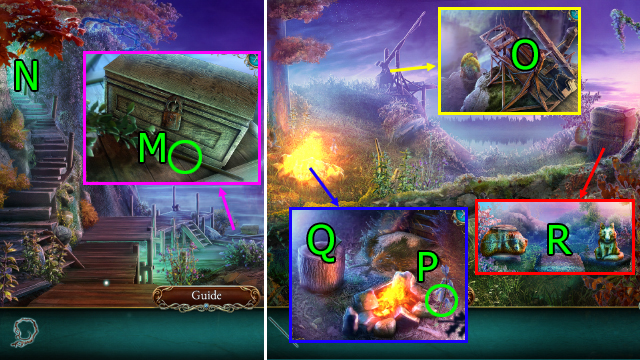
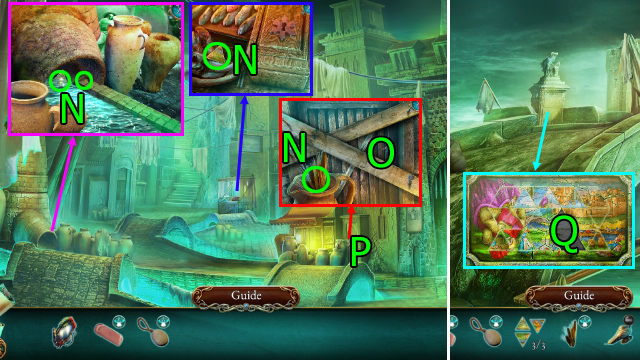
- Go (N).
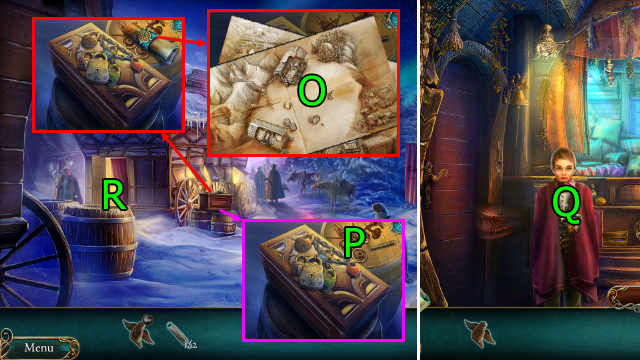
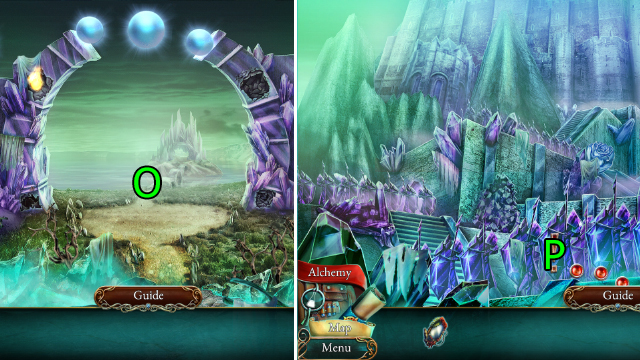
- Get Map (O).
- Get SPRINGS (2/2) (P).
- Use SPRINGS on BROKEN BIRD TOY; get BIRD TOY.
- Go My Carriage.
- Use BIRD TOY on (Q).
- Go Camp.
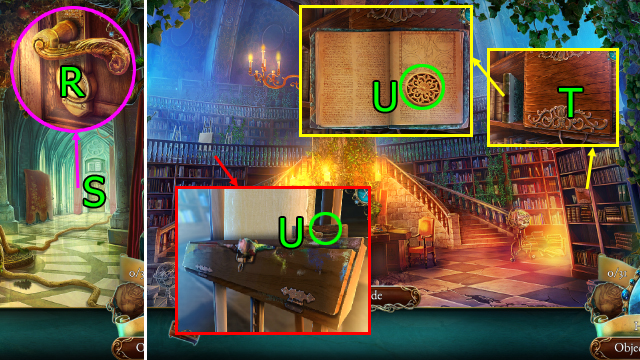
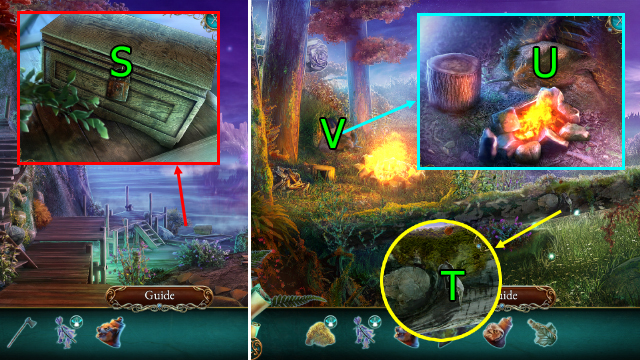
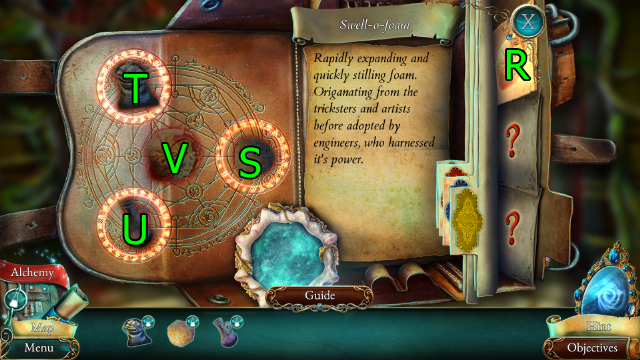
- Go (R).
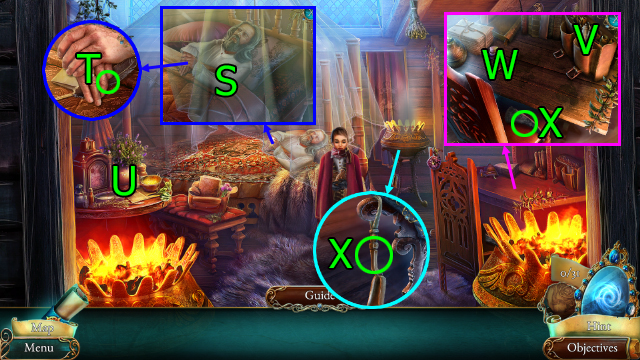
- Press (S).
- Get QUILL (T).
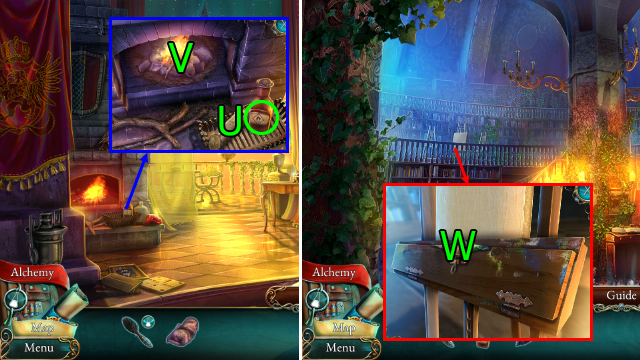
- Solve HOP (U); get Alchemy.
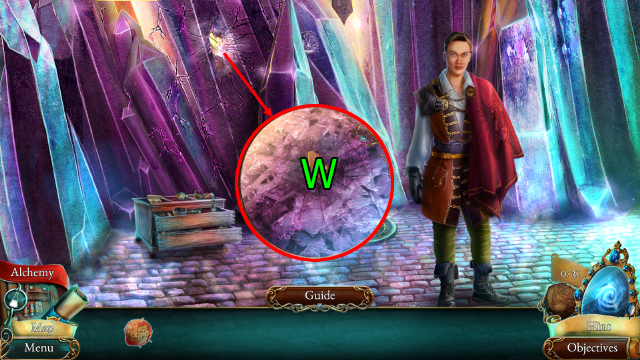
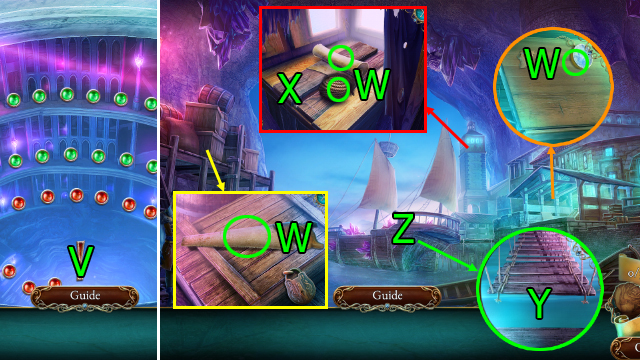
- Press (V), use QUILL on (W); get Redwood Brew Recipe.
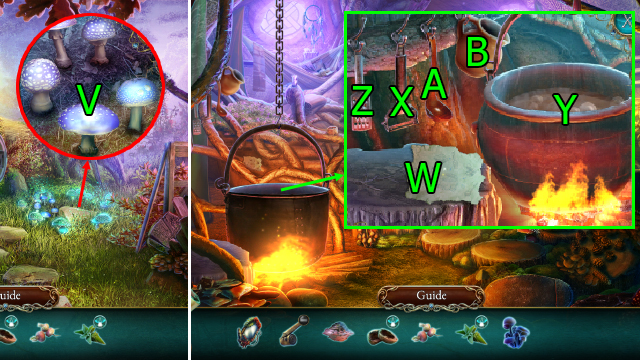
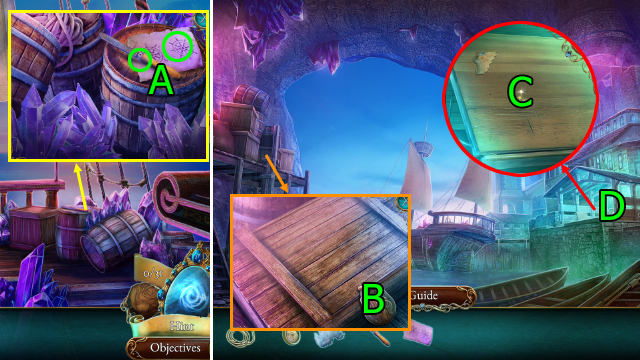
- Get RHINO HORN and SHOVEL (X).
- Go Camp.
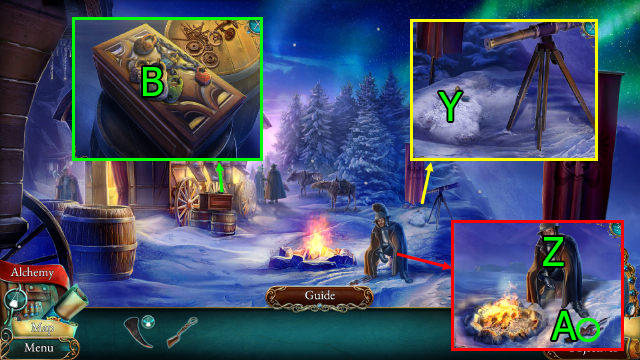
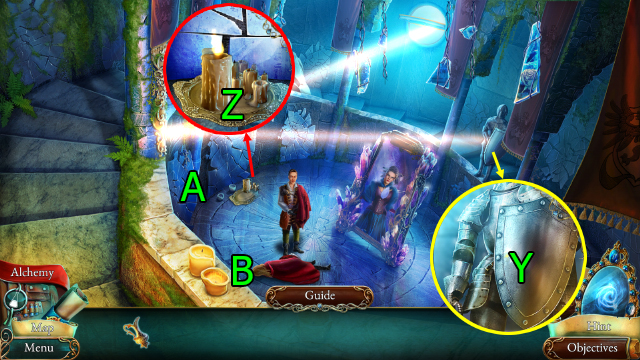
- Use SHOVEL on (Y); get HIP-FLASK.
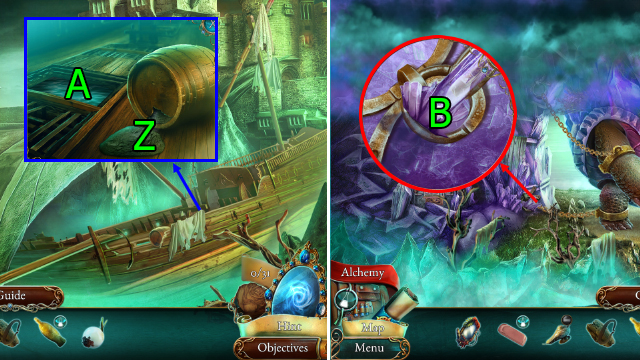
- Use HIP-FLASK on (Z); get CHEST KEY.
- Get RUSTED SHEARS (A).
- Use CHEST KEY on (B).
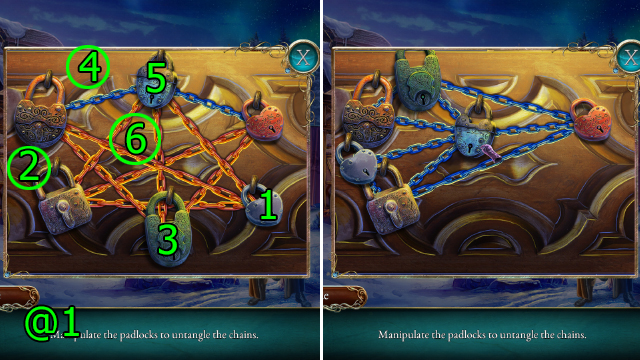
- Solution (@1): Drag (1-2)-(3-4)-(5-6).
- Get OIL and REDWOOD PINE.
- OIL on RUSTED SHEARS; get GARDEN SHEARS.
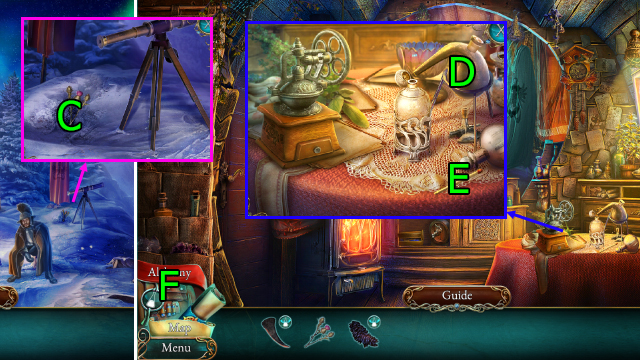
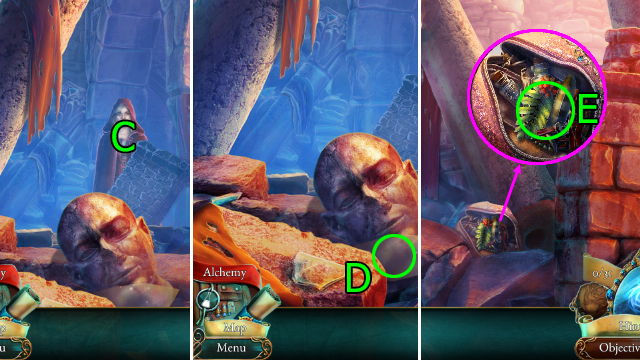
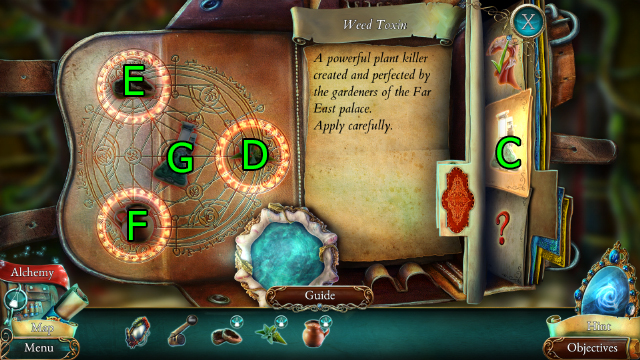
- Use GARDEN SHEARS on (C); get THISTLE.
- Go My Carriage.
- Use THISTLE on (D), drag (E) to (D); get THISTLE OIL.
- Press (F).
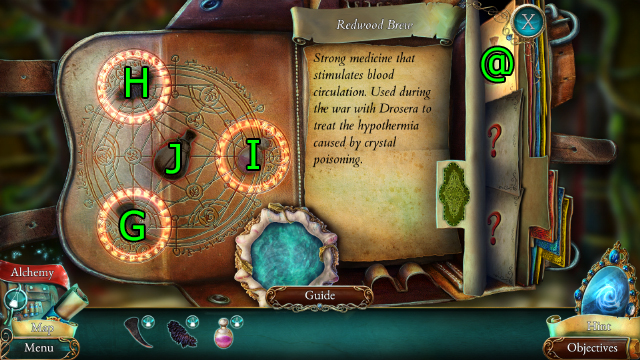
- Press (@). Use RHINO HORN on (G), use REDWOOD PINE on (H), use THISTLE OIL on (I), and press (J).
- Solve match-three puzzle; get REDWOOD BREW.
- Go King's Carriage.
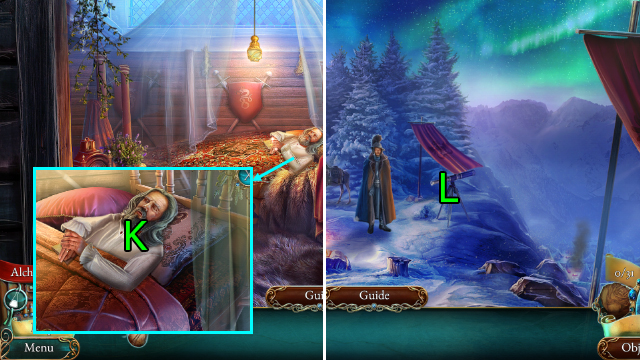
- Use REDWOOD BREW on (K).
- Go Camp.
- Press (L).

- Solution (@2): (1-A)-(2-B)-(3-C).
- Press (M) and press (N).
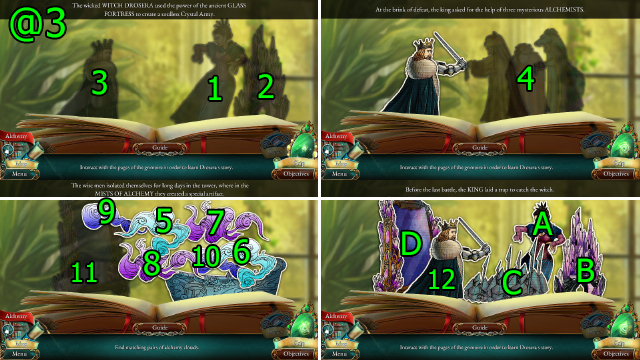
- Solution (@3): Press (1-2-3)-(4)-(5-6)-(7-8)-(9-10)-(11)-(12), drag (A-D)-(B-D)-(C-D).
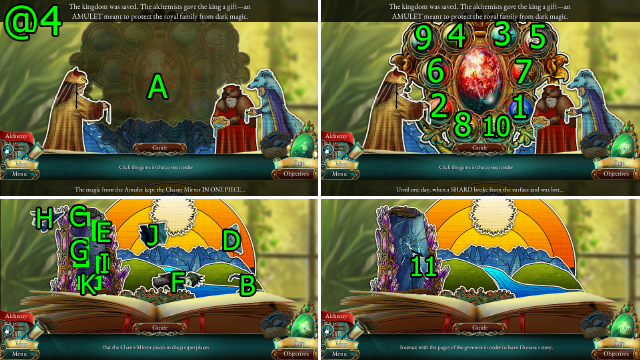
- Solution (@4): Press (A)-(1-2-3)-(4-5-6)-(7-8-9-10), drag (B-C)-(D-E)-(F-G)-(H-I)-(J-K), press (11).
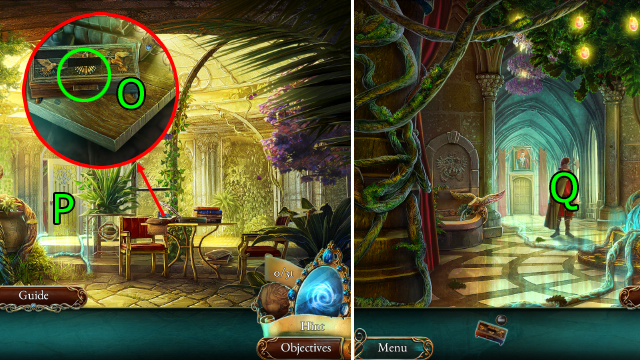
- Get CLOSED PEN-BOX (O).
- Go (P).
- Press (Q).
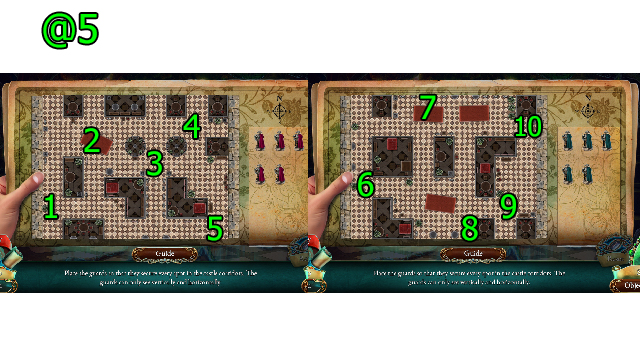
- Solution (@5).
- Go The Hall of Triumph.
- Get LIBRARY KEY.
- Use LIBRARY KEY on (R).
- Go (S).
- Press (T).
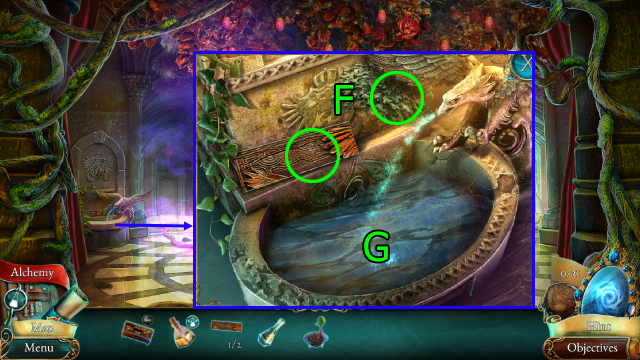
- Get GRIMOIRE SEAL and PEN-BOX SQUARES (1/2) (U).

- Use GRIMOIRE SEAL on (V), press (W), (X), (Y), and (V).
- Press (Z); get SAFETY PIN and Alchemical Fire Recipe (A).
- Use SAFETY PIN on (B); get WILD GROWTH OIL and SULFUR.
- Go The Hall of Triumph.
- Go (C).
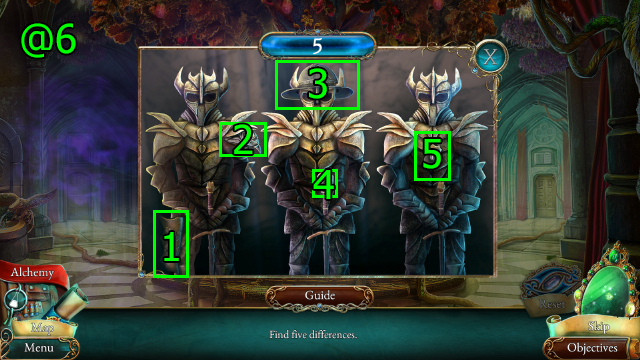
- Solution (@6): Press (1-2-3-4-5).
- Get HELM.
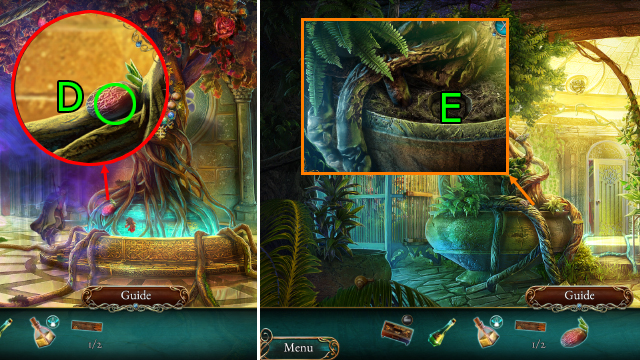
- Get EARTHROOT SEED (D).
- Go Orangery.
- Use EARTHROOT SEED, WILD GROWTH OIL, and HELM on (E); get EARTHROOT and EMPTY FLASK.
- Go The Hall of Triumph.
- Get SLIMY LICHEN and PEN-BOX SQUARES (2/2) (F).
- Use EMPTY FLASK on (G); get ROYAL WATER.
- PEN-BOX SQUARES on CLOSED PEN-BOX.
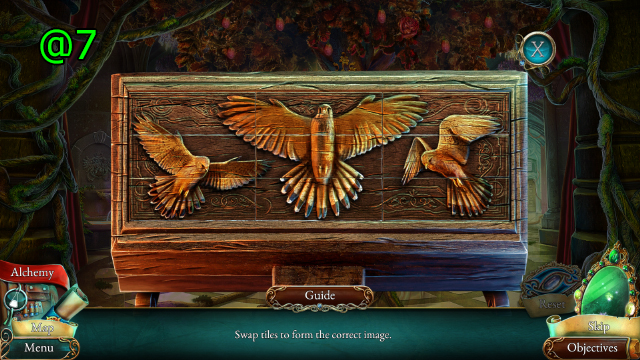
- Solution (@7).
- Get INKWELL and RULER.
- Press Alchemy.
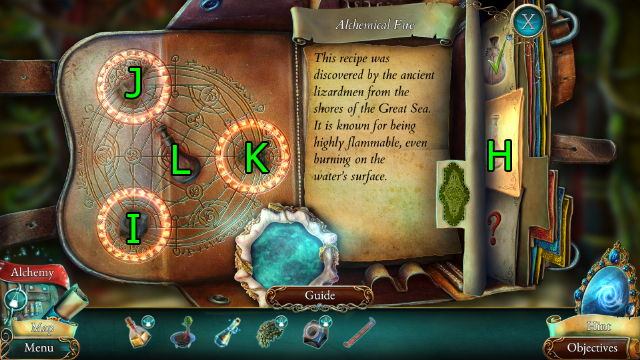
- Press (H).
- Use INKWELL on (I), use SULFUR on (J), and use SLIMY LICHEN on (K); press (L).
- Solve match-three puzzle; get ALCHEMICAL FIRE.
- Go Orangery.
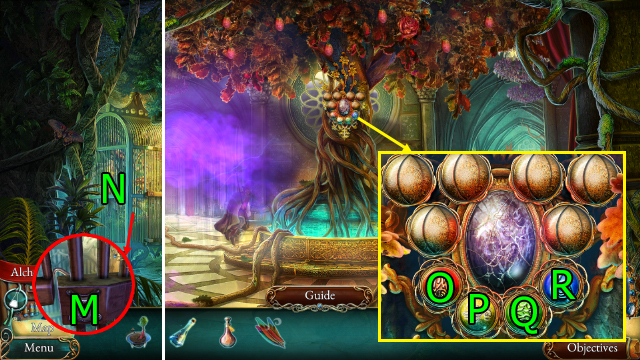
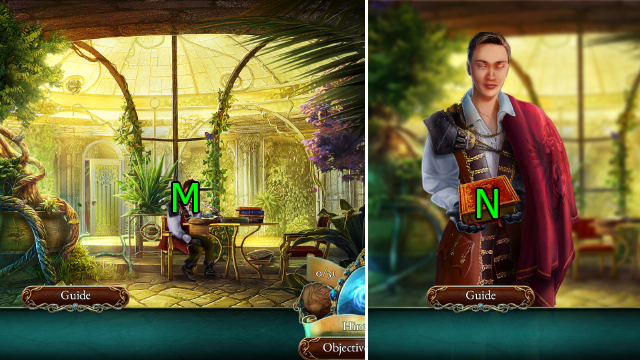
- Use RULER on (M).
- Solve HOP (N); get WIND FEATHERS.
- Go The Hall of Triumph.
- Use ALCHEMICAL FIRE on (O), use WIND FEATHERS on (P), use EARTHROOT on (Q), and use ROYAL WATER on (R).
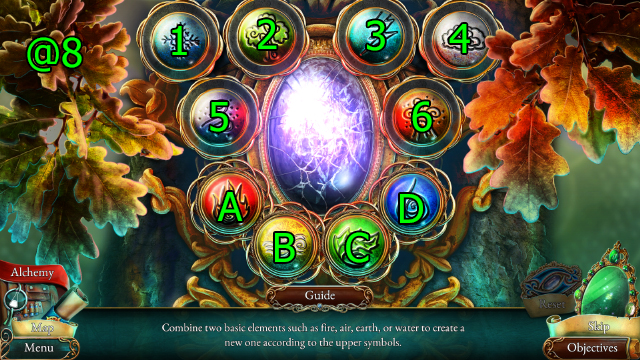
- Solution (@8): Press (A-3-4-6)-(B-1-3-5)-(C-2-5-6)-(D-1-2-4).

- Go (S).
- Press (T); get FERN'S HAIR and BLANKET.
- Get SOLVENT (U).
- Use BLANKET on (V); get SOOT.
- Go Old Library.
- Use SOLVENT on (W); get MUSIC BOX KEY and BRUSH.
- Go Fern's Chamber.
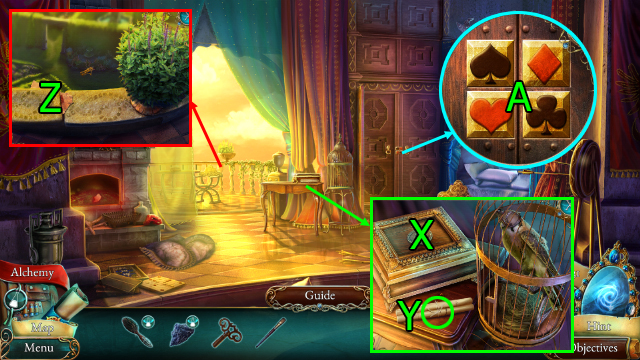
- Use MUSIC BOX KEY on (X); get CARD SUITS (1/2).
- Get Odor Sleuth Recipe (Y).
- Use BRUSH (Z); get CARD SUITS (2/2).
- Use CARD SUITS on (A).
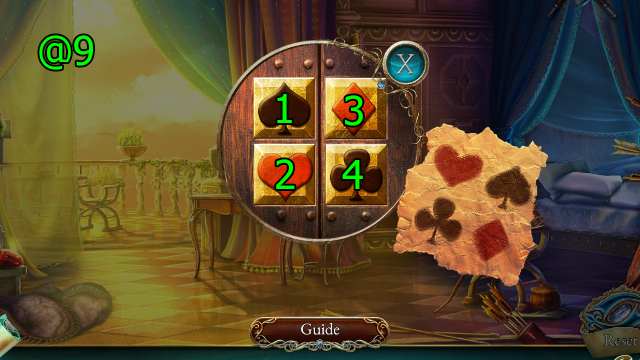
- Solution (@9): Press (2-1-3-4-2).
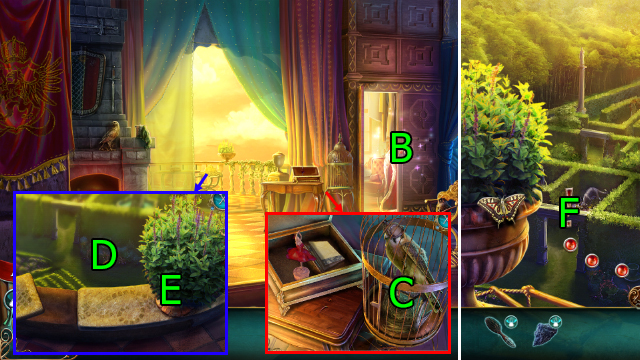
- Solve HOP (B); get FALCONER'S GLOVE.
- Use FALCONER'S GLOVE on (C); get KESTREL.
- Use KESTREL on (D); get ROPE LADDER.
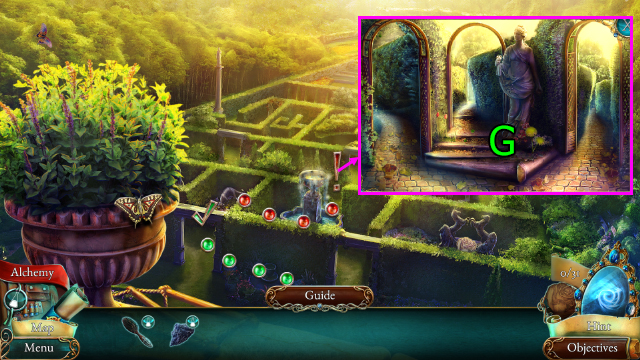
- Use ROPE LADDER and press (E).
- Go (F).
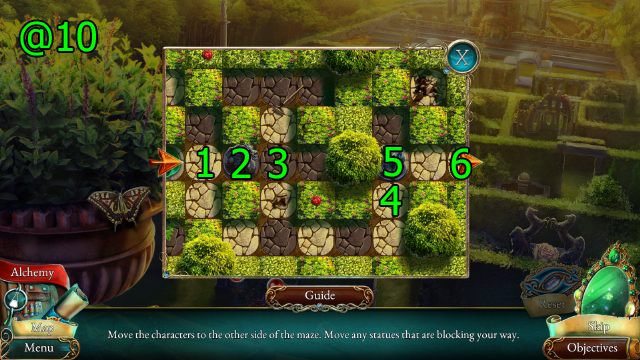
- Solution (@10): Press (1-2-3-4-5-6).
- Get DANDELION (G).
- Press Alchemy.
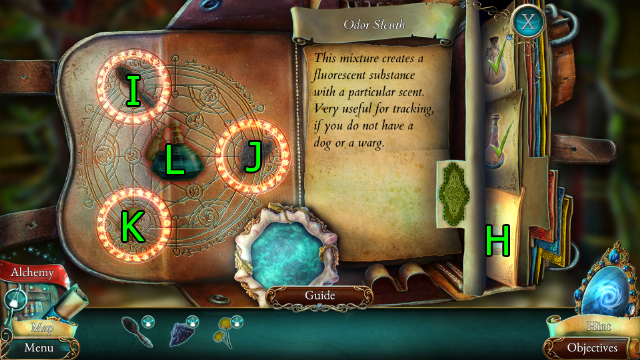
- Press (H).
- Use FERN'S HAIR on (I), use SOOT on (J), use DANDELION on (K), press (L).
- Solve match-three puzzle; get ODOR SLEUTH.

- Use ODOR SLEUTH on (M).
- Press (1)-(2)-(3)-(4)-(5), go (N).
- Go (O).
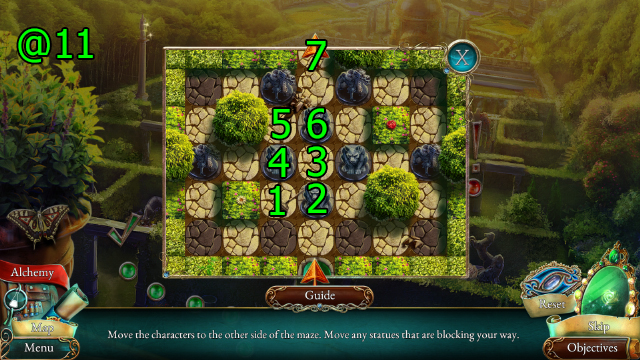
- Solution (@11): Press (1-2-3-4-5-6-7).
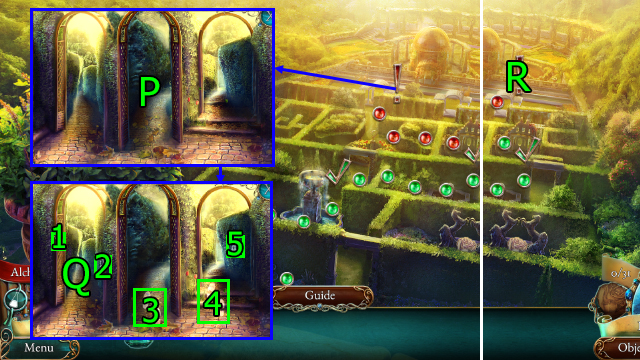
- Use ODOR SLEUTH on (P).
- Press (1)-(2)-(3)-(4)-(5), go (Q).
- Go (R).
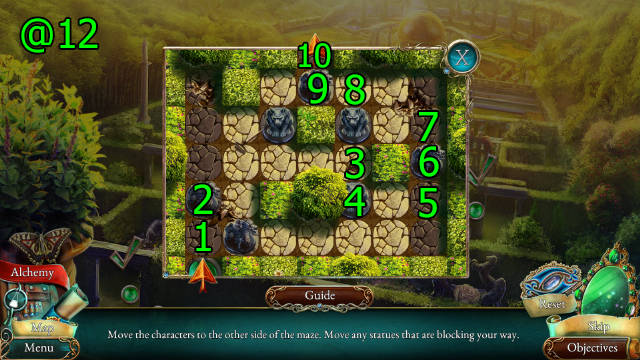
- Solution (@12): Press (1-2-3-4-5-6-7-8-9-10).
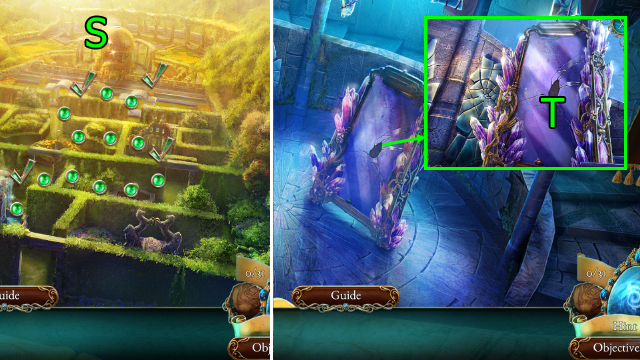
- Go (S).
- Press (T).
- Press (U); get ROPE WITH HOOK.
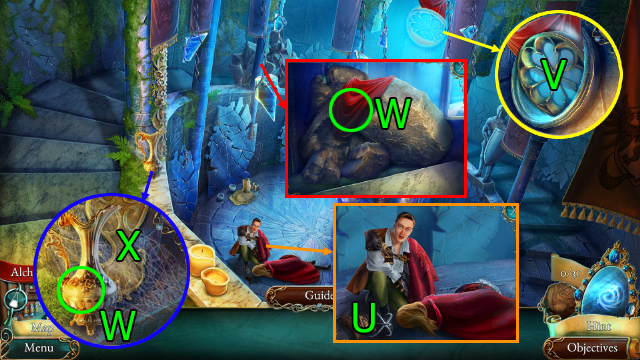
- Use ROPE WITH HOOK on (V).
- Get BANNER and GOLDEN VASE (W).
- Use BANNER on (X).
- Press (Y).
- Press (Z), press (A).
- Use GOLDEN VASE on (B).
Chapter 2: Rose
- Press (C).
- Get SHARD (D).
- Get SHARD FRAME and Sticky Ribbon Recipe (E).
- SHARD FRAME on SHARD.
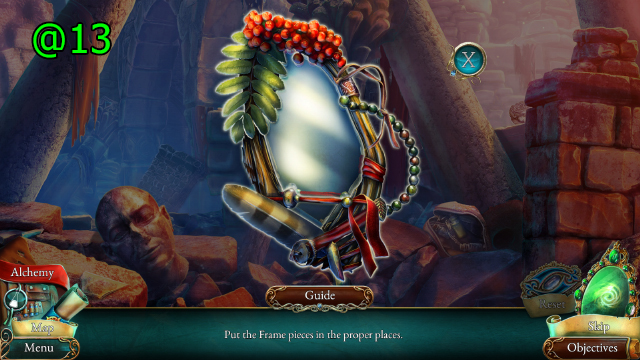
- Solution (@13).
- Get MIRROR FRAME.

- Drag (F) and (G) to (H), press and go (H).
- Go (I).
- Get STABLE KEY (J).
- Go Duct.
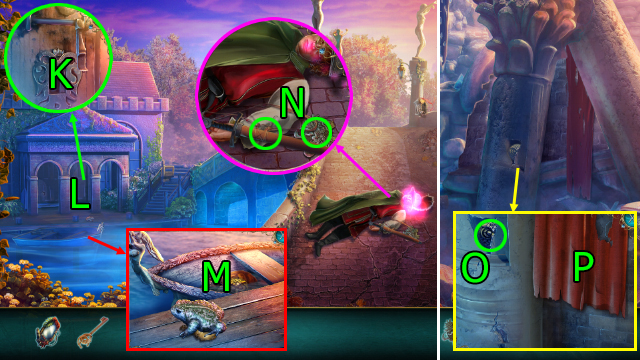
- Use STABLE KEY on (K).
- Solve HOP (L); get FISH NET.
- Use FISH NET on (M); get COGWHEEL (1/3).
- Get SWORD and BADGE (N).
- Go Ruined Altar of Mirrors.
- Get COGWHEEL (2/3) (O).
- Use SWORD on (P); get FABRIC.
- Go White Archway.
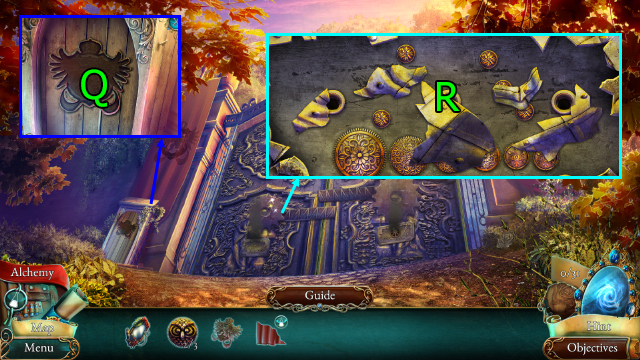
- Use BADGE on (Q); get COGWHEEL (3/3) and JAR.
- Press and use COGWHEEL on (R).
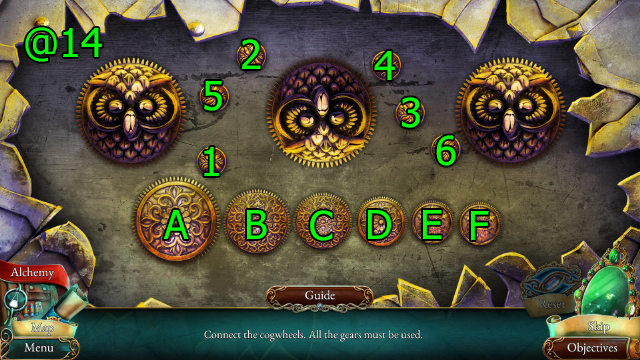
- Solution (@14): (A-1)-(B-2)-(C-3)-(D-4)-(E-5)-(F-6).
- Go Duct.
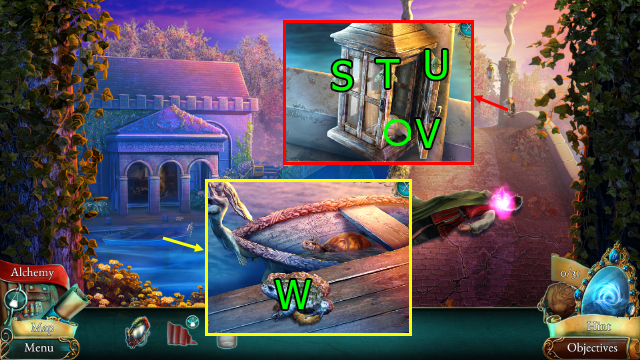
- Use JAR on (S), (T), and (U); get FLIES.
- Get WAX (V).
- Use FLIES on (W); get TOAD SLIME.
- Press Alchemy.
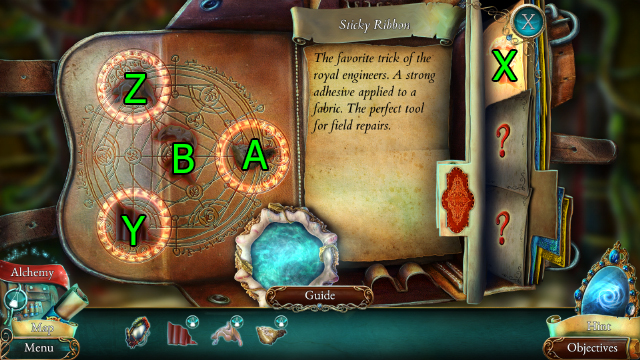
- Press (X).
- Use FABRIC on (Y), use WAX on (Z), use TOAD SLIME on (A), press (B).
- Solve match-three puzzle; get STICKY RIBBON.
- Go White Archway.
- Press (C).
- Get BROKEN CRANK (D).
- STICKY RIBBON on BROKEN CRANK; get CRANK.
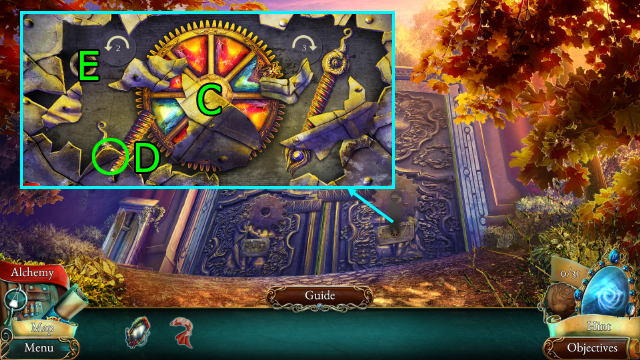
- Use CRANK on (E).
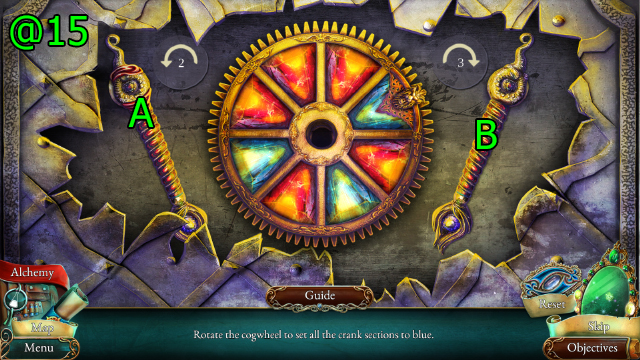
- Solution (@15): Press (Bx3-Ax2).
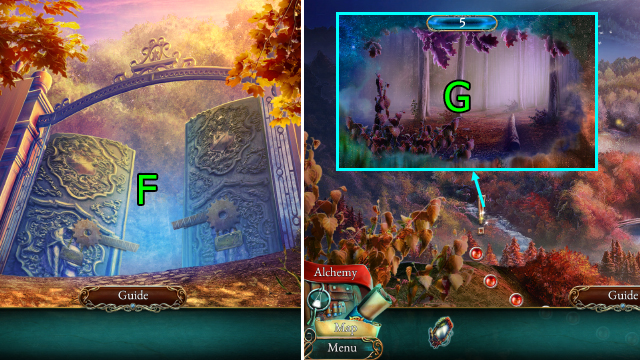
- Use MIRROR FRAME on and go (F).
- Use MIRROR FRAME on (G).
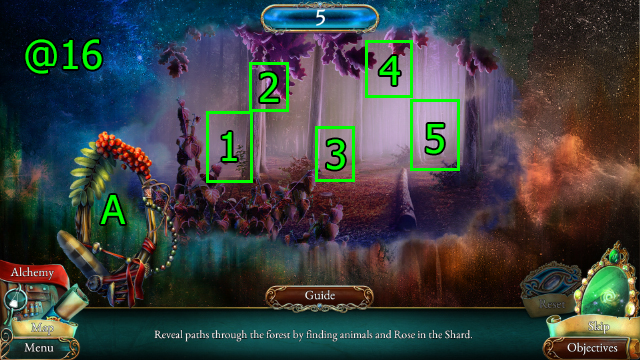
- Solution (@16): Drag (A) to (1-2-3-4-5), press (1).
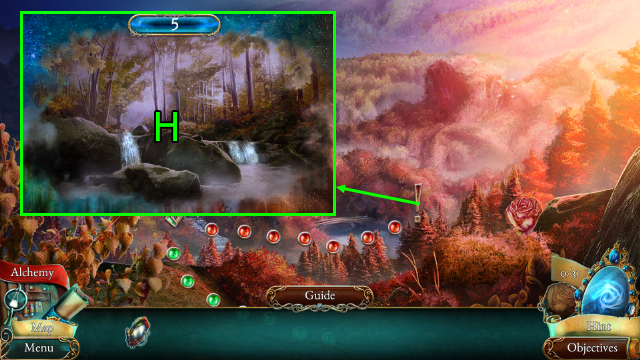
- Use MIRROR FRAME on (H).
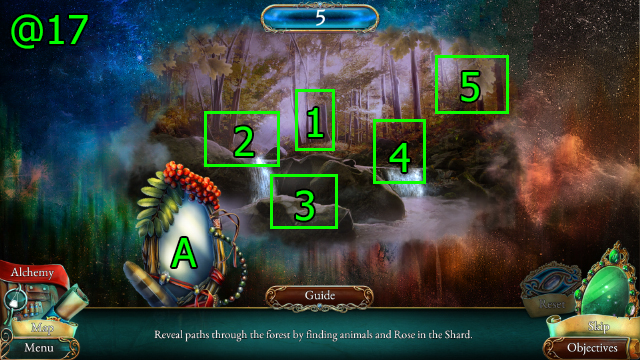
- Solution (@17): Drag (A) to (1-2-3-4-5), press (1).
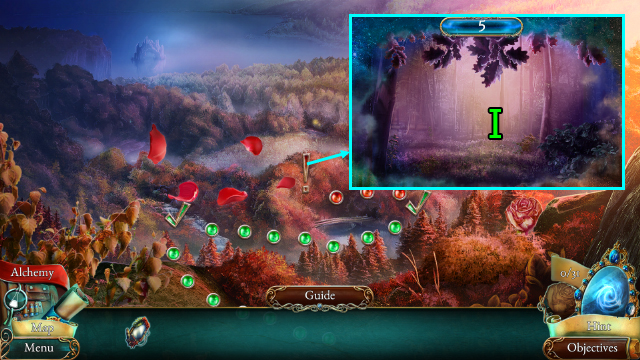
- Use MIRROR FRAME on (I).
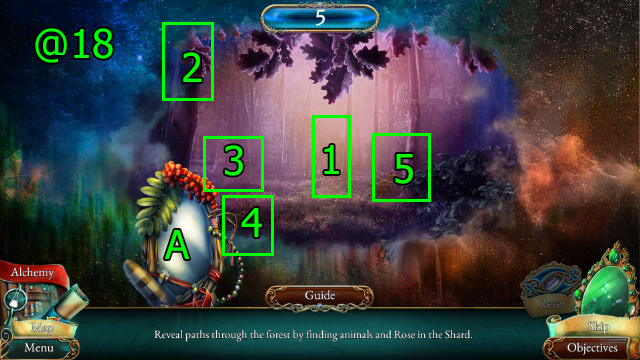
- Solution (@18): Drag (A) to (1-2-3-4-5), press (1).
- Go (J).
- Press (K); get KEY.
- Press (L); solve HOP (L), get SPRAYER PUMP.
- Use KEY on (M).
- Go (N).
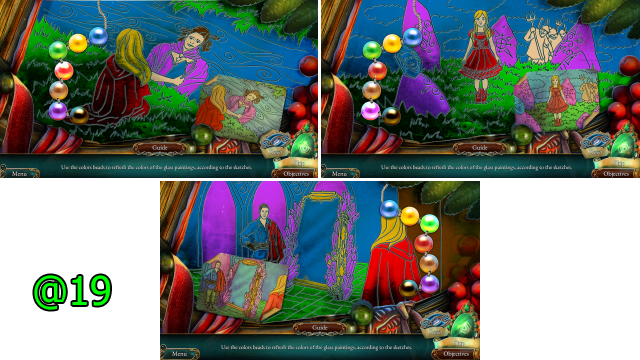
- Solution (@19).
- Get LADDER, SNAIL HANDLE (1/2), and Weed Toxin Recipe (O).
- Go Oak Grove.
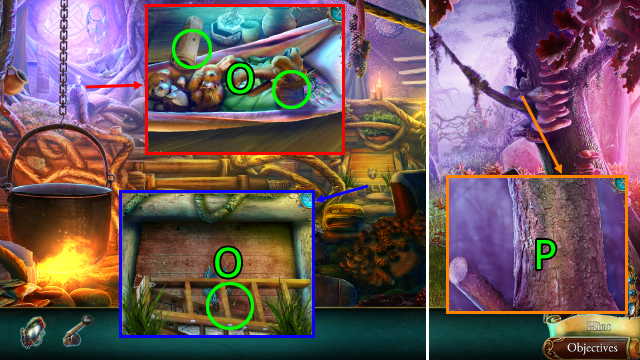
- Use LADDER on (P); get SNAIL HANDLES (2/2), POLYPORE, and WALNUT.
- Go Rose Hut.
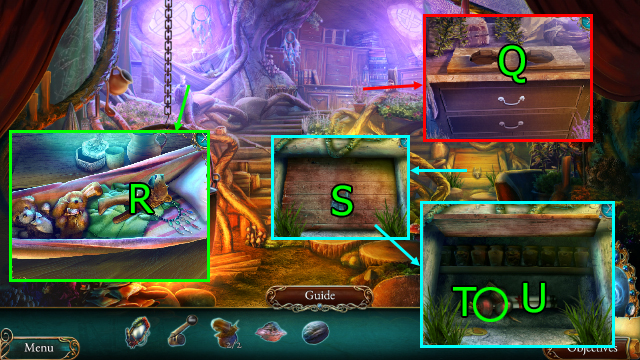
- Use SNAIL HANDLES on (Q); get FUNGUS KNIFE and TRAPDOOR RING.
- Use WALNUT on (R); get WALNUT SHELLS.
- Use TRAPDOOR RING on (S).
- Get TURNIP (T).
- Press (U).
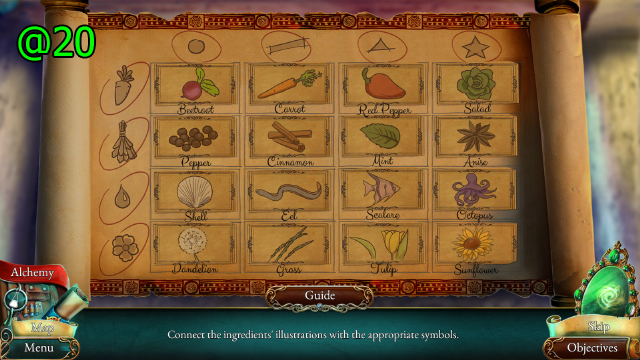
- Solution (@20).
- Get DRIED MINT.
- Go Oak Grove.
- Use FUNGUS KNIFE on (V); get LUMINOUS FUNGUS.
- Go Rose Hut.
- Press (W).
- Use TURNIP and drag (X) to (W); drag (W) to (Y).
- Use POLYPORE and drag (Z) to (W); drag (W) to (Y).
- Use LUMINOUS FUNGUS on (Y); drag (A) to (Y).
- Drag (B) to (Y); get MUSHROOMS BROTH.
- Press Alchemy.
- Press (C).
- Use DRIED MINT on (D), use WALNUT SHELLS on (E), use MUSHROOMS BROTH on (F), press (G).
- Solve match-three puzzle; get WEED TOXIN.
- WEED TOXIN on SPRAYER PUMP; get SPRAYER PUMP.
- Go Oak Grove.
- Use SPRAYER PUMP on (H).
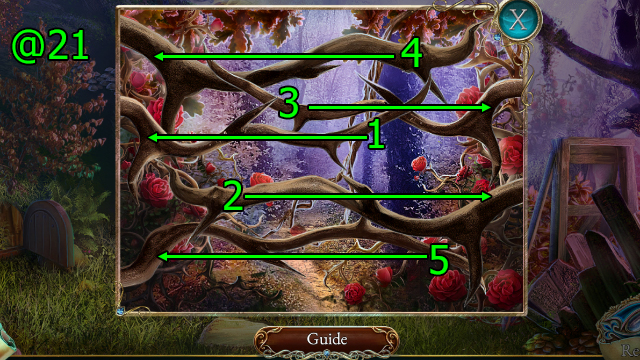
- Solution (@21): Drag (1)-(2)-(3)-(4)-(5).
- Get LIANA.
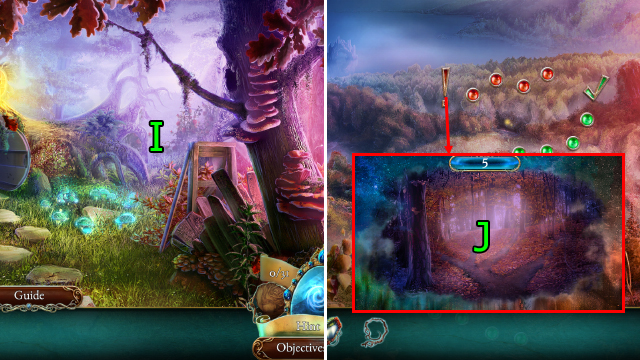
- Go (I).
- Use MIRROR FRAME on (J).
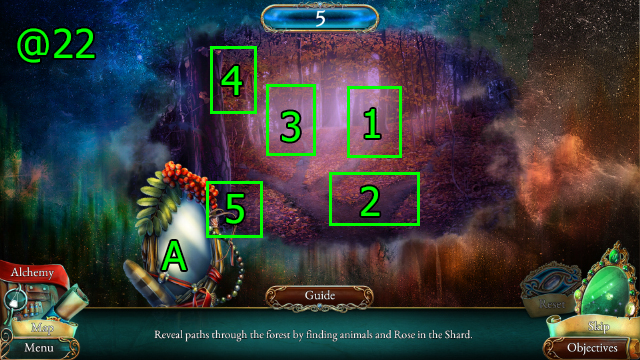
- Solution (@22): Drag (A) to (1-2-3-4-5), press (1).
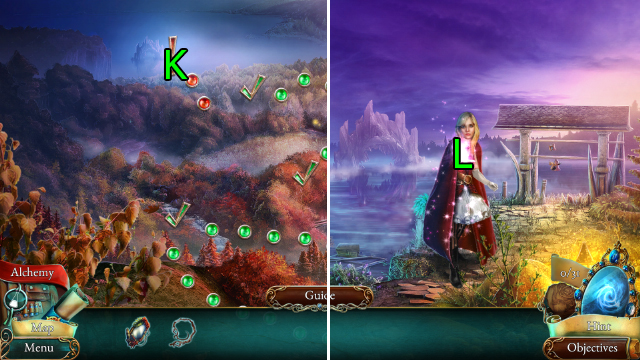
- Go (K).
- Use MIRROR FRAME on (L); get Echo Tonic Recipe.
- Get HOOK (M).
- Use HOOK; get STICK and HOOK.
- LIANA on HOOK; get GRAPPLING HOOK.
- Go (N).
- Use GRAPPLING HOOK and press (O); get MOSS and OWL BLOCK.
- Get BLUEBELL (P).
- Use STICK on (Q); get HATCHET.
- Use OWL BLOCK on (R).
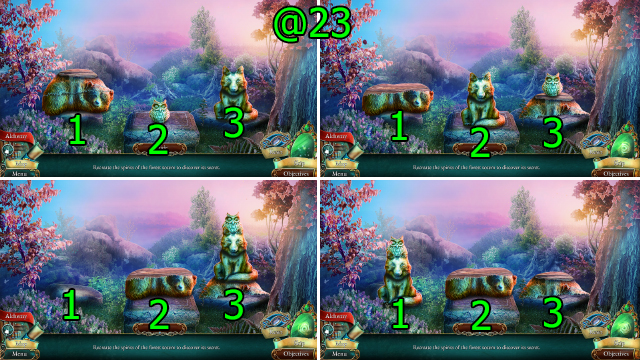
- Solution (@23): (3-1)-(2-1)-(3-2)-(1-3)-(1-2)-(3-2)-(1-3)-(2-3), (2-1)-(3-1)-(2-3)-(1-2)-(1-3)-(2-3)-(1-2), (3-1)-(3-2)-(1-2)-(3-1)-(2-3)-(2-1)-(3-1), (3-2)-(1-2)-(1-3)-(2-3)-(1-2)-(3-1)-(3-2)-(1-2).
- Get WOLF HOWL BELL.
- Go Dewdrop Lake.
- Use HATCHET and press (S); get SHOVEL, OWL HOOTER, and BOTTLE.
- Go Moorland.
- Use BOTTLE on (T); get BIRCH JUICE.
- Press and use SHOVEL on (U).
- Solve HOP (V); get BEAR ROAR DRUM.
- Press Alchemy.
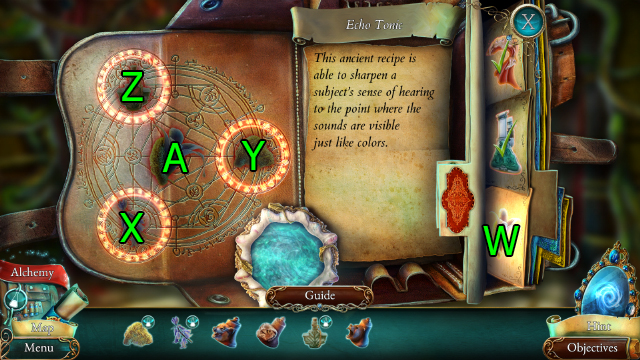
- Press (W).
- Use BLUEBELL on (X), use MOSS on (Y), use BIRCH JUICE on (Z), and press (A).
- Solve match-three puzzle; get ECHO TONIC.
- Go Dewdrop Lake.
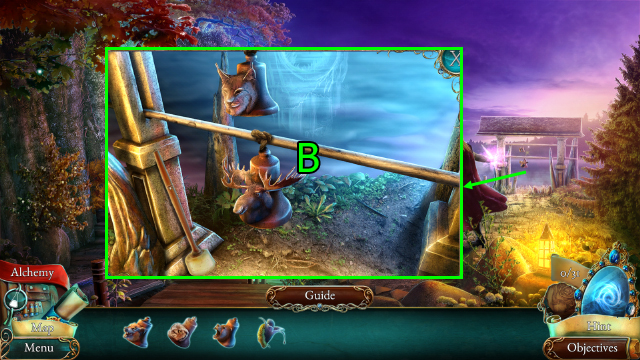
- Use OWL HOOTER, BEAR ROAR DRUM, WOLF HOWL BELL, and ECHO TONIC on (B).
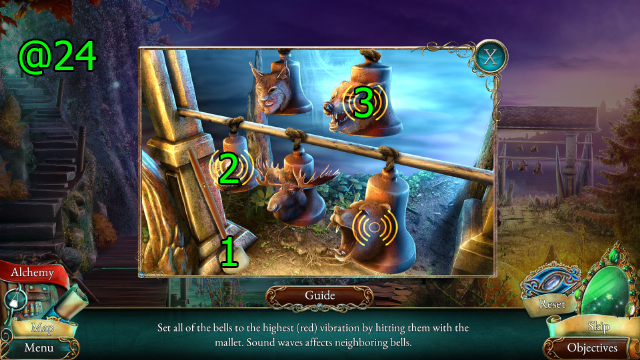
- Solution (@24): Drag (1) to (2-3).
Chapter 3: Drosera
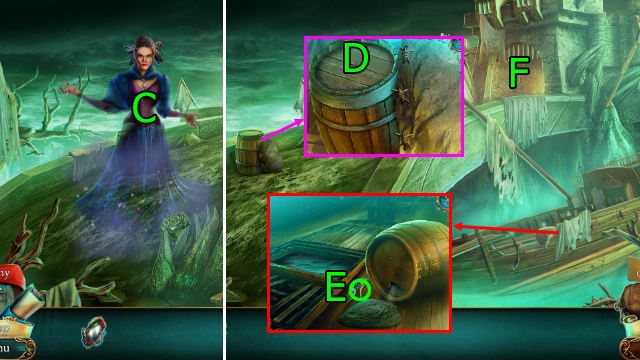
- Press (C).
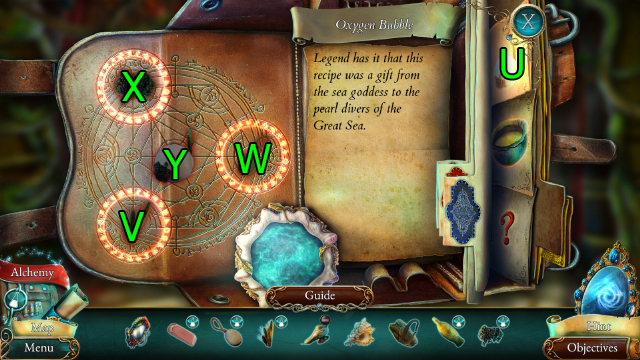
- Press (Dx2); get Oxygen Bubble Recipe.
- Get LEVER (E).
- Go (F).
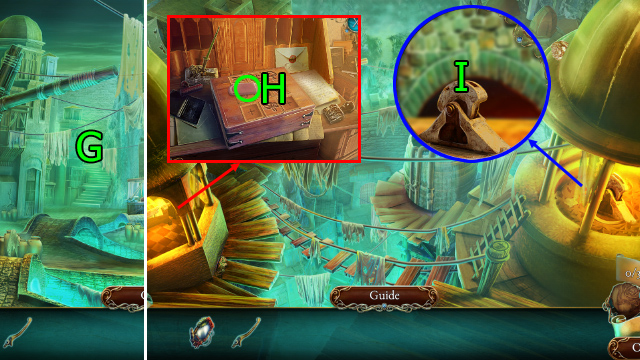
- Go (G).
- Get ERASER (H).
- Use LEVER and press (I).
- Go Float Town Main.
- Go (J).
- Get VALVE (K).
- Go Float Town Ledge.
- Get SOAP (L).
- use VALVE and press (M).
- Go Float Town Main.
- Get CERAMIC TILES (1/3), CERAMIC TILES (2/3), CALAMUS, and CROWBAR (N).
- Use CROWBAR on (O).
- Solve HOP (P); get OIL LAMP.
- Use OIL LAMP; get CERAMIC TILES (3/3).
- Go Harbor.
- Use CERAMIC TILES on (Q).
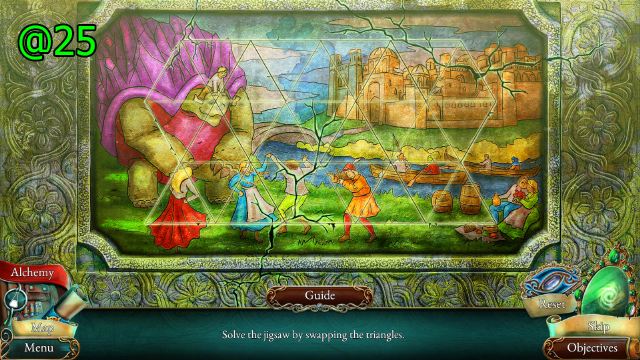
- Solution (@25).
- Get PINCERS and SEASHELL.
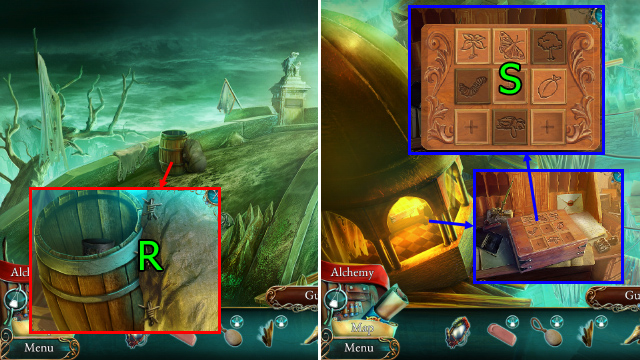
- Use PINCERS on (R); get STAMPS and FLINT AND STEEL.
- Go Float Town Ledge.
- Use STAMPS on (S).
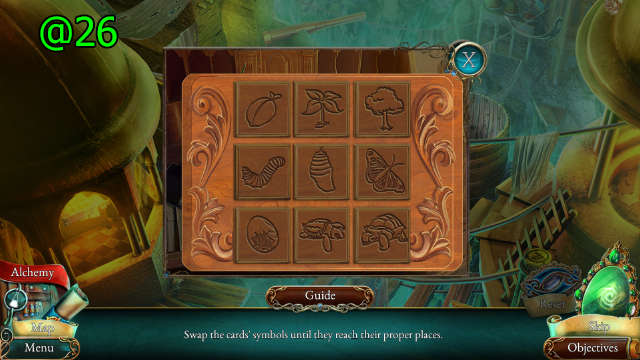
- Solution (@26).
- Get ICEBOX KEY and Anti-Fog Fuel Recipe.
- Go Float Town Main.
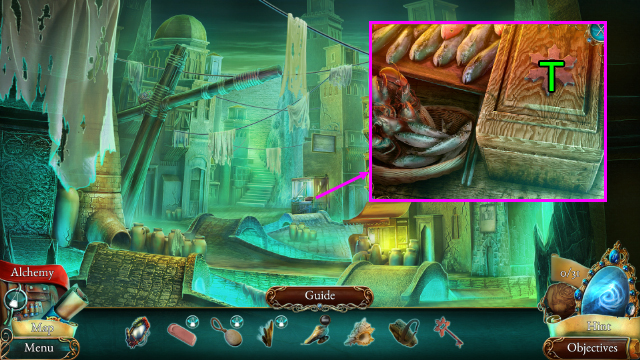
- Use ICEBOX KEY on (T); get COD LIVER OIL and CAVIAR.
- Press Alchemy.
- Press (U).
- Use CALAMUS on (V), use SOAP on (W), use CAVIAR on (X), press (Y).
- Solve match-three puzzle; get OXYGEN BUBBLE.
- Go Harbor.
- Use SEASHELL on (Z); get GUNPOWDER.
- Use OXYGEN BUBBLE on (A), solve HOP; get TRIDENT.
- Go Crystal Turtle.
- Use TRIDENT on (B); get CRYSTAL DUST.
- Press Alchemy.
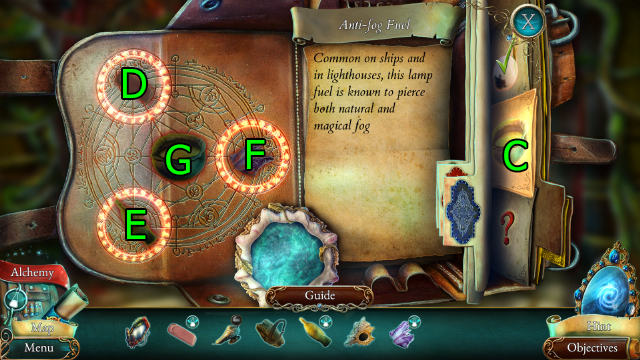
- Press (C).
- Use ERASER on (D), use COD LIVER OIL on (E), use CRYSTAL DUST on (F), press (G).
- Solve match-three puzzle; get ANTI-FOG FUEL.
- ANTI-FOG FUEL and FLINT AND STEEL on OIL LAMP; get ANTI-FOG LANTERN.
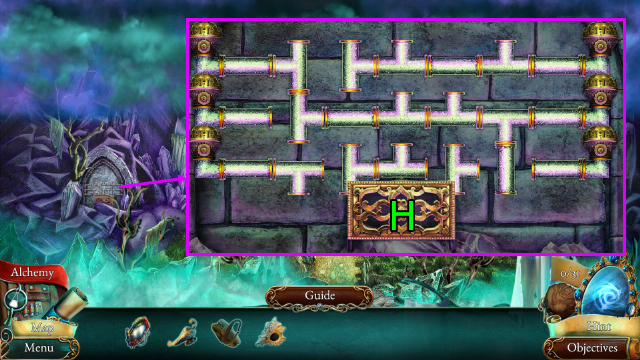
- Use ANTI-FOG LANTERN on (H).
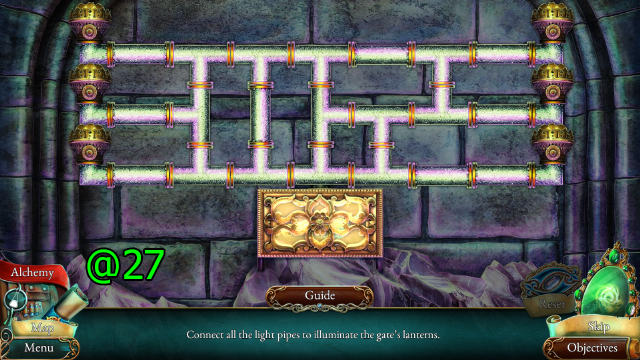
- Solution (@27).
- Go Float Town Ledge.
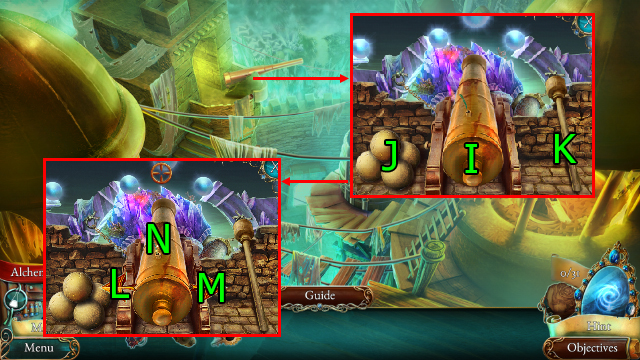
- Press and use GUNPOWDER on (I), drag (J) to (I) and (K) to (I); press (I).
- Press (L); use FLINT AND STEEL on (N).
- Press and use GUNPOWDER on (I), drag (J) to (I) and (K) to (I); press (I).
- Press (Mx2); use FLINT AND STEEL on (N).
- Go Crystal Turtle.
- Go (O).
- Go (P).
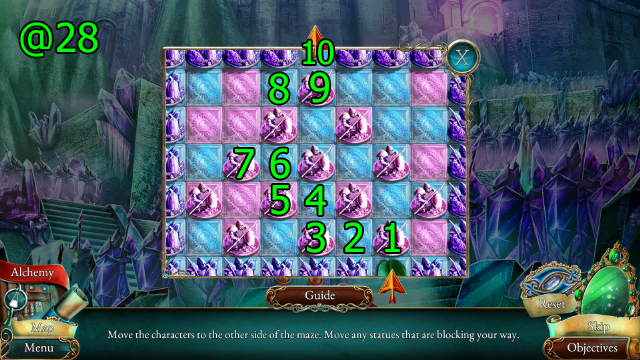
- Solution (@28): Press (1-2-3-4-5-6-7-8-9-10).
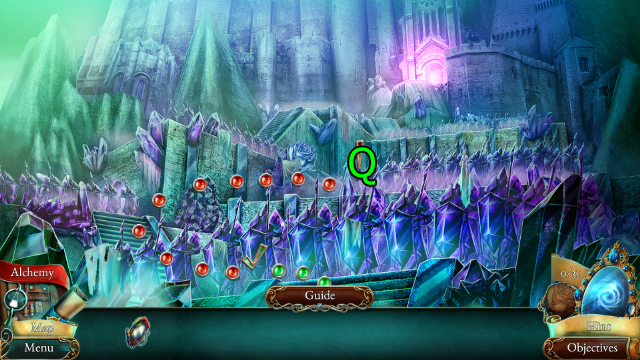
- Go (Q).
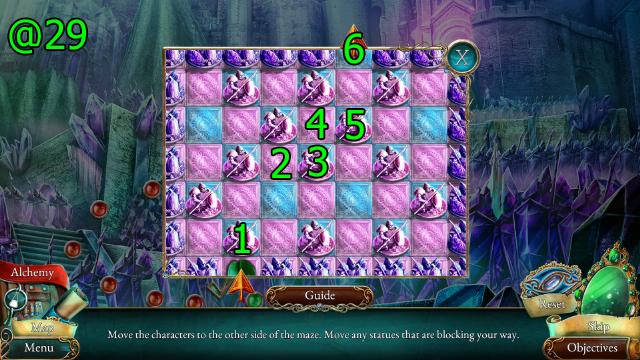
- Solution (@29): Press (1-2-3-4-5-6).
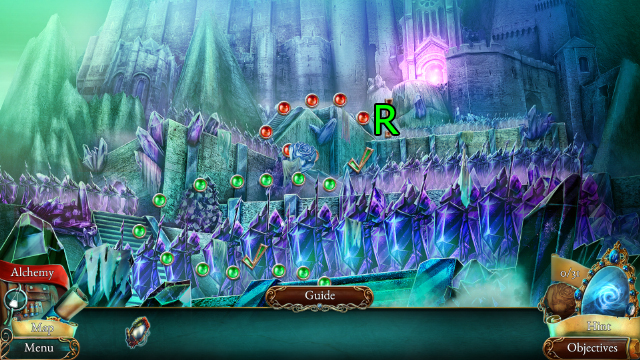
- Go (R).
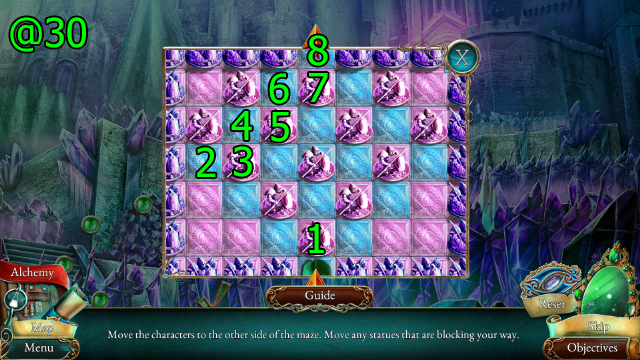
- Solution (@30): Press (1-2-3-4-5-6-7-8).
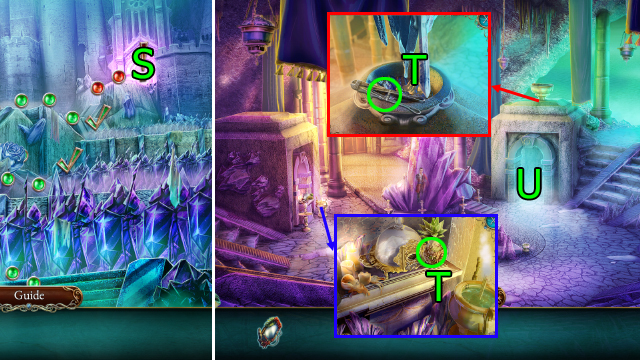
- Go (S).
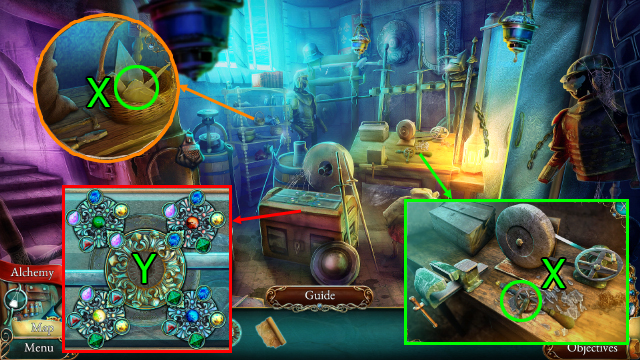
- Get ALOE OIL and BOLT CUTTERS (T).
- Go (U).
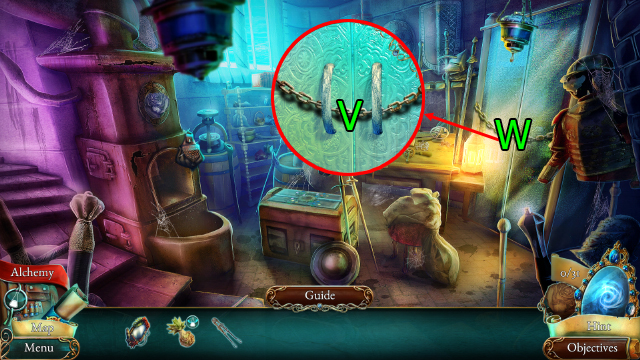
- Use BOLT CUTTERS on (V).
- Solve HOP (W); get SCROLL TUBE.
- Use SCROLL TUBE.
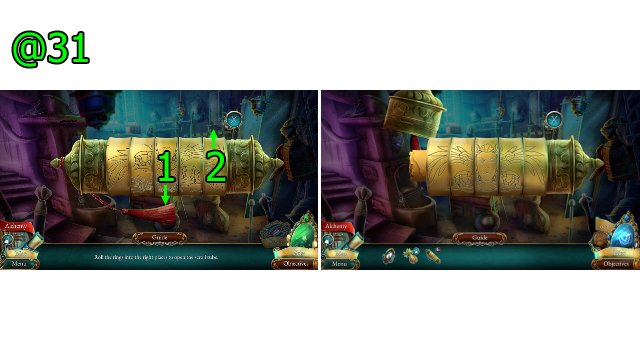
- Solution (@31): Scroll the center and far right into place.
- Get CHEST KEY and CRYSTAL SCEPTER PLANS.
- Get DRILL and Warming Lotion Recipe (X).
- Use DRILL; get FIRE STONE.
- Use CHEST KEY on (Y).
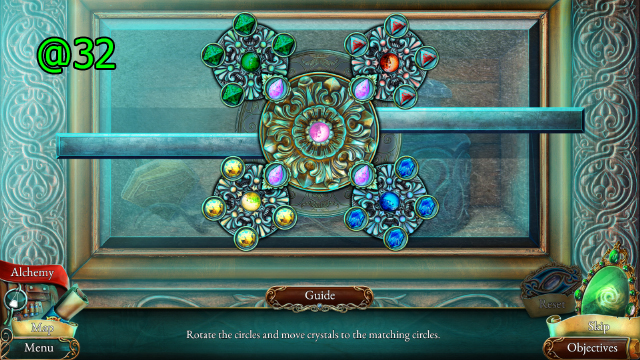
- Solution (@32).
- Get CRYSTAL HEAD, LAKE IDOL FIGURE, and MOON DUST.
- Press Alchemy.
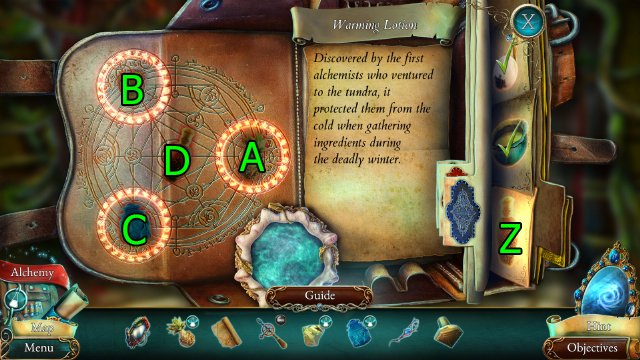
- Press (Z).
- Use ALOE OIL on (A), use FIRE STONE on (B), use MOON DUST on (C), press (D).
- Solve match-three puzzle; get WARMING LOTION.
- Go Courtyard.
- Use LAKE IDOL FIGURE on (E); get DIAMOND.
- DIAMOND on DRILL; get DRILL.
- Use WARMING LOTION on (F); get CRYSTAL SLIVER.
- Go Armory.

- Use CRYSTAL SCEPTER PLANS on (G).
- Use CRYSTAL SLIVER on (H), drag (H) to (I).
- Use DRILL and CRYSTAL HEAD on (I); get CRYSTAL SCEPTER.
- Go Courtyard.
- Use CRYSTAL SCEPTER on (J).
Chapter 4: Escape
- Get TRAVEL BAG, BAKING SODA, and BUCKLE (K).
- BUCKLE on TRAVEL BAG; get Swell-o-foam Recipe, FORK, and KIWANO.
- Use FORK on (L); get SPONGE.
- Use KIWANO on (M).
- Drag (N)-(M), drag (M)-(O); press (O).
- Drag (P)-(Q), drag (O)-(Q); get BULB JUICE.
- Press Alchemy.
- Press (R).
- Use SPONGE on (S), use BAKING SODA on (T), use BULB JUICE on (U), press (V).
- Solve match-three puzzle; get SWELL-O-FOAM.
- Use SWELL-O-FOAM on (W).
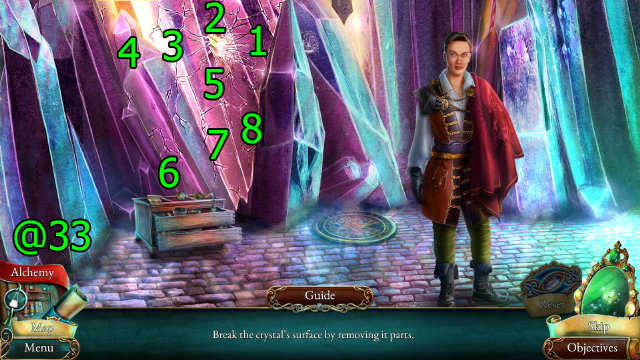
- Solution (@33): Press (1-2-3-4-5-6-7-8).
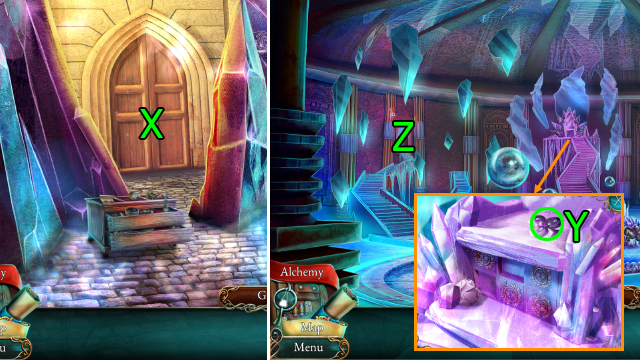
- Go (X).
- Get HAIRCLIP (Y).
- Go (Z).
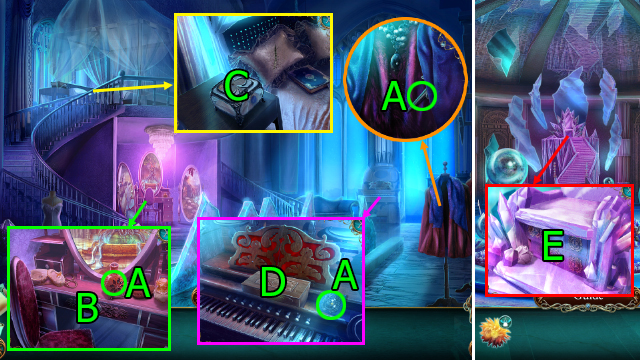
- Get CLOAK PIN, BRICKS (1/2), and DAISY PERFUME (A).
- Use CLOAK PIN on (B); get BRICKS (2/2) and MUSIC BOX PAPER.
- Use HAIRCLIP on (C); get Fiery Atomizer Recipe.
- Press, use MUSIC BOX PAPER, and press (D); get FIRE FLOWER.
- Go Crystal Chamber.
- Use BRICKS on (E); get LETTER KNIFE and DRAGON SCALE.
- Press Alchemy.
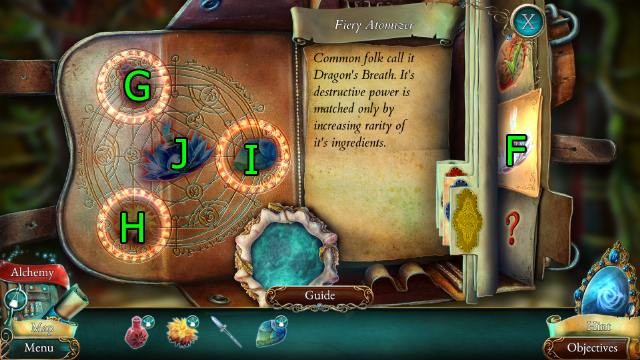
- Press (F).
- Use DAISY PERFUME on (G), use FIRE FLOWER on (H), use DRAGON SCALE on (I), press (J).
- Solve match-three puzzle; get FIERY ATOMIZER.
- Use FIERY ATOMIZER on (K).
- Solve HOP (L); get NOON GLARE.
- Go Drosera's Sanctuary.
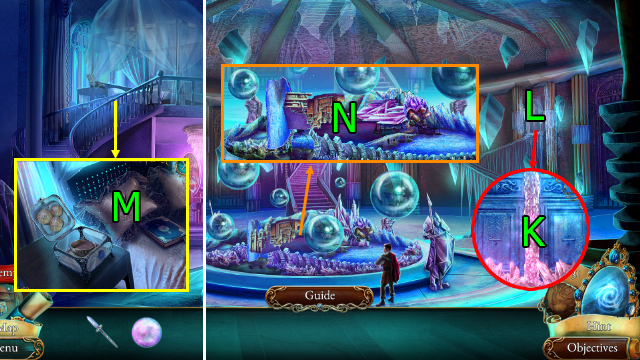
- Use LETTER KNIFE on (M); get GLASS FORTRESS FIGURE.
- Go Crystal Chamber.
- Use GLASS FORTRESS FIGURE on (N).
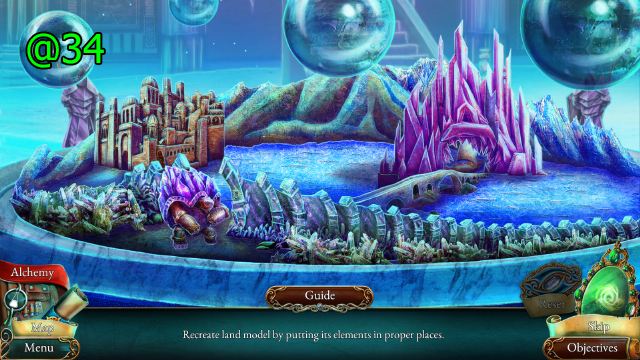
- Solution (@34).
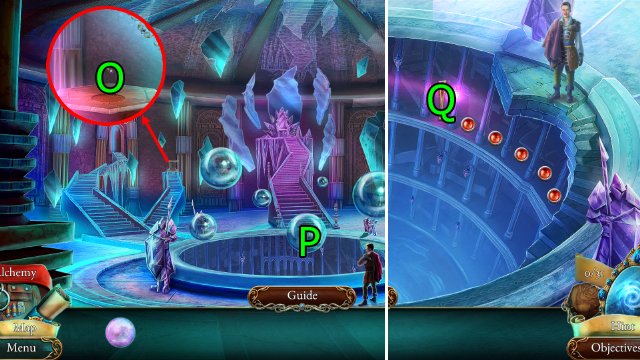
- Use NOON GLARE on (O).
- Go (P).
- Go (Q).
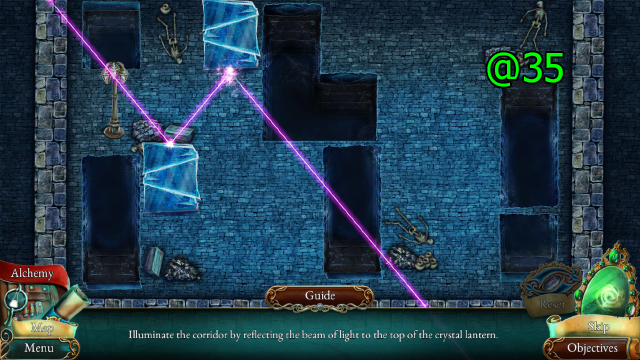
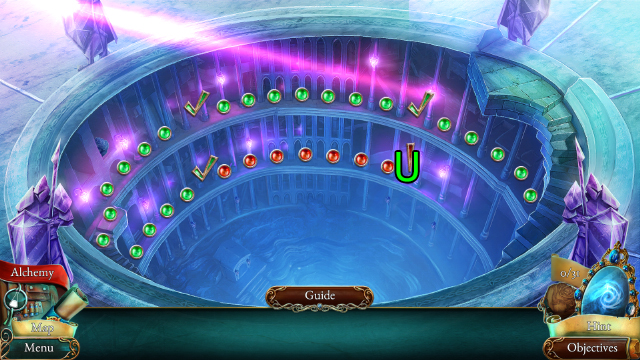
- Solution (@35).
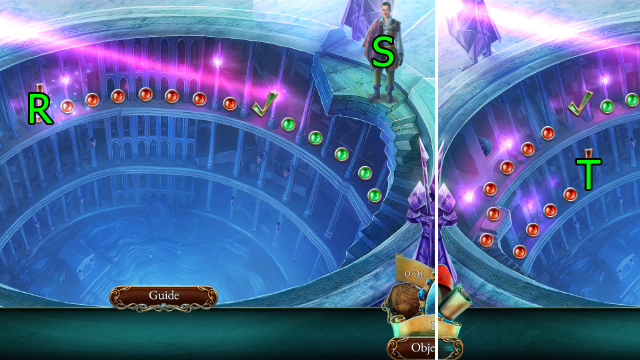
- Solve HOP (R); get GOLDEN SHIELD.
- Use GOLDEN SHIELD on (S).
- Go (T).
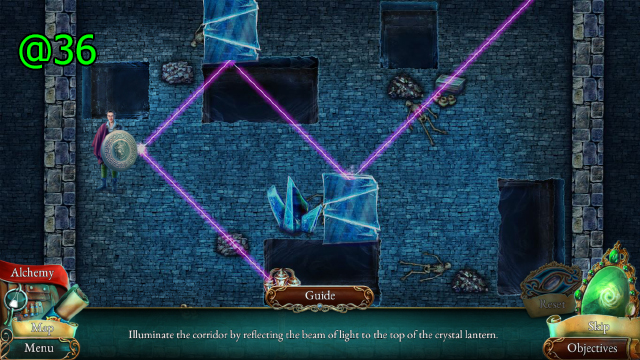
- Solution (@36).
- Go (U).
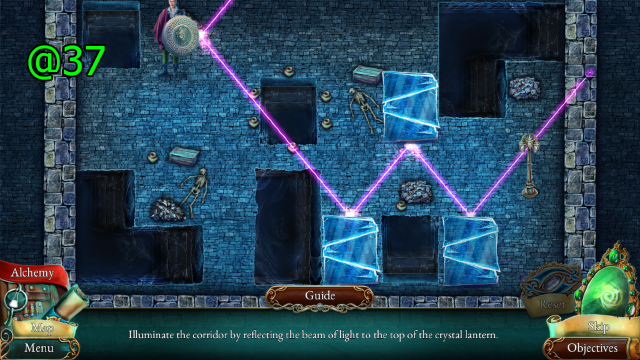
- Solution (@37).
- Go (V).
- Get BROKEN COMPASS, SAW, ROPE, and Freezing Salve Recipe (W).
- Use SAW on (X); get PLANKS.
- Use BROKEN COMPASS; get HOARFROST.
- Use PLANKS on (Y).
- Go (Z).
- Get FILE and SHIP WHEEL PLANS (A).
- Go Cave.
- Use FILE on (B); get NEEDLE AND THREAD and SNOWDROPS.
- Use SHIP WHEEL PLANS on (C).
- Solve HOP (D); get SHIP WHEEL.
- Go Quartz Ship.

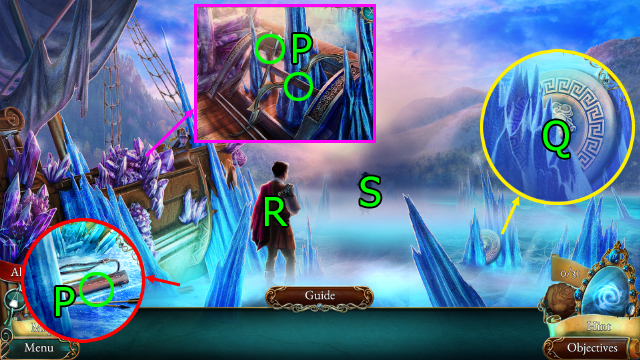
- Use ROPE on (E).
- Get LUMP OF QUARTZ (F).
- Use NEEDLE AND THREAD on (G); get NEEDLE.
- NEEDLE on BROKEN COMPASS; get COMPASS.
- Press Alchemy.
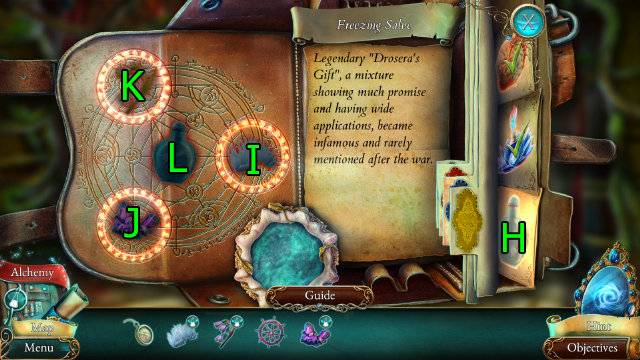
- Press (H).
- Use HOARFROST on (I), use LUMP OF QUARTZ on (J), use SNOWDROPS on (K), press (L).
- Solve match-three puzzle; get FREEZING SALVE.
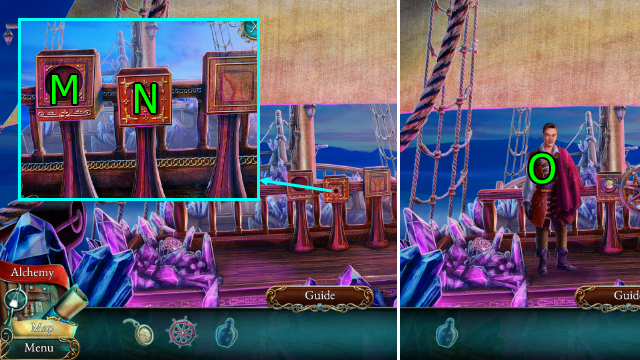
- Use COMPASS on (M), use SHIP WHEEL on (N).
- Use FREEZING SALVE on (O).
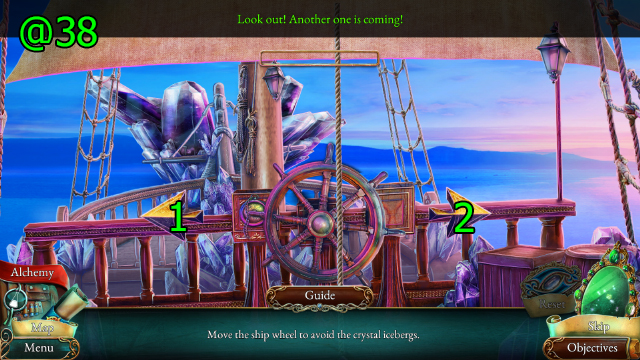
- Solution (@38): Press (1) and (2) to avoid obstacles.
- Get BOW, HORSEMAN'S PICK, and CRYSTAL ARROWS (P).
- Use HORSEMAN'S PICK on (Q); get GOLDEN SHIELD.
- Use GOLDEN SHIELD on (R).
- CRYSTAL ARROWS on BOW; get BOW WITH CRYSTAL ARROWS.
- Use BOW WITH CRYSTAL ARROWS on (S).
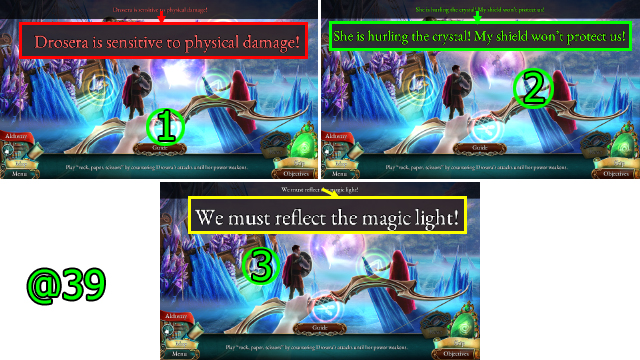
- Solution (@39): Press (1), (2), and (3) to counter Drosera.
- Congratulations! You've completed Lost Grimoires: Shard of Mystery!
Created at: 2018-03-14