

Walkthrough Menu
- General Tips
- Chapter 1: The Clockwork Tower
- Chapter 2: Memorial Park
- Chapter 3: The Toy Store
- Chapter 4: The Workshop
- Chapter 5: The Museum
- Chapter 6: Clocksmith’s Quarters
General Tips
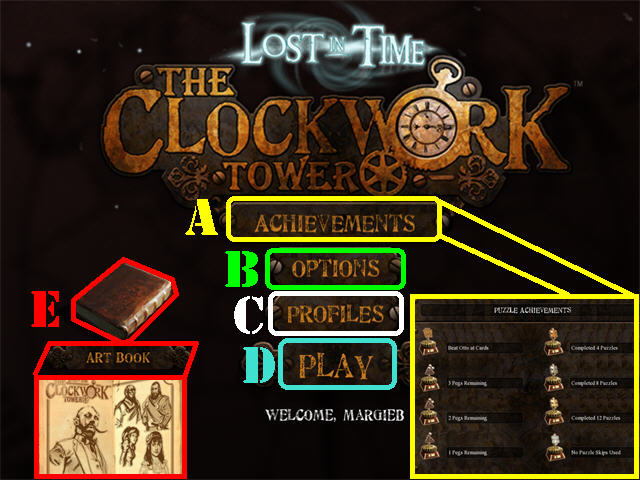
- Click on Play (D) to begin your adventure.
- You can adjust the sound, music, and screen size by clicking on the OPTIONS Button (B).
- The PROFILES (C) button allows you to manage all player profiles for this game.
- The best way to use this walkthrough is by clicking on the “CTRL” and “F” keys on your keyboard to simultaneously bring up a search box.
- Type the keyword into the search box at the bottom of your screen and click on “NEXT” to find the section you need help with. Clicking “NEXT” again will bring up all instances in which that keyword was mentioned in the guide.
- Click on ACHIEVEMENTS (A) to view the list of achievements you can earn during the game.
- The ART BOOK (E) can be purchased in the general store after you’ve collected enough diamonds.
- Puzzles can be skipped after the skip button is full.
- Collect diamonds and coals throughout the game. Diamonds can be used as currency in the general store to purchase items that will help you advance in the game.
- Hover your mouse over an item in the general store to view its price. Numbers in white can be purchased right away. Numbers in red mean you don’t have enough money to buy them.
- The COALS AND DIAMONDS are circled in yellow in the screenshots. They can be found in Hidden Object Scenes and in regular scenes.
- Click on the Hint to view the locations of the gears, diamonds and coals in a scene.
- You can use the coal converter in the workshop to convert coal into diamonds.
- You can earn 20 Diamonds each time you beat Otto at a card game in the back room of the toy store.
- Click on items when your cursor spins.
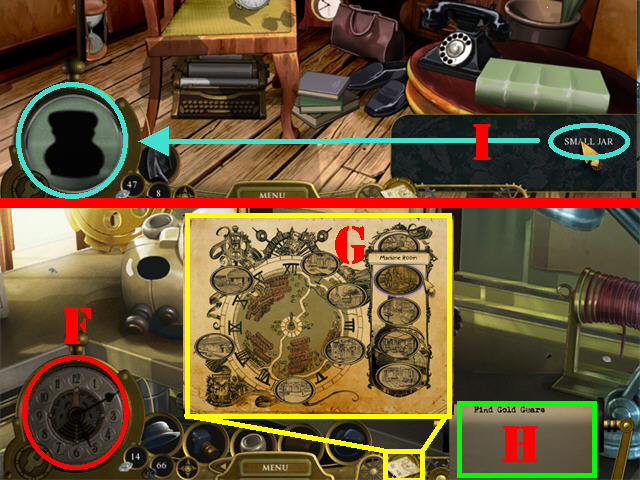
- The POCKET WATCH (F) can look for flux objects (stuck in time) which are invisible to the naked eye. It can also be used to restore an item, or on the people stuck in time.
- Click on the POCKET WATCH when it starts to glow. Move it around the scene until you see an item appear. Click on the item to make it materialize.
- You can also use the POCKET WATCH on items and people. Make sure to use it in different areas when it starts to glow.
- Use the TIME SLIDER that appears at the bottom of the scene to transform items.
- The MAP (G) can be used to warp to different areas in the game after all the GOLD GEARS have been collected.
- The Tasks (H) can be found in the lower right. Click on a Task to find out more about it.
- In Hidden Object Scenes, click on a name on the list to view its silhouette in the pocket watch (I).
- The Hint cannot be used in Hidden Object Scenes except to see the locations of diamonds, gears and coals.
- Clicking randomly in a Hidden Object Scene will cost you 1 COAL.
Chapter 1: Clockwork Tower
- Grab the POCKET WATCH (A) on the ground.
- You will receive the FOUND THE POCKET WATCH ACHIEVEMENT.
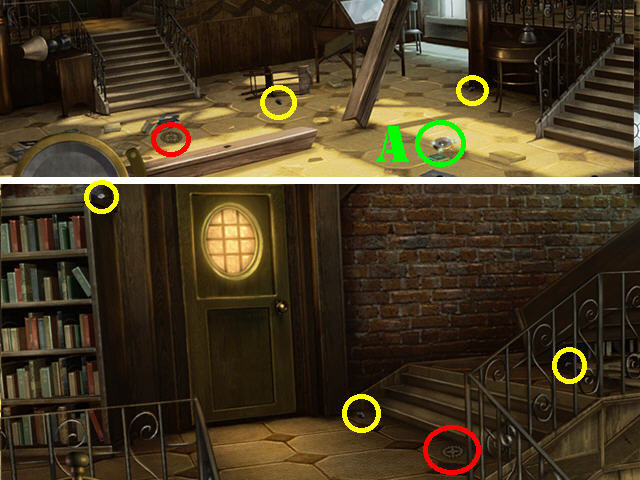
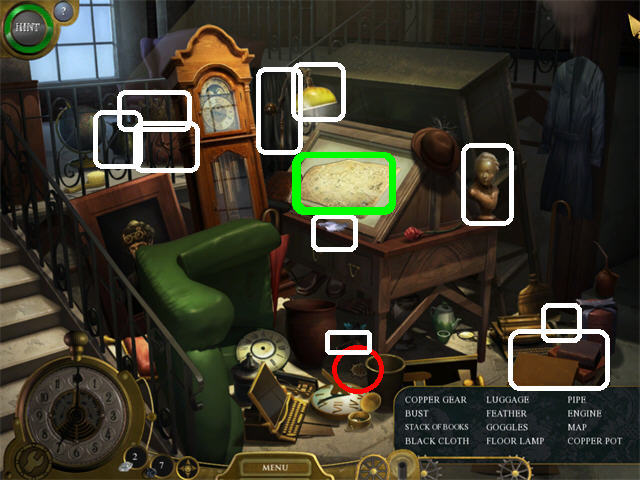
- Take the 2 COALS circled in yellow.
- Pick up the COPPER GEAR 1/3 marked in red.
- Go up the left steps.
- Take the 1 DIAMONDS AND 2 COALS circled in yellow.
- Grab the COPPER GEAR 2/3 marked in red by the steps.
- Click down and head right towards the front door.
- Take the 1 DIAMOND AND 3 COALS circled in yellow.
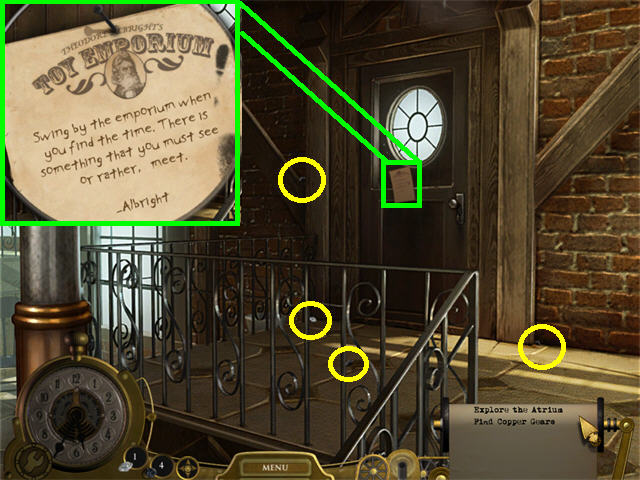
- Read the NOTE attached to the door.
- Click on the doorknob to trigger a task.
- Click down and go left towards the staircase.
- Go towards the drawing table to trigger a search scene to obtain the last COPPER GEAR 3/3 and the MAP.
- You will receive the FOUND ALL COPPER GEARS ACHIEVEMENT.
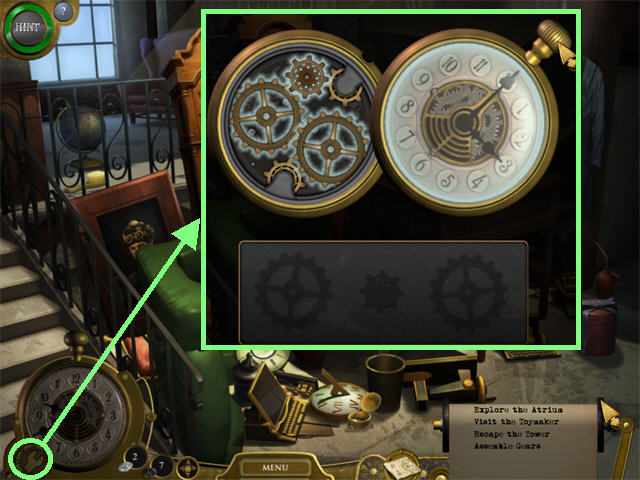
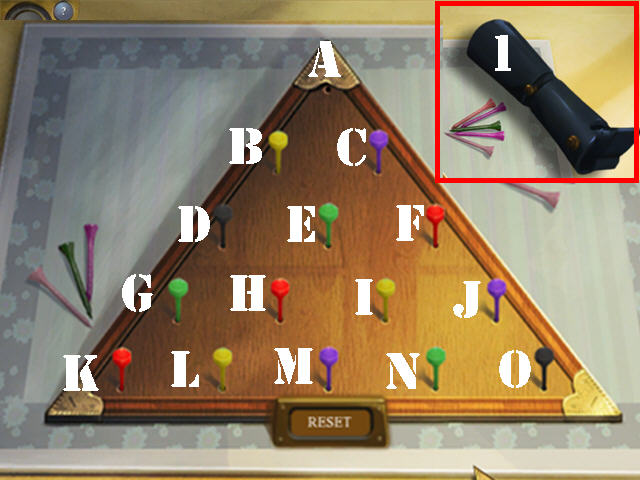
- Touch the wrench icon in the lower left to bring up the gears.
- Assemble the gears as shown in the screenshot.
- Exit that view.
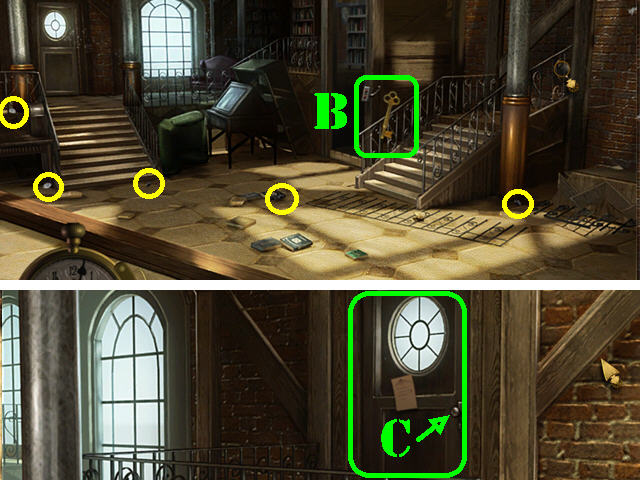
- Grab the POCKET WATCH and place it by the steps for the KEY to appear. Click on the KEY to make it materialize.
- Take the TOWER KEY (B).
- Take the 2 DIAMONDS AND 3 COALS circled in yellow.
- Go right towards the main floor and right towards the front door.
- Place the TOWER KEY in the lock and turn it to exit (C).
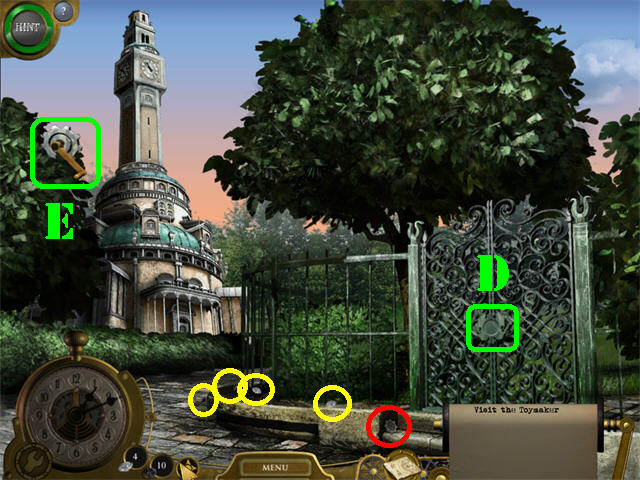
- Click on the gate (D) to activate a time quake and the POCKET WATCH.
- Take the 2 DIAMONDS AND 2 COALS circled in yellow.
- Pick up the SILVER GEAR 1/4 marked in red.
- Place the POCKET WATCH on the upper left side of the scene for the HAND CRANK to appear.
- Take the HAND CRANK (E).
- Place the HAND CRANK on the gate and click on it to unlock it; go through the gate to access memorial park.
Chapter 2: Memorial Park
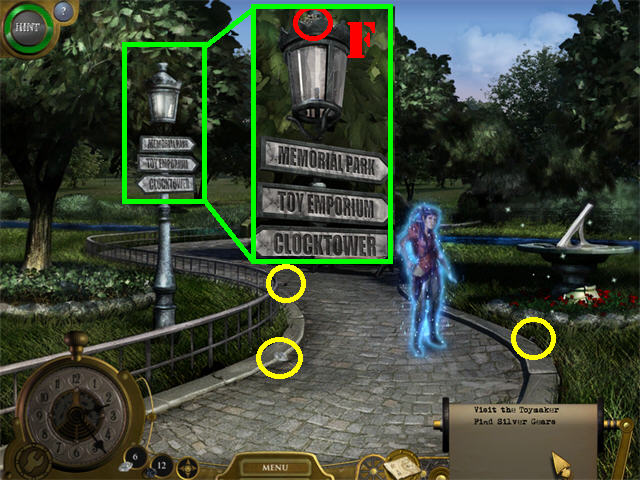
- Take the 1 DIAMOND AND 2 COALS circled in yellow.
- Zoom into the sign post in the park; take the SILVER GEAR 2/4 (F).
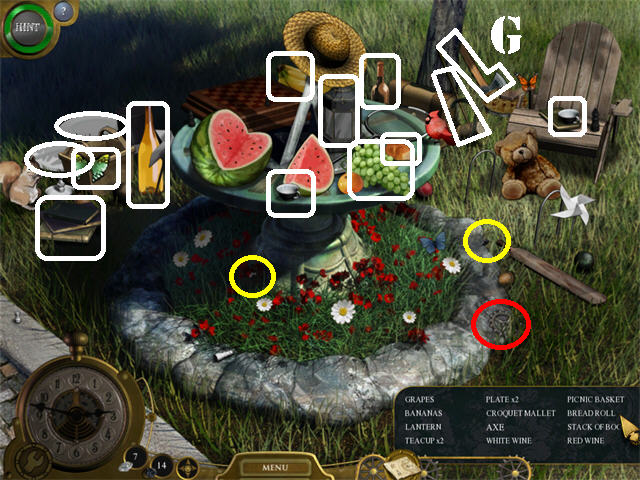
- Go right towards the sundial to activate a search scene.
- The SMALL AXE (G) will be added to inventory.
- Pick up the SILVER GEAR 3/4 marked in red (which is not on your list).
- Exit the sundial and head towards the Bridge.
- A new task will be triggered as soon as you get to the bridge.
- Return to the Park.
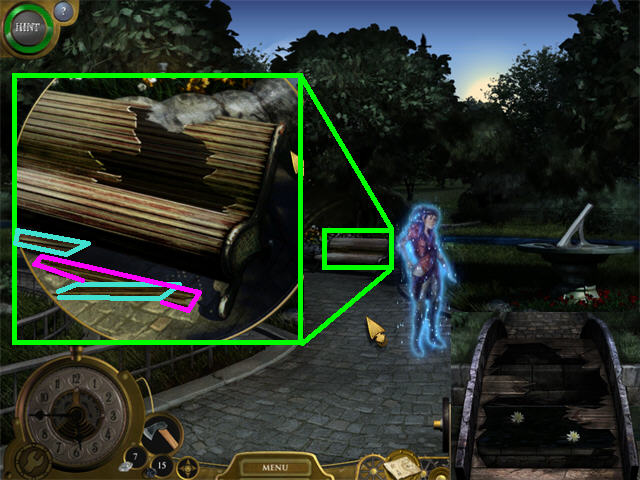
- Zoom into the bench; chop the wood with the SMALL AXE.
- Grab the 3 BROKEN BOARDS on the ground.
- Return to the Bridge.
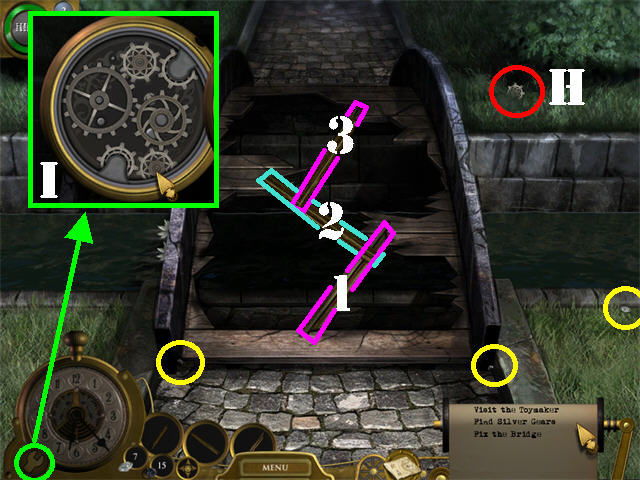
- Take the 1 DIAMOND AND 2 COALS circled in yellow.
- To fix the bridge, place the BOARDS on the bridge in the order shown.
- Pick up the SILVER GEAR 4/4 marked in red (H).
- You will receive the FOUND ALL SILVER GEARS ACHIEVEMENT.
- Click on the wrench icon and assemble the gears as shown in the screenshot (I).
- Your POCKET WATCH can now move an object backwards or forward in time.
- Cross the bridge to reach the toy store.
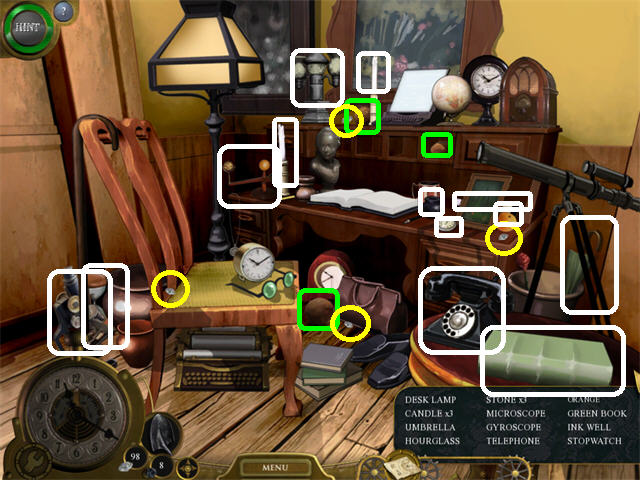
Chapter 3: The Toy Store
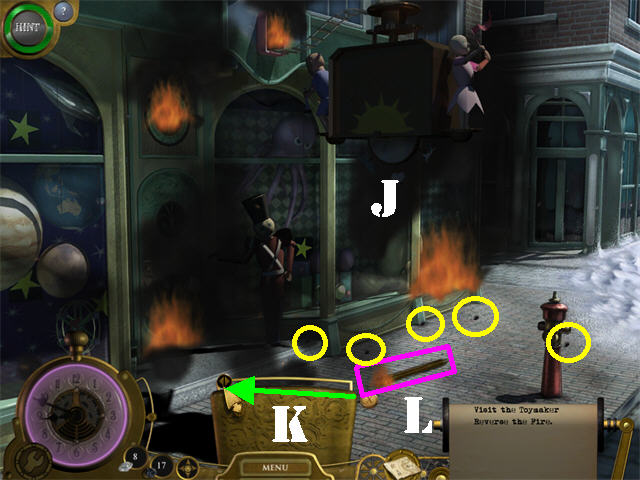
- Click on the POCKET WATCH; place it on the smoke (J) by the window for the board at the bottom of the scene to appear.
- Slide the bar all the way to the left to move items out of the way and make the fire appear (K).
- Grab the BURNING BOARD on the ground (L).
- Take the 5 COALS circled in yellow.
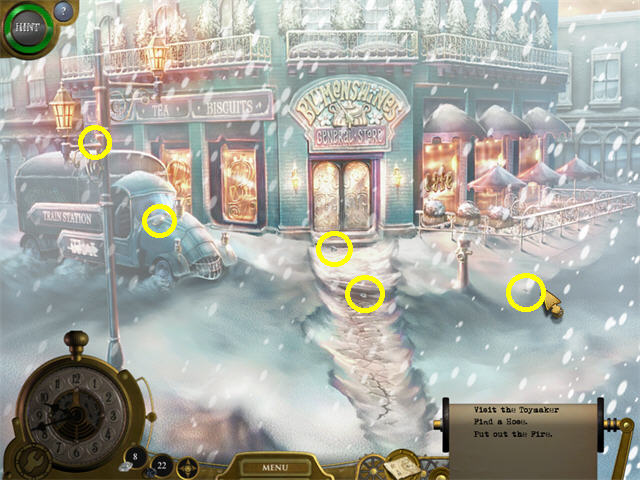
- Go right towards the general Store.
- Place the BURNING BOARD on the path leading to the entrance of the store.
- Take the 5 DIAMONDS circled in yellow.
- Enter the store.

- In here you can purchase items you using the diamonds as currency.
- Click on the FIRE HOSE (M) on the right to bring up a menu.
- Purchase the FIRE HOSE for 5 Diamonds by clicking on “Buy Item”.

- Go into the kitchen.
- Take the 3 DIAMONDS AND 9 COALS circled in yellow.
- Exit the store to receive a message that states if you need more diamonds you can find a useful device in the workshop.

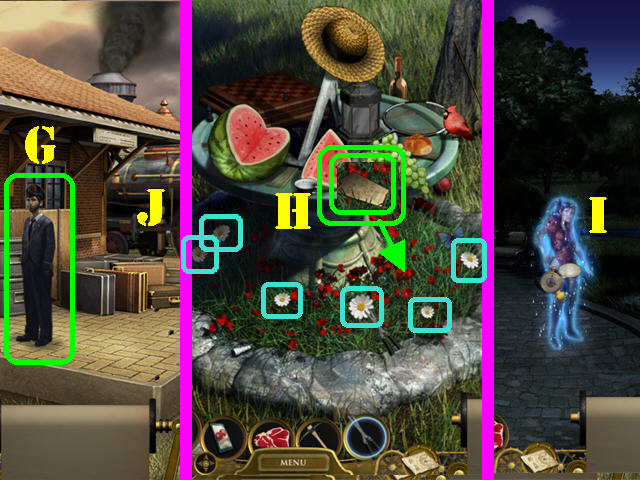
- Go left outside the store to reach the train station.
- Take the 31 COALS circled in yellow.
- You will receive the ACQUIRED 50 COAL ACHIEVEMENT.
- Return to the toy store entrance.
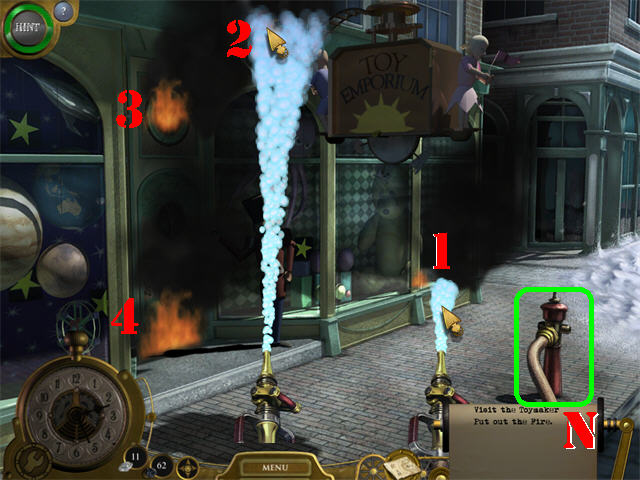
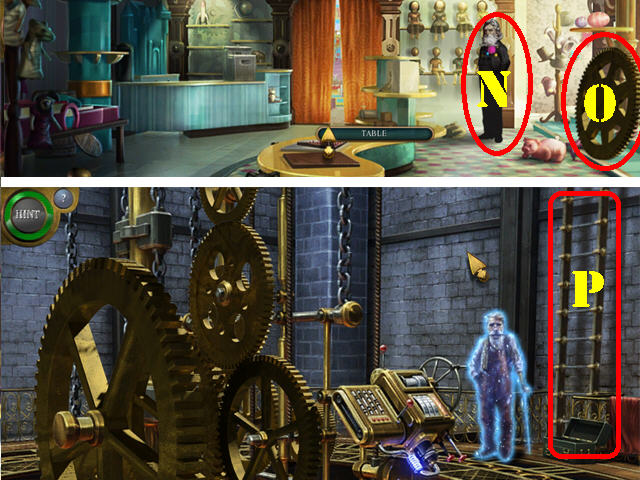
- Attach the FIRE HOSE to the FIRE HYDRANT (N).
- Place the water from the hose on the 4 flames to extinguish the fires.
- Go into the toy store.
- Place the POCKET WATCH on the fallen bookcase on right.
- Click on the watch to make the TIME SLIDER appear.
- Slide the bar on the TIME SLIDER all the way to the left to make the bookcase upright.
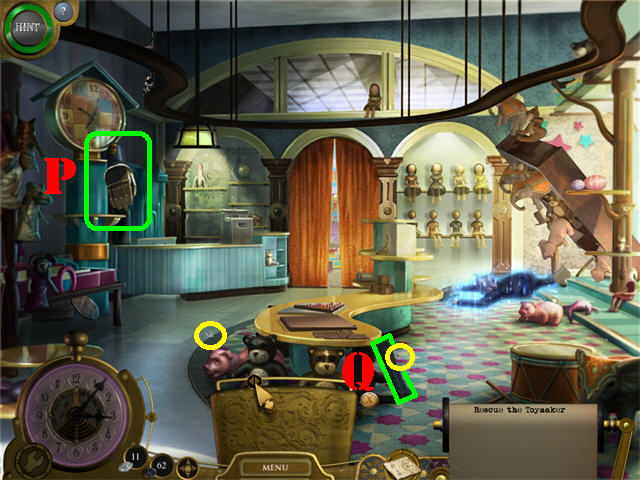
- Place the POCKET WATCH in the upper left to make Otto’s arm appear, click on it to materialize it.
- Take OTTO’S LOWER ARM (P).
- Take the 2 DIAMONDS circled in yellow.
- Grab OTTO’S LEFT LEG (Q) by the table.
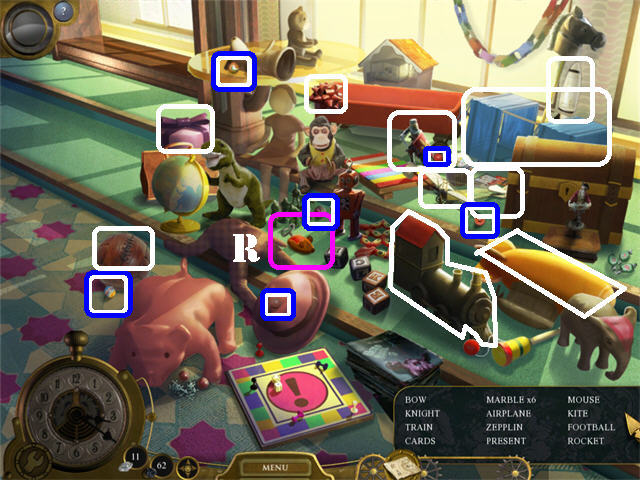
- Click on the lower right to access a search scene.
- The 6 marbles are marked in white and blue.
- The RED TOY MOUSE (R) will be added to inventory.
- Exit this view.
- Go left to the MAZE GAME (below the large clock).
- Place the RED TOY MOUSE on the board to activate the puzzle.
- Place all 5 mice on their matching colored circles to win the game.
- Click on a mouse for an arrow to appear, move the cursor around to see all directions an arrow can take.
- Once an arrow is facing the right way, click on it to make the mouse move in that direction.
- You may need to move a mouse to a temporary spot to act as a blocker in order to solve the puzzle.
- You can click on the RESET BUTTON (@) to start over.
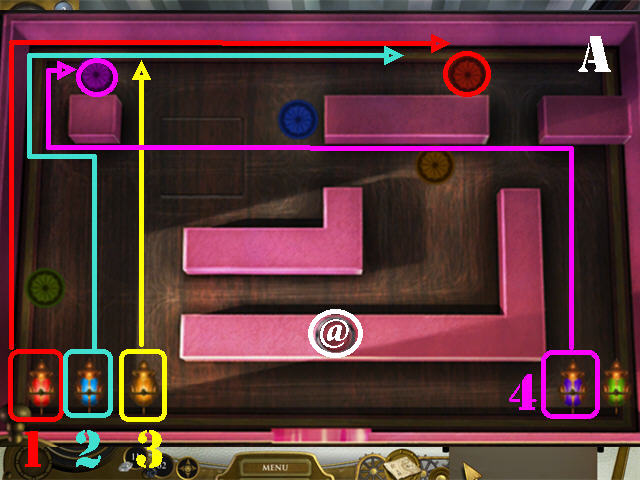
- There are many ways to solve this puzzle, here is one of them.
- In the first screenshot follow the steps in this order: RED, BLUE, YELLOW, and PURPLE (A).
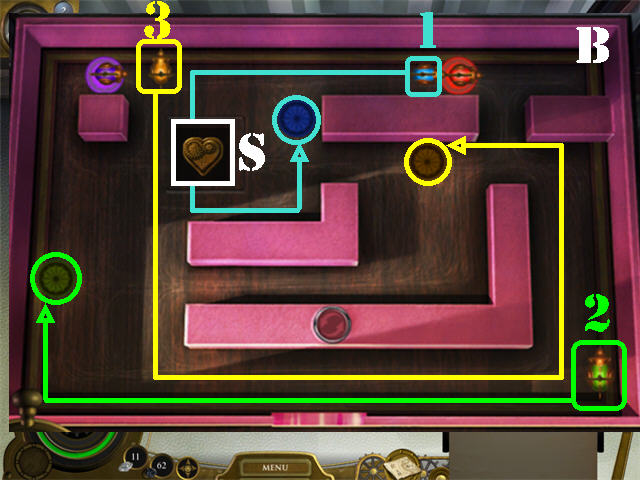
- In the second screenshot follow the steps in this order: BLUE, GREEN, and YELLOW (B).
- Grab OTTO’S GEARBOX (S) after the puzzle has been solved.
- Head towards the table in the center.
- Take the 3 DIAMONDS circled in yellow.
- Use the POCKET WATCH in the center; take the GOLD GEAR (T) marked in red.
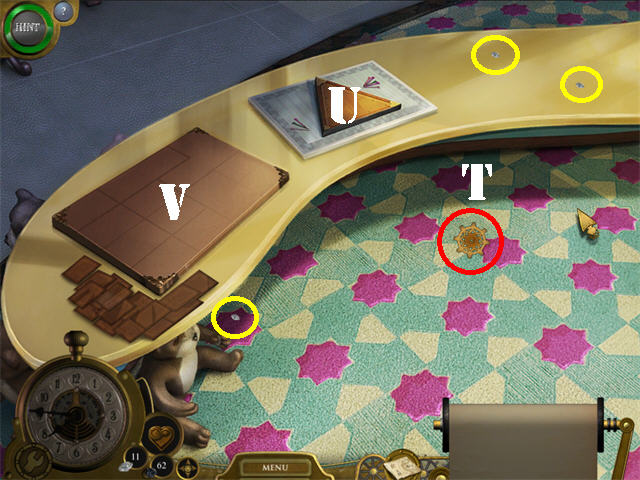
- There are 2 games on the table; the Peg Game (U) and the Jigsaw Puzzle (V).
- Zoom into the peg game.
- Remove as many pegs as you can without running out of moves.
- The solution below is for receiving the 1 PEG REMAINING ACHIEVEMENT.
- Check out our video solution for 1 Peg Remaining!
- Move Peg F into spot A.
- Move Peg D into spot F.
- Move Peg N into spot E.
- Move Peg L into spot N.
- Move Peg O into spot M.
- Move Peg K into spot D.
- Move Peg B into spot G.
- Move Peg M into spot D.
- Move Peg J into spot C.
- Move Peg A into spot F.
- Move Peg G into spot B.
- Move Peg F into spot D.
- Move Peg D into spot A.
- Take OTTO’S RIGHT LEG (1) after the puzzle has been completed.
- The solution below is for receiving the 2 PEGS REMAINING ACHIEVEMENT.
- Check out our video solution for 2 Pegs Remaining!
- Move Peg F into spot A.
- Move Peg M into spot F.
- Move Peg K into spot M.
- Move Peg N into spot L.
- Move Peg J into spot C.
- Move Peg A into spot F.
- Move Peg B into spot I.
- Move Peg D into spot M.
- Move Peg L into spot N.
- Move Peg N into spot E.
- Move Peg F into spot D.
- Move Peg D into spot K.
- The solution below is for receiving the 3 PEGS REMAINING ACHIEVEMENT.
- Check out our video solution for 3 Pegs Remaining!
- Move Peg F into spot A.
- Move Peg H into spot C.
- Move Peg N into spot E.
- Move Peg O into spot F.
- Move Peg L into spot N.
- Move Peg B into spot I.
- Move Peg N into spot E.
- Move Peg G into spot B.
- Move Peg A into spot D.
- Move Peg C into spot H.
- Move Peg D into spot M.
- With these solutions you will earn the following achievements: COMPLETED 4 PUZZLES ACHIEVEMENT, 3 PEGS REMAINING ACHIEVEMENT, 2 PEGS REMAINING ACHIEVEMENT, and 1 PEG REMAINING ACHIEVEMENT.
- Exit the peg puzzle and zoom into the next puzzle on the table.
- Assemble the jigsaw puzzle as shown in the screenshot.
- Grab OTTO’S ELBOW (2) after the puzzle has been solved.
- Exit the table.
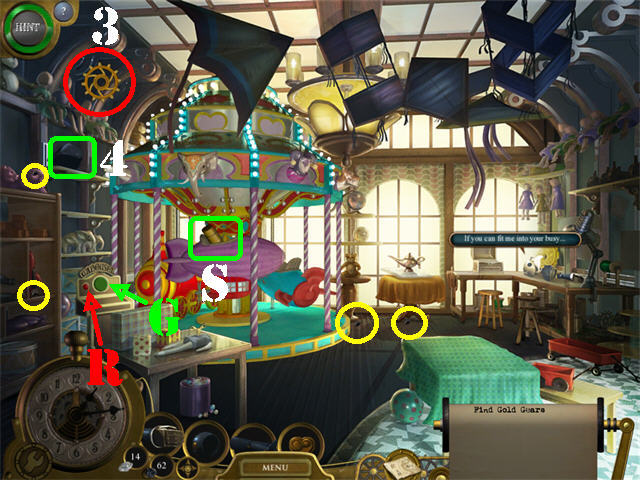
- Go forward to the back room.
- Use the POCKET WATCH in the upper left; take GOLD GEAR 2/4 (3).
- Take OTTO’S WAIST (4) in the upper left.
- Take the 4 COALS circled in yellow.
- Click on the green button (G) on the control on the left to activate the carousel.
- Click on the red button (R) to stop the carousel when the purple ship is in view.
- Grab OTTO’S SPINE (S) on the carousel.
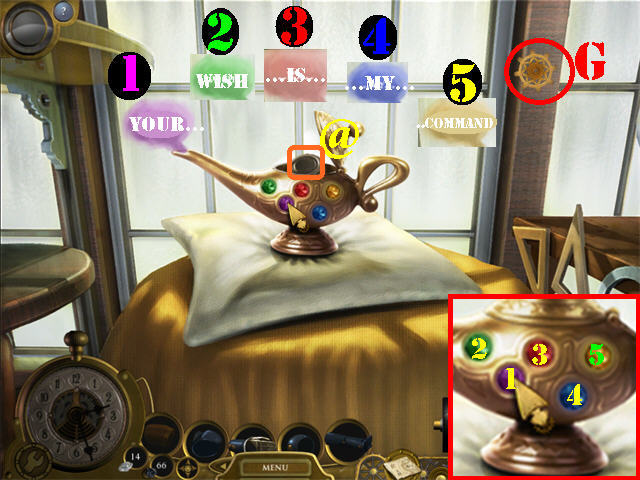
- Head straight into the Genie Lamp by the window.
- Use the POCKET WATCH in the upper right; take the GOLD GEAR 3/4 (G).
- Click on the gems on the genie lamp as follows: PURPLE (your) - GREEN (wish) - RED (is) – BLUE (my) - YELLOW (command) to spell out: “Your wish is my command”.
- Grab OTTO’S EYE (@) in the lamp after you’ve solved the puzzle.
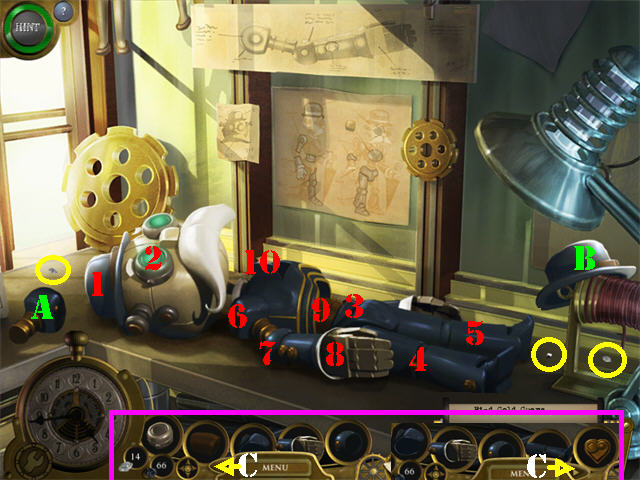
- Exit this view and head right to the workbench.
- Grab the 2 DIAMONDS AND 1 COAL circled in yellow.
- Take OTTO’S UPPER ARM (A) and OTTO’S HAT (B) on the table.
- Use the ARROWS (C) on either side of the menu button to scroll through all available items.
- Place the following items on Otto’s body on the table; OTTO’S HAT (1), EYE (2), WAIST (3), RIGHT LEG (4), LEFT LEG (5), UPPER ARM (6), ELBOW (7), LOWER ARM (8), SPINE (9), and finally the HEART GEARBOX (10).
- You will receive the SAVED OTTO ACHIEVEMENT.
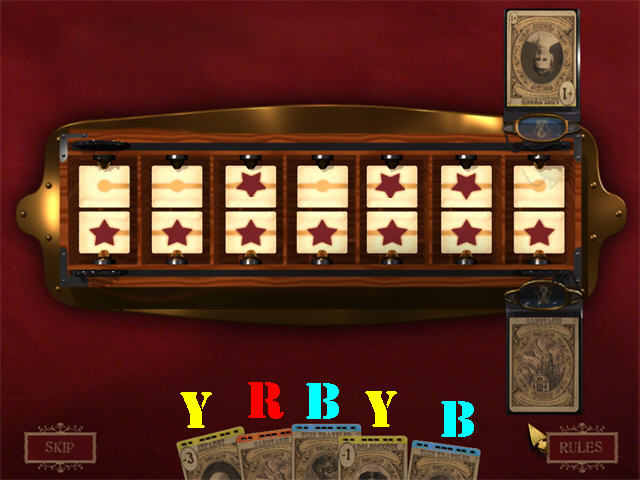
- Once Otto has been properly assembled he will offer to teach you a card game.
- The instructions for the game appear on the screen.
- Otto’s hand is on top and yours is at the bottom.
- Use the blue cards (B) to mark your spot with a star.
- Use the red cards (R) to remove a star from your opponent’s slot.
- Use the yellow cards (Y) to move the amount of spaces shown on the card (either backwards or forward).
- The cards with the plus symbols move the cards to the right.
- The cards with the minus symbols move the cards to the left.
- If you win the game, you will gain 20 extra diamonds and you can choose to play again for more diamonds as much as you wish.
- You will obtain the BEAT OTTO AT CARDS ACHIEVEMENT.
- You can choose to replay as many times as you like to earn 20 additional diamonds.
- Check out our random video solution!
- I played several times in order to bring my total up to 228 diamonds (that includes the diamonds I already had). You can choose to just play once and find the rest of the diamonds in the game.
- You will receive the ACQUIRED 50 and 100 DIAMONDS ACHIEVEMENT if you played the card game several times.

- Take GOLD GEAR 4/4 (A) after you beat Otto.
- You will receive the FOUND ALL GOLD GEARS ACHIEVEMENT.
- Arrange the gears as shown in the screenshot (B).
- Return to the Toymaker.
- Place the POCKET WATCH on the Toymaker; he will ask you for Dandelion Tea (C).
- You can now use the Map to warp directly to any part of the unlocked Map.
- Open the Map and click on the Atrium to be automatically transported there.
Chapter 4: The Workshop

- Go towards the workshop.
- Use the POCKET WATCH on the door to make a vent appear (D).
- Place the POCKET WATCH on the vent for a puzzle to appear.
- Slide the bars on the TIME SLIDER around; click on a button to lock in a phrase in each row until the phrase is complete. “TIME IS WHAT WE WANT MOST BUT WHAT WE USE WORST.”
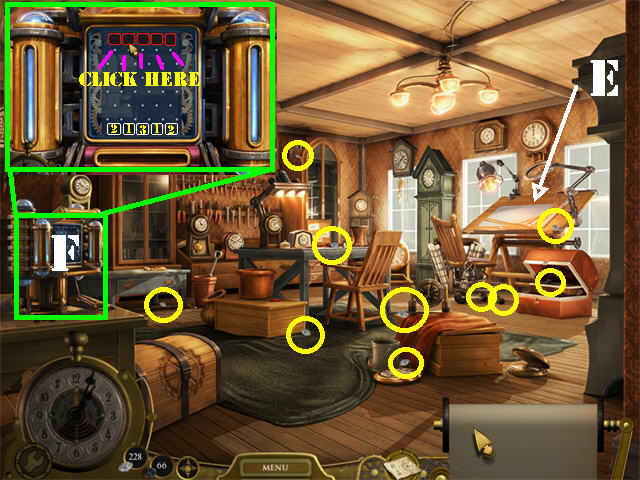
- Enter the workshop.
- Take the 7 DIAMONDS AND 3 COALS circled in yellow.
- Examine the drafting table on the right (E) to view a gear diagram.
- Zoom into the coal converter on the left (F).
- Use the coal converter to change 1 piece of coal into 1 to 3 diamonds.
- Click on one of the 5 squares above the puzzle to use up one coal and a piece of coal will fall on the board. You will receive the amount of diamonds indicated in whichever box the coal falls into.
- At the end of this process I had a total of 361 diamonds. You only need 280 diamonds to buy all the items in the general store.
- Go to the general store.
- Below is the list of items you can buy if you have enough diamonds. If you do not have a lot just buy the Clippers, Pickaxe, Meat, Shovel, and Packet of Apple Seeds. The rest of the items can be bought later.
- Buy the CLIPPERS for 20 diamonds.
- Buy the PICKAXE for 20 diamonds.
- Buy the MEAT for 10 diamonds.
- Buy the PACKET OF APPLE SEEDS for 20 diamonds.
- Purchase the GOLD STAR for 60 diamonds.
- Buy the SHOVEL for 30 diamonds.
- Purchase the ART BOOK for 70 diamonds. The Art Book is now available in the main menu.
- Buy the PLATINUM GEAR for 50 diamonds.
- You will receive the PURCHASED THE PLATINUM GEAR ACHIEVEMENT, PURCHASED STAR GEAR ACHIEVEMENT, PURCHASED ART BOOK ACHIEVEMENT, and the PURCHASED ALL STORE ITEMS ACHIEVEMENT.
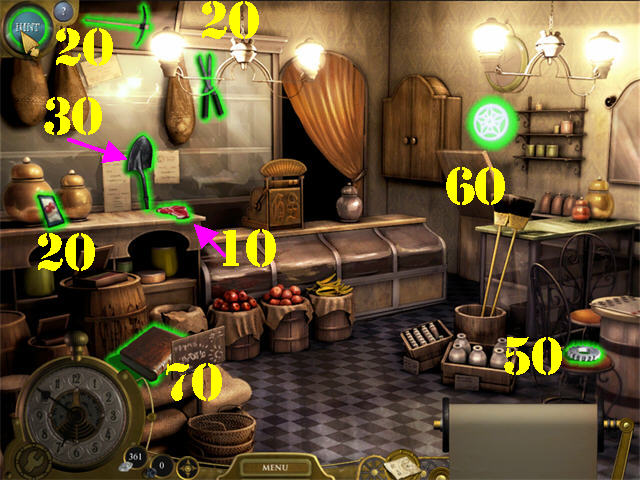
- Go to the Train Station.
- Place the POCKET WATCH on Herbert; he says he needs flowers (G).
- Go to the Sundial by the Park.
- Use the CLIPPERS to cut the 6 FLOWERS marked in blue. Place the tip of the clippers on the flowers.
- Take the TRAIN TICKETS (H) on the grass after the flowers have been cut.
- Exit the Sundial.
- Place the POCKET WATCH on Kaitlynn; give her the TRAIN TICKETS (I).
- You will receive the SAVED KAITLYNN ACHIEVEMENT.
- Kaitlynn gives you one of the tickets so you can ride around the train as much as you want (you will not see the ticket in your inventory).
- Return to the train station.
- Give the FLOWERS to Herbert (G).
- You will receive the SAVED HERBERT ACHIEVEMENT.
- Take the train to the museum (J).
Chapter 5: Museum
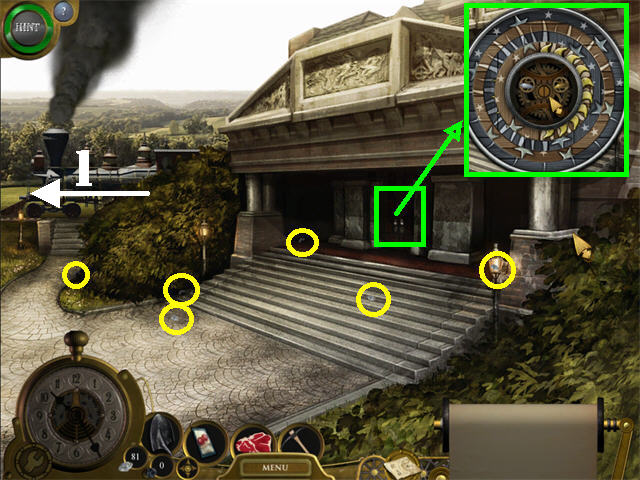
- Take the 3 DIAMONDS AND 3 COALS circled in yellow.
- Click on the museum door twice to trigger a new task.
- Take the train towards the LEFT (1), in the direction of the clockwork tower to reach the courtyard.

- Break the barricade with the PICKAXE to unlock the path to the Atrium.
- Take DIAMOND GEAR 1/5 (K) by the door after you break it down.
- Take some dandelions from the grass (you can collect them all but you only need a few).
- Take the 5 DIAMONDS and 5 COALS circled in yellow.
- Return to the general store. Go into the kitchen.
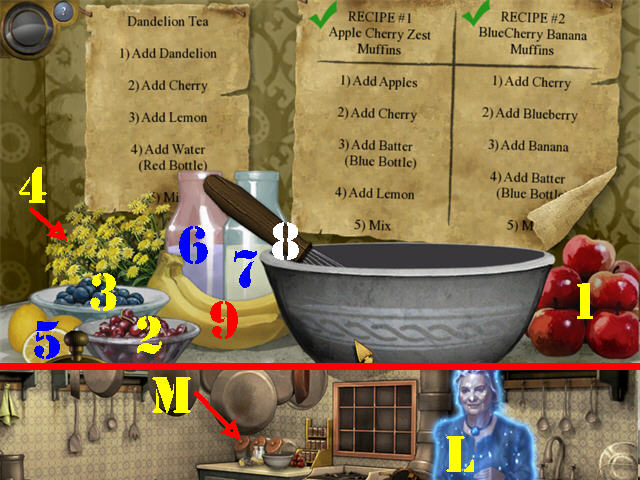
- Place the POCKET WATCH on Rosana (L); she needs to finish baking her muffins.
- Click on the food prep area by the stove (M).
- There are 2 recipes on the table, Apple Cherry Zest Muffins and Blue Cherry Banana Muffins.
- Recipe 1 - Click on the following items to add them to the Bowl: APPLE (1), CHERRY (2), BLUE BOTTLE (7), and LEMON (5).
- Stir the ingredients with the WHISK (8) in the bowl.
- Recipe 2 - Click on the following items to add them to the Bowl: CHERRY (2), BLUEBERRY (3), BANANA (9), and BLUE BOTTLE (7).
- Stir the ingredients with the WHISK (8) in the bowl.
- You will receive the SAVED ROSANA ACHIEVEMENT.
- Talk to Rosana and Eliza will ask her for the tea recipe. .
- Zoom into the Prep Table again; the Dandelion Tea recipe is now available. If you don’t see the 3rd recipe, you must talk to the Toymaker first and then collect the Dandelions in the courtyard for the recipe to appear.
- Recipe 3 - Click on the following items to add them to the Bowl: DANDELION, (4), CHERRY (2), LEMON (5), RED BOTTLE (6).
- Stir the ingredients with the WHISK (8).
- The DANDELION TEA will be added to inventory.
- Go to the toy store.
- Give the DANDELION TEA to the Toymaker (N).
- You will receive the SAVED TOYMAKER ACHIEVEMENT.
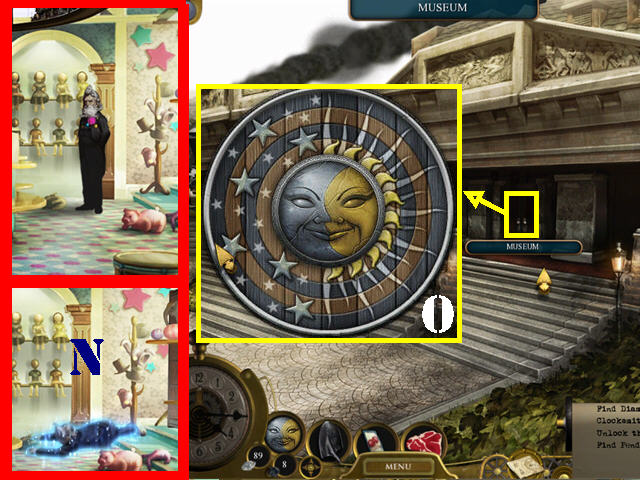
- The Toymaker says you need to talk to the Clockmaker and then gives you the MUSEUM KEY.
- Take the Map straight to the museum.
- Examine the door; place the MUSEUM KEY on the door to trigger a puzzle.
- Click on the rings to form the image shown in the screenshot (0).
- Check out our random video solution!
- You will receive the COMPLETED 8 PUZZLES ACHIEVEMENT.
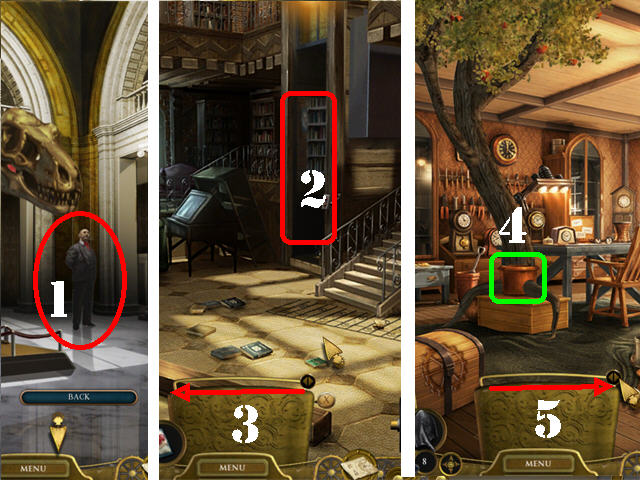
- Go into the museum.
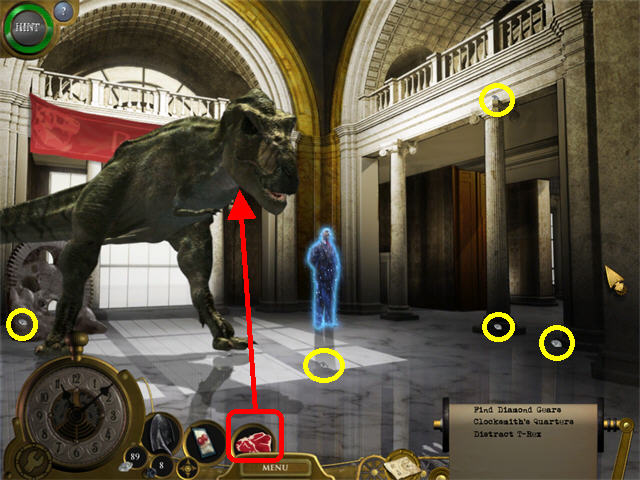
- Give the T-Rex the MEAT you bought at the general store. He needs something bigger to distract him.
- Take the 5 DIAMONDS circled in yellow.
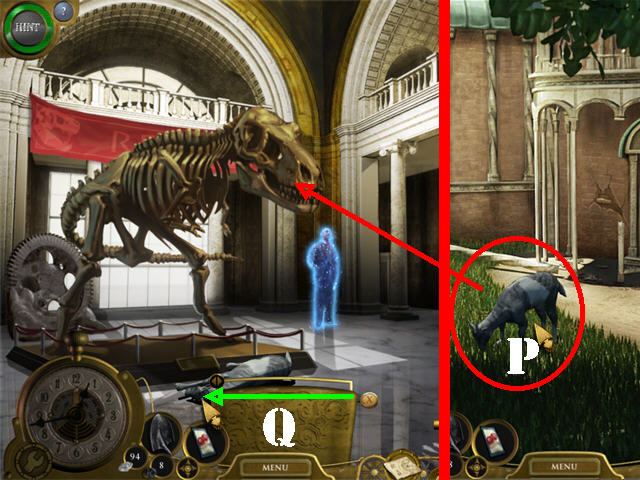
- Return to the courtyard.
- Click on Hortense (goat) for a time quake to occur (P).
- Take HORTENSE after the time quake is over.
- Return to the Museum.
- Give Hortense to the T-Rex.
- Place the POCKET WATCH on T-Rex.
- Slide the bar all the way to the left for the T-Rex to fossilize and bring the goat back to life (Q).
- Put the POCKET WATCH on Mr. Pendergast; he asks you to help him restore 3 of the exhibits.
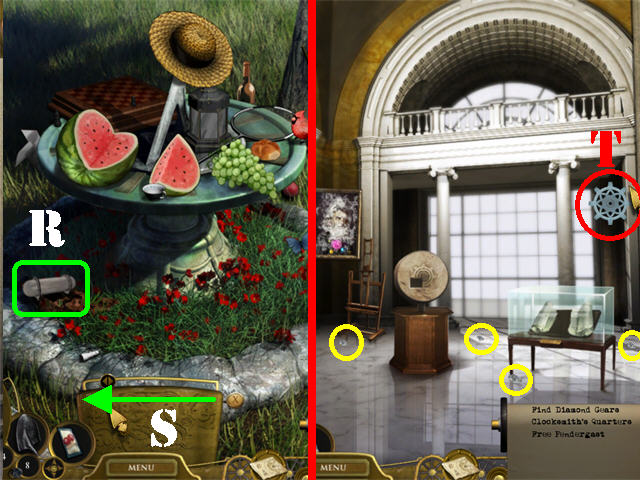
- Go to the Sundial in the park.
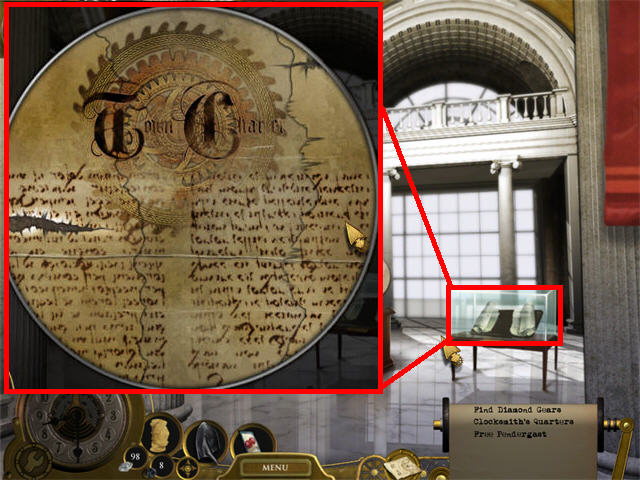
- Place the SHOVEL on the left side of the ground to make a rusty time capsule appear (R).
- Place the POCKET WATCH on the time capsule and slide the bar all the way to the left (S).
- Grab the TOWN CHARTER FRAGMENT.
- Return to the museum.
- Go into the exhibit hall on the right.
- Place the POCKET WATCH in the upper right for the DIAMOND GEAR to appear.
- Grab the DIAMOND GEAR 2/ 5 (T).
- Take the 4 DIAMONDS circled in yellow.
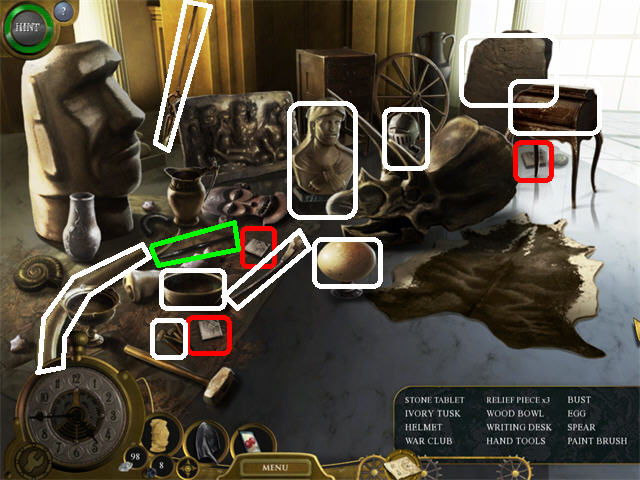
- Go towards the workspace on the left to activate a search scene.
- The PAINTBRUSH and the 3 CARVING FRAGMENTS will be added to inventory.
- Exit this view.
- Zoom into the CARVING in the center of the hall.
- Place the 3 CARVING FRAGMENTS on the board to activate the puzzle.
- Click on a piece to highlight and then click on the empty slot to move the piece to it.
- Rearrange the carving fragments as shown in the screenshot (U).
- Check out our video solution!
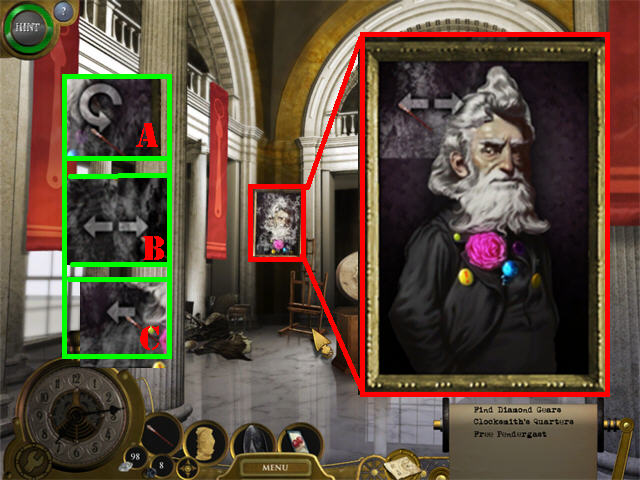
- Examine the Painting to activate a puzzle.
- Use the PAINTBRUSH to follow the arrow directions for each section to restore the painting.
- For an arrow with an open circle, move your cursor in circles around the marked area (A).
- For double arrows, move the paintbrush left and right (B).
- For a single arrow move the brush in the direction of the arrow (C).
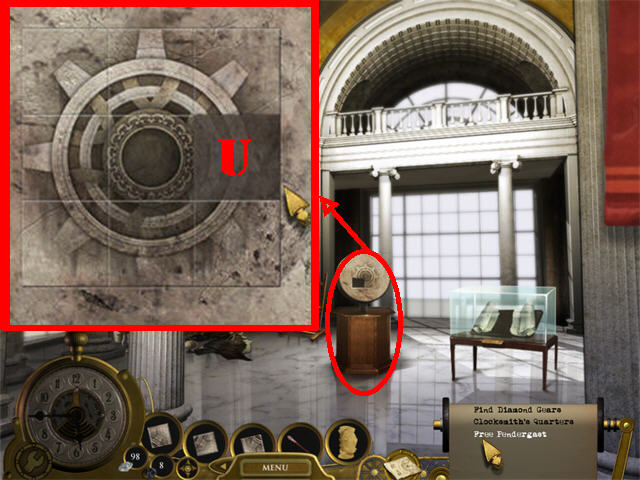
- Zoom into the Charter case on the right.
- Place the TOWN CHARTER FRAGMENT on the board to activate the puzzle.
- Click on each section of the charter to change it until it resembles the image in the screenshot.
- Click on the left side once and the far right side twice to complete the puzzle.
- You will receive the SAVED PENDERGAST ACHIEVEMENT.
- Talk to Mr.Pendergast.in the museum and he will give you DIAMOND GEAR 3/5 at the end of the conversation (1).
- Take the Map to the Atrium. Go left towards the staircase.
- Use the POCKET WATCH on the elevator (2) for the TIME SLIDER to appear.
- Slide the bar all the way to the left (3).
- Return to the Workshop; part of the ceiling caves in.
- Place the PACKET OF APPLE SEEDS into the large pot (4) to activate The POCKET WATCH.
- Place the POCKET WATCH on the pot for the TIME SLIDER to appear.
- Move the TIME SLIDER all the way to the right so a huge apple tree grows through the ceiling (5).
Chapter 6: Clocksmith’s Quarters
- Go up to the Clocksmith’s Quarters.
- Head towards the desk to activate a search scene.
- Take the 4 DIAMONDS circled in yellow.
- The 3 WEIGHTED STONES will be added to inventory.
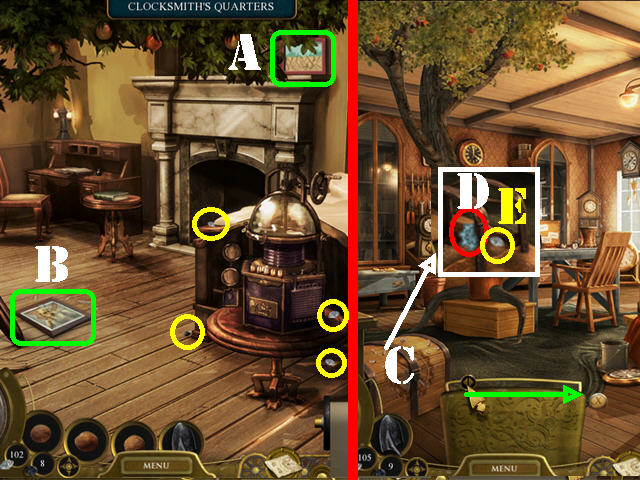
- Exit the desk view.
- Grab the 3 DIAMONDS and 1 COAL circled in yellow.
- Take the TERMITES (A) on the mantle.
- Click on the PHOTO (B) on the ground.
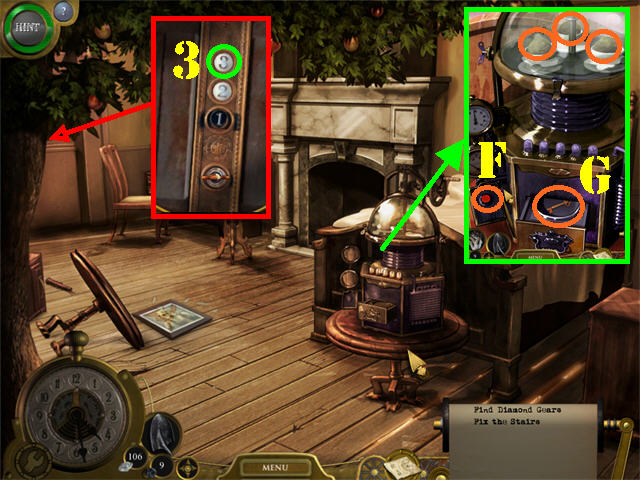
- Return to the workshop.
- Place the TERMITES on the chest in the lower left.
- Place the POCKET WATCH on the chest (C) for the TIME SLIDER to appear.
- Move the slider all the way to the right; take the DIAMOND GEAR 4/5 (D) and the 1 DIAMOND (E).
- Go back up the Clocksmith’s Quarters.
- Examine the lockbox by the bed.
- Place the 3 WEIGHTED STONES in the cup above.
- Click on the RED BUTTON (F) to open the drawer below.
- Take the ELEVATOR KEY (G).
- Exit the view.
- Press on the elevator on the left.
- Put the ELEVATOR KEY on the lock.
- Press the number 3 on the elevator. If the elevator does not work for you, go down to the elevator box by the staircase and repair it with the Time Slider.
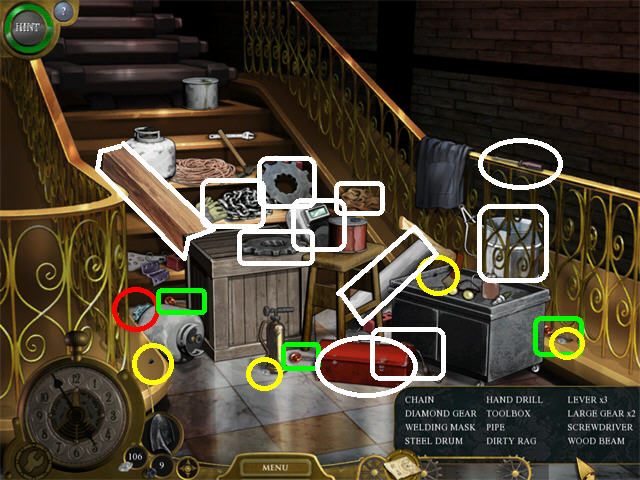
- Head right towards the TOOLS AND PARTS to activate a search scene.
- Take the DIAMOND GEAR 5/5 in the lower left.
- Grab the 2 DIAMONDS and the 2 COALS circled in yellow.
- The 3 SWITCH LEVERS will be added to inventory.
- You will receive the FOUND ALL THE DIAMOND GEARS ACHIEVEMENT, and the FOUND ALL THE WATCH GEARS ACHIEVEMENT.
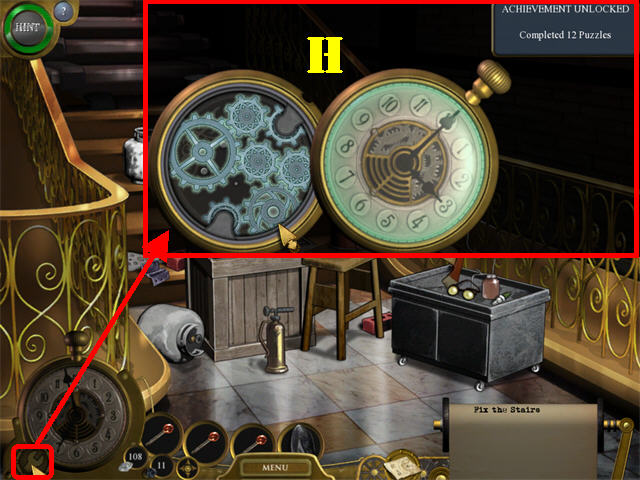
- Assemble the Gears as shown in the screenshot (H).
- You will receive the COMPLETED 12 PUZZLES ACHIEVEMENT.
- Exit the view.
- Place the 3 SWITCH LEVERS on the control panel on the left.
- Click on the 3 LEVERS in this order to arrange the steps as shown in the screenshot: A 3 times, B once, and C twice.
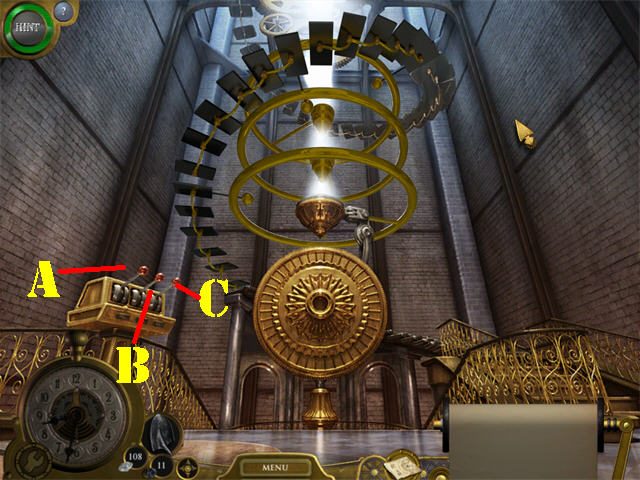
- Go up to the gear platform.
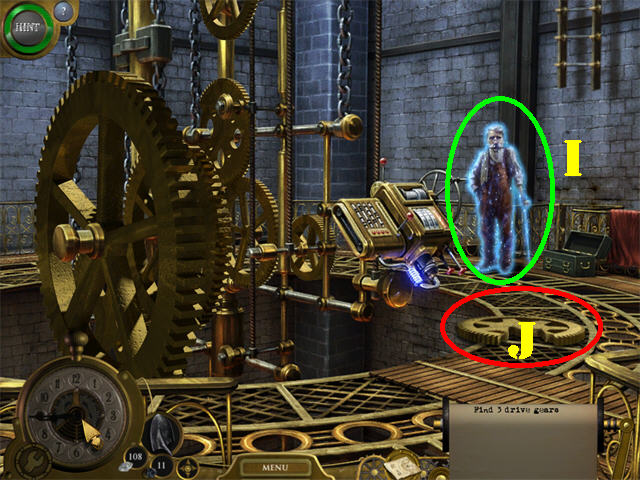
- Place the POCKET WATCH on the Clocksmith (I).
- The Clocksmith tells you to go back upstairs and reset all the clocks to 12 o’clock.
- Grab the BROKEN DRIVE GEAR (J) on the ground.
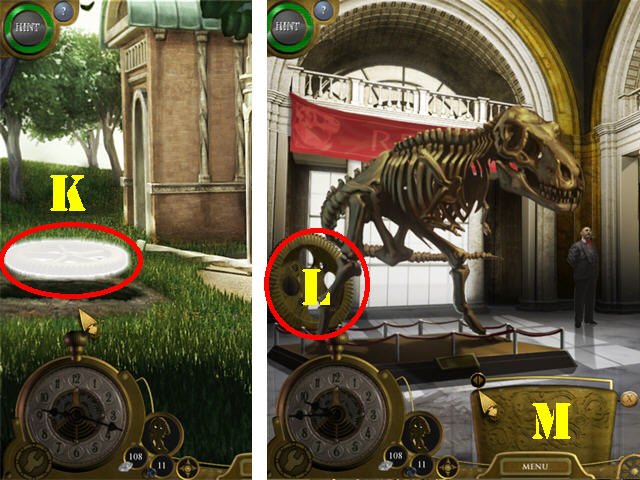
- Go to the courtyard.
- Dig a hole with the Shovel on the round shadowy area.
- Place the POCKET WATCH in the hole for the GEAR to appear (K).
- Return to the museum.
- Place the POCKET WATCH on the large gear (L) by the T-Rex for the TIME SLIDER to appear.
- Slide the bar all the way to the left (M).
- Put the POCKET WATCH on the gear again.
- Go to the Toymaker.
- Give the BROKEN DRIVE GEAR to the Toymaker (N) for the gear to appear on the right.
- Place the POCKET WATCH on the gear (O).
- You will receive the FOUND ALL DRIVE GEARS ACHIEVEMENT.
- Return to the gear platform above the machine room.
- The gears will automatically start to spin as soon as you get there and the ladder will drop from the ceiling.
- Take the ladder on the right up to the clock face room (P).
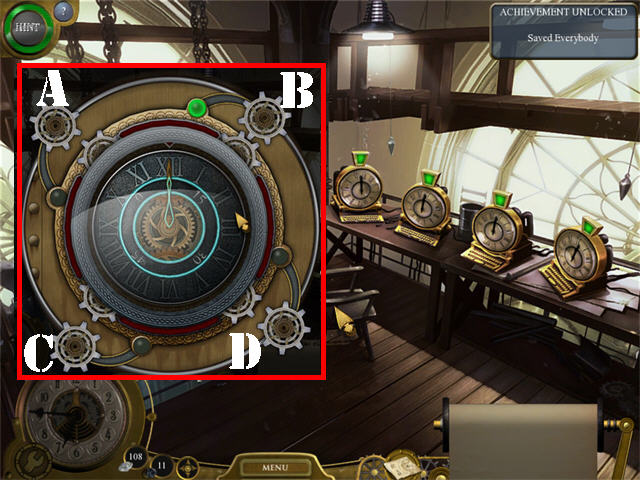
- There are 4 clocks in the room. Each clock must be reset to 12 o’clock.
- Click on a clock to trigger a puzzle.
- The A and B buttons control the inner ring (0, 15, 30, and 45) and the minute hand.
- The C and B buttons control the large ring (Roman numerals) and the hour hand.
- In order to set the clocks you must use the 4 buttons to manipulate the clock’s movements.
- The first thing you want to do is use the A and B buttons so the number zero in the inner ring and the minute hand both land on top. Once those are in place, do not touch the A and B buttons again.
- Now use the C and D buttons to make the hour hand and the number XII appear on top.
- The starting configuration is random and this puzzle cannot be skipped.
- Check out our random video solution for the 1st clock!
- Check out our random video solution for the 2nd clock!
- Check out our random video solution for the 3rd clock!
- Check out our random video solution for the 4th clock!
- Once the game has been completed you can go back and try to replay some of the puzzles in order to get the rest of the achievements.
- You will receive the SAVED CLOCKSMITH ACHIEVEMENT, and the SAVED EVERYBODY ACHIEVEMENT.
- Thank you for playing!
Created at: 2010-12-30